


Available Manuals
English
Thank you for purchasing the P-touch model E800T.
Your new E800T is an intuitive, easy to operate and feature-rich labeller that
produces professionally looking, high-quality labels.
This manual contains basic procedures for using the P-touch. Read the whole
guide before using your product and keep it for later reference.
The available options and supplies may vary depending on the country.
E800T
Quick Setup Guide
D01JGE001
IMPORTANT
4
12
13
Visit the Brother support website at support.brother.com and click Manuals
on your model page to download the latest manuals.
Product Safety Guide
This guide provides safety information; read it before you use the P-touch.
Quick Setup Guide (this guide)
This guide provides basic information about using the P-touch along with
detailed troubleshooting tips.
User’s Guide
This guide provides additional information about the P-touch settings and
operations, troubleshooting tips, and maintenance instructions. This guide is
on the included CD-ROM.
General Description
Front
1
2
Back
1 Tube exit slot
2 Handle
3 Cover open button
4 Tube insert slot
5 Top cover
6 Tape exit slot
7 (Tube) indicator
4
5
6
7
8
9
10
11
3
8 (Label) indicator
9 (Battery) indicator
10 (Power) button
11 (Feed and Cut) button
12 USB port
13 AC adapter socket
Unpacking Your P-touch
Before using your P-touch, check that the package contains the following:
P-touch Product Safety Guide Quick Setup Guide
CD-ROM AC adapter Power supply cord
USB cable Tape cassette Ribbon cassette
The components included in the box may differ depending on your country.
Inside
1234
10
5
6
12
13
7
8
1 Tube release lever
2 Tube half-cut adjuster
3 Tube cutter board
4 Tube cutter
5 Tube exit slot
6Platen roller
7 Print head (for tube)
8 Ribbon cassette compartment
(for tube)
Before using the P-touch, make sure you remove the protective material
according to the following procedure.
1 Press the cover open button to
open the top cover.
2 Pull the tape to remove the
tape together with the
protective material.
9 Tape exit slot
10 Tube cleaner
11 Tube insert slot
12 Tape cassette compartment
13 Print head (for tape)
14 Tape cutter unit
9
14
11
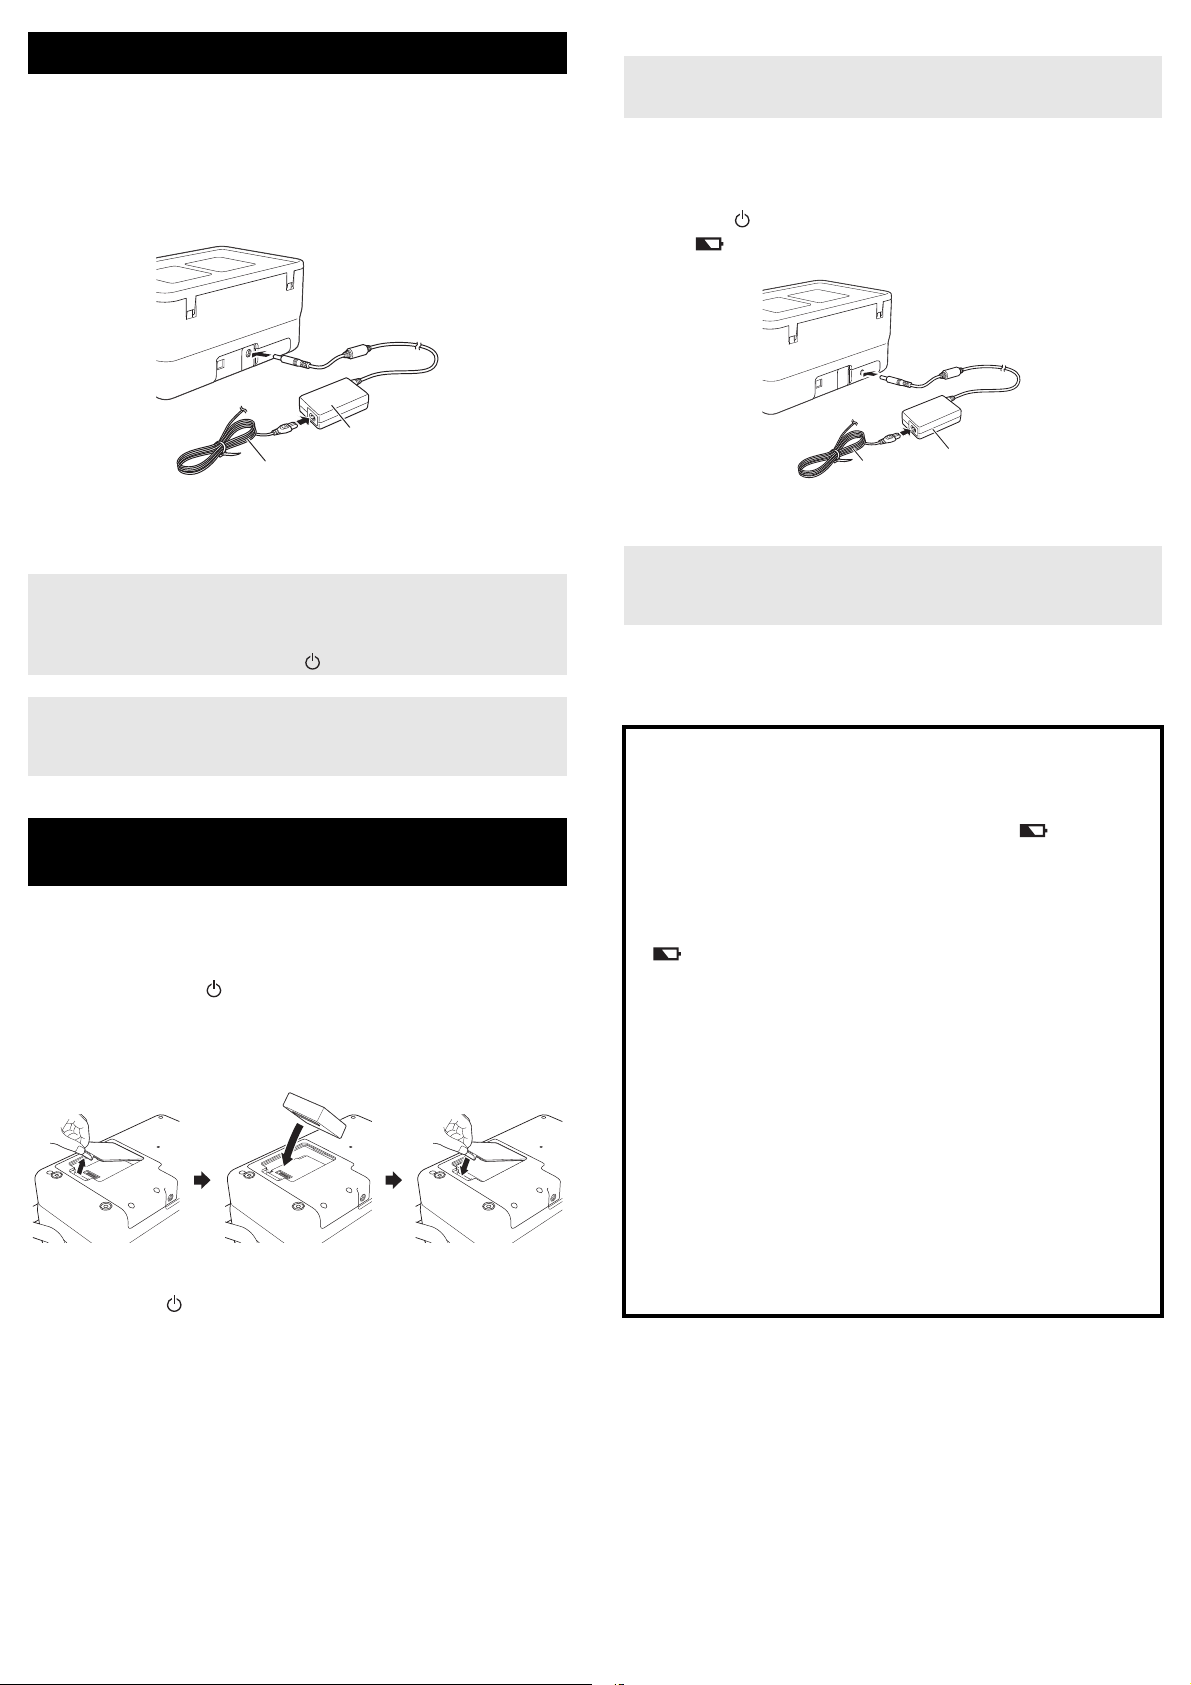
Connecting the Power Supply
IMPORTANT
NOTE
1
2
NOTE
NOTE
1
2
AC Adapter
Use the AD9100ESA (AC adapter) for this P-touch. Connect the AC adapter
directly to the P-touch.
1. Insert the plug on the AC adapter cord into the AC adapter socket
marked DC IN 24 V on the P-touch.
2. Insert the plug on the power supply cord into the AC adapter.
Charging the Rechargeable Li-ion Battery
• Before use, fully charge the battery.
• Up to three hours may be needed to fully charge the battery.
1. Make sure that the battery is installed in the P-touch.
2. Use the AC adapter and power supply cord to connect the P-touch to
an electrical socket.
Press the (Power) button to turn the P-touch on if it is not on already.
The (Battery) indicator lights in orange during charging, and it goes
off when the battery is fully charged.
1 AC adapter
2 Power supply cord
3. Insert the power supply plug into a standard electrical socket.
• Turn the P-touch off before disconnecting the AC adapter.
• Do not pull or bend the AC adapter cord and power supply cord.
• After the power supply plug is inserted into the electrical socket, it
may take a few seconds until the (Power) button is enabled.
To safeguard and backup the P-touch memory, when the power supply
is unplugged it is recommended to leave the rechargeable Li-ion
batteries (optional: PA-BT-4000LI), installed in the P-touch.
Using the Rechargeable Li-ion Battery
(Optional)
Attach the battery base (PA-BB-003) to the P-touch. For more information
about attaching the battery base, see its instruction manual.
Installing the Rechargeable Li-ion Battery
1. Press and hold the (Power) button to turn the P-touch off.
2. Open the battery cover on the bottom of the P-touch.
3. Insert the battery into the battery compartment.
4. Close the battery cover.
Removing the Rechargeable Li-ion Battery
Press and hold the (Power) button to turn the P-touch off.
Remove the battery cover and the battery, and then reattach the battery
cover.
1 AC adapter
2 Power supply cord
Although the charging stops if the P-touch is used to print, feed, or
perform another operation, the charging will start again automatically
after the operation is finished if the charging is not completed.
Stopping Rechargeable Li-ion Battery Charging
To stop the battery charging, disconnect the AC adapter.
Notes on Using the Rechargeable Li-ion Battery
Before use, fully charge the battery. Do not use it before it is fully
charged.
The battery charging must take place in environments between 0°C and
40°C, otherwise the battery will not charge, and the (Battery)
indicator will remain lit. If the charging stops because the environment
temperature is too low or too high, place the P-touch with a temperature
between 0°C and 40°C and try charging again.
If the P-touch is used to print, feed, or perform another operation when
both the battery is installed and the AC adapter is connected, the
(Battery) indicator may turn off and charging may stop even if the
battery is not fully charged.
Rechargeable Li-ion Battery Characteristics
To ensure the highest performance and longest life from the battery:
Do not use or store the battery in a location exposed to extreme high or
low temperatures as it may discharge more quickly. This may happen
when using a rechargeable Li-ion battery with a high charge (90%
charged or more) in a location exposed to high temperatures.
Remove the battery when storing the P-touch for long periods of time.
Store a battery with less than a 50% charge in a cool dry place out of
direct sunlight.
Recharge the battery every six months if it is stored for long periods of
time.
If you touch a part of the P-touch while the Li-ion battery is charging, that
part of the P-touch may feel warm. This is normal, and the P-touch may
be used safely. However, if the P-touch becomes extremely hot,
discontinue use.
Inserting a Tube
NOTE
IMPORTANT
IMPORTANT
IMPORTANT
1
2
1
2
Inserting a Tape Cassette
1. Open the top cover.
2. Pull the tube release lever up.
3. Pass the tube as shown in the illustration so that the end of the tube
reaches the “ ” mark on the P-touch, and then push the tube
release lever down.
The TZe tape, FLe label, and HSe tube cassettes can be used in your
P-touch.
If the new tape cassette has a cardboard stopper,
be sure to remove the stopper before inserting the
cassette.
1. Check that the end of the tape is not bent and that it passes through the
tape guide. If it does not, pass it through the tape guide as shown in the
illustration.
1
2
1 End of tape
2 Tape guides (The actual shape may be different depending on
the tape width.)
2. Open the top cover.
3. Insert the tape cassette into the tape cassette compartment with the end
of the tape facing the P-touch tape exit slot, then push down evenly until
the tape cassette is installed correctly.
4. Close the top cover.
• Do not use tube which is dirty, bent, flattened, has a rough surface or
uneven tube thickness, or is defective in any other way.
• When using the P-touch, position it so direct sunlight does not enter
the P-touch through the tube exit slot.
• You can use the tube half-cut adjuster to adjust the depth of half cuts
to one of three settings.
• If the tube is jammed or not cut completely, use the (Feed and
Cut) button to manually cut the tube completely. Press and hold the
button for 2 to 10 seconds until the (Power) indicator changes from
being lit in green to flashing in green, and then release it. The tube
will be cut when the button is released.
Inserting a Ribbon Cassette
1. Open the top cover.
2. Insert the ribbon cassette into the ribbon cassette compartment, and
press it firmly until you hear a click.
1 Tape exit slot
• When inserting the tape cassette, make sure that the tape and ink
ribbon do not catch on the print head.
• Make sure that there is no slack in
the tape, and then carefully insert
the tape cassette. If there is slack
in the tape, the tape will catch on
the protrusion (2) when the
cassette is inserted and become
bent or wrinkled, causing the tape
to jam.
To fix the slack in the tape, refer to
the illustration in step 1 and pull the tape outside of the tape guide.
• When removing the tape cassette, make sure that the tape does not
catch on the protrusion (2).
4. Close the top cover.
Store tape cassettes in a cool dark location, away from direct sunlight
and high temperature, high humidity, or dusty locations. After opening
the sealed package, use the tape cassette as quickly as possible.
3. Close the top cover.
Turning Power On/Off
IMPORTANT
IMPORTANT
On: Press the (Power) button to turn the P-touch on. The (Power)
indicator lights in green.
Off: Press and hold the (Power) button again to turn the P-touch off. The
(Power) indicator may light in orange until the power is off.
When turning the P-touch off, do NOT remove the battery or disconnect
the AC adapter until the (Power) indicator turns off.
Feeding Tape
• Be sure to feed tape to remove any slack in the tape and ink ribbon
after inserting the tape cassette.
• Do not pull the label when the P-touch is ejecting it from the tape
exit slot. Doing so will cause the ink ribbon to be discharged with the
tape. The tape may no longer be functional after the ink ribbon
discharges.
• Do not block the tape exit slot during printing or when feeding tape.
Doing so will cause the tape to jam.
Feed and Cut
The Feed and Cut function feeds approximately 22.3 mm of blank tape, and
then cuts the tape.
Press the (Feed and Cut) button.
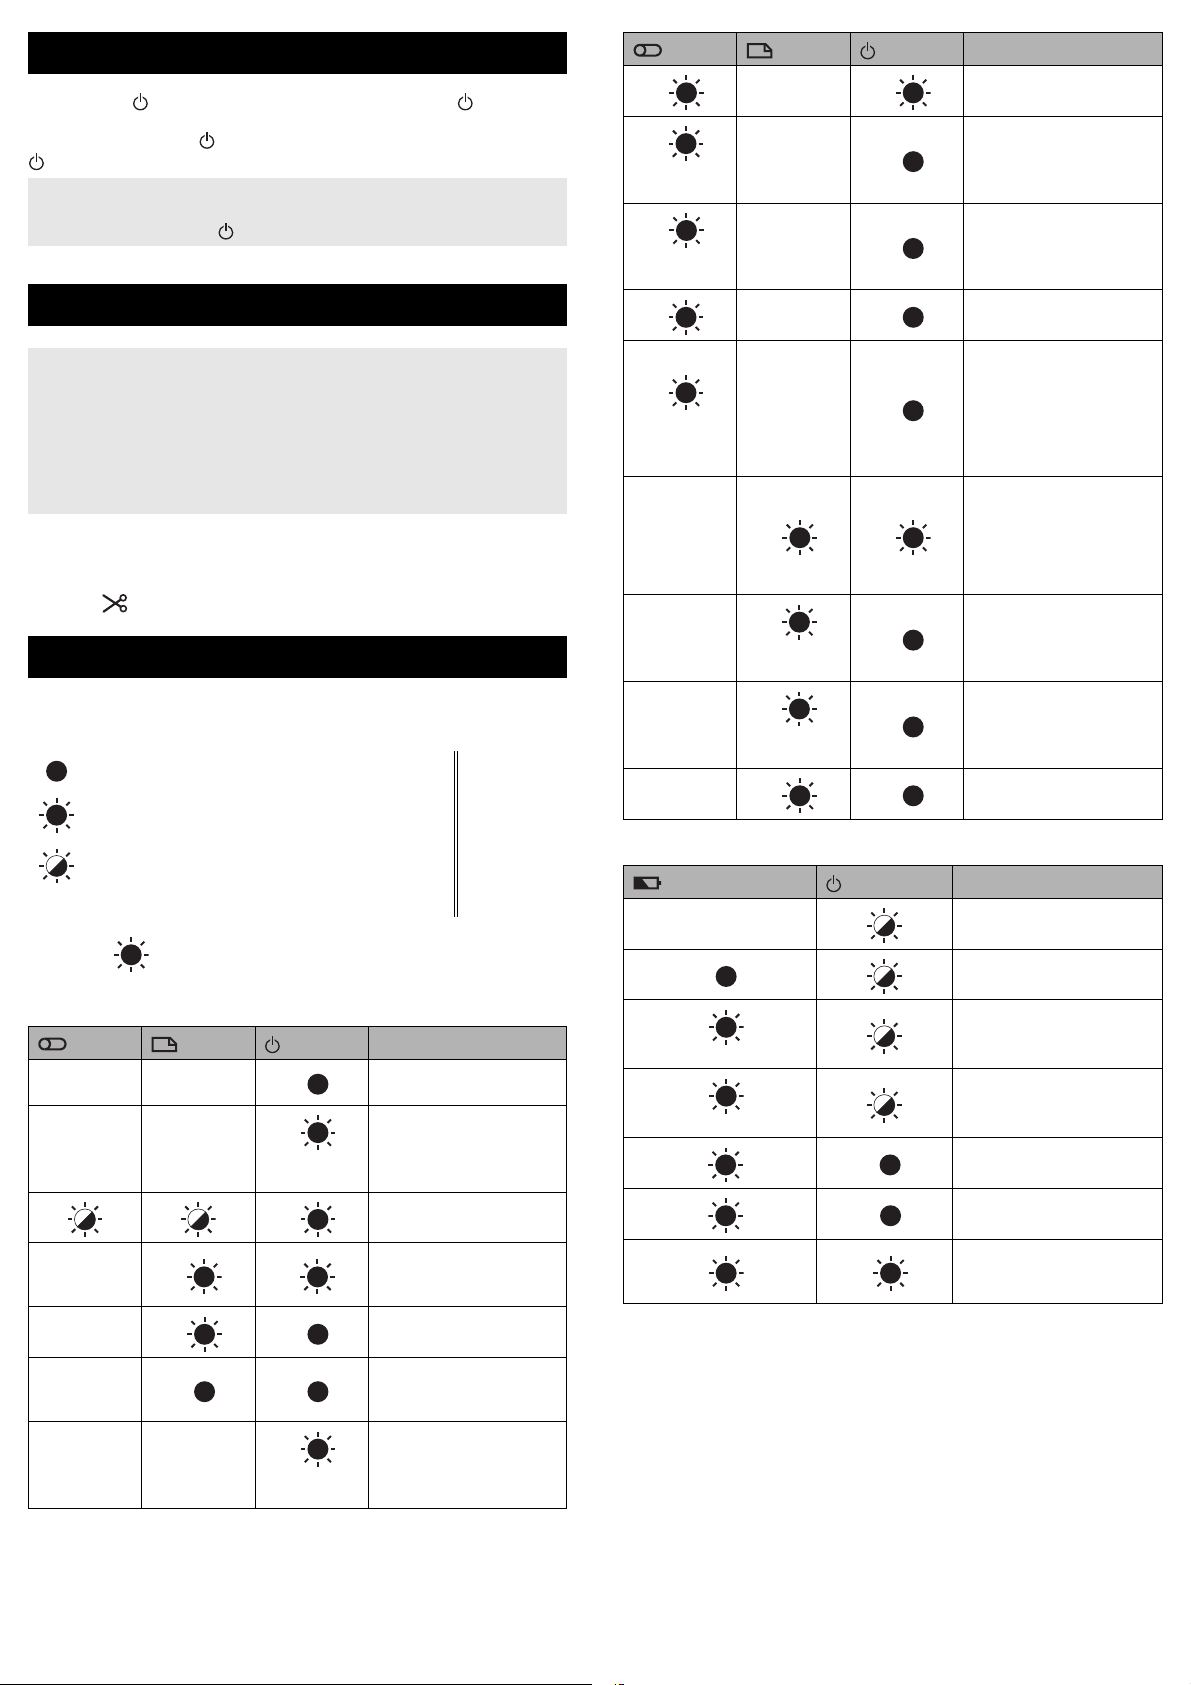
LED Indicators
(Tube)
O
R
(2 times in 1.8
seconds)
O
(1 time in 1
second)
R
R
(1 time in 1
second)
(Off)
(Off)
(Label) (Power)
(Off)
(Off)
(Off)
(Off)
(Off)
OO
R
(1 time in 1
second)
O
G
G
O
G
O
Condition
Cutter error (Tube)
No tube error (Tube)
Media end error (Tube)
Top cover open error
when printing (Tube)
No ribbon cassette error
(Tube)
Ink ribbon jam error
(Tube)
No remaining ink ribbon
error (Tube)
Tube jam error (Tube)
Tube feeding problem
(Tube)
When blinking alternately:
Cutter error (Label)
When blinking
simultaneously: High
temperature error (Label)
Wrong media error
(Label)
The indicators light and flash to indicate the P-touch status. The symbols
used in this section explain the meaning of the different indicator colours and
patterns:
= Indicator is lit
= Indicator is flashing
= Indicator can be off, lit or flashing in any colour
(Off) = Indicator is off
Example: G = Indicator is flashing in green
G = Green
O = Orange
R = Red
Tube, Label, Power indicator
(Tube)
(Off) (Off)
(Off) (Off)
(Off)
(Off)
(Off)
(Label) (Power)
RR
G
GO
O
G
(1 time in 1
second)
O
O
Condition
Power is turning off
Top cover open
Transferring data
Now cooling
System error 1
System error 2
System error 3
Reset mode (when the
mode is starting)
Reset mode (when the
button is pressed 2/6
times)
(Off)
(Off)
R
(2 times in 1.8
seconds)
OG
Battery indicator
(Battery)
(Off)
O
O
(1 time in 4 seconds)
O
(2 times in 4 seconds)
RR
R
OO
G
(Power)
G
No cassette error (Label)
Media end error (Label)
Top cover open error
when printing (Label)
Condition
Rechargeable battery
power: full
Charging
Rechargeable battery
power: half
Rechargeable battery
power: low
Rechargeable battery error
Rechargeable battery
power: empty
Adapter
connection/disconnection
error
(Off) (Off)
G
(2 times in 1.8
seconds)
In cutting mode (Tube)

Product Specifications
IMPORTANT
NOTE
P-touch Specifications
Model Name E800T
Size
Dimensions approx. 338 mm (W) × 188 mm (D) × 151 mm (H)
Weight approx. 3.9 kg
Printing
Method Thermal Transfer
1
Compatible tubes
Cassette • Brother TZe tape cassette (3.5 mm, 6 mm,
Interface
USB Version 2.0 Full Speed
Environment
Operating
temperature/humidity
1
You may not be able to obtain high-quality printing results depending on
the type of tube you are using. Before using a tube, print a test to check
the results.
• Inner diameter: Φ2.5–Φ6.5 mm
• Thickness: 0.5 mm
• Material: PVC
9 mm, 12 mm, 18 mm, 24 mm, 36 mm widths)
• Brother FLe label cassette (21 mm × 45 mm)
• Brother HSe tube cassette (5.8 mm, 8.8 mm,
11.7 mm, 17.7 mm, 23.6 mm widths)
• Brother TR ribbon cassette (12 mm width)
• TZe engine
When running: between 10°C and 35°C /
between 20% and 80%
max. wet bulb temperature:
27°C
• Tube engine
When running: between 15°C and 35°C /
between 20% and 80%
max. wet bulb temperature:
27°C
Installing the Software and Printer Driver
to a Computer
To print from your computer, install the printer driver, Cable Label Tool,
P-touch Editor and other applications to your computer.
DO NOT connect the P-touch to the computer until asked to do so.
1. Insert the CD-ROM into your CD-ROM drive.
Make sure you are logged on with administrator rights.
The latest software and manuals can be downloaded from the Brother
support website at support.brother.com
.
2. Click the [commoninstaller.exe] button.
3. Follow the on-screen instructions to proceed with the installation.
4. Close the dialog box when the installation is complete.
Connecting the P-touch to a Computer
1. Make sure the P-touch is turned off before connecting the USB cable.
2. Connect the P-touch end of the USB cable to the USB port on the back
of the P-touch.
3. Connect the other end of the USB cable to the USB port on the
computer.
Operating Environment
Item Specifications
OS Windows Vista / Windows 7 / Windows 8 /
Windows 8.1 / Windows 10
Memory Windows Vista: 512 MB or more
Windows 7 / Windows 8 / Windows 8.1 / Windows 10:
1 GB or more (32-bit) or 2 GB or more (64-bit)
Others CD-ROM drive
Brother support website
Please visit our support website at support.brother.com.
You can find following information:
• Software downloads
• Manuals/Documents
• Frequently Asked Questions (Troubleshooting, Useful tips on using printer)
• Consumable information
• Latest OS compatibility information
The contents of this website are subject to change without notice.
4. Turn the P-touch on.
Available Applications for Use with
Computers
Available
Applications
Cable Label
Tool
P-touch Editor Design and print custom labels with built in
Features Connection
Create and print labels for cables, patch
panels, faceplates, electrical equipment
and more.
drawing tools, text using different fonts and
styles, imported graphic images and
barcodes.
USB
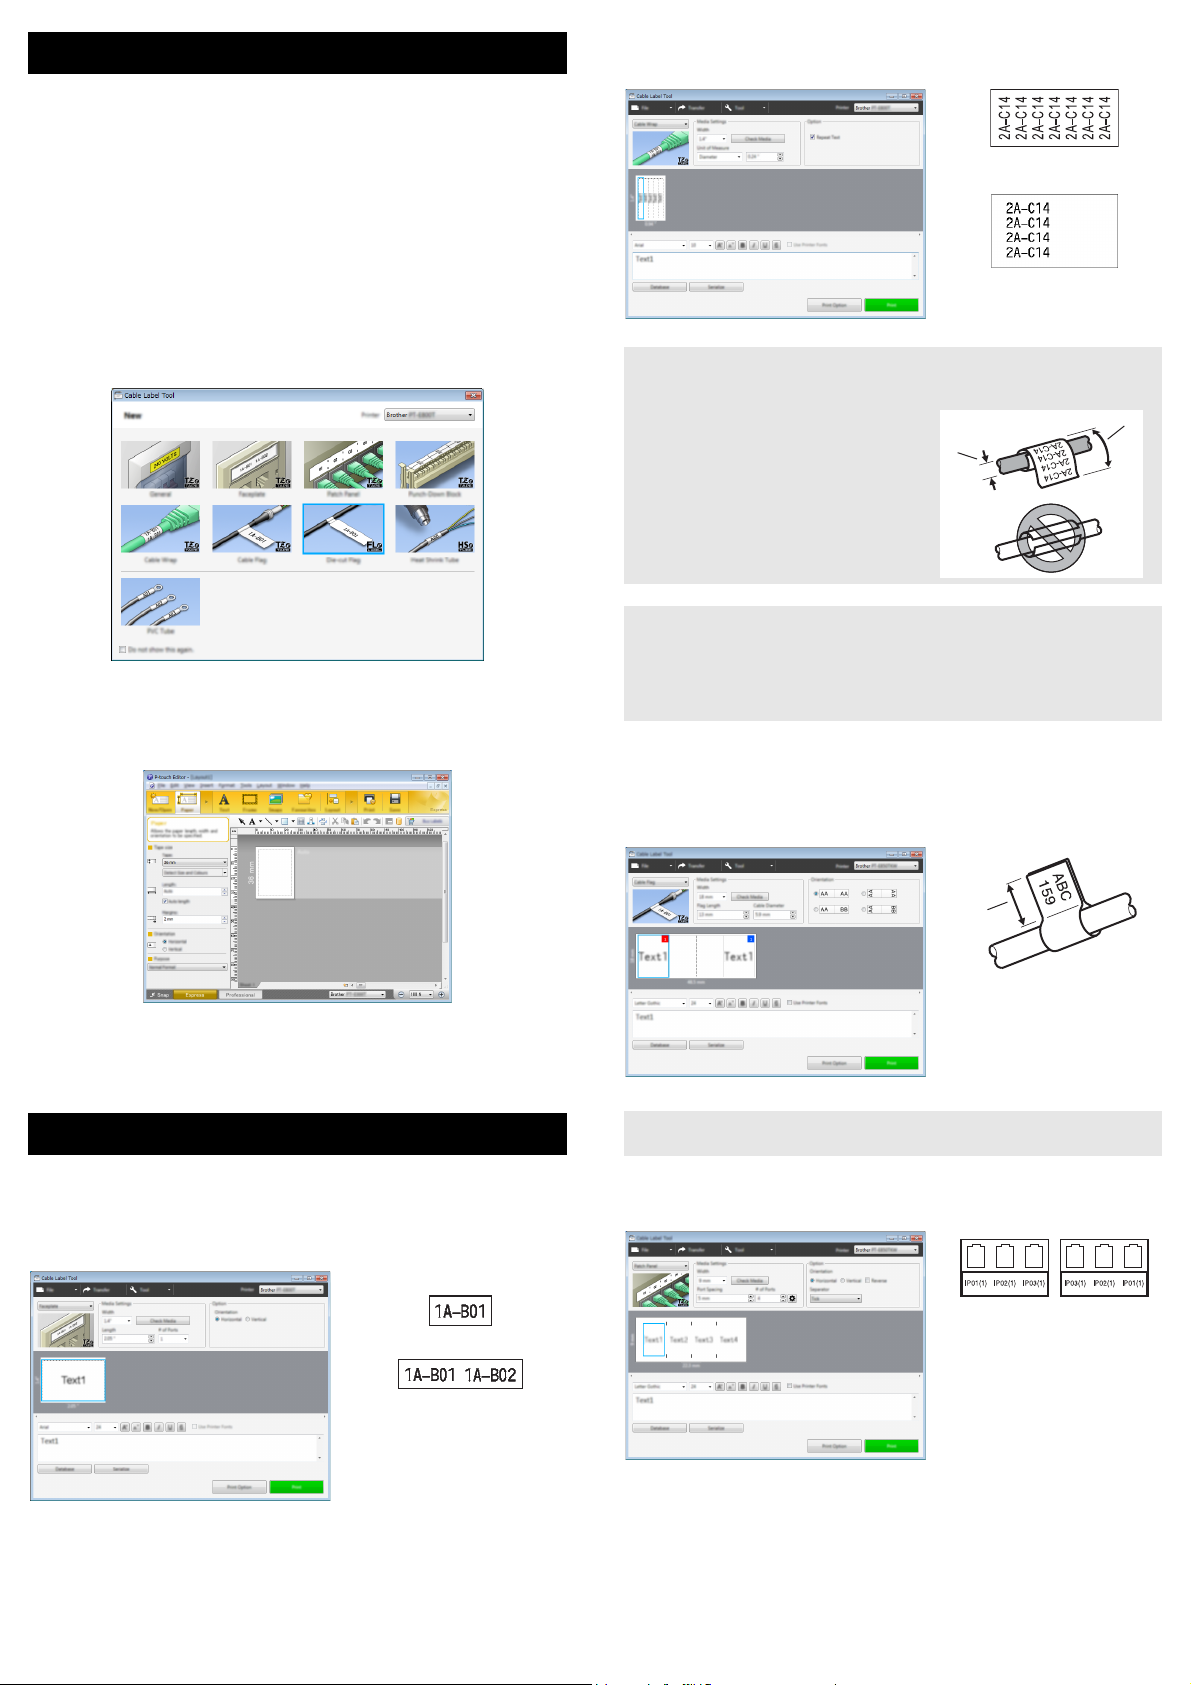
Starting P-touch Applications
One block
Two blocks
NOTE
NOTE
NOTE
2
1
1
1 Flag length at least
15 mm
For Windows Vista / Windows 7
From the Start button, click [All Programs] - [Brother P-touch] - [Cable
Label Tool 1.0] or [P-touch Editor 5.1], or double-click the [Cable Label
Tool 1.0] or [P-touch Editor 5.1] shortcut icon on the desktop.
For Windows 8 / Windows 8.1
Click [Cable Label Tool 1.0] or [P-touch Editor 5.1] on the [Apps] screen,
or double-click [Cable Label Tool 1.0] or [P-touch Editor 5.1] on the
desktop.
For Windows 10
From the Start button, select [All apps] and click [Cable Label Tool 1.0] or
[P-touch Editor 5.1] under [Brother P-touch], or double-click [Cable Label
Tool 1.0] or [P-touch Editor 5.1] on the desktop.
Cable Wrap
Labels of this type can be wrapped around a cable or wire.
Cable Label Tool
Select the type of label you want to create, set the necessary items, and then
print the label.
P-touch Editor
When using Flexible ID Tape:
• We recommend using Flexible ID Tape for “Cable Wrap” labels.
• When wrapping labels around
cylindrical objects, the diameter (1) of
the object should be at least 3 mm.
• The overlapping (2) ends of the label
should be at least 5 mm.
• Labels made with Flexible ID Tape
are not designed for use as electrical
insulation.
When using Self-Laminating Tape:
• We recommend using Self-Laminating Tape For "Cable Wrap" labels.
• The text is horizontally printed.
• Labels made with Self-Laminating Tape are not designed for use as
electrical insulation.
Cable Flag
Labels of this type can be wrapped around a cable or wire, and both ends of
the label stick together to form a flag. The text on flag labels is printed on both
ends of the label, leaving a blank space in the middle that wraps around the
cable.
Enter the text and images, and then print the label.
For more information, see the User’s Guide.
Cable Label Tool
For more information about cable label tool, see the User’s Guide.
Faceplate
Labels of this type can be used to identify various faceplates. Blocks of text
are evenly spaced on each label.
• We recommend using Flexible ID Tape for “Cable Flag” labels.
Patch Panel
Labels of this type can be used to identify various types of panels.

Punch-Down Block
Labels of this type can be used to identify a type of electrical connection often
used in telephony. You can enter up to eight lines for each block on a single
label.
Die-cut Flag
Labels of this type can be printed on special die-cut flag labels to create flag
labels for cables and wires. Use the FLe label cassettes for this type of
application.
PVC tube
Tubes of this type can be used to identify or insulate cables, or to protect them
from heat.
Heat Shrink Tube
Tubes of this type shrink by heat to fit a cable. Use the HSe tube cassettes
for this type of application.
Troubleshooting
Printing Problems
Problem Solution
The label or tube is not
printed.
The label or tube is not
printed correctly, or the
print result is not
satisfactory (faint or
smudged ink).
The fed tube is dirty. Replace the tube cleaner. For more information
• Check that text has been entered and that the
tape cassette or tube is installed correctly with
sufficient tape or tube remaining.
• Do not use a tube that is dirty, bent, or flattened,
has a rough surface or uneven tube thickness, or
is defective in any other way.
• If the tape or tube is bent, cut off the bent section
and thread the tape or tube through the exit slot.
• When printing from a computer, make sure the
computer is connected correctly to the P-touch.
Remove the tape cassette or ribbon cassette and
reinstall it, pressing it firmly until it locks into
place.
If the label print head is dirty, clean it with a dry
cotton swab or optional print head cleaning
cassette (TZe-CL6 for label print head only).
If the quality of the printed characters is poor
even after wiping the label print head, wipe the
label roller with a dry cotton swab. See the User’s
Guide.
If the tube print head is dirty, clean it with a dry
cotton swab. See the User’s Guide.
If the tube or tube cleaner is dirty, replace the
tube cleaner. For more information about
replacing the tube cleaner, see the User’s Guide.
If the rollers for tubes are dirty, remove the roller
cover, pull out the rollers, and clean them using
a cloth. Do not use alcohol or other organic
solvents. For more information about removing
the roller cover, see the User's Guide.
The rollers may be worn and need to be
replaced. For more information about replacing
the rollers, see the User's Guide.
Try changing one of the following settings using
the [Tube Settings] tab in [Device Settings] in
the “Printer Setting Tool”.
• Change the printing speed.
If you use the P-touch in an environment with
a temperature of 20°C or lower, we
recommend setting [Print Speed] to [Better
Quality].
• Change the feeding pressure.
If the characters are faint, change [Feeding
Pressure] to a stronger setting.
• Change the printing density.
If the characters are faint, change [Print
Density] to a higher setting.
For more information, see “Tube Settings Tab”
in the User's Guide.
Try changing one of the following settings when
small characters printed on the tube are faint.
• Change the font style to bold.
• Change the font size to a larger size.
Try changing one of the following settings when
the characters printed on the label are faint.
• Change the font style to bold.
• Change the font size to a larger size.
• High quality printing can be used if you are printing
from a computer, and TZe laminated tape with
black ink is installed. Use the printer driver to select
the high quality mode when printing the labels. You
cannot use this function for TZe-FX**1 tape.
about replacing the tube cleaner, see the User’s
Guide.

Problem Solution
1
1 Spool
The tape or tube is
jammed.
The ink ribbon is broken. Insert a new ribbon cassette.
Although some ink ribbon
remains and the tube is not
jammed, a message
appears indicating that
there is no ink ribbon
remaining, there is a tube
feeding error, or there is a
tube jam error.
The ink ribbon is separated
from the ink roller.
• Feeds the tube backward.
In the [Device Settings] menu bar in the
“Printer Setting Tool”, click [Maintenance] [Feed Tube] - [Backward].
• If you are unable to clear the tube jam by
feeding the tube backward, remove the roller
cover and remove the tube. For more
information about removing the roller cover,
see the User's Guide.
• If the tape or tube is jammed, remove the
tape cassette or tube, and then pull out the
jammed tape or tube and cut it. For the tape
cassette, check that the end of the tape
passes through the guide before reinstalling
the tape cassette.
• When the tube is jammed, the ribbon of the
ribbon cassette will be damaged. Because
the ribbon may break if you use it in this
condition, pull out approximately 10 cm of
ribbon from the cassette and wind the
damaged portion completely onto the spool.
You can use the ribbon to print starting from
the portion that is not damaged.
If you use the P-touch in an environment with a
temperature of 20°C or lower, we recommend
setting [Print Speed] to [Better Quality]. For
more information, see “Tube Settings Tab” in
the User's Guide.
If the P-touch cannot feed the tube correctly
because the tube is twisted or the tube is
caught on something outside of the P-touch,
this error may occur.
Check that the tube is not twisted and that the
tube can be fed smoothly outside of the
P-touch.
If the ink ribbon is broken, replace the tape
cassette or ribbon cassette. If not, leave the
tape uncut and remove the tape cassette or
ribbon cassette, then wind the loose ink ribbon
onto the spool as shown in the figure.
1
The P-touch stops while
printing a label or tube.
The label or tube is not cut
automatically.
A tape or tube jam error
cannot be cleared despite
following the
troubleshooting steps.
The tube is not cut or is
difficult to cut.
• Replace the tape cassette if striped tape is
visible, as this indicates that you have
reached the end of the tape.
• Connect the AC adapter directly to the
P-touch, or charge the rechargeable Li-ion
battery.
For labels, check the Cut Option setting using
the printer driver.
To cut labels manually, press the (Feed
and Cut) button to feed and cut the tape.
To cut tubes manually, press and hold the
(Feed and Cut) button for 2 to 10 seconds
until the (Power) indicator changes from
being lit in green to flashing in green, and then
release it. The tube will be cut when the button
is released.
Contact Brother customer service.
Replace the tube cutter.
Replace the tube cutter after approximately
50,000 cutting operations (this number may
vary depending on the operating conditions).
You can confirm the current number of cutting
operations from a computer by executing [Help]
- [Software Information Scan] in P-touch
Editor.
If the tube cutter has reached the
recommended number of cutting operations,
replace it with a new one (model number
PA-TC-001).
After replacing the tube cutter, reset the
counter. You can reset the counter for the tube
cutter by selecting [Reset Tube Cutter
Counter] in the [Device Settings] menu bar in
the "Printer Setting Tool". For more
information, see the User’s Guide.
Problem Solution
I want to adjust the depth of
half cuts for tubes.
Tubes are not fed correctly.
The length of printed tubes
is shorter than the set tube
length.
The tube rollers have
become worn.
The tube is not ejected
correctly after printing.
I want to make fine
adjustments to the print
result.
I want to faster printing. High speed printing can be used if the AC
I want to print in higher
resolution.
The print result is poor. High resolution printing can be used if the AC
The high resolution or high
speed printing setting was
specified, but an error
occurred and printing could
not be completed.
FLe labels cannot be
positioned correctly.
Half cuts can be adjusted to one of three
depths. Press the cover open button to open
the top cover, and then move the tube half-cut
adjuster to adjust the cutting depth.
To specify a more advanced setting, change
the [Cut Depth] setting on the [Tube Settings]
tab in [Device Settings] in the “Printer Setting
Tool”.
The rollers may be worn and need to be
replaced. For more information about replacing
the rollers, see the User’s Guide.
Replace the rollers. For more information, see
the User’s Guide.
Feeds the tube forward.
In the [Device Settings] menu bar in the
“Printer Setting Tool”, click [Maintenance] [Feed Tube] - [Forward].
The length and margins can be adjusted in the
“Printer Setting Tool”. For more information,
see the User’s Guide.
adapter is connected, and TZe laminated tape
with black ink is installed. Use the printer driver
to select the high speed mode when printing the
labels.
You cannot use this function for TZe-FX**1
tape.
High resolution printing can be used if the AC
adapter is connected and TZe laminated tape
with black ink is installed. Use the printer driver
to select the high resolution mode when printing
the labels.
You cannot use this function for TZe-FX**1
tape.
adapter is connected and TZe laminated tape
with black ink is installed. Use the printer driver
to select the high resolution mode when printing
the labels.
You cannot use this function for TZe-FX**1
tape.
If using the high speed printing setting, print
using the standard setting.
As conditions for high resolution or high speed
printing, the AC adapter must be connected,
and TZe laminated tape with black ink must be
installed.
You cannot use this function for TZe-FX**1
tape.
To clear the error, cancel the print job, and then
connect the AC adapter or cancel high
resolution or high speed printing.
If the FLe sensor is dirty, FLe labels cannot be
positioned correctly. Wipe the FLe sensor using
a cotton swab moistened with alcohol to clean
the sensor. See the User’s Guide.
Version information
Problem Solution
I do not know the version
number of the firmware of
my P-touch.
I want to confirm whether I
am using the latest version
of the software.
The version number and other information for
the firmware can be confirmed using the
following procedure:
Use 24 mm or 36 mm tape.
1 Turn the P-touch on.
2 Press and hold the (Feed and Cut)
button for more than 10 seconds to print the
report. For more information, see the User’s
Guide.
Use the P-touch Update Software to confirm if
you have the latest version.
See the User’s Guide for more information
about the P-touch Update Software.
 Loading...