

Page 1
ELECTRONIC LABELING SYSTEM
PT
-
97OOPC / 98OOPCN
User’s Guide
Guía del usuario
S
T
ATUS
If you encounter any problems with your product, visit our Web site:
http://solutions.brother.com/
Si tiene algún problema con su producto, visite nuestro sitio web:
http://solutions.brother.com/
S
T
A
TUS
Page 2

Introduction
Thank you for purchasing the PT-9700PC/PT-9800PCN.
The PT-9700PC/PT-9800PCN (hereafter, referred to as “printer”) is a label printer that enables you to
easily print custom labels after it is connected to a computer.
This manual contains various precautions and basic procedures for using this printer. Read this manual
carefully before starting and keep the manual in a handy place for future reference.
If new versions of the PT-9700PC/PT-9800PCN software become available, this manual may not reflect the
updated features. Therefore, you may find that the software and the contents in this manual are different.
■ Federal Communications Commission (FCC) Declaration of Conformity (For USA Only)
Responsible Party: Brother International Corporation
100 Somerset Corporate Boulevard
Bridgewater, NJ 08807-0911 USA
TEL: (908) 704-1700
declares, that the products
Product Name: Brother Label Printer P-touch
Model Numbers: PT-9700PC, PT-9800PCN
comply with Part 15 of the FCC Rules. Operation is subject to the following two conditions: (1)
This device may not cause harmful interference, and (2) this device must accept any interference
received, including interference that may cause undesired operation.
This equipment has been tested and found to comply with the limits for a Class B digital device,
pursuant to Part 15 of the FCC Rules. These limits are designed to provide reasonable protection
against harmful interference in a residential installation. This equipment generates, uses, and can
radiate radio frequency energy and, if not installed and used in accordance with the instructions,
may cause harmful interference to radio communications. However, there is no guarantee that
interference will not occur in a particular installation. If this equipment does cause harmful
interference to radio or television reception, which can be determined by turning the equipment
off and on, the user is encouraged to try to correct the interference by one or more of the
following measures:
•Reorient or relocate the receiving antenna.
•Increase the separation between the equipment and receiver.
•Connect the equipment to an outlet on a circuit different from that to which the receiver is
connected.
•Consult the dealer or an experienced radio/TV technician for help.
Important
•The enclosed interface cable should be used in order to ensure compliance with the limits for a
Class B digital device.
•A shielded interface cable should be used in order to ensure compliance with the limits for a
Class B digital device.
•Changes or modifications not expressly approved by Brother Industries, Ltd. could void the
user’s authority to operate the equipment.
®
International ENERGY STAR
The purpose of the International ENERGY STAR
development and popularization of energy-efficient office equipment.
As an ENERGY STAR
®
product meets the ENERGY STAR
Compliance Statement
Partner, Brother Industries, Ltd. has determined that this
®
guidelines for energy efficiency.
®
Program is to promote the
1
Page 3

Compilation and Publication Notice
Under the supervision of Brother Industries Ltd., this manual has been compiled and published, covering the
latest product’s descriptions and specifications.
The contents of this manual and the specifications of this product are subject to change without notice.
If new versions of the PT-9700PC/9800PCN software become available, this manual may not reflect the
updated features. Therefore, you may find that the software and the contents in this manual are different.
Brother reserves the right to make changes without notice in the specifications and materials contained herein
and shall not be responsible for any damages (including consequential) caused by reliance on the materials
presented, including but not limited to typographical and other errors relating to the publication.
The screen images in this manual may differ depending on your OS or printer.
© 2010 Brother Industries, Ltd.
Trademarks and Copyrights
The Brother logo is a registered trademark of Brother Industries, Ltd.
Brother is a registered trademark of Brother Industries, Ltd.
© 2010 Brother Industries, Ltd. All rights reserved.
Microsoft, Windows Vista, Windows Server and Windows are registered trademarks of Microsoft Corporation
in the United States and other countries.
Apple, Macintosh and Mac OS are trademarks of Apple Inc., registered in the United States and other countries.
QR Code is a registered trademark of DENSO WAVE INCORPORATED in JAPAN and other countries. QR
Code Generating Program Copyright © 2008 DENSO WAVE INCORPORATED.
BarStar Pro Encode Library (DataMatrix, MaxiCode, PDF417, RSS) Copyright © 2007 AINIX Corporation. All
rights reserved.
The names of other software or products used in this document are trademarks or registered trademarks of the
respective companies that developed them.
Each company whose software title is mentioned in this manual has a Software License Agreement specific to
its proprietary programs.
All other brand and product names mentioned in this User’s Guide, the Software User’s Guide and Network
User’s Guide (PT-9800PCN only) are registered trademarks of their respective companies.
2
Page 4

Brother® Two Year Limited Warranty
(USA Only)
Who is covered:
• This limited warranty (“warranty”) is given only
to the original end-user/retail purchaser
(referred to in this warranty as “Original
Purchaser”) of the accompanying Product,
consumables and accessories (collectively
referred to in this warranty as “this Product”).
• If you purchased a Product from someone other
than an authorized Brother reseller in the United
States or if the Product was used prior to your
purchase you are not the Original Purchaser and
the Product that you purchased is not covered
by this warranty.
What is covered:
• This Product includes the Product and may
include Consumable and Accessory Items.
Accessory Items may include, but are not
limited to USB cable, AC adaptor and photo
sleeves. Consumable Items may include but are
not limited to BMS paper, tape cassettes and
label rolls.
•
Except as otherwise provided herein, Brother
warrants that the Product and the accompanying
Consumable and Accessory Items will be free
from defects in materials and workmanship,
when used under normal conditions.
•
This warranty applies only to Products purchased
and used in the United States. For Products
purchased in, but used outside the United States,
this warranty covers only warranty service within
the United States.
What is the length of the Warranty Periods:
• Product and Accompanying Accessory Items:
two years from the original purchase date.
•
Accompanying Consumable Items: 90 days from
the original purchase date or the rated life of
consumable, whichever comes first.
What is NOT covered:
This warranty does not cover
(1) Physical damage to this Product;
(2) Damage caused by improper installation,
improper or abnormal use, misuse, neglect or
accident (including but not limited to shipping
this Product without the proper preparation and/
or packaging);
(3)
Damage caused by another device or software
used with this Product (including but not limited to
damage resulting from use of non Brother
parts and Consumable and Accessory Items);
(4) Consumable and Accessory Items that expired
in accordance with a rated life;
(5) Problems arising from other than defects in
materials or workmanship.
This limited warranty is VOID if this Product has
been altered or modified in any way (including but
not limited to attempted warranty repair without
authorization from Brother and/or alteration/
removal of the serial number).
:
®
-brand
What to do if you think your Product is eligible for
warranty service:
Report your issue to our Customer Service Hotline at
1-800-255-0415 or mobilesolutionsinfo@Brother.com
within the applicable warranty period
with a copy of your dated bill of sale showing that this
Product was purchased within the United States.
What Brother will ask you to do:
After contacting Brother you will be required to
send the Product properly packaged, freight
prepaid, to Brother together with a photocopy of
your bill of sale. Brother will provide a Return
Authorization Number (i.e RA#) that must be
written on the outside of the carton that contains
your Product and instructions to where you should
return your Product. You are responsible for the
cost of shipping, packing the Product, and
insurance (if you desire). You are also responsible
for loss or damage to this Product in shipping.
What Brother will do:
If the problem reported concerning your Product
and/or accompanying Consumable and Accessory
Items is covered by this warranty and
reported the problem within the applicable
warranty period, Brother will repair or replace the
Product and/or accompanying Consumable and
Accessory Items at no charge to you for parts or
labor. The decision as to whether to repair or
replace the Product and/or accompanying
Consumable and Accessory Items is made by
Brother in its sole discretion. Brother reserves the
right to supply a refurbished or remanufactured
replacement Products and/or accompanying
Consumable and Accessory Items and use
refurbished parts provided such replacement
Products conform to the manufacturer’s
specifications for new Product/parts. The repaired
or replacement Product and/or accompanying
Consumable and Accessory Items will be returned
to you freight prepaid.
If the Product and/or accompanying Consumable
and Accessory Items are not covered by this
warranty (either stage), you will be charged for
shipping the Product and/or accompanying
Consumable and Accessory Items back to you and
charged for any service and/or replacement parts/
Product at Brother’s then current rates.
Identification: Brother shall be allowed to place
identification marks on equipment covered and
repaired under this agreement.
. Supply Brother
if you first
3
Page 5

Limitations:
Brother is not responsible for damage to or loss of
any equipment, media, programs or data related to
the use of this Product. Except for the repair or
replacement as described above, Brother shall not
be liable for any direct, indirect, incidental or
consequential damages or specific relief. Because
some states do not allow the exclusion or limitation
of consequential or incidental damages, the above
limitation may not apply to you.
THIS WARRANTY IS GIVEN IN LIEU OF ALL
OTHER WARRANTIES, WRITTEN OR ORAL,
WHETHER EXPRESSED BY AFFIRMATION,
PROMISE, DESCRIPTION, DRAWING, MODEL
OR SAMPLE. ANY AND ALL WARRANTIES
OTHER THAN THIS ONE, WHETHER EXPRESS OR
IMPLIED, INCLUDING IMPLIED WARRANTIES OF
MERCHANTABILITY AND FITNESS FOR A
PARTICULAR PURPOSE, ARE HEREBY
DISCLAIMED.
• This Limited Warranty is the only warranty that
Brother is giving for this Product. It is the final
expression and the exclusive and only statement
of Brother’s obligations to you. It replaces all
other agreements and understandings that you
may have with Brother or its representatives.
• This warranty gives you certain rights and you
may also have other rights that may vary from
state to state.
• This Limited Warranty (and Brother’s obligation
to you) may not be changed in any way unless
you and Brother sign the same piece of paper in
which we (1) refer to this Product and your bill
of sale date, (2) describe the change to this
warranty and (3) agree to make that change.
4
Page 6

Important Information
Should you have questions, or need information about your Brother Product, we have a variety of support
options for you to choose from:
Customer Service
1-800-255-0415
Customer Service
1-303-460-1628 (fax)
World Wide Web
www.brothermobilesolutions.com
Supplies / Accessories
1-800-543-6144
Brother Mobile Solutions, Inc., 100 Technology Drive, #250A, Broomfield, CO 80021
Please record your model and serial number and your date and location of Purchase below for your records.
Keep this information with your proof of purchase (bill of sale) in case your Product requires service.
Model # ________________________________________________________________
Serial # _________________________________________________________________
Date of purchase: ________________________________________________________
Name of reseller:_________________________________________________________
Reseller address: _________________________________________________________
Important: We recommend that you keep all original packing materials, in the event you ship this product.
Don’t stand in line at the post office or worry about lost mail. Visit us on-line at
Save Time - Register On-Line!
www.registermybrother.com
Your product will immediately be registered in our database and you can be on your way!
Also, while you’re there, look for contests and other exciting information!
5
Page 7
Safety precautions
To prevent injury and damage, important notes are explained using various symbols.
The symbols and their meanings are as follows:
WARNING
CAUTION
Tells you what to do to avoid the risk of injury.
Tells you about procedures you must follow to avoid minor personal injury or
damage to the printer.
The symbols used in this manual are as follows:
Action NOT allowed. DO NOT disassemble the product.
DO NOT splash the product with or
immerse the product in water.
Mandatory action Unplugging
Safety alert Alerts to the possibility of electrical shock
DO NOT touch a given portion of the
product.
WARNING
AC adapter
Follow these guidelines to avoid fire, damage, electric shock, or failure.
Use only the AC adapter (AD9100ES), power
cord and USB cable designed exclusively for
your printer. Failure to observe this may result
in an accident or damage. Brother shall not
assume any responsibility for any accident or
damage resulting from not using the specified
AC adapter (AD9100ES), power cord and USB
cable.
Don’t use the enclosed AC adapter
(AD9100ES), power cord and USB cable to
other product.
Unplug the power cord immediately and stop
using the printer during an electrical storm.
There may be a remote risk of electric shock
from lightning.
Do not touch the AC adapter or power plug
with wet hands.
Do not use the AC adapter in places of high
humidity such as bathrooms.
Do not use a damaged power cord.
Do not overload the power outlet.
Do not place heavy objects on, damage or
modify the power cord or plug. Do not forcibly
bend or pull the power cord.
Do not drop, hit or otherwise damage the AC
adapter.
Make sure that the plug is fully inserted in the
power outlet. Do not use an outlet that is loose.
6
Page 8
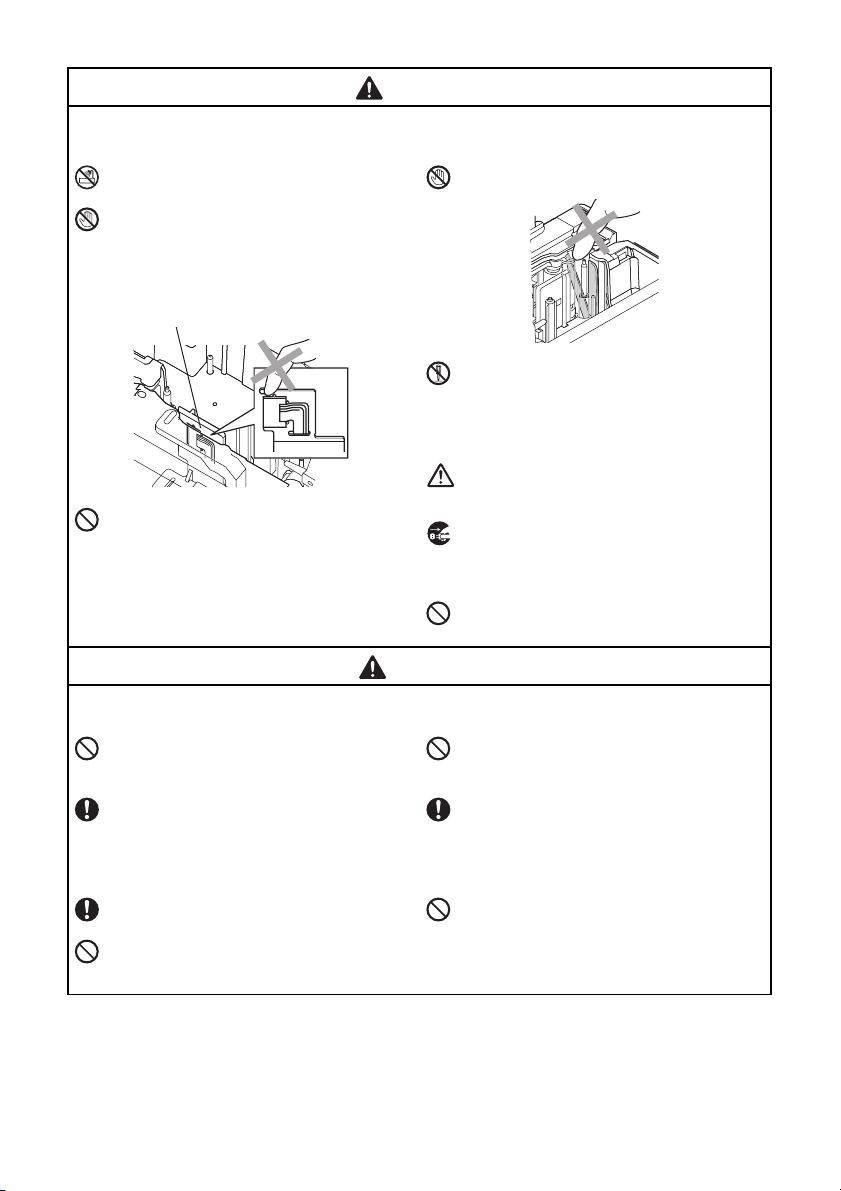
WARNING
Printer
Follow these guidelines to avoid fire, damage, electric shock, and choking.
Do not allow the printer to get wet in any way.
Do not touch any metal parts near the print
head. The print head becomes very hot during
use and remains very hot immediately after
use. Do not touch it directly with your hands.
Print head
Do not use the printer with a foreign object in
it. If water, metallic substance or any foreign
object enters the printer, disconnect the AC
adapter and contact the retail outlet where the
printer was purchased or your local authorized
service center.
Do not touch the blade of the cutter unit.
Do not disassemble the printer. For inspection,
adjustment, and repair of the printer, contact
the retail outlet where the printer was
purchased or your local authorized service
center.
Plastic bags are used in the packaging of your
printer. To avoid danger of suffocation, keep
these bags away from babies and children.
Disconnect the AC adapter immediately and
stop using when you notice abnormal odor,
heat, discoloration, deformation or anything
unusual while using or storing it.
To prevent damage, do not drop or hit the
printer.
CAUTION
Tape cutter
Follow these guidelines to avoid personal injury and damage of the printer.
Do not open the tape compartment cover
when operating the cutter unit.
AC adapter
If you do not intend using the printer for an
extended period of time, please disconnect the
AC adapter from the power outlet.
Printer
Follow these guidelines to avoid personal injury and damage of the printer.
Place the printer on a flat, stable surface such
as a desk.
Do not leave the printer within reach of
children with the tape compartment cover
open.
Do not apply excessive pressure to the cutter
unit.
Always hold the plug when disconnecting the
power cord from the power outlet.
Do not place any heavy objects on top of the
printer.
7
Page 9

General Precautions
● The printer may malfunction if left near a television, radio, etc. Do not install the printer near any printer
that will cause electromagnetic interference.
● Do not use the printer in any way or for any purpose not described in this manual. Doing so may result
in accidents or damage to the printer.
● Do not put any foreign objects into the label outlet, AC adapter jack, USB port, serial port or LAN port
(PT-9800PCN only), etc.
● Do not touch the print head with your fingers. Use a soft wipe (e.g. a cotton swab) when cleaning the
print head or the optional print head cleaning cassette (TZ-CL6) when cleaning the print head.
● Do not clean the printer with alcohol or other organic solvents. Only use a soft, dry cloth.
● Do not place the printer in direct sunlight or rain, near heaters or other hot appliances, in any location
exposed to extremely high or low temperatures (e.g. on the dashboard or in the back of your car), high
humidity, or dusty locations. Standard operating temperature range: 50 °F to 95 °F.
● Do not leave any rubber or vinyl on the printer for an extended period of time, otherwise the printer may
be stained.
● Depending on the environmental conditions and the applied settings, some characters or symbols may
be difficult to read.
● Use only Brother TZ tapes or Brother HG tapes with this printer. Do not use tapes that do not have the
or mark.
● Do not pull or apply pressure to the tape in the cassette. Otherwise the tape cassette or printer may be
damaged.
● Do not try to print labels using an empty tape cassette or without a tape cassette set in the printer. Doing
so will damage the print head.
● Do not attempt to cut tape while printing or feeding since this will damage the tape.
● Be careful not to scratch the CD-ROM. Do not place the CD-ROM in any location exposed to high or
low temperatures. Do not place heavy objects on the CD-ROM or bend it.
● The software on the CD-ROM is intended for use with the printer and may be installed on more than one
computer.
● We strongly recommend that you read this User’s Guide carefully before using your printer, and then
keep it nearby for future reference.
● Depending on the location, material, and environmental conditions, the label may unpeel or become
irremovable, the color of the label may change or be transferred to other objects. Before applying the
label, check the environmental condition and the material.
● Do not expose the tape cassettes to direct sunlight, high temperatures, high humidity, or dust. Store in a
cool, dark place. Use the tape cassettes soon after opening the tape cassette package.
● Markings made with oil-based or water-based ink may be visible through a label affixed over them. To
hide the markings, use two labels layered on top of each other or use a dark-colored label.
● Note that Brother Co., Ltd. does not assume responsibility for any damage, etc. arising from failure to
follow the precautions listed.
8
Page 10

Table of contents
Unpacking the printer .....................................................................................................10
General description .........................................................................................................11
LED display ....................................................................................................................................12
Getting ready to use your printer ....................................................................................14
Connecting the printer ....................................................................................................15
Connecting to the power source .....................................................................................................15
Connecting to a computer ..............................................................................................................16
Using the interface cables ...............................................................................................................17
Installing the tape cassette ..............................................................................................18
Authorized tape ..............................................................................................................................18
Installing the tape cassette ..............................................................................................................18
Installing the software for PT-9700PC .............................................................................19
When using Microsoft® Windows® ................................................................................................19
When using Mac OS
Installing the software for PT-9800PCN ..........................................................................22
When using Microsoft® Windows® ................................................................................................22
When using Mac OS
Uninstalling the software ................................................................................................32
When using Microsoft® Windows® ................................................................................................32
When using Mac OS
Advanced function ..........................................................................................................34
Printing at a higher speed or at a higher resolution .........................................................................34
Distributed printing ........................................................................................................................35
BTP (Barcode Template Print) function ...........................................................................................37
Using P-touch Editor Lite LAN (PT-9800PCN and Windows
Printing the printer settings .............................................................................................................43
Serial interface settings (Windows® only) .......................................................................44
Setting the computer baud rate .......................................................................................................44
Setting the printer baud rate ............................................................................................................44
Maintenance ....................................................................................................................45
Troubleshooting ..............................................................................................................46
Q & A ............................................................................................................................................46
Product specifications .....................................................................................................49
Appendix .........................................................................................................................50
General procedure for the BTP (Barcode Template Print) function ..................................................50
List of barcodes for specifying settings ............................................................................................51
Index ...............................................................................................................................54
Contact Information (For USA Only) ..............................................................................55
®
....................................................................................................................20
®
....................................................................................................................26
®
....................................................................................................................33
®
only) ................................................42
9
Page 11
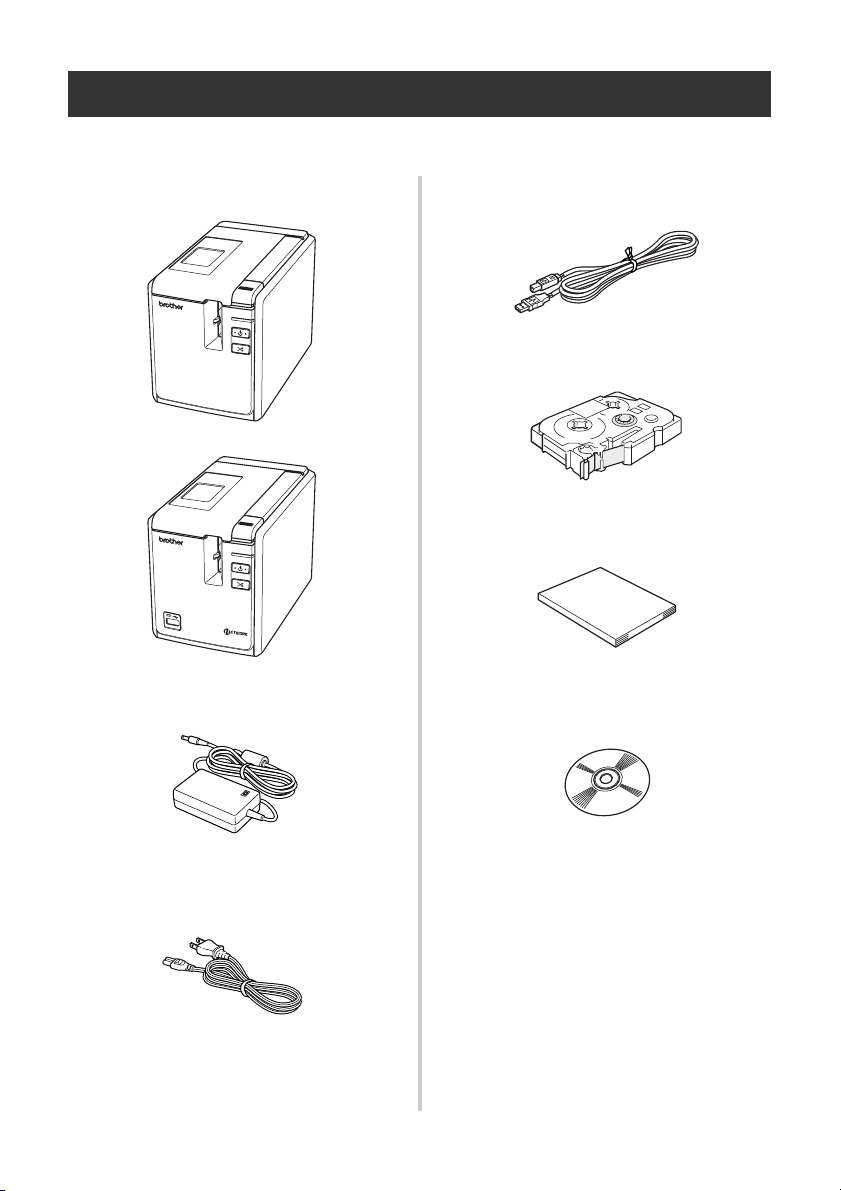
Unpacking the printer
Open the box and confirm that the following items are included. If any item is missing or damaged,
please contact the retail outlet where the printer was purchased.
■ PT-9700PC/PT-9800PCN
Printer (PT-9700PC)
STATUS
Printer (PT-9800PCN)
STATUS
■ USB cable
■ Tape cassette
■ User’s Guide
■ AC adapter
Connect to the power supply cord.
■ Power supply cord
Connect to an electrical outlet (AC 120 V).
10
■ CD-ROM
■ Tape catalog
■ Supplies and Accessories Guide
Page 12
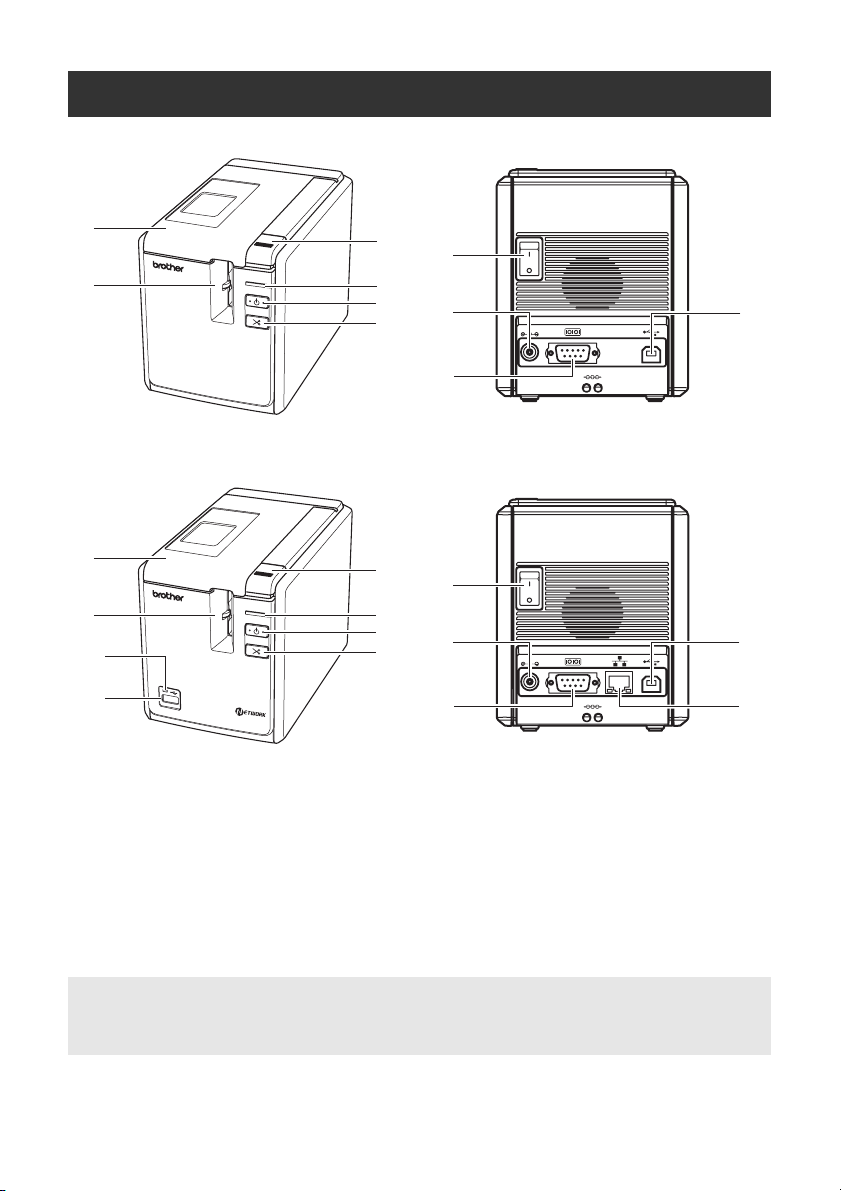
General description
■ PT-9700PC
1
2
STATUS
3
7
4
5
6
8
DC IN 24V
9
Front view Rear view
■ PT-9800PCN
1
2
STATUS
11
12
Front view Rear view
1. Tape compartment cover 8. AC adapter jack
2. Label outlet 9. Serial (RS-232C) port
3. Cover release button 10.USB port
4. STATUS lamp 11.LED lamp on USB Direct Interface
5. Power button (including lamp)
6. Feed/Cut button 12.USB Direct Interface (PT-9800PCN only)
7. Main power switch 13.LAN (10/100BASE-TX Wired Ethernet) port
3
7
4
5
6
8
DC IN 24V
9
(PT-9800PCN only)
(PT-9800PCN only)
10
10
13
Note
● If the tape compartment cover is left open, dust will collect on the print head. Always close the
cover.
11
Page 13

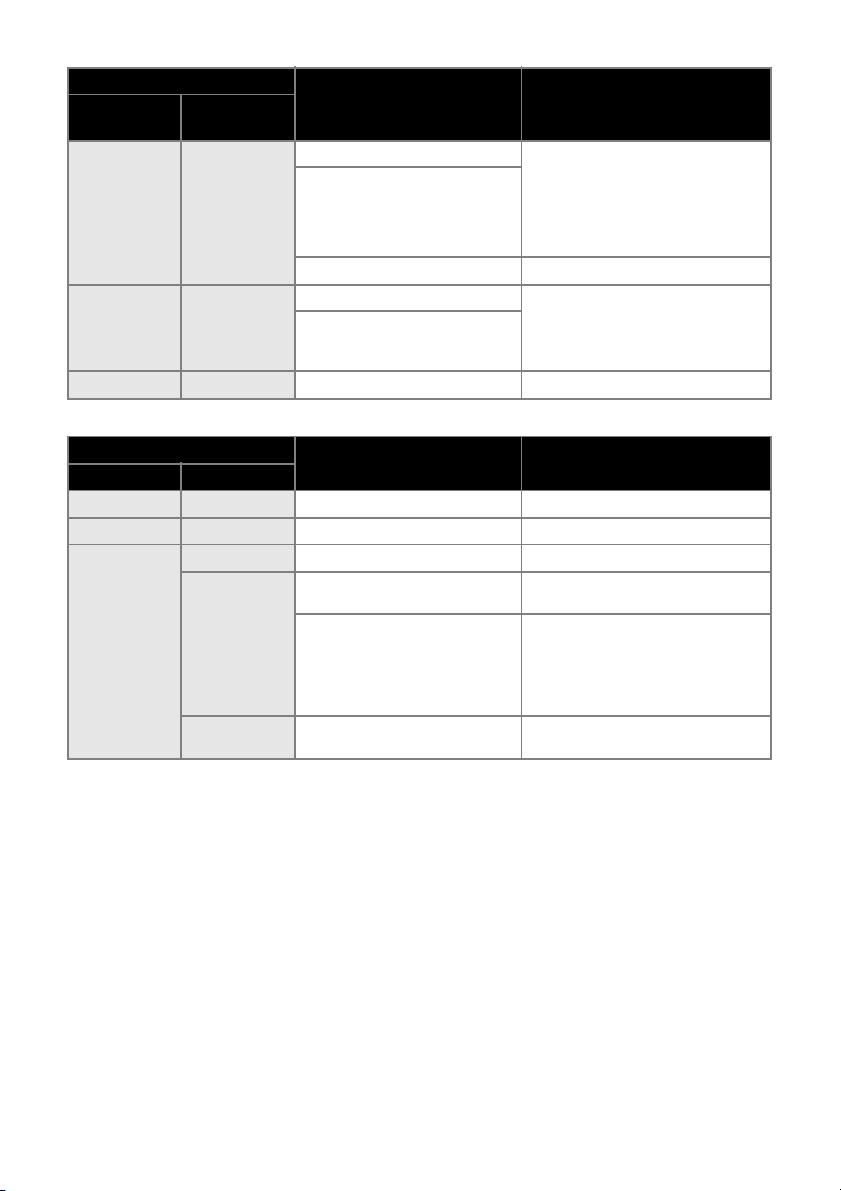
LED display
The condition of the printer can be determined by LED display on printer or USB Direct Interface (PT9800PCN only).
■ LED display on printer
Lamp condition
Power button
(green)
Lit Not lit Printer standby condition —
Flashing Not lit Receiving data —
Flashing Lit
Lit Lit
Lit Flashing
STATUS lamp
(red)
During the printer receiving data
1) No tape cassette 1) Install the tape cassette and
2) Tape compartment cover is
3) Incompatible tape cassette 3) Install the correct tape cassette
During the printer standby
1) No tape cassette 1) Install the tape cassette and
2) Tape compartment cover is
3) Incompatible tape cassette 3) Install the correct tape cassette
During printing
1) No tape cassette 1) Install the tape cassette and
2) Tape compartment cover is
3) Incorrect tape cassette 3) Install the correct tape cassette
4) Incompatible tape cassette 4) Install the correct tape cassette
Empty tape cassette
Transmission error
Condition Remedy
close the tape compartment
cover.
open.
open.
open.
2) Close the cover.
and close the tape compartment
cover.
close the tape compartment
cover.
2) Close the cover.
and close the tape compartment
cover.
close the tape compartment
cover.
2) Close the cover.
and close the tape compartment
cover.
and close the tape compartment
cover.
Install a tape cassette containing
tape and close the tape
compartment cover.
Press the power button on the front
of the printer.
12
Page 14
Lamp condition
Power button
(green)
Lit Flashing fast
Lit
Not lit Lit Booting —
STATUS lamp
(red)
Flashing very
fast
Cutter error Confirm that the tape is not jammed
Roller holder error
Print head overheat error Turn the printer off and on.
EEPROM error Turn the printer off and on. If the
Circuit board error
Condition Remedy
■ LED display on USB Direct Interface (PT-9800PCN only)
Lamp condition
Color Condition
— Not lit USB device not connected —
Green Lit USB device connected —
Flashing HUB connected Disconnect USB device.
Noncompliant USB device
connected
Red
Flashing fast
Flashing very
fast
“Buffer full” error with USB
Direct Interface
Overcurrent
Condition Remedy
in the printer. If necessary, turn the
printer off and on. If the STATUS
lamp continues to flash, contact the
reseller where the printer was
purchased or call Brother customer
service.
STATUS lamp continues to flash,
contact the reseller where the
printer was purchased or call
Brother customer service.
Disconnect USB device.
Data sent from the barcode reader is
saved on the printer.
Do not use the barcode reader to
consecutively scan barcodes or use
the barcode reader with multiple
interfaces at the same time.
Disconnect USB device and turn the
printer off and on.
13
Page 15

Getting ready to use your printer
Before creating labels with the printer, the following preparations are necessary.
Note
● The connection procedures are different depending on the operating system running on the
computer. They will also vary depending on whether a USB connection, serial connection or
network connection (PT-9800 PCN only) is used. For details on connecting the printer to your
specific computer, refer to “Connecting to a computer” (→ P.16).
Connecting the printer
Connect the printer to the power source and a computer.
For details, refer to “Connecting the printer” (→ P.15).
Installing the software
You will need to install the printer driver to use your
printer with your computer. You will also need to install Ptouch Editor label design software. For details on installing
this software, refer to “Installing the software for PT9700PC” (→ P.19) or “Installing the software for PT9800PCN” (→ P.22).
Creating labels
After setting up your printer you can start creating labels.
For details on how to design and create labels, refer to the
“Software User’s Guide” (PDF). For detailed feature
explanations, you may also reference the P-touch Editor
Help menu found in the software.
14
Page 16
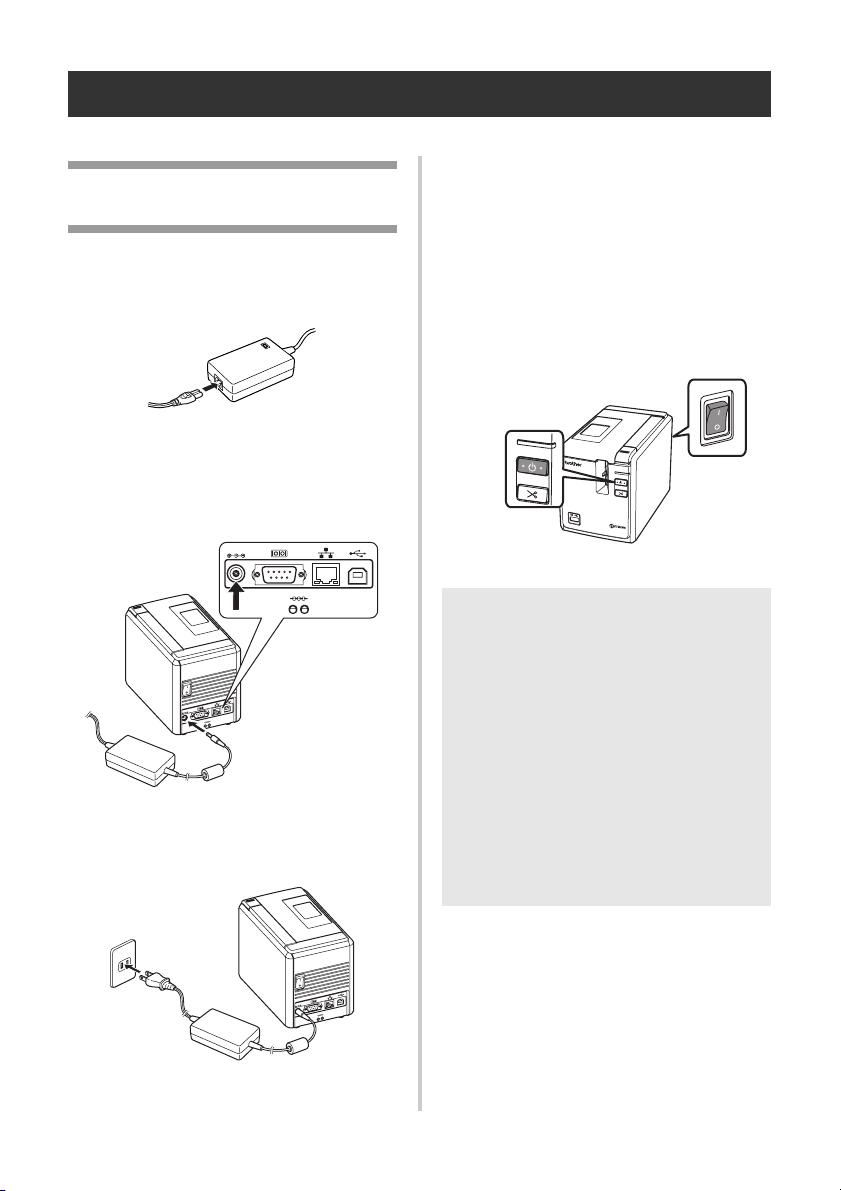
Connecting the printer
Connect the printer to the power source and a computer.
Connecting to the power source
4
Turning on the printer
Turn on the main power switch on the
back of the printer, and then press the
power button on the front of the printer.
Connect the included power supply cord
1
to the AC adapter.
Insert the AC adapter connector into the
2
AC adapter jack on the back of the
printer.
DC IN 24V
DC IN 24V
Plug the power supply cord into an
3
electrical outlet (AC 120 V).
Turning off the printer
Hold down the power button on the front
of the printer until the printer is turned off,
and then turn off the main power switch
on the back of the printer.
STATUS
Main power
switch
Power
button
STATUS
Note
● Always turn the power off first using the
power button on the front of the printer
before removing the AC adapter or
turning off the main power switch.
● After using the printer, remove the power
supply cord from the electrical outlet and
the AC adapter from the printer and store
for future use.
● When removing the AC adapter, do not
pull the AC adapter cord. The wire in the
AC adapter cord may break.
● Do not use any AC adapter other than the
one included with the printer. Otherwise
the printer may malfunction.
DC IN 24V
15
Page 17
Connecting to a computer
Connect the printer to a computer using the interface cables. The interface cables used to connect to a
USB port, serial (RS-232C) port and LAN (10/100BASE-TX Wired Ethernet) port are different.
Basic Setup Serial port
Operation Systems
USB port LAN port
(ESC/P and
P-touch
Template only)
Windows® XP/
Windows Vista
Windows
Mac OS
PT-9700PC
10.6
Windows® XP/
Windows Vista
Windows
Windows Server
2003/Windows
®
2008/
Server
2008 R2
PT-9800PCN
Mac OS
10.6
®
7
®
X 10.3.9-
®
7/
®
X 10.3.9-
®
/
{
{ –
–
®
/
®
{
{{
–
16
Page 18

Using the interface cables
Serial (RS-232C) cables and network (Ethernet) cables are not standard accessories. Use the
appropriate cable for your type of interface.
Note
● For USB interface, the included USB interface cable should be used to ensure compliance with
the limits for EMC.
● For serial and network interfaces, a shielded interface cable should be used to ensure
compliance with the limits for EMC.
● Changes or modifications not expressly approved by Brother Industries, Ltd. may affect the
performance and print quality, and damage may not be covered under the limited warranty.
■ USB cable
Use the enclosed interface cable.
■ Serial (RS-232C) cable (Windows® only)
The pin assignments for the serial cables (RS-232C cables) which can be used with this printer are
shown in the table below. You can purchase the cables at an electronics store. Do not use a serial
cable that is longer than 5.9' (1.8 m).
Brother printer side Computer side
(D-sub female, lock screw #4-40 inch screw) (D-Sub9P female)
Signal Name Pin Number Pin Assignments Pin Number Signal Name
DCD 1 1 DCD
RXD 2 2 RXD
TXD 3 3 TXD
DTR 4 4 DTR
GND 5 5 GND
DSR 6 6 DSR
RTS 7 7 RTS
CTS 8 8 CTS
RI 9 9 RI
Note
● The RS-232C serial connector part of this equipment is not Limited Power Source.
● For details on serial interface settings, refer to “Serial interface settings (Windows
P.44).
®
only)” (→
■ Network cable (PT-9800PCN only)
Use a straight-through Category5 (or greater) twisted-pair cable for 10BASE-T or 100BASE-TX Fast
Ethernet Network.
Note
● Connect this product to a LAN connection that is not subjected to overvoltages.
17
Page 19

Installing the tape cassette
This section lists the types of tape that may be used with the printer and explains the procedures to
install the tape cassettes.
Install the tape cassette.
3
Authorized tape
The types of tape that may be used with the
printer are listed below.
■ TZ Tapes
Standard Laminated Tape
Extra Strength Adhesive Tape - Laminated
Flexible ID tape - Laminated
Tamper Evident Tape - Laminated
Fabric Iron-On Tape - Non-Laminated
■ HG Tapes
HG tapes enable three available
combinations of higher printing speed and
print resolutions. For details on high-speed
printing, refer to “Printing at a higher speed
or at a higher resolution” (→ P.34).
Installing the tape cassette
This section explains the procedures to install
the tape cassette.
Hold down the power button on the front
1
of the printer, and make sure that the
power is turned off with the power
button.
Press the cover release button and open
2
the tape compartment cover.
Make sure that the end of the tape feeds
under the tape guides.
Toothed wheel
End of the
tape
Tape guide
• If the ink ribbon is loose, use your
finger to wind the toothed wheel in the
direction of the arrow on the cassette.
Close the tape compartment cover and
4
press the power button on the printer.
Press the Feed/Cut button to remove the
5
tape slack.
Note
● If no additional operation is performed
within 10 minutes after printing a label,
you will hear the roller assembly being
automatically released. Prior to being
released, the tape cannot be removed if
the AC adapter is removed from the
printer with the printer powered on or if
the power is first turned off by the main
power switch on the back of the printer.
Always turn the power off first using the
power button on the front of the printer
before removing the AC adapter or
turning off the main power switch.
18
Cover release button
Page 20
Installing the software for PT-9700PC
The procedure for installing the software varies depending on the OS of the computer. Install
procedure is subject to change without notice.
®
For Microsoft
For Macintosh
Note
● If you will be using the models "PT-9700PC", it is necessary to install the following versions of
P-touch Editor or b-PAC SDK to avoid printing difficulties:
● For details of the software, see the “Software User’s Guide” (PDF).
● You can find the “Software User’s Guide” (PDF) by clicking “Start” - “All Programs (Programs)” -
“Brother P-touch” - “Manuals” - “PT-9700PC” - “Software User’s Guide”.
When using Microsoft®
Windows
This section explains how to install the P-touch
Editor 5.0, printer driver, and Software User’s
Guide (PDF) as a whole via USB.
Note
● Do not connect the printer to the
computer until directed to do so.
●
You must be logged on as a user with
administrator privileges to install this software.
● Turn off the printer with the power button
and then with the main power switch.
Windows® users, see “When using Microsoft® Windows®” (→ P.19).
®
users, see “When using Mac OS®” (→ P.20).
[P-touch Editor] version 5.0.101 and later (included on CD).
[b-PAC SDK] version 3.0.010 and later (download from Brother Solutions Center).
Custom Installation
P-touch Editor 5.0, printer driver, and
®
Software User’s Guide (PDF) can all be
installed separately.
Display User’s Guide
Software User’s Guide (PDF)
Adobe Reader Download
Link to the download page for Adobe
®
will be displayed.
Reader
®
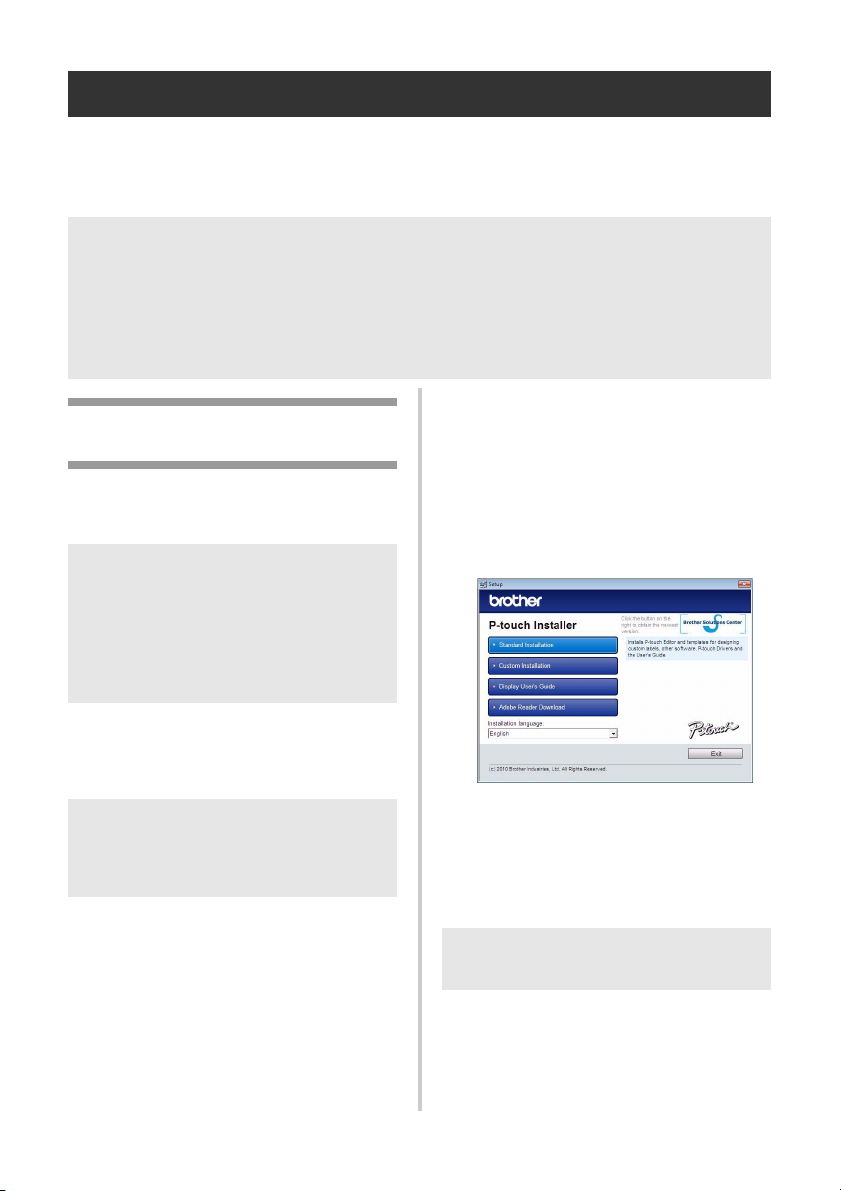
The following is the example for Windows Vista®.
Start the computer and put the CD-ROM
1
into the CD-ROM drive.
Note
● If it does not start up automatically, open
the files on the CD-ROM and double
click on “Setup.exe”.
Click [Standard Installation].
2
Installation items:
Standard Installation
P-touch Editor 5.0, printer driver, and
Software User’s Guide (PDF)
Read the license agreement and click [Yes]
3
if you agree with the terms and conditions.
Follow the on-screen instructions.
Put a check mark in the box next to the
4
Add-in programs you want to install, and
click [Next].
Note
● Make sure that all Microsoft
®
applications are closed.
Office
19
Page 21
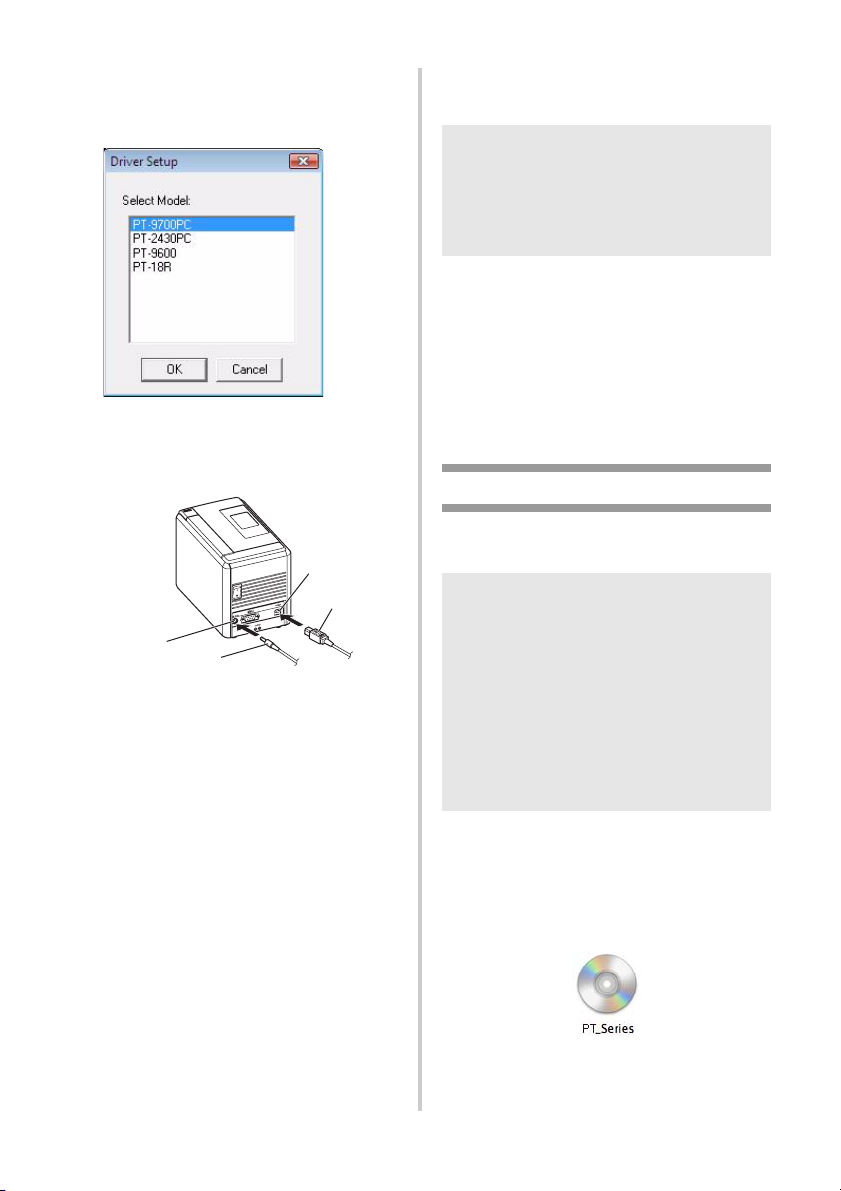
Select the desired model, and then click
5
[OK].
Follow the on-screen instructions of the
driver installation.
When instructed, connect your printer to
6
the computer by using the USB cable,
and then turn on the printer.
USB port
DC IN 24V
AC adapter jack
Once the printer is detected, the driver
7
will automatically be installed.
When instructed to register your printer
8
online, select a registration method and
AC adapter
click [Next].
If you have selected to register the
product online, your default internet
browser will be launched in a new
window.
When instructed to download the
9
optional tools, select your choice and
click [Next].
• If you choose “Yes, display the page”,
you will go to the web site “solutions
center” page before finishing the
installation. (recommended)
[Select your region/country]-[Choose
your product]-[Downloads]
USB cable
• If you choose “No, do not display the
page”, you will continue the
installation.
Note
● To download the optional tools later, you
can find them on this Web site:
http://solutions.brother.com/
[Select your region/country] - [Choose
your product] - [Downloads]
Click [Finish].
0
The software installation is now complete.
Restart your computer if you are
instructed to do so.
Start the software.
a
Click “Start” - “All Programs (Programs)” “Brother P-touch” - “P-touch Editor 5.0”
to start P-touch Editor 5.0.
When using Mac OS
®
This section explains how to install P-touch
Editor 5.0 and printer driver.
Note
● Until P-touch Editor 5.0 installation is
completed, do not connect the printer to
Macintosh
not connected until you are instructed to
connect it.
● You must be logged on as a user with
administrator privileges to install this
software.
● Turn off the printer with the power button
and then with the main power switch.
Below is the example for Mac OS
Start up Macintosh®, and insert the CD-
1
ROM into the CD-ROM drive.
Double click the “PT_Series” (CD-ROM)
icon.
®
. Make sure the USB cable is
®
X 10.5.7.
20
Page 22
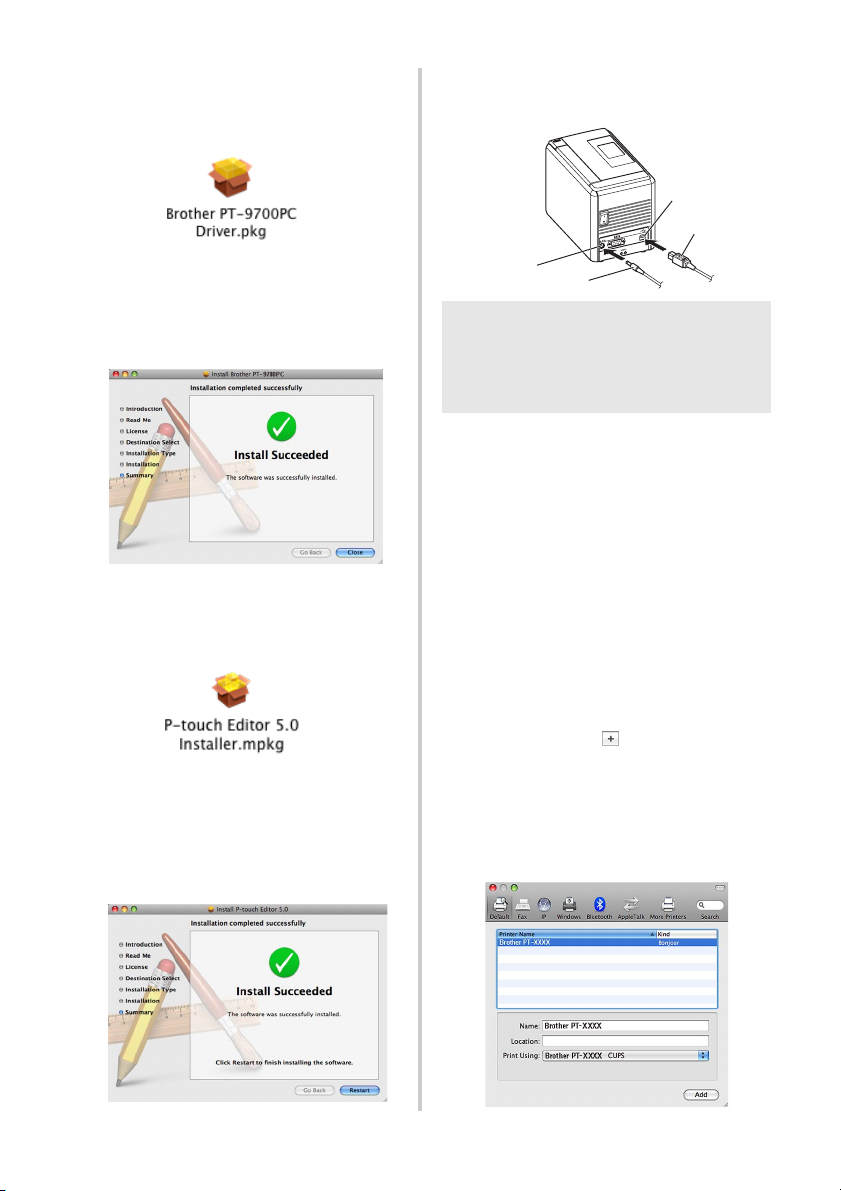
Double click “Brother PT-9700PC
2
Driver.pkg” in “Mac OS X” folder.
The Driver Installer starts up. Follow the
on-screen instructions.
After the installation is completed and
3
the screen shown below is displayed,
click [Close].
The installation of printer driver is completed.
Next, install the P-touch Editor 5.0.
Double click “P-touch Editor 5.0
4
Installer.mpkg”.
The P-touch Editor 5.0 Installer starts up.
Follow the on-screen instructions.
When the installation is completed and
5
the message “Click Restart to finish
installing the software” is displayed, click
[Restart].
®
The Macintosh
is restarted.
The installation of software is completed.
After restarting the computer, connect
6
your printer to the computer by using the
USB cable, and then turn on the printer.
USB port
DC IN 24V
AC adapter jack
AC adapter
USB cable
Note
●
If you are connecting the printer to
Macintosh
detected correctly. If so, connect the printer
directly to the USB port on Macintosh
For Mac OS® X 10.3.9 - 10.4.x
7
Double click the drive where Mac OS
is installed, and click in order of
“Applications” - “Utilities” - “Printer
Setup Utility”.
For Mac OS
Click in order of “Apple menu” - “System
Preferences”, and click “Print & Fax”.
For Mac OS® X 10.3.9 - 10.4.x
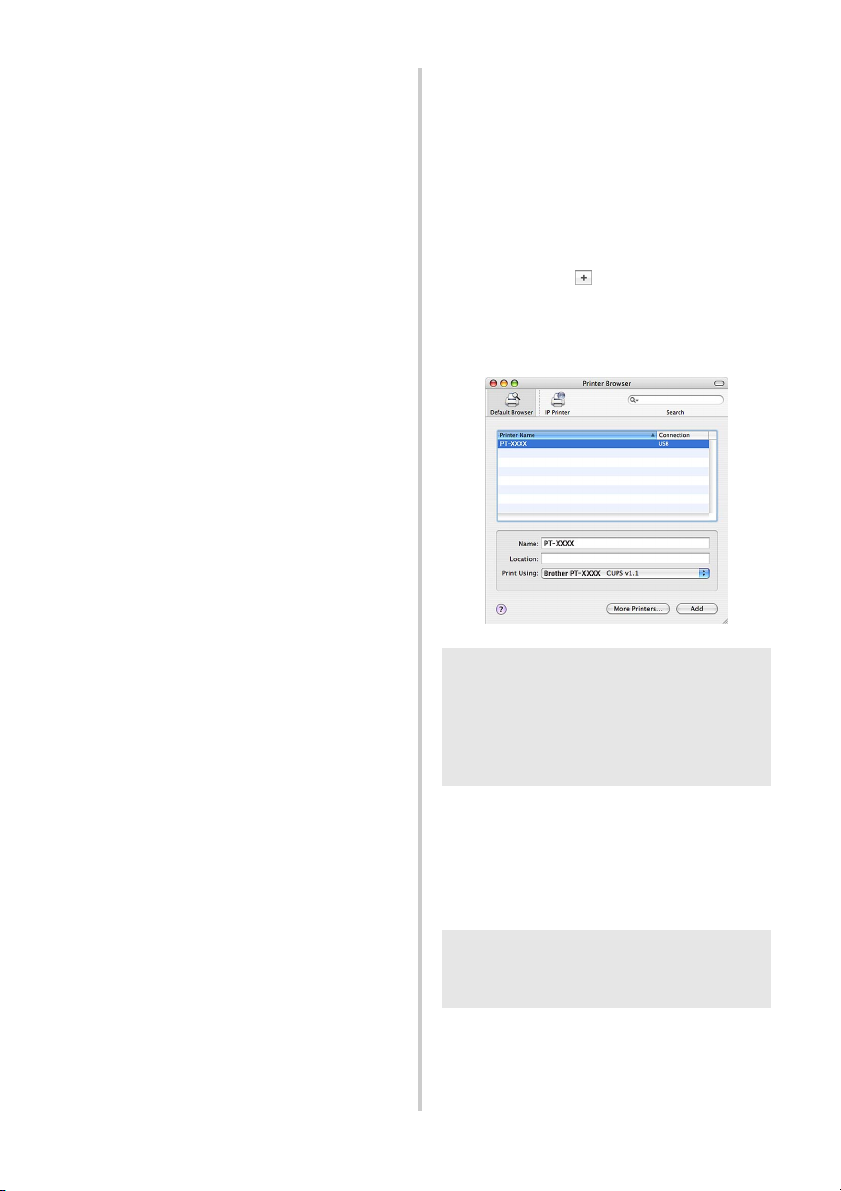
8
Click [Add] and choose USB at the top of
the screen.
Choose “PT-9700PC” from the list and
click [Add] again to add the printer to the
“Printer List”.
For Mac OS
Choose “Brother PT-9700PC” from the list
and click [Add] / to add the printer to
the “Printer List” / “Print & Fax”.
When the screen returns to “Printer List”
9
/ “Print & Fax” screen, check that “PT9700PC/Brother PT-9700PC” is added,
and close the “Printer List” / “Print &
Fax” screen.
Now you can use the printer.
®
via a USB hub, it may not be
®
X 10.5.x - 10.6
®
X 10.5.x - 10.6
®
.
®
X
21
Page 23
Installing the software for PT-9800PCN
The procedure for installing the software varies depending on the OS of the computer. Install
procedure is subject to change without notice.
®
For Microsoft
For Macintosh
Note
● If you will be using the models "PT-9800PCN", it is necessary to install the following versions of
P-touch Editor or b-PAC SDK to avoid printing difficulties:
● For details of the software, see the “Software User’s Guide” (PDF).
● For details of the Network, see the “Network User's Guide” (PDF).
● You can find the Software User’s Guide (PDF) by clicking “Start” - “All Programs (Programs)” -
“Brother P-touch” - “Manuals” - “PT-9800PCN” - “Software User’s Guide”.
When using Microsoft®
Windows
This section explains how to install the P-touch
Editor 5.0, printer driver, Software User’s Guide
(PDF), and Network User’s Guide (PDF) as a whole.
Note
● When using USB interface cable, do not
connect the printer to the computer until
directed to do so.
●
You must be logged on as a user with
administrator privileges to install this software.
● Turn off the printer with the power button
and then with the main power switch.
Windows® users, see “When using Microsoft® Windows®” (→ P.22).
®
users, see “When using Mac OS®” (→ P.26).
[P-touch Editor] version 5.0.101 and later (included on CD).
[b-PAC SDK] version 3.0.010 and later (download from Brother Solutions Center).
Custom Installation
P-touch Editor 5.0, printer driver, Software
®
User’s Guide (PDF), Network User’s Guide
(PDF), and P-touch Editor Lite LAN can all
be installed separately.
Utility Installation
BRAdmin Light
How to install the BRAdmin Light, see
page 25.
User’s Guide
Software User’s Guide (PDF), Network
User’s Guide (PDF), and link to the
download page for Adobe
®
Reader®.
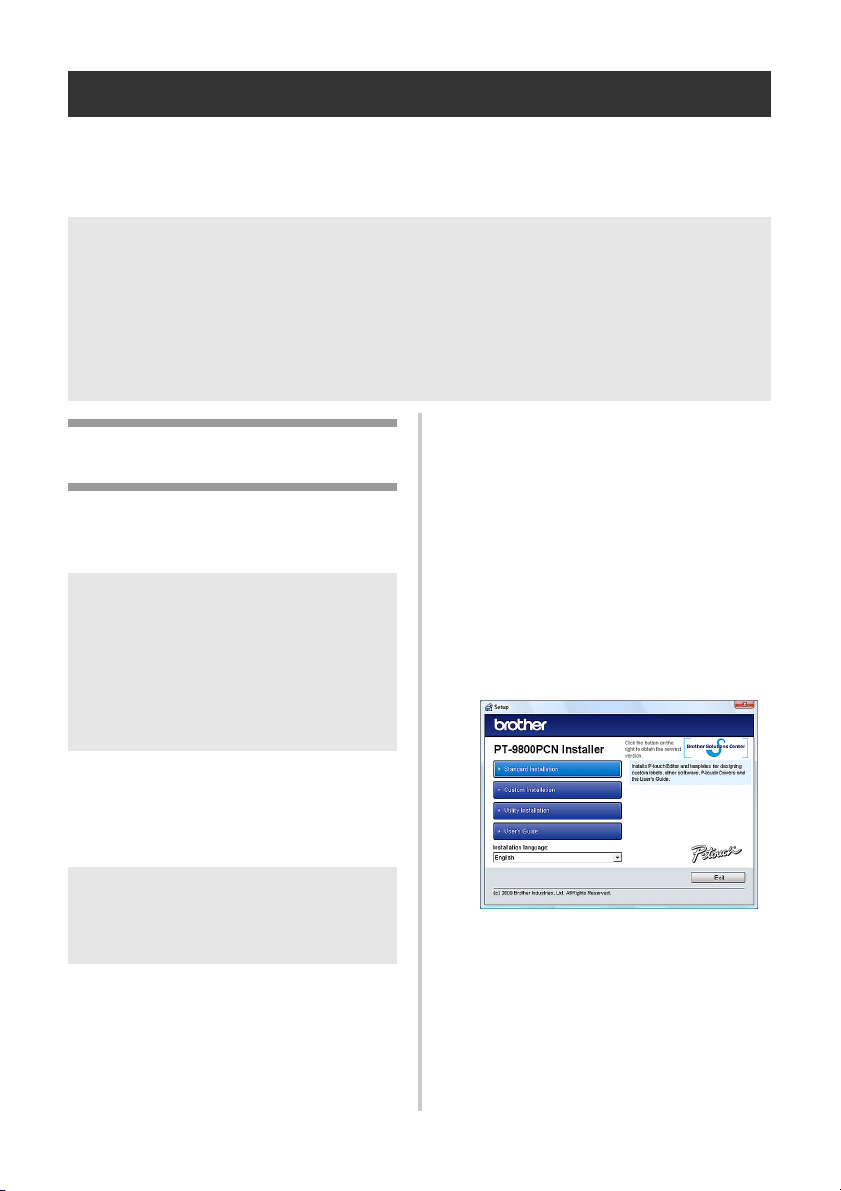
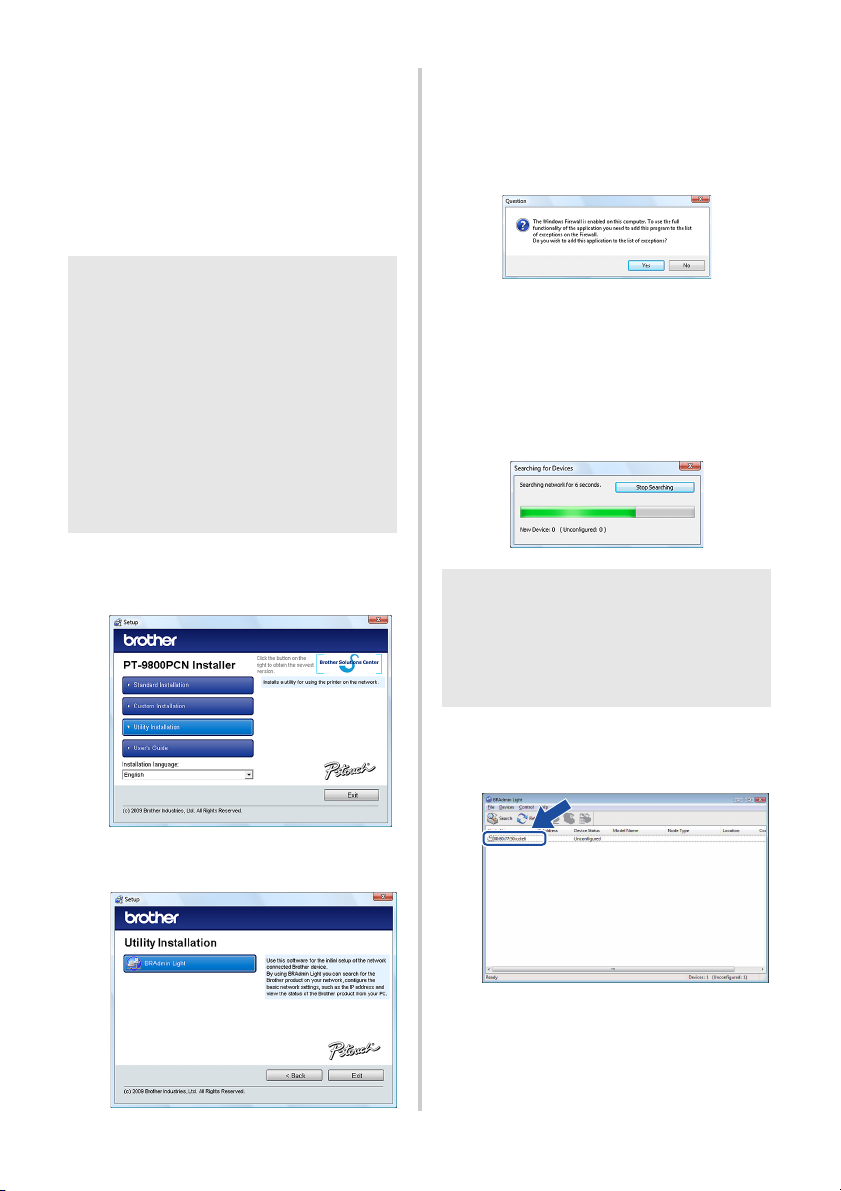
The following is the example for Windows
®
.
Vista
Start the computer and put the CD-ROM
1
into the CD-ROM drive.
Note
● If it does not start up automatically, open
the files on the CD-ROM and double
click on “Setup.exe”.
Click [Standard Installation].
2
Installation items:
Standard Installation
P-touch Editor 5.0, printer driver, Software
User’s Guide (PDF), and Network User’s
Guide (PDF)
22
Read the license agreement and click
3
[Yes] if you agree with the terms and
conditions.
Follow the on-screen instructions.
Page 24
Put a check mark in the box next to the
4
Add-in programs you want to install, and
click [Next].
Note
● Make sure that all Microsoft
applications are closed.
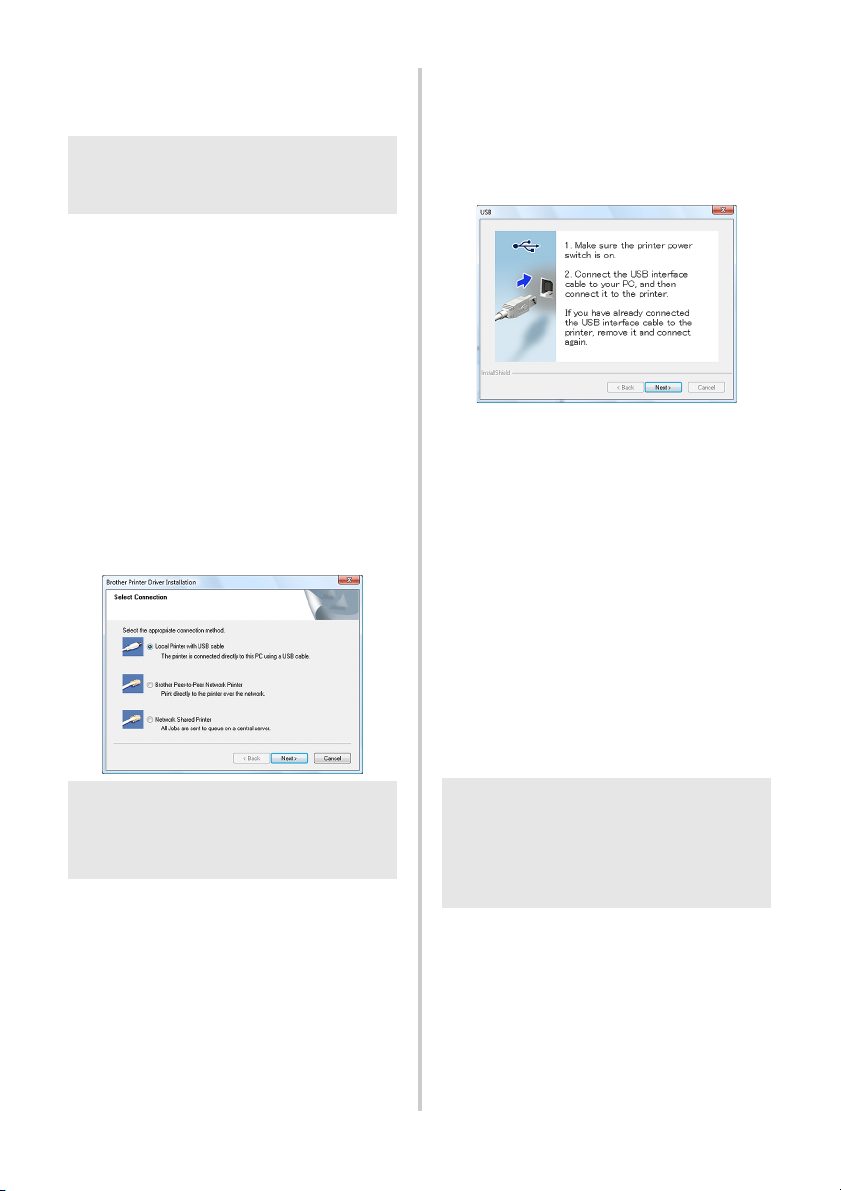
Then, choose your connection method
5
and click [Next].
Connection method:
Local Printer with USB cable
See “For USB interface cable users” (→
P.23).
Brother Peer-to-Peer Network Printer
Check the LAN cable is connected to the
printer.
See “For network interface cable users” (→
P.24).
Network Shared Printer
Check the LAN cable is connected to the
printer.
See “For shared network printer users” (→
P.24).
®
Office
Note
● When using USB interface cable, do not
connect the printer to the computer until
directed to do so.
■ For USB interface cable users
Follow the on-screen instructions. When
6
this screen appears, confirm the printer
power is on. Connect the USB interface
cable to your computer, and then
connect it to the printer.
When instructed to register your printer
7
online, select a registration method and
click [Next].
If you have selected to register the
product online, your default internet
browser will be launched in a new
window.
When instructed to download the
8
optional tools, select your choice and
click [Next].
• If you choose “Yes, display the page”,
you will go to the web site “solutions
center” page before finishing the
installation. (recommended)
[Select your region/country]-[Choose
your product]-[Downloads]
• If you choose “No, do not display the
page”, you will continue the
installation.
Note
● To download the optional tools later, you
can find them on this Web site:
http://solutions.brother.com/
[Select your region/country] - [Choose
your product] - [Downloads]
Click [Finish].
9
The software installation is now
completed.
Restart your computer if you are
instructed to do so.
Start the software.
0
Click “Start” - “All Programs (Programs)” “Brother P-touch” - “P-touch Editor 5.0”
to start P-touch Editor 5.0.
23
Page 25

■ For network interface cable users
■ For shared network printer users
Choose Search the network for devices
6
and choose from a list of discovered
devices (Recommended). Or enter your
printer’s IP address or its node name.
Click [Next].
You can find your printer’s IP address and
the node name by printing out the Printer
Settings Page. For details, refer to
“Printing the printer settings” (→ P.43).
Choose your printer.
7
Follow the on-screen instructions.
When instructed to register your printer
8
online, select a registration method and
click [Next].
If you have selected to register the
product online, your default internet
browser will be launched in a new
window.
When instructed to download the
9
optional tools, select your choice and
click [Next].
• If you choose “Yes, display the page”,
you will go to the web site “solutions
center” page before finishing the
installation. (recommended)
[Select your region/country]-[Choose
your product]-[Downloads]
• If you choose “No, do not display the
page”, you will continue the
installation.
Note
● To download the optional tools later, you
can find them on this Web site:
http://solutions.brother.com/
[Select your region/country] - [Choose
your product] - [Downloads]
Click [Finish].
0
The software installation is now
completed.
Restart your computer if you are
instructed to do so.
Start the software.
a
Click “Start” - “All Programs (Programs)” “Brother P-touch” - “P-touch Editor 5.0”
to start P-touch Editor 5.0.
Choose your printer’s queue, and then
6
click [OK].
Follow the on-screen instructions.
Note
● Contact your administrator if you do not
know the location or the name of the
printer in the network.
When instructed to register your printer
7
online, select a registration method and
click [Next].
If you have selected to register the
product online, your default internet
browser will be launched in a new
window.
When instructed to download the
8
optional tools, select your choice and
click [Next].
• If you choose “Yes, display the page”,
you will go to the web site “solutions
center” page before finishing the
installation. (recommended)
[Select your region/country]-[Choose
your product]-[Downloads]
• If you choose “No, do not display the
page”, you will continue the
installation.
Note
● To download the optional tools later, you
can find them on this Web site:
http://solutions.brother.com/
[Select your region/country] - [Choose
your product] - [Downloads]
Click [Finish].
9
The software installation is now
completed.
Restart your computer if you are
instructed to do so.
Start the software.
0
Click “Start” - “All Programs (Programs)” “Brother P-touch” - “P-touch Editor 5.0”
to start P-touch Editor 5.0.
24
Page 26
■ Installing the BRAdmin Light
configuration utility
The BRAdmin Light is a utility for initial setup
of Brother network connected devices. It can
also search for Brother products on your
network, view the status and configure basic
network settings, such as IP address.
For more information on BRAdmin Light, visit
us at http://solutions.brother.com/
Note
● If you require more advanced printer
management, use the latest Brother
BRAdmin Professional utility version that
is available as a download from
http://solutions.brother.com/
● If you are using Personal Firewall
software, BRAdmin Light may fail to
detect the unconfigured device. In that
case, disable your Personal Firewall
software, try BRAdmin Light again.
Restart your Personal Firewall software
after the address information is set.
Click [Utility Installation].
1
This screen is the same screen as you see
when you insert the CD-ROM.
If the Windows Firewall is enabled on
your computer, the message “Do you
wish to add this application to the list of
exceptions?” appears. Check your
computer environment and choose [Yes]
or [No].
■ Setting your IP address, Subnet Mask
and Gateway using BRAdmin Light
Click “Start”-“All Programs (Programs)”-
1
“Brother”-“BRAdmin Light”.
BRAdmin Light will search for new
devices automatically.
Note
● If you have a DHCP/BOOTP/RARP server
in your network, you don’t have to do the
following operation. Because the print
server will automatically obtain its IP
address.
Click [BRAdmin Light] and follow the on-
2
screen instructions.
Double-click the unconfigured device.
2
The default password is “access”.
25
Page 27
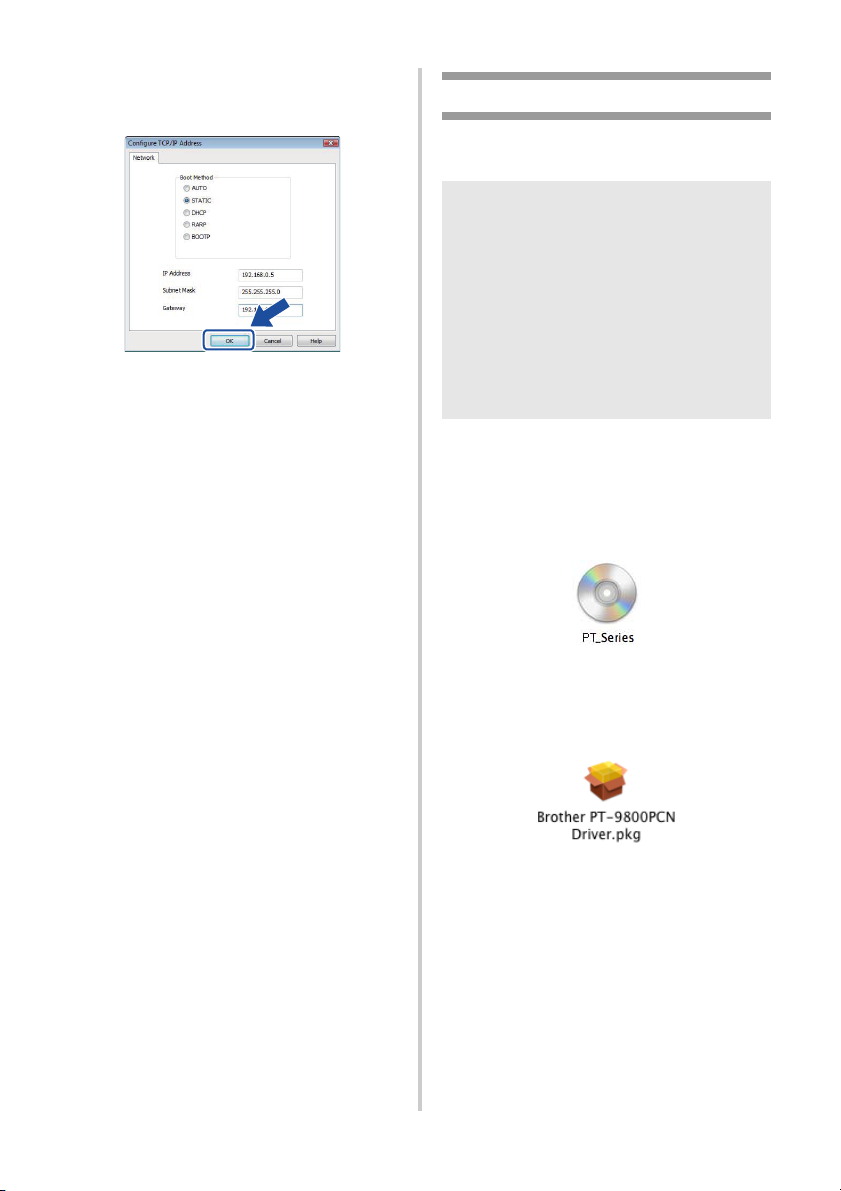
Choose STATIC for the Boot Method.
3
Enter the IP Address, Subnet Mask and
Gateway, and then click [OK].
The address information will be saved to
4
the printer.
When using Mac OS
®
This section explains how to install P-touch
Editor 5.0 and printer driver.
Note
● Until P-touch Editor 5.0 installation is
completed, do not connect the printer to
Macintosh
not connected until you are instructed to
connect it.
● You must be logged on as a user with
administrator privileges to install this
software.
● Turn off the printer with the power button
and then with the main power switch.
Below is the example for Mac OS
Start up Macintosh®, and insert the CD-
1
ROM into the CD-ROM drive.
Double click the “PT_Series” (CD-ROM)
icon.
®
. Make sure the USB cable is
®
X 10.5.7.
26
Double click “Brother PT-9800PCN
2
Driver.pkg” in “Mac OS X” folder.
The Driver Installer starts up. Follow the
on-screen instructions.
Page 28
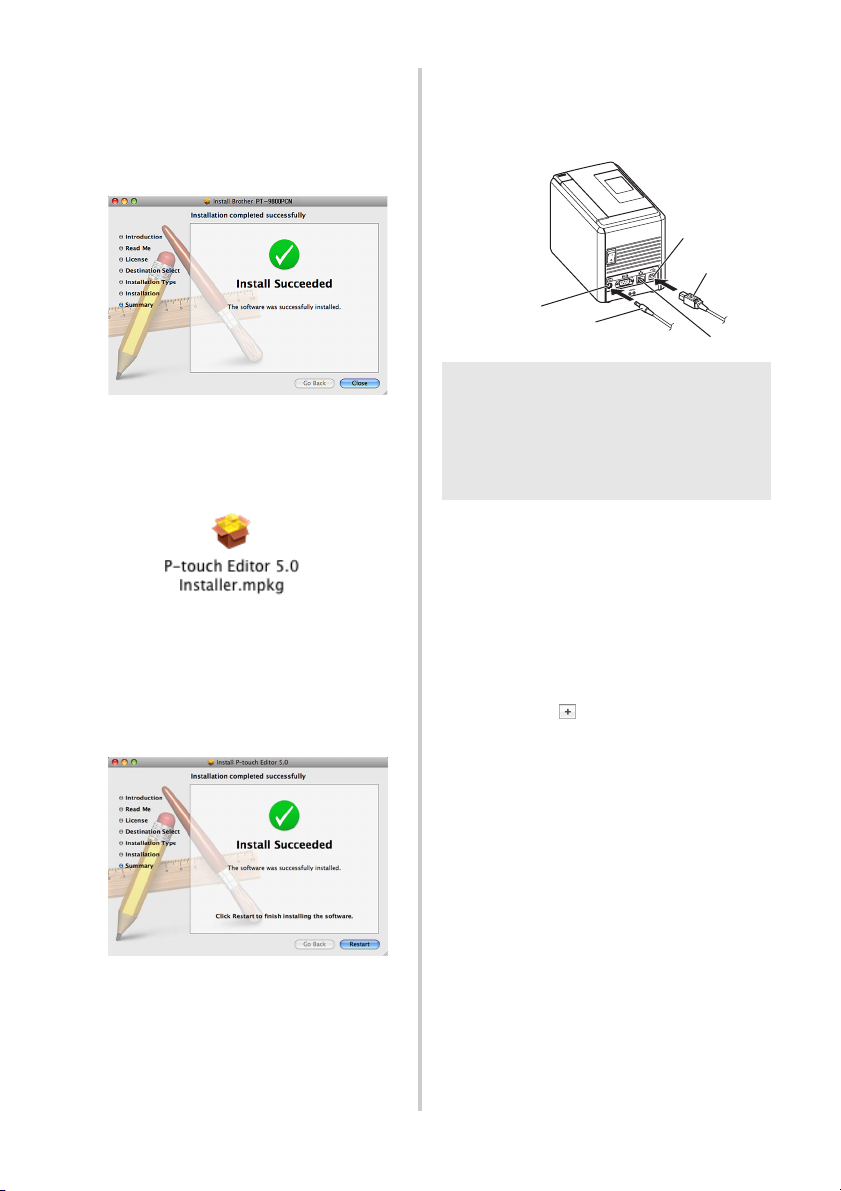
After the installation is completed and
3
the screen shown below is displayed,
click [Close].
The installation of printer driver is
completed.
Next, install the P-touch Editor 5.0.
After restarting the computer, connect
6
your printer to the computer by using the
USB/LAN cable, and then turn on the
printer.
USB port
USB cable
Double click “P-touch Editor 5.0
4
Installer.mpkg”.
The P-touch Editor 5.0 Installer starts up.
Follow the on-screen instructions.
When the installation is completed and
5
the message “Click Restart to finish
installing the software” is displayed, click
[Restart].
®
The Macintosh
is restarted.
The installation of software is completed.
AC adapter jack
AC adapter
Note
● If you are connecting the printer to
Macintosh
detected correctly. If so, connect the
printer directly to the USB port on
Macintosh
For Mac OS® X 10.3.9 - 10.4.x
7
Double click the drive where Mac OS
is installed, and click in order of
“Applications” - “Utilities” - “Printer
Setup Utility”.
For Mac OS
Click in order of “Apple menu” - “System
Preferences”, and click “Print & Fax”.
Then click to add your printer.
®
via a USB hub, it may not be
®
.
®
X 10.5.x - 10.6
LAN port
®
X
27
Page 29
Choose your connection method.
8
Local Printer with USB cable
See “For USB interface cable users” (→
P.28).
Network Shared Printer (Simple network
configuration)
Check that LAN cable and the printer are
connected.
See “For network interface cable users
(Simple network configuration)” (→ P.29).
Network Shared Printer (Manual network
configuration)
Check that LAN cable and the printer are
connected.
See “For network interface cable users
(Manual network configuration)” (→ P.30).
■ For USB interface cable users
For Mac OS® X 10.3.9
9
Click [Add] and choose “USB” at the top
of the screen.
Choose “PT-9800PCN” from the list and
click [Add] again to add the printer to the
“Printer Setup Utility”.
®
For Mac OS
Click [Add] / .
Choose “PT-9800PCN/Brother PT9800PCN” from the list and click [Add] to
add the printer to the “Printer Setup
Utility”/“Print & Fax”.
X 10.4.x - 10.6
28
Note
● For Mac OS
add the printer with the BRPTUSB
connection. (If you do so, an error dialog
appears when an printing error occurs.)
Set the appropriate printer name.
When the screen returns to “Printer List”
0
/ “Print & Fax” screen, check that “PT9800PCN/Brother PT-9800PCN” is
added, and close the “Printer List” /
“Print & Fax” screen.
Now you can use the printer.
®
X 10.4.x, click [Add] and
Note
● For details on software, see the P-touch
Editor Help.
Page 30
■
For network interface cable users
(Simple network configuration)
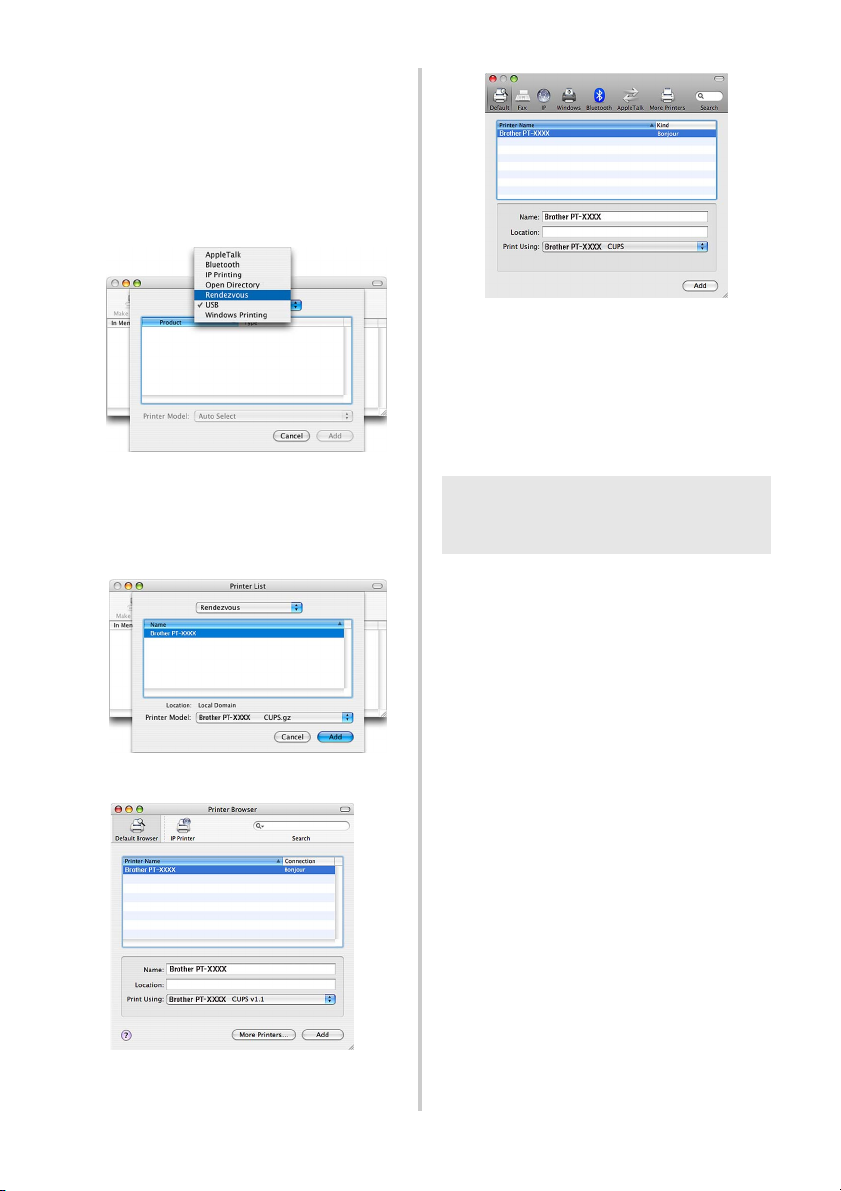
Click [Add].
9
For Mac OS® X 10.3.9
0
Make the selection shown below.
®
X 10.5.x-10.6
Mac OS
When the screen returns to “Printer List”
b
/ “Print & Fax” screen, check that
“Brother PT-9800PCN” is added, and
close the “Printer List” / “Print & Fax”
screen.
Now you can use the printer.
Choose “Brother PT-9800PCN” from the
a
list and click [Add] again to add the
printer to the “Printer Setup Utility”/
”Print & Fax”.
Mac OS® X 10.3.9
®
Mac OS
X 10.4.x
Note
● For details on software, see the P-touch
Editor Help.
29
Page 31

■
For network interface cable users
(Manual network configuration)
For Mac OS® X 10.3.9
9
Click [Add] and choose IP Printing at the
top of the screen.
Enter the IP address of the printer into the
Printer Address box. Choose “PT9800PCN” from the list and click [Add]
again to add the printer to the “Printer
Setup Utility”.
®
For Mac OS
Click [Add] and choose IP Printer / IP at
the top of the screen.
Enter the IP address of the printer into the
Address box. Choose “Brother PT9800PCN” from the list and click [Add]
again to add the printer to the “Printer
Setup Utility”.
X 10.4.x - 10.6
■ Installing the BRAdmin Light
configuration utility
The BRAdmin Light is a utility for initial setup
of Brother network connected devices. It can
also search for Brother products on your
network, view the status and configure basic
network settings, such as IP address.
For more information on BRAdmin Light, visit
us at http://solutions.brother.com/
Note
● If you are using Personal Firewall
software, BRAdmin Light may fail to
detect the unconfigured device. In that
case, disable your Personal Firewall
software, try BRAdmin Light again. Restart your Personal Firewall software after
the address information is set.
Double click “BRAdmin Light.pkg” in the
1
“Mac OS X” folder.
The BRAdmin Light Installer starts up.
Follow the on-screen instructions.
Note
● When specifying the Queue Name, use
the value BRNxxxxxxxxxxxx at where
xxxxxxxxxxxx is the Ethernet address.
When the screen returns to “Printer List”
0
/ “Print & Fax” screen, check that
“Brother PT-9800PCN” is added, and
close the “Printer List” / “Print & Fax”
screen.
Now you can use the printer.
Note
● For details on software, see the P-touch
Editor Help.
30
When the installation is completed and
2
the message “The Software was
successfully installed.” is displayed, click
[Close].
The installation of BRAdmin Light is
completed.
Page 32

■ Setting your IP Address, Subnet Mask
and Gateway using BRAdmin Light
Click “Library”-“Printers”-“Brother”-“P-
1
touch Utilities”-“BRAdmin Light.jar”.
BRAdmin Light will search for new
devices automatically.
Note
● If you have a DHCP/BOOTP/RARP server
in your network, you don’t have to do the
following operation, as the print server
will automatically obtain its IP address.
Double-click the unconfigured device.
2
The default password is “access”.
Choose “STATIC” for the “BOOT
3
Method”. Enter the IP Address, Subnet
Mask and Gateway, and then click [OK].
The address information will be saved to
4
the printer.
31
Page 33

Uninstalling the software
This section describes how to uninstall the software and printer driver. In the following steps, you will
see PT-XXXX. Read “XXXX” as your printer name.
®
For Microsoft
For Macintosh
When using Microsoft®
Windows
Windows® users, see “When using Microsoft® Windows®” (→ P.32).
®
users, see “When using Mac OS®” (→ P.33).
■ Uninstalling the printer driver
®
Turn off the printer.
1
■ Uninstalling P-touch Editor
For Windows® XP
1
From “Control Panel”, go to “Add or
Remove Programs”.
The “Add or Remove Programs” window
appears.
®
For Windows Vista
/Windows® 7
From “Control Panel”, go to “Programs”
and open “Programs and Features”.
The “Uninstall or change a program”
window appears.
For Windows® XP
2
Choose “Brother P-touch Editor 5.0”, and
click [Remove].
®
For Windows Vista
/Windows® 7
Choose “Brother P-touch Editor 5.0”, and
click [Uninstall].
When the “User Account Control” dialog
box appears, click [Continue]. If a
password is requested, type in the
password, and then click [OK].
Click [OK].
3
The uninstall operation starts. After the
software is removed from your computer,
the “Maintenance Complete” dialog box
appears, and click [Finish].
Close the “Add or Remove Programs (XP) /
4
Programs and Features (Windows Vista
Windows
®
7)” window.
P-touch Editor has been uninstalled.
Note
● Software User’s Guide (PDF) and
Network User’s Guide (PDF) (PT9800PCN only) can also be uninstalled
by following the same procedure.
For Windows® XP
2
From “Control Panel”, open “Printers and
Faxes” window.
For Windows Vista
®
From “Control Panel”, go to “Hardware
and Sound” and open “Printers”.
®
For Windows
7
Click the , go to [Devices and Printers].
Note
● For details, see Windows
For Windows® XP
3
Choose “Brother PT-XXXX”, and click
®
Help.
“File”-“Delete” or right click on the icon
and then click [Delete].
®
For Windows Vista
/Windows® 7
Choose “Brother PT-XXXX” , and click
[Delete this printer] or right click on the
icon, and then click [Delete] (Windows
®
Vista
)/ [Remove device] (Windows® 7).
For Windows® XP
4
Go to “File”-“Server Properties”.
The “Print Server Properties” window
appears.
®
/
In the “Printers” window, right click and select
“Run as administrator”-“Server Properties...”.
For Windows Vista
®
If the authorization confirmation dialog
appears, click [Continue].
If the “User Account Control” dialog
appears, enter the password and click [OK].
The “Print Server Properties” window appears.
32
Page 34

For Windows® 7
Choose [Fax] or [Microsoft XPS Document
Writer] in the [Devices and Printers] window,
and then click [Print server properties], which
appeared in the menu bar.
For Windows® XP
5
Click the “Drivers” tab and choose
“Brother PT-XXXX”. Then, click
[Remove].
Go to step
For Windows Vista
7.
®
Click the “Drivers” tab and choose “Brother
PT-XXXX”. Then, click [Remove...].
For Windows® 7
Click the [Drivers] tab, and then click
[Change Driver Settings].
(If a User Account Control message appears,
type in the password, and then click [OK].)
Choose "Brother XX-XXXX", and then
click [Remove...].
For Windows® XP
6
Go to step
For Windows Vista
7.
®
Choose [Remove driver only] and click
[OK].
®
For Windows
7
Choose [Remove driver and driver
package], and then click [OK].
Close the “Print Server Properties”
7
window.
The printer driver has been uninstalled.
When using Mac OS
®
■ Uninstalling P-touch Editor
On the drive where P-touch Editor is
1
installed, double-click the “Applications”
folder - “P-touch Editor 5.0” folder “Uninstall P-touch” folder “UninstallPtEditor.command”.
The “Terminal” window appears, and the
uninstall operation starts.
Note
● Administrator privileges are required for
the uninstall operation.
●
In case “Terminal” window doesn’t appear
by double-clicking the
“UninstallPtEditor.command”, right click
(or control key + click) the
“UninstallPtEditor.command”, the context
menu appears. Open with the “Terminal”
window from the context menu.
Click to close the “Terminal”
2
window.
Delete “Applications”-“P-touch Editor
3
5.0” folder.
Note
● Before you delete the “P-touch Editor
5.0” folder, please check if any necessary
files are saved in it.
P-touch Editor has been uninstalled.
■ Uninstalling the printer driver
Turn off the printer.
1
For Mac OS® X 10.3.9 - 10.4.x
2
Double-click the drive where Mac OS
is installed, and double-click
“Applications” - “Utilities” - “Printer
Setup Utility”.
The “Printer List” window appears.
®
For Mac OS
Click in order of “Apple menu” - “System
Preferences”, and click “Print & Fax”.
For Mac OS® X 10.3.9 - 10.4.x
3
Choose “PT-XXXX”, and click .
For Mac OS
Choose “Brother PT-XXXX”, and click
.
Close the “Printer List” / “Print & Fax”
4
window.
The printer driver has been uninstalled.
X 10.5.x - 10.6
®
X 10.5.x - 10.6
®
X
33
Page 35

Advanced function
After the printer has been connected to the computer, labels can be created and printed.
This section describes how to create labels using a barcode reader and various useful print settings.
■ Printing labels at high speed or a high resolution
See “Printing at a higher speed or at a higher resolution” (→ P.34)
■ Printing a large number of labels distributed to multiple printers
See “Distributed printing” (→ P.35)
■ Printing using only a barcode reader without a computer
See “BTP (Barcode Template Print) function” (→ P.37)
■
Creating and printing simple labels by using P-touch Editor Lite LAN (PT-9800PCN only)
See “Using P-touch Editor Lite LAN (PT-9800PCN and Windows® only)” (→ P.42)
■ Printing a list of the current printer settings
See “Printing the printer settings” (→ P.43)
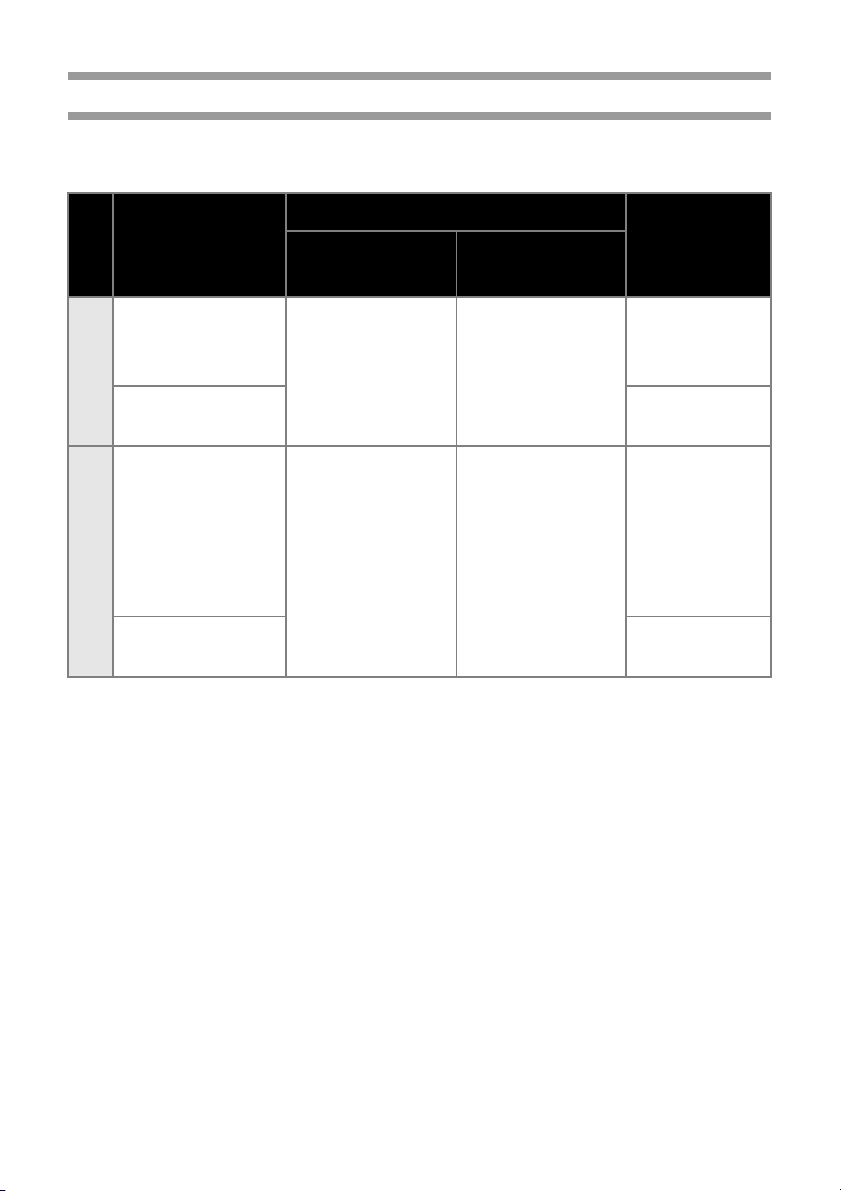
Printing at a higher speed or at a higher resolution
The print speed and resolution can be changed depending on the combination of the type of tape
being used and the selected output setting. With HG tape, labels can be printed at an even faster speed
or higher resolution.
Output
High Speed
(HG only)
Standard
High Resolution
(HG Only)
● When HG tape is used, printing can be performed at a faster speed than with TZ tape. (“Standard” setting)
● When HG tape is used with the “High Speed” setting selected, printing can be performed even faster.
However, since the resolution in the feed direction is reduced, this is not suitable for detailed printing.
● When HG tape is used with the “High Resolution” setting selected, printing can be performed with an even
higher resolution. This is suitable for detailed printing of objects such as graphics and curved lines.
● When printing barcodes, use the “Standard” setting, which has identical horizontal and vertical
resolutions.
(20 mm/sec)
Tape Type
TZ tape HG tape
—
0.78"/sec
—
3.15"/sec
(80 mm/sec)
2.05"/sec
(52 mm/sec)
0.78"/sec
(20 mm/sec)
Resolution
360 × 180 dpi
360 × 360 dpi
360 × 720 dpi
Note
● The print speeds listed above indicate the highest speeds possible. The actual speed may differ
depending on the operating conditions.
34
Page 36

Distributed printing
When printing a large number of labels,
printing can be distributed among multiple
printers.
Since printing is performed at the same time,
the total printing time can be reduced.
Note
● Printing can be distributed to printers
connected via a USB connection or
network connection (PT-9800PCN only).
● The number of pages to be printed is
automatically divided among the selected
printers. If the specified number of pages
cannot be evenly divided among the
printers, it will be divided in the order of
the printers listed in the dialog box when
the print settings are specified in step
4.
Select the “Advanced” tab, select the
3
“Distributed printing” check box, and
then click [Settings].
In the “Distributed Printing Settings”
4
dialog box, select the printers to be used
for distributed printing.
3
1
2
200
67 67
From the “File” menu in P-touch Editor
1
5.0, click “Print”.
Click [Properties...].
2
66
1. Click [Detect Current Paper
Information...].
2. The current printer information that
was detected appears below “Current
Width” and “Paper Type”.
3. Select the check box beside the “Printer
Name” to be used for distributed
printing.
35
Page 37

Specify the tape width to be used for
5
printing.
A.If only one printer has been selected
In the dialog box from step
4, select the
printer whose setting is to be specified,
and then either double-click it or rightclick it and click “Settings”. From the “Set
Width” drop-down list, select the tape
width.
Note
● Information to be displayed in the dialog
box from step
“Notes” text box.
B.If multiple printers have been selected
In the dialog box from step
printers whose setting are to be specified,
and right-click them and click “Settings”.
From the “Set Width” drop-down list,
select the tape width. The same tape
width setting is applied to all selected
printers.
4 can be entered in the
4, select the
Click [OK] to close the “Distributed
7
Printing Settings” window.
Setup is completed.
Click [OK] to start distributed printing.
8
Note
● If the selected tape width is different from
that displayed beside “Current Width”,
appears beside the setting below
“Current Width”. Load the printer with
tape of the width specified “Set Width”.
● It may not be possible for information to
be detected for a printer connected using
the PS-9000 or any common USB hub or
print server.
Before printing, enter the settings
manually, and check if the printer can be
used for printing.
● Depending on whether a router is used
and the security features in use, such as a
firewall, it may not be possible to use this
function.
● We recommend performing a connection
test for your operating environment. For
more information, contact a sales
representative.
Note
● The settings below “Printer Settings” and
“Notes” are not available.
Click [OK] to close the tape width setting
6
window.
36
Page 38

BTP (Barcode Template Print) function
With a barcode reader connected to the printer,
labels and barcodes can easily be printed by
scanning barcodes.
STATUS
■ Preparation
Connect a barcode reader to the printer.
Barcode reader connection interfaces
Barcode reader
RS-232
PT-9700PC PT-9800PCN
Barcode reader models whose operation
has been confirmed
• OPR-3201 (OPTOELECTRONICS CO.,
LTD.)
• LS 2208 (Motorola, Inc.)
• DS 6707 (Honeywell International Inc.)
USB direct interface
Preset template printing (→ P.38)
If a frequently used label layout is stored in
the printer, identical labels can be printed
simply by scanning barcodes.
Barcode printing (→ P.39)
A barcode scanned with the barcode
reader can be printed with the protocol
and size from a previously created
template.
Database-assisted label printing (→ P.40)
A database connected to label layout can
be searched, and the data can be printed
replacing object data arranged in the
layout of a template.
Note
● For the FAQ and up-to-date list of
barcode reader models whose operation
has been confirmed, visit the Brother
Solution Center (http://
solutions.brother.com/).
● Before this function can be used, the
label layout or template to be used must
be transferred with Transfer Manager
from the computer to the printer. For
details of the Transfer Manager, see the
“Software User’s Guide” (PDF).
● The barcode reader should be set for
barcodes with no prefix or suffix.
● Various settings such as the baud rate
must be changed in order to use the RS232C connection. For details on
changing the settings, refer to the
operation manual for the barcode reader.
The default settings for the serial port of
this printer are listed below.
Baud rate 9600bps Flow control DTR
Parity None Stop bit 1
Bit length 8
● To change the printer serial interface
communications settings, refer to “Serial
interface settings (Windows
P.44) for detailed information.
● For details on using the barcode reader,
contact the manufacturer.
®
only)” (→
37
Page 39

■ Preset template printing
If a frequently used label layout is stored in
the printer, identical labels can be printed
simply by scanning barcodes.
Scan the “P-touch template command”
3
barcode.
Refer to “List of barcodes for specifying
settings” (→ P.51).
<Name label>
<Address label>
Bill Anderson
Mr. Bill Anderson
4555 Cumberland Pkwy
Anytown USA 95063
Note
● For details on the barcodes that can be
scanned for the various settings, refer to
“List of barcodes for specifying settings”
(→ P.51).
Using Transfer Manager, transfer (from
1
P-touch Editor 5.0 to the printer) the
label layout to be printed.
Note
● A text object in the label layout can be
converted an image. After being
converted to an image, the text cannot be
changed. This is useful for protecting
frequently used templates from being
accidentally edited.
In the P-touch Editor layout window,
right-click the text object, and then click
“Properties”. Click the “Expanded” tab,
and then select the “Text Cannot Be
Edited” check box.
Otherwise, click “Options” in the “Tools”
menu, click the “General” tab, and then
select the “Display Expanded Tabs of
Object Properties” check box under
“Others”.
When the check box is cleared, the
object is converted back to text that can
be edited.
From the “Basic settings” barcodes, scan
4
the barcode for the parameter whose
setting is to be specified.
Note
● Settings can be specified for multiple
parameters.
● If no settings have been specified, a label
will be printed by P-touch Template
Settings. The default settings for P-touch
Template Settings is a single copy with
“Auto cut on” and “Half cut on”. For
details on P-touch Template Settings,
download “P-touch Template manual”
(English only) from the following web
site.
http://solutions.brother.com/
[Select your region/country]-[Choose
your product]-[Downloads] .
● To specify the number of copies to be
printed, scan the “Number of copies”
barcode, and then scan the barcodes
under “For entering numbers” to specify a
three-digit number.
Example:
Specify numbers by scanning barcodes as
follows: 7→[00][7], 15→[0][1][5]
● To change the setting for the number of
copies, scan the “Number of copies”
barcode again, and then scan the
barcodes for the new three-digit number.
Scan the barcode under “Preset template
5
number” with the same number as the
“Key Assign” number for the label layout
to be printed.
When data is transferred to
2
“Configurations” in Transfer Manager,
the “Key Assign” number is automatically
specified.
Note
● Specify a “Key Assign” number between
1 and 10 for label layouts to be used with
preset template printing.
38
The specified label is printed.
6
Page 40

■ Barcode printing
A barcode scanned with the barcode reader
can be printed with the protocol and size
from a previously created template.
Note
● For details on the barcodes that can be
scanned for the various settings, refer to
“List of barcodes for specifying settings”
(→ P.51).
● If the barcode to be scanned with the
barcode reader has a different protocol
than the barcode in the previously
created template, it may not be possible
for the barcode to be created and printed.
Using Transfer Manager, transfer (from
1
P-touch Editor 5.0 to the printer) the
barcode template to be printed.
(CODE128/9-digit/2.7"×0.65")
Note
● Be sure to create barcode templates that
comply with the limits on the size and
number of digits for the barcode to be
created. The barcode cannot be created if
it exceeds the number of digits specified
in the template.
When data is transferred to
2
“Configurations” in Transfer Manager,
the “Key Assign” number is automatically
specified.
Scan the “P-touch template command”
3
barcode.
Refer to “List of barcodes for specifying
settings” (→ P.51).
From the “Basic settings” barcodes, scan
4
the barcode for the parameter whose
setting is to be specified.
Note
● Settings can be specified for multiple
parameters.
● If no settings have been specified, a label
will be printed by P-touch Template
Settings. The default settings for P-touch
Template Settings is a single copy with
“Auto cut on” and “Half cut on”. For
details on P-touch Template Settings,
download “P-touch Template manual”
(English only) from the following web
site.
http://solutions.brother.com/
[Select your region/country]-[Choose
your product]-[Downloads].
● To specify the number of copies to be
printed, scan the “Number of copies”
barcode, and then scan the barcodes
under “For entering numbers” to specify a
three-digit number. The setting is
automatically applied when three digits
have been specified.
Example:
Specify numbers by scanning barcodes as
follows: 7→[00][7], 15→[0][1][5]
● To change the setting for the number of
copies, scan the “Number of copies”
barcode again, and then scan the
barcodes for the new three-digit number.
Scan the “Select template” barcode, and
5
then scan the barcodes under “For
entering numbers” to specify the “Key
Assign” number (three digits) for the
barcode template.
Note
● The setting is automatically applied when
three digits have been specified.
Example:
Specify numbers by scanning barcodes as
follows: 7→[00][7], 15→[0][1][5]
● To change the number, scan the “Select
template” barcode again, and then scan
the barcodes for the new three-digit
number.
39
Page 41

Scan the barcode whose data is to be
6
used.
(CODE128/9-digit)
Scan the “Begin printing” barcode.
7
The barcode is printed with the protocol
8
and size specified in the template.
■ Database-assisted label printing
First, a database field must be connected to
an object in the label layout. Then, when a
key barcode is scanned with the barcode
reader, the barcode data can be printed
replacing data from the connected database
file in the object of the specified template.
Note
● The key barcode is the barcode for the
information appearing in the database file
at the leftmost column in record view
(field “A” in form view). These key
barcodes must be created in advance.
● The database information in field “A” of
the form view must not include any other
data. In addition, even if the information
contains two lines of data, only the first
line of data is recognized when the
barcode is scanned with the barcode
reader. Therefore, enter only one line of
data into the information in field “A” of
the form view.
● For details on the barcodes that can be
scanned for the various settings, refer to
“List of barcodes for specifying settings”
(→ P.51).
Connect the database file to the label
1
layout to be printed.
For details on specifying the settings, refer
to the “P-touch Editor Help”.
40
Using Transfer Manager, transfer the
2
label layout from P-touch Editor 5.0 to
the printer.
The database file is also transferred.
When data is transferred to
3
“Configurations” in Transfer Manager,
the “Key Assign” number is automatically
specified.
Page 42

Scan the “P-touch template command”
4
barcode.
Refer to “List of barcodes for specifying
settings” (→ P.51).
From the “Basic settings” barcodes, scan
5
the barcode for the parameter whose
setting is to be specified.
Note
● Settings can be specified for multiple
parameters.
● If no settings have been specified, a label
will be printed by P-touch Template
Settings. The default settings for P-touch
Template Settings is a single copy with
“Auto cut on” and “Half cut on”. For
details on P-touch Template Settings,
download “P-touch Template manual"
(English only) from the following web
site.
http://solutions.brother.com/
[Select your region/country]-[Choose
your product]-[Downloads].
● To specify the number of copies to be
printed, scan the “Number of copies”
barcode, and then scan the barcodes
under “For entering numbers” to specify a
three-digit number. The setting is
automatically applied when three digits
have been specified.
Example:
Specify numbers by scanning barcodes as
follows: 7→[00][7], 15→[0][1][5]
● To change the setting for the number of
copies, scan the “Number of copies”
barcode again, and then scan the
barcodes for the new three-digit number.
Scan the key barcode whose data is to be
7
used in the database file.
Scan the “Delimiter” barcode.
8
Scan the “Begin printing” barcode.
9
The object data in the specified template
0
is replaced with the database data, and
the labels are printed.
ABC Company
Planning
Walter Freeman
876 6
Scan the “Select template” barcode, and
6
then scan the barcodes under “For
entering numbers” to specify the “Key
Assign” number (three digits) for the
barcode template.
Note
● The setting is automatically applied when
three digits have been specified.
Example:
Specify numbers by scanning barcodes as
follows: 7→[00][7], 15→[0][1][5]
● To change the number, scan the “Select
template” barcode again, and then scan
the barcodes for the new three-digit
number.
41
Page 43

Using P-touch Editor Lite LAN (PT-9800PCN and Windows® only)
Click [P-touch Editor Lite LAN].
3
Follow the on-screen instructions.
4
P-touch Editor Lite LAN is a basic version of a
label-editing tool.
By copying P-touch Editor Lite LAN, installed
from the enclosed CD-ROM, into a shared
folder on the server, P-touch Editor Lite LAN on
the server can be accessed by other network
users to create labels, and print from PT9800PCN connected to the network.
Note
● In order for P-touch Editor Lite LAN to be
used, the IP address of this printer must
be correctly specified.
The IP address can be specified with a
utility such as BRAdmin Light, which can
be installed from [Utility Installation] on
the CD-ROM.
For details on using this utility, refer to
“Setting the IP address and subnet mask”
in the “Network User’s Guide” (PDF).
● On a network where the IP address is
automatically assigned, for example, with
DHCP, the IP address is automatically
assigned when the printer is connected to
the network, therefore the printer can be
used immediately. However, since the IP
address may change dynamically, we
recommend specifying a static IP address
when P-touch Editor Lite LAN is being
used. For details, contact your network
administrator.
● Specify the settings after consulting with
your network administrator.
■ How to share P-touch Editor Lite LAN
• Copy the folder containing P-touch Editor
Lite LAN from the shared folder on the
network to your computer.
• Start up P-touch Editor Lite LAN from the
shared folder on the network.
Note
● A label created using P-touch Editor Lite
LAN can only be printed from the PT9800PCN connected to the network.
■ How to use P-touch Editor Lite LAN
Start P-touch Editor Lite LAN.
1
Enter the label text in P-touch Editor Lite
2
LAN.
For example, click on the layout area and
then type “Brother”.
Click on the “Print” button.
3
■ How to install P-touch Editor Lite LAN
Start the computer and put the CD-ROM
1
into the CD-ROM drive.
Note
● If it does not start up automatically, open
the files on the CD-ROM and double
click on “Setup.exe”.
Click [Custom Installation].
2
42
The label is printed.
4
Brother
Page 44

Note
● P-touch Editor Lite LAN is ideal for
creating simple labels. To create labels
with more complex designs, use P-touch
Editor 5.0.
● When using the P-touch Editor Lite LAN
for the first time, “Add shortcut” dialog
box appears. Select the desired location
from “Start menu”, “Desktop” or “Quick
Launch bar”, then put a check mark in
the box, and click [OK]. You can access
to the P-touch Editor Lite LAN from the
shortcut next time.
● Since P-touch Editor Lite LAN uses the
network printing method and not the
driver settings, high speed printing and
high resolution printing using HG tape
are not available.
● Print jobs from the full version of P-touch
Editor sent from another computer may
interrupt your printing. P-touch Editor Lite
LAN will resume printing once the print
job from the full version has been
completed.
● For more detailed information, see the
“Software User’s Guide” (PDF).
Printing the printer settings
The printer settings page prints a report listing
the printer settings and the network settings (PT9800PCN only). You can print the printer
settings page using the Feed/Cut button of the
printer.
Note
● The node name and Ethernet address in
addition to its detailed information are
printed in the printer settings list.
<Node name> BRNXXXXXXXXXXXXXXX
<Ethernet Address> XXXXXXXXXXXXXXX
● The default Node name of the network
card in the printer is
“BRNXXXXXXXXXXXXXXX” where
“XXXXXXXXXXXXXXX” is the Ethernet
address.
Make sure that the TZ or HG tape
1
cassette is set and the tape compartment
cover is closed.
To print the printer settings page, we
recommend to use the tape wider than 1"
(24 mm).
Turn on the printer.
2
Press and hold the Feed/Cut button to
3
print out the settings.
43
Page 45

Serial interface settings (Windows® only)
Use the following steps to change or confirm
the port and the baud rate settings on the
computer and the printer. The following
procedure is shown based on Windows Vista
Setting the computer baud rate
On the taskbar, click the “Start” button,
1
and then click “Control Panel”.
Select “Printers and Other Hardware”
2
(XP) / “Hardware and Sound” (Windows
®
Vista
/Windows® 7) and then click
“Printers and Faxes” (XP) / “Printer”
(Windows Vista
Right-click the “Brother PT-XXXX” icon,
3
and then select “Properties”.
Click the “Ports” tab and then select the
4
port you use from the list.
To save the settings, click [Apply].
Click the “Device Settings” tab, and
5
“Utility...”, and then click [Properties...]
that appears next to Utilities.
®
/Windows® 7).
Select the desired baud rate.
6
®
.
Click [Apply].
7
The baud rate will be changed.
Click [Exit].
8
Click [OK].
9
Setup is complete and the setting window
will close.
Setting the printer baud rate
44
For details on the setting the printer baud rate,
download “P-touch Template manual” (English
only) from the following web site.
http://solutions.brother.com/
[Select your region/country]-[Choose your
product]-[Downloads]
Page 46

Maintenance
Your printer should be cleaned on a regular basis to maintain its performance.
Note
● Always disconnect the AC adapter prior to cleaning the printer.
■ Cleaning the exterior of the printer
Wipe any dust and marks from the main unit
using a soft, dry cloth.
Use a slightly dampened cloth with water on
difficult to remove marks.
Note
● Do not use paint thinner, benzene,
alcohol or any other organic solvent.
These may deform the case or damage
the appearance of your printer.
■ Cleaning the print head and head roller
Streaks or poor quality characters on printed
labels generally indicates that the print head and
head roller is dirty. Clean the print head using a
dry cotton swab, self-cleaning function or
optional print head cleaning cassette (TZ-CL6).
Note
● Refer to the instructions provided with
the print head cleaning cassette for
directions on how to use it.
WARNING
Do not touch the print head directly with your
bare hands. The print head maybe hot.
Print head
Cotton swab
Head roller
Cotton swab
Self-cleaning function
Remove the tape cassette, and then press
the Feed/Cut button.
Head roller
■ Cleaning the tape cutter
About once every year, wipe the cutter
blades using a cotton swab moistened with
isopropyl alcohol (rubbing alcohol).
Tape adhesive can build up on the cutter
blade after repeated use, taking the edge off
the blade which may result in the tape
jamming in the cutter.
CAUTION
Do not touch the cutter blade with your finger.
Cutter blade
Print head
Cotton swab
Metal section
45
Page 47

Troubleshooting
For printer troubleshooting, refer to the following list of possible problems.
Q & A
Problem Solution
The printer does not print.
A printing error is received.
While printing, striped tape appears.
There is about 1” of blank space at the
leading edge of each printed label.
The label is not cut automatically.
The power button does not light up or
flash.
The printed label contains a blank horizontal line.
After the labels are cut, they are not
ejected from the printer correctly.
Check that the interface cable is connected correctly, the tape
cassette is installed correctly, and the tape compartment
cover is closed.
The tape cassette is empty.
Refer to “Installing the tape cassette” (→ P.18) and install a
new tape cassette.
Most TZ labels have a clear laminate top layer. This durable
laminate helps the label withstand abrasion, fading and wet
conditions providing a crisp, readable image. The process of
adding this laminate layer results in the leading edge of blank
space. Adjusting the label’s margin or using the chain printing
feature may reduce the amount of blank space.
• Check the Auto Cut, Chain Printing and Special Tape
settings.
• When using Fabric tapes or Non-laminated tapes, the label
is not cut automatically.
After printing, remove the tape cassette from the machine
and use scissors to cut the tape.
Be sure to read the instructions provided with tapes and
observe all precautions noted in the instructions.
• Check that the main power switch on the back of printer is
on.
• Check that the power supply cord is connected correctly. If
the power button still does not light up or flash, contact the
retail outlet where the printer was purchased or your local
authorized service center.
There maybe some dust on the print head.
Refer to “Maintenance” (→ P.45) and clean the print head
and head roller.
The cutter blade may be dirty.
Refer to “Maintenance” (→ P.45) and clean the cutter.
A data transmission error appears on the
computer.
46
• The wrong port may be selected.
For Windows
following port” list in the printer Properties dialog box.
For a USB connection, select “USB00n”.
• Is someone printing via network?
If you try to print while other users are printing large
amounts of data, the printer is unable to accept your print
job until the ongoing printing is finished. In such situations,
execute the print job again after the other jobs are
completed.
• The baud rates for the computer and the printer may not be
the same. Refer to “Setting the computer baud rate” (→
P.44) and change the baud rate.
®
, select the correct port from the “Print to the
Page 48

Problem Solution
The baud rate cannot be set using the
Change Baud Rate Wizard or the Brother
printer utilities.
I want to reset the printer/delete the data
transferred from computer.
• Error 99: the computer cannot detect the printer.
- Make sure that the printer is turned on.
- Make sure that the interface cable is connected correctly.
- Make sure that the COM port where the printer is
connected is the same COM port selected in the Change
Baud Rate Wizard. (Many computers have more than one
COM port and COM2 may have been selected in error in
the Change Baud Rate Wizard.)
• Error 1 or Error 5: the serial port of the computer cannot be
used.
• When another serial connection device is using the same
COM port, labels cannot be printed. Change the COM port
for the serial connection device or connect the printer to a
COM port that is not being used.
To reset the printer, press and hold the power button to turn
off the printer. Then, hold down the power button for two
seconds. Continue holding down the power button, and press
the Feed/Cut button six times. The printer will then reset. All
the transferred data from computer will be deleted and reset
the printer to factory setting.
I want to cancel the current printing job.
Data cannot be sent from a device plugged
into the USB Direct Interface on the front
of the printer, or a connected device
cannot be used (PT-9800PCN only).
• An error occurred during installation.
• Installation cannot be performed with
the CD-ROM.
• I would like more information about the
Add-ins.
• I do not understand how to connect to a
database.
Make sure that the printer is on, and then briefly press the
power button on the front of the printer.
• The connected device is incompatible with the
PT-9800PCN.
If the LED is flashing in red, either the device is
incompatible with the printer or the device consumes too
much power. In either case, the device cannot be used with
the PT-9800PCN.
• The buffer of the PT-9800PCN is full.
If the LED flashes in red while connected devices are being
used, the buffer of the PT-9800PCN may have become full.
Stop the data transmission, wait until the data buffered in
the PT-9800PCN has been processed, and then unplug the
device and plug it in again.
Visit http://www.brother-usa.com/faqs
See “Software User’s Guide” (PDF).
47
Page 49

Problem Solution
I do not understand how to install the
second printer that I have purchased.
• With a USB connection
When the printer is connected to the computer using a USB
cable, the driver for the second printer is automatically
installed through Plug and Play.
• With a Peer-to-Peer connection (PT-9800PCN only)
- If one is already installed
After the second printer is connected to the LAN, the
installer starts up and the printer driver is installed. Both
printers are listed in the dialog box where the printer can be
selected. Identify the second printer by its IP address, and
then select it. The selected printer driver is registered with
the computer.
- If multiple printers are to be installed at the same time
When the printers are connected to the LAN, the installer
starts up and the printer drivers are installed. If multiple
printers are selected in the list appearing in the dialog box
where printers are selected, the selected printer drivers are
registered with the computer.
I do not understand how to share a printer
on a network (PT-9800PCN only).
See “Network User’s Guide” (PDF).
48
Page 50

Product specifications
■ Printer specifications
Item Specification
Display
Printing
Buttons Power button, Feed/Cut button
Interface
Power source AC 120 V 60 Hz (AC adapter)
Power consumption
Measurements 4.6"× 7.6"× 5.5" (116 × 193 × 140 mm) (W × D × H)
Weight Approx. 3.5 lb (1.58 kg)
Cutter Auto full cutter/auto “crack and peel” cutter
* Auto “crack and peel” cutter is available only when using laminated tape.
* When using Fabric tapes or Non-laminated tapes, the label is not cut automatically.
■ Operating environment
OS
Standard Interface
Hard Disk
Memory
Monitor
Power lamp (green), STATUS lamp (red),
USB Direct Interface lamp (green/red) (PT-9800PCN only)
Printing method Heat transfer laminated printing/thermal printing
Print head 360 dpi/384 dot
Print resolution
Printing speed
Maximum printing width
Serial (RS-232C), USB2.0 full speed
LAN (10/100BASE-TX), USB Direct Interface (PT-9800PCN only)
For TZ tape cassettes: 360 × 360 dpi
For HG tape cassettes: 360 x 180 dpi, 360 x 360 dpi or 360 x 720 dpi
For TZ tape cassettes: Up to 0.78"/sec (20 mm/sec)
For HG tape cassettes: Up to 3.15"/sec (80 mm/sec)
1.07" (27.1 mm)
Approx. 30 W (during printing)
Item Specification
Windows
Macintosh
Windows
Macintosh
Windows
Macintosh
Windows
Macintosh
Windows
Macintosh
®
Windows Server
(for PT-9800PCN only) (Pre-installed device)
®
Mac OS® X 10.3.9 - 10.6
RS-232C, USB port (USB Spec. 1.1 or 2.0 protocol),
®
10/100BASE-TX Wired Ethernet (only for PT-9800PCN)
USB port (USB Spec. 1.1 or 2.0 protocol),
®
10/100BASE-TX Wired Ethernet (only for PT-9800PCN)
®
Disk space more than 70 MB
®
Disk space more than 100 MB
Windows® XP: More than 128 MB
Windows Server
®
Windows Vista®/Windows Server® 2008/2008 R2:
More than 512 MB
Windows
Mac OS® X 10.3.9: More than 128 MB
Mac OS
®
Mac OS® X 10.5.x: More than 512 MB
Mac OS
®
SVGA, high color or higher graphics card
®
More than 256 colors
®
2003/Windows Server® 2008/2008 R2
®
2003: More than 256 MB
®
7: More than 1 GB (32-bit) or 2GB (64-bit)
®
X 10.4.x: More than 256 MB
®
X 10.6: More than 1 GB
Windows® XP/Windows Vista®/Windows® 7,
Others CD-ROM drive
49
Page 51

Appendix
General procedure for the BTP (Barcode Template Print) function
The general procedure for using the BTP (Barcode Template Print) function is described below.
For details on specifying the various settings, refer to “BTP (Barcode Template Print) function” (→
P.37).
Use P-touch Editor 5.0 to create a template, and then transfer it to the printer.
1
Connect the barcode reader to the printer.
2
Scan the “P-touch template command” barcode.
3
This allows the settings to be specified or clears the previous settings.
Scan the “Basic settings” barcode.
4
Specify the cut method and the number of copies to be printed.
Specify the appropriate settings (A, B or C).
5
A.Preset template printing
1.Scan the “Preset template number” barcode.
B.Barcode printing
1.Scan the “Select template” barcode, then the barcodes under “For entering numbers”.
2.Scan the barcode whose data is to be used or copied.
3.Scan the “Begin printing” barcode.
C.Database-assisted label printing
1.Scan the “Select template” barcode, then the barcodes under “For entering numbers”.
2.Scan the key barcode for the database data to be used.
3.Scan the “Delimiter” barcode.
4.Scan the “Begin printing” barcode.
The specified label is printed.
6
50
Page 52

List of barcodes for specifying settings
These are the barcodes for specifying settings used with the “BTP (Barcode Template Print) function”
(→ P.37).
Note
● When using the barcodes in this list, set “Trigger for P-touch Template Printing” and “Command
Prefix Character” to default in P-touch Template Settings.
■ P-touch template command (Initialize + begin specifying settings)
■ Basic settings
• Auto cut on*1 • Auto cut off
• Half cut on*1 • Half cut off
• Chain printing on • Chain printing off*1
• Mirror printing on • Mirror printing off*1
• Number of copies*2
51
Page 53

■ For entering numbers*2
•1 •2
•3 •4
•5 •6
•7 •8
•9 •0
•00
■ Preset template number
• Preset template 1 • Preset template 2
• Preset template 3 • Preset template 4
52
Page 54

• Preset template 5 • Preset template 6
• Preset template 7 • Preset template 8
• Preset template 9 • Preset template 10
■ Select template
■ Delimiter
■ Begin printing
*1 This is the default setting.
*2 These are used when specifying the number of copies printed and when selecting a template
number.
Scan barcodes to specify a three-digit number, such as [00][7] or [0][1][5]. The setting is
automatically applied when three digits have been specified.
To change settings, scan the “Number of copies” barcode again when changing the number of
copies or scan the “Select template” barcode again when changing the template number, and then
scan the barcodes for the new three-digit number.
53
Page 55

Index
A
AC adapter............................................. 10, 15
AC adapter jack ........................................... 11
B
Barcode printing .......................................... 39
Baud rate ..................................................... 44
C
CD-ROM ..................................................... 10
Cleaning the exterior of the printer............... 45
Cleaning the print head and head roller ....... 45
Cleaning the tape cutter ............................... 45
Connecting to a computer............................ 16
Connecting to the power source................... 15
Contact Information ..................................... 55
Cover release button.............................. 11, 18
D
Database-assisted label printing ................... 40
Distributed printing ...................................... 35
F
Feed/Cut button ........................................... 11
G
General precautions ....................................... 8
H
HG Tapes..................................................... 18
High resolution printing ............................... 34
High speed printing...................................... 34
I
Installing the BRAdmin Light .................. 25, 30
Installing the software ............................ 19, 22
Installing the tape cassette............................ 18
Maintenance................................................ 45
N
Network cable............................................. 17
O
Operating environment................................ 49
P
Power button ............................................... 11
Power supply cord ................................. 10, 15
Preset template printing ............................... 38
Printing the printer settings........................... 43
Q
Q & A .......................................................... 46
S
Safety precautions.......................................... 6
Serial cable.................................................. 17
Serial port .................................................... 11
Specifications............................................... 49
STATUS lamp .............................................. 11
T
Tape cassette ............................................... 10
Tape catalog ................................................ 10
Tape compartment cover ............................. 11
Troubleshooting........................................... 46
TZ Tapes...................................................... 18
U
Uninstalling the software ............................. 32
USB cable.............................................. 10, 17
USB Direct Interface .................................... 11
USB port...................................................... 11
User’s Guide................................................ 10
L
Label outlet.................................................. 11
LAN port...................................................... 11
LED display............................................ 12, 34
M
Main power switch ...................................... 11
54
Page 56

Contact Information (For USA Only)
Operational Assistance
For technical and operational assistance you may call Brother Customer Service at:
Voice 1-800-255-0415 or Fax 1-303-460-1628
Assistance on the Internet
For product information and downloading the latest drivers:
http://solutions.brother.com/
For purchasing accessories and certain Brother products:
http://www.brothermobilesolutions.com
55
Page 57

Page 58

Guía del usuario
Page 59

Introducción
Gracias por adquirir la unidad PT-9700PC/PT-9800PCN.
La PT-9700PC/PT-9800PCN (de aquí en adelante, “la impresora”) es una impresora de etiquetas que
permite imprimir fácilmente etiquetas personalizadas cuando se conecta a una computadora.
Este manual contiene diversos procedimientos básicos y precauciones para utilizar esta impresora. Léalo
detenidamente antes de comenzar a utilizar la unidad y guárdelo en un lugar seguro para futuras consultas.
Si quedaran disponibles nuevas versiones del software de la PT-9700PC/PT-9800PCN, este manual puede
no reflejar las funciones actualizadas. Por lo tanto, podría encontrar que el software y el contenido de este
manual son diferentes.
■ Declaración de conformidad de la Federal Communications Commission (Comisión Federal de
Comunicaciones, FCC) (solamente para EE. UU.)
Parte responsable: Brother International Corporation
declara que el producto
Nombre del producto: Impresora de etiquetas P-touch de Brother
Número de modelo: PT-9700PC, PT-9800PCN
cumplen con la Parte 15 de las Normas de la FCC. El funcionamiento está sujeto a las dos
condiciones siguientes: (1) este dispositivo no puede causar interferencias perjudiciales, y (2)
este dispositivo debe aceptar cualquier interferencia que reciba, que incluye interferencias que
puedan causar un funcionamiento no deseado.
Este equipo se ha comprobado y cumple los límites establecidos para un dispositivo digital de
Clase B, conforme a la Parte 15 de las Normas de la FCC. Estos límites se han diseñado para
proporcionar una protección razonable contra las interferencias indeseables en una instalación
doméstica. Este equipo genera, utiliza y puede emitir energía de radiofrecuencia y, si no se
instala y se usa según las instrucciones, puede causar interferencias perjudiciales a las
comunicaciones de radio. No obstante, no se garantiza que no se producirán interferencias en
una instalación específica. Si este equipo causara interferencias perjudiciales en la recepción de
radio o de televisión, lo cual se puede comprobar apagando y encendiendo el dispositivo, el
usuario puede corregir la interferencia llevando a cabo una o más de las medidas siguientes:
•Cambie la orientación o la ubicación de la antena de recepción.
•Aumente la separación entre el equipo y el receptor.
•Conecte el equipo a una toma de corriente en un circuito distinto al que está conectado el
receptor.
•Consulte a su distribuidor o a un técnico experto en radio/TV para obtener ayuda.
Importante
•Se debe utilizar el cable de conexión incluido para garantizar el cumplimiento con los límites
establecidos para los dispositivos digitales de Clase B.
•Debe utilizarse un cable de conexión apantallado para garantizar la conformidad con los
límites establecidos para los dispositivos digitales de Clase B.
•Si se realizan cambios o modificaciones no aprobadas expresamente por Brother Industries,
Ltd. se podría anular la autoridad del usuario para utilizar el equipo.
100 Somerset Corporate Boulevard
Bridgewater, NJ 08807-0911 USA
TEL: (908) 704-1700
Declaración de conformidad conInternational ENERGY STAR
La finalidad del programa International ENERGY STAR® es promover el desarrollo y
la popularización de equipos de oficina de bajo consumo de energía.
Como asociado de ENERGY STAR
este producto cumple las directrices de ENERGY STAR
energía.
®
, Brother Industries, Ltd. ha determinado que
®
®
en cuanto a ahorro de
2
Page 60

Aviso de redacción y publicación
Este manual se ha redactado y publicado bajo la supervisión de Brother Industries Ltd. e incluye las últimas
descripciones y especificaciones del producto.
El contenido de este manual y las especificaciones de este producto están sujetos a cambios sin previo aviso.
Si quedaran disponibles nuevas versiones del software de la PT-9700PC/9800PCN, este manual puede no
reflejar las funciones actualizadas. Por lo tanto, podría encontrar que el software y el contenido de este manual
son diferentes.
Brother se reserva el derecho a realizar cambios sin previo aviso en las especificaciones y en el material
contenido en el presente documento y no será responsable de daños (incluidos los consecuenciales) causados
por la confianza en los materiales presentados incluidos, sin carácter limitativo, errores tipográficos y de otro
tipo relacionados con la publicación.
Las imágenes de la pantalla incluidas en este manual pueden diferir según su sistema operativo o la impresora.
© 2010 Brother Industries, Ltd.
Marcas comerciales y copyright
El logotipo de Brother es una marca registrada de Brother Industries, Ltd.
Brother es una marca registrada de Brother Industries, Ltd.
© 2010 Brother Industries, Ltd. Reservados todos los derechos.
Microsoft, Windows Vista, Windows Server y Windows son marcas registradas de Microsoft Corporation en
Estados Unidos y otros países.
Apple, Macintosh y Mac OS son marcas comerciales de Apple Inc., registradas en Estados Unidos y otros
países.
QR Code is a registered trademark of DENSO WAVE INCORPORATED in JAPAN and other countries. QR
Code Generating Program Copyright © 2008 DENSO WAVE INCORPORATED.
BarStar Pro Encode Library (DataMatrix, MaxiCode, PDF417, RSS) Copyright © 2007 AINIX Corporation. All
rights reserved.
Los nombres de otros programas o productos mencionados en este documento son marcas comerciales o
marcas comerciales registradas de sus respectivos titulares.
Todas las empresas cuyo título de software se mencione en este manual tienen un contrato de licencia de
software específico para sus programas.
El resto de marcas y nombres de productos mencionados en esta Guía del usuario, en la Guía del usuario para
el software y en la Guía del usuario en red (solamente PT-9800PCN) son marcas registradas de sus respectivos
propietarios.
3
Page 61

Garantía Limitada de Dos Años de Brother
(solamente para EE. UU.)
Quién está cubierto:
• Esta garantía limitada (“la garantía”) se concede
exclusivamente al usuario final/comprador
original (denominado en esta garantía
“Comprador Original”) del Producto,
consumibles y accesorios suministrados
(denominados colectivamente en esta garantía
“este Producto”).
• En el caso de haber adquirido un Producto a
alguien que no sea un proveedor autorizado de
Brother en Estados Unidos o bien, si el Producto
se hubiera utilizado con anterioridad a que
usted lo adquiriera, usted no será el Comprador
Original y el Producto que usted ha adquirido
no está cubierto por esta garantía.
Qué está cubierto:
• Este Producto incluye el Producto y puede
incluir Consumibles y Accesorios. Los
Accesorios pueden incluir, sin carácter
limitativo, el cable USB, el adaptador de CA y
fundas fotográficas. Los Consumibles pueden
incluir, sin carácter limitativo, papel BMS,
casetes de cinta y rollos de etiquetas.
•
Salvo cuando se disponga lo contrario en el
presente documento, Brother garantiza que el
Producto y los Consumibles y Accesorios
suministrados estarán libres de defectos tanto en
material como en mano de obra cuando se
utilicen en condiciones normales.
•
Esta garantía será aplicable exclusivamente a
Productos comprados y utilizados en Estados
Unidos. Para Productos adquiridos en, pero
utilizados fuera de, Estados Unidos esta garantía
cubrirá exclusivamente servicio de garantía
dentro de Estados Unidos.
Período de Garantía:
• Producto y Accesorios suministrados: dos años
a partir de la fecha original de compra.
•
Consumibles suministrados: 90 días a partir de la
fecha original de compra o la vida útil estimada
del consumible, lo que suceda antes.
®
Qué NO está cubierto:
Esta garantía no cubre
(1) Daños físicos a este Producto;
(2) Daños causados por la instalación incorrecta,
uso inadecuado o anormal, uso indebido,
negligencia o accidente (incluido, aunque sin
carácter limitativo, el envío de este Producto sin
la preparación y/o embalaje adecuados);
Daños causados por otro dispositivo o software
(3)
utilizado con este Producto (incluidos, aunque sin
carácter limitativo, los daños resultantes del uso de
piezas, Consumibles y Accesorios de marcas que
no sean Brother
(4) Consumibles y Accesorios que hayan superado
su vida útil estimada;
(5) Problemas que se originen por cualquier motivo
que no sea defectos en material o mano de obra.
Esta garantía limitada quedará ANULADA si este
Producto ha sido alterado o modificado de
cualquier forma (incluido aunque sin carácter
limitativo el intento de reparación en garantía sin la
autorización de Brother y/o la modificación/
eliminación del número de serie).
Qué hacer si cree que su Producto reúne los
requisitos necesarios para servicio de garantía:
Comunique su problema a nuestra línea directa de
atención al cliente en el teléfono 1-800-255-0415 o
en la dirección mobilesolutionsinfo@Brother.com
dentro del período de garantía aplicable
a Brother una copia de la factura de venta con fecha
que demuestre que este Producto fue adquirido en
Estados Unidos.
Qué le pedirá Brother:
Tras contactar con Brother se le pedirá que envíe el
Producto debidamente embalado, a portes
pagados, a Brother junto con una fotocopia de la
factura de compra. Brother le facilitará un Código
de Autorización de Devolución que deberá
aparecer escrito en el exterior de la caja que
contiene el Producto, así como instrucciones sobre
dónde deberá devolver el Producto. Usted deberá
asumir los costes del envío, del embalaje del
Producto y del seguro (si lo desea). Usted será
también responsable de la pérdida o daños que
puedan producirse en este Producto durante el
transporte.
:
®
);
. Proporcione
4
Page 62

Qué hará Brother:
Si el problema comunicado relativo al Producto y/
o Consumibles y Accesorios suministrados está
cubierto por esta garantía y
problema dentro del período de garantía aplicable,
Brother reparará o reemplazará el Producto y los
Consumibles y Accesorios suministrados sin coste
alguno para usted en cuanto a piezas o mano de
obra. La decisión entre reparar o sustituir el
Producto y/o los Consumibles y Accesorios
suministrados será tomada por Brother a su
exclusiva discreción. Brother se reserva el derecho
a suministrar Productos y/o Consumibles y
Accesorios que los acompañen reacondicionados o
reformados y a utilizar piezas reacondicionadas
siempre que dichos Productos de sustitución sean
conformes con las especificaciones del fabricante
para Productos/piezas nuevos. El Producto y/o
Consumibles y Accesorios suministrados reparados
o de sustitución le serán enviados a portes pagados.
Si el Producto y/o los Consumibles y Accesorios
suministrados no estuvieran cubiertos por esta
garantía (en cualquier punto), usted tendrá que
abonar los costes del reenvío del Producto y/o
Consumibles y Accesorios suministrados y todo el
servicio técnico y/o piezas/Producto de sustitución
según las tarifas en vigor que tuviera Brother en ese
momento.
Identificación: Brother estará autorizado a colocar
marcas de identificación en equipos cubiertos y
reparados en virtud de este acuerdo.
si ha comunicado el
Limitaciones:
Brother no será responsable de la pérdida o de
daños en cualquier equipo, medio, programa o
datos relacionados con el uso de este Producto.
Salvo por lo descrito anteriormente en cuanto a la
reparación o sustitución, Brother no será
responsable de daños directos, indirectos,
incidentales o consecuenciales ni compensación
específica. Puesto que algunos estados o provincias
no permiten la exclusión o limitación de daños
consecuenciales o incidentales, puede que la
anterior limitación no le sea de aplicación.
ESTA GARANTÍA SUSTITUIRÁ CUALQUIER OTRA
GARANTÍA, ESCRITA O VERBAL, YA SEA EL
MODO DE EXPRESIÓN MEDIANTE
AFIRMACIÓN, PROMESA, DESCRIPCIÓN,
DIBUJO, MODELO O MUESTRA. MEDIANTE EL
PRESENTE DOCUMENTO SE RENUNCIA A
CUALQUIESQUIERA Y TODAS LAS GARANTÍAS
DISTINTAS A ESTA, YA SEAN EXPRESAS O
IMPLÍCITAS, INCLUIDAS LAS GARANTÍAS
IMPLÍCITAS DE COMERCIABILIDAD Y DE
IDONEIDAD PARA UN PROPÓSITO
DETERMINADO.
• Esta Garantía Limitada es la única garantía que
otorga Brother para este Producto. Es la
expresión final y la declaración exclusiva de las
obligaciones de Brother hacia usted. Sustituye
todos los demás contratos y acuerdos que pueda
tener con Brother o sus representantes.
• Esta garantía le concede a usted determinados
derechos, si bien también puede tener otros
derechos que varían según el estado o
provincia.
• Esta Garantía Limitada (y obligación de Brother
hacia usted) no puede modificarse de forma
alguna a menos que usted y Brother firmen el
mismo documento en el que nosotros (1)
hagamos mención de este Producto y la fecha
de factura de venta, (2) describamos el cambio
realizado a esta garantía y (3) acordemos
realizar dicho cambio.
5
Page 63

Información importante
En caso de que le surja alguna pregunta o necesite información sobre el Producto de Brother, tenemos varias
opciones de asistencia entre las que podrá elegir:
Servicio de atención al cliente
1-800-255-0415
Servicio de atención al cliente
1-303-460-1628 (fax)
World Wide Web
www.brothermobilesolutions.com
Suministros / Accesorios
1-800-543-6144
Brother Mobile Solutions, Inc., 100 Technology Drive, #250A, Broomfield, CO 80021
Anote el número de modelo, el número de serie y la fecha y el lugar de compra a continuación. Guarde esta
información junto con su justificante de compra (factura) en caso de que su Producto requiera servicio técnico.
Nº de modelo ___________________________________________________________
Nº de serie ______________________________________________________________
Fecha de compra: ________________________________________________________
Nombre del proveedor: ___________________________________________________
Dirección del proveedor: __________________________________________________
Importante: Se recomienda guardar todo el material de embalaje original por si tuviera que enviar este
producto.
Evite largas esperas en la oficina de correos y no se preocupe por si se pierde el correo. Visítenos
Ahorre tiempo - ¡Registre en línea!
en línea en
www.registermybrother.com
Su producto quedará inmediatamente registrado en nuestra base de datos y usted podrá
Mientras esté en el sitio Web, busque también concursos y otra información interesante.
despreocuparse.
6
Page 64

Precauciones de seguridad
Para evitar lesiones personales y daños en el equipo, se facilita información importante utilizando
diversos símbolos.
Los símbolos y su significado son los siguientes:
ADVERTENCIA
PRECAUCIÓN
Indica lo que debe hacer para evitar el riesgo de sufrir lesiones personales.
Indica procedimientos que deberá seguir para prevenir lesiones personales
leves o daños en la impresora.
Los símbolos empleados en este manual son los siguientes:
Acción NO permitida. NO desmonte el producto.
NO salpique el producto con agua ni lo
sumerja.
Acción obligatoria Desenchufar
Alerta de seguridad
NO toque una determinada parte del
producto.
Alerta de la posibilidad de descarga
eléctrica
ADVERTENCIA
Adaptador de CA
Siga estas indicaciones para evitar fuego, daños, descargas eléctricas o fallos del equipo.
Utilice únicamente el adaptador de CA
(AD9100ES), el cable de alimentación y el
cable USB diseñados exclusivamente para la
impresora. De no hacerlo así, podrían
producirse accidentes o daños. Brother no
asumirá responsabilidad alguna por accidentes
o daños resultantes por no utilizar el adaptador
de CA (AD9100ES), el cable de alimentación y
el cable USB especificados.
No utilice el adaptador de CA (AD9100ES), el
cable de alimentación y el cable USB incluidos
con otro producto.
Desenchufe el cable de alimentación
inmediatamente y deje de utilizar la impresora
durante una tormenta eléctrica. Hay un riesgo
remoto de descarga eléctrica por rayos.
No toque el adaptador de CA ni el conector de
alimentación con las manos húmedas.
No utilice el adaptador de CA en lugares con
gran humedad, como los baños.
No utilice un cable de alimentación dañado.
No sobrecargue la toma eléctrica.
No coloque objetos pesados sobre el cable o el
conector de alimentación, ni dañe o modifique
estos. No doble o tire del cable de
alimentación con fuerza.
No deje caer, golpee o dañe de otro modo el
adaptador de CA.
Asegúrese de que el conector queda
totalmente introducido en la toma eléctrica.
No utilice una toma suelta.
7
Page 65

ADVERTENCIA
Impresora
Siga estas indicaciones para evitar fuego, daños, descargas eléctricas o asfixia.
No deje que la impresora se moje de forma
alguna.
No toque las piezas metálicas situadas cerca
del cabezal de impresión. El cabezal de
impresión se calienta en exceso durante su uso
y permanece muy caliente inmediatamente
después. No lo toque directamente con las
manos.
No toque la cuchilla del cortador.
Cabezal de impresión
No utilice la impresora con un objeto extraño
en su interior. Si se introduce en la impresora
agua, alguna sustancia metálica o cualquier
objeto extraño, desconecte el adaptador de CA
y comuníquese con el establecimiento en el
que adquirió la impresora o con su centro de
servicio local autorizado.
No desmonte la impresora. Para la inspección,
el ajuste o la reparación de la impresora,
comuníquese con el establecimiento en el que
adquirió la impresora o con su centro de
servicio local autorizado.
En el embalaje de la impresora se utilizan
bolsas de plástico. Para evitar riesgo de asfixia,
mantenga estas bolsas fuera del alcance de
bebés y niños.
Desconecte el adaptador de CA
inmediatamente y deje de utilizar la impresora
cuando perciba un olor raro, calor,
decoloración, deformación o cualquier otra
cosa inusual mientras la utiliza o la guarda.
Para evitar dañarla, no deje caer ni golpee la
impresora.
PRECAUCIÓN
Cortador de cinta
Siga estas indicaciones para evitar lesiones personales y daños en la impresora.
No abra la cubierta del compartimiento de la
cinta al utilizar el cortador.
Adaptador de CA
Si no pretende utilizar la impresora durante un
largo período de tiempo, desconecte el
adaptador de CA de la toma eléctrica.
Impresora
Siga estas indicaciones para evitar lesiones personales y daños en la impresora.
Coloque la impresora sobre una superficie
plana y estable, como una mesa.
No deje la impresora al alcance de los niños
con la cubierta del compartimiento de la cinta
abierta.
No ejerza demasiada presión sobre el cortador.
Sujete siempre el conector mientras
desconecta el cable de alimentación de la
toma eléctrica.
No coloque objetos pesados encima de la
impresora.
8
Page 66

Precauciones generales
● La impresora puede funcionar incorrectamente si se deja cerca de una televisión, radio, etc. No instale
la impresora cerca de cualquier aparato que cause interferencia electromagnética.
● No utilice la impresora de forma alguna o para cualquier fin que no se describa en este manual. Si lo
hiciera, podrían producirse accidentes o daños en la impresora.
● No coloque objetos extraños en la salida de etiquetas, en el tomacorriente para el adaptador de CA, en
el puerto USB, en el puerto en serie o en el puerto LAN (solamente PT-9800PCN), etc.
● No toque el cabezal de impresión con los dedos. Utilice un paño suave (por ejemplo, un bastoncillo de
algodón) para limpiar el cabezal de impresión o bien utilice el casete de limpieza del cabezal de
impresión (TZ-CL6) opcional.
● No limpie la impresora con alcohol u otros disolventes orgánicos. Utilice exclusivamente un paño suave
y seco.
● No deje que la impresora quede expuesta a la luz solar directa o a la lluvia, cerca de radiadores u otros
electrodomésticos calientes, ni en ubicaciones expuestas a temperaturas extremadamente altas o bajas
(por ejemplo, en el salpicadero o en la bandeja trasera del coche) o lugares de alta humedad o con
mucho polvo. Intervalo de temperaturas de funcionamiento estándar: 50 °F a 95 °F.
● No deje ningún objeto de goma o vinilo sobre la impresora durante un período largo de tiempo; de lo
contrario, la impresora podría mancharse.
● Dependiendo de las condiciones medioambientales y de los ajustes aplicados, algunos caracteres o
símbolos pueden resultar difíciles de leer.
● Utilice únicamente cintas Brother TZ o cintas Brother HG con esta impresora. No utilice cintas que no
tengan la marca o .
● No tire de la cinta en el casete ni ejerza presión sobre ella. De lo contrario, el casete de cinta o la
impresora podría dañarse.
● No intente imprimir etiquetas utilizando un casete de cinta vacío o sin que haya un casete instalado en
la impresora. Si lo hace, se dañará el cabezal de impresión.
● No intente cortar la cinta durante la impresión o alimentación puesto que se dañará la cinta.
● Tenga cuidado para no rayar el CD-ROM. No coloque el CD-ROM en lugares expuestos a altas o bajas
temperaturas. No coloque objetos pesados sobre el CD-ROM ni lo doble.
● El software incluido en el CD-ROM está diseñado para ser utilizado con la impresora y puede instalarse
en más de una computadora.
● Recomendamos que lea detenidamente esta Guía del usuario antes de utilizar la impresora y que la
tenga a mano para futuras consultas.
● Dependiendo de la ubicación, material y condiciones medioambientales, la etiqueta puede no
despegarse ni quitarse, el color de la etiqueta puede cambiar o transferirse a otros objetos. Antes de
colocar la etiqueta, compruebe el estado medioambiental y el material.
● No exponga los casetes de cinta a la luz solar directa, altas temperaturas, alta humedad o polvo.
Guárdelos en un lugar fresco y oscuro. Utilice los casetes de cinta inmediatamente tras abrir el paquete
de casete de cinta.
● Las marcas realizadas con tintas al óleo o al agua pueden verse a través de una etiqueta pegada sobre
ellas. Para ocultar las marcas, utilice dos etiquetas superpuestas o utilice una etiqueta de color oscuro.
● Tenga en cuenta que Brother Co., Ltd. no asume responsabilidad alguna por daños, etc. que puedan
resultar del incumplimiento de las precauciones descritas.
9
Page 67

Tabla de contenido
Tabla de contenido ..........................................................................................................10
Desembalaje de la impresora ..........................................................................................11
Descripción general ........................................................................................................12
Lámparas LED ................................................................................................................................13
Preparativos para utilizar la impresora ............................................................................15
Conexión de la impresora ................................................................................................16
Conexión a la fuente de alimentación ............................................................................................16
Conexión a una computadora ........................................................................................................ 17
Utilización de los cables de interfaz ...............................................................................................18
Instalación del casete de cinta .........................................................................................19
Cinta autorizada .............................................................................................................................19
Instalación del casete de cinta ........................................................................................................19
Instalación del software para la impresora PT-9700PC ...................................................20
Si se utiliza Microsoft® Windows® .................................................................................................20
Si se utiliza Mac OS
Instalación del software para la impresora PT-9800PCN ................................................24
Si se utiliza Microsoft® Windows® .................................................................................................24
Si se utiliza Mac OS
Desinstalación del software .............................................................................................34
Si se utiliza Microsoft® Windows® .................................................................................................34
Si se utiliza Mac OS
Función avanzada ............................................................................................................37
Impresión a mayor velocidad o con mayor resolución ....................................................................37
Impresión distribuida ......................................................................................................................38
Función BTP (Impresión de plantillas de códigos de barras) ............................................................40
Utilización de P-touch Editor Lite LAN (solamente PT-9800PCN y Windows
Impresión de los ajustes de la impresora .........................................................................................46
Ajuste de la interfaz en serie (solamente Windows®) ......................................................47
Ajuste de la velocidad en baudios de la computadora ....................................................................47
Ajuste de la velocidad en baudios de la impresora .........................................................................47
Mantenimiento ................................................................................................................48
Solución de problemas ....................................................................................................50
P y R ..............................................................................................................................................50
Especificaciones del producto .........................................................................................53
Apéndice .........................................................................................................................55
Procedimiento general para la función BTP (Impresión de plantillas de códigos de barras) .............55
Lista de códigos de barras para especificar ajustes ..........................................................................56
Index ...............................................................................................................................59
Información de contacto (solamente para EE. UU.) .........................................................60
®
.....................................................................................................................21
®
.....................................................................................................................28
®
.....................................................................................................................35
®
) ..............................45
10
Page 68

Desembalaje de la impresora
Abra la caja y confirme que contiene los siguientes artículos. Si alguno de estos artículos falta o está
dañado, comuníquese con la tienda o establecimiento donde compró la impresora.
■ PT-9700PC/PT-9800PCN
Impresora (PT-9700PC)
STATUS
Impresora (PT-9800PCN)
STATUS
■ Cable USB
■ Casete de cinta
■ Guía del usuario
■ Adaptador de CA
Se conecta al cable de alimentación.
■ Cable de alimentación
Se conecta a un enchufe (CA 120 V).
■ CD-ROM
■ Catálogo de cintas
■ Guía de suministros y accesorios
11
Page 69

Descripción general
■ PT-9700PC
1
2
STATUS
3
7
4
5
6
8
DC IN 24V
9
Vista frontal Vista posterior
■ PT-9800PCN
1
2
STATUS
11
12
Vista frontal Vista posterior
1. Cubierta del compartimiento de la cinta 8. Tomacorriente para el adaptador de CA
2. Salida de etiquetas 9. Puerto en serie (RS-232C)
3. Botón de apertura de la cubierta 10.Puerto USB
4. Lámpara de STATUS (ESTADO) 11. Lámpara LED en la interfaz directa USB
5. Botón de encendido (con lámpara)
6. Botón de Feed/Cut 12.Interfaz directa USB (solamente PT-9800PCN)
7. Interruptor de alimentación principal 13.Puerto LAN (Ethernet cableada 10/100BASE-
3
7
4
5
6
8
DC IN 24V
9
(solamente PT-9800PCN)
TX) (solamente PT-9800PCN)
10
13
10
Nota
● Si la cubierta del compartimiento de la cinta queda abierta, podría acumularse polvo en el
cabezal de impresión. Cierre siempre la cubierta.
12
Page 70

Lámparas LED
Puede determinarse cuál es el estado de la impresora por las lámparas LED en la impresora o la
interfaz directa USB (solamente PT-9800PCN).
■ Lámparas LED en la impresora
Estado de la lámpara
Botón de
encendido
(verde)
Encendido No encendida Estado en espera de la impresora —
Parpadeando No encendida Recibiendo datos —
Parpadeando Encendida
Encendido Encendida
Encendido Parpadeando
Lámpara de
STATUS
(ESTADO)
(rojo)
Estado Solución
Durante la recepción de datos
1) No hay casete de cinta 1) Instale el casete de cinta y cierre
2) La cubierta del
compartimiento de la cinta
está abierta.
3) Casete de cinta incompatible 3) Instale el casete de cinta
Mientras la impresora está en
espera
1) No hay casete de cinta 1) Instale el casete de cinta y cierre
2) La cubierta del
compartimiento de la cinta
está abierta.
3) Casete de cinta incompatible 3) Instale el casete de cinta
Durante la impresión
1) No hay casete de cinta 1) Instale el casete de cinta y cierre
2) La cubierta del
compartimiento de la cinta
está abierta.
3) Casete de cinta incorrecto 3) Instale el casete de cinta
4) Casete de cinta incompatible 4) Instale el casete de cinta
Casete de cinta vacío
Error de transmisión
la cubierta del compartimiento
de la cinta.
2) Cierre la cubierta.
correcto y cierre la cubierta del
compartimiento de la cinta.
la cubierta del compartimiento
de la cinta.
2) Cierre la cubierta.
correcto y cierre la cubierta del
compartimiento de la cinta.
la cubierta del compartimiento
de la cinta.
2) Cierre la cubierta.
correcto y cierre la cubierta del
compartimiento de la cinta.
correcto y cierre la cubierta del
compartimiento de la cinta.
Instale un casete de cinta que tenga
cinta y cierre la cubierta del
compartimiento de la cinta.
Presione el botón de encendido en
la parte frontal de la impresora.
13
Page 71

Estado de la lámpara
Botón de
encendido
(verde)
Encendido
Encendido
No encendido Encendida Iniciando —
Lámpara de
STATUS
(ESTADO)
(rojo)
Parpadeando a
intervalos
rápidos
Parpadeando a
intervalos muy
rápidos
Estado Solución
Error en el cortador Compruebe que la cinta no está
Error en el soporte del rodillo
Error de sobrecalentamiento del
cabezal de impresión
Error en la EEPROM Apague la impresora y vuelva a
Error en el tablero de circuitos
atascada en la impresora. Si es
necesario, apague la impresora y
vuelva a encenderla. Si la lámpara
de STATUS (ESTADO) continúa
parpadeando, llame al proveedor
que le vendió la impresora o con el
servicio de atención al cliente de
Brother.
Apague la impresora y vuelva a
encenderla.
encenderla. Si la lámpara de
STATUS (ESTADO) continúa
parpadeando, llame al proveedor
que le vendió la impresora o con el
servicio de atención al cliente de
Brother.
■ Lámparas LED en la interfaz directa USB (solamente PT-9800PCN)
Estado de la lámpara
Color Estado
— No encendida Dispositivo USB no conectado —
Verde Encendida Dispositivo USB conectado —
Parpadeando HUB conectado Desconecte el dispositivo USB.
Dispositivo USB conectado no
compatible
Parpadeando a
Rojo
intervalos
rápidos
Parpadeando a
intervalos muy
rápidos
Error de “búfer lleno” con la
interfaz directa USB
Sobrecorriente
Estado Solución
Desconecte el dispositivo USB.
Los datos enviados desde el lector
de códigos de barras se guardan en
la impresora.
No utilice el lector de códigos de
barras para escanear códigos de
barras consecutivamente ni lo
utilice con varias interfaces al
mismo tiempo.
Desconecte el dispositivo USB, y
apague la impresora y vuelva a
encenderla.
14
Page 72

Preparativos para utilizar la impresora
Antes de crear etiquetas con la impresora, es necesario seguir los siguientes pasos.
Nota
● Los procedimientos de conexión varían dependiendo del sistema operativo instalado en la
computadora, y también varían de acuerdo al tipo de conexión, ya sea conexión USB, en serie o
de red (solamente PT-9800PCN). Para obtener más información sobre la conexión de la
impresora a su computadora, consulte “Conexión a una computadora” (→ P.17).
Conexión de la impresora
Conecte la impresora a la fuente de alimentación y a una
computadora. Para obtener más información, consulte
“Conexión de la impresora” (→ P.16).
Instalación del software
Tendrá que instalar el controlador de impresora para
utilizar la impresora con la computadora. También deberá
instalar el software de diseño de etiquetas P-touch Editor.
Para obtener más información sobre la instalación de este
software, consulte “Instalación del software para la
impresora PT-9700PC” (→ P.20) o “Instalación del
software para la impresora PT-9800PCN” (→ P.24).
Creación de etiquetas
Cuando haya terminado de configurar la impresora, podrá
comenzar a crear etiquetas. Para obtener más información
sobre cómo diseñar y crear etiquetas, consulte la “Guía del
usuario para el software” (PDF). Para obtener explicaciones
detalladas sobre las funciones, también puede consultar el
menú Ayuda de P-touch Editor que encontrará en el
software.
15
Page 73

Conexión de la impresora
Conecte la impresora a la fuente de alimentación y a una computadora.
Encendido de la impresora
4
Conexión a la fuente de alimentación
Conecte el cable de alimentación
1
incluido al adaptador de CA.
Introduzca el conector del adaptador de
2
CA en el tomacorriente para este
adaptador situado en la parte trasera de
la impresora.
DC IN 24V
DC IN 24V
Conecte el cable de alimentación a un
3
enchufe (CA 120 V).
DC IN 24V
Ponga el interruptor de alimentación
principal, situado en la parte trasera de la
impresora, en la posición de encendido y,
a continuación, presione el botón de
encendido en la parte frontal de la
impresora.
Apagado de la impresora
Mantenga presionado el botón de
encendido en la parte frontal de la
impresora hasta que se apague la
impresora y, a continuación, ponga el
interruptor de alimentación principal,
situado en la parte trasera de la
impresora, en la posición de apagado.
STATUS
Botón de
encendido
Nota
● Desconecte siempre primero la
alimentación mediante el botón de
encendido en la parte frontal de la
impresora antes de quitar el adaptador de
CA o poner el interruptor de
alimentación principal en la posición de
apagado.
● Cuando haya terminado de utilizar la
impresora, desenchufe el cable de
alimentación y desconecte el adaptador
de CA de la impresora, y guárdelos para
futuros usos.
● Al retirar el adaptador de CA, no tire del
cable. Los hilos del cable del adaptador
de CA podrían romperse.
● No utilice ningún otro adaptador de CA
que no sea el que se suministra con la
impresora. En caso contrario, la
impresora podría fallar.
STATUS
Interruptor de
alimentación
principal
16
Page 74

Conexión a una computadora
Conecte la impresora a una computadora mediante los cables de interfaz. Los cables de interfaz que se
utilizan para la conexión a un puerto USB, puerto en serie (RS-232C) y puerto LAN (Ethernet cableada
10/100BASE-TX) son diferentes.
Configuración básica Puerto en serie
Sistemas operativos
Puerto USB Puerto LAN
(solamente ESC/
P y P-touch
Template)
Windows® XP/
Windows Vista
Windows
Mac OS
PT-9700PC
10.6
Windows® XP/
Windows Vista
Windows
Windows Server
2003/Windows
®
2008/
Server
2008 R2
PT-9800PCN
Mac OS
10.6
®
7
®
X 10.3.9-
®
7/
®
X 10.3.9-
®
/
{
{ –
–
®
/
®
{
{{
–
17
Page 75

Utilización de los cables de interfaz
Los cables en serie (RS-232C) y de red (Ethernet) no son accesorios estándar. Utilice el cable adecuado
para el tipo de interfaz.
Nota
● Para la interfaz USB, debe utilizarse el cable de interfaz USB incluido para garantizar el
cumplimiento de los límites de CEM.
● Para las interfaces en serie y de red, debe utilizarse un cable de interfaz apantallado para
garantizar el cumplimiento de los límites de CEM.
● Los cambios o modificaciones no expresamente aprobados por Brother Industries, Ltd. pueden
afectar el rendimiento y la calidad de impresión, y los daños podrían no estar cubiertos por la
garantía limitada.
■ Cable USB
Utilice el cable de interfaz incluido.
■ Cable en serie (RS-232C) (solamente Windows®)
En la tabla siguiente se muestran las asignaciones de patillas de los cables en serie (cables RS-232C)
que pueden utilizarse con esta impresora. Puede comprar los cables en una tienda o
establecimiento de componentes electrónicos. No utilice un cable en serie con una longitud
superior a 5.9' (1.8 m).
Lado de la impresora de Brother Lado de la computadora
(Conector hembra D-sub, tornillo de seguridad 4-40) (Conector hembra D-Sub 9P)
Nombre de
la señal
DCD 1 1 DCD
RXD 2 2 RXD
TXD 3 3 TXD
DTR 4 4 DTR
GND 5 5 GND
DSR 6 6 DSR
RTS 7 7 RTS
CTS 8 8 CTS
RI 9 9 RI
Número de
patilla
Asignaciones de patillas
Número de
patilla
Nombre de
la señal
Nota
●
La parte del conector en serie RS-232C de este equipo no es una fuente de alimentación limitada.
● Para obtener más información sobre los ajustes de la interfaz en serie, consulte “Ajuste de la
interfaz en serie (solamente Windows
®
)” (→ P.47).
■ Cable de red (solamente PT-9800PCN)
Utilice un cable de par trenzado de categoría 5 (o superior) recto para una red Fast Ethernet
10BASE-T o 100BASE-TX.
Nota
● Conecte este equipo a una conexión LAN que no esté sometida a sobretensiones.
18
Page 76

Instalación del casete de cinta
En esta sección se indican los tipos de cintas que se pueden utilizar con esta impresora y se explica el
procedimiento para instalar los casetes de cinta.
Instale el casete de cinta.
3
Cinta autorizada
A continuación se enumeran los tipos de cintas
que se pueden utilizar con la impresora.
■ Cintas TZ
Cinta laminada estándar
Cinta adhesiva extrafuerte: laminada
Cinta adhesiva fuerte: laminada
Cinta indicadora de alteraciones: laminada
Cinta de tela para transferencia con
plancha: no laminada
■ Cintas HG
Las cintas HG permiten tres combinaciones
disponibles de velocidad de impresión y
resolución de impresión superiores. Para
obtener más información sobre la impresión a
alta velocidad, consulte
velocidad o con mayor resolución” (→ P.37).
“Impresión a mayor
Asegúrese de que el extremo de la cinta
avanza por debajo de las guías de la
cinta.
Rueda dentada
Extremo
de la
cinta
Guía de cinta
• Si la cinta de tinta está suelta, utilice el
dedo para bobinar la rueda dentada en
la dirección de la flecha del casete.
Instalación del casete de cinta
En esta sección se explica el procedimiento
para instalar el casete de cinta.
Mantenga presionado el botón de
1
encendido situado en la parte frontal de
la impresora y asegúrese de que la
impresora se apague.
Presione el botón de apertura de la
2
cubierta y abra la cubierta del
compartimiento de la cinta.
Botón de apertura de la
cubierta
Cierre la cubierta del compartimiento de
4
la cinta y presione el botón de encendido
en la impresora.
Presione el botón de avance/corte para
5
quitar la parte sobrante de la cinta.
Nota
● Si no se realiza ninguna otra operación
durante los 10 minutos posteriores a la
impresión de una etiqueta, oirá que el
conjunto del rodillo se suelta
automáticamente. Antes de que se suelte,
la cinta no se puede retirar si el
adaptador de CA se extrae de la
impresora mientras está encendida o si se
desconecta primero la alimentación
mediante el interruptor de alimentación
principal situado en la parte trasera de la
impresora. Desconecte siempre primero
la alimentación mediante el botón de
encendido en la parte frontal de la
impresora antes de quitar el adaptador de
CA o poner el interruptor de
alimentación principal en la posición de
apagado.
19
Page 77

Instalación del software para la impresora PT-9700PC
El procedimiento para instalar el software varía según el sistema operativo instalado en la
computadora. El procedimiento de instalación está sujeto a cambios sin previo aviso.
®
Si usa Microsoft
Si usa Macintosh
Nota
●
Para los modelos “PT-9700PC”, se deben instalar las siguientes versiones de P-touch Editor o b-PAC
SDK para evitar dificultades en la impresión:
●
Para obtener más información sobre el software, consulte la “Guía del usuario para el software” (PDF).
● Para tener acceso a la “Guía del usuario para el software” (PDF), haga clic en “Iniciar” - “Todos
los programas (Programas)” - “Brother P-touch” - “Manuals” - “PT-9700PC” - “Guía del usuario
para el software”.
Windows®, consulte “Si se utiliza Microsoft® Windows®” (→ P.20).
®
, consulte “Si se utiliza Mac OS®” (→ P.21).
[P-touch Editor] versión 5.0.101 y posterior (incluidas en el CD).
[b-PAC SDK] versión 3.0.010 y posterior (se puede descargar desde Brother Solutions Center).
Si se utiliza Microsoft® Windows
En esta sección se explica cómo instalar
P-touch Editor 5.0, el controlador de impresora
y la Guía del usuario para el software (PDF) a la
vez mediante USB.
Nota
● No conecte la impresora a la
computadora hasta que así se le indique.
● Debe iniciar una sesión como usuario
con privilegios de administrador para
poder instalar este software.
● Apague la impresora con el botón de
encendido y luego con el interruptor de
alimentación principal.
A continuación se muestra el ejemplo para
Windows Vista
Inicie la computadora e introduzca el
1
CD-ROM en la unidad de CD-ROM.
Nota
● Si no se inicia automáticamente, abra los
archivos del CD-ROM y haga doble clic
en “Setup.exe”.
Haga clic en [Instalación estándar].
2
Opciones de instalación:
Instalación estándar
P-touch Editor 5.0, el controlador de
impresora y la Guía del usuario para el
software (PDF)
®
.
®
Instalación personalizada
P-touch Editor 5.0, el controlador de
impresora y la Guía del usuario para el
software (PDF) se pueden instalar por
separado.
Mostrar la Guía del usuario
Guía del usuario para el software (PDF)
Descargar Adobe Reader
Se mostrará un vínculo que lleva a la
página de descargas de Adobe
Lea el contrato de licencia y haga clic en
3
[Sí] si acepta los términos y condiciones.
®
Reader®.
Siga las instrucciones que se muestran en
pantalla.
Active la casilla de verificación
4
correspondiente a los programas de
complemento que desee instalar y haga
clic en [Siguiente].
Nota
● Asegúrese de que todas las aplicaciones
de Microsoft
®
Office están cerradas.
20
Page 78

Seleccione el modelo deseado y, después,
5
haga clic en [Aceptar].
Siga las instrucciones en pantalla para
instalar el controlador de impresora.
Cuando así se le indique, conecte la
6
impresora a la computadora mediante el
cable USB y, a continuación, encienda la
impresora.
Puerto USB
DC IN 24V
Tomacorriente
para el adaptador
de CA
Una vez detectada la impresora, el
7
controlador se instalará automáticamente.
Cuando se le indique que registre la
8
impresora en línea, seleccione un método
Adaptador de CA
de registro y haga clic en [Siguiente].
Si ha seleccionado registrar el producto
en línea, su explorador de Internet
predeterminado se abrirá en una nueva
ventana.
Cuando se le indique que debe descargar
9
herramientas opcionales, haga su
elección y haga clic en [Siguiente].
• Si elige “Sí, muestre la página”, se
dirigirá a la página “solutions center”
del sitio web antes de finalizar la
instalación. (recomendado)
[Seleccione su zona/país]-[Elija su
producto]-[Descargas]
• Si elige “No, no muestre la página”,
continuará con la instalación.
Cable USB
Nota
● Si desea descargar las herramientas
opcionales más tarde, puede encontrarlas
en este sitio web:
http://solutions.brother.com/
[Seleccione su zona/país]-[Elija su
producto]-[Descargas]
Haga clic en [Finalizar].
0
La instalación del software se ha
completado.
Reinicie la computadora si así se le indica.
Inicie el software.
a
Haga clic en “Iniciar” - “Todos los
programas (Programas)” - “Brother
P-touch” - “P-touch Editor 5.0” para
iniciar P-touch Editor 5.0.
Si se utiliza Mac OS
®
En esta sección se explica cómo instalar
P-touch Editor 5.0 y el controlador de
impresora.
Nota
● No conecte la impresora a la
computadora Macintosh
finalizado la instalación de P-touch Editor
5.0. Asegúrese de que el cable USB no
está conectado hasta que se le indique
que lo haga.
● Debe iniciar una sesión como usuario
con privilegios de administrador para
poder instalar este software.
● Apague la impresora con el botón de
encendido y luego con el interruptor de
alimentación principal.
A continuación se muestra el ejemplo para Mac
®
X 10.5.7.
OS
Inicie la computadora Macintosh® e
1
introduzca el CD-ROM en la unidad de
CD-ROM.
Haga doble clic en el icono “PT_Series”
(CD-ROM).
®
hasta que haya
21
Page 79

Haga doble clic en “Brother PT-9700PC
2
Driver.pkg”, en la carpeta “Mac OS X”.
El instalador del controlador se iniciará.
Siga las instrucciones que se muestran en
pantalla.
Una vez finalizada la instalación y que se
3
muestre la pantalla siguiente, haga clic
en [Cerrar].
La instalación del controlador de
impresora se ha completado.
A continuación, instale P-touch Editor
5.0.
Una vez finalizada la instalación y que se
5
muestre el mensaje “Haga clic en
Reiniciar para acabar de instalar el
software.”, haga clic en [Reiniciar].
La computadora Macintosh
®
La instalación del software se ha
completado.
Después de reiniciar la computadora,
6
conecte la impresora a la computadora
mediante el cable USB y, a continuación,
encienda la impresora.
Puerto USB
se reiniciará.
Haga doble clic en “P-touch Editor 5.0
4
Installer.mpkg”.
El instalador de P-touch Editor 5.0 se
iniciará.
Siga las instrucciones que se muestran en
pantalla.
22
Cable USB
Tomacorriente
para el adaptador
de CA
DC IN 24V
Adaptador de CA
Nota
● Si conecta la impresora a la computadora
Macintosh
posible que no se detecte correctamente.
En tal caso, conecte la impresora
directamente al puerto USB de la
computadora Macintosh
En Mac OS® X 10.3.9 - 10.4.x
7
Haga doble clic en la unidad donde está
instalado Mac OS
“Aplicaciones” - “Utilidades” - “Utilidad
Configuración Impresoras”, por este orden.
En Mac OS® X 10.5.x - 10.6
Haga clic en “Apple menú” “Preferencias del Sistema”, por este
orden, y haga clic en “Impresión y Fax”.
®
mediante un hub USB, es
®
.
®
X y haga clic en
Page 80

En Mac OS® X 10.3.9 - 10.4.x
8
Haga clic en [Añadir] y seleccione USB
en la parte superior de la pantalla.
Seleccione “PT-9700PC” en la lista y
vuelva a hacer clic en [Añadir] para añadir
la impresora a la “Lista de impresoras”.
En Mac OS® X 10.5.x - 10.6
Seleccione “Brother PT-9700PC” en la
lista y haga clic en [Añadir] / para
añadir la impresora a la “Lista de
impresoras” / “Impresión y Fax”.
Cuando vuelva a la pantalla “Lista de
9
impresoras” / “Impresión y Fax”,
compruebe que se ha añadido “PT9700PC/Brother PT-9700PC” y, a
continuación, cierre esta pantalla.
Ahora ya puede utilizar la impresora.
23
Page 81

Instalación del software para la impresora PT-9800PCN
El procedimiento para instalar el software varía según el sistema operativo instalado en la
computadora. El procedimiento de instalación está sujeto a cambios sin previo aviso.
®
Si usa Microsoft
Si usa Macintosh
Nota
● Para los modelos “PT-9800PCN”, se deben instalar las siguientes versiones de P-touch Editor o
b-PAC SDK para evitar dificultades en la impresión:
● Para obtener más información sobre el software, consulte la “Guía del usuario para el software”
(PDF).
● Para obtener más detalles sobre la Red, consulte la “Guía del usuario en red” (PDF).
● Para tener acceso a la “Guía del usuario para el software” (PDF), haga clic en “Iniciar” - “Todos
los programas (Programas)” - “Brother P-touch” - “Manuals” - “PT-9800PCN” - “Guía del
usuario para el software”.
Windows®, consulte “Si se utiliza Microsoft® Windows®” (→ P.24).
®
, consulte “Si se utiliza Mac OS®” (→ P.28).
[P-touch Editor] versión 5.0.101 y posterior (incluidas en el CD).
[b-PAC SDK] versión 3.0.010 y posterior (se puede descargar desde Brother Solutions Center).
Si se utiliza Microsoft® Windows
En esta sección se explica cómo instalar Ptouch Editor 5.0, el controlador de impresora, la
Guía del usuario para el software (PDF) y la
Guía del usuario en red (PDF) a la vez.
Nota
● Si utiliza un cable de interfaz USB, no
conecte la impresora a la computadora
hasta que así se le indique.
● Debe iniciar una sesión como usuario
con privilegios de administrador para
poder instalar este software.
● Apague la impresora con el botón de
encendido y luego con el interruptor de
alimentación principal.
A continuación se muestra el ejemplo para
Windows Vista
Inicie la computadora e introduzca el
1
CD-ROM en la unidad de CD-ROM.
Nota
● Si no se inicia automáticamente, abra los
archivos del CD-ROM y haga doble clic
en “Setup.exe”.
Haga clic en [Instalación estándar].
2
Opciones de instalación:
®
.
®
Instalación estándar
P-touch Editor 5.0, el controlador de
impresora, la Guía del usuario para el
software (PDF) y la Guía del usuario en red
(PDF)
Instalación personalizada
P-touch Editor 5.0, el controlador de
impresora, la Guía del usuario para el
software (PDF), la Guía del usuario en red
(PDF) y P-touch Editor Lite LAN se pueden
instalar por separado.
Instalación de la utilidad
BRAdmin Light
Para saber cómo se instala BRAdmin Light,
consulte la página 27.
Guía del usuario
La Guía del usuario para el software (PDF),
la Guía del usuario en red (PDF) y un
vínculo que lleva a la página de descargas
de Adobe
®
Reader®.
24
Page 82

Lea el contrato de licencia y haga clic en
3
[Sí] si acepta los términos y condiciones.
Siga las instrucciones que se muestran en
pantalla.
Active la casilla de verificación
4
correspondiente a los programas de
complemento que desee instalar y haga
clic en [Siguiente].
Nota
● Asegúrese de que todas las aplicaciones
de Microsoft
A continuación, seleccione el método de
5
conexión y haga clic en [Siguiente].
Método de conexión:
Impresora local con cable USB
Consulte “Para los usuarios de un cable de
interfaz USB” (→ P.25).
Impresora de red punto a punto de Brother
Compruebe que el cable LAN está
conectado a la impresora.
Consulte “Para los usuarios de un cable de
interfaz de red” (→ P.26).
Impresora compartida de red
Compruebe que el cable LAN está
conectado a la impresora.
Consulte “Para los usuarios de una
impresora compartida de red” (→ P.26).
®
Office están cerradas.
Nota
● Si utiliza un cable de interfaz USB, no
conecte la impresora a la computadora
hasta que así se le indique.
■ Para los usuarios de un cable de
interfaz USB
Siga las instrucciones que se muestran en
6
pantalla. Cuando aparezca esta pantalla,
compruebe que la impresora está
encendida. Conecte el cable de interfaz USB
a la computadora y, a continuación, conecte
el otro extremo del cable a la impresora.
Cuando se le indique que registre la
7
impresora en línea, seleccione un método
de registro y haga clic en [Siguiente].
Si ha seleccionado registrar el producto
en línea, su explorador de Internet
predeterminado se abrirá en una nueva
ventana.
Cuando se le indique que debe descargar
8
herramientas opcionales, haga su
elección y haga clic en [Siguiente].
• Si elige “Sí, muestre la página”, se
dirigirá a la página “solutions center”
del sitio web antes de finalizar la
instalación. (recomendado)
[Seleccione su zona/país]-[Elija su
producto]-[Descargas]
• Si elige “No, no muestre la página”,
continuará con la instalación.
Nota
● Si desea descargar las herramientas
opcionales más tarde, puede encontrarlas
en este sitio web:
http://solutions.brother.com/
[Seleccione su zona/país]-[Elija su
producto]-[Descargas]
25
Page 83

Haga clic en [Finalizar].
9
La instalación del software se ha
completado.
Reinicie la computadora si así se le indica.
Inicie el software.
0
Haga clic en “Iniciar” - “Todos los
programas (Programas)” - “Brother
P-touch” - “P-touch Editor 5.0” para
iniciar P-touch Editor 5.0.
■ Para los usuarios de un cable de
interfaz de red
Seleccione la opción para buscar
6
dispositivos en la red y elija de una lista
de dispositivos detectados
(recomendado). O bien, introduzca la
dirección IP o el nombre del nodo de la
impresora. Haga clic en [Siguiente].
Para obtener la dirección IP o el nombre
del nodo de la impresora, imprima la
página de ajustes de la impresora. Para
obtener más información, consulte
“Impresión de los ajustes de la impresora”
(→ P.46).
Seleccione la impresora.
7
Siga las instrucciones que se muestran en
pantalla.
Cuando se le indique que registre la
8
impresora en línea, seleccione un método de
registro y haga clic en [Siguiente].
Si ha seleccionado registrar el producto
en línea, su explorador de Internet
predeterminado se abrirá en una nueva
ventana.
Cuando se le indique que debe descargar
9
herramientas opcionales, haga su
elección y haga clic en [Siguiente].
• Si elige “Sí, muestre la página”, se
dirigirá a la página “solutions center”
del sitio web antes de finalizar la
instalación. (recomendado)
[Seleccione su zona/país]-[Elija su
producto]-[Descargas]
• Si elige “No, no muestre la página”,
continuará con la instalación.
Nota
● Si desea descargar las herramientas
opcionales más tarde, puede encontrarlas
en este sitio web:
http://solutions.brother.com/
[Seleccione su zona/país]-[Elija su
producto]-[Descargas]
Haga clic en [Finalizar].
0
La instalación del software se ha
completado.
Reinicie la computadora si así se le indica.
Inicie el software.
a
Haga clic en “Iniciar” - “Todos los
programas (Programas)” - “Brother
P-touch” - “P-touch Editor 5.0” para
iniciar P-touch Editor 5.0.
■ Para los usuarios de una impresora
compartida de red
Seleccione la cola de la impresora y, a
6
continuación, haga clic en [Aceptar].
Siga las instrucciones que se muestran en
pantalla.
Nota
● Si no conoce la ubicación o el nombre de
la impresora en la red, comuníquese con
el administrador.
Cuando se le indique que registre la
7
impresora en línea, seleccione un
método de registro y haga clic en
[Siguiente].
Si ha seleccionado registrar el producto
en línea, su explorador de Internet
predeterminado se abrirá en una nueva
ventana.
Cuando se le indique que debe descargar
8
herramientas opcionales, seleccione su
elección y haga clic en [Siguiente].
• Si elige “Sí, muestre la página”, se
dirigirá a la página “solutions center”
del sitio web antes de finalizar la
instalación. (recomendado)
[Seleccione su zona/país]-[Elija su
producto]-[Descargas]
• Si elige “No, no muestre la página”,
continuará con la instalación.
Nota
● Si desea descargar las herramientas
opcionales más tarde, puede encontrarlas
en este sitio web:
http://solutions.brother.com/
[Seleccione su zona/país]-[Elija su
producto]-[Descargas]
26
Page 84

Haga clic en [Finalizar].
9
La instalación del software se ha
completado.
Reinicie la computadora si así se le indica.
Inicie el software.
0
Haga clic en “Iniciar” - “Todos los
programas (Programas)” - “Brother
P-touch” - “P-touch Editor 5.0” para
iniciar P-touch Editor 5.0.
■ Instalación de la utilidad de
configuración BRAdmin Light
BRAdmin Light es una utilidad para la
configuración inicial de dispositivos de
Brother conectados en red. También puede
buscar productos de Brother en la red, ver el
estado y configurar los ajustes básicos de la
red, como la dirección IP.
Para obtener más información sobre
BRAdmin Light, visítenos en
http://solutions.brother.com/
Nota
● Si precisa una administración de la
impresora más avanzada, utilice la última
versión de la utilidad BRAdmin
Professional de Brother que puede
descargar en
http://solutions.brother.com/
● Si utiliza el software Personal Firewall, es
posible que BRAdmin Light no detecte el
dispositivo sin configurar. En tal caso,
desactive el software Personal Firewall y
pruebe de nuevo con BRAdmin Light.
Reinicie el software Personal Firewall una
vez definida la información de la
dirección.
Haga clic en [BRAdmin Light] y siga las
2
instrucciones que se muestran en
pantalla.
Si Firewall de Windows está activado en
la computadora, aparecerá el mensaje
“¿Desea añadir esta aplicación a la lista
de excepciones?”. Compruebe su entorno
informático y seleccione [Sí] o [No].
■ Configuración de la dirección IP, la
máscara de subred y la puerta de
acceso con BRAdmin Light
Haga clic en “Iniciar”-“Todos los
1
programas (Programas)”-“Brother”“BRAdmin Light”.
BRAdmin Light buscará nuevos
dispositivos automáticamente.
Haga clic en [Instalación de la utilidad].
1
Esta pantalla es la misma que se muestra
cuando se introduce el CD-ROM.
Nota
● Si hay un servidor DHCP/BOOTP/RARP
en la red, no es necesario que realice la
operación siguiente, ya que el servidor de
impresión obtendrá automáticamente la
dirección IP.
27
Page 85

Haga doble clic en el dispositivo sin
2
configurar.
La contraseña predeterminada es
“access”.
Seleccione el Método de arranque
3
STATIC. Introduzca la dirección IP, la
máscara de subred y la puerta de acceso
y, a continuación, haga clic en [Aceptar].
Si se utiliza Mac OS
®
En esta sección se explica cómo instalar
P-touch Editor 5.0 y el controlador de
impresora.
Nota
● No conecte la impresora a la
computadora Macintosh
finalizado la instalación de P-touch Editor
5.0. Asegúrese de que el cable USB no
está conectado hasta que se le indique
que lo haga.
● Debe iniciar una sesión como usuario
con privilegios de administrador para
poder instalar este software.
● Apague la impresora con el botón de
encendido y luego con el interruptor de
alimentación principal.
A continuación se muestra el ejemplo para Mac
®
OS
X 10.5.7.
Inicie la computadora Macintosh® e
1
introduzca el CD-ROM en la unidad de
CD-ROM.
Haga doble clic en el icono “PT_Series”
(CD-ROM).
®
hasta que haya
La información de la dirección se
4
guardará en la impresora.
28
Haga doble clic en “Brother
2
PT-9800PCN Driver.pkg”, en la carpeta
“Mac OS X”.
El instalador del controlador se iniciará.
Siga las instrucciones que se muestran en
pantalla.
Page 86

Una vez finalizada la instalación y que se
3
muestre la pantalla siguiente, haga clic
en [Cerrar].
La instalación del controlador de
impresora se ha completado.
A continuación, instale P-touch Editor
5.0.
Haga doble clic en “P-touch Editor 5.0
4
Installer.mpkg”.
El instalador de P-touch Editor 5.0 se
iniciará.
Siga las instrucciones que se muestran en
pantalla.
Una vez finalizada la instalación y que se
5
muestre el mensaje “Haga clic en
Reiniciar para acabar de instalar el
software.”, haga clic en [Reiniciar].
La computadora Macintosh
®
La instalación del software se ha
completado.
se reiniciará.
Después de reiniciar la computadora,
6
conecte la impresora a la computadora
mediante el cable USB/LAN y, a
continuación, encienda la impresora.
Puerto USB
Cable USB
Tomacorriente
para el adaptador
de CA
Adaptador de CA
Puerto LAN
Nota
● Si conecta la impresora a la computadora
Macintosh
posible que no se detecte correctamente.
En tal caso, conecte la impresora
directamente al puerto USB de la
computadora Macintosh
En Mac OS® X 10.3.9 - 10.4.x
7
Haga doble clic en la unidad donde está
instalado Mac OS
“Aplicaciones” - “Utilidades” - “Utilidad
Configuración Impresoras”, por este
orden.
En Mac OS
Haga clic en “Apple menú” “Preferencias del Sistema”, por este
orden, y haga clic en “Impresión y Fax”. A
continuación, haga clic en para añadir
la impresora.
®
mediante un hub USB, es
®
.
®
X y haga clic en
®
X 10.5.x - 10.6
29
Page 87

Seleccione el método de conexión.
8
Impresora local con cable USB
Consulte “Para los usuarios de un cable de
interfaz USB” (→ P.30).
Impresora compartida de red
(Configuración de red simple)
Compruebe que el cable LAN y la
impresora están conectados.
Consulte “Para los usuarios de un cable de
interfaz de red (Configuración de red
simple)” (→ P.31).
Impresora compartida de red
(Configuración de red manual)
Compruebe que el cable LAN y la
impresora están conectados.
Consulte “Para los usuarios de un cable de
interfaz de red (Configuración de red
manual)” (→ P.32).
■ Para los usuarios de un cable de
interfaz USB
En Mac OS® X 10.3.9
9
Haga clic en [Añadir] y seleccione “USB”
en la parte superior de la pantalla.
Seleccione “PT-9800PCN” en la lista y
vuelva a hacer clic en [Añadir] para
añadir la impresora a la “Utilidad
Configuración Impresoras”.
®
En Mac OS
Haga clic en [Añadir] / .
Seleccione “PT-9800PCN/Brother
PT-9800PCN” en la lista y haga clic en
[Añadir] para añadir la impresora a la
“Utilidad Configuración Impresoras”/
“Impresión y Fax”.
X 10.4.x - 10.6
30
Nota
● En Mac OS
[Añadir] y añada la impresora con la
conexión BRPTUSB. (En tal caso,
aparecerá un cuadro de diálogo de error
cuando se produzca un error de
impresión). Defina el nombre de
impresora adecuado.
Cuando vuelva a la pantalla “Lista de
0
impresoras” / “Impresión y Fax”,
compruebe que se ha añadido
“PT-9800PCN/Brother PT-9800PCN” y,
a continuación, cierre esta pantalla.
Ahora ya puede utilizar la impresora.
®
X 10.4.x, haga clic en
Nota
● Para obtener más información sobre el
software, consulte la Ayuda de P-touch
Editor.
Page 88

■ Para los usuarios de un cable de
interfaz de red (Configuración
de red simple)
Haga clic en [Añadir].
9
En Mac OS® X 10.3.9
0
Realice la selección que se muestra a
continuación.
Seleccione “Brother PT-9800PCN” en la
a
lista y vuelva a hacer clic en [Añadir]
para añadir la impresora a la “Utilidad
Configuración Impresoras”/“Impresión y
Fax”.
®
Mac OS
X 10.5.x-10.6
Cuando vuelva a la pantalla “Lista de
b
impresoras” / “Impresión y Fax”,
compruebe que se ha añadido “Brother
PT-9800PCN” y, a continuación, cierre
esta pantalla.
Ahora ya puede utilizar la impresora.
Nota
● Para obtener más información sobre el
software, consulte la Ayuda de P-touch
Editor.
Mac OS® X 10.3.9
®
Mac OS
X 10.4.x
31
Page 89

■ Para los usuarios de un cable de
interfaz de red (Configuración
de red manual)
En Mac OS® X 10.3.9
9
Haga clic en [Añadir] y seleccione
Impresión IP en la parte superior de la
pantalla.
Introduzca la dirección IP de la impresora
en el cuadro Dirección de la impresora.
Seleccione “PT-9800PCN” en la lista y
vuelva a hacer clic en [Añadir] para
añadir la impresora a la “Utilidad
Configuración Impresoras”.
®
En Mac OS
Haga clic en [Añadir] y seleccione
Impresora IP / IP en la parte superior de la
pantalla.
Introduzca la dirección IP de la impresora
en el cuadro Dirección. Seleccione
“Brother PT-9800PCN” en la lista y
vuelva a hacer clic en [Añadir] para
añadir la impresora a la “Utilidad
Configuración Impresoras”.
X 10.4.x - 10.6
■ Instalación de la utilidad de
configuración BRAdmin Light
BRAdmin Light es una utilidad para la
configuración inicial de dispositivos de
Brother conectados en red. También puede
buscar productos de Brother en la red, ver el
estado y configurar los ajustes básicos de la
red, como la dirección IP.
Para obtener más información sobre
BRAdmin Light, visítenos en
http://solutions.brother.com/
Nota
● Si utiliza el software Personal Firewall, es
posible que BRAdmin Light no detecte el
dispositivo sin configurar. En tal caso,
desactive el software Personal Firewall y
pruebe de nuevo con BRAdmin Light.
Reinicie el software Personal Firewall una
vez definida la información de la
dirección.
Haga doble clic en “BRAdmin Light.pkg”,
1
en la carpeta “Mac OS X”.
El instalador de BRAdmin Light se
iniciará. Siga las instrucciones que se
muestran en pantalla.
Nota
● Al especificar el nombre de la cola,
utilice el valor BRNxxxxxxxxxxxx, donde
xxxxxxxxxxxx es la dirección Ethernet.
Cuando vuelva a la pantalla “Lista de
0
impresoras” / “Impresión y Fax”,
compruebe que se ha añadido “Brother
PT-9800PCN” y, a continuación, cierre
esta pantalla.
Ahora ya puede utilizar la impresora.
Nota
● Para obtener más información sobre el
software, consulte la Ayuda de P-touch
Editor.
32
Una vez finalizada la instalación y que se
2
muestre el mensaje “El software se ha
instalado correctamente.”, haga clic en
[Cerrar].
La instalación de BRAdmin Light se ha
completado.
Page 90

■ Configuración de la dirección IP, la
máscara de subred y la puerta de
acceso con BRAdmin Light
Haga clic en “Biblioteca”-“Impresoras”-
1
“Brother”-“P-touch Utilities”-“BRAdmin
Light.jar”.
BRAdmin Light buscará nuevos
dispositivos automáticamente.
Nota
● Si hay un servidor DHCP/BOOTP/RARP
en la red, no es necesario que realice la
operación siguiente, ya que el servidor de
impresión obtendrá automáticamente la
dirección IP.
Haga doble clic en el dispositivo sin
2
configurar.
La contraseña predeterminada es
“access”.
Seleccione el método de arranque
3
STATIC. Introduzca la dirección IP, la
máscara de subred y la puerta de acceso
y, a continuación, haga clic en [Aceptar].
La información de la dirección se
4
guardará en la impresora.
33
Page 91

Desinstalación del software
En esta sección se explica cómo desinstalar el software y el controlador de impresora. En los pasos
siguientes verá el término PT-XXXX, donde “XXXX” es el nombre de su impresora.
®
Si usa Microsoft
Si usa Macintosh
Si se utiliza Microsoft®
Windows
■ Desinstalación de P-touch Editor
En Windows® XP
1
En “Panel de control”, vaya a “Agregar o
quitar programas”.
Aparecerá la ventana “Agregar o quitar
programas”.
En Windows Vista
En “Panel de control”, vaya a “Programas”
y abra “Programas y características”.
Aparecerá la ventana “Desinstalar o
cambiar este programa”.
En Windows® XP
2
Seleccione “Brother P-touch Editor 5.0” y
haga clic en [Quitar].
En Windows Vista
Seleccione “Brother P-touch Editor 5.0” y
haga clic en [Desinstalar].
Cuando aparezca el cuadro de diálogo
“Control de cuentas de usuario”, haga clic
en [Continuar]. Si se solicita una
contraseña, escriba la contraseña y haga
clic en [Aceptar].
Haga clic en [Aceptar].
3
La operación de desinstalación se
iniciará. Una vez quitado el software de
la computadora, aparece el cuadro de
diálogo “Mantenimiento finalizado”.
Haga clic en [Finalizar].
Cierre la ventana “Agregar o quitar
4
programas (XP) / Agregar o quitar programas
(Windows Vista
P-touch Editor se ha desinstalado.
Nota
● También es posible desinstalar la Guía
del usuario para el software (PDF) y la
Guía del usuario en red (PDF) (solamente
PT-9800PCN) con el mismo
procedimiento.
Windows®, consulte “Si se utiliza Microsoft® Windows®” (→ P.34).
®
, consulte “Si se utiliza Mac OS®” (→ P.35).
■ Desinstalación del controlador de
®
®
/Windows® 7
impresora
Apague la impresora.
1
En Windows® XP
2
En “Panel de control”, abra “Impresoras y
faxes”.
En Windows Vista
En “Panel de control”, vaya a “Hardware
y sonido” y abra “Impresoras”.
®
En Windows
Haga clic en y vaya a [Dispositivos e
impresoras].
7
Nota
● Para obtener más información, consulte
®
/Windows® 7
®
/Windows® 7)”.
la Ayuda de Windows
En Windows® XP
3
Seleccione “Brother PT-XXXX” y haga clic
en “Archivo”-“Eliminar” o bien, haga clic
con el botón derecho del ratón en el icono
y, a continuación, haga clic en [Eliminar].
En Windows Vista®/Windows® 7
Seleccione "Brother PT-XXXX" y haga clic
en [Eliminar esta impresora]; de lo
contrario, haga clic con el botón derecho
del ratón en el icono y, a continuación,
haga clic en [Eliminar] (Windows Vista
o [Eliminar dispositivo] (Windows
En Windows® XP
4
Vaya a “Archivo”-“Propiedades del
servidor”.
Aparecerá la ventana “Propiedades de
Servidor de impresión”.
En Windows Vista
En la ventana “Impresoras”, haga clic con
el botón derecho del ratón y seleccione
“Ejecutar como administrador”“Propiedades del servidor...”.
®
®
.
®
7).
®
®
)
34
Page 92

Si aparece el cuadro de diálogo de
confirmación de la autorización, haga
clic en [Continuar].
Si aparece el cuadro de diálogo “Control
de cuentas de usuario”, escriba la
contraseña y haga clic en [Aceptar].
Aparecerá la ventana “Propiedades de
Servidor de impresión”.
®
En Windows
7
Seleccione [Fax] o [Escritor de
documentos XPS de Microsoft] en la
ventana [Dispositivos e impresoras], y
luego haga clic en [Propiedades del
servidor de impresión], que aparece en la
barra del menú.
En Windows® XP
5
Haga clic en la ficha “Controladores” y
seleccione “Brother PT-XXXX”. A
continuación, haga clic en [Quitar].
Vaya al paso
En Windows Vista
7.
®
Haga clic en la ficha “Controladores” y
seleccione “Brother PT-XXXX”. A
continuación, haga clic en [Quitar...].
En Windows
®
7
Haga clic en la ficha [Controladores] y
luego en [Cambiar configuración de
controladores].
(Si aparece el mensaje Control de cuentas
de usuario, escriba la contraseña y luego
haga clic en [Aceptar].)
Seleccione "Brother XX-XXXX", y luego
haga clic en [Eliminar...].
En Windows® XP
6
Vaya al paso
En Windows Vista
7.
®
Seleccione [Quitar sólo el controlador] y
haga clic en [Aceptar].
En Windows
®
7
Seleccione [Quitar el controlador y el
paquete de controladores], y luego haga
clic en [Aceptar].
Si se utiliza Mac OS
®
■ Desinstalación de P-touch Editor
En la unidad donde está instalado
1
P-touch Editor, haga doble clic en las
carpetas “Aplicaciones” - “P-touch Editor
5.0” - “Desinstalar P-touch” y, por
último, en “UninstallPtEditor.command”.
Aparecerá la ventana “Terminal” y la
operación de desinstalación se iniciará.
Nota
● Se requieren privilegios de administrador
para poder realizar la operación de
desinstalación.
● Si no se muestra la ventana “Terminal”
haciendo doble clic en
“UninstallPtEditor.command”, haga clic
con el botón derecho del ratón (o
presione la tecla Control + clic) en
“UninstallPtEditor.command” para que
aparezca el menú contextual. Abra la
ventana “Terminal” desde el menú
contextual.
Haga clic en para cerrar la ventana
2
“Terminal”.
Elimine la carpeta “Aplicaciones”-
3
“P-touch Editor 5.0”.
Nota
● Antes de eliminar la carpeta “P-touch
Editor 5.0”, compruebe si contiene
archivos necesarios.
P-touch Editor se ha desinstalado.
Cierre la ventana “Propiedades de
7
Servidor de impresión”.
El controlador de impresora se ha
desinstalado.
35
Page 93

■ Desinstalación del controlador de
impresora
Apague la impresora.
1
En Mac OS® X 10.3.9 - 10.4.x
2
Haga doble clic en la unidad donde está
instalado Mac OS
“Aplicaciones” - “Utilidades” - “Utilidad
Configuración Impresoras”.
Aparecerá la ventana “Lista de
impresoras”.
En Mac OS
Haga clic en “Apple menú” “Preferencias del Sistema”, por este
orden, y haga clic en “Impresoras y
Faxes”.
En Mac OS® X 10.3.9 - 10.4.x
3
Seleccione “PT-XXXX” y haga clic en .
En Mac OS
Seleccione “Brother PT-XXXX” y haga clic
en .
Cierre la ventana “Lista de impresoras” /
4
“Impresoras y Faxes”.
El controlador de impresora se ha
desinstalado.
®
X y haga doble clic en
®
X 10.5.x - 10.6
®
X 10.5.x - 10.6
36
Page 94

Función avanzada
Una vez conectada la impresora a la computadora, es posible crear e imprimir etiquetas.
En esta sección se explica cómo crear etiquetas utilizando un lector de códigos de barras y diversos
ajustes de impresión útiles.
■ Impresión de etiquetas a alta velocidad o con alta resolución
Consulte “Impresión a mayor velocidad o con mayor resolución” (→ P.37)
■ Impresión de un gran número de etiquetas distribuidas entre varias impresoras
Consulte “Impresión distribuida” (→ P.38)
■ Impresión utilizando solamente un lector de códigos de barras y sin computadora
Consulte “Función BTP (Impresión de plantillas de códigos de barras)” (→ P.40)
■
Creación e impresión de etiquetas sencillas con P-touch Editor Lite LAN (solamente
PT-9800PCN)
Consulte “Utilización de P-touch Editor Lite LAN (solamente PT-9800PCN y Windows®)” (→ P.45)
■ Impresión de una lista de los ajustes actuales de la impresora
Consulte “Impresión de los ajustes de la impresora” (→ P.46)
Impresión a mayor velocidad o con mayor resolución
La velocidad y la resolución de impresión se pueden cambiar según la combinación del tipo de cinta
utilizada y el ajuste de salida seleccionado. Con cintas HG es posible imprimir etiquetas a una
velocidad o con una resolución aún mayor.
Salida
Alta velocidad
(solamente HG)
Estándar
Alta resolución
(solamente HG)
● Con una cinta HG es posible imprimir a una velocidad mayor que con una cinta TZ (ajuste “Estándar”)
● Si se utiliza una cinta HG con el ajuste “Alta velocidad” seleccionado, la impresión puede ser todavía más
rápida. No obstante, dado que disminuye la resolución en la dirección de avance, no resulta adecuado
para una impresión detallada.
● Si se utiliza una cinta HG con el ajuste “Alta resolución” seleccionado, la impresión puede tener una
resolución aún mayor. Esto resulta adecuado para la impresión detallada de objetos como gráficos y líneas
curvas.
● Si va a imprimir códigos de barras, utilice el ajuste “Estándar”, que tiene las resoluciones horizontal y
vertical idénticas.
Tipo de cinta
Cinta TZ Cinta HG
—
0,78"/seg
(20 mm/seg)
—
3,15"/seg
(80 mm/seg)
2,05"/seg
(52 mm/seg)
0,78"/seg
(20 mm/seg)
Resolución
360 × 180 ppp
360 × 360 ppp
360 × 720 ppp
Nota
● Las velocidades de impresión anteriores indican los valores máximos posibles. La velocidad real
puede variar según las condiciones operativas.
37
Page 95

Impresión distribuida
Si se va a imprimir un gran número de
etiquetas, es posible distribuir la impresión
entre varias impresoras.
Dado que la impresión es simultánea, el tiempo
total de impresión puede disminuir.
Nota
● La impresión se puede distribuir entre
impresoras conectadas mediante una
conexión USB o de red (solamente
PT-9800PCN).
● El número de páginas que se van a
imprimir se divide automáticamente entre
las impresoras seleccionadas. Si el
número especificado de páginas no se
puede dividir por igual entre las
impresoras, se dividirá en el orden de las
impresoras indicadas en el cuadro de
diálogo cuando los ajustes de impresión
se especifiquen en el paso
4.
Seleccione la ficha “Avanzado”, active la
3
casilla de verificación “Impresión
distribuida” y, a continuación, haga clic
en [Ajustes].
En el cuadro de diálogo “Ajustes de
4
impresion distribuida”, seleccione las
impresoras que va a utilizar para la
impresión distribuida.
3
1
2
200
67 67
En P-touch Editor 5.0, en el menú
1
“Archivo”, haga clic en “Imprimir”.
Haga clic en [Propiedades...].
2
38
66
1. Haga clic en [Detectar imformación del
papel actual...].
2. La información actual de la impresora
detectada aparece debajo de “Ancho
actual” y “Tipo de papel”.
3. Active la casilla de verificación que hay
junto al “Nombre de la impresora” que
se va a utilizar para la impresión
distribuida.
Page 96

Especifique el ancho de cinta que se va a
5
utilizar para imprimir.
A. Si solamente se ha seleccionado una
impresora
En el cuadro de diálogo del paso
seleccione la impresora cuyo ajuste se va
a especificar y, a continuación, haga
doble clic en ella o haga clic con el botón
derecho del ratón en ella y haga clic en
“Ajustes”. En la lista desplegable “Ajustar
ancho”, seleccione el ancho de cinta.
Nota
● La información que se va a mostrar en el
cuadro de diálogo del paso
introducir en el cuadro de texto “Notas”.
B.Si se han seleccionado varias
impresoras
En el cuadro de diálogo del paso
seleccione las impresoras cuyo ajuste se
va a especificar y, a continuación, haga
clic derecho en ellas y haga clic en
“Ajustes”. En la lista desplegable “Ajustar
ancho”, seleccione el ancho de cinta. Se
aplicará el mismo ajuste de ancho de
cinta a todas las impresoras
seleccionadas.
4 se puede
4,
4,
Haga clic en [OK] para cerrar la ventana
6
de ajuste del ancho de cinta.
Haga clic en [OK] para cerrar la ventana
7
“Ajustes de impresion distribuida”.
La configuración ha finalizado.
Haga clic en [OK] para comenzar la
8
impresión distribuida.
Nota
● Si el ancho de cinta seleccionado es
diferente al que se muestra al lado de
“Ancho actual”, aparecerá junto al
ajuste mostrado debajo de “Ancho
actual”. Cargue la impresora con cinta
del ancho especificado en “Ajustar
ancho”.
● Es posible que no se detecte la
información de una impresora conectada
utilizando el PS-9000 o cualquier otro
servidor de impresión o hub USB común.
Antes de imprimir, especifique los ajustes
manualmente y compruebe que la
impresora se puede utilizar para
imprimir.
● Según se utilice un enrutador y las
funciones de seguridad en uso, como un
servidor de seguridad, es posible que no
se pueda utilizar esta función.
● Se recomienda realizar una prueba de
conexión para su entorno operativo. Para
obtener más información, comuníquese
con un representante de ventas.
Nota
● Las opciones mostradas debajo de
“Configuración de impresora” y “Notas”
no están disponibles.
39
Page 97

Función BTP (Impresión de plantillas de códigos de barras)
Con un lector de códigos de barras conectado a
la impresora, es posible imprimir fácilmente
etiquetas y códigos de barras escaneando estos
últimos.
STATUS
Impresión de plantillas predefinidas (→
P.41)
Si se ha almacenado un diseño de etiqueta
de uso frecuente en la impresora, es
posible imprimir etiquetas idénticas con
solamente escanear los códigos de barras.
Impresión de códigos de barras (→ P.42)
Se puede imprimir un código de barras
escaneado con el lector de códigos de
barras con el protocolo y el tamaño de una
plantilla creada anteriormente.
Impresión de etiquetas asistida por base
de datos (→ P.43)
Es posible buscar una base de datos
conectada a un diseño de etiqueta e
imprimir los datos que sustituyen los datos
de objetos dispuestos en el diseño de una
plantilla.
■ Preparación
Conecte un lector de códigos de barras a la
impresora.
Interfaces de conexión del lector de
códigos de barras
Lector de códigos de barras
RS-232
PT-9700PC PT-9800PCN
Interfaz directa USB
Modelos de lectores de códigos de barras
cuyo funcionamiento se ha confirmado
• OPR-3201 (OPTOELECTRONICS CO.,
LTD.)
• LS 2208 (Motorola, Inc.)
• DS 6707 (Honeywell International Inc.)
Nota
● Para las P+F y una lista actualizada de los
modelos de lectores de códigos de barras
cuyo funcionamiento se ha confirmado,
visite Brother Solutions Center
(http://solutions.brother.com/).
● Para poder utilizar esta función, primero
se debe transferir el diseño de etiqueta o
la plantilla que se va a utilizar con
Transfer Manager desde la computadora
a la impresora. Para obtener más
información sobre Transfer Manager,
consulte la “Guía del usuario para el
software” (PDF).
● Es necesario configurar el lector de
códigos de barras para códigos de barras
sin prefijo o sufijo.
● Deben cambiarse diversos ajustes, como
la velocidad en baudios, para poder
utilizar la conexión RS-232C. Para
obtener más información sobre cómo
cambiar los ajustes, consulte el manual
de instrucciones del lector de códigos de
barras. A continuación se indican los
ajustes predeterminados para el puerto en
serie de esta impresora.
Velocidad
en
baudios
Paridad Ninguna Bit de parada 1
Longitud
en bits
● Para cambiar los ajustes de
comunicación de la interfaz en serie de la
impresora, consulte “Ajuste de la interfaz
en serie (solamente Windows
P.47) para obtener información detallada.
● Para obtener más información sobre el
uso del lector de códigos de barras,
comuníquese con el fabricante.
9.600
bps
8
Control de
flujo
®
)” (→
DTR
40
Page 98

■ Impresión de plantillas predefinidas
Si se ha almacenado un diseño de etiqueta
de uso frecuente en la impresora, es posible
imprimir etiquetas idénticas con solamente
escanear los códigos de barras.
<Etiqueta de nombre>
<Etiqueta de dirección>
Bill Anderson
Mr. Bill Anderson
4555 Cumberland Pkwy
Anytown USA 95063
Nota
● Para obtener más información sobre los
códigos de barras que se pueden
escanear para los diversos ajustes,
consulte “Lista de códigos de barras para
especificar ajustes” (→ P.56).
Con Transfer Manager, transfiera (desde
1
P-touch Editor 5.0 a la impresora) el
diseño de etiqueta para imprimir.
Nota
●
Se puede convertir un objeto de texto del
diseño de etiqueta en una imagen.
Después de su conversión en una imagen,
no es posible modificar el texto. Esto
resulta útil para proteger plantillas de uso
frecuente contra su edición accidental.
En la ventana de diseño de P-touch Editor,
haga clic con el botón derecho del ratón
en el objeto de texto y, a continuación,
haga clic en “Propiedades”. Haga clic en
la ficha “Expandido” y active la casilla de
verificación “EI texto no se puede editar”.
En caso contrario, haga clic en
“Opciones” en el menú “Herramienta”,
haga clic en la ficha “General” y, a
continuación, active la casilla de
verificación “Mostrar fichas expandidas
de propiedades objetos” que hay debajo
de “Otros”.
Si la casilla de verificación está
desactivada, el objeto se volverá a
convertir en texto editable.
Cuando los datos se transfieren a
2
“Configuraciones” en Transfer Manager,
el número de “Asignacion de clave” se
especifica automáticamente.
Nota
● Especifique un número de “Asignacion
de clave” entre 1 y 10 para diseños de
etiquetas que se vayan a utilizar con la
impresión de plantillas predefinidas.
Escanee el código de barras “Comando
3
de plantilla P-touch” (P-touch template
command).
Consulte “Lista de códigos de barras para
especificar ajustes” (→ P.56).
De los códigos de barras de “Ajustes
4
básicos” (Basic settings), escanee el
código de barras correspondiente al
parámetro cuyo ajuste desea especificar.
Nota
● Pueden especificarse los ajustes para
varios parámetros.
● Si no se han especificado ajustes, P-touch
Template Settings imprimirá una etiqueta.
La configuración predeterminada de
P-touch Template Settings es una sola
copia con “Corte automático activado”
(Auto cut on) y “Corte medio activado”
(Half cut on). Para obtener más
información sobre P-touch Template
Settings, descargue “P-touch Template
manual” (solamente en inglés) del sitio
web siguiente.
http://solutions.brother.com/
[Seleccione su zona/país]-[Elija su
producto]-[Descargas].
● Para especificar el número de copias que
se van a imprimir, escanee el código de
barras “Número de copias” (Number of
copies) y, a continuación, escanee los
códigos de barras de “Para introducir
números” (For entering numbers) para
especificar un número de tres dígitos.
Ejemplo:
Especifique los números escaneando
códigos de barras de la siguiente manera:
7→[00][7], 15→[0][1][5]
● Para cambiar el ajuste del número de
copias, vuelva a escanear el código de
barras “Número de copias” (Number of
copies) y, a continuación, escanee los
códigos de barras para el nuevo número
de tres dígitos.
Escanee el código de barras de “Número
5
de plantilla predefinida” (Preset template
number) con el mismo valor que el
número de “Asignacion de clave” para el
diseño de etiqueta que se va a imprimir.
Se imprimirá la etiqueta especificada.
6
41
Page 99

■ Impresión de códigos de barras
Se puede imprimir un código de barras
escaneado con el lector de códigos de barras
con el protocolo y el tamaño de una plantilla
creada anteriormente.
Nota
● Para obtener más información sobre los
códigos de barras que se pueden
escanear para los diversos ajustes,
consulte “Lista de códigos de barras para
especificar ajustes” (→ P.56).
● Si el código de barras que se va a
escanear con el lector de códigos de
barras tiene un protocolo distinto al
código de barras de la plantilla creada
anteriormente, es posible que no se
pueda crear ni imprimir el código de
barras.
Con Transfer Manager, transfiera (desde
1
P-touch Editor 5.0 a la impresora) la
plantilla de código de barras para
imprimir.
(CODE128/9 dígitos/2,7"×0,65")
Nota
● Asegúrese de crear plantillas de códigos
de barras que cumplan los límites de
tamaño y número de dígitos para el
código de barras que se va a crear. No se
puede crear el código de barras si supera
el número de dígitos especificado en la
plantilla.
Cuando los datos se transfieren a
2
“Configuraciones” en Transfer Manager,
el número de “Asignacion de clave” se
especifica automáticamente.
Escanee el código de barras “Comando
3
de plantilla P-touch” (P-touch template
command).
Consulte “Lista de códigos de barras para
especificar ajustes” (→ P.56).
De los códigos de barras de “Ajustes
4
básicos” (Basic settings), escanee el
código de barras correspondiente al
parámetro cuyo ajuste desea especificar.
Nota
● Pueden especificarse los ajustes para
varios parámetros.
● Si no se han especificado ajustes, P-touch
Template Settings imprimirá una etiqueta.
La configuración predeterminada de
P-touch Template Settings es una sola
copia con “Corte automático activado”
(Auto cut on) y “Corte medio activado”
(Half cut on). Para obtener más
información sobre P-touch Template
Settings, descargue “P-touch Template
manual” (solamente en inglés) del sitio
web siguiente.
http://solutions.brother.com/
[Seleccione su zona/país]-[Elija su
producto]-[Descargas].
● Para especificar el número de copias que
se van a imprimir, escanee el código de
barras “Número de copias” (Number of
copies) y, a continuación, escanee los
códigos de barras de “Para introducir
números” (For entering numbers) para
especificar un número de tres dígitos. El
ajuste se aplica automáticamente si se
han especificado tres dígitos.
Ejemplo:
Especifique los números escaneando
códigos de barras de la siguiente manera:
7→[00][7], 15→[0][1][5]
● Para cambiar el ajuste del número de
copias, vuelva a escanear el código de
barras “Número de copias” (Number of
copies) y, a continuación, escanee los
códigos de barras para el nuevo número
de tres dígitos.
42
Page 100

Escanee el código de barras “Seleccionar
5
plantilla” (Select template) y, a
continuación, escanee los códigos de
barras de “Para introducir números” (For
entering numbers) para especificar el
número de “Asignacion de clave” (tres
dígitos) para la plantilla de código de
barras.
Nota
● El ajuste se aplica automáticamente si se
han especificado tres dígitos.
Ejemplo:
Especifique los números escaneando
códigos de barras de la siguiente manera:
7→[00][7], 15→[0][1][5]
● Para cambiar el número, vuelva a
escanear el código de barras “Seleccionar
plantilla” (Select template) y, a
continuación, escanee los códigos de
barras para el nuevo número de tres
dígitos.
Escanee el código de barras cuyos datos
6
se van a utilizar.
(CODE128/9 dígitos)
Escanee el código de barras “Comenzar
7
impresión” (Begin printing).
El código de barras se imprime con el
8
protocolo y el tamaño especificados en la
plantilla.
■ Impresión de etiquetas asistida por base
de datos
En primer lugar, se debe conectar un campo
de la base de datos a un objeto del diseño de
etiqueta. Después, cuando se escanee un
código de barras clave con el lector de
códigos de barras, es posible imprimir los
datos correspondientes sustituyendo los
datos del archivo de la base de datos
conectada en el objeto de la plantilla
especificada.
Nota
● El código de barras clave es el código de
barras de la información que aparece en
el archivo de la base de datos, en la
primera columna por la izquierda en la
vista de registro (campo “A” en la vista de
formulario). Estos códigos de barras clave
se deben crear por adelantado.
● La información de la base de datos
contenida en el campo “A” de la vista de
formulario no debe incluir otros datos.
Además, aunque la información
contenga dos líneas de datos, solamente
se detecta la primera línea de datos al
escanear el código de barras con el
lector. Por tanto, introduzca solamente
una línea de datos en la información del
campo “A” de la vista de formulario.
● Para obtener más información sobre los
códigos de barras que se pueden
escanear para los diversos ajustes,
consulte “Lista de códigos de barras para
especificar ajustes” (→ P.56).
Conecte el archivo de la base de datos al
1
diseño de etiqueta para imprimir.
Para obtener más información sobre
cómo especificar los ajustes, consulte la
“Ayuda de P-touch Editor”.
43
 Loading...