

Page 1

Button Manager V2
User’s Guide
Version B
ENG
Page 2

Copyright
NOTE
© 2015 Brother Industries, Ltd. All rights reserved.
Information in this document is subject to change without notice. The software described in this document is
furnished under a license agreement. The software may be used or copied only in accordance with the terms
of those agreements. No part of this publication can be reproduced in any form or by any means without prior
written permission of Brother Industries, Ltd.
Trademarks
BROTHER is either a trademark or a registered trademark of Brother Industries, Ltd.
The optional Optical Character Recognition (OCR) capabilities are provided by Nuance Communications, Inc.
Microsoft, Windows, SharePoint and Paint are registered trademarks of Microsoft Corporation.
Other names and products mentioned in this document may be trademarks or registered trademarks of their
respective companies.
• Button Manager V2 is available only for Windows® users.
• For PDS-5000/5000F/6000F users: This guide uses PDS-6000 screen images, unless otherwise
indicated.
i
Page 3

Table of Contents
1 Product Overview 1
Button Manager V2 Features.....................................................................................................................1
2 Installation 2
Using the Wizard to Install Button Manager V2.........................................................................................2
3 Start Scanning 4
Starting Button Manager V2 ......................................................................................................................4
Quitting Button Manager V2 ......................................................................................................................7
4 Default Functions and Predefined Tasks 8
5 Button Panel Configuration 10
Changing Scan Button Properties ...........................................................................................................10
Basic Properties ................................................................................................................................12
Image Adjustment Properties ............................................................................................................17
Color Dropout Properties...................................................................................................................20
Image Processing Properties ............................................................................................................22
More Settings Properties ...................................................................................................................24
Using Scan Buttons .................................................................................................................................26
Sending Scans to a Folder as Image Data........................................................................................26
Sending Scans to a Folder as Text Data ...........................................................................................27
Opening Your Scanned Image in a Software Application..................................................................28
Attaching Your Scanned Image to a New Email................................................................................30
Sending Scans to a Printer................................................................................................................31
Sending Scans to a Shared Folder....................................................................................................34
Sending Scans to an FTP Server ......................................................................................................36
Sending Scans to a Microsoft
®
SharePoint® Server ........................................................................39
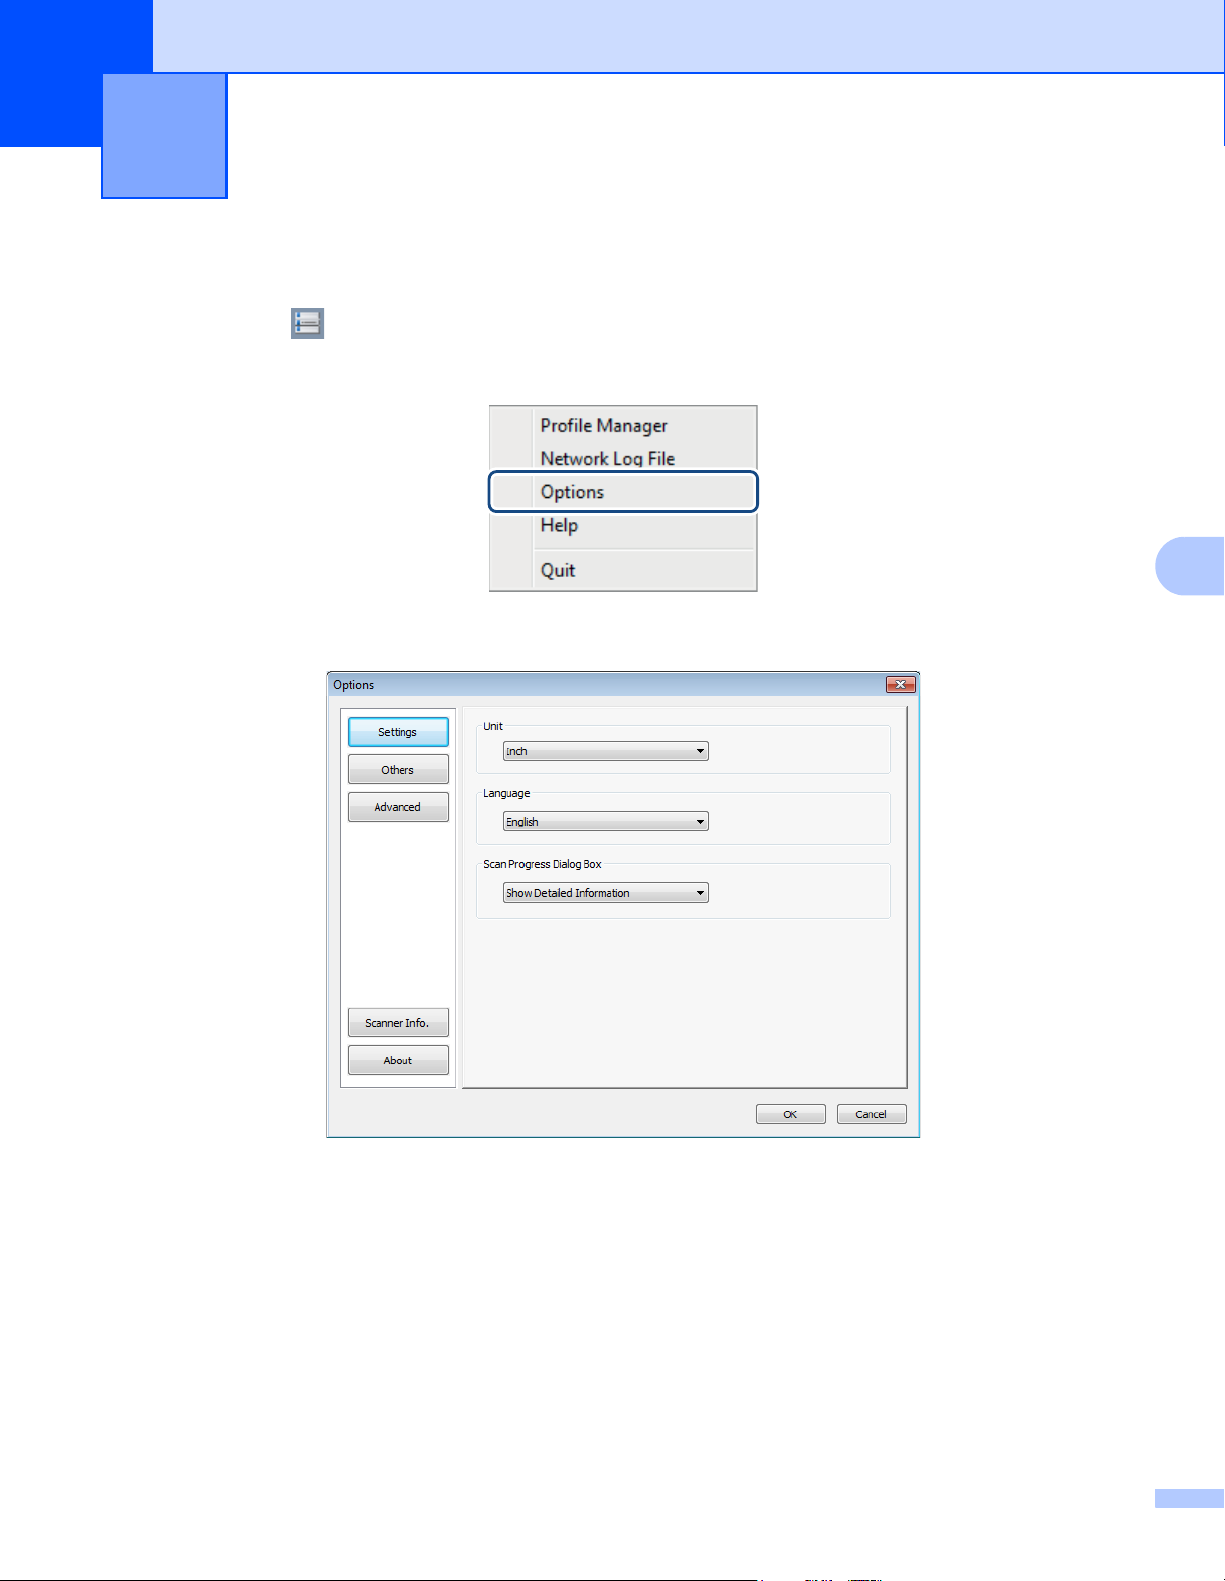
6 Using the Options Menu 42
Settings....................................................................................................................................................43
Others ......................................................................................................................................................44
Advanced.................................................................................................................................................46
Scanner Info. ...........................................................................................................................................47
About .......................................................................................................................................................47
ii
Page 4

7 Advanced Functions 48
Creating New Profiles ..............................................................................................................................48
Opening Your Scanned Image in a Software Application........................................................................50
Converting and Opening Your Scanned Text in a Software Application .................................................51
Saving Your Images as Searchable PDF Files........................................................................................52
“Drag and Drop” to Save Your File to a Button in the Button Panel ........................................................53
8 Troubleshooting 54
iii
Page 5
1
This is a party photo.
Button Manager V2 provides an easy way to scan your document and then send the scanned image to the
destination or software application of your choice. You can assign up to nine different destinations to
complete your frequently-performed tasks, and customize how you want different document types scanned
and saved.
Product Overview 1
Button Manager V2 Features 1
Button Manager V2 provides the following features to manage your scanned documents more effectively:
Uploading your scanned image to the network
Use Button Manager V2 to upload scanned images to various network file servers, including FTP and
other locations on your network.
Displaying the scanner’s TWAIN user interface
For more advanced scan settings, use Button Manager V2’s TWAIN user interface and customize your
scan configurations to fit with your application needs.
Supporting outside plug-in applications
1
If you are a software developer, you can develop and add your own plug-in features to expand Button
Manager V2’s scanning functions.
Scanning and inserting your image in a software application
Use Button Manager V2 to open a scanned image directly into a software application.
1
Page 6
2
NOTE
Installation 2
Using the Wizard to Install Button Manager V2 2
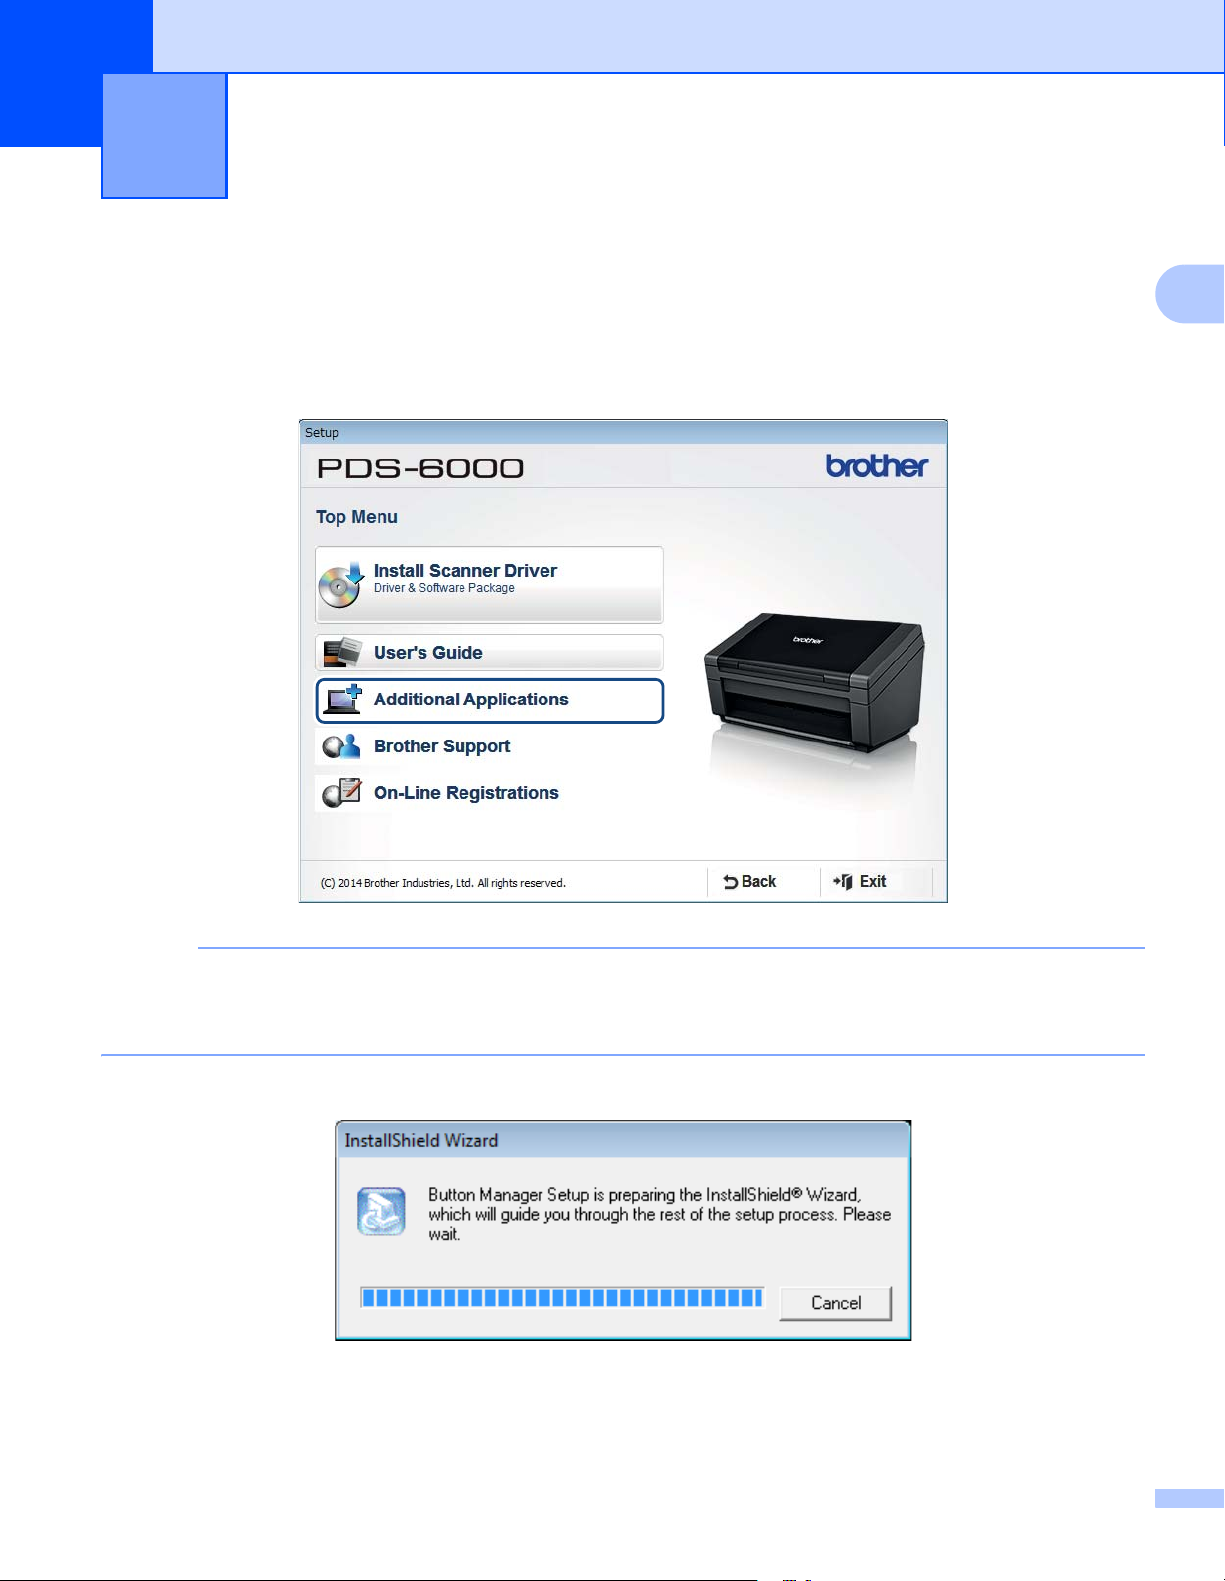
1 Put the DVD-ROM into your DVD-ROM drive.
2 When the Setup screen appears, click Additional Applications, and then select Install Button
Manager.
2
If the Brother screen does not appear automatically, go to Computer (My Computer).
Double-click the DVD-ROM icon, and then double-click Setup.exe.
If the User Account Control screen appears, click Allow or Yes.
3 The InstallShield Wizard appears and will guide you through the installation.
2
Page 7
Installation
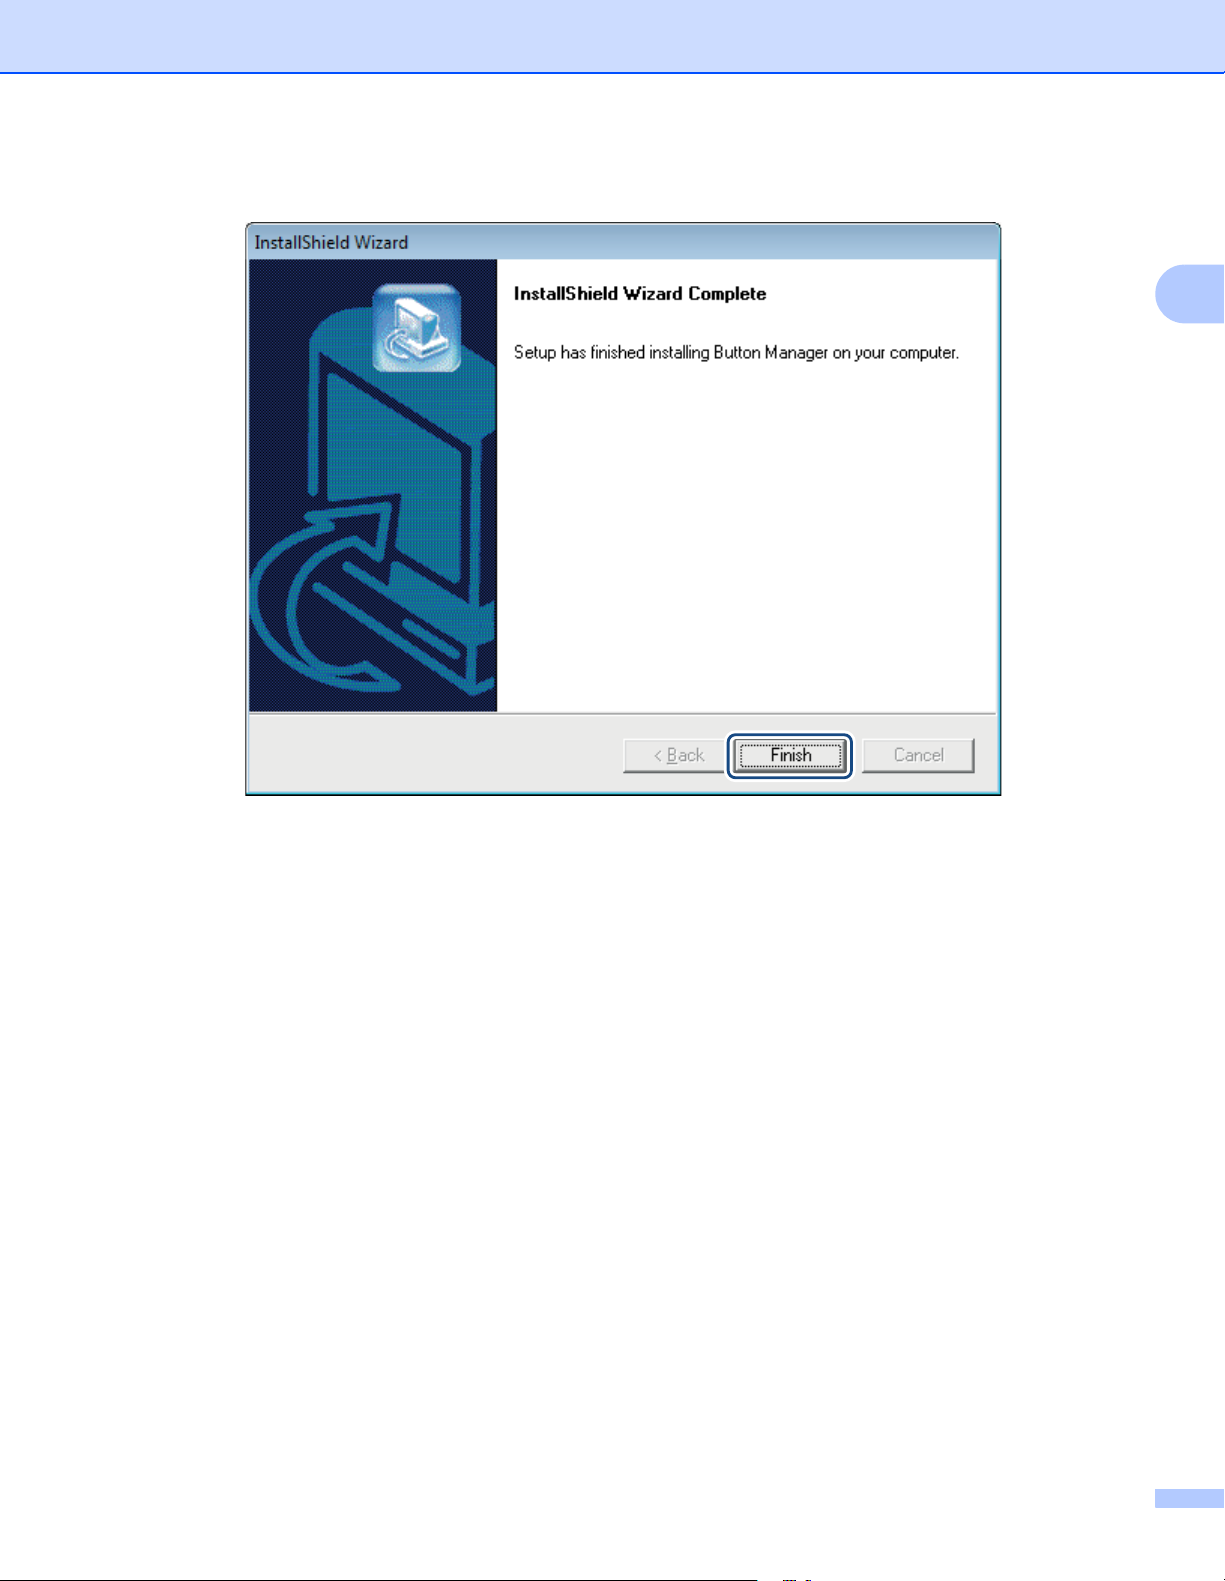
4 When the InstallShield Wizard is complete, click Finish.
2
3
Page 8
3
NOTE
After installing the scanner driver and Button Manager V2, you must restart your computer. After restarting,
Button Manager V2 will launch automatically when your scanner is connected and turned on. A shortcut icon
will appear in the system tray at the lower right corner of your Desktop.
When you start scanning, you can use Button Manager V2’s default settings or customize the scan settings
for your own needs. For more information on customizing Button Manager V2’s scanning configurations, see
Changing Scan Button Properties on page 10.
Before scanning, take a moment to become familiar with the Button Manager V2 Button Panel and the types
of scanning formats and configurations available by default.
Start Scanning 3
Starting Button Manager V2 3
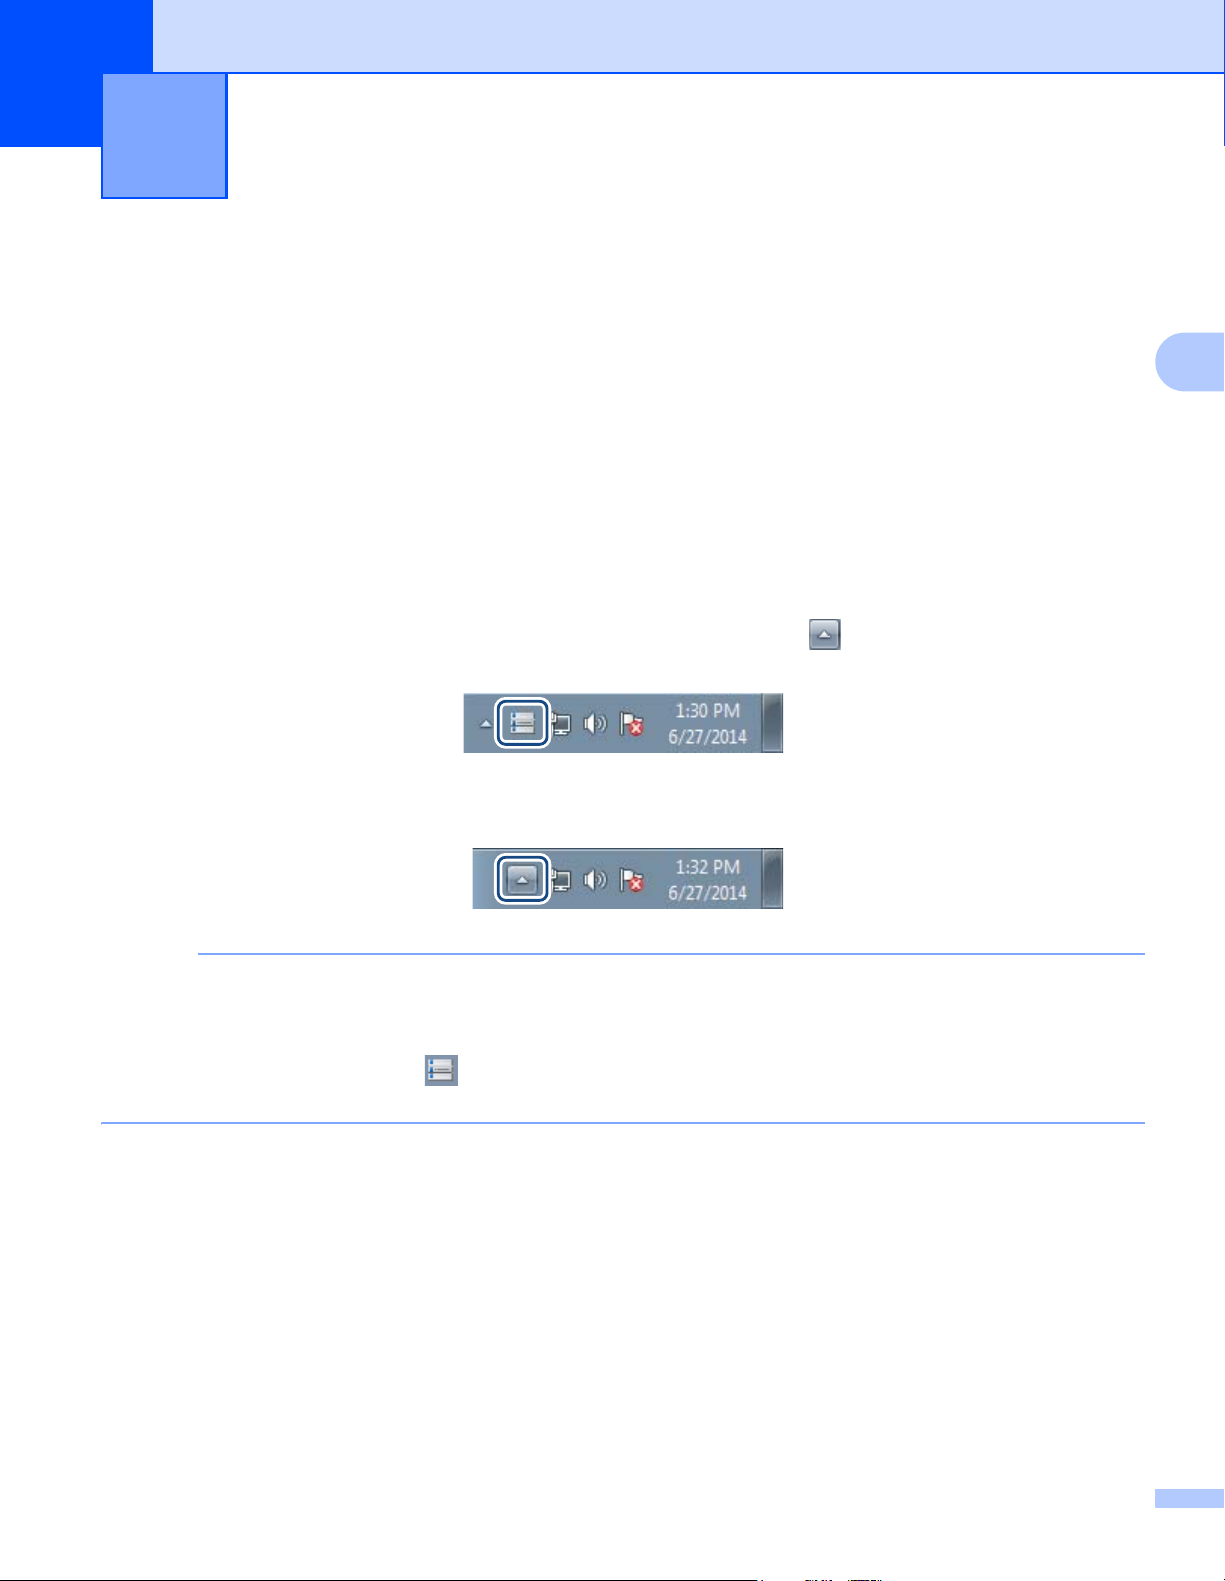
1 If Button Manager V2 is not already open, click the Button Manager V2 icon in the system tray in the
bottom right corner of your Desktop to launch the application.
If Button Manager V2 is installed but the icon is not visible, click the to view the rest of your system
tray, and then click the Button Manager V2 icon.
3
• If the Button Manager V2 icon does not appear in the Windows system tray, first make sure that your
scanner is connected to your computer with a USB cable. If it is connected, and you still do not see the
Button Manager V2 icon, turn your scanner off and then back on.
• If the Button Manager V2 icon is not displayed in the system tray, click Start > All Programs > Brother
PDS-XXXX Scanner (where XXXX is your model name) > Button Manager > Button Manager V2.
4
Page 9
Start Scanning
1
2
3
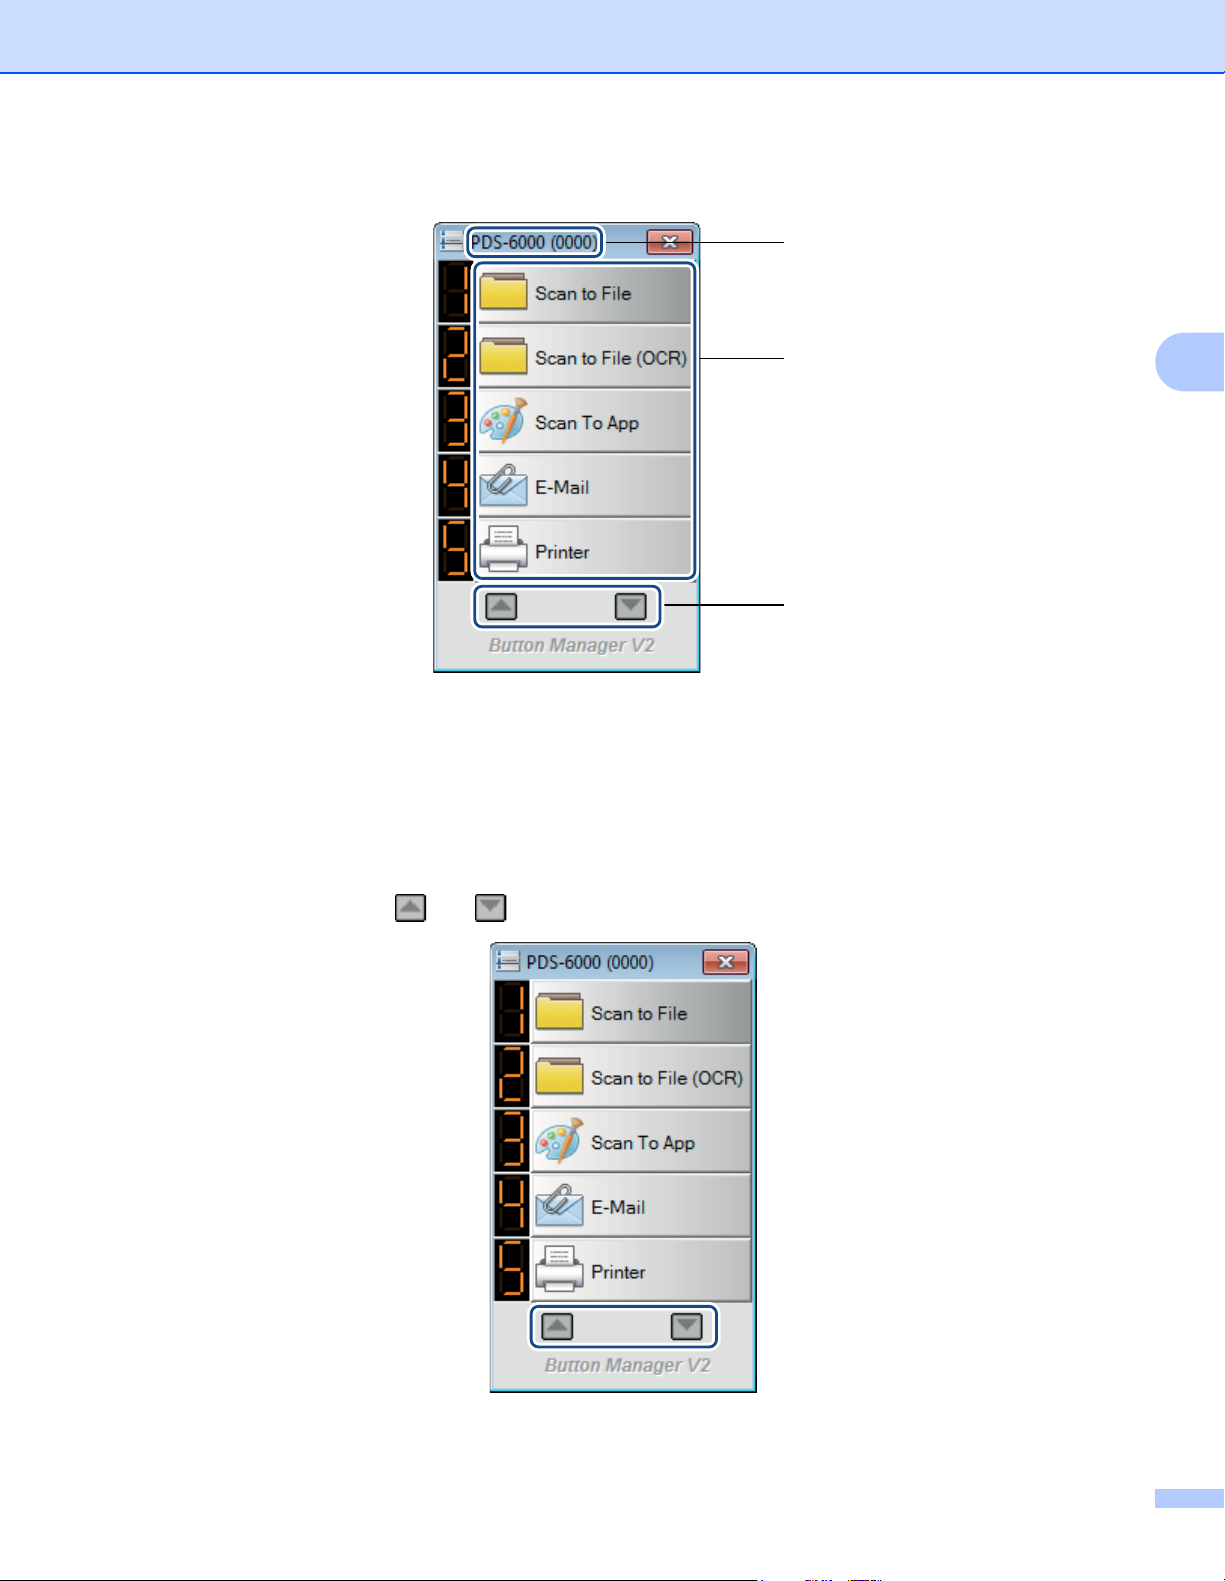
2 Button Manager V2 Button Panel appears.
3
1 Your scanner model and machine ID number are listed in the Button Panel’s title bar.
2 Function Icons (Buttons)
Each button represents a scan function.
3 Use the arrows to scroll up or down through the Button Panel.
3 The Button Manager V2 Button Panel displays five buttons at one time. To cycle through all the Button
Panel’s buttons, click the and buttons.
5
Page 10

Start Scanning
4 To check or change the scan configuration of any button, right-click the scan button to open the Button
Properties window, where you can customize button settings. For more information, see Button Panel
Configuration on page 10.
5 To start a scan, click the scan button you want to use. The scanner begins to scan your document and
will deliver the scanned image to the default destination. For more information on each button’s default
settings, see Default Functions and Predefined Tasks on page 8.
6 To close the Button Panel, click the (Close) button.
3
6
Page 11
Start Scanning
NOTE
Quitting Button Manager V2 3
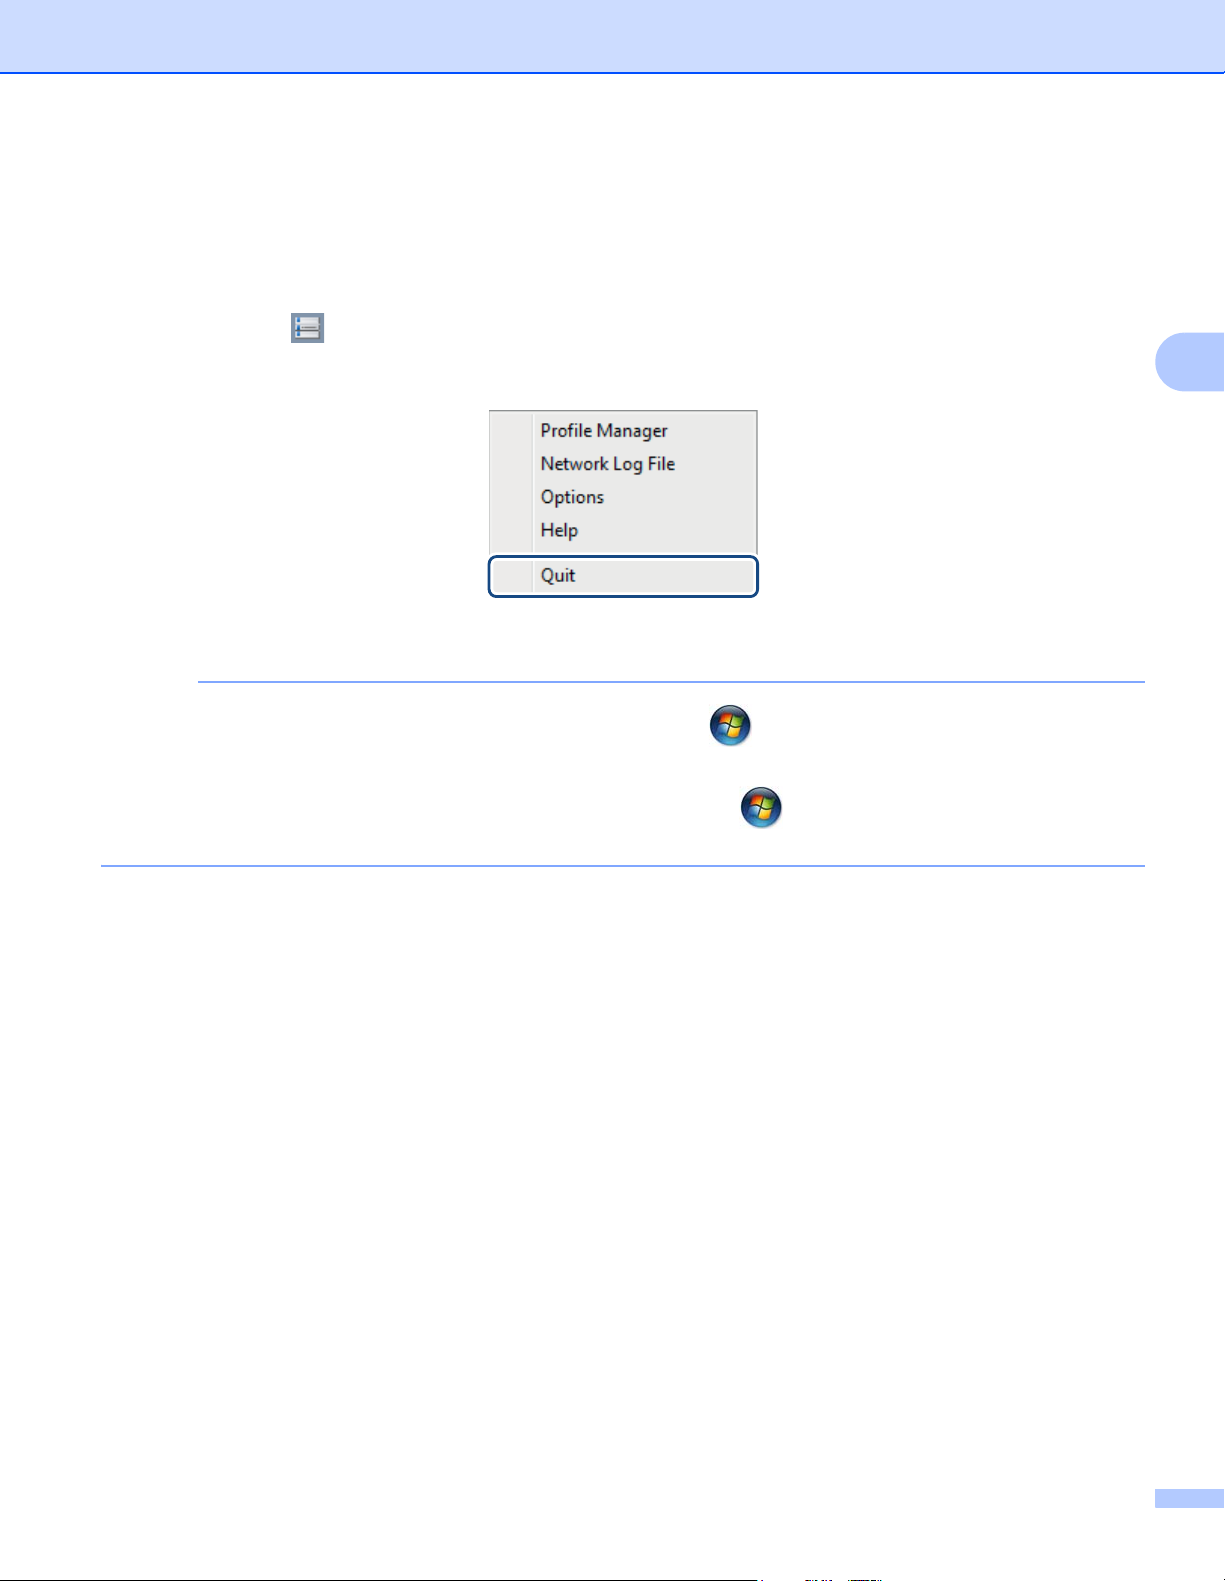
If you are not currently using Button Manager V2, you can quit and remove the Button Manager V2 icon
from your system tray:
1 Right-click the (Button Manager V2) icon in your system tray.
2 Click Quit.
To restart Button Manager V2, manually start Button Manager V2 from the Start menu.
3
3
• To start Button Manager V2 from the program group, click (Start) > All Programs > Brother
PDS-XXXX Scanner (where XXXX is your model name) > Button Manager > Button Manager V2.
• To remove Button Manager V2 from the program group, click (Start) > All Programs > Brother
PDS-XXXX Scanner (where XXXX is your model name) > Button Manager > Uninstall.
7
Page 12
4
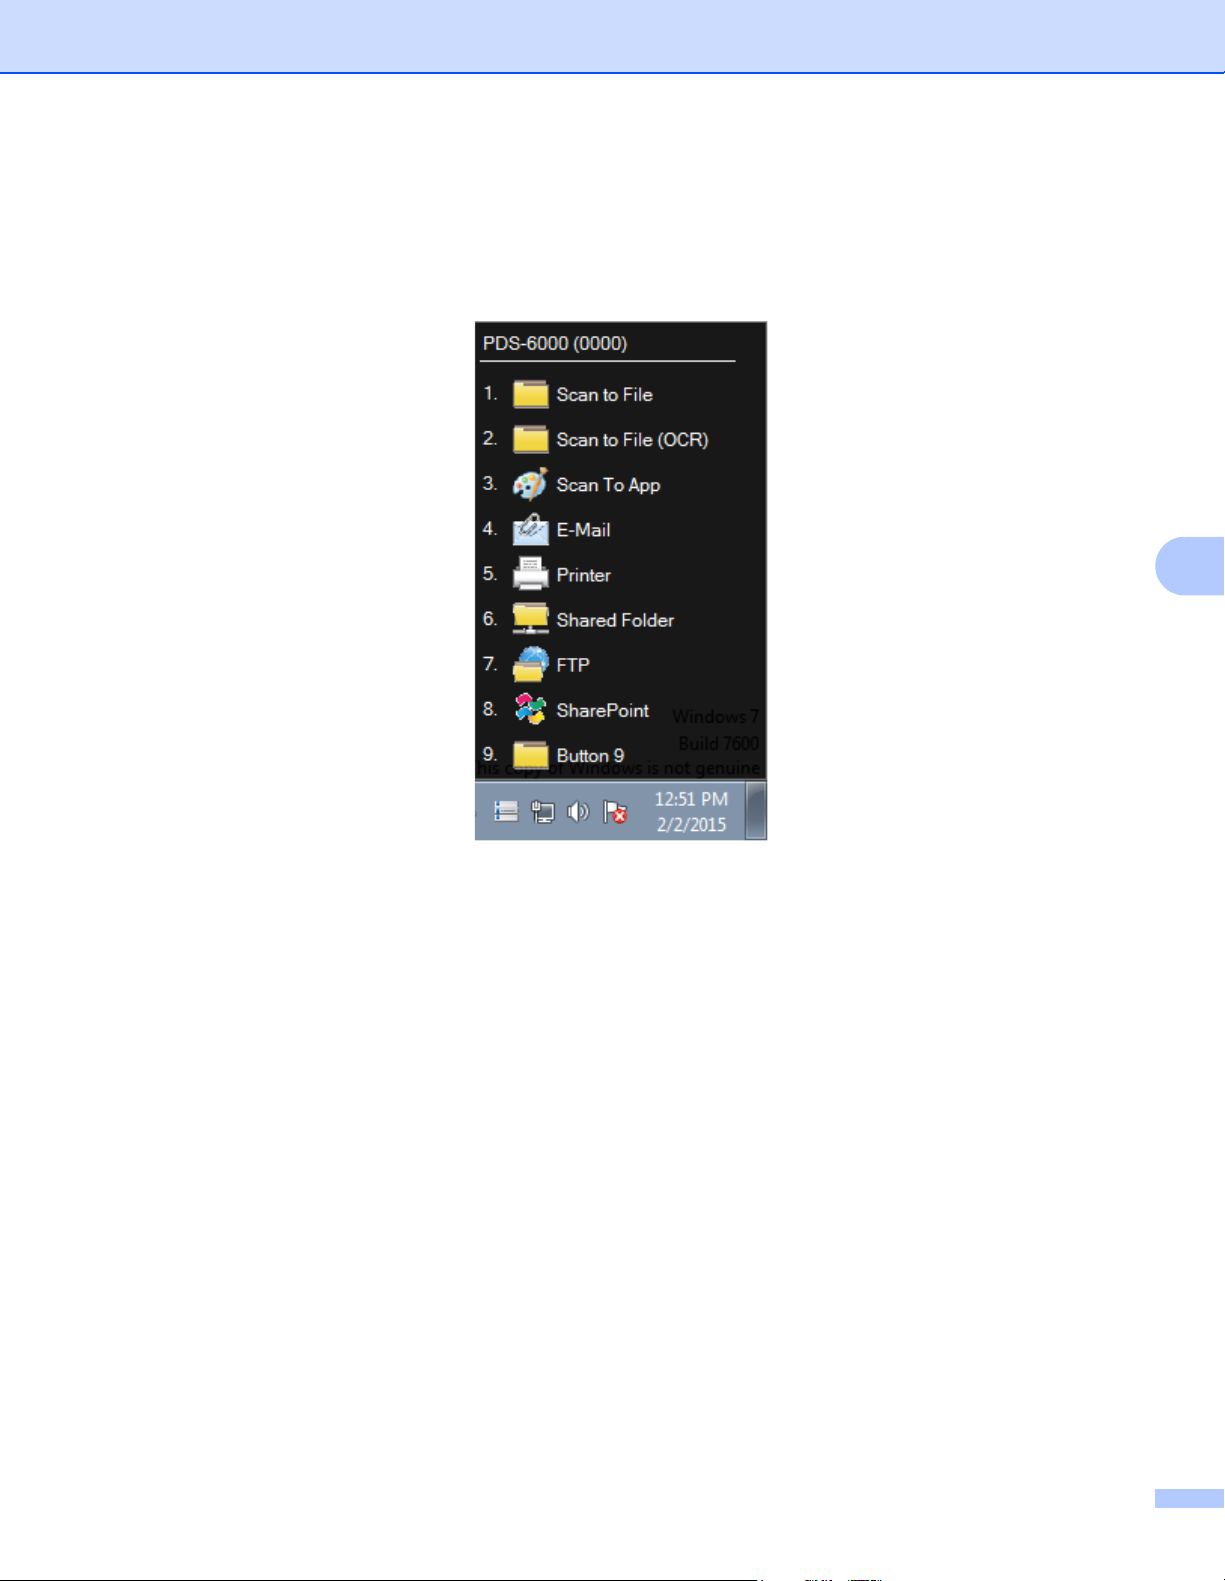
Default Functions and Predefined Tasks 4
Button Manager V2 features nine function buttons, which are pre-configured for your most frequently-used
tasks, such as scanning to a file, scanning to an email, and scanning to a printer.
This table describes the pre-configured buttons in the Button Panel. To change any of these settings or
names, see Button Panel Configuration on page 10.
Button
Number
1 Scan to File Select this button to scan a document and
2 Scan to File (OCR) Select this button to scan a document and
3 Scan To App Select this button to scan a document,
4 E-Mail Select this button to scan a document and
5 Printer Select this button to scan a document and
6 Shared Folder Select this button to scan a document and
7 FTP Select this button to scan a document and
8 SharePoint Select this button when you want to scan a
Name Destination/Application Preset Scan Settings
save it to a folder as an image file.
save it to a folder as an editable text file after
Optical Character Recognition (OCR).
launch and open the scanned image in an
image-editing software application.
send the scanned image as an email
attachment from your default email
application.
print the scanned image from your default
printer.
save the scanned image to a shared folder
on the network.
save the scanned image to a network file
server, such as FTP.
document and save the image to a
Microsoft
®
SharePoint® server.
4
Auto Color Detection, 200 dpi,
Simplex, JPEG, Auto Crop & Deskew
Auto Color Detection, 200 dpi,
Simplex, TXT, Auto Crop & Deskew
Auto Color Detection, 200 dpi,
Simplex, JPEG, Auto Crop & Deskew
Auto Color Detection, 200 dpi,
Simplex, JPEG, Auto Crop & Deskew
Auto Color Detection, 200 dpi,
Simplex, BMP, Auto Crop & Deskew
Auto Color Detection, 200 dpi,
Simplex, JPEG, Auto Crop & Deskew
Auto Color Detection, 200 dpi,
Simplex, JPEG, Auto Crop & Deskew
Auto Color Detection, 200 dpi,
Simplex, JPEG, Auto Crop & Deskew
8
Page 13

Default Functions and Predefined Tasks
NOTE
• To use the scanner’s default settings, configure features such as network access, Shared Folder, FTP and
establish internet connection before installing Button Manager V2.
• To send your scanned images to a network server such as FTP, make sure you have network server
access. You may need to create a login name and password first.
• Microsoft
Microsoft
®
.NET Framework: To accurately send your scanned images to a network server,
®
.NET Framework 2.0 or higher is required on your computer. Check the program and the version
by choosing Start > Control Panel > Programs and Features. A list of programs will be displayed; if you
have installed Microsoft
• Microsoft
by Microsoft
®
SharePoint®: Microsoft® SharePoint® is a collaboration and document library tool developed
®
for file sharing and web publishing. You may need to contact your system administrator
to get the correct URL for the SharePoint
to the SharePoint
®
.NET Framework, the program and version will be shown in the list.
®
®
and a valid user login and password.
server. Your system administrator will also give you access
4
9
Page 14
5
In Button Manager V2, you can customize the buttons in the Button Panel; change button names, update
the default settings, and customize scanning properties, including destination applications and how scanned
files are stored and named.
Button Panel Configuration 5
Changing Scan Button Properties 5
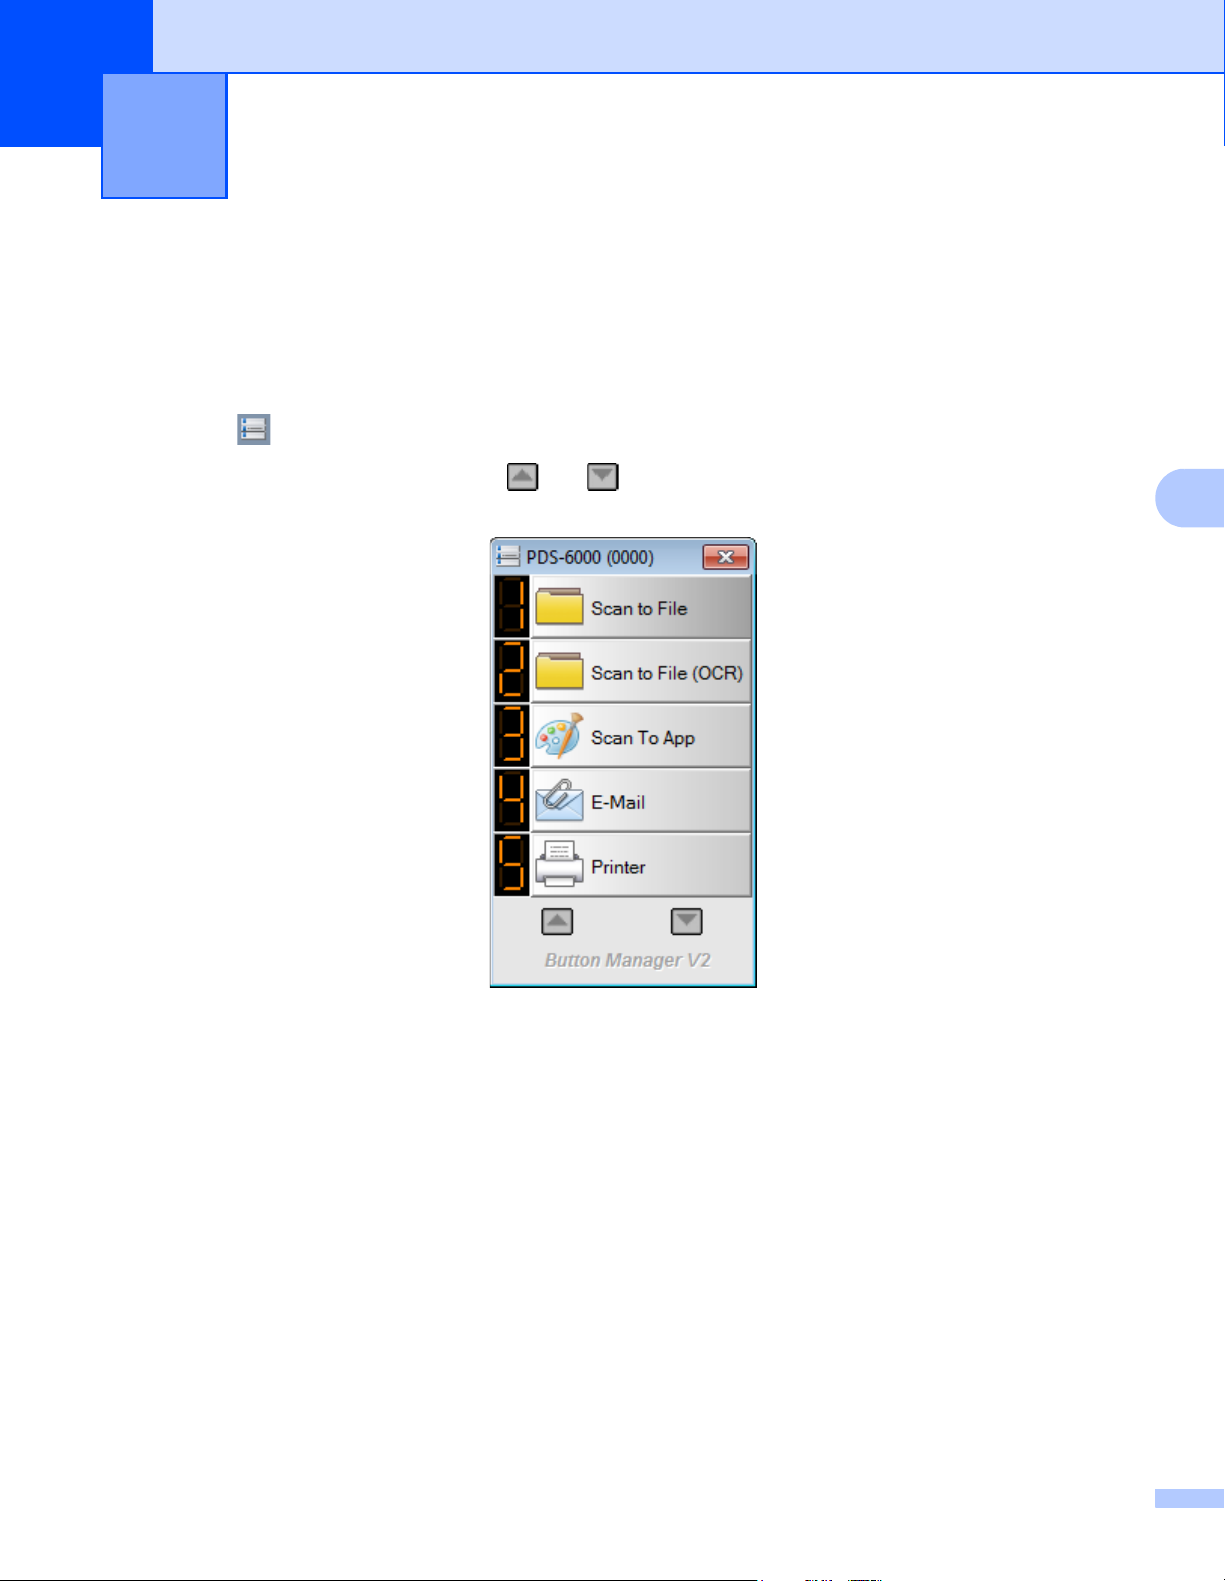
1 Click the (Button Manager V2) icon in the system tray.
2 Button Manager V2 launches. Click and to scroll through the Button Panel until you find the
button you want to change.
5
10
Page 15
Button Panel Configuration
3 Right-click the button to view its Button Properties screen.
5
4 Click any of the tabs to make changes to the scanning properties:
Basic tab: Use to select basic scan settings, including image mode, resolution, paper size, file path
and file name, and your desired Scan To destination. For more information, see Basic Properties
on page 12.
Image Adjustment tab: Use to set the desired brightness and contrast values to help improve your
scanned image. For more information, see Image Adjustment Properties on page 17.
Color Dropout tab: Use to choose a color channel to be removed to sharpen your text. For more
information, see Color Dropout Properties on page 20.
Image Processing tab: Use to rotate your scanned image or remove blank pages. For more
information, see Image Processing Properties on page 22.
More Settings tab: Use to detect overlapped pages and to separate your multi-page documents.
For more information, see More Settings Properties on page 24.
5 Do one of the following:
Click OK to save your settings and exit.
Click Cancel to close this screen without saving changes.
11
Page 16
Button Panel Configuration
NOTE
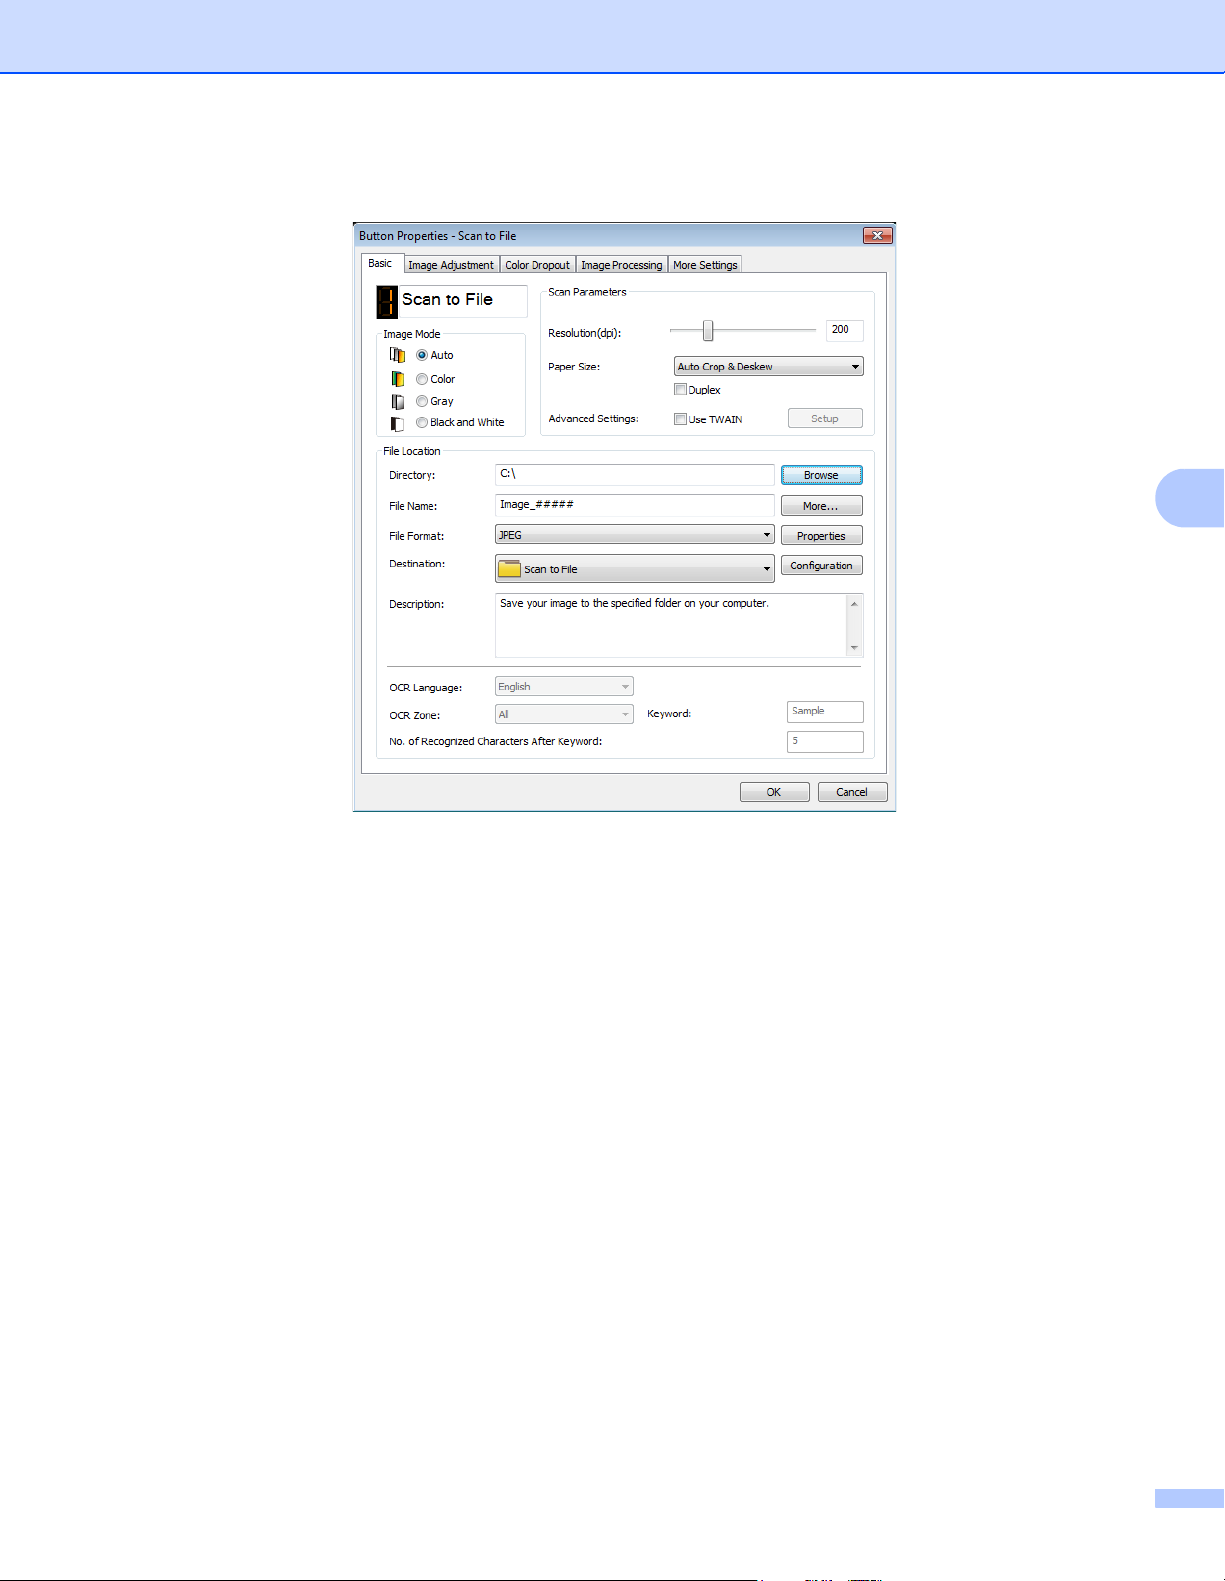
Basic Properties 5
In the Button Properties screen, click the Basic tab to change button configuration settings, including basic
scan settings, file format and path, and your “Scan To” destination.
5
Button Name 5
The Button Name field at the top of this screen allows you to rename the button. Type the name you want
in the field and when you click OK, the new name appears in the Button Panel.
To rename a button on the Button Panel:
1 On the Basic tab, click the (Button Name) field. The button name is editable.
2 Type the new button name in the field, and then press the Enter key on your keyboard.
3 The button name is changed and appears in the Button Panel.
This Button Name change also appears on the scanner’s LCD.
12
Page 17

Button Panel Configuration
Image Mode 5
Select the image mode you want for the scanned image.
Auto
(Auto Color
Detection)
Choose Auto to automatically detect and scan your color document in color image mode. If your
document is in color, the scanner will automatically scan the document as a color image. If your
document is non-color, the scanner will scan your document in Black and White mode. Use this
option for documents containing a mixture of color and non-color.
Auto mode does not support gray scale documents. To scan in gray scale, select Gray.
Color Choose Color when scanning color photographs or color documents.
Gray Choose Gray to scan documents containing drawings or black and white photographs.
A Gray scan produces an image of up to 256 shades of gray.
Black and White Choose Black and White to scan documents containing text, pencil, or ink.
5
13
Page 18
Button Panel Configuration
Scan Parameters 5
Resolution 5
Click and drag the Resolution slider to choose your ideal resolution. The default value is 200 dpi.
Available resolutions are 75, 100, 150, 200, 300, 400 and 600 dpi (dots per inch); options may vary
depending on your scanner model.
Higher resolutions result in more detail, slower scanning, and generally larger file sizes.
For Optical Character Recognition (OCR) scanning, we recommend choosing 300 dpi.
5
Resolution: 100 dpi
Resolution: 200 dpi
Paper Size
Click the Paper Size drop-down list, and then select your ideal scan size. Options may vary depending
on your scanner model. Select Auto Crop & Deskew to adjust the scanned image’s size automatically
according to document size, and to straighten a skewed or slanted image automatically. Use this option
if you are scanning batches of mixed-sized documents.
Duplex
Select the Duplex check box for duplex (2-sided) scanning.
Use TWAIN
Select the TWAIN check box to scan based on the scanner’s TWAIN user interface. Once selected, click
Setup to configure more advanced TWAIN settings.
For more information about settings, see the User’s Guide for your scanner.
5
5
5
14
Page 19

Button Panel Configuration
File Location 5
Directory 5
Click Browse to locate the folder where you want to store your scanned image.
File Name (auto-naming function)
The default File Name for your scanned image is composed of a text string and a numeric suffix. The
default text string is Image_, and the suffix is automatically generated as a sequential number. For
example, your first scanned image will be named Image_00001, and the next will be named Image_00002,
and so on. You can change the default string by typing a new default file name to replace “Image_”.
To further customize your file name, click More… You can add Date, Time, Year, and other current
information to the name.
The Date is in the format of YYYYMMDD (year, month and date). The Time is in the format of
HHMMSS (hours, minutes, seconds). If you choose both date and time, the file name will be:
Image_0000120130308175239.pdf (where 20130308 indicates the date and 175239 indicates
the time).
The following choices are available:
Choice Converts to
# Numbered Counter
Date Current Year+Month+Date, 4 digits+2 digits+2 digits
Time Current Hour+Minute+Second, 2 digits+2 digits+2 digits
Year Current Year, 4 digits
Month Current Month, 01-12
Day Current Day, 01-31
Hour Current Hour, 1-24
Minute Current Minute, 1-60
Second Current Second, 1-60
DayOfWeek Current Day of a week, 1-7
Weekly Current Week Number, 1-53
Barcode Recognized barcode from document
OCR The specified characters after the recognized OCR keyword.
When OCR is selected, OCR Language, OCR Zone, Keyword and No. of Recognized
Characters After Keyword in the Basic tab are available.
Custom When scanning, a dialog box will appear. Type the file name you want.
5
5
15
Page 20

Button Panel Configuration
NOTE
File Format 5
Click the File Format drop-down list, and then select the file format for the scanned image.
Choose Multi-page TIFF or Multi-page PDF if you want to create a multiple-page file.
Destination
Click the Destination drop-down list, and then select where you want to send your scanned image. Your
options are: Scan to File, iScan, Scan to App, E-Mail (your default email software), Printer (your default
printer), Shared Folder, FTP, and SharePoint.
Configuration
To upload your scanned image to a network file server, FTP or SharePoint, be sure to choose
Configuration and enter your account information. For example, to upload an image to a Shared Folder,
you must log in to a file server.
The Configuration button is active only when Destination is set to Scan to File, Scan to App, Printer,
Shared Folder, FTP, or SharePoint.
Description 5
This field displays the explanation of an item selected in Destination.
OCR Language (Only available when OCR is selected in the File Name field)
Choose your OCR language. With an OCR engine that supports over a hundred languages, your electronic
documents can be searched and managed more effectively.
5
5
5
5
OCR Zone (Only available when OCR is set in the File Name field)
Click the OCR Zone drop-down list, and then select the area where you want to recognize text.
Keyword (Only available when OCR is set in the File Name field)
Type a keyword in the field. The scanned and recognized characters after the keyword will be inserted in
the scanned file name.
No. of Recognized Characters After Keyword (Only available when OCR is set in the File Name field)
This feature is used when auto naming the file.
Type the number of characters you want the scanner to recognize after the keyword and insert the
characters in the scanned file name.
If you set the Keyword to “INVOICE” and set the No. of Recognized Characters After Keyword to “4”,
and then scan an invoice that includes the text “INVOICE1234”, the “1234” characters will be the file name.
16
5
5
5
Page 21
Button Panel Configuration
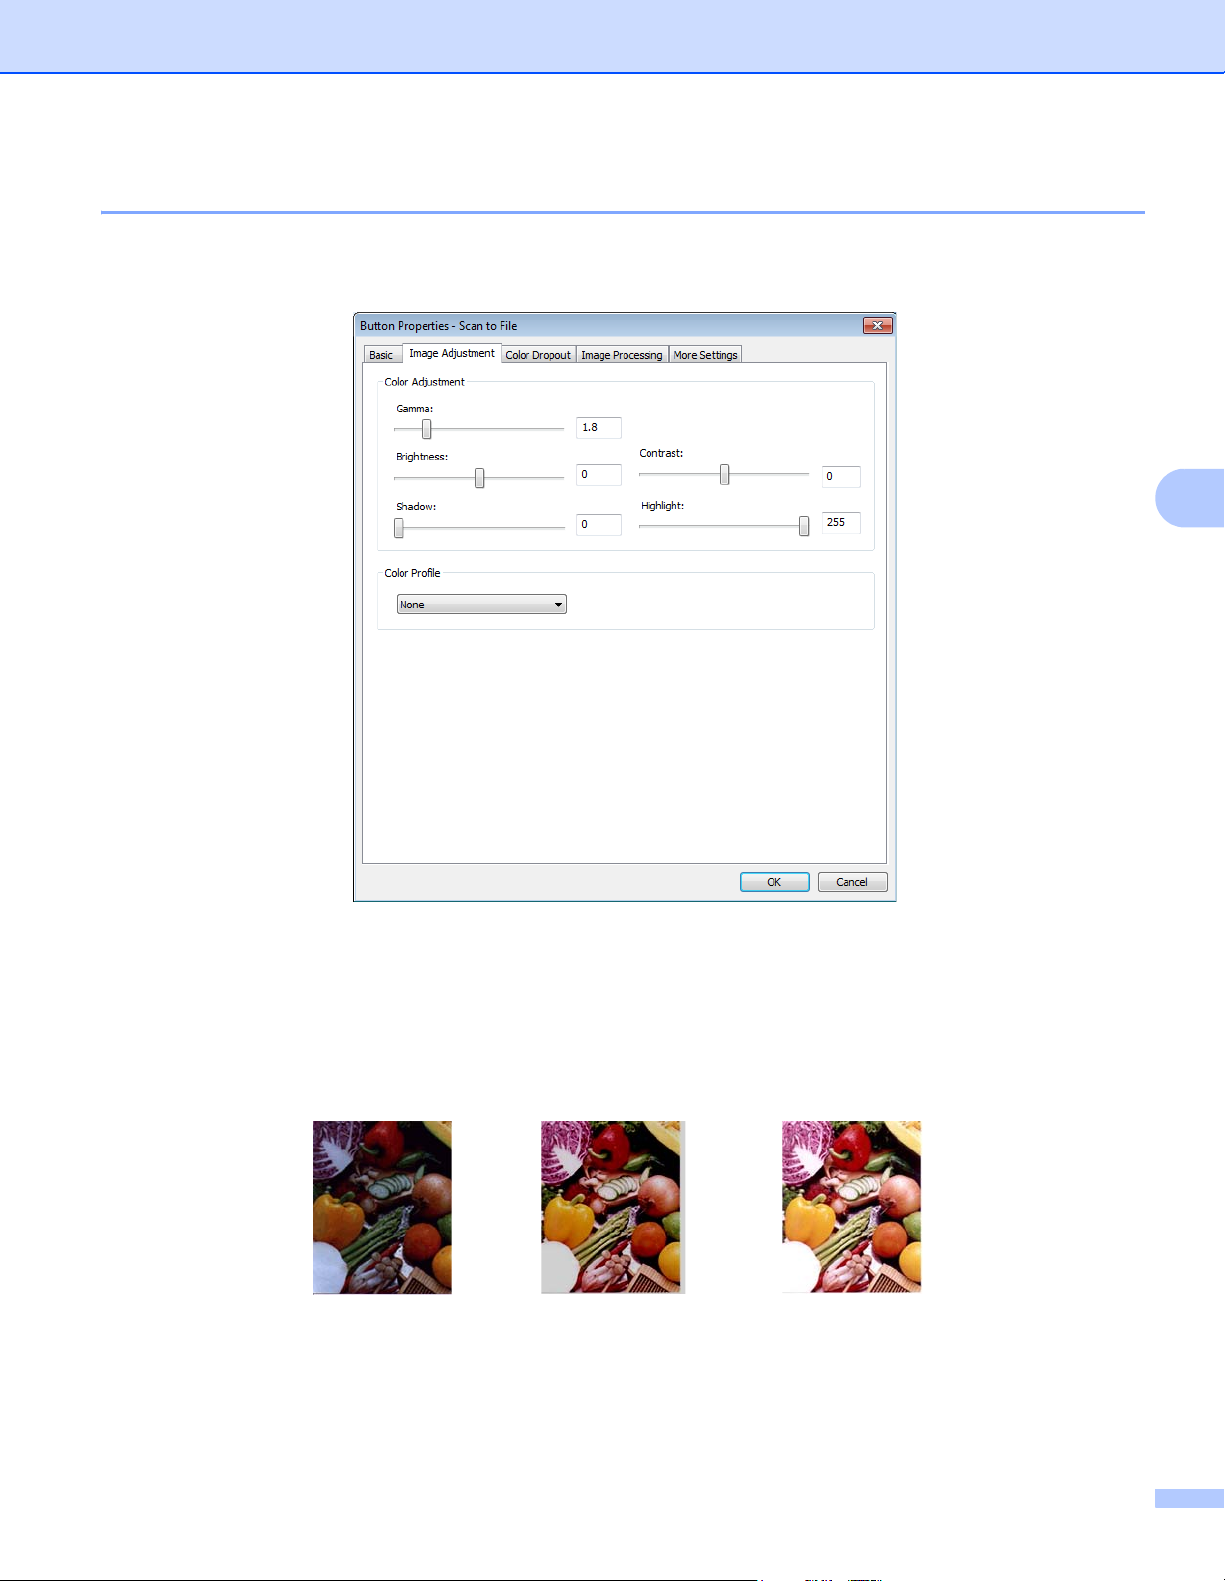
Image Adjustment Properties 5
In the Button Properties screen, click the Image Adjustment tab to adjust the scanned image’s color quality
to render it as closely as possible to the original document.
5
Color Adjustment 5
Gamma 5
To adjust the midtones of your scanned image without dramatically altering the lightest and the darkest
areas, click and drag the Gamma slider.
Gamma Value: 1.0
Gamma Value: 1.4
Gamma Value: 2.0
17
Page 22

Button Panel Configuration
Brightness and Contrast 5
Brightness Adjusts the lightness or darkness of an image. The higher the value, the brighter the image.
Drag the slider to the right or left to increase or decrease the brightness. The default value is 0.
Contrast Adjusts the range between the darkest and the lightest shades in the image. The higher the
contrast, the bigger the difference between dark and light. Drag the slider to the right or left to
increase or decrease the contrast. The default value is 0.
Brightness: -50
Contrast: -50
Brightness: 0 (Normal)
Contrast: 0 (Normal)
5
Brightness: 50
Contrast: 50
18
Page 23

Button Panel Configuration
Shadow and Highlight 5
Shadow Shadow is the scanned image’s darkest color. The higher the value, the darker the current
darkest color becomes. Drag the slider to the right or left to adjust the darkest level. The
default value is 0.
Highlight Highlight is the scanned image’s lightest color. The lower the value, the lighter the current
lightest color becomes. Drag the slider to the right or left to adjust the lightest level. The default
value is 255.
5
Shadow: 0/Highlight: 255
(Normal)
Shadow: 0/Highlight: 200
Shadow: 10/Highlight: 210
Shadow: 50/Highlight: 255
Color Profile 5
Color profiles are used with color mapping and are mainly used in digital photography and printing.
Select Photo, Document or Mix from the drop-down list to adjust the scanned image's color quality based
on an color profile.
19
Page 24
Button Panel Configuration
NOTE
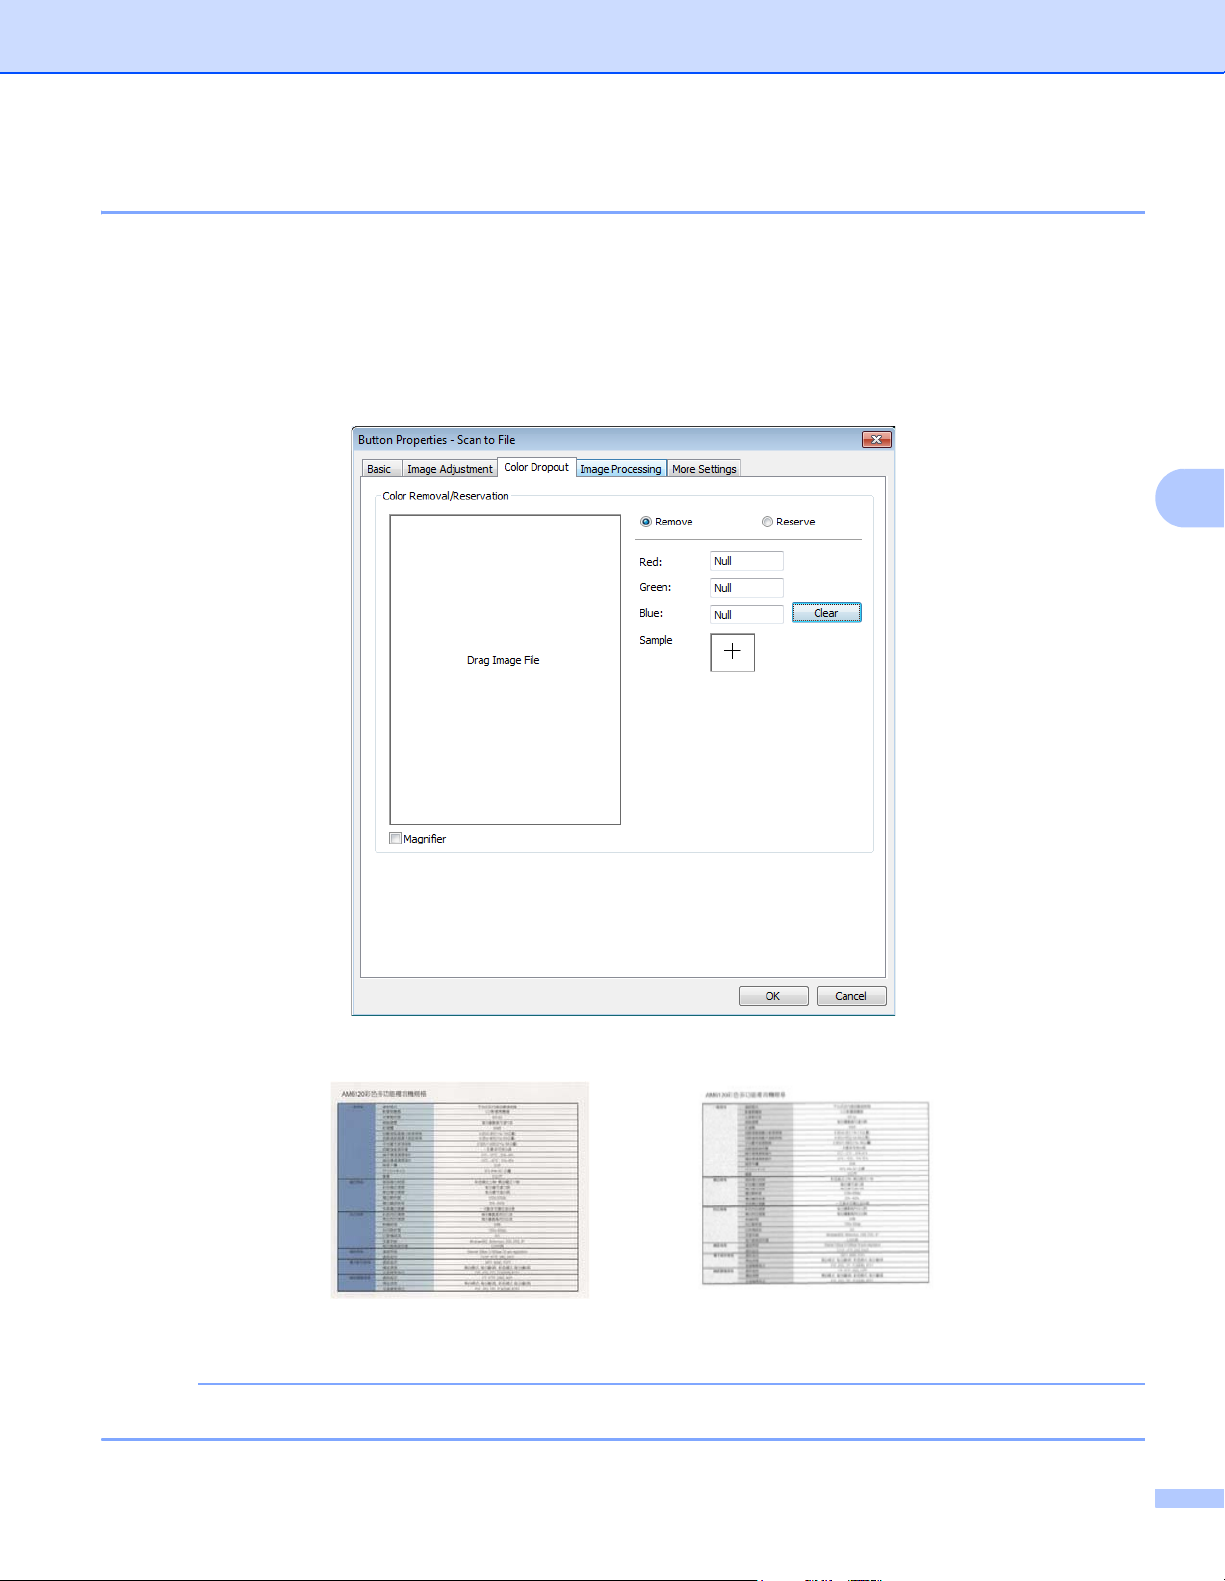
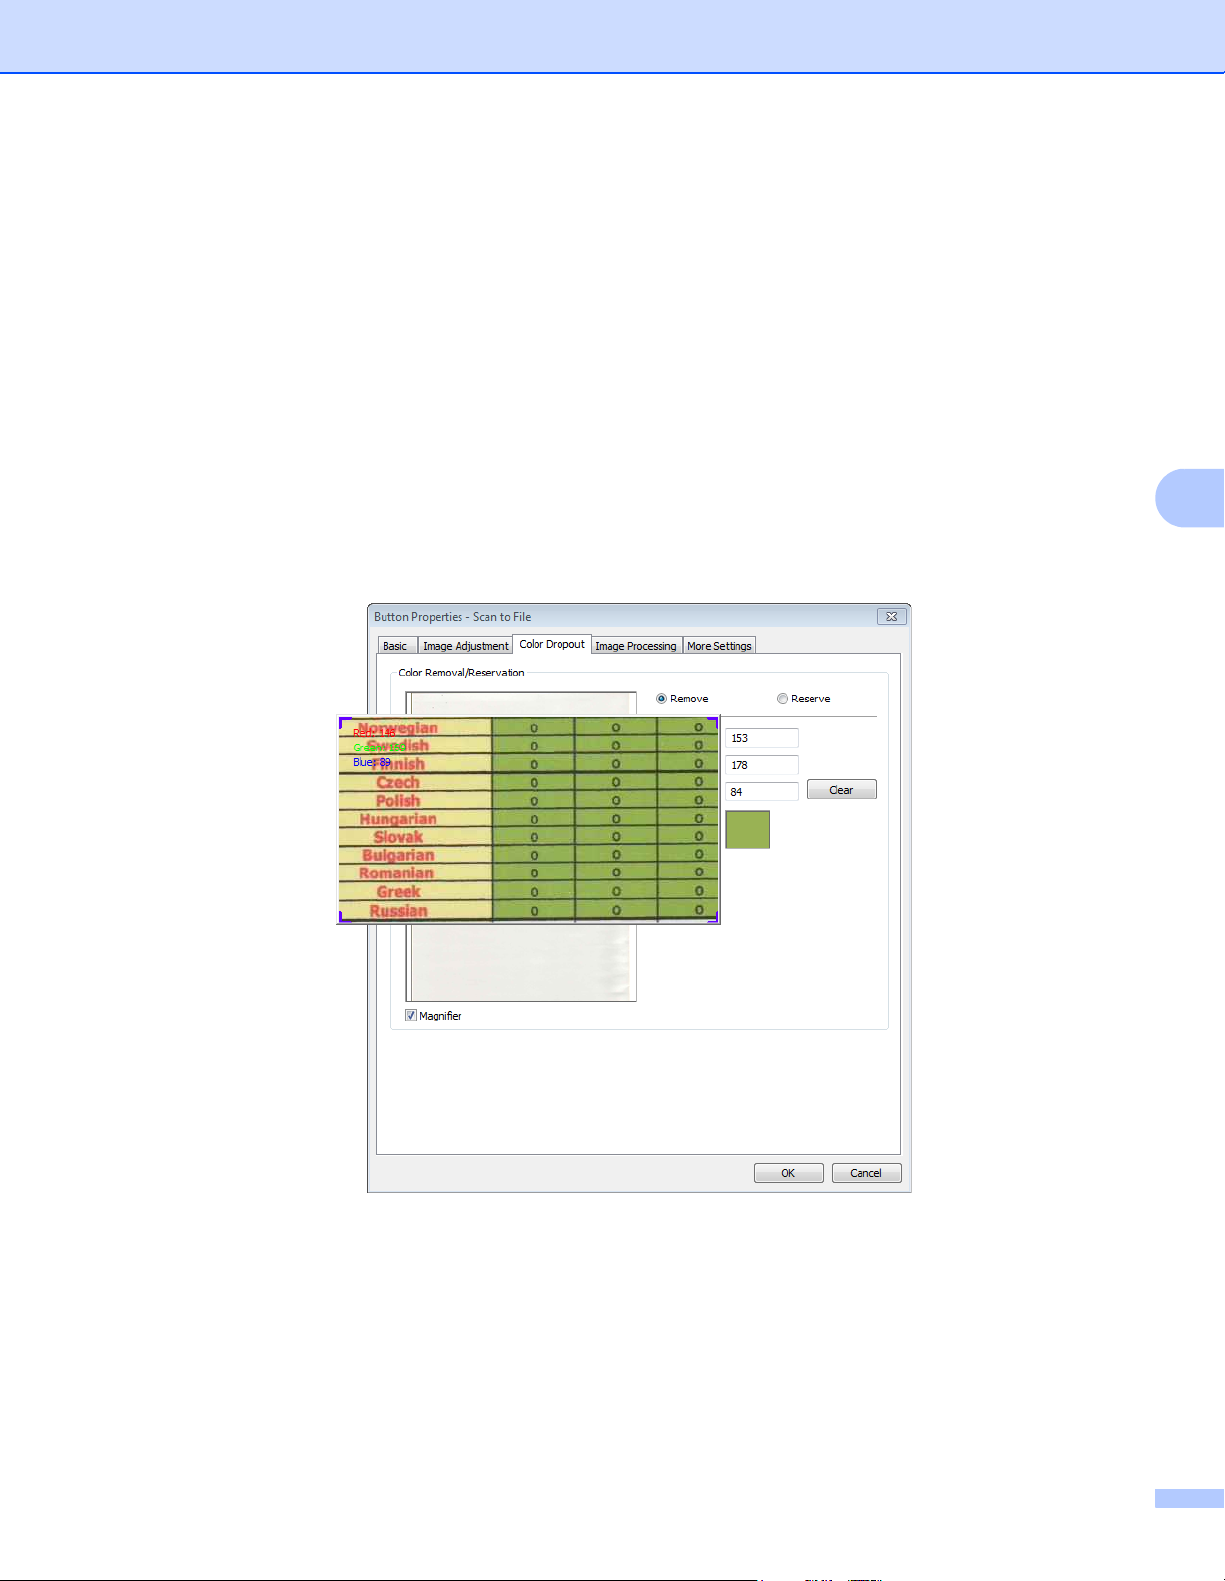
Color Dropout Properties 5
Color dropout is used when there is color in a document and the document is to be scanned in gray or black
and white for OCR. Removal of the color will improve the OCR process.
In the Button Properties screen, click the Color Dropout tab to filter out a color channel (red, green or blue).
For example, if you are scanning a document with a red watermark, you can choose to filter out the red
channel so the scanned image just shows the text and not the red watermark. Removing colors from the scan
might reduce the scan file size as well improve the OCR results.
5
Original
Color dropout only applies to gray and black and white scans.
Remove Blue Color Channel
20
Page 25
Button Panel Configuration
There are two ways to select the color to be filtered out.
Entering the RGB Values
You may specify the color to be removed by entering the RGB (Red, Green and Blue) values respectively.
Click the Clear button to reset the color values.
Selecting Your Color
We recommend selecting the color to be removed. Scan your document as normal and then do the
following:
1 After the scan is finished, drag and drop your scanned image into Button Manager.
2 Select the Magnifier check box, and click and hold the left mouse button to choose your specific
color on the scanned image. The RGB value for the color is displayed on the right, release the
mouse button to select the displayed color.
5
5
5
3 Click OK and then rescan your document with the selected color removed.
21
Page 26

Button Panel Configuration
Image Processing Properties 5
In the Button Properties screen, click the Image Processing tab to change the direction of your scanned
image.
5
22
Page 27

Button Panel Configuration
A
B
C
A
B
C
Image Rotation/Flip 5
Click the Image Rotation/Flip drop-down list, and then select the rotation angle you want for your scanned
document.
Choose None, Auto Rotate Image or one of the following options:
Original
Rotate 180°
Rotate 90° Left
Flip Horizontal
Rotate 90° Right
Flip Vertical
Blank Page Removal 5
Select the Enable check box of Blank Page Removal to remove blank pages from your scanned image.
Depending on your document, you may have to drag the slider to adjust the threshold level so the scanner
can identify blank pages.
5
Input documents Delete blank pages
23
Page 28
Button Panel Configuration
NOTE
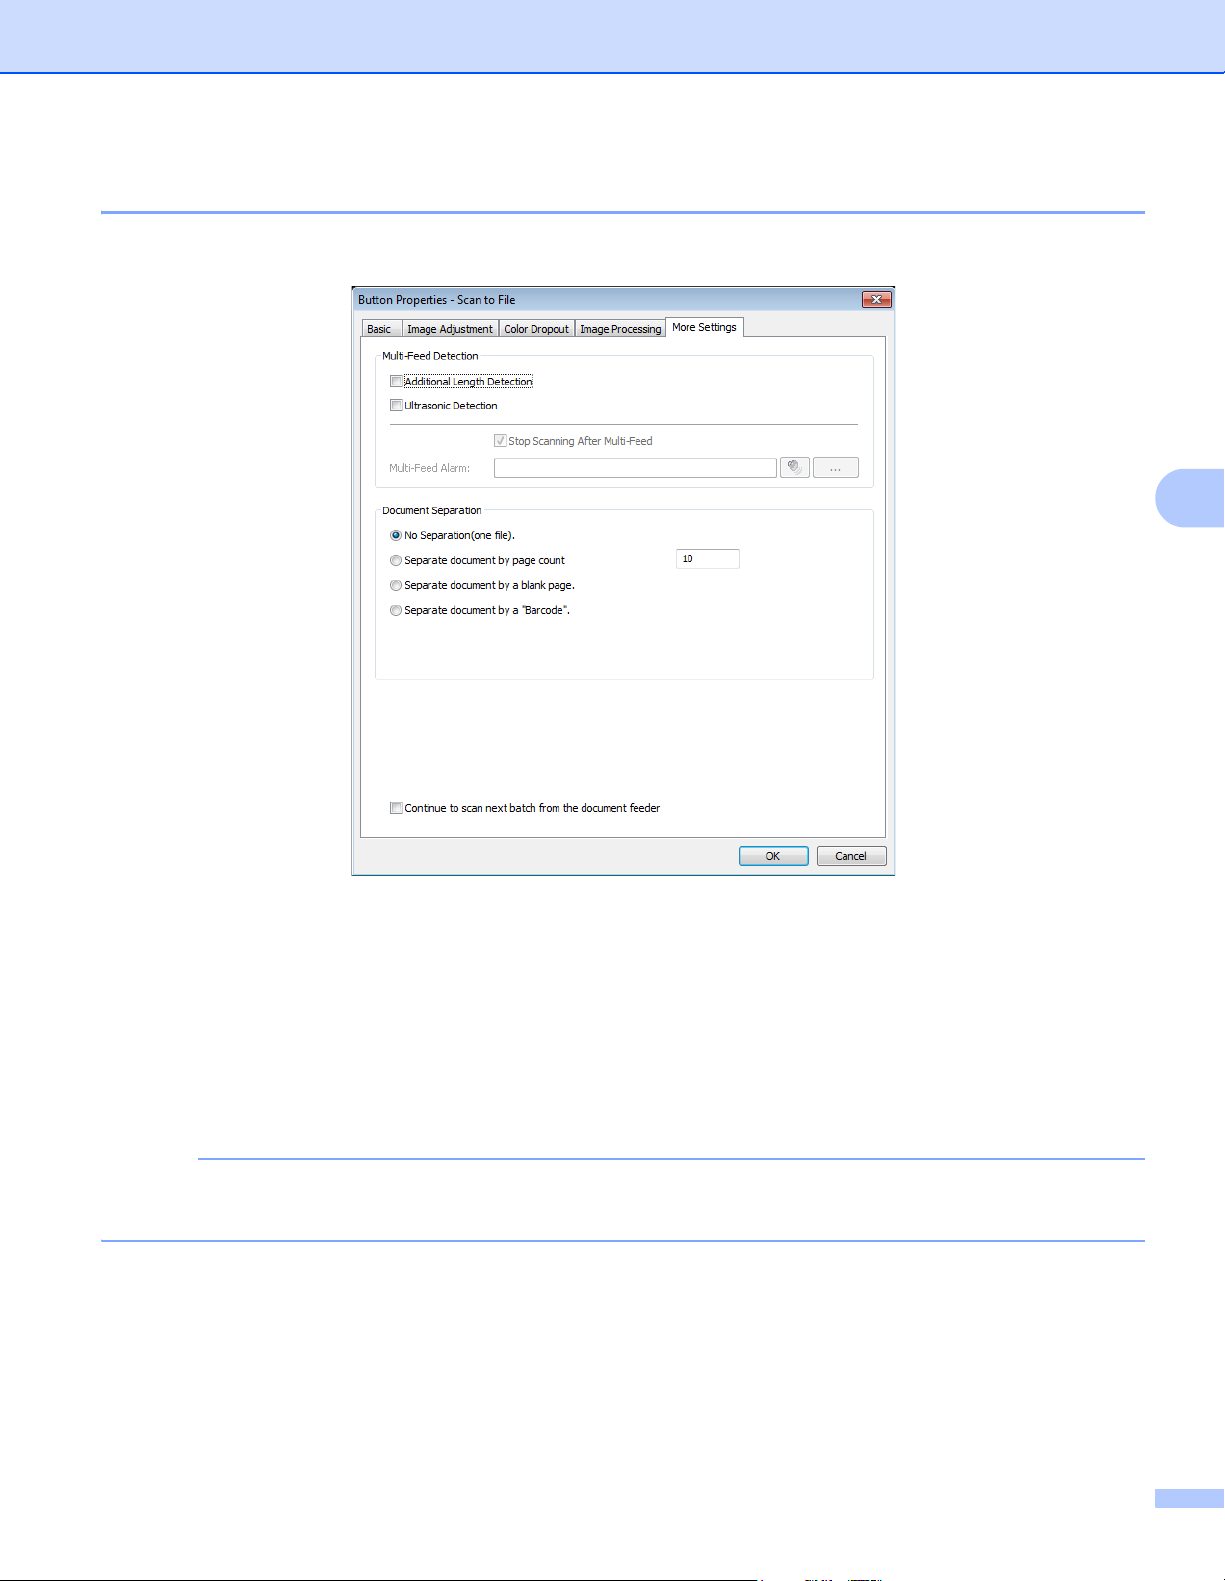
More Settings Properties 5
In the Button Properties screen, click the More Settings tab to configure additional functions.
5
Multi-Feed Detection 5
Multi-Feed Detection allows you to detect overlapping pages as they go through the automatic document
feeder (ADF).
Additional Length Detection
Additional Length Detection allows the scanner to detect overlapping pages when page lengths exceed
the defined paper size of the document being fed.
When you choose Auto Crop & Deskew or Maximum scan length for Paper Size in the Basic tab, this
feature is not available.
Ultrasonic Detection 5
Ultrasonic Detection allows the scanner to detect overlapping pages based on the paper thickness as
the document is being fed.
24
5
Page 29

Button Panel Configuration
Stop Scanning after Multi-Feed 5
If Stop Scanning after Multi-Feed is selected, the scanner will stop the feeder and display MultiFeed
detected ! message in the status dialog. Remove the rest of the paper from the ADF. Reset the
documents and restart the scan.
If Stop Scanning after Multi-Feed is not selected, the scanner will continue feeding the pages until the
end of your document. Rescan the pages where the multi-feed was detected afterwards.
Multi-Feed Alarm
If a wave file is added, the scanner will sound an alarm when a multi-feed is detected. No Warning dialog
box will appear.
How to add the sound alarm:
1 Click (Browse) on the right side of the speaker icon. The Open dialog box appears.
2 Choose your wave file (.wav sound file).
3 Click the Open button. The wave file is added.
Document Separation 5
Button Manager provides several options to separate your multi-page document. There are two types of file
formats that support multi-page documents. Be sure to select either the Multi-page TIFF or Multi-page PDF
file formats.
No separation (one file)
This is the default mode. Multi-page documents will be scanned and saved to one output file as long as
the file format supports it.
Separate document by page count
5
5
5
5
5
Select this mode to split output files according to a specified page number.
Separate document by a blank page
Select this mode to split output files whenever a blank page is detected.
Separate document by a "Barcode"
Select this mode to split output files whenever a barcode is detected.
Continue to scan next batch from the document feeder 5
Select the Continue to scan next batch from the document feeder check box if you want to continue
scanning the next batch after the first batch is finished.
25
5
5
Page 30

Button Panel Configuration
Using Scan Buttons 5
Sending Scans to a Folder as Image Data 5
You can scan a document and send the scanned data to a destination folder in JPEG format.
To scan a document and save it as an image file:
1 Insert the document into your scanner.
2 Click the (Button Manager V2) icon in your system tray.
3 Scroll through the Button Panel until you see the (Scan to File) button.
4 Click Scan to File. The scanned image is sent to the destination folder in JPEG format.
5
5
26
Page 31

Button Panel Configuration
Sending Scans to a Folder as Text Data 5
You can scan a document and convert the scanned image’s text to editable text using the OCR feature.
To convert the scanned image to editable text and send it to a folder:
1 Insert the document into your scanner.
2 Click the (Button Manager V2) icon in your system tray.
3 Scroll through the Button Panel until you see the (Scan to File (OCR)) button.
4 Click Scan to File (OCR). The scanned image’s text is sent to the destination folder in TXT format.
5
5
27
Page 32
Button Panel Configuration
NOTE
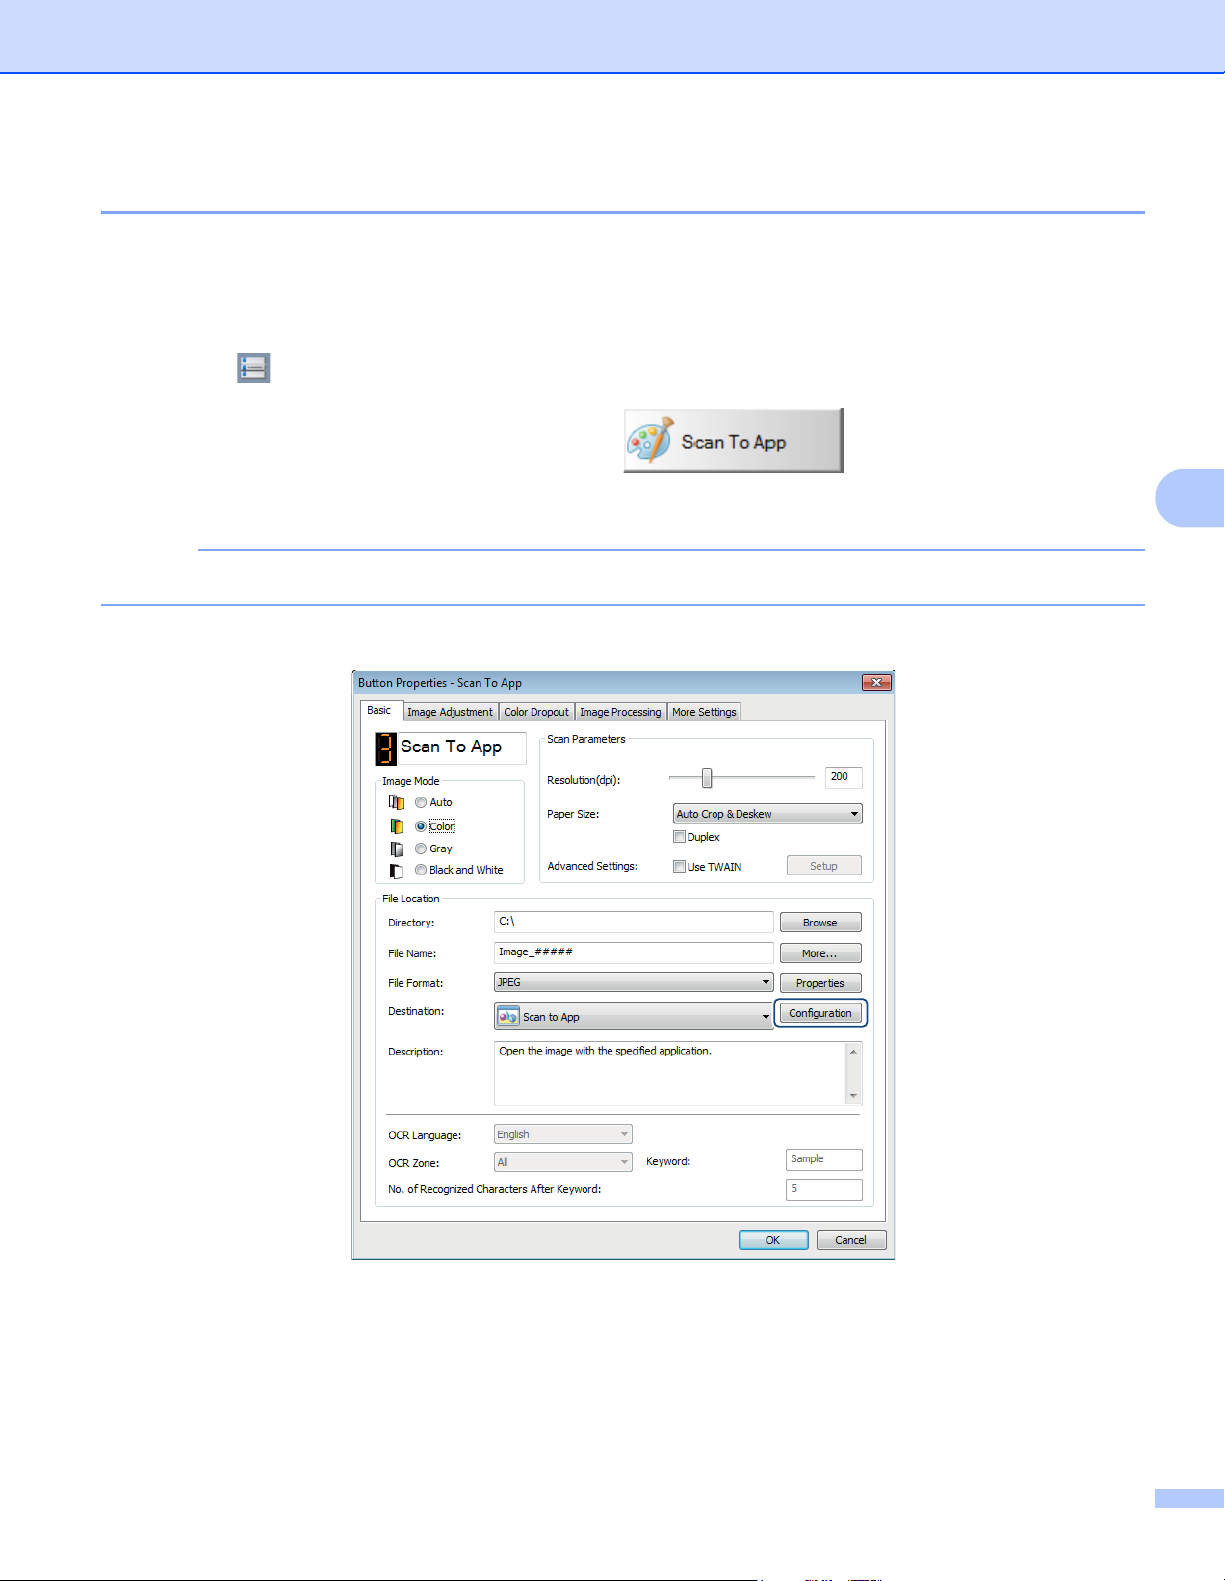
Opening Your Scanned Image in a Software Application 5
You can customize a scan button so that your scan automatically launches the image-editing software
application you want (such as Microsoft
®
Paint) and then opens your scanned image in the application.
To configure the Scan To App button to open scanned images in the application:
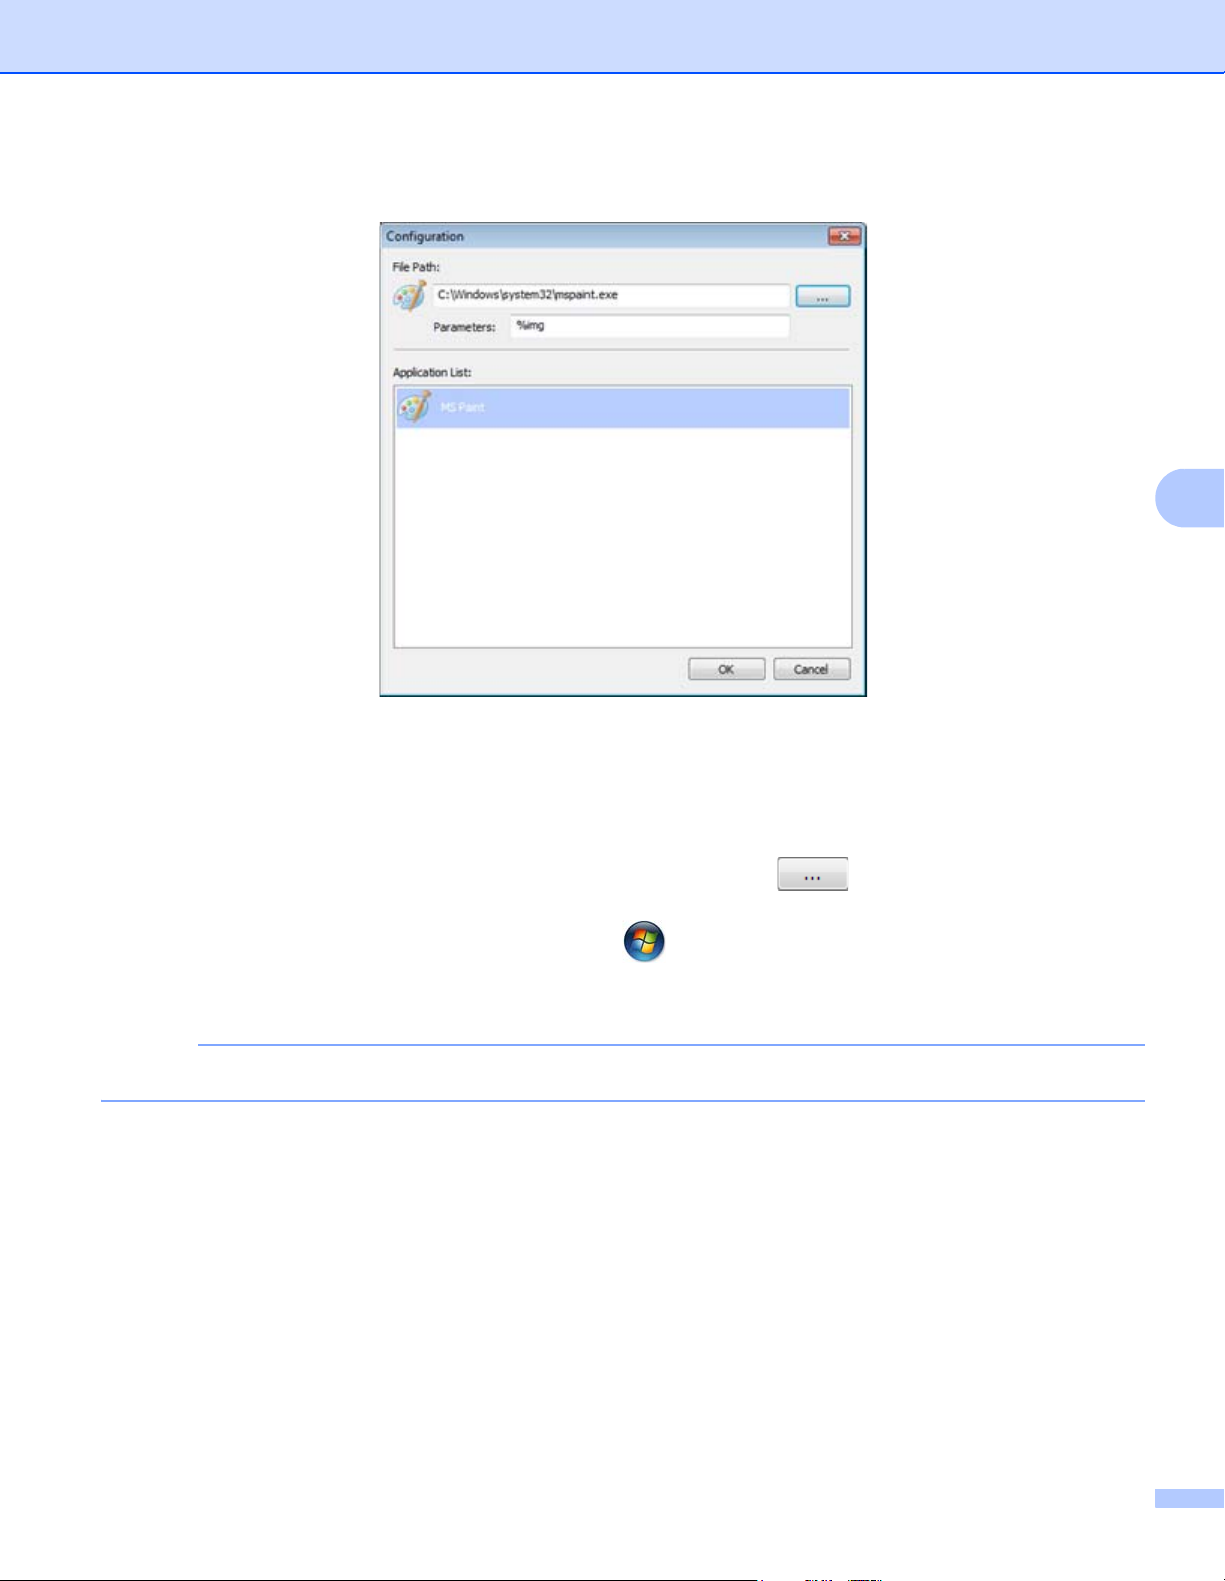
1 Click the (Button Manager V2) icon in your system tray.
2 Scroll through the Button Panel until you see the (Scan To App) button.
3 Right-click Scan To App. The Scan To App Button Properties screen appears.
Make sure the File Format is compatible with your application.
4 Click Configuration.
5
5
28
Page 33
Button Panel Configuration
NOTE
5 The Configuration screen appears.
5
6 To select a software application, do one of the following:
Select the application you want from the Application List. The application’s path will appear in the
File Path field. (Button Manager V2 searches for image-editing software applications on your
computer and displays the results in the Application List automatically.)
Type the File Path to the application you want to use, or click (Browse) to navigate to the
application folder and select its .exe file.
Alternatively, on your computer desktop, click (Start) > All Programs, and navigate to the
software application you want to use. Drag and drop the software application’s icon from your Start
menu to this Configuration screen. The application path will appear in the File Path field.
Parameters is a developer’s function. Users do not usually need to change this setting.
7 Do one of the following:
Click OK to save your settings and exit.
Click Cancel to close this screen without saving changes.
29
Page 34
Button Panel Configuration
Attaching Your Scanned Image to a New Email 5
After scanning, you can launch your default email application automatically and attach your scanned image
to a new message.
To attach your scanned image to a new email message:
1 Insert the document into your scanner.
2 Click the (Button Manager V2) icon in your system tray.
3 Scroll through the Button Panel until you see the (E-Mail) button.
4 Click E-Mail.
5 Your default e-mail application automatically launches and opens a new message with your scanned
image attached.
5
5
30
Page 35
Button Panel Configuration
Sending Scans to a Printer 5
In addition to scanning a document and sending the scan to a specified printer, if you are using a duplex
scanner you can print two scanned images on one side of a page.
To configure the Printer button to send scanned images to your printer:
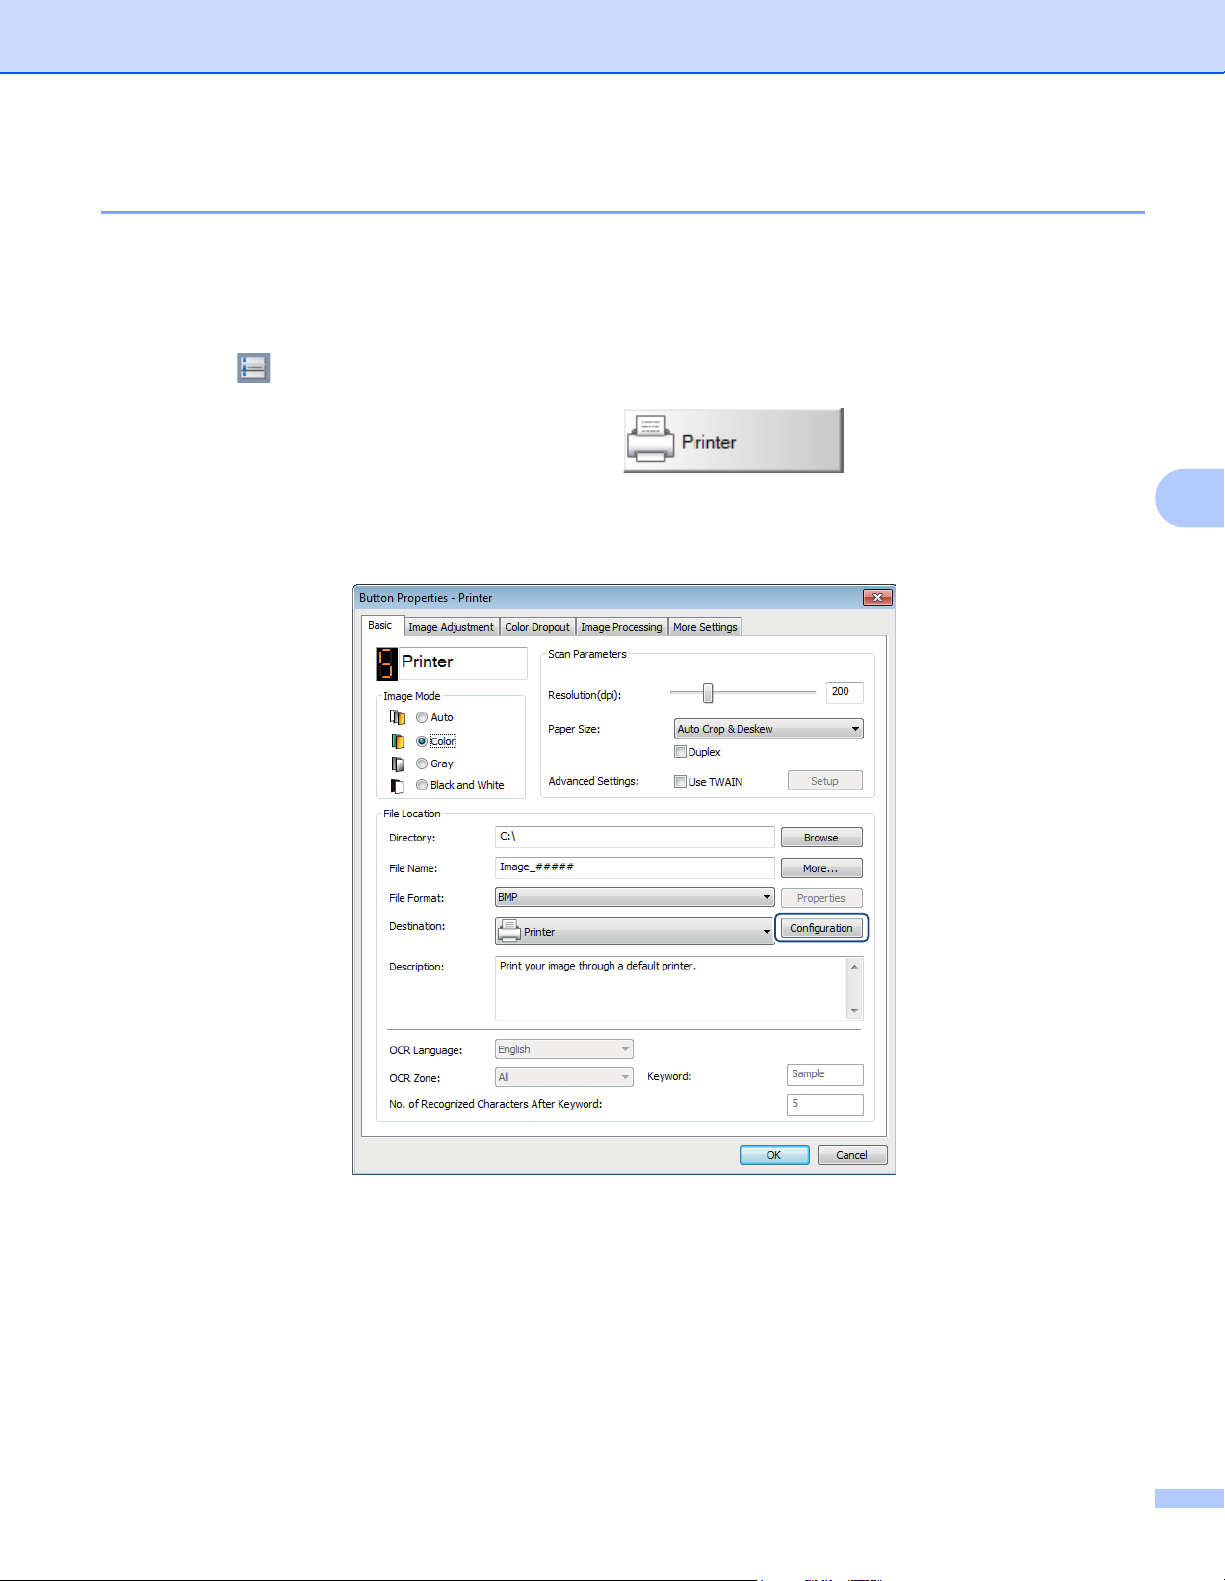
1 Click the (Button Manager V2) icon in your system tray.
2 Scroll through the Button Panel until you see the (Printer) button.
3 Right-click the Printer button. The Button Properties screen appears.
4 Click Configuration.
5
5
31
Page 36
Button Panel Configuration
NOTE
5 The Printer Configuration screen appears.
5
6 Select the printer that you want to print your scanned images.
The printer driver must be installed on your computer for it to appear in the Configuration screen.
To change the selected printer’s properties, click Properties, change the print settings, and then click OK
when finished.
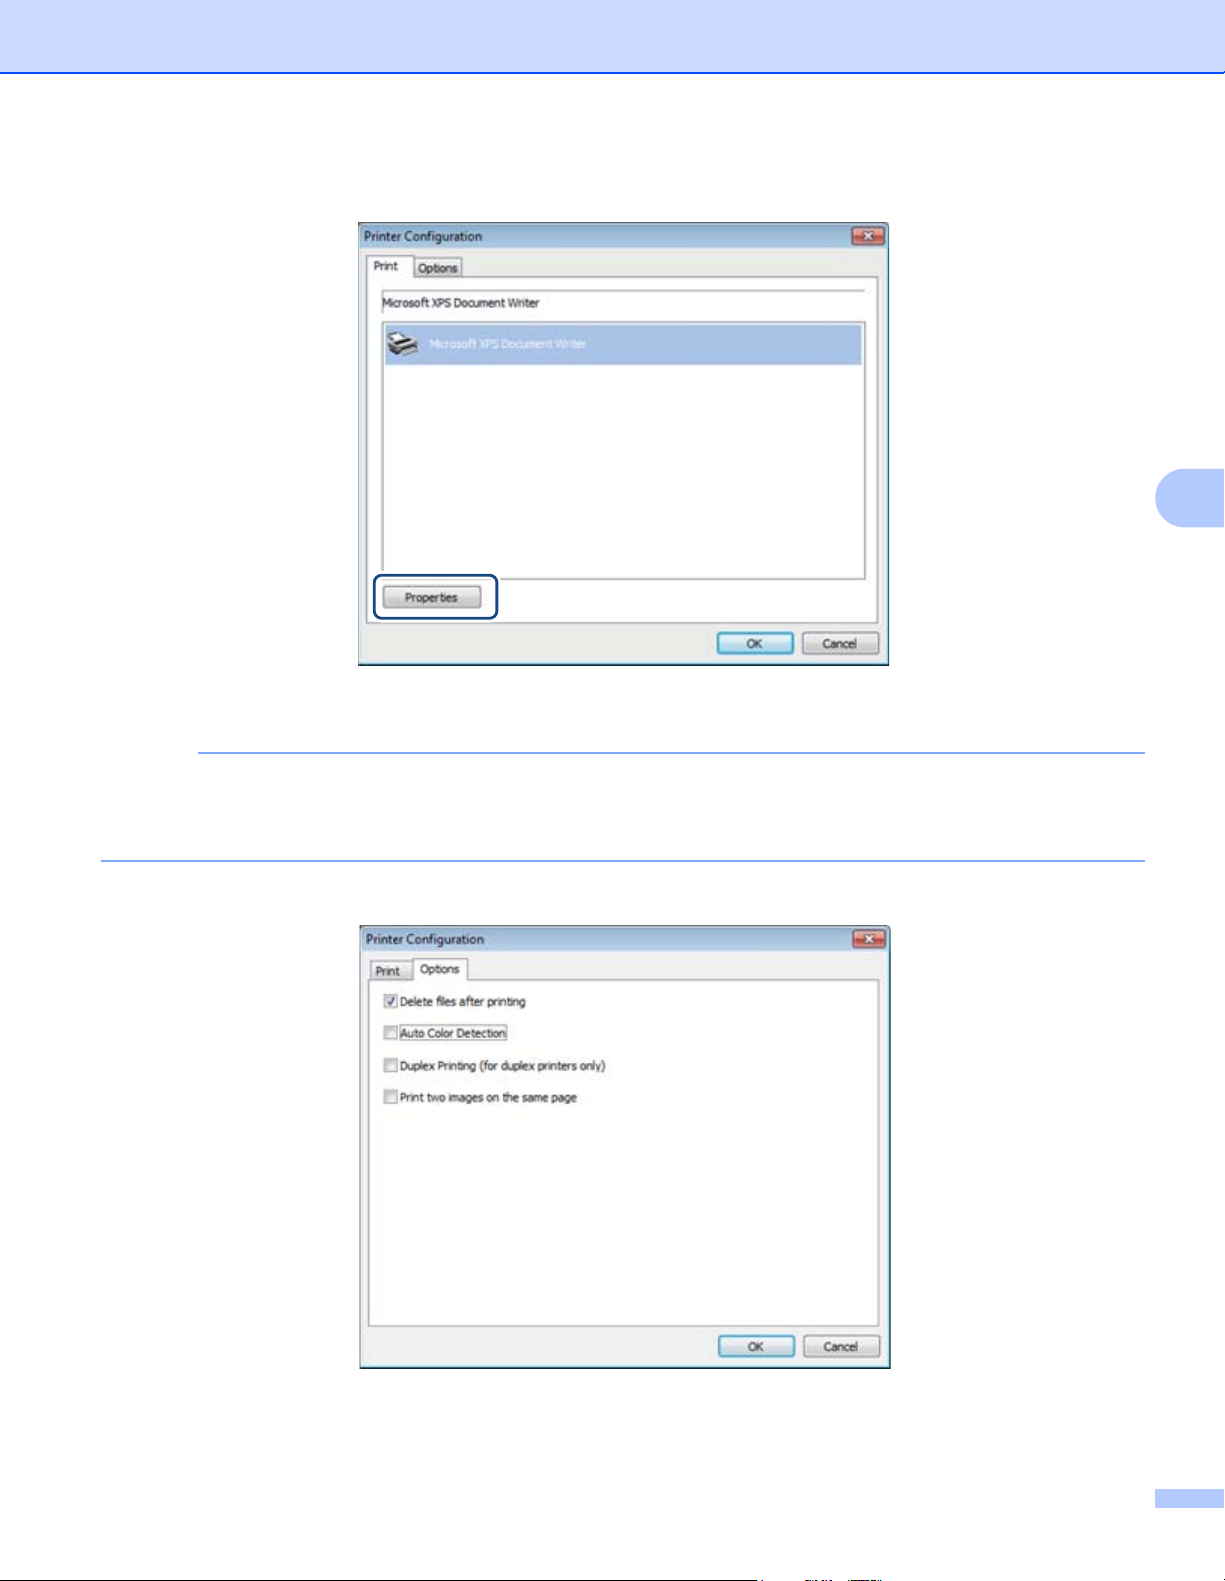
7 Click the Options tab.
32
Page 37

Button Panel Configuration
NOTE
NOTE
8 Select the check boxes for the features you want:
Delete files after printing:
Select only if you want to delete the scanned images after printing.
Files deleted after printing will no longer be available on your computer.
Auto Color Detection:
Select to detect the scanned image’s type and print the image using the appropriate image mode. For
example, if the scanned image is color, the image will be printed in color (if the specified printer is a
color printer); if the scanned image is black and white, the image will be printed in black and white.
Duplex Printing (for duplex printers only):
Select to print the scanned images on both the front and back sides of the paper. This option is
available only if the specified printer supports duplex (double-sided) printing.
Print two images on the same page:
Select to choose to print two images on the same side of the paper. This option is useful when you
wish to print the front and back side of your original document, such as ID card or driver license, on
the same page. This option is available only when scanning with a duplex scanner.
Auto Color Detection, Duplex Printing (for duplex printers only) and Print two images on the same
page may not be available depending on your printer’s settings.
9 Do one of the following:
Click OK to save your settings and exit.
Click Cancel to close this screen without saving changes.
5
33
Page 38
Button Panel Configuration
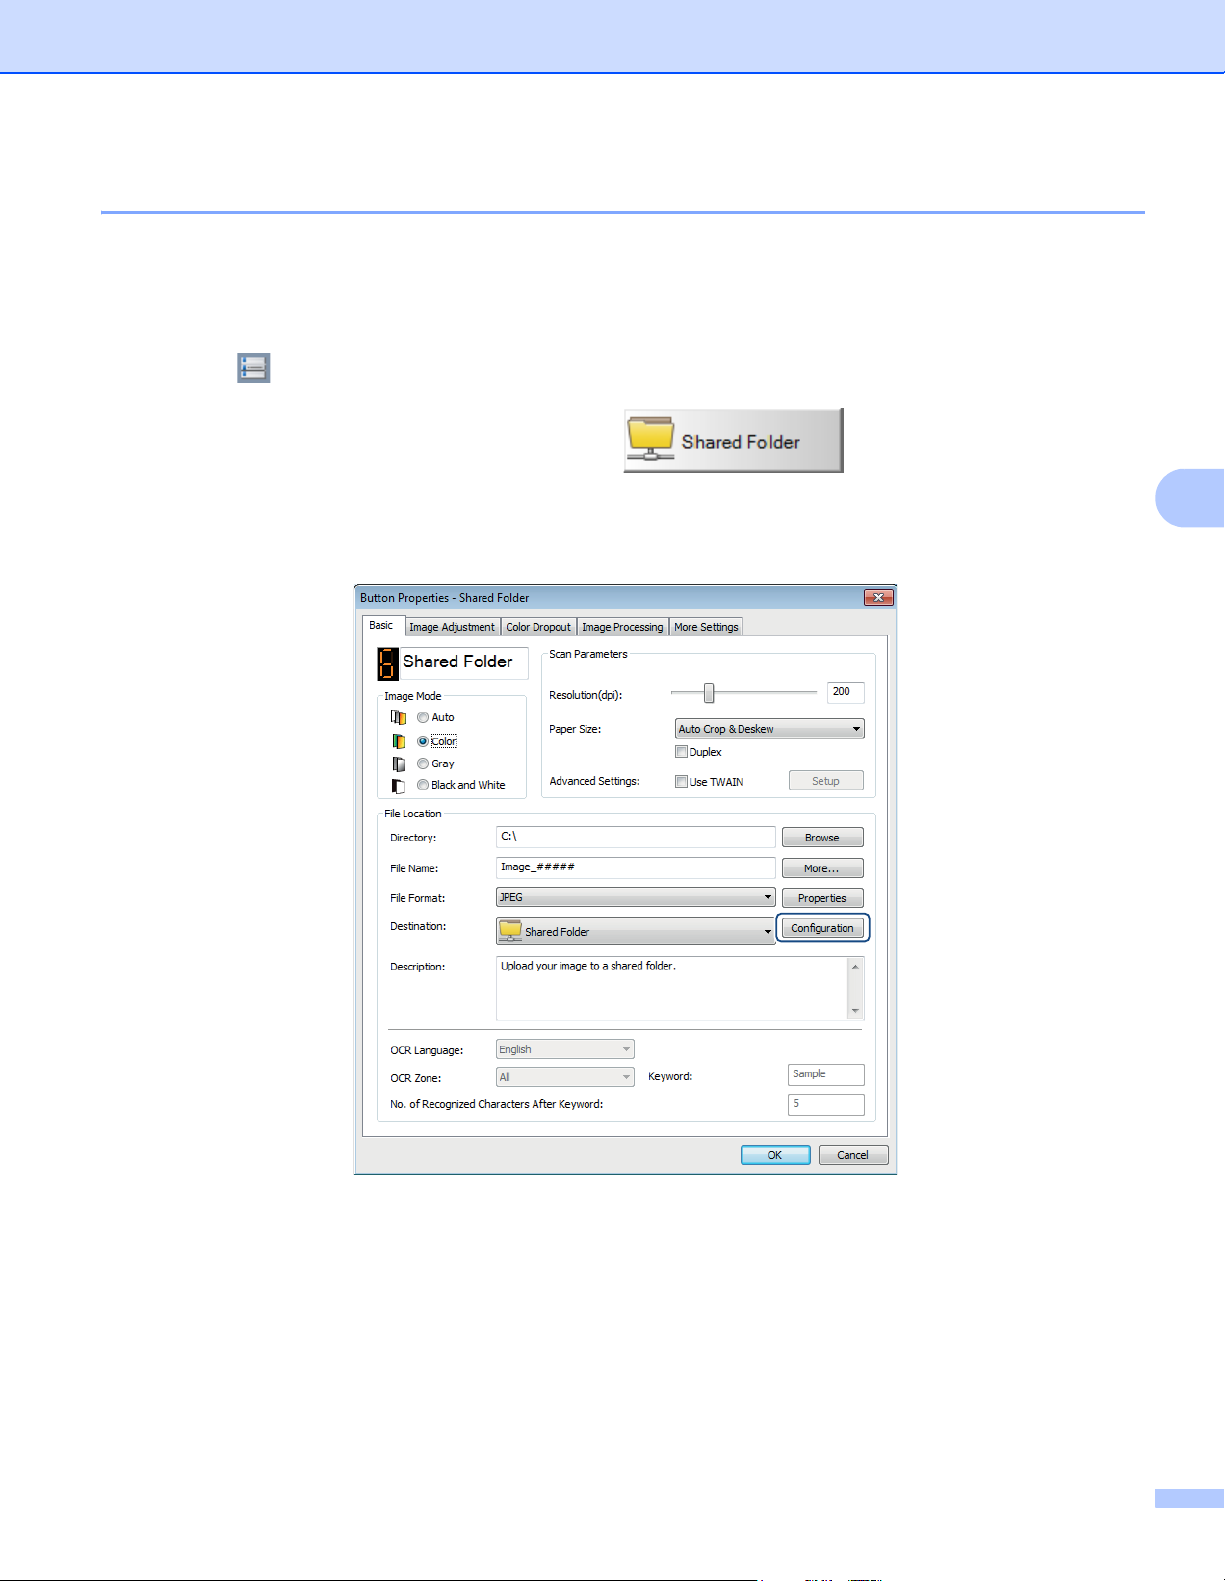
Sending Scans to a Shared Folder 5
To share your scanned images, you can send them to a shared folder, and all users who have access to that
shared folder will be able to share the uploaded images.
To configure the Shared Folder button for uploading images to a shared folder:
1 Click the (Button Manager V2) icon in your system tray.
2 Scroll through the Button Panel until you see the (Shared Folder) button.
3 Right-click Shared Folder. The shared folder Button Properties screen appears.
4 Click Configuration.
5
5
34
Page 39

Button Panel Configuration
NOTE
5 The Shared Folder Configuration screen appears.
6 In the User field, type your user account.
7 Type your Password.
8 Type the path to your shared folder.
Contact your System Administrator for authorization to send documents to a Shared Folder.
The User login name may include a domain name. If a domain name is included, the format that is required
by the user would be: domain\username (domain name followed by a backslash, then the user login
name).
9 In the Shared Folder field, type a name or click (Browse) to search for a specific folder. If you are
typing a folder name, you can use special attributes to name folders to help segregate files. For more
information, see the table Choice on page 15.
5
35
Page 40
Button Panel Configuration
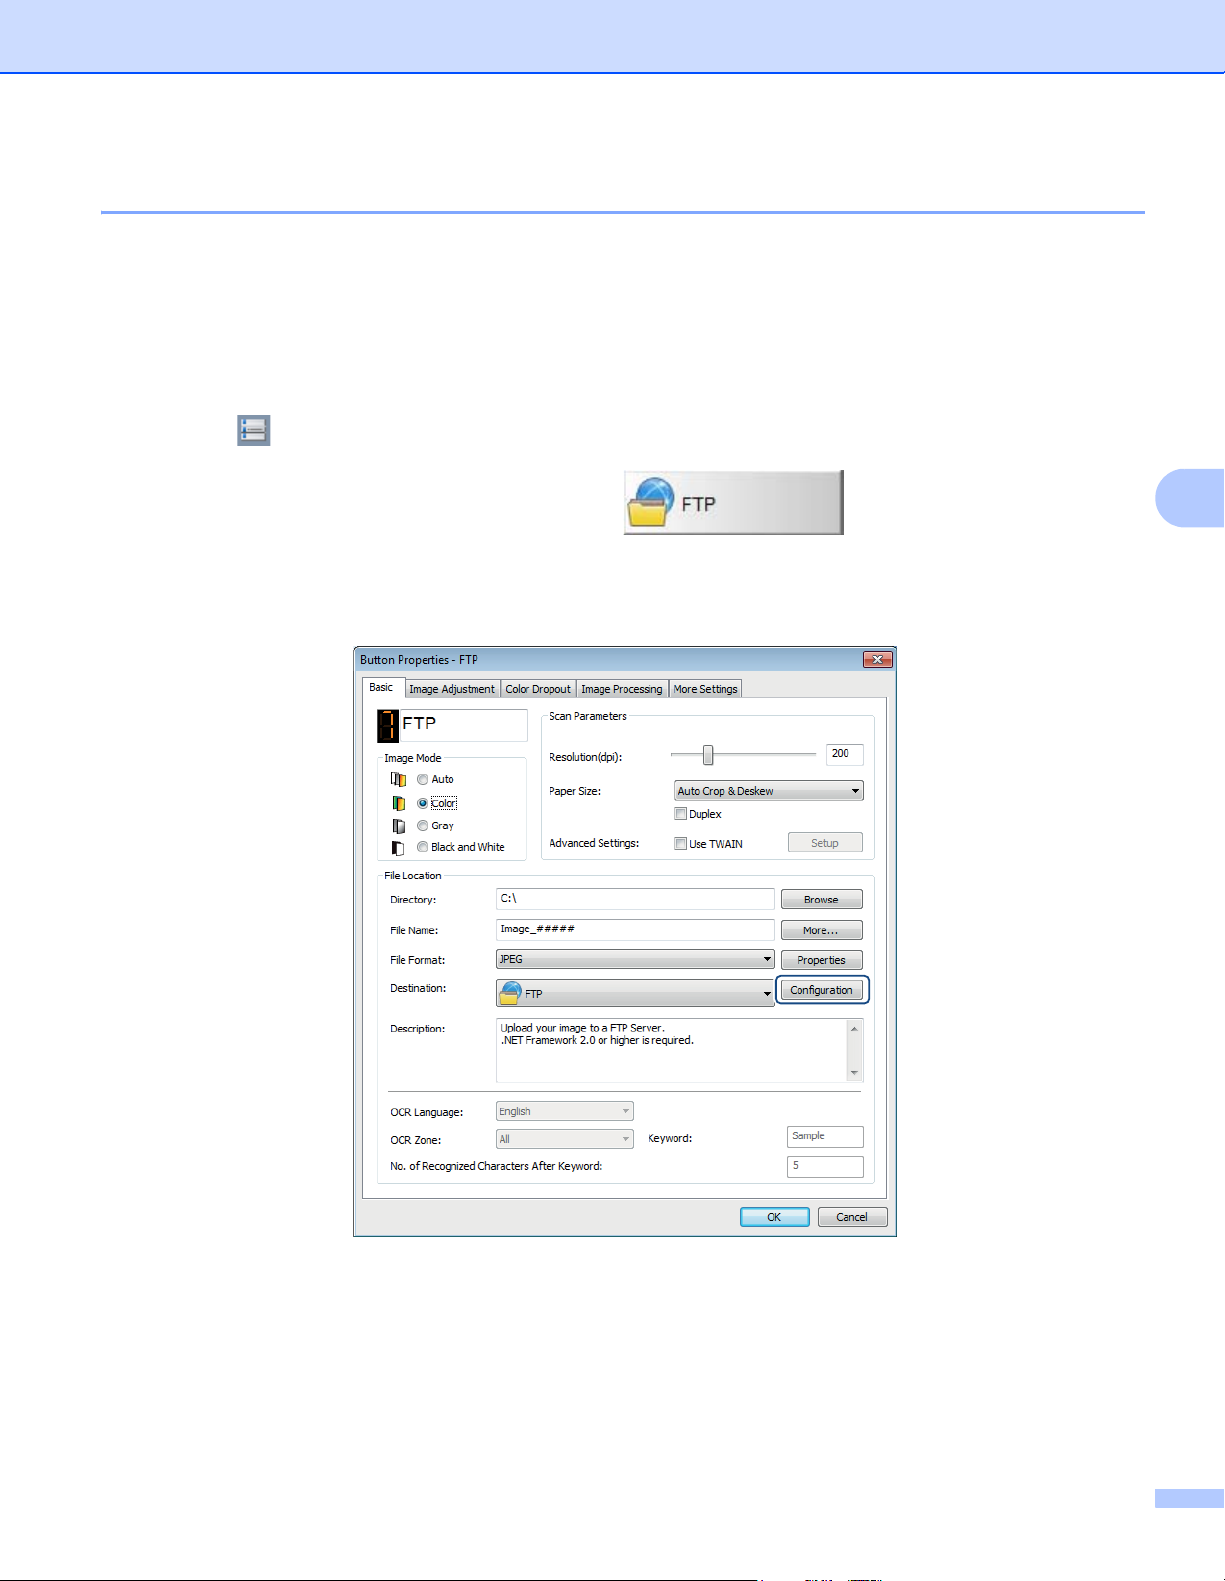
Sending Scans to an FTP Server 5
To share your scanned images, you can send them to a shared FTP server, and all users who have access
to that FTP server will be able to share the uploaded images.
You may need to contact your System Administrator for the FTP server’s correct URL or IP address. Your
System Administrator can give you access to the FTP server, along with a valid User Login and Password.
To configure the FTP button to upload images to an FTP server:
1 Click the (Button Manager V2) icon in your system tray.
2 Scroll through the Button Panel until you see the (FTP) button.
3 Right-click FTP. The FTP Button Properties screen appears.
4 Click Configuration.
5
5
36
Page 41

Button Panel Configuration
NOTE
5 The FTP Configuration screen appears.
6 In the Host field, type your IP address or URL using the format: ftp://yourhostname/yoursite, where:
ftp is your method
your host name is the name of your server
5
your site is your host’s website URL
7 Type your Port number.
8 Type your User Name.
9 Type your Password.
• Contact your System Administrator for authorization to send documents to the site.
• The User Login Name may include a domain name. If a domain name is included, the format that is
required by the user would be: domain\username (domain name followed by a backslash, then the user
login name).
0 In the Directory field, type a name or click (Browse) to search for a specific folder. If you are typing
a folder name, you can use special attributes for naming folders to help segregate files. For more
information, see the table Choice on page 15.
A If you secure the connection using Explicit TLS/SSL, select the Explicit TLS/SSL check box.
If your connection is in passive mode, select the Passive Mode check box.
37
Page 42

Button Panel Configuration
B Click the Proxy tab.
C If you are using a Proxy, select either Auto Detect Proxy or Specify Proxy. If you choose Specify
Proxy, you must type your Proxy Host IP address and your Proxy server’s Port number. Type your
User Name and Password, if they are required by your Host. For more information, see your Network
Administrator.
5
D Do one of the following:
Click OK to save your settings and exit.
Click Test to test your settings and verify that the account is active.
Click Cancel to close this screen without saving changes.
38
Page 43

Button Panel Configuration
Sending Scans to a Microsoft® SharePoint® Server 5
SharePoint® is a collaboration and document library tool. Button Manager V2 provides a way to scan
documents that you want to share and send to the SharePoint
to SharePoint
®
, you can use the capabilities of SharePoint® to manage your scanned documents.
You may need to contact your System Administrator to get the correct URL for the SharePoint
System Administrator will also give you access to the SharePoint
®
server. Once the electronic file is uploaded
®
®
site and a valid User Login ID and
server. Your
Password.
To configure the SharePoint button to upload images to a Microsoft
®
SharePoint® server: 5
1 Click the (Button Manager V2) icon in your system tray.
2 Scroll through the Button Panel until you see the (SharePoint) button.
3 Right-click SharePoint. The SharePoint
4 Click Configuration.
®
Button Properties screen appears.
5
39
Page 44
Button Panel Configuration
NOTE
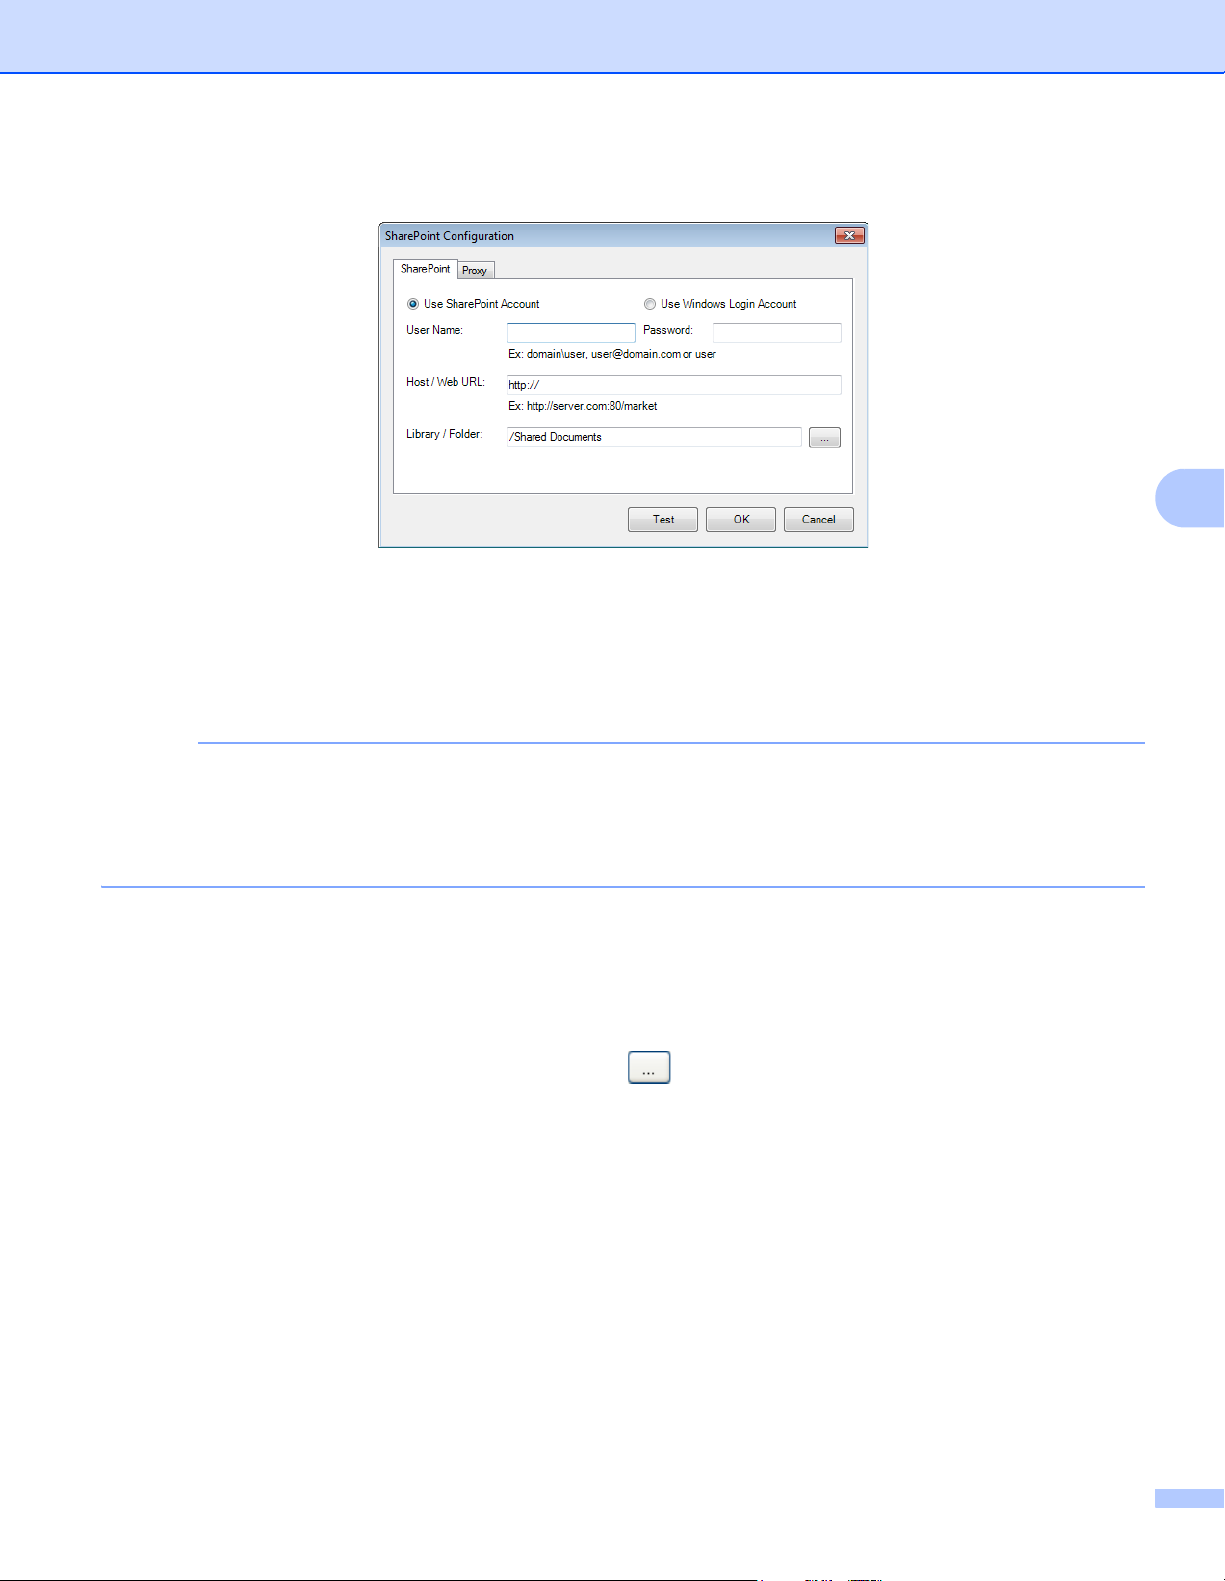
5 The SharePoint Configuration screen appears.
5
6 Select a login option.
®
If you would like to access the SharePoint
server with a unique user login and password, select Use
SharePoint Account. Type your User Name and Password.
If you want to access the SharePoint
®
to log in to Windows
on your PC, select Use Windows Login Account.
®
server by using the same user login and password that you use
• Contact your System Administrator for authorization to send documents to a Shared Folder.
• The User login name may include a domain name. If a domain name is included, the format that is required
by the user would be: domain\username (domain name followed by a backslash, then the user login
name).
7 In the Host / Web URL field, type your URL using the format: http://yourhostname/yoursite, where:
http is your method
your host name is the name of your server
your site is your host’s website URL (optional)
8 In the Library / Folder field, type a name or click (Browse) to search for a specific folder. Any
Document or Picture Library can be entered here.
40
Page 45
Button Panel Configuration
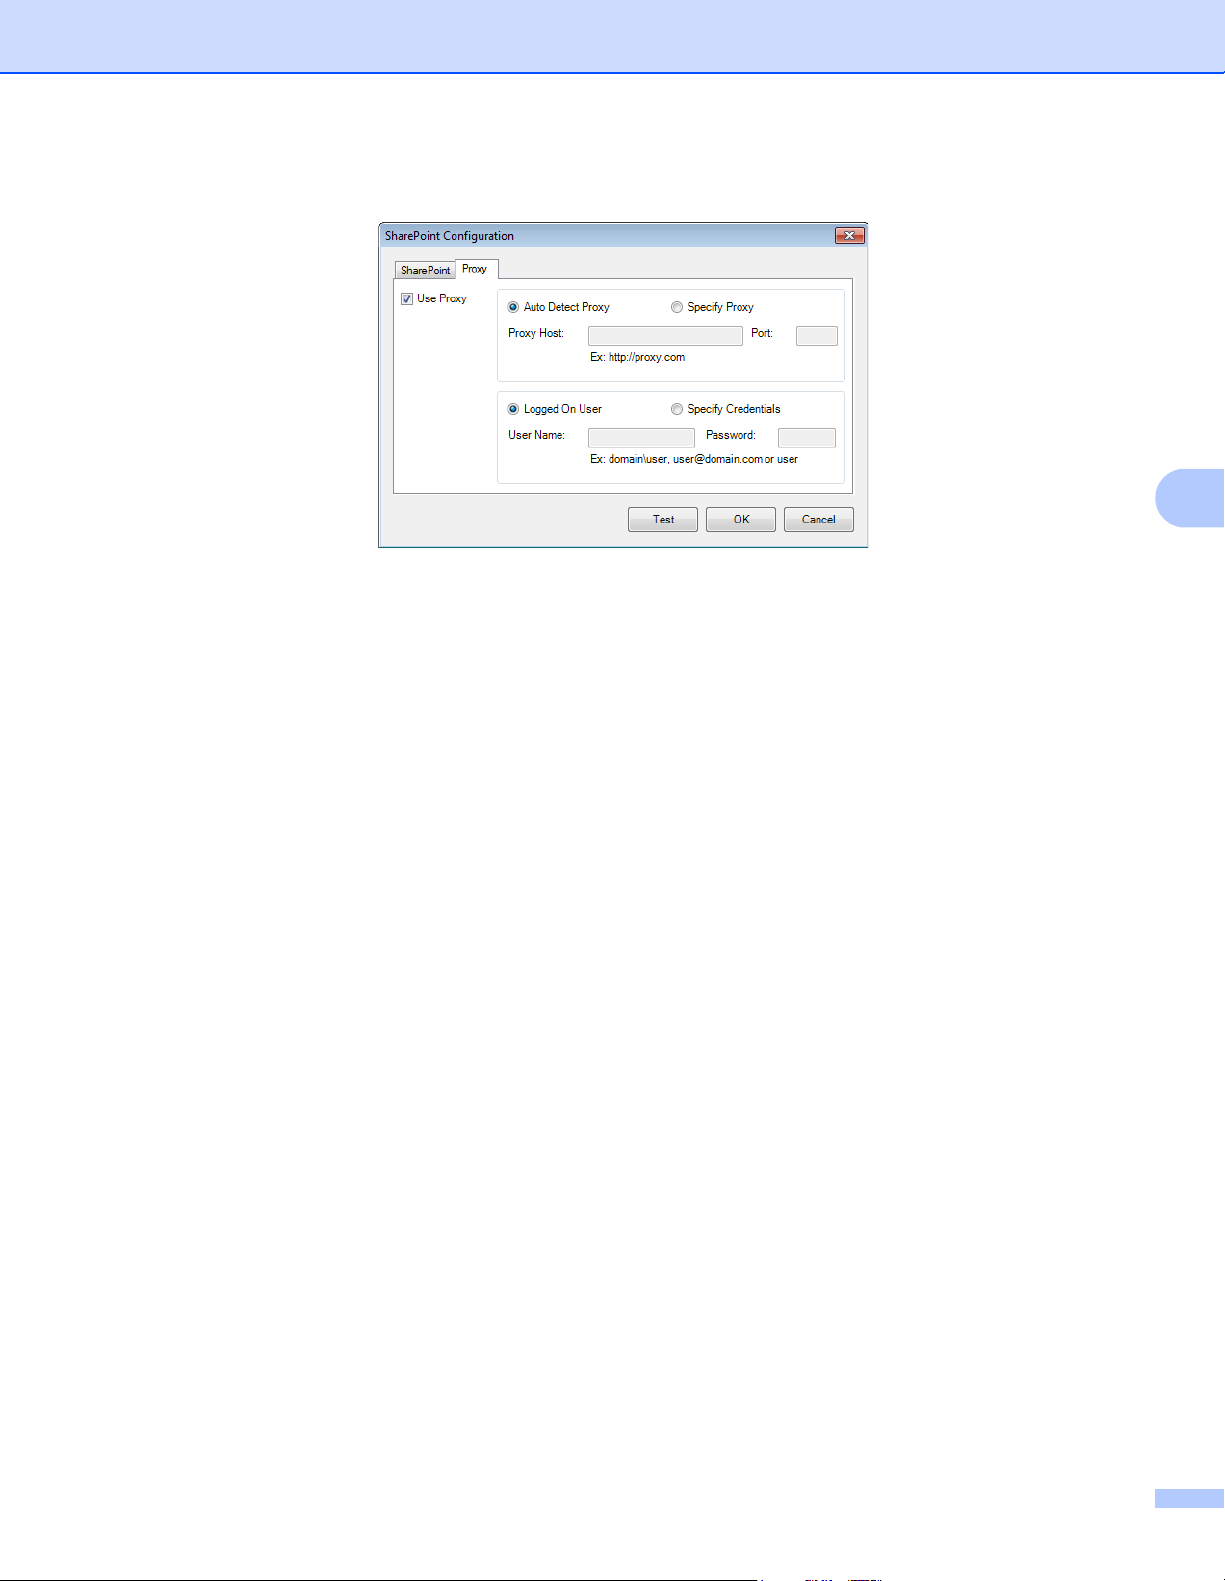
9 Click the Proxy tab.
0 If you are using a Proxy, select either Auto Detect Proxy or Specify Proxy. If you choose Specify
Proxy, you must type your Proxy Host IP address and your Proxy server’s Port number. Type your
User Name and Password, if they are required by your Host. For more information, see your Network
Administrator.
5
A Do one of the following:
Click OK to save your settings and exit.
Click Test to test your settings and verify that the account is active.
Click Cancel to close this screen without saving changes.
41
Page 46
6
Use Button Manager V2’s Options menu to change additional scan settings or to view more detailed
information, such as changing the user interface language and unit of measurement.
Using the Options Menu 6
1 Right-click the (Button Manager V2) icon in your system tray.
2 Click Options.
3 The Options screen appears.
6
4 Click the buttons in the left navigation panel to change the following settings:
42
Page 47
Using the Options Menu
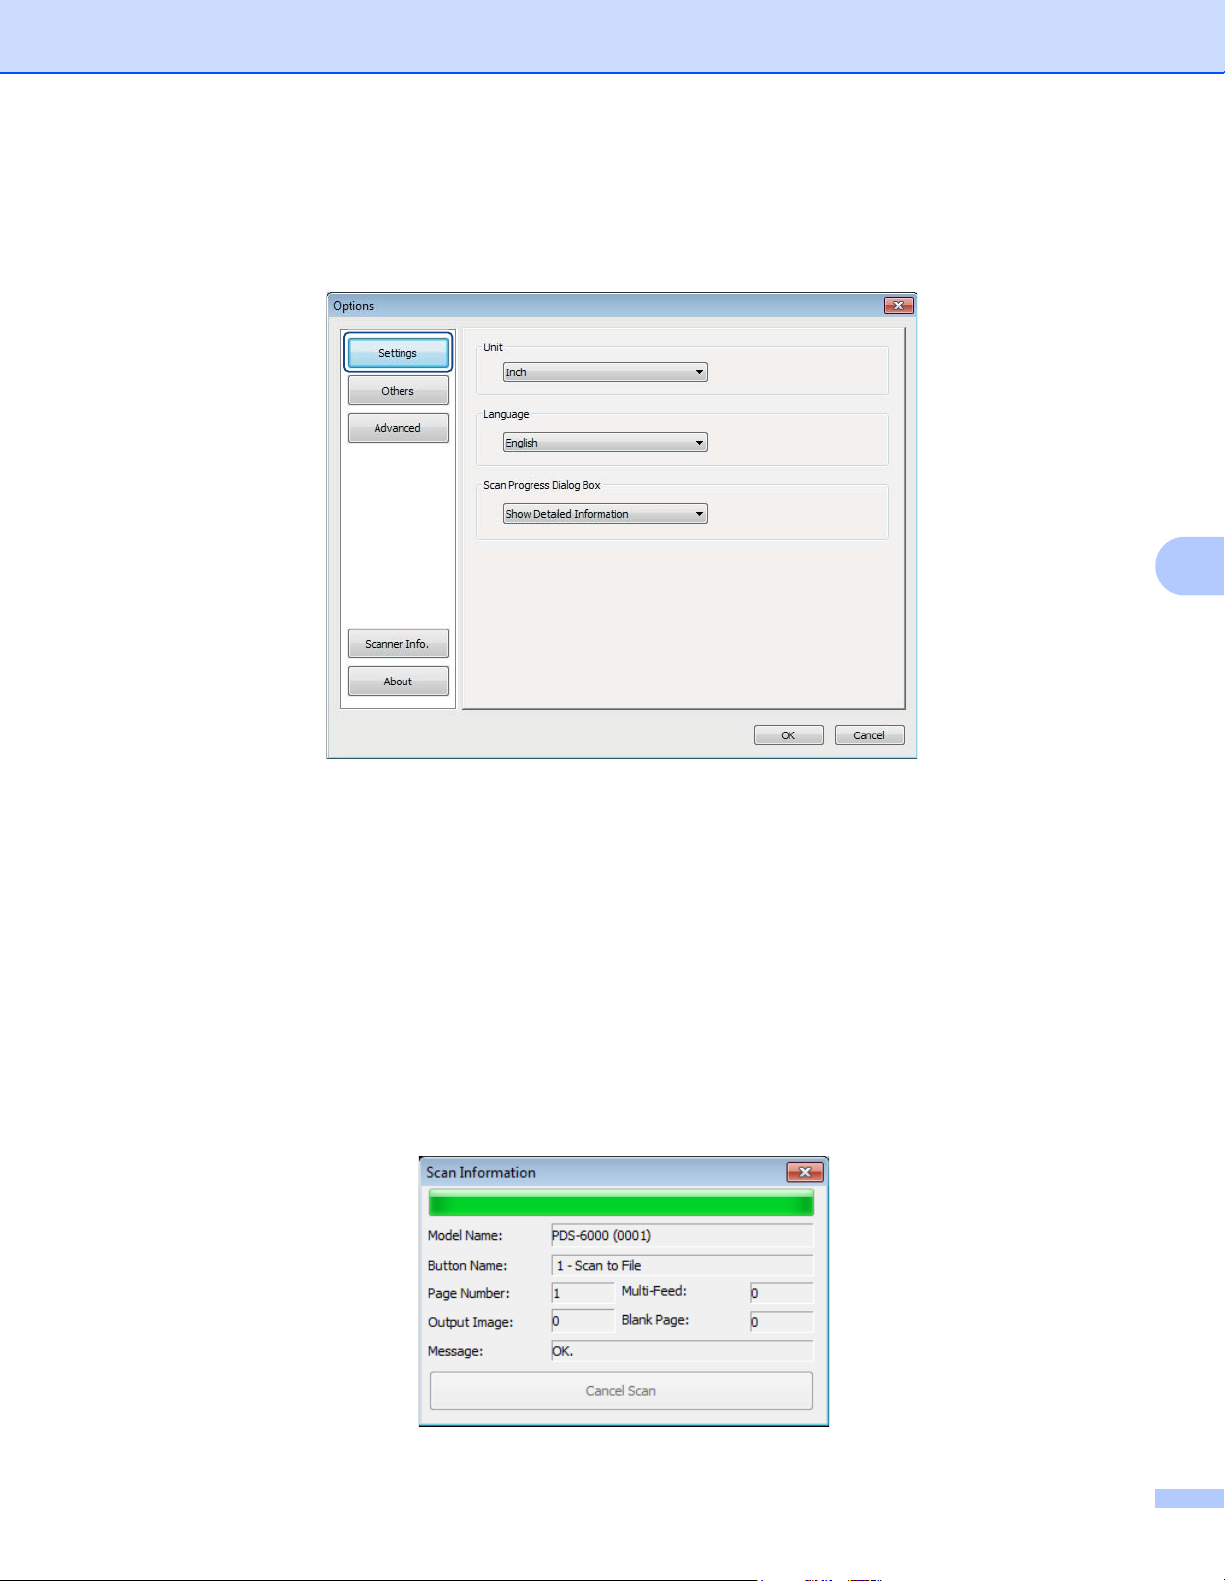
Settings 6
Click Settings to configure the following settings:
6
Unit 6
Choose your measurement units. Choices include: Centimeter, Inch, and Millimeter. This setting is
applied to the unit of Paper Size on the Basic tab.
Language
Choose the language you want to be shown in the user interface. After clicking OK, the specified
language will be displayed.
Scan Progress Dialog Box
Choose if you wish to show basic or detailed information while scanning. Choices include: Show Basic
Status Only, and Show Detailed Information.
6
6
43
Page 48

Using the Options Menu
Others 6
Click Others in the Options screen to configure the following settings:
6
Time to hide Button Panel 6
Select the Enable check box and move the slider to set the time to auto-hide the Button Panel. You can
choose from 0 ~ 120 seconds. To show the Button Panel after it is hidden, click the Button Manager V2
icon in your system tray.
Profile
Select the Show Profile Information For Each Button check box if you want to show profile information
for each button. If selected, basic profile information will be displayed in the Button Panel, as shown
below.
6
44
Page 49
Using the Options Menu
Static Button Panel 6
Select the Show check box to display a static button panel in the bottom-right corner of your desktop.
When the Static Button Panel is displayed, you can press the Start button on the scanner to start
scanning without having to launch Button Manager V2.
6
45
Page 50

Using the Options Menu
Advanced 6
Click Advanced in the Options screen to configure the following settings:
6
Default 6
Click Factory Defaults to reset Button Manager V2 configuration changes to the factory settings.
Register/Unregister Button
This option is recommended for use only by software developers. Click Unregister if you want to stop
using Button Manager V2 and use a different third-party button program.
Scanner Buttons
Select the Disable check box to stop the buttons on the scanner from working. This option can be used
to prevent users from accidentally starting scans.
Hotkey
To define a hotkey that executes one of the Button Panel’s scan functions, link a keyboard key to one of
the numbered buttons on the Button Panel. Select the Register System Hotkey check box, choose Ctrl
or Alt from the drop-down list, and click OK. The Number (1~9) indicates that you can use the hotkey
with any of the function buttons on the Button Panel.
When you select a scanned file and use the hotkey assigned here, Button Manager performs that
operation on the scanned file.
For example: Select Register System Hotkey, select Ctrl from the drop-down list, and then click OK.
Select a scanned file in Windows Explorer, hold the CTRL key on your keyboard and press the number 9.
Function 9 on the Button Panel is assigned to SharePoint, so the scanned file is sent to SharePoint
automatically.
6
6
6
46
Page 51

Using the Options Menu
Button Profile Import/Export 6
This option allows you to import or export button profiles including scan settings and destinations to
Button Manager V2. By clicking the Export button, you can save current profiles to a .bm file. By clicking
the Import button, you can import the previously saved .bm file to Button Manager V2.
Scanner Info. 6
Click Scanner Info. to view information about the scanner including serial number, roller count, etc. Use this
information if you report a problem to service personnel.
About 6
Click About to view the version of Button Manager V2 that is installed on your computer.
6
47
Page 52
7
Advanced Functions 7
Creating New Profiles 7
Button Manager V2 provides nine preset profiles for you to use and customize. You can also create new
personalized profiles for any specific needs you have, such as scanning a particular type of document or
working on certain scanned images.
To add a new profile:
1 Right-click the (Button Manager V2) icon in your system tray.
2 Click Profile Manager.
3 The Profile Manager screen appears.
7
7
4 Click Add. A new profile will be created and displayed in the list.
5 Name the button by typing a new name in the Name field.
48
Page 53

Advanced Functions
NOTE
NOTE
6 Change the button settings by clicking Edit. When the Button Properties screen appears, customize
the button properties if needed.
Edit any button in this list by selecting it, clicking Edit, and making changes in the Button Properties
screen.
7 To import a profile to the Button Panel, right-click the Button column of a profile entry to select a button
number to assign to the profile.
7
8 To delete a profile, select it and click Delete.
A profile with a Button number assigned to it cannot be deleted unless the Button number is switched to
another profile.
9 Click OK to save the settings and exit the Profile Manager.
49
Page 54
Advanced Functions
NOTE
NOTE
This is a party photo.
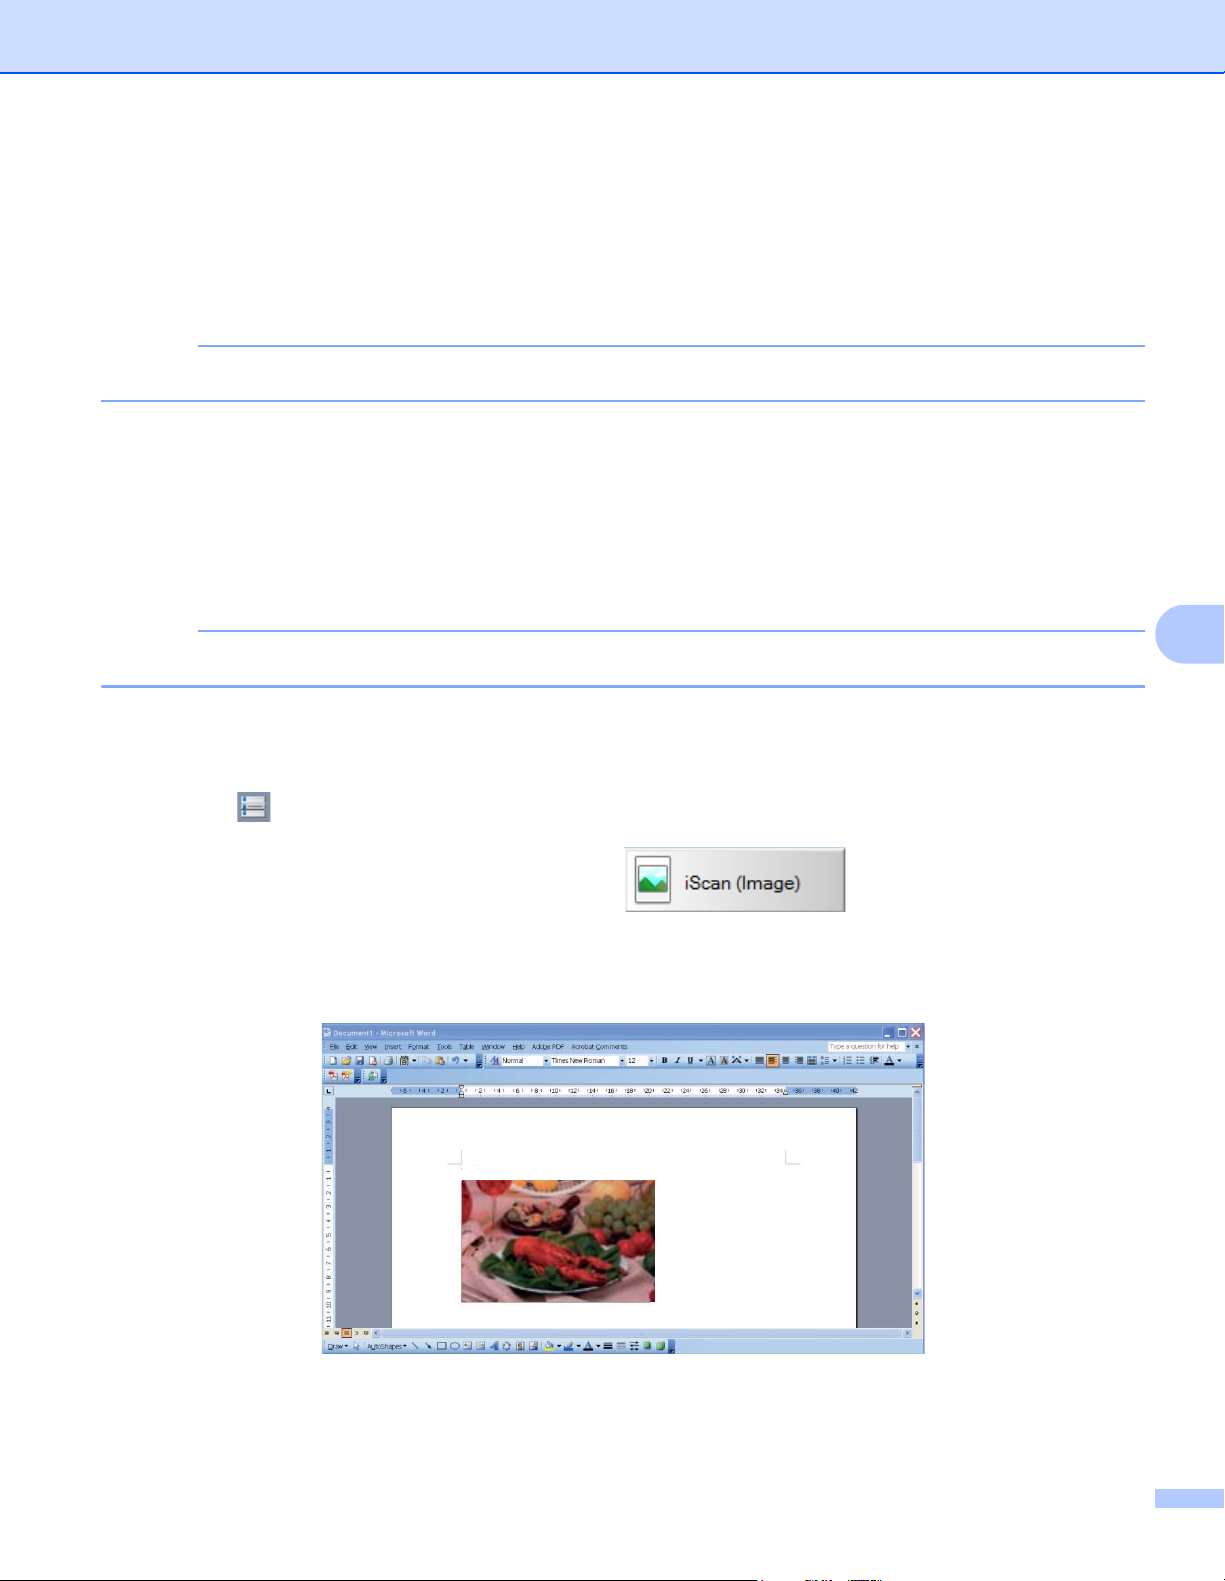
Opening Your Scanned Image in a Software Application 7
You can insert a scanned image directly into a software application that is already open. For example, when
you are editing text in Microsoft
away and the scanned image will be inserted and displayed in your Microsoft
A scanned image cannot be inserted into a text editor such as Notepad.
To convert and insert the image in a software application: 7
®
Word and you want to insert a scanned picture, you can start a scan right
®
Word document.
1 Import the preset iScan (Image) profile from Profile Manager screen to the Button Panel. For more
information, see Creating New Profiles on page 48.
2 Open the software application where you want to view your scanned image. In this example,
®
Microsoft
If no application is active, the scanned data is sent only to the directory file you set.
Word is the application.
3 Move your cursor to the place in the document where you want the scanned image to appear.
4 Insert the document into your scanner.
5 Click the (Button Manager V2) icon in your system tray.
7
6 Scroll through the Button Panel until you see the (iScan (Image)) button.
7 Click iScan (Image).
8 The scanned image will open in your Microsoft
®
Word .doc file.
50
Page 55

Advanced Functions
NOTE
Converting and Opening Your Scanned Text in a Software Application 7
You can scan an image and convert the image text to editable text through the OCR process and insert the
text directly into a software application. For example, when you are editing text in Microsoft
wish to scan and insert text from an image, you can start a scan right away and the converted text will be
inserted and displayed in your Microsoft
To convert and insert editable text into a software application:
®
Word document.
®
Word and you
1 Import the preset iScan (OCR) profile from Profile Manager screen to the Button Panel. For more
information, see Creating New Profiles on page 48.
2 Open the software application where you want to insert your scanned image’s text. In this example,
Microsoft
If no application is active, the text in the image will be converted to editable text and the data is sent only
to the directory file you set.
®
Word is the application.
3 Move your cursor to the place in the document where you want the editable text to appear.
4 Insert the document into your scanner.
5 Click the (Button Manager V2) icon in your system tray.
7
7
6 Scroll through the Button Panel until you see the (iScan (OCR)) button.
7 Click iScan (OCR).
8 The scanned image’s text will be inserted in your Microsoft
®
Word .doc file.
51
Page 56
Advanced Functions
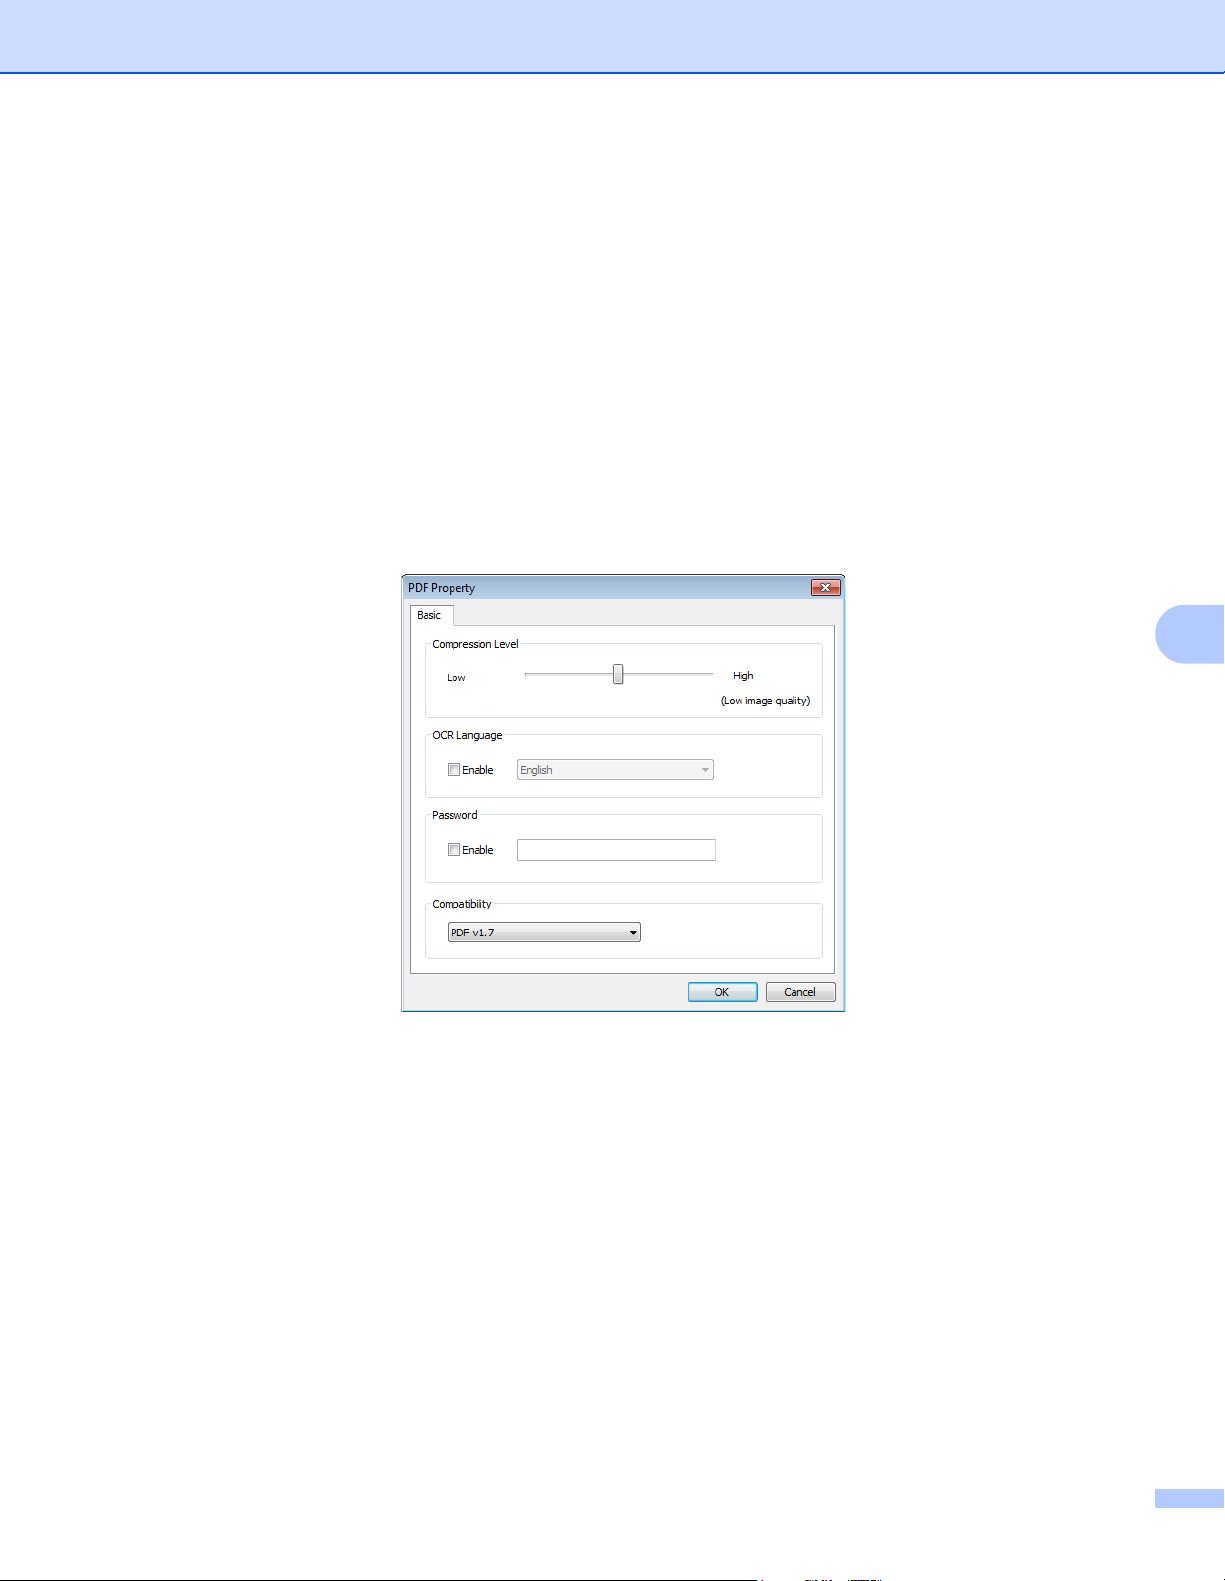
Saving Your Images as Searchable PDF Files 7
Use Button Manager V2 to save your scanned images as searchable PDF files (single-page or multi-page).
To save your images as searchable PDF files:
1 In the Button Panel, right-click the button you want to configure as the ’save as searchable PDF’ scan
button. The Button Properties screen appears.
2 In the File Format drop-down list, select PDF as your format (if you are scanning multiple pages and
want to save all scans in a single file, select Multi-page PDF).
3 Click Properties to the right of the File Format drop-down list.
4 The PDF Property screen appears.
7
7
5 In the OCR Language field, select the Enable check box and choose your OCR language from
the drop-down list.
6 Click OK to save your settings and exit.
7 Scan a document. The file is saved in a searchable PDF format.
52
Page 57

Advanced Functions
NOTE
“Drag and Drop” to Save Your File to a Button in the Button Panel 7
Button Manager V2 is designed with a convenient feature that lets you drag and drop your file to a button in
the Button Panel so the file is saved in that button’s pre-defined folder destination. This feature works with all
scan buttons in the Button Panel except the iScan or iScan (OCR) buttons. For example, when you drag and
drop an image file onto the Shared Folder Button, the image is saved in the Shared Folder’s destination
folder.
1 Launch the Windows
®
Explorer application and browse to your file.
2 Click (Button Manager V2) icon in your system tray.
3 Drag and drop your file from Windows
arrow and a plus sign will appear next to your cursor.
®
Explorer to the button you want on the Button Panel. A white
4 The file will be uploaded to the Shared Folder destination folder. To confirm that the drag and drop was
successful, navigate to your Shared Folder to check if the file is there.
7
• To use the drag and drop function, your scanner must be connected to your computer with a USB cable.
• If you drag and drop an image to a button that has the destination set to iScan and the file format set to
OCR (For iScan Only), the text in the image will be converted to editable text.
• You can also use the Hotkey to send your image to a specified destination. (For more information, see
Hotkey on page 46.)
53
Page 58

8
Troubleshooting 8
The following conditions may occur while Button Manager V2 is uploading a file to a network file server such
as FTP:
Error message Description Possible Solutions
Invalid host. The entry in the Host field is not
correctly formatted.
User name field cannot
be left blank.
Incorrect user name or
password.
Invalid proxy host URL. Your proxy host URL may not be
Invalid port number. The port number for the network
Unable to get proxy
settings automatically.
Proxy configuration is
incorrect.
File or directory doesn’t
exist.
The remote service point
could not be contacted.
The connection was
prematurely closed.
Exceeded the specified
size limit.
Unable to resolve the
host name.
Unable to resolve the
proxy name.
Unable to receive
complete response from
server.
The request was
canceled.
The request was not
permitted by the proxy.
A complete request could
not be sent to the remote
server.
The user name field is blank. Enter the user name.
The user login may not be authorized
to access the server, or the incorrect
password was entered.
correct.
server may not be correct.
The proxy settings may not be correct. Check with your System Administrator for the
The subfolder may not exist. Check with your System Administrator to see if you
No response was received from the
remote server.
The network connection may be
temporarily disconnected.
The image file you uploaded to the
server is larger than the specified size
limit.
The host name may be incorrect. Check with your System Administrator for the correct
The proxy host name may be
incorrect.
The request may not have been
received by the server.
The request may not have been
received by the server.
The request was not permitted by the
proxy server.
A complete request could not be sent
to the remote server.
Make sure the syntax is correct and the full path of
the network file server is provided.
Make sure the user login and password are correct.
You may also need to contact your System
Administrator to make sure you have permission to
access the network file server.
Check with your System Administrator for the
correct proxy host URL.
Check with your System Administrator for the
correct port number for the network server.
correct proxy settings.
have permission to create the subfolder.
There may be a network problem. Try again later or
check with your System Administrator.
There may be a network problem. Try again later or
check with your System Administrator.
Check with your System Administrator for file size
limitations.
host name.
Check with your System Administrator for the correct
proxy host name.
There may be a network problem. Try again later or
check with your System Administrator.
There may be a network problem. Try again later or
check with your System Administrator.
Check with your System Administrator for details
about the proxy server.
This may occur due to a network problem. You can
try later or check with your System Administrator.
8
54
Page 59

Troubleshooting
NOTE
Error message Description Possible Solutions
An error occurred while
establishing a connection
using SSL.
No response was
received during the
time-out.
A server certificate could
not be validated.
Invalid Document
Library/Folder.
Method not allowed. You are not allowed to access the
Unknown error. The document upload failed due to an
The network server may not support
SSL.
The scanned file could not be
uploaded to the server before the
connection timed out.
A server certificate could not be
validated.
The library name or folder name could
not be found on the server.
network file server.
undetermined reason.
This may also occur if Button
Manager V2 cannot establish a
connection with the network server.
Check with your System Administrator.
The network connection speed may be too slow. Try
again later.
Check with your System Administrator to make sure
you have permission to access the network file
server.
Make sure the library and folder names are correct.
Check with your System Administrator to make sure
you have permission to access the network file
server.
Check all Button Manager V2’s network settings to
make sure they are correct.
8
If you are having trouble uploading files, make sure you can access the network file server using an
Internet browser. If the network file server is not working or there is a problem with the network connection
between your computer and the network file server, Button Manager V2 will not be able to upload files.
55
 Loading...