

Brother MFC-J6510DW, MFC-J6710DW, MFC-J6910DW User guide

®
Advanced User’s Guide
Safety and Legal
Basic User’s Guide
User’s Guide
User’s Guide

Note
Safety and Legal
MFC-J6510DW/J6710DW/J6910DW
Brother Industries, Ltd.
15-1, Naeshiro-cho, Mizuho-ku, Nagoya 467-8561, Japan
Please read this booklet before attempting to operate the machine, or before attempting any
maintenance. Failure to follow these instructions may result in an increased risk of fire, electrical
shock, burns or suffocation.
1
Symbols and
conventions used in
the documentation
The following symbols and conventions are
used throughout the documentation.
Bold Bold typeface identifies specific
buttons on the machine’s
control panel, or on the
computer screen.
Italics Italicized typeface emphasizes
an important point or refers you
to a related topic.
Courier
New
Text in the Courier New font
identifies messages on the
LCD of the machine.
WARNING
WARNING indicates a potentially
1
hazardous situation which, if not avoided,
could result in death or serious injuries.
CAUTION
CAUTION indicates a potentially hazardous
situation which, if not avoided, may result in
minor or moderate injuries.
IMPORTANT
IMPORTANT indicates a potentially
hazardous situation which, if not avoided,
may result in damage to property or loss of
product functionality.
Notes tell you how you should
respond to a situation that may arise
or give tips about how the operation
works with other features.
Electrical Hazard icons alert you to
possible electrical shock.
Improper Setup icons alert you to
devices and operations that are not
compatible with the machine.
Fire Hazard icons alert you to the
possibility of fire.
Follow all warnings and instructions marked
on the machine.
The illustrations in this guide show the
MFC-J6710DW.
Version 0
1
UK/IRE/GEN

Compilation and Publication Notice 1
Under the supervision of Brother Industries, Ltd. this manual has been compiled and published,
covering the latest product descriptions and specifications.
The contents of this manual and the specifications of this product are subject to change without
notice.
Brother reserves the right to make changes without notice in the specifications and materials
contained herein and shall not be responsible for any damages (including consequential) caused
by reliance on the materials presented, including but not limited to typographical and other errors
relating to the publication.
2
Choose a safe location for your machine 1
WARNING
Put your machine on a flat, stable surface that is free of vibration and shocks, such as a desk. Put
the machine near a telephone socket and a standard grounded electrical socket. Choose a dry,
well ventilated location where the temperature remains between 10 C and 35 C.
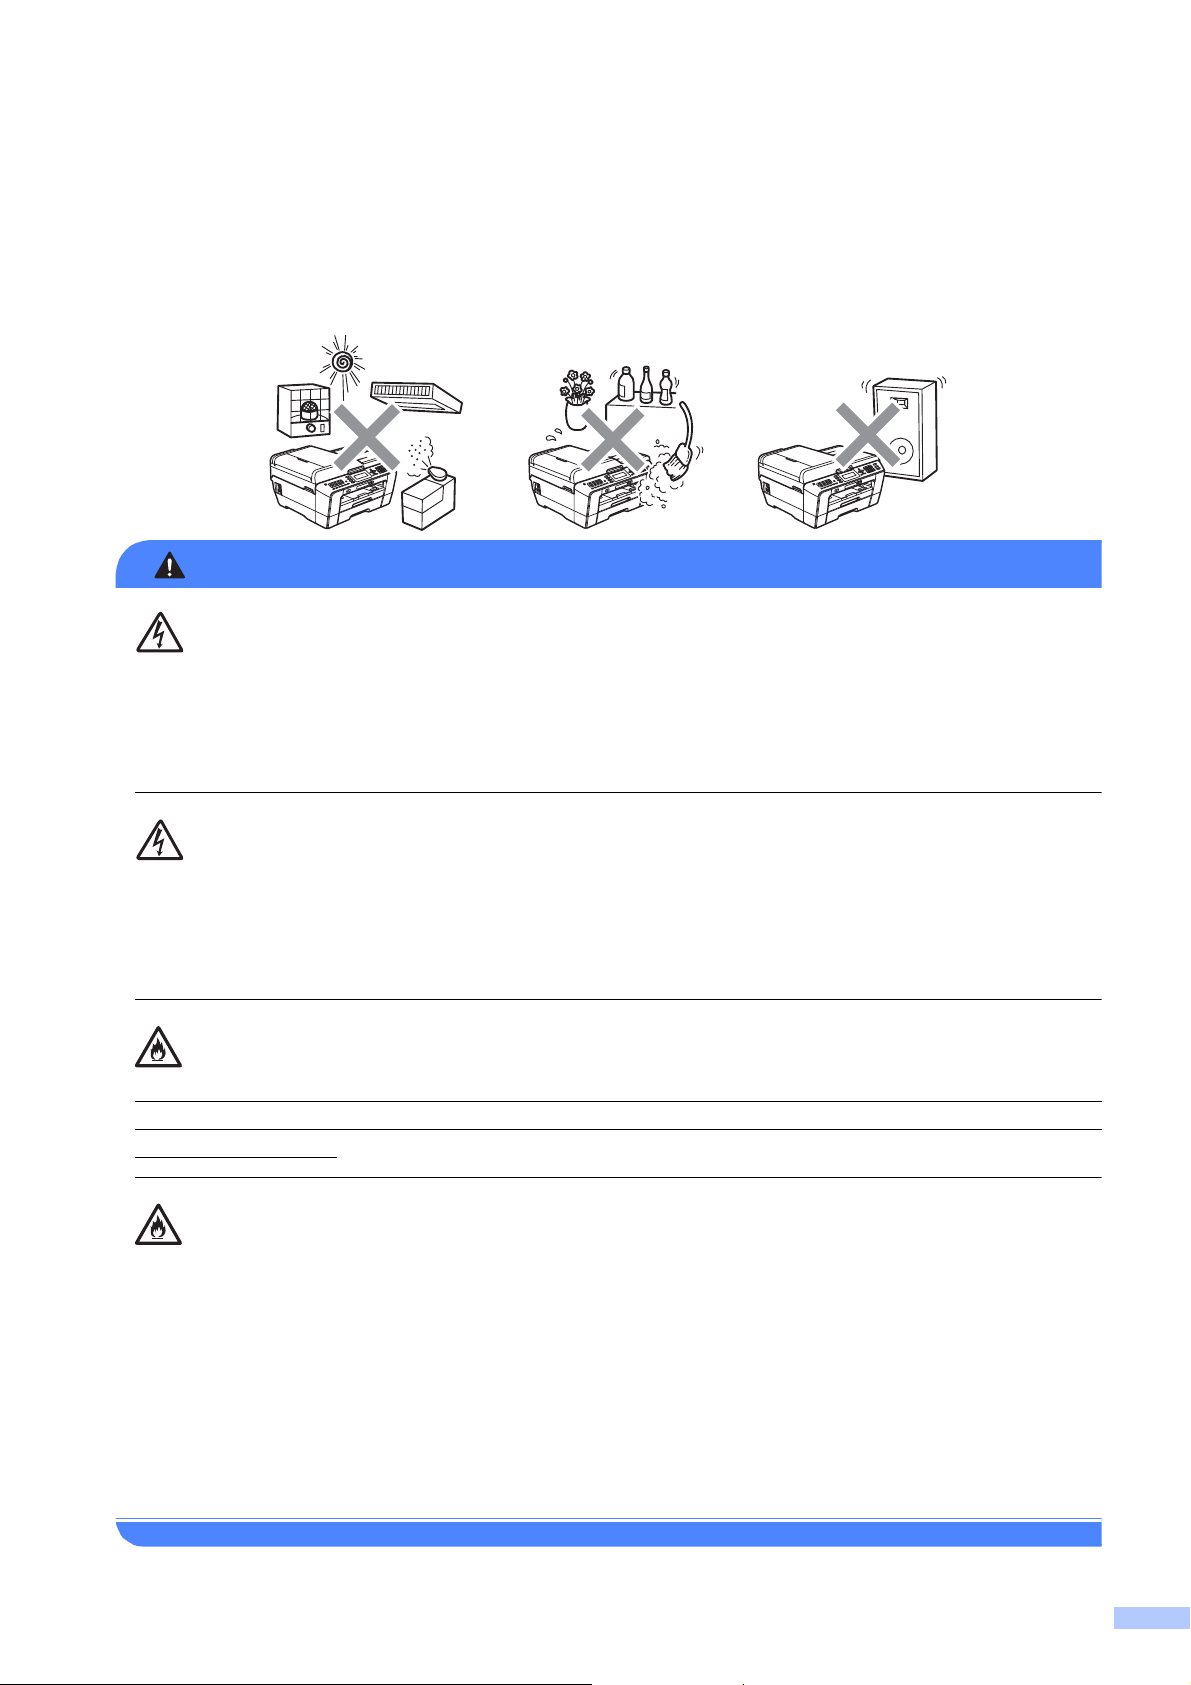
DO NOT expose the machine to direct sunlight, excessive heat, open flames, salty or corrosive
gasses, moisture or dust. DO NOT place your machine on a carpet or rug, as this will expose it
to dust. Doing so may create a risk of an electrical short or fire. It may also damage the machine
and/or render it inoperable.
DO NOT place the machine near heaters, air conditioners, water, chemicals or devices that
contain magnets or generate magnetic fields. Doing so may create the risk of a short circuit or
fire should water come into contact with the machine (including condensation caused by
heating/air conditioning/ventilation equipment).
Slots and openings in the casing and the back or bottom are provided for ventilation. To ensure
reliable operation of the machine and to protect it from overheating, these openings must not be
blocked or covered.
DO NOT put the machine in a location where any slot or opening in the machine is obstructed
or blocked. These slots and openings are provided for ventilation. Blocking the machine’s
ventilation could create a risk of overheating and/or fire.
IMPORTANT
• Always place the machine on a solid surface, never on a bed, sofa, rug, or other similar soft
surface.
• Do not place this machine near or over a radiator or heater.
• Do not place this machine in a “built-in” installation.
3
IMPORTANT
• DO NOT put objects on top of the machine.
WARNING
• DO NOT place anything in front of the machine that will block received faxes. DO NOT place
anything in the path of received faxes.
• DO NOT place your machine next to sources of interference, such as speakers or the base
units of non Brother cordless telephones. Doing so may interfere with the operation of the
machine's electronic components.
• DO NOT place the machine on any tilted/slanted surface. DO NOT tip the machine after the
ink cartridges are installed. Doing so may cause ink spillage and internal damage to the
machine.
General precautions 1
Plastic bags are used in the packing of your machine. To avoid the danger of suffocation, keep
these bags away from babies and children.
Never push objects of any kind into this machine through cabinet slots, since they may touch
dangerous voltage points or short out parts resulting in the risk of fire or electric shock. If metal
objects, water or other liquids get inside the machine, immediately unplug the machine from the
electrical socket. Call your Brother dealer or Brother Customer Service.
DO NOT use flammable substances, any type of spray, or an organic solvent/liquid that contains
alcohol or ammonia to clean the inside or outside of the machine. Doing this may cause a fire
or electrical shock.
4
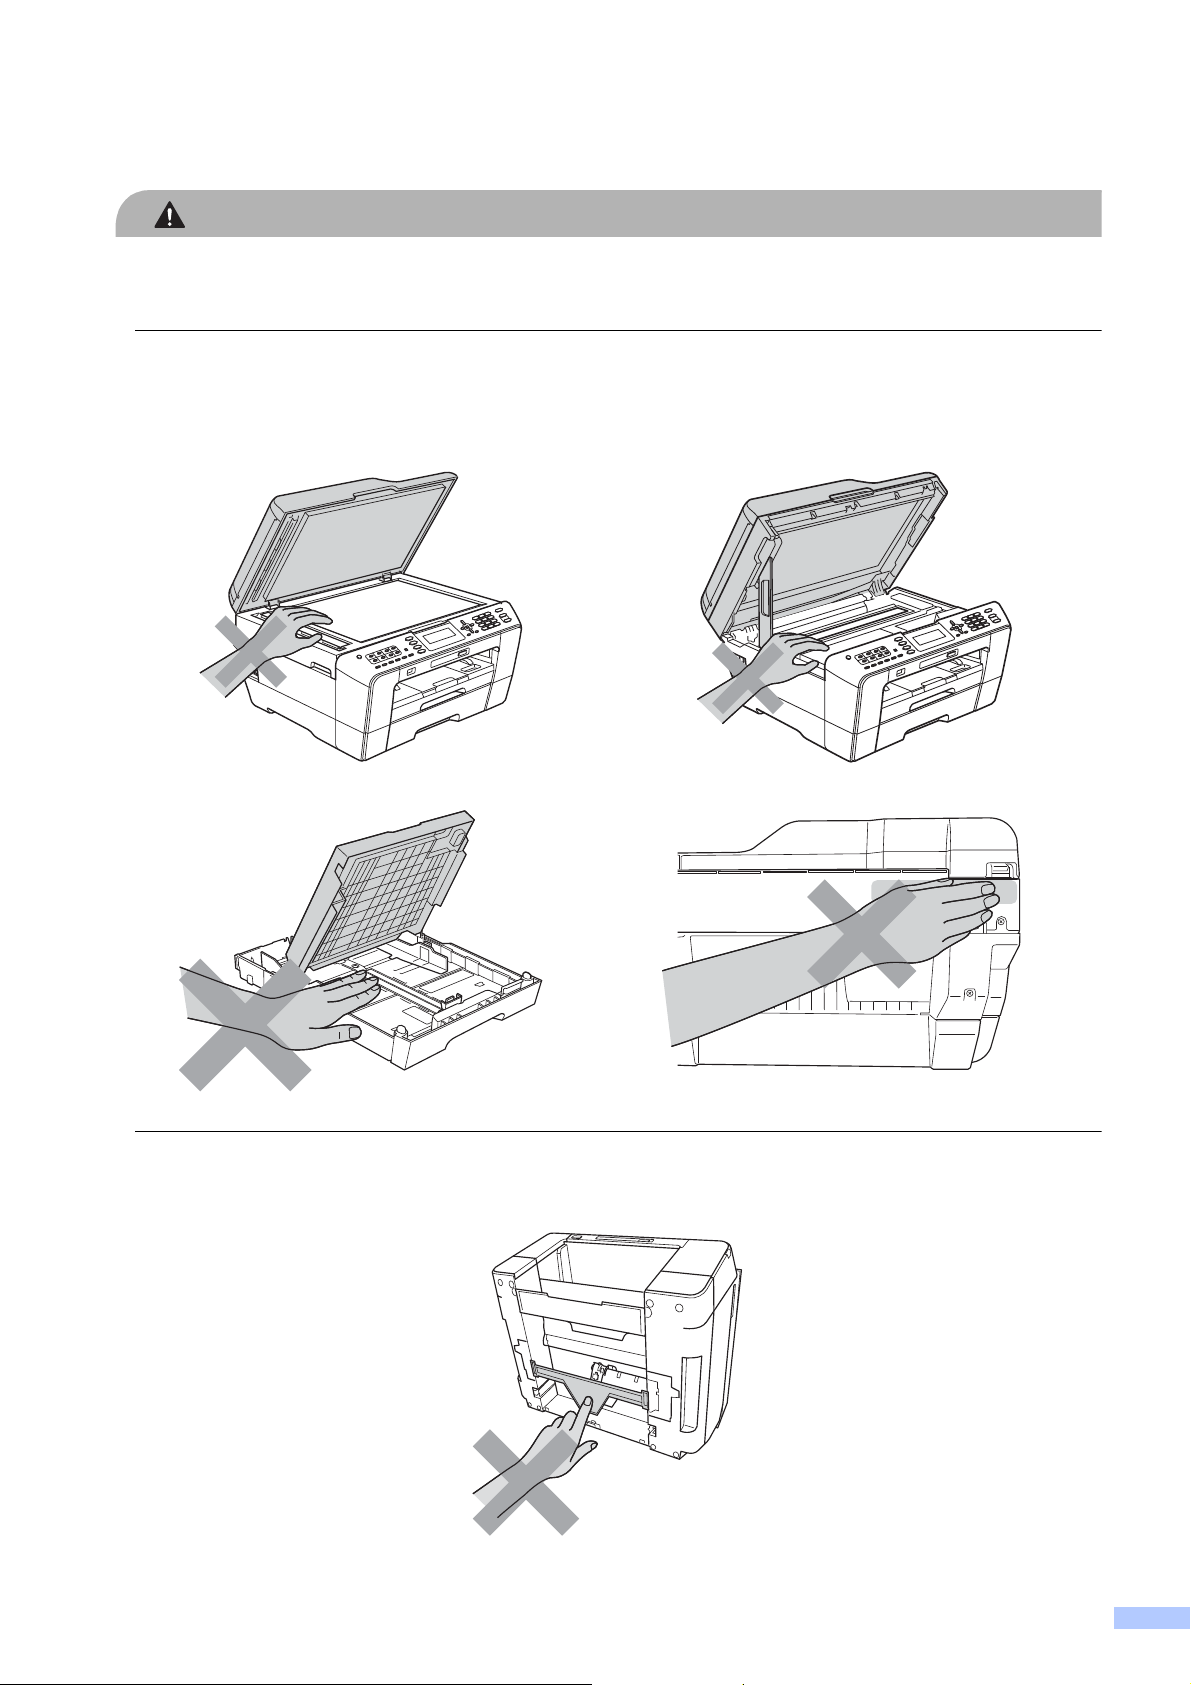
CAUTION
Wait until pages have exited the machine before picking them up. Doing this may cause injury
to your fingers by trapping them in a roller.
Some areas of the machine can cause injury if covers (shaded) are closed with force. Take care
when placing your hand in the areas shown in the illustrations.
DO NOT touch the area shaded in the illustration. Doing this may cause injury to your fingers by
cutting them on the edge of the machine.
5

IMPORTANT
DO NOT carry the machine by holding the scanner cover or the Jam Clear Cover. Doing this
may cause the machine to slip out of your hands. Only carry the machine by placing your hands
under the entire machine.
(MFC-J6510DW) 1
(MFC-J6710DW and MFC-J6910DW)
To prevent injuries when moving or lifting this machine, make sure to use at least two people.
Be careful not to pinch your fingers when you set the machine back down.
• Disruption of power can wipe out information in the machine's memory.
• (MFC-J6910DW)
DO NOT touch the Touchscreen immediately after plugging in the power cord or turning on the
machine. Doing this may cause an error.
6
Connecting the machine safely 1
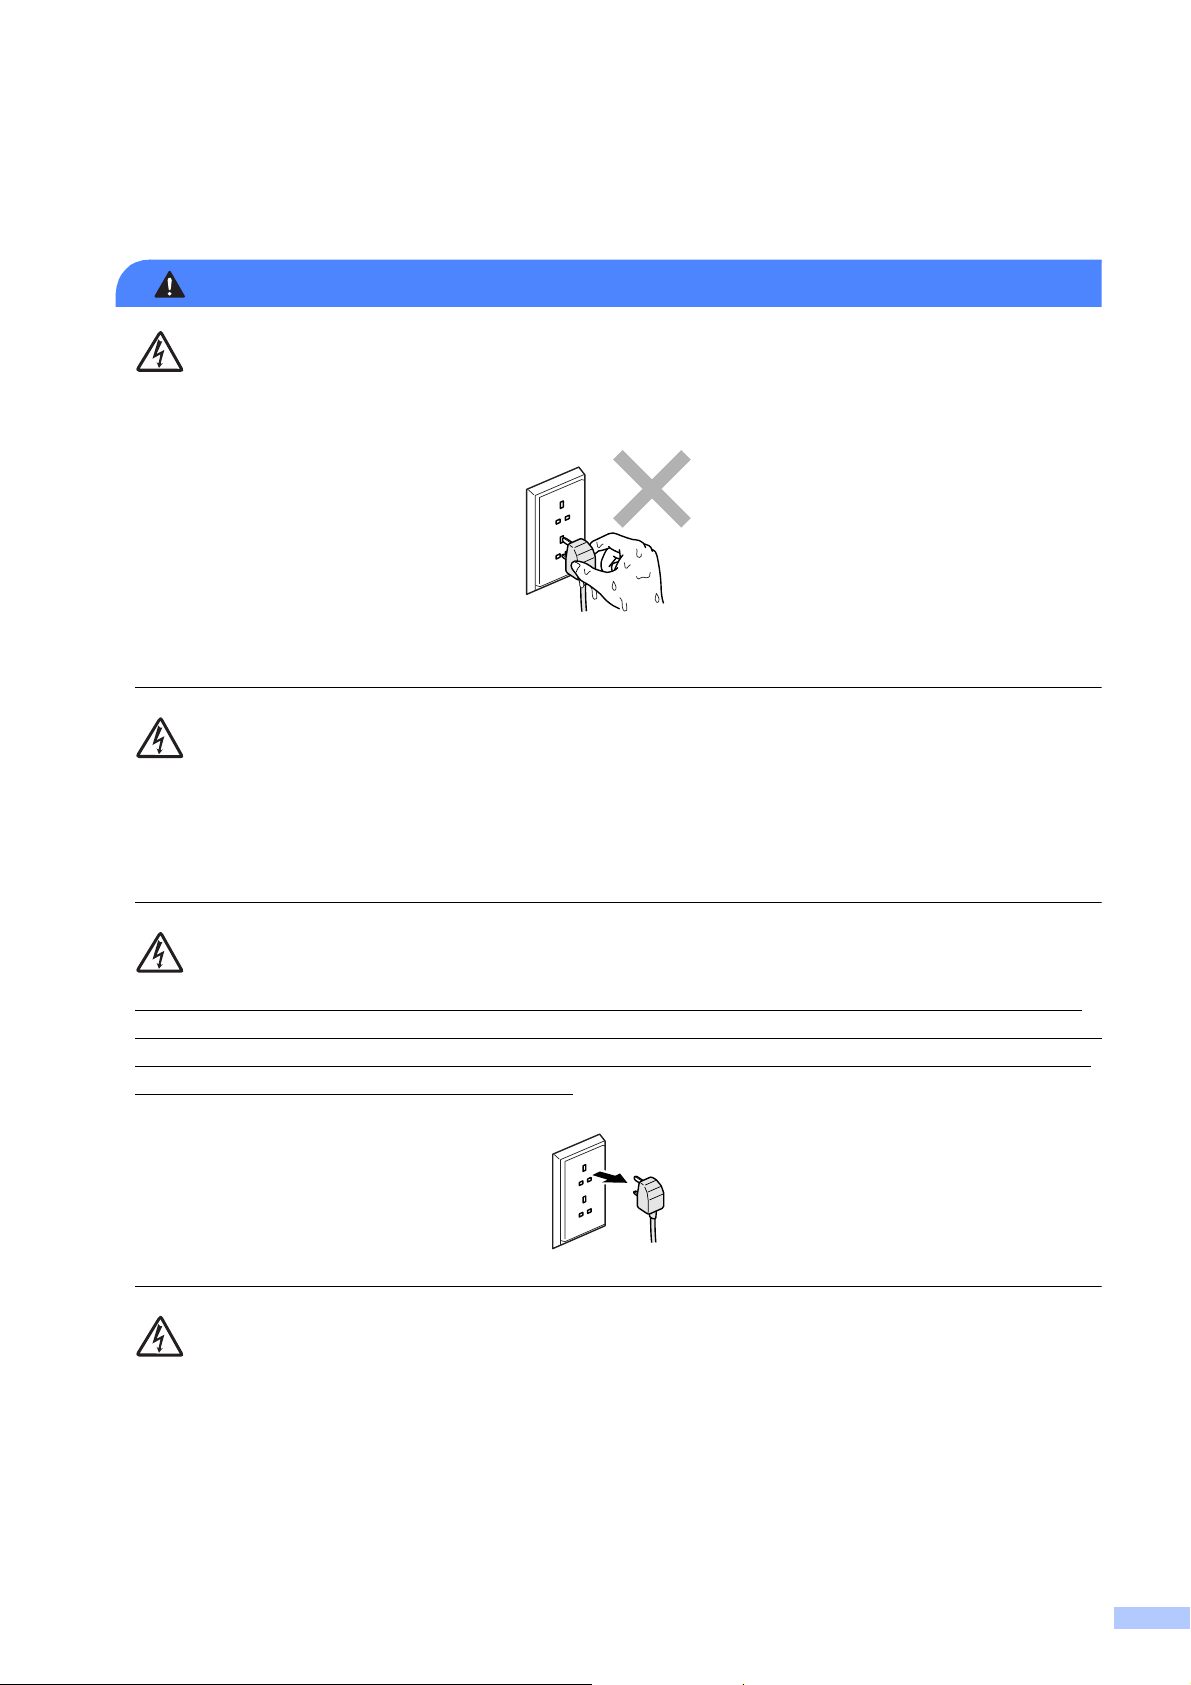
WARNING
DO NOT handle the plug with wet hands. Doing this might cause an electrical shock.
Always make sure the plug is fully inserted.
This machine should be connected to an adjacent grounded AC power source within the range
indicated on the rating label. DO NOT connect it to a DC power source or inverter. Doing this
might cause an electrical shock. If you are not sure what kind of power source you have, contact
a qualified electrician.
This machine is equipped with a 3-wire grounded plug. This plug will only fit into a grounded
power outlet. This is a safety feature. If you are unable to insert the plug into the outlet, call your
electrician to replace your obsolete outlet. DO NOT defeat the purpose of the grounded plug.
Doing this might cause an electrical shock.
DO NOT use the machine if the power cord is frayed or damaged, doing so may cause an
electrical shock or a fire.
7

WARNING
CAUTION
IMPORTANT
DO NOT pull on the middle of the AC power cord. DO NOT allow anything to rest on the power
cord. DO NOT place this machine where people can walk on the cord. Doing this might cause
an electrical shock.
Never touch telephone wires or terminals that are not insulated unless the telephone line has
been unplugged at the wall socket. Never install telephone wiring during a lightning storm. Never
install a telephone wall socket in a wet location. Doing this might cause an electrical shock.
Servicing the machine 1
DO NOT attempt to service this machine yourself because opening or removing covers may
expose you to dangerous voltage points and other risks and may void your warranty. Call your
Brother dealer or Brother Customer Service.
If the machine has been dropped or the casing has been damaged, unplug this machine from
the power socket and call your Brother dealer or Brother Customer Service. Doing this might
cause an electrical shock.
If the machine becomes unusually hot, releases smoke, generates any strong smells, or if you
accidentally spill any liquid on it, immediately unplug the machine from the electrical socket. Call
your Brother dealer or Brother Customer Service.
If the machine does not operate normally when the operating instructions are followed, adjust
only those controls that are covered by the operating instructions. Incorrect adjustment of other
controls may result in damage and will often require extensive work by a qualified technician
to restore the machine to normal operation.
8

Product Warranty & Liability 1
WARNING
Brother shall not be liable for any loss or damage that may arise from the use of the information
contained herein (including, without limitation, any direct, special or consequential damages).
Nothing contained herein shall affect any existing product warranty, or be construed as granting
any additional product warranty.
DO NOT use this machine near water, for example, near a bath tub, wash bowl, kitchen sink or
washing machine, in a wet basement or near a swimming pool.
Avoid using this machine during an electrical storm. There may be a remote risk of electric shock
from lightning.
DO NOT use this machine to report a gas leak in the vicinity of the leak.
Use only the power cord supplied with this machine.
This product must be installed near an electrical socket that is easily accessible. In case of an
emergency, you must unplug the power cord from the electrical socket to shut off the power
completely.
Approval Information 1
THIS EQUIPMENT IS DESIGNED TO WORK WITH A TWO WIRE ANALOGUE PSTN LINE
FITTED WITH THE APPROPRIATE CONNECTOR.
Brother advises that this product may not function correctly in a country other than where it was
originally purchased, and does not offer any warranty in the event that this product is used on
public telecommunication lines in another country.
9

Declaration of Conformity (Europe only) 1
IMPORTANT
We, Brother Industries, Ltd.
15-1, Naeshiro-cho, Mizuho-ku, Nagoya 467-8561 Japan
declare that this product is in compliance with the essential requirements of Directives 1999/5/EC
and 2009/125/EC.
The Declaration of Conformity (DoC) is on our Website.
Please go to http://solutions.brother.com/
-> choose region (eg. Europe)
-> choose country
-> choose your model
-> choose "Manuals"
-> choose Declaration of Conformity (Select Language when required.)
Wiring information (U.K. only) 1
If you need to replace the plug fuse, fit a fuse that is approved by ASTA to BS1362 with the same
rating as the original fuse. Always replace the fuse cover. Never use a plug that does not have a
cover. If in any doubt, call a qualified electrician.
Warning - This machine must be earthed.
The wires in the mains lead are coloured in line with the following code:
Green and Yellow: Earth
Blue: Neutral
Brown: Live
LAN connection 1
DO NOT connect this machine to a LAN connection that is subject to over-voltages.
Radio interference 1
This product complies with EN55022 (CISPR Publication 22)/Class B. When connecting the
machine to a computer, ensure that you use a USB cable which does not exceed 2 m in length.
10

Recycling information in accordance with the WEEE
(2002/96/EC) and Battery (2006/66/EC) Directives 1
Product mark Battery mark
European Union only
The product/battery is marked with one of the above recycling symbols. It indicates that at the end
of the life of the product/battery, you should dispose of it separately at an appropriate collection
point and not place it in the normal domestic waste stream.
For products with user replaceable batteries please refer to the users guide for replacement
instructions.
International ENERGY STAR® Qualification Statement 1
The purpose of the International ENERGY STAR® Program is to promote the development and
popularization of energy-efficient office equipment.
As an ENERGY STAR® Partner, Brother Industries, Ltd. has determined that this product meets
®
the ENERGY STAR
specifications for energy efficiency.
11

Trademarks 1
The Brother logo is a registered trademark of Brother Industries, Ltd.
Brother is a registered trademark of Brother Industries, Ltd.
Windows Vista is either a registered trademark or trademark of Microsoft Corporation in the United
States and/or other countries.
Microsoft and Windows are either registered trademarks or trademarks of Microsoft Corporation
in the United States and/or other countries.
Apple, Macintosh and Mac OS are trademarks of Apple Inc., registered in the United States and
other countries.
Adobe, Flash, Illustrator and Photoshop are either registered trademarks or trademarks of Adobe
Systems Incorporated in the United States and/or other countries.
Nuance, the Nuance logo, PaperPort and ScanSoft are trademarks or registered trademarks of
Nuance Communications, Inc. or its affiliates in the United States and/or other countries.
Memory Stick, Memory Stick PRO, Memory Stick PRO Duo, Memory Stick Duo, MagicGate,
MagicGate Memory Stick, Memory Stick Micro and M2 are trademarks of Sony Corporation.
AOSS is a trademark of Buffalo Inc.
WPA, WPA2, Wi-Fi Protected Access and Wi-Fi Protected Setup are either trademarks or
registered trademarks of Wi-Fi Alliance in the United States and/or other countries.
Wi-Fi and Wi-Fi Alliance are registered trademark of the Wi-Fi Alliance.
Intel and Pentium are trademarks of Intel Corporation in the U.S. and other countries.
AMD is a trademark of Advanced Micro Devices, Inc.
FaceFilter Studio is a trademark of Reallusion, Inc.
BRAdmin Professional is a trademark of Brother Industries, Ltd.
UNIX is a registered trademark of The Open Group in the United States and other countries.
Linux is the registered trademark of Linus Torvalds in the U.S. and other countries.
CorelDraw, Corel Paint Shop Pro and Corel WordPerfect are trademarks or registered trademarks
of Corel Corporation and/or its subsidiaries in Canada, the United States and/or other countries.
Each company whose software title is mentioned in this manual has a Software License
Agreement specific to its proprietary programs.
Any trade names and product names of companies appearing on Brother products, related
documents and any other materials are all trademarks or registered trademarks of those
respective companies.
12

Open Source Licensing Remarks 1
This product includes open-source software.
Please see Open Source Licensing Remarks and Copyright information on the supplied CD-ROM.
(For Windows®) “X:\License.txt” (where X is your drive letter).
(For Macintosh) Double-click the CD-ROM icon on your desktop. Then double-click the Utilities
icon. License.rtf will appear.
Unlawful use of copying equipment 1
It is an offence to make reproductions of certain items or documents with the intent to commit
fraud. The following is a non-exhaustive list of documents which it may be unlawful to produce
copies of. We suggest you check with your legal adviser and/or the relevant legal authorities if in
doubt about a particular item or document:
Currency
Bonds or other certificates of indebtedness
Certificates of Deposit
Armed forces service or draft papers
Passports
Postage stamps (cancelled or uncancelled)
Immigration papers
Welfare documents
Cheques or drafts drawn by governmental agencies
Identifying badges or insignias
In addition, driving licenses and/or Certificates of Title to motor vehicles may not be copied under
certain national laws.
Copyrighted works cannot be copied lawfully, subject to the “fair dealing” exception relating to
sections of a copyrighted work. Multiple copies would indicate improper use. Works of art should
be considered the equivalent of copyrighted works.
13

BASIC USER’S GUIDE
MFC-J6910DW
Version 0
UK/IRE/GEN

If you need to call Customer Service
Please complete the following information for future
reference:
Model Number: MFC-J6910DW
1
Serial Number:
Date of Purchase:
Place of Purchase:
1
The serial number is on the back of the unit. Retain
this User's Guide with your sales receipt as a
permanent record of your purchase, in the event of
theft, fire or warranty service.
Register your product on-line at
http://www.brother.com/registration/
© 2010 Brother Industries, Ltd.

User's Guides and where do I find it?
Which manual? What's in it? Where is it?
Safety and Legal Read this Guide first. Please read the Safety
Instructions before you set up your machine.
See this Guide for trademarks and legal
limitations.
Quick Setup Guide Follow the instructions for setting up your
machine and installing the drivers and software
for the operating system and connection type
you are using.
Basic User's Guide Learn the basic Fax, Copy, Scan and
PhotoCapture Center™ operations and how to
replace consumables. See troubleshooting tips.
Advanced User's Guide Learn more advanced operations: Fax, Copy,
security features, printing reports and
performing routine maintenance.
Software User's Guide Follow these instructions for Printing, Scanning,
Network Scanning, PhotoCapture Center™,
Remote Setup, PC-Fax, and using the Brother
ControlCenter utility.
Network Glossary This Guide provides basic information about
advanced network features of Brother
machines along with explanations about
general networking and common terms.
Printed / In the box
Printed / In the box
Printed / In the box
PDF file /
Documentation
CD-ROM
PDF file /
Documentation
CD-ROM
PDF file /
Documentation
CD-ROM
Network User's Guide This Guide provides useful information about
wired and wireless network settings and
security settings using the Brother machine.
You can also find supported protocol
information for your machine and detailed
troubleshooting tips.
PDF file /
Documentation
CD-ROM
i

Table of Contents
(BASIC USER’S GUIDE)
1 General information 1
Using the documentation ....................................................................................... 1
Symbols and conventions used in the documentation .................................... 1
Accessing the Advanced User’s Guide, Software User’s Guide,
Network User’s Guide, and Network Glossary ................................................... 1
Viewing Documentation ................................................................................... 1
Accessing Brother Support (Windows
Accessing Brother Support (Macintosh) ................................................................3
Control panel overview ..........................................................................................4
LCD screen indications....................................................................................6
Basic Operations .............................................................................................7
Volume Settings.....................................................................................................8
Ring Volume ....................................................................................................8
Beeper Volume................................................................................................8
Speaker Volume..............................................................................................9
LCD display ...........................................................................................................9
Setting the backlight brightness....................................................................... 9
®
)................................................................3
2 Loading paper 10
Loading paper and other print media...................................................................10
Loading paper in paper tray #1......................................................................10
Loading paper in paper tray #2......................................................................13
Loading paper in the manual feed slot ..........................................................17
Loading envelopes and postcards .................................................................19
Printable area ................................................................................................21
Paper settings......................................................................................................22
Paper Size and Type .....................................................................................22
Tray use in Copy mode .................................................................................22
Tray use in Fax mode ....................................................................................23
Secure Paper Feed mode for A3 size Short Grain Paper .............................23
Acceptable paper and other print media..............................................................24
Recommended print media ...........................................................................24
Handling and using print media.....................................................................25
Choosing the right print media.......................................................................26
3 Loading documents 28
How to load documents ....................................................................................... 28
Using the ADF ...............................................................................................28
Using the scanner glass ................................................................................29
Unscannable area .........................................................................................30
ii

4 Sending a fax 31
How to send a fax ................................................................................................ 31
Stop faxing..................................................................................................... 33
Setting scanner glass size for faxing .............................................................33
Colour fax transmission ................................................................................. 33
Cancelling a fax in progress .......................................................................... 33
How to preview an outgoing fax .................................................................... 33
Transmission Verification Report...................................................................34
5 Receiving a fax 35
Receive Modes....................................................................................................35
Choose the Receive Mode .................................................................................. 35
Using Receive Modes.......................................................................................... 36
Fax Only ........................................................................................................ 36
Fax/Tel...........................................................................................................36
Manual...........................................................................................................36
External TAD ................................................................................................. 36
Receive Mode settings ........................................................................................37
Ring Delay ..................................................................................................... 37
F/T Ring Time (Fax/Tel mode only)...............................................................37
Fax Detect ..................................................................................................... 38
Fax Preview (Monochrome only)......................................................................... 38
How to preview a received fax....................................................................... 38
Turning off Fax Preview.................................................................................40
6 Telephone and external devices 41
Voice operations..................................................................................................41
Tone or Pulse ................................................................................................ 41
Fax/Tel mode................................................................................................. 41
Caller ID (U.K. and Ireland only)....................................................................41
Telephone services..............................................................................................42
Setting the Telephone Line Type................................................................... 42
Connecting an external TAD (telephone answering device)................................44
Connections settings .....................................................................................44
Recording an outgoing message (OGM) on an external TAD .......................44
Multi-line connections (PBX) ......................................................................... 45
External and extension telephones......................................................................45
Connecting an external or extension telephone ............................................45
Operation from external and extension telephones.......................................46
Using extension telephones (U.K. only) ........................................................46
Using a cordless external telephone ............................................................. 47
Using remote codes....................................................................................... 47
iii

7 Dialling and storing numbers 49
How to dial ........................................................................................................... 49
Manual dialling...............................................................................................49
One Touch Dialling ........................................................................................49
Speed Dialling ...............................................................................................49
Fax Redial ..................................................................................................... 50
Additional Dialling Operations.............................................................................. 50
Outgoing Call history ..................................................................................... 50
Caller ID history .............................................................................................51
Storing numbers ..................................................................................................52
Storing a pause .............................................................................................52
Storing One Touch Dial numbers .................................................................. 52
Storing Speed Dial numbers..........................................................................53
Changing One Touch or Speed Dial names or numbers...............................54
8 Making copies 55
How to copy ......................................................................................................... 55
Stop copying ..................................................................................................55
Copy settings.................................................................................................56
Paper Options................................................................................................56
9 Printing photos from a memory card or
USB Flash memory drive 58
PhotoCapture Center™ operations .....................................................................58
Using a memory card or USB Flash memory drive .......................................58
Getting started .....................................................................................................59
Print Images.........................................................................................................61
View Photos................................................................................................... 61
PhotoCapture Center™ print settings.................................................................. 62
How to scan to a memory card or USB Flash memory drive............................... 62
10 How to print from a computer 64
Printing a document .............................................................................................64
11 How to scan to a computer 65
Scanning a document ..........................................................................................65
Scanning using the scan key...............................................................................65
Scanning using a scanner driver .........................................................................65
iv

A Routine maintenance 66
Replacing the ink cartridges ................................................................................ 66
Cleaning and checking the machine....................................................................68
Cleaning the scanner glass ...........................................................................68
Cleaning the print head .................................................................................69
Checking the print quality .............................................................................. 70
Checking the print alignment ......................................................................... 71
B Troubleshooting 72
Error and Maintenance messages.......................................................................72
Error animations display ................................................................................ 79
Transferring your faxes or Fax Journal report ............................................... 79
Document jam .............................................................................................. 80
Printer jam or paper jam................................................................................81
Troubleshooting ..................................................................................................88
If you are having difficulty with your machine ................................................ 88
Dial Tone detection........................................................................................96
Telephone line interference / VoIP ................................................................96
Machine Information ............................................................................................ 97
Checking the serial number ........................................................................... 97
Reset functions .............................................................................................. 97
How to reset the machine.............................................................................. 97
C Menu and features 98
On-screen programming ......................................................................................98
Menu table...........................................................................................................99
Entering Text ..................................................................................................... 127
Inserting spaces ......................................................................................... 127
Making corrections ......................................................................................127
Repeating letters ......................................................................................... 127
D Specifications 128
General..............................................................................................................128
Print media......................................................................................................... 130
Fax..................................................................................................................... 132
Copy .................................................................................................................. 133
PhotoCapture Center™ ..................................................................................... 134
PictBridge .......................................................................................................... 135
Scanner .............................................................................................................136
Printer ................................................................................................................ 137
Interfaces ........................................................................................................... 138
Computer requirements.....................................................................................139
Consumable items ............................................................................................. 140
Network (LAN) ................................................................................................... 141
EIndex 142
v

Table of Contents
(ADVANCED USER’S GUIDE)
The Advanced User's Guide explains the following features and operations.
You can view the Advanced User's Guide on the Documentation CD-ROM.
1 General setup
Memory storage
Automatic Daylight Saving Time
Sleep Mode
LCD display
Mode Timer
2 Security features
Secure Function Lock 2.0
3 Sending a fax
Additional sending options
Additional sending operations
Polling overview
4 Receiving a fax
Memory Receive (Monochrome only)
Remote Retrieval
Additional receiving operations
Polling overview
8 Printing photos from a
memory card or USB Flash
memory drive
PhotoCapture Center™ operations
Print Images
PhotoCapture Center™ print settings
Scan to a memory card or USB Flash
memory drive
9 Printing photos from a
camera
Printing photos directly from a
PictBridge camera
Printing photos directly from a digital
camera (without PictBridge)
A Routine maintenance
Cleaning and checking the machine
Packing and shipping the machine
B Glossary
5 Dialling and storing numbers
Voice operations
Additional dialling operations
Additional ways to store numbers
6 Printing reports
Fax reports
Reports
7 Making copies
Copy settings
CIndex
vi

Note
General information 1
1
Using the
documentation
Thank you for buying a Brother machine!
Reading the documentation will help you
make the most of your machine.
1
Notes tell you how you should
respond to a situation that may arise
1
or give tips about how the operation
works with other features.
Electrical Hazard icons alert you to
possible electrical shock.
Symbols and conventions
used in the documentation 1
The following symbols and conventions are
used throughout the documentation.
Bold Bold typeface identifies specific
buttons on the machine’s
control panel, or on the
computer screen.
Italics Italicized typeface emphasizes
an important point or refers you
to a related topic.
Courier
New
Text in the Courier New font
identifies messages on the
LCD of the machine.
WARNING
Accessing the
Advanced User’s Guide,
Software User’s Guide,
Network User’s Guide,
and Network Glossary
This Basic User’s Guide does not contain all the
information about the machine, such as how to
use the advanced features of the Fax, Copy,
PhotoCapture Center™, Printer, Scanner,
PC-Fax, and Network. When you are ready to
learn detailed information about these
operations, read the
Software User’s Guide
Network User’s Guide
that are on the Documentation CD-ROM.
Viewing Documentation 1
Advanced User’s Guide
,
, and
Network Glossary
,
1
WARNING indicates a potentially
hazardous situation which, if not avoided,
could result in death or serious injuries.
CAUTION
CAUTION indicates a potentially hazardous
situation which, if not avoided, may result in
minor or moderate injuries.
IMPORTANT
IMPORTANT indicates a potentially
hazardous situation which, if not avoided,
may result in damage to property or loss of
product functionality.
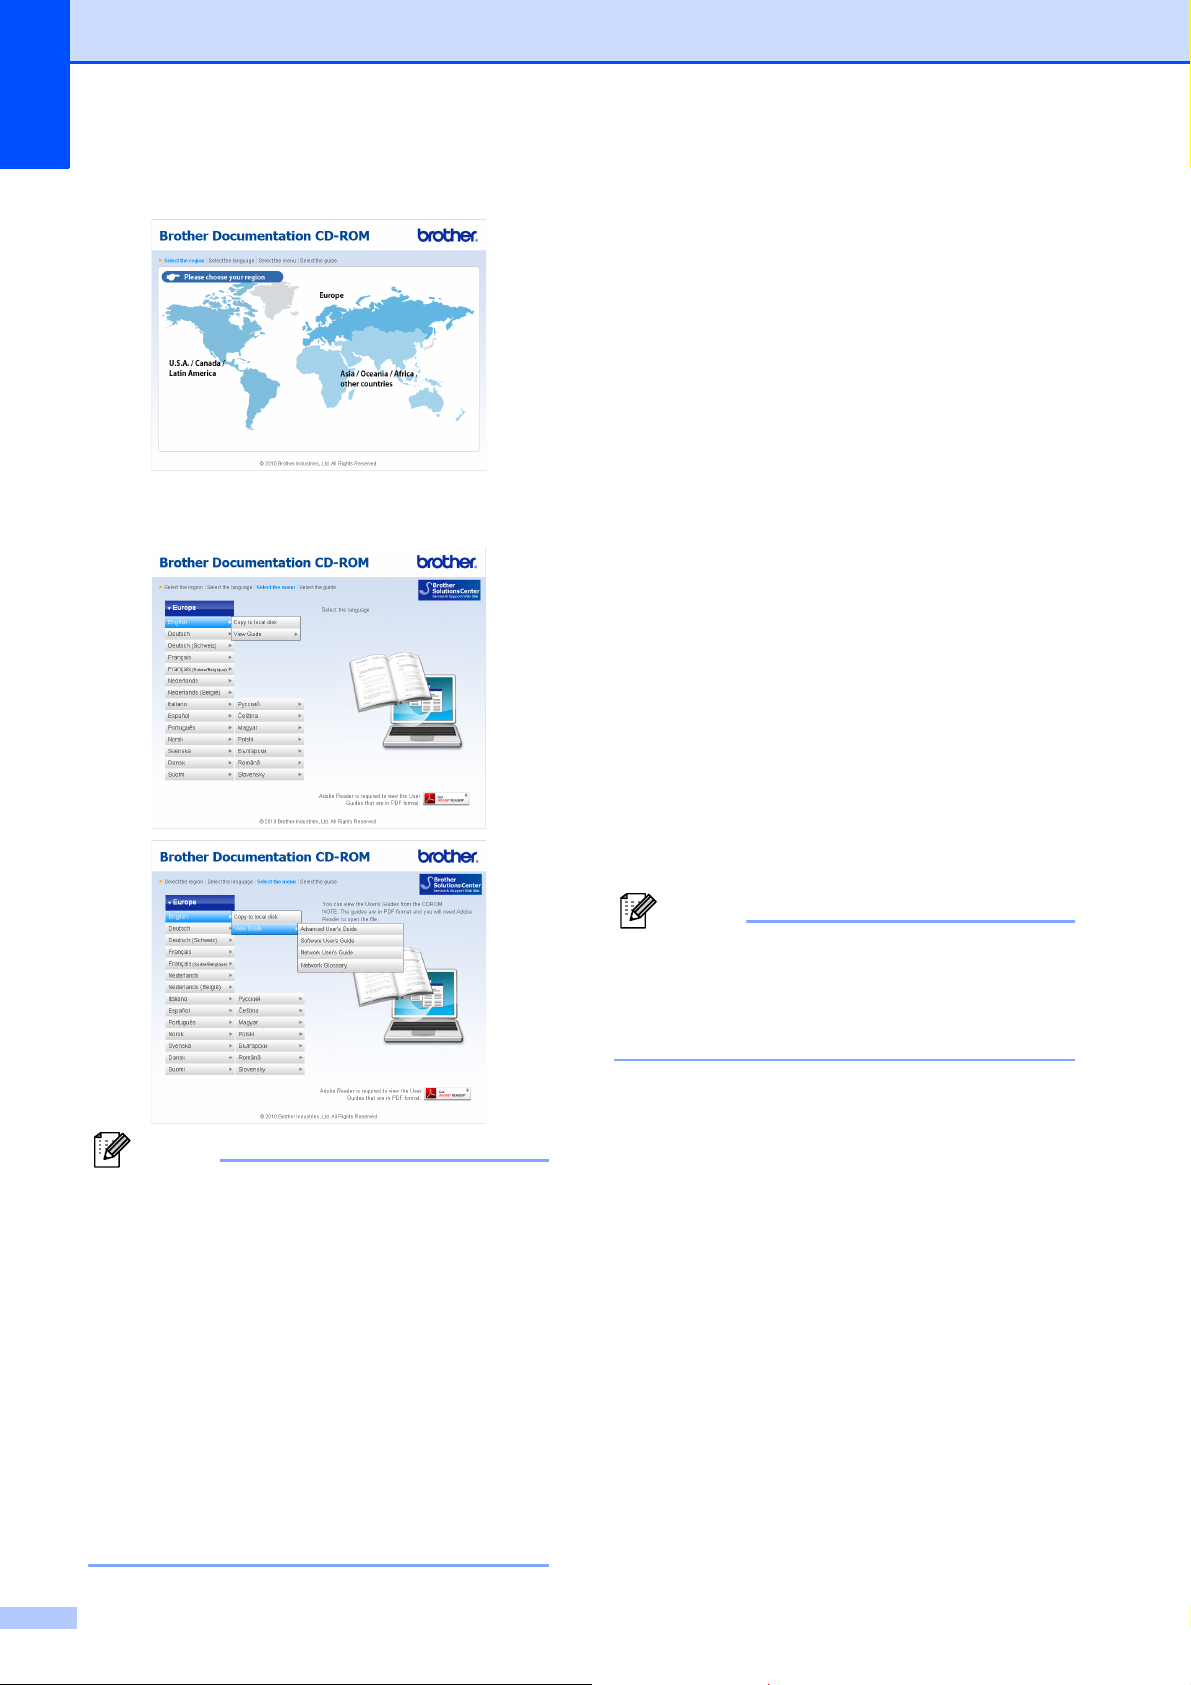
a Turn on your computer. Insert the
Documentation CD-ROM into your
CD-ROM drive. For Windows
to step c.
(Windows® users)
If the screen does not appear
automatically, go to
My Computer (Computer), double-click
the CD-ROM icon, and then double-click
index.html.
®
users, go
b (Macintosh users)
Double-click the Documentation
CD-ROM icon, and then double-click
index.html.
1
Chapter 1
Note
Note
c Click your country.
d
Point to your language, point to
and then click the guide you want to read.
View Guide
How to find Scanning instructions 1
There are several ways you can scan
documents. You can find the instructions as
follows:
Software User’s Guide
Scanning
ControlCenter
Network Scanning
,
ScanSoft™ PaperPort™12SE with OCR
How-to-Guides
(Windows
®
users)
The complete ScanSoft™
PaperPort™12SE with OCR How-toGuides can be viewed from the Help
selection in the ScanSoft™
PaperPort™12SE application.
(Windows
®
2000 users need to download
and install PaperPort™11SE from
website.)
•
(Windows® users only)
Your Web browser may display a yellow bar
at the top of the page that contains a security
warning about Active X controls. For the
page to display correctly you must click on
the bar, click
click
Yes
Allow Blocked Content
in the Security Warning dialog box.
• (Windows® users only)1
For faster access, you can copy all user
documentation in PDF format to a local
folder on your computer. Point to your
language, then click Copy to local disk.
1
Microsoft® Internet Explorer® 6.0 or greater.
, then
Presto! PageManager User’s Guide
(Macintosh users)
Presto! PageManager must be
downloaded and installed before use. See
Accessing Brother Support (Macintosh)
on page 3 for further instructions.
The complete Presto! PageManager
User’s Guide can be viewed from the Help
selection in the Presto! PageManager
application.
How to find Network setup
instructions
Your machine can be connected to a wireless
or wired network. You can find basic setup
instructions in the Quick Setup Guide. If your
wireless access point or router supports Wi-Fi
Protected Setup or AOSS™, you can also
follow the steps in the Quick Setup Guide. For
more information about network setup,
please see the Network User's Guide on the
Documentation CD-ROM.
1
2
General information
Accessing Brother
Support (Windows
You can find all the contacts you will need,
such as Web support (Brother Solutions
Center) on the Installation CD-ROM.
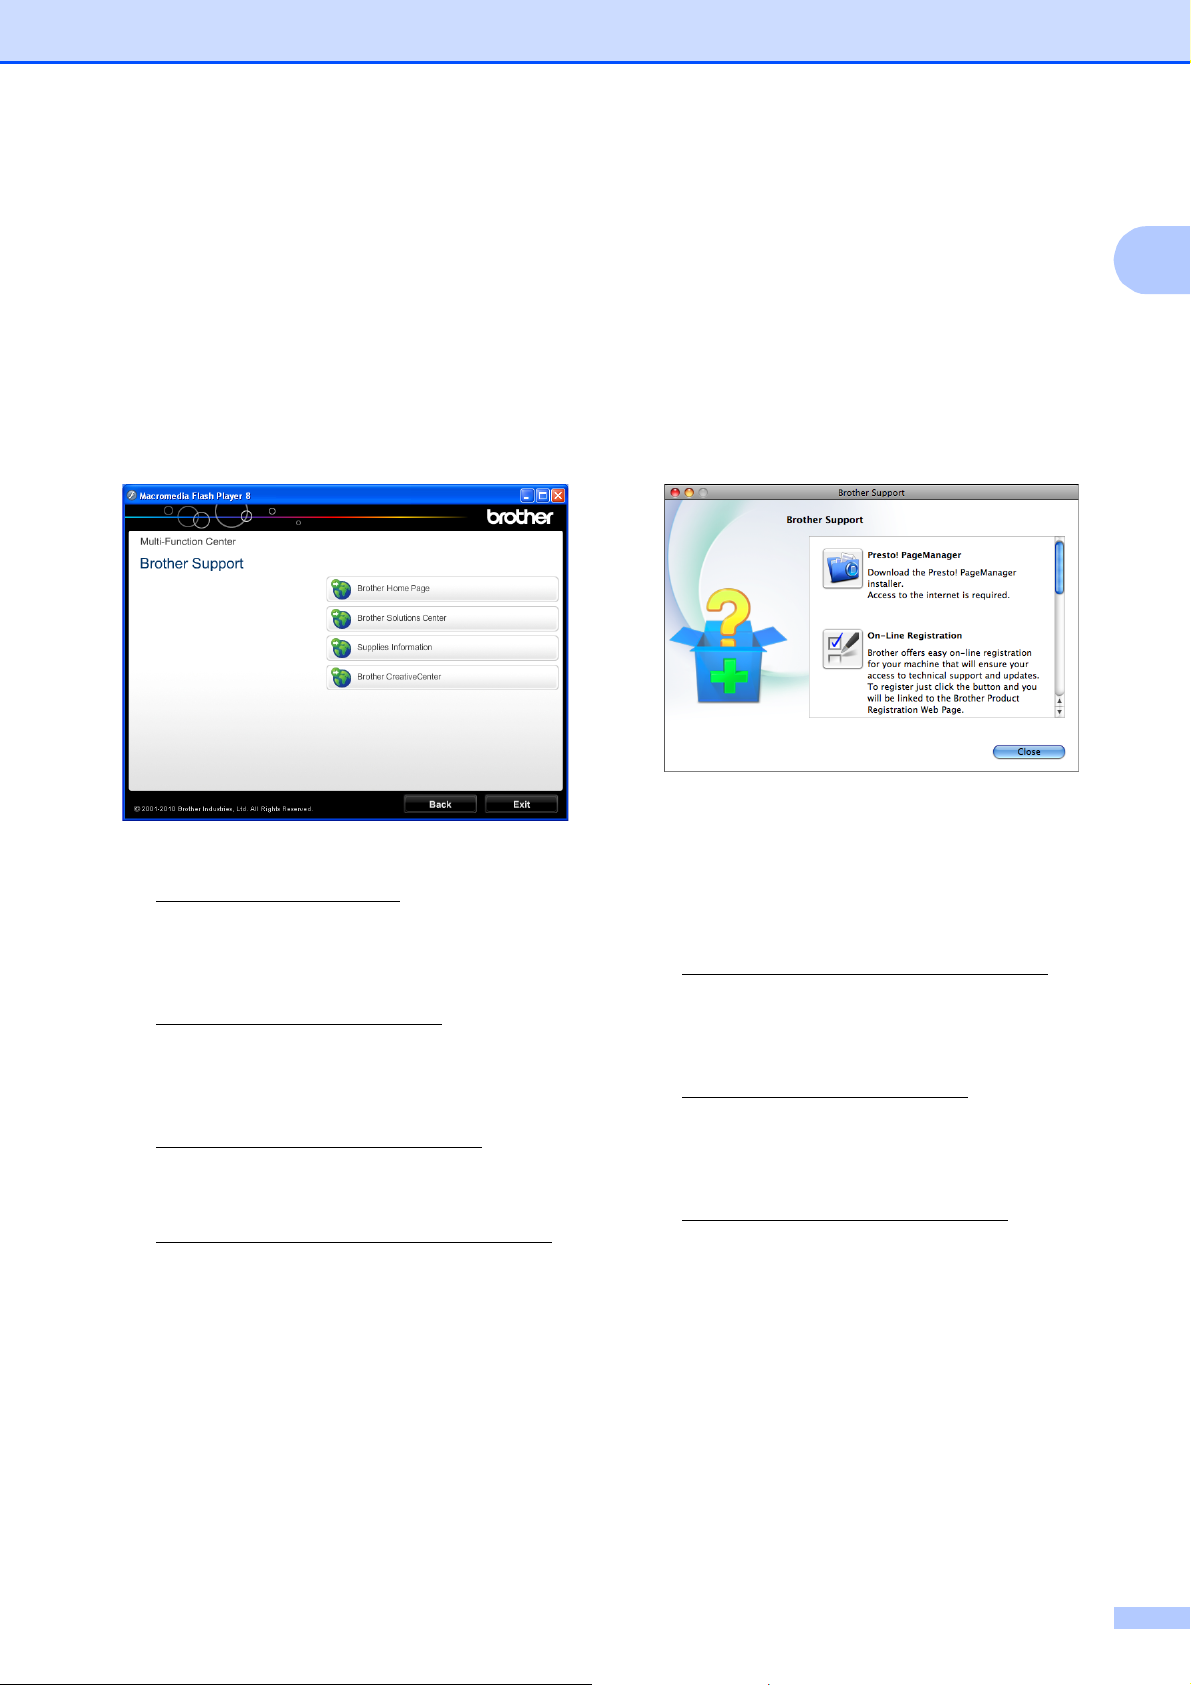
Click Brother Support on the top menu.
The following screen will appear:
®
) 1
Accessing Brother
Support (Macintosh)
You can find all the contacts you will need,
such as Web support (Brother Solutions
Center) on the Installation CD-ROM.
Double-click the Brother Support icon.
The following screen will appear:
1
1
To access our website
(http://www.brother.com/
Brother Home Page.
For the latest news and product support
information
(http://solutions.brother.com/
Brother Solutions Center.
To visit our website for original Brother
Supplies
(http://www.brother.com/original/
click Supplies Information.
To access the Brother CreativeCenter
(http://www.brother.com/creativecenter/
for FREE photo projects and printable
downloads,
click Brother CreativeCenter.
To return to the top menu, click Back or if
you have finished, click Exit.
), click
), click
),
)
To download and install Presto!
PageManager, click
Presto! PageManager.
To register your machine from the Brother
Product Register Page
(http://www.brother.com/registration/
click On-Line Registration.
For the latest news and product support
information
(http://solutions.brother.com/
Brother Solutions Center.
To visit our website for original Brother
Supplies
(http://www.brother.com/original/
Supplies Information.
), click
),
), click
3
Chapter 1
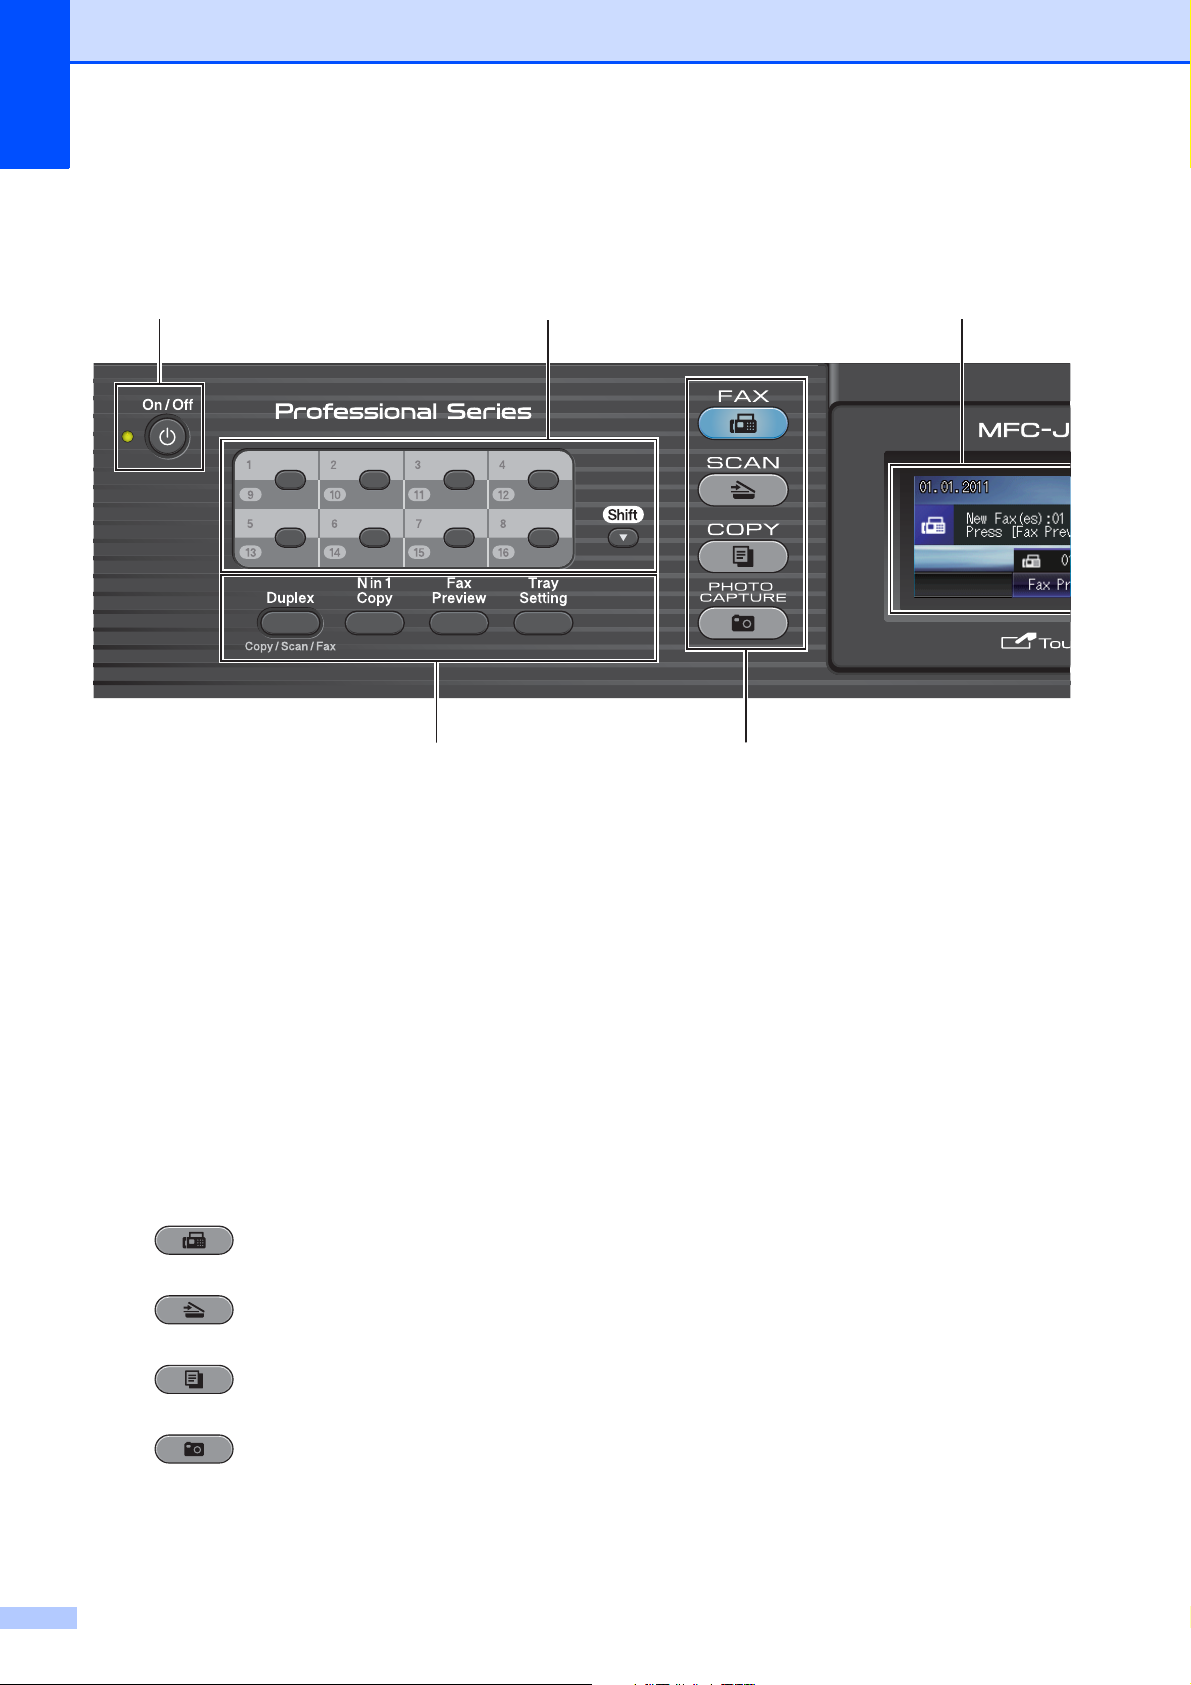
Control panel overview 1
9
1 Fax and Copy keys:
Duplex
Press this key to copy, scan or fax both
sides of the paper.
Nin1Copy
Press this key to make N in 1 or Poster
copies.
Fax Preview
Lets you preview incoming faxes on the
LCD.
Tray Setting
Press this key to choose the tray you want
to use for printing.
2 Mode keys:
FAX
Lets you access Fax mode.
SCAN
Lets you access Scan mode.
COPY
Lets you access Copy mode.
8
1 2
3 Dial Pad
Use these keys to dial telephone and fax
numbers and as a keyboard for entering
information into the machine.
This function transfers to the touchscreen
during some operations.
The # key lets you temporarily switch the
dialling mode during a telephone call from
Pulse to Tone.
4 Telephone keys:
Redial/Pause
Redials the last 30 numbers called. It also
inserts a pause when dialling.
Tel/R
This key is used to have a telephone
conversation after picking up the external
handset during the F/T Ring (fast
double-ring).
Also, when connected to a PBX, you can
use this key to gain access to an outside
line or to transfer a call to another
extension.
7
PHOTO CAPTURE
Lets you access PhotoCapture Center™
mode.
4

General information
6
3 54
1
5 Start keys:
Mono Start
Lets you start sending faxes or making
copies in monochrome. Also lets you start a
scanning operation (in colour or mono
depending on the scan setting in the
ControlCenter software).
Colour Start
Lets you start sending faxes or making
copies in full colour. Also lets you start a
scanning operation (in colour or mono,
depending on the scan setting in the
ControlCenter software).
6 Stop/Exit
Stops an operation or exits the menu.
7 LCD (Liquid Crystal Display)
This is a Touchscreen LCD. You can access
the menus and options by pressing buttons
displayed on the screen.
Also, you can adjust the angle of the LCD by
lifting it.
8 One Touch keys
These 8 keys give you instant access to 16
previously stored numbers.
Shift
To access One Touch numbers 9 to 16, hold
down Shift as you press the One Touch key.
Also, if no number is assigned to the key, you
can directly store the number by pressing the
empty key.
9On/Off
You can turn the machine on and off.
Press On/Off to turn the machine on.
Press and hold down On/Off to turn the
machine off. The LCD will show
Shutting Down and will stay on for a few
seconds before going off.
If you have connected an external telephone or
TAD, it is always available.
If you turn the machine off, it will still
periodically clean the print head to maintain
print quality. To prolong print head life, provide
the best ink cartridge economy, and maintain
print quality, you should keep your machine
connected to the power at all times.
5

Chapter 1
LCD screen indications 1
The LCD shows the current machine status
when the machine is idle.
8
10
9
12 3 4
1 Faxes in memory
Shows how many received faxes are in the
memory.
2 Fax Preview
Lets you preview received fax.
3MENU
Lets you access the main menu.
7
6
5
8 Wireless Status
A four level indicator shows the current
wireless signal strength if you are using a
wireless connection.
0Max
9 Call History
Lets you view a list of outgoing calls and the
caller ID history.
Also, lets you fax the number you have chosen
from the lists.
10 New Fax(es)
When Fax Preview is set to On, you can see
how many new faxes you have received.
The warning icon appears when
there is an error or maintenance message.
For details, see Error and Maintenance
messages on page 72.
4 Ink indicator
Lets you see the available ink volume.
Also, lets you access the Ink menu.
5 Current Receive Mode
Lets you see the current receive mode.
Fax (Fax Only)
F/T (Fax/Tel)
TAD (External TAD)
Mnl (Manual)
6 Memory Status
Lets you see the available memory in the
machine.
7 Phone Book
Lets you set up your phone book of
One Touch Dial, Speed Dial and Group
numbers.
Also, you can search the phone book for the
number you want to dial.
6
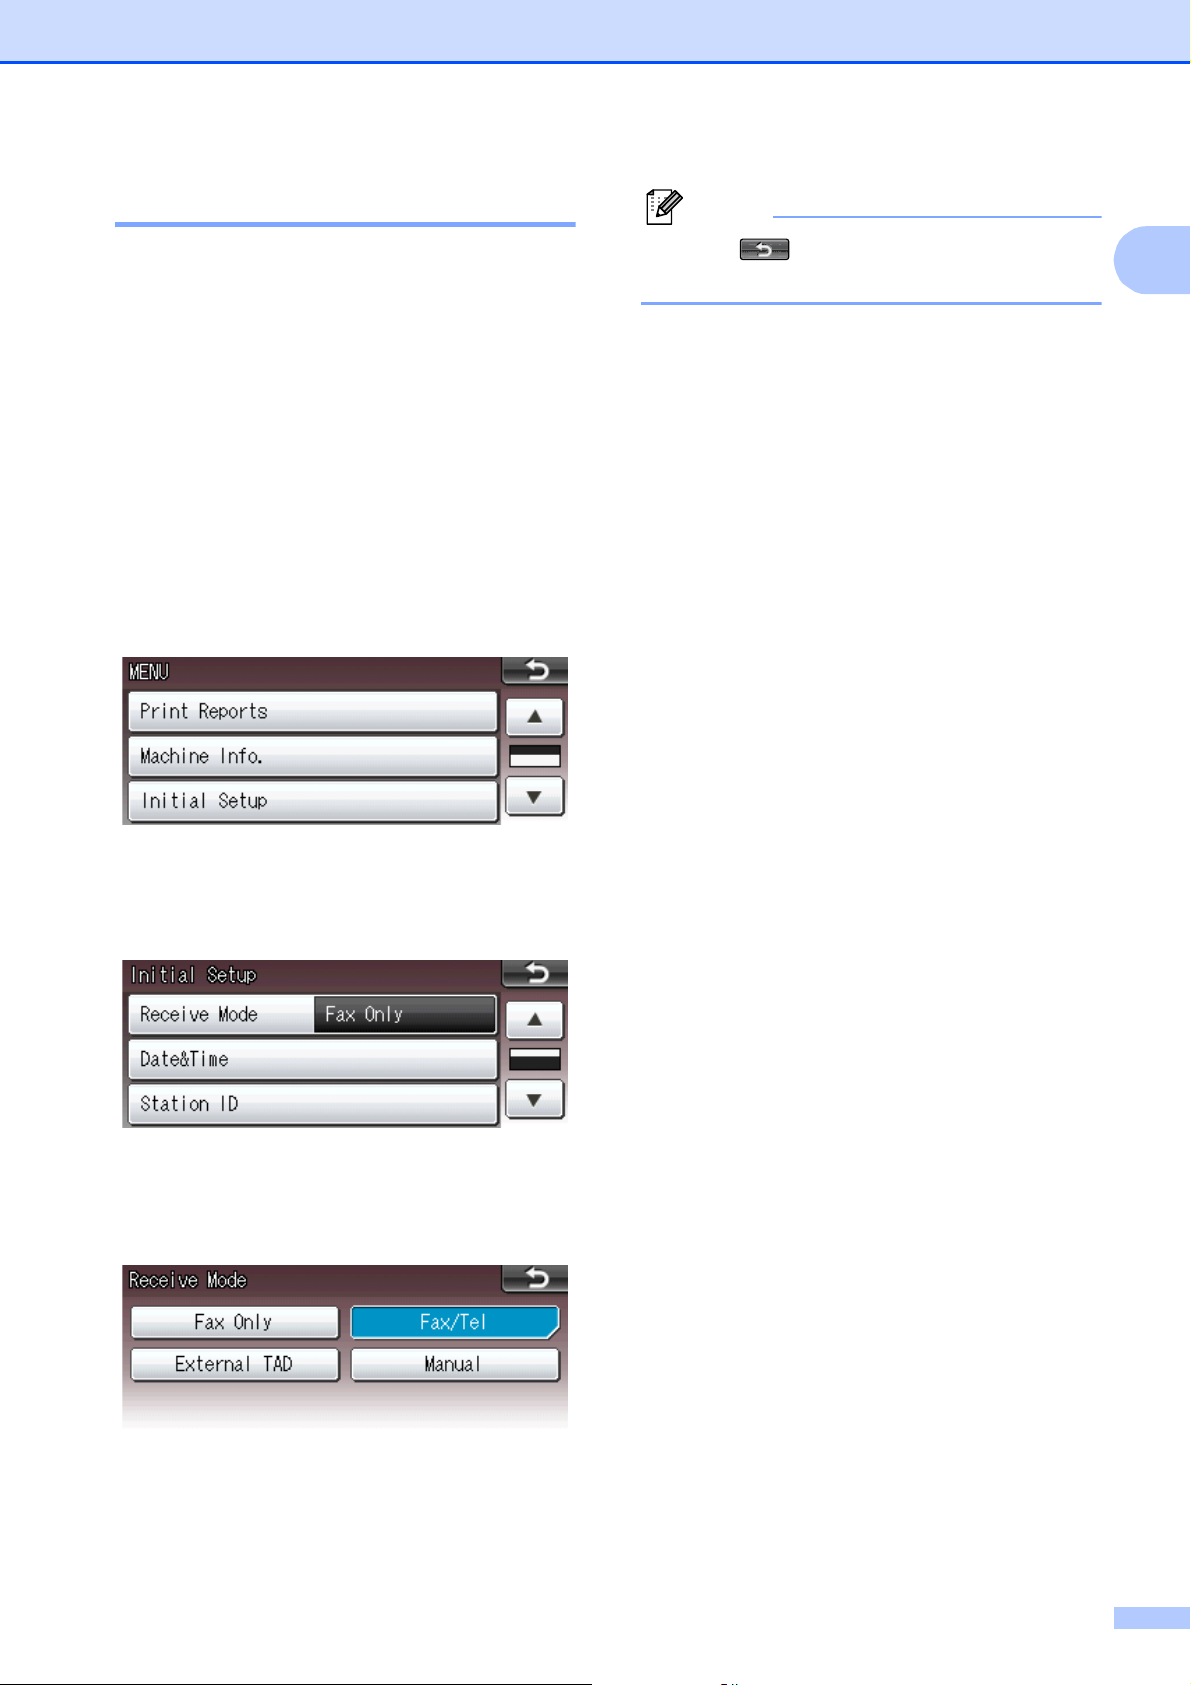
Basic Operations 1
Note
General information
To operate the Touchscreen use your finger
to press the MENU or option button directly on
the LCD screen. To display and access all the
screen menus or options in a setting, press
dc or ab to scroll through them.
The following steps show how to change a
setting in the machine. In this example the
Receive mode setting is changed from
Fax Only to Fax/Tel.
a Press MENU.
b Press a or b to display
Initial Setup.
Press to go back to the previous
level.
g Press Stop/Exit.
1
c Press Initial Setup.
d Press a or b to display Receive Mode.
e Press Receive Mode.
f Press Fax/Tel.
7
 Loading...