

Page 1

SOFTWARE
USER’S GUIDE
For DCP u sers; Th is doc umentat ion is for
both MFC and DCP models. Where it
says 'MFC' in this user's guide, please
read 'MFC' as 'DCP'.
Version A
Page 2

Table of Contents
Section I Windows
1Printing
Using the Brother printer driver..................................................................................................................2
Features ....................................................................................................................................................2
Choosing the right type of paper................................................................................................................3
Simultaneous printing, scanning and faxing ..............................................................................................3
Clearing data fro m th e memo ry..................................................................................... ............. ...............3
Checking the pri n t qua lity.............................................................................................. ............................3
Status Monitor............................................................................................................................................4
Monitoring the machine’s status..........................................................................................................4
Turning off the status monitor..............................................................................................................5
Printer drive r se ttings......... .............. ..........................................................................................................5
Accessing the printer driver settings..........................................................................................................5
Basic tab....................................................................................................................................................6
Media Type..........................................................................................................................................7
Quality.................................................................................................................................................7
Enhanced Print Settings......................................................................................................................8
Improve P at tern Printing (Windows
Paper Size.........................................................................................................................................10
Page Layout ......................................................................................................................................11
Orientation.........................................................................................................................................11
Copies...............................................................................................................................................12
Paper Source (MFC-5860CN only) ...................................................................................................12
Advanced tab...........................................................................................................................................13
Color..................................................................................................................................................14
Scaling...............................................................................................................................................16
Watermark .........................................................................................................................................17
Device Options..................................................................................................................................19
Support tab..............................................................................................................................................21
®
®
2000/XP only) .........................................................................10
2Scanning
Scanning a document using the TWAIN driver........................................................................................22
TWAIN compliant...............................................................................................................................22
Accessing the Scanner......................................................................................................................23
Scanning a document into the PC.....................................................................................................24
Settings i n the Scanner Setup dialog box....... .................................................. .................................25
Scanning a document using the WIA driver (Windows
WIA compliant............................................................... ....................................................................29
Accessing the scanner ......................................................................................................................29
Scanning a document into the PC.....................................................................................................30
Using the Scan key (For USB c abl e user s).............................................................................................34
Scan to E-mail...................................................................................................................................34
Scan to Image...................................................................................................................................35
Scan to OCR.....................................................................................................................................35
Scan to File........................................................................................................................................36
®
XP only) ...........................................................29
i
Page 3

Scan to Card (Not available for MFC-240C and MFC-3360C)..........................................................36
Using ScanSoft
Viewing ite ms.. ................................................................................................... ...............................41
Organizing your items in folders........................................................................................................42
Quick links to other applications........................................................................................................42
ScanSoft
®
You can import items from other applications...................................................................................43
You can export items into other formats............................................................................................43
Uninstalling ScanSoft
3 ControlCenter3
Using ControlCenter3........ ....... ...............................................................................................................44
Switching the user interface ..............................................................................................................46
Turning the AutoLoad feature off.......................................................................................................46
SCAN.................................................................................................................................................47
CUSTOM SCAN................................................................................................................................47
PHOTOCAPTURE (USB only) (Not available for MFC-3360C) ........................................................47
COPY ................................................................................................................................................48
PC-FAX (MFC models only).......................................................... ....... ....... ..... ....... ....... ..... ..............48
DEVICE SETTING.............................................................................................................................48
SCAN.......................................................................................................................................................49
Imag e (ex ample: Mi c rosoft
OCR (Word Processin g prog r a m).. .............................................................................. .....................51
E-mail................................................................................................................................................52
File attachments................................................................................................................................52
File.....................................................................................................................................................53
CUSTOM SCAN......................................................................................................................................54
Customizing a user-defined button....................................................................................................55
PHOTOCAPTURE (USB only) (Not available for MFC-3360C)..............................................................59
Open PCC Folder (PCC: PhotoCapture Center
Copy From PCC................................................................................................................................59
Copy To Application..........................................................................................................................60
COPY ......................................................................................................................................................61
PC-FAX (MFC models only)....................................................................................................................63
Send..................................................................................................................................................63
Receive/View Received (Not available for MFC-240C and MFC-3360C) .........................................64
Address Book....................................................................................................................................65
Setup.................................................................................................................................................65
DEVICE SETTING...................................................................................................................................66
Remote Setup (Not available for DCP models and MFC-240C) ...................... ....... ....... ..... ....... .......66
Quick-Dial (Not available for DCP models and MFC-240C)..............................................................67
Ink Level............................................................................................................................................67
User’s Guide......................................................................................................................................67
®
PaperPort® SE with OCR............................................................................................40
PaperPort® SE with OCR lets you convert image text into text you can edit...................42
®
PaperPort® SE with OCR.............................................................................43
®
Paint)....................................................................................................49
®
).............................................................................59
4 Network Scanning
(For models with built-in network support)
Before using Network Scanning..............................................................................................................68
Network licens e........................................................................ .........................................................68
Configuring Network Scanning ..........................................................................................................69
Using the Scan key....... .............. .............................................................................................................71
Scan to E-mail (PC ).................................................. .........................................................................71
ii
Page 4

Scan to Image...................................................................................................................................72
Scan to OCR.....................................................................................................................................72
Scan to File........................................................................................................................................73
5 Remote Setup
(Not available for DCP models and MFC-240C)
Remote Setup..........................................................................................................................................74
6 Brother PC-FAX Software
(MFC models only)
PC-FAX sending......................................................................................................................................76
Setting up user information................................................................................................................77
Sending setup....................................................................................................................................78
Setting up a cover page ........................................................ .............................................................79
Entering cover p a ge information.. ........ ..............................................................................................79
Address Book....................................................................................................................................80
Speed Dial setup ........................................... ..... .. ..... ..... ....... .. ..... .. ..... ..... ....... .. ..... .. ..... ..........................81
Brother Addr e ss Bo ok.......................................................................................................................82
Setting up a member i n the Addre ss Book........................................................................................82
Setting up a group for broadcasting ............................................................................... ....... ............83
Editing member information...............................................................................................................83
Deleting a member or group..............................................................................................................83
Exporting the Address Book ..............................................................................................................84
Importing to the Address Book..........................................................................................................85
Sending a file as a PC-FAX using the Facsimile style user interface ................................................86
Sending a file as a PC-FAX using the Simple style user interface....................................................87
PC-FAX receiving (Not available for MFC-240C and MFC-3360C).........................................................89
Enabling the PC-FAX Receiving software on your machine .............................................................90
Running the PC-FAX Receiving software on your PC.......................................................................91
Setting up your PC. .................................... .......................................................................................91
Configuring the Network PC-FAX Receiving Settings.......................................................................92
Viewing new PC-FA X mes sa ges...................................................................... .................................93
7 PhotoCaptur e Center
(Not available for MFC-3360C)
For USB cable users ............................................................................................. ...................................94
For network users (For models with built-in network support) .................................................................96
®
iii
Page 5

Section II Apple® Macintosh
8 Printing and Faxing
Setting up your USB-equipped Apple® Macintosh®................................................................................98
Simultaneous printing, scanning and faxing......................................................................................98
Clearing data fro m th e memo ry.................. .......................................................................................98
Checking the pri n t q ual ity..................................................................................................................98
Status Monitor...................................................................................................................................99
Using the Brother Ink driver...................................................................................................................100
Choosing page setup options..........................................................................................................100
Choosing printing options ................................................................................................................101
Media Type......................................................................................................................................101
Quality.............................................................................................................................................102
Paper Feed (MFC-5860CN only).....................................................................................................103
Sending a fax (MFC models only) .........................................................................................................104
Drag a vCard from the Mac OS
9Scanning
Scanning from a Macintosh®.................................................................................................................107
Accessing the scanner ....................................................................................................................107
Scanning an image into your Macintosh
Pre-Scanning an image...................................................................................................................108
Settings in the Scanner window ............................................................................................ ..... .....109
Using the Scan key (For USB c abl e user s)...........................................................................................113
Scan to E-mail.................................................................................................................................113
Scan to Image.................................................................................................................................114
Scan to OCR...................................................................................................................................114
Scan to File......................................................................................................................................115
Scan to Card (Not available for MFC-240C and MFC-3360C)........................................................115
Using Presto!
Features..........................................................................................................................................119
System requirements for Presto!
Technical support............................................................................................................................120
®
PageManager®.............................................................................................................119
®
X Address Book application...... .............. ....................................106
®
PageManager®.........................................................................119
®
®
.......................................................................................108
10 ControlCenter2
Using ControlCenter2........ ....... .............................................................................................................122
Turning the AutoLoad feature off.....................................................................................................123
SCAN...............................................................................................................................................123
CUSTOM SCAN..............................................................................................................................124
COPY / PC-FAX..............................................................................................................................124
DEVICE SETTINGS........................................................................................................................124
SCAN.....................................................................................................................................................125
Image (example: Apple
OCR (word processing application)........................................................... ....... ....... ............ ....... .....127
E-mail..............................................................................................................................................128
Supported file types.........................................................................................................................128
File...................................................................................................................................................129
CUSTOM SCAN....................................................................................................................................130
User-defined button.. .......................................................................................................................130
®
PreView)............. ....... ..............................................................................125
iv
Page 6

Scan to Image .................................................................................................................................131
Scan to OCR ...................................................................................................................................132
Scan to E-mail.................................................................................................................................133
Scan to File......................................................................................................................................134
COPY / PC-FAX (PC-FAX is not available for DCP models).................................................................135
DEVICE SETTINGS..............................................................................................................................136
Remote Setup (Not available for DCP models and MFC-240C) .....................................................136
Quick-Dial (Not available for DCP models and MFC-240C)............................................................137
Ink Level.......... ..................... ...........................................................................................................137
11 Net work Scanning
(For models with built-in network support)
Before using Network Scanning............................................................................................................138
Configuring network scanning .........................................................................................................138
Using the Scan key....... .............. ...........................................................................................................140
Scan to E-mail.................................................................................................................................140
Scan to Image.................................................................................................................................141
Scan to OCR...................................................................................................................................141
Scan to File......................................................................................................................................142
12 Remote Setup & PhotoCapture Center
Remote Setup (Not available for DCP models and MFC-240C)............................................................143
PhotoCapture Center
For USB cable users. ....... ................................................................................................... ............145
For network users (For models with built-in network support).... .....................................................147
®
(Not available for MFC-3360C).........................................................................145
IIndex
®
v
Page 7

Section I
Windows
Printing 2
Scanning 22
ControlCenter3 44
Network Scanning (For models with built-in
network support)
Remote Setup (Not available for DCP models and
MFC-240C)
®
I
68
74
Brother PC-FAX Software (MFC models only) 76
PhotoCapture Center® (Not available for MFC-3360C) 94
Page 8

1
Note
• The screens in this section are from Windows
operating system.
• If your PC is pro te cte d b y a firewall, and is u nable to print, you ma y n eed to configure the fi r ewal l set ti ng s
to allow communication through port number 137. Visit the Brother Solutions Center
(http://solutions.brother.com
Printing 1
®
XP. Screens on your PC may vary depending on your
) for more in form ation.
Using the Brother printer driver 1
A printer driver translates the data from your PC application, and using a page description language, converts
it into a format that can be understood by the printer/multi-function device.
You will fin d appr opri ate dr ive rs on th e CD- ROM sup plied wit h the mac hine . Ins tall those dri vers by fol lowi ng
the Quick Setup Guide. You can also downlo ad the latest driv ers f rom the Brother Solutions C ent er at:
http://solutions.brother.com
1
Features 1
This mac hine offers m any features yo u w ill f ind in a high qua lit y ink jet printer.
Fast Printing Speed
See the U s er’s Guide for the rat ed print speeds of th e m odel you are us ing.
Brilliant High Quality Output
Printing at up to 1200 × 6000 dpi on glossy paper to get the highest possible resolution. (See Resolution in
Specifications in the User’s Guide.) Th e printer drive r s upports N in 1, Wa te rmark printing, Color
Enhan c em ent technology and many other features .
Low Running Cost
Whenev er you run out of a particular ink color, you only hav e to replace the em pty cartridg e.
USB
Universal Serial Bus Interface provides fast communication with your PC.
Ethernet
The Ethernet interface lets your machine communicate with multiple PCs connected on a network. This
feature is av ailable for Network Standa rd m odels only.
Wireless LAN (IEEE802.11b/g) (For Wireless models only)
The wireless LAN capability lets your machine communicate with other wireless devices using the
IEEE802.11b/g wire less standar d in Infrastruct ure and Ad-hoc m odes. (See th e Network User’s Guide for
details .) Th is fe at ure is availab le f or W ireless Netw ork St andard models only.
2
Page 9

Printing
Choosing the right type of paper 1
For high quality printing, i t is impor tant to choose the right typ e of pape r. Be sure to read About paper in the
User’s Guide before buying paper.
Simultaneous printing, scanning and faxing 1
Your machine can print from your PC while sending or receiving a fax in memory, or while scanning a
document into the PC. Fax sending will not be stopped during PC printing.
However, when the machine is copying or receiving a fax on paper, it pauses the PC printing operation, and
then continues printing when copying or fax receiving has finished.
Clearing data from the memory 1
If the LCD shows Data Remaining, you can clear the data that is left in the memory by pressing the
Stop/Exit key on the control panel.
1
Checking the print quality 1
If you want to check the print quality and find out how to improve it, see Improving pr int quality in the User’s
Guide.
3
Page 10
Printing
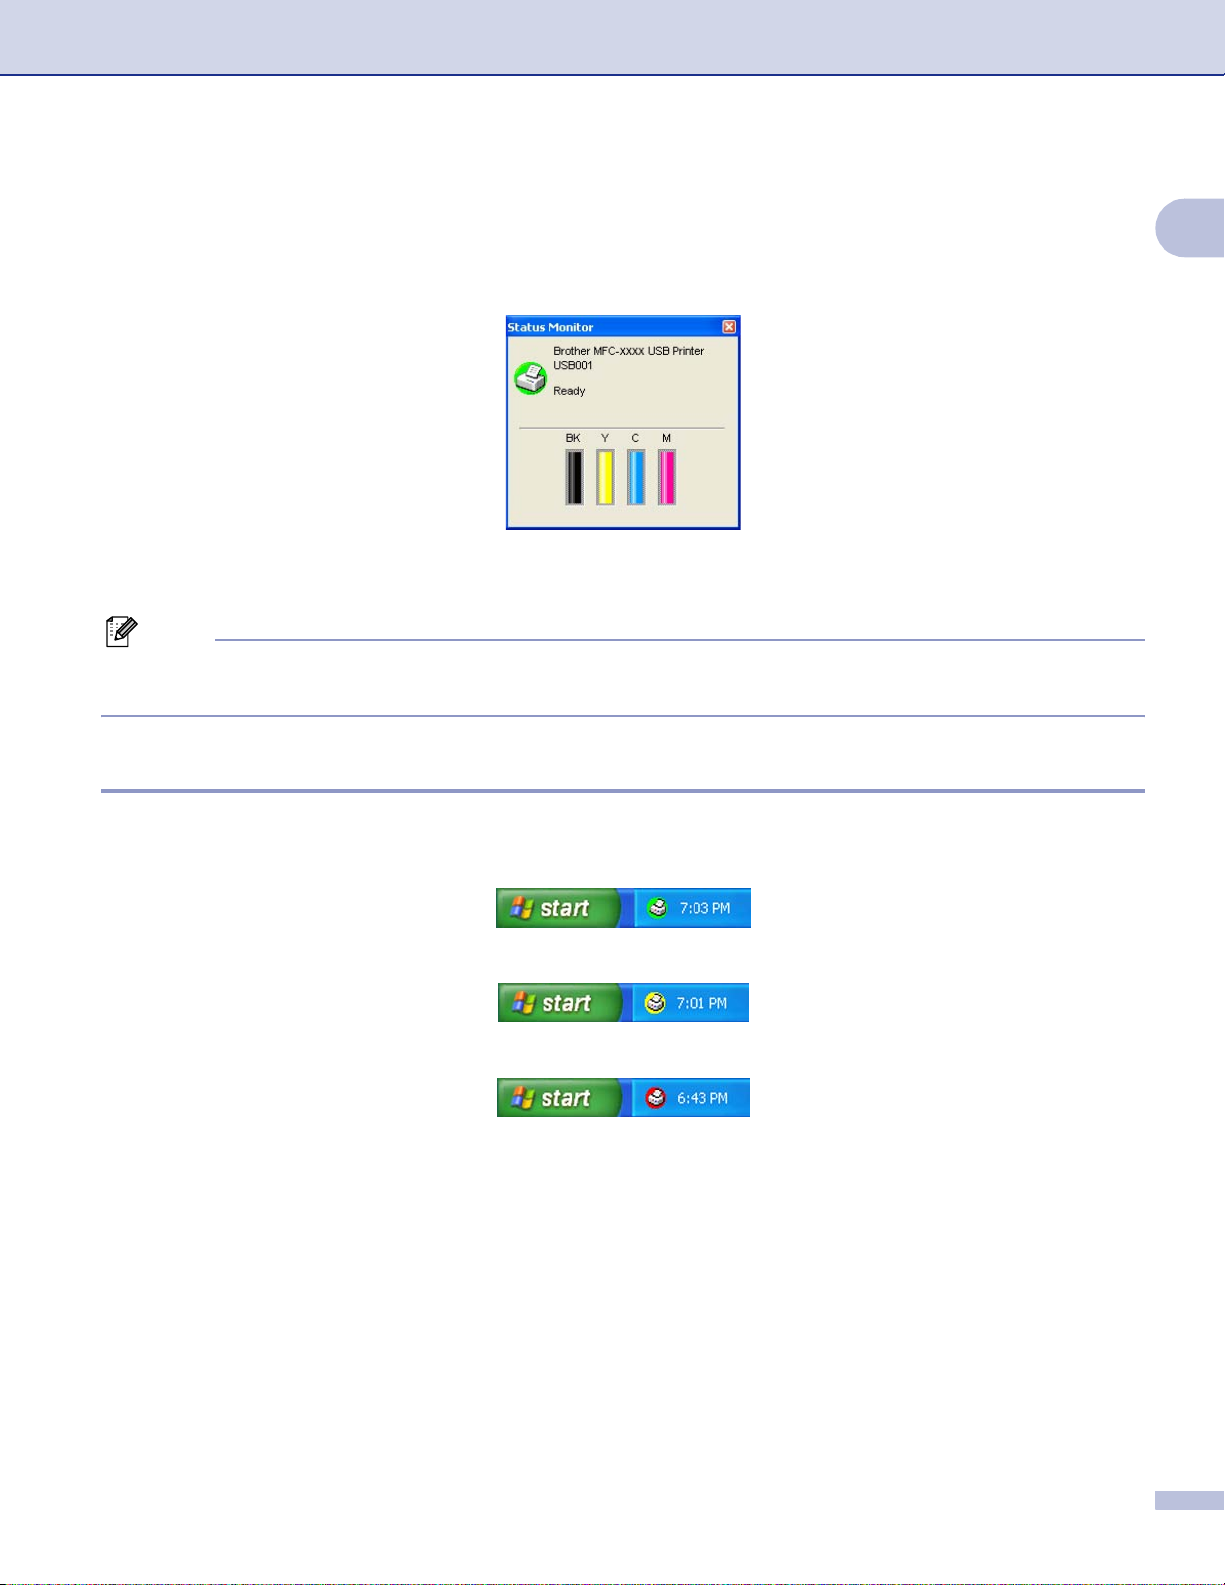
Status Monitor 1
The Status Monitor utility is a configurable software tool for monitoring the status of one or more devices,
allowing you to get im m ediate notificat ion of error mess ages such as paper empty, paper jam or ink em pty.
You can check the device status at anytime by double-clicking the icon in the tasktray or by choosing
Status Monitor located in Start/All Programs/Brother/MFC-XXXX on your PC.
Note
For more information about using the Status Monitor software, right-click the Status Monitor icon and
choose Help.
1
Monitoring the machine’s status 1
Once you start up your PC, the Status Monitor icon appears on the tasktray.
A green ic on indicates th e normal stand- by c ondition.
A yellow ic on indicates a warning.
A red icon indicates an error has occurred.
There are two locations where you can display the status monitor on your PC—in the tasktray or on the
desktop.
4
Page 11

Printing
Turning off the status monitor 1
If you want to switch off the status monitor, follow these steps:
a Right-click the Status Monitor icon or window and click Load Status Monitor on Startup to clear the
check mark.
b Right-click again then click Exit.
Note
Even if the status monitor is off , you can check the machine’s status at any time by clickin g Status Monitor
from the Start menu on your PC.
Printer driver settings 1
You can change the following printer settings when you print from your PC:
Media Type/Quality (Speed)
Paper Size
Page Layout
Color Matching/Halftone
Color Enhancement
1
Scaling
Watermark
Print Date & Time
Quick Print Setup
Accessing the printer driver settings 1
a Click File, then Print in your ap plication.
b Choose Brother MFC- XXXX USB Printer or Brother MFC-XXXX Printer (whe re XXXX is yo ur model
name) and click Properties.
The printe r properties d ialog box appea rs .
5
Page 12
Printing
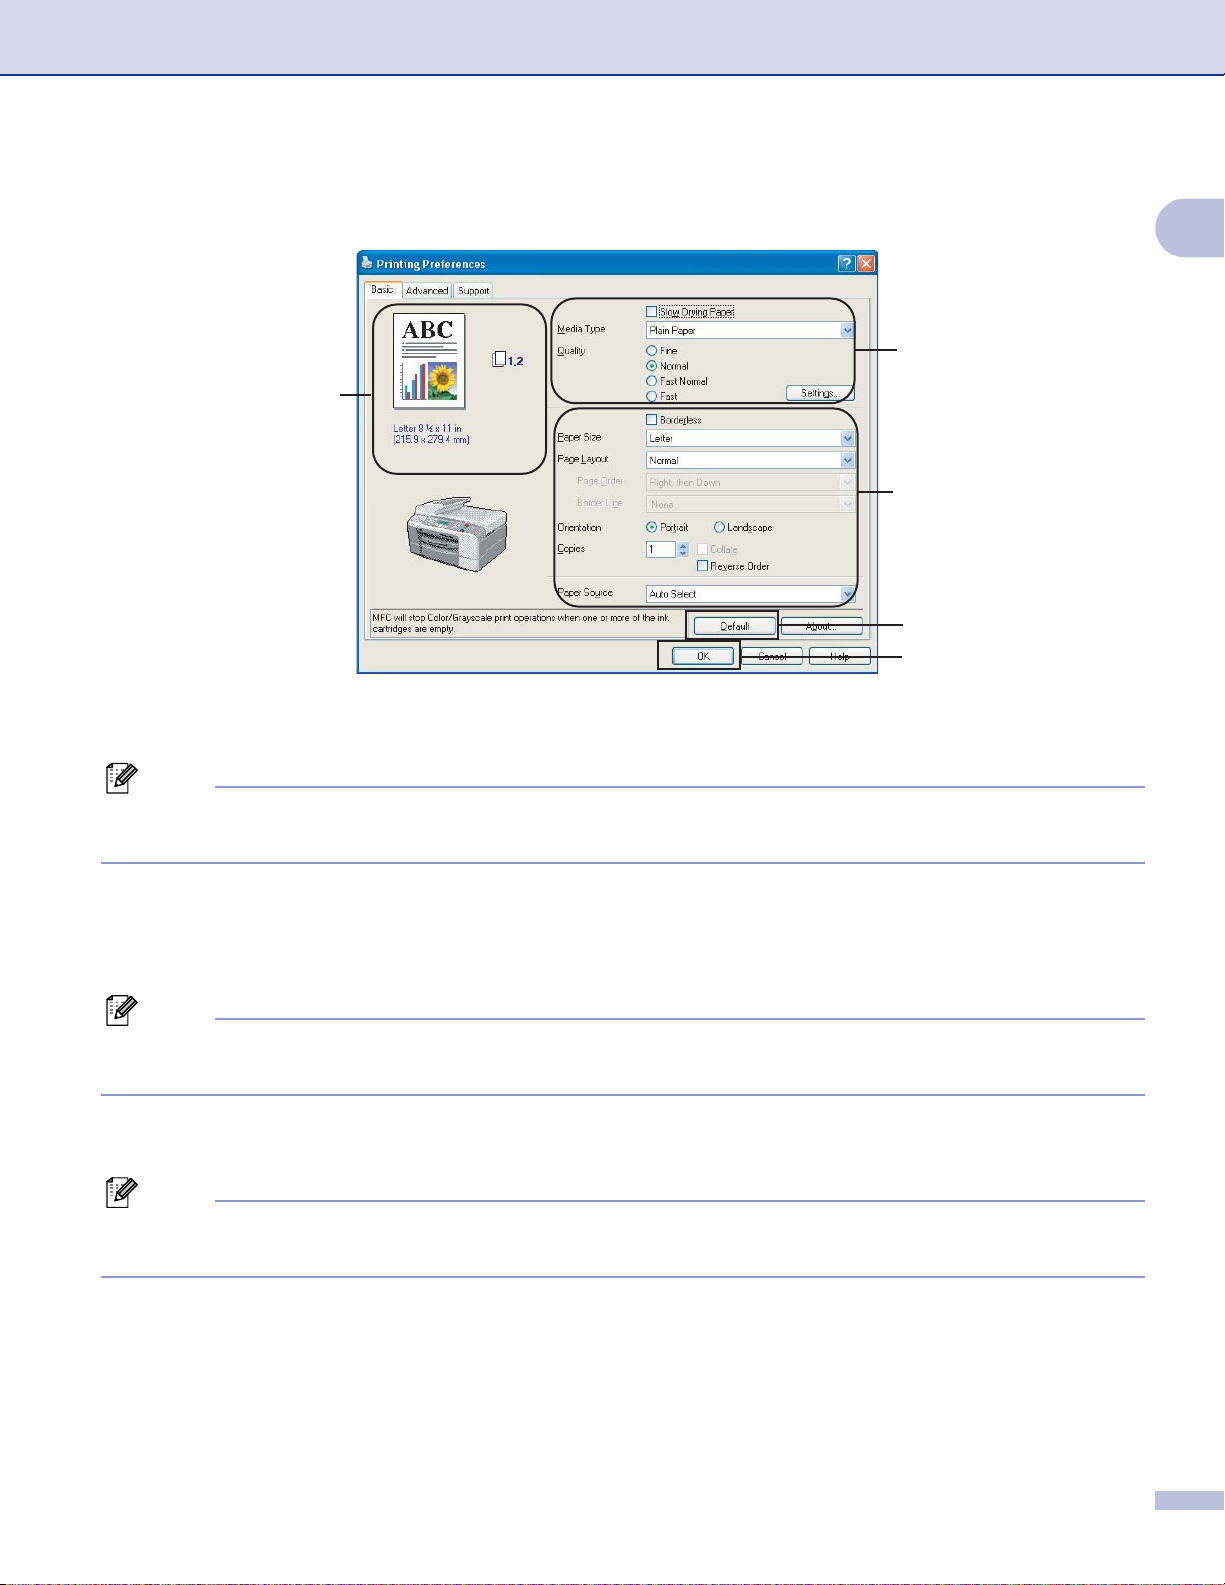
Basic tab 1
1
5
2
4
3
1
a Choose your setting for Slow Drying Paper, Media Type and Quality (1).
Note
Check Slow Drying Paper when printing with plain paper on w hich ink dries s low ly. This setting may
cause some slight blurring of text.
b Choose Paper Size, Page Layout, Page Order, Borderless, Border Line (if any), Orientation,
number of Copies and the page order (2).
c Select the Paper Source. (MFC-5860CN only)
Note
If you choose Auto Select, the machine will pull paper from T ray 1 and when Tra y 1 is empty, paper w ill
automatically be pulled from Tray 2.
d Click OK (3) to apply your chosen settings.
To return to the default settings, click Default (4), then OK (3).
Note
This area (5) shows the current settings of Quality, Paper Size , Page La yout, Page Order, Orientation,
Collate/Reverse Order an d Color/Grayscale.
6
Page 13
Printing
Media Type 1
To achie v e t he best print res ults, the media being printed on should be selected in the driv er. The mach ine
changes the way it prints depending on the selected media type.
Plain Paper
Inkjet Paper
Brother Premium Glossy Photo Paper
Other Photo Paper
Transparencies
Quality 1
The quality selection lets you choose the print resolution. As print quality and speed are related, the higher
the quality, the longer it will take to print the document. The quality selections that are available will vary
depend ing on the me dia type y ou choose.
Highest
Up to 120 0 × 6000 dpi. (See Resolution in Specifications in the User’s Guid e. ) U s e f or printing prec is e
images such as photographs. This is the highest resolution and slowest speed.
Photo
Up to 120 0 × 2400 dpi. Use f or printing photographs. S inc e the print data is m uch larger th an a normal
document, the processing time, data transfer time and print time will be longer.
Fine
1
1200 × 1200 dpi. Better print quality than Normal mode and faster print speed than Photo.
Normal
600 × 600 dpi. Good print quality with typical print speed.
Fast Normal
600 × 300 dpi. Be t te r print quality than Fast mode and fas te r print speed than Normal.
Fast
600 × 150 dpi. The fastest print m ode and the lowest amount of ink us ed. Use for print ing large volum e
documents or documents for proofing.
Media Type Color/Grayscale Print Quality Selection
Plain Paper Color/Grayscale Fast, Fast Normal, Normal, Fin e
Inkjet Paper Color/Grayscale Fine, Photo
Brother Premium Glossy Photo
Paper or Other Photo Paper
Transparencies Color/Grayscale Normal, Fin e
Color/Grayscale Fine, Photo, Highest
Note
• The de f ault settings are shown in bold.
• For DCP-130C and MFC-240C, the Highest Print Quality selection is not available if you choose
border les s printing.
7
Page 14
Printing
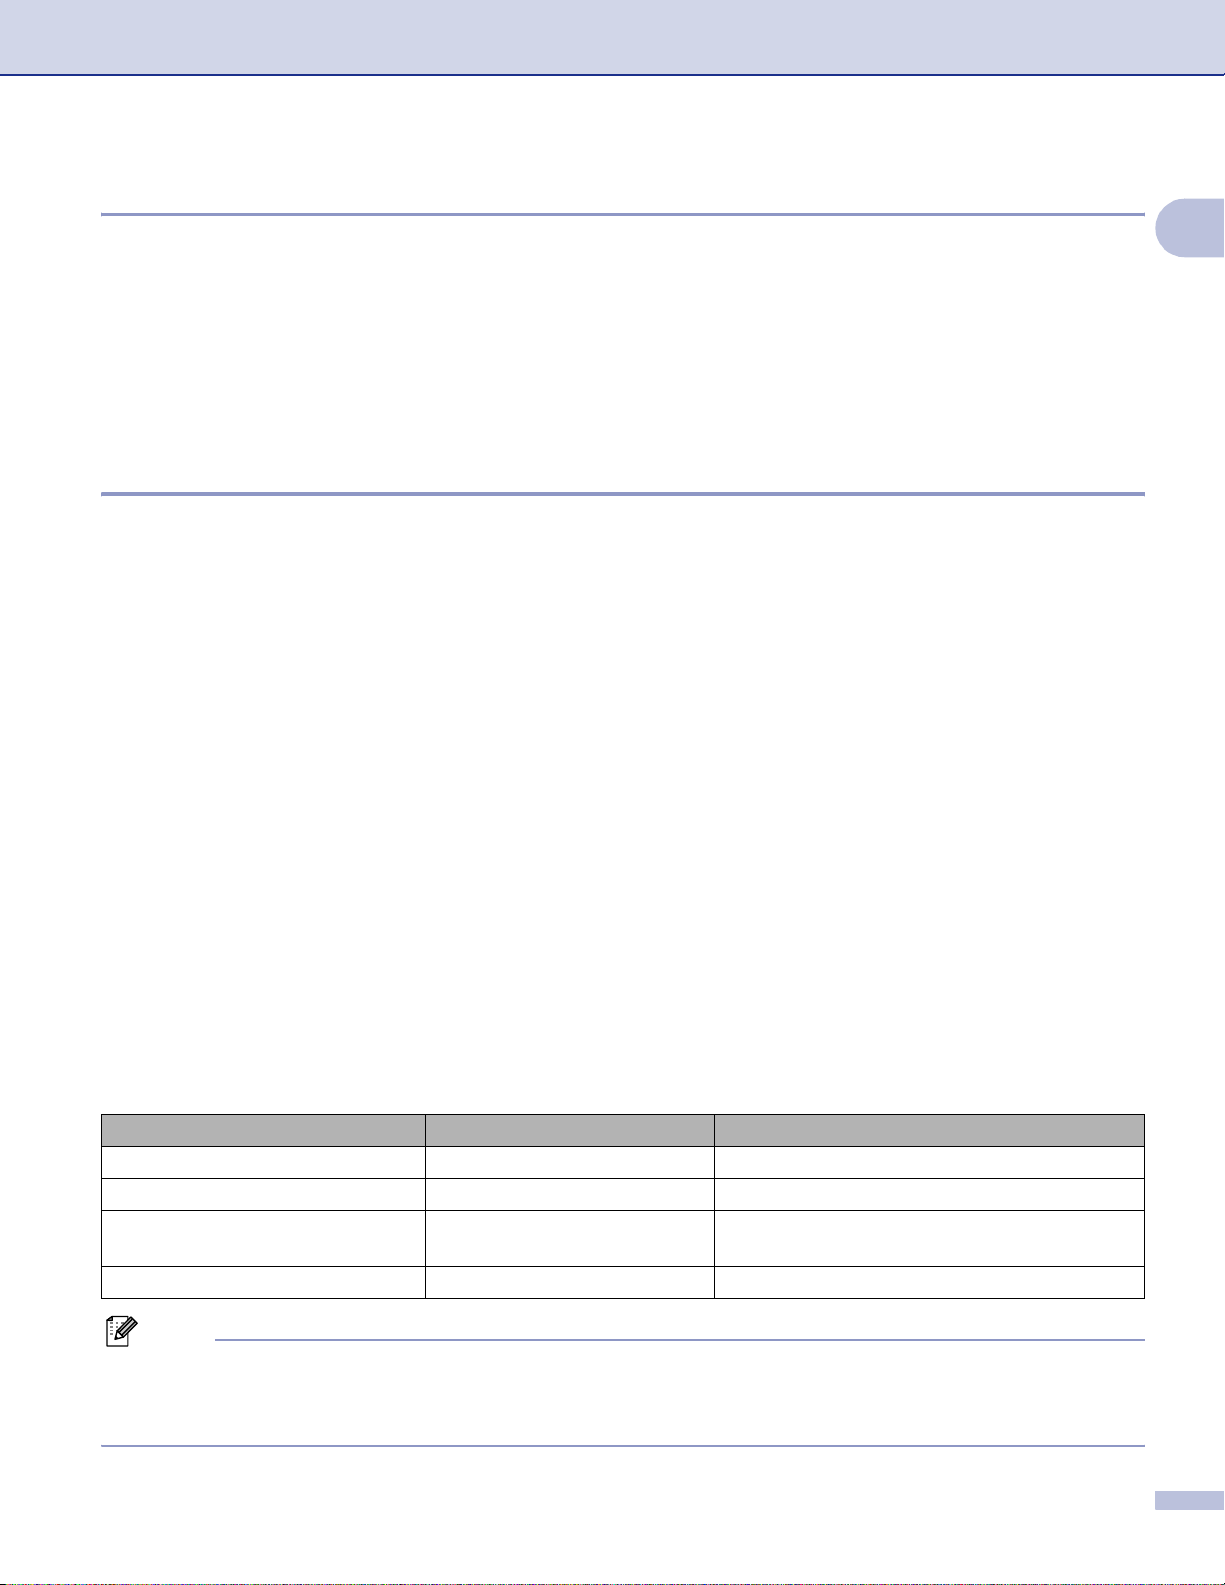
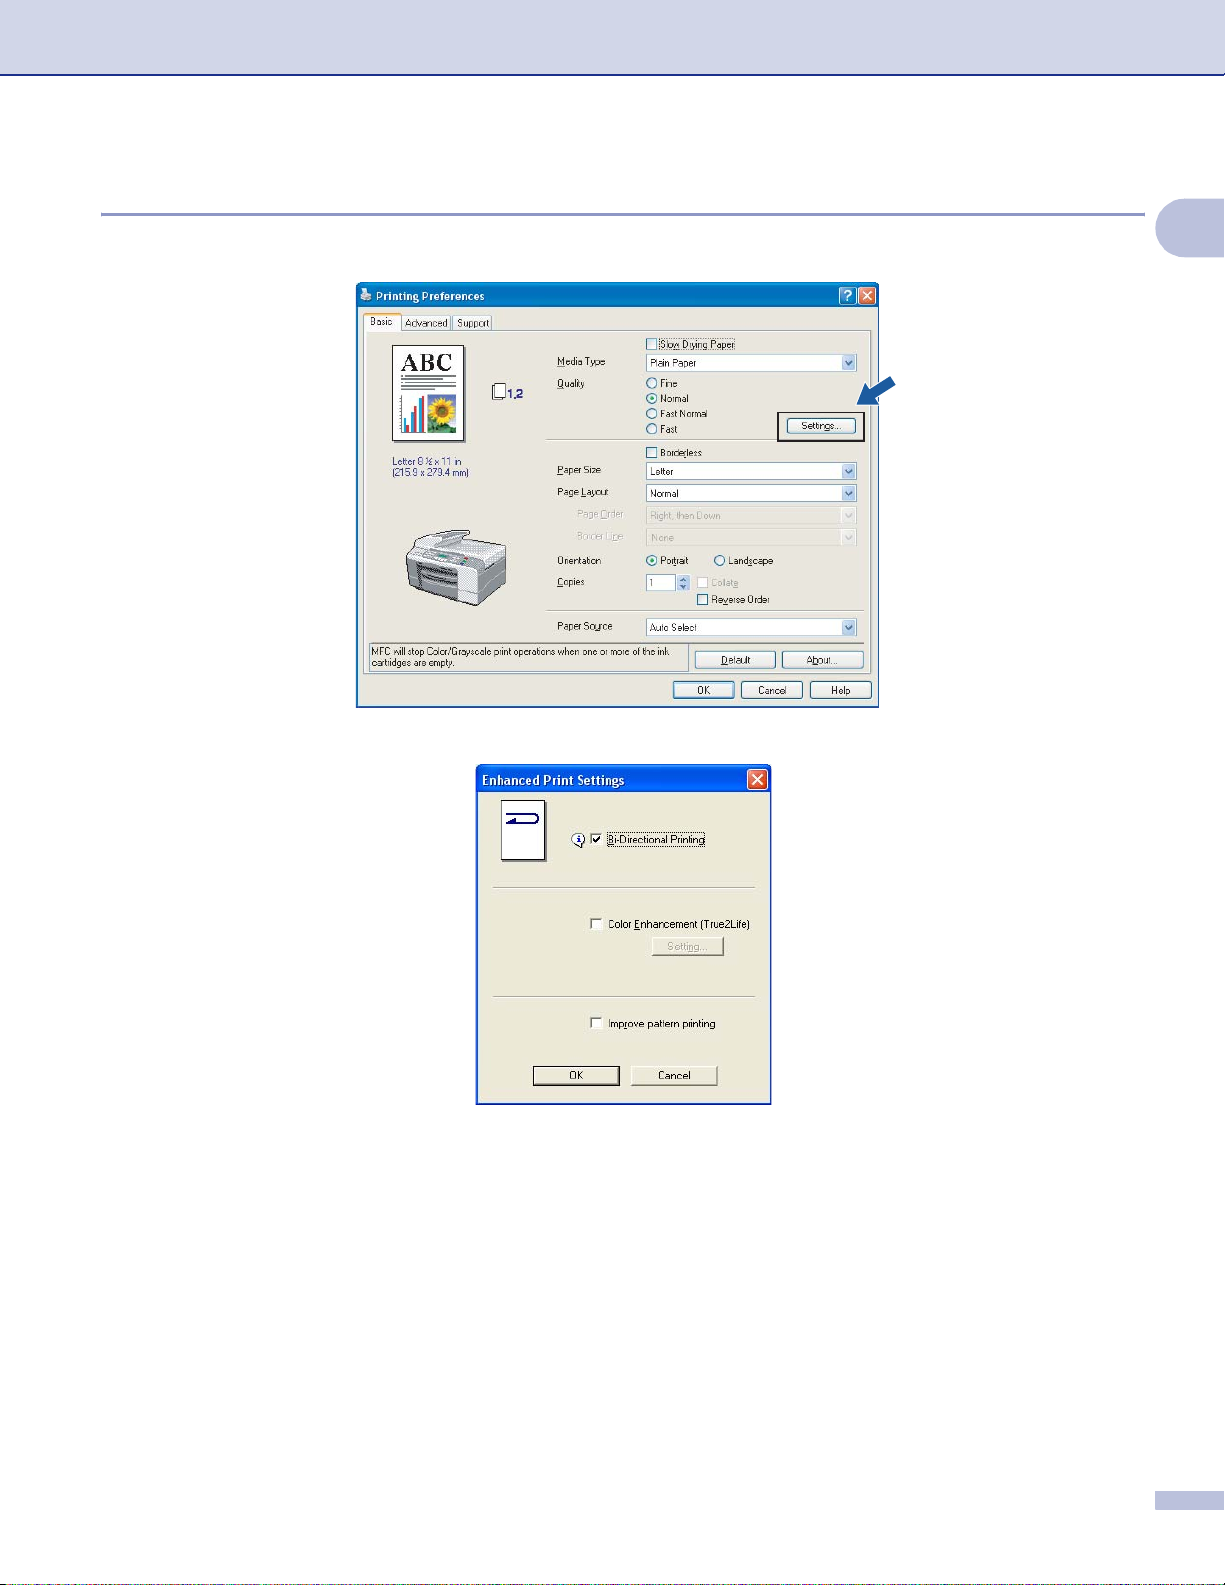
Enhanced Print Settings 1
Click the Settings button to see options for enhanced print settings.
1
Bi-Directional Printing 1
When Bi-Directional Printing is checked, the print he ad prints in both dire ctions offerin g faster print speed s.
When unchecked, the print head will only print in one direction giving higher quality printouts, but slower
printing s peeds.
Color Enhancement (True2Life®) 1
Checking Color Enhancement (True2Life®) option enables the True2Life® feature. This feature analyzes
your image to imp rove its sharpness, white balance and color densit y. This pro cess may take several minute s
depen ding on the size of t he image and th e s pecifications of yo ur PC.
8
Page 15
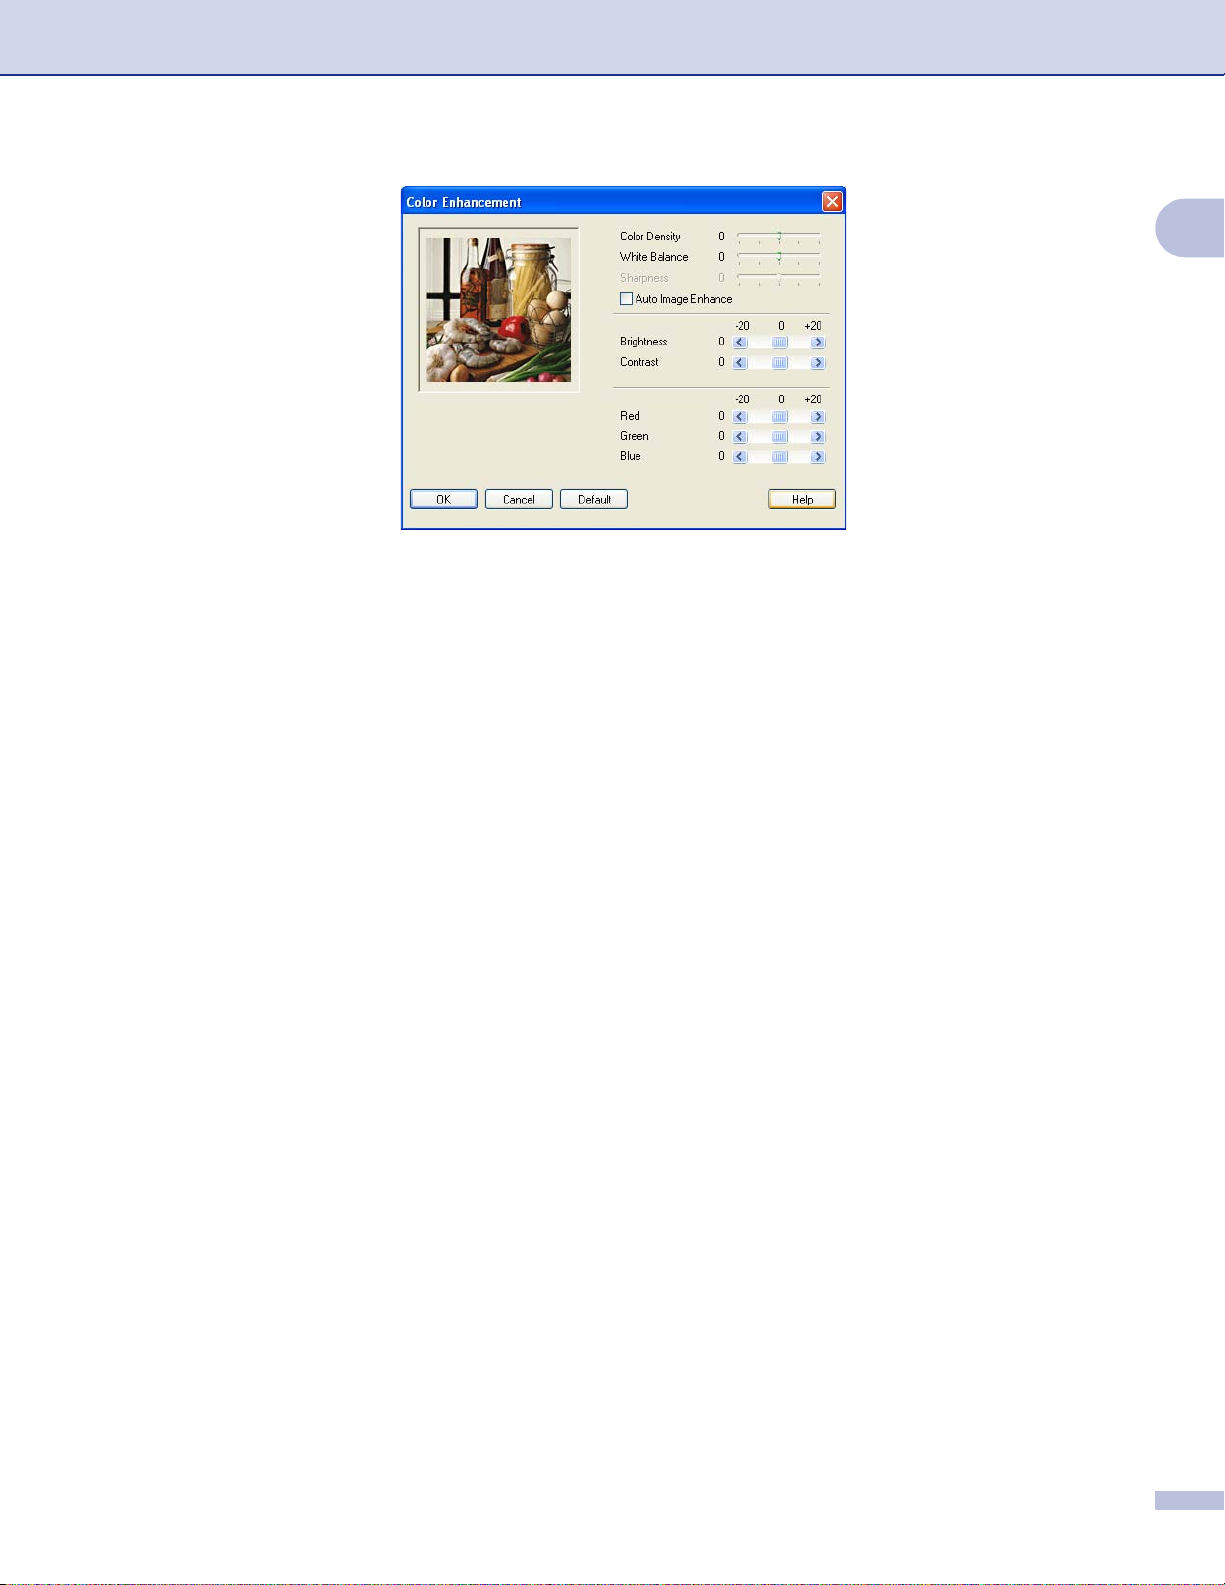
Color Density
Adjusts the total amount of color in the image. You can increase or decrease the amount of color in an
image t o im prove a washed out or wea k lo oking picture.
White Balance
Adjusts the hue of the white areas of an image. Lighting, camera settings and other influences will effect
the appe ar anc e of wh it e. Th e whi t e are as o f a pi ct ur e may be s li gh tl y pi nk , yel l ow or som e ot her col or . B y
adjust ing the wh ite bal ance you ca n adjust those wh ite area s .
Printing
1
Sharpness
Enhances the detail of an image, similar to adjusting the fine focus on a camera. If the image is not in true
focus and you canno t se e t he f ine details of th e picture, then adjust the sha rpness.
Auto Image Enhance
Allows alteration of individual picture settin gs to improve the printed image and analyzes data from
surrounding or neighboring pixels in the document.
Brightness
Adjusts the brightness of the whole image. To lighten or darken th e image, move the scroll bar to the lef t
or right.
Contrast
Adjusts the contrast of an image. This will make darker areas darker and lighter area s lighter. Increase th e
contrast when you want an image to be clearer. Decrease the contrast when you want an image to be more
subdued.
Red
Increases the intensity of Red in the image to mak e the image re dder.
Green
Increases the intensity of Green in the image to make t he image greener.
Blue
Increases the intensity of Blue in the image to m ak e t he image bluer.
9
Page 16
Improve Pattern Printing (Windows® 2000/XP only)
Printing
Select the Improve Pattern Printing option if the pattern of print ed fills are different from the pat t ern of the
fills you see on your PC.
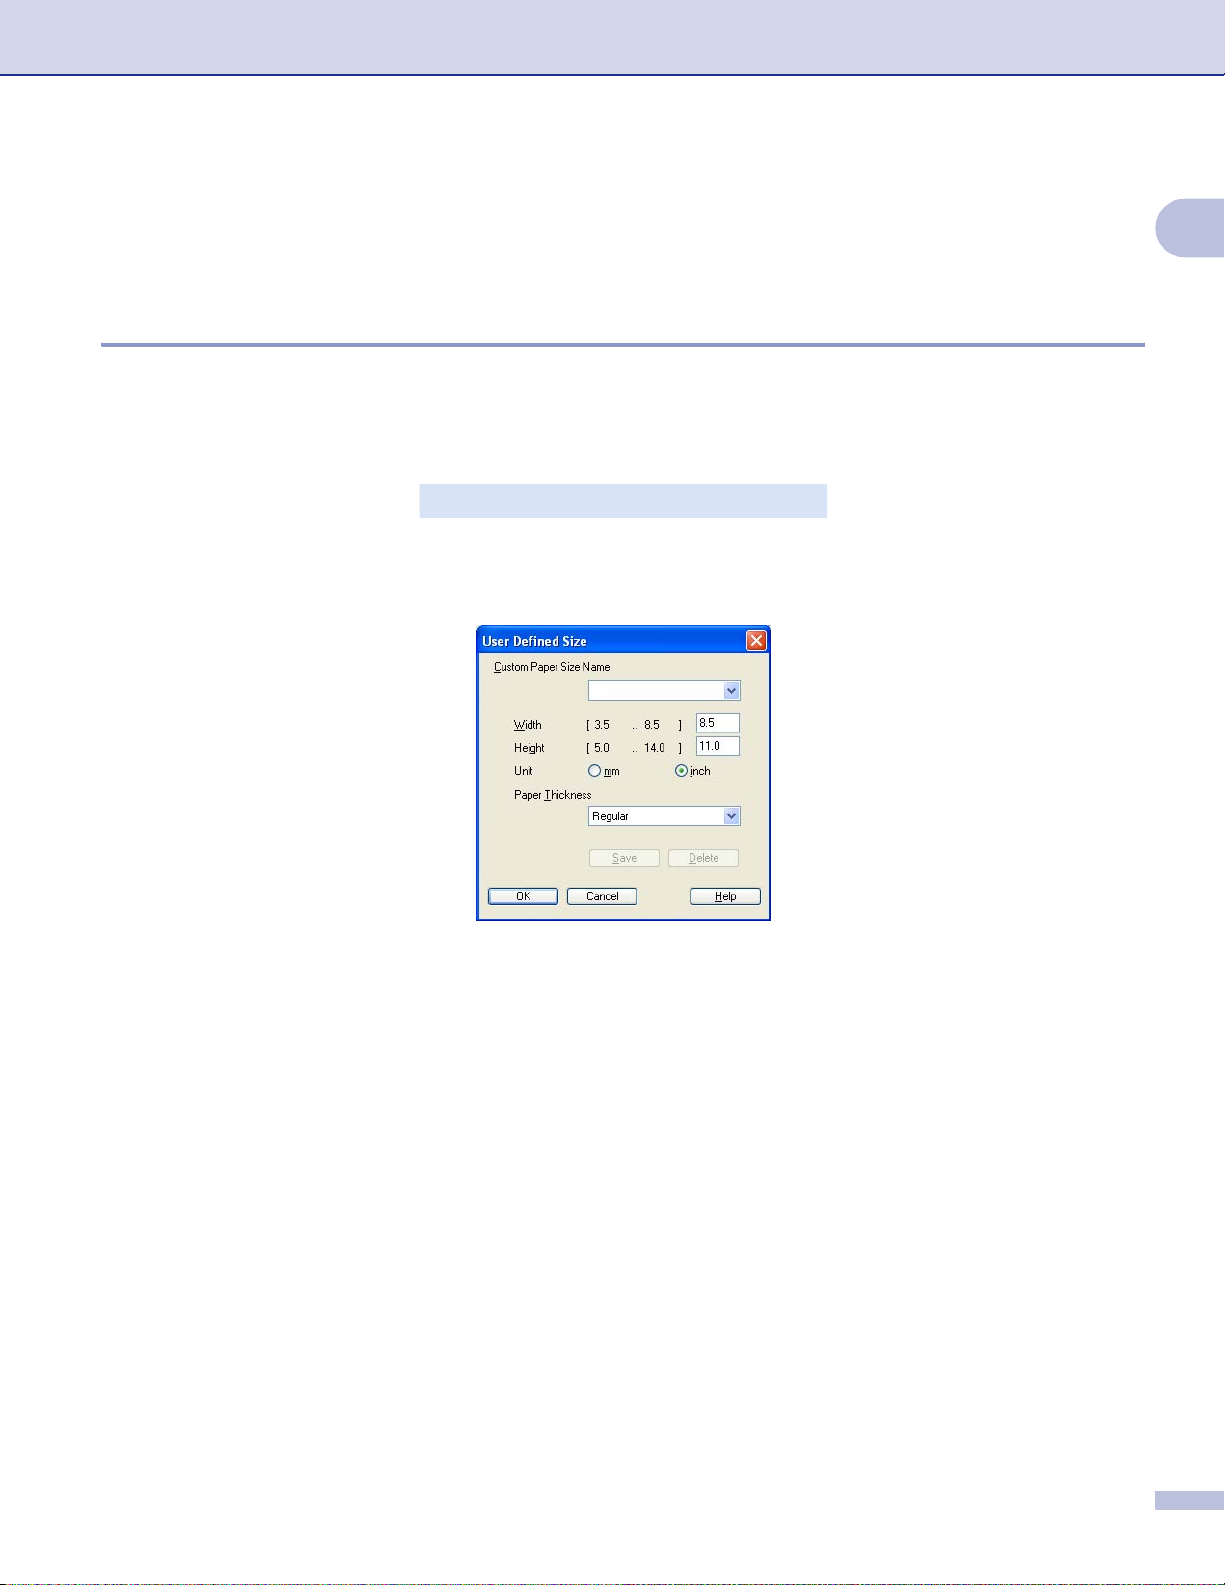
Paper Size 1
The Paper Size selection includes a large selection of standard paper sizes. If you want, you can create a
custom size ranging from 3.5 × 5 in. (88.9 × 127. 0 mm ) to 8.5 × 14 in. (215.9 × 355.6 mm). You can also
choose the borderless setting for specific paper sizes. From the drop-down list, choose the Paper Size you
are using.
You can create a custom size by choosing User De fined Size. Specify the Width and Height values, and
enter any name you want for this custom size. Choose the correct paper thickness to improve the quality of
your output.
1
To do borderless printing 1
From the Paper Size pull down list choose the size of paper you want to print such as Letter (borderless).
10
Page 17
Printing
Page Layout 1
The Page Layout option lets you choose the N in 1 options or the 1 in N options. The N in 1 options print 2,
4, 9 or 16 pages of a docum ent on 1 sheet of p aper. The 1 in N opt ions enlarge s your print size and prints
the doc um ent in poster print mode.
Note
If you are us ing Window s
®
98/98SE/Me, the 4 in 1, 9 in 1 and 16 in 1 layo ut is not av ailable.
Page Order (Windows® 2000/XP only) 1
When N in 1 option is selected, the Page Order can be selected from the drop-down menu.
Border Line 1
When printing multiple pages on one sheet with the Page Layout feature, you can choose to have a solid
border, dashed border or no border around each page on the sheet.
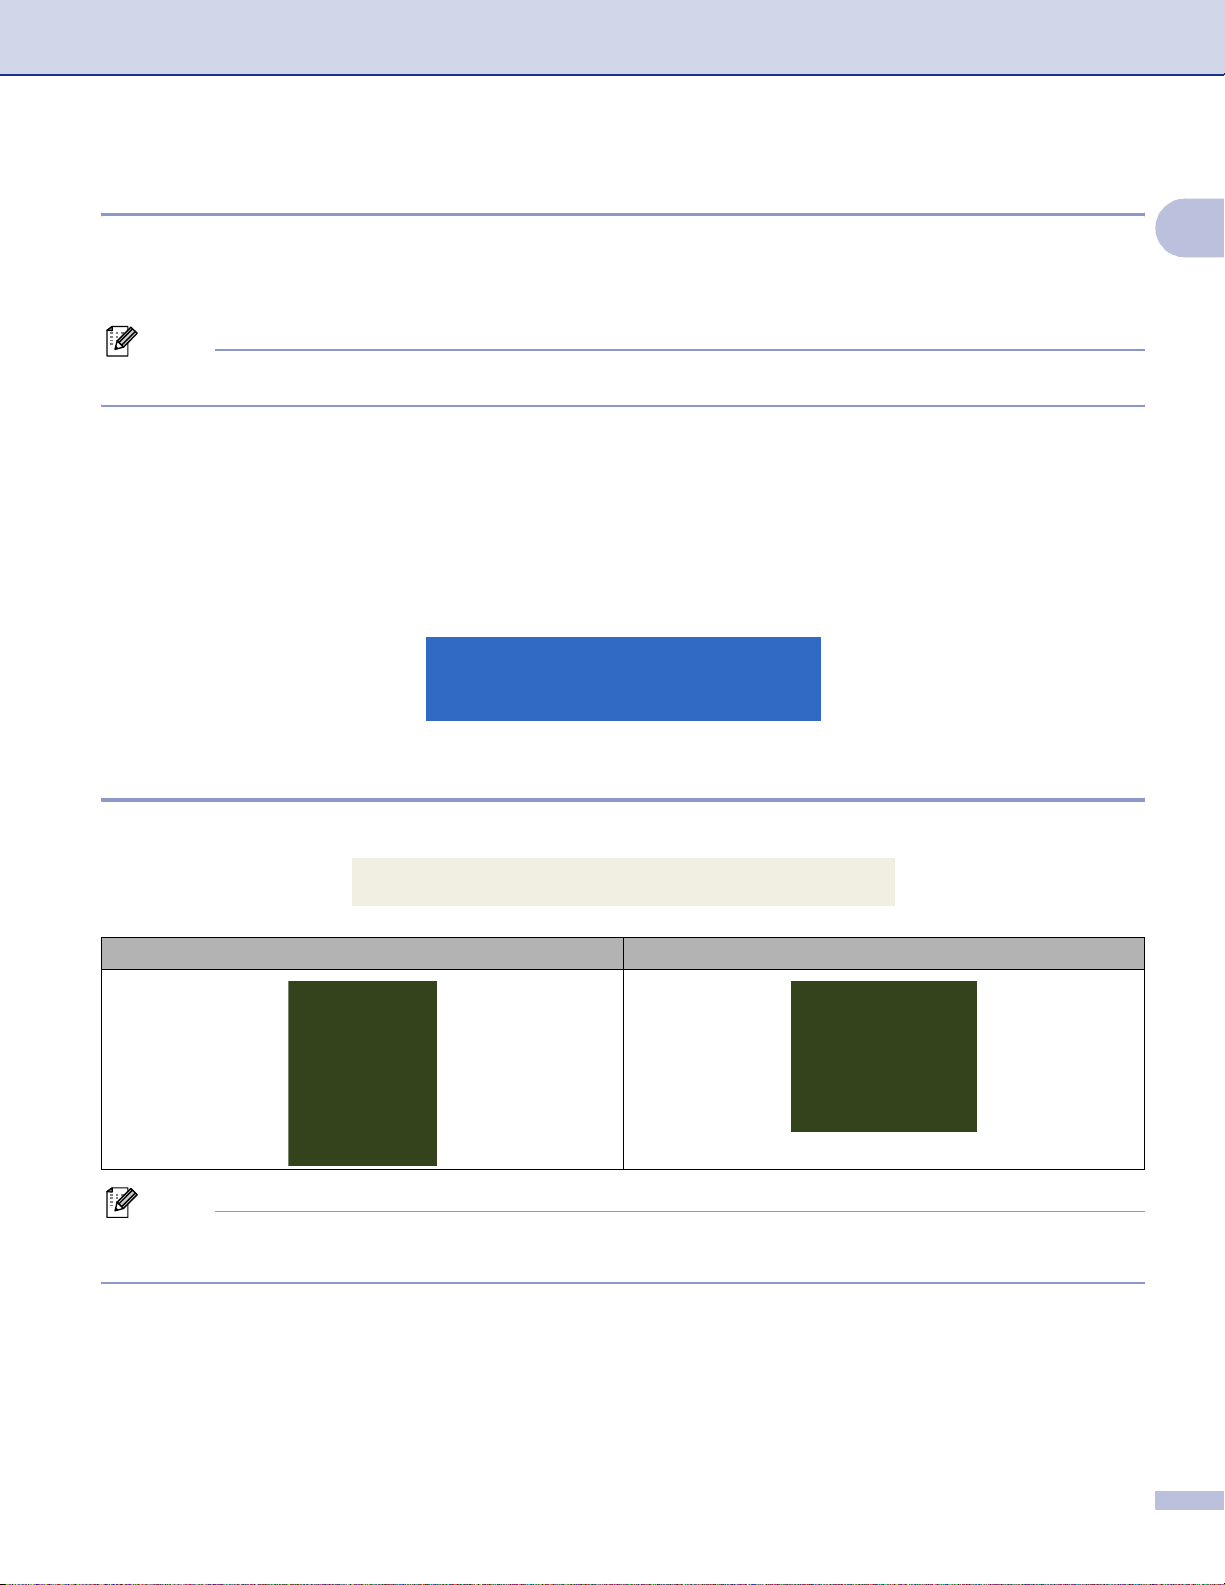
Orientation 1
1
Orientation chooses the pos it ion your docume nt w ill be printed (in Portrait or Landscape).
Portrait (Vertical) Landsca pe ( Horizontal)
Note
If your application software contains a similar function to this, we recommend you use the one in the
application.
11
Page 18

Printing
Copies 1
The Copies selection sets th e number of copies that will be printed (1 to 999).
Collate 1
With Collate checked, on e complete co py of y our documen t will be printed an d t hen reprinted according to
the number of copies you choose. If Collate is uncheck ed, then each p age will be print ed according to the
number of copies chosen before the next page of the document is printed.
Reverse Order 1
Reverse Order prints the pages of y our docume nt in t he opposite order.
Paper Source (MFC-5860CN only) 1
The Paper Source selection sets the paper tray from which the machine will feed the paper when printing. If
you choose Auto Select, the machine will take paper from Tray 1. When Tray 1 is empty, Auto Select allows
the machine take paper from Tray 2 if both trays are using paper that is the same type and size.
1
Note
• You ca n only use Plain Pap er for Media Type, and Letter, Legal, A4, Executive or B5 for Paper Size in
Tray 2.
• Tray 2 does not support Borderless pr intin g.
12
Page 19
Printing
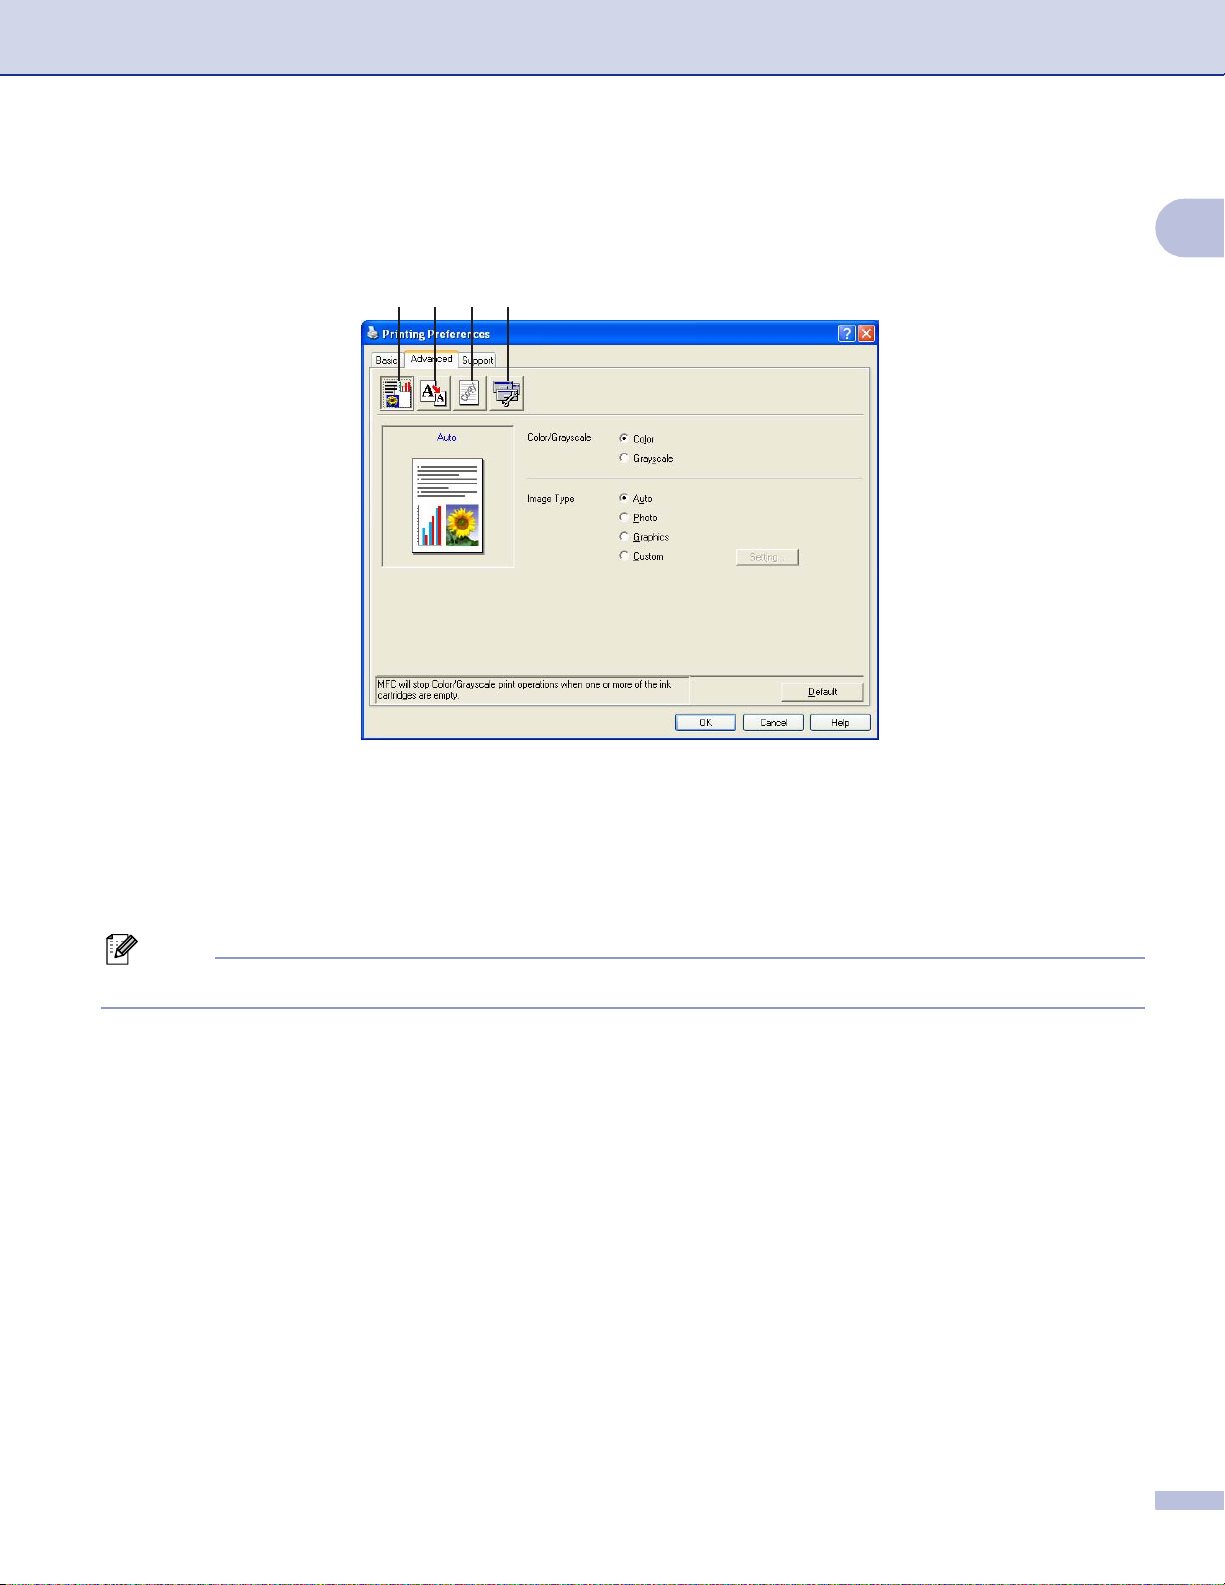
Advanced tab 1
Change the tab settin gs by c lic k ing one of the following icon s:
1 2 3 4
1
Color (1)
Scaling (2)
Watermark (3)
Device Options (4)
Note
To return to the default settings, click Default.
13
Page 20

Printing
Color 1
Color/Grayscale 1
This selection allows a c olor document to be printed in blac k and white using grayscale.
Image Type 1
The print er driver will choose the most su it able color matc hing and half tone method, depending on y our
image type. Generally, text and bu si ness graphics are printed vivid ly and photographic images are printed
softly.
Auto
The printer driver automatically chooses the image type.
Photo
Use for photographic images.
1
Graphics
Use for documents that contain text or business graphics (charts or clip art).
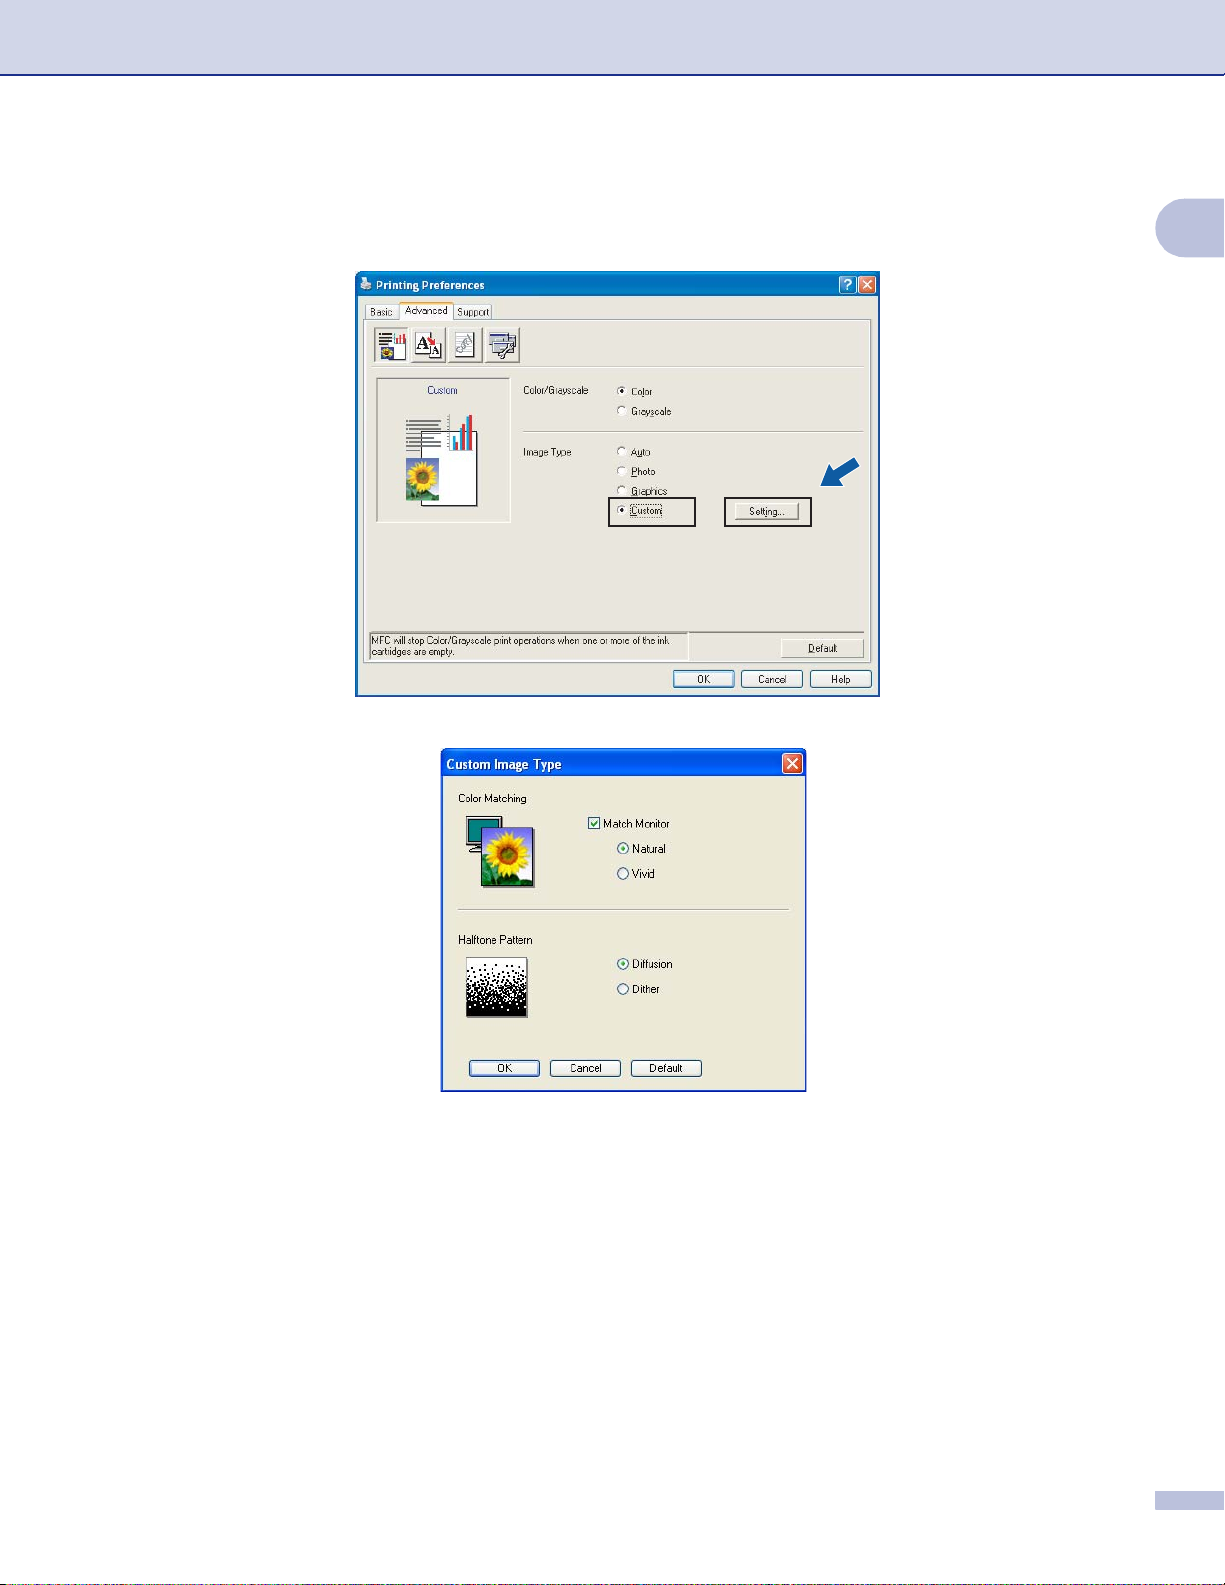
Custom
If you wa nt to ch oose the color m atching and halftone meth od, choose this m ode.
14
Page 21
Printing
Custom Image Type 1
You can choose the color matching method manually. Choose the best one for your document.
1
Match Monitor
Color is adjusted to get the closest color match with the PC monitor.
• Natural: Use for photogra phic images. Th e c olor is adjusted to print more na t ural colors.
• Vivid: Use for b u si ne ss g rap hics such as charts, graphics and text. Th e col or i s adjusted to p rin t mo re
vivid colors.
15
Page 22
Halftone Pattern
Printing
The machine can use two methods (Diffusion or Dither) to arrange dots to express halftones. There are
some predefined patterns and you can choose which one to use for your document.
• Diffusion: Dots are put at random to create the halftones. Use for printing photographs that have
delicate shades and gr aphic s .
• Dither: Dots are arranged in a pre-defined pattern t o m ak e halftones. U s e fo r printing graph ic s th at
have definite color boundaries or for printing charts such as business charts.
Note
Some halftone sett ings cannot be c hosen with certain combin at ions o f Media Type and Quality settings.
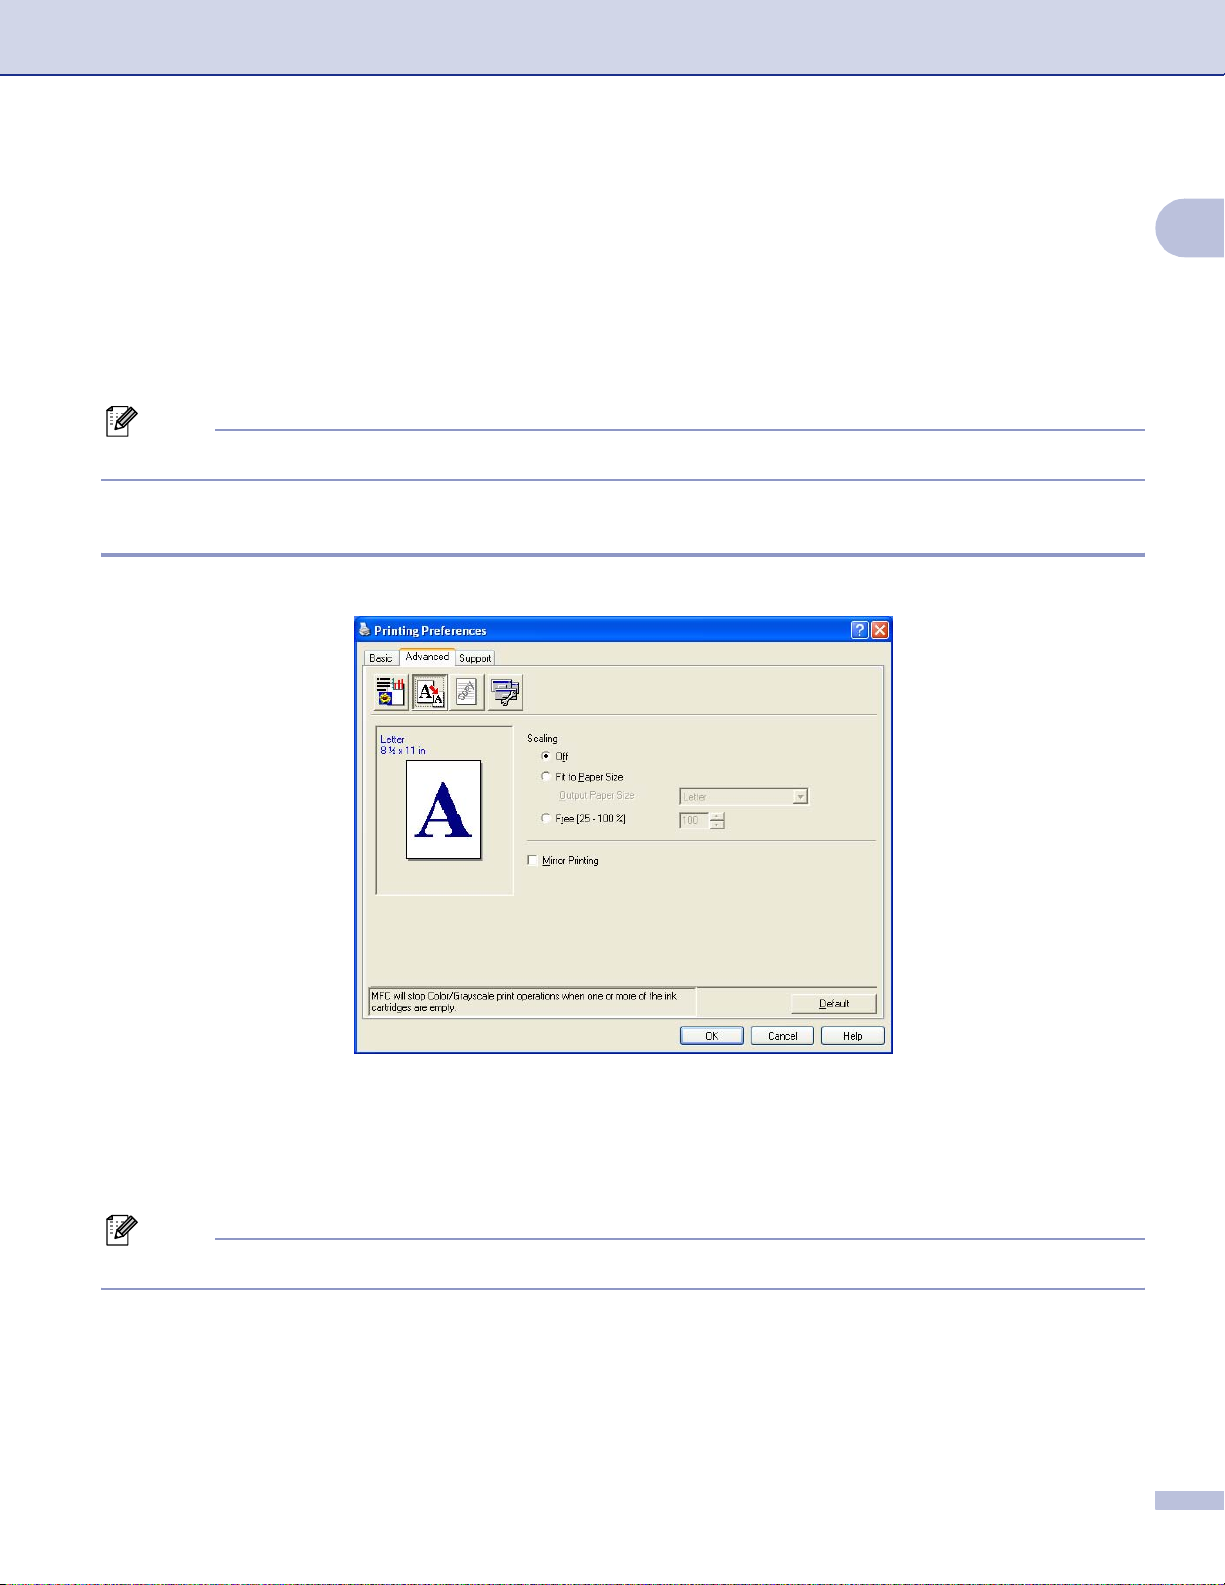
Scaling 1
You can change the print size of your document with the Scaling feature.
1
Choose Off if you want to print the document as it appears on your screen.
Choose Fit to Paper Size if your document has an unusual size, or if you only have standard size paper.
Choose Free if you want to reduce the size.
Check Mirror Printing to reverse the data from left to right.
Note
Mirror P rinting is not available when you choose Transparencies as the Media Type.
16
Page 23
Printing
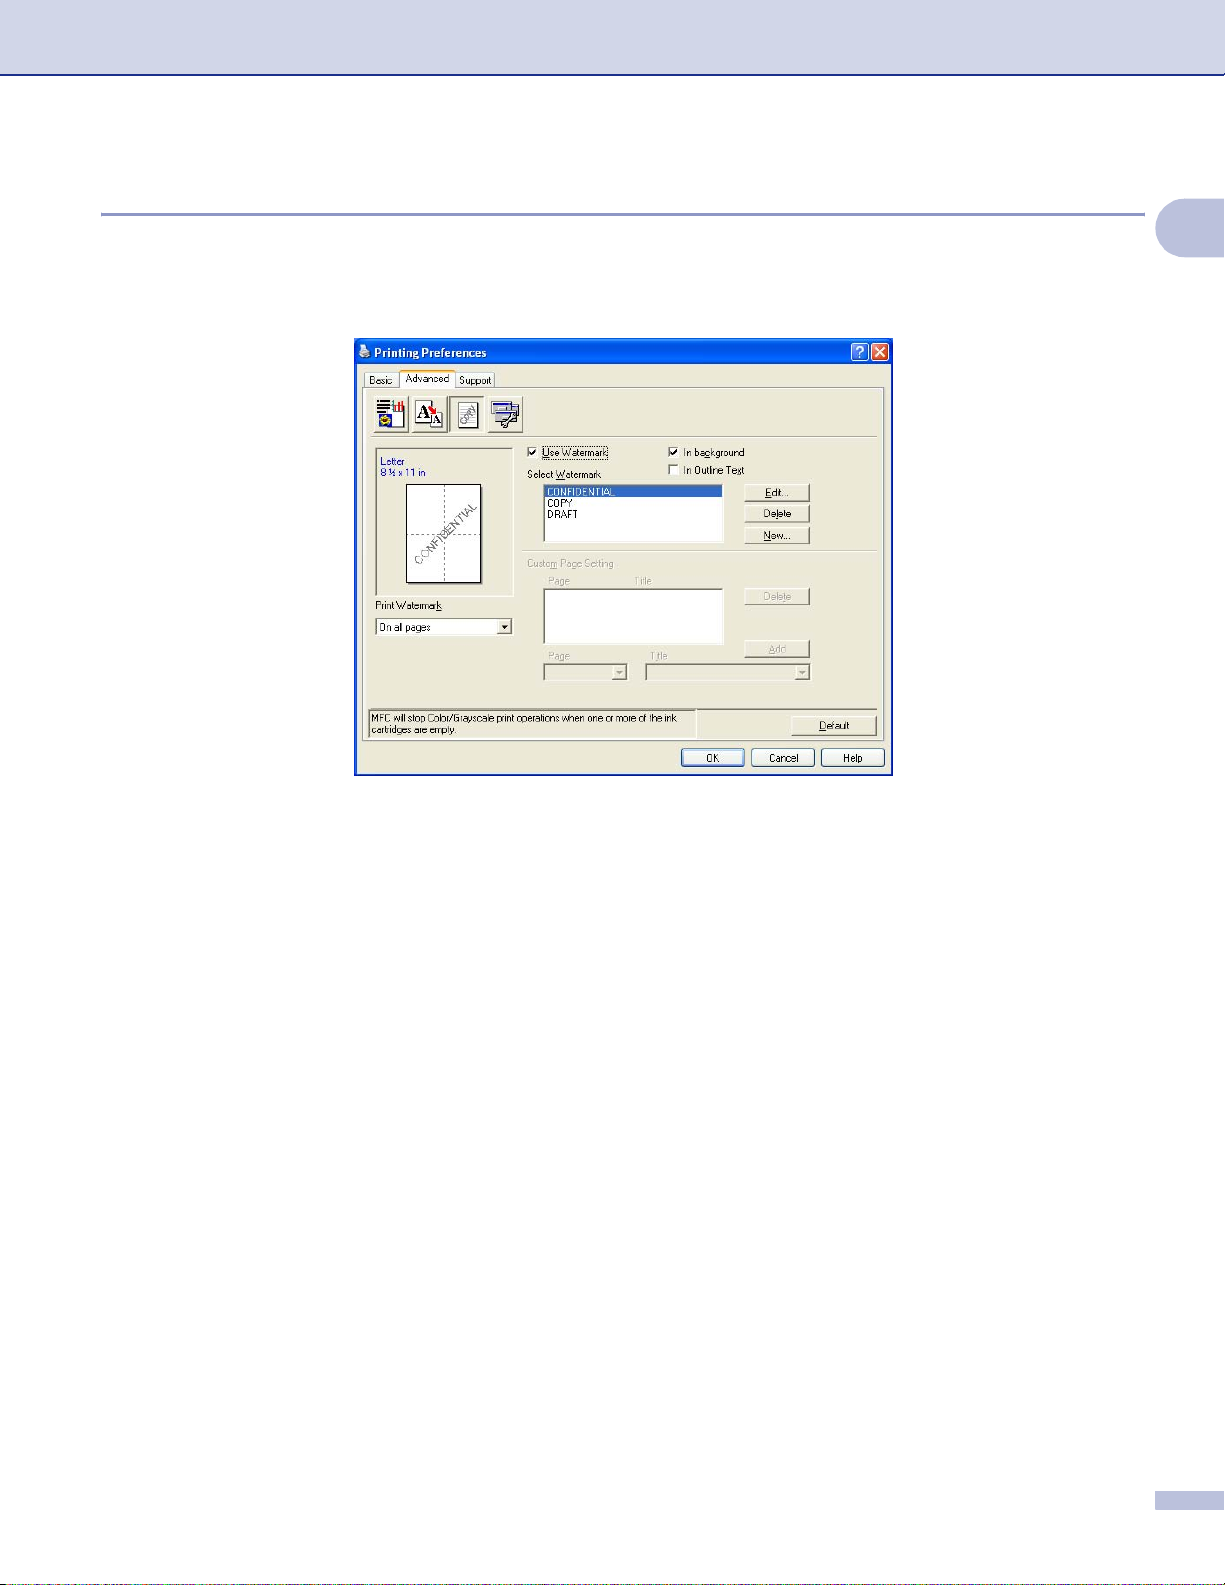
Watermark 1
You can print a logo or text onto your document as a Watermark. You can choose one of the preset
Watermarks, or you can use a bitmap file or text file that you have created.
Check Use Watermark, and then choo s e th e w atermark yo u w ant to use.
1
In background 1
Check In background to print the watermark image in the background of your document. If this feature is
unchecked, the Watermark will be printed on top of your document.
In Outline Text (Windows® 2000/XP only) 1
Check In Outline Text if you only want to print an outline of the watermark.
Print Watermark 1
You can print the watermark in any of the following ways:
On all pages
On first p ag e only
From second page
Custom
17
Page 24
Printing
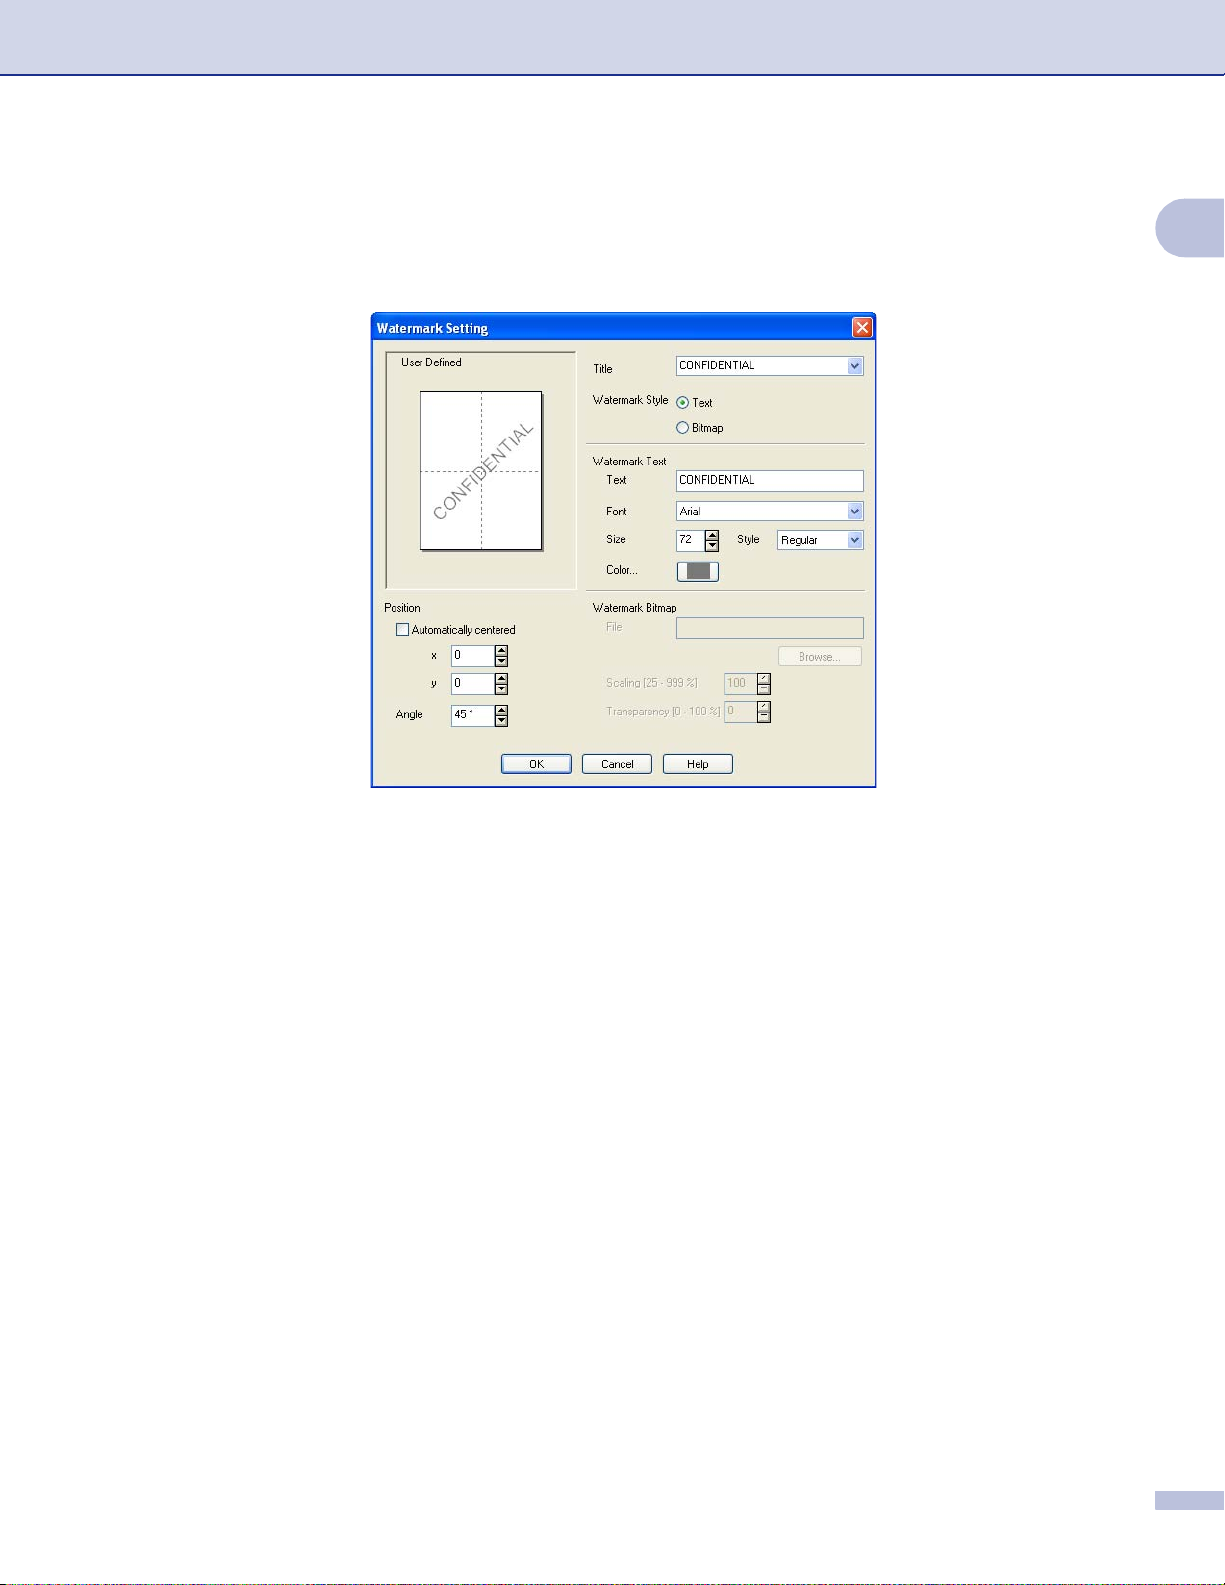
Watermark Setting 1
You can change the watermark size and position on the page by choosing the watermark, and clicking the
Edit button. If you want to add a new watermark, click the New button, and then choose Text or Bitmap in
Watermark Style.
1
Title
Choose CONFIDENTIAL, COPY or DRAFT as the title or enter a title you like in the field.
Watermark Text
Enter your watermark text into the Text Box, and then choose Font, Size, Color and Style.
Watermark Bitmap
Enter the file name and location of your bitmap image in the File box, or click Browse to search for the
file. You can also set the scaling size of the image.
Position
Use this se t tin g if y ou w ant to contro l th e po s it ion of the water m ark on the page.
18
Page 25
Printing
Device Options 1
You can set the following Printer Functions:
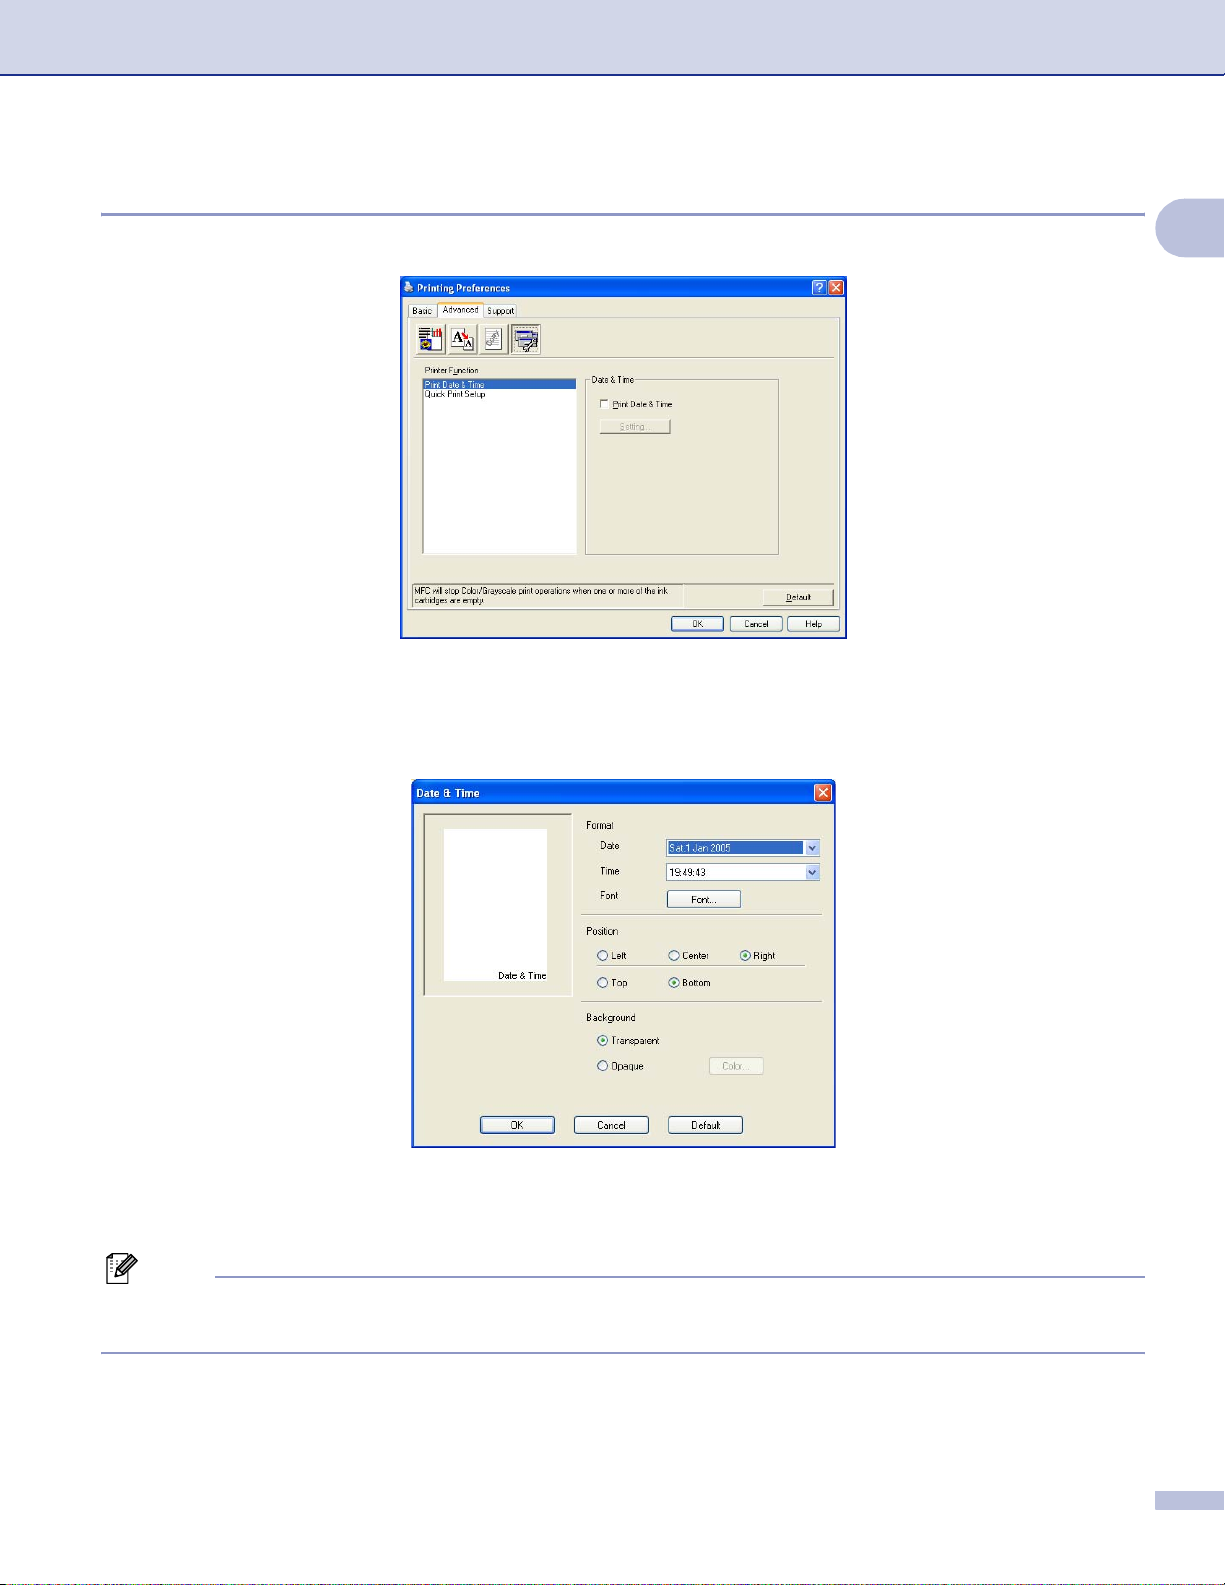
Print Date & Time 1
When the Print Date & Time feature is enabled, the date and time will print on your document from your PC’s
system clock.
1
Click the Setting button to change the Date, Time, Position an d Font. To include a background with the
Date and Time, choose Opaque. When Opaque is chosen, you can click the Color button to change the
color of the Date and Time backgr ound.
Note
The selection box shows the forma t of Date and Time to be pri nt ed. Th e ac tu al Date and Time printed on
your document is automatically retrieved from the settings on your PC.
19
Page 26
Printing
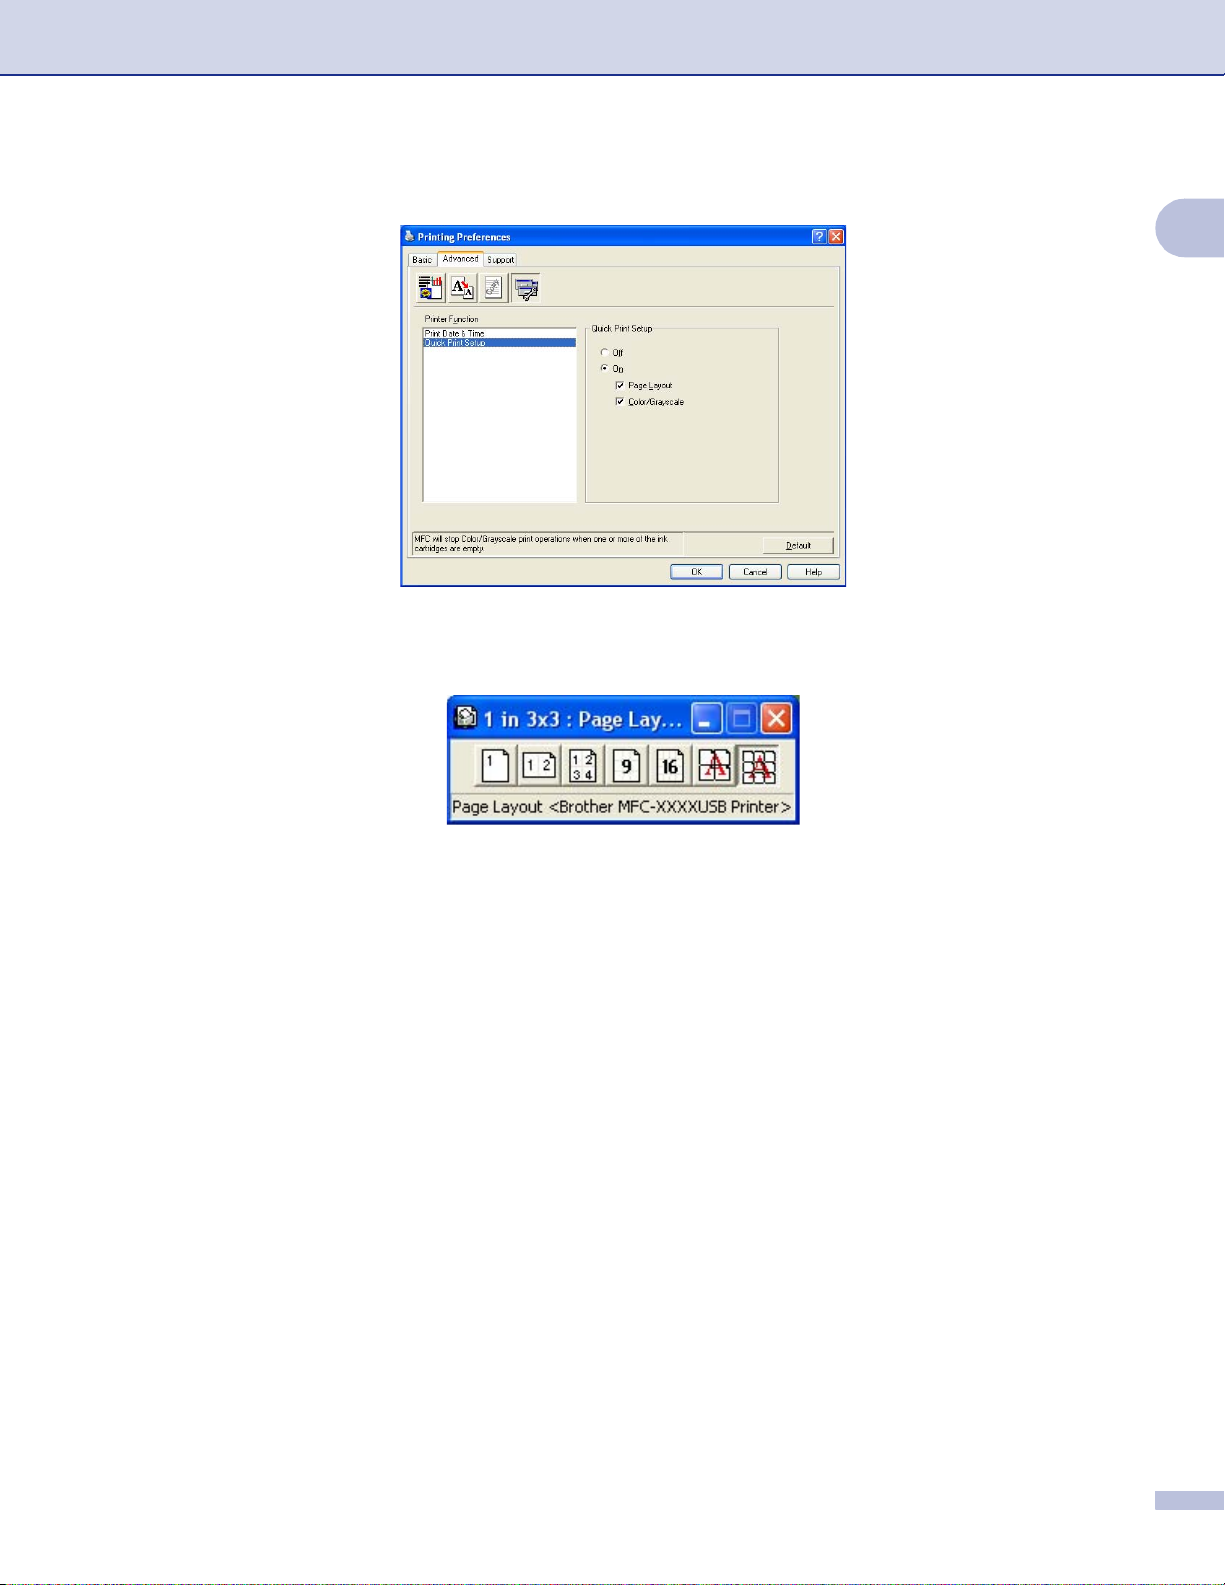
Quick Print Setup 1
The Quick Print Setup feature lets you quickly choose driver settings. Set Quick Print Setup to On and
choose the functi on wh i ch should b e displayed in the Q uick P rint S etup icon. To vie w a nd ch ange settings,
click the tasktray icon.
1
20
Page 27
Printing
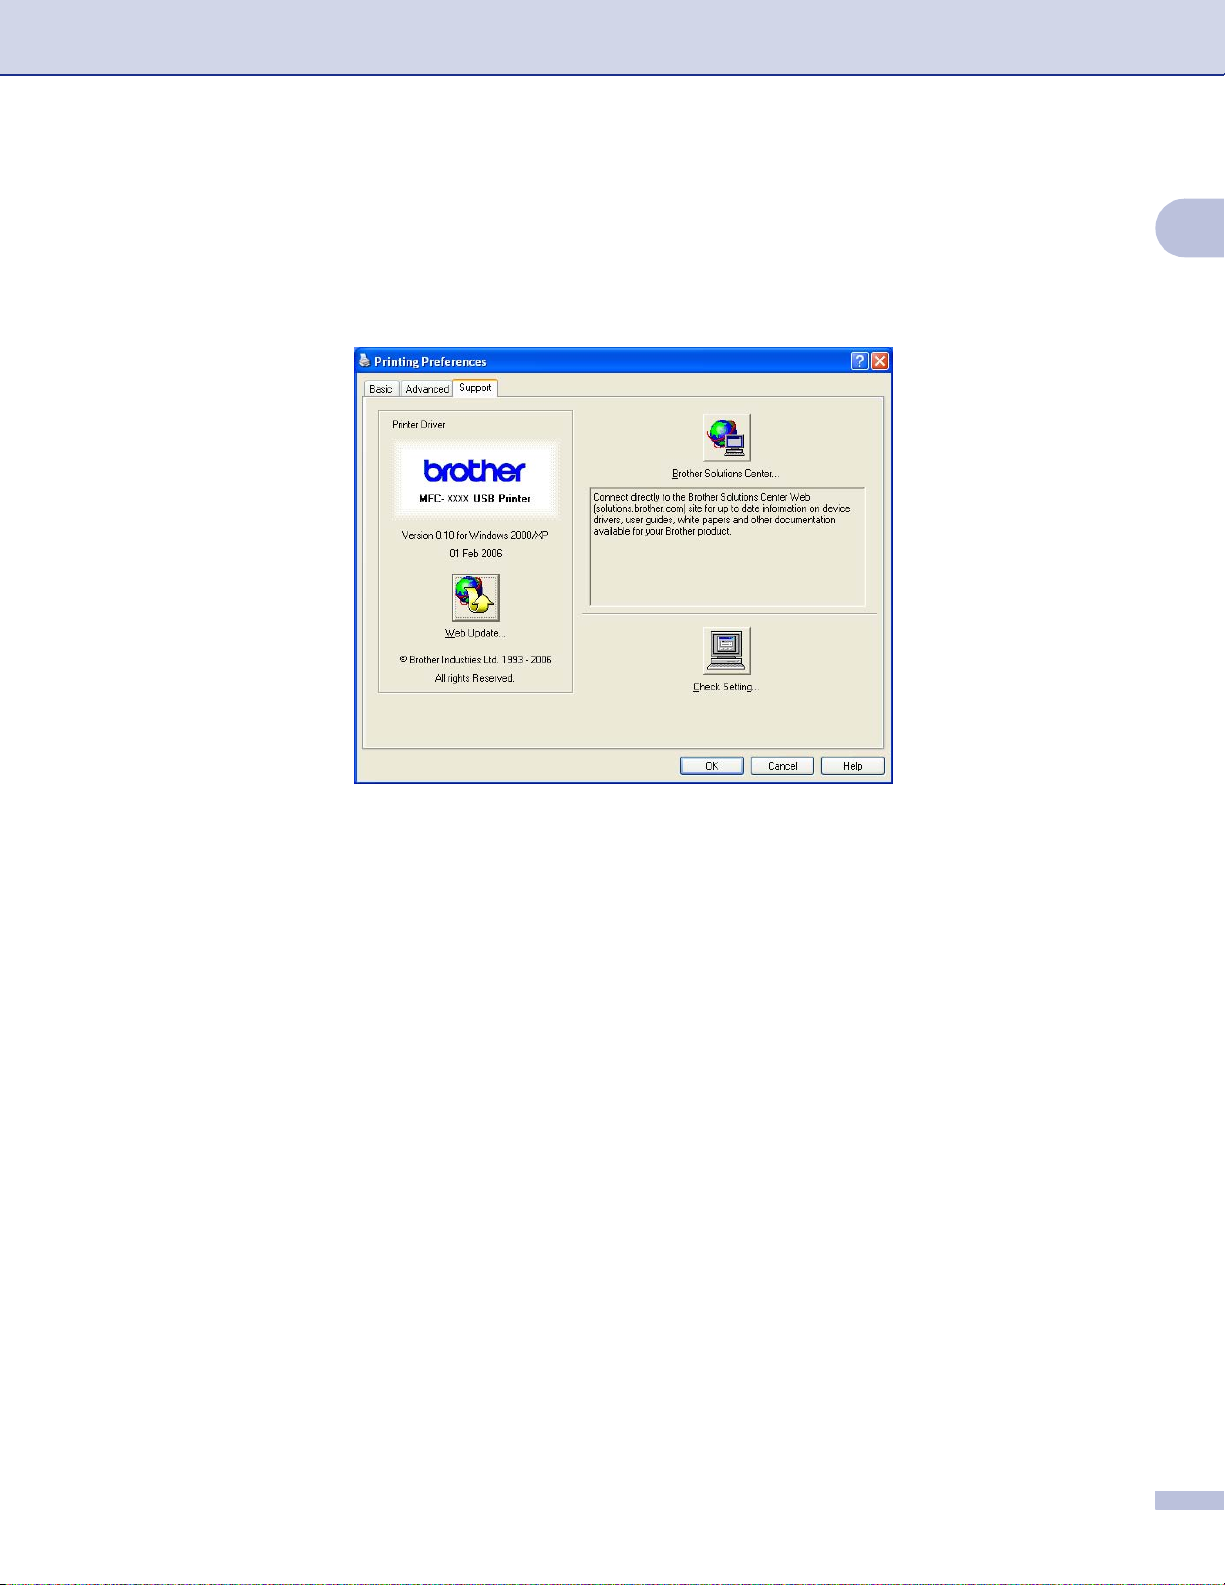
Support tab 1
The Support tab shows the driver version and settings information. There are also links to the
Brother S olutions Center and driver upd ate web si t es.
Click the Support tab to display the following screen:
1
Brother S olutions Center
The Brother S olutions Center is a web site offering information about your Brother product including
FAQs (Frequently Asked Questions), User’s Guides, driver updates and tips for using your machine.
Web Update
You can check the Brother web site for automatic downloads to update the printer driver on your PC.
Check Setting
You can check current driver settings.
21
Page 28

2
Scanning operation s and the drivers us ed will differ depending on t he operating s yst em you are using. As
default, the machine uses a TWAIN compliant driver when scanning documents from your applications.
For Windows
Two sca nner dr ive rs ar e ins tall ed. A TWAIN c ompl iant s cann er dri ver ( See TWAI N comp liant on page 22) and a Windows
(Windows
Windows
Note
• For ScanSoft
• If your PC is protecte d b y a fi r ewall a n d is u nable to scan, you may need to co nfig ure th e f ire wall se tti n gs
to allow communication through port number 137 and 54925. Visit the Brother Solutions Center
(http://solutions.brother.com
Scanning 2
®
XP
®
Imaging Ac quisition (WIA) driver (See Scanning a document using the WIA driv er
®
XP only) on page 29).
®
XP users ca n s elect either driv er when scanning docum ents.
®
Paper Port® SE, see Using ScanSoft® PaperP ort® SE with OCR on page 40.
) for more in form ation.
Scanning a document using the TWAIN driver 2
2
TWAIN compliant 2
The Brother MFL-Pro Suite software includes a TWAIN compliant scanner driver. TWAIN drivers meet the
standard universal protocol for communicating between scanners and applications. This means that you can
®
not onl y sca n imag es di rect ly i nto t he Pape rPor t
can also scan images directly into hundreds of other software applications that support TWAIN scanning.
These applications include popular programs, such as Adobe
®
CorelDraw
and many mor e.
SE viewer that Brother included with your machine, but you
®
Photoshop®, Adobe® PageMak er®,
22
Page 29
Scanning
Accessing the Scanner 2
a Start t he Scan Soft
®
PaperPort® SE software that was installed during the MFL-Pro Suite insta l lati o n to
scan a do c um ent.
Note
The instructions for scanning in this Guide are for when you use ScanSoft
steps may vary when using other software applications.
b Click File, then Scan. Or click the Scan button.
The Scan panel appears in the left side of the s c reen.
c Choose the scanner you are using from the Scanner drop-down list.
Note
®
• For Windows
XP:
Choose TW-Brother MFC-XXXX USB or TW-Brother MFC-XXXX LAN.
• For other operating systems:
Choose Brother MFC-XXXX USB or Brother MFC-XXXX LAN.
(Where XXXX is your model name)
d Click Scan.
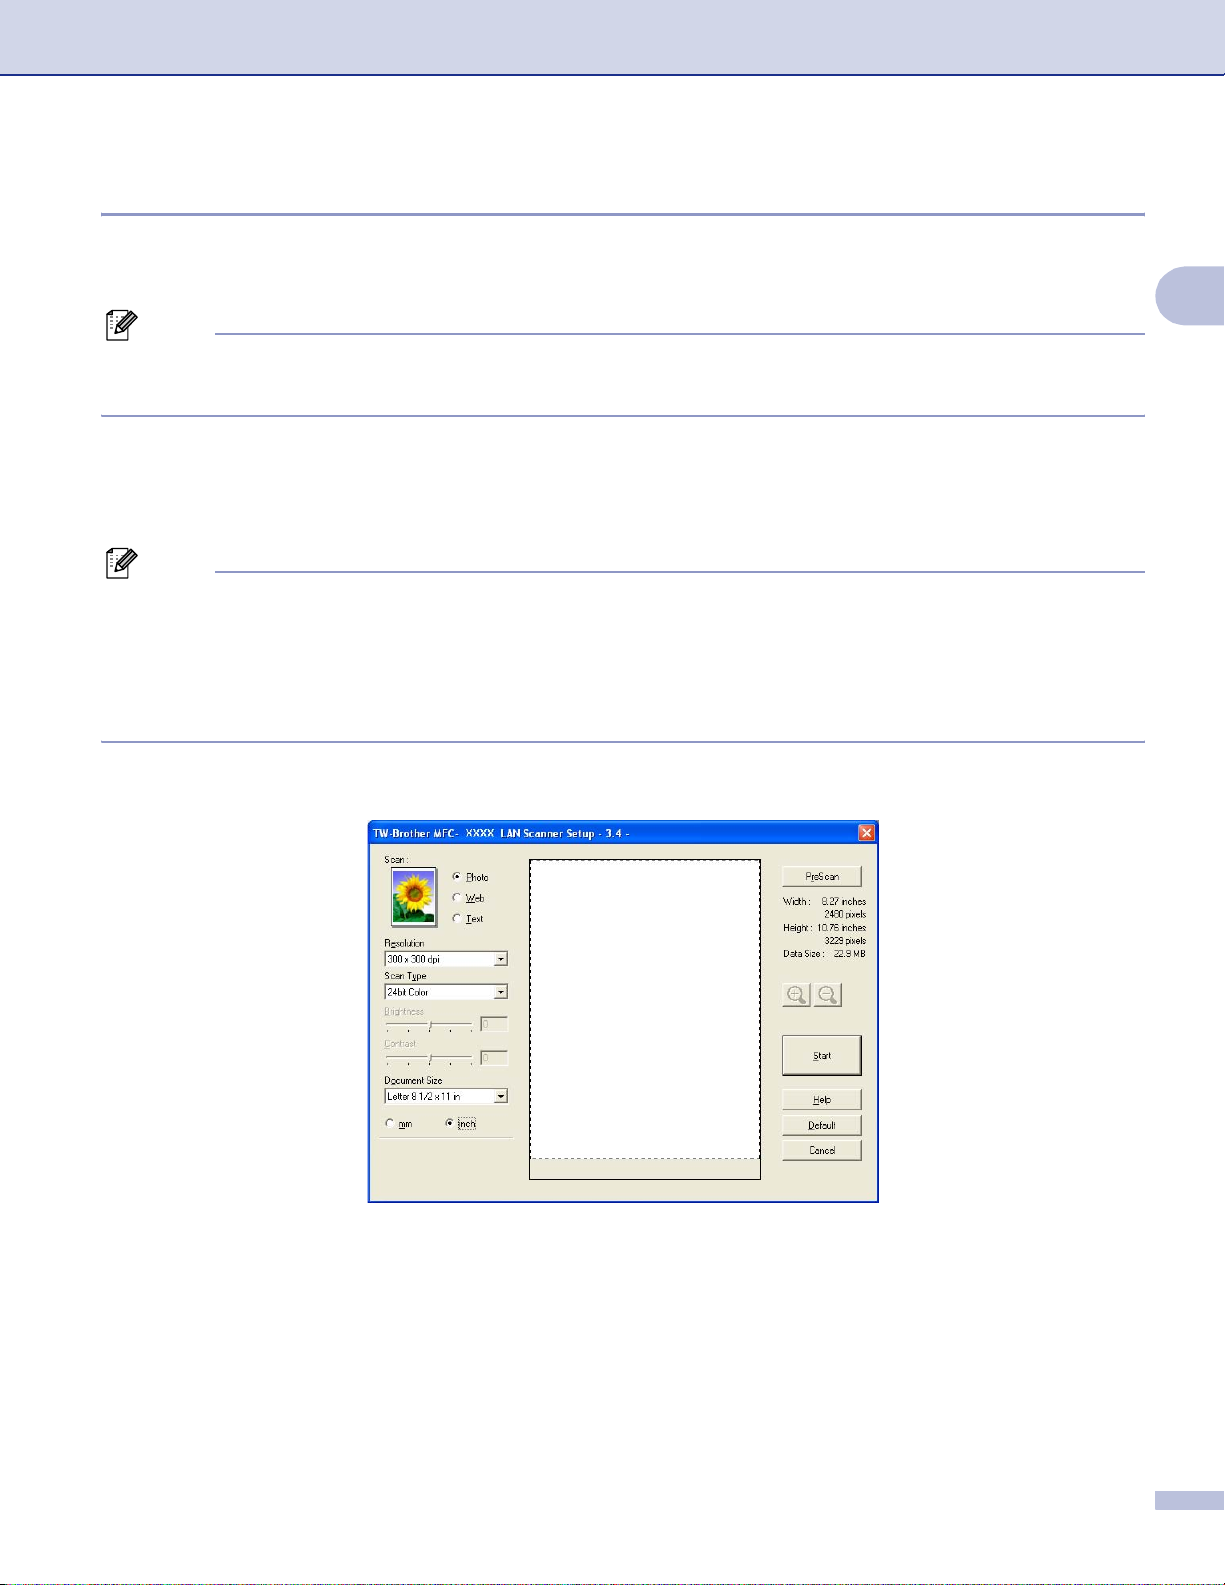
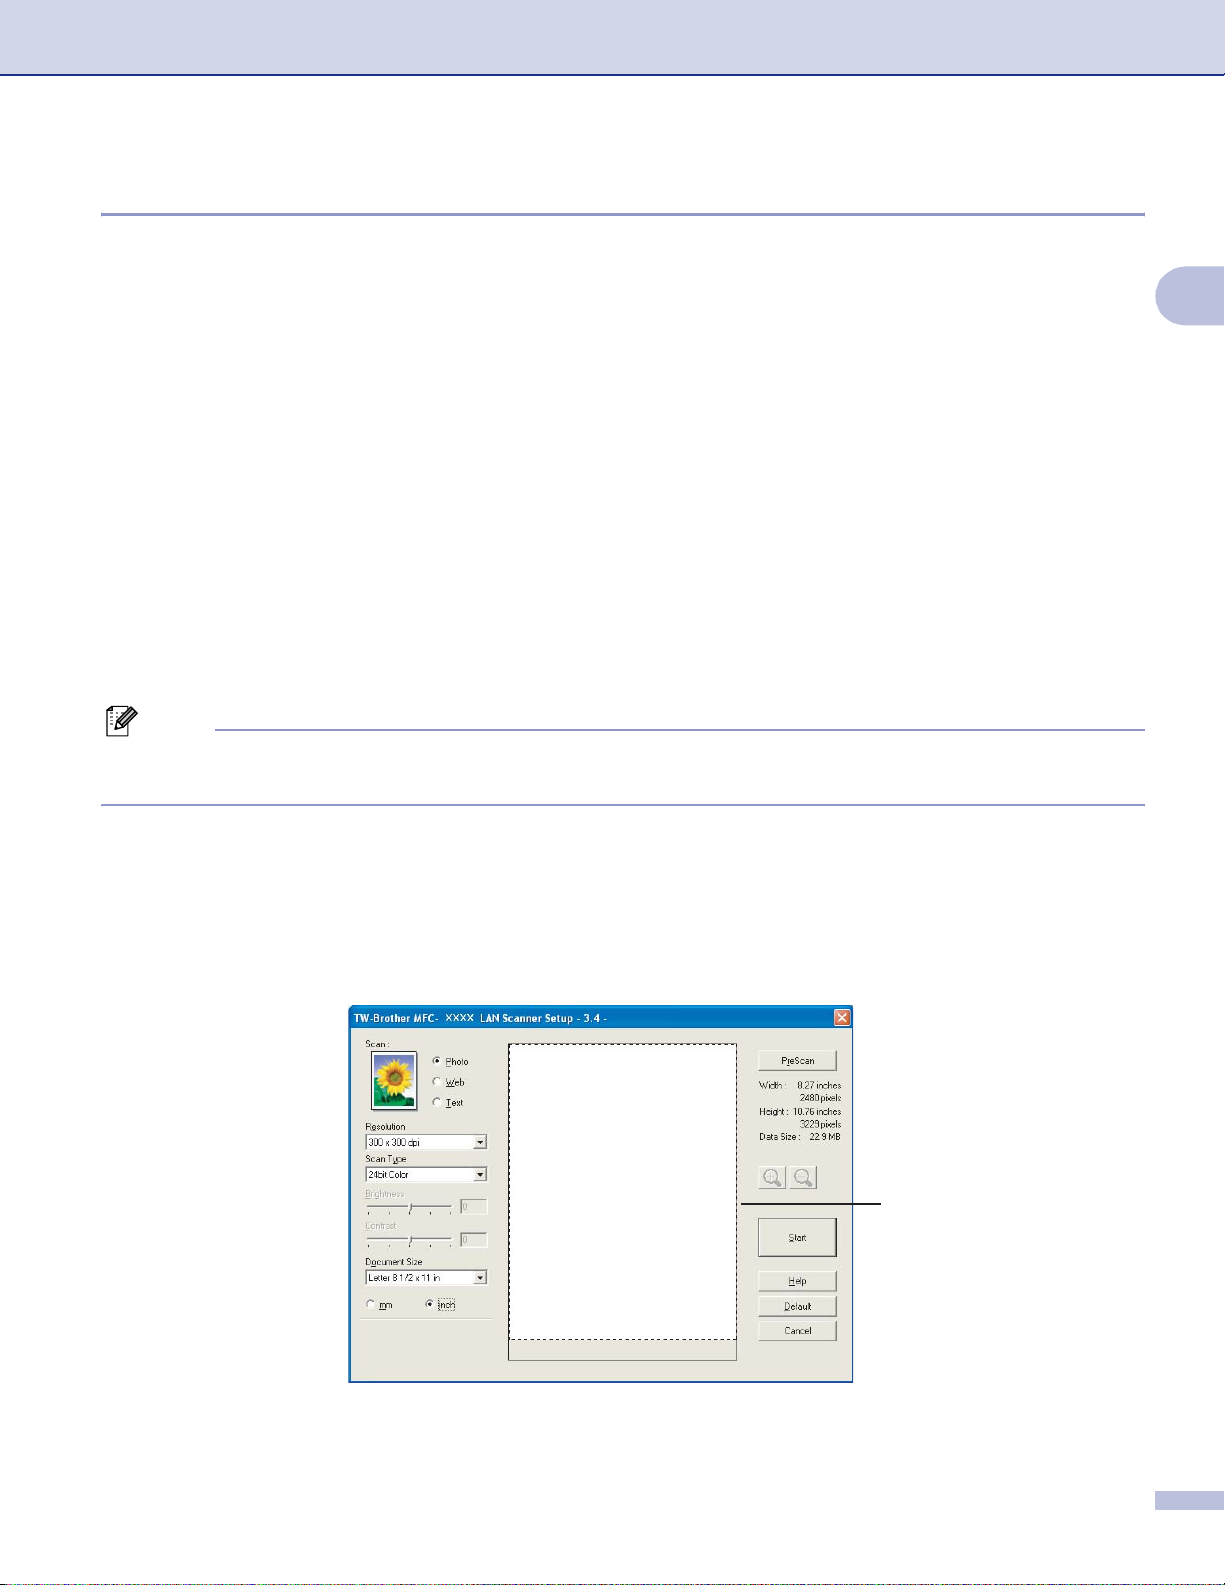
The Scan ner Setup dialog box appea rs :
®
Paper Port® SE. The scanning
2
23
Page 30
Scanning
Scanning a document into the PC 2
You can s c an a whole page, or a portion of the page by pre-scanning th e document.
Scanning a whole page 2
a Load your document.
b Adjust the f ollowing settings, if needed, in the Scanner Setup dialog box:
Scan (Image Type)
Resolution
Scan Type
Brightness
Contrast
Document S ize
c Click Start.
®
When scanning is finished, click Cancel to return to the PaperPort
Note
After you select a document size, you can ad just the scanning area further by cli cking the left mouse button
and dragging it. This is required when you want to crop an image when scanning.
Pre-Scanning an image — to crop a portion you want to scan 2
SE window .
2
The PreScan butt on is us ed t o prev iew an image and als o let s you c rop an y unwan ted ar eas f rom th e imag e.
When you are satisfied you are sca nni ng the correct are a, cl i ck the Start button in the Scanner Setup dialog
box to scan the image.
a Load your document.
1
b Choose the settings for Image Type, Resolution, Scan Type, Brightness, Contrast and
Document S ize as needed.
24
Page 31

c Click PreScan.
The whol e im age is scanned into the PC an d appears in th e Sc anning Area (1) of the Scanner Setup
dialog box.
Scanning
d Press and hold down the left mouse button and drag it over the portion you want to scan.
Note
You can enlarge the image using the icon, and then use the icon to restore the image to its
original size.
e Load your document again.
Note
Skip this step if you loaded the document on the scanner glass in step a.
f Click Start.
®
This time only t he chosen are a of t he document ap pears in the Pa perPort
application window).
SE window (or your
2
g In the Pap erPort
®
SE window , us e the options av ailable to refine the image.
Setti ng s in th e Scan ner Setup dialo g bo x 2
Image Type 2
Choose the output image type from Photo, Web or Text. Resolution and Scan Type will be automatically
altered for each of the default settings.
The def ault settings are listed in the ta ble below:
Image Type Resolution Scan Type
Photo Use for scanning photo images 300 × 300 dpi 24 bit color
Web Use for attaching the scanned image to web pages 100 × 100 dpi 24 bit color
Text Use for scanning text documents 200 × 200 dpi Black & White
25
Page 32

Scanning
Resolution 2
You can choose a scanning resolution from the Resolution drop-down list. Higher resolutions take more
memory and transfer time, but produce a finer scanned image. The followin g table shows the resolutions you
can choose and the available colors.
2
Resolution
100 × 100 dpi Yes Yes Yes
150 × 150 dpi Yes Yes Yes
200 × 200 dpi Yes Yes Yes
300 × 300 dpi Yes Yes Yes
400 × 400 dpi Yes Yes Yes
600 × 600 dpi Yes Yes Yes
1200 × 1200 dpi Yes No Yes
2400 × 2400 dpi Yes No Yes
4800 × 4800 dpi Yes No Yes
9600 × 9600 dpi Yes No Yes
19200 × 19200 dpi Yes No Yes
Black & White/
Gray (Error Diffusion)
256 col or True Gray/24 bit col or
Scan Type 2
Black & White
Use for text or line art images.
Gray (Error Diffusion)
Use for photographi c i ma ges o r gra phi cs. ( E rro r Di ffu si on i s a method for cre atin g simulated gray ima ges
without using true gray dots. Black dots are put in a specific pattern to give a gray appearance.)
True Gray
Use for photographic images or graphics. This mode is more exact because it uses up to 256 shades of
gray.
256 Color
Uses up to 256 colors to scan the image.
24 bit Color
Uses up t o 16.8 million co lors t o s c an the image.
Although using 24 bit Color creates an image with the most accurate color reproduction, the image file
size will be about three ti mes larger than a file created using the 256 Color option. It requires the most
memo ry and has the long es t tr ansfer time.
26
Page 33

Scanning
Brightness 2
Adjust the setting (-50 to 50) to get the best image. The default value is 0, representing an average and is
usually su it able for most ima ges.
You can set the Brightness level by dragging the slide bar to the right or left to lighten or darken the image.
You can also enter a value in the box to set the level.
If the s canne d image i s t oo light, s et a lowe r Brightness lev el and s c an the document agai n. If the ima ge is
too dark , set a higher Brightness level and scan the document again.
Note
The Brightness setting is only available when you set Scan Type to Black & White, Gray or True Gray.
Contrast 2
You can increase or decrease the contrast level by moving the slide bar to the left or right. An increase
emphas izes dark and li ght area s of t he image , wh ile a dec rease re v eals more detai l in gray areas. You can
also enter a value in the box to set the Contrast.
Note
The Contrast setting is only available when you set Scan Type to Gray or True Gray.
When s ca nning photog r aphs or other im ages for use in a w ord processor or ot her graphics application, t ry
different settings fo r the Resolution, Color Type, Brightness and Contrast to see which set ti ng best suits
your needs.
Document Size 2
2
Choos e one of the follow ing sizes:
A4 210 × 297 mm
JIS B5 182 × 25 7 m m
Letter 8 1/2 × 11 in.
Legal 8 1/2 × 14 in. (Available on ADF mod els )
A5 148 × 210 mm
Execu ti ve 7 1/ 4 × 10 1/2 in.
Business Card
To scan business cards, choose the Business Card size, and then put the business card face down at
the center of the scanner glass.
Photo 4 × 6in.
Index Card 5 × 8in.
Photo L 89 × 127 mm
Photo 2L 127 × 178 mm
Postcard 1 100 × 148 mm
Postcard 2 148 × 200 mm
27
Page 34

Custom (User adjustable from 0.35 × 0.35 in. to 8.5 × 14 in. or 8.9 × 8.9 mm to 215.9 × 355.6 mm.)
If you choose Custom as the size, the Custom Document Size dialog box appears.
Enter the Name, Width an d Height of the document.
You can c hoose ‘mm’ or ‘inch’ as the uni t for W idth and He ight.
Note
You can s ee the actual paper size you chose on the sc reen.
Scanning
2
• Width: shows the width of scanning area.
• Height: shows the height of scanning area.
• Data S ize: shows the approximate data size in Bitmap format. The size will vary depending on the type
of file, resolution and number of colors used.
28
Page 35

Scanning
Scanning a document using the WIA driver (Windows® XP only) 2
WIA compliant 2
For Windows® XP you can choose Windows® Image Acq uisit ion (WI A) when sc anning i mages. Yo u can scan
®
images directly into the PaperPort
images directly into any other applications that support WIA or TWAIN scanning.
SE viewer that Brother included with your machine or you can scan
Accessing the scanner 2
a Open your software ap plication to sca n t he documen t.
Note
The instructions for scanning in th is Guide are b ased on ScanSoft
when scanning from ot her applications.
®
PaperP ort® SE. The process will vary
b Click File, then Scan. Or click the Scan button.
The Scan panel appears on the left side of the screen.
c Choose the scanner you are using from the Scanner drop-down list.
Note
• Choose WIA-Brother MFC-XXXX USB or WIA-Brother MFC-XXXX LAN (Where XXXX is your model
name).
2
• If you choose TW-Brother MFC-XXXX, the TWAIN driver will start.
d Click Scan.
The Scan dialog box appears:
29
Page 36

Scanning
Scanning a document into the PC 2
There are two ways to scan a whole page. You can either use the ADF (automatic document feeder) or the
Flatbe d s c anner glass.
If you want to scan and then crop a portion of a page after pre-scanning the document, you must scan using
the scanner glass (Flatbed). (See Pre-Scanning an image — to crop a portion you want to scan on page 24.)
Scanning a document using the ADF (Available for ADF model) 2
a Load your document.
1
2
2
3
4
1 Paper source
2 Picture ty pe
3 Adjust the quality of the scanned picture
4 Page size
b Choose Document Feeder from the Paper s ource drop-down list (1).
c Choose the picture type (2).
d Choose the Page size from the drop-down lis t (4).
30
Page 37

Scanning
e If you want to change some advanced settings, click Adjust the quality of the scanned picture (3).
You can ch oose Brightness, Contrast, Resolution and Picture Type from Advanced Properties.
Click OK after you choose the settings.
Note
By default, the scanner resolution can be set to a maximum of 1200 dpi.
2
If you want to scan at higher resolutions, use the Brother Scanner Utility. (See Brother Scanner
Utility on page 33.)
f Click the Scan button in th e Sc an dialog box .
The machine starts scanning the document.
31
Page 38

Scanning
Pre-Scanning and cropping a portion using the scanner glass 2
The Preview bu t ton i s us ed to previe w an imag e for cropping any unwanted po rtion s f r om the image. When
you are s at is f i ed with the preview, click the Scan button in the Scan dialog box to scan the image.
a Put the document face down on the scanner glass.
b Choose Flatbed in the Paper source drop-down list (1).
Note
If your machine has no Auto Document Feeder (ADF), you do not need to specify the Paper source.
1
4
2
3
2
1 Paper source
2 Picture ty pe
3 Adjust the quality of the scanned picture
4 Scanning area
c Choose the picture type (2).
d Click Preview.
The whol e im age is scanned into the PC an d appears in th e s c anning area (4).
e Press and hold down the left mouse button and drag it over the portion you want to scan.
32
Page 39

Scanning
f If you need to access advanced se ttings, click Adjust the quality of the scanned picture (3) . Y ou c a n
choose Brightness, Contrast, Resolution and Picture Type from Advanced Properties. Click OK
after you choose a setting.
g Click the Scan button in th e Sc an dialog box .
The machine starts scanning the document.
®
This time only t he chosen are a of t he document ap pears in the Pa perPort
application window).
SE window (or your
2
Brother Scanner Utility 2
The Brot he r S can ner Util i ty is u sed to c onf ig ur e t he WI A sc ann er dri ve r fo r re sol u ti ons gre ate r tha n 120 0 dpi
and for changing the paper size. If you want to set Legal size as the defaul t size, use t his util ity to chan ge the
setting. You must restart your PC for the new settings to take effect.
Running the utility
You can run the utility by choosing Scanner Utility located in Start/All Programs/Brother/MFC-XXXX
menu (w here XXXX is your model nam e)/Scanner Settings.
Note
If you scan the document at a resolution of greater than 1200 dpi, the file size may dramatically increase.
Make sure that you have e nough memory and hard disk space for the size of the f ile you are tryin g to scan.
If you do not have enough memory or hard disk space then your PC may freeze as the document is
scann ed and you could lose your file.
33
Page 40

Scanning
Using the Scan key (For USB cable users) 2
Note
If you use the Scan key on a network, see Using the Scan key on page 71.
You can us e the (Scan) key on the control panel to scan documents d irectly into your word processing,
graphics or E-mail applications, to a folder on your PC or to a media card.
Before you can use the (Scan) key on the control panel, you have to install the Brother MFL-Pro
software suite and connect the machine to your PC. If you installed the MFL-Pro Suite from the included CD-
ROM, th en the correct driv ers and the Con t rolCenter3 sof t w are are install ed. Scanning us ing the
(Scan) key uses the configuration of the Device Button tab of the ControlCenter3 software. (See
SCAN on page 49.) For details about how to configure the scan settings and to launch the application of your
choice using the (Scan) key, see Usi ng C ontrolCente r3 on page 44.
Scan to E-mail 2
You can scan either a black and white or color document into your E-mail application as a file attachment.
You can change the (Scan) key configuration . (S ee E-mail on page 52.)
2
a Load your document.
b Press the (Scan) key.
c Press a or b to choose Scan to E-mail.
Press OK.
d Press Black Start or Color Start.
The machine starts scanning the document, creates a file attachment, and launches your E-mail
applicat ion, displaying th e new messag e w aiting to be add ressed.
34
Page 41

Scanning
Scan to Image 2
You can s c an a color picture int o y our graphics application for viewing and editing. You ca n c hange the
(Scan) key configuration . (S ee Image (example: Microsoft
®
Paint) on page 49.)
a Load your document.
b Press the (Scan) key.
c Press a or b to choose Scan to Image.
Press OK.
d Press Black Start or Color Start.
The machine starts the scanning process.
Scan to OCR 2
If your original document is text, you can use ScanSoft® Pape rPort® SE to scan the document and convert it
into a text file which can then be edited in your favorite word processing software. You can change the
2
(Scan) key configuration . (S ee OCR (Word Processing program) on page 51.)
a Load your document.
b Press the (Scan) key.
c Press a or b to choose Scan to OCR.
Press OK.
d Press Black Start or Color Start.
The machine starts the scanning process.
35
Page 42

Scanning
Scan to File 2
You can s can a black and whi te or a colo r documen t into your PC and s ave it as a file in the fold er you ch oose.
The file type and specific folder are based on the settings you have chosen in the Scan to File configuration
scree n of C ontrol C enter 3. (See File on page 53.)
a Load your document.
b Press the (Scan) key.
c Press a or b to choose Scan to File.
Press OK.
d Press Black Start or Color Start.
The machine starts the scanning process.
Note
If you want to change betwe en color an d black and whi te scannin g, choose col or or black and white in the
scan type option on the Device Bu tto n tab of the ControlCenter3 configuration screen. (See
File on page 53.)
2
Scan to Card (Not available for MFC-240C and MFC-3360C) 2
You can scan black and white and color documents directly to a media card. Black and white documents will
be stored in the PDF (*.PDF) or TIFF fi l e for mats (*.TIF). Color documents may be sto red in PDF (*.P DF) o r
JPEG (*.JPG) file formats. File names are based on the current date. For example, the fifth image scanned
on July 1 , 20 06 would be named 070106 05.PDF. You c an c hange the co lor, quality and f ile name.
Resolution
(For Monochrome Display
models)
B/W 200x100 dpi 200x100dpi B/W TIFF / PDF TIFF
B/W 200 dpi 200dpi B/W TIFF / PDF TIFF
Color 150 dpi 150dpi Color JPEG / PDF PDF
Color 300 dpi 300dpi Color JPEG / PDF PDF
Color 600 dpi 600dpi Color JPEG / PDF PDF
a Put a CompactFlash
Resolution
(For Color Display
models)
®1
, Memory Stick®2, Memory Stick Pro™, MultiMediaCard™, SecureDigital™ or
xD-Pictu re C ard™3 into your machine.
1
This product also suppor ts CompactFlash® type1.
2
MagicGate Memory Stick® and Memory Stick Pr o™ can be used, but any music data that is stored on the stick cannot be read.
3
This product supports xD-Picture Card™ Type M/Type H (Large Capacity).
File Format Option s Default File Format
36
Page 43

Scanning
CAUTION
DO NOT unplug the power cord or remove a CompactFlash®, Memory Stick®, Memory Stick Pro™,
MultiMediaCard™, SecureDi gital™ or xD-Pictu re Card™ from the machine whil e it is reading the card (the
PhotoCapture key is flashing). You could lose your data or damage the card.
If you take out the media card while the PhotoCapture key is flashing, you must restart your PC at once
before puttin g th e media ca r d bac k i n. If you put in ano ther med i a card b efor e the P C i s r e sta rt ed , the data
on it may be destroyed.
b Load your document.
c Press the (Scan) key.
d Press a or b to choose Scan to Card.
Press OK.
Do one of the following:
To change the quality, go to e.
To start scanning without changing any settings, press Black Start or Color Start.
e Press a or b to choose the quality you want.
Press OK.
Do one of the following:
2
To change the file type, go to f.
To start scanning without changing any settings, press Black Start or Color Start.
f Press a or b to choose the file type you want.
Press OK.
Do one of the following:
To change the file name, go to g.
To start scanning without changing any settings, press Black Start or Color Start.
Note
• If you choose color in the resolution setting, you cannot choose TIFF.
• If you choose black and white in the resolution setting, you cannot choose JPEG.
g The file name is se t automaticall y. However, you can creat a name of yo ur choice usi ng the dial pad. You
can only change the first 6 digits of the file name. (MFC models only)
Press OK.
Note
Press Stop/Exit or Clear/Back to delete the letters you entered.
h Press Black Start or Color Start to start scanning.
37
Page 44

Scanning
Changing the defau lt quality 2
(For MFC-5460CN and 5860CN) 2
a Press Menu, 4, 9, 1.
b Press a or b to choose B/W 200x100 dpi, B/W 200 dpi, Color 150 dpi, Color 300 dpi or
Color 600 dpi.
Press OK.
c Press Stop/Eixt.
2
(For DCP-130C)
a Press Menu.
b Press a or b to choose 2.PhotoCapture.
Press OK.
c Press a or b to choose 0.Scan to Card.
Press OK.
d Press a or b to choose 1.Quality.
Press OK.
e Press a or b to choose B/W 200x100 dpi, B/W 200 dpi, Color 150 dpi, Color 300 dpi or
Color 600 dpi.
Press OK.
f Press Stop/Exit.
Changing the default black & white file format 2
(For MFC-5460CN and 5860CN) 2
a Press Menu, 4, 9, 2.
b Press a or b to choose TIFF or PDF.
Press OK.
2
c Press Stop/Eixt.
(For DCP-130C)
a Press Menu.
b Press a or b to choose 2.PhotoCapture.
Press OK.
c Press a or b to choose 0.Scan to Card.
Press OK.
d Press a or b to choose 2.B/W File Type.
Press OK.
e Press a or b to choose TIFF or PDF.
Press OK.
f Press Stop/Exit.
2
38
Page 45

Scanning
Changing the default color file format 2
(For MFC-5460CN and 5860CN) 2
a Press Menu, 4, 9, 3.
b Press a or b to choose PDF or JPEG.
Press OK.
c Press Stop/Eixt.
2
(For DCP-130C)
a Press Menu.
b Press a or b to choose 2.PhotoCapture.
Press OK.
c Press a or b to choose 0.Scan to Card.
Press OK.
d Press a or b to choose 3.Color File Type.
Press OK.
e Press a or b to choose PDF or JPEG.
Press OK.
f Press Stop/Exit.
2
39
Page 46

Scanning
Using ScanSoft® PaperPort® SE with OCR 2
ScanSoft® Paper Port® SE for Brother is a document management application. You can use PaperPort® SE
to view s c anned doc um ents.
Not just viewing, PaperPort
your graphics and text documents. I t lets you mi x or ‘st ack’ documents o f diffe rent for mats for p rinting, f axing
or filing.
®
SE has a sophisticated yet easy- to-use fili ng system th at will help you organize
2
This chapter only introduce s the basi c functi ons of the software. For more deta ils, see the ScanSoft® user’s
guide.
To view the complete ScanSoft
®
PaperPort® SE User’s Guide, choose Help from PaperPort® SE menu b ar
and clic k User’s Guide.
When y ou install MFL- Pro Suite, Scan Soft
®
You can access ScanSoft
in Start/All Programs/ScanSoft
PaperPo rt® SE through the ScanSoft® PaperP ort® SE program group locat ed
®
PaperPort® SE on your PC.
®
PaperP ort® SE for Brot her is installed au t om atically.
40
Page 47

Scanning
Viewing items 2
ScanSoft® PaperP ort® SE gives several ways to view items:
Desktop View displays the item in the chosen folder with a thumbnai l (a small graphic tha t shows each item
in a desk to p or folder) or an ic on.
You can s ee bot h PaperPort
®
SE item s (MAX files) and non-PaperPort® SE items (files created usi ng ot her
applications).
Non-PaperPort
®
SE items inc lude an icon that i ndicates the application that w as us ed to create the it em.
Page View dis plays a c lose- up of a single page. You can open a PaperPort® SE item by double-clicking its
icon or thumbnail in Desktop View.
As long as y ou h ave th e p rop er ap pl ic at ion on yo ur PC to dis pl ay i t, y ou c an al so op en a n on -Pa pe rPo rt
®
SE
item with an appropriate application by double-clicking.
2
41
Page 48

Scanning
Organizing your items in folders 2
PaperPort® SE has an easy-to-use f iling system for organizing your items. The filing system consists of
®
folders and items that you choose to view in Desktop View. An item can be a PaperPort
SE item or a non-
PaperPort® SE item:
Folders are arranged in a ‘tree’ structure in the Folder View. You use this section to choose folders and
view their items in Desktop View.
You can s im ply drag and drop an item ont o a f older. When th e fo lder is highlight ed, release th e m ouse
button and the item is stored in that folder.
Folders can be ‘nested’—that is, stored in other folders.
®
When you double-click a folder, it s content s (both PaperPort
SE MAX files and non PaperPort® SE files)
appear on the Desktop.
You can also use Windows
®
Explorer to manage the folders and items shown in Desktop View.
Quick links to oth er app lica tio n s 2
ScanSoft® PaperP ort® SE automatically recognizes many other applications on your PC and creates a
‘working link’ to them.
The Send To Bar at the bottom of the Desktop view shows icons for those linked applications.
2
To use a link, drag an item onto one of the icons to start that application. A typical use of the Send To Bar is
to choose an item and then fax it.
This sample Send To Bar shows several applications with links to PaperPort
If Paper Port
®
SE does not automatically recognize one of the applications on your PC, you can manually
®
SE.
create a link using the New Program Link command.
ScanSoft® Paper P ort® SE with OCR lets you convert image text into text you can edit 2
ScanSoft® PaperP ort® SE can quickly convert the text on a ScanSoft® PaperPo rt® SE item (which is really
just a picture of the text) into text that you can edit with a word processing application.
PaperPort
PaperPort
item, or by us ing the Copy Text command, you can choose only a portion of the text to convert.
Dragging an item on to a w ord-processi ng link icon star ts PaperPort
can use yo ur own OCR app lic at ion.
®
SE uses the optical character recognition software (OCR), which comes with PaperPort® SE.
®
SE can use your preferred OCR application if it is already on your PC. You can convert the entire
®
SE’s built- in OCR application, or you
42
Page 49

Scanning
You can import items from other applications 2
As well as scanning items, you can bring items into PaperPort® SE in a variety of ways and convert them to
®
PaperPort
Print to the Desktop View from another application, such as Microsoft
Import files saved in other file formats, such as Windows
(TIFF).
SE (MAX) files in several different ways:
®
Excel.
®
Bitmap (BMP) or Tagged Image File Format
You can export items into othe r formats 2
You can export or save PaperPort® SE items in several popular file formats, such as BMP, JPEG, TIFF, PDF
or as a sel f- vi ew ing executable (.EXE) file.
Exporting an image file 2
2
a Click File, then Save As in the PaperPort
The Sav e ‘XXXXX’ as dialog box is dis playe d.
®
SE window .
b Choose the drive and folder where you want to store the file.
c Enter the new file name and choose the file type.
d Click Save to save your file, or Cancel to return to PaperPort
Uninstalling ScanSoft® PaperPort® SE with OCR 2
For Windows® 98/98SE and Windows® Me 2
®
SE withou t savi n g i t.
a Click the Start button, Settings, Control Panel, Add/Remove P rograms, and click the
Install/Uninstall tab.
b Choose PaperPort from the list and click Add/Remove.
For Windows® 2000 Professional 2
a Click the Start button, Settings, Control Panel, then Add/Remove Programs.
b Choose PaperPort from the list and click Change or Remove.
For Windows® XP 2
a Click the Start button, Control Panel, Add or Remove Programs, an d c lic k t he
Change or Remove Programs ico n.
b Choose PaperPort from the list and click Change or Remove.
43
Page 50

3
Note
The fea tu res available to yo u in ControlCen t er3 may vary de pending on the mo del number of yo ur
machine.
ControlCenter3 3
Using ControlCenter3 3
ControlCenter3 is a software utility that lets you quickly and easily access your often used applications. Using
Contro lC enter3 elimi nat es the need to manually launc h specific applications. ControlCente r3 has the
followi ng operations :
a Scan directly to a file, E-mail, word processor or graphics application of your choice. (1)
b Access to the Custom Scan settings. Custom Scan buttons let you configure a button to meet your own
appl ication needs . (2)
3
c Access to the advanced features of PhotoCapture Center
®
. (3)
d Access the Copy features available via your PC. (4)
e Access the ‘PC-FAX’ applications available for your device. (5)
f Access the settings available to configure your device. (6)
g You can choose which machine ControlCenter3 will connect with from the Model drop-dow n list. (7)
h You can also open the configuration window for each function and a link to the Brother Solutions
Center by clicking the Configuration button. (8)
44
Page 51

ControlCenter3
Modern 3
7
2
1,
3
8
4
5
6
Classic 3
7
1
2
3
4
5
6
8
Note
• To be a ble to choose another connec t ed model from the Model drop-down list, you must have the
MFL-Pro Suite Software installed on your PC for that model.
3
• For the Modern us er inte rface , you need to insta ll Mac romedi a Flash Pl ayer 8 or greate r. If you do not hav e
Flash P lay er 8 or greater, yo u w ill be prompte d s o y ou can down load the latest Fl as h Player.
• The Modern user interface is not supported in Windows® XP Profes s ional x64 Edition.
45
Page 52

ControlCenter3
Switching the user interface 3
You can choose the Modern or Classic user interface for ControlCenter3.
a To switch the user interface, click Configuration button and select SETUP then SKIN SELECT.
b From the SKIN SELECT dialog, you can choose your preferred user interface.
Turning the Aut oLoad feature off 3
Once yo u s t art C ontrolCenter3 from the Start m enu, the icon w ill appear on the ta skt ray. You can open the
Contro lC enter3 wind ow by double-click ing the icon.
3
If you do not want ControlCenter3 to run automatically each time you start your PC;
a Right-click the ControlCenter3 icon in the tasktray , and choose Preferences.
The ControlCenter3 preference window appears.
b Uncheck Start ControlCenter on computer startup.
c Click OK to close the window.
46
Page 53

ControlCenter3
SCAN 3
There are four scan options: Scan to Image, Scan to OCR, Scan to E-mail and Scan to File.
Image (Default: Microsoft
Lets you s c an a page direc tly into any grap hic v iew er/editor a pplication. You ca n c hoose the de s tin at ion
application, such as Microsoft
editing application on y our PC.
OCR (Default: Microsoft
Lets you s c an a page or doc ument, automatically run t he OCR applica ti on and put text (not a graphic
image) into a word pro c es s ing application. You can choo s e t he target word pr oc es s ing applicat ion, such
®
as Microsoft
your PC.
E-mail (Default: your default E-mail software)
Lets you scan a page or document directly into an E-mail application as a standard attachment. You can
choose the file type and resolution for the attachment.
File
NotePad, Microsoft® Word, Corel® WordPerfect® or any word processing application on
®
Paint)
®
Paint, Cor el® Paint Shop Pro®, Adobe® PhotoS hop®, or an y ki nd of i mage
®
NotePad)
3
Lets you scan directly to a disk file. You can change the file type and destination folder, as needed.
Contro lC enter3 gives you the ability to co nf igure the hard w are Scan key on your machine and th e
Contr olCe nter3 S oft ware butto n for each scan featu re. To conf igur e the har dwar e Scan key on your machine
choose th e Device Button tab in the config uration menu fo r each of the S CAN buttons. To configure the
Software button in ControlCenter3 choose the Software Button tab in the configuration menu for each of the
SCAN buttons.
CUSTOM SCAN 3
You can configure the button name and settings for each of these buttons to meet your specific needs by
right-c lic k ing a button an d fo llowing the configuration m enus.
PHOTOCAPTURE (USB only) (Not available for MFC-3360C) 3
There are three ways of ac c es s ing data stored on a media card . These access me t hods are only a v ailable
when the machine is connected to the PC by a USB cable.
Open PCC Folder
Lets you see the files and folders that are on the media card. (See For USB cable users on page 94.)
Copy From PCC
Lets you copy the fi les o n t he medi a c ard to a sp ec if ic fo lder o n your PC. Yo u ca n choose th e desti nati o n
folder.
Copy To Application
Lets you copy the files on the media card directly to a specific application.
47
Page 54

ControlCenter3
COPY 3
Lets you use the PC and any printer driv er for enhanced copy oper at ions. You can s c an a page on the
machine and print copies using any of the features of the machine’s printer driver, or you can direct the copy
output to any standard printer driver installed on the PC including network printers.
You can configure your preferred settings on up to four buttons.
PC-FAX (MFC models only) 3
These but t ons are for sending or receiving faxes usin g t he Brother PC-F AX applicati on.
Send
Lets you s c an a page or do c um ent and auto m at ic ally send the im age as a fax fro m th e PC using the
Brother PC-FAX software. (S ee PC-FAX sending on page 76.)
Receive (Not available for MFC-240C and MFC-3360C)
By clicking this button, th e PC-FAX receive software is activated and your PC starts receiving fax data fro m
your Brother machine. After activating PC-FAX option, the icon name changes to View Received which
when clicked will open an application and display the received faxes. Before using the PC-FAX Receive
option, you must select the PC- FAX Receive opti o n fr o m the contr ol p anel men u of the Brothe r machin e.
(See PC-FAX rec eiving (Not av ailable for MFC-240C and M F C -3360C) on page 89.)
3
Address Book
Lets you open the Brother PC-FAX address book. (See Brother Address Book on page 82.)
Setup
Lets you configure the PC-FAX sending settings. (See Sendi n g setup on page 78.)
DEVICE SETTING 3
You can configure the machine settings or check ink levels.
Remote Setup (Not available for DCP models and MFC-240C)
Lets you open the Remote Setup Program. (See Remote Setup on page 74.)
Quick-Dial (Not availab le f or DCP models and MFC-240C)
Lets you open the Set Quick-Dial wi ndow of Remo te Setup. (See Remote Setup on page 74.)
Ink Level
Lets you check the ink status.
User’s Guide
Lets you view the Software User’s Guide and the Network User’s Guide.
48
Page 55

ControlCenter3
SCAN 3
There are four scan options: Scan to Image, Scan to OCR, Scan to E-mail and Scan to File applica ti ons .
Note
You can configure your machine’s Scan key for each ControlCenter3 button in the Device Button tab.
3
Image (example: Microsoft® Paint) 3
The Scan to Image feature lets you scan an image directly into your graphics application for image editing.
To change the default settings, right-click the Image button, click ControlCenter Configuration and cl ick the
Software Button tab .
If you want to scan and then crop a portion of a page after pre-scanning the document, check the Show
Scanner Interface bo x .
49
Page 56

ControlCenter3
Change the other set t ings, if needed.
To change the destination application, choose the proper application from the Target Application drop-down
list. You can add an application to the list by clicking the Add button.
Enter the Application Name (up to 30 characters) and the Application Location. You can also find the
application location by clicking the icon. Choose File Type from the drop-down list.
You can delete an application that you have added by clicking the Delete button in th e Software Button tab.
3
Note
This func t ion is also availa ble for Scan to E-m ail and Scan t o OCR. The wind ow m ay vary depending on
the function.
50
Page 57

ControlCenter3
OCR (Word Processing program) 3
Scan to OCR scans a document and converts it into text. This text can be edited using your favorite word
proces s ing software.
To configure Scan to OCR, right-click the OCR button, click ControlCenter Configuration and click the
Software Button tab .
3
To chan ge the word proc es s ing applicati on, choose th e destination word processing application from the
Target Application drop-down list. You can add an application to the list by clicking the Add button. To
delete an application, click the Delete button in the Software Bu tto n tab.
If you want to scan and then crop a portion of a page after pre-scanning the document, check the Show
Scanner Interface bo x .
You can also configure the other settings for Scan to OCR.
51
Page 58

ControlCenter3
E-mail 3
Scan to E- mail lets you scan a document to your default E-mail application, so you can send the scanned
job as an at t achment . To c hange t he defa ult E- m ail applic at ion or attachment fil e type, right -cli c k t he E-mail
button, click ControlCenter Configurati on and click the Software Button tab.
3
To chan ge the E-mail a pplication, choose your pre fe rred E-mail app lic at ion from the E-mail Application
1
drop-d ow n list. You can add an application to the list by c lic k ing the Add button
. To delete an applicat ion,
click the Delete button.
1
When you fir st star t Cont rolC enter 3 a defa ult lis t of com patibl e E-mai l appl icat ions will ap pear in the drop- down list. If you are ha ving t roubl e using
a custom application with C ontrolCenter 3 you should choose an application from the list.
You can also change the other settings used to create the file attachments.
If you want to scan and then crop a portion of a page after pre-scanning the document, check the Show
Scanner Interface bo x .
File attachments 3
You can choose from the following list of file types when saving to a folder.
File Type 3
Choose from the drop-down list the type of file you want the scanned images to be saved in.
Windows Bitmap (*.bmp)
JPEG (*.jpg)
TIFF - Uncompressed (*.tif)
TIFF - Compressed (*.tif)
TIFF Multi-Page - Uncompressed (*.tif)
TIFF Multi-Page - Compressed (*.tif)
Portable Network Graphics (*.png)
PDF (*.pdf)
52
Page 59

ControlCenter3
File 3
The Scan to File button lets you scan an image to a folder on your hard disk in one of the file types shown
in the file att achment li st. To configure the file type and folder, r ight-cl ick t he File button, click ControlCenter
Configuration and click the Software Button tab.
3
Choose the file type for t he saved image from the File Type drop-down list. You can save the file to the defa ult
folder shown in the Destination Folder, or choose your preferred folder by clicking the icon.
To display where the sca nned image is saved when sc anning is f inished , check the Show Folder box. To let
you specify the destination of the scanned image every time you scan, check the Show Save as Window
box.
If you want to scan and then crop a portion of a page after pre-scanning the document, check the Show
Scanner Interface bo x .
53
Page 60

ControlCenter3
CUSTOM SCAN 3
The Custom Scan option lets you create your own scan options.
For Mod ern interface us ers, place the m ouse pointe r ov er the d and click Custom.
To configure a button, r ight-click the ap propriate but to n and click ControlCenter Configuration. There are
four options: Scan to Image, Scan to OCR, Scan to E-mail and Scan to File.
Scan to Image
Lets you scan a page directly into any image viewer/editor software. You can choose any image editor
applicat ion on your PC.
Scan to OCR
Converts scanned documents into editable text files. You can choose the destination application for the
editable text.
Scan to E-mail
Attaches the scanned im ages to an E-m ail message. You ca n choose any E -mail applic ation installe d on
your PC. You can also choose the file attachment type and create a quick send list of E-mail addresses
chosen from your E-mail address book.
Scan to File
3
Lets you save a scanned image to any folder o n a local or n etwork har d disk. You can also choose t he file
type to be used.
Modern
Classic 3
3
54
Page 61

ControlCenter3
Customizing a user-defined button 3
To configure a button, right-click the button, then click the ControlCenter Configuration button to see the
configuration window.
Scan to Image 3
General tab
To crea te th e button name, enter a name in th e Pl ease enter a n am e fo r th e C u stom Butto n text field
(up to 30 characters).
Choose the type of scan from the Scan Action field.
Settings tab
Choose the Target Application, File Type, Resolution, Scan Type, Document Size, Show Scanner
Interface, Brightness and Contrast settings.
3
55
Page 62

ControlCenter3
Scan to OCR 3
General tab
To crea te th e button name, enter a name in th e Pl ease enter a n am e fo r th e C u stom Butto n text field
(up to 30 characters).
Choose the type of scan from the Scan Action field.
3
Settings tab
Choose the Target Application, File Type, OCR Software, OCR Language, Resolution, Scan Type,
Document Size, Show Scanner Interface, Brightness and Contrast settings.
56
Page 63

ControlCenter3
Scan to E-mail 3
General tab
To crea te th e button name, enter a name in th e Pl ease enter a n am e fo r th e C u stom Butto n text field
(up to 30 characters).
Choose the type of scan from the Scan Action field.
3
Settings tab
Choose the E-mail Application, File Type, Resolution, Scan Type, Document Size, Show Scanner
Interface, Brightness and Contrast settings.
57
Page 64

ControlCenter3
Scan to File 3
General tab
To crea te th e button name, enter a name in th e Pl ease enter a n am e fo r th e C u stom Butto n text field
(up to 30 characters).
Choose the type of scan from the Scan Action field.
3
Settings tab
Choose the file format fro m the File Type drop-down list. Save the file to the default folder which is shown
in the Destination Folder box or choose your preferred folder by clicking the icon. Check
Show Folder to show where the scanned image is saved after scanning. Check S how Save As Window
to specify the destination of the scanned image after every scan.
Choose the Resolution, Scan Type, Document Size, Show Scanner Interface, Brightness and
Contrast settings.
58
Page 65

ControlCenter3
PHOTOCAPTURE (USB only) (Not available for MFC-3360C) 3
These buttons can be used to open or copy files and folders from a media card installed in the machine.
3
Open PCC Folder (PCC: PhotoC apture Center®) 3
The Open PCC Folder bu tton starts Windows® Explorer and displays f iles and folders on t he media card .
Copy From PCC 3
The Copy From PCC button lets you copy files o n a media card to a fo lder on your hard disk. To ch ange the
destination folder or other settings, right-click the button, click ControlCenter Configuration and c hoose
your pref erred settings f or f ile copying.
59
Page 66

ControlCenter3
Setting the Copy Folder 3
Create a new folder based on the PCC files Date or Month
The def ault setting is Date. A folder is created with a name derived from the date the original file was
created. The file is then saved into this folder. For example, a file created on the media card on Oct.08,
2006 will be saved into a fo lder named 10082006.
Retain PCC folder structure w hen copying
The copy is saved using the same fo lder str ucture as t he origi nal, no new fol ders ar e create d. If you check
Create date folder before copying, a f older based o n the current date is created. The co py is then saved
into this folder.
Copy To Applicatio n 3
The Copy To Application button lets you open files from a specific application after copying to the folder of
that application. To change the folder settings, right-click the button and choose your preferred settings for
file copying.
3
Setting the Copy Folder 3
Create a new folder based on the PCC files Date or Month
The def ault setting is Date. A copy folder is created with a name based on the date that the original file
was created. The copy is then saved into this folder. For example, the copy of an original file created on
Oct.8, 2006 will be saved into a folder named 10082006.
Retain PCC folder structure w hen copying
The copy is saved using the same fo lder str ucture as t he origi nal, no new fol ders ar e create d. If you check
Create date folder before copying, a f older based o n the current date is created. The co py is then saved
into this folder.
60
Page 67

ControlCenter3
COPY 3
The Copy1 to Copy4 buttons can be customized to let you use advanced copy functions such as N in 1
printing.
To use the Copy buttons, configu r e t he printer driver by right-clic k ing the button an d c hoosing the
ControlCenter Configuration.
3
Enter a name in Please enter a name for the Copy Button text field (up to 30 characters) and choose
Copy Ratio.
Choose the Resolution, Scan Type, Document Size, Show Scanner Interface, Brightness and Contrast
settings to be used.
Before finishing the Copy button configuration, set the Printer Name and cli c k t he Print Options button to
display the printer driver settings.
61
Page 68

Note
• You m us t co nf igure each of th e c op y b ut t ons before they c an be used.
•The Print O ptions screen will vary dep ending on the m odel of printe r yo u have chosen .
ControlCenter3
3
62
Page 69

ControlCenter3
PC-FAX (MFC models only) 3
The PC-FAX option lets you send and receive faxes. You can also configure the address book and change
some general machine settings.
3
Send 3
The Send button l ets you scan a d ocument and auto maticall y send the i mage as a fax fr om the PC using the
Brother PC-FAX software. (See PC-FAX sending on page 76.)
To change the Send settings, right-cl ick the Send button and click ControlCenter Configuration. You can
change the Resolution, Scan Ty pe, Document Size, Show Scanner Interface, Brightness and Contrast
settings.
63
Page 70

ControlCenter3
Receive/View Received (Not available for MFC-240C and MFC-3360C) 3
The Brother PC-FAX Receiving software option lets you view and store your faxes on your PC. It is
automatically installed when you install the MFL-Pro Suite.
By clicki n g the Receive button, the PC-FAX receiving is activated and starts to receive fax data from your
Brother machine. Bef ore you use the PC-FAX Re ceive fu nction, yo u must se lect the P C-FAX Recei ve option
from the control panel menu of the Brother machine. (See Running the PC-FAX Receivi n g softwa r e on you r
PC on page 91.)
To configure the PC-FAX Receive software, see Setting up your PC on page 91.
3
When th e PC-FAX receiving softwa re is running, you c an open the view er application w it h th e
®
View Received butt on. (PaperPort
SE)
Note
You can also activate the PC-FAX receiving software from the start menu. (See Running t he PC-FAX
Receiving software on your PC on page 91.)
64
Page 71

ControlCenter3
Address Book 3
The Address Book button lets you add, amend or delete contacts from your address book. To edit this
button, click the Address Book button to open th e dialog box. (S ee Br other Ad dress Book on page 82.)
Setup 3
3
By clicki n g the Setup button, you c an configure the us er settings of t he PC-FAX applic ation.
(See Setting up us er information on page 77.)
65
Page 72

ControlCenter3
DEVICE SETTING 3
In the Device Settings option, you can configure the machine settings or check ink levels.
Remote Setup (Not available for DCP models and MFC-240C) 3
3
The Remote Setup button lets yo u open the Remote Setup P rogram wind ow to c onf igure the mach ine
setting m enus.
Note
For deta ils , se e Re mote Setup on page 74.
66
Page 73

ControlCenter3
Quick-Dial (Not available for DCP models and MFC-240C) 3
The Quick-Dial button lets you open the Set Quick-Dial window in the Remote Setup Program. You can then
easily register or change the Quick-Dial numbers from your PC.
3
Ink Level 3
The Ink Level button opens the S tatus Monitor window, which displays the ink level for each cartridge.
User’s Guide 3
The User’s Guide button lets you vi ew t he Software U s er’s Guide and the Ne t w ork U s er’s Guide in H T M L
format.
67
Page 74

Network Scanning
4
To use the machine as a network scanner, the machine must be conf igured with a TCP/IP address. Y ou can
set or change the addre s s se ttings from the co nt rol panel (Se e Con tr ol Panel Setup in the Network User’s
Guide) or by using the BRAdmin Professional software. If you installed the machine following the instructions
for a network user in the Quick Setup Guide then the machine should already be configured for your network.
Note
• For network scanning, a maximum of 25 clients can be connected to one machine on a network. For
example, if 30 clients try to connect at a time, 5 of those clients will not be shown on the LCD.
• If your PC is protecte d b y a fi r ewall a n d is u nable to scan, you may need to co nfig ure th e f ire wall se tti ngs
to allow communication through port number 137 and 54925. Visit the Brother Solutions Center
(http://solutions.brother.com
(For models with built-in network support)
) for more in form ation.
Before using Network Scanning 4
Network license 4
4
4
This product includes a PC license for up to 2 Users.
®
This license supports the install a ti on of the MFL-Pro Software Suit e inclu ding ScanSof t
up to 2 PCs on the network.
If you want to use more than 2 PCs with ScanSoft
pack which is a multiple PC license agreement pack for up to 5 additional users. To buy the NL-5 pack,
conta c t yo ur Brot her dealer.
®
PaperPo rt® SE installed, please buy the Brother NL-5
PaperP ort® SE on
68
Page 75

Network Scanning (For models with built-in networ k support)
Configuring Network Scanning 4
If you are using a different machine than the one that was originally registered to your PC during the
installation of MFL-Pro Suite software (see the Qui ck Setup Gu i de), follow the steps below.
a For Windows
®
XP, click the Start button, Control Panel, Printers and Other Hardware, then
Scanners and Cameras (or Control Panel, Scanners and Cameras).
®
For Windows
98/Me/2000, click the Start button, Control Panel, then Scanners and Cameras.
b Right-click the Scanner Device icon and choose Properties.
The Network Scanner Properties dialog box appears.
c Click the Network Setting tab and choose the appropriate connection method.
4
Specifyyourmachinebyaddress
Enter IP address of the machine in IP Address, and then click Apply.
69
Page 76

Network Scanning (For models with built-in networ k support)
Specifyyourmachinebyname 4
1 Enter the machine node name in Node Name, or click Browse and c hoose the proper devi c e y ou
want to us e.
2 Click Apply.
d Click the Scan To Button tab and enter your PC name in the Display Na m e field. The machine’s LCD
displays the name you enter. The default setting is your PC name. You can enter any name that you like.
4
e If you want to avoid rece i ving unwante d d ocuments, enter a 4-digit P IN number i n the Pin number and
Retype P in number field. To send data to a PC protected by a PIN number, the LCD prompts you to
enter the PIN number before the document can be scanned and sent to the machine. (See Using the
Scan key on page 71.)
70
Page 77

Network Scanning (For models with built-in networ k support)
Using the Scan key 4
Note
If you are c onnected using USB, see Using the Scan key (For USB cable users) on page 34.
Scan to E-mail (PC) 4
When you choose Scan to E-mail (PC) your document will be scanned and sent directly to the PC you
designated on your net w ork. The Con tr olC enter3 soft w are will launch th e default E-mail applicatio n on the
designated PC . You can scan and s end a black and w hite o r c olor document from t he PC as an attac hment.
You can change the (Scan) configuration. (S ee E-mail on page 52.)
a Load your document.
b Press the (Scan) key.
c Press a or b to choose Scan to E-mail.
Press OK.
d Press a or b to choose the destination PC y ou want to use fo r E-m ailing your document.
Press OK.
If the LCD prompts you to enter a PIN number, enter the 4-digit PIN number for the destination PC on
the control panel.
Press OK.
e Press Black Start or Color Start.
The machine starts the scanning process.
4
71
Page 78

Network Scanning (For models with built-in networ k support)
Scan to Image 4
When you choose Scan to Image, your document will be scanned and sent directly to the PC you designated
on your network. The ControlCenter3 software will launch the default graphics application on the designated
®
PC. You can change the Scan configuration. (See Image (example: Microsoft
Paint)on page 49.)
a Load your document.
b Press the (Scan) key.
c Press a or b to choose Scan to Image.
Press OK.
d Press a or b to choose the destination PC you want to send to.
Press OK.
If the LCD prompts you to enter a PIN number, enter the 4-digit PIN number for the destination PC on
the control panel.
Press OK.
e Press Black Start or Color Start.
The machine starts the scanning process.
Scan to OCR 4
When you choose Scan to OCR, your document will be scanned and sent directly to the PC you designated
®
on your network. The ControlCenter3 software will launch the ScanSoft
and conv ert your docume nt in to tex t tha t can be vi ewed a nd edit ed f rom a wo rd pr ocess ing a ppli cat ion on t he
design ated PC. You c an c hange the Scan confi gurat ion. (S ee OCR (Wor d Process ing pro gram) on page 51.)
PaperPort® SE with OCR so ftwa re
a Load your document.
b Press the (Scan) key.
4
c Press a or b to choose Scan to OCR.
Press OK.
d Press a or b to choose the destination PC you want to send to.
Press OK.
If the LCD prompts you to enter a PIN number, enter the 4-digit PIN number for the destination PC on
the control panel.
Press OK.
e Press Black Start or Color Start.
The machine starts the scanning process.
72
Page 79

Network Scanning (For models with built-in networ k support)
Scan to File 4
When y ou c hoose Scan to File, you can sca n a black and white or color doc um ent and send it directly to a
PC you designate on your network. The file will be saved in the folder and file format that you have configured
in Contr olC enter3. Yo u c an c hange the Scan configuration. (See File on page 53.)
a Load your document.
b Press the (Scan) key.
c Press a or b to choose Scan to File.
Press OK.
d Press a or b to choose the destination PC you want to send to.
Press OK.
If the LCD prompts you to enter a PIN number, enter the 4-digit PIN number for the destination PC on
the control panel.
Press OK.
e Press Black Start or Color Start.
The machine starts the scanning process.
Note
If you want the scanned data in color, choose color in scan type on the Device Button tab of the
ControlCenter3 configuration. If you want the scanned data in black and white, choose black and white in
scan type on the Device Button tab of the Cont rolCenter3 co nf iguration. (S ee SCAN on page 49.)
4
73
Page 80

Remote Setup
5
(Not available for DCP models and
MFC-240C)
Remote Setup 5
The Remote Setup program lets you configure many machine settings from a Windows® applicatio n. W hen
you start th is application, t he settings on yo ur m achine will b e downloaded aut omatically to y our PC and
displayed on your PC screen. If you change the settings, you can upload them directly to the machine.
Click the Start button, All Programs, Brother, MFC-XXXX, and Remote Setup.
Note
• If you a re us ing the MFC -5460CN or MF C -5860CN wit h a network connection, you w ill be prompted to
enter a passwor d.
The default password is "access".
• For other models o r if you are connect ed using USB , n o password is requ ired by defaul t.
5
5
OK
Lets you start uploading data to the machi ne and exit the Remot e Setup appl icati o n. If an error message
is displayed, enter the correct data again and then click OK.
Cancel
Lets you exit the Remote Setup application without uploading data to the machine.
Apply
Lets you upload data to the machine without exiting the Remote Setup application.
74
Page 81

Remote Setup (Not availabl e for DCP models and MFC-240C)
Print
Lets you print the chosen items on the machine. You cannot print the data until it is uploaded to the
machine. Click Apply to upload the new data to th e m ac hine and then click Print.
Export
Lets you save the current configuration settings to a file.
Import
Lets you read the settings from a file.
Note
• You ca n use the Export and Import buttons to save several sets of settings for your machine.
• To save all your settings, highlight MFC-XXXX at the top of the settings list then click Export.
• To save a single setting or a group of settings, highlight each setting or function heading (for example, to
choose all fax settings highlight Fax) from the setting list then click Export.
• If you are using a different machine to the one that was originally registered to your PC during the
installation of MFL-Pro Suite (see the Quick Setup Guide), need to specify the new machine. Open the
proper ti es of th e R emote Setup Program and choose the new machine . To open the Properties of
Remote Setup Program, cli ck the Start button, All Programs, Brother, MFC-XXXX, and Remote Setup.
• If your PC is protected by a firewall, and is unable to use Remote Setup, you may need to configure the
firewall settings to allow communication through port number 137. Visit the Brother Solutions Center
(http://solutions.brother.com
) for more in form ation.
5
75
Page 82

Brother PC-FAX Software
6
Note
If you are using Windows
(MFC models only)
®
XP or W indows® 2000 Professional , you must log on wi th Administrator r i ghts.
PC-FAX sending 6
The Brot her PC-FAX fe at ure lets you use y our PC send an application or doc ument file as a standard fax.
You can send a file created in any ap pli ca ti on on yo ur PC as a PC- FAX. You ca n eve n atta ch a co ver pa g e.
All you have to do is set up the receiving parties as members or groups in your PC-FAX Address Book or
simply enter the destination addres s or fax number into the user interface. You c an use the Addr es s Bo ok
Search feature to quickly find members to send to.
The Brot her PC-FAX fe at ure lets you use y our PC to send a fa x fr om w it hin your Wind ow s application . The
PC-FA X s of t w are includes a co nv enient address book allowing you to qu ic kl y fin d and enter new fa x
numbers.
For the latest information and updates on the Brother PC-FAX feature, visit http://solutions.brother.com
Note
• The PC-FAX software can only send Black & White fax documents.
.
6
6
• If you r PC is protected by a fi rewall and is unab le to use PC -F AX send, you may nee d t o c onfig ure the
firewall settings to allow communication through port number 137. Visit the Brother Solutions Center
(http://solutions.brother.com
) for more in form ation.
76
Page 83

Brother PC-FAX Software (MFC models only)
Setting up user information 6
Note
You can access User Information from the FAX Sending dialog box by clicking the icon.
(See Sending a file as a PC-FAX using the Facsimile style user interface on page 86.)
a Click the Start button, All Programs, Brother, MFC-XXXX (where XXXX is your model name), PC-FAX
Sending, then PC-FAX Setup.
The Brother P C-FAX Setup dialog box appears:
6
b Enter this information to create the fax header and cover page.
c Click OK to save the User Information.
Note
®
If you are us ing Window s
®
Windows
account.
2000 and X P, y ou c an set up the User Information separately for each
77
Page 84

Brother PC-FAX Software (MFC models only)
Sendi n g set up 6
From the Brother PC-FAX Setup dialog box, click the Sending tab to display the screen below.
Outside line access
Enter a number to access an outside line here. This is sometimes required by local PBX telephone
systems (for example, dialling 9 to get an outside line in y our office).
6
Include he ader
To add header information to the top of the fax pages, check Include header.
User interface
Choose the user interface from two choices: Simple style or Facsimile style.
Simple style
6
Facsimile style 6
78
Page 85

Brother PC-FAX Software (MFC models only)
Setting up a cover page 6
From the PC-FAX dialog box, click the icon to access the PC-Fax Cover Page setup screen.
The Brother P C-FAX Cover Page Setup dialog box appears :
6
Entering cover page information 6
Note
If you are sendi ng a fax to more than on e recipient, the recipie nt informatio n will not b e printed o n the cover
page.
To
Choose the sender information you want to add to the cover page.
From
Choose the recipient information you want to add to the cover page.
Comment
Enter the comment you want to add to the cover page.
Form
Choose the cover page format you want to use.
Cover page title
You can put a bitmap file, such as your company logo, on the cover page.
Use the browse button to choose the BMP file, and then choose the alignment style.
Count cover page
When Count cover page is checked, t he c ov er page will be included in t he page numbe ring. When
Count cover page is unc hecked, th e c over page will not be included.
79
Page 86

Brother PC-FAX Software (MFC models only)
Address Book 6
If Outlook or Outlook Express is installed on your PC, you can choose in the Address Book which address
book t o use f or PC- F AX send ing. There are t hree t y pes: Brothe r Address Book, Outloo k or Out look E x press.
For the address book file, you must enter the path and file name of the database file which contains the
address book informa tio n.
Click the Browse button to choose the database file.
6
If you choose Outlook or Outlook Express, you can use the Outlook or Outlook Express Address Book by
clicking the Address Book but t on in the FAX Sending dialog box .
Outlook Express Address Book
Note
• To use your Outlook Address Book, you must select Microsoft Outlook 2000, 2002 or 2003 as your default
e-mail application.
• If your Outlook address book is password protected, you must have Outlook running before using the
Brother PC-FAX utility. For more information, visit http://solutions.brother.com
.
6
80
Page 87

Brother PC-FAX Software (MFC models only)
Speed Dial setup 6
From the Brother PC-FAX Setup dialog box, cl ick the Speed Dial tab. (To use this feature, you must choose
the Facsimile style user interface.)
6
You can register a member or group on each of the ten Speed Dial buttons.
Registering an address in a Speed Dial button
a Click the Speed Dial button you want to program.
b Click the member or group you want to store on the Speed Dial button.
c Click Add >> .
Clearing a Speed Dial button
a Click the Speed Dial button you want to clear.
b Click Clear.
6
6
81
Page 88

Brother PC-FAX Software (MFC models only)
Brother Address Book 6
a Click the Start button, All Programs, Brother, MFC-XXXX (where XXXX is your model name), PC-FAX
sending, then PC-FAX Address Book.
The Brother Address Book dialog box appears:
Setting up a member in the Address Book 6
6
In the Brother Address Book dialog box you c an add, edit and delete members and groups.
a In the Add res s Book dialog bo x, c lic k th e icon to add a member.
The Brother Address Book Member Setup dialog box appears:
b In th e M em ber Set up dialog box , enter t he member’s i nf ormation. Name is a required field. Click OK to
save the information.
82
Page 89

Brother PC-FAX Software (MFC models only)
Setti ng up a gr ou p fo r br oa d cas tin g 6
You can create a group to send the same PC-FAX to several recipients at one time.
a In the Brother Address Book dialog box, click the icon to create a Group.
The Brother Address Book Group Setup dialog box appears:
b Enter the nam e of the new gro up in the Group Name field.
6
c In the Available Names box, choose each member to be included in the group, and then click Add >>.
Membe rs added to the group appear in the Group Members box.
d After all the m embers you w ant have bee n added, click OK.
Note
You can have up to 50 members in a group.
Editing member information 6
a Choose the member or group you want to edit.
b Click the e dit icon .
c Change the member or group information.
d Click OK.
Deleting a member or group 6
a Choose the member or group you want to delete.
b Click the d elete ic on.
c When the co nf irmation dia log box appears, c lic k OK.
83
Page 90

Brother PC-FAX Software (MFC models only)
Exporting the Address Book 6
You can export the whole Address Book to an ASCII text file (*.csv ). You can also choose and create a Vcard
that can be attached to a member’s outgoing E-mail. (A Vcard is an electronic business card that contains
the sen der’s contact information.)
Exporting the whole current Address Book 6
Note
If you are creating a Vcard, you must first choose the member.
If you choose Vcard in a, Save as type: will be Vcard (*.vcf).
a Do one of the following:
From the Address Book, click File, Export, then Text.
Click Vcard and go to e.
b From the Available Item s column, choose the data fields you want to export and then click Add >>.
Note
Choos e t he items in the or der you want them lis t ed.
c If you are expor ti ng to a n ASCI I fi l e, ch oose Tab or Comma from Divide Character. This chooses Tab
or Comma to separate the data fields.
d Click OK to save the data.
6
e Enter the name of the file, and then click Save.
84
Page 91

Brother PC-FAX Software (MFC models only)
Importing to t h e Address Book 6
You can import ASCII text files (*.csv) or Vcards (electronic business cards) into your Address Book.
Importing an ASCII text file 6
a Do one of the following:
From the Address Book, click File, Import, then Text.
Click Vcard and go to e.
6
b From the Available Item s column choose the data fields you want to import, and click Add >>.
Note
From the Available Items list choose the fields in the same order they are listed in the import text file.
c Choose Tab or Comma based on th e f ile f ormat you are importing from Divide Cha racter.
d Click OK to import the data.
e Enter the name of the file, and then click Open.
Note
If you chose a text file in a, Files of t ype: will be T ext file (*.csv).
85
Page 92

Brother PC-FAX Software (MFC models only)
Sending a file as a PC-FAX using the Facsimile style user interface 6
a Create a file in any applic at ion on your PC.
b Click File, then Print.
The Print dialog box appears:
c Choose Brother P C-FAX as your printer, and then click Print.
The Facsimile style user interface appears:
6
Note
If the Simple style user interface appears, change the user interface selection setting. (See Sending
setup on page 78.)
d Enter a fax number using any of the following methods:
Use the dial pad t o enter the number .
Click any of the 10 Speed-Dial buttons.
Click the Address Book button, and then choose a member or group from the Address Book.
If you make a mistake, click Clear to delete all th e entries.
e To include a cover page, click Cover Page On.
Note
You can also click the cover page icon to create or edit a cover page.
86
Page 93

Brother PC-FAX Software (MFC models only)
f Click Start to send the fax.
Note
• If you want to cancel the fax, click Stop.
• If you want to redial a number, click Redial to scroll through the last five fax numbers, choos e a number,
and then click Start.
Sending a file as a PC-FAX using the Simple style user interface 6
a Create a file in any applic at ion on your PC.
b Click File, then Print.
The Print dialog box appears:
6
c Choose Brother P C-FAX as your printer, and then click Print.
The Simple style user interface appears:
Note
If the Facsimile style user interface appears, change the user interface selection setting. (See Sending
setup on page 78.)
d Enter the fax number using any of the following methods:
Enter the fax number in the To: field.
Click the To: button, and then choose destination fax numbers from the Address Book.
If you make a mistake, click Clear to delete all the entries.
87
Page 94

e To send a cover page and note, check Cover Page On.
Note
You can also click the icon to create or edit a cover page.
f Click the send icon.
Note
If you want to cancel the fax, click the cancel icon.
Brother PC-FAX Software (MFC models only)
6
88
Page 95

Brother PC-FAX Software (MFC models only)
PC-FAX receiving (Not available for MFC-240C and MFC-3360C) 6
Note
• For Wi ndow s
to use PC-FAX receiving.
• To use PC-FAX receiving with a Windows
PC-FAX receiving program must be excluded fr om the fi rewall setting. See Troubleshooting and Routine
Maintenance of the User’s Guide or visit the Brother Solutions Center (http://solutions.brother.com
more information.
• If yo ur PC is protected by a f irew all and is unab le to use PC-FAX recei v e, you m ay need to c onfig ure the
firewa ll se t ti ngs t o allow comm unication through port number 137 and 5 4926. Visit the Br o th er Solutions
Center (http://solutions.brother.com
Depending on the operating system you are using, you may get a Security Alert message when you start
the PC-FAX receiving feature. To enable PC-FAX receiving, you must unblock the program.
®
2000, XP and XP Profe ssional x64 Editio n users, you must log on with Administ rator r ights
®
XP computer that is protected by the firewall, the Network
) for
) for more in fo rm ation.
6
The Brother PC-FAX Receive Softwa re lets yo u view and sto re faxes on your PC. It i s automati cally in stalle d
when yo u install the MFL-Pro Suite an d w orks on locally or network connected mac hines.
When enabled, your machine will rec eive faxes in its m emory. Once it has received the f ax , it wil l
automatically be sent to your PC.
If you turn your PC off, your machine will continue to receive and store your faxes in its memory. The machine
LCD will display the num ber of stored fax es received, f or ex ample:
PC-Fa x Ms gs: 00 1
When you switch your PC on, the PC-FAX Receive Software automatically transfers your faxes to your PC.
To enable the PC-FAX Receive So ftw are, do the following:
Before you use the PC-FAX Receive function, you must choose PC-FAX Receive from the menu on the
machine.
Run the Brother PC-FAX Receive software on your PC. (We recommend you select the Add to Startup
folder check box, so that the software automatically runs and can transfer any faxes on PC startup.)
89
Page 96

Brother PC-FAX Software (MFC models only)
Enabling the PC-FAX Receiving software on your machine 6
You can optionally enable the Bac ku p Print option . When enabled, th e m achine will pr int a c opy of the fax
before the fax is sent to the PC or the PC is switched off.
a Press Menu.
b Press a or b to choose Fax, Advanced Fax Operation, Fwd/Page/Store and
PC Fax Receive.
Press OK.
c Press a or b to choose USB or your PC name if connected on a network.
Press OK.
d Press a or b to choose Backup Print:On or Backup Print:Off.
Press OK.
e Press Stop/Exit.
Note
If you select Backup Print:On, th e machine will print t he fax, s o you will ha ve a copy i f there i s a power
failure before it i s sent to the PC. The fax messages are automatically er ased from your machine’s memory
when they have been successfully printed and sent to your PC. When Backup Print is off, your fax
messages are automaticall y erased from your machine’ s memory when th ey have been successfu lly sent
to your PC.
6
90
Page 97

Brother PC-FAX Software (MFC models only)
Running the PC-FAX Receiving software on your PC 6
Click the Start button, All Programs, Brother, MFC-XXXX, PC-FAX Receiving and Receive.
The PC-FAX icon appears in your PC tasktray.
Setting up your PC 6
a Right-click the PC-FAX icon on your PC tasktray, and then click PC-Fax RX Setup.
The PC-Fax RX Setup dialog box appears:
6
b In Save file to, click the Browse button if you w ant to change the path whe re PC-FAX files are saved.
c In File Format, choose .tif or .max as the received document format. The default format is .tif.
d To play wave fil es (.wav sound files ) when re ceivi ng a fax, check Play wave file when receiving FAX,
and enter the path of the wave file.
e To automatically start the PC-FAX receiving software when you start Windows
AddtoStartupfolder.
®
, check
f If you want to use the PC-FAX Receiving software, see Configurin g t he N etwork PC-FAX Receivin g
Settings on page 92.
91
Page 98

Brother PC-FAX Software (MFC models only)
Configuring the Network PC-FAX Receiving Settings 6
The settings to sen d received f axes to your co mputer were automatica lly con figured d uring the in stal lation of
MFL-P ro Suite (See the Quick Setu p Guid e).
If you are using a different machine than the one that was registered to your PC during the installation of the
MFL-Pro Suite software, follow the steps below.
a In the PC-FAX RX Setup dialogu e box , c lick th e Network Settings button. The Network Settings
dialog box appears.
b You must specify the IP address or name of your machine.
Choose th e appropriate c onnection me th od.
6
Specifyyourmachinebyaddress
Enter the IP address of the machine in IP Address.
Specifyyourmachinebyname
Enter the machine node name i n Node Name, or click the Browse button and choose the correct Brother
machine you want to use from the list.
Specify your PC name
You can specify the PC name that will appear on the display of the machine. To change the name, enter
the new na m e in Display Your PC Name.
92
Page 99

Brother PC-FAX Software (MFC models only)
Viewing new PC-FAX messages 6
Each time your PC is receiving a PC-FAX, the icon will alternate between and . Once the fax has
been re ce iv ed, the icon will c hange to . T he icon w ill c hange to once the rec eived fax has
been viewed.
a Run PaperPort
®
.
b Open the Fax Received folder.
c Double-click any new faxes to open and view them.
Note
The nam e title of your un read PC mess age will be bas ed on the date and t ime that the messages we re
receiv ed until you ass ign a file name. For example ‘Fax 2-20-2006 16: 40:21.tif’.
6
93
Page 100

PhotoCapture Center
®
7
(Not available for MFC-3360C) 7
CAUTION
DO NOT start your PC with a media card installed in the media drive of the machine. You could lose your
data or dam age the card.
Note
• The P hot oCapture Center
• While the machine is printing from the PhotoCapture Center
®
Center
for any other operation.
®
will read only the card that was put in first.
®
, your PC cannot access the PhotoCapture
For USB cable users 7
Note
For Windows
install a W indows
a Put a CompactFlash
xD-Pictu re C ard™3 into your machine.
1
This product also suppor ts CompactFlash® type1.
2
MagicGate Memory Stick® and Memory Stick Pr o™ can be used, but any music data that is stored on the stick cannot be read.
3
This product supports xD-Picture Card™ Type M/Type H (Large Capacity).
®
2000 users, to access the PhotoCapture Center® features from your PC, you must first
®
2000 upd at e. See the Quick Setup Guide for installation instructi o ns.
®1
, Memory Stick®2, Memory Stick Pro™, MultiMediaCard™, SecureDigital™ or
7
b In Windows
®
Explorer, click the Removable Disk icon1. The files and folders on the media card appear
on your PC screen.
You can edit a file and save it to another drive on your PC.
1
If you are usi ng Windows® XP and you create a name for the volume label of the media card, this name appears instead of
‘Removable Disk’.
94
 Loading...