

Page 1
Instruction Manual:
USB Connections
Manual de instrucciones:
Conexiones USB
English Español
Page 2

Federal Communications Commission (FCC)
Declaration of Conformity (For USA Only)
Responsible Party: Brother International Corporation
100 Somerset Corporate Boulevard
Bridgewater, NJ 08807-0911 USA
TEL : (908) 704-1700
declares that the product
Product Name:
Model Number:
This device complies with Part 15 of the FCC Rules. Operation is subject to the following two
conditions: (1) this device may not cause harmful interference, and (2) this device must accept any
interference received, including interference that may cause undesired operation.
This equipment has been tested and found to comply with the limits for a Class B digital device,
pursuant to Part 15 of the FCC Rules. These limits are designed to provide reasonable protection against
harmful interference in a residential installation. This equipment generates, uses, and can radiate radio
frequency energy and, if not installed and used in accordance with the instructions, may cause harmful
interference to radio communications. However, there is no guarantee that interference will not occur
in a particular installation. If this equipment does cause harmful interference to radio or television
reception, which can be determined by turning the equipment off and on, the user is encouraged to try
to correct the interference by one or more of the following measures:
Brother Sewing Machine
HE-240
/SE-400/LB-6800
• Reorient or relocate the receiving antenna.
• Increase the separation between the equipment and receiver.
• Connect the equipment into an outlet on a circuit different from that to which the receiver is
connected.
• Consult the dealer or an experienced radio/TV technician for help.
• The included interface cable should be used in order to ensure compliance with the limits for a
Class B digital device.
• Changes or modifications not expressly approved by Brother Industries, Ltd. could void the user's
authority to operate the equipment.
Page 3
— — — — — — — — — — — — — — — — — — — — — — — — — — — — — — — — — — — — — — — — — — — — — — — — — — — —
Introduction
This manual provides descriptions for connecting the USB cable between the machine and the computer
and for performing the various operations that are available. For details on other machine functions and
operations, refer to the Operation Manual.
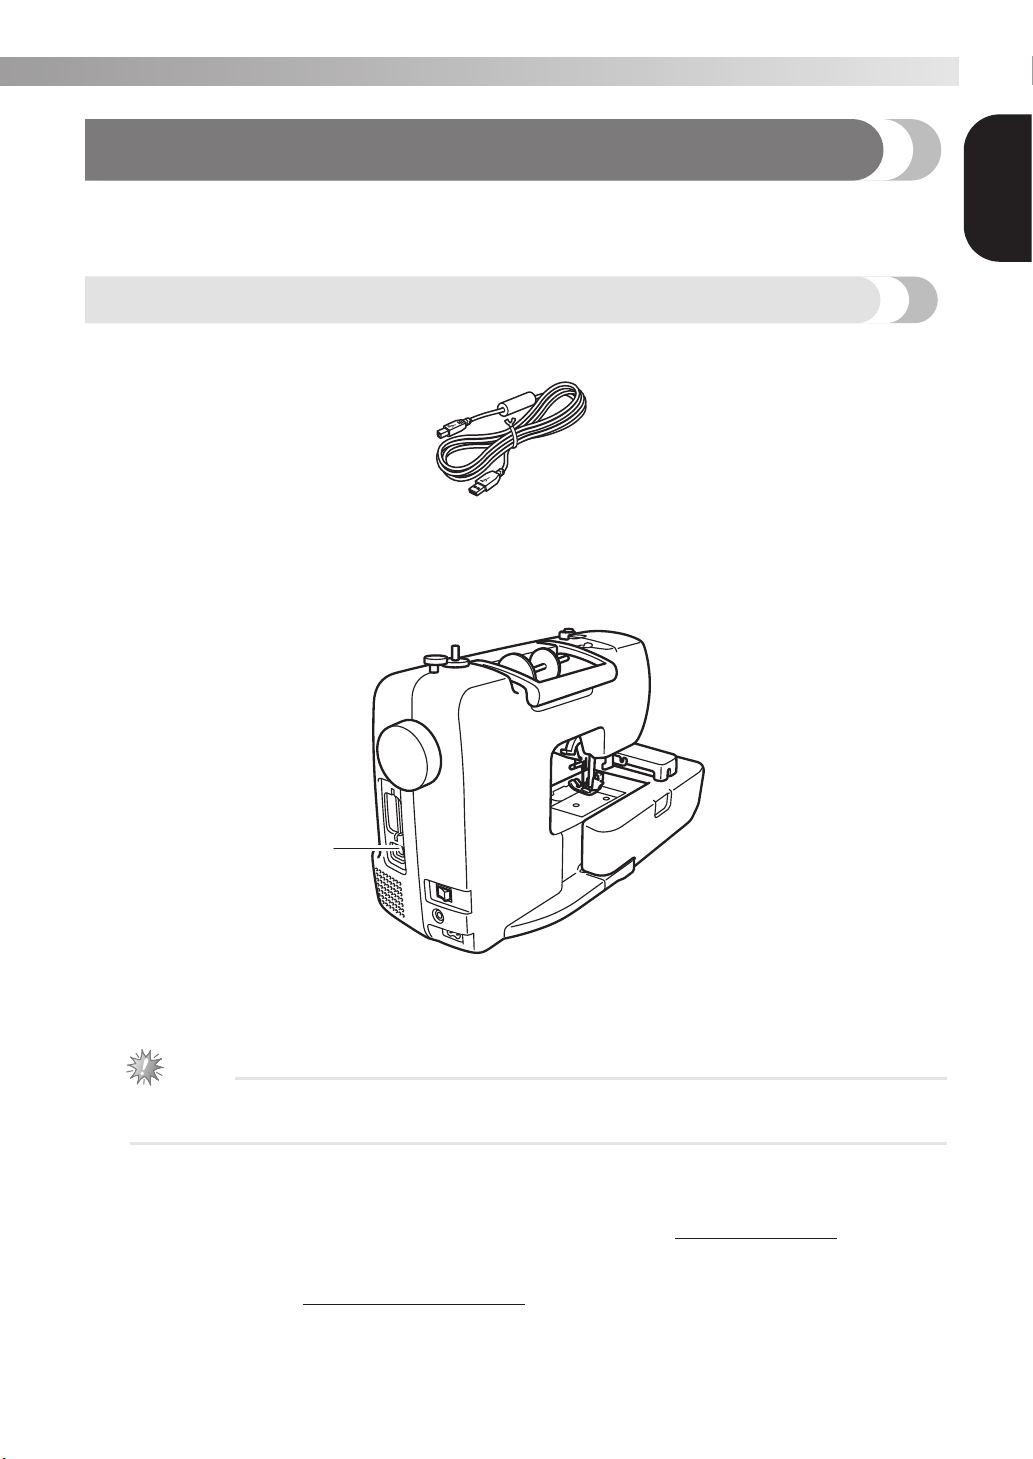
USB cable
The following USB cable is included with this machine.
USB cable (XD0745-051)
Plug the USB cable connector into the USB port on the right side of this machine.
English
a
a USB port connector
Plug the USB cable into the USB port connector.
Note
z Use only the interface cable (USB cable) included with this machine.
z Use only the power cord included with this machine.
IMPORTANT - Brother is at your side
Need help - call 1-877-276-8437, or by email at custsrv@brother.com.
*For important tips and tricks, savings on Brother sewing and embroidery
products, and to register your warranty online go to
www.registermybrother.com or call 1-877-276-8437.
1
Page 4

— — — — — — — — — — — — — — — — — — — — — — — — — — — — — — — — — — — — — — — — — — — — — — — — — — —
Using the Memory Function
Embroidery data precautions
Observe the following precautions when using embroidery data other than that created and saved in this machine.
CAUTION
● When using embroidery data other than our original patterns, the thread or needle may break
when sewing with a stitch density that is too fine or when sewing three or more overlapping
stitches. In that case, use one of our original data design systems to edit the embroidery data.
■ Types of Embroidery Data that can be Used
• Only .pes and .dst embroidery data files can be used with this machine. Using data other than that saved
using our data design systems or sewing machines may cause the embroidery machine to malfunction.
■ Where to Purchase Embroidery Designs
• There are many venues available for purchasing additional designs for your embroidery machine. The
local authorized Brother dealer will have a wide range of Brother embroidery cards, as well as CDs with
a variety of themes. In addition, there are many online sites where designs can be purchased and
downloaded directly to your computer. When purchasing designs be sure to check the file format and
hoop size of each design to make sure it is compatible with your machine model.
■ Computers and Operating Systems with the Following Specifications can be Used
• Compatible models:
IBM PC with a USB port as standard equipment
IBM PC-compatible computer equipped with a USB port as standard equipment
• Compatible operating systems:
Microsoft Windows Me/2000/XP/Vista
(Windows 98SE requires a driver. Download the driver from our web site (http://solutions.brother.com).)
■ Precautions on Using the Computer to Create and Save Data
• If the file name of embroidery data cannot be identified, for example, because the name contains special
characters, the file is not displayed. If this occurs, change the name of the file. We recommend using the
26 letters of the alphabet (uppercase and lowercase), the numbers 0 through 9, “-”, and “_”.
• .pes files saved with the number of stitches, the number of colors and the number of combined patterns
exceeding the specified limits cannot be displayed. Use one of our original data design systems to edit the
embroidery pattern so that it meets the specifications.
• Do not create folders in “Removable Disk” on a computer. If embroidery data is saved in a folder in
“Removable Disk”, that embroidery data cannot be retrieved by the machine.
• Even if the embroidery unit is not attached, the machine will manage embroidery data.
■ Tajima (.dst) Embroidery Data
• .dst data is displayed in the pattern list screen by file name (the actual image cannot be displayed). Only
the first eight characters of the file name can be displayed.
• Since Tajima (.dst) data does not contain specific thread color information, it is displayed with our default
thread color sequence. Check the preview and change the thread colors as desired.
■ Trademarks
• IBM is a registered trademark or a trademark of International Business Machines Corporation.
• Microsoft and Windows are registered trademarks or trademarks of Microsoft Corporation.
Each company whose software title is mentioned in this manual has a Software License Agreement specific
to its proprietary programs.
All other brands and product names mentioned in this manual are registered trademarks of their respective
companies. However, the explanations for markings such as
®
and ™ are not clearly described within the text.
2
Page 5
— — — — — — — — — — — — — — — — — — — — — — — — — — — — — — — — — — — — — — — — — — — — — — — — — — — —
a
b
c
d
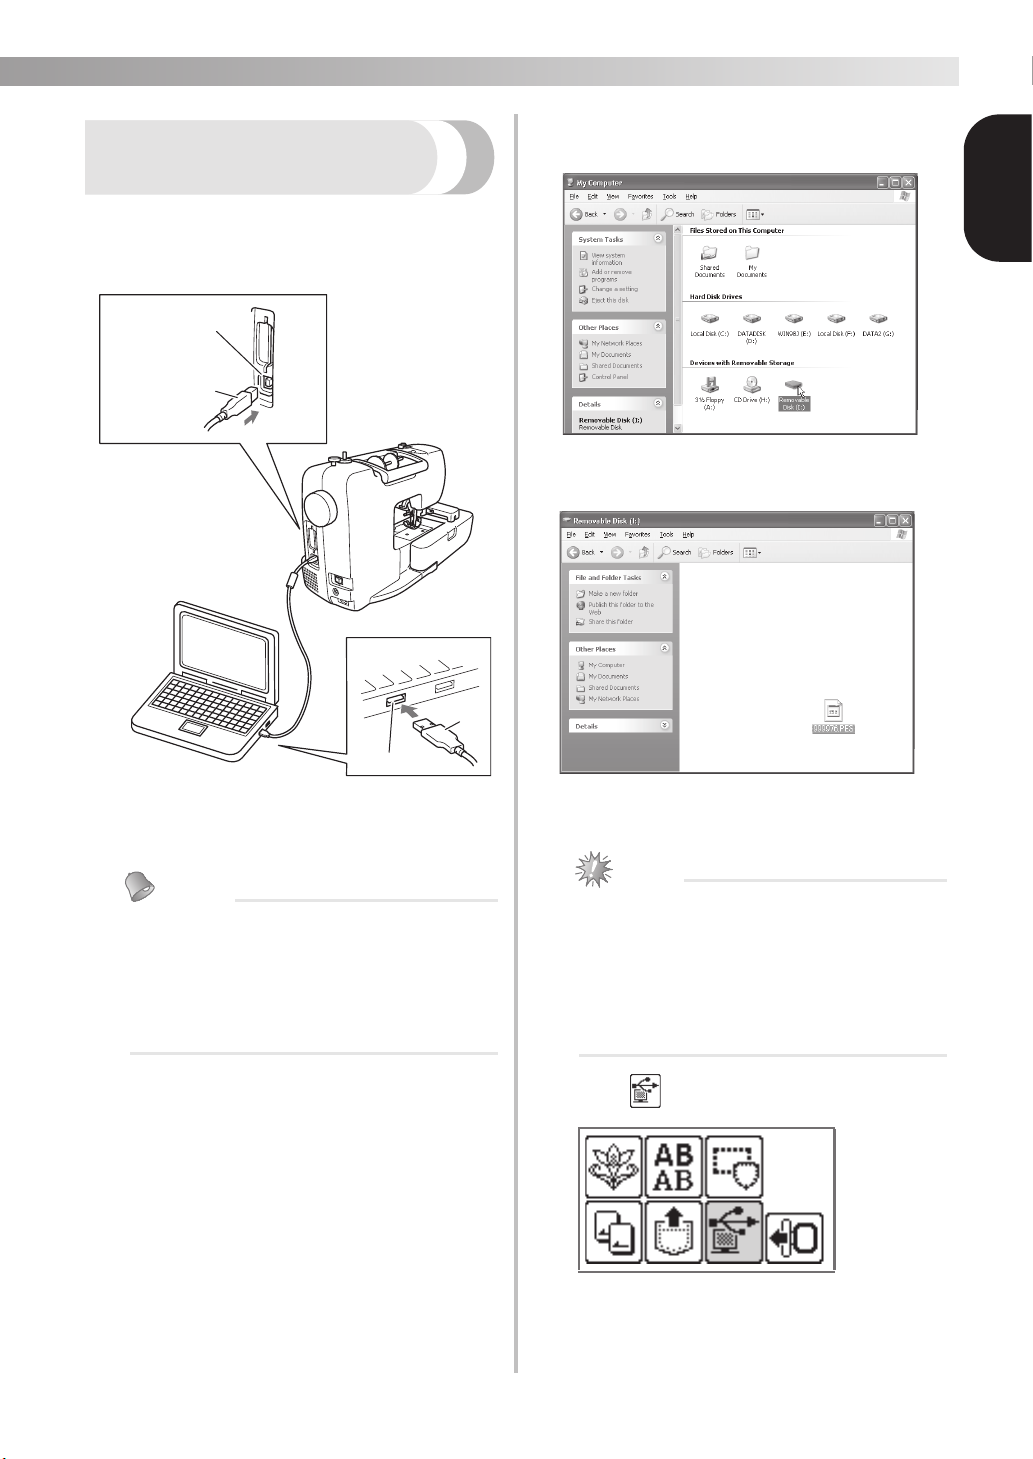
Retrieving embroidery
patterns from the computer
Plug the USB cable connectors into the corresponding USB port connectors on the computer and on the machine.
a
b
The “Removable Disk” icon appears in “My
b
Computer” on the computer.
Copy the pattern data to “Removable Disk”.
English
a
a USB port connector for computer
b USB cable connector
Memo
z The USB cable can be plugged into the USB
port connectors on the computer and
machine whether or not they are turned on.
z Embroidery patterns can be retrieved with or
without the embroidery unit attached to the
machine.
b
X Pattern data in “Removable Disk” is written
to the machine.
Note
z While data is being written, do not
disconnect the USB cable.
Do not create folders within “Removable
z
Disk”. Since folders are not displayed, pattern
data within folders cannot be retrieved.
z
While the machine is sewing, do not write
data to or delete data from “Removable Disk”.
Press .
X The saved patterns are displayed.
3
Page 6

— — — — — — — — — — — — — — — — — — — — — — — — — — — — — — — — — — — — — — — — — — — — — — — — — — —
e
f
g
Select the pattern you wish to retrieve.
Switch screens using (Previous page key)
and (Next page key).
b
a
c
a Total amount of memory used
b Total amount of memory space
c Number of the currently displayed page from the total
number of pages
X The selected pattern is shown in reverse
highlighting.
Press .
X The saved pattern is retrieved.
X The embroidery screen appears, and you
can embroider the retrieved pattern.
Adjust the pattern as desired, and then begin
embroidering.
Note
z If there are 13 or more patterns saved in
“Removable Disk”, the patterns cannot be
displayed. When the message “Reduce the
number of patterns. Only up to 12 patterns
can be handled.” appears, delete patterns
from “Removable Disk” so that it contains
no more than 12 patterns. Then, close the
error message, repeat the procedure starting
from step
the pattern.
z If patterns copied to “Removable Disk” are
not saved in the machine's memory, their
data is lost when the machine is turned off.
In order to retrieving patterns directly from
the machine the next time that they are
needed, save the data in the machine's
memory before turning off the machine. For
details, refer to “Saving patterns” of the
Operation Manual.
d and then press to retrieve
Error messages
Memo
z This manual describes the error messages concerning the USB connection. For details on other error
messages, refer to the Operation Manual.
Error Message Probable Cause
When 13 or more patterns are in “Removable Disk”, a pattern was
being retrieved.
The start/stop button was pressed after selecting a pattern which is
saved in the machine's memory or entered from the USB port without
pressing (Retrieve key).
4
Page 7

— — — — — — — — — — — — — — — — — — — — — — — — — — — — — — — — — — — — — — — — — — — — — — — — — — — —
a
b
c
d
e
f
Upgrading Your Machine’s Software
You can use a computer to download software upgrades for your sewing machine.
Visit our website at "http://solutions.brother.com" for notification of available updates.
Note
z Be sure to download the upgrade file for this model from our web site. An upgrade file for any different
model cannot be downloaded.
z Refer to the Operation Manual for how to check the version of the sewing machine’s software.
Memo
z The embroidery pattern which is saved in the sewing machine will not be deleted if you upgrade the
software.
z While the software is being upgraded, the buzzer will not sound when a key is pressed.
While holding (Settings key) pressed,
a
turn on the machine.
X The following screen appears.
When the screen shown in step a appears
again, press .
X The message “Saving the upgrade file. Do
not turn main power to OFF.” appears.
When the following screen appears, upgrading
is completed.
English
Plug the USB cable connectors into the
corresponding USB ports on the computer and
on the machine.
X The “Removable Disk” icon appears in “My
Computer” on the computer.
Copy the upgrade file to “Removable Disk”.
X The message “Connected to PC. Do not
disconnect the USB cable.” appears.
Note
z If an error occurred, an error message
appears. At this time, turn the machine off,
and then start the procedure again from step
a.
Disconnect the USB cable, and turn the
machine off, then on again.
5
Page 8

— — — — — — — — — — — — — — — — — — — — — — — — — — — — — — — — — — — — — — — — — — — — — — — — — — —
Introducción
En este manual se facilita información para conectar el cable USB de la máquina al ordenador y para
realizar las diversas operaciones disponibles. Si desea más información sobre otras funciones y
operaciones de la máquina, consulte el manual de instrucciones.
Cable USB
El siguiente cable USB se proporciona con esta máquina.
Cable USB (XD0745-051)
Enchufe el conector del cable USB en el puerto USB situado en el lado derecho de la máquina.
a
a Conector de puerto USB
Enchufe el cable USB en el conector de puerto USB.
Nota
z Utilice sólo el cable de interfaz (cable USB) que se proporciona con esta máquina.
z Utilice sólo el cable de corriente que se proporciona con esta máquina.
IMPORTANTE - Brother está de su lado
6
Necesita ayuda - llame al 1-877-276-8437, o por correo electrónico en
custsrv@brother.com.
*Para consejos y trucos, ahorros con la costura y los productos de
bordado de Brother y para registrar su garantía en línea visite el sitio
www.registermybrother.com o llame al 1-877-276-8437.
Page 9

— — — — — — — — — — — — — — — — — — — — — — — — — — — — — — — — — — — — — — — — — — — — — — — — — —
Uso de la función de Memoria
Medidas de precaución relativas a los datos de bordado
Tome las siguientes medidas de precaución cuando utilice datos de bordado distintos a los creados y guardados
en esta máquina.
PRECAUCIÓN
●
Al utilizar datos de bordados distintos de nuestros patrones, la aguja o el hilo podrían romperse al
coser con una densidad de puntada demasiado fina o al coser más de tres puntadas solapadas. En este
caso, utilice uno de nuestros sistemas originales de diseño de datos para editar los datos de bordado.
■ Tipos de datos de bordado que se pueden utilizar
• Con esta máquina sólo se pueden utilizar archivos de datos de bordado con extensión .pes y .dst. La
utilización de datos distintos de los guardados con nuestros sistemas de diseño de datos o con nuestras
máquinas de coser podría hacer que la máquina no funcionase correctamente.
■ Dónde comprar diseños de bordado
• Existen muchos lugares donde puede comprar diseños adicionales para su máquina de bordado. El
distribuidor local autorizado de Brother cuenta con una amplia gama de tarjetas de bordado de Brother
así como tambi
comprar diseños y descargarlos directamente en su ordenador. Al comprar diseños aseg
el formato del archivo y el tamaño del bastidor de cada diseño para asegurarse de que sea compatible
con el modelo de su máquina.
■ Ordenadores y sistemas operativos que se pueden utilizar con las siguientes especificaciones
• Modelos compatibles:
PC/IBM con un puerto USB como equipo estándar
PC compatible con IBM con un puerto USB disponible como equipo estándar
•
Sistemas operativos compatibles:
Microsoft Windows Me/2000/XP/Vista
(Windows 98SE necesita un controlador. Descargue el controlador de nuestro sitio Web (
brother.com
■ Medidas de precaución sobre la utilización de un ordenador para crear y guardar datos
• Si no se puede identificar el nombre del archivo de datos de bordado, por ejemplo, porque contiene caracteres
especiales, el archivo no se mostrará. En este caso, cambie el nombre del archivo. Recomendamos utilizar la
26 letras del alfabeto (mayúsculas y minúsculas), los números del 0 al 9, “-” y “_”.
• No pueden mostrarse en pantalla archivos .pes guardados con un número de puntadas, colores y patrones
combinados superior a los límites especificados. Utilice uno de nuestros sistemas originales de diseño de datos
para editar el patrón de bordado de manera que cumpla las especificaciones.
• No cree carpetas en el “Disco extraíble” del ordenador. Si los datos de bordado se guardan en una carpeta en
“Disco extraíble”, la máquina no podrá recuperarlos.
• Aunque no esté colocada la unidad de bordado, la máquina podrá manipular los datos de bordado.
■ Datos de bordado Tajima (.dst)
• Los datos .dst se muestran, por nombre de archivo, en la pantalla de lista de patrones (la imagen real no
puede verse en pantalla). Sólo se muestran los primeros ochos caracteres del nombre del archivo.
• Ya que los datos Tajima (.dst) no contienen información específica sobre los colores del hilo, se muestran
como nuestra secuencia de colores predeterminada. Compruebe la vista preliminar y cambie los colores
de hilo como desee.
■ Marcas comerciales
• IBM es una marca registrada o una marca comercial de International Business Machines Corporation.
• Microsoft y Windows son marcas registradas o marcas comerciales de Microsoft Corporation.
Las compañías cuyos programas se mencionan en este manual tienen contratos de licencia de software
específicos de sus programas.
Todas las demás marcas y nombres de productos mencionados en este manual son marcas comerciales
registradas de sus respectivos propietarios. No obstante, en el texto no se describen específicamente las
marcas del tipo
é
n CDs con variados temas. Adicionalmente, existen muchos sitios en línea donde puede
).)
®
y ™.
ú
rese de verificar
http://solutions.
Español
7
Page 10

— — — — — — — — — — — — — — — — — — — — — — — — — — — — — — — — — — — — — — — — — — — — — — — — — — —
a
b
c
d
En el ordenador aparecerá el icono “Disco
b
Recuperación de patrones de
extraíble” en “Mi PC” .
bordado desde el ordenador
Enchufe los conectores del cable USB a los
correspondientes conectores de puerto USB en
el ordenador y en la máquina.
a
b
Copie los datos del patrón a “Disco extraíble”.
a
a Conector de puerto USB para el ordenador
b Conector del cable USB
Recuerde
z El cable USB puede enchufarse en los
conectores de puerto USB del ordenador y
de la máquina independientemente de que
estén encendidos o no.
z Se pueden obtener patrones de bordado con
o sin la unidad de bordado instalada en la
máquina.
b
X Los datos del patrón de “Disco extraíble” se
escriben en la máquina.
Nota
z Mientras se escriben los datos, no
desconecte el cable USB.
No cree carpetas en “Disco extraíble”. Como
z
las carpetas no se muestran, los datos del
patrón que contengan no se pueden
recuperar.
z
Mientras la máquina esté cosiendo, no escriba
ni borre datos en “Disco extraíble”.
Pulse .
X Se muestran los patrones guardados.
8
Page 11

— — — — — — — — — — — — — — — — — — — — — — — — — — — — — — — — — — — — — — — — — — — — — — — — — —
e
f
g
Seleccione el patrón que desea recuperar.
Cambie de pantalla con (Tecla Página
anterior) y (Tecla Página siguiente).
b
a
c
a Cantidad total de memoria utilizada
b Espacio total en memoria
c Número de la página mostrada actualmente respecto al
número total de páginas
X El diseño seleccionado se muestra con el
resalte invertido.
Pulse .
X El patrón guardado se ha recuperado.
X Aparece la pantalla de bordado y podrá
bordar el patrón recuperado.
Ajuste el patrón como desea y comience a
bordar.
Nota
z
Si hay 13 o más patrones guardados en “Disco
extraíble”, no se podrán mostrar. Cuando
aparezca el mensaje , borre patrones
de “Disco extraíble” para que no contenga más
de 12 patrones. A continuación, cierre el mensaje
de error, repita el procedimiento desde el paso
d
y pulse para recuperar el patrón.
z
Si los patrones copiados en “Disco extraíble” no
se guardan en la memoria de la máquina, los
datos se pierden cuando la máquina está
apagada. Para recuperar los patrones
directamente desde la máquina la próxima vez
que se necesiten, guarde los datos en la memoria
de la máquina antes de apagarla. Para más
informacion, consulte “Almacenamiento de
diseños” del manual de instrucciones.
Español
Mensajes de error
Recuerde
z En este manual se describen los mensajes de error relativos a la conexión USB. Para más información
sobre otros mensajes de error, consulte el manual de instrucciones.
Mensaje de error Causa probable
Cuando hay 13 o más patrones en “Disco extraíble”, se ha recuperado
un patron.
Se pulsó el botón iniciar/parar después de haber seleccionado un
patrón que se encuentra almacenado en la memoria de la máquina o se
ha introducido desde un puerto USB sin haber pulsado (tecla de
Recuperación).
9
Page 12

— — — — — — — — — — — — — — — — — — — — — — — — — — — — — — — — — — — — — — — — — — — — — — — — — — —
a
b
c
d
a
e
f
Actualización del software de la máquina’
Puede utilizar un ordenador para descargar las actualizaciones del software de la máquina de coser.
Visite nuestro sitio web en la dirección “http://solutions.brother.com” para la notificación de las actualizaciones
disponibles.
Nota
z Asegúrese de descargar el archivo de actualización para este modelo desde nuestro sitio web. No se
puede descargar un archivo de actualización para otro modelo diferente.
z
Consulte el manual de instrucciones para saber como verificar la versión del software de la máquina de cocer.
Recuerde
z El patrón de bordado que se encuentra almacenado en la máquina de cocer no se eliminará al
actualizar el software.
z Mientras se está actualizando el software, no sonará el zumbador cuando una tecla esté pulsada.
Manteniendo pulsada (tecla de ajustes),
a
encienda la máquina.
X Aparecerá la siguiente pantalla.
Enchufe los conectores del cable USB en los
correspondientes puertos USB del ordenador y
de la máquina.
X En el ordenador aparecerá el icono “Disco
extraíble” en “Mi PC” .
Copie el archivo de actualización en “Disco
extraíble”.
Cuando aparece de nuevo la pantalla mostrada
en el paso
X Aparecerá el mensaje “Guardando el
archivo de actualización. No desconecte la
alimentación” .
Cuando se muestre la siguiente pantalla, la
actualización habrá terminado.
, pulse .
Nota
z Si se produce un error, aparecerá un
mensaje de error. En ese momento, apague
la máquina y realice de nuevo el
procedimiento desde el paso a.
Desenchufe el cable USB y apague y vuelva a
encender la máquina.
X Aparece el mensaje “Conectado al PC. No
desconecte el cable USB.”
10
Page 13

Page 14

Page 15

Page 16

885-V31/V32
XE7711-001
Printed in China
 Loading...