

Page 1
1
Setup, Getting Started,
File Manager, Fax, Internet and Email,
Calculator, World Clock, To Do List
& Troubleshooting
__' GEOS ®
US ENGLISH
Page 2
About this Manual
Welcome. Your new GeoBook TM contains software programs that provide a
variety of features. Inside this manual, Book 1, you will find information on
setting up the notebook, getting started using programs, and using File
.Manager to organize your documen',sl You will also fred information on these
notebook programs:
Preferences. Sets the system preferences, such as the clock.
Preferences also provides options for configuring a printer, modem,
optional serial mouse, and battery charging. See the chapter tiffed
Getting Started.
• lnternet. The Browser allows you to browse the World Wide Web
on the Internet. Emailer allows you_to send and receive email via the
Wodd Wide Web.
• Calculator. Performs math calculations. Press the CALC key from the
function key row to open file calculator from any program you have
open. Press CALC again to close it.
World Clock Keeps track of the time and date of any location in the
world. Press the WORLD key from the function key row to open the
the Wodd Clock from any program you have open. Press WORLD
again to close it.
• To Do List. Tracks and prioritizes tasks. Press the TO DO key from
.the function key row to open the To Do List from any program you
have open. Press EXIT to close it.
To register your notebook online, connect the modem to a phone
line. Then insert thediskette labelled Online Registration in the disk
drive. Turn the notebook power on and click on File Manager. Click
on the drive A icon; then double-click on the GeoBook Online
Registration icon. Follow the tin-screen instructions to register your
new GeoBook"
For technical assistance, you may call our customer service
representatives at 800-284-1937
Technical Note: Thefirst time you turn the power on to your notebook, it will
take several seconds for the programs to initialize.
Page 3
I I serialN°m r: I
Geoworks® application software and GEOS® operating system software copyright @1990-1997
Geoworks. All rights reserved. United States Patent 5,327,529.
Part of the software in this product is @copyright STNC Enterprises 1994-1997. All rights reserved.
Hardware and software floating point math library copyright @1984-1991 Dimensions Research, Inc.
Portions of this work are derived from The Standard C Library copyright @1992 by P.J. Plaguer, published
-by Prentice-Hall, and are used with permission.
ROM-DOS operating system software copyright @1989-1997 Datalight, Inc.
CardTrick Flash File System software copyright @1989-1997 Datalight, Inc.
Word for Word import export software copyright @1986-1993, Mastersoft, Inc. All rights reserved.
The American Heritage Dictionary licensed from Inso Corporation @ 1989 by Inso Corporation. All tights
reserved. Reproduction or disassembly of embodied programs or database prohibited. Based upon The
A_n Heritage l_'ctionary, Office Edition.
English Hyphenator licensed from Inso Corporation @1991 by Inso Corporation. All rights reserved.
Reproduction or disassembly of embodied algorithms or database prohibited.
Electronic Thesaurus licensed from Inso Corporation. @1987 by Inso Corporation. All rights reserved.
Thesaurus U.S. Pat. No. 4,724,523. Reproduction or disassembly of embodied programs or database
prohibited. Based upon Roget'sll: TheNew Thesaurus @1980 by Houghton Mifflin Company.
International CorrectSpell TM English spelling correction system @1994 by Inso Corporation. All rights
reselsfed .. Reproduction-Or_disassemblyof embodi.._gdalgon_'thms or database prohibited. .,
Portions of BIOS software provided by Phoen_ @1997 by Phoenix. All rights reserved.
Portions of software pro-_fded by Brother International. @1997 by Brother International Corporation.
The GEOS software in this device contains Nimbus Q from Digital Typeface Corp. and typefaces from
URW, GmbH, URW Roman@, URW Sans@, and URW Mono@ are registered trademarks of URW GmbH.
Geoworks® and GEOS®, are registered trademarks of Geoworks; and Scrapbook TM is a trademark of
Geoworks in the United States of America and other countries.
Mastersoft is a registered trademark of Mastersoft, Inc. in the U.S.A.
Copyright@ 1997 by. Brother International Corporation. All rights reserved.
Black & white clip aft'images in this product are licensed from Media Graphics International and are
prote_ed by U.S. and worldwide copyright laws.
Portions of color clip art images in this product are provided by Express Software, Inc.@ Copyright
Express Sofxware, Inc. Portions of color clip art images in this product are provided by Studio Advertising
Art, Inc.@ Copyright Studio Advertising Art, Inc.
All 0_er brand and product names are trademarks or registered trademarks of their respective holders.
Page 4
Keepthismanualin asafeplaceforfuturereference.Werecommendthatyouwritetheunit'smodel
numberandserialnumber(fromtherearpanelofthekeyboard/printerunit)intheblankspacesatthe .
topofthepreviouspage.
FCC NOTICE
This equipment has been tested and found to comply with the limits for a Class B digital device, pursuant
to Part 15 of the FCC Rules. These limits are designed to provide reasonable protection against harmful
interference in a residential installation. This equipment generates, uses, and can radiate radio frequency
energy and, if not installed and used in accordance with the instructions, may cause harmful interference
to radio or television reception. However, there is no guarantee that interference will not occur in a
particular installation. If this equipment does cause intereference, which can be determined by turning the
equipment off and on, the user is encouraged to try to correct the interference by one or more of the
following measures:
• Reorient or relocate the receiving antenna or increase the separation between the equipment and
receiver
• Connect the equipment to an outlet on a circuit different from that to which the receiver is connected
• Consult the dealer or an experienced radio/television technician for help (changes or modifications
not expressly approved by Brother International Corporation could void the Warranty)
This product uses RJllCiW jacks and is designed to connect to the telephone network or premises wiring
using a compatible modular jack that is Part 68 compliant.
If this telephone equipment causes harm to the telephone network, the telephone company will notify
you in advance that temporary discontinuance of service may be required. If advance notice is not
practical, the telephone company will notify you as soon as possible. Also, you will be advised of your
right to f'de a complaint with the FCC if you believe it is necessary.
The telephone company may make changes in its facilities, equipment, operations, or procedures that
could affect the operation of the equipment. If this happens, the telephone company will provide advance
notice for you to make necessary modifications to maintain -uninterrupted service.
Do not connect this equipment to-pffrty-lincs-or_cOih-'-"6perated telephone lines.
The FCC Registration number0n this product shows compliance with Federal Communications
Commission Part 68 Rul_s. TO ensure product compliance, use the AC adapter that comes with this
product. Do not substitute adapters.
PEN: 0.369B
If trouble is experienced with this equipment for repair or warranty information, please contact Brother
International Corporation, 3131 Appling Road, Bartlett, TN 38133, (901) 373-8500. ff the equipment is
causing harm to the telephone network, the telephone company may request that you disconnect the
equipment until the problem is solved.
DOC NOTICE
This Class B digital opparatus meets all the requirements of the Canadian Interference-Causing Equipment
Regulations. Le present appareil num6rique d6 la classe B respecte toutes les exigences du R_glement sur
le materiel brouilleur du Canada.
WARNING - FOR YOUR HEALTH
To avoid repetitive motion injuries when using this keyboard, we recommend the
following steps: maintain a comfortable, straight wrist position when typing, take breaks,
at least every hour, to stretch hands and arms, and report any pain or other symptoms
to your physician.
Page 5
Table of Contents
THEBASICS
1 Setting Up , 1
Unpacking .............................................................................. 1
Parts and Features ........................................................................ 2
C6mponent Descriptions .............................................................. 3
Safety and Maintenance ................................................................... 4
Warnings and Cautions ................................................................ 4
Cleaning ............................................................................ 5
Connecting the AC Adapter ............................................................... 6
Opening the Notebook ............................... . .................................... 6
Installing a Battery Pack ................................................................... 7
Charging the Battery Pack ................................................................. 8
Battery Maintenance .................................................................. 9
Connecting a Printer .................................................................... 10
Setting Printer Preferences ............................................................ 11
Connecting the Modem .................................................................. 12
Setting Modem Preferences ........................................................... 14
Connecting an Optional Monitor .......................................................... 15
Connecting an Optional External Mouse ................................................... 15
Setting-Mouse Preferences ...................... . ..... _.................................. 16
Using Diskettes ......................................................................... 17
Using PC Cards ...... _.. • ............................................................... 18
Started 19
2 Getting
Using the Glidepad or Optional Mouse .................................................... 20
Performing tasks with the glidepad or optional mouse ................................... 21
On-Screen Pointer Shapes ............................................................. 21
Using the Keyboard ..................................................................... 22
Setting System Preferences .............................. °....... : ......................... 25
Starting and Exiting Programs ............................................................ 26
Working with Documents ................................................................
Creating and Opening Documents ..................................................... 27
What You Will See in a Document Window ............................................. 28
Changing Your View of a Document Window . .... ....................................... 29
Showing or Hiding Scroll Bars ......................................................... 29
Using Copy To ...................................................................... 29
Making a Backup Copy of a Document ................................................. 30
Renaming a Document ............................................................... 30
Closing Documents .................................................................. 31
" Closing without Saving ............................................................... 31
Contents i
Page 6
Saving Documents ...................................................................... 31
Setting Auto Save .................................................................... 33
Working with Menus .................................................................... 34
Opening a Menu and Making a Selection ............................................... 34
Using Underlined Letters to Make Menu Selections ...................................... 35
Selecting from a Menu with Buttons or Check Boxes ...................................... 36
Selecting from a Submenu ..................... "....................................... 36
Using Shortcut Keys to Save Time and Work ............................................ 37
Using Arrow Keys ................................................................... 37
Pinning a Menu .......................................................... ........... 38
Working with Dialog Boxes .............................................................. 38
Two Types of Dialog Boxes ............................................................ 38
Responding to a Dialog BOx ........................................................... 39
Setting Printer Options ........................... . ...................................... 42
Getting Ready to Print ......................................... .. .................... 43
Setting Paper Type, Size, and Orientation (Options) ...................................... 44
Using Online Help ....................................................................... 45
Beyond the Basics ....................................................................... 47
Using and Creating Templates ........................................................ 47
Adding and Viewing Document Notes ................................................. 50
Opening Two Documents at Once ...................................................... 51
Naming a DOS File ................................................................... 52
Quick Start Exercise . ............... .. ................................................... 53
3 File Manager__ ......................................._ , 55
_tarting File Manager _. ...... . _._....._ :............... T................................. 55
Changing the View ................................................... .................... 58
Sorting Files .... :. ....................................................................... 59
Working with Folders ................................................................... 59
Moving or Copying a File or Folder .................................................... 60
Viewing Information about Files and Folders ............................................... 62
Changing Information about Files and Folders .............................................. 64
Formatting and Copying Diskettes .................... _................................... 65
Renaming, Duplicating, or Deleting a File or Folder ......................................... 66
MODEM A PPLI CATIONS
4"Fax and Data Modem .................................. 67
Before Sending a Fax .................................................................... 67
Sending a Fax .......................................................................... 69
_Using a Cover Page ................................................................. 71
Using Manual Dial ................................................................... 71
Setting Advanced Fax Options ........................................................ 72
-Fax Errors .......................................................................... 73
Contents ii
Page 7
Sending and Receiving Information ....................................................... 74
Calling the Other Person before You Start ............................................... 74
Starting Communication .............................................................. '74
Getting Ready to Communicate ....................................................... 76
Dialing ............................................................................ 78
Having a Conversation ............................................................... 79
Sendifig Brief Messages and Files ...................................................... 79
Receiving and Saving Messages and Files ............................................... 82
Using Scripts ........................................................................ 85
5 Internet and Email .................................. 87
Installing the Browser .................................................................... 87
Establishing an Intemet/Email Account and Setting Up ...................................... 88
Using the Default Internet Service Provider ............................................. 88
Using Another Internet Service Provider ................................................ 88
Browsing the Internet's World Wide Web ................................................... 91
Using Links to Access More Information or Other Web Pages .............................. 93
Searching the Current Web Page ....................................................... 93
Printing the Current Web Page ........................................................ 93
Saving Information from a Web Page ................................................... 94
Copying Text from a Web Page to the Clipboard ......................................... 94
Going Directly to Another Web Page .......... . ........................................ 95
Saving a List of Web Pages (Bookmarks) ................................................ 95
Using the History List to Access Web Pages ............................................. 96
Searching_.fo_Information on the Web ._.._, ..... ._....................................... 96
Browser Error Messag-es-..-_.-. _., .-, .................................................... 97
Customizing Your Web Browser ........................................................... 98
Selecting a Default Home Page ........................................................ 98
Selecting Text (Font) Attributes ........................................................ 98
Setting Memory Preferences ........................................................... 99
Selecting Display Preferences ........................................................ 100
Customizing the Tool Bar ............................................................ 100
Using Emailer ......................................................................... 101
Setting Email Preferences ............................ ,................................ 101
Retrieving Email Messages .................................. : ........................ 103
Reading or Replying to New Mail ..................................................... 1(_
Deleting Email Messages ............................................................ 105
Printing Email ...................................................................... 105
Creating and Sending Email Messages ......... • •...................................... 106
Changing Text Appearance & Running Spell Check ..................................... 108
Using Addressbook to Store Email Addresses .......................................... 108
Saving Emails as Files ............................................................... 109
Attaching or Including Files .......................................................... 110
Copying and Pasting Text to and from Email ........................................... 111
Working with Folders ............................................................... 111
Contents iii
Page 8
Sorting Mail ....................................................................... 112
Searching Mail ..................................................................... 112
Setting Emailer Options ............................................................. 113"
Email Error Messages ............................................................... 114
FUNCTION KEY ACCESSORIES
6 Calculator ......................................... 115
Starting Calculator ..................................................................... 115
Using Basic CalcuLator Functions ......................................................... 116
Using the Calculator's Buttons and Keys .............................................. 116
Performing Calculations ............................................................. 118
Order of Operations ................................................................ 118
Handling Error or Overflow Conditions ................................................ 119
Understanding Memory ...................... _......................................... 120
Converting Measurements ....................................... •...................... 121
Calculator Worksheets .................................................................. 121
Home and Family .................................................................. 122
Retail ............................................................................. 123
Financial .......................................................................... 124
7 World Clock ....................................... 125
S_rtig WorldC_ck.................. _..... ............. . ............................. 125
"_ewing Time Zones . .-. .... _.. :_:-.,-... __. ___-._.._ ...................................... :.. 126
Changing to Daylight Savings Time ....................................................... 126
Setting Clock Options ................................................................... 127
8 To Do List ......................................... 129
Starting To Do List ..................................................................... 129
Adding Items to a List .................................................................. 130
Editing a To Do List .................................................................... 131
Customizing the To Do List ................................ .............................. 132
Printing or Faxing a To Do List .................................... . ..................... 132
Creating a New To Do List .............................................................. 133
APPENDIX
Troubleshooting ..................................... 135
l_ecifications 138
ck &White Clip'A_ i i i iii iii iii i i iiii iii iii iii iii i 139
Color Clip Art ....................................... 145
Index ............................................... 147
Contents iv
Page 9
1
Setting Up
This chapter explains how to set up your new GeoBook. It contains
instructions on maintenance,' using the battery pack, connecting a printer,
connecting the modem, and connecting an optional monitor and serial
mouse. This chapter also contains instructions on using diskettes and optional
PC cards.
Unpacking
Make sure that the following items are included in the box:
• The GeoBook unit
• AC adapter
• One rechargeable battery pack
• program diskettes
• Onetelephone line cord to connect the modem
• Manuals, Intemet Service Provider booklet, and other literature
see tile -ac_:essory order form inside the box to purchase these optional
hardware products:
• 4 or 10 MB PC card
• Battery pack
• Carrying case
The accessory order form also lists additional software products that are
available for your notebook.
Setting Up 1
Page 10
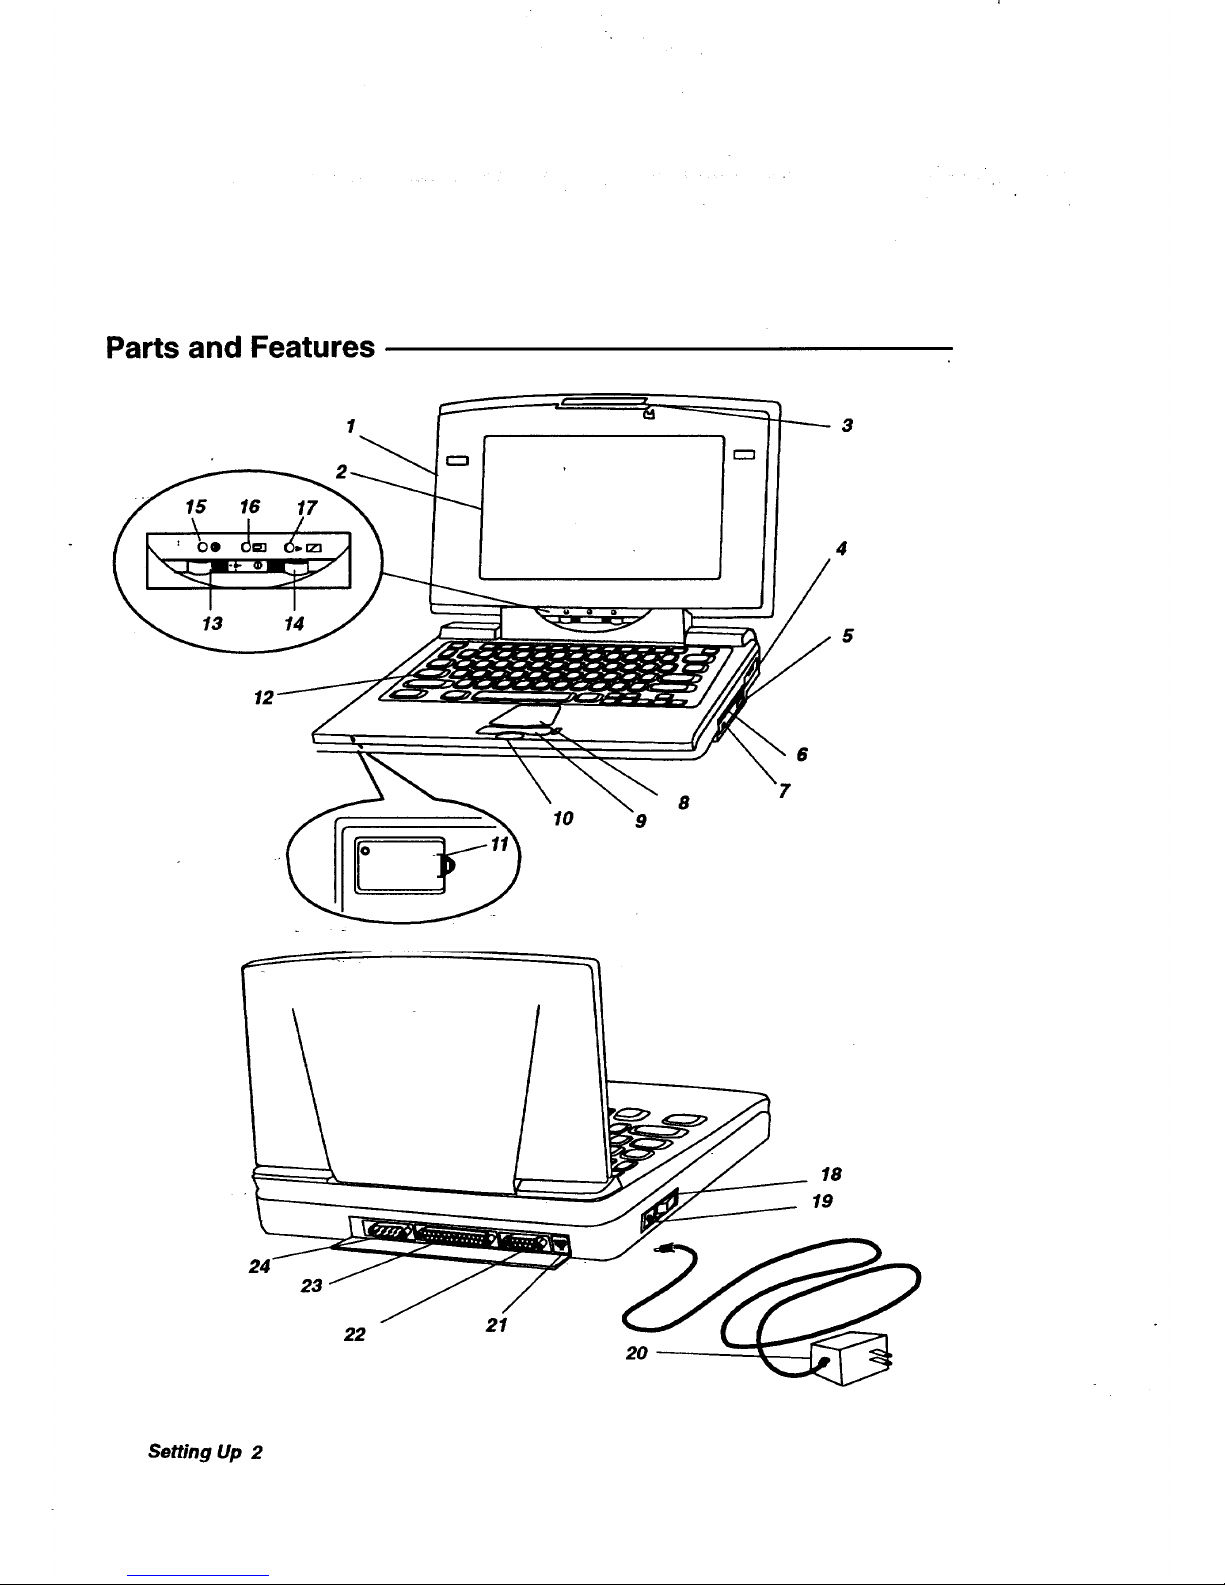
Parts and Features
15 16 17
I
13 14
3
4
5
12
6
10
8
9
24
23
22
21
18
19
Setting Up 2
Page 11
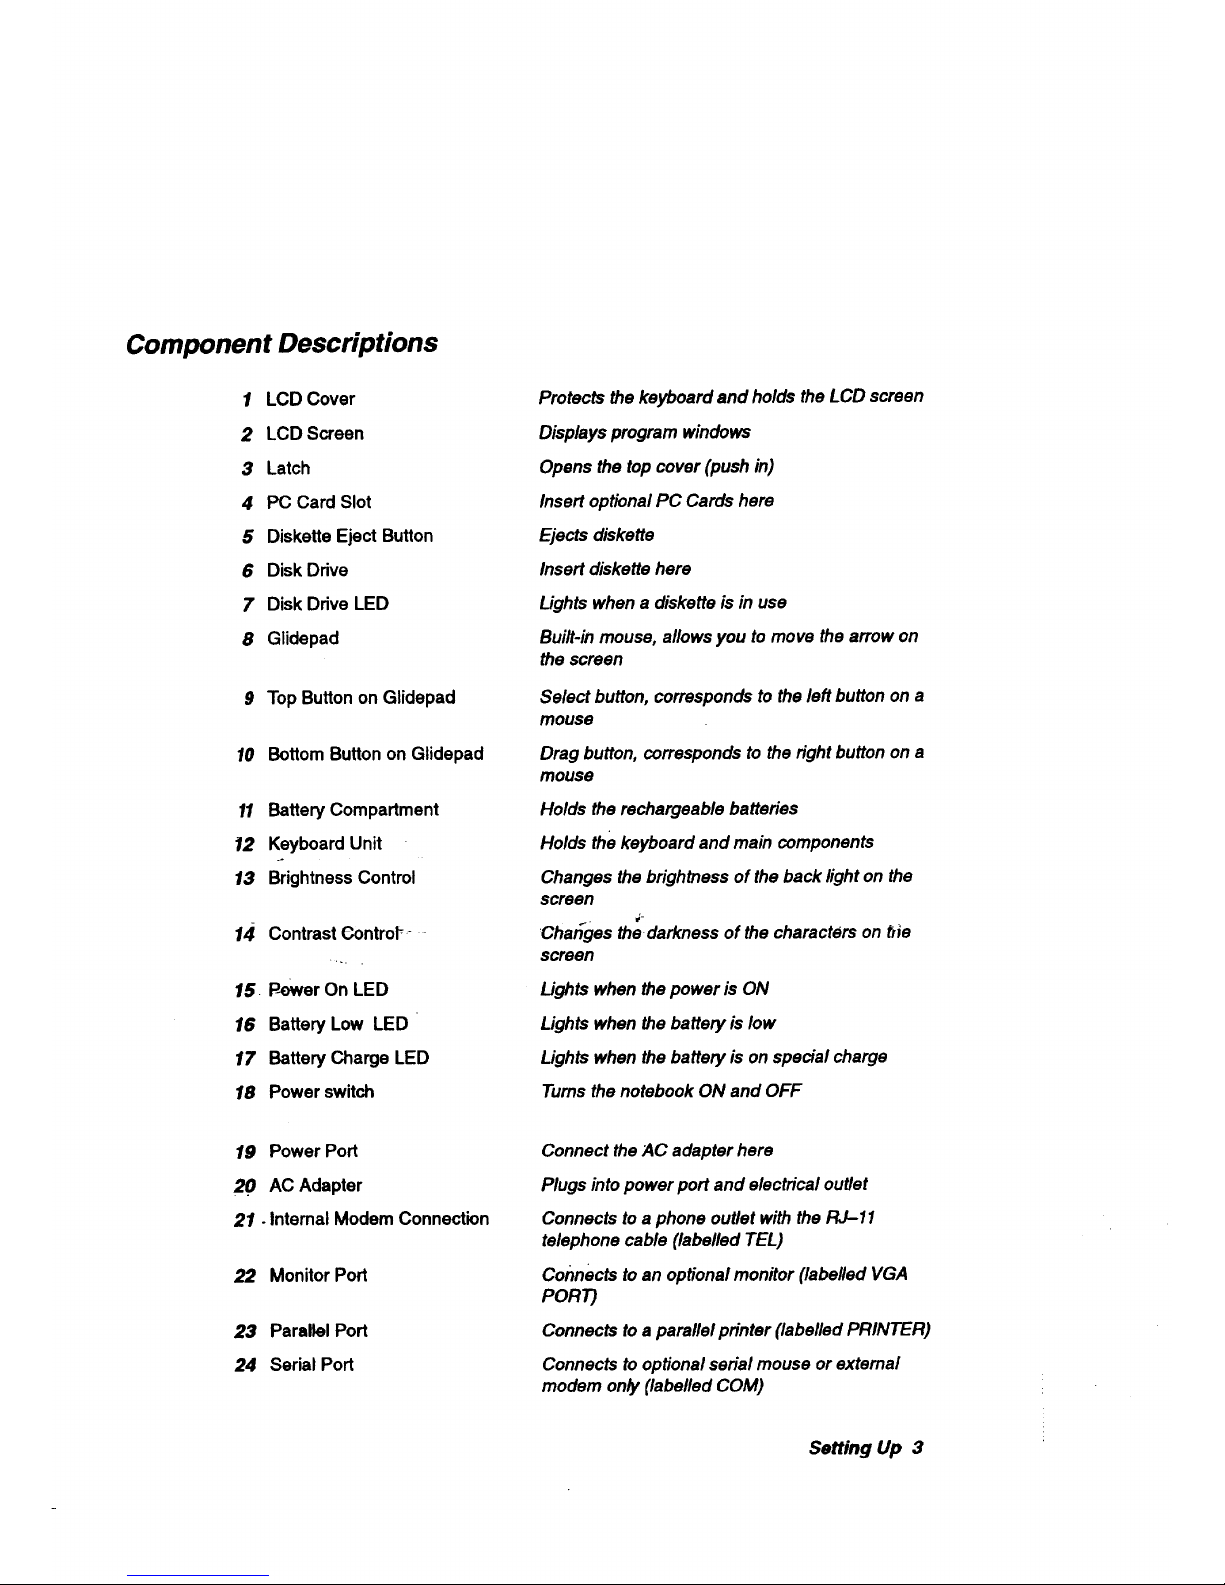
Component Descriptions
1 LCD Cover
2 LCD Screen
3 Latch
4 PC Card Slot
5 Diskette Eject Button
6 Disk Drive
7 Disk Drive LED
8 Glidepad
9 Top Buttonon Glidepad
10 BottomButtonon Glidepad
11 Battery Compartment
12 Keyboard Unit
.o
13 Brightness Control
14 Contrast €ontroF _
15. P-ewer On LED
16 Battery Low LED
17 Battery Charge LED
18 Power switch
19 Power Port
20 AC Adapter
21. InternalModem Connection
22 MonitorPod
23 ParallelPort
24 Serial Port
Protects the keyboard and holds the LCD screen
Displays program windows
Opens the top cover (push in)
Insert optional PC Cards here
Ejects diskette
Insert diskette here
Lights when a diskette is in use
Built-in mouse, allows you to move the arrow on
the screen
Select button, corresponds to the left button on a
mouse
Drag button, corresponds to the fight button on a
mouse
Holds the rechargeable batteries
Holds the keyboard and main components
Changes the brightness of the back light on the
screen
'ChatTges the darkness of the characters on tile
screen
Lights when the power is ON
Lights when the battery is low
Lights when the battery is on special charge
Turns the notebook ON and OFF
Connect the ;4C adapter here
Plugs into power port and electrical outlet
Connects to a phone outlet with the RJ-11
telephone cable (labelled TEL)
Connects to an optional monitor (labelled VGA
PORT)
Connects to a parallel printer (labelled PRINTER)
Connects to optional serial mouse or extemal
modem onpy(labelled COM)
Setting Up 3
Page 12
Safety and Maintenance
Read and follow these warnings and cautions. Be sure to save these
instructions.
Warnings and Cautions
WARNING:
Warnings are to prevent risk of fire, shock, or other possible injury.
• Read and understand all instructions.
• Follow all warnings and instructions marked on this product.
• Do not use this product near water (bath tub, shower,
swimming pool, etc.) or other liquids or if you are wet.
• Do not use this product near a gas leak.
• Do not overload wall outlets and extension cords.
• Install this product in a protected location where no one can
trip over any line or power cord. Protect cords from damage or
abrasion.
• Do nottry to take apart or repair this equipment yourself.
Service should be performed by authorized service personnel
only. WarrantY will be voided!f you take the unit apart.
• check the i_wer-rating of this product on the rating plate as
well as the rating of your local power supply. Connect this
machine only to a matching power supply and grounded AC
outlet. Connecting this product to an incorrect voltage and
frequency may interfere with its operation and damage
electrical parts, and thereby void your manufacturer's warranty.
• In case of malfunction, immediately turn the unit OFF,
disconnect the AC adapter, and consult your authorized service
center.
Do not pull on the power cords or connection cables. To
disconnect, be sure to always grasp the plug itself.
If you spill liquid on the notebook, immediately turn it OFF,
disconnect the AC adapter, and consult your authorized service
center.
• During thunderstorms, turn the unit OFF, disconnect the AC
adapter, and unplug the AC adapter from the AC outlet.
Setting Up 4
Page 13
Cleaning
CAUTION:
Cautions will prevent you from damaging the product.
• Avoid exposing the equipment to direct sunlight and other
sources of heat, excessive moisture, or dust. Be especially
careful not to leave the machine in an automobile exposed to
direct sunlight. The LCD screen cannot tolerate high
temperatures.
• Use the AC adapter supplied with this product. Do not
substitute adapters.
• Allow for open circulation of air around the notebook.
• Turn the unit OFF before replacing batteries or unplugging the
AC adapter.
• Do not allow foreign matter to enter the interior of the machine
or get between the keys.
To avoid electrical interference, do not place the machine close
to a radio receiver or television. If it is close to a television set,
the disk drive may not work properly and diskettes may be
damaged.
After turning the equipment OFF, wait at least 10 seconds
before restarting. Failure to wait 10 seconds may disrupt the
start-up sequence, resulting in faulty operation and possible
hardware damage.
With the power OFF and the modem unplugged, clean the notebook
(except the LCD screen) with a soft, slightly moist cloth. Moisten with water;
never use detergents, abrasive cleansers, benzene, or other chemicals. Avoid
spraying aerosols near the notebook, which can blow dust and dirt particles
into the keyboard, glidepad, and disk drive.
CAUTION: For the LCD screen only, do not use water, Ketone,
aromatics, Acetone, or Ethyl Acetate. For the LCD, you may wipe lightly
using a soft cloth and one of the following solvents: pure isopropyl alcohol
(rubbing alcohol) or pure Ethyl alcohol. Never use alcohol that contains
water.
Setting Up 5
Page 14

Connecting the AC Adapter
CAUTION:
Turn the unit OFF beam:
• disconnecting it from.the AC adapter;
• installing or removing a rechargeable battery; or
• connecting or removing any peripheral device, such as the
printer, external modem, or external mouse.
The first time you power
on your notebook, you
may have to wait several
seconds for the system
to ini#alize.
Also, be sure to turn the
power ON to the
notebook before turning
the power ON to any
peripheral device.
Always turn the power
OFF to peripherals
before turning the power
OFF to the notebook.
1. Plug the AC adapter into a wall AC outlet.
2. Plug the AC adapter cord into the power port on the unit.
3. If you do not have a rechargeable battery or do not wish to use it, you
can use the power switch to tum the unit ON. If you want to use the
rechargeable battery, see page 7.
Opening the_Notebook
Hold the notebook with one hand. With your other hand on the top cover,
sqtieeze the latch between your thumb and forefinger; then lift up.
Setting Up 6
Page 15
Installing a Battery Pack
Your notebook comes with a mchargeable battery pack, allowing you to use
the notebook away from an AC outlet. You can also order an additional
battery pack for longer mobile use (see the accessory order form that came in
the box).
Before using the battery, you must charge it. See page 8.
CAUTION:
Observe the following guidelines when using batteries:
Do not try to disassemble or burn the battery. It may burst.
If you are going to use the notebook for an extended period
with the AC adapter only, remove the nickel-cadmium battery
and store it in a cool, dry place. Be careful to prevent the
battery terminals from contacting metallic pisces. Recharge at
least once every 3 or 6 months, even if the battery has not been
used.
• Never recharge the battery using a recharger other than the
built-in recharger of your notebook or that supplied by the
manufacturer.
IMPORTANT: If the battery is installed and the AC adapter is
connscted, never disconnect the adapter from the machine or from the
AC outlet before turning the notebook off. Doing so can damage
memO. g you'Wan_ t;_use the machine with battery power only, first
turn It OFF, disconnect the AC adapter, and then turn the notebook ON.
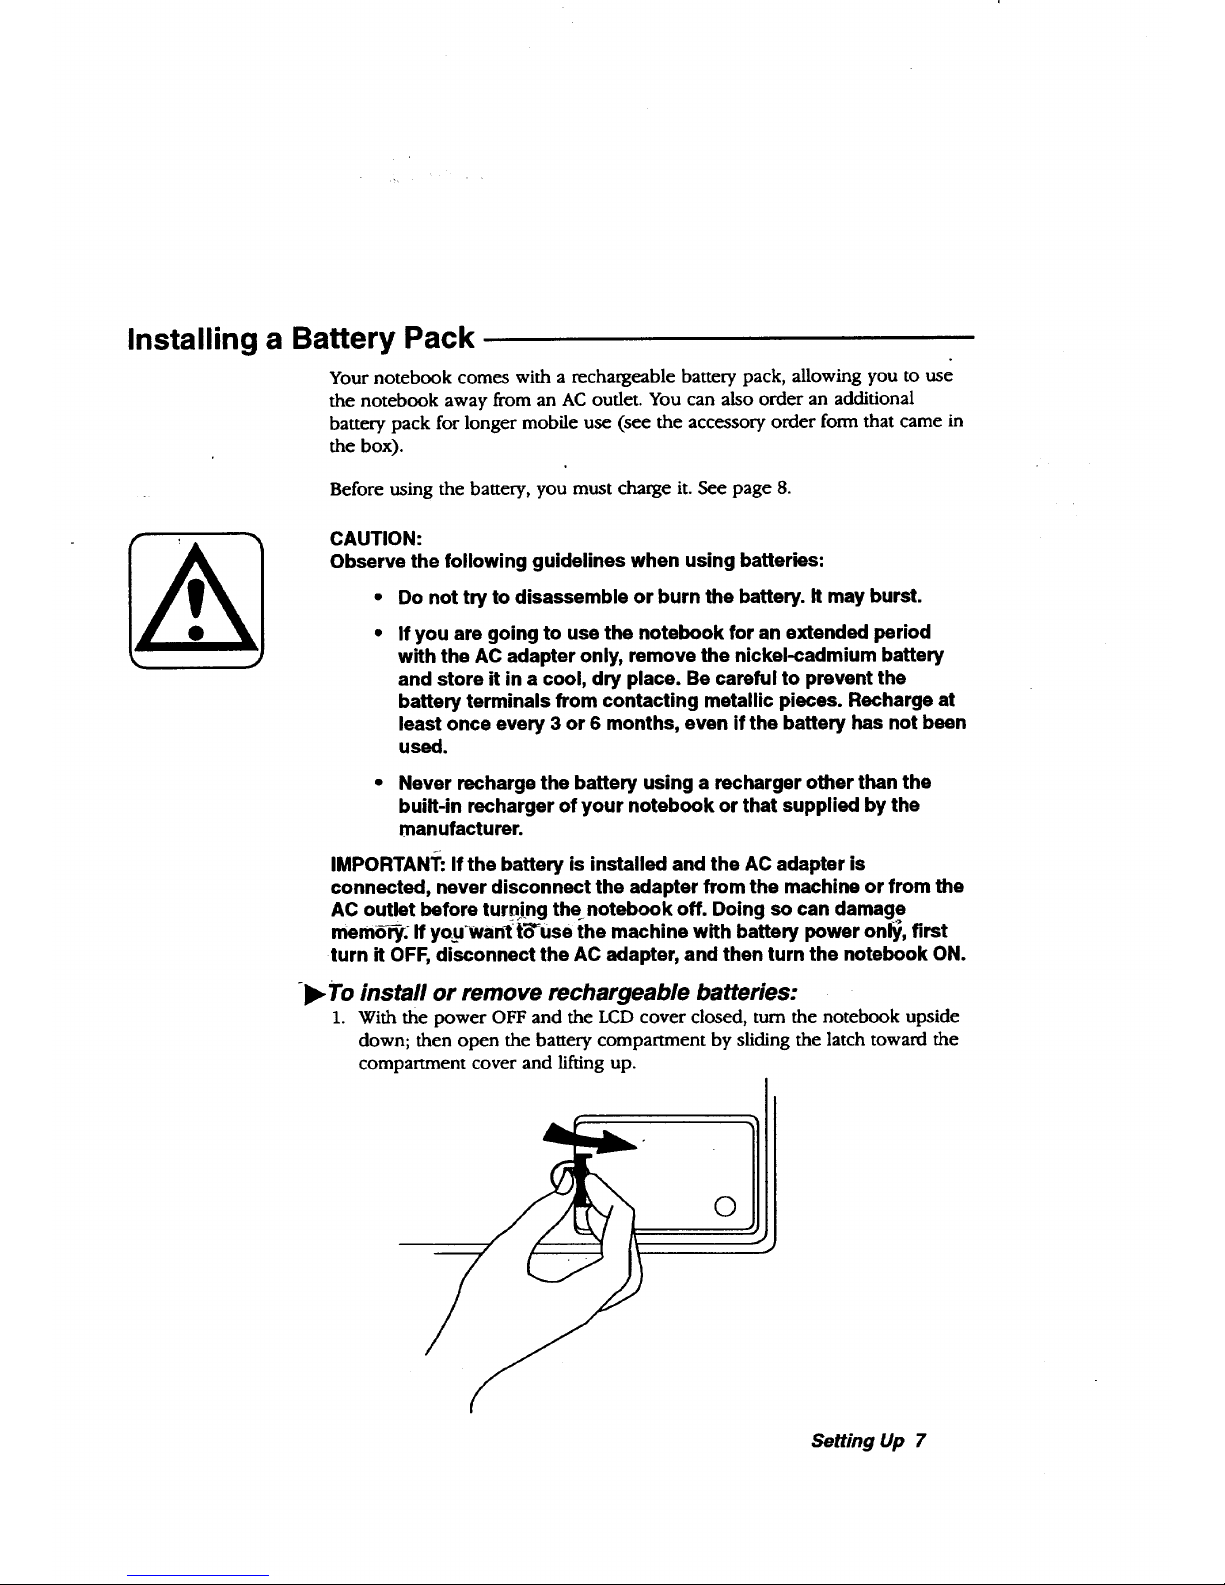
°ll_ To install or remove rechargeable batteries:
1. With the power OFF and the LCD cover closed, turn the notebook upside
down; then open the battery compartment by sliding the latch toward the
compartment cover and lifting up.
Setting Up 7
Page 16
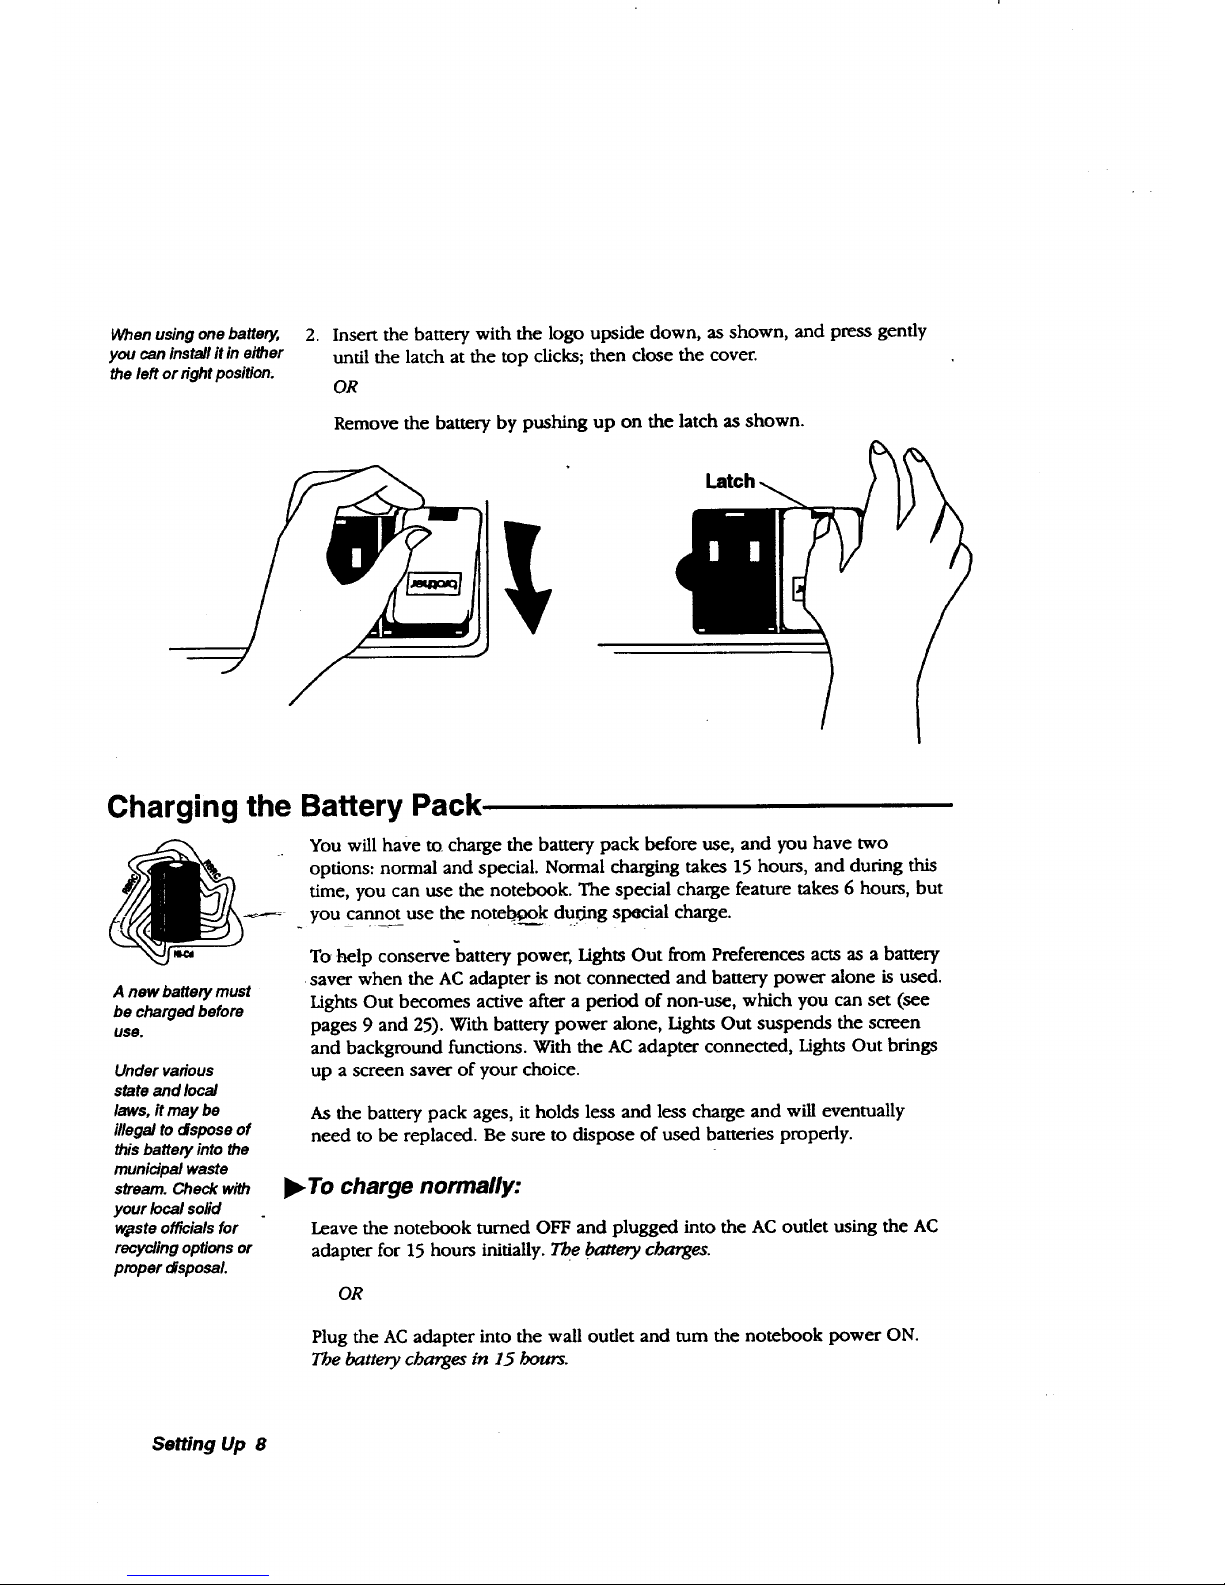
When using one battery,
you can install it in eider
the left or r_ght position,
2. Insert the battery with the logo upside down, as shown, and press gently
until the latch at the top clicks; then close the cover.
OR
Remove the battery by pushing up on the latch as shown.
Charging the Battery Pack
A new battery must
be charged before
use.
Under various
state and local
laws, it may be
illegal to dspose of
this batten/into the
municipal waste
stream. Check with
your local solid
w_ste officials for
recycling options or
proper dsposal.
You will have to charge the battery pack before use, and you have two
options: normal and special. Normal charging takes 15 hours, and during this
time, you can use the notebook. The special charge feature takes 6 hours, but
_ you cannot use the note boo_ k du.dng stmcial charge.
To help conserve battery power, Lights Out from Preferences acts as a battery
•saver when the AC adapter is not connected and battery power alone is used.
Lights Out becomes active after a period of non-use, which you can set (see
pages 9 and 25). With battery power alone, Lights Out suspends the screen
and background functions. With the AC adapter connected, Lights Out brings
up a screen saver of your choice.
As the battery pack ages, it holds less and less charge and will eventually
need to be replaced. Be sure to dispose of used batteries properly.
• To charge normally:
Leave the notebook turned OFF and plugged into the AC outlet using the AC
adapter for 15 hours initially. The battery charges.
OR
Plug the AC adapter into the wall outlet and turn the notebook power ON.
The battery charges in 15 hours.
Setting Up 8
Page 17

7"0stop charging the
battery after selecting
Start Charge, tum the
notebook OFF.
If you disconnect the
AC adapter during the
special charge cycle,
an error message
appears. To restart the
process, turn the
notebook OFF, connect
the AC adapter, and
repeat steps I through
,I.
If you close the cover
while using special
charge, the LCD will
become warm and may
appear bluny. Once the
LCD cools, the blurriness
will dminish.
I_ To use special charge:
1. With the AC adapter connected, turn the notebook ON.
2. Click on Preferences on the Main Menu. The Preferences menu appears
3. Click on Battery. A dialog box opens.
4. Select Start Charge. The screen goes blank, and the notebook begins to
charge the battery. The batiery charge LED lights. When finished, a
message appears telling you the time that the charge was completed.
LowbatteryLED;
lightswhenthebat-
teryneedscharging
BatterychargeLED
forspecialcharge
),To set Lights Out to conserve the battery:
When the AC
adapter is
connected, screeo_-
_- saver displays
moving patterns
(depenofng on which
one you select). -_-
With battery power
alone, screen saver
suspends the
system.
1. Click on Preferences on the Main Menu. The Preferences menu appears.
2. Select Lights Out. A dialog box opens.
3. _Besi-dE Scree_ SaVing_Kelect On and click on the arrow keys beside*Time
.... to select the time for Lights Out to take effect. It does not matter which
screen saver you select. The system enters Lights Out after the keyboard
and glidepad have not been used for the specified time.
4. Click on OK.
5. To restore the screen after Lights Out takes effect, use the keyboard
(preferably, press SHIFT to avoid opening a program or entering a
character if you use another key).
Battery Maintenance
Over time, most rechargeable batteries are subject to memory effect, which
results in shortened battery life per charge. To avoid this, recharge batteries
on special charge only after the Low Battery LED lights.
Setting Up 9
Page 18
Connecting a Printer
To print, you will need to connect a parallel printer to your notebook. After
connecting your printer, you will be ready to set printer preferences,
including default page type, size, layout, and margins.
To set printer preferences, select your printer from a list of printer names. If
your printer is not on the list, it may be able to emulate another printer that is
on the list. Refer to your printer manual to set emulation mode.
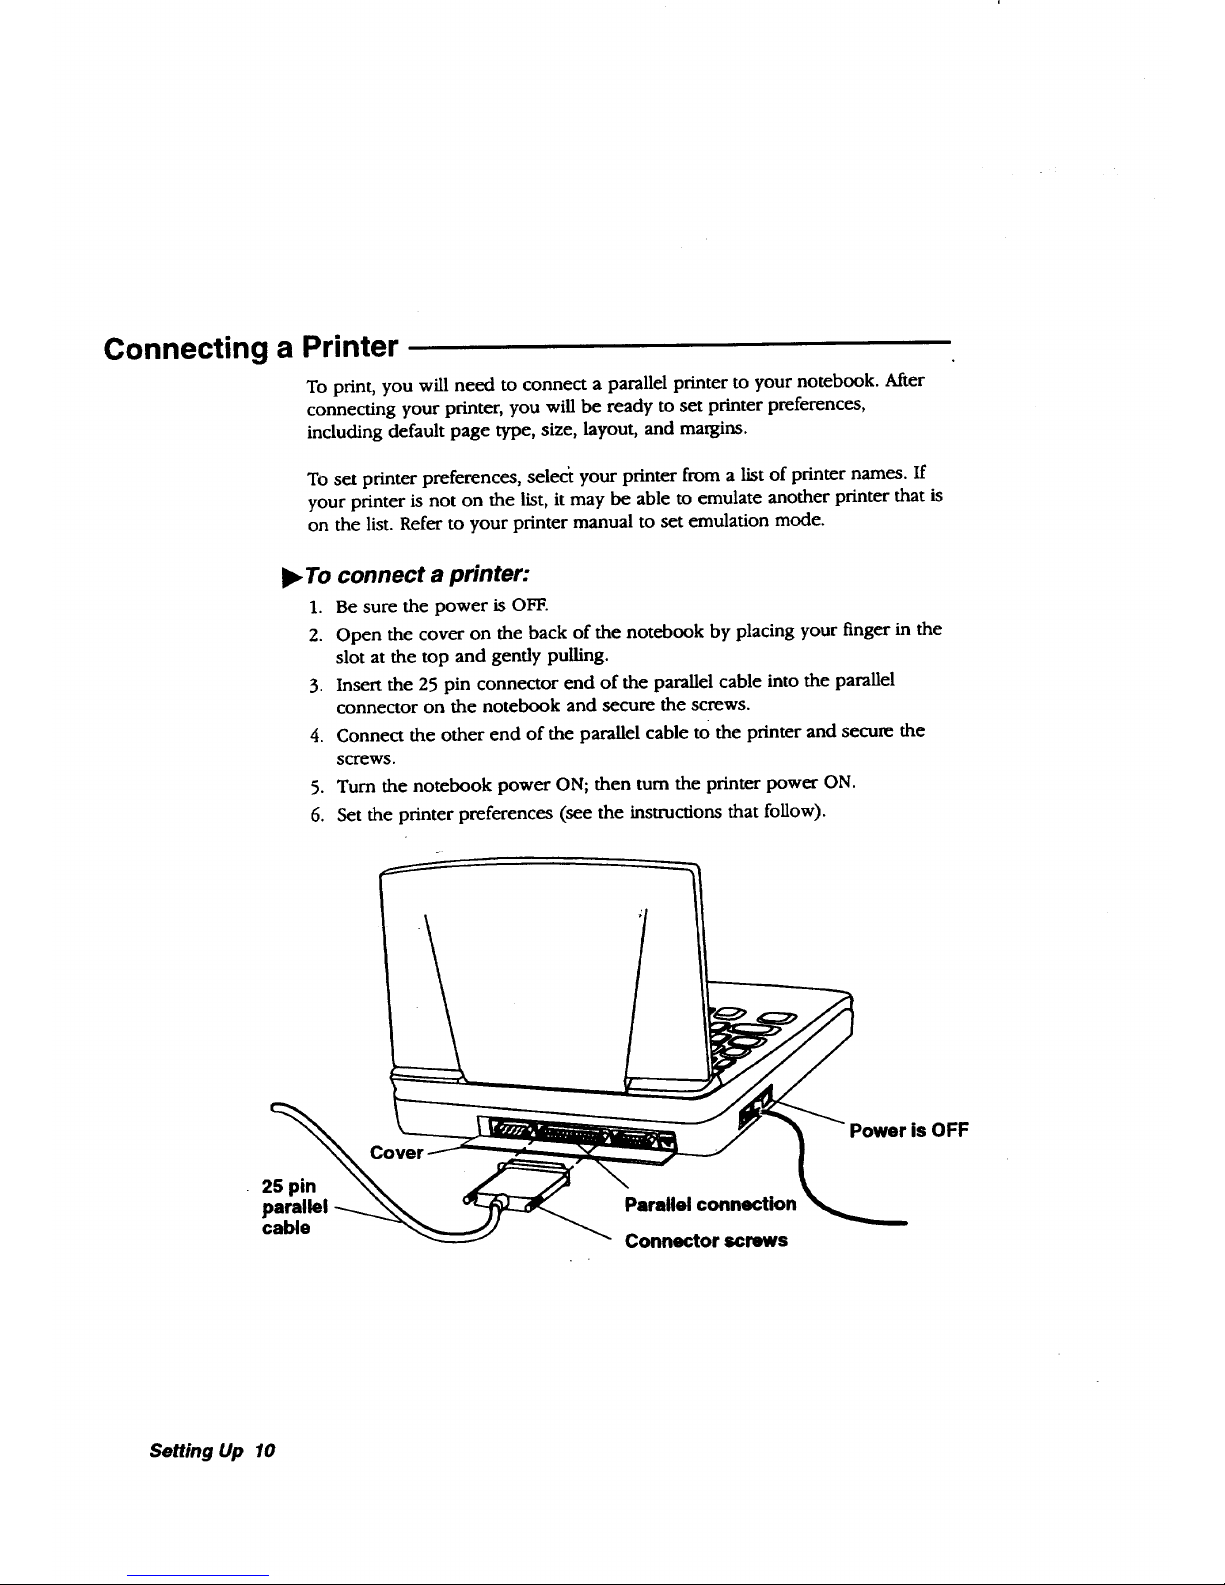
• To connect a printer:
1. Be sure the power is OFF.
2. Open the cover on the back of the notebook by placing your finger in the
slot at the top and gendy pulling.
3. Insert the 25 pin connector end of the parallel cable into the parallel
connector on the notebook and secure the screws.
4. Connect the other end of the parallel cable tO the printer and secure the
screws.
5. Turn the notebook power ON; then turn the printer power ON.
6. Set the printer preferences (see the instructions that follow).
25 pin
parallel
cable
Parallel connection
Connector screws
Power is OFF
Setting Up 10
Page 19
Setting Printer Preferences
When you connect a printer or change printers, you must set the printer
preferences, where you also set default paper type, size, layout, and margins
for your printer.
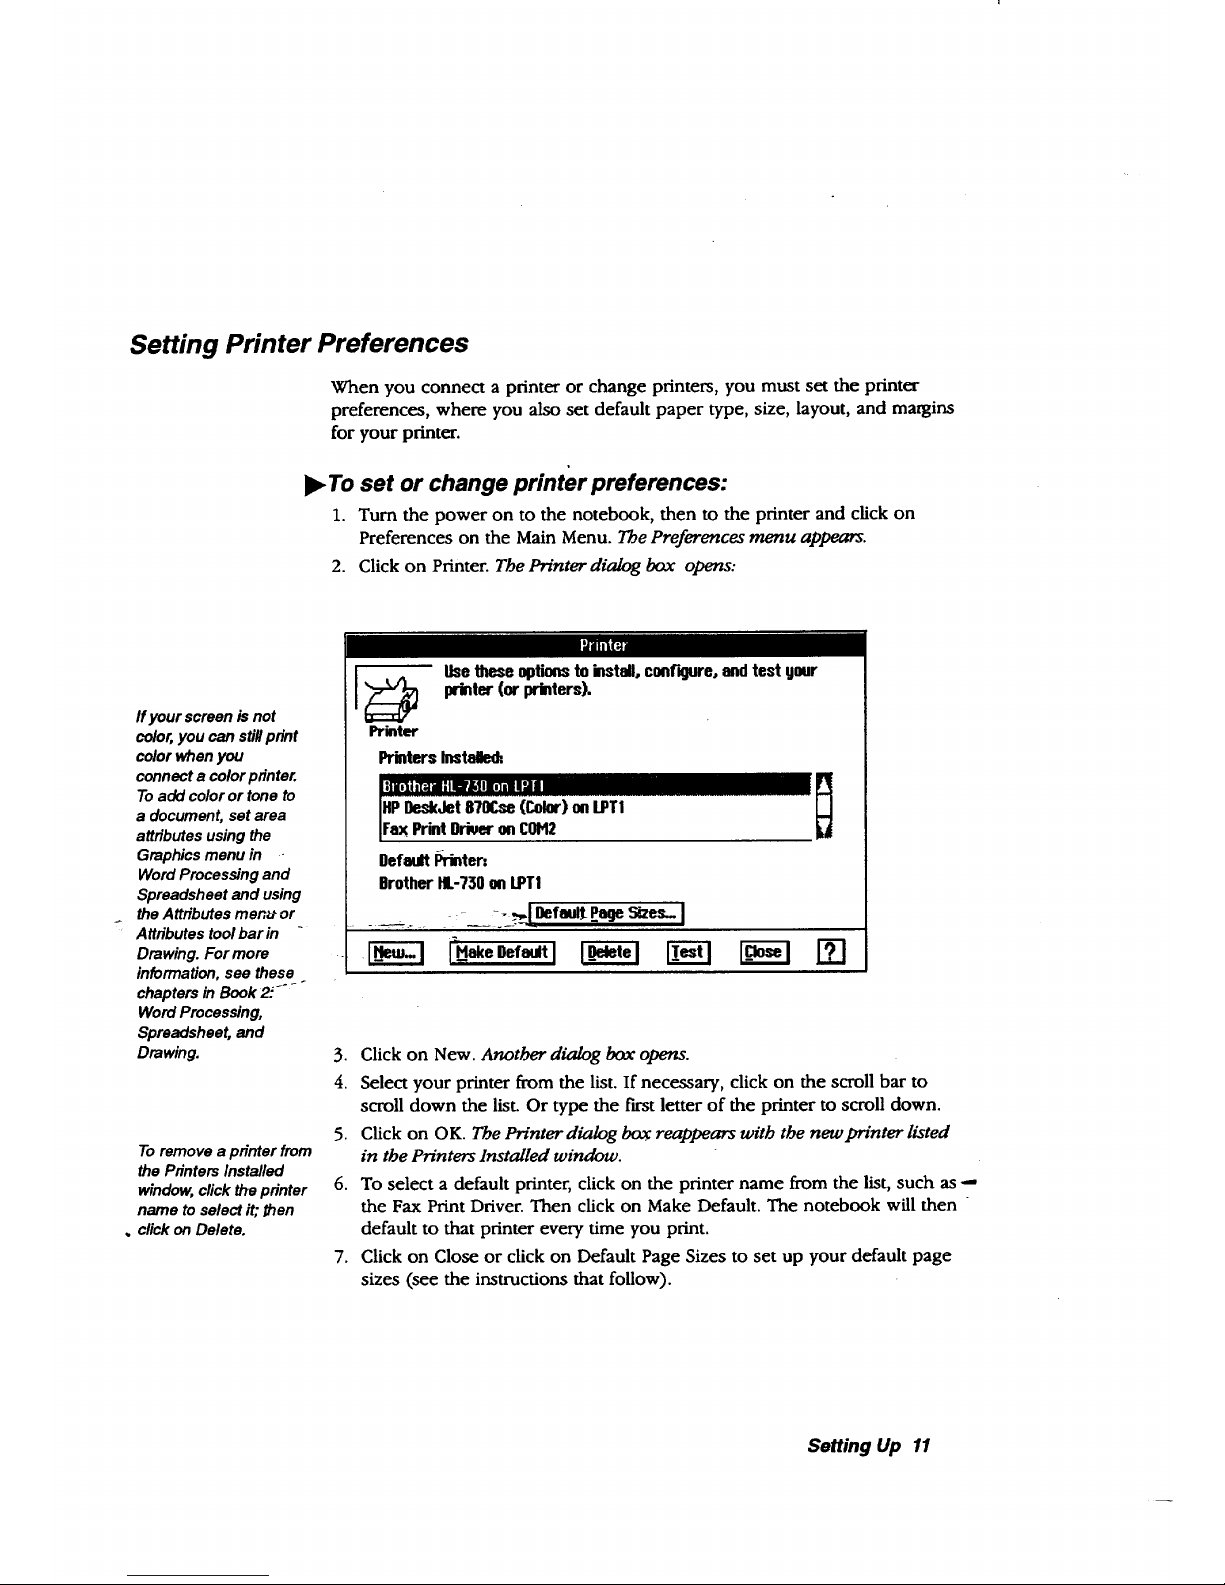
l_ To set or change printer preferences:
1. Turn the power on to the notebook, then to the printer and click on
Preferences on the Main Menu. The Preferences menu appears.
2. Click on Printer. The Printer dialog box opens:
I'd_iFai
ffyour screenis not
color,you can stillprint
colorwhenyou
connecta colorprinter.
Toadd coloror toneto
a document, setarea
attributesusing the
Graphicsmenu in -
WordProcessingand
Spreadsheet and using
the Attributesmenu or
Attributestool bar in -
Drawing. For more
information,see these
chapters in Book2_'_
WordProcessing,
Spreadsheet, and
Drawing.
To remove a printer from
the Printers Installed
window, click the printer
name to select it; then
. click on Delete.
Winter
Usethese optionsto install, conf'Rure, and test gonr
printer (or priders),
PrintersInstalled=,
Default I_rinter•
Brother NL-730onLPTI
3. Click on New. Another dialog box opens.
4. Select your printer from the list. If necessary, click on the scroll bar to
scroll down the list. Or type the first letter of the printer to scroll down.
5. Click on OK. The Printer dialog box reappears with the new printer listed
in the Printers Installed window.
6. To select a default printer, click on the printer name from the list, such as --
the Fax Print Driver. Then click on Make Default. The notebook will then
default to that printer every time you print.
7. Click on Close or click on Default Page Sizes to set up your default page
sizes (see the instructions that follow).
Setting Up 11
Page 20
The default page sizes
work for _e majority of
printers; however,
some printers cannot
print _e default
margins shown here.
Check your printer
manual and enter the
margins _at it can
p/YnL
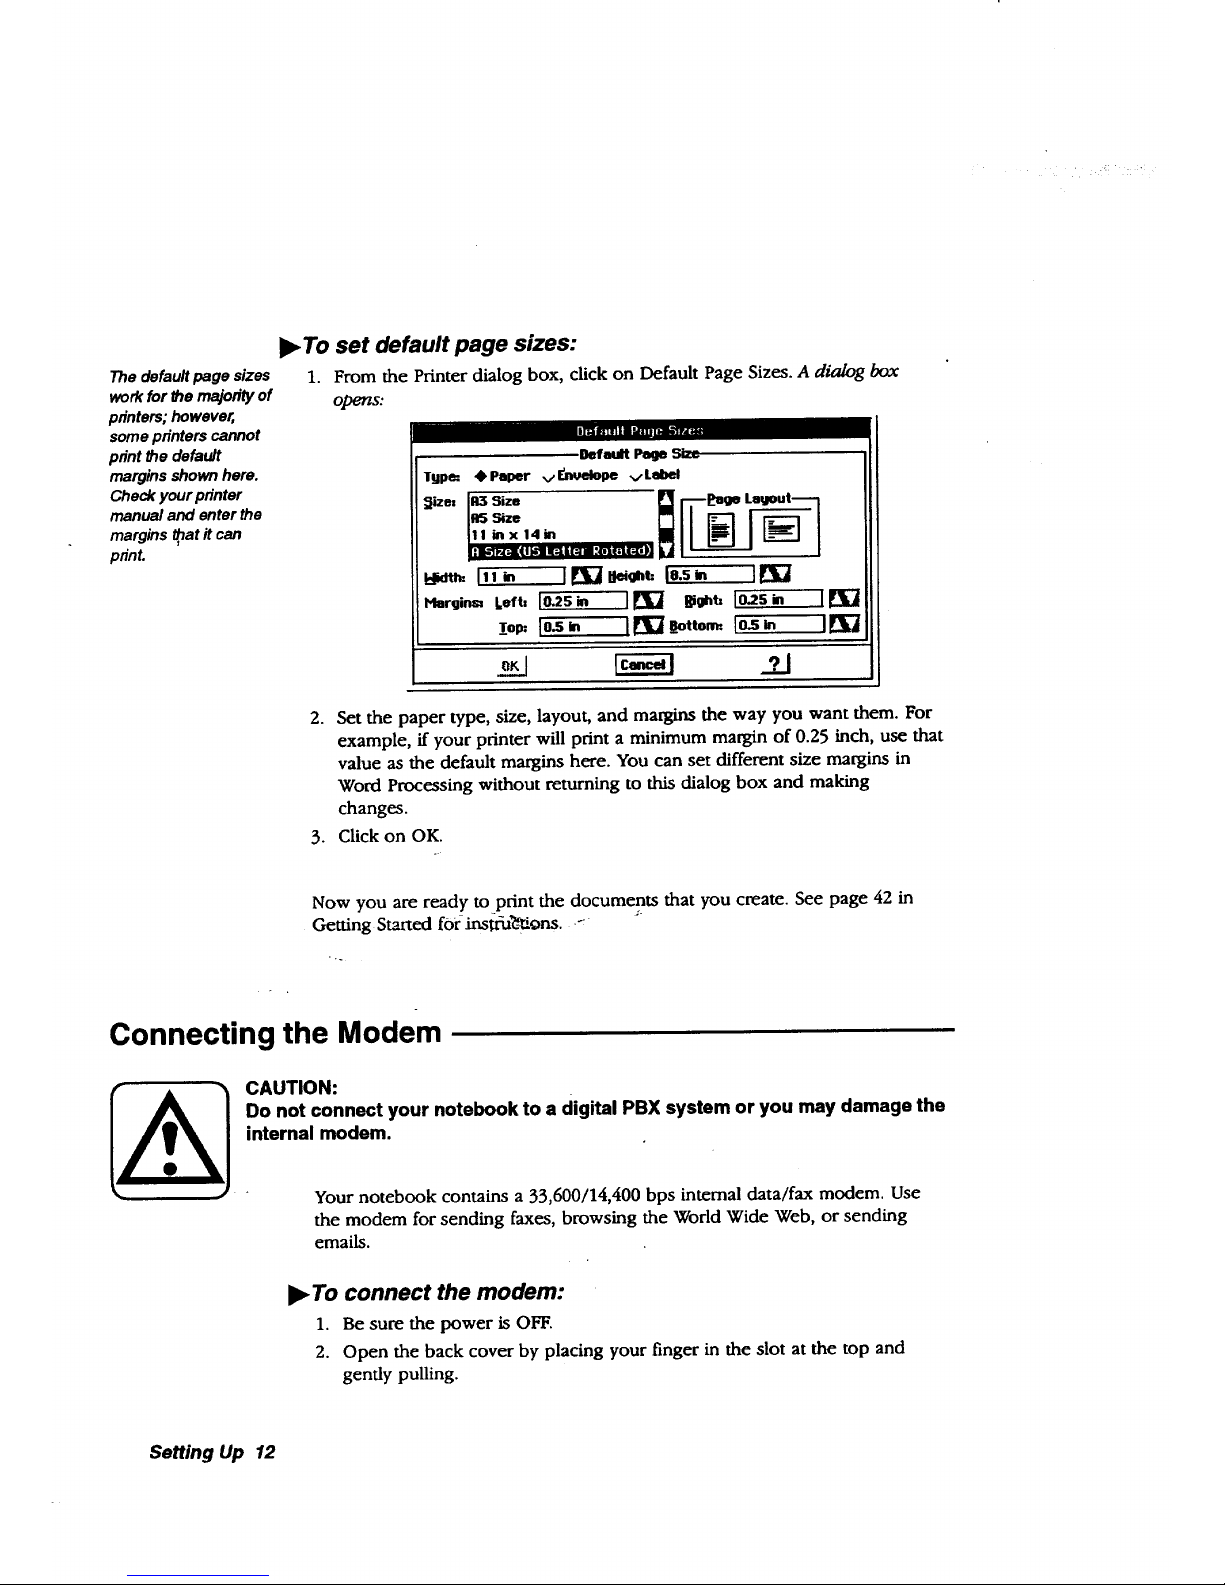
• To set default page sizes:
1. From the Printer dialog box, click on Default Page Sizes. A dialog box
opens:
_ lm_ k-wa_
.
_fe_n Pa_ mare
TUp_ • Paper v E_w_dlope vLaibel
Sizes iR3 Size [] _oge Louoot_
11 bzxl4m _'_
. :lk'IR'gE_I _11P3iP'Jll "(i1_[i'_, i|
I!!_ I E_J_U_oh_ le.s= lEVI]
Hlargin_ Left, Io.2s_ II[]i] _ Io_s- IE]i]
lop: io-s_ i_gottom= I_z il_
Set the paper type, size, layout, and margins the way you want them. For
example, if your printer will print a minimum margin of 0.25 inch, use that
value as the default margins here. You can set different size margins in
Word Processing without returning to this dialog box and making
changes.
3. Click on OK.
Now you are ready to print the documents that you cream. See page 42 in
Getting Started forinst_uZ'_tions. -"
Connecting the Modem
CAUTION:
Do not connect your notebook to a digital PBX system or you may damage the
internal modem.
Your notebook contains a 33,600/14,400 bps internal data/fax modem. Use
the modem for sending faxes, browsing the World Wide Web, or sending
emails.
• To connect the modem:
1. Be sure the power is OFF.
2. Open the back cover by placing your finger in the slot at the top and
gently pulling.
Setting Up 12
Page 21

3. Plug the telephone line cable into the modem connection on the back of
the unit. Plug the other end of the telephone line cable into the telephone
outlet.
4. Turn the power to the notebook ON; then set the modem preferences
(see the instructions that follow).
Telephone
line cable
ial mection
/
Modem
connection
is OFF
An external modem
and telephone can
share the same
telephone outleL
Plug the telephone
into the modem
connector labelled
Phone.
l_ To connect an external modem:
1. Be sure the power is OFF.
2. Open the back cover by placing your finger in the slot at the top and
gently pulling.
3. C0nn--e_zt-the-.,seria.1 cable into the serial port of the unit and secure the
" connector screws. Connect the 9 pin end of the serial cable into the
modem and secure the connector screws.
Serialpod(sedalmouseor
externalmodemonly)
Setting Up 13
Page 22
4. Plug the telephone line cable into the modem connector labelled IJ'ne.
5. Plug the other end of the telephone line cable into the telephone Outlet.
6. Connect the AC adapter to the modem and plug it into the oudet.
7. Turn the power ON to the notebook; then turn the power ON to the
modem and set the modem preferences (instructions follow).
Setting Modem Preferences
t
Optionalextemal
modems have
separatepower
switches.Turnthe
notebookonfirst, then
the modem.
if you have connected
an optional external
modem, select
External here.
After connecting the modem, set modem preferences before using.
)_ To set or change modem preferences:
1. Tum the power on to the notebook, then the modem and click on
Preferences on the Main Menu. The Preferences menu appears.
2. Click on Modem. A dialog box opens.
3. Select Internal and set Can Fax to Yes.
4. Select the dialing type of your telephone: Tone or Pulse.
5. Beside the words Can Fax, be sure that Yes is selected.
6. Click on OK. If you did not need to make any changes, select Cancel to
return to Preferences.
7. Press EXIT to return to the Main Menu. To set Speed and Format Options,
see the instructions that follow.
For faxing, browsing
the inteme_ and
sending email, most
of the options in
Speed and Format
are already set for
you. The Baud Rate is
the only setting you
may need to change.
The other setlJngs
apply when using the
modem to
communicate with
another computer
(see the Fax and Data
Modem chapter).
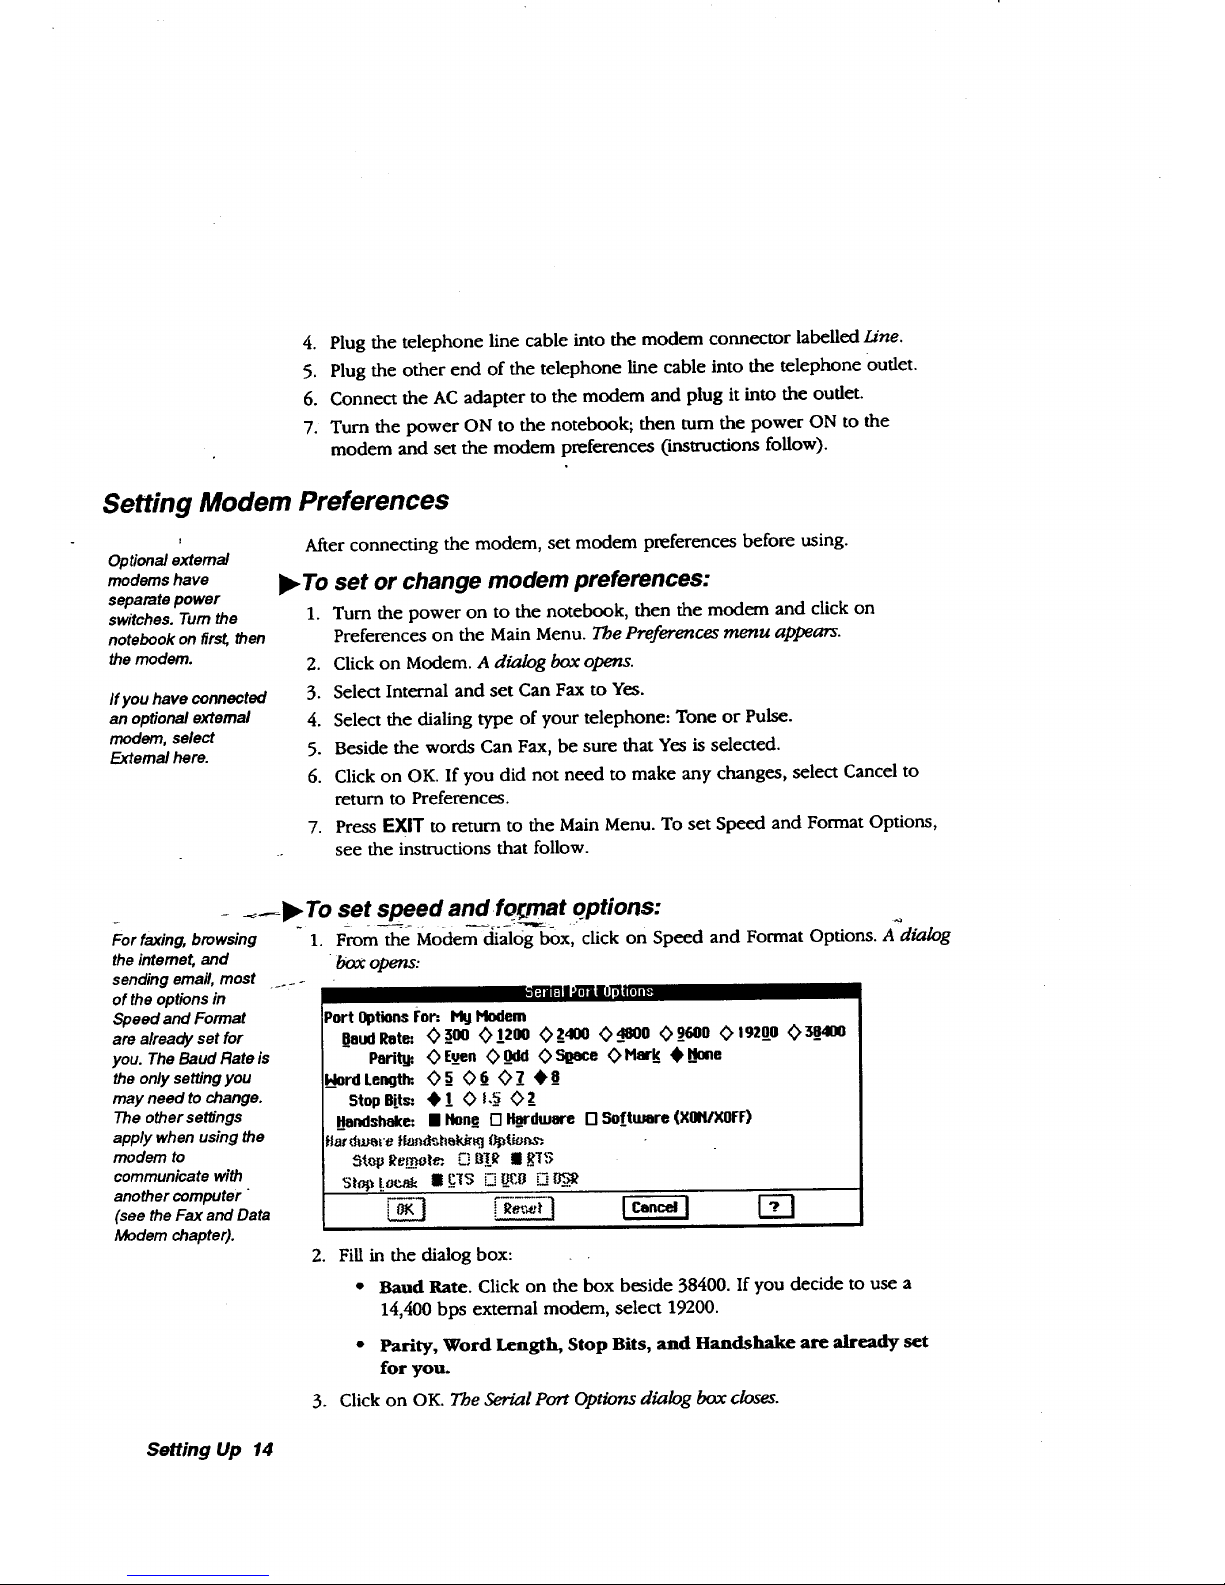
__.--_ To set speed and fo3_mat qptions:
" 1. From the Modem dialog box, click on Speed and Format Options. A_dialog
box opens-
i-_iiS;_flim_l[,]l[_
Port Optionsfop. PigHodem
OoudRote: __300 (>I_200 (>2_400 (>_4800 (>_9600(>19200 _58_4100
Parit_ (> Even (>_0dd (> SILage (> Hark 4k_/ioae
L_lordLength=,(> _5(> _6(> 7_ • _8
StopBits: 4_1 (> t,5 (> 2_
Handshake: • Hone [] X_ordware[] Software (X01t/XOFF)
Hardwarefiande.,h_ki_. _tJoe_
.
Fill in the dialog box:
• Baud Rate. Click on the box beside 38400. If you decide to use a
14,400 bias external modem, select 19200.
• Parity, Word Length, Stop Bits, and Handshake are already set
for you.
3. Click on OK. The Serial Port Options dialog box closes.
Setting Up 14
Page 23
4. Click on OK to dose the Modem dialog box. If you did not need to make
changes, click on Cancel.
5. Select Exit from the File menu.
Connecting an Optional Monitor
• Your notebook contains an LCD display. You can also connect an optional
color monitor to your notebook, but connect only a VGA (Video Graphics
Array) color monitor with a 640 x 480 resolution.
When you connect a
monitor and then turn
the power on, everything
appears on the monitor
screen, not on the LCD.
Whenyou connect a
colormonitor, the screen
appears in color,even if
your LCD doesnot.
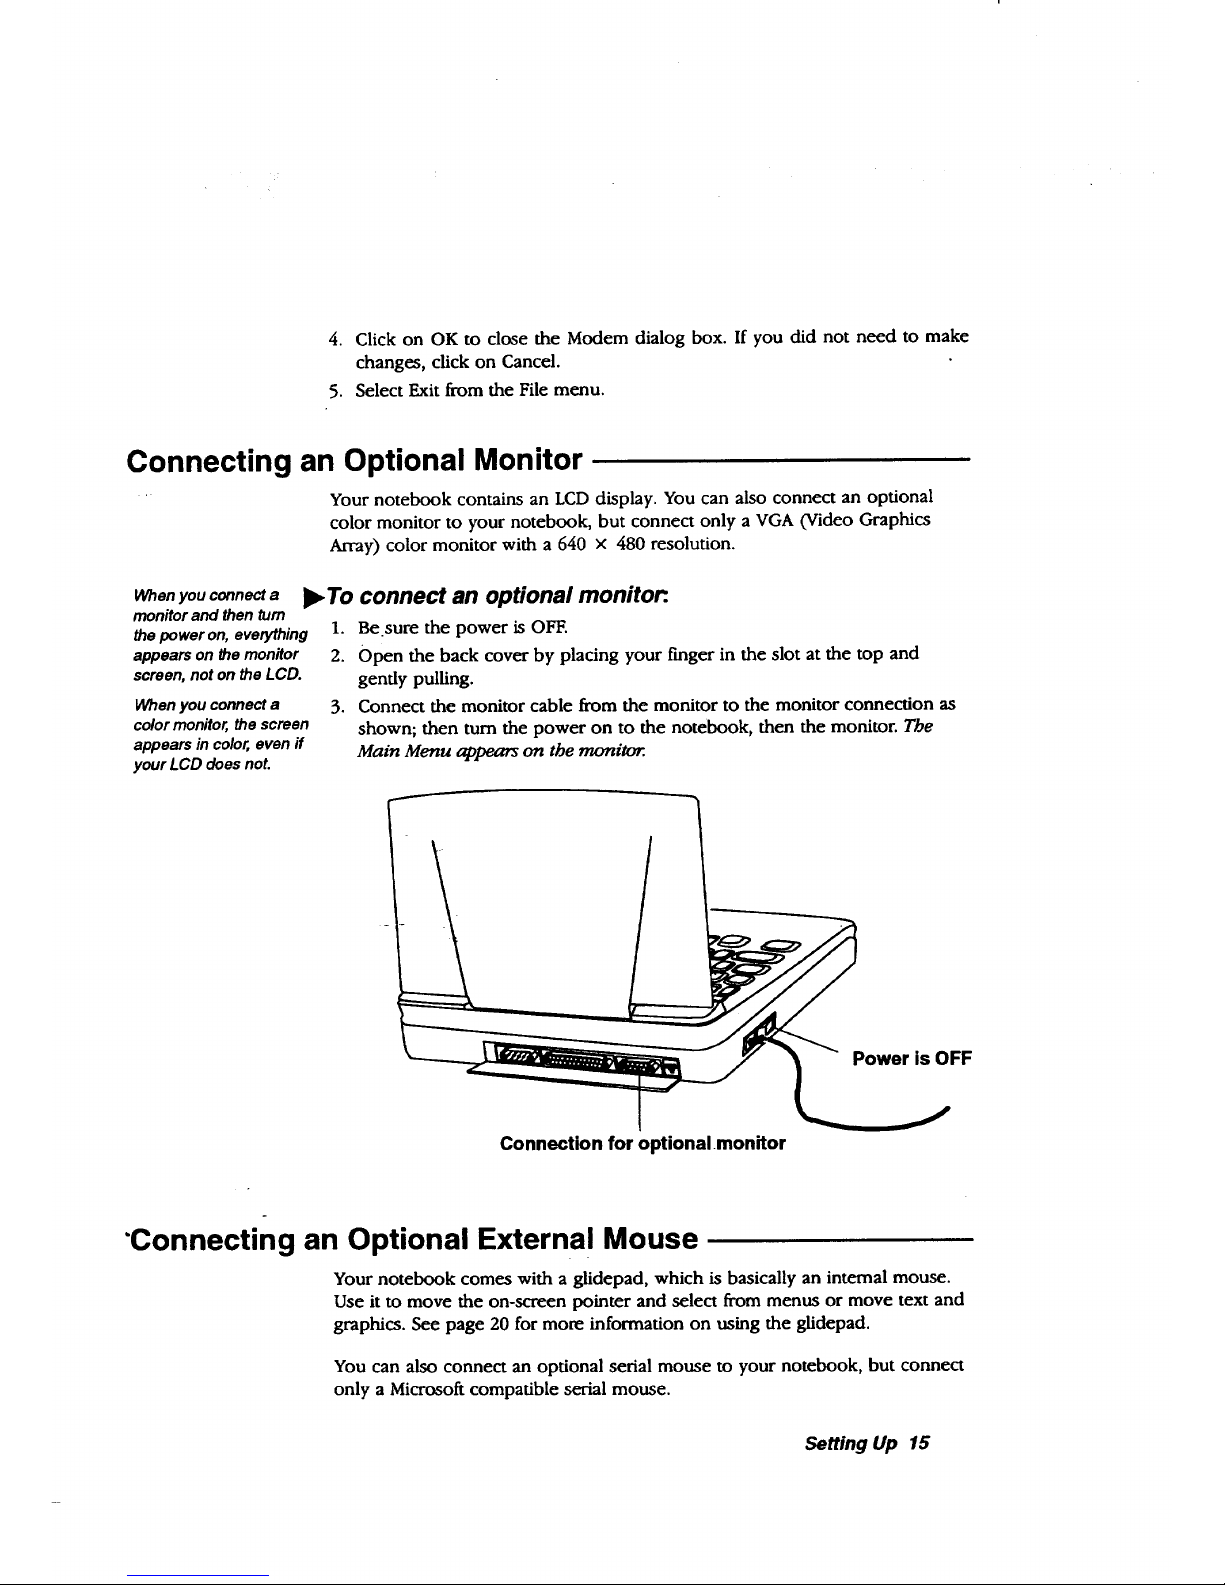
,To connect an optional monitor:.
1. Be.sure the power is OFF.
2. Open the back cover by placing your finger in the slot at the top and
gently pulling.
3. Connect the monitor cable from the monitor to the monitor connection as
shown; then turn the power on to the notebook, then the monitor. The
Main Menu appears on the moniKm.
Power is OFF
Connection for optional .monitor
"Connecting an Optional External Mouse
Your notebook comes with a glidepad, which is basically an internal mouse.
Use it to move the on-screen pointer and select from menus or move text and
graphics. See page 20 for more information on using the glidepad.
You can also connect an optional serial mouse to your notebook, but connect
only a Microsoft compatible serial mouse.
Setting Up 15
Page 24

L _ -7 _.
Note: There is only
one set_al port. You
can connect a
modem or a
mouse, but not
both.
)_To connect an optional serial mouse:
1. Be sure the power is OFF.
2. Open the back cover by placing your finger in the slot at the top and
gently pulling.
3. Connect the mouse cable to the serial port of the unit and secure the
connector screws.
To mouse
Power is OFF
connection
Mouse sedal cable
Connector screws on the serial cable
4. Turn the power ON; then set the preferences for the external mouse (see
the instructions that follow)..
Setting Mouse Preferences
Before using an optional mouse, set mouse preferences, including
double-click time and acceleration speed.
To use the glidepad
again, you must
change the
preferences from
mouse back to
glidepad.
_ To set or change mouse preferences:
1. Click on Preferences on the Main Menu. The Preferences menu appears.
2. Click on Mouse. A dialog box opens.. °
[[L_Illit#I_
-- hese options let gou change thebelmuior of your mouse.
Current House: gde Pad (Internal)
iBouble Click Tim_ i i House J_celeralion-_ !
• _lotu _>Pledium (> Fast II
3. Click on Change Mouse. A dialog box appears.
Setting Up 16
Page 25
Double-click and
Acceleration can only
be adjusted for an
external mouse, not the
glidepad.
4. Select Microsoft-compatible serial and click on OK. A dialog box appears
allowing you to test the mouse. Follow the on-screen instructions.
5. Adjust the double-click time and acceleration of the mouse.
6. Click on OK to return to Preferences.
7. Press EXN" to return to the Main Menu.
Using Diskettes
CAUTIOI_.Never
insert or remove a
diskette while the
LED is on.
Keep diskettes
away from
magnetic fields.
The diskette can
be damaged.
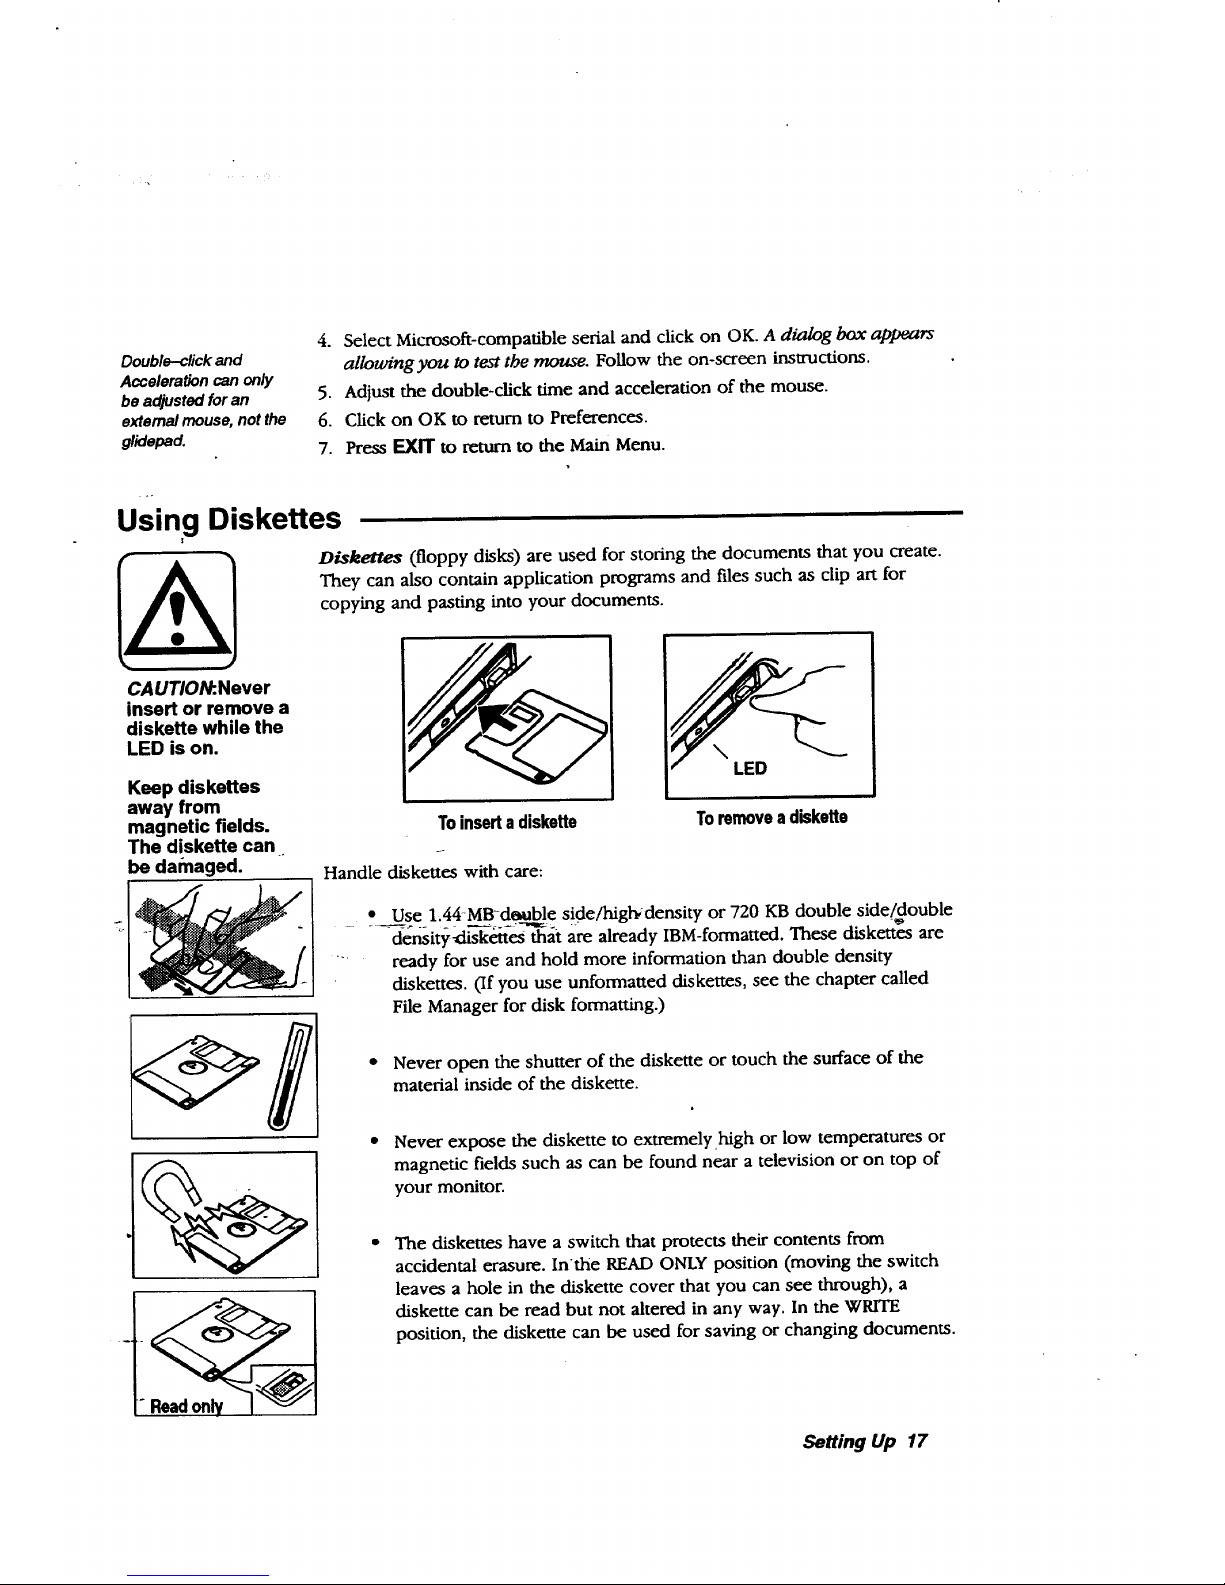
Diskettes (floppy disks) are used for storing the documents that you create.
They can also contain application programs and files such as clip art for
copying and pasting into your documents.
Handle
N
LED
To insert a diskette
diskettes with care:
Toremovea diskette
Use 1.44-MRd_able side/highdensity or 720 KB double side/double
-der_ity_'_4t-es-_at are already IBM-formatted. These diskettes are
ready for use and hold more information than double density
diskettes. (If you use unformatted diskettes, see the chapter called
File Manager for disk formatting.)
• Never open the shutter of the diskette or touch the surface of the
material inside of the diskette.
Never expose the diskette to extremely _high or low temperatures or
magnetic fields such as can be found near a television or on top of
your monitor.
The diskettes have a switch that protects their contents from
accidental erasure. Inthe READ ONLY position (moving the switch
leaves a hole in the diskette cover that you can see through), a
diskette can be read but not altered in any way, In the WRITE
position, the diskette can be used for saving or changing documents.
Setting Up 17
Page 26
Using PC Cards
Your notebook has a slot for PC Cards, which are like diskettes but contain
more storage space than diskettes.
We recommend that you use the enclosed order form to purchase the
4 Mbyte or 10 Mbyte PC cardg. These PC cards are compatible with
your notebook.
Your notebook does not support SRAM cards or FAX modem PC cards.
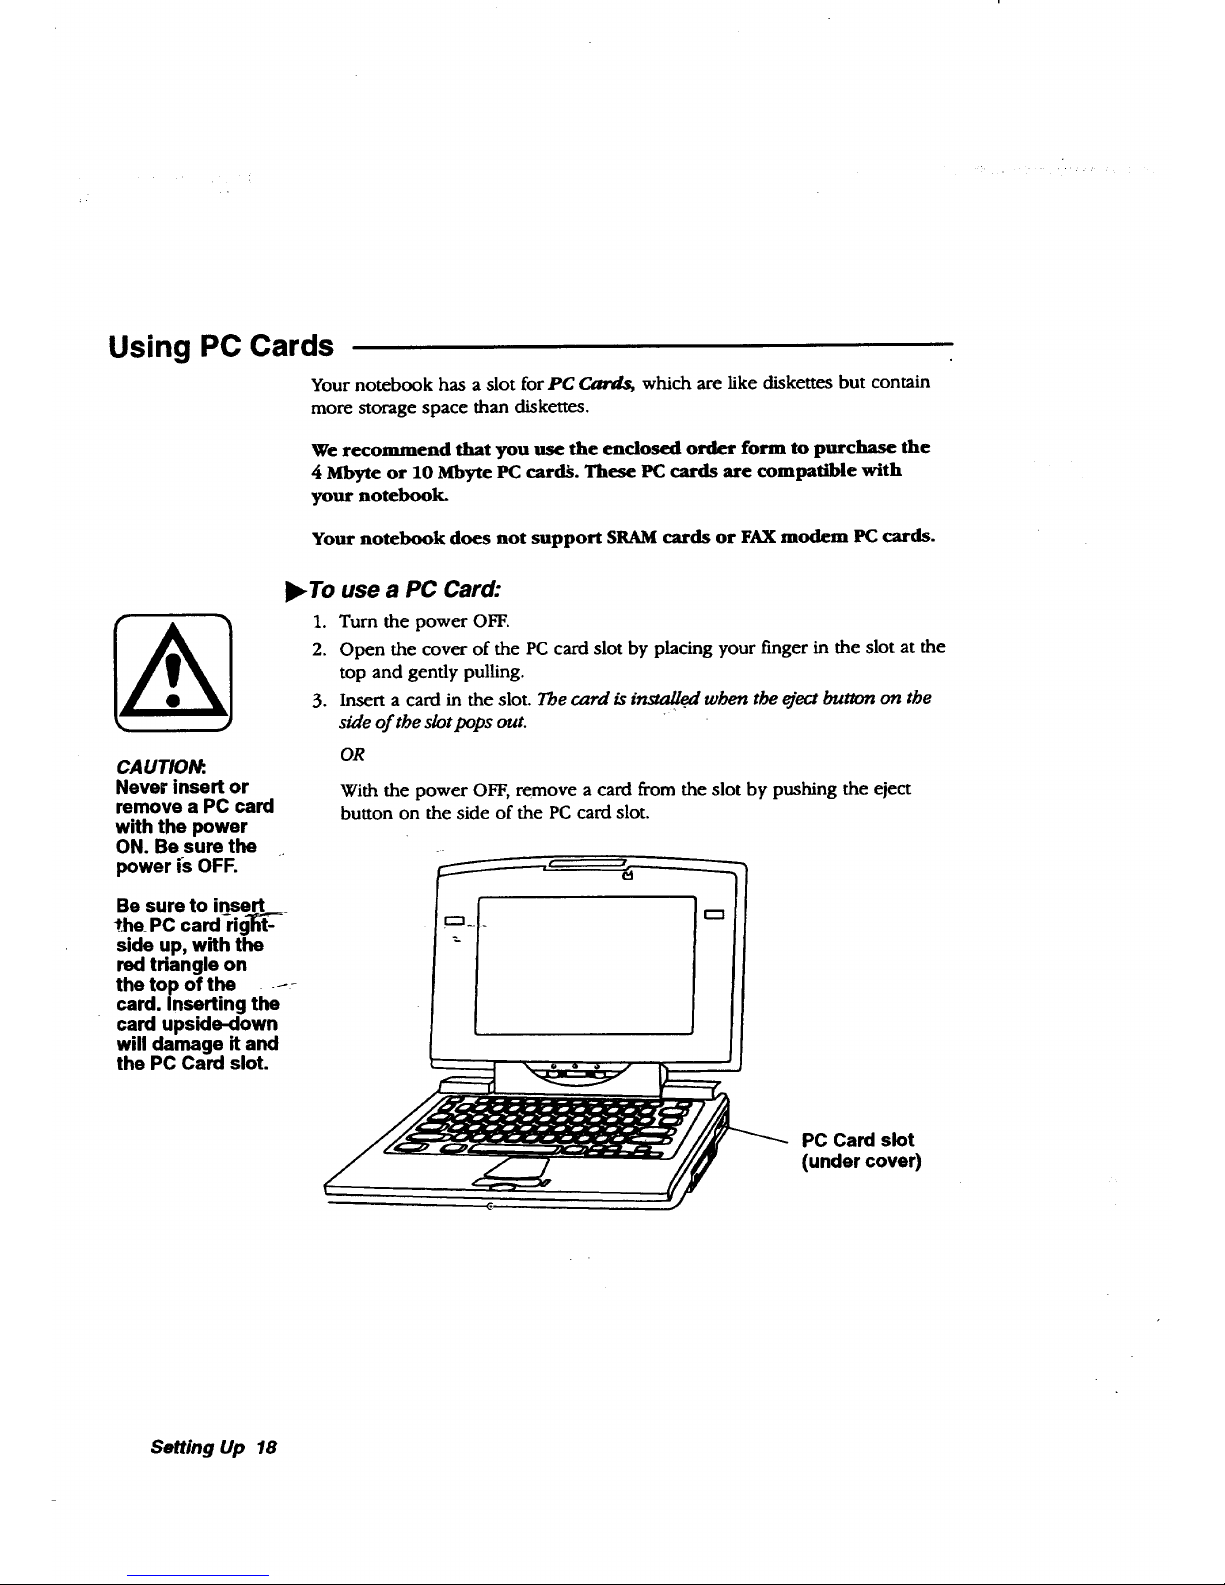
To use a PC Card:
1. Turn the power OFF.
2. Open the cover of the PC card slot by placing your finger in the slot at the
top and gently pulling.
3. Insert a card in the slot. The card is installed when the eject button on the
side of the slot pops ouL
CAUTIOI_..
Never insert or
remove a PC card
with the power
ON. Be sure the
power is OFF.
OR
With the power OFF, _move a card from the slot by pushing the eject
button on the side of the PC card slot.
Be sure to insert
the PC cardrig_ _--
side up, with the
red triangle on
the top of the .... -
card. Inserting the
card upside-down
will damage R and
the PC Card slot.
PC Card slot
(under cover)
Setting Up 18
Page 27
2
Getting Started
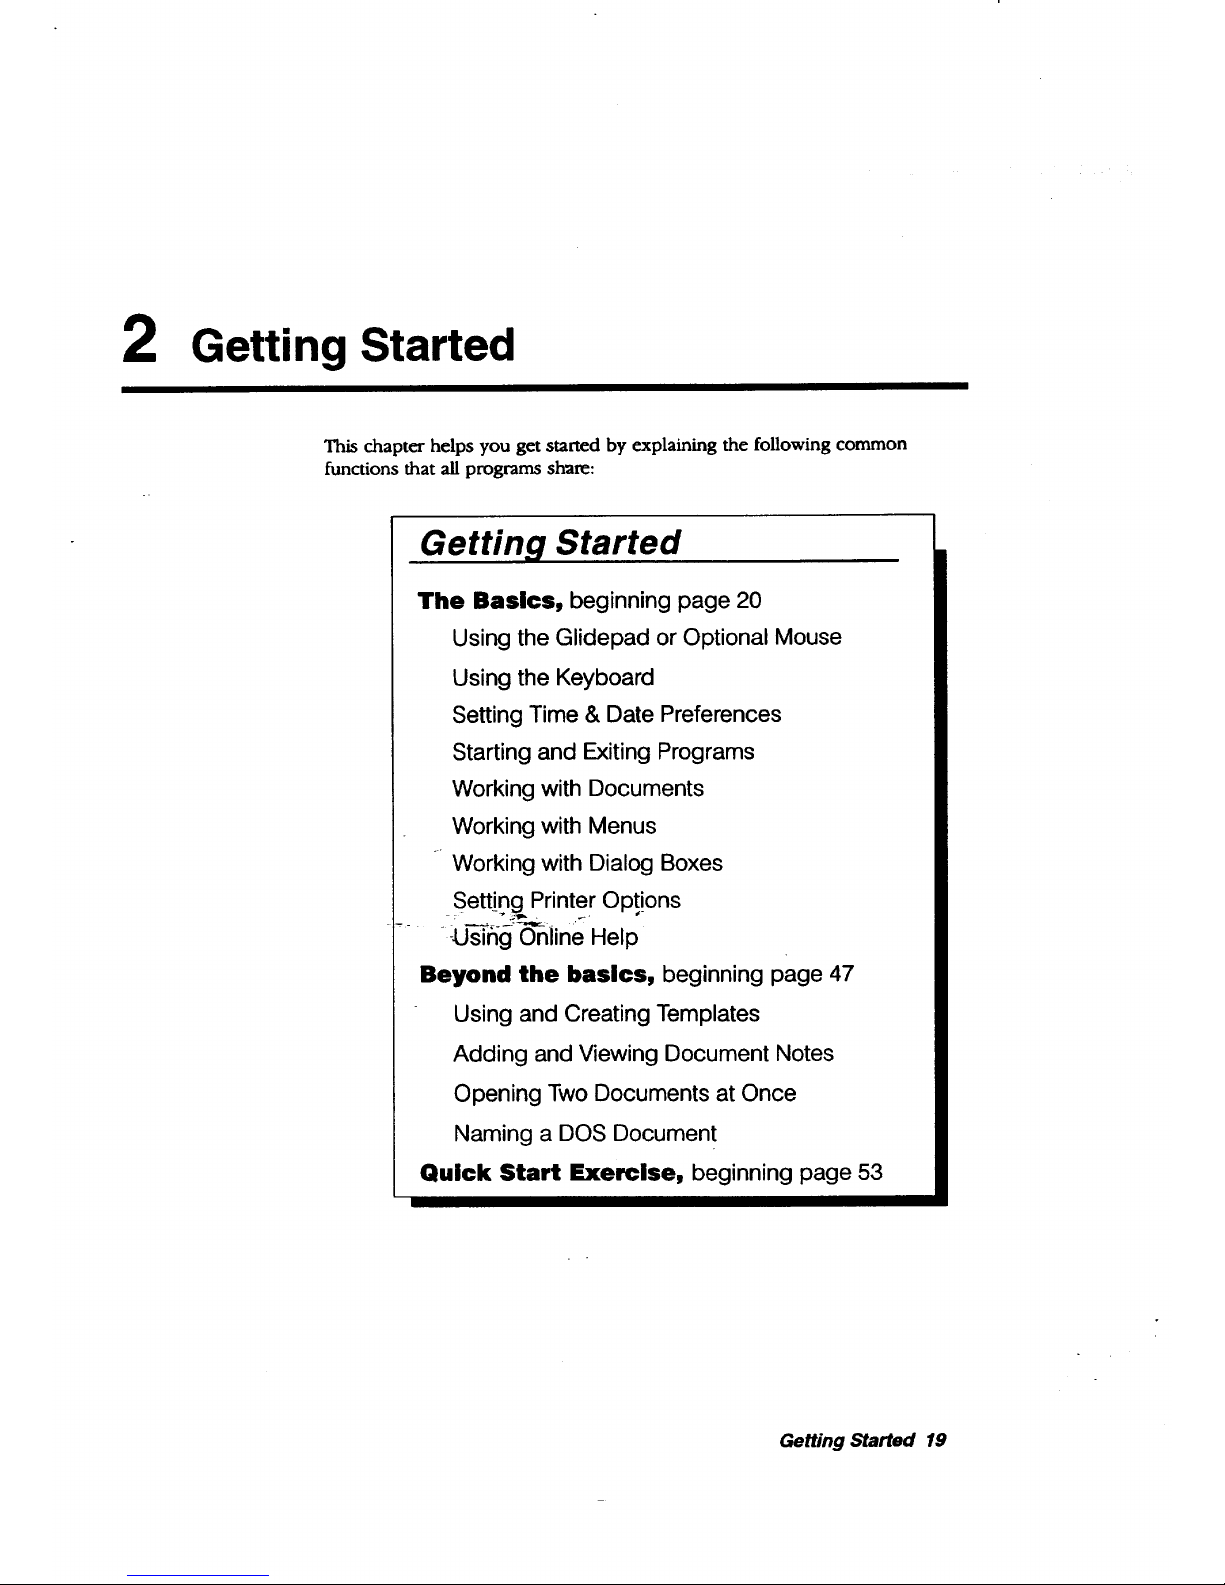
This chapter helps you get started by explaining the following common
functions that all programs share:
Getting Started
The Basics, beginning page 20
Using the Glidepad or Optional Mouse
Using the Keyboard
Setting Time & Date Preferences
Starting and Exiting Programs
Working with Documents
Working with Menus
Working with Dialog Boxes
Setting Printer Opt!ons
..... -U-_fig o'nii ne Help
Beyond the basics, beginning page 47
Using and Creating Templates
Adding and Viewing Document Notes
Opening Two Documents at Once
Naming a DOS Document
Quick Start Exercise, beginning page 53
Getting Started 19
Page 28
Using the Glidepad or Optional Mouse
Using the glidepad or an optional mouse, you can perform a variety of tasks,
such as selecting from on-screen menus, opening a program, selecting text or
graphics, or dragging text or graphics to new locations.
If you want, you can connect art optional serial mouse. Once connected, you
must set the preferences for using a mouse. See page 16 for instructions.
The glidepad functions just like a mouse, but is conveniently built into the
notebook.
CAUTION:
Use a light touch
on the glideped.
Excessive force
can damage it.
Do not use a
sharp object or
ink pen on the--_
glidepad. Sharp
objects and
chemicals in ink
pens can damage
the surface.
To clean the
glidepad, use a
soft, slightly
moist cloth.
Moisten with
water; never use
detergents or
solvents.
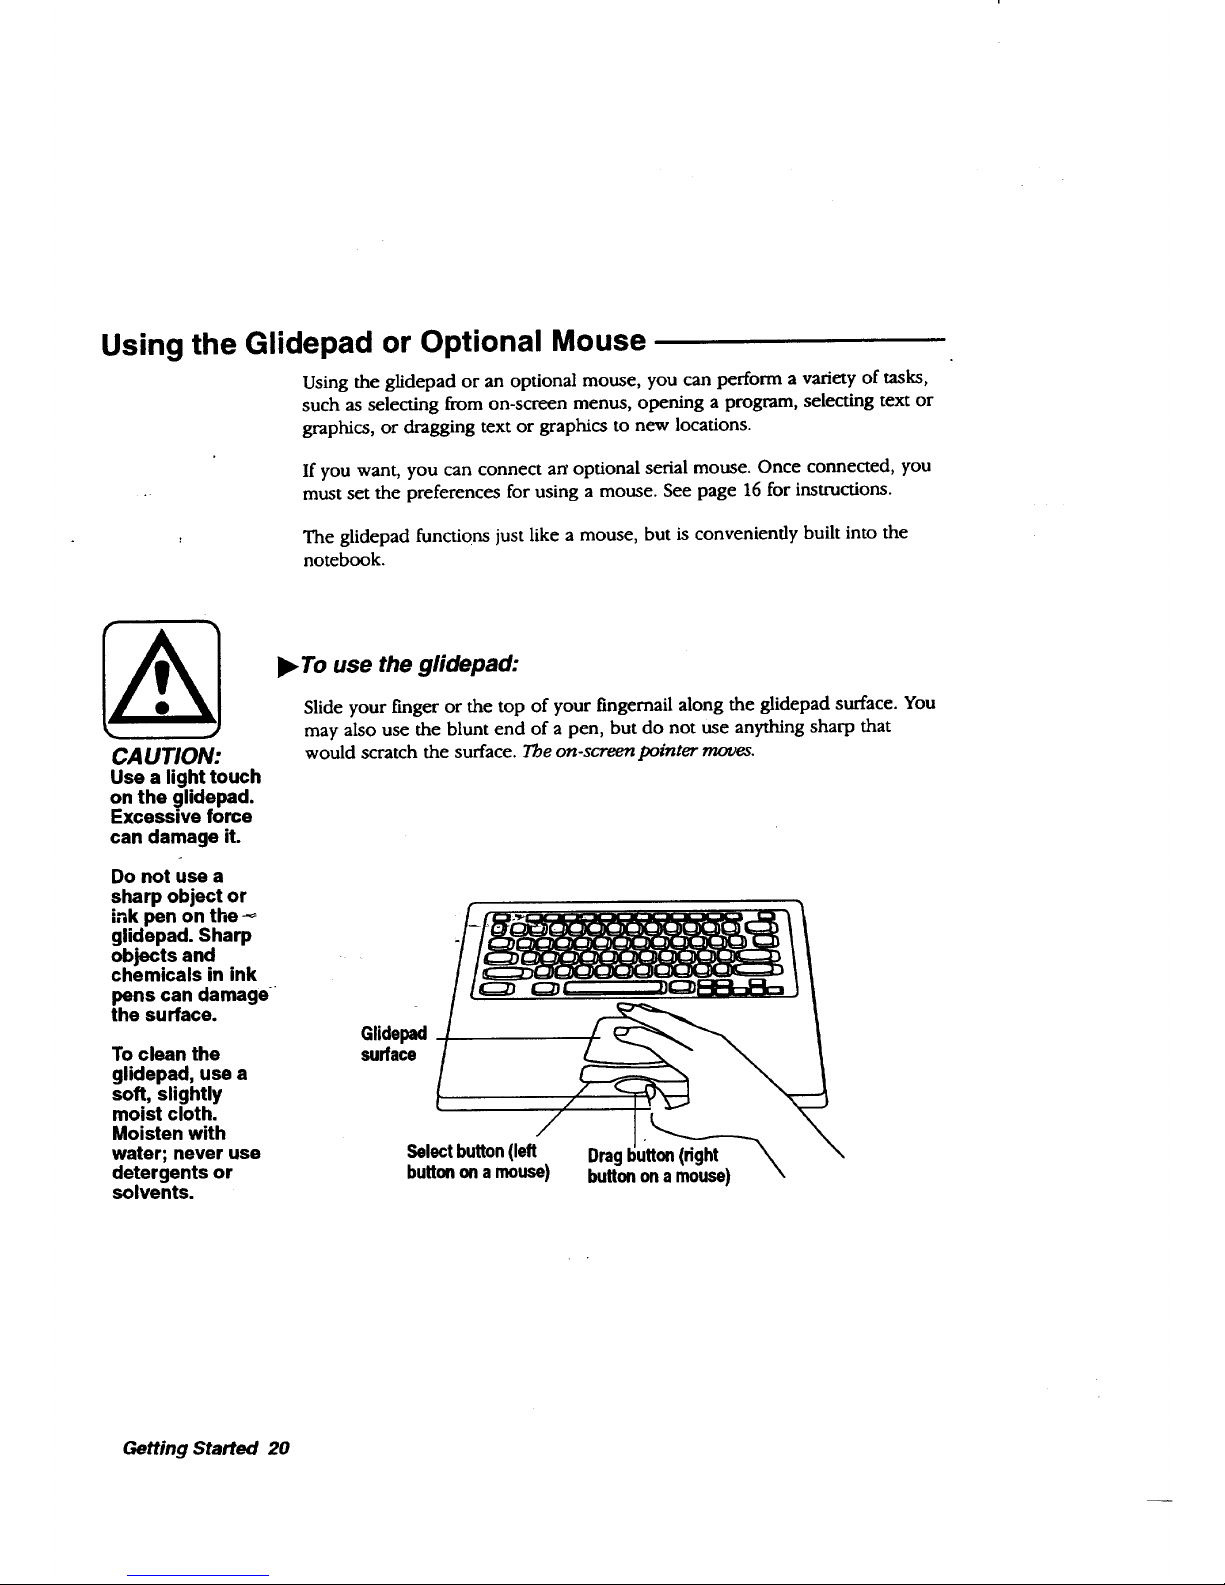
,To use the gfidepad:
Slide your finger or the top of your fingernail along the glidepad surface. You
may also use the blunt end of a pen, but do not use anything sharp that
would scratch the surface. The on-screen pointer moves.
Glidepad
surface
Selectbutton(left
buttonona muse)
Oragt ;_
buttonona mouse) \
Getting Started 20
Page 29
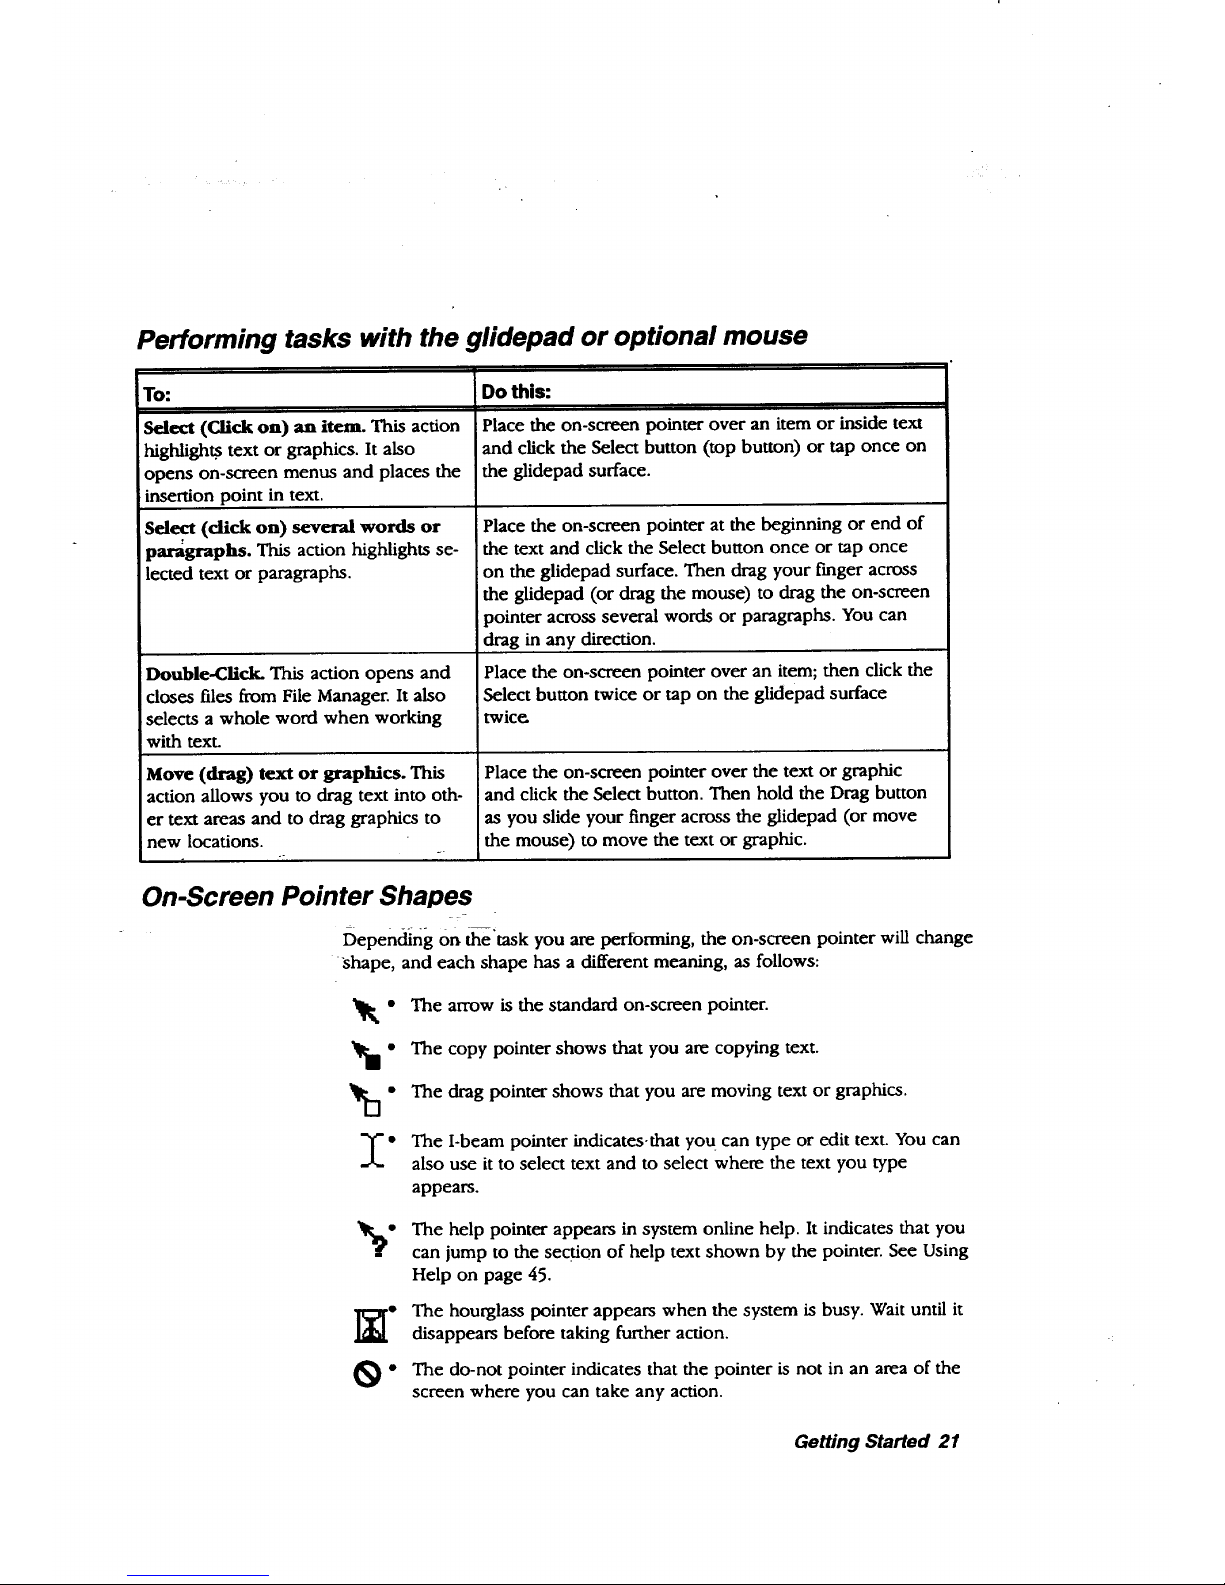
Performing tasks with the glidepad or optional mouse
TO"
Select (Olick on) an item. This action
highligh_ text or graphics. It also
opens on-screen menus and places the
insertion point in text.
Select (dick on) several words or
paragraphs. This action highlights se-
lected text or paragraphs.
Double-Click. This action opens and
closes files from File Manager. It also
selects a whole word when working
with text.
Move (drag) text or graphics. This
action allows you to drag text into oth-
er text areas and to drag graphics to
inew locations.
Do this:
Place the on-screen pointer over an item or inside text
and click the Select button (top button) or tap once on
the glidepad surface.
Place the on-screen pointer at the beginning or end of
the text and click the Select button once or tap once
on the glidepad surface. Then drag your finger across
the glidepad (or drag the mouse) to drag the on-screen
pointer across several words or paragraphs. You can
drag in any direction.
Place the on-screen pointer over an item; then click the
Select button twice or tap on the glidepad surface
twic_
Place the on-screen pointer over the text or graphic
and click the Select button. Then hold the Drag button
as you slide your finger across the glidepad (or move
the mouse) to move the text or graphic.
On-Screen Pointer Shapes
Depending On the "task you are performing, the on-screen pointer will change
shape, and each shape has a different meaning, as follows:
vu-
I"
The arrow is the standard on-screen pointer.
The copy pointer shows that you are copying text.
The drag pointer shows that you are moving text or graphics.
The I-beam pointer indicates-that yo u can type or edit text. You can
also use it to select text and to select where the text you type
appears.
The help pointer appears in system online help. It indicates that you
can jump to the section of help text shown by the pointer. See Using
Help on page 45.
The hourglass pointer appears when the system is busy. Wait until it
disappears before taking further action.
The do-not pointer indicates that the pointer is not in an area of the
screen where you can take any action.
Getting Started 21
Page 30
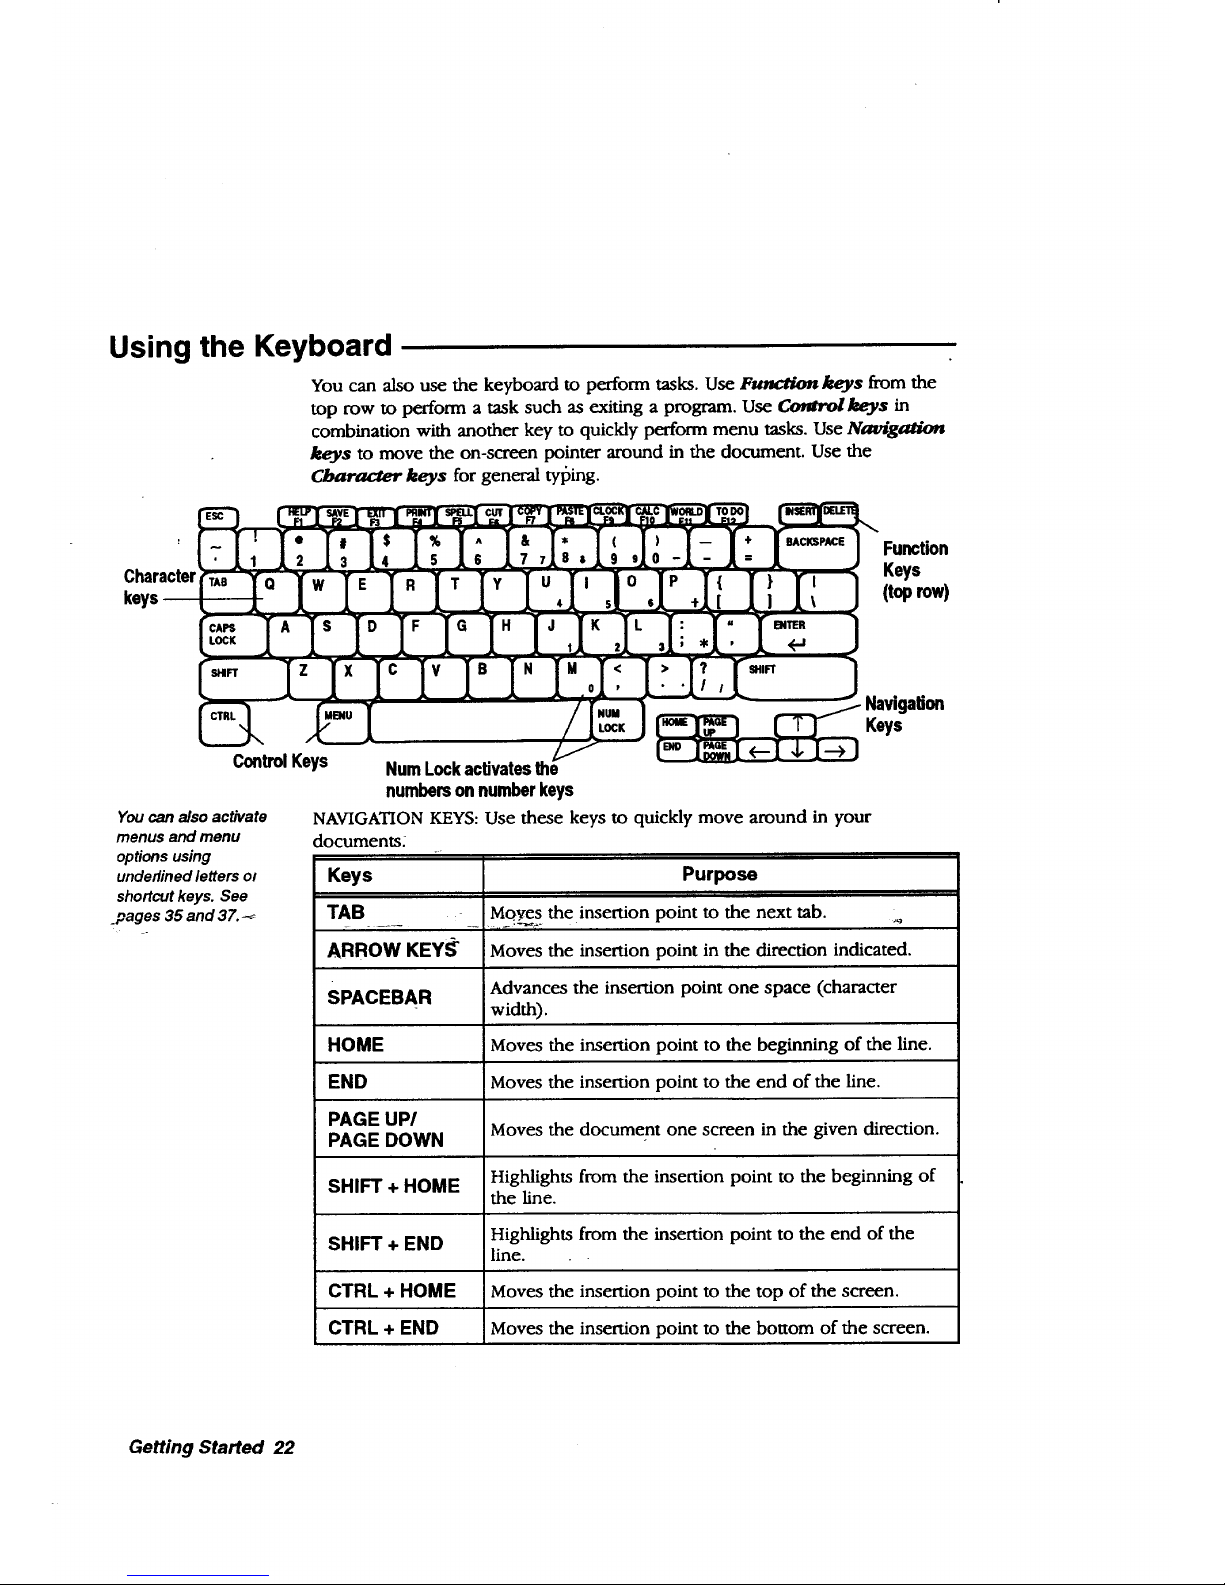
Using the Keyboard
You can also use the keyboard to perform tasks. Use Function keys from the
top row to perform a task such as exiting a program. Use _keys in
combination with another key to quickly perform menu tasks. Use Navig_
keys to move the on-screen pointer around in the document. Use the
Cl_racter keys for general tyl_ing.
Character
Function
Keys
(toprow)
ControlKeys
Youcan also activate
menus and menu
optionsusing
underlinedletters ot
shortcutkeys. See
_pages35 and 37.
NavigaUon
I$I 1
Keys
Num Lock activates the
numbers on number keys
NAVIGATION KEYS: Use these keys to quickly move around in your
documents.
Keys
TAB o
ARROWKEYff
SPACEBAR
HOME
END
PAGE UP/
PAGE DOWN
SHIFT + HOME
SHIFT + END
CTRL + HOME
CTRL + END
Purpose
Moyes the insertion point to the next tab. _
Moves the insertion point in the direction indicated.
Advances the insertion point one space (character
width).
Moves the insertion point to the beginning of the line.
Moves the insertion point to the end of the line.
Moves the document one screen in the given direction.
Highlights from the insertion point to the beginning of
the line.
Highlights from the insertion point to the end of the
line.
Moves the insertion point to the top of the screen.
Moves the insertion point to the bottom of the screen.
Getting Started 22
Page 31

FUNCTION KEYS:
Keys
HELP
SAVE
EXIT
PRINT
SPELL
CUT
COPY
PASTE
CLOCK
CALC
Jse these as shortcuts.
Purpose
Opens the help screen for quick answers to system
questions.
Saves your most recent work.
Closes the program.
Opens the Print dialog box for printing your artwork,
document, spreadsheet, etc.
Begins the spell checker.
Eliminates items such as graphics or text from your
document and places them on the clipboard.
Makes a copy of selected item which is stored in
clipboard.
Pastes a copy of an item that had been copied or cut
from a document at the insertion point in the current
document.
Displays the system clock.
Opens the on-screen calculator.
opens the World Clock program. _
Opens the To Do List program.
Getting Started 23
Page 32

On-screen keyboard
To create characters and symbols that are not on the standard keyboard, use
the O_-$creen Keyboard. This keyboard allows you to select character and
symbol layouts for different fonts and insert them into the document.
The On-screen Keyboard will st,3y open until you close it, even if you switch
to another program. It disappears temporarily when the insertion point is not
present and reappears when you are entering text.
• To display the On-screen Keyboard:
Click on the SYM button at the lower right comer of the window. The
Symbol Keyboard appears in tbe font you are using. Click on a symbol with
the glidepad, and the character appears in your document.
Click here to see .i
international and
mathsymbols.
+_.
IFont"uewRo,_,, I.-J Sgmbols =1?,,
¢
\ ..... t 1 § • ql i
A
_.._-+_T _ ] { } (
• •J << ))
/
:.! --2.+ +3-+,4_,.5 +6 7 8 9
) s
,v
L
0 _ O
• To move the On-screen Keyboard:
Click on the empty button top of the Symbols box and drag the keyboard.
• To close the On-screen Keyboard:
Click on the box in the top left comer.
Getting Started 24
Page 33

Setting System Preferences
Todisplay the system
c!ockon your screen
press CLOCK from the
functionkey row. To
remorseit, press CLOCK
again.
Disable screen saver
before printing toprint
faster.
Once you set or
change settings and
apply them, they
remain in effect until
changed.
Setting preferences works the same for all system preferences. Your notebook
allows you to set the following system preferences:
• Date & Tmae allows, you to set the current date and time.
Lights Out lets you select a screen saver, which acts as a battery
saver when the AC adapter is not connected and battery power alone
is used (see page 9). When the system is not in use for a specified
period of time, the screen saver you selected appears. You specify the
period of time. To exit the screen saver (Lights Ou0, use the
keyboard (preferably, press SHIFT to avoid opening a program with
another key).
Look & Feel sets options that control the background design, color,
and the text that appears at the top of the Main Menu. Look & Feel
also sets the automatic save function (see Setting Auto Save
Preferences on page 33).
Sound turns the sound on or off for errors.
You can also set preferences for peripheral functions. Instructions for these
functions are found as follows:
F.
• Battery sets battery charging preferences (see page 8).
• Modem i._tglls_,and configures the modem (see page 14). .,
• Mouse installs and configures an optional serial mouse (see page 16).
• Printer installs and configures a printer (see page 11).
• Fax sets up the Fax function (see the Fax and Data Modem chapter
in this book).
_ To set or change system preferences:
1. Click on Preferences on the Main Menu. The Preferences menu appears.
2. Click on the icon for the feature you want to set. A dialog box for that
feature opens.
3. Set the options in the dialog box and click on OK. If you want to go back
to the original settings, click on Reset.
4. At the top of the Preferences menu screen, click on File. A submenu
appears.
5. Click on Exit to return to the Main Menu.
Getting Started 25
Page 34

Starting and Exiting Programs
You can start a program two ways: by opening it from the Main Menu or by
opening a document from File Manager.
You can also open a
program by
pressing _e letter
that is underlined in
its icon. For
example, press W
to open Word
Processing.
• To start a program from its icon on the Main Menu:
Click on the program you want to start in the Main Menu. Tbeprogram opens.
• To start a program by opening a document:
1. Insert a diskette containing the document, open File Manager, and click
on the drive A icon. The contents of tbe diskette appear.
OR
2.
Open File Manager and click on the F drive icon. The contents ofdritm F
appear.
Double-click on the icon of the document you want to open. Tbeprogram
opens with the selected document ready for use.
• To exit a program while M a document:
1. Select File from the menu bar. The File submenu appears.
2. Select Exit.
OR
Press EXIT fr6"m the function key row. If you made any changes, a
•message appears asMng you to save the document.
Getting Started 26
Page 35

Working with Documents
A documem, also called a file, is a holding place for information. For
example, you can create a document in the Planner program for tracking your
appointments.
Cre'ating and Opening Documents
Once you have created documents and saved them, you can open them,
change them, and save them again.
The new document
is named Untitled.
Give it a name when
you save it. See
Saving Documents,
page-31, in this "
chapte[.
I_ To create a new document:
1. Click on Word Processing, Spreadsheet, or Drawing from the Main Menu.
The New/Open dialog box appears:
OR
If you have a document open, select Close from the File menu. (If you
have unsaved changes in the current document, you are asked if you want
to save or discard them.) The New/Open dialog box appears:
Jl_|]
For information on_.- -
templates, see page
47.
Import allows you to
open a document
created in another
program. For more
information, see the
Word Processing,
Spreadsheet, .
Dravdng, and
Addressbook
chapters in Book 2.
L
Templetet
Usa a pre-deeigned template to create e
new document.
Import,
Import text from another word
processor to create e nero document.
2. Click on New. A new document appears.
Getting Started 27
Page 36

What You Will See in a Document Window
Word Processing, Spreadsheet, and Drawing all use variations of the
document window shown below:
Capslock
Menubar
Scrollbars
The menu bar lists the menu items available for that program. You
can make menu selections with the glidepad or with the keyboard
(Press MENU + the underlined letter of the menu item name).
* The ruler helps you to align items on the page, judge distances, and
set tabs and indentations. You c_n also use a vertical ruler on the left
- - side of thedocam-'i_t window. These rulers are especially helpfi31 in
setting the page format. The document window in Drawing opens
with both horizontal and vertical rulers.
The-title bar shows the program you are in and the name of the
open document.
The Basic Functions tool bar appears in the Word Processing and
Spreadsheet windows. It has a series of buttons for common
operations, such as save, print, copy, etc. Word Processing and
Spreadsheet also have an Advanced Functions tool bar. Select tool
bars from the Show Tools submenu of the Options menu.
Scroll bars help you to move a document around in the window.
NUM locks the keyboard keys that have numbers on them so that the
numbers appear on-screen when typed. For example, with Num Lock
on, pressing the k key will result in a 2 on the screen. Turn this on
and off by clicking once on NUM.
CAP locks the keyboard so that all characters typed am capitals. Turn
this on and off by clicking once on CAP or pressing CAPS lOCK.
Getting Started 28
Page 37

• INS locks insert mode, so that all new characters typed push existing
ones to the right. Turn this on and off by clicking once on INS or
pressing INSERT.
Changing Your View of a Document Window
When you open a document, it appears actual size, the size of the printed
document. To change your view of a document in a window, use the View
menu. For example, to see more of your document at once, zoom out. This
procedure works in Word Processing, Spreadsheet, and Drawing.
• To Zoom In or Zoom Out on a document:
1. To enlarge the size of a page, select Zoom In from the View menu.
2. To reduce the size of a page, select Zoom Out from the View menu.
3. To return to normal size, select Normal Size from the View menu. (Normal
size is 100% of the view.)
• To scale a document to fit the window:
Select Scale to Fit from the View menu. The view percentage changes,
shrinking the document so that an entire page fits in the window at once, if it
can. _
• To change the document viewing percentage:
1_ Seleci Vie_ a't--%'[r0"_'r_=theView menu. The View % dialog box aplfears.
2. Type a number (depending on the program, you have different minimum
and maximum values), or use the arrow buttons to change the value in
the View (%) box. Click on Apply. The percentage you specify is applied to
the document.
3. Click on Close.
Showing or Hiding Scroll Bars
Hiding the scroll
bars can give you
more space to
work in.
• To show or hide the horizontal or vertical scroll bars:
Select or deselect Show Scroll Bar from the View menu.
Using Copy To
Copy To creates a copy of the current version of a document. The copy is
saved to drive A or F (depending on which one you selec0, and you are left
editing the original. It is important that the copy have a different name from
the original.
Getting Started 29
Page 38

%1 _ •
Copy To is in contrast to Save As, which saves all of your changes to the
document with a new name and closes the original document without saving
any changes to it.
• To copy a document using Copy To:
1. Select Other from the File menu. The Other submenu appears.
2. Select Copy To. The Copy To dialog box appears.
3. Select the drive (A for diskette, F for internal storage) and the folder
where you would like to put the copy.
4. Type the name you want to use for the copy. (You can use BACKSPACE
or DELETE to edit the name.) The new name appears in the text entry
box.
5. Click on Copy To. The document with the new name is saved and closed,
and the document with the original name remains in the document
window.
Making a Backup Copy of a Document
You can also protect your work by making a backup copy of a document. If
needed, you can revert to this backup copy.
• To back up adocument:
1. With the document open, select Backup from the File menu. A submenu
appear_s._.-
2. Select Backup._our document is saved as a backup copy.
- .]I_-To revert to the backup copy:
1. With the document open, select Backup from the File menu. A submenu
appears.
2. Select Restore from Backup. You are prompted to confirm this; select Yes
and the backup document appears in the window.
Renaming a Document
You may want to rename a document so it more closely identifies the
document's contents or purpose. You may also want to rename a document if
you want to use its original name for another document. To rename a
document, first save it and give it a name.
• To rename a document:
1. Open a document and select Other from the File menu. The Other
submenu appears.
2. Select Rename. The Rename dialog box appears with the document's
current name in the New Name text entry box.
Getting Started 30
Page 39

You can also use File
Manager to rename a
documenL See page 66.
3. Type the new document name. (You can use BACKSPACE or DELETE
to edit the name.) The new name appears in the New Name text entry box.
4. Click on Rename. The dialog box closes, and the new name appears in the
title bar of the document.
Closing Documents
Closing a document, removes it from the screen. However, the program
remains open. You may want to close a document but not its program so that
you can create or edit another document in that program.
l_ To close a document:
Select Close from the File menu. If there are unsaved changes in the
document, you are asked if you want to save the changes. If no changes were
made, the document closes. If there are no more open documents, then the
New/Open dialog box appears.
Closing without Saving
Discard Changes will
remove the most
recent changes even ff
Auto Save has saved
the 'document (see
page 33).
If Discard Changes is
dimmed, you have--- -
made no changes
since the last time
you saved.
You may want to close a document without saving any changes you made to
it.
)_To discard changes:
1. Select Other from htah_File, menu. The Other submenu appears.
2. Select Disdard Changes. A dialog box appears asking you if you are sure
you want to discard all the changes you have made to the document since
you last saved it.
3. Click on Yes, and the last saved version appears in the window. A/1
changes since then are erased permanently.
Saving Documents
After you have saved
a document, the "Save
option on the
submenu changes to
gray. If you make
more changes to your
documen_ the Save
option again appears
in black.
Save your documents periodically as you work on them. It is also good
practice to save a document before you print it, before you make a significarlt"
change to it, and as soon as you have finished any work you would not want
to redo.
When the file that you are working in becomes too large, a message appears
asking you to save your document or informing you that the system memory
is filling up. To avoid losing any of your work, immediately save the File you
are working on and open a new File.
Getting Started 31
Page 40

Do not includecolons(:),
backsfashes (I), asterisks
/*),_ ques#onmarks
(?) in the names of
documents.
i
For example, ff you are working in a file named Aug. report and the Memory
Full dialog box appears, save the document at the end of the page or erase to
the end of the previous page. Save the document as Aug. report and open a
new document that you save as Aug. report2.
When you create a new document, it is temporarily called Untitled. To save it,
give it a name. The name can be up to 32 characters long and may contain
both uppercase and lowercase letters. Each space or character you type
counts as one character. Note: If you plan on using a file with a DOS
program, you must use a name that DOS can recognize (see page 52).
For more information
on selecting ddves,
see the chapter called
File Manager.
If you save to drive F,
the default folder is
called Document.
Anything saved is
saved in Document
unless you select a
different folder by
double-clicidng on _e,__
Tolder in the Save As
dialog box. But drive F
is limited, so save most
tiles on diskette.
l_ To save a new document:
1. Select Save As from the File menu. The Save As dialog box appears with a
New Name text entry box.
2. Select the drive (A or F) where you would like to place the document.
You may also want to select a folder to save the document in.
3. Type a document name in the New Name text entry box. If you do not
name the document, it will automatically be named Untitled.
4. Click on Save. When you return to the open document, its name appears in
the title bar.
l_ To save changes to a document that already has a name:
Select Save from the File menu. Any changes you bave made are saved, and
you are returned to tbeopp_a document. _f Save is dimmed, there are no
_ changes tosave.)_
--. .
OR
Press SAVE from the function key row.
l_ To save a new document onto another diskette:
1. Select Save As from the File menu. The Save As dialog box appears with a
New Name text entry box.
2. Insert the diskette where you would like to save the file.
3. Click on Drive; then select A.
4. Type a document name in the New Name text entry box.
5. Click on Save.
)_ To save a copy using a different name:
1. Select Save As from the File menu. The Save As dialog box appears with the
current name of the document in the New Name text entry box.
2. Select the drive (A or F) where you would like to place the document.
You may also want to select a folder to save the document in.
Getting Started 32
Page 41

3. Type the new name, which replaces the current name of the document.
The new name appears in the text entry box.
4. Click on Save. The origina/document is closed and remains as you last
saved it. Any recent, unsaved changes are saved to the new version only,
which appears in the window ready for editing. If you continue editing the
version on the screen, you are editing the new document.
SeRing Auto Save
You can set options to control the automatic save feature, which saves
documents after a period of time has passed. You set the period of time. You
can also disable auto save.
If auto save is active and occurs when you are alternating diskettes (such as a
diskette copy), you are asked to insert the document diskette (where your
document is saved) to do an automatic save. After saving, again insert the
diskette you were using before you received the message. To get your work
back, open the document you were working on. If there are unsaved changes
in the document, and auto save protected them, a dialog box appears letting
you know the document has unsaved changes. Respond to the dialog box
and then select Save from the File menu to make the changes permanent.
To discard changes"
made to a document,
select Other from the
File menu. Then_select
Discard Changes. This
method will remove the
most recent changes_ _
even if Auto Save has
saved the document.
If you make-changes to a document that has been previously saved and then
close it without saving, a message appears giving you three options: Save
Changes, Discard Changes, and Cancel. If you select Discard Changes, the file
will-close without- savff_the most recent changes. However, if Auto Gave
saved the file I_efore you selected Discard Changes, those changes are not
discarded.
l_ To set or change Auto Save Preferences:
1. Click on Preferences on the Main Menu. The Preferences menu appears.
2. Click on Look & Feel. A dialog box opens.
3. Select On or Off and the time for the auto save feature.
4. Click on OK.
5. Select Exit from the File menu. The Main Menu returns.
Getting Started 33
Page 42

Working with Menus
A program m_nu, like a restaurant menu, contains a list of items. When you
select from a menu, the program begins that function or activates that feature.
When you open a menu, it appears on your screen and you select from it.
Menu items that are not currently available appear dimmed; if you select a
dimmed menu item, nothing happens. For example, in Addressbook, Copy
Record is dimmed until you f',st view an existing record.
Opening a Menu and Making a Selection
file lf.Jt Uietu _)t
.-M
UwIope.-
£Josa
Saue SAU£
item _
has an elli_ (...I,
meaning that a dia-
l2 box appears....
-whenselected.
Every program has its own set of menus. You do not see the menu itself until
you click on the menu name.
l_ To select from a menu by clicking:
1. Click on a menu on the menu bar. The menu opens.
2. If the item you want is not on this menu, click on the name of another
menu. The first menu closes and the second appears. Continue clicking
menu names until you see the item you want.
OR
3.
If you select a menu item followed by an ellipsis ( ... ), a dialog box
appears so you can pro+vide mgre information about your selection.
+++
Click on the item you Wantl As long as you select an available item, the
function starts and the menu closes.
OR
Close the menu without selecting an item by clicking anywhere outside
the menu.
I_ To select from a menu by dragging:
1. Place the insertion point over the name of a menu on the menu bar.
2. Hold down the Select button on the glidepad The menu appears.
Continue to hold down the button as you drag the insertion point left or
right across the menu bar. The menu for each menu name appears.
3. When the menu appears with the item you want, pause, but do not
release the Select button.
4. Drag the insertion point down the list of menu items in the open menu.
As you drag through the items, each item in turn is selected.
Getting Started 34
Page 43

. When the item you want is selected, release the Select button. The
function starts, and the menu closes (as long as you selected an undimmed
item).
OR
If you select a menu item followed by an ellipsis ( ... ), a dialog box
appears so you can provide information about your selection.
OR
Close the menu without selecting an item by dragging the insertion point
outside the menu and releasing the Select button.
Using Underlined Letters to Make Menu Selections
Underlined letter
\
_leiE_dit _ Opti
.-M
_NemrOpen-
_Oose
_aue 51R_IE
5ave Bs-
_Other
The name of each menu and menu item has an underlined letter, which is
typically the first letter unless several items on a menu sham the same fLrSt
letter. Use the underlined letter to select froma menu. Of course, you can use
the glldepad, function keys, or arrow keys as well.
l_ To select from a menu using underlined letters:
1. Holddown MENU and press the underlined key in the menu name you
want. For example, if you want to open the File menu, hold down MENU
and press F. The File menu opens.
2. Once the menu is open, press the underlined letter of the item you want.
- For-example,t(rseleetSave As from the File menu, press A.
- OR
Close the menu without making a selection by pressing ESC.
Getting Started 35
Page 44

Selecting from a Menu with Buttons or Check Boxes
Radio buttons
_eml_ t.eu_t arm
!_ML ,
NWm
to _
Checkbox
Radio buttons appear before a menu item. These buttons come in groups,
and only one button in the group can be selected at any given time.
Check boxes can come in any number, and any number can be selected at a
given time.
For more information about check boxes and radio buttons see Working with
Dialog Boxes on page 39 in this chapter.
)_To select from a group of radio buttons:
Click on the one that is not Idled or darkened. The radio button of the selected
item darkens, and the button of the previously selected item appears empty.
l_ To select or deselect a check box:
Click on the menu item. lf the item was de.selected, the check box is now
filled. If the item was selected, the check box is empty.
Selecting from a Submenu
Some subrnenus
themselves have
_ubmenus; these "
submenus can also
have submenus, and
so on. Select from a
subrnenu the same
way you do from
other menus.
Submenus appear when you select a menu item that has a right arrow next
to it.
x.
Options ] Lagout
.-M
_how Tools
_ulers
• Show Inui_ib_ k
5a_e_Configuration
Re_set Configuration
Menu
_Graphics _Paragraph []iaracter kl_indotu
t>
__ Rightarrows
.--iil
ii _rmp to Ruler Harks /
• align Ruler with Page
• Show Horizontal Rulers I
FI Show Uertical Rulers \
RulerUnits _ t>
%
Rulers Submenu
@.Inches
Centimeter
<>Points
0 pica_a
RulerUnitsSubmenu
To select from a submenu:
1. Open a menu from the menu bar as you normally would.
2. Select a menu item that has a right arrow. The submenu opens.
3. Select the item you want from the submenu. The submenu closes.
Getting Started 36
Page 45

OR
Close the submenu without selecting an item by clicking anywhere
outside the menu.
Using Shortcut Keys to Save Time and Work
Toundothelast
itemyou typed,
press CTRL + z.
\
J.,-N
_UndoTW_ c'nu.z
c__ f;,
_P_le F8
.O_te mlt'I[
.mtrt_
r._nts_
_Selectfll CTI_I-
Shortcut keys are keystrokes you can use to select menus and menu items.
If you are familiar with using a keyboard, shortcut keys can speed up your
work.
You can use two types of shortcut keys: thef_ keys across the top of
the keyboard or control key combinations (they control the effect of the key
used with them) using CTRL, SHIFT, or MENU.
• To select a menu item using a shortcut key:
1. Open the menu to see if the item you want has a shortcut key. Close the
menu.
2. Press the shortcut key, such as CUT, or press the key combination by
holding down CTRL and pressing the character key. Your selection
appears.
Using Arrow Keys
Arrow keys may be easier and quicker for you to use at times, rather than
the shortcut keys or the glidepad to select menu items.
• To select from a menu using the arrow keys:
1. Press and release MENU. The name of the first menu on the menu bar is
selected.
2. If this menu is not the one you want, press <---or --->to move across the
menu bar, highlighting each name as you move across.
3. Press ,1,, SPACEBAR, or ENTER to display the menu for the highlighted
name. If the item you want is not on the menu, press _-- and --* to move
through the other menus.-
4. When the menu you want is shown, use T and J, to select your menu
item.
5. If your item has a submenu (indicated by a right arrow next to the menu
item), you can open it by pressing -->. When the submenu is open, press 1"
and ,1,to select the item. If you want to close the submenu without
making a selection, press _---.
Getting Started 37
Page 46

. When the item you want is selected, press SPACEBAR or ENTER.
OR
Close the menu without making a selection by pressing ESC.
Pinning a Menu
Click on the pin to pin
the Options menu.
Whenpinned,this
button closes the
menu.
If you want to keep a menu open, or if a drop-down menu covers something
you need to see on the screen, you may want to pin it. A pinned menu stays
open and can be moved out of the way. It remains open until you close it.
Only menus with pushpins can be pinned.
• To pin a menu:
1. Open a menu as you normally would.
2. Click on the pushpin at the top of the menu. The menu stays open, and
the pin changes to a Window Control button.
3. To move the menu, click on the menu name and drag the pinned menu to
the desired location.
4. To close the-pinned menu, click on the Window Control button to the left
of the menu nam_
Working with Dialog Boxes
When a program needs more information from you or needs to alert you to
something, a dialog box appears. There are two types of dialog boxes: one
that requires a response before you can continue and one that stays open
after you have responded to it.
Two Types.of Dialog Boxes
.@
Do-Notpointer
The first type of dialog box requires a response from you before you can
continue. If you move the glidepad pointer outside this type of dialog box,
the pointer changes to a do-notpointer. One example of this type of dialog
box is the New/Open dialog box. You cannot do anything else in the
program until you respond to this type of dialog box.
The second type of dialog box stays open until you close it or exit the
program. An example of this type of dialog box is the Page Size or the Page
Setup dialog boxes that you may open from the File menu.
Getting Started 38
Page 47

WindowControlButton TitleBarcan beusedto
/,_[ closesIhedialogbox. / movethedialogbox.
Setup
Section to Change Page Setup for= Plain
I_ster hgt.;= # O_ _ Tmo (Left and Right)
Hlargins= LeftI' i. Itri'] Right ]tin ] [_
TopI' " ]_"]eottom 11,- II_'7
Responding to a Dialog Box
To respond to a dialog box, select from the available options and type text in
text entry boxes where applicable. When you have finished, click on one of
the buttons at the bottom of the dialog box to apply what you have chosen
and continue. Every dialog box has buttons that initiate actions when you
click on them. If a button label is followed by an ellipsis (...), clicking on it
leads to another dialog box.
There are various ways for you to enter information and make selections in
dialog boxes. Some of these include:
: * _Radio bu_se radio bOttons to select one item from a.om'oup.
• Text entry boxes. Use text entry boxes to type in the appropriate
text.
• Value selectors. Use value selectors to change a value.
• Check boxes. Use check boxes to turn items on or off.
• lists. Use lists to select one or more items.
I_ To select a radio button:
Click on one radio button in a group. Or, use the arrow keys to select an item
and press ENTER or SPACEBAR. The radio button datums to show it bas
been selected. (lf you make a mistake, click on the correct radio button.)
Getting Started 39
Page 48

Radiobutton
I peSeset.p
Section to Change Page _ far, HoJn
Flautist Paoe_ _ Turn (Left and Right)
Margim;_ Left II in I[t_ Right LI in
vopIt_ II_I_'°''I'in _.If--l-_)
Text
1entry box
Value
selector
• To enter text in a text entry box:.
1. If the insertimJpobmr (a blinking vertical line) is not blinking in the text
entry box or if the name in the box is not highlighted, move the glidepad
pointer to the text entry box and click. The insertion point appears in the
box.
II I
2. Type text in the box. If you make a mistake, press BACKSPACE to erase
as many characters as necessary and then type the correct text.
• To change a value in a value selector:
--Value Sel-ect_'_ -Click o-n-fii-e up a_w+to'_6ve to the next item or increase the value. (Click
[I
]_,] on.the down arrow to move to the previous item or decrease the value.)
r
OR
If the insertion point is blinking in the value selector, type the appropriate
value in the box. If the insertion point is not in the box, move the pointer to
it and click. Then, type the appropriate value. (If you make a mistake, press
BACKSPACE to erase the number, and then type the correct value.)
• To select an item from a scrolling list:-
Click on the item you want to select. The selected item is highlighted. If the
list contains more items than can fit in the window, click on the scroll arrow
to show more of the list, then make your selection.
• To open or close a folder from a scrolling list:
Double-click on the folder. If it is closed, it will open and the names of the
fries or folders within it will appear below its name. If it is open, it will close.
Getting Started 40
Page 49

!_ To select or deselect a check box:
DropDown List Click on an empty check box. The check box darkens, indicating that the item
is selected. Click on the check box again to turn it off.
<>9 I_ To select an item from a drop-down list:
Oto
Otz 1. Click on the drop-down list button. The listdrops down so thatyou can
0 t4 make a different selection.
ors
' O 24 2. Select the item you want from the list. The item is selected, and the
0 36 drop-down list closes.
054
o____ I_ To start an action by clinking buttons:
• Apply. Applies the current settings but leaves the dialog box open so
you can continue to adjust the setffngs.
• Close. Closes the dialog box. (The current settings are applied only if
you have previously used the Apply button.)
• Reset. Resets the box to its original settings, undoing any changes you
have made.
• OK. Applies the current settings and closes the dialog box.
• Cancel. Closes the dialog box without applying your changes.
• Stop. Ends the task in progress at the next possible stoppingplace.
• Yes. Ans__s_pthe_question in the dialog box. The dialog box
closes.
No. Answers no to the question in the dialog box. The dialog box
cIQ.$e$.
Getting Started 41
Page 50

l_ To use the keyboard to respond to a dialog box:
1. To move from one group of options to another, press TAB. To move
backward, hold down SHIFT and press TAB. (Inside a group, use the
arrow keys on the keyboard to move from item to item.)
2. To select or deselect a check box, move the selection cursor with T or ,1,to
the item and press SPACEBAR.
3. When you finish setting items, select one of the buttons at the bottom of
the dialog box.
4. One button has a thick border around it. If this is the button you want to
select, press SPACEBAR.
OR
Either press TAB or SHIFT + TAB until the button you want to select is
surrounded by a thick border. Then press SPACEBAR.
To close a dialog box:
Click on the button in the upper left corner.
Setting Printer Options
This section explains common printing options that the programs share.
However, each progra m has some unique printing options, which you will
find in the-chapter on.the-program, like'Word Processing or SpreadsheeL
Also, some printing options depend on the printer you are using.
If you are pdnting color-- -
and your screen does
not display color, you
may want to
experiment with the
colors you select by
printing sample pages.
Note: You can connect a color printer to print color in your documents, even
if your screen does not show color. Add color or tone to text and drawings
by selecting Area Attributes, Line Attributes, or Attributes from the Graphics
menu in either Word Processing or Spreadsheet. In Drawing, you can add
color or tone by selecting from the Attributes menu or by using the Attribute
tool bar. For information on adding color or tone, see these chapters in Book
2: Word Processing, Spreadsheet, and Drawing.
Disable screen saver
before printing to print
faster.
Before you print, you must set physical paper options, such as size and
margins, for the printer you currently have installed.
Getting Started 42
Page 51

Getting Ready to Print
[]
Start the printing process from within a program by pressing PRINT from the
function key row or by selecting Send from the File menu. This opens the
menu on the left:
Select Print from the Send menu. The Pn'nt dialog box opens:
I'./=Till _i
J
The printer name appears
after you install the printar
and set pdnter preferences.
See page 10.
Some programs have
an additionalOptions
sectionat thebottom;
for example, Word
Processingcontains_---
Merge Optionsfor
mergingnames and
addresses.See the
chapteron Word
Processing(Book2)
forinformationon
merging.
i_lidth: 11 in
,Printer Optionm I
HP LaserJet II Compatible on LPT1 "-'l
I_ight= 8.5 in IOptions.. I
Document Options.
Print gualittj: _ High v" Hedium v Low (Fast)
Humber of Copies: ['_ [_]
Merge Option8
4_1to Herge -...-M_.rt.leOJ_t_.
_Contents: t Document -"l
•....,.:::: ....
Fill in the dialog box-_Ls-'_Tollow_
• Printer. Click on the printer button to select from installed printers.
• Width and Height. Click on the Options button to select the width
and height of the paper in your printer. See the instructions under
Setting Paper Type, Size, and Orientation below.
Print Quality. Click on the print quality you want to use. High
quality produces the most professional looking documents, but it
uses more ink. Low quality uses less ink but prints faster. Select high
quality to print final documents.
• Number of Copies. To print more than one copy, change the
number of copies by clicking on the arrows or typing a number in
the Number of Copies box.
Contents. Click here to select a portion of the document or the
entire document to print. Options available depend on the program
you have open. For example, in Addressbook you have the option of
selecting the current card only.
Getting Started 43
Page 52

Setting Paper Type, Size, and Orientation (Options)
For example, to print a
Word Processing
document in landscape
orientation, firs.t set up
the page in Word
Processing for
landscape and then set
the printer options to
landscape.
Printer options describe the physical setup of your printer. Change options
when you change the paper type (for example from paper to envelope) or
when you change the paper size or feed. Printer options must always
reflect the actual physical setup of your printer.
Some options in this dialog box will differ, depending on the type of printer
you have installed. For example, some printers will not print on large size
paper, so if that printer is installed, that paper size will not be available in the
Printer Options.
Printer options for laser printers differ from printer options for inkjet printers.
However, all printers share the basic printer options.
in Options, the printer
you have connected
and the paper type
determine the Paper
Feed, Size, and Width
and Height settings.
For example, when
you select envelope,
the Paper Size
automatically
changes.
• To change basic printer options:
1. In the Print dialog box, be sure the printer you are using is selected. If
not, select it from the drop-down list.
2. Click on Options. The Options dialog box appears. This dialog box differs
somewhat, depending on the type of pn'nter you am using.
3. Fill in the dialog box basic options:
• Type of Paper. Select from paper, envelope, or label.
Size of Paper. If the selected paper size is not the size of the paper
in your printer, select the correct size from the paper size list. For
-enx;elop_s_fid'Ia-fi"_lS, select the size from the list.
Paper Feed (Orientation). Select either portrait or landscape paper
orientation, depending on the direction of the paper in the paper
tray_ Portragt orientation is a page printed so that, as you read it, the
width of the page is less than its height. A horizontal orientation is
called landscape. When you change orientation, width and height
automatically change.
• Width & Height. To use a custom paper size that is not included in
the paper size list, use the Width and Height value selectors to enter
the width and height of the paper you want to use.
Depending on the printer
you are using, the paper
_ource optionsmay appear
as radio buttons.
.
• Paper Source. Use this drop-down list to select the location of the
paper you want to use; the available paper source options will differ
depending on the printer you are using.
Click on OK if you want the changes you have made to remain in effect
for printing one document.
OR
Getting Started 44
Page 53

Click on Save Options and then click on OK ff you want the changes to
remain in effect every time you print. You can, of course, return to the
Options dialog box whenever you want and change any of these options
again.
Additional printer options
Depending on the printer you are using, additional settings appear in the
Print Options dialog box. For example, laser printers allow you to set
timeout, maximum retries, printer memory, and memory usage; however, you
will not normally have to change the default settings. For more information,
see the manual that came with your particular printer.
Using Online Help
To get answers to your questions, use the online help.
• To open Help:
---] lick on the Help button in the bottom fight comer of the window or press
HELP. Help information for the program or dialog box you are using
apl_ars- .
Table of Contents_--- WordProcessing Help
°i En+rin_n'; Ch_ina Inforrndon
Chenaina the Look ol Your Text
• Chlmaina Mmalns and Indantlno
• How can I oMce oaae numbers on my documenl ?
When the Help
window is open, it is
on top of other
• windows, ff the Help
_ndow is obscuring
something, move it by
dragging its title bar.
• To get help on how to use the Help window:
Click on the Help button in the tide bar of the Help window.
• To resize the Help window:
1. Place the on-screen pointer in any comer of the Help window. Tbepointer
changes to a frame pointer sboum at lej_.
2. Click and hold the Select button (top button on glidepad); then slide your
f'mger on the glidepad surface to drag toward the center of the window.
The window becomes smaller. Drag away from the center to make it k_rger.
Getting Started 45
Page 54

m
Help windowsare
arranged by topic.
Most topicsare
arranged around
common,
questions.The
buttonsat the top
of theHelp
mndow helpyou
move easily
between topics.
3. Release the Select button. The window is resized.
• To jump to another topic:
1. Move the pointer over any undedined, blue text. Thepointer changes to
the Help pointe_, sboum at the lej_.
2. Click on the underlined text. Information specific to that topic appears in
the Help window. Go back to the pretn'ous window by clicking Go Back.
• TO see the major topics for a program:
1. Click on Contents. The Table of Contents Help window appears.
2. To go to one of the topics listed in the Table of Contents window, click
on the underlined text for that topic.
• To return to the previous Help window:
Click on Go Back. Theprevious He!p window appears.
• To go back to an earlier Help window:
1. Click on History. A drop-doum list with your last ten Help windows
appears.
2. Click on the topic you would like to see. The Help window for that topic
appears.
Getting Started 46
Page 55

Beyond the Basics
This section describes the following: using templates, editing document
notes, and naming DOS fdes.
Using and Creating Templates
These templatesare
availab/e on cfskette:
for Word Processing
Business Letter
Envelope #10
Fax Cover Sheet
Fun Fax Cover Sheet
Formal Personal Letter
Informal Letter
Informal Memo
Travel Itinerary
Menu
Overhead Slide
Newsletter (1 column)
Newsletter2 (2 column)
Resume
for Spreadsheet
Checkbook Register
- Invoice - _'_-
PurchaseOrder
Travel and Expense Report -
for Drawing
Meeting Sign
BirthdayCard
PartyInvitation
Picnic
StudentAward
ThankYouCard
A template is a document that you use as a model to create similar
documents. It contains the text, graphics, formatting, and special layouts
common to all documents of a particular type. For example, a letter template
might contain the following elements:
Companylogo
Date
Address
Salutation
Text
Closing
- Name
p-,- (
kj ._& (_,ll. _l.k; k
;,.,,,io,,.r--k.i
Use templates as you find them or change them to fit your needs. You can
also create your own library of templates for different uses.
Getting Started 47
Page 56

Using standard templates
Templates can only be
accessed from diskette
and saved to the F
ddve as documents.
To save a document as
a template, you must
save to diskette.
When you select a template from the New/Open dialog box, the program
creates a new document containing the information in the template you
selected. All you do is fill in the information that is missing or change the
information of the place bolder text. Place holders are text that define the
type of entry in a location, such as ZIP CODE that you later replace with the
actual information you want.
• To use a template:
1. Start the program you want to use and insert the diskette labelled
Templates.
2. Select New/Open from the File menu. The New/Open dialog box appears.
3. Click on Template. A dialog lists available templates.
4. Select the template you want to use, scrolling the list ff necessary. A
description of the template, if available, appears in the Notes box.
5. Click on Use Template or press ENTER or double-click the highlighted
name. The program creates a copy of the template as a new, untitled
document.
Select the place holder text and type your text. The new text replaces the
place holder text.
Save the document if you want. Cbanges you make to the new document
do not affect the original template.
Creating your. own template
To create your own template, begin with an empty document in Word
Processing, Drawing, or Spreadsheet. Or use an existing document and save it
as a template. You must save templates to diskette, not to the F drive.
• To create a template:
1. Open a new or existing document in.the program you want to use.
2. Specify the settings you want to use. For example, in Word Processing,
you might want to define the following:
• Page size
• Margins
• Text specifications, such as font, size, and style
Getting Started 48
Page 57

Review _e chapter
on Word Processing
in Book 2 for
information on
creating text and
placing graphics.
When adoYnjl
document notes to the
template, do so
before closing it. See
Adding,and Hewing
Document Notes on
page 50 for more
information.
3. Add the text and place holder text (such as City, State, and Zip code).
4. Add any graphics you want to include (such as a logo).
5. Select Other from the File menu. A subnmnu appe_ws.
6. Select Save As Template from the Other submenu. A d_dog box appeam.
7. Insert a diskette to save the template to.
8. If necessary, select the fol_ler where you want to save the template.
9. Type the name of the template and then click on Save. The template is
saved on diskette.
OR
Click on Export to export the template to another format. A dia/og box
appears. Select a folder for storing the exported document; then select a
format, give the document a name, and click on Export. The template is
exported in the new format.
10. Close the document.
Modifying a template
You can change any template you have created so that it meets your
particular needs. Sometimes you can modify the same template for different
situations (such as documents for different clients).
)_ To change a=template you have created:
1. Insert the diskette labelled Templates.
2. If the New/Open dialog box is not showing, select New/Open from the
File menu.
Click on the Template. A dialog box lists the available template foMers or
templates.
.
4. Select the template you want to modify, scrolling the list if necessary.
A description of the template, if available, appears in the Notes box.
5. Select the For Editing check box and then click on Use Template. The
template appears in tbe program window.
6. Edit the template until it appears the wag you want.
7. Select Save from the File menu; then close the document. The template is
saved with your changes.
Getting Started 49
Page 58

• To create a new template based on one of the existing
templates:
1. Select New/Open from the File menu.
2. Click on Templates. A dialog box lists the available template folders or
templates.
3. Select the template you warit to use, scrolling the list if necessary. A
description of the template, if available, appears in the Notes box.
4. Click on Use Template. The template appears in the document window.
5. Select Other from the File menu. A submenu appears.
6. Select Save As Template from the Other submenu. A dialog box appears.
7. If necessary, select the folder to which you want to save the template.
8. Type the name of the template.
9. Make the changes you want for the new template.
10. Click on Save. The new template is saved with the name you specified in
Step 8.
11. Close the document.
Adding and Viewing Document Notes
You cannot add
document notes to an
unfftled document You
must first save the
.document and give iVa
name.
Document notes can be any information you might want to record about
your documeml For example, you can use document notes to keep a revision
history of a document.
- Notes accompany a-do_tmxent, but they are not an integral part of the Lody
of the document-'Notes attached to a document appear in the Open dialog
box. The Open dialog box appears after you select Open an Existing
.... Document from the New/Open dialog box.
• To create, view, or edit document notes:
1. Create and save the document in any program.
2. Select Other from the File menu. The Other submenu appears.
3. Select Edit Document Notes. A dialog box appears:
Typeoreditdocumentnoteshere.
[tit Doctm'mnt Notes
Edit the note* for this document.
tl_nk you letter
Is.,_cm-,.o,..I _ []
4. Type your new document notes or edit the existing ones. Then click on
Set Document Notes.
Getting Started 50
Page 59

OR
If you are just viewing the document notes, click on Cancel when you a_
done. The dialog box closes and you return to the document.
Opening Two Documents at Once
You can open two Word Processing or Drawing documents at once and
switch between the two.
• To open two documents at once:
1. Create a new document or save an existing one.
2. With that document open, select New/Open from the File menu. A dialog
box appears.
3. Select a second document to open. The document appears on the screen.
• To switch between two documents:
1. Click on the Window menu. The drop-down menu appears. At the bottom_
the names of both documents appear with a radio box beside each name.
The document on screen has its radio box filled.
2. Click on the radio box of the other document. That document appears on
top. _.
Getting Started 51
Page 60

Naming a DOS File
If you plan to use any of your documents on a computer that uses DOS,
create a name that DOS will recognize. DOS names can be up to eight
characters long, followed by an optional period and three more characters.
The three characters or extension usually indicates the type of data the file
contains. For example, give a .T_T extension to a DOS text file, such as one
created with Text File Editor.
DOS: Disk Operating
System
DOS file names can only contain the letters A through Z, the numbers 0
through 9, and only the following special characters:
No ob_er special
characters are
permitted.
Special Characters Allowed in DOS File Names
underscore caret "
dollar sign $ tilde
exclamation
! number sign #
point
percentage sign % ampersand &
hyphen - braces { }
parenflaeses ( ) at sign @
apostrophe ' grave accent "
DOE names cann& contain spaces, commas, backslashes, asterisks, question
. marks, or periods (except the period following the first eight characters). The
letters are always converted to uppercase.
Getting Started 52
Page 61

Quick Start Exercise
To become familiar with creating documents, follow the steps in this Quick
Start exercise to create, save, and print this simple document:
Your Name
Your Address
Your Phone Number
Creating your document
• To enter the text:
1. Turn on the notebook unit.
2. When the Main Menu appears showing the programs, press the ENTER
key. Pressing ENTER at the Main menu automatically opens Word
Processing, tbe first icon on the menu. Select New from the New/Open
box.
3. When the Word Processing screen appears with the blinking insertion
point, type your name andpress ENTER.
4. Type your a_ss and press ENTER; then type your city, state, and zip
code and press ENTER.
5. Type your phone number.
Using the glidepad,
you have two ways to
select (or click on an
item): you can click
on the Select button
oryou can tap once
on the glidepad.
Selectbutton(left
buttononamouse)
Drag button (right
-- buttonona mouse)
• To change the font and size:
1. Use the glidepad to click on the Edit menu. A submenu appears.
2. Click on Select All. All your text is selected.
3. Using the glidepad, move the insertion point to the button that says URW
Roman. The insertion point changes into an arrow.
4. With the arrow over the button that says URW Roman, tap once on the
glidepad to click on the button. A list of other fonts (or typefaces) appears --
below URW Roman.
5. Move the arrow down to URW Sans and click once. Your typed text
appears on screen in URW Sans font.
6. Move the arrow to the 12 button (to the right of the button that now reads
URW Sans) and tap once on the glidepad to click on the 12 button.
7. Move the arrow down the list to the number 14 and tap once. The text size
increases from 12pts. to 14 pts.
Getting Started 53
Page 62

• To center the text:
1. With your text still selected (if it is not, repeat steps 1 and 2 above), use
the glidepad to select Alignment from the Paragraph menu.
2. Move the arrow to the word Center and tap once to select it. Your text
appears in the center of the page.
Saving your document
• To save your document:
1. Insert a diskette into the disk drive.
2. Select Save from the File menu.
3. When a dialog box appears, move the arrow to the rectangular box beside
New Name and click. It changes to an insertion point for, text entry.
4. Type a name for your document.
5. Move the arrow to the Drives button and tap once on the glidepad. A
drop-down list of drives appears.
6. Select drive A to save on the diskette in the disk drive.
7. Select the Save button below the New Name box and tap once.
Printing your document
Before printing, you must connect a printer and set printer preferences. See
pages 10 and 11.
The pant dialog box-
allows you to set print
options like print size
and quality. For more
information on these
options, see Setting
Printer Options on
page 42.
• To print-your c!ocum-dr_t:
1. Press PRINT from the top row of the keyboard. A dialog box appears.
_- -2. Select Print from this dialog box. Your document prints to the default
settings: letter size paper, high print quality, one copy, no merge.
3. Press EXIT to return to the Main Menu.
You just created, saved, and printed a document.
Getting Started 54
Page 63

3 File Manager
File Manager lists the files and folders on your diskettes (drive A) and internal
storage (drive F). File Manager also allows you to create folders for storing
files and to copy or move files and folders.
Starting File Manager
l_ To open File Manager:
Click on File Manager from the Main Menu. A window appears wRb icons
representing tbe j'des, foMers, or programs stored on the diskette in drive A, on
the internal storage (drive F), or on an optional PC card.
Menubar --
Information
bar
Folder
Toolbar
L_e _w I[t_ I_ndmu
_AdUnmm_ddl _,- 4 _ ,(.ix,ss2 bWhm)of 4. a.A43,................._O_ fre_
Title bar
4 Io_ I.ml m
Icons with DOS written
on them are files
created with a DOS
_ program.
Files, folders, and programs are represented by k:ons. When you want to do
something with a tile, folder, or program, click on its icon.
• The menu bar shows the menu options available in File Manager:
File, View, Disk, and Window. When you select one of these, a
submenu appears with more options, such as Exit in the File menu.
File Manager 55
Page 64

The power must be OFF before
you insert a PC card.
A Folder (also called a directory) is a holding place for storing
documents, programs, and other folders.
F'de and document mean the same thing. They do not contain other
ides or documents. For example, a letter created in Word Processing
is a document and a file.
The Title bar shows thd name of the program you have open.
The Tool bar shows the following tools:
The Whole window icon uses one window to show the
contents of one folder, the contents of a diskette in drive A, or the
contents of drive E
The Tile window icon shows each folder as a separate window,
tiled across the screen. To move a folder to the front, click on its
title bar or menu bar. To close a folder, click on the close folder
button from the Information bar.
Drive A is the diskette in the disk drive. Click here to view its
contents. When you change diskettes, click here again to view the
contents of the new diskette.
Drive E is active when a PC card is inserted. Click here to see
files on an optional PC card inserted in the slot. See page 18 for
more information on using PC cards.
Drive F is the internal storage space for the notebook. You can
__ also saVe._es_to, this locatioK However, the amount of mem_'ry is
limitecf:. Save the F drive for files you access frequendy from other
programs, like Addressbook files or your Intemet Bookmarks file.
Click here to view the contents of drive E
• The Information bar shows information about the diskette, folder,
or drive.
Close folder button _ / Drive letter / Pathname .
Informationbar-- _HIHE] huork- 4 items(151,434bgtes)of4, !,096,192bgtesfree. I
Number of items/ I
Total size Free space
Close folder button allows you to close a folder. Click once here
to close the current folder.
Drive letter shows the drive whose contents you are viewing
(drive A or F).
File Manager 56
Page 65

Pa_e shows the drive and folders you went through to
reach the current folder. Each level as you go down into folders
is separated by a slash (from left to right in pathname). This
pathname is DOS compatible.
Number of items shows the number of files or folders on the
drive, on the diskette, or in the folder.
Total size shows the total size of all files on the diskette or in the
folder expressed in bytes of memory. To determine the size, select
individual file icons. To determine the size of a folder within this
folder, first open the folder.
Free space shows the amount of memory remaining on the
diskette or drive, measured in bytes. This is the free space
available for saving documents.
• To open a folder:
Double-click on a folder icon. The Folder window appears, sboun'ng the
contents of the folder. (Both the name and patb of the folder appear in the
Information bar.)
• To close a folder
Click once on the folder's icon in the Information bar.
File Manager 57
Page 66

Changing the View
To change the view of
the files inside a folder,
first open the folder.
You can view f'des and folders as a word list, with or without file details. You
can also open more than one folder at the time and tile, or layer, the folder
windows across the screen.
Tomove iconsor file
names closertogether
on the screen, select
Compress Display
from the Viewmenu.
I_ To change the current viewing option:
1. Open File Manager and click on the drive A icon to view the contents of a
diskette.
OR
Click on the drive F icon to view the contents of drive E
2. Select the View menu. The View menu opens:
Names Only shows the files or folders in the folder as a list of small
icons with names.
Names and Details shows the files or folders as a list of small icons
with the name, size, and modification date. Files also have attributes
listed to the right of their icons. Each file attribute is represented by a
single letter: Read-Only (R), Hidden (I-l), System (S), and Archive (A).
See page 62 for information on these attributes.
Icons shows the file or folder icons, with the name below the icon.
-_7_ To tile folder windows_
To move another folder to Clickon the Tile window icon at the bottom of the screen. The folders that
the top, click on its .... _rre Opened tile across the screen, one on top of the other. To open a folder,
Information bar. double-click on it.
Tosee one folderwindow
only,clickon the Whole
window buttonat the
bottomof the screen.
_File _em _Disk Hindom
,,,,.n °, ,. ,,4.=, h,,,...,r.._
F I '''_] 7 items (60.438 bgtes) of "/. 72;192 bgtes free_
l :, II
::_ _ ILSolibir e Text File Edibl Turnabout
File Manager 58
Page 67

Sorting Files
Tosortthe filesina
folder,firstopen the
folder.
You can sort files several ways: by name, by the date the last changes were
made, by the date of creation, or by size.
)_ To sort the contents: .
1. Open File Manager and click on the drive A icon to view the contents of a
diskette.
OR
2°
3.
Click on the drive F icon to view the contents of drive E
Select Sort By from the View menu. A submenu appears, lisa'ng sort
options.
Select a sort option:
* Name sorts the contents of the folder alphabetically by the entire
DOS name.
DOS Extension sorts the files by the 3-letter extension that appears
after the period.
Modification Date and Time sorts the contents of the folder by date
and time of last modification in reverse chronological order.
* Creation Date and Tame sorts by date and time of creation in
reverse chronological order.
• Size sorts me contents of the folder by ascending size, with folders
first, then individual files.
• DOS order sorts the files in the same order as DOS.
Working with Folders
You can create new folders for organizing your files. For example, you may
want to create one folder for storing personal letters and another for storing
business letters.
You can also move or copy folders to other folders or to the internal storage
(Drive F) or to another diskette.
You can create a
.--.new folder inside
any open folder.
The new folder is
..mpty until you
move or copy items
into iL
!_ To create a new folder:
1. Click on the drive in which you want to place the new folder.
2. Select Create Folder from the File menu. A dialog box appears asking you
to name the new folder
File Manager 59
Page 68

grtmte Folder
Current FoRint i* _ \
[]
3. Type the name for the folder. Use any characters, and the name can be as
long as 32 characters. However, if you want to use the folder with a DOS
program, the name can be no longer than 8 characters (see Naming a DOS
File on page 52).
4. Click on Create. The new folder appears in the current folder or diskette.
Moving or Copying a File or Folder
You can copy or move files and folders to other folders or to another drive (A
or F). This can be done two ways: by dragging a selected file or folder across
the screen or by using the Move or Copy selections from the File menu.
The pointer looks like
this when you are
dragging.
The pointer looks h_d"-_
this when you cannot
move the item to _e
destination.
0
To move a file or folder
using the menu, select
the file or folder. Then
select Move from the
File menu, select a
destination drive or
folder, and click on
Move.
I_ To move a file or folder:
1. Move the on-screen pointer over the file or folder and click the Select
button (top button) once to select it.
2. Hold the Dr',ig button (bottom button on the glidepad) and move your
f'mger across the glidepad surface to drag the file or folder.
3. With the dragged file:o,£ folderover the new folder, release the Drag
button.-7-The tcon _/__ into the new folder. To see the zcon, chck on
the folder to open it.
_To move several files or folders:
1. To select several files or folders, click and hold the Select button (top
button on the gildepad) and slide your finger along the surface to create a
rectangle around the icons. Tbe files or folders are selected.
2. Move the on-screen pointer directly over one of the selected files or
folders. A small outline appears on top of the icon.
3. With the Drag button held down, drag your finger across the glidepad
surface so that the on-screen pointer moves the small outline.
4. With the oudine over the folder, release the button. All the icons disappear
into the folder. To see the files or folders you moved, click on the folder to
open it.
File Manager 60
Page 69

Thepointer looks
like this whenyou
are copying _
To-copy a file or folder
using the menu, select
the file _)r folder. Then
select Copy from the
F_le menu, select a
destination drive or
folder, and click on
Copy.
ll_To copy a file or folder:
1. Move the on-screen pointer to the file or folder and click the Select button
(top button) once to select it.
2. Press and hold CTRL;; then hold the Drag button as you slide your finger
along the glidepad surface so that the on-screen pointer moves the
oudine. Then, with the oddine over the folder, release the button. Tbef!/es
or folders are copied into the folder.
OR
Hold the Drag button as you slide your finger along the glidepad surface
so that the on-screen pointer moves the outline. Then, with the outline
over drive A or F, release the Drag button. Thefiles or folders are copie d.
File Manager 61
Page 70

Viewing Information about Files and Folders
A file or folder has
two names: a name
that you use to refer
to it and b_e name the
system uses, called
the DOS name.
• To find information about files and folders:
1. Select one or more files or folders.
2. Select File Information from the File menu. A submenu appears.
3. Select Get Info. A d_a/og box appears:
r
Informationaboutthefile or
folderyouselected--
/
G_ Imfonnetion
Poth_ _LI •
HlodiflceUons 4h3_26 P!4 06/21/96
Or#reck Ih!2142 AM 06121196
Itttrlbutesa R Flle QuJnert -
Flle_ 6.840 FileTupet UttFille
Creelo_ "34P0_'o0 Iteloemn 2,0 46-370
Notus
:m'lmnel letter to Irnu
Youcanviewnotesaboutthe file orfoklerhere.
Hi_en files are not
normally listed in the File
Manager window. Tolist
them, select Show
Hidden Files from the
V'mwmenu.
• Name. The name that you use to refer to the file or folder.
• DOS Name. The DOS name that your system uses to recognize the
fde_or folde_A_.l_OS_name has eight characters with a three cha__cter
extension.'-The DOS name may not resemble the other name.
• Path. The location of the file, showing how you can get to it.
• Last Mod_cation. The time and date that the last change was made
to the file or folder.
Created. The time and date that the file or folder was created.
Attributes. The letters below (A, D, etc.) stand for attributes that
have been given to a file:
Archive. This am'ibute is used as a flag by some DOS commands
to track which files have been modified since their last backup.
Directory. This indicates that the item is a DOS directory, which
appears as a folder.
Hidden. This indicates that DOS does not display the file or folder
in a directory list.
Read-Only. This indicates that you cannot modify the file or
folder.
File Manager 62
Page 71

Add notes to documents
using the program the
document v_s _r_ed
in. See page 50.
System. This indicates that this is a special-purpose file or folder
for use by DOS.
Template. This indicates a program template from Word
Processing, Drawing, or Spreadsheet.
• File Size. This is the number of bytes in a file or folder.
• Creator. This is the name of the program with which a file was
created.
• File Owner. This remains blank.
• File Type. This identifies the system function of the fde or folder. File
types include the following:
Executable. This file is a program.
Data Fil_ This file.. C0ntains data.
VIM File. This file is a data f'de that uses the virtual memory
storage system.
Folder. The item is a folder or DOS directory.
DOS FOe. The file is a DOS data file or program.
• Release. This is a version number used for programs only.
• User Notes. You can view your own document notes in this text
box.
4. Click on either OK or Cancel.
OR
If you selected several items for which you wanted to view information,
click on Next to see information about the next selected f'de or folder.
File Manager 63
Page 72

Changing Information about Files and Folders
When you create a file or folder, you can add one of the following attributes
to it, depending on your needs:
• Read-Only means that the file cannot be changed; it can only be
read.
Archive is a DOS attribute that tracks which files have been modified
since their last backup. When the file is backed up (using DOS
commands on a DOS-based computer), the archive attribute is
removed. If the file is modified, DOS turns the archive attribute back
on.
• Hidden means that the file is not normally displayed in File Manager.
• System means that the file is used by the system to execute
programs.
• Template means that the file is saved as a template, which allows
you to use the formatting as a basis to create other, similar files.
Whenyou select
more thanone file at
a time, the Change
Attributesdialog box
allowsyou tochange
the attributesfor the
_qrstfile and then €libR_
on Next tochange
those forthe next file.
• To change information about files and folders:
1. Select one or more files or folders.
2. Select File Information from the File menu. A submenu appears.
3. Select Change Attributes. The Change Attm'butes dialog box appears.
4. Selectthe attribute i_oTadd(Read-Onl)t, Archive, Hidden, System, Template)
and select Change.
File Manager 64
Page 73

Formatting and Copying Diskettes
You can use File Manager to format diskettes; however, most diskettes come
formatted when purchased. You can also copy and rename diskettes using
File Manager. However, because File Manager makes an exact duplicate of the
source diskette, the destination diskette must be the same size as the source
diskette. Also note that, during a disk copy, File Manager writes over all files
that are on the destination diskette.
You must format a
diskette before using it.
Formatting erases all
information on a
diskette.
• To format a diskette:
1. Insert the diskette into the disk chive.
2. Select Format Disk from the Disk menu. A dialog box appears.
3. Select the disk size of your diskette.
4. Click on OK. A dialog box appears requesa'ng a name for the diskette.
5. Type a name for the diskette (1 to 11 characters long) and click on
Format. A message tells you when formatting is finisbed.
Whenmaking a
backupcopyof
program diskettes,
donot copy individual
files to separately.
diskettes.Some
programswillnot
workproperlyffyou
do. -
• To copy a diskette:
1. Select Copy Disk from the Disk menu. A dialog box appears.
2. Insert the diskette that contains the information to copy.
3. When File Manager finishes, it asks you to insert the destination disk (the
diskette on whichzy_ou want to copy).
4-1 Insert the destination diskette.
5. Click on OK and follow the instructions on the screen. You may need to
repeat tbis process several ames. File Manager shows you the progress it is
making as it copies. It also gives you the option of stopping at any time.
• To rename a diskette:
1. Select Rename Disk from the Disk menu. A dialog box appears.
2. Enter a new name (1-11 characters long).
3. Click on Rename.
Use Rescan to update
your view of the "
" diskette contents after
adding or deleting files • TO rescan the current diskette:
to the same diskette.
To view the contents of Select Rescan Drives from the Disk menu.
another diskette, insert
_- that diskette and click
on the drive A icon.
File Manager 65
Page 74

Renaming, Duplicating, or Deleting a File or Folder
You can change a folder or file name. You can also make copies (exact in all
but name) of both files and folders. When you need more room on your
diskettes, you can delete files or folders that you no longer need.
If you havq selected
several items, you get
a separate dialog box
for each item. Click
on Next to leave _e
name of the current
item unchanged and
go on to the next.
Click on Cancel to
close the dialog box
without renaming the
remaining selected
files.
• To rename a file or folder'.
1. Select the item (or items) you want to rename.
2. Select Rename from the File menu. A dialog box appears.
3. Enter the new name in the box.
4. Click on Rename. lf a file with the same name already exists, a dialog box
asks you to type a different name.
• To duplicate a file or folder:
1. Select the item (or items) you want to rename.
2. Select Duplicate from the File menu. A dialog box appears:
Curr_nt Fold_ i_ [P(RSONRI.] \
Oulpaceto: Iqonl Iott_
I_ _43puof _ letter
When you duplicate
many items, you can
change the name of
each copy. Clicking on
Next skips the current
item altogether.
Clicking on Cancel
closes the dialog box
without duplicating the
ra[naining items.
Be careful to delete only
those files you know you
will not need later.
3.
.
.
Type a name for the duplicate. If you do not, the copy will be named as
follows: Copy of (file or foMer name).
Click on Duplicate. A duplicate colry of the selected item (or items) appears
in the same folder as the original.
If you are duplicating more than one item, the name of the next item
appears in the dialog box and the whole process repeats.
• To delete a file or folden
1. Select the item (or items) you want to delete.
2. Press DELETE. A dialog box appears asking if you are sure you want to
delete. Click on Delete.
File Manager 66
Page 75

4 Fax and Data Modem
You can use your internal modem to send faxes (but not receive them). As
you send a fax, you can send.it to multiple recipients. You can also use the
modem to communicate with other computers using the CommunicaUon
program, which is supplied on diskette.
CAUTION:
The Telephone Consumer Protection Act of 1991 makes it unlawful for
any person to use a computer or other electronic device, including fax
machines, to send any message unless such message dearly contains
in a margin at the top and bottom of each transmitted page or on the
first page of the transmission, the date and time it is sent and an
identification of the business or other entity, or other individual
sending the message and the telephone number of the sending
machine or such business, other entity or individual. (The telephone
number provided may not be a 900 number or any other nmnber for
which charges exceed local or long-distance transmission charges.)
To program _ information into your fax machine, complete the steps on
how to set preferences for sender information below.
Before Sendinga Fax-
Before faxing, you must connect the modem and set modem
preferences. See page 12. When you set modem preferences, be sure
that Can Fax is set to Yes.
You must also set up Fax Preferences, including the default sender
information.
In Preferences, you can also set up and save dialing codes for sending
long-distance faxes and charging to a billing ca_! or for dialing an outside
line. Then when you send a fax, you can activate one of those dialing codes,...
and the system will dial it before dialing the fax number.
For information on the
Advanced button, see
page 72 in this chapter.
To set preferences for .sender information:
1. Click on Preferences in the Main Menu. Prefereno_s opens.
2. Click on Fax. A dialog box appears.
3. Be sure that the radio button beside Internal is darkened. If you are using
an optional external modem, click on the button beside External.
4. Click on the Sender InformaUon button. A dialog box appears.
Fax and Data Modem 67
Page 76

5. Fill in the dialog box:
• From. Enter your name.
• Company. Enter the name of your company.
• Voice Phone. Enter your phone number; it will appear at the top of
each page.
• Fax. Enter your fax number here.
• Station ID. Enter your fax number again, so a receiving fax modem
can identify your fax modem. This will appear at the top of each
page.
• OK. Applies changes.
• Cancel. Erases changes.
)_ To set preferences for dialing codes (access and
long-distance):
1. Click on Preferences from the Main Menu.
.
3.
.- 4.
5.
For informationo_disabling
"_callwaiting, contactyour
local phone company.
Click on Fax.
Click on Sender Info.
Click on Dialing Codes. A dialog box appears.
Fill in the dialog box:
Access. Click.here if you have an outside line or want to enter a
_-numbe'_g&_uen-'_Ce that will disable call waiting. First enter he
number, then enter a comma to briefly pause the dialing. For
example, for an outside line, dial 9,. Also add a note describing
this access code in the box beside Notes; then click on Add.
When you send a fax, use this note to select the access code (see
page 70).
You can save multiple
access codes and
long-distance codes, so
always enter a note to save
with the access code. Type
the note in the blank; then
click on Add. Thai way, you
will be able to select an
_ccess code or
long-distance code by
selecting the note.
When sending a
-_g-distance fax using a
prepaid billing card,
manual dialing is often the
easiest method. See page
71.
If you have call waiting, disable it before faxing. Contact your
local phone company for the numbers that will disable call
waiting. Enter the code; then enter a comma to pause the dialing
sequence (for example: "79,).
Long Distance. Click here to enter long-distance information.
Use a period when dialing Europe (011.XX.YYY---YY): 011
(international access); XX (country code); Y (fax number). Add a
note describing this in the blank beside Notes; then click on Add.
To use a billing card for long distance faxes, you must enter
the billing card access number, account number, and recipient fax
number in the order specified by your long-distance provider. You
may also need to enter one or more commas to pause the dialing
as needed. The following are examples for AT&T and MCI:
Fax and Data Modem 68
Page 77

WithMCI, orany provider
thatrequires the fax
number last, enter it in
either the LongDistance
field(see MCI example)
or in the Fax # field of the
Fax dialog"box(used to
send the fax), but not in
both. In the Long
Distance field fromFax
Preferences, the fax
number isstored
permanently. In the Fax #
fieldofthe Fax dialog
box, itis used once only.
For AT&T, enter (without spaces, include commaas):
18002255288, 1, area code fax number, card number PIN,
For MCI, enter (without spaces, include coramas):
18008888000, card number PIN, area code fax number,
6. When finished, click on OK.
Your access codes and long-distance information are now stored for use. If
needed, you can change this information at anytime.
Sending a Fax
Send a fax from the program you create a document in, such as Word
Processing, Spreadsheet, Drawing, Text File Editor, Planner, or To Do List.
When sending a
long-distancefax U_b_g
a biffingcard,do not
enter the biffingcard
access and account
numbersin the Fax #
field,ff you do, your
billingcard account
number will appear at
the top of every fax.
Enter thisinformationin
the Dialing Codes dialog
box (see the sectLon
titled Before Sending a
Fax andsee Dialing
Codes below).
• To send a fax:
1. Create a document in Word Processing, Spreadsheet, Drawing,
Addressbook, Text File Editor, Planner, or To Do List.
2. In the program used to create the document, save your document.
3, Press PRINT from_'*_ function key row. A submenu appears.
4. Select Fax._t dialog box appears.
5. Make your selections:
• To. Enter the name of the recipient in the To box, up to 20
characters.
Fax #. Enter the fax number. The following characters are accepted:
Digits 0-9, *, and #
Space
Comma. A comma briefly pauses the dialing. Use a comma when
you dial 9 or another number for an outside line. For example,
type a comma after the nine (9, 555-5578).
Hyphen -
Period. You can use a period when dialing International,
(011.XX.YYY---YY): 011 (international access); XX (country code);
Y (fax number).
Parentheses ( )
Fax and Data Modem 69
Page 78

You can save dialing
codes fromFax
Preferences (see page
68). Whenyou use a
dialingcode, it willnot
appear in the Fax # box,
butthe system willdial it.
Youcan also enter an
access code orarea code
in frontof the fax number
in theFax # field (for
example:9, 333-4545).
When using a billingcard,
enterthat informationin
the Dialing Codes dialog
box.
If the fax number is
busy,the system willlet
you try the number
again.
.
Fax and Data Modem 70
Note: If you are sending a long distance fax using an AT&T billing.
card, enter a comma in the Fax # field (enter the fax number in
the Long Distance field). With long-distance providers that require
the fax number last, you can enter it in either the Long Distance
field or in the Fax # field, but not in both. (See Dialing Codes
below).
Last Recipients. Click here to see a list of past fax recipients. You
can select from the list by clicking on a name.
Dialing Codes. Dialing codes (prefixes) are dialed by the system
before it dials the fax number. Click here to activate dialing codes. A
dialog box appears. Click on Use Default Settings so the box will not
be filled; then select Access or Long Distance (when selected, the
box darkens). Click on the Access button or the Long Distance
button to select a dialing code that you created in Preferences (see
page 68). Then click on OK.
If you have not saved billing card information in Fax Preferences,
you can enter the information here to use once. You must enter
the billing card access number, account number, and recipient fax
aumber in the order specified by your long-distance provider. You
may also need to enter one or more commas to pause the dialing
as needed. The following are examples for AT&T and MCI:
For AT&T, enter (without spaces, include commas):
18002255288, 1, area code fax number, card number PIN,. Enter a
comma in the, Fax # field ofdae Fax dialog box.
For I_CI, enter (without spaces, indude comumms):
18008888000, card number PIN, area code fax number,. With MCI
or any provider that requires the fax number last, you can either
enter it in the Long Distance field (as shown in this example) or in
the Fax # field of the Fax dialog box.
• Multiple Destinations. Click here to send the same fax to more than
one recipient. A dialog box appears. Enter the name and fax number
of the additional recipient(s); then click on Add. The name and fax
number appear in the box at the.top.
• Document options. Select Fine or Standard Fax quality. Standard is
adequate for most machines.
• Content. Select how much of the document you want to fax. This
option varies with different programs. For example, in Spreadsheet,
you can select a range of cells to prinL
• Cover Page. Click here to include a cover page. See below for
information on creating a cover page.
When you are finished selecting from the Fax dialog box, click on Fax to
send the fax. The Fax Progress dialog box appears.
• The title of the document appears.
• The fax number dialed appears.
Page 79

• A Progress Indicator appears along with the current page being
sent.
• Hide. Click here to hide the Fax Progress dialog box.
• Stop. Click on Stop if you do not want to send the fax.
Using a Cover Page
A basic cover page is supplied on diskette.
)_To use the cover page:
1. Insert the diskette that contains the cover sheet (diskette 1).
2. From the Fax Document dialog box, click on Cover Page. The CouerPage
dialog box appears.
3. Select the Fax sheet and click on OK. To see the cover page, click on
Preview.
4. Click on Message (from the Cover page dialog box or the Fax Document
dialog box) to enter a message on the cover sheet. Then click on Done.
Using Manual Dial
Manual dial is most useful when sending a long-distance fax that you want to
charge to a prepaid billing card. Before using manual dial, set up the Fax
Preferences.
II_To set up F'_tx Preferences for manual dial:
1. Select Preferences from the Main Menu; then click on Fax. TheFax dialog
box appears.
2. Click on Advanced. The Advanced dialog box appears.
3. If not already selected, select Poor for phone line quality.
4. In the box beside Initialization, type ATX1.
5. Click on OK to close each dialog box; then exit Preferences (press EXIT).
l_ To use manual dial:
1. In the program used to create the document, select Send from the File
menu. Then select Fax The Fax dialog box appears.
2. Click on the box beside Manual Dial (when filled, Manual Dial is active).
3. Click on Fax. a dt2dog box appears.
4. Pick up the handset of the phone and dial the recipient number, billing
card number, and account number in the order specified by the
long-distance provider.
5. When you hear the line ringing, click on the Done Dialing button.
6. Hang up the telephone.
Fax and Data Modem 71
Page 80

Setting Advanced Fax Options
In addition to setup for manual dial (phone line quality and intitialization
string), you can select the time for the modem to wait for a fax connection.
The other setting (Post-Modem,Use) applies to extemal modems other than
that recommended for this notebook. This setting does not normally need to
be entered. See your external modem manual for information on this setting.
I_ To set Advanced Options:
1. From the Main Menu, click on Preferences. The Preferences appear.
2. Click on Fax. The Fax dialog box appears.
3. Click on the Advanced button. Another dialog box appears.
4. Fill in the dialog box:
• Phone Line Quality. This regulates the fax transmission, depending
on what you select: normal, uneven, poor. For example, if you know
that your phone line is subject to noise, set this to poor.
• Wait for a modem connection. This is the maximum number of
seconds that your fax modem will wait for a connection to another
fax modem or machine.
• Ini "ttalization. This is the start-up string (AT command) for your
modem and is used for manual dial (enter ATXl for the manual dial
start up string): tf_y,pu am usinff an external modem not o
- _oi_am_d--ed for _ais notebook, see your modem manual for Other
" AT command uses.
Post-Modem Use. This is the shut-down string (AT command) and is
not normally needed. If you are using an external modem not
recommended for this notebook, see your modem manual for other
AT command uses.
Fax and Data Modem 72
Page 81

Fax Errors
On Screen Messages
Busy signal
No answer from dialed phone number
i
Document is corrupted
Answered by non-fax device
Transmission stopped by the user
Error from modem
Unexpected modem response
Modem not class 2
Could not send page
Timeout: the fa_x modem is not responding
Could not _qpen serial port
g.
Out of heap-sia_ce
Could not contact Fax spooler
Solution
The fax number you are sending to is busy. Try
again.
Tell person to turn fax machine on.
Retype document. Send document again.
Check fax number and try again.
You stopped the fax. Try again.
Check settings and send fax again.
Check settings and send fax again.
Modem you are sending to is wrong type and
cannot receive a fax.
Document is too large. Shorten document.
You did not type a comma after the 9 to dial out.
Be sure modem is connected properly, and that
the modem Preferences are set to Can Fax. See
page 12.
Shorten document.
Try to fax again.
Fax and Data Modem 73
Page 82

Sending and Receiving Information
You can use your modem to communicate with computers or bulletin board
systems. You can also share information with other computer users.
This section describes how to do the folowing:
• Get started using Communication
• Establish various modem, terminal, and window settings
• Dial phone numbers
• Send messages and fries
• Receive messages and files
Calling the Other Person before You Start
Modem settings must match the settings of the other computer. Before you
begin, call the person you will communicate with by modem and fred out the
following information:
• Protocq!settings on receiver's computer:
Word Length or data bits
Stop bits
Parity_"
• Type of terminal the other person selects on his or her computer.
• Phone number of phone connected to his or her modem.
Starting Communication
!_ To start Communication:
1. Insert the diskette labelled Communication.
2. Click on the File Manager icon on the Main Menu; then click on the drive A -,
icon. The contents of the diskette appear.
3. Double-click on the Communication icon. The Communication window
appears.
)g window settings
You can control the size of the Communication window to show as much or
as little information at a time as you want.
Fax and Data Modem 74
Page 83

l_ To change the window size:
1. Select Window Size from the View menu. A dialog box appears.
2. Fill in the dialog box:
* Window Lines. Window Lines sets the number of lines your
computer screen sho_rs in the window. Select any number from 1 to
20.
• Window Columns. Window Columns sets the number of columns
your computer screen shows. Select any number from 1 to 80.
3. Click on Apply.
4. Click on Close.
Changing the text size
You can increase or decrease the size of text shown on the Communication
window. Anytime you open Communication, a small font is in effect.
Changing text to the larger font can make it easier to read.
Youcannot change
the fontsize of
individualwords or
sentences.
I_ To change the font size:
Select either Large Font or Small Font from the View menu.
Showing line status
Dam-communication _-stmilar to a regular phone call in that sometimes then:
is noise on the_line, which affects communication. Show Line Status monitors
the quality. If it is poor, you can hang up and try again later.
The status window
v#ll remain on
screen duHng the
communication
session. To close it,
click on the Window
Control button at the
top left.
l_ To monitor the line connection quality:
1. Start communication by inserting the diskette labelled Communication and
clicking on File Manager from the Main Menu; then click on the drive A
icon. The diskette contents appear
2. Double-click on Communication. The Communication window appears.
3. Select Show Line Status from the Options menu. A status window appears.
The line status errors are the number of errors in reading the message being -'
received or writing the message being sent. It is normal to have a small
number of errors. However, if you see hundreds of errors during a session,
consider hanging up and dialing again.
Fax and Data Modem 75
Page 84

• . _'7.-
Reset the counters
every timeyou
starta
comrnunication
session.
Otherwise, the
errorcount for the
currentsession is
added to that of the
last session.
t
I_ To reset the counters to zero errors:
1. Click on Reset Counters. The counters are all reset to zero values.
2. Click on Close to close the dialog box.
Getting Ready to Communicate
You can use the Communication window to exchange messages with another
modem. Before communicating, set the protocol and terminal settings (see
the following instructions).
Once connected, anything you type is sent to the other computer. The
messages sent to you also appear in the Communication window.
Choosing the protocol settings
Always turn off call
waiting when using
the phone line to
communicate wj_
-another computer.
Consult your local
telephone company.
Protocol allows ordedy exchange of information between two modems.
Protocol settings tell your modem such things as the phone type.
Call to find out what pro,.ocol settings the other computer is using. Your
- protocol _ngs m_-h_atc_-the protocol settings of the other compute_
_-l_ To select the protocol settings for the current session:
1. Insert the diskette labelled Communication and click on File Manager from
the Main Menu; then click on the drive A icon. The contents of the diskette
appear.
2. Double-click on Communication. The Communication window appears.
3. Select Protocol from the Options menu. Fill in the following:
• Baud Rate. The baud rate is the" rate of speed your modem sends
and receives information. If you are using a 33,600 bps modem,
select 38400 baud. If you are using a 14,400 bps modem, select
19200.
• Parity. Parity checks errors in sending information. The most
common setting is None.
• Word Length. Word Length is the number of bits that form a
character. The most common setting is 8.
• Stop Bits. Stop bits help a computer figure out when to send or
receive a character. The most common setting is 1.
Fax and Data Modem 76
1
Page 85

From the
Communications
diskette, you can
select the protocol
settings for a single
communications
session. To change
the protocol
settings
permanently, select
the default protocol
settings.
.
5.
• Handshake. Select Software (XON/XOFF), and the modem will
verify the flow of information from the other computer, allowing you
to receive all information sent.
• Hardware Handshaking Options. Use the default settings.
Click on Apply.
Click on Close.
l_ To change the default protocol settings:
1. Click on Preferences from the Main Menu.
2. Click on Modem. A dialog box appears.
3. Select whether your phone is tone or pulse.
4. Click on Speed and Format Options. The Serial Port Options dialog box
appears.
5. Change the settings to match those you made in the Protocol dialog box.
6. Click on OK. The Serial Port Options dialog box closes.
7. Click on OK to close the Modem dialog box.
8. Select Exit from the File menu.
Choosing theterminal settings
Before you communicate with another computer, call the petv_n you want to
communicate with to find out what kind of terminal he or she has selected
on thetr-computer._.Tla_'P,.select terminal setungs.
The modem can speak the language of terminals such as TI'Y, VT52, VT100,
WYSE50, and ANSI by imitating the language. Because the imitation is not
complete,- you may find that some features do not work as you expect with a
certain terminal. However, the imitation should be adequate for most
situations.
To find out ff you need
• full or haft duplex, type a
few characters on your
screen while connected
to another computer. If
what you type appears
twice, you need Full (full
-- echo); otherwise, select
Haft (local echo).
l_ To select the terminal settings:
1. Insert the diskette labelled Communication; then select File Manager and
click on the drive A icon. The contents of the diskette appear.
2. Double-click on the Communication icon. The Communication windt_
appears.
3. Select Terminal from the Options menu. A dialog box appears.
4. Fill in the dialog box changing the options you want:
• Select Terminal. You and the receiver must match with this setting.
Select VT100 as your first choice, TI'Y as your second choice, and
ANSI as a third choice.
• Duplex. At full duplex, information flows between two computers at
the same time. At half duplex, information can flow only in one
direction at any given time.
Fax and Data Modem 77
Page 86

.
• Wrap Lines at Edge. If you select this option, long lines of text end
at the edge of your screen and continue to the next line. If you do
not select this option, lines of text that go beyond your screen's edge
do not appear. However, ff you capture this text to a DOS file, you
capture all text, even the text that did not fit on your screen.
• Auto LinefeeclL Auto Linefeed converts each incoming carriage return
(end of line) with a carriage return and new line. Otherwise, each
new line of incoming text overwrites the last line. If all your
incoming lines appear as double-spaced text, do not select Auto
Linefeed (unless you prefer double-spacing).
• Host Code Page. Host Code Page allows you to select a language for
your text. When you select this option, a dialog box with a list of
languages appears. Select the appropriate language from the list.
Click on Apply.
Click on Apply.
OR
Click on Close.
After you have chosen your protocol and terminal settings, you are ready to
dial the pbone number.
Dialing
Always turnoff call
waiting when using
the phone line to
communicatewith
another computer. _
Consultyour local
telephonecompany.
- Use Quick-Dial to dia_3id0ther computef_
_.l_-To uso Quick Dial:
1. Insert the diskette labelled Communication; then select File Manager and
click on the drive A icon. The contents of the diskette appear
2. Double-click on the Communication icon. gbe Communication window
appears.
3. Select Quick Dial from the Dial menu. A dialog box appears.
4. Enter the phone number for the phone connected to the other modem. To
disable call waiting or to access an outside phone line (for example, by
dialing a 9), enter a comma after the call waiting code numbers or 9 and
before the number (for example, 9,5551212 tells the modem to dial 9 first
to get an outside line, then pause, and then dial 5551212).
5. Click on Dial. When the con n.ection has been made to the other compute_,
CONNECT appears in the Communication window.
6. When you see CONNECT on your screen, click on Close. You are now
ready to send and receive messages.
Fax and Data Modem 78
Page 87

Having a Conversation
Once you have connected, any text you enter on the Communication screen
is automatically sent to the receiver.
II
0
The cursor changes from solid to hollow, depending on what tasks are taking
place. When the cursor is solici, generally it means that what you type
appears in the Communication window and is sent to the computer that you
are connected to.
When the cursor is hollow, generally it means what you type is not sent to
the other computer. You could be filling in a dialog box or receiving
information from another computer.
When you have finished communicating, select Hang Up from the Dial menu.
Sending Brief Messages and Files
Besides having a conversation, there are four other ways to send information
to another computer:
• Using Message from the Edit menu for brief messages.
• Sending text that you have copied into the clipboard.
• Sending an ASCII text file to the other computer. An ASCII text file is
- -the samc-as,a_mxt file add are created in Text File Editor;, You
can alsb convert a Word Processing document to an ASCII text file by
exporting it.
• Sending files using XMODEM to send a file or a large amount of
information. XMODEM checks for errors to make sure files arrive
intact.
Sending brief messages
Message in the Edit menu allows you to create brief messages before you are
connected to another computer (before you enter protocol or terminal
settings) or after you are connected.
Message does not check for errors, which is usually not a problem for short
messages.
!_ To send a brief text message:
1. Insert the diskette labelled Communication and click on the File Manager icon
from the Main Menu. Then click on the drive A icon. The contents of the
diskette appea_.
2. Double-click on Communication. The Communication window appears.
Fax and Data Modem 79
Page 88

3. Select Quick Dial from the Dial menu; then enter the phone number for
the phone connected to the other modem and click on Dial. When tbe
connection has been made to the other compute, CONNECT appears in the
Communication window. Close the Dial window.
4. Select Message from the Edit menu. A dialog box appears.
5. Type your message in the dialog box.
6. Edit the text as needed.
7. Click on Send. Your message appears on the other computer's screen.
8. Select Hang Up from the Dial menu.
9. Click on Close.
Sending text using the clipboard
You can copy text from Word Processing or other programs and send it to
another computer. When you do this, Communication sends the text to the
other computer just as if you had typed it into the Communication screen.
• To send the contents of your clipboard:
1. Open the fde containing the text you want to send.
2. Select the text you want to send.
. 3. Press COPY to copy the text to the clipboard.
4. Insert the diskette labelled Communication.
5. Click on the File Manager icon from the Main Menu; then click on the drive A
icon. -T,§e contents Of-ilY_diskette appgglr.
6. Double-click on Communication. The Communication window appears.
7. Select Quick Dial from the Dial menu; then enter the phone number. When
the connection has been made to the other compute_, CONNECT appears in the
Communication window. Close the Dial window.
8. Press PASTE. The contents of your ch'pboard are sent.
9. To exit, select Hang Up from the Dial menu; then press EXIT.
Sending ASCII text files
You can send text fries saved on diskette. This method does not check for
errors, so there is no guarantee that the information arrives exactly as it was
typed,
• To send an ASCll text file:
1. Create a document in Text File Editor to make an ASCII text file.
2. Insert the diskette labelled Communication.
3. Click on the File Manager icon from the Main Menu; then click on the drive A
icon. The contents of the diskette appear.
4. Double-dick on Communication. The Communication window appears.
Fax and Data Modem 80
Page 89

Before=sendinga DOS
textfile, check whether
thereceiving computer
requireslinefeeds.
Linefeedsprevent text
fromtyping over itseff.
5. Use Quick Dial from the Dial menu to enter the phone number for the phone
connected to the other modem and click on Dial. When the connection boa
been made to the other computer;, CONNECT appears in the Communication
window. Close the Dial window.
6. Select Type From Text File from the File menu. A dialog box appears.
7. Select the drive (A or F); then select ASCII file you want to use. If the file
is on diskette, remove the Communications diskette and insert the diskette
containing the file.
8. Select Strip Linefeeds From Text if the other computer does not need
linefeeds after carriage returns. Most computers need linefeeds, so you
will normally not need to select this option.
9. Click on Type to send the DOS file. A status window appears, shoun'ng
bow your file transfer is going. When the file transfer is finished, the
Communication window appears.
10. To exit, select Hang Up from the Dial menu; then press EXIT.
If you create a document in Word Processing and want to send it as an ASCII
text file, export the document. See the Word Processing chapter in Book 2.
Sending text files using XMODEM
Before you can use _,
XMODEM to
transfer files, check
that the other
computer is setup
to receive an
XMODEM transfer.
With the XMODEM protocol you can send files or a large amount of
information to another computer. The advantage of using XMODEM is that
XMODEM detects a transmission failure and resends the information again.
l_ To send a fife using XMODEM:
1. Insert the diskette labelled Communication.
2. Click on the File Manager icon from the Main Menu; then dick on the drive A
icon. The contents of the diskette appear
3. Double-click on Communication. The Communication window appears.
4. Use Quick Dial from the Dial menu to enter the phone number for the phone
connected to the other modem and click on Dial. When the connects'on has
been made to the other computer,, CONNECT appears in the Communication
window. Close the Dial window.
5. Select Send XMODEM from the File menu. A dialog box appears.
6. Select the file you want to send. If the file is on diskette, remove the
Communications diskette and insert the diskette containing the fde.
7. Select the size of the data-packet. Large files are broken up into small data
packets to make the file easier to send to another computer. The
recommended selection is 128 bytes.
Fax and Data Modem 81
Page 90

8. Click on Send. The Send XMODEM Status window appears and shows the
progress of the transfer, reporting any errors. XMODEM automatically
resends those portions of the transmission that have errors. However, if
the error count increases suddenly, you probably have a problem in the
phone line and may want to try to send the file again later.
9. To exit, select Hang Up from the Dial menu; then press EXIT.
Receiving and Saving Messages and Files
Before you receive information, determine what you intend to do with it.
Depending on the type and volume of information, there are various ways to
accept, store, and save it, including the following:
• Scrolling through the text as it arrives without saving it
• Copying text to the clipboard
• Saving text in a file
Scrolling through text on the screen
As the text arrives at your computer, the first part of the text may scroll off the
screen. If the message is longer than 175 lines, consider saving it to a file.
_I_To -scrofl throdgh the texdton your screen:
Click on the up or down arrow on the scroll bar.
Copying text to the clipboard
Only the last 175
lines of text
receivedare
saved. If the
message exceeds
175 lines, newly
amvJngtextwrites
over the text that
has already
anived.
You can copy and paste information one screen at a time, or you can wait
until the entire message has arrived, as long as the message does not go over
175 lines of text.
l_ To copy text from your clipboard to a _e:
1. Select the text in the Communication window that you want to copy.
2. Press COPY.
3. Select Hang Up from the Dial menu.
4. Close Communication.
5. Click on Word Processing or another program.
6. Create a new document or open an existing one to paste the text to.
7. Place the on-screen pointer where you want to place the text.
8. Press PASTE. The text is placed into the file.
Fax and Data Modem 82
Page 91

Saving screen and scroll-back buffer text to a file
Communication saves the last 175 lines of text in the scroll-back buffer, which
is an area that stores the text that scrolls off the screen. This information is
stored so that you can view it by scrolling back through the window.
Otherwise, all the text that scrolls off your screen would be lost. By saving
text in a file, you can prevent' the loss of incoming text.
),To save the contents of your screen and scroll-back buffer:
1. When your phone rings, press ENTER.
2. After your screen shows CONNECT and text appears on your screen, insert a
diskette.
3. Select Save Buffer from the File menu. A dialog box appears.
4. Select the drive and folder you want.
5. Type a DOS file name (a DOS file name contains up to eight letters or
numbers, followed by a period, then a three-letter extension).
6. Select Screen Only (saving only what you see on your screen).
OR
Select Scroll-back Buffer Only (saving only what is hidden in the
Scroll-back Buffer).
OR
Select Scroll-back Buffer and Screen (saving both).
7. Click on ON-to save the text to the f'de.
81 To exit, select Hang Up from the Dial menu; then press EXIT.
Saving text in a file
You can capture all text as it arrives and have it immediately placed in a file.
Saving text in a file is also faster than using the Copy and Paste method.
Do not save
incoming text in a
file and run
XMODEM at the
same time.
• To save all incoming text to a file:
1. Insert the diskette labelled Communication,-
2. Click on the File Manager icon from the Main Menu; then click on the drive _l,
icon. The contents of the diskette appear
3. Double-click on Communication. The Communication window appears.
4. When your phone rings, press ENTER.
5. When your screen shows CONNECT, select Capture to Text File from the File
menu. A dialog box appears.
6. Select End Lines with CR/LF if you want the end of each line to contain a
carriage return and linefeed. If you are unsure, it is a good idea to select it.
7. If you want the capture file on diskette, insert a diskette and select the A drive;
then click on Capture. A status window appears.
Fax and Data Modem 83
Page 92

8. When all information appears on the screen, press Stop Capture.
9. To exit, select Hang Up from the Dial menu; then press EXIT.
10. To read the capture.txt f'tle, open Text File Editor. For more information
see the chapter called Text File Editor in Book 2.
Saving text files using XMODEM
Before you can use
XMODEM, find out ff
the other computer is
set up to send files
using XMODEM.
Also, find out what
error-checking
mechanism is
supported on the
other computer,
Checksum or CRC.
Also, find out if the file
you will receive is
ASCII (a DOS file) or
a word processing
file.
You can receive text files without errors from being sent from one location to
another. The other choices for receiving files do not check for errors.
l_ To receive a file using XMODEM:
1. Insert the diskette labelled Communication.
2. Click on the File Manager icon from the Main Menu; then click on the drive A
icon. The contents of the diskette appear.
3. Double-click on Communication. The Communication window appears.
4. When you see CONNECT on your screen, select Receive XMODEM from the
File menu. A dialog box appears.
5. Select the directory you want.
6. Select the type of f'de you are receiving. You have the following two choices:
• Text. Select Text if the file you are receiving is a DOS text file
(ASCII).
• Binary. Select Binary if the file you are receiving is a Word
Processing or a Gsaphic file. _-
7. S_elect how you want to check for errors. There are two choices; both give you
the file without errors in sending:
• Checksum. This is a simple method of checking for file corruption
during sending and receiving.
• CRC (Cyclic Redundancy Check). CRC is more sophisticated than
Checksum. It is a good idea to select it ff the sending computer
supports it.
8. Type the name of a file.
9. Click on Receive. The status screen at the le_ appears showing you the
progress of the transfer. If errors increase dramatically, you may have a
poor line connection. In that case, consider canceling the transfer and
trying again later.
10. To exit, select Hang Up from the Dial menu; then press EXIT.
Fax and Data Modem 84
Page 93

Using Scripts
Before using a script to
connect to a bulletin
board, set the modem
preferences to match
the particular bulletin
board you are using
(protocol settings on
page 76).
Scripts contain commands that instruct the Communication program to
perform a series of tasks.
Two sample scripts are available: GENIE.MAC and GEOS_BBS.MAC. These are
for use with commercial bulletin boards, which are online communications
services that you can establish an account with. For example, the GENIE.MAC
script contains a command that automatically dials the Genie phone number.
However, commercial bulletin boards change, so you will probably need to
modify the script before use. For information on what to modify, contact the
company that maintains the bulletin board you want to use.
You can also modify these two scripts to create new scripts for use with
Communication. Be sure to give a new name to any new script file and add
the extension MAC to the name.
Communication
commands must be all
uppercase.
Lines beginning with a
semicolon or colon are
comment lines only;
they are not
commands.
I_ To modify a script:
1. Insert the diskette labelled Text File Editor. Then click on File Manager from
the Main Menu.
2. Click on the drive A icon. The contents of the diskette appear.
3. Double-click on Text File Editor from the Main Menu. The New/Open
dialog box appears.
4. Remove the Text File Editor diskette; then insert the Communications
diskette and c_[_o_pen an Existing Document in the New/Open
dialog box.
5. Select the script to open and modify (GENIE.MAC or GEOS_BBS.MAC) The
contents of the script file appea_.
6. These scripts contain most or all of the following commands which you can
modify or add to:
• :<lalml>. Lines beginning with colons or semicolons are descriptive
labels of commands that will follow. For example, if you want the
script to return to a task already performed, use the GOTO command
to return to the label of the section containing the commands for that
task.
• GOTO <label>. Tells Communication to go to the line specified by
the label.
• ABORT. Stops the process.
• BELL. Sounds a beep. Use this to signal an activity that is taking
place.
• CLEAR. Clears the script display window.
Fax and Data Modem 85
Page 94

COMM <baud-databits-parity-stopbits--duplex>. Sets the baud
rate, databits, parity, stopbits, and duplex.
DIAL <number>. Dials the phone number that you specify.
END. Stops the script.
MATCH <text> GOTO'<label> PROMPT <mlmber>. Match and
Prompt work together to perform an action based on text received by
another computer.
PAUSE <mtmber>. Causes Communication to pause for a specified
period of time (number). The number is in sixtieths of a second. For
example, to pause for one minute, enter PAUSE 3600.
PRINT <text>. Tells Communication to print the specified text
on-screen.
• PULSE TONE. Tells Communication the phone type: pulse or tone.
• SEND <text>. Sends the specified text to the other computer, enter
,CR to send a carriage return at the end of a line of text (example:
SEND "password" ,CR).
• TERM <terminal type>. Tells Communication to emulate a terminal.
Valid terminals are TIT, VT52, VT100, WYSE50, ANSI, IBM3101, and
TVl1950.
7. When f'mished, press SAVE to save the changes to the script. Be sure to
include_the extensi.dfi'_d._AC to all script names.
l!_Touse a script:
1. Insert the diskette labelled Communication.
2. Click on the File Manager icon from the Main Menu; then click on the drive A
icon. The contents of the diskette appear.
3. Double-click on Communication. The Communication window appears.
4. Select Scripts from the Dial menu. A dialog box appears.
5. Select the script from the A drive; then click on Run. The modem dials and
connects to the bulletin board service ktsing the commands inside the script.
To cancel during the dialing phase, click on Stop Running Script.
Fax and Data Modem 86
Page 95

5
Internet and Email
Your Intemet Browser provides access to the Intemet's Wor/d Wgde Web, a
world-wide collection of computers connected to share information. Use this
Browser to navigate the Web and view information on different Web pages.
Emailer allows you to send and receive email through your Intemet
connection. Email instructions begin on page 101.
Before starting, you must connect the modem and set modem
preferences. See page 12.
Installing the Browser
Before starting, you must install the Web Browser and Emailer programs that
are supplied on diskette. These programs am designed to work with your
system, and you can install just the Emailer or both the Emailer and Browser.
Once installed, these programs are available whenever you want to browse
the World Wide Web or exchange email messages.
• To install the Browser:
1. Insert the diskette !._lled GlobeHopper TM Net Browser.
2. From the Main Menu, open File Manager by pressing E FileManager
opens.
3. Click on the drive A icon at the bottom of the screen. The contents of
Dn've A appear on the screen.
4. Double-click on the Package Installer icon. A dialog box appaam with two
install options: GlobeHopper Web Browser plus Email or Email only.
5. Click once on GlobeHopper plus Email to select both programs.
OR
Click once on Email to select the Emailer program only.
6. Click on Install Packages. A status window appears, showing the status of
the install procedure.
7. When f'mished, you are returned to File Manager.
Now you are ready to establish an account with an Intemet Service Provider
and start browsing the Web.
lntemet and Email 87
Page 96

Establishing an Internet/Email Account and Setting Up-
To search the World Wide Web and send and receive email, you must f_rst
open an account with an l_,mer_,_,tServ_r.e Pro_. Internet Service
Providers are connected to the Internet 24 hours a day. Use your modem to
connect to the Provider, who acts as a gateway to the Web.
Your system is already setup for use with an Intemet Service Provider. You
can select another Intemet Service Provider if desired. To login to another
Service Provider, you must set up that Provider's protocol information (see
Using Another Intemet Service Provider below).
Using the Default Internet Service Provider
The fastest way to start browsing the World Wide Web is to use the default
Internet Service Provider, whose information is ready for you to use.
After you have set up
your account with the
default Service
Provider, the
information will appear
in the Setup dialog box
(see page 89 to see
_.this dalog box). '_-'-_
_ To set up:
1. Click on Internet from the Main Menu. The Setup window appears.
1. Select Close because using the default Service Provider will complete the
Setup window. Another menu appears showing four buttons.
2. Click on Subscribe. A dialog box appears asking you to confirm that you
want to sign on. Select Yes. If you must dial an outside line, enter the
preftx here. Then the Browser window appears, and the modem dials and
automatically connectsoto thddefault Inter'net Sem'ce
3.-Follow the on-screen instructions to set up your account.
YOU are now ready to start browsing the World Wide Web. See page 91.
Using Another Internet Service Provider
When you select an Intemet Service Provider on your own, be sure to select
one who offers a communications protocol called PPP (Po#a-to-Poktt
Protocol). Most Service Providers offer, this type of protocol.
Ask your Service Provider if they offer manual connection (login) or
automatic connection (the connection type will apply to both the Browser
and Emailer). With manual, you must enter your user name and password
each time you connect, and with automatic, the program enters that
information for you.
Internet and Email 88
Page 97

Before exchanging
email, you must set
up Emailer by
entering Preferences.
.See page 101.
Also ask your Service Provider for the following information that you will
need to set up your program for browsing the Web. Use this table to write the
information down.
Setup Information
PPP account name
PPP account Password
Dial-up telephone number
PPP server IP address
PPP server IP gateway
PPP server IP mask
DNS server IP address (first)
DNS server IP address (sec-
ond)
Write the Information Below
Once you have established an account and gathered the above information,
you are ready to set up your program.
I_ To set up the Browser:
1. Click on Ifitemet from the Main Menu. Anotbermenu appears with four
buttons: Subscribe, Browser;, Emaile_, and Setup.
2. Click on Setup. A S¢._ p wi_ appears.
I h'r_u
IfyourServicePmvider_
requiresthatyou con-
nectmanually,clickhere.
PPPRccount nen_ I
PPPRccount Pessmor(b It****
Dialup Telephone Ilmnlmr: I
"/Bring up Iooin terminal
PPP 5_ IPRddlr_': ILl .- [-0-'] .
PPpSermer IP Gotmumj= ['_. [_.
PPP5eruer IP Hlesk: ['fi'_. ['_'].
lstl)NSSeruerlPl_lre_= ['_. [_.
[El.
r¢-1.
3. Fill in the boxes with the information from your Intemet Service Provider.
4. Click on Apply; then click on Close.
Intemet and Email 89
Page 98

5. When finished, open Emailer and set up the Preferences (see page 101).
Connecting to your Internet Service Provider
The two options for connecting depend on your Internet Service Provider.
For manual
connection, be sure
that the box beside
Bring up Io#n
terminal is selected
in the Setup _alog
box.
If the manual
connection is not
successful the first
time, exit by selecting
Close from the Dial
menu and then
selecting Exit from the
File menu. After that,
try the connection
again.
When you connect manually, enter your user name and password each time
you connect to the Internet Service Provider.
When you connect automatically, you do not have to enter your user name
and password; the program automatically provides that information after you
enter it in the Setup window.
_,To connect manually:
After setting up your account, click on Browser. The Browser window appears,
and the modem dials your lnternet Service Prt_'der. A terminal window
appears, allowing you to enter your account name and passtoord. The format
varies depending on your Service Pro_'der.
To connect automatically:
•After setti_'ng_up your ac¢o.unt, click on Browser. The Browser window appears,
and the modem dia-_ur In-'_tg'rnetService Provider
Internet and Ernail 90,
Page 99

Browsing the Internet's World Wide Web
When you first open Browser, you will see a default document called a
Home Page. This page is your starting point for connecting to your Internet
Service Provider to browse internet documents, called Web pages.
All Web pages have a uniqu_ address called a Uniform Resource Locx_or
(URL), which is a long string of text (for example, http://www.brother.com).
See page 98 for
information on
customizing your
browser.
),.To open the Browser:
1. Click on Intemet from the Main Menu; then click on Browser. The Web
Browser window appears witb the default document opened:
Menubar
Toolbar
Locationbox
Statusindicatorarea\
Welcome to
GlobeHopper TM Net Browser
\
] "\
\
Get Started ou your ,journeyth_#x the baemett
To see what a button on
the tool bar does,.move
, the on-screen pointer
over the button. A
description of the tool
appears at the bottom of
the window.
The Menu bar contains menu options for the Browser.
The Tool bar provides shortcuts for menu options:
Open. Click here to open or go to a URL.
Stop. Click here to stop the progress of opening the URL.
Refresh. Click here to redraw or update the screen.
Back. Click here to return from a URL.
Forward. Click here to move forward after you have returned
from a URL.
Internet and Email 91
Page 100

Add. Click here to add a URL to your list of Bookmarks (see page
95).
Bookmarks. Click here to show your list of Bookmarks (see page
95).
As you become more
familiarwith the Web,
you will learn more
-URLs. You will_lsdfi_d
ithelpful to save URLs
as Bookmarks (see
page 95).
Ifyou have saved
Bookmarks, click on
Show Bookmarks
from the Bookmarks
menu; then select a
bookmark and the
browser will connecL
The Scroll bar appears when the Web page is larger than the screen.
Click on the scroll bar to scroll down the page.
The Location box shows the address or Uniform Resource Locator
(URL) of the Web page. To open another page from here, place the
insertion point in the box and delete the current URL; then type the
URL of the page to open and press ENTER.
The Status Indicator area, across the bottom of the screen, shows
the URL and the file size of Web pages as you navigate through the
Web.
Links (Hypertext Links) appear as bold or underlined text. Click on
a link to quickly access more information in the current page or to go
to another Web page.
ll_To start browsing the World Wide Web:
1. Click on the Open button. The Open Location dialog box appears.
2. Enter a URL (for example, enter www.brother.com) and click on OK. The
modem dials and con?lects to your Service Protn'de_.
OR --
Place the insertion point in the Location box and press BACKSPACE or
DELETEto remove the text; then enter the URL (for example enter
www.yahoo.com); then press ENTER. The modem dials and connects to
your Service Provider.
)_ To exit the Internet Browser:
Select Exit from the File menu. The Browser disconnect_
OR
To exit a manual log,in that did not connect, fLrSt select Close from the Dial
menu; then select Exit from the File menu.
Internet and Entail 92
 Loading...