

Page 1
Basic User’s Guide
DCP-J140W
Version 0
USA/CAN
Page 2

If you need to call Customer Service
Please complete the following information for future
reference:
Model Number: DCP-J140W
1
Serial Number:
Date of Purchase:
Place of Purchase:
1
The serial number is on the back of the unit. Retain
this User's Guide with your sales receipt as a
permanent record of your purchase, in the event of
theft, fire or warranty service.
Register your product on-line at
http://www.brother.com/registration/
By registering your product with Brother, you will be recorded as the
original owner of the product. Your registration with Brother:
may serve as confirmation of the purchase date of your product
should you lose your receipt;
may support an insurance claim by you in the event of product loss
covered by insurance; and,
will help us notify you of enhancements to your product and special
offers.
The most convenient and efficient way to register your new product is online at http://www.brother.com/registration/
© 2012 Brother Industries, Ltd. All rights reserved.
Page 3
Brother numbers
Important
Note
For technical help, you must call the country where you bought the machine. Calls must be
made from within that country.
Register your product
By registering your product with Brother International Corporation, you will be recorded as the
original owner of the product. Your registration with Brother:
may serve as confirmation of the purchase date of your product should you lose your receipt;
may support an insurance claim by you in the event of product loss covered by insurance; and,
will help us notify you of enhancements to your product and special offers.
Please complete and fax the Brother Warranty Registration And Test Sheet or, for your
convenience and most efficient way to register your new product, register on-line at
http://www.brother.com/registration/
FAQs (frequently asked questions)
The Brother Solutions Center is our one-stop resource for all your Digital Copier/Printer needs.
You can download the latest software documents and utilities, read FAQs and troubleshooting
tips, and learn how to get the most from your Brother product.
http://solutions.brother.com/
• You can check here for Brother driver updates.
• To keep your machine performance up to date, check here for the latest firmware upgrade.
For Customer Service
In USA: 1-877-BROTHER (1-877-276-8437)
1-901-379-1215 (fax)
In Canada: 1-877-BROTHER
Service Center Locator (USA only)
For the location of a Brother authorized service center, call 1-877-BROTHER (1-877-276-8437).
Service Center Locations (Canada only)
For the location of a Brother authorized service center, call 1-877-BROTHER.
(514) 685-4898 (fax)
i
Page 4
Ordering accessories and supplies
Note
For best quality results use only genuine Brother accessories, which are available at most Brother
retailers. If you cannot find the accessory you need and you have a Visa, MasterCard, Discover,
or American Express credit card, you can order accessories directly from Brother. (You can visit
us online for a complete selection of the Brother accessories and supplies that are available for
purchase.)
In Canada only Visa and MasterCard are accepted.
In USA: 1-877-552-MALL (1-877-552-6255)
1-800-947-1445 (fax)
http://www.brothermall.com/
In Canada: 1-877-BROTHER
http://www.brother.ca/
Description Item
Ink Cartridge Standard <black>
Ink Cartridge <yellow>
Ink Cartridge <cyan> (blue)
Ink Cartridge <magenta> (red)
LC61BK (Prints approx. 450 pages)
LC61Y (Prints approx. 325 pages)
LC61C (Prints approx. 325 pages)
LC61M (Prints approx. 325 pages)
1
1
1
1
Premium Plus Glossy Photo Paper
(Letter size / 20 sheets) BP71GLTR
(4" 6" size / 20 sheets) BP71GP
Premium Glossy Photo Paper
(Letter size / 20 sheets) BP61GLL (USA only)
(4" 6" size / 20 sheets) BP61GLP (USA only)
Multipurpose Paper - Plain Paper
(Letter size / 500 sheets) BP60MPLTR (USA only)
Basic User's Guide LEG182001 (English for USA and Canada)
CD ROM for Windows
1
For more information about the replacement consumables, visit us at http://www.brother.com/pageyield
®
& Mac
LZ4175001 (DCP-J140W)
ii
Page 5

Notice - Disclaimer of Warranties
(USA and Canada)
BROTHER'S LICENSOR(S), AND THEIR DIRECTORS, OFFICERS, EMPLOYEES OR AGENTS
(COLLECTIVELY BROTHER'S LICENSOR) MAKE NO WARRANTIES, EXPRESS OR IMPLIED,
INCLUDING WITHOUT LIMITATION THE IMPLIED WARRANTIES OF MERCHANTABILITY
AND FITNESS FOR A PARTICULAR PURPOSE, REGARDING THE SOFTWARE. BROTHER'S
LICENSOR(S) DOES NOT WARRANT, GUARANTEE OR MAKE ANY REPRESENTATIONS
REGARDING THE USE OR THE RESULTS OF THE USE OF THE SOFTWARE IN TERMS OF
ITS CORRECTNESS, ACCURACY, RELIABILITY, CURRENTNESS OR OTHERWISE. THE
ENTIRE RISK AS TO THE RESULTS AND PERFORMANCE OF THE SOFTWARE IS
ASSUMED BY YOU. THE EXCLUSION OF IMPLIED WARRANTIES IS NOT PERMITTED BY
SOME STATES IN THE USA AND SOME PROVINCES IN CANADA. THE ABOVE EXCLUSION
MAY NOT APPLY TO YOU.
IN NO EVENT WILL BROTHER'S LICENSOR(S) BE LIABLE TO YOU FOR ANY
CONSEQUENTIAL, INCIDENTAL OR INDIRECT DAMAGES (INCLUDING DAMAGES FOR
LOSS OF BUSINESS PROFITS, BUSINESS INTERRUPTION, LOSS OF BUSINESS
INFORMATION, AND THE LIKE) ARISING OUT OF THE USE OR INABILITY TO USE THE
SOFTWARE EVEN IF BROTHER'S LICENSOR HAS BEEN ADVISED OF THE POSSIBILITY OF
SUCH DAMAGES. BECAUSE SOME STATES IN THE USA AND SOME PROVINCES IN
CANADA DO NOT ALLOW THE EXCLUSION OR LIMITATION OF LIABILITY FOR
CONSEQUENTIAL OR INCIDENTAL DAMAGES, THE ABOVE LIMITATIONS MAY NOT APPLY
TO YOU. IN ANY EVENT BROTHER'S LICENSOR'S LIABILITY TO YOU FOR ACTUAL
DAMAGES FROM ANY CAUSE WHATSOEVER, AND REGARDLESS OF THE FORM OF THE
ACTION (WHETHER IN CONTRACT, TORT (INCLUDING NEGLIGENCE), PRODUCT
LIABILITY OR OTHERWISE), WILL BE LIMITED TO $50.
Compilation and Publication Notice
Under the supervision of Brother Industries, Ltd., this manual has been compiled and published,
covering the latest product descriptions and specifications.
The contents of this manual and the specifications of this product are subject to change without
notice.
Brother reserves the right to make changes without notice in the specifications and materials
contained herein and shall not be responsible for any damages (including consequential) caused
by reliance on the materials presented, including but not limited to typographical and other errors
relating to the publication.
iii
Page 6

User’s Guides and where do I find them?
Which Guide? What's in it? Where is it?
Product Safety Guide
Quick Setup Guide
Basic User’s Guide
Advanced User’s Guide
Software User’s Guide
Network Glossary
Read this Guide first. Please read the Safety
Instructions before you set up your machine.
See this Guide for trademarks and legal
limitations.
Follow the instructions for setting up your
machine and installing the drivers and software
for the operating system and connection type
you are using.
Learn the basic Copy and Scan operations and
how to replace consumables. See
troubleshooting tips.
Learn more advanced operations: Copy,
printing reports and performing routine
maintenance.
Follow these instructions for Printing, Scanning,
Network Scanning, Web Services (Scan), and
using the Brother ControlCenter utility.
This Guide provides basic information about
advanced network features of Brother
machines along with explanations about
general networking and common terms.
Printed / In the box
Printed / In the box
Printed / In the box
PDF file / CD-ROM
PDF file / CD-ROM
PDF file / CD-ROM
Network User’s Guide
This Guide provides useful information about
wireless network settings and security settings
using the Brother machine. You can also find
supported protocol information for your
machine and detailed troubleshooting tips.
Mobile Print/Scan Guide for
Brother iPrint&Scan
This Guide provides useful information about
printing JPEG and PDF
device and scanning from your Brother machine
to your mobile device when connected to a
Wi-Fi network.
1
Visit us at http://solutions.brother.com/.
2
PDF printing is not supported on Windows® Phone.
2
files from your mobile
PDF file / CD-ROM
PDF file / Brother
Solutions Center
1
iv
Page 7

Table of Contents
(Basic User’s Guide)
1 General information 1
Using the documentation .......................................................................................1
Symbols and conventions used in the documentation ....................................1
Accessing the Advanced User’s Guide, Software User’s Guide,
Network User’s Guide, and Network Glossary ...................................................2
Viewing Documentation ...................................................................................2
Accessing Brother Support (Windows
Accessing Brother Support (Macintosh) ................................................................5
Control panel overview ..........................................................................................6
Warning LED indications .................................................................................7
2 Loading paper 8
Loading paper and other print media.....................................................................8
Loading envelopes and postcards.................................................................11
Removing small printouts from the machine ................................................. 12
Unprintable area ............................................................................................ 13
Paper settings......................................................................................................14
Paper Type ....................................................................................................14
Paper Size.....................................................................................................14
Acceptable paper and other print media..............................................................15
Recommended print media ...........................................................................15
Handling and using print media.....................................................................16
Choosing the right print media.......................................................................17
®
)................................................................ 4
3 Loading documents 19
How to load documents .......................................................................................19
Using the scanner glass ................................................................................19
Unscannable area .........................................................................................20
4 Making copies 21
How to copy ......................................................................................................... 21
Stop copying.................................................................................................. 21
Copy settings ....................................................................................................... 21
Paper Options................................................................................................22
5 How to print from a computer 23
Printing a document............................................................................................. 23
v
Page 8

6 How to scan to a computer 24
Scanning a document ..........................................................................................24
Scanning using the SCAN key.............................................................................24
Scanning using a scanner driver .........................................................................25
Scanning using the ControlCenter.......................................................................25
A Routine maintenance 26
Replacing the ink cartridges ................................................................................26
Cleaning and checking the machine....................................................................29
Cleaning the scanner glass ...........................................................................29
Cleaning the print head .................................................................................29
Checking the print quality ..............................................................................30
Checking the print alignment .........................................................................31
B Troubleshooting 32
Error and Maintenance messages.......................................................................32
Printer jam or paper jam................................................................................36
Troubleshooting ..................................................................................................39
If you are having difficulty with your machine ................................................39
Machine Information ............................................................................................45
Checking the serial number ...........................................................................45
Reset functions .............................................................................................. 45
How to reset the machine.............................................................................. 45
C Menu and features 46
On-screen programming......................................................................................46
Menu keys ...........................................................................................................46
Menu table ...........................................................................................................48
D Specifications 55
General ................................................................................................................55
Print media...........................................................................................................57
Copy ....................................................................................................................58
Scanner ...............................................................................................................59
Printer .................................................................................................................. 60
Interfaces ............................................................................................................. 61
Network................................................................................................................61
Computer requirements ....................................................................................... 62
Consumable items ............................................................................................... 63
E Index 64
vi
Page 9

Table of Contents
(Advanced User’s Guide)
The Advanced User’s Guide explains the following features and operations.
You can view the Advanced User’s Guide on the CD-ROM.
1 General setup
Memory storage
Sleep Mode
LCD display
2Printing reports
Reports
3 Making copies
Copy settings
Copy Options
A Routine maintenance
Cleaning and checking the machine
Packing and shipping the machine
B Glossary
CIndex
vii
Page 10

viii
Page 11

General information 1
1
Using the documentation
Thank you for buying a Brother machine!
Reading the documentation will help you
make the most of your machine.
1
WARNING
1
WARNING indicates a potentially
hazardous situation which, if not avoided,
could result in death or serious injuries.
CAUTION
Symbols and conventions used in the documentation 1
The following symbols and conventions are
used throughout the documentation.
Bold Bold typeface identifies specific
keys on the machine’s control
panel or on the computer
screen.
Italics Italicized typeface emphasizes
an important point or refers you
to a related topic.
Courier
New
Text in the Courier New font
identifies messages on the
LCD of the machine.
CAUTION indicates a potentially hazardous
situation which, if not avoided, may result in
minor or moderate injuries.
Important
Important
situation which, if not avoided, may result in
damage to property or loss of product
functionality.
indicates a potentially hazardous
Notes tell you how you should
respond to a situation that may arise
or give tips about how the operation
works with other features.
Electrical Hazard icons alert you to
possible electrical shocks.
1
Page 12
Chapter 1
Note
Accessing the Advanced User’s Guide, Software User’s Guide, Network User’s Guide, and Network Glossary
This Basic User’s Guide does not contain all
the information about the machine, such as
how to use the advanced Copy, Printer,
Scanner and Network features. When you
are ready to learn detailed information about
these operations, you can read the
Advanced User’s Guide,
Software User’s Guide,
Network User’s Guide and
Network Glossary that are on the CD-ROM.
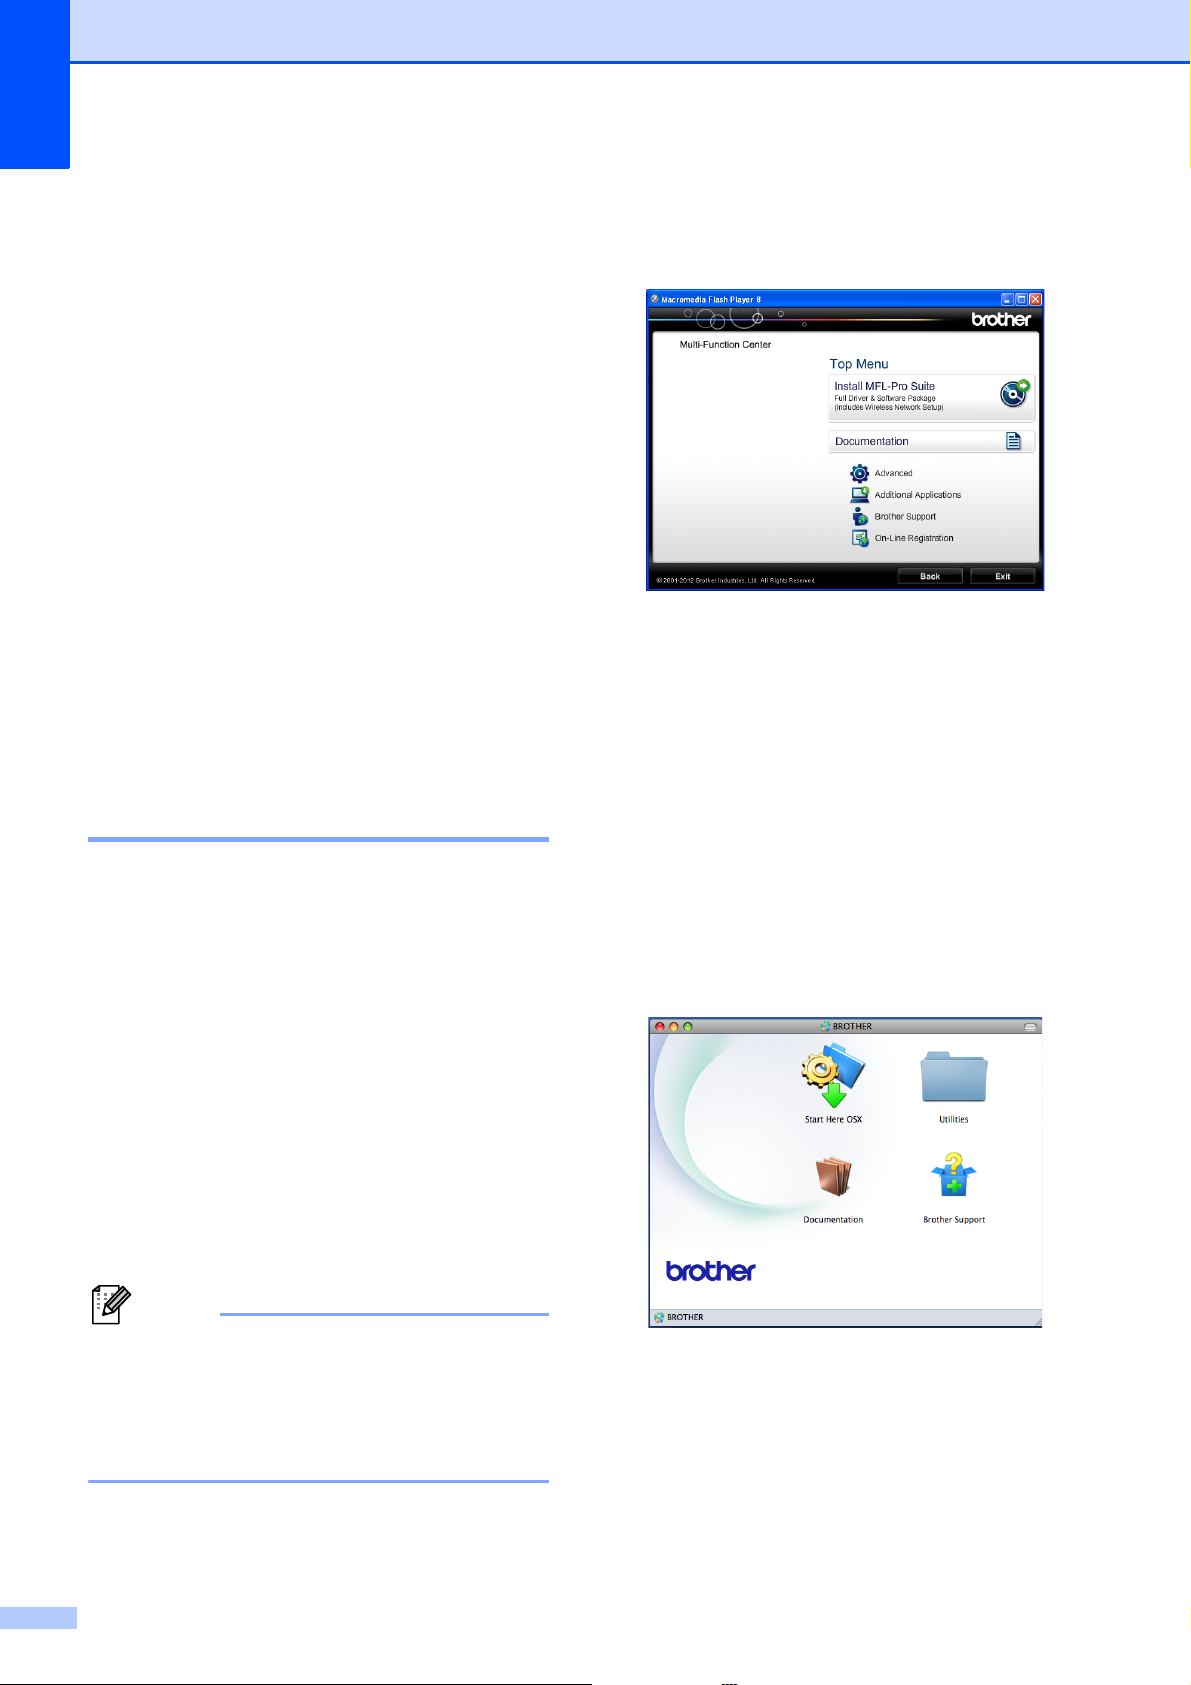
c If the language screen appears, click
your language. The CD-ROM Top Menu
will appear.
1
d Click Documentation.
e Click PDF documents. If the country
screen appears, choose your country.
After the list of User’s Guides appears,
choose the guide you want to read.
Viewing Documentation 1
Viewing Documentation
(Windows
To view the documentation, from the Start
menu, select Brother, DCP-XXXX (where
XXXX is your model name) from the
programs group, and then choose
User’s Guides.
If you have not installed the software, you can
find the documentation on the CD-ROM by
following the instructions below:
®
) 1
a Turn on your PC. Insert the Brother
CD-ROM into your CD-ROM drive.
If the Brother screen does not appear
automatically, go to
My Computer (Computer), double-click
the CD-ROM icon, and then double-click
start.exe.
b If the model name screen appears, click
your model name.
Viewing Documentation (Macintosh)
a Turn on your Macintosh. Insert the
Brother CD-ROM into your CD-ROM
drive. The following window will appear.
b Double-click the Documentation icon.
If the model name screen appears,
choose your model name and click next.
c If the language screen appears, double-
click your language folder.
1
2
Page 13

General information
Note
d Double-click top.pdf.
If the country screen appears, choose
your country.
e After the list of User’s Guides appears,
choose the guide you want to read.
How to find Scanning instructions 1
There are several ways you can scan
documents. You can find the instructions as
follows:
Software User’s Guide
Scanning
ControlCenter
Network Scanning
Nuance™ PaperPort™ 12SE
How-to-Guides (Windows
The complete Nuance™ PaperPort™
12SE How-to-Guides can be viewed from
the Help section in the PaperPort™ 12SE
application.
®
)
How to find Network setup instructions
Your machine can be connected to a wireless
network.
Basic setup instructions
(uuQuick Setup Guide)
The wireless access point or router
supports Wi-Fi Protected Setup or
AOSS™
(uuQuick Setup Guide)
More information about network setup
(uuNetwork User’s Guide)
1
1
Presto! PageManager User’s Guide
(Macintosh)
Presto! PageManager is available as a
download from
http://nj.newsoft.com.tw/download/
brother/PM9SEInstaller_BR_multilang.dmg
The complete Presto! PageManager
User’s Guide can be viewed from the Help
selection in the Presto! PageManager
application.
3
Page 14

Chapter 1
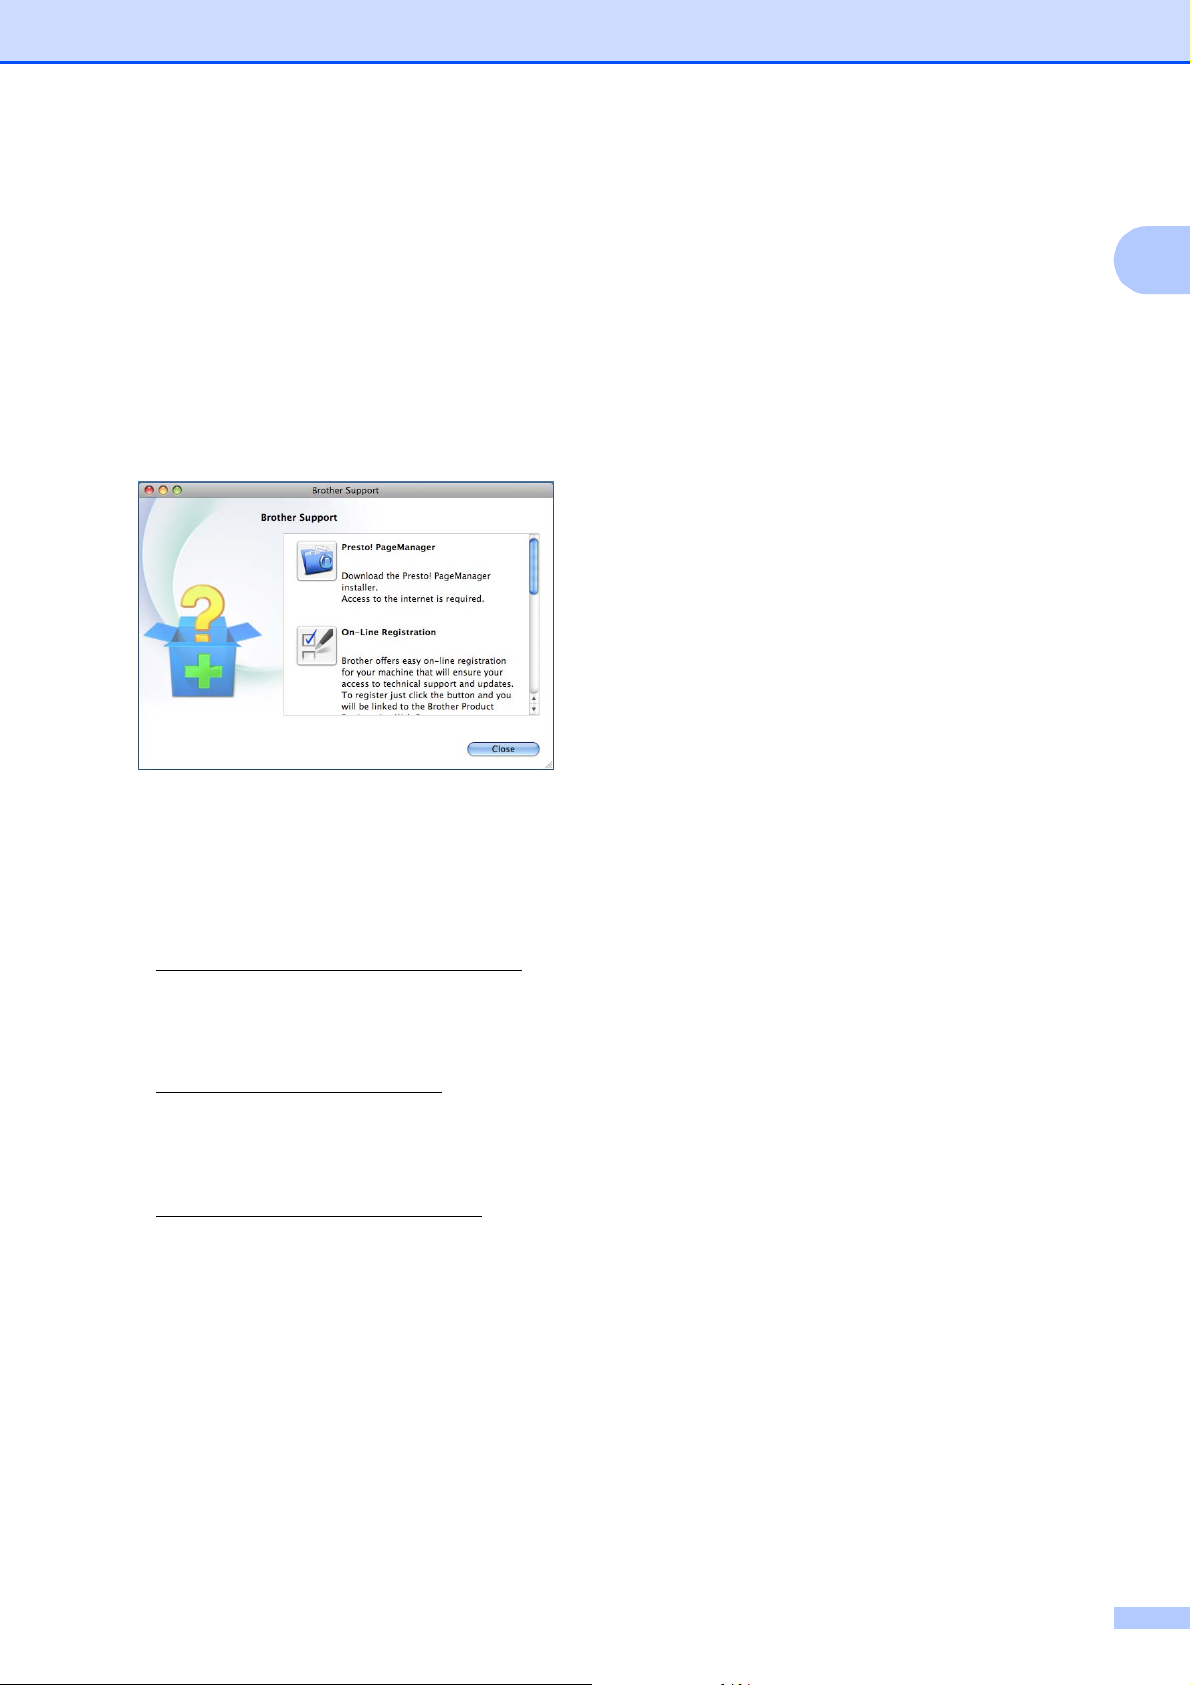
Accessing Brother
Support (Windows
You can find all the contacts you will need,
such as Web support (Brother Solutions
Center), Customer Service and Brother
Authorized Service Centers in Brother
numbers uu page i and on the CD-ROM.
Click Brother Support on the Top Menu.
The following screen will appear:
®
) 1
To access the Brother CreativeCenter
(http://www.brother.com/creativecenter/
for FREE photo projects and printable
downloads, click
Brother CreativeCenter.
To return to the Top Menu, click Back or
if you are finished, click Exit.
)
To access our Web site
(http://www.brother.com/
Brother Home Page.
To view all Brother Numbers, including
Customer Service numbers for the USA
and Canada, click Support Information.
To access the USA Brother online
shopping mall
(http://www.brothermall.com/
additional product and services
information, click Brother Mall.com.
To access Canada’s Brother online
shopping mall (http://www.brother.ca/
additional product and services
information, click Shop Online (Canada).
For the latest news and product support
information
(http://solutions.brother.com/
Brother Solutions Center.
), click
) for
) for
), click
To visit our Web site for genuine Brother
Supplies
(http://www.brother.com/original/
click Supplies Information.
4
),
Page 15
Accessing Brother
General information
Support (Macintosh)
You can find all the contacts you will need,
such as Web support (Brother Solutions
Center) on the CD-ROM.
Double-click the Brother Support icon.
The following screen will appear:
To download and install Presto!
PageManager, click
Presto! PageManager.
1
1
To register your machine from the Brother
Product Registration Page
(http://www.brother.com/registration/
click On-Line Registration.
For the latest news and product support
information
(http://solutions.brother.com/
Brother Solutions Center.
To visit our Web site for genuine Brother
Supplies
(http://www.brother.com/original/
Supplies Information.
), click
),
), click
5
Page 16
Chapter 1
100% Normal 01
1 342
678 5
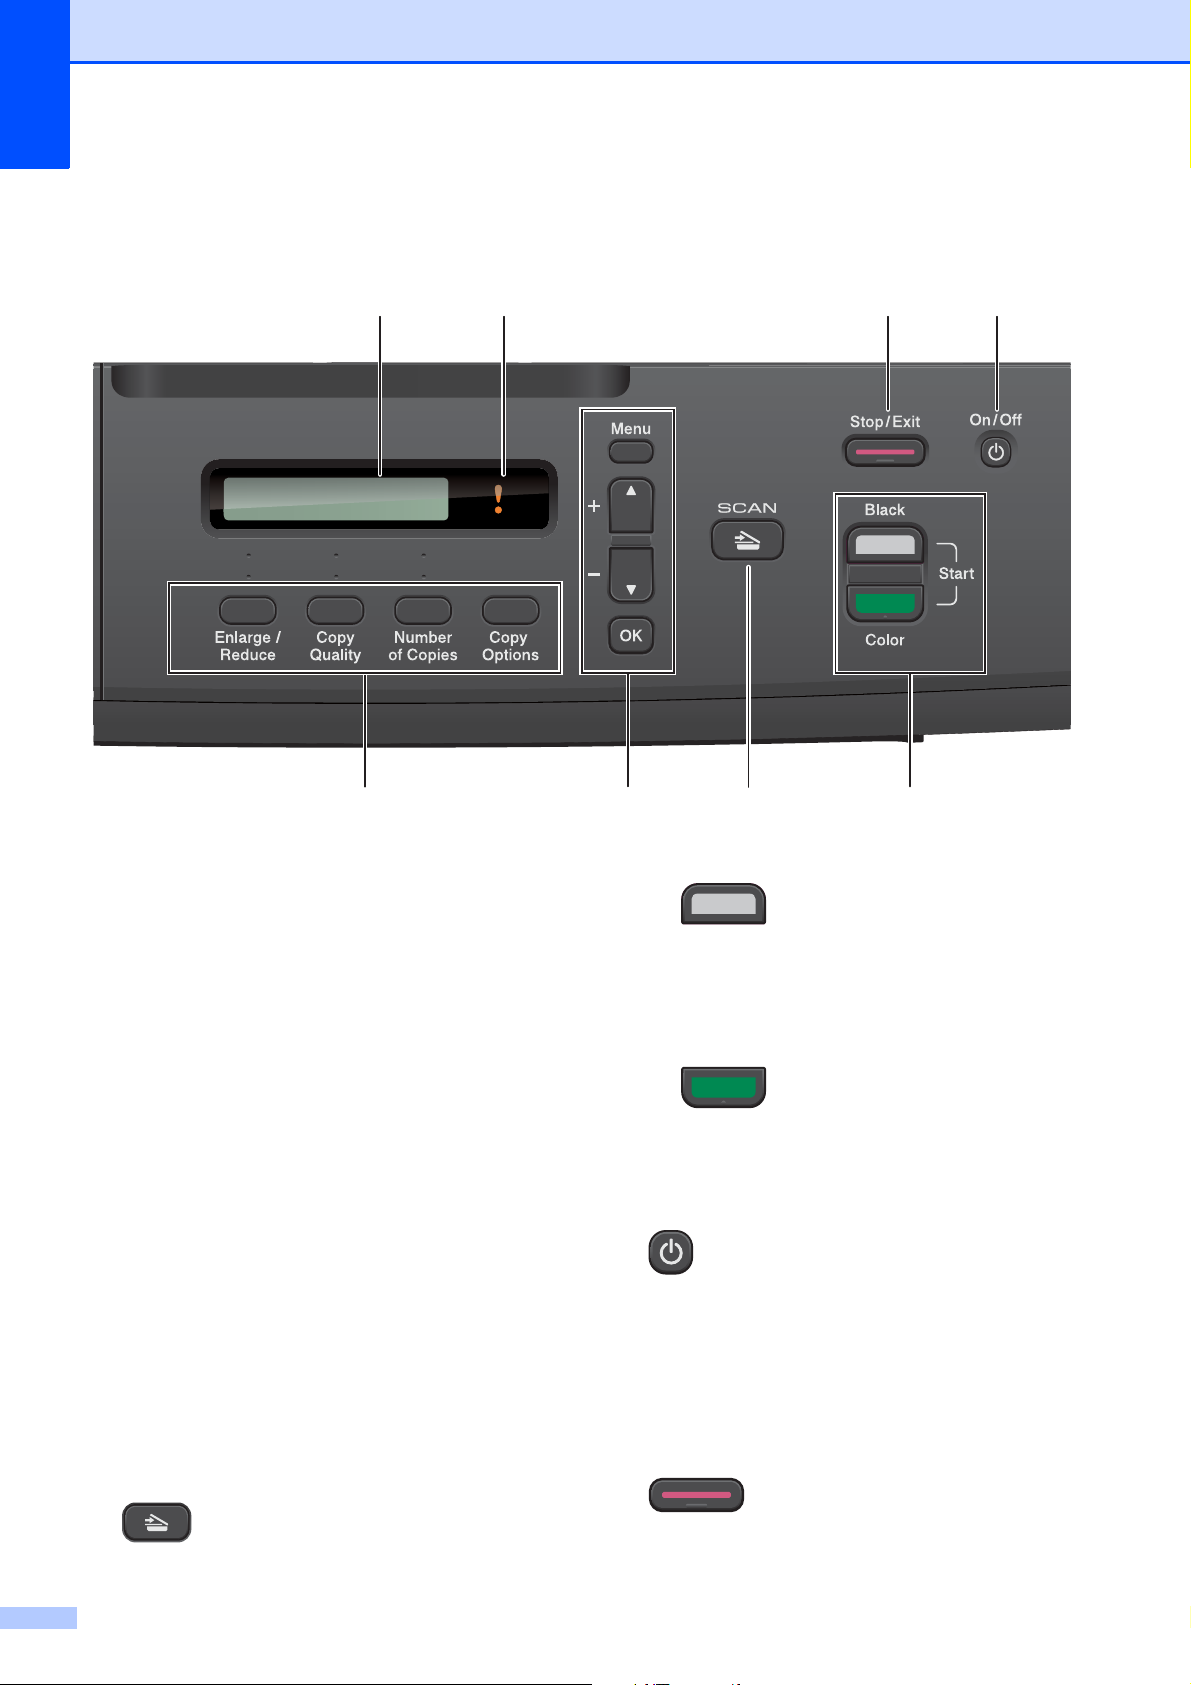
Control panel overview 1
1 Copy keys:
You can temporarily change the copy settings
when in copy mode.
Enlarge/Reduce
Lets you enlarge or reduce copies
depending on the ratio you select.
Copy Quality
Use this key to temporarily change the
quality of your copies.
Number of Copies
Use this key to make multiple copies.
Copy Options
You can quickly and easily select
temporary settings for copying.
2 Menu keys:
Menu
Lets you access the main menu.
+a or -b
Press to scroll through the menus and
options.
OK
Lets you select a setting.
3 SCAN
Lets you access Scan mode.
4 Start keys:
Black Start
Lets you start making copies in black &
white. Also lets you start a scanning
operation (in color or black & white,
depending on the scan setting in the
ControlCenter software).
Color Start
Lets you start making copies in full color.
Also lets you start a scanning operation (in
color or black & white, depending on the
scan setting in the ControlCenter software).
5 On/Off
You can turn the machine on and off.
If you turn the machine off, it will still
periodically clean the print head to maintain
print quality. To prolong print head life, provide
the best ink cartridge economy, and maintain
print quality, you should keep your machine
connected to the power at all times.
6 Stop/Exit
Stops an operation or exits from a menu.
6
Page 17
7 Warning LED
100% Normal 01
General information
Blinks in orange when the LCD displays an
error or an important status message.
8 LCD (Liquid Crystal Display)
Displays messages on the screen to help you
set up and use your machine.
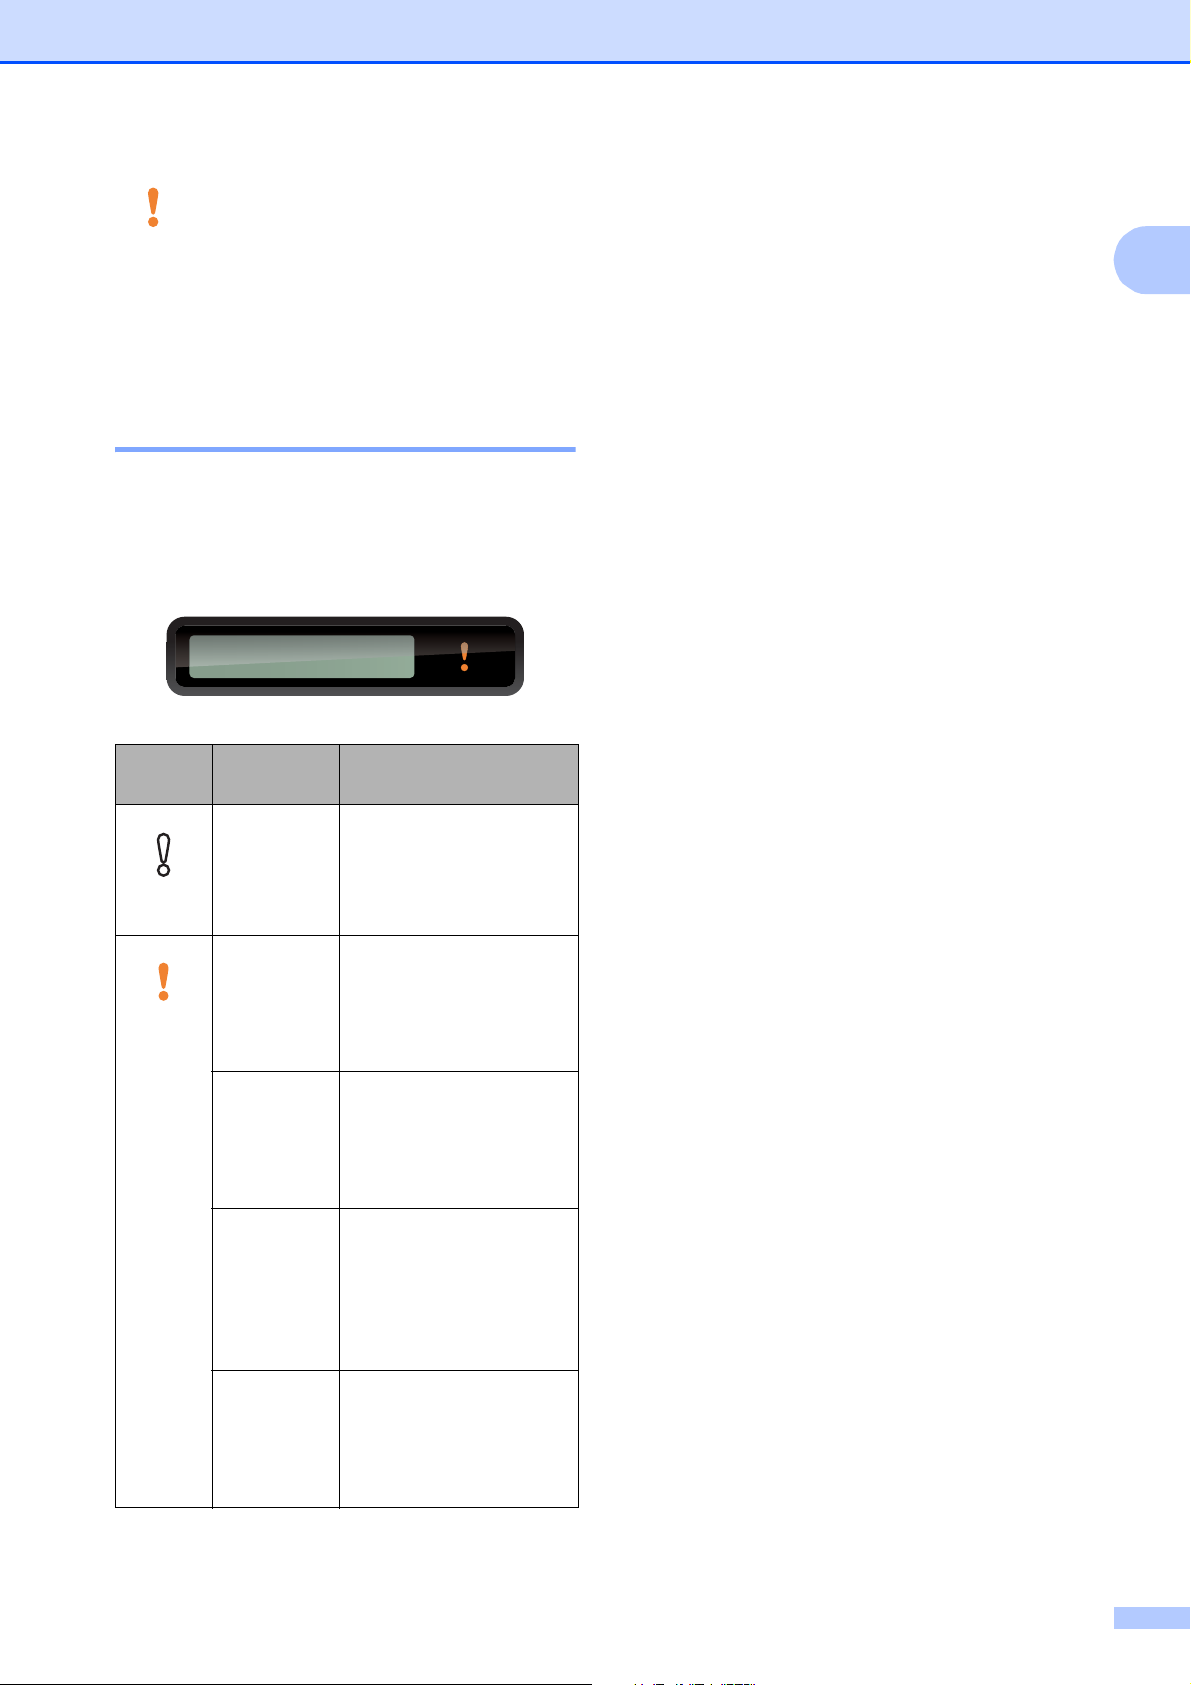
Warning LED indications 1
The Warning LED (Light Emitting Diode) is a
light that shows the DCP status. The LCD
shows the current machine status when the
machine is idle.
LED DCP
status
Ready The DCP is ready for
Description
use.
1
Off
Orange
Cover
Open
The cover is open.
Close the cover. (See
Error and Maintenance
messages
uu page 32.)
Cannot
Print
Replace the ink
cartridge with a new
one. (See Replacing the
ink cartridges
uu page 26.)
Paper Error Put paper in the tray or
clear the paper jam.
Check the LCD
message. (See
Troubleshooting
uu page 39.)
Other
Messages
Check the LCD
message. (See Error
and Maintenance
messages
uu page 32.)
7
Page 18

2
Note
11
2
Loading paper 2
Loading paper and other print media
Load only one size of paper and one type of
paper in the paper tray at any one time.
a Pull the paper tray completely out of the
machine.
If the paper support flap (1) is open, close
it, and then close the paper support (2).
b Lift the output paper tray cover (1).
2
1
c With both hands, gently press and slide
the paper side guides (1) and then the
paper length guide (2) to fit the paper
size.
Make sure that the triangular marks (3)
on the paper side guides (1) and paper
length guide (2) line up with the marks
for the paper size you are using.
1
3
2
3
8
Page 19

Note
When using Legal size paper, press and
Note
Important
Note
1
hold the universal guide release button (1)
as you slide out the front of the paper tray.
Loading paper
e Gently put the paper into the paper tray
print side down and top edge in first.
Check that the paper is flat in the tray.
2
d Fan the stack of paper well to avoid
paper jams and misfeeds.
Always make sure that the paper is not
curled or wrinkled.
Be careful not to push the paper in too far;
it may lift at the back of the tray and cause
paper feed problems.
If you want to add paper before the tray is
empty, remove the paper from the tray
and combine it with the paper you are
adding. Always fan the stack of paper well
before loading it in the tray. If you add
paper without fanning the stack the
machine may feed multiple pages.
9
Page 20
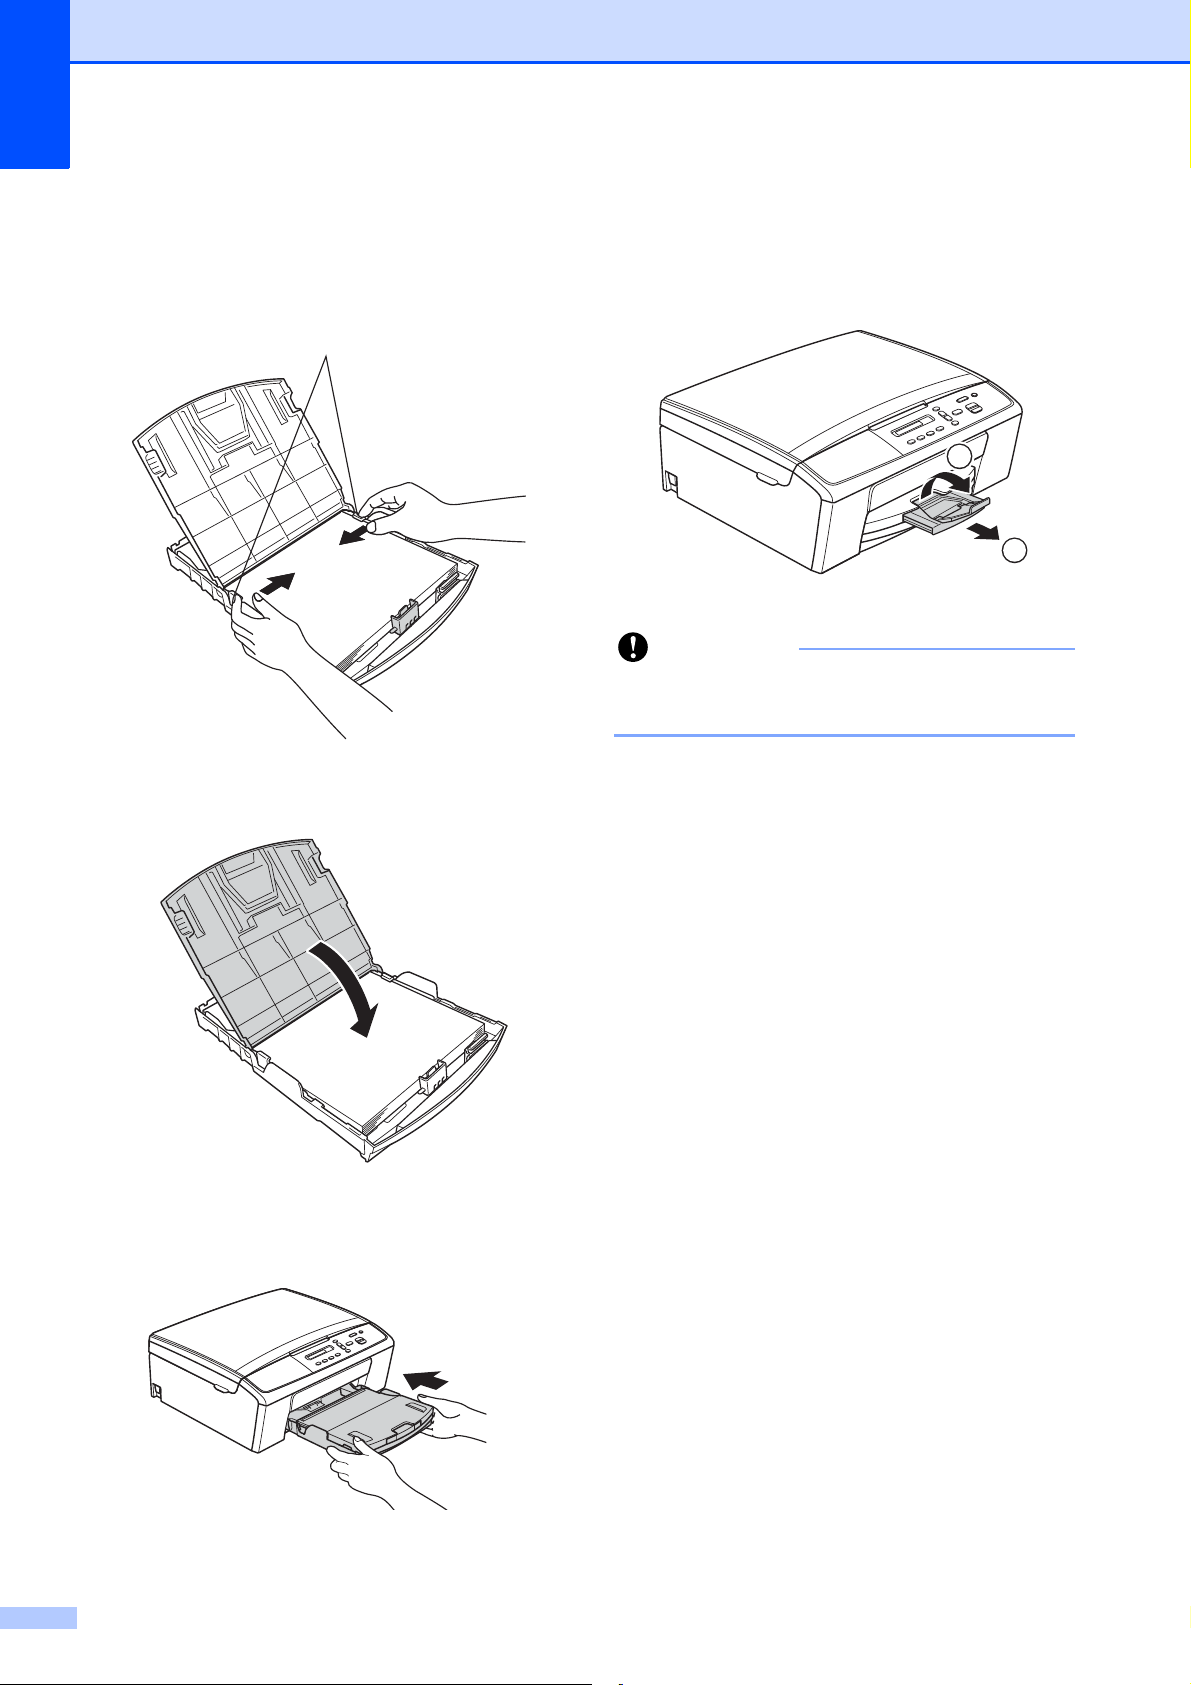
Chapter 2
Important
1
22
f Gently adjust the paper side guides (1)
to fit the paper using both hands.
Make sure the paper side guides touch
the sides of the paper.
1
i While holding the paper tray in place,
pull out the paper support (1) until it
clicks, and then unfold the paper
support flap (2).
DO NOT use the paper support flap for
Legal size paper.
g Close the output paper tray cover.
h Slowly push the paper tray completely
into the machine.
10
Page 21
Loading paper
Important
Important
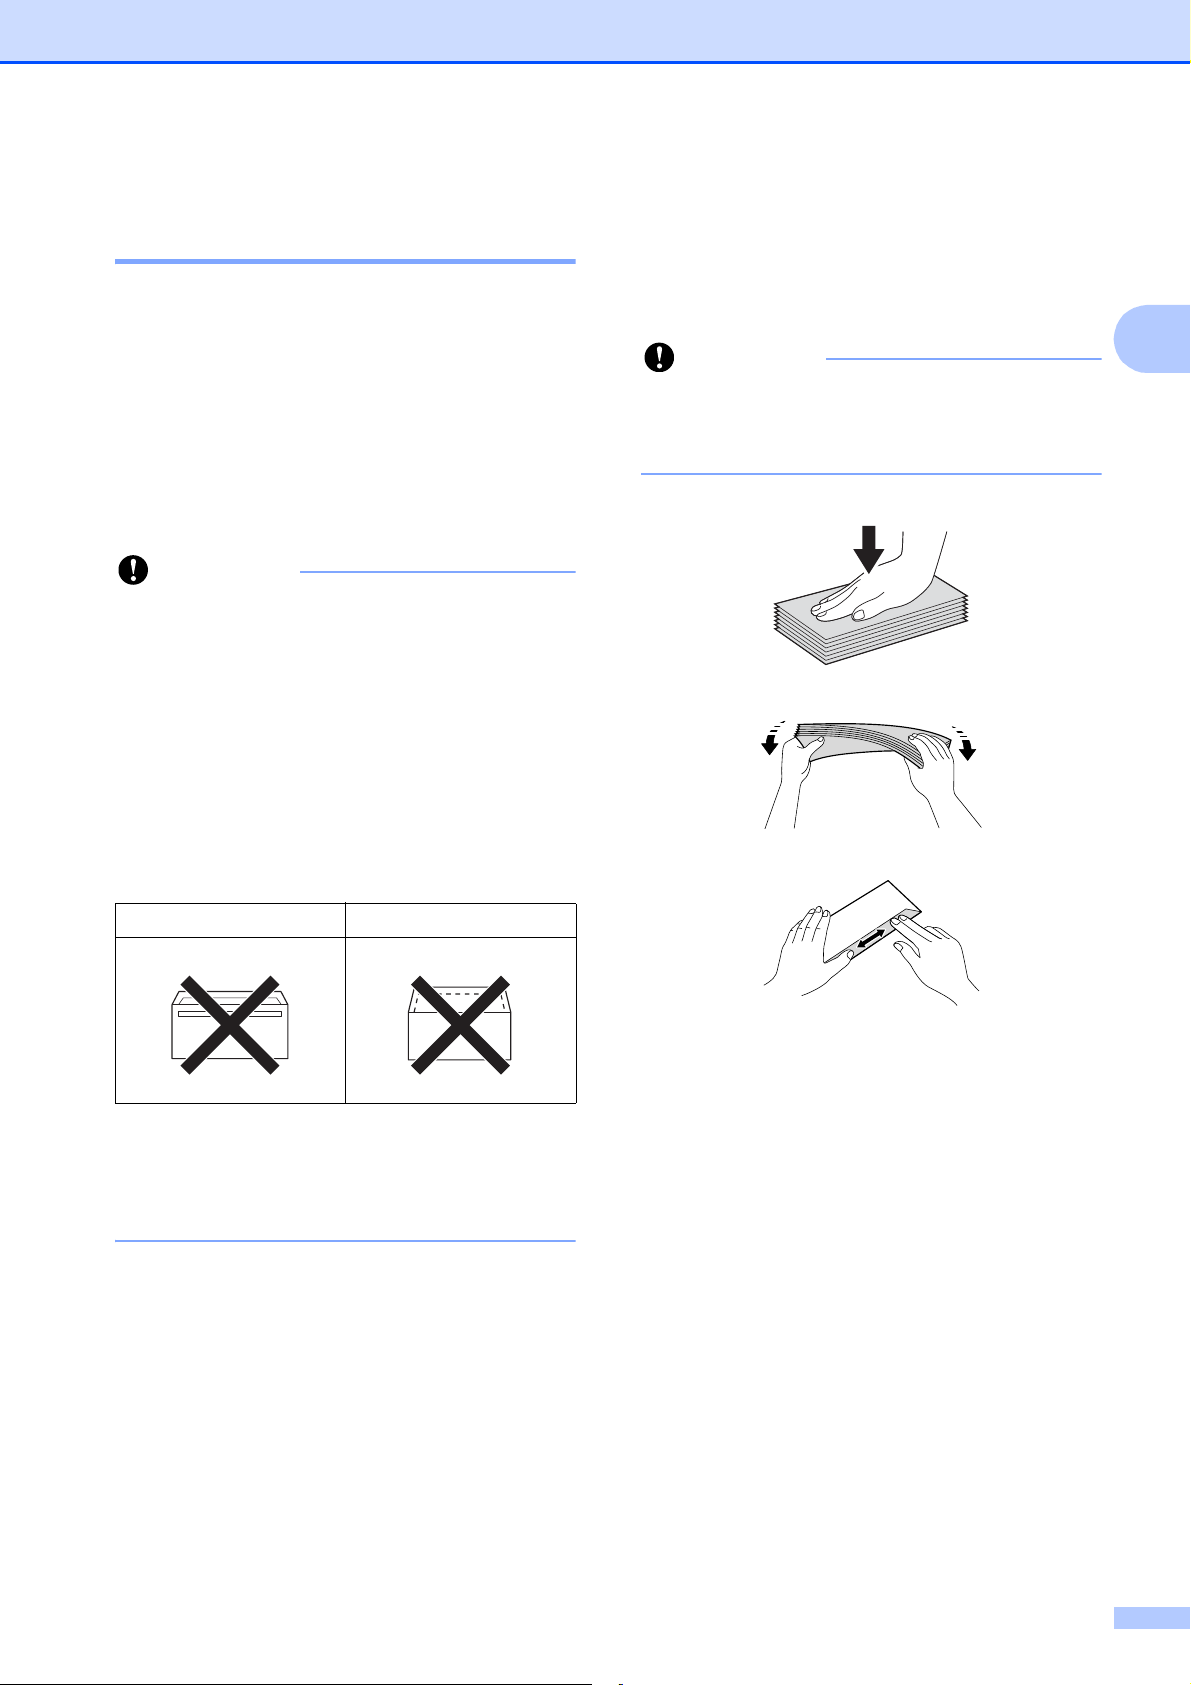
Loading envelopes and postcards 2
About envelopes 2
Use envelopes that weigh from 20 to 25 lb
2
(80 to 95 g/m
Some envelopes need margin settings to
be set in the application. Make sure you
do a test print first before printing many
envelopes.
DO NOT use the following types of
envelopes, as they will not feed correctly:
• That are of a baggy construction.
• That have windows.
• That are embossed (have raised
writing on them).
).
Loading envelopes and postcards 2
a Before loading, press the corners and
sides of the envelopes or postcards to
make them as flat as possible.
2
If envelopes or postcards are “doublefeeding,” put one envelope or postcard in
the paper tray at a time.
• That have clasps or staples.
• That are pre-printed on the inside.
Glue Double flaps
Occasionally you may experience paper
feed problems caused by the thickness,
size and flap shape of the envelopes you
are using.
11
Page 22
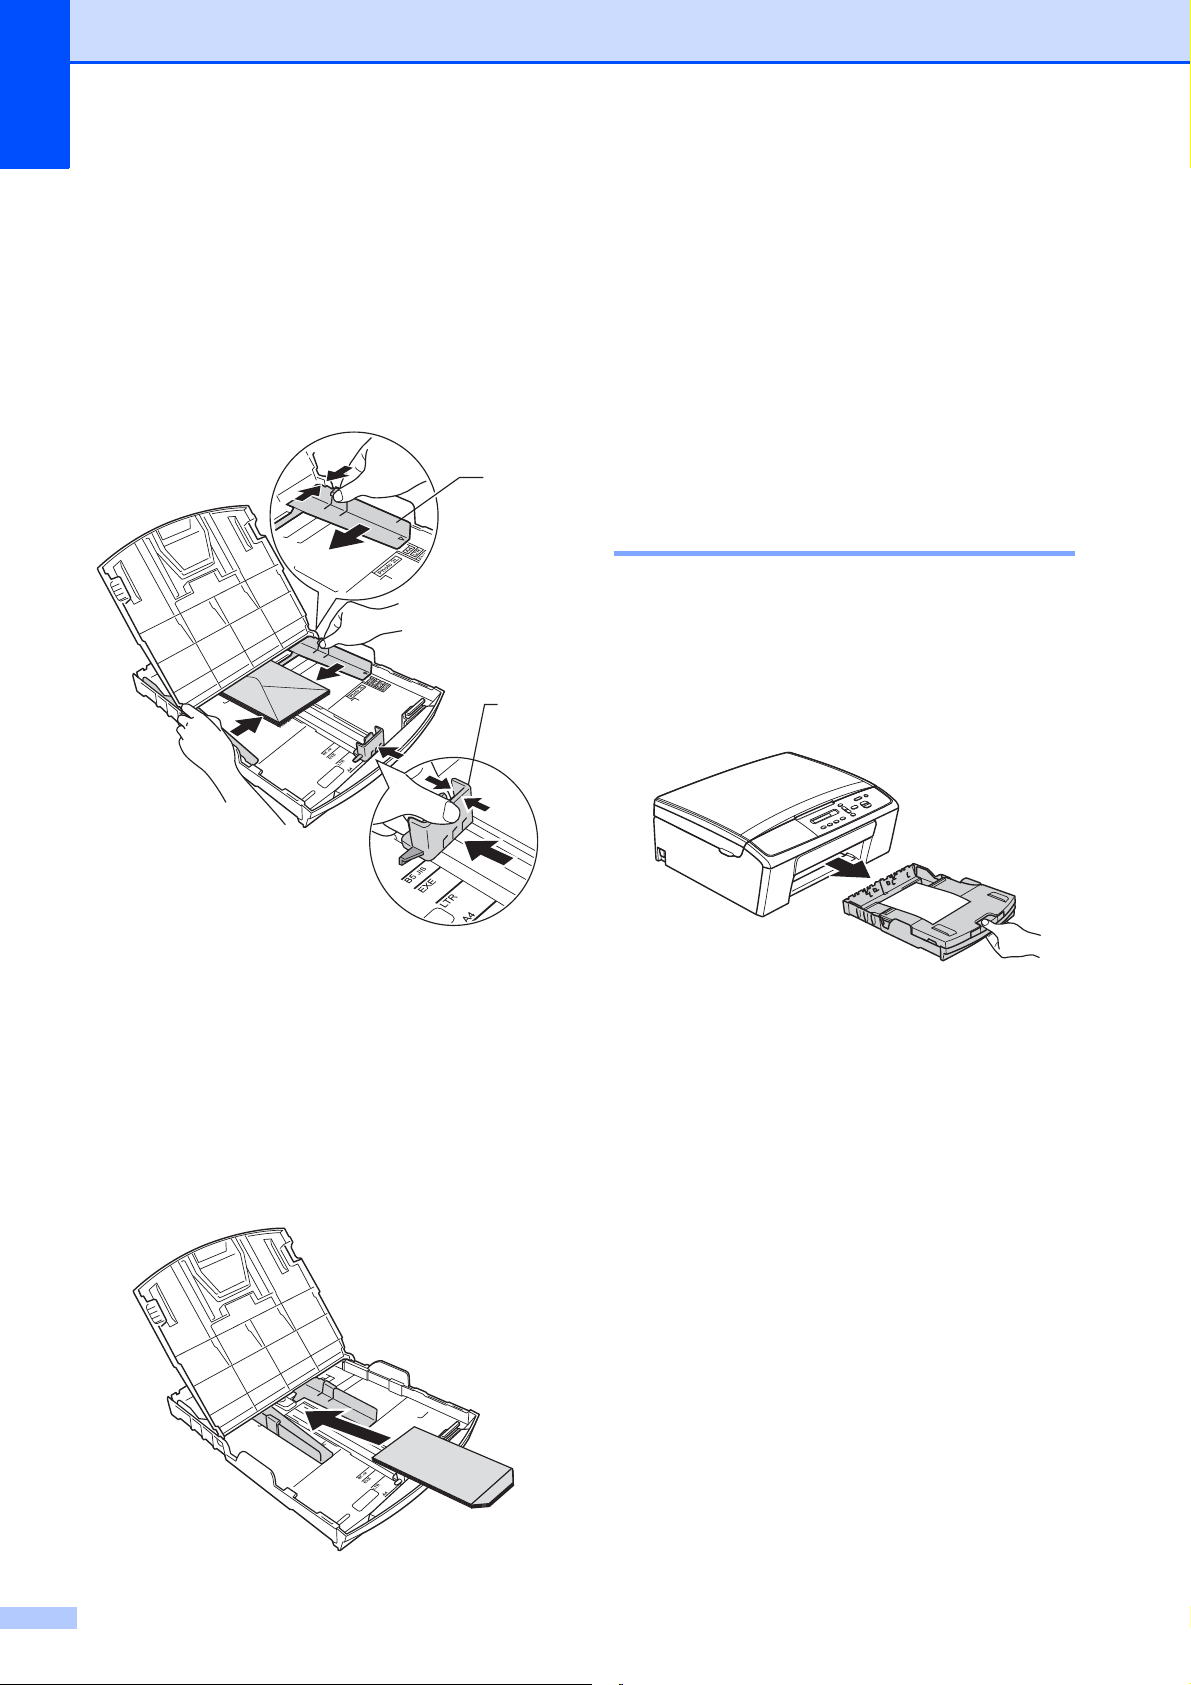
Chapter 2
2
1
b Put envelopes or postcards in the paper
tray with the address side down and the
leading edge in first as shown in the
illustration. Using both hands, gently
press and slide the paper side
guides (1) and paper length guide (2) to
fit the size of the envelopes or
postcards.
c Select Reverse Print (Windows
®
) or
Reverse Page Orientation
(Macintosh) in the printer driver’s dialog
box and then adjust the size and margin
in your application.
uuSoftware User’s Guide: Printing
(Windows
®
)
uuSoftware User’s Guide: Printing
(Macintosh)
Removing small printouts from the machine 2
When the machine ejects small paper onto
the output paper tray cover you may not be
able to reach it. Make sure printing has
finished, and then pull the tray completely out
of the machine.
If you have problems printing on
envelopes with the flap on the short edge,
try the following:
a Open the envelope flap.
b Put the envelope into the paper tray with
the address side down and the flap
positioned as shown in the illustration.
2
12
Page 23
Loading paper
Note
1
3
42
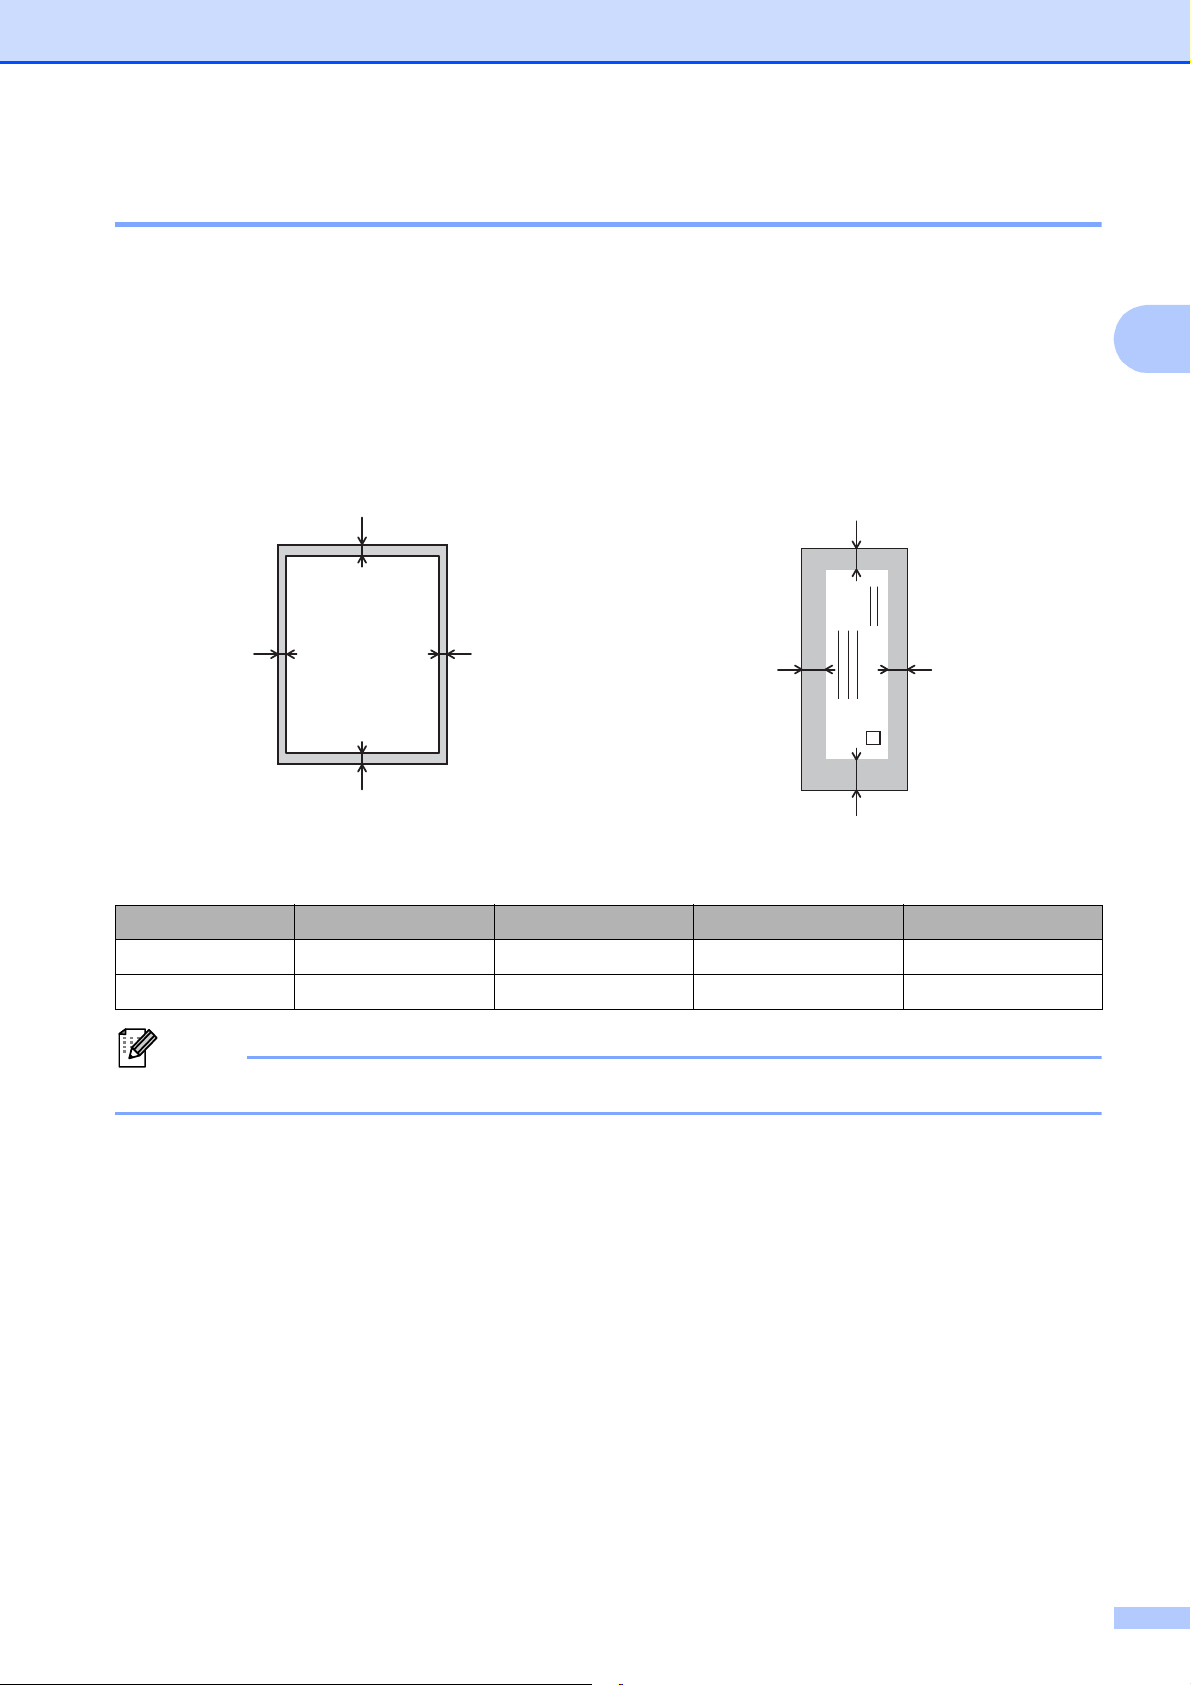
Unprintable area 2
The printable area depends on the settings in the application you are using. The figures below
show the unprintable areas on cut sheet paper and envelopes. The machine can print in the
shaded areas of cut sheet paper when the Borderless print feature is available and turned on.
uuSoftware User’s Guide: Printing (Windows
uuSoftware User’s Guide: Printing (Macintosh)
Cut Sheet Paper Envelopes
1
24
®
)
2
3
Top (1) Left (2) Bottom (3) Right (4)
Cut Sheet 0.12 in. (3 mm) 0.12 in. (3 mm) 0.12 in. (3 mm) 0.12 in. (3 mm)
Envelopes 0.47 in. (12 mm) 0.12 in. (3 mm) 0.95 in. (24 mm) 0.12 in. (3 mm)
The Borderless print feature is not available for envelopes.
13
Page 24

Chapter 2
Note
Paper settings 2
Paper Type 2
To get the best print quality, set the machine
for the type of paper you are using.
a Press Menu.
b Press a or b to choose 2.Copy.
Press OK.
c Press a or b to choose 1.Paper Type.
Press OK.
d Press a or b to choose Plain Paper,
Inkjet Paper, Brother BP71,
Brother BP61, Other Glossy or
Transparency.
Press OK.
Paper Size 2
You can use the following sizes of paper for
copies: Letter, Legal, A4, A5, Executive and
4" 6" (10 15 cm). When you change the
size of paper you load in the machine, you will
need to change the paper size setting at the
same time.
a Press Menu.
b Press a or b to choose 2.Copy.
Press OK.
c Press a or b to choose 2.Paper Size.
Press OK.
d Press a or b to choose the paper size
you are using, Letter, Legal, A4, A5,
Executive or 4"x6".
Press OK.
e Press Stop/Exit.
The machine ejects paper with the printed
surfaces face up onto the paper tray at the
front of the machine. When you use
transparencies or glossy paper, remove
each sheet at once to prevent smudging
or paper jams.
e Press Stop/Exit.
14
Page 25

Loading paper
Acceptable paper and other print media
The print quality can be affected by the type
of paper you use in the machine.
To get the best print quality for the settings
you have chosen, always set the Paper Type
to match the type of paper you load.
You can use plain paper, inkjet paper (coated
paper), glossy paper, transparencies and
envelopes.
We recommend testing various paper types
before buying large quantities.
For best results, use Brother paper.
When you print on inkjet paper (coated
paper), transparencies and glossy paper,
be sure to choose the proper print media
in the “Basic” tab of the printer driver or in
the Paper Type setting of the machine’s
menu. (See Paper Type uu page 14.)
Recommended print media 2
2
To get the best print quality, we suggest using
Brother paper. (See the table below.)
We recommend using “3M Transparency
Film” when you print on transparencies.
Brother paper
Paper Type Item
Premium Plus Glossy
Photo
Letter BP71GLTR
4" 6" BP71GP
Premium Glossy Photo
Letter BP61GLL (USA only)
4" 6" BP61GLP (USA only)
2
When you print on Brother Photo paper,
load one extra sheet of the same photo
paper in the paper tray. An extra sheet has
been included in the paper package for
this purpose.
When you print on transparencies, load
one extra sheet in the paper tray.
When using transparencies or photo
paper, remove each sheet at once to
prevent smudging or paper jams.
Avoid touching the printed surface of the
paper immediately after printing; the
surface may not be completely dry and
may stain your fingers.
15
Page 26

Chapter 2
Important
Handling and using print media 2
Store paper in its original packaging and
keep it sealed. Keep the paper flat and
away from moisture, direct sunlight and
heat.
Avoid touching the shiny (coated) side of
photo paper. Load photo paper with the
shiny side facing down.
Avoid touching either side of
transparencies because they absorb
water and perspiration easily, and this
may cause decreased output quality.
Transparencies designed for laser
printers/copiers may stain your next
document. Use only transparencies
recommended for inkjet printing.
You can only print on both sides of the
paper with PC printing.
Paper capacity of the output paper tray cover
Up to 50 sheets of Letter, Legal or A4 20 lb
2
(80 g/m
Transparencies and photo paper must be
) paper.
picked up from the output paper tray cover
one page at a time to avoid smudging.
2
uuSoftware User’s Guide: Printing
(Windows
®
).
uuSoftware User’s Guide: Printing
(Macintosh)
DO NOT use the following kinds of paper:
• Damaged, curled, wrinkled, or
irregularly shaped
1
1
1 0.08 in. (2 mm) or greater curl may
cause jams to occur.
• Extremely shiny or highly textured
• Paper that cannot be arranged
• Paper made with a short grain
16
uniformly when stacked
Page 27

Loading paper
Choosing the right print media 2
Paper type and size for each operation 2
Paper Type Paper Size Usage
Copy Printer
Cut-Sheet Letter 8 1/2 11 in. (215.9 279.4 mm) Yes Yes
A4 8.3 11.7 in. (210 297 mm) Yes Yes
Legal 8 1/2 14 in. (215.9 355.6 mm) Yes Yes
Executive 7 1/4 10 1/2 in. (184 267 mm) Yes Yes
JIS B5 7.2 10.1 in. (182 257 mm) – User
Defined
A5 5.8 8.3 in. (148 210 mm) Yes Yes
A6 4.1 5.8 in. (105 148 mm) – Yes
Cards Photo 4 6 in. (10 15 cm) Yes Yes
Photo 2L 5 7 in. (13 18 cm) – Yes
Index Card 5 8 in. (127 203 mm) – Yes
Postcard 1 3.9 5.8 in. (100 148 mm) – User
Defined
Postcard 2
(Double)
Envelopes C5 Envelope 6.4 9 in. (162 229 mm) – Yes
5.8 7.9 in. (148 200 mm) – User
Defined
2
DL Envelope 4.3 8.7 in. (110 220 mm) – Yes
COM-10 4 1/8 9 1/2 in. (105 241 mm) – Yes
Monarch 3 7/8 7 1/2 in. (98 191 mm) – Yes
Y4 Envelope 4.1 9.3 in. (105 235 mm) – User
Defined
Transparencies Letter 8 1/2 11 in. (215.9 279.4 mm) Yes Yes
A4 8.3 11.7 in. (210
Legal 8 1/2 14 in. (215.9 355.6 mm) Yes Yes
A5 5.8 8.3 in. (148 210 mm) Yes Yes
297 mm) Yes Yes
17
Page 28

Chapter 2
Paper weight, thickness and capacity 2
Paper Type Weight Thickness No. of
sheets
Cut Sheet Plain Paper
Inkjet Paper
Glossy Paper
Cards Photo 4" 6"
Index Card
Postcard
Envelopes
17 to 32 lb (64 to 120 g/m
17 to 53 lb (64 to 200 g/m
Up to 58 lb (Up to 220 g/m
Up to 58 lb (Up to 220 g/m
Up to 32 lb (Up to 120 g/m
Up to 53 lb (Up to 200 g/m
20 to 25 lb (80 to 95 g/m
2
2
)
2
)
2
2
2
2
)
3 to 6 mil (0.08 to 0.15 mm)
3 to 10 mil (0.08 to 0.25 mm) 20
Up to 10 mil (Up to 0.25 mm)
)
Up to 10 mil (Up to 0.25 mm)
)
Up to 6 mil (Up to 0.15 mm) 30
)
Up to 10 mil (Up to 0.25 mm) 30
)
Up to 20 mil (Up to 0.52 mm) 10
Transparencies – – 10
1
Up to 100 sheets of plain paper 20 lb (80 g/m2).
2
BP71 69 lb (260 g/m2) paper is especially designed for Brother inkjet machines.
100
20
20
1
2
2
18
Page 29

3
Important
Loading documents 3
How to load documents
You can make copies and scan from the
scanner glass.
Using the scanner glass 3
You can use the scanner glass to copy or
scan pages of a book or one page at a time.
Document Sizes Supported 3
Length: Up to 11.7 in. (297 mm)
Width: Up to 8.5 in. (215.9 mm)
Weight: Up to 4.4 lb (2 kg)
How to load documents 3
3
a Lift the document cover.
b Using the document guidelines on the
left and top, place the document
face down in the upper left corner of the
scanner glass.
3
c Close the document cover.
If you are scanning a book or thick
document, DO NOT slam the cover down
or press on it.
19
Page 30

Chapter 3
1
3
24
Unscannable area 3
The scannable area depends on the settings
in the application you are using. The figures
below show the unscannable areas.
Usage Document
Size
Copy All paper
Scan
sizes
Top (1)
Bottom (3)
0.12 in.
(3 mm)
Left (2)
Right (4)
0.12 in.
(3 mm)
20
Page 31

4
Note
Making copies 4
How to copy 4
The following steps show the basic copy
operation.
a Load your document face down on the
scanner glass.
(See How to load documents
uu page 19.)
b If you want more than one copy, press
Number of Copies repeatedly until the
number of copies you want appears (up
to 99).
Or press a or b to change the number of
copies.
c Press Black Start or Color Start.
Stop copying 4
Copy settings 4
When you want to quickly change the copy
settings temporarily for the next copy, use the
Copy keys. You can use different
combinations of settings.
4
The machine returns to its default settings
1 minute after it finishes copying.
You can save some of the copy settings
you use most often by setting them as the
default. You can find instructions on how
to do this in the section for each feature.
To stop copying, press Stop/Exit.
(Basic User’s Guide)
For details about changing the following copy
settings uupage 22.
Paper Type
Paper Size
(Advanced User’s Guide)
For details about changing the following copy
settings
uuAdvanced User’s Guide: Making copies
Enlarge/Reduce
Quality
Density
Page Layout
2in1(ID)
21
Page 32

Chapter 4
Note
Note
Paper Options 4
Paper Type 4
If you are copying on a special type of paper,
set the machine for the type of paper you are
using to get the best print quality.
Press
and then a or b to
choose Paper Type
Plain Paper
Inkjet Paper
Brother BP71
Brother BP61
Other Glossy
Transparency
a Load your document.
b Enter the number of copies you want.
c Press Copy Options and a or b to
choose Paper Type.
Press OK.
d Press a or b to choose the type of paper
you are using.
Press OK.
e Press Black Start or Color Start.
Paper Size 4
If you are copying on paper other than Letter
size, you will need to change the Paper Size
setting. You can copy only on Letter, Legal,
A4, A5, Executive or Photo 4" 6"
(10 15 cm) paper.
Press
and then a or b to
choose Paper Size
Letter
Legal
A4
A5
Executive
4"x6"
a Load your document.
b Enter the number of copies you want.
c Press Copy Options and a or b to
choose Paper Size.
Press OK.
d Press a or b to choose the size of paper
you are using.
Press OK.
e Press Black Start or Color Start.
To change the default setting, see Paper
Type uu page 14.
22
To change the default setting, see Paper
Size uu page 14.
Page 33

How to print from a computer 5
5
Printing a document 5
The machine can receive and print data from
your computer. To print from a computer, you
must install the printer driver.
uuSoftware User’s Guide: Printing
(Windows
uuSoftware User’s Guide: Printing
(Macintosh)
®
)
a Install the Brother printer driver from the
CD-ROM. (uuQuick Setup Guide)
b From your application, choose the Print
command.
c Choose the name of your machine in the
Print dialog box and click Properties or
Preferences, depending on the
application you are using.
d Choose the settings you want to change
in the Properties dialog box.
Commonly used settings include:
Media Type
Print Quality
Paper Size
Orientation
Color/Grayscale
5
Scaling
e Click OK.
f Click Print to begin printing.
23
Page 34

6
How to scan to a computer 6
Scanning a document 6
There are several ways to scan documents.
You can use the SCAN key on the machine or
the scanner drivers on your computer.
a To use the machine as a scanner, you
must install a scanner driver. If the
machine is on a Network, configure it
with a TCP/IP address.
Install the scanner drivers from the
CD-ROM. (uuQuick Setup Guide)
Configure the machine with a TCP/IP
address if network scanning does not
work. (uuSoftware User’s Guide:
Configuring Network Scanning for
Windows
scanning for Macintosh)
b Load your document. (See How to load
documents uu page 19.)
c Do one of the following:
To scan using the SCAN key on the
machine, go to Scanning using the
SCAN key.
To scan using a scanner driver at
your computer, go to Scanning using
a scanner driver.
®
and Configuring network
Scanning using the SCAN key
For more information
uuSoftware User’s Guide: Using the Scan
key
a Press (SCAN).
b Press a or b to choose the available
scan modes as follows.
Press OK.
Scan to E-mail
Scan to Image
Scan to OCR
Scan to File
Web Service
(Web Services Scan)
1
(Macintosh)
This function is available after you download
and install Presto! PageManager from
http://nj.newsoft.com.tw/download/brother/
PM9SEInstaller_BR_multilang.dmg
2
(Windows® only)
(uuSoftware User’s Guide: Using Web
Services for scanning on your network
(Windows Vista
Windows
®
7))
1
2
®
SP2 or later and
6
24
c (For network users)
Press a or b to choose the computer you
want to send the data to.
Press OK.
d Press Black Start or Color Start to
begin scanning.
Page 35

How to scan to a computer
Note
Scanning using a scanner driver
uuSoftware User’s Guide: Scanning a
document using the TWAIN driver
(Windows®)
uuSoftware User’s Guide: Scanning a
document using the WIA driver (Windows®)
uuSoftware User’s Guide: Scanning a
document using the TWAIN driver
(Macintosh)
uuSoftware User’s Guide: Scanning a
document using the ICA driver (Mac OS X
10.6.x, 10.7.x)
The names of the buttons or menus
shown on the screen may vary depending
on the application you are using.
Scanning using the
6
ControlCenter
uuSoftware User’s Guide: ControlCenter4
®
(Windows
uuSoftware User’s Guide: ControlCenter2
(Macintosh)
)
6
6
a Start a scanning application and click
the button to open the scan settings
window.
b Adjust the settings such as Resolution,
Brightness and Scan Type in the
Scanner Setup dialog box.
c Click Start or Scan to begin scanning.
25
Page 36

CAUTION
Important
Routine maintenance A
A
Replacing the ink cartridges
Your machine is equipped with an ink dot
counter. The ink dot counter automatically
monitors the level of ink in each of the
four cartridges. When the machine detects an
ink cartridge is running out of ink, the machine
will display a message on the LCD.
The LCD will show which ink cartridge is low
or needs replacing. Be sure to follow the LCD
prompts to replace the ink cartridges in the
correct order.
Even though the machine tells you to replace
an ink cartridge, there will be a small amount
of ink left in the ink cartridge. It is necessary
to keep some ink in the ink cartridge to
prevent air from drying out and damaging the
print head assembly.
If ink gets in your eyes, wash it out with
water at once and call a doctor if you are
concerned.
A
Brother strongly recommends that you do
not refill the ink cartridges provided with
your machine. We also strongly
recommend that you continue to use only
Genuine Brother Brand replacement ink
cartridges. Use or attempted use of
potentially incompatible ink and/or
cartridges in the Brother machine may
cause damage to the machine and/or may
result in unsatisfactory print quality. Our
warranty coverage does not apply to any
problem that is caused by the use of
unauthorized third-party ink and/or
cartridges. To protect your investment and
obtain premium performance from the
Brother machine, we strongly recommend
the use of Genuine Brother Supplies.
a Open the ink cartridge cover.
If one or more of the ink cartridges have
reached the end of their life, the LCD
shows B&W Print Only or
Cannot Print.
26
Page 37

Routine maintenance
b Press the lock release lever as shown to
release the cartridge for the color
indicated on the LCD. Remove the
cartridge from the machine.
d Turn the green knob on the protective
yellow cap clockwise until it clicks to
release the vacuum seal, then remove
the cap (1).
1
A
c Open the new ink cartridge bag for the
color indicated on the LCD, and then
take out the ink cartridge.
e Each color has its own correct position.
Insert the ink cartridge in the direction of
the arrow on the label.
27
Page 38

f Gently push the ink cartridge in until it
Note
Important
clicks, and then close the ink cartridge
cover.
g The machine will automatically reset the
ink dot counter.
• DO NOT take out ink cartridges if you do
not need to replace them. If you do so, it
may reduce the ink quantity and the
machine will not know the quantity of ink
left in the cartridge.
• DO NOT touch the cartridge insertion
slots. If you do so, the ink may stain your
skin.
• If ink gets on your skin or clothing
immediately wash it off with soap or
detergent.
• If you mix the colors by installing an ink
cartridge in the wrong position, clean the
print head several times after correcting
the cartridge installation.
• Once you open an ink cartridge, install it in
the machine and use it up within six
months of installation. Use unopened ink
cartridges by the expiration date written on
the cartridge package.
• If you replaced an ink cartridge, for
example Black, the LCD may ask you to
verify that it was a brand new one
(Did You Change Blck?). For each
new cartridge you installed, press a (Yes)
to reset the ink dot counter for that color. If
the ink cartridge you installed is not a
brand new one, be sure to press b (No).
• If the LCD shows No Cartridge or
Cannot Detect after you install the ink
cartridges, check that the ink cartridges
are installed properly.
• DO NOT dismantle or tamper with the ink
cartridge; this can cause the ink to leak out
of the cartridge.
28
Page 39

Routine maintenance
Note
Important
Note
2
1
3
Cleaning and checking the machine
Cleaning the scanner glass A
a Unplug the machine from the AC power
outlet.
b Lift the document cover (1). Clean the
scanner glass (2) and the white
plastic (3) with a soft lint-free cloth
moistened with a non-flammable glass
cleaner.
Cleaning the print head A
A
To maintain good print quality, the machine
will automatically clean the print head when
needed. You can start the cleaning process
manually if there is a print quality problem.
Clean the print head if you get a horizontal
line in the text or graphics, or blank text on
your printed pages. You can clean Black only,
three colors at a time
(Yellow/Cyan/Magenta), or all four colors at
once.
Cleaning the print head consumes ink.
Cleaning too often uses ink unnecessarily.
DO NOT touch the print head. Touching
the print head may cause permanent
damage and may void the print head's
warranty.
A
In addition to cleaning the scanner glass
with a non-flammable glass cleaner, run
your finger tip over the glass to see if you
can feel anything on it. If you feel dirt or
debris, clean the glass again
concentrating on that area. You may need
to repeat the cleaning process three or
four times. To test, make a copy after each
cleaning attempt.
a Press Menu.
b Press a or b to choose 1.Ink.
Press OK.
c Press a or b to choose 2.Cleaning.
Press OK.
d Press a or b to choose Black, Color or
All.
Press OK.
The machine cleans the print head.
When cleaning is finished, the machine
will go back to Ready mode
automatically.
If you clean the print head at least five
times and the print has not improved, try
installing a new Genuine Brother Brand
replacement ink cartridge for each
problem color. Try cleaning the print head
again up to five more times. If the print has
not improved call Brother Customer
Service. (See Brother numbers
uu page i.)
29
Page 40

Checking the print quality A
Important
If faded or streaked colors and text appear on
your printouts, some of the print head nozzles
may be clogged. You can check this by
printing the Print Quality Check Sheet and
looking at the nozzle check pattern.
i The LCD asks you if the print quality is
OK for black and three colors.
Black OK?
a Yes b No
Press a (Yes) or b (No).
a Press Menu.
b Press a or b to choose 1.Ink.
Press OK.
c Press a or b to choose 1.Test Print.
Press OK.
d Press a or b to choose
Print Quality.
Press OK.
e Press Color Start.
The machine begins printing the Print
Quality Check Sheet.
f Check the quality of the four color blocks
on the sheet.
g The LCD asks you if the quality of the
four colors are OK.
Is Quality OK?
a Yes b No
h Do one of the following:
If all lines are clear and visible, press
a to choose Yes, and go to step l.
If you can see missing short lines as
shown below, press b to choose No.
OK Poor
j The LCD asks you if you want to start
cleaning.
Start Cleaning?
a Yes b No
Press a (Yes).
The machine starts cleaning the print
head.
k After cleaning is finished, press
Color Start.
The machine starts printing the Print
Quality Check Sheet again. Repeat the
procedure from step f.
l Press Stop/Exit.
If you repeat this procedure at least five
times and the print quality is still poor,
replace the ink cartridge for the clogged
color.
After replacing the ink cartridge, check
the print quality. If the problem still
exists, repeat the cleaning and test print
procedures at least five times for the
new ink cartridge. If ink is still missing,
call Brother Customer Service. (See
Brother numbers uu page i.)
DO NOT touch the print head. Touching
the print head may cause permanent
damage and may void the print head's
warranty.
30
Page 41

Routine maintenance
Note
e Press Black Start or Color Start.
The machine starts printing the
i
Alignment Check Sheet.
When a print head
nozzle is clogged
the printed
sample looks like
this.
After the print
head nozzle is
cleaned, the
horizontal lines
are gone.
Checking the print alignment A
You may need to adjust the print alignment
after transporting the machine if your printed
text becomes blurred or images become
faded.
a Press Menu.
Press a or b to choose 1.Ink.
b
Press OK.
c Press a or b to choose 1.Test Print.
Press OK.
d Press a or b to choose Alignment.
Press OK.
f For the “A” pattern, press a or b to
choose the number of the test print that
has the least visible vertical stripes
(1-9). Press OK.
g For the “B” pattern, press a or b to
choose the number of the test print that
has the least visible vertical stripes
(1-9). Press OK.
h For the “C” pattern, press a or b to
choose the number of the test print that
has the least visible vertical stripes
(1-9). Press OK.
i For the “D” pattern, press a or b to
choose the number of the test print that
has the least visible vertical stripes
(1-9). Press OK.
A
j Press Stop/Exit.
31
Page 42

Troubleshooting B
Note
B
Error and Maintenance messages B
As with any sophisticated office product, errors may occur and consumable items may need to be
replaced. If this happens, your machine identifies the error and shows an error message. The
most common error and maintenance messages are shown below.
You can correct most errors and clear routine maintenance messages by yourself. If you need
more help, the Brother Solutions Center offers the latest FAQs and troubleshooting tips.
Visit us at http://solutions.brother.com/
Error Message Cause Action
B&W Print Only
Replace XX Ink
Cannot Detect You installed a new ink cartridge too
One or more of the color ink cartridges
have reached the end of their life.
You can use the machine in
black & white mode for approximately
four weeks depending on the number
of pages you print.
While this message appears on the
LCD, each operation works in the
following way:
Printing
If you choose Grayscale in the
Advanced tab of the printer driver
you can use the machine as a
black & white printer.
Copying
If the paper type is set to
Plain Paper or Inkjet Paper
you can make copies in
black & white.
quickly and the machine did not detect
it.
An ink cartridge is not installed
properly.
.
Replace the ink cartridges. (See
Replacing the ink cartridges
uu page 26.)
The machine will stop all print
operations and you will not be able to
use the machine until you change to a
new ink cartridge in the following
cases:
• If you unplug the machine or take
• If the paper type is set to anything
• (Windows
Take out the new ink cartridge and
re-install it slowly until it clicks. (See
Replacing the ink cartridges
uu page 26.)
out the ink cartridge.
except Plain Paper or
Inkjet Paper.
®
) If you check
Slow Drying Paper in the Basic
tab of the printer driver.
(Macintosh) If you check
Slow Drying Paper in the
Print Settings of the printer driver.
Cannot Print
Replace XX Ink
32
If you are not using Genuine Brother
Innobella™ ink the machine may not
detect the ink cartridge.
One or more of the ink cartridges have
reached the end of their life. The
machine will stop all print operations.
Use a new Genuine Brother
Innobella™ Ink Cartridge. If the error
is not cleared, call Brother Customer
Service.
Replace the ink cartridges. (See
Replacing the ink cartridges
uu page 26.)
Page 43

Error Message Cause Action
Troubleshooting
Clean Unable XX
Init Unable XX
Print Unable XX
Scan Unable XX
Close Ink Cover The ink cartridge cover is not
Cover is Open The scanner cover is not completely
Data Remaining Print data is left in the machine's
High Temperature The print head is too warm. Allow the machine to cool down.
The machine has a mechanical
problem.
—OR—
A foreign object such as a paper clip or
ripped paper is in the machine.
completely closed.
closed.
memory.
Open the scanner cover and remove
any foreign objects and paper scraps
from inside the machine. If the error
message continues, disconnect the
machine from the power for several
minutes and reconnect it.
Firmly close the ink cartridge cover
until it clicks.
Lift the scanner cover and then close it
again.
Press Stop/Exit. The machine will
cancel the job and clear it from the
memory. Try to print again.
B
33
Page 44

Note
Error Message Cause Action
Ink Box Full The ink absorber box or flushing box is
full. These components are periodic
maintenance items that may require
replacement after a period of time to
ensure optimum performance from
your Brother machine. Because these
components are periodic maintenance
items, the replacement is not covered
under the warranty. The need to
replace these items and the time
period before replacement is
dependent on the number of purges
and flushes required to clean the ink
system. These boxes acquire
amounts of ink during the different
purging and flushing operations. The
number of times a machine purges
and flushes for cleaning varies
depending on different situations. For
example, frequently powering the
machine on and off will cause
numerous cleaning cycles since the
machine automatically cleans upon
power up. The use of non-Brother ink
may cause frequent cleanings
because non-Brother ink could cause
poor print quality which is resolved by
cleaning. The more cleaning the
machine requires the faster these
boxes will fill up.
The ink absorber box or flushing box
will need to be replaced. Contact
Brother Customer Service or a Brother
Authorized Service Center to have
your machine serviced. (See Brother
numbers uu page i.)
Other reasons for cleaning are:
1 The machine automatically cleans
itself after clearing a printer jam.
2 The machine automatically cleans
itself after sitting idle for more than
45 days (infrequent use).
3 The machine automatically cleans
itself after the ink cartridges have
been replaced 12 times.
Repairs resulting from the use of
non-Brother supplies may not be
covered under the stated product
warranty.
InkBox NearFull The ink absorber box or flushing box is
nearly full.
The ink absorber box or flushing box
will need to be replaced soon. Call
Brother Customer Service or a Brother
Authorized Service Center to have
your machine serviced. (See Brother
numbers uu page i.)
Ink Low XXXXXXX One or more of the ink cartridges are
near the end of their life.
Order a new ink cartridge. You can
continue printing until the LCD shows
Cannot Print. (See Ordering
accessories and supplies uu page ii
and Replacing the ink cartridges
uu page 26.)
Low Temperature The print head is too cold. Allow the machine to warm up.
34
Page 45

Error Message Cause Action
Troubleshooting
No Cartridge An ink cartridge is not installed
properly.
No Paper Fed The machine is out of paper or paper
is not properly loaded in the paper
tray.
The paper is jammed in the machine. Remove the jammed paper by
Paper dust has accumulated on the
surface of the paper pick-up rollers.
The Jam Clear Cover is not closed
properly.
Out of Memory The machine's memory is full. If a copy operation is in process
Take out the new ink cartridge and reinstall it slowly until it clicks. (See
Replacing the ink cartridges
uu page 26.)
Do one of the following:
Refill the paper in the paper tray,
and then press Black Start or
Color Start.
Remove and reload the paper,
then press Black Start or
Color Start. (See Loading paper
and other print media uu page 8.)
following the steps in Printer jam or
paper jam uu page 36.
Clean the paper pick-up rollers.
(uuAdvanced User’s Guide: Cleaning
the paper pick-up rollers)
Check the Jam Clear Cover is closed
evenly at both ends. (See Printer jam
or paper jam uu page 36.)
B
Press Stop/Exit and wait until the
other operations that are in progress
finish, and then try again.
Paper Jam The paper is jammed in the machine. Remove the jammed paper by
following the steps in Printer jam or
paper jam uu page 36.
Make sure the paper length guide is
set to the correct paper size. DO NOT
extend the paper tray when you load
A5 or smaller size paper.
Wrong Paper Size The Paper Size setting does not
match the size of paper in the tray. Or,
you did not set the paper guides in the
tray to the indicators for the paper size
you are using.
1 Check that the paper size you
choose matches the size of paper
in the tray. (See Paper Size
uu page 14.)
2 Make sure you loaded the paper in
a Portrait position, by setting the
paper guides at the indicators for
your paper size. (See Loading
paper and other print media
uu page 8.)
3 After you have checked the paper
size and the paper position, press
Black Start or Color Start.
35
Page 46

Printer jam or paper jam B
1
1
Take out the jammed paper depending on
where it is jammed in the machine.
a Unplug the machine from the AC power
outlet.
b Open the Jam Clear Cover (1) at the
back of the machine. Pull the jammed
paper out of the machine.
c Close the Jam Clear Cover.
Make sure the cover is closed properly.
d If the paper support flap is open, close it,
and then close the paper support. Pull
the paper tray completely out of the
machine.
e Pull out the jammed paper (1).
36
Page 47

f Using both hands, grasp the plastic tabs
Important
1
2
3
on both sides of the machine and lift the
scanner cover (1) until it locks securely
in the open position.
Move the print head (if necessary) to
take out any paper remaining in this
area. Make sure that jammed paper is
not left in the corners of the machine (2)
and (3).
Troubleshooting
• If the paper is jammed under the print
head, unplug the machine from the power
source, and then move the print head to
take out the paper.
• If the print head is in the right corner as
shown in the illustration, you cannot move
it. Re-connect the power cord. Hold down
Stop/Exit until the print head moves to the
center. Then unplug the machine from the
power source and take out the paper.
B
• If ink gets on your skin or clothing
immediately wash it off with soap or
detergent.
g Lift the scanner cover to release the
lock (1). Gently push the scanner cover
support down (2) and close the scanner
cover (3) using both hands.
1
2
3
h Push the paper tray firmly back into the
machine.
37
Page 48

i While holding the paper tray in place,
Important
1
22
pull out the paper support (1) until it
clicks, and then unfold the paper
support flap (2).
DO NOT use the paper support flap for
Legal size paper.
j Re-connect the power cord.
38
Page 49

Troubleshooting
Important
Troubleshooting B
For technical help, you must call the country where you bought the machine. Calls must be
made from within that country.
If you think there is a problem with your machine, check the chart and follow the troubleshooting
tips.
Most problems can be easily resolved by yourself. If you need additional help, the Brother
Solutions Center offers the latest FAQs and troubleshooting tips.
Visit us at http://solutions.brother.com/
Using non-Brother supplies may affect the print quality, hardware performance, and machine
reliability.
If you are having difficulty with your machine B
.
Printing
Difficulty Suggestions
No printout. Check the interface cable or wireless connection on both the machine and your
computer. (uuQuick Setup Guide)
Check that the machine is plugged in and press to turn the machine on.
One or more ink cartridges have reached the end of their life.
(See Replacing the ink cartridges uu page 26.)
Check to see if the LCD is showing an error message.
(See Error and Maintenance messages uu page 32.)
If the LCD shows Cannot Print or Replace XX Ink, see Replacing the ink
cartridges uu page 26.
Check that the correct printer driver has been installed and chosen.
B
39
Page 50

Printing (continued)
Difficulty Suggestions
No printout.
(Continued)
(Windows
(Windows
Click /Devices and Printers. Right-click Brother DCP-XXXXX (where
XXXXX is your model name) and choose Seewhat’sprinting. Click Printer and
make sure that Use Printer Offline is unchecked.
(Windows Vista
Click /Control Panel/Hardware and Sound/Printers. Right-click
Brother DCP-XXXXX (where XXXXX is your model name). If the printer is offline,
it will show Use Printer Online. Select this option to enable the printer.
(Windows
Click Start/Control Panel/Printers and Other Hardware/Printers and Faxes.
Right-click Brother DCP-XXXXX (where XXXXX is your model name). If the
printer is offline, it will show Use Printer Online. Select this option to enable the
printer.
If old unprinted data remains in the printer driver spooler, it will prevent new print
jobs from printing. Open the printer icon and delete all data as follows:
(Windows
®
only) Make sure that the machine is online.
®
7)
®
)
®
XP)
®
7)
Click /Devices and Printers/Printers and Faxes.
®
(Windows Vista
)
Click /Control Panel/Hardware and Sound/Printers.
(Windows
®
XP)
Click Start/Control Panel/Printers and Other Hardware/Printers and Faxes.
(Mac OS X 10.7.x)
Click System Preferences/Print & Scan.
(Mac OS X 10.5.8, 10.6.x)
Click System Preferences/Print & Fax.
40
Page 51

Troubleshooting
Printing (continued)
Difficulty Suggestions
Poor print quality. Check the print quality. (See Checking the print quality uu page 30.)
Make sure that the Media Type setting in the printer driver or the Paper Type
setting in the machine’s menu matches the type of paper you are using.
See Paper Type uu page 14.
®
uuSoftware User’s Guide: Printing (Windows
uuSoftware User’s Guide: Printing (Macintosh)
Make sure that your ink cartridges are fresh. The following may cause ink to clog:
The expiration date written on the cartridge package has passed. (Genuine
Brother Innobella™ ink cartridges stay usable for up to two years if kept in their
original packaging.)
The ink cartridge has been in your machine for over six months.
The ink cartridge may not have been stored properly before use.
Make sure you are using Genuine Brother Innobella™ Ink. Using non-Brother
supplies may affect the print quality, hardware performance, and machine
reliability.
Try using the recommended types of paper.
(See Acceptable paper and other print media uu page 15.)
The recommended environment for your machine is between 68 F to 91 F
(20 C to 33 C).
White horizontal lines appear in text
or graphics.
The machine prints blank pages. Clean the print head. (See Cleaning the print head uu page 29.)
Characters and lines are blurred. Check the printing alignment. (See Checking the print alignment uu page 31.)
Printed text or images are skewed. Make sure the paper is loaded properly in the paper tray and the paper side guides
Smudge or stain at the top center of
the printed page.
Printing appears dirty or ink seems
to run.
Stains appear on the reverse side
or at the bottom of the page.
The machine prints dense lines on
the page.
Clean the print head. (See Cleaning the print head uu page 29.)
Make sure you are using Genuine Brother Innobella™ Ink.
Try using the recommended types of paper.
(See Acceptable paper and other print media uu page 15.)
Make sure you are using Genuine Brother Innobella™ Ink.
are adjusted correctly. (See Loading paper and other print media uu page 8.)
Make sure the Jam Clear Cover is closed properly.
Make sure the paper is not too thick or curled.
(See Acceptable paper and other print media uu page 15.)
Make sure you are using the recommended types of paper. (See Acceptable
paper and other print media uu page 15.) Don't handle the paper until the ink is
dry.
Make sure you are using Genuine Brother Innobella™ Ink.
If you are using photo paper, make sure that you have set the correct paper type.
If you are printing a photo from your PC, set the Media Type in the printer driver.
Make sure the printer platen is not dirty with ink. (uuAdvanced User’s Guide:
Cleaning the machine’s printer platen)
Make sure you are using Genuine Brother Innobella™ Ink.
Make sure you are using the paper support flap.
(See Loading paper and other print media uu page 8.)
(Windows® only)
Check Reverse Order in the Basic tab of the printer driver.
)
B
41
Page 52

Printing (continued)
Difficulty Suggestions
The printouts are wrinkled.
(Windows
In the printer driver Advanced tab, click Color Settings, and uncheck
Bi-Directional Printing.
(Macintosh)
In the printer driver, choose Print Settings, click Advanced, choose
Other Print Options, and uncheck Bi-Directional Printing.
Make sure you are using Genuine Brother Innobella™ Ink.
Cannot perform “Page Layout”
printing.
Check that the paper size setting in the application and in the printer driver are the
same.
Print speed is too slow. Try changing the printer driver setting. The highest resolution needs longer data
processing, sending and printing time. Try the other quality settings in the printer
driver Advanced tab (Windows
Color Settings (Windows
sure you uncheck Color Enhancement (True2Life).
Turn the borderless feature off. Borderless printing is slower than normal printing.
uuSoftware User’s Guide: Printing (Windows
uuSoftware User’s Guide: Printing (Macintosh)
True2Life™ is not working properly. If the image data is not full color in your application (such as 256 color),
True2Life™ will not work. Use at least 24 bit color data with the
True2Life™feature.
Photo paper does not feed
properly.
When you print on Brother Photo paper, load one extra sheet of the same photo
paper in the paper tray. An extra sheet has been included in the paper package
for this purpose.
Clean the paper pick-up rollers. (uuAdvanced User’s Guide: Cleaning the paper
pick-up rollers)
Machine feeds multiple pages. Make sure the paper is loaded properly in the paper tray. (See Loading paper and
other print media uu page 8.)
Remove all the paper from the tray and fan the stack of paper well, then put it back
in the tray. (See step e in Loading paper and other print media uu page 8.)
Make sure you do not push the paper in too far. (See step e in Loading paper and
other print media uu page 8.)
Make sure the paper support is pulled out until it clicks and the paper support flap
is unfolded. (See step i in Loading paper and other print media uu page 8.)
Make sure the Jam Clear Cover is closed properly. (See step c in Printer jam or
paper jam uu page 36.)
Make sure the Base Pad in the paper tray is not dirty. (uuAdvanced User’s Guide:
Cleaning the paper pick-up rollers)
There is a paper jam. Make sure the paper length guide is set to the correct paper size. Do not extend
the paper tray when you load A5 or smaller size paper. (See Printer jam or paper
jam uu page 36.)
Printed pages are not stacked
neatly.
Machine does not print from
®
Adobe
Illustrator®.
Make sure you are using the paper support flap.
(See Loading paper and other print media uu page 8.)
Try to reduce the print resolution.
uuSoftware User’s Guide: Printing (Windows®)
uuSoftware User’s Guide: Printing (Macintosh)
®
)
®
) or Color Settings (Macintosh). Click
®
) or Advanced Color Settings (Macintosh) and make
®
)
42
Page 53

Troubleshooting
Printing (continued)
Difficulty Suggestions
Ink is smudged or running when
using glossy photo paper.
Be sure to check the front and back of the paper. Place the glossy surface (printing
surface) face down. (See Paper Type uu page 14.)
If you use glossy photo paper, make sure that the paper type setting is correct.
Copying Difficulties
Difficulty Suggestions
Copies are blank. Make sure you are loading the document properly. (See Loading documents
uu page 19.)
Fit to Page does not work properly. Make sure the document is not skewed on the scanner glass.
Reposition the document and try again.
Scanning Difficulties
Difficulty Suggestions
TWAIN or WIA errors appear when
®
starting to scan. (Windows
TWAIN or ICA errors appear when
starting to scan. (Macintosh)
OCR does not work. Try increasing the scanner resolution.
)
Make sure the Brother TWAIN or WIA driver is chosen as the primary source in
your scanning application. For example, in Nuance™ PaperPort™ 12SE, click
Scan Settings, Select to choose the Brother TWAIN/WIA driver.
Make sure the Brother TWAIN driver is chosen as the primary source.
In PageManager, click File, Select Source and choose the Brother TWAIN driver.
Mac OS X 10.6.x and 10.7.x users can also scan documents using the ICA
Scanner Driver. uuSoftware User’s Guide: Scanning a document using the ICA
driver (Mac OS X 10.6.x, 10.7.x)
B
(Macintosh)
Make sure you have finished downloading and installing Presto! PageManager
from:
http://nj.newsoft.com.tw/download/brother/PM9SEInstaller_BR_multilang.dmg
Software Difficulties
Difficulty Suggestions
Cannot install software or print.
“Device Busy” Make sure the machine is not showing an error message on the LCD.
Cannot print images from
®
FaceFilter Studio. (Windows
)
(Windows
Run the Repair MFL-Pro Suite program on the CD-ROM. This program will repair
and reinstall the software.
To use FaceFilter Studio, you must install the FaceFilter Studio application from
the CD-ROM supplied with your machine. (uuQuick Setup Guide)
Also, before you start FaceFilter Studio for the first time, you must make sure your
Brother machine is turned on and connected to your computer. This will allow you
to access all the functions of FaceFilter Studio.
®
only)
43
Page 54

Network Difficulties
Difficulty Suggestions
Cannot print over the network. Make sure that your machine is powered on and is online and in the Ready mode.
Print a Network Configuration list (uuAdvanced User’s Guide: Reports) and
check the current Network settings printed in this list.
If you are using a wireless connection or are having Network problems
uuNetwork User’s Guide: Troubleshooting
The network scanning feature does
not work.
The Brother software cannot be
installed.
It is necessary to configure the third-party Security/Firewall Software to allow
Network scanning. To add port 54925 for Network scanning, enter the information
below:
In Name: Enter any description, for example Brother NetScan.
In Port number: Enter 54925.
In Protocol: UDP is selected.
Please refer to the instruction manual that came with your third-party
Security/Firewall Software or contact the software manufacturer.
(Macintosh)
Re-select your machine in the Device Selector application located in
Macintosh HD/Library/Printers/Brother/Utilities/DeviceSelector or from the
model list in ControlCenter2.
®
(Windows
If the Security Software warning appears on the PC screen during the installation,
change the Security Software settings to permit the Brother product setup
program or other program to run.
)
(Macintosh)
If you are using a firewall function of anti-spyware or antivirus security software,
temporarily disable it and then install the Brother software.
Cannot connect to wireless
network.
Reset the network settings. Press Menu, and then press a or b to choose 3.Network. Press OK. Press a or
Investigate the problem using the WLAN Report.
Press Menu, and then press a or b to choose 4.Print Reports. Press OK.
Press a or b to choose 3.WLAN Report, and then press OK.
(uuNetwork User’s Guide)
b to choose 0.Network Reset, and then press OK.
(uuNetwork User’s Guide)
44
Page 55

Troubleshooting
Machine Information B
Checking the serial number B
You can see the machine’s serial number on
the LCD.
a Press Menu.
b Press a or b to choose
5.Machine Info.
Press OK.
c Press a or b to choose 1.Serial No.
Press OK.
Your machine’s serial number will
appear on the LCD.
d Press Stop/Exit.
Reset functions B
How to reset the machine B
a Press Menu.
b Press a or b to choose
0.Initial Setup.
Press OK.
c Press a or b to choose 4.Reset.
Press OK.
d Press a or b to choose the type of reset,
1.Network or 2.All Settings.
Press OK.
e Press a to choose a Reset.
f Press a to confirm.
The following reset functions are available:
1 Network
You can reset the print server back to its
factory settings, such as the password
and IP address information.
2 All Settings
You can restore all settings to the factory
settings.
Brother strongly recommends performing
this procedure before handing over or
disposing of the machine.
B
45
Page 56

C
Menu and features C
On-screen programming
Your machine is designed to be easy to
operate with LCD on-screen programming
using the menu keys. User-friendly
programming helps you take full advantage of
all the menu selections your machine has to
offer.
Since your programming is done on the LCD,
we have created step-by-step on-screen
instructions to help you program your
machine. All you need to do is follow the
instructions as they guide you through the
menu selections and programming options.
Menu keys C
C
Access the menu.
Scroll through the current
menu level.
Go to the next menu level.
Accept an option.
Exit the menu or stop the
current operation.
46
Page 57

To access the menu mode:
a Press Menu.
b Choose an option.
You can scroll more quickly through
each menu level by pressing a or b for
the direction you want.
1.Ink
2.Copy
3.Network
4.Print Reports
5.Machine Info.
0.Initial Setup
Menu and features
c Press OK when that option appears on
the LCD.
The LCD will then show the next menu
level.
d Press a or b to scroll to choose the
setting you want to change.
Press OK.
e Press a or b to choose the option you
want.
Press OK.
The LCD will show Accepted.
f Press Stop/Exit.
C
47
Page 58

Menu table C
The menu table will help you understand the menu selections and options that are found in the
machine's programs. The factory settings are shown in Bold with an asterisk.
Menu ( ) C
Level1 Level2 Level3 Options Descriptions Page
1.Ink 1.Test Print — Print Quality
Alignment
2.Cleaning — Black
Color
All
3.Ink Volume — — Lets you check the
2.Copy 1.Paper Type — Plain Paper*
Inkjet Paper
Brother BP71
Brother BP61
Lets you check the print
quality or alignment.
Lets you clean the print
head.
available ink volume.
Sets the type of paper in
the paper tray.
30, 31
29
See .
14
Other Glossy
Transparency
2.Paper Size — Le tter*
Legal
A4
A5
Executive
4"x6"
3.Quality — Best
Normal*
Fast
4.Density — -nnnno+
-nnnon+
-nnonn+*
-nonnn+
-onnnn+
See Advanced User’s Guide.
The factory settings are shown in Bold with an asterisk.
Sets the size of the paper
in the paper tray.
Chooses the copy
resolution for your type of
document.
Adjusts the density of
copies.
14
See .
See .
48
Page 59

Menu and features
Network menu C
Level1 Level2 Level3 Options Descriptions Page
3.Network 1.TCP/IP 1.BOOT Method Auto*
Static
RARP
BOOTP
DHCP
2.IP Address [000-255].
[000-255].
[000-255].
[000-255]
3.Subnet Mask [000-255].
[000-255].
[000-255].
Chooses the BOOT
method that best suits
your needs.
Enter the IP address.
Enter the Subnet mask.
See .
Setup Wizard
2.
[000-255]
4.Gateway [000-255].
[000-255].
[000-255].
[000-255]
5.Node Name
6.WINS Config Auto*
7.WINS Server (Primary)
8.DNS Server (Primary)
9.APIPA On*
— — You can manually
BRWXXXXXXXXXXXX
Static
000.000.000.000
(Secondary)
000.000.000.000
000.000.000.000
(Secondary)
000.000.000.000
Off
Enter the Gateway
address.
Lets you check the Node
name.
Chooses the WINS
configuration mode.
Specifies the IP address
of the primary or
secondary WINS server.
Specifies the IP address
of the primary or
secondary DNS server.
Automatically allocates
the IP address from the
link-local address range.
configure your print
server for a wireless
network.
C
See NetworkUser’sGuide.
The factory settings are shown in Bold with an asterisk.
49
Page 60

Level1 Level2 Level3 Options Descriptions Page
3.Network
(Continued)
3.WPS/AOSS — — You can easily configure
your wireless network
settings using the onebutton push method.
WPS w/PIN Code
4.
5.WLAN Status 1.Status Active(11b)
6.MAC Address — — You can see your
7.WLAN Enable — On
Network Reset
0.
— — You can easily configure
your wireless network
settings using WPS with
a PIN code.
You can see the current
Active(11g)
Active(11n)
AOSS Active
Connection Fail
2.Signal — You can see the current
3.SSID — You can see the current
4.Comm. Mode — You can see the current
Off*
— — Restore all network
wireless network status.
wireless network signal
strength.
SSID.
Communication Mode.
machine’s MAC address
from the control panel.
Lets you use the wireless
network connection.
settings to the factory
settings.
See .
See Network User’s Guide.
The factory settings are shown in Bold with an asterisk.
50
Page 61

Menu and features
Menu (continued) C
Level1 Level2 Level3 Options Descriptions Page
Print Reports
4.
Machine Info.
5.
0.
Initial Setup
1.
User Settings
Network Config
2.
3.WLAN Report ——
1.Serial No. — — Lets you check the serial
1.Date&Time — — Sets the date and time in
2.
LCD Contrast
3.Sleep Mode — 1Min
— — Prints these lists and
——
— Light
Dark*
2 Mins
3 Mins
5 Mins*
reports.
number of your machine.
your machine.
Adjusts the contrast of the
LCD.
You can choose how long
the machine must be idle
before it goes into Sleep
mode.
See .
45
See .
See .
See .
10 Mins
30 Mins
60 Mins
4.Reset 1.Network — Resets the print server
back to the factory
settings, such as the
password and IP address
information.
All Settings
2.
Local Language
0.
(USA only)
Local Language
0.
(Canada only)
See Advanced User’s Guide.
See Quick Setup Guide.
The factory settings are shown in Bold with an asterisk.
— English*
— English*
— Resets all the machine’s
settings back to the
factory settings.
Allows you to change the
Spanish
French
LCD language.
Allows you to change the
LCD language.
45
C
See .
51
Page 62

Copy Quality ( ) (Temporary settings) C
Level1 Level2 Level3 Options Descriptions Page
———Best
Normal*
Fast
See Advanced User’s Guide.
The factory settings are shown in Bold with an asterisk.
Choose the Copy
resolution.
See .
Enlarge/Reduce ( ) (Temporary settings) C
Level1 Level2 Level3 Options Descriptions Page
———Fit to Page
Custom(25-400%)
198% 4"x6"iA4
186% 4"x6"iLTR
104% EXEiLTR
You can choose the
enlargement and
reduction ratio.
See .
100%*
97% LTRiA4
93% A4iLTR
85% LTRiEXE
83%
78%
46% LTRi4"x6"
See Advanced User’s Guide.
The factory settings are shown in Bold with an asterisk.
52
Page 63

Menu and features
Copy Options ( ) (Temporary settings) C
Level1 Level2 Level3 Options Descriptions Page
Paper Type ——Plain Paper*
Inkjet Paper
Brother BP71
Brother BP61
Other Glossy
Transparency
Paper Size ——Letter*
Legal
A4
A5
Executive
4"x6"
Density ——-nnnno+
-nnnon+
Choose the paper type. 22
Choose the paper size. 22
Adjusts the density.
See .
-nnonn+*
-nonnn+
-onnnn+
Page Layout ——Off(1in1)*
2in1(P)
2in1(L)
2in1(ID)
4in1(P)
4in1(L)
Poster(3x3)
See Advanced User’s Guide.
The factory settings are shown in Bold with an asterisk.
You can make N in 1 or
Poster copies.
See .
C
53
Page 64

SCAN ( ) C
Level1 Level2 Level3 Options Descriptions Page
Scan to E-mail
Scan to Image — — — You can scan a color
Scan to OCR
(Available after
Presto!
PageManager is
downloaded for
Macintosh. See
Accessing
Brother Support
(Macintosh)
uu page 5.)
Scan to File — — — You can scan a black &
Web Service
(Appears when
you install a Web
Services
Scanner, which is
displayed in your
computer’s
Network
Explorer.)
— — — You can scan a black &
white or a color document
into your E-mail
application.
picture into your graphics
application.
— — — You can have your text
document converted to a n
editable text file.
white or a color document
into your computer.
Scan — — You can scan data by
Scan for E-mail
Scan for Fax ——
Scan for Print
——
——
using the Web Services
protocol.
See .
54
See Software User’s Guide.
The factory settings are shown in Bold with an asterisk.
Page 65

Note
Specifications D
D
General D
This chapter provides a summary of the machine’s specifications. For additional specifications
visit http://www.brother.com/
Printer Type Inkjet
for details.
Print Head Black:
Color:
Memory Capacity 32 MB
LCD (Liquid Crystal
Display)
Power Source AC 100 to 120 V 50/60 Hz
Power Consumption
1
Measured when the machine is connected to the USB interface.
2
When resolution: standard / document: ISO/IEC 24712 printed pattern.
1
16 characters 1 line
Copying Mode:
Ready Mode: Approx. 3.5 W
Sleep Mode: Approx. 1.5 W
Off: Approx. 0.45 W
Piezo with 94 nozzles 1
Piezo with 94 nozzles 3
Approx. 18.5 W
2
D
55
Page 66

Dimensions
17.7 in.
(450 mm)
15.4 in.
(390 mm)
5.9 in.
(150 mm)
14.2 in.
(360 mm)
14.5 in.
(368 mm)
Weight 15 lb (6.8 kg)
Noise Operating:
Temperature Operating:
Best Print Quality:
Humidity Operating:
Best Print Quality:
50 dB or less
50 to 95 F (10 to 35 C)
68 to 91 F (20 to 33 C)
20 to 80% (without condensation)
20 to 80% (without condensation)
1
Document Size Scanner Glass Width: Max. 8.5 in. (215.9 mm)
Scanner Glass Length: Max. 11.7 in. (297 mm)
1
Noise depends on printing conditions.
56
Page 67

Specifications
Print media D
Paper Input Paper Tray
Paper Type:
Plain Paper, Inkjet Paper (coated paper),
Glossy Paper
1
and Transparency
Paper Size:
Letter, Legal, Executive, A4, A5, A6, Envelopes (commercial No.10,
DL, C5, Monarch), Photo 4" 6", Photo 2L 5" 7" and
Index Card 5" 8"
3
Width: 3.86 in. - 8.5 in. (98 mm - 215.9 mm)
Length: 5.8 in. - 14 in. (148 mm - 355.6 mm)
For more details, see Paper weight, thickness and capacity
uu page 18.
12
Maximum paper tray capacity:
Up to 100 sheets of 20 lb (80 g/m
Paper Output
1
For glossy paper or transparencies, remove printed pages from the output paper tray immediately after they exit the
machine to avoid smudging.
2
Use only transparencies recommended for inkjet printing.
3
See Paper type and size for each operation uu page 17.
Up to 50 sheets of 20 lb (80 g/m
output paper tray)
1
2
) plain paper
2
) plain paper (face up print delivery to the
D
57
Page 68

Copy D
Color/Black Yes/Yes
Copy Width
1
8.26 in. (210 mm)
Multiple Copies Stacks up to 99 pages
Enlarge/Reduce 25% to 400% (in increments of 1%)
Resolution (Black & White)
Prints up to 1200 1200 dpi
(Color)
Prints up to 600 1200 dpi
1
When copying on letter size paper.
58
Page 69

Specifications
Scanner D
Color/Black Yes/Yes
TWAIN Compliant
WIA Compliant
Yes (Windows® XP1/Windows Vista®/Windows®7)
(Mac OS X 10.5.8, 10.6.x, 10.7.x
®
Yes (Windows
XP1/Windows Vista®/Windows®7)
2
)
ICA Compliant Yes (Mac OS X 10.6.x, 10.7.x)
Color Depth 30 bit color Processing (Input)
24 bit color Processing (Output)
Resolution
Up to 19200 19200 dpi (interpolated)
3
Up to 1200 2400 dpi (optical)
Scanning Width and Length Width: Up to 8.26 in. (210 mm)
Length: Up to 11.45 in. (291 mm)
Gray Scale 10 bit color Processing (Input)
8 bit color Processing (Output)
1
Windows® XP in this User’s Guide includes Windows® XP Home Edition, Windows® XP Professional, and Windows®
XP Professional x64 Edition.
2
For the latest driver updates for the Mac OS X you are using, visit us at http://solutions.brother.com/.
3
Maximum 1200 1200 dpi scanning when using the WIA Driver for Windows® XP, Windows Vista® and Windows® 7
(resolution up to 19200 19200 dpi can be selected by using the Brother scanner utility).
D
59
Page 70

Printer D
Resolution Up to 1200 6000 dpi
Printing Width
Borderless
1
3
8.26 in. [8.5 in. (borderless)2]
Letter, A4, A6, Photo 4" 6", Index Card 5" 8",
Photo 2L 5" 7"
Print Speed
1
When printing on letter size paper.
2
When the Borderless feature is set to On.
3
See Paper type and size for each operation uu page 17.
4
For detailed specifications visit http://www.brother.com/.
4
60
Page 71

Specifications
Note
Interfaces D
USB
12
Use a USB 2.0 interface cable that is no longer than 6 feet (2 m).
Wireless LAN IEEE 802.11b/g/n (Infrastructure Mode)
IEEE 802.11b (Ad-hoc Mode)
1
Your machine has a USB 2.0 Hi-Speed interface. The machine can also be connected to a computer that has a USB
1.1 interface.
2
Third party USB ports are not supported.
Network D
For more information about the Network specifications, see the Network User’s Guide.
You can connect your machine to a wireless network for Network Printing and Network
1
Scanning
Wireless Network
Security
. Also included is Brother BRAdmin Light2 Network Management software.
SSID (32 chr), WEP 64/128 bit, WPA-PSK (TKIP/AES),
WPA2-PSK (AES)
Setup Support Utility AOSS™ Yes
WPS Yes
1
See Computer requirements uu page 62.
2
If you require more advanced printer management, use the latest Brother BRAdmin Professional utility version that is
available as a download from http://solutions.brother.com/
.
D
61
Page 72

Computer requirements D
SUPPORTED OPERATING SYSTEMS AND SOFTWARE FUNCTIONS
Computer Platform &
Operating System Version
®
13
13
XP
Windows®
Operating
System
Windows® XP Home
Windows® XP
Professional
Windows
Professional x64
Edition
Windows Vista
Windows
13
® 713
®
13
Windows Server® 2003
(print only via network)
Windows Server® 2003
x64 Edition (print only
via network)
Windows Server® 2003
R2 (print only via network)
Supported
PC S oftw are
Functions
Printing,
Scanning
Printing
PC
Interface
USB,
Wireless
802.11b/g/n
USB,
Wireless
802.11b/g/n
Processor
Minimum
Speed
Intel® Pentium®II
or equivalent
64-bit (Intel® 64
or AMD64)
supported CPU
Intel® Pentium®4
or equivalent
-
bit (Intel® 64 or
64
AMD64)
supported CPU
Intel® Pentium®III
or equivalent
64-bit (Intel® 64
or AMD64)
supported CPU
Intel® Pentium®III
or equivalent
Minimum
RAM
Recommended
RAM
For
Drivers
128 MB 256 MB 150 MB
256 MB 512 MB
Hard Disk Space to install
512 MB
1GB
(32 bit)
2GB
(64 bit)
256 MB 512 MB
1GB
1GB
(32 bit)
2GB
(64 bit)
500 MB
650 MB
50 MB N/A
For
Applications
1GB
1.3 GB
Windows Server® 2003
R2 x64 Edition (print
only via network)
Windows Server® 2008
(print only via network)
Windows Server® 2008
R2 (print only via network)
Macintosh
Operating
Mac OS X 10.5.8
Printing,
Scanning
System
Mac OS X 10.6.x
Mac OS X 10.7.x 2 GB
Conditions:
1
For WIA, 1200 1200 resolution. Brother Scanner
Utility enables to enhance up to 19200 19200 dpi.
2
Third party USB ports are not supported.
3
PaperPort™ 12SE supports Windows® XP Home
(SP3 or greater), XP Professional (SP3 or greater),
XP Professional x64 Edition (SP2 or greater),
®
Windows Vista
(SP2 or greater) and Windows® 7.
USB2,
Wireless
802.11b/g/n
64-bit (Intel® 64
512 MB
1GB
or AMD64)
supported CPU
Intel® Pentium®4 or
2GB
equivalent 64-bit
®
64 or AMD64)
(Intel
supported CPU
64-bit (Intel® 64 or
AMD64) supported CPU
PowerPC®
512 MB
1GB 80MB
550 MB
G4/G5
Intel® Processor
Intel® Processor
1GB 2GB
For the latest driver updates, visit us at
(in USA) http://www.brother.com/
(in Canada) http://www.brother.ca/
All trademarks, brand and product names are the
property of their respective companies.
62
Page 73

Specifications
Consumable items D
Ink The machine uses individual Black, Yellow, Cyan and Magenta ink
cartridges that are separate from the print head assembly.
Service Life of Ink
Cartridge
Replacement
Consumables
What is Innobella™?
Starter ink cartridges are in the box. The first time you install the ink
cartridges the machine will use extra ink to fill the ink delivery tubes.
This is a one-time process that enables high quality printing.
Afterward, replacement ink cartridges will print the specified
number of pages. Starter cartridge yield is approx. 65% of the yield
of the LC61 replacement cartridges.
<Standard Yield Black> LC61BK
<Standard Yield Yellow> LC61Y
<Standard Yield Cyan> LC61C
<Standard Yield Magenta> LC61M
Black - Approximately 450 pages
Yellow, Cyan, Magenta - Approximately 325 pages
1
Approx. cartridge yield is declared in accordance with ISO/IEC 24711
1
1
For more information about the replacement consumables, visit us
at http://www.brother.com/pageyield/
.
Innobella™ is a range of genuine consumables offered by Brother.
The name "Innobella™" derives from the words "Innovation" and
"Bella" (meaning "Beautiful" in Italian) and is a representation of the
"innovative" technology providing you with "beautiful" and "long
lasting" print results.
When you print photo images, Brother recommends Innobella™
glossy photo paper (BP71 series) for high quality. Brilliant prints are
made easier with Innobella™ Ink and paper.
D
63
Page 74

E
Index
A
Accessories and supplies .......................... ii
Apple Macintosh
See Software User's Guide.
B
Brother
accessories and supplies
Brother numbers
CreativeCenter
Customer Service
FAQs (frequently asked questions)
product support
service centers
Solutions Center
warranties
.............................................. iii
...................................... i
........................................4
.................................... i
........................................ i
......................................... i
...................................... i
........................ ii
.......... i
C
Cleaning
print head
scanner
Consumable items
Control panel overview
ControlCenter
See Software User's Guide.
Copy
paper size
paper type
using scanner glass
..............................................29
.................................................29
................................... 63
..............................6
.............................................22
.............................................22
..............................19
D
Document
loading
..................................................19
E
Envelopes ....................................11, 17, 18
Error messages on LCD
B&W Print Only
Cannot Detect
Cannot Print
Clean Unable
Cover is Open
Data Remaining
Init Unable
Ink Box Full
Ink Low
InkBox Near Full
No Ink Cartridge
No Paper Fed
Out of Memory
Print Unable
Scan Unable
Wrong Paper Size
................................................. 34
.................................... 32
...................................... 32
......................................... 32
........................................ 33
...................................... 33
.................................... 33
............................................ 33
........................................... 34
................................... 35
....................................... 35
...................................... 35
.......................................... 33
......................................... 33
.......................... 32
................................... 34
................................ 35
G
Gray scale ............................................... 59
H
Help
LCD messages
using menu keys
Menu Table
..................................... 46
............................... 46
.......................................... 48
I
Ink cartridges
ink dot counter
replacing
Innobella™
................................ 26, 28
............................................... 26
.............................................. 63
64
J
Jams
paper
.................................................... 36
L
LCD (Liquid Crystal Display) ................... 46
Page 75

M
Macintosh
See Software User's Guide.
Maintenance, routine
replacing ink cartridges
Mode, entering
SCAN
......................................................6
.........................26
N
Network
Printing
See Network User's Guide.
Scanning
See Software User's Guide.
Nuance™ PaperPort™ 12SE
See Software User's Guide. Also see Help
in the PaperPort™ 12SE application.
O
On-screen programming ..........................46
P
Paper ................................................ 15, 57
capacity
loading
loading envelopes and postcards
printable area
size
type
Presto! PageManager
See Software User's Guide. Also see Help
in the Presto! PageManager application.
Print
difficulties
on small paper
paper jams
printable area
resolution
specifications
Printing
See Software User's Guide.
Programming your machine
.................................................18
............................................. 8, 11
.........11
........................................13
.......................................................14
................................................ 14, 17
.............................................. 39
......................................12
............................................36
........................................13
.............................................. 60
........................................60
.....................46
R
Resolution
copy
...................................................... 58
print
...................................................... 60
scan
...................................................... 59
S
Scanning
See Software User's Guide.
Serial Number
how to find ...............See inside front cover
T
Transparencies ...............15, 16, 17, 18, 57
Troubleshooting
error messages on LCD
if you are having difficulty
copying
Network
printing
scanning
software
maintenance messages on LCD
paper jam
....................................... 39
....................... 32
.............................................. 43
............................................. 44
.............................................. 39
............................................ 43
............................................. 43
.......... 32
............................................. 36
U
Unscannable area ................................... 20
W
Warranties
Notice-Disclaimer
Windows
See Software User's Guide.
Wireless Network
See Quick Setup Guide and Network
User's Guide.
World Wide Web
®
................................... iii
.........................................i
E
65
Page 76

Brother International Corporation
100 Somerset Corporate Boulevard
Bridgewater, NJ 08807-0911 USA
Brother International Corporation (Canada) Ltd.
Dollard-des-Ormeaux, QC, Canada H9B 3H6
P.O. Box 6911
1 rue Hôtel de Ville,
Visit us on the World Wide Web
http://www.brother.com/
This machine is approved for use in the country of purchase only. Local Brother companies or their
dealers will only support machines purchased in their own countries.
 Loading...