

Brother MFC-7360N, MFC-7460DN, DCP-7057R, HL-2280DW, DCP-7070DW User Manual
...
Multi-Protocol On-board Ethernet Multi-function Print Server and
Wireless Ethernet Multi-function Print Server
NETWORK
USER’S GUIDE
This Network User’s Guide provides useful information of wired
and wireless network settings, security settings and Internet fax
settings using your Brother machine. You can also find supported
protocol information and detailed troubleshooting tips.
To find basic information about network and advanced network
features of your Brother machine, see the Network Glossary.
To download the latest manual, please visit the Brother Solutions
Center at (http://solutions.brother.com/)
the latest drivers and utilities for your machine, read FAQs and
troubleshooting tips or learn about special printing solutions from
the Brother Solutions Center.
. You can also download
Version A
ENG
Definitions of notes
IMPORTANT
Note
We use the following icons throughout this User’s Guide:
IMPORTANT
may result in damage to property or loss of product functionality.
Notes tell you how you should respond to a situation that may arise or give tips
about how the operation works with other features.
indicates a potentially hazardous situation which, if not avoided,
IMPORTANT NOTE
This product is approved for use in the country of purchase only. Do not use this product outside the
country of purchase as it may violate the wireless telecommunication and power regulations of that
country.
®
Windows
Edition and Windows
Windows Server
x64 Edition.
Windows Server
R2.
Windows Vista
Windows
XP in this document represents Windows®XP Professional, Windows®XP Professional x64
®
XP Home Edition.
®
2003 in this document represents Windows Server® 2003 and Windows Server® 2003
®
2008 in this document represents Windows Server® 2008 and Windows Server® 2008
®
in this document represents all editions of Windows Vista®.
®
7 in this document represents all editions of Windows®7.
Not all models are available in all countries.
i

Table of Contents
1 Introduction 1
Network features........................................................................................................................................1
Other Network features .......................................................................................................................2
2 Changing your machine’s network settings 3
How to change your machine’s network settings (IP address, Subnet mask and Gateway) .....................3
Using the control panel........................................................................................................................3
Using the BRAdmin Light utility ...........................................................................................................3
Other Management Utilities .......................................................................................................................6
Web Based Management (web browser) ............................................................................................6
BRAdmin Professional 3 utility (Windows
Web BRAdmin (Windows
BRPrint Auditor (Windows
®
).................................................................................................................7
®
)................................................................................................................7
3 Configuring your machine for a wireless network
(For HL-2280DW, DCP-7070DW and MFC-7860DW) 8
Overview....................................................................................................................................................8
Step by step chart for wireless network configuration ...............................................................................9
For Infrastructure mode .......................................................................................................................9
For Ad-hoc mode...............................................................................................................................10
Confirm your network environment..........................................................................................................11
Connected to a computer with a WLAN access point/router in the network (Infrastructure mode)...11
Connected to a wireless capable computer without a WLAN access point/router in the network
(Ad-hoc mode)...............................................................................................................................11
Confirm your wireless network setup method..........................................................................................12
Configuration using the machine’s control panel Setup Wizard to configure your machine for a
wireless network (Recommended) ................................................................................................12
Configuration using WPS or AOSS™ from the control panel menu to configure your machine for
a wireless network (Push Button Configuration) (Infrastructure mode only) .................................12
Configuration using the Brother installer application on the CD-ROM to configure your machine for
a wireless network .........................................................................................................................13
Configuration using the PIN Method of Wi-Fi Protected Setup to configure your machine for a
wireless network (Infrastructure mode only)..................................................................................15
Configuring your machine for a wireless network
(For Infrastructure mode and Ad-hoc mode) ........................................................................................16
Using the Setup Wizard from the control panel .................................................................................16
Using WPS or AOSS™ from the control panel menu to configure your machine for a wireless
network (Push Button Configuration).............................................................................................16
Configuring your machine when the SSID is not broadcast ..............................................................17
Using the Brother installer application on the CD-ROM to configure your machine for a wireless
network..........................................................................................................................................20
Using the PIN Method of Wi-Fi Protected Setup ...............................................................................20
®
) ........................................................................................6
ii

4 Wireless configuration using the Brother installer application
(For HL-2280DW, DCP-7070DW and MFC-7860DW) 22
Before configuring the wireless settings ..................................................................................................22
Configure the wireless settings................................................................................................................22
5 Control panel setup 25
Network menu..........................................................................................................................................25
TCP/IP ...............................................................................................................................................25
Ethernet (wired network only)............................................................................................................27
Status (For DCP-7065DN, MFC-7360N, MFC-7460DN and MFC-7860DN)/Wired Status (For
HL-2280DW, DCP-7070DW and MFC-7860DW)..........................................................................28
Setup Wizard (wireless network only) ...............................................................................................28
WPS or AOSS™ (wireless network only) ..........................................................................................28
WPS w/PIN Code (wireless network only).........................................................................................28
WLAN Status (wireless network only) ...............................................................................................28
MAC Address ....................................................................................................................................29
Set to Default (For HL-2280DW, DCP-7070DW and MFC-7860DW) ...............................................29
Wired Enable (For HL-2280DW, DCP-7070DW and MFC-7860DW)................................................29
WLAN Enable (For HL-2280DW, DCP-7070DW and MFC-7860DW)...............................................29
E-mail / IFAX (For MFC-7460DN, MFC-7860DN and MFC-7860DW (if you download IFAX)).........29
How to set a new default for Scan to E-mail (E-mail server)
(MFC-7460DN, MFC-7860DN and MFC-7860DW (if you download IFAX)) .................................32
Scan to FTP (For MFC-7460DN, MFC-7860DN and MFC-7860DW) ...............................................32
Fax to Server (For MFC-7460DN, MFC-7860DN and MFC-7860DW: available as a download) .....33
Time Zone .........................................................................................................................................35
Reset the network settings to the factory default.....................................................................................36
Printing the Network Configuration List ...................................................................................................36
Printing the WLAN report (For HL-2280DW, DCP-7070DW and MFC-7860DW) ...................................37
Function table and default factory settings ..............................................................................................38
DCP-7065DN, MFC-7360N, MFC-7460DN and MFC-7860DN.........................................................38
HL-2280DW, DCP-7070DW and MFC-7860DW ...............................................................................40
MFC-7460DN, MFC-7860DN and MFC-7860DW (if you download IFAX ) .......................................44
6 Web Based Management 46
Overview..................................................................................................................................................46
How to configure the machine settings using Web Based Management (web browser).........................46
Password information ..............................................................................................................................47
Secure Function Lock 2.0 (For MFC-7860DN and MFC-7860DW) .........................................................48
How to configure the Secure Function Lock 2.0 settings using Web Based Management (web
browser).........................................................................................................................................48
Changing the Scan to FTP configuration using a web browser (For MFC-7460DN, MFC-7860DN and
MFC-7860DW) .....................................................................................................................................51
iii

7 Internet fax (For MFC-7460DN, MFC-7860DN and MFC-7860DW: available as a
download) 52
Internet fax Overview...............................................................................................................................52
Important information on Internet fax.................................................................................................53
How to Internet fax...................................................................................................................................54
Sending an Internet fax .....................................................................................................................54
Receiving E-mail or Internet fax ........................................................................................................55
Additional Internet Fax options ................................................................................................................57
Forwarding received E-mail and fax messages.................................................................................57
Relay broadcasting............................................................................................................................57
TX Verification Mail............................................................................................................................60
Error mail ...........................................................................................................................................61
Scan to E-mail (E-mail server) overview..................................................................................................62
How to operate Scan to E-mail (E-mail server) .................................................................................62
Using One Touch or Speed Dial number...........................................................................................63
8 Security features 64
Overview..................................................................................................................................................64
Sending an E-mail securely .....................................................................................................................64
Configuration using Web Based Management (web browser) ..........................................................64
Sending an E-mail with user authentication ......................................................................................65
Secure Management using BRAdmin Professional 3 (Windows
Using BRAdmin Professional securely ..............................................................................................66
®
)..........................................................66
9 Troubleshooting 67
Overview..................................................................................................................................................67
Identifying your problem ....................................................................................................................67
A Appendix A 74
Supported protocols and security features ..............................................................................................74
B Index 75
iv
1
Note
Introduction 1
Network features 1
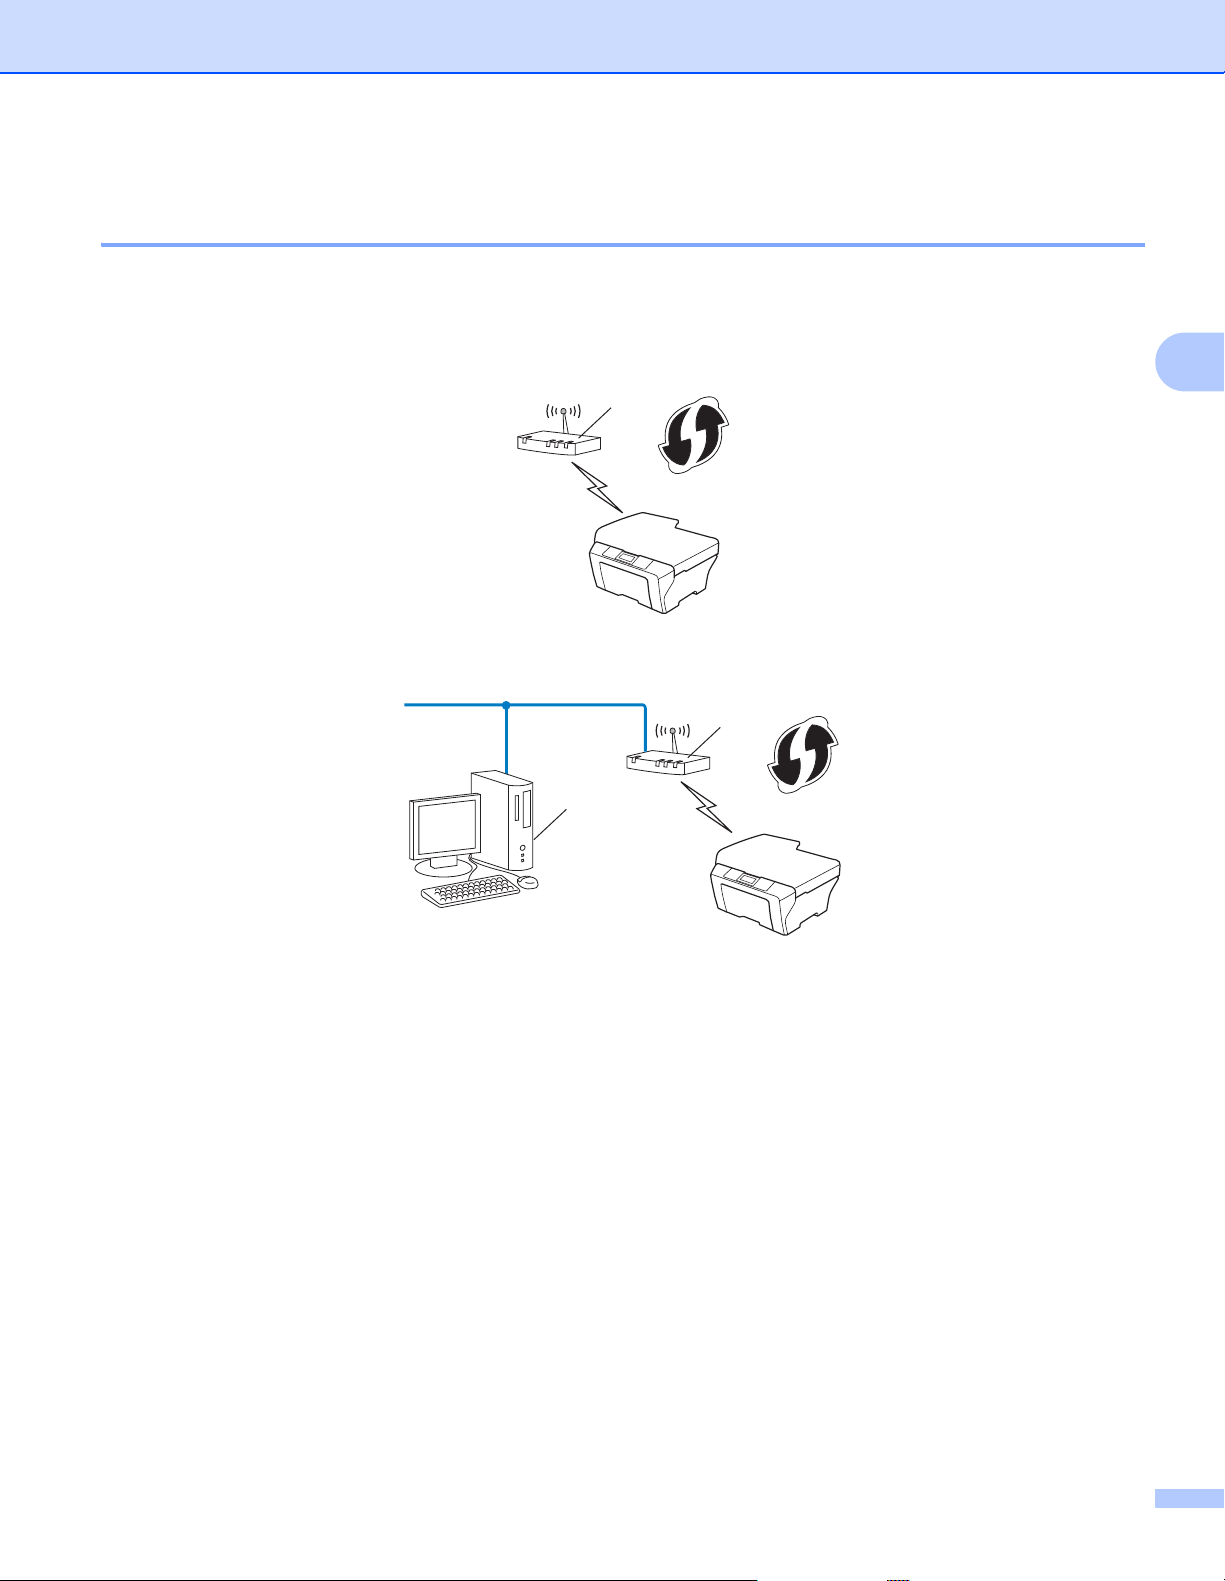
Your Brother machine can be shared on a 10/100 MB wired or IEEE 802.11b/g wireless Ethernet network
using the internal network print server. The print server supports various functions and methods of connection
depending on the operating system you are running on a network supporting TCP/IP. The following chart
shows what network features and connections are supported by each operating system.
Although the Brother machine can be used in both a wired and wireless network, only one connection
method can be used at a time.
1
Operating Systems
Printing rrr
Scanning
See Software User’s Guide.
PC Fax Send
See Software User’s Guide.
PC Fax Receive
See Software User’s Guide.
BRAdmin Light
See page 3.
BRAdmin Professional 3
See page 6.
Web BRAdmin
See page 7.
Web Based Management
(web browser)
See page 46.
Remote Setup
See Software User’s Guide.
Status Monitor
See Software User’s Guide.
Driver Deployment Wizard rr
Vertical Pairing
See Network Glossary.
1
1
2
2
1
Windows®
2000/XP
Windows Vista
Windows®7
rr
rr
r
rrr
rr
rr
rrr
rr
rr
3
r
Windows Server®
2003/2008
®
Mac OS X 10.4.11 -
10.6.x
1
Not available for DCP-7065DN.
2
BRAdmin Professional 3 and Web BRAdmin are available as a download from http://solutions.brother.com/.
3
Windows®7 only.
1

Introduction
Other Network features 1
Internet fax (MFC-7460DN, MFC-7860DN and MFC-7860DW: available as a download) 1
Internet fax (IFAX) allows you to send and receive fax documents using the Internet as the transport
mechanism. (See Internet fax (For MFC-7460DN, MFC-7860DN and MFC-7860DW: available as a
download) on page 52.)
In order to use this function, please download the necessary software from our web site, the Brother Solutions
Center (http://solutions.brother.com/
machine settings by using the machine’s control panel. For details, please see Internet fax (For
MFC-7460DN, MFC-7860DN and MFC-7860DW: available as a download) on page 52.
Security 1
Your Brother machine employs some of the latest network security and encryption protocols available. (See
Security features on page 64.)
Fax to Server (MFC-7460DN, MFC-7860DN and MFC-7860DW: available as a download) 1
The Fax to Server feature allows the machine to scan a document and send it over the network to a separate
fax server. (See Fax to Server (For MFC-7460DN, MFC-7860DN and MFC-7860DW: available as a
download) on page 33.)
). Before using this function, you have to configure the necessary
1
In order to use this function, please download the necessary software from our web site, the Brother Solutions
Center (http://solutions.brother.com/
machine settings by using the machine’s control panel. For details, please see Internet fax (For
MFC-7460DN, MFC-7860DN and MFC-7860DW: available as a download) on page 52.
). Before using this function, you have to configure the necessary
Secure Function Lock 2.0 (For MFC-7860DN and MFC-7860DW) 1
Secure Function Lock 2.0 increases security by restricting the use of functions. (See Secure Function
Lock 2.0 (For MFC-7860DN and MFC-7860DW) on page 48.)
2

Changing your machine’s network
2
settings
How to change your machine’s network settings (IP address, Subnet mask and Gateway) 2
Using the control panel 2
You can configure your machine for a network using the control panel Network menu. (See Control panel
setup on page 25.)
Using the BRAdmin Light utility 2
The BRAdmin Light utility is designed for initial setup of Brother network connected devices. It also can
search for Brother products in a TCP/IP environment, view the status and configure basic network settings,
such as IP address.
Installing BRAdmin Light 2
Windows®
2
2
a Please make sure that your machine is ON.
b Turn on your computer. Close any applications running before configuration.
c Put the supplied CD-ROM into your CD-ROM drive. The opening screen will appear automatically. If
the model name screen appears, choose your machine. If the language screen appears, choose your
language.
d The CD-ROM main menu will appear. Click Network Utilities.
e Click BRAdmin Light and follow the on-screen instructions.
Macintosh
The BRAdmin Light software will be installed automatically when you install the printer driver. If you have
already installed the printer driver, you do not have to install BRAdmin Light again.
3

Changing your machine’s network settings
Note
Setting the IP address, Subnet Mask and Gateway using BRAdmin Light 2
• You can download Brother’s latest BRAdmin Light utility from http://solutions.brother.com/.
• If you require more advanced machine management, use the latest version of the BRAdmin Professional 3
utility that is available as a download from http://solutions.brother.com/
Windows
®
users.
. This utility is only available for
• If you are using a firewall function of anti-spyware or antivirus applications, temporarily disable them. Once
you are sure that you can print, re-enable the application.
• Node name: The Node name appears in the current BRAdmin Light window. The default node name of
the print server in the machine is “BRNxxxxxxxxxxxx” for a wired network or “BRWxxxxxxxxxxxx” for a
wireless network. (“xxxxxxxxxxxx” is your machine’s MAC Address / Ethernet Address.)
• The default password for Brother print servers is “access”.
a Start the BRAdmin Light utility.
Windows
Click Start / All Programs1 / Brother / BRAdmin Light / BRAdmin Light.
1
Programs for Windows®2000 users
Macintosh
®
2
Double-click Macintosh HD (Startup Disk) / Library / Printers / Brother / Utilities / BRAdmin
Light.jar file.
b BRAdmin Light will search for new devices automatically.
4

Changing your machine’s network settings
Note
c Double-click the unconfigured device.
Windows
®
Macintosh
• If the print server is set to its factory default settings (if you are not using a DHCP/BOOTP/RARP server),
the device will appear as Unconfigured in the BRAdmin Light utility screen.
• You can find the Node Name and MAC Address (Ethernet Address) by printing the Network Configuration
List. (See Printing the Network Configuration List on page 36 for information on how to print the Network
Configuration List on your print server.) You can also find the Node Name and MAC Address from the
control panel. (See Chapter 5: Control panel setup.)
d Choose STATIC from Boot Method. Enter the IP Address, Subnet Mask and Gateway (if needed) of
your print server.
2
Windows
®
Macintosh
e Click OK.
f With the correctly programmed IP address, you will see the Brother print server in the device list.
5

Changing your machine’s network settings
Note
Other Management Utilities 2
Your Brother machine has the following management utilities other than the BRAdmin Light utility. You can
change your network settings using these utilities.
Web Based Management (web browser) 2
A standard web browser can be used to change your print server settings using the HTTP (Hyper Text
Transfer Protocol). (See How to configure the machine settings using Web Based Management (web
browser) on page 46.)
BRAdmin Professional 3 utility (Windows®) 2
BRAdmin Professional 3 is a utility for more advanced management of network connected Brother devices.
This utility can search for Brother products on your network and view the device status from an easy to read
Explorer style window that changes color identifying the status of each device. You can configure network
®
and device settings along with the ability to update device firmware from a Windows
BRAdmin Professional 3 can also log activity of Brother devices on your network and export the log data in
an HTML, CSV, TXT or SQL format.
computer on your LAN.
2
For users who want to monitor locally connected machines, install the Print Auditor Client software on the
client PC. This utility allows you to monitor machines that are connected to a client PC via the USB or parallel
interface from BRAdmin Professional 3.
For more information and to download the software, visit us at http://solutions.brother.com/
• Please use the latest version of the BRAdmin Professional 3 utility that is available as a download from
http://solutions.brother.com/
• If you are using a firewall function of anti-spyware or antivirus applications, temporarily disable them. Once
you are sure that you can print, configure the software settings following the instructions.
• Node name: The Node name for each Brother device on the network appears in BRAdmin Professional 3.
The default Node name is “BRNxxxxxxxxxxxx” for a wired network or “BRWxxxxxxxxxxxx” for a wireless
network. (“xxxxxxxxxxxx” is your machine’s MAC Address / Ethernet Address.)
. This utility is only available for Windows® users.
.
6

Changing your machine’s network settings
Web BRAdmin (Windows®) 2
Web BRAdmin is a utility for managing network connected Brother devices. This utility can search for Brother
products on your network, view the status and configure the network settings.
Unlike BRAdmin Professional 3, which is designed for Windows
that can be accessed from any client PC with a web browser that supports JRE (Java Runtime Environment).
By installing the Web BRAdmin server utility on a computer running IIS
Web BRAdmin server using a web browser, which then communicates with the device itself.
®
only, Web BRAdmin is a server based utility
1
, administrators can connect to the
2
For more information and to download the software, visit us at http://solutions.brother.com/
1
Internet Information Server 4.0 or Internet Information Services 5.0/5.1/6.0/7.0
.
BRPrint Auditor (Windows®) 2
The BRPrint Auditor software brings the monitoring power of Brother network management tools to locally
connected machines. This utility allows a client computer to collect usage and status information from a
Brother machine connected via the parallel or USB interface. The BRPrint Auditor can then pass this
information to another computer on the network running BRAdmin Professional 3 or Web BRAdmin 1.45 or
greater. This allows the administrator to check items such as page counts, toner and drum status and the
firmware version. In addition to reporting to Brother network management applications this utility can E-mail
the usage and status information directly to a predefined E-mail address in a CSV or XML file format (SMTP
Mail support required). The BRPrint Auditor utility also supports E-mail notification for reporting warning and
error conditions.
7

Note
Configuring your machine for a wireless
3
network (For HL-2280DW, DCP-7070DW
and MFC-7860DW)
Overview 3
To connect your machine to your wireless network, we recommend you to follow the steps in the Quick Setup
Guide using WPS or AOSS™ (Push Button Configuration). By using this method, you can easily connect your
machine to your wireless network.
Please read this chapter for additional methods on how to configure the wireless network settings. For
information on TCP/IP settings, see How to change your machine’s network settings (IP address, Subnet
mask and Gateway) on page 3.
• To achieve optimum results with normal everyday document printing, place the Brother machine as close
to the WLAN access point/router as possible with minimal obstructions. Large objects and walls between
the two devices as well as interference from other electronic devices can affect the data transfer speed of
your documents.
Due to these factors, wireless may not be the best method of connection for all types of documents and
applications. If you are printing large files, such as multi-page documents with mixed text and large
graphics, you may want to consider choosing wired Ethernet for a faster data transfer, or USB for the
fastest throughput speed.
3
3
• Although the Brother machine can be used in both a wired and wireless network, only one connection
method can be used at a time.
• Before configuring wireless settings, you will need to know your Network name: (SSID, ESSID) and
Network Key.
8
Configuring your machine for a wireless network (For HL-2280DW, DCP-7070DW and MFC-7860DW)
Step by step chart for wireless network configuration 3
For Infrastructure mode 3
a Confirm your network environment. See page 11.
Infrastructure mode
Connected to a computer with a WLAN access
point/router
b Confirm your wireless network setup method. See page 12.
Ad-hoc mode See page 10
or
Connected to a wireless capable computer
without a WLAN access point/router
3
Using the Setup
Wizard from the
control panel
(Recommended)
Using WPS/AOSS™
from the control
panel menu
(Push Button
Configuration)
Using the Brother
installer
application
Using WPS/AOSS™, a USB or
network cable
c Configure your machine for a wireless network. See page 16.
See the Quick Setup
Guide
See the Quick Setup
Guide
See page 22 See page 20
Installing drivers and software (See the Quick Setup Guide)
Using the PIN
Method of Wi-Fi
Protected Setup
Wireless configuration and installing the printer driver have been completed.
9
Configuring your machine for a wireless network (For HL-2280DW, DCP-7070DW and MFC-7860DW)
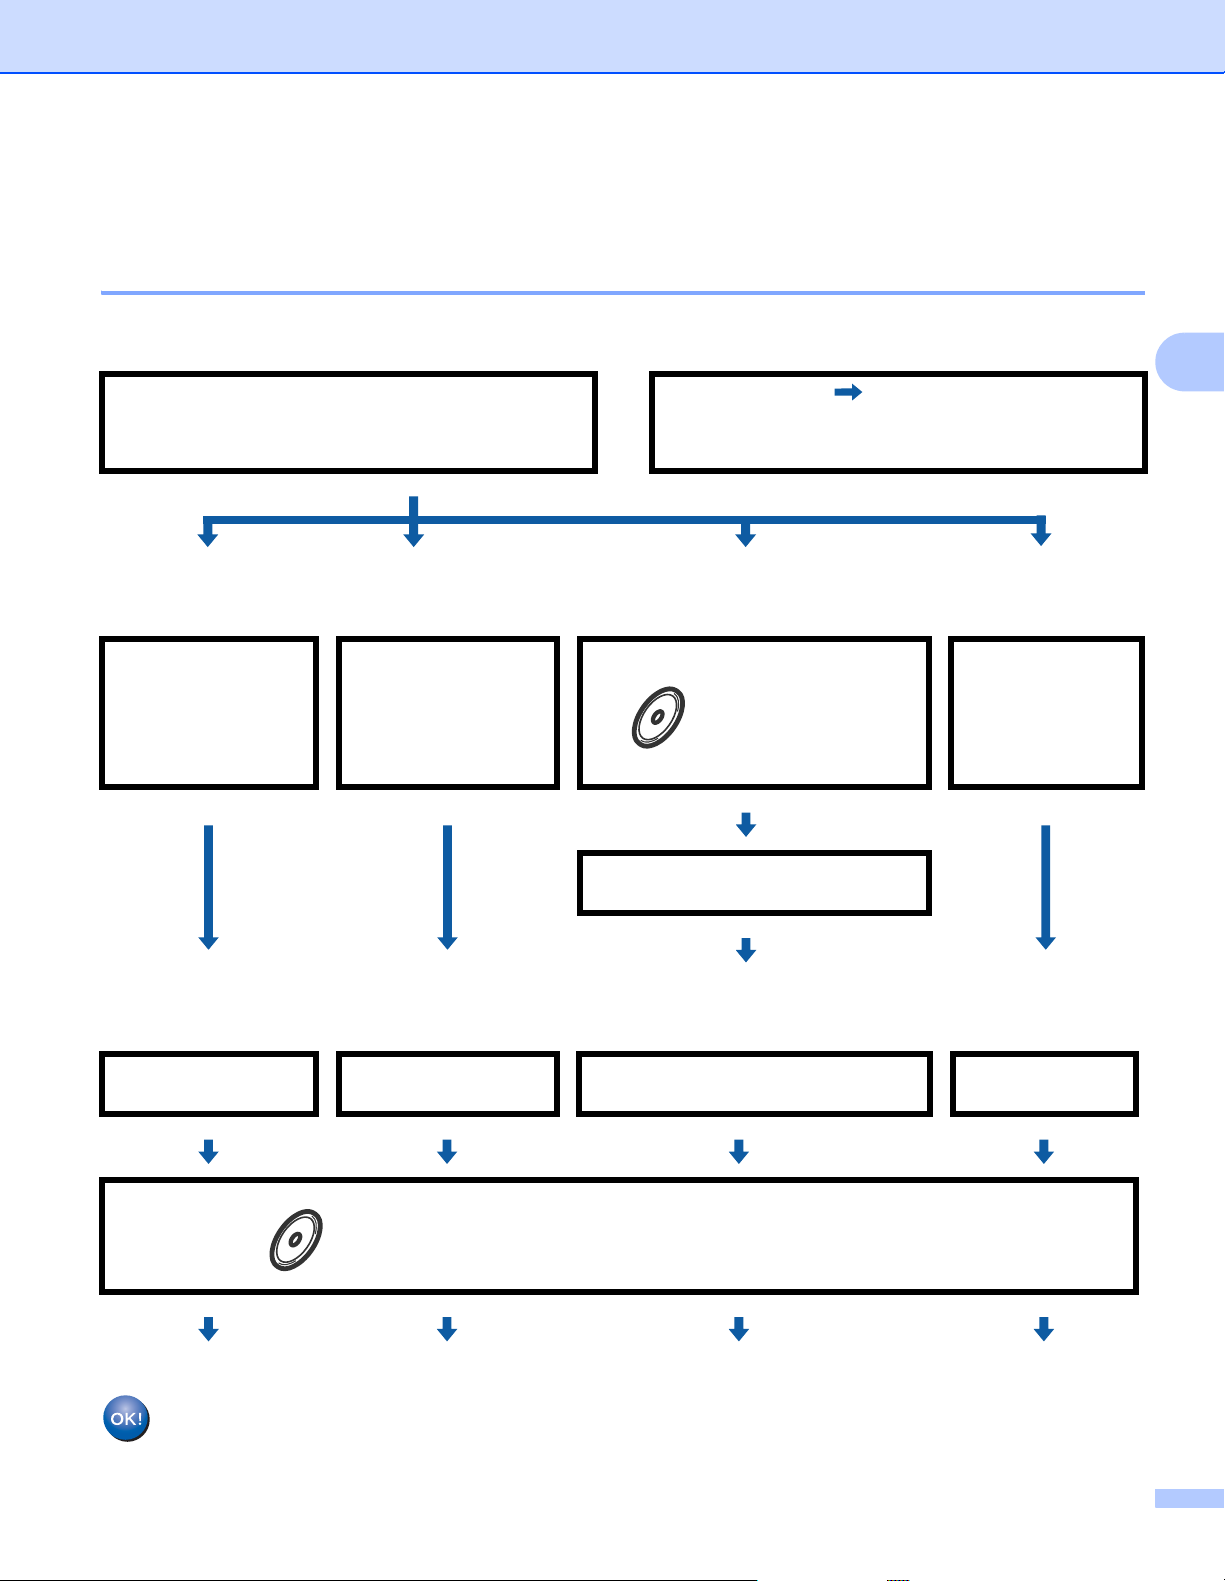
For Ad-hoc mode 3
a Confirm your network environment. See page 11.
Ad-hoc mode
Connected to a wireless capable computer
without a WLAN access point/router
Infrastructure mode See page 9
or
Connected to a computer with a WLAN access
point/router
b Confirm your wireless network setup method. See page 12.
Using the Setup Wizard from the control panel
(Recommended)
c Configure your machine for a wireless network. See page 16.
See page 16 See page 22
3
Using the Brother installer
application
Installing drivers and software (See the Quick Setup Guide)
Wireless configuration and installing the printer driver have been completed.
10
Configuring your machine for a wireless network (For HL-2280DW, DCP-7070DW and MFC-7860DW)
Note
Confirm your network environment 3
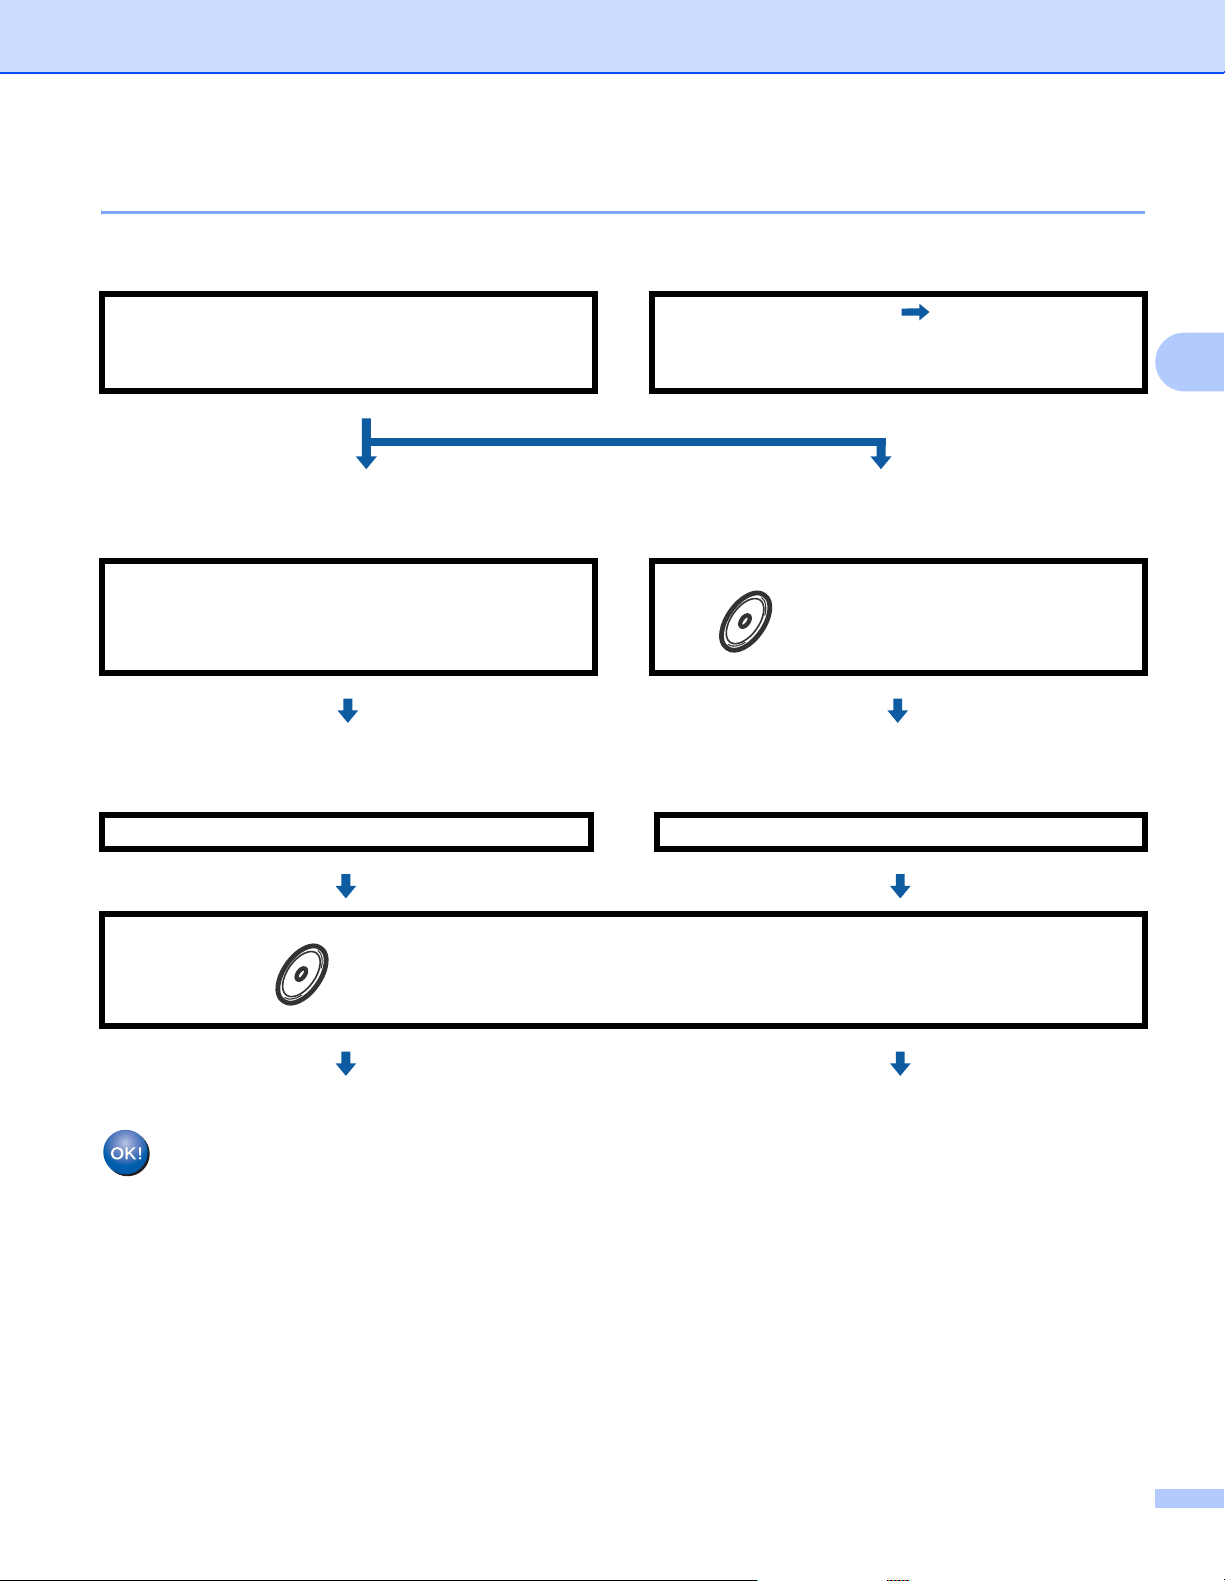
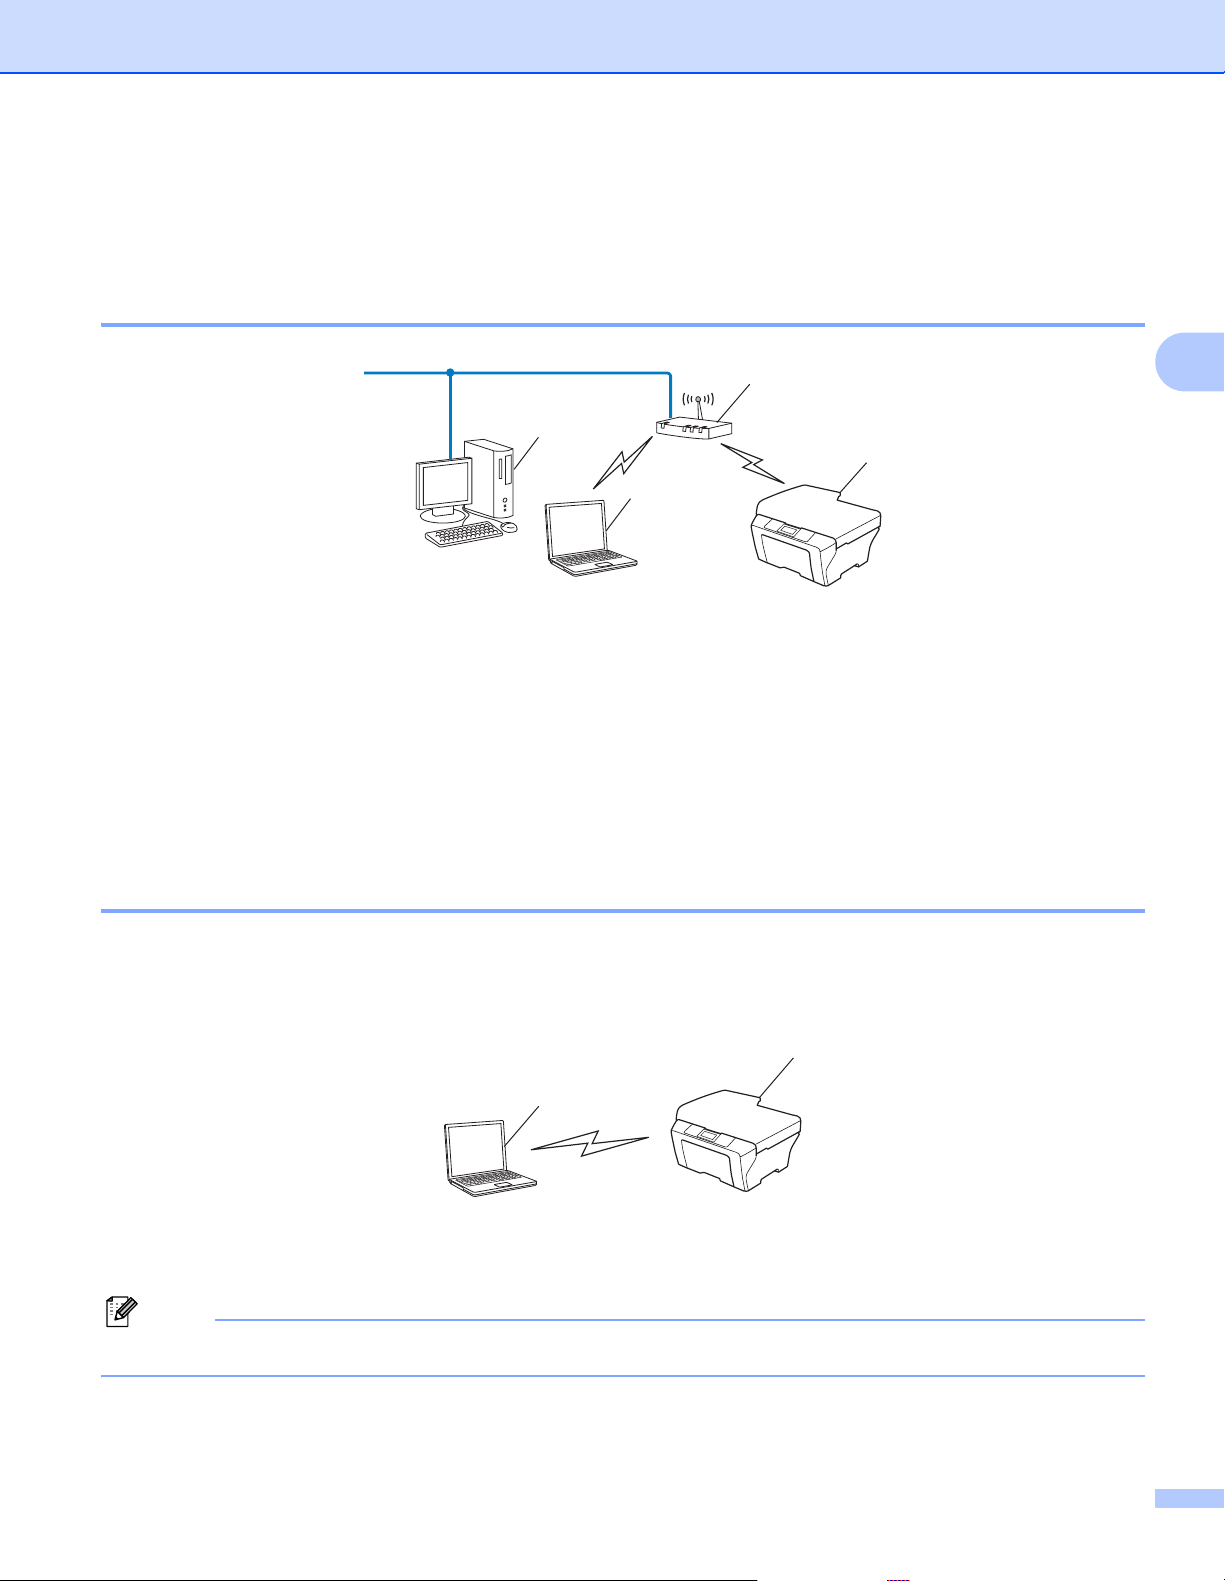
Connected to a computer with a WLAN access point/router in the network (Infrastructure mode) 3
1
4
2
3
3
1 WLAN access point/router
1
If your computer supports Intel® MWT (My WiFi Technology), you can use your computer as a Wi-Fi Protected Setup supported access point.
1
2 Wireless network machine (your machine)
3 Wireless capable computer connected to the WLAN access point/router
4 Wired computer which is not wireless capable connected to the WLAN access point/router with a
network cable
Connected to a wireless capable computer without a WLAN access point/router in the network (Ad-hoc mode) 3
This type of network does not have a central WLAN access point/router. Each wireless client communicates
directly with each other. When the Brother wireless machine (your machine) is part of this network, it receives
all print jobs directly from the computer sending the print data.
1
2
1 Wireless network machine (your machine)
2 Wireless capable computer
We do not guarantee the wireless network connection with Windows Server® products in Ad-hoc mode.
11
Configuring your machine for a wireless network (For HL-2280DW, DCP-7070DW and MFC-7860DW)
Confirm your wireless network setup method 3
There are four methods to configure your wireless network machine. Use Setup Wizard from the control panel
(recommended), WPS/AOSS™ (Push Button Configuration) from the control panel menu, the Brother
installer application on the CD-ROM or the PIN Method of Wi-Fi Protected Setup. The setup process will be
different depending on your network environment.
Configuration using the machine’s control panel Setup Wizard to configure your machine for a wireless network (Recommended) 3
You can use the machine’s control panel to configure your wireless network settings. By using the control
panel Setup Wizard function, you can easily connect your Brother machine to your wireless network. You
must know your wireless network settings before you proceed with this installation.
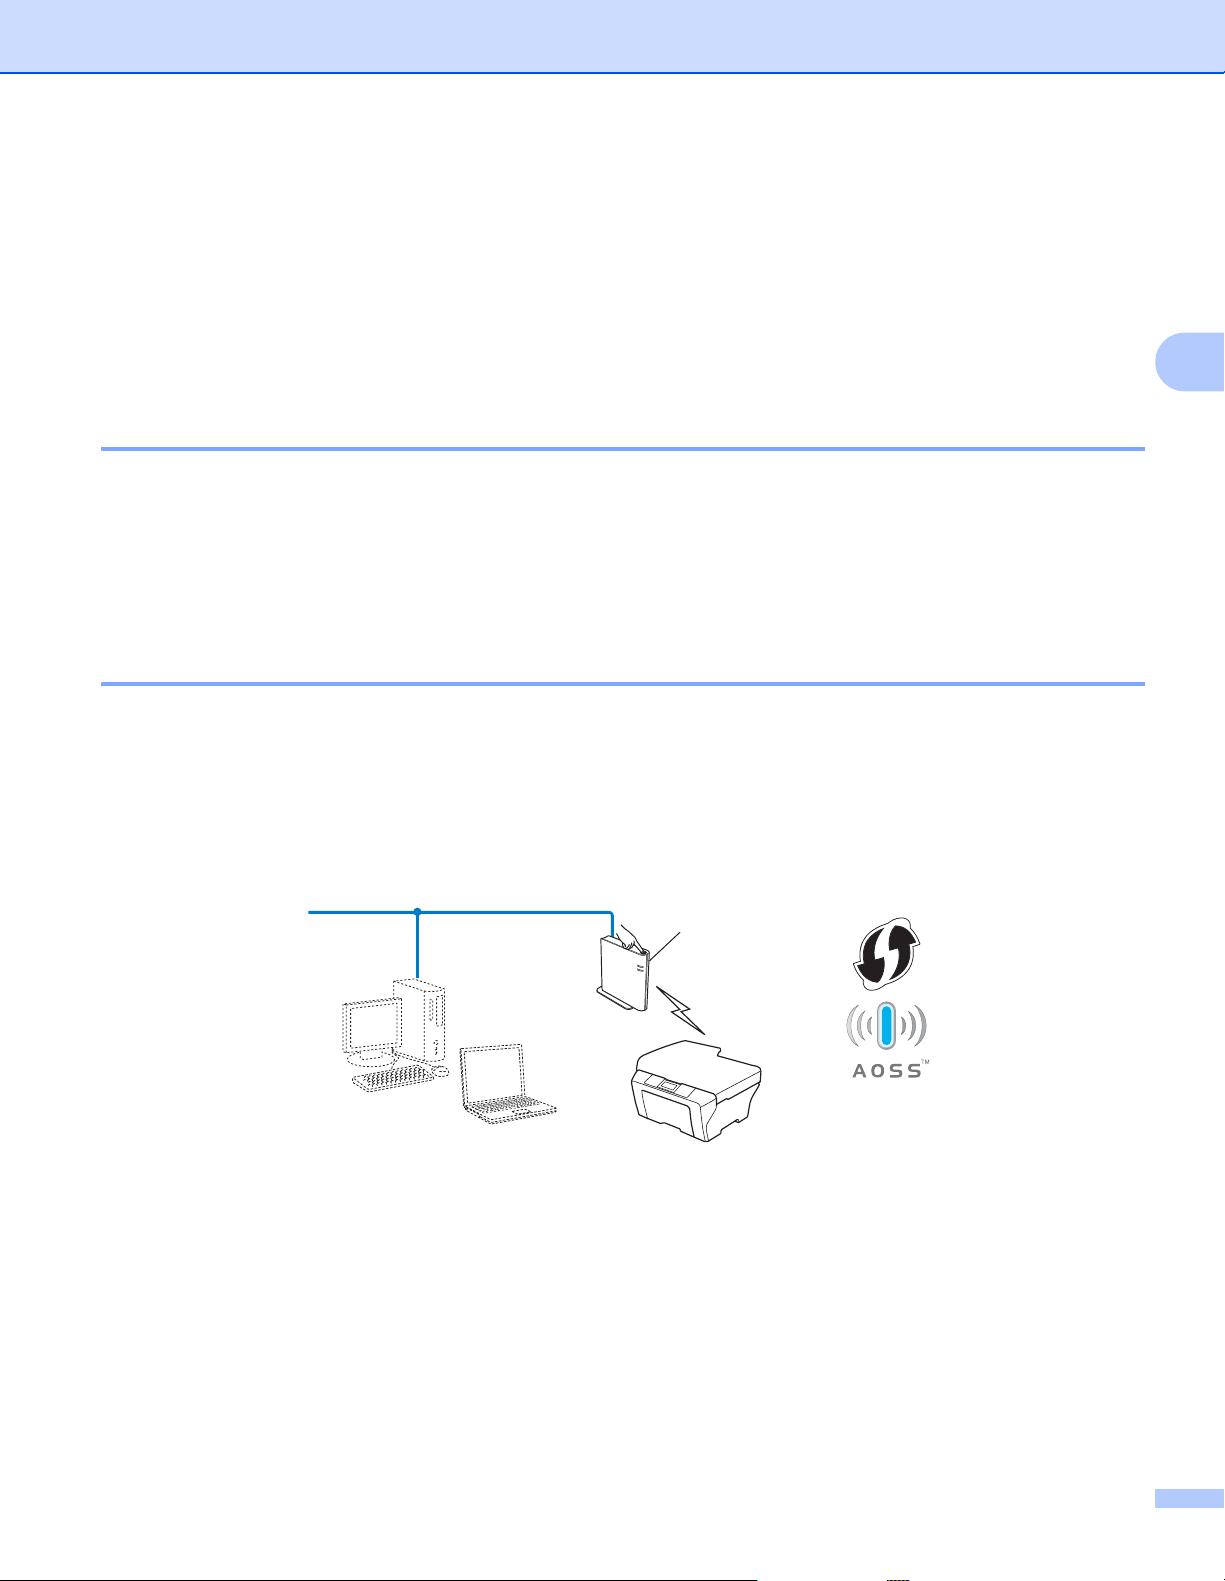
Configuration using WPS or AOSS™ from the control panel menu to configure your machine for a wireless network (Push Button Configuration) (Infrastructure mode only) 3
3
We recommend that you use WPS or AOSS™ from the control panel menu to configure your wireless
1
network settings if your WLAN access point/router (A) supports either Wi-Fi Protected Setup (PBC
) or
AOSS™.
A
1
Push Button Configuration
12
Configuring your machine for a wireless network (For HL-2280DW, DCP-7070DW and MFC-7860DW)
Configuration using the Brother installer application on the CD-ROM to configure your machine for a wireless network 3
You can also use the Brother installer application on the CD-ROM we have provided with the machine. You
will be guided by the on-screen instructions until you are able to use your Brother wireless network machine.
You must know your wireless network settings before you proceed with this installation.
Configuration using Push Button Configuration 3
If your WLAN access point/router (A) supports either Wi-Fi Protected Setup (PBC1) or AOSS™, you can
configure the machine easily without knowing your wireless network settings using the Brother installer
application.
A
3
1
Push Button Configuration
13
Configuring your machine for a wireless network (For HL-2280DW, DCP-7070DW and MFC-7860DW)
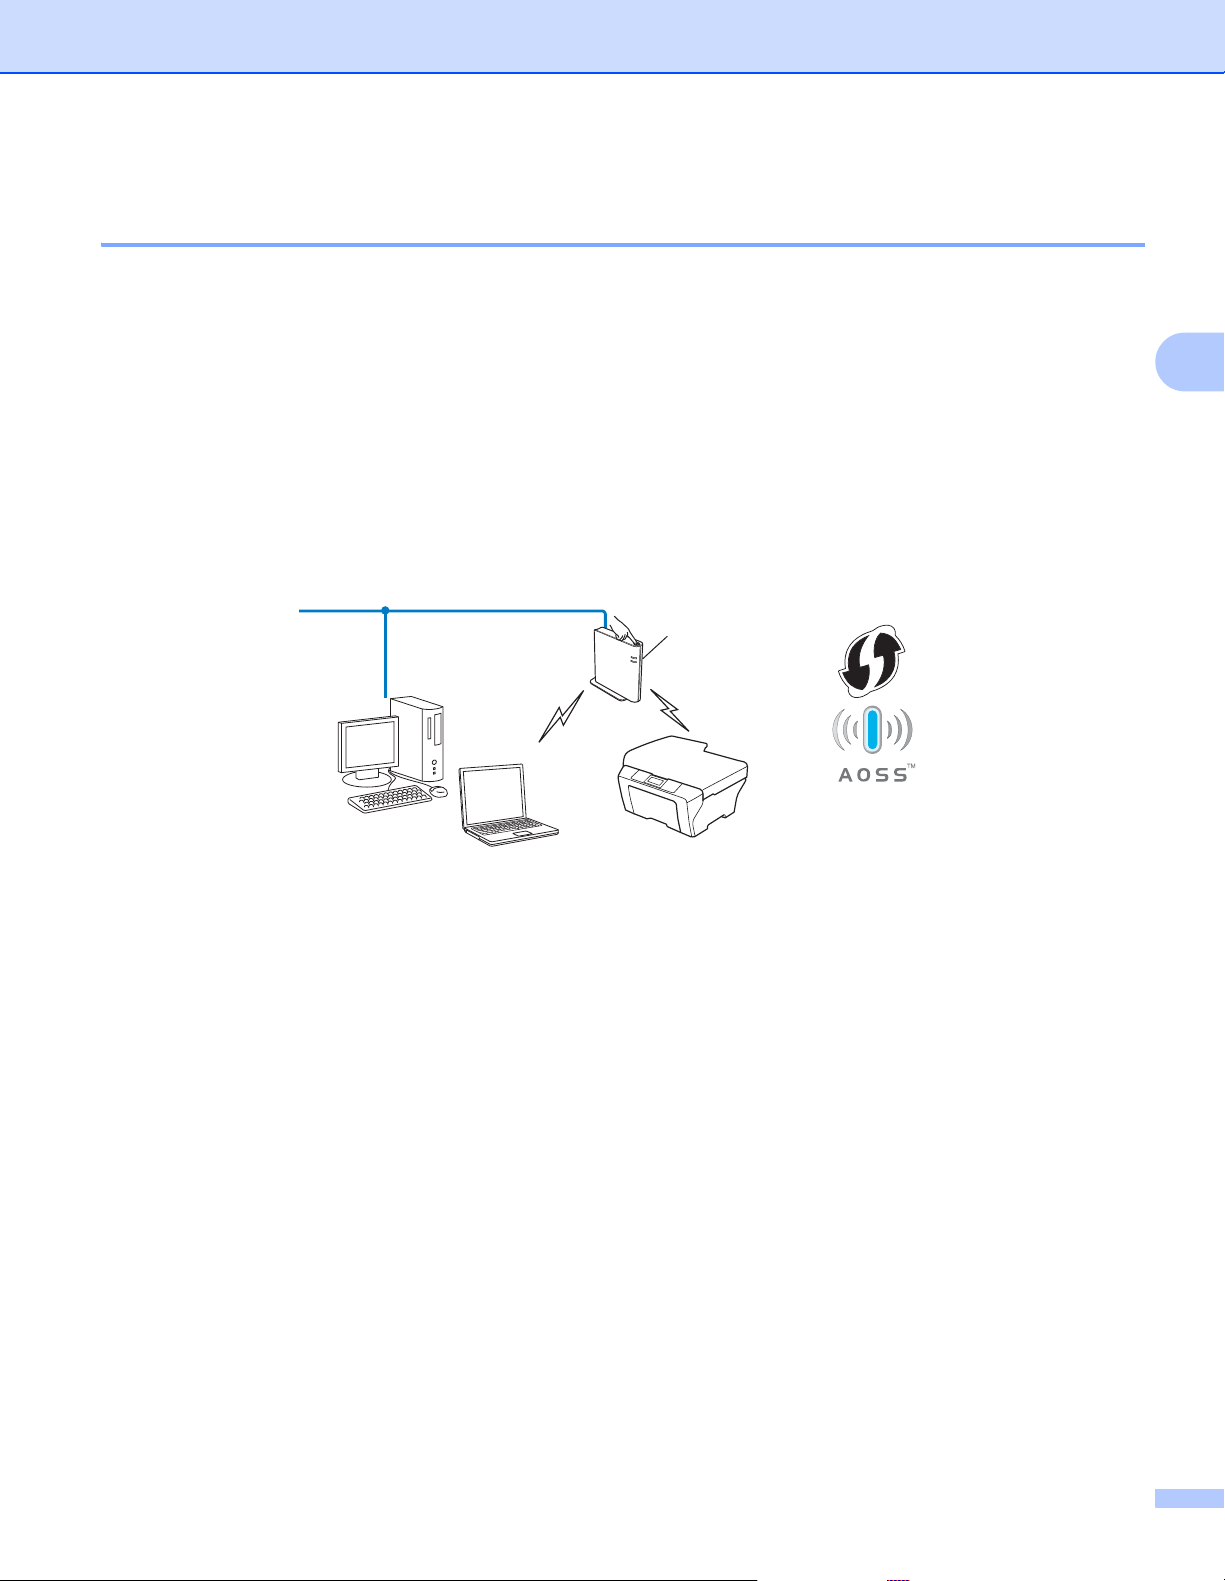
Configuration temporarily using a USB or network cable 3
You can temporarily use a USB cable or network cable to configure your Brother machine for your wireless
network.
USB method 3
You can remotely configure the machine from a computer that is also on the network using a USB cable
1
.
(A)
A
1
You can configure the wireless settings of the machine using a USB cable temporarily connected to a wired or wireless computer.
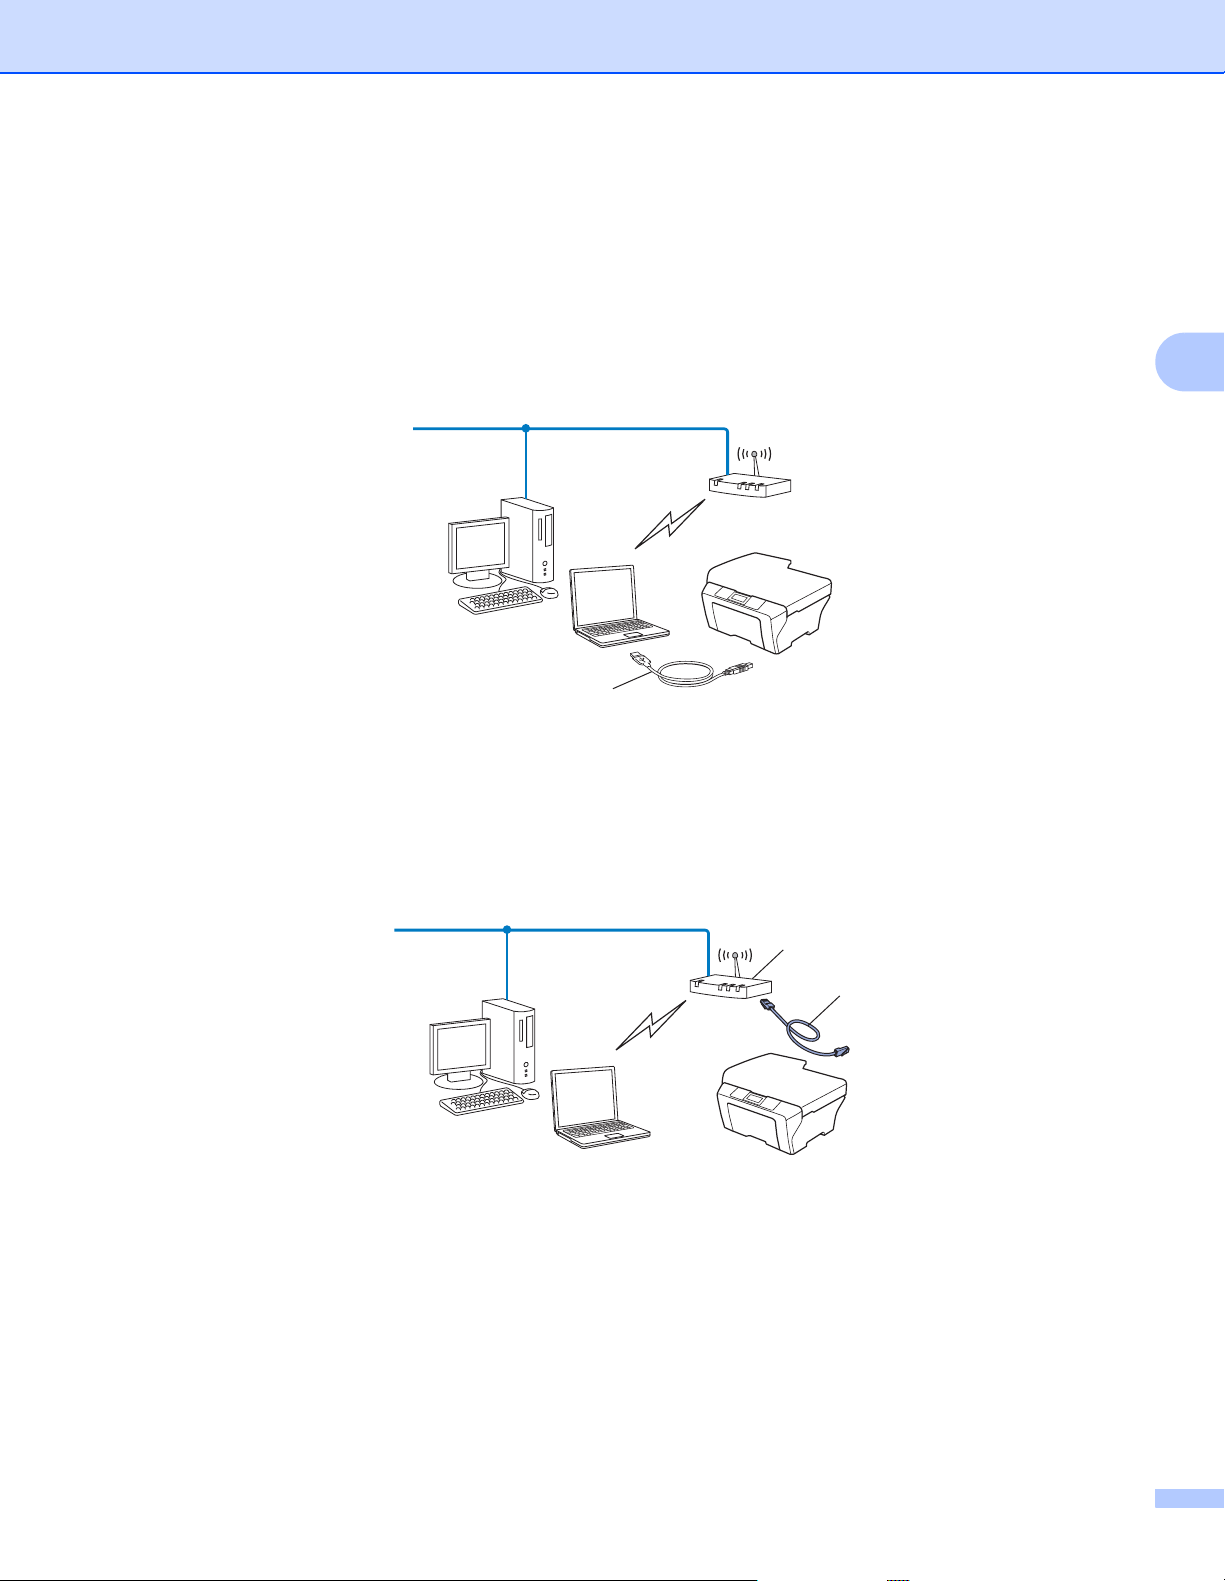
Ethernet cable method 3
If there is an Ethernet Hub or Router on the same network as the WLAN access point (A), you can
temporarily connect the Hub or Router to the machine using a network cable (B). You can then remotely
configure the machine from a computer on the network.
A
3
B
14
Configuring your machine for a wireless network (For HL-2280DW, DCP-7070DW and MFC-7860DW)
Configuration using the PIN Method of Wi-Fi Protected Setup to configure your machine for a wireless network (Infrastructure mode only) 3
If your WLAN access point/router (A) supports Wi-Fi Protected Setup, you can also configure using the
PIN Method of Wi-Fi Protected Setup.
1
Connection when the WLAN access point/router (A) doubles as a Registrar
A
Connection when another device (C), such as a computer is used as a Registrar1.
A
.
3
1
The Registrar is a device that manages the wireless LAN.
C
15

Configuring your machine for a wireless network (For HL-2280DW, DCP-7070DW and MFC-7860DW)
IMPORTANT
Configuring your machine for a wireless network (For Infrastructure mode and Ad-hoc mode) 3
• If you are going to connect your Brother machine to your network, we recommend that you contact your
system administrator prior to installation. You must know your wireless network settings before you
proceed with this installation.
• If you have previously configured the wireless settings of the machine, you must reset the network LAN
settings before you can configure the wireless settings again. Press Menu, a or b to choose Network,
press OK. Press a or b to choose Network Reset, press OK. Press 1 to reset and then press 1 to accept
the change. The machine will restart automatically.
Using the Setup Wizard from the control panel 3
You can configure your Brother machine by using the Setup Wizard function. This is located in the
Network menu on the machine’s control panel.
3
If you are configuring your machine using Wi-Fi Protected Setup (PIN Method), see Using the PIN Method
of Wi-Fi Protected Setup on page 20.
Other methods of configuration from the control panel:
• To configure your machine for an existing wireless network using the SSID and Network Key (if
required), see the Quick Setup Guide.
• If your WLAN access point/router is set to not broadcast the SSID name, see Configuring your machine
when the SSID is not broadcast on page 17.
Using WPS or AOSS™ from the control panel menu to configure your machine for a wireless network (Push Button Configuration) 3
If your WLAN access point/router supports either Wi-Fi Protected Setup (PBC1) or AOSS™, you can
configure the machine easily without knowing your wireless network settings. Your Brother machine has the
WPS/AOSS™ menu on the control panel. See the Quick Setup Guide for more information.
1
Push Button Configuration
16
Configuring your machine for a wireless network (For HL-2280DW, DCP-7070DW and MFC-7860DW)
Note
Configuring your machine when the SSID is not broadcast 3
a Before configuring your machine we recommend you write down your wireless network settings. You will
need this information before you continue with the configuration.
Check and record the current wireless network settings.
Network name: (SSID, ESSID)
Communication Mode Authentication method Encryption mode Network key
Infrastructure Open system NONE —
WEP
Shared key WEP
WPA/WPA2-PSK AES
1
TKIP
Ad-hoc Open system NONE —
WEP
1
TKIP is supported for WPA-PSK only.
For example:
Network name: (SSID, ESSID)
HELLO
Communication Mode Authentication method Encryption mode Network key
Infrastructure WPA2-PSK AES 12345678
3
If your router uses WEP encryption, enter the key used as the first WEP key. Your Brother machine
supports the use of the first WEP key only.
b Press Menu.
c Press a or b to choose Network.
Press OK.
d Press a or b to choose WLAN.
Press OK.
Network
2.WLAN
17

Configuring your machine for a wireless network (For HL-2280DW, DCP-7070DW and MFC-7860DW)
e Press a or b to choose Setup Wizard.
Press OK.
WLAN
2.Setup Wizard
f When WLAN Enable ? is displayed, choose On.
This will start the wireless setup wizard.
To cancel, press Stop/Exit.
WLAN Enable ?
1.On 2.Off
g The machine will search for your network and display a list of available SSIDs.
Choose <New SSID> using a or b.
Press OK.
Select SSID&Set
<New SSID>
h Enter the SSID name. (For information how to enter text, see the Quick Setup Guide.)
Press OK.
SSID:
3
i Using a or b, choose Ad-hoc or Infrastructure when instructed.
Press OK.
Mode Select
Infrastructure
Do one of the following:
If you chose Ad-hoc, go to step k.
If you chose Infrastructure, go to step j.
j Choose the Authentication method using a or b, and press OK.
Do one of the following:
Auth. Select
Open System
If you chose Open System, go to step k.
If you chose Shared Key, go to step l.
If you chose WPA/WPA2-PSK, go to step m.
k Choose the Encryption type None or WEP using a or b, and press OK.
Do one of the following:
Encryption Type?
None
If you chose None, go to step o.
If you chose WEP, go to step l.
18
Configuring your machine for a wireless network (For HL-2280DW, DCP-7070DW and MFC-7860DW)
l Enter the WEP key you wrote down in step a. Press OK. Go to step o. (For information how to enter
text, see the Quick Setup Guide.)
Network Key
m Choose the Encryption type, TKIP or AES using a or b. Press OK. Go to step n.
Encryption Type?
TKIP
n Enter the WPA key you wrote down in step a and press OK. Go to step o. (For information how to enter
text, see the Quick Setup Guide.)
o To apply the settings, choose Yes. To cancel, choose No.
Apply Settings?
1.Yes 2.No
Do one of the following:
If you chose Yes, go to step p.
If you chose No, go back to step g.
p The machine starts to connect to the wireless device you have chosen.
3
q If your wireless device is connected successfully, the display shows Connected.
The machine will print the WLAN Report. If the connection failed, check the error code on the printed
report and refer to Troubleshooting in the Quick Setup Guide.
Connected
Printing
(Windows®)
You have completed the wireless network setup. If you would like to continue installing drivers
and software necessary for operating your device, please choose Install MFL-Pro Suite from
the CD-ROM menu.
(Macintosh)
You have completed the wireless network setup. If you would like to continue installing drivers
and software necessary for operating your device, please choose Start Here OSX from the
CD-ROM menu.
19
 Loading...