

Page 1
Quick Setup Guide ADS-1000W / ADS-1500W
ADS-1000W
Start Here
ADS-1500W
Brother Industries, Ltd.
15-1, Naeshiro-cho, Mizuho-ku, Nagoya 467-8561, Japan
Thank you for choosing Brother. Your support is important to us and we value your business. Your Brother product
is engineered and manufactured to the highest standards to deliver reliable performance, day-in and day-out.
Please read the Product Safety Guide on page 20 before you set up your machine. Then, please return to
this page of the Quick Setup Guide for the correct setup and installation procedure.
WARNING
CAUTION
IMPORTANT
NOTE
NOTE
Unless otherwise specified, illustrations in this guide show the ADS-1500W.
WARNING indicates a potentially hazardous situation which, if not avoided, could result in death
or serious injuries.
CAUTION indicates a potentially hazardous situation which, if not avoided, may result in minor
or moderate injuries.
IMPORTANT indicates a potentially hazardous situation which, if not avoided, may result in
damage to property or loss of product functionality.
Notes tell you how you should respond to a situation that may arise or give tips about how the
operation works with other features.
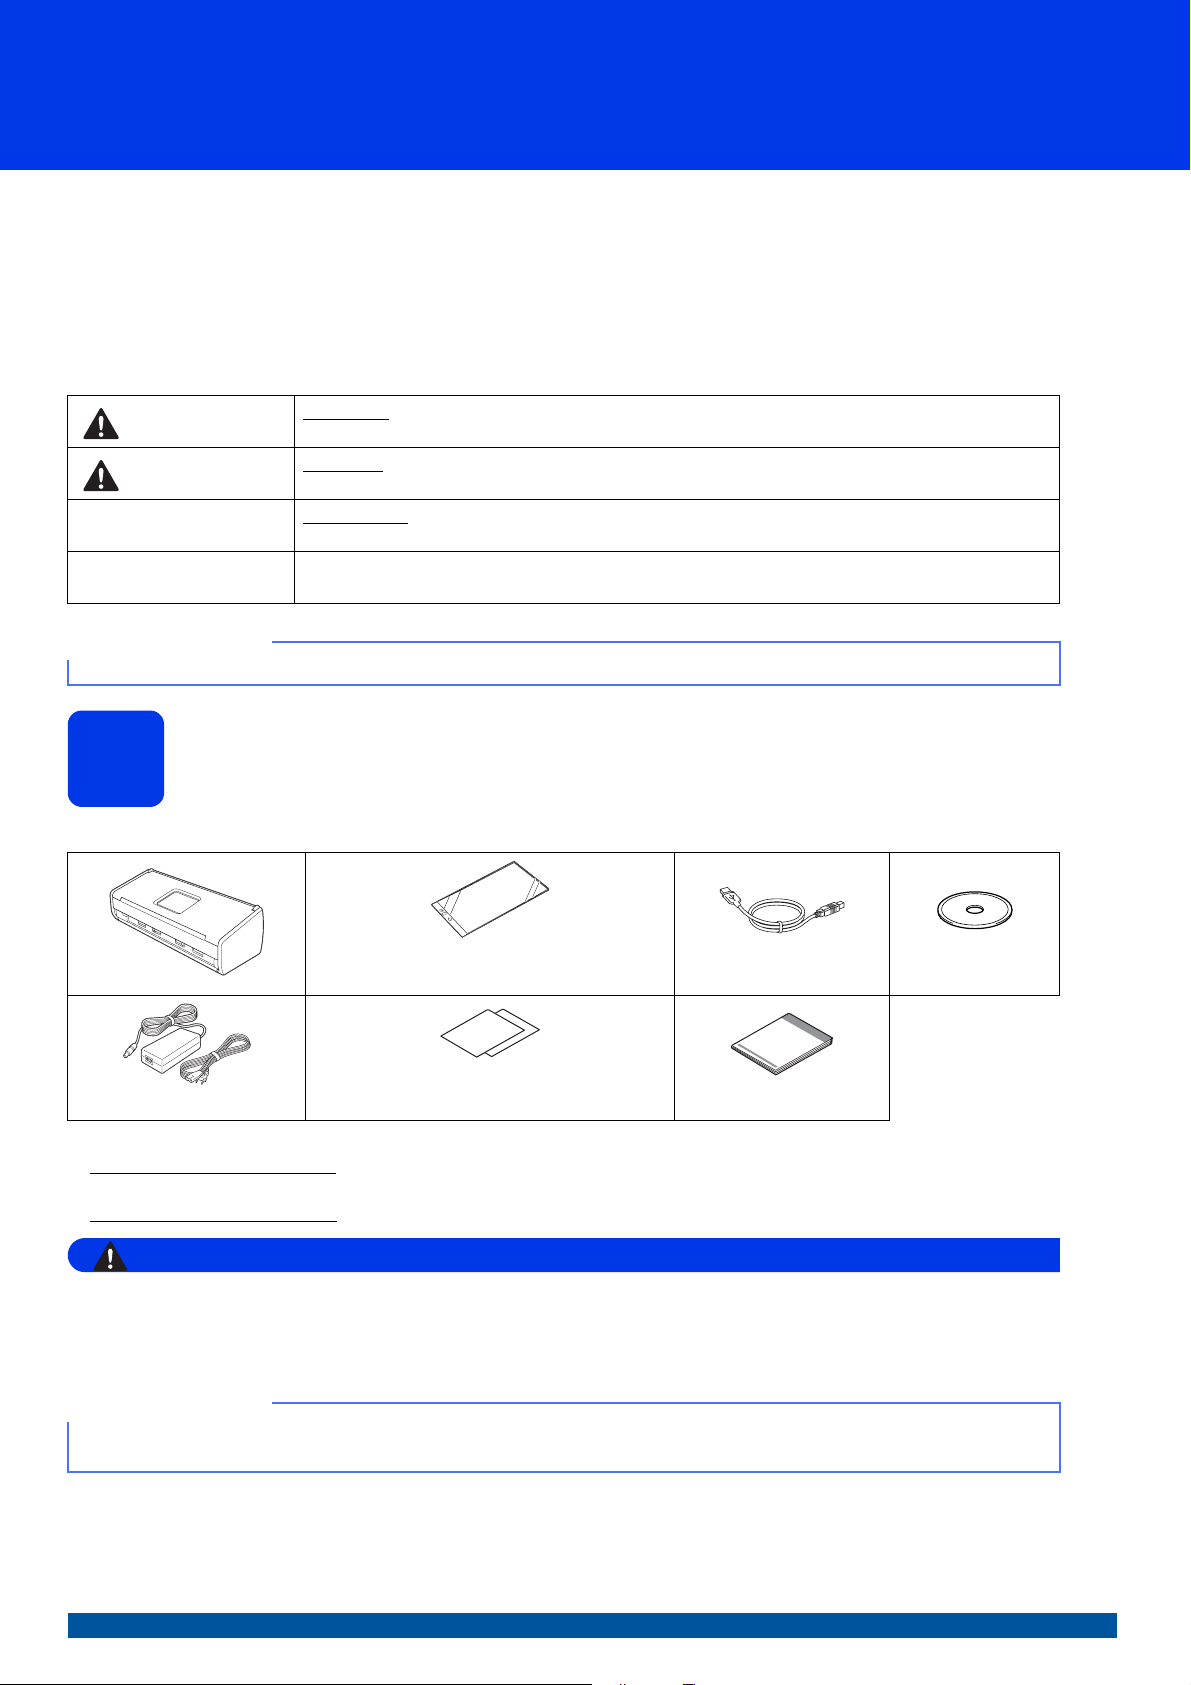
Unpack the machine and check the components
1
The components included in the box may differ depending on your country.
Receipt Carrier Sheet for BR-Receipts
(USA only)
Product Registration Sheet (USA only)
AC adapter
You can download the User’s Guide and Network User’s Guide for your model from the Brother Solutions Center
at http://solutions.brother.com/
not contain drivers for your operating system, or you want to download manuals and utilities, visit your model page
at http://solutions.brother.com/
. If your computer does not have a DVD-ROM drive, the supplied DVD-ROM does
.
Warranty Card
USB Interface Cable
Quick Setup Guide
WARNING
• This product was packaged in a plastic bag. To avoid suffocation, keep plastic bags away from babies
and children. Do not use the bag in cribs, beds, carriages, or play pens. The bag is not a toy.
• Use only the AC adapter supplied with this product.
DVD-ROM
NOTE
• We recommend saving the original packaging in case you must ship your machine.
• Use the supplied USB cable if you want to connect the machine to a computer.
a Remove the protective tape and film covering the machine and the LCD or Control Panel.
b Make sure you have all the components.
USA/CAN Version A
1
Page 2
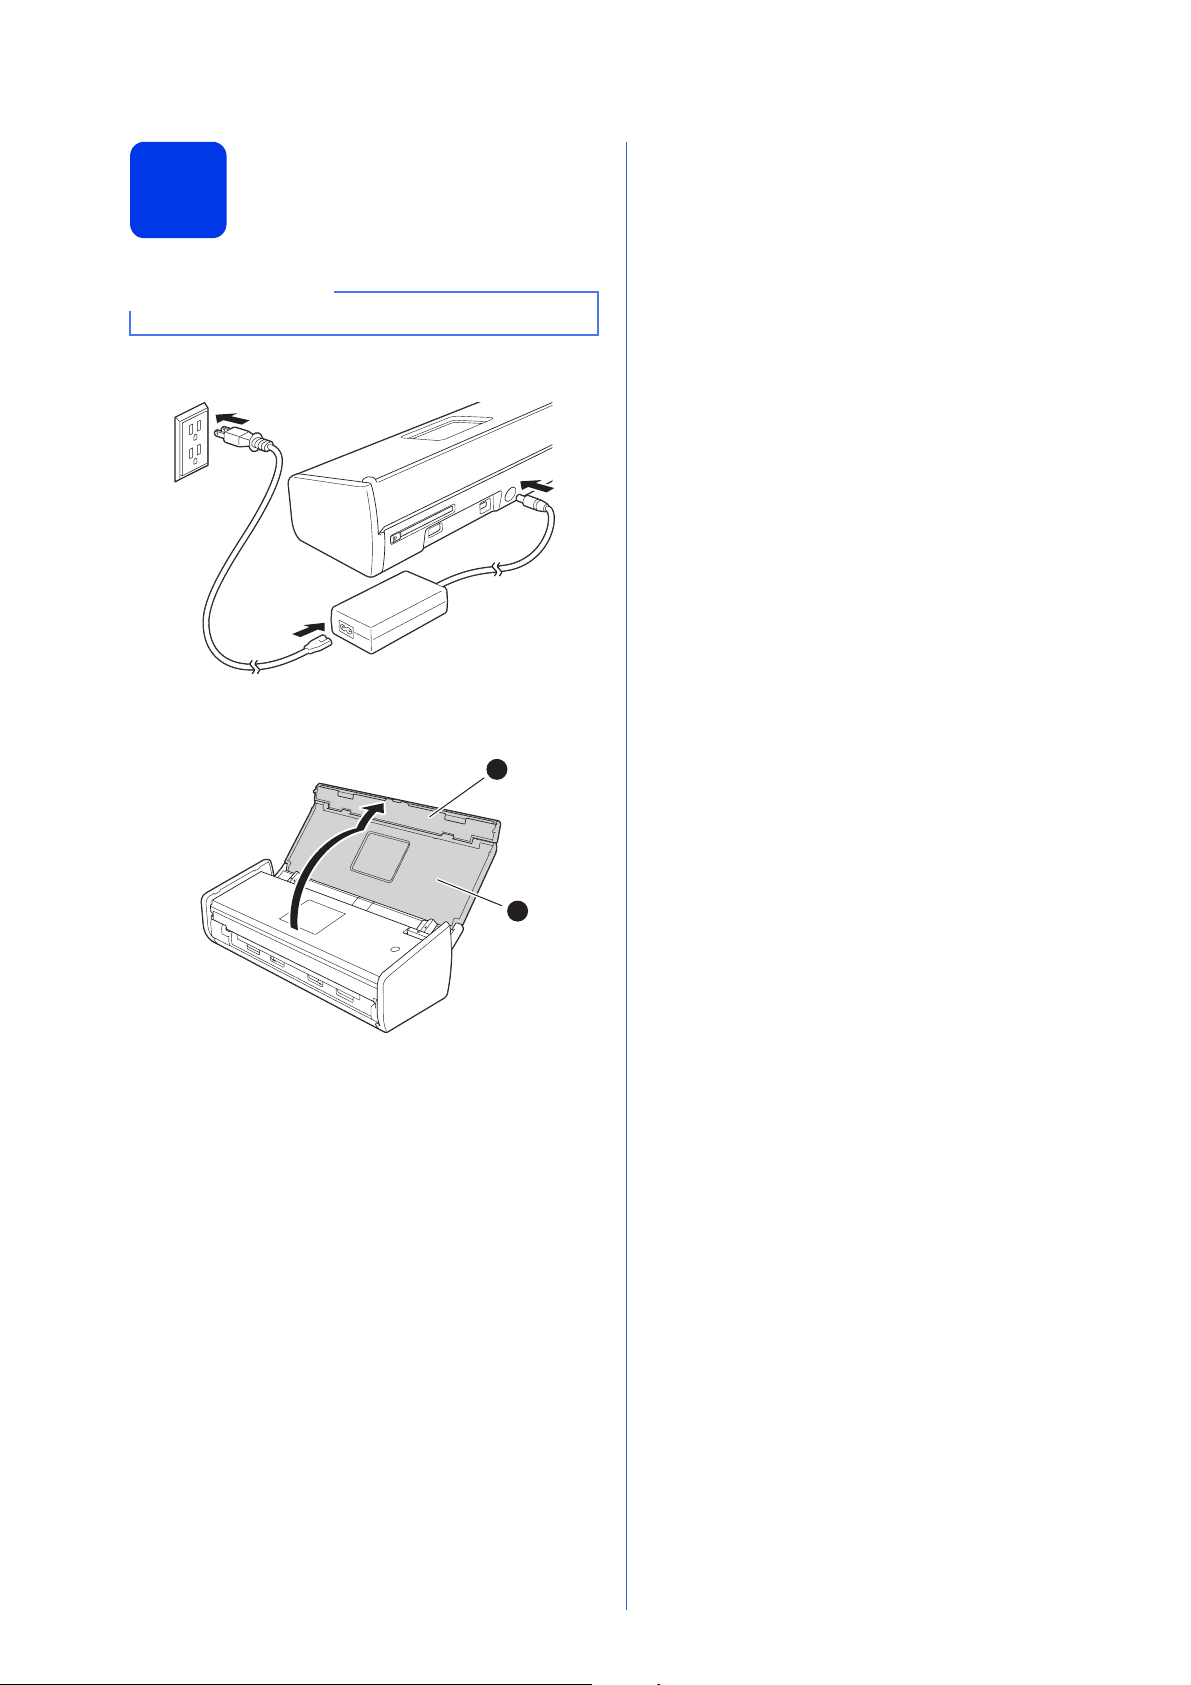
Connect the AC adapter
2
NOTE
DO NOT connect the USB cable yet.
a Connect the AC adapter.
b Open the Top Cover a and push the flap of the
Top Cover b firmly back until it clicks.
2
1
2
Page 3
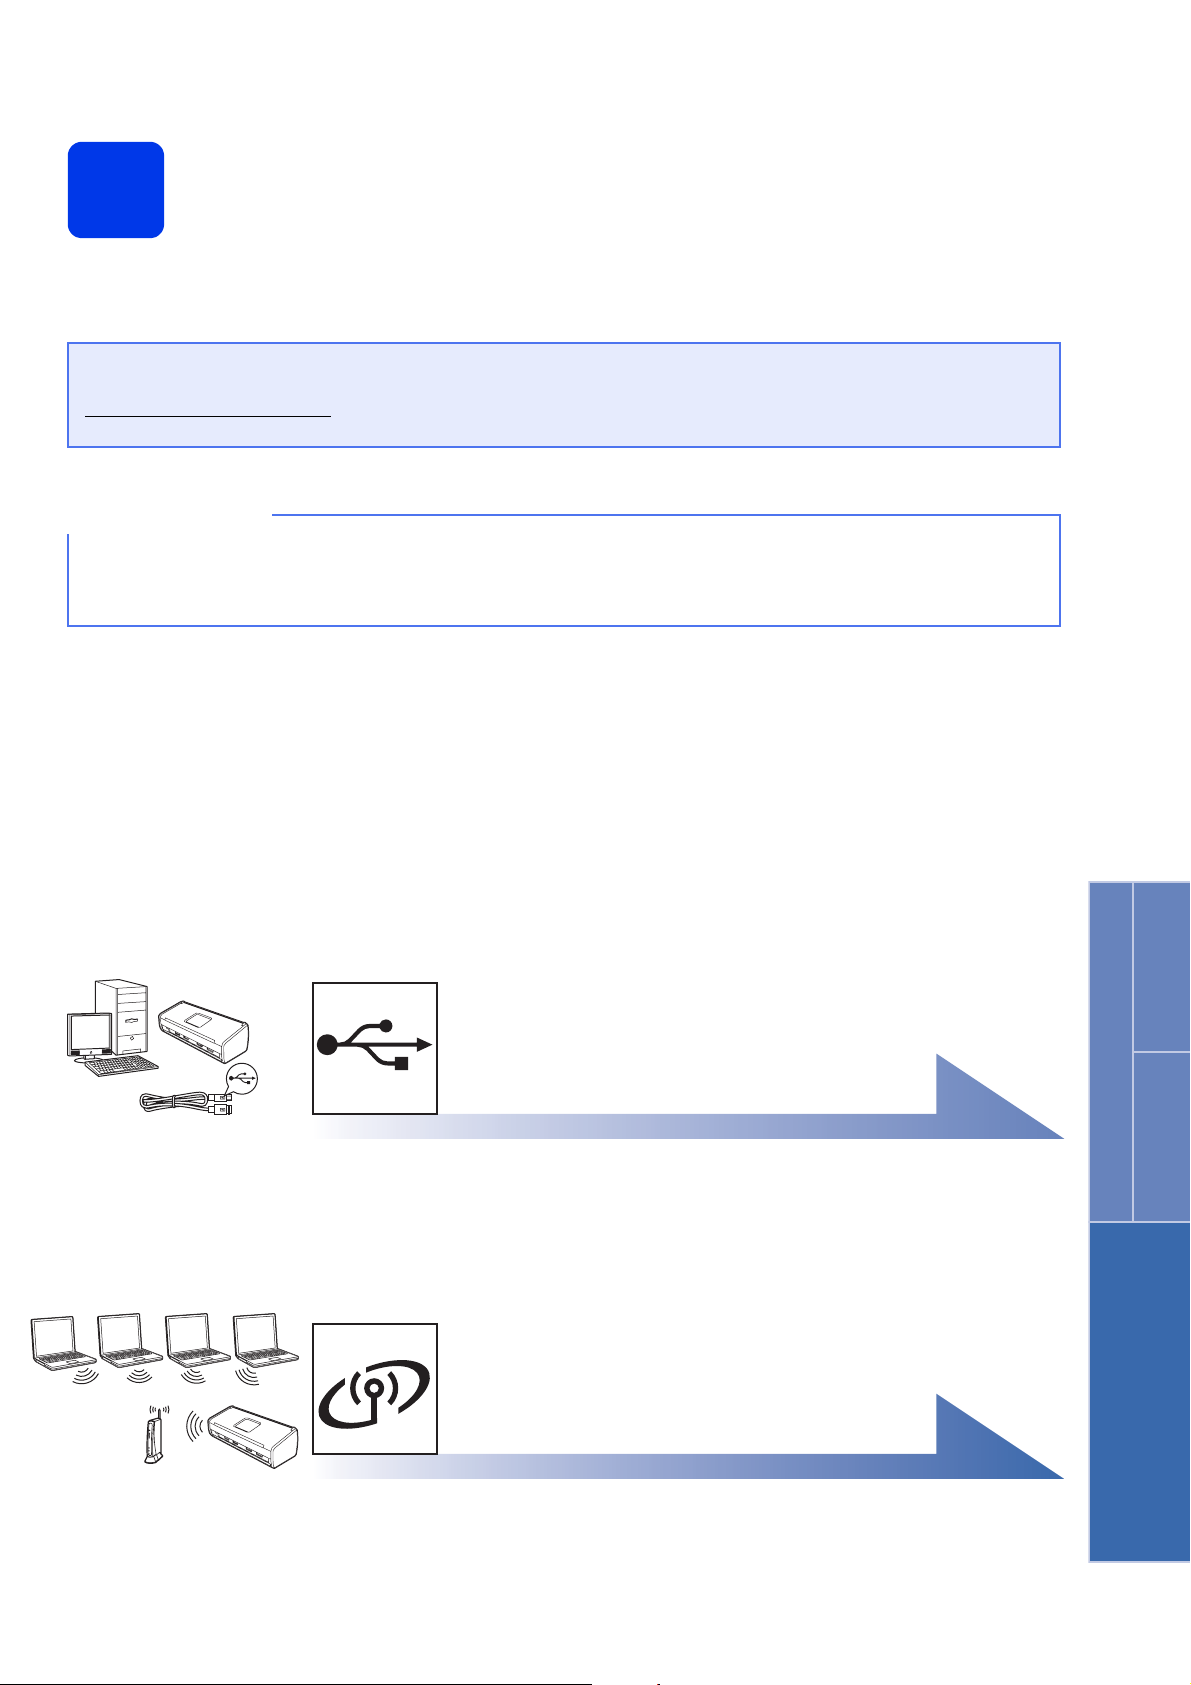
Choose your connection type
3
These installation instructions are for Windows®XP Home, XP Professional, Windows Vista®, Windows®7,
®
Windows
If your computer does not have a DVD-ROM drive or the supplied DVD-ROM does not contain drivers for your
operating system, or you want to download manuals and utilities, visit your model page at
http://solutions.brother.com/
a download.
NOTE
Windows® 8 users: If the Brother manuals are in PDF format, use Adobe® Reader® to open them. If Adobe®
Reader
association for PDF (see How to open a PDF file in Adobe
8, and Mac OS X v10.6.8, 10.7.x and 10.8.x.
. Some software applications included on the DVD-ROM may not be available as
®
is installed on your computer but you cannot open the files in Adobe® Reader®, change the file
®
Reader® (Windows® 8) on page 19).
For USB interface cable
Windows®, go to page 4
Macintosh, go to page 6
For Wireless Network
Windows® and Macintosh,
go to page 7
Windows
®
USB
Macintosh
Wireless Network
3
Page 4
USB
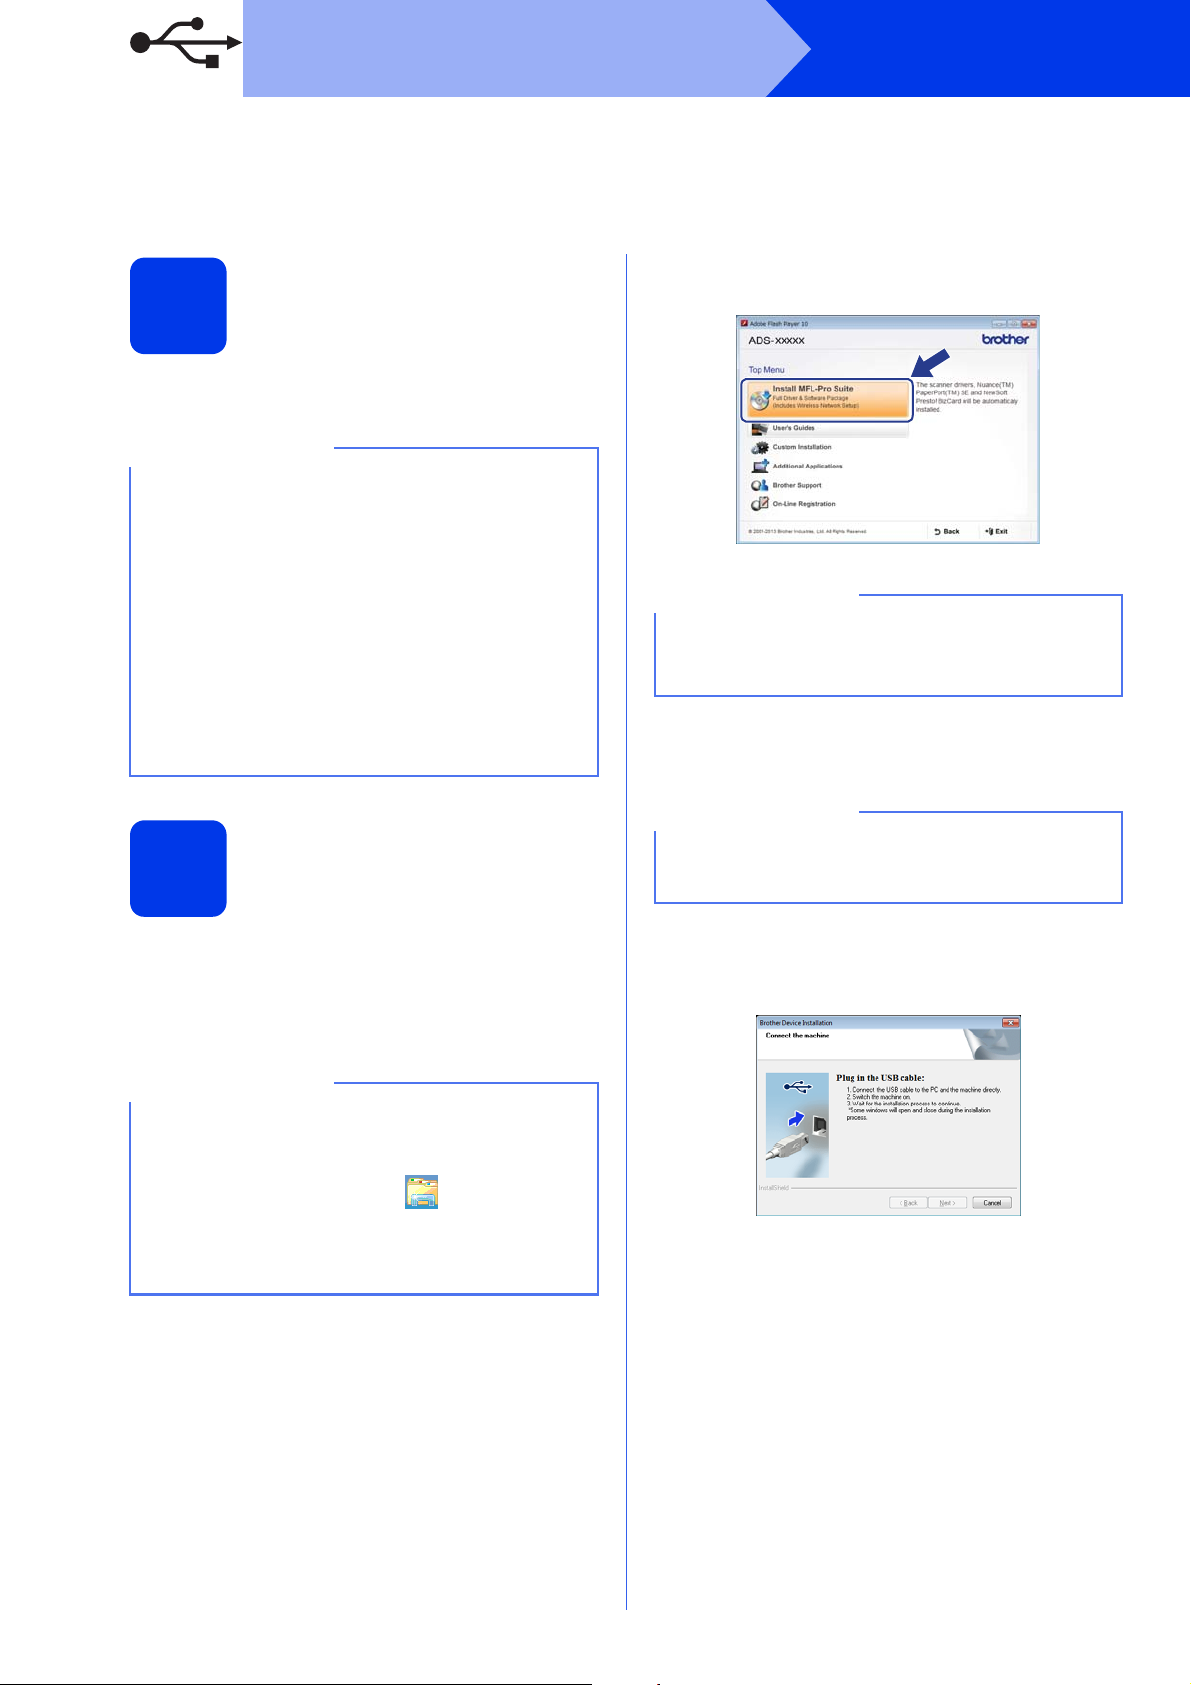
For Windows® USB interface users
(Windows®XP Home/XP Professional/Windows Vista®/Windows®7/Windows®8)
b Click Install MFL-Pro Suite, and then click
Before you install
Yes if you accept the license agreements.
4
Make sure that your computer and machine are ON.
NOTE
• DO NOT connect the USB cable yet.
• If there are any programs running, close them.
• The screens may differ depending on your
operating system.
• The DVD-ROM includes Nuance™
PaperPort™12SE. This software supports
Windows
Professional (SP3 or greater), Windows Vista
(SP2 or greater), Windows
Windows
Service Pack before installing MFL-Pro Suite.
®
XP Home (SP3 or greater), XP
®
7 and
®
8. Update to the latest Windows®
®
NOTE
For Windows Vista®, Windows®7 and
®
Windows
screen appears, click Allow or Yes.
8, when the User Account Control
c Choose Local Connection (USB), and then
click Next.
Windows
®
Install MFL-Pro Suite
5
a Put the DVD-ROM into your DVD-ROM drive. If
the model name screen appears, choose your
machine. If the language screen appears,
choose your language.
NOTE
• If the Brother screen does not appear
automatically, go to Computer (My
Computer).
(For Windows
icon on the taskbar, and then go to Computer.)
• Double-click the DVD-ROM icon, and then
double-click start.exe.
®
8: click the (File Explorer)
NOTE
If the Windows Security screen appears, select
the check box and click Install to complete the
installation correctly.
d Follow the on-screen instructions until the Plug
in the USB cable screen appears, and then
click Next.
4
Page 5
USB
Windows
®
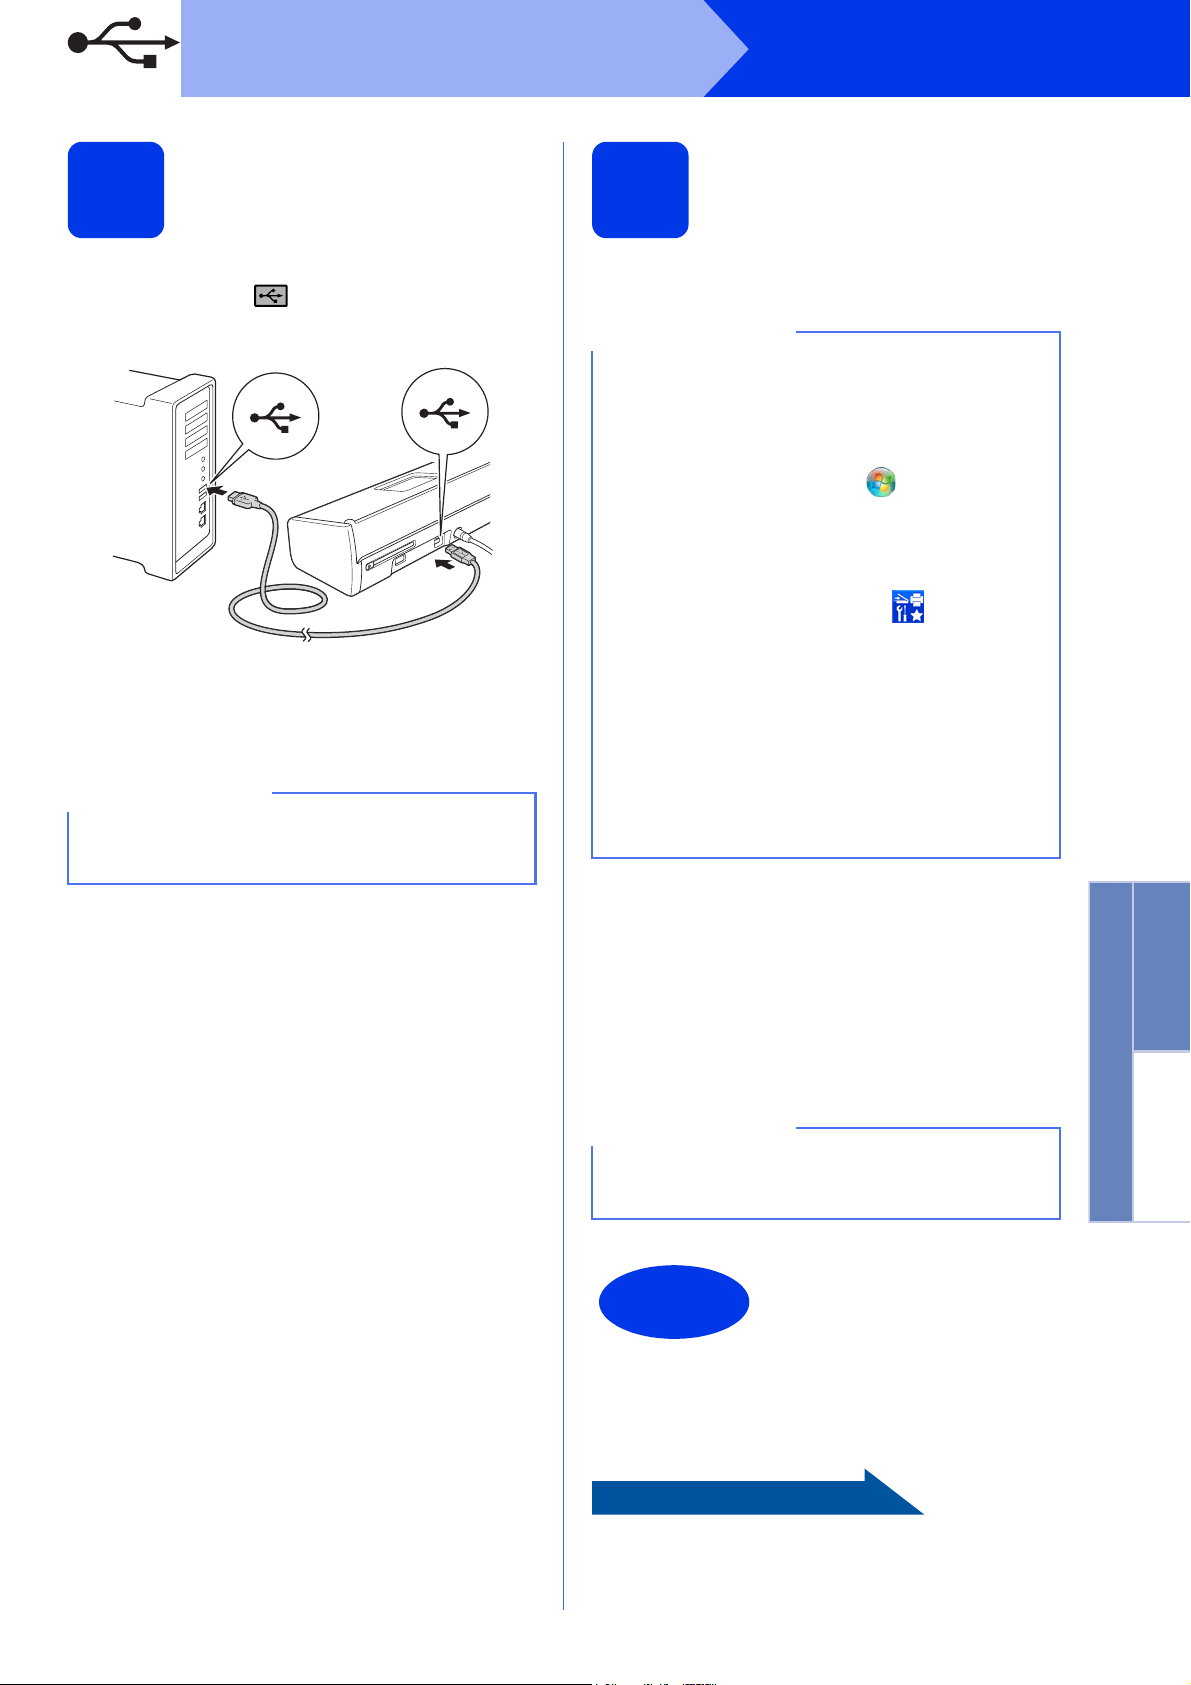
Connect the USB cable
6
a Connect the USB cable to the USB port
marked with a symbol on the back of your
machine. Connect the other end of the cable to
your computer.
b The installation will continue automatically.
The installation screens appear one after
another.
NOTE
DO NOT cancel any of the screens during the
installation. It may take a few seconds for all
screens to appear.
c When the On-Line Registration screen is
displayed, make your selection and follow the
on-screen instructions.
Finish and restart
7
a Click Finish to restart your computer.
NOTE
• If an error message appears during the
software installation, do one of the following:
- Windows
Windows
Diagnostics located in (Start) >
All Programs > Brother > ADS-XXXXX
(where XXXXX is your model name).
- Windows
Diagnostics, double-click (Brother
Utilities) on the desktop, and then click the
drop-down list and select your model name
(if not already selected). Click Tools in the
left navigation bar.
• Depending on your security settings, a
Windows
window may appear when using the machine
or its software. Please allow or permit the
window to continue.
b The following screens will appear:
• When the Software Update Setting screen
appears, choose the software update setting
you want and click OK.
• When the Brother Product Research and
Support Program screen appears, select
your preference and follow the on-screen
instructions.
®
XP, Windows Vista® and
®
7 users: Run the Installation
®
8 users: To run the Installation
®
Security or antivirus software
Windows
®
USB
Macintosh
NOTE
Internet access is required for the software
update and the Brother Product Research and
Support Program.
The installation is now
Finish
To install optional applications:
Now go to
Page 16
complete and it is time to
do a test scan. See Test
Scan (scan to PDF) on
page 18.
5
Page 6

USB
For Macintosh USB interface users
(Mac OS X v10.6.8/10.7.x/10.8.x)
Macintosh
Before you install
4
Make sure your machine is connected to the power
and your Macintosh is ON.
NOTE
For Mac OS X v10.6.0 to 10.6.7 users, upgrade to
Mac OS X v10.6.8 - 10.8.x.
Connect the USB cable
5
NOTE
• DO NOT connect the machine to a USB port on
a keyboard or a non-powered USB hub.
• Connect the machine directly to your
Macintosh.
Install MFL-Pro Suite
6
a Put the DVD-ROM into your DVD-ROM drive.
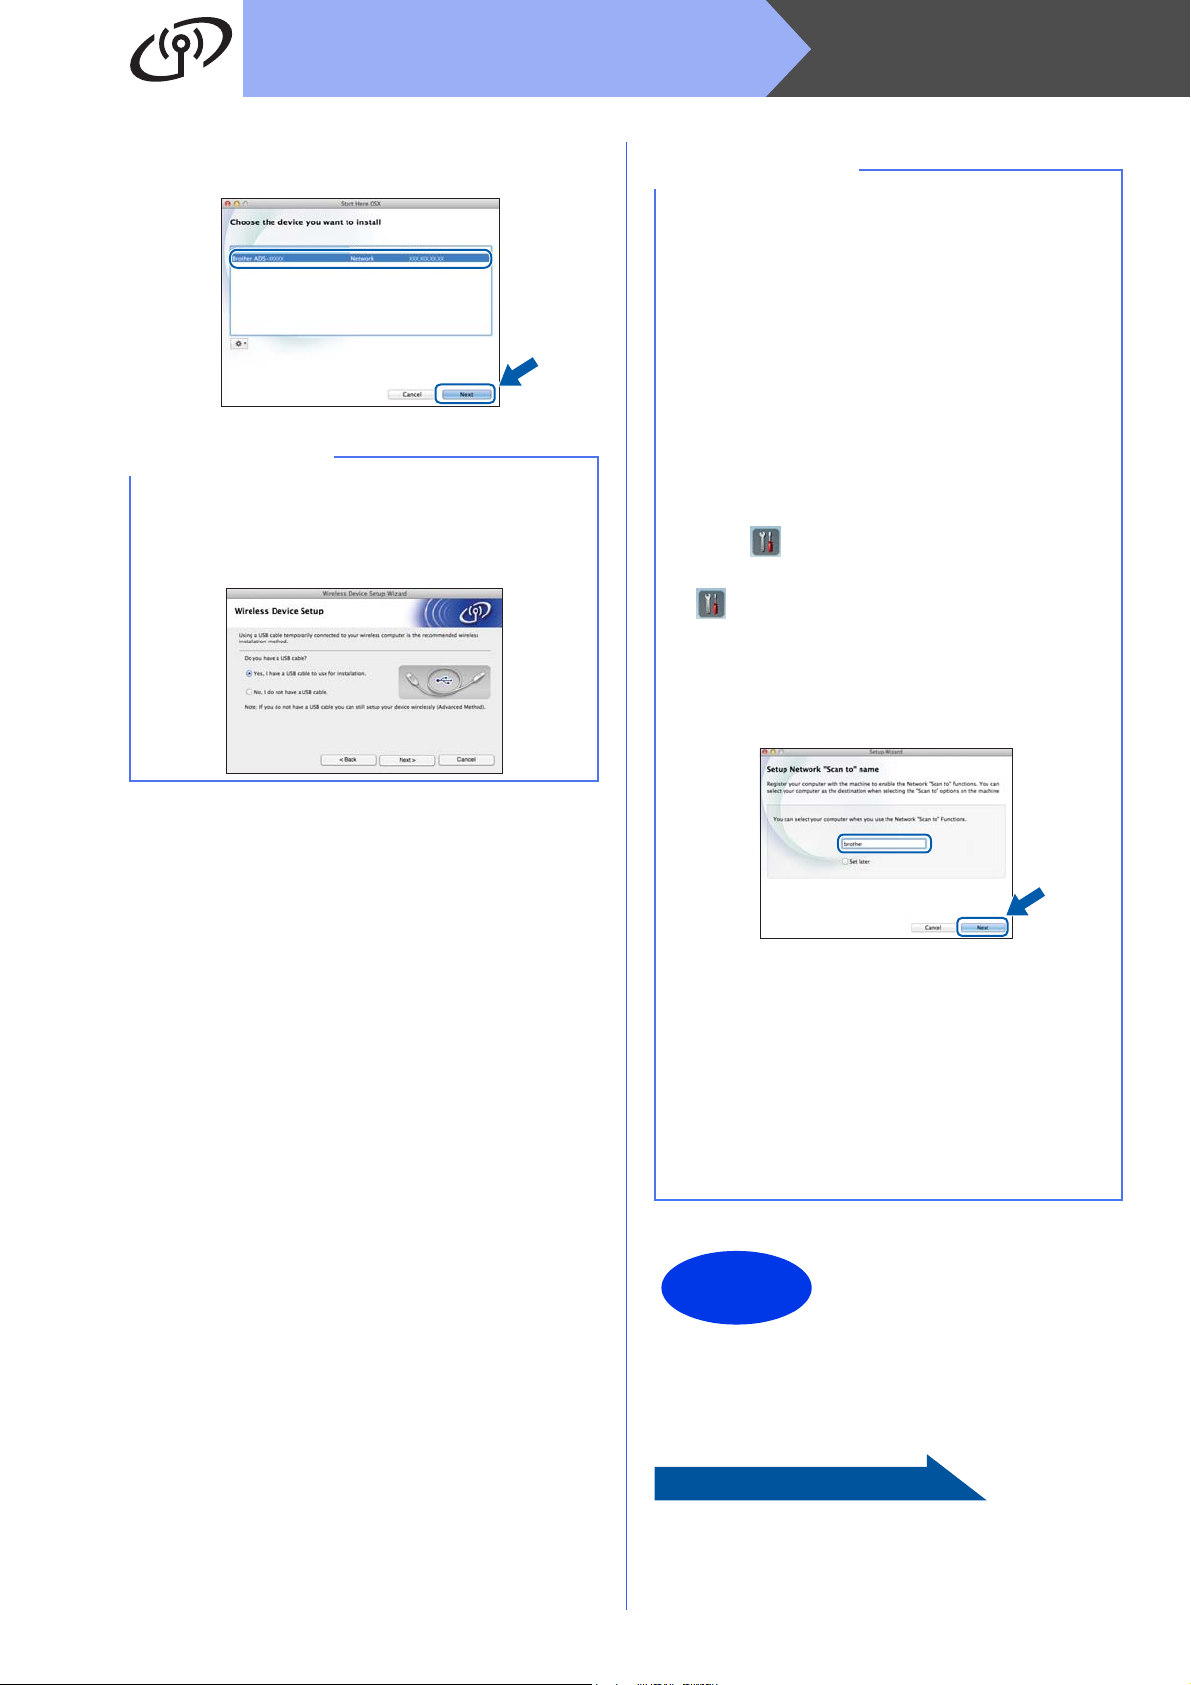
b Double-click the Start Here OSX icon to install.
If the model name screen appears, choose
your machine.
c Choose Local Connection (USB), and then
click Next. Follow the on-screen instructions.
d After the installation, the Brother software will
search for the Brother device. This will take a
few moments to complete.
a Connect the USB cable to the USB port
marked with a symbol on the back of your
machine. Connect the other end of the cable to
your computer.
e Choose your machine from the list, and then
click Next.
The installation is now
Finish
To install optional applications:
Now go to
Page 17
complete and it is time to
do a test scan. See Test
Scan (scan to PDF) on
page 18.
6
Page 7
For Wireless Network Users
For wireless network interface users
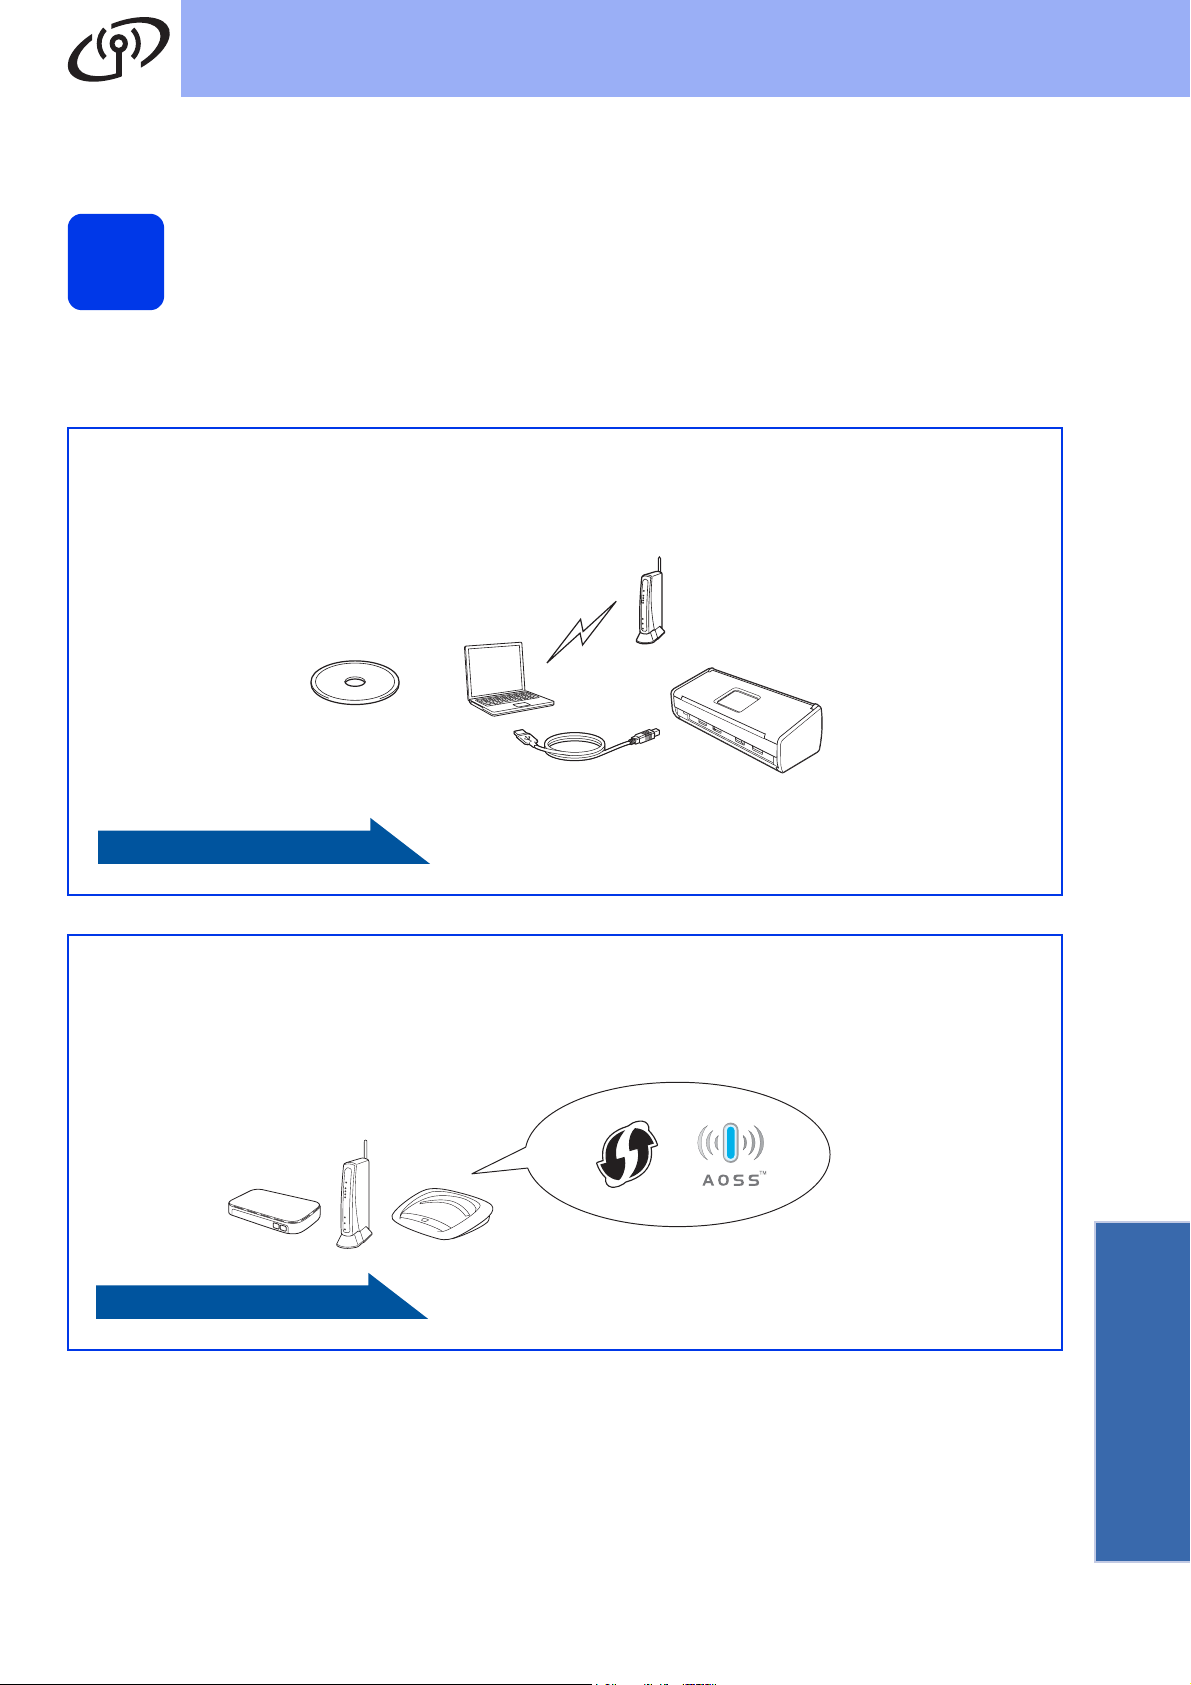
Choose your wireless setup method
4
The following instructions will offer two methods for setting up your Brother machine on a wireless network. If you
want to scan using your mobile devices only and your wireless access point/router supports automatic wireless
(one-push) setup (WPS or AOSS™), select method b. Otherwise, select method a.
a Setup using the DVD-ROM and a USB cable (Windows
• We recommend using a computer wirelessly connected to your network for this method.
• You will need to use a USB cable temporarily during configuration.
Now go to
One-push setup using WPS or AOSS™ (mobile devices)
b
• Use this method if your wireless access point/router supports automatic wireless (one-push) setup
(WPS or AOSS™).
• If you want to scan using your computer, use method a.
®
and Macintosh)
page 8
Now go to
Wireless Network
page 11
7
Page 8
For Wireless Network Users
Setup using the
DVD-ROM and USB cable
5
For Macintosh Users:
For Macintosh installation, insert the
DVD-ROM into your DVD-ROM drive and
double-click Start Here OSX. Select Wireless
installation and follow the Wireless Device
Setup instructions on your computer screen.
When setup is complete, go to step g on
page 10.
For Windows® Users:
(Windows® and Macintosh)
a Put the DVD-ROM into your DVD-ROM drive. If
the model name screen appears, choose your
machine. If the language screen appears,
choose your language.
NOTE
• If the Brother screen does not appear
automatically, go to Computer (My
Computer).
(For Windows
icon on the taskbar, and then go to Computer.)
• Double-click the DVD-ROM icon, and then
double-click start.exe.
®
8: click the (File Explorer)
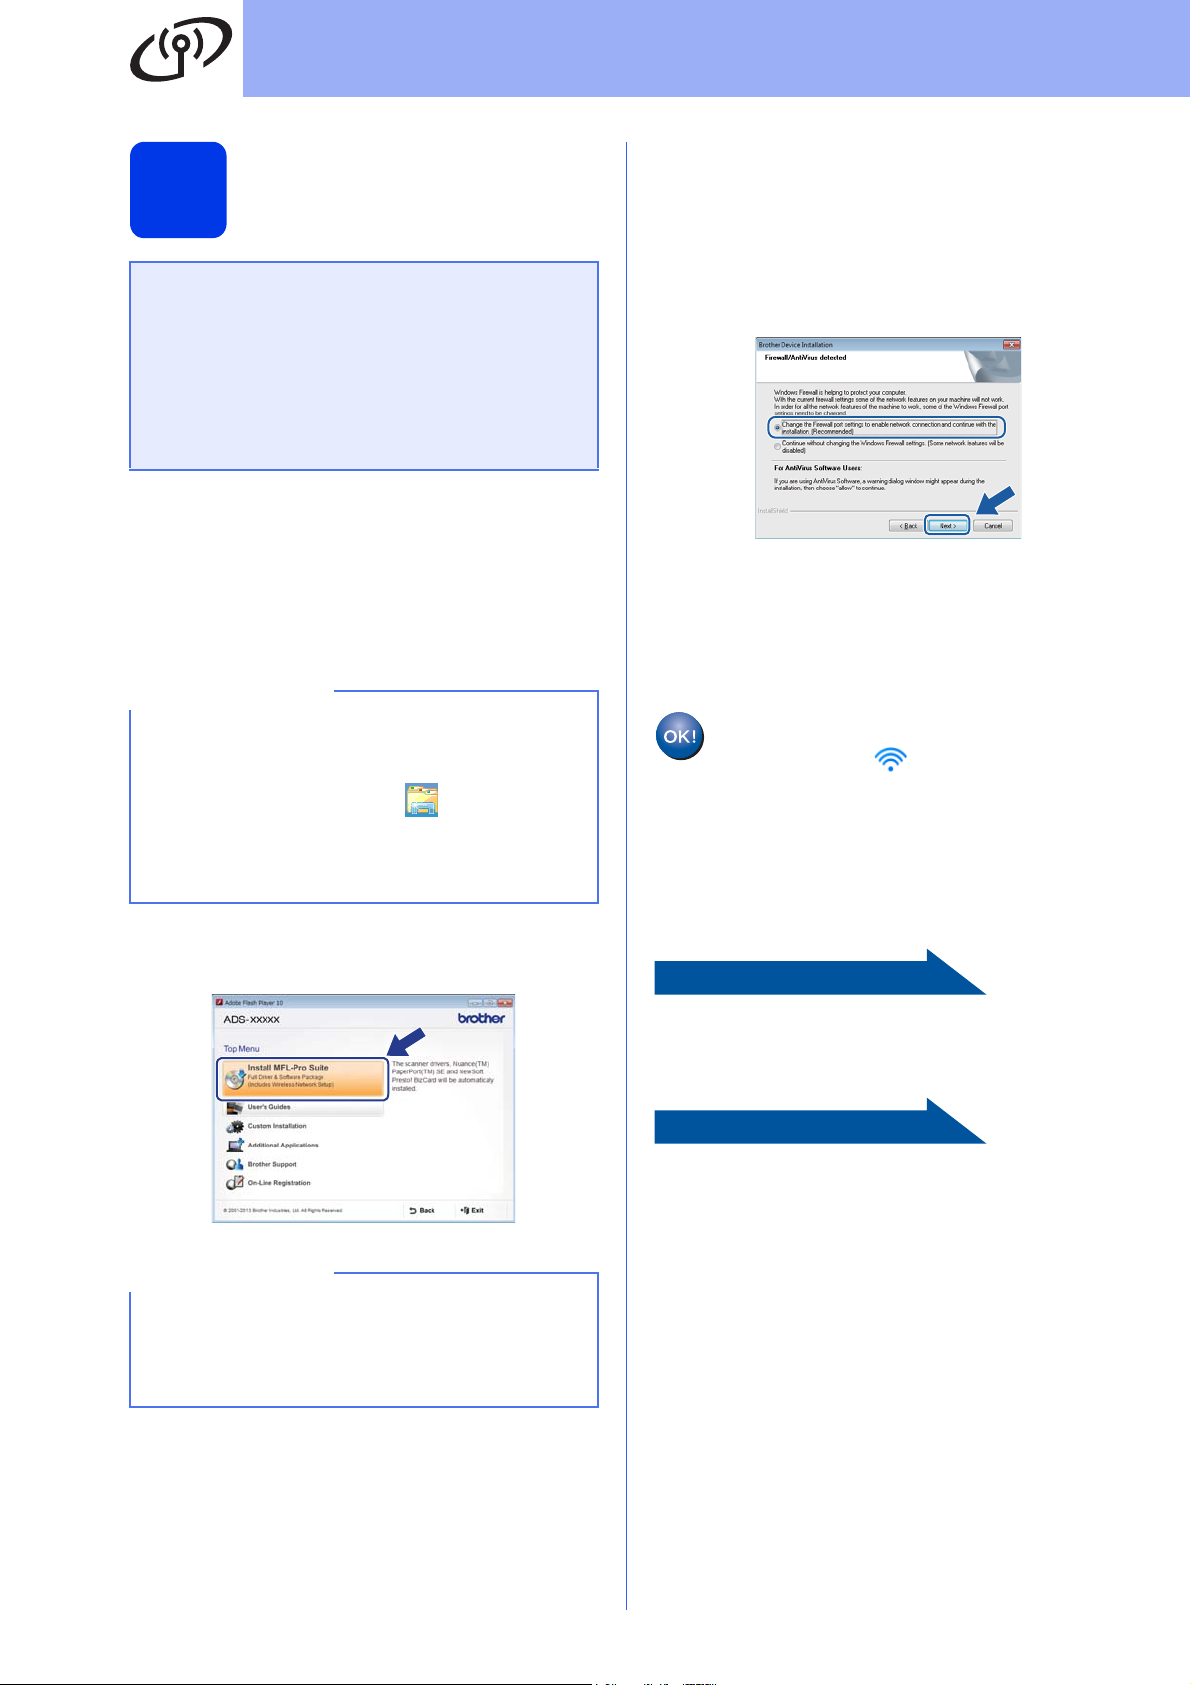
c Choose Wireless Network Connection, and
then click Next.
d When the Firewall/AntiVirus detected screen
appears, choose Change the Firewall port
settings to enable network connection and
continue with the installation.
(Recommended) and click Next.
e Follow the on-screen instructions to set up the
Brother machine.
f Your machine will now try to connect to your
wireless network. It may take a few minutes.
Wireless setup is now complete.
The Wi-Fi light on the Control Panel
lights up, indicating that the machine’s
Network I/F is set to WLAN.
To install MFL-Pro Suite
b Click Install MFL-Pro Suite and click Yes if
you accept the license agreements.
NOTE
• For Windows Vista®, Windows®7 and
®
Windows
screen appears, click Allow or Yes.
• Click Yes if you accept the license agreements.
8, when the User Account Control
For Windows® users:
Now go to
Step g on page 9
For Macintosh users:
Now go to
Step g on page 10
8
Page 9
Wireless Network
Windows
®
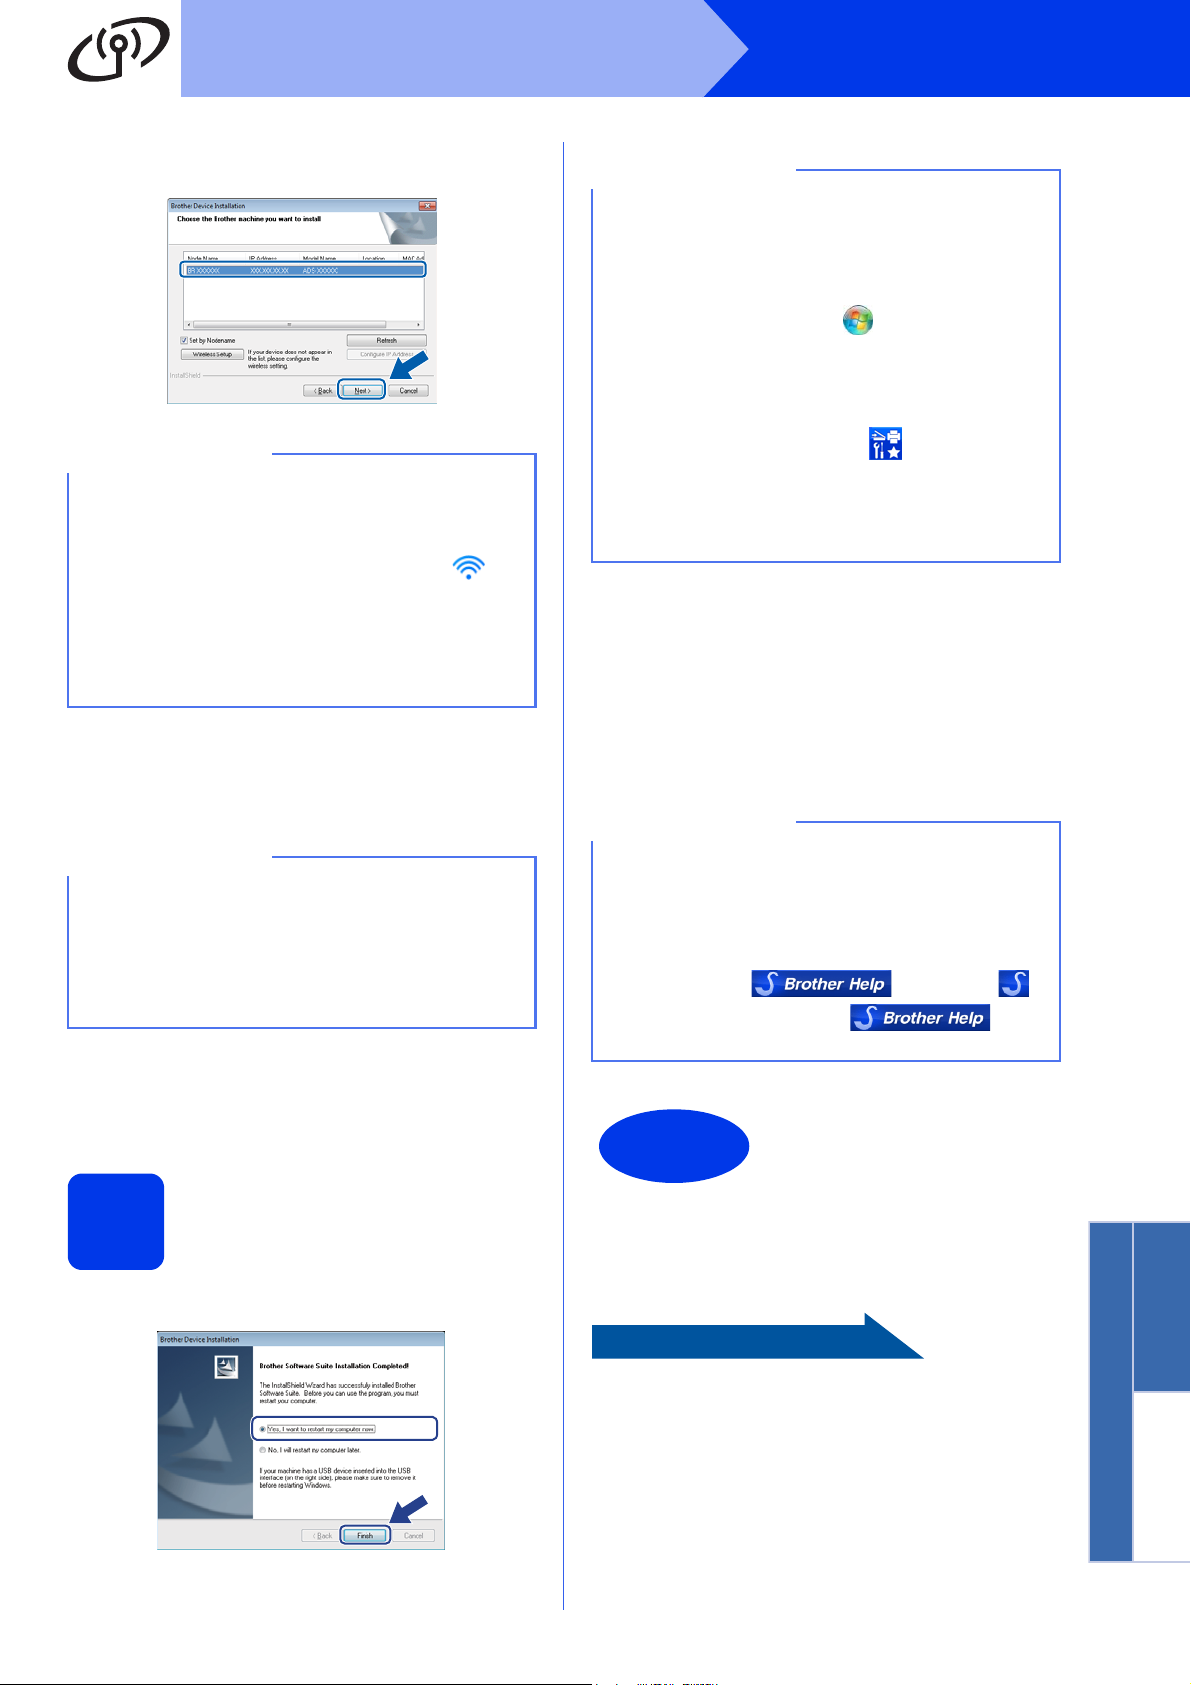
g Choose your machine from the list, and then
click Next.
NOTE
• If your machine is not found over the network,
confirm your settings by following the
on-screen instructions.
• If you are using WEP and the WiFi light on
the Control Panel lights up (for ADS-1000W) or
the LCD displays Connected (for
ADS-1500W) but your machine is not found on
the network, make sure you entered the WEP
key correctly. The WEP key is case-sensitive.
h The installation of the Brother drivers will
automatically start. The installation screens
appear one after another.
NOTE
• DO NOT cancel any of the screens during the
installation. It may take a few seconds for all
screens to appear.
•If the Windows Security screen appears,
select the check box and click Install to
complete the installation correctly.
i When the On-Line Registration screen is
displayed, make your selection and follow the
on-screen instructions.
Finish and restart
6
a Click Finish to restart your computer.
NOTE
If an error message appears during the software
installation, do one of the following:
- Windows
Windows
Diagnostics located in (Start) >
All Programs > Brother > ADS-XXXXX
(where XXXXX is your model name).
- Windows
Diagnostics, double-click (Brother
Utilities) on the desktop, and then click the
drop-down list and select your model name (if
not already selected). Click Tools in the left
navigation bar.
®
XP, Windows Vista® and
®
7 users: Run the Installation
®
8 users: To run the Installation
b The following screens will appear:
• When the Software Update Setting screen
appears, choose the software update setting
you want and click OK.
• When the Brother Product Research and
Support Program starts up, follow the
on-screen instructions.
NOTE
• Internet access is required for the software
update and the Brother Product Research and
Support Program.
• When you install MFL-Pro Suite, Brother Help
will also be installed automatically. Launch
Brother Help by clicking
in the system tray. Click to
access the Brother Solutions Center.
The installation is now
Finish
To install optional applications:
complete and it is time to
do a test scan. See Test
Scan (scan to PDF) on
page 18.
Windows
Wireless Network
Now go to
Page 16
®
Macintosh
9
Page 10
Wireless Network
Macintosh
g Choose your machine from the list, and then
click Next.
NOTE
If your wireless settings fail, the Wireless Device
Setup Wizard screen appears. Follow the
on-screen instructions to complete the wireless
configuration.
NOTE
• (ADS-1000W)
You can find your machine’s MAC Address
(Ethernet Address) in Network Status from the
Network tab, and IP address in TCP/IP
(Wireless) in Wireless from the Network tab,
in Web Based Management. See How to
Configure the Machine Settings Using Web
Based Management (Web Browser) in the
Network User’s Guide.
(ADS-1500W)
You can display your machine’s MAC Address
(Ethernet Address) and IP Address using the
machine’s LCD. To find the MAC Address,
press (Settings) > Network > WLAN >
MAC Address. To find the IP Address, press
(Settings) > Network > WLAN >
TCP/IP > IP Address.
• If the Setup Network “Scan to” name screen
appears, type a name for your Macintosh (up to
15 characters), and then click Next.
h The installation of the Brother drivers will
automatically start. Please wait for the software
to install.
The name you type will appear in the
Destination drop-down list in Scan to
Network Device from the Scan tab in Web
Based Management (ADS-1000W only)(see
Save Scanned Documents on Your Computer
in the User’s Guide) or on the LCD of the
machine (ADS-1500W only) when you choose
a scan option. For more information, see Scan
from the Control Panel of the Machine in the
User’s Guide.
The installation is now
Finish
complete and it is time to
do a test scan. See Test
Scan (scan to PDF) on
page 18.
10
To install optional applications:
Now go to
Page 17
Page 11
For Wireless Network Users
One-push setup using
WPS or AOSS™ (mobile
5
(ADS-1000W)
devices)
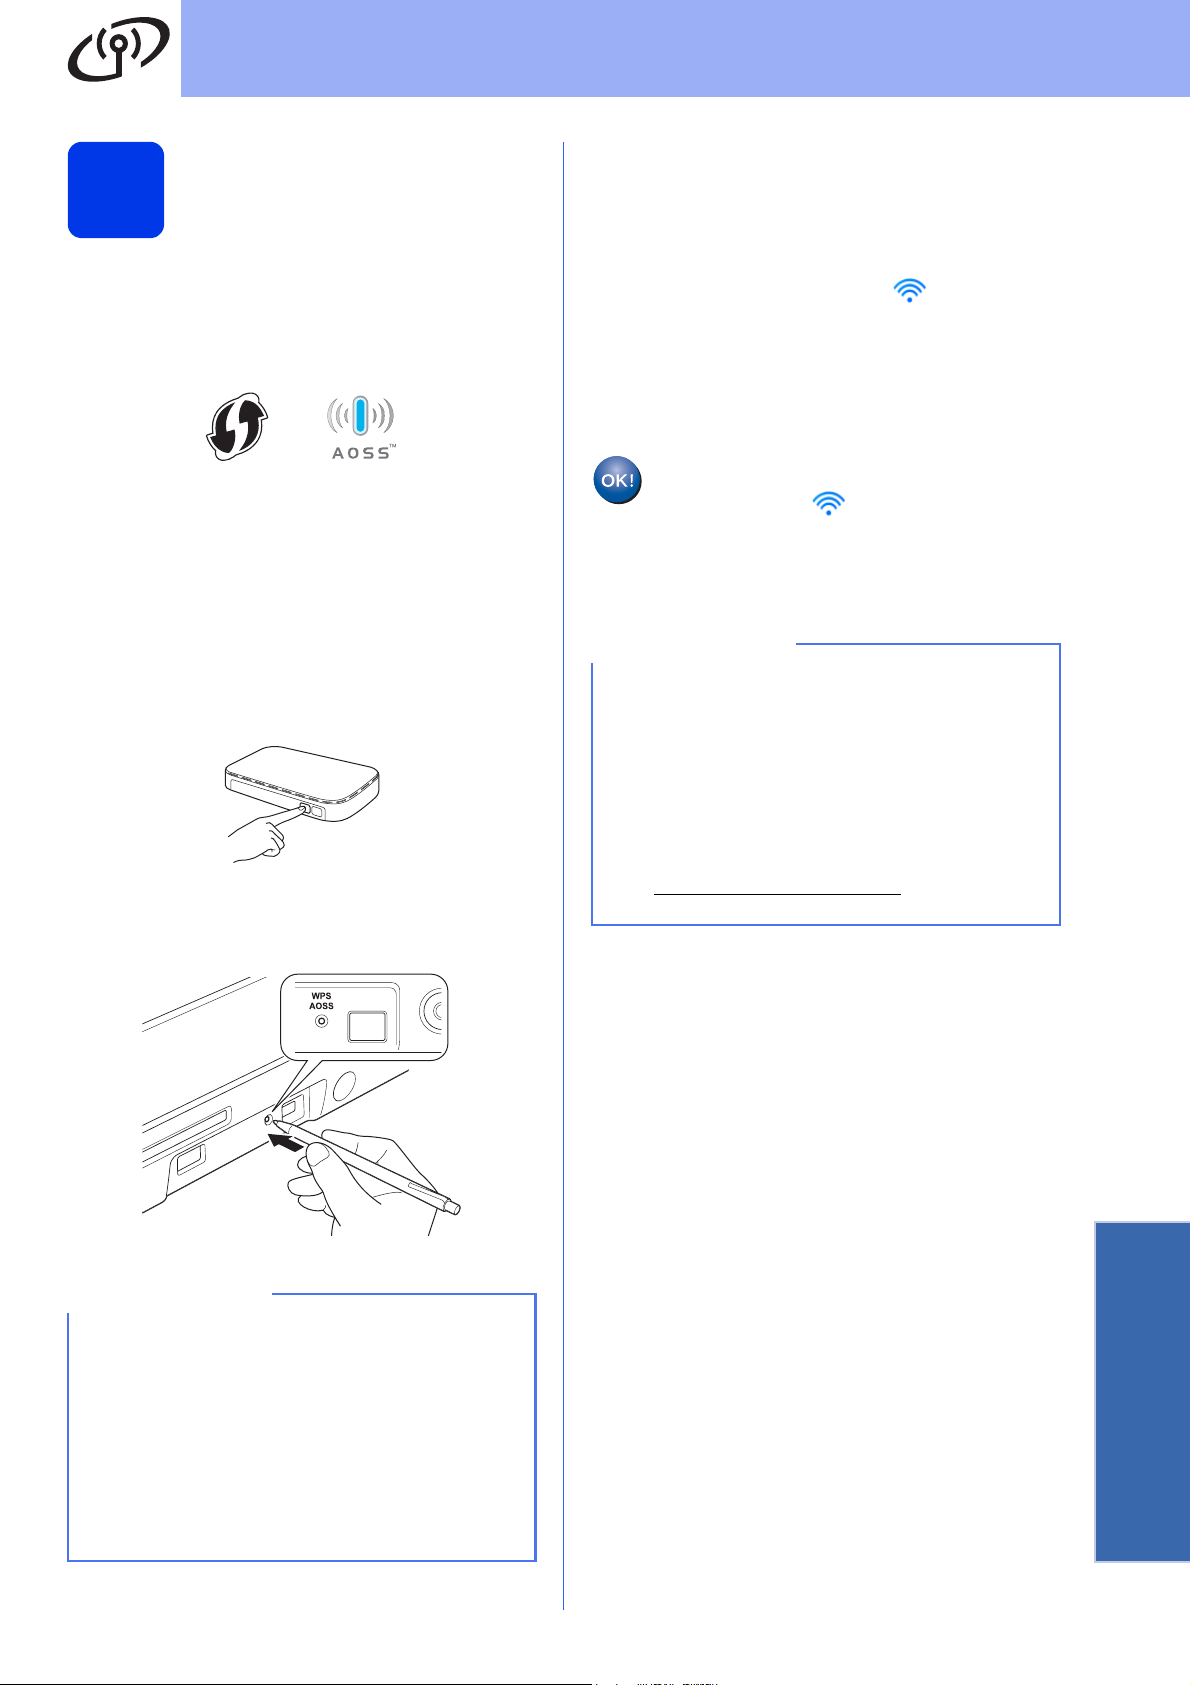
a Confirm that your wireless access point/router
has the WPS or AOSS™ symbol as shown
below.
b Place the Brother machine within range of your
WPS or AOSS™ access point/router. The
range may differ depending on your
environment. Refer to the instructions provided
with your access point/router.
c Press the WPS or AOSS™ button on your
wireless access point/router (for more
information, see the instructions provided with
your wireless access point/router).
d Using a small, pointed object, press the
AOSS/WPS button on the back of the machine
for less than two seconds.
e This feature will automatically detect which
mode (WPS or AOSS™) your wireless access
point/router uses and try to connect to your
wireless network.
f If your wireless device is connected
successfully, the Wi-Fi light on the Control
Panel will light up.
If the connection failed, the LEDs blink to
indicate an error status. Make a note of the
error status, see Troubleshooting on page 13,
and then correct the error.
Wireless setup is now complete.
The Wi-Fi light on the Control Panel
lights up, indicating that the machine’s
Network I/F is set to WLAN.
NOTE
• Connect your mobile device to a wireless
access point/router using a Wi-Fi connection.
• Download and install Brother iPrint&Scan
(Android™/iOS/Windows
mobile device’s application download site.
• To download the User’s Guide for the
application you are using (Brother
iPrint&Scan), visit the Brother Solutions Center
at http://solutions.brother.com/
Manuals on your model’s page.
®
Phone) from your
and click
NOTE
• If you do not press the AOSS/WPS button on
the back of the machine soon after pressing the
WPS or AOSS™ button on your wireless
access point/router, the connection may fail.
• If your wireless access point/router supports
WPS and you want to configure your machine
using the PIN (Personal Identification Number)
Method, see Configuration using the PIN
Method of WPS (Wi-Fi Protected Setup) in the
Network User’s Guide.
Wireless Network
11
Page 12
For Wireless Network Users
(ADS-1500W)
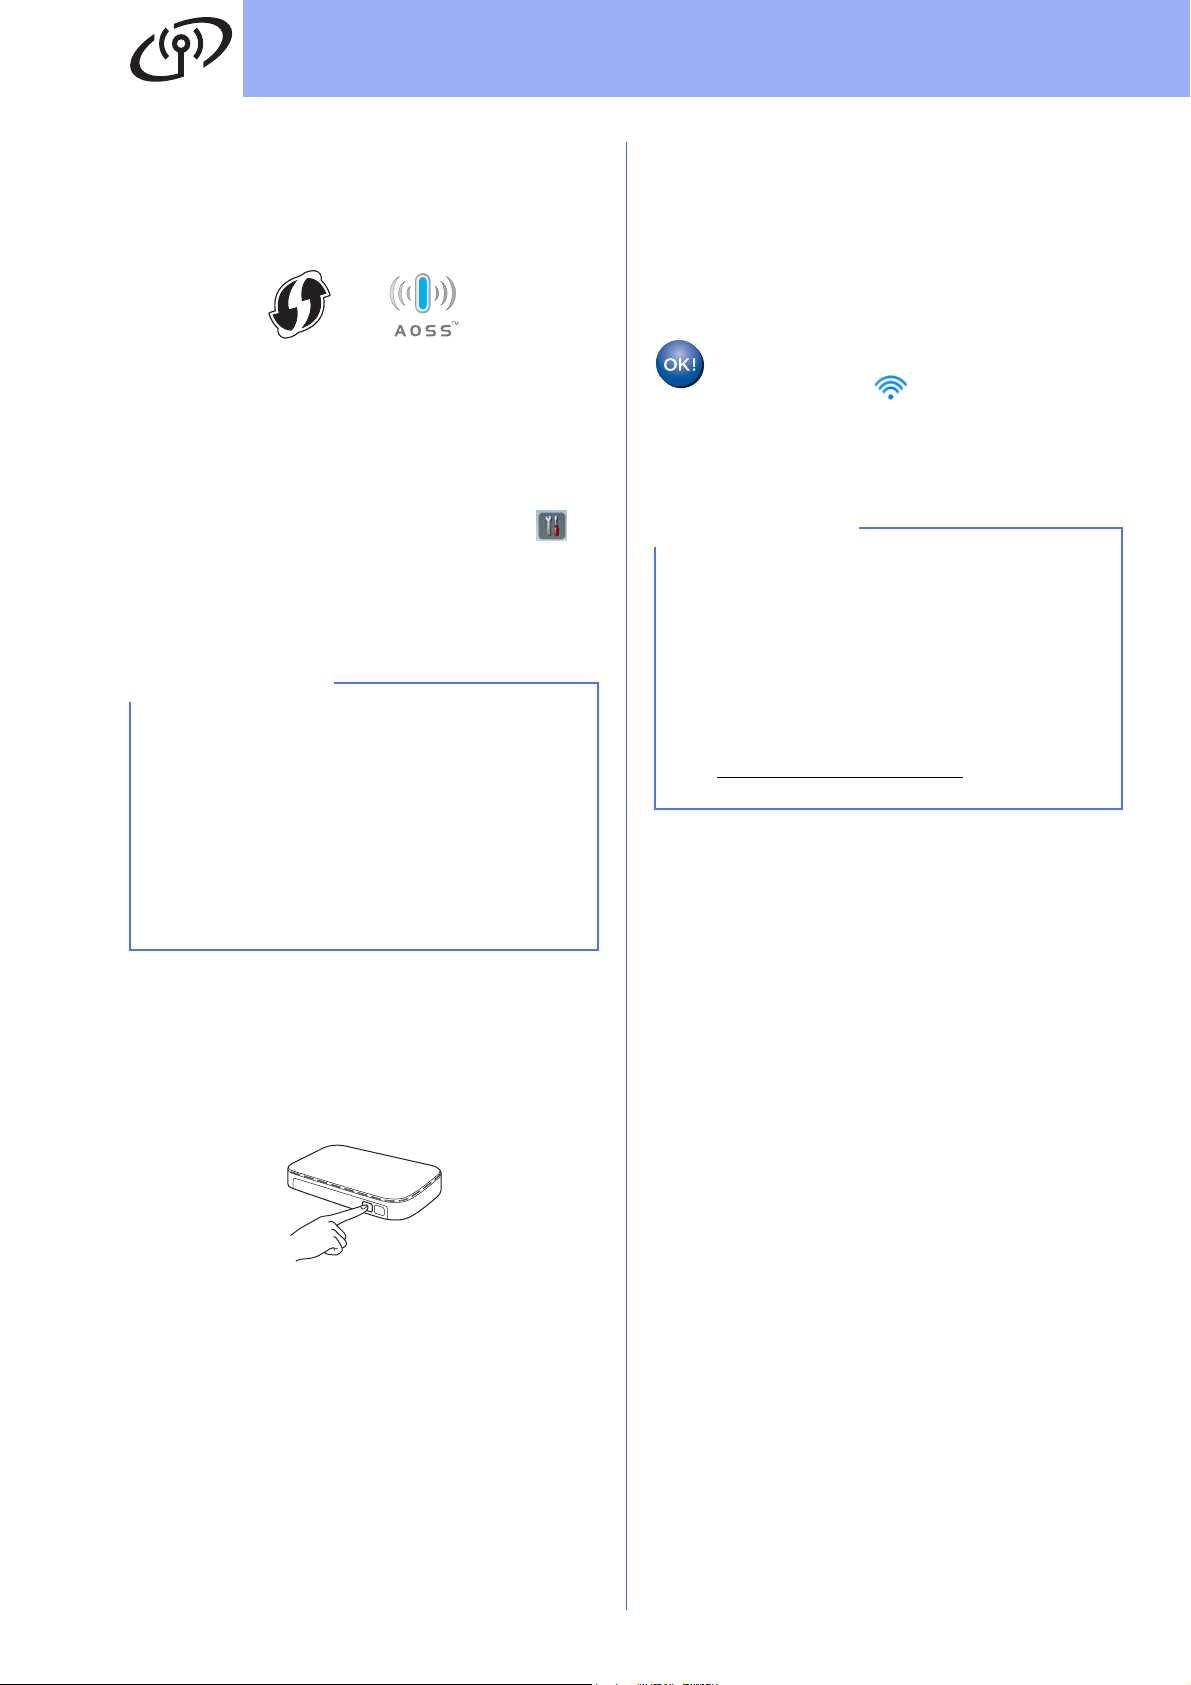
a Confirm that your wireless access point/router
has the WPS or AOSS™ symbol as shown
below.
b Place the Brother machine within range of your
WPS or AOSS™ access point/router. The
range may differ depending on your
environment. Refer to the instructions provided
with your access point/router.
c On the machine’s Control Panel, press
(Settings) > Network > WLAN > WPS/AOSS.
When Enable WLAN? is displayed, press Yes
to accept.
NOTE
• If you do not start WPS/AOSS from the
machine’s Control Panel soon after pressing
the WPS or AOSS™ button on your wireless
access point/router, the connection may fail.
• If your wireless access point/router supports
WPS and you want to configure your machine
using the PIN (Personal Identification Number)
Method, see Configuration using the PIN
Method of WPS (Wi-Fi Protected Setup) in the
Network User’s Guide.
f If your wireless device is connected
successfully, the LCD will display the message
Connected until you press OK.
If the connection failed, the LCD will display an
error code. Make a note of the error code, see
Troubleshooting on page 13, and then correct
the error.
Wireless setup is now complete.
The Wi-Fi light on the Control Panel
lights up, indicating that the machine’s
Network I/F is set to WLAN.
NOTE
• Connect your mobile device to a wireless
access point/router using a Wi-Fi connection.
• Download and install Brother iPrint&Scan
(Android™/iOS/Windows
mobile device’s application download site.
• To download the User’s Guide for the
application you are using (Brother
iPrint&Scan), visit the Brother Solutions Center
at http://solutions.brother.com/
Manuals on your model’s page.
®
Phone) from your
and click
d When the LCD instructs you to start WPS or
AOSS™, press the WPS or AOSS™ button on
your wireless access point/router (for more
information, see the instructions provided with
your wireless access point/router).
Press OK on your machine.
e This feature will automatically detect which
mode (WPS or AOSS™) your wireless access
point/router uses and try to connect to your
wireless network.
12
Page 13
For Wireless Network Users
Troubleshooting
If you need assistance during setup and want to contact Brother Customer Service, make sure you
have your SSID (Network Name) and Network Key ready. We cannot assist you in locating this
information.
How can I find the wireless security information (SSID and Network Key*)
1) Check documentation provided with your wireless access point/router.
2) The default SSID could be the manufacturer’s name or the model name.
3) If you do not know the security information, please consult the router manufacturer, your system
administrator, or your Internet provider.
* The Network Key may also be described as the Password, Security Key, or Encryption Key.
* If the WLAN access point/router is not broadcasting the SSID, the SSID will not automatically be detected.
You must manually enter the SSID name. See Configuring your machine when the SSID is not broadcasting
in the Network User’s Guide.
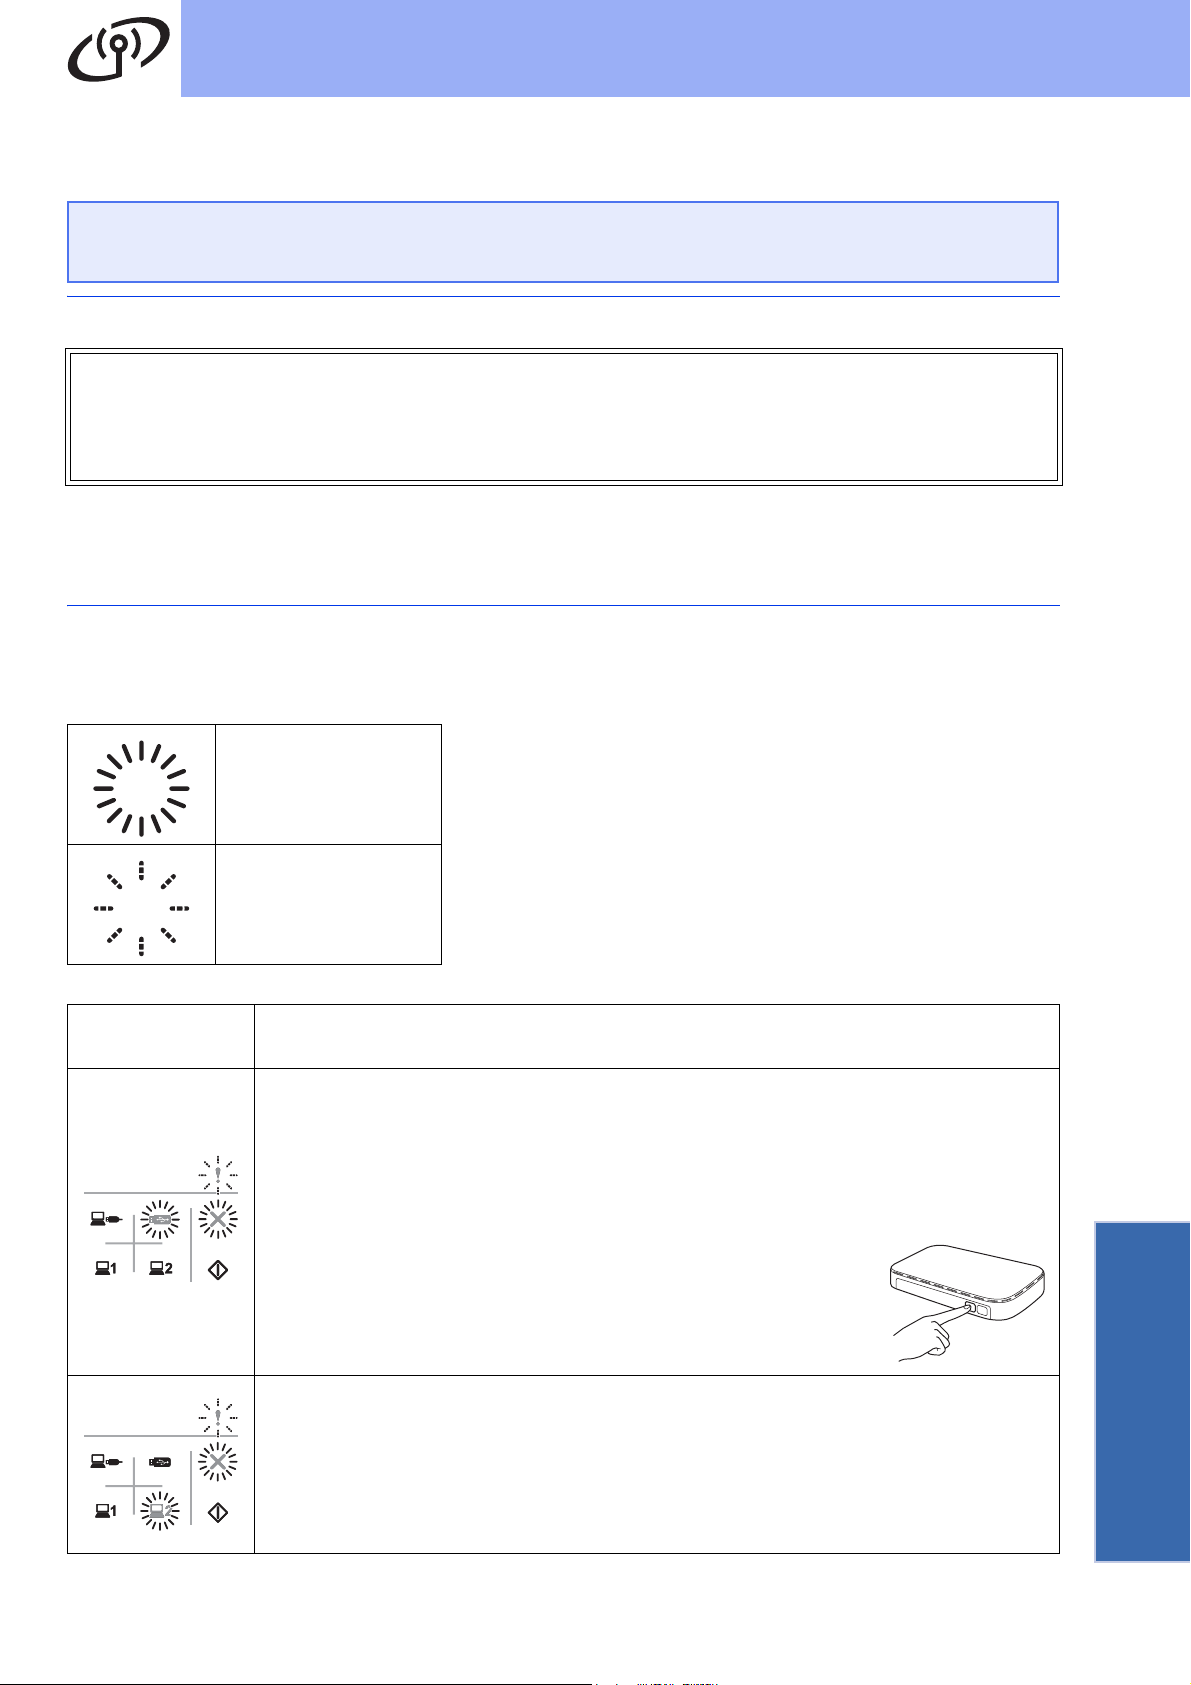
Error Status/Error Codes
If the LED indicators (on the ADS-1000W) or the LCD (on the ADS-1500W) indicate an error, locate the error
status or code in the tables that follow and use the recommended solution to correct the error.
The LED is on.
The LED is blinking.
ADS-1000W
Error Status
The machine cannot detect a wireless access point/router that has WPS or AOSS™
enabled.
To configure your wireless settings using WPS or AOSS™, you must configure both your
machine and the wireless access point/router.
Confirm that your wireless access point/router supports WPS or AOSS™, and start from
step 5 on page 11 again.
Recommended Solutions
If you do not know how to operate your wireless access point/router
using WPS or AOSS™, see the documentation provided with your
wireless access point/router, ask the manufacturer of your wireless
access point/router, or ask your system administrator.
Two or more wireless access points that have WPS or AOSS™, enabled are detected.
Confirm that only one wireless access point/router within range has the WPS or AOSS™
method active and try again.
Try starting from step 5 on page 11 again after a few minutes in order to avoid interference
from other access points.
Wireless Network
13
Page 14

For Wireless Network Users
ADS-1500W
Error Code
TS-01
TS-02
Recommended Solutions
The wireless setting is not activated.
Turn the wireless setting to ON:
1. On your machine, press (Settings) > Network > WLAN > Setup Wizard.
2. When Enable WLAN? is displayed, press Yes.
This will start the wireless setup wizard.
The wireless access point/router cannot be detected.
1. Check the following:
- Make sure that the wireless access point/router is powered on.
- Move your machine to an obstruction-free area, or closer to the wireless access
point/router.
- Temporarily place your machine within about 3.3 feet (one meter) from the wireless
access point when you are configuring the wireless settings.
- If your wireless access point/router is using MAC address filtering, confirm the MAC
address of the Brother machine is allowed in the filter.
2. If you manually entered the SSID and security information (SSID/authentication
method/encryption method/Network Key), the information may be incorrect.
Confirm the SSID and security information and re-enter the correct information as
necessary. See How can I find the wireless security information (SSID and Network
Key*) on page 13.
TS-03
TS-04
The wireless network and security setting you entered may be incorrect.
Confirm the wireless network settings. See How can I find the wireless security information
(SSID and Network Key*) on page 13.
Confirm that the entered or selected SSID/authentication method/encryption
method/UserID/Userpass are correct.
The Authentication/Encryption methods used by the selected wireless access point/router
are not supported by your machine.
For infrastructure mode, change the authentication and encryption methods of the wireless
access point/router. Your machine supports the following authentication methods:
Authentication Method Encryption Method
WPA-Personal
WPA2-Personal AES
Open
Shared key WEP
If your problem is not solved, the SSID or network settings you entered may be incorrect.
Reconfirm the wireless network settings. See How can I find the wireless security
information (SSID and Network Key*) on page 13.
None (without encryption)
TKIP
AES
WEP
14
For ad-hoc mode, change the authentication and encryption methods of your computer for
the wireless setting. Your machine supports Open authentication method only, with optional
WEP encryption.
Page 15

For Wireless Network Users
ADS-1500W
Error Code
TS-05
TS-06
TS-07
Recommended Solutions
The security information (SSID/Network Key) is incorrect.
Confirm the SSID and security information (Network Key). See How can I find the wireless
security information (SSID and Network Key*) on page 13.
If your router uses WEP encryption, enter the key used as the first WEP key. Your Brother
machine supports the use of the first WEP key only.
The wireless security information (Authentication method/Encryption method/Network Key)
is incorrect.
Confirm the wireless security information (Authentication method/Encryption method/
Network Key) using the Authentication Method table in error TS-04. See How can I find the
wireless security information (SSID and Network Key*) on page 13.
If your router uses WEP encryption, enter the key used as the first WEP key. Your Brother
machine supports the use of the first WEP key only.
The machine cannot detect a wireless access point/router that has WPS or AOSS™
enabled.
To configure your wireless settings using WPS or AOSS™, you must operate both your
machine and the wireless access point/router.
Confirm that your wireless access point/router supports WPS or AOSS™, and try starting
step 5 on page 11 again.
TS-08
TS-20
If you do not know how to operate your wireless access point/router
using WPS or AOSS™, see the documentation provided with your
wireless access point/router, ask the manufacturer of your wireless
access point/router, or ask your network administrator.
Two or more wireless access points that have WPS or AOSS™, enabled are detected.
Confirm that only one wireless access point/router within range has the WPS or AOSS™
method active and try again.
To avoid interference from other access points, after a few minutes, try again starting from
step 5 on page 11.
The machine is still trying to connect to your wireless network. Please wait a few minutes,
and then check the WLAN status.
Wireless Network
15
Page 16

Install Optional Applications
Install optional
applications
1
(Windows
BR-Receipts (USA only)
Brother’s BR-Receipts application processes receipts
by taking information from your scanned images and
categorizing it. You can generate reports to view and
track categorized expenses.
Nuance PDF Converter Professional 8
(ADS-1500W only)
Nuance PDF Converter Professional 8 offers a
variety of features for handling PDF files. It can unlock
and open PDF files for viewing, editing, annotation
and re-assembly.
Enter the Nuance serial number that is shown on
the MFL-Pro Suite DVD-ROM sleeve when
installing Nuance PDF Converter Professional 8.
®
users)
a Reinsert the DVD-ROM or double-clicking the
start.exe program. If the model name screen
appears, choose your machine. If the language
screen appears, choose your language.
b The DVD-ROM Top Menu will appear. Click
Additional Applications.
d When installation is complete, click Back to go
back to the Additional Applications screen
and install other applications.
To exit, click Exit.
NOTE
• To start BR-Receipts, do one of the following:
®
-Windows
Windows
Programs > Brother > BR-Receipts.
-Windows
(Brother Utilities) on the desktop, and then
click (BR-Receipts).
• To start Nuance PDF Converter Professional 8,
do one of the following:
-Windows
Windows
Programs > Nuance PDF Converter
Professional 8 > PDF Converter
Professional.
-Windows
lower right corner of your desktop. When the
menu bar appears, click Start and then click
XP, Windows Vista® and
®
7 users: Click (Start) > All
®
8 users: Double-click
®
XP, Windows Vista® and
®
7 users: Click (Start) > All
®
8 users: Move your mouse to the
(PDF Converter Professional).
c Click the button for the application you want to
install. (These applications available may differ
depending on your country.)
Finish
The installation is now
complete.
16
Page 17

Install Optional Applications
Install optional
applications
1
BR-Receipts (USA only)
Brother’s BR-Receipts application processes receipts
by taking information from your scanned images and
categorizing it. You can generate reports to view and
track categorized expenses.
Presto! PageManager
Presto! PageManager adds Optical Character
Recognition (OCR) capability to Brother
ControlCenter2. OCR allows you to scan a document
and convert its contents to text, so that you can edit
the text using the word processing application of your
choice. You can scan, share and organize photos and
documents using Presto! PageManager.
(Macintosh users)
a Double-click the Brother Support icon to
install. The Brother Support window will
appear.
b Click the button for the application you want to
install. (These applications available may differ
depending on your country.)
Finish
The installation is now
complete.
17
Page 18

Test Scan (scan to PDF)
For Windows® users:
Load your document
1
Step 2 on page 18
a Lift the Document Support Arms a.
Now go to
1
b Place your document, face down, top edge first
in the document feeder between the Guides
until you feel it touch the inside of the machine
gently.
For Macintosh users:
Now go to
Step 2 on page 19
Scan using
ControlCenter4
2
(Windows
®
)
a Click the (ControlCenter4) icon in the
system tray, and then select Open from the
menu.
NOTE
If the icon is not displayed in the system tray,
do one of the following:
®
•Windows
Windows
Programs > Brother > ADS-XXXXX >
ControlCenter4 (where XXXXX is your model
name).
XP, Windows Vista® and
®
7 users: Click (Start) > All
NOTE
When you load multiple documents, position the
documents so that the leading edges are aligned
at a slight angle in the feed direction.
•Windows
Utilities) on the desktop, and then click
(ControlCenter4).
®
8 users: Double-click (Brother
b Select Home Mode in the mode dialog box.
The ControlCenter4 window appears.
c Click (Scan). The machine starts to feed
and scan your document.
d Click (Save). The Save dialog box
appears.
18
Page 19

Test Scan (scan to PDF)
e Click OK. The scanned data will be saved in
PDF format.
The test scan is now
Finish
NOTE
(ADS-1000W only)
If you set up the machine using a Wireless
Network connection and want to start scanning
using Scan to FTP, Scan to PC (Network
Connect) or WS Scan, see Scan from the Control
Panel of the Machine in the User’s Guide to
configure the scan settings from the machine’s
Control Panel.
How to open a PDF file in Adobe®
Reader
®
complete.
(Windows® 8)
Scan using
ControlCenter2
2
(Macintosh)
a Click the (ControlCenter2) icon in the
Dock. The ControlCenter2 window appears.
NOTE
If the icon is not displayed in the Dock, click
Go from the Finder bar, Applications, Brother,
and then double-click the icon. The
(ControlCenter2) icon will appear in the Dock.
a Move your mouse to the lower right corner of
your desktop. When the menu bar appears,
click Settings, and then click Control Panel.
b Click Programs, click Default Programs,
and then click Associate a file type or
protocol with a program.
c Select .pdf, and then click the Change
program... button.
d Click Adobe Reader. The icon next to .pdf
changes to the ‘Adobe Reader’ icon.
®
Adobe
application for reading .pdf files until you
change this file association.
Reader® is now the default
b Click (File).
c Click Start Scanning. The machine starts to
feed and scan your document.
The scanned data is saved in PDF format.
The test scan is now
Finish
NOTE
(ADS-1000W only)
If you set up the machine using a Wireless
Network connection and want to start scanning
using Scan to FTP, Scan to PC (Network
Connect) or WS Scan, see Scan from the Control
Panel of the Machine in the User’s Guide to
configure the scan settings from the Control
Panel.
complete.
19
Page 20

Product Safety Guide
Symbols and conventions used in the documentation
The following symbols and conventions are used
throughout the documentation.
WARNING
WARNING indicates a potentially hazardous situation
which, if not avoided, could result in death or serious
injuries.
CAUTION
CAUTION indicates a potentially hazardous situation
which, if not avoided, may result in minor or moderate
injuries.
IMPORTANT
IMPORTANT indicates a potentially hazardous situation
which, if not avoided, may result in damage to property or
loss of product functionality.
NOTE
Notes tell you how you should respond to a situation that
may arise or give tips about how the operation works with
other features.
Bold typeface identifies specific keys
Bold
Italics
(ADS-1500W
only)
Courier New
Follow all warnings and instructions marked on the
machine.
on the machine’s control panel or on
the computer screen.
Italicized typeface emphasizes an
important point or refers you to a
related topic.
Text in Courier New font identifies
messages on the LCD of the machine.
NOTE
The illustrations in this guide show the
ADS-1500W.
Prohibition icons indicate actions that must not be
performed.
This icon indicates that flammable sprays may not
be used.
This icon indicates that organic solvents such as
alcohol and liquids may not be used.
Electrical Hazard icons alert you to possible
electrical shock.
Fire Hazard icons alert you to the possibility of fire.
Unplug icons indicate that you should unplug the
machine.
20
Page 21

Product Safety Guide
Compilation and Publication
Under the supervision of Brother Industries, Ltd., this manual has been compiled and published, covering the
latest product descriptions and specifications.
The contents of this manual and the specifications of this product are subject to change without notice.
Brother reserves the right to make changes without notice in the specifications and materials contained herein and
shall not be responsible for any damages (including consequential) caused by reliance on the materials presented,
including but not limited to typographical and other errors relating to the publication.
Choosing a location
Put your machine and AC adapter (hereinafter collectively referred to as “the unit”) on a flat, level, stable surface
that is free of vibration and shocks, such as a desk. Choose a location where the temperature remains between
41°F and 95°F (5°C and 35°C) and the humidity is between 20% to 80% (without condensation).
WARNING
DO NOT expose the unit to direct sunlight, excessive heat, open flames, corrosive gasses, moisture or
dust.
DO NOT place the unit on a carpet or rug, as this will expose it to dust. Doing so may create a risk of
an electrical short or fire. It may also damage the unit and/or render it inoperable.
DO NOT place the unit near heaters, air conditioners, electric fans, refrigerators, radiators, or water.
Doing so may create the risk of a short circuit or fire should water come into contact with the unit
(including condensation from heating, air conditioning, and/or ventilation equipment that may be
sufficient to create a short circuit or fire).
DO NOT place the unit near chemicals or in a place where chemicals could be spilled on it. Should
chemicals come into contact with the unit, there may be a risk of fire or electric shock. In particular,
organic solvents or liquids such as benzene, paint thinner, polish remover, or deodorizer may melt or
dissolve the plastic cover and/or cables, resulting in a risk of fire or electric shock. These or other
chemicals may also cause the unit to malfunction or become discolored.
21
Page 22

Product Safety Guide
The product should be placed so as not to come into contact with any wall or other device. Otherwise,
it could create a risk of overheating and/or fire.
Instead:
• Place the unit on a solid surface, never on a bed, sofa, rug, or other similar soft surface.
• Do not place the unit in a “built-in” installation unless adequate ventilation is provided.
CAUTION
Avoid placing the unit in a high-traffic area. If you must place it in a high-traffic area, ensure that the unit is in
a safe location where it cannot be accidentally knocked-over, which could cause injury to you and serious
damage to the unit.
Ensure that cables and cords leading to the unit are secured so as not to pose a tripping hazard.
DO NOT place the unit on an unstable or tilted cart, stand, table or on any tilted/slanted surface. The machine
is heavy and may fall, causing injury to you and serious damage to the unit.
Make sure that no part of the unit protrudes from the desk or stand where the unit is located. Make sure that
the unit is located on a flat, level, and stable surface free from vibration. Failure to observe these precautions
could cause the unit to fall, causing injury to you and serious damage to the unit.
IMPORTANT
• DO NOT place your machine next to sources of interference, such as speakers or the base units of
non-Brother cordless telephones. Doing so may interfere with the operation of the machine’s electronic
components.
• DO NOT connect the unit to an AC power outlet controlled by wall switches or automatic timers. Disruption
of power can delete information from the machine’s memory, and repeated cycling of the power can
damage the unit.
22
Page 23

Product Safety Guide
To use the unit safely
WARNING
ELECTRICAL HAZARDS
Failure to follow the warnings in this section may create the risk of an electrical shock. In addition, you
could create an electrical short, which may create the risk of a fire.
There are high-voltage electrodes inside the unit. Before you access the inside of the machine,
including for routine maintenance such as cleaning, make sure you have unplugged the power cord
from the AC power outlet.
DO NOT push objects of any kind into the unit through slots or openings in the cabinet, as they may
touch dangerous voltage points or short out parts.
DO NOT continue using the unit if it has been dropped or the cabinet has been damaged. Instead,
unplug the unit from the power outlet and contact Brother Authorized Service Personnel.
The unit should be connected to an AC power source within the range indicated on Specifications in
the User's Guide. DO NOT connect it to a DC power source or inverter. Doing this might cause an
electrical shock or a risk of fire. If you are not sure what kind of power source you have, contact a
qualified electrician.
If water, other liquids, or metal objects get inside the unit, immediately unplug the unit from the AC
power outlet and contact Brother Authorized Service Personnel.
Power Cord Safety:
• Use only the power cord supplied with this product.
• DO NOT allow anything to rest on the power cord.
• DO NOT place the unit where people can walk on the cord.
• DO NOT place the unit in a position where the cord is stretched or strain is otherwise put on the
cord, as it may become worn or frayed.
• DO NOT use the unit or handle the cord if the cord has become worn or frayed. If unplugging the
unit, DO NOT touch the damaged/frayed part.
• Brother strongly recommends that you DO NOT use any type of extension cord.
23
Page 24

Product Safety Guide
AC Adapter Safety
Only use the supplied AC adapter with the unit. Only plug the AC adapter into a power outlet with
voltage that is within the range indicated on Specifications in the User's Guide. Failure to do so may
result in injury to yourself or others, or damage to the machine or other property. Brother does not
assume any responsibility for any damage resulting from using an AC adapter other than the one
specified.
DO NOT use a damaged AC adapter.
DO NOT place heavy objects on, damage, or modify the AC adapter.
DO NOT forcibly bend the cord of the AC adapter.
DO NOT forcibly pull the cord of the AC adapter.
DO NOT drop, hit, or otherwise damage the AC adapter.
DO NOT touch the unit during a thunderstorm when the AC adapter is plugged in. There may be a
remote risk of electric shock from lightning when the machine is used during a thunderstorm.
When disconnecting the AC adapter from the machine or from the power outlet, always hold the
connector, not the cable, and pull firmly. Failure to do so may result in exposed or broken power cord
wires and/or create a risk of fire, or electric shock.
Make sure that one end of the power cord is firmly plugged into a standard power outlet and the other
end is firmly plugged into the adapter block. Do not use an outlet that is loose. If the power cord is not
completely plugged into the power outlet and adapter block, the adapter may become hot and/or catch
fire.
24
Page 25

Product Safety Guide
DO NOT exceed the rated input or output of the AC adapter.
DO NOT connect the supplied AC adapter to other products.
This product was packaged in a plastic bag. To avoid suffocation, keep this plastic bag away from
babies and children. Do not use the bag in cribs, beds, carriages or play pens. The bag is not a toy.
FIRE HAZARDS
Failure to follow the warnings in this section may create the risk of a fire.
DO NOT use flammable substances, any type of spray or an organic solvent/liquid that contains
alcohol or ammonia to clean the inside or outside of the unit. Doing this may cause a risk of fire or
electrical shock.
Do not disassemble or modify the unit, otherwise fire or electric shock may result. If the unit requires
repair, contact Brother Authorized Service Personnel.
If the unit becomes hot, releases smoke, or generates any strong smells, immediately unplug the unit
from the power outlet and call Brother Customer Service.
DO NOT touch the AC adapter or handle the plug with wet hands.
25
Page 26
Product Safety Guide
CAUTION
DO NOT sit or stand on the unit or use it for any purpose beyond its intended purpose.
Wait until pages have exited the machine before picking them out. Otherwise, you could cause injury to your
fingers by trapping them in a roller.
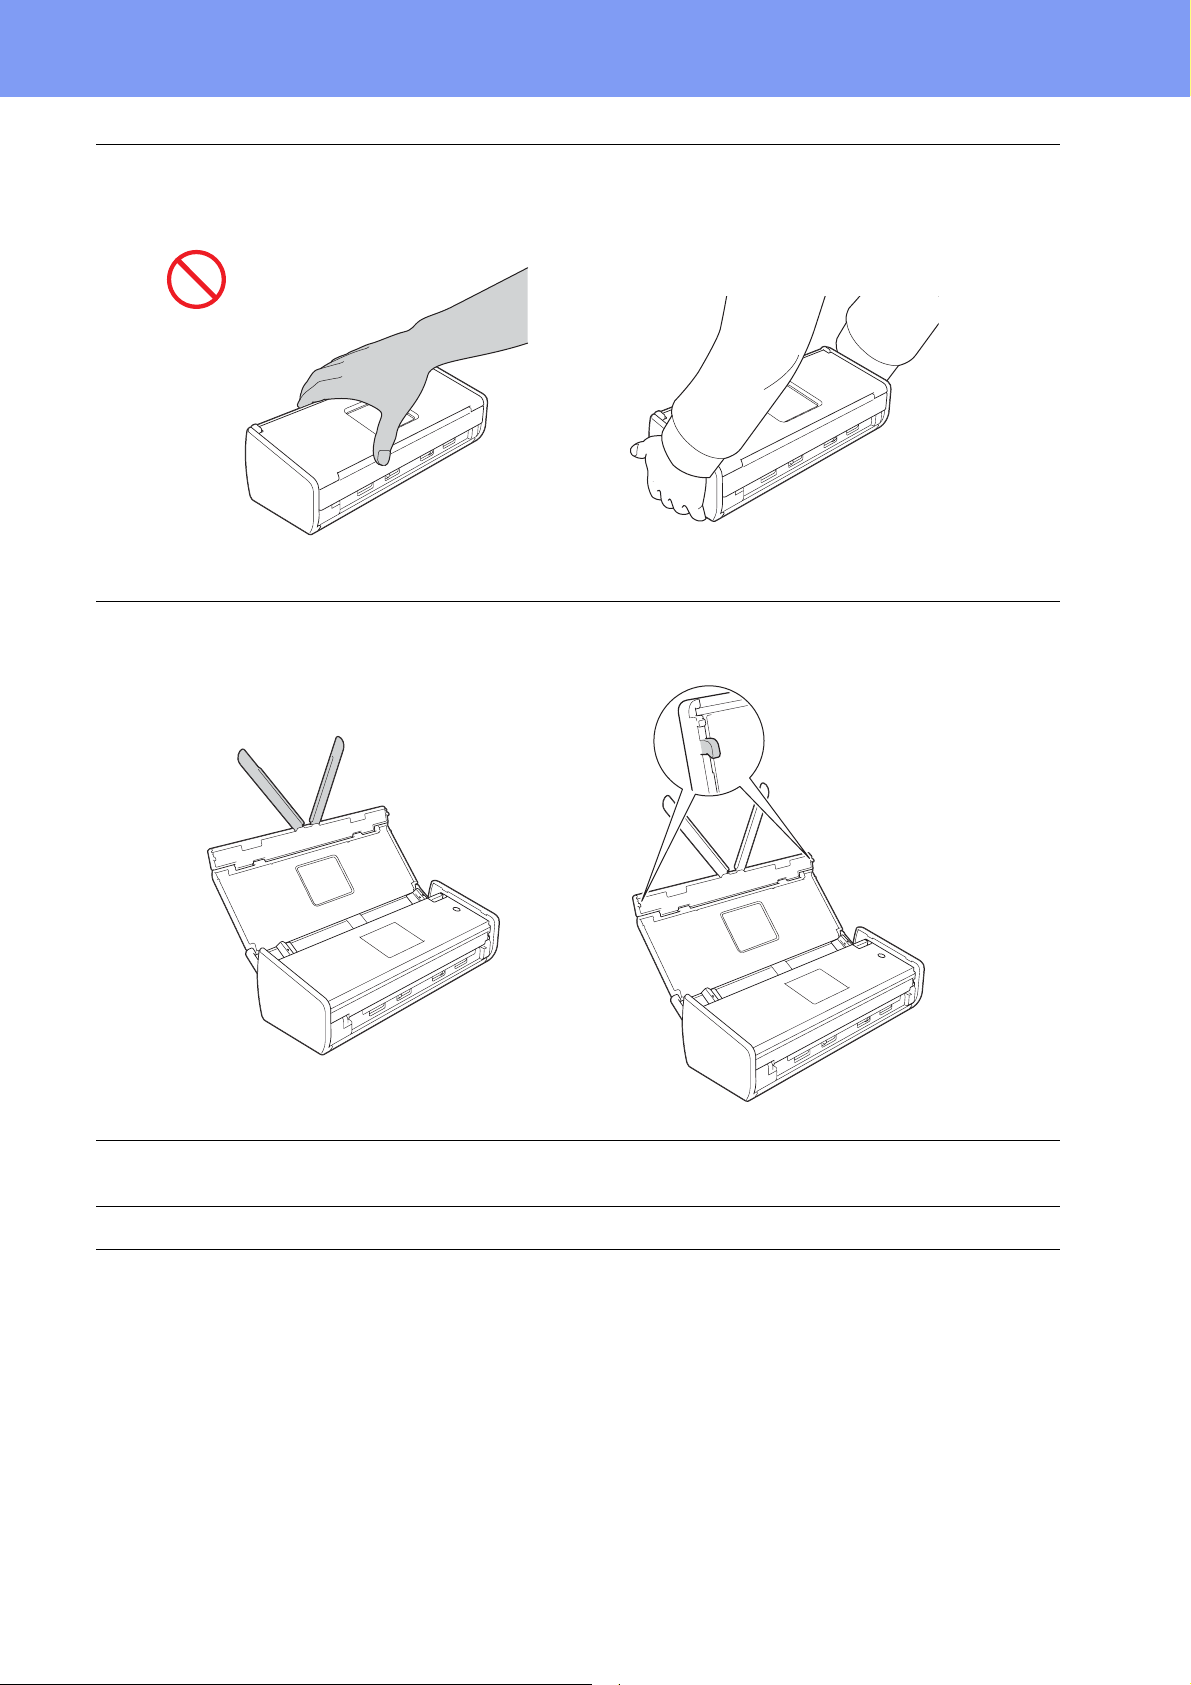
DO NOT put your hands on the edge of the machine. Doing this may cause injury to your fingers by pinching
them.
26
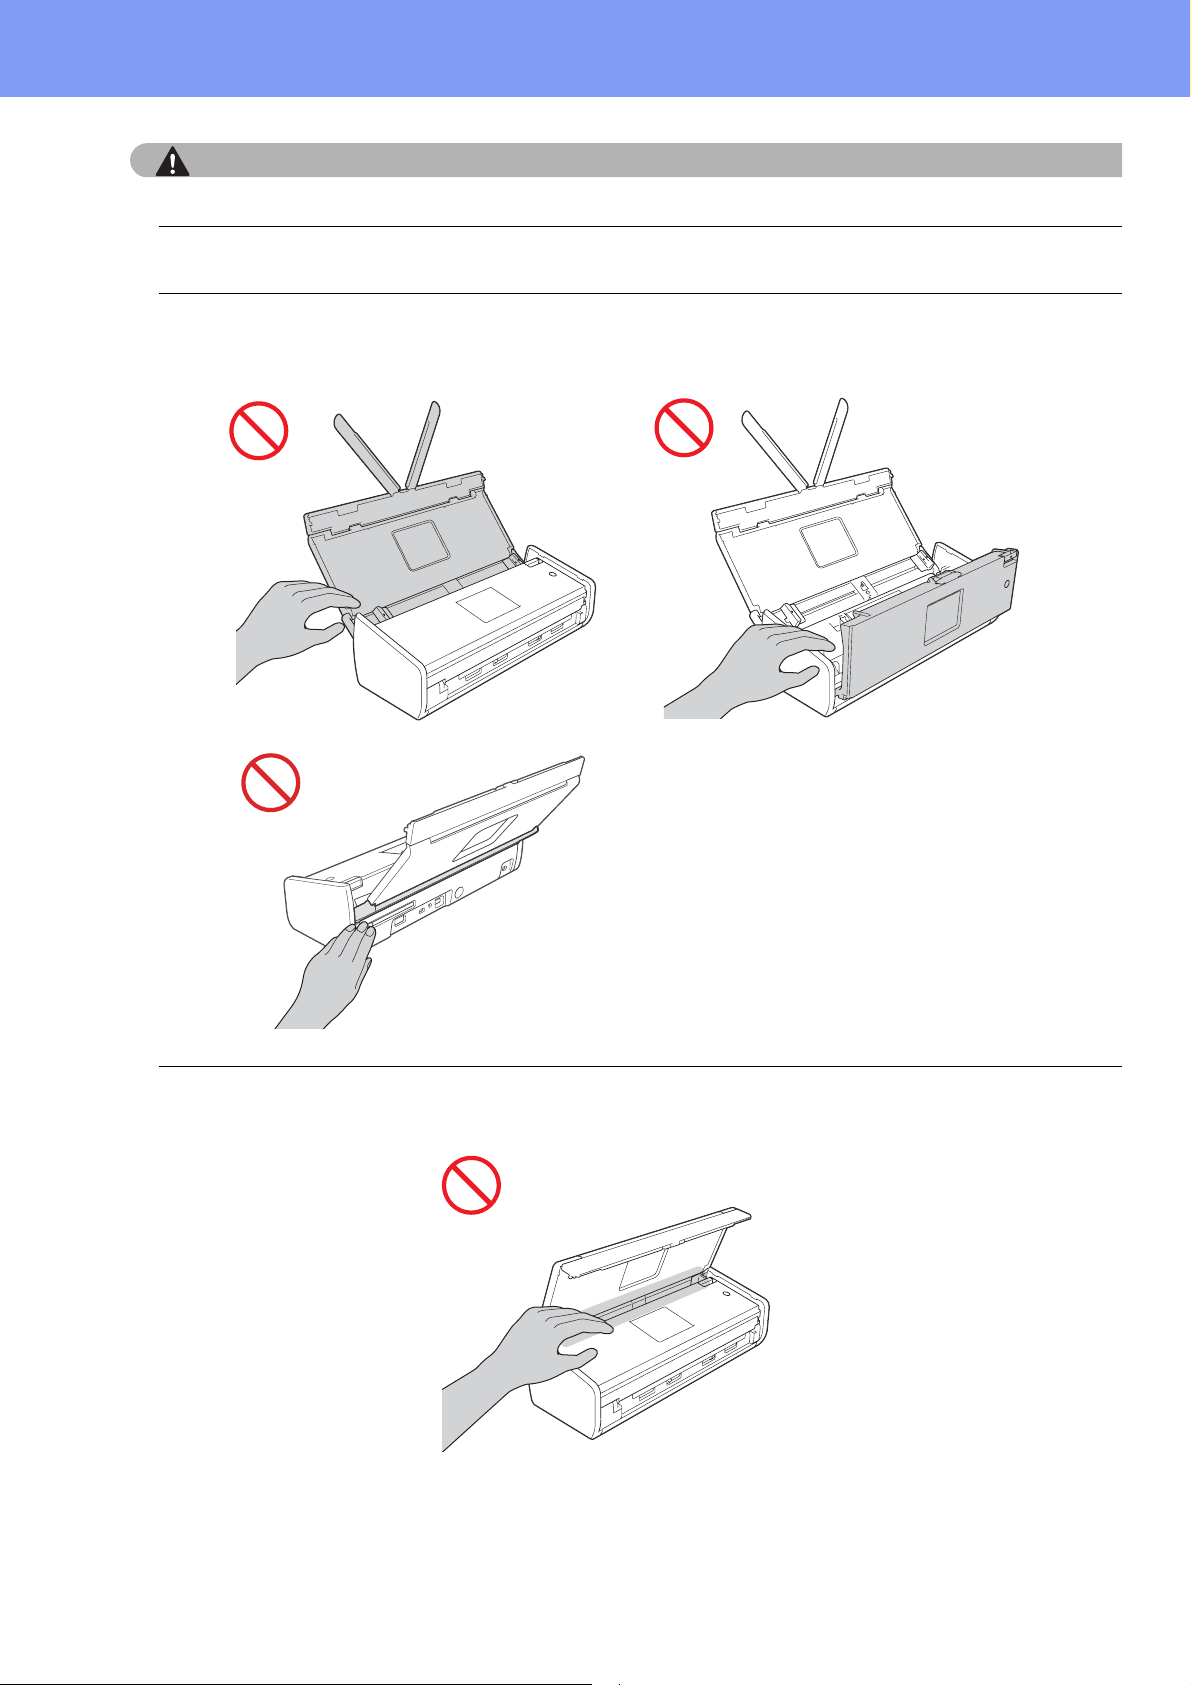
DO NOT touch the shaded area shown below when the top cover is open. Doing this may cause injury to your
fingers by pinching them.
Page 27
Product Safety Guide
DO NOT carry the machine by holding the top cover. Doing this may cause the machine to slip out of your
hands. Only carry the machine by placing your hands under the entire machine.
Be careful of the projections on the machine. Otherwise, injury could result.
If you do not intend to use the unit for an extended period of time, disconnect the AC adapter from the power
outlet.
DO NOT swing the AC adapter around or play with it. Doing so may result in injury to yourself or others.
Use caution when operating the machine to prevent clothing (particularly sleeves, neckties, etc.), hair, or
accessories from being drawn into the machine, otherwise injury may result. In the event that an object is drawn
into the machine, immediately disconnect the unit from the power source.
27
Page 28

Product Safety Guide
IMPORTANT
• Be careful when touching the Separation Pad and its surrounding area in the machine. Otherwise, you could
cause serious damage to the machine.
• Disruption of power can wipe out information in the machine’s memory.
• DO NOT put objects on top of the unit.
• If the machine does not operate normally when the operating instructions are followed, adjust only those
controls that are covered by the operating instructions. Improper adjustment of other controls may result in
damage or minor exposure to electromagnetic waves and will often require extensive work by a qualified
technician to restore the machine to normal operation.
• A distinct change in the machine’s performance may indicate a need for service.
• (ADS-1500W only)
DO NOT touch the Touchscreen immediately after plugging in the power cord or turning on the machine.
Doing this may cause an error.
Important safety instructions
DO NOT attempt to service the unit yourself because opening or removing covers may expose you to dangerous
voltage points and other risks and may void your warranty. Refer all servicing to a Brother Authorized Service
Center. For the location of your nearest Brother Authorized Service Center, please call:
In USA: 1-877-BROTHER (1-877-276-8437)
In Canada: 1-877-BROTHER
28
Page 29

Product Safety Guide
Regulation
WARNING
This product must be installed near an AC power outlet that is easily accessible. In case of an
emergency, you must unplug the power cord from the AC power outlet to shut off the power
completely.
IMPORTANT
• Brother cannot accept any financial or other responsibilities that may be the result of your use of this
information, including direct, special or consequential damages. There are no warranties extended or
granted by this document.
• This machine has been certified to comply with FCC standards, which are applied to the USA only.
Federal Communications Commission (FCC) Declaration of Conformity (USA only)
Responsible Party: Brother International Corporation
200 Crossing Boulevard
Bridgewater, NJ 08807 USA
TEL: (908) 704-1700
declares, that the products
Product Name: ADS-1000W and ADS-1500W
comply with Part 15 of the FCC Rules. Operation is subject to the following two conditions:
(1) This device may not cause harmful interference, and (2) this device must accept any interference received,
including interference that may cause undesired operation.
This equipment has been tested and found to comply with the limits for a Class B digital device, pursuant to Part
15 of the FCC Rules. These limits are designed to provide reasonable protection against harmful interference in
a residential installation. This equipment generates, uses, and can radiate radio frequency energy and, if not
installed and used in accordance with the instructions, may cause harmful interference to radio communications.
However, there is no guarantee that interference will not occur in a particular installation. If this equipment does
cause harmful interference to radio or television reception, which can be determined by turning the equipment off
and on, the user is encouraged to try to correct the interference by one or more of the following measures:
Reorient or relocate the receiving antenna.
Increase the separation between the equipment and receiver.
Connect the equipment into an outlet on a circuit different from that to which the receiver is connected.
Consult the dealer or an experienced radio/TV technician for help.
This transmitter must not be co-located or operated in conjunction with any other antenna or transmitter.
IMPORTANT
• Changes or modifications not expressly approved by Brother Industries, Ltd. could void the user’s authority
to operate the equipment.
• A specific shielded interface cable should be used to ensure compliance with the limits for a Class B digital
device.
Wireless connection (Mexico only)
The operation of this equipment is subject to the following two conditions:
(1) it is possible that this equipment or device may not cause harmful interference, and (2) this equipment or device
must accept any interference, including interference that may cause undesired operation.
29
Page 30

Product Safety Guide
Industry Canada Compliance Statement (Canada only)
This device complies with Industry Canada licence-exempt RSS standard(s). Operation is subject to the following
two conditions: (1) this device may not cause interference, and (2) this device must accept any interference,
including interference that may cause undesired operation of the device.
Le present appareil est conforme aux CNR d'Industrie Canada applicables aux appareils radio exempts de
licence. L'exploitation est autorisee aux deux conditions suivantes : (1) l'appareil ne doit pas produire de
brouillage, et (2) l'utilisateur de l'appareil doit accepter tout brouillage radioelectrique subi, meme si le brouillage
est susceptible d'en compromettre le fonctionnement.
For use in the USA or Canada only
These machines are made for use in the USA and Canada only. We cannot recommend using them overseas
because the power requirements of your machine may not be compatible with the power available in foreign
countries. Using USA or Canada models overseas is at your own risk and may void your warranty.
International ENERGY STAR® Qualification Statement
The purpose of the International ENERGY STAR® Program is to promote the development and popularization of
energy-efficient equipment.
As an ENERGY STAR
ENERGY STAR
®
Partner, Brother Industries, Ltd. has determined that this product meets the
®
specifications for energy efficiency.
30
Page 31

Product Safety Guide
Trademarks
The Brother logo is a registered trademark of Brother Industries, Ltd.
Brother is a registered trademark of Brother Industries, Ltd.
Microsoft, Windows, Windows Vista, Windows Server, Outlook and Internet Explorer are either registered
trademarks or trademarks of Microsoft Corporation in the United States and/or other countries.
Apple, Macintosh, Mac OS and Safari are trademarks of Apple Inc., registered in the United States and other
countries.
Nuance, the Nuance logo, PaperPort and ScanSoft are trademarks or registered trademarks of Nuance
Communications, Inc. or its affiliates in the United States and/or other countries.
PowerPC is a registered trademark of IBM in the United States and/or other countries.
AOSS is a trademark of Buffalo Inc.
WPA, WPA2, Wi-Fi Protected Access and Wi-Fi Protected Setup are marks of the Wi-Fi Alliance.
Wi-Fi and Wi-Fi Alliance are registered marks of the Wi-Fi Alliance.
AMD is a trademark of Advanced Micro Devices, Inc.
Linux is the registered trademark of Linus Torvalds in the U.S. and other countries.
Android is a trademark of Google Inc.
ISIS, Captiva and QuickScan are either registered trademarks or trademarks of EMC Corporation in the United
States and/or other countries.
Intel is a trademark of Intel Corporation in the U.S. and/or other countries.
Adobe, Reader and Photoshop are either registered trademarks or trademarks of Adobe Systems Incorporated in
the United States and/or other countries.
Each company whose software title is mentioned in this manual has a Software License Agreement specific to its
proprietary programs.
Any trade names and product names of companies appearing on Brother products, related documents
and any other materials are all trademarks or registered trademarks of those respective companies.
Copyright and License
©2013 Brother Industries, Ltd. All rights reserved.
This product includes software developed by the following vendors:
©1983-1998 PACIFIC SOFTWORKS, INC.
©2008 Devicescape Software, Inc.
This product includes the “KASAGO TCP/IP” software developed by ZUKEN ELMIC,Inc.
Open Source Licensing Remarks
This product includes open-source software.
To see the open source licensing remarks, please go to the manual download section on your model’s home page
of Brother Solutions Center at http://solutions.brother.com/
.
31
Page 32

Product Safety Guide
Legal limitations for copying
Observe all copyright laws when using this product.
Color reproductions of certain documents are illegal and may result in either criminal or civil liability. This
memorandum is intended to be a guide rather than a complete listing of every possible prohibition. In case of
doubt, we suggest that you check with counsel as to any particular questionable documents.
The following documents issued by the United States/Canadian Government or any of its Agencies may not be
copied:
Money
Bonds or other certificates of indebtedness
Certificates of Deposit
Internal Revenue Stamps (canceled or uncanceled)
Selective Service or draft papers
Passports
United States/Canadian Postage Stamps (canceled or uncanceled)
Food Stamps
Immigration Papers
Checks or drafts drawn by Governmental agencies
Identifying badges or insignias
Copyrighted works cannot be copied. Sections of a copyrighted work can be copied for ‘fair use’. Multiple copies
would indicate improper use.
Works of art should be considered the equivalent of copyrighted works.
Notice Regarding the Faithful Reproduction of Scanned Documents
After scanning a document, confirm that the accuracy and quality of the corresponding scan data meets your
needs by confirming the size of the scan data, the amount of image data captured, image fidelity, color tones, etc.
Always confirm the scan data before destroying the original document.
It is possible that a portion of the scan data may be lost or damaged, therefore, read all instructions carefully and
keep the following in mind.
Depending on the condition of the document, the document may become worn thin, distorted, dirty, or cracked
during scanning. In this case, some or all of the scan data may be lost.
Confirm that the document has no wrinkles, bends, or holes.
If the inside of the machine is dirty, the document may become worn thin, distorted, dirty, or cracked during
scanning. In this case, some or all of the scan data may be lost.
Clean the inside of the machine carefully and regularly.
The following may occur depending on the scan settings, such as document size, scanning resolution,
color-related settings, single-side or double-side scanning settings, auto deskew, blank page skip, etc.
• Text may be illegible or unclear if image resolution is too low.
32
• Scan data of a color document may be captured in black-and-white.
• Only one side of a two-sided document may be captured.
• A portion of the document may not be scanned, or the size may be too small.
• The document may only be scanned up to a certain point, after which scan data will be lost.
• Blank pages may not be deleted, or pages may be deleted unnecessarily.
• Margins may be added to the edges of the scan data.
Refer to the User’s Guide for information about how to configure the scan settings.
Page 33

Product Safety Guide
Depending on the condition of the document (such as if it has wrinkles, bends, or holes) and consumables,
multiple pages of a document may be fed at once, causing some pages to be missing from the scanned data.
Confirm that the document has no wrinkles, bends, or holes.
Replace all consumables periodically.
When scanning documents that are not within the recommended guidelines, or depending on the condition of
the document (such as if it has wrinkles, bends, or holes), consumables, or the paper feeding mechanisms
inside the machine, documents may become jammed inside the machine during scanning. In this case, some
or all of the scan data may be lost. (Documents may be destroyed as a result of a paper jam.)
Refer to “Acceptable Documents” in the User’s Guide for information about acceptable documents.
When scanning documents that have been marked with a fluorescent marker, marked areas may not be seen
properly in the scan data, or the marker color may not be reproduced properly, depending on the color and
density of the marker ink.
You may achieve more desireable results by increasing the scanning resolution. Refer to the User’s Guide for
information about resolution settings.
33
Page 34

Visit us on the World Wide Web
http://www.brother.com/
www.brotherearth.com
 Loading...