

Page 1
BDF450_IB_FA.qxp:Blender 12/1/10 2:21 PM Page 1
Instructions for use
Includes recipes
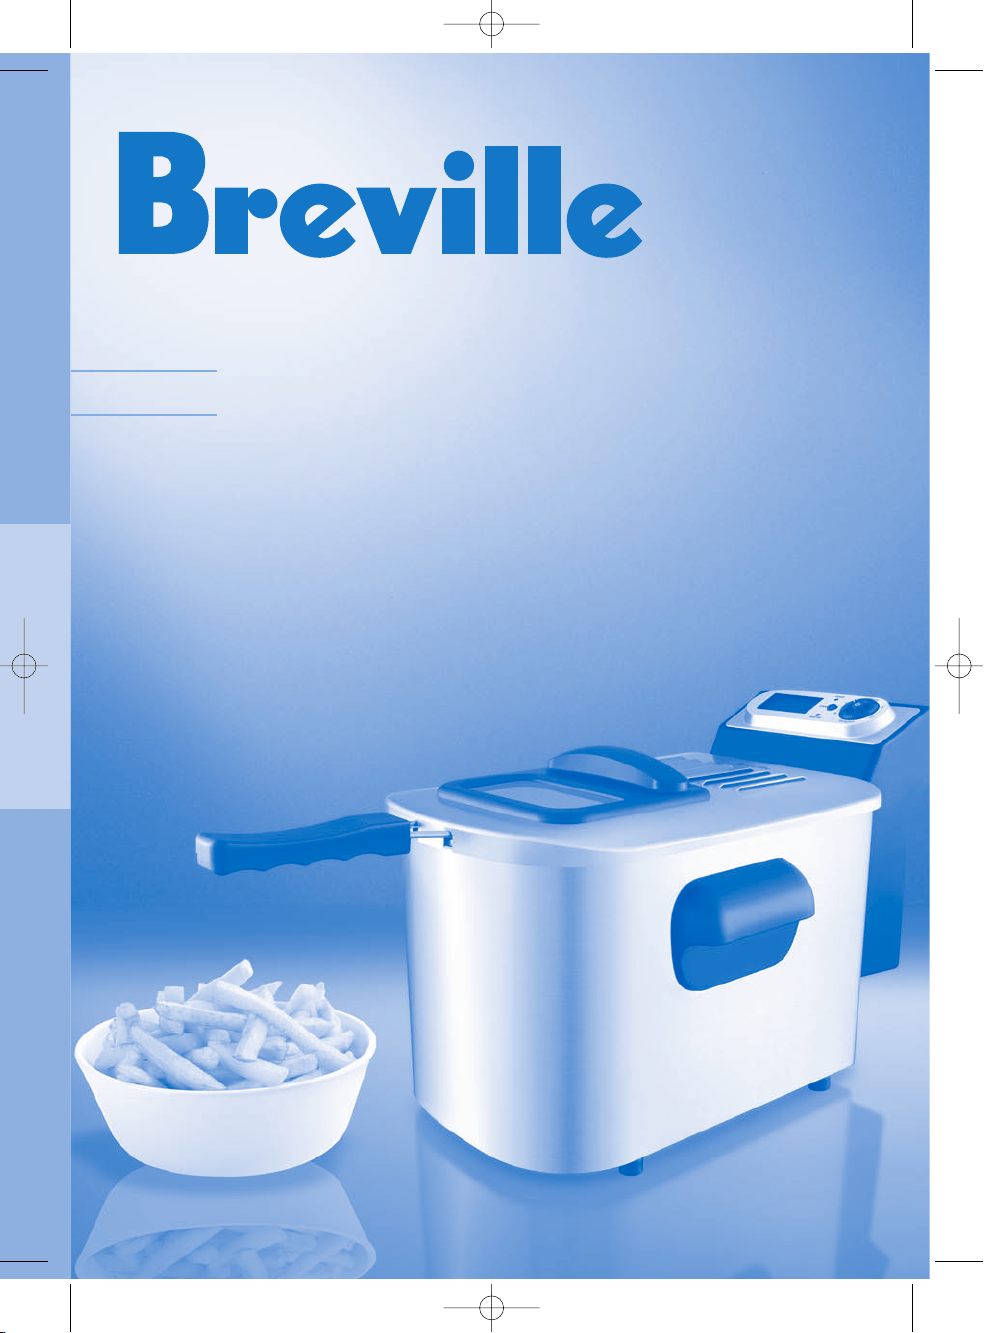
4L Deep Fryer
Model BDF450
Page 2

BDF450_IB_FA.qxp:Blender 12/1/10 2:21 PM Page 2
Contents
Introduction 3
Breville recommends safety first 4
Page
Know your Breville 4L Deep Fryer 6
How to assemble/disassemble your Breville 4L Deep Fryer 7
Operating your Breville 4L Deep Fryer 8
Auto cut-out reset button 11
Care and cleaning 12
Cooking guide 13
Handy hints 14
Recipes R1
2
Page 3

BDF450_IB_FA.qxp:Blender 12/1/10 2:21 PM Page 3
Congratulations
on the purchase of your new Breville 4L Deep Fryer
Page 4

BDF450_IB_FA.qxp:Blender 12/1/10 2:21 PM Page 4
Breville recommends safety first
We at Breville are very safety conscious. We design and manufacture consumer products with you, our valued
customer, foremost in mind. In addition, we ask that you exercise a degree of care when using any electrical
appliance and adhere to the following precautions.
Important safeguards for your Breville 4L Deep Fryer
• Carefully read all instructions before operating the
appliance and save for future reference.
• Remove any packaging material and promotional
stickers before using the Deep Fryer for the first
time.
• Do not place the Deep Fryer near the edge of a
bench or table during operation. Ensure the surface
is level, clean and free of water.
• Do not place the Deep Fryer on or near a hot gas
or electric burner, or where it could touch a heated
oven. Place the Deep Fryer at least 20cm away
from walls and curtains. Provide adequate space
above and on all sides for air circulation around the
deep fryer.
• Do not use on metal surfaces, for example, a sink
drain board.
• Always ensure the Deep Fryer is properly
assembled before use. Follow the instructions
provided in this book.
• Do not touch hot surfaces.
• Extreme caution must be used when the Deep Fryer
is filled with hot oil or other liquid. Do not move
the Deep Fryer during cooking and allow it to cool
before removing oil.
• Solid oil products, such as butter, margarine or
animal fats of any kind should not be used in the
deep fryer as they may overheat and cause a
fire hazard.
• Ensure the Deep Fryer is completely dry
and free of water before adding any oil. When
deep frying, ensure water does not come in contact
with hot oil as this will cause the oil to bubble
and splatter.
• At no time should the Deep Fryer be left
unattended when in use.
• The deep fryer will generate a lot of heat and
steam during and after the cooking process. To
prevent the risk of burns, do not touch or block the
steam ventilation area on the lid.
• Take care when opening the lid. This product
generates heat and steam at high temperatures,
which will escape immediately when the lid is
opened. Avoid touching hot surfaces.
• Do not place anything on top of the deep fryer
when the lid is closed, when in use and
when stored.
• Always switch the Deep Fryer off at the power
outlet, then unplug and allow to cool, if appliance
is not in use, before cleaning, before attempting to
move the appliance, disassembling, assembling and
when storing the appliance.
• Keep the Deep Fryer clean. Follow the cleaning
instructions provided in this book.
• Do not immerse the deep fryer control panel,
element or cord in water or any other liquid.
4
Page 5

BDF450_IB_FA.qxp:Blender 12/1/10 2:21 PM Page 5
Important safeguards for all electrical appliances
• Unwind the cord before use.
• Do not let the cord hang over the edge of a table
or counter, touch hot surfaces or become knotted.
• Avoid the use of extension cords. Serious hot oil
burns may result from a deep fryer being pulled off
a bench top. Do not allow the cord to hang off the
edge of a bench top where it may be grabbed by
children, or become entangled by the user. Never
leave the deep fryer unattended while in use.
• To protect against electric shock do not immerse
the power cord, plug or appliance in water or any
other liquid.
• This appliance is not intended for use by young
children or infirm persons unless they have been
adequately supervised by a responsible person to
ensure that they can use the appliance safely.
• Young children should be supervised to ensure that
they do not play with the appliance.
• It is recommended to inspect the appliance
regularly. Do not use the appliance if power supply
cord, plug or appliance becomes damaged in any
way. Return the entire appliance to the nearest
authorised Breville Service Centre for examination
and/or repair.
• Any maintenance other than cleaning should be
performed at an authorised Breville Service Centre.
• This appliance is for household use only. Do not use
this appliance for anything other than its intended
use. Do not use in moving vehicles or boats. Do not
use outdoors.
• The installation of a residual current device
(safety switch) is recommended to provide
additional safety protection when using electrical
appliances. It is advisable that a safety switch with
a rated residual operating current not exceeding
30mA be installed in the electrical circuit supplying
the appliance. See your electrician for
professional advice.
5
Page 6

BDF450_IB_FA.qxp:Blender 12/1/10 2:21 PM Page 6
Know your Breville 4L Deep Fryer
Large viewing window
LED display
‘Power’ and ‘Heating’ lights
Digital control panel
Cool touch handles
Frying basket with
fold down handle
Removable enamel bowl
4 litre oil capacity
1.6kg food capacity
Stylish stainless steel exterior
Mesh filter
Powerful 2200 watt
removable element
Cord storage
‘Cool Zone’ technology
6
Page 7

BDF450_IB_FA.qxp:Blender 12/1/10 2:21 PM Page 7
How to assemble/disassemble your 4L Deep Fryer
Step 1.
Remove lid from the deep fryer by grasping the
handle on top and lift off.
Step 2.
The wire frying basket has a hinged handle for
compact storage. Remove the basket from the deep
fryer. Extend and lock the basket handle into position
by squeezing the two handle prongs together, pull
back and lock behind the two wire supports
extending from edge of basket.
Step 3.
Lift the control panel with attached element upwards
and away from the deep fryer.
Step 4.
Remove the enamel frying bowl by grasping the rim
and lifting upwards.
Step 5.
To reassemble the deep fryer, reverse Steps 1-4
The lid, enamel frying bowl and element are
shaped so that they can only be inserted in the
correct position.
Note
WHEN ASSEMBLING YOUR DEEP FRYER FOR USE, PLEASE ENSURE THE NARROW TONGUES IN
THE CONTROL PANEL ARE INSERTED INTO THE CORRESPONDING GROOVES OF THE DEEP FRYER
BODY. THE DEEP FRYER WILL NOT OPERATE UNLESS CORRECTLY ASSEMBLED.
7
Page 8

BDF450_IB_FA.qxp:Blender 12/1/10 2:21 PM Page 8
Operating your Breville 4L Deep Fryer
Before first use
Remove all packaging materials and any promotional
labels from your deep fryer.
Wash the lid, removable enamel bowl, stainless steel
outer body and wire frying basket in hot soapy water,
rinse and dry thoroughly. Wipe the element with a
soft, damp cloth and dry thoroughly. Reassemble and
ensure the bowl is completely free of water before
adding any oil.
Step 1.
Place the deep fryer on a dry, level surface. Ensure
the deep fryer is not too close to the edge of the
bench top, and that the power cord or basket handle
does not extend over the edge.
Step 2.
Remove the frying basket from the deep fryer and
add oil to the bowl. Do not add less than the
minimum level mark (2
maximum level mark (4 litres).
Important: NEVER exceed the maximum level
mark with oil (maximum is 4 litres). This product
must be filled with oil to the exact marked
level. The product will be severely damaged if
heated without oil in the frying bowl.
1
⁄2litres) or exceed the
Note
Step 3.
Replace the lid.
Step 4.
Plug the power cord into a 230/240 volt power
outlet. Ensure cord is fully extended. Switch on at
power outlet and the deep fryer will beep once; the
red ‘power’ light will illuminate on the display panel
and a celsius temperature will be displayed on the
LCD (liquid crystal display) screen. The ºC will show
the last temperature selection.
Step 5.
To choose a cooking temperature, use (a) the mode
button to select a cooking mode option or (b) a
cooking temperature selection:
(a) Cooking Mode Options
The ‘Mode’ button allows you to select a cooking
mode with the temperature of the oil predetermined:
Press once: 190°C – chips
Press twice: 175°C – fish
Press 3 times: 175°C – chicken pieces
Press 4 times: 175°C – prawn cutlets
Press 5 times: Display will return to the last °C
temperature selected when
using (b) Cooking
Temperature Selection
If a Fahrenheit cooking temperature display is
required, press the ‘Cº - Fº’ button on the left-hand
side of the Control Selector. The cooking mode
temperatures will display as follows:
Press once: 375°F – chips
Press twice: 350°F – fish
Press 3 times: 350°F – chicken pieces
Press 4 times: 350°F – prawn cutlets
Press 5 times: Display will return to the last
°F temperature selected when
using (b) Cooking
Temperature Selection
8
Page 9

BDF450_IB_FA.qxp:Blender 12/1/10 2:21 PM Page 9
When the deep fryer is switched off at the
power outlet and then switched back on, the
cooking temperature display will default to the
celsius temperature scale.
Note
(b) Cooking Temperature Selection
If you wish to select a celsius temperature (other
than those predetermined in the Cooking Mode
Options), change the initial display temperature by
pressing the ‘Time-Temp’ button, then the ‘+’ button
to increase the temperature up to 190ºC or the ‘-‘
button down to 100ºC.
If you wish to select a Fahrenheit temperature (other
than those predetermined in the Cooking Mode
Options), change the initial display temperature by
pressing the ‘Cº-Fº’ button, then the ‘Time-Temp’
button, then the ‘+’ button to increase the
temperature up to 375ºF or the ‘-‘ button down
to 210ºF.
Step 6.
After selecting a cooking mode option or a cooking
temperature, press the (symbol) button in the centre
of the Control Selector. This starts the preheating and
the orange ‘heating’ light will illuminate on the
control panel. The word ‘Heating’ will flash and the
actual temperature of the oil will display on the LCD
screen and increase in 5º increments until the oil has
heated to the selected temperature (the blue
backlight will go out after 30 seconds). The orange
‘Heating’ light will go out and the word ‘Heating’ will
stop flashing. The word ‘Ready’ will flash on the LCD
screen and the deep fryer will sound 3 quick beeps
5 times.
Step 7.
Add food to the frying basket. Do not over fill the
basket, it should not exceed two-thirds full. (refer to
the MAX FILL LINE under handle).
Step 8.
Remove the lid and place the frying basket (with the
basket handle locked into the extended horizontal
position) into the holding position above the frying
bowl (slip the slot on the frying basket onto the
corresponding tongue in the frying bowl).
Step 9.
Holding the frying basket handle, lift from the
holding position and gently lower the basket into
the oil.
Step 10.
The default cooking time is 19 minutes. If a longer
or shorter cooking time is required, press the ‘Temp –
Time’ button on the right-hand side of the Control
Selector, then press the ‘+’ button to increase the
cooking time up to 60:58 (60 minutes 58 seconds)
or the ‘-‘ button to decrease the cooking time
down to 00:58 (58 seconds).
Step 11.
Press the button in the centre of the Control
Selector. This starts the cooking and the word
‘Cooking’ will flash and the cooking time will
display on the LCD screen. The time 19:00 will
count down in 1-minute increments; when 1 minute
remains on the screen the time will count down
in 1-second increments.
Step 12.
At the end of the cooking time, the time and the
word ‘Cooking’ on the LCD screen go out, the
temperature selected is displayed and the deep fryer
sounds 5 beeps.
9
Page 10

COOL ZONE AREA
BDF450_IB_FA.qxp:Blender 12/1/10 2:21 PM Page 10
Operating your Breville 4L Deep Fryer continued
The functions can be cancelled at any time by
pressing the button.
Care should be taken when lowering food in the
frying basket into the hot oil. Some splattering
may occur.
When cooking foods coated with batter, lower
the frying basket into the hot oil then carefully
add coated food directly into the oil using metal
tongs – cook a few pieces at a time – and follow
Steps 10-16.
Note
Step 13.
When the food is cooked, raise the frying basket out
of the oil, place in the holding position to drain, then
switch the power off at the power outlet and remove
the power plug.
Step 14.
Keep the frying basket in the holding position for a
few minutes to drain any excess oil from the food.
Step 15.
Lift the frying basket upwards to remove. Place the
food on a heat resistant plate or tray lined with
kitchen paper to absorb any excess oil.
Step 16.
Allow the deep fryer to cool completely before
emptying the oil or cleaning.
Do not overfill the basket with food, too many
items lower the oil temperature causing food to
absorb oil and not cook properly.
Note
TIP: Ensure the oil has reached the selected
temperature before lowering foods into the oil.
Food cooked in oil that has not reached the
correct temperature will absorb more oil and
become soggy.
TIP: Food should be of uniform size when placed in
the basket to ensure even cooking. Wet foods
should be patted dry to decrease the amount of
water coming into contact with the oil.
Cool Zone Technology
The submerged heating element system in the Deep
Fryer allows oil to be heated more effectively, and
respond quickly to oil temperature changes.
Oil below the heating element is cooler and allows
cooked foods, including crumbs, to sink to the bottom
of the enamel bowl and not cook any further, tainting
the oil taste. This allows further cooking to take place
without food particles interfering or tainting the
cooked result.
The Cool Zone Technology results in less need to
change the cooking oil. Used oil can be re-used more
times than in standard deep fryers.
10
Page 11

BDF450_IB_FA.qxp:Blender 12/1/10 2:21 PM Page 11
Auto cut-out reset button
Always add the required amount of oil BEFORE
switching the power on at the power outlet. An Auto
Cut Out safety switch will be activated if the deep
fryer is turned on without oil in the bowl.
To re-set, allow the deep fryer to cool completely
then press the reset button located above the cord
storage area at the back of the control panel.
DURING AND IMMEDIATELY AFTER COOKING, STEAM MAY RISE THROUGH THE FILTER VENT
OPENINGS IN THE LID. THIS IS NORMAL, HOWEVER AVOID TOUCHING THIS AREA DURING
COOKING TO PREVENT STEAM BURNS AS THE STEAM GENERATED IS AT A HIGH TEMPERATURE.
AS THE BASKET GETS VERY HOT, ONLY USE THE HANDLE TO HOLD OR CARRY THE BASKET FOR
SERVING. ENSURE THE BASKET HANDLE IS LOCKED INTO POSITION.
SOLID OIL PRODUCTS, SUCH AS BUTTER, MARGARINE OR ANIMAL FATS OF ANY KIND SHOULD
NOT BE USED IN THE DEEP FRYER AS THEY MAY OVERHEAT AND CAUSE A FIRE HAZARD.
WATER AND OIL DO NOT MIX – NEVER ADD ANY WATER OR OTHER LIQUID TO HOT OIL. EVEN
SMALL AMOUNTS OF WATER WILL CAUSE THE OIL TO SPLATTER.
AVOID THE USE OF EXTENSION CORDS. SERIOUS HOT OIL BURNS MAY RESULT FROM A DEEP
FRYER BEING PULLED OFF A BENCH TOP. DO NOT ALLOW THE CORD TO HANG OFF THE EDGE
OF A BENCH TOP WHERE IT MAY BE GRABBED BY CHILDREN, OR BECOME ENTANGLED BY THE
USER. NEVER LEAVE THE DEEP FRYER UNATTENDED WHILE IN USE.
THE DEEP FRYER WILL GENERATE A LOT OF HEAT AND STEAM DURING AND AFTER THE
COOKING PROCESS. TO PREVENT THE RISK OF BURNS, DO NOT TOUCH OR BLOCK THE STEAM
VENTILATION AREA ON THE LID.
TAKE CARE WHEN OPENING THE LID. THIS PRODUCT GENERATES HEAT AND STEAM AT HIGH
TEMPERATURES, WHICH WILL ESCAPE IMMEDIATELY WHEN THE LID IS OPENED. AVOID
TOUCHING HOT SURFACES.
EXTREME CAUTION MUST BE USED WHEN THE DEEP FRYER IS FILLED WITH HOT OIL OR OTHER
LIQUID. DO NOT MOVE THE DEEP FRYER DURING COOKING AND ALLOW IT TO COOL BEFORE
REMOVING OIL.
11
Page 12

BDF450_IB_FA.qxp:Blender 12/1/10 2:21 PM Page 12
Care and cleaning
• Before cleaning, always ensure the deep fryer is
turned off and disconnected from the power outlet,
• Ensure the deep fryer and oil are completely cool.
Oil will retain its temperature for a long time after
use. Do not attempt to move or carry the deep
fryer, element or control panel while they are hot.
• Wash the frying basket in hot soapy water. Rinse
and dry thoroughly.
• Remove the control panel/element of the deep
fryer by lifting upwards. Place the element onto
kitchen paper to absorb excess oil. Wipe element
with a soft, damp cloth and dry thoroughly.
• Grasp each side of the removable frying bowl and
lift upwards.
• Empty the cooled oil from the frying bowl. Oil can
be re-used several times, depending on the type of
food cooked. Filter the oil through a fine sieve.
Oil should be filtered after each use and stored
in a clean, air-tight container in a cool area.
Good quality oil can be used several times. Do
not store the oil in the deep fryer. Discard used
oil in a sealed container with household waste.
Do not pour down a sink or drain.
• Wash the lid, removable enamel frying bowl, stainless
steel outer body and wire frying basket in hot soapy
water, rinse and dry thoroughly The removable
enamel bowl frying allows for easy cleaning. Wipe the
bowl with absorbent paper, then a damp cloth and a
little mild detergent. Finish off with a clean damp
cloth followed by a clean dry cloth.
• The removable enamel frying bowl, frying basket
and stainless steel outer body are dishwasher safe.
Do not use any abrasive cleaners, such as steel
wool to clean the surface of your deep fryer as
this will scratch the coating.
Note
• Wipe over the control panel with a soft, damp
cloth and a little mild detergent. Finish off with a
clean damp cloth and dry thoroughly with a clean
dry cloth.
• Reassemble the deep fryer for storage. Do not
place anything on top of the deep fryer
during storage.
Note
NEVER IMMERSE THE DEEP FRYER CONTROL PANEL, ELEMENT OR CORD IN WATER OR ANY
OTHER LIQUID.
ALWAYS TURN THE APPLIANCE OFF AT THE POWER OUTLET AND THEN UNPLUG CORD BEFORE
ATTEMPTING TO MOVE THE APPLIANCE AND BEFORE CLEANING.
DO NOT, UNDER ANY CIRCUMSTANCES, IMMERSE THE CONTROL PANEL/ELEMENT, THE POWER
CORD OR PLUG IN WATER OR ANY OTHER LIQUID.
12
Page 13

BDF450_IB_FA.qxp:Blender 12/1/10 2:21 PM Page 13
Cooking guide
Food Temperature Approx. Cooking Time
Mushrooms 160 degrees, 3-4 minutes
Chicken pieces (crumbed) 175 degrees, 12-15 minutes
Chicken strips 180 degrees, 3-4 minutes
Prawn cutlets (raw, crumbed) 175 degrees, 3-4 minutes
Fish cakes or pieces 190 degrees, 4-6 minutes
Fish fillets (in batter) 175 degrees, 5-7 minutes
Onion rings 190 degrees, 2-4 minutes
Chips (thick) 500g 190 degrees, 5-6 minutes
Potato wedges 170 degrees, 7-10 minutes
Spring rolls, small 180 degrees, 4-6 minutes
Fruit fritters 180 degrees, 4-5 minutes
Chips (thin) 500g 190 degrees, 2-4 minutes
The cooking times given in this chart are a guide only
and should be adjusted to suit the quantity of food
being deep fried.
13
Page 14

BDF450_IB_FA.qxp:Blender 12/1/10 2:21 PM Page 14
Handy hints
Food should be crisp when deep fried. If results are
soggy, the oil isn’t hot enough. This can be attributed
to one or more of the following:
• Not enough preheating time.
• Temperature setting is too low.
• Too much food in the basket (do not fill more than
two thirds full).
• Do not use solid frying oil, only use liquid oils.
• Use good quality liquid oil. For best results we
recommend the oils listed. We do not recommend
fats that deteriorate quickly such as lard or
dripping. Deep frying in butter or margarine is also
not recommended because of their low smokepoint temperatures.
• Olive oil is not recommended for deep frying due
to its low smoke-point temperature.
Oil can be re-used several times before it starts
to break down (low smoke-point decreases
(i.e. the oil will burn at a lower temperature and
fried food will be less crisp). Filter the cooled oil
through a fine sieve then store in an airtight
container in a dark place. A fine sieve can be
made by lining a funnel with an unused Chuxbrand cloth, paper coffee filter or clean cotton
material. Oil will absorb food flavours, so it’s a
good idea to label the oil storage container with
the type of food the oil was last used to cook.
For example, don’t fry a dessert in oil previously
used for cooking fish.
Recommended oils
Vegetable oil
A general term that refers to a blend of oils extracted
from various seeds and fruits. Vegetable oil has a
very mild flavour and aroma. It is low in cholesterol
and saturated fats.
Sunflower oil
The oil is extracted from the seeds of the sunflower
plant. It is pale yellow in colour with virtually no
flavour. Sunflower oil is high in polyunsaturated fats
and low in saturated fats.
Canola oil
Made from seeds of the canola plant. It is relatively
low in saturated fats, contains Omega 3 fatty acids
and has a bland, neutral flavour.
Safflower oil
Safflower oil is derived from the seeds of the
safflower. It is strong in flavour, rich in colour and has
a high smoke point. Safflower oil is high in
polyunsaturated fats and vitamin E.
Peanut oil
Peanut oil is obtained from the kernels of the
groundnut or peanut. It has a delicate flavour, nutty
odour and has a high smoke point. Peanut oil is high
in mono-unsaturated oil and vitamin E.
De
Inc
Note
DO NOT USE SOLID FRYING OILS, ONLY USE LIQUID OILS AS PER THE RECOMMENDATIONS.
14
Page 15

BDF450_IB_FA.qxp:Blender 12/1/10 2:21 PM Page R1
Recipes
Delicious recipes
Includes instructions for use
Page 16

BDF450_IB_FA.qxp:Blender 12/1/10 2:21 PM Page R2
Contents
Page
Entrees and light meals R3
Main meals R8
Accompaniments and garnishes R11
Desserts R13
R2
Page 17

BDF450_IB_FA.qxp:Blender 12/1/10 2:21 PM Page R3
Entrees and light meals
Crumbed brie with
strawberry sauce
4 x 125g Brie cheese
1 egg, beaten
1 tablespoon milk
1 cup dried breadcrumb
4 litres oil for deep frying
1. Coat cheese in combined beaten egg and milk,
then breadcrumbs. Once coated, repeat coating in
egg then breadcrumbs to give a thick coating.
Chill for 30 minutes.
2. Fill deep fryer with oil to maximum level.
Preheat to 180°C with lid closed.
3. Deep fry cheese in two batches until cooked and
golden, approximately 2 minutes allowing oil to
reheat between each batch. Drain.
Serving suggestion: Serve as an entrée with
Strawberry Sauce and a salad garnish.
STRAWBERRY SAUCE
1 punnet strawberries, washed and hulled
1 tablespoon sugar
Salt and pepper calamari
44
4 litres oil for deep frying
1
⁄2cup corn flour
1 teaspoon salt
1 teaspoon finely ground pepper
500g calamari rings
1 egg white
2 tablespoons water
Sweet Thai Chilli Sauce
1. Fill deep fryer with 4 litres of oil. Preheat
to 190°C.
2. Combine flour, salt, pepper, egg white and water.
Add to calamari in a large plastic bag. Shake bag
to coat calamari evenly with flour mixture.
3. Deep fry in two batches for approximately 3-4
minutes allowing oil to reheat between each
batch. Drain.
Serving suggestion: Serve with chilli sauce and salad
as an entrée or light meal.
1. Puree strawberries and sugar.
Serve chilled as an accompaniment to Crumbed Brie.
R3
Page 18

BDF450_IB_FA.qxp:Blender 12/1/10 2:21 PM Page R4
Entrees and light meals
Crumbed prawn cutlets with
garlic chive mayonnaise
750g (approx 36) green king prawns, peeled and
deveined, tails intact
250g plain flour
1 egg, beaten
1 tablespoon milk
1 cup dried breadcrumbs
grated zest 1 lemon
4 litres oil for deep frying
1. Coat prawns in flour, then the combined beaten
egg and milk, then breadcrumbs mixed with
lemon zest. Once coated, repeat coating in egg
then breadcrumbs to give a thick coating.
Chill for 30 minutes.
2. Fill deep fryer with oil to maximum level.
Preheat to 180°C.
3. Deep fry prawns in four batches until cooked and
golden, approximately 2-3 minutes allowing oil to
reheat between each batch. Drain.
GARLIC CHIVE MAYONNAISE
1
⁄2cup mayonnaise
1
⁄4cup sour cream
1 clove garlic, crushed
finely grated zest 1 lemon
2 tablespoons snipped chives
salt and pepper to taste
continued
Salmon croquettes
44
2 large potatoes, peeled and diced
415g can pink salmon, well drained
1 small onion, finely chipped
grated zest and juice 1 lime or lemon
2 tablespoon chopped coriander or parsley
1 egg, beaten
1 cup grated tasty cheese
salt and pepper to taste
plain flour
2 eggs, beaten
3 cups plain flour
4 litres oil for deep frying
1. Boil potatoes until tender. Drain and mash (yield
approximately 2 cups). Combine mashed potato,
salmon, onion, lime zest, juice, coriander, beaten
egg and grated cheese. Season to taste.
2. Divide and shape mixture into 12 sausage-shaped
croquettes. Coat croquettes in flour. Chill for
30 minutes.
3. Crumb the croquettes by placing hem in the egg
mix, then breadcrumb. Chill again for 30 minutes.
4. Fill deep fryer with 4 litres of oil. Preheat to 180°C.
5. Deep fry croquettes in two batches until cooked
and golden, about 4-5 minutes allowing oil to
reheat between each batch. Drain.
Serving suggestion: Serve as a light meal with salad.
1. Combine mayonnaise, sour cream, garlic, lemon
zest and chives. Season to taste.
Serve chilled as an accompaniment to Crumbed
Prawn Cutlets.
R4
Page 19

BDF450_IB_FA.qxp:Blender 12/1/10 2:21 PM Page R5
Spring rolls
4 litres oil for deep frying
350g pork mince
200g green prawn meat diced
1 tablespoon soy sauce
1
⁄2cup finely diced water chestnuts
4 green shallots, finely sliced
1. Combine all the filling ingredients and mix well.
1
2. Place
/4cup of mixture onto each wrapper and
roll; secure the last rolled edge with a drizzle
of water.
3. Place the finished rolls onto a flat tray, the rolls
can be frozen and cooked at a later date. These
need to be defrosted before cooking.
4. Fill the deep fryer with 4 litres of oil and preheat
to 180°C.
5. Place up to 4 spring rolls into the basket and
carefully lower them into the oil. Cook for 4-6
minutes or until golden brown, allowing the oil to
reheat between each batch.
Samosas
168
1 tablespoon oil
1 small onion, finely chopped
1 teaspoon crushed garlic
1 teaspoon curry powder or paste
150g potato, finely chopped
100g carrot, finely chopped
1 tablespoon frozen peas
4 sheets ready rolled shortcrust pastry
1 tablespoon milk
4 litres oil for deep frying
1. To prepare filling, heat oil in a saucepan. Fry
onion, garlic and curry powder until onion is soft.
Add potato and carrot.
2. Cover and cook on a low heat until tender,
approximately 10 minutes, stirring occasionally.
Add peas.
3. Cool, then divide mixture into 16 portions.
4. Cut out 16 x 12 rounds from pastry. Top each with
potato mixture and brush edges of pastry with
milk. Fold pastries in half, pressing edges together.
5.
Fill deep fryer with 4 litres of oil. Preheat to 190°C.
6. Deep fry samosas, 4 at a time until golden,
approximately 4-5 minutes allowing oil to reheat
between each batch. Drain.
Serving suggestion: Serve as a starter to a curry meal
or as a light meal.
R5
Page 20

ml
BDF450_IB_FA.qxp:Blender 12/1/10 2:21 PM Page R6
Entrees and light meals
continued
Tempura
Tempura is a style of deep frying that originated in
Japan. It uses a very light batter to coat seafood
(particularly prawns) and vegetables. Tempura is then
traditionally served with a light dipping sauce.
Food suitable for Tempura are:
* Prawns
* Whole button mushrooms
* Sliced sweet potato
* Fresh asparagus
* Whole beans
* Whole baby corn
* Cauliflower or broccoli florets
Tempura batter
4 litres oil for deep frying
2 cups plain flour
2 egg yolks
2 cups iced water
selection of food from above
Serve with Tempura Dipping Sauce or teriyaki sauce.
Tip: If batter becomes too thick, thin down with
extra iced water.
When the basket is in the lowered position
always use tongs and gently lower the battered
food into the oil.
Note
Tempura dipping Sauce
250
1
⁄3cup soy sauce
1
⁄3cup mirin or sherry
1
⁄3cup strained chicken stock
1. Combine soy sauce, mirin and stock. Serve as
dipping sauce for Tempura.
Tempura Batter can also be used in recipes other than
the traditional Tempura.
1. Fill deep fryer with 4 litres of oil. Preheat to 190°C.
2. To prepare batter, sift flour into a bowl. Make a
well in the centre. Add egg yolks and iced water
stirring until just combined. The batter should be
rough and only half mixed. As batter will thicken
on standing, use immediately.
3. Coat food of choice in batter allowing excess batter
to drain off.
4. With basket in lowered position, deep fry in small
batches until pale golden, approximately 4-5
minutes allowing oil to reheat between each
batch. Drain.
R6
Page 21

BDF450_IB_FA.qxp:Blender 12/1/10 2:21 PM Page R7
Honey prawns
4
4 litres oil for deep frying
16 green king prawns, peeled and deveined
1
⁄2quantity Tempura Batter
1
⁄2cup honey, warmed
1
⁄3cup toasted sesame seeds
100g packet vermicelli noodles
1. Fill deep fryer with 4 litres of oil. Preheat to 190°C.
2. Coat prawns in batter allowing excess batter to
drain off.
3. With basket in lowered position, deep fry in two
batches until golden, approximately 3-4 minutes
allowing oil to reheat between each batch.
4. Drain and drizzle with the warmed honey, then
toss in sesame seeds.
5. Deep fry noodles a bundle at a time until the
noodles rise to the surface, approximately 2-3
seconds. Drain.
Serving suggestion: Serve prawns with crispy noodles.
When the basket is in the lowered position
always use tongs and gently lower the battered
food into the oil.
Note
R7
Page 22

BDF450_IB_FA.qxp:Blender 12/1/10 2:21 PM Page R8
Mains
Fish and chips
4
11⁄4cups plain flour
pinch salt
2 eggs, separated
250ml beer
1 tablespoon oil
4 litres oil for deep frying
4 boneless fish fillets (150g each)
4 potatoes, peeled and cut in 1cm
cubed chips
lemon wedges
1. To prepare batter, sift flour and salt into a bowl.
Make a well in the centre. Add egg yolks, beer
and oil. Beat until smooth then stand for 30
minutes. Beat egg whites until soft peaks form,
fold through batter.
2. Fill deep fryer with 4 litres of oil and preheat to
180°C. Preheat an oven to 150c to keep fish warm
when cooked.
3. Coat the fish in batter allowing excess batter to
drain off.
4. Deep fry fish in two batches until cooked and
golden, approximately 3-4 minutes allowing oil to
reheat between each batch. Drain and keep warm.
5. Increase deep fryer temperature to
190°C. When heated, deep fry chips in two
batches until golden, approximately 12-15 minutes
allowing oil to reheat between each batch. Drain.
Serving suggestion: Serve fish and chips with lemon
wedges and Tartare sauce.
When the basket is in the lowered position
always use tongs and gently lower the battered
food into the oil.
Tip: If fish fillets have skin on, remove the skin
otherwise the fish curls up while frying.
Note
Tartare sauce
1
⁄2cup mayonnaise
1
⁄4cup sour cream
2 tablespoons chopped capers
2 tablespoons chopped gherkin
1 tablespoon chopped parsley
salt and pepper to taste
1. Combine mayonnaise, sour cream, capers and
gherkin. Season to taste.
Serve as an accompaniment to Fish and Chips.
R8
Page 23

BDF450_IB_FA.qxp:Blender 12/1/10 2:21 PM Page R9
Crumbed lamb cutlets with
green tomato salsa
12 frenched lamb cutlets
plain flour
2 eggs, beaten
2 tablespoons milk
1 cup dried breadcrumbs
4 litres oil for deep frying
1. Coat cutlet in flour, shaking off any excess then
coat in combined egg and milk, then breadcrumbs.
Repeat coating in egg mixture and breadcrumbs to
give a thick coating. Chill for 30 minutes.
2. Fill deep fryer with 4 litres of oil. Preheat to 180°C.
3. Deep fry cutlets in three batches until crisp and
golden, approximately 5-6 minutes allowing oil to
reheat between each batch. Drain.
Serving suggestion: Serve with Green Tomato Salsa.
Accompany with mashed potato.
Green tomato salsa
44
1 cup parsley sprigs
1
⁄2cup mint leaves
1 clove garlic, peeled
1 Spanish onion, quartered
2 green tomatoes, quartered
2 tablespoons olive oil
2 tablespoons lemon juice
1. Place parsley and mint into a food processor and
process using pulse button until roughly chopped.
2. Add garlic, onion, tomatoes, olive oil
and lemon juice. Process using pulse button until
just combined but still chunky in texture.
Serve chilled with lamb cutlets.
R9
Page 24

BDF450_IB_FA.qxp:Blender 12/1/10 2:21 PM Page R10
Mains
continued
Italian meatballs
400g beef mince
1 egg, beaten
1 cup fresh breadcrumbs
2 teaspoons crushed garlic
1
⁄2teaspoon dried Italian herbs
plain flour
4 litres of oil for deep frying
1. Combine mince, egg, breadcrumbs, garlic and herbs.
Form into 16 round meatballs then coat in flour.
2. Fill deep fryer with 4 litres of oil. Preheat to 160°C.
3. Deep fry meatballs in two batches until cooked
and golden, approximately 10 minutes allowing oil
to reheat between each batch. Drain.
Serving suggestion: Serve with your favourite pasta
sauce and spaghetti.
Southern style chicken
44
4 litres oil for deep frying
1 cup flour
1
⁄2teaspoon salt
1
⁄2teaspoon ground black pepper
1 teaspoon paprika
8 chicken pieces (drumsticks, wings)
2 eggs, beaten
2 tablespoons milk
1. Fill deep fryer with 4 litres of oil. Preheat to 170°C.
2. Sift flour, pepper and paprika into a bowl. Coat
chicken pieces in combined beaten egg and milk
then flour mixture.
3. Deep fry in two batches until cooked and golden,
approximately 15 minutes allowing oil to reheat
between each batch. Drain.
Serving suggestion: Serve with corn and salad.
To quicken cooking time, boil the chicken pieces
first before crumbing.
R10
Note
Page 25

BDF450_IB_FA.qxp:Blender 12/1/10 2:21 PM Page R11
Accompaniments and garnishes
Shoestring fries
4 litres oil for deep frying
4 potatoes
1. Fill deep fryer with oil to maximum level and
preheat to 160°C.
2. While waiting for oil to heat, peel and cut
potatoes into thin straws and soak in water to
prevent discolouration. When ready to cook, drain
potatoes will and pat dry with paper towel.
3. Deep fry potato straws in two batches for 3-4
minutes, drain and place on a tray with
absorbent paper.
4. Increase the temperature to 190°C and cook the
fries for 3-4 minutes to finish.
Allow oil to thoroughly reheat and potato straws
to drain thoroughly in between frying. Frying
twice will twice will give a crisper result.
Tip: Use “baking” potatoes for deep frying
(ie desiree and pontiac potatoes).
New potatoes are not recommended due
to their high water content.
Deep fried mushrooms
44
4 litres oil for deep frying
24 button mushrooms (approx 200g),
stalks trimmed
1 egg, beaten
1 tablespoon milk
cup fresh breadcrumbs
1. Fill deep fryer with 4 litres of oil and preheat to
150°C.
2. Coat mushrooms in combined egg and milk
then breadcrumbs.
3. Deep fry mushrooms until golden, approximately
5 minutes allowing oil to reheat between each
batch. Drain.
Serving suggestion: Serve as an accompaniment to
chicken, or as a fingerfood idea served with a dipping
sauce of sour cream and chopped chives.
Note
R11
Page 26

BDF450_IB_FA.qxp:Blender 12/1/10 2:21 PM Page R12
Accompaniments and garnishes
Shredded vegetables
4 litres oil for deep frying
grated vegetables such as potato, carrot or zucchini
1. Fill deep fryer with 4 litres of oil and preheat
to 180°C.
2. Squeeze any excess moisture from vegetables and
pat dry thoroughly with paper towel.
3. Mix some tempura batter through the vegetables.
4. Deep fry about
golden, approximately 2-3 minutes allowing oil to
reheat between each batch. Drain.
Serving suggestion: Serve as a garnish.
1
/2cup at a time until crisp and
Crispy parsley
4 litres of oil for deep frying
parsley sprigs
Croutons
4 litres of oil for deep frying
slices of day old bread, crusts removed
1. Fill deep fryer with oil and preheat to 190°C.
2. Cut bread into small cubes. Deep fry about 1 cup
at a time until crisp and golden, approximately 1-2
minutes allowing oil to reheat between each
batch. Drain.
Serving suggestion: Serve as a garnish for soup or
Caesar Salad.
continued
1. Fill deep fryer with 4 litres of oil and preheat
to 190°C.
2. Wash parsley and pat dry thoroughly with
paper towel.
3. Deep fry about
golden, approximately 2-3 minutes allowing oil to
reheat between each batch. Drain.
Serving suggestion: Serve as a garnish to
seafood dishes.
R12
1
/2cup at a time until crisp and
Page 27

BDF450_IB_FA.qxp:Blender 12/1/10 2:21 PM Page R13
Desserts
Deep fried ice cream with
caramel sauce
Full cream vanilla ice cream
500g 2 day old commercial Madeira cake,
processed into crumbs
3 eggs, beaten
1
⁄4teaspoon milk
4 litres oil for deep frying
1. Place a scone tray into the freezer for 10 minutes
to get really cold. Scoop ice cream onto cold tray
to make 8 balls. Return to freezer immediately
until ice cream is very hard.
2. Meanwhile, break cake into small pieces and
process in a food processor or crumble with fingers
to yield 4 cups cake crumbs.
3. To coat ice cream, remove one ball at a time from
freezer. Using two spoons, roll ice cream in
combined egg and milk then cake crumbs. Return
to freezer and repeat with remaining ice cream.
Working one at a time ensures ice cream
doesn’t melt.
4
Note
Caramel sauce
60g butter
3
⁄4cup brown sugar
1 tablespoon cornflour
1
⁄2cup water
1
⁄2cup cream
pinch salt
1. Melt butter in saucepan or microwave. Add brown
sugar stirring until smooth.
2. Add cornflour blended with water; bring to boil
stirring until thickened.
3. Stir through cream and salt.
4. Leave in freezer for a minimum 1 hour then repeat
coating in egg mixture then cake crumbs to ensure a
thick, firm coating. Return to freezer for 15 minutes.
5. Fill deep fryer with 4 litres of oil and preheat
to 190°C.
6. Deep fry ice cream in two batches until golden,
approximately 30 seconds allowing oil to reheat
between each batch. Drain.
Serving suggestion: Serve immediately with
Caramel Sauce.
R13
Page 28

BDF450_IB_FA.qxp:Blender 12/1/10 2:21 PM Page R14
Desserts
continued
Banana fritters
4
1 cup self raising flour
1 teaspoon sugar
1 egg, beaten
2
⁄3cup milk
1 tablespoon butter, melted
4 bananas, peeled and cut in three
4 litres oil for deep frying
1. Sift flour into a bowl and make a well in the
centre. Add sugar, combined egg, milk and
melted butter.
2. Mix to a smooth batter and allow to stand for
15 minutes before using.
3. Coat bananas in batter allowing excess batter to
drain off.
4. Fill deep fryer with 4 litres of oil and preheat
to 180°C.
5. With basket in lowered position, deep fry bananas
in two batches until golden, approximately 4-5
minutes allowing oil to reheat between each
batch. Drain.
Serving suggestion: Serve with ice cream.
When the basket is in the lowered position
always use tongs and gently lower the battered
food into the oil.
Note
R14
Page 29

BDF450_IB_FA.qxp:Blender 12/1/10 2:21 PM Page R15
Notes
R15
Page 30

BDF450_IB_FA.qxp:Blender 12/1/10 2:21 PM Page R16
Notes
R16
Page 31

BDF450_IB_FA.qxp:Blender 12/1/10 2:21 PM Page R17
Notes
R17
Page 32

BDF450_IB_FA.qxp:Blender 12/1/10 2:21 PM Page 1
Breville Customer Service Centre
Breville Customer Service Centre
Ins
Inc
Australian Customers
Breville Customer Service Centre
✉
PO Box 22
Botany NSW 2019
AUSTRALIA
Customer Service: 1300 139 798
☎
Fax (02) 9384 9601
Email Customer Service: askus@breville.com.au
www.breville.com.au
www.breville.com.au
Breville is a registered trademark of Breville Pty. Ltd. ABN 98 000 092 928
Breville is a registered trademark of Breville Pty. Ltd. ABN 98 000 092 928
© Copyright. Breville Pty. Ltd. 2006
Due to continual improvements in design or otherwise, the product you
purchase may differ slightly from the one illustrated in this booklet.
Model BDF450 Issue A10
New Zealand Customers
Breville Customer Service Centre
✉
Private Bag 94411
Greenmount
Auckland, New Zealand
Customer Service: 09 271 3980
☎
Fax 0800 288 513
Email Customer Service: askus@breville.com.au
4L
 Loading...