

BRANDT TV399XF1 User Manual [fr]
Guide to using and installing your
ceramic hob/hood duo.
Guide d’utilisation et d’installation
de votre duo
table vitrocéramique / hotte
Guia de utilização e de instalação
do seu conjunto placa de
vitrocerámica/exaustor
Пдзгьт чсЮузт кбй егкбфЬуфбузт
кпхжЯнбт ме хблпкесбмйкЭт
еуфЯет кбй брпсспцзфЮсб
FR
REF CONSTRUCTEUR 419
9963 0471 07/03
GB
PT
GR
Dear Customer,
You have just purchased your BRANDT hob and hood set and we would like to thank you for that.
Our research teams have designed for you a new generation of appliances for pleasurable
cooking every day.
This automatic set comprising a hob and a hood ensures that everything is cooked to
perfection with no smells, and no smoke whatever dishes you are preparing. With its simple
lines and modern design, your new BRANDT set blends perfectly with your kitchen and
combines optimum ease of use and high cooking performance.
You will also find in the Brandt range a wide selection of ovens, extractor hoods,
dishwashers and refrigerators that you can coordinate with your new Brandt hob.
Of course, constantly concerned with better satisfying your requirements, our consumer
department can answer all your questions and welcomes all your suggestions (details at the
end of this booklet).
At the cutting edge of innovation, Brandt contributes to the quality of daily life by giving you
constantly improving products that are simple to use, respect the environment and are welldesigned and reliable
BRANDT.
Using your duo in complete safety.............................3
Installing your duo in complete safety........................4
Using your hob in all simplicity.......................... .......8
Using your hood in all simplicity.......................... ....10
Preserving and maintaining your hob........................12
Preserving and maintaining your hood .....................14
Cooking..................................................................16
List of contents
In this Manual,
displays safety
instructions
displays tips and hints
For any information on our products please contact us at :
Brandt UK Ltd
Intec 4
Wade Road
Basingstoke
RG24 8NE
tel : 01256 308000
Fax : 01256 346377

3
If a crack appears in the glass surface, disconnect the appliance immediately to
avoid any risk of electric shock.
For disconnecting, remove the fuses or use the cutout switch.
Do not re-use your hob until the glass surface has been changed.
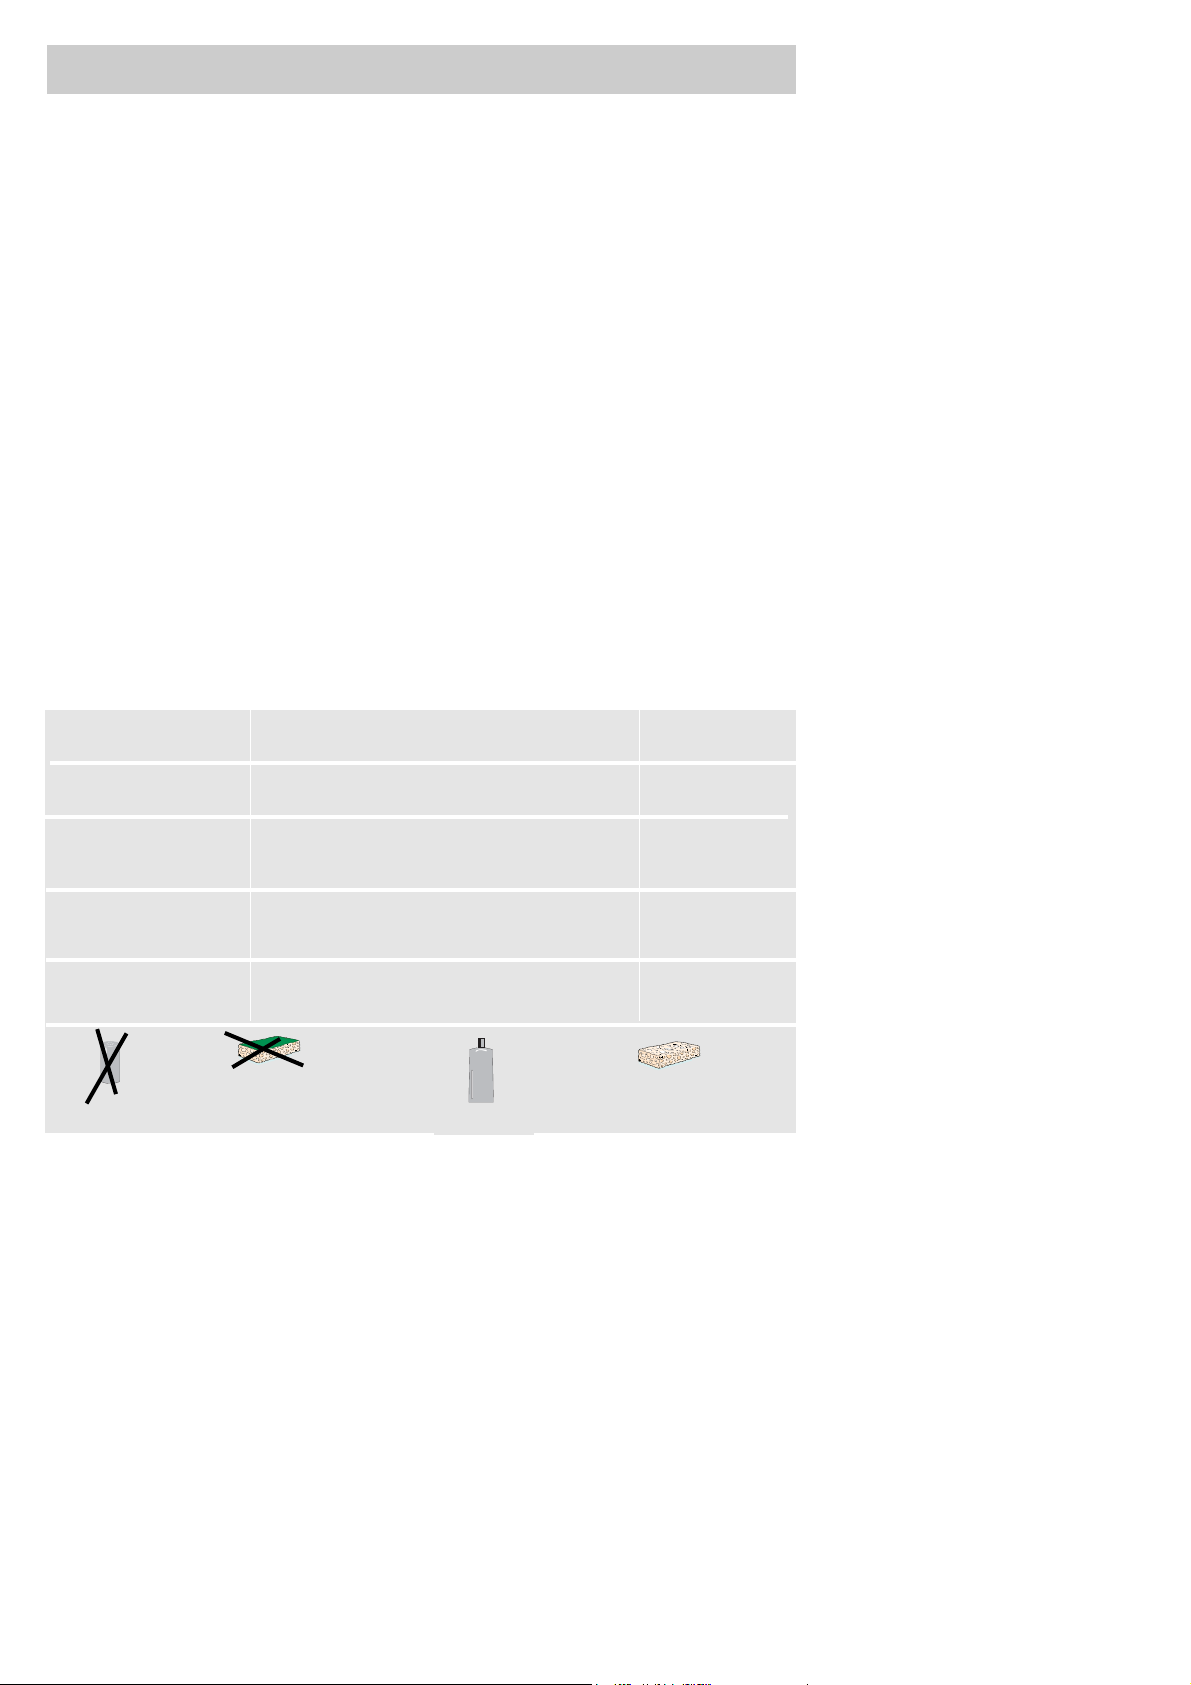
Your hob must never be used as a storage space for any products whatsoever.
When cooking never use aluminium foil and never place products wrapped in
aluminium foil or products deep-frozen in aluminium packs on the hob.
The aluminium will melt and damage your appliance irreparably.
Do not connect electrical appliances on plugs close to the hob. Make sure that the power cable is not in
contact with any heating zones.
Leave pans on your frame or plate (depending on the model).
Do not stare fixedly at the halogen lamps on the cooking zone
A steam cleaner should never be used
We have designed this duo for private use in homes.
We have designed this duo for private use in homes.
With a view to constantly improving our products, we reserve the right to make
any changes to their technical, program or aesthetic features connected with their
technical evolution.
These hobs are exclusively designed for cooking drinks and foodstuffs and contain
no asbestos based components.
The hood is completely automatic and controlled by the hob to adjust to your
cooking power. You only need to clean it regularly and change the recycling
carbon filters (see the chapter on maintenance).
Using your duo in complete safety
You must not flambé dishes (flames drawn into the unit could cause damage to it). Any frying
done under the unit must be watched constantly.
Repairs must only be carried out by an approved specialist.
If your kitchen is heated by an appliance connected to a chimney (stove, range etc.), you must install
the hood in recycling mode.
Do not use the hood without the metal filters.
4
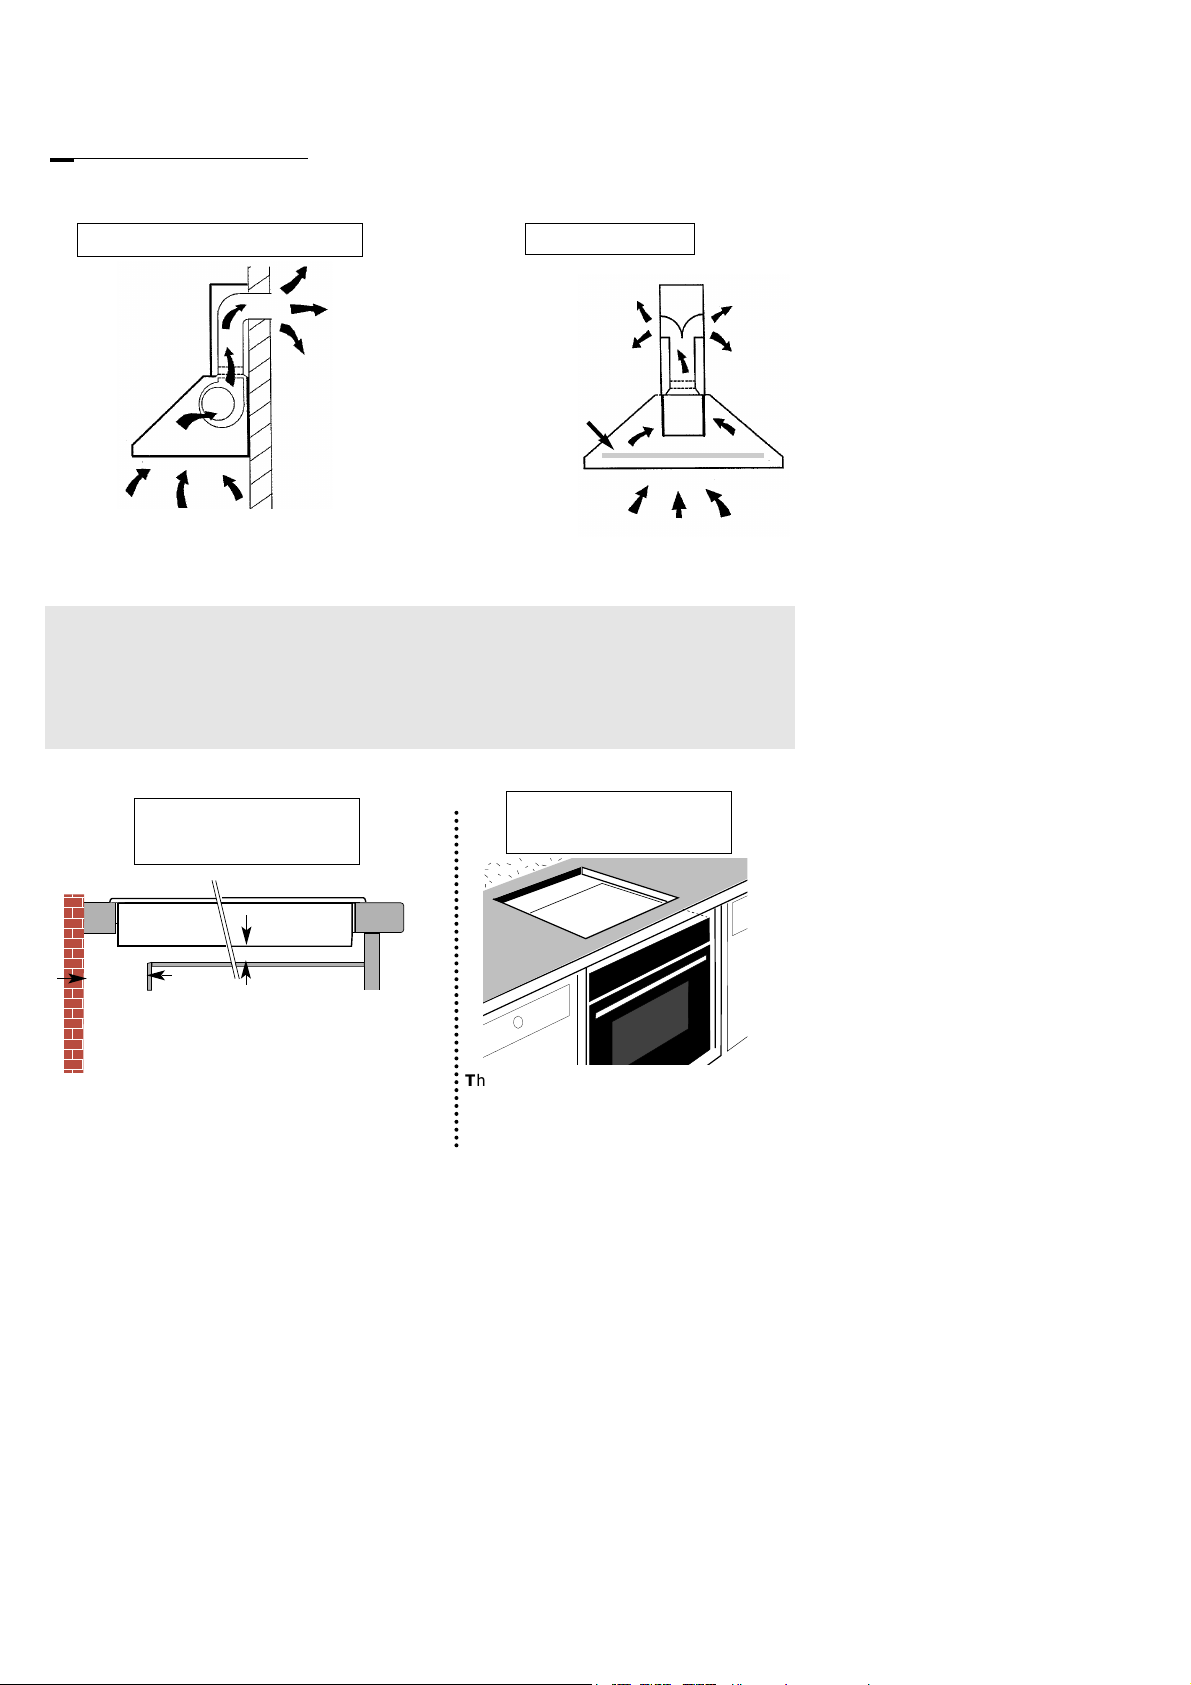
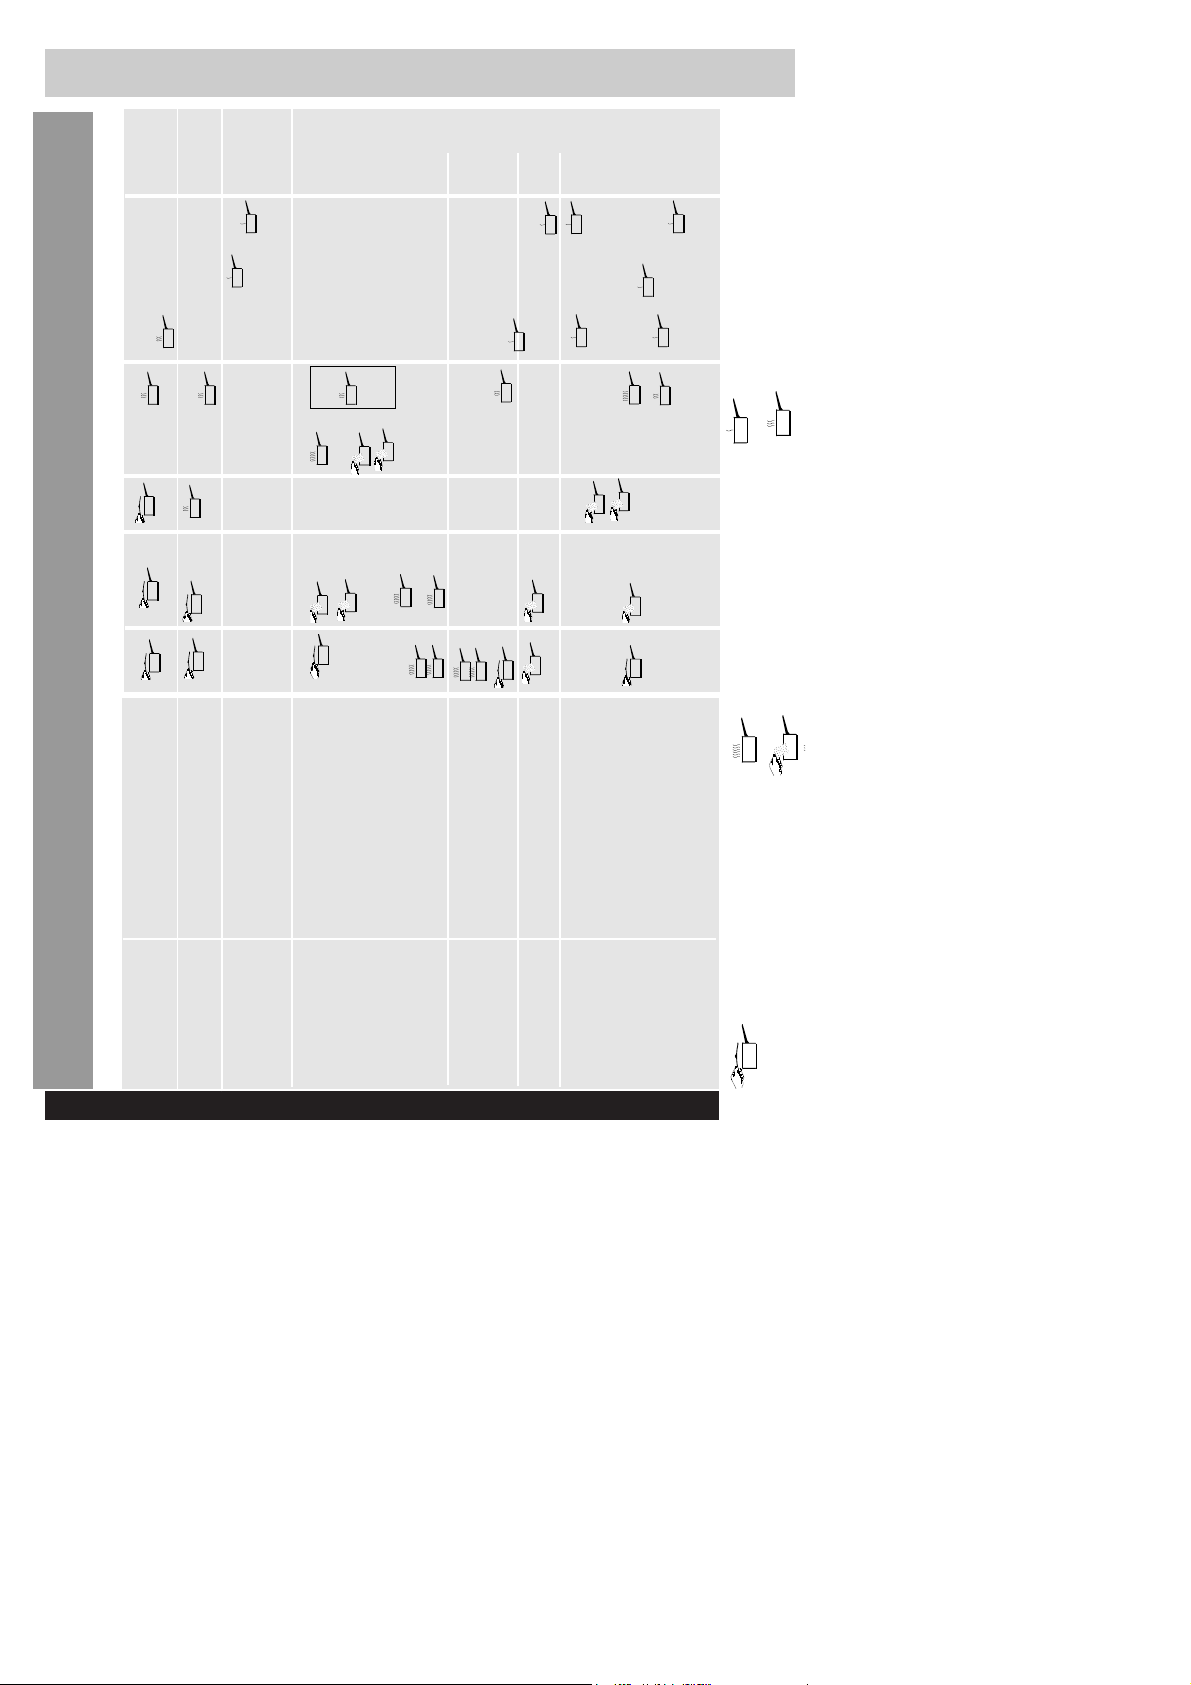
Installing your duo in complete safety
C
hoice of installation
Active carbon
filter ompulsory
EXTERNAL EXTRACTION
RECYCLING
Not supplied with the unit:
● The evacuation duct: it may be in Sheet enamel, aluminium, flexible or any non-inflammable
material and should be 15 cm or, if necessary, 12.5 cm in diameter.
● The active charcoal filter needed for hoods set up for air recycling
These filters are available at your retailers under the reference marked on the identity plate (see inside
the hood).
Outside
No outlet to
the outside
Extraction duct internal diameter 15 cm (or if this
is not available you may use a duct with an
internal diameter of 12.5 cm using the adapter
supplied with your hood).
1 cm mini
The hob can be fitted directly into the
worktop above an oven placed in its upper
position.
● Hob
● Hood
All our appliances can operate in the following modes:
4 cm
ABOVE A CUPBOARD
ABOVE AN OVEN
CUPBOARD FRONT
Gap
vide
sanitaire
AVANT MEUBLE
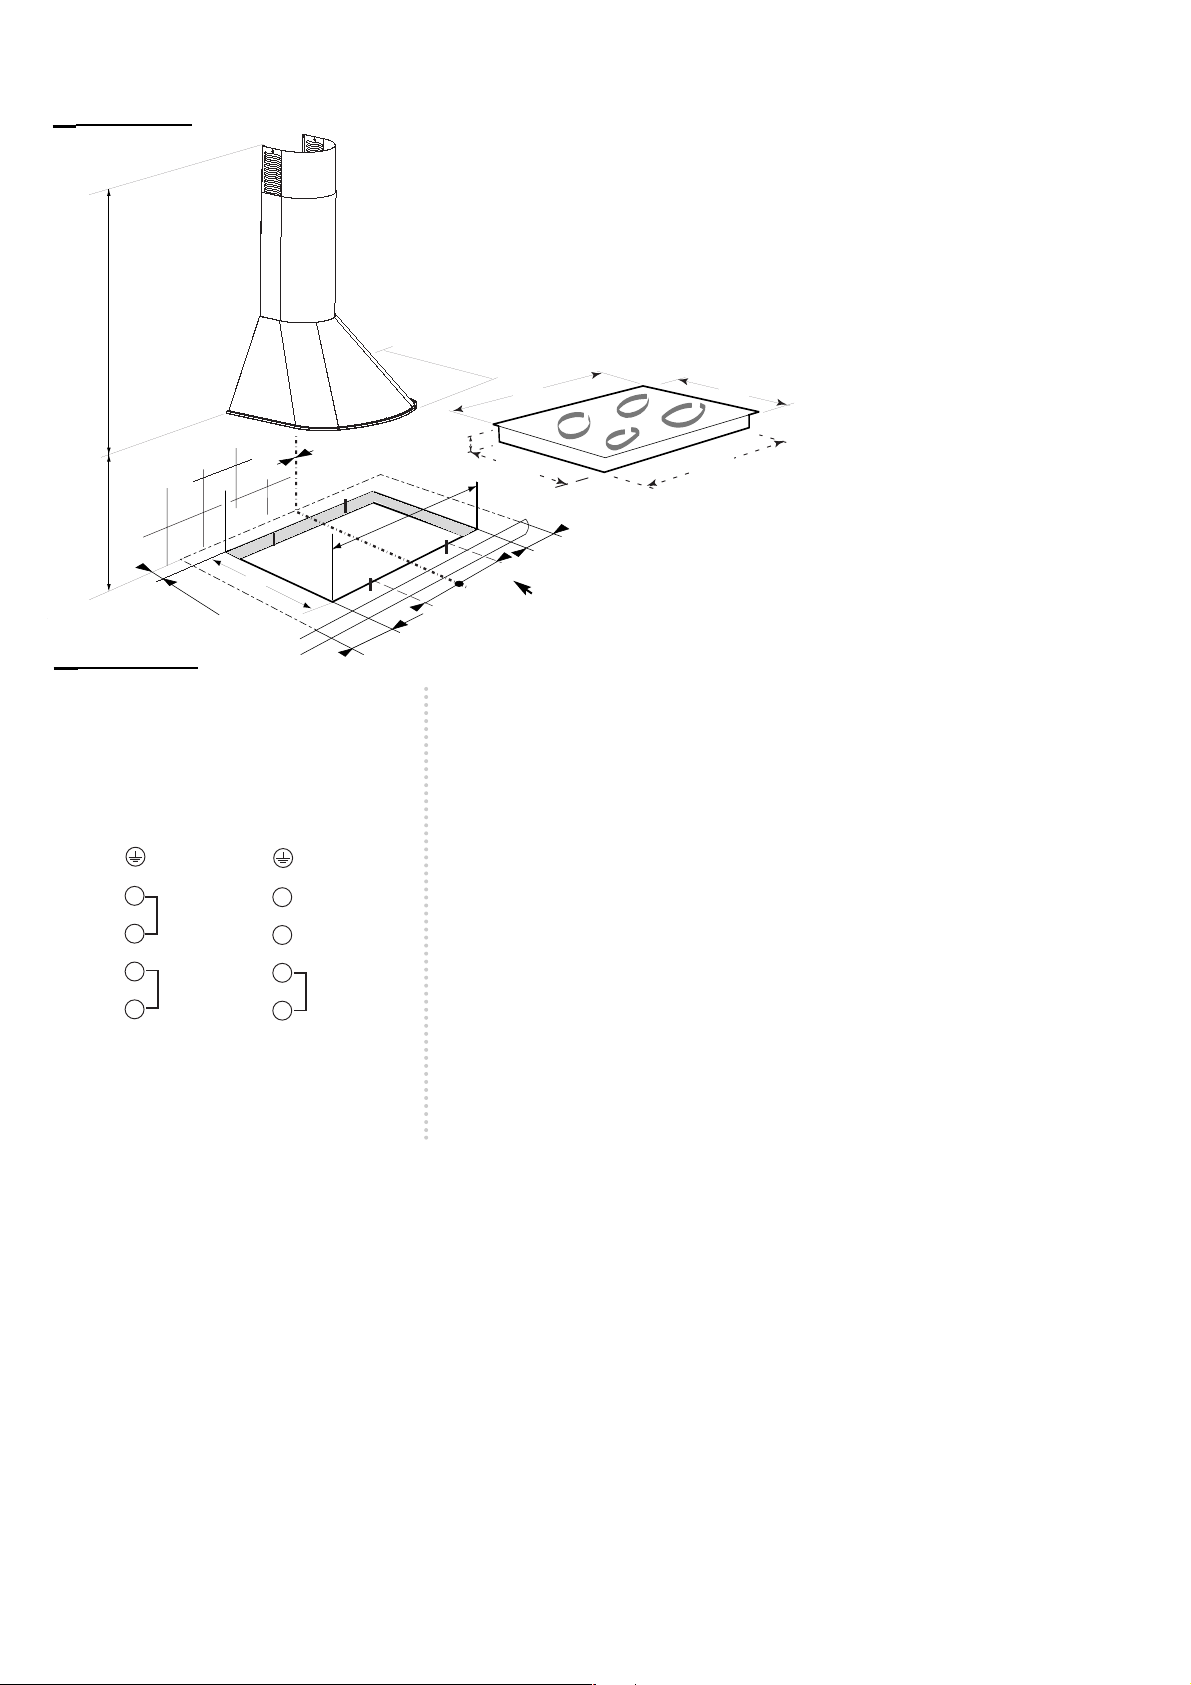
5
mini 74 - maxi 103
70 mini
50
140,1 à 170,3
4 mini
56
4 m
ini
4 mini
=
=
21,6
21,6
49
- Centred hob and hood
- First of all install your hood to avoid any risk of damage to
your hob. Check the position of the electric junction box.
Try to hide this in the body of the hood.
dimensions in cm
P
ositioning
- You must not exceed the maximum number of bends or
the maximum length of the duct.
Installing your duo in complete safety
58
51
48,8
55,5
4,1
These duo must be connected to the mains using
a plug in compliance with the publication CEI
60083 or an omnipolar circuit braking device at
least 3mm from the contact opening.
When the power is switched on, or after a long
power failure, a light code appears on the
control panel. This disappears automatically
after about 30 seconds or as soon as any touch
control is touched on the panel. This is normal,
as the display is for use by the after-sales
service when required The user must not take
this into account under any circumstances.If
the unit has a 3 phase 400 V2N connection,
and is not working correctly, check that the
neutral wire is correctly connec-ted. This
precaution should also be taken for all your
other electronic apparatus.
The unit must be installed so that the
mains plug is easily accessible.
When installing the cooktop, great care should
be taken to prevent sharp edges from damaging
the power cable.
Connection
32 amp
16 amp
1
2
3
4
L1
L2
N
1
2
3
4
L1
N
Your hob (220-240 V∼ 50 Hz, 6,9 kW) must be
connected to the mains with :
- A H05RRF type cable with three 2.5 mm² conductors or five 1.5 mm² conductors (including a yellow
/ green earth wire).
Your hood (220-240V∼ 50 Hz-240 W) eis supplied
with an H05 VVF cable with 3 0.75mm wires
(negative, positive and earth).
10 or 16 amp fuse
220-240 V
400 V

A
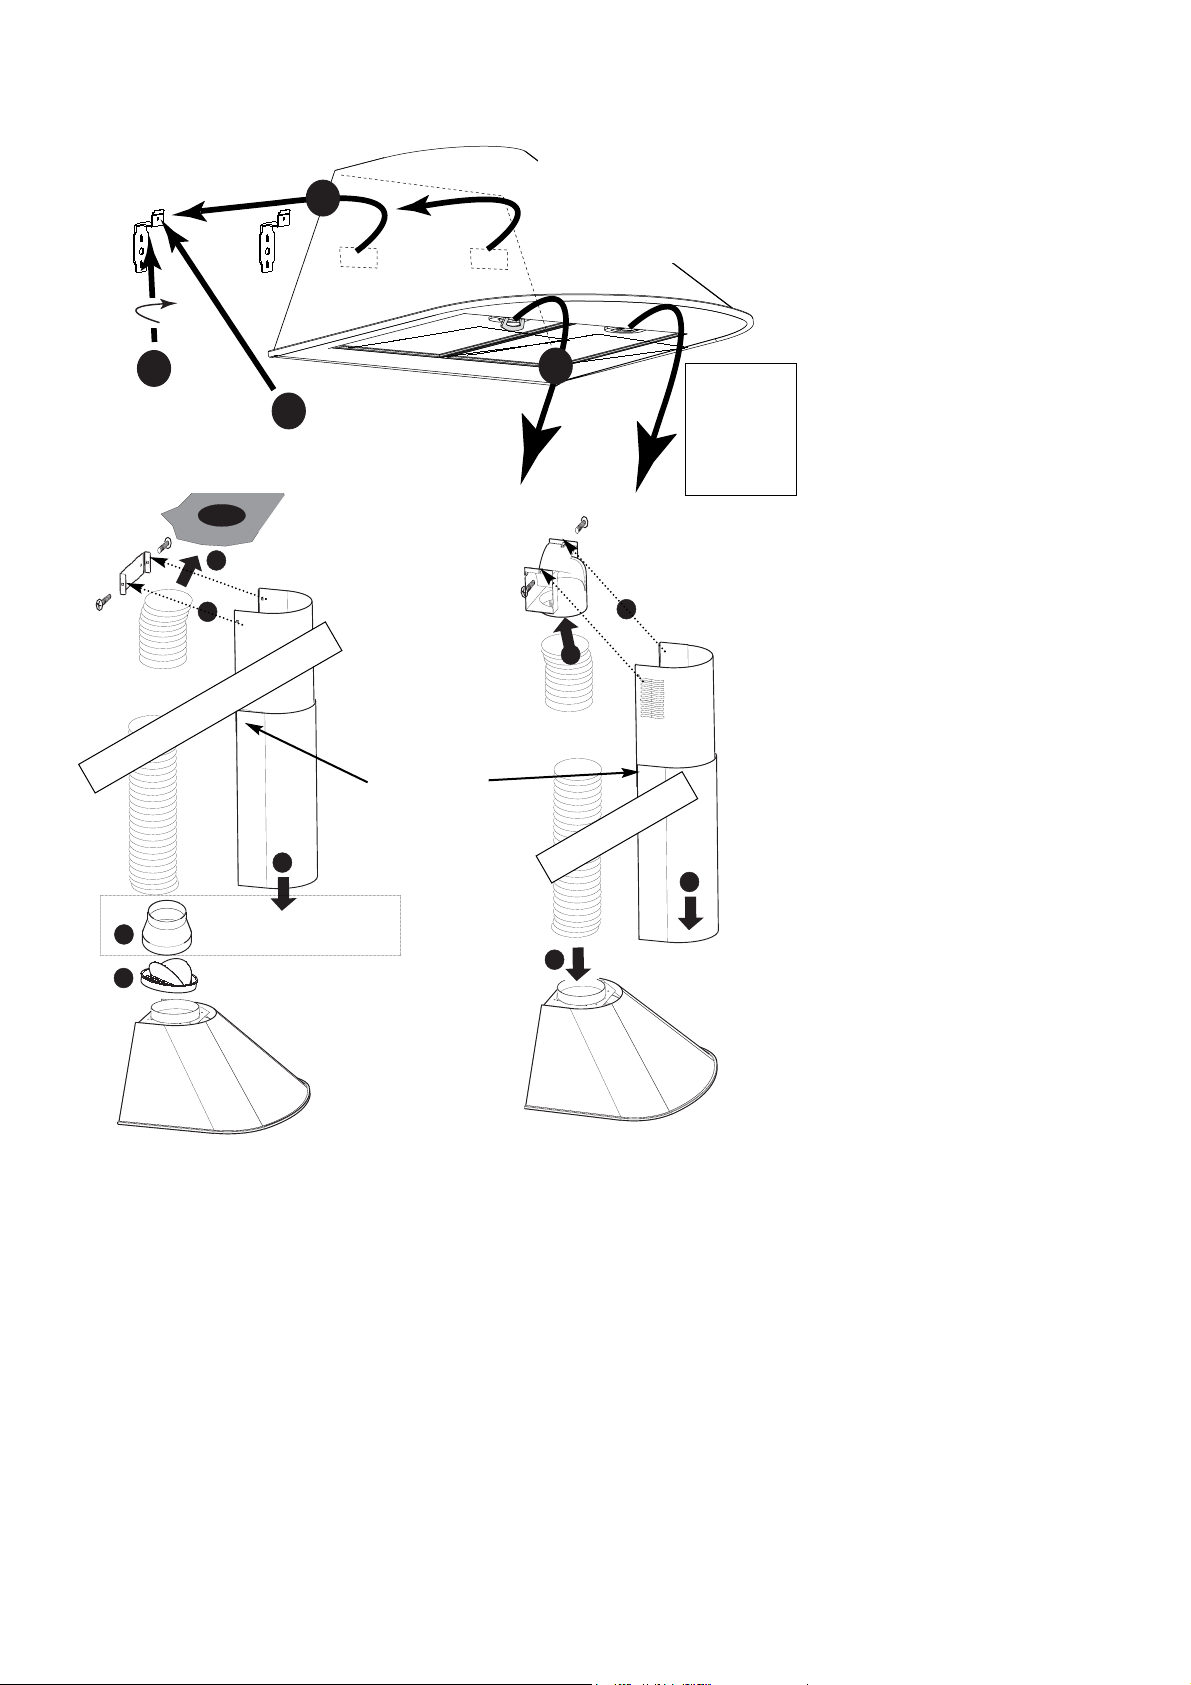
ssembling the main body of the hood
6
The unit must be installed in compliance with regulations in force concerning ventilation of
inside premises. In France, these regulations are to be found in DTU 61.1 of the CSTB. In
particular, any fumes evacuated must not be blown into ventilation, hot air, or fume
removal conduits.
Disused conduits are only to be used after approval from a specialist.
5
4
3
2
6
70...85 mm
=
=
diametre 8 mm
long 25
long 8
fourni
fourni
1
7
e
n
é
v
a
c
u
a
t
i
o
n
e
x
t
é
r
i
e
u
r
e
e
n
r
e
c
y
c
l
a
g
e
fourni
=
=
Installing your duo in complete safety
70 cm mini
Supplied
Supplied
F
o
r
e
x
t
e
r
n
a
l
e
x
t
r
a
c
t
i
o
n
f
o
r
r
e
c
y
c
l
i
n
g
m
o
d
e
25 long
Supplied
8 long
8 mm diameter
7
3
2
1
4
NOTE
The size of the cutouts
enables the hood to be
moved to the left or right.
screw for setting
the height of
your hood
screw for aligning the hood
against the wall
1
2
3
4
5
1
2
3
4
RECYCLING
Non-return flap
Adaptor
ONLY for use with a
duct ∅ 12.5 cm
Installing your duo in complete safety
Remove the
protective film
on the cassette
filters .
Remove the
chimney transport
screws
EXTERNAL EXTRACTION
Using your hob in all simplicity
8
Ø 23 cm
2,2 kW
Halogen
Ø 18 cm
1,5 kW
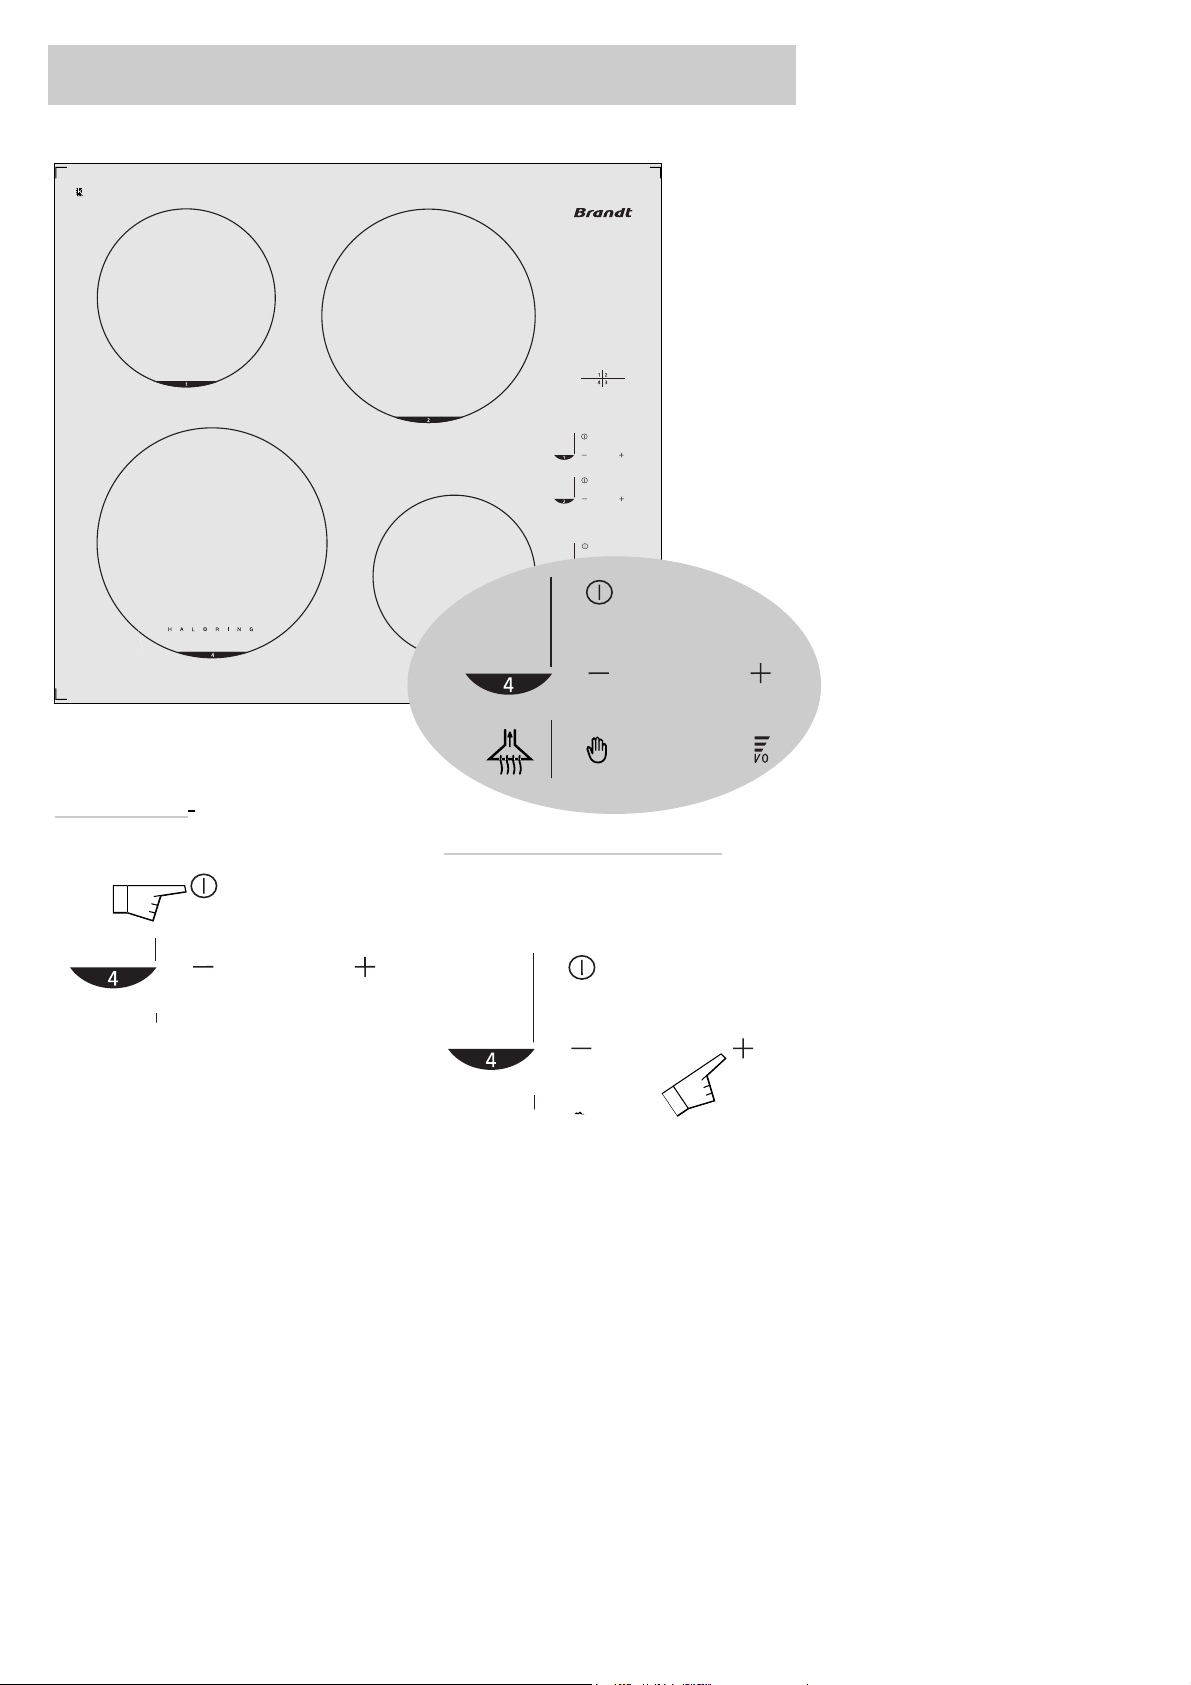
A “0” show that the zone concerned has been
lighted.
You can then choose the desired power.
If you do not set the power, the cooking zone
will turn itself off automatically.
Start/Stop
Setting manual power
0
1...9
Ø 16,5 cm
1,2 kW
Ø 21,5 cm
2 kW
9
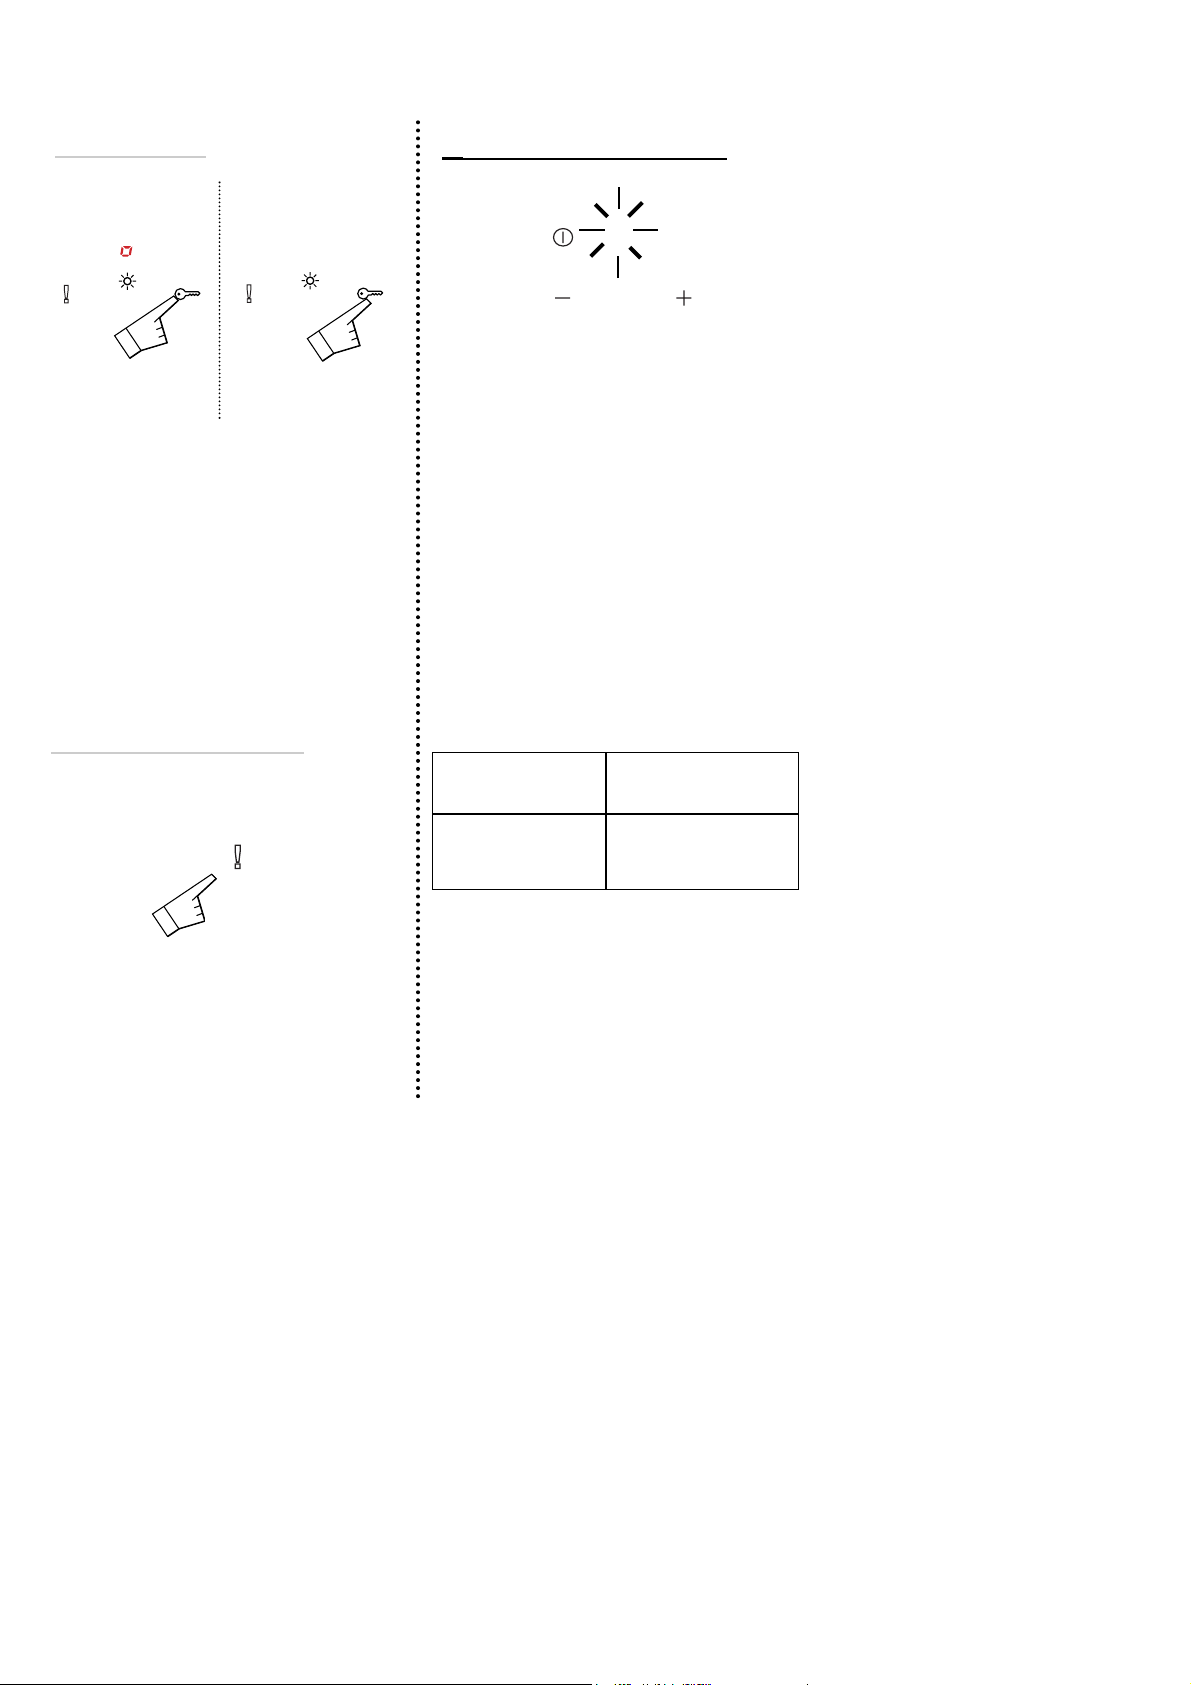
Residual heat indicator
The display shows H.
After a prolonged power cut, a light display may
appear. It will turn itself of after pressing any
key for a while. However, the temperature of the
cooking areas may remain high.
Locked
Controls can be locked:
- Either when turned off (cleaning)
- Or during use (the operations in progress
continue and the settings displayed stay active).
However when in the locked position, the "STOP"
touch control has priority and cuts off the power
to the oven.
Unlocked
Child safety
3 , 4 secs
bleep
3 , 4 secs
bleep
H
Using your hob in all simplicity
The general stop button turns off all cooking
zones.
General stop button
3 , 4 secs
bleep ...........
Automatic-Stop
Automatic stop is a safety function for your hob. It
starts up automatically if ever you forget to turn
off your cooking.
The letter A is displayed for the heating zone
concerned and the hob will bleep for about 2 minutes. The A will continue to be displayed until any
control of the zone in question is touched. The hob
will then bleep twice to confirm your action.
Power consumed The heating zone
goes out
automatically after
Between 1....4 8 hours
Between 5....7 2 hours
Between 8....9 1 hour
10
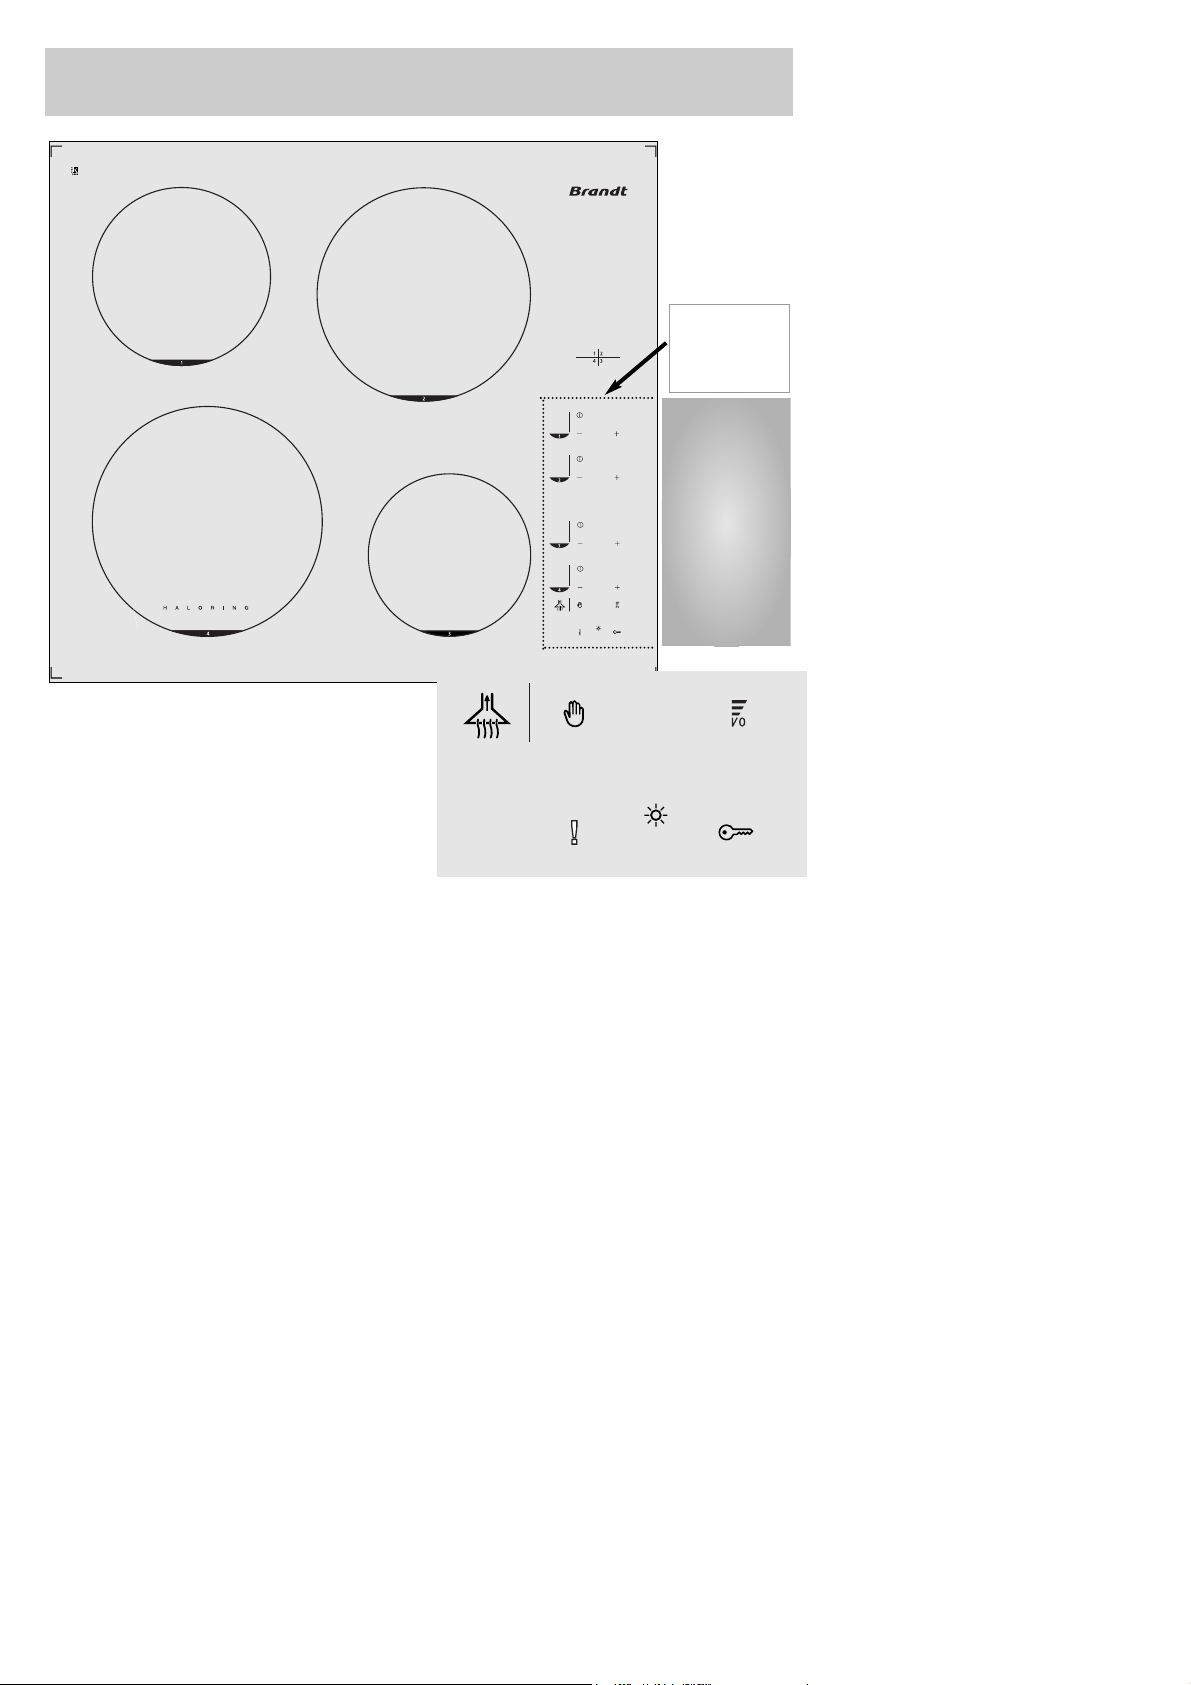
Hood infra red
control zone
DO NOT
OBSTRUCT
THIS AREA
BETWEEN
THE TABLE
AND THE
HOOD
The hob has an infra red system (specially designed
for the hood) which controls the extraction power
automatically.
When the hob is switched on the light goes on and
the hood is in automatic mode: An A is displayed
on the hob.
The extraction speed of your hob changes
automatically depending on the cooking power you
have chosen.
In this mode you can change the setting on your
hood at any time depending on the specific
requirements of particular types of cooking (frying,
excessive steam etc.).
You can also use your hood in manual mode.
The extraction speed is entirely under your
control. You just need to choose the extraction
setting by pressing the buttons on your hob.
It is preferable to use the back cooking areas of
your cooker.
In manual mode:
We recommend that you use this from the time
you start cooking. When all the burners are off
the hood stops automatically after 1 - 4 minutes
depending on the extraction speed you have
chosen.
In automatic mode:
These criteria are taken into consideration by the
hob as the hood starts working as soon as the
cooking areas start to warm up.
Using your hood in all simplicity
A

...... ...... ......
11
Using your hood in all simplicity
Automatic function
+
.....
+......+
...... ...... ..
-
......
-
......-
0
The hood automatically recalculates the
extraction speed depending on the other
burners.
Keep the button pressed down until
you reach the required setting.
Changing hob
power
Turning off one burner
Changing the power or turning
the hood off
Turning off the hood light
The hood automatically calculates the
stopping time (depending on the cooking you
have been doing it will stop after 1 - 4 minutes).
Turning off all burners
Manual operation
Keep the button pressed
down until you reach the
required setting.
Switching to manual operation
changing the power or turning the
hood off
Turning the hood light on
and off
(or going back to
automatic
operation)
bleep bleep
...... ...... ...... .....
Extraction speed:
Off..... mini......medium....maxi
..... .... .. ...... .......
Preserving and maintaining your hob
●
You must not
Put plastic utensils on the cooking surface when
it is hot.
Store
M
AINTENANCE
or
I
NFLAMMABLE
products in
the cupboard under your hob.
Leave an empty recipient on a heating zone.
Heat up a closed can. It may burst; this
recommendation applies to all methods of
cooking.
Leave a casserole or a pan containing hot fat
or oil unattended on the cooking zone.
●
You must:
Avoid any shocks with recipients etc.:
The glass surface is highly resistant but not
unbreakable.
Avoid rubbing with recipients etc. as in time this
will deteriorate the markings on the top of your
ceramic hob.
Avoid using recipients with rough or dinted
bases:
They may hold and transport matter liable to stain
or scratch the hob.
Place your recipient in the middle of the heating
zone.
Use a pan of the right size. The diameter of the
base must be as big as, or bigger than the
cooking zone surface area marked on the
ceramic plate.
Any such faults, which are not the cause of
breakdowns nor make the hob impossible to
use, are not included in the guarantee
conditions.
12
TYPE OF STAIN
Minor
Accumulated burnt-on
stains
Rings and traces of
limescale
Burnt-on stains following
sugar spillage, melted
aluminium or plastic.
Soak the area to be cleaned with hot water, then
wipe it.
Cleaning sponges
Soak the area to be cleaned with hot water, use a special
ceramic hob scraper to remove the worst, finish off with the
rough side of a cleaning sponge, then wipe it clean.
Cleaning sponges
special ceramic hob
scraper
Apply hot white spirit vinegar on the stain, leave to
act then wipe off with a soft cloth.- Use a
commercial cleaner.
Special ceramic hob
cleaning paste
- Apply a special ceramic hob cleaner on the
surface, preferably one which contains silicone
(protective action).
Special ceramic
hob cleaner
WHAT TO DO
ACCESSORIES
EMPLOYED
cream
powder
abrasive-backed sponge
ordinary sponge or special
sponge for delicate items
13
For easy use, we have provided cooking zones
specially adapted to your needs, nevertheless:
However, higher temperatures may be
required for:
- Large quantities
- Cooking with a non-covered casserole.
- Using a glass or ceramic casserole.
And lower temperatures are required for:
- Cooking food products that tend to burn easily
(start with a low temperature that can always be
increased if possible).
- In case of overflowing
(take the lid off, or remove the pan from the heat,
then lower the temperature).
Energy saving:
To finish off cooking turn the knob back to 0 and
leave the pan in place to use up all the
accumulated heat (which saves energy).
Use a lid whenever possible to reduce any loss of
heat through evaporation.
Automatic cooking zone temperature adjustment
The radiant cooking zone is self-regulating,
It switches itself on and off so as to remain at the
programmed power. Under these conditions the
temperature remains constant and is correctly
adapted to the food you are cooking.
The frequency of self-regulation depends on the
power being used.
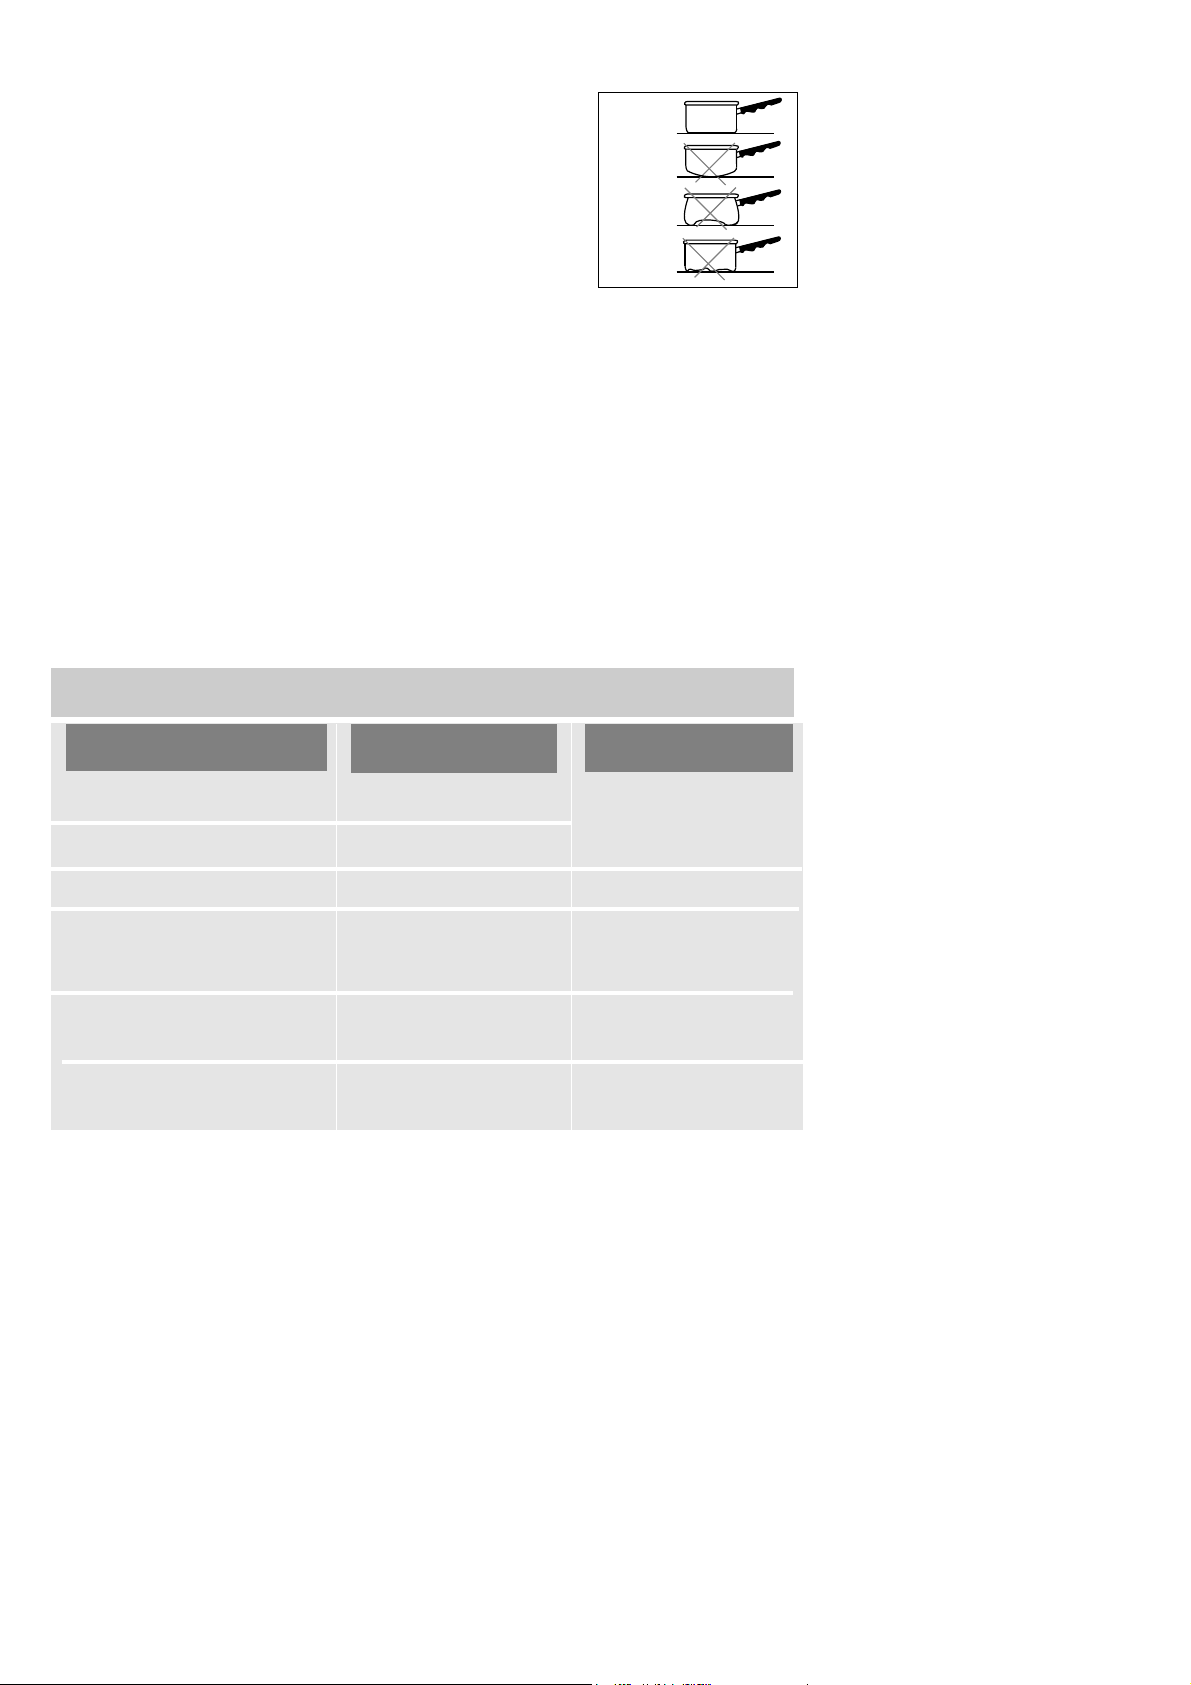
Pans and casseroles must be designed for use with electric hobs.
Use pans with flat bases that have good surface contact with the cooking
zone surface. They must be made out of:
- Stainless steel with a thick tri-metal or "sandwich" bottom.
- In aluminium with a thick smooth bottom.
- In enamelled steel.
The best way to use your ceramic hob
Minor troubleshooting
Check the connection and
make sure it complies with
requirements.
Your hob is connected
incorrectly
Your hob is connected incorrectly
Inspect the fuses and the
cut-out switch.
The apparatus is not under
power.
There is a power or connection problem.
When you switch on, the fuse
blows
When you switch on, only one side of the hob works.
Clean the hob or remove
the object in question and
start cooking again.
- Something has overflowed
and or an object is touching
the control panel.
The hob has stopped during use
and is giving out a bleep
The hob doesn't work. The display lights don't come on
The display reads Message
E
E
The electronic circuits have overheated. The hob has gone into
its overheating protection mode.
Leave to cool.
WHAT SHOULD
YOU DO?
POSSIBLE-
CAUSES
IF YOU REALIZE
THAT
NOTHING: see chapter Remarks on connections
The hob is working normally
When you switch on, the display
lights up
14
MAINTENANCE
REASON
HOW
ESSENTIAL ONCE A MONTH
YEARLY
This filter retains all the fatty vapours and
dust. It is the most important element for
keeping your hood efficient.
This filter retains odours and,
depending on its use, should be
changed at least once a year.
Wash using a standard household product,
rinse thoroughly and leave to dry.Put the filter
in your dishwasher vertically for cleaning.
(Do
not allow it to come into contact with any
dirty dishes).
Order these filters from your local
retailer (
using the reference
marked on the identity plate inside
the hood
) and note down the date
you have changed it.
Cassette filter
Active charcoal filter
Never use steel-wool pads, abrasive products or over-stiff brushes.
To clean the outside of the hood and the light cover, use any standard household product diluted in
water and wipe with a clean soft cloth.
Before using the cassette filter for the first time
remember to remove the protective film
For hoods set up for recycling
The hood must be disconnected from the mains before removing the filter cassettes and
after cleaning the filter cassettes must be fitted again according to the instructions.
Preserving and maintaining your hood
●
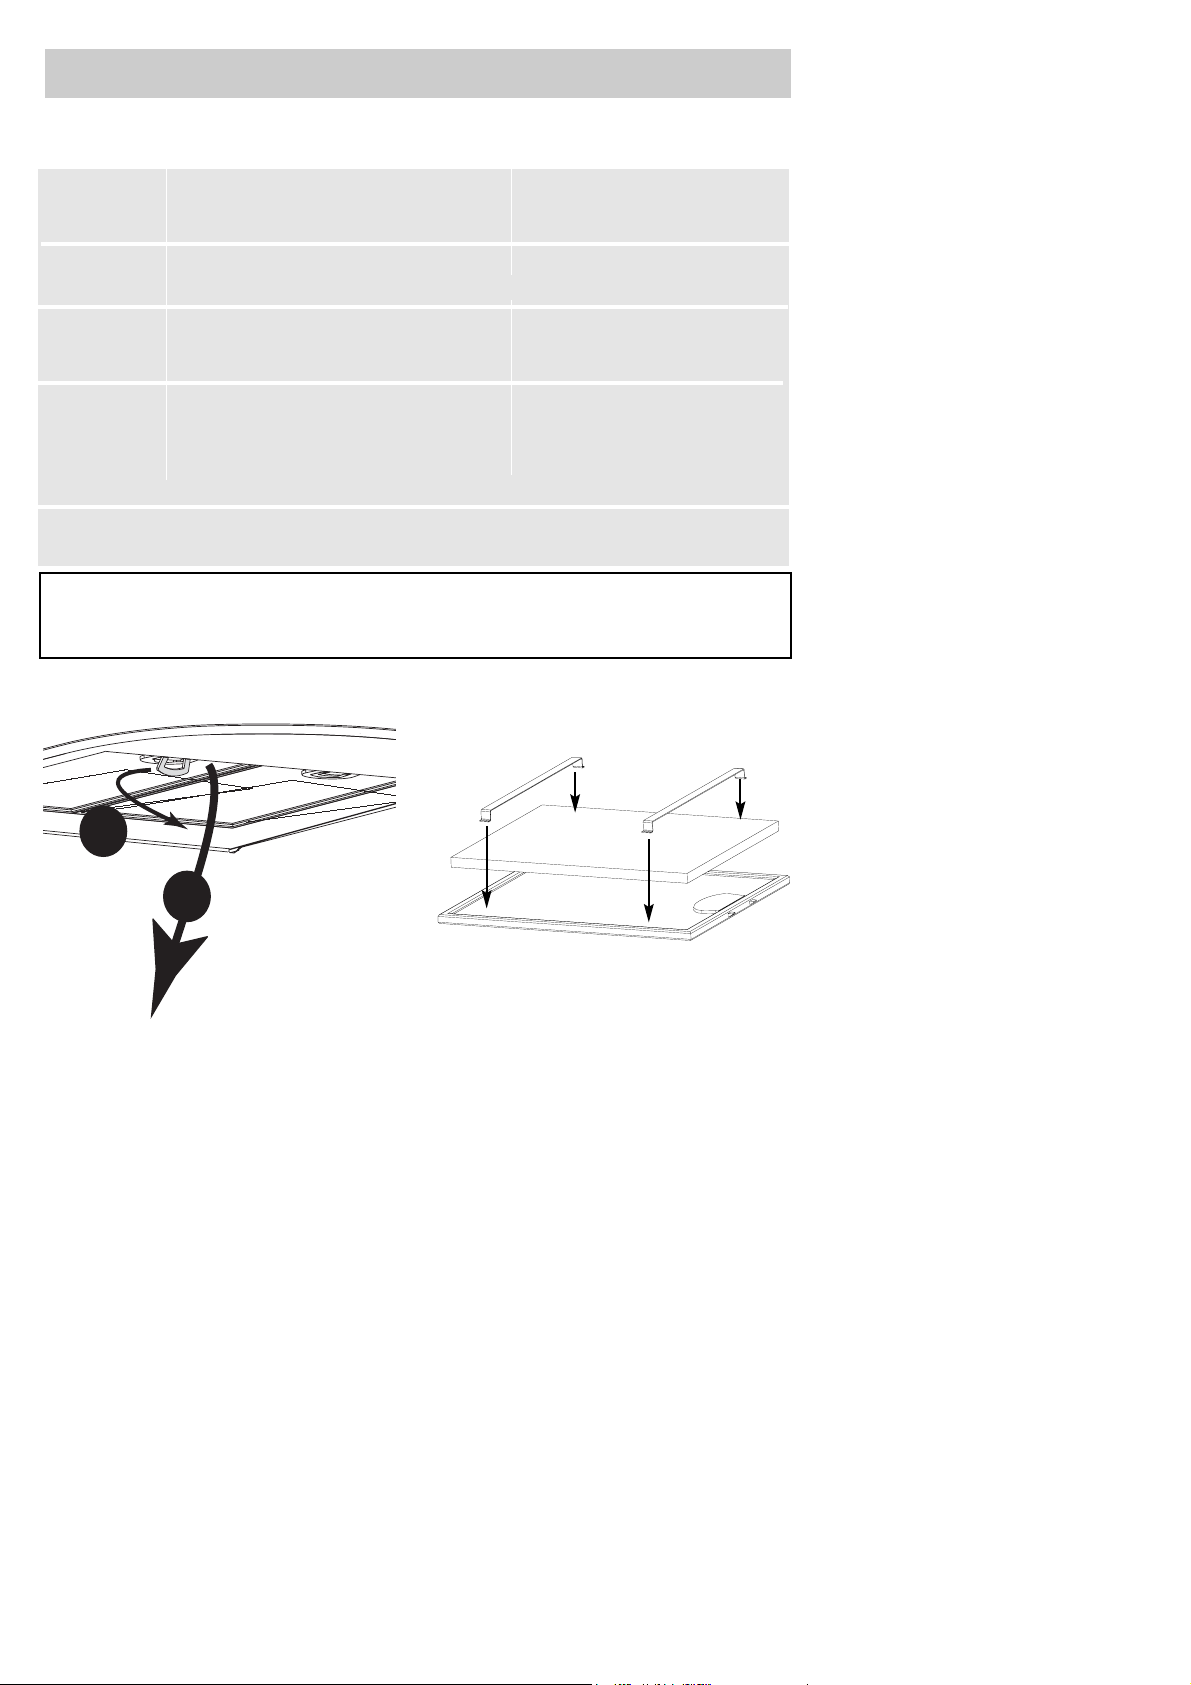
Removing the cassette filter
●
Removing the charcoal filter
After cleaning replace the filter by carrying out
the procedure in reverse.
1. Remove the cassette.
2. Put the new charcoal filter on the cassette that goes
at the back of the hood.
3. Slot the two support rods into position.
4. Carry out the same operation on all the
cassette filters.
To avoid any risks of fire
1
2
15
Preserving and maintaining your hood
●
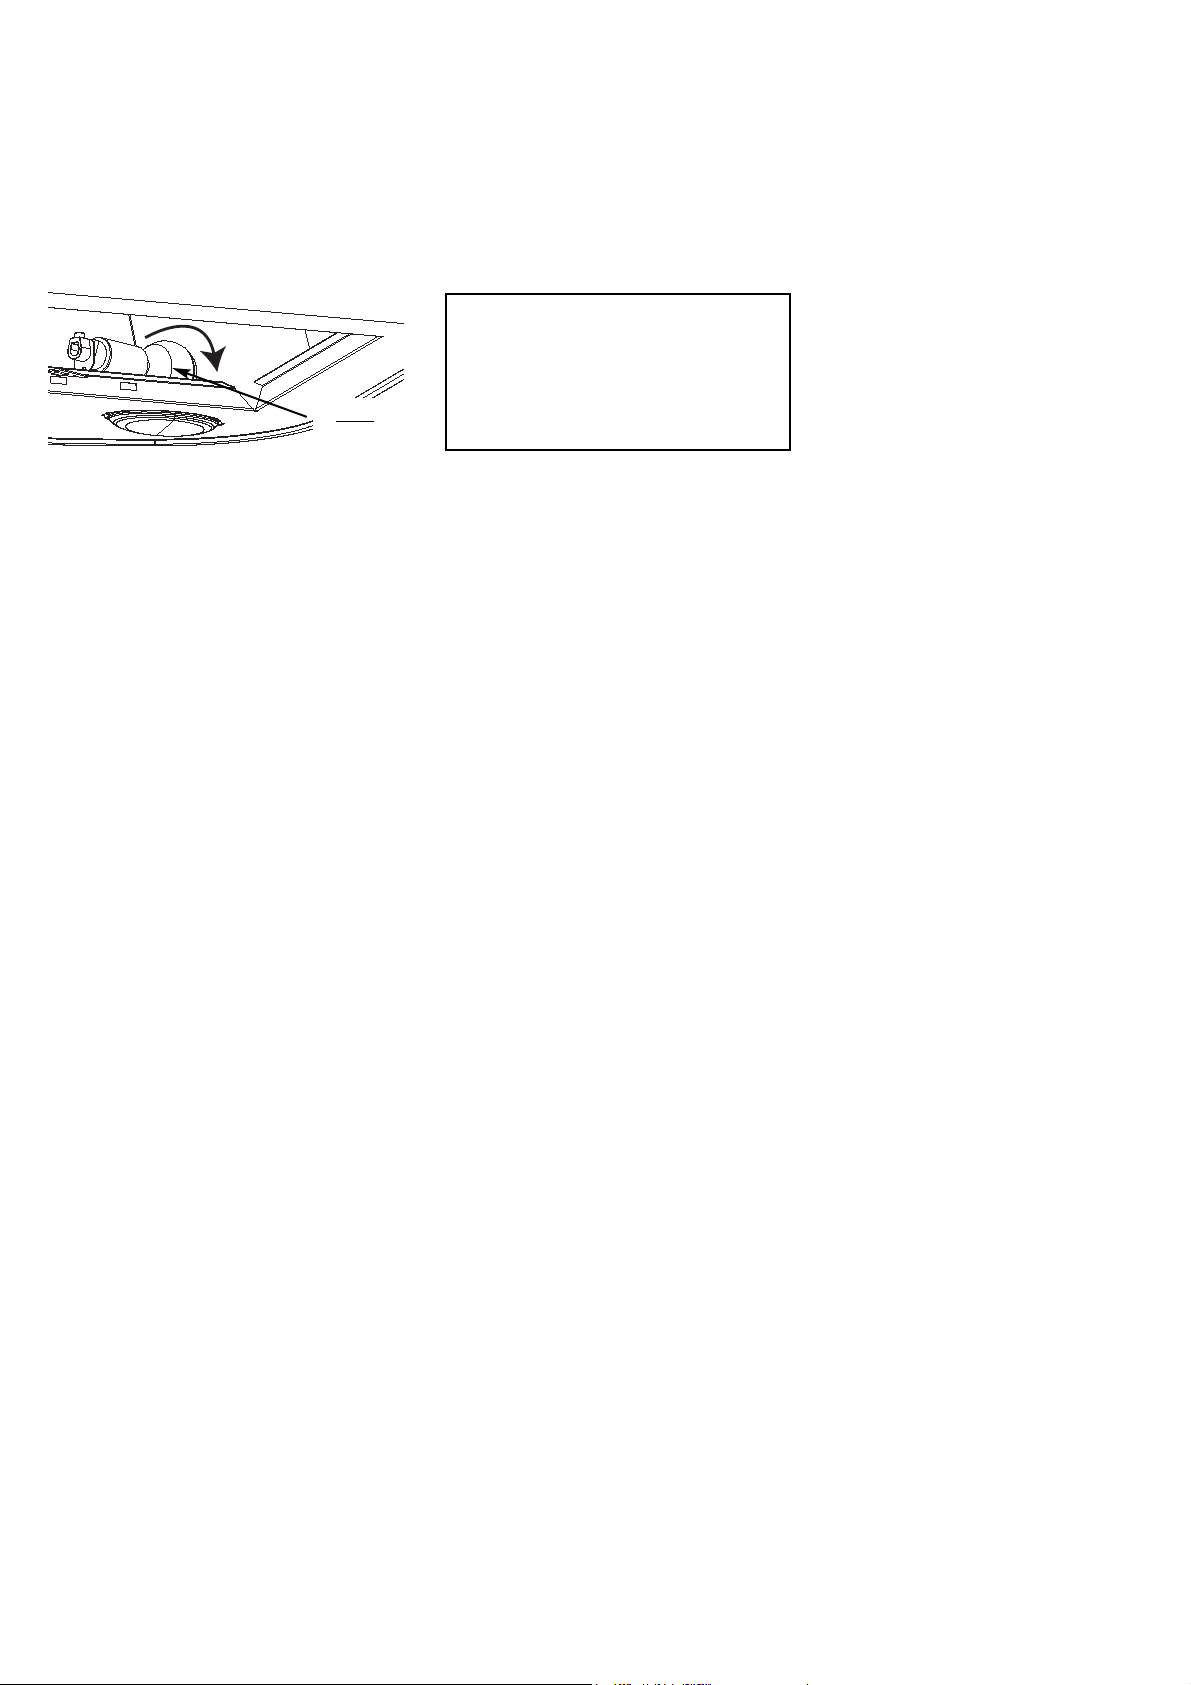
Changing the bulbs
bulb
1. Remove the cassettes.
2. Put your hand inside the front of the hood
and unscrew the faulty bulb.
3. Screw in a new bulb (E14 40 W).
4. Replace the cassettes.
Make sure your hood is disconnected or
switched off at the mains before
servicing.
16
maximum power is reserved for frying and quick boiling.
Cooking
boil with cover
add food
boil or fry
fast cooking
slow cooking
SOUPS
BROTH
THICK SOUP
FISH
STOCK
FROZEN
SAUCES
T
HICK, MADE WITH FLOUR
M
ADE WITH BUTTER AND EGGS
(
BEARNAISE, HOLLANDAISE)
VEGETABLES
CHICORY, SPINACH
P
ULSES,
B
OILED POTATOES
FRIED POTATOES
S
AUTE POTATOES
DEFROSTING VEGETABLES
MEAT
T
HINLY SLICED MEAT
F
RYING STEAKS
G
RILLING (CAST IRON GRILL PAN
)
DEEP FRYING
FROZEN CHIPS
F
RESH CHIPS
MISCELLANEOUS
PRESSURE COOKER
S
TEWED FRUIT
P
ANCAKES
CUSTARD
M
ELTING CHOCOLATE
JAM
MILK
F
RIED EGGS
PASTA
SIMMERING KEEPING
DISHES
MAXI VERY HOT HOT MEDIUM REHEATING WARM
7 6
5
4 3
2 1
9
8

17
18
Cher Cliente, Cher Client,
Vous venez d'acquérir un ensemble table et hotte BRANDT et nous vous en remercions.
Nos équipes de recherche ont conçu pour vous une nouvelle génération d'appareils pour
cuisiner chaque jour avec plaisir.
Cet ensemble automatique composé d'une table et d'une hotte vous assure une cuisson
parfaite, sans odeur et sans fumée, quels que soient les plats que vous réalisez.
Avec des lignes pures et une esthétique moderne, votre nouvel ensemble BRANDT s'intègre
harmonieusement dans votre cuisine et allie parfaitement facilité d'utilisation et
performances de cuisson.
Vous trouverez également dans la gamme des produits Brandt, un vaste choix de fours, de
lave-vaisselle et de réfrigérateurs intégrables, que vous pourrez coordonner à votre
ensemble BRANDT.
Bien entendu, dans un souci permanent de satisfaire au mieux vos exigences vis à vis de nos
produits, notre service consommateurs est à votre disposition et à votre écoute pour
répondre à toutes vos questions ou suggestions (coordonnées dans ce livret).
A la pointe de l'innovation, Brandt contribue ainsi à l'amélioration de la qualité de la vie
quotidienne en vous apportant des produits toujours plus performants, simples d'utilisation,
respectueux de l'environnement, esthétiques et fiables.
La Marque BRANDT.
Votre duo en toute sécurité................................19
Installez votre duo en toute sécurité...................20
Utilisez votre table en toute simplicité.................24
Utilisez votre hotte en toute simplicité.................26
Comment préserver et entretenir votre table ?.....28
Comment préserver et entretenir votre hotte ?....30
Guide de cuisson...............................................32
sommaire
tout au long de la notice,
vous signale les
consignes de sécurité,
vous signale les
conseils et les astuces
Tout dépannage doit être effectué par un technicien qualifié.
Seuls les distributeurs de notre marque :
• • CConnaissent parfaitement votre appareil et son fonc
onnaissent parfaitement votre appareil et son fonc--
tionnement
tionnement,,
• • AAppliquent intégralement nos méthodes de réglage,
ppliquent intégralement nos méthodes de réglage,
d’entretien et de réparation,
d’entretien et de réparation,
• • UUtilisent exclusivement les pièces d’origine.
tilisent exclusivement les pièces d’origine.
En cas de réclamation ou pour commander des pièces de rechange à votre distributeur, précisez-lui la référence complète de
votre appareil (désignation commerciale, type de l’appareil et
numéro de série).Ces renseignements figurent sur la plaque signalétique fixée à l’intérieur de l’appareil.
PIECES D’ORIGINE : demandez à votre vendeur que, lors d’une intervention d’entretien, seules des
PIECES DÉTACHÉES CERTIFIÉES
D
’ORIGINE soient utilisées.
S
ERVICE CONSOMMATEURS B
RANDT
BP 9526
95069 CERGY PONTOISE CEDEX
Relations consommateurs
0,20TTC la minute
tarif en vigueur à la date
d’impression du document
pour en savoir plus :
informations, conseils, les points de vente, les spécialistes après-vente :
36 15
BRANDT
Service Consommateurs BRANDT
0 825
06 16 01
19
Si une fêlure dans la surface du verre apparaissait, déconnectez immédiatement l’appareil
,pour éviter un risque de choc électrique
Pour cela enlevez les fusibles ou actionnez le disjoncteur
Ne plus utiliser votre table avant changement du dessus verre.
La table ne doit pas servir à entreposer quoi que ce soit.
Pour la cuisson, n’utilisez jamais de feuille de papier d’aluminium, ou ne placez jamais directement
sur la table des produits emballés avec de l’aluminium ou produit congelé en barquette aluminium.
L’aluminium fondrait et endommagerait définitivement votre appareil.
Ne pas brancher des appareils électriques sur une prise de courant située à proximité: assurez-vous que
le câble d’alimentation n’est pas en contact avec les zones de cuisson.
Ne pas mettre de casseroles sur votre cadre ou enjoliveur (suivant modèle)
Ne pas regarder fixement les lampes halogènes des zones de cuisson.
Un nettoyeur vapeur ne doit pas être utilisé
Utilisez votre duo en toute sécurité
Nous avons conçu ce duo de cuisson pour une utilisation par des particuliers dans
un lieu d’habitation.
Dans le souci d’une amélioration constante de nos produits, nous nous réservons
le droit d’apporter à leurs caractéristiques techniques, fonctionnelles ou
esthétiques toutes modifications liées à l’évolution technique.
Ce duo de cuisson est destiné exclusivement à la cuisson des boissons et denrées
alimentaires, ne contient aucun composant à base d’amiante.
La hotte entièrement automatique est pilotée par la table de cuisson et s’adapte a
votre puissance de cuisson. Elle ne nécessite qu’un nettoyage régulier et un
changement des filtres à charbon en recyclage (voir chapitre entretien)
Votre duo en toute sécurité
Il est interdit de flamber des mets (les flammes aspirées risqueraient de détériorer l’appareil).
Les fritures effectuées sous l’appareil doivent faire l’objet d’une surveillance constante.
Les réparations doivent être exclusivement effectuées par un spécialiste agréé.
Si votre cuisine est chauffée avec un appareil raccordé à une cheminée (poêle, cuisinière...), il faut
installer la hotte en version recyclage
Ne pas utiliser la hotte sans les filtres métalliques.

20
Installez votre duo en toute sécurité
C
hoix d’installation
filtre à charbon
actif obligatoire
EVACUATION EXTÉRIEUR
RECYCLAGE
Non fournie avec votre appareil :
● Gaine d’évacuation: elle peut-être en tôle émaillée, en alu, flexible ou matière ininflammable de
diamètre intérieur 15 cm ou à défaut 12,5 cm.
● Filtre a charbon actif pour les hottes branchées en recyclage
Ces filtres sont disponibles chez votre revendeur sous la référence indiquée sur la plaque signalétique
(voir à l’intérieur de la hotte).
extérieur
pas de sortie
extérieur
Gaine d’évacuation diamètre intérieur 15 cm (ou
à défaut sur une gaine diamètre intérieur 12,5
cm en utilisant l’adaptateur fourni avec votre
hotte).
1 cm mini
La table peut être encastrée directement
dans le plan de travail au dessus du four en
position haute.
● Table
● Hotte
Tous nos appareils ont la possibilité de fonctionner en :
4 cm
AU DESSUS D’UN
MEUBLE AVEC PORTE
AU DESSUS D’UN
FOUR
vide
sanitaire
AVANT MEUBLE
 Loading...