

BRANDT TV310 User Manual
Ceramic hob operating and
installation guide
GB
REF CONSTRUCTEUR 419
9962 9822 07/03
Guide d’utilisation et d’installation
de votre table vitrocéramique
FR
Guia de utilização e de instalação
da sua placa vitrocerâmica
PT
Пдзгьт чсЮузт кбй егкбфЬуфбузт
фщн хблпкесбмйкюн еуфйюн фзт
кпхжЯнбт убт
GR
In this Manual,
displays safety
instructions
displays tips and hints
Dear Customer,
Thank you for purchasing a Brandt hob.
Our research teams have designed for you a new generation of appliances for pleasurable
cooking every day.
With pure lines and a modern design, your new fits perfectly into your kitchen and is a
perfect combination of easiness of use and cooking performance.
You will also find in the Brandt range a wide selection of ovens, extractor hoods,
dishwashers and refrigerators that you can coordinate with your new Brandt hob.
Of course, constantly concerned with better satisfying your requirements, our customer
service can answer all your questions and welcomes all your suggestions (details at the end
of this booklet).
At the cutting edge of innovation, Brandt contributes to the quality of daily life by giving you
constantly improving products that are simple to use, respect the environment and are welldesigned and reliable
BRANDT.
Using your hob in complete safety..................................3
Installing your hob in complete safety................................4-5
Using your hob in all simplicity......................................6
The best way to use your ceramic hob..........................7
Small problems and solutions........................................8
Preserving and maintaining your hob.............................9
Cooking......................................................................10
List of contents
For any information on our products please contact us at :
Brandt UK Ltd
Intec 4
Wade Road
Basingstoke
RG24 8NE
tel : 01256 308000
Fax : 01256 346377
3
If a crack appears in the glass surface, disconnect the appliance immediately to
avoid any risk of electric shock. For disconnecting, remove the fuses or use the
cutout switch.
Do not re-use your hob until the glass surface has been changed.
Your hob must never be used as a storage space or cutting surface for any products
whatsoever.
When cooking never use aluminium foil and never place products wrapped in
aluminium foil or products deep-frozen in aluminium packs on the hob.
The aluminium will melt and damage your appliance irreparably.
Do not leave empty pans on your hob or in case of residual heat or the hob being turned on by
mistake. Do not allow pans to touch or rest over the control knobs.
Do not connect electrical
appliances on plugs close to the hob. Make sure that the power cable is not in contact with any
heating zones.
A steam cleaner must not be used.
We have designed this hob for private use in homes.
With a view to constantly improving our products, we reserve the right to make any changes to their
technical, program or aesthetic features connected with their technical evolution.
These hobs are exclusively designed for cooking drinks and foodstuffs and contain no asbestos based
components.
Using your hob in complete safety

4
Installing your hob in complete safety
The hob can be fitted directly into the worktop
above an oven placed in its upper position
(Minimum distance 10 mm).
Above a cupboard
Above an oven
According to the layout of your kitchen, you should install your hob:
C
hoice of installation
4 mini
56
49
4 mini
4 mini
21,6
21,6
Fitting
A seal exists for preventing any
humidity getting under the hob.
-Stick the seal under the rim of the
hob and lower the hob into position
on the worktop.
-This seal is supplied in the sachet;
stick it in place beneath the hob.
The unit must be installed so that the mains plug is easily accessible.
4 m
ini
26,5
49
4 mini
4 mini
17,5
17,5
58
51
48,8
55,5
5,3
28,8
51
48,8
26,3
5,3
dimensions in cm
vide
sanitaire
AVANT MEUBLE
1 cm mini
4 cm
CUPBOARD FRONT
Gap
5
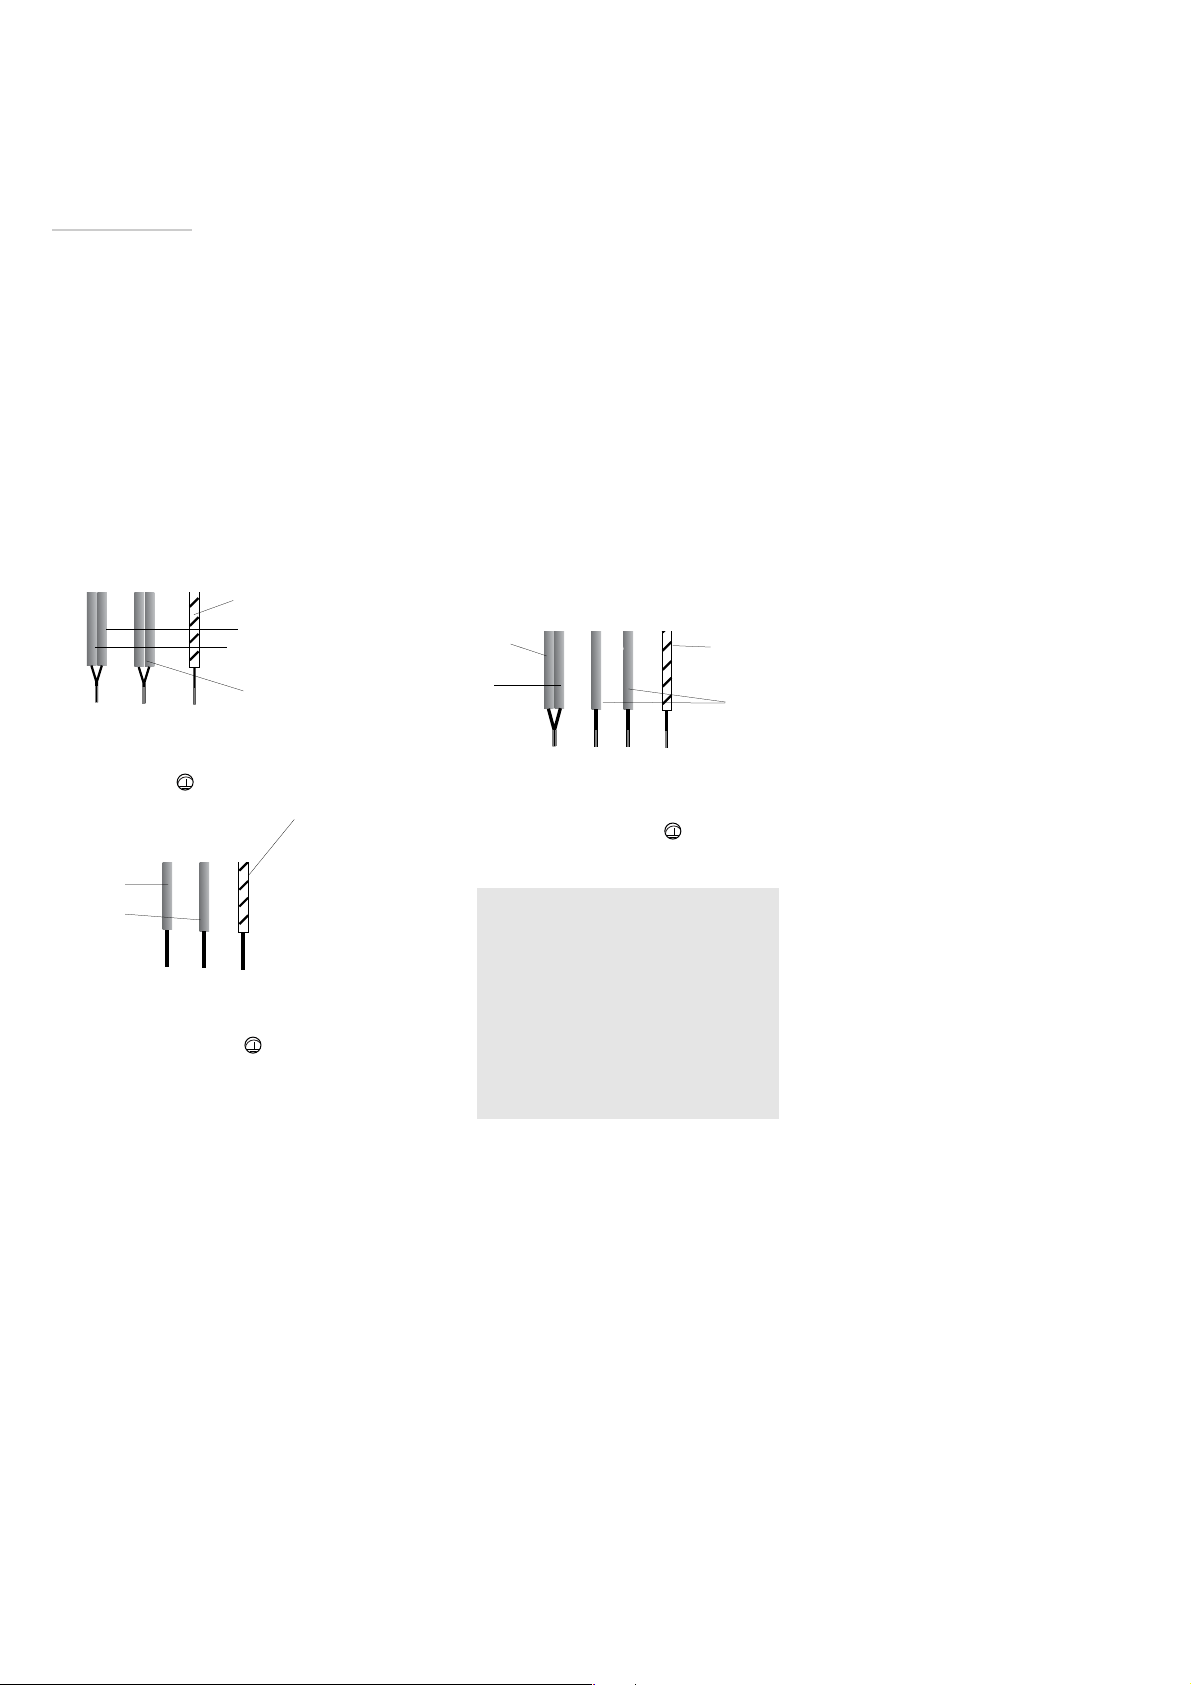
Installing your hob in complete safety
Neutral
Earth
Phase
N
L
- 220-240 V monophase
fuse 32 Amp
Neutral
Earth
Phase 2
Phase 1
N
L1
L2
Separate the 2
phase wires L1
and L2 before
connecting
Blue
Green/yellow
Black
- 400 V 2N three-phase
fuse : 16 Amp
Green/yellow
Blue
Black
These hobs are delivered with type H 05 VVF power cable (1.5mm²) with 3/5 conductors (including a
green/yellow earth wire), which must be connected to the power supply via a plug that complies with
publication CEI 60083 or an all-pole cut-out unit with contacts that open by at least 3mm.
If the cable is damaged, it must be replaced by the manufacturers, their After Sales Service or another
similarly qualified person for avoiding any possible risk of accident.
When connected to 400 V2N three-phase, if you hob malfunctions, check that the neutral cable is properly connected.
"When installing the cooktop, precautions must be taken to avoid damaging the power cable with the
sharp edges".
220 -240V
∼∼
50-60 Hz
Total energy consumption
TV300.......3 kW
TV310.....6,5 kW
TV311.....6,9 kW
brown
brown
Connection
Green/yellow
Neutral
Earth
Phase
N
L
Blue
brown
- 220-240 V monophase
fuse 16 Amp
Using your hob in all simplicity
6
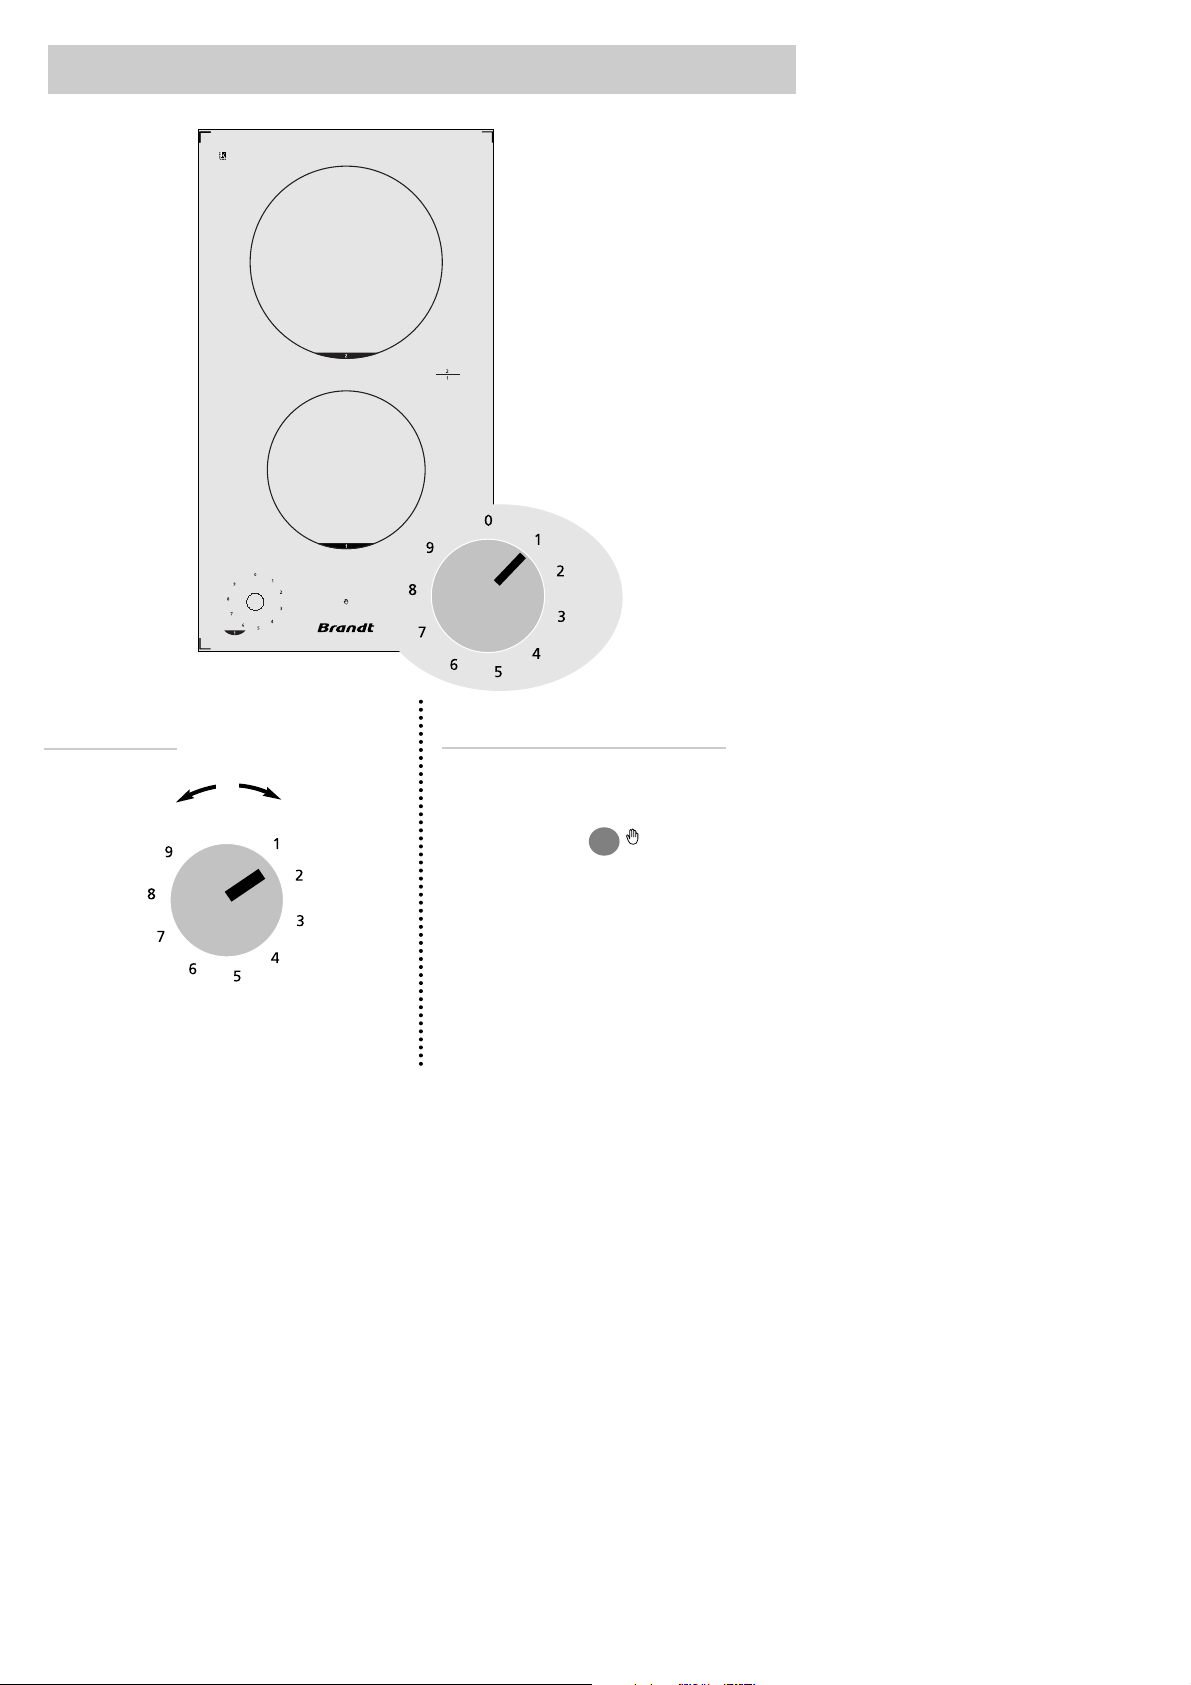
Start/Stop
Residual heat indicator
As long as a cooking zone stays hot, the light on
the display that corresponds to the zone in
question stays lit.
When a cooking zone is switched off, but is still
hot, the residual heat indicator will blink.
WARNING
Do not touch the zone, you may get burnt.
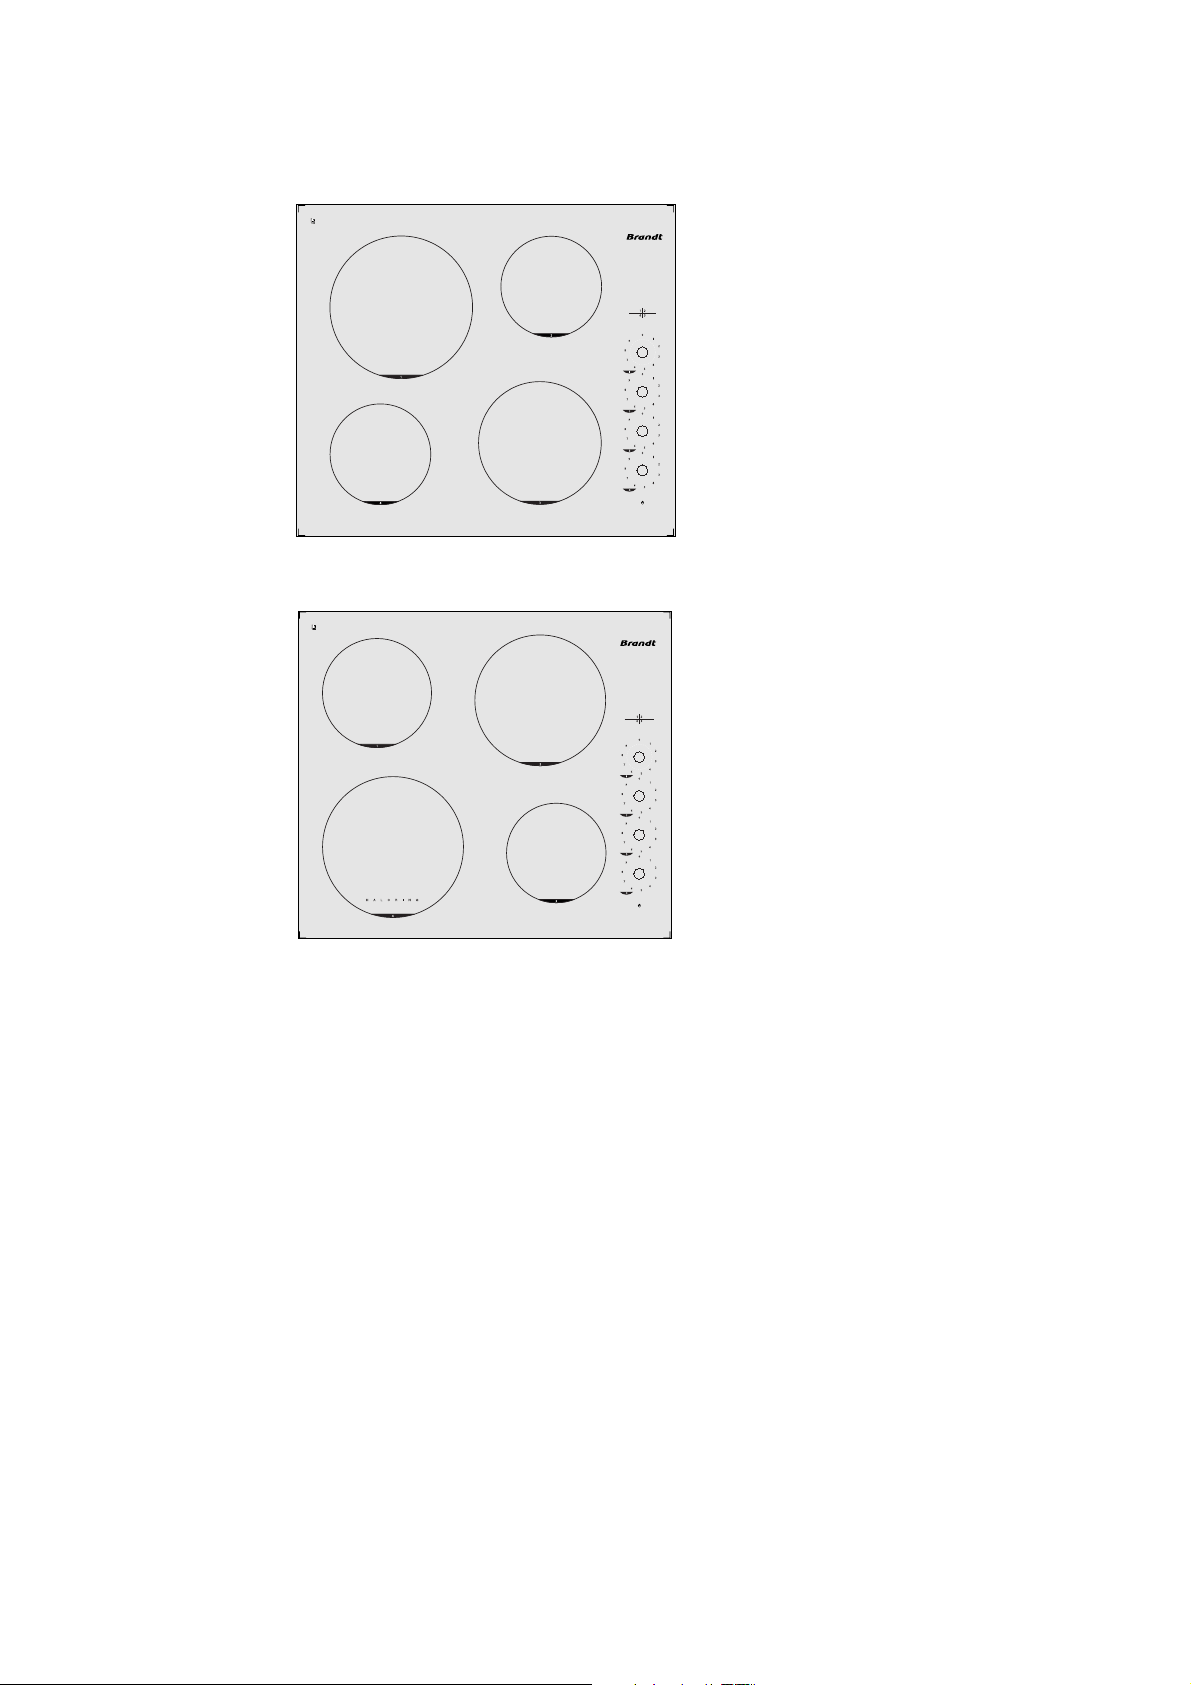
TV 300
0
Ø 20 cm
1,8 kW
Ø 16,5 cm
1,2 kW
7
TV 310
Using your hob in all simplicity
TV 311
Ø 16,5 cm
1,2 kW
Ø 16,5 cm
1,2 kW
Ø 23 cm
2,3 kW
Ø 20 cm
1,8 kW
Ø 16,5 cm
1,2 kW
Ø 23 cm
2,2 kW
Halogen
Ø 21,5 cm
2 kW
Ø 18 cm
1,5 kW
8
The best way to use your ceramic hob
For easy use, we have provided cooking zones
specially adapted to your needs, nevertheless:
However, higher temperatures may be required
for:
- Large quantities
- Cooking with a non-covered casserole.
- Using a glass or ceramic casserole.
And lower temperatures are required for:
- Cooking food products that tend to burn easily
(start with a low temperature that can always be
increased if possible).
- In case of overflowing
(take the lid off, or remove the pan from the heat,
then lower the temperature).
Energy saving:
To finish off cooking turn the knob back to 0 and
leave the pan in place to use up all the
accumulated heat (which saves energy).
Use a lid whenever possible to reduce any loss of
heat through evaporation.
Automatic cooking zone temperature adjust-
ment
The radiant cooking zone is self-regulating, It
switches itself on and off so as to remain at the
programmed power. Under these conditions the
temperature remains constant and is correctly
adapted to the food you are cooking.
The frequency of self-regulation depends on the
power being used.
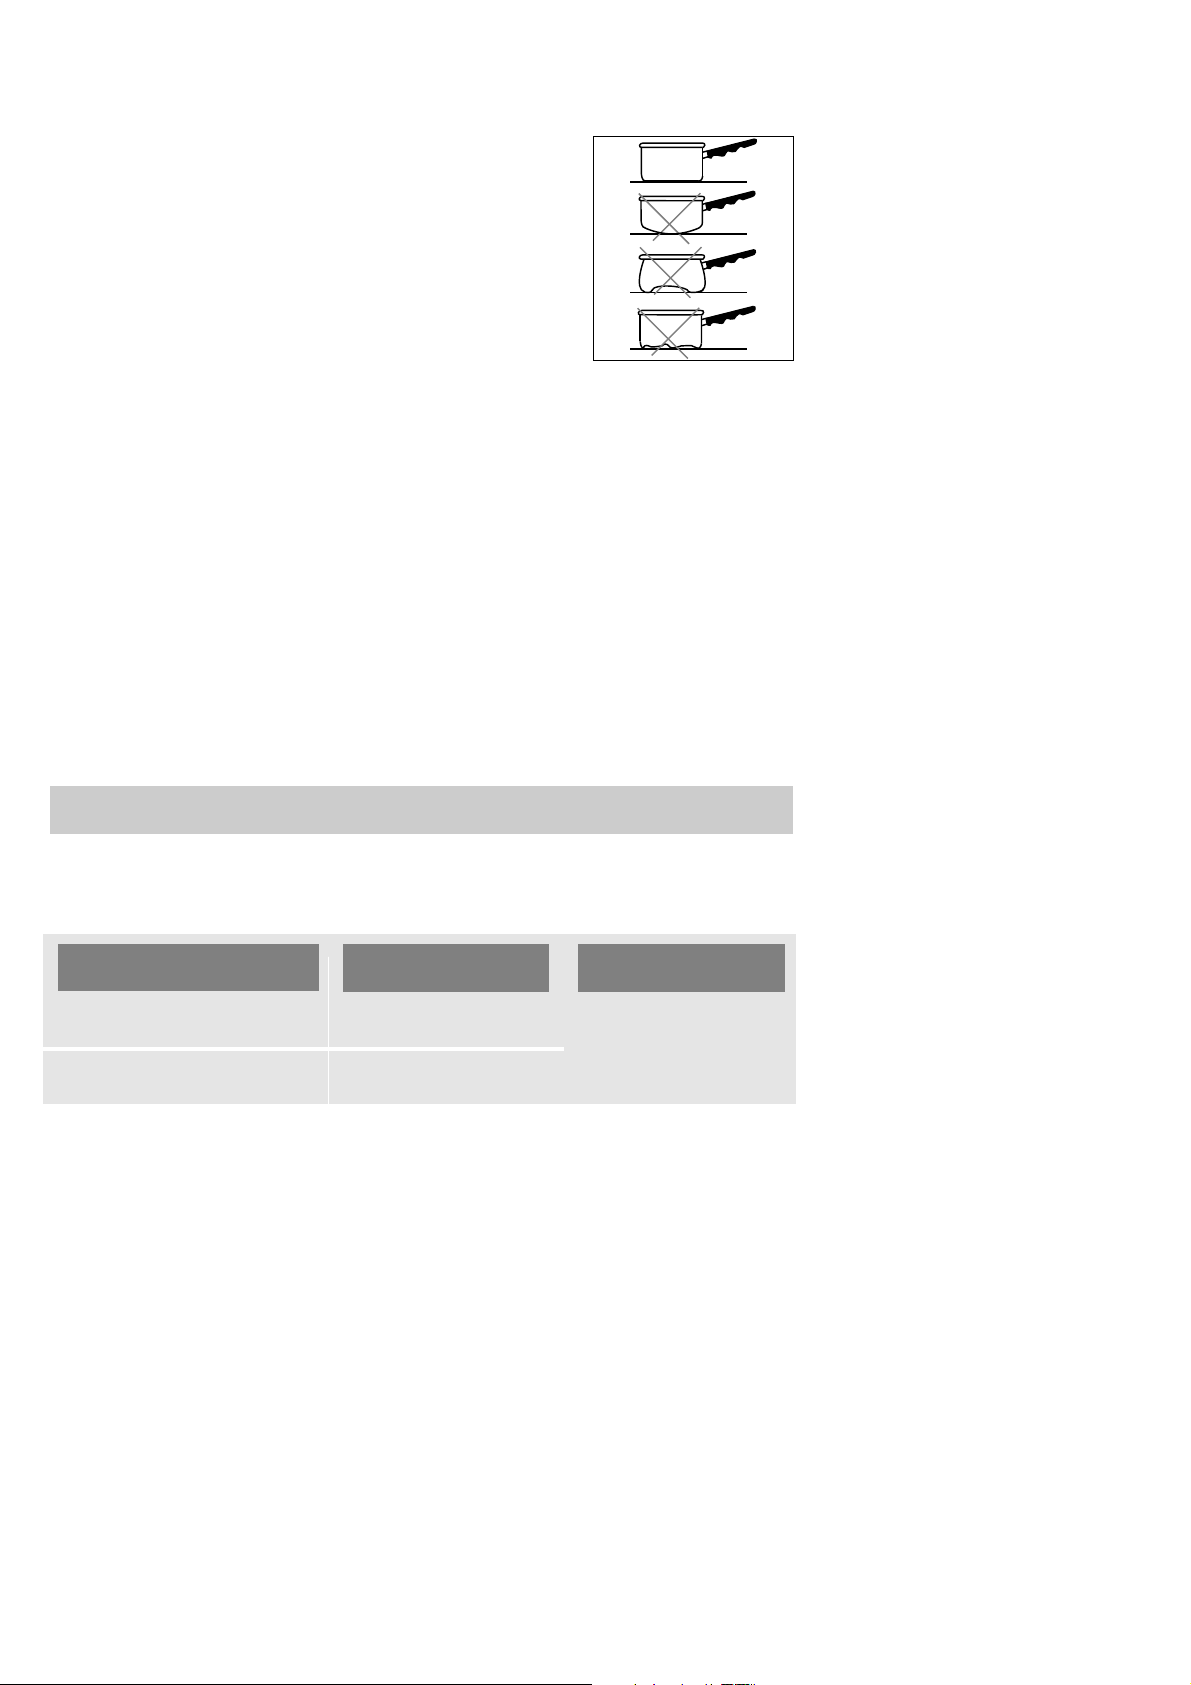
Pans and casseroles must be designed for use with electric hobs.
Use pans with flat bases that have good surface contact with the cooking
zone surface. They must be made out of:
- Stainless steel with a thick tri-metal or "sandwich" bottom.
- In aluminium with a thick smooth bottom.
- In enamelled steel.
You have doubts about whether your hob is working correctly .... ...... this does not necessarily
mean there is a breakdown. Nevertheless, check the following points
Minor troubleshooting
Your hob is connected
incorrectly
Your hob is connected
incorrectly
When you switch on, the fuse blows
When you switch on, only one side of the hob
works
WHAT SHOULD
YOU DO?
POSSIBLE
CAUSES
IF YOU REALIZE THAT
Check the connection and make sure it
complies with requirements.
9
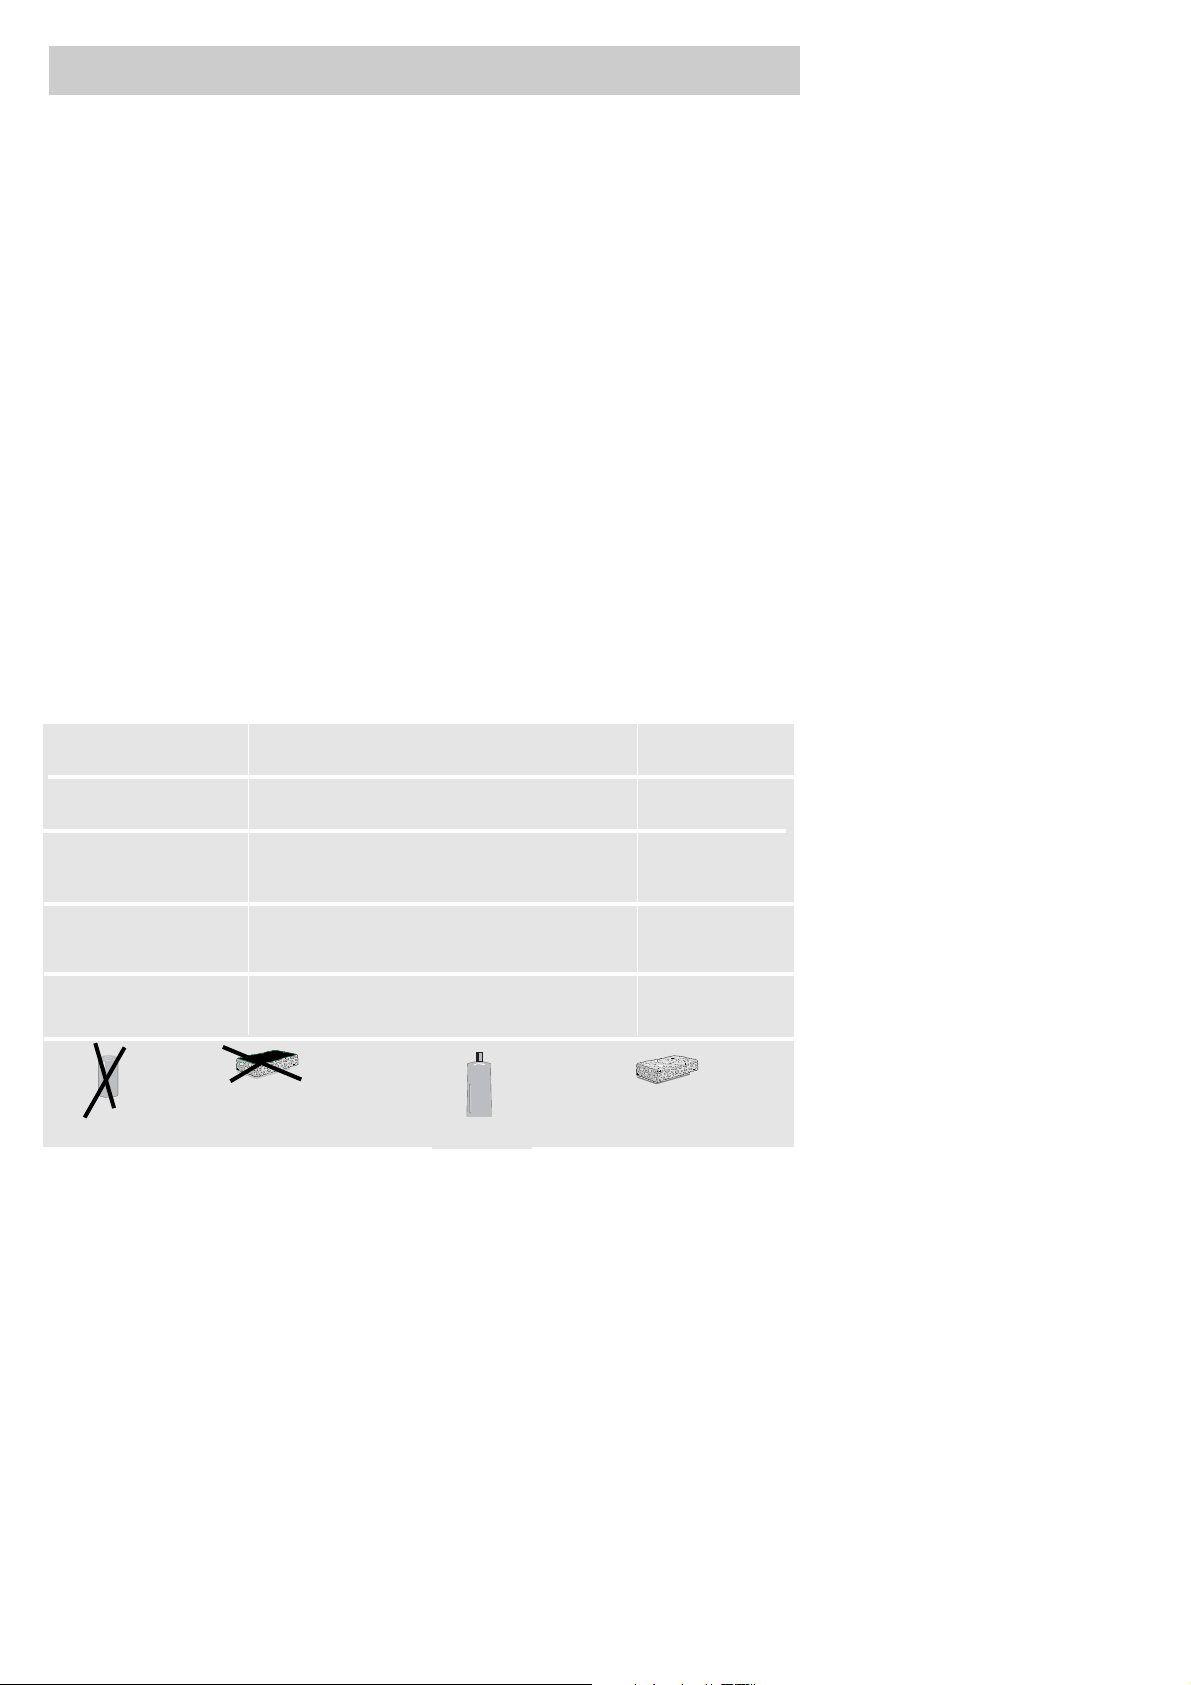
Preserving and maintaining your hob
●
You must not
Put plastic utensils on the cooking surface when
it is hot.
Store MAINTENANCE or INFLAMMABLE products in
the cupboard under your hob.
Leave an empty pan on a heating zone.
Heat up a closed can. It may burst; this
recommendation applies to all methods of
cooking.
Leave a casserole or a pan containing hot fat or
oil unattended on the cooking zone.
●
You must:
Avoid any shocks with recipients etc.:
The glass surface is highly resistant but not
unbreakable.
Avoid rubbing with any abrasive or with base of
pans etc. as in time this will deteriorate the
markings on the top of your ceramic hob.
Avoid using pans with rough or dented bases:
They may hold and transport matter liable to stain
or scratch the hob.
Any such faults, which are not the cause of
breakdowns nor make the hob impossible to
use, are not included in the guarantee
conditions.
Place your pan in the middle of the heating zone.
Use a pan of the right size. The diameter of the
base must be as big as, or bigger than the cooking
zone surface area marked on the ceramic plate.
TYPE OF STAIN
Minor
Accumulated burnt-on
stains
Rings and traces of
limescale
Burnt-on stains following
sugar spillage, melted
aluminium or plastic.
Soak the area to be cleaned with hot water, then
wipe it.
Clean sponges
Soak the area to be cleaned with hot water, use a special
ceramic hob scraper to remove the worst, finish off with the
rough side of a cleaning sponge, then wipe it clean.
Clean sponges
special ceramic hob
scraper
Apply hot white spirit vinegar on the stain, leave to
act then wipe off with a soft cloth.- Use a
commercial cleaner.
Special ceramic hob
cleaner.
- Apply a special ceramic hob cleaner on the
surface, preferably one which contains silicone
(protective action).
Special ceramic
hob cleaner
WHAT TO DO
ACCESSORIES
EMPLOYED
cream
powder
abrasive-backed sponge
ordinary sponge or special
sponge for delicate items
It is very easy to clean your hob, especially if you follow these few recommendations:
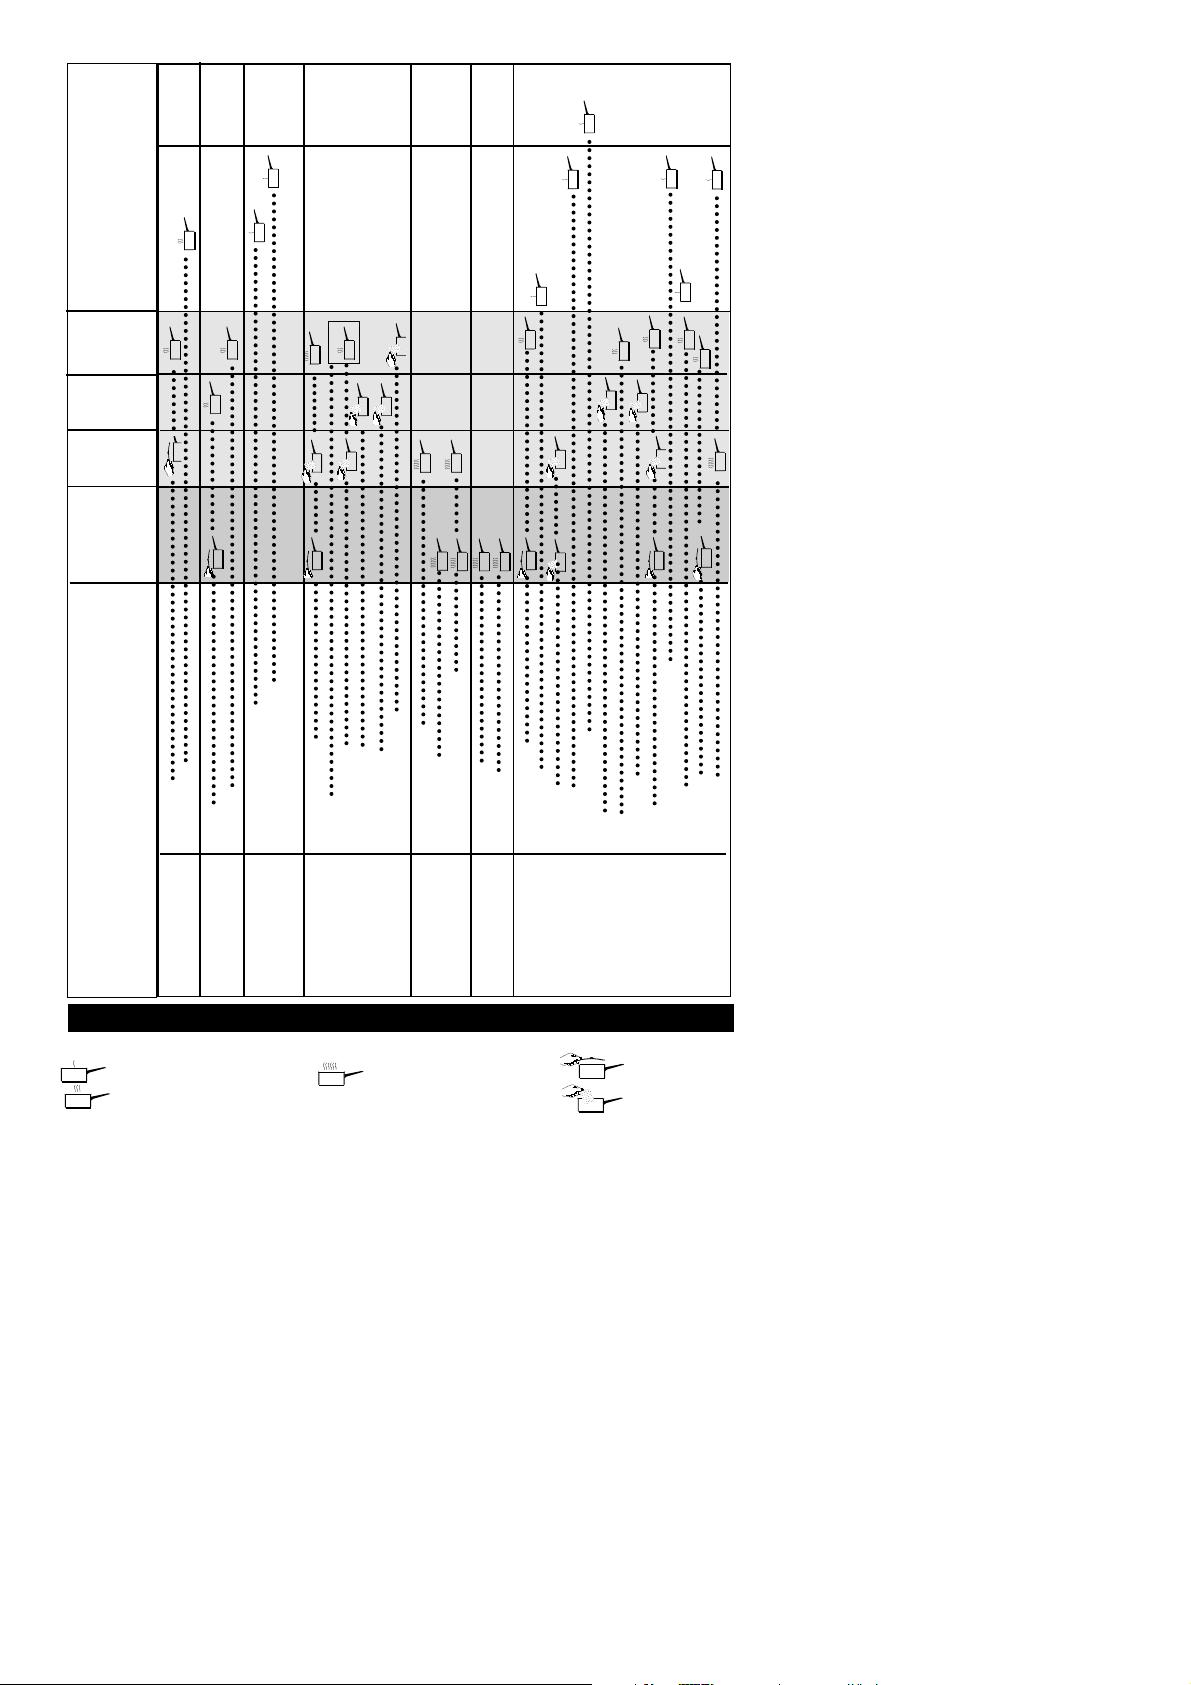
add food
boil or fry
fast cooking
slow cooking
boil with cover
maximum power is reserved for frying and quick boiling.
SOUPS
BROTH
THICK SOUP
FISH
STOCK
FROZEN
SAUCES
THICK, MADE WITH FLOUR
MADE WITH BUTTER AND EGGS
(BEARNAISE, HOLLANDAISE)
VEGETABLES
CHICORY,
SPINACH
PULSES,
B
OILED POTATOES
FRIED POTATOES
SAUTE POTATOES
DEFROSTING VEGETABLES
MEAT
THINLY SLICED MEAT
FRYING STEAKS
G
RILLING (CAST IRON GRILL PAN)
DEEP FRYING
FROZEN CHIPS
FRESH CHIPS
MISCELLANEOUS
PRESSURE COOKER
STEWED FRUIT
PANCAKES
CUSTARD
MELTING CHOCOLATE
JAM
MILK
FRIED EGGS
P
ASTA
BABY FOOD IN JARS (BAIN MARIE)
S
TEWS
C
REOLE RICE
RICE PUDDING
SIMMERING KEEPING
DISHES
MAXI
VERY HOT
HOT MEDIUM REHEATING WARM
9 8-7 6 5-4 3 2 1
91

11
12
tout au long de la notice,
vous signale les
consignes de sécurité,
vous signale les conseils
et les astuces
Chère Cliente, Cher Client,
Vous venez d'acquérir une table BRANDT et nous vous en remercions.
Nos équipes de recherche ont conçu pour vous une nouvelle génération d'appareils pour
cuisiner chaque jour avec plaisir.
Avec des lignes pures et une esthétique moderne, votre nouvelle table BRANDT s'intègre
harmonieusement dans votre cuisine et allie parfaitement facilité d'utilisation et
performances de cuisson.
Vous trouverez également dans la gamme des produits Brandt, un vaste choix de fours, de
hottes aspirantes, de lave-vaisselle et de réfrigérateurs intégrables, que vous pourrez
coordonner à votre nouvelle table BRANDT.
Bien entendu, dans un souci permanent de satisfaire au mieux vos exigences vis à vis de nos
produits, notre service consommateurs est à votre disposition et à votre écoute pour
répondre à toutes vos questions ou suggestions (coordonnées à la fin de ce livret).
A la pointe de l'innovation, Brandt contribue ainsi à l'amélioration de la qualité de la vie
quotidienne en vous apportant des produits toujours plus performants, simples d'utilisation,
respectueux de l'environnement, esthétiques et fiables.
La Marque BRANDT.
Votre table en toute sécurité.............................................13
Installez votre table en toute sécurité..........................14-15
Utilisez votre table en toute simplicité................................16
Utilisez au mieux vos foyers votrocéramique......................17
Petites pannes et remèdes................................................18
Comment préserver et entretenir votre table ?...................19
Guide de cuisson..............................................................20
sommaire
 Loading...