

Boss GT-1B Owner’s Manual

Owner’s Manual
Getting Ready . . . . . . . . . . . . . . . . . . . . . . . . . . . . . . . . . . . . . 2
Connecting the Equipment . . . . . . . . . . . . . . . . . . . . . . . . 2
Specify the Type of Amplier You Have Connected . . . . 3
Tuning the Bass (TUNER) . . . . . . . . . . . . . . . . . . . . . . . . . . 3
Playing . . . . . . . . . . . . . . . . . . . . . . . . . . . . . . . . . . . . . . . . . . . . 4
Selecting a Patch . . . . . . . . . . . . . . . . . . . . . . . . . . . . . . . . . 4
Selecting by Patch Number . . . . . . . . . . . . . . . . . . . 4
Choose a Patch Based on a Category
(EASY SELECT) . . . . . . . . . . . . . . . . . . . . . . . . . . . . . . 4
About the Play Screen . . . . . . . . . . . . . . . . . . . . . . . . . . . . . 4
Editing: Eects . . . . . . . . . . . . . . . . . . . . . . . . . . . . . . . . . . . . . 5
Basic Procedure for Eect Editing . . . . . . . . . . . . . . . . . . . 5
Changing the Eect Connection Order . . . . . . . . . 5
Editing from the Play Screen . . . . . . . . . . . . . . . . . . . . . . . 5
EASY EDIT . . . . . . . . . . . . . . . . . . . . . . . . . . . . . . . . . . . . . . . 6
Saving a Patch . . . . . . . . . . . . . . . . . . . . . . . . . . . . . . . . . . . 6
Editing: MENU . . . . . . . . . . . . . . . . . . . . . . . . . . . . . . . . . . . . . 7
Basic MENU Operations . . . . . . . . . . . . . . . . . . . . . . . . . . . 7
Assigning Favorite Parameters to [1]–[3] Knobs . 7
Adjusting the Contrast (Brightness) of the
Display . . . . . . . . . . . . . . . . . . . . . . . . . . . . . . . . . . . . 7
Restoring the Factory Default Settings
(Factory Reset) . . . . . . . . . . . . . . . . . . . . . . . . . . . . . . 7
Settings for CTL1, EXP1, and an External Pedal . . . . 9
Assigning a Function . . . . . . . . . . . . . . . . . . . . . . . . . . . . . . 9
Adjusting the Expression Pedal
(Pedal Calibration). . . . . . . . . . . . . . . . . . . . . . . . . . . 9
Connecting External Pedals . . . . . . . . . . . . . . . . . . 10
Looper . . . . . . . . . . . . . . . . . . . . . . . . . . . . . . . . . . . . . . . . . . . . . 11
Loop Playback Level Setting . . . . . . . . . . . . . . . . . . 11
[CTL1] Switch Color. . . . . . . . . . . . . . . . . . . . . . . . . . 11
Error Message List . . . . . . . . . . . . . . . . . . . . . . . . . . . . . . . . . 11
Main Specications . . . . . . . . . . . . . . . . . . . . . . . . . . . . . . . . 12
USING THE UNIT SAFELY/IMPORTANT NOTES . . . . . . 12
Connecting to a Computer . . . . . . . . . . . . . . . . . . . . . . . . 8
Installing the USB Driver . . . . . . . . . . . . . . . . . . . . . . . . . . . 8
Connecting to a Computer . . . . . . . . . . . . . . . . . . . . . . . . 8
Using the GT-1B as an Audio Interface . . . . . . . . . . . . . . . 8
Owner’s Manual (this document)
Read this rst. It explains the basic things you need to know in order to use the GT-1B.
PDF Manual (download from the Web)
5 Parameter Guide
This explains all parameters of the GT-1B.
5 Sound List
This is a list of the sounds built into the GT-1B.
1. Enter the following URL in your computer.
2. Choose “GT-1B” as the product name.
Before using this unit, carefully read “USING THE UNIT SAFELY” and
“IMPORTANT NOTES” (leaet “USING THE UNIT SAFELY” and Owner’s
Manual (p. 12)).After reading, keep the document(s) where it will be
available for immediate reference.
© 2017 Roland Corporation
To obtain the PDF manual
http://www.boss.info/manuals/
I
Getting Ready
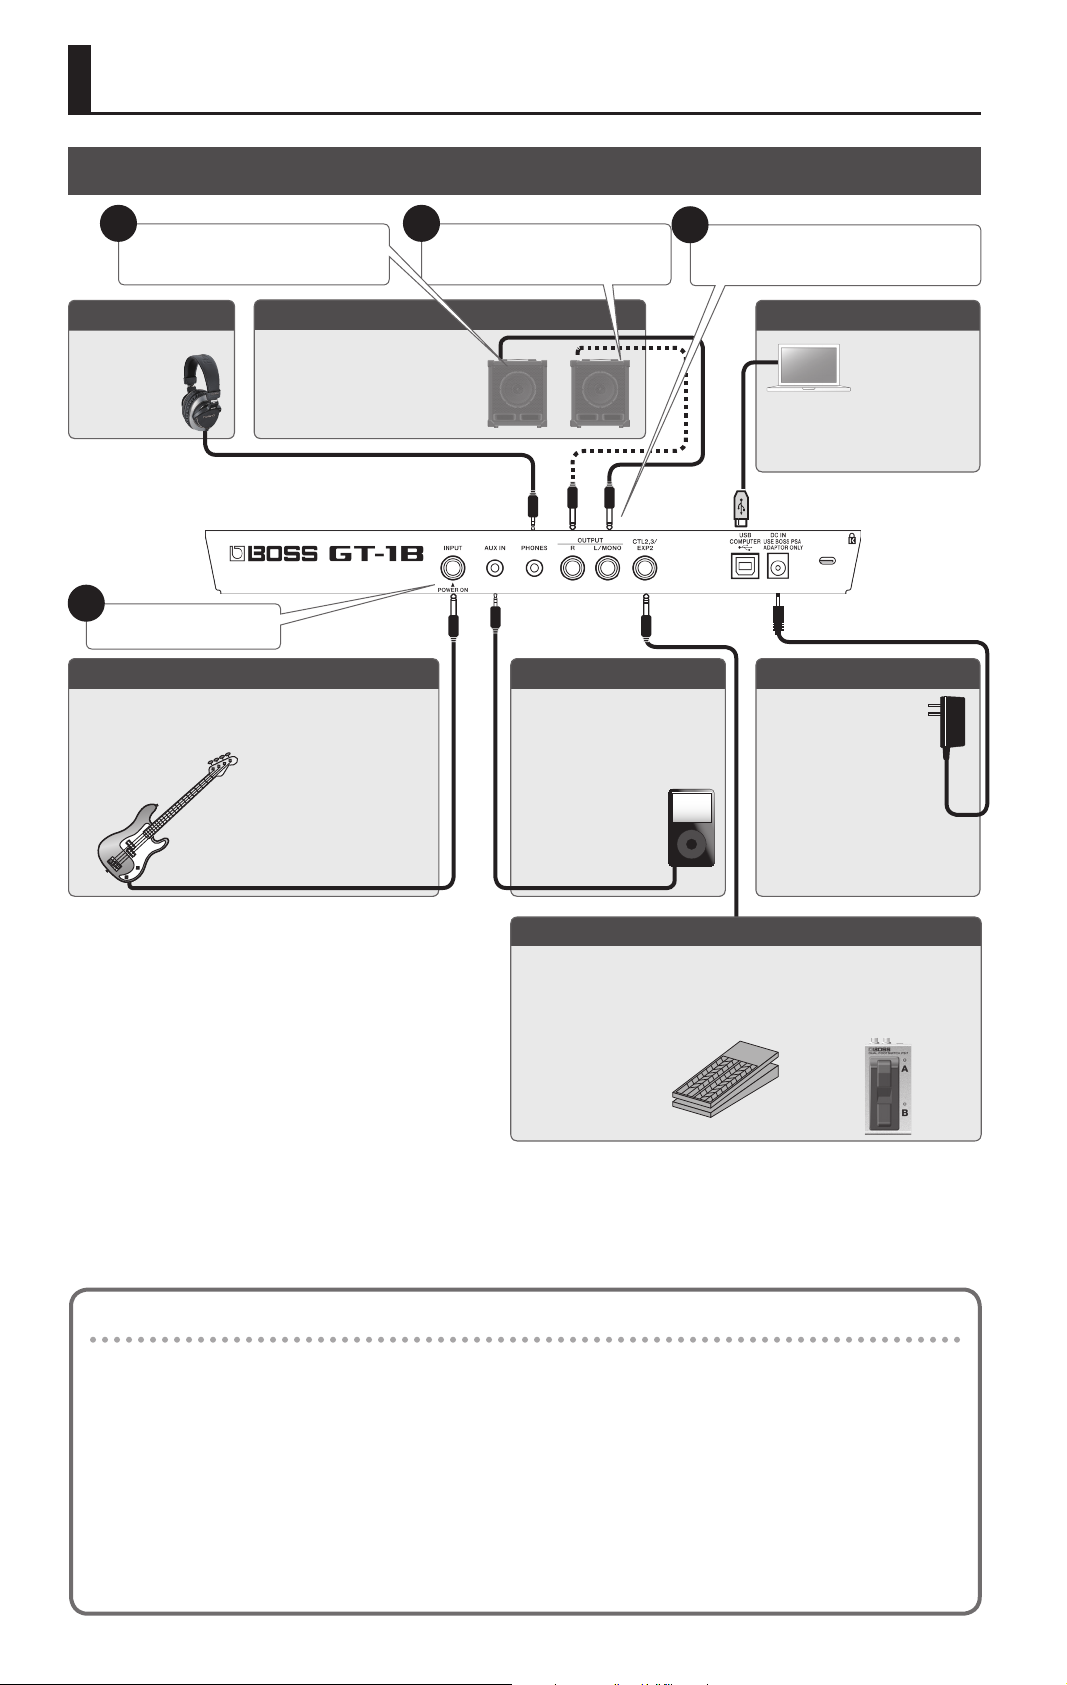
Connecting the Equipment
1
Turn down the volume of the
connected device
PHONES jack
You can connect a set of
headphones here.
* To prevent malfunction and equipment failure, always turn down the
volume, and turn o all the units before making any connections.
OUTPUT jack
Connect these to your bass amp or
mixer. If using a mono connection,
use only the L/MONO jack.
4
Turn on the power of the
amp(s)
3
Connect your bass
INPUT jack
Connect your bass. The INPUT jack doubles as the power
switch. Power to the unit is turned on when you plug into
the INPUT jack; the power is turned o when the cable is
unplugged.
2
AUX IN jack
Use a stereo-mini plug to
connect your audio player.
Use your audio player’s volume
control to control the volume of
OUTPUT jacks and PHONES jack.
Connect your equipment to the
OUTPUT jack(s)
USB COMPUTER port
Use a USB cable
to connect to a
computer and
exchange audio
data between the
GT-1B and the
computer (p. 8).
DC IN jack
This jack is for connecting
an AC adaptor (BOSS PSA
series; sold separately).
Use only the specied AC
adaptor (PSA series), and
connect it to an AC outlet
of the correct voltage.
Do not use any other AC
adaptor, since this may cause
malfunction.
* Before turning the unit on/o, always be sure to turn the volume
down. Even with the volume turned down, you might hear some
sound when switching the unit on/o. However, this is normal and
does not indicate a malfunction.
Installing the Batteries
Install four alkaline batteries (AA, LR6) in the battery compartment located on the bottom of the unit.
* When turning the unit over, be careful so as to protect the buttons and knobs from damage. Also, handle the unit
carefully; do not drop it.
* If you handle batteries improperly, you risk explosion and uid leakage. Make sure that you carefully observe all of the
items related to batteries that are listed in “USING THE UNIT SAFELY” and “IMPORTANT NOTES” (separate sheet “USING THE
UNIT SAFELY” and Owner’s manual (p. 12)).
* We recommend that you keep batteries installed in the unit even though you’ll be powering it with the AC adaptor. That
way, you’ll be able to continue a performance even if the cord of the AC adaptor gets accidentally disconnected from the
unit.
* To prevent malfunctions or accidents, install or replace the batteries before connecting the unit to other equipment.
* “BATTERY LOW” will appear on the display if the batteries are low. Replace them with new ones.
CTL2, 3/EXP2 jacks (Connecting to External Pedals)
You can control various parameters by connecting an expression pedal
(EV-30, Roland EV-5: sold separately) or a footswitch (FS-5U, FS-6, FS-7: sold
separately).
For details on the settings, refer to “Settings for CTL1, EXP1, and an External
Pedal” (p. 9).
2
Getting Ready
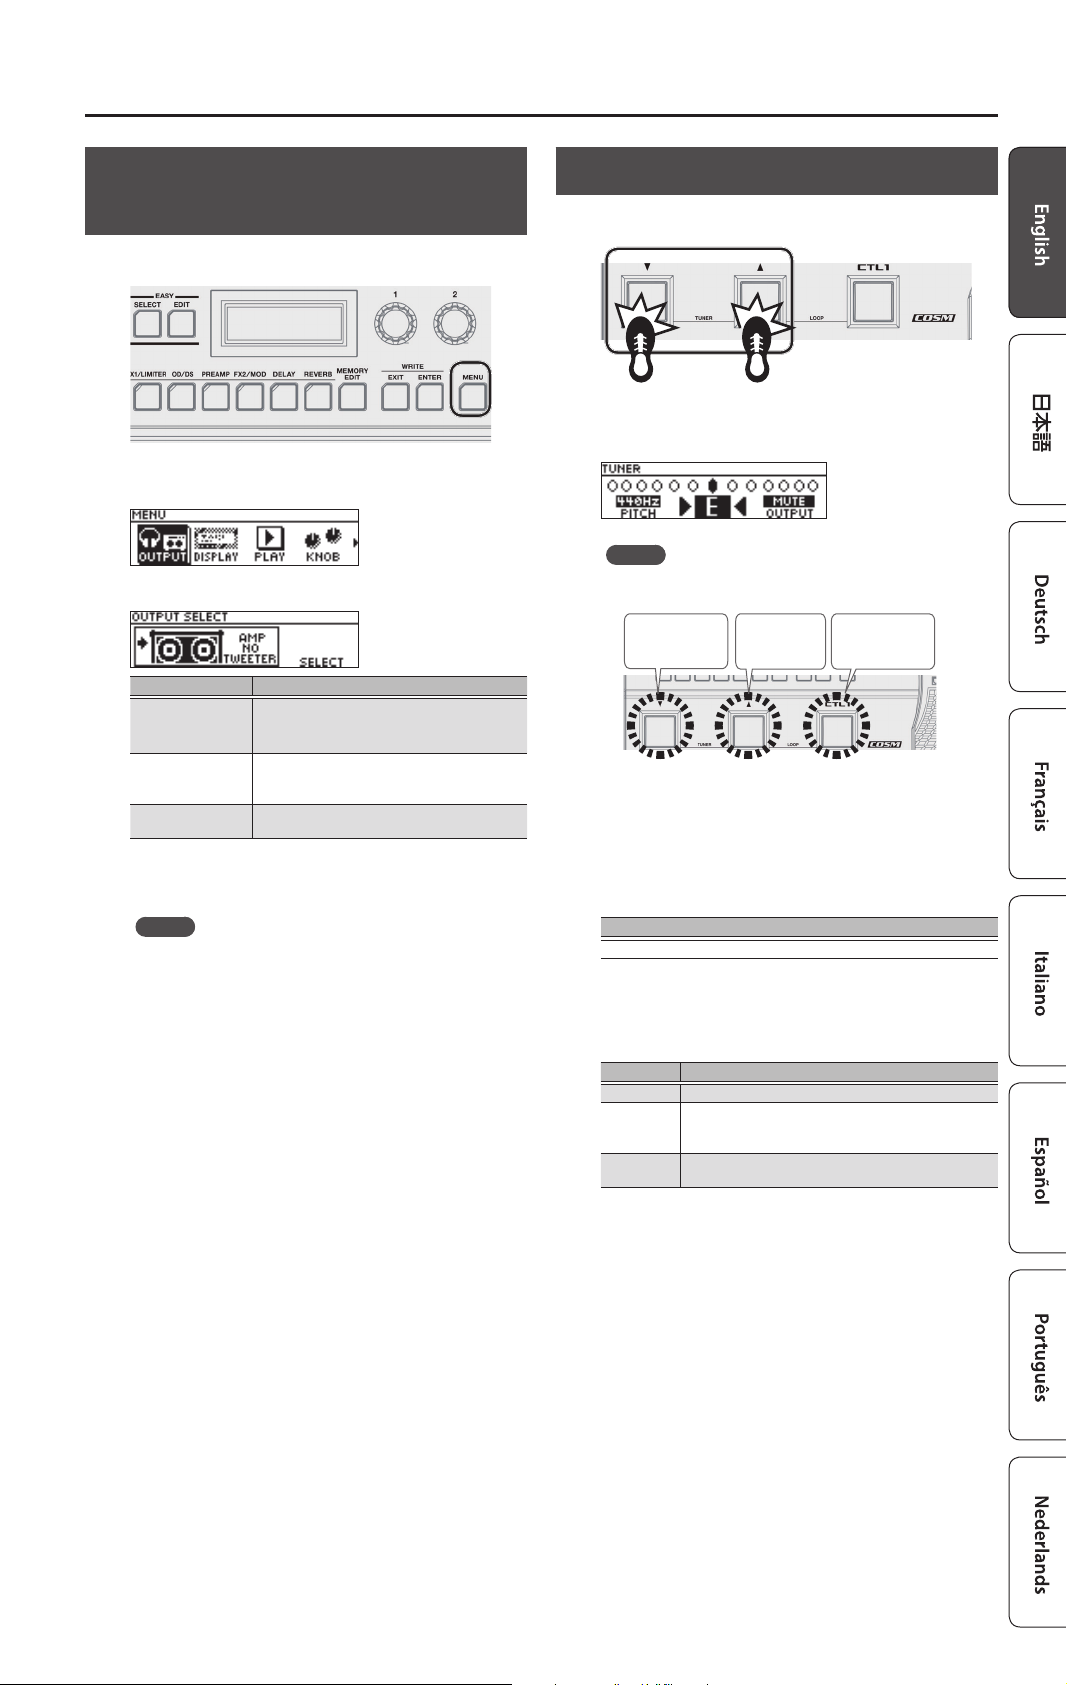
Specify the Type of Amplier You
Have Connected
1. Press the [MENU] button.
2. Use the [1] knob to select “OUTPUT,” and then press
the [ENTER] button.
3. Use the [3] knob to select the type of amp.
Value Explanation
LINE/PHONES
AMP NO TWEETER
AMP WITH
TWEETER
4. Press the [EXIT] button a number of times to return
to the play screen (p. 4).
MEMO
In the play screen (p. 4), you can adjust the output level
of the entire GT-1B by turning the [3] knob.
Choose this if you’re using headphones, or if
the GT-1B is connected to monitor speakers,
mixer, or digital recorder.
Use this setting when connecting to a bass
amp that has no tweeter. The high-frequency
range is adjusted.
Use this setting when connecting to a
tweeter-equipped bass amp.
Tuning the Bass (TUNER)
1. Press the [
2. Play an open string, and tune it so that only the
center indicator in the screen is lit.
MEMO
3. When you nish tuning, press once again the [
[I] switches simultaneously.
Setting the standard pitch
In Tuner mode, you can turn the [1] knob to change the
standard pitch of the tuner.
Pitch
435–445 Hz (default: 440 Hz)
Output setting
In the tuner screen, you can also change the output setting
for when the tuner is in use by turning [3] knob
OUTPUT Explanation
MUTE Sound will not be output while tuning.
BYPASS
THRU
H
], [I] switches simultaneously.
You can also tune while watching the [H], [I], and
[CTL1] switches.
Too low Too highTuned
While tuning, the sound of the bass being input to
the GT-1B will be output without change. All eects
will be o.
Allows you to tune while hearing the current eect
sound.
H
],
3
Playing
Now that you’re nished with the preparations, you can get
started playing the GT-1B.
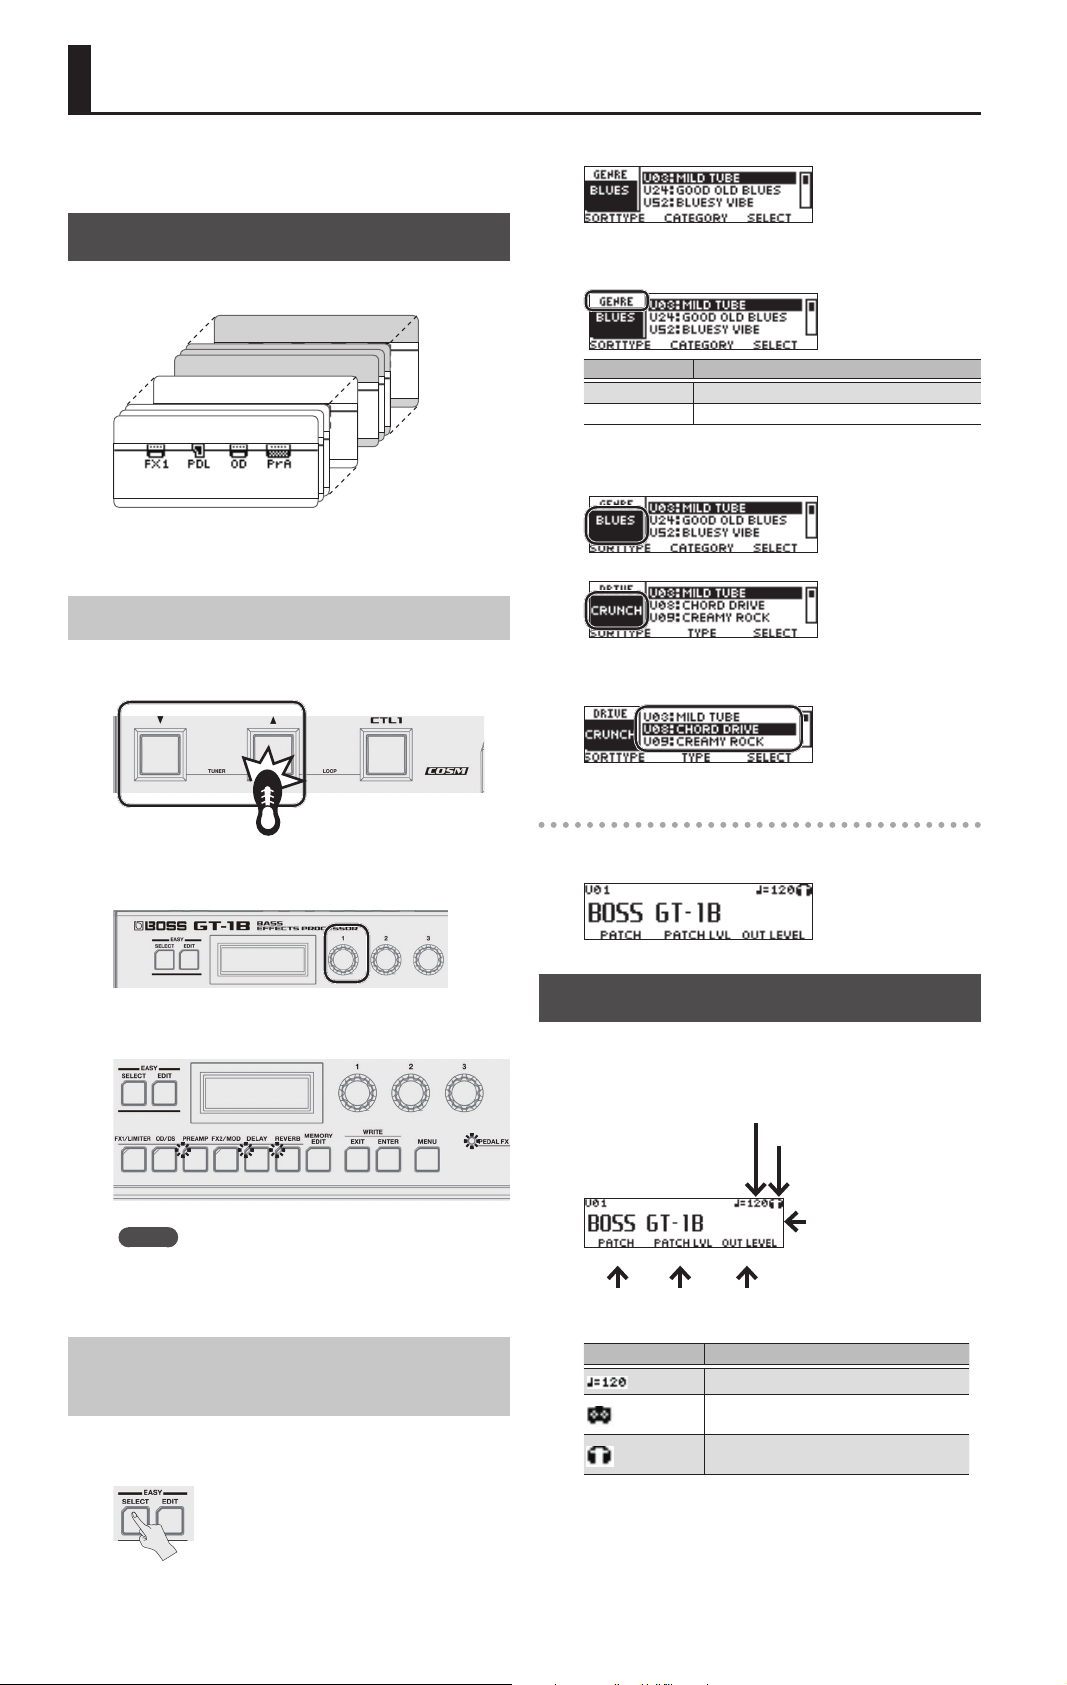
Selecting a Patch
The GT-1B contains numerous eects. A combination of
these eects and their settings is called a “patch.”
Preset patch P99
Preset patch P01
User patch U99
User patch U01
Built in to its memory, the GT-1B has 99 (starting from U01)
user patches that can be overwritten, and 99 preset patches
(starting from P01) that cannot be overwritten.
Selecting by Patch Number
1. Press [
H
], [I] switches to switch patches.
EASY SELECT screen is displayed.
2. Use the [1] knob to choose the search method
(SORT TYPE).
Value Explanation
GENRE Search by the patch category
DRIVE Search by the distortion type
3. Use the [2] knob to choose the patch category or
the distortion type.
or
4. Use the [3] knob to choose a patch from the list on
the display.
You can also change patches consecutively by turning the
[1] knob.
When you select a patch, the buttons or PEDAL FX indicator
that are turned on for that patch are lit.
MEMO
You can’t switch patches unless you’re in the Play screen
(p. 4). Press the [EXIT] button to return to the Play
screen, and then switch patches.
Choose a Patch Based on a Category (EASY SELECT)
1. With the play screen displayed, press the [EASY
SELECT] button
Patch number display
The display shows the currently selected patch number and
the patch name.
About the Play Screen
The screen that appears after you turn on the power is
called the “Play screen.”
Icons in the display
MASTER BPM
OUTPUT setting
Patch number
Patch name
[1] [2] [3]
Parameters that can be adjusted
using the [1]–[3] knobs
Icon Explanation
Displays the MASTER BPM.
This is displayed when OUTPUT is set to
anything other than LINE/PHONES.
This is displayed when OUTPUT is set to
LINE/PHONES.
* For details about MASTER BPM, refer to “Parameter
Guide” (PDF le).
4
 Loading...