

Page 1

Register your
new device on
MyBosch now and
get free benefits:
bosch-home.com/
welcome
Universal kitchen machine
MUM5X....
[de] Gebrauchsanleitung Universal-Küchenmaschine 7
[en] User manual Universal kitchen machine 32
[fr] Notice d’utilisation Robots pâtissiers 55
[it] Istruzioni per l'uso Macchina da cucina universale 80
[nl] Gebruiksaanwijzing Keukenmachine 105
[da] Brugsanvisning Køkkenmaskine 130
[no] Bruksanvisning Kjøkkenmaskin 153
[sv] Bruksanvisning Köksmaskin 174
[fi] Käyttöohje Yleiskone 195
Page 2
A B C D E F G
1
1
2
3
4
5
6
7
8
9
10
11
12
13
14
2
Page 3
0
1
2
3
4
5
6
3
10 mm
4 5
6 7
8 9
Page 4
10 11
12 13
14 15
16 17
Page 5
18 19
20 21
22 23
24 25
Page 6
26
Page 7

Inhaltsverzeichnis
de
Sicherheit ........................................8
Allgemeine Hinweise ........................8
Bestimmungsgemäßer Ge-
brauch ..............................................8
Einschränkung des Nutzerkrei-
ses....................................................9
Sicherheitshinweise..........................9
Sachschäden vermeiden ..............13
Umweltschutz und Sparen ...........13
Verpackung entsorgen...................13
Auspacken und Prüfen .................13
Gerät und Teile auspacken............13
Lieferumfang...................................13
Gerät aufstellen ..............................14
Kennenlernen................................14
Gerät...............................................14
Drehschalter ...................................14
Leuchtring.......................................15
Bedienfeld ......................................15
Funktionstasten ..............................15
Display............................................15
Schwenkarm...................................15
Antriebe ..........................................16
Werkzeuge......................................16
Symbole..........................................17
Parkposition....................................17
Sicherheitssysteme ........................18
Vor dem ersten Gebrauch ............18
Gerät vorbereiten ...........................18
Verarbeitung...................................20
Antriebsschutzdeckel .....................21
Waage ............................................21
Anzeigewerte der Waage ...............22
Zutaten wiegen...............................22
Anzeigeeinheiten der Waage än-
dern ................................................22
Timer..............................................22
Anzeigewerte des Timers...............22
Verarbeitungsdauer ablesen und
zurücksetzen ..................................23
Reinigen und Pflegen ...................23
Reinigungsmittel.............................23
Reinigungsübersicht.......................23
Sonderzubehör..............................23
Rezepte..........................................23
Rezeptübersicht .............................24
Störungen beheben ......................26
Funktionsstörungen........................26
Hinweise im Anzeigefeld ................27
Entsorgen ......................................29
Altgerät entsorgen..........................29
Kundendienst................................29
Erzeugnisnummer (E-Nr.) und
Fertigungsnummer (FD) .................29
Garantiebedingungen.....................29
Grundlegende Bedienung ............18
Kabellänge .....................................18
Schwenkarm bewegen...................19
Schüssel einsetzen.........................19
Schüssel entnehmen......................19
Werkzeug einsetzen .......................19
Werkzeug entnehmen ....................19
Schüsseldeckel aufsetzen..............19
Schüsseldeckel entfernen ..............19
7
Page 8

de Sicherheit
Sicherheit
Beachten Sie die Informationen zum Thema Sicherheit, um Ihr Gerät sicher gebrauchen zu können.
Allgemeine Hinweise
Hier finden Sie allgemeine Informationen zu dieser Anleitung.
¡ Lesen Sie diese Anleitung sorgfältig. Nur dann können Sie das
Gerät sicher und effizient verwenden.
¡ Beachten Sie die zusätzlichen Anleitungen bei Verwendung des
mitgelieferten oder optionalen Zubehörs.
¡ Diese Anleitung richtet sich an den Benutzer des Geräts.
¡ Beachten Sie die Sicherheitshinweise und die Warnhinweise.
¡ Bewahren Sie die Anleitung sowie die Produktinformationen für
einen späteren Gebrauch oder Nachbesitzer auf.
¡ Prüfen Sie das Gerät nach dem Auspacken. Schließen Sie das
Gerät bei einem Transportschaden nicht an.
Bestimmungsgemäßer Gebrauch
Um das Gerät sicher und richtig zu benutzen, beachten Sie die
Hinweise zum bestimmungsgemäßen Gebrauch.
Verwenden Sie das Gerät nur:
¡ gemäß dieser Gebrauchsanleitung.
¡ mit Originalteilen und -zubehör.
¡ für zusätzliche Anwendungen, die in den Anleitungen von mitge-
liefertem oder optionalem Zubehör beschrieben sind.
¡ zum Rühren, Kneten und Schlagen von Lebensmitteln.
¡ unter Aufsicht.
¡ im privaten Haushalt und in geschlossenen Räumen des häusli-
chen Umfelds bei Raumtemperatur.
¡ für haushaltsübliche Verarbeitungsmengen und Verarbeitungs-
zeiten.
¡ bis zu einer Höhe von 2000m über dem Meeresspiegel.
Trennen Sie das Gerät von der Stromversorgung, wenn Sie:
¡ das Gerät nicht verwenden.
8
Page 9

Sicherheit de
¡ das Gerät nicht beaufsichtigen.
¡ das Gerät zusammenbauen.
¡ das Gerät auseinandernehmen.
¡ das Gerät reinigen.
¡ sich rotierenden Teilen nähern.
¡ Werkzeuge wechseln.
¡ mit einem Fehler konfrontiert werden.
Einschränkung des Nutzerkreises
Vermeiden Sie Risiken für Kinder und gefährdete Personen.
Dieses Gerät kann von Personen mit reduzierten physischen, sensorischen oder mentalen Fähigkeiten oder Mangel an Erfahrung
und/oder Wissen benutzt werden, wenn sie beaufsichtigt oder bezüglich des sicheren Gebrauchs des Geräts unterwiesen wurden
und die daraus resultierenden Gefahren verstanden haben.
Kinder dürfen nicht mit dem Gerät spielen.
Reinigung und Benutzerwartung dürfen nicht durch Kinder durchgeführt werden.
Das Gerät darf nicht von Kindern benutzt werden. Kinder vom Gerät und der Anschlussleitung fernhalten.
Sicherheitshinweise
Beachten Sie die Sicherheitshinweise.
WARNUNG‒Stromschlaggefahr!
¡ Ein beschädigtes Gerät oder eine beschädigte Netzanschluss-
leitung ist gefährlich.
▶
Nie ein beschädigtes Gerät betreiben.
▶
Nie ein Gerät mit gerissener oder gebrochener Oberfläche
betreiben.
▶
Nie an der Netzanschlussleitung ziehen, um das Gerät vom
Stromnetz zu trennen. Immer am Netzstecker der Netzanschlussleitung ziehen.
▶
Wenn das Gerät oder die Netzanschlussleitung beschädigt
ist, sofort den Netzstecker der Netzanschlussleitung ziehen
oder die Sicherung im Sicherungskasten ausschalten.
▶
"Den Kundendienst rufen." →Seite29
9
Page 10

de Sicherheit
▶
Nur dafür geschultes Fachpersonal darf Reparaturen am
Gerät durchführen.
¡ Unsachgemäße Installationen sind gefährlich.
▶
Das Gerät nur gemäß den Angaben auf dem Typenschild
anschließen und betreiben.
¡ Unsachgemäße Reparaturen sind gefährlich.
▶
Nur dafür geschultes Fachpersonal darf Reparaturen am
Gerät durchführen.
▶
Nur Original-Ersatzteile dürfen zur Reparatur des Geräts verwendet werden.
▶
Wenn die Netzanschlussleitung dieses Geräts beschädigt
wird, muss sie durch den Hersteller oder seinen Kundendienst oder eine ähnlich qualifizierte Person ersetzt werden,
um Gefährdungen zu vermeiden.
¡ Eindringende Feuchtigkeit kann einen Stromschlag verursa-
chen.
▶
Nie das Gerät oder die Netzanschlussleitung in Wasser tauchen oder in den Geschirrspüler geben.
▶
Das Gerät nur in geschlossenen Räumen verwenden.
▶
Nie das Gerät großer Hitze und Nässe aussetzen.
▶
Keinen Dampfreiniger oder Hochdruckreiniger verwenden,
um das Gerät zu reinigen.
¡ Eine beschädigte Isolierung der Netzanschlussleitung ist ge-
fährlich.
▶
Nie die Netzanschlussleitung mit heißen Geräteteilen oder
Wärmequellen in Kontakt bringen.
▶
Nie die Netzanschlussleitung mit scharfen Spitzen oder
Kanten in Kontakt bringen.
▶
Nie die Netzanschlussleitung knicken, quetschen oder verändern.
WARNUNG‒Brandgefahr!
Starke Hitze kann das Gerät und weitere Teile in Brand setzen.
▶
Nie das Gerät auf oder in die Nähe heißer Oberflächen stellen.
10
Page 11

Sicherheit de
WARNUNG‒Verletzungsgefahr!
¡ Rotierende Antriebe, Werkzeuge oder Zubehörteile können zu
Verletzungen führen.
▶
Die Hände, das Haar, die Kleidung und andere Utensilien
von rotierenden Teilen fernhalten.
▶
Die Werkzeuge und das Zubehör nur bei Stillstand des Antriebs und ausgestecktem Gerät aufsetzen und abnehmen.
▶
Vor dem Werkzeugwechsel oder der Reinigung das Gerät
ausschalten und vom Netz trennen.
▶
Die Werkzeuge nur mit eingesetzter Schüssel, angebrachtem Deckel und aufgesetzten Antriebsschutzdeckeln betreiben.
▶
Nie bei der Verarbeitung den Schwenkarm öffnen.
¡ Das Gerät mit beschädigten Teilen zu betreiben, kann zu Ver-
letzungen führen.
▶
Teile, die Risse oder sonstige Beschädigungen aufweisen
oder nicht korrekt sitzen, gegen Originalersatzteile austauschen.
WARNUNG‒Quetschgefahr!
Hände und Finger können eingeklemmt werden.
▶
Beim Absenken des Schwenkarms nicht in die Schüssel
fassen.
WARNUNG‒Erstickungsgefahr!
¡ Kinder können sich Verpackungsmaterial über den Kopf zie-
hen oder sich darin einwickeln und ersticken.
▶
Verpackungsmaterial von Kindern fernhalten.
▶
Kinder nicht mit Verpackungsmaterial spielen lassen.
¡ Kinder können Kleinteile einatmen oder verschlucken und da-
durch ersticken.
▶
Kleinteile von Kindern fernhalten.
▶
Kinder nicht mit Kleinteilen spielen lassen.
11
Page 12

de Sicherheit
WARNUNG‒Gefahr von Gesundheitsschäden!
Verschmutzungen auf Oberflächen können die Gesundheit gefährden.
▶
Die Reinigungshinweise beachten.
▶
Oberflächen, die mit Nahrungsmitteln in Berührung kommen, vor jedem Gebrauch reinigen.
12
Page 13

Sachschäden vermeiden de
A
B
C
D
Sachschäden vermeiden
Sachschäden vermeiden
Sachschäden vermeiden
Um Sachschäden an Ihrem Gerät,
Zubehör oder Küchengegenständen
zu vermeiden, beachten Sie diese
Hinweise.
ACHTUNG!
¡ Unsachgemäßer Gebrauch kann
zu Sachschäden führen.
▶
Nie verschiedene Antriebe
gleichzeitig verwenden.
▶
Das Gerät nie länger als notwendig betreiben.
▶
Das Gerät nie im Leerlauf betreiben.
▶
Nie Originalteile und -zubehör
für andere Geräte verwenden.
▶
Die maximalen Verarbeitungsmengen beachten.
▶
Keine Fremdgegenstände in der
Schüssel lagern.
¡ Während des Betriebs tritt warme
Abluft hinten aus dem Abluftgitter
aus. Blockierte Abluft kann zur
Überhitzung des Geräts führen.
▶
Das Gerät mit ausreichend Abstand zur Wand, zu empfindlichen Flächen und Geräten aufstellen.
¡ Erschütterungen können die Funk-
tionsweise des Geräts beeinträchtigen.
▶
Das Gerät nicht auf bewegliche
oder vibrierende Oberflächen
stellen.
Umweltschutz und Sparen
Umweltschutz und
Sparen
Umweltschutz und Sparen
Schonen Sie die Umwelt, indem Sie
Ihr Gerät ressourcenschonend gebrauchen und wiederverwendbare
Materialien richtig entsorgen.
Verpackung entsorgen
Die Verpackungsmaterialien sind umweltverträglich und wiederverwertbar.
▶
Die einzelnen Bestandteile getrennt nach Sorten entsorgen.
Informationen über aktuelle Entsorgungswege erhalten Sie bei Ihrem
Fachhändler sowie Ihrer Gemeinde- oder Stadtverwaltung.
Auspacken und Prüfen
Auspacken und Prüfen
Auspacken und Prüfen
Was Sie beim Auspacken beachten
müssen, erfahren Sie hier.
Gerät und Teile auspacken
1. Das Gerät aus der Verpackung
nehmen.
2. Alle weiteren Teile und die Begleit-
unterlagen aus der Verpackung
nehmen und bereitlegen.
3. Vorhandenes Verpackungsmaterial
entfernen.
4. Vorhandene Aufkleber und Folien
entfernen.
Lieferumfang
Prüfen Sie nach dem Auspacken alle
Teile auf Transportschäden und die
Vollständigkeit der Lieferung.
Hinweis:Je nach Ausstattung wird
das Gerät mit weiterem Zubehör geliefert. Entnehmen Sie den zusätzlichen Lieferumfang den Zubehöranleitungen.
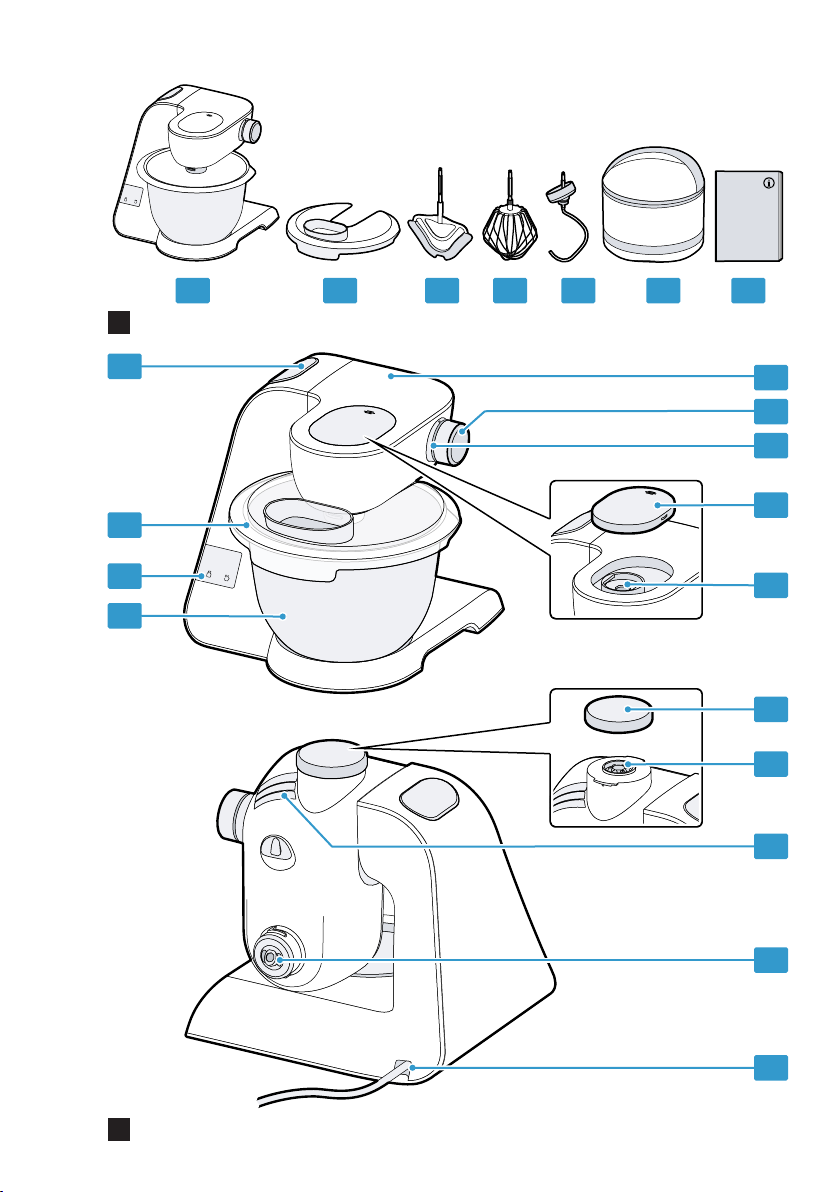
→Abb.
1
Grundgerät mit Rührschüssel
Deckel mit integriertem Einfüllschacht
Profi Flexi-Rührbesen
Profi Schlagbesen
13
Page 14
de Kennenlernen
E
F
G
1
2
3
4
5
6
8
9
10
11
12
13
14
Knethaken
Aufbewahrungstasche
Begleitunterlagen
Gerät aufstellen
WARNUNG
Brandgefahr!
Starke Hitze kann das Gerät und die
Werkzeuge in Brand setzen.
▶
Nie das Gerät auf oder in die Nähe
heißer Oberflächen stellen.
ACHTUNG!
¡ Während des Betriebs tritt warme
Abluft hinten aus dem Abluftgitter
aus. Blockierte Abluft kann zur
Überhitzung des Geräts führen.
▶
Das Gerät mit ausreichend Abstand zur Wand, zu empfindlichen Flächen und Geräten aufstellen.
¡ Erschütterungen können die Funk-
tionsweise des Geräts beeinträchtigen.
▶
Das Gerät nicht auf bewegliche
oder vibrierende Oberflächen
stellen.
1. Das Gerät auf eine stabile, ebene,
saubere und glatte Arbeitsfläche
stellen.
2. Das Netzkabel auf die benötigte
Länge herausziehen.
→"Kabellänge", Seite18
Nicht den Netzstecker einstecken.
Kennenlernen
Kennenlernen
Kennenlernen
Lernen Sie die Bestandteile Ihres Geräts kennen.
Gerät
Hier finden Sie eine Übersicht über
die Bestandteile Ihres Geräts.
→Abb.
2
Edelstahl-Rührschüssel
Bedienfeld
Deckel mit integriertem Einfüllschacht
Entriegelungstaste für Schwenkarm
Schwenkarm
Drehschalter
Schutzdeckel für Antrieb 2
Antrieb 2
Schutzdeckel für Antrieb 3
Antrieb 3
Abluftgitter
Hauptantrieb
Kabelaufbewahrung
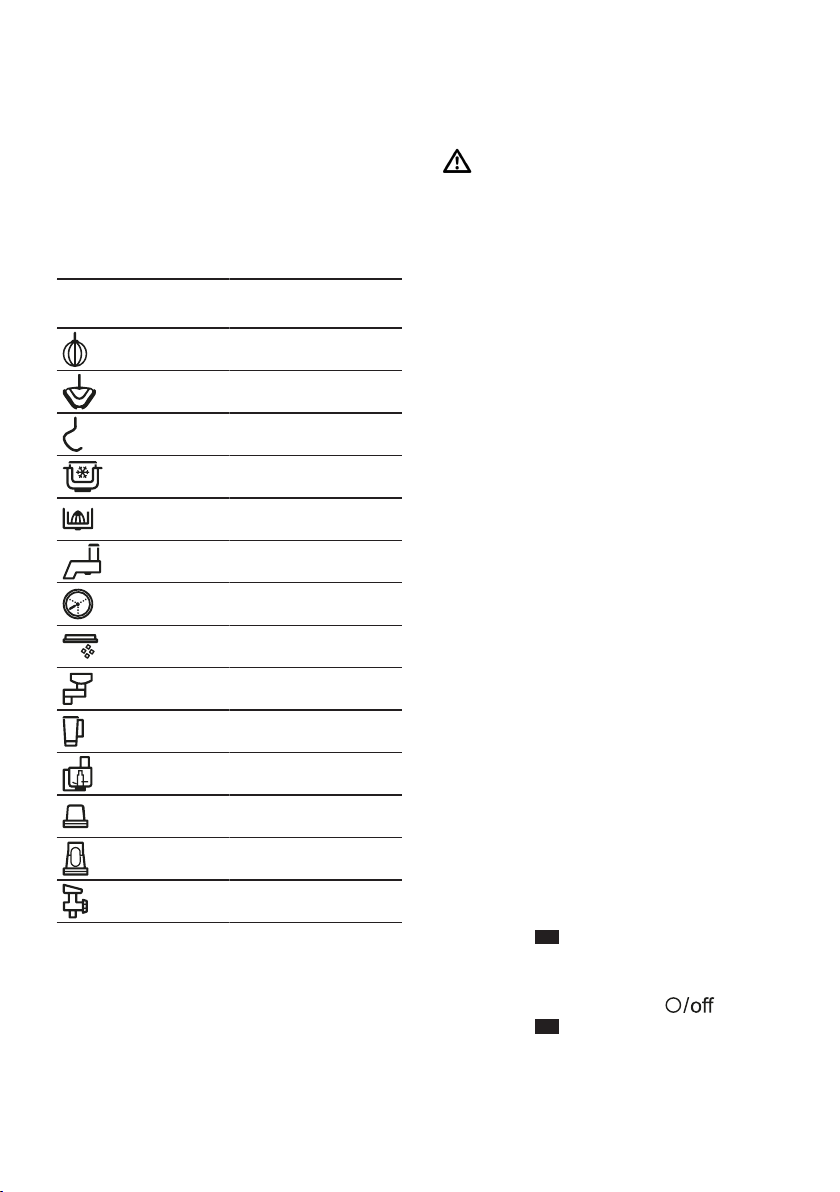
Drehschalter
Mit dem Drehschalter starten und
stoppen Sie die Verarbeitung und
wählen die Geschwindigkeit aus.
Symbol Funktion
Verarbeitung stoppen.
Zutaten mit niedriger Geschwin-
digkeit verarbeiten.
Zutaten mit höchster Geschwin-
digkeit verarbeiten.
Zutaten kurz mit höchster Ge-
schwindigkeit verarbeiten.
→"Momentschaltung verwenden", Seite21
14
Page 15
Kennenlernen de
1
2
3
4
5
6
Leuchtring
Der Leuchtring am Drehschalter informiert Sie über den Betriebszustand
Ihres Geräts.
Anzeige Status
Der Leuchtring leuchtet und die Verarbeitung läuft.
Der Leuchtring leuchtet nicht und die Verarbeitung kann nicht
gestartet werden.
Der Leuchtring blinkt
und die Verarbeitung
kann nicht gestartet
oder fortgesetzt werden.
Tipp:Weitere Informationen finden
Sie hier:
→"Sicherheitssysteme", Seite18
→"Störungen beheben", Seite26
Das Gerät funktioniert
einwandfrei.
¡ Das Gerät hat kei-
ne Stromversorgung.
¡ Ein Gerätefehler
liegt vor.
¡ Ein Sicherheitssys-
tem ist aktiviert.
¡ Ein Gerätefehler
liegt vor.
Bedienfeld
Hier finden Sie eine Übersicht des
Bedienfelds.
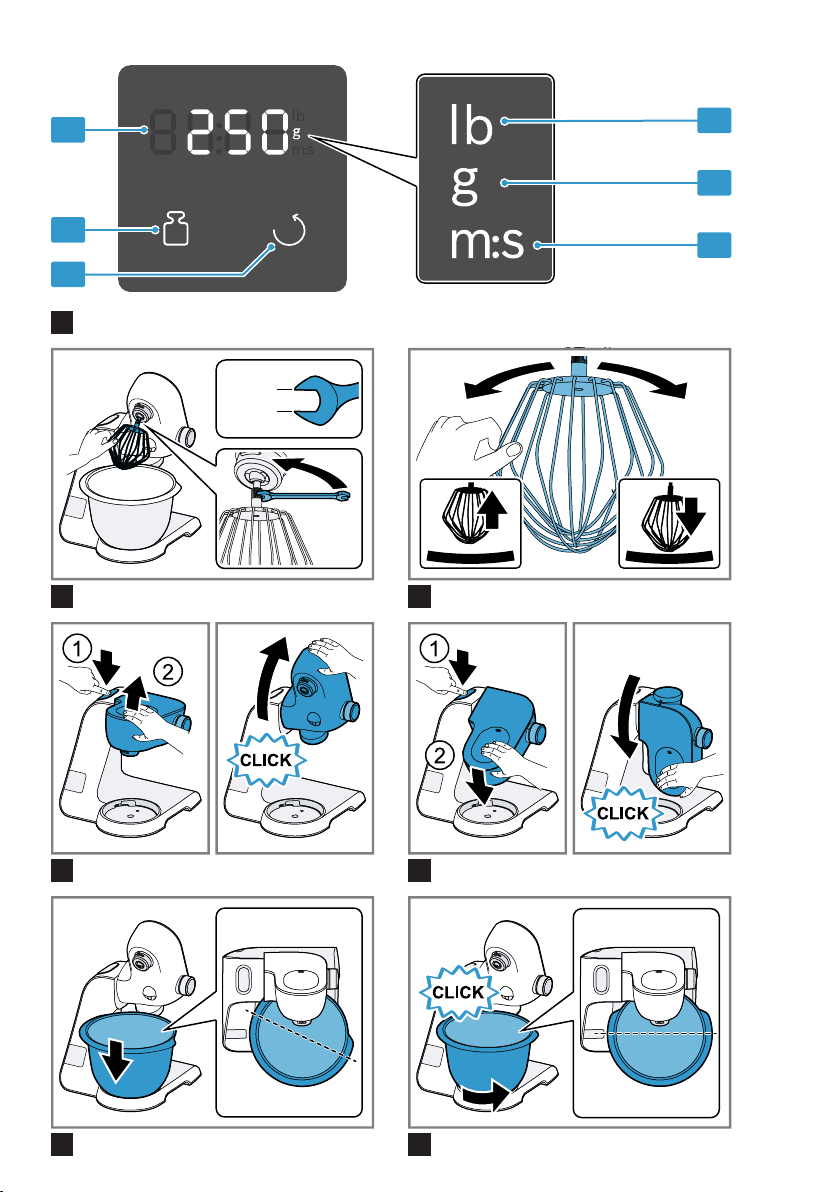
→Abb.
3
Rücksetztaste
Taste Waage
Display
Symbol Gewicht in Pfund
Symbol Gewicht in Gramm
Symbol Zeit in Minuten und Sekunden
Funktionstasten
Mit den Funktionstasten wählen Sie
Zusatzfunktionen aus oder nehmen
Einstellungen vor. Um eine Auswahl
zu treffen, berühren Sie die entsprechenden Symbole mit dem Finger.
Symbol Funktion
Waage einschalten und ausschalten.
¡ Waage zurücksetzen.
¡ Timer zurücksetzen.
Hinweis:Die Tasten mit den Fingern
und ohne Küchenhandschuhe bedienen. Sie können die Tasten nicht mit
Gegenständen bedienen, z.B. Kochlöffel.
Display
Das Display zeigt Werte und Meldungen zum Betriebszustand an.
Hinweis:Wenn in einer bestimmten
Zeit keine Bedienung erfolgt ist,
schaltet sich das Display automatisch
aus. Um das Display wieder zu aktivieren, eine Taste drücken oder die
Verarbeitung starten.
Schwenkarm
Der Schwenkarm kann verstellt und
in verschiedenen Positionen fixiert
werden.
Wenn die Entriegelungstaste gedrückt wird, lässt sich der Schwenkarm in die gewünschte Position bewegen.
→"Schwenkarm bewegen",
Seite19
Hinweis:Der Schwenkarm ist mit der
Funktion EasyArm Lift ausgestattet.
Diese Funktion unterstützt die Bewegung des Schwenkarms nach oben.
15
Page 16
de Kennenlernen
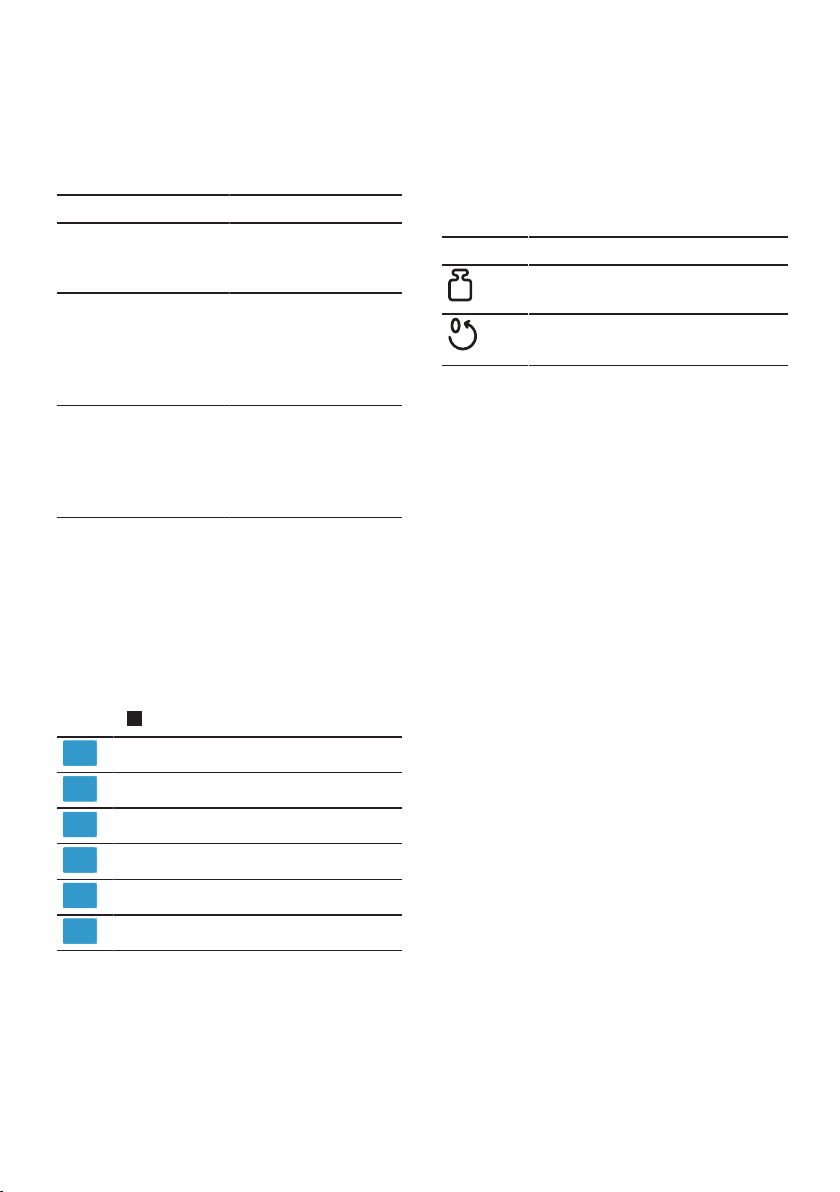
Schwenkarmpositionen
Hier finden Sie eine Übersicht der Positionen des Schwenkarms.
Position Verwendung
Position1 Schwenkarm ist geschlossen.
¡ Zutaten mit den Werkzeugen
verarbeiten.
¡ Zubehör am Hauptantrieb ver-
wenden, z.B. Eisbereiter.
¡ Zubehör am Antrieb 2 verwen-
den, z.B. Durchlaufschnitzler
Position2 Schwenkarm ist geöffnet.
¡ Schüssel einsetzen oder ent-
nehmen.
¡ Werkzeug einsetzen oder ent-
nehmen.
¡ Zutaten in die Schüssel füllen.
Position3 ¡ Zubehör am Hauptantrieb ver-
wenden, z.B. Fleischwolf.
¡ Zubehör am Antrieb 3 verwen-
den, z.B. Mixeraufsatz.
Antriebe
Ihr Gerät ist mit unterschiedlichen Antrieben ausgestattet, die speziell auf
die Werkzeuge und das Zubehör abgestimmt sind.
Hinweis:Die Antriebe 2 und 3 sind
mit Schutzdeckeln abgedeckt.
→"Antriebsschutzdeckel", Seite21
Übersicht der Antriebe
Hier finden Sie eine Übersicht der
Antriebe und deren Verwendungszweck.
Antrieb Verwendung
Hauptantrieb
Für die Werkzeuge und für Zubehör, z.B.
¡ Fleischwolf
¡ Pastavorsatz
¡ Eisbereiter
Antrieb Verwendung
Antrieb2 Für Zubehör, z.B.
¡ Durchlaufschnitzler
¡ Zitruspresse
Antrieb3 Für Zubehör, z.B.
¡ Glas-Mixeraufsatz
¡ Kunststoff-Mixeraufsatz
¡ Multi-Zerkleinerer Set
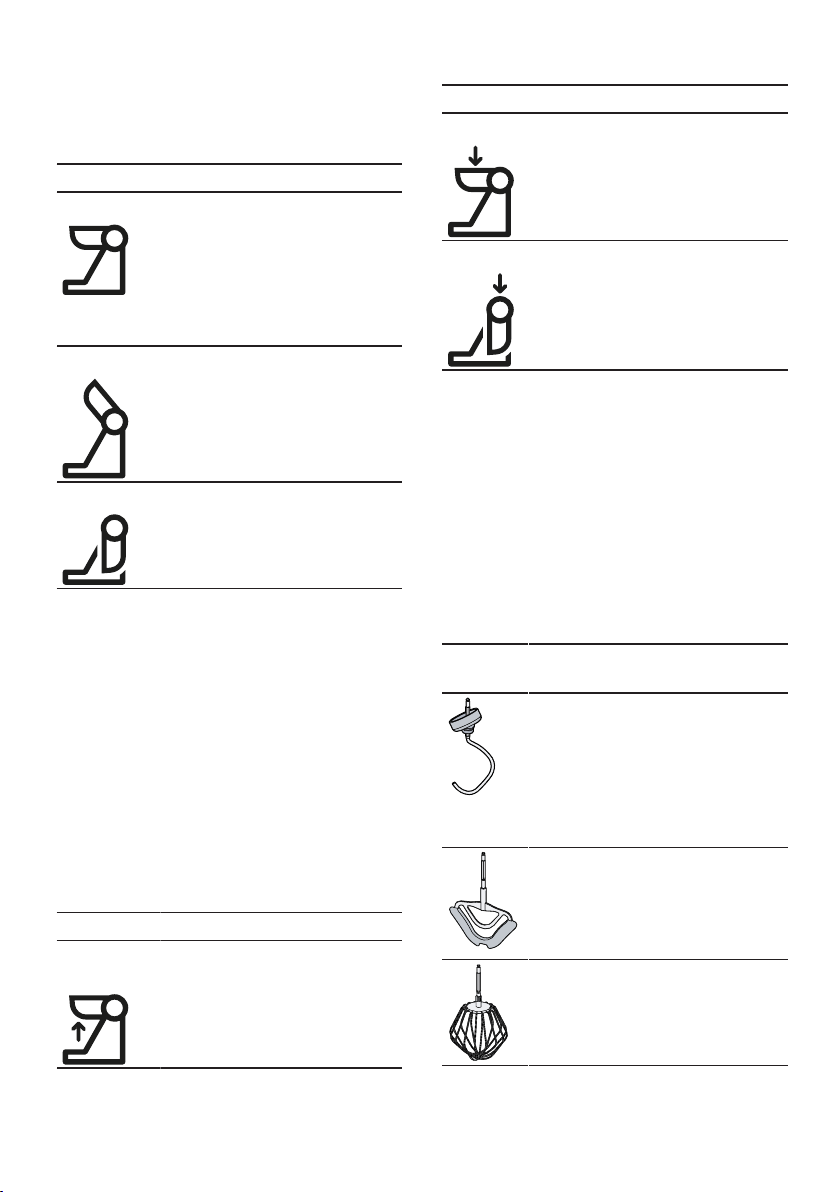
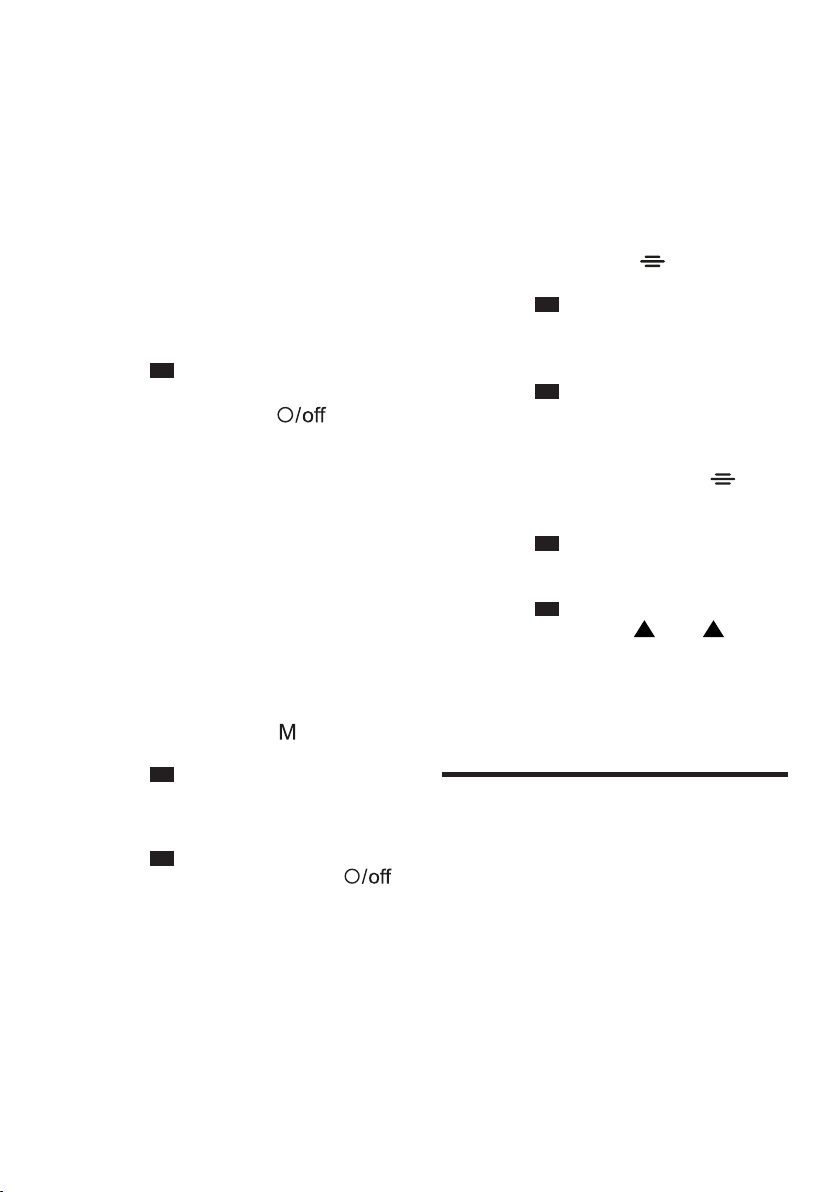
Werkzeuge
Hier erfahren Sie das Wesentliche zu
den unterschiedlichen Werkzeugen.
Der Knethaken ist mit einer abnehmbaren Schutzkappe ausgestattet, um
den Antrieb vor Verschmutzungen zu
schützen.
Übersicht der Werkzeuge
Nutzen Sie je nach Verwendung das
geeignete Werkzeug.
Werkzeug
Verwendung
Knethaken
¡ Schwere Teige kneten, z.B.
Hefeteig.
¡ Lebensmittel unterheben, die
nicht zerkleinert werden sollen,
z.B. Rosinen oder Schokoladenplättchen.
Profi Flexi-Rührbesen
¡ Lebensmittel rühren, z.B.
Rührteige oder Mousse.
¡ Lebensmittel unterheben, z.B.
Eischnee, Sahne oder Rosinen.
Profi Schlagbesen
¡ Eischnee und Sahne schlagen.
¡ Leichte Teige rühren, z.B. Bis-
kuitteige.
16
Page 17
Kennenlernen de
Feineinstellung des Profi Schlagbesens
Korrigieren Sie mit der Feineinstellung den Abstand zwischen der
Schüssel und dem Profi Schlagbesen.
Hinweis:Der Profi Schlagbesen ist
ab Werk so eingestellt, dass die
Zutaten optimal miteinander vermischt werden.
Werkzeugeinstellung korrigieren
ACHTUNG!
Das Gerät und die Werkzeuge können durch eine falsche Werkzeugeinstellung beschädigt werden.
▶
Nie ein Werkzeug betreiben, das
die Schüssel berührt.
Voraussetzungen
¡ Der Netzstecker ist nicht einge-
steckt.
¡ Der Schwenkarm ist geöffnet.
¡ Der Profi Schlagbesen ist einge-
setzt.
¡ Die Schüssel ist eingesetzt.
1. Den Schlagbesen mit einer Hand
am unteren Teil festhalten und die
Kontermutter mit dem Gabelschlüssel im Uhrzeigersinn lösen.
→Abb.
2. Um den Abstand zu verändern,
4
das Werkzeug drehen.
→Abb.
5
Die Werte in der Tabelle beachten:
Einstellung Abstand
Optimale Einstellung 3mm
Eine Umdrehung im
1mm mehr
Uhrzeigersinn
Eine Umdrehung ge-
1mm weniger
gen den Uhrzeigersinn
3. Die Entriegelungstaste drücken
und den Schwenkarm nach unten
drücken, bis er einrastet.
4. Die Einstellung überprüfen.
5. Die Entriegelungstaste drücken
und den Schwenkarm anheben,
bis er einrastet.
6. Den Schlagbesen mit einer Hand
am unteren Teil festhalten und die
Kontermutter mit einem Gabelschlüssel gegen den Uhrzeigersinn
festdrehen.
Symbole
Hier finden Sie eine Übersicht der
Symbole auf Ihrem Gerät.
Symbol Beschreibung
Markierung am Schutzdeckel für
Antrieb2.
Aufsetzmarkierung am Schutzdeckel für Antrieb3.
Positionsmarkierung am Antrieb3.
Parkposition
Ihr Gerät ist mit einer automatischen
Parkposition ausgestattet.
Nach dem Ausschalten bewegen
sich die Antriebe einige Sekunden
weiter, bis die korrekte Parkposition
erreicht ist.
Hinweis:Der Schwenkarm lässt sich
mit eingesetztem Werkzeug nur öffnen oder schließen, wenn sich der
Antrieb in der korrekten Parkposition
befindet.
Folgende Ursachen führen zu einer
falschen Parkposition:
¡ Die Stromversorgung wurde wäh-
rend der Verarbeitung unterbrochen.
¡ Ein Sicherheitssystem hat die Ver-
arbeitung beendet.
¡ Während der Verarbeitung hat sich
der Schwenkarm gelöst oder die
Entriegelungstaste für den
Schwenkarm wurde gedrückt.
17
Page 18

de Vor dem ersten Gebrauch
Tipp:Eine falsche Parkposition kön-
nen Sie leicht selbst korrigieren.
→"Störungen beheben", Seite26
Sicherheitssysteme
Hier finden Sie eine Übersicht über
die Sicherheitssysteme Ihres Geräts.
Einschaltsicherung
Die Einschaltsicherung verhindert,
dass Ihr Gerät ungewollt eingeschaltet wird.
Das Gerät lässt sich nur einschalten
und bedienen, wenn
¡ der Schwenkarm in Position1 ein-
gerastet ist und die Schüssel oder
ein Zubehör eingesetzt ist, z.B.
Eisbereiter.
¡ der Schwenkarm in Position3 ein-
gerastet ist und auf dem Antrieb3
der Schutzdeckel oder ein Zubehör angebracht ist.
Wiedereinschaltsicherung
Die Wiedereinschaltsicherung verhindert, dass Ihr Gerät nach einem
Stromausfall die Verarbeitung selbstständig startet.
Das Gerät ist nach einem Stromausfall wieder eingeschaltet. Die Verarbeitung kann erst wieder gestartet
werden, nachdem der Drehschalter
auf gestellt wurde.
Überlastsicherung
Die Überlastsicherung verhindert,
dass der Motor und andere Bauteile
durch eine zu hohe Belastung beschädigt werden.
Der Motor schaltet ab, wenn
¡ eine zu große Menge verarbeitet
wird.
¡ das Werkzeug oder Zubehör blo-
ckiert wird.
Vor dem ersten Gebrauch
Vor dem ersten Gebrauch
Vor dem ersten Gebrauch
Bereiten Sie das Gerät für die Verwendung vor.
Gerät vorbereiten
1. Die Entriegelungstaste drücken
und den Schwenkarm anheben,
bis er einrastet.
→"Schwenkarm bewegen",
Seite19
2. Die Schüssel im Uhrzeigersinn dre-
hen und entnehmen.
→"Schüssel entnehmen",
Seite19
3. Alle Teile, die mit Lebensmitteln in
Berührung kommen, vor dem ersten Gebrauch reinigen.
→"Reinigen und Pflegen",
Seite23
4. Die gereinigten und getrockneten
Teile für die Verwendung bereitlegen.
Grundlegende Bedienung
Grundlegende Bedienung
Grundlegende Bedienung
Hier erfahren Sie das Wesentliche zur
Bedienung Ihres Geräts.
Kabellänge
Stellen Sie die Länge des Netzkabels
auf Ihre Bedürfnisse ein.
Kabellänge mit dem Kabelaufroller einstellen
1. Das Netzkabel bis zur benötigten
Länge herausziehen und langsam
loslassen.
2. Um die Kabellänge zu verkürzen,
‒ am Kabel ziehen,
‒ das Kabel aufrollen lassen,
‒ das Kabel erneut herausziehen.
18
Page 19

Grundlegende Bedienung de
Hinweis:Das Kabel nicht von Hand
einschieben. Wenn sich das Kabel
verklemmt, das Kabel ganz herausziehen und erneut aufrollen lassen.
Schwenkarm bewegen
1. Die Entriegelungstaste drücken
und den Schwenkarm anheben,
bis er einrastet.
→Abb.
6
a Der Schwenkarm ist in Position2
fixiert.
2. Die Entriegelungstaste drücken
und den Schwenkarm nach unten
bewegen, bis er in der senkrechten Position einrastet.
→Abb.
7
a Der Schwenkarm ist in Position3
fixiert.
Schüssel einsetzen
1. Die Schüssel in das Grundgerät
setzen.
→Abb.
8
Die Aussparungen am Grundgerät
beachten.
2. Die Schüssel gegen den Uhrzei-
gersinn drehen, bis sie einrastet.
→Abb.
9
Schüssel entnehmen
▶
Die Schüssel im Uhrzeigersinn drehen und entnehmen.
→Abb.
10
Werkzeug einsetzen
1. Das benötigte Werkzeug auswäh-
len.
→"Übersicht der Werkzeuge",
Seite16
2. Das Werkzeug in den Hauptantrieb
drücken, bis es einrastet.
→Abb.
3. Um den Knethaken einzusetzen:
11
‒ Knethaken mit angebrachter
Schutzkappe in den Hauptantrieb stecken.
‒ Schutzkappe drehen, bis sich
der Knethaken vollständig einrasten lässt.
→Abb.
12
Die Schutzkappe muss den
Hauptantrieb vollständig abdecken.
Werkzeug entnehmen
▶
Das Werkzeug vollständig aus
dem Antrieb ziehen.
→Abb.
13
Schüsseldeckel aufsetzen
Voraussetzungen
¡ Das gewünschte Werkzeug ist ein-
gesetzt.
¡ Die Schüssel ist eingesetzt.
¡ Der Schwenkarm ist geschlossen.
1. Die Entriegelungstaste drücken,
den Schwenkarm leicht anheben
und festhalten.
→Abb.
2. Den Deckel vorne leicht anheben,
14
vollständig auf die Schüssel schieben und absetzen.
→Abb.
15
Der Einfüllschacht muss nach vorne zeigen.
3. Den Schwenkarm nach unten
drücken, bis er einrastet.
→Abb.
16
Schüsseldeckel entfernen
1. Die Entriegelungstaste drücken,
den Schwenkarm leicht anheben
und festhalten.
2. Den Deckel vorne leicht anheben
und nach vorne herausziehen.
3. Den Schwenkarm nach oben
drücken, bis er einrastet.
19
Page 20
de Grundlegende Bedienung
Verarbeitung
Hier erfahren Sie das Wesentliche zur
Verarbeitung der Lebensmittel.
Geschwindigkeitsempfehlungen
Beachten Sie die Geschwindigkeitsempfehlungen, um optimale Ergebnisse zu erreichen.
Werkzeug oder Zubehör
Stufe
1-7
1-5
1-3
1
3-5
3-7
3-7
3-5
7
5-7
3-7
M
M
5-7
Zutaten mit den Werkzeugen verarbeiten
WARNUNG
Verletzungsgefahr!
Rotierende Antriebe, Werkzeuge oder
Zubehörteile können zu Verletzungen
führen.
▶
Die Hände, das Haar, die Kleidung
und andere Utensilien von rotierenden Teilen fernhalten.
▶
Die Werkzeuge und das Zubehör
nur bei Stillstand des Antriebs und
ausgestecktem Gerät aufsetzen
und abnehmen.
▶
Vor dem Werkzeugwechsel oder
der Reinigung das Gerät ausschalten und vom Netz trennen.
▶
Die Werkzeuge nur mit eingesetzter Schüssel, angebrachtem Deckel und aufgesetzten Antriebsschutzdeckeln betreiben.
▶
Nie bei der Verarbeitung den
Schwenkarm öffnen.
Voraussetzungen
¡ Die Schüssel ist eingesetzt.
¡ Das benötigte Werkzeug ist einge-
setzt.
1. Die Zutaten in die Schüssel füllen.
2. Die Entriegelungstaste drücken
und den Schwenkarm nach unten
drücken, bis er einrastet.
3. Den Schüsseldeckel aufsetzen.
→"Schüsseldeckel aufsetzen",
Seite19
4. Den Netzstecker einstecken.
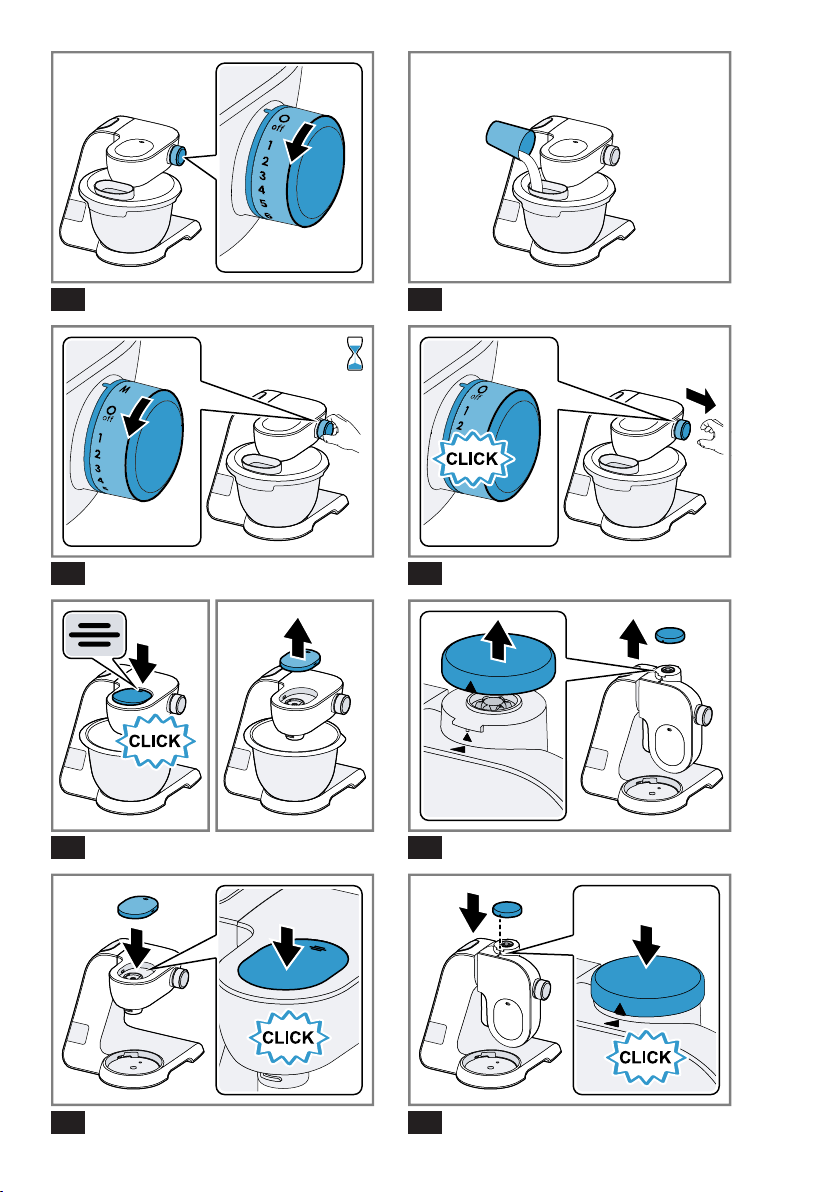
5. Den Drehschalter auf die ge-
wünschte Geschwindigkeit stellen.
→Abb.
6. Die Zutaten verarbeiten, bis das
17
gewünschte Ergebnis erreicht ist.
7. Den Drehschalter auf stellen.
→Abb.
18
Den Stillstand des Geräts abwarten.
8. Den Netzstecker ziehen.
20
Page 21
Waage de
Tipps
¡ Sie können die Geschwindigkeit
während der Verarbeitung jederzeit
ändern oder die Verarbeitung unterbrechen.
¡ Reinigen Sie nach dem Gebrauch
sofort alle Teile, damit die Rückstände nicht antrocknen.
Zutaten nachfüllen
1. Während der Verarbeitung die
Zutaten durch den Einfüllschacht
im Deckel einfüllen.
→Abb.
2. Um größere Mengen nachzufüllen,
19
den Drehschalter auf stellen.
Den Stillstand des Geräts abwar-
ten.
3. Den Schüsseldeckel entfernen.
→"Schüsseldeckel entfernen",
Seite19
4. Die Zutaten in die Schüssel füllen.
5. Den Schüsseldeckel aufsetzen.
→"Schüsseldeckel aufsetzen",
Seite19
6. Die Zutaten verarbeiten, bis das
gewünschte Ergebnis erreicht ist.
Momentschaltung verwenden
1. Den Drehschalter auf stellen und
festhalten.
→Abb.
20
a Die Zutaten werden mit höchster
Geschwindigkeit verarbeitet.
2. Den Drehschalter loslassen.
→Abb.
21
a Der Drehschalter springt auf .
a Die Verarbeitung wird gestoppt
und die Antriebe bewegen sich in
die Parkposition.
Tipp
Die Momentschaltung ist besonders
geeignet für die Verwendung von
folgendem Zubehör:
¡ Glas-Mixeraufsatz
¡ Multi-Zerkleinerer Set
¡ Multi-Mixer-Aufsatz
Antriebsschutzdeckel
Nehmen Sie den Schutzdeckel ab,
um Zubehör am Antrieb 2 oder 3 zu
verwenden.
Antriebsschutzdeckel entfernen
1. Den Schutzdeckel von Antrieb 2
an der Markierung nach unten
drücken und abnehmen.
→Abb.
2. Den Schutzdeckel für den An-
22
trieb3 nach oben ziehen und abnehmen.
→Abb.
23
Antriebsschutzdeckel anbringen
1. Den Schutzdeckel für den An-
trieb2 mit der Markierung nach
hinten ausrichten, aufsetzen und
festdrücken.
→Abb.
2. Den Schutzdeckel für den An-
24
trieb3 aufsetzen und festdrücken.
→Abb.
25
Die Markierungen und müssen aufeinander ausgerichtet sein.
Hinweis:Verschließen Sie nicht genutzte Antriebe immer mit den
Schutzdeckeln.
Waage
Waage
Waage
Ihr Gerät ist mit einer Waage ausgestattet. Sie können Zutaten einzeln
abwiegen.
Das Grundgerät hat 4 Gewichtssensoren in den Standfüßen.
Folgende Faktoren können das
Messergebnis verfälschen:
¡ Standfüße sitzen nicht korrekt auf
der Arbeitsfläche.
¡ Vibrationen der Arbeitsfläche
¡ Gegenstände unter dem Grundge-
rät
21
Page 22
de Timer
¡ Zutatenmengen unter 5g oder
0,01lb
¡ Verschieben des Grundgeräts
¡ Berühren des Grundgeräts
¡ Gegenstände auf dem Grundgerät
Anzeigewerte der Waage
Beachten Sie bei der Verwendung
der Waage folgende Werte.
Anzeigeeinheit in Gramm
Anzeigebereich -990g bis 5000g
Anzeigeschritte 5g
Anzeigeeinheit in Pfund
Anzeigebereich -2,20lb bis 11,00lb
Anzeigeschritte 0,01lb
Tipp:Sie können die Anzeigeeinheiten der Waage jederzeit ändern.
→"Anzeigeeinheiten der Waage än-
dern", Seite22
Zutaten wiegen
Voraussetzungen
¡ Die Schüssel ist eingesetzt oder
ein Zubehör ist angebracht.
¡ Der Drehschalter steht auf .
¡ Der Netzstecker ist eingesteckt.
1. drücken und das Gerät nicht
mehr berühren.
a Die Waage kalibriert sich.
a Das Display zeigt "----".
2. Die Kalibrierung abwarten.
a Das Display zeigt "0g" oder
"0.00lb".
3. Die gewünschte Zutat einfüllen.
a Das Display zeigt das Gewicht.
4. Um weitere Zutaten zu wiegen, ei-
ne der folgenden Optionen wählen:
‒ Weitere Zutaten einfüllen und
das Gesamtgewicht ablesen.
‒ drücken und warten, bis das
Display "0g" oder "0.00lb" anzeigt.
5. Um die Waage auszuschalten,
drücken oder die Verarbeitung
starten.
Tipp:Nutzen Sie die Waage auch in
Verbindung mit dem Zubehör. Wiegen Sie die Zutaten direkt beim Einfüllen, z.B. in den Mixeraufsatz oder
in den Eisbereiter.
Hinweis:Die Waage schaltet sich
nach ca. 3Minuten Inaktivität automatisch aus.
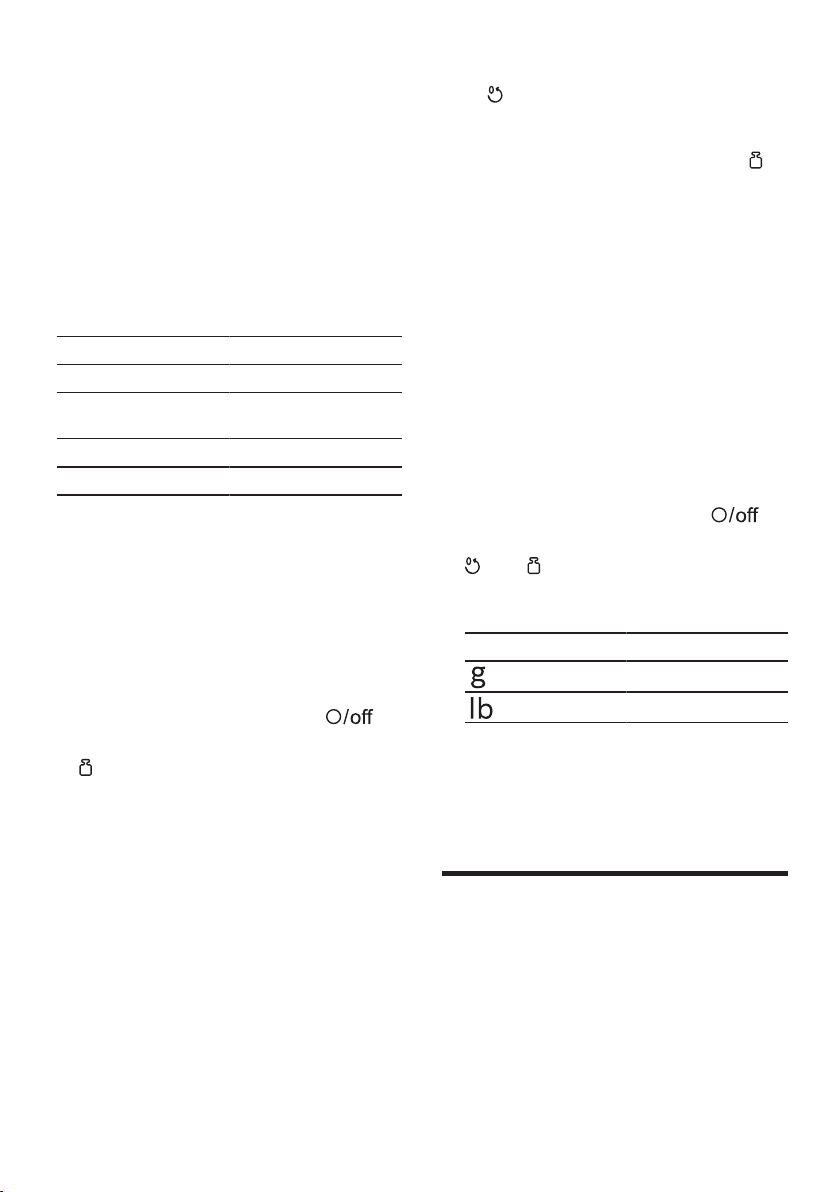
Anzeigeeinheiten der Waage ändern
Voraussetzungen
¡ Der Drehschalter steht auf .
¡ Die Waage ist eingeschaltet.
1. und drücken und halten.
Die Anzeigeeinheit der Waage ändert sich.
Symbol Einheit
Anzeige in Gramm
Anzeige in Pfund
2. Beide Tasten loslassen.
a Die Waage kalibriert sich und und
startet mit der geänderten Einstellung neu.
a Die Einstellung ist gespeichert.
Timer
Timer
Timer
Sie können die bisherige Verarbeitungsdauer ablesen oder zurücksetzen.
Anzeigewerte des Timers
Beachten Sie bei der Verwendung
des Timers folgende Werte.
22
Page 23

Anzeigebereich 0 Sekunden bis
59Minuten und
59Sekunden
Anzeigeschritte 1Sekunde
Reinigen und Pflegen de
▶
Das Bedienfeld und das Display
nur mit einem feuchten Mikrofasertuch reinigen.
Reinigungsübersicht
Verarbeitungsdauer ablesen und zurücksetzen
1. Den Drehschalter auf die ge-
wünschte Geschwindigkeit stellen.
a Das Display zeigt die Verarbei-
tungsdauer.
2. Um die Anzeige auf "00:00" zu-
rückzusetzen, drücken.
Hinweise
¡ Wenn Sie die Verarbeitung weniger
als 30Sekunden unterbrechen,
bleiben die zuletzt angezeigten
Werte gespeichert und laufen bei
der erneuten Verarbeitung weiter.
¡ Wenn Sie die Verarbeitung mehr
als 30Sekunden unterbrechen,
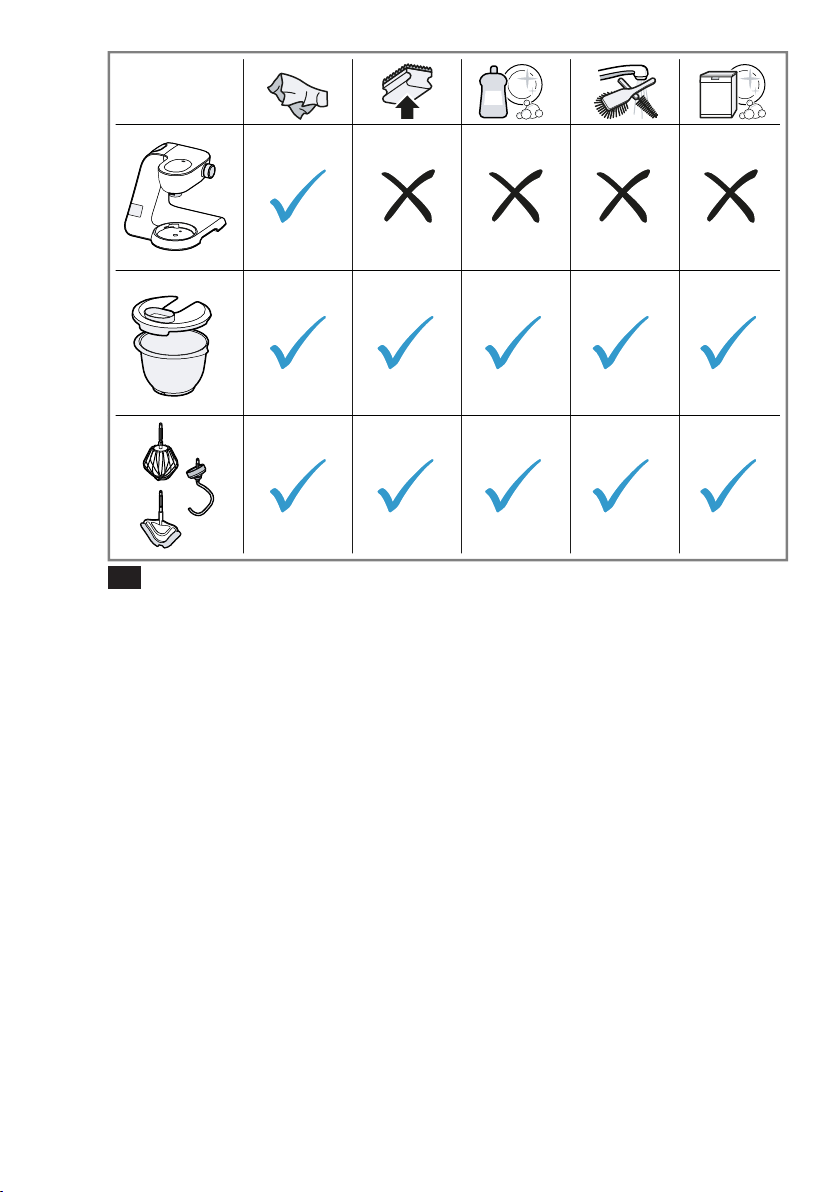
schaltet das Gerät die Waage ein
und kalibriert sich.
Reinigen und Pflegen
Reinigen und Pflegen
Reinigen und Pflegen
Damit Ihr Gerät lange funktionsfähig
bleibt, reinigen und pflegen Sie es
sorgfältig.
Reinigungsmittel
Hier finden Sie eine Übersicht, wie
Sie das Gerät und die weiteren Teile
am besten reinigen.
→Abb.
26
Tipp:An den Kunststoffteilen können
Verfärbungen entstehen, z. B. bei der
Verarbeitung von Karotten. Entfernen
Sie die Verfärbungen mit einem weichen Tuch und einigen Tropfen Speiseöl.
Sonderzubehör
Sonderzubehör
Sonderzubehör
Zubehör können Sie beim Kundendienst, im Fachhandel oder im Internet kaufen. Verwenden Sie nur Originalzubehör, da dieses genau auf Ihr
Gerät abgestimmt ist.
"Zubehör ist gerätespezifisch. Geben
Sie beim Kauf immer die genaue Bezeichnung (E-Nr.) Ihres Geräts an."
→Seite29
Welches Zubehör für Ihr Gerät verfügbar ist, erfahren Sie in unserem
Katalog, im Online-Shop oder beim
Kundendienst.
www.bosch-home.com
Erfahren Sie, welche Reinigungsmittel
für Ihr Gerät geeignet sind.
ACHTUNG!
Durch ungeeignete Reinigungsmittel
oder durch falsche Reinigung kann
das Gerät beschädigt werden.
▶
Keine alkohol- oder spiritushaltigen
Reinigungsmittel verwenden.
▶
Keine scharfen, spitzen oder metallischen Gegenstände benutzen.
▶
Keine scheuernden Tücher oder
Reinigungsmittel verwenden.
Rezepte
Rezepte
Rezepte
Hier finden Sie eine Auswahl an Rezepten, die speziell für Ihr Gerät entwickelt wurden.
Tipps
¡ Beachten Sie die angegebenen
maximalen Verarbeitungsmengen,
um optimale Ergebnisse zu erzielen.
23
Page 24

de Rezepte
¡ Sie können Sie die Zutaten beim
Einfüllen mit der integrierten Waage wiegen.
→"Waage", Seite21
¡ Sie können die Verarbeitungszei-
ten mit dem Timer überwachen.
→"Timer", Seite22
Rezeptübersicht
In dieser Übersicht finden Sie die Zutaten und Verarbeitungsschritte für verschiedene Rezepte.
Rezept Zutaten Verarbeitung
Schlagsahne 100-600g Sahne ¡ Schlagbesen einsetzen.
¡ Sahne einfüllen.
¡ 1½-4Minuten auf Stufe7 verarbei-
ten.
Eiweiß 1-8 Eiweiß (Raumtemperatur) ¡ Schlagbesen einsetzen.
¡ Eiweiß einfüllen.
¡ 4-6Minuten auf Stufe7 verarbei-
ten.
Biskuitteig ¡ 2 Eier
¡ 2-3EL heißes Wasser
¡ 100g Zucker
¡ 1EL Vanillezucker
¡ 70g Mehl (gesiebt)
¡ 70g Stärkemehl
¡ Backpulver (nach Belieben)
Hinweis:Maximal 2-fache Menge
gleichzeitig verarbeiten.
Rührteig ¡ 6 Eier
¡ 500g Zucker
¡ 1Prise Salz
¡ 2EL Vanillezucker oder geriebene
Schale einer halben Zitrone
¡ 500g Butter oder Margarine
(Raumtemperatur)
¡ 1000g Mehl
¡ 15g Backpulver
¡ 250ml Milch
Hinweis:Maximal 1-fache Menge
gleichzeitig verarbeiten.
¡ Schlagbesen einsetzen.
¡ Alle Zutaten außer Mehl und Stär-
kemehl einfüllen.
¡ 4-6Minuten auf Stufe7 verarbei-
ten.
¡ Auf Stufe1 stellen.
¡ Innerhalb von 30-60Sekunden das
Mehl und das Stärkemehl löffelweise dazugeben.
¡ Rührbesen einsetzen.
¡ Eier, Salz, Zucker und Vanillezucker
oder geriebene Zitronenschale einfüllen.
¡ 10Sekunden auf Stufe1 verarbei-
ten.
¡ Danach 2Minuten auf Stufe5 ver-
arbeiten.
¡ Butter hinzufügen und 60Sekun-
den auf Stufe3 verarbeiten.
¡ Mehl und Backpulver hinzufügen
und 2Minuten auf Stufe1 verarbeiten.
¡ Auf Stufe3 stellen.
¡ Innerhalb von 2Minuten die Milch
hinzufügen.
24
Page 25

Rezept Zutaten Verarbeitung
Mürbeteig ¡ 125g Butter
¡ 100-125g Zucker
¡ 1 Ei
¡ 1 Prise Salz
¡ etwas Vanillezucker oder geriebene
Zitronenschale
¡ 250g Mehl
¡ Backpulver (nach Belieben)
Hinweis:Maximal 2-fache Menge
gleichzeitig verarbeiten.
¡ Rührbesen einsetzen.
¡ Alle Zutaten einfüllen.
¡ 30Sekunden auf Stufe1 verarbei-
ten.
¡ 2-3Minuten auf Stufe6 verarbei-
ten.
Ab 500g Mehl:
¡ Knethaken einsetzen.
¡ Alle Zutaten einfüllen.
¡ 30Sekunden auf Stufe1 verarbei-
ten.
¡ 3-4Minuten auf Stufe3 verarbei-
ten.
Hefeteig ¡ 500g Mehl
¡ 1 Ei
¡ 80g Fett (Raumtemperatur)
¡ 80g Zucker
¡ 200-250ml lauwarme Milch
¡ 25g frische Hefe oder 1EL ge-
¡ Knethaken einsetzen.
¡ Alle Zutaten einfüllen.
¡ 30Sekunden auf Stufe1 verarbei-
ten.
¡ 3-6Minuten auf Stufe3 verarbei-
ten.
trocknete Hefe.
¡ geriebene Schale einer halben Zi-
trone
¡ 1 Prise Salz
Hinweis:Maximal 2-fache Menge
gleichzeitig verarbeiten.
Nudelteig ¡ 300g Mehl
¡ 150g Eier (ca. 3Stück)
¡ 15-30ml kaltes Wasser (nach Be-
lieben)
¡ Knethaken einsetzen.
¡ Alle Zutaten einfüllen.
¡ 3-5Minuten auf Stufe3 verarbei-
ten.
Hinweis:Maximal 1½-fache Menge
gleichzeitig verarbeiten.
Brotteig ¡ 1000g Mehl
¡ 2EL getrocknete Hefe
¡ 2TL Salz
¡ 660ml lauwarmes Wasser
Hinweis:Maximal 1-fache Menge
gleichzeitig verarbeiten.
¡ Knethaken einsetzen.
¡ Alle Zutaten einfüllen.
¡ 30Sekunden auf Stufe1 verarbei-
ten.
¡ 4-5Minuten auf Stufe3 verarbei-
ten.
Rezepte de
25
Page 26
de Störungen beheben
Störungen beheben
Störungen beheben
Störungen beheben
Kleinere Störungen an Ihrem Gerät können Sie selbst beheben. Nutzen Sie die
Informationen zur Störungsbehebung, bevor Sie den Kundendienst kontaktieren. So vermeiden Sie unnötige Kosten.
WARNUNG
Stromschlaggefahr!
Unsachgemäße Reparaturen sind gefährlich.
▶
Nur dafür geschultes Fachpersonal darf Reparaturen am Gerät durchführen.
▶
Nur Original-Ersatzteile dürfen zur Reparatur des Geräts verwendet werden.
▶
Wenn die Netzanschlussleitung dieses Geräts beschädigt wird, muss sie
durch den Hersteller oder seinen Kundendienst oder eine ähnlich qualifizierte
Person ersetzt werden, um Gefährdungen zu vermeiden.
Funktionsstörungen
Störung Ursache Störungsbehebung
Gerät funktioniert nicht. Netzstecker der Netzan-
schlussleitung ist nicht eingesteckt.
Sicherung ist defekt.
Stromversorgung ist ausgefallen.
Gerät startet die Verarbeitung nicht.
Gerät startet die Verarbeitung nicht oder schaltet während der Verarbeitung ab.
Drehschalter ist falsch eingestellt.
Verarbeitungsmenge ist zu
hoch oder Verarbeitungsdauer war zu lang.
Gerät oder Zubehör ist blockiert.
Waage zeigt keine Gewichtsänderung an, obwohl Zutaten eingefüllt werden.
Menge an Zutaten liegt unterhalb des Messbereichs
der Waage.
▶
Schließen Sie das Gerät am Stromnetz an.
▶
Prüfen Sie die Sicherung im Sicherungskasten.
▶
Prüfen Sie, ob die Raumbeleuchtung oder andere Geräte im Raum
funktionieren.
▶
Stellen Sie den Drehschalter vor
der Verarbeitung auf .
▶
Stellen Sie den Drehschalter auf
.
▶
Reduzieren Sie die Menge an Zutaten.
▶
Lassen Sie das Gerät auf Raumtemperatur abkühlen.
▶
Stellen Sie den Drehschalter auf
.
▶
Entfernen Sie die Blockade.
▶
Füllen Sie mindestens 5g oder
0,01lb ein, damit die Waage korrekte Werte anzeigt.
26
Page 27

Störungen beheben de
Störung Ursache Störungsbehebung
Schwenkarm lässt sich nicht
öffnen oder schließen, weil
das Werkzeug an der Schüssel klemmt.
Antrieb ist nicht in Parkposition, nachdem ein Sicherheitssystem die Verarbeitung gestoppt hat oder die
Stromversorgung unterbrochen war.
1. Stellen Sie den Drehschalter auf
.
2. Beheben Sie die Ursache, die zum
Stoppen des Geräts geführt hat.
→"Sicherheitssysteme", Seite18
3. Wenn der Schwenkarm geöffnet ist,
entnehmen Sie das Werkzeug und
schließen den Schwenkarm.
4. Stellen Sie den Drehschalter kurz
auf und dann wieder auf .
a Der Antrieb läuft eine kurze Zeit
weiter, bis die Parkposition erreicht
ist.
Hinweise im Anzeigefeld
Störung Ursache Störungsbehebung
Im Display blinkt "5000g"
oder "11.00lb".
Im Display blinkt "-990g"
oder "-2.20lb".
Im Display blinkt
"59:59m:s".
Anzeigewerte der Waage
wurden überschritten.
Anzeigewerte der Waage
wurden unterschritten.
Anzeigebereich des Timers
wurde überschritten.
Das Display zeigt "ERROR" Waage ist zu starken Vibra-
tionen ausgesetzt.
Untergrund ist uneben. 1. Stellen Sie das Gerät auf eine stabi-
Die Standfüße sind verschmutzt.
▶
Beachten Sie die Anzeigewerte der
Waage.
→"Anzeigewerte der Waage",
Seite22
▶
Beachten Sie die Anzeigewerte der
Waage.
→"Anzeigewerte der Waage",
Seite22
▶
Verarbeiten Sie die Lebensmittel
nicht länger als 59Minuten und
59Sekunden oder setzen Sie die
Verarbeitungsdauer innerhalb dieser Zeit zurück.
→"Verarbeitungsdauer ablesen
und zurücksetzen", Seite23
▶
Verwenden Sie das Gerät nicht auf
Arbeitsplatten, die Vibrationen ausgesetzt sind, z. B. unter denen ein
Geschirrspüler in Betrieb ist.
le, ebene, saubere und glatte Arbeitsfläche.
2. Überprüfen Sie, ob alle 4 Standfüße
Kontakt zur Arbeitsfläche haben.
▶
Wischen Sie die Standfüße mit einem feuchten Tuch ab.
27
Page 28

de Störungen beheben
Störung Ursache Störungsbehebung
Das Display zeigt "ERROR" Die Waage muss neu gestar-
tet werden.
1. Um die Waage neu zu starten:
‒ Drücken Sie .
‒ Warten Sie 30-60Sekunden.
‒ Drücken Sie erneut und
warten die Kalibrierung ab.
2. Wenn der Fehler weiterhin ange-
zeigt wird, trennen Sie das Gerät einige Zeit vom Netz und versuchen
dann erneut die Waage einzuschalten.
Hinweis:Führen Sie die Schritte zur
Störungsbehebung mehrfach durch,
bevor Sie sich an den Kundendienst
wenden.
28
Page 29
Entsorgen de
Entsorgen
Entsorgen
Entsorgen
Erfahren Sie hier, wie Sie Altgeräte
richtig entsorgen.
Altgerät entsorgen
Durch umweltgerechte Entsorgung
können wertvolle Rohstoffe wiederverwendet werden.
1. Den Netzstecker der Netzan-
schlussleitung ziehen.
2. Die Netzanschlussleitung durch-
trennen.
3. Das Gerät umweltgerecht entsor-
gen.
Dieses Gerät ist entsprechend
der europäischen Richtlinie
2012/19/EU über Elektro- und
Elektronikaltgeräte (waste electrical and electronic equipment
– WEEE) gekennzeichnet.
Die Richtlinie gibt den Rahmen
für eine EU-weit gültige Rücknahme und Verwertung der Altgeräte vor.
Kundendienst
Kundendienst
Kundendienst
Wenn Sie Fragen haben, eine Störung am Gerät nicht selbst beheben
können oder das Gerät repariert werden muss, wenden Sie sich an unseren Kundendienst.
Viele Probleme können Sie durch die
Information zur Störungsbehebung in
dieser Anleitung oder auf unserer
Webseite selbst beheben. Falls dies
nicht der Fall ist, wenden Sie sich an
unseren Kundendienst.
Wir finden immer eine passende Lösung.
Wir stellen sicher, dass Ihr Gerät mit
Original-Ersatzteilen von geschultem
Kundendienstpersonal im Garantiefall
und nach Ablauf der Herstellergarantie repariert wird.
Funktionsrelevante Original-Ersatzteile gemäß der entsprechenden Ökodesign-Verordnung erhalten Sie bei
unserem Kundendienst für die Dauer
von mindestens 7 Jahren ab dem Inverkehrbringen Ihres Geräts innerhalb des Europäischen Wirtschaftsraums.
Hinweis:Der Einsatz des Kundendiensts ist im Rahmen der Herstellergarantiebedingungen kostenfrei.
Detaillierte Informationen über die
Garantiezeit und die Garantiebedingungen in Ihrem Land erhalten Sie
bei unserem Kundendienst, Ihrem
Händler oder auf unserer Webseite.
Wenn Sie den Kundendienst kontaktieren, benötigen Sie die Erzeugnisnummer (E-Nr.) und die Fertigungsnummer (FD) Ihres Geräts.
Die Kontaktdaten des Kundendiensts
finden Sie im Kundendienstverzeichnis am Ende der Anleitung oder auf
unserer Webseite.
Erzeugnisnummer (E-Nr.) und Fertigungsnummer (FD)
Die Erzeugnisnummer (E-Nr.) und die
Fertigungsnummer (FD) finden Sie
auf dem Typenschild des Geräts.
Um Ihre Gerätedaten und die Kundendienst-Telefonnummer schnell
wiederzufinden, können Sie die Daten
notieren.
Garantiebedingungen
Sie haben für Ihr Gerät Anspruch auf Garantie gemäß nachfolgender Bedingungen.
29
Page 30

de Kundendienst
Für dieses Gerät gelten die von unserer jeweils zuständigen Landesvertretung
herausgegebenen Garantiebedingungen des Landes, in dem das Gerät gekauft
wurde. Sie können die Garantiebedingungen jederzeit über Ihren Fachhändler,
bei dem Sie das Gerät gekauft haben oder direkt bei unserer Landesvertretung
anfordern. Die Garantiebedingungen für Deutschland finden Sie am Ende des
deutschen Sprachteils. Die Adressen finden Sie auf den letzten Seiten dieses
Hefts. Darüber hinaus sind die Garantiebedingungen auch im Internet unter der
genannten Web-Adresse hinterlegt. Für die Inanspruchnahme von Garantieleistungen ist in jedem Fall die Vorlage des Kaufbeleges erforderlich.
30
Page 31

Kundendienst de
31
Page 32

en
Table of contents
Safety.............................................33
General information........................33
Intended use...................................33
Restriction on user group...............34
Safety instructions ..........................34
Avoiding material damage............37
Environmental protection and
saving energy................................37
Disposing of packaging .................37
Unpacking and checking..............37
Unpacking the appliance and
parts ...............................................37
Contents of package......................37
Setting up appliance ......................38
Familiarising yourself with
your appliance...............................38
Appliance .......................................38
Rotary switch..................................38
Illuminated ring...............................39
Control panel..................................39
Function buttons.............................39
Display............................................39
Swivel arm ......................................39
Drives .............................................40
Tools...............................................40
Symbols..........................................41
Parked position ..............................41
Safety systems ...............................41
Before using for the first time ......42
Preparing the appliance.................42
Removing bowl lid..........................43
Processing......................................43
Drive cover .....................................44
Scales ............................................45
Display values of scales.................45
Weighing ingredients......................45
Changing the display units of
the scales .......................................45
Timer..............................................46
Display values of timer...................46
Reading off and resetting the
processing time..............................46
Cleaning and servicing.................46
Cleaning products..........................46
Overview of cleaning......................46
Special accessories......................46
Recipes..........................................47
Overview of recipes........................47
Troubleshooting............................50
Malfunctions ...................................50
Information on display panel..........51
Disposal.........................................53
Disposing of old appliance ............53
Customer Service..........................53
Product number (E-Nr.) and pro-
duction number (FD) ......................53
Warranty conditions........................53
Basic operation .............................42
Cable length ...................................42
Moving the swivel arm ...................42
Inserting bowl .................................42
Removing bowl...............................42
Inserting tools.................................42
Removing tools ..............................43
Attaching bowl lid...........................43
32
Page 33

Safety en
Safety
Please read the safety information to ensure that you use the appliance safely.
General information
You can find general information for this instruction manual here.
¡ Read this instruction manual carefully. Only this will ensure you
use the appliance safely and efficiently.
¡ Please note the additional instructions when using supplied or
optionally available accessories.
¡ This manual is intended for the user of the appliance.
¡ Follow the safety instructions and warnings.
¡ Keep the instruction manual and the product information safe
for future reference or for the next owner.
¡ Check the appliance after unpacking it. Do not connect the ap-
pliance if it has been damaged in transit.
Intended use
Please read the information on intended use to ensure that you
use the appliance correctly and safely.
Only use this appliance:
¡ As specified in this instruction manual.
¡ With genuine parts and accessories.
¡ For additional applications described in the instructions for ac-
cessories that are optional or come with the appliance.
¡ For mixing, kneading and beating food.
¡ Under supervision.
¡ In private households and in enclosed spaces in a domestic en-
vironment at room temperature.
¡ for normal processing quantities and for normal processing
times for domestic use.
¡ Up to an altitude of max. 2000m above sea level.
Disconnect the appliance from the power supply when:
¡ are not using the appliance.
33
Page 34

en Safety
¡ the appliance is unattended.
¡ assembling the appliance.
¡ taking the appliance apart.
¡ cleaning the appliance.
¡ approaching rotating parts.
¡ Change tools.
¡ confronted with a fault.
Restriction on user group
Avoid risks to children and vulnerable persons.
This appliance can be used by persons with reduced physical,
sensory or mental capabilities or a lack of experience and/or
knowledge if they have been given supervision or instruction concerning use of the appliance in a safe way and if they understand
the hazards involved.
Children must not play with the appliance.
Cleaning and user maintenance must not be performed by children.
The appliance must not be used by children. Keep children away
from the appliance and power cable.
Safety instructions
Observe the safety instructions.
WARNING‒Risk of electric shock!
¡ If the appliance or the power cord is damaged, this is danger-
ous.
▶
Never operate a damaged appliance.
▶
Never operate an appliance with a cracked or fractured surface.
▶
Never pull on the power cord to unplug the appliance. Always unplug the appliance at the mains.
▶
If the appliance or the power cord is damaged, immediately
unplug the power cord or switch off the fuse in the fuse box.
▶
"Call Customer Service." →Page53
▶
Repairs to the appliance should only be carried out by
trained specialist staff.
34
Page 35

Safety en
¡ Improper installation is dangerous.
▶
Connect and operate the appliance only in accordance with
the specifications on the rating plate.
¡ Incorrect repairs are dangerous.
▶
Repairs to the appliance should only be carried out by
trained specialist staff.
▶
Only use genuine spare parts when repairing the appliance.
▶
If the power cord of this appliance is damaged, it must be
replaced by the manufacturer, the manufacturer's Customer
Service or a similarly qualified person in order to prevent
any risk.
¡ An ingress of moisture can cause an electric shock.
▶
Never immerse the appliance or the power cord in water or
clean in the dishwasher.
▶
Only use the appliance in enclosed spaces.
▶
Never expose the appliance to intense heat or humidity.
▶
Do not use steam- or high-pressure cleaners to clean the
appliance.
¡ If the insulation of the power cord is damaged, this is danger-
ous.
▶
Never let the power cord come into contact with hot appliance parts or heat sources.
▶
Never let the power cord come into contact with sharp
points or edges.
▶
Never kink, crush or modify the power cord.
WARNING‒Risk of fire!
Intense heat may cause the appliance and other parts to
catch fire.
▶
Never place the appliance on or near hot surfaces.
WARNING‒Risk of injury!
¡ Rotating drives, tools or accessory parts may cause injury.
▶
Keep hands, hair, clothing and utensils away from rotating
parts.
▶
Only attach and remove tools and accessories once the
drive has stopped and you have unplugged the appliance.
35
Page 36

en Safety
▶
Before changing tools or cleaning the appliance, switch off
and disconnect it from the mains.
▶
Only use the tools when the bowl is inserted, the lid is fitted
and the drive covers are in place.
▶
Never open the swivel arm during processing.
¡ Operating the appliance with damaged parts may result in in-
jury.
▶
Parts which show cracks or other damage or do not fit correctly must be replaced with genuine spare parts.
WARNING‒Risk of crushing!
Your hands and fingers could get caught.
▶
Do not reach into the bowl when lowering the swivel arm.
WARNING‒Risk of suffocation!
¡ Children may put packaging material over their heads or wrap
themselves up in it and suffocate.
▶
Keep packaging material away from children.
▶
Do not let children play with packaging material.
¡ Children may breathe in or swallow small parts, causing them
to suffocate.
▶
Keep small parts away from children.
▶
Do not let children play with small parts.
WARNING‒Risk of harm to health!
Soiling on surfaces may be harmful to health.
▶
Follow the cleaning instructions.
▶
Clean surfaces which come in contact with food before
each use.
36
Page 37

Avoiding material damage en
A
B
C
Avoiding material damage
Avoiding material damage
Avoiding material damage
Follow these instructions to prevent
material damage to your appliance,
accessories or other objects in your
kitchen.
ATTENTION!
¡ Improper use may cause material
damage.
▶
Never use different drives at the
same time.
▶
Never operate the appliance
longer than necessary.
▶
Do not operate the appliance at
no-load.
▶
Never use genuine parts and accessories for other appliances.
▶
Observe the maximum processing quantities.
▶
Do not use the bowl to store objects which do not belong to it.
¡ During operation warm exhaust air
escapes from the vent grille at the
rear. If this is blocked, it may
cause the appliance to overheat.
▶
Set up the appliance at a sufficient distance from walls, easily
damaged surfaces and other
appliances.
¡ Vibrations may impair functioning
of the appliance.
▶
Do not place the appliance on
moving or vibrating surfaces.
Environmental protection and saving energy
Environmental protection
and saving energy
Environmental protection and saving energy
Help protect the environment by using your appliance in a way that conserves resources and by disposing of
reusable materials properly.
Disposing of packaging
The packaging materials are environmentally compatible and can be recycled.
▶
Sort the individual components by
type and dispose of them separately.
Information about current disposal
methods are available from your
specialist dealer or local authority.
Unpacking and checking
Unpacking and checking
Unpacking and checking
Find out here what you need to note
when unpacking the appliance.
Unpacking the appliance and parts
1. Take the appliance out of the
packaging.
2. Take all other parts and the ac-
companying documents out of the
packaging and place them to
hand.
3. Remove any packaging material.
4. Remove any stickers or film.
Contents of package
After unpacking all parts, check for
any damage in transit and completeness of the delivery.
Note:The appliance comes with additional accessories depending on its
features. See the instructions for the
accessories to discover the further
contents of the package.
→Fig.
1
Base unit with mixing bowl
Lid with integrated filling shaft
Professional flexible stirrer
37
Page 38

en Familiarising yourself with your appliance
D
E
F
G
1
2
3
4
5
6
8
9
10
11
12
13
14
Professional beating whisk
Kneading hook
Storage pouch
Accompanying documents
Setting up appliance
WARNING
Risk of fire!
Intense heat may cause the appliance and tools to catch fire.
▶
Never place the appliance on or
near hot surfaces.
ATTENTION!
¡ During operation warm exhaust air
escapes from the vent grille at the
rear. If this is blocked, it may
cause the appliance to overheat.
▶
Set up the appliance at a sufficient distance from walls, easily
damaged surfaces and other
appliances.
¡ Vibrations may impair functioning
of the appliance.
▶
Do not place the appliance on
moving or vibrating surfaces.
1. Place the appliance on a stable,
level, clean and flat work surface.
2. Pull the power cable out to the re-
quired length.
→"Cable length", Page42
Do not insert the mains plug.
Familiarising yourself with your appliance
Familiarising yourself
with your appliance
Familiarising yourself with your appliance
Familiarise yourself with the parts of
your appliance.
Appliance
You can find an overview of the parts
of your appliance here.
→Fig.
2
Stainless steel mixing bowl
Control panel
Lid with integrated filling shaft
Release button for swivel arm
Swivel arm
Rotary switch
Protective cover for drive 2
Drive 2
Protective cover for drive 3
Drive 3
Vent grille
Main drive
Cord store
Rotary switch
The rotary switch is used to start and
stop processing and select the
speed.
Symbol Function
Stop processing.
Process ingredients at low speed.
Process ingredients at maximum
speed.
Process ingredients briefly at max-
imum speed.
→"Using instantaneous switching", Page44
38
Page 39

Familiarising yourself with your appliance en
1
2
3
4
5
6
Illuminated ring
The illuminated ring on the rotary
switch informs you about the operating status of your appliance.
Display Status
The illuminated ring
lights up and processing is underway.
The illuminated ring
does not light up and
processing cannot
start.
The illuminated ring
flashes and processing cannot start
or continue.
Tip:You can find further information
here:
→"Safety systems", Page41
→"Troubleshooting", Page50
The appliance is functioning perfectly.
¡ The appliance has
no power supply.
¡ There is a fault
with the appliance.
¡ A safety system
has been activated.
¡ There is a fault
with the appliance.
Control panel
You can find an overview of the control panel here.
→Fig.
3
Reset button
Scales button
Display
Symbol Weight in pounds
Symbol Weight in grammes
Symbol Time in minutes and seconds
Function buttons
You can use the function buttons to
select additional functions or configure settings. To make a selection,
touch the relevant symbols with your
finger.
Symbol Function
Switch scales on and off.
¡ Reset scales.
¡ Reset timer.
Note:Press the buttons with your fingers without wearing rubber/oven
gloves. Do not operate buttons with
objects, e.g. a wooden spoon.
Display
The display shows values and messages about the operating status.
Note:The display will switch off automatically if the appliance is not operated for a given period of time. To reactivate the display, press a button or
start processing.
Swivel arm
The swivel arm can be adjusted and
fixed in different positions.
If the release button is pressed, the
swivel arm can be moved to the required position.
→"Moving the swivel arm", Page42
Note:The swivel arm features the
EasyArm Lift function. This function
supports upwards movement of the
swivel arm.
Swivel arm positions
You can find an overview of the positions of the swivel arm here.
Position Use
Position1 Swivel arm is closed.
¡ Process ingredients with tools.
¡ Use accessory on main drive,
e.g. Ice maker.
¡ Use accessory on drive 2, e.g.
Continuous-feed shredder
39
Page 40

en Familiarising yourself with your appliance
Position Use
Position2 Swivel arm is open.
¡ Insert or remove bowl.
¡ Insert or remove tool.
¡ Add the ingredients to the
bowl.
Position3 ¡ Use accessory on main drive,
e.g. Meat mincer.
¡ Use accessory on drive 3, e.g.
Blender attachment.
Drives
Your appliance is equipped with different drives, which are specially designed for its tools and accessories.
Note:Drives 2 and 3 come with protective covers.
→"Drive cover", Page44
Overview of drives
You can find an overview of the
drives and their purposes here.
Drive Use
Main drive For the tools and accessories,
e.g.
¡ Meat mincer
¡ Pasta press
¡ Ice maker
Drive2 For accessories, e.g.
¡ Continuous-feed shredder
¡ Citrus press
Drive3 For accessories, e.g.
¡ Glass blender attachment
¡ Plastic blender attachment
¡ Multi-chopper set
Tools
You can find out everything you need
to know about the different tools
here.
The kneading hook is equipped with
a removable protective cap to protect
the drive from soiling.
Overview of tools
Use the appropriate tool depending
on use.
Tool Use
Kneading hook
¡ Knead heavy dough, e.g. yeast
dough.
¡ Fold in food that is not to be
cut, e.g. raisins or chocolate
chips.
Professional flexible stirrer
¡ Stir food, e.g. cake mixture or
mousse.
¡ Fold in food, e.g. egg whites,
cream or raisins.
Professional beating whisk
¡ Beat egg whites and cream.
¡ Make light dough, e.g. sponge
mixture.
Fine adjustment of the professional whisk
Use the fine adjustment system to
correct the distance between the
bowl and the professional beating
whisk.
Note:The professional beating whisk
is factory-set so that ingredients are
mixed together perfectly.
Correcting tool adjustment
ATTENTION!
The appliance and tools can be damaged if a wrong tool setting is used.
▶
Never operate a tool that touches
the bowl.
40
Page 41

Familiarising yourself with your appliance en
Requirements
¡ The mains plug is not inserted.
¡ The swivel arm is open.
¡ The professional beating whisk is
inserted.
¡ The bowl has been inserted.
1. Hold the beating whisk at the bot-
tom with one hand and release the
lock nut clockwise using a spanner
wrench.
→Fig.
2. To change the distance, turn the
4
tool.
→Fig.
5
Observe the values in the table:
Setting Distance
Optimum setting 3mm
One turn clockwise 1mm more
One turn anticlock-
1mm less
wise
3. Press the release button and push
the swivel arm down until it engages.
4. Check the setting.
5. Press the release button and raise
the swivel arm until it engages.
6. Hold the beating whisk at the bot-
tom with one hand and tighten the
lock nut anticlockwise using a
spanner wrench.
Symbols
You can find an overview of the symbols used on your appliance here.
Symbol Description
Marking on the protective cover
for drive2.
Attachment marking on the protective cover for drive3.
Position marking on drive3.
Parked position
Your appliance is equipped with an
automatic parked position.
After the appliance has switched off,
the drives will continue moving for a
few seconds until the correct parked
position is reached.
Note:The swivel arm will only open
or close with the inserted tool when
the drive is located in the correct
parked position.
The following causes result in an
incorrect parked position:
¡ The power supply was interrupted
during processing.
¡ A safety system terminated pro-
cessing.
¡ During processing the swivel arm
disengaged or the release button
for the swivel arm was pressed.
Tip:You can easily adjust an incorrect parking position yourself.
→"Troubleshooting", Page50
Safety systems
You can find an overview of your appliance's safety systems here.
Start lock-out
Start lock-out prevents your appliance from being switched on accidentally.
The appliance can only be switched on
and operated if
¡ the swivel arm is engaged in posi-
tion1 and the bowl or an accessory is inserted, e.g. Ice maker.
¡ the swivel arm is engaged in posi-
tion3 and the protective cover or
an accessory is fitted on drive3.
Restart lock-out
Restart lock-out prevents your appliance from automatically restarting
processing after a power failure.
41
Page 42

en Before using for the first time
The appliance is switched on again
after a power failure. Processing cannot start again until the rotary switch
has been set to .
Overload protection
The overload protection system prevents the motor and other components from being damaged through
being overloaded.
The motor will switch off if
¡ too large a quantity is processed.
¡ a tool or accessory is blocked.
Before using for the first time
Before using for the
first time
Before using for the first time
Prepare the appliance for use.
Preparing the appliance
1. Press the release button and raise
the swivel arm until it engages.
→"Moving the swivel arm",
Page42
2. Turn the bowl clockwise and re-
move.
→"Removing bowl", Page42
3. Clean all parts that come into con-
tact with food before using for the
first time.
→"Cleaning and servicing",
Page46
4. Put the cleaned and dried parts
out ready for use.
Adjusting cable length via cable rewinder
1. Pull the power cable out to the re-
quired length and slowly let go.
2. To shorten the cable,
‒ pull the cable,
‒ allow the cable to wind up,
‒ pull the cable out again.
Note:Do not push the cable in by
hand. If the cable jams, pull right out
and let it wind up again.
Moving the swivel arm
1. Press the release button and raise
the swivel arm until it engages.
→Fig.
6
a The swivel arm is fixed in posi-
tion2.
2. Press the release button and move
the swivel arm down until it engages in the vertical position.
→Fig.
7
a The swivel arm is fixed in posi-
tion3.
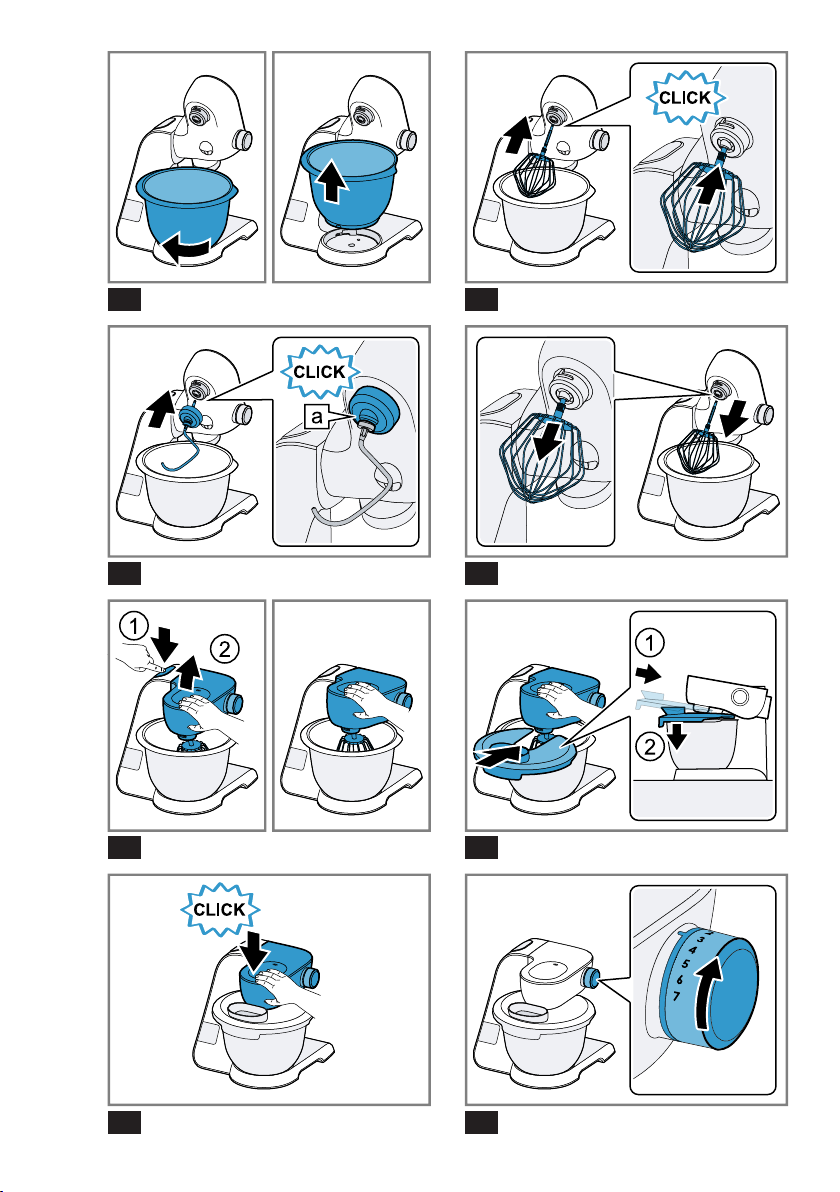
Inserting bowl
1. Place the bowl in the base unit.
→Fig.
Use the recesses on the base unit.
2. Turn the bowl anticlockwise until it
engages.
→Fig.
8
9
Removing bowl
Basic operation
Basic operation
Basic operation
You can find out everything you need
to know about operating your appliance here.
Cable length
Adjust the length of the power cable
to your needs.
42
▶
Turn the bowl clockwise and remove.
→Fig.
10
Inserting tools
1. Select the tool required.
→"Overview of tools", Page40
Page 43

Basic operation en
2. Press the tool into the main drive
until it engages.
→Fig.
3. To insert the kneading hook:
‒ Insert the kneading hook with
11
the protective cap fitted in the
main drive.
‒ Turn the protective cap until the
kneading hook engages fully.
→Fig.
12
The protective cap must cover
the main drive completely.
Removing tools
▶
Pull the tool completely out of the
drive.
→Fig.
13
Attaching bowl lid
Requirements
¡ The required tool is used here.
¡ The bowl has been inserted.
¡ The swivel arm is closed.
1. Press the release button, raise the
swivel arm slightly and hold in
place.
→Fig.
2. Lift the lid slightly at the front, slide
fully onto the bowl and set down.
→Fig.
The filling shaft must face towards
the front.
3. Push the swivel arm down until it
engages.
→Fig.
14
15
16
Processing
You can find out everything you need
to know about processing food here.
Recommended speeds
Observe the recommended speeds
for optimum results.
Tool or accessory Setting
1-7
1-5
1-3
1
3-5
3-7
3-7
3-5
7
5-7
3-7
M
M
5-7
Removing bowl lid
1. Press the release button, raise the
swivel arm slightly and hold in
place.
2. Lift the lid slightly at the front and
pull it out towards the front.
3. Push the swivel arm up until it en-
gages.
Processing ingredients with tools
WARNING
Risk of injury!
Rotating drives, tools or accessory
parts may cause injury.
▶
Keep hands, hair, clothing and
utensils away from rotating parts.
43
Page 44

en Basic operation
▶
Only attach and remove tools and
accessories once the drive has
stopped and you have unplugged
the appliance.
▶
Before changing tools or cleaning
the appliance, switch off and disconnect it from the mains.
▶
Only use the tools when the bowl
is inserted, the lid is fitted and the
drive covers are in place.
▶
Never open the swivel arm during
processing.
Requirements
¡ The bowl has been inserted.
¡ The required tool is inserted.
1. Add the ingredients to the bowl.
2. Press the release button and push
the swivel arm down until it engages.
3. Attach the bowl lid.
→"Attaching bowl lid", Page43
4. Insert the mains plug.
5. Set the rotary switch to the re-
quired speed.
→Fig.
6. Process the ingredients until you
17
achieve the required result.
7. Set the rotary switch to .
→Fig.
18
Wait until the appliance stops.
8. Unplug the mains plug.
Tips
¡ You can change the speed at any
time during processing or interrupt
processing.
¡ Clean all parts immediately after
use so that residues do not dry on.
Adding more ingredients
1. To add ingredients during pro-
cessing, use the filling shaft in the
lid.
→Fig.
2. To add large quantities, set the
19
rotary switch to .
Wait until the appliance stops.
3. Remove the bowl lid.
→"Removing bowl lid", Page43
4. Add the ingredients to the bowl.
5. Attach the bowl lid.
→"Attaching bowl lid", Page43
6. Process the ingredients until you
achieve the required result.
Using instantaneous switching
1. Set the rotary switch to and
hold.
→Fig.
20
a The ingredients are processed at
maximum speed.
2. Release the rotary switch.
→Fig.
21
a The rotary switch springs to .
a Processing stops and the drives
move to the parked position.
Tip
Instantaneous switching is especially
suitable when using the following
accessories:
¡ Glass blender attachment
¡ Multi-chopper set
¡ Multi-blender attachment
Drive cover
Remove the protective cover to use
accessories on drive 2 or 3.
Removing drive cover
1. Press down the protective cover
for drive2 at the marking and
remove.
→Fig.
2. Pull up the protective cover for
drive3 and remove.
→Fig.
22
23
44
Page 45

Scales en
Fitting drive cover
1. Align the protective cover for the
drive2 with the marking towards the back, position and press
in place firmly.
→Fig.
2. Position the protective cover for
24
the drive3 and press in place
firmly.
→Fig.
25
Markings and must match
up.
Note:Always close unused drives
with the protective covers.
Scales
Scales
Scales
Your appliance is equipped with a set
of scales. You can weigh ingredients
individually.
The base unit has 4 weight sensors
in its feet.
The following factors can falsify the
measuring result:
¡ Feet not standing on the work sur-
face properly
¡ Work surface vibrating
¡ Objects underneath the base unit
¡ Ingredient quantities less than 5g
or 0.01lb
¡ Base unit slipped
¡ Base unit touched
¡ Objects on the base unit
Display values of scales
Observe the following values when
using the scales.
Display unit in grams
Display range -990g to 5000g
Display steps 5g
Display unit in pounds
Display range -2.20lb to 11.00lb
Display steps 0.01lb
Tip:You can change the display
units of the scales at any time.
→"Changing the display units of the
scales", Page45
Weighing ingredients
Requirements
¡ The bowl is inserted or an access-
ory is fitted.
¡ The rotary switch is set to .
¡ The mains plug is inserted.
1. Press and do not touch the ap-
pliance again.
a The scales will be calibrated.
a The display shows "----".
2. Wait for calibration to finish.
a The display shows "0g" or
"0.00lb".
3. Add the required ingredient.
a The display shows the weight.
4. To weigh further ingredients, select
one of the following options:
‒ Add further ingredients and read
off the total weight.
‒ Press and wait until the dis-
play shows "0g" or "0.00lb".
5. To switch off the scales, press or
start processing.
Tip:Also use the scales together
with the accessory. Weigh the ingredients directly when adding them,
e.g. to the blender attachment or the
ice maker.
Note:The scales switch off automatically after approx. 3minutes of inactivity.
Changing the display units of the scales
Requirements
¡ The rotary switch is set to .
¡ The scales are switched on.
45
Page 46

en Timer
1. Press and hold and .
The display unit for the scales
changes.
Symbol Unit
Display in grammes
Display in pounds
2. Release both buttons.
a The scales will calibrate them-
selves and restart with the
changed setting.
a The setting is saved.
Timer
Timer
Timer
You can read off the processing time
that has elapsed or reset it.
Display values of timer
Observe the following values when
using the timer.
Display range 0 seconds to
59minutes and
59seconds
Display steps 1second
Reading off and resetting the processing time
1. Set the rotary switch to the re-
quired speed.
a The display shows the processing
time.
2. To reset the display to "00:00"
press .
Notes
¡ If you interrupt processing for less
than 30seconds, the last values
displayed are saved and will resume if processing starts again.
¡ If you interrupt processing for
more than 30seconds, the appliance will switch on the scales and
perform calibration.
46
Cleaning and servicing
Cleaning and servicing
Cleaning and servicing
To keep your appliance working efficiently for a long time, it is important
to clean and maintain it carefully.
Cleaning products
Find out here which cleaning
products are suitable for your appliance.
ATTENTION!
Using unsuitable cleaning agents or
incorrect cleaning may damage the
appliance.
▶
Do not use cleaning agents containing alcohol or spirits.
▶
Do not use sharp, pointed or metal
objects.
▶
Do not use abrasive cloths or
cleaning agents.
▶
Only clean the control panel and
the display using a damp microfibre cloth.
Overview of cleaning
You can find an overview of how to
best clean the appliance and the
other parts here.
→Fig.
Tip:When processing food such as
carrots, plastic parts may become
discoloured. Remove discolouration
with a soft cloth and a few drops of
cooking oil.
Special accessories
26
Special accessories
Special accessories
You can buy accessories from the
after-sales service, from specialist retailers or online. Only use genuine
accessories as these have been specifically designed for your appliance.
Page 47

Recipes en
"Accessories vary from one appliance to another. When purchasing
accessories, always quote the exact
product number (E no.) of your appliance." →Page53
You can find out which accessories
are available for your appliance in
our catalogue, in the online shop or
from our after-sales service.
www.bosch-home.com
Recipes
Recipes
Recipes
You can find a selection of recipes
specially developed for your appliance here.
Tips
¡ For optimum results observe the
maximum processing quantities
specified here.
¡ You can use the integrated scales
to weigh the ingredients when
adding them.
→"Scales", Page45
¡ You can use the timer to monitor
processing times.
→"Timer", Page46
Overview of recipes
This overview lists the ingredients and processing steps for various recipes.
Recipe Ingredients Processing
Whipped cream 100-600g cream ¡ Insert beating whisk.
¡ Add cream.
¡ Process for 1½-4minutes at set-
ting7.
Egg whites 1-8 Egg whites (room temperature) ¡ Insert beating whisk.
¡ Add egg whites.
¡ Process for 4-6minutes at set-
ting7.
Sponge mixture ¡ 2 eggs
¡ 2-3tbsp hot water
¡ 100g sugar
¡ 1tbsp vanilla extract
¡ 70g flour (sifted)
¡ 70g cornflour
¡ Baking powder (as wished)
Note:Process max. 2 times the quantity at the same time.
¡ Insert beating whisk.
¡ Add all ingredients except the flour
and cornflour.
¡ Process for 4-6minutes at set-
ting7.
¡ Select setting1.
¡ Add the flour and cornflour by the
spoonful within 30-60seconds.
47
Page 48

en Recipes
Recipe Ingredients Processing
Cake mixture ¡ 6 eggs
¡ 500g sugar
¡ 1pinch salt
¡ 2tbsp vanilla sugar or zest of half a
lemon
¡ 500g butter or margarine (room
temperature)
¡ 1000g flour
¡ 15g baking powder
¡ 250ml milk
Note:Process max. 1 times the quantity at the same time.
Shortcrust pastry ¡ 125g butter
¡ 100-125g sugar
¡ 1 egg
¡ 1 pinch salt
¡ A little vanilla sugar or lemon zest
¡ 250g flour
¡ Baking powder (as wished)
Note:Process max. 2 times the quantity at the same time.
¡ Insert stirring whisk.
¡ Add eggs, salt, sugar and vanilla
sugar or lemon zest.
¡ Process for 10seconds at set-
ting1.
¡ Then process for 2minutes at set-
ting5.
¡ Add butter and process for
60seconds at setting3.
¡ Add flour and baking powder and
process for 2minutes at setting1.
¡ Select setting3.
¡ Add the milk within 2minutes.
¡ Insert stirring whisk.
¡ Add all ingredients.
¡ Process for 30seconds at set-
ting1.
¡ Process for 2-3minutes at set-
ting6.
From 500g flour:
¡ Insert kneading hook.
¡ Add all ingredients.
¡ Process for 30seconds at set-
ting1.
¡ Process for 3-4minutes at set-
ting3.
Yeast dough ¡ 500g flour
¡ 1 egg
¡ 80g fat (room temperature)
¡ 80g sugar
¡ 200-250ml lukewarm milk
¡ 25g fresh yeast or 1tbsp dried
¡ Insert kneading hook.
¡ Add all ingredients.
¡ Process for 30seconds at set-
ting1.
¡ Process for 3-6minutes at set-
ting3.
yeast
¡ Zest of half a lemon
¡ 1 pinch salt
Note:Process max. 2 times the quantity at the same time.
Pasta dough ¡ 300g flour
¡ 150g eggs (approx 3)
¡ 15-30ml cold water (as wished)
Note:Process max. 1½ times the
¡ Insert kneading hook.
¡ Add all ingredients.
¡ Process for 3-5minutes at set-
ting3.
quantity at the same time.
Bread dough ¡ 1000g flour ¡ Insert kneading hook.
48
Page 49

Recipe Ingredients Processing
¡ 2tbsp dried yeast
¡ 2tsp salt
¡ 660ml lukewarm water
Note:Process max. 1 times the quantity at the same time.
¡ Add all ingredients.
¡ Process for 30seconds at set-
ting1.
¡ Process for 4-5minutes at set-
ting3.
Recipes en
49
Page 50

en Troubleshooting
Troubleshooting
Troubleshooting
Troubleshooting
You can rectify minor faults on your appliance yourself. Read the troubleshooting information before contacting after-sales service. This will avoid unnecessary costs.
WARNING
Risk of electric shock!
Incorrect repairs are dangerous.
▶
Repairs to the appliance should only be carried out by trained specialist
staff.
▶
Only use genuine spare parts when repairing the appliance.
▶
If the power cord of this appliance is damaged, it must be replaced by the
manufacturer, the manufacturer's Customer Service or a similarly qualified
person in order to prevent any risk.
Malfunctions
Fault Cause troubleshooting
The appliance is not working.
Appliance does not start processing.
Appliance does not start processing or switches off during processing.
Scales show no change in
weight despite ingredients
being added.
The mains plug of the power
cord is not plugged in.
The circuit breaker is faulty.
There has been a power cut.▶Check whether the lighting in your
Rotary switch is set incorrectly.
Processing quantity is too
great or processing time
was too long.
Appliance or accessory is
blocked.
Quantity of ingredients outside measuring range of
scales.
▶
Connect the appliance to the power
supply.
▶
Check the circuit breaker in the
fuse box.
kitchen or other appliances are
working.
▶
Set the rotary switch to before processing.
▶
Set the rotary switch to .
▶
Reduce the quantity of ingredients.
▶
Allow the appliance to cool down to
room temperature.
▶
Set the rotary switch to .
▶
Remove the blockage.
▶
Add at least 5g or 0.01lb so the
scales show correct values.
50
Page 51

Fault Cause troubleshooting
The swivel arm cannot be
opened or closed because
the tool is jammed in the
bowl.
Drive is not in the parked position after a safety system
has stopped processing or
the power supply has been
interrupted.
1. Set the rotary switch to .
2. Eliminate the problem that caused
the appliance to stop.
→"Safety systems", Page41
3. When the swivel arm is open, re-
move the tool and close the swivel
arm.
4. Set the rotary switch briefly to and
then back to .
a The drive remains on for a short
time until the parked position is
reached.
Information on display panel
Fault Cause troubleshooting
"5000g" or "11.00lb" is
flashing on the display.
"-990g" or "-2.20lb" is flashing on the display.
"59:59m:s" is flashing on
the display.
Display values of the scales
have been exceeded.
Display values of scales
have not been attained.
Display range of the timer
has been exceeded.
The display shows "ERROR" Scales are exposed to ex-
cessive vibrations.
Base is uneven. 1. Set up the appliance on a stable,
The feet are soiled.
The scales have to be restarted.
▶
Observe the display values of the
scales.
→"Display values of scales",
Page45
▶
Observe the display values of the
scales.
→"Display values of scales",
Page45
▶
Process food for not longer than
59minutes and 59seconds or reset the processing time within this
time.
→"Reading off and resetting the
processing time", Page46
▶
Do not use the appliance on worktops exposed to vibrations, e.g. with
a dishwasher running underneath.
level, clean and flat work surface.
2. Check whether all 4 feet are in con-
tact with the work surface.
▶
Wipe the feet down with a damp
cloth.
1. To restart the scales:
‒ Press .
‒ Wait 30-60seconds.
Troubleshooting en
51
Page 52

en Troubleshooting
Fault Cause troubleshooting
The display shows "ERROR" ‒ Press again and wait for
calibration.
2. If the fault is still displayed, discon-
nect the appliance from the power
supply for a while and then try to
switch the scales back on.
Note:Please perform the
troubleshooting procedure several
times before contacting customer service.
52
Page 53

Disposal en
Disposal
Disposal
Disposal
Find out here how to dispose of old
appliances correctly.
Disposing of old appliance
Valuable raw materials can be reused by recycling.
1. Unplug the appliance from the
mains.
2. Cut through the power cord.
3. Dispose of the appliance in an en-
vironmentally friendly manner.
This appliance is labelled in accordance with European Directive 2012/19/EU concerning
used electrical and electronic
appliances (waste electrical and
electronic equipment - WEEE).
The guideline determines the
framework for the return and recycling of used appliances as
applicable throughout the EU.
Customer Service
Customer Service
Customer Service
If you have any queries, are unable to
rectify faults on the appliance yourself or if your appliance needs to be
repaired, contact Customer Service.
You can solve many problems yourself by consulting the information on
troubleshooting in these instructions
or on our website. If this is not the
case, contact our after-sales service.
We always find an appropriate solution.
With any warranty claims, we will
make sure that your appliance is repaired by trained after-sales technicians using genuine spare parts, including after the manufacturer's warranty has expired.
Function-relevant genuine spare parts
according to the corresponding Ecodesign Order can be obtained from
Customer Service for a period of at
least 7 years from the date on which
your appliance was placed on the
market within the European Economic Area.
Note:Under the terms of the manufacturer's warranty the use of Customer Service is free of charge.
Detailed information on the warranty
period and terms of warranty in your
country is available from our aftersales service, your retailer or on our
website.
If you contact Customer Service, you
will require the product number (ENr.) and the production number (FD)
of your appliance.
The contact details for Customer Service can be found in the Customer
Service directory at the end of the
manual or on our website.
Product number (E-Nr.) and production number (FD)
You can find the product number (ENr.) and the production number (FD)
on the appliance's rating plate.
Make a note of your appliance's details and the Customer Service telephone number to find them again
quickly.
Warranty conditions
You can make warranty claims for
your appliance under the following
conditions.
The guarantee conditions for this appliance are as defined by our representative in the country in which it is
sold. Details regarding these conditions can be obtained from the dealer
from whom the appliance was purchased. The bill of sale or receipt
53
Page 54

en Customer Service
must be produced when making any
claim under the terms of this guarantee.
54
Page 55

Table des matières
fr
Sécurité..........................................56
Indications générales .....................56
Conformité d’utilisation...................56
Restrictions du périmètre utilisa-
teurs................................................57
Consignes de sécurité ...................57
Prévenir les dégâts matériels.......61
Protection de l'environnement
et économies d'énergie ................61
Élimination de l'emballage .............61
Déballer et contrôler .....................61
Déballer l’appareil et ses com-
posants...........................................61
Contenu de la livraison ..................62
Installer l’appareil ...........................62
Description de l'appareil...............62
Appareil ..........................................62
Interrupteur rotatif...........................63
Anneau lumineux............................63
Bandeau de commande ................63
Touches de fonction.......................63
Afficheur .........................................64
Bras pivotant ..................................64
Entraînements.................................64
Ustensiles .......................................65
Symboles........................................66
Position de repos ...........................66
Systèmes de sécurité.....................66
Avant la première utilisation ........66
Préparer l’appareil..........................67
Utilisation de base ........................67
Longueur du cordon.......................67
Déplacer le bras pivotant...............67
Mettre le bol mélangeur en
place...............................................67
Retirer le bol mélangeur.................67
Mettre un ustensile en place..........67
Retirer l’ustensile............................68
Mettre le couvercle du bol mé-
langeur en place ............................68
Retirer le couvercle du bol mé-
langeur ...........................................68
Traitement.......................................68
Capuchon de protection de l’en-
traînement.......................................70
Balance..........................................70
Valeurs d’affichage de la ba-
lance...............................................71
Peser les ingrédients......................71
Modifier les unités d’affichage
de la balance..................................71
Minuterie........................................71
Valeurs d’affichage de la minute-
rie....................................................71
Lire et remettre à zéro la durée
de traitement ..................................72
Nettoyage et entretien ..................72
Produits de nettoyage ....................72
Guide de nettoyage........................72
Accessoires en option..................72
Recettes.........................................72
Aperçu des recettes.......................73
Dépannage ....................................75
Dysfonctionnements.......................75
Remarques sur le bandeau d’af-
fichage............................................76
Mise au rebut.................................78
Mettre au rebut un appareil usa-
gé ...................................................78
Service après-vente ......................78
Numéro de produit (E-Nr) et nu-
méro de fabrication (FD)................78
Conditions de garantie...................79
55
Page 56

fr Sécurité
Sécurité
Veuillez respecter les consignes de sécurité afin d'utiliser l'appareil en toute sécurité.
Indications générales
Vous trouverez ici des informations générales sur la présente notice.
¡ Lisez attentivement la présente notice. C’est en effet la seule
manière d’utiliser l’appareil de manière sûre et efficace.
¡ Respectez les notices supplémentaires lors de l'utilisation des
accessoires optionnels ou fournis.
¡ Cette notice d’utilisation s’adresse à l'utilisateur de l’appareil.
¡ Respectez les consignes de sécurité et les avertissements.
¡ Conservez la notice ainsi que les informations produit en vue
d’une réutilisation ultérieure ou pour un futur nouveau propriétaire.
¡ Contrôlez l’appareil après l’avoir déballé. Ne raccordez pas l’ap-
pareil si ce dernier a été endommagé durant le transport.
Conformité d’utilisation
Respectez les consignes d'utilisation afin d'utiliser l'appareil correctement et en toute sécurité.
Utilisez l'appareil uniquement:
¡ en conformité avec la présente notice d’utilisation.
¡ avec des pièces et accessoires d’origine.
¡ pour les utilisations décrites dans les instructions des acces-
soires fournis ou disponibles en option.
¡ pour remuer, pétrir et battre les aliments.
¡ sous surveillance.
¡ pour un usage domestique privé et dans les pièces fermées
d’un domicile, à la température ambiante.
¡ pour les quantités de préparation et durées de traitement habi-
tuelles pour un ménage.
¡ à une hauteur maximale de 2000m au-dessus du niveau de la
mer.
56
Page 57

Sécurité fr
Débranchez l’appareil du secteur lorsque:
¡ vous n'utilisez pas l'appareil.
¡ vous ne surveillez pas l’appareil.
¡ vous assemblez l’appareil.
¡ vous démontez l’appareil.
¡ vous nettoyez l’appareil.
¡ vous vous approchez des pièces en rotation.
¡ vous changez les ustensiles.
¡ vous détectez un défaut.
Restrictions du périmètre utilisateurs
Évitez les risques pour les enfants et les personnes vulnérables.
Cet appareil peut être utilisé par des personnes aux capacités
physiques, sensorielles ou mentales réduites ou des personnes
inexpérimentées, à condition qu'elles soient surveillées ou qu'elles
aient été informées de l'utilisation de l'appareil et qu'elles comprennent les risques inhérents à son usage.
Les enfants ne sont pas autorisés à jouer avec l'appareil.
Le nettoyage et l’entretien de l'appareil ne doivent pas être effectués par des enfants.
L'appareil ne doit pas être utilisé par des enfants. Les enfants
doivent être tenus à distance de l’appareil et du cordon d’alimentation secteur.
Consignes de sécurité
Respectez les consignes de sécurité.
AVERTISSEMENT‒Risque d’électrocution!
¡ Un appareil endommagé ou un cordon d’alimentation secteur
endommagé est dangereux.
▶
N'utilisez jamais un appareil endommagé.
▶
Ne jamais faire fonctionner l’appareil avec une surface fissurée ou cassée.
▶
Ne tirez jamais sur le cordon d'alimentation secteur pour
débrancher l'appareil du secteur. Débranchez toujours la
fiche du cordon d'alimentation secteur.
57
Page 58

fr Sécurité
▶
Si l'appareil ou le cordon d'alimentation secteur est endommagé, débranchez immédiatement le cordon d'alimentation
secteur ou coupez le fusible dans le boîtier à fusibles.
▶
"Rubrique service après-vente." →Page78
▶
Seul un personnel dûment qualifié peut entreprendre des
réparations sur l'appareil.
¡ Les installations non conformes sont dangereuses.
▶
Pour le raccordement et l’utilisation de l’appareil, respectez
impérativement les indications figurant sur la plaque signalétique.
¡ Les réparations non conformes sont dangereuses.
▶
Seul un personnel dûment qualifié peut entreprendre des
réparations sur l'appareil.
▶
Seules des pièces de rechange d'origine peuvent être utilisées pour réparer l'appareil.
▶
Afin d’écarter tout danger quand le cordon d’alimentation
secteur de cet appareil est endommagé, seul le fabricant
ou son service après-vente ou toute autre personne de qualification équivalente est habilité à le remplacer.
¡ L’infiltration d’humidité peut occasionner un choc électrique.
▶
Ne jamais plonger l’appareil ou le cordon d’alimentation
secteur dans l’eau et ne pas les mettre au lave-vaisselle.
▶
Utiliser l’appareil uniquement dans des pièces fermées.
▶
Ne jamais exposer l’appareil à une forte chaleur ou humidité.
▶
Ne pas utiliser de nettoyeur vapeur ou haute pression pour
nettoyer l’appareil.
¡ Le cordon d'alimentation pose un danger si sa gaine de pro-
tection est endommagée.
▶
Ne mettez jamais en contact le cordon d'alimentation avec
des sources de chaleur et des pièces chaudes de l'appareil.
▶
Ne mettez jamais en contact le cordon d'alimentation avec
des pointes acérées ou arêtes tranchantes.
▶
Ne pliez, écrasez ou modifiez jamais le cordon d'alimentation.
58
Page 59

Sécurité fr
AVERTISSEMENT‒Risque d’incendie!
Une forte chaleur risque de provoquer l'incendie de l'appareil
et d'autres pièces.
▶
Ne jamais poser l’appareil sur des surfaces chaudes ou à
proximité de celles-ci.
AVERTISSEMENT‒Risques de blessures!
¡ Les entraînements en rotation, les ustensiles ou accessoires
peuvent occasionner des blessures.
▶
Tenir les mains, les cheveux, les vêtements et autres ustensiles à distance des pièces en rotation.
▶
Mettre en place et retirer les ustensiles et les accessoires
uniquement après immobilisation de l’entraînement et débranchement de l’appareil.
▶
Avant le changement d’ustensile ou le nettoyage, mettre
l’appareil hors tension et le débrancher du secteur.
▶
Exploiter les ustensiles uniquement lorsque le bol, son couvercle ainsi que les capuchons de protection des entraînements sont mis en place.
▶
Ne jamais ouvrir le bras pivotant lors de la préparation.
¡ L’utilisation de l’appareil avec des pièces endommagées peut
entraîner des blessures.
▶
Les pièces présentant des fissures ou autres défauts évidents ou qui sont mal positionnées doivent être remplacées
par des pièces de rechange d’origine.
AVERTISSEMENT‒Risque d’écrasement!
Les mains et doigts risquent d’être coincés.
▶
Ne pas mettre les doigts dans le bol lors de l’abaissement
du bras pivotant.
AVERTISSEMENT‒Risque d’étouffement!
¡ Les enfants risquent de s’envelopper dans les matériaux
d’emballage ou de les mettre sur la tête et de s’étouffer.
▶
Conserver les matériaux d’emballage hors de portée des
enfants.
▶
Ne jamais laisser les enfants jouer avec les emballages.
59
Page 60

fr Sécurité
¡ Les enfants risquent d'inhaler ou d'avaler des petits morceaux
et s'étouffer.
▶
Conserver les petites pièces hors de portée des enfants.
▶
Ne pas laisser les enfants jouer avec les petites pièces.
AVERTISSEMENT‒Risque de préjudice pour la santé!
Les salissures en surface peuvent nuire à la santé.
▶
Respecter les consignes de nettoyage.
▶
Nettoyer les surfaces qui entrent en contact avec les denrées alimentaires avant chaque utilisation.
60
Page 61

Prévenir les dégâts matériels fr
Prévenir les dégâts matériels
Prévenir les dégâts matériels
Prévenir les dégâts matériels
Respectez les consignes suivantes
afin de ne pas endommager votre
appareil, vos accessoires ou autres
ustensiles de cuisine.
ATTENTION!
¡ Une utilisation non conforme peut
entraîner des dommages matériels.
▶
Ne jamais utiliser simultanément
des entraînements différents.
▶
Ne jamais faire fonctionner l’appareil plus longtemps que nécessaire.
▶
Ne jamais faire tourner l’appareil
à vide.
▶
Ne jamais utiliser les pièces et
accessoires d’origine appartenant à d’autres appareils.
▶
Respecter les quantités maximales à traiter.
▶
Ne jamais ranger des objets
étrangers dans le bol.
¡ Pendant le fonctionnement, de l’air
chaud s’échappe par l’arrière de la
grille d’évacuation d’air. Une évacuation de l’air obstruée peut provoquer une surchauffe de l’appareil.
▶
Placer l’appareil à une distance
suffisante par rapport au mur,
aux surfaces sensibles et aux
autres appareils.
¡ Les chocs peuvent affecter le bon
fonctionnement de l’appareil.
▶
Ne pas poser l’appareil sur des
surfaces mobiles ou vibrantes.
Protection de l'environnement et économies d'énergie
Protection de l'environnement et économies
d'énergie
Protection de l'environnement et économies d'énergie
Protégez l'environnement tout en faisant un usage économique de votre
appareil et en éliminant correctement
les matériaux recyclables.
Élimination de l'emballage
Les emballages sont écologiques et
recyclables.
▶
Veuillez éliminer les pièces détachées après les avoir triées par
matière.
Vous trouverez des informations
sur les circuits actuels d'élimination auprès de votre revendeur
spécialisé ou de l’administration
de votre commune/ville.
Eliminez l'emballage en respectant l'environnement.
Déballer et contrôler
Déballer et contrôler
Déballer et contrôler
Lisez ici les points que vous devez
respecter lors du déballage.
Déballer l’appareil et ses composants
1. Retirer l’appareil de son embal-
lage.
2. Sortir de l’emballage et préparer
tous les autres composants ainsi
que la documentation fournie.
3. Retirer les emballages.
4. Retirer les autocollants et les films
présents.
61
Page 62

fr Description de l'appareil
A
B
C
D
E
F
G
1
2
3
4
5
6
8
9
Contenu de la livraison
Après avoir déballé le produit, inspectez toutes les pièces pour détecter d’éventuels dégâts dus au transport et pour vous assurer de l'intégralité de la livraison.
Remarque:En fonction de son niveau d’équipement, l’appareil est livré avec des accessoires supplémentaires. Pour connaître le contenu
de la livraison, consulter les notices
d’accessoires.
→Fig.
1
Appareil de base avec bol mélangeur
Couvercle avec ouverture pour ajout
Fouet mixeur «Pro Flexi»
Fouet batteur pro
Crochet pétrisseur
Housse protectrice
Documents d’accompagnement
Installer l’appareil
AVERTISSEMENT
Risque d’incendie!
Une forte chaleur risque de provoquer l'incendie de l’appareil et ses
accessoires.
▶
Ne jamais poser l’appareil sur des
surfaces chaudes ou à proximité
de celles-ci.
cuation de l’air obstruée peut provoquer une surchauffe de l’appareil.
▶
Placer l’appareil à une distance
suffisante par rapport au mur,
aux surfaces sensibles et aux
autres appareils.
¡ Les chocs peuvent affecter le bon
fonctionnement de l’appareil.
▶
Ne pas poser l’appareil sur des
surfaces mobiles ou vibrantes.
1. Placer l’appareil sur un plan de tra-
vail stable, plan, propre et lisse.
2. Sortir le cordon d’alimentation à la
longueur nécessaire.
→"Longueur du cordon",
Page67
Ne pas brancher la fiche dans la
prise de courant.
Description de l'appareil
Description de l'appareil
Description de l'appareil
Découvrez les composants de votre
appareil.
Appareil
Cette section contient une vue d'ensemble des composants de votre appareil.
→Fig.
2
Bol mélangeur en acier inoxydable
Bandeau de commande
Couvercle avec ouverture pour ajout
ATTENTION!
¡ Pendant le fonctionnement, de l’air
chaud s’échappe par l’arrière de la
grille d’évacuation d’air. Une éva-
62
Touche de déverrouillage du bras pivotant
Bras pivotant
Interrupteur rotatif
Couvercle de protection de l’entraîne-
ment 2
Entraînement 2
Page 63

Description de l'appareil fr
10
11
12
13
14
1
2
3
4
5
6
Couvercle de protection de l’entraînement 3
Entraînement 3
Grille d’évacuation
Entraînement principal
Rangement du cordon
Interrupteur rotatif
L’interrupteur rotatif permet de démarrer et d’arrêter le traitement et de
sélectionner la vitesse.
Symbole Fonction
Arrêter le traitement.
Traiter les ingrédients à vitesse
faible.
Traiter les ingrédients à la vitesse
maximale.
Traiter les ingrédients brièvement
à la vitesse maximale.
→"Utiliser le fonctionnement momentané", Page70
Anneau lumineux
L’anneau lumineux de l’interrupteur
rotatif donne des informations sur
l’état de fonctionnement de votre appareil.
Affichage État
L’anneau lumineux est
allumé et le traitement
est en cours.
L’anneau lumineux est
allumé et le traitement
ne peut pas être lancé.
L’anneau lumineux clignote. Le traitement
ne peut pas être démarré ou poursuivi.
L’appareil fonctionne
correctement.
¡ L’appareil n’est
pas alimenté en
électricité.
¡ L’appareil pré-
sente un défaut.
¡ Le système de sé-
curité s’est déclenché.
Affichage État
¡ L’appareil pré-
sente un défaut.
Conseil:Vous trouverez de plus
amples informations à ce sujet ici
→"Systèmes de sécurité", Page66
→"Dépannage", Page75
Bandeau de commande
Vous trouverez ici un aperçu du bandeau de commande.
→Fig.
3
Touche de réinitialisation
Touche balance
Écran
Symbole pour le poids en livres
Symbole pour le poids en grammes
Symbole pour la durée en minutes et
secondes
Touches de fonction
Les touches de fonction permettent
de sélectionner les fonctions supplémentaires ou d’effectuer des réglages. Pour effectuer une sélection,
effleurer les symboles correspondants avec le doigt.
Symbole Fonction
Allumer et éteindre la balance.
¡ Réinitialiser la balance.
¡ Remettre la minuterie à zéro.
Remarque:Actionner les touches
avec les doigts, sans gants de cuisine. Il n’est pas possible d’actionner
les touches à l’aide d’objets, p. ex.
d’une cuillère en bois.
63
Page 64

fr Description de l'appareil
Afficheur
L’afficheur indique les valeurs et
messages concernant l’état de fonctionnement.
Remarque:L’afficheur s’éteint automatiquement si aucune manipulation
n’a lieu pendant un certain temps.
Pour réactiver l’afficheur, appuyer sur
une touche quelconque ou lancer la
préparation.
Bras pivotant
Le bras pivotant peut être déplacé et
fixé dans différentes positions.
Pour déplacer le bras pivotant dans
la position souhaitée, la touche de
déverrouillage doit être actionnée.
→"Déplacer le bras pivotant",
Page67
Remarque:Le bras pivotant est doté
de la fonction EasyArm Lift. Cette
fonction supporte le mouvement du
bras pivotant vers le haut.
Positions du bras pivotant
Vous trouverez ici un aperçu des positions du bras pivotant.
Position Utilisation
Position1 Le bras pivotant est fermé.
¡ Traiter les ingrédients avec les
ustensiles.
¡ Utiliser l’accessoire correspon-
dant sur l’entraînement principal, p.ex.Sorbetière.
¡ Utiliser l’accessoire correspon-
dant sur l’entraînement 2,
p.ex. Râpeur
Position2 Le bras pivotant est ouvert.
¡ Mettre le bol mélangeur en
place ou le retirer.
¡ Mettre en place l’ustensile ou
le retirer.
¡ Verser les ingrédients dans le
bol mélangeur.
Position Utilisation
Position3 ¡ Utiliser l’accessoire sur l’entraî-
nement principal, p.ex.Hachoir à viande.
¡ Utiliser l’accessoire sur l’entraî-
nement 3, p.ex. Bol mixeur.
Entraînements
Votre appareil est équipé de différents entraînements qui ont été
conçus spécialement pour les ustensiles et accessoires disponibles.
Remarque:Les entraînements 2 et 3
sont recouverts d’un capuchon de
protection.
→"Capuchon de protection de l’en-
traînement", Page70
Aperçu des entraînements
Vous trouverez ici un aperçu des entraînements et leurs utilisations.
Entraînement
Entraînement principal
Entraînement 2
Entraînement 3
Utilisation
Pour les ustensiles et accessoires, p.ex.
¡ Hachoir à viande
¡ Machine à pâtes
¡ Sorbetière
Pour accessoires, p.ex.
¡ Râpeur
¡ Presse-agrumes
Pour accessoires, p.ex.
¡ Bol blender en verre
¡ Bol blender en plastique
¡ Kit multibroyeur
64
Page 65

Description de l'appareil fr
Ustensiles
Vous trouverez ici les informations
essentielles sur les différents ustensiles.
Le crochet pétrisseur est équipé d’un
capuchon de protection amovible
destiné à protéger l’entraînement
contre les salissures.
Aperçu des ustensiles
Toujours utiliser l’ustensile approprié
au traitement souhaité.
Accessoire
Réglage précis du fouet batteur professionnel
Corrigez l’interstice entre le bol mélangeur et le fouet batteur pro.
Remarque:D’usine, le fouet batteur
pro est réglé de manière à mélanger
les ingrédients de manière optimale.
Utilisation
Crochet pétrisseur
¡ Pétrir des pâtes lourdes, p.ex.
les pâtes levées.
¡ Incorporer les aliments qui ne
doivent pas être broyés, p.ex.
des raisins secs ou des pépites
de chocolat.
Fouet mixeur «Pro Flexi»
¡ Mélanger les aliments, p.ex.
pour les pâtes à cake ou les
mousses.
¡ Incorporer les aliments, p.ex.
des œufs en neige, de la crème
chantilly ou des raisins secs.
Fouet batteur pro
¡ Battre des œufs en neige ou de
la crème chantilly.
¡ Mélanger les pâtes légères,
p.ex. les pâtes génoises.
Corriger le réglage des ustensiles
ATTENTION!
L’appareil et les ustensiles peuvent
être endommagés par un mauvais réglage des ustensiles.
▶
Ne jamais utiliser un ustensile
ayant contact avec le bol.
Conditions préalables
¡ La fiche secteur n'est pas bran-
chée.
¡ Le bras pivotant est ouvert.
¡ Le fouet batteur pro est inséré.
¡ Le bol mélangeur a été mis en
place.
1. Tenir la partie inférieure du fouet
batteur avec une main et desserrer
le contre-écrou avec une clé à
fourche en le tournant dans le
sens des aiguilles d’une montre.
→Fig.
2. Pour modifier l’interstice, tourner
4
l’ustensile.
→Fig.
5
Respecter les valeurs figurant
dans le tableau:
Réglage Interstice
Réglage optimal 3mm
Une rotation dans le
1mm de plus
sens des aiguilles
d’une montre
Une rotation dans le
1mm de moins
sens inverse des aiguilles d’une montre
3. Appuyer sur la touche de déver-
rouillage et abaisser le bras pivotant progressivement jusqu’à ce
qu’il s’enclenche.
4. Vérifier le réglage.
5. Appuyer sur la touche de déver-
rouillage et soulever le bras pivotant jusqu’à ce qu’il s’enclenche.
6. Tenir la partie inférieure du fouet
batteur avec une main et serrer le
contre-écrou à l’aide d’une clé à
65
Page 66

fr Avant la première utilisation
fourche en le tournant dans le
sens inverse des aiguilles d’une
montre.
Symboles
Vous trouverez ici une vue d’ensemble des symboles sur votre appareil.
Symbole Description
Repère sur le couvercle de protection de l’entraînement2.
Repère de mise en place sur le
couvercle de protection de l’entraînement3.
Repère de position sur l’entraînement3.
Position de repos
Votre appareil est équipé d’une position de repos automatique.
Après l’arrêt, les entraînements continuent de tourner pendant quelques
secondes jusqu’à ce que la position
de repos correcte soit atteinte.
Remarque:Le bras pivotant ne peut
être ouvert ou fermé avec l’ustensile
inséré que si l’entraînement se trouve
dans la position de repos correcte.
Les causes suivantes entraînent une
position de repos incorrecte:
¡ L’alimentation électrique a été cou-
pée pendant le traitement.
¡ Un système de sécurité a mis fin
au traitement.
¡ Pendant le traitement, le bras pivo-
tant s’est détaché ou la touche de
déverrouillage pour le bras pivotant a été actionnée.
Conseil:Vous pouvez facilement
corriger vous-même une position de
repos incorrecte.
→"Dépannage", Page75
Systèmes de sécurité
Vous trouverez ici un aperçu des systèmes de sécurité de votre appareil.
Sécurité anti-enclenchement
La sécurité anti-enclenchement empêche que votre appareil se mette en
marche de façon intempestive.
L’appareil ne peut être allumé et utilisé
que si
¡ le bras pivotant est enclenché en
position1 et si le bol mélangeur
ou un accessoire est mis en place,
p.ex. Sorbetière.
¡ le bras pivotant est enclenché en
position3 et si le capuchon de
protection ou un accessoire est
monté sur l’entraînement3.
Sécurité anti-réenclenchement
La sécurité anti-réenclenchement empêche que votre appareil ne reprenne le traitement de manière automatique après une coupure de courant.
L’appareil est remis en marche après
une panne de courant. Le traitement
peut être redémarré uniquement
après que l’interrupteur rotatif a été
amené en position .
Sécurité anti-surcharge
La sécurité anti-surcharge empêche
que le moteur et d’autres composants ne soient endommagés suite à
une charge trop élevée.
Le moteur se coupe lorsque
¡ une quantité trop importante est
traitée.
¡ l’ustensile ou l’accessoire est blo-
qué.
Avant la première utilisation
Avant la première
utilisation
Avant la première utilisation
Préparez l’appareil pour l’utilisation.
66
Page 67

Utilisation de base fr
Préparer l’appareil
1. Appuyer sur la touche de déver-
rouillage et soulever le bras pivotant jusqu’à ce qu’il s’enclenche.
→"Déplacer le bras pivotant",
Page67
2. Tourner le bol mélangeur dans le
sens des aiguilles d’une montre et
le retirer.
→"Retirer le bol mélangeur",
Page67
3. Avant la première utilisation, net-
toyer toutes les pièces qui entreront en contact avec des produits
alimentaires.
→"Nettoyage et entretien",
Page72
4. Tenir les composants préalable-
ment nettoyés et séchés à disposition pour l’utilisation.
Utilisation de base
Utilisation de base
Utilisation de base
Cette section contient des renseignements essentiels sur l'utilisation de
votre appareil.
Longueur du cordon
Régler la longueur du cordon d’alimentation en fonction de vos besoins.
Régler la longueur du cordon avec l’enrouleur de câble
1. Sortir la longueur souhaitée du
cordon en fonction des besoins,
puis relâcher lentement.
2. Pour réduire la longueur du cor-
don,
‒ tirer sur le cordon,
‒ laisser le câble s’enrouler,
‒ tirer de nouveau sur le câble.
Remarque:Ne pas introduire le
câble à la main. Si le cordon se
coince, sortir la longueur de câble
maximum, puis le laisser à nouveau
s’enrouler.
Déplacer le bras pivotant
1. Appuyer sur la touche de déver-
rouillage et soulever le bras pivotant jusqu’à ce qu’il s’enclenche.
→Fig.
6
a Le bras pivotant est fixé en posi-
tion2.
2. Appuyer sur la touche de déver-
rouillage et abaisser le bras pivotant progressivement jusqu’à ce
qu’il s’enclenche en position verticale.
→Fig.
7
a Le bras pivotant est fixé en posi-
tion3.
Mettre le bol mélangeur en place
1. Placer le bol mélangeur sur l’appa-
reil de base.
→Fig.
8
Respecter ce faisant les évidements de l’appareil de base.
2. Tourner le bol mélangeur dans le
sens inverse des aiguilles d’une
montre jusqu’à ce qu’il s’enclenche.
→Fig.
9
Retirer le bol mélangeur
▶
Tourner le bol mélangeur dans le
sens des aiguilles d’une montre et
le retirer.
→Fig.
10
Mettre un ustensile en place
67
Page 68

fr Utilisation de base
1. Sélectionner l’ustensile nécessaire.
→"Aperçu des ustensiles",
Page65
2. Insérer l’ustensile dans l’entraîne-
ment principal jusqu’à ce qu’il
s’enclenche.
→Fig.
3. Pour insérer le crochet pétrisseur:
‒ Insérer le crochet pétrisseur
11
avec capuchon de protection
dans l’entraînement principal.
‒ Tourner le capuchon de protec-
tion jusqu’à ce que le crochet
pétrisseur s’enclenche complètement.
→Fig.
12
Le capuchon de protection doit
recouvrir entièrement l’entraînement principal.
Retirer l’ustensile
▶
Sortir entièrement l’ustensile de
l’entraînement.
→Fig.
13
Mettre le couvercle du bol mélangeur en place
Conditions préalables
¡ L’ustensile voulu est inséré.
¡ Le bol mélangeur a été mis en
place.
¡ Le bras pivotant est fermé.
1. Appuyer sur la touche de déver-
rouillage, soulever légèrement le
bras pivotant et le maintenir dans
cette position.
→Fig.
2. Soulever légèrement le couvercle
à l’avant, le pousser entièrement
sur le bol mélangeur et le rabaisser.
→Fig.
L’orifice d’ajout doit être orienté
vers l’avant.
14
15
3. Abaisser le bras pivotant jusqu’à
ce qu’il s’enclenche.
→Fig.
16
Retirer le couvercle du bol mélangeur
1. Appuyer sur la touche de déver-
rouillage, soulever légèrement le
bras pivotant et le maintenir dans
cette position.
2. Soulever légèrement le couvercle
à l’avant et le tirer vers l’avant.
3. Relever le bras pivotant jusqu’à ce
qu’il s’enclenche.
Traitement
Vous trouverez ici les informations
essentielles sur le traitement des aliments.
Recommandations de vitesse
Pour obtenir des résultats optimaux,
respecter les vitesses recommandées.
Ustensiles ou accessoires
Puissance
1-7
1-5
1-3
1
3-5
3-7
3-7
3-5
7
68
Page 69

Utilisation de base fr
Ustensiles ou ac-
Puissance
cessoires
5-7
3-7
M
M
5-7
Traiter les ingrédients avec les ustensiles
AVERTISSEMENT
Risques de blessures!
Les entraînements en rotation, les ustensiles ou accessoires peuvent occasionner des blessures.
▶
Tenir les mains, les cheveux, les
vêtements et autres ustensiles à
distance des pièces en rotation.
▶
Mettre en place et retirer les ustensiles et les accessoires uniquement après immobilisation de l’entraînement et débranchement de
l’appareil.
▶
Avant le changement d’ustensile
ou le nettoyage, mettre l’appareil
hors tension et le débrancher du
secteur.
▶
Exploiter les ustensiles uniquement
lorsque le bol, son couvercle ainsi
que les capuchons de protection
des entraînements sont mis en
place.
▶
Ne jamais ouvrir le bras pivotant
lors de la préparation.
Conditions préalables
¡ Le bol mélangeur a été mis en
place.
¡ L’ustensile nécessaire est inséré.
1. Verser les ingrédients dans le bol
mélangeur.
2. Appuyer sur la touche de déver-
rouillage et abaisser le bras pivotant progressivement jusqu’à ce
qu’il s’enclenche.
3. Mettre le couvercle du bol mélan-
geur en place.
→"Mettre le couvercle du bol mé-
langeur en place", Page68
4. Brancher la fiche dans la prise de
courant.
5. Tourner l’interrupteur rotatif sur la
vitesse souhaitée.
→Fig.
6. Traiter les ingrédients jusqu’à avoir
17
atteint le résultat souhaité.
7. Amener l’interrupteur rotatif sur
.
→Fig.
18
Attendre que l’appareil sesoit immobilisé.
8. Débrancher la fiche secteur.
Conseils
¡ Il est possible de modifier, à tout
moment, la vitesse pendant le traitement ou d’interrompre le traitement.
¡ Après utilisation, nettoyer immédia-
tement toutes les pièces afin d’éviter que les résidus ne se sèchent.
Rajouter des ingrédients
1. Il est possible d’ajouter, pendant le
traitement, des ingrédients par
l’orifice d’ajout situé dans le couvercle.
→Fig.
2. Pour rajouter de grandes quanti-
19
tés, tourner l’interrupteur rotatif
sur .
Attendre que l’appareil sesoit immobilisé.
3. Retirer le couvercle du bol mélan-
geur.
→"Retirer le couvercle du bol mé-
langeur", Page68
69
Page 70

fr Balance
4. Verser les ingrédients dans le bol
mélangeur.
5. Mettre le couvercle du bol mélan-
geur en place.
→"Mettre le couvercle du bol mé-
langeur en place", Page68
6. Traiter les ingrédients jusqu’à avoir
atteint le résultat souhaité.
Utiliser le fonctionnement momentané
1. Amener l’interrupteur rotatif en po-
sition et le maintenir dans cette
position.
→Fig.
20
a Les ingrédients sont traités à la vi-
tesse maximale.
2. Relâcher l’interrupteur rotatif.
→Fig.
21
a L’interrupteur rotatif passe à .
a Le traitement s’arrête et les entraî-
nements se déplacent dans la position de repos.
Conseil
Le fonctionnement momentané est
particulièrement approprié pour
l’utilisation des accessoires suivants:
¡ Bol blender en verre
¡ Kit multibroyeur
¡ Bol mélangeur multifonction
Capuchon de protection de l’entraînement
Retirer le capuchon de protection
pour pouvoir utiliser les accessoires
sur l’entraînement 2 ou 3.
Retirer le capuchon de protection de l’entraînement
1. Pousser le couvercle de protection
de l’entraînement 2 vers le bas au
niveau du repère et le retirer.
→Fig.
22
2. Tirer le couvercle de protection de
l’entraînement3 vers le haut et le
retirer.
→Fig.
23
Mettre en place le capuchon de protection de l’entraînement
1. Positionner le couvercle de protec-
tion de l’entraînement2 avec le repère vers l’arrière, le mettre en
place et bien appuyer.
→Fig.
2. Positionner le couvercle de protec-
24
tion de l’entraînement3 et bien appuyer.
→Fig.
25
Les repères et doivent être
alignés.
Remarque:Fermer toujours les entraînements inutilisés avec des couvercles de protection.
Balance
Balance
Balance
Votre appareil est équipé d’une balance. Vous pouvez peser individuellement tous les ingrédients.
L’appareil de base dispose de
4sondes de poids placées dans les
pieds.
Les facteurs suivants peuvent fausser
le résultat de la mesure:
¡ Les pieds ne se trouvent pas cor-
rectement sur le plan de travail.
¡ Le plan de travail est sujet à des
vibrations
¡ Des objets se trouvent sous l’ap-
pareil de base
¡ Les quantités sont inférieures à
5g ou 0,01lb
¡ L’appareil de base est déplacé
¡ L’appareil de base est touché
¡ Des objets se trouvent sur l’appa-
reil de base
70
Page 71

Minuterie fr
Valeurs d’affichage de la balance
Lors de l’utilisation de la balance, observer les valeurs suivantes.
Unité d’affichage en grammes
Zone d’affichage -990g à 5000g
Étapes d’affichage 5g
Unité d’affichage en livres
Zone d’affichage -2,20lb à 11,00lb
Étapes d’affichage 0,01lb
Conseil:Les unités d’affichage de la
balance peuvent être modifiées à
tout moment.
→"Modifier les unités d’affichage de
la balance", Page71
Peser les ingrédients
Conditions préalables
¡ Le bol mélangeur est inséré ou un
accessoire est monté.
¡ L’interrupteur rotatif est sur .
¡ La prise de l’appareil est bran-
chée.
1. Appuyer sur la touche et ne plus
toucher l’appareil.
a La balance se calibre.
a L’afficheur indique "----".
2. Attendre la fin du calibrage.
a L’afficheur indique "0g" ou
"0.00lb".
3. Verser l’aliment souhaité.
a L’afficheur indique le poids.
4. Pour peser d’autres ingrédients,
sélectionner une des options suivantes:
‒ Ajouter des ingrédients et lire le
poids total.
‒ Appuyer sur et attendre jus-
qu’à ce que l’écran affiche "0g"
ou "0.00lb".
5. Pour éteindre la balance, appuyer
sur ou lancer le traitement.
Conseil:Utiliser aussi la balance en
liaison avec les accessoires. Peser
les ingrédients directement lors du
remplissage, p.ex. dans le bol
mixeur ou dans la sorbetière.
Remarque:La balance s’éteint automatiquement après env. 3minutes
d’inactivité.
Modifier les unités d’affichage de la balance
Conditions préalables
¡ L’interrupteur rotatif est sur .
¡ La balance est activée.
1. Appuyer sur et et maintenir
ces touches appuyées.
L’unité d’affichage de la balance
change.
Symbole Unité
Affichage en
grammes
Affichage en livres
2. Relâcher cesdeux touches.
a La balance se calibre et démarre
avec le réglage modifié.
a Le réglage est mémorisé.
Minuterie
Minuterie
Minuterie
Vous pouvez lire la durée de préparation écoulée jusque-là ou la remettre à zéro.
Valeurs d’affichage de la minuterie
Pour l’utilisation de la minuterie, respecter les valeurs suivantes.
Zone d’affichage 0secondes à 59mi-
nutes et 59secondes
71
Page 72

fr Nettoyage et entretien
Étapes d’affichage 1seconde
Lire et remettre à zéro la durée de traitement
1. Tourner l’interrupteur rotatif sur la
vitesse souhaitée.
a L’écran affiche la durée de traite-
ment.
2. Pour réinitialiser l’affichage à
"00:00", appuyer sur .
Remarques
¡ Si vous interrompez le traitement
pendant moins de 30secondes,
les valeurs affichées en dernier
restent mémorisées et recommencent à s’écouler lors du traitement suivant.
¡ Si vous interrompez le traitement
pendant plus de 30secondes, la
balance s’allume et se calibre.
Nettoyage et entretien
Nettoyage et entretien
Nettoyage et entretien
Pour que votre appareil reste longtemps opérationnel, nettoyez-le et entretenez-le avec soin.
Produits de nettoyage
Apprenez ici quels produits de nettoyage sont adaptés à votre appareil.
ATTENTION!
Des produits de nettoyage inappropriés ainsi qu’un nettoyage incorrect
peuvent endommager l’appareil.
▶
Ne pas utiliser de produit nettoyant
contenant de l’alcool ou de l’alcool
à brûler.
▶
Ne pas utiliser d’objets acérés,
pointus ou métalliques.
▶
Ne pas utiliser de chiffons abrasifs
ou de produits nettoyants.
▶
Nettoyer le panneau de commande et l’écran uniquement avec
un chiffon en microfibres humide.
Guide de nettoyage
Vous trouverez ici des instructions
sur la meilleure façon de nettoyer
l'appareil et les autres éléments.
→Fig.
26
Conseil:Des décolorations peuvent
apparaître sur les pièces en plastique, p.ex. lors du traitement des
carottes. Enlevez les décolorations
avec un chiffon doux et quelques
gouttes d’huile alimentaire.
Accessoires en option
Accessoires en option
Accessoires en option
Vous pouvez acheter les accessoires
auprès du service après-vente, dans
le commerce spécialisé ou sur notre
site internet. Utilisez uniquement les
accessoires d'origine, car ils sont
parfaitement adaptés à votre appareil.
"Les accessoires sont spécifiques à
l'appareil. Lors de l'achat, indiquez
toujours la désignation exacte de
votre appareil (E-Nr.)." →Page78
Pour connaître les accessoires disponibles pour votre appareil, consultez
notre catalogue, notre boutique en
ligne ou le service après-vente.
www.bosch-home.com
Recettes
Recettes
Recettes
Vous trouverez ici un choix de recettes spécialement conçues pour
votre appareil.
Conseils
¡ Pour obtenir des résultats opti-
maux, respecter les quantités
maximales indiquées.
¡ Vous pouvez peser les ingrédients
lors du remplissage, avec la balance intégrée.
→"Balance", Page70
72
Page 73

Recettes fr
¡ Avec la minuterie, vous pouvez
surveiller les durées de préparation.
→"Minuterie", Page71
Aperçu des recettes
Dans cet aperçu, vous trouverez les ingrédients ainsi que les étapes de traitement pour différentes recettes.
Recette Ingrédients Préparation
Crème chantilly 100-600g de crème ¡ Mettre en place le fouet batteur.
¡ Verser la crème chantilly.
¡ Travailler le mélange pendant
1½-4minutes au niveau7.
Blancs d'oeufs 1-8 blancs d'oeufs (à température am-
biante)
Pâte génoise ¡ 2 œufs
¡ 2-3c. à. s. d’eau chaude
¡ 100g de sucre
¡ 1c. à s. de sucre vanillé
¡ 70g de farine (tamisée)
¡ 70g de fécule
¡ Levure chimique (selon les goûts)
Remarque:Traiter simultanément au
maximum 2fois le volume.
Pâte à cake ¡ 6 œufs
¡ 500g de sucre
¡ 1pincée de sel
¡ 2c. à s. de sucre vanille ou le zeste
d’un demi-citron
¡ 500g de beurre ou de margarine (à
température ambiante)
¡ 1000g de farine
¡ 15g de levure chimique
¡ 250ml de lait
Remarque:Traiter simultanément au
maximum 1fois le volume.
¡ Mettre en place le fouet batteur.
¡ Verser les blancs d’œufs.
¡ Travailler pendant 4-6minutes au
niveau7.
¡ Mettre en place le fouet batteur.
¡ Verser tous les ingrédients, sauf la
farine et la fécule.
¡ Travailler le mélange pendant
4-6minutes au niveau7.
¡ Régler sur niveau1.
¡ Dans les 30-60secondes qui
suivent, ajouter la farine et la fécule,
cuillère après cuillère.
¡ Mettre en place le fouet mélangeur.
¡ Verser les oeufs, le sel, le sucre et
le sucre vanillé ou le zeste d'un demi-citron.
¡ Travailler pendant 10secondes au
niveau1.
¡ Travailler ensuite pendant 2mi-
nutes au niveau5.
¡ Ajouter le beurrer et travailler pen-
dant 60secondes au niveau3.
¡ Ajouter la farine et la levure chi-
mique et travailler pendant 2minutes au niveau1.
¡ Régler sur niveau3.
¡ Ajouter le lait dans les 2minutes.
73
Page 74

fr Recettes
Recette Ingrédients Préparation
Pâte sablée ¡ 125g de beurre
¡ 100-125g de sucre
¡ 1 œuf
¡ 1 pincée de sel
¡ un peu de sucre vanillé ou de zeste
de citron
¡ 250g de farine
¡ Levure chimique (selon les goûts)
Remarque:Traiter simultanément au
maximum 2fois le volume.
¡ Mettre en place le fouet mélangeur.
¡ Verser tous les ingrédients.
¡ Travailler le mélange pendant
30secondes au niveau1.
¡ Travailler le mélange pendant
2-3minutes au niveau6.
À partir de 500g de farine:
¡ Utiliser le crochet pétrisseur.
¡ Verser tous les ingrédients.
¡ Travailler le mélange pendant
30secondes au niveau1.
¡ Travailler le mélange pendant
3-4minutes au niveau3.
Pâte à la levure de
boulanger
¡ 500g de farine
¡ 1 œuf
¡ 80g de matière grasse (à tempéra-
ture ambiante)
¡ 80g de sucre
¡ 200-250ml de lait tiède
¡ 25g de levure de boulanger ou 1c.
¡ Mettre en place le crochet pétris-
seur.
¡ Verser tous les ingrédients.
¡ Travailler pendant 30secondes au
niveau1.
¡ Travailler pendant 3-6minutes au
niveau3.
à s. de levure sèche.
¡ Zeste d’un demi-citron
¡ 1 pincée de sel
Remarque:Traiter simultanément au
maximum 2fois le volume.
Pâteàpâtes ¡ 300g de farine
¡ 150g d’œufs (3 œufs environ)
¡ 15-30ml d’eau froide (selon les
goûts)
¡ Utiliser le crochet pétrisseur.
¡ Verser tous les ingrédients.
¡ Travailler le mélange pendant
3-5minutes au niveau3.
Remarque:Traiter simultanément au
maximum 1½fois le volume.
Pâte à pain ¡ 1000g de farine
¡ 2c. à s. de levure sèche
¡ 2c. à c. de sel
¡ 660ml d’eau tiède
Remarque:Traiter simultanément au
maximum 1fois le volume.
¡ Mettre en place le crochet pétris-
seur.
¡ Verser tous les ingrédients.
¡ Travailler pendant 30secondes au
niveau1.
¡ Travailler pendant 4-5minutes au
niveau3.
74
Page 75

Dépannage fr
Dépannage
Dépannage
Dépannage
Vous pouvez corriger par vous-même les petits défauts de votre appareil. Lisez
les renseignements de dépannage avant de contacter le service consommateurs. Vous vous épargnerez ainsi des dépenses inutiles.
AVERTISSEMENT
Risque d’électrocution!
Les réparations non conformes sont dangereuses.
▶
Seul un personnel dûment qualifié peut entreprendre des réparations sur
l'appareil.
▶
Seules des pièces de rechange d'origine peuvent être utilisées pour réparer
l'appareil.
▶
Afin d’écarter tout danger quand le cordon d’alimentation secteur de cet appareil est endommagé, seul le fabricant ou son service après-vente ou toute
autre personne de qualification équivalente est habilité à le remplacer.
Dysfonctionnements
Dérangement Cause Résolution de problème
L'appareil ne fonctionne pas. La fiche secteur du cordon
d'alimentation secteur n'est
pas branchée.
Le fusible est défectueux.
L’alimentation électrique est
tombé en panne.
L’appareil ne démarre pas le
traitement.
L’appareil ne démarre pas
ou s’arrête pendant le traitement des aliments.
Interrupteur rotatif est mal
réglé.
La quantité à traiter est trop
importante ou la durée de
traitement est trop longue.
L’appareil ou l’accessoire
est bloqué.
La balance n’affiche aucun
changement de poids alors
que des ingrédients sont
La quantité d’ingrédients est
inférieure à la plage de mesure de la balance.
ajoutés.
▶
Branchez l’appareil au réseau électrique.
▶
Vérifiez le fusible dans le boîtier à
fusibles.
▶
Vérifiez si l’éclairage du compartiment ou d’autres appareils dans la
pièce.
▶
Avant le traitement, positionner l’interrupteur rotatif en position .
▶
Amenez l’interrupteur sur .
▶
Réduisez la quantité d’ingrédients.
▶
Laisser refroidir l’appareil à température ambiante.
▶
Amenez l’interrupteur sur .
▶
Supprimez le blocage.
▶
Verser au moins 5g ou 0,01lb afin
que la balance affiche des valeurs
correctes.
75
Page 76

fr Dépannage
Dérangement Cause Résolution de problème
Bras pivotant ne se laisse
pas ouvrir ou fermer, parce
que l’ustensile est coincé sur
le bol.
L’entraînement n’est pas en
position de repos, après
qu’un système de sécurité a
arrêté le traitement ou que
l’alimentation a été interrompue.
1. Amenez l’interrupteur sur .
2. Supprimez la cause qui a entraîné
l’arrêt de l’appareil.
→"Systèmes de sécurité", Page66
3. Si le bras pivotant est ouvert, retirez
l’ustensile et fermer le bras pivotant.
4. Réglez l’interrupteur rotatif briève-
ment sur , puis de nouveau
sur .
a L’entraînement s’actionne briève-
ment jusqu’à ce que la position de
repos soit atteinte.
Remarques sur le bandeau d’affichage
Dérangement Cause Résolution de problème
"5000g" ou "11.00lb" clignote à l’écran.
Les valeurs d’affichage de la
balance ont été dépassées
positivement.
"-990g" ou "-2.20lb" clignote à l’écran.
Les valeurs d’affichage de la
balance ont été dépassées
négativement.
"59:59m:s" clignote à
l’écran.
La plage d’affichage de la
minuterie a été dépassée.
L’écran indique «ERROR» La balance est exposée à
des vibrations excessives.
La surface est irrégulière. 1. Placez l’appareil sur un plan de tra-
Les pieds sont encrassés.
▶
Respectez les valeurs d’affichage
de la balance.
→"Valeurs d’affichage de la balance", Page71
▶
Respectez les valeurs d’affichage
de la balance.
→"Valeurs d’affichage de la balance", Page71
▶
Ne traitez pas les aliments plus de
59minutes et 59secondes ou remettez la durée de traitement à zéro pendant cette période.
→"Lire et remettre à zéro la durée
de traitement", Page72
▶
N’utilisez pas l’appareil sur des
plans de travail exposés à des vibrations, p.ex. sur des plans de travail
sous lesquels un lave-vaisselle est
en marche.
vail stable, plan, propre et lisse.
2. Vérifiez si les 4 pieds sont en
contact avec le plan de travail.
▶
Essuyez les pieds avec un chiffon
humide.
76
Page 77

Dépannage fr
Dérangement Cause Résolution de problème
L’écran indique «ERROR» La balance doit être redé-
marrée.
1. Pour redémarrer la balance:
‒ Appuyez sur .
‒ Patientez 30 à 60secondes.
‒ Appuyez de nouveau sur et
attendez la fin du calibrage.
2. Si la balance affiche encore des dé-
fauts, débrancher l’appareil du secteur pendant une certaine durée,
puis redémarrer la balance.
Remarque:Effectuez les étapes de
dépannage plusieurs fois par avant de
contacter le Service après-vente.
77
Page 78

fr Mise au rebut
Mise au rebut
Mise au rebut
Mise au rebut
Apprenez comment mettre au rebut
correctement les appareils usagés.
Mettre au rebut un appareil usagé
La destruction dans le respect de
l’environnement permet de récupérer
de précieuses matières premières.
1. Débrancher la fiche du cordon
d’alimentation secteur.
2. Couper le cordon d’alimentation
secteur.
3. Mettre au rebut l’appareil dans le
respect de l’environnement.
Cet appareil est marqué selon
la directive européenne
2012/19/UE relative aux appareils électriques et électroniques usagés (waste electrical
and electronic equipment WEEE).
La directive définit le cadre
pour une reprise et une récupération des appareils usagés applicables dans les pays de la
CE.
Service après-vente
Service après-vente
Service après-vente
Contactez notre service après-vente
si vous avez des questions, si vous
n'arrivez pas à corriger un défaut de
l'appareil ou si ce dernier doit être réparé.
De nombreux problèmes peuvent
être corrigés grâce aux informations
de dépannage du présent manuel ou
sur notre site internet. Si vous ne parvenez pas à les corriger, veuillez
vous adresser à notre service aprèsvente.
Nous trouverons toujours une solution adaptée.
Nous nous assurons que votre appareil est réparé à l'aide de pièces de
rechange d'origine et par un technicien dûment qualifié dans le cadre
de la prestation de garantie ou après
son échéance.
Les pièces de rechange relatives au
fonctionnement de l’appareil et
conformes à l’ordonnance d’écoconception correspondante sont disponibles auprès de notre service aprèsvente pour une durée d’au moins 7
ans à partir de la mise sur le marché
de l'appareil dans l’espace économique européen.
Remarque:Dans le cadre des
conditions de la garantie, le recours
au service après-vente est gratuit.
Pour plus d'informations sur ladurée
etles conditions de la garantie dans
votre pays, adressez-vous à notre
service après-vente, à votre revendeur ou consulteznotre site internet.
Lorsque vous contactez le service
après-vente, vous avez besoin du numéro de produit (E-Nr.) et du numéro
de fabrication (FD) de votre appareil.
Vous trouverez les coordonnées du
service après-vente dans la liste figurant à la fin de cette notice d’utilisation ou sur notre site internet.
Numéro de produit (E-Nr) et numéro de fabrication (FD)
Le numéro de série (E-Nr.) et le numéro de fabrication (FD) sont indiqués sur la plaque signalétique de
l’appareil.
Pour retrouver rapidement les données de votre appareil et le numéro
de téléphone du service consommateurs, n'hésitez pas à les recopier
ailleurs.
78
Page 79

Conditions de garantie
Les conditions de garantie de votre
appareil sont les suivantes.
Les conditions de garantie applicables sont celles publiées par notre
distributeur dans le pays où a été effectué l’achat. Le revendeur chez qui
vous vous êtes procuré l’appareil
fournira les modalités de garantie sur
simple demande de votre part. En
cas de recours en garantie, veuillez
toujours vous munir de la preuve
d’achat.
Service après-vente fr
79
Page 80

it
Sommario
Sicurezza .......................................81
Avvertenze generali........................81
Utilizzo conforme all'uso previsto...81
Limitazione di utilizzo......................82
Avvertenze di sicurezza..................82
Prevenzione di danni materiali.....86
Tutela dell'ambiente e rispar-
mio .................................................86
Smaltimento dell’imballaggio .........86
Disimballaggio e controllo ...........86
Disimballaggio dell'apparecchio
e dei componenti ...........................86
Contenuto della confezione ...........87
Installazione dell'apparecchio ........87
Conoscere l'apparecchio..............87
Apparecchio ...................................87
Manopola........................................88
Anello luminoso..............................88
Pannello di comando .....................88
Tasti funzione .................................88
Display............................................88
Braccio oscillante...........................88
Ingranaggi ......................................89
Utensili............................................89
Simboli............................................90
Posizione di riposo.........................91
Sistemi di sicurezza........................91
Prima del primo utilizzo................91
Preparazione dell'apparecchio.......91
Comandi di base ...........................92
Lunghezza cavo .............................92
Movimentazione del braccio
oscillante ........................................92
Inserimento della ciotola impa-
statrice............................................92
Rimozione della ciotola impasta-
trice.................................................92
Applicazione dell’utensile...............92
Rimozione dell'utensile...................92
Posizionamento del coperchio
della ciotola impastatrice ...............93
Rimozione del coperchio della
ciotola impastatrice ........................93
Lavorazione ....................................93
Coperchio disicurezza dell'in-
granaggio .......................................94
Bilancia..........................................95
Valori di visualizzazione della bi-
lancia ..............................................95
Pesare gli ingredienti .....................95
Modifica delle unità di visualizza-
zione della bilancia.........................96
Timer..............................................96
Valori di visualizzazione del ti-
mer .................................................96
Lettura e ripristino della durata
di lavorazione .................................96
Pulizia e cura.................................96
Detergenti.......................................96
Panoramica per la pulizia...............97
Accessori speciali.........................97
Ricette............................................97
Ricettario ........................................97
Sistemazione guasti....................100
Anomalie di funzionamento..........100
Indicazioni sul display ..................101
Smaltimento ................................103
Rottamazione di un apparecchio
dismesso ......................................103
Servizio di assistenza clienti......103
Codice prodotto (E-Nr.) e codice
di produzione (FD) .......................103
Condizioni di garanzia..................104
80
Page 81

Sicurezza it
Sicurezza
Osservare le informazioni sul tema della sicurezza per poter utilizzare l'apparecchio in modo sicuro.
Avvertenze generali
Qui sono riportate le informazioni generali relative a queste istruzioni.
¡ Leggere attentamente le presenti istruzioni. Solo così sarà pos-
sibile utilizzare l'apparecchio in modo sicuro ed efficiente.
¡ Osservare le istruzioni aggiuntive durante l'utilizzo degli acces-
sori forniti in dotazione oppure opzionali.
¡ Queste istruzioni sono rivolte all'utente dell'apparecchio.
¡ Osservare le istruzioni di sicurezza e le avvertenze.
¡ Conservare le istruzioni e le informazioni sul prodotto per il suc-
cessivo utilizzo o per il futuro proprietario.
¡ Controllare l'apparecchio dopo averlo disimballato. Non collega-
re l'apparecchio se ha subito danni durante il trasporto.
Utilizzo conforme all'uso previsto
Per utilizzare l'apparecchio in modo sicuro e corretto, osservare le
istruzioni per l'utilizzo conforme all'uso previsto.
Utilizzare l'apparecchio soltanto:
¡ osservando queste istruzioni per l'uso;
¡ con gli accessori e le parti originali.
¡ per ulteriori applicazioni descritte nelle istruzioni di accessori
forniti in dotazione oppure opzionali.
¡ per miscelare, impastare e montare alimenti.
¡ sotto sorveglianza;
¡ in case private e in locali chiusi in ambito domestico a tempera-
tura ambiente;
¡ per quantità e tempi di lavoro usuali nell’attività domestica.
¡ fino a un'altitudine di massimo 2000m sul livello del mare.
Scollegare l'apparecchio dall'alimentazione elettrica se:
¡ Non usare l'apparecchio.
81
Page 82

it Sicurezza
¡ l'apparecchio non viene sorvegliato.
¡ l'apparecchio viene rimontato.
¡ l'apparecchio viene smontato.
¡ l'apparecchio viene pulito.
¡ parti rotanti sono vicine.
¡ gli utensili vengono sostituiti.
¡ si verifica un errore.
Limitazione di utilizzo
Evitare pericoli per i bambini e le persone a rischio.
Questo apparecchio può essere usato da persone con ridotte facoltà psichiche, sensoriali o mentali o con conoscenze e/o esperienza insufficienti, purché siano sotto il controllo di persone adulte o siano stati istruiti sull’uso sicuro dell’apparecchio e abbiano
compreso i pericoli connessi all’uso dello stesso.
I bambini non devono giocare con l'apparecchio.
Ai bambini è vietato eseguire la pulizia e manutenzione di competenza dell’utente.
L’uso di questo apparecchio è vietato ai bambini. Tenere i bambini lontani dall’apparecchio e dal cavo di alimentazione.
Avvertenze di sicurezza
Osservare le avvertenze di sicurezza.
AVVERTENZA‒Pericolo di scossa elettrica!
¡ Un apparecchio o un cavo di alimentazione danneggiati costi-
tuiscono un pericolo.
▶
Non mettere mai in funzione un apparecchio danneggiato.
▶
Non utilizzare mai un apparecchio con la superficie danneggiata.
▶
Non tirare mai il cavo di collegamento alla rete elettrica per
staccare l'apparecchio dalla rete elettrica. Staccare sempre
la spina del cavo di alimentazione.
▶
Se l'apparecchio o il cavo di alimentazione è danneggiato,
staccare subito la spina di alimentazione del cavo di alimentazione e spegnere il fusibile nella scatola dei fusibili.
▶
"Rivolgersi al servizio di assistenza clienti." →Pagina103
82
Page 83

Sicurezza it
▶
Solo il personale adeguatamente specializzato e formato
può eseguire riparazioni sull'apparecchio.
¡ Le installazioni effettuate in modo non appropriato costituisco-
no un pericolo.
▶
Collegare e utilizzare l’apparecchio solo in conformità con i
dati indicati sulla targhetta identificativa.
¡ Gli interventi di riparazione effettuati in modo non appropriato
rappresentano una fonte di pericolo.
▶
Solo il personale adeguatamente specializzato e formato
può eseguire riparazioni sull'apparecchio.
▶
Per la riparazione dell'apparecchio possono essere impiegati soltanto pezzi di ricambio originali.
▶
Al fine di evitare pericoli, se il cavo di alimentazione di questo apparecchio subisce danni deve essere sostituito dal
produttore, dal suo servizio di assistenza clienti o da persona in possesso di simile qualifica.
¡ L'infiltrazione di umidità può provocare una scarica elettrica.
▶
Non immergere mai l'apparecchio o il cavo di alimentazione
nell'acqua e non metterli in lavastoviglie.
▶
Utilizzare l'apparecchio esclusivamente in luoghi chiusi.
▶
Non esporre mai l'apparecchio a calore e umidità eccessivi.
▶
Non lavare l'apparecchio con pulitori a vapore o idropulitrici.
¡ Un isolamento danneggiato del cavo di allacciamento alla re-
te costituisce un pericolo.
▶
Non mettere mai il cavo di allacciamento alla rete a contatto
con fonti di calore o parti dell'apparecchio calde.
▶
Non mettere mai il cavo di allacciamento alla rete a contatto
con spigoli vivi.
▶
Non piegare, schiacciare o modificare mai il cavo di allacciamento alla rete.
AVVERTENZA‒Pericolo di incendio!
Un surriscaldamento eccessivo può provocare un incendio
all'apparecchio e ad altri componenti.
▶
Non disporre mai l’apparecchio sopra oppure in prossimità
di superfici calde.
83
Page 84

it Sicurezza
AVVERTENZA‒Pericolo di lesioni!
¡ Gli ingranaggi, gli utensili o gli accessori rotanti possono cau-
sare lesioni.
▶
Tenere lontano mani, capelli, abiti e altri utensili dalle parti
rotanti.
▶
Applicare e rimuovere gli utensili e gli accessori solo ad ingranaggio fermo ed apparecchio scollegato.
▶
Spegnere l'apparecchio e scollegarlo dalla rete prima di sostituire gli utensili o della pulizia.
▶
Mettere in funzione gli utensili soltanto con la ciotola inserita, il coperchio chiuso e i coperchi di sicurezza applicati.
▶
Non aprire mai il braccio oscillante durante la lavorazione.
¡ L'azionamento dell'apparecchio con componenti danneggiati
può causare lesioni.
▶
Sostituire i componenti che presentano incrinature o altri
danni o che non possono essere alloggiati correttamente
nella propria sede con ricambi originali.
AVVERTENZA‒Pericolo di schiacciamento!
Le dita e le mani possono rimanere incastrate.
▶
Durante l'abbassamento del braccio oscillante, non afferrare
la ciotola.
AVVERTENZA‒Pericolo di soffocamento!
¡ I bambini potrebbero mettersi in testa il materiale di imballag-
gio o avvolgersi nello stesso, rimanendo soffocati.
▶
Tenere lontano il materiale di imballaggio dai bambini.
▶
Vietare ai bambini di giocare con materiali d’imballaggio.
¡ I bambini possono inspirare o ingoiare le parti piccole, rima-
nendo soffocati.
▶
Tenere i bambini lontano dalle parti piccole.
▶
Non lasciare che i bambini giochino con le parti piccole.
AVVERTENZA‒Rischio di danni alla salute!
La sporcizia sulle superfici può nuocere alla salute.
▶
Attenersi alle istruzioni per la pulizia.
84
Page 85

Sicurezza it
▶
Pulire le superfici che vengono a contatto con gli alimenti
prima di ogni utilizzo.
85
Page 86

it Prevenzione di danni materiali
Prevenzione di danni materiali
Prevenzione di danni materiali
Prevenzione di danni materiali
Per prevenire danni materiali all'apparecchio, agli accessori o agli oggetti
da cucina, osservare le presenti avvertenze.
ATTENZIONE!
¡ L'utilizzo non conforme può causa-
re danni materiali.
▶
Non utilizzare diversi funzionamenti contemporaneamente.
▶
Non mettere mai in funzione
l'apparecchio per un tempo superiore a quello necessario.
▶
Non mettere mai l’apparecchio
in funzione a vuoto.
▶
Non utilizzare mai le parti e gli
accessori originali con altri apparecchi.
▶
Rispettare le quantità di lavorazione massime.
▶
Non conservare alcun oggetto
esterno nella ciotola.
¡ Durante l'esercizio fuoriesce aria
calda dalla parte posteriore della
griglia di scarico. L'aria di scarico
bloccata può causare il surriscaldamento dell'apparecchio.
▶
Installare l'apparecchio mantenendo una distanza sufficiente
dalla parete, dalle superfici e dagli apparecchi sensibili.
¡ Le vibrazioni possono compromet-
tere il funzionamento dell'apparecchio.
▶
Non disporre l’apparecchio sopra superfici mobili o vibranti.
Tutela dell'ambiente e risparmio
Tutela dell'ambiente e risparmio
Tutela dell'ambiente e risparmio
Tutelate l'ambiente utilizzando l'apparecchio cercando di risparmiare le risorse e smaltendo correttamente i
materiali riutilizzabili.
Smaltimento dell’imballaggio
I materiali dell'imballaggio sono rispettosi dell'ambiente e possono essere riutilizzati.
▶
Smaltire lesingole parti distintamente secondo iltipo dimateriale.
Per informazioni sulle attuali procedure di smaltimento rivolgersi al rivenditore specializzato o al comune di competenza.
Disimballaggio e controllo
Disimballaggio e controllo
Disimballaggio e controllo
Di seguito sono riportate le avvertenze da osservare durante il disimballaggio.
Disimballaggio dell'apparecchio e dei componenti
1. Estrarre dalla confezione l'apparec-
chio.
2. Estrarre dalla confezione tutti gli al-
tri componenti e i documenti di accompagnamento e renderli disponibili.
3. Rimuovere il materiale d'imballag-
gio
4. Togliere le etichette e le pellicole che
ricoprono l‘apparecchio.
86
Page 87

Conoscere l'apparecchio it
A
B
C
D
E
F
G
1
2
3
4
5
6
8
9
10
11
12
13
Contenuto della confezione
Dopo il disimballaggio controllare
che tutti i componenti siano presenti
e che non presentino danni dovuti al
trasporto.
Nota:L'apparecchio viene fornito con
ulteriori accessori a seconda
dell'equipaggiamento. Consultare le
istruzioni degli accessori per scoprire
l'ulteriore fornitura.
→Fig.
1
Apparecchio base con contenitore di
miscelazione
Coperchio con bocca di carico integrata
Frusta «Profi Flexi»
Frusta per montare professionale
Gancio impastatore
Custodia
Documentazione di accompagnamen-
to
Installazione dell'apparecchio
AVVERTENZA
Pericolo di incendio!
Un surriscaldamento eccessivo può
provocare un incendio all'apparecchio e agli utensili.
▶
Non disporre mai l’apparecchio
sopra oppure in prossimità di superfici calde.
ATTENZIONE!
¡ Durante l'esercizio fuoriesce aria
calda dalla parte posteriore della
griglia di scarico. L'aria di scarico
bloccata può causare il surriscaldamento dell'apparecchio.
▶
Installare l'apparecchio mantenendo una distanza sufficiente
dalla parete, dalle superfici e dagli apparecchi sensibili.
¡ Le vibrazioni possono compromet-
tere il funzionamento dell'apparecchio.
▶
Non disporre l’apparecchio sopra superfici mobili o vibranti.
1. Collocare l'apparecchio su un pia-
no di lavoro stabile, piano, pulito e
liscio.
2. Estrarre il cavo di alimentazione fi-
no alla lunghezza necessaria.
→"Lunghezza cavo", Pagina92
Non inserire la spina di alimentazione.
Conoscere l'apparecchio
Conoscere l'apparecchio
Conoscere l'apparecchio
In questa sezione sono riportati i
componenti dell'apparecchio.
Apparecchio
Di seguito è riportata una panoramica dei componenti dell'apparecchio.
→Fig.
2
Ciotola in acciaio inox
Pannello di comando
Coperchio con bocca di carico integra-
ta
Pulsante di sblocco per braccio oscil-
lante
Braccio oscillante
Manopola
Coperchio per ingranaggio 2
Ingranaggio 2
Coperchio per ingranaggio 3
Ingranaggio 3
Griglia aria di scarico
Ingranaggio principale
87
Page 88

it Conoscere l'apparecchio
14
1
2
3
4
5
6
Portacavo
Manopola
Utilizzare la manopola per avviare ed
arrestare la lavorazione e selezionare
la velocità.
Simbolo Funzione
Arrestare la lavorazione.
Lavorare gli ingredienti a velocità
minima.
Lavorare gli ingredienti a massima
velocità.
Lavorare brevemente gli ingre-
dienti a massima velocità.
→"Utilizzo del funzionamento
«pulser»", Pagina94
Anello luminoso
L'anello luminoso sulla manopola fornisce informazioni sullo stato operativo dell'apparecchio.
Indicatore Stato
L’anello luminoso si
accende e la lavorazione è in corso.
L’anello luminoso non
si accende e la lavorazione non può essere
avviata.
L’anello luminoso lampeggia e la lavorazione non può essere avviata o proseguita.
Consiglio:Ulteriori informazioni sono
disponibili su:
→"Sistemi di sicurezza", Pagina91
→"Sistemazione guasti", Pagina100
L'apparecchio funziona senza anomalie.
¡ L'apparecchio non
riceve alimentazione elettrica.
¡ L'apparecchio pre-
senta un guasto.
¡ Un sistema di sicu-
rezza è attivato.
¡ L'apparecchio pre-
senta un guasto.
Pannello di comando
Qui si trova la panoramica del pannello di comando.
→Fig.
3
Tasto Reset
Tasto Bilancia
Display
Simbolo peso in libbre
Simbolo peso in grammi
Simbolo tempo in minuti e secondi
Tasti funzione
I tasti funzione consentono di selezionare funzioni supplementari o di configurare impostazioni. Per effettuare
una selezione, toccare i simboli corrispondenti con il dito.
Simbolo Funzione
Accendere e spegnere la bilancia.
¡ Ripristinare la bilancia.
¡ Ripristinare il timer.
Nota:Azionare i tasti con le dita e
senza guanti da cucina. Non azionare
i tasti con oggetti, ad es. mestoli.
Display
Sul display vengono visualizzati i valori e i messaggi relativi allo stato di
funzionamento.
Nota:L'apparecchio si spegne automaticamente se resta inattivo per un
determinato periodo di tempo. Per
riattivare il display, premere un tasto
o avviare la lavorazione.
Braccio oscillante
Il braccio oscillante può essere regolato e fissato in diverse posizioni.
88
Page 89

Conoscere l'apparecchio it
Premendo il pulsante di sblocco è
possibile spostare il braccio oscillante nella posizione desiderata.
→"Movimentazione del braccio oscil-
lante", Pagina92
Nota:Il braccio oscillante è dotato
della funzione EasyArm Lift. Tale funzione supporta il movimento del braccio oscillante verso l'alto.
Posizioni del braccio oscillante
Qui si trova la panoramica delle posizioni del braccio oscillante.
Posizio-neUtilizzo
Posizione1
Posizione2
Il braccio oscillante è chiuso.
¡ Lavorare gli ingredienti con gli
utensili.
¡ Utilizzare l'accessorio sull'in-
granaggio principale, ad es.
Produttore di ghiaccio.
¡ Utilizzare l'accessorio sull'in-
granaggio 2, ad es. Sminuzzatore continuo
Il braccio oscillante è aperto.
¡ Inserire la ciotola o rimuoverla.
¡ Inserire l'utensile o rimuoverlo.
¡ Versare gli ingredienti nella cio-
tola.
Nota:Gli ingranaggi 2 e 3 sono coperti con appositi coperchi.
→"Coperchio disicurezza dell'ingra-
naggio", Pagina94
Panoramica degli ingranaggi
Qui è riportata una panoramica degli
ingranaggi e del relativo ambito di
applicazione.
Ingranaggio
Ingranaggio
principale
Ingranaggio2
Ingranaggio3
Utilizzo
Per utensili ed accessori, ad es.
¡ Tritacarne
¡ Accessorio pasta
¡ Produttore di ghiaccio
Per accessori, ad es.
¡ Sminuzzatore continuo
¡ Spremiagrumi
Per accessori, ad es.
¡ Kit mixer in vetro
¡ Kit mixer in plastica
¡ Kit tritatutto universale
Posizione3
¡ Utilizzare l'accessorio sull'in-
granaggio principale, ad es.
Tritacarne.
¡ Utilizzare l'accessorio sull'in-
granaggio 3, ad es. Adattatore
frullatore.
Ingranaggi
L'apparecchio è dotato di diversi ingranaggi concepiti appositamente
per gli utensili e gli accessori.
Utensili
Qui sono riportate le informazioni generali sui diversi utensili.
Il gancio impastatore è dotato di un
cappuccio rimovibile per proteggere
l'ingranaggio da imbrattamenti.
Panoramica degli utensili
Adoperare l'utensile idoneo in base
all'utilizzo.
89
Page 90

it Conoscere l'apparecchio
Utensile Utilizzo
Gancio impastatore
¡ Impastare impasti duri, ad es.
paste lievitate.
¡ Amalgamare ingredienti che
non devono essere sminuzzati,
ad es. uvetta, pezzetti di cioccolato.
Frusta «Profi Flexi»
¡ Miscelare gli ingredienti, ad es.
paste fluide miscelate o mousse.
¡ Incorporare gli alimenti, ad es.
albumi montati a neve, panna o
uvetta.
Frusta per montare professionale
¡ Montare gli albumi montati a
neve e la panna.
¡ Miscelare impasti molli, ad es.
paste biscotto.
Regolazione fine della frusta per montare professionale
Correggere la distanza tra la ciotola
e la frusta per montare professionale
con la regolazione di precisione.
Nota:La frusta per montare professionale è regolata di fabbrica per mescolare al meglio gli ingredienti.
Correzione della regolazione degli utensili
ATTENZIONE!
L'apparecchio e gli utensili possono
essere danneggiati da una regolazione errata dell'utensile.
▶
Non azionare mai un utensile che
tocca la ciotola.
Condizioni indispensabili
¡ La spina di alimentazione non è in-
serita.
¡ Il braccio oscillante è aperto.
¡ La frusta per montare professiona-
le è inserita.
¡ La ciotola è inserita.
1. Fissare la frusta per montare pro-
fessionale con una mano nella parte inferiore e svitare il controdado
in senso orario con una chiave a
forchetta.
→Fig.
2. Ruotare l'utensile per modificare la
4
distanza.
→Fig.
5
Rispettare i valori indicati nella tabella:
Impostazione Distanza
Regolazione ottima-le3mm
Un giro in senso ora-
più di 1mm
rio
Un giro in senso an-
meno di 1mm
tiorario
3. Premere il pulsante di sblocco e
premere il braccio oscillante verso
il basso fino all'arresto.
4. Controllare la regolazione.
5. Premere il pulsante di sblocco e
sollevare il braccio oscillante fino
all'arresto.
6. Fissare la frusta per montare pro-
fessionale con una mano nella parte inferiore e avvitare il controdado
in senso antiorario con una chiave
a forchetta.
Simboli
Di seguito è riportata una panoramica dei simboli sull'apparecchio.
Simbolo Descrizione
Marcatura sul coperchio per ingranaggio2.
Marcatura di inserimento sul coperchio per ingranaggio3.
Marcatura di posizione sull'ingranaggio3.
90
Page 91

Prima del primo utilizzo it
Posizione di riposo
L’apparecchio è dotato di una posizione di riposo automatica.
Dopo lo spegnimento, gli ingranaggi
continuano a muoversi per alcuni secondi fino al raggiungimento della
corretta posizione di riposo.
Nota:Il braccio oscillante può essere
aperto o chiuso solamente con l'utensile inserito, se l'ingranaggio si trova
nella corretta posizione di riposo.
Le seguenti cause comportano una
posizione di riposo errata:
¡ L'alimentazione elettrica è stata in-
terrotta durante la lavorazione.
¡ Un sistema di sicurezza ha termi-
nato la lavorazione.
¡ Durante la lavorazione il braccio
oscillante si è sganciato o il pulsante di sblocco corrispondente è
stato premuto.
Consiglio:Una posizione di riposo
errata può essere facilmente corretta
in tutta autonomia.
→"Sistemazione guasti", Pagina100
Sistemi di sicurezza
Di seguito è riportata una panoramica dei sistemi di sicurezza dell'apparecchio.
Sicurezza d’accensione
Il blocco di accensione previene che
l'apparecchio venga acceso inavvertitamente.
L’apparecchio può essere acceso ed
azionato solo se
¡ il braccio oscillante è fissato in po-
sizione1 e viene utilizzata la ciotola o un accessorio, ad es. Produttore di ghiaccio
¡ il braccio oscillante è fissato in po-
sizione3 e sull'ingranaggio3 è applicata la ciotola o un accessorio.
Blocco di riaccensione
Il blocco di riaccensione previene
che l'apparecchio avvii autonomamente la lavorazione dopo un'interruzione dell'alimentazione.
In caso d’interruzione dell’alimentazione elettrica l’apparecchio viene
reinserito. La lavorazione può essere
riavviata solo dopo aver impostato la
manopola su .
Sicurezza di sovraccarico
La sicurezza di sovraccarico previene
che il motore ed altri componenti
vengano danneggiati da un sovraccarico eccessivo.
Il motore si spegne se
¡ viene lavorata una quantità ecces-
siva,
¡ l'apparecchio o l'accessorio viene
bloccato.
Prima del primo utilizzo
Prima del primo utilizzo
Prima del primo utilizzo
Preparare l'apparecchio per l'uso.
Preparazione dell'apparecchio
1. Premere il pulsante di sblocco e
sollevare il braccio oscillante fino
all'arresto.
→"Movimentazione del braccio
oscillante", Pagina92
2. Ruotare la ciotola in senso orario e
rimuoverla.
→"Rimozione della ciotola impa-
statrice", Pagina92
3. Prima del primo uso pulire tutte le
parti, che entrano in contatto con
gli alimenti.
→"Pulizia e cura", Pagina96
4. Predisporre le parti pulite ed asciu-
gate per l'utilizzo.
91
Page 92

it Comandi di base
Comandi di base
Comandi di base
Comandi di base
Qui sono fornite le informazioni essenziali sull'utilizzo dell'apparecchio.
Lunghezza cavo
Regolare la lunghezza del cavo di alimentazione in base alle proprie esigenze.
Regolazione della lunghezza cavo con l'avvolgicavo
1. Estrarre il cavo fino alla lunghezza
necessaria e rilasciarlo lentamente.
2. Per accorciare la lunghezza del ca-
vo,
‒ tirarlo,
‒ farlo avvolgere,
‒ estrarlo nuovamente.
Nota:Non reintrodurre il cavo manualmente. Se il cavo si blocca,
estrarlo completamente e poi lasciarlo riavvolgere di nuovo.
Movimentazione del braccio oscillante
1. Premere il pulsante di sblocco e
sollevare il braccio oscillante fino
all'arresto.
→Fig.
a Il braccio oscillante è fissato in po-
sizione2.
2. Premere il pulsante di sblocco e
spostare il braccio oscillante verso
il basso fino all'arresto in posizione
verticale.
→Fig.
a Il braccio oscillante è fissato in po-
sizione3.
6
7
Inserimento della ciotola impastatrice
1. Inserire la ciotola nell'apparecchio
base.
→Fig.
8
Prestare attenzione agli incavi
sull'apparecchio base.
2. Ruotare la ciotola in senso antiora-
rio fino allo scatto.
→Fig.
9
Rimozione della ciotola impastatrice
▶
Ruotare la ciotola in senso orario e
rimuoverla.
→Fig.
10
Applicazione dell’utensile
1. Selezionare l'utensile necessario.
→"Panoramica degli utensili",
Pagina89
2. Premere l'utensile sull'ingranaggio
principale finché non si innesta in
posizione.
→Fig.
3. Per utilizzare il gancio impastatore:
‒ Inserire il gancio impastatore
‒ Ruotare il cappuccio di protezio-
→Fig.
Il cappuccio di protezione deve
coprire completamente l'ingranaggio principale.
11
con il cappuccio di protezione
applicato nell'ingranaggio principale.
ne finché non è possibile innestare completamente il gancio
impastatore.
12
92
Rimozione dell'utensile
▶
Estrarre completamente l'utensile
dall'ingranaggio.
→Fig.
13
Page 93

Comandi di base it
Posizionamento del coperchio della ciotola impastatrice
Condizioni indispensabili
¡ L'utensile desiderato è inserito.
¡ La ciotola è inserita.
¡ Il braccio oscillante è chiuso.
1. Premere il pulsante di sblocco, sol-
levare leggermente il braccio oscillante e fissarlo.
→Fig.
2. Sollevare leggermente il coperchio
14
anteriore, farlo scorrere completamente sulla ciotola ed appoggiarlo.
→Fig.
15
La bocchetta di riempimento deve
essere rivolta in avanti.
3. Premere il braccio oscillante verso
il basso fino all'arresto.
→Fig.
16
Rimozione del coperchio della ciotola impastatrice
1. Premere il pulsante di sblocco, sol-
levare leggermente il braccio oscillante e fissarlo.
2. Sollevare leggermente il coperchio
anteriore ed estrarlo in avanti.
3. Premere il braccio oscillante verso
l'alto fino all'arresto.
Lavorazione
Qui sono fornite le informazioni essenziali sulla lavorazione degli alimenti.
Consigli relativi alla velocità
Prestare attenzione ai consigli relativi
alla velocità per ottenere risultati ottimali.
Utensili o accessori Livello
1-7
Utensili o accessori Livello
1-5
1-3
1
3-5
3-7
3-7
3-5
7
5-7
3-7
M
M
5-7
Lavorazione degli ingredienti con gli utensili
AVVERTENZA
Pericolo di lesioni!
Gli ingranaggi, gli utensili o gli accessori rotanti possono causare lesioni.
▶
Tenere lontano mani, capelli, abiti
e altri utensili dalle parti rotanti.
▶
Applicare e rimuovere gli utensili e
gli accessori solo ad ingranaggio
fermo ed apparecchio scollegato.
▶
Spegnere l'apparecchio e scollegarlo dalla rete prima di sostituire
gli utensili o della pulizia.
▶
Mettere in funzione gli utensili soltanto con la ciotola inserita, il coperchio chiuso e i coperchi di sicurezza applicati.
93
Page 94

it Comandi di base
▶
Non aprire mai il braccio oscillante
durante la lavorazione.
Condizioni indispensabili
¡ La ciotola è inserita.
¡ L'utensile necessario è inserito.
1. Versare gli ingredienti nella ciotola.
2. Premere il pulsante di sblocco e
premere il braccio oscillante verso
il basso fino all'arresto.
3. Posizionare il coperchio della cio-
tola impastatrice.
→"Posizionamento del coperchio
della ciotola impastatrice",
Pagina93
4. Inserire la spina di alimentazione.
5. Riportare la manopola alla velocità
desiderata.
→Fig.
6. Lavorare gli ingredienti fino a otte-
17
nere il risultato desiderato.
7. Portare la manopola su .
→Fig.
18
Attendere che l'apparecchio sia
fermo.
8. Staccare la spina di alimentazione.
Consigli
¡ È possibile modificare la velocità
in qualsiasi momento durante la lavorazione o interrompere la lavorazione stessa.
¡ Pulire tutte le parti subito dopo
l’uso per prevenire l'essiccamento
dei residui.
Aggiunta di ingredienti
1. Durante la lavorazione, inserire gli
ingredienti nel coperchio attraverso la bocchetta di riempimento.
→Fig.
2. Per aggiungere quantità maggiori,
19
ruotare la manopola su .
Attendere che l'apparecchio sia
fermo.
3. Rimuovere il coperchio della cioto-
la impastatrice.
→"Rimozione del coperchio della
ciotola impastatrice", Pagina93
4. Versare gli ingredienti nella ciotola.
5. Posizionare il coperchio della cio-
tola impastatrice.
→"Posizionamento del coperchio
della ciotola impastatrice",
Pagina93
6. Lavorare gli ingredienti fino a otte-
nere il risultato desiderato.
Utilizzo del funzionamento «pulser»
1. Ruotare e mantenere la manopola
su .
→Fig.
20
a Gli ingredienti vengono lavorati a
massima velocità.
2. Rilasciare la manopola.
→Fig.
21
a La manopola si sposta su .
a La lavorazione viene arrestata e gli
ingranaggi si spostano in posizione di riposo.
Consiglio
Il funzionamento «pulser» è
particolarmente idoneo per l'utilizzo dei
seguenti accessori:
¡ Kit mixer in vetro
¡ Kit tritatutto universale
¡ Kit multi-mixer
Coperchio disicurezza dell'ingranaggio
Rimuovere il coperchio per utilizzare
l'accessorio sull'ingranaggio 2 o 3.
Rimozione del coperchio di sicurezza dell'ingranaggio
1. Premere verso il basso e rimuove-
re il coperchio dell'ingranaggio 2
sulla marcatura .
→Fig.
22
94
Page 95

Bilancia it
2. Tirare il coperchio di protezione
per ingranaggio3 verso l'alto e rimuoverlo.
→Fig.
23
Applicazione del coperchio di sicurezza dell'ingranaggio
1. Posizionare il coperchio di prote-
zione dell'ingranaggio 2 con la
marcatura verso la parte posteriore, applicarlo e comprimerlo.
→Fig.
2. Applicare e comprimere il coper-
24
chio di protezione dell'ingranaggio3.
→Fig.
25
Le marcature e devono essere allineate.
Nota:Chiudere sempre gli ingranaggi non utilizzati con i coperchi di protezione.
Bilancia
Bilancia
Bilancia
L'apparecchio è dotato di una bilancia. È possibile pesare gli ingredienti
singolarmente.
L'apparecchio base ha 4 sensori di
peso nei piedini di appoggio.
I seguenti fattori possono alterare il
risultato di misurazione:
¡ I piedini di appoggio non poggiano
correttamente sul piano di lavoro.
¡ Vibrazioni del piano di lavoro
¡ Oggetti sotto l'apparecchio base
¡ Quantità degli ingredienti inferiori a
5g o 0,01lb
¡ Spostamento dell'apparecchio ba-
se
¡ Contatto dell'apparecchio base
¡ Oggetti sull'apparecchio base
Valori di visualizzazione della bilancia
Durante l'utilizzo della bilancia osservare i seguenti valori.
Unità di visualizzazione in grammi
Intervallo di indicazio-neda -990 g a 5000 g
Step di visualizzazione 5g
Unità di visualizzazione in libbre
Intervallo di indicazio-neda -2,20 lb a 11,00 lb
Step di visualizzazione 0,01lb
Consiglio:È possibile modificare le
unità di visualizzazione della bilancia
in qualunque momento.
→"Modifica delle unità di visualizza-
zione della bilancia", Pagina96
Pesare gli ingredienti
Condizioni indispensabili
¡ Viene utilizzata la ciotola o viene
applicato un accessorio.
¡ La manopola si trova su .
¡ La spina di alimentazione è inseri-
ta.
1. Premere e non toccare più l'ap-
parecchio.
a La bilancia si tara.
a Il display indica "----".
2. Attendere la taratura.
a Il display indica "0g" o "0.00lb".
3. Versare l'ingrediente desiderato.
a Il display indica il peso.
4. Per pesare altri ingredienti, selezio-
nare una delle seguenti opzioni:
‒ Aggiungere gli altri ingredienti e
leggere il peso complessivo.
‒ Premere e attendere finché il
display non mostra "0g" o
"0.00lb".
95
Page 96

it Timer
5. Per spegnere la bilancia, premere
o avviare la lavorazione.
Consiglio:Utilizzare la bilancia anche in combinazione con l'accessorio. Pesare gli ingredienti direttamente durante il versamento, ad es. nel
kit mixer o nella gelatiera.
Nota:La bilancia si spegne automaticamente dopo circa 3minuti di inattività.
Modifica delle unità di visualizzazione della bilancia
Condizioni indispensabili
¡ La manopola si trova su .
¡ La bilancia è attivata.
1. Premere e mantenere premuti e
.
L'unità di indicazione sulla bilancia
cambia.
Simbolo Unità
Indicazione in grammi
Indicazione in libbre
2. Rilasciare idue pulsanti.
a La bilancia si calibra e si riavvia
con l'impostazione modificata.
a L'impostazione è memorizzata.
Timer
Timer
Timer
È possibile rilevare o ripristinare la
durata di lavorazione attuale.
Valori di visualizzazione del timer
Durante l'utilizzo del timer osservare i
seguenti valori.
Intervallo di indicazio-ne0secondi fino a
59minuti e 59secondi
Step di visualizzazione 1secondo
Lettura e ripristino della durata di lavorazione
1. Riportare la manopola alla velocità
desiderata.
a Il display indica la durata di lavora-
zione.
2. Premere per ripristinare la visua-
lizzazione su "00:00".
Note
¡ Se la lavorazione viene interrotta
per meno di 30secondi, gli ultimi
valori visualizzati rimangono memorizzati e vengono applicati durante la nuova lavorazione.
¡ Se la lavorazione viene interrotta
per oltre 30secondi, l'apparecchio
attiva la bilancia e si tara.
Pulizia e cura
Pulizia e cura
Pulizia e cura
Per mantenere a lungo l'apparecchio
in buone condizioni, sottoporlo a una
cura e a una manutenzione scrupolose.
Detergenti
Di seguito sono indicati i detersivi
adatti per l'apparecchio.
ATTENZIONE!
L'apparecchio può essere danneggiato se non viene lavato correttamente o se viene utilizzato un detergente non idoneo.
▶
Non impiegare detergenti a base
di alcol.
▶
Non utilizzare oggetti taglienti, appuntiti o metallici.
▶
Non usare panni o detergenti abrasivi.
▶
Pulire il pannello dei comandi e il
display solo con un panno in microfibra umido.
96
Page 97

Accessori speciali it
Panoramica per la pulizia
Di seguito è riportata una panoramica per una pulizia ottimale dell'apparecchio e dei componenti.
→Fig.
26
Consiglio:Durante la lavorazione,
per es. di carote, sulle parti di plastica si possono formare macchie colorate. Rimuovere le macchie con un
panno morbido e alcune gocce di
olio da cucina.
Accessori speciali
Accessori speciali
Accessori speciali
Gli accessori si possono acquistare
presso il servizio clienti, i rivenditori
specializzati o su Internet. Utilizzare
solo gli accessori originali, i quali sono stati progettati appositamente per
l'apparecchio.
"Gli accessori sono specifici dell'apparecchio. Al momento dell'acquisto
indicare sempre il codice prodotto
preciso (E-Nr.) dell'apparecchio."
→Pagina103
Per conoscere gli accessori disponibili per il proprio apparecchio consultare il catalogo, il punto vendita online o il servizio clienti.
www.bosch-home.com
Ricette
Ricette
Ricette
Qui è riportata una selezione di ricette elaborate appositamente per l'apparecchio.
Consigli
¡ Rispettare le quantità di lavorazio-
ne massime indicate per ottenere
risultati ottimali.
¡ Gli ingredienti possono essere pe-
sati durante il versamento con la
bilancia integrata.
→"Bilancia", Pagina95
¡ Il timer consente di monitorare i
tempi di lavorazione.
→"Timer", Pagina96
Ricettario
Questa panoramica riporta gli ingredienti e le fasi di lavorazione delle diverse
ricette.
Ricetta Ingredienti Lavorazione
Panna montata 100-600g di panna ¡ Inserire la frusta per montare.
¡ Versare la panna.
¡ Lavorare 1½-4minuti alla veloci-
tà7.
Albumi 1-8 albumi (a temperatura ambiente) ¡ Inserire la frusta per montare.
¡ Versare l'albume.
¡ Lavorare 4-6minuti alla velocità7.
97
Page 98

it Ricette
Ricetta Ingredienti Lavorazione
Pasta biscotto ¡ 2 uova
¡ 2-3cucchiai di acqua calda
¡ 100g di zucchero
¡ 1cucchiaio di zucchero vanigliato
¡ 70g di farina (setacciata)
¡ 70g di fecola
¡ Lievito in polvere (a piacere)
¡ Inserire la frusta per montare.
¡ Versare tutti gli ingredienti tranne la
farina e la fecola.
¡ Lavorare 4-6minuti alla velocità7.
¡ Portare sulla velocità1.
¡ Entro 30-60secondi versare la fari-
na e la fecola con il cucchiaio.
Nota:Lavorare contemporaneamente
2 volte max la quantità.
Impasto di base
per dolci
¡ 6 uova
¡ 500g di zucchero
¡ 1pizzico di sale
¡ 2cucchiaio di zucchero vanigliato o
scorza grattugiata di mezzo limone
¡ 500g di margarina o burro (a tem-
peratura ambiente)
¡ 1000g di farina
¡ 15g di lievito in polvere
¡ 250ml di latte
Nota:Lavorare contemporaneamente
max 1 volte la quantità.
¡ Inserire la frusta per mescolare.
¡ Aggiungere uova, sale, zucchero e
zucchero vanigliato o scorza di limone grattugiata.
¡ Lavorare 10secondi alla velocità1.
¡ Successivamente lavorare 2minuti
alla velocità5.
¡ Aggiungere il burro e lavorare
60secondi alla velocità3.
¡ Aggiungere la farina e il lievito in
polvere e lavorare 2minuti alla velocità1.
¡ Portare sulla velocità3.
¡ Aggiungere il latte entro 2minuti.
Pasta frolla ¡ 125g di burro
¡ 100-125g di zucchero
¡ 1 uovo
¡ 1 pizzico di sale
¡ Un poco di scorza di limone grattu-
giata o zucchero vanigliato
¡ 250g di farina
¡ Lievito in polvere (a piacere)
Nota:Lavorare contemporaneamente
¡ Inserire la frusta per mescolare.
¡ Versare tutti gli ingredienti.
¡ Lavorare 30secondi alla velocità1.
¡ Lavorare 2-3minuti alla velocità6.
A partire da 500g di farina:
¡ Inserire il gancio per impastare.
¡ Versare tutti gli ingredienti.
¡ Lavorare 30secondi alla velocità1.
¡ Lavorare 3-4minuti alla velocità3.
2 volte max la quantità.
98
Page 99

Ricetta Ingredienti Lavorazione
Pasta lievitata ¡ 500g di farina
¡ 1 uovo
¡ 80g di burro (a temperatura am-
biente)
¡ Inserire il gancio per impastare.
¡ Versare tutti gli ingredienti.
¡ Lavorare 30secondi alla velocità1.
¡ Lavorare 3-6minuti alla velocità3.
¡ 80g di zucchero
¡ 200-250ml di latte tiepido
¡ 25g di lievito fresco o 1cucchiaio
di lievito secco.
¡ Scorza grattugiata di mezzo limone
¡ 1 pizzico di sale
Nota:Lavorare contemporaneamente
max 2 volte la quantità.
Pasta ¡ 300g di farina
¡ 150g di uova (ca. 3uova)
¡ 15-30ml di acqua fredda (a piace-
¡ Inserire il gancio per impastare.
¡ Versare tutti gli ingredienti.
¡ Lavorare 3-5minuti alla velocità3.
re)
Nota:Lavorare contemporaneamente
1½ volte max la quantità.
Pasta per il pane ¡ 1000g di farina
¡ 2cucchiaio di lievito secco
¡ 2cucchiaino di sale
¡ 660ml di acqua tiepida
¡ Inserire il gancio per impastare.
¡ Versare tutti gli ingredienti.
¡ Lavorare 30secondi alla velocità1.
¡ Lavorare 4-5minuti alla velocità3.
Nota:Lavorare contemporaneamente
max 1 volte la quantità.
Ricette it
99
Page 100

it Sistemazione guasti
Sistemazione guasti
Sistemazione guasti
Sistemazione guasti
I guasti minori possono essere sistemati autonomamente dall'utente. Utilizzare
le informazioni per la sistemazione dei guasti prima di contattare il servizio di
assistenza clienti. In questo modo si evitano costi non necessari.
AVVERTENZA
Pericolo di scossa elettrica!
Gli interventi di riparazione effettuati in modo non appropriato rappresentano
una fonte di pericolo.
▶
Solo il personale adeguatamente specializzato e formato può eseguire riparazioni sull'apparecchio.
▶
Per la riparazione dell'apparecchio possono essere impiegati soltanto pezzi
di ricambio originali.
▶
Al fine di evitare pericoli, se il cavo di alimentazione di questo apparecchio
subisce danni deve essere sostituito dal produttore, dal suo servizio di assistenza clienti o da persona in possesso di simile qualifica.
Anomalie di funzionamento
Anomalia Causa Eliminazione dell'anomalia
L'apparecchio non funziona. La spina non è inserita nella
rete elettrica.
Il fusibile è difettoso.
Alimentazione di corrente
guasta.
L'apparecchio non avvia la
lavorazione.
L'apparecchio non avvia la
lavorazione o si spegne durante la lavorazione.
Manopola non impostata
correttamente.
Quantità di lavorazione eccessiva o durata di lavorazione eccessiva.
L'apparecchio o l'accessorio
è bloccato.
La bilancia non indica variazioni di peso, nonostante siano stati aggiunti ingredienti.
La quantità di ingredienti è al
di sotto dell'intervallo di misurazione della bilancia.
▶
Collegare l'apparecchio alla rete
elettrica.
▶
Controllare il fusibile nella scatola
corrispondente.
▶
Verificare che l'illuminazione interna o altri apparecchi nel locale funzionino correttamente.
▶
Prima della lavorazione portare la
manopola su .
▶
Portare la manopola su .
▶
Ridurre la quantità di ingredienti.
▶
Lasciare raffreddare l’apparecchio
a temperatura ambiente.
▶
Portare la manopola su .
▶
Rimuovere il blocco.
▶
Versare almeno 5g o 0,01lb per la
corretta visualizzazione dei valori
sulla bilancia.
100
 Loading...