

Page 1
ςТЎϩХʉ ЌТϾϦφЍʉ ʌμВТЎϺυ
ΖЎϩʉ ˒μВЖЙʉʓ ИͳϞφЁʑ
OBJ_BUCH-2853-001.book Page 1 Monday, January 16, 2017 1:36 PM
Robert Bosch Power Tools GmbH
70538 Stuttgart
GERMANY
www.bosch-pt.com
GOP 12V-28 Professional
1 609 92A 2LW (2017.01) T / 302
de Originalbetriebsanleitung
en Original instructions
fr Notice originale
es Manual original
pt Manual original
it Istruzioni originali
nl Oorspronkelijke gebruiksaanwijzing
da Original brugsanvisning
sv Bruksanvisning i original
no Original driftsinstruks
fi Alkuperäiset ohjeet
el Πρωτότυπο οδηγιών χρήσης
tr Orijinal işletme talimatı
pl Instrukcja oryginalna
cs Původní návod k používání
sk Pôvodný návod na použitie
hu Eredeti használati utasítás
ru Оригинальное руководство по
эксплуатации
uk Оригінальна інструкція з
експлуатації
kk Пайдалану нұсқаулығының
түпнұсқасы
ro Instrucţiuni originale
bg Оригинална инструкция
mk Оригинално упатство за работа
sr Originalno uputstvo za rad
sl Izvirna navodila
hr Originalne upute za rad
et Algupärane kasutusjuhend
lv Instrukcijas oriģinālvalodā
lt Originali instrukcija
ko 사용 설명서 원본
ar
fa
Page 2

OBJ_BUCH-2853-001.book Page 2 Monday, January 16, 2017 1:56 PM
2 |
Deutsch. . . . . . . . . . . . . . . . . . . . . . . . . . . . . . . . . . . . . . . . . Seite 5
English . . . . . . . . . . . . . . . . . . . . . . . . . . . . . . . . . . . . . . . . . . Page 14
Français . . . . . . . . . . . . . . . . . . . . . . . . . . . . . . . . . . . . . . . . . Page 23
Español . . . . . . . . . . . . . . . . . . . . . . . . . . . . . . . . . . . . . . . . Página 32
Português . . . . . . . . . . . . . . . . . . . . . . . . . . . . . . . . . . . . . . Página 42
Italiano . . . . . . . . . . . . . . . . . . . . . . . . . . . . . . . . . . . . . . . . Pagina 51
Nederlands . . . . . . . . . . . . . . . . . . . . . . . . . . . . . . . . . . . . . Pagina 61
Dansk . . . . . . . . . . . . . . . . . . . . . . . . . . . . . . . . . . . . . . . . . . . Side 70
Svenska . . . . . . . . . . . . . . . . . . . . . . . . . . . . . . . . . . . . . . . . . Sida 78
Norsk. . . . . . . . . . . . . . . . . . . . . . . . . . . . . . . . . . . . . . . . . . . . Side 86
Suomi . . . . . . . . . . . . . . . . . . . . . . . . . . . . . . . . . . . . . . . . . . . Sivu 94
Ελληνικά . . . . . . . . . . . . . . . . . . . . . . . . . . . . . . . . . . . . . . . Σελίδα 103
Türkçe . . . . . . . . . . . . . . . . . . . . . . . . . . . . . . . . . . . . . . . . . . Sayfa 112
Polski . . . . . . . . . . . . . . . . . . . . . . . . . . . . . . . . . . . . . . . . . Strona 121
Česky . . . . . . . . . . . . . . . . . . . . . . . . . . . . . . . . . . . . . . . . . Strana 131
Slovensky . . . . . . . . . . . . . . . . . . . . . . . . . . . . . . . . . . . . . . Strana 139
Magyar . . . . . . . . . . . . . . . . . . . . . . . . . . . . . . . . . . . . . . . . . Oldal 149
Русский . . . . . . . . . . . . . . . . . . . . . . . . . . . . . . . . . . . . Страница 158
Українська . . . . . . . . . . . . . . . . . . . . . . . . . . . . . . . . . . . Сторінка 169
Қазақша . . . . . . . . . . . . . . . . . . . . . . . . . . . . . . . . . . . . . . . . . . Бет 179
Română. . . . . . . . . . . . . . . . . . . . . . . . . . . . . . . . . . . . . . . . Pagina 189
Български . . . . . . . . . . . . . . . . . . . . . . . . . . . . . . . . . . Страница 198
Македонски . . . . . . . . . . . . . . . . . . . . . . . . . . . . . . . . . . . Страна 208
Srpski . . . . . . . . . . . . . . . . . . . . . . . . . . . . . . . . . . . . . . . . . Strana 218
Slovensko . . . . . . . . . . . . . . . . . . . . . . . . . . . . . . . . . . . . . . . Stran 226
Hrvatski. . . . . . . . . . . . . . . . . . . . . . . . . . . . . . . . . . . . . . . Stranica 235
Eesti . . . . . . . . . . . . . . . . . . . . . . . . . . . . . . . . . . . . . . . . Lehekülg 243
Latviešu . . . . . . . . . . . . . . . . . . . . . . . . . . . . . . . . . . . . . . Lappuse 251
Lietuviškai. . . . . . . . . . . . . . . . . . . . . . . . . . . . . . . . . . . . . Puslapis 261
한국어 . . . . . . . . . . . . . . . . . . . . . . . . . . . . . . . . . . . . . . . . . . . . . . 페이지 269
. . . . . . . . . . . . . . . . . . . . . . . . . . . . . . . . 288
. . . . . . . . . . . . . . . . . . . . . . . . . . . . . . 298
. . . . . . . . . . . . . . . . . . . . . . . . . . . . . . . . . . . . . . . . . . . . . . . . I
1 609 92A 2LW | (16.1.17) Bosch Power Tools
Page 3

GOP 12V-28
15
14
13
2
3
4
4
5
6
12
11
11
12
16
10
8
9
1
7
OBJ_BUCH-2853-001.book Page 3 Monday, January 16, 2017 1:56 PM
3 |
1 609 92A 2LW | (16.1.17) Bosch Power Tools
Page 4
20
19
1814
17
Ø 22 mm:
2 608 000 572 (3 m)
2 608 000 568 (5 m)
GAS 55 M AFC
GAS 35 L SFC+
GAS 35 L AFC
GAS 35 M AFC
A
OBJ_BUCH-2853-001.book Page 4 Monday, January 16, 2017 1:56 PM
4 |
1 609 92A 2LW | (16.1.17) Bosch Power Tools
Page 5
OBJ_BUCH-2853-001.book Page 5 Monday, January 16, 2017 1:56 PM
Wenn der Betrieb des Elektrowerkzeuges in feuchter
Deutsch
Sicherheitshinweise
Allgemeine Sicherheitshinweise für Elektrowerkzeuge
WARNUNG
haltung der Sicherheitshinweise und Anweisungen können
elektrischen Schlag, Brand und/oder schwere Verletzungen
verursachen.
Bewahren Sie alle Sicherheitshinweise und Anweisungen
für die Zukunft auf.
Der in den Sicherheitshinweisen verwendete Begriff „Elektrowerkzeug“ bezieht sich auf netzbetriebene Elektrowerkzeuge
(mit Netzkabel) und auf akkubetriebene Elektrowerkzeuge
(ohne Netzkabel).
Arbeitsplatzsicherheit
Halten Sie Ihren Arbeitsbereich sauber und gut be-
leuchtet. Unordnung oder unbeleuchtete Arbeitsbereiche
können zu Unfällen führen.
Arbeiten Sie mit dem Elektrowerkzeug nicht in explo-
sionsgefährdeter Umgebung, in der sich brennbare
Flüssigkeiten, Gase oder Stäube befinden. Elektrowerk-
zeuge erzeugen Funken, die den Staub oder die Dämpfe
entzünden können.
Halten Sie Kinder und andere Personen während der
Benutzung des Elektrowerkzeugs fern. Bei Ablenkung
können Sie die Kontrolle über das Gerät verlieren.
Elektrische Sicherheit
Der Anschlussstecker des Elektrowerkzeuges muss in
die Steckdose passen. Der Stecker darf in keiner Weise
verändert werden. Verwenden Sie keine Adapterstecker gemeinsam mit schutzgeerdeten Elektrowerkzeugen. Unveränderte Stecker und passende Steckdosen ver-
ringern das Risiko eines elektrischen Schlages.
Vermeiden Sie Körperkontakt mit geerdeten Oberflä-
chen wie von Rohren, Heizungen, Herden und Kühlschränken. Es besteht ein erhöhtes Risiko durch elektri-
schen Schlag, wenn Ihr Körper geerdet ist.
Halten Sie Elektrowerkzeuge von Regen oder Nässe
fern. Das Eindringen von Wasser in ein Elektrowerkzeug
erhöht das Risiko eines elektrischen Schlages.
Zweckentfremden Sie das Kabel nicht, um das Elektro-
werkzeug zu tragen, aufzuhängen oder um den Stecker
aus der Steckdose zu ziehen. Halten Sie das Kabel fern
von Hitze, Öl, scharfen Kanten oder sich bewegenden
Geräteteilen. Beschädigte oder verwickelte Kabel erhö-
hen das Risiko eines elektrischen Schlages.
Wenn Sie mit einem Elektrowerkzeug im Freien arbei-
ten, verwenden Sie nur Verlängerungskabel, die auch
für den Außenbereich geeignet sind. Die Anwendung
eines für den Außenbereich geeigneten Verlängerungskabels verringert das Risiko eines elektrischen Schlages.
Lesen Sie alle Sicherheitshinweise und
Anweisungen. Versäumnisse bei der Ein-
Sicherheit von Personen
Seien Sie aufmerksam, achten Sie darauf, was Sie tun,
Tragen Sie persönliche Schutzausrüstung und immer
Vermeiden Sie eine unbeabsichtigte Inbetriebnahme.
Entfernen Sie Einstellwerkzeuge oder Schrauben-
Vermeiden Sie eine abnormale Körperhaltung. Sorgen
Tragen Sie geeignete Kleidung. Tragen Sie keine weite
Wenn Staubabsaug- und -auffangeinrichtungen mon-
Verwendung und Behandlung des Elektrowerkzeuges
Überlasten Sie das Gerät nicht. Verwenden Sie für Ihre
Benutzen Sie kein Elektrowerkzeug, dessen Schalter de-
Ziehen Sie den Stecker aus der Steckdose und/oder
Deutsch | 5
Umgebung nicht vermeidbar ist, verwenden Sie einen
Fehlerstromschutzschalter. Der Einsatz eines Fehler-
stromschutzschalters vermindert das Risiko eines elektrischen Schlages.
und gehen Sie mit Vernunft an die Arbeit mit einem
Elektrowerkzeug. Benutzen Sie kein Elektrowerkzeug,
wenn Sie müde sind oder unter dem Einfluss von Drogen, Alkohol oder Medikamenten stehen. Ein Moment
der Unachtsamkeit beim Gebrauch des Elektrowerkzeuges
kann zu ernsthaften Verletzungen führen.
eine Schutzbrille. Das Tragen persönlicher Schutzausrüstung, wie Staubmaske, rutschfeste Sicherheitsschuhe,
Schutzhelm oder Gehörschutz, je nach Art und Einsatz des
Elektrowerkzeuges, verringert das Risiko von Verletzungen.
Vergewissern Sie sich, dass das Elektrowerkzeug ausgeschaltet ist, bevor Sie es an die Stromversorgung und/
oder den Akku anschließen, es aufnehmen oder tragen.
Wenn Sie beim Tragen des Elektrowerkzeuges den Finger
am Schalter haben oder das Gerät eingeschaltet an die
Stromversorgung anschließen, kann dies zu Unfällen führen.
schlüssel, bevor Sie das Elektrowerkzeug einschalten.
Ein Werkzeug oder Schlüssel, der sich in einem drehenden
Geräteteil befindet, kann zu Verletzungen führen.
Sie für einen sicheren Stand und halten Sie jederzeit
das Gleichgewicht. Dadurch können Sie das Elektrowerk-
zeug in unerwarteten Situationen besser kontrollieren.
Kleidung oder Schmuck. Halten Sie Haare, Kleidung
und Handschuhe fern von sich bewegenden Teilen.
Lockere Kleidung, Schmuck oder lange Haare können von
sich bewegenden Teilen erfasst werden.
tiert werden können, vergewissern Sie sich, dass diese
angeschlossen sind und richtig verwendet werden. Ver-
wendung einer Staubabsaugung kann Gefährdungen
durch Staub verringern.
Arbeit das dafür bestimmte Elektrowerkzeug. Mit dem
passenden Elektrowerkzeug arbeiten Sie besser und
sicherer im angegebenen Leistungsbereich.
fekt ist. Ein Elektrowerkzeug, das sich nicht mehr ein- oder
ausschalten lässt, ist gefährlich und muss repariert werden.
entfernen Sie den Akku, bevor Sie Geräteeinstellungen
vornehmen, Zubehörteile wechseln oder das Gerät
weglegen. Diese Vorsichtsmaßnahme verhindert den
unbeabsichtigten Start des Elektrowerkzeuges.
Bosch Power Tools 1 609 92A 2LW | (16.1.17)
Page 6

OBJ_BUCH-2853-001.book Page 6 Monday, January 16, 2017 1:56 PM
6 | Deutsch
Bewahren Sie unbenutzte Elektrowerkzeuge außer-
Verwenden Sie das Elektrowerkzeug nur für Trocken-
halb der Reichweite von Kindern auf. Lassen Sie Personen das Gerät nicht benutzen, die mit diesem nicht vertraut sind oder diese Anweisungen nicht gelesen
haben. Elektrowerkzeuge sind gefährlich, wenn sie von
Achtung Brandgefahr! Vermeiden Sie eine Überhit-
unerfahrenen Personen benutzt werden.
Pflegen Sie Elektrowerkzeuge mit Sorgfalt. Kontrollie-
ren Sie, ob bewegliche Teile einwandfrei funktionieren
und nicht klemmen, ob Teile gebrochen oder so beschädigt sind, dass die Funktion des Elektrowerkzeuges beeinträchtigt ist. Lassen Sie beschädigte Teile vor
dem Einsatz des Gerätes reparieren. Viele Unfälle haben
ihre Ursache in schlecht gewarteten Elektrowerkzeugen.
Halten Sie Schneidwerkzeuge scharf und sauber.
Sorgfältig gepflegte Schneidwerkzeuge mit scharfen
Halten Sie die Hände vom Sägebereich fern. Greifen
Schneidkanten verklemmen sich weniger und sind leichter
zu führen.
Verwenden Sie Elektrowerkzeug, Zubehör, Einsatz-
Verwenden Sie geeignete Suchgeräte, um verborgene
werkzeuge usw. entsprechend diesen Anweisungen.
Berücksichtigen Sie dabei die Arbeitsbedingungen und
die auszuführende Tätigkeit. Der Gebrauch von Elektro-
werkzeugen für andere als die vorgesehenen Anwendungen kann zu gefährlichen Situationen führen.
Verwendung und Behandlung des Akkuwerkzeuges
Halten Sie das Elektrowerkzeug beim Arbeiten fest
Laden Sie die Akkus nur mit Ladegeräten auf, die vom
Hersteller empfohlen werden. Durch ein Ladegerät, das
für eine bestimmte Art von Akkus geeignet ist, besteht
Brandgefahr, wenn es mit anderen Akkus verwendet wird.
Verwenden Sie nur die dafür vorgesehenen Akkus in
Sichern Sie das Werkstück. Ein mit Spannvorrichtungen
den Elektrowerkzeugen. Der Gebrauch von anderen
Akkus kann zu Verletzungen und Brandgefahr führen.
Halten Sie den nicht benutzten Akku fern von Büro-
Öffnen Sie den Akku nicht. Es besteht die Gefahr eines
klammern, Münzen, Schlüsseln, Nägeln, Schrauben
oder anderen kleinen Metallgegenständen, die eine
Überbrückung der Kontakte verursachen könnten. Ein
Kurzschluss zwischen den Akkukontakten kann Verbrennungen oder Feuer zur Folge haben.
Bei Beschädigung und unsachgemäßem Gebrauch des
Bei falscher Anwendung kann Flüssigkeit aus dem
Akku austreten. Vermeiden Sie den Kontakt damit. Bei
zufälligem Kontakt mit Wasser abspülen. Wenn die
Flüssigkeit in die Augen kommt, nehmen Sie zusätzlich
Verwenden Sie den Akku nur in Verbindung mit Ihrem
ärztliche Hilfe in Anspruch. Austretende Akkuflüssigkeit
kann zu Hautreizungen oder Verbrennungen führen.
Service
Durch spitze Gegenstände wie z. B. Nagel oder Schrau-
Lassen Sie Ihr Elektrowerkzeug nur von qualifiziertem
Fachpersonal und nur mit Original-Ersatzteilen reparieren. Damit wird sichergestellt, dass die Sicherheit des
Elektrowerkzeuges erhalten bleibt.
Sicherheitshinweise für Akku-Multi-Cutter
Tragen Sie beim Wechsel der Einsatzwerkzeuge
Halten Sie das Gerät an den isolierten Griffflächen,
wenn Sie Arbeiten ausführen, bei denen das Einsatzwerkzeug verborgene Stromleitungen treffen kann.
Schaben Sie keine angefeuchteten Materialien (z.B.
Der Kontakt mit einer spannungsführenden Leitung kann
auch metallene Geräteteile unter Spannung setzen und zu
einem elektrischen Schlag führen.
schliff. Das Eindringen von Wasser in ein Elektrogerät
erhöht das Risiko eines elektrischen Schlages.
zung des Schleifgutes und des Schleifers. Entleeren
Sie vor Arbeitspausen stets den Staubbehälter. Schleif-
staub im Staubsack, Microfilter, Papiersack (oder im
Filtersack bzw. Filter des Staubsaugers) kann sich unter
ungünstigen Bedingungen, wie Funkenflug beim Schleifen
von Metallen, selbst entzünden. Besondere Gefahr
besteht, wenn der Schleifsta ub mit Lack-, Polyurethanresten oder anderen chemischen Stoffen vermischt ist und
das Schleifgut nach langem Arbeiten heiß ist.
Sie nicht unter das Werkstück. Bei Kontakt mit dem
Sägeblatt besteht Verletzungsgefahr.
Versorgungsleitungen aufzuspüren, oder ziehen Sie
die örtliche Versorgungsgesellschaft hinzu. Kontakt mit
Elektroleitungen kann zu Feuer und elektrischem Schlag
führen. Beschädigung einer Gasleitung kann zur Explosion
führen. Eindringen in eine Wasserleitung verursacht Sachbeschädigung.
mit beiden Händen und sorgen Sie für einen sicheren
Stand. Das Elektrowerkzeug wird mit zwei Händen siche-
rer geführt.
oder Schraubstock festgehaltenes Werkstück ist sicherer
gehalten als mit Ihrer Hand.
Kurzschlusses.
Schützen Sie den Akku vor Hitze, z. B. auch vor
dauernder Sonneneinstrahlung, Feuer, Wasser
und Feuchtigkeit. Es besteht Explosionsgefahr.
Akkus können Dämpfe austreten. Führen Sie Frischluft
zu und suchen Sie bei Beschwerden einen Arzt auf. Die
Dämpfe können die Atemwege reizen.
Bosch Elektrowerkzeug. Nur so wird der Akku vor gefährlicher Überlastung geschützt.
benzieher oder durch äußere Krafteinwirkung kann der
Akku beschädigt werden. Es kann zu einem internen
Kurzschluss kommen und der Akku brennen, rauchen,
explodieren oder überhitzen.
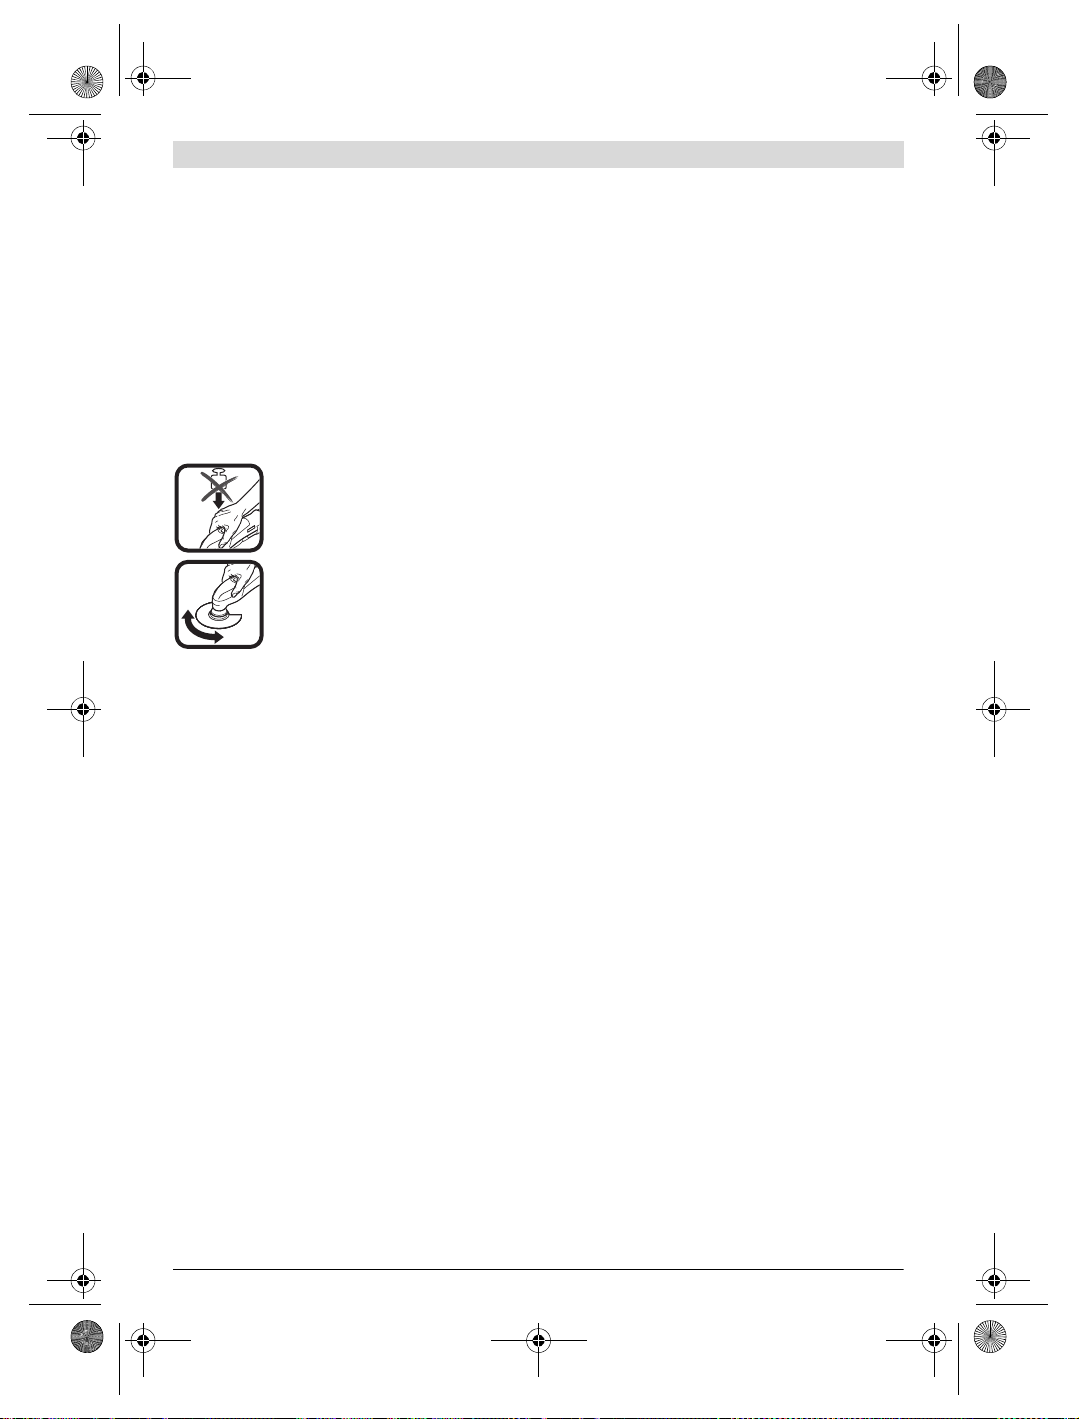
Schutzhandschuhe. Einsatzwerkzeuge werden bei längerem Gebrauch warm.
Tapeten) und nicht auf feuchtem Untergrund. Das Eindringen von Wasser in ein Elektrowerkzeug erhöht das
Risiko eines elektrischen Schlages.
1 609 92A 2LW | (16.1.17) Bosch Power Tools
Page 7
OBJ_BUCH-2853-001.book Page 7 Monday, January 16, 2017 1:56 PM
Behandeln Sie die zu bearbeitende Fläche nicht mit
lösungsmittelhaltigen Flüssigkeiten. Durch die Erwär-
mung der Werkstoffe beim Schaben können giftige
Dämpfe entstehen.
Seien Sie beim Umgang mit dem Schaber besonders
vorsichtig. Das Werkzeug ist sehr scharf, es besteht Ver-
letzungsgefahr.
Produkt- und Leistungsbeschreibung
Lesen Sie alle Sicherheitshinweise und Anweisungen. Versäumnisse bei der Einhaltung
der Sicherheitshinweise und Anweisungen
Technische Daten
Akku-Multi-Cutter GOP 12V-28
Sachnummer
Nennspannung
Leerlaufdrehzahl n
Oszillationswinkel links/rechts
Gewicht entsprechend
EPTA-Procedure 01:2014
erlaubte Umgebungstemperatur
–beim Laden
– beim Betrieb
können elektrischen Schlag, Brand und/oder
schwere Verletzungen verursachen.
empfohlene Akkus GBA 10,8V...
Bitte klappen Sie die Aufklappseite mit der Darstellung des
Elektrowerkzeugs auf, und lassen Sie diese Seite aufgeklappt,
während Sie die Betriebsanleitung lesen.
empfohlene Ladegeräte
Bestimmungsgemäßer Gebrauch
Das Elektrowerkzeug ist bestimmt zum Sägen und Trennen
von Holzwerkstoffen, Kunststoff, Gips, Nichteisen-Metallen
und Befestigungselementen (z.B. ungehärteten Nägeln,
Klammern). Es ist ebenso geeignet zum Bearbeiten von weichen Wandfliesen sowie zum trockenen Schleifen und Schaben kleiner Flächen. Es ist besonders zum randnahen und
bündigen Arbeiten geeignet. Das Elektrowerkzeug darf ausschließlich mit Bosch-Zubehör betrieben werden.
Abgebildete Komponenten
Die Nummerierung der abgebildeten Komponenten bezieht sich
auf die Darstellung des Elektrowerkzeuges auf der Grafikseite.
1 Ein-/Ausschalter
2 Akku-Entriegelungstaste
3 Akku
4 Lüftungsschlitze
5 Stellrad Schwingzahlvorwahl
6 Akku-Ladezustandsanzeige
7 Werkzeugaufnahme
8 Spannhebel des Tiefenanschlags
9 Tiefenanschlag
10 Tauchsägeblatt *
11 Innensechskantschraube
12 Innensechskantschlüssel
13 Handgriff (isolierte Grifffläche)
14 Staubabsaugung *
15 Schleifplatte *
16 Schleifblatt *
17 Spannhebel der Staubabsaugung
18 Absaugstutzen *
19 Absaugadapter *
20 Absaugschlauch *
*Abge bildetes oder beschriebenes Zubehör gehört nicht zum
Standard-Lieferumfang. Das vollständige Zubehör finden Sie in
unserem Zubehörprogramm.
1) abhängig vom verwendeten Akku
2) eingeschränkte Leistung bei Temperaturen < 0 ° C
Technische Daten ermittelt mit Akku aus Lieferumfang.
Geräusch-/Vibrationsinformation
Geräuschemissionswerte ermittelt entsprechend
EN 60745-2-4.
Der A-bewertete Geräuschpegel des Elektrowerkzeugs beträgt typischerweise: Schalldruckpegel 79 dB(A); Schallleistungspegel 90 dB(A). Unsicherheit K =3 dB.
Gehörschutz tragen!
Schwingungsgesamtwerte a
gen) und Unsicherheit K ermittelt entsprechend
EN 60745-2-4:
Schleifen: a
Sägen mit Tauchsägeblatt: a
Sägen mit Segmentsägeblatt: a
Schaben: a
Der in diesen Anweisungen angegebene Schwingungspegel
ist entsprechend einem in EN 60745 genormten Messverfahren gemessen worden und kann für den Vergleich von
Elektrowerkzeugen miteinander verwendet werden. Er eignet sich auch für eine vorläufige Einschätzung der Schwingungsbelastung.
Der angegebene Schwingungspegel repräsentiert die hauptsächlichen Anwendungen des Elektrowerkzeugs. Wenn
allerdings das Elektrowerkzeug für andere Anwendungen,
mit unterschiedlichen Zubehören, mit abweichenden Einsatzwerkzeugen oder ungenügender Wartung eingesetzt
wird, kann der Schwingungspegel abweichen. Dies kann die
Schwingungsbelastung über den gesamten Arbeitszeitraum
deutlich erhöhen.
rung
=2,9m/s2, K= 1,5 m/s2,
h
=8,3m/s2, K= 1,5 m/s2.
h
0
2)
und bei Lage-
Deutsch | 7
3 601 HB5 0..
V= 12
min–15000–20000
°1,4
1)
kg 0,97– 1,2
°C
°C
0...+45
–20...+50
GBA 12V...
GBA 12V... W
GAL 11.. CV
GAL 12.. CV
GAL 18... W
(Vektorsumme dreier Richtun-
h
=9,2m/s2, K= 1,5 m/s2,
h
=2,5m/s2, K= 1,5 m/s2,
h
Bosch Power Tools 1 609 92A 2LW | (16.1.17)
Page 8
OBJ_BUCH-2853-001.book Page 8 Monday, January 16, 2017 1:56 PM
8 | Deutsch
Für eine genaue Abschätzung der Schwingungsbelastung
sollten auch die Zeiten berücksichtigt werden, in denen das
Gerät abgeschaltet ist oder zwar läuft, aber nicht tatsächlich
im Einsatz ist. Dies kann die Schwingungsbelastung über den
gesamten Arbeitszeitraum deutlich reduzieren.
Legen Sie zusätzliche Sicherheitsmaßnahmen zum Schutz
des Bedieners vor der Wirkung von Schwingungen fest wie
zum Beispiel: Wartung von Elektrowerkzeug und Einsatzwerkzeugen, Warmhalten der Hände, Organisation der
Arbeitsabläufe.
Montage
LED Kapazität
Dauerlicht 3 x Grün ≥2/3
Dauerlicht 2 x Grün ≥1/3
Dauerlicht 1 x Grün < 1/3
Blinklicht 1 x Grün Reserve
Blinklicht 3 x Grün leer
Leuchtet nach dem Einschalten keine LED, ist der Akku defekt
und muss ausgetauscht werden.
Werkzeugwechsel
Nehmen Sie den Akku vor allen Arbeiten am Elektro-
Akku laden
Benutzen Sie nur die in den technischen Daten aufge-
führten Ladegeräte. Nur diese Ladegeräte sind auf den
bei Ihrem Elektrowerkzeug verwendeten Li-Ionen-Akku
abgestimmt.
Hinweis: Der Akku wird teilgeladen ausgeliefert. Um die volle
Leistung des Akkus zu gewährleisten, laden Sie vor dem
ersten Einsatz den Akku vollständig im Ladegerät auf.
Der Li-Ionen-Akku kann jederzeit aufgeladen werden, ohne
die Lebensdauer zu verkürzen. Eine Unterbrechung des Ladevorganges schädigt den Akku nicht.
Akku entnehmen
Zur Entnahme des Akkus 3 drücken Sie die Entriegelungstasten 2 und ziehen den Akku nach hinten aus dem Elektrowerkzeug. Wenden Sie dabei keine Gewalt an.
Akku-Ladezustandsanzeige
Die drei grünen LEDs der Akku-Ladezustandsanzeige 6 zeigen
den Ladezustand des Akkus 3 an. Die Ladezustandsanzeige
leuchtet nur 5 Sekunden nach Inbetriebnahme.
Tragen Sie beim Werkzeugwechsel Schutzhandschu-
Einsatzwerkzeug auswählen
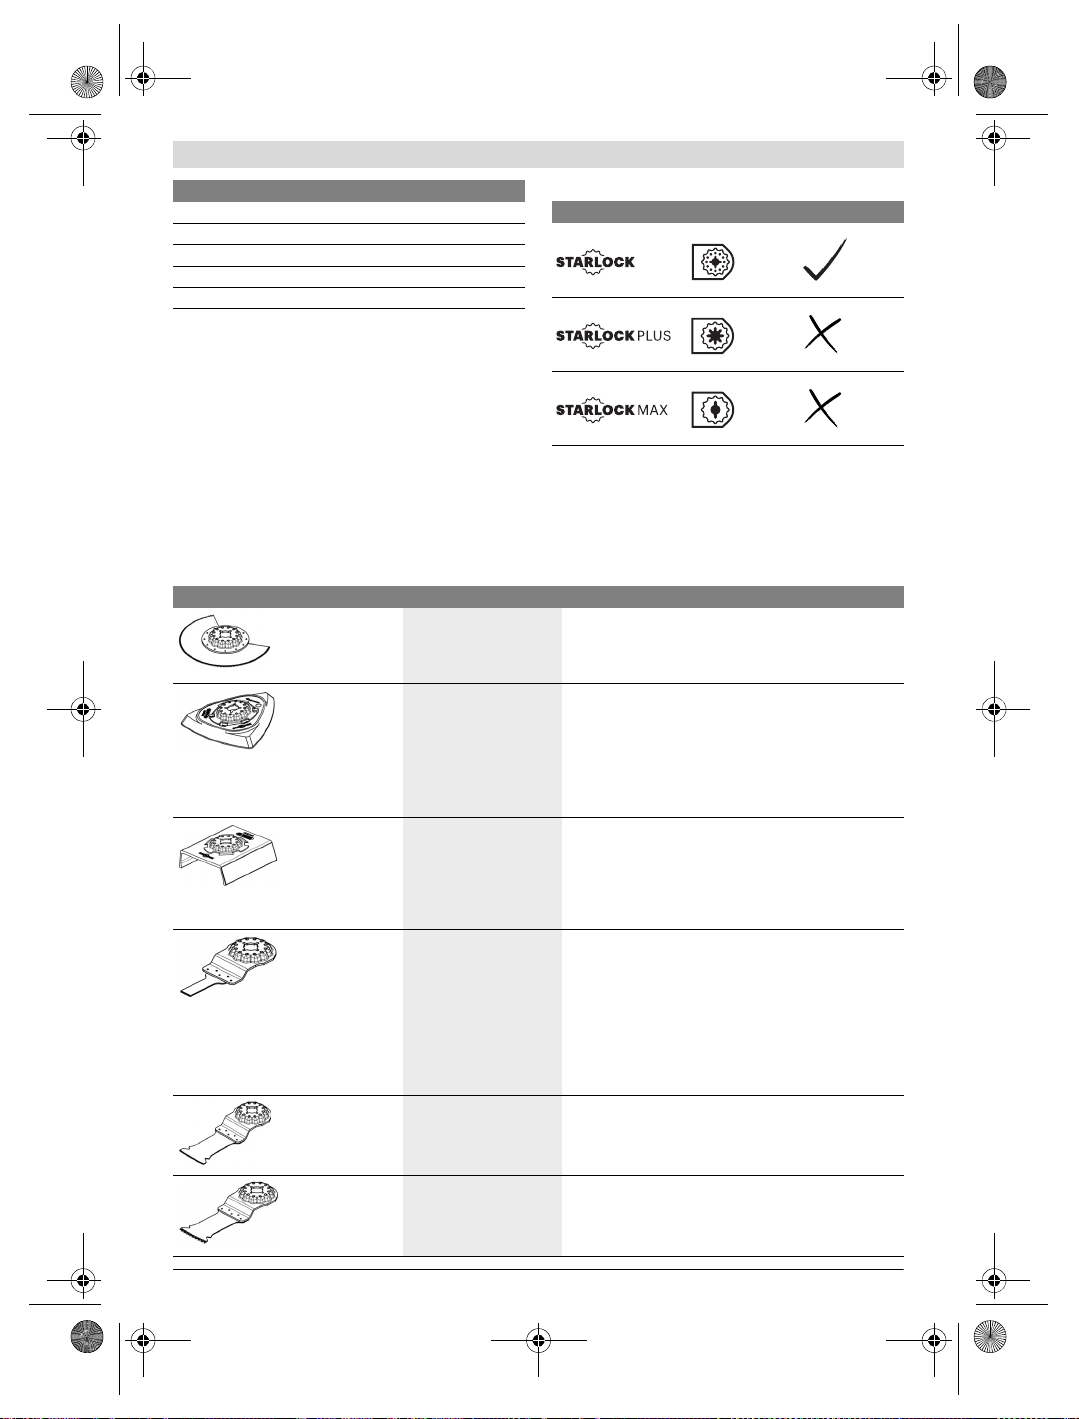
Einsatzwerkzeug GOP 12V-28
werkzeug (z.B. Wartung, Werkzeugwechsel etc.) sowie bei dessen Transport und Aufbewahrung aus dem
Elektrowerkzeug. Bei unbeabsichtigtem Betätigen des
Ein-/Ausschalters besteht Verletzungsgefahr.
he. Bei Berührung der Einsatzwerkzeuge besteht Verletzungsgefahr.
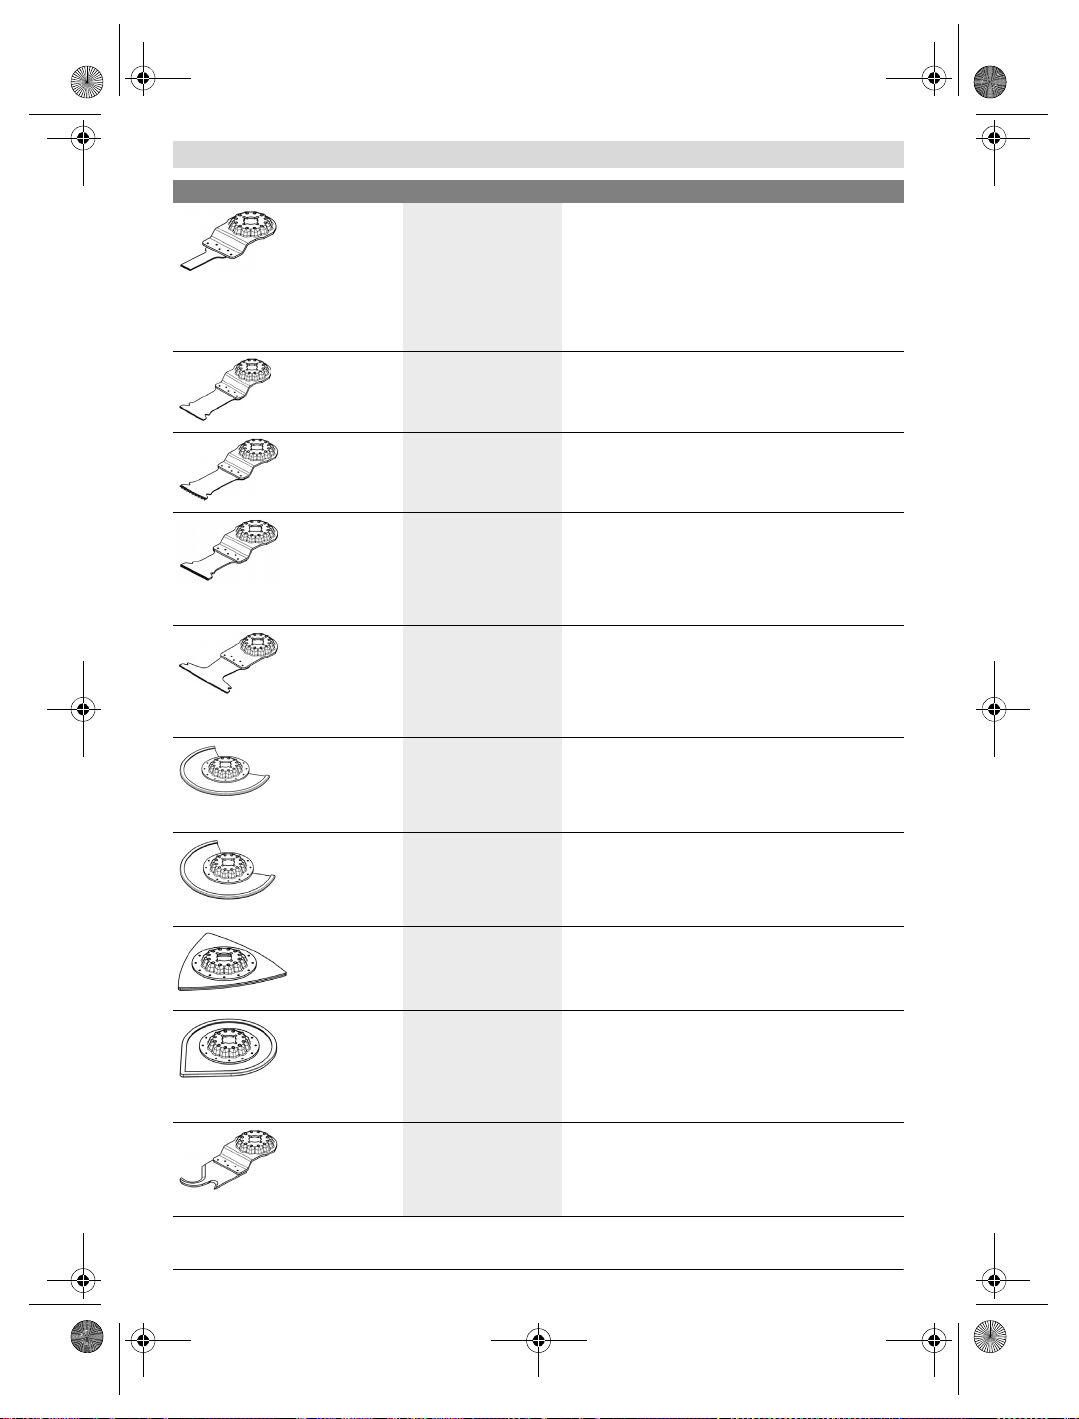
Die nachfolgende Tabelle zeigt Beispiele für Einsatzwerkzeuge. Weitere Einsatzwerkzeuge finden Sie im umfangreichen BoschZubehörprogramm.
Einsatzwerkzeug Material Anwendung
Bi-MetallSegmentsägeblatt
Schleifplatte für
Schleifblätter
Serie Delta 93 mm
Profilschleifer
1 609 92A 2LW | (16.1.17) Bosch Power Tools
Holzwerkstoffe,
Kunststoff,
Nichteisen-Metalle
abhängig vom Schleifblatt Flächenschleifen an Rändern, in Ecken oder schwer
Holz,
Rohre/Profile,
Farbe,
Lacke,
Füller,
Metall
Trenn- und Tauchsägeschnitte; auch zum randnahen
Sägen, in Ecken und schwer zugänglichen Bereichen;
Beispiel: bereits installierte Fußbodenleisten oder Türzargen kürzen, Tauchschnitte beim Anpassen von Bodenpaneelen
zugänglichen Bereichen;
je nach Schleifblatt z.B. zum Schleifen von Holz, Farbe,
Lack, Stein
Vliese zum Reinigen und für das Strukturieren von Holz,
Entrosten von Metall und zum Anschleifen von Lacken,
Polierfilz für das Vorpolieren
Komfortables und effizientes Schleifen von Profilen bis zu
einem Durchmesser von 55 mm;
rote Schleifblätter zum Schleifen von Holz,
Rohren/Profilen, Lacken, Füller und Metall
Page 9
OBJ_BUCH-2853-001.book Page 9 Monday, January 16, 2017 1:56 PM
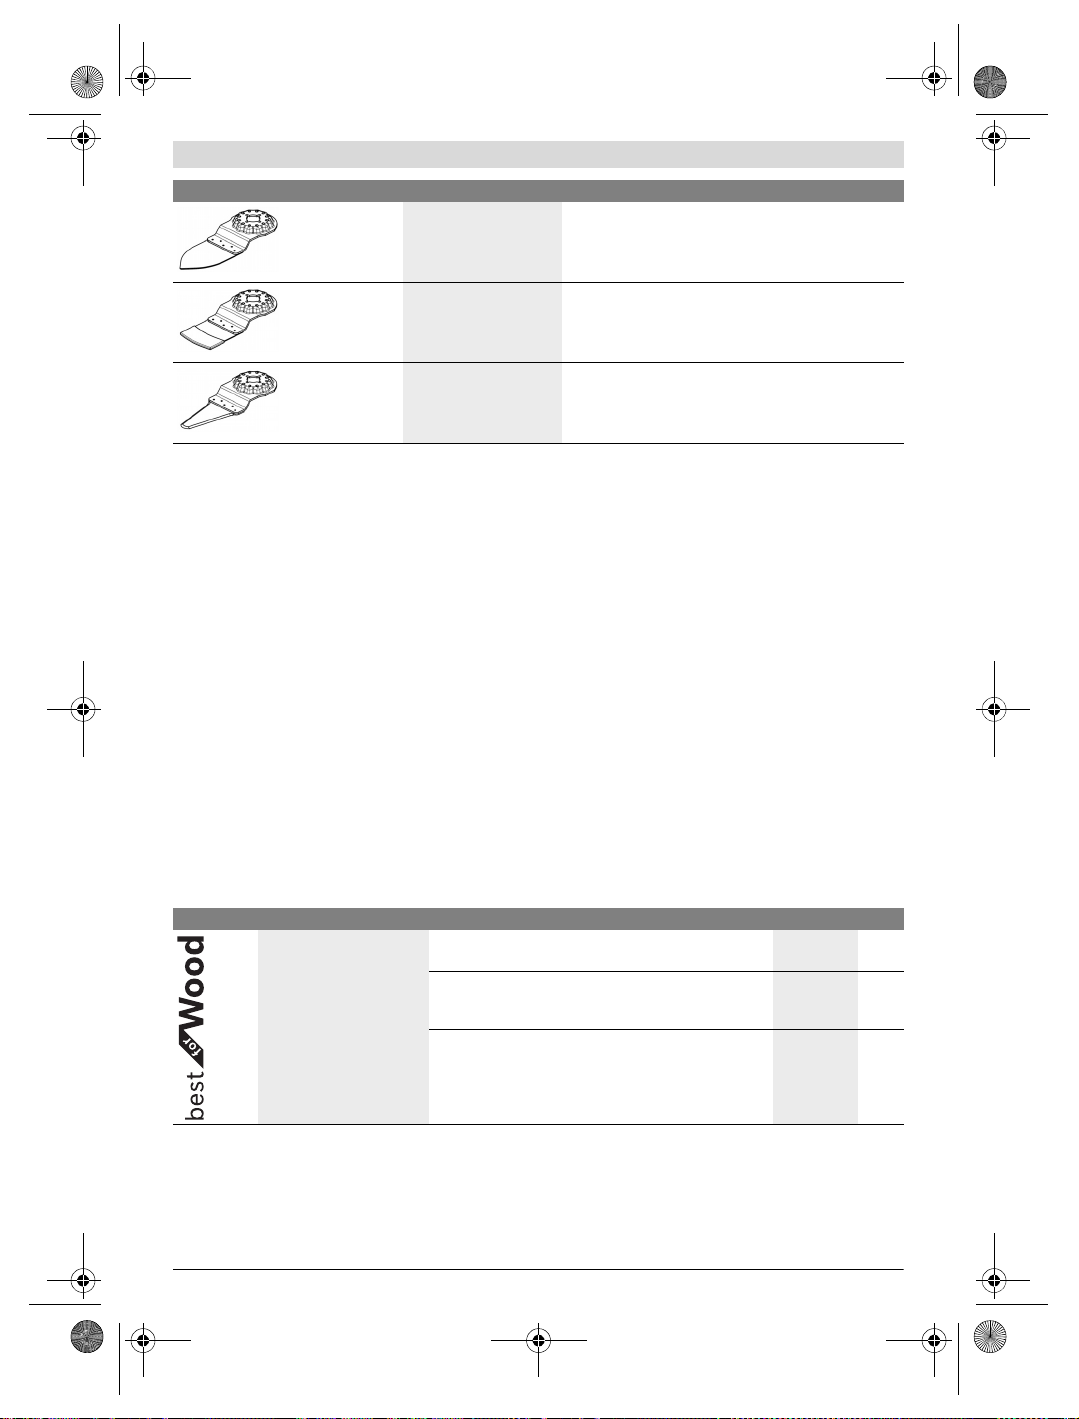
Einsatzwerkzeug Material Anwendung
Bi-Metall-Tauchsägeblatt Holz und
Metall
HCS-Tauchsägeblatt Holz
Weichholz,
weiche Kunststoffe,
Gipskarton,
dünnwandige Aluminiumund Buntmetallprofile,
dünne Bleche,
nichtgehärtete Nägel und
Schrauben
Holzwerkstoffe,
weiche Kunststoffe
Kleinere Trenn- und Tauchschnitte;
Beispiel: Aussparung für Steckdosen schneiden, Kupferrohr flächenbündig trennen, Tauchschnitte in Gipskartonplatten
Filigrane Anpassarbeiten in Holz;
Beispiel: Aussparungen für Schlösser und Beschläge nachsägen
Trenn- und tiefe Tauchsägeschnitte; auch zum randnahen
Sägen, in Ecken und schwer zugänglichen Bereichen;
Beispiel: schmaler Tauchschnitt in Massivholz für den Einbau eines Lüftungsgitters
Bi-Metall-Tauchsägeblatt Hartholz
Hartholz,
beschichtete Platten
Tauchschnitte in beschichtete Platten oder Hartholz;
Beispiel: Einbau von Dachfenstern
Deutsch | 9
HM-Tauchsägeblatt Metall
Bi-Metall-Tauchsägeblatt Holz und
Metall
HM-Riff-Segmentsägeblatt
Diamant-RiffSegmentsägeblatt
HM-Riff-Deltaplatte
HM-Riff-Mörtelentferner
HCS Multi-Messer
Metall,
stark abrasive Werkstoffe,
Fiberglas,
Gipskarton,
zementgebundene Faserplatten
Weichholz,
Hartholz,
furnierte Platten,
kunststoffbelegte Platten,
nichtgehärtete Nägel und
Schrauben
Zementfugen,
weiche Wandfliesen,
glasfaserverstärkte Kunststoffe,
Porenbeton
Zementfugen,
weiche Wandfliesen,
Epoxidharz,
glasfaserverstärkte Kunststoffe
Mörtel,
Betonreste,
Holz,
abrasive Materialien
Mörtel,
Fugen,
Epoxidharz,
glasfaserverstärkte Kunststoffe,
abrasive Materialien
Dachpappe,
Teppiche,
Kunstrasen,
Karton,
PVC-Boden
Tauchschnitte in stark abrasive Werkstoffe oder Metall;
Beispiel: Schneiden von Küchenfrontabdeckungen, einfaches Schneiden durch gehärtete Schrauben, Nägel und
rostfreien Stahl
Tauchschnitte in beschichtete Platten oder Hartholz;
Beispiel: Türzargen kürzen, Aussparungen für ein Tablar
Schneiden und Trennen im randnahen Bereich, in Ecken
oder schwer zugänglichen Bereichen;
Beispiel: Fugen zwischen Wandfliesen für Ausbesserungsarbeiten entfernen, Aussparungen in Fliesen, Gipsplatten
oder Kunststoffe schneiden
Präzises Ausfräsen und Trennen von Fliesen-/Fugenmaterial, Epoxidharzen und glasfaserverstärkten Kunststoffen;
Beispiel: Schneiden von kleineren Ausschnitten in weiche
Wandfliesen und Aussparungen in glasfaserverstärkten
Kunststoff fräsen
Raspeln und Schleifen auf hartem Untergrund;
Beispiel: Mörtel oder Fliesenkleber entfernen (z. B. beim
Austausch beschädigter Fliesen), Entfernen von Teppichkleberresten
Ausfräsen und Trennen von Fugen- und Fliesenmaterial
sowie Raspeln und Schleifen auf hartem Untergrund;
Beispiel: Fliesenkleber und Fugenmörtel entfernen
Schnelles und präzises Schneiden von weichem Material
und flexiblen abrasiven Werkstoffen;
Beispiel: Schneiden von Teppichen, Karton, PVC-Boden,
Dachpappe etc.
Bosch Power Tools 1 609 92A 2LW | (16.1.17)
Page 10

OBJ_BUCH-2853-001.book Page 10 Monday, January 16, 2017 1:56 PM
10 | Deutsch
Einsatzwerkzeug Material Anwendung
Schaber, starr
Teppiche,
Mörtel,
Beton,
Schaben auf hartem Untergrund;
Beispiel: Entfernen von Mörtel, Fliesenkleber, Beton- und
Teppichkleberresten
Fliesenkleber
Schaber, flexibel
Teppichkleber,
Farbreste,
Silikon
Flexibles Schaben auf weichem Untergrund;
Beispiel: Entfernen von Silikonfugen, Teppichkleber- und
Farbresten
Bi-MetallSegmentwellenschliffmesser
Isolationsmaterial,
Dämmplatten,
Bodenplatten,
Trittschall-Dämmplatten,
Karton,
Teppiche,
Gummi,
Leder
HM-Riff-Schleiffinger
HM-Riff-Tauchsägeblatt
Holz,
Farbe
Fiberglas,
Mörtel,
Holz
HCS-Universalfugenschneider
Dehnfugen,
Fensterkitt,
Dämmstoffe (Steinwolle)
Einsatzwerkzeug einsetzen
Setzen Sie das gewünschte Einsatzwerkzeug (z. B. Tauchsägeblatt 10) so auf die Werkzeugaufnahme 7, dass die Kröpfung nach unten zeigt (siehe Abbildung auf der Grafikseite,
Beschriftung des Einsatzwerkzeugs von oben lesbar).
Drehen Sie das Einsatzwerkzeug in eine für die jeweilige
Arbeit günstige Position und lassen Sie es in den Nocken der
Werkzeugaufnahme 7 einrasten. Dabei sind zwölf um 30°
versetzte Positionen möglich.
Befestigen Sie das Einsatzwerkzeug mit der Schraube 11.
Ziehen Sie die Schraube 11 mit dem Innensechskantschlüs-
sel 12 gut an.
Prüfen Sie das Einsatzwerkzeug auf festen Sitz. Falsch
oder nicht sicher befestigte Einsatzwerkzeuge können sich
während des Betriebs lösen und Sie gefährden.
Einsatzwerkzeug entnehmen
Zum Entnehmen des Einsatzwerkzeugs lösen Sie mit dem Innensechskantschlüssel 12 die Schraube 11 und nehmen das
Einsatzwerkzeug ab.
Präzises Schneiden von weichen Materialien;
Beispiel: Zuschneiden von Dämmplatten, flächenbündiges
Ablängen von überstehendem Isolationsmaterial
Schleifen von Holz oder Farbe an schwer zugänglichen
Stellen ohne Schleifpapier;
Beispiel: Abschleifen von Farbe zwischen Fensterladenlamellen, Schleifen von Holzböden in Ecken
Tauchschnitte in stark abrasive Werkstoffe;
Beispiel: Ausfräsen von dünnen Mosaikfliesen
Schneiden und Trennen von weichen Materialien;
Beispiel: Schneiden von Silikon-Dehnfugen oder Fensterkitt
Schleifblatt auf die Schleifplatte aufsetzen/wechseln
Die Schleifplatte 15 ist mit einem Klettgewebe ausgestattet,
damit Sie Schleifblätter mit Kletthaftung schnell und einfach
befestigen können.
Klopfen Sie das Klettgewebe der Schleifplatte 15 vor dem
Aufsetzen des Schleifblattes 16 aus, um eine optimale Haftung zu ermöglichen.
Setzen Sie das Schleifblatt 16 an einer Seite der Schleifplatte
15 bündig an, legen Sie das Schleifblatt anschließend auf die
Schleifplatte auf und drücken Sie es gut fest.
Achten Sie zur Gewährleistung einer optimalen Staubabsaugung darauf, dass die Ausstanzungen im Schleifblatt
mit den Bohrungen an der Schleifplatte übereinstimmen.
Zum Abnehmen des Schleifblattes 16 fassen Sie es an einer
Spitze und ziehen Sie es von der Schleifplatte 15 ab.
Sie können alle Schleifblätter, Polier- und Reinigungsvliese
der Serie Delta 93 mm des Bosch-Zubehörprogramms benutzen.
Schleifzubehöre wie Vlies/Polierfilz werden in gleicher Weise
auf der Schleifplatte befestigt.
1 609 92A 2LW | (16.1.17) Bosch Power Tools
Page 11
OBJ_BUCH-2853-001.book Page 11 Monday, January 16, 2017 1:56 PM
Deutsch | 11
Wahl des Schleifblattes
Entsprechend dem zu bearbeitenden Material und dem gewünschten Abtrag der Oberfläche sind unterschiedliche Schleifblätter
verfügbar:
Schleifblatt Material Anwendung Körnung
–Sämtliche Holzwerkstoffe
(z.B. Hartholz, Weichholz, Spanplatten, Bauplatten)
– Metallwerkstoffe
Zum Vorschleifen, z. B. von rauen, ungehobelten Balken
und Brettern
Zum Planschleifen und zum Ebnen kleinerer Unebenheiten mittel 80
Zum Fertig- und Feinschleifen von Holz
grob 40
fein 180
60
100
120
240
320
400
–Farbe
–Lack
– Füller
–Spachtel
Staub-/Späneabsaugung
Stäube von Materialien wie bleihaltigem Ans trich, einigen
Holzarten, Mineralien und Metall können gesundheitsschädlich sein. Berühren oder Einatmen der Stäube können allergische Reaktionen und/oder Atemwegserkrankungen des Benutzers oder in der Nähe bef indlicher Personen hervorrufen.
Bestimmte Stäube wie Eichen- oder Buchenstaub gelten als
krebserzeugend, besonders in Verbindung mit Zusatzstoffen
zur Holzbehandlung (Chromat, Holzschutzmittel). Asbesthaltiges Material darf nur von Fachleuten bearbeitet werden.
– Benutzen Sie möglichst eine für das Material geeignete
Staubabsaugung.
– Sorgen Sie für gute Belüftung des Arbeitsplatzes.
– Es wird empfohlen, eine Atemschutzmaske mit Filter-
klasse P2 zu tragen.
Beachten Sie in Ihrem Land gültige Vorschriften für die zu
bearbeitenden Materialien.
Vermeiden Sie Staubansammlungen am Arbeitsplatz.
Stäube können sich leicht entzünden.
Staubabsaugung anschließen (siehe Bild A)
Die Staubabsaugung 14 ist nur für Arbeiten mit der Schleifplatte 15 bestimmt, in Kombination mit anderen Einsatzwerkzeugen ist sie nicht von Nutzen.
Schließen Sie zum Schleifen immer eine Staubabsaugung an.
Nehmen Sie für die Montage der Staubabsaugung 14 (Zube-
hör) das Einsatzwerkzeug ab.
Setzen Sie gegebenenfalls die Teile der Staubabsaugung 14
wie im Bild gezeigt zusammen. Setzen Sie die montierte
Staubabsaugung an der Werkzeugaufnahme 7 auf das Elektrowerkzeug. Drehen Sie die Staubabsaugung so, dass die
Nocken der Staubabsaugung in den entsprechenden Aus-
Bosch Power Tools 1 609 92A 2LW | (16.1.17)
Zum Abschleifen von Farbe
Zum Schleifen von Vorstreichfarbe (z. B. Entfernen von Pinselstrichen, Farbtropfen und Laufnasen)
Zum Endschliff von Grundierungen vor der Lackierung
sparungen am Gehäuse einrasten. Befestigen Sie die Staubabsaugung wie im Bild gezeigt mit der Halteklammer 17 am
Elektrowerkzeug.
Achten Sie darauf, dass der Filzring 16 unbeschädigt ist und
dicht an der Schleifplatte 15 anliegt. Wechseln Sie einen beschädigten Filzring sofort aus.
Stecken Sie einen Absaugschlauch 20 (Zubehör) je nach
Ausführung entweder direkt auf den Absaugstutzen 18 oder
schneiden Sie Ihr altes Schlauchendstück ab, schrauben den
Absaugadapter 19 (Zubehör) auf das Schlauchende und
stecken ihn dann direkt auf den Absaugstutzen 18. Verbinden
Sie den Absaugschlauch 20 mit einem Staubsauger (Zubehör). Eine Übersicht zum Anschluss an verschiedene Staubsauger finden Sie auf der Aufklappseite.
Der Staubsauger muss für den zu bearbeitenden Werkstoff
geeignet sein.
Verwenden Sie beim Absaugen von besonders gesundheitsgefährdenden, krebserzeugenden oder trockenen Stäuben
einen Spezialsauger.
Betrieb
Inbetriebnahme
Akku einsetzen
Verwenden Sie nur original Bosch Li-Ionen-Akkus mit
der auf dem Typenschild Ihres Elektrowerkzeugs angegebenen Spannung. Der Gebrauch von anderen Akkus
kann zu Verletzungen und Brandgefahr führen.
Hinweis: Der Gebrauch von nicht für Ihr Elektrowerkzeug geeigneten Akkus kann zu Fehlfunktionen oder zur Beschädigung des Elektrowerkzeuges führen.
grob 40
60
mittel 80
100
120
fein 180
240
320
400
Page 12
OBJ_BUCH-2853-001.book Page 12 Monday, January 16, 2017 1:56 PM
12 | Deutsch
Setzen Sie den geladenen Akku 3 in den Griff ein, bis dieser
spürbar einrastet und bündig am Griff anliegt.
Ein-/Ausschalten
Zum Einschalten des Elektrowerkzeugs schieben Sie den Ein-/
Ausschalter 1 nach vorn, sodass am Schalter „I“ erscheint.
Zum Ausschalten des Elektrowerkzeugs schieben Sie den
Ein-/Ausschalter 1 nach hinten, sodass am Schalter „0“ erscheint.
Um Energie zu sparen, schalten Sie das Elektrowerkzeug nur
ein, wenn Sie es benutzen.
Der Li-Ionen-Akku ist durch die „Electronic Cell Protection
(ECP)“ gegen Tiefentladung geschützt. Bei entladenem Akku
wird das Elektrowerkzeug durch eine Schutzschaltung abgeschaltet: Das Einsatzwerkzeug bewegt sich nicht mehr.
Hinweis: Schaltet das Elektrowerkzeug automatisch wegen
des entladenen oder überhitzten Akkus ab, dan n schalten Sie
das Elektrowerkzeug mit dem Ein-/Ausschalter 1 aus. Laden
Sie den Akku bzw. lassen Sie ihn abkühlen, bevor Sie das
Elektrowerkzeug wieder einschalten. Der Akku kann sonst beschädigt werden.
Schwingzahl vorwählen
Mit dem Stellrad Schwingzahlvorwahl 5 können Sie die benötigte Schwingzahl auch während des Betriebes vorwählen.
Die erforderliche Schwingzahl ist vom Werkstoff und den
Arbeitsbedingungen abhängig und kann durch praktischen
Versuch ermittelt werden.
Arbeitshinweise
Nehmen Sie den Akku vor allen Arbeiten am Elektro-
werkzeug (z.B. Wartung, Werkzeugwechsel etc.)
sowie bei dessen Transport und Aufbewahrung aus
dem Elektrowerkzeug. Bei unbeabsichtigtem Betätigen
des Ein-/Ausschalters besteht Verletzungsgefahr.
Warten Sie, bis das Elektrowerkzeug zum Stillstand
gekommen ist, bevor Sie es ablegen.
Hinweis: Halten Sie die Lüftungsschlitze 4 des Elektrowerk-
zeugs beim Arbeiten nicht zu, da sonst die Lebensdauer des
Elektrowerkzeugs verringert wird.
Arbeitsprinzip
Durch den oszillierenden Antrieb schwingt das Einsatzwerkzeug bis zu 200 00 mal pro Minute um 2,8° hin und her. Das
ermöglicht präzises Arbeiten auf engstem Raum.
Arbeiten Sie mit geringem und gleichmäßigem Anpressdruck, sonst verschlechtert
sich die Arbeitsleistung und das Einsatzwerkzeug kann blockieren.
Bewegen Sie während des Arbeitens das
Elektrowerkzeug hin und her, damit das
Einsatzwerkzeug sich nicht zu stark erwärmt und nicht blockiert.
Sägen
Verwenden Sie nur unbeschädigte, einwandfreie Säge-
blätter. Verbogene oder unscharfe Sägeblätter können
brechen, den Schnitt negativ beeinflussen oder einen
Rückschlag verursachen.
Beachten Sie beim Sägen von Leichtbaustoffen die
gesetzlichen Bestimmungen und Empfehlungen der
Materialhersteller.
Verwenden Sie geeignete Suchgeräte, um verborgene
Versorgungsleitungen aufzuspüren, oder ziehen Sie
die örtliche Versorgungsgesellschaft hinzu. Kontakt mit
Elektroleitungen kann zu Feuer und elektrischem Schlag
führen. Beschädigung einer Gasleitung kann zur Explosion
führen. Eindringen in eine Wasserleitung verursacht Sachbeschädigung.
Es dürfen nur weiche Werkstoffe wie Holz, Gipskarton
o.Ä. im Tauchsägeverfahren bearbeitet werden!
Prüfen Sie vor dem Sägen mit HCS-Sägeblättern in Holz,
Spanplatten, Baustoffen etc. diese auf Fremdkörper wie
Nägel, Schrauben o. Ä. Entfernen Sie die Fremdkörper gegebenenfalls oder verwenden Sie Bi-Metall-Sägeblätter.
Trennen
Hinweis: Beachten Sie beim Trennen von Wandfliesen, dass
die Einsatzwerkzeuge bei längerem Gebrauch einem hohen
Verschleiß unterliegen.
Schleifen
Die Abtragsleistung und das Schliffbild werden im Wesentlichen durch die Wahl des Schleifblattes, die vorgewählte
Schwingzahlstufe und den Anpressdruck bestimmt.
Nur einwandfreie Schleifblätter bringen gute Schleifleistung
und schonen das Elektrowerkzeug.
Achten Sie auf gleichmäßigen Anpressdruck, um die Lebensdauer der Schleifblätter zu erhöhen.
Eine übermäßige Erhöhung des Anpressdruckes führt nicht zu
einer höheren Schleifleistung, sondern zu stärkerem Verschleiß des Elektrowerkzeuges und des Schleifblattes.
Zum punktgenauen Schleifen von Ecken, Kanten und schwer
zugänglichen Bereichen können Sie auch allein mit der Spitze
oder einer Kante der Schleifplatte arbeiten.
Beim punktuellen Schleifen kann sich das Schleifblatt stark
erwärmen. Reduzieren Sie Schwingzahl und Anpressdruck,
und lassen Sie das Schleifblatt regelmäßig abkühlen.
Benutzen Sie ein Schleifblatt, mit dem Metall bearbeitet
wurde, nicht mehr für andere Materialien.
Verwenden Sie nur original Bosch-Schleifzubehör.
Schließen Sie zum Schleifen immer eine Staubabsaugung an.
Schaben
Wählen Sie beim Schaben eine hohe Schwingzahlstufe.
Arbeiten Sie auf weichem Untergrund (z.B. Holz) in flachem
Winkel und mit geringem Anpressdruck. Der Spachtel kann
sonst in den Untergrund schneiden.
1 609 92A 2LW | (16.1.17) Bosch Power Tools
Page 13

OBJ_BUCH-2853-001.book Page 13 Monday, January 16, 2017 1:56 PM
Temperaturabhängiger Überlastschutz
Bei bestimmungsgemäßem Gebrauch kann das Elektrowerkzeug nicht überlastet werden. Bei zu starker Belastung oder
Verlassen des zulässigen Akkutemperaturbereiches wird die
Drehzahl reduziert oder das Elektrowerkzeug schaltet ab.
Bei reduzierter Drehzahl läuft das Elektrowerkzeug erst nach
Erreichen der zulässigen Akkutemperatur oder bei verringerter Belastung wieder mit voller Drehzahl. Bei automatischer
Abschaltung schalten Sie das Elektrowerkzeug aus, lassen
den Akku abkühlen und schalten das Elektrowerkzeug wieder ein.
Hinweise für den optimalen Umgang mit dem Akku
Schützen Sie den Akku vor Feuchtigkeit und Wasser.
Lagern Sie den Akku nur im Temperaturbereich von – 20 ° C
bis 50 °C. Lassen Sie den Akku z. B. im Sommer nicht im Auto
liegen.
Eine wesentlich verkürzte Betriebszeit nach der Aufladung
zeigt an, dass der Akku verbraucht ist und ersetzt werden
muss.
Beachten Sie die Hinweise zur Entsorgung.
Wartung und Service
Wartung und Reinigung
Nehmen Sie den Akku vor allen Arbeiten am Elektro-
werkzeug (z.B. Wartung, Werkzeugwechsel etc.) sowie bei dessen Transport und Aufbewahrung aus dem
Elektrowerkzeug. Bei unbeabsichtigtem Betätigen des
Ein-/Ausschalters besteht Verletzungsgefahr.
Halten Sie das Elektrowerkzeug und die Lüftungs-
schlitze sauber, um gut und sicher zu arbeiten.
Reinigen Sie Riff-Einsatzwerkzeuge (Zubehör) regelmäßig mit
einer Drahtbürste.
Kundendienst und Anwendungsberatung
Der Kundendienst beantwortet Ihre Fragen zu Reparatur und
Wartung Ihres Produkts sowie zu Ersatzteilen. Explosionszeichnungen und Informationen zu Ersatzteilen finden Sie
auch unter:
www.bosch-pt.com
Das Bosch-Anwendungsberatungs-Team hilft Ihnen gerne bei
Fragen zu unseren Produkten und deren Zubehör.
www.powertool-portal.de, das Internetportal für Handwerker und Heimwerker.
Geben Sie bei allen Rückfragen und Ersatzteilbestellungen
bitte unbedingt die 10-stellige Sachnummer laut Typenschild
des Produkts an.
Deutschland
Robert Bosch Power Tools GmbH
Servicezentrum Elektrowerkzeuge
Zur Luhne 2
37589 Kalefeld – Willershausen
Unter www.bosch-pt.de können Sie online Ersatzteile
bestellen oder Reparaturen anmelden.
Kundendienst: Tel.: (0711) 40040460
Fax: (0711) 40040461
E-Mail: Servicezentrum.Elektrowerkzeuge@de.bosch.com
Anwendungsberatung: Tel.: (0711) 40040460
Fax: (0711) 40040462
E-Mail: kundenberatung.ew@de.bosch.com
Österreich
Unter www.bosch-pt.at können Sie online Ersatzteile
bestellen.
Tel.: (01) 797222010
Fax: (01) 797222011
E-Mail: service.elektrowerkzeuge@at.bosch.com
Schweiz
Unter www.bosch-pt.com/ch/de können Sie online
Ersatzteile bestellen.
Tel.: (044) 8471511
Fax: (044) 8471551
E-Mail: Aftersales.Service@de.bosch.com
Luxemburg
Tel.: +32 2 588 0589
Fax: +32 2 588 0595
E-Mail: outillage.gereedschap@be.bosch.com
Transport
Die enthaltenen Li-Ionen-Akkus unterliegen den Anforderungen des Gefahrgutrechts. Die Akkus können durch den
Benutzer ohne weitere Auflagen auf der Straße transportiert
werden.
Beim Versand durch Dritte (z.B.: Lufttransport oder Spedition) sind besondere Anforderungen an Verpackung und
Kennzeichnung zu beachten. Hier muss bei der Vorbereitung
des Versandstückes ein Gefahrgut-Experte hinzugezogen
werden.
Versenden Sie Akkus nur, wenn das Gehäuse unbeschädigt
ist. Kleben Sie offene Kontakte ab und verpacken Sie den
Akku so, dass er sich nicht in der Verpackung bewegt.
Bitte beachten Sie auch eventuelle weiterführende nationale
Vorschriften.
Entsorgung
Werfen Sie Elektrowerkzeuge und Akkus/Batterien nicht in
den Hausmüll!
Nur für EU-Länder:
Deutsch | 13
Elektrowerkzeuge, Akkus, Zubehör und Verpackungen sollen einer umweltgerechten Wiederverwertung
zugeführt werden.
Gemäß der europäischen Richtlinie
2012/19/EU müssen nicht mehr gebrauchsfähige Elektrowerkzeuge und gemäß der
europäischen Richtlinie 2006/66/EG
müssen defekte oder verbrauchte Akkus/
Batterien getrennt gesammelt und einer
umweltgerechten Wiederverwendung zugeführt werden.
Bosch Power Tools 1 609 92A 2LW | (16.1.17)
Page 14

WARNING
OBJ_BUCH-2853-001.book Page 14 Monday, January 16, 2017 1:56 PM
14 | English
Nicht mehr gebrauchsfähige Akkus/Batterien können direkt
abgegeben werden bei:
Deutschland
Recyclingzentrum Elektrowerkzeuge
Osteroder Landstraße 3
37589 Kalefeld
Schweiz
Batrec AG
3752 Wimmis BE
Akkus/Batterien:
Li-Ion:
Bitte beachten Sie die Hinweise im
Abschnitt „Transport“, Seite 13.
Änderungen vorbehalten.
English
Safety Notes
General Power Tool Safety Warnings
Read all safety warnings and all instructions. Failure to follow the warnings and
instructions may result in electric shock, fire and/or serious
injury.
Save all warnings and instructions for future reference.
The term “power tool” in the warnings refers to your mainsoperated (corded) power tool or battery-opera ted (cordless)
power tool.
Work area safety
Keep work area clean and well lit. Cluttered or dark areas
invite accidents.
Do not operate power tools in explosive atmospheres,
such as in the presence of flammable liquids, gases or
dust. Power tools create sparks which may ig nite the dust
or fumes.
Keep children and bystanders away while operating a
power tool. Distractions can cause you to lose control.
Electrical safety
Power tool plugs must match the outlet. Never modify
the plug in any way. Do not use any adapter plugs with
earthed (grounded) power tools. Unmodified plugs and
matching outlets will reduce risk of electric shock.
Avoid body contact with earthed or grounded surfaces,
such as pipes, radiators, ranges and refrigerators.
There is an increased risk of electric shock if your body is
earthed or grounded.
Do not expose power tools to rain or wet conditions.
Water entering a power tool will increase the risk of electric
shock.
Do not abuse the cord. Never use the cord for carrying,
pulling or unplugging the power tool. Keep cord away
from heat, oil, sharp edges and moving parts. Damaged
or entangled cords increase the risk of electric shock.
When operating a power tool outdoors, use an exten-
sion cord suitable for outdoor use. Use of a cord s uitable
for outdoor use reduces the risk of electric shock.
If operating a power tool in a damp location is unavoid-
able, use a residual current device (RCD) protected
supply. Use of an RCD reduces the risk of electric shock.
Personal safety
Stay alert, watch what you are doing and use common
sense when operating a power tool. Do not use a power
tool while you are tired or under the influence of drugs,
alcohol or medication. A moment of inattention while op-
erating power tools may result in serious personal injury.
Use personal protective equipment. Al ways wear eye
protection. Protective equipment such as dust mask,
non-skid safety shoes, hard hat, or hearing protection used
for appropriate conditions will reduce personal injuries.
Prevent unintentional starting. Ensure the switch is in
the off-position before connecting to power source
and/or battery pack, picking up or carrying the tool.
Carrying power tools with your finger on the switch or
energising power tools that have the switch on invites
accidents.
Remove any adjusting key or wrench before turning
the power tool on. A wrench or a key left attached to a ro-
tating part of the power tool may result in personal injury.
Do not overreach. Keep proper footing and balance at
all times. This enables better control of the power tool in
unexpected situations.
Dress properly. Do not wear loose clothing or jewel-
lery. Keep your hair, clothing and gloves away from
moving parts. Loose clothes, jewellery or long hair can be
caught in moving parts.
If devices are provided for the connection of dust
extraction and collection facilities, ensure these are
connected and properly used. Use of dust collection can
reduce dust-related hazards.
Power tool use and care
Do not force the power tool. Use the correct power tool
for your application. The correct power tool will do the
job better and safer at the rate for which it was designed.
Do not use the power tool if the switch does not turn it
on and off. Any power tool that cannot be controlled with
the switch is dangerous and must be repaired.
Disconnect the plug from the power source and/or the
battery pack from the power tool before making any
adjustments, changing accessories, or storing power
tools. Such preventive safety measures reduce the risk of
starting the power tool accidentally.
Store idle power tools out of the reach of children and
do not allow persons unfamiliar with the power tool or
these instructions to operate the power tool. Power
tools are dangerous in the hands of untrained users.
1 609 92A 2LW | (16.1.17) Bosch Power Tools
Page 15
OBJ_BUCH-2853-001.book Page 15 Monday, January 16, 2017 1:56 PM
Maintain power tools. Check for misalignment or bind-
ing of moving parts, breakage of parts and any other
condition that may affect the power tool’s operation. If
damaged, have the power tool repaired before use.
Many accidents are caused by poorly maintained power
tools.
Keep cutting tools sharp and clean. Properly maintained
cutting tools with sharp cutting edges are less likely to bind
and are easier to control.
Use the power tool, accessories and tool bits etc. in
accordance with these instructions, taking into
account the working conditions and the work to be performed. Use of the power tool for operations different
from those intended could result in a hazardous situation.
Battery tool use and care
Recharge only with the charger specified by the manu-
facturer. A charger that is suitable for one type of battery
pack may create a risk of fire when used with another
battery pack.
Use power tools only with specifically designated
battery packs. Use of any other battery packs may create
a risk of injury and fire.
When battery pack is not in use, keep it away from
other metal objects, like paper clips, coins, keys, nail s,
screws or other small metal objects, that can make a
connection from one terminal to another. Shorting the
battery terminals together may cause burns or a fire.
Under abusive conditions, liquid may be ejected from
the battery; avoid contact. If contact accidentally
occurs, flush with water. If liquid contacts eyes, additionally seek medical help. Liquid ejected from the
battery may cause irritation or burns.
Service
Have your power tool serviced by a qualified repair
person using only identical replacement parts. This will
ensure that the safety of the power tool is maintained.
Safety Warnings for Cordless Multi-Cutters
Hold power tool by insulated gripping surfaces, when
performing an operation where the cutting accessory
may contact hidden wiring. Cutting accessory contacting
a “live” wire may make exposed metal parts of the power
tool “live” and could give the operator an electric shock.
Use the machine only for dry sanding. Penetration of
water into the machine increases the risk of an electric
shock.
Caution, fire hazard! Avoid overheating the object
being sanded as well as the sander. Always empty the
dust collector before taking breaks. In unfavourable
conditions, e. g., when sparks emit from sanding metals,
sanding debris in the dust bag, micro filter or paper sack
(or in the filter sack or filter of the vacuum cleaner) can
self-ignite. Particularly when mixed with remainders of varnish, polyurethane or other chemical materials and when
the sanding debris is hot after long periods of working.
Keep hands away from the sawing range. Do not reach
under the workpiece. Contact with the saw blade can
lead to injuries.
Use appropriate detectors to determine if utility lines
are hidden in the work area or call the local utility company for assistance. Contact with electric lines can lead
to fire and electric shock. Damaging a gas line can lead to
explosion. Penetrating a water line causes property damage.
When working with the machine, always hold it firmly
with both hands and provide for a secure stance. The
power tool is guided more secure with both hands.
Secure the workpiece. A workpiece clamped with clamp-
ing devices or in a vice is held more secure than by hand.
Do not open the battery. Danger of short-circuiting.
In case of damage and improper use of the battery,
vapours may be emitted. Ventilate the area and seek
medical help in case of complaints. The vapours can
irritate the respiratory system.
Use the battery only in conjunction with your Bosch
power tool. This measure alone protects the battery
against dangerous overload.
The battery can be damaged by pointed objects such as
nails or screwdrivers or by force applied externally. An
internal short circuit can occur and the battery can burn,
smoke, explode or overheat.
Wear protective gloves when changing application
tools/accessories. Application tools/accessories become
hot after prolonged usage.
Do not scrape wetted materials (e.g. wallpaper) or on
moist surfaces. Penetration of water into the machine
increases the risk of an electric shock.
Do not treat the surface to be worked with solvent-
containing fluids. Materials being warmed up by the
scraping can cause toxic vapours to develop.
Exercise extreme caution when handling the scraper.
The accessory is very sharp; danger of injury.
Product Description and
Specifications
While reading the operating instructions, unfold the graphics
page for the machine and leave it open.
Intended Use
The machine is intended for sawing and cutting wooden materials, plastic, gypsum, non-ferrous metals and fastening elements ( e. g., unha rdened nail s, staples) . It is also s uitable for
English | 15
Protect the battery against heat, e. g., against
continuous intense sunlight, fire, water, and
moisture. Danger of explosion.
Read all safety warnings and all instructions. Failure to follow the warnings and in-
structions may result in electric shock, fire
and/or serious injury.
Bosch Power Tools 1 609 92A 2LW | (16.1.17)
Page 16
OBJ_BUCH-2853-001.book Page 16 Monday, January 16, 2017 1:56 PM
16 | English
working soft wall tiles, as well as for dry sanding and scraping
of small surfaces. It is especially suitable for working close to
edges and for flush cutting. Operate the power tool exclusively with Bosch accessories.
Product Features
The numbering of the product features refers to the illustration of the machine on the graphics page.
1 On/Off switch
2 Battery unlocking button
3 Battery pack
4 Venting slots
5 Thumbwheel for orbit frequency preselection
6 Battery charge-control indicator
7 Tool holder
8 Clamping lever of the depth stop
9 Depth stop
10 Plunge saw blade *
11 Hex screw
12 Hex key
13 Handle (insulated gripping surface)
14 Dust extraction *
15 Sanding plate *
16 Sanding sheet *
17 Clamping lever of the dust extraction
18 Vacuum connection *
19 Extraction adapter *
20 Vacuum hose *
*Accessories shown or described are not part of the standard delivery scope of the product. A complete overview of accessories
can be found in our accessories program.
Technical Data
Cordless Multi-Cutter GOP 12V-28
Article number
Rated voltage
No-load speed n
0
Oscillation angle, left/right
Weight according to
EPTA-Procedure 01:2014
1)
Permitted ambient temperature
– during charging
– during operation
2)
and during
storage
Recommended batteries
Recommended chargers
1) depending on the battery pack being used
2) limited performance at temperatures < 0 °C
Technical data determined with battery from d elivery scope.
3 601 HB5 0..
V= 12
min-15000–20000
°1.4
kg 0.97– 1.2
°C
°C
0...+45
–20...+50
GBA 10,8V...
GBA 12V...
GBA 12V... W
GAL 11.. CV
GAL 12.. CV
GAL 18... W
Noise/Vibration Information
Sound emission values determined according to
EN 60745-2-4.
Typically the A-weighted noise levels of the product are:
Sound pressure level 79 dB(A); Sound power level 90 dB(A).
Uncertainty K =3 dB.
Wear hearing protection!
Vibration total values a
determined according to EN 60745-2-4:
Sanding: a
Sawing with plunge cut saw blade: a
Sawing with segment saw blade: a
Scraping: a
The vibration level given in this information sheet has been
measured in accordance with a standardised test given in
EN 60745 and may be used to compare one tool with another. It may be used for a preliminary assessment of
exposure.
The declared vibration emission level represents the main applications of the tool. However if the tool is used for different
applications, with different accessories or insertion tools or is
poorly maintained, the vibration emission may differ. This
may significantly increase the exposure level over the total
working period.
An estimation of the level of exposure to vibration should also
take into account the times when the tool is switched off or
when it is running but not actually doing the job. This may
significantly reduce the exposure level over the total working
period.
Identify additional safety measures to protect the operator
from the effects of vibration such as: maintain the tool and the
accessories, keep the hands warm, organisation of work
patterns.
Assembly
Battery Charging
Use only the chargers listed in the technical data. Only
these chargers are matched to the lithium-ion battery of
your power tool.
Note: The battery supplied is partially charged. To ensure full
capacity of the battery, completely charge the battery in the
battery charger before using your power tool for the first time.
The lithium-ion battery can be charged at any time without
reducing its service life. Interrupting the charging procedure
does not damage the battery.
Removing the battery
To remove the battery 3, press the unlocking buttons 2 and
pull the battery out of the machine to the rear. Do not exert
any force.
Battery Charge-control Indication
The three green LEDs of the battery charge-control indicator
6 show the charging status of the battery 3. The battery
charge-control indicator only illuminates for 5 seconds after
start-up.
(triax vector sum) and uncertainty K
h
=2.9m/s2, K=1.5 m/s2,
h
=8.3m/s2, K= 1.5 m/s2.
h
=9.2m/s2, K= 1.5 m/s2,
h
=2.5m/s2, K= 1.5 m/s2,
h
1 609 92A 2LW | (16.1.17) Bosch Power Tools
Page 17
OBJ_BUCH-2853-001.book Page 17 Monday, January 16, 2017 1:56 PM
English | 17
LED Capacity
Continuous lighting 3 x green ≥2/3
Selecting the Application Tool/Accessory
Accessory GOP 12V-28
Continuous lighting 2 x green ≥1/3
Continuous lighting 1 x green <1/3
Flashing light 1 x green Reserve
Flashing light 3 x green Empty
When no LED lights up after switching on, then the battery is
defective and must be replaced.
Changing the Tool
Before any work on the machine itself (e. g. mainte-
nance, tool change, etc.) as well as during transport
and storage, remove the battery from the power tool.
There is danger of injury when unintentionally actuating
the On/Off switch.
Wear protective gloves when changing application
tools/accessories. Contact with the application tool/
accessory can lead to injuries.
The following table shows examples for application tools. Further application tools can be found in the extensive Bosch accessories program.
Accessory Material Application
BIM segment saw
blade
Base plate for
sanding, series
Delta 93 mm
Profile sander
BIM plunge cut
saw blade, wood
and metal
HCS plunge cut
saw blade, wood
Bi-metal plunge
cut saw blade,
hardwood
Wooden materials,
Plastic,
Non-ferrous metals
Separating and plunge cuts; also fo r sa wing clo se to edge s,
in corners and hard to reach areas;
example: shortening already installed bottom rails or door
hinges, plunge cuts for adjusting floor panels
Depends on sanding sheet Sanding surfaces close to edges, in corners or hard to
reach areas;
depending on the sanding sheet for, e.g., sanding wood,
paint, varnish, stone
Fleeces for cleaning and for texturing wood, removing rust
from metal and for keying varnishes, polishing felt for prepolishing
Wood,
Pipes/Profile,
Paint,
Varnishes,
Convenient, efficient sanding of profiles up to a diameter of
55 mm;
Red sanding sheets for sanding wood, pipes/profiles,
varnishes, fillers and metal
Filler,
Metal
Softwood,
Soft plastics,
Plasterboard,
Thin-walled aluminium
and non-ferrous metal
profiles,
Smaller separating and plunge cuts;
example: cutting an opening for sockets, flush cutting a
copper pipe, plunge cuts in plasterboard
Filigree adjustment work in wood;
example: sawing openings for locks and fittings
Thin sheet metals,
Non-hardened nails and
screws
Wooden materials,
Soft plastics
Separating and deep plunge cuts; also for sawing close to
edges, in corners and hard to reach areas;
example: narrow plunge cut in solid wood for installing a
ventilation grid
Hardwood,
Laminated panels
Plunge cuts in laminated panels or hardwood;
example: installing skylights
Bosch Power Tools 1 609 92A 2LW | (16.1.17)
Page 18

OBJ_BUCH-2853-001.book Page 18 Monday, January 16, 2017 1:56 PM
18 | English
Accessory Material Application
TC plunge cut saw
blade, metal
Metal,
Severely abrasive materials,
Plunge cuts in severely abrasive materials or metal;
example: cutting kitchen front covers, easy cutting through
hardened screws, nails and stainless steel
Fibreglass,
Plasterboard,
Cement-bonded fibre
boards
BIM plunge cut
saw blade, wood
and metal
Softwood,
Hardwood,
Veneered panels,
Plunge cuts in laminated panels or hardwood;
example: shortening door frames, cutting openings for a
shelf
Plastic-laminated panels,
Non-hardened nails and
screws
HM-Riff segment
saw blade
Diamond-Riff
segment saw
blade
Cement joints,
Soft wall tiles,
Glass fibre reinforced
plastics,
Porous concrete
Cement joints,
Soft wall tiles,
Epoxy resin,
Glass fibre reinforced
Cutting and separating close to edges, in corners or hard to
reach areas;
example: removing grouting joints between wall tiles for
repair work, cutting openings in tiles, gypsum boards or
plastic
Precise routing and cutting of tile/joint material, epoxy
resins and glass fibre reinforced plastics;
example: making smaller cutouts in soft wall tiles and rout-
ing openings in glass fibre reinforced plastic
plastics
HM-Riff delta plate
Mortar,
Concrete residues,
Wood,
Rasping and sanding on hard surfaces;
example: removing mortar or tile adhesive (e.g. when re-
placing damaged tiles), removing carpet adhesive residues
Abrasive materials
HM-Riff grout and
mortar remover
Mortar,
Joints,
Epoxy resin,
Routing and cutting joint and tile material and rasping and
sanding on hard surfaces;
example: removing tile adhesive and grout
Glass fibre reinforced
plastics,
Abrasive materials
HCS multi blade
Roofing felt,
Carpets,
Artificial turf,
Cardboard,
Fast, precise cutting of soft material and flexible abrasive
materials;
example: cutting carpets, cardboard, PVC flooring, roofing
felt, etc.
PVC flooring
Scraper, rigid
Carpets,
Mortar,
Concrete,
Scraping on hard surfaces;
example: removing mortar, tile adhesive, concrete and
carpet adhesive residues
Tile adhesive
Scraper, flexible
Carpet adhesive,
Paint residues,
Silicone
Flexible scraping on soft surfaces;
example: removing silicone joints, carpet adhesive and
paint residues
BIM serrated
segment saw
blade
Insulation material,
Insulation panels,
Floor panels,
Precise cutting of soft materials;
example: cutting insulation panels to size, flush cutting
protruding insulation material to length
Sound-dampening floor
panels,
Cardboard,
Carpets,
Rubber,
Leather
1 609 92A 2LW | (16.1.17) Bosch Power Tools
Page 19
OBJ_BUCH-2853-001.book Page 19 Monday, January 16, 2017 1:56 PM
Accessory Material Application
HM-Riff sanding
finger
Wood,
Paint
Sanding wood or paint in hard to reach areas without
sanding paper;
example: sanding off paint between shutter louvres,
sanding wooden floors in corners
HM-Riff plunge cut
saw blade
Fibreglass,
Mortar,
Plunge cuts in severely abrasive materials;
example: routing thin mosaic tiles
Wood
English | 19
HCS universal
joint cutter
Expansion joints,
Putty,
Cutting and separating soft materials;
example: cutting silicone expansion joints or putty
Insulation materials (rock
wool)
Inserting
Mount the requested applicatio n tool/accessory (e.g. plunge
cut saw blade 10) in such a manner on the tool holder 7 that
the offset faces downward (see illustration on the graphics
page; marking on the application tool/accessory is readable
from above).
Turn the application tool/accesso ry to a position favourable
for the respective job, and allow it to engage into the cams of
the tool holder 7. 12 different positions are possible, each
offset by 30°.
Use the screw 11 to fasten the application tool/accessory.
Tightly fasten the screw 11 with the hex key 12.
Check the tight seating of the application tool/accesso-
ry. Incorrect or not securely fastened application tools/
accessories can come loose during operation and pose a
hazard.
Removing
For removing the application tool/accessory, loosen the
screw 11 with the hex key 12 and remove the application
Mounting/Replacing a Sanding Sheet on the Sanding
Plate
The sanding plate 15 is fitted with Velcro backing for quick
and easy fastening of sanding sheets with Velcro adhesion.
Before attaching the sanding sheet 16, free the Velcro backing of the sanding plate 15 from any debris by tapping against
it in order to enable optimum adhesion.
Position the sanding sheet 16 flush alongside one edge of the
sanding plate 15, then lay the sanding sheet onto the sanding
plate and press firmly.
To ensure optimum dust extraction, pay attention that the
punched holes in the sanding sheet match with the holes in
the sanding plate.
To remove the sanding sheet 16, grasp it at one of the tips and
pull it off from the sanding plate 15.
You can use all sanding sheets, fleece pads/polishing cloth
pads of the Delta 93 mm series of Bosch accessory program.
Sanding accessories, such as fleece pads/polishing cloth
pads, are attached to the sandin g plate in the same manner.
tool/accessory.
Selecting the Sanding Sheet
Depending on the material to be worked and the required rate of material removal, different sanding sheets are available:
Sanding disc Material Application Grain size
–All wooden materials
(e. g., hardwood,
softwood, chipboard,
building board)
For coarse-sanding, e. g. of rough, unplaned beams and
boards
For face sanding and planing small irregularities medium 80
coarse 40
–Metal materials
For finish and fine sanding of wood
fine 180
60
100
120
240
320
400
Bosch Power Tools 1 609 92A 2LW | (16.1.17)
Page 20

OBJ_BUCH-2853-001.book Page 20 Monday, January 16, 2017 1:56 PM
20 | English
Sanding disc Material Application Grain size
–Paint
–Varnish
– Filling compound
– Filler
For sanding off paint
For sanding primer (e. g., for removing brush dashes,
drops of paint and paint run)
For final sanding of primers before coating fine 180
coarse 40
medium 80
60
100
120
240
320
400
Dust/Chip Extraction
Dust from materials such as lead-containing coatings,
some wood types, minerals and metal can be harmful to
one’s health. Touching or breathing-in the dust can cause
allergic reactions and/or lead to respiratory infections of
the user or bystanders.
Certain dust, such as oak or beech dust, is considered carcinogenic, especially in connection with wood-treatment
additives (chromate, wood preservative). Materials containing asbestos may only be worked by specialists.
– As far as possible, use a dust extraction system suitable
for the material.
– Provide for good ventilation of the working place.
– It is recommended to wear a P2 filter-class respirator.
Observe the relevant regulations in your country for the
materials to be worked.
Prevent dust accumulation at the workplace. Dust can
easily ignite.
Connecting the Dust Extraction (see figure A)
The dust extraction 14 is intended only when working with the
sanding plate 15; it is not of use in combination with other
application tools.
For sanding, always connect the dust extraction.
Remove the application tool/accessory when mounting the
dust extraction 14 (accessory).
If required, assemble the parts of the dust extraction 14 as
shown in the figure. Position the assembled dust extraction
onto the machine via the tool holder 7. Turn the dust extraction in such a manner that the cams of the dust extraction engage into the corresponding recesses on the housing. Fasten
the dust extraction to the machine with the retaining clip 17
as shown in the figure.
Pay attention that the felt ring 16 is undamaged and faces
tightly against the sanding plate 15. Replace a damage felt
ring immediately.
Depending on machine version, place a vacuum hose 20
(accessory) either directly onto the vacuum connection 18 or
cut off the old hose end, screw the extraction adapter 19
(accessory) onto the hose end and then place it directly onto
the vacuum connection 18. Connect the vacuum hose 20 with
a vacuum cleaner (accessory). An overview for the connection of various vacuum cleaners can be found on the fold-out
page.
The vacuum cleaner must be suitable for the material being
worked.
When vacuuming dry dust that is especially detrimental to
health or carcinogenic, use a special vacuum cleaner.
Operation
Starting Operation
Inserting the battery
Use only original Bosch lithium-ion batteries with the
voltage listed on the nameplate of your power tool.
Using other batteries can lead to injuries and pose a fire
hazard.
Note: Use of batteries not suitable for the machine can lead to
malfunctions of or cause damage to the power tool.
Insert the charged battery 3 into the handle until it can be felt
to engage and faces flush against the handle.
Switching On and Off
To start the machine, push the On/Off switch 1 forward so
that the “I” is indicated on the switch.
To switch off the machine, push the On/Off switch 1 toward
the rear so that the “0” is indicated on the switch.
To save energy, only switch the power tool on when using it.
The lithium-ion battery is protected against deep discharging
by the “Electronic Cell Protection (ECP)”. When the battery is
empty, the machine is switched off by means of a protective
circuit: The inserted tool no longer rotates.
Note: If the machine should automatically switch off because
of a discharged or overheated battery, make sure to set the
machine’s On/Off switch 1 to off. Charge the battery and allow it to cool down before restarting the machine. Otherwise
the battery can become damaged.
Preselecting the Orbital Stroke Rate
With the thumbwheel for preselection of the orbital stroke
rate 5, you can preselect the required orbital stroke rate, even
during operation.
The required stroke rate depends on the material and the
working conditions and can be determined through practical
testing.
1 609 92A 2LW | (16.1.17) Bosch Power Tools
Page 21
OBJ_BUCH-2853-001.book Page 21 Monday, January 16, 2017 1:56 PM
Working Advice
Before any work on the machine itself (e. g. mainte-
nance, tool change, etc.) as well as during transport
and storage, remove the battery from the power tool.
There is danger of injury when unintentionally actuating
the On/Off switch.
Wait until the machine has come to a standstill before
placing it down.
Note: Do not cover off the venting slots 4 of the machine while
working, as this reduces the working life of the machine.
Operating Principle
Due to the oscillating drive the application tool/accessory
oscillates up to 20000 times per minute at 2,8 °. This allows
for precise work in narrow spaces.
Work with low and uniform application
pressure, otherwise, the working performance will decline and the application tool
can become blocked.
While working, move the machine back and
forth, so that the application tool does not
heat up excessively and become blocked.
Sawing
Use only undamaged saw blades that are in perfect
condition. Bent or dull saw blades can break, negatively
influence the cut, or lead to kickba ck.
When sawing light building materials, observe the
statutory provisions and the recommendations of the
material suppliers.
Use appropriate detectors to determine if utility lines
are hidden in the work area or call the local utility company for assistance. Contact with electric lines can lead
to fire and electric shock. Damaging a gas line can lead to
explosion. Penetrating a water line causes property
damage.
Plunge cuts may only be applied to soft materials, such
as wood, gypsum plaster boards, etc.!
Before sawing with HCS saw blades in wood, particle board,
building materials, etc., check these for foreign objects such
as nails, screws, or similar. If required, remove foreign objects or use BIM saw blades.
Separating
Note: When separating wall tiles take into consideration that
the application tools/accessories wear heavily when used for
longer periods of time.
Sanding
The removal rate and the sanding pattern are primarily determined by the choice of sanding sheet, the preset oscillation
rate and the applied pressure.
Only flawless sanding sheets achieve good sanding capacity
and extend the service life of the machine.
Pay attention to apply uniform sanding pressure; this increases the working life of the sanding sheets.
Intensifiying the sanding pressure does not lead to an increase of the sanding capacity, but to increased wear of the
machine and the sanding sheet.
For precise on-the-spot sanding of edges, corners and hard to
reach areas, it is also possible to work only with the tip or an
edge of the sanding plate.
When selectively sanding on the spot, the sanding sheet can
heat up considerably. Reduce the orbital stroke rate and the
sanding pressure, and allow the sanding sheet to cool down
regularly.
A sanding sheet that has been used for metal should not be
used for other materials.
Use only original Bosch sanding accessories.
For sanding, always connect the dust extraction.
Scraping
For scraping, select a high oscillation rate.
Work on a soft surface (e. g. wood) at a flat ange, and apply
only light pressure. Otherwise the scraper can cut into the
surface.
Temperature Dependent Overload Protection
In normal conditions of use, the power tool cannot be overloaded. If the power tool is overloaded or not kept within the
permitted battery temperature range, the speed is reduced or
the power tool switches off. At reduced speed, the power tool
will run again at full speed once the permitted battery temperature is reached or the load is reduced. During automatic
shut-down, switch off the power tool, allow the battery to cool
down, then switch the power tool back on.
Recommendations for Optimal Handling of the Battery
Protect the battery against moisture and water.
Store the battery only within a temperature range between
–20 ° C and 50 ° C. As an example, do not leave the battery in
the car in summer.
A significantly reduced working period after charging indicates that the battery is used and must be replaced.
Observe the notes for disposal.
Maintenance and Service
Maintenance and Cleaning
Before any work on the machine itself (e. g. mainte-
nance, tool change, etc.) as well as during transport
and storage, remove the battery from the power tool.
There is danger of injury when unintentionally actuating
the On/Off switch.
For safe and proper working, always keep the machine
and ventilation slots clean.
Clean Riff application tools (accessory) regularly with a wire
brush.
English | 21
Bosch Power Tools 1 609 92A 2LW | (16.1.17)
Page 22
OBJ_BUCH-2853-001.book Page 22 Monday, January 16, 2017 1:56 PM
22 | English
After-sales Service and Application Service
Our after-sales service responds to your questions con cerning maintenance and repair of your product as well as spare
parts. Exploded views and information on spare parts can
also be found under:
www.bosch-pt.com
Bosch’s application service team will gladly answer questions
concerning our products and their accessories.
In all correspondence and spare parts orders, please always
include the 10-digit article number given on the nameplate of
the product.
Great Britain
Robert Bosch Ltd. (B.S.C.)
P.O. Box 98
Broadwater Park
North Orbital Road
Denham
Uxbridge
UB 9 5HJ
At www.bosch-pt.co.uk you can order spare parts or arrange
the collection of a product in need of servicing or repair.
Tel. Service: (0344) 7360109
E-Mail: boschservicecentre@bosch.com
Ireland
Origo Ltd.
Unit 23 Magna Drive
Magna Business Park
City West
Dublin 24
Tel. Service: (01) 4666700
Fax: (01) 4666888
Australia, New Zealand and Pacific Islands
Robert Bosch Australia Pty. Ltd.
Power Tools
Locked Bag 66
Clayton South VIC 3169
Customer Contact Center
Inside Australia:
Phone: (01300) 307044
Fax: (01300) 307045
Inside New Zealand:
Phone: (0800) 543353
Fax: (0800) 428570
Outside AU and NZ:
Phone: +61 3 95415555
www.bosch.com.au
Republic of South Africa
Customer service
Hotline: (011) 6519600
Gauteng – BSC Service Centre
35 Roper Street, New Centre
Johannesburg
Tel.: (011) 4939375
Fax: (011) 4930126
E-Mail: bsctools@icon.co.za
KZN – BSC Service Centre
Unit E, Almar Centre
143 Crompton Street
Pinetown
Tel.: (031) 7012120
Fax: (031) 7012446
E-Mail: bsc.dur@za.bosch.com
Western Cape – BSC Service Centre
Democracy Way, Prosperity Park
Milnerton
Tel.: (021) 5512577
Fax: (021) 5513223
E-Mail: bsc@zsd.co.za
Bosch Headquarters
Midrand, Gauteng
Tel.: (011) 6519600
Fax: (011) 6519880
E-Mail: rbsa-hq.pts@za.bosch.com
Transport
The contained lithium-ion batteries are subject to the Dangerous Goods Legislation requirements. The user can transport
the batteries by road without further requirements.
When being transported by third parties (e. g.: air transport or
forwarding agency), special requirements on packaging and
labelling must be observed. For preparation of the item being
shipped, consulting an expert for hazardous material is required.
Dispatch batteries only when the housing is undamaged.
Tape or mask off open contacts and pack up the battery in
such a manner that it cannot move around in the packaging.
Please also observe possibly more detailed national regulations.
Disposal
Do not dispose of power tools and batteries/rechargeable
batteries into household waste!
Only for EC countries:
The machine, rechargeable batteries, accessories
and packaging should be sorted for environmentalfriendly recycling.
According to the European Guideline
2012/19/EU, power tools that are no longer
usable, and according to the European
Guideline 2006/66/EC, defective or used
battery packs/batteries, must be collected
separately and disposed of in an environmentally correct manner.
1 609 92A 2LW | (16.1.17) Bosch Power Tools
Page 23
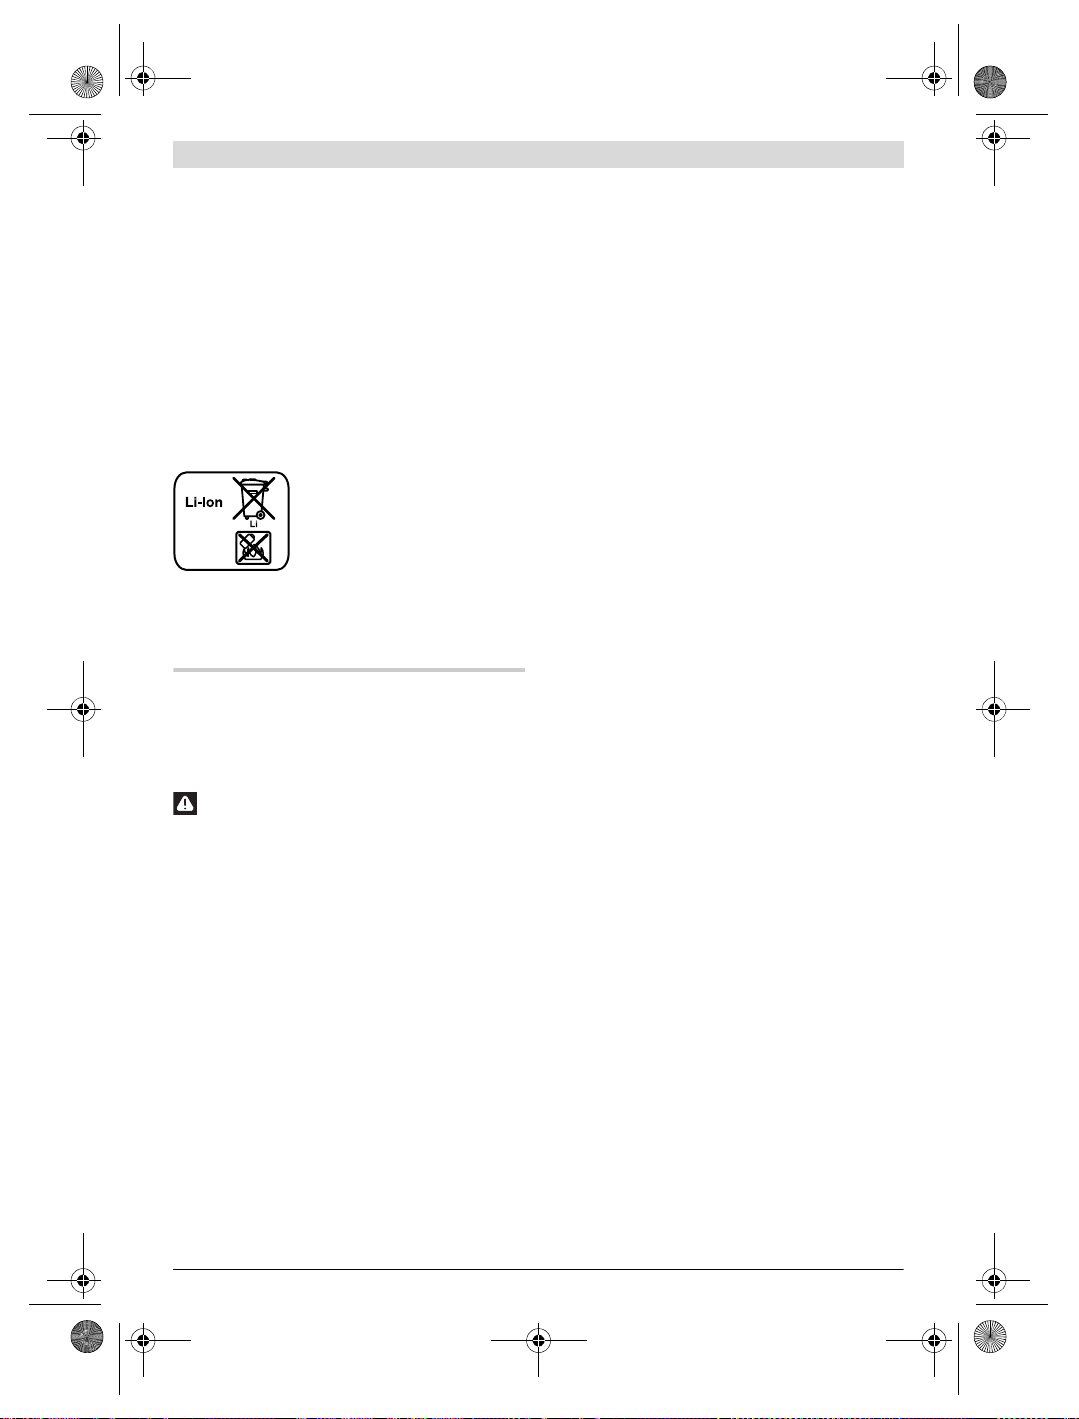
AVERTISSEMENT
OBJ_BUCH-2853-001.book Page 23 Monday, January 16, 2017 1:56 PM
Français | 23
Batteries no longer suitable for use can be dire ctly returned
at:
Great Britain
Robert Bosch Ltd. (B.S.C.)
P.O. Box 98
Broadwater Park
North Orbital Road
Denham
Uxbridge
UB 9 5HJ
At www.bosch-pt.co.uk you can order spare parts or arrange
the collection of a product in need of servicing or repair.
Tel. Service: (0344) 7360109
E-Mail: boschservicecentre@bosch.com
Battery packs/batteries:
Li-ion:
Please observe the instructions in section “Transport”, page 22.
Subject to change without notice.
Français
Avertissements de sécurité
Avertissements de sécurité généraux pour l’outil
Lire tous les avertissements
de sécurité et toutes les ins-
tructions. Ne pas suivre les avertissements et instructions
peut donner lieu à un choc électrique, un incendie et/ou une
blessure sérieuse.
Conserver tous les avertissements et toutes les instructions pour pouvoir s’y reporter ultérieurement.
Le terme « outil » dans les avertissements fait référence à
votre outil électrique alimenté par le secteur (avec cordon
d’alimentation) ou votre outil fonctionnant sur batterie (sans
cordon d’alimentation).
Sécurité de la zone de travail
Conserver la zone de travail propre et bien éclairée. Les
zones en désordre ou sombres sont propices aux accidents.
Ne pas faire fonctionner les outils électriques en at-
mosphère explosive, par exemple en présence de liquides inflammables, de gaz ou de poussières. Les ou-
tils électriques produisent des étincelles qui peuvent
enflammer les poussières ou les fumées.
Maintenir les enfants et les personnes présentes à
l’écart pendant l’utilisation de l’outil. Les distractions
peuvent vous faire perdre le contrôle de l’outil.
Bosch Power Tools 1 609 92A 2LW | (16.1.17)
Sécurité électrique
Il faut que les fiches de l’outil électrique soient adap-
tées au socle. Ne jamais modifier la fiche de quelque façon que ce soit. Ne pas utiliser d’adaptateurs avec des
outils à branchement de terre. Des fiches non modifiées
et des socles adaptés réduiront le risque de choc électrique.
Eviter tout contact du corps avec des surfaces reliées à
la terre telles que les tuyaux, les radiateurs, les cuisinières et les réfrigérateurs. Il existe un risque accru de
choc électrique si votre corps est relié à la terre.
Ne pas exposer les outils à la pluie ou à des conditions
humides. La pénétration d’eau à l’intérieur d’un outil aug-
mentera le risque de choc électrique.
Ne p as ma lt ra ite r l e c or don . N e j am ais ut il is er l e c or do n
pour porter, tirer ou débrancher l’outil. Maintenir le
cordon à l’écart de la chaleur, du lubrifiant, des arêtes
ou des parties en mouvement. Les cordons endommagés
ou emmêlés augmentent le risque de choc électrique.
Lorsqu’on utilise un outil à l’extérieur, utiliser un pro-
longateur adapté à l’utilisation extérieure. L’utilisation
d’un cordon adapté à l’utilisation extérieure réduit le risque
de choc électrique.
Si l’usage d’un outil dans un emplacement humide est
inévitable, utiliser une alimentation protégée par un
dispositif à courant différentiel résiduel (RCD). L’usage
d’un RCD réduit le risque de choc électrique.
Sécurité des personnes
Rester vigilant, regarder ce que vous êtes en train de
faire et faire preuve de bon sens dans l’utilisation de l’outil. Ne pas utiliser un outil lorsque vous êtes fatigué ou
sous l’emprise de drogues, d’alcool ou de médicaments.
Un moment d’inattention en cours d’utilisation d’un outil
peut entraîner des blessures graves des personnes.
Utiliser un équipement de sécurité. Toujours porter
une protection pour les yeux. Les équipements de sécu-
rité tels que les masques contre les poussières, les chaussures de sécurité antidérapantes, les casques ou les protections acoustiques utilisés pour les conditions
appropriées réduiront les blessures des personnes.
Eviter tout démarrage intempestif. S’assurer que l’in-
terrupteur est en position arrêt avant de brancher l’outil au secteur et/ou au bloc de batteries, de le ramasser
ou de le porter. Porter les outils en ayant le doigt sur l’in-
terrupteur ou brancher des outils dont l’interrupteur est en
position marche est source d’accidents.
Retirer toute clé de réglage avant de mettre l’outil en
marche. Une clé laissée fixée sur une partie tournante de
l’outil peut donner lieu à des blessures de personnes.
Ne pas se précipiter. Garder une position et un équi-
libre adaptés à tout moment. Cela permet un meilleur
contrôle de l’outil dans des situations inattendues.
S’habiller de manière adaptée. Ne pas porter de vête-
ments amples ou de bijoux. Garder les cheveux, les vêtements et les gants à distance des parties en mouvement. Des vêtements amples, des bijoux ou les cheveux
longs peuvent être pris dans des parties en mouvement.
Page 24
OBJ_BUCH-2853-001.book Page 24 Monday, January 16, 2017 1:56 PM
24 | Français
Si des dispositifs sont fournis pour le raccordement
d’équipements pour l’extraction et la récupération des
poussières, s’assurer qu’ils sont connectés et correctement utilisés. Utiliser des collecteurs de poussière peut
réduire les risques dus aux poussières.
Utilisation et entretien de l’outil
Ne pas forcer l’outil. Utiliser l’outil adapté à votre appli-
cation. L’outil adapté réalisera mieux le travail et de ma-
nière plus sûre au régime pour lequel il a été construit.
Ne pas utiliser l’outil si l’interrupteur ne permet pas de
passer de l’état de marche à arrêt et vice versa. Tout ou-
til qui ne peut pas être commandé par l’interrupteur est
dangereux et il faut le faire réparer.
Débrancher la fiche de la source d’alimentation en cou-
rant et/ou le bloc de batteries de l’outil avant tout réglage, changement d’accessoires ou avant de ranger
l’outil. De telles mesures de sécurité préventives ré-
duisent le risque de démarrage accidentel de l’outil.
Conserver les outils à l’arrêt hors de la portée des en-
fants et ne pas permettre à des personnes ne connaissant pas l’outil ou les présentes instructions de le faire
fonctionner. Les outils sont dangereux entre les mains
d’utilisateurs novices.
Observer la maintenance de l’outil. Vérifier qu’il n’y a
pas de mauvais alignement ou de blocage des parties
mobiles, des pièces cassées ou toute autre condition
pouvant affecter le fonctionnement de l’outil. En cas de
dommages, faire réparer l’outil avant de l’utiliser. De
nombreux accidents sont dus à des outils mal entretenus.
Garder affûtés et propres les outils permettant de cou-
per. Des outils destinés à couper correctement entretenus
avec des pièces coupantes tranchantes sont moins susceptibles de bloquer et sont plus faciles à contrôler.
Utiliser l’outil, les accessoires et les lames etc., confor-
mément à ces instructions, en tenant compte des
conditions de travail et du travail à réaliser. L’utilisation
de l’outil pour des opérations différentes de celles prévues
pourrait donner lieu à des situations dangereuses.
Utilisation des outils fonctionnant sur batteries et
précautions d’emploi
Ne recharger qu’avec le chargeur spécifié par le fabri-
cant. Un chargeur qui est adapté à un type de bloc de bat-
teries peut créer un risque de feu lorsqu’il est utilisé avec
un autre type de bloc de batteries.
N’utiliser les outils qu’avec des blocs de batteries spé-
cifiquement désignés. L’utilisation de tout autre bloc de
batteries peut créer un risque de blessure et de feu.
Lorsqu’un bloc de batteries n’est pas utilisé, le mainte-
nir à l’écart de tout autre objet métallique, par exemple
trombones, pièces de monnaie, clés, clous, vis ou
autres objets de petite taille qui peuvent donner lieu à
une connexion d’une borne à une autre. Le court-circui-
tage des bornes d’une batterie entre elles peut causer des
brûlures ou un feu.
Dans de mauvaises conditions, du liquide peut être
éjecté de la batterie ; éviter tout contact. En cas de
contact accidentel, nettoyer à l’eau. Si le liquide entre
en contact avec les yeux, rechercher en plus une aide
médicale. Le liquide éjecté des batteries peut causer des
irritations ou des brûlures.
Maintenance et entretien
Faire entretenir l’outil par un réparateur qualifié utili-
sant uniquement des pièces de rechange identiques.
Cela assurera que la sécurité de l’outil est maintenue.
Instructions de sécurité pour les
découpeurs-ponceurs sans fil
Tenir l’outil par les surfaces de préhension isolées, lors
de la réalisation d’une opération au cours de laquelle
l’organe de coupe peut entrer en contact avec un câblage non apparent. Le contact avec un fil « sous tension »
peut également mettre « sous tension » les parties métalliques exposées de l’outil électrique et provoquer un choc
électrique sur l’opérateur.
N’utiliser l’outil électroportatif que pour un travail à
sec. La pénétration d’eau dans un outil électroportatif aug-
mente le risque d’un choc électrique.
Attention ! Risque d’incendie ! Eviter la surchauffe des
matériaux travaillés et de la ponceuse. Vider toujours
le bac de récupération des poussières avant de faire
une pause de travail. Les particules de poussière se trou-
vant dans le sac à poussières, le microfiltre, le sac en papier (o u dans le sac à poussière s en tissu ou le filtre de l’aspirateur) peuvent s’enflammer d’elles-mêmes dans des
conditions défavorables, p. ex. projection d’étincelles lors
du ponçage de pièces en métal, ceci notamment lorsque
les particules de poussières sont mélangées à des résidus
de vernis, de polyuréthane ou d’autres substances
chimiques et que les matériaux travaillés sont très chauds
après avoir été travaillés pendant une période assez
longue.
Garder les mains à distance de la zo ne d e s ci ag e. Ne p as
passer les mains sous la pièce à travailler. Lors d’un
contact avec la lame de scie, il y a risque de blessures.
Utiliser des détecteurs appropriés afin de déceler des
conduites cachées ou consulter les entreprises d’approvisionnement locales. Un contact avec des conduites
d’électricité peut provoquer un incendie ou un choc électrique. Un endommagement d’une conduite de gaz peut
provoquer une explosion. La perforation d’une conduite
d’eau provoque des dégâts matériels.
Toujours bien tenir l’outil électroportatif des deux
mains et veiller à toujours garder une position de travail stable. Avec les deux mains, l’outil électroportatif est
guidé de manière plus sûre.
Bloquer la pièce à travailler. Une pièce à travailler serrée
par des dispositifs de serrage appropriés ou dans un étau
est fixée de manière plus sûre que tenue dans les mains.
1 609 92A 2LW | (16.1.17) Bosch Power Tools
Page 25
OBJ_BUCH-2853-001.book Page 25 Monday, January 16, 2017 1:56 PM
Ne pas ouvrir l’accu. Risque de court-circuit.
Protéger l’accu de toute source de chaleur,
comme p. ex. l’exposition directe au soleil, au
feu, à l’eau et à l’humidité. Il y a risque d’explo-
sion.
En cas d’endommagement et d’utilisation non
conforme de l’accu, des vapeurs peuvent s’échapper.
Ventiler le lieu de travail et, en cas de malaises, consulter un médecin. Les vapeurs peuvent entraîner des irrita-
tions des voies respiratoires.
N’utiliser l’accu qu’avec votre outil électroportatif
Bosch. Seulement ainsi l’accu est protégé contre une sur-
charge dangereuse.
Les objets pointus comme un clou ou un tournevis et le
fait d’exercer une force extérieure sur le boîtier risque
d’endommager l’accu. Il peut en résulter un court-circuit
interne et l’accu risque de s’enflammer, de dégager des fumées, d’exploser ou de surchauffer.
Porter des gants de protection pour remplacer les ou-
tils de travail. Les outils de travail se chauffent lors d’une
utilisation prolongée.
Ne grattez pas de matériaux humidifiés (p.ex. papiers
Eléments de l’appareil
La numérotation des éléments de l’appareil se réfère à la représentation de l’outil électroportatif sur la page graphique.
1 Interrupteur Marche/Arrêt
2 Touche de déverrouillage de l’accumulateur
3 Accu
4 Ouïes de ventilation
5 Molette de réglage présélection de la vitesse
6 Voyant lumineux indiquant l’état de charge de l’accu
7 Porte-outil
8 Levier de serrage de la butée de profondeur
9 Butée de profondeur
10 Lame de scie à plongée *
11 Vis à six pans creux
12 Clé mâle coudée pour vis à six pans creux
13 Poignée (surface de préhension isolante)
14 Dispositif d’aspiration de poussières *
15 Plateau de ponçage *
16 Feuille abrasive *
17 Levier de serrage du dispositif d’aspiration des
peints) et pas sur une surface humide. La pénétration
d’eau à l’intérieur d’un outil électrique augmente le risque
de choc électrique.
Ne traitez pas la surface à travailler avec des liquides
contenant des solvants. Des vapeurs nuisibles à la santé
peuvent être générées si les matériaux s’échauffent lors du
grattage.
Soyez extrêmement vigilant lors de la manipulation du
racloir. L’outil est très tranchant, il y a danger de blessure.
18 Raccord d’aspiration des poussières *
19 Adaptateur d’aspiration*
20 Tuyau d’aspiration *
*Les access oires décrits ou illustrés ne sont pas tous compris dans
la fourniture. Vous trouverez les accesso ires complets dans notre
programme d’accessoires.
Caractéristiques techniques
Découpeur-ponceur sans fil GOP 12V-28
Description et performances du
produit
Il est impératif de lire toutes les consignes
de sécurité et toutes les instructions. Le
non-respect des avertissements et instructions indiqués ci-après peut conduire à une
électrocution, un incendie et/ou de graves
blessures.
Dépliez le volet sur lequel l’appareil est représenté de manière
graphique. Laissez le volet déplié pendant la lecture de la présente notice d’utilisation.
N° d’article
Tension nominale
Vitesse à vide n
Angle d’oscillation gauche/droite
Poids suivant
EPTA-Procedure 01:2014
Plage de températures autorisées
–pendant la charge
– pendant le fonctionnement
pour le stockage
Accus recommandés
Utilisation conforme
Cet outil électroportatif est destiné à scier et tronçonner le
bois, les matières plastiques, le plâtre, les métaux non-ferreux et les éléments de fixation (p. ex. clous non durcis,
agrafes). Il est également approprié pour travailler du carrelage mural tendre ainsi qu’au ponçage à sec et au grattage de
petites surfaces. Il est particulièrement bien approprié pour
travailler près du bord et bord à bord. N’utiliser l’outil électroportatif qu’avec des accessoires Bosch.
Chargeurs recommandés
1) selon l’accumulateur utilisé
2) performances réduites à des températures <0 ° C
Caractéristiques techniques déterminées avec l’accu fourni avec
l’appareil.
poussières
Français | 25
3 601 HB5 0..
V= 12
0
tr/min 5000–20000
°1,4
1)
2)
et
kg 0,97– 1,2
°C
°C
0...+45
–20...+50
GBA 10,8V...
GBA 12V...
GBA 12V... W
GAL 11.. CV
GAL 12.. CV
GAL 18... W
Bosch Power Tools 1 609 92A 2LW | (16.1.17)
Page 26

OBJ_BUCH-2853-001.book Page 26 Monday, January 16, 2017 1:56 PM
26 | Français
Niveau sonore et vibrations
Valeurs d’émissions sonores déterminées selon la norme
EN 60745-2-4.
Les mesures réelles (A) des niveaux sonores de l’appareil
sont : niveau de pression acoustique 79 dB(A) ; niveau d’intensité acoustique 90 dB(A). Incertitude K= 3 dB.
Porter une protection acoustique !
Valeurs totales des vibrations a
axes directionnels) et incertitude K relevées conformément à
la norme EN 60745-2-4 :
Ponçage : a
Sciage avec lame plongeante : a
=2,9m/s2, K= 1,5 m/s2,
h
Sciage avec lame segment : a
Déjointage : a
=8,3m/s2, K= 1,5 m/s2.
h
Le niveau d’oscillation indiqué dans ces instructions d’utilisation a été mesuré conformément à la norme EN 60745 et peut
être utilisé pour une comparaison d’outils électroportatifs. Il
est également approprié pour une estimation préliminaire de
la charge vibratoire.
Le niveau d’oscillation correspond aux utilisations principales
de l’outil électroportatif. Si l’outil électrique est néanmoins
utilisé pour d’autres applications, avec différents accessoires
ou d’autres outils de travail ou s’il est mal entretenu, le niveau
d’oscillation peut être différent. Ceci peut augmenter considérablement la charge vibratoire pendant toute la durée de
travail.
Pour une estimation précise de la charge vibratoire, il est recommandé de prendre aussi en considération les périodes
pendant lesquelles l’appareil est éteint ou en fonctionnement,
mais pas vraiment utilisé. Ceci peut réduire considérablement la charge vibratoire pendant toute la durée de travail.
Déterminez des mesures de protection supplémentaires pour
protéger l’utilisateur des effets des vibrations, telles que par
exemple : Entretien de l’outil électrique et des outils de travail, maintenir les mains chaudes, organisation des opérations de travail.
(somme vectorielle des trois
h
=9,2m/s2, K=1,5 m/s2,
h
=2,5m/s2, K=1,5 m/s2,
h
La batterie Lithium-ion peut être rechargée à tout moment,
sans que sa durée de vie n’en soit réduite. Le fait d’interrompre le processus de charge n’endommage pas la batterie.
Retirer l’accu
Pour sortir l’accu 3, appuyez sur la touche de déverrouillage 2
et sortez l’accu à l’arrière de l’outil électroportatif. Ne pas for-
cer.
Voyant lumineux indiquant l’état de charge de l’accu
Les tro is LED verte s du voyant l umineux d’é tat de charg e 6 indiquent le niveau de charge de l’accu 3. Le voyant lumineux
d’état de charge ne s’allume que pendant les 5 secondes qui
suivent la mise en marche.
LED Capacité
Lumière permanente 3 x verte ≥2/3
Lumière permanente 2 x verte ≥1/3
Lumière permanente 1 x verte <1/3
Lumière clignotante 1 x verte Réserve
Lumière clignotante 3 x verte vide
Si au cune LE D ne s’al lume ap rès la m ise en ma rche, l ’accu e st
défectueux, il faut le remplacer.
Changement d’outil
Avant d’effectuer des travaux sur l’appareil (p.ex. tra-
vaux d’entretien, changement d’outils, etc.) et pour le
transporter ou le stocker, retirez l’accu de l’appareil
électroportatif. Il y a risque de blessure lorsqu’on appuie
par mégarde sur l’interrupteur Marche/Arrêt.
Portez des gants de protection lors du ch angement
d’outil. Lors d’un contact avec les outils de travail, il y a un
risque de blessures.
Choix de l’outil de travail
Outil de travail GOP 12V-28
Montage
Chargement de l’accu
N’utilisez que les chargeurs indiqués dans les Caracté-
ristiques techniques. Seuls ces chargeurs sont adaptés à
l’accu Lithium-Ion de votre outil électroportatif.
Note : L’ac cu es t fo urni en é tat d e cha rge faib le. Afin de g aran tir la puissance complète de l’accu, chargez complètement
l’accu dans le chargeur avant la première mise en service.
Le tableau suivant donne des exemples d’outils de travail. Vous trouverez d’autres outils de travail dans la gamme étendue des
accessoires Bosch.
Outil de travail Matériau Utilisation
Lame de scie
segmentée
bimétal
1 609 92A 2LW | (16.1.17) Bosch Power Tools
Bois et dérivés,
Plastiques,
Métaux non ferreux
Coupes de tronçonnage et coupes en plongée ; également
pour le sciage près du bord, dans les coins et les endroits
d’accès difficile ;
Exemple : raccourcir des plinthes ou des châssis de porte
déjà montés, coupes en plongée lors de l’ajustement de
panneaux de sol
Page 27
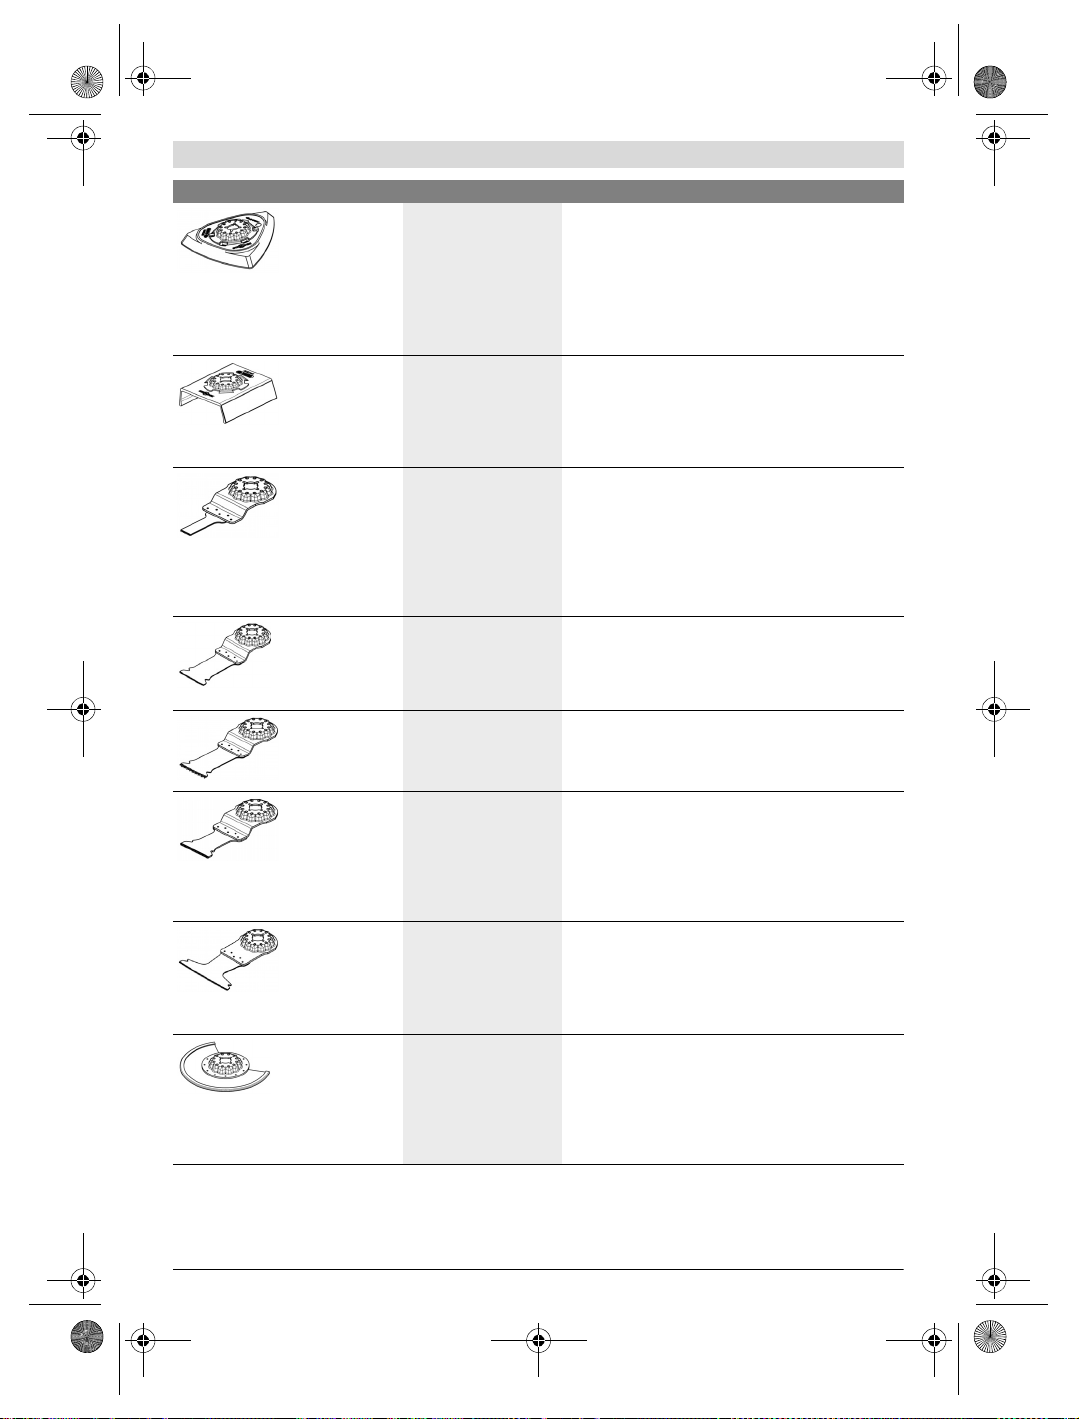
OBJ_BUCH-2853-001.book Page 27 Monday, January 16, 2017 1:56 PM
Outil de travail Matériau Utilisation
Plaque de ponçage pour lames
de scie de la série
Delta 93 mm
En fonction de la lame de
scie
Ponçage des surfaces aux bords, dans les coins ou les
endroits d’accès difficile ;
en fonction de la lame de scie, p. ex. pour le ponçage de
bois, peinture, vernis, pierre
Non-tissés de nettoyage, non-tissés pour la structuration/
le cérusage du bois, le dérouillage du métal et le ponçage
léger des vernis et laques, feutre à polir pour le prépolissage
Plateau de ponçage pour profilés
Bois,
Tubes/Profilés,
Peintures,
Vernis et laques,
Ponçage facile et efficace de profilés jusqu’à 55 mm de
diamètre ;
feuilles abrasives rouges pour le ponçage du bois, des
tubes/profilés, des vernis, des apprêts et du métal
Apprêts,
Métal
Lame de scie à
plongée bimétal
bois et métal
Bois tendre,
Plastiques tendres,
Plaques de plâtre,
Profilés à parois minces en
métaux non ferreux et
aluminium,
Tôles minces,
Petites découpes et coupes plongeantes
Exemple : découpe d’un évidement pour prise électrique,
sectionnement au ras d’un tuyau de cuivre, coupes
plongeantes dans des plaques de plâtre
Travaux d’ajustement de précision dans le bois
Exemple : découpe d’évidements pour serrures et ferrures
Clous et vis non trempés
Lame de scie à
plongée HCS bois
Bois et dérivés,
Plastiques tendres
Coupes de tronçonnage et coupes en plongée profondes ;
également pour le sciage près du bord, dans les coins et les
endroits d’accès difficile ;
Exemple : coupe en plongée étroite dans le bois massif
pour le montage d’une grille de ventilation
Lame plongeante
bi-métal pour bois
dur
Bois dur,
Panneaux replaqués
Coupes plongeantes dans des panneaux replaqués ou du
bois dur
Exemple : montage de fenêtres de toit
Français | 27
Lame plongeante
au carbure pour
métal
Métal,
Matériaux fortement
abrasifs,
Fibres de verre,
Coupes plongeantes dans des matériaux fortement
abrasifs ou du métal
Exemple : découpe de crédences de cuisine, découpe
facile de vis et clous en acier trempé et d’acier inoxydable
Plaques de plâtre,
Panneaux de fibres à liant
ciment
Lame de scie à
plongée bimétal
bois et métal
Bois tendre,
Bois dur,
Panneaux plaqués,
Panneaux à revêtement
Coupes plongeantes dans des panneaux replaqués ou du
bois dur
Exemple : raccourcissement de cadres de porte,
réalisation de découpes dans une étagère
plastique,
Clous et vis non trempés
Lame de scie
segmentée
HM Riff
Joints en ciment,
Faïences et carreaux
muraux tendres,
Plastiques renforcés de
fibres de verre,
Couper et tronçonner près du bord, dans les coins ou les
endroits d’accès difficile ;
Exemple : enlever les interstices entre le carrelage mural
pour les travaux de réparation, couper des encoches dans
les carreaux, plaques de plâtre ou matières plastiques
Béton cellulaire/
thermopierre
Bosch Power Tools 1 609 92A 2LW | (16.1.17)
Page 28
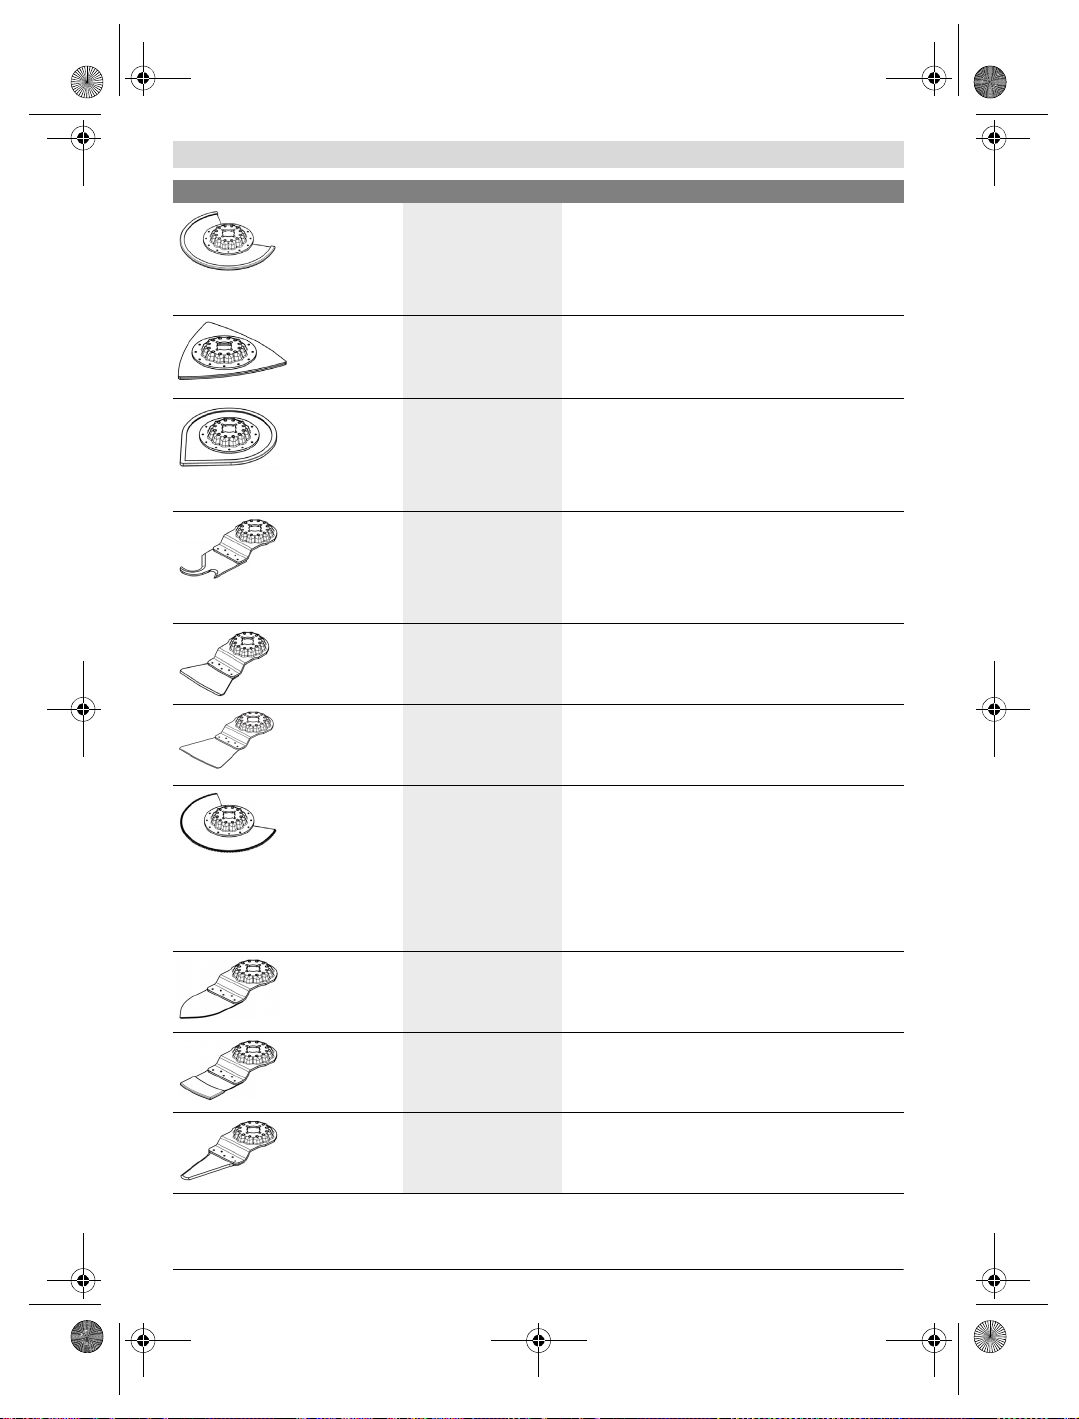
OBJ_BUCH-2853-001.book Page 28 Monday, January 16, 2017 1:56 PM
28 | Français
Outil de travail Matériau Utilisation
Lame segment à
concrétion
diamant
Joints en ciment,
Faïences et carreaux
muraux tendres,
Résine époxy,
Plastiques renforcés de
Enlèvement précis de joint/mortier à carrelage, de résines
époxy et de plastiques renforcés de fibres de verre
Exemple : réalisation de petites découpes dans des car-
reaux muraux tendres et d’évidements dans du plastique
renforcé de fibres de verre
fibres de verre
Lame delta
HM Riff
Enlève-mortier à
concrétion
carbure
Mortier,
Restes de béton,
Bois,
Matériaux abrasifs
Mortier,
Joints,
Résine époxy,
Plastiques renforcés de
Grattage et ponçage sur supports durs
Exemple : enlèvement de mortier ou de colle à carrelage
(p.ex. pour le remplacement de carreaux endommagés),
enlèvement de restes de colle à moquette
Enlèvement de joints et de matériaux de carrelage ainsi
que grattage et ponçage de supports durs
Exemple : enlèvement de colle à carrelage et de mortier à
joint
fibres de verre,
Matériaux abrasifs
Lame multiusages HCS
Carton bitumé,
Moquettes,
Gazon synthétique,
Carton,
Découpe précise et rapide de matériaux tendres et de
matériaux abrasifs souples
Exemple : découpe de moquettes, carton, revêtements de
sol en PVC, carton bitumé etc.
Revêtements de sol en
PVC
Racloir, rigide
Moquettes,
Mortier,
Béton,
Raclage et grattage sur supports durs
Exemple : enlèvement de mortier, de colle à carrelage, de
restes de béton et de colle à moquette
Colle à carrelage
Racloir, flexible
Colle à moquette,
Restes de peinture,
Silicone
Raclage souple sur supports tendres
Exemple : enlèvement de joints de silicone, de restes de
colle à moquette ou de peinture
Lame de scie bimétal à segments
ondulés
Matériaux isolants,
Plaques d’isolation,
Dalles de tapis,
Découpe précise de matériaux tendres
Exemple : découpe de plaques d’isolation, découpe à ras
de surlongueurs de matériau isolant
Plaques d’isolation
phonique,
Carton,
Moquettes,
Caoutchouc,
Cuir
Languette de ponçage à concrétion
carbure
Bois,
Peintures
Ponçage sans papier abrasif de bois ou de peinture dans
des endroits difficiles d’accès
Exemple : enlèvement de peinture entre des lattes de vo-
lets, ponçage de revêtements de sol en bois dans les coins
Lame plongeante
à concrétion
carbure
Fibres de verre,
Mortier,
Bois
Coupes plongeantes dans des matériaux fortement
abrasifs
Exemple : enlèvement de carreaux mosaïque de faible
épaisseur
Lame coupe-joint
universelle HCS
Joints de dilatation,
Mastic de fenêtre,
Matériaux d’isolation
Découpe et enlèvement de matériaux tendres
Exemple : découpe de joints de dilatation en silicone ou de
mastic de fenêtre
(laine de roche)
1 609 92A 2LW | (16.1.17) Bosch Power Tools
Page 29
OBJ_BUCH-2853-001.book Page 29 Monday, January 16, 2017 1:56 PM
Montage des outils de travail
Montez l’outil de travail souhaité (p. e x. lam e de sci e à p lo ngé e
10 dans le porte-outil 7 de sorte que le coude soit orienté vers
le bas (voir figure sur la page des graphiques, l’inscription de
l’outil de travail est lisible par le haut).
Tournez l’outil de travail dans la position favorable pour le travail respectif et faites-le s’encliqueter dans les cames du
porte-outil 7. Douze positions, décalées de 30° les unes par
rapport aux autres, sont possibles.
Fixer l’outil au moyen de la vis 11. Serrer complètement la vis
11 au moyen de la clé mâle pour vis à six pans creuse 12.
Contrôler si l’accessoire est bien serré. Les accessoires
incorrectement fixés peuvent se détacher pendant l’utilisation et vous mettre en danger.
Sortir l’outil de travail
Desserrez la vis 11 à l’aide de la clé pour vis à six pans creux
12 et retirez l’outil.
Montage de la lame de scie sur la plaque de ponçage/
remplacement de la lame de scie
Le plateau de ponçage 15 est équipée d’un revêtement autoaggripant, ce qui permet de fixer rapidement et facilement les
feuilles abrasives.
Tapotez légèrement sur le revêtement auto-agrippant du plateau de ponçage 15 avant de monter la feuille abrasive 16 afin
d’obtenir une adhésion optimale.
Placez la feuille abrasive 16 de façon à la faire coïncider avec
un bord du plateau de ponçage 15 et appuyez sur la feuille
abrasive par un léger mouvement de rot atio n da ns le sen s des
aiguilles d’une montre.
Afin de garantir une bonne aspiration de poussières, assurezvous que les trous perforés d e la feuille abrasive et du plateau
de ponçage coïncident.
Pour retirer la feuille abrasive 16, prenez-la par un coin et re-
tirez-la du plateau de ponçage 15.
Il est possible d’utiliser toutes les lames de scie ou feutres de
polissage et de nettoyage de la série Delta 93 mm du programme d’accessoires Bosch.
Montez les accessoires de ponçage tels que les non-tissé ou
les feutres à polir de la même manière sur le plateau de ponçage.
Choix de la feuille abrasive
En fonction du matériau à travailler et du travail demandé, il existe différentes feuilles abrasives :
Feuille
Matériau Utilisation Grains
abrasive
– Tous les bois (p. ex. bois
dur, bois tendre, panneaux agglomérés, panneaux muraux)
– Matériaux en métal
Pour le dégrossissage p. ex. de poutres et planches rugueuses, non rabotées
Pour la rectification (plane) et le nivellement de petites rugosités
Pour la rectification de parachèvement et le ponçage du
bois
Français | 29
grossier 40
60
moyen 80
100
120
fin 180
240
320
400
–Peinture
–Vernis
– Masse de remplissage
–Spatule
Pour retirer des couches de peinture
Po ur p onc er l es cou che s de ba se d e pe int ur e (p . ex. enl eve r
les traits de pinceau, les gouttes de peinture et les nez)
grossier 40
60
moyen 80
100
120
Pour le finissage d’apprêts avant l’application de la peinture
laquée
fin 180
240
320
400
Aspiration de poussières/de copeaux
Les poussières de matériaux tels que peintures contenant
du plomb, certains bois, minéraux ou métaux, peuvent être
nuisibles à la santé. Entrer en contact ou aspirer les poussières peut entraîner des réactions allergiques et/ou des
maladies respiratoires auprès de l’utilisateur ou de personnes se trouvant à proximité.
Bosch Power Tools 1 609 92A 2LW | (16.1.17)
Certaines poussières telles que les poussières de chêne ou
de hêtre sont considérées comme cancérigènes, surtout
en association avec des additifs pour le traitement du bois
(chromate, lazure). Les matériaux contenant de l’amiante
ne doivent être travaillés que par des personnes qualifiées.
– Si possible, utilisez un dispositif d’aspiration des pous-
sières approprié au matériau.
Page 30

OBJ_BUCH-2853-001.book Page 30 Monday, January 16, 2017 1:56 PM
30 | Français
– Veillez à bien aérer la zone de travail.
– Il est recommandé de porter un masque respiratoire
avec un niveau de filtration de classe P2.
Respectez les règlements spécifiques aux matériaux à traiter en vigueur dans votre pays.
Evitez toute accumulation de poussières à l’emplace-
ment de travail. Les poussières peuvent facilement s’en-
flammer.
Raccordement de l’aspiration des poussières
(voir figure A)
Le dispositif d’aspiration 14 n’est conçu que pour les travaux
avec le plateau de ponçage 15, il ne peut pas être utilisé avec
d’autres outils de travail.
Utilisez toujours une aspiration des poussières pour les travaux de ponçage.
Pour monter l’aspiration des poussières 14 (accessoire), enlevez l’outil de travail.
Le cas échéant, assemblez les éléments de l’aspiration des
poussières 14 conformément aux indications sur la figure.
Placez l’aspiration des poussières montée sur le porte-outil 7
sur l’outil électroportatif. Tour nez l’aspiration des poussières
de sorte que les cames de l’aspiration des poussières s’encliquettent dans les cames correspondantes du carter. Fixez
l’aspiration des poussières, conformément aux indications
sur la figure, au moyen du clip de retenue 17 sur l’outil électroportatif.
Veillez à ce que la bague en fe utre 16 ne soit pas endommagée
et repose bien sur le plateau de ponçage 15. Remplacez immédiatement une bague en feutre endommagée.
Suivant la version, montez un tuyau d’aspiration 20 (accessoire) directement sur la tubulure d’aspiration 18 ou coupez
le vieux bout du tuyau, vissez l’adaptateur d’aspiration 19 (accessoire) sur le bout du tuyau et puis montez-le directement
sur la tubulure d’aspiration 18. Raccordez le tuyau d’aspiration 20 à un aspirateur (accessoire). Vous trouverez un tableau pour le raccordement aux différents aspirateurs sur le
volet.
L’aspirateur doit être approprié au matériau à travailler.
Pour l’aspiration de poussières particulièrement nuisibles à la
santé, cancérigènes ou sèches, utilisez des aspirateurs spécifiques.
Mise en marche
Mise en service
Montage de l’accu
N’utilisez que des accus à ions lithium d’origine Bosch
dont la tension correspond à celle indiquée sur la
plaque signalétique de l’outil électroportatif. L’utilisa-
tion de tout autre accumulateur peut entraîner des blessures et des risques d’incendie.
Note : L’utilisation d’accus non appropriés pour votre outil
électroportatif peut entraîner des dysfonctionnements ou endommager l’outil électroportatif.
Montez l’accu chargé 3 dans la poignée jusqu’à ce q u’il s’encliquette de façon perceptible et ne dépasse plus de la poignée.
Mise en Marche/Arrêt
Pour mettre en marche l’outil électroportatif, poussez l’interrupteur Marche/Arrêt 1 vers l’avant de sorte que «I» appa-
raisse sur l’interrupteur.
Pour éteindre l’outil électroportatif, poussez l’interrupteur
Marche/Arrêt 1 vers l’arrière de sorte que le chiffre «0» ap-
paraisse sur l’interrupteur.
Afin d’économiser l’énergie, ne mettez l’outil électroportatif
en marche que quand vous l’utilisez.
Grâce à la Protection Electronique des Cellules « Electronic
Cell Protection (ECP) », l’accu à ions lithium est protégé
contre une décharge profonde. Lorsque l’accumulateur est
déchargé, l’outil électroportatif s’arrête grâce à un dispositif
d’arrêt de protection : L’outil de tr avail ne tourne plus.
Note : Si l’outil électroportatif s’arrête automatiquement
parce que l’accu est déchargé ou surchauffé, mettez l’outil
électroportatif hors marche au moyen de l’interrupteur
Marche/Arrêt 1. Rechargez l’accu ou laissez-le refroidir avant
de remettre en marche l’o util électroportatif. L’accu risque sinon d’être endommagé.
Présélection de la vitesse
La molette de réglage présélection de la vitesse 5 permet de
présélectionner la vitesse nécessaire (même durant le travail
de ponçage).
La vitesse nécessaire dépend du matériau à travailler et des
conditions de travail et peut être déterminée par des essais
pratiques.
Instructions d’utilisation
Avant d’effectuer des travaux sur l’appareil (p.ex. tra-
vaux d’entretien, changement d’outils, etc.) et pour le
transporter ou le stocker, retirez l’accu de l’appareil
électroportatif. Il y a risque de blessure lorsqu’on appuie
par mégarde sur l’interrupteur Marche/Arrêt.
Avant de déposer l’outil électroportatif, attendez que
celui-ci soit complètement à l’arrêt.
Note : Ne pas bloquer les ouïes de ventilation 4 de l’outil élec-
troportatif lors du travail, autrement la durée de vie de l’outil
électroportatif est réduite.
Principe de fonctionnement
L’entraînement oscillant fait que l’outil électroportatif oscille
jusqu’à 20 000 fois par minute de 2, 8 °. C eci pe rme t un tra va il
précis dans un endroit étroit.
Travaillez en exerçant une faible pression
uniforme afin de ne pas réduire le rendement de travail ou bloquer l’outil de travail.
Déplacez de temps en temps l’outil électroportatif lors du travail pour éviter tout réchauffement excessif ou blocage de l’outil
de travail.
1 609 92A 2LW | (16.1.17) Bosch Power Tools
Page 31

OBJ_BUCH-2853-001.book Page 31 Monday, January 16, 2017 1:56 PM
Le sciage
N’utiliser que des lames de scie en parfait état. Les
lames de scie déformées ou émoussées peuvent se casser,
avoir des effets négatifs sur la qualité de la coupe ou causer
un contrecoup.
Lors du sciage de matériaux de construction légers,
respectez les dispositions légales ainsi que les recommandations du fabricant du matériau.
Utiliser des détecteurs appropriés afin de déceler des
conduites cachées ou consulter les entreprises d’approvisionnement locales. Un contact avec des conduites
d’électricité peut provoquer un incendie ou un choc électrique. Un endommagement d’une conduite de gaz peut
provoquer une explosion. La perforation d’une conduite
d’eau provoque des dégâts matériels.
Le procédé de coupes en plongée ne peut être appliqué
que pour des matériaux tendres tels que le bois, les
plaques de plâtre, etc. !
Avant de scier avec des lames de scie HCS dans le bois, les
panneaux agglomérés, les matériaux de construction etc., vérifiez si ceux-ci contiennent des corps étrangers tels que
clous, vis etc. Le cas échéant, enlevez les corps étrangers ou
utilisez des lames de scie bimétal.
Le tronçonnage
Note : Lors du tronçonnage de carrelages muraux, tenez
compte que les outils s’usent rapidement lors d’une utilisation
prolongée.
Le ponçage
La puissance d’enlèvement de matière ainsi que l’état de la
surface dépendent en grande partie du choix de la feuille
abrasive, de la vitesse de rotation présélectionnée ainsi que
de la pression exercée sur l’appareil.
Seules des feuilles abrasives impeccables assurent un bon
travail de ponçage et ménagent l’outil électroportatif.
Veillez à ce que la press ion de travail soit régulière, afin d’augmenter la durée de vie des feuilles abrasives.
Une pression trop élevée exercée sur l’appareil n’améliore pas
la puissance de ponçage mais augmente considérablement
l’usure de l’outil électroportatif et de la feuille abrasive.
Pour poncer avec une précision extrême dans les coins, sur
des bords et dans des endroits d’accès difficile, il est également possible de ne travailler qu’avec la pointe ou le bord du
plateau de ponçage.
Lors de travaux de ponçage ponctuel, la feuille abrasive peut
fortement chauffer. Réduisez alors la vitesse et la pression, et
laissez la feuille abrasive régulièrement refroidir.
Une feuille abrasive avec laquelle on a travaillé du métal, ne
doit pas être utilisée pour d’autres matériaux.
N’utilisez que des accessoires de ponçage d’origine Bosch.
Utilisez toujours une aspiration des poussières pour les tra-
vaux de ponçage.
Grattage
Choisissez une vitesse élevée pour le grattage.
Travaillez sur une surface souple (p. ex. bois) avec un angle
plat et une pression minimale. Sinon, le racloir peut couper
dans la surface.
Protection contre surcharge en fonction de la
température
Si l’outil électroportatif est utilisé de manière conforme, tout
ri sq ue de s ur ch arg e e st ex clu . E n c as de t ro p f or te s ol li ci tat io n
de l’outil ou de surchauffe de l’accu, il y a soit réduction de la
vitesse de rotation, soit arrêt automatique de l’outil électroportatif. En cas de réduction de la vitesse de rotation, l’outil
électroportatif se remet à fonctionner à pleine vitesse dès que
la température de l’accu repasse dans la plage des températures admissibles ou que l’outil est moins sollicité. En cas d’arrêt automatique, éteignez l’outil électroportatif, laissez refroidir l’accu et remettez l’outil en marche.
Indications pour le maniement optimal de l’accu
Protégez l’accu de l’humidité et de l’eau.
Ne stockez l’accu que dans la plage de température de
–20 °C à 50 ° C. Ne stockez pas l’accu trop longtemps dans
une voiture par ex. en été.
Si l’autonomie de l’accu diminue considérablement après les
recharges effectuées, cela signifie que l’accu est usagé et qu’il
doit être remplacé.
Respectez les indications concernant l’élimination.
Entretien et Service Après-Vente
Nettoyage et entretien
Avant d’effectuer des travaux sur l’appareil (p.ex. tra-
vaux d’entretien, changement d’outils, etc.) et pour le
transporter ou le stocker, retirez l’accu de l’appareil
électroportatif. Il y a risque de blessure lorsqu’on appuie
par mégarde sur l’interrupteur Marche/Arrêt.
Veillez à ce que l’outil électroportatif ainsi que les ouïes
de ventilation soient toujours propres afin d’obtenir un
travail impeccable et sûr.
Nettoyez les outils de travail Riff (accessoire) régulièrement
au moyen d’une brosse métallique.
Service Après-Vente et Assistance
Notre Service Après-Vente répond à vos questions concernant la réparation et l’entretien de votre produit et les pièces
de rechange. Vous trouverez des vues éclatées ainsi que des
informations concernant les pièces de rechange également
sous :
www.bosch-pt.com
Les conseillers techniques et assistants Bosch sont à votre
disposition pour répondre à vos questions concernant nos
produits et leurs accessoires.
Pour toute demande de renseignement ou commande de
pièces de rechange, précisez-nous impérativement le numéro
d’article à dix chiffres indiqué sur la plaque signalétique du
produit.
Français | 31
Bosch Power Tools 1 609 92A 2LW | (16.1.17)
Page 32

OBJ_BUCH-2853-001.book Page 32 Monday, January 16, 2017 1:56 PM
32 | Español
France
Passez votre commande de pièces détachées directement en
ligne sur notre site www.bosch-pt.fr.
Vous êtes un utilisateur, contactez :
Le Service Clientèle Bosch Outillage Electroportatif
Tel. : 0811 360122
(coût d’une communication locale)
Fax : (01) 49454767
E-Mail : contact.outillage-electroportatif@fr.bosch.com
Vous êtes un revendeur, contactez :
Robert Bosch (France) S. A.S.
Service Après-Vente Electroportatif
126, rue de Stalingrad
93705 DRANCY Cédex
Tel. : (01) 43119006
Fax : (01) 43119033
E-Mail : sav.outillage-electroportatif@fr.bosch.com
Belgique, Luxembourg
Tel. : +32 2 588 0589
Fax : +32 2 588 0595
E-Mail : outillage.gereedschap@be.bosch.com
Suisse
Passez votre commande de pièces détachées directement en
ligne sur notre site www.bosch-pt.com/ch/fr.
Tel. : (044) 8471512
Fax : (044) 8471552
E-Mail : Aftersales.Service@de.bosch.com
Seulement pour les pays de l’Union Européenne :
Les batteries/piles dont on ne peut plus se servir peuvent être
déposées directement auprès de :
Suisse
Batrec AG
3752 Wimmis BE
Batteries/piles :
Sous réserve de modifications.
Transport
Les batteries Lithium-ion sont soumises aux règlements de
transport des matières dangereuses. L’utilisateur peut transporter les batteries par voie routière sans mesures supplémentaires.
Lors d’une expédition par tiers (par ex. : transport aérien ou
entreprise de transport), les mesures à prendre spécifiques à
l’emballage et au marquage doivent être observées. Dans un
tel cas, lors de la préparation de l’envoi, il est impératif de
faire appel à un expert en transport des matières dangereuses.
N’expédiez les accus que si le carter n’est pas endommagé.
Recouvrez les contacts non protégés et emballez l’accu de
manière à ce qu’il ne puisse pas se déplacer dans l’emballage.
Veuillez également respecter les règlementations supplémentaires éventuellement en vigueur.
Élimination des déchets
Les outils électroportatifs et les accus, ainsi que leurs
accessoires et emballages, doivent pouvoir suivre
chacun une voie de recyclage appropriée.
Ne jetez pas les outils électroportatifs et les accus/piles avec
les ordures ménagères !
Español
Instrucciones de seguridad
Advertencias de peligro generales para
herramientas eléctricas
caso de no atenerse a las advertencias de peligro e instrucciones siguientes, ello puede ocasionar una descarga eléctrica,
un incendio y/o lesión grave.
Guardar todas las advertencias de peligro e instrucciones
para futuras consultas.
El término herramienta eléctrica empleado en las siguientes
advertencias de peligro se refiere a herramientas eléctricas
de conexión a la red (con cable de red ) y a herramientas eléctricas accionadas por acumulador (o sea, sin cable de red).
Seguridad del puesto de trabajo
Mantenga limpio y bien iluminado su puesto de trabajo.
El desorden o una iluminación deficiente en las áreas de
trabajo pueden provocar accidentes.
No utilice la herramienta eléctrica en un entorno con
peligro de explosión, en el que se encuentren combustibles líquidos, gases o material en polvo. Las herra-
mientas eléctricas producen chispas que pueden llegar a
inflamar los materiales en polvo o vapores.
Conformément à la directive européenne
2012/19/UE, les équipements électriques
dont on ne peut plus se servir, et conformément à la directive européenne
2006/66/CE, les accus/piles usés ou défectueux doivent être isolés et suivre une voie
de recyclage appropriée.
ADVERTENCIA
Lithium ion :
Respectez les indications données
dans le chapitre « Transport »,
page 32.
Lea íntegramente estas advertencias de peligro e instrucciones. En
1 609 92A 2LW | (16.1.17) Bosch Power Tools
Page 33

OBJ_BUCH-2853-001.book Page 33 Monday, January 16, 2017 1:56 PM
Mantenga alejados a los niños y otras personas de su
puesto de trabajo al emplear la herramienta eléctrica.
Una distracción le puede hacer perder el control sobre la
herramienta eléctrica.
Seguridad eléctrica
El enchufe de la herramienta eléctrica debe correspon-
der a la toma de corriente utilizada. No es admisible
modificar el enchufe en forma alguna. No emplear
adaptadores en herramientas eléctricas dotadas con
una toma de tierra. Los enchufes sin modificar adecuados
a las respectivas tomas de corriente reducen el riesgo de
una descarga eléctrica.
Evite que su cuerpo toque partes conectadas a tierra
como tuberías, radiadores, cocinas y refrigerado res. El
riesgo a quedar expuesto a una sacudida eléctrica es mayor si su cuerpo tiene contacto con tierra.
No exponga la herramienta eléctrica a la lluvia y evite
que penetren líquidos en su interior. Existe el peligro de
recibir una descarga eléctrica si penetran ciertos líquidos
en la herramienta eléctrica.
No utilice el cable de red para transportar o colgar la
herramienta eléctrica, ni tire de él para sacar el enchufe de la toma de corriente. Mantenga el cable de red
alejado del calor, aceite, esquinas cortantes o piezas
móviles. Los cables de red dañados o enredados pueden
provocar una descarga eléctrica.
Al trabajar con la herramienta eléctrica a la intemperie
utilice solamente cables de prolongación apropiados
para su uso en exteriores. La utilización de un cable de
prolongación adecuado para su uso en exteriores reduce el
riesgo de una descarga eléctrica.
Si fuese imprescindible utilizar la herramienta eléctri-
ca en un entorno húmedo, es necesario conectarla a
través de un fusible diferencial. La aplicación de un fusi-
ble diferencial reduce el riesgo a exponerse a una descarga
eléctrica.
Seguridad de personas
Esté atento a lo que hace y emplee la herramienta eléc-
trica con prudencia. No utilice la herramienta eléctrica
si estuviese cansado, ni tampoco después de haber
consumido alcohol, drogas o medicamentos. El no estar
atento durante el uso de la herramienta eléctrica puede
provocarle serias lesiones.
Utilice un equipo de protección personal y en todo caso
unas gafas de protección. El riesgo a lesionarse se reduce
considerablemente si, dependiendo del tipo y la aplicación
de la herramienta eléctrica empleada, se utiliza un equipo
de protección adecuado como una mascarilla antipolvo,
zapatos de seguridad con suela antideslizante, casco, o
protectores auditivos.
Evite una puesta en marcha fortuita. Asegurarse de
que la herramienta eléctrica esté desconectada antes
de conectarla a la toma de corriente y/o al montar el
acumulador, al recogerla, y al transportarla. Si trans-
porta la herramienta eléctrica sujetándola por el interrup-
tor de conexión/desconexión, o si alimenta la herramienta
eléctrica estando ésta conectada, ello puede dar lugar a un
accidente.
Retire las herramientas de ajuste o llaves fijas antes de
conectar la herramienta eléctrica. Una herramienta de
ajuste o llave fija colocada en una pieza rotante puede producir lesiones al poner a funcionar la herramienta eléctrica.
Evite posturas arriesgadas. Trabaje sobre una base fir-
me y mantenga el equilibrio en todo momento. Ello le
permitirá controlar mejor la herramienta eléctrica en caso
de presentarse una situación inesperada.
Lleve puesta una vestimenta de trabajo adecuada. No
utilice vestimenta amplia ni joyas. Mantenga su pelo,
vestimenta y guantes alejados de las piezas móviles. La
vestimenta suelta, el pelo largo y las joyas se pueden enganchar con las piezas en movimiento.
Siempre que sea posible utilizar unos equipos de aspi-
ración o captación de polvo, asegúrese que éstos estén
montados y que sean utilizados correctamente. El em-
pleo de estos equipos reduce los riesgos deriva dos del polvo.
Uso y trato cuidadoso de herramientas eléctricas
No sobrecargue la herramienta eléctrica. Use la herra-
mienta eléctrica prevista para el trabajo a realizar. Con
la herramienta adecuada podrá trabajar mejor y más seguro dentro del margen de potencia indicado.
No utilice herramientas eléctricas con un interruptor
defectuoso. Las herramientas eléctricas que no se pue-
dan conectar o desconectar son peligrosas y deben hacerse reparar.
Saque el enchufe de la red y/o desmonte el acumulador
antes de realizar un ajuste en la herramienta eléctrica,
cambiar de accesorio o al guardar la herramienta eléctrica. Esta medida preventiva reduce el riesgo a conectar
accidentalmente la herramienta eléctrica.
Guarde las herramientas eléctricas fuera del alcance
de los niños. No permita la utilización de la herramienta
eléctrica a aquellas personas que no estén familiarizadas con su uso o que no hayan leído estas instrucciones. Las herramientas eléctricas utilizadas por personas
inexpertas son peligrosas.
Cuide la herramienta eléctrica con esmero. Controle si
funcionan correctamente, sin atascarse, las partes móviles de la herramienta eléctrica, y si existen partes rotas o deterioradas que pudieran afectar al funcionamiento de la herramienta eléctrica. Haga reparar estas
piezas defectuosas antes de volver a utilizar la herramienta eléctrica. Muchos de los accidentes se deben a
herramientas eléctricas con un mantenimiento deficiente.
Mantenga los útiles limpios y afilados. Los útiles mante-
nidos correctamente se dejan guiar y controlar mejor.
Utilice la herramienta eléctrica, accesorios, útiles, etc.
de acuerdo a estas instrucciones, considerando en ello
las condiciones de trabajo y la tarea a realizar. El uso de
herramientas eléctricas para trabajos diferentes de aquellos para los que han sido concebidas puede resultar peligroso.
Español | 33
Bosch Power Tools 1 609 92A 2LW | (16.1.17)
Page 34

OBJ_BUCH-2853-001.book Page 34 Monday, January 16, 2017 1:56 PM
34 | Español
Trato y uso cuidadoso de herramientas accionadas por
acumulador
Solamente cargar los acumuladores con los cargadores
recomendados por el fabricante. Existe un riesgo de in-
cendio al intentar cargar acumuladores de un tipo diferente al previsto para el cargador.
Solamente emplee los acumuladores previstos para la
herramienta eléctrica. El uso de otro tipo de acumulado-
res puede provocar daños e incluso un incendio.
Si no utiliza el acumulador, guárdelo separado de clips,
monedas, llaves, clavos, tornillos o demás objetos metálicos que pudieran puentear sus contactos. El corto-
circuito de los contactos del acumulador puede causar
quemaduras o un incendio.
La utilización inadecuada del acumulador puede provo-
car fugas de líquido. Evite el contacto con él. En caso de
un contacto accidental enjuagar el área afectada con
abundante agua. En caso de un contacto con los ojos recurra además inmediatamente a un médico. El líquido del
acumulador puede irritar la piel o producir quemaduras.
Servicio
Únicamente haga reparar su herramienta eléctrica por
un profesional, empleando exclusivamente piezas de
repuesto originales. Solamente así se mantiene la seguri-
dad de la herramienta eléctrica.
Instrucciones de seguridad para Multi-Cutter a
batería
Sujete la herramienta eléctrica por las superficies de
agarre aisladas al realizar trabajos en los que el útil
pueda llegar a tocar conductores eléctricos ocultos. El
contacto con conductores bajo tensión puede hacer que
las partes metálicas de la herramienta eléctrica le provoquen una descarga eléctrica.
Solamente emplee la herramienta eléctrica para lijar
en seco. La penetración de agua en el aparato eléctrico
comporta un mayor riesgo de electrocución.
¡Atención! Peligro de incendio. Evite el sobrecalenta-
miento de la pieza y de la propia lijadora. Vacíe siempre
el depósito de polvo antes de cada pausa. El material en
polvo acumulado en el saco colector de polvo, Microfiltro,
bolsa de papel (o la bolsa filtrante o filtro del aspirador)
puede llegar a autoincendiarse bajo unas condiciones desfavorables, como, p. ej., al proyectarse chispas al lijar metal . La pr obab ilida d de qu e est o ocur ra es mayor si el m aterial va mezclado con partículas de pintura, poliuretano u
otras sustancias químicas y si éste se hubiese calentando
tras un uso intenso de la herramienta.
Mantenga alejadas las manos del área de corte. No to-
que debajo de la pieza de trabajo. Podría accidentarse al
tocar la hoja de sierra.
Utilice unos aparatos de exploración adecuados para
detectar conductores o tuberías ocultas, o consulte a
sus compañías abastecedoras. El contacto con conduc-
tores eléctricos puede provocar un incend io o una electrocución. Al dañar una tubería de gas puede producirse una
explosión. La perforación de una tubería de agua puede
causar daños materiales.
1 609 92A 2LW | (16.1.17) Bosch Power Tools
Trabajar sobre una base firme sujetando la herramien-
ta eléctrica con ambas manos. La herramienta eléctrica
es guiada de forma más segura con ambas manos.
Asegure la pieza de trabajo. Una pieza de trabajo fijada
con unos dispositivos de sujeción, o en un tornillo de banco, se mantiene sujeta de forma mucho más segura que
con la mano.
No intente abrir el acumulador. Podría provocar un cor-
tocircuito.
Proteja el acumulador del calor excesivo como,
p. ej., de una exposición prolongada al sol, del
fuego, del agua y de la humedad. Existe el riesgo
de explosión.
Si el acumulador se daña o usa de forma inapropiada
puede que éste emane vapores. Ventile con aire fresco
el recinto y acuda a un médico si nota alguna molestia.
Los vapores pueden llegar a irritar las vías respiratorias.
Únicamente utilice el acumulador en combinación con
su herramienta eléctrica Bosch. Solamente así queda
protegido el acumulador contra una sobrecarga peligrosa.
Mediante objetos puntiagudos, como p. ej. clavos o
destornilladores, o por influjo de fuerza exterior se
puede dañar el acumulador. Se puede generar un corto-
circuito interno y el acumulador puede arder, humear, explotar o sobrecalentarse.
Utilice unos guantes de protección al cambiar los úti-
les. Los útiles se calientan tras un uso prolongado.
No trate de rascar materiales humedecidos (p. ej. pa-
pel de empapelar) y no trabaje sobre firmes húmedos.
Existe el peligro de recibir una descarga eléctrica si penetra agua en la herramienta eléctrica.
No trate la superficie a trabajar con líquidos que con-
tengan disolventes. Al calentarse el material al rascarlo
puede producirse un vapor tóxico.
Proceda con especial cautela al trabajar con el rasca-
dor. El útil está muy afilado y corre riesgo a lesionarse.
Descripción y prestaciones del
producto
Lea íntegramente estas advertencias de peligro e instrucciones. En caso de no a tenerse
a las advertencias de peligro e instrucciones siguientes, ello puede ocasionar una descarga
eléctrica, un incendio y/o lesión grave.
Despliegue y mantenga abierta la solapa con la imagen del
aparato mientras lee las instrucciones de manejo.
Utilización reglamentaria
La herramienta eléctrica ha sido diseñada para serrar o dividir
materiales de madera, plástico, escayola, metales no férricos
y elementos de sujeción (p. ej., clavos sin templar, grapas).
Es adecuada asimismo para tratar azulejos de baja dureza en
paredes, así como para lijar y raspar en seco pequeñas superficies. Es especialmente apropiada para realizar trabajos cerca de bordes y para enrasar. La herramienta eléctrica deberá
emplearse exclusivamente con accesorios Bosch.
Page 35

OBJ_BUCH-2853-001.book Page 35 Monday, January 16, 2017 1:56 PM
Componentes principales
La numeración de los componentes está referida a la imagen
de la herramienta eléctrica en la página ilustrada.
1 Interruptor de conexión/desconexión
2 Botón de extracción del acumulador
3 Acumulador
4 Rejillas de refrigeración
5 Rueda de ajuste para preselección del nº de oscilaciones
6 Indicador del estado de carga del acumulador
7 Alojamiento del útil
8 Palanca de sujeción del tope de profundidad
9 Tope de profundidad
10 Hoja de sierra de inmersión *
11 Tornillo de hexágono interior
12 Llave macho hexagonal
13 Empuñadura (zona de agarre aislada)
14 Dispositivo de aspiración de polvo *
15 Placa lijadora *
16 Hoja lijadora *
17 Palanca de fijación de la aspiración de polvo
18 Boquilla de aspiración*
19 Adaptador para aspiración de polvo *
20 Manguera de aspiración *
*Los acc esorios descritos e ilustrados no corresponden al mater ial
que se adjunta de serie. La gama completa de accesorios opcionales se detalla en nuestro programa de accesorios.
Datos técnicos
Multi-Cutter a batería GOP 12V-28
Nº de artículo
Tensión nominal
Revoluciones en vacío n
0
Ángulo de oscilación izquierda/
derecha
Peso según
EPTA-Procedure 01:2014
1)
3 601 HB5 0..
V= 12
min-15000–20000
°1,4
kg 0,97– 1,2
Información sobre ruidos y vibraciones
Valores de emisión de ruidos determinados según
EN 60745-2-4.
El nivel de presión sonora típico del aparato, determinado con
un filtro A, asciende a: Nivel de presión sonora 79 dB(A); nivel de potencia acústica 90 dB(A). Tolerancia K= 3 dB.
¡Usar unos protectores auditivos!
Nivel total de vibraciones a
nes) y tolerancia K determinados según EN 60745-2-4:
Amolado: a
Serrado con hoja de sierra de inmersión: a
K=1,5m/s
Serrado con hoja de sierra de segmentos: a
K=1,5m/s
Rascado: a
El nivel de vibraciones indi cado en estas instrucciones ha sido
determinado según el procedimiento de medición fijado en la
norma EN 60745 y puede servir como base de comparación
con otras herramientas eléctricas. También es adecuado para
estimar provisionalmente la solicitación experimentada por
las vibraciones.
El nivel de vibraciones indicado ha sido determinado para las
aplicaciones principales de la herramienta eléctrica. Por ello,
el nivel de vibraciones puede ser diferente si la herramienta
eléctrica se utiliza para otras aplicaciones, con accesorios
diferentes, con útiles divergentes, o si el mantenimiento de la
misma fuese deficiente. Ello puede suponer un aumento drástico de la solicitación por vibraciones durante el tiempo total
de trabajo.
Para determinar con exactitud la solicitación experimentada
por las vibraciones, es necesario considerar también aquellos
tiempos en los que el aparato esté desconectado, o b ien, esté
en funcionamiento, pero sin ser utilizado realmente. Ello
puede suponer una disminución drástica de la solicitación por
vibraciones durante el tiempo total de trabajo.
Fije unas medidas de seguridad adicionales para proteger al
usuario de los efectos por vibraciones, como por ejemplo:
Mantenimiento de la herramienta eléctrica y de lo s útiles, conservar calientes las manos, organización de las secuencias de
trabajo.
Temperatura ambiente permitida
–al cargar
– durante el servicio
2)
y el
almacenamiento
Acumuladores recomendados
Cargadores recomendados
1) según el acumulador utilizado
2) potencia limitada a temperaturas <0 °C
Datos técnicos determinados con el tipo de acumulador suministrado.
°C
°C
0...+45
–20...+50
GBA 10,8V...
GBA 12V...
GBA 12V... W
GAL 11.. CV
GAL 12.. CV
GAL 18... W
Montaje
Carga del acumulador
Utilice únicamente los cargadores que se enumeran en
los datos técnicos. Solamente estos cargadores han sido
especialmente adaptados a los acumuladores de iones de
litio empleados en su herramienta eléctrica.
Observación: El acumulador se suministra parcialmente cargado. Con el fin de obtener la plena potencia del acumulador, antes de su primer uso, cárguelo completamente en el cargador.
El acumulador de iones de litio puede recargarse siempre que
se quiera, sin que ello merme su vida útil. Una interrupción del
proceso de carga no afecta al acumulador.
(suma vectorial de tres direccio-
h
=2,9m/s2, K=1,5 m/s2,
h
2
,
2
,
=8,3m/s2, K= 1,5 m/s2.
h
Español | 35
=9,2m/s2,
h
=2,5m/s2,
h
Bosch Power Tools 1 609 92A 2LW | (16.1.17)
Page 36

OBJ_BUCH-2853-001.book Page 36 Monday, January 16, 2017 1:56 PM
36 | Español
Desmontaje del acumulador
Para desmontar el acumulador 3 presione los botones de extracción 2 y sáquelo hacia atrás de la herramienta eléctrica.
No proceda con brusquedad.
Indicador del estado de carga del acumulador
Los tres LED verdes del indicador del estado de carga del acumulador 6 indican el estado de carga del acumulador 3. El indicador del estado de carga del acumulador se encien de sólo
5 segundos tras la puesta en servicio.
LED Capacidad
Cambio de útil
Desmonte el acumulador antes de manipular en la he-
rramienta eléctrica (p. ej. en el mantenimiento, cambio
de útil, etc.), así como al transportarla y guardarla. En
caso contrario podría accidentarse al accionar fortuitamente el interruptor de conexión/desconexión .
Utilice unos guantes de protección al cambiar de útil.
Podría accidentarse en caso de tocar los útiles.
Selección del útil
Útil GOP 12V-28
3 LED verdes encendidos ≥2/3
2 LED verdes encendidos ≥1/3
1 LED verde encendido <1 /3
1 LED verde intermitente Reserva
3 LED verde intermitente vacío
Si tras la conex ión no se enciende ningún LED , está defectuoso el acumulador y debe sustituirse.
En la tabla siguiente se muestran algunos de los útiles a título de ejemplo. Una variedad de útiles adicionales los encontrará en el
amplio programa de accesorios Bosch.
Útil Material Aplicación
Segmento de
serrar bimetálico
Materiales de madera,
plástico,
metales no férreos
Cortes de división y de inmersión; también para serrar cerca de los bordes, en esquinas y en puntos de difícil acceso;
ejemplo: para recortar molduras o marcos de la puerta ya
instalados, cortes de inmersión para ajustar tarimas
Placa lijadora para
hojas lijadoras de
la serie Delta
93 mm
Dependiente de la hoja
lijadora empleada
Para el lijado superficial de bordes, esquinas, o en á reas de
difícil acceso;
según la hoja lijadora utilizada para lijar, p. ej., madera,
pintura, barniz o piedra
Vellones para limpiar y para la estructuración de madera,
eliminar el óxido de metal y para lijar pinturas, fieltro para
el prepulido
Amoladora
perfilada
Madera,
tubos/perfiles,
pintura,
lacas,
Amolado de perfiles confortable y eficiente hasta un
diámetro de 55 mm;
hojas lijadoras rojas para el lijado de madera,
tubos/perfiles, pinturas, aparejo y metal
aparejos,
metal
Hoja de sierra de
inmersión,
bimetálica, para
madera y metal
Madera blanda,
plásticos blandos,
cartón enyesado,
perfiles de aluminio y
metales no férreos de lámina delgada,
chapas delgadas,
Pequeños cortes de separación e inmersión;
ejemplo: cortar aberturas para cajas de enchu fe, separar a
ras de superficie tubos de cobre, cortes de inmersión en
paneles de cartón enyesado
Trabajos de adaptación filigrana en madera;
ejemplo: reaserrar aberturas para cerraduras y herrajes
clavos y tornillos no
templados
1 609 92A 2LW | (16.1.17) Bosch Power Tools
Page 37

OBJ_BUCH-2853-001.book Page 37 Monday, January 16, 2017 1:56 PM
Útil Material Aplicación
Hoja de sierra de
inmersión HCS
para madera
Materiales de madera,
plásticos blandos
Cortes de división y cortes profundos de inmersión;
también para serrar cerca de los bordes, en esquinas y en
puntos de difícil acceso;
ejemplo: recorte de una ventana estrecha en madera
maciza para el montaje de una rejilla de ventilación
Hoja bimetálica de
sierra de inmer-
Madera dura,
placas recubiertas
Cortes de inmersión en placas recubiertas o madera dura;
ejemplo: montaje de ventanillas de techo
sión para madera
dura
Hoja de sierra de
inmersión de
metal duro (HM)
para metal
Metal,
materiales fuertemente
abrasivos,
fibra de vidrio,
cartón enyesado,
Cortes de inmersión en materiales fuertemente abrasivos
o metal;
ejemplo: corte de cubiertas frontales de cocinas, corte
simple a través de tornillos templados, clavos y acero
inoxidable
placas de fibras aglomeradas con cemento
Hoja de sierra de
inmersión,
bimetálica, para
madera y metal
Madera blanda,
madera dura,
placas enchapadas,
placas cubiertas con
Cortes de inmersión en placas recubiertas o madera dura;
ejemplo: acortar cercos de puertas, recortes para una
bandeja
plástico,
clavos y tornillos no
templados
Segmento de
serrar HM (metal
duro)
Hoja de sierra de
segmentos
estriados de
diamante
Placa delta
estriada HM
Eliminador de
mortero estriado
de metal duro
(HM)
Fugas de cemento,
azulejos blandos,
plásticos reforzados con
fibra de vidrio,
hormigón celular
Fugas de cemento,
azulejos blandos,
resina epoxi,
plásticos reforzados con
fibra de vidrio
Mortero,
restos de hormigón,
madera,
materiales abrasivos
Mmortero,
fugas,
resina epoxi,
plásticos reforzados con
Cortar y dividir cerca de bordes, esquinas y áreas de
acceso difícil;
ejemplo: vaciado de juntas en azulejos para pared para
saneamiento de las mismas; recortes interiores en
azulejos, placas de escayola o plásticos
Fresado preciso y separación de material de azulejos/
fugas, resinas epoxi y plásticos reforzados con fibra de
vidrio;
ejemplo: corte de pequeños recortes en azulejos blandos y
aberturas en plásticos reforzados con fibra de vidrio
Raspado y amolado sobre base dura;
ejemplo: eliminar mortero o pegamento de azulejos (p. ej.
al sustituir azulejos dañados), eliminar restos de pegamen-
to de alfombra
Fresado y separación de material de fugas y azulejos así
como raspado y amolado sobre base dura;
ejemplo: eliminar pegamento de azulejos y mortero de
fugas
fibra de vidrio,
materiales abrasivos
Multicuchilla HCS
Cartón alquitranado para
tejados,
alfombras,
césped sintético,
Corte rápido y preciso de material blando y materiales
flexibles abrasivos ;
ejemplo: corte de alfombras, cartón, pisos de PVC, cartón
de techo, etc.
cartón,
piso de PVC
Rascador rígido
Alfombras,
mortero,
hormigón,
Rascado sobre base dura;
ejemplo: eliminación de mortero, pegamento de azulejos,
restos de pegamento de hormigón y alfombra
pegamento de azulejos
Español | 37
Bosch Power Tools 1 609 92A 2LW | (16.1.17)
Page 38

OBJ_BUCH-2853-001.book Page 38 Monday, January 16, 2017 1:56 PM
38 | Español
Útil Material Aplicación
Rascador flexible
Pegamento de alfombra,
restos de pintura,
silicona
Rascado flexible sobre base blanda;
ejemplo: eliminación de fugas de silicona, restos de
pegamento de alfombra y pintura
Cuchilla segmentada bimetálica de
filo ondulado
Material de aislamiento,
placas aislantes,
placas de piso,
placas insonorizantes de
pasos,
cartón,
alfombras,
goma,
cuero
Dedo lijador
estriado de metal
Madera,
pintura
duro (HM)
Hoja estriada de
sierra de
inmersión de
Fibra de vidrio,
mortero,
madera
metal duro (HM)
Cortador universal
de fugas HCS
Fugas de dilatación,
masilla de ventanas,
materiales aislantes (lana
mineral)
Montaje del útil
Coloque el útil deseado (p. ej. la hoja de sierra de inmersión
10) en el portaútiles 7, de manera que mire hacia abajo la parte acodada (ver figura en página ilustrada, la inscripción del
útil deberá ser legible desde arriba).
Gire el útil a una posición apropiada para el trabajo a realizar,
cuidando que éste encastre en los resaltes del portaútiles 7.
Es posible realizar el montaje en doce posiciones diferentes
desplazadas 30 ° entre sí.
Sujete el útil con el tornillo 11. Apriete firmemente el tornillo
11 con la llave macho hexagonal 12.
Controle la sujeción firme del útil. Los útiles sujetos de
forma incorrecta o insegura pueden aflojarse durante el
trabajo y accidentarle.
Desmontaje del útil
Para desmontar el útil, afloje el tornillo 11 con la llave macho
hexagonal 12 y retire entonces el útil.
Corte preciso de materiales blandos;
ejemplo: recortar placas aislantes, cortes a ras de
superficie de material aislante sobresaliente
Lijado de madera o pinturas en lugares difícilmente
accesibles sin papel de lijar;
ejemplo: lijado de pintura entre láminas de postigos, lijado
de pisos de madera en esquinas
Cortes de inmersión en materiales fuertemente abrasivos;
ejemplo: fresado de azulejos de mosaico delgados
Corte y separación de materiales blandos;
ejemplo: corte de fugas de dilatación de silicona o masilla
de ventanas
Cambio y montaje de la hoja lijadora en la placa lijadora
La placa lijadora 15 va recubierta con un tejido de cardillo
(Velcro) que permite sujetar de forma rápida y sencilla las hojas lijadoras con cierre de cardillo.
Antes de montar la h oja lijadora 16 sacuda el tejido de cardillo
(Velcro) de la placa lijadora 15 para conseguir una buena adherencia.
Coloque la hoja lijadora 16 enrasada con uno de los lados de
la placa lijadora 15, y presione entonces firmemente la hoja lijadora contra la placa lijadora.
Para que la eficacia en la aspiración de polvo sea óptima, cuide que las perforaciones en la hoja lijadora coincidan con los
taladros en la placa lijadora.
Para desprender la hoja lijadora 16 de la placa lijadora 15 sujétela por una de sus esquinas y tire de ella.
Ud. puede utilizar todas las hojas lijadoras y vellones de pulido y limpieza de la serie Delta 93 mm pertenecientes al programa de accesorios Bosch.
Los accesorios como el vellón o el fieltro para pulir se fijan d e
igual manera sobre la placa lijadora.
1 609 92A 2LW | (16.1.17) Bosch Power Tools
Page 39

OBJ_BUCH-2853-001.book Page 39 Monday, January 16, 2017 1:56 PM
Español | 39
Selección de la hoja lijadora
De acuerdo al material a trabajar y al arranque de material deseado puede seleccionarse entre diversas hojas lijadoras:
Hoja lijadora Material Aplicación Grano
– Todo tipo de maderas
(p.ej. madera dura,
madera blanda, tableros
de aglomerado, tableros
de construcción)
– Materiales metálicos
Para el lijado previo p. ej. de vigas y tablas en bruto, sin
cepillar
Para planificar e igualar pequeñas irregularidades
Para el acabado y lijado fino de madera
Basto 40
Mediana 80
Fino 180
60
100
120
240
320
400
–Pintura
–Barniz
–Sellador
–Emplastecido
Aspiración de polvo y virutas
El polvo de ciertos materiales como, pinturas que conten-
gan plomo, ciertos tipos de madera y algunos minerales y
metales, puede ser nocivo para la salud. El contacto y la
inspiración de estos polvos pueden provocar en el usuario
o en las personas circundantes reacciones alérgicas y/o
enfermedades respiratorias.
Ciertos polvos como los de roble, encina y haya son considerados como cancerígenos, especialmente en combinación con los aditivos para el tratamiento de la madera (cromatos, conservantes de la madera). Los materiales que
contengan amianto solamente deberán ser procesados
por especialistas.
– A ser posible utilice un equipo para aspiración de polvo
apropiado para el material a trabajar.
– Observe que esté bien ventilado el puesto de trabajo.
– Se recomienda una mascarilla protectora con un filtro
de la clase P2.
Observe las prescripciones vigentes en su país sobre los
materiales a trabajar.
Evite acumulaciones de polvo en el puesto de trabajo.
Los materiales en polvo se pueden inflamar fácilmente.
Conexión del equipo para aspiración de polvo
(ver figura A)
El dispositivo de aspiración de polvo 14 ha sido diseñado
para ser utilizado exclusivamente con la placa lijadora 15, ya
que su efecto es nulo con los demás útiles.
Al lijar, conecte siempre un equipo para aspiración de polvo.
Antes de montar el dispositivo de aspiración de polvo 14
(accesorio especial) es necesario desmontar primero el útil.
Si procede, ensamble primero las piezas que componen el
dispositivo de aspiración de polvo 14, según figura. Pase el
Bosch Power Tools 1 609 92A 2LW | (16.1.17)
Para decapar pintura
Para lijar la primera mano de pintura (p.ej. para eliminar
pinceladas, gotas e irregularidades)
Para el lijado final de imprimaciones antes de pintar
dispositivo de aspiración de polvo ensamblado por encima
del alojamiento del útil 7, y asiéntelo contra la herramienta
eléctrica. Gire el dispositivo de aspiración de polvo de manera que los resaltes del mismo encajen en las respectivas aberturas de la carcasa. Fije el dispositivo de aspiración de polvo
a la herramienta eléctrica con el clip de sujeción 17 según se
ilustra en la figura.
Preste atención a que no esté dañado el anillo de fieltro 16 y
que quede muy próximo a la placa lijadora 15. Cambie inmediatamente un anillo de fieltro deteriorado.
Según la manguera de aspiración 20 (accesorio especial) utilizada, inserte ésta directamente en la boquilla de aspiración
18, o bien, corte su extremo antiguo, enrosque el adaptador
para aspiración 19 (accesorio especial) en el extremo de la
manguera, e introduzca directamente el adaptador en la boquilla de aspiración 18. Conecte el otro extremo de la manguera de aspiración 20 a un aspirador (accesorio especial).
Una relación para su conexión a diversos aspiradores, la encuentra en la solapa.
El aspirador debe ser adecuado para el material a trabajar.
Para aspirar polvo especialmente nocivo para la salud, cance-
rígeno, o polvo seco utilice un aspirador especial.
Operación
Puesta en marcha
Montaje del acumulador
Solamente utilice acumuladores de iones de litio origi-
nales Bosch de la tensión indicada en la placa de características de su herramienta eléctrica. El uso de otro ti-
po de acumuladores puede provocar daños e incluso un
incendio.
Basto 40
60
Mediana 80
100
120
Fino 180
240
320
400
Page 40

OBJ_BUCH-2853-001.book Page 40 Monday, January 16, 2017 1:56 PM
40 | Español
Observación: El uso de acumuladores que no sean adecua-
dos para esta herramienta eléctrica puede hacer que ésta funcione incorrectamente o incluso dañarla.
Monte el acumulador cargado 3 asentándolo hasta el tope en
la empuñadura, cuidando que quede enclavado de forma pe rceptible.
Conexión/desconexión
Para la conexión de la herramienta eléctrica, empuje hacia
delante el interruptor de conexión/desconexión 1 de manera
que aparezca “I” en el interruptor.
Para la desconexión de la herramienta eléctrica, empuje hacia atrás el interruptor de conexión/desconexión 1 de manera
que aparezca “0” en el interruptor.
Para ahorrar energía, solamente conecte la herramienta eléctrica cuando vaya a utilizarla.
El acumulador de iones de litio va protegido contra altas descargas por “Electronic Cell Protection (ECP) (Protección Electrónica de Celdas)”. Si el acumulador está descargado, un circuito de protección se encarga de desconectar la herramienta
eléctrica. El útil deja de moverse.
Observación: Si la herramienta eléctrica se desconecta automáticamente debido a que el acumulador se ha descargado o
sobrecalentado, desconecte la herramienta eléctrica con el
interruptor de conexión/desconexión 1. Cargue el acumulador, o bien, espere a que se enfríe, antes de volver a conectar
la herramienta eléctrica. En caso contrario podría deteriorarse el acumulador.
Preselección del nº de oscilaciones
Con la rueda de ajuste 5 puede preseleccionarse el nº de oscilaciones, incluso con el aparato en marcha.
El nº de oscilaciones requerido depende del material y condiciones de trabajo y se recomienda por ello determinarlo probando.
Instrucciones para la operación
Desmonte el acumulador antes de manipular en la he-
rramienta eléctrica (p. ej. en el mantenimiento, cambio
de útil, etc.), así como al transportarla y guardarla. En
caso contrario podría accidentarse al accionar fortuitamente el interruptor de conexión/desconexión .
Antes de depositarla, espere a que la herramienta eléc-
trica se haya detenido completamente.
Observación: No cubra las rejillas de refrigeración 4 de la he-
rramienta eléctrica al trabajar, ya que ello mermaría la vida
útil de la herramienta eléctrica.
Principio de funcionamiento
Un accionamiento oscilante hace que el útil efectúe un movimiento de vaivén de 2,8 ° hasta 20000 veces por minuto. Ello
permite trabajar de forma precisa en un espacio muy restringido.
Trabaje ejerciendo una presión reducida
uniforme para lograr un buen rendimiento
en el trabajo y evitar que se bloquee el útil.
Serrado
Solamente utilice hojas de sierra sin dañar y en perfec-
to estado. Las hojas de sierra deformadas o melladas pue-
den romperse, mermar la calidad de corte, o provocar un
retroceso brusco del aparato.
Al serrar materiales de construcción ligeros atenerse a
las prescripciones legales y a las recomendaciones del
fabricante del material.
Utilice unos aparatos de exploración adecuados para
detectar conductores o tuberías ocultas, o consulte a
sus compañías abastecedoras. El contacto con conduc-
tores eléctricos puede provocar un incendio o una electrocución. Al dañar una tubería de gas puede producirse una
explosión. La perforación de una tubería de agua puede
causar daños materiales.
¡El procedimiento de serrado por inmersión solamente
deberá emplearse al trabajar materiales blandos como
la madera, placas de pla dur, etc.!
Antes de serrar madera, tablas de aglomerado de madera,
materiales de construcción, etc., con hojas de sierra HCS,
inspeccionar si existen en ellos cuerpos extraños como clavos, tornillos o similares y, en caso afirmativo, retirarlos, o
emplear en su lugar hojas de sierra bimetálicas.
División
Observación: Al dividir azulejos para paredes considere que
los útiles se desgastan fuertemente en caso de un uso prolongado.
Lijado
El rendimiento en el arranque de material y la calidad de la superficie obtenidos vienen determinados esencialmente por la
hoja lijadora empleada, el nº de oscilaciones preseleccionado, y por la presión de aplicación ejercida.
Únicamente unas hojas lijadoras en buenas condiciones permiten conseguir un buen rendimiento en el arranque de material además de cuidar la herramienta eléctrica.
Preste atención a ejercer una presión de aplicación uniforme
para prolongar la vida útil de las hojas lijadoras.
Una presión de aplicación excesiva no supone un mayor rendimiento en el arranque de material, sino un mayor desgaste
de la herramienta eléctrica y hoja lijadora.
Para lijar con exactitud esquinas, bordes y en lugares de difícil
acceso puede trabajarse también con la punta o uno de los
bordes de la placa lijadora.
Al lijar solamente con la punta de la hoja lijadora puede que
ésta se caliente excesivamente. Reduzca el nº de oscilaciones, la presión de aplicación, y deje que se enfríe la hoja lijadora con regularidad.
No emplee una hoja lijadora con la que se ha trabajado metal
para lijar otros tipos de material.
Guíe la herramienta eléctrica con movimiento de vaivén al trabajar para evitar que
se sobrecaliente o bloquee el útil.
1 609 92A 2LW | (16.1.17) Bosch Power Tools
Page 41

OBJ_BUCH-2853-001.book Page 41 Monday, January 16, 2017 1:56 PM
Solamente utilice accesorios para lijar originales Bosch.
Al lijar, conecte siempre un equipo para aspiración de polvo.
Rascado
Ajuste una frecuencia de oscilación elevada al realizar este tipo de trabajo.
Trabaje sobre una base blanda (p. ej. madera) manteniendo
un ángulo de ataque agudo y ejerciendo una presión de aplicación reducida. De lo contrario puede que la espátula alcance
a dañar la base.
Protección contra sobrecarga térmica
La herramienta eléctrica no puede sobrecargarse si se realiza
un uso apropiado y conforme a lo descrito. En el caso de una
carga pronunciada o al abandonar el margen admisible de
temperatura del acumulador, se reduce el número de revoluciones o se desconecta la herramienta eléctrica. Con un número de revoluciones reducido, la herramienta eléctrica vuelve a funciona con pleno número de revoluciones recién tras
alcanzar la temperatura admisible del acumulador o con carga
reducida. En el caso de una desconexión automática, desconecte la herramienta eléctrica, deje enfriar el acumulador y
conecte de nuevo la herramienta eléctrica.
Indicaciones para el trato óptimo del acumulador
Proteja el acumulador de la humedad y del agua.
Únicamente almacene el acumulador sin exceder el margen
de temperatura de – 20 ° C a 50 ° C. P.ej., no deje el acumulador en el coche en verano.
Si después de una recarga, el tiempo de funcionamiento del
acumulador fuese muy reducido, ello es señal de que éste está agotado y deberá sustituirse.
Observe las indicaciones referentes a la eliminación.
Mantenimiento y servicio
Mantenimiento y limpieza
Desmonte el acumulador antes de manipular en la he-
rramienta eléctrica (p. ej. en el mantenimiento, cambio
de útil, etc.), así como al transportarla y guardarla. En
caso contrario podría accidentarse al accionar fortuitamente el interruptor de conexión/desconexión .
Mantenga limpia la herramienta eléctrica y las rejillas
de refrigeración para trabajar con eficacia y seguridad.
Limpie con regularidad con un cepillo de alambre los útile s estriados (accesorios especiales).
Servicio técnico y atención al cliente
El servicio técnico le asesorará en las consultas que pueda
Ud. tener sobre la reparación y mantenimiento de su producto, así como sobre piezas de recambio. Los dibujos de despiece e informaciones sobre las piezas de recambio los podrá obtener también en internet bajo:
www.bosch-pt.com
Nuestro equipo de asesores técnicos le orientará gustosamente en cuanto a la adquisición, aplicación y ajuste de los
productos y accesorios.
Para cualquier consulta o pedido de piezas de repuesto es imprescindible indicar el nº de artículo de 10 dígitos que figura
en la placa de características del producto.
España
Robert Bosch España S.L.U.
Departamento de ventas Herramientas Eléctricas
C/Hermanos García Noblejas, 19
28037 Madrid
Para efectuar su pedido online de recambios o pedir la recogida para la reparación de su máquina, entre en la página
www.herramientasbosch.net.
Tel. Asesoramiento al cliente: 902 531 553
Fax: 902 531554
Venezuela
Robert Bosch S.A.
Final Calle Vargas. Edf. Centro Berimer P.B.
Boleita Norte
Caracas 107
Tel.: (0212) 2074511
México
Robert Bosch S. de R.L. de C.V.
Calle Robert Bosch No. 405 C.P. 50071
Zona Industrial, Toluca - Estado de México
Tel. Interior: (01) 800 6271286
Tel. D.F.: 52843062
E-Mail: arturo.fernandez@mx.bosch.com
Argentina
Robert Bosch Argentina S.A.
Av. Córdoba 5160
C1414BAW Ciudad Autónoma de Buenos Aires
Atención al Cliente
Tel.: (0810) 5552020
E-Mail: herramientas.bosch@ar.bosch.com
Perú
Robert Bosch S.A.C.
Av. Primavera 781, Urb. Chacarilla, San Borja (Edificio Aldo)
Buzón Postal Lima 41 - Lima
Tel.: (01) 2190332
Chile
Robert Bosch S.A.
Calle El Cacique
0258 Providencia – Santiago
Tel.: (02) 2405 5500
Ecuador
Robert Bosch Sociedad Anonima Ecuabosch
Av. Las Monjas nº 10 y Carlos J. Arosamena
Guayaquil – Ecuador
Tel. (04) 220 4000
Email: atencion.cliente@ec.bosch.com
Español | 41
Bosch Power Tools 1 609 92A 2LW | (16.1.17)
Page 42

ATENÇÃO
OBJ_BUCH-2853-001.book Page 42 Monday, January 16, 2017 1:56 PM
42 | Português
Transporte
Los acumuladores de iones de litio incorporados están sujetos a los requerimientos estipulados en la legislación sobre
mercancías peligrosas. Los acumuladores pueden ser transportados por carretera por el usuario sin más imposiciones.
En el envío por terceros (p. e j., transporte aéreo o por agencia
de transportes) deberán considerarse las exigencias especiales en cuanto a su embalaje e identificación. En este caso deberá recurrirse a los servicios de un experto en mercancías
peligrosas al preparar la pieza para su envío.
Únicamente envíe acumuladores si su carcasa no está dañada. Si los contactos no van protegidos cúbralos con cinta adhesiva y embale el acumulador de manera que éste no se pueda mover dentro del embalaje.
Observe también las prescripciones adicionales que pudieran
existir al respecto en su país.
Eliminación
Las herramientas eléctricas, acumuladores, accesorios y embalajes deberán someterse a un proceso de
recuperación que respete el medio ambiente.
¡No arroje las herramientas eléctricas, acumuladores o pilas a
la basura!
Sólo para los países de la UE:
Las herramientas eléctricas inservibles, así
como los acumuladores/pilas defectuosos o
agotados deberán acumularse por separado
para ser sometidos a un reciclaje ecológico
tal como lo marcan las Directivas Europeas
2012/19/UE y 2006/66/CE, respectivamente.
Los acumuladores /pilas agotados pueden entregarse directamente a su distribuidor habitual de Bosch:
España
Servicio Central de Bosch
Servilotec, S.L.
Polig. Ind. II, 27
Cabanillas del Campo
Tel.: +34 9 01 11 66 97
Acumuladores/pilas:
Iones de Litio:
Observe las indicaciones comprendidas en el apartado “Transporte”,
página 42.
Reservado el derecho de modificación.
El símbolo es solamente válido, si también se enc uentra sobre la
placa de características del producto/fabricado.
Português
Indicações de segurança
Indicações gerais de advertência para
ferramentas elétricas
O desrespeito das advertências e instruções apresentadas
abaixo pode causar choque elétrico, incêndio e/ou graves
lesões.
Guarde bem todas as advertências e instruções para futura referência.
O termo “Ferramenta elétrica” utilizado a seguir nas indicações de advertência, refere-se a ferramentas elétricas operadas com corrente de rede (com cabo de rede) e a ferr amentas
elétricas operadas com acumulador (sem cabo de rede).
Segurança da área de trabalho
Mantenha a sua área de trabalho sempre limpa e bem
iluminada. Desordem ou áreas de trabalho insuficiente-
mente iluminadas podem levar a acidentes.
Não trabalhar com a ferramenta elétrica em áreas com
risco de explosão, nas quais se encontrem líquidos, gases ou pós inflamáveis. Ferramentas elétricas produzem
faíscas, que podem inflamar pós ou vapores.
Manter crianças e outras pessoas afastadas da ferra-
menta elétrica durante a utilização. No caso de distra-
ção é possível que perca o controlo sobre o aparelho.
Segurança elétrica
A ficha de conexão da ferramenta elétrica deve caber
na tomada. A ficha não deve ser modificada de maneira
alguma. Não utilizar uma ficha de adaptação junto com
ferramentas elétricas protegidas por ligação à terra. Fi-
chas não modificadas e tomadas apropriadas reduzem o
risco de um choque elétrico.
Evitar que o corpo possa entrar em contacto com su-
perfícies ligadas à terra, como tubos, aquecimentos,
fogões e frigoríficos. Há um risco elevado devido a cho-
que elétrico, se o corpo estiver ligado à terra.
Manter o aparelho afastado de chuva ou humidade. A
infiltração de água numa ferramenta elét rica aumenta o risco de choque elétrico.
Não deverá utilizar o cabo para outras finalidades. Ja-
mais utilizar o cabo para transportar a ferramenta elétrica, para pendurá-la, nem para puxar a ficha da tomada. Manter o cabo afastado de calor, óleo, cantos
afiados ou partes do aparelho em movimento. Cabos
danificados ou emaranhados aumentam o risco de um choque elétrico.
Se trabalhar com uma ferramenta elétrica ao ar livre,
só deverá utilizar cabos de extensão apropriados para
áreas exteriores. A utilização de um cabo de extensão
apropriado para áreas exteriores reduz o risco de um choque elétrico.
Devem ser lidas todas as indicações de
advertência e todas as instruções.
1 609 92A 2LW | (16.1.17) Bosch Power Tools
Page 43

OBJ_BUCH-2853-001.book Page 43 Monday, January 16, 2017 1:56 PM
Se não for possível evitar o funcionamento da ferra-
menta elétrica em áreas húmidas, deverá ser utilizado
um disjuntor de corrente de avaria. A utilização de um
disjuntor de corrente de avaria r eduz o risco de um choque
elétrico.
Segurança de pessoas
Esteja atento, observe o que está a fazer e tenha pru-
dência ao trabalhar com a ferramenta elétrica. Não utilizar uma ferramenta elétrica quando estiver fatigado
ou sob a influência de drogas, álcool ou medicamentos.
Um momento de descuido ao utilizar a ferra menta elétrica,
pode levar a lesões graves.
Utilizar equipamento de proteção pessoal e sempre
óculos de proteção. A utilização de equipamento de pro-
teção pessoal, como máscara de proteção contra pó, sapatos de segurança antiderrapantes, capacete de segurança
ou proteção auricular, de acordo com o tipo e aplicação da
ferramenta elétrica, reduz o risco de lesões.
Evitar uma colocação em funcionamento involuntária.
Assegure-se de que a ferramenta elétrica esteja desligada, antes de conectá-la à alimentação de rede e/ou
ao acumulador, antes de levantá-la ou de transportá-la.
Se tiver o dedo no interruptor ao transportar a ferramenta
elétrica ou se o aparelho for conectado à alimentação de
rede enquanto estiver ligado, poderão ocorrer acidentes.
Remover ferramentas de ajuste ou chaves de boca an-
tes de ligar a ferramenta elétrica. Uma ferramenta ou
chave que se encontre numa parte do aparelho em movimento pode levar a lesões.
Evite uma posição anormal. Mantenha uma posição firme
e mantenha sempre o equilíbrio. Desta forma é mais fácil
controlar a ferramenta elétrica em situações inesperadas.
Usar roupa apropriada. Não usar roupa larga nem joias.
Mantenha os cabelos, roupas e luvas afastadas de partes em movimento. Roupas frouxas, cabelos longos ou
joias podem ser agarrados por peças em movimento.
Se for possível montar dispositivos de aspiração ou de
recolha, assegure-se de que estejam conectados e utilizados corretamente. A utilização de uma aspiração de
pó pode reduzir o perigo devido ao pó.
Utilização e manuseio cuidadoso de ferramentas elétricas
Não sobrecarregue o aparelho. Utilize a ferramenta
elétrica apropriada para o seu trabalho. É melhor e mais
seguro trabalhar com a ferramenta elétrica apropriada na
área de potência indicada.
Não utilizar uma ferramenta elétrica com um interrup-
tor defeituoso. Uma ferramenta elétrica que não pode
mais ser ligada nem desligada, é perigosa e deve ser reparada.
Puxar a ficha da tomada e/ou remover o acumulador an-
tes de executar ajustes no aparelho, de substituir acessórios ou de guardar o aparelho. Esta medida de seguran-
ça evita o arranque involuntário da ferramenta elétrica.
Guardar ferramentas elétricas não utilizadas fora do al-
cance de crianças. Não permita que pessoas que não
estejam familiarizadas com o aparelho ou que não te-
nham lido estas instruções, utilizem o aparelho. Ferra-
mentas elétricas são perigosas se forem utilizadas por pessoas inesperientes.
Tratar a ferramenta elétrica com cuidado. Controlar se
as partes móveis do aparelho funcionam perfeitamente e não emperram, e se há peças quebradas ou danificadas que possam prejudicar o funcionamento da ferramenta elétrica. Permitir que peças danificadas sejam
reparadas antes da utilização. Muitos acidentes têm co-
mo causa, a manutenção insuficiente de ferramentas elétricas.
Manter as ferramentas de corte afiadas e limpas. Ferra-
mentas de corte cuidadosamente tratadas e com cantos
de corte afiados emperram com menos frequência e podem ser conduzidas com maior facilidade.
Utilizar a ferramenta elétrica, acessórios, ferramentas
de aplicação, etc. conforme estas instruções. Considerar as condições de trabalho e a tarefa a ser executada.
A utilização de ferramentas elétricas para outras tarefas a
não ser as aplicações previstas, pode levar a situações perigosas.
Manuseio e utilização cuidadosos de ferramentas com
acumuladores
Só carregar acumuladores em carregadores recomen-
dados pelo fabricante. Há perigo de incêndio se um car-
regador apropriado para um certo tipo de acumuladores
for utilizado para carregar acumuladores de outros tipos.
Só utilizar ferramentas elétricas com os acumuladores
apropriados. A utilização de outros acumuladores pode
levar a lesões e perigo de incêndio.
Manter o acumulador que não está sendo utilizado
afastado de clipes, moedas, chaves, parafusos ou outros pequenos objetos metálicos que possam causar
um curto-circuito dos contactos. Um curto-circuito entre
os contactos do acumulador pode ter como consequência
queimaduras ou fogo.
No caso de aplicação incorreta pode vazar líquido do
acumulador. Evitar o contacto. No caso de um c ontac to
acidental, deverá enxaguar com água. Se o líquido entrar em contacto com os olhos, também deverá consultar um médico. Líquido que escapa do acumulador pode
levar a irritações da pele ou a queimaduras.
Serviço
Só permita que o seu aparelho seja reparado por pesso-
al especializado e qualificado e só com peças de reposição originais. Desta forma é assegurado o funcionamento
seguro do aparelho.
Indicações de segurança para Multi-Cutter sem
fio
Ao executar trabalhos durante os quais possam ser
atingidos cabos elétricos, deverá sempre segurar a f erramenta elétrica pelas superfícies isoladas do punho. O
contacto com um cabo sob tensão também pode colocar
sob tensão as peças metálicas da ferramenta elétrica e levar a um choque elétrico.
Português | 43
Bosch Power Tools 1 609 92A 2LW | (16.1.17)
Page 44

OBJ_BUCH-2853-001.book Page 44 Monday, January 16, 2017 1:56 PM
44 | Português
Apenas utilizar a ferramenta elétrica para o corte a se-
co. A infiltração de água num aparelho elétrico aumenta o
risco de choque elétrico.
Atenção, perigo de incêndio! Evitar um sobreaqueci-
mento do material a ser lixado e da lixadeira. Sempre
esvaziar o recipiente de pó antes das pausas de trabalho. Sob condições desfavoráveis é possível que a amola-
dur a no sa co de pó, no micro filt ro, no saco de pap el (ou no
saco de filtro ou no filtro do aspirador de pó) seja inflamada automaticamente, como voo de faúlhas ao lixar metais.
É especialmente perigoso, se o pó de lixar estiver misturado com restos de verniz, poliuretano ou outros produtos
químicos e o material de lixar tornar-se quente após um período de trabalho prolongado.
Manter as mãos afastadas da área de serrar. Não tocar
na peça a ser trabalhada pelo lado de baixo. Há perigo
de lesões no caso de contacto com a lâmina de serra.
Utilizar detetores apropriados, para encontrar cabos
escondidos, ou consultar a companhia elétrica local. O
contacto com cabos elétricos pode provocar incêndio e
choques elétricos. Danos em tubos de gás podem levar à
explosão. A infiltração num cano de água provoca danos
materiais.
Segurar a ferramenta elétrica firmemente com ambas
as mãos durante o trabalho e manter uma posição firme. A ferramenta elétrica é conduzida com segurança com
ambas as mãos.
Fixar a peça a ser trabalhada. Uma peça a ser trabalhada
fixa com dispositivos de aperto ou com torno de bancada
está mais firme do que segurada com a mão.
Não abrir o acumulador. Há risco de um curto-circuito.
Proteger o acumulador contra calor, p. ex. também contra uma permanente radiação solar, fogo, água e humidade. Há risco de explosão.
Em caso de danos e de utilização incorreta do acumula-
dor, podem escapar vapores. Arejar bem o local de trabalho e consultar um médico se forem constatados
quaisquer sintomas. É possível que os vapores irritem as
vias respiratórias.
Só utilizar o acumulador junto com a sua ferramenta
elétrica Bosch. Só assim é que o seu acumulador é prote-
gido contra perigosa sobrecarga.
Os objetos afiados como, p. ex., pregos ou chaves de
fendas, assim como o efeito de forças externas podem
danificar a bateria. Podem causar um curto-circuito inter-
no e a bateria pode ficar queimada, deitar fumo, explodir
ou sobreaquecer.
Usar luvas de proteção ao substituir as ferramentas de
trabalho. As ferramentas de trabalho tornam-se quentes
após uma utilização prolongada.
Não raspar materiais húmidos (p. ex. tapetes de pare-
de) e nem sobre uma superfície húmida. A infiltração de
água numa ferramenta elétrica aumenta o risco de choque
elétrico.
A superfície a ser trabalhada não deve ser tratada com
líquidos que contenham solventes. Devido ao aqueci-
mento das substâncias durante o processo de raspar, podem ser produzidos vapores venenosos.
Tenha cuidado especial no manuseio do raspador. A fer-
ramenta é bem afiada e há perigo de lesões.
Descrição do produto e da potência
Abrir a página basculante contendo a apresentação do aparelho, e deixar esta página aberta enquanto estiver lendo a instrução de serviço.
Utilização conforme as disposições
A ferramenta elétrica é determinada para serrar e cortar materiais de madeira, plástico, gesso, metais não-ferrosos e elementos de fixação (p. ex. pregos e grampos não temperados). Ela é especialmente apropriada para trabalhar em
ladrilhos macios e para lixar e raspar pequenas superfícies a
seco. Ela é especialmente apropriada para trabalhos próximos de bordas e para cortes face a face. A ferramenta e létrica
só deve ser operada com acessórios Bosch.
Componentes ilustrados
A numeração dos componentes ilustrados refere-se à
apresentação da ferramenta elétrica na página de esquemas.
1 Interruptor de ligar-desligar
2 Tecla de destravamento do acumulador
3 Acumulador
4 Aberturas de ventilação
5 Roda de ajuste para a pré-seleção do número de
6 Indicação do estado de carga do acumulador
7 Fixação da ferramenta
8 Alavanca tensora do batente de profundidade
9 Esbarro de profundidade
10 Lâmina de serrar por imersão*
11 Parafuso de sextavado interior
12 Chave de sextavado interno
13 Punho (superfície isolada)
14 Dispositivo de aspiração de pó *
15 Placa de lixar *
16 Folha de lixar *
17 Alavanca tensora da aspiração de pó
18 Bocais de aspiração *
19 Adaptador de aspiração *
20 Mangueira de aspiração *
*Acessó rios apresentados ou descritos não pertencem ao volume
de fornecimento padrão. Todos os acessórios encontram -se no
nosso programa de acessórios.
Devem ser lidas todas as indicações de advertência e todas as instruções. O desres-
peito das advertências e instruções apresentadas abaixo pode causar choque elétrico,
incêndio e/ou graves lesões.
oscilações
1 609 92A 2LW | (16.1.17) Bosch Power Tools
Page 45

OBJ_BUCH-2853-001.book Page 45 Monday, January 16, 2017 1:56 PM
Dados técnicos
Multi-Cutter sem fio GOP 12V-28
N.° do produto
Tensão nominal
Número de rotações em vazio n
0
3 601 HB5 0..
V= 12
rpm 5000–20000
Ângulo de oscilações esquerda/
direita °1,4
Peso conforme
EPTA-Procedure 01:2014
1)
kg 0,97– 1,2
Temperatura ambiente admissível
–ao carregar
– em funcionamento
2)
armazenamento
Baterias recomendadas
e durante o
°C
°C
0...+45
–20...+50
GBA 10,8V...
GBA 12V...
GBA 12V... W
Carregadores recomendados
GAL 11.. CV
GAL 12.. CV
GAL 18... W
1) dependendo do acumulador utili zado
2) potência limitada a temperaturas <0 °C
Dados técnicos averiguados com o acumulador fornecido.
Informação sobre ruídos/vibrações
Os valores de emissão de ruído determinados de acordo com
EN 60745-2-4.
O nível de ruído avaliado como A do aparelho é tipicamente:
Nível de pressão acústica 79 dB(A); Nível de potência acústica 90 dB(A). Incerteza K= 3 dB.
Usar proteção auricular!
Totais valores de vibrações a
ções) e incerteza K averiguada conforme EN 60745-2-4:
=2,9m/s2, K= 1,5 m/s2,
Lixar: a
h
serrar com lâmina de serra de imersão: a
K=1,5m/s
serrar com lâmina de serra de segmento: a
K=1,5m/s
raspar: a
2
,
2
,
=8,3m/s2, K= 1,5 m/s2.
h
O nível de vibrações indicado nestas instruções foi medido de
acordo com um processo de medição normalizado pela norma EN 60745 e pode ser utilizado para a comparação de ferramentas elétricas. Ele também é apropriado para uma avaliação provisória da carga de vibrações.
O nível de vibrações indicado representa as aplicações principais da ferramenta elétrica. Se, contudo, a ferramenta elétrica for utilizada para outras aplicações, com acessórios diferentes, com outras ferramentas de trabalho ou com
manutenção insuficiente, é possível que o nível de vibrações
(soma dos vetores de três dire-
h
=9,2m/s2,
h
=2,5m/s2,
h
Além disso também deverão ser estipuladas medidas de segurança para proteger o operador contra o efeito de vibrações, como por exemplo: manutenção de ferramentas elétricas e de ferramentas de trabalho, manter as mãos quentes e
organização dos processos de trabalho.
Montagem
Carregar o acumulador
Utilize apenas os carregadores listados nos dados téc-
nicos. Só estes carregadores são apropriados para os acu-
muladores de iões de lítio utilizados para a sua ferramenta
elétrica.
Nota: O acumulador é fornecido parcialmente carregado. Para assegurar a completa potência do acumulador, o acumulador deverá ser carregado completamente no carregador antes da primeira utilização.
O acumulador de iões de lítio pode ser carregado a qualquer
altura, sem que a sua vida útil seja reduzida. Uma interrupção
do processo de carga não danifica o acumulador.
Retirar o acumulador
Para retirar o acumulador 3, deverá premir as teclas de destravamento 2 e puxar o acumulador para trás, para tirar da
ferramenta elétrica. Não empregar força.
Indicação do estado de carga do acumulador
Os três LEDs verdes do indicador do nível de carga da bateria
6 indicam o nível de carga da bateria 3. O indicador do nível
de carga só acende por 5 segundos após a colocação em funcionamento.
LED Capacidade
Luz permanente 3 x verde ≥2/3
Luz permanente 2 x verde ≥1/3
Luz permanente 1 x verde < 1/3
Luz intermitente 1 x verde Reserva
Luz intermitente 3 x verde vazia
Se depois da ligação não se acender qualquer LED, a bateria
tem defeito e tem de ser substituída.
Troca de ferramenta
O acumulador deverá ser retirado antes de todos os
trabalhos no aparelho e antes de transportar ou de
guardar a ferramenta elétrica (p. ex. manutenção, troca de ferramenta). Há perigo de lesões se o interruptor de
ligar-desligar for acionado involuntariamente.
Usar luvas de proteção durante a substituição de ferra-
mentas. Há perigo de lesões no caso de um contacto com
as ferramentas de trabalho.
seja diferente. Isto pode aumentar sensivelmente a carga de
vibrações para o período completo de trabalho.
Para uma estimação exata da carga de vibrações, também deveriam ser considerados os períodos nos quais o aparelho está desligado ou funciona, mas não está sendo utilizado. Isto
pode reduzir a carga de vibrações durante o completo período de trabalho.
Português | 45
Bosch Power Tools 1 609 92A 2LW | (16.1.17)
Page 46

OBJ_BUCH-2853-001.book Page 46 Monday, January 16, 2017 1:56 PM
46 | Português
Selecionar a ferramenta de trabalho
Ferramenta de trabalho GOP 12V-28
A tabela a seguir apresenta exemplos de ferramentas de trabalho. Outras ferramentas de trabalho encontram-se no amplo programa de acessórios Bosch.
Ferramenta de trabalho Material Aplicação
Lâmina de serra
de segmento de
bimetal
Derivados de madeira,
Plástico,
Metais não ferrosos
Cortes de separação e de imersão; tamb ém para serrar ao
longo de bordas, em cantos e em áreas de difícil acesso;
Exemplo: encurtar rodapés ou aros de portas já instalados,
cortes de imersão ao adaptar painéis de soalho
Placa de lixar para
folhas de lixar da
série Delta 93 mm
Depende da folha de lixar Lixar superfícies em bordas, em cantos ou em áreas de
difícil acesso;
de acordo com a folha de lixar p. ex. para lixar madeiras,
tintas, vernizes, pedras
Velo para limpar e texturar madeira, desenferr ujar metal e
lixar vernizes, feltro de polir para polimento prévio
Lixadeira de perfis
Madeira,
Tubos/Perfis,
Tinta,
Verniz,
Lixamento cómodo e eficaz de perfis até um diâmetro de
55 mm;
Folhas de lixa vermelhas para lixar madeira, tubos/perfis,
verniz, betume de enchimento e metal
Betume de enchimento,
Metal
Lâminas de corte
por imersão de
bimetal para
madeira e metal
Lâmina de serra
por imersão HCS,
madeira
Madeira macia,
Plástico macio,
Pladur,
Perfis finos de alumínio e
metal não-ferroso,
Chapas finas,
Pregos e parafusos não
temperados
Derivados de madeira,
Plástico macio
Pequenos cortes de seccionamento e imersão;
Exemplo: cortar roços para tomadas, seccionar tubos de
cobre à face, cortes de imersão em placas de gesso carto-
nado
Trabalhos de ajuste de filigrana em madeira;
Exemplo: serragem posterior de roços para fechaduras e
ferragens
Cortes de separação e de imersão profundos; também
para serrar ao longo de bordas, em cantos e em áreas de
difícil acesso;
Exemplo: corte de imersão estreito, em madeira maciça
para a montagem de uma grelha de ventilação
Lâmina de serra
de imersão em
Madeira dura,
Placas revestidas
Cortes de imersão em placas revestidas ou madeira dura;
Exemplo: montagem de janelas de telhado
bimetal para
madeira dura
1 609 92A 2LW | (16.1.17) Bosch Power Tools
Page 47

OBJ_BUCH-2853-001.book Page 47 Monday, January 16, 2017 1:56 PM
Ferramenta de trabalho Material Aplicação
Lâmina de serra
de imersão em
metal duro para
metal
Metal,
Materiais muito abrasivos,
Fibra de vidro,
Pladur,
Cortes de imersão em materiais muito abrasivos ou metal;
Exemplo: corte de tampos frontais de cozinhas, cortes fácil
em parafusos temperados, pregos e aço inoxidável
Placas de fibra ligadas
com cimento
Lâminas de corte
por imersão de
bimetal para
madeira e metal
Madeira macia,
Madeira dura,
Placas folheadas,
Placas revestidas a
Cortes de imersão em placas revestidas ou madeira dura;
Exemplo: encurtar caixilhos de portas, roços para estantes
plástico,
Pregos e parafusos não
temperados
Lâmina de serra
de segmento
estria HM
Lâmina de serra
de segmentos com
granulado Riff de
diamante
Placa delta estria
HM
Removedor de
argamassa com
granulado de
metal duro
Betume cimentício,
Ladrilhos macios,
Plásticos reforçados a
fibra de vidro,
Betão poroso
Betume cimentício,
Ladrilhos macios,
Resina epoxídica,
Plásticos reforçados a
fibra de vidro
Argamassa,
Restos de betão,
Madeira,
Materiais abrasivos
Argamassa,
Juntas,
Resina epoxídica,
Plásticos reforçados a
Cortar e separar em áreas rente a bordas, em cantos e em
áreas de difícil acesso;
Exemplo: remover juntas entre azulejos de parede para
executar trabalhos de reparação, cortar entalhes em
azulejos, placas de gesso ou em plásticos
Malhetamento preciso e seccionamento de material de
ladrilho/junta, resinas epoxídicas e plásticos reforçados a
fibra de vidro;
Exemplo: efetuar pequenos recortes em ladrilhos macios e
fresar roços em plástico reforçado a fibra de vidro
Grosagem e lixamento sobre uma base dura;
Exemplo: remover argamassa ou cola para ladrilhos (p. ex.
em caso de substituição de ladrilhos danificados),
remover restos de cola para alcatifas
Malhetamento e seccionamento de material de juntas e
ladrilhos, assim como grosagem e lixamento sobre uma
base dura;
Exemplo: remover cola para ladrilhos e massa para juntas
fibra de vidro,
Materiais abrasivos
Acessório de corte
multimateriais
HCS
Papelão alcatroado,
Alcatifas,
Relva artificial,
Cartão,
Corte rápido e preciso de material macio e materiais
abrasivos flexíveis;
Exemplo: cortar alcatifa, cartão, piso em PVC, papelão
alcatroado, etc.
Piso em PVC
Raspador, rígido
Alcatifas,
Argamassa,
Betão,
Raspar sobre uma base dura;
Exemplo: remover argamassa, cola para ladrilhos, restos
de betão e alcatifa
Cola para ladrilhos
Raspador, flexível
Cola para alcatifas,
Restos de tinta,
Silicone
Raspagem flexível sobre uma base macia;
Exemplo: remover juntas de silicone, restos de cola para
alcatifas e restos de tinta
Português | 47
Lâmina de serra
de segmentos de
bimetal
Material de isolamento,
Painéis de isolamento,
Pranchas de soalho,
Corte preciso de materiais macios;
Exemplo: corte de painéis de isolamento, cortes no com-
primento certo à face de material de isolamento saliente
Painéis de isolamento
para redução de eco,
Cartão,
Alcatifas,
Borracha,
Cabedal
Bosch Power Tools 1 609 92A 2LW | (16.1.17)
Page 48

OBJ_BUCH-2853-001.book Page 48 Monday, January 16, 2017 1:56 PM
48 | Português
Ferramenta de trabalho Material Aplicação
Placa de lixar delta
com granulado de
metal duro
Madeira,
Tinta
Lixamento de madeira ou tinta em locais de difícil acesso
sem folha de lixa;
Exemplo: desbastar tinta entre as lamelas das persianas,
lixar soalho de madeira nos cantos
Lâmina de serra
de imersão com
granulado de
Fibra de vidro,
Argamassa,
Madeira
Corte de imersão em materiais muito abrasivos;
Exemplo: malhetar mosaicos finos
metal duro
Cortador de juntas
universal HCS
Juntas de dilatação,
Kit de janela,
Materiais isolantes (lã de
Corte e seccionamento de materiais macios;
Exemplo: cortar juntas de dilatação de silicone ou
mástique
rocha)
Introduzir a ferramenta de trabalho
Colocar a ferramenta de trabalho desejada (p. ex. lâmina de
serra por imersão 10) na fixação de ferramentas 7, de modo
que a curvatura mostre para baixo (veja a figura na página de
gráficos, o texto da ferramenta de trabalho pode ser lido por
cima).
Girar a ferramenta de trabalho para uma posição apropriada
para o respetivo trabalho e permitir que engate nos ressaltos
da fixação da ferramenta 7. Estão disponíveis doze posições
a cada 30°.
Fixar a ferramenta de trabalho com o parafuso 11. Apertar firmemente o parafuso 11 com a chave de sextavado interior
12.
Controlar a posição firme da ferramenta de trabalho.
Ferramentas de trabalho incorretamente ou insuficientemente fixas podem se soltar durante o funcionamento e
apresentar um perigo para o operador.
Retirar a ferramenta de trabalho
Para retirar a ferramenta de trabalho deverá soltar com a c ha-
Colocar/substituir a folha de lixar na placa de lixar
A placa de lixar 15 está equipada com um tecido de velcro,
para uma fixação rápida de simples de folhas de lixar com
aderência de velcro.
Sacudir o tecido de velcro da placa de lixar 15 antes de colocar a folha de lixar 16 para possibilitar uma aderência ideal.
Posicionar a folha de lixar 16 de forma alinhada num dos lados da placa de lixar 15, e agora premir bem a folha de lixar
sobre a placa de lixar.
Para assegurar uma aspiração de pó ideal, deverá observar
que os recortes na folha de lixar coincidam com os orifícios na
placa de lixar.
Para retirar a folha de lixar 16 deverá segurá-la por um a ponta
e puxá-la da placa de lixar 15.
Podem ser utilizadas todas as folhas d e lixa r, fe ltros de pol ir e
de limpeza da série Delta 93 mm do programa de acessórios
Bosch.
Acessórios de lixar, como não tecido/feltro de polir, devem
ser fixos da mesma forma sobre a placa de lixar.
ve de sextavado interior 12 o parafuso 11 e retirar a ferramenta de trabalho.
Seleção da folha de lixar
Estão disponíveis diversas folhas de lixar, de acordo com o material a ser trabalhado e com o desbaste desejado da superfície:
Folha de
Material Aplicação Grão
lixar
– Todos materiais de
madeira (p.ex. madeira
de lei, madeira macia,
painéis de partículas,
placas de construção)
– Materiais de metal
Para a retificação prévia de p. ex. vigas e tábuas ásperas e
não aplainadas
Para lixamento plano e para nivelar pequenas rugosidades médio 80
Para o acabamento fino de lixar madeiras
grosseiro 40
100
120
fino 180
240
320
400
60
1 609 92A 2LW | (16.1.17) Bosch Power Tools
Page 49

OBJ_BUCH-2853-001.book Page 49 Monday, January 16, 2017 1:56 PM
Português | 49
Folha de
lixar
Material Aplicação Grão
–Cor
–Verniz
–Enchedor
–Espátula
Para lixar tinta
Para lixar tinta de base (p. ex. remover vestígios de
aplicação com pincel, pingos de tintas e escorridos)
Para o acabamento final de primeiras demãos antes de
envernizar
Aspiração de pó/de aparas
Pós de materiais como por exemplo, tintas que contém
chumbo, alguns tipos de madeira, minerais e metais, podem ser nocivos à saúde. O contacto ou a inalação dos pós
pode provocar reações alérgicas e/ou doenças nas vias
respiratórias do utilizador ou das pessoas que se encontrem por perto.
Certos pós, como por exemplo pó de carvalho e faia são
considerados como sendo cancerígenos, especialmente
quando juntos com substâncias para o tratamento de madeiras (cromato, preservadores de madeira). Material que
contém asbesto só deve ser processado por pessoal especializado.
– Se possível deverá usar um dispositivo de aspiração
apropriado para o material.
– Assegurar uma boa ventilação do local de trabalho.
– É recomendável usar uma máscara de prote ção respira-
tória com filtro da classe P2.
Observe as diretivas para os materiais a serem trabalha-
dos, vigentes no seu país.
Evite o acúmulo de pó no local de trabalho. Pós podem
entrar levemente em ignição.
Conectar a aspiração de pó (veja figura A)
A aspiração de pó 14 só é destinada para trabalhos c om a placa de lixar 15 e não deve ser usada em combinação com outras ferramentas de trabalho.
Para lixar deverá sempre conectar a aspiração de pó.
Para a montagem da aspiração de pó 14 (acessório) é neces-
sário retirar a ferramenta de trabalho.
Se necessário, monte as partes da aspiração de pó 14 como
indicado na figura. Colocar a aspiração de pó montada na fixação de ferramentas 7 da ferramenta elétrica. Girar a aspiração de pó de modo que os ressaltos da aspiração de pó engatem nos respetivos entalhes da carcaça. Fixar a aspiração de
pó à ferramenta elétrica com as braçadeiras de fixação 17,
como indicado na figura.
Observe que o anel de feltro 16 não esteja danificado e esteja
bem rente da placa de lixar 15. Substituir um anel de feltro danificado imediatamente.
Introduzir a mangueira de aspiração 20 (acessório), de acor-
do com o modelo, diretamente no bocal de aspiração 18 ou
cortar a extremidade da sua mangueira velha, atarraxar o
adaptador de aspiração 19 (acessório) na extremidade da
grosseiro 40
60
médio 80
100
120
fino 180
240
320
400
mangueira e, em seguida, diretamente no bocal de aspiração
18. Conectar a mangueira de aspiração 20 a um aspirador de
pó (acessório). Uma vista geral sobre a conexão a diversos aspiradores de pó encontram-se na página basculante.
O aspirador de pó deve ser apropriado para o material a ser
trabalhado.
Utilizar um aspirador especial para aspirar pó que seja extremamente nocivo à saúde, cancerígeno ou seco.
Funcionamento
Colocação em funcionamento
Colocar o acumulador
Só utilizar acumuladores de iões de lítio Bosch com a
tensão indicada no logótipo da sua ferramenta elétrica.
A utilização de outros acumuladores pode levar a lesões e
perigo de incêndio.
Nota: A utilização de acumuladores não apropriados para a
ferramenta elétrica, pode levar a erros de funcion amento ou a
danos na ferramenta elétrica.
Introduzir o acumulador carregado 3 no punho até engatar
percetivelmente e estar alinhando ao punho.
Ligar e desligar
Para ligar a ferramenta elétrica, deverá empurrar o interruptor de ligar-desligar 1 para frente, de modo que apareça o interruptor “I”.
Para desligar a ferramenta elétrica, deverá empurrar o interruptor de ligar-desligar 1 para trás, de modo que apareça o interruptor “0”.
Para poupar energia só deverá ligar a ferramenta elétrica
quando ela for utilizada.
O acumulador de iões de lítio está protegido por “Electronic
Cell Protection (ECP)” contra descarga total. A ferramenta
elétrica é desligada através de um disjuntor de proteção, logo
que o acumulador estiver descarregado. A ferramenta de trabalho não se movimenta mais.
Nota: Se a ferramenta elétrica for desligada automaticamente devido a um acumulador descarregado ou sobreaquecido,
desligue a ferramenta elétrica com o interruptor de ligar-desligar 1. Recarregar o acumulador ou deixá-lo arrefecer antes
de ligar novamente a ferramenta elétrica. Caso contrário o
acumulador poderá sofrer danos.
Bosch Power Tools 1 609 92A 2LW | (16.1.17)
Page 50

OBJ_BUCH-2853-001.book Page 50 Monday, January 16, 2017 1:56 PM
50 | Português
Pré-selecionar o número de oscilações
Com a roda de pré-seleção do número de oscilações 5 é possível pré-selecionar o número de oscilações necessário durante o funcionamento.
O n.º de oscilações necessário depende do material e das
condições de trabalho e pode ser verificado através de ensaios práticos.
Indicações de trabalho
O acumulador deverá ser retirado antes de todos os
trabalhos no aparelho e antes de transportar ou de
guardar a ferramenta elétrica (p. ex. manutenção, troca de ferramenta). Há perigo de lesões se o interruptor de
ligar-desligar for acionado involuntariamente.
Espere a ferramenta elétrica parar completamente, an-
tes de depositá-la.
Nota: Não obstruir as aberturas de ventilação 4 da ferramen-
ta elétrica durante o trabalho pois isto reduzirá a vida útil da
sua ferramenta elétrica.
Princípio de trabalho
Devido ao accionamento oscilante, a ferramenta de trabalho
vibra até 20 000 vezes por minuto 2,8° para lá e para cá. Desta forma é possível trabalhar com precisão em áreas estreitas.
Trabalhar com reduzida e uniforme força de
pressão, caso contrário o desempenho de
trabalho é reduzido e a ferramenta de trab alho pode bloquear.
Cortar
Nota: Ao cortar azulejos de parede deverá observar que as
ferramentas estão sujeitas a um alto desgaste ao serem utilizadas por muito tempo.
Lixar
A potência abrasiva e o resultado de trabalho são principalmente determinados pela seleção da folha de lixa, do número
de vibrações selecionado e da força de pressão.
Apenas folhas de lixar em perfeito estado proporcionam uma
perfeita potência abrasiva e poupam a ferramenta elétrica.
Trabalhar com uma força de pressão uniforme para aumentar
a vida útil das folhas de lixar.
Um aumento demasiado da força de pressão não leva a uma
potência abrasiva mais alta, mas a um desgaste mais forte da
ferramenta elétrica e da folha de lixar.
Para lixar ângulos, cantos e áreas de difícil acesso também é
possível trabalhar apenas com a ponta ou com o canto da placa de lixar.
Ao lixar sobre um ponto só, é possível que a folha de lixa se
aqueça fortemente. Reduza o número de oscilações e a pressão e permita que a folha de lixa se arrefeça em intervalos regulares.
Jamais utilizar uma folha de serra com a qual foi processado
metal, para processar outros materiais.
Só utilizar acessórios de lixar originais Bosch.
Para lixar deverá sempre conectar a aspiração de pó.
Raspar
Movimentar a ferramenta eléctrica para lá e
para cá durante o trabalho, para que a ferramenta de trabalho não seja demasiadamente aquecida e não bloqueie.
Para raspar deverá selecionar uma alta frequência de vibrações.
Trabalhar sobre uma superfície macia (p.ex. madeira), num
ângulo plano e com reduzida força de pressão. Caso contr ário
a espátula poderá cortar a superfície.
Serrar
Só utilizar lâminas de serra que estejam em perfeito es-
tado e que não apresentem danos. Lâminas de serrar tor-
tas e não suficiente afiadas podem quebrar, influenciar negativamente o corte ou causar um contragolpe.
Ao serrar materiais de construção leves, deverá respei-
tar as diretivas legais e as recomendações do fabric ante do material.
Utilizar detetores apropriados, para encontrar cabos
escondidos, ou consultar a companhia elétrica local. O
contacto com cabos elétricos pode provocar incêndio e
choques elétricos. Danos em tubos de gás podem levar à
explosão. A infiltração num cano de água provoca danos
materiais.
No processo de serrar por imersão só devem ser pro-
cessados materiais macios como madeira, gesso encartonado!
Antes de serrar madeiras, placas de aglomerado, materiais de
construção etc., com lâminas de serrar HCS, deverá controlar
se estes materiais não contêm pregos, parafusos ou objetos
semelhantes. Se for o caso, deverá remover estes objetos ou
Proteção contra sobrecarga em dependência da
temperatura
Numa utilização correta, a ferramenta elétrica não pode ser
sobrecarregada. Em caso de sobrecarga ou sa ída fora da faixa
de temperatura permitida para a bateria, a número de rotaçõ es é red uzi do ou a fer ra men ta d esl ig a-s e. N o ca so de u m nú mero de rotações reduzido, a ferramenta elétrica só volta ao
número de rotações plenas depois de atingida a temperatura
da bateria permitida. Em caso de desligamento automático,
desligue a ferramenta elétrica, deixe a bateria arrefecer e depois volte a ligar a ferramenta elétrica.
Indicações sobre o manuseio ideal do acumulador
Proteger o acumulador contra humidade e água.
Sempre guardar o acumulador a uma temperatura de – 20 ° C
a 50 ° C. Por exemplo, não deixe o acumulador dentro do automóvel no verão.
Um período de funcionamento reduzido após o carregamento, indica que o acumulador está gasto e que deve ser substituído.
Observar a indicação sobre a eliminação de forma ecológica.
utilizar lâminas de serrar de bimetal.
1 609 92A 2LW | (16.1.17) Bosch Power Tools
Page 51

OBJ_BUCH-2853-001.book Page 51 Monday, January 16, 2017 1:56 PM
Manutenção e serviço
Eliminação
Manutenção e limpeza
O acumulador deverá ser retirado antes de todos os
trabalhos no aparelho e antes de transportar ou de
guardar a ferramenta elétrica (p. ex. manutenção, troca de ferramenta). Há perigo de lesões se o interruptor de
ligar-desligar for acionado involuntariamente.
Manter a ferramenta elétrica e as aberturas de ventila-
ção sempre limpas, para trabalhar bem e de forma segura.
Limpar a ferramenta de trabalho estriada (acessório) em intervalos regulares com uma escova de arame.
Serviço pós-venda e consultoria de aplicação
O serviço pós-venda responde às suas perguntas a respeito
de serviços de reparação e de manutenção do seu produto,
assim como das peças sobressalentes. Desenhos explodidos
e informações sobre peças sobressalentes encontram-se em:
www.bosch-pt.com
A nossa equipa de consultoria de aplicação Bosch esclarece
com prazer todas as suas dúvidas a respeito da compra, aplicação e ajuste dos produtos e acessórios.
Indique para todas as questões e encomendas de peças sobressalentes a referência de 10 dígitos de acordo com a placa
de caraterísticas do produto.
Portugal
Robert Bosch LDA
Avenida Infante D. Henrique
Lotes 2E – 3E
1800 Lisboa
Para efetuar o seu pedido online de peças entre na página
www.ferramentasbosch.com.
Tel.: 21 8500000
Fax: 21 8511096
Brasil
Robert Bosch Ltda.
Caixa postal 1195
13065-900 Campinas
Tel.: (0800) 7045446
www.bosch.com.br/contacto
Transporte
Os acumuladores de iões de lítio, contidos, estão sujeitos ao
direito de materiais perigosos. Os acumuladores podem ser
transportados na rua pelo utilizador, sem mais obrigações.
Na expedição por terceiros (por ex.: transporte aéreo ou expedição), devem ser observadas as especiais exigências
quanto à embalagem e à designação. Neste caso é necessário
consultar um especialista de materiais perigosos ao preparar
a peça a ser trabalhada.
Só enviar acumuladores se a carcaça não estiver danificada.
Colar contactos abertos e embalar o acumulador de modo
que não possa se movimentar dentro da embalagem.
Por favor observe também eventuais diretivas nacionais suplementares.
Não deitar ferramentas elétricas e acumuladores/pilhas no lixo doméstico!
Apenas países da União Europeia:
Acumuladores/pilhas:
Sob reserva de alterações.
Italiano
Norme di sicurezza
Avvertenze generali di pericolo per elettroutensili
caso di mancato rispetto delle avvertenze di pericolo e delle
istruzioni operative si potrà creare il pericolo di scosse elettriche, incendi e/o incidenti gravi.
Conservare tutte le avvertenze di pericolo e le istruzioni
operative per ogni esigenza futura.
Il termine «elettroutensile» utilizzato nelle avvertenze di pericolo si riferisce ad utensili elettrici alimentati dalla rete (con linea di allacciamento) ed ad utensili elettrici alimentati a batteria (senza linea di allacciamento).
Sicurezza della postazione di lavoro
Tenere la postazione di lavoro sempre pulita e ben illu-
minata. Il disordine oppure zone della postazione di lavoro
non illuminate possono essere causa di incidenti.
Evitare d’impiegare l’elettroutensile in ambienti sog-
getti al rischio di esplosioni nei quali si abbia presenza
di liquidi, gas o polveri infiammabili. Gli elettroutensili
producono scintille che possono far infiammare la polvere
o i gas.
Tenere lontani i bambini ed altre persone durante l’im-
piego dell’elettroutensile. Eventuali distrazioni potranno
comportare la perdita del controllo sull’elettroutensile.
Italiano | 51
As ferramentas elétricas, os acessórios e as embalagens devem ser enviados a uma reciclagem ecológica
de matéria-prima.
Conforme as Diretivas Europeias
2012/19/UE relativa aos resíduos de ferramentas elétricas europeias 2006/66/CE é
necessário recolher separadamente os acumuladores/as pilhas defeituosos ou gastos e
conduzi-los a uma reciclagem ecológica.
Iões de lítio:
Observar as indicações no capítulo
“Transporte”, página 51.
AVVERTENZA
Leggere tutte le avvertenze di pericolo e le istruzioni operative. In
Bosch Power Tools 1 609 92A 2LW | (16.1.17)
Page 52

OBJ_BUCH-2853-001.book Page 52 Monday, January 16, 2017 1:56 PM
52 | Italiano
Sicurezza elettrica
La spina di allacciamento alla rete dell’elettroutensile
deve essere adatta alla presa. Evitare assolutamente di
apportare modifiche alla spina. Non impiegare spine
adattatrici assieme ad elettroutensili dotati di collegamento a terra. Le spine non modificate e le prese adatte
allo scopo riducono il rischio di scosse elettriche.
Evitare il contatto fisico con superfici collegate a terra,
come tubi, riscaldamenti, cucine elettriche e frigoriferi. Sussiste un maggior rischio di scosse elettriche nel mo-
mento in cui il corpo è messo a massa.
Custodire l’elettroutensile al riparo dalla pioggia o
dall’umidità. La penetrazione dell’acqua in un elettrouten-
sile aumenta il rischio di una scossa elettrica.
Non usare il cavo per scopi diversi da quelli previsti ed,
in particolare, non usarlo per trasportare o per appendere l’elettroutensile oppure per estrarre la spina dalla
presa di corrente. Non avvicinare il cavo a fonti di calore, olio, spigoli taglienti e neppure a parti della macchina che siano in movimento. I cavi danneggiati o aggrovi-
gliati aumentano il rischio d’insorgenza di scosse
elettriche.
Qualora si voglia usare l’elettroutensile all’aperto, im-
piegare solo ed esclusivamente cavi di prolunga che siano adatti per l’impiego all’esterno. L’uso di un cavo di
prolunga omologato per l’impiego all’esterno riduce il rischio d’insorgenza di scosse elettriche.
Qualora non fosse possibile evitare di utilizzare l’elet-
troutensile in ambiente umido, utilizzare un interruttore di sicurezza. L’uso di un interruttore di sicurezza r iduce
il rischio di una scossa elettrica.
Sicurezza delle persone
È importante concentrarsi su ciò che si sta facendo e
maneggiare con giudizio l’elettroutensile durante le
operazioni di lavoro. Non utilizzare mai l’elettroutensile in caso di stanchezza oppure quando ci si trovi sotto
l’effetto di droghe, bevande alcoliche e medicinali. Un
attimo di distrazione durante l’uso dell’elettroutensile può
essere causa di gravi incidenti.
Indossare sempre equipaggiamento protettivo indivi-
duale nonché occhiali protettivi. Indossando abbiglia-
mento di protezione personale come la maschera per polveri, scarpe di sicurezza che non scivolino, elmetto di
protezione oppure protezione acustica a seconda del tipo
e dell’applicazione dell’elettroutensile, si riduce il rischio di
incidenti.
Evitare l’accensione involontaria dell’elettroutensile.
Prima di collegarlo alla rete di alimentazione elettrica
e/o alla batteria ricaricabile, prima di prenderlo oppure
prima di iniziare a trasportarlo, assicurarsi che l’elettroutensile sia spento. Tenendo il dito sopra l’interruttore
mentre si trasporta l’elettroutensile oppure collegandolo
all’alimentazione di corrente con l’interruttore inserito, si
vengono a creare situazioni pericolose in cui possono veri-
Prima di accendere l’elettroutensile togliere gli attrez-
zi di regolazione o la chiave inglese. Un accessorio oppu-
re una chiave che si trovi in una parte rotante della macchina può provocare seri incidenti.
Evitare una posizione anomala del corpo. Avere cura di
mettersi in posizione sicura e di mantenere l’equilibrio
in ogni situazione. In questo modo è possibile controllare
meglio l’elettroutensile in caso di situazioni inaspettate.
Indossare vestiti adeguati. Non indossare vestiti lar-
ghi, né portare bracciali e catenine. Tenere i capelli, i
vestiti ed i guanti lontani da pezzi in movimento. Vestiti
lenti, gioielli o capelli lunghi potranno impigliarsi in pezzi in
movimento.
In caso fosse previsto il montaggio di dispositivi di
aspirazione della polvere e di raccolta, assicurarsi che
gli stessi siano collegati e che vengano utilizzati correttamente. L’utilizzo di un’aspirazione polvere può ridurre lo
svilupparsi di situazioni pericolose dovute alla polvere.
Trattamento accurato ed uso corretto degli elettroutensili
Non sottoporre la macchina a sovraccarico. Per il pro-
prio lavoro, utilizzare esclusivamente l’elettroutensile
esplicitamente previsto per il caso. Con un elettrouten-
sile adatto si lavora in modo migliore e più sicuro nell’ambito della sua potenza di prestazione.
Non utilizzare mai elettroutensili con interruttori difet-
tosi. Un elettroutensile con l’interruttore rotto è pericoloso
e deve essere aggiustato.
Prima di procedere ad operazioni di regolazione sulla
macchina, prima di sostituire parti accessorie oppure
prima di posare la macchina al termine di un lavoro,
estrarre sempre la spina dalla presa della corrente e/o
estrarre la batteria ricaricabile. Tale precauzione eviterà
che l’elettroutensile possa essere messo in funzione involontariamente.
Quando gli elettroutensili non vengono utilizzati, con-
servarli al di fuori del raggio di accesso di bambini. Non
fare usare l’elettroutensile a persone che non siano abituate ad usarlo o che non abbiano letto le presenti istruzioni. Gli elettroutensili sono macchine pericolose quando
vengono utilizzati da persone non dotate di sufficiente
esperienza.
Eseguire la manutenzione dell’elettroutensile operan-
do con la dovuta diligenza. Accertarsi che le parti mobili della macchina funzionino perfettamente, che non
s’inceppino e che non ci siano pezzi rotti o danneggiati
al punto da limitare la funzione dell’elettroutensile
stesso. Prima di iniziare l’impiego, far riparare le parti
danneggiate. Numerosi incidenti vengono causati da elet-
troutensili la cui manutenzione è stata effettuata poco accuratamente.
Mantenere gli utensili da taglio sempre affilati e puliti.
Gli utensili da taglio curati con particolare attenzione e con
taglienti affilati s’inceppano meno frequentemente e sono
più facili da condurre.
ficarsi seri incidenti.
1 609 92A 2LW | (16.1.17) Bosch Power Tools
Page 53

OBJ_BUCH-2853-001.book Page 53 Monday, January 16, 2017 1:56 PM
Utilizzare l’elettroutensile, gli accessori opzionali, gli
utensili per applicazioni specifiche ecc., sempre attenendosi alle presenti istruzioni. Così facendo, tenere
sempre presente le condizioni di lavoro e le operazioni
da eseguire. L’impiego di elettroutensili per usi diversi da
quelli consentiti potrà dar luogo a situazioni di pericolo.
Trattamento ed utilizzo appropriato di utensili dotati di
batterie ricaricabili
Caricare la batteria ricaricabile solo ed esclusivamente
nei dispositivi di carica consigliati dal produttore. Per
un dispositivo di carica previsto per un determinato tipo di
batteria sussiste pericolo di incendio se viene utilizzato
con un tipo diverso di batteria ricaricabile.
Avere cura d’impiegare negli elettroutensili solo ed
esclusivamente batterie ricaricabili esplicitamente
previste. L’uso di batterie ricaricabili di tipo diverso potrà
dare insorgenza a lesioni e comportare il rischio d’incendi.
Non avvicinare batterie non utilizzate a fermagli, mo-
nete, chiavi, chiodi, viti e neppure ad altri piccoli oggetti metallici che potrebbero provocare un cavallottamento dei contatti. Un eventuale corto circuito tra i
contatti dell’accumulatore potrà dare origine a bruciature
o ad incendi.
In caso d’impiego errato si provoca il pericolo di fuoriu-
scita di liquido dalla batteria ricaricabile. Evitarne assolutamente il contatto. In caso di contatto accidenta-
mente pericolosa si viene a creare quando la polvere di
smerigliatura si mischia con resti di vernice e poliuretano
oppure con altri materiali chimici ed il materiale in lavorazione si riscalda troppo nel corso di una lavorazione di lunga durata.
Tenere le mani sempre lontane dalla zona operativa.
Mai afferrare con le mani la parte inferiore del pezzo in
lavorazione. Toccando la lama vi è un serio rischio di inci-
dente.
Al fine di rilevare linee di alimentazione nascoste, uti-
lizzare adatte apparecchiature di ricerca oppure rivolgersi alla locale società erogatrice. Un contatto con linee
elettriche può provocare lo sviluppo di incendi e di scosse
elettriche. Danneggiando linee del gas si può creare il pericolo di esplosioni. Penetrando una tubazione dell’acqua si
provocano seri danni materiali.
Durante le operazioni di lavoro è necessario tenere
l’elettroutensile sempre con entrambe le mani ed adottare una posizione di lavoro sicura. Utilizzare con sicu-
rezza l’elettroutensile tenendolo sempre con entrambe le
mani.
Assicurare il pezzo in lavorazione. Un pezzo in lavorazio-
ne può essere bloccato con sicurezza in posizione solo utilizzando un apposito dispositivo di serraggio oppure una
morsa a vite e non tenendolo con la semplice mano.
Non aprire la batteria. Vi è il pericolo di un corto circuito.
le, sciacquare accuratamente con acqua. Rivolgersi
immediatamente al medico, qualora il liquido dovesse
entrare in contatto con gli occhi. Il liquido fuoriuscito
dalla batteria ricaricabile potrà causare irritazioni cutanee
o ustioni.
Assistenza
Fare riparare l’elettroutensile solo ed esclusivamente
da personale specializzato e solo impiegando pezzi di
ricambio originali. In tale maniera potrà essere salvaguar-
data la sicurezza dell’elettroutensile.
Avvertenze di pericolo per Multi-Cutter a batteria
Tenere l’apparecchio per le superfici isolate dell’impu-
gnatura qualora venissero effettuati lavori durante i
quali l’accessorio potrebbe venire a contatto con cavi
elettrici nascosti. Il contatto con un cavo sotto tensione
può mettere sotto tensione anche parti metalliche dell’apparecchio, causando una scossa elettrica.
Utilizzare l’elettroutensile esclusivamente per leviga-
tura a secco. L’eventuale infiltrazione di acqua in un elet-
troutensile va ad aumentare il rischio d’insorgenza di scosse elettriche.
Attenzione: Pericolo d’incendio! Evitare un surriscal-
damento del materiale in lavorazione e della levigatrice. Prima di iniziare una pausa svuotare sempre il contenitore per la polvere. La polvere di abrasione nel
sacchetto raccoglipolvere, nel Microfilter, nel sacchetto
raccoglipolvere in carta (o nel sacchetto raccoglipolvere o
nel filtro dell’aspirapolvere) può prendere fuoco in caso di
In caso di difetto e di uso improprio della batteria rica-
ricabile vi è il pericolo di una fuoriuscita di vapori. Far
entrar e aria fresc a e farsi vis itare da un me dico in caso
di disturbi. I vapori possono irritare le vie respiratorie.
Utilizzare la batteria ricaricabile esclusivamente insie-
me all’elettroutensile Bosch. Solo in questo modo la batte-
ria ricaricabile viene protetta da sovraccarico pericoloso.
Se si usano oggetti appuntiti, come ad es. chiodi o un
cacciavite, oppure se si esercita forza dall’esterno, la
batteria ricaricabile può danneggiarsi. Può verificarsi un
cortocircuito interno e la batteria può incendiarsi, emettere fumo, esplodere o surriscaldarsi.
Portare guanti di protezione quando si sostituiscono gli
accessori. In caso di uso prolungato, gli accessori si riscal-
dano.
Non raschiare materiali inumiditi (p. es. tappezzerie) e
non raschiare su fondi umidi. La penetrazione di acqua in
un elettroutensile aumenta il rischio di una scossa elettrica.
Non trattare la superficie da lavorare con liquidi conte-
nenti solventi. A causa del riscaldamento dei materiali du-
rante la raschiatura possono formarsi dei vapori tossici.
Utilizzando il raschietto prestare particolare attenzio-
ne. L’utensile è molto affilato, esiste pericolo di lesioni.
condizioni sfavorevoli come la scia di scintille prodotta durante la levigatura del metallo. Una situazione particolar-
Italiano | 53
Proteggere la batteria ricaricabile dal calore,
p. es. anche dall’irradiamento solare continuo,
dal fuoco, dall’acqua e dall’umidità. Esiste peri-
colo di esplosione.
Bosch Power Tools 1 609 92A 2LW | (16.1.17)
Page 54

OBJ_BUCH-2853-001.book Page 54 Monday, January 16, 2017 1:56 PM
54 | Italiano
Descrizione del prodotto e
caratteristiche
Leggere tutte le avvertenze di pericolo e le
istruzioni operative. In caso di mancato ri-
spetto delle avvertenze di pericolo e delle
istruzioni operative si potrà creare il pericolo
di scosse elettriche, incendi e/o incidenti
gravi.
Si prega di aprire la pagina ribaltabile su cui si trova raffigurata
schematicamente la macchina e lasciarla aperta mentre si legge il manuale delle Istruzioni per l’uso.
Uso conforme alle norme
L’elettroutensile è adatto per il taglio e la troncatura di legname, plastica, gesso, metalli non ferrosi ed elementi di fissag-
Dati tecnici
Multi-Cutter a batteria GOP 12V-28
Codice prodotto
Tensione nominale
Numero di giri a vuoto n
Angolo di oscillazione sinistra/
destra °1,4
Peso in funzione della
EPTA-Procedure 01:2014
Temperatura ambiente consentita
– durante la carica
– durante il funzionamento
lo stoccaggio
Batterie raccomandate
gio (p.es. chiodi non temprati, grappe). Lo stesso è altrettanto idoneo per la lavorazione di piastrelle da parete morbide
nonché per la levigatura a secco e la raschiatura di superfici
Caricabatteria raccomandati
piccole. L’apparecchio è adatto in modo particolare per lavori
vicino ai bordi e a livello. L’elettroutensile può essere fatto
funzionare esclusivamente con accessori Bosch.
Componenti illustrati
La numerazione dei componenti illustrati si riferisce all’illustrazione dell’elettroutensile che si trova sulla pagina con la
rappresentazione grafica.
1 Interruttore di avvio/arresto
2 Tasto di sbloccaggio della batteria ricaricabile
3 Batteria ricaricabile
4 Prese di ventilazione
5 Rotellina per la preselezione del numero di oscillazioni
6 Indicatore dello stato di carica della batteria
7 Mandrino portautensile
8 Leva di bloccaggio della guida di profondità
9 Guida di profondità
10 Lama per tagli dal centro *
11 Vite esagonale a brugola
12 Chiave per vite a esagono cavo
13 Impugnatura (superficie di presa isolata)
14 Dispositivo di aspirazione polvere *
15 Piastra di levigatura *
16 Foglio abrasivo *
17 Leva di bloccaggio del dispositivo di aspirazione polvere
18 Innesto per aspirazione *
19 Adattatore per l’aspirazione *
20 Tubo di aspirazione *
*L’accessorio illustrato oppure descritto non è compreso nel volume di fornitura standard. L’accessorio completo è contenuto nel
nostro programma accessori.
1) in funzione della batteria ricaricabile utilizzata
2) prestazioni limitate in presenza di temperature < 0 ° C
Dati tecnici rilevati con batteria ricaricabile del volume di fornitura.
Informazioni sulla rumorosità e sulla vibrazione
Valori di emissione acustica rilevati conformemente a
EN 60745-2-4.
Il livello di pressione acustica stimato A della macchina ammonta a dB(A): livello di rumorosità 79 dB(A); livel lo di potenza acustica 90 dB(A). Incertezza della misura K =3 dB.
Usare la protezione acustica!
Valori complessivi di oscillazione a
tre direzioni) e incertezza della misura K misurati conformemente alla norma EN 60745-2-4:
Levigatura: a
taglio con lama per tagli dal centro: a
K=1,5m/s
taglio con lama a settori riportati: a
raschiatura: a
Il livello di vibrazioni indicato nelle presenti istruzioni è stato
rilevato seguendo una procedur a di misurazione conforme alla norma EN 60745 e può essere utilizzato per confrontare gli
elettroutensili. Lo stesso è idoneo anche per una valutazione
temporanea della sollecitazione da vibrazioni.
Il livello di vibrazioni indicato rappresenta gli impieghi principali dell’elettroutensile. Qualora l’elettroutensile venisse utilizzato tuttavia per altri impieghi, con accessori e utensili da
innesto differenti oppure con manutenzione insufficiente, il livello di vibrazioni può differire. Questo può aumentare sensibilmente la solleci tazione da vibrazioni per l’intero periodo di
tempo operativo.
Per una valutazione precisa della sollecitazione da vibrazioni
bisognerebbe considerare anche i tempi in cui l’apparecchio
è spento oppure è acceso ma non è utilizzato ef fettivamente.
Questo può ridurre chiaramente la sollecitazione da vibrazioni per l’intero periodo operativo.
0
1)
2)
e per
=2,9m/s2, K= 1,5 m/s2,
h
2
,
=8,3m/s2, K= 1,5 m/s2.
h
3 601 HB5 0..
V= 12
min-15000–20000
kg 0,97– 1,2
°C
°C
0...+45
–20...+50
GBA 10,8V...
GBA 12V...
GBA 12V... W
GAL 11.. CV
GAL 12.. CV
GAL 18... W
(somma vettoriale delle
h
=9,2m/s2,
h
=2,5m/s2, K= 1,5 m/s2,
h
1 609 92A 2LW | (16.1.17) Bosch Power Tools
Page 55

OBJ_BUCH-2853-001.book Page 55 Monday, January 16, 2017 1:56 PM
Adottare misure di sicurezza supplementa ri per la protezione
dell’operatore dall’effetto delle vibrazioni come p.es.: manutenzione dell’elettroutensile e degli accessori, mani calde, organizzazione dello svolgimento del lavoro.
Montaggio
Caricare la batteria
Utilizzare esclusivamente i caricabatteria indicati nei
dati tecnici. Soltanto questi caricabatteria sono adatti alle
batterie agli ioni di liti o utilizzate nel vostro elettroutensile.
Nota bene: La batteria ricaricabile viene fornita par zialmente
carica. Per garantire l’intera potenza della batteria ricaricabile, prima del primo impiego ricaricare completamente la batteria ricaricabile nella stazione di ricarica.
La batteria ricaricabile a ioni di litio può essere ricaricata in
qualsiasi momento senza ridurne la durata. Un’interruzione
dell’operazione di ricarica non danneggia la batteria ricaricabile.
Rimozione della batteria ricaricabile
Per estrarre la batteria ricaricabile 3 premere i tasti di sbloccaggio 2 ed estrarre la batteria ricaricabile dall’elettroutensile
verso la parte posteriore. Così facendo, non esercitare for-
za eccessiva.
Indicatore dello stato di carica della batteria
I tre LED verdi dell’indicatore di carica della batteria 6 indicano il livello di carica della batteria 3. L’indicatore di carica della batteria si accende per soli 5 secondi dopo la messa in funzione.
LED Autonomia
Luce continua 3 x verde ≥2/3
Luce continua 2 x verde ≥1/3
Luce continua 1 x verde <1/3
Luce lampeggiante 1 x verde Riserva
Luce lampeggiante 3 x verde Vuoto
Qualora non si illumini alcun LED dopo l’accensione, ciò significa che la batteria è difettosa e deve essere sostituita.
Cambio degli utensili
Prima di effettuare lavori all’elettroutensile (p. es. la-
vori di manutenzione, cambio d’utensile, ecc.), nonché
in caso di trasporto e di conservazione dello stesso,
avere sempre cura di estrarne sempre la batteria ricaricabile. In caso d’azionamento accidentale dell’interrut-
tore di avvio/di arresto sussisterà il pericolo di incidenti.
Durante il cambio degli utensili portare guanti di prote-
zione. Toccando l’accessorio esiste pericolo di lesioni.
Selezione dell’utensile accessorio
Utensile accessorio GOP 12V-28
Italiano | 55
La tabella che segue illustra esempi per accessori. Ulteriori accessori sono indicati nell’ampio programma accessori Bosch.
Utensile accessorio Materiale Applicazione
Lama a settori
riportati
bimetallica
Piastra di levigatura per fogli abrasivi Serie Delta
93 mm
Accessorio per la
levigatura di profili
Bosch Power Tools 1 609 92A 2LW | (16.1.17)
Materiali legnosi,
Material plastici,
Metalli non ferrosi
In funzione del foglio
abrasivo
Legno,
Tubi/Profili,
Colore,
Vernici,
Materiali riempitivi,
Metallo
Tagli troncati e tagli dal centro; anche per tagli vicino ai
bordi, negli angoli e settori difficilmente accessibili;
Esempio: accorciare zoccolini già montati oppure telai
delle porte, tagli dal centro in caso di adattamento di
rivestimenti del pavimento
Levigatura di superfici piane sui bordi, negli angoli oppure
settori difficilmente accessibili;
a seconda del foglio abrasivo p.es. per la levigatura di
legno, pittura, vernice, pietra
Abrasivi in tessuto non tessuto per pulire e strutturare il
legno, disossidare metalli e per asportare vernici, feltro di
lucidatura per la prelucidatura
Levigatura comoda ed efficiente di profili con diametro fino
a 55 mm;
Fogli abrasivi rossi per la levigatura di legno,
tubazioni/profili, vernici, materiali riempitivi e metallo
Page 56

OBJ_BUCH-2853-001.book Page 56 Monday, January 16, 2017 1:56 PM
56 | Italiano
Utensile accessorio Materiale Applicazione
Lama bimetallica
per tagli dal centro
legno e metallo
Lama per tagli dal
centro HCS legno
Legno tenero,
Materiali plastici teneri,
Cartongesso,
Profili sottili in alluminio e
metalli non ferrosi,
Lamiere sottili,
Chiodi e viti non temprati
Materiali legnosi,
Materiali plastici teneri
Tagli a troncare e tagli dal centro più piccoli;
Esempio: esecuzione di aperture per prese, taglio di tubi di
rame a filo con la superficie, tagli dal centro in pannelli di
cartongesso
Lavori di adattamento precisi nel legno;
Esempio: esecuzione di aperture per serrature e
guarnizioni di metallo
Tagli troncati e profondi tagli dal centro; anche per tagli vicino ai bordi, negli angoli e settori difficilmente accessibili;
Esempio: taglio stretto dal centro in legno massivo per il
montaggio di una griglia d ventilazione
Lama bimetallica
per tagli dal centro
Legno duro,
Pannelli rivestiti
Tagli dal centro in pannelli rivestiti o legno duro;
Esempio: montaggio di finestre a soffitto
per legno duro
Lama in metallo
duro per tagli dal
centro per metallo
Metallo,
Materiali molto abrasivi,
Fibra di vetro,
Tagli dal centro in materiali molto abrasivi o metallo;
Esempio: taglio di rivestimenti per cucine, taglio semplice
di viti temprate, chiodi e acciaio inossidabile
Cartongesso,
Pannelli in fibra rinforzati
con cemento
Lama bimetallica
per tagli dal centro
legno e metallo
Legno tenero,
Legno duro,
Pannelli impiallacciati,
Tagli dal centro in pannelli rivestiti o legno duro;
Esempio: taglio di telai di porte, aperture per un ripiano
Pannelli con inserti in
plastica,
Chiodi e viti non temprati
Lama a settori
riportati scanalata
HM
Fughe in cemento,
Piastrelle da parete
tenere,
Materiali plastici rinforzati
con fibra di vetro,
Taglio e tranciatura in settore vicino al bordo, negli angoli o
settori difficilmente accessibili;
Esempio: rimuovere le fughe tra le piastrelle da parete per
lavori di riparazione, tagliare cavità in piastrelle, pannelli di
gesso o plastiche
Calcestruzzo poroso
Lama a settori
riportati Riff
diamantata
Piastra a delta
scanalata HM
Lama Riff in
metallo duro per
rimozione della
malta
Fughe in cemento,
Piastrelle da parete
tenere,
Resina epossidica,
Materiali plastici rinforzati
con fibra di vetro
Malta,
Residui di calcestruzzo,
Legno,
Materiali abrasivi
Malta,
Fughe,
Resina epossidica,
Materiali plastici rinforzati
Fresatura e taglio di precisione di piastrelle/materiale delle
fughe, resine epossidiche e materiali plastici rinforzati con
fibra di vetro;
Esempio: esecuzione di piccole aperture in piastrelle da
parete tenere e fresatura di aperture in materiale plastico
rinforzato con fibra di vetro
Raspatura e levigatura di superfici dure;
Esempio: rimozione di malta o colla per piastrelle (ades.
per la sostituzione di piastrelle danneggiate), rimozione di
residui di colla per moquette
Fresatura e taglio di materiale per fughe e piastrelle;
raspatura e levigatura di superfici dure;
Esempio: rimozione di colla per piastrelle e malta per fughe
con fibra di vetro,
Materiali abrasivi
Lama universale
HCS
Cartone catramato per
coperture,
Moquette,
Prati artificiali,
Taglio rapido e preciso di materiali teneri e materiali
abrasivi flessibili;
Esempio: taglio di moquette, cartone, pavimenti in PVC,
cartone catramato, ecc.
Cartone,
Pavimenti in PVC
1 609 92A 2LW | (16.1.17) Bosch Power Tools
Page 57

OBJ_BUCH-2853-001.book Page 57 Monday, January 16, 2017 1:56 PM
Utensile accessorio Materiale Applicazione
Raschietto, rigido
Moquette,
Malta,
Calcestruzzo,
Raschiatura di superfici dure;
Esempio: rimozione di malta, colla per piastrelle, residui di
calcestruzzo e di colla per moquette
Colla per piastrelle
Raschietto,
flessibile
Colla per moquette,
Residui di colore,
Silicone
Raschiatura flessibile di materiali teneri;
Esempio: rimozione di cordoni di silicone, residui di colore
e di colla per moquette
Italiano | 57
Lama ondulata a
settori riportati
bimetallica
Materiale isolante,
Pannelli fonoassorbenti,
Fondi per pavimenti,
Pannelli isolanti anticalpestio,
Cartone,
Moquette,
Gomma,
Cuoio
Barretta di levigatura Riff in metallo
Legno,
Colore
duro
Lama Riff in
metallo duro per
tagli dal centro
Tagliafughe
universale HCS
Fibra di vetro,
Malta,
Legno
Fughe di espansione,
Stucco per finestre,
Materiali isolanti (lana
minerale)
Montaggio dell’utensile accessorio
Applicare l’accessorio desiderato (p. es. lama per tagli dal
centro 10) sul mandrino portautensile 7 in mod o che l a pieg atura a gomito sia rivolta verso il basso (vedi figura riportata
sulla pagina grafica, dicitura dell’accessorio deve essere leggibile dall’alto).
Ruotare l’accessorio in una posizione favorevole per il relativo
lavoro e fare scattare in posizione nella camma del mandrino
portautensile 7. Per la regolazione della posizione sono possibili dodici posizioni spostate di 30°.
Fissare l’utensile accessorio con la vite 11. Serrare bene la vite 11 con la chiave per vite ad esagono cavo 12.
Controllare la sede fissa dell’utensile ad innesto. Uten-
sili ad innesto fissati in modo errato oppure non sicuro possono allentarsi durante il funzionamento e diventare pericolosi.
Smontaggio dell’utensile accessorio
Per la rimozione dell’accessorio, allentare con l’ausilio della
chiave per vite a esagono cavo 12 la vite 11 e togliere l’accessorio.
Taglio preciso di materiali teneri;
Esempio: taglio di pannelli fonoassorbenti, taglio a filo con
la superficie di materiale isolante
Levigatura di legno o colore in punti di difficile accesso
senza carta abrasiva;
Esempio: rimozione del colore tra i listelli delle persiane,
levigatura di pavimenti in legno negli angoli
Tagli dal centro in materiali molto abrasivi;
Esempio: esecuzione di aperture in piastrelle a mosaico
sottili
Taglio di materiali teneri;
Esempio: taglio di fughe di espansione in silicone o stucco
per finestre
Applicazione/sostituzione del foglio abrasivo sul
platorello abrasivo
Il platorello abrasivo 15 è dotato di un fissaggio a strappo in
modo che i fogli abrasivi con fissaggio a strappo possano essere applicati in modo veloce e semplice.
Dare colpi sul fissaggio a strappo del platorello abrasivo 15
prima di applicarvi il foglio abrasivo 16 in modo da permettere un’ottimale adesione.
Mettere a livello il foglio abrasivo 16 su di un lato della piastra
di levigatura 15, successivamente applicare il foglio abrasivo
sulla piastra di levigatura e premere bene saldamente.
Per poter garantire un’ottimale aspirazione della polvere, accertarsi che i fori nel foglio abrasivo combacino con quelli sul
platorello abrasivo.
Per rimuovere il foglio abrasivo 16 afferrarne una punta e
staccarla dal platorello abrasivo 15.
È possibile utilizzare tutti i fogli abrasivi, velli lucidatori e velli
detergenti della Serie Delta 93 mm del programma accessori
Bosch.
Accessori di levigatura come veli abrasivi/feltri di lucidatura
vengono fissati sulla piastra di levigatura procedendo allo
stesso modo.
Bosch Power Tools 1 609 92A 2LW | (16.1.17)
Page 58

OBJ_BUCH-2853-001.book Page 58 Monday, January 16, 2017 1:56 PM
58 | Italiano
Scelta del foglio abrasivo
A seconda del materiale in lavorazione ed in funzione del livello di levigatura della superficie che si vuole raggiungere, si hanno a
disposizione fogli abrasivi di diversa qualità:
Foglio
Materiale Applicazione Grana
abrasivo
– Tutti i materiali di legno
(p.es. legno duro, legno
dolce, pannelli di
masonite, pannelli da
costruzione)
– Materiali me tallici
Per una prelevigatura p. es. di travi e tavole ruvide e non
piallate
Per levigatura in piano e per correggere piccole superfici
non perfettamente piane
Per la levigatura finale e la microlevigatura del legno
grossa 40
media 80
fine 180
60
100
120
240
320
400
–Colore
Per rimozione di vernice
–Vernice
– Stucco
–Fondo
Per la levigatura di colore preverniciato (p.es. rimozione di
righe del pennello, gocce di colore e gocce di vernice
seccate)
Per la levigatura finale di materiali di fondo prima della
verniciatura
Aspirazione polvere/aspirazione trucioli
Polveri e materiali come vernici contenenti piombo, alcuni
tipi di legname, minerali e metalli possono essere dannosi
per la salute. Il contatto oppure l’inalazione delle polveri
possono causare reazioni allergiche e/o malattie delle vie
respiratorie dell’operatore oppure delle persone ch e si trovano nelle vicinanze.
Determinate polveri come polvere da legname di faggio o
di quercia sono considerate cancerogene, in modo particolare insieme ad additivi per il trattamento del legname
(cromato, protezione per legno). Materiale contenente
amianto deve essere lavorato esclusivamente da personale specializzato.
– Utilizzare possibilmente un’aspirazione polvere adatta
per il materiale.
– Provvedere per una buona aerazione del posto di lavo-
ro.
– Si consiglia di portare una mascherina protettiva con
classe di filtraggio P2.
Osservare le norme in vigore nel Vostro paese per i materiali da lavorare.
Evitare accumuli di polvere sul posto di lavoro. Le pol-
veri si possono incendiare facilmente.
Collegamento dell’aspirazione polvere (vedi figura A)
Il dispositivo di aspirazione polvere 14 è destinato esclusivamente per lavori con la pias tra di levigatura 15, in combinazione con altri accessori lo stesso non è di alcuna utilità.
Per la levigatura collegare sempre un’aspirazione della
polvere.
grossa 40
60
media 80
100
120
fine 180
240
320
400
Per il montaggio dell’aspirazione polvere 14 (accessorio) rimuovere l’accessorio.
Se necessario, assemblare le parti dell’aspirazione polvere
14 come illustrato nella figura. Applicare l’ aspirazione polvere
montata al mandrino portautensile 7 sull’elettroutensile. Ruotare l’aspirazione polvere in modo che le camme dell’aspirazione polvere scattino in posizione nelle relative rientranze
sulla carcassa. Fissare l’aspirazione polvere all’elettroutensile
con la graffa di fissaggio 17 come illustrato nella figura.
Prestare attenzione affinché l’anello di feltro 16 non sia danneggiato e sia applicato ermeticamente alla piastra di levigatura 15. Sostituire immediatamente un anello di feltro danneggiato.
Inserire un tubo di aspirazione 20 (accessorio), a seconda
della versione, o direttamente nell’innesto per aspirazione 18
oppure tagliare la parte finale del tubo vecchio, avvitare
l’adattatore per l’aspirazione 19 (accessorio) sull’estremità
del tubo ed inserirlo poi direttamente nell’innesto per aspirazione 18. Collegare il tubo di aspirazione 20 ad un aspirapolvere (accessorio). Una vista generale relativa all’attacco ad
aspirapolveri differenti è riportata sulla pagina apribile.
L’aspirapolvere deve essere adatto per il materiale da
lavorare.
Utilizzare un aspiratore speciale per l’aspirazione di polveri
particolarmente nocive per la salute, cancerogene oppure
polveri asciutte.
1 609 92A 2LW | (16.1.17) Bosch Power Tools
Page 59

OBJ_BUCH-2853-001.book Page 59 Monday, January 16, 2017 1:56 PM
Uso
Messa in funzione
Applicazione della batteria ricaricabile
Utilizzare esclusivamente batterie agli ioni di litio origi-
nali Bosch dotate della tensione riportata sulla targhetta di costruzione dell’elettroutensile in dotazione. L’im-
piego di batterie diverse da quelle consigliate potrà
comportare il pericolo di lesione o d’incendio.
Nota bene: L’utilizzo di batterie ricaricabili che non siano
adatte all’elettroutensile in dotazione può provocare disfunzioni oppure arrecare danni all’elettroutensile.
Applicare la batteria ricaricata 3 nell’impugnatura fino a percepirne lo scatto d’innesto e si trovi a filo con l’impugnatura.
Accendere/spegnere
Per accendere l’ettroutensile, spingere l’interruttore di avvio/arresto 1 in avanti in modo che sull’interruttore si veda
«I».
Per spegnere l’ettroutensile, spingere l’interruttore di avvio/arresto 1 all’indietro in modo che sull’interruttore si veda
«0».
Per risparmiare energia accendere l’elettroutensile solo se lo
stesso viene utilizzato.
La batteria ricaricabile agli ioni di litio è protetta dalla «Electronic Cell Protection (ECP)» contro lo scaricamento completo. In caso di batteria scarica l’elettroutensile si spegne attraverso un interruttore automatico: Il portautensile od
accessorio non si muove più.
Nota bene: Se l’elettroutensile si disinserisce automaticamente a causa della batteria scarica oppure surriscaldata,
spegnere poi l’elettroutensile con l’interruttore di avvio/arresto 1. Caricare la batteria oppure lasciarla raffreddare prima
di accendere di nuovo l’elettroutensile. In caso contrario la
batteria potrebbe venire danneggiata.
Preselezione della frequenza di oscillazione
Tramite la rotellina per la preselezione del numero di oscillazioni 5 è possibile preselezionare la frequenza di oscillazione
richiesta anche in fase di funzionamento.
Il numero di oscillazioni necessario dipende dal tipo di materiale in lavorazione e dalle specifiche condizioni operative e
può essere dunque determinato a seconda del caso eseguendo delle prove pratiche.
Indicazioni operative
Prima di effettuare lavori all’elettroutensile (p. es. la-
vori di manutenzione, cambio d’utensile, ecc.), nonché
in caso di trasporto e di conservazione dello stesso,
avere sempre cura di estrarne sempre la batteria ricaricabile. In caso d’azionamento accidentale dell’interrut-
tore di avvio/di arresto sussisterà il pericolo di incidenti.
Prima di posare l’elettroutensile, attendere sempre fi-
no a quando si sarà fermato completamente.
Nota bene: Tenendo chiuse durante il lavoro le prese di ven-
tilazione 4 dell’elettroutensile, viene ridotta la durata
dell’elettroutensile stesso.
Principio operativo
Tramite l’azionamento oscillante, l’elettroutensile oscilla fino
a 20 000 volte al minuto per 2,8°. Questo consente lavori precisi in uno spazio ristretto.
Tagli
Utilizzare esclusivamente lame integre ed in perfette
condizioni. Lame deformate oppure non affilate possono
rompersi, influenzare negativamente il taglio oppure causare un contraccolpo.
In caso di lavori di taglio di materiali leggeri da costru-
zione, rispettare le vigenti norme legislative e le raccomandazioni della casa costruttrice del materiale.
Al fine di rilevare linee di alimentazione nascoste, uti-
lizzare adatte apparecchiature di ricerca oppure rivolgersi alla locale società erogatrice. Un contatto con linee
elettriche può provocare lo sviluppo di incendi e di scosse
elettriche. Danneggiando linee del gas si può creare il pericolo di esplosioni. Penetrando una tubazione dell’acqua si
provocano seri danni materiali.
Seguendo il procedimento di taglio dal centro possono
essere lavorati solo materiali teneri con legno, lastre di
carton gesso o simili!
Prima di tagliare con lame HCS nel legno, pannelli di masonite, materiali da costruzione ecc. controllare gli stessi in meri to
a corpi estranei come chiodi, viti o altro. Eventualmente rimuovere i corpi estranei oppure utilizzare lame bimetalliche.
Tranciatura
Nota bene: Durante la tranciatura di piastrelle da parete tene-
re presente che gli utensili, in caso di uso di lunga durata, sono
sottoposti ad una usura elevata.
Levigatura
La capacità di asportazione e la micrografia vengono determinate essenzialmente dalla scelta del foglio abrasivo, dal livello
di numero di oscillazioni preselezionato e dalla pressione di
contatto.
Soltanto fogli abrasivi in perfetto stato possono garantire
buone prestazioni abrasive e non sottopongono l’elettroutensile a sforzi eccessivi.
Per aumentare la durata dei fogli abrasivi avere sempre cura
di esercitare una pressione uniforme.
Un eccessivo aumento della pressione esercitata non comporta una più alta prestazione abrasiva ma provoca una maggiore usura dell’elettroutensile e del foglio abrasivo.
Italiano | 59
Lavorare con una pressione scarsa ed uniforme altrimenti peggiora la prestazione
operativa e l’accessorio può bloccarsi.
Durante il lavoro muovere avanti ed indietro
l’elettroutensile affinché l’accessorio non si
riscaldi troppo e non si blocchi.
Bosch Power Tools 1 609 92A 2LW | (16.1.17)
Page 60

OBJ_BUCH-2853-001.book Page 60 Monday, January 16, 2017 1:56 PM
60 | Italiano
Per poter levigare con precisione angoli, spigoli e punti difficilmente accessibili è possibile anche lavorare soltanto c on la
punta oppure con uno spigolo della piastra di levigatura.
In caso di levigatura di precisione, il foglio abrasivo può riscaldarsi notevolmente. Ridurre il numero di oscillazioni e la pressione di contatto e lasciare raffreddare regolarmente il foglio
abrasivo.
Una volta utilizzato un foglio abrasivo per la lavorazione del
metallo non utilizzarlo più per altri materiali.
Utilizzare esclusivamente accessori di levigatura originali
Bosch.
Per la levigatura collegare sempre un’aspirazione della polvere.
Raschiatura
Per la raschiatura selezionare un alto livello di numero di oscillazioni.
Lavorare su un fondo morbido (p. es. legno) con un angolo
piatto e con scarsa pressione di contatto. Altrimenti la spatola
può tagliare nel fondo.
Protezione termosensibile contro sovraccarichi
Se impiegato in modo conforme, l’elettroutensile non può subire sovraccarichi. In caso di carico eccessivo, o qualora venga utilizzato oltre il campo di temperatura consentito per la
batteria, il numero di giri viene ridotto oppure l’elettroutensile
si disattiva. In caso di numero di giri ridotto, l’elettroutensile
entra in funzione solamente al raggiungimento della temperatura consentita per la batteria o, in caso di carico ridotto, nuovamente con il massimo numero di giri. In caso di disinserimento automatico, disattivare l’elettroutensile, lasciare
raffreddare la batteria e mettere nuovamente in funzione
l’elettroutensile.
Indicazioni per l’uso ottimale della batteria ricaricabile
Proteggere la batteria ricaricabile da umidità ed acqua.
Conservare la batteria ricaricabile esclusivamente nel campo
di temperatura da –20 °C fino a 50 °C. Non lasciare la batteria ricaricabile p.es. in estate nell’automobile.
Una sensibile riduzione della durata del funzionamento dopo
l’operazione di ricarica sta ad indicare che la batteria ricaricabile dovrà essere sostituita.
Si prega di attenersi alle indicazioni relative allo smaltimento.
Manutenzione ed assistenza
Manutenzione e pulizia
Prima di effettuare lavori all’elettroutensile (p. es. la-
vori di manutenzione, cambio d’utensile, ecc.), nonché
in caso di trasporto e di conservazione dello stesso,
avere sempre cura di estrarne sempre la batteria ricaricabile. In caso d’azionamento accidentale dell’interrut-
tore di avvio/di arresto sussisterà il pericolo di incidenti.
Per poter garantire buone e sicure operazioni di lavoro,
tenere sempre puliti l’elettroutensile e le prese di ventilazione.
Pulire regolarmente con una spazzola metallica gli accessori
scanalati (accessori).
Assistenza clienti e consulenza impieghi
Il servizio di assistenza risponde alle Vostre domande relative
alla riparazione ed alla manutenzione del Vostro prodotto
nonché concernenti le parti di ricambio. Disegni in vista
esplosa ed informazioni relative alle parti di ricambio sono
consultabili anche sul sito:
www.bosch-pt.com
Il team Bosch che si occupa della consulenza impieghi vi aiuterà in caso di domande relative ai nostri prodotti ed ai loro
accessori.
In caso di richieste o di ordinazione di pezzi di ricambio,
comunicare sempre il codice prodotto a 10 cifre riportato
sulla targhetta di fabbricazione del prodotto.
Italia
Officina Elettroutensili
Robert Bosch S.p.A.
Corso Europa 2/A
20020 LAINATE (MI)
Tel.: (02) 3696 2663
Fax: (02) 3696 2662
Fax: (02) 3696 8677
E-Mail: officina.elettroutensili@it.bosch.com
Svizzera
Sul sito www.bosch-pt.com/ch/it è possible ordinare direttamente on-line i ricambi.
Tel.: (044) 8471513
Fax: (044) 8471553
E-Mail: Aftersales.Service@de.bosch.com
Trasporto
Le batterie ricaricabili agli ioni di litio contenute sono soggette
ai requisiti di legge relativi a merci pericolose. Le batterie ricaricabili possono essere trasportate su strada tramite l’utente
senza ulteriori precauzioni.
In caso di spedizione tramite terzi (es.: trasporto aereo oppure spedizioniere) devono essere osservati particolari requisiti
relativi ad imballo e marcatura. In questo caso per la preparazione del pezzo da spedire è necessario ricorrere ad un esperto per merce pericolosa.
Spedire batterie ricaricabili solamente se la carcassa non è
danneggiata. Coprire con nastro adesivo i contatti scoperti ed
imballare la batteria ricaricabile in modo tale che non si muova nell’imballo.
Vi preghiamo di osservare anche eventuali ulteriori norme nazionali.
Smaltimento
Non gettare elettroutensili e batterie ricaricabili/batterie tra i
rifiuti domestici!
Avviare ad un riciclaggio rispettoso dell’ambiente
elettroutensili, batterie ricaricabili, accessori ed imballaggi non più impiegabili.
1 609 92A 2LW | (16.1.17) Bosch Power Tools
Page 61

WAARSCHUWING
OBJ_BUCH-2853-001.book Page 61 Monday, January 16, 2017 1:56 PM
Solo per i Paesi della CE:
Conformemente alla direttiva europea
2012/19/UE gli elettroutensili diventati inservibili e, in base alla direttiva europea
2006/66/CE, le batterie ricaricabili/batterie
difettose o consumate devono essere raccolte separatamente ed essere inviate ad una riutilizzazione ecologica.
Per le batterie ricaricabili/le batterie non funzionanti rivolgersi al Consorzio:
Italia
Ecoelit
Viale Misurata 32
20146 Milano
Tel.: +39 02 / 4 23 68 63
Fax: +39 02 / 48 95 18 93
Svizzera
Batrec AG
3752 Wimmis BE
Batterie ricaricabili/Batterie:
Li-Ion:
Si prega di tener presente le indicazioni riportare nel paragrafo «Trasporto»,
pagina 60.
Con ogni riserva di modifiche tecniche.
Nederlands
Veiligheidsvoorschriften
Algemene veiligheidswaarschuwingen voor
elektrische gereedschappen
Lees alle veiligheidswaarschuwingen en alle voor-
schriften. Als de waarschuwingen en voorschriften niet
worden opgevolgd, kan dit een elektrische schok, brand of
ernstig letsel tot gevolg hebben.
Bewaar alle waarschuwingen en voorschriften voor toekomstig gebruik.
Het in de waarschuwingen gebruikte begrip „elektrisch gereedschap” heeft betrekking op elektrische gereedschapp en
voor gebruik op het stroomnet (met netsnoer) en op elektrische gereedschappen voor gebruik met een accu (zonder netsnoer).
Veiligheid van de werkomgeving
Houd uw werkomgeving schoon en goed verlicht. Een
rommelige of onverlichte werkomgeving kan tot ongevallen leiden.
Werk met het elektrische gereedschap niet in een om-
geving met explosiegevaar waarin zich brandbare
vloeistoffen, brandbare gassen of brandbaar stof bevinden. Elektrische gereedschappen veroorzaken vonken
die het stof of de dampen tot ontsteking kunnen brengen.
Houd kinderen en andere personen tijdens het gebruik
van het elektrische gereedschap uit de buurt. Wanneer
u wordt afgeleid, kunt u de controle over het gereedschap
verliezen.
Elektrische veiligheid
De aansluitstekker van het elektrische gereedschap
moet in het stopcontact passen. De stekker mag in
geen geval worden veranderd. Gebruik geen adapterstekkers in combinatie met geaarde elektrische gereedschappen. Onveranderde stekkers en passende
stopcontacten beperken het risico van een elektrische
schok.
Voorkom aanraking van het lichaam met geaarde op-
pervlakken, bijvoorbeeld van buizen, verwarmingen,
fornuizen en koelkasten. Er bestaat een verhoogd risico
door een elektrische schok wanneer uw lichaam geaard is.
Houd het gereedschap uit de buurt van regen en vocht.
Het binnendringen van water in het elektrische gereedschap vergroot het risico van een elektrische schok.
Gebruik de kabel niet voor een verkeerd doel, om het
elektrische gereedschap te dragen of op te hangen of
om de stekker uit het stopcontact te trekken. Houd de
kabel uit de buurt van hitte, olie, scherpe randen en bewegende gereedschapdelen. Beschadigde of in de war
geraakte kabels vergroten het risico van een elektrische
schok.
Wanneer u buitenshuis met elektrisch gereedschap
werkt, dient u alleen verlengkabels te gebruiken die
voor gebruik buitenshuis zijn goedgekeurd. Het gebruik
van een voor gebruik buitenshuis geschikte verlengkabel
beperkt het risico van een elektrische schok.
Als het gebruik van het elektrische gereedschap in een
vochtige omgeving onvermijdelijk is, dient u een aardlekschakelaar te gebruiken. Het gebruik van een aardlek-
schakelaar vermindert het risico van een elektrische
schok.
Veiligheid van personen
Wees alert, let goed op wat u doet en ga met verstand
te werk bij het gebruik van het elektrische gereedschap. Gebruik geen elektrisch gereedschap wanneer
u moe bent of onder invloed staat van drugs, alcohol of
medicijnen. Een moment van onoplettendheid bij het ge-
bruik van het elektrische gereedschap kan tot ernstige verwondingen leiden.
Draag persoonlijke beschermende uitrusting. Draag al-
tijd een veiligheidsbril. Het dragen van persoonlijke be-
schermende uitrusting zoals een stofmasker, slipvaste
werkschoenen, een veiligheidshelm of gehoorbescherming, afhankelijk van de aard en het gebruik van het elektrische gereedschap, vermindert het risico van verwondingen.
Nederlands | 61
Bosch Power Tools 1 609 92A 2LW | (16.1.17)
Page 62

OBJ_BUCH-2853-001.book Page 62 Monday, January 16, 2017 1:56 PM
62 | Nederlands
Voorkom per ongeluk inschakelen. Controleer dat het
elektrische gereedschap uitgeschakeld is voordat u de
stekker in het stopcontact steekt of de accu aansluit en
voordat u het gereedschap oppakt of draagt. Wanneer u
bij het dragen van het elektrische gereedschap uw vinger
aan de schakelaar hebt of wanneer u het gereedschap ingeschakeld op de stroomvoorziening aansluit, kan dit tot
ongevallen leiden.
Verwijder instelgereedschappen of schroefsleutels
voordat u het elektrische gereedschap inschakelt. Een
instelgereedschap of sleutel in een draaiend deel van het
gereedschap kan tot verwondingen leiden.
Voorkom een onevenwichtige lichaamshouding. Zorg
ervoor dat u stevig staat en steeds in evenwicht blijft.
Daardoor kunt u het elektrische gereedschap in onverwachte situaties beter onder controle houden.
Draag geschikte kleding. Draag geen loshangende kle-
ding of sieraden. Houd haren, kleding en handschoenen uit de buurt van bewegende delen. Loshangende
kleding, lange haren en sieraden kunnen door bewegende
delen worden meegenomen.
Wanneer stofafzuigings- of stofopvangvoorzieningen
kunnen worden gemonteerd, dient u zich ervan te verzekeren dat deze zijn aangesloten en juist worden gebruikt. Het gebruik van een stofafzuiging beperkt het ge-
vaar door stof.
Zorgvuldige omgang met en zorgvuldig gebruik van
elektrische gereedschappen
Overbelast het gereedschap niet. Gebruik voor uw
werkzaamheden het daarvoor bestemde elektrische
gereedschap. Met het passende elektrische gereedschap
werkt u beter en veiliger binnen het aangegeven capaciteitsbereik.
Gebruik geen elektrisch gereedschap waarvan de
schakelaar defect is. Elektrisch gereedschap dat niet
meer kan worden in- of uitgeschakeld, is gevaarlijk en moet
worden gerepareerd.
Trek de stekker uit het stopcontact of neem de accu uit
het elektrische gereedschap voordat u het gereedschap instelt, toebehoren wisselt of het gereedschap
weglegt. Deze voorzorgsmaatregel voorkomt onbedoeld
starten van het elektrische gereedschap.
Bewaar niet-gebruikte elektrische gereedschappen
buiten bereik van kinderen. Laat het gereedschap niet
gebruiken door personen die er niet mee vertrouwd
zijn en deze aanwijzingen niet hebben gelezen. Elektri-
sche gereedschappen zijn gevaarlijk wanneer deze door
onervaren personen worden gebruikt.
Verzorg het elektrische gereedschap zorgvuldig. Con-
troleer of bewegende delen van het gereedschap correct functioneren en niet vastklemmen en of onderdelen zodanig gebroken of beschadigd zijn dat de
werking van het elektrische gereedschap nadelig
wordt beïnvloed. Laat deze beschadigde onderdelen
voor het gebruik repareren. Veel ongevallen hebben hun
oorzaak in slecht onderhouden elektrische gereedschappen.
Houd snijdende inzetgereedschappen scherp en
schoon. Zorgvuldig onderhouden snijdende inzetge reed-
schappen met scherpe snijkanten klemmen minder snel
vast en zijn gemakkelijker te geleiden.
Gebruik elektrisch gereedschap, toebehoren, inzetge-
reedschappen en dergelijke volgens deze aanwijzingen. Let daarbij op de arbeidsomstandigheden en de
uit te voeren werkzaamheden. Het gebruik van elektri-
sche gereedschappen voor andere dan de voorziene toepassingen kan tot gevaarlijke situaties leiden.
Gebruik en onderhoud van accugereedschappen
Laad accu’s alleen op in oplaadapparaten die door de
fabrikant worden geadviseerd. Voor een oplaadappa-
raat dat voor een bepaald type accu geschikt is, bestaat
brandgevaar wanneer het met andere accu’s wordt gebruikt.
Gebruik alleen de daarvoor bedoelde accu’s in de elek-
trische gereedschappen. Het gebruik van andere accu’s
kan tot verwondingen en brandgevaar leiden.
Voorkom aanraking van de niet-gebruikte accu met pa-
perclips, munten, sleutels, spijkers, schroeven en andere kleine metalen voorwerpen die overbrugging van
de contacten kunnen veroorzaken. Kortsluiting tussen
de accucontacten kan brandwonden of brand tot gevolg
hebben.
Bij verkeerd gebruik kan vloeistof uit de accu lekken.
Voorkom contact daarmee. Spoel bij onvoorzien contact
met water af. Wanneer de vloeistof in de ogen komt,
dient u bovendien een arts te raadplegen. Gelekte accu-
vloeistof kan tot huidirritaties en verbrandingen leiden.
Service
Laat het elektrische gereedschap alleen repareren
door gekwalificeerd en vakkundig personeel en alleen
met originele vervangingsonderdelen.
gewaarborgd dat de veiligheid van het gereedschap in
stand blijft.
Veiligheidsvoorschriften voor Accu-Multi-Cutter
Houd het gereedschap aan de geïsoleerde greepvlak-
ken vast als u werkzaamheden uitvoert waarbij het inzetgereedschap verborgen stroomleidingen kan raken. Contact met een onder spanning staande leiding kan
ook metalen delen van het gereedschap onder spanning
zetten en tot een elektrische schok leiden.
Gebruik het elektrische gereedschap alleen voor droog
schuren. Het binnendringen van water in het elektrische
gereedschap vergroot het risico van een elektrische schok.
Let op, brandgevaar! Voorkom oververhitting van het
te schuren materiaal en de schuurmachine. Maak voor
onderbrekingen van de werkzaamheden altijd de stofzak leeg. Schuurstof in stofzak, microfilter, papieren stof-
zak (filterzak of filter van de stofzuiger) kan zelf ontbranden onder ongunstige omstandigheden, bijvoorbeeld
wegvliegende vonken bij het schuren van metalen. Bijzonder gevaar bestaat als het schuurstof vermengd is met resten lak, polyurethaan of andere chemische stoffen en het
schuurmateriaal na langdurige werkzaamheden heet is.
Daarmee wordt
1 609 92A 2LW | (16.1.17) Bosch Power Tools
Page 63

OBJ_BUCH-2853-001.book Page 63 Monday, January 16, 2017 1:56 PM
Nederlands | 63
Houd uw handen uit de buurt van de plaats waar wordt
gezaagd. Grijp niet onder het werkstuk. Bij aanraking
van het zaagblad bestaat verwondingsgevaar.
Gebruik een geschikt detectieapparaat om verborgen
stroom-, gas- of waterleidingen op te sporen of raadpleeg het plaatselijke energie- of waterleidingbedrijf.
Contact met elektrische leidingen kan tot brand of een
elektrische schok leiden. Beschadiging van een gasleiding
kan tot een explosie leiden. Breuk van een waterleiding
veroorzaakt materiële schade.
Houd het elektrische gereedschap tijdens de werk-
zaamheden stevig met beide handen vast en zorg ervoor dat u stevig staat. Het elektrische gereedschap
wordt met twee handen veiliger geleid.
Zet het werkstuk vast. Een met spanvoorzieningen of een
bankschroef vastgehouden werkstuk wordt beter vastgehouden dan u met uw hand kunt doen.
Open de accu niet. Er bestaat gevaar voor kortsluiting.
Bescherm de accu tegen hitte, bijvoorbeeld ook
tegen voortdurend zonlicht, vuur, water en
vocht. Er bestaat explosiegevaar.
Bij beschadiging en onjuist gebruik van de accu kunnen
er dampen vrijkomen. Zorg voor frisse lucht en raadpleeg bij klachten een arts. De dampen kunnen de lucht-
wegen irriteren.
Gebruik de accu alleen in combinatie met uw Bosch
elektrische gereedschap. Alleen zo wordt de accu tegen
gevaarlijke overbelasting beschermd.
Door scherpe voorwerpen, zoals bijv. spijkers of
schroevendraaiers of door krachtinwerking van buitenaf kan de accu beschadigd worden. Het kan tot een
interne kortsluiting leiden en de accu doen branden, roken, exploderen of oververhitten.
Draag werkhandschoenen bij het wisselen van de in-
zetgereedschappen. Inzetgereedschappen worden
warm bij langdurig gebruik.
Krab geen natgemaakte materialen (zoals behang) af
en krab niet op een vochtige ondergrond. Het binnen-
dringen van water in het elektrische gereedschap vergroot
de kans op een elektrische schok.
Behandel het te bewerken oppervlak niet met oplos-
middelhoudende vloeistoffen. Door de verwarming van
de materialen bij het afkrabben kunnen giftige dampen
ontstaan.
Wees bij de omgang met de krabber bijzonder voor-
zichtig. Het gereedschap is zeer scherp. Er bestaat ver-
wondingsgevaar.
Product- en vermogensbeschrijving
Lees alle veiligheidswaarschuwingen en alle voorschriften. Als de waarschuwingen en
voorschriften niet worden opgevolgd, kan dit
een elektrische schok, brand of ernstig letsel
tot gevolg hebben.
Vouw de uitvouwbare pagina met de afbeelding van het gereedschap open en laat deze pagina opengevouwen terwijl u
Gebruik volgens bestemming
Het elektrische gereedschap is bestemd voor het zagen en
doorslijpen van houtmaterialen, kunststof, gips, non-ferrometalen en bevestigingselementen (zoals ongeharde nagels
en nieten). Het is eveneens geschikt voor het bewerken van
zachte wandtegels en voor het droog schuren en afkrabben
van kleine oppervlakken. Het is bij uitstek geschikt voor werkzaamheden langs opstaande en aansluitende randen. Het
elektrische gereedschap mag uitsluitend met Bosch-toebehoren worden gebruikt.
Afgebeelde componenten
De componenten zijn genummerd zoals op de afbeelding van
het elektrische gereedschap op de pagina met afbeeldingen.
1 Aan/uit-schakelaar
2 Accu-ontgrendelingsknop
3 Accu
4 Ventilatieopeningen
5 Stelwiel vooraf instelbaar aantal schuurbewegingen
6 Accu-oplaadindicatie
7 Gereedschapopname
8 Spanhendel van de diepteaanslag
9 Diepteaanslag
10 Zaagblad voor invallend zagen *
11 Inbusschroef
12 Binnenzeskantsleutel
13 Handgreep (geïsoleerd greepvlak)
14 Stofafzuiging *
15 Schuurplateau *
16 Schuurblad *
17 Spanhendel van de stofafzuiging
18 Afzuigaansluiting *
19 Afzuigadapter *
20 Afzuigslang *
* Niet elk afgebeeld en beschreven toebehoren wordt standaard
meegeleverd. Het volledige toebehoren vindt u in ons toebehorenprogramma.
Technische gegevens
Accu-Multi-Cutter GOP 12V-28
Productnummer
Nominale spanning
Onbelast toerental n
0
Oscillatiehoek links/rechts
Gewicht volgens
EPTA-Procedure 01:2014
1)
Toegestane omgevingstemperatuur
– bij het laden
–bij het gebruik
1) afhankelijk van gebruikte accu
2) beperkt vermogen bij temperaturen <0 ° C
Technische gegevens bepaald met meegeleverde accu.
2)
en bij opslag
3 601 HB5 0..
V= 12
min-15000–20000
°1,4
kg 0,97– 1,2
°C
°C
0...+45
–20...+50
de gebruiksaanwijzing leest.
Bosch Power Tools 1 609 92A 2LW | (16.1.17)
Page 64

OBJ_BUCH-2853-001.book Page 64 Monday, January 16, 2017 1:56 PM
64 | Nederlands
Accu-Multi-Cutter GOP 12V-28
Aanbevolen accu’s
GBA 10,8V...
GBA 12V...
GBA 12V... W
Aanbevolen laadapparaten
GAL 11.. CV
GAL 12.. CV
GAL 18... W
1) afhankelijk van gebruikte accu
2) beperkt vermogen bij temperaturen <0 ° C
Technische gegevens bepaald met meegeleverde accu.
Informatie over geluid en trillingen
Geluidsemissiewaarden vastgesteld volgens EN 60745-2-4.
Het A-gewogen geluidsniveau van het gereedschap bedraagt
kenmerkend: geluidsdrukniveau 79 dB(A); geluidsvermogenniveau 90 dB(A). Onzekerheid K= 3 dB.
Draag een gehoorbescherming.
Totale trillingswaarden a
onzekerheid K bepaald volgens EN 60745-2-4:
Schuren: a
Zagen met invalzaagblad: a
=2,9m/s2, K= 1,5 m/s2,
h
Zagen met segmentzaagblad: a
Schaven: a
=8,3m/s2, K= 1,5 m/s2.
h
Het in deze gebruiksaanwijzing vermelde trillingsniveau is gemeten met een volgens EN 60745 genormeerde meetmethode en kan worden gebruikt om elektrische gereedschappen
met elkaar te vergelijken. Het is ook geschikt voor een voorlopige inschatting van de trillingsbelasting.
Het aangegeven trillingsniveau representeert de voornaamste toepassingen van het elektrische gereedschap. Als echter
het elektrische gereedschap wordt gebruikt voo r andere toepassingen, met verschillende accessoire, met afwijkende inzetgereedschappen of onvoldoende onderhoud, kan het trillingsniveau afwijken. Dit kan de trillingsbelasting gedurende
de gehele arbeidsperiode duidelijk verhogen.
Voor een nauwkeurige schatting van de trillingsbelasting
moet ook rekening worden gehouden met de tijd waarin het
gereedschap uitgeschakeld is, of waarin het gereedschap wel
loopt, maar niet werkelijk wordt gebruikt. Dit kan de trillings-
(vectorsom van drie richtingen) en
h
=9,2m/s2, K= 1,5 m/s2,
h
=2,5m/s2, K= 1,5 m/s2,
h
Opmerking: De accu wordt gedeeltelijk op geladen geleverd.
Om de volledige capaciteit van de accu te verkrijgen, laadt u
voor het eerste gebruik de accu volledig in het oplaadapparaat op.
De Lithium-Ion-accu kan op elk moment worden opgeladen
zonder de levensduur te verkorten. Een onderbreking van het
opladen schaadt de accu niet.
Accu verwijderen
Als u de accu 3 wilt verwijderen, drukt u op de ontgrendelingsknoppen 2 en trekt u de accu naar achteren uit het elektrische
gereedschap. Forceer daarbij niet.
Accu-oplaadindicatie
De drie groene LED's van de accu-oplaadindicatie 6 geven de
laadtoestand van de accu 3 weer. De oplaadindicatie brandt
slechts 5 seconden na ingebruikneming.
LED Capaciteit
Permanent licht 3 x groen ≥2/3
Permanent licht 2 x groen ≥1/3
Permanent licht 1 x groen < 1/3
Knipperlicht 1 x groen Reserve
Knipperlicht 3 x groen leeg
Bran dt na he t inscha kelen g een LED, dan is d e accu de fect en
moet deze vervangen worden.
Inzetgereedschap wisselen
Neem altijd de accu uit het elektrische gereedschap
voor werkzaamheden aan het gereedschap (zoals het
uitvoeren van onderhoud en het wisselen van inzetgereedschap) en voor het vervoeren en opbergen van het
gereedschap. Bij per ongeluk bedienen van de aan/uit-
schakelaar bestaat verwondingsgevaar.
Draag werkhandschoenen bij het wisselen van inzetge-
reedschap. Bij het aanraken van de inzetgereedschappen
bestaat verwondingsgevaar.
Inzetgereedschap kiezen
Inzetgereedschap GOP 12V-28
belasting gedurende de gehele arbeidsperiode duidelijk verminderen.
Leg aanvullende veiligheidsmaatregelen ter bescherming van
de bediener tegen het effect van trillingen vast, zoals: Onderhoud van elektrische gereedschappen en inzetgereedschappen, warm houden van de handen, organisatie van het arbeidsproces.
Montage
Accu opladen
Gebruik alleen de in de technische gegevens vermelde
oplaadapparaten. Alleen deze oplaadapparaten zijn afge-
stemd op de bij het elektrische gereedschap gebruikte lithiumionaccu.
1 609 92A 2LW | (16.1.17) Bosch Power Tools
Page 65

OBJ_BUCH-2853-001.book Page 65 Monday, January 16, 2017 1:56 PM
Nederlands | 65
De volgende tabel geeft voorbeelden voor inzetgereedschappen. Meer inzetgereedschappen vindt u in het omvangrijke Boschtoebehorenprogramma.
Inzetgereedschap Materiaal Gebruik
Bimetaalsegmentzaagblad
houtmaterialen,
kunststof,
non-ferrometalen
Afkorten en invallend zagen; ook voor zaagwerkzaamheden tot aan opstaande randen, in hoeken en op moeilijk
bereikbare plaatsen;
Voorbeeld: reeds geïnstalleerde vloerplinten of deurkozijnen inkorten, invallend zagen bij het aanpassen van
vloerpanelen
Schuurplateau
voor schuurbladen serie Delta
93 mm
Afhankelijk van schuurblad
Schuren van oppervlakken aan randen, in hoeken of op
moeilijk bereikbare plaatsen;
afhankelijk van schuurblad bijv. schuren van hout, verf, lak
of steen
Vliezen voor het reinigen en structureren van hout, ontroesten van metaal en voor het opschuren van lak,
polijstvilt voor het voorpolijsten
Profielschuurhulpstuk
hout,
Buizen/Profielen,
verf,
lak,
Comfortabel en efficiënt schuren van profielen tot een
diameter van 55 mm;
Rode schuurbladen voor het schuren van hout, buizen/
profielen, lak, vulmateriaal en metaal
vulmateriaal,
Metaal
Bimetaalzaagbladen voor
invallend zagen in
hout en metaal
zacht hout,
zachte kunststoffen,
gipskarton,
dunwandige profielen van
aluminium en
non-ferrometaal,
dun staal,
Kleinere doorslijp- en invallende zaagwerkzaamheden;
Voorbeeld: uitsparing voor stopcontacten zagen, koperen
buis vlak met de muur doorslijpen, invallend zagen in gips-
kartonplaten
Filigrane aanpaswerkzaamheden in hout;
Voorbeeld: uitsparingen voor sloten en beslag bijzagen
niet-geharde spijkers en
schroeven
HCS-zaagblad
voor invallend
zagen in hout
houtmaterialen,
zachte kunststoffen
Afkorten en diep invallend zagen; ook voor zaagwerkzaam-
heden tot aan opstaande randen, in hoeken en op moeilijk
bereikbare plaatsen;
Voorbeeld: invallend zagen met smalle zaaglijn in massief
hout voor de inbouw van een ventilatierooster
Bimetalen
invalzaagblad
hardhout,
gelamineerde platen
Invallend zagen in gelamineerde platen of hardhout;
Voorbeeld: inbouw van dakramen
hardhout
Hardmetalen
invalzaagblad
metaal
Metaal,
sterk abrasieve
materialen,
Invallend zagen in sterk abrasieve materialen of metaal;
Voorbeeld: keukenfrontafdekkingen zagen, eenvoudig
snijden door geharde schroeven, spijkers en roestvrij staal
fiberglas,
gipskarton,
cementgebonden vezelplaten
Bimetaalzaagbladen voor
invallend zagen in
hout en metaal
zacht hout,
hardhout,
gefineerde platen,
met kunststof beklede
Invallend zagen in gelamineerde platen of hardhout;
Voorbeeld: deurkozijnen inkorten, uitsparingen voor een
plank
platen,
niet-geharde spijkers en
schroeven
Bosch Power Tools 1 609 92A 2LW | (16.1.17)
Page 66

OBJ_BUCH-2853-001.book Page 66 Monday, January 16, 2017 1:56 PM
66 | Nederlands
Inzetgereedschap Materiaal Gebruik
HM-riff-segmentzaagblad
Diamant-Riffsegmentzaagblad
HM-riff-deltaplaat
HM-Riff-tegelspecie- en tegellijmverwijderaar
cementvoegen,
zachte wandtegels,
met glasvezel versterkte
kunststoffen,
cellenbeton
cementvoegen,
zachte wandtegels,
epoxyhars,
met glasvezel versterkte
kunststoffen
specie,
betonresten,
hout,
abrasieve materialen
specie,
voegen,
epoxyhars,
Zagen en afkorten tot aan opstaande randen, in hoeken en
op moeilijk bereikbare plaatsen;
Voorbeeld: voegen tussen wandtegels voor renovatiewerk-
zaamheden verwijderen, uitsparingen in tegels, gipsplaten
of kunststoffen maken
Precies uitfrezen en doorslijpen van tegel-/voegenmateri-
aal, epoxyharsen en met glasvezel versterkte kunststoffen;
Voorbeeld: kleinere uitsnijdingen maken in zachte wand-
tegels en uitsparingen in met glasvezel versterkte kunststof
frezen
Vijlen en schuren op harde ondergrond;
Voorbeeld: specie of tegellijm verwijderen (bijv. bij het
vervangen van beschadigde tegels), verwijderen van
tapijtlijmresten
Uitfrezen en doorslijpen van voegen- en tegelmateriaal
evenals vijlen en schuren op harde ondergrond;
Voorbeeld: tegellijm en voegspecie verwijderen
met glasvezel versterkte
kunststoffen,
abrasieve materialen
HCS multimes
dakvilt,
tapijt,
kunstgras,
karton,
Snel en precies snijden van zacht materiaal en flexibele
abrasieve materialen;
Voorbeeld: snijden van tapijt, karton, PVC-vloerbedekking,
dakvilt enz.
PVC-vloerbedekking
Krabber, stijf
tapijt,
specie,
beton,
Krabben op harde ondergrond;
Voorbeeld: verwijderen van specie, tegellijm, beton- en
tapijtlijmresten
tegellijm
Krabber, flexibel
tapijtlijm,
verfresten,
silicone
Flexibel krabben op zachte ondergrond;
Voorbeeld: verwijderen van siliconenvoegen, tapijtlijm- en
verfresten
Bimetaalsegmentasslijpmes
isolatiemateriaal,
isolatieplaten,
vloerplaten,
Precies snijden van zachte materialen;
Voorbeeld: op maat snijden van isolatieplaten, vlak
afzagen van uitstekend isolatiemateriaal
geluidsisolatieplaten,
karton,
tapijt,
rubber,
leer
HM-Riff-schuurvinger
hout,
verf
Schuren van hout en verf op moeilijk toegankelijke
plaatsen zonder schuurpapier;
Voorbeeld: verf afschuren tussen raamluiklamellen,
hoeken bij houten vloeren schuren
HM-Riff-invalzaagblad
fiberglas,
specie,
Invallend zagen in sterk abrasieve materialen;
Voorbeeld: uitfrezen van dunne mozaïektegels
hout
HCS-universele
voegensnijder
uitzetvoegen,
raamkit,
(Door)snijden van zachte materialen;
Voorbeeld: snijden van silicone uitzetvoegen of raamkit
isolatiematerialen (steenwol)
1 609 92A 2LW | (16.1.17) Bosch Power Tools
Page 67

OBJ_BUCH-2853-001.book Page 67 Monday, January 16, 2017 1:56 PM
Nederlands | 67
Inzetgereedschap inzetten
Zet het gewenste inzetgereedschap (bijvoorbeeld het zaagblad voor invallend zagen 10) zodanig op de gereedschapopname 7 dat de buiging omlaag wijst (zie de afbeelding op de
pagina met afbeeldingen, het opschrift van het inzetgereedschap is van boven leesbaar).
Draai het inzetgereedschap in een voor de werkzaamheden
gunstige positie en laat het in de nokken van de gereedschapopname 7 vastklikken. Daarbij zijn twaalf posities met een
verplaatsing van telkens 30° mogelijk.
Bevestig het inzetgereedschap met de schroef 11. Draai de
schroef 11 met de inbussleutel 12 goed vast.
Controleer of het inzetgereedschap stevig vastzit. Ver-
keerd of niet stevig bevestigde inzetgereedschappen kunnen tijdens het gebruik losraken en kunnen u in gevaar
brengen.
Inzetgereedschap verwijderen
Als u het inzetgereedschap wilt verwijderen, draait u met de
binnenzeskantsleutel 12 de schroef 11 los en verwijdert u het
inzetgereedschap.
Schuurblad op het schuurplateau aanbrengen of
vervangen
Het schuurplateau 15 is voorzien van klitweefsel, zodat u
schuurbladen met klithechting snel en eenvoudig kunt bevestigen.
Klop het klitweefsel van het schuurplateau 15 voor het aanbrengen van het schuurblad 16 uit, om een optimale hechting
mogelijk te maken.
Plaats het schuurblad 16 tegen één zijde van het schuurplateau 15, leg het schuurblad vervolgens op het schuurplateau
en druk het stevig vast.
Als u een optimale stofafzuiging wilt bereiken, dient u erop te
letten dat de perforaties in het schuurblad overeenkomen
met de boorgaten in het schuurplateau.
Als u het schuurblad 16 wilt verwijderen, pakt u het aan een
punt vast en trekt u het van het schuurplateau 15 los.
U kunt alle schuurbladen, polijst- en reinigingsvliezen van de
serie Delta 93 mm uit het Bosch-toebehorenprogramma gebruiken.
Schuurtoebehoren zoals vlies en polijstvilt worden op dezelfde wijze op het schuurplateau bevestigd.
Keuze van het schuurblad
Afgestemd op het te bewerken materiaal en de gewenste afname van het oppervlak zijn er verschillende schuurbladen verkrijgbaar:
Schuurblad Materiaal Gebruik Korrel
– Alle houtmate rialen (zoals
hardhout, zachthout,
spaanplaat en bouwplaat)
– Metaal
Schuren van bijvoorbeeld ruwe, ongeschaafde balken en
planken
Vlakschuren en wegschuren van kleine oneffenheden
Hout fijn schuren
Grof 40
Middel 80
Fijn 180
60
100
120
240
320
400
–Verf
–Lak
–Vulmiddel
–Plamuur
Voor het afschuren van verf
Voor het schuren van grondverf (bijv. verwijderen van
kwaststrepen, verfdruppels en uitgelopen verf)
Grof 40
60
Middel 80
100
120
Voor het opschuren van grondverflagen voor het lakken
Fijn 180
240
320
400
Afzuiging van stof en spanen
Stof van materialen zoals loodhoudende verf, enkele hout-
soorten, mineralen en metaal kunnen schadelijk voor de
gezondheid zijn. Aanraking of inademing van stof kan leiden tot allergische reacties en/of ziekten van de ademwegen van de gebruiker of personen die zich in de omgeving
bevinden.
Bepaalde soorten stof, bijvoorbeeld van eiken- en beukenhout, gelden als kankerverwekkend, in het bijzonder in
combinatie met toevoegingsstoffen voor houtbehandeling
Bosch Power Tools 1 609 92A 2LW | (16.1.17)
(chromaat en houtbeschermingsmiddelen). Asbesthoudend materiaal mag alleen door bepaalde vakmensen worden bewerkt.
– Gebruik indien mogelijk een voor het materiaal geschik-
te stofafzuiging.
– Zorg voor een goede ventilatie van de werkplek.
– Er wordt geadviseerd om een ademmasker met filter-
klasse P2 te dragen.
Neem de in uw land geldende voorschriften voor de te be-
werken materialen in acht.
Page 68

OBJ_BUCH-2853-001.book Page 68 Monday, January 16, 2017 1:56 PM
68 | Nederlands
Voorkom ophoping van stof op de werkplek. Stof kan
gemakkelijk ontbranden.
Stofafzuiging aansluiten (zie afbeelding A)
De stofafzuiging 14 is alleen bestemd voor werkzaamheden
met het schuurpla teau 15. In combinatie met andere inzetgereedschappen heeft deze geen nut.
Sluit voor het schuren altijd een stofafzuiging aan.
Verwijder het inzetgereedschap vóór de montage van de stof-
afzuiging 14 (toebehoren).
Combineer indien nodig de delen van de stofafzuiging 14 zo-
als op de afbeelding getoond. Plaats de gemonteerde stofafzuiging bij de gereedschapopname 7 op het elektrische gereedschap. Draai de stofafzuiging zodanig dat de nokken van
de stofafzuiging in de desbetreffende uitsparingen van het
machinehuis vastklikken. Bevestig de stofafzuiging zoals op
de afbeelding getoond met de vasthoudklem 17 op het elektrische gereedschap.
Let erop dat de viltring 16 onbeschadigd is en dicht tegen het
schuurplateau 15 aanligt. Vervang een beschadigde viltring
onmiddellijk.
Steek een afzuigslang 20 (toebehoren) afhankelijk van de uitvoering rechtstreeks op de afzuigaansluiting 18 of knip het
oude eindstuk van de slang, schroef de afzuigadapter 19 (toe-
behoren) op het einde van de slang en steek deze vervolgens
rechtstreeks op de afzuigaansluiting 18. Verbind de afzuigslang 20 met een stofzuiger (toebehoren). Een overzicht van
aansluitingen op verschillende stofzuigers vindt u op de uitvouwbare pagina.
De stofzuiger moet geschikt zijn voor het te bewerken materiaal.
Gebruik bij het afzuigen van voor de gezondheid bijzonder gevaarlijk, kankerverwekkend of droog stof een speciale zuiger.
Gebruik
Ingebruikneming
Accu plaatsen
Gebruik alleen originele Bosch-lithiumionaccu’s met
de op het typeplaatje van het elektrische gereedschap
aangegeven spanning. Het gebruik van andere accu’s kan
tot verwondingen en brandgevaar leiden.
Opmerking: Het gebruik van niet voor uw elektrische gereedschap geschikte accu’s kan tot functiestoringen of beschadiging van het elektrische gereedschap leiden.
Zet de opgeladen accu 3 in de greep to t deze merkbaar vastklikt en vlak op de greep aansluit.
In- en uitschakelen
Als u het elektrische gereedschap wilt inschakelen duwt u de
aan/uit-schakelaar 1 naar voren, zodat op de schakelaar „I”
verschijnt.
Als u het elektrische gereedschap wilt uitschakelen duwt u
de aan/uit-schakelaar 1 naar achteren, zodat op de schakelaar „0” verschijnt.
Om energie te besparen, schakelt u het elektrische gereedschap alleen in wanneer u het gebruikt.
De lithiumionaccu is door middel van „Electronic Cell Protection (ECP)” beschermd tegen te sterk ontladen. Als de accu
leeg is, wordt het elektrische gereedschap door een veiligheidsschakeling uitgeschakeld. Her inzetgereedschap beweegt niet meer.
Opmerking: Als het elektrische gereedschap automatisch
wordt uitgeschakeld vanwege een lege of oververhitte accu,
zet u de aan/uit-schakelaar 1 van het elektrische gereedschap
in de uit-stand. Laad de accu op of laat deze afkoelen voordat
u het elektrische gereedschap weer inschakelt. De accu kan
anders beschadigd raken.
Aantal schuurbewegingen vooraf instellen
Met het stelwiel voor het vooraf instellen van het aantal
schuurbewegingen 5 kunt u het benodigde aantal schuurbewegingen, ook terwijl de machine loopt, vooraf instellen.
Het vereiste aantal schuurbewegingen is afhankelijk van het
materiaal en de werkomstandigheden en kan proefsgewijs
worden vastgesteld.
Tips voor de werkzaamheden
Neem altijd de accu uit het elektrische gereedschap
voor werkzaamheden aan het gereedschap (zoals het
uitvoeren van onderhoud en het wisselen van inzetgereedschap) en voor het vervoeren en opbergen van het
gereedschap. Bij per ongeluk bedienen van de aan/uit-
schakelaar bestaat verwondingsgevaar.
Wacht tot het elektrische gereedschap tot stilstand is
gekomen voordat u het neerlegt.
Opmerking: Houd de ventilatieopeningen 4 van het elektri-
sche gereedschap tijdens de werkzaamheden niet dicht, omdat anders de levensduur van het elektrische gereedschap
verkort wordt.
Werkprincipe
Door de oscillerende aandrijving trilt het inzetgereedschap
tot 20000 keer per minuut 2,8 ° heen en weer. Daardoor zijn
nauwkeurige werkzaamheden binnen een zeer kleine ruimte
mogelijk.
Zagen
Gebruik alleen onbeschadigde zaagbladen die hele-
maal in orde zijn. Verbogen of niet-scherpe zaagbladen
kunnen breken, het zagen negatief beïnvloeden of een terugslag veroorzaken.
Neem bij het zagen van lichte bouwmaterialen de wet-
telijke voorschriften en de adviezen van de fabrikanten
van de materialen in acht.
Werk met geringe en gelijkmatige aandrukkracht. Anders verslechtert het arbeidsvermogen en kan het inzetgereedschap blokkeren.
Beweeg tijdens de werkzaamheden het
elektrische gereedschap heen en weer, zodat het inzetgereedschap niet te warm
wordt en niet blokkeert.
1 609 92A 2LW | (16.1.17) Bosch Power Tools
Page 69

OBJ_BUCH-2853-001.book Page 69 Monday, January 16, 2017 1:56 PM
Nederlands | 69
Gebruik een geschikt detectieapparaat om verborgen
stroom-, gas- of waterleidingen op te sporen of raadpleeg het plaatselijke energie- of waterleidingbedrijf.
Contact met elektrische leidingen kan tot brand of een
elektrische schok leiden. Beschadiging van een gasleiding
kan tot een explosie leiden. Breuk van een waterleiding
veroorzaakt materiële schade.
Alleen zachte materialen als hout en gipskarton mogen
invallend worden gezaagd.
Controleer hout, spaanplaat, bouwmaterialen enz., voordat u
met HCS-zaagbladen in deze materialen zaagt, op spijkers,
schroeven en dergelijke, en verwijder deze voorwerpen indien nodig, of gebruik bimetaalzaagbladen.
Afkorten
Opmerking: Let er bij het afkorten van wandtegels op dat de
inzetgereedschappen bij langdurig gebruik aan grote slijtage
onderhevig zijn.
Schuren
De afnamecapaciteit en het schuurbeeld worden in hoofdzaak bepaald door de keuze van het schuurblad, het vooraf ingestelde aantal schuurbewegingen en de aandrukkracht.
Alleen onbeschadigde schuurbladen zorgen voor een goede
schuurcapaciteit en ontzien het elektrische gereedschap.
Let op een gelijkmatige aandrukkracht om de levensduur van
de schuurbladen te verlengen.
Een overmatige verhoging van de aandrukkracht leidt niet tot
een groter schuurvermogen, maar wel tot een sterkere slijtage van het elektrische gereedschap en het schuurblad.
Voor zeer nauwkeurig schuren van hoeken, randen en moeilijk
bereikbare gebieden kunt u ook alleen met de punt of een
rand van het schuurplateau werken.
Bij het schuren op een klein oppervlak kan het schuurblad zeer
warm worden. Verminder het aantal schuurbewegingen en de
aandrukkracht en laat het schuurblad regelmatig afkoelen.
Gebruik een schuurblad waarmee metaal is bewerkt niet meer
voor andere materialen.
Gebruik uitsluitend origineel Bosch-schuurtoebehoren.
Sluit voor het schuren altijd een stofafzuiging aan.
Afkrabben
Kies bij het afkrabben een hoog trillingsgetal.
Werk op een zachte ondergrond (zoals hout) met een scherpe
hoek en met geringe aandrukkracht. Anders kan de spatel in
de ondergrond snijden.
Temperatuurafhankelijke beveiliging tegen
overbelasting
Bij reglementair gebruik kan het elektrische gereedschap niet
overbelast worden. Bij te sterke belasting of het verlaten van
het toegestane accutemperatuurbereik wordt het toerental
gereduceerd of het elektrische gereedschap schakelt uit. Bij
gereduceerd toerental loopt het elektrische gereedschap pas
na het bereiken van de toegestane accutemperatuur of bij verminderde belasting opnieuw met maximaal toerental. Bij automatische uitschakeling schakelt u het elektrische gereedschap uit, laat de accu afkoelen en schakel het elektrische
gereedschap opnieuw in.
Bosch Power Tools 1 609 92A 2LW | (16.1.17)
Aanwijzingen voor de optimale omgang met de accu
Bescherm de accu tegen vocht en water.
Bewaar de accu alleen bij een temperatuur tussen – 20 ° C en
50 ° C. Laat de accu bijvoorbeeld in de zomer niet in de auto
liggen.
Een duidelijk kortere gebruiksduur na het opladen duidt erop
dat de accu versleten is en moet worden vervangen.
Neem de voorschriften ten aanzien van de afvalverwijdering
in acht.
Onderhoud en service
Onderhoud en reiniging
Neem altijd de accu uit het elektrische gereedschap
voor werkzaamheden aan het gereedschap (zoals het
uitvoeren van onderhoud en het wisselen van inzetgereedschap) en voor het vervoeren en opbergen van het
gereedschap. Bij per ongeluk bedienen van de aan/uit-
schakelaar bestaat verwondingsgevaar.
Houd het elektrische gereedschap en de ventilatieope-
ningen altijd schoon om goed en veilig te werken.
Reinig riff-inzetgereedschappen (toebehoren) regelmatig
met een draadborstel.
Klantenservice en gebruiksadviezen
Onze klantenservice beantwoordt uw vragen over reparatie
en onderhoud van uw product en over vervangingsonderdelen. Explosietekeningen en informatie over vervangingsonderdelen vindt u ook op:
www.bosch-pt.com
Het Bosch-team voor gebruiksadviezen helpt u graag bij vragen over onze producten en toebehoren.
Vermeld bij vragen en bestellingen van vervangingsonderdelen altijd het uit tien cijfe rs bestaande productnummer volgens het typeplaatje van het p roduct.
Nederland
Tel.: (076) 579 54 54
Fax: (076) 579 54 94
E-mail: gereedschappen@nl.bosch.com
België
Tel.: (02) 588 0589
Fax: (02) 588 0595
E-mail: outillage.gereedschap@be.bosch.com
Vervoer
Op de meegeleverde Lithium-Ion-accu’s zijn de eisen voor het
vervoer van gevaarlijke stoffen van toepassing. De accu’s kunnen door de gebruiker zonder verdere voorwaarden over de
weg worden vervoerd.
Bij de verzending door derden (bijv. luchtvervoer of expeditiebedrijf) moeten bijzondere eisen ten aanzien van verpakking en markering in acht worden genomen. In deze gevallen
moet bij de voorbereiding van de verzending een deskundige
voor gevaarlijke goederen worden geraadpleegd.
Page 70

ADVARSEL
OBJ_BUCH-2853-001.book Page 70 Monday, January 16, 2017 1:56 PM
70 | Dansk
Verzend accu’s alleen als de behuizing onbeschadigd is. Plak
blootliggende contacten af en verpak de accu zodanig dat deze niet in de verpakking beweegt.
Neem ook eventuele overige nationale voorschriften in acht.
Afvalverwijdering
Elektrische gereedschappen, accu’s, toebehoren en
verpakkingen moeten op een voor het milieu verantwoorde wijze worden hergebruikt.
Gooi elektrische gereedschappen, accu’s en batterijen niet bij
het huisvuil.
Alleen voor landen van de EU:
Volgens de Europese richtlijn 2012/19/EU
moeten niet meer bruikbare elektrische gereedschappen en volgens de Europese richtlijn 2006/66/EG moeten defecte of lege accu’s en batterijen apart worden ingezameld
en op een voor het milieu verantwoorde wijze worden hergebruikt.
Accu’s en batterijen:
Li-ion:
Lees de aanwijzingen in het gedeelte
„Vervoer”, pagina 69 en neem deze in
acht.
Wijzigingen voorbehouden.
Dansk
Sikkerhedsinstrukser
Generelle sikkerhedsinstrukser til el-værktøj
Læs alle sikkerhedsinstrukser og anvisninger. I tilfælde af manglende over-
holdelse af sikkerhedsinstrukserne og anvisningerne er der
risiko for elektrisk stød, brand og/eller alvorlige kvæstelser.
Opbevar alle sikkerhedsinstrukser og anvisninger til senere brug.
Det i sikkerhedsinstrukserne benyttede begreb „el-værktøj“
refererer til netdrevet el-værktøj (med netkabel) og akkudrevet el-værktøj (uden netkabel).
Sikkerhed på arbejdspladsen
Sørg for, at arbejdsområdet er rent og rigtigt belyst.
Uorden eller uoplyste arbejdsområder øger faren for
uheld.
Brug ikke el-værktøjet i eksplosionsfarlige omgivelser,
hvor der findes brændbare væsker, gasser eller støv.
El-værktøj kan slå gnister, der kan antænde støv eller
dampe.
Sørg for, at andre personer og ikke mindst børn holdes
væk fra arbejdsområdet, når maskinen er i brug. Hvis
man distraheres, kan man miste kontrollen over maskinen.
Elektrisk sikkerhed
El-værktøjets stik skal passe til kontakten. Stikket må
under ingen omstændigheder ændres. Brug ikke adapterstik sammen med jordforbundet el-værktøj. Uæn-
drede stik, der passer til kontakterne, nedsætter risikoen
for elektrisk stød.
Undgå kropskontakt med jordforbundne overflader
som f. eks. rør, radiatorer, komfurer og køleskabe. Hvis
din krop er jordforbundet, øges risikoen for elek trisk stød.
Maskinen må ikke udsættes for regn eller fugt. Ind-
trængning af vand i et el-værktøj øger risikoen for elektrisk
stød.
Brug ikke ledningen til formål, den ikke er beregnet til
(f.eks. må man aldrig bære el-værktøjet i ledningen,
hænge el-værktøjet op i ledningen eller rykke i ledningen for at trække stikket ud af kontakten). Beskyt ledningen mod varme, olie, skarpe kanter eller maskindele, der er i bevægelse. Beskadigede eller indviklede
ledninger øger risikoen for elektrisk stød.
Hvis el-værktøjet benyttes i det fri, må der kun benyt-
tes en forlængerledning, der er egnet til udendørs
brug. Brug af forlængerledning til udendørs brug nedsæt-
ter risikoen for elektrisk stød.
Hvis det ikke kan undgås at bruge el-værktøjet i fugtige
omgivelser, skal der bruges et HFI-relæ. Brug af et
HFI-relæ reducerer risikoen for at få elektrisk stød.
Personlig sikkerhed
Det er vigtigt at være opmærksom, se, hvad man laver,
og bruge el-værktøjet fornuftigt. Brug ikke noget
el-værktøj, hvis du er træt, har nydt alkohol eller er påvirket af medikamenter eller euforiserende stoffer. Få
sekunders uopmærksomhed ved brug af el-værktøjet kan
føre til alvorlige personskader.
Brug beskyttelsesudstyr og hav altid beskyttelsesbril-
ler på. Brug af sikkerhedsudstyr som f.eks. støvmaske,
skridsikkert fodtøj, beskyttelseshjelm eller høreværn afhængig af maskintype og anvendelse nedsætter risikoen
for personskader.
Undgå utilsigtet igangsætning. Kontrollér, at el-værktø-
jet er slukket, før du tilslutter det til strømtilførslen
og/eller akkuen, løfter eller bærer det. Undgå at bære
el-værktøjet med fingeren på afbryderen og sørg for, at
el-værktøjet ikke er tændt, når det sluttes til nettet, da dette øger risikoen for personskader.
Gør det til en vane altid at fjerne indstillingsværktøj el-
ler skruenøgle, før el-værktøjet tændes. Hvis et stykke
værktøj eller en nøgle sidder i en roterende maskindel, er
der risiko for personskader.
Undgå en anormal legemsposition. Sørg for at stå sik-
kert, mens der arbejdes, og kom ikke ud af balance.
Dermed har du bedre muligheder for at ko ntrollere el-værktøjet, hvis der skulle opstå uventede situationer.
1 609 92A 2LW | (16.1.17) Bosch Power Tools
Page 71

OBJ_BUCH-2853-001.book Page 71 Monday, January 16, 2017 1:56 PM
Dansk | 71
Brug egnet arbejdstøj. Undgå løse beklædningsgen-
stande eller smykker. Hold hår, tøj og handsker væk fra
dele, der bevæger sig. Dele, der er i bevægelse, kan gribe
fat i løstsiddende tøj, smykker eller langt hår.
Hvis støvudsugnings- og opsamlingsudstyr kan monte-
res, er det vigtigt, at dette tilsluttes og benyttes korrekt. Brug af en støvopsugning kan reducere støvmæng-
den og dermed den fare, der er forbundet støv.
Omhyggelig omgang med og brug af el-værktøj
Undgå overbelastning af maskinen. Brug altid et
el-værktøj, der er beregnet til det stykke arbejde, der
skal udføres. Med det passende el-værktøj arbejder man
bedst og mest sikkert inden for det angivne effektområde.
Brug ikke et el-værktøj, hvis afbryder er defekt. Et
el-værktøj, der ikke kan startes og stoppes, er farlig og skal
repareres.
Træk stikket ud af stikkontakten og/eller fjern akkuen,
inden maskinen indstilles, der skiftes tilbehørsdele, eller maskinen lægges fra. Disse sikkerhedsforanstaltnin-
ger forhindrer utilsigtet start af el-værktøjet.
Opbevar ubenyttet el-værktøj uden for børns række-
vidde. Lad aldrig personer, der ikke er fortrolige med
maskinen eller ikke har gennemlæst disse instrukser,
benytte maskinen. El-værktøj er farligt, hvis det benyttes
af ukyndige personer.
El-værktøjet bør vedligeholdes omhyggeligt. Kontroller,
om b evæge lige m aski ndele funge rer k orrek t og i kke si dder fast, og om delene er brækket eller beskadiget, således at el-værktøjets funktion påvirkes. Få beskadigede
dele repareret, inden maskinen tages i brug. Mange
uheld skyldes dårligt vedligeholdte el-værktøjer.
Sørg for, at skæreværktøjer er skarpe og rene. Omhyg-
geligt vedligeholdte skæreværktøjer med skarpe skærekanter sætter sig ikke så hurtigt fas t og er nemm ere at føre.
Brug el-værktøj, tilbehør, indsatsværktøj osv. iht. dis-
se instrukser. Tag hensyn til arbejdsforholdene og det
arbejde, der skal udføres. Anvendelse af el-værktøjet til
formål, som ligger uden for det fastsatte anvendelsesområde, kan føre til farlige situationer.
Omhyggelig omgang med og brug af akku-værktøj
Oplad kun akku’er i ladeaggregater, der er anbefalet af
fabrikanten. Et ladeaggregat, der er egnet til en bestemt
type batterier, må ikke benyttes med andre batterier –
brandfare.
Brug kun de akku’er, der er beregnet til el-værktøjet.
Brug af andre akku’er øger risikoen for personskader og er
forbundet med brandfare.
Ikke benyttede akku’er må ikke komme i berøring med
kontorclips, mønter, nøgler, søm, skruer eller andre
små metalgenstande, da disse kan kortslutte kontakterne. En kortslutning mellem batteri-kontakterne øger ri-
sikoen for personskader i form af forbrændinger.
Hvis akku’en anvendes forkert, kan der slippe væske
ud af akku’en. Undgå at komme i kontakt med denne
væske. Hvis det alligevel skulle ske, skylles med vand.
Søg læge, hvis væsken kommer i øjnene. Akku-væske
Service
Sørg for, at el-værktøj kun repareres af kvalificerede
fagfolk og at der kun benyttes originale reservedele.
Dermed sikres størst mulig maskinsikkerhed.
Sikkerhedsinstrukser for akku-multi-cutter
Hold el-værktøjet i de isolerede gribeflader, når du ud-
fører arbejde, hvor indsatsværktøjet kan ramme bøjede strømledninger. Kontakt med en spændingsførende
ledning kan også sætte el-værktøjets metaldele under
spænding, hvilket kan føre til elektrisk stød.
Anvend kun el-værktøjet til tørsavning. Indtrængning af
vand i el-værktøjet øger risikoen for elektrisk stød.
Pas på brandfare! Undgå overophedning af slibeemnet
og sliberen. Tøm altid støvbeholderen, før arbejdspauser indtages. Slibestøv i støvpose, mikrofilter, papirpose
(eller i filterpose eller støvsugerens filter) kan antænde sig
selv under ugunstige forhold som f.eks. gnistregn, der opstår under metalslibning. Det er særlig farligt, hvis støvet
er blandet med lak-, polyurethanrester eller andre kemiske
stoffer og slibeemnet er varmt efter lang tids arbejde.
Hold hænderne væk fra saveområdet. Stik ikke fingre-
ne ind under emnet. Du kan blive kvæstet, hvis du kom-
mer i kontakt med savklingen.
Anvend egnede søgeinstrumenter til at finde frem til
skjulte forsyningsledninger eller kontakt det lokale
forsyningsselskab. Kontakt med elektriske ledninger kan
føre til brand og elektrisk stød. Beskadigelse af en gasledning kan føre til eksplosion. Beskadigelse af en vandledning kan føre til materiel skade.
Hold altid maskinen fast med begge hænder og sørg for
at stå sikkert under arbejdet. El-værktøjet føres sikkert
med to hænder.
Sikr emnet. Et emne holdes bedre fast med spændean-
ordninger eller skruestik end med hånden.
Åben ikke akkuen. Fare for kortslutning.
Beskyt akkuen mod varme (f.eks. også mod varige solstråler, brand, vand og fugtighed). Fare
for eksplosion.
Beskadiges akkuen eller bruges den forkert, kan der si-
ve dampe ud. Tilfør frisk luft og søg læge, hvis du føler
dig utilpas. Dampene kan irritere luftvejene.
Anvend kun akkuen i forbindelse med dit Bosch el-
værktøj. Kun på denne måde beskyttes akkuen mod farlig
overbelastning.
Akkuen kan blive beskadiget af spidse genstande som
f.eks. nåle eller skruetrækkere eller ekstern kraftpåvirkning. Der kan opstå indvendig kortslutning, så akkuen
kan antændes, ryge, eksplodere eller overophedes.
Brug beskyttelseshandsker, når indsatsværktøjet skif-
tes. Indsatsværktøj bliver varmt, hvis det anvendes i læn-
gere tid.
Skrab ikke fugtigt materiale (f.eks. tapet) og ikke på
fugtig undergrund. Indtrængning af vand i et el-værktøj
øger risikoen for elektrisk stød.
kan give hudirritation eller forbrændinger.
Bosch Power Tools 1 609 92A 2LW | (16.1.17)
Page 72

OBJ_BUCH-2853-001.book Page 72 Monday, January 16, 2017 1:56 PM
72 | Dansk
Behandle ikke den flade, der skal bearbejdes, med op-
løsningsmiddelholdige væsker. Giftige dampe kan opstå
under skrabearbejdet, da materialerne bliver varme.
Håndtér skraberen særlig forsigtig. Værktøjet er meget
skarpt, fare for kvæstelser.
Tekniske data
Akku-Multi-Cutter GOP 12V-28
Typenummer
Nominel spænding
Omdrejningstal i tomgang n
Beskrivelse af produkt og ydelse
Læs alle sikkerhedsinstrukser og anvisninger. I tilfælde af manglende overholdelse af
sikkerhedsinstrukserne og anvisningerne er
der risiko for elektrisk stød, brand og/eller alvorlige kvæstelser.
Klap venligst foldesiden med illustration af produktet ud og
Oscillationsvinkel venstre/højre
Vægt svarer til
EPTA-Procedure 01:2014
Tilladt omgivelsestemperatur
–ved opladning
–ved drift
Anbefalede batterier
lad denne side være foldet ud, mens du læser betjeningsvejledningen.
Beregnet anvendelse
Anbefalede ladere
El-værktøjet er beregnet til savning og gennemsavning af træmaterialer, kunststof, gips, ikke-jernholdige metaller og fastgørelseselementer (f. eks. uhærdede søm, klemmer). Det er
ligeledes egnet til behandling af bløde vægfliser samt tør slibning og skrabning af små flader. Det er især egnet til kantnært
og kantflugtende arbejde. El-værktøjet må udelukkende anvendes med Bosch-tilbehør.
Illustrerede komponenter
Nummereringen af de illustrerede komponenter refererer til
illustrationen af el-værktøjet på illustrationssiden.
1 Start-stop-kontakt
2 Akku-udløserknap
3 Akku
4 Ventilationsåbninger
5 Hjul til indstilling af svingtal
6 Akku-ladetilstandsindikator
7 Værktøjsholder
8 Spændehåndtag til dybdeanslag
9 Dybdeanslag
10 Dyksavklinge *
11 Unbrakoskrue
12 Unbraconøglen
13 Håndgreb (isoleret gribeflade)
14 Støvopsugning *
15 Pudsesål *
16 Slibeblad *
17 Spændehåndtag til støvudsugning
18 Opsugningsstuds *
19 Opsugningsadapter *
20 Opsugningsslange *
*Tilbe hør, som er illustreret og beskrevet i brugsanvisningen, er
ikke indeholdt i leveringen. Det fuldstændige tilbehør findes i vores tilbehørsprogram.
1) afhængigt af den anvendte akku
2) begrænset effekt ved temperaturer < 0 ° C
Tekniske data fastlagt med akku fra leveringen.
Støj-/vibrationsinformation
Støjemissionsværdier bestemt iht. EN 60745-2-4.
Værktøjets A-vægtede støjniveau er typisk: Lydtryksniveau
79 dB(A); lydeffektniveau 90 dB(A). Usikkerhed K= 3 dB.
Brug høreværn!
Samlede vibrationsværdier a
og usikkerhed K beregnet iht. EN 60745-2-4:
Slibning: a
Savning med dyksavklinge: a
Savning med segmentsavklinge: a
Skrabning: a
Det svingningsniveau, der er angivet i nærværende instruktioner, er blevet målt iht. en standardiseret måleproces i
EN 60745, og ka n bruges til at sammenligne el-værktøjer. Det
er også egnet til en foreløbig vurdering af svingningsbelastningen.
Det angivede svingningsniveau repræsenterer de væsentlige
anvendelser af el-værktøjet. Hvis el-værktøjet dog anvendes
til andre formål, med forskellige tilbehørsdele, med afvigende
indsatsværktøj eller utilstrækkelig vedligeholdelse, kan svingningsniveauet afvige. Dette kan føre til en betydelig forøgelse
af svingningsbelastningen i hele arbejdstidsrummet.
Til en nøjagtig vurdering af svingningsbelastningen bør der
også tages højde for de tider, i hvilke værktøjet er slukket eller
godt nok kører, men rent faktisk ikke anvendes. Dette kan føre til en betydelig reduktion af svingningsbelastningen i hele
arbejdstidsrummet.
Fastlæg ekstra sikkerhedsforanstaltninger til beskyttelse af
brugeren mod svingningers virkning som f.eks.: Vedligeholdelse af el-værktøj og indsatsværktøj, holde hænder varme,
organisation af arbejdsforløb.
0
1)
2)
og opbevaring
(vektorsum for tre retninger)
h
=2,9m/s2, K= 1,5 m/s2,
h
=8,3m/s2, K= 1,5 m/s2.
h
=9,2m/s2, K= 1,5 m/s2,
h
3 601 HB5 0..
V= 12
min-15000–20000
°1,4
kg 0,97– 1,2
°C
°C
0...+45
–20...+50
GBA 10,8V...
GBA 12V...
GBA 12V... W
GAL 11.. CV
GAL 12.. CV
GAL 18... W
=2,5m/s2, K= 1,5 m/s2,
h
1 609 92A 2LW | (16.1.17) Bosch Power Tools
Page 73

OBJ_BUCH-2853-001.book Page 73 Monday, January 16, 2017 1:56 PM
Dansk | 73
Montering
Opladning af akku
Brug kun de ladere, der fremgår af de tekniske data.
Kun disse ladeaggregater er afstemt i forhold til den Li-ionakku, der bruges på dit el-værktøj.
Bemærk: Akkuen er til dels oplades ved udleveringen. For at
sikre at akkuen fungerer 100 % oplades a kkuen helt før første
ibrugtagning.
Li-ion-akkuen kan oplades til enhver tid, uden at levetiden forkortes. En afbrydelse af opladningen beskadiger ikke akkuen.
Akku tages ud
Akkuen tages ud 3 ved at trykke på udløserknappen 2 og
trække akkuen bagud ud af el-værktøjet. Undgå brug af vold.
Akku-ladetilstandsindikator
De tre grønne lysdioder på akkue-ladestandsindikatoren 6 viser akkuens 3 ladestand. Ladestandsindikatoren lyser kun 5
sekunder efter idrifttagning.
LED Kapacitet
Konstant lys 3 x grøn ≥2/3
Konstant lys 2 x grøn ≥1/3
Konstant lys 1 x grøn < 1/3
Blinklys 1 x grøn Reserve
Blinklys 3 x grøn tom
Hvis der ikke tændes nogen lysdioder efter aktivering, er batteriet defekt og skal udskiftes.
Efterfølgende tabel viser eksempler på indsatsværktøj. Yderligere indsatsværktøjer findes i det omfangsrige tilbehørsprogram
fra Bosch.
Indsatsværktøj Materiale Anvendelse
Bi-metalsegmentsavklinge
Slibeplade til
slibeblade serie
Delta 93 mm
Profilsliber
Bi-metal-dyksavklinge til træ og
metal
Bosch Power Tools 1 609 92A 2LW | (16.1.17)
Træemner,
Kunststof,
Ikke-jernholdige metaller
Afhængigt af slibebladet Fladeslibning ved kanter, i hjørner eller vanskeligt tilgænge-
Træ,
Rør/Profiler,
Farve,
Lak,
Filler,
Metal
Blødt træ,
bløde kunststoffer,
Gipskarton,
tynde profiler i aluminium
og uædle metaller,
tynde metalplader,
ikke-hærdede søm og
skruer
Værktøjsskift
Tag akkuen ud af el-værktøjet, før der arbejdes på
el-værktøjet (f.eks. vedligeholdelse, værktøjsskift
osv.) samt før det transporteres og lægges til opbevaring. Utilsigtet aktivering af start-stop-kontakten er for-
bundet med kvæstelsesfare.
Brug beskyttelseshandsker, når værktøjet skiftes. Be-
røring med indsatsværktøjet er forbundet med kvæstelsesfare.
Indsatsværktøj vælges
Indsatsværktøj GOP 12V-28
Gennemskære- og dyksavsnit; også til kantnær savning,
i hjørner og vanskeligt tilgængelige områder;
Eksempel: allerede installerede gulvlister eller dørkarme afkortes, dyksnit i forbindelse med tilpasning af gulvpaneler
lige områder;
afhængigt af slibeblad f.eks. til slibning af træ, farve, lak,
sten
Fleece til rengøring og strukturering af træ, fjernelse af rust
fra metal og slibning af lak, poleringsfilt til forpolering
Komfortabel og effektiv slibning af profiler til en diameter
på 55 mm;
røde slibeblade til slibning af træ, rør/profiler, lak, filler og
metal
Mindre dele- og dyksnit;
Eksempel: Skæring af udsparinger til stikkontakter, niveauskæring af kobberrør, dyksnit i gipskartonplader
Fint tilpasningsarbejde i træ;
Eksempel: Eftersavning af udsparinger til låse og beslag
Page 74

OBJ_BUCH-2853-001.book Page 74 Monday, January 16, 2017 1:56 PM
74 | Dansk
Indsatsværktøj Materiale Anvendelse
HCS-dyksavklinge
til træ
Træemner,
bløde kunststoffer
Gennemskæresnit og dybe dyksavsnit; også til kantnær
savning, i hjørner og vanskeligt tilgængelige områder;
Eksempel: smalt dyksnit i massivt træ til indbygning af et
ventilationsgitter
Bi-metal-dyksavklinge til hårdt træ
Hårdt træ,
coatede plader
Dyksnit i coatede plader eller hårdt træ;
Eksempel: Montering af tagvinduer
HM-dyksavklinge
metal
Bi-metal-dyksavklinge til træ og
metal
HM-riffsegmentsavklinge
Diamant-Riffsegmentsavklinge
HM-riff-deltaplade
HM-Riffmørtelfjerner
HCS Multi-kniv
Skraber, stiv
Skraber, fleksibel
Metal,
meget slibende emner,
Glasfiber,
Gipskarton,
cementbundne fiberplader
Blødt træ,
Hårdt træ,
finerplader,
kunststofcoatede plader,
ikke-hærdede søm og
skruer
Cementfuger,
bløde vægfliser,
glasfiberforstærket
kunststof,
Porebeton
Cementfuger,
bløde vægfliser,
Epoxid-harpiks,
glasfiberforstærket
kunststof
Mørtel,
Betonrester,
Træ,
slibende materialer
Mørtel,
Fuger,
Epoxid-harpiks,
glasfiberforstærket
kunststof,
slibende materialer
Tagpap,
Tæpper,
Kunstgræs,
Karton,
Pvc-gulv
Tæpper,
Mørtel,
Beton,
Fliseklæb
Tæppelim,
Malingsrester,
Silikone
Dyksnit i meget slibende emner eller metal;
Eksempel: Skæring af køkkenfrontafdækninger, enkel
skæring gennem hærdede skruer, søm og rustfrit stål
Dyksnit i coatede plader eller hårdt træ;
Eksempel: Afkortning af dørkarme, udsparinger til en hylde
Skæring og gennemskæring i kantnære områder, i hjørner
eller vanskeligt tilgængelige områder;
Eksempel: fuger fjernes mellem vægfliser til udbedringsarbejde, udsparinger skæres i fliser, gipsplader eller
kunststof
Præcis udfræsning og skæring af flise-/fugemateriale,
epoxid-harpiks og glasfiberforstærkede kunststoffer;
Eksempel: Skæring af mindre udsnit i bløde vægfliser og
fræsning af udsparinger i glasfiberforstærket kunststof
Raspning og slibning på hårdt underlag;
Eksempel: Fjernelse af mørtel og fliseklæb (f.eks. ved
udskiftning af beskadigede fliser), fjernelse af tæppelimsrester
Udfræsning og skæring af fuge- og flisemateriale samt
raspning og slibning på hårdt underlag;
Eksempel: Fjernelse af fliseklæb og fugemørtel
Hurtig og præcis skæring af bløde materiale og fleksible
slibende emner;
Eksempel: Skæring af tæpper, karton, pvc-gulve, tagpap
etc.
Skrabning på hårdt underlag;
Eksempel: Fjernelse af mørtel, fliseklæb, beton- og
tæppelimsrester
Fleksibel skrabning på blødt underlag;
Eksempel: Fjernelse af silikoneuger, tæppelims- og
malingsrester
1 609 92A 2LW | (16.1.17) Bosch Power Tools
Page 75

OBJ_BUCH-2853-001.book Page 75 Monday, January 16, 2017 1:56 PM
Indsatsværktøj Materiale Anvendelse
Bi-metal-segment
bølgeformet kniv
Isoleringsmateriale,
Dæmpningsplader,
Gulvplader,
Præcis skæring af bløde materialer;
Eksempel: Tilskæring af dæmpningsplader, niveau-
afkortning af fremstående isoleringsmateriale
Trinstøjdæmpningsplader,
Karton,
Tæpper,
Gummi,
Læder
HM-Riff-slibefinger
Træ,
Farve
Sli bning af tr æ og ma ling p å svært tilgængelige steder uden
slibepapir;
Eksempel: Bortslibning af maling mellem skodder, slibning
af hjørner på trægulve
HM-Riff-dyksavklinge
Glasfiber,
Mørtel,
Dyksnit i meget slibende emner;
Eksempel: Udfræsning af tynde mosaikfliser
Træ
Dansk | 75
HCS-universalfugeskærer
Ekspansionsfuger,
Vindueskit,
Isoleringsmateriale
Skæring og deling af bløde materialer;
Eksempel: Skæring af silikone-ekspansionsfuger eller
vindueskit
(mineraluld)
Isætning af indsatsværktøj
Anbring det ønskede indsatsværktøj (f.eks. dyksavklinge 10)
på værktøjsholderen 7 på en sådan måde, at forkrøpningen
peger nedad (se illustration på grafiksiden, tekst til indsatsværktøj kan læses oppefra).
Drej indsatsværktøjet i en position, der passer til det arbejde,
der skal udføres, og få det til at falde i hak i knasten på værktøjsholderen 7. Her kan der vælges mellem tolv positioner,
der hver især er forskudt 30 °.
Fastgør indsatsværktøjet med skruen 11. Spænd skruen 11
godt med unbrakonøglen 12.
Kontrollér indsatsværktøjet for korrekt positionering.
Forkert eller ikke sikkert fastgjort indsatsværktøj kan løsne
sig under arbejdet og udsætte dig for fare.
Udtagning af indsatsværktøj
Indsatsværktøjet tages ud ved at løsne skruen 11 med unbra-
Slibeblad skiftes/anbringes på slibeplade
Pudsesålen 15 er udstyret med velcrostof, hvilket gør det hurtigt og nemt at fastgøre slibeblade med velcrolukning.
Bank på pudsesålens 15 velcrostof før slibebladet 16 sættes
på for at sikre en optimal vedhæftning.
Anbring slibebladet 16 langs med den ene side af pudsesålen
15, læg herefter slibebladet på pudsesålen og tryk det godt
fast.
En optimal støvopsugning forudsætter, at udstansningerne i
slibebladet passer til boringerne i pudsesålen.
Til aftagning af slibebladet 16 tages fat i en spids, hvorefter
det trækkes af pudsesålen 15.
Du kan anvende alle slibeblade, poler- og rengøringsfilt fra serien Delta 93 mm i Bosch tilbehørsprogrammet.
Slibetilbehør som f.e ks. filt/poleringsfilt fastgøres på slibesålen på samme måde.
konøglen 12 og tage indsatsværktøjet af.
Valg af slibeblad
Vælg det slibeblad og den afslibningsmåde, som passer bedst til det materiale, som skal bearbejdes:
Slibeblad Materiale Anvendelse Korn
– Alle træsor ter (f.eks.
Til forslibning f.eks. af ru, uhøvlede bjælker og brædder
grov 40
hårdt træ, blødt træ,
spånplader, byggeplader)
– Metalmaterialer
Til planslibning og udjævning af små ujævnheder
Til færdig- og finslibning af træ
middel 80
fin 180
60
100
120
240
320
400
Bosch Power Tools 1 609 92A 2LW | (16.1.17)
Page 76

OBJ_BUCH-2853-001.book Page 76 Monday, January 16, 2017 1:56 PM
76 | Dansk
Slibeblad Materiale Anvendelse Korn
–Farve
–Lak
–Fylder
–Spartel
Til afslibning af farve
Til afslibning af farve (f.eks. fjernelse af penselstreger og
farvedråber)
Til endelig slibning af grundering før lakering fin 180
grov 40
60
middel 80
100
120
240
320
400
Støv-/spånudsugning
Støv fra materialer som f.eks. blyholdig maling, nogle træ-
sorter, mineraler og metal kan være sundhedsfarlige. Berøring eller indånding af støv kan føre til allergiske reaktioner og/eller åndedrætssygdomme hos brugeren eller
personer, der opholder sig i nærheden af arbejdspladsen.
Bestemt støv som f.eks. ege- eller bøgestøv gælder som
kræftfremkaldende, især i forbindelse med ekstra stoffer
til træbehandling (chromat, træbeskyttelsesmiddel). Asbestholdigt materiale må kun bearbejdes af fagfolk.
– Brug helst en støvopsugning, der egner sig til materia-
let.
– Sørg for god udluftning af arbejdspladsen.
– Det anbefales at bære åndeværn med filterklasse P2.
Overhold forskrifterne, der gælder i dit land vedr. de materialer, der skal bearbejdes.
Undgå at der samler sig støv på arbejdspladsen. Støv
kan let antænde sig selv.
Tilslutning af støvudsugning (se Fig. A)
Støvopsugningen 14 er kun beregnet til arbejde med pudsesålen 15, i kombination med andet indsatsværktøj kan den ikke bruges.
Tilslut altid en støvopsugning til slibning.
Tag indsatsværktøjet af, når støvopsugningen 14 (tilbehør)
skal monteres.
Samle i givet fald støvopsugningens dele 14 som vist på illu-
strationen. Anbring den monterede støvopsugning på værktøjsholderen 7 på el-værktøjet. Drej støvopsugningen, så
støvopsugningens knaster falder i hak i de pågældende udsparinger på huset. Fastgør støvopsugningen (som vist på illustrationen) på el-værktøjet med holdeklemmen 17.
Sørg for, at filtringen 16 er ubeskadiget og ligger tæt op ad
pudsesålen 15. Skift en beskadiget filtring med det samme.
Sæt en opsugningsslangen 20 (tilbehør) – afhængigt af
udførelsen – enten direkte på opsugningsstudsen 18 eller
skær dit gamle slangeslutstykke af, skru opsugningsadapteren 19 (tilbehør) på slangeenden og montér den direkte på
opsugningsstudsen 18. Forbind opsugningsslangen 20 med
en støvsuger (tilbehør). En oversigt over tilslutning til forskellige støvsugere findes på foldesiden.
Støvsugeren skal være egnet til det materiale, som skal opsuges.
Anvend en specialstøvsuger til opsugning af særligt sundhedsfarligt, kræftfremkaldende eller tørt støv.
Brug
Ibrugtagning
Isæt akku
Brug kun originale li-ion-akkuer fra Bosch, der skal ha-
ve den spænding, der er angivet på dit el-værktøjs typeskilt. Brug af andre akku’er øger risikoen for personska-
der og er forbundet med brandfare.
Bemærk: Brug af akkuer, der ikke er egnet til dit el-værktøj,
kan føre til fejlfunktioner eller beskadigelser på el-værktøjet.
Anbring den ladede akku 3 i grebet, til den falder rigtigt i hak
og flugter med grebets kant.
Tænd/sluk
El-værktøjet tændes ved at skubbe start-stop-kontakten 1
frem, så „I“ fremkommer på kontakten.
El-værktøjet slukkes ved at skubbe start-stop-kontakten 1 tilbage, så „0“ fremkommer på kontakten.
For at spare på energien bør du kun tænde for el-værktøjet,
når du bruger det.
Li-ion-akkuen er beskyttet mod afladning med „Electronic Cell
Protection (ECP)“. Er akkuen afladet, slukkes el-værktøjet
med en beskyttelseskontakt: Indsatsværktøjet bevæger sig
ikke mere.
Bemærk: Slukker el-værktøjet automatisk, fordi akkuen er afladt eller overophedet, skal du slukke for el-værktøjet med
start-stop-kontakten 1. Oplad akkuen hhv. lad d en afkøle, før
du tænder for el-værktøjet igen. Ellers kan akkuen blive beskadiget.
Indstilling af svingtal
Med stillehjulet indstilling af svingtal 5 kan du indstille det
nødvendige svingtal under driften.
Det krævede svingtal afhænger af arbejdsmaterialet og arbejdsbetingelserne; det fastlægges bedst ved praktiske forsøg.
Arbejdsvejledning
Tag akkuen ud af el-værktøjet, før der arbejdes på
el-værktøjet (f.eks. vedligeholdelse, værktøjsskift
osv.) samt før det transporteres og lægges til opbevaring. Utilsigtet aktivering af start-stop-kontakten er for-
bundet med kvæstelsesfare.
El-værktøjet må først lægges fra, når det står helt stille.
1 609 92A 2LW | (16.1.17) Bosch Power Tools
Page 77

OBJ_BUCH-2853-001.book Page 77 Monday, January 16, 2017 1:56 PM
Bemærk: Sørg for, at ventilationsåbningerne 4 på el-værktøjet ikke tildækkes under arbejdet, da el-værktøjets levetid ellers forringes.
Arbejdsprincip
Det oscillerende drev sætter indsatsværktøjet i svingninger –
op til 20000 gange/minuttet med 2,8 ° frem og tilbage. Det
muliggør præcist arbejde i et lille område.
Arbejd med lavt og jævnt modtryk, da arbejdsydelsen ellers forringes, og indsatsværktøjet kan blokere.
Bevægel-værktøjet frem og tilbage under
arbejdet, så indsatsværktøjet ikke opvarmes alt for meget og ikke blokerer.
Savning
Anvend kun ubeskadigede, fejlfrie savklinger. Bøjede
eller uskarpe savklinger kan brække, påvirke snittet negativt eller føre til tilbageslag.
Gældende lovbestemmelser og anbefalinger fra mate-
rialefabrikanterne skal overholdes, når der saves i lette byggematerialer.
Anvend egnede søgeinstrumenter til at finde frem til
skjulte forsyningsledninger eller kontakt det lokale
forsyningsselskab. Kontakt med elektriske ledninger kan
føre til brand og elektrisk stød. Beskadigelse af en gasledning kan føre til eksplosion. Beskadigelse af en vandledning kan føre til materiel skade.
Ved dyksavning må der kun bearbejdes bløde materia-
ler som f. eks. træ, gipskarton el.lign.!
Kontrollér før savning med HCS-savklinger i træ, spånplader,
byggematerialer osv. disse for fremmedlegemer som f. eks.
søm, skruer o.lign. Fjern fremmedlegemerne i givet fald eller
anvend bi-metal-savklinger.
Gennemskære
Bemærk: Vær ved gennemskæring af vægfliser opmærksom
på, at værktøjet slides hurtigt, hvis det anvendes i længere
tid.
Slibe
Afslibningsarbejdet og slibebilledet bestemmes især af det
valgte slibeblad, det valgte svingtaltrin og det tryk, som brugeren udøver på maskinen.
Kun fejlfrie slibeblade sikrer et godt sliberesultat og skåner
el-værktøjet.
Sørg for jævnt slibetryk, da dette er med til at forlænge slibebladenes levetid.
Et overdrevet tryk fører ikke til en større slibekapacitet, men
derimod til et større slid af el-værktøj og slibepapir.
Til punktnøjagtig slibning af hjørner, kanter og vanskeligt tilgængelige områder kan man også bare bruge spidsen eller en
af slibesålens kanter.
Slibebladet kan opvarmes stærkt ved punktuelt slibearbejde.
Reducer svingtal og modtryk og lad slibebladet afkøle med regelmæssige mellemrum.
Anvend ikke et slibeblad, der forinden har været brug til slibning af metal, til andre materialer.
Anvend kun originalt Bosch slibetilbehør.
Tilslut altid en støvopsugning til slibning.
Skrabning
Vælg et højt svingtaltrin til skrabning.
Arbejd på blød undergrund (f.eks. træ) i en flad vinkel og med
et lille modtryk. Ellers kan spartlen skære ned i undergrunden.
Temperaturafhængig overbelastningsbeskyttelse
Ved korrekt brug kan el-værktøjet ikke blive overbelastet.
Hvis belastningen bliver for stor, eller det tilladte temperaturområde overskrides, reduceres omdrejningstallet, eller elværktøjet slukker. Når omdrejningstallet er reduceret, kører
el-værktøjet først med fuldt omdrejningstal, når det tilladte
batteritemperaturområde er nået, eller belastningen er reduceret. Ved automatisk deaktivering deaktiverer du el-værktøjet, lader batteriet afkøle og tænder el-værktøjet igen.
Henvisninger til optimal håndtering af akkuen
Beskyt akkuen mod fugtighed og vand.
Opbevar kun akkuen i et temperaturområde mellem – 20 ° C
og 50 ° C. Opbevar ikke akkuen i bilen f.eks. om sommeren.
Når driftstiden pr. opladning forkortes væsentligt, er det tegn
på, at akkuerne er slidt op og skal udskiftes.
Læs og overhold henvisningerne mhr. bortskaffelse.
Vedligeholdelse og service
Vedligeholdelse og rengøring
Tag akkuen ud af el-værktøjet, før der arbejdes på
el-værktøjet (f.eks. vedligeholdelse, værktøjsskift
osv.) samt før det transporteres og lægges til opbevaring. Utilsigtet aktivering af start-stop-kontakten er for-
bundet med kvæstelsesfare.
El-værktøj og el-værktøjets ventilationsåbninger skal
altid holdes rene for at sikre et godt og sikkert arbejde.
Rengør riff-indsatsværktøj (tilbehør) med en trådbørste med
regelmæssige mellemrum.
Kundeservice og brugerrådgivning
Kundeservice besvarer dine spørgsmål vedr. reparation og
vedligeholdelse af dit produkt samt reservedele. Eksplosionstegninger og informationer om reservedele findes også under:
www.bosch-pt.com
Bosch brugerrådgivningsteamet vil gerne hjælpe dig med at
besvare spørgsmål vedr. vores produkter og deres tilbehør.
Produktets 10-cifrede typenummer (se typeskilt) skal altid
angives ved forespørgsler og bestilling af reservedele.
Dansk | 77
Bosch Power Tools 1 609 92A 2LW | (16.1.17)
Page 78

VARNING
OBJ_BUCH-2853-001.book Page 78 Monday, January 16, 2017 1:56 PM
78 | Svenska
Dansk
Bosch Service Center
Telegrafvej 3
2750 Ballerup
På www.bosch-pt.dk kan der online bestilles reservedele eller
oprettes en reparations ordre.
Tlf. Service Center: 44898855
Fax: 44898755
E-Mail: vaerktoej@dk.bosch.com
Transport
De indeholdte Li-Ion-akkuer overholder bestemmelserne om
farligt gods. Akkuerne kan transporteres af brugeren på offentlig vej uden yderligere pålæg.
Ved forsendelse gennem tredjemand (f.eks.: lufttransport eller spedition) skal særlige krav vedr. emballage og mærkning
overholdes. Her skal man kontakte en faregodsekspert, før
forsendelsesstykket forberedes.
Send kun akkuer, hvis huset er ubeskadiget. Tilklæb åbne
kontakter og indpak akkuen på en sådan måde, at den ikke
kan bevæge sig i emballagen.
Følg venligst også eventuelle, videreførende, nationale forskrifter.
Bortskaffelse
El-værktøj, akku, tilbehør og emballage skal genbruges på en miljøvenlig måde.
Smid ikke el-værktøj og akkuer/batterier ud sammen med det
almindelige husholdningsaffald!
Gælder kun i EU-lande:
Iht. det europæiske direktiv 2012/19/EU
skal kasseret elektroværktøj og iht. det europæiske direktiv 2006/66/EF skal defekte eller opbrugte akkuer/batterier indsamles se parat og genbruges iht. gældende
miljøforskrifter.
Akkuer/batterier:
Li-Ion:
Læs og overhold henvisningerne i afsnit „Transport“, side 78.
Ret til ændringer forbeholdes.
Svenska
Säkerhetsanvisningar
Allmänna säkerhetsanvisningar för elverktyg
till följd av att säkerhetsanvisningarna och instruktionerna
inte följts kan orsaka el stöt, brand och/eller allvarliga personskador.
Förvara alla varningar och anvisningar för framtida bruk.
Nedan använt begrepp ”Elverktyg” hänför sig till nätdrivna
elverktyg (med nätsladd) och till batteridrivna elverktyg
(sladdlösa).
Arbetsplatssäkerhet
Håll arbetsplatsen ren och välbelyst. Oordning på
arbetsplatsen och dåligt belyst arbetsområde kan leda till
olyckor.
Använd inte elverktyget i explosionsfarlig omgivning
med brännbara vätskor, gaser eller damm. Elverktygen
alstrar gnistor som kan antända dammet eller gaserna.
Håll under arbetet med elverktyget barn och obehöriga
personer på betryggande avstånd. Om du störs av obe-
höriga personer kan du förlora kontrollen över elverktyget.
Elektrisk säkerhet
Elverktygets stickpropp måste passa till vägguttaget.
Stickproppen får absolut inte förändras. Använd inte
adapterkontakter tillsammans med skyddsjordade
elverktyg. Oförändrade stickproppar och passande vägg-
uttag reducerar risken för elstöt.
Undvik kroppskontakt med jordade ytor som t. ex. rör,
värmeelement, spisar och kylskåp. Det finns en större
risk för elstöt om din kropp är jordad.
Skydda elverktyget mot regn och väta. Tränger vatten in
i ett elverktyg ökar risken för elstöt.
Missbruka inte nätsladden och använd den inte för att
bära eller hänga upp elverktyget och inte heller för att
dra stickproppen ur vägguttaget. Håll nätsladden på
avstånd från värme, olja, skarpa kanter och rörliga
maskindelar. Skadade eller tilltrasslade ledningar ökar
risken för elstöt.
När du arbetar med ett elverktyg utomhus använd
endast förlängningssladdar som är avsedda för utomhusbruk. Om en lämplig förlängningssladd för utomhus-
bruk används minskar risken för elstöt.
Använd ett felströmsskydd om det inte är möjligt att
undvika elverktygets användning i fuktig miljö. Fel-
strömsskyddet minskar risken för elstöt.
Personsäkerhet
Var uppmärksam, kontrollera vad du gör och använd
elverktyget med förnuft. Använd inte elverktyg när du
är trött eller om du är påverkad av droger, alkohol eller
mediciner. Under användning av elverktyg kan även en
kort ouppmärksamhet leda till allvarliga kroppsskador.
Läs noga igenom alla säkerhetsanvisningar och instruktioner. Fel som uppstår
1 609 92A 2LW | (16.1.17) Bosch Power Tools
Page 79

OBJ_BUCH-2853-001.book Page 79 Monday, January 16, 2017 1:56 PM
Bär alltid personlig skyddsutrustning och skyddsglas-
ögon. Användning av personlig skyddsutrustning som
t.ex. dammfiltermask, halkfria säkerhetsskor, skyddshjälm och hörselskydd reducerar alltefter elverktygets typ
och användning risken för kroppsskada.
Undvik oavsiktlig igångsättning. Kontrollera att
elverktyget är frånkopplat innan du ansluter stickproppen till vägguttaget och/eller ansluter/tar bort batteriet, tar upp eller bär elverktyget. Om du bär elverktyget
med fingret på strömställaren eller ansluter påkopplat
elverktyg till nätströmmen kan olycka uppstå.
Ta bort alla inställningsverktyg och skruvnycklar innan
du kopplar på elverktyget. Ett verktyg eller en nyckel i en
roterande komponent kan medföra kroppsskada.
Undvik onormala kroppsställningar. Se till att du står
stadigt och håller balansen. I detta fall kan du lättare kon-
trollera elverktyget i oväntade situationer.
Bär lämpliga arbetskläder. Bär inte löst hängande klä-
der eller smycken. Håll håret, kläderna och handskarna
på avstånd från rörliga delar. Löst hängande kläder,
långt hår och smycken kan dras in av roterande delar.
När elverktyg används med dammutsugnings- och -upp-
samlingsutrustning, se till att dessa är rätt monterade
och används på korrekt sätt. Användning av damm-
utsugning minskar de risker damm orsakar.
Korrekt användning och hantering av elverktyg
Överbelasta inte elverktyget. Använd för aktuellt
arbete avsett elverktyg. Med ett lämpligt elverktyg kan
du arbeta bättre och säkrare inom angivet effektområde.
Ett elverktyg med defekt strömställare får inte längre
användas. Ett elverktyg som inte kan kopplas in eller ur är
farligt och måste repareras.
Dra stickproppen ur vägguttaget och/eller ta bort bat-
teriet innan inställningar utförs, tillbehörsdelar byts ut
eller elverktyget lagras. Denna skyddsåtgärd förhindrar
oavsiktlig inkoppling av elverktyget.
Förvara elverktygen oåtkomliga för barn. Låt elverkty-
get inte användas av personer som inte är förtrogna
med dess användning eller inte läst denna anvisning.
Elverktygen är farliga om de används av oerfarna personer.
Sköt elverktyget omsorgsfullt. Kontrollera att rörliga
komponenter fungerar felfritt och inte kärvar, att komponenter inte brustit eller skadats; orsaker som kan
leda till att elverktygets funktioner påverkas menligt.
Låt skadade delar repareras innan elverktyget tas i
bruk. Många olyckor orsakas av dåligt skötta elverktyg.
Håll skärverktygen skarpa och rena. Omsorgsfullt skötta
skärverktyg med skarpa eggar kommer inte så lätt i kläm
och går lättare att styra.
Använd elverktyget, tillbehör, insatsverktyg osv.
enligt dessa anvisningar. Ta hänsyn till arbetsvillkoren
och arbetsmomenten. Om elverktyget används på ett sätt
som det inte är avsett för kan farliga situationer uppstå.
Omsorgsfull hantering och användning av sladdlösa
elverktyg
Ladda batterierna endast i de laddare som tillverkaren
rekommenderat. Om en laddare som är avsedd för en viss
typ av batterier används för andra batterityper finns risk
för brand.
Använd endast batterier som är avsedda för aktuellt
elverktyg. Används andra batterier finns risk för kropps-
skada och brand.
Håll gem, mynt, nycklar, spikar, skruvar och andra små
metallföremål på avstånd från reservbatterier för att
undvika en bygling av kontakterna. En kortslutning av
batteriets kontakter kan le da till brännskador eller brand.
Om batteriet används på fel sätt finns risk för att
vätska rinner ur batteriet. Undvik kontakt med vätskan. Vid oavsiktlig kontakt spola med vatten. Om
vätska kommer i kontakt med ögonen uppsök dessutom läkare. Batterivätskan kan medföra hudirritation
och brännskada.
Service
Låt endast kvalificerad fackpersonal reparera elverk-
tyget och endast med originalreservdelar. Detta garan-
terar att elverktygets säkerhet upprätthålls.
Säkerhetsanvisningar för sladdlös Multi-Cutter
Håll i elverktyget endast vid de isolerade greppytorna
när arbeten utförs på ställen där insatsverktyget kan
skada dolda elledningar. Kontakt med en spänningsfö-
rande ledning kan sätta maskinens metalldelar under spänning och leda till elstöt.
Använd elverktyget endast för torrslipning. Tränger
vatten in i ett elverktyg ökar risken för elstöt.
Observera brandrisk! Undvika att överhetta slipytan
och slipmaskinen. Töm dammbehållaren före arbetspauser. Slipdammet i dammpåsen, mikrofiltret, pappers-
påsen (eller i filterpåsen resp. dammsugarens filter) kan
under ogynnsamma förhållanden antändas av t. ex. gnistor
som bildas vid slipning av metall. Särskilt farligt är ett slipdamm som innehåller lack-, uratanrester eller andra
kemiska ämnen som kan antändas när arbetsstycket efter
en längre tids arbete blir hett.
Se till att hålla händerna utanför sågområdet. För inte
in handen under arbetsstycket. Kontakt med sågbladet
medför risk för personskada.
Använd lämpliga detektorer för lokalisering av dolda
försörjningsledningar eller konsultera lokalt distributionsföretag. Kontakt med elledningar kan förorsaka
brand och elstöt. En skadad gasledning kan leda till explosion. Borrning i vattenledning kan förorsaka sakskador.
Håll i elverktyget med båda händerna under arbetet
och se till att du står stadigt. Elverktyget kan styras säk-
rare med två händer.
Säkra arbetsstycket. Ett arbetsstycke som är fastspänt i
en uppspänningsanordning eller ett skruvstycke hålls säkrare än med handen.
Öppna inte batteriet. Detta kan leda till kortslutning.
Svenska | 79
Bosch Power Tools 1 609 92A 2LW | (16.1.17)
Page 80

OBJ_BUCH-2853-001.book Page 80 Monday, January 16, 2017 1:56 PM
80 | Svenska
Skydda batteriet mot hög värme som t. ex.
längre solbestrålning, eld, vatten och fukt.
Explosionsrisk föreligger.
I skadat eller felanvänt batteri kan ångor uppstå. Tillför
friskluft och uppsök läkare vid åkommor. Ångorna kan
leda till irritation i andningsvägarna.
Använd batteriet endast med Bosch elverktyget. Detta
skyddar batteriet mot farlig överbelastning.
Batteriet kan skadas av vassa föremål som t. ex. spikar
eller skruvmejslar eller på grund av yttre påverkan. En
intern kortslutning kan uppstå och rök, explosion eller
överhettning kan förekomma hos batteriet.
Använd skyddshandskar vid byte av insatsverktyg.
Insatsverktygen värms upp under en längre användning.
Använd inte skavkniven på fuktigt material (t.ex. tape-
ter) och inte heller på fuktigt underlag. Om vatten
tränger in i ett elverktyg ökar risken för en elstöt.
Behandla inte arbetsytan med vätskor som innehåller
lösningsmedel. När materialet vid skrapning värms upp
kan giftiga ångor uppstå.
Var ytterst försiktig vid hantering av skavkniv. Verkty-
get är mycket vasst och risk finns för kroppsskada.
11 Insexkantskruv
12 Sexkantnyckel
13 Handgrepp (isolerad greppyta)
14 Dammsugutrustning *
15 Slipplatta *
16 Slippapper *
17 Spännspak till dammbortsugningen
18 Utsugningsadapter *
19 Utsugningsadapter *
20 Utsugningsslang *
*I bruk sanvisningen avbildat och beskrivet tillbehör ingår inte i
standardleveransen. I vårt tillbehörsprogram b eskrivs allt tillbehör som finns.
Tekniska data
Sladdlös Multi-Cutter GOP 12V-28
Produktnummer
Märkspänning
Tomgångsvarvtal n
Oscillationsvinkel vänster/höger
Vikt enligt
EPTA-Procedure 01:2014
Produkt- och kapacitetsbeskrivning
Läs noga igenom alla säkerhetsanvisningar
och instruktioner. Fel som uppstår till följd av
att säkerhetsanvisningarna och instruktio-
Tillåten omgivningstemperatur
– vid laddning
–vid drift
Rekommenderade batterier
nerna inte följts kan orsaka elstöt, brand
och/eller allvarliga personskador.
Fäll upp sidan med illustration av elverktyget och håll sidan
Rekommenderade laddare
uppfälld när du läser bruksanvisningen.
Ändamålsenlig användning
Elverktyget är avsett för sågning och kapning av trävirke,
plast, gips, ickejärn-metaller och fästelement (som t.ex. icke
härdade spikar, klamrar). Verktyget kan även användas för
bearbetning av mjuka väggkakel samt för torr slipning och
skrapning av mindre ytor. Verktyget är speciellt lämpligt för
exakta arbeten nära kanter. Elverktyget får användas bara
med Bosch-tillbehör.
Illustrerade komponenter
Numreringen av komponenterna hänvisar till illustration a v
elverktyget på grafiksida.
1 Strömställare Till/Från
2 Batteriets upplåsningsknapp
3 Batteri
4 Ventilationsöppningar
5 Ställratt slagtalsförval
6 Indikering av batteriets laddningstillstånd
7 Verktygsfäste
8 Djupanslagets spännspak
9 Djupanslag
10 Sågblad *
1) i relation till använt batteri
2) begränsad effekt vid temperaturer <0 °C
Tekniska data baserade på medlevererad batterimodul.
Buller-/vibrationsdata
Bullernivåvärde förmedlas enligt EN 60745-2-4.
Maskinens A-vägda ljudnivå uppnår i typiska fall: Ljudtryck-
snivå 79 dB(A); ljudeffektnivå 90 dB(A). Onoggrannhet
K=3dB.
Använd hörselskydd!
Totala vibrationsemissionsvärden a
riktningar) och onoggrannhet K framtaget enligt
EN 60745-2-4:
Slipa: a
Såga med instickssågblad: a
Såga med segmentsågb lad: a
Skrapa: a
Mätningen av den vibrationsnivå som anges i denna anvisning
har utförts enligt en mätmetod som är standardiserad i
EN 60745 och kan användas vid jämförelse av olika elverktyg. Mätmetoden är även lämplig för preliminär bedömning av
vibrationsbelastningen.
min-15000–20000
0
1)
2)
och lagring
=2,9m/s2, K= 1,5 m/s2,
h
=8,3m/s2, K= 1,5 m/s2.
h
h
3 601 HB5 0..
V= 12
°1,4
kg 0,97– 1,2
°C
°C
–20...+50
GBA 10,8V...
GBA 12V...
GBA 12V... W
GAL 11.. CV
GAL 12.. CV
GAL 18... W
(vektorsumma ur tre
h
=9,2m/s2, K= 1,5 m/s2,
=2,5m/s2, K= 1,5 m/s2,
h
0...+45
1 609 92A 2LW | (16.1.17) Bosch Power Tools
Page 81

OBJ_BUCH-2853-001.book Page 81 Monday, January 16, 2017 1:56 PM
Den angivna vibrationsnivån representerar den huvudsakliga
användningen av elverktyget. Om däremot elverktyget
används för andra ändamål, med olika tillbehör, med andra
insatsverktyg eller inte underhållits ordentligt kan vibrationsnivån avvika. Härvid kan vibrationsbelastningen under
arbetsperioden öka betydligt.
För en exakt bedömning av vibrationsbelastningen bör även
de tider beaktas när elverktyget är frånkopplat eller är igång,
men inte används. Detta reducerar tydligt vibrationsbelastningen för den totala arbetsperioden.
Bestäm extra säkerhetsåtgärder för att skydda operatören
mot vibrationernas inverkan t. ex.: underhåll av elverktyget
och insatsverktygen, att hålla händerna varma, organisation
av arbetsförloppen.
Montage
Batteriets laddning
Använd endast de laddare, som anges i de tekniska
data. Endast denna typ av laddare är anpassad till det
litium-jonbatteri som används i elverktyget.
Anvisning: Batteriet levereras ofullständigt uppladdat. För
full effekt ska batteriet före första användningen laddas upp i
laddaren.
Litiumjonbatteriet kan när som helst laddas upp eftersom
detta inte påverkar livslängden. Batteriet skadas inte om
laddning avbryts.
Borttagning av batteri
Ta bort batterimodulen 3 genom att trycka på upplåsningsknappen 2 och dra sedan batterimodulen ur elverktyget.
Bruka inte våld.
Batteriets laddningsindikering
De tre gröna LED-lamporna på batteristatusindikeringen 6
visar batteriets laddstatus 3. Laddstatusindikeringen lyser
endast i 5 sekunder efter start.
Lysdiod Kapacitet
Permanent ljus 3 gröna ≥2/3
Permanent ljus 2 gröna ≥1/3
Permanent ljus 1 grönt < 1/3
Blinkljus 1 grönt Reserv
Blinkljus 3 gröna Tom
Om ingen LED lyser efter påslagning är batteriet defekt och
måste bytas ut.
Verktygsbyte
Ta bort batteriet innan åtgärder utförs på elverktyget
(t.ex. underhåll, verktygsbyte etc.) samt före transport och lagring. Om strömställaren Till/Från oavsiktligt
påverkas finns risk för personskada.
Använd skyddshandskar vid verktygsbyte. Risk finns
för kroppsskada om insatsverktyg berörs.
Val av insatsverktyg
Insatsverktyg GOP 12V-28
Svenska | 81
Tabellen nedan tar upp exempel på insatsverktyg. Ytterligare insatsverktyg finns i Bosch omfångsrika tillbehörsprogram.
Insatsverktyg Material Användning
Bimetall segmentsågklinga
Slipplatta för slippapper Serie Delta
93 mm
Profilslip
Bosch Power Tools 1 609 92A 2LW | (16.1.17)
Trämaterial,
Plast,
Ickejärn-metaller
Beroende på slippappret Ytslipning av ränder, i hörn eller på svåråtkomliga ställen;
Trä,
Rör/Profiler,
Färg,
Lacker,
Fyllare,
Metall
Kap- och insågssnitt; även för sågning invid kanter, i hörn
och på svårtillgängliga platser;
Exempel: avkortning av monterade golvlister eller dörrkarmar, insågning vid passning av golvpaneler
alltefter slippapper t.ex. för slipning av trä, färg, sten
Fiber för rengöring och för strukturering av trä, rostborttag-
ning på metaller och för slipning av lacker, poleringsfilt för
förpolering
Bekväm och effektiv slipning av profiler upp till den
diameter på 55 mm;
röda slipblad för slipning av trä, rör/profiler, lacker, fyllare
och metall
Page 82

OBJ_BUCH-2853-001.book Page 82 Monday, January 16, 2017 1:56 PM
82 | Svenska
Insatsverktyg Material Användning
Bi-metallinstickssågblad för trä och
metall
Mjukt trä,
Mjuka plaster,
Gipskartong,
Tunnväggiga aluminium
och icke järnhaltiga
metallprofiler,
Mindre kapnings- och doppningssnitt;
Exempel: skära ur ursparningar för uttag, kapning i plan av
kopparrör, doppsnitt i gipskartongplattor
Filigrana anpassningsarbeten i trä;
Exempel: ursparningar för lås och eftersågning av beslag
Tunna plåtar,
Ej härdade spikar och
skruvar
Sågblad i kolstål
för trä
Trämaterial,
Mjuka plaster
Kapning och djupa instickssnitt; även för sågning nära kant,
i hörn och på svåråtkomliga ställen;
Exempel: smalt instickssnitt i massivt trä för montering av
ett ventilationsgaller
Bi-metall doppsågblad för hårda
Hårda träslag,
ytbehandlade plattor
Doppsnitt i ytbehandlade plattor eller hårda träslag;
Exempel: inmontering av takfönster
träslag
HM-doppsågblad
metall
Bi-metallinstickssågblad för trä och
metall
Räfflad segmentsågklinga i hårdmetall
Diamant-Riffsegmentssågblad
HM-riff-deltaplatta
HM-Riff-mortelborttagare
HCS multi-kniv
Metall,
Kraftigt abrasiva material,
Fiberglas,
Gipskartong,
Cementbundna
fiberplattor
Mjukt trä,
Hårda träslag,
Fanéerade skivor,
Plastbelagda plattor,
Ej härdade spikar och
skruvar
Cementfogar,
Mjuk väggklinker,
Glasfiberförstärkta
plaster,
Porbetong
Cementfogar,
Mjuk väggklinker,
Epoxidharts,
Glasfiberförstärkta
plaster
Mortel,
Betongrester,
Trä,
Abrasiva material
Mortel,
Fogar,
Epoxidharts,
Glasfiberförstärkta
plaster,
Abrasiva material
Takpapp,
Mattor,
Konstgräs,
Kartong,
PVC-golv
Doppsnitt i kraftigt abrasiva material eller metall;
Exempel: kapning av köksfrontövertäckningar, enkel
kapning av härdade skruvar, spikar och rostfritt stål
Doppsnitt i ytbehandlade plattor eller hårt trä;
Exempel: kapa dörrsargar, ursparningar för en hyllbräda
Skärning och kapning invid kanter, i hörn och på svårtillgängliga platser;
Exempel: rengöring av fogar mellan väggplattor efter förbättringar, sågning av urtag i stenplattor, gipsplattor eller
plast
Exakt utfräsning och kapning av klinker-fogmaterial,
epoxidhartser och glasfiberförstärkta plaster;
Exempel: utskärning av mindre utskärningar i mjuk väggklinkler och fräsning av ursparningar i glasfiberförstärkt
plast
Raspa och slipa på hårt underlag;
Exempel: borttagning av mortel och borttagning av kakeloch klinkerlim (t.ex. vid borttagning av skadade plattor),
borttagning av mattlimrester
Utfräsning och kapning av fog- och kakel- och klinkermaterial, liksom raspning och slipning på hårt underlag;
Exempel: borttagning av kakel- och klinkerlim och
fogmortel
Snabba och exakta snitt i mjuka material och flexibla
abrasiva material;
Exempel: skära mattor, kartong, PVC-golv, takpapp etc.
1 609 92A 2LW | (16.1.17) Bosch Power Tools
Page 83

OBJ_BUCH-2853-001.book Page 83 Monday, January 16, 2017 1:56 PM
Insatsverktyg Material Användning
Skavkniv, styv
Mattor,
Mortel,
Betong,
Skrapa på hårt underlag;
Exempel: borttagning av mortel, kakel- och klinkerlim,
betong- och mattlimsrester
Kakel- och klinkerlim
Skavkniv, flexibel
Mattlim,
Färgrester,
Silikon
Flexibel skrapning på mjukt underlag;
Exempel: borttagning av silikonfogar, mattlims- och färgrester
Svenska | 83
Bimetallkniv med
segmentvågsslipning
Isoleringsmaterial,
Isoleringsmaterial,
Golvplattor,
Golvljudsisoleringsmaterial,
Kartong,
Mattor,
Gummi,
Läder
HM-Riff-slipfingrar
Trä,
Färg
HM-Riffdoppsågblad
Fiberglas,
Mortel,
Trä
HCS-universalfogskärare
Expansionsfogar,
Fönsterkitt,
Isoleringsmaterial (stenull)
Insättning av insatsverktyg
Lägg upp insatsverktyget (t.ex. instickssågblad 10) på verk-
tygsfästet 7 så att bockningen ligger nedåt (se bild på grafiksidan, texten på insatsverktyget kan nu läsas uppifrån).
Vrid insatsverktyget till ett för arbetet gynnsamt läge och låt
det snäppa fast i kammarna på verktygsfästet 7. Det finns
sammanlagt tolv lägen i steg om 30°.
Montera insatsverktyget med skruven 11. Dra år skruven 11
stadigt med sexkantnyckel 12.
Kontrollera att insatsverktyget sitter stadigt. Felaktigt
eller dåligt fastsatta insatsverktyg kan lossa under arbetet
och leda till personskada.
Borttagning av insatsverktyget
För borttagning av insatsverktyget lossa med sexkantnyckeln
12 skruven 11 och ta bort insatsverktyget.
Exakta snitt i mjuka material;
Exempel: Kapning av isoleringsplattor, ytplan kapning av
utstickande isoleringsmaterial
Slipning av trä och färg på svåråtkomliga ställen utan slippapper;
Exempel: slipning av färg mellan fönsterluckslameller, slipning av trägolv i hörn
Doppsnitt i kraftigt abrasiva material;
Exempel: fräsning av tunn mosaikkakel eller klinker
Skära och kapa mjuka material;
Exempel: skära silikon-expansionsfogar eller fönsterkitt
Montering/byte av slippapper på slipplattan
Slipplattan 15 är försedd med en kardborrsväv för snabb och
enkel infästning av slippapperen med kardborrssystem.
Knacka slipplattans 15 kardborrsväv ren innan slippapperet
16 sätts på för att uppnå optimal infästning.
Lägg upp slippapperet 16 kant i kant med en sida på slipplattan 15, tryck sedan kraftigt fast slippapperet på slipplattan.
För att optimal dammutsugning ska kunna garanteras måste
slippapperets hål överensstämma med slipplattans.
För borttagning av slippapperet 16 grip tag i ett hör och dra av
papperet från slipplattan 15.
Alla typer av slippapper, poler- och rengöringsfilt i Serie Delta
93 mm i Bosch tillbehörsprogram kan användas.
Sliptillbehör som fiber/polerfilt placeras på samma sätt på
slipplattan.
Bosch Power Tools 1 609 92A 2LW | (16.1.17)
Page 84

OBJ_BUCH-2853-001.book Page 84 Monday, January 16, 2017 1:56 PM
84 | Svenska
Val av slippapper
Slippapper finns att tillgå i olika utföranden som motsvarar material som ska bearbetas och önskad nedslipningseffekt:
Slippapper Material Användning Kornstorlek
– Allt trävirke (t. ex. hårt trä,
mjukt trä, spånskivor,
byggskivor)
–Metallmaterial
För förslipning t. ex. av råa, ohyvlade bjälkar och brädor
För planslipning och planing av mindre ojämnheter medelgrov 80
För färdig- och finslipning av trä
grov 40
fin 180
60
100
120
240
320
400
–Färg
–Lack
– Fyllnadsmedel
–Spackel
För nedslipning av färg
För slipning av grundfärg (t. ex. för att ta bort penseldrag,
färgdroppar och löpande färg)
För slipning av mellanstrykningsfärg före lackering
Damm-/spånutsugning
Dammet från material som t. ex. blyhaltig målning, vissa
träslag, mineraler och metall kan vara hälsovådligt. Beröring eller inandning av dammet kan orsaka allergiska reaktioner och/eller andningsbesvär hos användaren eller personer som uppehåller sig i närheten.
Vissa damm från ek eller bok anses vara cancerogena, speciellt då i förbindelse med tillsatsämnen för träbehandling
(kromat, träkonserveringsmedel). Endast yrkesmän får
bearbeta asbesthaltigt material.
– Använd om möjligt en för materialet lämplig dammut-
sugning.
– Se till att arbetsplatsen är väl ventilerad.
– Vi rekommenderar ett andningsskydd i filterklass P2.
Beakta de föreskrifter som i aktuellt land gäller för bearbetat material.
Undvik dammanhopning på arbetsplatsen. Damm kan
lätt självantändas.
Anslutning av dammutsugning (se bild A)
Dammutsugning 14 är endast avsedd för arbeten med slipplatta 15 i kombination med andra insatsverktyg har den
ingen nytta.
Använd vid slipning dammutsugningsutrustning.
För montering av dammutsugningsenhet 14 (tillbehör) ska
insatsverktyget tas bort.
Sammanfoga, om så behövs, komponenterna för dammut-
sugningsenheten 14 så som bilden visar. Lägg upp den monterade dammutsugningsenheten vid verktygsfästet 7 på
elverktyget. Vrid dammutsugningsenheten så att enhetens
kammar snäpper fast i respektive urtag på motorhuset. Fäst
dammutsugningsenheten som bilden visar med fästklämman
17 på elverktyget.
grov 40
60
medelgrov 80
100
120
fin 180
240
320
400
Kontrollera att filtringen 16 är oskadad och att den ligger väl
an mot slipplattan 15. Byt genast ut en skadad filtring.
Stick upp en utsugningsslang 20 (tillbehör) alltefter utförande antingen direkt på utsugningsstutsen 18 eller klipp av
en bit från det gamla slangändstycket, skruva in utsugningsadaptern 19 (tillbehör) på slangändan och skjut sedan upp
den direkt på utsugningsstutsen 18. Koppla utsugningsslangen 20 till en dammsugare (tillbehör). En översikt över
hur slangen kopplas till olika dammsugare hittar du på utvikningssidan.
Dammsugaren måste vara lämplig för det material som ska
bearbetas.
Använd för utsugning av hälsovådligt och cancerframkallande
eller torrt damm en specialdammsugare.
Drift
Driftstart
Insättning av batteri
Använd endast original Bosch litiumjonbatterier med
den spänning som anges på elverktygets typskylt.
Används andra batterier finns risk för kroppsskada och
brand.
Anvisning: Använd endast för elverktyget lämpliga batterier,
i annat fall finns risk för felfunktion eller skador på elverktyget.
Skjut in den uppladdade batterimodulen 3 i handtaget tills
den tydligt snäpper fast och ligger i plan med handtaget.
In- och urkoppling
För inkoppling av elverktyget skjut strömställaren 1 framåt
så långt att på strömställaren Till/Från ”I” visas.
1 609 92A 2LW | (16.1.17) Bosch Power Tools
Page 85

OBJ_BUCH-2853-001.book Page 85 Monday, January 16, 2017 1:56 PM
För frånkoppling av elverktyget skjut strömställaren 1 bakåt
så långt att på strömställaren Till/Från ”0” visas.
För att spara energi, koppla på elverktyget endast när du vill
använda det.
Litium-jonbatteriet är med ”Electronic Cell Protection (ECP)”
skyddad mot djupurladdning. Vid urladdat batteri kopplar
skyddskopplingen från elverktyget: Insatsverktyget roterar
inte längre.
Anvisning: Om elverktyget på grund av urladdat eller överhettat batteri automatiskt kopplas från, stäng av elverktyget
med strömställaren Till/Från 1. Ladda upp batteriet resp. låt
det svalna innan elverktyget återinkopplas. I annat fall finns
risk för att batteriet skadas.
Förval av svängningstal
Med ställratten för förval av svängningstal 5 kan önskat svängningstal väljas även under drift.
Erforderligt svängningstal är beroende av material och
arbetsbetingelser, prova dig fram till bästa inställning genom
praktiska försök.
Arbetsanvisningar
Ta bort batteriet innan åtgärder utförs på elverktyget
(t.ex. underhåll, verktygsbyte etc.) samt före transport och lagring. Om strömställaren Till/Från oavsiktligt
påverkas finns risk för personskada.
Vänta tills elverktyget stannat helt innan du lägger bort
det.
Anvisning: Se till att elverktygets ventilationsöppningar 4
inte blockeras under arbetet eftersom detta reducerar elverktygets livslängd.
Arbetsprincip
Den oscillerande drivningen får insatsverktyget att svänga fram
och tillbaka upp till 20000 gånger per minut i en vinkel på 2,8 °.
Detta ger möjlighet till exakta arbeten i trånga utrymmen.
Använd verktyget med lågt och jämnt
anliggningstryck, i annat fall försämras
arbetseffekten och risk finns att insatsverktyget låser sig.
Under arbetets gång för elverktyget fram
och tillbaka, för undvikande av att insatsverktyget blir för varmt eller att det låser
sig.
Det är endast tillåtet att använda insågning i mjuka
material såsom trä, gipskartong etc.
Kontrollera före sågning med kolstålssågblad (HCS) i trävirke,
spånskiva, byggmaterial etc. att inga främmande föremål
såsom spika, skruvar e.d. finns i materialet. Ta bort eventuella främmande föremål eller använd bimetallsågblad.
Kapning
Anvisning: Observera vid kapning av väggplattor att verkty-
get utsätts för stor förslitning vid användning under längre tid.
Slipa
Avverkningseffekten och slipbilden bestäms främst av valt
slippapper, förvald oscillationsfrekvens och anliggningstrycket.
Endast felfria slippapper ger gott slipresultat samtidigt som
de skonar elverktyget.
Slippapperen kan användas under en längre tid om slipning
sker med jämnt anliggningstryck.
Ett kraftigt ökat anliggningstryck medför inte en högre slipeffekt, utan kraftigare förslitning på elverktyg och slippapper.
För punktexakt slipning av hörn, kanter och svåråtkomliga
partier kan även slipplattans spets eller kant användas.
Vid punktuell slipning kan slippapperet bli hett. Reducera
slagfrekvensen och anliggningstrycket och låt slippapperet
regelbundet avkylas.
Slippapper som använts för slipning av metall får inte längre
användas för andra material.
Använd endast original Bosch sliptillbehör.
Använd vid slipning dammutsugningsutrustning.
Skrapning
Välj för skrapning en hög oscilleringsfrekvens.
Arbeta på mjukt underlag (t. ex. trä) i liten vinkel och med lågt
anliggningstryck. Spackelspaden kan i annat fall skära in i
underlaget.
Temperaturberoende överbelastningsskydd
Elverktyget kan inte överbelastas om användning sker enligt
föreskrifterna. Vid för krafti g belastning eller om tillåtet batteritemperaturintervall inte beaktas reduceras varvtalet, eller
elverktyget stängs av. Vid reducerat varvtal går elverktyget
med fullt varvtal igen först då tillåten batteritemperatur har
uppnåtts. Vid automatisk avstängning, stäng av elverktyget,
låt batteriet svalna och slå på elverktyget igen.
Anvisningar för korrekt hantering av batterimodulen
Sågning
Använd endast oskadade, felfria sågblad. Deformerade
eller oskarpa sågblad kan brytas, negativt påverka snittet
eller orsaka bakslag.
Vid sågning av lätt byggmaterial beakta lagbestämmel-
serna och materialtillverkarens rekommendationer.
Använd lämpliga detektorer för lokalisering av dolda
Skydda batterimodulen mot fukt och vatten.
Batterimodulen får endast lagras inom ett temperaturområde
mellan –20 ° C och 50 ° C. Låt därför inte batterimodulen
t. ex. på sommaren ligga kvar i bilen.
Är brukstiden efter uppladdning onormalt kort tyder det på
att batterierna är förbrukade och måste bytas mot nya.
Beakta anvisningarna för avfallshantering.
försörjningsledningar eller konsultera lokalt distributionsföretag. Kontakt med elledningar kan förorsaka
brand och elstöt. En skadad gasledning kan leda till explosion. Borrning i vattenledning kan förorsaka sakskador.
Svenska | 85
Bosch Power Tools 1 609 92A 2LW | (16.1.17)
Page 86

OBJ_BUCH-2853-001.book Page 86 Monday, January 16, 2017 1:56 PM
86 | Norsk
Underhåll och service
Sekundär-/primärbatterier:
Underhåll och rengöring
Ta bort batteriet innan åtgärder utförs på elverktyget
(t.ex. underhåll, verktygsbyte etc.) samt före transport och lagring. Om strömställaren Till/Från oavsiktligt
påverkas finns risk för personskada.
Håll elverktyget och dess ventilationsöppningar rena
för bra och säkert arbete.
Rengör riffinsatsverktygen (tillbehör) regelbundet med en
stålborste.
Kundtjänst och användarrådgivning
Kundservicen ger svar på frågor beträffande reparation och
underhåll av produkter och reservdelar. Sprängskisser och
information om reservdelar hittar du på:
www.bosch-pt.com
Bosch användarrådgivningsteamet hjälper gärna vid frågor
som gäller våra produkter och tillbehör.
Ange alltid vid förfrågningar och reservdelsbeställningar det
10-siffriga produktnumret som finns på produktens typskylt.
Svenska
Bosch Service Center
Telegrafvej 3
2750 Ballerup
Danmark
Tel.: (08) 7501820 (inom Sverige)
Fax: (011) 187691
Transport
De litiumjonbatterier som ingår är underkastade kraven för
farligt gods. Användaren kan utan ytterligare förpliktelser
transportera batterierna på allmän väg.
Vid transport genom tredje person (t. ex. flygfrakt eller spedition) ska speciella villkor för förpackning och märkning beaktas. I detta fall bör vid förberedelse av transport en expert för
farligt gods konsulteras.
Batterier får försändas endast om höljet är oskadat. Tejpa
öppna kontakter och förpacka batteriet så att det inte kan
röras i förpackningen.
Beakta även tillämpliga nationella föreskrifter.
Avfallshantering
Elverktyg, batterier, tillbehör och förpackning ska
omhändertas på miljövänligt sätt för återvinning.
Släng inte elverktyg och inte heller batterier i hushållsavfall!
Endast för EU-länder:
Enligt europeiska direktivet 2012/19/EU
måste obrukbara elverktyg och enligt europeiska direktivet 2006/66/EG felaktiga eller
förbrukade batterier separat omhändertas
och på miljövänligt sätt lämnas in för återvinning.
Ändringar förbehålles.
Norsk
Sikkerhetsinformasjon
Generelle advarsler for elektroverktøy
varslene og nedenstående anvisninger kan medføre elektriske støt, brann og/eller alvorlige skader.
Ta godt vare på alle advarslene og informasjonene.
Det nedenstående anvendte uttrykket «elektroverktøy» gjelder for strømdrevne elektroverktøy (med ledning) og batteridrevne elektroverktøy (uten ledning).
Sikkerhet på arbeidsplassen
Hold arbeidsområdet rent og ryddig og sørg for bra be-
lysning. Rotete arbeidsområder eller arbeidsområder
uten lys kan føre til ulykker.
Ikke arbeid med elektroverktøyet i eksplosjonsutsatte
omgivelser – der det befinner seg brennbare væsker,
gass eller støv. Elektroverktøy lager gnister som kan an-
tenne støv eller damper.
Hold barn og andre personer unna når elektroverktøy-
et brukes. Hvis du blir forstyrret under arbeidet, kan du
miste kontrollen over elektroverktøyet.
Elektrisk sikkerhet
Støpselet til elektroverktøyet må passe inn i stikkon-
takten. Støpselet må ikke forandres på noen som helst
måte. Ikke bruk adapterstøpsler sammen med jordede
elektroverktøy. Bruk av stø psle r som i kke er fora ndret på
og passende stikkontakter reduserer risikoen for elektriske støt.
Unngå kroppskontakt med jordede overflater slik som
rør, ovner, komfyrer og kjøleskap. Det er større fare ved
elektriske støt hvis kroppen din er jordet.
Hold elektroverktøyet unna regn eller fuktighet. Der-
som det kommer vann i et elektroverktøy, øker risikoen for
elektriske støt.
Ikke bruk ledningen til andre formål, f. eks. til å bære
elektroverktøyet, henge det opp eller trekke det ut av
stikkontakten. Hold ledningen unna varme, olje, skarpe kanter eller verktøydeler som beveger seg. Med ska-
dede eller opphopede ledninger øker risikoen for elektriske støt.
ADVARSEL
Li-jon:
Beakta anvisningarna i avsnittet
”Transport”, sida 86.
Les gjennom alle advarslene og anvisningene. Feil ved overholdelsen av ad-
1 609 92A 2LW | (16.1.17) Bosch Power Tools
Page 87

OBJ_BUCH-2853-001.book Page 87 Monday, January 16, 2017 1:56 PM
Norsk | 87
Når du arbeider utendørs med et elektroverktøy, må du
kun bruke en skjøteledning som er egnet til utendørs
bruk. Når du bruker en skjøteledning som er egnet for
utendørs bruk, reduseres risikoen for elektriske støt.
Hvis det ikke kan unngås å bruke elektroverktøyet i
fuktige omgivelser, må du bruke en jordfeilbryter. Bruk
av en jordfeilbryter reduserer risikoen for elektriske støt.
Personsikkerhet
Vær oppmerksom, pass på hva du gjør, gå fornuftig
frem når du arbeider med et elektroverktøy. Ikke bruk
elektroverktøy når du er trett eller er påvirket av narkotika, alkohol eller medikamenter. Et øyeblikks uopp-
merksomhet ved bruk av elektroverktøyet kan føre til alvorlige skader.
Bruk personlig verneutstyr og husk alltid å bruke ver-
nebriller. Bruk av personlig sikkerhetsutstyr som støv-
maske, sklifaste arbeidssko, hjelm eller hørselvern – avhengig av type og bruk av elektroverktøyet – reduserer
risikoen for skader.
Unngå å starte verktøyet ved en feiltagelse. Forviss
deg om at elektroverktøyet er slått av før du kobler det
til strømmen og/eller batteriet, løfter det opp eller bærer det. Hvis du holder fingeren på bryteren når du bærer
elektroverktøyet eller kobler elektroverktøyet til strømmen i innkoblet tilstand, kan dette føre til uhell.
Fjern innstillingsverktøy eller skrun økler f ør du slå r på
elektroverktøyet. Et verktøy eller en nøkkel som befinner
seg i en roterende verktøydel, kan føre til skader.
Unngå en unormal kroppsholdning. Sørg for å stå stø-
dig og i balanse. Dermed kan du kontrollere elektroverk-
tøyet bedre i uventede situasjoner.
Bruk alltid egnede klær. Ikke bruk vide klær eller smyk-
ker. Hold hår, tøy og hansker unna deler som beveger
seg. Løstsittende tøy, smykker eller langt hår kan komme
inn i deler som beveger seg.
Hvis det kan monteres støvavsug- og oppsamlingsinn-
re tn ing er , m å d u fo rv is se deg om at di sse er ti lk obl et og
brukes på korrekt måte. Bruk av et støvavsug reduserer
farer på grunn av støv.
Omhyggelig bruk og håndtering av elektroverktøy
Ikke overbelast verktøyet. Bruk et elektroverktøy som
er beregnet til den type arbeid du vil utføre. Med et pas-
sende elektroverktøy arbeider du bedre og sikrer e i det angitte effektområdet.
Ikke bruk elektroverktøy med defekt på-/av-bryter. Et
elektroverktøy som ikke lenger kan slås av eller på, er farlig
og må repareres.
Trekk støpselet ut av stikkontakten og/eller fjern batte-
riet før du utfører innstillinger på elektroverktøyet, skif ter tilbehørsdeler eller legger maskinen bort. Disse tilta-
kene forhindrer en utilsiktet starting av elektroverktøyet.
Elektroverktøy som ikke er i bruk må oppbevares util-
gjengelig for barn. Ikke la maskinen brukes av personer som ikke er fortrolig med dette eller ikke har lest
disse anvisningene. Elektroverktøy er farlige når de bru-
kes av uerfarne personer.
Bosch Power Tools 1 609 92A 2LW | (16.1.17)
Vær nøye med vedlikeholdet av elektroverktøyet. Kon-
troller om bevegelige verktøydeler fungerer feilfritt og
ikke klemmes fast, og om deler er brukket eller skadet,
slik at dette innvirker på elektroverktøyets funksjon.
La disse skadede delene repareres før elektroverktøyet brukes. Dårlig vedlikeholdte elektroverktøy er årsaken
til mange uhell.
Hold skjæreverktøyene skarpe og rene. Godt stelte
skjæreverktøy med skarpe skjær setter seg ikke så ofte
fast og er lettere å føre.
Bruk elektroverktøy, tilbehør, verktøy osv. i henhold til
disse anvisningene. Ta hensyn til arbeidsforholdene og
arbeidet som skal utføres. Bruk av elektroverktøy til an-
dre formål enn det som er angitt kan før e til farlige situasjoner.
Omhyggelig bruk og håndtering av batteridrevne verktøy
Lad batteriet kun opp i ladeapparater som er anbefalt
av produsenten. Det oppstår brannfare hvis et ladeappa-
rat som er egnet til en bestemt type batterier, brukes med
andre batterier.
Bruk derfor kun riktig type batterier for elektroverk-
tøyene. Bruk av andre batterier kan medføre skader og
brannfare.
Hold batteriet som ikke er i bruk unna binders, mynter,
nøkler, spikre, skruer eller andre mindre metallgjenstander, som kan lage en forbindelse mellom kontaktene. En kortslutning mellom batterikontaktene kan føre til
forbrenninger eller brann.
Ved gal bruk kan det lekke væske ut av batteriet. Unn-
gå kontakt med denne væsken. Ved tilfeldig kontakt
må det skylles med vann. Hvis det kommer væske i øynene, må du i tillegg oppsøke en lege. Batterivæske som
renner ut kan føre til irritasjoner på huden eller forbrenninger.
Service
Elektroverktøyet ditt skal alltid kun repareres av kvali-
fisert fagpersonale og kun med originale reservedeler.
Slik opprettholdes verktøyets sikkerhet.
Sikkerhetsinformasjon for batteridrevet
Multi-Cutter
Hold elektroverktøyet på de isolerte gripeflatene, hvis
du utfører arbeid der innsatsverktøyet kan treffe på
skjulte strømledninger. Kontakt med en spenningsføren-
de ledning kan også sette elektroverktøyets metalldeler
under spenning og føre til elektriske støt.
Bruk elektroverktøyet kun til tørrsliping. Dersom det
kommer vann i et elektroverktøy, øker risikoen for elektriske støt.
OBS! Brannfare! Unngå at slipematerialet og sliperen
overopphetes. Tøm støvbeholderen alltid før arbeidspauser. Slipestøv i støvposen, mikrofilteret, papirposen
(eller i filterposen hhv. filteret til støvsugeren) kan antennes ved ugunstige vilkår som gnistsprut ved sliping av metaller. Det er spesielt farlig hvis slipestøvet er blandet med
lakk-, polyuretanrester eller andre kjemiske stoffer og slipematerialet er varmt etter lang tids arbeid.
Page 88

OBJ_BUCH-2853-001.book Page 88 Monday, January 16, 2017 1:56 PM
88 | Norsk
Hold hendene unna sagområdet. Ikke grip under ar-
beidsstykket. Ved kontakt med sagbladet er det fare for
skader.
Bruk egnede detektorer til å finne skjulte
strøm-/gass-/vannledninger, eller spør hos det lokale
el-/gass-/vannverket. Kontakt med elektriske ledninger
kan medføre brann og elektrisk støt. Skader på en gassledning kan føre til eksplosjon. Hull i en vannledning forårsaker materielle skader.
Hold elektroverktøyet fast med begge hender under ar-
beidet og sørg for å stå stødig. Elektroverktøyet føres
sikrere med to hender.
Sikre arbeidsstykket. Et arbeidsstykke som holdes fast
med spenninnretninger eller en skrustikke, holdes sikrere
enn med hånden.
Batteriet må ikke åpnes. Det er fare for kortslutning.
Beskytt batteriet mot varme, f. eks. også mot
permanent solinnvirkning, ild, vann og fuktighet. Det er fare for eksplosjoner.
Ved skader og usakkyndig bruk av batteriet kan det
slippe ut damp. Tilfør frisk luft og gå til lege hvis det
oppstår helseproblemer. Dampene kan irritere ånde-
drettsorganene.
Bruk batteriet kun i kombinasjon med Bosch el-verk-
tøyet. Kun slik beskyttes batteriet mot farlig overbelast-
ning.
Batteriet kan bli skadet av spisse gjenstander som spi-
ker eller skrutrekker eller på grunn av påvirkning fra
ytre krefter. Resultat kan bli intern kortslutning, og det
kan da komme røyk fra batteriet, eller batteriet kan ta fyr,
eksplodere eller bli overopphetet.
Bruk vernehansker ved utskifting av innsatsverktøye-
ne. Innsatsverktøy blir varme ved bruk over lengre tid.
Skrap ikke fuktede materialer (f. eks. tapet) og ikke på
fuktig undergrunn. Dersom det kommer vann i et elektro-
verktøy, øker risikoen for elektriske støt.
Flaten som skal bearbeides må ikke behandles med lø-
semiddelholdig væske. Ved oppvarming av arbeidsmate-
rialene ved skraping kan det oppstå giftige damper.
Vær spesielt forsiktig ved bruk av skraperen. Verktøyet
er svært skarpt, det er fare for skader.
ping av mindre flater. Det er spesielt egnet til arbeid kant i
kant og i nærheten av kanter. Elektroverktøyet må utelukkende brukes med Bosch-tilbehør.
Illustrerte komponenter
Nummereringen av de illustrerte komponentene gjelder for
bildet av elektroverktøyet på illustrasjonssiden.
1 På-/av-bryter
2 Batteri-låsetast
3 Batteri
4 Ventilasjonsspalter
5 Stillhjul svingtallforvalg
6 Batteri-ladeindikator
7 Verktøyfeste
8 Spennhåndtak for dybdeanlegg
9 Dybdeanlegg
10 Dykksagblad*
11 Skrue med innvendig sekskant
12 Umbrakonøkkel
13 Håndtak (isolert grepflate)
14 Støvavsug *
15 Slipesåle *
16 Slipeskive *
17 Spennhåndtak for støvavsug
18 Avsugstuss *
19 Avsugadapter *
20 Avsugslange *
*Illustr ert eller beskrevet tilbehør inngår ikke i standard-leveransen. Det komplette tilbehøret finner du i vårt tilbehørsprog ram.
Tekniske data
Batteridrevet Multi-Cutter GOP 12V-28
Produktnummer
Nominell spenning
Tomgangsturtall n
Oscillasjonsvinkel venstre/høyre
Vekt tilsvarende
EPTA-Procedure 01:2014
Tillatt omgivelsestemperatur
–ved lading
Produkt- og ytelsesbeskrivelse
Les gjennom alle advarslene og anvisninge-
–ved drift
Anbefalte batterier
ne. Feil ved overholdelsen av advarslene og
nedenstående anvisninger kan medføre elektriske støt, brann og/eller alvorlige skader.
Anbefalte ladere
Brett ut utbrettssiden med bildet av maskinen, og la denne siden være utbrettet mens du leser bruksanvisningen.
Formålsmessig bruk
Elektroverktøyet er beregnet til saging og kapping av tremate-
1) avhengig av benyttet batteri
2) redusert ytelse ved temperatur < 0 °C
Tekniske data med batteriet som inngår i leveransen.
rialer, kunststoff, gips, ikke-jernholdige metaller og festeelementer (f.eks. uherdede spikre, klammer). Det er også egnet
til bearbeidelse av myke veggfliser og til tørr sliping og skra-
2)
og lagring
3 601 HB5 0..
V= 12
0
min-15000–20000
°1,4
1)
kg 0,97– 1,2
°C
°C
0...+45
–20...+50
GBA 10,8V...
GBA 12V...
GBA 12V... W
GAL 11.. CV
GAL 12.. CV
GAL 18... W
1 609 92A 2LW | (16.1.17) Bosch Power Tools
Page 89

OBJ_BUCH-2853-001.book Page 89 Monday, January 16, 2017 1:56 PM
Støy-/vibrasjonsinformasjon
Støyutslippsverdier målt i henhold til EN 60745-2-4.
Maskinens typiske A-bedømte støynivå er: Lydtrykknivå
79 dB(A); lydeffektnivå 90 dB(A). Usikkerhet K= 3 dB.
Bruk hørselvern!
Totale svingningsverdier a
usikkerhet K beregnet jf. EN 60745-2-4:
Sliping: a
Saging med dykksagblad: a
=2,9m/s2, K= 1,5 m/s2,
h
Saging med segmentsagblad: a
Skraping: a
=8,3m/s2, K=1,5 m/s2.
h
Vibrasjonsnivået som er angitt i disse anvisningene, er målt
iht. en målemetode som er standardisert i EN 60745 og kan
brukes til sammenligning av elektroverktøy med hverandre.
Det egner seg også til en foreløpig vurdering av vibrasjonsbelastningen.
Det angitte vibrasjonsnivået representerer de hovedsakelige
anvendelsene til elektroverktøyet. Men hvis elektroverktøyet
brukes til andre anvendelser, med forskjellig tilbehør eller
utilstrekkelig vedlikehold, kan vibrasjonsnivået avvike. Dette
kan føre til en tydelig øking av vibrasjonsbelastningen over hele arbeidstidsrommet.
Til en nøyaktig vurdering av vibrasjonsbelastningen skal det
også tas hensyn til de tidene maskinen er slått av eller går,
men ikke virkelig brukes. Dette kan tydelig redusere vibrasjonsbelastningen over hele arbeidstidsrommet.
Bestem ekstra sikkerhetstiltak til beskyttelse av brukeren mot
vibrasjonenes virkning, som for eksempel: Vedlikehold av
elektroverktøy og innsatsverktøy, holde hendene varme, organisere arbeidsforløpene.
(vektorsum fra tre retninger) og
h
=9,2m/s2, K= 1,5 m/s2,
h
=2,5m/s2, K= 1,5 m/s2,
h
Fjerning av batteriet
Til fjerning av batteriet 3 trykker du opplåsingstastene 2 og
trekker batteriet bakover ut av elektroverktøyet. Ikke bruk
makt.
Batteri-ladeindikator
De tre grønne lysdiodene i batteriets ladetilstandsindikator 6
viser batteriets 3 ladetilstand. Ladetilstandsindikatoren lyser
bare i 5 sekunder etter start.
LED Kapasitet
Kontinuerlig lys 3 x grønn ≥2/3
Kontinuerlig lys 2 x grønn ≥1/3
Kontinuerlig lys 1 x grønn <1/3
Blinklys 1 x grønn Reserve
Blinklys 3 x grønn Tomt
Hvis ingen lysdiode lyser etter at enheten er slått på, er batteriet defekt og må skiftes ut.
Verktøyskifte
Ta batteriet ut av elektroverktøyet før alle arbeider på
elektroverktøyet utføres (f. eks. vedlikehold, verktøyskifte osv.) hhv. ved transport og oppbevaring. Det er
fare for skader hvis du trykker på på-/av-bryteren ved en
feiltagelse.
Bruk vernehansker ved verktøyskifte. Ved berøring av
innsatsverktøyene er det fare for skader.
Valg av innsatsverktøy
Innsatsverktøy GOP 12V-28
Norsk | 89
Montering
Opplading av batteriet
Bruk bare laderne som er oppført i de tekniske spesifi-
kasjonene. Kun disse ladeapparatene er tilpasset til Liti-
um-ion-batteriet som er innebygget i elektroverktøyet.
Merk: Batteriet leveres delvis oppladet. For å sikre full effekt
fra batteriet, må du lade det fullstendig opp i ladeapparatet
før førstegangs bruk.
Litium-ion-batteriet kan lades opp til enhver tid uten at levetiden forkortes. Det skader ikke batteriet å avbryte oppladingen.
Nedenstående tabell viser eksempler for innsatsverktøyene. Ytterligere innsatsverktøy finner du i det omfangrike Bosch-tilbehørprogrammet.
Innsatsverktøy Materiale Anvendelse
Bi-metallsegmentsagblad
Slipeplate for
slipeskivene serie
Delta 93 mm
Bosch Power Tools 1 609 92A 2LW | (16.1.17)
Trematerialer,
Plast,
Ikke-jernholdige metaller
Kapping og dykksaging; også til saging
nær kanter, i hjørner og dårlig tilgjengelige områder;
for eksempel: kapping av allerede installerte gulvlister eller
dørrammer, dykksaging ved tilpasning av gulvpanel
Avhengig av slipeskiven Flatesliping på kanter, i hjørner eller dårlig tilgjengelige
områder;
avhengig av slipeskive f.eks. til sliping av tre, maling, lakk,
stein
Duker for rengjøring og strukturering av tre, rustfjerning på
metall og sliping av lakk, poleringsfilt for forpolering
Page 90

OBJ_BUCH-2853-001.book Page 90 Monday, January 16, 2017 1:56 PM
90 | Norsk
Innsatsverktøy Materiale Anvendelse
Profilslipemaskin Tre,
Rør/Profiler,
Maling,
Lakk,
Komfortabel og effektiv sliping av profiler med diameter på
opptil 55 mm;
Røde slipeblad for sliping av tre, rør/profiler, lakk, fyller og
metall
Fyller,
Metall
Bi-metall-dyppsagblad tre og
metall
Mykt tre,
Myk plast,
Gipsplate,
Profiler i aluminium og
ikke-jernholdige metaller
med tynne vegger,
Mindre kappe- og dykkutt,
for eksempel utsparinger for stikkontakter, nøyaktig
kapping av kobberrør, dykkutt i gipsplater
Tilpasningsarbeider i tre,
for eksempel saging av utsparinger for låser og beslag
Tynne stålplater,
Ikke-herdede spikre og
skruer
HCS-dykksagblad
tre
Trematerialer,
Myk plast
Kapping og dype dykksnitt; også til saging nær kanter,
i hjørner og dårlig tilgjengelige områder;
for eksempel: smale dykksnitt i massivt tre til innbygging av
et ventilasjonsgitter
Bimetall-dykksagblad hardt tre
Hardt tre,
Laminatplater
Dykkutt i laminatplater eller hardt tre,
for esempel montering av takvinduer
HM-dykksagblad
metall
Bi-metall-dyppsagblad tre og
metall
HM-raspsegmentsagblad
Diamant-riffsegmentsagblad
HM-rasp-deltaplate
Metall,
Sterkts slipende
materialer,
Glassfiber,
Gipsplate,
Sementbundede
trefiberplater
Mykt tre,
Hardt tre,
Finerplater,
Plater med plastoverflate,
Ikke-herdede spikre og
skruer
Sementfuger,
Myke veggfliser,
Glassfiberforsterkede
plastmaterialer,
Porebetong
Sementfuger,
Myke veggfliser,
Epoksyharpiks,
Glassfiberforsterkede
plastmaterialer
Mørtel,
Betongrester,
Tre,
Slipende materialer
Dykkutt i sterkt slipende materialer eller metall,
for eksempel saging av benkeplater til kjøkken, enkel sa ging
gjennom herdede skruer, spiker og rustfritt stål
Dykkutt i plater med plastoverflate eller hardt tre,
for eksempel forkorting av dørkarmer, utsparinger for
ledningsrør
Skjæring og kapping nær kanter, i hjørner eller dårlig
tilgjengelige områder;
for eksempel: fjerne fuger mellom veggfliser til reparasjons-
arbeider, skjære utsparinger i fliser, gipsplater eller kunst-
stoff
Nøyaktig utfresing og kapping av flise-/fugemateriale,
epoksyharpiks og glassfiberforsterket plast,
for eksempel saging av mindre utsnitt i myke veggfliser og
fresing av utsparinger i glassfiberforsterket plast
Rasping og sliping på hardt underlag,
for eksempel fjerning av mørtel eller flislim (for eksempel
ved utskifting av skadde fliser), fjerning av rester av
teppelim
1 609 92A 2LW | (16.1.17) Bosch Power Tools
Page 91

OBJ_BUCH-2853-001.book Page 91 Monday, January 16, 2017 1:56 PM
Innsatsverktøy Materiale Anvendelse
HM-riff-mørtelfjerner
Mørtel,
Fuger,
Epoksyharpiks,
Utfresing og kapping av flis- og fugemateriale, rasping og
sliping på hardt underlag,
for eksempel fjerning av flislim og fugemørtel
Glassfiberforsterkede
plastmaterialer,
Slipende materialer
HCS-multikniv
Takpapp,
Tepper,
Gressmatter,
Kartong,
Rask og nøyaktig skjæring av mykt materiale og fleksible
slipende materialer,
for eksempel skjæring av tepper, kartong, PVC-gulv,
takpapp osv.
PVC-gulv
Skraper, stiv
Tepper,
Mørtel,
Skraping på hardt underlag,
for eksempel fjerning av mørtel, betong- og teppelimrester
Betong,
Flislim
Skraper, fleksibel
Teppelim,
Malingsrester,
Silikon
Fleksibel skraping på mykt underlag,
for eksempel fjerning av silikonfuger, teppelim- og malings-
rester
Norsk | 91
Bi-metallsegmentbølgeslipi
ngskniv
Isolasjonsmateriale,
Isolasjonsplater,
Gulvfliser,
Trinnlydplater,
Kartong,
Tepper,
Gummi,
Skinn
HM-riff-slipefinger
Tre,
Maling
HM-riff-dykksagblad
Glassfiber,
Mørtel,
Tre
HCS-universalfugeskjærer
Ekspansjonsfuger,
Vinduskitt,
Isolasjon (steinull)
Innsetting av innsatsverktøy
Sett det ønskede innsatsverktøyet (f. eks. dykksagblad 10)
slik på verktøyfestet 7 at bøyen peker nedover (se bildet på illustrasjonssiden, skriften på innsatsverktøyet skal være lesbar ovenfra).
Drei innsatsverktøyet i en gunstig posisjon for det arbeidet du
vil utføre, og la det gå i lås i knastene i verktøyfestet 7. Det er
da mulig med tolv 30 ° dreide posisjoner.
Fest innsatsverktøyet med skruen 11. Skru skruen 11 godt
fast med umbrakonøkkelen 12.
Kontroller om innsatsverktøyet sitter godt fast. Galt el-
ler ikke sikkert festede innsatsverktøy kan løsne i løpet av
driften og utsette deg for fare.
Nøyaktig skjæring av myke materialer,
for eksempel tilskjæring av islasjonsplater, kapping av
overflødig isolasjonsmateriale
Sliping av tre eller maling på vanskelig tilgjengelige steder
uten bruk av slipepapir,
for eksempel sliping av maling mellom lameller på vindus-
skodder, sliping i hjørner på tregulv
Dykkutt i sterkt slipende materialer,
for eksempel utfresing av tynne mosaikkfliser
Skjæring og kutting av myke materialer,
for eksempel skjæring av ekspansjonsfuger i silikon eller
vinduskitt
Fjerning av innsatsverktøyet
Til fjerning av innsatsverktøyet løsner du skruen 11 med umbrakonøkkelen 12 og tar av innsatsverktøyet.
Påsetting/utskifting av slipeskiven på slipeplaten
Slipesålen 15 er utstyrt med en borrelåsoverflate, slik at slipeskiver med borrelås kan festes på en hurtig og enkel måte.
Bank borrelåsen til slipesålen 15 ut før du setter på en slipe-
skive 16, slik at den festes så godt som mulig.
Sett slipeskiven 16 kant i kant på en side av slipesålen 15,
legg slipeskiven deretter på slipesålen og trykk den godt fast.
For å sikre en optimal støvavsuging må du passe på at utstansingene på slipeskiven passer overens med boringene på slipesålen.
Bosch Power Tools 1 609 92A 2LW | (16.1.17)
Page 92

OBJ_BUCH-2853-001.book Page 92 Monday, January 16, 2017 1:56 PM
92 | Norsk
Til fjerning av slipeskiven 16 tar du tak i en spiss og trekker
den av fra slipesålen 15.
Du kan bruke alle slipeskiver, polerings- og rengjøringpads i
serien Delta 93 mm til Bosch-tilbehørprogrammet.
Valg av slipeskive
Avhengig av materialet som skal bearbeides og ønsket slipegrad finnes det forskjellige typer slipepapir:
Slipeskive Materiale Anvendelse Korning
– Samtlige trematerialer
(f.eks. hardt tre, mykt tre,
sponplater, bygningsplater)
–Metallmaterialer
Til forsliping av f. eks. rue, uhøvlede bjelker og bord
Til plansliping og utjevning av små ujevnheter
Til ferdig- og finsliping av tre fin 180
Slipetilbehør som filt/polerfilt festes på samme måte på slipesålen.
grov 40
middels 80
60
100
120
240
320
400
–Maling
–Lakk
–Fyller
–Sparkel
Støv-/sponavsuging
Støv fra materialer som blyholdig maling, noen tresorter,
mineraler og metall kan være helsefarlige. Berøring eller
innånding av støv kan utløse allergiske reaksjoner og/eller
åndedrettssykdommer hos brukeren eller personer som
befinner seg i nærheten.
Visse typer støv som eik- eller bøkstøv gjelder som kreftfremkallende, spesielt i kombinasjon med tilsetningsstoffer til trebearbeidelse (kromat, trebeskyttelsesmidler).
Asbestholdig materiale må kun bearbeides av fagfolk.
– Bruk helst et støvavsug som er egnet for dette materia-
let.
– Sørg for god ventilasjon av arbeidsplassen.
– Det anbefales å bruke en støvmaske med filterklasse
P2.
Følg ditt lands gyldige forskrifter for de materialene som
skal bearbeides.
Unngå støv på arbeidsplassen. Støv kan lett antennes.
Tilkobling av støvavsuget (se bilde A)
Støvavsuget 14 er kun beregnet til arbeid med slipeplaten 15,
det nytter ingenting i kombinasjon med andre innsatsverktøy.
Du må alltid koble til et støvavsug til sliping.
Ta av innsatsverktøyet til montering av støvavsuget 14 (tilbe-
hør).
Sett eventuelt delene til støvavsuget 14 sammen som vist på
bildet. Sett det monterte støvavsuget på verktøyfestet 7 på
elektroverktøyet. Drei støvavsuget slik at knastene på støvav-
1 609 92A 2LW | (16.1.17) Bosch Power Tools
Til avsliping av maling
Til sliping av forhåndsmaling (f.eks. fjerning av penselstrøk, malingsdrypp og nedrennende maling)
Til siste sliping av grunnmaling før lakkering
suget smekker i lås i de tilsvarende utsparingene på huset.
Fest støvavsuget med holdeklemmen 17 på elektroverktøyet
som vist på bildet.
Pass på at filtringen 16 ikke er skadet og ligger tett mot slipesålen 15. Skift straks ut en skadet filtring.
Sett en avsugslange 20 (t ilb eh ør ) a vhe ng ig av mod el le n e nte n
direkte på avsugstussen 18 eller kapp ditt gamle slangeendestykke, skru avsugadapteren 19 (tilbehør) på slangeenden og
sett den så direkte på avsugstussen 18. Forbind avsugslangen 20 med en støvsuger (tilbehør). En oversikt over tilkobling til forskjellige støvsugere finner du på utbrettsiden.
Støvsugeren må være egnet til materialet som skal bearbeides.
Ved avsuging av spesielt helsefarlig, kreftfremkallende eller
tørt støv må du bruke en spesialstøvsuger.
Bruk
Igangsetting
Innsetting av batteriet
Bruk kun original Bosch litium-ion-batterier med en
spenning som er angitt på typeskiltet til elektroverktøyet ditt. Bruk av andre batterier kan medføre skader og
brannfare.
Merk: Bruk av batterier som ikke er egnet for dette verktøyet
kan føre til feilfunksjoner eller til skader på elektroverktøyet.
Sett det oppladede batteriet 3 inn i håndtaket til dette går følbart i lås og ligger kant i kant på håndtaket.
grov 40
60
middels 80
100
120
fin 180
240
320
400
Page 93

OBJ_BUCH-2853-001.book Page 93 Monday, January 16, 2017 1:56 PM
Inn-/utkobling
Til innkobling av elektroverktøyet skyver du på-/av-bryteren
1 fremover, slik at det vises «I» på bryteren.
Til utkobling av elektroverktøyet skyver du på-/av-bryteren 1
bakover, slik at det vises «0» på bryteren.
Slå elektroverktøyet kun på når du bruker det for å spare
energi.
Litium-ion-batteriet er beskyttet av «Electronic Cell Protection (ECP)» mot total utlading. Når batteriet er utladet, kobles
elektroverktøyet ut med en beskyttelseskobling: Innsatsverktøyet beveger seg ikke lenger.
Merk: Hvis elektroverktøyet kopler automatisk ut på grunn av
utladet eller overopphetet batteri, kopler du ut elektroverktøyet med på-/av-bryteren 1. Lad opp batteriet hhv. la det avkjøle før du kopler inn elektroverktøyet. Batteriet kan ellers ta
skade.
Forhåndsinnstilling av svingtall
Med stillhjulet for svingtallforvalg 5 kan du forhåndsinnstille
nødvendig svingtall også i løpet av driften.
Det nødvendige svingtallet er avhengig av materiale og arbeidsvilkårene og kan finnes frem til praktiske forsøk.
Arbeidshenvisninger
Ta batteriet ut av elektroverktøyet før alle arbeider på
elektroverktøyet utføres (f. eks. vedlikehold, verktøyskifte osv.) hhv. ved transport og oppbevaring. Det er
fare for skader hvis du trykker på på-/av-bryteren ved en
feiltagelse.
Vent til elektroverktøyet er stanset helt før du legger
det ned.
Merk: Ikke tett ventilasjonsåpningene 4 til elektroverktøyet
under arbeidet, ellers reduseres levetiden til elektroverktøyet.
Arbeidsprinsipp
Med den oscillerende driften svinger elektroverktøyet opp til
20000 ganger i minuttet 2,8 ° frem og tilbake. Dette muliggjør
et nøyaktig arbeid på trange steder.
Arbeid med lavt og jevnt presstrykk, ellers
reduseres arbeidseffekten og innsatsverktøyet kan blokkere.
Bruk egnede detektorer til å finne skjulte
strøm-/gass-/vannledninger, eller spør hos det lokale
el-/gass-/vannverket. Kontakt med elektriske ledninger
kan medføre brann og elektrisk støt. Skader på en gassledning kan føre til eksplosjon. Hull i en vannledning forårsaker materielle skader.
Det må kun bearbeides myke materialer som tre, gips-
kartong o.l. med dykksagemetoden!
Før du sager med HCS-sagblad i tre, sponplater, bygningsmaterialer etc. må du sjekke om disse inneholder fremmedlegemer slik som spiker, skruer e. l. Fjern eventuelt fremmedlegemene eller bruk bi-metall-sagblad.
Kapping
Merk: Ved kapping av veggfliser må du passe på at verktøye-
ne er utsatt for sterk slitasje når de brukes over lengre tid.
Sliping
Slipemengden og slipebildet bestemmes vesentlig med valget
av slipeskive, forhåndsinnstilt svingtallstrinn og presstrykket.
Kun feilfrie slipeskiver gir bra slipeeffekt og skåner elektroverktøyet.
Pass på jevnt presstrykk, for å øke levetiden til slipeskivene.
En stor øking av presstrykket fører ikke til en høyere slipeef-
fekt, men til en sterkere slitasje av elektroverktøyet og slipeskiven.
Til en punkt-nøyaktig sliping av hjørner, kanter og områder
som er vanskelig tilgjengelige kan du også arbeide med spissen eller en kant på slipesålen.
Ved punkt-sliping kan slipeskiven varmes sterkt opp. Reduser
svingtallet og presstrykket og la slipeskiven avkjøle med jevne
mellomrom.
En slipeskive som ble brukt til bearbeidelse av metall, må ikke
lenger brukes til andre materialer.
Bruk kun originalt Bosch slipetilbehør.
Du må alltid koble til et støvavsug til sliping.
Skraping
Velg et høyt svingtalltrinn til skraping.
Arbeid på en myk undergrunn (f. eks. tre) i flat vinkel og med
lite presstrykk. Sparkelen kan ellers skjære inn i undergrunnen.
Temperaturavhengig overlastbeskyttelse
Beveg elektroverktøyet frem og tilbake i løpet av arbeidet, slik at innsatsverktøyet ikke
varmes for sterkt opp og ikke blokkerer.
Ved forskriftsmessig bruk kan ikke elektroverktøyet overbelastes. Hvis belastningen blir for stor eller batteritemperaturen ikke er i samsvar med spesifikasjonene, reduseres turtallet, eller elektroverktøyet slås av. Ved redusert turtall går ikke
elektroverktøyet med fullt turtall igjen før batteriet har tillatt
temperatur eller belastningen reduseres. Ved automatisk ut-
Saging
Bruk kun ikke-skadede og feilfrie sagblad. Bøyde eller
kobling slår du av elektroverktøyet, lar batteriet avkjøles og
slår deretter på elektroverktøyet igjen.
butte sagblad kan brekke, påvirke skjæringen negativt eller forårsake et tilbakeslag.
Ved saging av lette bygningsmaterialer må du følge lo-
ver og bestemmelser og materialprodusentens anbefalinger.
Norsk | 93
Bosch Power Tools 1 609 92A 2LW | (16.1.17)
Page 94

OBJ_BUCH-2853-001.book Page 94 Monday, January 16, 2017 1:56 PM
94 | Suomi
Regler for optimal bruk av oppladbare batterier
Beskytt batteriet mot fuktighet og vann.
Batteriet må kun lagres i et temperaturområde på – 20 ° C til
50 ° C. Ikke la batteriet f.eks. ligge i bilen om sommeren.
En vesentlig kortere driftstid etter oppladingen er et tegn på
at batteriet er oppbrukt og må skiftes ut.
Følg informasjonene om kassering.
Kun for EU-land:
Batterier/oppladbare batterier:
Service og vedlikehold
Vedlikehold og rengjøring
Ta batteriet ut av elektroverktøyet før alle arbeider på
elektroverktøyet utføres (f. eks. vedlikehold, verktøyskifte osv.) hhv. ved transport og oppbevaring. Det er
fare for skader hvis du trykker på på-/av-bryteren ved en
feiltagelse.
Hold elektroverktøyet og ventilasjonsspaltene alltid
rene, for å kunne arbeide bra og sikkert.
Rengjør rasp-innsatsverktøyene (tilbehør) regelmessig med
en stålbørste.
Kundeservice og rådgivning ved bruk
Kundeservicen svarer på dine spørsmål om reparasjon og
vedlikehold av produktet samt om reservedeleler. Sprengskisser og informasjon om reservedeler finner du også på:
www.bosch-pt.com
Bosch rådgivningsteamet hjelper deg gjerne ved spørsmål angående våre produkter og deres tilbehør.
Ved alle forespørsler og reservedelsbestillinger må du oppgi
det 10-sifrede produktnummeret som er angitt på produktets
typeskilt.
Norsk
Robert Bosch AS
Postboks 350
1402 Ski
Tel.: 64 87 89 50
Faks: 64 87 89 55
Transport
Li-ion-batteriene i verktøyet underligger kravene for farlig
gods. Batteriene kan transporteres på veier av brukeren uten
ytterligere krav.
Ved forsendelse gjennom tredje personer (f. eks.: lufttransport eller spedisjon) må det oppfylles spesielle krav til emballasje og merking. Du må da konsultere en ekspert for farlig
gods ved forberedelse av forsendelsen.
Send batterier kun hvis huset ikke er skadet. Lim igjen de åpne kontaktene og pakk batteriet slik at det ikke beveger seg i
emballasjen.
Ta også hensyn til eventuelle videreførende nasjonale forskrifter.
Deponering
Elektroverktøy, batterier, tilbehør og emballasje må
leveres inn til miljøvennlig gjenvinning.
Elektroverktøy og batterier må ikke kastes i vanlig søppel!
Rett til endringer forbeholdes.
Suomi
Turvallisuusohjeita
Sähkötyökalujen yleiset turvallisuusohjeet
laiminlyönti saattaa johtaa sähköiskuun, tulipaloon ja/tai
vakavaan loukkaantumiseen.
Säilytä kaikki turvallisuus- ja muut ohjeet tulevaisuutta
varten.
Turvallisuusohjeissa käytetty käsite ”sähkötyökalu” käsittää
verkkokäyttöisiä sähkötyökaluja (verkkojohdolla) ja akkukäyttöisiä sähkötyökaluja (ilman verkkojohtoa).
Työpaikan turvallisuus
Pidä työskentelyalue puhtaana ja hyvin valaistuna.
Työpaikan epäjärjestys tai valaisemattomat työalueet voivat johtaa tapaturmiin.
Älä työskentele sähkötyökalulla räjähdysalttiissa ym-
päristössä, jossa on palavaa nestettä, kaasua tai pölyä.
Sähkötyökalu muodostaa kipinöitä, jotka saattavat sytyttää pölyn tai höyryt.
Pidä lapset ja sivulliset loitolla sähkötyökalua käyttä-
essäsi. Voit menettää laitteesi hallinnan huomiosi suun-
tautuessa muualle.
Sähköturvallisuus
Sähkötyökalun pistotulpan tulee sopia pistorasiaan.
Pistotulppaa ei saa muuttaa millään tavalla. Älä käytä
mitään pistorasia-adaptereita maadoitettujen sähkötyökalujen kanssa. Alkuperäisessä kunnossa olevat pisto-
tulpat ja sopivat pistorasiat vähentävät sähköiskun vaaraa.
Vältä koskettamasta maadoitettuja pintoja, kuten put-
kia, pattereita, liesiä tai jääkaappeja. Sähköiskun vaara
kasvaa, jos kehosi on maadoitettu.
VAROITUS
Iht. det europeiske direktivet 2012/19/EU
om gamle elektriske apparater og iht. det europeiske direktivet 2006/66/EC må defekte
eller oppbrukte batterier/oppladbare batterier samles inn adskilt og leveres inn til en
miljøvennlig resirkulering.
Li-ion:
Ta hensyn til informasjonene i avsnittet «Transport», side 94.
Lue kaikki turvallisuus- ja muut ohjeet.
Turvallisuusohjeiden noud attamisen
1 609 92A 2LW | (16.1.17) Bosch Power Tools
Page 95

OBJ_BUCH-2853-001.book Page 95 Monday, January 16, 2017 1:56 PM
Älä aseta sähkötyökalua alttiiksi sateelle tai kosteudel-
le. Veden tunkeutuminen sähkötyökalun sisään kasvattaa
sähköiskun riskiä.
Älä käytä verkkojohtoa väärin. Älä käytä sitä sähkötyö-
kalun kantamiseen, ripustamiseen tai pistotulpan irrottamiseen pistorasiasta vetämällä. Pidä johto loitolla
kuumuudesta, öljystä, terävistä reunoista ja liikkuvista
osista. Vahingoittuneet tai sotkeutuneet johdot kasvatta-
vat sähköiskun vaaraa.
Käyttäessäsi sähkötyökalua ulkona käytä ainoastaan
ulkokäyttöön soveltuvaa jatkojohtoa. Ulkokäyttöön so-
veltuvan jatkojohdon käyttö pienentää sähköiskun vaaraa.
Jos sähkötyökalun käyttö kosteassa ympäristössä ei
ole vältettävissä, tulee käyttää vikavirtasuojakytkintä.
Vikavirtasuojakytkimen käyttö vähentää sähköiskun vaaraa.
Henkilöturvallisuus
Ole valpas, kiinnitä huomiota työskentelyysi ja nouda-
ta tervettä järkeä sähkötyökalua käyttäessäsi. Älä käytä mitään sähkötyökalua, jos olet väsynyt tai huumeiden, alkoholin tahi lääkkeiden vaikutuksen alaisena.
Hetken tarkkaamattomuus sähkötyökalua käytettäessä
saattaa johtaa vakavaan loukkaantumiseen.
Käytä suojavarusteita. Käytä aina suojalaseja. Henkilö-
kohtaisen suojavarustuksen käyttö, kuten pölynaamarin,
luistamattomien turvakenkien, suojakypärän tai kuulonsuojaimien, riippuen sähkötyökalun lajista ja käyttötavasta, vähentää loukkaantumisriskiä.
Vältä tahatonta käynnistämistä. Varmista, että sähkö-
työkalu on poiskytkettynä, ennen kuin liität sen sähköverkkoon ja/tai liität akun, otat sen käteen tai kannat
sitä. Jos kannat sähkötyökalua sormi käynnistyskytkimellä
tai kytket sähkötyökalun pistotulpan pistorasiaan käynnistyskytkimen ollessa käyntiasennossa, altistat itsesi onnettomuuksille.
Poista kaikki säätötyökalut ja ruuvitaltat, ennen kuin
käynnistät sähkötyökalun. Työkalu tai avain, joka sijait-
see laitteen pyörivässä osassa, saattaa johtaa loukkaantumiseen.
Vältä epänormaalia kehon asentoa. Huolehdi aina tuke-
vasta seisoma-asennosta ja tasapainosta. Täten voit pa-
remmin hallita sähkötyökalua odottamattomissa tilanteissa.
Käytä tarkoitukseen soveltuvia vaatteita. Älä käytä
löysiä työvaatteita tai koruja. Pidä hiukset, vaatteet ja
käsineet loitolla liikkuvista osista. Väljät vaatteet, korut
ja pitkät hiukset voivat takertua liikkuviin osiin.
Jos pölynimu- ja keräilylaitteita voidaan asentaa, tulee
sinun tarkistaa, että ne on liitetty ja että niitä käytetään oikealla tavalla. Pölynimulaitteiston käyttö vähentää
pölyn aiheuttamia vaaroja.
Sähkötyökalujen huolellinen käyttö ja käsittely
Älä ylikuormita laitetta. Käytä kyseiseen työhön tarkoi-
tettua sähkötyökalua. Sopivaa sähkötyökalua käyttäen
työskentelet paremmin ja varmemmin tehoalueella, jolle
Älä käytä sähkötyökalua, jota ei voida käynnistää ja py-
säyttää käynnistyskytkimestä. Sähkötyökalu, jota ei
enää voida käynnistää ja pysäyttää käynnistyskytkimellä,
on vaarallinen ja se täytyy korjata.
Irrota pistotulppa pistorasiasta, ennen kuin suoritat
säätöjä, vaihdat tarvikkeita tai siirrät sähkötyökalun
varastoitavaksi. Nämä turvatoimenpiteet estävät sähkö-
työkalun tahattoman käynnistyksen.
Säilytä sähkötyökalut poissa lasten ulottuvilta, kun nii-
tä ei käytetä. Älä anna sellaisten henkilöiden käyttää
sähkötyökalua, jotka eivät tunne sitä tai jotka eivät ole
lukeneet tätä käyttöohjetta.
sia, jos niitä käyttävät kokemattomat henkilöt.
Hoida sähkötyökalusi huolella. Tarkista, että liikkuvat
osat toimivat moitteettomasti, eivätkä ole puristuksessa sekä, että siinä ei ole murtuneita tai vahingoittuneita osia, jotka saattaisivat vaikuttaa haitallisesti sähkötyökalun toimintaan. Anna korjata nämä vioittuneet
osat ennen käyttöä. Monen tapaturman syyt löytyvät huo-
nosti huolletuista laitteista.
Pidä leikkausterät terävinä ja puhtaina. Huolellisesti
hoidetut leikkaustyökalut, joiden leikkausreunat ovat teräviä, eivät tartu helposti kiinni ja niitä on helpompi hallita.
Käytä sähkötyökaluja, tarvikkeita, vaihtotyökaluja jne.
näiden ohjeiden mukaisesti. Ota tällöin huomioon työolosuhteet ja suoritettava toimenpide. Sähkötyökalun
käyttö muuhun kuin sille määrättyyn käyttöön saattaa johtaa vaarallisiin tilanteisiin.
Akkukäyttöisten työkalujen huolellinen käsittely ja
käyttö
Lataa akku vain valmistajan suosittelemassa latauslait-
teessa. Latauslaite, joka soveltuu määrätyntyyppiselle
akulle, saattaa muodostaa tulipalovaaran erilaista akkua ladattaessa.
Käytä sähkötyökalussa ainoastaan kyseiseen sähkö-
työkaluun tarkoitettua akkua. Jonkin muun akun käyttö
saattaa johtaa loukkaantumiseen ja tulipaloon.
Pidä irrallista akkua loitolla metalliesineistä, kuten pa-
perinliittimistä, kolikoista, avaimista, nauloista, ruuveista tai muista pienistä metalliesineistä, jotka voivat
oikosulkea akun koskettimet. Akkukoskettimien välinen
oikosulku saattaa aiheuttaa palovammoja tai johtaa tulipaloon.
Väärästä käytöstä johtuen akusta saattaa vuotaa nes-
tettä. Vältä koskettamasta nestettä. Jos nestettä vahingossa joutuu iholle, huuhtele kosketuskohta vedellä. Jos nestettä pääsee silmiin, tarvitaan tämän lisäksi
lääkärin apua. Akusta vuotava neste saattaa aiheuttaa är-
sytystä ja palovammoja.
Huolto
Anna ainoastaan koulutettujen ammattihenkilöiden
korjata sähkötyökalusi ja hyväksy korjauksiin vain alkuperäisiä varaosia. Täten varmistat, että sähkötyökalu
säilyy turvallisena.
sähkötyökalu on tarkoitettu.
Suomi | 95
Sähkötyökalut ovat vaaralli-
Bosch Power Tools 1 609 92A 2LW | (16.1.17)
Page 96

OBJ_BUCH-2853-001.book Page 96 Monday, January 16, 2017 1:56 PM
96 | Suomi
Akkukäyttöisen monitoimityökalun
turvallisuusohjeet
Pidä sähkötyökalua eristetyistä pinnoista, tehdessäsi
työtä, jossa vaihtotyökalu saattaisi osua piilossa olevaan sähköjohtoon. Kosketus jännitteiseen johtoon voi
saattaa sähkötyökalun metalliosat jännitteisiksi ja johtaa
sähköiskuun.
Käytä sähkötyökalua ainoastaan kuivaleikkaukseen.
Veden tunkeutuminen sähkötyökalun sisään kasvattaa
sähköiskun riskiä.
Huomio tulipalovaara! Vältä hionta-aineen ja hiomako-
neen ylikuumenemista. Tyhjennä aina pölysäiliö ennen
työtaukoja. Suodatinpussissa, mikrosuodattimessa tai
paperipussissa (tahi pölynimurin suodatinpussissa tai suodattimessa) oleva hiomapöly saattaa epäsuotuisissa olosuhteissa, kuten kipinästä metallia hiottaessa, syttyä itsestään. Erityisen vaarallista on, jos hiomapöly on sekoittunut
lakka-, polyuretaanijäännösten tai muitten kemiallisten aineiden kanssa ja hiottava aines on kuumaa pitkän työrupeaman jälkeen.
Pidä kädet loitolla sahauskohdasta. Älä pane käsiä työ-
kappaleen alle. Sahanterää kosketettaessa on olemassa
loukkaantumisvaara.
Käytä sopivia etsintälaitteita piilossa olevien syöttö-
johtojen paikallistamiseksi tai käänny paikallisen jakeluyhtiön puoleen. Kosketus sähköjohtoon saattaa johtaa
tulipaloon ja sähköiskuun. Kaasuputken vahingoittaminen
saattaa johtaa räjähdykseen. Vesijohtoputken puhkaisu aiheuttaa aineellista vahinkoa.
Pidä työn aikana sähkötyökalua kaksin käsin ja ota tu-
keva seisoma-asento. Sähkötyökalua pystyy ohjaamaan
varmemmin kahdella kädellä.
Varmista työkappale. Kiinnityslaitteilla tai ruuvipenkkiin
kiinnitetty työkappale pysyy tukevammin paikoillaan kuin
kädessä pidettynä.
Älä avaa akkua. On olemassa oikosulun vaara.
Suojaa akku kuumuudelta esim. myös pitkäaikaiselta auringonpaisteelta, tulelta, vedeltä ja
kosteudelta. On olemassa räjähdysvaara.
Jos akku vaurioituu tai sitä käytetään asiaankuulumat-
tomalla tavalla, siitä saattaa purkautua höyryjä. Tuuleta raikkaalla ilmalla ja hakeudu lääkärin luo, jos ilmenee haittoja. Höyryt voivat ärsyttää hengitystiehyeitä.
Käytä akkua ainoastaan yhdessä Bosch-sähkötyökalu-
si kanssa. Vain täten suojaat akkusi vaaralliselta ylikuormi-
tukselta.
Terävät esineet (esim. naulat ja ruuvitaltat) tai kuo-
reen kohdistuvat iskut voivat vaurioittaa akkua. Silloin
voi syntyä sisäinen oikosulku ja akku voi syttyä palamaan,
muodostaa savua, räjähtää tai ylikuumentua.
Käytä suojakäsineitä, kun vaihdat vaihtotyökaluja.
Vaihtotyökalut lämpenevät pidemmässä käytössä.
Älä kaavi kostutettuja materiaaleja (esim. tapetteja)
eikä kostealla alustalla. Veden tunkeutuminen sähkötyö-
kalun sisään kasvattaa sähköiskun riskiä.
Älä käsittele työstettävää pintaa liuotinpitoisilla nes-
teillä. Materiaalien lämmetessä kaavinnassa saattaa syn-
tyä myrkyllisiähöyryjä.
Ole erityisen varovainen kaavinta käyttäessäsi. Työka-
lu on erittäin terävä, on olemassa loukkaantumisvaara.
Tuotekuvaus
Käännä auki taittosivu, jossa on laitteen kuva ja pidä se uloskäännettynä lukiessasi käyttöohjetta.
Määräyksenmukainen käyttö
Sähkötyökalu on tarkoitettu puuaineksen, muovin, kipsin, eirautametallien ja kiinnitysosien (esim. karkaisemattomien
naulojen ja hakasten) sahaukseen ja katkaisuun. Se soveltuu
myös pehmeiden seinälaattojen käsittelyyn sekä pienten pintojen kuivahiontaan ja kaavintaan. Se soveltuu erityisesti töihin lähellä reunoja ja tasoa. Sähkötyökalua saa käyttää yksinomaan Bosch-lisätarvikkeiden kanssa.
Kuvassa olevat osat
Kuvassa olevien osien numerointi viittaa grafiikkasivussa olevaan sähkötyökalun kuvaan.
1 Käynnistyskytkin
2 Akun vapautuspainike
3 Akku
4 Tuuletusaukot
5 Värähtelytaajuuden asetuksen säätöpyörä
6 Akun latausvalvontanäyttö
7 Työkalunpidin
8 Syvyydenrajoittimen kiinnitysvipu
9 Syvyydenrajoitin
10 Upotussahanterä *
11 Kuusiokoloruuvi
12 Kuusiokoloavain
13 Kahva (eristetty kädensija)
14 Pölynimulaite *
15 Hiomalevy *
16 Hiomapaperi *
17 Pölynpoisto-osan kiinnitysvipu
18 Imunysä *
19 Imuadapteri *
20 Imuletku *
*Kuva ssa tai selostuksessa esiintyvä lisätarvike ei kuulu vakiotoimitukseen. Löydät täydellisen tarvikeluettelon tarvikeohjelmastamme.
Lue kaikki turvallisuus- ja muut ohjeet. Tur-
vallisuusohjeiden noudattamisen laiminlyönti
saattaa johtaa sähköiskuun, tulipaloon ja/tai
vakavaan loukkaantumiseen.
1 609 92A 2LW | (16.1.17) Bosch Power Tools
Page 97

OBJ_BUCH-2853-001.book Page 97 Monday, January 16, 2017 1:56 PM
Tekniset tiedot
Akku-Multi-Cutter (Monitoimityökalu) GOP 12V-28
Tuotenumero
Nimellisjännite
Tyhjäkäyntinopeus n
0
3 601 HB5 0..
V= 12
min-15000–20000
Värähtelykulma vasemmalle/
oikealle °1,4
Paino vastaa
EPTA-Procedure 01:2014
1)
kg 0,97– 1,2
Sallittu ympäristön lämpötila
– ladattaessa
–käytössä
2)
Suositellut akut
ja säilytyksessä
°C
°C
0...+45
–20...+50
GBA 10,8V...
GBA 12V...
GBA 12V... W
Suositellut latauslaitteet
GAL 11.. CV
GAL 12.. CV
GAL 18... W
1) riippuen käytetystä akusta
2) rajoitettu tehokkuus, kun lämpötilat < 0 ° C
Tekniset tiedot määritetty toimitukseen kuuluvan ak un kanssa.
Melu-/tärinätiedot
Melun mittausarvot on määritetty EN 60745-2-4 mukaan.
Laitteen tyypillinen A-painotettu äänen painetaso on: Äänen
painetaso 79 dB(A); äänen tehotaso 90 dB(A). Epävarmuus
K=3dB.
Käytä kuulonsuojaimia!
Värähtelyn yhteisarvot a
epävarmuus K mitattuna EN 60745-2-4 mukaan:
Hiominen: a
Sahaus upotussahanterällä: a
=2,9m/s2, K= 1,5 m/s2,
h
Sahaus segmenttisahanterällä: a
Kaavinta: a
=8,3m/s2, K=1,5 m/s2.
h
Näissä ohjeissa mainittu värähtelytaso on mitattu normissa
EN 60745 standardoidun mittausmenetelmän mukaisesti ja
sitä voidaan käyttää sähkötyökalujen keskinäiseen vertailuun.
Se soveltuu myös värähtelyrasituksen väliaikaiseen arviointiin.
(kolmen suunnan vektorisumma) ja
h
=9,2m/s2, K= 1,5 m/s2,
h
=2,5m/s2, K =1,5 m/s2,
h
Asennus
Akun lataus
Käytä vain teknisissä tiedoissa ilmoitettuja latauslait-
teita. Vain nämä latauslaitteet on sovitettu sähkötyökalus-
sasi käytettävälle litiumioniakulle.
Huomio: Akku toimitetaan osittain ladattuna. Jotta akun täysi
teho voitaisiin taata, tulee akku ennen ensimmäistä käyttöönottoa ladata täyteen latauslaitteessa.
Litiumioniakkua voidaan ladata milloin vain lyhentämättä
akun elinikää. Latauksen keskeytys ei vaurioita akkua.
Akun irrotus
Irrota akku 3 painamalla lukkopainikkeita 2 ja vetämällä akku
taaksepäin ulos sähkötyökalusta. Älä käytä voimaa tähän.
Akun lataustilan näyttö
Akun lataustilan näytön 6 kolme vihreää LED-valoa ilmoittavat
akun 3 lataustilan. Lataustilan näyttö syttyy käyttöönoton yhteydessä vain 5 sekunniksi.
LED Kapasiteetti
3 vihreä LED palaa jatkuvasti ≥2/3
2 vihreä LED palaa jatkuvasti ≥1/3
1 vihreä LED palaa jatkuvasti < 1/3
Vilkkuvalo 1 vihreä LED Varalla
Vilkkuvalo 3 vihreä LED Tyhjä
Jos päällekytkennän yhteydessä ei syty yhtään LED-valoa, akku on rikki ja täytyy vaihtaa.
Työkalunvaihto
Irrota aina akku sähkötyökalusta ennen kaikkia laittee-
seen kohdistuvia töitä (esim. huolto, työkalun vaihto
jne.) sekä laitetta kuljetettaessa ja säilytettäessä. Muu-
toin käynnistyskytkimen tahaton painallus muodostaa
loukkaantumisvaaran.
Käytä suojakäsineitä työkalun vaihdossa. Vaihtotyöka-
luja kosketettaessa on olemassa loukkaantumisvaara.
Vaihtotyökalun valinta
Vaihtotyökalu GOP 12V-28
Ilmoitettu värähtelytaso vastaa sähkötyökalun pääasiallisia
käyttötapoja. Jos sähkötyökalua käytetään kuitenkin muihin
käyttötarkoituksiin, erilaisilla lisävarusteilla, poikkeavilla
käyttötarvikkeilla tai riittämättömästi huollettuna, silloin värähtelytaso saattaa poiketa ilmoitetusta arvosta. Tämä saattaa kasvattaa koko työaikajakson värähtelyrasitusta huomattavasti.
Värähtelyrasituksen tarkaksi arvioimiseksi tulee huomioida
myös ne ajat, jolloin laite on sammutettuna tai tyhjäkäynnillä .
Tämä voi selvästi pienentää koko työaikajakson värähtelyrasitusta.
Määrittele tarvittavat lisävarotoimenpiteet käyttäjän suojelemiseksi värähtelyn vaikutuksilta, esimerkiksi: Sähkötyökalujen ja käyttötarvikkeiden huolto, käsien pitäminen lämpiminä,
työprosessien organisointi.
Suomi | 97
Bosch Power Tools 1 609 92A 2LW | (16.1.17)
Page 98

OBJ_BUCH-2853-001.book Page 98 Monday, January 16, 2017 1:56 PM
98 | Suomi
Seuraava taulukko näyttää esimerkkejä vaihtotyökaluista. Muita vaihtotyökaluja löydät Boschin laajasta tarvikeohjelmasta.
Vaihtotyökalu Materiaali Käyttö
Bimetallisegmenttisahanterä
Puumateriaalit,
Muovi,
Ei-rautametallit
Katkaisu- ja upotussahaukset; myös reunan vierestä sahaa-
minen, kulmissa ja vaikeapääsyisissä kohdissa;
Esimerkkejä: asennettujen jalkalistojen tai ovenkehysten
katkaisu, upotussahaukset lattiapaneelien sovituksessa
Hiomalevy sarjan
Delta 93 mm
hiomalevyille
Riippuen hiomapaperista Pintahionta reunoissa, kulmissa tai vaikeapääsyisissä
kohdissa;
riippuen hiomapaperista, esim. puun, maalin, lakan ja kiven
hionta
Karhunkielet puhdistustöihin ja puun kuviointiin,
metallipintojen ruosteen poistamiseen ja maalipintojen
hiomiseen, kiillotushuopa esikiillotukseen
Profiilihiomatarvike
Puu,
Putket/Profiilit,
Maalipinnat,
Lakkapinnat,
Halkaisijaltaan maks. 55 mm profiilien kätevä ja tehokas
hiominen;
Punaiset hiomapaperit puun, putkien/profiilien,
lakkapintojen, täytemaalip intojen ja metallin hiontaan
Täytemaalipinnat,
Metalli
Bimetalliupotussahanterä, puu ja
metalli
HCS-upotussahanterä puu
Pehmeä puu,
Pehmeät muovit,
Kipsilevy,
Ohutseinäiset alumiini- ja
värimetalliprofiilit,
Ohuet peltilevyt,
Karkaisemattomat naulat
ja ruuvit
Puumateriaalit,
Pehmeät muovit
Pienehköt katkaisu- ja upotussahaukset;
Esimerkiksi: pistorasian asennuspaikan leikkaus,
kupariputken katkaisu pinnan tasalta, upotussahaukset
kipsilevyihin
Erittäin tarkat sovitustyöt puuhun;
Esimerkiksi: lukkojen ja helojen asennusaukkojen
sahaaminen
Katkaisu- ja syvät upotussahaukset; myös reunan vierestä
sahaaminen, kulmissa ja vaikeapääsyisissä kohdissa;
Esimerkki: kapeat upotussahaukset umpipuuhun
tuuletussäleikön asennusta varten
Bi-metallinen
upotussahanterä
Kova puu,
Pinnoitetut levyt
Pinnoitettujen levyjen tai kovan puun upotussahaukset;
Esimerkiksi: kattoikkunoiden asentaminen
kovan puun
sahaukseen
HM-upotussahanterä metallin
sahaukseen
Metalli,
Voimakkaasti kuluttavat
materiaalit,
Lasikuitu,
Kipsilevy,
Upotussahaukset voimakkaasti kuluttaviin materiaaleihin
tai metalliin;
Esimerkiksi: keittiön etuverhousten sahaaminen, karkais-
tujen ruuvien, naulojen ja ruostumattoman teräksen helppo
sahaaminen
Sementtisidonnaiset
kuitulevyt
Bimetalliupotussahanterä, puu ja
metalli
Pehmeä puu,
Kova puu,
Vanerilevyt,
Pinnoitettujen levyjen tai kovan puun upotussahaukset;
Esimerkiksi: ovenkarmien lyhentäminen, aukkojen sahaa-
minen hyllyihin
Muovipintaiset levyt,
Karkaisemattomat naulat
ja ruuvit
HM-Riff-segmenttisahanterä
Sementtisaumat,
Pehmeät seinälaatat,
Lasikuitumuovit,
Kevytbetoni
Sahaus ja katkaisu reunan vierestä, kulmissa ja vaikeapää-
syisissä kohdissa;
Esimerkkejä: seinälaattojen saumojen poistaminen sanee-
raustöitä varten, aukkojen le ikkaus laattoihin, kipsilevyihin
tai muoviin
1 609 92A 2LW | (16.1.17) Bosch Power Tools
Page 99

OBJ_BUCH-2853-001.book Page 99 Monday, January 16, 2017 1:56 PM
Vaihtotyökalu Materiaali Käyttö
Timantti-RIFF-segmenttisahanterä
Sementtisaumat,
Pehmeät seinälaatat,
Epoksihartsi,
Lasikuitumuovit
Laatta- ja saumamateriaalien, epoksihartsin ja lasikuitu-
muovin tarkka poistaminen ja leikkaaminen;
Esimerkiksi: pienehköjen aukkojen leikkaaminen pehmei-
siin seinälaattoihin ja aukkojen leikkaaminen lasikuitumuo-
viin
HM-Riff-hiomalevy
Laastin HM-RIFFpoistoterä
Laastipinta,
Betoniroiskeet,
Puu,
Kuluttavat materiaalit
Laastipinta,
Saumat,
Epoksihartsi,
Lasikuitumuovit,
Kovan alustan raspaaminen ja hiominen;
Esimerkiksi: laastipinnan tai laattakiinnityslaastin poistami-
nen (esimerkiksi viallisen laatan vaihdossa), ylimääräisen
mattoliiman poistaminen
Sauma- ja laattamateriaalin poistaminen ja leikkaaminen
sekä kovan alustan raspaaminen ja hiominen;
Esimerkiksi: laattakiinnityslaastin ja saumalaastin poista-
minen
Kuluttavat materiaalit
HCS-yleisveitsi
Kattohuopa,
Kokolattiamatot,
Keinonurmi,
Kartonki,
Nopea ja tarkka pehmeiden, joustavien ja kuluttavien
materiaalien leikkaaminen;
Esimerkiksi: kokolattiamattojen, kartongin, PVC-maton,
kattohuovan yms. leikkaaminen
PVC-matto
Kaavin, jäykkä
Kokolattiamatot,
Laastipinta,
Betoni,
Kovan alustan kaapiminen;
Esimerkiksi: laastin, laattakiinnityslaastin, betoniroiskei-
den ja ylimääräisen mattoliiman poistaminen
Laattakiinnityslaasti
Kaavin, taipuisa
Mattoliima,
Maalijäänteet,
Silikoni
Pehmeän alustan kätevä kaavinta;
Esimerkiksi: silikonisaumojen sekä mattoliima- ja
maalijäänteiden poistaminen
Suomi | 99
Bimetallinen
aaltomuotoiltu
segmenttiterä
Eristysmateriaalit,
Eristelevyt,
Lattialevyt,
Pehmeiden materiaalien tarkka leikkaaminen;
Esimerkiksi: eristelevyjen leikkaaminen, ylimääräisen
eristysmateriaalin katkaiseminen pinnan tasalta
Askeleristelevyt,
Kartonki,
Kokolattiamatot,
Kumi,
Nahka
HM-RIFFhiomasormi
Puu,
Maalipinnat
Puun ja maalipinnan hiominen vaikeapääsyisissä kohdissa
ilman hiomapaperia;
Esimerkiksi: ikkunaluukun lamellien välissä olevien
maalipintojen hiominen, puulattian nurkkien hiominen
HM-RIFFupotussahanterä
Lasikuitu,
Laastipinta,
Voimakkaasti kuluttavien materiaalien upotussahaukset;
Esimerkiksi: ohuiden mosaiikkilaattojen poistaminen
Puu
HCS-yleisterä
saumojen poistamiseen
Liikuntasaumat,
Ikkunakitti,
Eristeet (kivivilla)
Vaihtotyökalun asennus
Aseta haluttu vaihtotyökalu (esim. upotussahanterä 10) työkalunpitimeen 7 niin, että taive osoittaa alaspäin (katso kuvaa
grafiikkasivussa, vaihtotyökalun teksti on luettavissa ylhäältäpäin).
Bosch Power Tools 1 609 92A 2LW | (16.1.17)
Pehmeiden materiaalien leikkaaminen ja poistaminen;
Esimerkiksi: silikonisaumojen tai ikkunakitin poistaminen
Kierrä vaihtotyökalu kyseistä työtä varten sopivaan asentoon
ja saata se lukkiutumaan työkalunpitimen 7 nokkaan. Kaksitoista toisistaan 30° järjestetyt asennot ova t mahdollisia.
Kiinnitä vaihtotyökalu ruuvilla 11. Kiristä ruuvi 11 kuusiokoloavaimella 12.
Page 100

OBJ_BUCH-2853-001.book Page 100 Monday, January 16, 2017 1:56 PM
100 | Suomi
Tarkista, että vaihtotyökalu on tiukasti paikallaan. Vää-
rin tai huonosti kiinnitetyt vaihtotyökalut voivat löystyä
käytön aikana ja aiheuttaa vaaratilanteita.
Vaihtotyökalun irrotus
Poista vaihtotyökalu hölläämällä ruuvia 11 kuusiokoloavaimella 12 ja irrottamalla työkalu.
Hiomapaperin vaihto ja kiinnitys hiomalevyyn
Hiomalevyssä 15 on tarrakudos, jotta tarrakiinnitteiset hiomapaperit voidaan kiinnittää nopeasti ja yksinkertaisesti.
Koputa hiomalevyn 15 tarrakudosta puhtaaksi ennen hioma-
Aseta hiomapaperi 16 hiomalevyn 15 toista laitaa pitkin ja sitten hiomalevyyn painaen se tiukasti kiinni.
Tarkista parhaan mahdollisen pölynpoiston varmistamiseksi,
että hiomapaperin aukot ovat hiomalevyn reikien kohdalla.
Poista hiomapaperi 16 tarttumalla siihen yhdestä kulmasta ja
vetämällä se irti hiomale vystä 15.
Voit käyttää kaikkia Bosch-tarvikeohjelman sarjan Delta
93 mm hiomapapereita, kiillotus- ja puhdistusvillavuotia.
Muut hiomatarvikkeet, kuten villavuota/kiillotushupa kiinnitetään hiomalevyyn samalla tavalla.
paperin 16 kiinnitystä mahdollisimman hyvän tartunnan mahdollistamiseksi.
Hiomapaperin valinta
Riippuen hiottavasta materiaalista ja pinnan halutusta hiomatehosta on saatavissa erilaisia hiomapapereita:
Hiomapaperi Materiaali Käyttö Karkeus
– kaikki puuaines (esim.
kova puu, pehmeä puu,
lastulevyt,
rakennuslevyt)
Karkeiden, höyläämättömien palkkien ja lautojen
esihiontaan
Tasohiontaan ja pienien epätasaisuuksien tasoitukseen
karkea 40
keskikarkea 80
– metallit
Puun viimeistely- ja hienohiontaan
hieno 180
60
100
120
240
320
400
–maalit
– lakka
–filleri
–spakkeli
Värin poistohiontaan
Pohjamaalin hiontaan (esim. sivellinraitojen,
maalipisaroiden ja valumien poistoon)
karkea 40
60
keskikarkea 80
100
120
Pohjustuksen lopulliseen hiontaan ennen lakkausta
hieno 180
240
320
400
Pölyn ja lastun poistoimu
Materiaalien, kuten lyijypitoisen pinnoitteen, muutamien
puulaatujen, kivennäispölyt ja metallipölyt voivat olla terveydelle vaarallisia. Pölyn kosketus tai hengitys saattaa aiheuttaa käyttäjälle tai lähellä oleville henkilöille allergisia
reaktioita ja/tai hengitystiesairauksia.
Määrättyjä pölyjä, kuten tammen- tai pyökinpölyä pidetään
karsinogeenisina, eritoten yhdessä puukäsittelyssä käytettyjen lisäaineiden kanssa (kromaatti, puunsuoja-aine).
Asbestipitoisia aineita saavat käsitellä vain ammattilaiset.
– Käytä materiaalille soveltuvaa pölynimua, jos se on
mahdollista.
– Huolehdi työkohteen hyvästä tuuletuksesta.
– Suosittelemme käyttämään suodatusluokan P2 hengi-
tyssuojanaamaria.
Ota huomioon maassasi voimassaolevat säännökset ko ski-
en käsiteltäviä materiaaleja.
Vältä pölynkertymää työpaikalla. Pöly saattaa helposti
syttyä palamaan.
Pölynimun liitäntä (katso kuva A)
Pölynimu 14 on tarkoitettu ainoastaan hiomalevyn 15 kanssa
tehtäviin töihin, toisten vaihtotyökalujen kanssa siitä ei ole
hyötyä.
Liitä aina pölynimu, kun hiot.
Poista vaihtotyökalu pölynimulaitteen 14 (lisätarvike) asen-
nusta varten.
Kokoa tarvittaessa pölynimulaitteen 14 osat kuvan osoitta-
malla tavalla. Asenna koott u pölynimulaite sähkötyökalun työkalunpitimeen 7. Kierrä pölynimulaite niin, että pölynimulaitteen nokat lukkiutuvat kotelon vastaaviin syvennyksiin.
Kiinnitä pölynimulaite sähkötyökaluun kuvan osoittamalla tavalla kiinnityskäpälällä 17.
Tarkista, että huoparengas 16 on ehjä ja tiukasti kiinni hiomalevyssä 15. Vaihda välittömästi vahingoittunut huoparengas
uuteen.
1 609 92A 2LW | (16.1.17) Bosch Power Tools
 Loading...