

Page 1
D621 Series
EN
User's Guide
LED Keypad
Page 2
D621 Series | User's Guide | Security Company
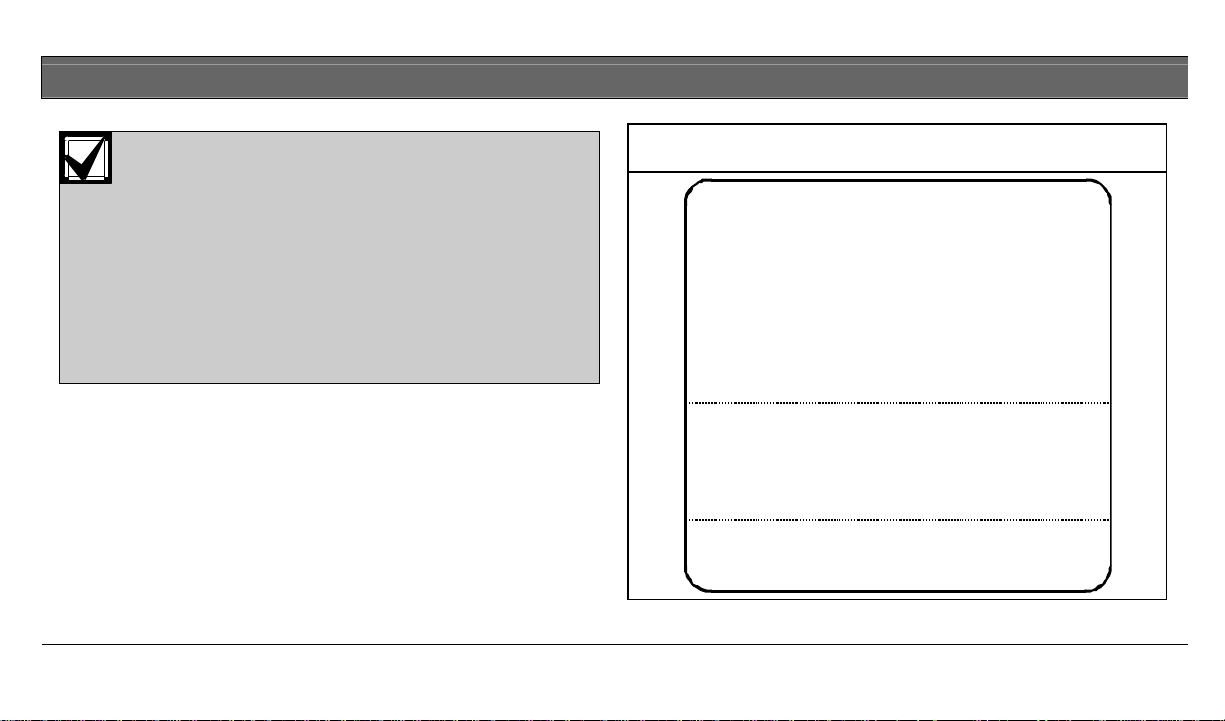
This system includes a telephone line seizure
feature. The system may be programmed to
communicate with a central monitoring station to
report system events. You will not be able to use
your phone while the system is communicating
with the central monitoring station. In the unlikely
event that the central station is not able to
receive the report, your phone may be unavailable
for up to 20 minutes while the panel makes
additional communication attempts.
Figure 1: Information Box
ECURITY COMPANY IS
MY S
ALL BEFORE TEST
C
THIS SECURITY SYSTEM IS CONNECTED TO TELEPHONE NUMBER:
THE SECURITY CONTROL PANEL IS CONNECTED TO THE PHONE JACK LOCATED:
TRANSFORMER LOCATION: _________________________________
CIRCUIT BREAKER NUMBER: _______________________________
: ____________________________
____________________________________
____________________________________
:
Bosch Security Systems | 8/04 | 2
Page 3

D621 Series | User's Guide | Contents
About This User’s Guide ..................................................................5
Introduction...........................................................................................5
Security System Basics .......................................................................7
What Is A Point? ....................................................................................7
What Is A Faulted Point?.....................................................................7
Are All Points The Same? ...................................................................7
Controlled Points ...................................................................................7
24-Hour Points ........................................................................................7
All On .....................................................................................................8
Part On .....................................................................................................9
Command Center Keys ..................................................................10
Keypad Tones.....................................................................................11
Keypad LED Descriptions.............................................................12
Commands.............................................................................................13
System Events .....................................................................................14
Fire Alarms ............................................................................................14
Burglary Alarms ...................................................................................14
Trouble Events ......................................................................................14
How Your System Reports Alarms............................................15
Silence Alarms ....................................................................................15
Keypad Adjust (Cmd 49) ................................................................16
Log Out Of The System..................................................................16
Turn the System Off .........................................................................17
Turn The System All On (All On or Cmd 1)..........................18
Turn The System Part On (Part On or Cmd 2) .....................20
Turn The System Part 2 On (Cmd 3) .........................................21
Set Part 2 Points (Cmd 65)..............................................................23
Turn The System On With No Delay ........................................24
Turn The System On With No Exit Tone................................24
Turn The System On With Points Faulted (Force Arm) ...26
Bypass Points .......................................................................................27
Date And Time (Cmd 45)...............................................................28
Change a Passcode (Cmd 55) ........................................................29
Change Others’ Passcodes (Cmd 56).........................................30
Bosch Security Systems | 8/04 | 3
Page 4

D621 Series | User's Guide | Contents
Change Others’ Passcode Level (Cmd 56)..............................32
Add A Passcode (Cmd 56) ..............................................................33
Delete A Passcode (Cmd 58).........................................................35
Renew One-Time Passcodes (Cmd 53).....................................36
Check System Troubles (Cmd 4) .................................................37
View Alarm Memory (Cmd 40) ...................................................38
View System Trouble (Cmd 42) ..................................................39
View Point Trouble (Cmd 48)......................................................41
System Test (Cmd 41).......................................................................42
Walk Test (Cmd 44)..........................................................................44
Reset The System (Cmd 47)...........................................................45
Turn Watch On/Off (Cmd 61) ......................................................45
Select Watch Tone (Cmd 62)........................................................46
Select Watch Points (Cmd 63) ......................................................48
Extend Auto On Time (Cmd 51).................................................49
All Areas On (Cmd 80) ....................................................................50
All Areas Off (Cmd 81) ....................................................................51
Auto-Forward On/Off (Cmd 82)..................................................51
Remote Arming With Telephone, Area 1...............................52
Remote Program (Cmd 43) ............................................................53
Security System Limitations ..........................................................53
Fire Safety And Evacuation ..........................................................54
Maintenance And Service .............................................................56
Power Failure ......................................................................................57
How To Clean The Keypad..........................................................57
Glossary.................................................................................................58
Notes: ...................................................................................................61
Bosch Security Systems | 8/04 | 4
Page 5

D621 Series | User's Guide | About This User’s Guide
About This User’s Guide
This user’s guide shows you how to use and maintain your
security system. It covers basic functions, such as turning the
system on and off.
This guide describes functions that are programmed by your
security company. Your system may not have all of them.
Certain functions covered may require you to enter your
personal passcode.
Bosch Security Systems | 8/04 | 5
Introduction
Your security system helps to secure life, property, and
investments against fire, theft and bodily harm. It consists of
one or more keypads, motion sensors (such as detectors or
devices located on doors and windows), and sensing devices
designed to detect the presence of smoke or combustion. Each
device is connected to a sophisticated control panel with a
microprocessor, which processes all events registered by the
system.
Control of your security system is achieved through the
keypad (the D621, D621W or D621B), which offers a variety
of basic and advanced features. The keypads, shown in
Figure 2, are tailored to meet your individual needs. Moreover,
they have been designed with you, the user, in mind.
Page 6
D621 Series | User's Guide | Introduction
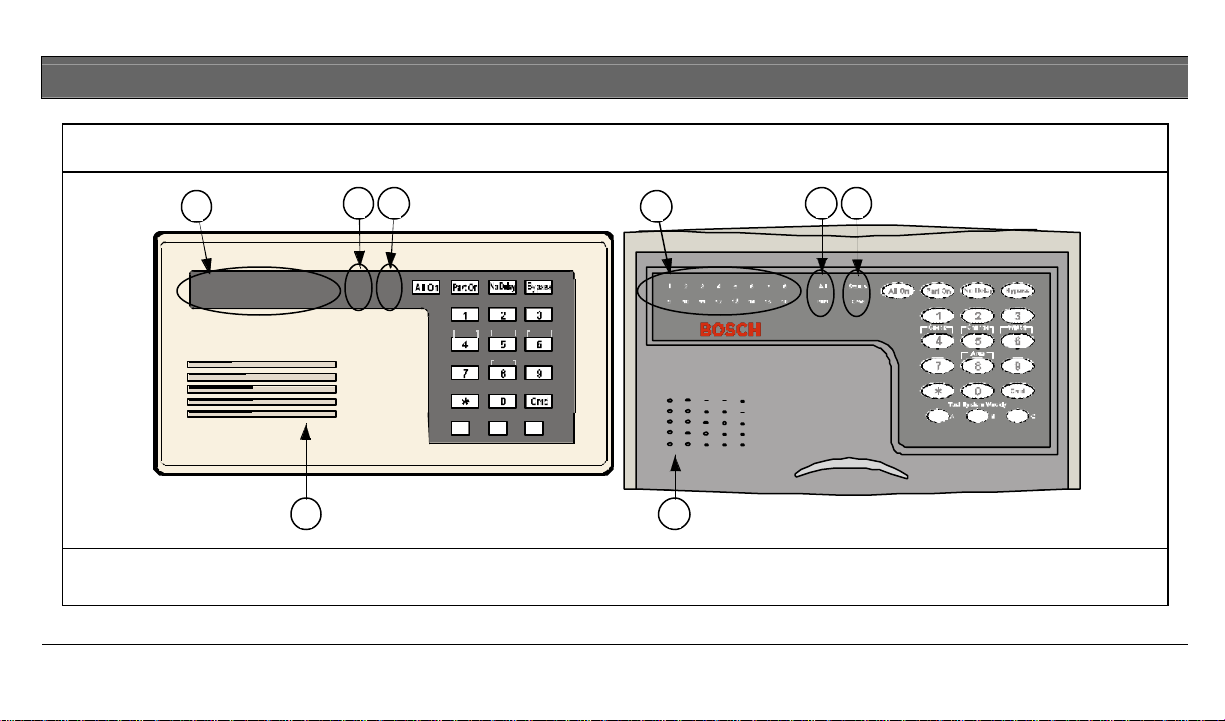
Figure 2: D621/D621B Front Panel Features
2
1
2 3 4 5 6 7 8
9 10 11 12 13 14 15 16 Part
D621
3 4
All
Status
Cmd
C heck
Cha nge Watch
Areas
Test System Weekly
A B C
1
2
1
3 4
4 9981 5297 9A
D621B
1 - Sounder
2 - Point status indicators
3- All On and Part On indicators
4 - Status and Cmd indicators
Bosch Security Systems | 8/04 | 6
Page 7

D621 Series | User's Guide | Security System Basics
Security System Basics
What Is A Point?
A Point is a detection device or group of devices connected to
your security system. Points are identified by the area they
monitor, such as a front door, bedroom window, or hallway.
What Is A Faulted Point?
When a point (such as a door or window) is closed, it is
normal. When the door or window is open, the point is
faulted or not normal. When you turn your system on, you
will usually want all of the points in your system to be normal.
However, you can turn your system on with faulte d points by
using the Bypass Points command.
If a point indicator on the Keypad is on, the point is faulted.
When the faulted point has returned to normal, the point
indicator on the Keypad turns off.
Are All Points The Same?
Not all points are the same. In fact, there are two basic types
of points: Controlled and 24-Hour.
Controlled Points
Controlled Points respond to alarm conditions depending
upon whether the system is turned on or off. They are
programmed to either respond instantly to alarm conditions or
to provide a delay for you to reach the keypad and turn the
system off. Various controlled points may be located
throughout your house and/or office.
When you turn your system on, you have the option of
turning on all controlled points (All On), or just some of the
controlled points (Part On). Refer to All On and Part On on
page 9 for more information.
24-Hour Points
24-Hour Points are always on, even when the system is turned
off. There are two types of 24-Hour Points: Fire and Non- Fire.
Refer to Reset the system for more information.
Bosch Security Systems | 8/04 | 7
Page 8
D621 Series | User's Guide | Security System Basics
• Fire Points: Only monitor fire detection devices, such as
smoke detectors. They are always on and cannot be
turned off.
• Non- Fire Points: Monitors non-fire detection devices.
They are always on and cannot be turned off.
All On
When you turn your system All On (refer to Figure 3), you are
turning on all controlled points, both interior (motion
detectors) and perimeter (doors and windows of the building).
Figure 3: Controlled Points are All On
1
3
2
4 4
4
1 - Dining room
2 - Living room
3 - Kitchen
4 - Bedroom
Bosch Security Systems | 8/04 | 8
Page 9
D621 Series | User's Guide | Security System Basics
Part On
When you turn your system Part On (refer to Figure 4), you
are turning on only a portion of the controlled points. The
particular points included in this portion are determined by
your security company. Part points may include only the
perimeter (doors and windows) of your system, or the points
on the first floor of a two-story house. Check with your
security company to learn which points are Part points.
Figure 4: Controlled Points are Part On
1
3
2
4 4
4
5 6
1 - Dining room
2 - Living room
3 - Kitchen
4 - Bedroom
5 - controlled
point
6 - Part point
Bosch Security Systems | 8/04 | 9
Page 10
D621 Series | User's Guide | Command Center Keys
Command Center Keys
Your keypad has nineteen keys to perform the various
functions described in Table 1.
Table 1: Keypad Keys
Key Function
[1], [2], [3],
[4], [5], [6],
[7], [8], [9], [0]
[Cmd]
[All On]
[Part On]
[No Delay]
Numeric keys used for entering passcodes and
issuing commands.
Used in conjunction with numeric keys to enter
commands. Also displays system status.
Lets you turn your system All On. Refer to Turning
the system All On.
Lets you turn your system Part On. Refer to Turning
the system Part On.
Lets you turn your system All On or Part On without
entry or exit delay. Refer to Turning the system on
with no delay.
Table 1: Keypad Keys (continued)
Key Function
[Bypass]
[*] When available, advances to the next display.
[A], [B], [C]
Lets you bypass one or more points. Refer to Bypass
points.
Emergency functions (Fire, Panic, or Emergency
Alarms) may be assigned to these keys by your
installing company.
To activate the special function, press the key twice
(consecutively) within two seconds.
Your security company labels each key to its
assigned function.
Bosch Security Systems | 8/04 | 10
Page 11
D621 Series | User's Guide | Keypad Tones
Keypad Tones
The keypad emits sever al distinct tones and illuminates lights
to alert you to system events as described in Table 2.
Table 2: Keypad Tones
Tone Tone Pattern Description
Fire Alarm
Burglary
Alarm
When a fire point activates, the keypad
emits a repeated one frequency tone
(on for two seconds, then briefly off).
When a burglary point activates while
your system is turned on, the keypad
emits a continuous one frequency tone.
The sounder remains on for the duration
of the time set by your security
company.
Table 2: Keypad Tones (continued)
Tone Tone Pattern Description
Exit Delay Error!
Entry
Delay
Error
OK ——
Objects
cannot be
created from
editing field
codes.
After you turn your system on, the
keypad emits an intermittent beep and
counts down the Exit Delay time. If you
do not exit before the exit delay time
expires and an Exit Delay point is
faulted, an alarm event begins.
If you press an incorrect key, the keypad
emits an error tone to indicate an invalid
entry. The error tone is the same one
frequency tone as the Trouble Tone, but
is not repeated.
Indicates a keypad entry is accepted,
such as a correctly entered passcode.
The keypad emits a single, high-pitched
beep for one second.
Bosch Security Systems | 8/04 | 11
Page 12

D621 Series | User's Guide | Keypad LED Descriptions
Table 2: Keypad Tones (continued)
Tone Tone Pattern Description
Watch various
Keypad emits a tone to alert you when
any watched point is faulted. The tone
varies in duration, depending on the
selected Watched Tone. (Refer to
Select watch tone.)
Keypad LED Descriptions
Table 3 describes the keypad LEDs.
Table 3: Keypad LED Descriptions
LED Status Description
Status
Cmd
On No system troubles.
Slow
Flash
Fast
Flash
Off User logged off and no command is active.
Fast
Flash
On
AC failure, system trouble, or keypad was moved
away from its assigned area.
keypad in Command Mode System Test was
initiated.
Waiting for passcode entry.
Exit Delay timer is active or a command is in
progress.
Bosch Security Systems | 8/04 | 12
Page 13
D621 Series | User's Guide | Keypad LED Descriptions
Table 3: Keypad LED descriptions (continued)
LED Status Description
All
Part
Off Panel disarmed or armed Part On.
Slow
Flash
On Panel armed All On with Entry/Exit Delay.
Off Panel disarmed or armed All On.
Slow
Flash
On
Panel armed All On with No Delay.
Panel armed Part On/Part 2 On with No Delay.
Panel armed Part On/Part 2 On with Entry/Exit
Delay.
Commands
Commands allow you to carry out various tasks such as add
or delete passcodes, set the date and time, or test the system.
Each command is detailed throughout this user guide.
Commands are written as: [Cmd] [6] [3]. To enter this
command, first press and release the [Cmd] key, followed by
the [6] key, and then the [3] key.
Bosch Security Systems | 8/04 | 13
Page 14

D621 Series | User's Guide | System Events
System Events
Your system responds to four types of alarm events. If more
than one event occurs, your system sorts them into one of four
groups:
• Fire alarms (highest priority)
• Burglary alarms
• Fire troubles
• Non- Fire troubles (lowest priority)
Events grouped as highest priority are always sent to the
central station first.
Fire Alarms
Fire alarms are the highest priority events. When a fire point
activates, your keypad emits a Fire Alarm tone. Evacuate all
occupants and investigate for smoke or fire. Make sure all
occupants know the difference between the Burglary Alarm
tone and the Fire Alarm tone.
Burglary Alarms
Burglary alarms are the second priority. When a burglary
point activates, your keypad emits a Burglary Alarm tone.
Ensure all occupants know the difference between the
Burglary Alarm tone and the Fire Alarm tone (refer to Table 2
on page 11).
The keypad display shows each burglary point that went int o
alarm by flashing the point number (up to Point 16).
Trouble Events
When a trouble event (such as a loose wire or low battery
condition) occurs, your keypad emits a trouble tone.
The keypad status indicator is on steady. Refer to Check System
Troubles on page 37 for more information on determining the
nature of the trouble.
Bosch Security Systems | 8/04 | 14
Page 15
D621 Series | User's Guide | How Your System Reports Alarms
How Your System Reports Alarms
Your security system may be programmed to automatically
disconnect your telephone when sending reports to your
security company. Once the report is complete, the system
returns the telephone to normal operation (verify with your
installing company).
Your system makes repeated attempts to send reports to your
security company. If your system fails to report, the keypad
signals a system trouble. Refer to Check System Troubles on
page 37 for more information on determining the nature of
the trouble.
If your telephone service is interrupted, your
Silence Alarms
When there is an alarm, the alarm tone sounds and the
point(s) in alarm illuminate on the display. If you enter your
passcode before the system dials your security company, the
alarm report is aborted.
1. Enter your passcode to silence the alarm and turn the
system off (if it was turned on). An alarm report is sent if
not acknowledged in time.
2. Press and hold the [Cmd] key to remove the alarm(s)
(flashing point numbers) from the keypad display. Refer
to View Alarm Memory (Cmd 40) on page 38 to see which
points caused the alarm.
security system cannot send reports to your
security company unless it has an alternate
means of transmitting them.
Bosch Security Systems | 8/04 | 15
Page 16
D621 Series | User's Guide | Keypad Adjust (Cmd 49)
Figure 5: Alarm ind ication
1 2 3 4 5 6 7 8
9 10 1 1 12 13 14 15 16
All
Part
Status
Cmd
Keypad Adjust (Cmd 49)
o I can perform this command.
o I cannot perform this command.
Use this command to adjust the keypad sounder volume.
1. Press [Cmd] [4] [9]. Enter your passcode if necessary.
2. To adjust the keypad sounder volume, press and hold the
[*] key and then press [1] to increase the volume or [4] to
decrease the volume.
3. Press [Cmd] to exit this command function when all
adjustments are made.
Log Out Of The System
The system remembers passcodes entered for approximately
10 seconds after you have stopped pressing keys. To log out of
the system, press the [Cmd] key twice. The Cmd LED
remains off, acknowledging that you have successfully logged
out.
Bosch Security Systems | 8/04 | 16
Page 17
D621 Series | User's Guide | Turn the System Off
Turn the System Off
You have __________ second(s) to enter premises and turn the
system off.
Turn off the security system by entering your passcode. When
the system is on, you must enter through a designated entry
door to prevent an alarm. Opening a designated door starts
the entry delay. During entry delay time, the keypad emits a
entry delay tone every second to remind you to turn the
system on. Enter your passcode before the entry delay time
expires to turn the system off.
If you enter through the wrong door or fail to turn the system
off before the entry delay time expires, you may cause an
alarm. If an alarm occurs, silenc e the alarm by entering your
passcode and call your security company to let them know it
is not an emergency situation.
1. When the system is All On, the keypad illuminates the All
On indicator. If the system is either Part On or Part 2 On
(refer to Part On on page 9 for more information), the
keypad illuminates the Part On indicator.
Figure 6: All On Keypad Indication
1 2 3 4 5 6 7 8
9 10 1 1 12 13 14 15 16
All
Status
CmdPart
2. Enter your passcode to turn the system off. Once the
system is off, the keypad turns the All On indicator or the
Part On indicator off.
Bosch Security Systems | 8/04 | 17
Page 18
D621 Series | User's Guide | Turn The System All On (All On or Cmd 1)
Figure 7: Part On Keypad Indication
Turn The System All On (All On or
Cmd 1)
All
Part
Status
Cmd
o I can perform this command.
o I cannot perform this command.
You have __________ second(s) to exit premises before system
turns on.
Use this command to turn on the entire system. Once you
press the All On key, the Exit Delay timer starts its
countdown. Your security company programs the length of
exit delay time to ensure you have adequate time to exit.
You should leave the premises before the exit time expires.
Leaving after exit delay expires starts an alarm event.
1. Make sure all points are normal (not faulted). If your
system has a faulted point, return it to normal or bypass
the point (refer to Bypass Points on page 27).
2. Press [All On]. The keypad may prompt you to enter a
valid passcode if necessary by flashing the Cmd indicator.
1 2 3 4 5 6 7 8
9 10 1 1 12 13 14 15 16
Bosch Security Systems | 8/04 | 18
Page 19
D621 Series | User's Guide | Turn The System All On (All On or Cmd 1)
3. Enter your passcode if necessary. Exi t delay begins. The
4. During the last 10 seconds of Exit Delay, the Exit Delay
All On, Status, and Cmd indicators light. You should
leave at this time.
Figure 8: All On Keypad Indication
5. To turn the system off, enter your passcode.
tone becomes more urgent warning you not to exit or to
turn the system off. The system then turns All On. The
All On indicator remains on steady.
1 2 3 4 5 6 7 8
9 10 1 1 12 13 14 15 16 CmdPart
All Status
During the exit delay, you may stop the system from
turning on by entering your passcode.
If you wish, you can turn the system All On with No
Delay (refer to Section Turn The System On With No Delay on
page 24) by pressing [No Delay] or you may bypass
points by pressing [Bypass]. Refer to Bypass Points on page
27 for more information.
Bosch Security Systems | 8/04 | 19
Page 20

D621 Series | User's Guide | Turn The System Part On (Part On or Cmd 2)
Turn The System Part On (Part On or
Cmd 2)
o I can perform this command.
o I cannot perform this command.
3. Enter your passcode, if necessary. The Part On, Status,
and Cmd indicators light (Figure 9). If your system has a
faulted point (door or window open), you can either close
it or bypass it (refer to Bypass Points on page 27).
Figure 9: Part On Keypad Indication
You have __________ second(s) to exit premises before the
system turns on.
Part On turns on part of your system, leaving the rest of the
1 2 3 4 5 6 7 8
9 10 1 1 12 13 14 15 16
system turned off. Refer to the Point identification section of
your keypad reference card to identify Part points designated
for Part On activation.
Once you press the Part On key, the exit delay timer begins.
You should leave the premises before the exit time expires.
Leaving after exit delay expires starts an alarm event.
1. Make sure Part points are normal (not faulted).
If you wish, you can turn the system Part On with No
Delay by pressing [No Delay], or you may bypass points
by pressing [Bypass].
During the exit delay, you may stop the system from
turning on by entering your passcode.
2. Press [Part On]. The keypad may prompt you to enter a
valid passcode by flashing the Cmd indicator.
All
Part
Status
Cmd
Bosch Security Systems | 8/04 | 20
Page 21

D621 Series | User's Guide | Turn The System Part 2 On (Cmd 3)
4. During the last 10 seconds of Exit Delay, the Exit Delay
tone becomes more urgent warning you not to exit or to
turn the system off. The system then turns Part On. The
Part On indicator remains on steady.
5. To turn the system off, enter your passcode.
Turn The System Part 2 On (Cmd 3)
o I can perform this command.
o I cannot perform this command.
You have __________ second(s) to exit premises before the
system turns on.
Part 2 On turns on part of your system designated as Part 2,
leaving the rest of the system turned off. You can select the
points that turn on for Part 2 On (refer to Set Part 2 Points
(Cmd 65) on page 23).
1. Make sure Part 2 points are normal (not faulted). If your
system has a faulted point, you should return it to normal,
or bypass the point (refer to Bypass Points on page 27).
2. Press [Cmd] [3] to turn the system Part 2 On. The keypad
may prompt you to enter a valid passcode by flashing the
Cmd indicator.
Bosch Security Systems | 8/04 | 21
Page 22

D621 Series | User's Guide | Turn The System Part 2 On (Cmd 3)
3. Enter your passcode, if necessary. The Part On, Status,
and Cmd indicators light (Figure 10) and the exit delay
time starts.
Figure 10: Part 2 On Keypad Indication
All
Part
Status
Cmd
1 2 3 4 5 6 7 8
9 10 1 1 12 13 14 15 16
During exit delay, you may stop the system from turning
on by entering your passcode.
If you wish, you can turn the system Part 2 On with No
Delay (refer to Section Turn The System On With No Delay on
page 24) by pressing [No Delay], or you may bypass
points by pressing [Bypass].
4. During the last 10 seconds of Exit Delay, the Exit Delay
tone becomes more urgent warning you not to exit or to
turn the system off. The system then turns Part On. The
Part On indicator remains on steady.
5. To turn the system off, enter your passcode.
Bosch Security Systems | 8/04 | 22
Page 23

D621 Series | User's Guide | Set Part 2 Points (Cmd 65)
Set Part 2 Points (Cmd 65)
o I can perform this command.
o I cannot perform this command.
Use this command to select which points are armed when you
turn the system Part 2 On. This allows you to turn part of the
system on to detect intrusion, while the remaining part of the
system allows you to move freely without sounding an alarm.
1. Make sure the system is turned off (All and Part indi cators
are off).
2. Press [Cmd] [6] [5]. The keypad may prompt you to enter
a valid passcode by flashing the Cmd indicator.
3. Enter your passcode if necessary. The keypad indicates
which points are available for selections. Points that are
on steady are selecte d for Part 2, flashing points are
available for selection.
4. Enter the Point Number you want to activate or
deactivate for Part 2 On followed by the [*] key. Repeat
this step until all points have been designated Yes or No
for Part 2 Mode (Yes = Active, ready to detect intrusion;
No = Non-Active, you can move freely without sounding
an alarm).
5. Press [Cmd] to exit this command.
Bosch Security Systems | 8/04 | 23
Page 24

D621 Series | User's Guide | Turn The System On With No Delay
Turn The System On With No Delay
Use this command to turn the system All On or Part On
without entry or exit delays. Remember that turning the
system on with no delay allows no exit or entry delay time
through the designated delay point (for example, Front Door).
1. Make sure all points are normal (not faulted).
2. Press [All On] if you want to turn the system All On or
press [Part On] if you want to turn the system Part On.
Press [Cmd] [3] if you want to turn the system Part 2 On.
The keypad may prompt you to enter a valid passcode by
flashing the Cmd indicator.
3. Enter your passcode if necessary. The keypad display
lights the Cmd indicator an d either the All On or Part On
indicator.
4. Press [No Delay] to turn the system on with no delay.
There is a 10 second window before the panel arms as No
Delay.
5. To turn the system off, enter your passcode.
Bosch Security Systems | 8/04 | 24
Turn The System On With No Exit
Tone
Use this comma nd to turn the entire system All On, Part On,
or Part 2 On without any exit tones. Remember that turning
the system on with no exit tone eliminates the tone emitted by
the keypad intended to alert occupants that the system is
about to arm.
This command is useful when you want to arm the system,
but not disturb the occupants while the system counts down
prior to arming.
1. Make sure all points are normal (not faulted).
2. Press and hold the appropriate key to silence the exit tone
(refer to Table 4 on page 25). The keypad may prompt you
to enter a valid passcode.
Page 25

D621 Series | User's Guide | Turn The System On With No Exit Tone
Part 2 On (Cmd 3) Operation: “Part” and “Cmd”
Table 4: Exit Tones
Arming With To Silence Exit Tone
All On Press and hold [All On].
or
Press [Cmd], then press and hold [1].
Part On Press and hold [Part On].
or
Press [Cmd], then press and hold [2].
Part 2 On Press [Cmd], then press and hold [3].
The Cmd indicator turns off when Exit Delay expires.
Silencing the Exit Delay Tone doubles the Exit
Delay period.
• All On (Cmd 1) Operation: “All” and “Cmd”
LEDs are on during the Exit Delay period.
• Part On (Cmd 2) Operation: “Part” and “Cmd”
LEDs are on during the Exit Delay period.
•
LEDs are on during the Exit Delay period.
Bosch Security Systems | 8/04 | 25
Page 26

D621 Series | User's Guide | Turn The System On With Points Faulted (Force Arm)
Turn The System On With Points
Faulted (Force Arm)
Force-arming is not permitted in UL applications.
2. To force arm the system All On or Part On with doubled
Exit Delay time and no exit tone, press and hold [All On]
or [Part On] until the Cmd LED lights (after
approximately one second). The faulted point’s LED
indicator remains on. Press [All On] or [Part On] again. If
the Cmd indicator flashes, enter your passcode. The All
1. To force arm the system All On or Part On with the
normal Exit Delay time and tone, press [All On] or [Part
On]. The faulted point’s LED indicator remains on. The
Cmd indicator turns on. Press [All On] or [Part On] again.
If the Cmd indicator flashes fast, enter your passcode. The
All or Part indicator turns on, indicating the system is
turning All On or Part On. The Exit Delay Time
countdown begins with the exit tone. The faulted point’s
LED indicator flashes indicating that this point is forcearmed.
or Part indicator turns on, indicating the system is turning
All On or Part On. The Exit Delay Time countdown is
doubled and begins without the exit tone. The faulted
point’s LED indicator flashes indicating that this point is
force-armed. Once the panel is armed, the Cmd indicator
turns off.
The system “forces” the faulted points on. As long as they
remain faulted they do not provide protection. If they
return to normal before the system is turned off they
provide protection and are capable of starting alarm
events. If a point becomes faulted after the exit delay
begins, the keypad displays the faulted point. If the point
remains faulted at the end of exit delay, it starts an alarm
event.
Bosch Security Systems | 8/04 | 26
Page 27

D621 Series | User's Guide | Bypass Points
Bypass Points
o I can perform this command.
o I cannot perform this command.
Use this command to bypass one or more points before
turning the system All On, Part On, or Part 2 On. When a
point is bypassed, it can be faulted without starting an alarm
event.
For example, your kitchen has just been painted and you want
to leave the windows open but still turn on the system.
Bypassing points allows the system to be on but prevents it
from monitoring undesired points.
1. Ensure the system is turned off (All and Part indicators are
not illuminated).
2. Press [BYPASS]. The keypad may prompt you to enter a
valid passcode by flashing the Cmd indicator.
3. Enter your passcode if necessary.
4. Enter the Point Number that you want to bypass followed
by the [*] key. For example, if you want to bypass Point
10, enter [1] [0] [*]. Repeat this step until all points that
are required to be bypassed are programmed.
Figure 11: Bypassed Points
All
Part
Status
Cmd
1 2 3 4 5 6 7 8
9 10 11 12 13 14 15 16
Bypassed points flash on the keypad (Figure 11).
To un-bypass a point, repeat the steps above for the
desired point number.
5. Press [Cmd] to exit this command.
Bosch Security Systems | 8/04 | 27
Page 28

D621 Series | User's Guide | Date And Time (Cmd 45)
Date And Time (Cmd 45)
Use this command to program the system’s date and time.
1. Ensure the system is turned off (All and Part indicators are
not illuminated).
2. Press [Cmd] [4] [5]. The keypad may prompt you to enter
a valid passcode by flashing the Cmd indicator.
3. Enter your passcode. The keypad lights Point 1 on the
display.
4. Enter the date and time using the MM/DD/YY, HH:MM
format shown in Figure 12.
Figure 12: Date and time format
H
___M___
M
Minute of
the hour
___M___
M
Month of
the year
/ ___D___
D
Day of
the month
___Y___
/ :
___H___
Y
Current
Year
Hour of
the day
The keypad lights points 1 through 6 (each point
represents a digit to be entered) for the date and points 1
through 4 for the time
Figure 13: Date And Time Digit Indication On Keypad
All
1 2 3 4 5 6 7 8
9 10 11 12 13 14 15 16
Status
CmdPart
The time should be entered in 24 hour format
(8:00 p.m. = 20:00).
5. After you enter the date and time, the keypad sounds a
long beep and automatically exits the Date and Time
command.
Bosch Security Systems | 8/04 | 28
Page 29

D621 Series | User's Guide | Change a Passcode (Cmd 55)
In the event of a power cycle (power is lost to the
system and then restored), the panel takes the
last event in the log and uses that as a starting
point for the time and date. Then, it alerts you to
enter the current time and date.
Change a Passcode (Cmd 55)
o I can perform this command.
o I cannot perform this command.
Use this command to change your passcode at any time. Only
use this feature under the direction of your security company.
Write down your old passcode and the new one before you
begin.
1. Make sure your system is off (All and Part indicators are
off).
2. Press [Cmd] [5] [5]. The keypad flashes the Cmd indicator
to prompt you to enter your passcode.
3. Enter your current passcode. The keypad lights your user
number (1 to 16).
4. Enter a new passcode with the same number of digits as
your old passcode. If the error tone sounds, try a different
new passcode.
5. Enter your new passcode again.
Bosch Security Systems | 8/04 | 29
Page 30

D621 Series | User's Guide | Change Others’ Passcodes (Cmd 56)
6. The keypad sounds the OK tone and returns to the off
state. You successfully changed your passcode.
Change Others’ Passcodes
(Cmd 56)
o I can perform this command.
o I cannot perform this command.
Use this command to change passcodes for each user in the
system. This command requires the appropriate authority
level to change passcodes.
Cmd 56 is only for changing passcodes other
than the one used to access Cmd 56. For
example, if User 1 performs Cmd 56, User 1
cannot modify User 1’s own passcode. Use Cmd
55 instead.
1. Make sure the system is turned off (All and Part indicators
are off).
2. Press [Cmd] [5] [6]. The keypad may prompt you to enter
a valid passcode by flashing the Cmd indicator.
Bosch Security Systems | 8/04 | 30
Page 31

D621 Series | User's Guide | Change Others’ Passcodes (Cmd 56)
3. Enter your passcode. Point indicators 1, 2, and 3 flash.
Figure 14: Available User Numbers
1 2 3 4 5 6 7 8
9 10 1 1 12 13 14 15 16
All
Part
Status
Cmd
4. Press [1] to change passcodes. The available user numbers
now flash.
5. Enter the user number you want to change followed by
the [*] key. (For example, press [2] [*] to change the
Passcode for User 2.) The point indicator for that
particular user number now stays on steady.
If the user does not exist in the system, the
keypad emits an error tone.
6. Enter a new passcode with the same number of digits as
the old passcode. If the error tone sounds, try a different
new passcode. Enter the new passcode again for
verification.
7. Press [Cmd]. The available user numbers flash. Repeat
Steps 5 and 6 to change another user passcode, or press
[Cmd] twice to exit.
Bosch Security Systems | 8/04 | 31
Page 32

D621 Series | User's Guide | Change Others’ Passcode Level (Cmd 56)
Change Others’ Passcode Level
The following should be filled in by your security company.
• Authority Level 1 includes these commands:
(Cmd 56)
o I can perform this command.
o I cannot perform this command.
Use this command to change passcode authority levels for
each user in the system. This command requires the
appropriate authority level to change passcodes. You cannot
change your own passcode authority level.
• Authority Level 2 includes these commands:
• Authority Level 3 includes these commands:
• Authority Level 4 includes these commands:
1. Make sure the system is turned off (All and Part indicators
2. Press [Cmd] [5] [6]. The keypad may prompt you to enter
3. Enter your passcode. Point indicators 1, 2, and 3 flash.
_________________________________________________
_________________________________________________
_________________________________________________
_________________________________________________
are off).
a valid passcode by flashing the Cmd indicator.
Bosch Security Systems | 8/04 | 32
Page 33

D621 Series | User's Guide | Add A Passcode (Cmd 56)
Figure 15: Available User Numbers
1 2 3 4 5 6 7 8
9 10 1 1 12 13 14 15 16
All
Part
Status
Cmd
4. Press [2] to change passcode authority levels. The
available user numbers now flash.
5. Enter the user number that you want to change the
authority level for, followed by the [*] key. (For example,
press [3] [*] to change the authority level for User 3). The
user number now turns on solid.
If the user does not exist in the system, the
keypad will emit an error tone.
6. Enter the new authority level (1 to 4) followed by [Cmd].
7. The available user numbers flash. Select another user, or
press [Cmd] twice to exit.
Add A Passcode (Cmd 56)
o I can perform this command.
o I cannot perform this command.
Use this command to add new passcodes to the system. This
command requires the appropriate authority level to add
passcodes. To add a new passcode to the system, you must
assign an area(s) to the new user in addition to using the other
Cmd 56 features (changing a passcode and changing a
passcode authority level) as outlined below. Only use this
feature under the direction of your security company.
1. Make sure the system is turned off (All and Part indicators
are off).
2. Press [Cmd] [5] [6]. The keypad may prompt you to enter
a valid passcode by flashing the Cmd indicator.
3. Enter your passcode. Point indic ators 1, 2, and 3 flash.
4. Press [3] to assign an area(s) to the new user. The point
indicators flash to indicate available users.
Bosch Security Systems | 8/04 | 33
Page 34

D621 Series | User's Guide | Add A Passcode (Cmd 56)
5. Enter the user number you want to add followed by the
[*] key. (For example, to add User 4, press [4] [*].)
6. Enter the area(s) you want to assign to the new user by
pressing the appropriate numeric key(s). For example, if
the new user is to be assigned to Areas 1 and 2, press the
[1] and [2] keys. To remove a currently assigned area(s),
press the corresponding numeric key(s). The appropriate
point indicator turns off. (For example, if User 4 is
assigned to Areas 1 and 2, but should only be assigned to
Area 1, press [2] to remove Area 2 from User 4’s area
assignment.)
7. Press [Cmd] twice. Point indicators 1 to 3 flash.
8. Press [1] to assign a new passcode.
9. Enter the user number followed by the [*] key. (For
example, press [4] [*] to create the passcode for User 4.)
10. Enter a new passcode. If the error tone sounds, try a
different new passcode.
11. Enter the new passcode again for verification. Press [Cmd]
twice. Point indicators 1 to 3 flash.
12. Press [2] to assign a passcode authority level to the new
user.
13. Enter the user number followed by the [*] key. (For
example, press [4] [*] to assign an authority level for User
4.)
14. Enter the authority level.
15. Press the [Cmd] key until the keypad emits a single beep
tone, the Cmd indicator turns off and the Status indicator
turns on. This indicates that the keypad has exited this
command.
The new user passcode, area assignment, and
authority level are automatically logged into the
system’s programming memory. Make sure your
security company’s programming records are
properly updated.
Bosch Security Systems | 8/04 | 34
Page 35

D621 Series | User's Guide | Delete A Passcode (Cmd 58)
Delete A Passcode (Cmd 58)
o I can perform this command.
o I cannot perform this command.
Use this command to delete passcodes. This command
requires the appropriate authority level to delete passcodes.
You cannot delete your own passcode using this
command.
1. Make sure the system is turned off (All and Part indicators
are off).
2. Press [Cmd] [5] [8]. The keypad may prompt you to enter
a valid passcode by flashing the Cmd indicator.
3. Enter your passcode. The available user numbers flash.
Figure 16: Available User Numbers
All
1 2 3 4 5 6 7 8
9 10 11 12 13 14 15 16
Status
CmdPart
4. Enter the user number you want to delete. (For example,
press [2] [*] to delete User 2). You cannot delete yourself
as a user.
If the user does not exist in the system as set up
by your security company, the keypad emits an
error tone.
5. Press [Cmd] to exit this command.
Bosch Security Systems | 8/04 | 35
Page 36

D621 Series | User's Guide | Renew One-Time Passcodes (Cmd 53)
Renew One- Time Passcodes
4. Press [0] [*] if you want to renew all one-time passcodes,
(Cmd 53)
o I can perform this command.
o I cannot perform this command.
One-time passcodes can only be used once to turn the system
off. This command allows those with the applicable authority
level to renew previous one-time passcodes. Once renewed,
the one-time passcode is again able to turn the system off only
once.
1. Make sure the system is turned off (All and Part indicators
are off).
2. Press [Cmd] [5] [3]. The keypad may prompt you to enter
a valid passcode by flashing the Cmd indicator.
3. Enter your passcode. The keypad sounds the OK tone.
5. Press [Cmd] to exit this command.
or press the number of the user whose one-time code you
want to renew followed by the [*] key. (For example,
press [5] [*] to renew passcode 5.)
Bosch Security Systems | 8/04 | 36
Page 37

D621 Series | User's Guide | Check System Troubles (Cmd 4)
Check System Troubles (Cmd 4)
Your system emits a trouble tone to alert you to a system
trouble event, for example low batteries. Use this command to
learn what is causing the trouble and what steps to take to
correct it.
1. The system may be on or off when a system trouble
occurs. If the system is on, you must turn it off to check
the trouble.
2. Press [Cmd] [4] to silence the trouble tone. The keypad
displays all system troubles. Follow the keypad point
indicators to determine the type of system trouble. Refer
to Table 5.
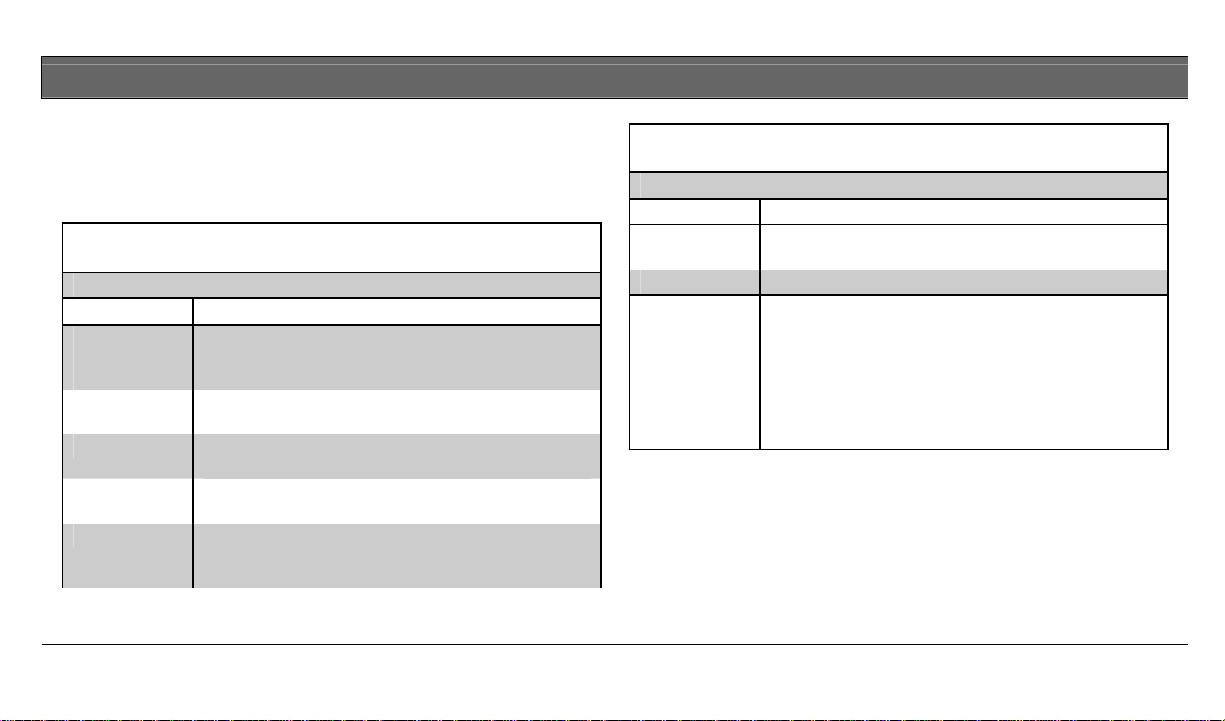
Table 5: System Troubles
Point # Description
1 Weekly Test Due
Prompts you to conduct your weekly system test (refer to
System Test (Cmd 41) on page 42).
Table 5: System Troubles (continued)
Point # Description
2 System Trouble
Press [2] to determine the specific trouble (refer to View
System Trouble (Cmd 42) on page 39).
3 Remote Program Session Active
Security company is currently connected to your system via
the telephone line.
5 Date and Time Lost
Press [5] to set the date and time.
6 Running on Battery Only
Power to your system is disconnected or has failed.
8 Point Trouble
Press [8] to determine which point trouble is current (refer
to View Point Trouble (Cmd 48) on page 41).
10 Alarm Memory
Press [0] to view previous alarms that occurred.
Bosch Security Systems | 8/04 | 37
Page 38

D621 Series | User's Guide | View Alarm Memory (Cmd 40)
3. Press [Cmd] to exit this com mand.
The trouble tone for Power Failure events sounds
at all keypads in all areas. However, the trouble
tone must be silenced in each area (silencing it in
one area does not silence it in the other areas).
View Alarm Memory (Cmd 40)
o I can perform this command.
o I cannot perform this command.
After an alarm has been silenced and cleared from the display,
you may still review the points that were in alarm.
1. Make sure the system is turned off (All and Part indicators
are off).
2. Press [Cmd] [4] [0]. Enter passcode if prompted. The
keypad displays all points that are in alarm memory.
3. To clear the alarm memory, turn the system on and then
off.
• If the point indicator is flashing fast, the point is
currently in alarm.
• If the point indicator is flashing slow, the alarm
was aborted. No reports for the alarm event were
sent to the security company.
Bosch Security Systems | 8/04 | 38
Page 39

D621 Series | User's Guide | View System Trouble (Cmd 42)
The keypad only displays Points 1 to 16.
View System Trouble (Cmd 42)
Use this command to view system trouble events. A system
trouble condition may occur if there is a communications
trouble, or it is time for the system to be serviced by your
security company.
1. Make sure the system is turned off (All and Part indicators
are off).
2. Press [Cmd] [4] [2]. The keypad may prompt you to enter
a valid passcode by flashing the Cmd light.
3. Enter your passcod e. The keypad displays current system
trouble events by lighting the point indicators. Refer to
Table 6 on page 40.
Bosch Security Systems | 8/04 | 39
Page 40

D621 Series | User's Guide | View System Trouble (Cmd 42)
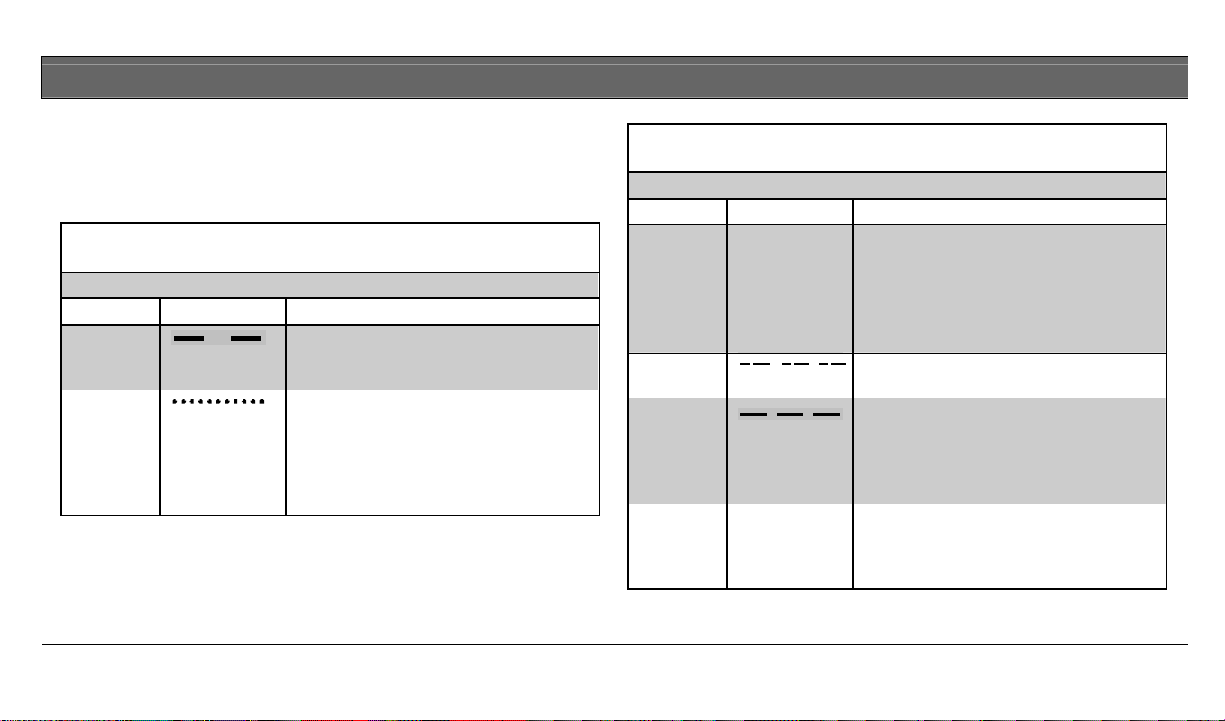
Table 6: System Trouble Events
Point # Description
1
2 On Alternate Comm Trouble
3 On Installer Switch Closed
5 On Bell Supervision Fail
7
On Telephone Line Fail
Flashing Slow Comm Fail, Destination 1
Flashing Fast Comm Fail, Destination 2
On Backup Battery Low 4
Flashing Slow Backup Battery Missing
On RF Receiver Jammed 6
Flashing Slow RF Receiver Trouble
On Data Bus Device Missing
Flashing Slow Data Bus Tamper
Flashing Fast Data Bus Device Trouble/Reset
Table 6: System Trouble Events (continued)
Point # Description
8
On System Fault
Flashing Slow Service Interval
Flashing Fast Ground Fault Condition
4. Press [Cmd] twice to exit the View system trouble
command.
Bosch Security Systems | 8/04 | 40
Page 41

D621 Series | User's Guide | View Point Trouble (Cmd 48)
View Point Trouble (Cmd 48)
o I can perform this command.
o I cannot perform this command.
Use this command to view which points (if any) are in trouble.
1. Make sure the system is turned off (All and Part indicators
are off).
2. Press [Cmd] [4] [8]. The keypad may prompt you to enter
a valid passcode by flashing the Cmd light.
3. Enter your passcode. The keypad displays all points that
are in trouble (if any). Refer to Table 7.
The keypad only displays Points 1 to 16.
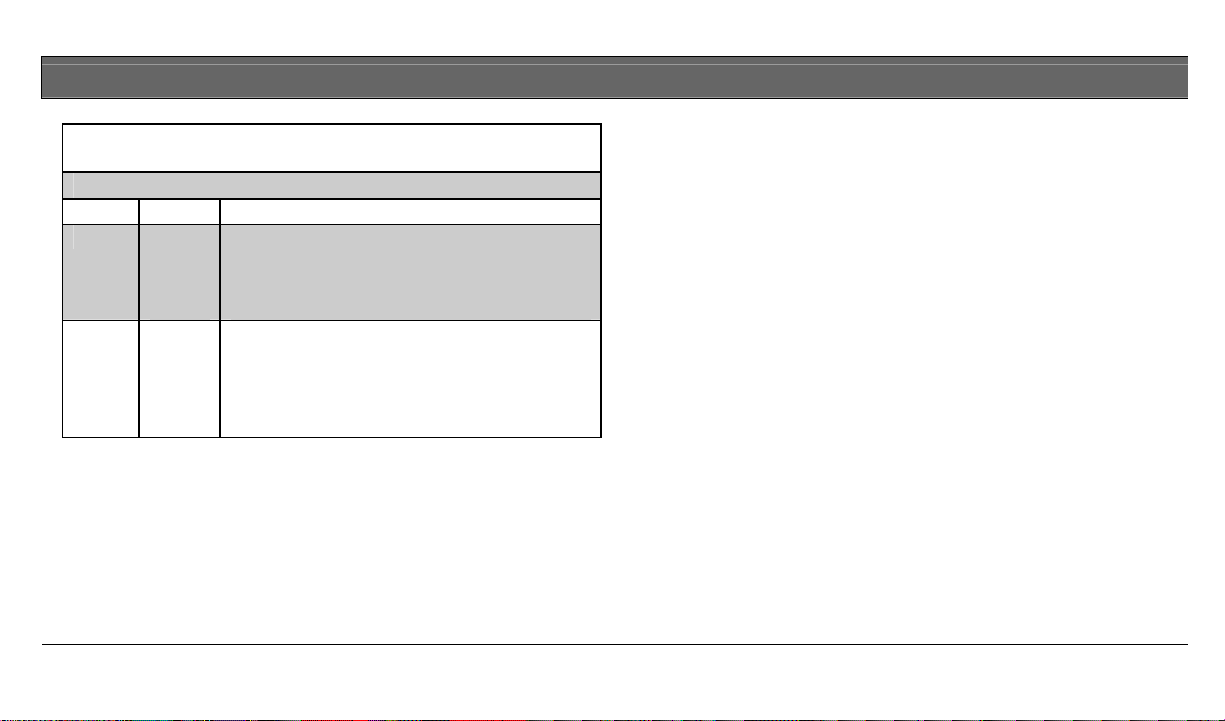
Table 7: Trouble Points
Point Trouble Condition
Off No Point Trouble
On Wiring Fault
Flashing Slow RF Sensor Low Battery
Flashing Fast RF Sensor Missing
4. Press [Cmd] twice to exit the View point trouble
command.
Bosch Security Systems | 8/04 | 41
Page 42

D621 Series | User's Guide | System Test (Cmd 41)
System Test (Cmd 41)
o I can perform this command.
o I cannot perform this command.
The System Test command allows you to ensure your system
is operating correctly. Your security company configures the
system test for you.
o
o
My system test includes:
System Bell
System Strobe
Battery
o
Phone Line
o
If any of these components fails to test, contact your security
company for assistance. Be sure to contact your security
company before you begin the system test if a phone line is
connected.
1. Make sure the system is turned off (All and Part indicators
are off).
2. Press [Cmd] [4] [1]. The keypad may prompt you to enter
a valid passcode by flashing the Cmd indicator.
3. Enter your passcode if necessary. The system starts t he
test. As each test is underway, the corresponding point
indicator lights. Refer to Table 8.
Table 8: System Test Lights
Point # Testing
1 Bell
2 Strobe (may take up to 20 min.)*
3 Backup Battery (may take 4 min.)*
4 Communications (may take up to 10 min.)*
* To skip to the next text, press the [*] key.
When testing the bell and strobe, check for
bell/strobe activation. The LED testing status
does not indicate bell/strobe test failure (point
indicator does not flash fast upon test failure).
Bosch Security Systems | 8/04 | 42
Page 43

D621 Series | User's Guide | System Test (Cmd 41)
As the system tests each bell, strobe, battery, and system’s
communication, the corresponding point indicator displays
the stage of each test. Refer to Table 9.
Table 9: System Test Point Status
Point Testing Status
Flash Slow Testing Segment Underway
Flash Fast Testing Segment Failed
On Testing Segment Complete
4. When the test is complete, the keypad automatically exits
this command.
5. To stop the test currently in progress and skip to the next
test, press the [*] key. To abort all system tests and return
to the normal display, press the [Cmd] key.
Bosch Security Systems | 8/04 | 43
Page 44

D621 Series | User's Guide | Walk Test (Cmd 44)
Walk Test (Cmd 44)
o I can perform this command.
o I cannot perform this command.
Use this command to walk-test detection devices connected to
your system. Perform the walk test on a weekly basis. The
points included in the walk test are set by your security
company.
1. Make sure the system is turned off (All and Part indicators
are off).
2. Press [Cmd] [4] [4]. The keypad may prompt you to enter
a valid passcode by flashing the Cmd indicator.
3. Enter your passcode if necessary. The keypad emits a
single tone.
4. To test each point, trigger the corresponding detection
device (such as open a door or walk in front of a motion
detector) until all points are tested. When a point is tested,
the keypad emits a single one second tone and the
corresponding point indicator turns on. When the tested
point is restored, the keypad emits a second single one
second tone and the corresponding point indicator turns
off.
5. To exit the walk test, press [Cmd]. The Status indicator
flashes rapidly. The walk test is over when the Status
indicator stops flashing.
Test fire detection devices (smoke/heat
detectors) weekly as instructed by your security
company and in accordance with the devices
instructions.
Bosch Security Systems | 8/04 | 44
Page 45

D621 Series | User's Guide | Reset The System (Cmd 47)
Reset The System (Cmd 47)
o I can perform this command.
o I cannot perform this command.
Use this command to reset the system (including fire points)
after an alarm. Detection devices, such as smoke detectors and
shock sensors, must be reset after being activated. Resetting
the system takes about 20 seconds.
If points do not reset, contact your security company for help.
1. Ensure your system is off (All and Part indicators are off).
2. Press [Cmd] [4] [7]. The keypad may prompt you to enter
a valid passcode by flashing the Cmd indicator.
3. Enter your passcode if necessary. The system now resets.
After the system resets, the keypad automatically exits this
command.
Bosch Security Systems | 8/04 | 45
Turn Watch On/Off (Cmd 61)
o I can perform this command.
o I cannot perform this command.
Use the Watch feature to “watch” points when the system is
off. For example, parents with small children may want a tone
to sound whenever a door or window is opened as a way of
monitoring the location of the children.
Use this command to turn the watch feature on and off.
Once yo u have programmed the system with points to watch
(refer to Select Watch Points on page 48) and the responses
(refer to Select Watch Tone on page 46), you need to turn the
watch function on and off.
1. Make sure your system is off (All and Part indicators are
off).
2. Press [Cmd] [6] [1]. The keypad may prompt you to enter
a valid passcode by flashing the Cmd indicator.
Page 46

D621 Series | User's Guide | Select Watch Tone (Cmd 62)
3. Enter your passcode, if necessary. The keypad beeps for
one second.
• If Watch Tone is ON, the LED indicator for
Point 2 flashes. Press [2] to turn off.
• If Watch Tone is OFF, the LED indicator for
Point 1 flashes. Press [1] to turn on).
Select Watch Tone (Cmd 62)
o I can perform this command.
o I cannot perform this command.
The watch feature gives you the ability to “watch” points
when the system is off. For example, parents with small
children may want a tone to sound whenever a door or
window is opened as a way of monitoring the whereabouts of
the children.
Use this command to set the type of response your system
produces when a watch point is faulted. If you wish, you may
tell your system to display the point’s LED indicator and
sound a short tone whenever certain doors or windows are
opened. Refer to Select Watch Points on page 48 for information
on programming which points in your system are to be
“watched.”
1. Make sure your system is off (All and Part indicators are
off).
Bosch Security Systems | 8/04 | 46
Page 47

D621 Series | User's Guide | Select Watch Tone (Cmd 62)
2. Press [Cmd] [6] [2]. The keypad may prompt you to enter
a valid passcode by flashing the Cmd indicator.
3. Enter your passcode if necessary. The keypad displays
steady the current choice and flashes the other possible
choices. The factory default watch tone setting is Short
Beep (Choice 2).
4. Select the type of watch tone you want by pressing the
required digit. Refer to Table 10.
Table 10: Watch Tones
Choice # Tone
1 No Tone
2 Short Beep
3 Beep Until Key
4 Beep Until Closed
5. If you just want to review (not change) the current watch
tone setting, press [Cmd] to exit this function.
Table 11 gives a description of each watch tone.
Table 11: Watch Tone Description
Watch Tone Description
Off
Short Beep
Beep Till Key
Beep Till Closed
Displays point(s), but no tone when point(s) is
faulted.
Displays point and sounds a short tone when
point(s) is faulted.
Displays point and sounds a tone until the
[Cmd] key is pressed.
Displays point and sounds a tone until the
point(s) is returned to normal (door or window
is closed). Pressing the [Cmd] key also
silences the tone.
Bosch Security Systems | 8/04 | 47
Page 48

D621 Series | User's Guide | Select Watch Points (Cmd 63)
Select Watch Points (Cmd 63)
I can perform this command.
o
o I cannot perform this command.
The Watch feature gives you the ability to “watch” points
when the system is off. For example, parents with small
children may want a tone to sound whenever a door or
window is opened as a way of monitoring the location of the
children.
Once you have decided how your system responds to watched
points (refer to Select Watch Tone on page 46), you need to decide
which of the points in your system will be watched. Use this
command to tell your system which points to watch. You
cannot watch 24 hour or fire points.
Choosing which points to watch depends upon your goals. If
you have small children, you may choose to watch points of
entry and exit. Each time a watch point is faulted (a door or
window is opened), the keypad responds as programmed. For
example, you may tell your system to produce a short beep
when a watch point is faulted.
1. Make sure your system is off (All and Part indicators are
off).
2. Press [Cmd] [6] [3]. The keypad may prompt you to enter
a valid passcode by flashing the Cmd indicator.
3. Enter your passcode if necessary. The keypad displays all
points that are currently being watched (Watch On).
• Point Indicator On Solid: indicates point(s)
already being “watched.”
• Point Indicator Flashing: indicates point(s)
available to be “watched.”
Bosch Security Systems | 8/04 | 48
Page 49

D621 Series | User's Guide | Extend Auto On Time (Cmd 51)
4. Enter the point number you want to watch followed by
the [*] key. (For example, press [5] [*] to watch Point 5.)
Repeat this step to select all the points you want to watch.
To turn Watch Mode off for a point, enter the point
number followed by the [*] key. (For example, press [5] [*]
to turn Watch off for Point 5.)
Figure 17: Current Watch Points
All
1 2 3 4 5 6 7 8
9 10 11 12 13 14 15 16
Status
CmdPart
5. Press [Cmd] to exit this command.
Extend Auto On Time (Cmd 51)
o I can perform this command.
o I cannot perform this command.
Your security company can program your system to turn on
automatically. This command allows you to delay the auto-on
time by one hour during the auto-on pre-alert time.
1. Make sure the system is turned off (All and Part indicators
are off).
2. Press [Cmd] [5] [1]. The keypad may prompt you to enter
a valid passcode by flashing the Cmd indicator.
3. Enter your passcode if necessary. The keypad sounds a
valid tone.
Bosch Security Systems | 8/04 | 49
Page 50

D621 Series | User's Guide | All Areas On (Cmd 80)
All Areas On (Cmd 80)
o I can perform this command.
o I cannot perform this command.
This command allows you to turn on all areas at the same
time when the system is split into more than one area if
assigned to your authority level.
1. Press [Cmd] [8] [0]. The keypad may prompt you to enter
a valid passcode by flashing the Cmd indicator.
2. Enter your passcode. If your passcode is valid, the keypad
illuminates the All On indicator and exit delay starts.
If an area has a faulted point(s) when you try to turn all areas
All On, the appropriate point LED illuminates (Points 1 to
16). Hold down the All On key for two seconds to force all
areas to All On.
The keypad lights Point Indicators 1 to 4 to indicate the areas
that are forced on. These indicators are:
• Point 1 Indicator = Area 1
• Point 2 Indicator = Area 2
• Point 3 Indicator = Area 3
• Point 4 Indicator = Area 4
Bosch Security Systems | 8/04 | 50
Page 51

D621 Series | User's Guide | All Areas Off (Cmd 81)
All Areas Off (Cmd 81)
o I can perform this command.
o I cannot perform this command.
This command allows you to turn off all areas at the same
time when the system is split into more than one area if
assigned to your authority level.
1. Press [Cmd] [8] [1]. The keypad may prompt you to enter
a valid passcode by flashing the Cmd indicator.
2. Enter your passcode if necessary. The keypad turns off all
areas at the same time.
Bosch Security Systems | 8/04 | 51
Auto-Forward On/Off (Cmd 82)
o I can perform this command.
o I cannot perform this command.
This command allows you to turn on or off the auto-forward
feature as necessary.
1. Press [Cmd] [8] [2]. The keypad may prompt you to enter
a valid passcode by flashing the Cmd indicator.
2. Enter your passcode if necessary. The keypad sounds the
valid entry tone.
3. Press [1] to turn auto-forward on or press [2] to turn autoforward off.
• Point Indicator 1 On Solid: Auto-Forward ON
(Point Indicator 2 flashes)
• Point Indicator 2 On Solid: Auto-Forward OFF
(Point Indicator 1 flashes)
4. Press [Cmd] to exit this command.
Page 52

D621 Series | User's Guide | Remote Arming With Telephone, Area 1
Remote Arming With Telephone,
• arms if it detects a [5] key press from the telephone (All
Area 1
o I can perform this command.
o I cannot perform this command.
This function controls the built-in telephone arming feature
for Area 1. When enabled, the panel answers the phone on
the programmed ring count.
When the panel answers the phone, it
• sounds three beeps and starts the handshake tone for
remote programming if the panel is All or Part On.
• sounds one short beep, waits approximately 3 seconds,
and then sounds one long beep if the panel is off. Press
and hold the [5] key* for two seconds immediately after
the first short arming beep and before the long beep
begins.
On with Delay, faulted points are force- armed). The panel
sounds three beeps (new armed state) and then hangs up.
* If arming from a cell phone, quickly press the [5] key
three times. If pressing and holding the [5] key for 2
seconds from a house (land-line) phone does not produce
a tone long enough to arm Area 1, retry by quickly
pressing the [5] key three times.
Remotely disarming the panel cannot be done with a
telephone.
Bosch Security Systems | 8/04 | 52
Page 53

D621 Series | User's Guide | Remote Program (Cmd 43)
Remote Program (Cmd 43)
o I can perform this command.
o I cannot perform this command.
This command forces the system to connect to your security
company’s remote PC computer for programming alterations
via the telephone line. Only use this feature under the
direction of your security company.
1. Ensure the system is turned off (All and Part indicators are
off).
2. Press [Cmd] [4] [3]. The keypad may prompt you to enter
a valid passcode by flashing the Cmd indicator.
3. Enter your passcode. The keypad emits a single-beep
tone, indicating the remote programming session has
begun. When the session is completed, the keypad
automatically exits this command.
Bosch Security Systems | 8/04 | 53
Security System Limitations
Not even the most advanced security system can guarantee
protection against burglary, fire, or environmental threats. All
security systems are subject to possible compromise or failureto-warn for a variety of reasons including, but not limited to,
the following:
• If sirens or horns are placed outside the hearing range of
people in remote areas of the building or in areas which
are frequently closed off, they do not provide the intended
protection.
• If intruders gain access through unprotected points of
entry, the system does not detect their entrance.
• If intruders have the technical means of bypassing,
jamming, or disconnecting all or part of the system, they
are not detected.
• If the AC power supply is OFF and the back up battery is
either missing or dead, sensors do not detect intrusion.
Page 54

D621 Series | User's Guide | Fire Safety And Evacuation
• Smoke detectors cannot detect smoke in chimneys, walls,
or roofs, or smoke blocked by a closed door. They may
not detect smoke or fire on a level of the building
different from the one on which they are located. Smoke
detectors may not be able to warn in time about fires
started by explosions, improper storage of flammables,
overloaded electrical circuits, or other types of hazardous
conditions.
• If phone lines are out of service, reports from the security
system to the security company cannot be sent.
Telephone lines are vulnerable to compromise by several
means. Inadequate maintenance and failure to test are the
most common causes of alarm failure. It is strongly
recommended that you test your system once a week to
be sure that all system components are working properly.
Although having a security system may make you eligible
for reduced insurance premiums, the system is no
substitute for insurance. Warning devices cannot
compensate you for loss of life or property.
Fire Safety And Evacuation
Residential fire is a leading cause of accidental death. Most
fire related deaths occur at night when occupants suffocate in
their sleep from smoke and toxic gases, rather than from
burns. To help reduce this risk, the following program should
be implemented.
1. Minimize fire hazards. Smoking in bed, cleaning with
flammable liquids such as gasoline, leaving children home
alone, and using unsafe holiday decorations are some of
the common causes of household fire.
2. Install a fire alarm system. The primary purpose of this
system is to protect lives by giving the earliest possible
warning of danger.
3. A smoke detector should be provided to protect each
sleeping area in a home.
4. Practice an escape plan. Because there may be very little
time between detection of a fire and the time it becomes
deadly, it is important that every member of the family
understand how to quickly evacuate according to the plan.
Bosch Security Systems | 8/04 | 54
Page 55

D621 Series | User's Guide | Fire Safety And Evacuation
5. Plan both primary and alternate escape routes. Since
stairwells an d hallways may be blocked during a fire,
exiting through a bedroom window must be a part of the
escape plan. If the sleeping area is above the ground floor,
install a means of safely descending outside the building if
one does not already exist.
6. As a part of this plan, all family members should arrange
to meet at a location away from the house (such as a
neighbor’s house) so you will know that everyone is
accounted for.
7. If it is determined that the alarm was accidentally
sounded, the bell should be silenced, the detectors reset,
and your security company notified immediately that
there is no emergency situation.
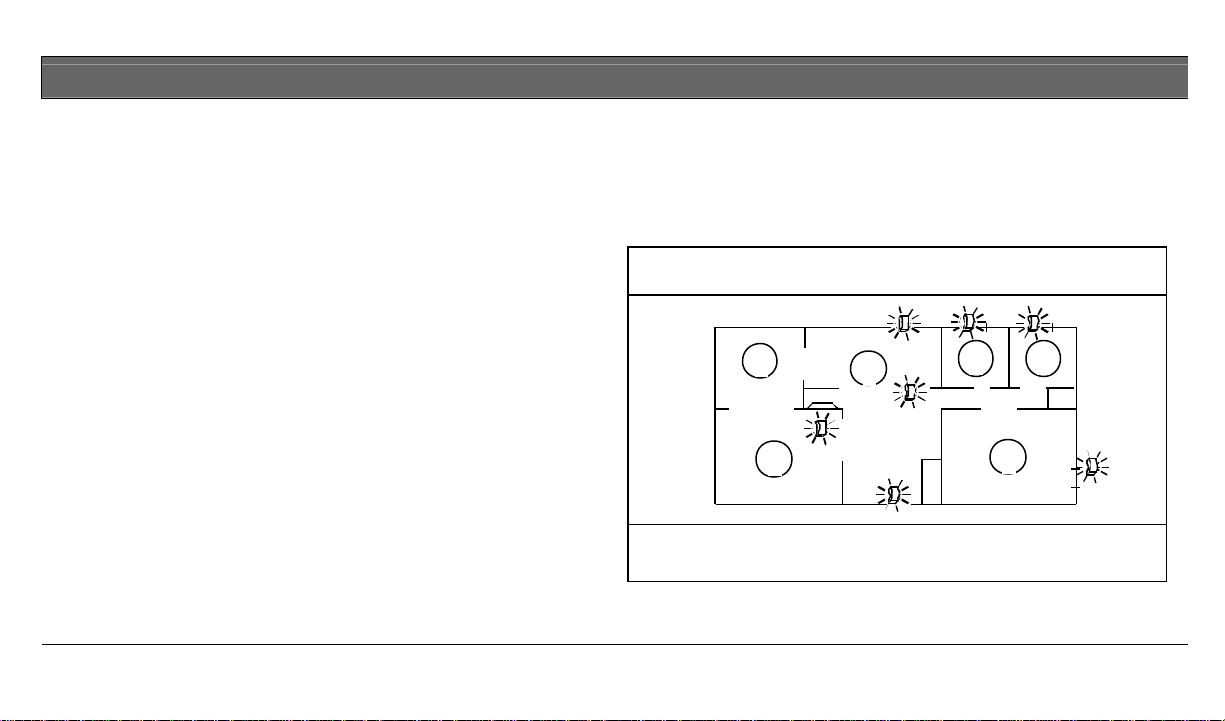
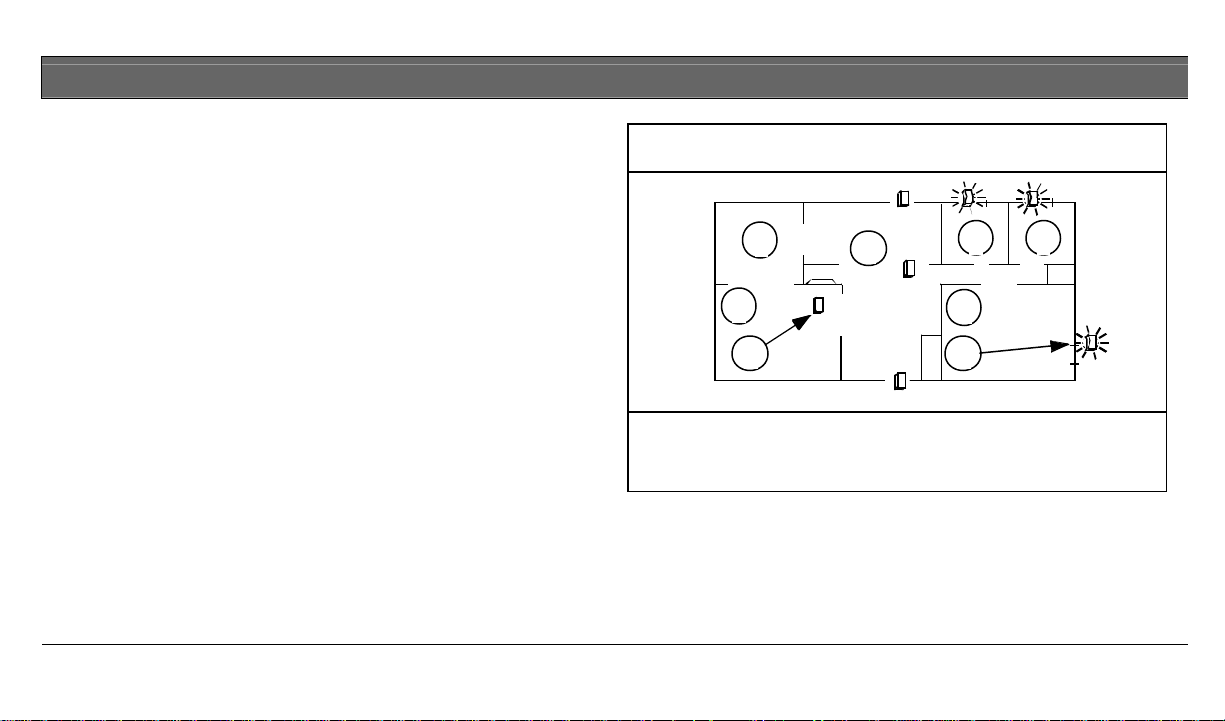
Figure 18: Smoke Detector Location - Plan View
2
4 5
1
3
*
5
*
5
1 - Rec room
2 - Dining room
Locate smoke detectors between sleeping areas and family living areas.
3 - Living room
4 - Kitchen
6
5 - Bedroom
6 - Smoke
detector
Bosch Security Systems | 8/04 | 55
Page 56

D621 Series | User's Guide | Maintenance and Service
Figure 19: Smoke Detector Location
6
1 2 1
3 4
5
1 - Bedroom
2 - Hall
A smoke detector should be located on each story including basements, but
excluding crawl spaces and unfinished attics.
Bosch Security Systems | 8/04 | 56
3 - Living room
4 - Dining room
*
*
*
5 - Basement
6 - Smoke detector
Maintenance and Service
Your security system requires very little maintenance;
however, you should test the system weekly to ensure it is
working properly. A test schedule and maintenance program
can be arranged. If you notice a change in operation during
normal use or testing, call for service as soon as possible. Do
not attempt to repair the control panel, keypads, or detectors
yourself.
Refer to the information box for security company, contact,
and installation information.
Page 57

D621 Series | User's Guide | Power Failure
Power Failure
If the keypad indicates a power failure, and you have power
in the rest of your premises, there may be a problem with the
electrical transformer or circuit breaker supplying power to
your security control panel. First, check to be sure that the
transformer is securely plugged into the electrical outlet. If it
appears to be damaged in any way, do not attempt to repair it.
Call your security company for service .
If the transformer is plugged in, check the circuit breaker
supplying power to the outlet. If the breaker is tripped, check
the appliances on the circuit for signs of electrical problems.
Make sure someone has not intentionally turned the breaker
off. Wh en all is clear, reset the breaker.
Refer to the information box (refer to Figure 1 on page 2) for
the transformer information and circuit breaker number.
Bosch Security Systems | 8/04 | 57
How To Clean The Keypad
If your keypad gets dirty, apply a household glass cleaner to a
clean cloth or paper towel and wipe the surface. Do not spray
any liquid directly onto the keypad. It could run inside the
case and damage electrical circuits.
Page 58

D621 Series | User's Guide | Glossary
Glossary
24-Hour
Points
All On Turn on all of the points in the system.
Burglary
Alarm Tone
Bypass Selectively remove points from the security
Central Station Facility where trained personnel monitor
Points that are always on even when the
system is turned off. There are two types of
24-Hour Points: Fire Points and Non-Fire
Points.
Constant warble tone.
system, temporarily.
your security system 24 hours a day. Your
security system may be programmed to
contact the central station during alarm
conditions, enabling central station
personnel to dispatch the proper
authorities.
Controlled
Point
Entry Delay Programmed delay of the system alarm
Error Tone Same warble tone as Trouble Tone, but not
Exit Delay Programmed delay of the system alarm
Point that reports alarm conditions only
when the system is turned on.
response that allows you to enter the
building through the entry door to turn
your system off. An alarm response begins
if you do not turn the system off before the
entry delay expires. Entry delay is
programmed by your security company.
repeated.
response that allows you to exit after
turning the system on. If you don’t exit the
building before the delay time expires, an
alarm response begins. Exit delay is
programmed by your security company.
Bosch Security Systems | 8/04 | 58
Page 59

D621 Series | User's Guide | Glossary
Faulted Point Point that is not normal, such as an open
door or window.
Fire Alarm
Tone
Warble tone that is on for one second and
then briefly off (repeatedly).
Fire Point Type of 24-Hour Point that only monitors a
fire detection device(s), such as a smoke
detector. This type of point is always on
and cannot be turned off.
Part On Turn on part of the points in the system.
Part On points are determined by your
security company.
Part 2 On Turn on part of the points in the system.
Part 2 On points are determined by you,
the user.
Point Detection device or group of devices
connected to your security system.
Hold Instruction to press and hold a key to
perform a function.
No Delay Turns the system on without entry or exit
delay.
Non- Fire Point Type of 24-Hour Point that is always on
and cannot be turned off.
Off Display Display that appears when the system is
Press/Push Interchangeable terms instructing you to
push down and then release a key.
Trouble Service condition that needs to be
corrected, such as a broken wi re.
Trouble Tone Warble tone that is on briefly, followed by
a pause, and then followed by the warble
tone (repeatedly).
turned off and no keys are pressed.
Bosch Security Systems | 8/04 | 59
Page 60

D621 Series | User's Guide | Glossary
Warble Tone Tone that is on for one second, then briefly
off.
Bosch Security Systems | 8/04 | 60
Page 61

D621 Series | User's Guide | Notes:
Notes:
Bosch Security Systems | 8/04 | 61
Page 62

For technical support, please contact:
© 2004 Bosch Security Systems
 Loading...