


1
2017
B426/B420 Conettix Ethernet
Communication Module: Setup &
Troubleshooting Guide

2
Table of Contents
IP Communicator Component Overview ....................................................................................................................4
Bus Type, Address Selection and Function ................................................................................................................4
Maintenance and troubleshooting LEDs ....................................................................................................................5
How to connect to RPS using the IP Communicator. .................................................................................................7
How to connect to RPS using: ‘Connect Via: IP Direct:’ ................................................................................7
How to connect to RPS using ‘Connect Via: Network’:.................................................................................8
B8512G/B9512G or GV4: ...............................................................................................................................8
FPD-7024, all G series 6.0 and higher, GV2 and GV3 types: ..................................................................8
How to configure the IP Communicator using keypad programming. .......................................................................8
When using B920 or B930 SDI2 type Keypads: .............................................................................................8
When using D1255 or D1260 SDI type keypads: ...........................................................................................9
How to configure the IP Communicator using Remote Programming Software. .................................... 10
How to configure the IP Communicator using the Web Browser. .......................................................................... 11
Basic Network Settings Page .......................................................................................................................... 12
Advanced Network Settings Page .................................................................................................................. 12
Panel Address Settings Page ......................................................................................................................... 13
Select the Device Address Remotely ............................................................................................................ 13
Encryption and Security Settings Page ......................................................................................................... 14
Encryption Enable ......................................................................................................................................... 14
Web and Automation Security .................................................................................................................... 14
Maintenance Page ............................................................................................................................................ 15
Factory Default Page........................................................................................................................................ 15
Firmware Upgrade Page.................................................................................................................................. 16
Connect to the Web Interface when the IP address is Unknown ........................................................................... 17
Replace an IP Communicator connected to SDI2 keeping the original settings ..................................................... 17
Determine if the B426 is the original or the modified version ................................................................................ 17
Troubleshooting ...................................................................................................................................................... 18
Trouble connecting the IP Communicator to the Web Interface ............................................................... 18
Applications with the IP communicator set to DHCP/Auto-Enable=YES ............................................. 18
Applications with the IP communicator set to DHCP/Auto-Enable=NO ............................................... 18
There is a problem with the security certificate when logging into the Web Interface. .......................... 19
The IP Communicator LED’s are not working .............................................................................................. 19
Can supervision be disabled for the IP Communicator? ............................................................................ 19

3
The IP Communicator settings in RPS are greyed out or keypad programming is locked ................... 19
Trouble connecting to RPS using the IP Communicator ............................................................................ 20
Verify correct panel account type selected in RPS for existing panel firmware revision. .................. 20
Verify correct module address selection. .................................................................................................. 20
Check for address conflicts. ........................................................................................................................ 20
Verify the correct RPS passcode is used when connecting. .................................................................. 21
Trouble connecting to RPS: ‘Connect via: IP Direct’. .............................................................................. 22
Trouble connecting when using Connect via: Network ........................................................................... 23
Verify correct Encryption settings (G or Non-G thru GV4 v1.00-1.99 types only). ............................. 23
4
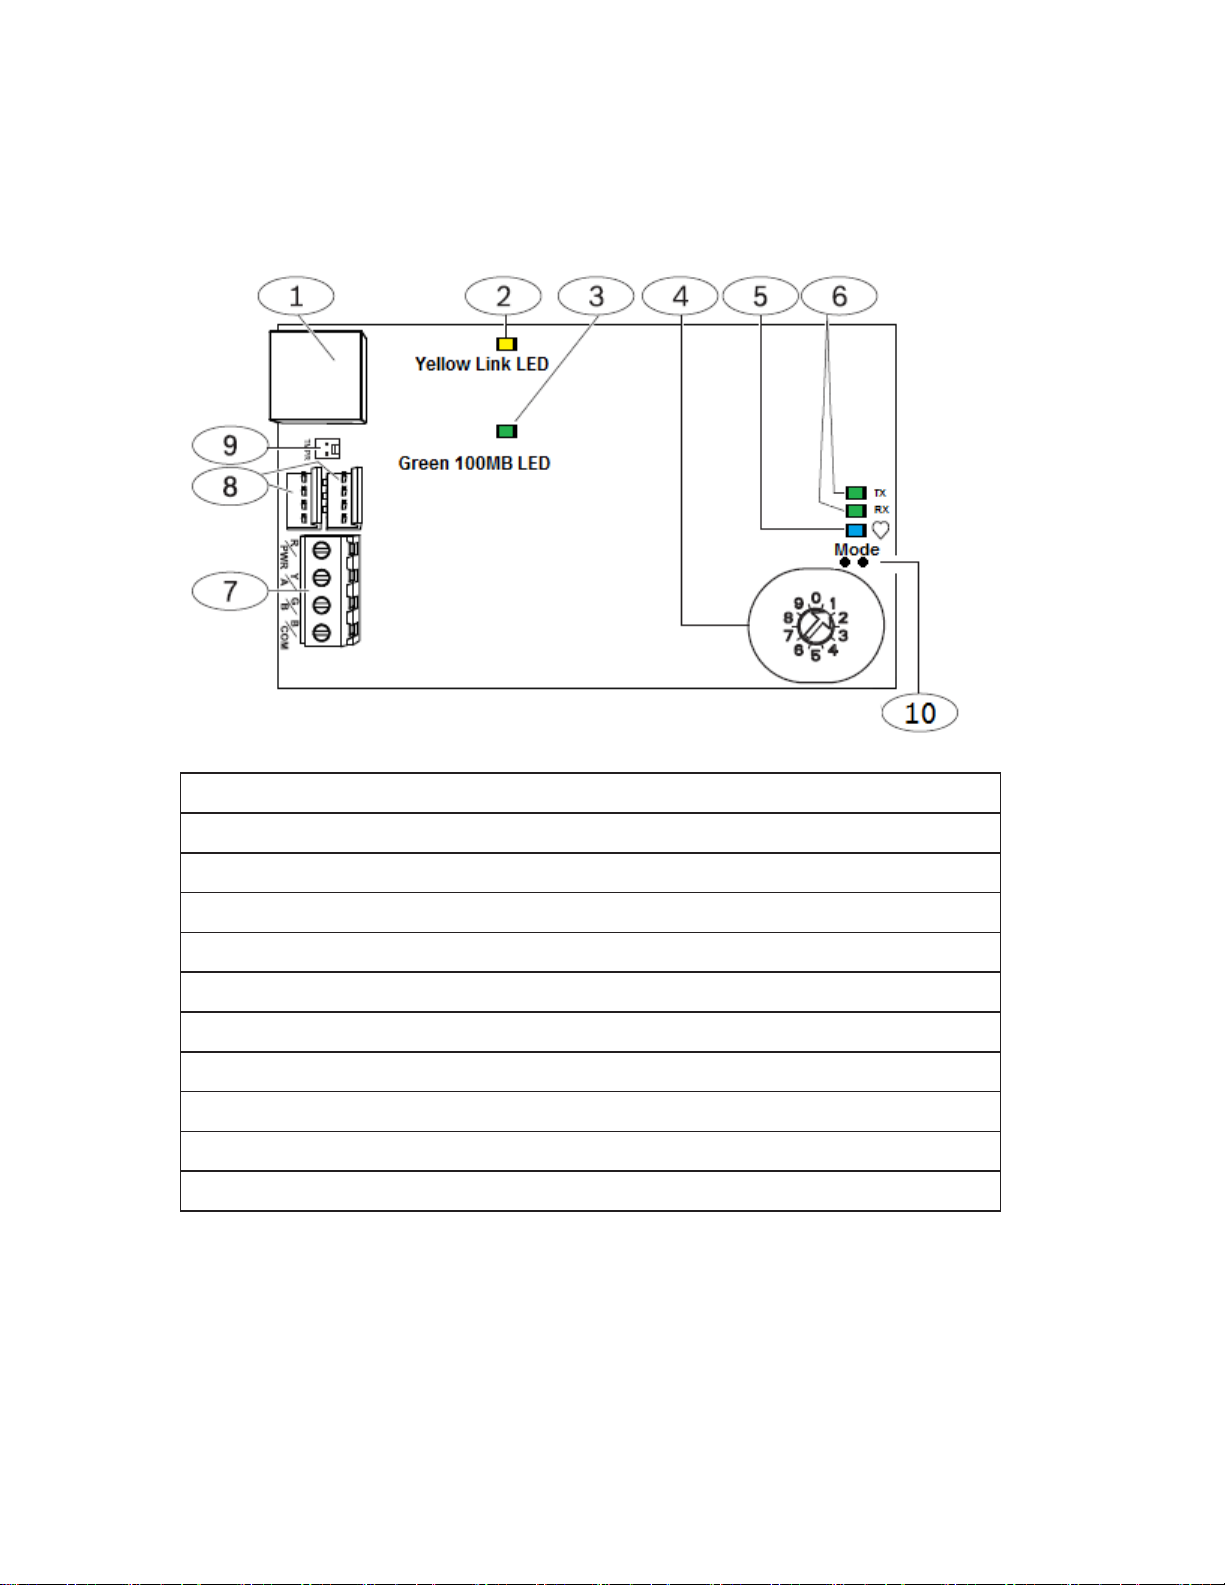
IP Communicator Component Overview
Callout ᅳ Description
1 ᅳ Ethernet RJ-45 port
2 ᅳ Yellow LINK LED
3 ᅳ Green 100MB LED
4 ᅳ Address switch
5 ᅳ Heartbeat LED
6 ᅳ TX and RX LEDs
7 ᅳ Terminal strip (to control panel)
8 ᅳ Interconnect wiring connectors (to control panel or other compatible modules)
9 ᅳ Tamper switch connector
10ᅳ Mode Pins
Figure 1 Ethernet Communication Module
5
Bus Type, Address Selection and Function
Set the address switch to the correct position for the control panel SDI or Option Bus address using table 1
below.
Address Switch
Position
Bus/Address
Compatible Control Panels
Operation
0
SDI: Address Selected in
Browser
Select Panel address using web browser
Determined by panel address selected
1
SDI 2: 1
GV4 & B-Series
Remote Programming, Reporting or Automation
2
SDI 2: 2
GV4 & B-Series
Remote Programming, Reporting or Automation
3
SDI: 80
GV4 Series, G – GV3 and any with firmware
version 6.0+
Automation
4
SDI: 88
GV4 Series, G – GV3 and any with firmware
version 6.0+
Remote Programming, or Reporting
5
SDI: 92
GV4 Series, GV3 Series
Remote Programming, or Reporting
6
Option Bus: 134
FPD-7024, D7240v2, D7220v2, Easy Series 3+
Reporting only
7
Option Bus: 13
DS7400xi
Remote Programming, or Reporting
8
Option Bus: 14
DS7400xi
Reporting
9
Option Bus: 250
FPD-7024
Remote Programming, or Reporting
Table 1 Panel Compatibility & Address Selection
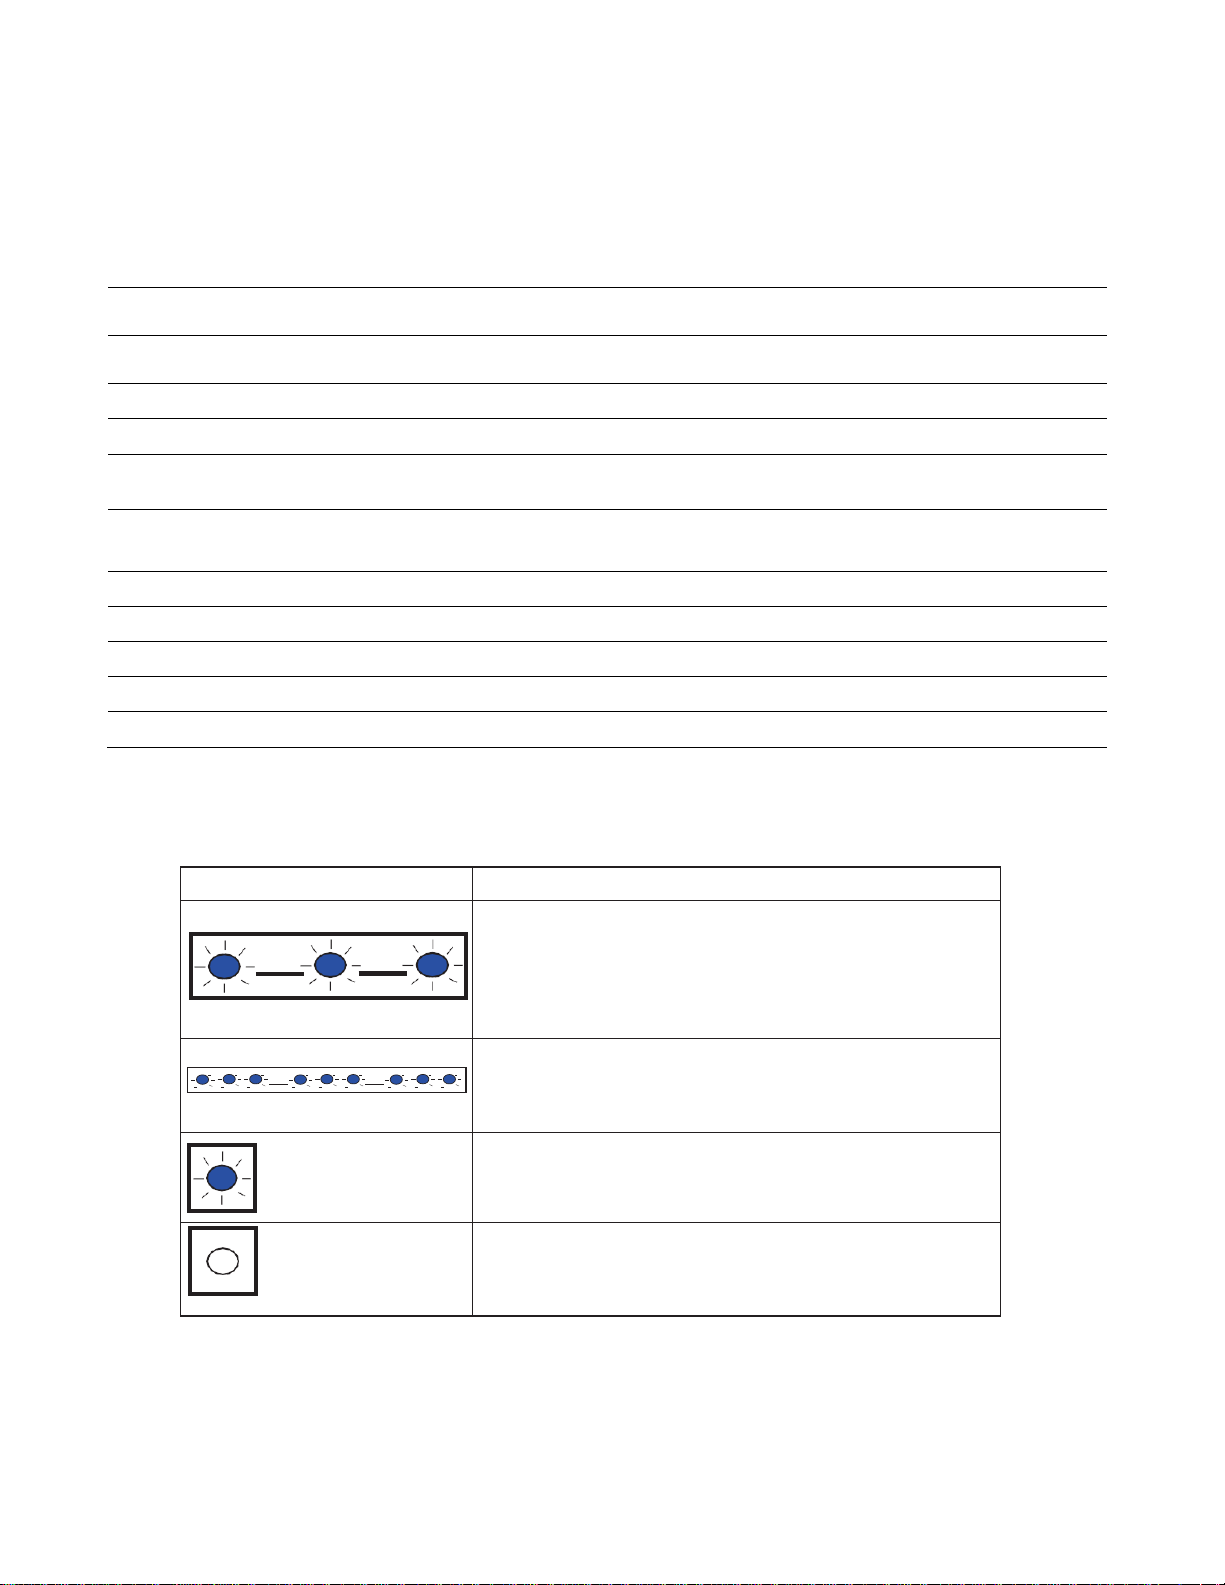
Maintenance and troubleshooting LEDs
Use the Heartbeat (system status), RX (receive) and TX (transmit) LEDs to assist with troubleshooting:
Flash pattern
Function
Flashes once every 1 sec
Normal state. Indicates normal operation state.
3 quick flashes every 1 sec
Communication error state. Indicates a bus communication
error. The module is not receiving commands from the control
panel.
On Steady
Trouble state. Indicates a trouble condition exists.
Off
LED trouble state. Module is not powered, or some other trouble
condition prohibits the module from controlling the heartbeat
LED.
Table 2 Heartbeat LED descriptions
6
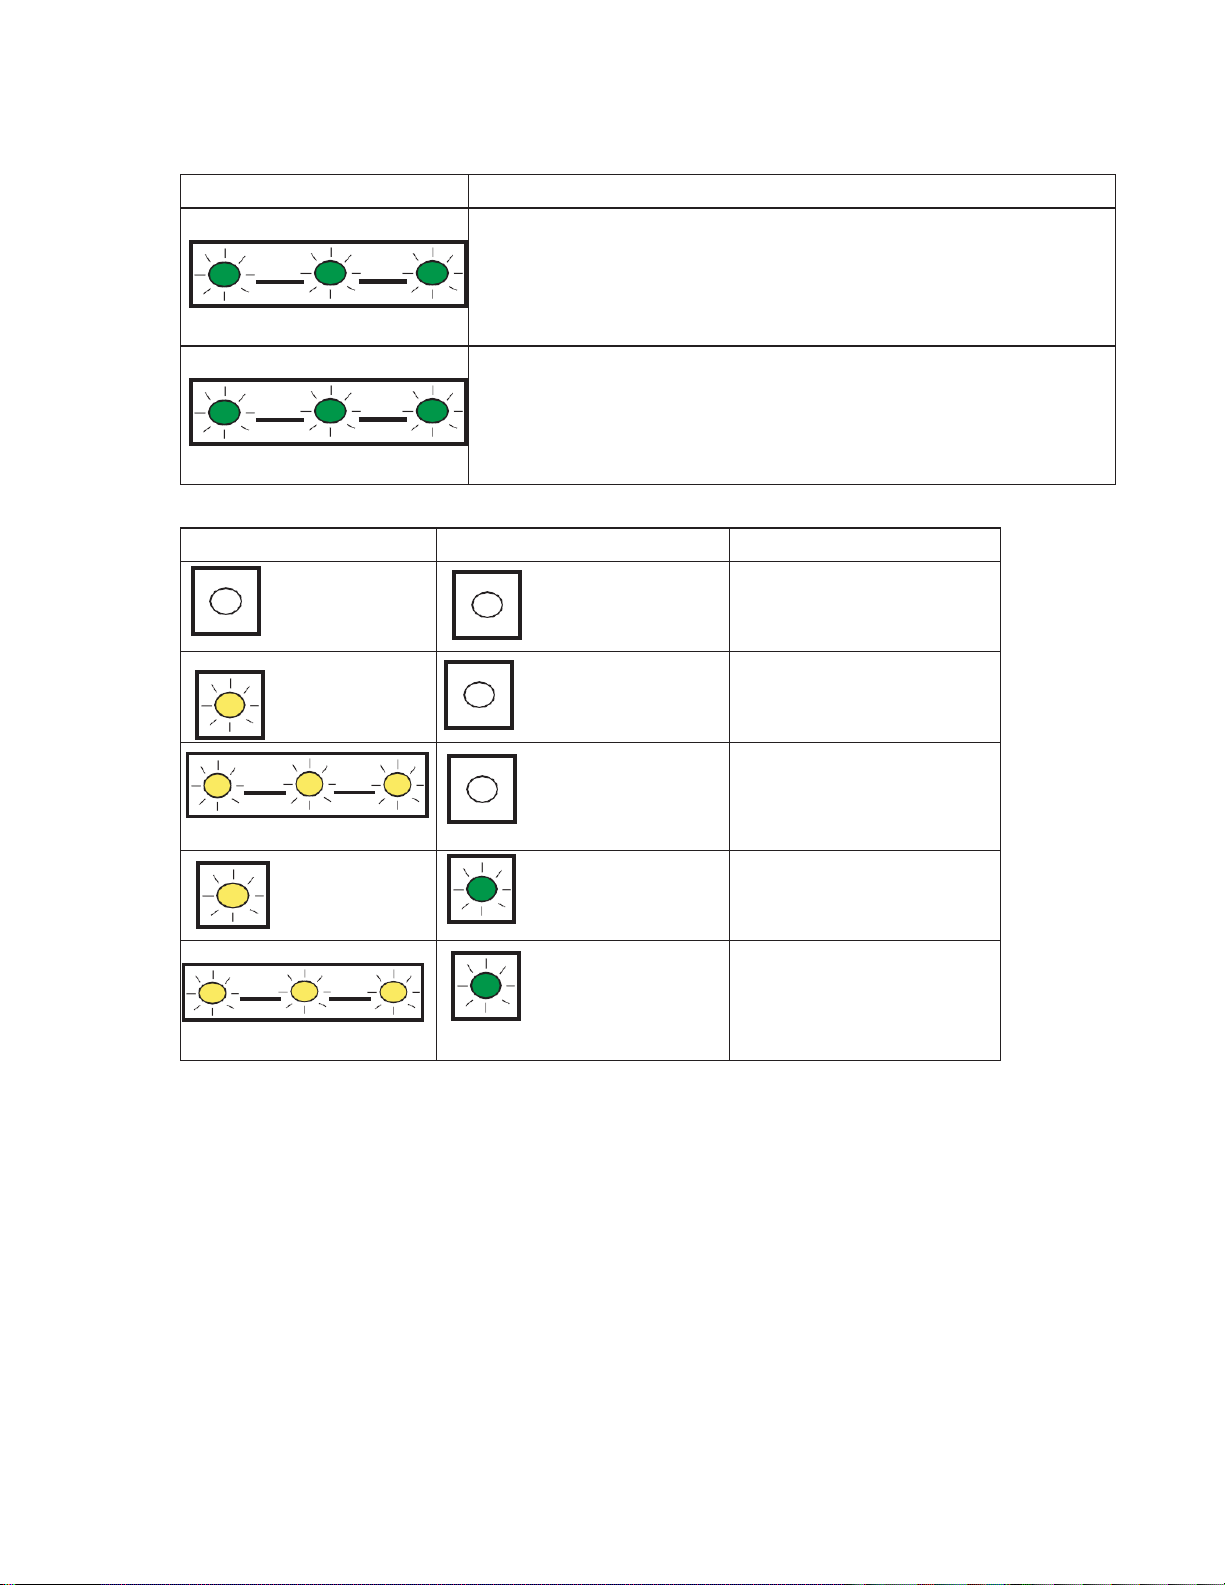
Maintenance and troubleshooting LEDs (continued)
Flash pattern
Function
RX (Receive) Flashing
Occurs when the module receives a message over the network
connection – UPD, TCP, or DNS.
TX (Transmit) Flashing
Occurs when the module sends a message over the network
connection – UPD, TCP, or DNS.
Table 3 Ethernet Link LEDs descriptions
LINK (yellow) LED pattern
100Mb (green) LED pattern
Function
Off
Off
No Ethernet link
On Steady
Off
10Base-T link
Flashing
Off
10Base-T activity
On Steady
On Steady
100Base-TX link
Flashing
On Steady
100Base-TX activity
Table 4 Ethernet Link LEDs descriptions

7
Trouble Condition
Heartbeat
Transmit (TX)
Receive (RX)
Network cable
disconnected
On Steady
Off
Flashes once every 1 sec
Obtaining an IP address
On Steady
Off
2 quick flashes
every 1 sec
Low bus voltage
On Steady
Off
3 quick flashes
every 1 sec
Internal failure
On Steady
Off
On Steady
Table 5 Trouble conditions
How to connect to RPS using the IP Communicator.
How to connect to RPS using: ‘Connect Via: IP Direct:’
The IP Direct connection to RPS provides for a local connection from B-Series or GV4 panels to Remote Programming
Software. IP Direct uses an Ethernet cable connected directly between the computer and IP Communicator with both
configured for DHCP (Dynamic Host Configuration Protocol). Dynamic Host Configuration Protocol is controlled by a
DHCP server which distributes an addressing configuration when requested by the connected device.
How it works:
The computer and IP Communicator are both set to DHCP and therefore both will request an IP address from a server.
With the Ethernet cable connected directly between computer and IP Communicator; and no DHCP server is available,
the PC fails to obtain an IP address and falls back to the APIPA (Automatic Private IP Address) of 169.254.xxx.xxx
(where xxx= a random number between 0-255). The IP Communicator, also configured to DHCP, will fall back to its
auto IP address of 169.254.1.1. When configured in this way connecting via ‘IP Direct’ will work because both the
computer and IP communicator fall within the same subnet by design.
Note: The IP Communicator does not require additional configuration when:
Currently contains default settings (unused card)
DHCP is available on the network
AES encryption is not required
UDP on Port 7700 (default B426 port setting) is available on the network.
Configure the IP Communicator and computer to connect Via: IP Direct
1. Set the address switch to either 1 or 2. Use different addresses on each module when multiple IP
communicators are connected (B420, B426 or B450).
2. Connect to the SDI2 bus with either a 4-pin molex connector or 4-conductor cable to terminals 33-36 (never
use both at the same time).
3. Set the PC to obtain an IP address automatically and the IP communicator to: DHCP/AutoIP Enable=Yes
(default setting)
4. Connect an Ethernet cable direct from the PC to the IP communicator and wait 60 sec. With DHCP enabled on
the computer, a 169.254.xxx.xxx address should now be assigned and the IP Communicator should fall back to
its default address of 169.254.1.1. The conditions for IP Direct have now been satisfied.
5. Select Connect Via IP Direct.

8
How to connect to RPS using ‘Connect Via: Network’:
Used for making local or remote connections with RPS using standard networking rules. The IP communicator
can use either DHCP or a static IP address depending site requirements. Port forwarding rules may be required
when connecting from outside of the host network.
Note: IP address 169.254.1.1 can be used for ‘Connect via Network’ when an Ethernet cable is connected directly
between the IP communicator and computer and both are configured to use DHCP.
1. Set the IP communicator address switch for the panel type according to table 1 on pg5. Avoid duplicate
addresses when multiple modules (B420, B426 or B450) are connected to the same bus (SDI, SDI2 or Option
bus).
2. Connect to the SDI2 or SDI bus, depending on panel type, with either a 4-pin molex connector or 4-conductor
cable (never use both at the same time). SDI2: terminals 33-36, SDI: terminals 29-32.
3. Configure the PC’s network interface depending on the network application (LAN, WAN, etc.). Remote
connections may require a port forwarding rule for UDP protocol.
B8512G/B9512G or GV4:
1. Configure the IP communicator DHCP/AutoIP Enable to either Yes or No depending on network requirements.
2. When using DHCP/AutoIP Enable=NO, enter an IP address.
3. Connect an Ethernet cable from the IP communicator to the site network or PC as required.
4. Select Connect Via: Network, enter the IP address and press Connect.
FPD-7024, all G series 6.0 and higher, GV2 and GV3 types:
1. Configure the IP Communicator using the Web Browser Interface.
2. Select Connect Via: Network, enter the IP address and press Connect.
Note: Configuration steps are required in the FPD-7024 for using the IP Communicator and for connecting to
RPS. The FPD-7024 Troubleshooting Guide provides detailed information for configuring the IP Communicator
and is located on the Bosch Security Knowledge Base.
How to configure the IP Communicator using keypad programming.
When using B920 or B930 SDI2 type Keypads:
1. Enter the installer code (default-123) and press Enter.
2. Press 1 (Installer Menu).
3. Press 1 (Programming Menu).
4. Press 2 (Network Menu).
5. Press 1 for Bus module (1) Menu (or 2 for Bus module (2) Menu).
6. Press 1 for Module Parameters
7. Press 1 to edit DHCP, the keypad displays Set DHCP Enable with the current setting Yes/No.
8. Press NEXT until the keypad displays: Set DHCP Enabled=No, and press ENTER. The keypad displays
Parameter Saved and returns to [Press 1 to edit DHCP Enable] with the changed setting.
9. Press ESC to view Module Param Menu
10. Press 2 for Address Param Menu, press 1 to edit the IP address.
11. The display reads: [edit IP address?] with the current setting. Press Enter to edit the IP address.
1) Enter the first Octet and press Next…….
2) Enter the second Octet.
3) Enter the third Octet.
4) Enter the fourth Octet and press Enter. The keypad says Parameter Saved and returns to the [Edit IP
Address?] Display. Press ESC.
12. Press 2 to edit the Subnet Mask. The display reads [edit subnet mask?], with the current setting.
13. Perform steps 11a-d.
14. Press 3 to edit the Default Gateway. The display reads [edit default gateway?], with the current setting.
15. Press ENTER to edit the Default Gateway.
16. Perform steps 11a-d.
17. Press Escape to exit keypad programming.

9
When using D1255 or D1260 SDI type keypads:
1. Press 99 ENT
2. Press NEXT to access the TOOLS MENU? display. Select [ENT], (D1260: use soft-key)
3. Enter the Installer Passcode and press ENT (default=123)
4. The display reads PROGRAMMING: Select [ENT], (D1260: use soft-key)
5. Press NEXT to access the IP MODULE CONFIG display: Select [ENT], (D1260: use soft-key)
6. At the B420 MOD 1-2? prompt, enter press 1 ENT
7. MODULE PARAM displays, select [ENT], (D1260: use soft-key)
8. Continue with steps for D1255 or D1260 below:
Using the D1255:
1) The display reads DHCP ENABLE; press [ENT].
2) The display reads MODULE [#] DHCP (YES / NO) alternating with the current setting.
3) Press ENT followed by NEXT until NO displays and press ENT.
4) The display reads PARAMETER SAVED alternating with the changed setting, Press ESC 2x to reach
MODULE PARAMS.
5) Press NEXT to reach ADDRESS PARAMS, press ENT to select and ENT again to select IP Address.
6) The display reads MOD [#] ADDRESS alternating with the current IP Address.
7) Press ENT again to change the setting. The display is ready to change the first Octet.
a. Enter the 1st Octet (xxx) and press NEXT.
b. Enter the 2nd Octet (xxx) and press NEXT.
c. Enter the 3rd Octet (xxx) and press NEXT.
d. Enter the 4th Octet (xxx) and press ENT, the display reads PARAMETER SAVED alternating with
MOD [#] and the changed setting.
Note: Digits can be deleted by pressing the PREV key.
8) Press ESC the display reads IP ADDRESS, press NEXT to display SUBNET MASK.
9) Press ENT to Select Subnet Mask, the display reads Mod [#] SUBNET alternating with the current
Subnet Mask. Press enter to change the Subnet Mask.
10) Perform steps [7a. – d.] to change the Subnet Mask.
11) Press ESC, the display reads IP ADDRESS. Press NEXT (2x) to reach DEFAULT GATEWAY.
12) Press ENT to select Default Gateway, the display reads; Mod [#] GATEWAY alternating with the current
Default Gateway setting. Press ENT to change the Default Gateway.
13) Perform steps [7a. – d.] to enter the Default Gateway.
14) Press ESC until programming is exited.
Using the D1260:
1) The display reads DHCP Enable / UP&P Enable; Select DHCP ENABLE
2) The display reads Module [#] DHCP Enabled with current setting (Yes or No), press Edit, select No and
select Save.
3) Display reads [Parameter Saved] and returns to Module [#] DHCP Enabled with the changed setting.
4) Press Exit 2x and select ADDRESS PARAMETERS.
5) Select IP Address. The display reads: Module [#] Address with current address [default= 0.0.0.0].
6) Press Edit to change the setting. The display is ready to change the first Octet.
a. Enter the 1st Octet (xxx) and press Next
b. Enter the 2nd Octet (xxx) and press Next
c. Enter the 3rd Octet (xxx) and press Next
d. Enter the 4th Octet (xxx) and press Save, the display reads Parameter Saved and returns to Module
[#] Address with the changed setting.
7) Press Exit and select SUBNET MASK.
8) Press Edit to change the Subnet Mask.
9) Perform steps [6a. – d.] to enter the Subnet Mask
10) Press Exit and select DEFAULT GATEWAY.
11) Press Edit to change the Default Gateway.
12) Perform steps [6a. – d.] to enter the Default Gateway.
13) Press Escape until programming is exited.

10
How to configure the IP Communicator using Remote Programming Software.
1. The B-Panels can connect to RPS using a USB-A to USB-A cable, Bosch p/n B99. Select Connect via:
USB. GV4 panel types can use the DX4010V2 and Connect via: Enhanced Direct. Once connected to RPS
the IP communicator settings can be located in the section: SDI2 Modules> [B420 Ethernet Communicator
(GV4 Ver1.00-1.00)] or [IP Communicator (GV4 Ver2.00+)].
Figure 2 GV4 ver1 Static IP entered into RPS account
Figure 3 GV4 ver2 Static IP entered into RPS account
Note: After making programming changes to prepare for connection to RPS, ensure these changes
are saved to the RPS account. When starting with a blank account, receive the changes to the RPS
account. When starting with a fully programmed RPS account, manually enter changes into the
account. Otherwise the previous steps may become overwritten with default entries and require
entering again with required settings.

11
How to configure the IP Communicator using the Web Browser.
Note: The web browser configuration is only required when connecting to the SDI or Option bus (see table
1 (pg5) for details). B-Series or GV4 panels normally connect the IP communicator to the SDI-2 bus and
use panel programming to configure.
Note: When having trouble connecting to the Web Browser it may be necessary to change the web
browser configuration so that it does not use a proxy server. Refer to the browser’s online help for
instructions on disabling proxy service.
1. Set the address switch correctly for the panel type as described in table 1.
2. Connect the IP Communicator to the panel SDI bus using either the 4-pin molex connector or a 4-conductor wire
landed on terminals 29-32.
3. Open an internet browser (Microsoft Internet Explorer 6 or higher, or Mozilla Firefox 3 or higher) and connect to the IP
communicator using the default IP address: 169.254.1.1 (or a previously configured IP address) and press [Enter].
The B426’s Login page opens (figure 4).
Figure 4 B426 Login Page
Figure 5 Home Page
4. Enter the password (default: B42V2) and click Login. The Device Information home page opens. Check for current
firmware version (figure 5). The firmware download is located at; http://us.boschsecurity.com/ under
Catalog>Intrusion Alarm Systems>Conettix Communicators.
5. Browse to the desired page and configure following the steps described in the following pages. Select OK on each
page after entering changes. Changes are not saved if OK isn’t selected.
Note: When the IP Communicator is not default and has an IP address configured, the Web and Automation Security
setting must be adhered to for successful connection.
Web and Automation Security Enabled, use: https:// [B426 IP address]
Web and Automation Security Disabled, use: http:// [B426 IP address]

12
Basic Network Settings Page
Used to configure the basic network settings used by the IP Communicator. See figure 6 below.
Figure 6 Basic Network Settings
Note: Legacy TCP Automation Enable is used for Automation. Leave this setting=No when configuring
for Remote Programming Software and/or Reporting.
Advanced Network Settings Page
Legacy Panel Mode Disabled / Enabled: When enabled allows a single TCP connection with no security.
Legacy Panel Mode must be configured correctly for the IP Communicator to communicate with the panel. Set to
Enabled Only for the listed panels, set to Disabled for all other panel types. Note that the Enabled option is
greyed out when the address switch is set to one only compatible with Non-Legacy Panel types. (see table 1pg.5)
Port 77EE Configuration Enable: Select Yes to enable the network configuration port or No to disable the
network configuration port.
UPnP Enable: Enable Universal Plug and Play Yes or No.
HTTP Port Number: Select the HTTP Port number (1-65535) used for the module web server.
ARP Cache Timeout: When the module communicates with any device on a network, an entry is added to its
ARP table for each of those devices. The ARP Cache Timeout defines the number of seconds (1 to 600) before
the ARP table of the module is refreshed.
Figure 7 Advanced Network Settings

13
Panel Address Settings Page
When the IP Communicator address switch is set as 1 – 9 the Device Address used by the control panel is displayed.
Figure 8 Panel Address Settings
Select the Device Address Remotely
When set to ‘0’ the below screen displays allowing the device address to be set with the Web Interface. This could
provide for a remote selection of the IP Communicator’s device address when needed. See table 1 Panel Address
Selection for details.
Figure 9 Panel Address Page

14
Encryption and Security Settings Page
Encryption settings for the IP communicator is configured on this page when connected to SDI. When
connected to SDI2, encryption is configured in panel programming.
Encryption Enable
Enable encryption by setting as Yes and select the AES Key Size and enter the encrypted key string.
Figure 10 Encryption Settings
Web and Automation Security
Selecting Enable adds a layer of security to the web interface connection. (HTTPS provides authentication of the website
and associated web server as well as encryption of communications.)
Disabled: Use http:// [B426 IP address]
Enabled: Use https:// [B426 IP address]
Figure 11 Encryption and Security Settings

15
Maintenance Page
Figure 12 Maintenance Page
1. Web Access Password: For changing the default password (B42V2) to access the web browser. Use
four to ten case sensitive alphanumeric characters.
2. Web Access Enable: Used to Enable/Disable access to the web browser interface. Set to Enable to
allow or Disable to prevent access to the web browser interface. The default setting in the web browser
is Enable.
3. Panel Programming Enable: Enable/Disable programming of IP Module from SDI2 compatible panels.
Set to Enable by default. When set to Disable the IP module parameters area in the RPS panel
account are greyed out.
4. Firmware Upgrade Enable: Enable/Disable the ability to upgrade the module's firmware from the
Firmware Upgrade configuration page.
5. Module Host Name: Set by default as Bxxxxxx, where xxxxxx is the last six digits of the module's MAC
address. Use this parameter to create or change a module hostname. This is the hostname that
represents the module on the network. Optionally use the hostname to contact the control panel via
RPS over network, for Remote Security Control, or for module web configuration and diagnostics.
Setting the Module Host Name as [blank] restores the default hostname previously described.
6. Unit Description: Up to twenty alphanumeric characters may be entered to create a simple description
for the unit shown in the web configuration pages.
Factory Default Page
Select Factory Default to return all parameters to the factory default settings. Select OK to continue with
defaulting the IP Communicator. Note the IP address configuration of the computer may need to be changed to
allow for reconnect.
Figure 13 Factory Default Page

16
Firmware Upgrade Page
1. Select the Firmware Upgrade page. The firmware update will initialize, the end of the count-down
press Continue. The figures below will display during the update. Select OK to continue with updating
the firmware.
Figure 14 Select Firmware Update menu
2. Note that normal operations will be disabled until the update is finished and select OK to continue.
Figure 15 Firmware Update Initializing
3. Browse to the location that the firmware was saved to and select Update.
Figure 16 Browse to the Firmware, press Update
4. Wait for the IP Communicator to finish its reset after the update completes and select [Re Login] to
connect back into the web browser (see figure 17). The Home page should indicate the new firmware
revision.
Figure 17 Device Reset after Update

17
Connect to the Web Interface when the IP address is Unknown
When the IP address is unknown the web interface connection can be made by using the configuration steps below. This
will enable connection to the IP Communicator using http://169.254.1.1 and the default password: B42V2. Previously
configured parameters in the module are left unchanged.
1. Set the address switch to 9 and place a jumper across the ‘Mode’ pins, located adjacent to the address switch.
2. Set the PC network interface to operate in network range of IP address: 169.254.1.1. (Set to either ‘Obtain
automatically’ and fall back to the APIPA: 169.254.x.x, or set a Static IP such as 169.2454.1.2)
3. Open an internet browser (Microsoft Internet Explorer 6 or higher, or Mozilla Firefox 3 or higher) and connect to the IP
communicator using the default IP address: 169.254.1.1 and press [Enter]. The B426 Login page displays.
Figure 18 B426 Login Page
4. Enter the password (default: B42V2) and click Login. The Device Information home page opens.
5. Browse to the desired page and configure as needed.
6. Select OK after entering changes to save edited values. Changes are not saved if OK isn’t selected.
Replace an IP Communicator connected to SDI2 keeping the original settings.
1. Set the address switch on the new IP Communicator the same as the one to be replaced.
2. Remove the old IP communicator and connect the replacement to SDI2.
3. Reboot the panel by closing reset switch until the panel piezo sounds and then open it. The program settings for the
selected address (1 or 2) will be pushed to the IP Communicator.
4. Select Connect Via: Network, enter the IP address and press Connect.
Determine if the B426 is the original or the modified version
The original B426 release was eventually upgraded hardware with increased memory allowing for firmware upgrades.
The modified B426 has a slight change in the circuit board for identification purposes. The modified version has the
tamper pins relocated to between the SDI2 connectors as seen below.
Figure 19 Modified verses Old Version

18
Troubleshooting
Note: The panel’s installer passcode is required for some troubleshooting steps and when unknown can be
recovered using Remote Programming Software provided the RPS Passcode and datalock are available.
These security codes are used to prevent unauthorized access to panel programming and when unknown
access is not available. When this occurs the panel would need to be sent to repair to default all program
parameters and security codes.
Trouble connecting the IP Communicator to the Web Interface
Note: B-Series or GV4 panels are designed to force programing to IP communicators connected to SDI2 when rebooted.
When having trouble connecting to the web interface of a module previously connected to a panel SDI2 bus, there are
settings which may have been pushed to the card and causing the trouble. This should be considered while
troubleshooting.
1. Perform a power-reset on the IP communicator and attempt the connection to the web interface again.
2. Verify correct switch address using table 1 on pg4. Be sure to reset power to the IP Communicator, any time an
address change is made, prior to connecting to the web interface.
3. Disable any Firewalls and/or Anti-Virus software on the computer.
4. Ensure the setting for Web and Automation Security is followed. When set to YES connect using https://...ip
address. When set to NO, connect using http://...ip address. When not sure attempt the connection using the
reverse of the current entry (https:// or http://).
Figure 20 Web and Automation Security setting
Applications with the IP communicator set to DHCP/Auto-Enable=YES
1. Verify the Ethernet cable is connected directly from the PC to the IP Communicator and that the link lights indicate
network activity.
2. Disable the Wi-Fi or other network interfaces. Verify the PC’s Network Adapter PC is configured: ‘Obtain an
Address Automatically’ and has obtained an Automatic Private IP Address (APIPA); 169.254.xxx.xxx (where
xxx=0-255). Open a browser and connect to the IP communicator using the IP Communicator default IP
address: 169.254.1.1.
3. When configuration settings have been verified correct and the web browser still does not connect there may be a
conflict from previous programming. The steps below allow for connection to http://169.254.1.1 using the default
password (B42V2) regardless of other configuration settings.
1) Remove power from the IP communicator.
2) Set the address switch to 9 and place a jumper across the ‘Mode’ pins, adjacent to the address switch.
3) Verify an Ethernet cable is connected directly from the PC to the IP Communicator and that the link lights
indicate network activity.
4) Apply power to the IP communicator.
5) Verify the PC obtains an Automatic Private IP Address (APIPA); 169.254.xxx.xxx (where xxx=0-255). Open
a browser and connect to the IP communicator using the default IP address: 169.254.1.1. Use the login
password B42V2.
Applications with the IP communicator set to DHCP/Auto-Enable=NO
1. Disable the Wi-Fi or other network interfaces. Verify that the PC is using an IP address in the same network as
the IP communicator.
2. Verify any firewall settings in the PC or network are disabled or have a port forwarding rule for the port assigned
to the IP communicator.
3. Open a browser and connect to the IP communicator using the assigned address.
4. If the web browser does not connect after verifying correct configuration settings, there may be an error in
programming. Refer to the section above; [Applications with the IP communicator set to DHCP/Auto-
Enable=YES] and follow step 3.

19
There is a problem with the security certificate when logging into the Web Interface.
If a message is displayed while connecting to the IP communicator which reads: ‘There is a problem with this website’s
security certificate’, select Continue to this Website (see below).
Figure 21 Problem with Security Certificate
The IP Communicator LED’s are not working
1. Check power and basic wiring connections.
2. Verify the tamper pins are not covered with a jumper.
3. Replace the module.
Can supervision be disabled for the IP Communicator?
No. Devices SDI2 are always supervised during normal operation.
Can’t change Legacy Mode in the Web Browser’s Advanced Network Settings page
Legacy Mode Enabled is greyed out when the IP communicator selected switch address is only used with nonlegacy panel types. Verify using the correct module address (see table 1 pg.5).
Legacy Mode Enabled setting available with switch settings: 3, 4, 7, 8.
NOT available (greyed out) with switch settings: 0, 1, 2, 5, 6, 9.
The IP Communicator settings in RPS are greyed out or keypad programming is locked
Panel programming has been disabled in the web interface when programming items are greyed out in RPS
(figure 22) or the D1255 or D1260 keypad displays B420 Module Locked (figure 23). Connect to the web
interface, open the Maintenance page and set Panel Programming=Enabled (figure 24).
Figure 22 Module settings are greyed out
Figure 23 Remote Programming displays Mod Locked
Figure 24 Maintenance Page of Web Interface

20
Trouble connecting to RPS using the IP Communicator
Verify correct panel account type selected in RPS for existing panel firmware revision.
1. Confirm the panel type and firmware revision:
1) Press [CMD + 59] at a panel keypad (works on all panels).
2) (GV2 and older only) Look for the EEProm chip, located in a socket on the main circuit board under the heat-
shield. The panel type and firmware version will be printed on. Note that the D7212B/B1 or D9112B/B1 are
not compatible with the IP communicator.
2. Confirm the correct account type was created in RPS:
1) Right-click on the panel from the Panel List view in RPS.
2) Select ‘Open Panel Data-View’. Check for correct account type creation.
All D7212/D7412 or D9412-G and Non-G types will use a D7212/D7412 or D9412 account type in RPS.
All GV2 panel types will use D7212GV2/D7412GV2 or D9412GV2 account types in RPS.
GV3 or GV4 panel types require a Panel Version selection in the RPS account (see figure 25). Confirm
the Panel firmware version with [CMD + 59], then verify the correct Panel Version was selected the RPS
account.
Figure 25 Panel Firmware Selection
Note 1: GV3 or GV4 account types can be promoted from a lower panel version group to higher but
cannot be reverted from a higher panel version group down to the lower group. For example, if a [GV4
V2.00 or greater] account was created to connect with a GV4 ver 1.00.011 panel, the RPS connection
would fail because of the mismatch. The V2.00 or greater account cannot be reverted back to v1.00
thru v1.99 and must be recreated from a blank account.
Note 2: Stickers or hand written firmware revisions may not accurately reflect panel firmware revision
due to possible changes made after installation. Use CMD59 to confirm existing revision.
Verify correct module address selection.
Use [CMD + 59] to confirm the panel type and firmware. Using table 1 on pg5, verify the address setting was set in
the IP Communicator.
Check for address conflicts.
1. An address conflict occurs when multiple IP communicators connected to the same bus (SDI or SDI2) use the
same switch address. Ensure each module (B426, B420 or B450) connected to the same bus (SDI or SDI2)
is addressed differently. Reset power after changing module address.
2. Remove any DX4010V2 modules wired to SDI if the IP communicator is wired to SDI. The DX4010V2
address may conflict with the IP communicator address.

21
Verify the correct RPS passcode is used when connecting.
The RPS code in the panel account must match the code in the physical panel when connecting to Remote
Programming Software. When having trouble connecting the RPS Code entry should be verified in both the physical
panel and the panel account. Keypad programming can be used to inspect the programmed RPS code in B-panels,
GV4 and GV3 v8.10+ types. Note, keypad programming is not available in GV3 ver8.00-8.09, GV2, G or non-G
types.
1. B-Panels or GV4 Version 2+ using a B920 or B930 type Keypad:
1) Enter the Installer Code + ENT (Default=123).
2) Press 1; Installer Menu.
3) Press 1; Program Menu.
4) Press 3; RPS Menu.
5) Press 1 to view the RPS Passcode.
2. GV4 Version 1.00-1.99 using an SDI Keypad:
1) Press 99 + ENT.
2) Press Next until Tools Menu displays, select Tools Menu.
3) Enter the Installer Code (Default=123).
4) Press Next until Programming displays and select Programming.
5) Press Next until RPS Parameters displays and select RPS Parameters to view the programmed RPS
code.
3. GV3 Version 8.10+ using an SDI Keypad:
1) Press 99 + ENT.
2) Press Next until KEYPAD PROG? displays. Select KEYPAD PROG.
3) The display reads: Enter Passcode, enter the installer code (default=123) and press Enter.
4) The display reads: Phone Numbers. Press Next until RPS Parameters displays. Select RPS Parameters.
5) The display reads: RPS Passcode and alternates with the currently programmed RPS Passcode.

22
Trouble connecting to RPS: ‘Connect via: IP Direct’.
IP Direct requires both the PC and IP communicator to use DHCP. Therefore, both are waiting to be assigned an IP
address from the server. Because no server is available when connected using only an Ethernet cable, neither obtains an
IP address. The IP communicator falls back to its default address (169.254.1.1) and the PC falls back to the Auto
configuration IPv4 address of 169.254.xxx.xxx (where xxx= a random number between 0-255). Configured in this way the
IP Direct connection can work. (see the section: How to connect to RPS using: ‘Connect Via: IP Direct’ for more details)
See figure 26 to verify proper addressing in the PC.
1) Select Control Panel.
2) Select Network and Sharing Center.
3) Select Change Adapter Settings. The Network
connections will display.
4) Ensure only the Local Area Connection to be
used should be enabled. Disable any others.
5) Right-click the Local Area Connection and
select Status.
6) Click on Details.
7) The Auto-configuration IPv4 address should
read 169.254.xxx.xxx.
Figure 26 Verify Network settings in PC
Verify both the PC and IP communicator use DHCP. When available, a connection to RPS, using ‘connect via:
USB’ or ‘Enhanced Direct’, may be used to verify the setting: SDI2 Modules > IP Communicator > IPv4
DHCP/AutoIP Enable is set to YES
If an alternate connection to RPS is not available, use keypad programming to verify the IP communicator is
configured: DHCP/AutoIP Enable = YES in the panel account.
Using an SDI type keypad (D1255/D1260):
1) Press 9+9+[Enter] and then [Next] to reach Tools Menu, select Tools Menu.
2) Enter the installer code (default 123).
3) Press [Next] to reach Programming and select Programming.
4) Press [Next] to reach IP Module Config and select IP Module Config.
5) B420 Mod 1 - 2 displays; select [1] or [2] + [Enter] (depending on the device address).
6) Module Params displays; select Module Params.
7) DHCP ENABLE displays; select DHCP ENABLE.
8) The display reads MODULE [x] DHCP with the current setting YES/NO. Press Next until YES is selected.
9) Press escape to exit keypad programing.
Using a B920 or B930 keypad:
1) Press 123 + [Enter].
2) Press 1 for Installer menu.
3) Press 1 for Programming.
4) Press 2 for Network menu.
5) Press 1 for Module address 1 or 2 for Module address 2.
6) Press 1 for Module Param menu.
7) Press 1 for DHCP Enable. The display reads “Set DHCP Enabled” with the current selection. Press Next
until YES is selected. Press escape to exit keypad programing.

23
Trouble connecting when using Connect via: Network
The PC must be configured in the same network as the IP communicator. RPS can be used to check the IP communicator
addressing if connection ‘via: USB or Enhanced Direct’ is available. Keypad diagnostics can also be used on B- panels or
GV4 types can use keypad diagnostics (see below). For SDI and option bus connections review the section: How to
configure the IP Communicator using the Web Browser to verify the IP address.
Verify the IP communicator and PC are in the same network (check with IT if necessary).
If not in the same network, a port forwarding rule for TCP protocol may be required. Check with IT.
Any Windows OS or 3
rd
party firewalls should be disabled or port forwarding rules for UDP configured.
For SDI2 Connections:
1. Review the section: How to connect to RPS using ‘Connect Via: Network’ on pg. 8 and ensure the general
configuration is correct.
2. Review the section: How to configure the IP Communicator using keypad programming on pg. 8. Verify
correct settings for; IP address, Subnet Mask and Default Gateway.
For SDI or Option Bus connections:
1. Verify correct setting of Legacy Mode Enabled/Disabled in Advanced Network settings in the web browser.
An incorrect setting will prevent communication with the panel. Legacy Panel Mode is set as Enabled only for
the following panel types:
D7212/D7412/D9412GV2 version 7.05 & lower
D7212/D7412/D9412GV version 6.99 & lower
DS7400XiV4
2. Data traffic or Noise on data wires.
1) If connected to SDI bus, close the reset switch and attempt the connection again. This will
reduce the data traffic on the SDI bus and may resolve the trouble connecting by network.
2) Remove the data wires for all devices but the IP communicator from the SDI or Option bus.
This will isolate any field wire issues and may resolve the trouble connecting by network.
Verify correct Encryption settings (G or Non-G thru GV4 v1.00-1.99 types only).
Encrypted connections to Remote Programming Software only pertain to GV4 v1.00-1.99 and earlier panel types.
Remote Programming Software generates an encrypted network connection to B-Panels or GV4 version 2+ panel types.
Therefore, problems connecting to B-Panels or GV4 v2+ types will not be affected by encryption settings.
Verify correct encryption configuration in GV4 v1.00-1.99 and earlier panel types.
1. Check the ‘Encryption & Security Settings’ page in the web browser and verify correct entries in the Key Size
and AES Key String.
Figure 27 Web Browser ‘Encryption & Security Settings’ Page
Figure 28 Network Tab for the RPS Account
2. Verify the correct Encryption Key is selected to the panel account in Remote Programming Software. Locate
the panel list in RPS and right-click the panel account. Select Open Panel Data-View and the Network tab.
The Panel Data-Edit screen displays as seen on right. Select Encryption: Enabled and then select the
correct encryption key for the panel account from the dropdown list.
 Loading...