

Page 1
Part No. 6252215/B
Please READ AND SAVE these instructions for future reference.
Sírvase LEER Y GUARDAR estas instrucciones para uso futuro.
Recycled Paper
PORTABLE EVAPORATIVE AIRCOOLER
ENFRIADOR EVAPORATIVO DE AIRE PORTATIL
• English
• Español
Operating and Maintenance Instructions
Instrucciones para el Uso y Mantenimiento
As the policy of this company is one of continuous improvement,
all specifications are subject to alteration without notice.
Como la política de la compañía se basa en una mejora continua de sus productos,
todas las especificaciones están sujetas a cambios sin previo aviso.
Page 2

1
Contents - Contenido
Congratulations on your choice
We’re delighted you’ve chosen a CLIMATE TECHNOLOGIES
portable evaporative aircooler for your home. It is an aircooler
we are very proud of. Designed and made in Australia, it
embodies the latest advances in evaporative aircooling
technology in a stylish compact cabinet.
Information
The information contained in the following pages has been
prepared to ensure you enjoy trouble-free operation of your
portable evaporative cooler.
1
Lo felicitamos por su elección
Nos da mucho gusto que usted haya elegido el enfriador
evaporativo de aire portátil de ‘CLIMATE TECHNOLOGIES’.
Estamos muy orgullosos de este producto. El aparato,
diseñado y fabricado en Australia, ofrece con su elegante y
compacta presentación los últimos adelantos de la tecnología
de enfriamiento del aire.
Información
La información que aparece a continuación ha sido preparada
para asegurar que usted disfrute sin problema los beneficios
que puede obtener con el uso de su enfriador evaporativo de
aire portátil.
Page 3

1
Safe Operation -
Funcionamiento Seguro
2
IN ORDER TO REDUCE THE POSSIBILITY OF FIRES,
ELECTRIC SHOCK OR PERSONAL INJURY.
• Please READ AND SAVE THESE INSTRUCTIONS prior to assembly or operation.
• Use only with a 120V, 60Hz, Grounded outlet.
• Do not use the unit on uneven or unstable surfaces.
• Unplug unit during servicing or cleaning.
• Do not operate unit with the rear panel removed.
• Do not use immediately adjacent to heat sources such as stoves or radiators.
• Do not use the unit immediately adjacent to sources of water, such as swimming pools, hot tubs, bath
tubs, sinks, etc.
• Do not operate the appliance with a damaged cord, plug or other component.
• Do not run the power cord under carpet or other floor covering.
• Do not use the power cord with an adaptor plug that converts the three prong plug into a two prong
connector. Do not use an extension cord.
• Do not use the appliance with an improperly grounded receptacle.
• Do not overfill. Use water only.
•Do not alter or modify this product.
• Do not allow children to operate or service this product.
• Save instructions for future reference. Keep them in a handy location. Do not throw them away.
PARA DISMINUIR LA PROBABILIDAD DE INCENDIO,
SHOCK ELECTRICO O DAÑOS PERSONALES.
•
Sírvase LEER Y GUARDAR ESTAS INSTRUCCIONES antes del armado o de ponerlo en funcionamientto.
• Usar solamente con un tomacorriente de 120V, 60Hz, conectado a masa.
• No utilizar el aparato sobre superficies desniveladas o inestables.
• Desenchufar el aparato antes de hacerle el servicio o limpiarlo.
• No utilizar el aparato sin el panel posterior.
• No utilizar muy cerca de fuentes de calor como cocinas y estufas eléctricas.
• No utilizar el aparato demasiado cerca de fuentes de agua tales como piscinas, tinas de agua caliente,
bañeras, lavaderos, etc.
• No utilizar el aparato con el cable, enchufe o alguna otro pieza dañada.
• No colocar el cable de electricidad debajo de alfombras o algún otro tipo de cubierta para el piso.
• No utilizar el cable con un adaptador que convierte un enchufe de tres clavijas en enchufe de dos
clavijas. Tampoco utilizar cables de extensión.
• No utilizar el aparato con un tomacorriente que no está puesto a tierra correctamente.
• No Ilenar excesivamente. Utlizar agua solamente.
• No se debe alterar o modificar de manera alguna este aparato.
• No permitir que un niño haga funcionar el aparato, ni que le haga el ervicio.
• Guardar las instrucciones para uso futuro. Las instrucciones deben colocarse en un lugar de fácil
acceso. No se deshaga de las instrucciones.
Page 4
13
Evaporative aircooling has been the natural way to beat
summer heat since the day of Pharoahs. Evaporative
aircooling WORKS through the process of natural
evaporation taking heat from the air and thereby lowering it’s
temperature.
Additional cooling effect takes place as air passes over your
body further improving comfort. Fresh evaporative
aircooling works best only with doors and windows OPEN you don’t have to seal yourself away as you would with a
refrigerated system.
Your COOLER will cool you quickly and keep you that way.
It continually changes the air in a room every two to three
minutes. You can relax in the cool fresh air produced by
your COOLER knowing that it is environmentally friendly. It
emits no CFCs and filters floating air irritants. How
refreshing!
Desde la época de los faraones, el enfriamiento del aire por
medio de la evaporación ha sido el método natural utilizado
para combatir el calor del verano. El enfriamiento del aire
ocurre por medio de la evaporación natural que extrae el
calor del aire y por lo tanto baja la temperatura.
El aire al soplar el cuerpo causa más enfriamiento brindando
aún más comodidad. El método de enfriamiamiento de aire
fresco por medio de la evaporación tiene un mejor resultado
al utilizarse en habitaciones con puertas y ventanas
ABIERTAS -no es necesario encerrarse como tendría que
hacerse con un método refrigerante.
(Aire acondicionado tradicional).
Su enfriador le refrescará rápidamente y le mantendrá fresco
todo el día. El aire es renovado continuamente cada dos o
tres minutos. Puede relajarse en un ambiente enfriado por
su enfriador y saber que no está causando ningún daño al
entorno natural. El enfriador no emite gases CFC y filtra las
materias irritantes que flotan en el aire.
¡Qué refrescante!
Evaporative principle - El principio
evaporativo
AGE OLD PRINCIPLE
HELLO COOL FRESH AIR
COOL IN MINUTES
ENVIRONMENTALLY
FRIENDLY
Page 5
4
Key Operational Points
1. Your COOLER must be positioned in front of an open window or door if it is to operate effectively.
2. Always ensure that there is another open window or door through which the air can exhaust from the
room.
3. Ensure the filter is kept clean throughout the summer season.
4. At the end of each day run your COOLER on FAN ONLY for 30 minutes to dry out filter.
5. Prior to putting your unit away for winter always:
(a) Drain the tank and wipe out clean.
(b) Clean the filter
(c) Reassemble and run on FAN ONLY for 30 minutes to dry out the filter.
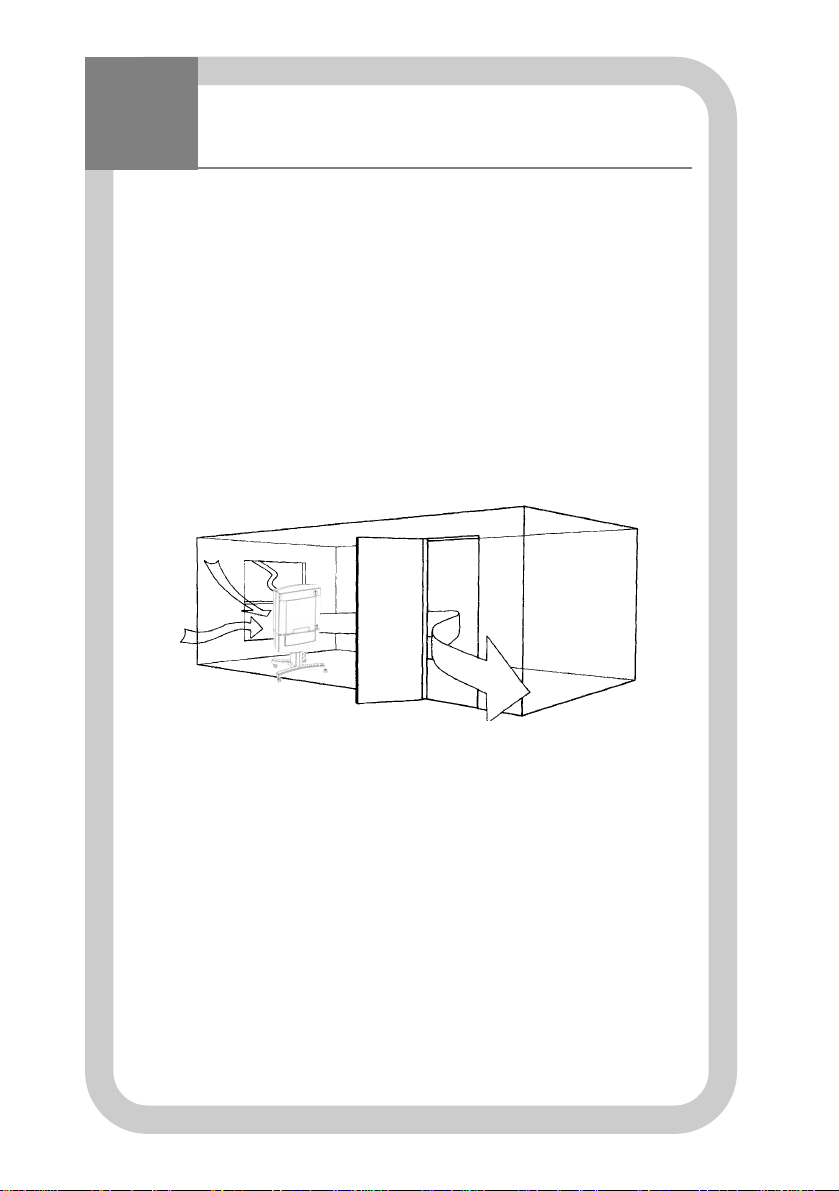
Location! Location! Location!
Having completed assembly of your COOLER position the unit with its back to an open window or door. This
will allow fresh air to be drawn through which the air can exhaust from the room. Constant air change is essential and part of the fresh air benefit from evaporative aircooling.
Remember your COOLER has been designed to operate even if it runs out of water. No damage will be
caused to the pump if your unit runs out of water.
Aspectos Importantes de su Funcionamiento
1. Su enfriador TIENE que estar colocado delante de una ventana o puerta abierta para funcionar debidamente.
2. Asegúrese siempre de que haya otra puerta o ventana abierta para permitir que el aire caliente salga de la
habitación.
3. Asegúrese de que el filtro esté limpio durante todo el verano.
4. Al final de cada día haga funcionar su enfriador en la posición de FAN ONL Y(ventilador solamente) para secar el filtro.
5. Antes de guardar el aparato durante el invierno siempre debe:
(a) Drenar el tanque y limpiarlo y secarlo con un paño
(b) Limpiar el filtro
(c) Volver a armar y hacer funcionar el VENTILADOR
SOLAMENTE (FAN ONLY) durante 30 minutos para que se seque el filtro.
¡Ubicación, Ubicación Ubicación!
Una vez que haya terminado de armar su enfriador colóquelo con la parte posterior delante de una ventana o puerta
abierta. De esta manera mantendrá un flujo de aire fresco. La circulación constante del aire es esencial y es una
característica de los beneficios obtenidos por medio del enfriamiento evaporativo del aire.
Recuerde que su enfriador ha sido diseñado para seguir funcionando aún cuando se le acaba el agua. La
bomba no se dañará si el aparato sigue funcionando sin agua.
Location - Ubicacion
Page 6

5
El ENFRIADOR ha sido diseñado para su fácil transportación de habitación en habitación de
manera que usted pueda disfrutar de sus beneficios dónde y cuándo más los necesita.
Utilícelo en el dormitorio, estudio, garaje, dormitorio de bebés, cocina. La base sobre ruedas
puede retirarse y el aparato puede colocarse encima de un mueble o mesa si así se requiere.
Recuerde: Que al utilizar el enfriador en dormitorios para ayudar a dormir, es preferible utilizar
la modalidad más baja del ventilador/soplante de manera que se pueda aprovechar al máximo
el uso del agua. Aún si faltase el agua (esto no es un problema, ver sección 4) el aparato
seguirá proporcionándole confort soplando aire.
ADVERTENCIA, ES NECESARIO MOVER ELAPARATO CUIDADOSAMENTE CUANDO EL
TANQUE ESTALLENO PARA EVITAR DERRAMES DE AGUA.
Application - Usos
The COOLER has been designed to move easily from room to room so that you can enjoy the
comfort it provides, where you need it most.
Use it in the bedroom, study, garage, nursery, kitchen. With the mobile base removed the COOLER
CABINET can be placed on a bench top or table if required.
Remember, when using your COOLER in bedrooms to assist sleeping, use the lowest fan/blower
setting to maximise water consumption. Even if the unit runs out of water (this is not a problem, see
notes section 4) it will still provide comfort by blowing air over you.
CAUTION, MOVE THE UNIT CAREFULLYWHEN THE TANK IS FULLAS WATER CAN SPILL OUT.
Page 7

6
1. Remove the components from the packing screws, base, post parts and castors, and then
set them to one side.
2. Hold the two post halves together and place them
on a table on something soft with the flange
overhanging the edge of the table. Using the
palms of your hand apply even pressure along
one edge, then the other until the clips snap shut.
3. Place the assembled post on a flat surface (flange
down). Locate the central recess in the base over
the post and push down until the clips engage.
Take care that your fingers are clear of the gap
between the two halves when clipping together.
! WARNING ! Please dispose of the plastic bag
carefully. It could be a suffocation risk for
young children.
4. Push the castors into their mounting bushes until
they click.
5. Carefully lay your COOLER on a bench or table,
with the bottom of the cabinet to prevent
damage. Line the post up with the depression in
the bottom of the tank, then insert the screws
supplied and firmly tighten. You will require a flatheaded screwdriver to insert the screws.
6. Gently place your COOLER unit on the floor and
wheel it into position near an open window or
door (see section 4 for location
details).
POST
BASE
6
1
2
3
4
5
Assembly - Asemble
Page 8

6
1. Desempaquete las diversas piezas - tornillos, base,
componentes de la columna y ruedas; y colóquelas a un lado
2. Junte las dos mitades de la columna, coloque algo suave
sobre una mesa y coloque las mitades encima, haciendo que
el reborde sobresalaga. Aplique con las palmas de sus manos
presión de forma pareja, primero por un extremo y luego por el
otro hasta que los clips encajen.
3. Coloque la columna ya armada sobre una superficie plana
(con el reborde hacia abajo). Coloque la cavidad central de la
base sobre la columna y empuje hacia abajo hasta que los
clips encajen.
Al juntar las dos mitades del aparato es importante
asegurarse que los dedos no estén entre las dos
mitades.
¡ADVERTENCIA! Por favor deshágase de la
bolsa de plástico cuidadosamente. Podría
sofocar a niños pequeños.
4. Coloque a presión las ruedas en los casquillos
correspondientes hasta que encajen.
5. Coloque cuidadosamente su enfriador sobre un mueble o
mesa haciendo que la parte inferior del mueble sobresalga.
Siempre utilice algo suave (como una toalla por ejemplo) entre
el enfriador y la superficie para evitar que la misma se dañe.
Alinee la columna con las hendiduras en la parte inferior del
tanque, luego coloque los tornillos proporcionados y ajuste
firmemente. Necesitará utilizar un destornillador de hoja plana.
6. Pare su enfriador cuidadosamente en el piso y empújelo a un
lugar cerca de una ventana o puerta abierta (ver sección 4
para obtener más información).
Assembly - Asemble
POST
BASE
6
1
2
3
4
5
Page 9

7
TANK EMPTY
Filling with water
Pull the front filler door open as shown, and fill your COOLER with 5.8 Gallons (U.S.) of water
(approximately 2 average size buckets).
THE EASY VIEW WATER LEVEL INDICATOR located on the front of the unit, as shown below,
accurately indicates the water level in the tank.
CAUTION, DO NOT OVERFILLAS WATER CAN SPILLFROM UNIT.
Your COOLER will consume water at different rates, depending on the relative humidity in your
area at the time of operation. In areas of extremely low relative humidity you may need to fill
the unit every few hours. In other areas a tank full may last more than 4 hours. This variation is
normal.
Para llenar con agua
Abra la compuerta de entrada de la manera indicada y llene su enfriador con 5.8 Galones
(U.S.) de agua (aproximadamente dos baldes de agua).
El nivel del agua en el tanque se indica con precisión por medio del fácil de ver INDICADOR
DE NIVEL DE AGUA como aparece a continuación.
ADVERTENCIA, NO LLENE EXCESIVAMENTE ELTANQUE PUES ELAGUA PUEDE
DERRAMARSE.
El consumo de agua de su enfriador variará según la humedad relativa del medio ambiente al
momento de funcionar el aparato. En las zonas donde hay una humedad relativa muy baja,
usted necesitará llenar el aparato después de unas horas. En otras zonas un tanque lleno
puede durar más de cuatro horas. Esta fluctuación es normal.
Operation - Funcionamiento
TANK FULL
Page 10

8
Operation - Funcionamiento
Fuente de Alimentación
Simplemente enchufe el cable en el tomacorriente más cercano y prenda el aparato.
Uso de los controles
La perilla de control permite dos modalidades de funcionamiento y está ubicada al frente del
aparato. La modalidad de enfriamiento "COOLING" produce aire frío y funciona en tres velocidades. La modalidad de ventilación "FAN ONLY" hace circular aire fresco y funciona en tres
velocidades.
NOTA: En la modalidad de ventilación "FAN ONLY" la bomba no funciona. En esta modalidad su
COOOLER funciona como un ventilador y no como un aclimatizador evaporativ
Para prender: Simplemente coloque la perilla de control en la posición de la modalidad y
velocidad deseadas.
Para apagar: Simplemente coloque la perilla de control en la posición de apagado (OFF)
Recuerde que mientras más rápido funcione el ventilador/soplante, más agua consumirá.
Para su uso durante la noche seleccione la velocidad más baja del ventilador para lograr
un funcionamiento silencioso y poder aprovechar al máximo el uso del agua. De esta
manera no será necesario llenar el tanque de agua con tanta frecuencia. Recuerde que no
importa si el agua se acaba. (ref. sección 4)
Power supply
Simply plug in the power lead into the nearest power point and
switch on.
Operation of controls
The control knob allows two modes of operation and is located
on the front of the unit. The ‘COOLING’ mode will deliver fresh
cool air at 3 speeds. The ‘FAN ONLY’mode will deliver fresh
circulating air at 3 speeds.
NOTE: In the ‘FAN ONLY’mode the pump is not operating. In
this condition your COOLER is operating as a box fan and not
an evaporative aircooler.
Starting: Simply turn the control knob to the desired mode of
operation and speed.
Stopping: Just turn the control knob back to the (OFF)
position.
Remember the faster the fan/blower runs the more water you
will use.
For night time use the lowest fan speed for quietest
operation and maximise water consumption. This way the
unit will not require filling as often and remember it does
not matter that the units run out of water. (Ref section 4)
Page 11

9
Maintenance - Mantenimiento
Daily maintenance on your COOLER is required. At the end of each day run your COOLER on fan
only for 30 minutes to dry out filter. Regular maintenance is essential if your COOLER is to operate
at peak efficiency. It is recommended that two to three times during the summer you drain the unit
and clean the filter.
! WARNING ! This is an electrical appliance. Stop the unit and disconnect the plug from
the power point before doing any maintenance .
1. Remove the rear panel by inserting a screw driver or similar tool into the slotted ‘clip release
area’ at the top rear of the unit, then lift the screw driver in an upwards fashion, the clip will
disengage, repeat for each of the three clips and lift out the panel.
2. To drain the unit, remove the drain plug. Ensure that the bucket is placed under the unit to
catch the water.
3. To clean the filter, hose the filter and rear panel assembly from the inside until the run of water
is clear. This will remove any accumulated dust which would otherwise impair the cooling
efficiency of the unit. Ensure filter pad is dry prior to packing away unit for winter.
4. Replace the drain plug into the tank and replace the rear panel.
NOTE: The filter over two seasons may become dust laden and result in reduced performance.
When this occurs the filter should be replaced so that the summer comfort is maintained.
To remove the filter from the rear panel simply unclip the retaining grille and discard the old filter.
Ensure the filter is properly located on the rear panel so that there are no gaps around the edges.
Replace the retaining grille and put the rear panel back onto the unit.
Page 12

9
Maintenance - Mantenimiento
Su COOLER necesita mantenimiento diario. Al final de cada día haga funcionar el COOLER
como ventilador solamente durante 30 minutos para secar el filtro. Es esencial realizar un mantenimiento regular para que el COOLER funcione con máxima eficiencia. Se recomienda drenar
el aparato y limpiar el filtro dos o tres veces durante el verano.
¡ADVERTENCIA! Este es un aparato eléctrico. Apáguelo y desenchúfelo del tomacorriente antes de llevar a cabo cualquier mantenimiento.
1.
Retire el panel posterior insertando un destornillador o una herramienta similar en la ranura
de "desenganche de los clips" en la parte superior de atrás del aparato, haga palanca hacia
arriba con el destornillador, el clip se desenganchará. Una vez que haya desenganchado
todos los clip y saque el panel hacia arriba.
2. Retire el tapón de drenaje para drenar el aparato. Asegúrese de colocar un balde para el
agua debajo del aparato.
3. Para limpiar el filtro y el conjunto del panel posterior, utilice una manguera y deje correr el
agua hasta que ésta salga limpia. De esta manera se elimina el polvo acumulado que de no
ser eliminado impediría el funcionamiento eficiente del aparato. Asegúrese de que el filtro
esté seco antes de guardar el aparato durante el invierno.
4. Vuelva a colocar el tapón de drenaje y el panel exterior en el aparato.
NOTA: Después de dos temporadas es posible que el filtro se impregne de polvo y como
resultado el aparato no funcione tan eficazmente como debería. Si esto ocurre se debe cambiar
el filtro para mantener un confort máximo durante el verano.
Para retirar el filtro del panel posterior simplemente desprenda la rejilla de soporte y reemplace
el filtro. Asegúrese de colocar el filtro correctamente en el panel posterior de tal manera que no
queden espacios en los bordes. Vuelva a colocar la rejilla de soporte y el panel posterior.
Page 13

10
Dismantling for storage - Para desarmar
y guardar
POST
BASE
1. Using a flat blade screwdriver remove the four screws which attach the post to the
underside of the Tank. Replace the screws into the Tank for safe keeping.
2. Pull the Castors from the Base if required.
3. Place the Base on the floor or firm surface. Pull the two halves of the Post apart as shown
in the diagram, this will release the clips holding the Post into the Base. The Unit and
components can now be stored.
1. Utilice un destornillador de hoja plana para retirar los cuatro tornillos que sujetan la
columna a la parte inferior del tanque. Vuelva a colocar los tornillos en el tanque para
que no se pierdan.
2. Si es necesario tire de las rueditas en la base para retirarlas.
3. Coloque la base en el piso o sobre una superficie firme. Separe ambas mitades de la
columna como se indica en el diseño, esto soltará los clips que sujetan la columna a la
base. Ahora ya se pueden guardar el aparato y sus piezas.
Page 14

Troubleshooting - Solución de Problemas
11
Page 15

12
PORTABLE EVAPORATIVE AIRCOOLER
Designed and Manufactured by
A.B.N. 13 001 418 042
26 Nylex Avenue, Salisbury, South Australia 5108 AUSTRALIA
Telephone: 61 8 8307 5100 Facsimile: 61 8 8283 0401
ENFRIADOR EVAPORATIVO DE AIRE PORTATIL
Diseñado y Fabricado por
A.B.N. 13 001 418 042
26 Nylex Avenue, Salisbury, South Australia 5108 AUSTRALIA
Teléfono No.: 61 8 8307 5100 Fax No.: 61 8 8283 0401
Product Information -
Informació
n
sobre el producto
© Text and Illustration Copyright. Climate Technologies 2001
All rights reserved. No part of this document may be reproduced or transmitted in any form
or by means, electronic or mechanical, including photocopying, recording or by information
storage and retrieval system, without prior permission in writing from Climate Technologies.
FOR CUSTOMER CARE,
INFORMATION AND PARTS
PLEASE USE THE FOLLOWING
TOLL FREE NUMBERS
AND EMAIL ADDRESS
PARA ATENCION DEL CLIENTE, INFORMACION Y REPUESTOS SIRVASE USAR
LOS SIGUIENTES NUMEROS TELEFONI-
COS GRATUITOS Y LA SIGUIENTE
DIRECCION DE E MAIL
Remember, your filter pads do need replacing at some stage!
Contact the
PARTS LINE
for pads that fit!
email: support@kenmarsales.com
Recuerde que las almohadillas de los filtros
en algún momento tienen que
reemplazarse! Para obtener las almohadillas
correctas llame a la línea de repuestos!
 Loading...