


Touchpad Control
Table of contents
 Loading...
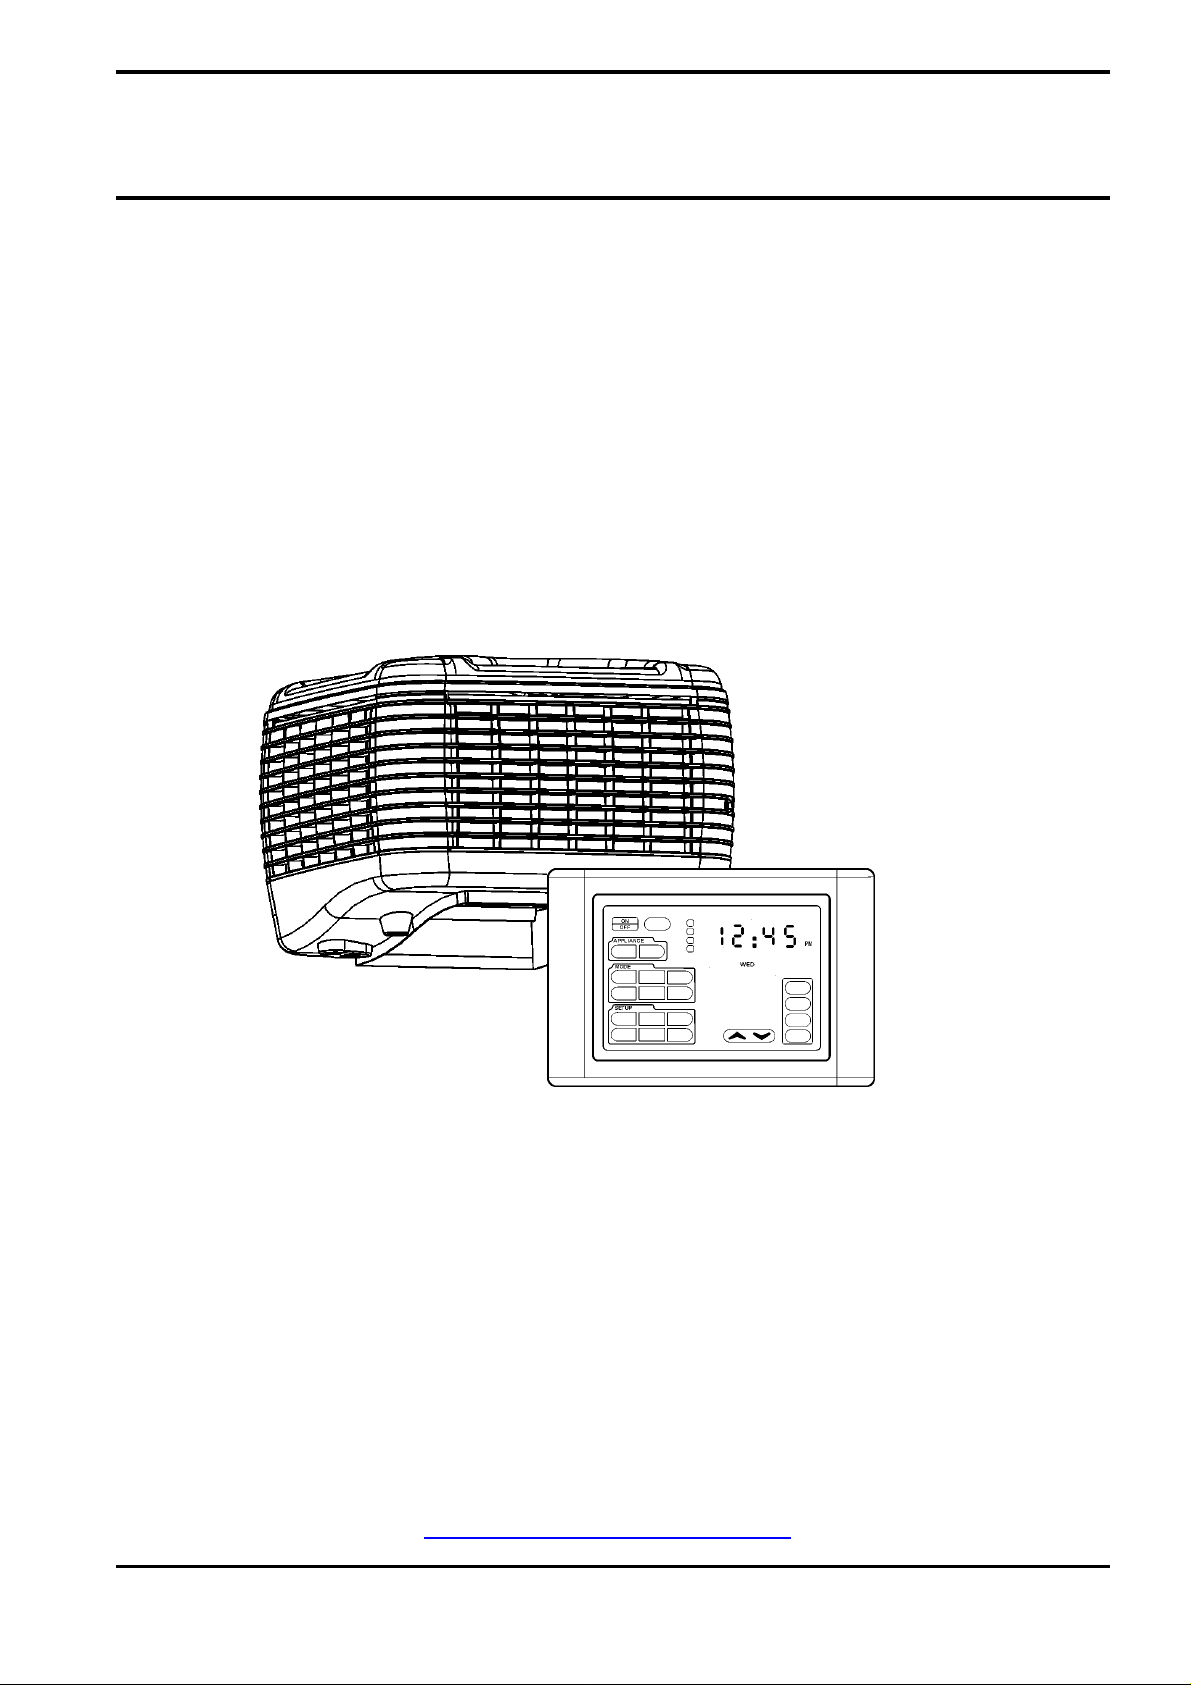
Owner’s Manual
TEK600 Series Control
Using the
Ducted Evaporative Air Conditioning
with Your
Touch Pad Control
Operating, Installation & Maintenance
Please keep this important manual in a safe place. It is the owner’s responsibility to ensure that regular
maintenance is carried out on this Evaporative Air Conditioner. Failure to do so will void all guarantees beyond
statutory and legal requirements.
www.climatetechnologies.com.au

Touch Pad Control
Navigating the Controls
TEK600 Series Cont rol Page 2
Introduction
You have chosen one of the world's most advanced Touch Pad systems incorporating the latest technology.
The Touch Pad control is an Australian and world first for its use with ducted heating and cooling systems. Designed
exclusively for Climate Technologies, the self-prompting display panel controls your unit’s functions, providing the
ultimate cooling flexibility.
This technologically advanced controller comes with manual and thermostat control, programmable timer, boost function
plus many other setup functions.
Your Touch Pad Control is designed to automatically detect the appliances during the commissioning of the unit by the
installer. Controller options not required for your appliances will usually not be visible on your Touch Pad display.
Due to Climate Technologies policy of continuous product improvement, design and technical specifications are
subject to change without notice.’
E.& O.E.

Touch Pad Control
Table of Contents
TEK600 Series Control
Table of Contents
Introduction ................................................................................................................... ....................................2
Table of Contents .............................................................................................................................................3
Navigating the Controls...................................................................................................................................5
TOUCH PAD FUNCTIONS....................................................................................................................................................7
ON / OFF.........................................................................................................................................................................................7
APPLIANCE.....................................................................................................................................................................................7
MODE..............................................................................................................................................................................................7
SETUP.............................................................................................................................................................................................8
RESETTING the Touch Pad Control...............................................................................................................................................8
Ducted Evaporative Air Conditioning.............................................................................................................9
INTRODUCTION................................................................................................................................................................ 10
U
NIT OPERATION ............................................................................................................................................................10
Exhaust..........................................................................................................................................................................................10
Bleed-off........................................................................................................................................................................................11
OPERATING THE TOUCHPAD............................................................................................................................................ 12
MANUAL MODE............................................................................................................................................................................12
BOOST MODE..............................................................................................................................................................................12
THERMOSTAT MODE..................................................................................................................................................................13
PROGRAM MODE........................................................................................................................................................................13
Set-up & Commissioning...............................................................................................................................14
INTRODUCTION................................................................................................................................................................ 14
Safety.............................................................................................................................................................................................14
BEFORE COMMENCING....................................................................................................................................................14
Packaging......................................................................................................................................................................................14
Is the control system correct?........................................................................................................................................................14
CONTROL LOCATION.......................................................................................................................................................15
I
NSTALLING THE CONTROL............................................................................................................................................... 15
C
IRCUIT DIAGRAM........................................................................................................................................................... 16
S
ETUP OPTIONS. ............................................................................................................................................................17
Setup.............................................................................................................................................................................................18
Review...........................................................................................................................................................................................18
Program Setup...............................................................................................................................................................................18
Clock Setup...................................................................................................................................................................................19
SETUP PARAMETERS....................................................................................................................................................... 20
P
ARAMETER TABLES.......................................................................................................................................................20
Setting the Water Management Systems Parameters and values................................................................................................21
Setting the Water Level & Bleed rate.............................................................................................................................................22
Setting the Fan Speed...................................................................................................................................................................23
PROBLEM SOLVING.........................................................................................................................................................24
INSTALLATION CHECK LIST....................................................................................................................................... 25
Unit................................................................................................................................................................................................25
Ductwork and general....................................................................................................................................................................25
Site.................................................................................................................................................................................................26
Customer Hand Over.....................................................................................................................................................................26
Unit Maintenance............................................................................................................................................27
FILTER PADS...................................................................................................................................................................27
W
ATER TANK.................................................................................................................................................................. 27

Touch Pad Control
Navigating the Controls
TEK600 Series Cont rol Page 4
WATER LEVEL / FLOAT VALVE .........................................................................................................................................27
M
OTOR AND FAN............................................................................................................................................................. 27
E
LECTRICAL....................................................................................................................................................................27
B
LEED OFF..................................................................................................................................................................... 28
P
UMP .............................................................................................................................................................................28
W
ATER DISTRIBUTION.....................................................................................................................................................28
Warranty..........................................................................................................................................................29
WARRANTY STATEMENT.................................................................................................................................................. 29
Conditions And Exclusions............................................................................................................................................................29
WARRANTY ON REPLACEMENTS PARTS...........................................................................................................................30
P
ROOF OF PURCHASE..................................................................................................................................................... 30
D
EALER / PRODUCT INFORMATION................................................................................................................................... 30
Service.............................................................................................................................................................31

Touch Pad Control
Navigating the Controls
TEK600 Series Control
Navigating the Controls
Introduction
The Touch Pad control is an Australian and world first for its use with air conditioning systems. Designed exclusively
for Climate Technologies, the self-prompting display panel controls your unit’s functions, providing the ultimate in
cooling flexibility.
This technologically advanced controller comes with manual and thermostat control, programmable timer, boost
function as well pre-cool, pre-fill and dumping setup options.
Touch Pad Control
Navigating the Controls
TEK600 Series Cont rol Page 6
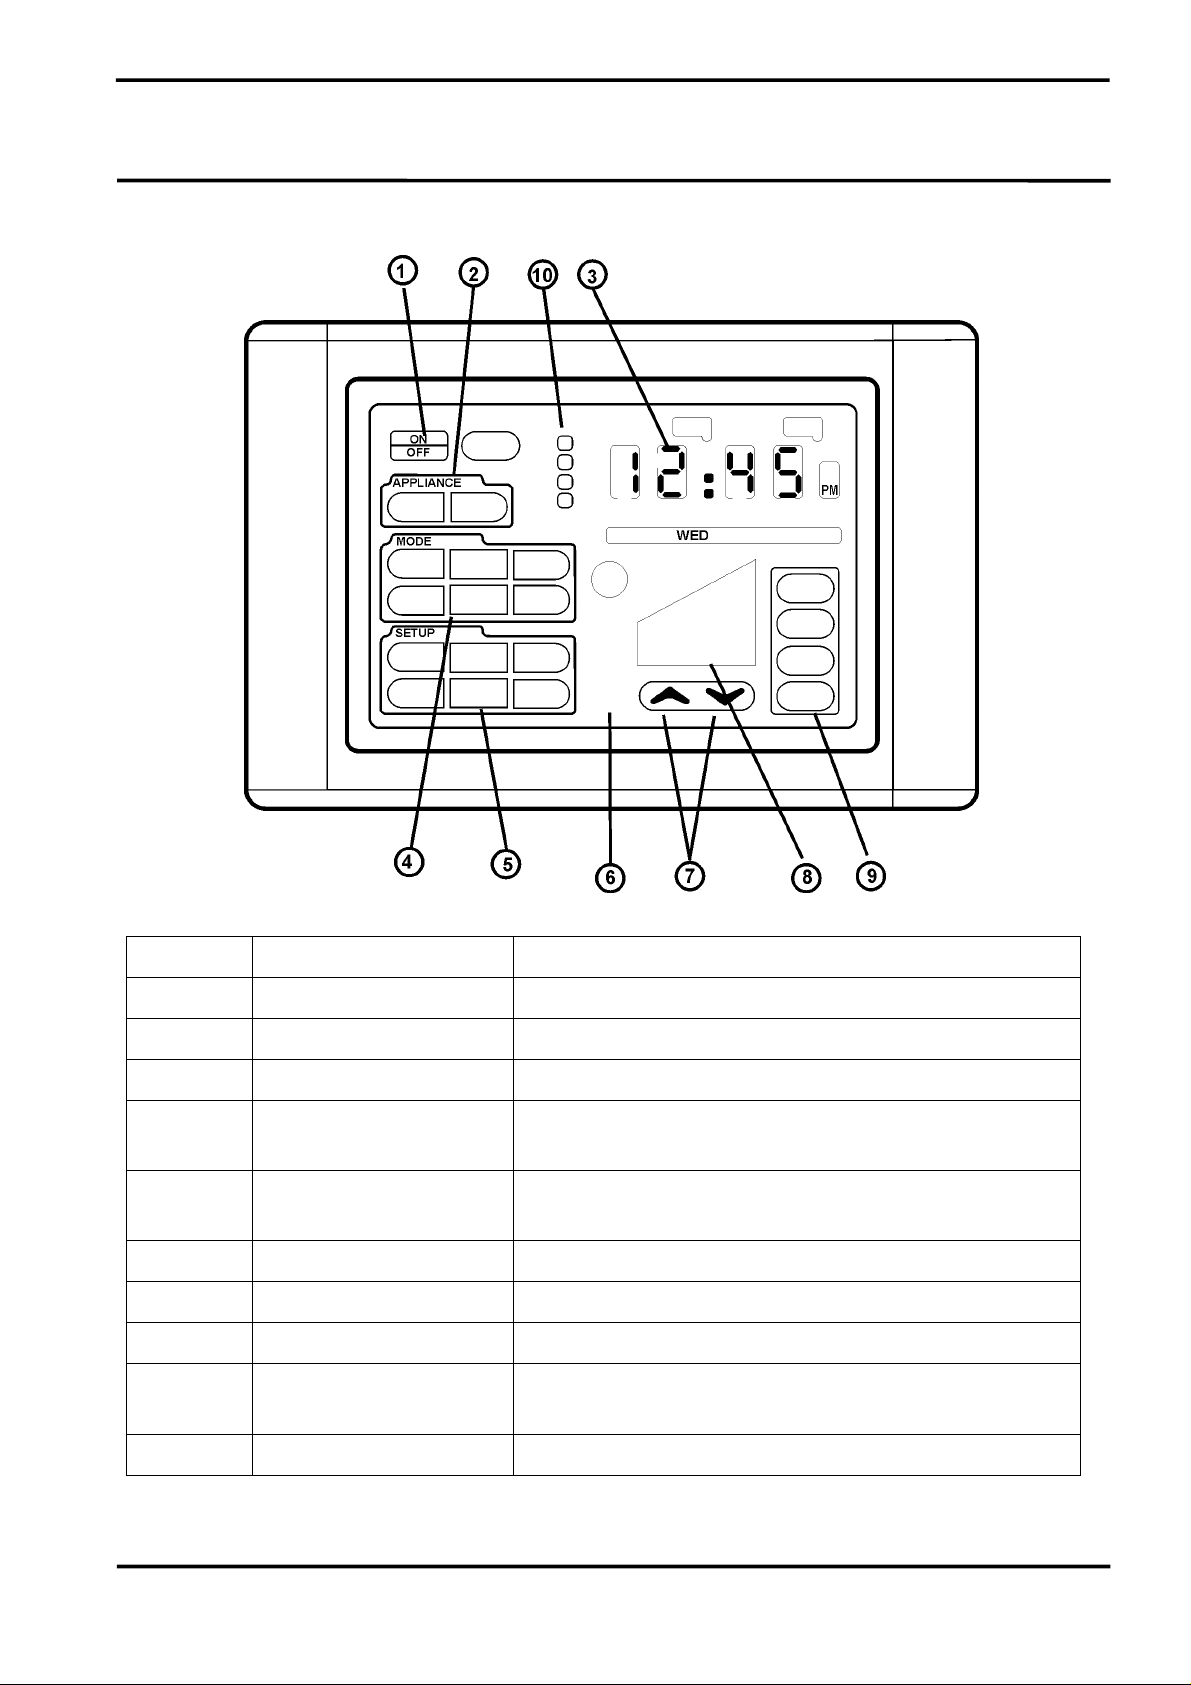
Number Description Function
1 ON / OFF Turns the unit ON or OFF
2 APPLIANCE Touch any area with the APPLIANCE outline to select product.
3 CLOCK 12 hour clock denoting AM / PM and the day.
4 MODE Touch any area within the MODE outline and the available
operating modes will be displayed.
5 SETUP Touch any area within the SETUP outline and the available
operating modes will be displayed.
6 FUNCTION SYMBOLS Symbols indicate the unit components functioning.
7 UP / DOWN ARROWS Arrows will adjust the output of the unit.
8 FUNCTION LEVEL Function level displays the output level settings with graphic bars
9 ZONES Where there is more the one unit fitted the zones buttons can
control the ON / OFF function of one or more air conditioners.
10 Periods This identifies which time period program is operating.
Touch Pad Control
Navigating the Controls
TEK600 Series Cont rol Page 7
Touch Pad Functions
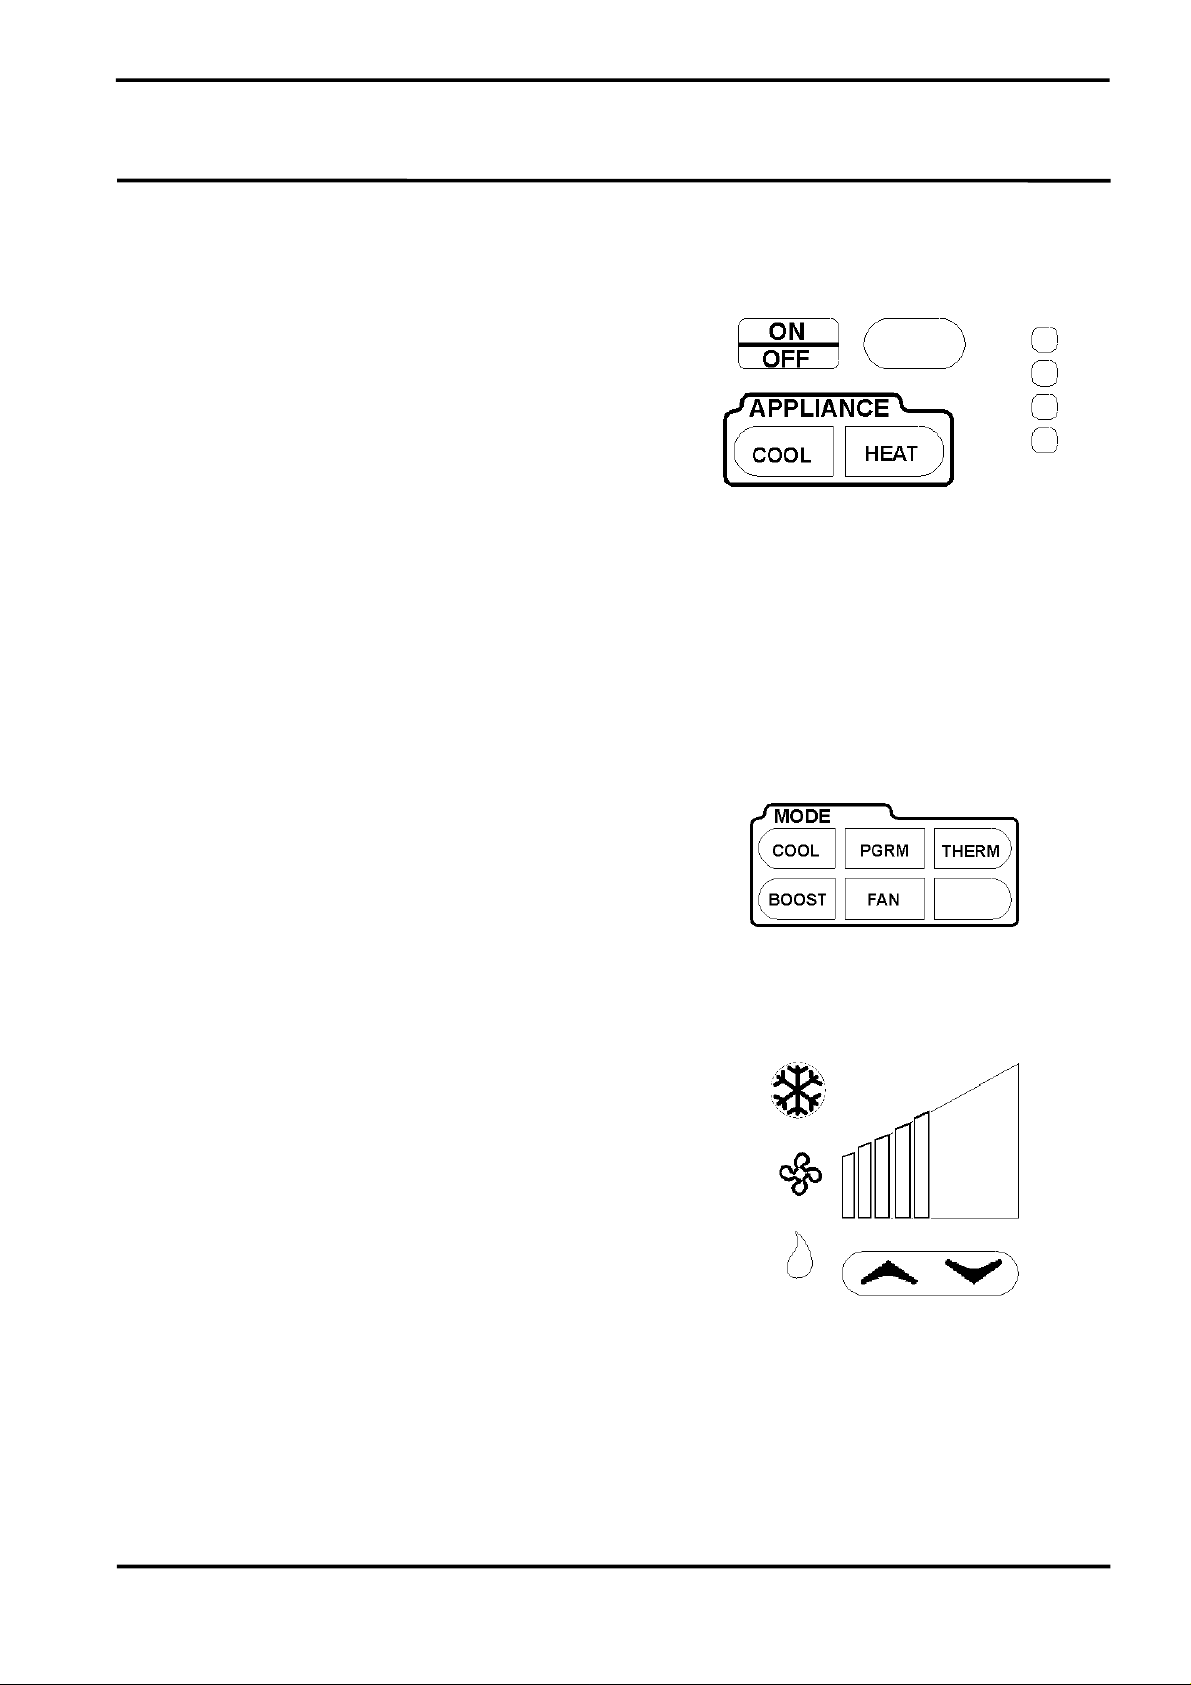
ON / OFF
When pressing the ON / OFF button to turn the unit on, the touch pad
control will return to the last used setting.
APPLIANCE
When unit is turned on the last used appliance will be activated. There
is the possibility of having an Ultra High Efficiency gas fired central
heater operated from the same control.
Press any area within the Appliance area and if there is a heater fitted
the option will display COOL or HEAT. Press the required product.
After 3 flashes the selection will be accepted.
MODE
To view the MODE options available press the touch pad anywhere
within the MODE area. The available functions for COOL (Evaporative
Air Conditioning) are:
• COOL - Fan and Pump in manual mode. This means the fan
can be adjusted manually via the UP / DOWN arrows.
• BOOST - The fan will operate at maximum speed.
• PGRM - The unit can be set up in Program Mode to turn the
unit ON and OFF in the desire mode operation. Program mode
will operate for a 24-hour period from the moment it is activated.
• FAN - Fan only in manual mode. This means the fan only can
be adjusted via the UP / DOWN arrows.
• THERM - Thermostat mode will control the unit via a
temperature sensor. Set the comfort level and the unit will
automatically increase or decrease according to demand. The
comfort level can be adjusted using the UP / DOWN arrows to
increase or decrease the amount of cooling required.
• ECON – Economy is not displayed, as it is a central heating
function only.
Touch Pad Control
Navigating the Controls
TEK600 Series Cont rol Page 8
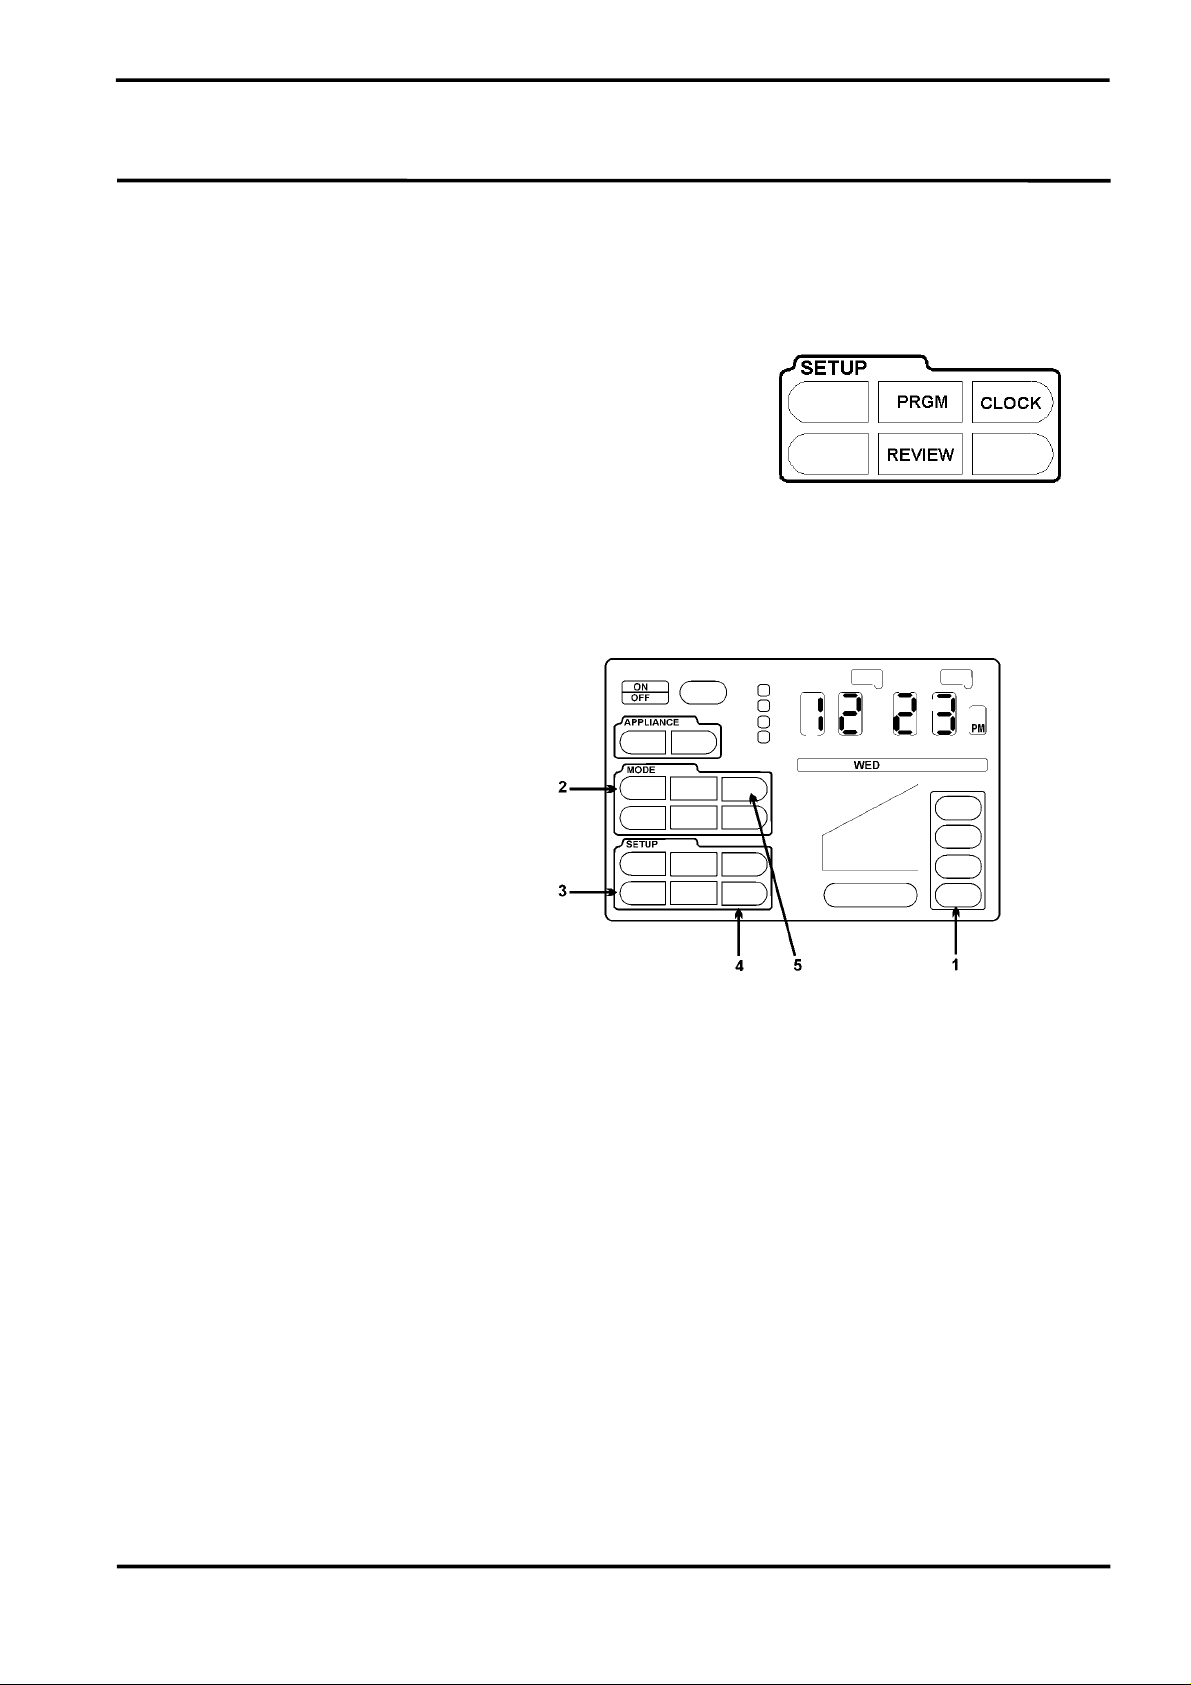
SETUP
To view the SETUP options available, press the touch pad anywhere
within the SETUP area. The available functions are:
• PGRM – Program setup allows you to create a timed program to
start and stop the air conditioner. There are 4 period programs
available requiring a minimum of 2 to be set. The program option
will only function for 24 hours and then the unit will stop.
• CLOCK – Setting the time
• REVIEW – Pressing the review button will automatically step the
control through the timer programs set.
RESETTING the Touch Pad Control.
Resetting the Touch Pad Control will return the
Touch Pad to its default settings for all
configuration and program options.
This function does not reset the cooler.
To reset the Touch Pad Control a number of
unseen icons will need to be pressed.
Step 1 Ensure the control is turned OFF.
Step 2 Press the ZONE 4 icon until a triple BEEP
followed by single BEEP is heard.
Step 3 In quick succession press COOL, CANCEL,
FINISH and THERM icons.
All the icons on the screen will now light up. They will slowly disappear one by one. Once all the icons have cleared it
will take approximately 1 minute for the control to return to an operating mode. The time will be displayed when the
RESET is complete.
If unsuccessful restart from STEP 1.
Press and wait
for a buzz
followed by a
beep

Touch Pad Control
Ducted Evaporative Air Conditioning
TEK600 Series Cont rol Page 9
Ducted Evaporative Air Conditioning
Owners Operating and Maintenance
Touch Pad Control
Ducted Evaporative Air Conditioning
TEK600 Series Cont rol Page 10
Introduction
Your ducted evaporative air conditioner is engineered to meet the rigours of our harsh Australian environment.
Operated and maintained in accordance with this manual, it will provide you with years of quiet, cool and
environmentally friendly operation. Please take the time to read this manual.
The principal of your unit is to introduce fresh air, which is washed through the filter pads to provided cool fresh air.
The air is exhausted taking with it any heat loadings on the home.
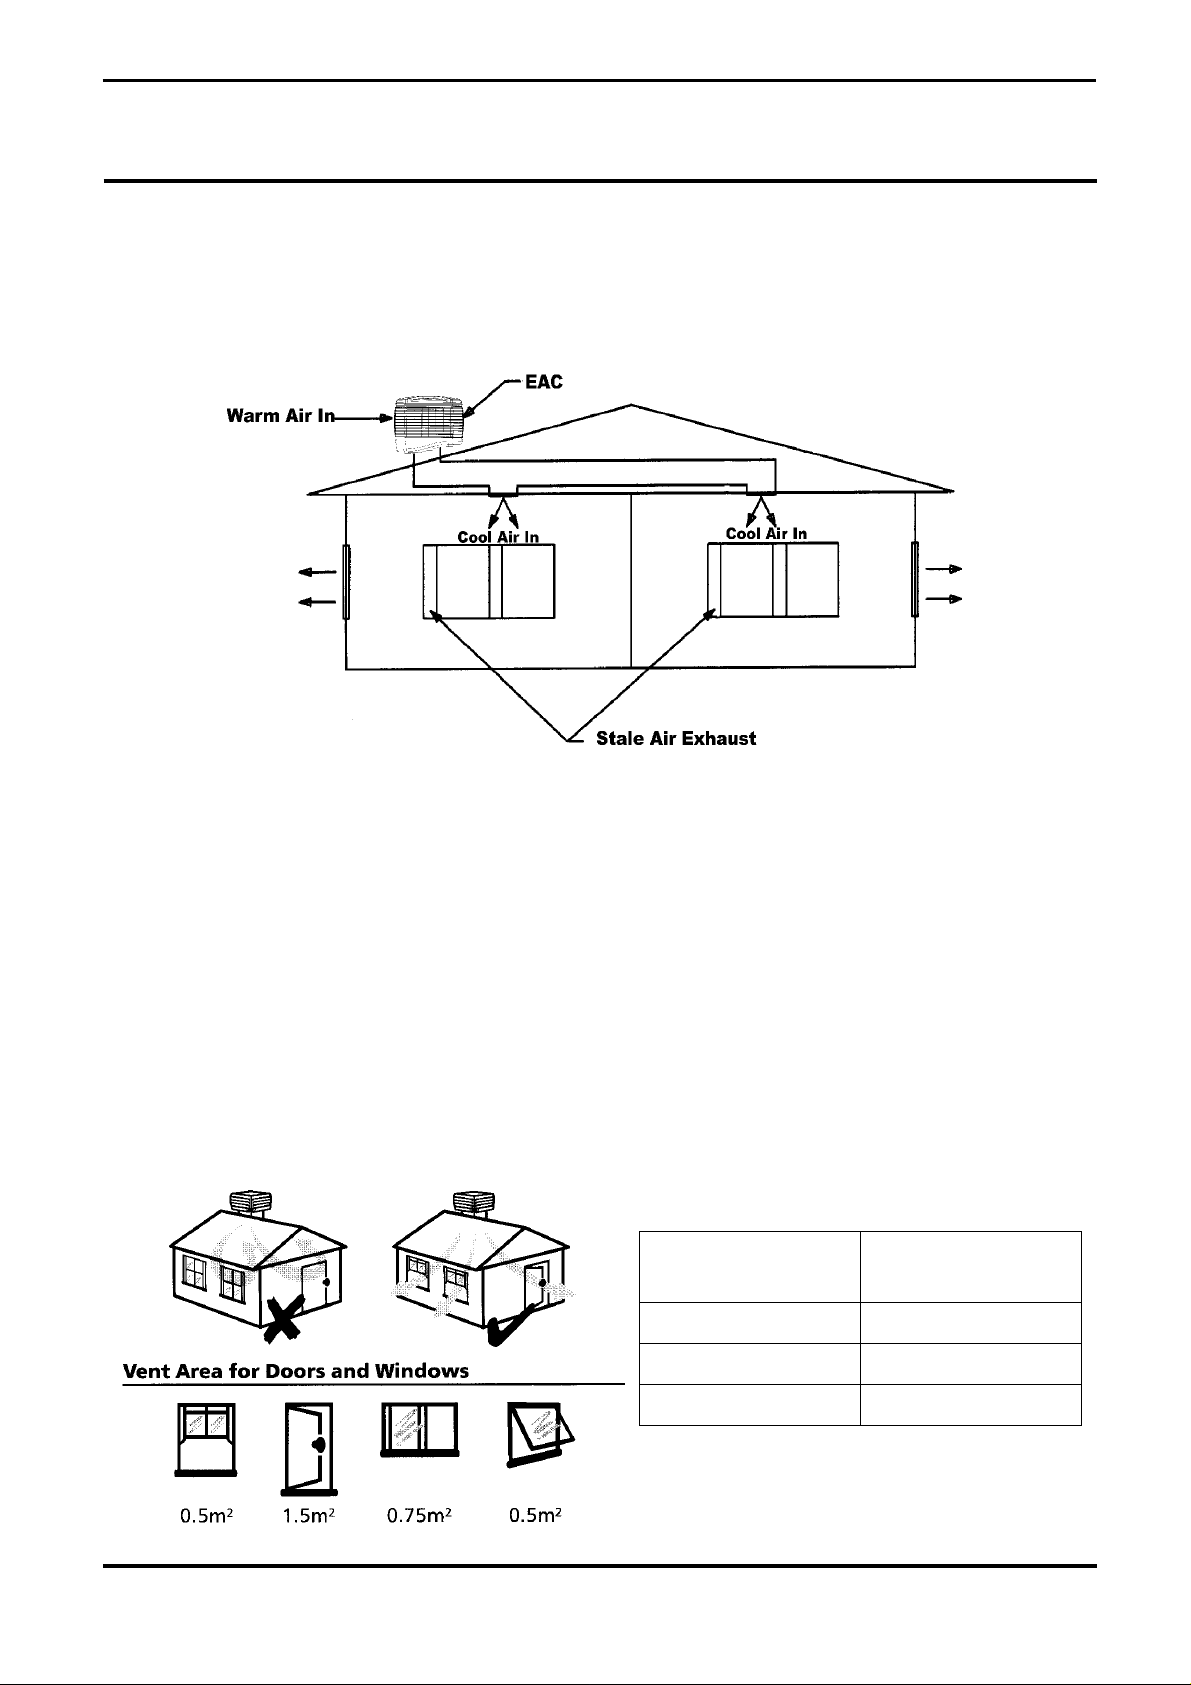
Unit Operation
Exhaust
It is essential for successful operation of evaporative air-conditioning that there be sufficient exhaust openings in
the area to be ventilated. Open doors and windows will usually provide this.
The minimum exhaust opening should be as per the table guide set out below. It is recommended that ceiling
vents or exhaust fans be used where there is any doubt about there being sufficient exhaust area available.
Ceiling exhaust fans or ceiling vents should have a capacity equivalent to that of the air conditioner.
MODEL MINIMUM EXHAUST
AREA
Small 0.85 m²
Medium 1.48 m²
Large 2.02 m²
Loading...