

Page 1
Using the
Ducted Gas Central Heating
Dual Cycle Refrigerated Air Conditioning
Ducted Evaporative Air Conditioning
with your
multi-appliance
Touch Pad Control
Owner’s Manual
Please keep this important manual in a safe place. It is the owner’s responsibility to ensure that
regular maintenance is carried out on this ducted heating / cooling product. Failure to do so will
void all guarantees beyond statutory and legal requirements.
www.climatetechnologies.com.au
PNE2002 Series Control
Page 2

MULTI-APPLIANCE TOUCH PAD
Contents
INTRODUCTION.....................................................................................................................................5
GENERAL INFORMATION..........................................................................................................................6
Important Installation Notice.....................................................................................................................6
Data Location...........................................................................................................................................6
N
AVIGATING THE CONTROLS.................................................................................................................7
QUICK START - SIMPLE MANUAL OPERATION ..................................................................................................8
ON / OFF.................................................................................................................................................8
APPLIANCE - selecting the desired appliance.........................................................................................8
MODE - operating your appliance in your preferred mode.......................................................................9
SETUP - setting up or reviewing various functions................................................................................10
Child Lock..............................................................................................................................................10
Temperature / Time Toggle....................................................................................................................10
Zones – where zone motors are fitted....................................................................................................10
Adjustment Arrows.................................................................................................................................11
Reset / Fault Code.................................................................................................................................11
Icons......................................................................................................................................................11
DUCTED GAS CENTRAL HEATING........................................................................................................12
GENERAL INFORMATION...............................................................................................................................13
Important Notice.....................................................................................................................................13
Data Location.........................................................................................................................................13
Assembly. ..............................................................................................................................................13
SAFETY.......................................................................................................................................................14
Safety & Owner Responsibility...............................................................................................................14
Precautions............................................................................................................................................14
Features.................................................................................................................................................14
Power or Gas interruption......................................................................................................................14
USING YOUR TOUCH PAD WITH DUCTED GAS CENTRAL HEATING..................................................................15
THERM Operation (Thermostat)............................................................................................................15
ECONOMY & BOOST for heating..........................................................................................................16
FAN ........................................................................................................................................................16
ZONES...................................................................................................................................................17
Setting the open or closed status...........................................................................................................17
Programming Your Touch Pad...............................................................................................................17
Using The Program Mode (PGRM)........................................................................................................19
Program Override (PGRM)....................................................................................................................19
Clock Setup............................................................................................................................................20
Summer Shutdown (Optional)................................................................................................................20
First Startup Or Restart After Shutdown ................................................................................................20
DUCTED GAS HEATING MAINTENANCE..........................................................................................................21
General Maintenance.............................................................................................................................21
Scheduled Maintenance.........................................................................................................................21
PROBLEM SOLVING......................................................................................................................................22
DUAL CYCLE REFRIGERATED AIR CONDITIONING..............................................................................23
Bonaire Control System
Page 2
Page 3

MULTI-APPLIANCE TOUCH PAD
Contents
GENERAL INFORMATION...............................................................................................................................24
Important Notice.....................................................................................................................................24
Data Location.........................................................................................................................................24
Assembly. ..............................................................................................................................................24
SAFETY.......................................................................................................................................................24
Safety & Owner Responsibility...............................................................................................................24
Precautions............................................................................................................................................24
Features.................................................................................................................................................24
Power interruption..................................................................................................................................24
Manual Operation ..................................................................................................................................25
ZONES - Selecting ZONE 1, 2, 3, or 4...................................................................................................26
Programming Your Touch Pad...............................................................................................................26
Programming Sequence........................................................................................................................26
DUCTED EVAPORATIVE AIR CONDITIONING ..........................................................................................27
INTRODUCTION ............................................................................................................................................28
Exhaust..................................................................................................................................................28
Water Management................................................................................................................................29
OPERATING THE TOUCH PAD........................................................................................................................30
Cool Mode..............................................................................................................................................30
Boost Mode............................................................................................................................................30
Thermostat Mode...................................................................................................................................31
Program Mode.......................................................................................................................................31
Program Setup.......................................................................................................................................32
Clock Setup............................................................................................................................................33
DUCTED EVAPORATIVE AIR CONDITIONER MAINTENANCE..............................................................................34
General..................................................................................................................................................34
Filter Pads..............................................................................................................................................34
Water Tank ............................................................................................................................................34
Water Level / Float Valve.......................................................................................................................34
Motor and Fan........................................................................................................................................35
Electrical................................................................................................................................................35
Bleed Off................................................................................................................................................35
Pump......................................................................................................................................................35
Water Distribution ..................................................................................................................................35
No Seasonal Maintenance.....................................................................................................................35
TROUBLE SHOOTING GUIDE .........................................................................................................................36
ONTROL SETUP................................................................................................................................37
C
SETTING UP THE CONTROL - GENERAL.........................................................................................................37
Before Starting.......................................................................................................................................37
Installation..............................................................................................................................................37
USING THE SETUP MODES ...........................................................................................................................38
Product Identification..............................................................................................................................38
CODING.......................................................................................................................................................39
Auto-Coding...........................................................................................................................................39
Bonaire Control System
Page 3
Page 4
MULTI-APPLIANCE TOUCH PAD
Contents
Coding Defaults .....................................................................................................................................39
Forced Scan Auto-Coding: .....................................................................................................................39
Important Notes .....................................................................................................................................39
MULTIPLE UNIT SETUP – HEATER / COOLER..................................................................................................40
Force Coding a New / Additional Product..............................................................................................40
Fault Codes Access...............................................................................................................................41
View The Fault Code..............................................................................................................................41
Fault Codes For High Efficiency, Mid Efficiency Heaters.......................................................................42
Resetting the Touch Pad Control...........................................................................................................43
Calibrating the Thermostat.....................................................................................................................43
EVAPORATIVE AIR CONDITIONING SETUP......................................................................................................44
Setting the Water Management Systems Parameters and values.........................................................44
Setting the Water Level & Bleed rate.....................................................................................................45
Fan Speed Settings ...............................................................................................................................46
MULTIPLE UNIT SETUP – EVAPORATIVE COOLERS.........................................................................................47
Setting the Common Zone For Multiple Units........................................................................................48
Scan For Products:............................................................................................................. ...................48
DUCTED GAS CENTRAL HEATING..................................................................................................................49
Setting Fan SPEEDS – High / Low........................................................................................................49
Setting Fan Speeds - Zoning.................................................................................................................50
Setting the Zone Availability - Heating...................................................................................................51
COMMISSIONING CHECK LIST ...............................................................................................................53
General..................................................................................................................................................53
Unit – Ducted Heating............................................................................................................................53
Unit – Dual Cycle Refrigerated Air Conditioning....................................................................................53
Unit - Ducted Evaporative Air Conditioner .............................................................................................54
Ductwork................................................................................................................................................54
Site .........................................................................................................................................................54
Customer Hand Over.............................................................................................................................54
WARRANTY .......................................................................................................................................55
SERVICE.........................................................................................................................................59
Bonaire Control System
Page 4
Page 5
MULTI-APPLIANCE TOUCH PAD
Introduction
Introduction
You have chosen one of the world's most advanced control syst ems incorporating the latest technology.
The Touch Pad control is an Australian and wor ld first for its use with ducted heating and cooling systems.
Designed exclusively for Climate Technologies air comfort products, the self-prompting display panel
controls your unit’s functions, providing the ultimate in heating and cooling flexibility.
This technologically advanced controller comes with manual and thermostat control, programmable timer,
boost function plus many other setup functions.
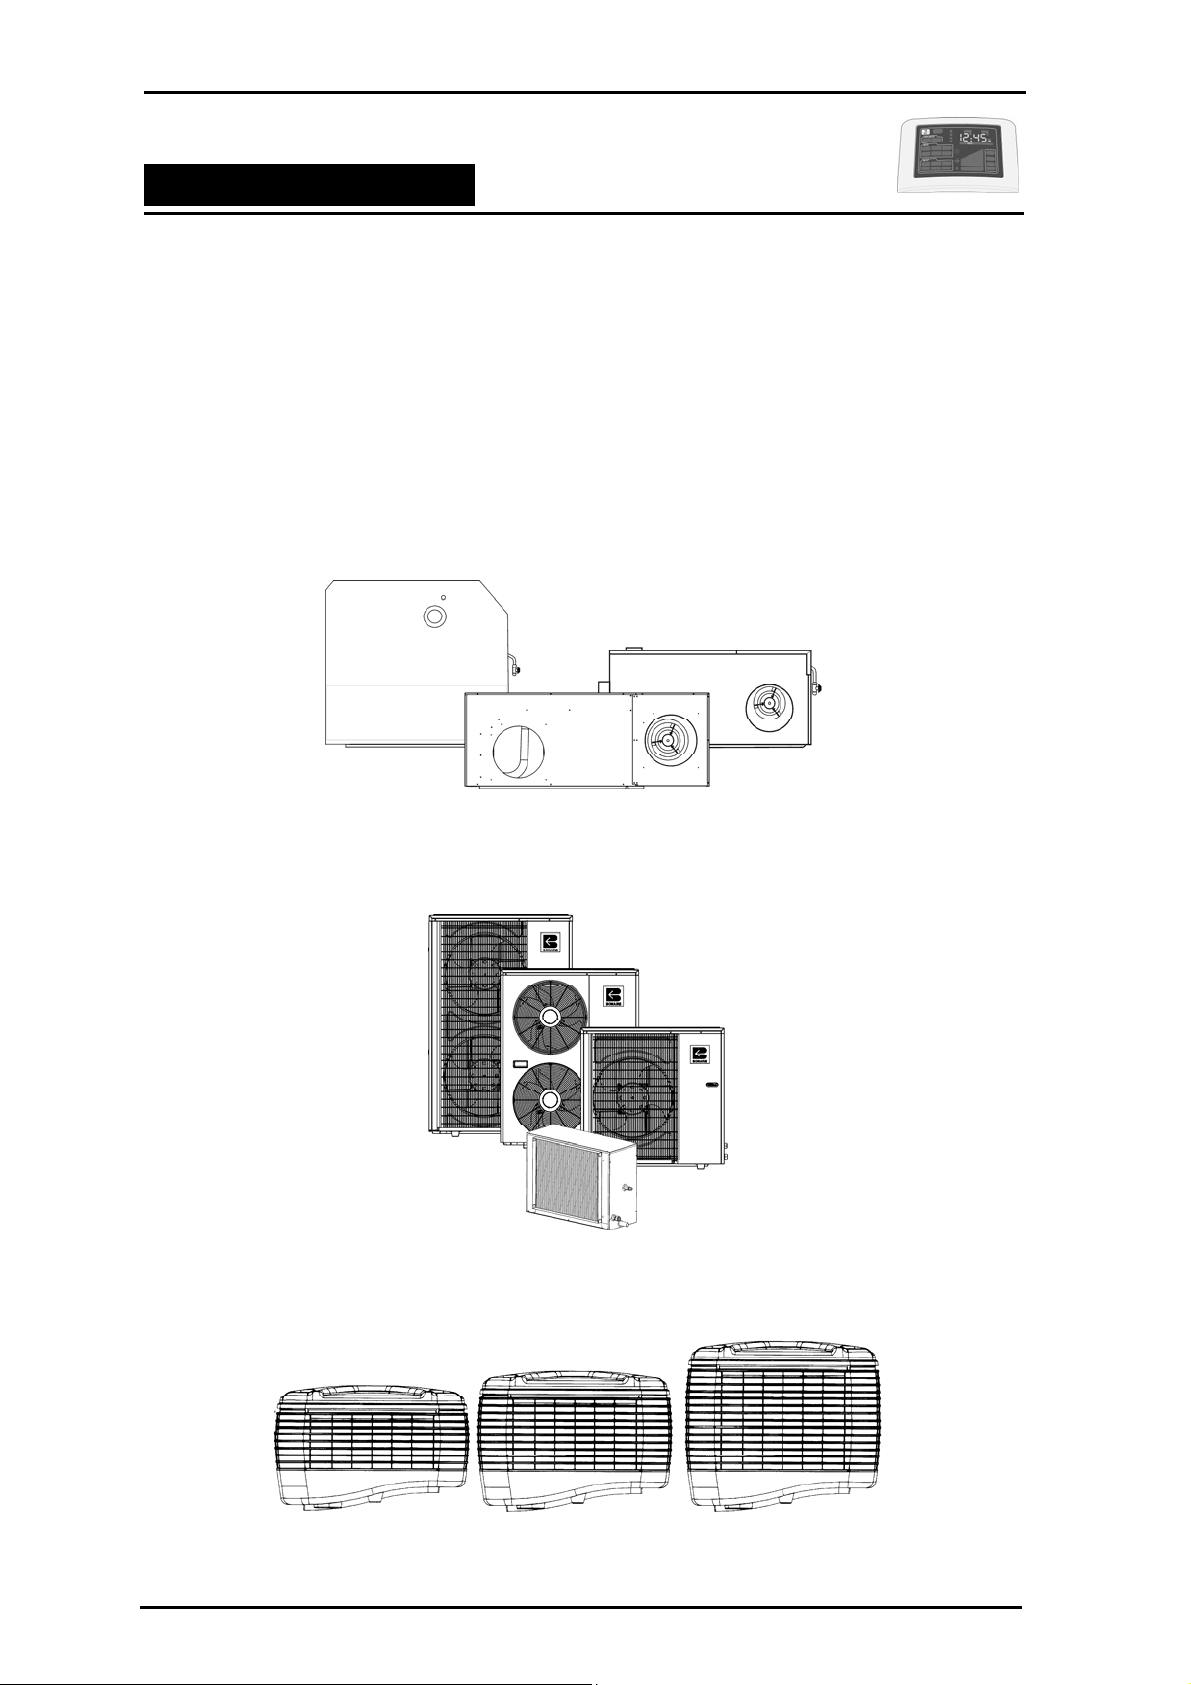
Your Touchpad Control has been designed to operate the following Climate Technologies products:
Heating – 3, 4, 5 Star Ducted Gas Central Heaters.
Dual Cycle Cooling - Refrigerated Air Conditioning (cooling only) designed to Dual Cycle to Ducted Gas
Central Heaters.
Fresh Air Conditioners - Ducted Evaporative Air Conditio ners.
Bonaire Control System
Page 5
Page 6

MULTI-APPLIANCE TOUCH PAD
Introduction
Your Touch Pad Control is desig ned to automatic ally detect the a ppliances during th e commissioning of the
unit by the installer. Controller options not required for your appl iances will usually not be visible on your
Touch Pad display.
Additional control accessories that ca n be adde d to
your Touchpad control for enhanced operation
include:
Remote Thermostat – an extra thermostat that
can be connected in conjunction with the
Touchpad to individually control a zone motor in
a specified area of a ducted gas heating
system.
Home Automation – allows the unit to be
turned ON or OFF through most home security
systems.
Your Touch Pad is designed in Australia to suit
Australian conditions and will ensure that your
home is comfortable all year round.
GENERAL INFORMATION
IMPORTANT INSTALLATION NOTICE
A licensed person is required to instal l Climate Technologies equipme nt. If the equipment is not installed i n
accordance with the installation instructions and the governing body regulations, Climate Technologies
reserves the right to refuse service on non compli ant installations.
Subject to state regulations and by laws a certificate of compliance must be is sued for the electrical and
plumbing connections certifying that the work compli es with all the relevant standards.
Note: Only a licensed person will have insur ance protecting their workmanship.
D
ATA LOCATION.
Your appliance model number, seri al number an d model descript ion are locate d on the appli ance data plate
on the end of the heater or inside the cooler in the vici nity of the electronic controls. These details should
also be in the warranty section of this booklet.
You will need this information, should your appliance require servicing, spare parts or just if you require
additional information about this product.
Bonaire Control System
Page 6
Page 7
MULTI-APPLIANCE TOUCH PAD
Navigating the Controls
Nav igating the Controls
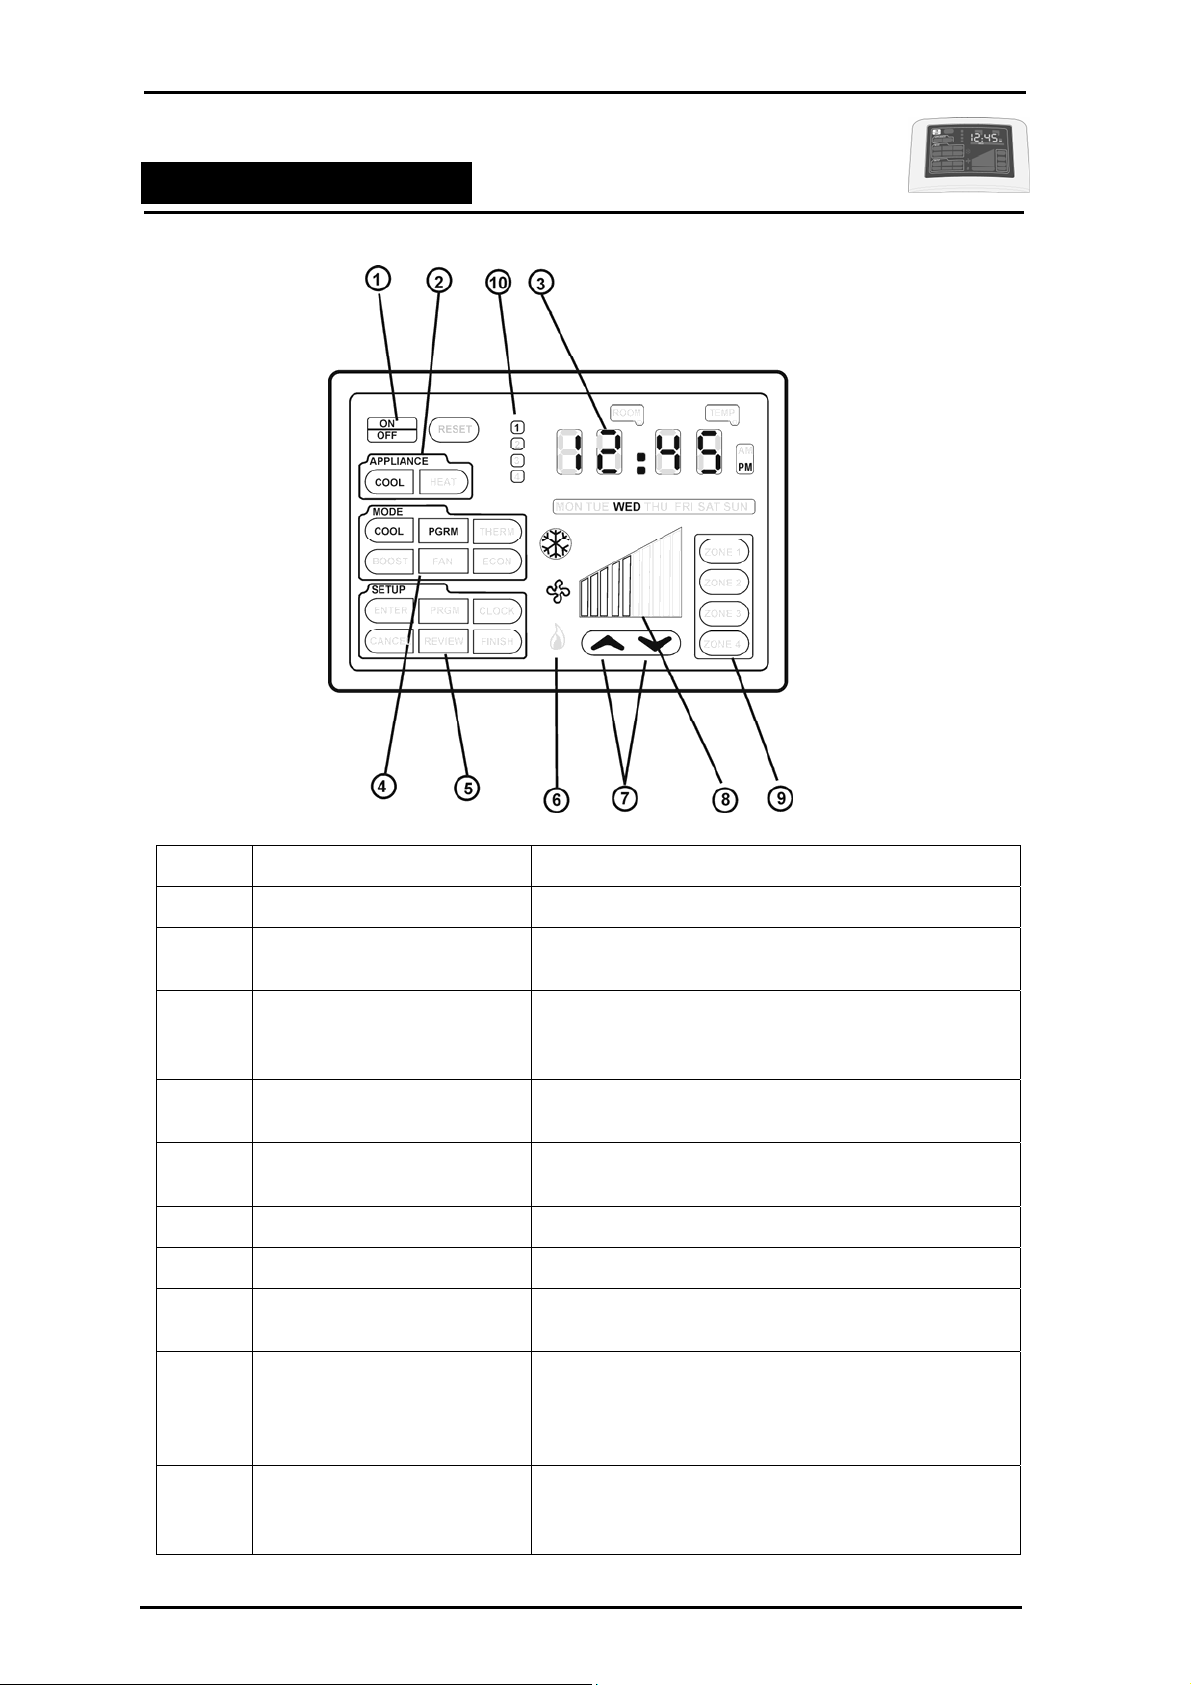
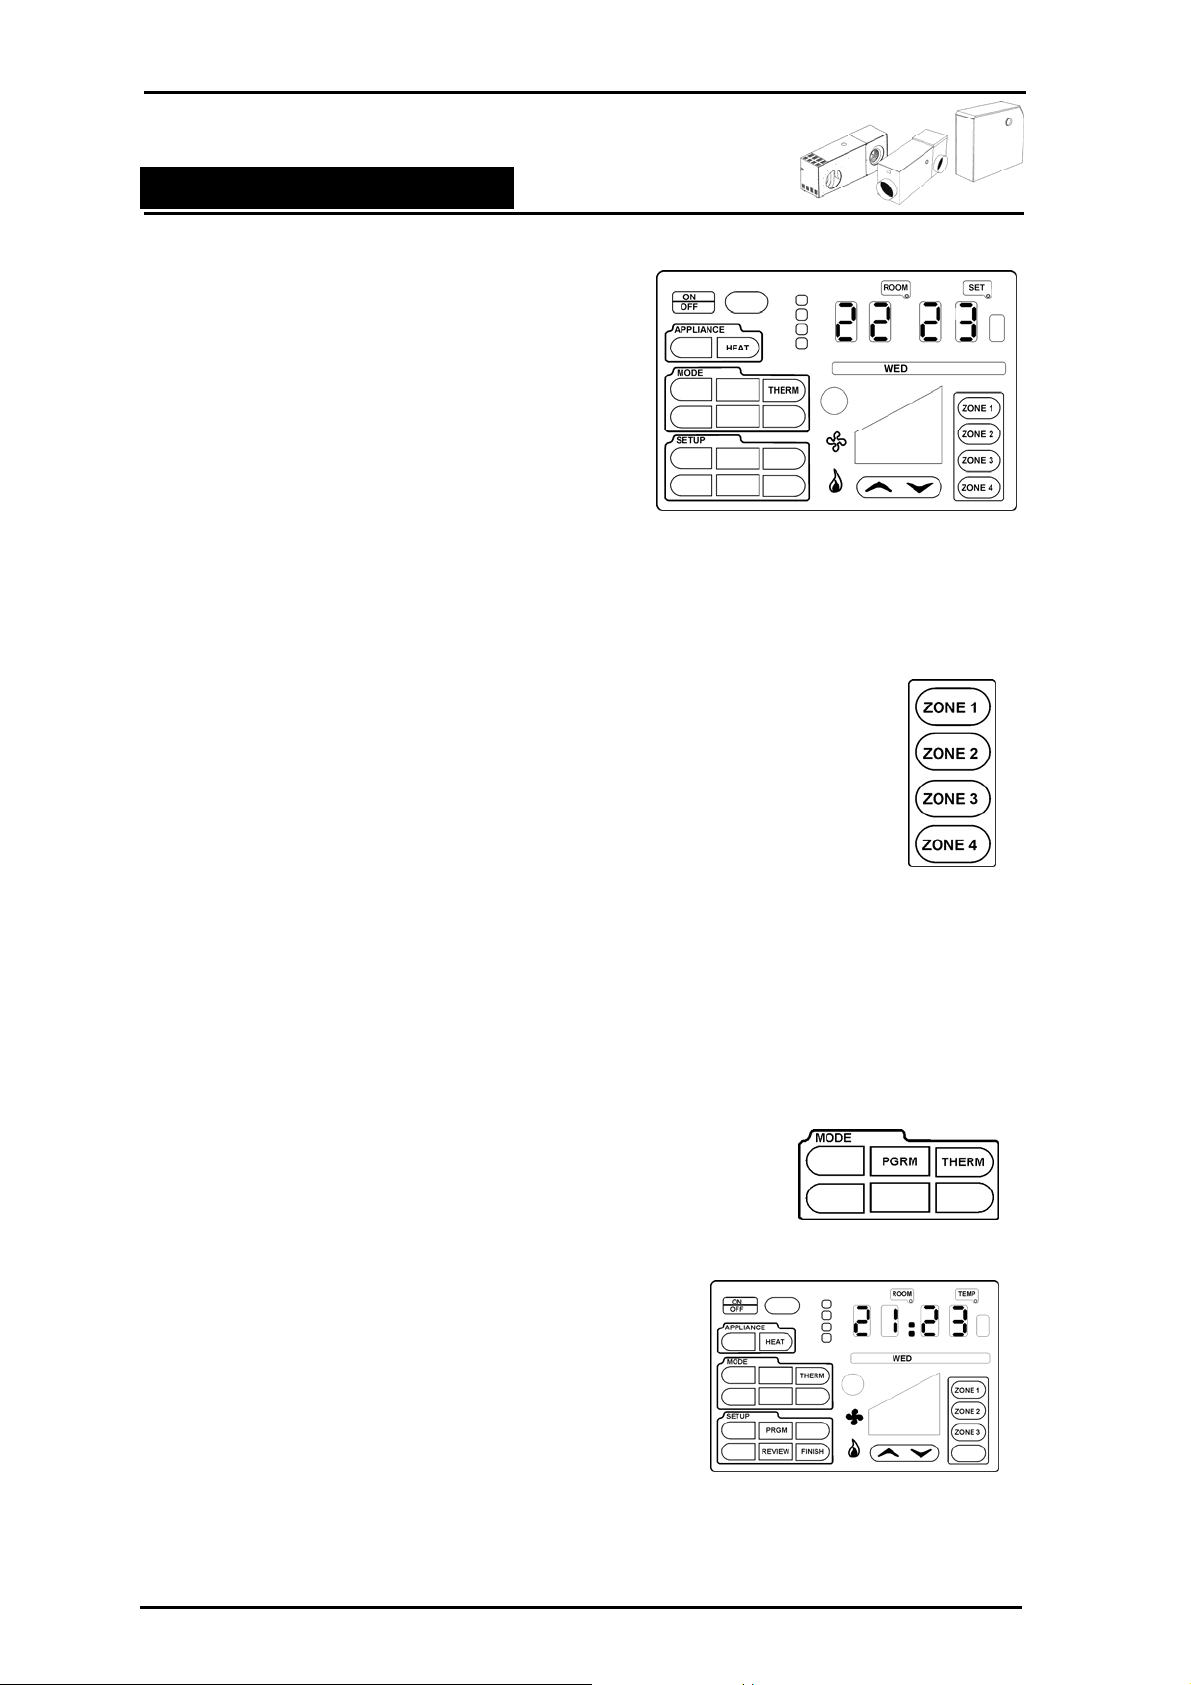
Number Description Function
1 ON / OFF Turns the unit ON or OFF
2 APPLIANCE Touch any area within the APPLIANCE outline to select
product.
3 CLOCK / TEMPERATURE 12 hour clock denoting AM / PM and the day OR room
and SET temperature for HEATING and DUAL CYCLE
cooling mode.
4 MODE Touch any area within the MODE outline an d the avail abl e
operating modes will be displayed.
5 SETUP Touch any area within the SETUP outline and the
available setup icons will be displayed.
6 FUNCTION SYMBOLS Symbols indicate the unit components functioning.
7 UP / DOWN ARROWS Arrows will adjust the output of the unit.
8 FUNCTION LEVEL Function level displays the output level settings with
graphic bars
9 ZONES Controls zones for Ducted Gas Heating / Dual Cycle Air
Conditioning. Where there is more than one unit fitted the
zones buttons can control the ON / OFF function of one or
more units. Each unit is then treated as a zone.
10 PERIOD In PRGM mode there are 4 operating periods available.
The 1, 2 , 3, 4 advises which operating period the pro gram
is in.
Bonaire Control System
Page 7
Page 8
MULTI-APPLIANCE TOUCH PAD
Navigating the Controls
Quick Start - Simple Manual Operation
Here's all you have to do to get going (if the installer hasn't already done it for you).
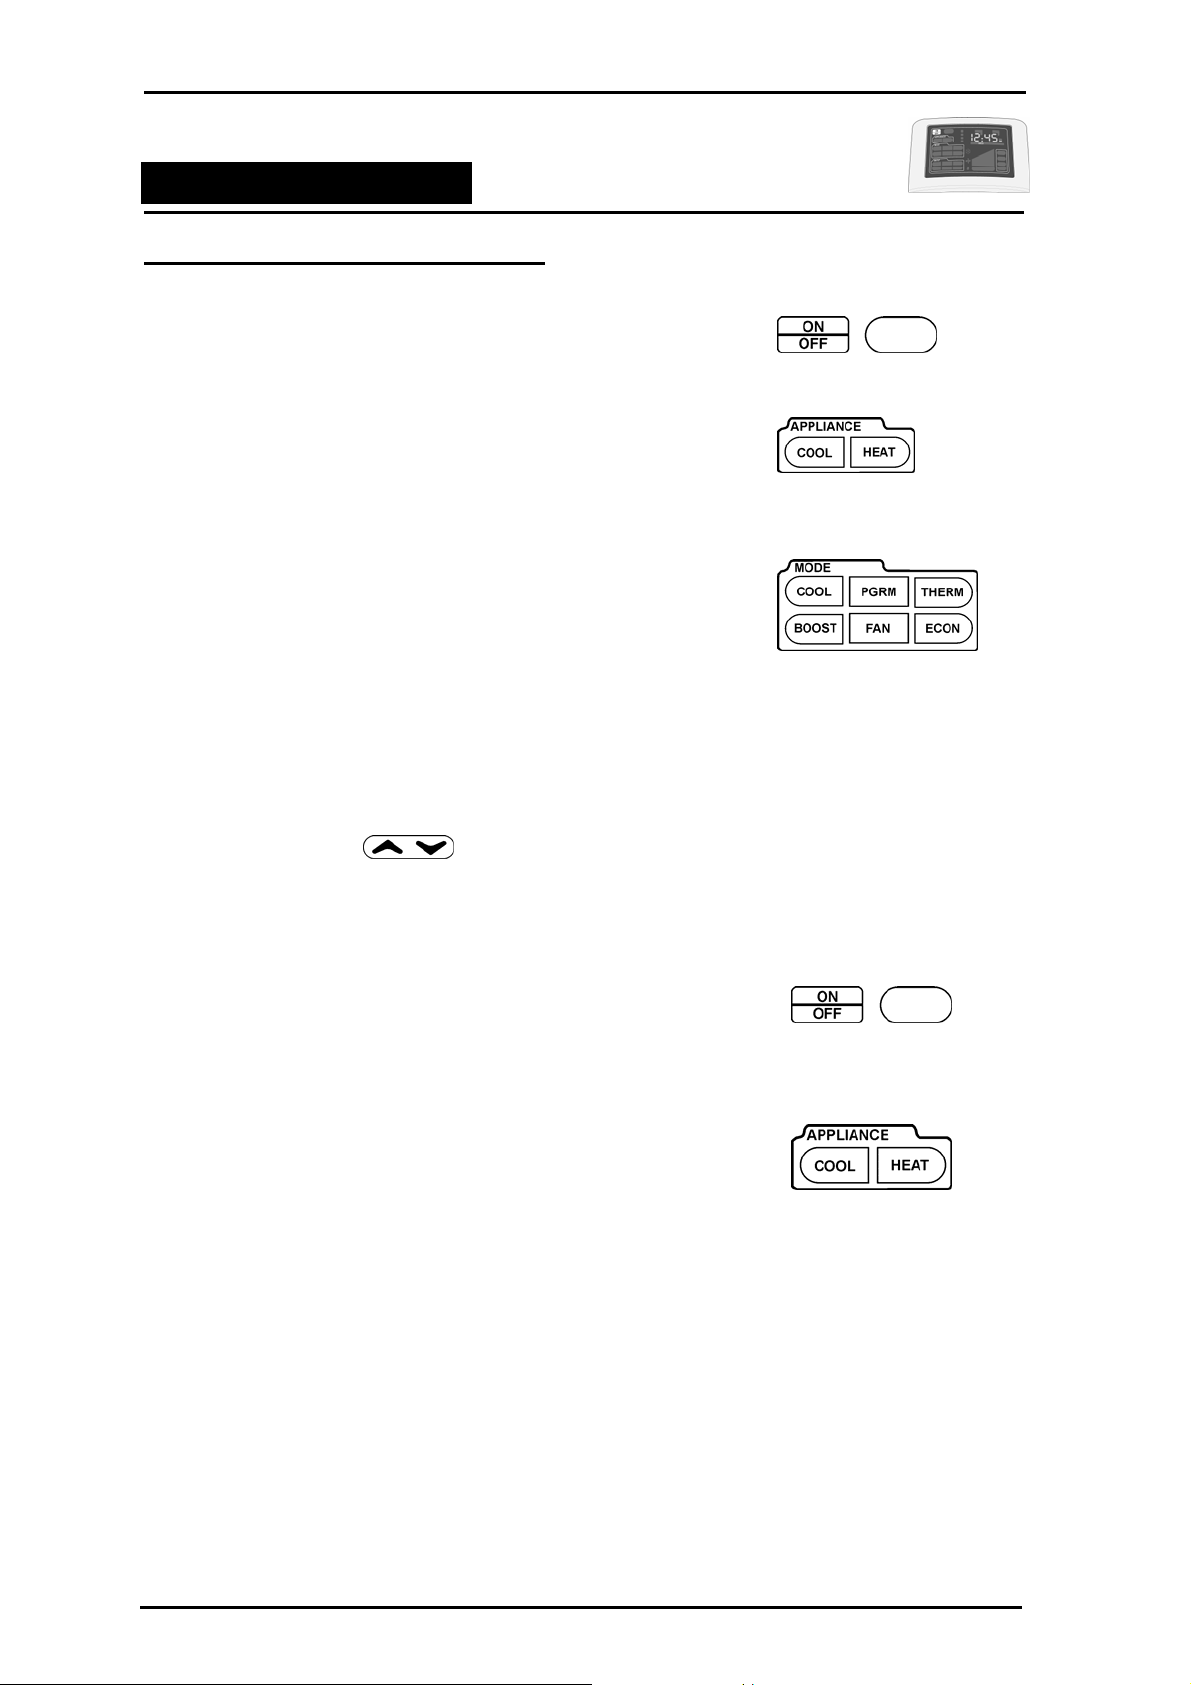
Step 1 Turn the control ON at the ON
/ OFF button.
Step 2 Select the Appliance if not already
selected in the APPLIANCE area.
Step 3 Select the MODE of operation required
by pressing anywhere within the MODE
area.
(The icon availability will vary according
to the Appliances selected. See display
options below)
Press the required mode so the
selection is solid. The remaining icons
will flash 5 more times and disappear.
Step 4 Use the arrows to vary the
unit output.
Refer next page for more details.
ON
/ OFF
When pressing the ON / OFF button to turn the unit on,
the touch pad control will return to the last used setting.
APPLIANCE
- SELECTING THE DESIRED APPLIANCE
Press any area within the Appliance outline for the available appliances.
• If only one appliance type is fitted the control will BEEP.
• If more than one appliance type is installed the COOL and HEAT icons will flash. Make your
selection by pressing the required product icon. Once selected the icon will become solid. The
remaining icon will continue to flash a further 5 times then disappear.
When the touchpad is turned on the last appliance used will be activated.
This control is capable of controlling the following Climate Technology products installed with PNE
control systems:
• Ducted Gas Central Heating
• Dual Cycle Ducted Gas Central Heating an d Dual Cycle Refrigerated Air Conditioning
• Ducted Evaporative Air Conditioni ng
• Ducted Gas Central Heating and Ducted Ev aporative Air Conditioning.
Bonaire Control System
Page 8
Page 9

MULTI-APPLIANCE TOUCH PAD
(
Navigating the Controls
Mode / Icon Options
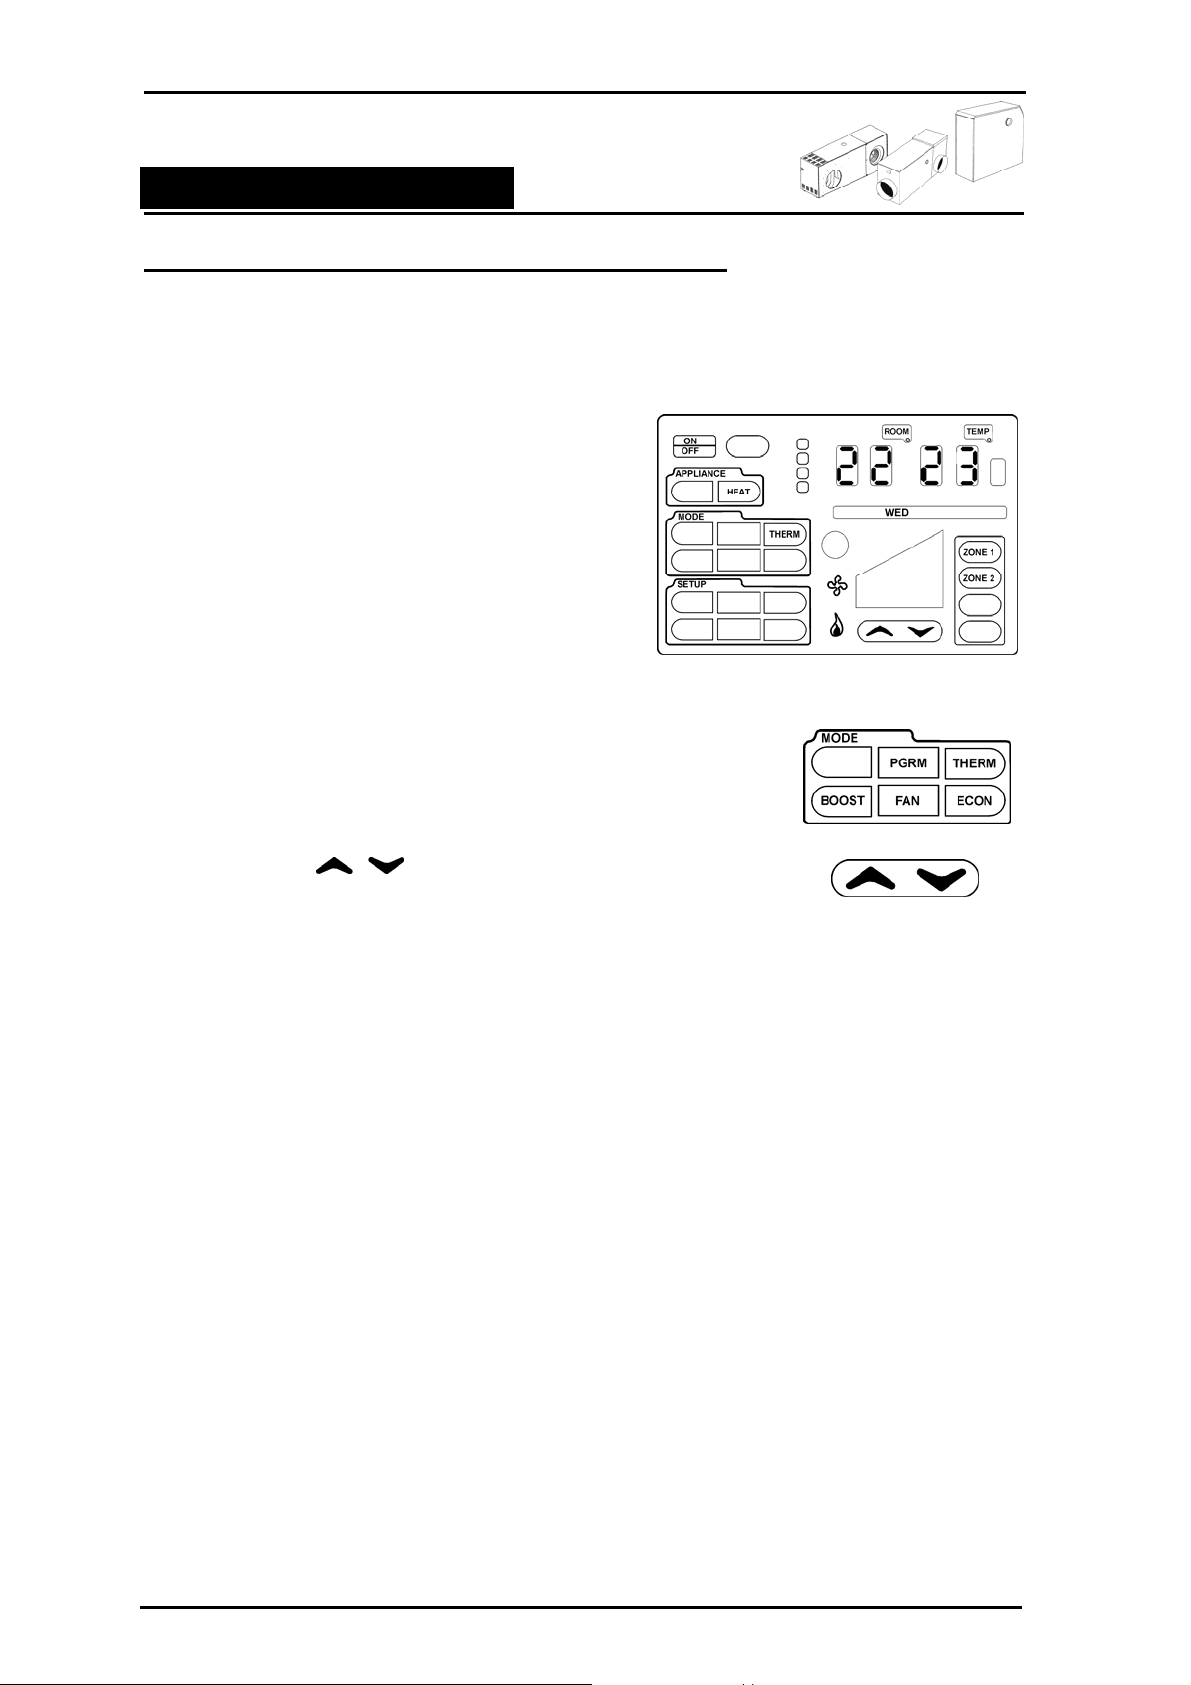
To view the MODE options available press the touch pad anywhere within the MODE outline. The
available functions will be dependent on the products installed.
Ducted Gas Heating
Available Icons HEAT Appliance
Ducted Gas)
Ducted Evaporative A/C
Available Icons COOL Appliance
Dual Cycle Refrigeration A/C
Available Icons COOL Appliance
- OPERATING YOUR APPLIANCE IN YOUR PREFERRED MODE
MODE
• COOL – Evaporative Air Conditioning Only
Fan and Pump in manual mode. This means the fan can be adjusted manually via the UP
/ DOWN arrows and the pump operates continuously.
• BOOST – Ducted Gas Central Heating and Evap orative Air Conditioning Only
The room air fan will operate at maximum speed.
• PGRM - Ducted Gas Central Heating, Evaporative Air Conditioning, Dual Cycle Air C onditioning
The unit can be set up in Program Mode to turn the unit ON and OFF in the desired mode.
For ducted heating and dual cycle refrigerati on this is a 7-day program.
For ducted evaporative air conditioning this is a 1-day (24-hour) program.
• FAN – Ducted Heating and Evaporat ive Air Conditioning.
Fan only in manual mode. This means the f an only can be run and adjust ed via the UP /
DOWN arrows.
In dual cycle cooling mode the fan will run continuously while the condenser cycles ON
and OFF
• THERM – Ducted Gas Central Heating, Evaporative Air Conditioning, Dual Cycle Air Conditioning
Thermostat mode will control the unit via a temperature sensor located inside the touchpad
itself.
Set the comfort level and the unit will automatically increase or decrease the amount of
heating or cooling required accordin g to demand.
Adjust the comfort level using the UP / DOWN arrows
• ECON – Ducted Gas Central Heating Only
Economy will run a ducted gas central heater at the lowest available fan speed and gas
setting. This is best used once the space has been brou ght up to temperature.
Bonaire Control System
Page 9
Page 10
MULTI-APPLIANCE TOUCH PAD
Navigating the Controls
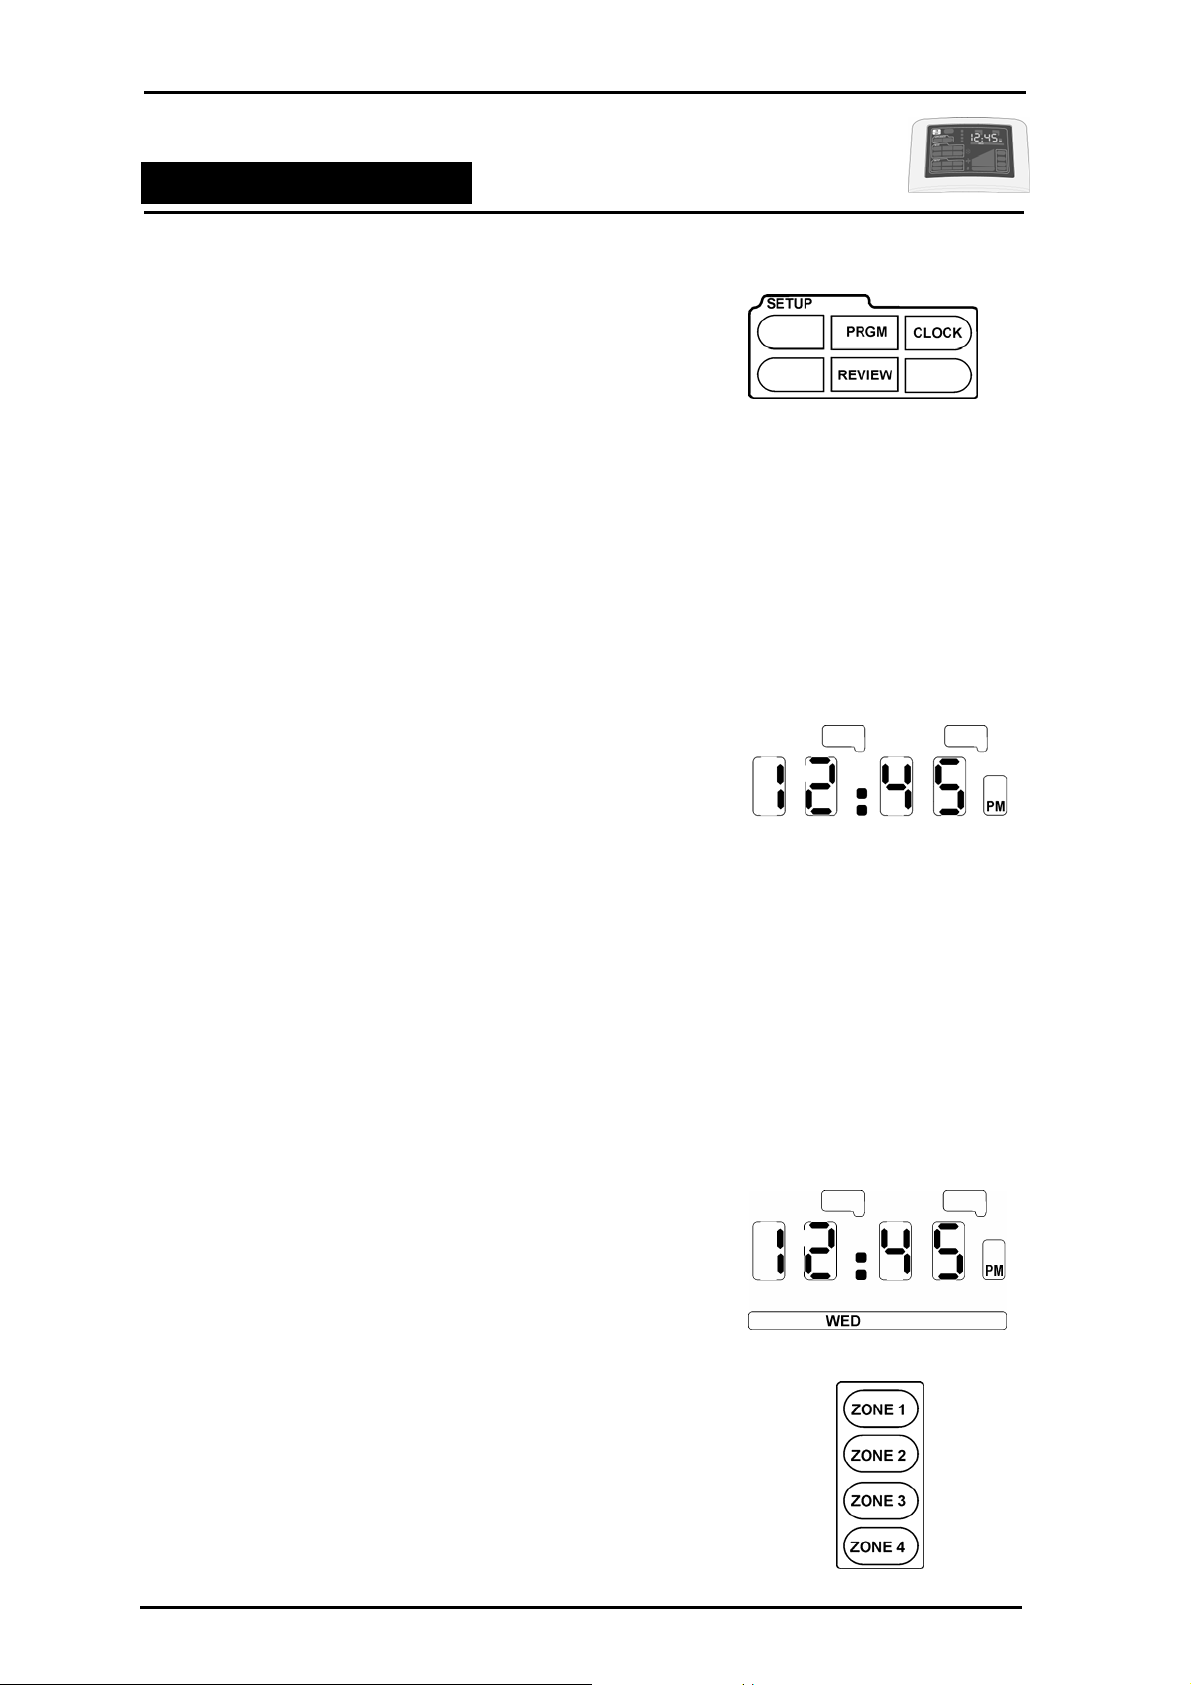
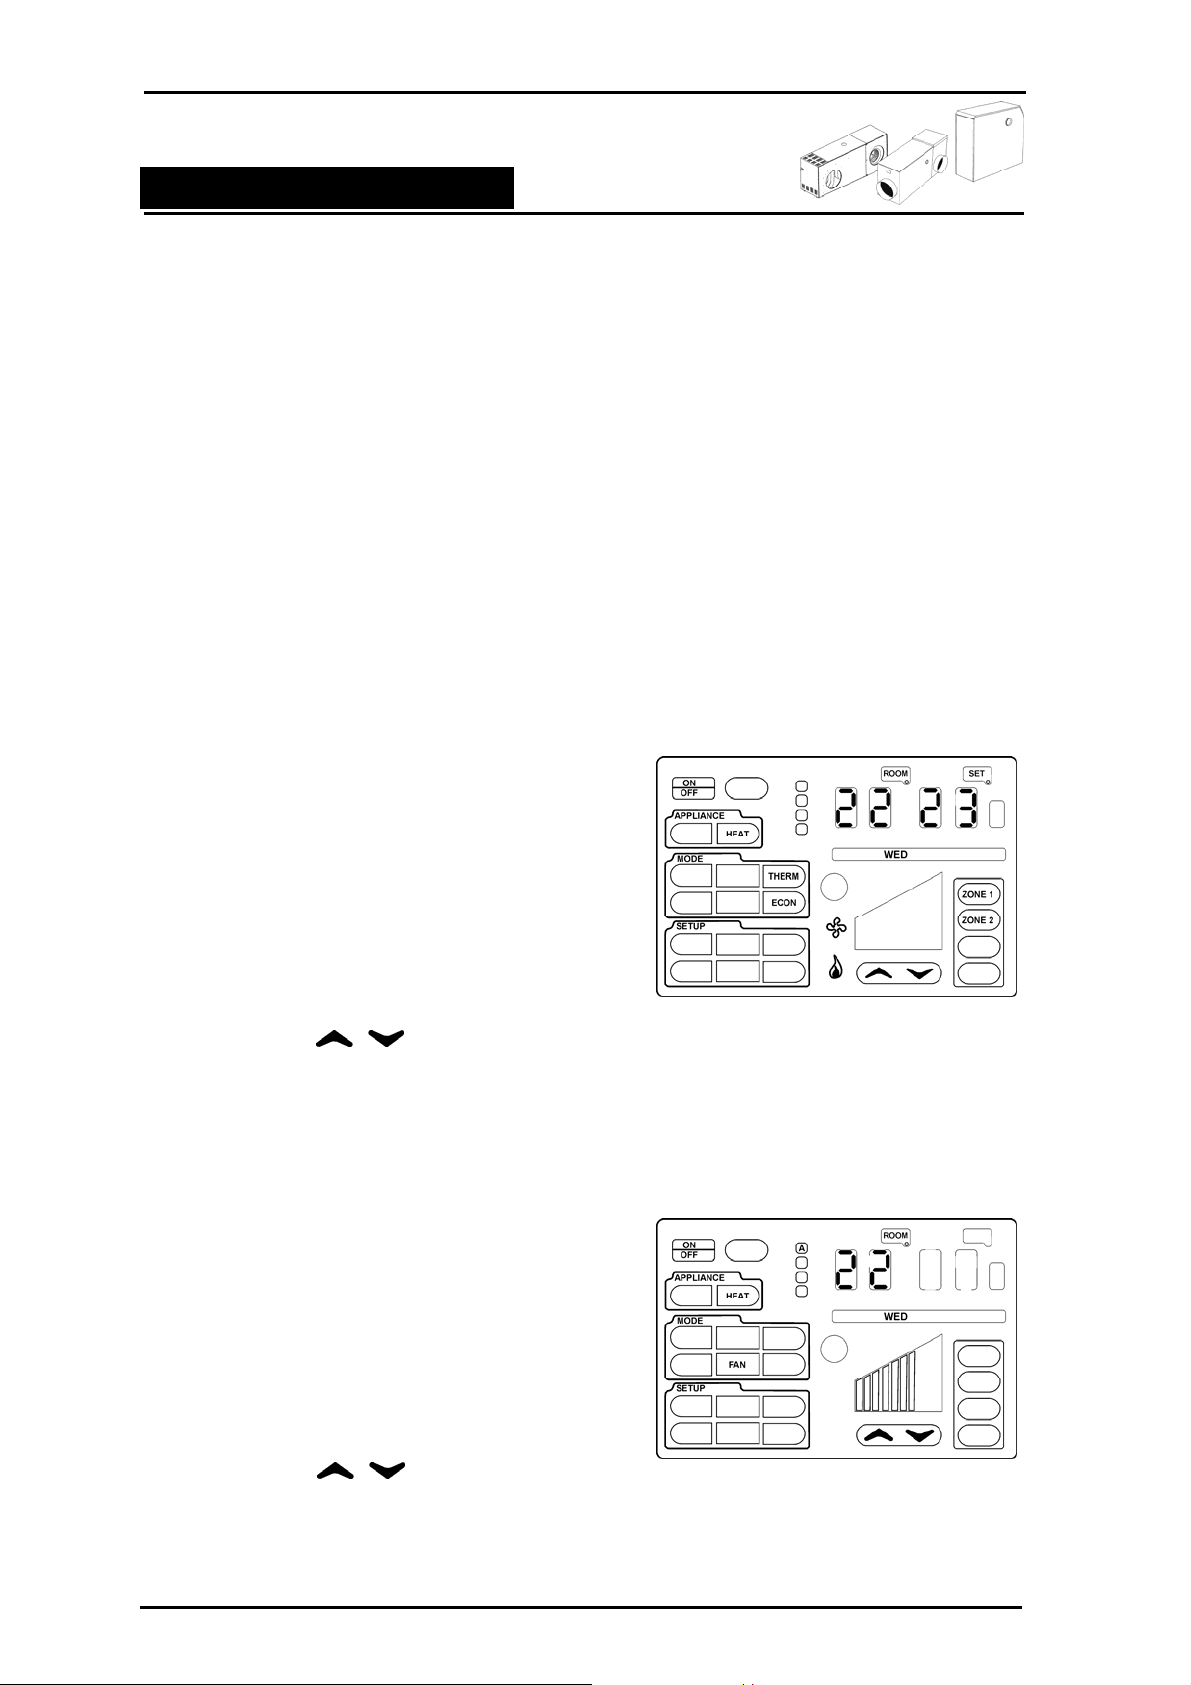
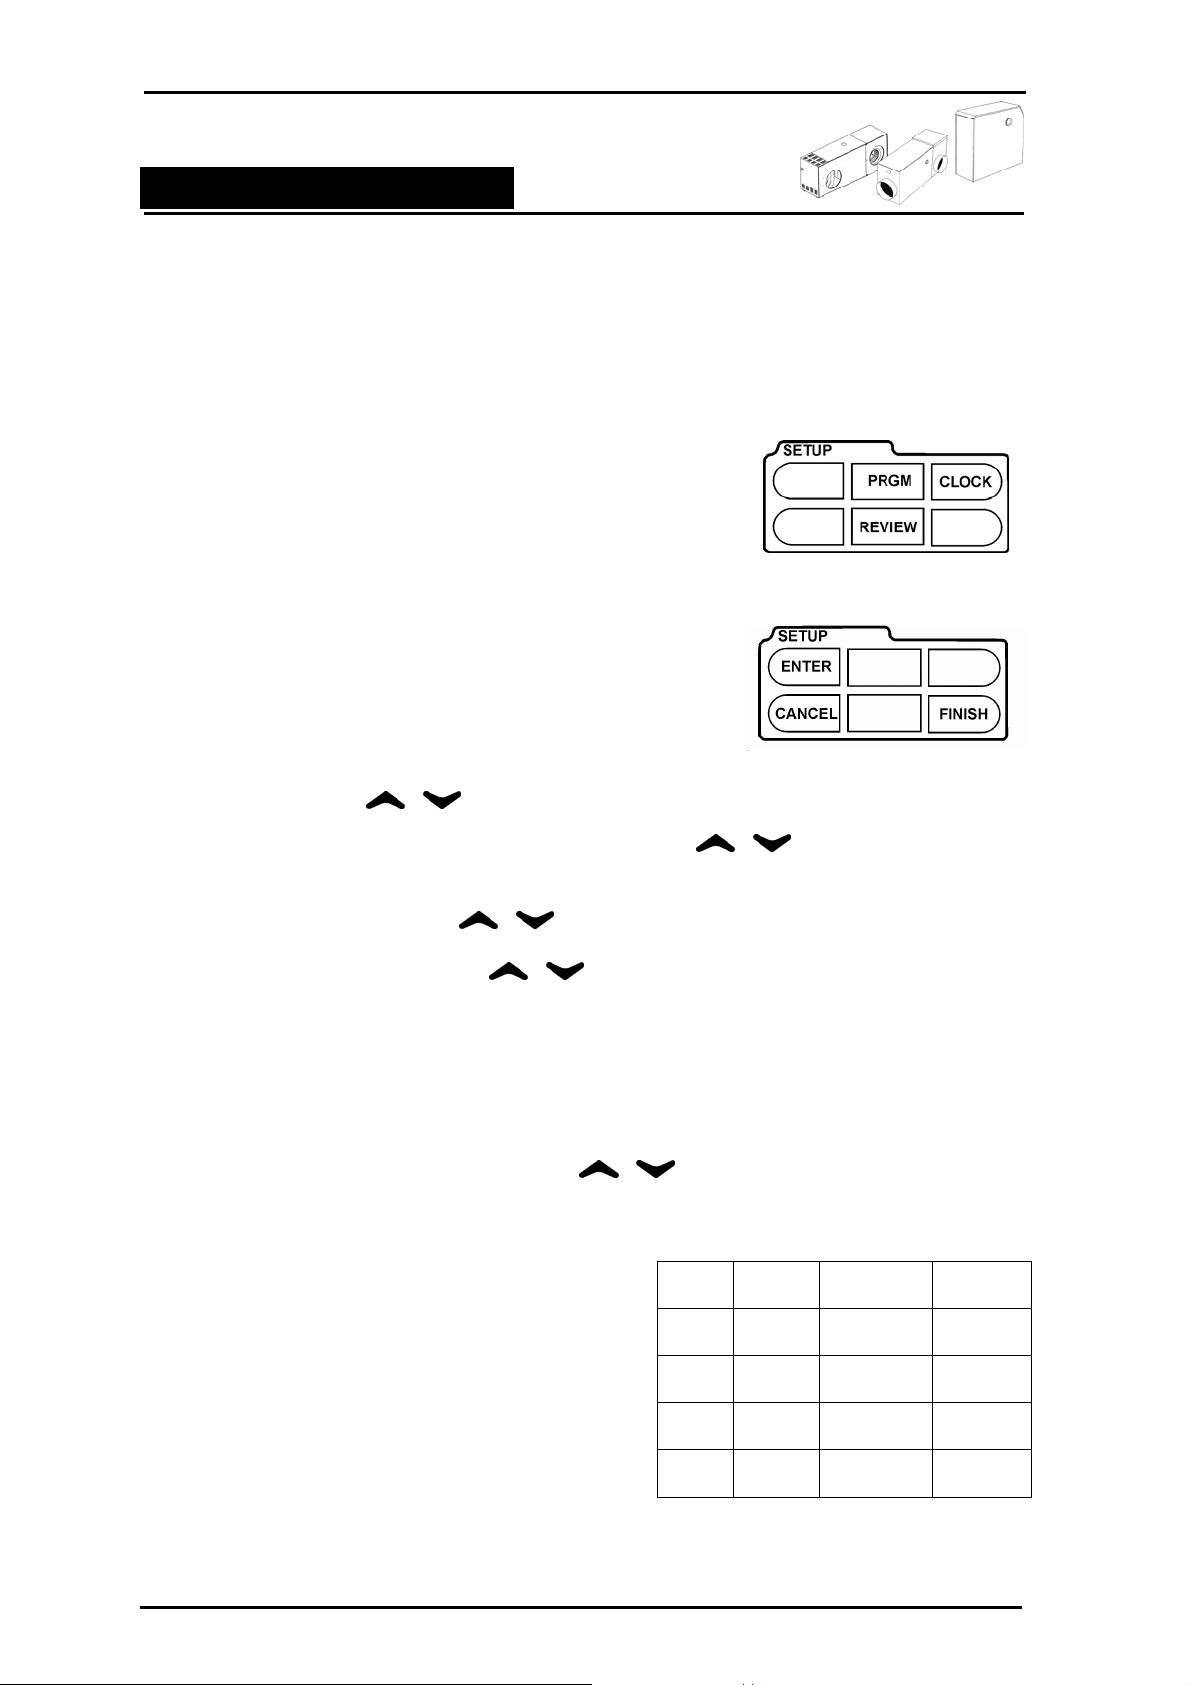
SETUP - SETTING UP OR REVIEWING VARIOUS FUNCTIONS
To view the SETUP options available, press the touc h pad
anywhere within the SETUP outline. The available
functions are:
• PGRM – Program setup allows you to create a timed
program to start and stop the product. There are 4
period programs available requiri ng a minimum of 2 t o
be set per day.
For ducted evaporative air conditioning the program
option will only function for 24 hours and th en the unit
will stop.
• CLOCK – Setting the time
• REVIEW – Pressing the review button will
automatically step the control through the timer
programs set.
C
HILD LOCK
This function is designed to be a simple me chanism to lock
the control to prevent unnecessary adjustments to the
system. When the lock is engaged there will be no system
functions available. (This is available in either on or off
modes)
• To engage the Child Lock press and hold anywhere
over the numeric display for 4 seconds. A BEEP
followed by a BEEP will be heard to indicate the lock is
ON.
• To remove the child lock press and hold anywhere over
the numeric display for 4 seconds. A Single BEEP
followed by another single BEEP will be heard to
indicate the lock is OFF.
T
EMPERATURE / TIME TOGGLE
To change the display between temperature and time just
press anywhere in the numeric display. In Evaporative
Cooling mode only the time will be displayed.
Z
ONES – WHERE ZONE MOTORS ARE FITTED
The zone motor option is only available with ducted gas
heating / dual cycle products. These icons allow zones to be
turned ON or OFF. This function will ONLY be made
available by the installer if zone motors have been fitted to
your duct work.
Bonaire Control System
Page 10
Page 11
MULTI-APPLIANCE TOUCH PAD
Navigating the Controls
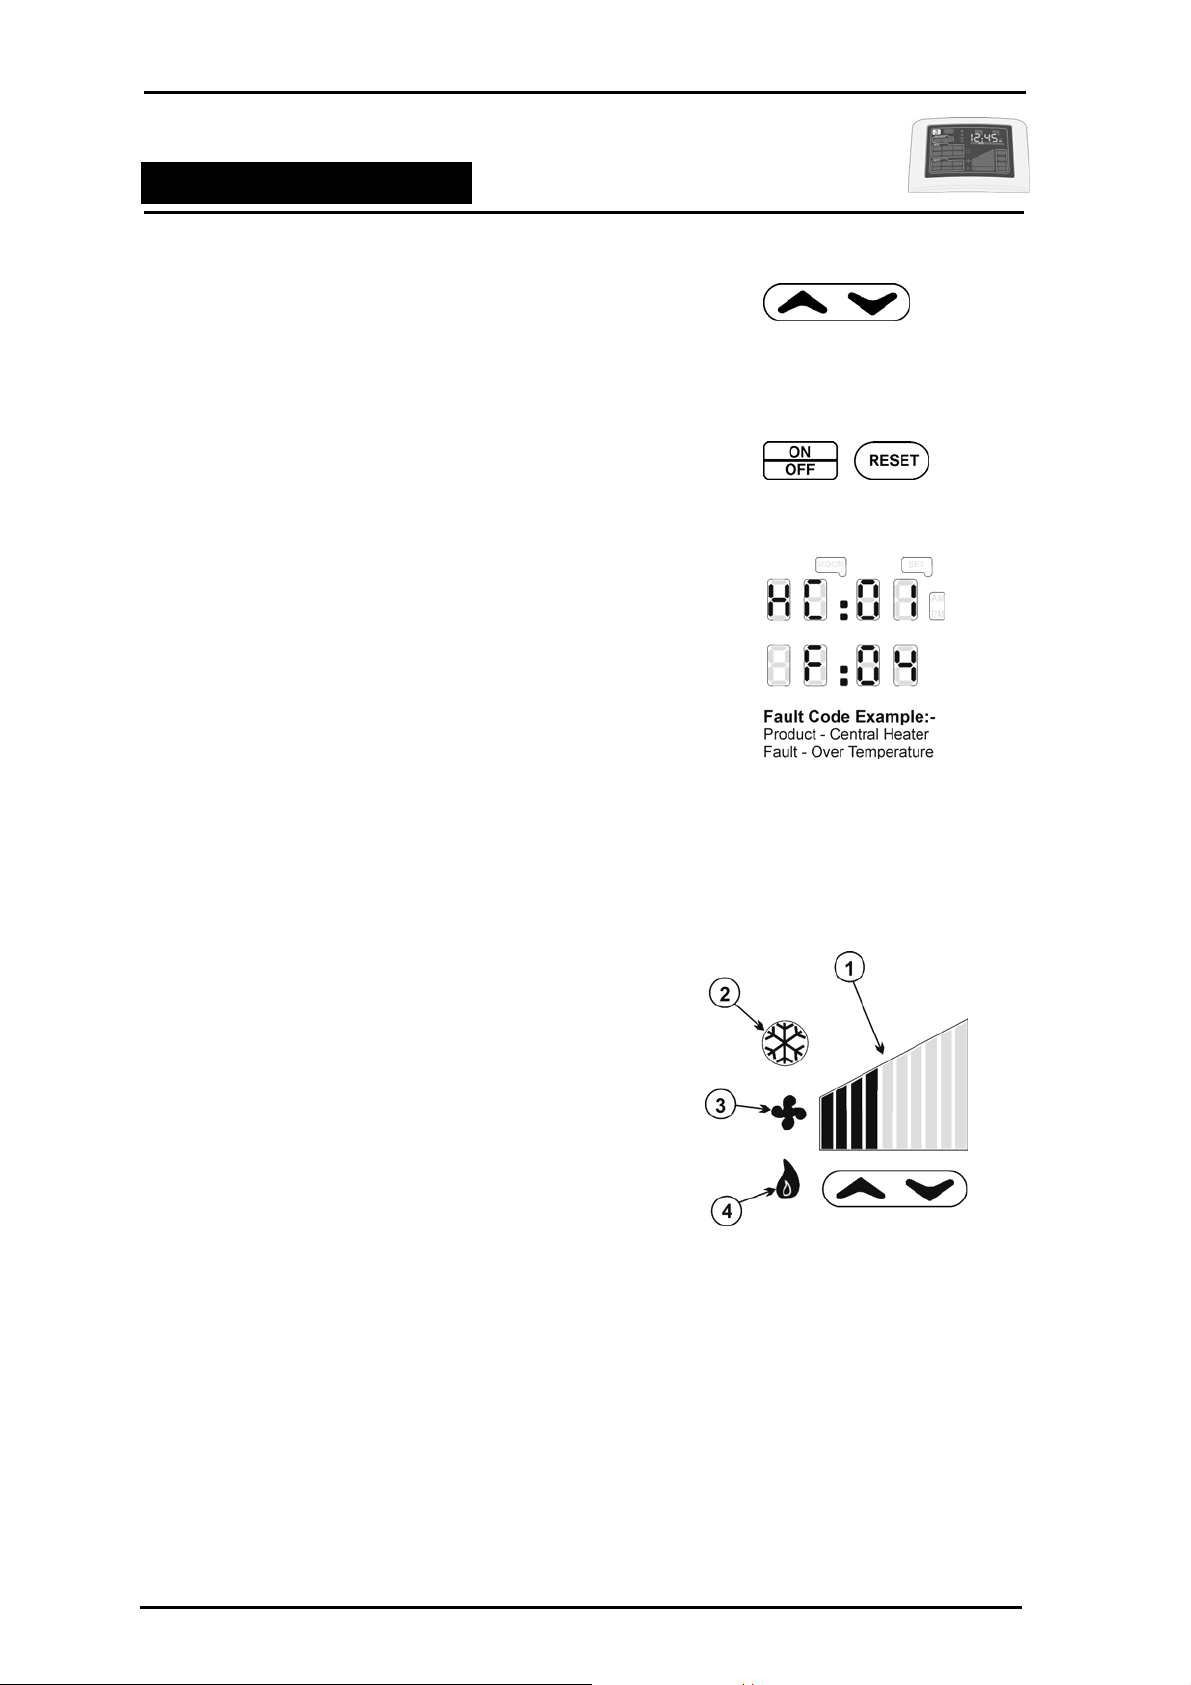
ADJUSTMENT ARROWS
The adjustment arrows can be used to increase or decre ase
the function of product being controlled. The icons will c ome
on automatically to indicate the unit’s m ode of operation.
R
ESET / FAULT CODE
If the reset icon appears and the touchpad thermostat is
flashing information in clock area, it means the unit has
stopped as the result of a fault e.g. electricity / gas
interruption or some other malfunction.
The information being displayed will continually rotate
between the unit identification and the fault cod e e.g. HC: 01
and F: 04. Before resetting the control, note the fault code
information. Should a service call be required, this will assist
in quick diagnostics and service requirements.
To RESET the unit, press and hold the RESET icon for
approximately 4 seconds until 2 Be eps hav e be en hear d. The
reset icon will disappear and your appliance will be reset. If
there has been no component failure the unit will now resume
its function.
I
CONS
The operating icons will be displayed relative to the unit’s operation.
1. Indicator Bars
Evaporative Air Conditioning
(Manual Mode) shows fan speed.
(Thermostat Mode) comfort settings.
Central Heaters shows fan speed setting in FAN mode.
2. Snow Flake Symbol
For evaporative air conditioning it indicates that the
pump is on.
or
For Dual Cycle Refrigerated Air Conditioning it indicates
that the condenser is operating.
3. Fan Symbol
For Evaporative Air Conditioning it indicates that the fan is operating.
For Ducted Heating it indicates that the fan is operating.
For Dual Cycle Refrigerated Cooling it indicates that the fan is operating.
4 Flame Symbol
Indicates that the thermostat is calling for heat from the ducted central heater
Bonaire Control System
Page 11
Page 12
MULTI-APPLIANCE TOUCH PAD
Ducted Gas Central Heating
Ducted Gas Central Heating
Owner’s Operation and Maintenance Details
Please keep this important manual in a safe place. It is the owner’s responsibility to ensure that
regular maintenance is carried out on this Ducted Gas Central Heater. Failure to do so will void all
guarantees beyond statutory and legal requirements.
www.climatetechnologies.com.au
Bonaire Control System
Page 12
Page 13
MULTI-APPLIANCE TOUCH PAD
Ducted Gas Central Heating
Congratulations on purchasing this ducted gas central heating system, an exciting new product
manufactured by Climate Technologies.
Wholly designed and manufactured i n Australia, this Ducted Gas Central Heat er represents an exciting
new development in warm air furnace design. It emb od ies the latest advances in gas heating technology.
Your heater is supported by Climate Technologies, Australia’s most advanced manufacturer of a
complete range of climate control products.
To ensure you fully enjoy the benefits of this Ducte d Gas Central Heater, pl ease read these instr uctions
carefully and keep them handy for future reference.
Operated and maintained in accordance with this manual, this unit will pr ovide you with years of warm
and environmentally friendly operation. Plea se take the time to read this manual.
NOTE: The manufacturer and its service providers reserve the right to refuse service unless
safety and accessibility to the unit can be guaranteed in accordance with the installation
instructions and Australian Standards. The cost of any extra equipment required to provide
access to the unit for servicing is the responsibility of the owner.
General Information
I
MPORTANT NOTICE
A licensed person is required to i nstall Clim ate Technolog ies equipm ent. If the equipm ent is not inst alled
in accordance with the installation instr uctio ns and t he gov ern ing bo dy r egu latio ns, C limate Technologies
reserves the right to refuse service on non compli ant installations.
Subject to state regulations and by l aws a certificate of co mpliance must be is sued for the electri cal and
plumbing connections certifying that the work compli es with all the relevant standards.
Note: Only a licensed person will have insur ance protecting their workmanship.
ATA LOCATION
D
Your appliance model number, serial number and model description are located on the appliance data
plate on the end of the heater or under the lid in the vicinity of the electronic controls. These details
should also be in the warranty section of this booklet.
You will need this information, shoul d your appliance require serv icing, spare parts or just if you require
additional information about this product.
ASSEMBLY
There is no assembly required of this Ducted Gas Central Heater. Your Dealer or installer will carry out
all assembly and commissioning upon installation.
Bonaire Control System
Page 13
Page 14
MULTI-APPLIANCE TOUCH PAD
Ducted Gas Central Heating
Safety
SAFETY & OWNER RESPONSIBILITY
The manufacturer and its service providers reserve the right to refuse service unless safety and
accessibility to the unit can be guaranteed. The cost of any extra equipment require d to provide access
to the unit for servicing is the responsibility of the owner.
P
RECAUTIONS
DO NOT PLACE ARTICLES ON OR AGAINST THIS APPLIANCE.
DO NOT USE OR STORE FLAMMABLE MATERIALS NEAR THIS APPLIANCE.
DO NOT SPRAY AEROSOLS IN THE VICINITY OF THIS APPLIANCE WHILE IT IS IN OPERATION.
DO NOT PLACE ARTICLES IN FRONT OF OR OVER THE RETURN AIR GRILLE.
EATURES
F
Your Ducted Gas Central Heater has all the safety devices to ensure safe operation. These devices
conform to the standards set out by the Standards Australia.
P
OWER OR GAS INTERRUPTION
Should there be an interruption to the power supply during the heating operation the controls will
automatically turn off the gas.
The heater will be ready to resume operation once the power has been restored.
Should there be an interruption to the gas supply, the heater will endeavor to re-light 3 times and if
unsuccessful will lock out. (This is part of the safety features). S hould this occur the heater will need to
be reset. If the RESET icon is displayed, press and hold the RESET icon till a BEEP is heard and the
unit will be ready to resume operation.
Please refer to your problem-solving chart to assist resolving other problems.
Bonaire Control System
Page 14
Page 15
MULTI-APPLIANCE TOUCH PAD
Ducted Gas Central Heating
Using Your Touch Pad with Ducted Gas Central Heating
Using your Touch Pad for manual operation of your Central Heating when you want direct control,
without timers or programming.
THERM
OPERATION (THERMOSTAT)
Step 1 To turn the Touch Pa d on, press and release the
ON/OFF button. If there is only a central heater
HEAT will automatically display in the Appliance
Outline.
NOTE: Your Touch Pad Control is designed to
automatically detect the appliances you have
installed. Options not required for your ap pliances
will not be displayed on the touchpad. So don't
worry if you don't see all the menu ite ms listed in
this book.
Step 2 Press anywhere within the MODE outline.
The available icons will flash. Select THERM. The icon will
become solid and the remaining icons will flash 5 more times
before disappearing.
Step 3 Press the arrows to increase or decrease the set
temperature (TEMP).
Step 4 Your Touc h P a d m easur es t h e r oom tem p er atur e usi ng a t herm ost at i nsi de its case. The Touch
Pad will run the Heater until i t measures temperature a little above your set temperature and
then turn off the unit. When the temperature falls a little below the set temperature the unit will
restart. The unit operation will be as follows:
• When the room temperature (ROOM) is colder than the set temperat ure (TEMP) the heater
will come on after approximately a 30 second ignition process
• If at start up the room temperature (ROOM) is 2.0° or more below the set temperature
(TEMP), the central heater will start up at high fan speed and high gas rate bring your
house up to temperature as quickly as possible.
• As the room temperature gets closer to the set temperature the central heater will reduce
the room air fan and the gas rate to the burner.
• When the thermostat reaches the set temperature the central h eater wi ll be o n low fan and
the gas will modulate to low fire.
• When the temperature has gone over the set tem perature by 0.5° the central heater will
shut down.
• When the temperature has dropped to 1° below s et temperature the unit will restart.
The flame symbol will be displayed on the control to indicate the heater is
•
functioning.
Step 5 To turn the heater OFF Press the ON/OFF button on the touchpad.
Bonaire Control System
Page 15
Page 16
MULTI-APPLIANCE TOUCH PAD
Ducted Gas Central Heating
The Touch Pad remembers your SET TEMPERATURE setting and uses it next time you turn it ON.
As your activities vary, you may find you need different temperature settings, e.g. a
temperature comfortable for sitting is usually too warm compared to when you’re moving
about.
For economical operation, set a lower set temperature during the day when you are active, or use
economy (ECON). Switch the Touch Pad OFF wh en asleep and ON again when awake. These cost
saving functions can be programmed to operate automatically (see Programmed Control).
ECONOMY
& BOOST FOR HEATING
Economy (ECON) operates the heater at the lowest fan
speed and a lowest possible gas rate. This is best used
once the space has been brought up to temperature.
BOOST operates the heater at the highest fan speed and
a highest possible gas rate.
The unit will switch off when the SET TEMPERATURE is
reached.
Step 1 To select econ omy or boost switch the Controller
ON.
Step 2 Ensure the APPLIANCE outline is set to HEAT.
Step 3 Press any where in the MOD E outline to see the
available icons.
Step 4 Press the ECON or BOOST icon so that it stops
flashing. The remaining icons will flash 5 more
times and disappear.
Step 5 Use the arrows to adjust the
SET temperature as required.
FAN
The fan in your heater can be used to circulate the room
air without running the heater. To run the fan only option:
Step 1 To select FAN only switch the Controller ON
Step 2 Ensure the APPLIANCE outline is set to HEAT.
Step 3 Press any where in the MOD E outline to see the
available icons.
Step 4 Press the FAN icon so that it stops flashing. The
remaining icons will flash 5 more times and
disappear. The room air fan will now run.
Step 5 Use the arrows to adjust the fan
speed as required.
Bonaire Control System
Page 16
Page 17
MULTI-APPLIANCE TOUCH PAD
Ducted Gas Central Heating
ZONES
Selecting ZONE 1 2 3 4 only applies if your hom e is fitted
with optional motorised ductwork dampers (p lease consult
your installer) that allow opening or closing of each sect io n
of ducting.
Many homes have no motorised ductwork dampers fitted,
however the control will still display the zones. Where
zone motors are fitted the installer can s et your controller
to show only the zones available for use.
In homes with more than one zone, the default requir es at least one z one open at all ti mes. The common
zone feature, which allows all zones to be turned off, can only be applied to specific duct designs. This
must ONLY be set by the installer.
S
ETTING THE OPEN OR CLOSED STATUS
Step 1 To select ZONES switch the Touch Pad Control ON.
Step 2 Ensure the Appliance is set to HEAT and T HERM.
Step 3 Press any where in the ZONE area to see the avai lable zone icons.
Step 4 To turn a ZONE ON, press the ZONE icon required to make it solid.
To turn a ZONE OFF press the ZONE icon to make it flash.
The flashing icons will flash 5 more times and disappear. In approximately 30 seconds the new zone
settings will be effective.
ROGRAMMING YOUR TOUCH PAD
P
Programming your Touch Pad will provide energy and operating ti me savings. Your heati ng and or cooli ng
system will only operate when you need it, and at your chosen comfort levels.
Determine your most comfortable settings, program them and let your Touch Pad do the rest
automatically.
Turning on the program function
Press the PRGM button in the mode panel to run program.
Programming Sequence
If you've never programmed your Touch Pad control
before (or it’s been a while) remember it's easier to
program the whole week to the same settings (by
selecting the whole week MON TUE WED THU FRI
SAT SUN day choice) and then program variations for
particular days or the weekend as you become more
familiar with programming.
If the Controller exits program mode it may be beca use you've paused longer than about 60 seconds to
make your next choice. All the settings you've made up to then in a completed program period (P eriod 1,
2, or 3) will be saved. Just switch back to PRGM in setup, select the day co mbination and scroll through
your settings using the ENTER key and carry on from where you left off.
Bonaire Control System
Page 17
Page 18
MULTI-APPLIANCE TOUCH PAD
Ducted Gas Central Heating
During the program sequence only the icons requiring changing for each step will be displayed.
In the SETUP outline, there are 2 setup mode icons PGRM and CLOCK as well as 4 function icons,
ENTER, CANCEL, REVIEW and FINISH. To enter setup mode, touch anywhere within the SETUP
outline. The accessible icons will be displayed.
Program Setup
Program setup will take you through the steps to set your Duct ed
Gas Central Heater up for automatic control:
Step 1 To select the PGRM (Program) mode touch anywhere
in the SETUP outline.
Step 2 Press PGRM. The 3 icons will disappear and edit
mode has begun with the 1
st
period.
Two new icons will now be displayed ENTER &
CANCEL.
ENTER will save each step of the program •
• CANCEL will step back the program 1 step at a
time.
Step 3 Using the arrows select the day or day grouping to program. Press ENTER
Step 4 Period 1 will be displayed with ON or OFF. Using the arrows make a selection if
required and press ENTER.
Step 5 Set the Hour using the arrows and press ENTER
Step 6 Set the Minutes using the arrows and Pre ss ENTER
Step 7 Change the Unit in the APPLIANCE area if r eq uired.
Step 8 Select the MODE of operation, THERM, ECON, BOOST, FAN (only) and press ENTER.
Step 9 If zones are fitted, select the zones required to be open.
Step 10 Adjust the SET temperature using the arrow. Press ENTER
The First Program period is now completed.
Default Setup Ducted Gas Central Heating
Program
Step 11 Program the second period using steps 4 to 9
Event ON/OFF Start Time Mode
Step 12 If only 2 program periods are required press
FINISH. If a 3
rd
period is required program
using steps 4 to 9.
Step 13 If only 3 program periods are required press
FINISH. If a 4
th
period is required program
using steps 4 to 9 and press FINISH.
1 ON 6:00 am THERM
2 OFF 9:00 am 3 ON 4:00 pm THERM
4 OFF 10:00 pm -
IMPORTANT NOTE: The program does not automatically start at this point.
Bonaire Control System
Page 18
Page 19

MULTI-APPLIANCE TOUCH PAD
Ducted Gas Central Heating
To start the program, touch the MODE outli ne area for the availa ble icons to be displayed. Press PRGM
icon and make solid. The icons will flash 5 more times and program mode will be engaged.
Reviewing Entered Programs
REVIEW is a feature that allows you to first view the current program
settings. Each step remains visible for 3 seconds.
Once the review procedure has started th e FINISH icon will be illum inated.
The FINISH icon can be used to stop the REVIEW proces s.
U
SING THE PROGRAM MODE (PGRM)
Activates the 4 program x 7 day / night timer.
To operate the PGRM mode:
Step 1 Turn the Touch Pad on, press and r elease t he
ON/OFF button. If there is only a central
heater HEAT will automatically display in the
Appliance area.
Step 2 Press the MODE outline. The available icons
will flash. Select PGRM.
The icon will become solid and the remaining
icons will flash 5 more times before
disappearing.
The touchpad will now be in program mode with the current program settings being indicated e.g.
time period, mode of operation, period and settings.
Step 3 To exit the PGRM mode yo u have 2 options.
1. Turn the unit off using the ON OFF button
Press the MODE area. The available icons will flash. Select a new mode of operation.
2.
PROGRAM OVERRIDE (PGRM)
When PGRM is selected, the progr am can be overridden within an event period (1, 2, 3, or 4) wit hout
altering the program setup. There are 2 scenarios for changing the event:
1. When the program event is ON, operating the unit:
The operating parameters can be altered tempor arily. Sim ply adjust the temper ature or cha nge the
zone selection (where fitted) at any time.
2. When the program event has the unit turned OFF.
To override the PGRM mode when th e unit is scheduled to be OFF, press and hold the PGRM
mode button for 5 seconds until it beeps and th en immediately select one of the mode functions
available. The PGRM button will remain illuminated with your new selection.
The event number will now flas h, indicating a temporary change to the program. The program will res et
itself once the next timed event has started or if the PRGM in the m ode section is turned OFF then ON or if
the touchpad has been turned OFF then ON.
Bonaire Control System
Page 19
Page 20

MULTI-APPLIANCE TOUCH PAD
Ducted Gas Central Heating
CLOCK SETUP
Timer setup will take you through the steps to set your 12- hour clock. You
can use FINISH at any stage of setting the Day and Time.
Step 1 To select the CLOCK setup touch anywhere in the SETUP
outline.
Step 2 Press CLOCK. The 3 icons will disappear and edit mode has
begun.
Step 3 Three new icons will now be displayed ENTER, CANCEL &
FINISH.
•
ENTER will save each step of the program
•
CANCEL will abort the setup and no entries will be sav ed.
FINISH allows you to stop at any time and save the settings.
•
Step 4 Adjust the hours using the arrows. Press
ENTER
Step 5 Adjust the minutes using the arrows. Press
ENTER.
Step 6 Adjust the day using the arrows. Press
ENTER
Time s p is now complete and all functio ns are resumed.
etu
S
UMMER SHUTDOWN (OPTIONAL)
Step 1 Switch the Touch Pad OFF
Step 2 int OFF and turn the gas tap OFF. These co nnections are usually located
Switch the power po
close to the Heater.
F
IRST STARTUP OR RESTART AFTER SHUTDOWN
Step 1 n the power point to the heater. Turn on the gas tap on the gas supply line into the
Switch o
heater.
Step 2 Switch the Touch Pad ON.
Step 3 Select HEAT in the Appliance area if not alr eady displayed.
Step 4 E. If the set
Press the arrows to increase or decrease the SET TEMPERATUR
temperature is greater than the room temper ature, the heater will resume operation.
Bonaire Control System
Page 20
Page 21

MULTI-APPLIANCE TOUCH PAD
Ducted Gas Central Heating
Ducted Gas Heating Maintenance
GENERAL MAINTENANCE
Return Air Grille Filter.
If your heating system has a filter in the return air gril le, it is extremely important it is cleaned every 3 – 4
weeks during the operating period to ensure correct o peration of the heating unit. Failure to do so may
cause your heater to stop because of over temperature and cause an unnecessary service call not
covered by warranty.
Electrical
Warning: Before commencing any maintenance work on your unit, isolate the power at the supply
(Fuse Box).
No general maintenance is required to the electrical system.
A Licensed Electrician only should carry out electrical connections and maintenance.
Flue
The flue and cowl assembly should be clean and free of obstructions.
S
CHEDULED MAINTENANCE
Note: It is essential that your central heater be maintained in accordance with Climate
Technologies requirements. Failure to do so will affect the life of the product and
reduce the level of efficiency which may also affect your warranty.
Your Ducted Gas Central Heater should be serviced at least every 2 years to ensure trouble free
operation.
1. To ensure that your heater continues to operate at peak efficiency it is recommended that it be
periodically serviced by a qualified service technician (for your nearest Climate Technologies
service office refer to Service section of this document).
2. Fan blades, motors, ignition systems and burners should be checked. Heater cabinet and
immediate surroundings should be kept clean and clear.
Bonaire Control System
Page 21
Page 22

MULTI-APPLIANCE TOUCH PAD
Ducted Gas Central Heating
Problem Solving
Central Heater will not operate!
Question Y/N Solution
Has the unit been run
1.
since installation?
Is the unit installed in a
2.
new home?
Has the installer run the
3.
unit?
Is the SET temperature
4.
greater that the room
temperature?
Yes Refer to question 4
No Check the unit is turned on at the power point and the gas cock is
turned on. Call the installer to commission the unit.
Yes Refer to question 3
No Refer to question 4
Yes Refer to question 4
No Check the unit is turned on at the power point and the gas cock is
turned on. Call the installer to commission the unit.
Yes Press the r eset ico n or turn the un it off then on to reset unit . If the
unit still does not start call for service. (refer to solution 6 for reset
instructions)
No Increase the SET temperature so the thermostat calls for heat.
Is the thermostat in
5.
program mode?
Has there been a known
6.
power surge?
FOR SERVICE OR WARRANTY REQUIREMENTS PLEASE REFER TO
Yes The heater may be programmed to be OFF. To override the
program press anywhere in the MO DE outline and selecting the
required icon. The program will resume at the program period
start time.
No Adjust the roo m thermostat greater than SET temperature.
Yes Reset the heater. This can be done by:
Pressing and holding the RESET icon until a BEEP is heard. The
unit should resume operation.
No Unit should operate normally. If not a service call will be required.
THIS TROUBLE SHOOTING GUIDE IS A REFERENCE ONLY.
THE WARRANTY SECTION OF THIS BOOK
Bonaire Control System
Page 22
Page 23

MULTI-APPLIANCE TOUCH PAD
g
Dual Cycle – Refrigerated Air Conditionin
DUAL CYCLE Refrigerated Air Conditioning
Owners Operating and Maintenance Details
Please keep this important manual in a safe place. It is the owner’s responsibility to ensure that
regular maintenance is carried out on this Ducted Gas Central Heater / Dual Cycle Air Conditioner.
Failure to do so will void all guarantees beyond statutory and legal requirements.
www.climatetechnologies.com.au
Bonaire Control System
Page 23
Page 24

MULTI-APPLIANCE TOUCH PAD
g
Dual Cycle – Refrigerated Air Conditionin
General Information.
IMPORTANT NOTICE
A licensed person is required to i nstall Clim ate Technolog ies equipm ent. If the equipm ent is not inst alled
in accordance with the installation instr uctio ns and t he gov ern ing bo dy r egu latio ns, C limate Technologies
reserves the right to refuse service on non compli ant installations.
Subject to state regulations and by l aws a certificate of co mpliance must be is sued for the electri cal and
plumbing connections certifying that the work compli es with all the relevant standards.
Note: Only a licensed person will have insur ance protecting their workmanship.
D
ATA LOCATION
Your appliance model number, serial number and model description are located on the appliance data
plate on the end of the ducted gas heat er / Dual Cycle air conditioner in the vicinity of the electronic
controls access. These details should also be in the warranty section of this booklet.
You will need this information, shoul d your appliance require serv icing, spare parts or just if you require
additional information about this product.
A
SSEMBLY
There is no assembly required of this Dual Cycle Refrigerated Air Conditioner. Your Dealer or install er
will carry out all assembly and commissioning upon installation.
Safety
SAFETY & OWNER RESPONSIBILITY
The manufacturer and its service providers reserve the right to refuse service unless safety and
accessibility to the unit can be guaranteed. The cost of any extra equipment require d to provide access
to the unit for servicing is the responsibility of the owner.
RECAUTIONS
P
DO NOT PLACE ARTICLES ON OR AGAINST THE CONDENSER.
DO NOT PLACE ARTICLES IN FRONT OF THE CONDENSER.
ENSURE THE CLEARANCES BETWEEN THE UNIT AND WALL ARE KEPT CLEAR.
DO NOT PLACE ARTICLES IN FRONT OF OR OVER THE RETURN AIR GRILLE.
EATURES
F
Your Ducted Gas Central Heater an d Dual Cycle Refrigerated air conditioner has all the safety devices to
ensure safe operation. These devices conform to the standards set out by the Standards Australia.
OWER INTERRUPTION
P
Should there be an interruption to the p ower supply during the heating / cooling operat ion the controls
will automatically shut the unit down.
Your gas ducted heater and or Dual Cycle cooler will be ready to resum e operation once the pow er has
been restored.
Bonaire Control System
Page 24
Page 25

MULTI-APPLIANCE TOUCH PAD
g
Dual Cycle – Refrigerated Air Conditionin
Using Your Touch Pad with Dual Cycle Air Conditioning
Using your Touch Pad for manual operation of your Dual Cycle Refrigerated Air Conditioner is the same as
your gas central heater where you want dire ct control, without timers or programming.
M
ANUAL OPERATION
Step 1 Turn the Touch Pad on, press and release the
ON/OFF button. HEAT or COOL may be
displayed in the APPLIANCE area. Select
COOL if not already displayed.
NOTE: Your Touch Pad Control is designed to
automatically detect the appl iances you have
installed. Controller options not required for
your appliances will not be visible on your
Touch Pad Control display. So don't worry if
you don't see all the menu items list ed in this
book.
Step 2 Press anywher e in the MODE outline. The available icons will
flash. Select THERM. The icon will become solid and the
remaining icons will flash 5 more times before disappearing.
Step 3 Press the arrows to decrease or increase the
set temperature (TEMP).
Step 4 Touch Pad measures the room temperature using a
thermostat inside its case. When the room temperature is
colder than the set temperature (TEMP) the Dual Cycle Co oler
will Turn OFF. The cool symbol and fan symbol will be
displayed on the control to indicat e the Dual Cycle Cooler is
on.
For continuous fan, meaning the fan runs continuously and the
condenser unit only cycles ON and OFF the display should
show FAN and THERM.
Step 5 The Touch Pad will run the Dual Cycle Cool er u ntil it me as ures
the room temperature (ROOM) a little below your set
temperature (TEMP) and then turn off th e condenser unit until
the temperature rises a little below SET temperature.
The operation of the Dual Cycle Cooler is as follows:
• The Dual Cycle cooler will start almost immediately when
first turned ON. Once the unit has turned OFF when in
operation there is a 5 minute delay before it will resume
again and a minimum of 5 minutes operating time before it
can turn off again.
• The room air fan will always run on hig h speed. T he room air fan ca n be set as a lways on
or it can be set to cycle ON and OFF with the Condenser Unit.
• When the temperature has gone under the SET temperature by approximately 1° the
condenser unit will shut down.
• When the temperature has gone over the SET tem perature by approximately 1° the Dual
Cycle cooler condenser unit will restart.
Bonaire Control System
Page 25
Page 26

MULTI-APPLIANCE TOUCH PAD
g
Dual Cycle – Refrigerated Air Conditionin
• As your activities vary, you may find you need different temperature settings, e.g. a
temperature comfortable for sitting is usually too cool co mpared to when you’re moving
about.
Step 6 Press the ON/OFF button to switch the Dual Cycle Cooler
OFF.
Step 7 The Touch Pad remembers your SET TEMPERATURE setting
and uses it next time you turn it ON.
ZONES
- SELECTING ZONE 1, 2, 3, OR 4
Selecting ZONE 1, 2, 3, 4 applies with Dual Cycle air conditioning
because the suitable cooling unit w ill norm ally achieve effective cool ing in
a smaller portion of your home than compared to the gas heating.
The installer will have set your controller to show the zones you have
available.
In homes with more than one zone, at least one zone must be open at all
times.
To set the open or closed status of a ZONE:
Refer to ZONES - Selecting ZONE 1, 2, 3 or 4 options in the Ducte d Gas
Central Heating Section.
ROGRAMMING YOUR TOUCH PAD
P
Programming your Touch Pad will provide ener gy and time savings. Your
heating/cooling system will only operate when you need it, and at your
chosen comfort levels.
Determine your most comfortable settings, program them and let your
Touch Pad Control do the rest autom atically.
P
ROGRAMMING SEQUENCE
Refer to Programming Sequence in the Ducted Gas Central Heating
Section.
Bonaire Control System
Page 26
Page 27

MULTI-APPLIANCE TOUCH PAD
g
Ducted Evaporative Air Conditionin
Ducted Evaporative Air Conditioning
Owners Operating and Maintenance Details
Please keep this important manual in a safe place. It is the owner’s responsibility to ensure that
regular maintenance is carried out on this Evaporative Air Conditioner. Failure to do so will void all
guarantees beyond statutory and legal requirements.
www.climatetechnologies.com.au
Page 28

MULTI-APPLIANCE TOUCH PAD
g
Ducted Evaporative Air Conditionin
Introduction
Your ducted evaporative air conditioner is engineered to meet the rigours of our harsh Australian
environment. Operated and maintained in accordance with this manual, it will provide you with years of
cool and environmentally friendly operation. Please take the time to read this manual.
The principal of your unit is to introduce fresh air, w hich is washed throu gh the filter pads to provi ded cool
fresh air. The air is exhausted taking with it any heat loa ding on the home.
XHAUST
E
It is essential for successful operation of evaporative air-conditioning that there are sufficient exhaust
openings in the area to be ventilated. Open doors and windows will usually provide this.
The minimum exhaust opening should be as per the table guide set out below. It is recommended that
ceiling vents or exhaust fans be used where there is any doubt about there being sufficient exhaust area
available. Ceiling exhaust fans or ceiling vents should have a capacity equivalent to that of the air
conditioner.
MODEL MINIMUM EXHAUST
AREA
Small 0.85 m²
Medium 1.19 m² to 1.48 m²
Large 2.02 m²
Page 29

MULTI-APPLIANCE TOUCH PAD
g
Ducted Evaporative Air Conditionin
WATER MANAGEMENT
All evaporative air conditioners need some water to go to
waste to prevent build-up of mineral deposits in the system.
Your unit has been supplied with a dump v alve as well as a
bleed control to provide maximum options for best water
management.
The correct setting of the dump valve and bleed will
ultimately govern the life of the unit. Should there be
evidence of a build up of mineral deposits i n the unit, review
the dump and or bleed-off values.
Failure to manage the correct levels of dissolve d solids in the
unit will void warranty. Refer to your local dealer for best
settings.
Dump Valve
The dump valve provided with your unit is able to be
operated with various timed dumping options (0, 1, 2, 4, 8,
12, 24 hours).
Dumping cycles will have to be activat ed (refer to the setup
section of this document) and set in accordance with the
water quality in your area. In areas of good water quality, the
correct dumping cycle only may suffice and the bleed-off
function in the Dialflo may not be required. I ncreased water
hardness may require a bleed rate as well as a dump cycle
and increased maintenance.
Drainage from the dump valve must be plumbed away in
accordance with local and state plumbing requirements.
However this water could also be stor ed in a non drinking
water tank for other use.
Set the Water Distribution Flow Rate
To set the water distribution rate locate the DIALFLO
externally on one of the unit corner posts. Rotate the filter
knob (the outer knob) anti-clockwise for more water and
clockwise for less water. Do this before setting a bleed
rate.
Set the BLEED-OFF Rate.
Use the DIALFLO to rotate the BLEED knob (the inner
knob) clockwise for more water flow and anti clockwise for
less.
Note: Hold the distribution knob (Filters) while setting the
bleed rate as the distribution flow rate may go out of
adjustment.
Page 30

MULTI-APPLIANCE TOUCH PAD
g
Ducted Evaporative Air Conditionin
Operating the Touch Pad
To operate your touch pad control simply press the op erating area required firmly until a “B EEP” is heard.
The unit will then display the next available options or it will be ready to operate.
If the unit has been setup to use “Pre-cool” the fan and cool ic ons will flash for approximately 3 minutes
while the filters are saturating before the room fan delivers cool fresh air.
OOL MODE
C
Step 1 Press the ON / OFF button to turn the unit on .
Step 2 Check the Appliance is selected as COOL.
Step 3 To select the COOL (Fan and Pump) or FAN
mode touch anywhere in the MODE outline and
the available icons will be illuminated.
Step 4 Press COOL or FAN. The selected icon will
stop flashing. The remaining icons will flash 5
more times and then disappear.
Step 5 To adjust the air output use the
to adjust the air output. The level of adjustment
is measured by the bar graph display.
OOST MODE
B
Boost mode is an option to run the unit in cool mode at
maximum speed. If the unit is in COOL mode prior to
pressing BOOST the unit will operate in cool BOOST. If
the unit is in FAN mode prior to pressing BOOST, the
pump will not operate.
Step 1 To select the BOOST touch anywhere in the
MODE outline and the available icons will
flash.
Step 2 Press BOOST to select the MODE and the
icon will stop flashing. The remaining icons
will flash 5 more times and then disappear.
Page 31

MULTI-APPLIANCE TOUCH PAD
g
Ducted Evaporative Air Conditionin
THERMOSTAT MODE
Step 1 Press the ON / OFF button to turn the
unit on.
Step 2 Check the Appliance is selected as
COOL.
Step 3 To select the THERM (Thermostat)
mode touch anywhere in the MODE
outline.
Step 4 Press THERM and the selected icon will
stop flashing. The remaining icons will
flash 5 more times and then disappear.
Step 5 To adjust the comfort level use the
arrows. Increase the
graphics scale for more cooling,
decrease for less cooling.
Note: The comfort level is individual to each situation and location. Some trial and error may be required
to set the graphic scale to your desired co mfort level; a good starting point is to have the scale set at
approximately the half way mark. Once the unit has been set, the fan speed and pu mp are controlled
automatically. The unit can be left and will cycle on and off to keep the area being cooled to the set
comfort level.
P
ROGRAM MODE
Step 1 Press the ON / OFF button to turn the
unit on.
Step 2 Check the Appliance is selected as
COOL.
Step 3 To Select the PRGM (Program) mode
touch anywhere within the MODE
outline.
Step 4 Press PGRM. The selected icon will
stop flashing and the remaining icons
will flash 5 more times and then
disappear. In addition the programmed
mode of operation icon will be displayed
when the program calls for it as well as
the period (1, 2, 3, or 4).
This function will only enable program mode. To setup the program parameters refer to the section
“Operating the Touch Pad – SETUP” to edit the settings.
Program Mode will only operate for a 24-hour period from activation and then the product will
cease to function until the unit is restarted or program is reactivated.
Page 32

MULTI-APPLIANCE TOUCH PAD
g
Ducted Evaporative Air Conditionin
Setup
In the SETUP outline, there are 2 setup mode icons a nd 4 function icons. To enter setup mode, touch
anywhere within the SETUP outline. The accessi ble icons will be displayed.
Review
Review is a feature that allows you to first view the current program settings. Each step remains v isi ble for
3 seconds.
Once the review procedure has started the FINISH icon will be ill uminated. The FINISH icon c an be used
to stop the REVIEW process.
ROGRAM SETUP
P
The PRGM setup will take you throug h the steps to
set / edit activities for your evaporative air
conditioner. These will only be activated once the
PGRM icon is made solid in the mode area.
Step 1 To select the PGRM (Program) mode touch
anywhere in the SETUP outline.
Step 2 Press PGRM. The 3 icons will disappear and
edit mode has begun with the 1
st
period.
Accessable Icons
Step 3 Two new ic ons will now be displ ayed ENTER &
CANCEL.
ENTER will save each step of the program •
• CANCEL will step bac k the program 1 step
at a time.
Step 4 The first period will be displayed with ON or
OFF. Using the arrows
make a selection and press ENTER.
Step 5 Set the Hour using the UP DOWN arrows and
press ENTER
Step 6 Set the Minutes using the
arrows and Press ENTER
Step 7 Select the MODE of operation and press
ENTER.
Continued next page.
Page 33

MULTI-APPLIANCE TOUCH PAD
g
Ducted Evaporative Air Conditionin
Step 8 Adjust the output using the arrows and
press ENTER
Step 9 Program the second period using steps
4 to 8.
Step 10 If only 2 program periods are required
press FINISH. If a 3
program using Steps 4 to 8.
Step 11 If Only 3 Program Periods Are Required
press FINISH. If a 4
program using Steps 4 to 8.
rd
period is required
th
period is required
Default Setup Evaporative Air Conditioning
Program
Period ON/OFF Start Time Mode
1 ON 6:00 am THERM
2 OFF 9:00 am 3 ON 4:00 pm THERM
Program setup is now complete and all
functions are resumed.
Step 12 To execute the program, touch the mode
area and select PRGM.
C
LOCK SETUP
The CLOCK setup will take you through the steps t o
set the day and time.
Step 1 To select the CLOCK setup touch anywhere
in the SETUP outline.
Step 2 Press CLOCK. The 3 icons will disapp ear
and edit mode has begun.
Step 3 Three new icons will now be displayed
ENTER, CANCEL & FINISH.
ENTER will save each step of the
•
program
• • CANCEL will abort the setup and no
entries will be saved.
4 OFF 10:00 pm -
FINISH allows you to stop at any time
and save the settings.
Step 4 Adjust the hours using the
arrows. Press ENTER
Step 5 Adjust the minutes using the
arrows. Press ENTER.
Step 6 Adjust the day using the
arrows. Press ENTER.
Time setup is now complete and all functions are resumed.
Page 34

MULTI-APPLIANCE TOUCH PAD
g
Ducted Evaporative Air Conditionin
Ducted Evaporative Air Conditioner Maintenance
GENERAL.
All Ducted Evaporative Air Conditioners benefit from some general maintenance to ensure continued
cooling efficiency and a long life. Mai ntenance is carried out at the begi nning and end of summer to start
up and close down your unit.
We recommend that all maintenance work be undertaken by our fully trained and accredited Service
Technicians or an authorised Climate Technologies Service Provider.
The frequency of general maintenance will depend on lo cal operating conditions such as water quality, air
borne dust and pollen.
It is essential that your evaporativ e air con dit ioner is m ai ntaine d in ac cor da nce w ith thi s m an ual. F ai lur e to
do so will affect the life of the product, reduce the level of efficiency and may void warranty.
For service Australia wide refer to the details on the service section of this manual.
NOTE: The manufacturer and its agents reserve the right to refuse service unless safety and
accessibility to the unit can be guaranteed. The cost of any extra equipment required to
provide access to the unit for servicing is the responsibility of the owner.
SAFETY: Prior to commencing any maintenance isolate the unit at the power sourc e. Ensure the
roof is safe to access, your ladder is securely positioned and use suitable safety
equipment.
FILTER PADS
Visually check CELDEK pads for dama ge or blockage. Hose down pads from both sides to remove any
build up of salts, dust and pollen. In du sty a r eas m ore r e gul ar cle anin g is r ecomme n ded. Ch eck the w at er
distributor, making sure it is clear and free from blocka ge. Failure to do so may lead to uneven water
distribution and therefore less efficient operation.
W
ATER TANK
It is important to keep the water tank clean and free from sediment a nd algae growth. To clean the tank,
use a soft brush or similar. Wipe all surf aces in the tank while it is full of water (DO NOT FORGET THE
PUMP STRAINER). Turn off the water inlet to the unit (an Isolation Valve should be fitted to the water inlet
before the Float Valve). Drain the t ank by removing the 40mm overflow pipe. It may be necessary to
repeat this procedure if the tank is very dirty.
SAFETY: Wet roofs are dangerous – Take Care When Draining Tank.
W
ATER LEVEL / FLOAT VALVE
The water level should be set at nominal 65-70mm from the top of the overflow before filter pads are
saturated. After run off from operating filters the level fro m the top of the overflow fitting should be 25 –
30mm. The float valve is a mechanical typ e and is factory set. If it requir es adjustment keep be nds tight.
If the valve is leaking the seal may require cle aning or replacing. Turn of the water. Remove th e split pin
and then float arm. Remove piston and clean or turn seal. Flush system and replace piston, float arm and
split pin.
Note: Water supply line to float valve must be flushed before connecting.
Page 35

MULTI-APPLIANCE TOUCH PAD
g
Ducted Evaporative Air Conditionin
Note: Some discharge from the overflow may be experienced after shut down due to water
draining back from the Celdek pads. This is normal.
M
OTOR AND FAN
Check that the fan spins freely and that there is no build up on the blades.
ELECTRICAL
No general maintenance is required to the electrical system.
A Qualified Electrician should only carry o ut electrical connections and maintenance.
LEED OFF
B
The bleed rate should be checked to ensur e it is ade quat e and th at there is no buil d up of minera l deposit s
in or on your air conditioner. White deposits indicate hi gh mineral content and the Bleed Rate should b e
increased. If it is at maximum and the deposits are still forming, then more regular maintenance is
required.
PUMP
Check the pump spins freely and that the strainer is clean.
WATER DISTRIBUTION
Check the water distribution system for blockage. Check the delivery tube for kinks or holes. Check that
the clamps are secure and in place.
N
O SEASONAL MAINTENANCE
Your unit has been supplied with a dump valve system. As long as the dump valve has been fitted, ther e is
no need for regular checking of the system during th e operating (summer) period. This however d oes not
remove the responsibility of the customer to have the unit service on an annual basis to check the unit
function and to ensure the unit is clean and free from any mineral deposit build up.
Page 36

MULTI-APPLIANCE TOUCH PAD
g
Ducted Evaporative Air Conditionin
Trouble Shooting Guide
PROBLEM
Unit fails to start
Pump fails to start
Water leaking from
overflow
Water Droplets in
air stream
PROBABLE CAUSE REMEDY
A Black – out a Wait
b Tripped Circuit Breaker b Reset
c Blown Fuse c Replace
Electrical Fault d Call Climate Technologies
d
Service Provider
a Pump Seized a Isolate power and then take off
top of pump and try to free it.
Some lubricant may help.
b
Pump Burnt Out b Call Climate Technologies
Service Provider
a Float Valve Leaking a Check adjustment or replace seal
b
Drain from Celdek Pads b Normal Operation
a Loose Delivery Tube a Check and tighten
b Break in tubing b Replace as necessary
c
Pump Delivers Excessive Water to
Pads
c Adjust the Dialflo to reduce the
flow
Excessive humidity
Inadequate Cooling
Unpleasant Odor
Rapid formation of
white deposits on
pads
FOR SERVICE OR WARRANTY REQUIREMENTS PLEASE REFER
a Inadequate Exhaust a Provide more open area to
exhaust stale air
b
Outside humidity high b Turn pump off.
a Dirty Filters a Clean / Replace
b Dry Filters b Check water delivery system.
Adjust if necessary.
Dialflo not set correctly c Adjust Dialflo so that the pads
c
have even saturation.
a Unit located near odor source a Remove source
New Celdek filter smell b Smell will disappear after a period
b
of operation (Approximately 48
hours or use).
High Mineral Content Bleed off should be set at
maximum. More regular
maintenance may be required.
THIS TROUBLE SHOOTING GUIDE IS A REFERENCE ONLY.
TO THE WARRANTY SECTION.
Page 37

MULTI-APPLIANCE TOUCH PAD
g
Controls – Installation / Setup / Commissionin
Control setup
Setting Up the Control - General
BEFORE STARTING
Before attempting to use the setup instructions for the contr ols system, make sure the l ow voltage cable i s
connected and the 240 volt power has been turned on to the heater / cooler.
The Low voltage controls are connected to the un it control box / controller via a 20-metre low voltage loom.
NOTE: Do not run the low voltage loom in long parallel runs with 240V mains cables. Keep the
low voltage loom 200mm away from any long runs of mains wiring.
Cross over mains wiring at right angles.
Do not use existing access holes in wall cavities where 240V mains wiring exists. Drill a
new access hole 200mm from the existing hole.
I
NSTALLATION
Where the control is using the thermostat for operation, it must be installed approximately 1.5 metres
above the floor level on a room wall which is most commonly used for best average sensing.
Secure the Touch Pad Control back panel t o the wall using screws and plugs.
Do not locate Touch Pad near concealed hot or cold water pipes, warm air ducts, radiators, sunlight, or
draughts from hallways, stairways or firepl aces and s eal against dra ughts thro ugh wall cavities. Thes e can
all affect the temperature.
Page 38
MULTI-APPLIANCE TOUCH PAD
g
Controls – Installation / Setup / Commissionin
Using the Setup Modes
There are a series of available parameters that can assis t the installer to set the unit up to specification
and tailor the control to meet the customer’s requirem ents. Carefu lly read these tab les before ent ering the
maintenance modes. These set up features cover Ducted Evaporative Air Conditioning, Ducted Gas
Central Heating and Dual Cycle Refrigerated Air Conditioning.
Important Note: Changes made to the set up modes outside the parameters set by your inst aller
could have an adverse effect on the unit operation and life. Warranty could also be void.
The Setup modes include:
Coding – All products
Diagnostics – All products
Fan Speed Settings – All products
Zoning Setup – Heating / Dual Cycle Cooling
Zone Setup – Multiple Evaporative Air Conditioners
Water Management – Evaporative Air Conditioning
RODUCT IDENTIFICATION
P
The setup mode will cater for many options of heating / cooling unit c onfi gurati ons. As a res ult ther e are a
number of potential product classes that th e touch pad control system will control. The class is the first
requirement for selection when coding or entering the setup mode.
Class Appliance Class Code
tP Touch Pad Wall Control tP:01
H Heater H:01,02,03,04
E Evaporative A/C E:01,02,03,04
HC Combined Heater –
Dual Cycle Cooler
For standard domestic applications wit h a single unit or heater cooler combinati ons the following default
classes will be used:
HC:01,02,03,04
Ducted Gas Heating Only HC 01
Ducted Gas Heating c/w Dual Cycle Refrigerated Air Co nditioning HC 01
Ducted Evaporative Air Conditioni ng E 01
Ducted Gas Heating and Evaporative Air Conditioning. HC 01 & E 01
Page 39

MULTI-APPLIANCE TOUCH PAD
g
Controls – Installation / Setup / Commissionin
Coding
A
UTO-CODING
The moment the power is applied to the control system t he touch pad will scan for all the ne w equipment
that has been installed and powered on. The powering up of a m ultiple configuration, a ducted central
heater and a ducted evaporative air conditioner, must happen within 20 seconds of each other for the scan
to find both units. If the scan misses one or the other units a forced sca n can be done.
Important Note: Ensure all appliances are connected pr ior to powering up the system. Ensure also that
the remote isolation switch, where fitted, is also turned on.
If you have a ducted central heater and you are addi ng an evaporative air conditio ner to the touch pad or
you are adding a ducted central h eater to an evaporativ e air conditioner you can force the control to s can
for the new equipment.
C
ODING DEFAULTS
• Ducted Gas Central Heating
Ö HC01 - Ducted Gas Heating and Dual Cycle Refrigerated Air Conditioning
Ö Thermostat Mode for Heating
Ö 4 Zones ON
Ö NO Common Zone – This can be set up subject to system design.
• Ducted Evaporative Air Conditioni ng
Ö E 01 – Evaporative Air Conditioning
Ö Thermostat Mode
ORCED SCAN AUTO-CODING:
F
To force a scan for new equipment:
1. Power up the new unit.
2. Within 3 minutes of the unit being powered up:
2.1. Turn the touch pad ON
2.2. Turn the touch pad OFF and keep holding the ON-OFF icon unti l the clock area shows - - - -.
Release the ON-OFF button and the touch pad will scan for the new unit and re-initialise.
3. When the time clock returns to normal, turn the touch pad on a nd check the unit has been coded
successfully.
4. If the unit did not code restart the process by turning the power OFF then ON at the unit to
reestablish the 3 minute coding win dow
I
MPORTANT NOTES
Things to note when connecting new pr oducts to a touch pad control
1. There is only a 3 minute coding window after the unit has been powered up to force a scan to find a
new unit.
2. Central Heating will have a default configur ation that includes Dual Cycle cooling and 4 available
zones.
3. When a ducted evaporative air conditioner is added to a ducted central heater, the Dual Cycle
cooling functions are no longer av ailable for use.
4. The auto coding process can only discriminate between a single central heater and a single
evaporative air conditioner
Page 40

MULTI-APPLIANCE TOUCH PAD
g
Controls – Installation / Setup / Commissionin
5. Where there are multiple units of a single type (e.g. 2 up to 4 evaporative air conditioners)
connecting to a single Touch Pad control call yo ur Climate Technologi es office for more i nformation
to setup and control multiple units.
Multiple Unit Setup – Heater / Cooler
Your Touch Pad control is capable of controlling more than one type of unit. For the Touch Pad control to
communicate with each unit, the units must be coded to the Touch Pad. The following opti ons may apply
when adding a new unit:
• Installing Ducted heater and Evaporativ e Air Conditioning
• Adding a Ducted Heater to an Evaporative Air Conditioner
• Adding Dual Cycle Air Conditioning to a Ducted Central Heater
• Adding an Evaporative Air Conditioner to a Ducte d Central Heater.
The following product codes will be available for coding the next new appliance to the Touch Pad control
Heating H 01
Heating c/w Dual Cycle Cooling HC 01
Evaporative Air Conditioning E 01
ORCE CODING A NEW / ADDITIONAL PRODUCT
F
When coding a new product there i s a c od ing w in dow of 3 min utes aft er t he pr oduct has be e n po wer ed on.
Once the 3 minutes has finished the unit will not acce pt any coding informati on. If the 3 minutes has been
exceeded before the coding process is completed, turn the power OFF then ON at the unit.
Coding a new / additional product.
STEP 1 Ensure the control is in the OFF mode.
STEP 2 A series of unseen icons must be pressed
1. Press and hold the ZONE 4 (1) icon allowing for
a triple BEEP followed by a single BEEP.
2. In quick succession press the unseen SETUP
icons ENTER (2), REVIEW (3) & CLOCK (4).
3. If successfully executed the numeric area will
display tP:01.
4. If unsuccessful repeat 1 and 2 of STEP 2.
STEP 3 Press ENTER
STEP 4 Using the arrows select 4 from the
display. Press ENTER.
COOL will flash in the APPLIANCE area and the
TIME display will alternate between Co dE and E 01
STEP 5 Using the arrows, select the new
unit to be coded from th e display e.g. E01, H01, and
HC01. Press ENTER
STEP 6 Press FINISH to exit.
Page 41

MULTI-APPLIANCE TOUCH PAD
g
Controls – Installation / Setup / Commissionin
FAULT CODES ACCESS
The Touch Pad control can recover the last 5 faults that the unit diagno stics has stored. Fault code 1 is
the current registered fault, while 2, 3, 4 & 5 is the fault code history.
1. At the time of the unit stopping and displaying the RESET icon. Press the RESET icon while the
Touch Pad control is in the ON mode before resetting the unit.
2. Recovering the fault log after the unit has been reset. In the OFF mode press and hold the RESET
icon outline till the numeric screen display changes.
V
IEW THE FAULT CODE
There are a number of fault codes that can be registered subject to the failure or the product associated.
Step 1 Once the fault code lo g has been entered tP:
01 will be displayed.
Step 2 Using the arrows select
the unit that displays the APPLIANCE and
reset icon (Reset Icon is not displayed after the
unit has been reset). Press ENTER
.
Step 3 The last fault code number will be displayed
with number 0 and the fault code. Number 0 is
always the most recent fault. See the fault
code table next page.
Step 4 Using the arrows, review
fault codes for 0, 1, 2, 3 & 4. Number 0 will be
the most recent.
Step 5 Press FINISH to exit.
Step 6 If the unit has not been reset, press a nd hold
RESET icon until a BEEP is heard for the unit
to recommence operation.
Page 42

MULTI-APPLIANCE TOUCH PAD
g
Controls – Installation / Setup / Commissionin
FAULT CODES FOR HIGH EFFICIENCY, MID EFFICIENCY HEATERS
Code No. Fault Code Diagnosis
00
01
02
03
04
05
06
07
08
No Activity There has been no fault codes registered or the
control has not been coded to the unit.
Block Flue Check flue cowl installed correctly
Pressure Switch fused closed Service Call
Combustion air pressure system failure Check combustion fan OK. Service call.
Room air over temperature (auto reset) Check Minimum Fan Speed, Duct design
Controller electronic malfunction Reset, Service Call
Slow closing gas valve Reset, Service Call
Ignition failure Check: - igniter works, flame sensor, gas supply. For
forced draft High Efficiency units also check blocked
flue and blocked condensate drain. Service Call
Gas Interruption Check gas supply, Flame Sensor, Service Call
09
11
12
15
EEPROM failure Reset, Service Call
Missed Transmission Check loom integrity and connections
No Communication (Touch Pad Only) Touchpad cannot detect unit – check loom integrity
and connections
No recorded fault codes
Page 43

MULTI-APPLIANCE TOUCH PAD
g
Controls – Installation / Setup / Commissionin
RESETTING THE TOUCH PAD CONTROL.
Resetting the Touch Pad Control w ill return the
Touch Pad to its default settings for all
configuration and program options.
This function does not reset the heater or
cooler.
To reset the Touch Pad Control a number of
unseen icons will need to be pressed.
Step 1 Ensure the control is turned OFF.
Step 2 Press the ZONE 4 (1) icon until a
triple BEEP followed by single
BEEP is heard.
Step 3 In quick succession press COOL
(2), CANCEL (3), FINISH (4) and
THERM (5) icons.
All the icons on the screen will now light up. They wi ll slowly disappear one by one. Once all the icons
have cleared it will take approximately 1 min ute for the c ont rol to r etur n to the OFF mo de. The tim e wi ll be
displayed when the RESET is complete.
If unsuccessful restart from STEP 1.
C
ALIBRATING THE THERMOSTAT.
The thermostats come pre-calibrated from the manufacturer. However, should the thermostat require
calibrating the following is the procedure. To enter into the installer maintenance to calibrate the
thermostat:
Step 1 Ensure the control is in the OFF mode.
Step 2 A series of unseen icons must be pressed
1. Press and hold the ZONE 4 (1) icon
allowing for a triple BEEP followed by a
single BEEP.
2. In quick succession press the unseen
SETUP icons ENTER (2), REVIEW (2)
& CLOCK (4).
If successfully executed the area will
display tP:01.
3. If unsuccessful repeat 1 and 2 of STEP 2.
Step 3 Press ENTER. Parameter 1 is calibration
mode and the value is the current temperature.
Step 4 Press ENTER. The display will now change
relative to the current temperature e.g. 23
Step 5 Using the to change the
thermostat temperature value to the required
settings. The value increments are 0.1º.
Step 6 Press ENTER to save and finish.
c
9.
Page 44

MULTI-APPLIANCE TOUCH PAD
g
Controls – Installation / Setup / Commissionin
Evaporative Air Conditioning Setup
SETTING THE WATER MANAGEMENT SYSTEMS PARAMETERS AND VALUES
There are 4 setup modes availabl e in the water management as set out in the table below. The use of
these modes is based on 2 selection criteria:
Parameter 1 – DUMP VALVE DELAY This provides the option for a 1 hour delay before dumping the
water from the tank. This function is particularly useful when
the unit is being used in THERM mode as it will stop premature
dumping of the water.
Parameter 2 – PRECOOL: The option to have the pump run for 2 minute s before the fan
starts. The benefit is that when the fan starts cool air will be
delivered immediately.
Parameter 3 – DUMP INTERVALS: This option provides the available hourly dump cycle times
available. These should be set according to water hard ness in
the supply.
Parameter 4– PREFILL: The option provides the availability to have the valve prefill the
tank for 2 minutes before starting the pump operati on.
.
Water Management Table – Evaporative Air Conditioning.
Installer Maintenance Parameter Default OFF Value ON Value
Dump Delay after shutdown 1 01 00 = OFF 01= 1 hr
Pre-Cool 2 00 00 = OFF 01 = 3.0 min
Dump Interval 3 12 00 = OFF 01, 02, 04, 08, 12, 24 hrs
Pre-Fill 4 00 00= OFF 01
Page 45

MULTI-APPLIANCE TOUCH PAD
g
Controls – Installation / Setup / Commissionin
Setting the Water Management Systems Parameter Table.
To enter into the installer setup mode for the water management options use the following steps.
Step 1 Ensure the control is in the OFF
mode.
Step 2 A series of unseen icons must be
pressed
1. Press and hold the ZONE 4 (1) icon
allowing for a Triple BEEP followed by a
Single BEEP.
2. In quick succession press the unseen
APPLIANCE COOL (2) icon followed by
the HEAT (3) icon.
3. If successfully executed the area will
display tP:01.
4. If unsuccessful repeat 1 and 2 of STEP 2.
Step 3 Using the to select E:01 from the display
area.
Step 4 Press ENTER. The display will now change to 1:01.
Step 5 Using the arrows, select the parameter t o
be changed as per the Water Management Ta ble. Press
ENTER.
Step 6 Using the to change the value as per the
‘Water Management Table”. Press ENTER.
Step 7 To change more water management parameters repeat
Step 4 – 7.
Step 8 Press FINISH to exit.
Where multiple units have been connected to a single touchp ad, this procedure will have to be repeated for
each of the units connected – E01, E02 etc.
S
ETTING THE WATER LEVEL & BLEED RATE
There are 3 diagnostic modes available for use of whic h Parameter 2 and 3 can be used to assist the
setting of water levels in the unit. See the table below.
Diagnostic Table
Installer Maintenance Parameter Value Duration
1 Rt _ _ _ _ x 100 Unit Run Time
2 00 10 Minutes Fill Valve
3 00 20 Minutes Fill Valve & Pump
Page 46

MULTI-APPLIANCE TOUCH PAD
g
Controls – Installation / Setup / Commissionin
To enter into the installer maintenance / diagnostic m ode to check wat er level and pump function, use the
following steps:-
Step 1 Ensure the control is in the OFF mode.
Step 2 A series of unseen icons must be pressed
1. Press and hold the ZONE 4 (1) icon
allowing for a triple BEEP followed
by a BEEP.
2. In quick succession press the
unseen APPLIANCE COOL (2)
icon 2 times.
If successfully executed the
numeric area will display tP 01.
3. If unsuccessful repeat 1 and 2 of
STEP 2.
Step 3 Using the to select E:01 from
the numeric display area.
Step 4 Press ENTER. The display will now
change to 1 rt.
Step 5 Using the arrows, select the
diagnostic 2 or 3 as per the Diagnostic
Table on this page. Press ENTER. 00 will
flash for the duration period.
Step 6 To exit the diagnostic, press ENTER.
Step 7 To select the other diagnostic parameter
repeat Step 5 & 6.
Step 8 Press FINISH to exit.
FAN SPEED SETTINGS
There are 2 available fan speed setting options for evaporative air conditioning as set out on the Fan
Speed Chart. Minimum fan speed should not go belo w 500 RPM else the fan motor will stop and start
because of over temping.
NOTE: fan speed settings should ONLY be set by a qualified installer or service technician
Fan Speed Chart
Installer
Maintenance
Parameter Default Value
Range
Low Fan Speed 1 13 0 – 35
High Fan Speed 2 35 0 - 35
Page 47

MULTI-APPLIANCE TOUCH PAD
g
Controls – Installation / Setup / Commissionin
To enter into the installer maintenance to adjust minim um and maximum fans speeds, t he following steps
must be followed.
Step 1 Ensure the control is in the OFF mode.
Step 2 A series of unseen icons must be pressed
1. Press and hold the ZONE 4 icon allowing for
a triple BEEP followed by a single BEEP.
2. In quick succession press the unseen
SETUP icons ENTER, REVIEW & CLOCK.
If successfully executed the numeric area
will display tP:01.
3. If unsuccessful repeat 1 and 2 of STEP 2.
Step 3 Using the select E:01 from the
numeric area display.
Step 4 Press ENTER. The display will now change to 1 13 or w hat
ever the last setting was made to.
Step 5 Using the to select the low or high speed
parameter for change. Press ENTER. The fan will begin
operation.
Step 6 Using the to change the value / fan
speed setting. Press ENTER to save the revised setting.
Step 7 To change the other fan speed parameter repeat Step 5 – 6.
Step 8 Press FINISH to exit.
Multiple Unit Setup – Evaporative Coolers
When multiple EAC units are used on a si ngle touc hpad, th ey have t o be alloc ated to a z one to ensure t heir
function. There can only be one unit p er zone w hich mean s a total of 4 EAC units per to uchpad. Th ere are
4 steps to complete a successful installation:
1. Connect the low voltage cables between th e units and power up.
2. Code the unit
3. Rescan
4. Turn off the common zone.
Coding the units
Step 1 Turn the power on to the appliances
being coded at the control box. Check
the green LED is visible.
Step 2 Press and hold down the RESET button
in the unit control box for 25 seconds.
At the 25 second mark, the green LED
will start to flicker. Do not release the
button at this point.
Evaporative Cooler Board
Page 48

MULTI-APPLIANCE TOUCH PAD
g
Controls – Installation / Setup / Commissionin
Step 3 The LED will now flicker a sequence of
1 through to 4 flickers with a pause in
between each set of flickers. To
allocate the unit to the correct zone,
release the reset button immediately
after the required number of flickers has
been completed. See Table.
Step 4 Move to the next unit and perform the
same procedure as in Step 2 and Step 3,
to allocate a code number to each unit.
NOTE:- Each unit must be on a separate zone. More than one unit on a zone will result in a
communication conflict causing inconsistent operation of the units.
S
ETTING THE COMMON ZONE FOR MULTIPLE UNITS
To ensure ZONE 1 is available for use on the touchpad, the common zone must be turned off. To do this
you must enter the zone availability parameters and t urn off the common zone default setting.
Evaporative Air Conditioners
LED
Flickers
1 ZONE 1 E01
2 ZONE 2 E02
3 ZONE 3 E03
4 ZONE 4 E04
Zone
Allocation
Identification
Unit
Code
STEP 1 Ensure the control is in the OFF mode.
STEP 2 A series of unseen icons must be pressed
1. Press and hold the ZONE 4 (1) icon allowing
for a Triple BEEP followed by a Single BEEP.
2. In quick succession press the unseen
APPLIANCE COOL (2) icon followed by the
HEAT (3) icon.
3. If successfully executed the numeric area wi ll
display tP:01.
4. If unsuccessful repeat 1 and 2 of STEP 2.
STEP 3 Press ENTER.
STEP 4 Using the arrows, for an evaporative air conditi oner and s elect E01. Press
ENTER .
STEP 5 Press and make the ZONE 1 button solid.
STEP 6 Press FINISH
CAN FOR PRODUCTS:
S
To access the units allocated to the zones, a forced scan must b e complete with the touchpad.
STEP 1 Turn the touch pad ON
STEP 2 Turn the touch pad OFF and keep holding the
ON-OFF icon until the numeric area shows
- - - -.
STEP 3 Release the ON-OFF button and the touch
pad will scan for the new unit and re-initialise.
STEP 4 When the time clock returns to normal, turn
the touch pad on and check the units have
been successfully located to their zone.
STEP 5 Turn the zones on and check the units
function.
Page 49

MULTI-APPLIANCE TOUCH PAD
g
Controls – Installation / Setup / Commissionin
Ducted Gas Central Heating
S
ETTING FAN SPEEDS – HIGH / LOW
There are 2 available fan speed setting options for ducted gas central heati ng as set out on the Fan Speed
Options Chart. Minimum fan speed should be set so that the heater does not go out on over temperature.
NOTE: fan speed settings should ONLY be set by a qualified installer or service technician
Fan Speed Options
Installer Maintenance Parameter Default Value Range
Low Fan Speed 1 27 0 – 35
High Fan Speed 2 35 0 – 35
High Fan Speed – Dual Cycle AC 3 35 0 – 35
To enter into the installer maintenance to adjust minim um and maximum fans speeds, t he following steps
must be followed.
Step 1 Ensure the control is in the OFF mode.
Step 2 A series of unseen icons must be pressed
1. Press and hold the ZONE 4 (1) icon
allowing for a triple BEEP followed by a
single BEEP.
2. In quick succession press the unseen
SETUP icons ENTER (2), REVIEW (3) &
CLOCK (4).
If successfully executed the clock area
will display tP:01.
3. If unsuccessful repeat 1 and 2 of STEP 2.
Step 3 Using the to select H 01 or if
Dual Cycle cooling is fitted HC 01 from the
clock display area.
Step 4 Press ENTER. The display will now change to
1 27 or any other previous setting.
Step 5 Using the to select the
parameter to be changed. Press ENTER. The
heater will begin operation.
NOTE:- Wait for the heater to be fully
functional before adjusting the fan speeds.
Step 6 Using the to change the
value / fan speed setting. Press ENTER to
save the revised setting.
Step 7 To change the other fan speed parameter repeat Step 5 – 6.
Step 8 Press FINISH to exit.
Page 50

MULTI-APPLIANCE TOUCH PAD
g
Controls – Installation / Setup / Commissionin
SETTING FAN SPEEDS - ZONING
o
As the central heater fan will attempt to run at maximum when the temperatur e is more than 2
SET temperature, certain zone configurations may have unacceptable air noise. With the Touch Pad
control you can set the maximum fan speed for particular zone combinations.
To set the maximum fan speed with a particular zone confi guration:
Step 1 Turn the heater ON. Set the
temperature so the heater will run.
Step 2 Set the MODE of the Heater to
BOOST.
Step 3 Select the Zone combination required
to set the maximum speed. A total of
16 different combinations can be
created. Wait 30 seconds for the zone
motors to open or close.
under the
Step 4 Press and Hold the BOOST button until
the screen changes in the numeric
display to SP 35 or any other revised
setting. (35 is the default high speed
setting.)
Step 5 Adjust the fan speed to suit the maximum air required.
After 10 Seconds of no activity the setting will be saved.
If further adjustment is required, repeat STEP 4.
Step 6 When that combination is complete wait for the setting to
automatically save or press ENTER.
Step 7 For further combination settings, repeat steps 4 – 6.
Step 8 When all the combinations required have been completed
press FINISH.
Page 51

MULTI-APPLIANCE TOUCH PAD
g
Controls – Installation / Setup / Commissionin
SETTING THE ZONE AVAILABILITY - HEATING
If during the coding process the zo nes available did not config ure correctly or zones have been removed
or added, the Touch Pad can be configured to suit the changes.
To enter into the installer maintenance to set the zone availability, the following steps must be followed.
Step 1 Ensure the control is in the OFF
mode.
Step 2 A series of unseen icons must be
pressed
1. Press and hold the ZONE 4 (1) icon
allowing for a Triple BEEP followed by a
Single BEEP.
2. In quick succession press the unseen
APPLIANCE COOL (2) icon followed by
the HEAT (3) icon.
3. If successfully executed the clock area
will display tP:01.
4. If unsuccessful repeat 1 and 2 of STEP 2.
Step 3 Press ENTER.
Step 4 Using the arrows, for a
single ducted gas central heater, select
HC:01.
HC:01 is the default code setting. If the uni t
has been forced coded with another unit
option eg H 01, new unit option will have to
be selected to recognise the common zone.
Press ENTER.
Step 5 The ON/OFF icon and the 4 zone icons will
flash.
To see the current zone selection press anywhere in the z one outline. All icons that ar e solid
will be the current selection. To change the zone selection req uirement there are 3 options:
• No Zone Motors Installed. Press the ON / OFF icon to make it solid. This turns on
the common zone feature. Press any z one icons that are solid to make them all flash
and turn off their availability.
• Zone Motors Only. Make 2, 3 or 4 zones availab le. Press the zones not require d by
making them flash to turn off their availability.
• Common Zone plus Zone Motors: This option can only be used if there is adequate
duct work to handle the air that is not controlled by a z one motor.
Press the ON/OFF button to making the ico n Solid. This turns ON the common zone
feature.
Press the zone icons not required by making them flash and turn off their availability.
Step 6 Press ENTER. The zones have now been reconfigured. See options next page.
Page 52

MULTI-APPLIANCE TOUCH PAD
g
Controls – Installation / Setup / Commissionin
Option 1:- H 01 / HC01 Ducted Gas Central Heating
The ON/OFF icon and the 4 zone icons will flash.
The default setting for zoning is 4 zones on with
no common zone. Press ENTER at this point if
no change is required.
If changes are required, the zone avail ability can
be set using the following options:
• No Zone Motors Installed. Press t he ON /
OFF icon to make it solid. This turns on the
common zone feature. The zone icons are all
solid. Press each zone icon to mak e them all
flash to turn off their availability.
• Zone Motors Only. Make 2, 3 or 4 zones
available. Press anywhere in the zone are a
and the 4 zones will become solid. Press the
zones not required by making them flash to
turn off their availability.
• Common Zone plus Zone Motors: This option can only be used if there is adequate
ductwork to handle the air that is not controlled by a zone motor.
Press the ON/OFF button to making the icon Solid. This turns on the common zone feature.
The zone icons are all solid. Press the zone icons n ot requ i red by m aki ng them flas h to turn
off their availability.
If you make a mistake with zoning this can be corrected in SETTING THE ZONE
AVAILABILITY.
Option 2:- HC 01 Ducted Gas Central Heating / DUAL CYCLE Refrigerated Air Conditioning
For Dual Cycle Cooler refrigerated air c onditioning HC 01, use the Option 1:- H:01 Ducted Gas
Heating on this page for zone setup.
Step 7 Press ENTER. The unit is now coded. After 30 seconds of initialization the control will be
ready for operation
Page 53

MULTI-APPLIANCE TOUCH PAD
g
Controls – Installation / Setup / Commissionin
COMMISSIONING CHECK LIST
G
ENERAL
All equipment ordered by the customer is installed.
The unit is level and secure.
The mains and control wiring are complete and the circuit breaker and GPO are turned ON.
All Controller funct ions for the appliance operate.
All electrical or ga s connections are to manufacturers specifications and the relevant electrical or gas
standards and codes.
NIT – DUCTED HEATING
U
Electrical polarity of the power outlet is correct.
Heater is installed away from sources of dust and fumes (i.e. pool chlorine/petrol etc).
Gas leaks checked for, none present.
Flue outlet pipe complies with limits given / code and is sealed waterproof.
Combustion air meets requirements (internal, under floor).
Fan speed set is correct.
Burner pressure is correct.
Mounting pad/pl atform complies with requirements / codes.
NIT – DUAL CYCLE REFRIGERATED AIR CONDITIONING
U
Unit Foundation correct
All pipe work is welded and vacuumed down.
Condenser Coil is purged before charging.
System is charged, all joints checked and pressures set correctly
Condenser unit is level
All clearances around the condenser set to manufacturers specifications.
Page 54

MULTI-APPLIANCE TOUCH PAD
g
Controls – Installation / Setup / Commissionin
UNIT - DUCTED EVAPORATIVE AIR CONDITIONER
The water supply line has been flushed to clear swarf and debris and is free of leaks.
The tank is free of foreign ma tter and debris and the water isolating tap is turned ON.
Water drainpipe work is completed and sealed.
The water basin fills with water and t he float valve closes correctly when the water level is 65-70mm
below the overflow level.
The water pump operates correctly when turned ON at the controller.
The Dialflo water bleed rate is adjusted to suit local water conditions.
The Dump Valve. The tank drains correctly when unit turns off.
The fan deck is correctly l ocated and the fan blade spins freely.
The fan operates through the entire speed range.
The minimum fan speed is cor rectly set.
Water distribution is even with the filter pads fitted and the air conditioner operating pump and fan.
UCTWORK
D
All ductwork is completed to plan, correctly supported and airtight, with no bend less t han 1.5 x the
ductwork diameter.
Air distribution checked, dampers are adjusted and all outlets correctly adjusted and wiped clean.
All roof penetrations are fully sealed and watertight.
Manhole cover replaced.
S
ITE
All rubbish has been removed from inside and on the roof.
C
USTOMER HAND OVER
The operation of the Co ntroller.
The need to open windows and doors for the correct operation of Fresh Air Conditioning
The operation of the bleed or dumping system and it’s importance to operate all the time in ducted
evaporative air conditioning
Maintenance requirements
Page 55

MULTI-APPLIANCE TOUCH PAD
Warranty – Australia ONLY
Warranty
IMPORTANT:
Please read this warranty information and complete the Dealer/Product information on the fo llowing page.
KEEP this with your original purchase documents for any claim under warranty.
Firstly refer to your owners manual to ens ure you have followed the correct operating proce dures of your
product, and refer to the trouble shooting guide to assist solving any problems you may have.
1. Read this warranty statement carefully befor e you request warranty service as items relation to
installation are not covered by this appliance warranty.
2. A proof of product purchase must be provided for warra nty service, to validate the appliance is
within the manufacturer’s warranty periods.
3. This warranty is only for products and associated original controls for Climate Technologies
manufactured product.
4. Only an authorised Climate Technologies service provi der must carry out warranty servic e .
Climate Technologies provides th e following Manufacturers warranty addition al to all implied warranties
and other statutory rights which you may have under the Trade Practices Act and similar State &
Territory Laws, subject to the following terms and conditions.
Conditions to warranty
• Subject to the exclusions noted, Climate Te chnologies warrant the product for the period as
prescribed in the table following this statement to be free from Inherent defects in materials and
workmanship for functional and structural components.
• This product is only valid if the product is operated in acc ordance with the manufacturers
instructions
• The appliance must not be modified or changed in any way.
• Your proof of purchase MUST be produced before free serv ice will be provided.
• Traveling time and mileage are included within 30km of either your authorised Climate
Technologies dealer or service provider’s premises. Customers in areas other than the ab ove are
responsible for any traveling time and mileag e required to carry out warranty repairs.
• The product must be installed by a qualified person in the manner prescribed by local & statutor y
regulations and to the manufacturer’s specifications.
• Service within the terms of this warranty will be recognised where we are satisfied that the
appliance or part was supplied within the relevant time limits. Documents of purchase and
Dealer/Installer information will assist in this process.
• Product fitness for purpose and overall syste m design / sizing is solely the responsibility of the
dealer / installer. This includes but is not limited to heat load calculations, air flow, system
balancing, humidity, water quality etc.
• The product must be installed in an easily and safe access ible area for service, appliances installed
in areas not easily and safely assessable, costs will be borne by the owner for access equipment
should maintenance be required.
DIY installation Warranty
• If the product has been installed as a DIY, a supply part only warranty will apply. Parts only will be
supplied free of charge on the return of the faulty part and the owner will be responsible for all
labour charges incurred for the part to be fitted by a qual ified person. Labour warranty as
prescribed in the following table is void in this situation.
Remote Location Warranty
• If the product has been installed outside the Climate Technolog ies service network, a supply part
only warranty will apply. Parts only will be supplied free of charg e o n the return of the faulty part
and the owner will be responsible for all labour charges incurred for the part to be fitted by a
qualified person. Labour warranty as prescr ibed in the following table is void in this situation.
Page 56

MULTI-APPLIANCE TOUCH PAD
Warranty – Australia ONLY
Exclusions to warranty
• Consumable items subject to wear and t ear such as filter pads, drive belts and bearings are not
covered by this warranty.
• Components used as part of the installation such as grilles filters, ducting, fittings, zone motors and
consumer services pipe work are warranted from your place of purchase and not covered by this
warranty.
• Damage caused by elements such as w ind, rain, lighting, floods etc along with power spiking and
brownouts are not considered defective material or workmanship and as such are not co nsidered
warranty.
• No responsibility will be accepted for outside elements such as pests, animals, pets and vermin that
may cause damage to the unit.
• Harsh environmental situations such as salt air that may cause cabinet damage / rusting can not be
considered warranty.
• The manufacturer does not accept liability or any claims for damage to building contents, carpet,
walls, ceilings, foundations or any other consequential loss either direct or indirect. Damage
resulting from, power spikes, incorrect operation, incorrect in stallation, and incorrect maintenance is
also not covered.
• All warranties are NOT transferable.
Conditions where warranty may be void
• If there is no certificate of compliance for plumbing, e lectrical or refrigeration as required by State &
Territory Laws. Climate Technologies reserves the right to r efuse service on non-compliant
installations.
• The defective operation of the appliance that is due to failure of electricity, gas, water or refrigerant
gas supplied.
• Defects are caused by neglect, incorrect application, abuse or by accidental damage of the
appliance.
• An unauthorised person has attempting to repair the appliance.
• A situation arises referenced in the troubl e-shooting guide.
• A charge will be made for work done or for a service call where there is nothing wrong with the
appliance.
Page 57

MULTI-APPLIANCE TOUCH PAD
Warranty – Australia ONLY
PERIODS OF WARRANTY – YEARS BY PRODUCT AND APPLICATION:
Ducted Gas Heating
Unit Components
RESIDENTIAL
Parts Labour
COMMERCIAL
Parts
Labour
Heat Exchanger 10 3 2 2
Burner 10 3 2 2
**All other components 3 3 1 1
** Return air filter/s and zone motors are field supplied and therefore are not covered by the above warranty periods.
Dual Cycle Refrigerated Air Conditioning
Unit Components
RESIDENTIAL
COMMERCIAL
Parts Labour Parts Labour
Compressor 5 5 2 2
**All other components 5 5 2 2
** Return air filter/s and zone motors are field supplied and therefore are not covered by the above warranty periods.
Ducted Evaporative Air Conditioning - Domestic
Unit Components
RESIDENTIAL
Parts Labour
COMMERCIAL
Parts
Labour
Corrosion on Cabinet 25 3 2 2
Structural Guarantee 10 3 2 2
** All other components 3 3 1 1
** Filter pads are a consumable and are therefore not covered by this warranty
Aged New Product Warranties
For a New Product warranty to apply, a product needs to be sold and installed within 3 years of the
manufacturing date.
Product that is aged as the result of extended storage or be ing used f or demonstration p urposes, the foll owing
warranty will apply.
• For a product that is greater than 3 years and less than 5 years old from date of manufacture the
statutory warranty
For a product that is greater than 5 years of age from date of manufacture, the statutory warranty will
•
will apply and any voluntary warranty originally supplied will be reduced by 1 year
apply to electrically functioning components on ly. All other components being cabinets, louvres,
filters etc. will not be covered by warranty.
WARRANTY ON REPLACEMENT PARTS:
Parts replaced under warranty are warranted for the balance of the original warranty period.
Page 58

MULTI-APPLIANCE TOUCH PAD
Warranty – Australia ONLY
PROOF OF PURCHASE:
It is important that the name of the Dealer or Retailer from whom you purchased your product and the
name of the installer are recorded on this page. Th e inst aller is res ponsibl e for the correc t install ation, st art
up and demonstrating the operation of this product. The Dealer or retailer is also responsible for issuing
the relevant certificates of compliance for the electrical con nections. (These may differ from state to state)
Please attach your proof of purchase here. Your receipt is your warranty and will be required to validate any warranty.
DEALER PRODUCT INFORMATION:
Dealer/Retailer:
Dealer Address:
Dealer Phone Number:
Unit Model Number:
Serial No:
Date Installed:
Serial No:
Date Installed:
Serial No:
Date Installed:
Installed by:
Date Commissioned:
Commissioned by:
Signature:
Page 59

MULTI-APPLIANCE TOUCH PAD
Service
SERVICE
SERVICE CENTRES:
Only qualified service personnel should c onduct any service work carried out on your heating / cooling
ducted system. It is important that periodical service is carried out on your product to ensure your will
receive the efficiency benefits the product p rovides.
For Metro Service only ring the numbers below.
South Australia/ (08) 8307 5230
Northern Territory
New South Wales / (03) 8795 2457
Australian Capital Territory
Western Australia (08) 9454 1000
Victoria/Tasmania (03) 8795 2456
Queensland (03) 8795 2457
Outside Metro areas please contact your nearest Climate Technologies Service Provider.
New Zealand (ABERGAS LTD) 0800 161 161
Page 60

Manufactured by
Climate Technologies
ABN 13 001 418 042
26 Nylex Avenue
Salisbury, SA 5108
Australia
www.climatetechnologies.com.au
6052245/G
 Loading...