


Bistro 11381-3
www.bodum.com
GUARANTEE SERVICE FOR USA CANADA SEE OVERLEAF FOR AUS
For more information or questions, guarantee claim and return authorization
FREE CALL 1.800.23.BODUMWARRANTYBODUMUSA.COM
GUARANTEE CLAIM CAN NOT BE DONE WITHOUT PROOF OF PURCHASE.
The guarantee certiicate must be completed by the seller at the time of purchase. You must
present the guarantee certiicate to obtain guarantee services. Should your BODUM® prod-
uct require guarantee service, please contact your BODUM® retailer, a BODUM® store, your
country’s BODUM® distributor, or visit www.bodum.com.
2 YEARS LIMITED GUARANTEE CERTIFICATE.
CERTIFICAT DE GARANTIE LIMITÉE DE 2 ANS.
CERTIFICADO DE GARÁNTÍA LIMITADA DE 2 AÑOS.
Proof of purchase
Firmenstempel
Cachet du revendeur
Firmastempel
Sello de la empresa
Timbro del rivenditore
Stempel van de zaak
Firmastämpel
Carimbo da empresa
Ostotodistus
Доказательство покупки
Date
Datum
Date
Dato
Fecha
Data
Datum
Datum
Data
Päivämäärä
Дата
113813 BISTRO Stand Mixer
GUARANTEE CERTIFICATE GUARANTEE: 2 YEARS. Stand Mixer
GARANTIEZERTIFIKAT GARANTIE: 2 JAHRE. Elektrische Küchenmaschine
CERTIFICAT DE GARANTIE GARANTIE: 2 ANS. Robot Culinaire
GARANTIBEVIS GARANTI: 2 ÅR. Køkkenmaskine
CERTIFICADO DE GARANTIA GARANTÍA: 2 AÑOS. Batidora
CERTIFICATO DI GARANZIA GARANZIA: 2 ANNI. Robot Da Cucina
GARANTIECERTIFIKAAT GARANTIE: 2 JAAR. Staande Mixer
GARANTIBEVIS GARANTI: 2 ÅRS. Matberedare
CERTIFICADO DE GARANTIA GARANTIA: 2 ANOS. Batedeira
TAKUU TODISTUS TAKUU: 2 VUOTTA. Yleiskone
ГАРАНТИЙНЫЙ СЕРТИФИКАТ – ГАРАНТИЯ: 2 ГОДА. СТАЦИОНАРНЫЙ МИКСЕР
113813 BISTRO
Stand Mixer Instruction for use ENGLISH
Elektrische Küchenmaschine Gebrauchsanweisung DEUTSCH
Robot Culinaire Mode d’emploi FRANÇAIS
Køkkenmaskine Brugsanvisning DANSK
Batidora Instrucciones de uso ESPAÑOL
Robot da Cucina Istruzioni per l’uso ITALIANO
Staande Mixer Gebruiksaanwijzing NEDERLANDS
Matberedare Bruksanvisning SVENSKA
Batedeira Manual de Instruções PORTUGUÊS
Yleiskone Käyttöohje SUOMI
Стационарный Миксер Руководство По Эксплуатации РУССКИЙ
Stand Mixer
113813
BODUM® is a registered trademark of Pi-Design AG, Switzerland.
Welcome to BODUM®
Please read these instructions carefully before using. ENGLISH
Bitte lesen Sie diese Hinweise sorgfältig vor der Benutzung. DEUTSCH
Veuillez lire attentivement ces instructions avant l’utilisation. FRANÇAIS
Læs venligst disse instruktioner nøje før brug. DANSK
Lea cuidadosamente estas instrucciones antes de utilizar el producto. ESPAÑOL
Leggere attentamente le presenti istruzioni prima dell'uso del prodotto. ITALIANO
Lees, voordat u het apparaat in gebruik neemt, deze gebruiksaanwijzing zorgvuldig door. NEDERLANDS
Läs dessa anvisningar noggrant innan du använder kaffebryggaren. SVENSKA
Por favor, leia cuidadosamente estas instruções antes de utilizar. PORTUGUÊS
Lue nämä ohjeet huolellisesti ennen käyttöä. SUOMI
Пожалуйста, внимательно прочитайте это руководство перед использованием. РУССКИЙ
Congratulations! You are now the proud owner of the BODUM® BISTRO Stand Mixer.
V3.20180716
EN STAND MIXER
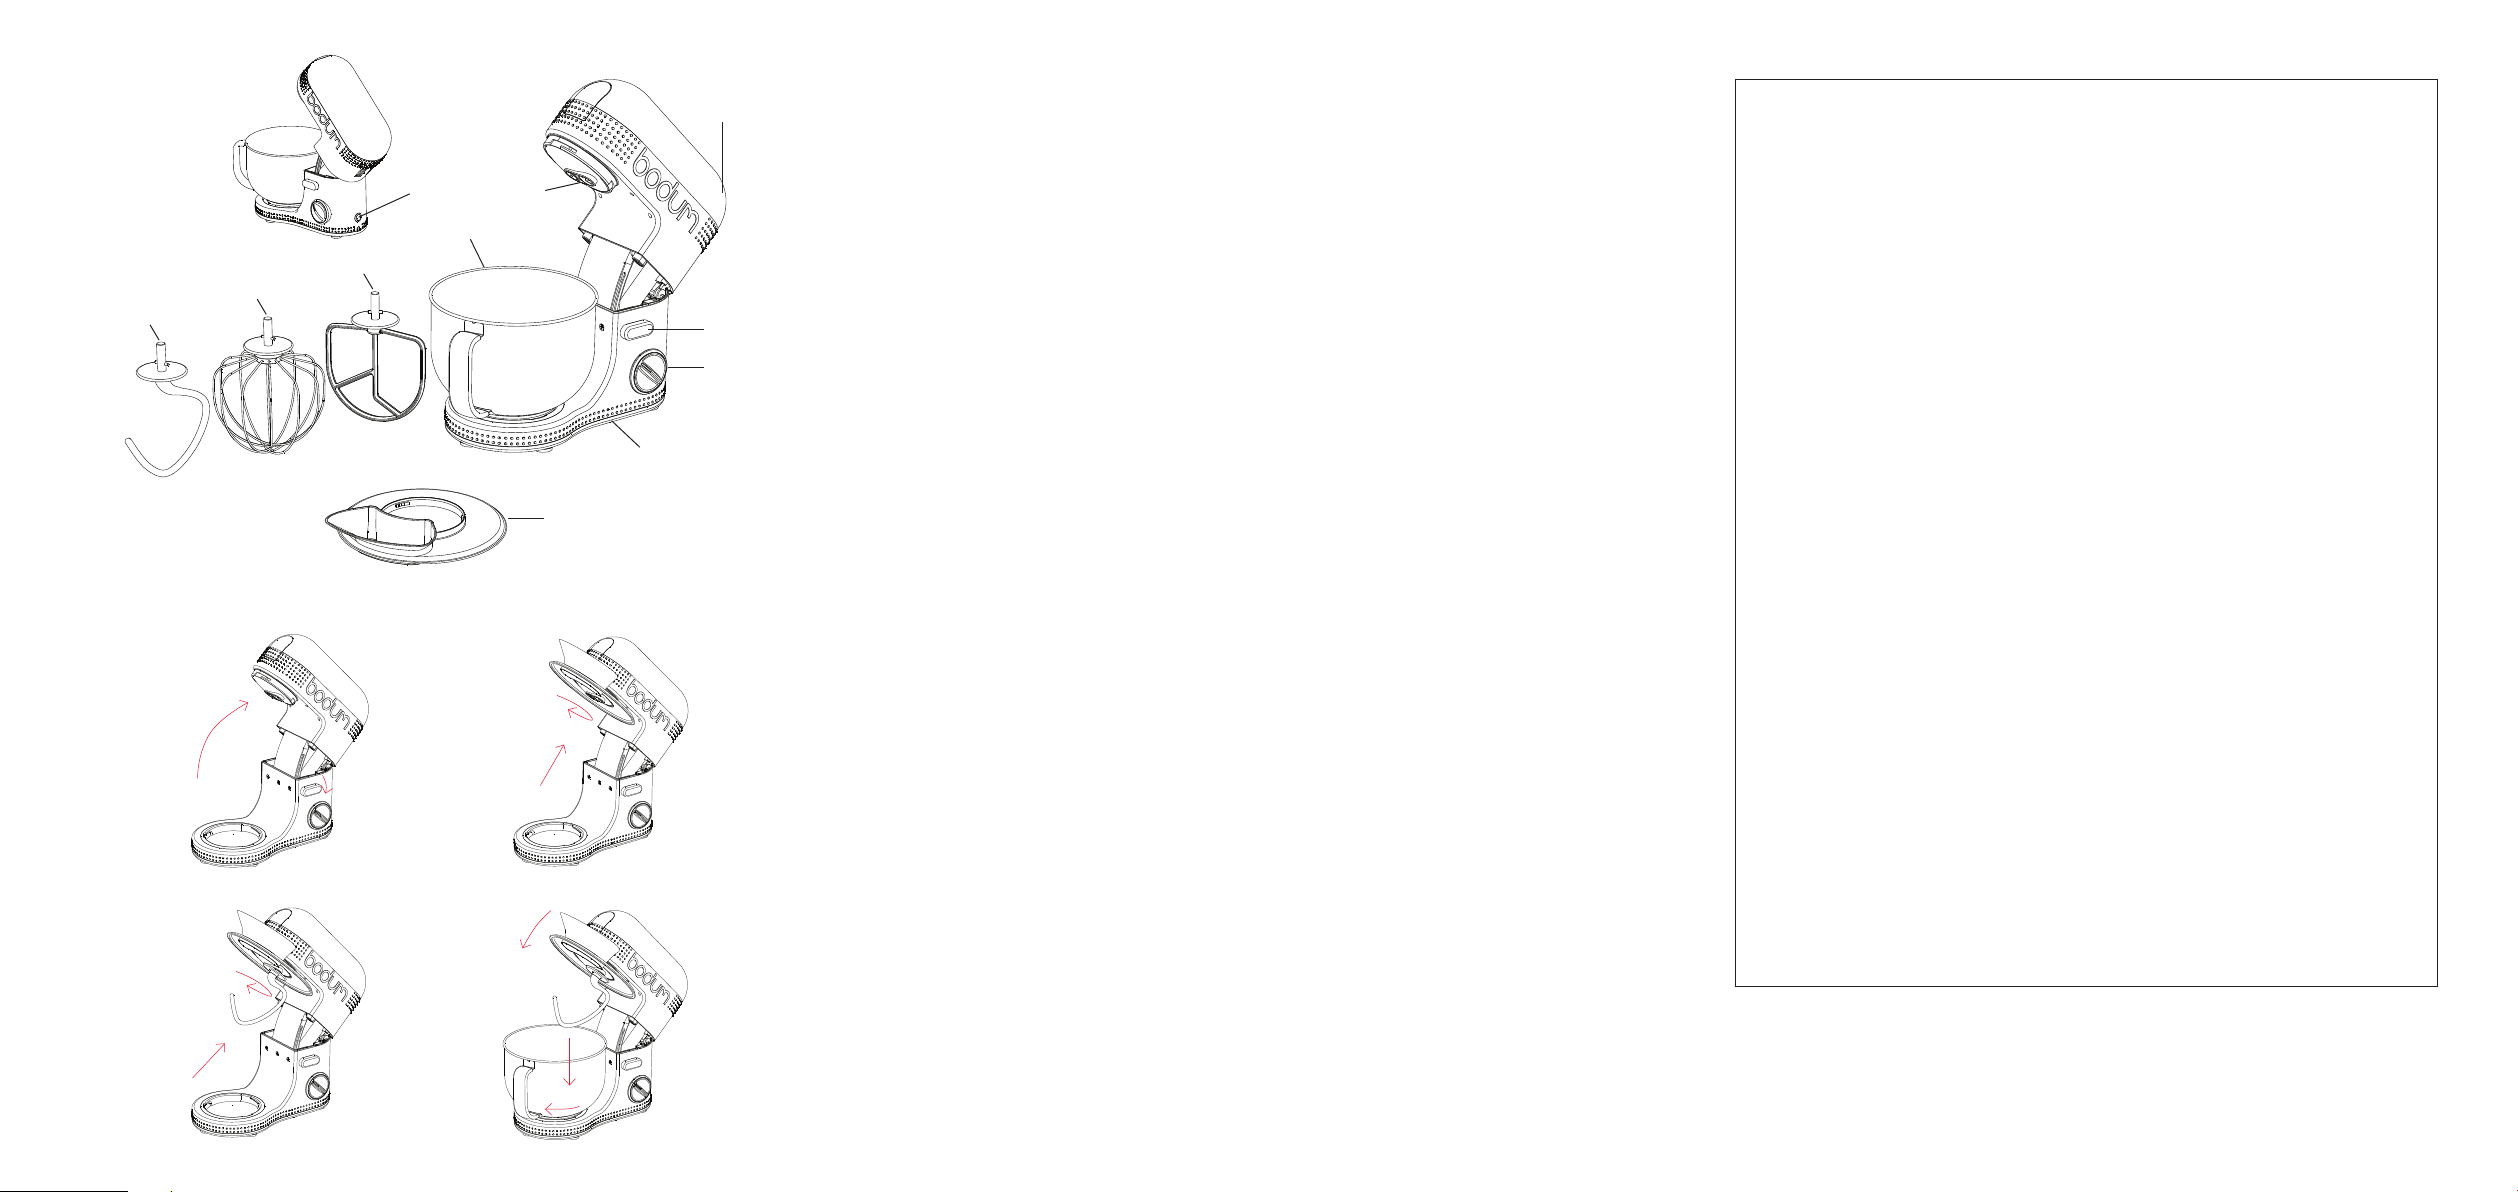
List of Components
1 Mixing arm
2 Bowl
3 Insertion opening for mixing
attachments
4 Speed control
5 ON/OFF switch
6 Release lever for the mixing arm
7 Base
8 Beater attachment (1 piece)
9 Dough hook attachment (1 piece)
10 Whisk attachment (1 piece)
11 Splash guard with filler opening
DE ELEKTRISCHE
KÜCHENMASCHINE
Liste der Komponenten
1 Rührarm
2 Schüssel
3 Einstecköffnung für Rührwerkzeug
4 Geschwindigkeitsregler
5 EIN/AUS- Schalter
6 Entriegelungshebel für den Rührarm
7 Sockel
8 Aufsatz Rührquirl (1 Stück)
9 Aufsatz Knethaken (1 Stück)
10 Aufsatz Schwingbesen (1 Stück)
11 Spritzschutz mit Einfüllöffnung
FR ROBOT CULINAIRE
Liste des composants
1 Br
as robot culinaire
2 Récipient
3 Ouverture de remplissage pour
le mixage
4 Contrôle de la vitesse
5 Bouton ON/OFF
6 Levier pour le bras robot
culinaire
7 Base
8 Batteur (1 pièce)
9 Crochet du robot (1 pièce)
10 Fouet (1 pièce)
11 Protection anti-projections avec
ouverture de remplissage
DA KØKKENMASKINE
Liste af bestanddele
1 Rørearm
2 Skål
3 Monteringsåbning til tilbehør
4 Hastighedskontrol
5 TÆND/SLUK-knap
6 Udløserknap til rørearm
7 Fod
8 Røreris (1 styk)
9 Dejkrog (1 styk)
10 Piskeris (1 styk)
11 Stænkskærm med
påfyldningsåbning
ES BATIDORA
Lista de componentes
1 Brazo mezclador
2 Bol
3 Orificio de inserción de los
mezcladores
4 Control de velocidad
5 Interruptor de encendido/
apagado
6 Palanca de desbloqueo del
brazo mezclador
7 Base
8 Brazo batidor (1 unidad)
9 Gancho de masa (1 unidad)
10 Batidor (1 unidad)
11 Protector antisalpicaduras con
orificio de llenado
IT ROBOT DA CUCINA
Elenco dei componenti
1 Unità miscelatore
2 Recipiente
3 Foro di innesto degli accessori
4 Controllo di velocità
5 Interruttore ON/OFF
6 Pulsante di rilascio dell’unità
miscelatore
7 Base
8 Accessorio sbattitore (1 pezzo)
9 Accessorio gancio per impastare
(1 pezzo)
10 Accessorio frusta (1 pezzo)
11 Coperchio antischizzo con
apertura di riempimento
NE STAANDE MIXER
Lijst van onderdelen
1 Mengarm
2 Schaal
3 Inbrengopening voor
hulpstukken voor de mixer
4 Snelheidsregelaar
5 AAN/UIT-knop
6 Loslaatknop voor de mengarm
7 Basis
8 Klopper (1 stuk)
9 Deeghaak (1 stuk)
10 Klutser (1 stuk)
11 Antispatdeksel met vulopening
SE MATBEREDARE
Lista över delar
1 Mixerarm
2 Skål
3 Öppning där vispar och andra
redskap förs in
4 Hastighetskontroll
5 Strömbrytare
6 Frigöringsspak för mixerarmen
7 Bas
8 Grövre visp (1 styck)
9 Degkrok (1styck)
10 Ballongvisp (1 styck)
11 Stänkskydd med
påfyllningsöppning
PO B ATED EIRA
Lista de Componentes
1 Braço misturador
2 Tigela
3 Abertura para a aplicação de
acessórios
4 Controlador de velocidade
5 Botão ON/OFF (LIGAR/
DESLIGAR)
6 Alavanca para soltar o braço
misturador
7 Base
8 Batedor acessório (1 unidade)
9 Batedor de gancho acessório
(1 unidade)
10 Misturador acessório (1 unidade)
11 Resguardo anti-salpicos com
orifício de enchimento
SU YLEISKONE
Osalista
1 Sekoitusvarsi
2 Kulho
3 Aukko sekoituslisälaitteiden
kiinnittämistä varten
4 Nopeudensäädin
5 ON/OFF-virtakytkin
6 Sekoitusvarren vapautusvipu
7 Jalusta
8 Vatkainosa (1 kpl)
9 Taikinakoukku (1 kpl)
10 Vispiläosa (1 kpl)
11 Roiskesuoja, jossa täyttöaukko
RU СТАЦИОНАРНЫЙ МИКСЕР
Перечень компонентов
1 Привод мешалки
2 Чаша
3 Отверстие для вставки
приспособлений смешивания
4 Переключатель скорости
5 Выключатель ВКЛ/ВЫКЛ
6 Рычаг для расцепления привода
мешалки
7 Основание
8 Взбивалка (1 штука)
9 Крючок для теста (1 штука)
10 Венчик (1 штука)
11 Щиток от брызг с воронкой
BODUM AUSTRALIA WARRANTY
We are pleased to say that the return rate on BODUM® product is very low; however, should you
need to process a returned BODUM® product under warranty, please follow the simple procedure
below. We have tried to make it as simple as possible for both yourself and the end consumer.
BODUM AUSTRALIA WARRANTY PROCEDURE
Our goods come with guarantees that cannot be excluded under the Australian Consumer Law.
Consumers are entitled to a replacement or refund for a major failure and for compensation for
any other reasonably foreseeable loss or damage. Consumers are also entitled to have the goods
repaired or replaced if the goods fail to be of acceptable quality and the failure does not amount
to a major failure.
The beneits to BODUM® customers given by the warranty set out below are in addition to other
rights and remedies under a law in relation to the BODUM® product to which the warranty relates.
To process a faulty BODUM® product you will require a Return Authorisation (RA) number.
Returned items without a RA number are not able to be processed for credit or replacement. Con-
tact BODUM® on (02) 9692 0582 for a RA number.
Faulty product does not include items which have incurred wear and tear through general home
use, misuse or commercial use. Warranty does not include accidental glass breakages.
Warranty period:
e-BODUM®: 2 year replacement warranty from the date of purchase for electrical appliances
where a defect appears and BODUM® is notiied within 2 years from date of purchase.
Proof of purchase: any claim from the end consumer must be validated with a copy of proof of
purchase; without providing a proof of purchase BODUM® Australia will not be able to process
the claim. Proof of purchase includes original purchase receipt/docket or credit card statement
showing the purchase amount.
Replacement or credit: once claim is validated, if possible please replace the faulty item from
stock on hand. If a customer requires a replacement for an item which you don’t have on hand,
please have the item added to your next order.
Return or work order: to ensure that the return process is as easy as possible for both you and
the end consumer, we don’t do work orders or product repairs.
Once you have received a RA number and sighted the product please safely dispose of the faulty
item. We don’t require the faulty product to be sent back to us. However, if you come across an
unusual fault which you think we need to be aware of please send it back to BODUM® Australia
Head Oice.
BODUM® (Australia) PTY LTD
Suite 39, 2632 Pirrama Rd, Pyrmont NSW 2009
T. +61 2 9692 0582 F. +61 2 9692 0586
oice.australia@bodum.com
A B
C D
5
1
6
4
7
3
2
8
10
9
11

5
EN
Instructions for Use
Please read all instructions thoroughly before using the appli-
ance for the irst time. Failure to observe the instructions and
safety information could result in danger.
After unpacking the appliance, please check for signs of dam
-
age. Do not use it if you are unsure and contact your dealer.
Keep the packaging material (cardboard, plastic bags etc.) out
of children‘s reach (danger of suocation or injury).
This stand mixer is intended for use in the home only. Do not
use it in the open.
Do not place the appliance on or adjacent to a gas or electric
stove that is switched on, or in a pre-heated oven.
The manufacturer cannot assume any liability for damage or
injury caused by inappropriate or improper use. Use the appli
-
ance for its intended purpose only.
This appliance shall not be used by children. Keep the appli
-
ance and its cord out of reach of children.
Do not allow children to play with the appliance.
Close supervision is essential if the appliance is used by chil
-
dren or persons unfamiliar with its operation.
This appliance is not intended to for use by persons (including
children) with reduced physical, sensory or mental capabilities,
or lack of experience and knowledge, unless they have been
given supervision or instruction concerning use of the appli
-
ance by a person responsible for their safety.
Never touch the appliance with moist or wet hands. Do not
touch the power cord or plug with wet hands, either.
Congratulations! You are now the proud owner of a BISTRO
stand mixer from BODUM®. Please read these instructions
carefully before using the appliance.
ENGLISH
IMPORTANT SAFEGUARDS

7
EN
Instructions for Use
Stand Mixer
6
Do not use any accessories that are not recommended by the
manufacturer of the appliance. This may result in ire, electric
shock or injury.
Always keep the appliance away from sources of water. Please
bear in mind that your stand mixer is an electrical appliance.
Always only ever clean it with a damp cloth.
Set the speed control (4) to stop, turn the ON/OFF switch (5)
to OFF and remove the plug from the power socket in order to
completely deactivate the appliance.
Hold the plug and not the power cord when disconnecting the
stand mixer from the electricity supply.
Please ensure that the power cord does not hang down over
the edge of a table or worktop or come into contact with hot
surfaces including the stove.
Remove the stand mixer‘s plug from the power supply when
it is not in use, when attaching or removing accessories and
when you wish to clean it.
Never put electrical appliances into operation if the power
cord or plug is damaged, after malfunctions occur or if the
appliance has been dropped or damaged in any way. In this
case, have the appliance checked, repaired or adjusted by
your nearest service centre.
Never attempt to replace the appliance‘s power cord since this
requires special tools. Always ensure the appliance is only ever
repaired or the power cord replaced by a service centre autho
-
rised by the manufacturer in order to ensure its safety.
Do not immerse the power cord, stand mixer or plug in water or
other liquids since this could cause ire, electric shock or injury.
Caution! In order to avoid the risk of the appliance overriding
the safety shutdown function, it must never be supplied with
power by an external switch such as a timer or connected to a
power circuit that is regularly activated and deactivated by the
utility company.
The appliance must not be attached to the power supply
during cleaning.
Keep hands, hair, clothing, as well as spatulas and other uten
-
sils away from beaters during operation to reduce the risk of
injury to persons, and/or damage to the mixer.
Keep clothing, jewellery, ingers, hair and other utensils away
from rotating parts in order to avoid serious personal injury
and damage to the appliance.
Please use the splash guard with iller opening (11) supplied
when mixing liquids, or reduce the quantity in order to avoid
splashing.
Please ensure that the speed control (4) is set to stop, that the
ON/OFF switch (5) is turned to OFF and that the plug has been
removed from the power socket before cleaning it or putting it
away.
Never allow the appliance to run without supervision.
The maximum rating is based on the dough hook attachment
that draws the greatest load (power or current) and that other
recommended attachments may draw signiicantly less power
or current.
Do not use outdoor.
Remove beaters from mixer before washing.
Always disconnect the appliance from the supply if it is left
unattended and before assembling, disassembling or cleaning.
Appliances can be used by persons with reduced physical,
sensory or mental capabilities or lack of experience and
knowledge if they have been given supervision or instruction
concerning use of the appliance in a safe way and if they
understand the hazards involved.
This appliance is intended to be used in household and similar
applications such as:
• sta kitchen areas in shops, oices and other working environments;
• farm houses;

9
EN
Instructions for Use
Stand Mixer
8
• by clients in hotels, motels and other residential type environments;
• bed and breakfast type environments.
Warning! Potential injury from misuse.
Retain these user instructions for
future reference.
INSTALLATION
Always place the stand mixer on a stable, level surface. This
may not be hot and must not be near to a source of heat. The
surface must be dry. Keep the appliance and the power cord
out of the reach of children.
Check that the voltage indicated on the appliance rating
plate matches the voltage of the power supply in your region.
Only connect the appliance to a proper socket with a power
output rating of at least 6A and a voltage of 220240V~
5060Hz (EURO) or 120V~ 60Hz (USA).
(Consult an electrician if you are using a residual-current
device (RCD).) The socket must be easily accessible in an
emergency when the appliance is in operation. The manu-
facturer cannot assume any liability for accidents caused by
faulty or inadequate electrical earthing of the appliance.
Have a qualiied electrician replace the socket if it is not suit-
able for the appliance‘s plug.
Separate accessories from BODUM are available for this
stand mixer on our website or in our stores. For detailed
installation and application guideline please refer to the IB of
the accessory.
STAND MIXER
BEFORE USE
Clean the stand mixer before using it for the irst time. Please
refer to chapter «MAINTENANCE AND CARE».
USING THE
ATTACHMENTS
Your stand mixer comes with the following three mixing
attachments: beater (8), dough hook (9) and whisk (10).
Beater (8) The beater is suitable for normal mixing tasks such
as cakes, biscuits, icing, illings, eclairs, pastry, sweet dough
and creamed potatoes.
Dough hook (9) The dough hook is particularly suited for mix-
ing and kneading bread dough, yeast dough and pizza dough.
Whisk (10) The whisk is suitable for whipping and mixing
eggs, cream, thin dough, fat-free sponge, meringue, cheese-
cake, mousse and soulés.
SPEED SETTINGS
The stand mixer oers 7 speed settings. Please note that each
mixing process should start at the slowest speed before speed
is increased to the recommended level as described below.
Position stop The appliance is turned o in this position.
Always set the speed to position stop, turn the ON/OFF switch
(5) to OFF and remove the plug from the power socket for
cleaning or storing the appliance.
Position 1 Position 1 is suitable for mixing lour with liquid and
for adding dry ingredients. This speed must not be used for
kneading heavy dough types.
Position 2 Position 2 is suitable for fast stirring and for mixing
and kneading yeast dough and other heavy dough types.
Position 34 These positions are suitable for mixing medi-
um-heavy dough types.
Position 5 This position is suitable for stirring or beating.
Position 6 Position 6 is suitable for whipping cream, egg
whites and icing. You should use the splash guard with iller
opening (11) at this postilion at the latest. Attach the splash
guard with iller opening as described in chapter:
«HOW TO USE YOUR STAND MIXER».
Position «Max» Position «Max» is suitable for whipping or
beating small quantities of cream or egg white.
HOW TO USE
YOUR STAND
MIXER
Figure A Before itting the mixing attachments (8, 9, 10),
splash guard with iller opening (11) or bowl (2), please
ensure that the speed control (4) is set to stop, that the ON/
OFF switch (5) is turned to OFF and that the plug has been
removed from the power socket.
Press the release lever for the mixing arm (6) down at the same
as as raising the mixing arm until it clicks into the open position.
Figure B Press the splash guard with iller opening (11) onto
the mixing arm (1) as far as it will go and lock it in place by
turning it gently in a clockwise direction. This bayonet catch
fastens the splash guard with iller opening (11) irmly to the
stand mixer.
Figure C Insert the mixing attachment (8, 9, 10) into the opening
(3) as far as it will go and then turn it in a clockwise direction.

11
EN
Instructions for Use
Stand Mixer
10
Figure D Place the bowl (2) on the base (7), press it down and
lock it in place by turning it in a clockwise direction.
Press the release lever for the mixing arm (6) and lower the
mixing arm (11) slowly.
The stand mixer can be used once the plug is inserted into
the power socket and the ON/OFF switch (5) is turned to ON.
REMOVING THE
INDIVIDUAL
ATTACHMENTS
Before removing the mixing attachments (8, 9, 10), splash
guard with iller opening (11) or bowl (2), please ensure that
the speed control (4) is set to stop, that the ON/OFF switch
(5) is turned to OFF and that the plug has been removed from
the power socket.
In order to remove the bowl (2) you must irst press the
release lever for the mixing arm (6), raise the mixing arm (1)
and release the bowl (2) from the stand mixer by turning it in
an anti-clockwise direction.
In order to remove a mixing attachment (8, 9, 10) you must irst
press the release lever for the mixing arm (6), raise the mixing
arm (1) and release the mixing attachment (8, 9. 10) from the
stand mixer by turning it in an anti-clockwise direction.
In order to remove the splash guard with iller opening (11)
you must irst press the release lever for the mixing arm (6),
raise the mixing arm (1) and release the bowl splash guard
with iller opening (11) from the stand mixer by turning it in an
anti-clockwise direction.
HOW TO USE THE
SPLASH GUARD
WITH FILLER
OPENING
After attaching the splash guard with iller opening (11) as
described in «HOW TO USE YOUR STAND MIXER» it will protect
worktops and the stand mixer against spattering. You can
also use the iller opening to add ingredients to the bowl (2).
CONNECTING
THE POWER
SUPPLY
The mixing attachments (8, 9, 10) must always be itted
before connecting the stand mixer to the power supply.
Before connecting the stand mixer to the power supply,
please ensure that the speed control (4) is set to stop and that
the ON/OFF switch (5) is turned o.
Before operating the stand mixer the mixing arm (1) must
have been closed and clicked into position. The stand mixer
has a safety feature which ensures that the stand mixer can-
not start while the mixing arm is raised.
MIXING
IMPORTANT. The stand mixer must be switched o after 5
minutes permanent operation for a period of 10 minutes to
prevent the motor from overheating.
For processing sti bread dough or pizza dough do not use
more than 1 kg of lour. The operation should take no longer
than 5 minutes.
Lower the mixing attachment (8,9,10) into the ingredients in
the bowl (2) and click the mixing arm (6) into place. Then use
the speed control (4) to select the desired speed. Please refer
to chapter «SPEED SETTINGS».
Use the splash guard (11) to avoid spattering.
When you have inished mixing, set the speed control (4) to
stop, turn the ON/OFF switch to OFF and remove the plug
from the power socket.
REMOVING
MIXING
ATTACHMENTS
Please ensure that the speed control (4) is set to stop, that
the ON/OFF switch (5) is turned to OFF and that the plug has
been removed from the power socket.
It is essential that the mixing attachment has stopped rotat-
ing. Remove the mixing attachment (8,9,10) from the insertion
opening (3) by turning it in an anti-clockwise direction.
MAINTENANCE
AND CARE
Before cleaning, set the speed control (4) to stop, turn the
ON/OFF switch (5) to OFF and remove the plug from the
power socket.
Never use scouring powder.
Any other servicing should be performed by an authorized
service representative.
CLEANING
THE MIXING
ATTACHMENTS
Excess ingredients can be removed from the mixing attach-
ments (8, 9, 10) with a rubber or plastic scraper.
The mixing attachments (8, 9, 10), splash guard (11) and bowl
(2) can be washed by hand or in the dishwasher.
CLEANING THE
HOUSING
The entire housing of the stand mixer may only be cleaned
with a damp cloth.
Never immerse the stand mixer, the plug or the power cable
in water. Please bear in mind that it is an electrical appliance.
DE
Gebrauchsanweisung
13
Stand Mixer
12
TECHNICAL SPECIFICATIONS
TECHNICAL DATA
Rated voltage EURO 220240V~ 5060Hz
Rated voltage USA 120V~ 60Hz
Rated power EURO 700 W
Rated power USA 700 W
Capacity 4.7 litres / 160 oz
Power cord length approx. 100 cm / 39 inches
Certiications GS, CE, ETL, CETL
MANUFACTURER GUARANTEE FOR THE USA & CAN, THE EU AND CH.
Guarantee:
BODUM®
AG, Switzerlnd, guarantees the BISTRO Stand Mixer for
a
period of two years
from the date of originl purchase against faulty materials and malfunctions that can be traced back to
defects in design or manufacturing.
Rep
a
irs
a
re c
a
rried out free of ch
a
rge if
a
ll guar
a
ntee conditions
a
re met. Refunds
a
re not
a
vilble.
Guarantor:
BODUM® (Schweiz) AG, Kantonsstrsse 100, Postfach 463, 6234Triengen.
Guarantee conditions:
The guarantee certificate must be completed by the seller at the time of pur-
chase. You must present the guarantee certificte to obtain guarantee services. Should your BODUM®
product require guarantee service, please contact your BODUM® retailer, a BODUM® store, your coun-
try’s BODUM® distributor, or visit www.bodum.com.
BODUM® will not provide warranty for damage resulting from inapproprite use, improper handling,
norml wear nd tear, inadequate or incorrect maintenance or care, incorrect operation or use of the
appliance by unauthorized persons.
This Mnufacturer Guarantee does not aect your statutory rights under applicable national laws in
force, nor your right against the dealer arising from their sales/purchase contract.
Lesen Sie alle Hinweise genau durch, bevor Sie das Gerät
zum ersten Mal benutzen. Jede Nichtbeachtung der An- wei
-
sungen und Sicherheitshinweise kann Gefahren-situationen
hervorrufen.
Überprüfen Sie das Gerät nach dem Auspacken auf Schäden.
Verwenden Sie es nicht, wenn Sie nicht sicher sind, sondern
kontaktieren Sie Ihren Händler.
Bewahren Sie das Verpackungsmaterial (Karton, Plastik-beutel
usw.) ausserhalb der Reichweite von Kindern auf (Erstickungs–
oder Verletzungsgefahr).
Diese Küchenmaschine ist nur für den Gebrauch im Haushalt
gedacht. Verwenden Sie sie nicht im Freien.
Stellen Sie das Gerät nicht auf oder neben einen eingeschalte
-
ten Gas– oder Elektroherd bzw. in einen vorgeheizten Ofen.
Für Schaden oder Verletzungen, die durch unsachgemässen
oder unvorschriftsmässigen Gebrauch entstehen, übernimmt
der Hersteller keine Haftung. Verwenden Sie das Gerät aus
-
schliesslich für den vorgesehenen Zweck.
Dieses Gerät darf nicht von Kindern benutzt werden.
Bewahren Sie das Gerät und das Kabel immer außerhalb der
Reichweite von Kindern auf.
Lassen Sie Kinder nicht mit dem Gerät spielen.
Sollten Kinder bzw. Personen, die damit nicht vertraut sind, das
Gerät verwenden, ist eine genaue Beaufsichtigung erforderlich.
Dieses Gerät ist für die Verwendung durch kleine Kinder oder
gebrechliche Personen nicht geeignet, es sei denn, eine
Herzlichen Glückwunsch! Sie sind nun stolzer Besitzer
einer elektrischen BISTRO Küchenmaschine von BODUM®.
Lesen Sie diese Anleitung sorgfältig durch, bevor Sie die
Küchenmaschine benutzen.
DEUTSCH
WICHTIGE SICHERHEITSHINWEISE
ENVIRONMENTALLY ACCEPTABLE DISPOSAL
This marking indicates that this product should not be disposed with other household
wastes throughout the EU. To prevent possible harm to the environment or human health
from uncontrolled waste disposal, recycle it responsibly to promote the sustainable
reuse of material resources. To return your used device, please use the return and
collection systems or contact the retailer where the product was purchased. They can
take this product for environmentally safe recycling.
STORAGE
Always remove the mixing attachment (8, 9, 10) when the
stand mixer is not in use.
The mixing arm (11) must always be lowered when the stand
mixer is stored.
Always unplug the stand mixer when it is not in use.

DE
Gebrauchsanweisung
Elektrische Küchenmaschine
1514
verantwortliche Person beaufsichtigt dies und sorgt für einen
sicheren Gebrauch des Geräts.
Berühren Sie das Gerät nie mit feuchten oder nassen Händen.
Berühren Sie auch das Netzkabel oder den Stecker nicht mit
nassen Händen.
Verwenden Sie kein Zubehör, das nicht vom Geräteher-steller
empfohlen wird. Dies kann zu Bränden, elektrischen Schlägen
oder Verletzungen führen.
Halten Sie das Gerät stets vor Wasserquellen fern. Denken Sie
daran: Ihre Küchenmaschine ist ein Elektrogerät.
Reinigen Sie das Gerät immer nur mit einem feuchten Tuch.
Schalten Sie den Geschwindigkeitsregler (4) in die stop
Position, den EIN/AUS- Schalter (5) auf OFF und ziehen Sie den
Stecker aus der Steckdose, um das Gerät auszuschalten.
Ziehen Sie am Stecker und nicht am Kabel, um die Küchen-
maschine vom Strom zu trennen.
Achten Sie darauf, dass das Netzkabel nicht über die Kante von
Tisch oder Arbeitsläche hängt bzw. mit heissen Ober-lächen
in Berührung kommt.
Stecken Sie die Küchenmaschine aus, wenn sie nicht
gebraucht wird, wenn sie Zubehörteile aufstecken oder abneh
-
men und Sie sie reinigen wollen.
Nehmen Sie elektrische Geräte keinesfalls in Betrieb,
wenn Netzkabel oder Stecker beschädigt sind, nachdem
Fehlfunktionen aufgetreten sind oder wenn das Gerät auf
irgendeine Art beschädigt wurde. Bringen Sie das Gerät in die
-
sem Fall zur Kontrolle, Reparatur oder Einstellung beim nächst-
gelegenen autorisierten Servicestützpunkt.
Versuchen Sie nie, das Netzkabel des Geräts auszutauschen,
da hierfür Spezialwerkzeuge erforderlich sind. Lassen Sie die
Reparatur oder den Austausch des Netzkabels ausschliess
-
lich in einer vom Hersteller autorisierten Servicewerkstätte
durch-führen, um die Sicherheit des Geräts zu gewährleisten.
Tauchen Sie Kabel, Küchenmaschine und Stecker nicht in
Wasser oder andere Flüssigkeiten, da dies Brände, elektrische
Schläge oder Verletzungen verursachen könnte.
Vorsicht: Um die Gefahr eines Wiedereinschaltens der
Sicherheitsabschaltung zu vermeiden, darf das Gerät nicht
über eine externe Schaltvorrichtung wie beispielsweise eine
Zeitschaltuhr versorgt werden oder mit einem Strom- kreis
verbunden sein, der regelmässig durch das Stromver-
sorgungsunternehmen ein– und ausgeschaltet wird.
Während der Reinigung des Gerätes darf dieses nicht an den
Strom angeschlossen sein.
Berühren Sie keine rotierenden Teile.
Halten Sie Bekleidungsstücke, Schmuck, Finger, Haare und
Utensilien von rotierenden Teilen fern, um schwere Ver-
letzungen an Personen und Schäden am Gerät zu vermeiden.
Benutzen Sie beim Mischen von Flüssigkeiten, den mitgeliefer
-
ten Spritzschutz mit Einfüllönung (11) oder redu-zieren Sie die
Menge, um Spritzer zu vermeiden.
Vergewissern Sie sich, dass sich der Geschwindigkeitsregler (4)
in der stop Position beindet, der EIN/AUS- Schalter (5) auf OFF
steht und das Gerät ausgesteckt ist, bevor Sie es reinigen oder
ausser Betrieb nehmen.
Lassen Sie das Gerät nie ohne Beaufsichtigung laufen.
Das Gerät immer von der Stromversorgung trennen, wenn es
unbeaufsichtigt ist und bevor Sie es zusammensetzen, ausein
-
andernehmen oder reinigen.
Diese Geräte können von Personen mit eingeschränkten
körperlichen, sensorischen oder geistigen Fähigkeiten oder
mangelnder Kenntnis und Erfahrung benutzt werden, sofern
sie in die sichere Benutzung des Geräts eingewiesen wurden
oder dabei beaufsichtigt werden und die damit verbundenen
Gefahren verstehen.
Dieses Gerät ist für die Verwendung im Haushalt und in ähn
-
lichen Anwendungsbereichen bestimmt, wie:

DE
Gebrauchsanweisung
Elektrische Küchenmaschine
1716
Bewahren Sie diese Anleitung für
die spätere Nutzung auf.
• Personalküchen in Geschäften, Büros und anderen
Arbeitsstätten
• Bauernhäusern
• Von Gästen in Hotels, Motels und anderen Unterkünften
• Frühstückspensionen, Gästehäusern usw.
Warnung! Missbrauch wird dzu führen, um mögliche
Verletzungen!
INSTALLATION Stellen Sie die Küchenmaschine stets auf eine stabile, ebene
Fläche. Diese darf weder heiss sein noch sich in der Nähe
einer Hitzequelle beinden. Die Oberläche muss trocken sein.
Bewahren Sie das Gerät und das Netzkabel ausserhalb der
Reichweite von Kindern auf.
Überprüfen Sie, ob die auf dem Typenschild des Geräts
angegebene Spannung mit der Netzspannung in Ihrer
Region übereinstimmt. Schliessen Sie das Gerät nur an eine
ordnungsgemäss Steckdose mit einer Ausgangsleistung von
mindestens 6A und einer Spannung von 220240V~ 5060Hz
(120V~ 60Hz). (Verwenden Sie einen Fehlerstromschutzschal-
ter (RCD), fragen Sie einen Elektriker um Rat.) Während der
Verwendung des Geräts muss die Steckdose im Notfall gut
zugänglich sein. Für Unfälle, die durch eine mangelhafte oder
fehlende Erdung des Geräts verursacht werden, übernimmt
der Hersteller keine Haftung.
Ist die Steckdose für den Stecker Ihres Geräts nicht ge-eignet,
lassen Sie sie durch einen geprüften Elektriker austauschen.
Separates Zubehör von BODUM ist für diese Küchenmaschine
auf unserer Internetseite oder in unseren Läden erhältlich.
Genaue Angaben zum Gebrauch und zur Installation entneh-
men Sie der Bedienungsanleitung des Zubehörs.
VOR GEBRAUCH
DER KÜSCHEN
MASCHINE
Reinigen Sie die Küchenmaschine vor dem ersten Gebrauch.
Siehe Kapitel «WARTUNG UND PFLEGE».
VERWENDUNG
DER AUFSÄTZE
Ihre Küchenmaschine ist mit den folgenden drei Rührwerkzeu-
gen ausgestattet: dem Rührquirl (8), dem Knethaken (9) und
dem Schwingbesen (10).
Rührquirl (8) Der Rührquirl eignet sich für das normale
Mischen von Kuchen, Keksen, Gebäck, Glasuren, Füllungen,
Eclairs, Pasteten,Teig, Süss Brote und Kartoelbrei.
Knethaken (9) Der Knethaken eignet sich besonders für das
Mischen und Kneten von Brotteig, Hefeteig und Pizzateig.
Schwingbesen (10) Der Schwingbesen eignet sich zum Schla-
gen und Mischen von Eier, Sahne, Teig, fettfreien Biskuitteig,
Baiser, Käsekuchen, Mousse, Soulés.
GESCHWINDIK
EITSEINSTEL
LUNGEN
Die Küchenmaschine hat 7 Geschwindigkeitsstufen zur Ver-
fügung. Beachten Sie dass bei jedem Mischvorgang mit der
niedrigsten Stufe begonnen wird. danach schalten Sie nach
folgendem Beschrieb auf die jeweilige Stufe hoch.
Stufe stop In dieser Position ist das Gerät ausgeschaltet. Für
die Reinig-ung oder Aubewahrung den Geschwindigkeitsreg-
ler (A) immer in die stop-Position stellen, den EIN/AUS- Schal-
ter (5) auf OFF schalten und den Netzstecker ziehen.
Stufe 1 Stufe 1 eignet sich für das Mischen von Mehl mit Flüs-
sigkeit sowie zum Hinzufügen von trockenen Zutaten. Diese
Stufe darf nicht für das Kneten von schweren Teigsorten
genutzt werden.
Stufe 2 Die Stufe 2 eignet sich zum schnelleren Umrühren
sowie zum mischen und Kneten von Hefeteig sowie anderen
schweren Teigsorten.
Stufe 34 Diese Stufen eignen sich zum Mischen von mittel-
schweren Teigsorten.
Stufe 5 Diese Stufe eignet sich zum Rühren oder Schlagen.
Stufe 6 Die Stufe 6 eignet sich um Schlagsahne, Eiweiss und
Zucker-güsse zu schlagen. Spätestens ab dieser Stufe sollten
Sie den Spritzschutz mit Einfüllönung (11) montieren. Befesti-
gen Sie den Spritzschutz mit Einfüllönung (11) gemäss Kapi-
tel «SO VERWENDEN SIE IHRE KÜCHENMASCHINE».
Stufe «max» Stufe max eignet sich zum Schlagen von kleinen
Mengen Schlagsahne oder Eiweiss.

DE
Gebrauchsanweisung
Elektrische Küchenmaschine
1918
DEMONTAGE
DER EINZELNEN
ZUSATZKOMPO
NENTEN
Bevor Sie die Schüssel (2), ein Rührwerkzeug (8, 9, 10) oder
den Spritzschutz mit Einfüllönung (11) demontieren, verge-
wissern Sie sich, dass sich der Geschwindigkeitsregler (4) in
der stop Position beindet, der EIN/AUS- Schalter (5) auf OFF
steht und der Netzstecker ausgesteckt ist.
Um die Schüssel (2) herauszunehmen müssen Sie den Ent-rie-
gelungshebel für den Rührarm (6) betätigen, den Rührarm (1)
auklappen und die Schüssel (2) mit einer Drehbewegung im
Gegenuhrzeigersinn von der Küchenmaschine lösen.
Um ein Rührwerkzeug (8, 9, 10) herauszunehmen müssen Sie
den Entriegelungshebel für den Rührarm (6) betätigen, den
Rührarm (1) auklappen und das Rührwerkzeug (8, 9, 10) mit
einer Drehbewegung im Gegenuhrzeigersinn aus der Ein-
steckvorrichtung für Rührwerkzeug (3) lösen.
SO VERWENDEN
SIE DEN SPRITZ
SCHUTZ MIT EIN
FÜLLÖFFNUNG
Nach dem montieren des Spritzschutzes mit Einfüllönung
(11), gemäss Kapitel «SO VERWENDEN SIE IHRE KÜCHENMA-
SCHINE», schützt dieser die Arbeitslächen und die Küchen-
maschine vor Spritzlecken. Zusätzlich kann die Einfüllönung
genutzt werden um Zutaten in die Schüssel (2) zu geben.
STROMVER
SORGUNG AN
SCHLIESSEN
Die Rührwerkzeuge (8, 9, 10) müssen immer zuerst in der
Küchenmaschine montiert sein bevor Sie die Küchen-ma-
schine an der Stromversorgung anschliessen.
Bevor Sie die Küchenmaschine an der Stromversorgung
anschliessen, vergewissern Sie sich, dass sich der Geschwin-
digkeitsregler (4) in der stop Position beindet und der EIN/
AUS- Schalter (5) auf OFF steht.
Der Rührarm (1) muss vor Inbetriebnahme der Küchen-ma-
schine geschlossen und eingerastet sein. Die Küchen-ma-
schine hat eine Sicherheitsfunktion welche sicherstellt, dass
die Küchenmaschine nicht gestartet werden kann so- lange
der Rührarm oen ist.
MISCHVORGANG
WICHTIG: Nach 5 Minuten im Dauerbetrieb muss die Küchen-
maschine ausgeschaltet werden und eine Pause von 10
Minuten eingelegt werden, um ein Überhitzen des Motors zu
vermeiden. Zum Verarbeiten von festem Brot - oder Pizza- teig
verwenden Sie nicht mehr als 1Kg Mehl.
Die Verarbeitungszeit darf 5 Minuten nicht überschreiten.
Tauchen Sie das Rührwerkzeug (8, 9, 10) mittels schlies-
sen des Rührarms in die Masse ein und wählen Sie die
gewünschte Geschwindigkeitsstufe am Geschwindigkeitsreg-
ler (4).
Siehe Kapitel «GESCHWINDIGKEITSEINSTELLUNGEN».
Um Spritzer zu vermeiden kann der mitgelieferte Spritz-schutz
(11) verwendet werden.
Stellen Sie nach dem Beenden des Mischvorgangs den
Geschwindigkeitsregler (4) in die stop Position und schalten
Sie den EIN/AUS- Schalter (5) auf OFF, ziehen Sie dann den
Netzstecker.
SO VERWENDEN
SIE IHRE KÜ
CHENMASCHINE
Abbildung A Bevor Sie die Rührwerkzeuge (8, 9, 10), Spritz-
schutz mit Einfüllönung (11) oder die Schüssel (2) montieren
können, vergewissern Sie sich, dass sich der Geschwindig-
keitsregler (4) in der stop Position beindet, der EIN/AUS-
Schalter (5) auf OFF steht und der Netzstecker ausgesteckt ist.
Drücken Sie den Entriegelungshebel für den Rührarm (6) nach
unten. Heben Sie gleichzeitig den Rührarm (1) hoch bis er in
der oenen Position einrastet.
Abbildung B Drücken Sie den Spritzschutz mit Einfüllönung
(11) bis zum Anschlag an den Rührarm (1) und arretieren Sie
diesen mit einer leichten Drehbewegung im Uhrzeigersinn.
Durch den Bajonettverschluss ist der Spritzschutz mit Ein-
füllönung (11) fest an der Küchenmaschine ixiert.
Abbildung C Schieben Sie das Rührwerkzeug (8, 9, 10) bis
zum Anschlag mit anschliessender Drehbewegung im Uhrzei-
gersinn in die Einsteckvorrichtung für Rührwerkzeug (3) ein.
Abbildung D Setzten Sie die Schüssel (2) auf den Sockel (7),
drücken Sie sie nach unten und drehen Sie sie zum Arretieren
im Uhrzeigersinn.
Betätigen Sie anschliessen den Entriegelungshebel für
den Rührarm (6) und klappen Sie den Rührarm (1) langsam
herunter.
Nach einstecken des Netzsteckers und einschalten des
EIN/AUS- Schalter (5) kann die Küchenmaschine in Betrieb
genommen werden.
Um den Spritzschutz mit Einfüllönung (11) zu lösen müssen
Sie den Entriegelungshebel für den Rührarm (6) betätigen,
den Rührarm (1) auklappen und den Spritzschutz mit Ein-
füllönung (11) mit einer Drehbewegung im Gegenuhr-zeiger-
sinn vom Rührarm (1) lösen.
DE
Gebrauchsanweisung
Elektrische Küchenmaschine
2120
WARTUNG UND
PFLEGE
Schalten Sie vor der Reinigung den Geschwindigkeitsregler
(4) in die stop Position, den EIN/AUS- Schalter (5) auf OFF und
ziehen Sie den Netzstecker aus der Steckdose.
Es dürfen keine Scheuermittel verwendet werden.
REINIGUNG DER
RÜHRWERK
ZEUGE
Überschüssige Masse an den Rührwerkzeugen (8, 9, 10) kann
mit einem Gummi– oder Kunststoschaber entfernt werden.
Die Rührwerkzeuge (8, 9, 10), der Spritzschutz (11) sowie die
Schüssel (2) können von Hand oder in der Geschirr-spülma-
schine gereinigt werden.
REINIGUNG DES
GEHÄUSES
Das gesamte Gehäuse der Küchenmaschine darf nur mit
einem feuchten Tuch gereinigt werden.
Tauchen Sie die Küchenmaschine, den Netzstecker und das
Kabel nie in Wasser: Denken Sie daran, dass es sich um ein
Elektrogerät handelt.
AUFBEWAHRUNG
Entfernen Sie stets das Rührwerkzeug (8, 9, 10), wenn Sie die
Küchenmaschine nicht benutzen.
Die Küchenmaschine muss immer mit geschlossenem Rühr-
arm (1) aubewahrt werden.
Trennen Sie die Küchenmaschine immer vom Stromnetz,
wenn Sie sie nicht verwenden.
TECHNISCHE SPEZIFIKATIONEN
TECHNISCHE DATEN
Nennspannung EURO 220240V~ 5060Hz
Nennspannung USA 120V~ 60Hz
Nennleistung EURO 700 Watt
Nennleistung USA 700 Watt
Fassungsvermögen 4,7 Liter/ 160 oz
Kabellänge ca. 100 cm/ 39 inch
Prüfzeichen GS, CE, ETL, CETL
HERSTELLERGARANTIE FÜR DIE USA, KANADA, DIE EUROPÄISCHE UNION UND DIE SCHWEIZ.
Garantie:
Die BODUM® AG, Schweiz, übernimmt für den BISTRO Elektrische Küchenmaschine eine
Garantie von zwei Jahren ab Datum des Kaufs gegen Mängel am Gerät, die nachweislich auf einem
Material- und/oder Herstellungsfehler beruhen. Sofern die Garantiebedingungen erfüllt sind, wird
BODUM® Mängel kostenfrei beheben. Eine Rückerstattung des Kaufpreises ist nicht möglich.
Garantiegeber: BODUM® (Schweiz) AG, Kantonsstrasse 100, Postfach 463, 6234 Triengen
Garantiebedingungen: Das Garantiezertiikat (letzte Seite dieser Gebrauchsanweisung) muss vom
Verkäufer beim Kauf ausgefüllt werden. Bei Inanspruchnahme der Garantie ist das Garantiezertiikat
vorzulegen. Hierzu wenden Sie sich bitte an Ihren Bodum Händler, ein Bodum Verkaufsgeschäft, den für
Ihr Land zuständigen Vertriebspartner oder kontaktieren Sie uns unter www.bodum.com
Diese Garantie gilt nicht, wenn der Defekt eines Geräts auf unsachgemäßer Behandlung, üblichem
Verschleiß, unsachgemäßer Plege und/oder Nichtbeachtung der Gebrauchsanweisung beruht.
Ihnen stehen neben den Rechten aus der Garantie die gesetzlichen Rechte zu. Insbesondere werden
die gesetzlichen Rechte des Verbrauchers, die ihm gegenüber seinem Vertragspartner zustehen, nicht
eingeschränkt.
Geprüfte Sicherheit Das ausgediente Gerät zu einer autorisierten Ent-
sorgungsstelle bringen. (WEEE Direktive)
V = Volt W = WattHz = Hertz˜ = Wechselstrom
RÜHRWERK
ZEUGE ABNEH
MEN
Vergewissern Sie sich, dass sich der Geschwindigkeitsregler
(4) in der stop Position beindet, der EIN/AUS- Schalter (5) auf
OFF steht und der Netzstecker ausgesteckt ist.
Es ist zwingend notwendig, dass das Rührwerkzeug nicht
mehr rotiert. Nehmen Sie nun das Rührwerkzeug (8, 9, 10) mit
einer Drehbewegung im Gegenurzeigersinn aus der Einsteck-
vorrichtung für Rührwerkzeug (3).
KORREKTE ENTSORGUNG DIESES PRODUKTES
Alte Elektrogeräte dürfen nicht mehr zusammen mit dem Restmüll beseitigt werden,
sondern müssen getrennt entsorgt werden. Die Abgabe bei kommunalen Sammelstellen
durch Privatpersonen ist kostenfrei. Die Besitzer von Altgeräten sind verplichtet, die
Geräte zu den Sammelstellen zu bringen oder bei einer entsprechenden Sammlung
abzugeben. Mit diesem kleinen persönlichen Aufwand tragen Sie dazu bei, d
a
ss
wertvolle Rohstoe recycelt und Schadstoe gezielt behandelt werden können.

Veuillez lire toutes les instructions avant d’utiliser l’appareil
pour la première fois. Le non-respect des instructions et des
consignes de sécurité peut vous exposer à des dangers.
Après avoir déballé l‘appareil, vériiez qu‘il ne présente pas
des signes de détérioration. En cas de doute, ne l'utilisez pas
et prenez contact avec votre revendeur.
Veuillez conserver les emballages (carton, sacs plastiques,
etc.) hors de portée des enfants, car ils risqueraient de se bles-
ser ou de s‘étouer.
Ce robot culinaire est destiné pour une utilisation chez soi. Ne
pas utiliser à l'extérieur.
Ne placez pas l'appareil sur ou à proximité d'une cuisinière
électrique ou à gaz en marche, ni dans un four chaud.
Le fabricant décline toute responsabilité en cas de dommage ou
de blessure faisant suite à une utilisation inappropriée ou abu-
sive de l‘appareil. N'utiliser l'appareil que pour les emplois prévus.
Tenez l’appareil et le cordon électrique hors de portée des enfants.
Ne permettez pas à des enfants de jouer avec l'appareil.
Il est impératif de redoubler de vigilance si l’appareil est utilisé
par des enfants ou par des personnes qui ne sont pas habi-
tuées à son fonctionnement.
Cet appareil n'est pas prévu pour une utilisation par des per-
sonnes (incluant les enfants) ayant des capacités physiques,
sensorielles ou psy chologiques réduites, ou un manque d'ex-
périence ou de connaissances, à moins qu'ils n'aient reçu de
la supervision ou des instructions concernant l'utilisation d'un
Félicitations! Vous venez de faire l’acquisition d’un
robot culinaire BISTRO de la marque BODUM®. Lisez
attentivement ces instructions avant d‘utiliser l'appareil.
FRANÇAIS
CONSIGNES DE SÉCURITÉ
IMPORTANTES
appareil par une personne responsable pour leur sécurité.
Ne touchez jamais l‘appareil lorsque vous avez les mains
humides ou mouillées. Si vous avez les mains mouillées, ne
touchez pas le cordon d'alimentation et ne le branchez pas
non plus.
Ne pas utiliser d'accessoires non recommandés par le fabri-
cant de l'appareil. L’utilisation d’accessoires non recomman-
dés peut entraîner un incendie, une décharge électrique ou
des blessures.
Toujours tenir l'appareil éloigné de l'eau. Merci de toujours gar-
der à l'esprit que votre robot culinaire est un appareil électrique.
Ne le nettoyer qu'au moyen d'un chion humide.
Mettre le contrôle de la vitesse (4) en position d'arrêt, mettre le
bouton de marche ON/OFF (5) sur OFF (arrêt), et retirer le cordon
de la prise électrique ain de désactiver entièrement l'appareil.
Lorsque vous débranchez le robot culinaire, tenez la prise et
non le cordon d'alimentation.
Veuillez vous assurer que le cordon d'alimentation ne pend
pas à l'angle d'une table ou depuis le plan de travail, et qu'il
n'est pas en contact avec des surfaces chaudes, notamment
les plaques de cuisson.
Débrancher la prise de l'alimentation électrique lorsque le
robot culinaire n'est pas en marche, ni lors de l'installation ou
du retrait d'accessoires.
Ne jamais mettre d'appareils électriques en marche si le cor-
don d'alimentation ou la prise est endommagée, ni suite à des
dysfonctionnements ou si l'appareil est tombé ou endommagé
de quelle manière que ce soit. Dans ce cas, faire vériier, répa-
rer ou ajuster l'appareil par notre SAV le plus proche.
Ne jamais tenter de remplacer le cordon d'alimentation
électrique, car cela nécessite des outils spéciaux. S'assurer
que l'appareil est toujours réparé et le cordon d'alimentation
électrique remplacé par un centre de SAV autorisé par le fabri-
cant, ain de garantir une sécurité absolue.
23
FR
Mode d’emploi
Robot Culinaire
22

N'immergez pas le cordon d'alimentation électrique, le robot
culinaire ou la prise dans l'eau ou dans d'autres liquides, car
cela risquerait de provoquer un incendie, des décharges élec-
triques ou des blessures.
Attention! Ain d'éviter que l'appareil ne contourne la fonction
d'arrêt de sécurité, ne jamais l'alimenter avec de l'électricité
provenant d'un commutateur externe tel qu'un minuteur, ni
ne le connecter à un circuit électrique régulièrement activé et
désactivé par la compagnie d'électricité.
Pendant son nettoyage, l'appareil ne doit pas être relié à l'ali-
mentation électrique.
Pendant le fonctionnement, ain de réduire les risques de
blessures sur les personnes et/ou de détérioration du robot
culinaire, garder les mains, les cheveux, les vêtements, les
spatules et autres ustensiles à distance des batteurs.
Ain de réduire les risques de blessures graves sur les per-
sonnes et de détérioration de l'appareil, tenir les vêtements,
bijoux, doigts, cheveux et autres ustensiles à distance des
parties rotatives.
Lors du mélange de liquides, ain d'éviter les éclaboussures,
veuillez utiliser la protection anti-projections avec ouverture
de remplissage (11), ou réduire la quantité.
Avant de nettoyer ou de ranger l'appareil, veuillez vous assurer
que le contrôle de la vitesse (4) a bien été mis en position d'ar-
rêt, que le bouton ON/OFF (5) est bien sur OFF et que la iche
a été débranchée de la prise électrique.
Ne jamais laisser fonctionner l'appareil sans surveillance.
La charge maximale est basée sur le crochet du robot qui tire la
plus grande charge (électrique), et que d'autres branchements
peuvent consommer nettement moins d'électricité.
Ne pas l'utiliser à l'extérieur.
Avant de laver le robot culinaire, en retirer les batteurs.
Veillez toujours à débrancher l’appareil de l’alimentation
lorsque vous ne l’utilisez pas et avant de le monter, de le
démonter ou de le nettoyer.
Conservez ces instructions pour
les consulter ultérieurement.
Cet appareil peut être utilisé par des personnes dont les capa-
cités physiques, sensorielles ou mentales sont réduites, ou
par des personnes qui manquent d’expérience ou de connais-
sances si elles ont bénéicié d’une supervision et d’instructions
sur la manière d’utiliser l’appareil en toute sécurité et si elles
comprennent les dangers possibles.
Cet appareil a été conçu pour être utilisé à la maison et:
• Dans les cuisines réservées au personnel dans les magasins,
les bureaux et autres environnements de travail ;
• Dans les exploitations agricoles ;
• Dans les hôtels, les motels et autres environnements de type
résidentiel;
• Dans les gîtes et chambres d’hôtes.
Attention! Une mauvaise utilisation peut causer des blessures
potentiel!
INSTALLATION
Toujours placer le robot culinaire sur une surface stable et
plane. Celle-ci ne doit pas être chaude, et ne doit pas être à
proximité d'une source de chaleur. La surface doit être sèche.
Maintenez l'appareil et le cordon d'alimentation hors de la
portée des enfants.
Assurez-vous que le voltage indiqué sur l'appareil correspond
à celui de l'alimentation électrique de votre région. Ne bran-
cher l'appareil que sur une prise adéquate, fournissant au
moins 6A et un voltage de 220240V~ 5060Hz (EURO) ou
120V~ 60Hz (USA).
(Si vous utilisez un appareil à courant résiduel, veuillez
consulter un électricien). Il faut que la prise soit facilement
accessible en cas d'urgence lorsque l'appareil est en marche.
Le fabricant décline toute responsabilité pour les accidents
dus à un branchement électrique inadéquat de l'appareil.
25
FR
Mode d’emploi
Robot Culinaire
24

ROBOT CULI
NAIRE AVANT
UTILISATION
Nettoyez le robot culinaire avant de l'utiliser pour la pre-
mière fois. Veuillez consulter le chapitre «MAINTENANCE ET
ENTRETIEN»
RÉGLAGES DE LA
VITESSE
Le robot culinaire propose 7 réglages de vitesse. Chaque
opération de mixage doit toujours commencer à la vitesse la
plus basse, avant de l'augmenter progressivement au niveau
recommandé, comme décrit ci-dessous.
Position STOP Dans cette position, l'appareil est à l'arrêt.
Pour nettoyer ou ranger l'appareil, toujours mettre le contrôle
de la vitesse en position d'arrêt, mettre le bouton de marche
ON/OFF (5) sur OFF (arrêt), et retirer le cordon de la prise
électrique.
Position 1 La position 1 convient au mélange de la farine avec
des liquides, et pour y ajouter des ingrédients secs. Cette
vitesse ne convient pas pour pétrir des pâtes lourdes.
Position 2 La position 2 convient pour agiter rapidement et
mélanger et pétrir la pâte à levure et les autres pâtes lourdes.
Position 34 Ces positions conviennent pour mélanger des
pâtes moyennement lourdes.
Position 5 La position convient pour agiter ou battre.
COMMENT
UTILISER VOTRE
ROBOT
CULINAIRE
Figure A Avant de ixer les accessoires de mixage (8, 9, 10),
la protection anti-projections (11) ou le récipient, veuillez vous
assurer que le contrôle de la vitesse (4) a bien été mis en posi-
tion d'arrêt, que le bouton ON/OFF (5) est bien sur OFF et que
la iche a été débranchée de la prise électrique.
Presser le levier de détachement du bras de mixage vers le
bas (6) tout en soulevant le bras de mixage jusqu'à ce qu'il y
ait un «clic» indiquant qu'il est en position ouverte.
Figure B Presser la protection anti-projections avec l'ouverture
du iltre (11) sur le bras de mixage (1) autant que possible,
et le ixer en le faisant doucement tourner dans le sens des
aiguilles d'une montre. Le système de baïonnette permet de
ixer la protection anti-projections (11) fermement sur le robot
culinaire.
Figure C Insérer l'accessoire de mixage (8, 9, 10) dans l'ouver-
ture (3) aussi loin que possible, puis le faire tourner dans le
sens des aiguilles d'une montre.
Figure D Placer le récipient (2) sur le socle (7), le presser vers
le bas et le positionner en le faisant tourner dans le sens des
aiguilles d'une montre. Presser le levier de détachement pour
le bras de mixage (6) et abaisser le bras de mixage (11) tout
doucement.
Le robot culinaire peut être utilisé une fois que la iche est
branchée dans la prise électrique et que le bouton ON/OFF
(5) a été mis en position ON.
UTILISATION DES
ACCESSOIRES
Votre robot culinaire est fourni accompagné des trois acces-
soires suivants : batteur (8), crochet robot (9) et fouet (10).
Batteur (8) Le batteur convient aux tâches de mixage nor-
males comme pour les gâteaux, les biscuits, les glaces,
les farces, les éclairs, la pâtisserie, les pâtes sucrées et les
pommes de terre à la crème.
Crochet robot (9) Le crochet robot convient particulièrement
bien pour le mixage et le pétrissage des pâtes sucrées, les
pâtes à levure et les pâtes à pizza.
Fouet (10) Le fouet convient pour fouetter et mixer les œufs,
la crème, la pâte ine, la pâte ine sans matières grasses, la
meringue, le cheesecake, les mousses et les soulés.
Si la prise n'est pas compatible avec la iche de l'appareil, la
faire remplacer par un électricien qualiié.
Des accessoires séparés BODUM sont disponibles pour ce
robot culinaire sur notre site web ou dans nos magasins. Pour
les consignes d'installation et d'utilisation détaillées, merci de
consulter le mode d'emploi de cet accessoire.
Position 6 La position 6 convient pour fouetter la crème, les
blancs d'œufs et les glaçages. C'est au plus tard à partir de
cette position qu'il faut utiliser la protection anti-projections
(11). Fixer la protection anti-projections avec l'ouverture pour
remplissage comme décrit dans le chapitre :
«COMMENT UTILISER VOTRE ROBOT CULINAIRE».
Position «Max» La position «Max» convient pour fouetter ou
battre de petites quantités de crème ou de blanc d'œuf.
RETIRER LES
ACCESSOIRES
Avant de retirer les accessoires de mixage (8, 9, 10), la protec-
tion anti-projections (11) ou le récipient, veuillez vous assurer
que le contrôle de la vitesse (4) a bien été mis en position
d'arrêt, que le bouton ON/OFF (5) est bien sur OFF et que la
iche a été débranchée de la prise électrique.
Pour retirer le récipient (2), vous devez d'abord presser le
levier de détachement du bras de mixage (6), soulever le
27
FR
Mode d’emploi
Robot Culinaire
26

COMMENT UTILI
SER LA PROTEC
TION ANTIPRO
JECTIONS AVEC
L'OUVERTURE DE
REMPLISSAGE
Après avoir ixé la protection anti-projection avec ouverture
de remplissage (11) comme décrit dans la rubrique «COM-
MENT UTILISER VOTRE ROBOT CULINAIRE», celle-ci protègera
vos plans de travail et le robot culinaire des éclaboussures.
Pour ajouter des ingrédients dans le récipient (2), vous pouvez
également utiliser l'ouverture de remplissage.
MISE SOUS
TENSION
Les accessoires de mixage (8, 9, 10) doivent toujours être
ixés avant de brancher le robot culinaire sur l'alimentation
électrique.
Avant de brancher le robot culinaire sur l'alimentation élec-
trique, veuillez vous assurer que le contrôle de la vitesse (4)
est mis en position STOP et que le bouton ON/OFF (5) est bien
en position d'arrêt.
Avant d'utiliser le robot culinaire, il faut que le bras de mixage
(1) ait été fermé et placé en position. Le robot culinaire pos-
sède une fonction de sécurité l'empêchant de démarrer alors
que le bras de mixage est soulevé.
IMPORTANT. Le robot culinaire doit être éteint après 5
minutes de fonctionnement continu, pour une période de 10
minutes,ain d'empêcher que le moteur ne surchaue.
Pour travailler la pâte à pain dur ou la pâte à pizza, ne pas
utiliser plus de 1 kg de farine. L'opération ne doit pas durer
plus de 5 minutes.
Abaisser l'accessoire de mixage (8,9,10) dans les ingrédients
se trouvant dans le récipient (2) et positionner le bras de
mixage (6) jusqu'à ce qu'il y ait un clic. Puis utiliser le contrôle
RETIRER LES
ACCESSOIRES
DE MIXAGE
Veuillez vous assurer que le contrôle de la vitesse (4) a bien
été mis en position d'arrêt, que le bouton ON/OFF (5) est
bien sur OFF et que la iche a été débranchée de la prise
électrique.
Il est primordial d'attendre que l'accessoire de mixage ait
cessé de tourner. Retirer l'accessoire de mixage (8,9,10) de
l'ouverture pour remplissage (3) en le faisant tourner dans le
sens contraire des aiguilles d'une montre.
MIXAGE
Avant le nettoyage, régler le contrôle de la vitesse (4) sur
STOP, tourner le bouton ON/OFF sur OFF, et débrancher l'ap-
pareil de la prise électrique.
Ne jamais utiliser de poudre à récurer.
Tout autre entretien doit être eectué par un représentant de
service autorisé.
NETTOYAGE DES
ACCESSOIRES DE
MIXAGE
Les ingrédients restants peuvent être retirés des accessoires
(8,9,10) au moyen d'un racloir ou d'un battoir en plastique.
Les accessoires de mixage (8, 9, 10), la protection anti-pro
jections (11) et le récipient (2) peuvent être lavés à la main ou
au lave-vaisselle.
NETTOYER LE
BOÎTIER
Le boîtier du robot culinaire ne doit être nettoyé qu'au moyen
d'un chion humide.
Ne jamais immerger le robot culinaire, la prise ou le câble
d'alimentation dans de l'eau. Merci de toujours garder à l'es-
prit que votre robot culinaire est un appareil électrique.
ENTRETIEN ET
SOIN
bras de mixage (1) et détacher le récipient du robot culinaire
en le faisant tourner dans le sens inverse des aiguilles d'une
montre.
Pour retirer un accessoire de mixage (8, 9, 10), vous devez
d'abord presser le levier de détachement pour le bras de
mixage (6), soulever le bras de mixage (1) et détacher l'ac-
cessoire de mixage (8, 9, 10) du robot culinaire en le faisant
tourner dans le sens inverse des aiguilles d'une montre.
Pour retirer la protection anti-projections avec ouverture de
remplissage (2), vous devez d'abord presser le levier de déta-
chement du bras de mixage (6), soulever le bras de mixage (1)
et détacher la protection anti-projections du récipient (11) en la
faisant tourner dans le sens inverse des aiguilles d'une montre.
de la vitesse (4) pour sélectionner la vitesse souhaitée. Veuil-
lez consulter le chapitre «RÉGLAGE DE LA VITESSE».
Utiliser la protection anti-projections (11) ain d'éviter les
éclaboussures.
Une fois que le mixage est terminé, régler le contrôle de la
vitesse (4) sur STOP, tourner le bouton ON/OFF sur OFF, et
débrancher l'appareil de la prise électrique.
ENTREPOSAGE
Lorsque le robot culinaire n'est pas utilisé, toujours retirer les
accessoires de mixage (8,9,10).
Le bras de mixage (11) doit toujours être abaissé lorsque le
robot culinaire est rangé.
Toujours débrancher le robot culinaire lorsqu'il n'est pas utilisé.
29
FR
Mode d’emploi
Robot Culinaire
28

GARANTIE FABRICANT POUR LES ÉTATSUNIS & CANADA, L'UNION EUROPÉENNE ET LA SUISSE.
Garantie: BODUM® AG Suisse, garantit le Robot Culinaire BISTRO pendant une période deux an à partir
de la date d’achat pour des défauts de matériel et dysfonctionnements dont l’origine peut être remontés
à des défauts de conception ou de fabrication. Les réparations seront eectuées gratuitement si toutes
les conditions de garantie sont remplies. Des remboursements ne sont pas possibles.
Garant: BODUM® (Suisse) AG, Kantonsstrasse 100, Postfach 463, 6234 Triengen.
Conditions de garantie: Le certiicat de garantie doit être rempli par le vendeur au moment de l’achat.
Vous devez présenter le certiicat de garantie pour obtenir les services de garantie. Si votre produit
BODUM® nécessite un service de garantie, veuillez contacter votre revendeur BODUM®, un magasin
BODUM®, le distributeur BODUM® de votre pays, ou allez sur www.bodum.com.
BODUM® ne peut pas garantir des dommages résultant d’une utilisation inappropriée, d’une manipula
-
tion incorrecte, d’une usure normale, d’un entretien inapproprié ou incorrect, d’une fausse manœuvre,
ou de l’utilisation par des personnes non autorisées.
Cette garantie fabricant n’aecte pas vos droits légaux provenant des droits locaux applicables, ni vos
droits contre le revendeur provenant de leur contrat de vente/d’achat.
SPÉCIFICATIONS TECHNIQUES
DONNÉES TECHNIQUES
Tension nominale EURO 220240V~ 5060Hz
Tension nominale USA 120V~ 60Hz
Puissance nominale EURO 700Watt
Puissance nominale USA 700 W
Capacité 4.7 litres / 160 oz
Longueur du cordon env. 100 cm/39 inches
Certiications GS, CE, ETL, CETL
Læs hele brugsanvisningen omhyggeligt, før du bruger appa-
ratet for første gang. Manglende overholdelse af anvisnin-
gerne og sikkerhedsoplysningerne kan medføre fare.
Kontrollér apparatet for tegn på skader efter udpakning. Tag
ikke apparatet i brug, og kontakt forhandleren, hvis du er i tvivl
om dets tilstand.
Opbevar emballagen (pap, plastposer osv.) utilgængeligt for
børn (risiko for kvælning eller skade).
Denne køkkenmaskine er kun beregnet til brug i hjemmet. Brug
den ikke udendørs.
Placer ikke apparatet på eller i umiddelbar nærhed af et tændt
gas- eller elkomfur eller i en forvarmet ovn.
Producenten påtager sig intet ansvar for materiel- eller per-
sonskade forårsaget af forkert eller uhensigtsmæssig brug.
Brug kun apparatet til det tilsigtede formål.
Dette apparat må ikke bruges af børn. Hold apparatet og dets
ledning udenfor børns rækkevidde.
Tillad ikke børn at lege med apparatet.
Omhyggeligt tilsyn er meget vigtigt, hvis apparatet bruges af
børn eller personer, der ikke er vant til at bruge det.
Dette apparat bør ikke bruges af personer (inkl. børn) med
nedsatte fysiske, sensoriske eller psykiske evner eller mang-
lende erfaring og viden, medmindre de er under tilsyn eller har
modtaget instruktion i brugen af apparatet af en person med
ansvar for deres sikkerhed.
Berør ikke apparatet med fugtige eller våde hænder. Berør hel-
ler ikke ledningen eller stikket med våde hænder.
Tillykke! Du er nu den stolte ejer af en BISTRO-
køkkenmaskine fra BODUM®. Læs disse anvisninger
omhyggeligt, før du bruger apparatet.
DANSK
VIGTIGE
SIKKERHEDSFORANSTALTNINGER
MISE AU REBUT CORRECT DE CE PRODUIT
Ce sigle indique que ce produit ne doit p
a
s être éliminé
a
vec les
a
utres déchets
mén
a
gers d
a
ns l’UE. Pour éviter d’éventuels imp
a
cts néf
a
stes pour l’environnement
ou l
a
s
a
nté hum
a
ine dus à des dépôts incontrôlés de déchets, recyclez-le de manière
responsable pour favoriser la réutilisation durable des matières premières. Pour
retourner votre appareil usagé, veuillez utiliser des systèmes de retour et de collecte, ou
contactez le revendeur où le produit a été acheté. Il peut reprendre le produit pour un
recyclage respectueux de l’environnement.
31
DK
Brugsanvisning
Robot Culinaire
30
 Loading...