

Page 1

Getting Started
BMW
Page 2

Product Introduction
Congratulations on the purchase of a new AccessPORT hand-held programmer. This quick
start guide explains how to install the AP on your vehicle. Refer to the AP user manual
located online at http://cobbtuning.com/bmw. Check the website for more information
about features, capabilities and additional instructions.
The AccessPORT can:
• Reprogram the factory engine control unit (ECU) with improved
tuning parameters through the on-board diagnostic (OBD-II) port
• Monitor vehicle sensor data
• Read and clear engine diagnostic trouble codes (DTCs)
AccessPORT Buttons:
In-Box Contents:
AccessPORT
USB Cable
OBD-II Cable
Please visit http://cobbtuning.com/start to download AccessPORT Manager 2.0 for your
computer operating system as well as get access to the latest COBB Tuning Off-The-Shelf maps
for your AccessPORT.
Page 3
O
BD
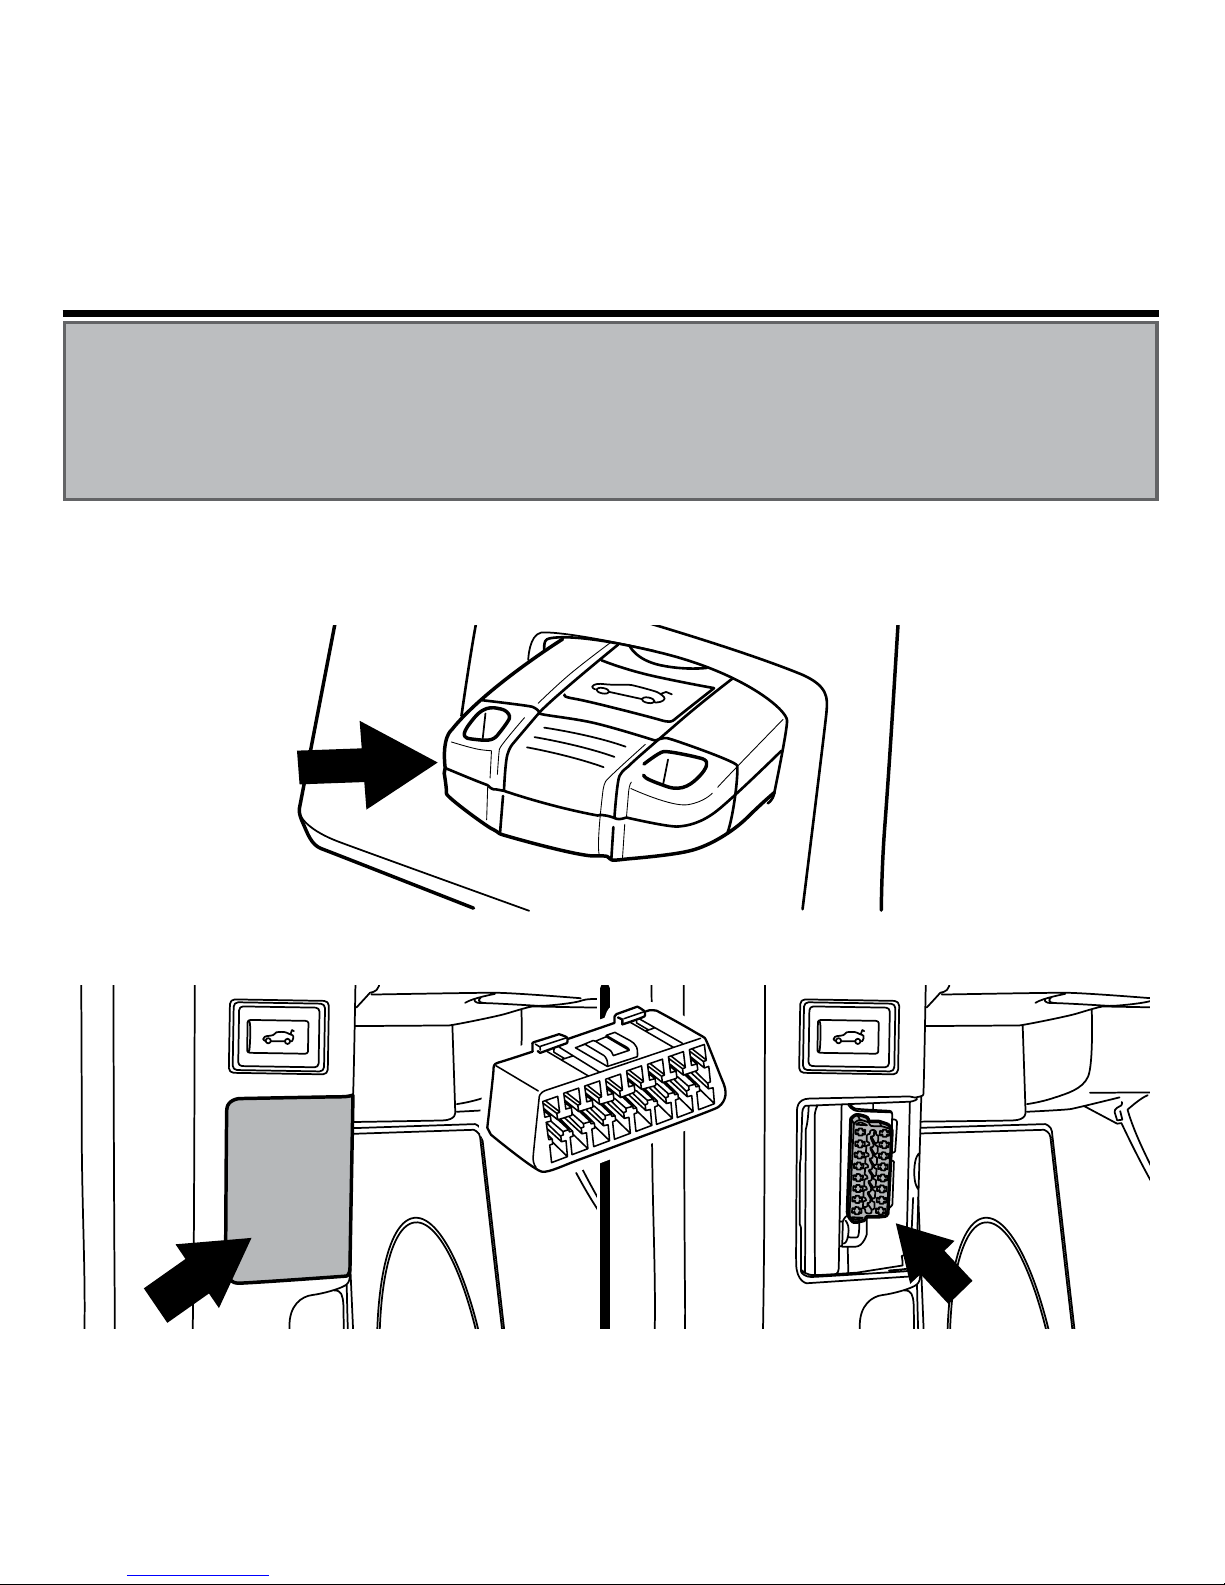
2. On the driver side kick panel, locate the small plastic cover over the OBDII connector. Remove
the cover.
AccessPORT Installation
Getting Started :
1. You will need the AccessPORT and OBD-II cable to perform the installation. Insert the key into
the vehicle’s ignition.
IMPORTANT!
For installation purposes, it is important to ensure that the vehicle’s battery has adequate power for
both the AccessPORT and the ECU. Because of this, it is recommended that all in-car electronics and
vehicle lights are turned off during the installation process to reduce drain on the vehicle’s battery.
For improved safety during installation, a car battery charger can be connected to the vehicle during
the installation process
Page 4

4. Connect the small end of the OBD-II cable to the 10 pin port on the bottom of the AccessPORT.
5. Make sure the clasp on the OBD-II cable firmly engages the tab on the 10 pin port.
3. Plug the male OBDII plug from the AccessPORT into the uncovered OBDII port.
Page 5

7. Select Install to proceed with installation.
6. Without touching the clutch or brake pedal press the START button once to put the car into
the ON position.
Vehicle Identification:
The AccessPORT will attempt to automatically determine the target vehicle for installation.
If the AccessPORT successfully identifies the vehicle:
Verify that the identified vehicle is correct and press OK to confirm.
If an error occurs:
Please reference the Troubleshooting section of the AccessPORT User Manual for additional
information. The AccessPORT User Manual can be found online under the Manuals tab on
http://www.cobbtuning.com/bmw.
WARNING!
Do not disturb the AccessPORT or OBD-II cable while installation is taking place. Failure to
do so may result in incomplete ECU reprogramming which will render the vehicle inoperable.
Page 6

Map Selection:
After the AccessPORT identifies the vehicle, it will present a list of maps for that vehicle. The
map selected will become the base map for the vehicle. To ensure the best performance,
select the map that most closely matches the modification level of the vehicle. Select a map and
press OK to view detailed information about that map. After confirming that the selected map is
correct, press OK again to proceed, or press CANCEL to return to the map selection list.
Save Stock ECU Program Data:
After confirming the installation map, the AccessPORT will download the current stock
ECU program data from the vehicle. The AccessPORT saves this data for use during the
Uninstall process to ensure that the vehicle is completely returned to stock. The download
process with take 8-9 minutes to complete.
Install AccessPORT Programming:
With the stock ECU data saved, the AccessPORT will proceed with installation to the vehicle. At
this point the AccessPORT reprograms the vehicle’s ECU with new program data and calibration
parameters from the selected map file. This process will take around 10 minutes to complete.
Installation Complete:
Your screen should now display “Installation Complete”. The AccessPORT is now successfully
installed. Remove the key from the ignition, place key back into the ignition, and start the
vehicle. The AccessPORT does not need to be plugged in to the vehicle again until a map
change is necessary, however, it can remain plugged in to use the Performance testing,
Live Data monitoring and Data Logging features. Please note that the AccessPORT is designed to
work with only one vehicle at a time. Once the AccessPORT is installed, it cannot be used with
another vehicle until it is uninstalled from the original vehicle.
Page 7

MAP & FIRMWARE Management
What Is A Map?
The AccessPORT reprograms the tuning parameters inside the factory engine control unit
(ECU)using map files, which contain specially written instructions for the AccessPORT to follow
during the reprogramming process. A given map file contains programming information
to properly calibrate the ECU for a specific set of modifications to a vehicle. In addition to
calibrating for specific modifications, maps are also programmed for different uses, such as
improved performance, higher fuel efficiency, alternate fuel grades, anti-abuse (valet) and anti
theft. Through the use of the AccessPORT and different map files, the ECU can be reprogrammed
to accommodate the user’s immediate need.
Downloading and Installing the AccessPORT Manager Software:
The AccessPORT Manager Software can be found at http://www.cobbtuning.com/support.
Please follow all on-screen instructions during the installation process.
Acquiring And Loading New AccessPORT Maps:
The AccessPORT ships with a number of pre-installed maps that are up-to-date at the time of
shipping. However, it is possible that newer revisions of maps have been made available, or that
the AccessPORT did not come pre-installed with a map that is appropriate for the target vehicle.
To load a new or updated map to the AccessPORT, simply download and save the map file to
an easy-to-remember location (My Documents, Desktop, etc.). After the map file is completely
downloaded, double-click the map file to automatically run the AP Manager software and
import it to the map library. With the map file in the AP Manager library, simply right-click
on the map and select “Send to AccessPORT.” Continue this process for all desired maps.
N OTE: The AccessPORT must to be installed on the vehicle before it can be connected to the
AP Manager software.
How do I update the software on my AccessPORT?
Designed with user friendliness in mind, AccessPORT Manager will automatically
communicate with COBB’s servers to find and download the latest AccessPORT application
and firmware packages. Simply plug in the AccessPORT, using the provided USB cable, and
launch
AccessPORT Manager. All firmware details are handled for you. Just sit back and wait
for completion.
Page 8

© 2011 COBB Tuning Inc. All rights reserved. AccessPORT, AccessTUNER, COBB Tuning and the COBB logo are
trademarks of COBB Tuning Inc. All other company and product names mentioned are trademarks of their
respective companies. Mention of third-party brands or products does not constitute an endorsement or
recommendation of COBB Tuning from said companies.
ph: 866.922.3059 fax: 512.997.6400
2311 W Rundberg Ln. Suite 500 Austin, TX 78758
 Loading...