

Page 1
Car Radio | CD | USB | SDHC | MP3 | WMA
www.blaupunkt.com
Caracas 2010 U 1 011 103 200
Operating and installation instructions
Mode d’emploi et de montage
Instrucciones de manejo e instalación
Instruções de serviço e de montagem
01_Caracas2010U_gb.indd 101_Caracas2010U_gb.indd 1 17.02.11 12:1317.02.11 12:13
Page 2
2
Safety Precautions Contents
PRECAUTIONS
• Use only in a 12-volt DC negative-ground
electrical system.
• Disconnect the vehicle’s negative battery
terminal while mounting and connecting the
unit.
• When replacing the fuse, be sure to use one
with an identical amperage rating. Using
a fuse with a higher amperage rating may
cause serious damage to the unit.
• DO NOT attempt to disassemble the unit.
Laser beams from the optical pickup are
dangerous to the eyes.
• Make sure that pins or other foreign objects
do not get inside the unit, they may cause
malfunctions, or create safety hazards such
as electrical shock or laser beam exposure.
• If you have parked the car for a long time in
hot or cold weather, wait until the temperature in the car becomes normal before operating the unit.
• Keep the volume at a level at which you can
hear outside warning sounds (horns sirens,
etc.).
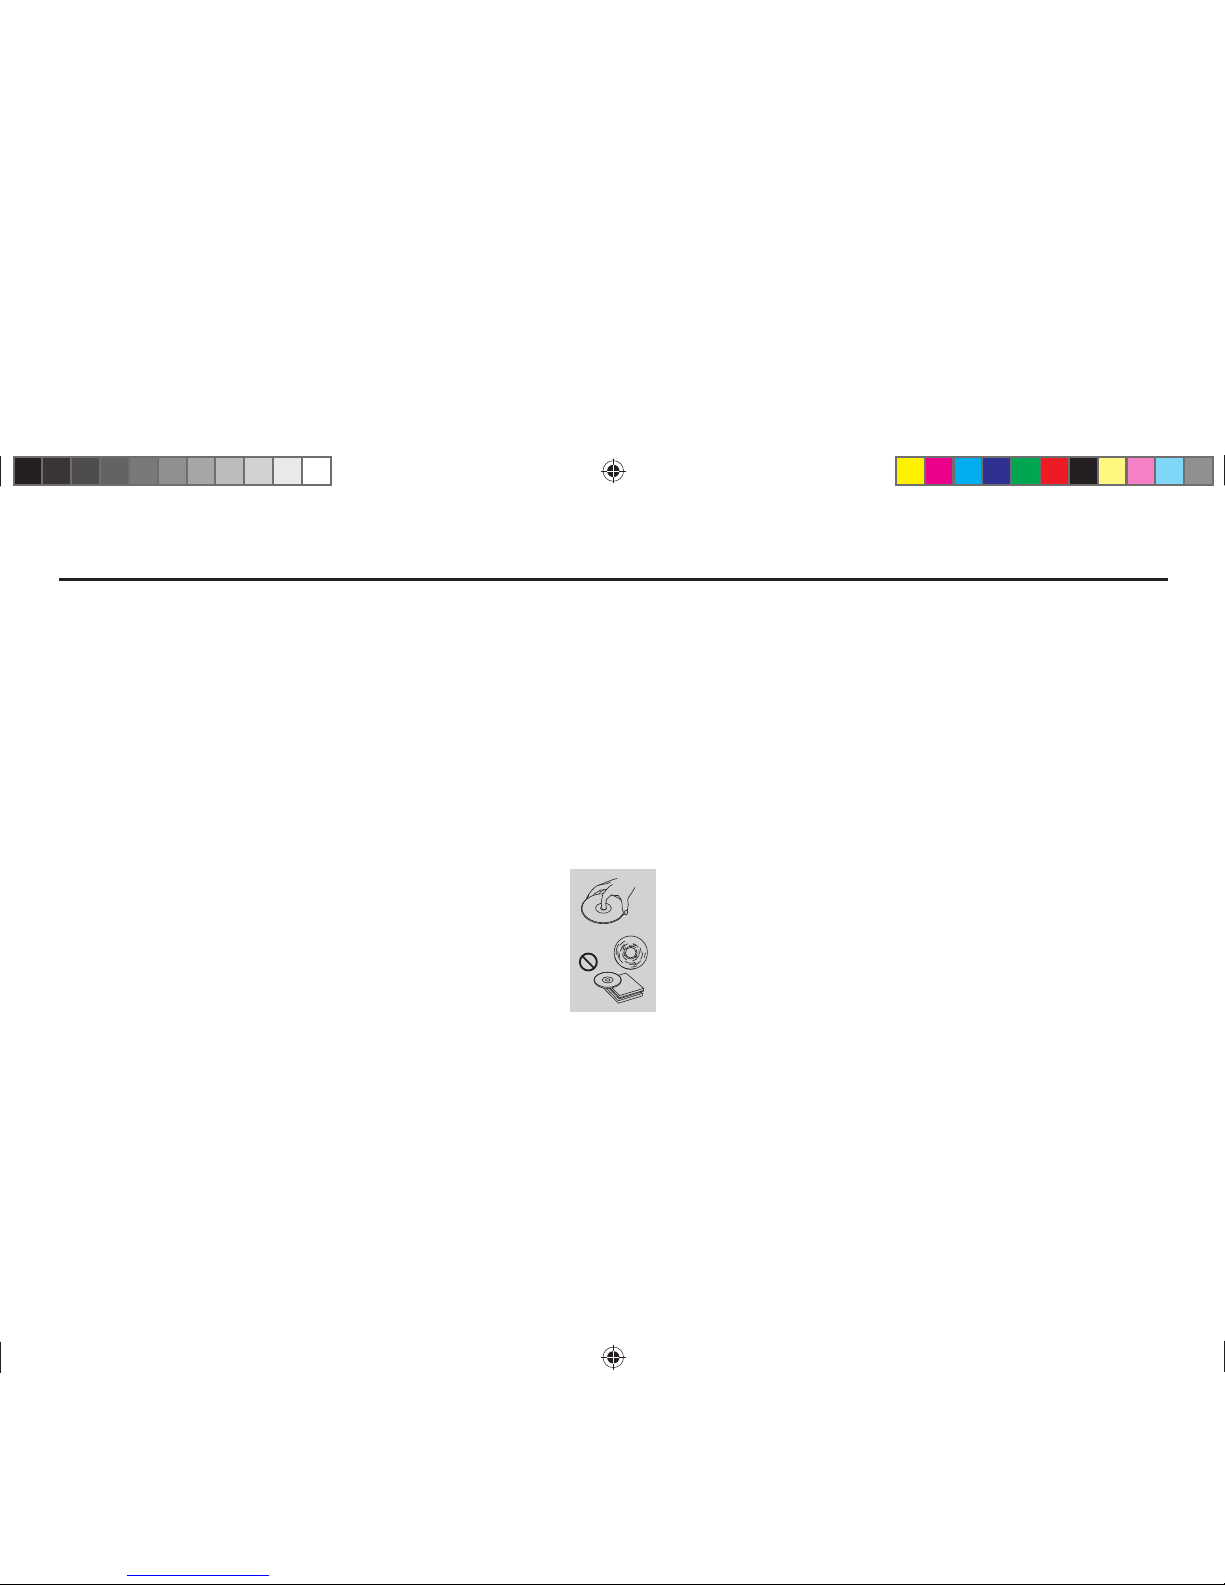
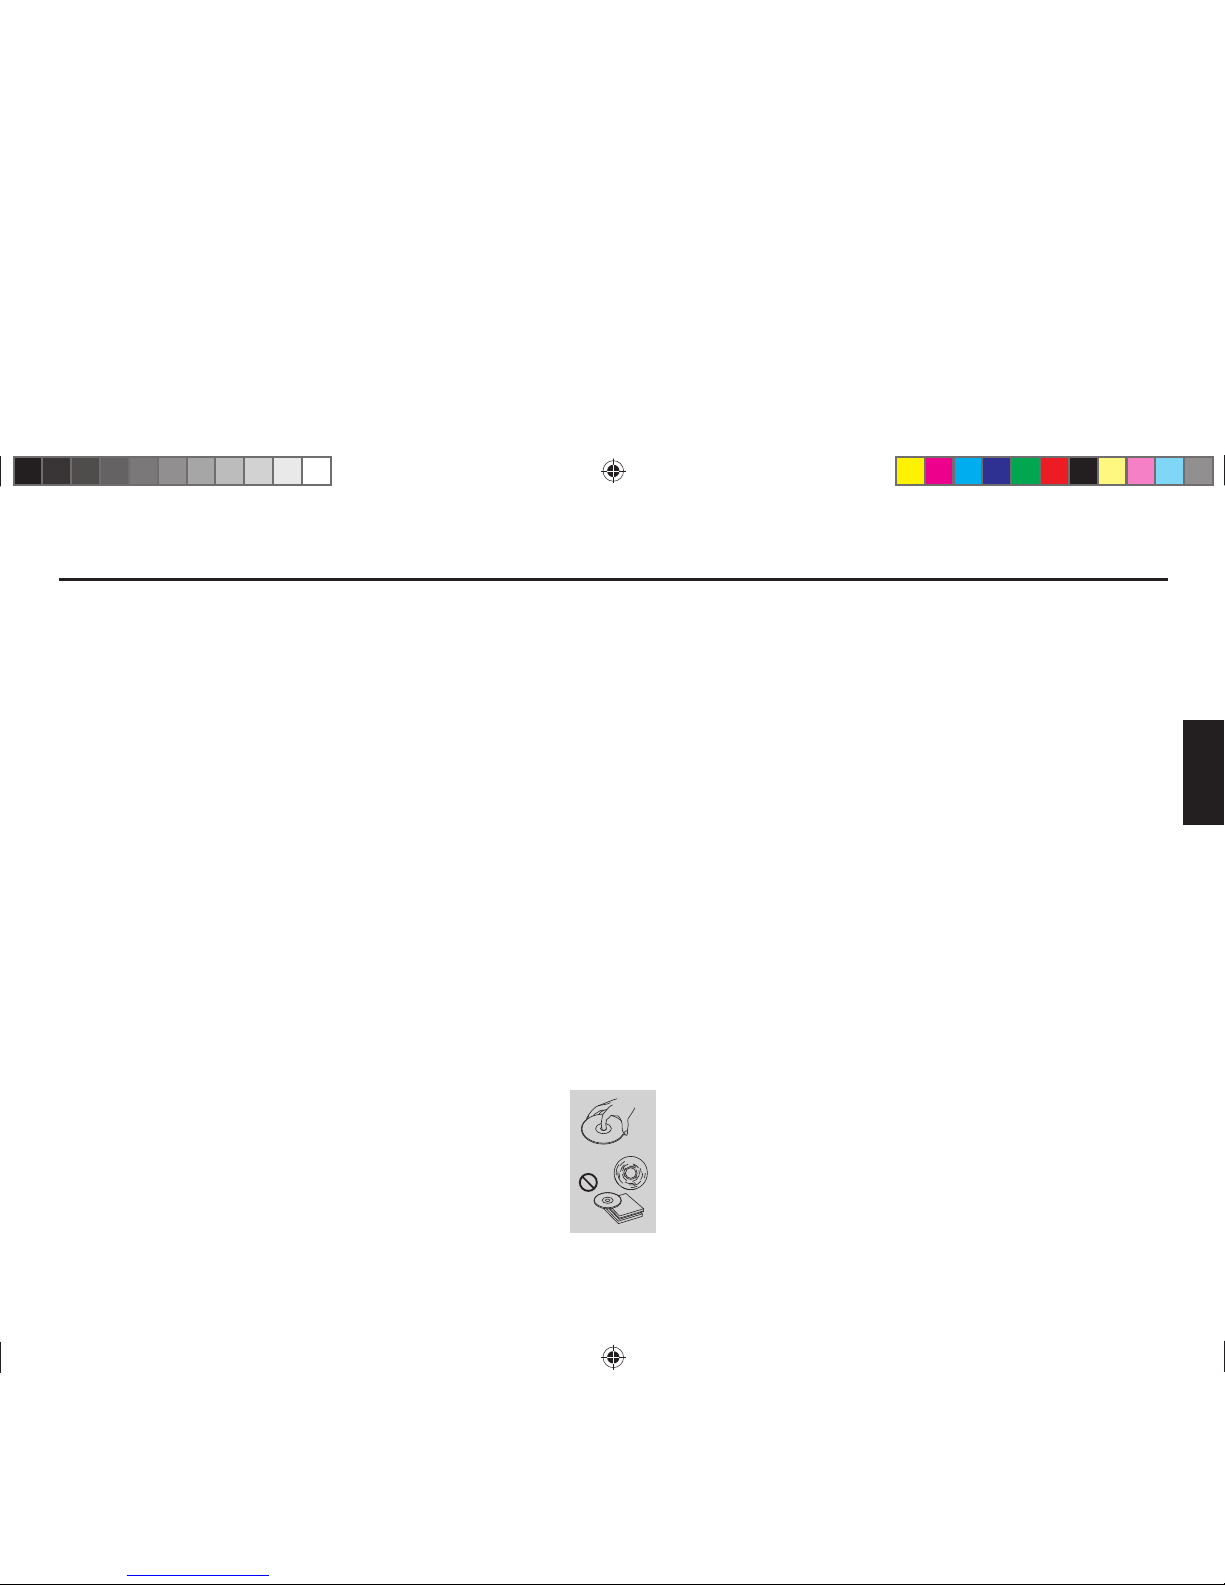
CD Notes
• Playing a defective or dusty CD can cause
dropouts in sound.
• Hold CDs as illustrated.
• Do not touch the unlabeled side.
• Do not attach any seal, label or data protection sheet to either side of a disc.
• Do not expose a CD to direct sunlight or excessive heat.
• Wipe a dirty CD from the center outward
with a cleaning cloth.
• Never use solvents such as benzine or alcohol.
• This unit cannot play 3-inch (8 cm) CDs.
NEVER insert a 3-inch CD contained in the
adapter or an irregularly shaped CD. The
unit may not be able to eject it, resulting in a
malfunction.
• In addition to ordinary CDs, this unit can
playback a CD-R or CD-RW, MP3.
Before Operation
• Do not raise the volume level too much, as
this will block outside sounds, making driving dangerous.
• Stop the car before performing any complicated operation.
CAUTION
• DO NOT open covers and do not repair
yourself. Consult the dealer or an experienced technician for help.
Safety Precautions .........................................2
Panel Controls ................................................3
Remote Controls............................................. 4
General Operation ..........................................5
Radio Mode .................................................... 7
USB/SD/MMC Mode....................................... 8
CD Player Operation ......................................9
Playing MP3/WMA Files ...............................10
Electrical Connections ..................................12
Anti-Theft System .........................................13
Installation Guide .......................................... 14
Troubleshooting ............................................ 15
Specifications ............................................... 16
01_Caracas2010U_gb.indd 201_Caracas2010U_gb.indd 2 17.02.11 12:1317.02.11 12:13
Page 3
3
ENGLISH
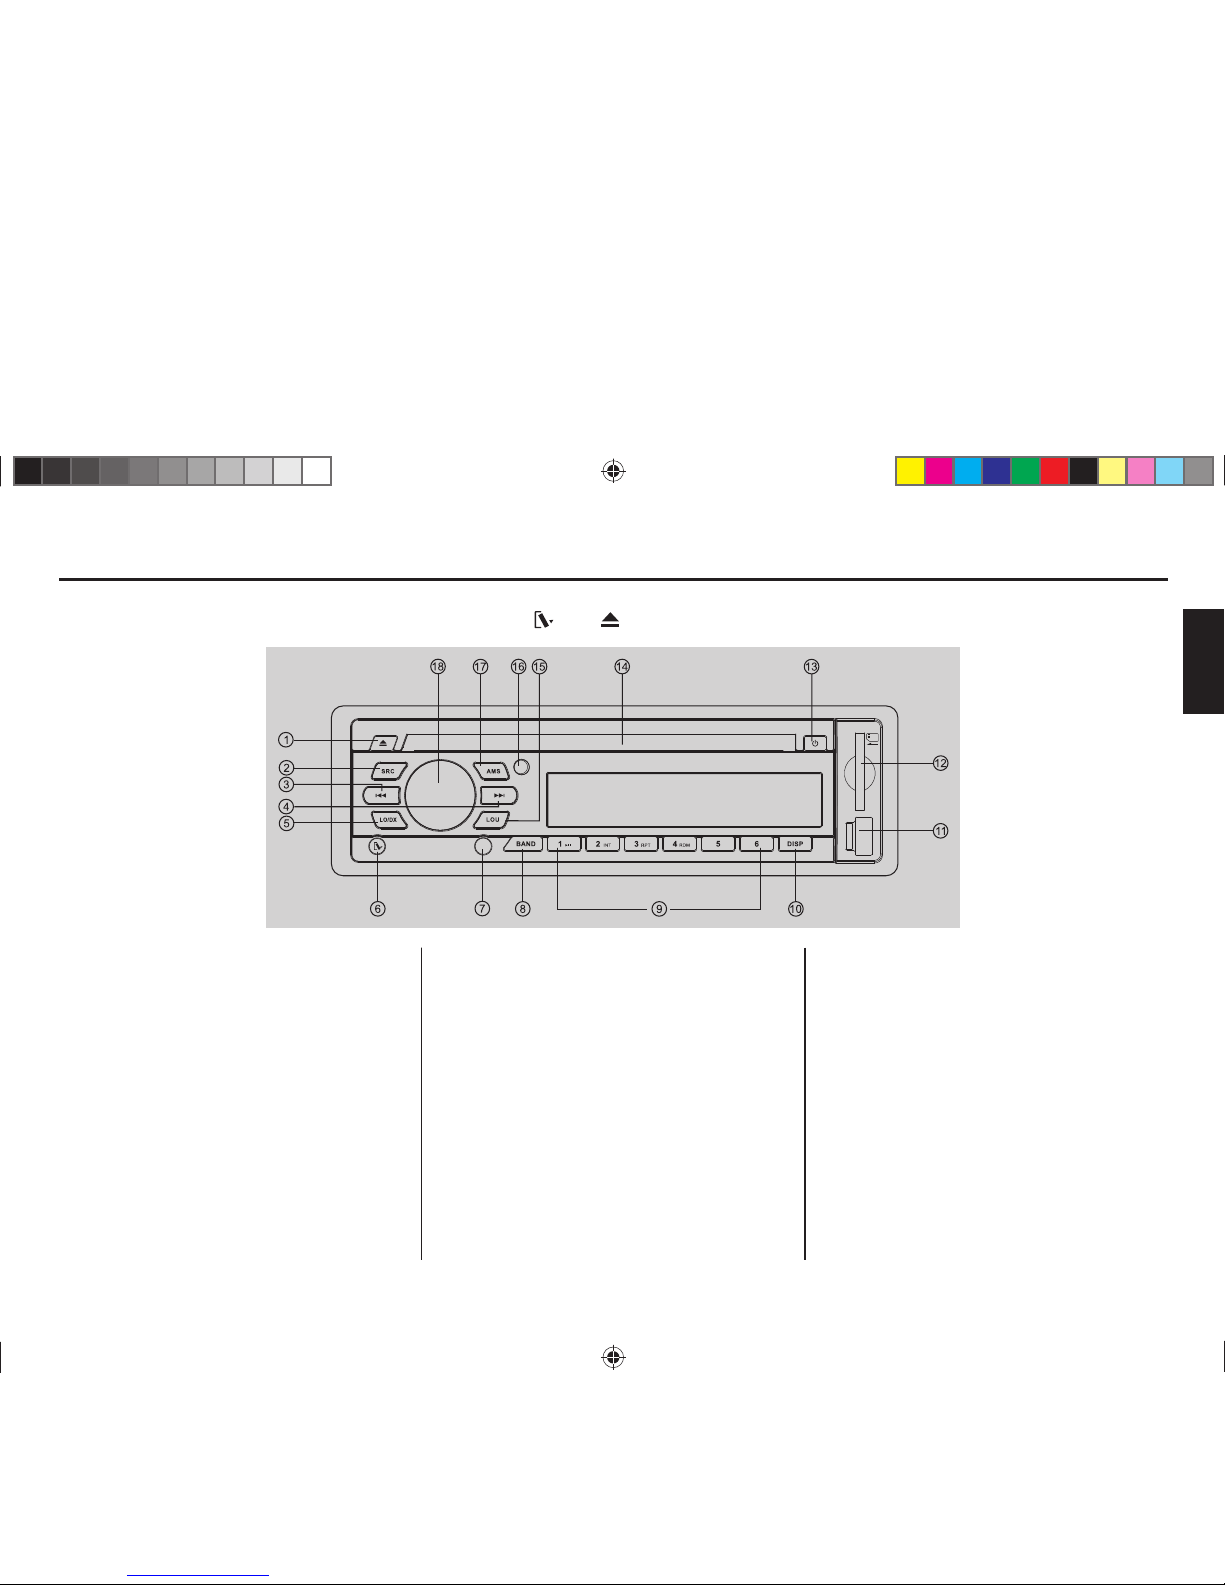
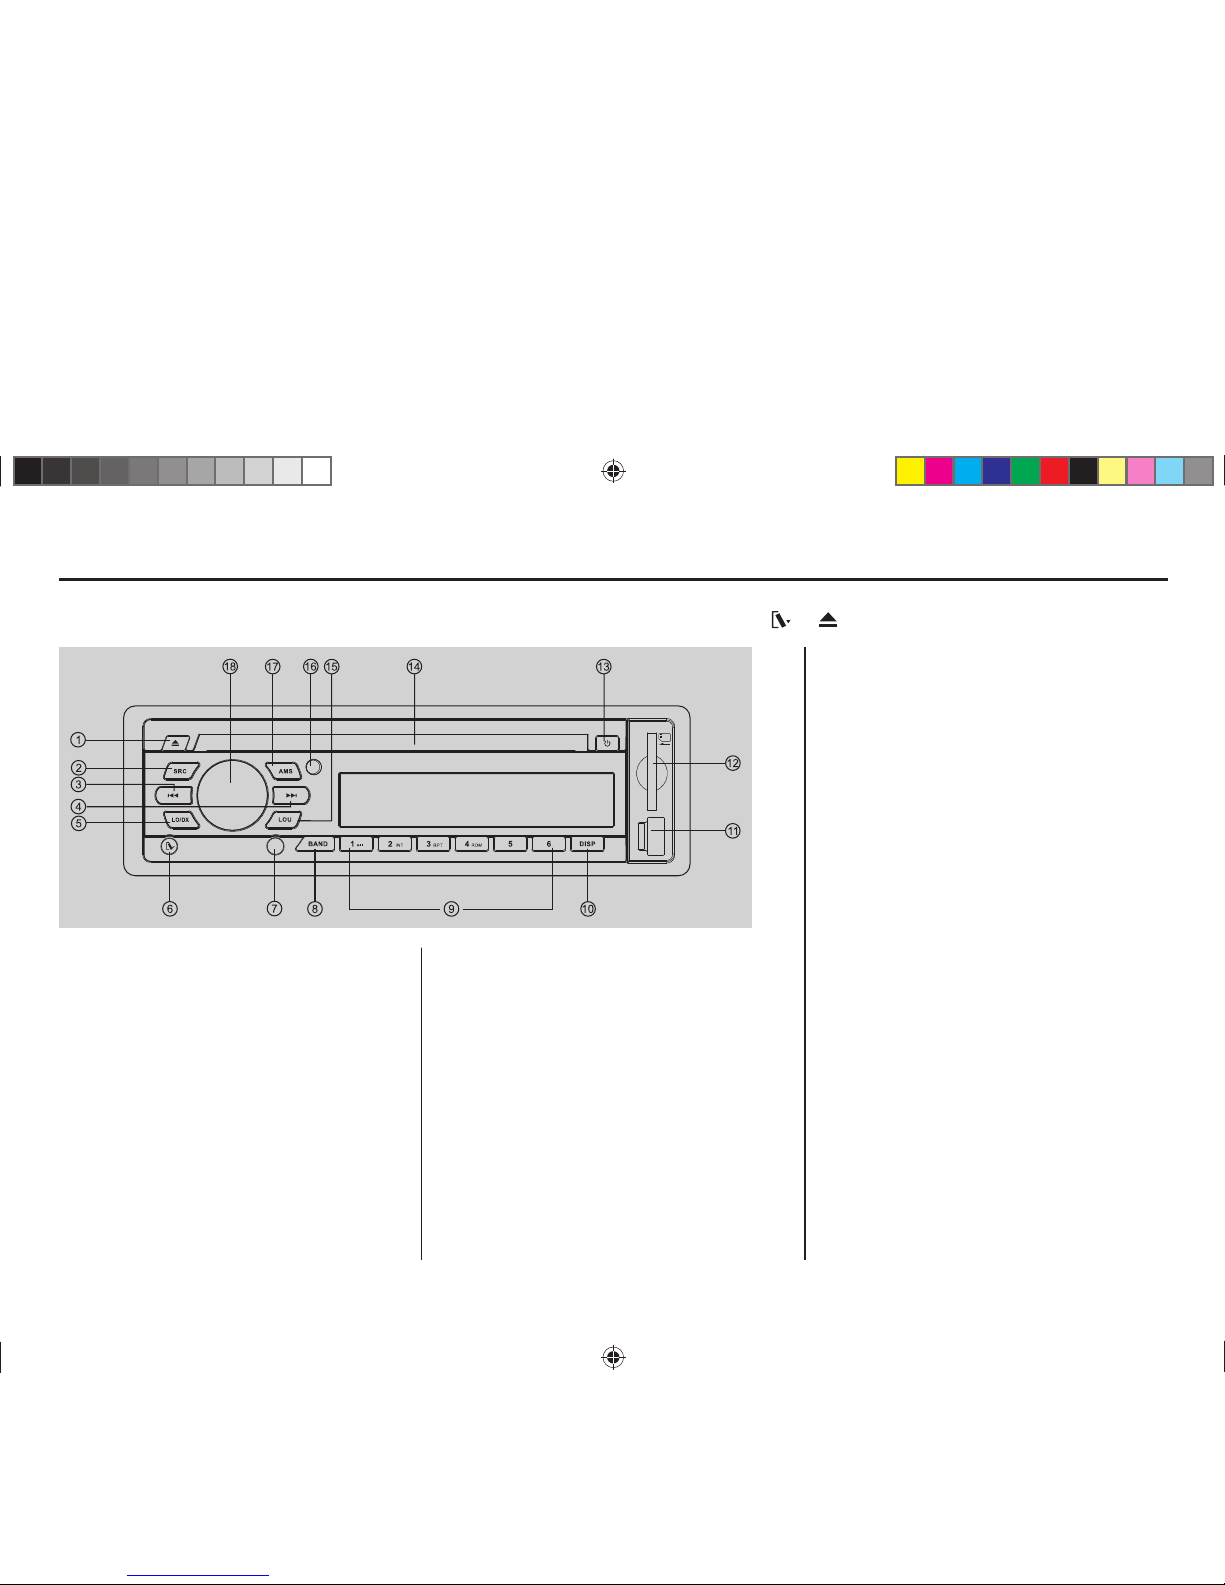
Panel Controls
Power on: Press any button on the panel except and to turn on the unit.
1. Disc eject
2. - Radio
- Disc play (when disc inserted)
- USB (when USB connected)
- Card (when SD/MMC card inserted)
- Aux-in
3. & 4. - Radio tune
- Track seek
5. Radio local/distant
6. Panel release
7. Aux-in jack
8. Band switch:
FM1, FM2, FM3, MW1, MW2
9. - Disc playback
• Button 1: Play/Pause
Top play (press more than 2 sec.)
• Button 2: Intro play (10 sec.)
• Button 3: Track repeat play
• Button 4: Track random play
• Button 5: - MP3 folder down (If there are
more than 1 folders)
- MP3 track -10 down (long
press)
• Button 6: - MP3 folder up (If there are
more than 1 folders)
- MP3 track +10 up (long press)
- Radio preset 1~6
- Press to tune in a preset station.
- Hold for more than 2 seconds to store
station.
10. - Short press to switch to clock display,
press again to exit.
- Short press to display USB information in
USB mode.
- Long press to enter clock setting.
11. USB connector
12. SD/MMC card slot
13. - Power on / off (long press)
- Mute
14. Disc slot
15. Loudness
16. Remote sensor
17. Radio station auto preset
18. - Rotate the knob to adjust volume level.
- Push to select VOL/BAS/MID/TRE/BAL/
FAD, rotate the knob to adjust level.
- Press more than 2 seconds to enter
menu mode.
01_Caracas2010U_gb.indd 301_Caracas2010U_gb.indd 3 17.02.11 12:1317.02.11 12:13
Page 4
4
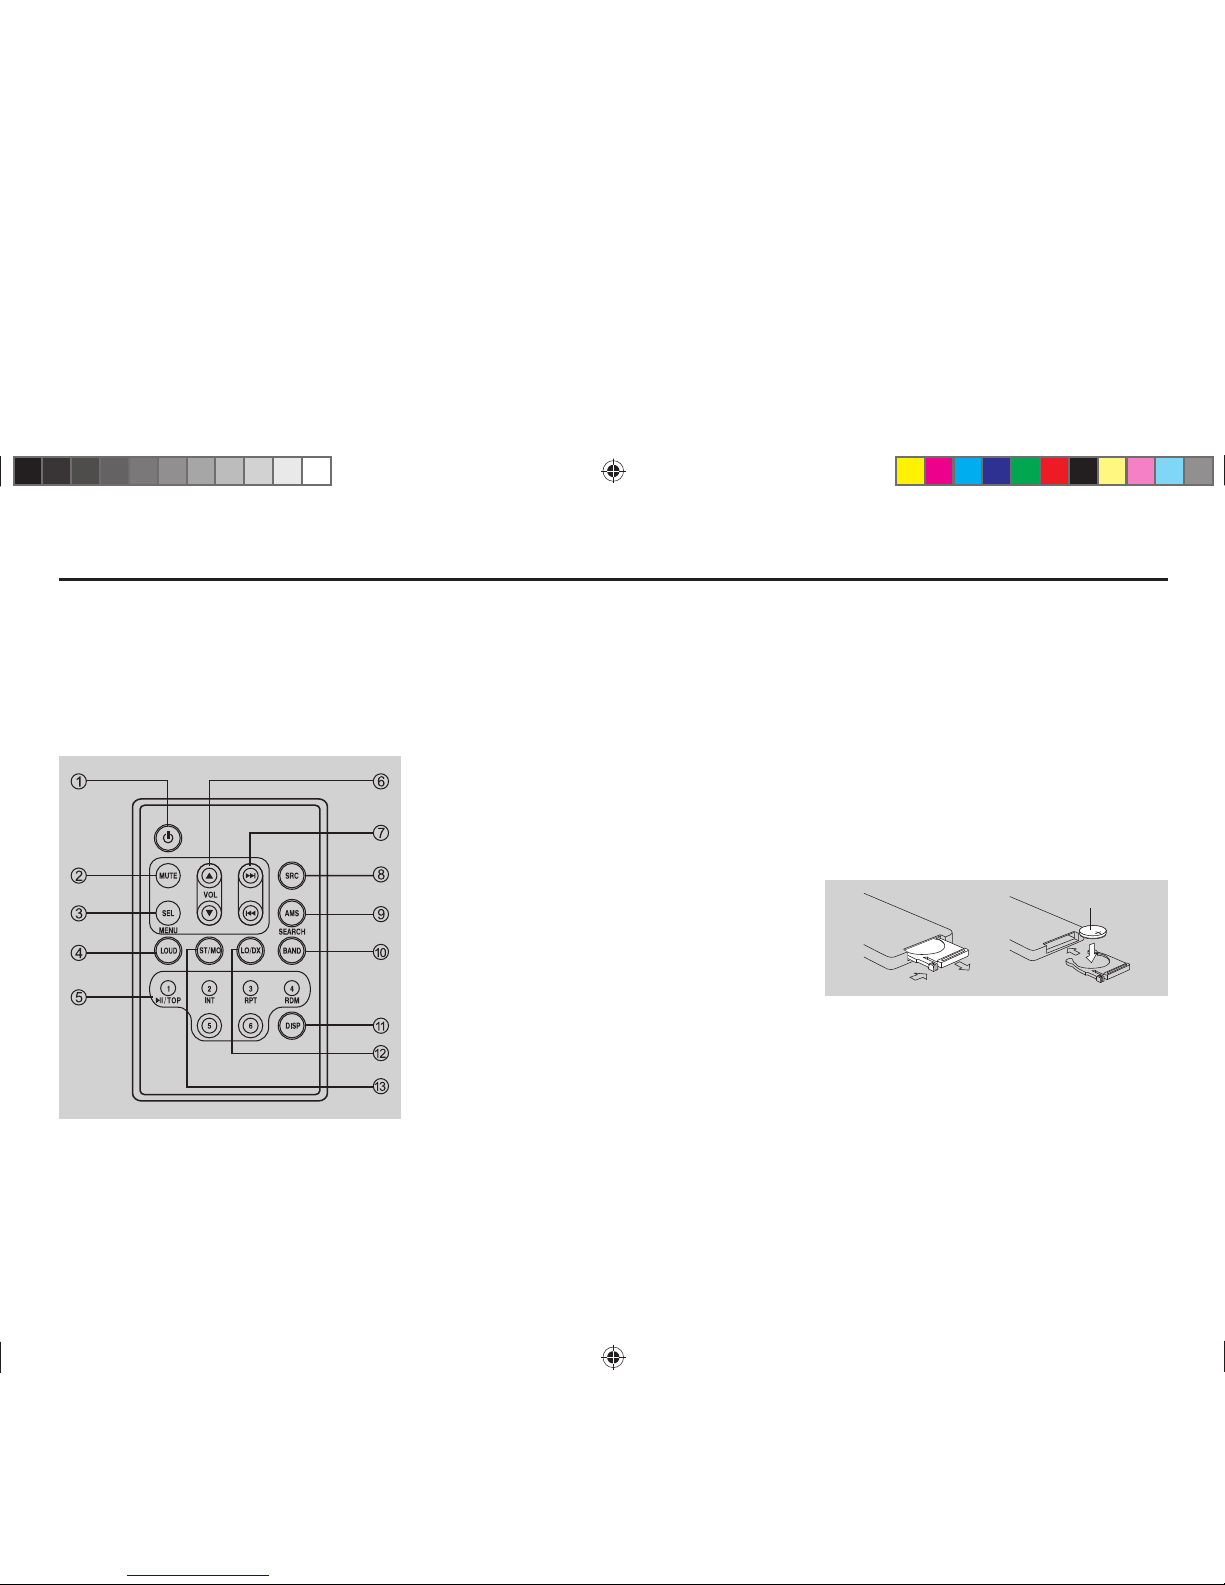
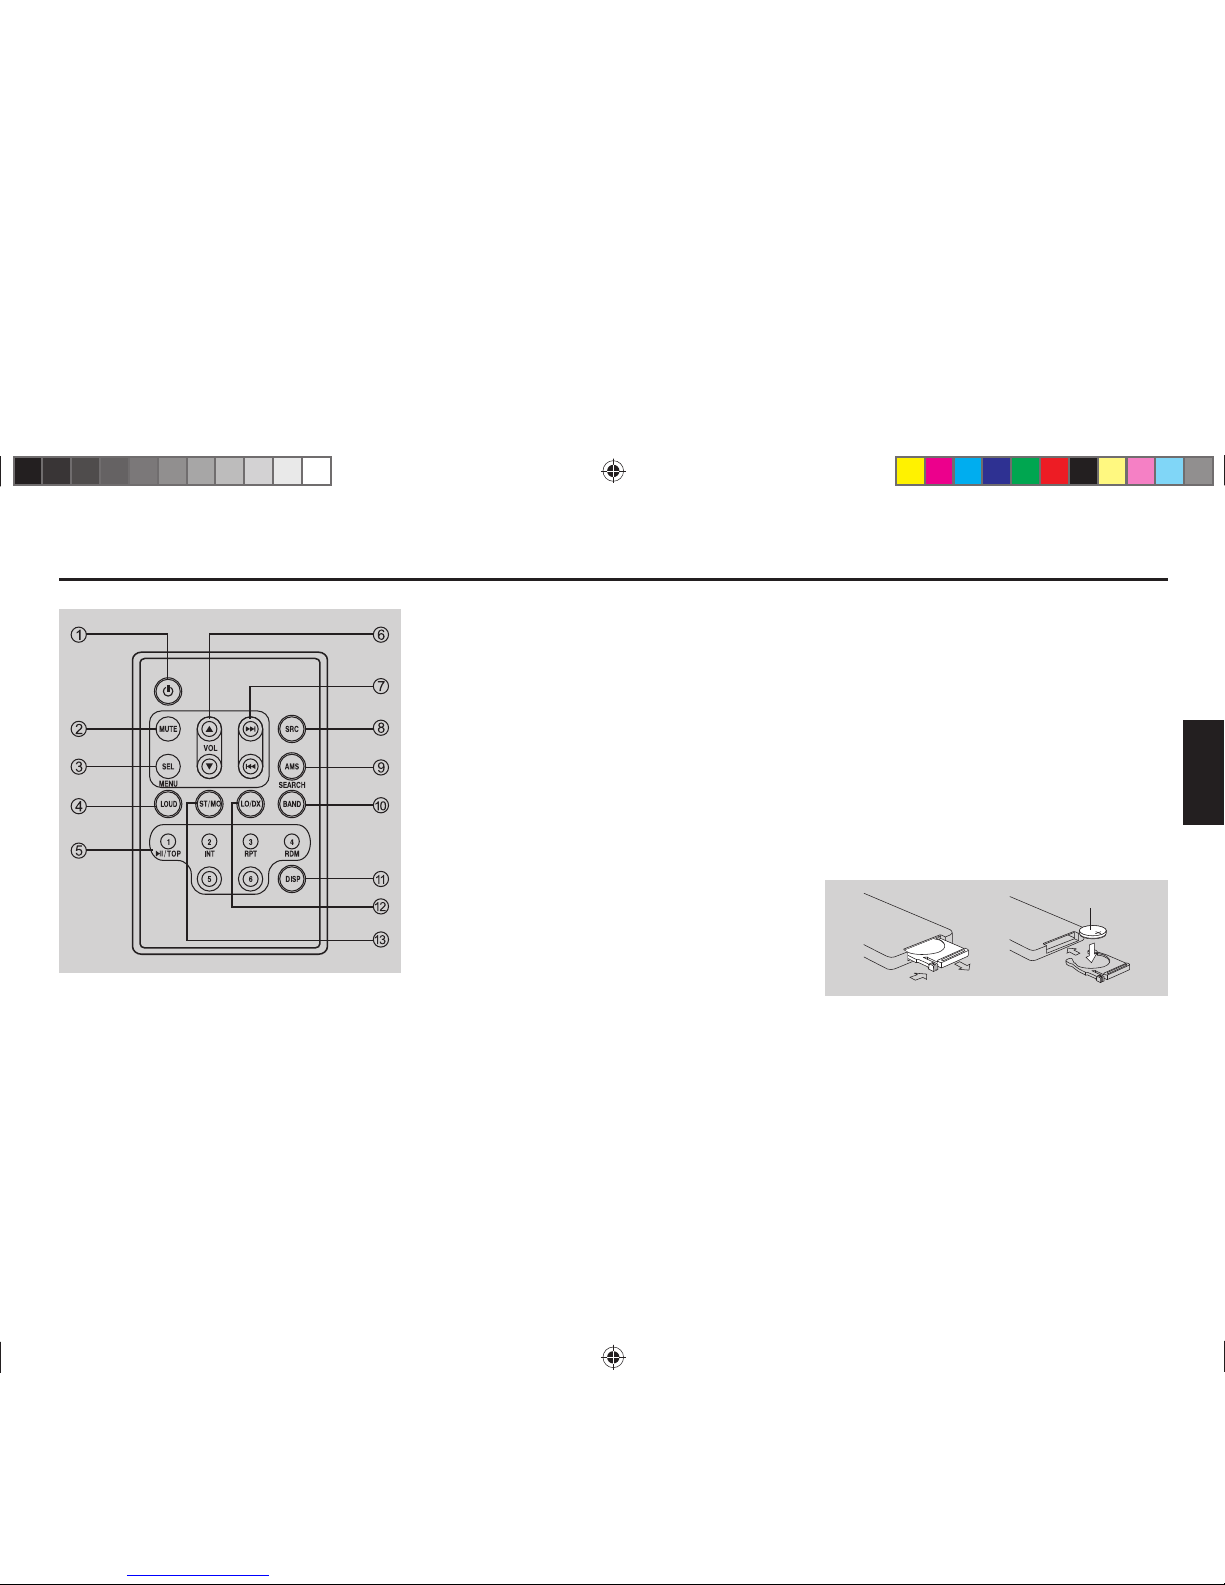
Remote Controls
1. - Power on/off
2. - Mute
3. - Press to select VOL/BAS/MID/TRE/BAL/
FAD, use volume button to adjust level.
- Long press to enter menu mode.
4. - Loudness
5. - Track playback
Button 1: Press briefly to Play/Pause.
Top play (long press)
Button 2: Intro play (10 sec.)
Button 3: Track repeat play
Button 4: Track random play
Button 5: - MP3 folder down
- MP3 track -10 down (long
press)
Button 6: - MP3 folder up
- MP3 track +10 up (long press)
- 1-6 Button: Radio preset
Press to listen to a preset station, hold
for more than 2 seconds to store station.
6. - Volume
7. - Radio tune
- Track seek
8. - Radio
- Disc play (when disc inserted)
- Card (when SD/MMC card inserted)
- USB (when USB connected)
- Aux-in
9. - AMS: Radio auto preset/Radio preset scan
- MP3 track/file/character search
10. - Band switch
11. - Display switch
12. - Radio local/distant
13. - FM stereo/mono
Replacing the lithium battery of
remote control unit.
When the range of the operation of the card
remote control becomes short or no functions
while operating. Replace the battery with a
new lithium battery. Make sure the battery polarity replacement is correct.
1. Pull out the battery holder while pressing
the stopper.
2. Insert the button-type battery with the
stamped (+) mark facing upward.
Insert the battery holder into the remote
control.
(CR 2025)
1 2
01_Caracas2010U_gb.indd 401_Caracas2010U_gb.indd 4 17.02.11 12:1317.02.11 12:13
Page 5
5
ENGLISH
Remote Controls General Operation
Power On/Off Button
Press the button to turn the unit on when the
vehicle ignition switch is on. Press and hold
the button to turn the unit off.
Adjust Volume level
Rotate the
VOL/MENU
knob to adjust volume
level. Rotate it clockwise to increase and anticlockwise to decrease the volume.
Audio Mute
Press the button to mute the volume from
the system. "MUTE" will appear on the display
panel and the volume will be muted. Press the
button again, or rotate the
VOL/MENU
knob
to return the volume level to the setting in use
before the mute function was activated.
Audio Controls
To adjust the bass, treble, middle, balance and
fader, press the
VOL/MENU
knob repeatedly
until the appropriate audio control appears on
the display panel. Within five seconds, rotate
the
VOL/MENU
knob to select a value.
-VOL
Display shows the volume level VOL and number from 0 to 47.
- BAS
Display shows the BASS level.
BASS range: -7 to +7.
- MID
Display shows the middle level.
Middle range: -7 to +7.
- TRE
Display shows the TREBLE level.
TREBLE range: -7 to +7.
- BAL
Display shows the BALANCE level.
BALANCE range: 12 L (full left) to 12 R (full
right).
L = left speaker, R = right speaker.
- FAD
Display shows the FADER level.
FADER range: 12 R (full rear) to 12 F (full
front).
R = rear speaker, F = front speaker.
Mode Button (SRC)
Press the
SRC
button to change between
Radio, DISC (when disc is in), USB (when
USB is connected), Card (when SD/MMC card
is in) or AUX play, etc.
Auxiliary Input
To access an auxiliary device:
1. Connect the portable audio player to the
AUX interface on the front panel.
2. Press the
SRC
button to select Aux-In
mode.
Press the
SRC
button again to cancel Aux-In
mode and go to the next mode.
WARNING:
• Store the battery in place where children cannot reach. If a child accidentally swallowed
the battery, consult a doctor immediately.
• Do not recharge, short, disassemble or heat
the battery or dispose it in a fire. Doing any
of these things may cause the battery to
give off heat, crack or catch fire.
• Do not leave the battery with other metallic
materials.
• When throwing away or saving the battery,
wrap it in tape and insulate.
• Do not poke the battery with tweezers or
similar tools. Doing this may cause the battery to give off heat, crack or catch fire.
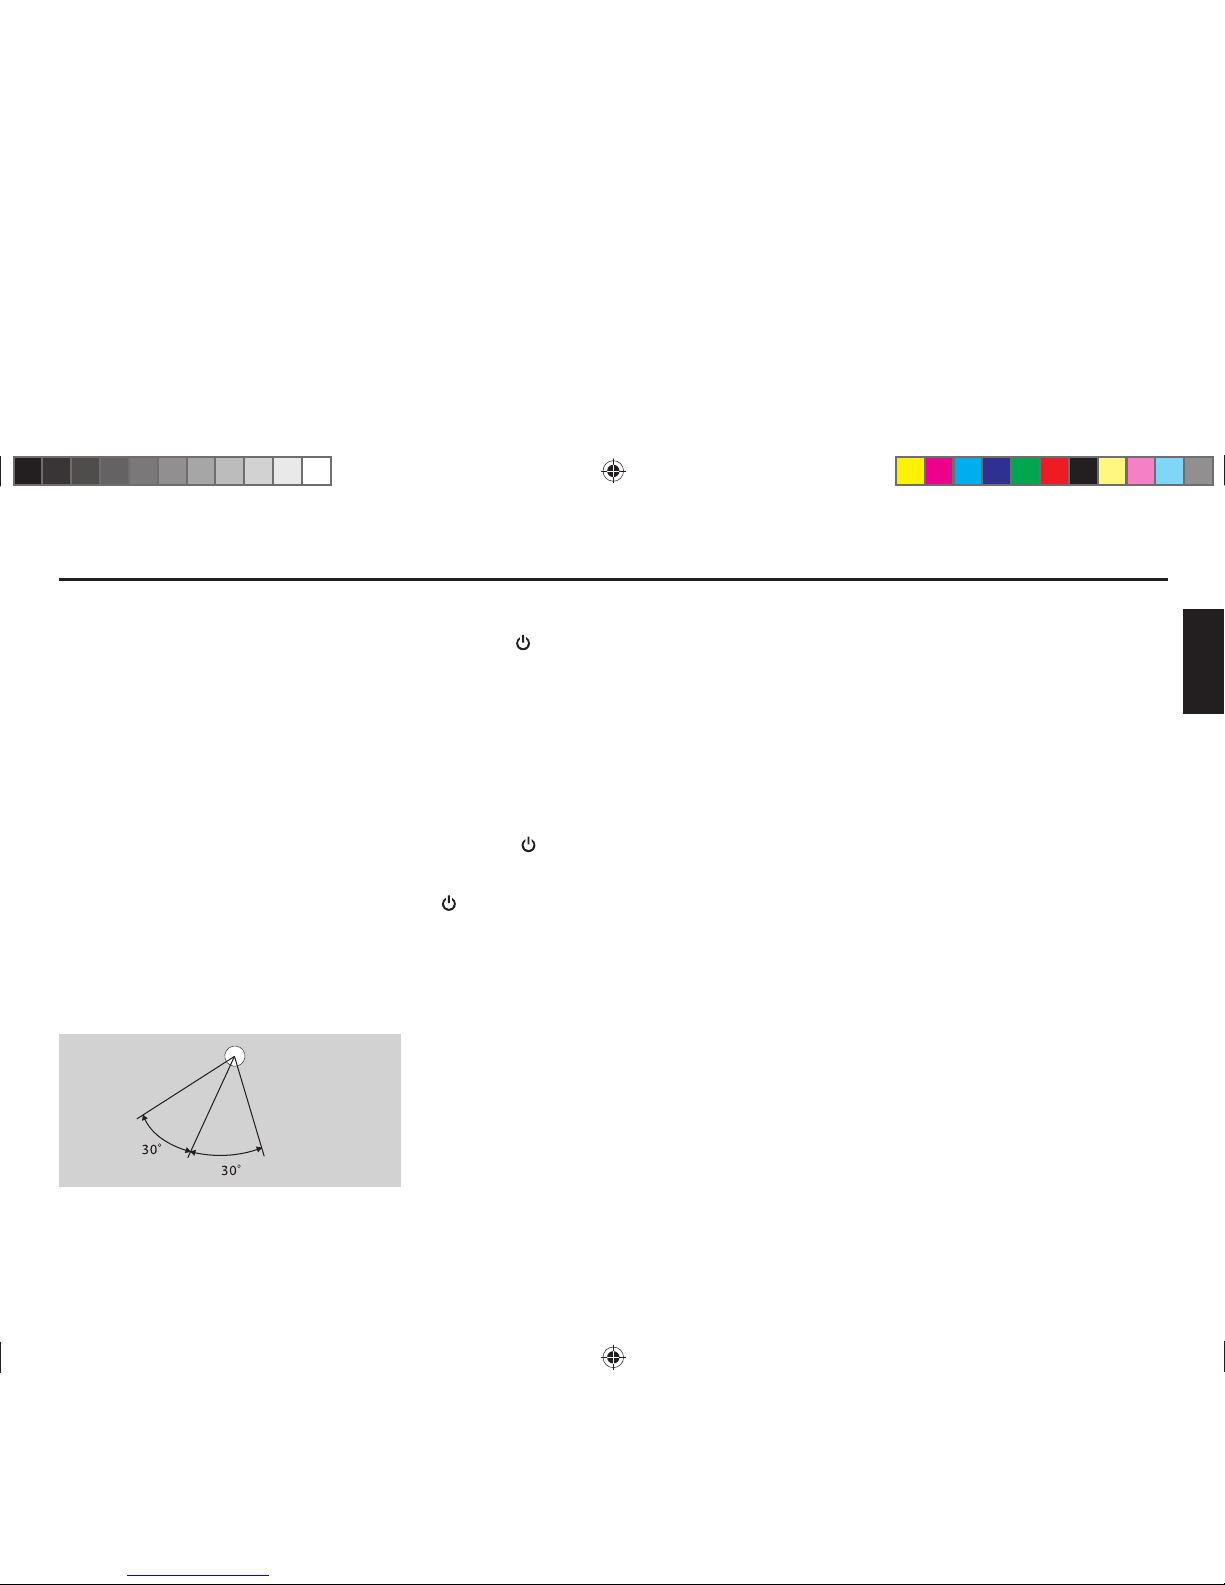
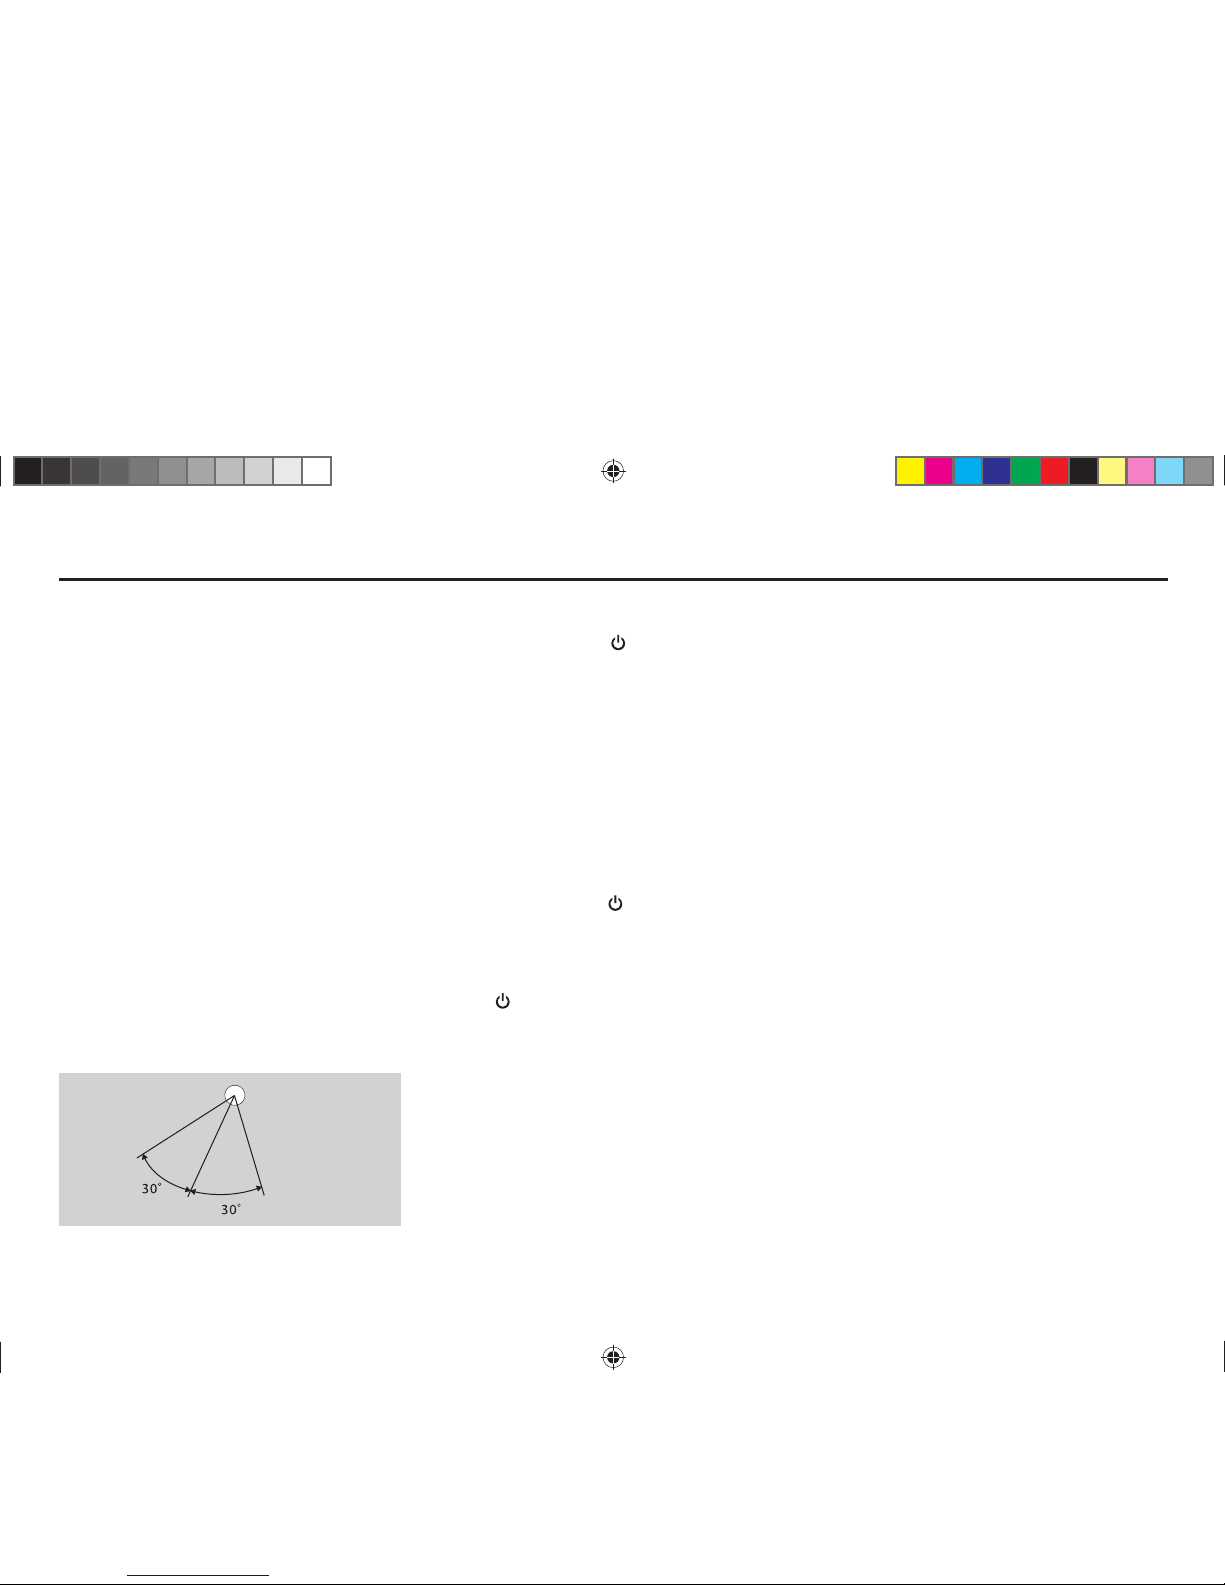
Remote control operating range
The remote control can operate within a distance of 3~5 m.
Point the top of remote control to the remote
sensor when you operate with it.
Remote sensor
01_Caracas2010U_gb.indd 501_Caracas2010U_gb.indd 5 17.02.11 12:1317.02.11 12:13
Page 6

6
Setting the Clock
The correct time of day can be set by pressing
and holding the
DISP
button.
To set the clock, perform the following steps:
1. Turn the vehicle ignition and radio on.
2. Press the
DISP
button to view the clock.
3. With the clock visible on the display, press
and hold the
DISP
button until the time dis-
play flashes.
4. Within 5 seconds, rotate the
VOL/MENU
control counter clockwise to adjust the minutes to the desired setting. To change the
hour, rotate the
VOL/MENU
control clock-
wise to adjust the hour to the desired time.
Display Selector (DISP)
This unit can display either the clock time or
radio frequency/CD player functions. Ordinarily, the radio frequency or CD player track
indication is displayed, but the unit will display
the time when the
DISP
button is pressed. The
time will display for approximately 5 seconds
then return to the radio or CD player function
display.
Loudness (LOUD)
When listening to music at low volumes, this
feature will selectively boost certain bass and
treble frequencies. Press the
LOU
button to
choose LOUD on or off.
- ROLL mode:
Rotate the
VOL/MENU
knob to choose roll on
or off.
When ROLL is ON, the LCD will display MP3
ID3 tag information cyclically, e.g: FOLDER
> FILE > ALBUM > TITLE > ARTIST > Track
Number/Elapsed Time.
When ROLL is OFF, the LCD just will display
"Play time".
- 12/24 HOURS mode:
Rotate the
VOL/MENU
knob to select 12 or 24
hour mode.
- AREA SET
This option allows you to select the appropriate
frequency spacing for your area.
Rotate the
VOL/MENU
knob to choose USA or
Europe.
General Operation
Menu Setting
Press and hold the
VOL/MENU
knob more
than 2 seconds to enter menu mode, then
each press changes the mode as follows:
- DSP mode:
Rotate the
VOL/MENU
knob to choose DSP
sound effect:
POP->ROCK->CLASSIC->FLAT->DSP OFF
- BEEP ON/OFF:
Rotate the
VOL/MENU
knob to choose beep
sound on or off.
- SEEK 1/2 mode (Radio mode):
Rotate th
VOL/MENU
knob to choose radio
seek mode 1 or 2.
SEEK 1: Searching station will stop when next
station is received.
SEEK 2: Searching station will stop when
or button is released and next station is
received.
- VOL LAST/ADJ mode
Rotate the
VOL/MENU
knob to choose power
on volume mode.
VOL LAST: The turn on volume level is the volume level of latest power off.
VOL ADJUST: Press to enter A-VOL mode,
then rotate to set the turn on volume level.
01_Caracas2010U_gb.indd 601_Caracas2010U_gb.indd 6 17.02.11 12:1317.02.11 12:13
Page 7
7
ENGLISH
Radio Mode
Selecting a Band
Press
BAND
once or more to select FM1 - FM2
- FM3 - MW1 - MW2.
Display shows wave band, frequency, and preset station number if already stored.
Selecting a Station
Press the or tuning button to tune to
another station.
Up Tuning
Press the seek up button to tune stations
upward step-by-step. The current frequency
will be shown in digital format on the display
panel.
Press and hold the seek button to the next
available station.
Down Tuning
Press the seek down button to tune stations downward step-by-step.
Press and hold the seek down button to
the previous available station.
Preset Mode
Six numbered preset buttons store and recall
stations for each band. The stored stations
(1-6) for the current band can be viewed on the
screen.
Storing Stations
- Auto storing
1. Select a band (if needed).
2. Press
AMS
briefly to search all stations in
the band, the 6 strongest available station
will be automatically saved in the preset
button (numbers 1-6).
- Manual storing
1. Select a band (if needed), then select a station.
2. Press and hold a preset button (numbers
1-6) on the front panel or remote control.
3. The preset number and station is displayed
and highlighted.
Recalling a Station
1. Select a band (if needed).
2. Press a front panel or remote control preset
button (numbers 1-6) to select the corresponding stored station.
01_Caracas2010U_gb.indd 701_Caracas2010U_gb.indd 7 17.02.11 12:1317.02.11 12:13
Page 8
8
USB/SD/MMC Mode
1. Load SD/MMC Card
Insert the SD/MMC card into the slot. The unit
will read the file of the card automatically.
2. Take out SD/MMC Card
Press
SRC
button to non-SD mode, press the
SD/MMC card to pop out.
3. Load USB Device
Insert USB device into the USB jack. The unit
will read the file in the USB device automatically.
4. Take out USB Device
Press the
SRC
button to non-USB mode and
take out the USB device from the USB jack.
USB/SD/MMC Notes
USB functions (flash memory type) and MP3
music play.
1. SD/MMC card support.
2. USB flash memory 2 in 1 (SD/MMC) support.
3. FAT 12 / FAT 16 / FAT 32 is possible.
4. File name: 32 byte / dir name: 32 byte / tag
name: 32 byte
5. Tag (ID3 tag ver 2.0)
Title / artist / album: 32 byte upport.
6. Multi card reader not support.
7. USB 1.1 support
USB 2.0 support (It can not support USB 2.0
speed. Just, get the same speed with USB
1.1).
Not all kinds of USB devices are compatible
with the unit.
01_Caracas2010U_gb.indd 801_Caracas2010U_gb.indd 8 17.02.11 12:1317.02.11 12:13
Page 9

9
ENGLISH
CD Player Operation
Inserting a Disc
With the label surface facing up, fully insert a
compact disc into the disc slot until the mechanism engages and pulls the disc in. Play will
automatically begin from the first track on the
disc.
NOTE:
The unit is designed for play of standard 5" (12 cm) compact discs only. Do not
attempt to use 3" (8 cm) CD singles in this unit,
either with or without an adaptor, as damage to
the player and/or the disc may occur.
Disc Eject Button
Press the eject button to stop disc play and
eject the disc. The unit will revert to radio operation. Discs may be ejected with the vehicle
ignition switch on or off. If an ejected disc is not
removed from the disc slot within 10 seconds
of being ejected, the disc will be re-inserted
automatically.
NOTE:
To prevent a disc from accidentally being damaged, always remove the disc from the
unit when disc play is finished.
CD Play/Pause Selector
Press the 1/ button to freeze disc playback.
Press 1/ again to resume disc playback.
Seek Up/Next Track
Press the next track button during disc play
to select the beginning of the next track.
Seek Down/Previous Track
Press the previous track button during
disc play to select the beginning of the current
track. Press twice to select the beginning of
the previous track.
Cue/Review Functions
High-speed audible search to any section of
the disc can be made by the Cue and Review
functions. Press and hold the next track
button to advance rapidly in the forward direction or the previous track button to advance rapidly in the backward direction.
Intro Play Selector
During disc play, press the
2/INT
button to select "INT ON" and play the first 10 seconds of
each track. When a desired track is reached,
press the
2/INT
button to select "INT OFF" and
play the current track.
Track Repeat Play Select
During disc play, press the
3/RPT
button to
select "RPT TRK" and repeatedly play the selected track. Press
3/RPT
button again to select "RPT FOLD" and repeatedly play all tracks
in the current folder. Repeat play will continue
until
3/RPT
is pressed to select "RPT OFF".
Random Play Select
During disc play, press the
4/RDM
button to
select "RDM ON" and play all tracks on the
disc in random, shuffled order. In Random Play
mode, you can press the tune/track buttons to
select tracks in a random order instead of the
normal progression. Press
4/RDM
button again
to select "RDM OFF" and cancel Random Play
mode.
01_Caracas2010U_gb.indd 901_Caracas2010U_gb.indd 9 17.02.11 12:1317.02.11 12:13
Page 10

10
Playing MP3/WMA Files
Information
During playback, ID3 tag information display scrolling on the screen: FOLDER, FILE,
ALBUM, TITLE, ARTIST and Track Number/
Elapsed Time.
Folder Up/Down
Press the 5 button to go to the previous folder.
Press the 6 button to go to the next folder.
Direct Song/File Access
1. Press the
AMS
button once and press the
VOL/MENU
knob to enable direct track
searching.
2. Rotate the
VOL/MENU
knob to select a
digit.
3. Press the
VOL/MENU
knob to confirm entry
and the tens digit will flash.
4. Rotate the
VOL/MENU
knob to select digit.
5. Repeat above steps to enter the hundreds
and thousands digit, if necessary.
NOTE:
The unit will only allow the selection
of digits that correspond with the number of
files on the media you are searching.
6. Once the track number appears on the
screen, press the
VOL/MENU
knob to play
the selected song/file.
Searching Folders/Files
1. Press the
AMS
button twice and press the
VOL/MENU
knob to access the file search
option.
2. Rotate the
VOL/MENU
knob to select the
desired directory/song.
3. Press the
VOL/MENU
knob to view the files
inside the selected directory.
4. Rotate the
VOL/MENU
knob to select the
song/file. Press the
VOL/MENU
knob to
play the selected song/file.
Searching by Name (CHAR-SCH)
1. Press the
AMS
button three times and
press the
VOL/MENU
knob to access the
character search option.
2. Rotate the
VOL/MENU
knob to select the
characters A-Z, _ , - , + , and 0-9 for the first
character.
3. Press the
VOL/MENU
knob to confirm entry
of the character and move to the next position.
4. Repeat for up to eight characters.
5. Press the
VOL/MENU
knob to begin the
search.
6. If a song/file is found, press the
VOL/MENU
knob to play the selected song/file.
NOTE:
"NOT FIND" appears if there is no
file beginning with the search string entered.
MP3 Overview
• MP3 is short for MPEG Audio Layer 3 and
refers to an audio compression technology
standard.
• This product allows playback of MP3 files on
CD-R or CD-RW discs.
• The unit can read MP3 files written in the
format compliant with ISO 9660. However
it does not support the MP3 data written by
the method of packet write.
• The unit can not read an MP3 file that has a
file extension other than ".mp3".
• If you play a non-MP3 file that has the ".mp3"
extension, you may hear some noise.
• In this manual, we refer to what are called
"MP3 file" and "folder" in PC terminology as
"Track" and "Album", respectively.
• Maximum number of directory level is 8, including the root directory. Maximum number
of files and folders per disc is 256.
• The unit may not play tracks in the order of
track numbers.
• The unit plays only the audio tracks if a disc
contains both audio tracks and MP3 files.
• When playing a disc of 8 kbps or VBR*, the
elapsed playing time in the display window
will not be correct and also the intro play
may not function properly.
*VBR: Variable Bit Rate.
01_Caracas2010U_gb.indd 1001_Caracas2010U_gb.indd 10 17.02.11 12:1317.02.11 12:13
Page 11

11
ENGLISH
Note on creating your own CD-Rs
or CD-RWs containing MP3 files
• To enjoy high quality sound, we recommend
converting to MP3 files with a sampling frequency of 44.1 kHz and a fixed bit rate of
128 kbps.
• DO NOT store more than 256 MP3 files per
disc.
• For ISO 9660-compliant format, the maximum allowable depth of nested folders is 8,
including the root directory(folder).
• When CD-R disc is used, playback is possible only for discs which have been finalized.
• Make sure that when MP3 CD-R is burned
that it is formatted as a data disc and NOT
as an audio disc.
• You should not write non-MP3 files or unneeded folders along with MP3 files on the
CD-R otherwise it takes a long time until the
unit starts to play MP3 files.
• With some CD-R media, data may not be
properly written depending on their manufacturing quality. In this case, data may not
be reproduced correctly. High quality CD-R
disc is recommended.
• Up to 16 characters are displayed for the
name of an Album or a Track. ID3 tag version 1.x is required.
• Note that the unit may not play tracks in the
order that you wrote them to the disc.
Playing MP3/WMA Files
01_Caracas2010U_gb.indd 1101_Caracas2010U_gb.indd 11 17.02.11 12:1317.02.11 12:13
Page 12
12
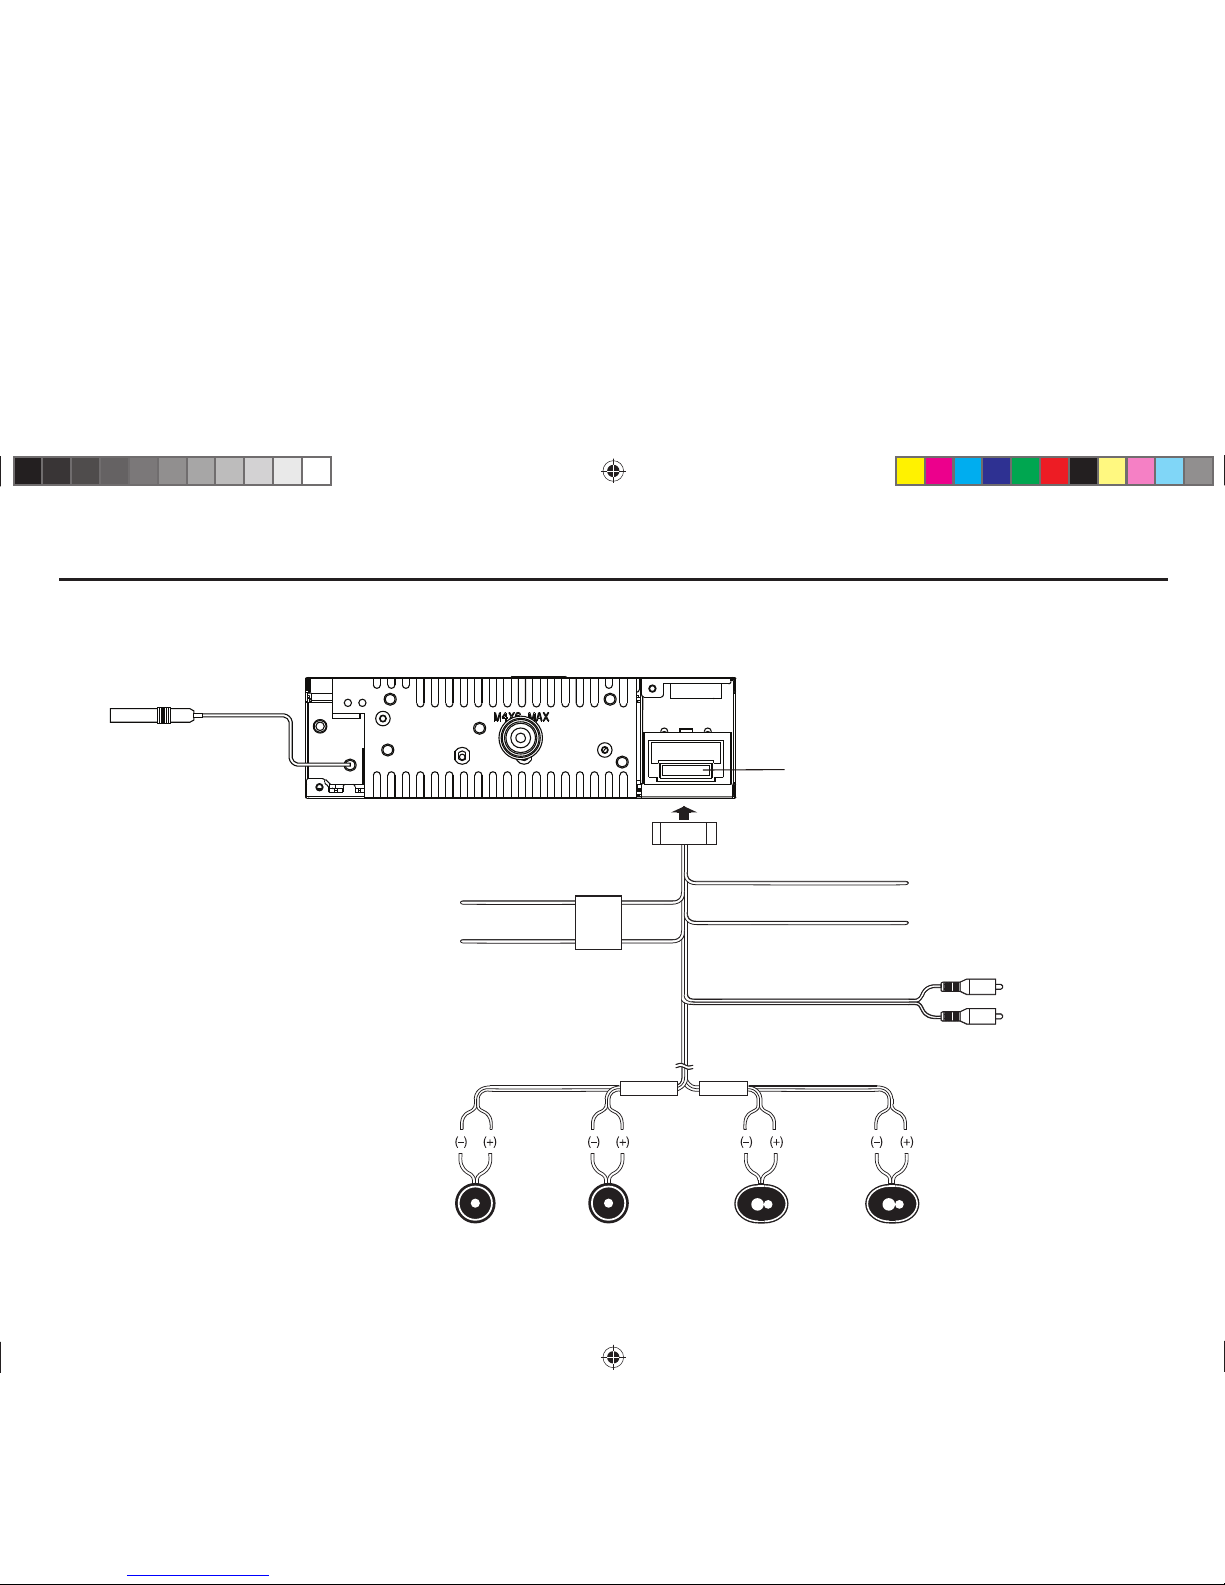
Electrical Connections
Wiring Diagram
FRONT SP
PurplePurple/Black
Stripe
GreyGrey/Black
Stripe
White/Black
Stripe
White Green/Black
Stripe
Green
Right Speaker
(Rear)
Right Speaker
(Front)
Left Speaker
(Front)
Left Speaker
(Rear)
Filter
Box
Ground Lead
To car battery (+)
continuous +12V DC
Black
Yellow
Blue
Red
Motor/Electric Antenna relay control Lead
Amplifier relay control Lead
Ignition key +12V DC
when ON/ACC
REAR SP
Line-out
(Grey)
R (Red)
L (White)
(Black)
Fuse 15A
Antenna
01_Caracas2010U_gb.indd 1201_Caracas2010U_gb.indd 12 17.02.11 12:1317.02.11 12:13
Page 13
13
ENGLISH
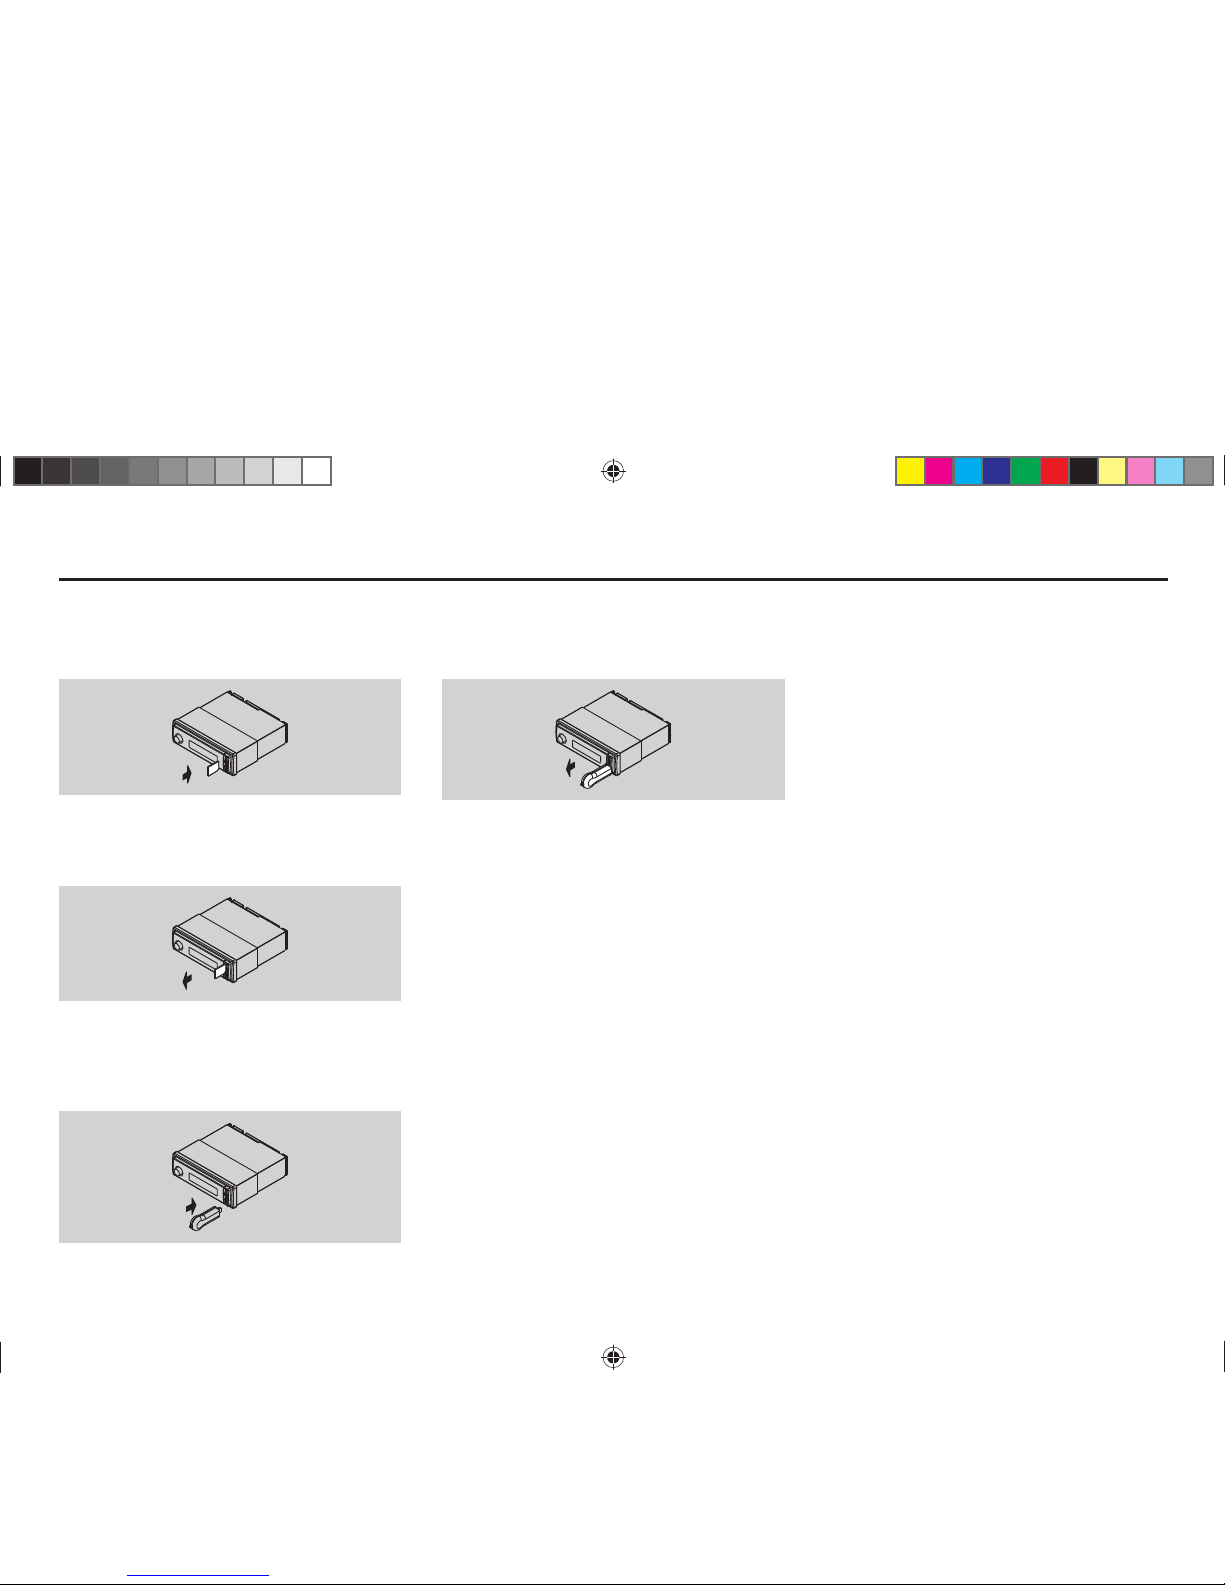
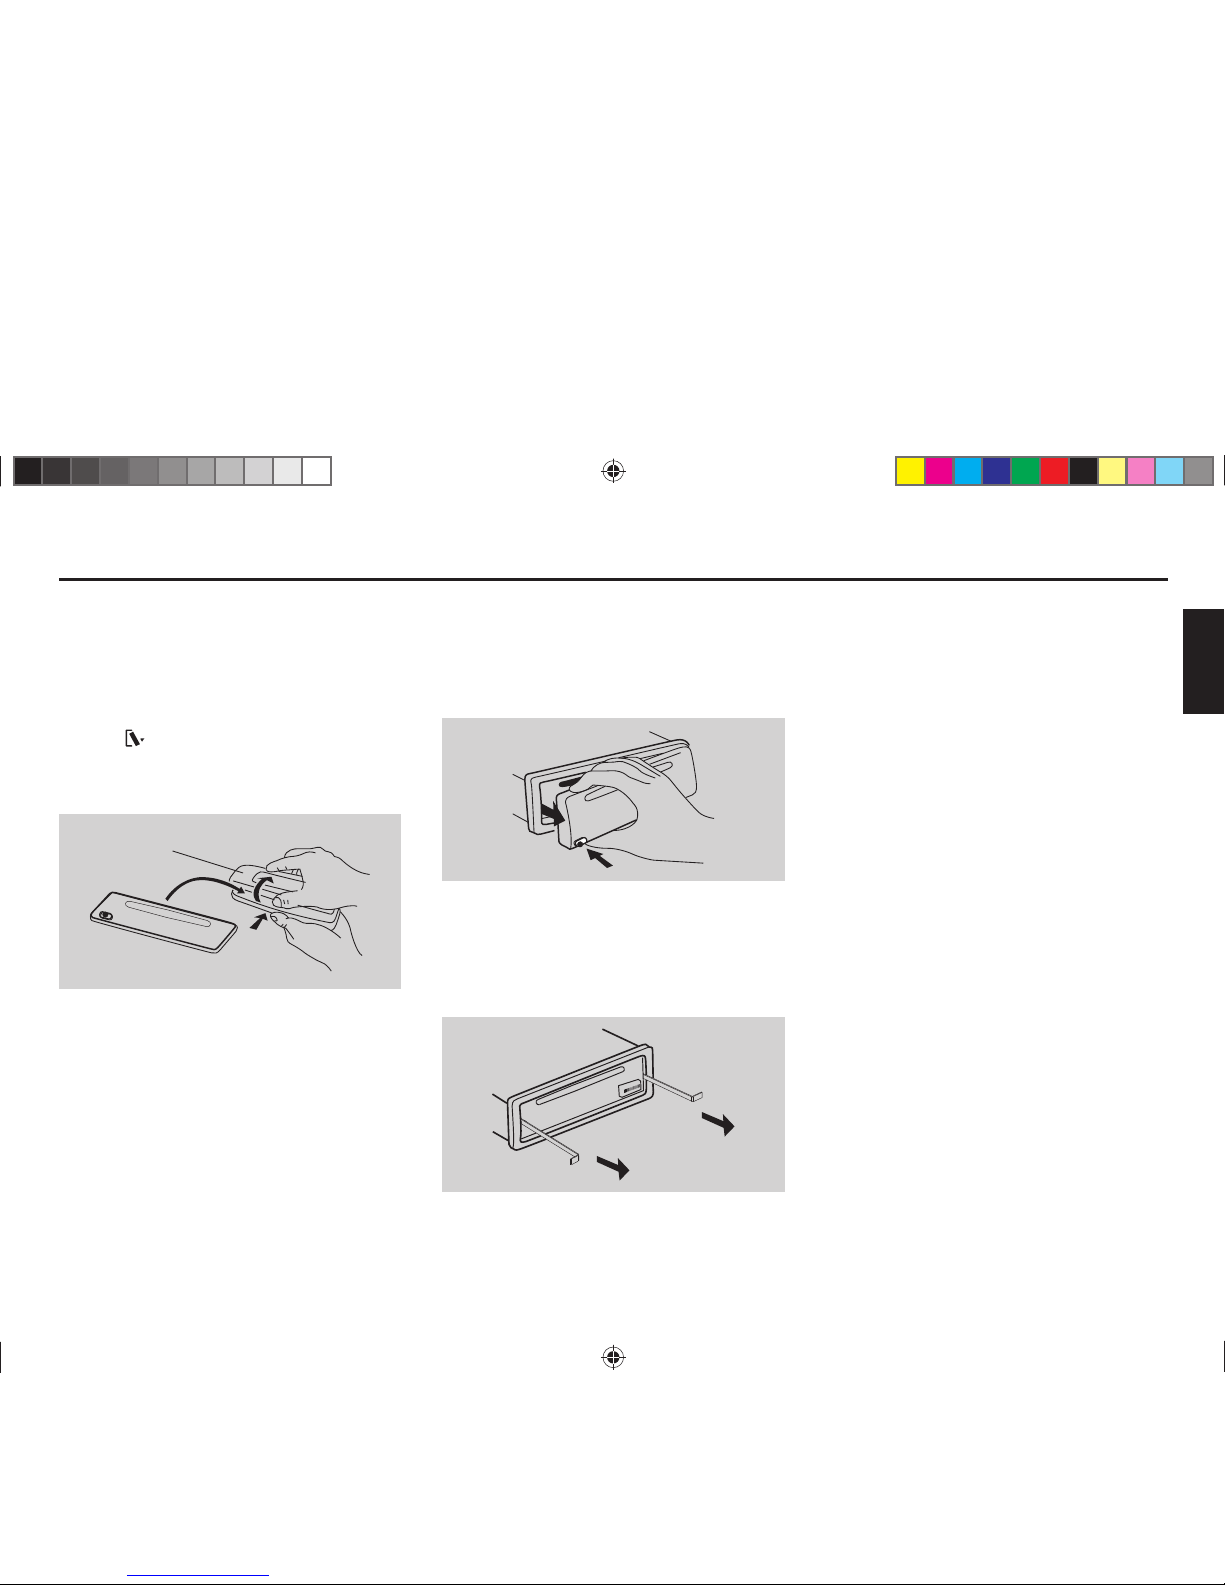
This unit is equipped with a detachable panel.
Panel can be detached and taken with you,
helping to deter theft.
Removing the Panel
1. Switch off the power of the unit.
2. Press
button.
3. At an angle hold the panel to pull it out.
4. Place the panel into the case and take it
with you when you leave the car.
Detachable panel case
Installing the Panel
1. Hold the panel and ensure the panel faces
toward you, and set the right side of the
panel in the panel bracket.
2. Press the left side of the panel until it locks.
Removing the Unit
1. Remove the panel and the trim plate.
2. Insert both L-keys into hole on the front of
the set until they lock.
3. Pull out the unit.
Anti-Theft System
01_Caracas2010U_gb.indd 1301_Caracas2010U_gb.indd 13 17.02.11 12:1317.02.11 12:13
Page 14
14
Installation Guide
Installation Procedures
First complete the electrical connections, and
then check for correctness.
Reset
Press button. At an angle hold the panel to
pull it out. Then press the
RESET
button with
a pointed object to reset the unit to the original
status.
Note:
Press the
RESET
button will erase the
clock and stored stations.
Reset
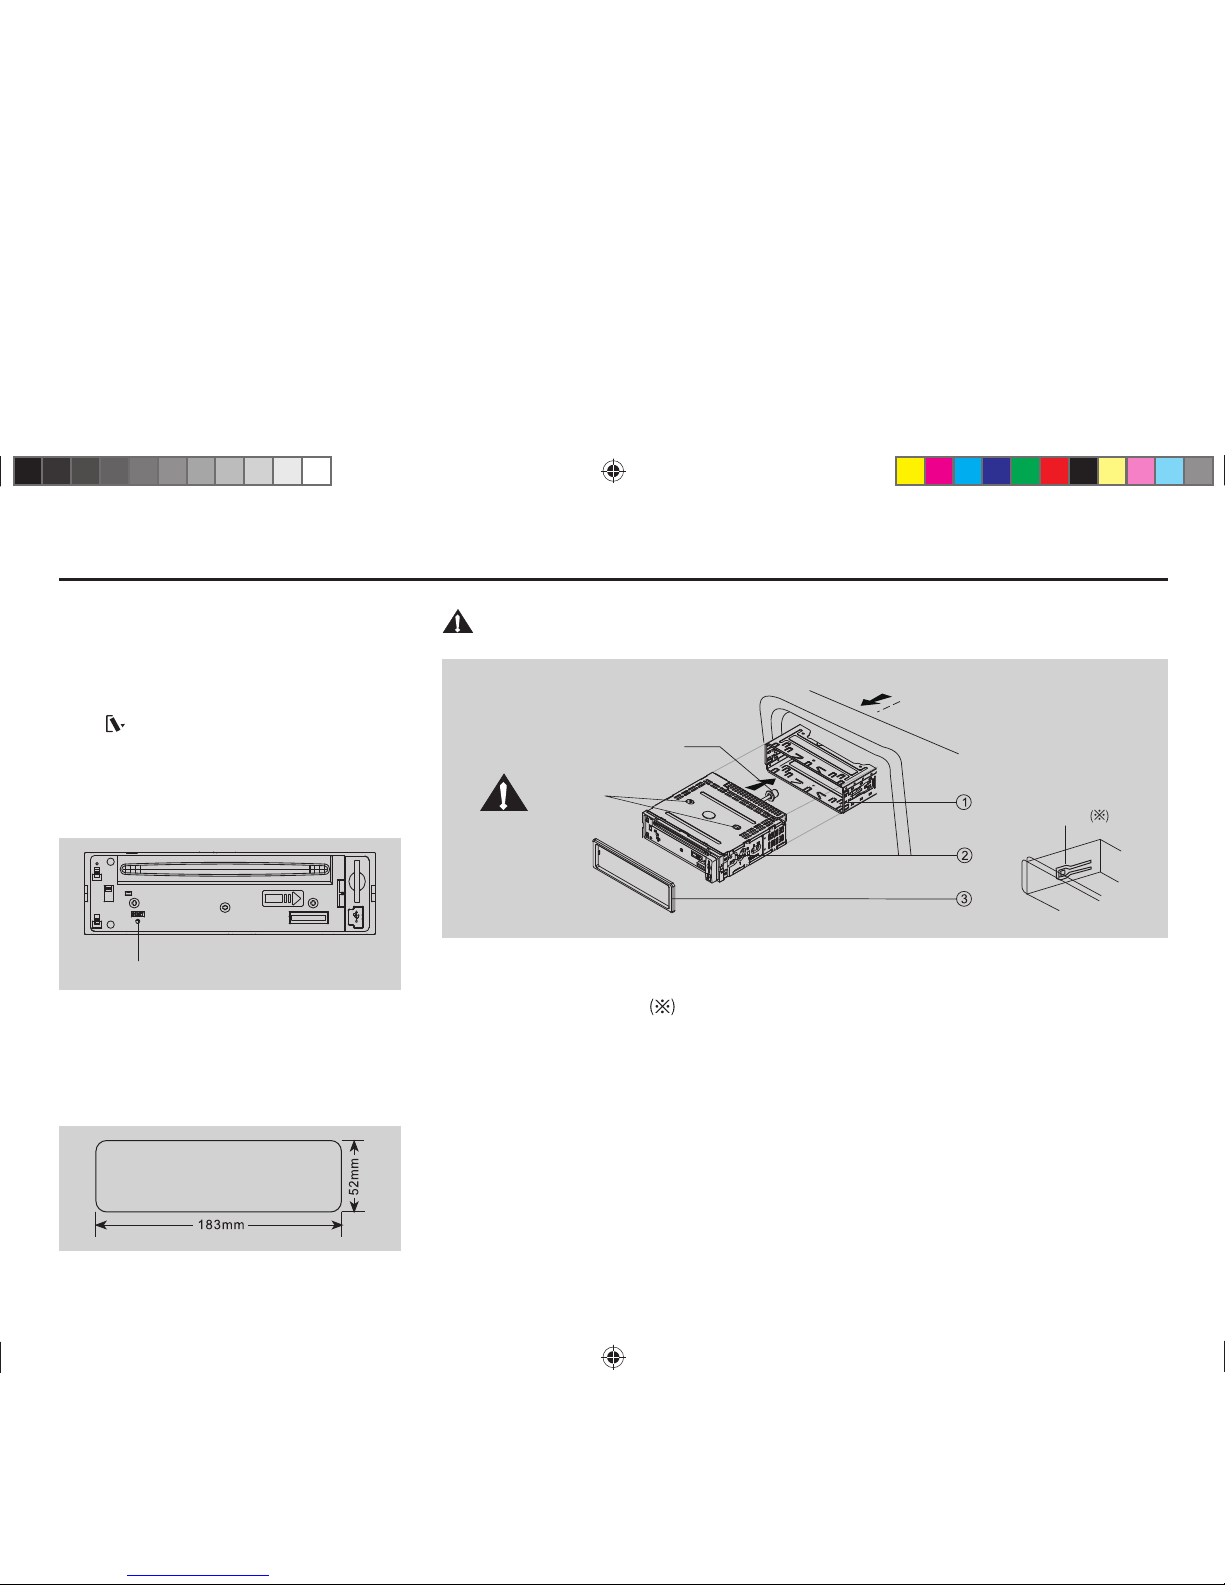
Installation Opening
This unit can be installed in any dashboard
having an opening as shown below.
The dashboard should be 4.75 mm - 5.56 mm
thick in order to be able to support the unit.
Important:
Remove these two screws before installation. Otherwise, the player will not work.
1. Insert mounting collar into the dashboard, and bend the mounting tabs out with a screwdriver.
Make sure that lock lever
is flush with the mounting collar (not projecting outward).
2 Secure the rear of the unit.
After fixing mounting bolt and power connector, fix the rear of the unit to the car body by rubber
cushion.
3. Insert trim plate.
Mounting bolt
rubber cushion
Transport
screws
Lock lever
01_Caracas2010U_gb.indd 1401_Caracas2010U_gb.indd 14 17.02.11 12:1317.02.11 12:13
Page 15
15
ENGLISH
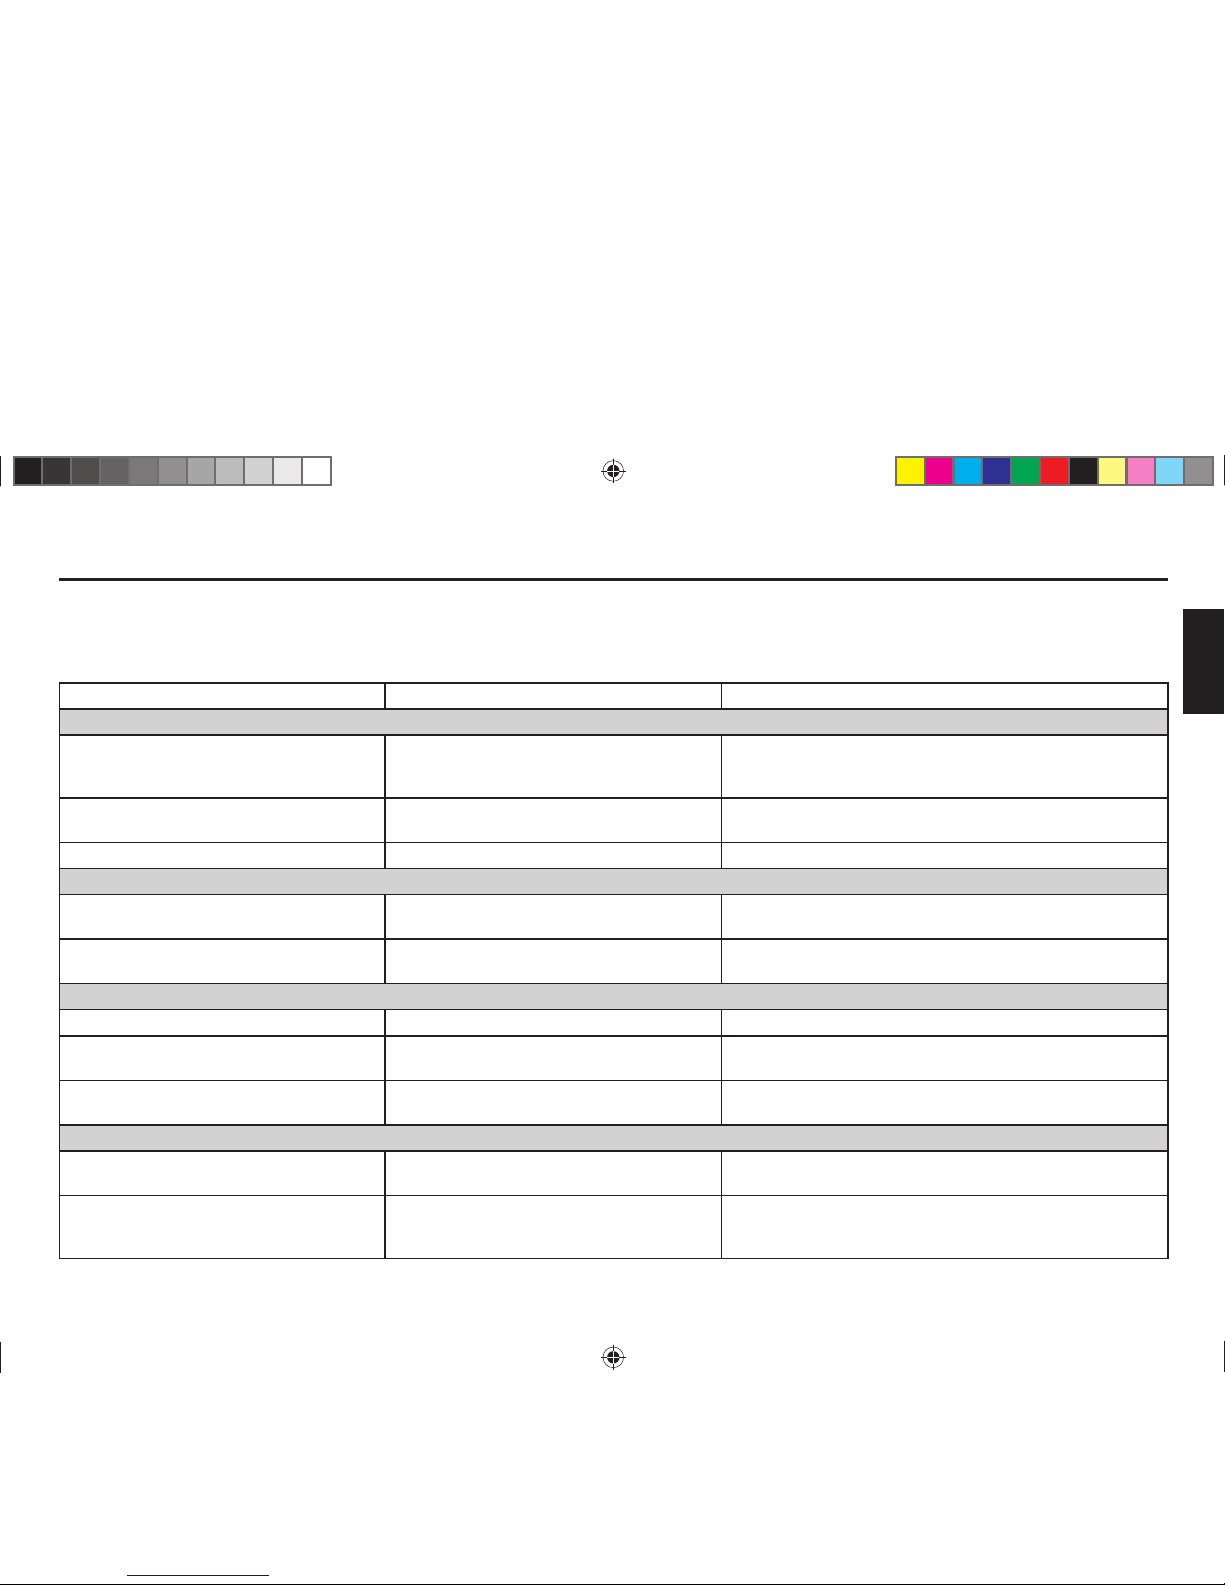
Troubleshooting
The following checklist can help you solve some problems which you may encounter when using the unit. Before consulting it, check the connections
and follow the instructions in the user manual. Do not use the unit in abnormal condition, for example without sound, or with smoke or foul smell can
cause fire or electric shock, immediately stop using it and call the store where you purchased it.
Problem Possible cause Solution
General
The unit will not switch on. Car ignition is not on.
Cable is not properly connected.
Fuse is burnt.
Turn your car key in the ignition.
Check cable connection.
Replace fuse with a new fuse of the same capacity.
No sound Volume is set at minimum or the mute
function is on.
Check the volume or switch the mute function off.
The unit or screen does not work normally. The unit system is unstable. Press the RESET button.
DISC mode
The appliance will not play discs. The disc is inserted incorrectly.
The disc is dirty or damaged.
Disc must be inserted with the label side facing up. Clean
the disc and check for damage. Try another disc.
Sound skips due to vibration. Mounting angle is over 30°.
Mounting is unstable.
Adjust mounting angle to less than 30°.
Mount the unit securely with the supplied parts.
TUNER mode
Unable to receive stations. The antenna is not connected properly. Connect the antenna properly.
Poor quality reception of radio station. The antenna is not fully extended or it is
broken.
Fully extend the antenna and if broken, replace it with a
new one.
Preset stations are lost. The battery cable is not properly connected. Connect the permanent live on the unit to the permanent
live on the vehicle.
USB/SD/MMC mode
Unable to insert USB device or SD/MMC
card.
The memory card or USB device has been
inserted the wrong way round.
Insert it the other way around.
The USB device or SD/MMC card cannot
be read.
NTFS format is not supported. Check that the file system is in FAT 16 or FAT 32 format.
Due to different formats, some models of storage devices
or MP3 players may not be read.
01_Caracas2010U_gb.indd 1501_Caracas2010U_gb.indd 15 17.02.11 12:1317.02.11 12:13
Page 16
16
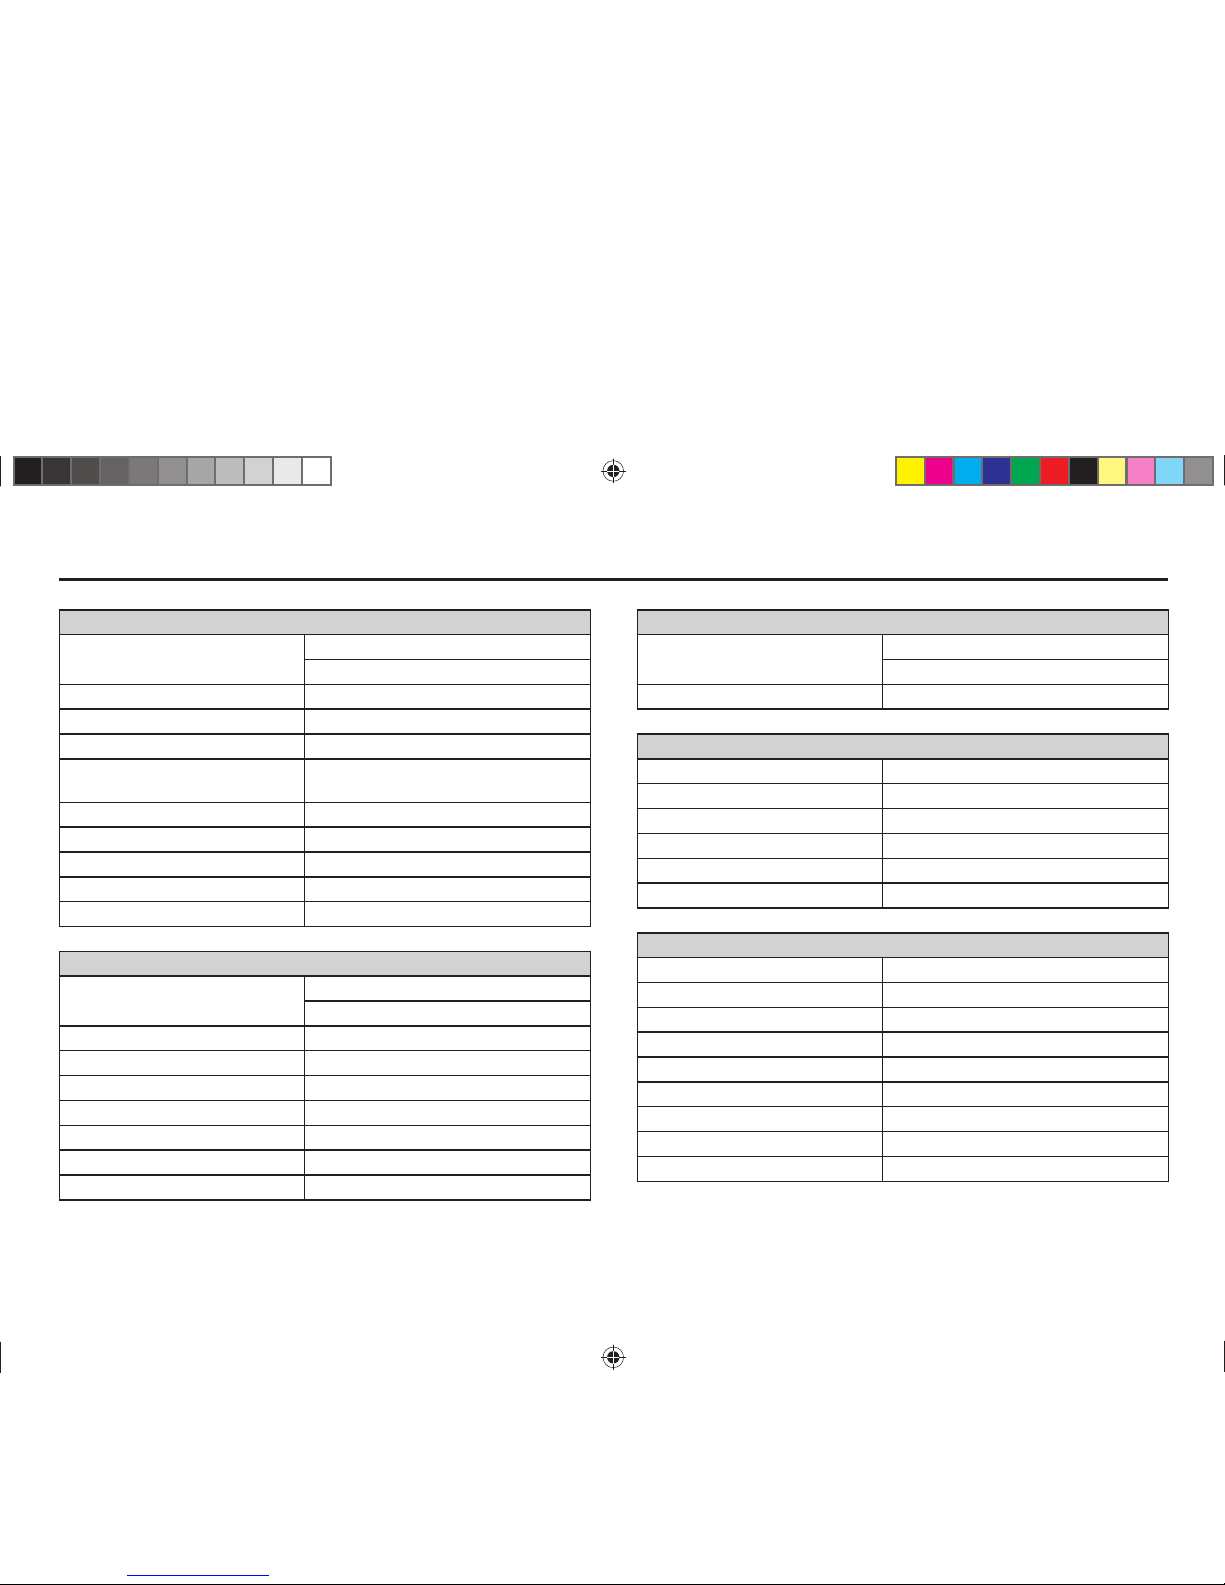
Specifications
General
Power supply: 12 V DC (11 V - 16 V)
Test voltage 14.4 V, negative ground
Maximum power output: 45 W x 4 channels
Continuous power output: 20 W x 4 channels (4 Ω,10 % T.H.D.)
Suitable speaker impedance: 4 - 8 ohm
Pre-Amp output voltage: 2.0 V (CD play mode: 1 KHz, 0 dB,
10 KΩ load)
Fuse: 15 A
Dimensions (WxHxD): 178x50x160 mm
Weight: 1.7 kg
Aux-in: ≥300 mV
Max. current consumption: 12 A
FM Stereo Radio
Frequency range: 87.5 - 108.0 MHz (Europe)
87.5 - 107.9 MHz (America)
Usable sensitivity: 8 dBμ
Quieting sensitivity (S/N=50dB): 12 dBμ
Frequency response: 30 Hz - 15 kHz
Stereo separation: 30 dB (1 kHz)
Image response ratio: 50 dB
IF response ratio: 70 dB
Signal/noise ratio: 55 dB
MW (AM) Radio
Frequency range: 522 - 1620 KHz (Europe)
530 - 1710 KHz (America)
Usable sensitivity (S/N=20dB): 30 dBμ
Disc Player
System: Disc digital audio system
Frequency response: 20 Hz - 20 kHz
Signal/noise ratio: >80 dB
Total harmonic distortion: Less than 0.20 % (1 kHz)
Wow and flutter: Below measurable limits
Channel separation: >55 dB
Components
Mounting sleeve 1
Machine screws M 5x6 mm 4
Mounting bolt (50 mm) 1
Wire connector 1
Removable face plate case 1
Trim plate 1
L-key 2
Operating instructions 1
Rubber cushion 1
Note: Specifications and the design are subject to change without notice due to improvements in technology.
01_Caracas2010U_gb.indd 1601_Caracas2010U_gb.indd 16 17.02.11 12:1317.02.11 12:13
Page 17
17
FRANÇAIS
Consignes de sécurité Table des matières
PRÉCAUTIONS
• Raccordez l'appareil uniquement à une alimentation 12 volts en courant continu avec
le négatif à la masse.
• Débranchez la borne négative de la batterie
du véhicule pendant le montage et le raccordement de l'appareil.
• En cas de remplacement du fusible, veillez
à utiliser un fusible de rechange de calibre
identique. Un fusible de calibre supérieur
peut entraîner des dommages importants au
niveau de l'appareil.
• N'essayez PAS essayer de désassembler
l'appareil. Les faisceaux laser de la tête de
lecture sont dangereux pour les yeux.
• Veillez à ce que des épingles ou autres objets étrangers ne parviennent pas à l'intérieur
de l'appareil, ils pourraient causer des dysfonctionnements ou entraîner des risques
pour la sécurité, tels qu'une décharge électrique ou une exposition au rayon laser.
• Si votre véhicule est resté immobilisé pendant une période prolongée par temps
chaud ou froid, attendre que la température
à l'intérieur de celui-ci soit devenue normale
avant d'utiliser l'appareil.
• Réglez le volume sonore à un niveau qui
vous permettra d'entendre les signaux
d'alerte extérieurs (avertisseurs sonores,
sirènes, etc.).
Remarques à propos des CD
• La lecture de CD défectueux ou poussiéreux
peut entraîner des coupures du son.
• Tenez les CD comme montré sur l'illustration.
• Ne touchez pas le côté opposé à celui de
l'étiquette.
• Ne fixez aucun scellé, label ou film de protection des données sur un côté ou l'autre
du disque.
• N'exposez pas un CD directement à la lumière du soleil ou à une chaleur excessive.
• Essuyez un CD sale du centre vers l'extérieur avec un chiffon propre.
• N'utilisez jamais de solvants tels que de la
benzine ou de l'alcool.
• Cet appareil ne peut pas lire les CD de 3"
(8 cm).
N'introduisez JAMAIS un CD de 3" monté
dans un adaptateur, ni un CD avec un
contour irrégulier. L'appareil pourrait avoir
un problème pour l'éjecter et, par suite, des
dysfonctionnements.
• Outre les CD habituels, cet appareil peut lire
les CD-R ou CD-RW et les fichiers MP3.
Avant l'utilisation
• N'augmentez pas trop le volume sonore afin
de ne pas couvrir les sons venant de l'extérieur et rendre ainsi la conduite dangereuse.
• Pour effectuer des manipulations complexes, arrêtez le véhicule.
ATTENTION
• N'ouvrez pas les couvercles et n'effectuez
pas de réparations vous-même. Adressezvous au vendeur ou à un technicien expérimenté pour avoir de l'aide.
Consignes de sécurité .................................. 17
Commandes sur fa face avant...................... 18
Télécommande ............................................. 19
Utilisation générale ....................................... 20
Mode radio.................................................... 22
Mode USB/SD/MMC..................................... 23
Utilisation du lecteur de CD .......................... 24
Lecture des fichiers MP3/WMA .................... 25
Raccordement électrique.............................. 27
Système antivol ............................................ 28
Guide de montage ........................................ 29
Dépannage ................................................... 30
Caractéristiques............................................ 31
02_Caracas2010U_fr.indd 1702_Caracas2010U_fr.indd 17 17.02.11 13:2617.02.11 13:26
Page 18
18
Commandes sur fa face avant
Mise en marche : appuyez sur n'importe quel bouton de la face avant sauf et pour mettre l'appareil en marche.
1. Ejection du disque
2. - Radio
- Lecture du disque (si un disque est introduit)
- USB (si un dispositif USB est raccordé)
- Carte (si une carte SD/MMC est introduite)
- Aux-in
3. et 4. - Accord sur une station
- Recherche de plage
5. Stations radio locales/distantes
6. Déverrouillage de la face avant
7. Jack Aux-in
8. Gamme d'ondes :
FM1, FM2, FM3, MW1 (OM1), MW2 (OM2)
9. - Lecture du disque
• Bouton 1 : Lecture/pause
Lecture depuis le début
(pression pendant plus de 2 s)
• Bouton 2 : Lecture des débuts de plage
(10 s)
• Bouton 3 : Lecture répétée des plages
• Bouton 4 : Lecture aléatoire des plages
• Bouton 5 : - Dossier MP3 précédent
(si plus d'un dossier)
- Saut de 10 plages MP3
vers le bas (pression
prolongée)
• Bouton 6 : - Dossier MP3 suivant
(si plus d'un 1 dossier)
- Saut de 10 plages MP3
vers le haut (pression
prolongée)
- Présélections radio 1~6
- Pression brève pour régler une station
présélectionnée.
- Pression pendant plus de 2 secondes
pour mémoriser une station.
10. - Pression brève pour afficher l'heure,
nouvelle pression pour quitter.
- Pression brève pour afficher les informa-
tions USB dans le mode USB.
- Pression prolongée pour activer le mode
de réglage de l'heure.
11. Prise USB
12. Fente d'introduction des cartes SD/MMC
13. - Mise en marche/arrêt (pression prolongée)
- Coupure du son
14. Fente d'introduction des disques
15. Commande physiologique (loudness)
16. Capteur de télécommande
17. Présélection automatique des stations
radio
18. - Rotation du bouton pour régler le volume
sonore.
- Pression pour sélectionner VOL/BAS/
MID/TRE/BAL/FAD, rotation pour régler
le niveau.
- Pression pendant plus de 2 secondes
pour activer le mode menu.
02_Caracas2010U_fr.indd 1802_Caracas2010U_fr.indd 18 17.02.11 13:2617.02.11 13:26
Page 19
19
FRANÇAIS
Télécommande
1. - Marche/arrêt
2. - Coupure du son
3. - Pression pour sélectionner VOL/BAS/
MID/TRE/BAL/FAD, rotation du bouton
de volume pour régler le niveau.
- Pression prolongée pour activer le mode
menu.
4. - Commande physiologique (loudness)
5. - Lecture des plages
Bouton 1 : Pression brève pour lecture/
pause.
Lecture depuis le début
(pression prolongée)
Remplacement de la pile au lithium
de la télécommande.
Lorsque la portée de la télécommande diminue
ou que les fonctions de la télécommande ne
s'effectuent plus, remplacez la pile par une pile
au lithium neuve. Lors du remplacement, faites
attention à la polarité de la pile.
1. Appuyez sur le bouton de déverrouillage et
retirez le porte-batterie.
2. Placez la pile de type bouton dans le portebatterie avec le repère (+) en haut.
Introduisez le porte-batterie dans la télé-
commande.
(CR 2025)
1 2
Bouton 2 : Lecture des débuts de plage
(10 s)
Bouton 3 : Lecture répétée des plages
Bouton 4 : Lecture aléatoire des plages
Bouton 5 : - Dossier MP3 précédent
- Saut de 10 plages MP3
vers le bas (pression prolongée)
Bouton 6 : - Dossier MP3 suivant
- Saut de 10 plages MP3
vers le haut (pression prolongée)
- Boutons 1-6 : stations radio présélection-
nées
Pression pour régler une station pré-
sélectionnée, maintien pendant 2 secondes pour mémoriser une station.
6. - Volume sonore
7. - Accord sur une station
- Recherche de plage
8. - Radio
- Lecture du disque (si un disque est
introduit)
- Carte (si une carte SD/MMC est introduite)
- USB (si un appareil USB est raccordé)
- Aux-in
9. - AMS : présélection automatique de sta-
tions radio/balayage des présélections
- Recherche de plage/fichier/caractère
MP3
10. - Gamme d'ondes
11. - Sélection de l'affichage
12. - Stations radio locales/distantes
13. - FM stéréo/mono
02_Caracas2010U_fr.indd 1902_Caracas2010U_fr.indd 19 17.02.11 13:2617.02.11 13:26
Page 20
20
Télécommande Utilisation générale
Bouton de marche/arrêt
Appuyez sur le bouton pour mettre l'appareil
en marche lorsque le contact du véhicule est
mis. Pour arrêter l'appareil, appuyez sur le
bouton et maintenez-le appuyé.
Réglage du volume sonore
Tournez le bouton
VOL/MENU
pour régler le
niveau du volume sonore. Tournez-le dans le
sens des aiguilles d'une montre pour augmenter le volume sonore et dans le sens inverse
des aiguilles d'une montre pour le diminuer.
Coupure du son (mute)
Appuyez sur le bouton pour couper le son du
système. « MUTE » apparaît sur l'écran de la
face avant et le volume sonore est réduit à zéro.
Pour revenir au volume sonore réglé avant la
coupure du son, appuyez de nouveau sur le
bouton ou tournez le bouton
VOL/MENU
.
Commandes audio
Pour régler les graves, les aigus, le médium,
la balance et le fader, appuyez sur le bouton
VOL/MENU
autant de fois que nécessaire pour
faire apparaître la commande audio souhaitée
sur l'écran. Tournez le bouton
VOL/MENU
dans les cinq secondes qui suivent pour sélectionner une valeur.
- VOL
L'écran affiche le niveau du volume sonore par
VOL et un nombre allant de 0 à 47.
- BAS
L'écran affiche le niveau des graves (BASS).
Plage pour BASS : -7 à +7.
- MID
L'écran affiche le niveau de médium.
Plage de médium : -7 à +7.
- TRE
L'écran affiche le niveau des aigus (TREBLE).
Plage pour TREBLE : -7 à +7.
- BAL
L'écran affiche le niveau de répartition gauche/
droite du volume sonore (BALANCE).
Plage pour BALANCE : 12 L (tout à gauche) à
12 R (tout à droite).
L = haut-parleurs gauches, R = haut-parleurs
droits.
- FAD
L'écran affiche le niveau de répartition avant/
arrière du volume sonore (FADER).
Plage pour FADER : 12 R (tout en arrière) à
12 F (tout en avant).
R = haut-parleurs arrière, F = haut-parleurs
avant.
Bouton de mode (SRC)
Appuyez sur le bouton
SRC
pour commuter
entre radio, DISC (si un disque est introduit),
carte (si une carte SD/MMC est introduite),
AUX (entrée auxiliaire), etc.
AVERTISSEMENT :
• Rangez les piles dans un endroit que les enfants ne peuvent pas atteindre. Si un enfant
avale accidentellement une pile, consultez
immédiatement un médecin.
• N'essayez pas de recharger, de mettre en
court-circuit, de démonter ou de chauffer la
pile ni de la mettre au feu. Elle pourrait dégager de la chaleur, exploser ou prendre feu.
• Ne laissez pas la pile avec d'autres objets
métalliques.
• Si vous devez jeter la pile ou la conserver,
entourez-la de ruban isolant.
• Ne pas enfoncer la pile avec une pince à épiler ou un outil similaire. Elle pourrait dégager
de la chaleur, exploser ou prendre feu.
Portée de la télécommande
La télécommande peut fonctionner à une distance de 3 à 5 m.
Lorsque vous utilisez la télécommande, dirigez
le haut de celle-ci sur le capteur qui se trouve
sur l'appareil.
Capteur de
télécommande
02_Caracas2010U_fr.indd 2002_Caracas2010U_fr.indd 20 17.02.11 13:2617.02.11 13:26
Page 21

21
FRANÇAIS
Entrée auxiliaire
Pour accéder à un dispositif auxiliaire :
1. Raccordez un lecteur audio portable à l'in-
terface AUX qui se trouve sur la face avant.
2. Appuyez sur le bouton
SRC
pour sélection-
ner le mode Aux-In.
Appuyez de nouveau sur le bouton
SRC
pour
quitter le mode Aux-In et passer au mode suivant.
Réglage de l'heure
Le réglage de l'heure s'effectue en appuyant
sur le bouton
DISP
et en le maintenant appuyé.
Pour régler l'heure, effectuez les opérations
suivantes :
1. Mettez le contact, puis mettez l'autoradio en
marche.
2. Appuyez sur le bouton
DISP
pour afficher
l'heure.
3. Lorsque l'heure est affichée sur l'écran,
appuyez sur le bouton
DISP
et maintenez-le
appuyé jusqu'à ce que l'heure clignote.
4. Tournez le bouton
VOL/MENU
dans le
sens inverse des aiguilles d'une montre
dans les 5 secondes qui suivent et réglez le
nombre de minutes souhaité. Pour modifier
le nombre des heures, tournez le bouton
VOL/MENU
dans le sens des aiguilles d'une
montre et réglez le nombre d'heures souhaité.
- Mode SEEK 1/2 (en mode radio) :
Tournez le bouton
VOL/MENU
pour sélectionner le mode de recherche des stations radio 1
ou 2.
SEEK 1 : la recherche des stations radio s'arrête lors de la réception de la station suivante.
SEEK 2 : la recherche des stations radio s'arrête lorsque le bouton
ou est relâchée
et que la station suivante est reçue.
- Mode VOL LAST/ADJ
Tournez le bouton
VOL/MENU
pour sélectionner le niveau du volume sonore à la mise en
marche.
VOL LAST : le volume sonore à la mise en
marche est le volume sonore réglé en dernier
avant l'arrêt de l'appareil.
VOL ADJUST : appuyez sur le bouton pour
activer le mode A-VOL, puis tournez le bouton pour régler le volume sonore à la mise en
marche.
- Mode ROLL
Tournez le bouton
VOL/MENU
pour activer ou
désactiver la fonction ROLL.
Lorsque ROLL est activé (ON), les informations de la balise ID3 de MP3, par ex. : FOLDER (dossier) > FILE (fichier) > ALBUM >
TITLE (titre) > ARTIST (artiste) > Numéro de
plage/Temps écoulé défilent sur l'écran LCD.
Lorsque ROLL est désactivé (OFF), l'écran
LCD affiche uniquement la durée de lecture.
Utilisation générale
Sélecteur d'affichage (DISP)
Cet appareil peut afficher l'heure, la fréquence
des stations radio ou les fonctions du lecteur
de CD. Normalement, la fréquence de la station radio réglée ou la plage du CD en cours
de lecture est affichée, mais l'appareil affiche
l'heure après une pression sur le bouton
DISP
.
L'heure reste affichée pendant 5 secondes
environ, puis l'affichage de la fréquence de la
station radio ou de la plage du CD réapparaît.
Loudness (LOUD)
Lors de l'écoute de plages musicales à faible
volume, cette fonction permet d'augmenter sélectivement le volume de certaines fréquences
graves ou aiguës. Appuyez sur le bouton
LOU
pour activer ou désactiver la fonction de commande physiologique (LOUD).
Menu réglages
Appuyez sur le bouton
VOL/MENU
et maintenez-le appuyé pendant plus de 2 secondes
pour activer le menu. Chaque pression successive change le mode comme suit :
- Mode DSP
Tournez le bouton
VOL/MENU
pour sélectionner un des effets sonores DSP disponibles :
POP->ROCK->CLASSIC->FLAT->DSP OFF
- Activation/désactivation du bip (BEEP)
Tournez le bouton
VOL/MENU
pour activer
(ON) ou désactiver (OFF) le bip.
02_Caracas2010U_fr.indd 2102_Caracas2010U_fr.indd 21 17.02.11 13:2617.02.11 13:26
Page 22

22
Utilisation générale Mode radio
Sélection d'une gamme d'ondes
Appuyez sur
BAND
autant de fois que nécessaire pour sélectionner FM1 - FM2 - FM3 MW1 (OM1) - MW2 (OM2).
L'écran affiche la gamme d'ondes, la fréquence
et le numéro de station présélectionnée si
celle-ci est déjà en mémoire.
Sélection d'une station
Appuyez sur le bouton d'accord ou
pour vous accorder sur une autre station.
Accord sur une station de
fréquence supérieure
Appuyez sur le bouton de recherche pour
vous accorder pas à pas sur une station de
fréquence supérieure. La fréquence actuelle
est affichée dans un format numérique sur
l'écran de la face avant. Appuyez sur le bouton
de recherche et maintenez-le appuyé pour
vous accorder sur la station suivante disponible.
Accord sur une station de
fréquence inférieure
Appuyez sur le bouton de recherche pour
vous accorder pas à pas sur une station de
fréquence inférieure. Appuyez sur le bouton
de recherche et maintenez-le appuyé pour
vous accorder sur la station précédente disponible.
Mode présélection
Six boutons numérotés permettent de rappeler
six stations présélectionnées dans chaque
gamme d'ondes. Les stations en mémoire
(1 à 6) pour la gamme d'ondes réglée sur le
moment peuvent être affichées sur l'écran.
Mémorisation des stations
- Mémorisation automatique
1. Sélectionnez une gamme d'ondes (si besoin).
2. Appuyez brièvement sur
AMS
pour rechercher toutes les stations de la gamme
d'ondes, les 6 stations disponibles les plus
puissantes seront sauvegardées automatiquement au niveau des boutons de présélection (numéros 1 à 6).
- Mémorisation manuelle
1. Sélectionnez une gamme d'ondes (si besoin), puis réglez une station.
2. Appuyez sur un bouton de présélection
(numéros 1 à 6) de la face avant ou de la
télécommande et maintenez-le appuyé.
3. Le numéro de présélection et la station sont
affichés et mis en surbrillance.
Rappel d'une station
1. Sélectionnez une gamme d'ondes (si besoin).
2. Appuyez sur un bouton de présélection
(numéros 1 à 6) de la face avant ou de la
télécommande pour régler la station correspondante.
- Mode 12/24 HEURES :
Tournez le bouton
VOL/MENU
pour sélectionner l'affichage de l'heure sur 12 heures ou sur
24 heures.
- RÉGLAGE DE ZONE
Cette option vous permet de sélectionner
l'espacement des fréquences approprié pour la
zone dans laquelle vous vous trouvez.
Tournez le bouton
VOL/MENU
pour sélectionner USA ou Europe.
02_Caracas2010U_fr.indd 2202_Caracas2010U_fr.indd 22 17.02.11 13:2617.02.11 13:26
Page 23

23
FRANÇAIS
Mode USB/SD/MMC
1. Chargement d'une carte SD/MMC
Introduire la carte SD/MMC dans la fente.
L'appareil lit automatiquement le fichier de la
carte.
2. Retrait de la carte SD/MMC
Appuyez sur le bouton
SRC
pour activer un
mode non-SD, appuyez ensuite sur la carte
SD/MMC pour qu'elle sorte.
3. Chargement d'un dispositif (clé) USB
Introduisez le dispositif USB dans la prise
USB, l'appareil lit automatiquement le fichier
mémorisé dans le dispositif USB.
4. Retrait du dispositif (clé) USB
Appuyez sur le bouton
SRC
pour activer un
mode non-SD, puis retirez le dispositif USB de
la prise USB.
Remarques à propos de USB/SD/
MMC
Fonctions USB (type mémoire flash) et lecture
MP3
1. Carte SD/MMC supportée.
2. Mémoire flash USB 2 en 1 (SD/MMC) supportée.
3. FAT 12 / FAT 16 / FAT 32 si possible.
4. Nom de fichier : 32 octets / nom de répertoire : 32 octets / nom de balise : 32 octets
5. Balise (balise ID3 version 2.0)
Titre / artiste / album : 32 octets supporté.
6. Lecteur multicarte pas supporté.
7. USB 1.1 supporté
USB 2.0 supporté (ne peut pas supporter la
vitesse de USB 2.0. Donne la même vitesse
qu'avec USB 1.1).
Tous les dispositifs USB ne sont pas com-
patibles avec l'appareil.
02_Caracas2010U_fr.indd 2302_Caracas2010U_fr.indd 23 17.02.11 13:2617.02.11 13:26
Page 24

24
Utilisation du lecteur de CD
Introduction d'un disque
Introduire le disque compact, face de l'étiquette en haut, dans la fente jusqu'à ce que le
mécanisme soit engagé et entraîne le disque à
l'intérieur. La lecture commence automatiquement par la première plage du disque.
REMARQUE :
L'appareil est conçu uniquement pour lire les disques compacts standard
de 5" (12 cm). N'essayez pas d'introduire des
CD « Single » de 3" (8 cm) dans cet appareil,
que ce soit avec ou sans adaptateur, sous
peine d'endommager le lecteur et/ou le disque.
Bouton d'éjection du disque
Appuyez sur le bouton d'éjection du disque et
éjectez le disque. L'appareil passe en mode
radio. Le disque peut être éjecté que le contact
du véhicule soit mis ou coupé. Si un disque
éjecté n'est pas retiré de la fente dans les
10 secondes qui suivent l'éjection, il est réintroduit automatiquement dans l'appareil.
REMARQUE :
Pour éviter d'endommager accidentellement un disque, retirez toujours celuici de l'appareil une fois sa lecture terminée.
Lecture/pause du CD
Appuyez sur le bouton 1/ pour interrompre
la lecture du disque. Appuyez de nouveau sur
le bouton 1/ pour poursuivre la lecture du
disque.
Recherche vers le haut/plage
suivante
Appuyez sur le bouton plage suivante
pendant la lecture du disque pour passer à la
lecture de la plage suivante.
Recherche vers le bas/plage
précédente
Appuyez sur le bouton plage précédente
pendant la lecture du disque pour revenir au
début de la plage actuelle. Pour passer au
début de la plage précédente, appuyez deux
fois de suite sur le bouton.
Fonctions repère et révision
Les fonctions repère et révision vous permettent d'effectuer une recherche haute
vitesse audible de n'importe quelle section du
disque. Appuyez sur le bouton plage suivante
pour vous déplacer rapidement en avant et
sur le bouton plage précédente pour vous
déplacer rapidement en arrière.
Lecture des débuts de plage
Pendant la lecture du disque, appuyez sur le
bouton
2/INT
pour sélectionner « INT ON »
et lire les 10 premières secondes de chaque
plage. Lorsque la plage souhaitée est atteinte,
appuyez du le bouton
2/INT
pour sélectionner
« INT OFF » et lire la plage.
Répétition de la lecture d'une plage
Pendant la lecture du disque, appuyez sur le
bouton
3/RPT
pour sélectionner « RPT TRK »
et répéter la lecture de la plage sélectionnée.
Appuyez de nouveau sur le bouton
3/RPT
pour
sélectionner « RPT FOLD » et répéter la lecture de toutes les plages du dossier actuel. La
répétition continue jusqu'à ce que
3/RPT
soit
de nouveau actionné pour sélectionner « RPT
OFF ».
Lecture aléatoire
Pendant la lecture du disque, appuyez sur le
bouton
4/RDM
pour sélectionner « RDM ON »
et lire toutes les plages du disque dans un
ordre aléatoire. Dans le mode de lecture aléatoire, vous pouvez appuyer sur les boutons accord sur une station/recherche de plage pour
sélectionner les plages dans un ordre aléatoire
à la place de la progression normale. Appuyez
de nouveau sur le bouton
4/RDM
pour sélectionner « RDM OFF » et quitter le mode de
lecture aléatoire.
02_Caracas2010U_fr.indd 2402_Caracas2010U_fr.indd 24 17.02.11 13:2617.02.11 13:26
Page 25

25
FRANÇAIS
Lecture des fichiers MP3/WMA
Informations
Pendant la lecture, les informations de la balise
ID3 défilent sur l'écran : DOSSIER, FICHIER,
ALBUM, TITRE, ARTISTE et numéro de plage/
temps écoulé.
Dossier précédent/suivant
Appuyez sur le bouton 5 pour passer au dossier précédent. Appuyez sur le bouton 6 pour
passer au dossier suivant.
Accès direct plage/fichier
1. Appuyez une fois sur le bouton
AMS
, puis
sur le bouton
VOL/MENU
pour activer la
recherche de plage directe.
2. Tournez le bouton
VOL/MENU
pour sélec-
tionner un chiffre.
3. Appuyez sur le bouton
VOL/MENU
pour
confirmer l'entrée, le chiffre des dizaines
clignote.
4. Tournez le bouton
VOL/MENU
pour sélec-
tionner un chiffre.
5. Répéter les opérations précédentes pour
entrer le chiffre des centaines et des milliers
selon besoin.
REMARQUE :
L'appareil permet uniquement de sélectionner des chiffres qui correspondent au nombre de fichiers sur le
support où vous effectuez la recherche.
6. Une fois le numéro de la plage affiché sur
l'écran, appuyez sur le bouton
VOL/MENU
pour lire la plage ou le fichier sélectionné.
Recherche de dossiers/fichiers
1. Appuyez deux fois sur le bouton
AMS
, puis
sur le bouton
VOL/MENU
pour accéder à
l'option de recherche de fichiers.
2. Tournez le bouton
VOL/MENU
pour sélec-
tionner la plage ou le répertoire souhaité.
3. Appuyez sur le bouton
VOL/MENU
pour
afficher les fichiers contenus dans le répertoire sélectionné.
4. Tournez le bouton
VOL/MENU
pour sélectionner la plage ou le fichier. Appuyez sur le
bouton
VOL/MENU
pour lire la plage ou le
fichier sélectionné.
Recherche par nom (CHAR-SCH)
1. Appuyez trois fois sur le bouton
AMS
, puis
sur le bouton
VOL/MENU
pour accéder à
l'option de recherche de caractères.
2. Tournez le bouton
VOL/MENU
pour sélectionner le premier caractère parmi les caractères A-Z, _ , - , + , et 0-9.
3. Appuyez sur le bouton
VOL/MENU
pour
confirmer l'entrée du caractère et passer à
la position suivante.
4. Répéter les opérations pour sélectionner
jusqu'à huit caractères.
5. Appuyez sur le bouton
VOL/MENU
pour
démarrer la recherche.
6. Si une plage ou un fichier est trouvé, appuyez sur le bouton
VOL/MENU
pour lire la
plage ou le fichier sélectionné.
REMARQUE :
« NOT FIND » apparaît s'il
n'y a pas de fichier qui correspond à la
chaîne de caractères entrée.
Généralités sur MP3
• MP3 est l'abréviation de MPEG Audio Layer
3 et elle se réfère à une norme de technologie de compression.
• Ce produit permet de lire des fichiers MP3
sur des disques CD-R ou CD-RW.
• L'appareil peut lire des fichiers MP3 écrits
dans un format compatible avec la norme
ISO 9660. Il ne reconnaît cependant pas les
données MP3 écrites selon la technologie
Packet writing.
• L'appareil ne peut pas lire un fichier MP3
dont l'extension de fichier est autre que
« .mp3 ».
• Si vous lisez un fichier non-MP3 avec l'extension « .mp3 », vous pouvez entendre du
bruit.
• Dans ce manuel, nous appelons respectivement « plage » et « album » ce qui est
appelé « fichier MP3 » et « dossier » dans la
terminologie PC.
• Le nombre maximal de niveaux de répertoire est de 8, répertoire racine compris. Le
nombre maximal de fichiers et de dossiers
sur un disque est de 256.
• Il peut arriver que l'appareil ne lise pas les
plages dans l'ordre des numéros de plage.
02_Caracas2010U_fr.indd 2502_Caracas2010U_fr.indd 25 17.02.11 13:2617.02.11 13:26
Page 26

26
• L'appareil lit uniquement les plages audio
lorsque le disque contient à la fois des
plages audio et des fichiers MP3.
• Lors de la lecture d'un disque 8 kbps ou
VBR*, le temps de lecture écoulé affiché
sur l'écran n'est pas correct et la lecture des
débuts de plage ne s'effectue pas correctement.
*VBR : Variable Bit Rate ou débit binaire
variable.
Remarques sur la création de ses
propres CD-R ou CD-RW contenant
des fichiers MP3
• Pour bénéficier d'un son de haute qualité,
nous recommandons la conversion en
fichiers MP3 avec une fréquence d'échantillonnage de 44,1 kHz et un débit binaire de
128 kbps.
• N'enregistrez PAS plus de 256 fichiers MP3
sur un disque.
• Pour le format compatible ISO 9660, la profondeur maximale autorisée d'imbrication
des dossiers est de 8, dossier (répertoire)
source compris.
• Lorsqu'un disque CD-R est utilisé, la lecture
est possible uniquement si le disque a été
finalisé.
• Assurez-vous que lorsque le CD-R MP3 est
gravé, il est formaté en tant que disque de
données et PAS en tant que disque audio.
Lecture des fichiers MP3/WMA
• Vous ne devriez pas enregistrer des fichiers
non-MP3 ou des fichiers inutiles avec des
fichiers MP3 sur le CD-R sous peine de
retarder le démarrage de la lecture des
fichiers MP3.
• Avec certains CD-R, il peut arriver que suite
à une qualité de fabrication insuffisante, les
données ne sont pas écrites correctement.
Dans ce cas, la lecture des données ne s'effectue pas sans problème. L'utilisation de
CD-R de haute qualité est recommandée.
• Le nombre de caractères affichés pour le
nom de l'album ou de la plage peut aller
jusqu'à 16. La version de balise ID3 1.x est
nécessaire.
• Il peut arriver que l'appareil ne lise pas les
plages dans l'ordre d'enregistrement sur le
disque.
02_Caracas2010U_fr.indd 2602_Caracas2010U_fr.indd 26 17.02.11 13:2617.02.11 13:26
Page 27

27
FRANÇAIS
Raccordement électrique
Schéma de câblage
HP AVANT
VioletFils
violet/noir
GrisFils
gris/blanc
Fils
blanc/noir
Blanc Fils
vert/noir
Vert
Haut-parleur
droit (arrière)
Haut-parleur
droit (avant)
Haut-parleur
gauche (avant)
Haut-parleur
gauche (arrière)
Boîtier
avec
filtre
Fil de masse
+12 VDC permanent depuis
batterie du véhicule (+)
Noir
Jaune
Bleu
Rouge
Fil de commande du relais
d'antenne électrique
Fil de commande du relais
d'amplificateur
+12 VDC depuis clé de contact
sur ON (contact)/ACC (accessoires)
HP ARRIERE
Sortie ligne
(gris)
R (droit, rouge)
L (gauche, blanc)
(noir)
Fusible 15 A
Antenne
02_Caracas2010U_fr.indd 2702_Caracas2010U_fr.indd 27 17.02.11 13:2617.02.11 13:26
Page 28

28
Cet appareil est équipé d'une face avant détachable.
Pour dissuader les voleurs, vous pouvez détacher la face avant et la prendre avec vous.
Dépose de la face avant
1. Arrêtez l'appareil.
2. Appuyez sur le bouton
.
3. Maintenez la face avant selon un angle pour
la retirer.
4. Placer la face avant dans l'étui et prenez-la
avec vous lorsque vous quittez le véhicule.
Etui pour face avant détachable
Pose de la face avant
1. Tenez la face avant côté boutons vers vous
et engagez le côté droit de celle-ci dans le
support.
2. Appuyez sur le côté gauche de la face
avant jusqu'à ce que celle-ci se verrouille.
Dépose de l'appareil
1. Enlevez la face avant et le cadre enjoliveur.
2. Introduisez les deux clés en L dans les
trous de l'appareil jusqu'à ce qu'elles se verrouillent.
3. Retirez l'appareil.
Système antivol
02_Caracas2010U_fr.indd 2802_Caracas2010U_fr.indd 28 17.02.11 13:2617.02.11 13:26
Page 29

29
FRANÇAIS
Guide de montage
Procédure de montage
Effectuez d'abord le raccordement électrique
et contrôlez-le.
Réinitialisation
Appuyez sur le bouton
. Maintenez la face
avant selon un angle pour la retirer. Pour réinitialiser l'appareil et le remettre ainsi dans son état
d'origine, appuyez ensuite sur le bouton RESET
avec un objet pointu.
Remarque :
Le bouton
RESET
efface l'heure et les stations mémorisées.
Bouton Reset
Ouverture de montage
Cet appareil peut être monté dans n'importe quel
tableau de bord qui a une ouverture telle que
le montre l'illustration. Le tableau de bord doit
avoir une épaisseur comprise entre 4,75 mm et
5,56 mm pour supporter correctement l'appareil.
Important :
Enlever ces deux vis avant de procéder au montage. Sinon, le lecteur ne fonc-
tionnera pas.
1. Introduisez le cadre de montage dans le tableau de bord et repliez les languettes de fixation avec un tournevis.
Veillez à ce que le levier de verrouillage
soit à fleur du cadre de montage (il ne doit pas faire
saillie vers l'extérieur).
2. Immobilisez l'arrière de l'appareil.
Une fois le boulon de fixation et le connecteur d'alimentation en place, fixer l'arrière de l'appareil
sur la carrosserie par l'intermédiaire du tampon en caoutchouc.
3. Emboîtez le cadre enjoliveur.
Boulon de fixation avec
tampon en caoutchouc
Vis de
transport
Levier de
verrouillage
02_Caracas2010U_fr.indd 2902_Caracas2010U_fr.indd 29 17.02.11 13:2617.02.11 13:26
Page 30

30
Dépannage
La check-liste suivante peut vous aider à résoudre certains problèmes que vous pourriez rencontrer lorsque vous utilisez l'appareil. Avant de la consulter,
contrôlez les connexions et suivez les instructions du mode d'emploi. N'utilisez pas l'appareil lorsque les conditions sont anormales, par exemple pas de
son, de la fumée, une mauvaise odeur ou une décharge électrique. Arrêtez immédiatement l'appareil et appelez le magasin dans lequel vous l'avez acheté.
Problème Cause possible Remède
En général
L'appareil ne se met pas en marche. Le contact du véhicule n'est pas mis.
Le câble n'est branché correctement.
Le fusible est grillé.
Mettez le contact.
Contrôler le branchement du câble.
Remplacer le fusible par un fusible de rechange de même calibre.
Pas de son Le volume sonore est réglé au minimum ou la
fonction de coupure du son (mute) est activée.
Contrôler le réglage du volume sonore ou désactiver la fonction
de coupure du son.
L'appareil ou l'écran ne fonctionnent
pas normalement.
Le système est instable. Appuyez sur le bouton RESET.
Mode DISC
L'appareil ne lit pas les disques. Le disque n'est pas introduit correctement.
Le disque est sale ou endommagé.
Le disque doit être introduit avec la face de l'étiquette en haut.
Nettoyez le disque et contrôlez son état. Essayez un autre
disque.
Sauts de lecture dus à des vibrations. L'angle de montage est supérieur à 30°.
Le montage n'est pas stable.
Réglez l'angle de montage à moins de 30°.
Fixez l'appareil correctement avec le matériel fourni.
Mode TUNER
Pas de réception de stations. L'antenne n'est pas branchée correctement. Branchez l'antenne correctement.
Mauvaise qualité de réception. L'antenne n'est pas déployée entièrement ou
elle est cassée.
Déployez complètement l'antenne, remplacez-la si elle est
cassée.
Les stations présélectionnées sont
perdues.
Le fil venant de la batterie n'est branché
correctement.
Branchez le fil d'alimentation permanente de l'appareil au plus
permanent du véhicule.
Mode USB/SD/MMC
Impossibilité d'introduire un dispositif
(clé) USB ou une carte SD/MMC.
La carte mémoire ou le dispositif USB sont
introduits dans le mauvais sens.
Les introduire dans l'autre sens.
Le dispositif (clé) USB ou la carte
SD/MMC ne peuvent pas être lus.
Le format NTFS n'est pas reconnu. Contrôlez que le système de fichiers est dans le format FAT 16
ou FAT 32. En raison de formats différents, certains modèles de
mémoire ou de lecteur MP3 ne peuvent pas être utilisés.
02_Caracas2010U_fr.indd 3002_Caracas2010U_fr.indd 30 17.02.11 13:2617.02.11 13:26
Page 31

31
FRANÇAIS
Caractéristiques
Générales
Alimentation : 12 VDC (11 V-16 V)
Tension de test 14,4 V,
négatif à la masse
Sortie de puissance maximale : 45 W x 4 canaux
Sortie de puissance continue : 20 W x 4 canaux
(4 Ω, 10 % T.H.D.)
Impédance de haut-parleur appropriée : 4-8 ohms
Tension de sortie du préamplificateur : 2,0 V (mode lecture de CD :
1 KHz, 0 dB, charge 10 KΩ)
Fusible : 15 A
Dimensions (lxhxp) : 178x50x160 mm
Poids : 1,7 kg
Aux-in : ≥300 mV
Courant absorbé max. : 12 A
Radio FM stéréo
Plage de fréquences : 87,5-108,0 MHz (Europe)
87,5-107,9 MHz (Amérique)
Sensibilité utile : 8 dBμ
Seuil de sensibilité
(rapport signal/bruit = 50 dB) :
12 dBμ
Bande passante : 30 Hz-15 kHz
Séparation stéréo : 30 dB (1 kHz)
Affaiblissement sur fréquence conjuguée : 50 dB
Affaiblissement sur fréquence
intermédiaire :
70 dB
Rapport signal/bruit : 55 dB
Radio MW (OM/AM)
Plage de fréquences : 522-1620 KHz (Europe)
530-1710 KHz (Amérique)
Sensibilité utile
(rapport signal/bruit = 20 dB) :
30 dBμ
Lecteur de disque
Système : Disque audio numérique
Bande passante : 20 Hz-20 kHz
Rapport signal/bruit : >80 dB
Distorsion harmonique totale : Inférieure à 0,20 % (1 kHz)
Pleurage et papillottement : En dessous des limites
mesurables
Séparation des canaux : >55 dB
Composants
Cadre de montage 1
Vis à métaux M5x6 mm 4
Boulon de fixation (50 mm) 1
Connecteur 1
Etui pour face avant détachable 1
Cadre enjoliveur 1
Clé en L 2
Mode d'emploi 1
Tampon en caoutchouc 1
Remarque : En raison des améliorations technologiques, les caractéristiques et le design sont sujets à modifications sans préavis.
02_Caracas2010U_fr.indd 3102_Caracas2010U_fr.indd 31 17.02.11 13:2617.02.11 13:26
Page 32

32
Medidas de seguridad Contenido
PRECAUCIONES
• Utilice exclusivamente un sistema eléctrico
con toma a tierra negativa de 12 V CC.
• Desconecte el borne negativo de la batería
del vehículo para montar y conectar la unidad.
• Al sustituir el fusible, asegúrese de utilizar
uno de igual amperaje. El uso de un fusible
con amperaje superior podría producir daños graves en la unidad.
• NO trate de desmontar la unidad. La radiación láser del lector óptico es peligrosa para
los ojos.
• Asegúrese de que no entren alfileres ni
otros objetos extraños en la unidad, ya que
podrían originar fallos en el funcionamiento
o provocar riesgos relacionados con la seguridad, como descargas eléctricas o exposición a la radiación láser.
• Si ha estacionado el coche durante un periodo prolongado o en condiciones atmosféricas de frío o calor, espere hasta que la
temperatura del coche vuelva a la normalidad antes de conectar la unidad.
• Mantenga el volumen a un nivel con el que
pueda oír los sonidos de advertencia del exterior (bocinas, etc.).
Notas sobre el CD
• La reproducción de CD defectuosos o sucios puede provocar interrupciones en el
sonido.
• Coja los CD como se muestra en la imagen.
• No toque la zona sin etiqueta.
• No pegue sellos, etiquetas ni hojas de protección de datos en ninguno de los lados del
disco.
• No exponga los CD a la luz directa del Sol
ni a un calor excesivo.
• Limpie los CD sucios desde el centro hacia
fuera con un paño.
• No utilice nunca disolventes como bencina o
alcohol.
• Esta unidad no reproduce CD de 3 pulgadas
(8 cm).
No inserte NUNCA CD de 3 pulgadas en el
adaptador ni CD con forma irregular. Puede
que la unidad no pueda expulsarlos, lo que
provocaría un fallo en el funcionamiento.
• Además de los CD convencionales, esta
unidad reproduce CD-R, CD-RW y MP3.
Antes de la utilización
• No suba el volumen demasiado, ya que de
esa lo contrario, bloqueará los sonidos del
exterior y la conducción será peligrosa.
• Detenga el coche si va a realizar una operación complicada.
PRECAUCIÓN
• NO abra las cubiertas ni realice reparaciones. Para obtener ayuda, consulte con su
distribuidor o con un técnico con experiencia.
Medidas de seguridad .................................. 32
Elementos de mando del panel .................... 33
Mandos a distancia....................................... 34
Funcionamiento general ............................... 35
Modo de radio............................................... 37
Modo USB/SD/MMC..................................... 38
Funcionamiento del reproductor de CD........ 39
Reproducción de archivos MP3/WMA .......... 40
Conexiones eléctricas ..................................42
Sistema antirrobo .........................................43
Guía de instalación ....................................... 44
Detección y resolución de averías................ 45
Especificaciones ........................................... 46
03_Caracas2010U_es.indd 3203_Caracas2010U_es.indd 32 17.02.11 13:3017.02.11 13:30
Page 33

33
ESPAÑOL
Elementos de mando del panel
Conexión: Pulse cualquier botón del panel excepto y para encender la unidad.
1. Expulsión de disco
2. - Radio
- Reproducción de disco (cuando hay un
disco insertado)
- USB (cuando está conectado un USB)
- Tarjeta (cuando hay una tarjeta SD/MMC
insertada)
- Entrada auxiliar
3. y 4. - Sintonización de radio
- Búsqueda de títulos
5. Radio local/distante
6. Expulsión del panel
7. Enchufe de entrada auxiliar
8. Cambio de banda:
FM1, FM2, FM3, MW1 (OM1), MW2 (OM2)
9. - Reproducción de disco
• Botón 1: Reproducción/pausa
Reproducción desde el princi-
pio (pulse durante más de 2 s)
• Botón 2: Reproducción intro (10 s)
• Botón 3: Reproducción con repetición
de títulos
• Botón 4: Reproducción aleatoria
• Botón 5: - Bajar carpeta MP3
(si hay más de 1 carpeta)
- Bajar -10 títulos MP3
(pulsación prolongada)
• Botón 6: - Subir carpeta MP3
(si hay más de 1 carpeta)
- Subir +10 títulos MP3
(pulsación prolongada)
- Preajuste de radio 1~6
- Pulse para sintonizar una emisora
preajustada.
- Mantenga presionado durante más de
2 segundos para guardar una emisora.
10. - Pulse brevemente para visualizar el reloj;
pulse de nuevo para salir.
- Pulse brevemente para visualizar infor-
mación sobre el USB en modo USB.
- Realice una pulsación prolongada para
acceder al ajuste del reloj.
11. Conector USB
12. Ranura para tarjeta SD/MMC
13. - Conexión/desconexión (pulsación prolon-
gada)
- Supresión del sonido
14. Ranura para disco
15. Sonoridad
16. Sensor remoto
17. Preajuste automático de emisoras de radio
18. - Gire la rueda para ajustar el volumen.
- Pulse para seleccionar VOL/BAS/MID/
TRE/BAL/FAD, gire la rueda para ajustar
el nivel.
- Pulse durante más de 2 segundos para
acceder al modo de menú.
03_Caracas2010U_es.indd 3303_Caracas2010U_es.indd 33 17.02.11 13:3017.02.11 13:30
Page 34

34
Mandos a distancia
1. - Conexión/desconexión
2. - Supresión del sonido
3. - Pulse para seleccionar VOL/BAS/MID/
TRE/BAL/FAD, utilice el botón de volumen para ajustar el nivel.
- Realice una pulsación prolongada para
acceder al modo de menú.
4. - Sonoridad
5. - Reproducción de títulos
Botón 1: Pulse brevemente para
Reproducción/pausa
Reproducción desde el princi-
pio (pulsación prolongada)
Sustitución de la batería de litio
del mando a distancia de la unidad
Cuando el alcance de funcionamiento del
mando a distancia sea insuficiente o no pueda
accederse a las funciones mientras está en
funcionamiento la unidad. Sustituya la batería
por una batería de litio nueva. Asegúrese de
que la polaridad de la batería sea correcta.
1. Extraiga el soporte de la batería pulsando
el tope.
2. Inserte una batería de litio de tipo botón con
la marca (+) hacia arriba.
Inserte el soporte de la batería en el mando
a distancia.
(CR 2025)
1 2
Botón 2: Reproducción intro (10 s)
Botón 3: Reproducción con repetición
de títulos
Botón 4: Reproducción aleatoria
Botón 5: - Bajar carpeta MP3
- Bajar -10 títulos MP3
(pulsación prolongada)
Botón 6: - Subir carpeta MP3
- Subir +10 títulos MP3
( pulsación prolongada)
- Botones 1-6: Preajuste de radio
Pulse para escuchar una emisora
preajustada, mantenga presionado
durante más de 2 segundos para
guardar una emisora.
6. - Volumen
7. - Sintonización de radio
- Búsqueda de títulos
8. - Radio
- Reproducción de disco (cuando hay un
disco insertado)
- Tarjeta (cuando hay una tarjeta SD/MMC
insertada)
- USB (cuando está conectado un USB)
- Entrada auxiliar
9. - AMS: Escaneo de preajuste de radio/
preajuste automático de radio
- Búsqueda de caracteres/archivo/título
MP3
10. - Cambio de banda
11. - Cambio de visualización
12. - Radio local/distante
13. - FM estéreo/mono
03_Caracas2010U_es.indd 3403_Caracas2010U_es.indd 34 17.02.11 13:3017.02.11 13:30
Page 35

35
ESPAÑOL
Mandos a distancia Funcionamiento general
Tecla On/Off
Pulse el botón para encender la unidad con
el vehículo arrancado. Para apagar la unidad,
pulse y mantenga presionado el botón.
Ajuste del volumen
Gire la rueda
VOL/MENU
para ajustar el volumen. Gírela hacia la derecha para subir el
volumen y hacia la izquierda para bajarlo.
Supresión del sonido
Pulse el botón para silenciar el volumen del
sistema. Aparecerá "MUTE" en la pantalla y el
volumen se silenciará. Pulse de nuevo el botón
o gire la rueda
VOL/MENU
para devolver el
volumen al ajuste que estaba en uso antes de
activar la función de supresión del sonido.
Elementos de mando del audio
Para ajustar los niveles de graves, agudos,
medios, balance y fader (atenuador), pulse
la rueda
VOL/MENU
repetidamente hasta
que aparezca el elemento de mando del audio correspondiente en la pantalla. Antes de
que transcurran 5 segundos, gire la rueda
VOL/MENU
para seleccionar un valor.
- VOL
En la pantalla aparecen el volumen VOL y un
número del 0 al 47.
- BAS
En la pantalla aparece el nivel de GRAVES.
Rango de GRAVES: de -7 a +7.
- MID
En la pantalla aparece el nivel de medios.
Rango de medios: de -7 a +7.
- TRE
En la pantalla aparece el nivel de AGUDOS.
Rango de AGUDOS: de -7 a +7.
- BAL
En la pantalla aparece el nivel de BALANCE.
Rango de BALANCE: de 12 L (totalmente a la
izquierda) a 12 R (totalmente a la derecha).
L = altavoz izquierdo, R = altavoz derecho.
- FAD
En la pantalla aparece el nivel de FADER (atenuador). Rango de FADER (atenuador): de 12 R
(totalmente trasero) a 12 F (totalmente delantero).
R = altavoz trasero, F = altavoz delantero.
Botón de modo (SRC)
Pulse el botón
SRC
para cambiar entre Radio,
DISC (cuando hay un disco introducido), USB
(cuando el USB está conectado), Card (Tarjeta,
cuando hay una tarjeta SD/MMC insertada),
AUX play (reproducción AUX), etc.
Entrada auxiliar
Para acceder a un equipo auxiliar:
1. Conecte el reproductor de audio portátil a la
interfaz AUX del panel frontal.
2. Pulse el botón
SRC
para seleccionar el
modo Entrada auxiliar.
Pulse de nuevo el botón
SRC
para cancelar el
modo Entrada auxiliar y acceder al modo siguiente.
ADVERTENCIA:
• Guarde la batería en un lugar alejado del
alcance de los niños. En caso de que un niño
se tragase la batería accidentalmente, debe
ponerse en contacto con un médico de inmediato.
• No recargue ni desmonte la batería; no caliente la batería ni la arroje al fuego. De lo
contrario, la batería podría liberar calor, romperse o arder.
• No deje la batería junto a otros materiales
metálicos.
• Al desechar o guardar la batería, cúbrala
con cinta adhesiva y aíslela.
• No pinche la batería con pinzas u objetos
similares. De lo contrario, la batería podría
liberar calor, romperse o arder.
Alcance del mando a distancia
El mando a distancia funciona dentro de una
distancia de 3~5 m.
Cuando vaya a utilizar el mando a distancia,
apunte con la parte superior del mismo hacia
el sensor remoto.
Sensor remoto
03_Caracas2010U_es.indd 3503_Caracas2010U_es.indd 35 17.02.11 13:3017.02.11 13:30
Page 36

36
Ajuste del reloj
Es posible ajustar la hora correcta pulsando y
manteniendo presionado el botón
DISP
.
Para ajustar el reloj realice los siguientes pasos:
1. Arranque el vehículo y encienda la radio.
2. Pulse el botón
DISP
para que aparezca el
reloj.
3. Con el reloj visible en pantalla, pulse y man-
tenga presionado el botón
DISP
hasta que
la indicación de hora parpadee.
4. Antes de que transcurran 5 segundos, gire
la rueda
VOL/MENU
hacia la izquierda para
ajustar los minutos. Para cambiar la hora
gire la rueda
VOL/MENU
hacia la derecha
para ajustar las horas.
Selector de visualización (DISP)
En esta unidad es posible visualizar la hora o
las funciones de reproductor de CD/frecuencia
de radio. Normalmente aparece la frecuencia
de radio o la indicación del título del reproductor de CD, pero puede visualizar la hora en
pantalla si pulsa el botón
DISP
. La hora aparecerá durante unos 5 segundos y después volverán a aparecer la visualización de funciones
de reproductor de CD o de radio.
- Modo VOL LAST/ADJ
Gire la rueda
VOL/MENU
para escoger el volumen de encendido.
VOL LAST: El volumen de encendido es el volumen existente antes de apagarse la radio la
vez anterior.
VOL ADJUST: Pulse para acceder al modo
A-VOL y, a continuación, gire para ajustar el
volumen de encendido.
- Modo ROLL:
Gire la rueda
VOL/MENU
para activar o desactivar la función de visualización cíclica.
Si ROLL está activado, en la pantalla LCD
aparecerá la información de etiqueta ID3 de
MP3 de forma cíclica, p. ej., FOLDER (carpeta)
> FILE (archivo) > ALBUM (álbum) > TITLE
(título) > ARTIST (intérprete) > Track Number
(número de título)/Elapsed Time (tiempo transcurrido).
Si ROLL está desactivado, en la pantalla LCD
sólo aparecerá el tiempo de reproducción.
- Modo 12/24 HOURS (12/24 horas):
Gire la rueda
VOL/MENU
para seleccionar el
modo de 12 ó 24 horas.
- AREA SET (ajuste de área)
Esta opción le permite seleccionar el espacio
de frecuencia adecuado para su área.
Gire la rueda
VOL/MENU
para escoger
EE. UU. o Europa.
Funcionamiento general
Sonoridad (LOUD)
Al escuchar música con el volumen bajo esta
función potencia de forma selectiva unas frecuencias de graves y agudos determinadas.
Pulse el botón
LOU
para activar o desactivar
la función LOUD.
Ajuste del menú
Pulse y mantenga presionado la rueda
VOL/
MENU
durante más de 2 segundos para acceder al modo de menú y, a continuación,
cambie de modo con cada pulsación como se
indica a continuación:
- Modo DSP:
Gire la rueda
VOL/MENU
para escoger el
efecto sonoro DSP:
POP->ROCK->CLASSIC->FLAT->DSP OFF
- BEEP ON/OFF:
Gire la rueda
VOL/MENU
para activar o des-
activar el sonido de beep.
- Modo de SEEK 1/2 (modo de radio):
Gire la rueda
VOL/MENU
para escoger el
modo de búsqueda de radio 1 ó 2.
SEEK 1: La búsqueda de emisoras se detiene
al recibir la siguiente emisora.
SEEK 2: La búsqueda de emisoras se detiene
al soltar los botones
o y recibirse la
siguiente emisora.
03_Caracas2010U_es.indd 3603_Caracas2010U_es.indd 36 17.02.11 13:3017.02.11 13:30
Page 37

37
ESPAÑOL
Modo de radio
Selección de una banda
Pulse
BAND
(banda) una o más veces para
seleccionar FM1, FM2, FM3, MW1 o MW2.
En la pantalla aparecen la banda de onda, la
frecuencia y el número de emisora preajustada
si ya está guardada.
Selección de una emisora
Pulse el botón de sintonización o para
sintonizar otra emisora.
Sintonización hacia arriba
Pulse el botón de sintonización hacia arriba para sintonizar las emisoras paso a paso
hacia arriba. La frecuencia actual aparecerá
en formato digital en el panel de visualización.
Pulse y mantenga presionado el botón de
búsqueda para ir a la siguiente emisora disponible.
Sintonización hacia abajo
Pulse el botón de sintonización hacia abajo para sintonizar las emisoras paso a paso
hacia abajo.
Pulse y mantenga presionado el botón de
búsqueda hacia abajo para ir a la emisora anterior disponible.
Modo preajuste
Seis botones de preajuste numerados guardan
y recuperan emisoras de cada banda. Las
emisoras guardadas (1-6) de la banda actual
aparecen en pantalla.
Guardado de emisoras
- Guardado automático
1. Seleccione una banda (en caso necesario).
2. Pulse
AMS
brevemente para buscar todas
las emisoras de la banda; las 6 emisoras
más potentes se guardarán de forma automática en el botón de preajuste (números 1-6).
- Guardado manual
1. Seleccione una banda (en caso necesario) y,
a continuación, seleccione una emisora.
2. Pulse y mantenga presionado un botón de
preajuste (números 1-6) del panel frontal o
del mando a distancia.
3. El número de preajuste y la emisora aparecen visualizados y destacados.
Recuperación de una emisora
1. Seleccione una banda (en caso necesario).
2. Pulse un botón de preajuste del panel frontal o del mando a distancia (números 1-6)
para seleccionar la emisora guardada correspondiente.
03_Caracas2010U_es.indd 3703_Caracas2010U_es.indd 37 17.02.11 13:3017.02.11 13:30
Page 38

38
Modo USB/SD/MMC
1. Cargar una tarjeta SD/MMC
Inserte la tarjeta SD/MMC en la ranura. La
unidad leerá el archivo de la tarjeta de forma
automática.
2. Extraer una tarjeta SD/MMC
Pulse el botón
SRC
hasta llegar a un modo
que no sea SD; presione la tarjeta SD/MMC
para expulsarla.
3. Cargar un dispositivo USB
Introduzca el dispositivo USB en el puerto
USB. La unidad leerá el archivo del dispositivo
USB.
4. Extraer un dispositivo USB
Pulse el botón
SRC
hasta llegar a un modo
que no sea USB y extraiga el dispositivo USB
del puerto USB.
Notas USB/SD/MMC
Funciones USB (tipo de memoria flash) y reproducción de música MP3
1. Admite tarjetas SD/MMC.
2. Admite memoria flash USB 2 en 1 (SD/
MMC).
3. Posibilidad de FAT 12/FAT 16/FAT 32.
4. Nombre del archivo: 32 bytes/nombre dir.:
32 bytes/nombre etiqueta: 32 bytes
5. Admite etiqueta (etiqueta ID3 ver. 2.0)
Título/intérprete/álbum: 32 bytes.
6. No admite lector de tarjetas múltiple.
7. Admite USB 1.1
Admite USB 2.0 (no admite velocidad
USB 2.0. Se obtiene la misma velocidad
que con USB 1.1).
No todos los tipos de dispositivo USB son
compatibles con la unidad.
03_Caracas2010U_es.indd 3803_Caracas2010U_es.indd 38 17.02.11 13:3017.02.11 13:30
Page 39

39
ESPAÑOL
Funcionamiento del reproductor de CD
Introducción de un disco
Con la etiqueta hacia arriba, introduzca completamente el disco compacto en la ranura
para discos hasta que se accione el mecanismo y pase a introducir el disco sin su ayuda.
La reproducción se iniciará de forma automática desde el primer título del disco.
NOTA:
La unidad está diseñada para reproducir discos compactos de 5" (12 cm) únicamente. No intente utilizar CD de 3" (8 cm) en
la unidad, ya sea con o sin adaptador, puesto
que el reproductor y/o el disco podrían sufrir
daños.
Botón de expulsión del disco
Pulse el botón de expulsión para detener la
reproducción y expulsar el disco. La unidad
volverá a la función de radio. Los discos se
pueden expulsar con el vehículo arrancado
o sin arrancar. Si el disco expulsado no se
retira de la ranura para discos en un plazo de
10 segundos tras ser expulsado, éste volverá
a introducirse de forma automática.
NOTA:
Para evitar que el disco sufra daños
de forma accidental, extráigalo siempre de la
unidad al finalizar la reproducción.
Selector de reproducción/pausa
de CD
Pulse el botón 1/ para pausar la reproducción del disco. Pulse de nuevo el botón 1/
para reanudar la reproducción.
Búsqueda hacia arriba/título
siguiente
Pulse el botón del título siguiente durante
la reproducción para seleccionar el inicio del
título siguiente.
Búsqueda hacia abajo/título
anterior
Pulse el botón del título anterior durante
la reproducción para seleccionar el inicio del
título actual. Pulse 2 veces para seleccionar el
inicio del título anterior.
Funciones de búsqueda rápida
La búsqueda audible de alta velocidad hasta
cualquier apartado del disco se puede realizar
a través de las funciones de búsqueda rápida.
Pulse y mantenga presionado el botón
de título siguiente para avanzar rápidamente
hacia delante o pulse y mantenga presionado
el botón de título anterior para avanzar rápidamente hacia atrás.
Selector de reproducción Intro
Durante la reproducción de un disco, pulse
el botón
2/INT
para seleccionar "INT ON" y
reproducir los primeros 10 segundos de cada
título. Al llegar al título deseado, pulse el botón
2/INT
para seleccionar "INT OFF" y reproducir
el título actual.
Selección de reproducción con
repetición de títulos
Durante la reproducción de un disco, pulse
3/RPT
para seleccionar "RPT TRK" y reproducir repetidamente el título seleccionado. Pulse
de nuevo
3/RPT
para seleccionar "RPT FOLD"
y reproducir repetidamente todos los títulos de
la carpeta actual. La reproducción con repetición continuará hasta que pulse
3/RPT
para
seleccionar "RPT OFF".
Selección de reproducción
aleatoria
Durante la reproducción de un disco, pulse el
botón
4/RDM
para seleccionar "RDM ON" y
reproducir todos los títulos del disco en orden
aleatorio. En el modo de reproducción aleatoria, puede pulsar los botones de sintonización/
título para seleccionar los títulos en orden
aleatorio en lugar de utilizar la progresión
normal. Vuelva a pulsar el botón
4/RDM
para
seleccionar "RDM OFF" y cancelar el modo de
reproducción aleatoria.
03_Caracas2010U_es.indd 3903_Caracas2010U_es.indd 39 17.02.11 13:3017.02.11 13:30
Page 40

40
Reproducción de archivos MP3/WMA
Información
Durante la reproducción va apareciendo en
pantalla información de la etiqueta ID3: FOLDER (carpeta), FILE (archivo), ALBUM (álbum),
TITLE (título), ARTIST (intérprete) y Track
Number/Elapsed Time (número de título/tiempo transcurrido).
Subir/bajar carpeta
Pulse el botón 5 para ir a la carpeta anterior.
Pulse el botón 6 para ir a la carpeta siguiente.
Acceso directo a canción/archivo
1. Pulse el botón
AMS
una vez y pulse la rue-
da
VOL/MENU
para activar la búsqueda
directa de títulos.
2. Gire la rueda
VOL/MENU
para seleccionar
un dígito.
3. Pulse la rueda
VOL/MENU
para confirmar la
entrada y el dígito de decenas parpadeará.
4. Gire la rueda
VOL/MENU
para seleccionar
un dígito.
5. Repita los pasos indicados arriba con los
dígitos de centenas y de unidades de millar
en caso necesario.
NOTA:
La unidad sólo permite seleccionar
los dígitos correspondientes al número de
archivos del soporte en el que esté realizando la búsqueda.
6. Cuando el número de título aparezca en
pantalla, pulse la rueda
VOL/MENU
para
reproducir la canción o el archivo seleccionado.
Búsqueda de carpetas/archivos
1. Pulse el botón
AMS
2 veces y pulse la rue-
da
VOL/MENU
para acceder a la opción de
búsqueda de archivos.
2. Gire la rueda
VOL/MENU
para seleccionar
el directorio o la canción que desee.
3. Pulse la rueda
VOL/MENU
para ver los
archivos que contiene el directorio seleccionado.
4. Gire la rueda
VOL/MENU
para seleccionar
la canción o el archivo. Pulse la rueda
VOL/
MENU
para reproducir la canción o el archi-
vo seleccionado.
Búsqueda por nombre (CHAR-SCH)
1. Pulse el botón
AMS
3 veces y pulse la rue-
da
VOL/MENU
para acceder a la opción de
búsqueda de caracteres.
2. Gire la rueda
VOL/MENU
para seleccionar
los caracteres A-Z, _ , - , + y 0-9 para el primer carácter.
3. Pulse la rueda
VOL/MENU
para confirmar
la entrada del carácter y desplazarse a la
siguiente posición.
4. Repita el proceso para un máximo de 8 caracteres.
5. Pulse la rueda
VOL/MENU
para iniciar la
búsqueda.
6. En caso de encontrar una canción o un
archivo, pulse la rueda
VOL/MENU
para
reproducir la canción o el archivo que haya
seleccionado.
NOTA:
Aparecerá "NOT FIND" si no se encuentra ningún archivo que empiece por la
cadena de búsqueda que haya introducido.
Aspectos generales del MP3
• MP3 es la abreviatura de "MPEG Audio
Layer 3" y hace referencia a una norma de
tecnología de compresión de audio.
• Este producto permite reproducir archivos
MP3 de discos CD-R y CD-RW.
• La unidad es capaz de leer archivos MP3
en formato conforme a la ISO 9660. Sin embargo, no admite datos MP3 editados con el
método de escritura en paquete.
• La unidad no es capaz de leer archivos MP3
con extensiones distintas a ".mp3".
• Si reproduce un archivo que no sea MP3
con la extensión ".mp3", es posible que escuche algún ruido.
• En este manual hacemos referencia a lo
que se denomina "archivo MP3" y "carpeta"
en la terminología informática con "título" y
"álbum", respectivamente.
• La cantidad máxima de niveles de directorio
es 8, incluyendo el directorio de origen. La
cantidad máxima de archivos y carpetas por
disco es 256.
• Puede que la unidad no reproduzca los títulos en el orden de los números de título.
• La unidad sólo reproduce los títulos de
audio si el disco contiene títulos de audio y
archivos MP3.
03_Caracas2010U_es.indd 4003_Caracas2010U_es.indd 40 17.02.11 13:3017.02.11 13:30
Page 41

41
ESPAÑOL
• Al reproducir un disco de 8 kbps o VBR*, el
tiempo de reproducción transcurrido de la
ventana de visualización puede que no sea
correcto, y también es posible que la reproducción intro no funcione correctamente.
*VBR: tasa de bits variable.
Nota sobre la creación de sus
propios discos CD-R o CD-RW con
archivos MP3
• Para disfrutar de una alta calidad del sonido, se recomienda convertir los archivos a
MP3 con una frecuencia de muestreo de
44,1 kHz y una tasa de bits fija de 128 kbps.
• NO guarde más de 256 archivos MP3 por
disco.
• Para obtener un formato conforme a la
ISO 9660, la profundidad máxima permitida
de carpetas anidadas es de 8, incluyendo el
directorio (carpeta) de origen.
• Al utilizar discos CD-R, la reproducción sólo
es posible en el caso de los discos finalizados.
• Al grabar discos CD-R MP3, asegúrese de
que se formatean como disco de datos y NO
como disco de audio.
• No escriba archivos que no sean MP3 ni
carpetas innecesarias junto con los archivos MP3 del disco CD-R; de lo contrario, la
unidad necesitará mucho tiempo antes de
comenzar a reproducir los archivos MP3.
Reproducción de archivos MP3/WMA
• En el caso de algunos soportes CD-R, es
posible que los datos no se escriban correctamente dependiendo de la calidad de fabricación. En este caso, puede que los datos
no se reproduzcan correctamente. Se recomienda utilizar discos CD-R de gran calidad.
• Aparece un máximo de 16 caracteres para
el nombre del álbum y del título. Se requiere
la versión 1.x de la etiqueta ID3.
• Tenga en cuenta que es posible que la unidad no reproduzca los títulos en el orden en
que los escribió en el disco.
03_Caracas2010U_es.indd 4103_Caracas2010U_es.indd 41 17.02.11 13:3017.02.11 13:30
Page 42

42
Conexiones eléctricas
Diagrama de cableado
ALTAVOZ
DELANTERO
MoradoFranja
morada/
negra
GrisFranja
gris/
negra
Franja
blanca/
negra
Blanco
Franja
verde/
negra
Verde
Altavoz derecho
(trasero)
Altavoz derecho
(delantero)
Altavoz izquierdo
(delantero)
Altavoz izquierdo
(trasero)
Caja
de
filtro
Cable a tierra
A batería del coche (+)
continua +12 V CC
Negro
Amarillo
Azul
Rojo
Cable de control de relé de antena
eléctrica/motor
Cable de control de relé de amplificador
Llave de encendido +12 V CC
con ON/ACC
Fuera de servicio
(gris)
R (derecho, rojo)
L (izquierdo, blanco)
(negro)
Fusible 15 A
Antena
ALTAVOZ
TRASERO
03_Caracas2010U_es.indd 4203_Caracas2010U_es.indd 42 17.02.11 13:3017.02.11 13:30
Page 43

43
ESPAÑOL
Esta unidad incorpora un panel extraíble.
Puede extraer y llevarse el panel a fin de evitar
robos.
Extracción del panel
1. Desconecte la alimentación de la unidad.
2. Pulse el botón
.
3. Agarre el panel por una esquina y extráigalo.
4. Guarde el panel en la carcasa y lléveselo
cuando salga del coche.
Carcasa de panel extraíble
Instalación del panel
1. Sujete el panel, asegúrese de que éste
apunta hacia usted y ajuste el lado derecho
del panel en el soporte del panel.
2. Presione el lado izquierdo del panel hasta
que quede trabado.
Extracción de la unidad
1. Extraiga el panel y la placa de contorno.
2. Inserte ambas llaves en L en el orificio
situado en la parte delantera del conjunto
hasta que queden trabadas.
3. Extraiga la unidad.
Sistema antirrobo
03_Caracas2010U_es.indd 4303_Caracas2010U_es.indd 43 17.02.11 13:3017.02.11 13:30
Page 44

44
Guía de instalación
Procedimientos de instalación
Primero realice las conexiones eléctricas y, a
continuación, compruebe que sean correctas.
Restauración
Pulse el botón
. Agarre el panel por una
esquina y extráigalo. A continuación, pulse el
botón RESET con un objeto puntiagudo para
restaurar la unidad a su estado original.
Nota:
Al pulsar el botón
RESET
se borrarán el
reloj y las emisoras guardadas.
Restauración
Abertura para la instalación
Esta unidad se puede instalar en cualquier
salpicadero que tenga una abertura como la
que se muestra a continuación. El salpicadero debe tener un grosor de entre 4,75 mm y
5,56 mm para poder instalar en él la unidad.
Importante:
Extraiga estos 2 tornillos antes de la instalación. De lo contrario, el reproductor
no funcionará.
1. Introduzca el anillo de montaje en el salpicadero y doble las presillas de montaje hacia
fuera con un destornillador.
Asegúrese de que la palanca de trabado
quede alineada con el anillo de montaje (sin pro-
yectarse hacia el exterior).
2. Fije la parte trasera de la unidad.
Tras instalar el perno de montaje y el conector de alimentación, fije la parte trasera de la unidad
a la carrocería con el cojín de caucho.
3. Inserte la placa de contorno.
Cojín de caucho del
perno de montaje
Tornillos de
transporte
Palanca
de trabado
03_Caracas2010U_es.indd 4403_Caracas2010U_es.indd 44 17.02.11 13:3017.02.11 13:30
Page 45

45
ESPAÑOL
Detección y resolución de averías
La siguiente lista de comprobación le ayudará a resolver algunos problemas que podría encontrar al utilizar la unidad. Antes de consultarla, compruebe
las conexiones y siga las instrucciones del manual del usuario. No utilice la unidad en condiciones anormales, p. ej., sin sonido, con humo o con olor
desagradable pueden producirse incendios o descargas eléctricas; en caso de que así sea, deje de utilizar la unidad de inmediato y póngase en contacto con el establecimiento donde la adquirió.
Problema Posible causa Solución
General
La unidad no se enciende. El coche no está arrancado.
El cable no está conectado correctamente.
El fusible está quemado.
Arranque el coche con la llave.
Compruebe la conexión del cable.
Sustituya el fusible por uno nuevo de la misma capacidad.
No hay sonido. El volumen está ajustado al mínimo o está
activada la función de supresión del sonido.
Compruebe el volumen o desactive la función de supresión
del sonido.
La unidad o la pantalla no funcionan con
normalidad.
El sistema de la unidad es inestable. Pulse el botón RESET.
Modo de disco
El aparato no reproduce los discos. El disco no se ha introducido correctamente.
El disco está sucio o dañado.
El disco debe insertarse con la etiqueta hacia arriba. Limpie
el disco y compruebe si está dañado. Pruebe con otro disco.
El sonido salta debido a las vibraciones. El ángulo de montaje es superior a 30°.
El montaje es inestable.
Ajuste el ángulo de montaje a menos de 30°.
Monte bien la unidad con las piezas suministradas.
Modo sintonizador
No se puede recibir emisoras. La antena no está conectada correctamente. Conecte la antena correctamente.
Calidad insuficiente de la recepción de
emisoras de radio.
La antena no está completamente extendida
o está rota.
Extienda completamente la antena y, si está rota,
sustitúyala por una nueva.
Se han perdido las emisoras preajustadas. El cable de la batería no está conectado
correctamente.
Conecte la conexión permanente de la unidad a la conexión
permanente del vehículo.
Modo USB/SD/MMC
No es posible insertar el dispositivo USB o
la tarjeta SD/MMC.
La tarjeta de memoria o el dispositivo USB
se han insertado al revés.
Insértelos por el otro lado.
No se lee el dispositivo USB o la tarjeta
SD/MMC.
El formato NTFS no es compatible. Compruebe que el sistema de archivo esté en formato
FAT 16 o FAT 32. Debido a formatos distintos, puede que
no sea posible leer algunos modelos de dispositivos de
almacenamiento o reproductores de MP3.
03_Caracas2010U_es.indd 4503_Caracas2010U_es.indd 45 17.02.11 13:3017.02.11 13:30
Page 46

46
Especificaciones
General
Suministro eléctrico: 12 V CC (11 V - 16 V)
Tensión de prueba de 14,4 V, tierra
negativa
Salida de alimentación máxima: 4 canales de 45 W
Salida de alimentación continua: 4 canales de 20 W (4 Ω,10 % T.H.D.)
Impedancia de altavoz adecuada: 4-8 ohmios
Resistencia de entrada previa a
amperaje:
2,0 V (modo de reproducción de CD:
carga de 1 kHz, 0 dB, 10 kΩ)
Fusible: 15 A
Dimensiones (An. x Al. x Pr.): 178 x 50 x 160 mm
Peso: 1,7 kg
Entrada auxiliar: ≥ 300 mV
Consumo de corriente máx.: 12 A
Radio FM estéreo
Gama de frecuencias: 87,5 - 108,0 MHz (Europa)
87,5 - 107,9 MHz (América)
Sensibilidad útil: 8 dBμ
Sensibilidad de silenciamiento
(S/N=50 dB):
12 dBμ
Respuesta de frecuencia: 30 Hz - 15 kHz
Separación estéreo: 30 dB (1 kHz)
Ratio de respuesta de imagen: 50 dB
Ratio de respuesta IF: 70 dB
Ratio ruido/señal: 55 dB
Radio OM (AM)
Gama de frecuencias: 522 - 1620 kHz (Europa)
530 - 1710 kHz (América)
Sensibilidad útil (S/N=20 dB): 30 dBμ
Reproductor de disco
Sistema: Sistema de audio digital de disco
Respuesta de frecuencia: 20 Hz - 20 kHz
Ratio ruido/señal: >80 dB
Distorsión armónica total: Menos del 0,20 % (1 kHz)
Lloro y fluctuación: Inferior a límites medibles
Separación de canales: > 55 dB
Componentes
Funda de montaje 1
Tornillos de máquina M5 x 6 mm 4
Perno de montaje (50 mm) 1
Conector de cable 1
Carcasa de placa extraíble 1
Placa de contorno 1
Llave en L 2
Manual de instrucciones 1
Cojín de caucho 1
Nota: Las especificaciones y el diseño están sujetos a cambios sin
previo aviso debido a la realización de mejoras tecnológicas.
03_Caracas2010U_es.indd 4603_Caracas2010U_es.indd 46 17.02.11 13:3017.02.11 13:30
Page 47

47
PORTUGUÊS
Medidas de segurança Conteúdo
PRECAUÇÕES
• Utilize apenas num sistema eléctrico de terra negativo de 12 volt CC.
• Desconecte o terminal negativo da bateria
enquanto estiver a montar e conectar a unidade.
• Se precisar de substituir um fusível, este
deverá ser substituído por um fusível de
amperagem idêntica. Se utilizar um fusível
de amperagem superior, poderá danificar
gravemente a unidade.
• NÃO tente desmantelar a unidade. Os raios
laser da unidade óptica são perigosos para
os olhos.
• Certifique-se de que não entram clipes ou
outros objectos estranhos na unidade, pois
eles podem causar falhas de funcionamento
ou colocar em risco a segurança devido a
choques eléctricos ou exposição ao raio laser.
• Se tiver estacionado o veículo durante muito
tempo num local com temperaturas elevadas ou baixas, antes de operar a unidade,
aguarde até que a temperatura no veículo
normalize.
• Regule o volume de forma a que possa ouvir sons de aviso provenientes do exterior
(buzinas, sirenes, etc.).
Notas referentes aos CDs
• Reproduzir um CD defeituoso ou com pó
pode provocar falhas no som.
• Segure os CDs como ilustrado.
• Não toque no lado sem etiqueta.
• Não fixe qualquer selo, etiqueta ou folha de
protecção de dados em qualquer dos lados
de um disco.
• Não exponha um CD à luz directa do Sol ou
a calor excessivo.
• Limpe um CD sujo, do centro para o exterior, utilizando um pano de limpeza.
• Nunca utilize solventes, tais como benzina
ou álcool.
• Esta unidade não está apta para reproduzir
CDs de 3 polegadas (8 cm).
NUNCA insira um CD de 3 polegadas en-
cerrado no adaptador ou um CD com forma
irregular. A unidade poderá não conseguir
ejectá-los, resultando daí uma falha de funcionamento.
• Para além dos CDs normais, esta unidade
pode reproduzir CD-Rs ou CD-RWs, MP3s.
Antes da operação
• Não aumente demasiado o volume, pois
isso irá impedir que ouça os sons do exterior, tornando a condução perigosa.
• Pare o veículo antes de realizar uma operação complicada.
AVISO
• NÃO abra as tampas nem efectue qualquer
reparação por si mesmo. Procure o agente
comercial ou um técnico com experiência
para o ajudar.
Medidas de segurança ................................. 47
Painéis de controlo ....................................... 48
Controlos remotos ........................................ 49
Operações básicas ....................................... 50
Modo Rádio .................................................. 52
Modo USB/SD/MMC..................................... 53
Operação do leitor de CDs ........................... 54
Reprodução de ficheiros MP3/WMA.............55
Ligações eléctricas ....................................... 57
Sistema anti-roubo .......................................58
Guia de instalação ........................................ 58
Diagnóstico de falhas ................................... 60
Especificações.............................................. 61
04_Caracas2010U_pt.indd 4704_Caracas2010U_pt.indd 47 17.02.11 13:3217.02.11 13:32
Page 48

48
Painéis de controlo
Ligar: pressione qualquer botão no painel, excepto e , para ligar a unidade.
1. Ejecção Disco
2. - Rádio
- Reprodução Disco (quando está inserido
um disco)
- USB (quando o USB está conectado)
- Cartão de memória (quando está inserido
um cartão de memória SD/MMC)
- Aux-in
3. & 4. - Sintonização Rádio
- Procura Faixa
5. Rádio local/remoto
6. Abertura Painel
7. Ficha jack Aux-in
8. Selector Bandas:
FM1, FM2, FM3, MW1, MW2
9. - Reprodução Disco
• Botão 1: Reproduzir/Pausa
Reproduzir de início (pressio-
nar mais de 2 seg.)
• Botão 2: Função Intro (10 seg.)
• Botão 3: Repetição da mesma faixa
• Botão 4: Reprodução aleatória de faixa
• Botão 5: - Avançar Pasta MP3 (se existir mais do que uma pasta)
- Avança 10 faixas MP3 (pressionar prolongadamente)
• Botão 6: - Recuar Pasta MP3 (se existir
mais do que uma pasta)
- Recua 10 faixas MP3 (pressionar prolongadamente)
- Memorização de emissoras de rádio 1~6
- Pressionar para sintonizar uma emissora
memorizada.
- Manter pressionada durante mais de
2 segundos para memorizar a emissora.
10. - Pressionar brevemente para mudar para
a visualização do relógio; premir novamente para sair.
- Pressionar brevemente para visualizar
informação USB no modo USB.
- Pressionar prolongadamente para entrar
na configuração do relógio.
11. Conector USB
12. Entrada para cartão de memória SD/MMC
13. - Ligar/desligar (pressão prolongada)
- Mute
14. Entrada Disco
15. Loudness
16. Sensor remoto
17. Memorização automática de emissora
de rádio
18. - Rodar o botão para regular o volume.
- Pressione para seleccionar VOL/BAS/
MID/TRE/BAL/FAD, rode o botão para
regular o nível.
- Pressione durante mais de 2 segundos
para entrar no modo de Menu.
04_Caracas2010U_pt.indd 4804_Caracas2010U_pt.indd 48 17.02.11 13:3217.02.11 13:32
Page 49

49
PORTUGUÊS
Controlos remotos
1. - Ligar/Desligar
2. - Mute
3. - Pressionar para seleccionar VOL/BAS/
MID/TRE/BAL/FAD, utilizar o botão do
volume para regular o nível.
- Pressionar prolongadamente para entrar
no modo de Menu.
4. - Loudness
5. - Reprodução Faixa
Botão 1: Pressionar brevemente para
Reproduzir/Pausa.
Reprodução desde o início
(pressionar prolongadamente)
Substituir a pilha de lítio de uma
unidade de controlo remoto.
Quando o alcance de operação do controlo remoto se tornar curto ou não funcionar durante
a operação. Substitua a pilha por uma pilha de
lítio nova. Certifique-se de que coloca a pilha
com a polaridade certa.
1. Puxe o alojamento da pilha para fora, enquanto pressiona a peça de fecho.
2. Insira a pilha tipo botão com a marca (+)
estampada virada para cima.
Introduza o alojamento da pilha dentro do
controlo remoto.
(CR 2025)
1 2
Botão 2: Função Intro (10 seg.)
Botão 3: Repetição da mesma faixa
Botão 4: Reprodução aleatória de faixa
Botão 5: - Avanço Pasta MP3
- Avança 10 faixas MP3 (pressionar prolongadamente)
Botão 6: - Recuo Pasta MP3
- Recua 10 faixas MP3 (pressionar prolongadamente)
- Botão 1-6: Memorização de emissoras
de rádio
Pressione para ouvir uma emissora
memorizada; mantenha pressionada durante mais de 2 segundos para
memorizar a emissora.
6. - Volume
7. - Sintonização do rádio
- Procura Faixa
8. - Rádio
- Reprodução Disco (quando está inserido
um disco)
- Cartão (quando está inserido um cartão
de memória SD/MMC)
- USB (quando o USB está conectado)
- Aux-in
9. - AMS: Memorização automática de emis-
sora de rádio/scan para memorização
de emissora de rádio
- Procura de faixa MP3/ficheiro/caracter
10. - Selector Bandas
11. - Mudar Visor
12. - Rádio local/remoto
13. - FM estéreo/mono
04_Caracas2010U_pt.indd 4904_Caracas2010U_pt.indd 49 17.02.11 13:3217.02.11 13:32
Page 50

50
Controlos remotos Operações básicas
Botão Ligar/Desligar
Pressione o botão para ligar a unidade
quando a ignição do veículo estiver ligada.
Pressione o botão e mantenha-o pressionado
para desligar a unidade.
Regular o nível do volume
Rode o botão
VOL/MENU
para regular o nível
do volume. Rode no sentido horário para aumentar o volume e no sentido anti-horário para
diminuir o volume.
Silenciar áudio
Pressione o botão para silenciar o volume
do sistema. Irá aparecer "MUTE" no visor e o
volume será silenciado. Volte a pressionar o
botão ou rode o botão
VOL/MENU
para repor o nível de volume que estava a ouvir antes
de ser activada a função Mute.
Controlos Áudio
Para ajustar os graves, agudos, médios, balance
e fader, pressione repetidamente o botão
VOL/
MENU
até surgir o controlo áudio adequado no
visor. Num intervalo de cinco segundos, rode o
botão
VOL/MENU
para seleccionar um valor.
-VOL
No visor surge o nível de volume VOL e um
número de 0 a 47.
- BAS
No visor surge o nível de graves (BASS).
Intervalo BASS: -7 a +7.
- MID
No visor surge o nível de médios (Middle).
Intervalo Middle: -7 a +7.
- TRE
No visor surge o nível de agudos (TREBLE).
Intervalo TREBLE: -7 a +7.
- BAL
No visor surge o nível de BALANCE.
Intervalo de BALANCE: 12 L (tudo à esquerda)
a 12 R (tudo à direita).
L = Altifalante esquerdo, R = Altifalante direito.
- FAD
No visor surge o nível de FADER.
Intervalo do FADER: 12 R (tudo atrás) a 12 F
(tudo à frente).
R = Altifalante traseiro, F = Altifalante dianteiro.
Botão Modo (SRC)
Pressione o botão
SRC
para alternar entre
Radio, DISC (quando está inserido um disco),
USB (quando o USB está conectado), Card
(quando está inserido um cartão de memória
SD/MMC) ou AUX play, etc.
Entrada auxiliar
Para aceder a um dispositivo auxiliar:
1. Ligue o leitor de áudio portátil AUX à inter-
face no painel dianteiro.
2. Pressione o botão
SRC
para seleccionar o
modo Aux-In.
Pressione novamente o botão
SRC
para cancelar
o modo Aux-In e avançar para o modo seguinte.
AVISO:
• Guarde a pilha num local inacessível às crianças. Se uma criança engolir acidentalmente a
pilha, procure imediatamente um médico.
• Não recarregue, curto-circuite, desmantele
ou aqueça a pilha, nem a deite para o fogo.
A realização de qualquer uma destas acções pode fazer com que a pilha solte calor,
parta ou incendeie.
• Não deixe a pilha junto de outros materiais
metálicos.
• Envolva a pilha numa película e isole-a antes de a deitar fora ou de a guardar.
• Não bata na pilha com tesouras ou ferramentas semelhantes. A realização de qualquer uma destas acções pode fazer com
que a pilha solte calor, parta ou incendeie.
Alcance de operação do controlo
remoto
O controlo remoto pode operar a uma distância de 3~5 m.
Aponte o topo do controlo remoto para o sensor remoto quando o estiver a utilizar.
Sensor remoto
04_Caracas2010U_pt.indd 5004_Caracas2010U_pt.indd 50 17.02.11 13:3217.02.11 13:32
Page 51

51
PORTUGUÊS
Acertar o relógio
É possível definir a hora certa do dia, pressionando e mantendo pressionado o botão
DISP
.
Para acertar o relógio, execute os seguintes
passos:
1. Ligue a ignição do veículo e o rádio.
2. Pressione o botão
DISP
para visualizar o
relógio.
3. Com o relógio visível no visor, pressione e
mantenha pressionado o botão
DISP
até a
indicação das horas começar a piscar.
4. Num intervalo de 5 segundos, rode o con-
trolo
VOL/MENU
no sentido anti-horário
para ajustar os minutos ao pretendido. Para
mudar a hora, rode o controlo
VOL/MENU
no sentido horário para ajustar a hora ao
pretendido.
Selector de visor (DISP)
Esta unidade permite visualizar a hora ou a
frequência do rádio/funções do leitor de CDs.
Normalmente, é apresentada a frequência do
rádio ou uma indicação da faixa do leitor de
CDs; no entanto, a unidade apresentará a hora
quando se pressionar o botão
DISP
. A hora
será apresentada durante cerca de 5 segundos e, depois disso, volta a ser apresentada a
função do rádio ou do leitor de CDs.
- Modo VOL LAST/ADJ
Rode o botão
VOL/MENU
para seleccionar o
modo de volume ao ligar o rádio.
VOL LAST: o volume ao ligar o rádio é igual ao
volume que estava regulado da última vez que
o rádio foi desligado.
VOL ADJUST: pressione para entrar no modo
A-VOL; em seguida, rode para definir o volume ao ligar o rádio.
- Modo ROLL:
Rode o botão
VOL/MENU
para seleccionar roll
on (ligado) ou off (desligado).
Quando ROLL está ON (ligado), o LCD irá
apresentar ciclicamente a informação Tag MP3
ID3, p. ex.: FOLDER (pasta) > FILE (ficheiro)
> ALBUM (álbum) > TITLE (título) > ARTIST
(artista) > Número da faixa/Tempo decorrido
Quando ROLL está OFF (desligado), o LCD só
apresenta "Tempo de reprodução".
- Modo 12/24 HOURS:
Rode o botão
VOL/MENU
para seleccionar
entre o modo de 12 ou 24 horas.
- AREA SET
Esta opção permite-lhe seleccionar o espaçamento entre frequências adequado para a sua
área.
Rode o botão
VOL/MENU
para seleccionar
EUA ou Europa.
Operações básicas
Loudness (LOUD)
Ao ouvir música com volumes baixos, esta função irá acentuar selectivamente determinadas
frequências de graves e agudos. Pressione o
botão
LOU
para activar ou desactivar LOUD.
Menu Configuração
Pressione e mantenha pressionado o botão
VOL/MENU
durante mais de 2 segundos para
entrar no modo de Menu; depois disso, cada
vez que pressionar o botão, o modo muda da
seguinte forma:
- Modo DSP:
Rode o botão
VOL/MENU
para seleccionar o
efeito sonoro DSP:
POP->ROCK->CLASSIC->FLAT->DSP OFF
- BEEP ON/OFF:
Rode o botão
VOL/MENU
para seleccionar
entre beep on (ligado) ou off (desligado).
- Modo SEEK 1/2 (modo rádio):
Rode o botão
VOL/MENU
para seleccionar o
modo de procura (seek) 1 ou 2 do rádio.
SEEK 1: a procura pela estação emissora pára
quando se capta a próxima estação.
SEEK 2: a procura pela estação emissora pára
quando se solta o botão ou e se capta
a próxima estação.
04_Caracas2010U_pt.indd 5104_Caracas2010U_pt.indd 51 17.02.11 13:3217.02.11 13:32
Page 52

52
Modo Rádio
Seleccionar uma banda
Pressione
BAND
uma ou várias vezes para
seleccionar FM1 - FM2 - FM3 - MW1 - MW2.
No visor aparece a banda de ondas, frequência e número da estação emissora predefinida,
se já estiver memorizada.
Seleccionar uma estação emissora
Pressione o botão de sintonização ou
para sintonizar outra estação emissora.
Sintonizar para cima (Avançar)
Pressione o botão Procurar para cima ,
para avançar passo-a-passo na sintonização
de estações emissoras. A frequência actual
será indicada em formato digital no visor.
Pressione e mantenha pressionado o botão de
procura para a próxima estação emissora
disponível.
Sintonizar para baixo (Recuar)
Pressione o botão Procurar para baixo ,
para recuar passo-a-passo na sintonização de
estações emissoras.
Pressione e mantenha pressionado o botão de
procura para baixo para a anterior estação
emissora disponível.
Modo de memorização
Seis botões de memória numerados guardam
e voltam a chamar estações emissoras para
cada banda. As estações emissoras memorizadas (1 - 6) para a banda actual podem ser
visualizadas no ecrã.
Guardar estações emissoras
- Memorização automática
1. Seleccione uma banda (se necessário).
2. Pressione
AMS
por breves instantes para
procurar todas as estações emissoras na
banda; as 6 estações com sinal mais forte
serão guardadas automaticamente no botão
de memorização (números 1 - 6).
- Memorização manual
1. Seleccione uma banda (se necessário); em
seguida, seleccione uma estação emissora.
2. Pressione e mantenha pressionado um botão de memória (números 1 - 6) no painel
frontal ou no controlo remoto.
3. O número de memória e a estação emissora são apresentados e realçados.
Voltar a chamar uma estação
emissora
1. Seleccione uma banda (se necessário).
2. Pressione um botão de memória no painel
frontal ou no controlo remoto (números 1 - 6)
para seleccionar a correspondente estação
emissora guardada.
04_Caracas2010U_pt.indd 5204_Caracas2010U_pt.indd 52 17.02.11 13:3217.02.11 13:32
Page 53

53
PORTUGUÊS
Modo USB/SD/MMC
1. Carregar a partir do cartão de
memória SD/MMC
Insira o cartão SD/MMC na entrada. A unidade
irá ler automaticamente o ficheiro do cartão.
2. Retire o cartão SD/MMC
Pressione o botão
SRC
para o modo não SD,
pressione o cartão SD/MMC para que salte
para fora.
3. Carregar a partir do dispositivo USB
Conecte o dispositivo USB à ficha jack USB.
A unidade irá ler automaticamente o ficheiro
no dispositivo USB.
4. Desconecte o dispositivo USB
Pressione o botão
SRC
para o modo não USB
e desconecte o dispositivo USB da ficha jack
USB.
Notas referentes a USB/SD/MMC
Funções USB (tipo memória flash) e reprodução de MP3.
1. Suporta cartão de memória SD/MMC.
2. Suporta memória flash USB 2 em 1 (SD/
MMC).
3. É possível o FAT 12 / FAT 16 / FAT 32.
4. Nome do ficheiro: 32 byte / nome do directório: 32 byte / nome do tag: 32 byte
5. Tag (tag ID3, versão 2.0)
Título / artista / álbum: 32 byte de suporte.
6. Não suporta leitor multi-cartões.
7. Suporta USB 1.1
Suporta USB 2.0 (não suporta a velocidade
do USB 2.0. Só consegue alcançar a mesma velocidade que com o USB 1.1).
Nem todos os dispositivos USB são compa-
tíveis com a unidade.
04_Caracas2010U_pt.indd 5304_Caracas2010U_pt.indd 53 17.02.11 13:3217.02.11 13:32
Page 54

54
Operação do leitor de CDs
Inserir um disco
Com a superfície da etiqueta virada para cima,
insira o CD por completo na entrada do disco,
até o mecanismo agarrar o disco e o puxar
para dentro. A reprodução inicia automaticamente a partir da primeira faixa do disco.
NOTA:
A unidade foi concebida para reproduzir apenas CDs padrão de 5" (12 cm). Não tente usar CDs single de 3" (8 cm) nesta unidade,
quer seja com ou sem adaptador, pois poderá
danificar o leitor e/ou o disco.
Botão de ejecção do disco
Pressione o botão Ejectar para parar a reprodução do disco e ejectar o disco. A unidade
muda para a operação de rádio. O disco pode
ser ejectado com a ignição do veículo ligada
ou desligada. Se um disco ejectado não for
retirado da entrada do disco num intervalo de
10 segundos após ser ejectado, o disco volta
automaticamente a ser inserido.
NOTA:
para evitar que um disco seja danificado acidentalmente, retire-o sempre da unidade
depois de terminada a sua reprodução.
Selector Reproduzir CD/Pausa
Pressione o botão 1/ para pausar a reprodução do disco. Volte a pressionar 1/ para
retomar a reprodução do disco.
Procura, avançar/próxima faixa
Pressione o botão da próxima faixa durante a reprodução do disco, para seleccionar o
início da próxima faixa.
Procurar, recuar/faixa anterior
Pressione o botão da faixa anterior durante a reprodução do disco, para seleccionar o
início da faixa actual. Pressione duas vezes
para seleccionar o início da faixa anterior.
Funções de avanço/recuo rápido
Pode ser feita uma procura audível a alta velocidade até qualquer secção do disco, através
das funções de avanço rápido e de recuo
rápido. Pressione e mantenha pressionado o
botão de próxima faixa para avançar rapidamente no sentido avançar ou o botão de
faixa anterior para avançar rapidamente
no sentido Recuar.
Selector de função Intro
Durante a reprodução do disco, pressione
o botão
2/INT
para seleccionar "INT ON" e
reproduzir os primeiros 10 segundos de cada
faixa. Quando chegar à faixa pretendida,
pressione o botão
2/INT
para seleccionar "INT
OFF" e reproduza a faixa actual.
Seleccionar Repetição da mesma
faixa
Durante a reprodução do disco, pressione o
botão
3/RPT
para seleccionar "RPT TRK" e
reproduzir repetidamente a faixa seleccionada.
Volte a pressionar o botão
3/RPT
para seleccionar "RPT FOLD" e reproduzir repetidamente
todas as faixas na pasta actual. A reprodução
repetitiva irá continuar até ser seleccionado
"RPT OFF" com o botão
3/RPT
.
Seleccionar a reprodução aleatória
Durante a reprodução do disco, pressione
o botão
4/RDM
para seleccionar "RDM ON"
e reproduzir todas as faixas do disco numa
sequência aleatória e misturada. No modo Reprodução aleatória, pode pressionar os botões
Sintonizar/Faixa para seleccionar faixas numa
sequência aleatória em vez da progressão
normal. Volte a pressionar o botão
4/RDM
para
seleccionar "RDM OFF" e cancelar o modo
Reprodução aleatória.
04_Caracas2010U_pt.indd 5404_Caracas2010U_pt.indd 54 17.02.11 13:3217.02.11 13:32
Page 55

55
PORTUGUÊS
Reprodução de ficheiros MP3/WMA
Informação
Durante a reprodução, a informação tag ID3
vai passando no ecrã: PASTA, FICHEIRO,
ÁLBUM, TÍTULO, ARTISTA e Número da faixa/
Tempo decorrido.
Avançar/Recuar Pasta
Pressione o botão 5 para ir para a pasta anterior. Pressione o botão 6 para ir para a pasta
seguinte.
Acesso directo a música/ficheiro
1. Pressione o botão
AMS
uma vez e pres-
sione o botão
VOL/MENU
para activar a
procura directa de faixa.
2. Rode o botão
VOL/MENU
para seleccionar
um dígito.
3. Pressione o botão
VOL/MENU
para confirmar a introdução e o dígito das dezenas
começa a piscar.
4. Rode o botão
VOL/MENU
para seleccionar
um dígito.
5. Repita os passos supracitados para, se necessário, introduzir o dígito das centenas e
dos milhares.
NOTA:
A unidade só permitirá a selecção
de dígitos que correspondam ao número de
ficheiros existente no suporte em que está
a fazer a procura.
6. Assim que o número da faixa aparecer no
ecrã, pressione o botão
VOL/MENU
para
reproduzir a música/ficheiro seleccionado.
Procurar Pastas/Ficheiros
1. Pressione o botão
AMS
duas vezes e pres-
sione o botão
VOL/MENU
para aceder à
opção de procura por ficheiros.
2. Rode o botão
VOL/MENU
para seleccionar
o directório/música pretendida.
3. Pressione o botão
VOL/MENU
para visualizar os ficheiros dentro do directório seleccionado.
4. Rode o botão
VOL/MENU
para seleccionar
a música/ficheiro. Pressione o botão
VOL/
MENU
para reproduzir a música/ficheiro se-
leccionado.
Procurar por nome (CHAR-SCH)
1. Pressione o botão
AMS
três vezes e pres-
sione o botão
VOL/MENU
para aceder à
opção de procura por caracteres.
2. Rode o botão
VOL/MENU
para seleccionar
os caracteres de A - Z, _ , - , + , e 0 - 9 para
o primeiro caracter.
3. Pressione o botão
VOL/MENU
para confirmar a introdução do caracter e avançar
para a próxima posição.
4. Repita a operação até um máximo de oito
caracteres.
5. Pressione o botão
VOL/MENU
para dar iní-
cio à procura.
6. Se for encontrado uma música/ficheiro,
pressione o botão
VOL/MENU
para repro-
duzir a música/ficheiro seleccionado.
NOTA:
Aparece "NOT FIND" se não for encontrado nenhum ficheiro que comece com a
cadeia de caracteres de procura introduzida.
Visão geral MP3
• MP3 é uma abreviatura para MPEG Audio
Layer 3 e diz respeito a um padrão de tecnologia de compressão de áudio.
• Este produto permite a reprodução de ficheiros MP3 em discos CD-R ou CD-RW.
• A unidade consegue ler ficheiros MP3 escritos no formato compatível com ISO 9660.
No entanto, não suporta dados MP3 escritos
pelo método de escrita em pacotes.
• A unidade não consegue ler um ficheiro
MP3 com outra extensão que não ".mp3".
• Se reproduzir um ficheiro que não seja MP3,
mas que tenha a extensão ".mp3", poderá
ouvir um pouco de ruído.
• Neste manual, a "Ficheiro MP3" e "Pasta"
(designações da terminologia informática)
convencionou chamar-se "Faixa" e "Álbum",
respectivamente.
• O número máximo para o nível do directório
é 8, incluindo o directório de raiz. O número
máximo de ficheiros e pastas por disco é
de 256.
• A unidade poderá não reproduzir as faixas
pela ordem dos números das faixas.
• A unidade só reproduz as faixas áudio se o
disco incluir tanto as faixas áudio como também os ficheiros MP3.
04_Caracas2010U_pt.indd 5504_Caracas2010U_pt.indd 55 17.02.11 13:3217.02.11 13:32
Page 56

56
• Quando é reproduzido um disco de 8 kbps
ou VBR*, o tempo de reprodução decorrido,
indicado na janela de visualização, não estará correcto e também a função Intro poderá não funcionar correctamente.
*VBR: taxa de bits variável.
Ao gravar os seus próprios CD-Rs
ou CD-RWs contendo ficheiros
MP3, tenha em consideração o
seguinte
• Para aproveitar o som de alta qualidade,
recomendamos que efectue a conversão
para ficheiros MP3 com uma frequência de
amostragem de 44,1 kHz e uma taxa de bits
fixa de 128 kbps.
• NÃO guarde mais de 256 ficheiros MP3 por
cada disco.
• Para o formato compatível com a norma
ISO 9660, a máxima profundidade permitida
para pastas aninhadas é de 8, incluindo o
directório (pasta) de raiz.
• Quando se utilizam discos CD-R, a reprodução só é possível para discos que tenham
sido finalizados.
• Aquando da gravação do CD-R MP3, certifique-se de que é formatado como um disco
de dados e NÃO como um disco áudio.
Reprodução de ficheiros MP3/WMA
• Não deve gravar ficheiros não MP3 ou
pastas desnecessárias juntamente com os
ficheiros MP3 no CD-R; caso contrário, demora muito tempo até que a unidade comece a reproduzir os ficheiros MP3.
• Em alguns suportes CD-R, os dados podem
não ser gravados correctamente, dependendo da sua qualidade de fabrico. Neste caso,
os dados poderão não ser reproduzidos correctamente. Recomenda-se discos CD-R de
alta qualidade.
• São apresentados até 16 caracteres para o
nome do álbum ou do ficheiro. É necessário
o tag ID3, versão 1.x.
• Tenha em consideração que a unidade poderá não reproduzir as faixas pela ordem
que as gravou no disco.
04_Caracas2010U_pt.indd 5604_Caracas2010U_pt.indd 56 17.02.11 13:3217.02.11 13:32
Page 57

57
PORTUGUÊS
Ligações eléctricas
Esquema de ligações
RoxoFita,
roxo/
preto
CinzentoFita,
cinzento/
preto
Fita,
branco/
preto
Branco Fita,
verde/
preto
Verde
Altifalante direito
(traseiro)
Altifalante direito
(dianteiro)
Altifalante esquerdo
(dianteiro)
Altifalante esquerdo
(traseiro)
Caixa
do
filtro
Fio terra
À bateria do veículo (+)
contínuo +12 V CC
preto
amarelo
azul
vermelho
Fio de controlo do relé do motor/antena
eléctrica
Fio de controlo do relé do amplificador
Chave de ignição +12 V DC
Quando LIG/ACC
Line-out
(cinzento)
R (direito, vermelho)
L (esquerdo, branco)
(preto)
Fusível 15 A
Antena
Altifalante
dianteiro
Altifalante
traseiro
04_Caracas2010U_pt.indd 5704_Caracas2010U_pt.indd 57 17.02.11 13:3217.02.11 13:32
Page 58

58
A unidade está equipada com um painel
destacável.
Pode remover e levar o painel consigo, de forma a dissuadir o roubo.
Remover o painel
1. Desligue a unidade.
2. Pressione o botão
.
3. Segure o painel num determinado ângulo
para o puxar para fora.
4. Coloque o painel dentro da caixa e leve-o
consigo quando abandonar o veículo.
Caixa para painel destacável
Instalar o painel
1. Segure o painel e certifique-se de que fica
virado para si, coloque o lado direito do painel no respectivo suporte.
2. Pressione o lado esquerdo do painel até
que este engate.
Remover a unidade
1. Remova o painel e a guarnição.
2. Insira ambas as chaves em L no orifício, na
parte dianteira do equipamento, até engatarem.
3. Puxe a unidade para fora.
Sistema anti-roubo
Procedimentos de instalação
Primeiro, efectue as ligações eléctricas e, em
seguida, verifique se estão correctas.
Reset
Pressione o botão
. Segure o painel num
determinado ângulo para o puxar para fora.
Em seguida, pressione o botão RESET com
um objecto pontiagudo, para repor a unidade
no seu estado original.
Nota:
pressionar o botão
RESET
faz com que
o relógio e as estações emissoras memorizadas sejam apagadas.
Reset
Guia de instalação
04_Caracas2010U_pt.indd 5804_Caracas2010U_pt.indd 58 17.02.11 13:3217.02.11 13:32
Page 59

59
PORTUGUÊS
Guia de instalação
Importante:
remova estes dois parafusos antes da instalação. Caso contrário, o leitor não
irá funcionar.
1. Insira o rebordo de montagem no painel de instrumentos e dobre as patilhas de montagem para fora com uma chave de fendas.
Certifique-se de que a alavanca de fecho
está alinhada com o rebordo de montagem (não
sobressai).
2. Prenda a parte de trás da unidade.
Depois de fixar o parafuso de fixação e o conector eléctrico, fixe a parte de trás da unidade ao
chassis do veículo através da almofada de borracha.
3. Insira a guarnição.
Almofada de borracha
do parafuso de fixação
Parafusos de
transporte
Alavanca
de fecho
Abertura de instalação
A unidade pode ser instalada num painel de
instrumentos com uma abertura igual à ilustrada em baixo.
O painel de instrumentos deverá ter uma espessura de 4,75 mm - 5,56 mm, de forma a
conseguir suportar a unidade.
04_Caracas2010U_pt.indd 5904_Caracas2010U_pt.indd 59 17.02.11 13:3217.02.11 13:32
Page 60

60
Diagnóstico de falhas
A seguinte lista de verificação poderá ajudá-lo a resolver eventuais problemas que possa encontrar ao utilizar a unidade. Antes de a consultar, verifique
as ligações e siga as instruções no manual do utilizador. Não utilize a unidade em condições fora do comum, por exemplo, sem som, ou com fumo ou
cheiro desagradável, pois isso poderá dar origem a fogo ou choque eléctrico; pare imediatamente de utilizar a unidade e entre em contacto com a loja
onde adquiriu o equipamento.
Problema Causa possível Solução
Geral
Não é possível ligar a unidade. A ignição do veículo não está ligada.
O cabo não está conectado correctamente.
O fusível queimou.
Rode a chave no canhão de ignição.
Verifique a ligação por cabo.
Substitua o fusível por um fusível com a mesma amperagem.
Sem som O volume está regulado para um valor
mínimo ou a função mute está activa.
Verifique o volume ou desactive a função mute.
A unidade ou ecrã não funciona normalmente. O sistema da unidade está instável. Pressione o botão RESET.
Modo de disco (DISC)
A ferramenta não reproduz discos. O disco não foi inserido correctamente.
O disco está sujo ou danificado.
O disco tem de ser inserido com a etiqueta virada para
cima. Limpe o disco e verifique se está danificado.
Experimente outro disco.
Falhas no som devido a vibração. Ângulo de montagem superior a 30°.
A montagem está instável.
Ajuste o ângulo de montagem para um valor inferior a 30°.
Monte a unidade de modo seguro com as peças fornecidas.
Modo de sintonizador (TUNER)
Incapaz de captar estações emissoras. A antena não está conectada correctamente. Conecte a antena correctamente.
Má qualidade de recepção da estação
emissora de rádio.
A antena não está totalmente extraída ou
está partida.
Estenda por completo a antena e, se estiver partida,
substitua-a por uma nova.
As estações emissoras memorizadas
desapareceram.
O cabo da bateria não está conectado
correctamente.
Conecte o positivo permanente na unidade ao positivo
permanente no veículo.
Modo USB/SD/MMC
Incapaz de inserir dispositivo USB ou cartão
de memória SD/MMC.
O cartão de memória ou dispositivo USB foi
inserido ao contrário.
Insira-os ao contrário.
Não é possível ler o dispositivo USB ou o
cartão de memória SD/MMC.
O formato NTFS não é suportado. Verifique se o sistema do ficheiro está no formato FAT 16
ou FAT 32. Devido a formatos diferentes, poderá dar-se o
caso de não ser possível ler alguns modelos de dispositivos
de memória ou leitores MP3.
04_Caracas2010U_pt.indd 6004_Caracas2010U_pt.indd 60 17.02.11 13:3217.02.11 13:32
Page 61

61
PORTUGUÊS
Especificações
Geral
Alimentação eléctrica: 12 V DC (11 V - 16 V)
Tensão de teste 14,4 V, terra negativo
Potência de saída máxima: 45 W x 4 canais
Saída de potência contínua: 20 W x 4 canais (4 Ω,10 % T.H.D.)
Impedância do altifalante
adequada:
4 - 8 ohm
Tensão de saída no préamplificador:
2,0 V (modo de reprodução de CD:
1 KHz, 0 dB, 10 KΩ de carga)
Fusível: 15 A
Dimensões (LxAxP): 178x50x160 mm
Peso: 1,7 kg
Aux-in: ≥300 mV
Máx. consumo de corrente: 12 A
Rádio FM estéreo
Gama de frequências: 87,5 - 108,0 MHz (Europa)
87,5 - 107,9 MHz (América)
Sensibilidade utilizável: 8 dBμ
Sensibilidade de silenciamento
(S/N=50 dB):
12 dBμ
Resposta de frequência: 30 Hz - 15 kHz
Separação estéreo: 30 dB (1 kHz)
Taxa de resposta de imagem: 50 dB
Taxa de resposta de IF: 70 dB
Relação sinal/ruído: 55 dB
Rádio MW (AM)
Gama de frequências: 522 - 1620 kHz (Europa)
530 - 1710 kHz (América)
Sensibilidade utilizável
(S/N=20 dB):
30 dBμ
Leitor de discos
Sistema: Disc digital audio system
Resposta de frequência: 20 Hz - 20 kHz
Relação sinal/ruído: >80 dB
Distorção harmónica total: Inferior a 0,20 % (1 kHz)
Flutuações: Abaixo dos limites mensuráveis
Separação de canal: >55 dB
Componentes
Casquilho de montagem 1
Parafusos de máquina
M5x6 mm
4
Parafuso de fixação (50 mm) 1
Conector de fio 1
Caixa para painel dianteiro
amovível
1
Guarnição 1
Chave em L 2
Manual de instruções 1
Almofada de borracha 1
Nota: as especificações e o design estão sujeitos a alterações sem aviso prévio em virtude de melhoramentos tecnológicos.
04_Caracas2010U_pt.indd 6104_Caracas2010U_pt.indd 61 17.02.11 13:3217.02.11 13:32
Page 62

62
© 2011 All rights reserved by Blaupunkt. This material may be reproduced, copied or distributed for personal use only.
This product is protected by certain intellectual property rights of Microsoft. Use or distribution of such technology outside of this product is prohibited
without a license from Microsoft.
04_Caracas2010U_pt.indd 6204_Caracas2010U_pt.indd 62 17.02.11 13:3217.02.11 13:32
Page 63

63
CLASS 1
LASER PRODUCT
04_Caracas2010U_pt.indd 6304_Caracas2010U_pt.indd 63 17.02.11 13:3217.02.11 13:32
Page 64

Blaupunkt AudioVision GmbH & Co. KG
Robert-Bosch-Straße 200
D-31139 Hildesheim
http://www.blaupunkt.com
5 101 030 001
03/11 450 164 – gb, fr, es, pt
04_Caracas2010U_pt.indd 6404_Caracas2010U_pt.indd 64 18.03.11 10:4218.03.11 10:42
 Loading...