

Page 1
AMPLIFICATION
CFX96 Touch™ Real-Time PCR System
Installation Quick Guide
Unpacking the Instruments
The CFX96™ optical reaction module and the C1000 Touch™
thermal cycler chassis are shipped in separate containers.
Unpack each box carefully. The included power cable, USB
cable, and CFX Manager™ software CD are required for
installation. The CFX96 optical reaction module may also be
placed on a previously purchased C1000 Touch thermal cycler
for a quick upgrade to a real-time PCR detection system.
Important: Carefully read the safety information and
instrument operating specifications provided in the CFX96
Touch™ and CFX384 Touch™ Real-Time PCR Detection
Systems Instruction Manual before using the system.
Setting Up the CFX96 Touch Real-Time PCR System
The CFX96 Touch real-time PCR detection system should
be installed on a clean, dry, level surface with sufficient
cool airflow to run properly.
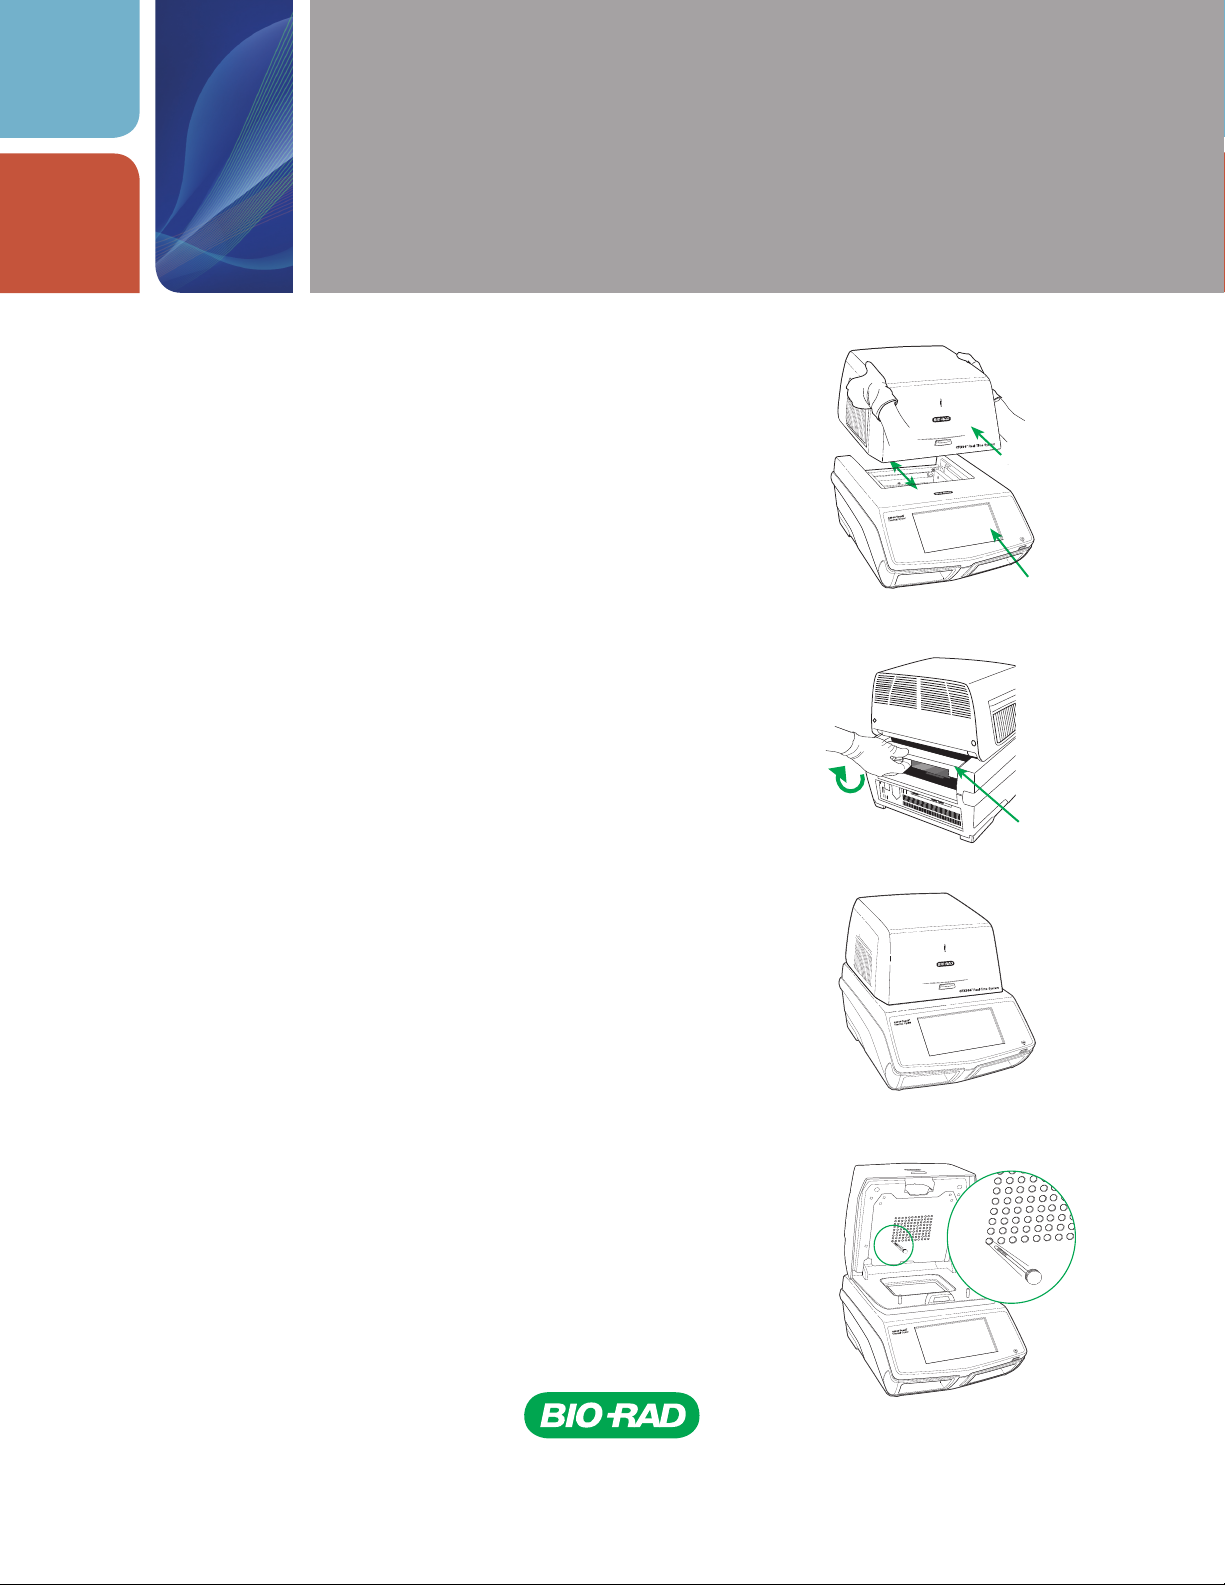
Fig. 1. Lifting the CFX96 optical reaction module
onto the C1000 Touch thermal cycler chassis.
CFX96 optical
reaction module
C1000 Touch thermal
cycler chassis
To insert the CFX96 optical reaction module into the
reaction module bay of the C1000 Touch chassis:
1. Place the C1000 Touch chassis in a suitable location
with the locking bar down.
2. Remove the instructions overlay from the C1000 Touch
chassis. Lift the CFX96 module using the handle
indents above the side air vents, as shown in Figure 1.
3. Position the CFX96 module in the reaction module bay
of the C1000 Touch chassis, leaving about 2 cm of
space in the front.
4. Reach around the thermal cycler and pull up the
locking bar (Figure 2) until it is flush with the sides of
the module bay. This action moves the reaction module
forward, locking it into place (Figure 3).
5. Use the supplied power cord to plug the chassis into
an appropriate electrical outlet.
6. Turn on the CFX96 Touch system using the power
switch on the back of the chassis.
Removing the Red Shipping Screw
The CFX96 optical reaction module is shipped with a
red screw in place in the inner lid in the hole corresponding
to well A1 (see Figure 4). Follow the instructions on the
C1000 Touch screen to remove this shipping screw before
beginning operation.
Locking bar
Fig. 2. Locking the CFX96 module into place.
Fig. 3. The CFX96 module positioned on
the C1000 Touch chassis.
Fig. 4. Red shipping screw included with
the CFX96 optical reaction module.
Page 2
Operating under Software Control
Installing CFX Manager Software
A computer with the Windows XP, Windows Vista, or Windows 7 operating system is
required to run the software. Minimum computer specifications are listed in the CFX96
Touch and CFX384 Touch systems instruction manual. The software must be installed on
the computer by a user with administrative privileges. To install CFX Manager software:
1. Place the CFX Manager software CD in the computer’s CD drive. The software
launch page should appear automatically.
2. Double click Install Software on the software launch page.
3. Follow the instructions onscreen to complete installation.
4. If the launch page does not appear automatically, double click on (CD drive):\
Bio-Rad CFX, then open and follow instructions in the Readme.txt file.
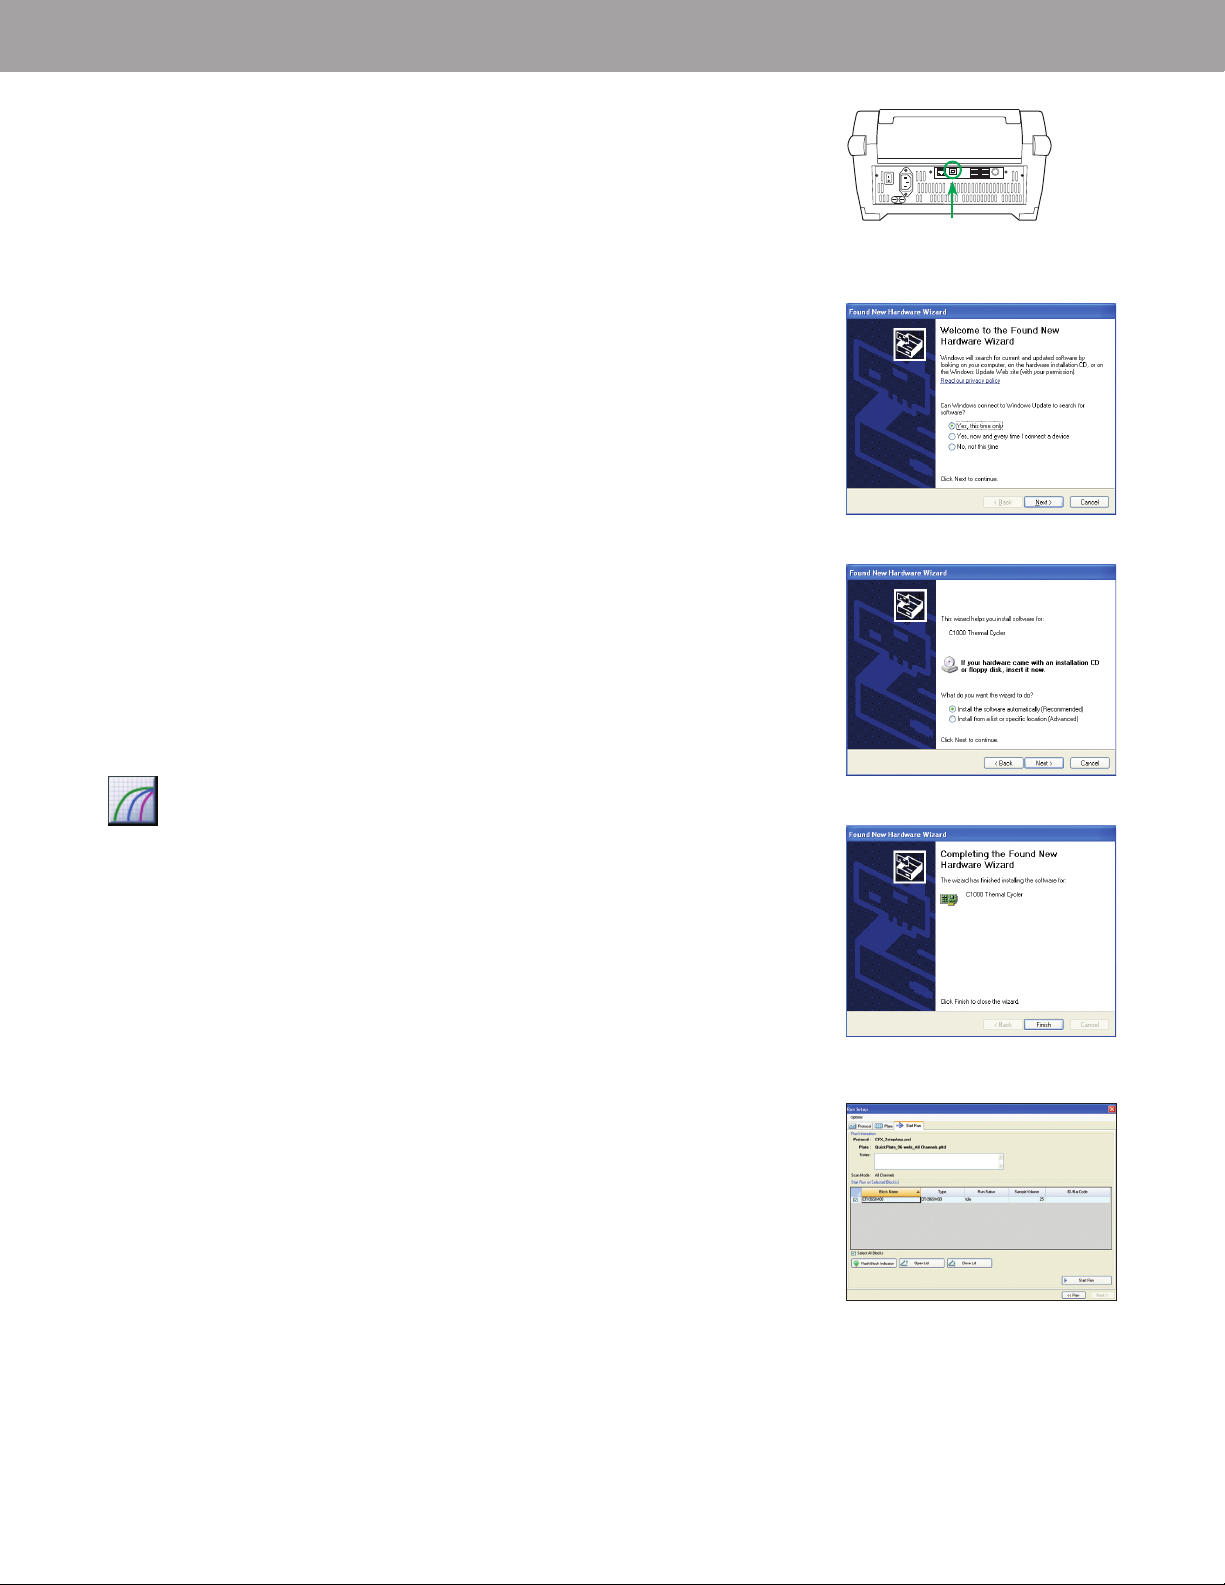
Installing the Drivers
With the instrument powered off, plug the supplied USB cable into the USB B port
(Figure 5) located on the back of the C1000 Touch chassis and into a USB 2.0 A port
on the computer. Turn on the CFX96 Touch system using the power switch on the
back of the chassis. To install the drivers for the CFX96 Touch system, follow the
instructions in the Found New Hardware Wizard that launches after the instrument is
first detected by the computer:
1. In the first screen, select Yes, this time only to instruct Windows to connect to
Windows Update to search for software (Figure 6). Click Next.
2. Instruct the wizard to Install the software automatically (Figure 7). Click Next
to continue installing the drivers.
3. Click Finish when the drivers are installed (Figure 8).
USB B por t
Fig. 5. USB B port on the back of the
C1000 Touch cha ssis.
Fig. 6. Windows Update screen.
After installation — open CFX Manager software by double clicking the
Shortcut icon located on the Windows desktop.
Creating, Starting, and Analyzing a Run
The Run Setup window provides quick access to the files and settings needed to set
up and start a run. To open the Run Setup window, follow one of these options:
n
Click the Create a New Run option in the Startup Wizard
n
Click the Run Setup button in the main software toolbar
The Run Setup window includes three tabs (Figure 9):
n
Click the Protocol tab to select an existing protocol to run or edit,
or to create a new protocol in the Protocol Editor window
n
Click the Plate tab to select an existing plate to run or edit, or to create a new plate
in the Plate Editor window
n
Click the Start Run tab to check run settings, select one or more
instrument blocks, and begin a run
CFX Manager software processes real-time PCR data automatically at the end of
each run, and opens the data analysis window. The data file can be analyzed or
saved to the folder of your choice, and it can be emailed from the software.
(Refer to the CFX96 Touch and CFX384 Touch systems instruction manual for
detailed information about run setup and data analysis.)
Fig. 7. Software installation screen.
Fig. 8. Software installation completion
screen.
Fig. 9. Run Setup window, including the
Protocol, Plate, and St art Run tabs.
Page 3

Stand-Alone Operation
The CFX96 Touch system can also be operated as a stand-alone instrument that can
run a real-time PCR protocol without a computer attached. However, data analysis
requires the use of CFX Manager software installed on a PC.
Creating a Protocol
n
To create a new run, touch New Protocol in the home screen to open a
New Protocol template (Figure 10); touch the Name field, then enter a protocol
name to save
n
To edit an existing protocol, touch Saved Files to open the file library
and select a protocol to edit
n
For more information about creating, editing, and running protocols, refer to the
CFX96 Touch and CFX384 Touch systems instruction manual
Fig. 10. Default real-time PCR protocol.
Exporting Data
When a run is finished, the fluorescence data need to be transferred to a computer
running CFX Manager software for analysis. At the end of a run, the data file is
automatically saved to the Real-Time Data folder located in the Real-Time Data
directory (Figure 11). Up to 100 real-time PCR runs are stored in this folder.
Exporting Data Using a USB Flash Drive
n
If a USB flash drive is present in a USB port on the C1000 Touch chassis at the end
of a run, the data file (.zpcr) will automatically be saved to the Real-Time Data folder,
which will be created on the USB flash drive
n
If a USB flash drive has not been inserted into a USB port, follow these instructions
to transfer a data file to the USB flash drive:
1. Touch Saved Files in the home screen to access the Files folders.
2. In the Locations pane, select Real-Time Data.
3. Select the file to export from the Files pane. Information about the selected file will
be displayed in the Preview pane.
4. To export the file, touch the File Options button.
5. Touch the OK button to save the file to the attached USB flash drive.
Exporting Data Using Email
You can choose to email your data from the C1000 Touch chassis after configuring
your email settings (see the Setting Up Email on the C1000 Touch Chassis section).
To send an email with an attached data file (.zpcr) from the C1000 Touch chassis at
the end of a run, enter an email address in the Additional Settings window prior to the
run start (Figure 12).
Fig. 11. Real-Time Data folder stores
real-time PCR runs.
Fig. 12. Selecting email notification.
Note: When users are logged in, they can specify that a notification and an
attachment be sent to a particular email address at the completion of each run.
Page 4

Analyzing a Data File
A stand-alone run data file (.zpcr) needs to be converted into a data analysis file
(.pcrd) by CFX Manager software in order to be analyzed. Create a data analysis file
from a stand-alone run using one of the following options:
n
Click and drag the .zpcr file over the main software window
n
Select File > Open > Stand-alone Run from the main software window menu options
After the file has been created, click the Select Plate button to import a plate file.
The software will use this plate information to name and analyze the data file. The scan
mode and plate size for the plate file must match the run settings used for the run.
Refer to the CFX96 Touch and CFX384 Touch systems instruction manual for detailed
information about data analysis.
Setting Up Email on the C1000 Touch Chassis
To configure the outgoing email from the C1000 Touch chassis, follow these instructions:
1. If you have not already done so, in the home screen, select Too ls, then touch the
Admin button to log in as the administrator. If no password has been set, the Admin
tools list appears without a log-in prompt.
2. In the Admin tools list, select Email Settings (Figure 13).
3. Select a mail server from the drop-down menu in the Outgoing Mail (SMTP) Server
Settings window or create a new one by touching the New Server button (Figure 14).
Make this server the default by touching the Set As Default box.
4. To create a new mail server, enter the mail server address and mail server port in
the appropriate fields. A network administrator may need to be contacted to obtain
this information.
5. Enter the user name and password for the selected mail server.
6. To verify that the Outgoing Mail (SMTP) Server Settings are correct, a test email can
be sent by touching the Test Email button.
7. Enter the email address and an attachment size, then touch Send Email (Figure 15).
Fig. 13. Tools window following Admin
log-in.
Fig. 14. Outgoing Mail (SMTP) Server
Settings window.
Fig. 15. Test Email window.
Windows and Windows Vista are trademar ks of Microsoft Corporation.
Notice regarding Bio-Rad thermal cyclers and real-time systems:
Purchase of this instrument conveys a limited non-transferable immunity from suit for the purchaser’s own internal research and development and for use in human
in vitro diagnostics and all other applied fields under one or more of U.S. Patent Numbers 5,656,493; 5,333,675; 5,475,610 (Claims 1, 44, 158, 160–163, and 167
only); and 6,703,236 (Claims 1–7 only), or corresponding claims in their non-U.S. counterparts, owned by Applera Corporation. No right is conveyed expressly, by
implication or by estoppel under any other patent claim, such as claims to apparatus, reagents, kits, or methods such as 5' nuclease methods. Further information
on purchasing licenses may be obtained by contacting the Director of Licensing, Applied Biosystems, 850 Lincoln Centre Drive, Foster City, California 94404, USA.
Bio-Rad’s real-time thermal cycle rs are licensed real-time thermal cyclers under Applera’s United States Patent Number 6,814,934 B1 for use in research, human in
vitro diagnostics, and all other fields except veterinary diagnostics.
Bio-Rad’s real-time thermal cycle rs are covered by one or more of the following U.S. patents or their foreign counterparts owned by Eppendor f AG: U.S. Patent
Numb ers 6,767,512 and 7,074,367.
Bio-Rad
Laboratories, Inc.
Life Science
Group
Web site ww w.bio-rad.com USA 800 424 6723 Australia 61 2 9914 2800 Austria 01 877 89 01 Belgium 09 385 55 11 Brazi l 55 31 3689 6600
Canada 905 364 3435 China 86 21 6169 8500 Cz ech Republic 420 241 430 532 Den mark 44 52 10 00 Finland 09 804 22 00
France 01 47 95 69 65 Germany 089 31 884 0 Greece 30 210 777 4396 Ho ng Kong 852 2789 3300 Hungar y 36 1 459 6100 India 91 124 4029300
Israel 03 963 6050 Italy 39 02 2160 91 Japan 03 6361 7000 Ko rea 82 2 3473 4460 Malaysia 60 3 2117 5260 Mexico 52 555 488 7670
The Netherlands 0318 540666 New Zealand 64 9 415 2280 Norw ay 23 38 41 30 Poland 48 22 331 99 99 Portugal 351 21 472 7700
Russia 7 495 721 14 04 Singapore 65 6415 3170 South Africa 27 861 246 723 Spain 34 91 590 5200 S weden 08 555 12700
Switzerland 061 717 95 55 Taiwan 886 2 2578 7189 Thailand 66 2 6518311 United Kingdom 020 8328 2000
10-1805 0311 Sig 021110021418 Rev A US/EG
 Loading...