


VVeerrssiioonn 55..22 UUsseerr GGuuiiddee
Life Science
Group
Bio-Rad
Laboratories
2000 Alfred Nobel Drive
Hercules, CA 94547
P/N 4000138-03 RevA

Catalog Number 170-9520
Bio-Rad Technical Services Department
Open Monday–Friday, 8:00 a.m. to 4:00 p.m., Pacific Standard Time.
Phone: (800) 424-6723, option 2, option 3
(510) 741-6576
Fax: (510) 741-5802
E-mail: LSG.TechServ.US@Bio-Rad.com (U.S.)
LSG.TechServ.Intl@Bio-Rad.com (International)
Notice:
No part of this publication may be reproduced or transmitted in any form or by any
means, electronic or mechanical, including photocopy, recording, or any information
storage or retrieval system, without permission in writing from Bio-Rad.
Microplate Manager is a trademark of Bio-Rad Laboratories. Microsoft, Windows, and
Windows NT are registered trademarks of Microsoft Corporation. All other trademarks
and registered trademarks are of their respective companies.
Copyright © 2002 by Bio-Rad Laboratories. All rights reserved.
ii

Table of Contents
1. Introduction ............................................................. 1
Overview of Microplate Manager..........................................................1
Types of Files ......................................................................................3
New Features in Version 5.2................................................................4
2. Installation and Setup ............................................. 5
Instrument Specifications.....................................................................5
Computer .................................................................................................. 5
Microplate Readers ................................................................................... 5
Cables and Connections ........................................................................... 5
Connecting the Microplate Readers to the Host
Computer......................................................................................6
Attaching the Hardware Protection Key................................................6
Installing Microplate Manager ..............................................................6
Starting Microplate Manager ................................................................7
3. Getting Started ........................................................ 9
Menus, Toolbars, and Other Features .................................................9
Menu Bar................................................................................................... 9
Toolbars .................................................................................................... 9
Right-click Commands ............................................................................ 10
Status Bar ............................................................................................... 10
Selecting a Reader ............................................................................11
iii

Setting Filters .................................................................................... 11
Ultramark and Ultramark EX Setup ......................................................... 12
Model 550 Setup .....................................................................................12
Preferences....................................................................................... 13
Sample Data Files............................................................................. 14
Opening and Saving Files ................................................................. 15
Importing Data .................................................................................. 16
Quick Start ........................................................................................ 16
Typical Scenarios.............................................................................. 16
4. Protocols................................................................ 21
Reader Identification ......................................................................... 21
Creating/Opening a Protocol............................................................. 22
Common Protocol Features .............................................................. 23
Selecting a Template...............................................................................24
Read Speed (Model 680 only).................................................................26
Setting the Measurement Wavelength ....................................................26
Incubator Controls (Not Available for Model 550).................................... 28
Initial Wait ................................................................................................28
Mix Settings .............................................................................................29
Reader Door Controls (Benchmark Plus and Ultramark only) ................29
Scan Well Command (Benchmark Plus only) .........................................29
Reports 31
Running a Protocol ..................................................................................34
Saving Protocol Files...............................................................................34
Endpoint Protocol Features............................................................... 35
Absorbance Delay and Ratio Delay......................................................... 36
Kinetic Protocol Features .................................................................. 38
Reading Sets ...........................................................................................39
Analysis Options......................................................................................40
Multiple-Plate Protocol Features ....................................................... 43
iv

Plate Loading in a Multiple Plate Protocol............................................... 44
Saving Files from Multiple Plate Readings.............................................. 46
Absorbance Delay and Ratio Delay ........................................................ 49
5. Templates .............................................................. 53
Opening a Template ..........................................................................54
Opening an Existing Template ................................................................ 54
Opening a New Template ....................................................................... 54
Creating a Custom Plate Type ................................................................ 55
Template Features.............................................................................59
Formatting a Template.......................................................................61
Defining the Assays ................................................................................ 62
Defining Standards and Unknowns......................................................... 65
Defining Blanks and Controls.................................................................. 67
Replicate Groups .................................................................................... 68
Entering Standard Concentrations .......................................................... 70
Entering Dilutions of Unknowns .............................................................. 72
Using External Standards ....................................................................... 73
Saving Templates ................................................................................... 76
6. Data Files and Reports.......................................... 77
Opening/Saving Data Files ................................................................77
Reports ..............................................................................................77
Limit, Matrix and Normalization Reports ................................................. 78
Control Report......................................................................................... 81
Standard Curve Report ........................................................................... 82
Unknown Concentrations Report ............................................................ 87
Custom Reports ...................................................................................... 89
Raw Image Report (Ultramark only) ....................................................... 94
Raw Data Report..................................................................................... 98
Absorbance Report ................................................................................. 99
Ratio Report .......................................................................................... 100
Velocity Report...................................................................................... 100
Adjusted Velocity Report....................................................................... 101
v

Kinetic Correlation Coefficient Report ...................................................102
Kinetic Standard Errors Report.............................................................. 102
Kinetic Plots Report ...............................................................................103
Kinetic Zoom Plot ..................................................................................104
Report Labels.................................................................................. 105
Manually Editing Data ..................................................................... 107
Identifying Outliers .......................................................................... 108
Editing or Replacing the Template in a Data File............................. 110
7. Printing and Exporting ........................................ 111
Printing............................................................................................ 111
Exporting Data ................................................................................ 112
Kinetic Data Formats ............................................................................. 114
8. Quick Guides ....................................................... 117
Creating a New 96-Well Template .................................................. 117
Creating and Running a New Kinetic Protocol with a
Stored Template ...................................................................... 118
Creating and Running a New Kinetic Protocol with a
New Template.......................................................................... 119
Creating and Running a New Endpoint Protocol with a
Stored Template ...................................................................... 120
Creating and Running a New Endpoint Protocol with a
New Template.......................................................................... 121
Creating and Running a Multiple Plate Protocol with a
Stored Template ...................................................................... 122
Creating and Running a New Multiple Plate Protocol
with a New Template................................................................ 123
vi

Appendix A. Menus .................................................. 125
Appendix B. Glossary.............................................. 131
Appendix C. Ordering Information......................... 133
Appendix D. Warranty.............................................. 135
Index .......................................................................... 137
vii


1. Introduction
Chapter 1. Introduction
This manual assumes that you are familiar with your computer and standard
commands and functions associated with the Windows
opening, closing, and saving files, and moving and clicking your mouse.
Some of the features and functions in Microplate Manager will be slightly different
depending on which microplate reader you are using (e.g., Benchmark Plus,
Ultramark, Model 550, etc.). These differences are noted in the text.
®
operating system, such as
Overview of Microplate Manager
Microplate Manager is designed to collect, analyze, and output absorbance data from
Bio-Rad’s microplate readers. It runs as a Windows
application on a computer that is directly connected to the reader. It features a
standard Windows
shortcuts.
Using Microplate Manager, you first specify the type of reader you are using, the
type of reading you want to perform, and the layout of your microplate. Then you
capture your data using the microplate reader. Finally, you display your reports and
print and/or export your data.
®
interface, with pulldown menus, toolbars, and keyboard
®
95, 98, ME, NT, 2000, or XP
1
Microplate Manager User Guide
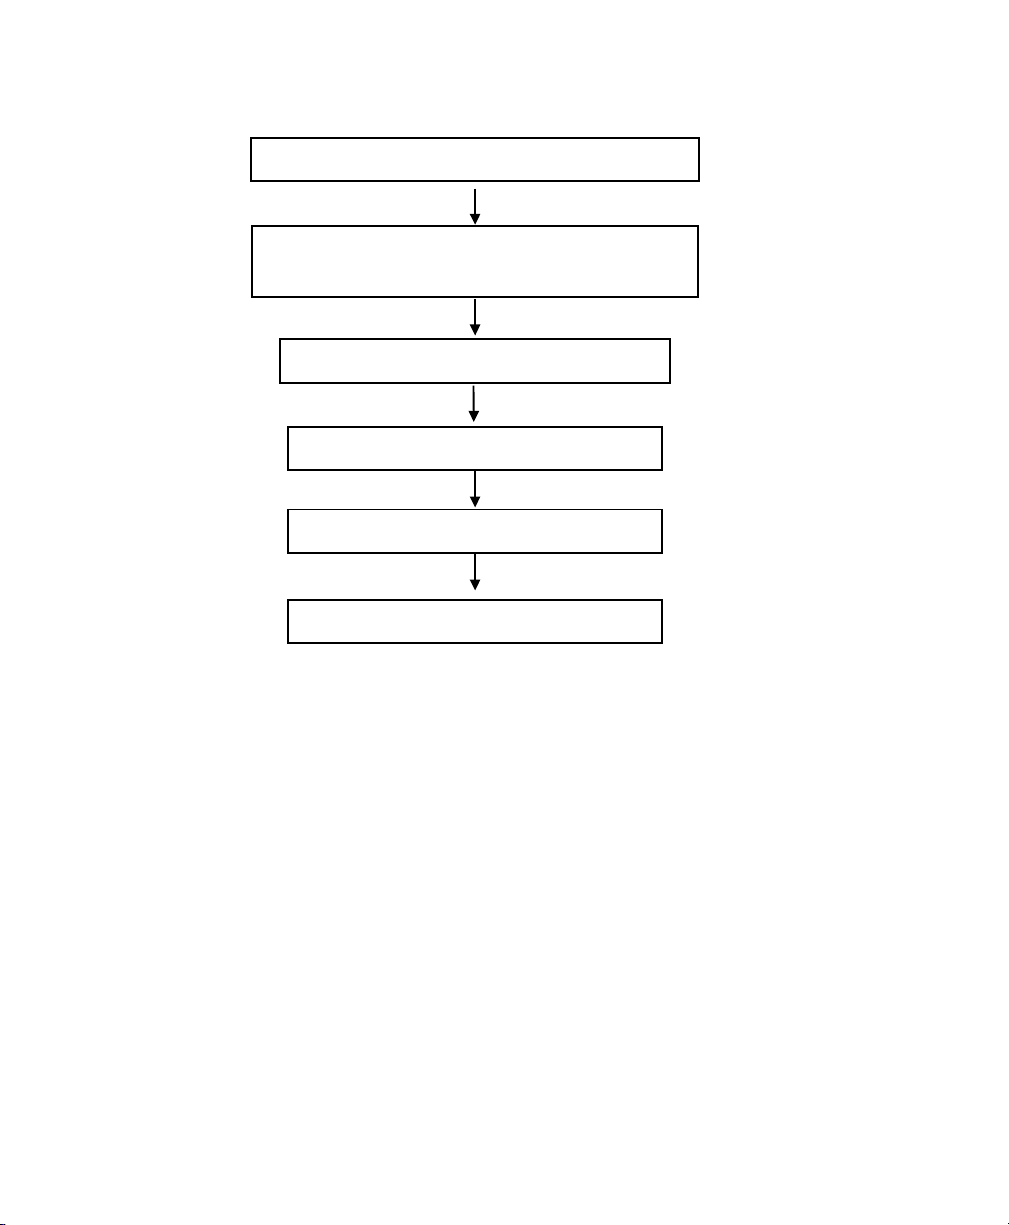
Select Type of Reader
Select Type of Reading
(Endpoint, Kinetic, or Multiple Plate Protocol)
Define or Select Microplate Template
Take Reading
Generate and Format Reports
Print/Export Data
Figure 1. Workflow of Microplate Manager
Microplate Manager can perform three general types of microplate readings. These
are called “Protocols.”
• Endpoint Protocols are used to acquire a single absorbance reading from each
well.
• Kinetic Protocols are used to acquire a series of absorbance readings from each
well over a user-defined interval. These Protocols are used to calculate reaction
velocities.
• Multiple Plate Protocols are used with a plate loader to collect Endpoint data
from a series of plates. Multiple Plate Protocols save each Endpoint data set in a
separate file.
First you select the type of Protocol that you want to create from the FILE menu.
Then you specify the settings for your particular Protocol and define or select a
2

Chapter 1. Introduction
template for your microplate. Finally you take the reading. If you want to use the
particular Protocol you’ve created again, you can save it as a file.
After the absorbances have been read, you can save them as a Data File and display
them in a selection of reports. Your data can be viewed, printed, or exported to other
applications.
Types of Files
There are two types of files used by Microplate Manager. Protocol Files contain the
settings for reading a microplate. Data Files contain the data from the reading and
any formatting associated with that data.
Protocol Files
A Protocol File contains the parameters of a reading. It includes such information as
mixing times and measurement wavelengths. Each of the three Protocol types
(Endpoint, Kinetic, and Multiple Plate) is slightly different, to accommodate the
different parameters used in each type. Protocol File names have the extensions .epr
(Endpoint reading), .mpr (Multiple Plate reading), or .kpr (Kinetic plate reading).
Each Protocol File also includes a plate template. The template specified in the
Protocol File is copied into the Data File at the completion of a plate reading. If there
is no template specified in the Protocol File, then the default template is copied into
the Data File. Defining a template in the Protocol File before a reading allows you to
create Data Files that contain all the information necessary to evaluate the absorbance
data and automatically generate the desired reports. (You can edit or replace the
template in the Data File after a reading. However, changes made to the Data File
template after a reading are not updated in the Protocol File.)
You may specify labels for reports; these are stored in the Protocol File. A list of
reports to be printed and/or displayed at the end of a run can also be saved in the
Protocol File.
3

Microplate Manager User Guide
Data Files
Data Files contain the data from a microplate reading. They have the extension
.mpm.
For an Endpoint reading, this data consists of the individual absorbance readings
from the wells on the microplate. For a Kinetic reading, this data is the time course
series of the individual absorbance readings. A Multiple Plate reading creates a new
Data File for each plate; each file contains Endpoint absorbance measurements.
The Data File also contains a plate template, which contains all the information
necessary to analyze the absorbance data, including a description of the assays, well
types, concentrations, dilutions, and the regression method used for computing
unknowns from standards. When the Data File is first created after a reading, the
template stored in the Protocol File is copied into the Data File. You can later edit the
template or completely replace it with a template from another Data File.
Finally, the Data File includes some information on how the plate was read (e.g.,
measurement wavelength, date/time of reading).
New Features in Version 5.2
Version 5.2 of Microplate Manager includes the following new features:
• Support for Bio-Rad's Model 680 microplate reader.
• A Custom Reports option for generating custom reports using Microsoft
templates.
• A new Custom Report for Bio-Rad's BSE test kit.
• Three new regression methods for generating standard curves: Five-Parameter
Logistic (Cook), Five-Parameter Logistic (Rodbard), and Point to Point.
• Additional standard curve features.
• An initial wait time option for Kinetic Protocols.
4
®
Excel

2. Installation and Setup
Instrument Specifications
Computer
Microplate Manager software is compatible with Windows® 95, 98, ME, NT, 2000,
and XP.
The minimum
Processor: Pentium 166
Memory: 16 MB RAM
Disk size: 200 MB
Monitor: 1024 x 768 resolution, 256 colors.
computer requirements for running Microplate Manager are:
Microplate Readers
Microplate Manager 5.2 supports Bio-Rad’s Benchmark Plus, Benchmark,
Ultramark, Ultramark EX, Model 550, and Model 680 microplate readers.
Cables and Connections
A SCSI interface is required to connect to the Ultramark or Ultramark EX microplate
reader. You can use the UltraSCSI Adaptec card provided by Bio-Rad (cat. no.
170-9521) or purchase it from any computer store.
The Benchmark Plus, Benchmark, and Model 550 microplate readers connect via a
Bio-Rad serial cable (Cat. no. 170-6584). The Model 680 reader connects via a
different Bio-Rad serial cable (Cat. no 168-1005).
5

Microplate Manager User Guide
Connecting the Microplate Readers to the Host Computer
A serial cable is required to connect the Benchmark Plus, Benchmark, Model 550,
and Model 680 microplate reader with the computer. Make sure the computer and all
devices are turned off before making or changing cable connections. See your
specific hardware manual for details.
A SCSI cable and card are required to connect the Ultramark and Ultramark EX to
the computer. Make sure the computer and all devices are turned off before making
or changing cable connections. See the hardware manual for details.
Attaching the Hardware Protection Key
A hardware protection key (HPK) is included with this version of Microplate
Manager. You must attach the HPK to your computer before you can run Microplate
Manager.
Before attaching the HPK, turn off your computer. If you have a printer attached to
your computer's parallel port, turn that off as well.
The HPK attaches to the parallel port on the back of your PC. If a printer cable is
attached to this port, disconnect it. After you have attached the HPK, you can attach
the printer cable to the key itself and restart your computer and printer.
The HPK has a driver that is automatically installed when you install Microplate
Manager.
Installing Microplate Manager
Insert the Microplate Manager CD into the disk drive on your computer. The installer
will auto-start. The default program directory is
6

Chapter 2. Installation and Setup
C:\Program Files\Bio-Rad\Microplate Manager. You can select a different directory
when prompted to do so by the installer.
The installer will place a startup icon on your desktop and create a Microplate
Manager directory on your Windows
click on the Finish button.
®
Start menu. When the installer is finished,
Starting Microplate Manager
To start Microplate Manager, make sure the HPK is attached to your computer, then
click on the application icon on your desktop or select Microplate Manager from the
Programs directory on your START menu.
Figure 2. Microplate Manager desktop icon.
The software will open, displaying the main application interface.
7

3. Getting Started
Menus, Toolbars, and Other Features
Menu Bar
Microplate Manager has a standard menu bar with pulldown menus that include all
the commands and functions in the software. The available menus and menu items
are different depending on the specific actions you are performing.
For example, when the software first opens, the menus will include basic file opening
and set-up features. When you are formatting a template, the menus will change to
include functions for formatting a template. When you are creating a Protocol, the
menus will change to include related functions. After you have read a microplate and
the data is displayed, the menus will change again to include functions for creating
different reports and exporting your data.
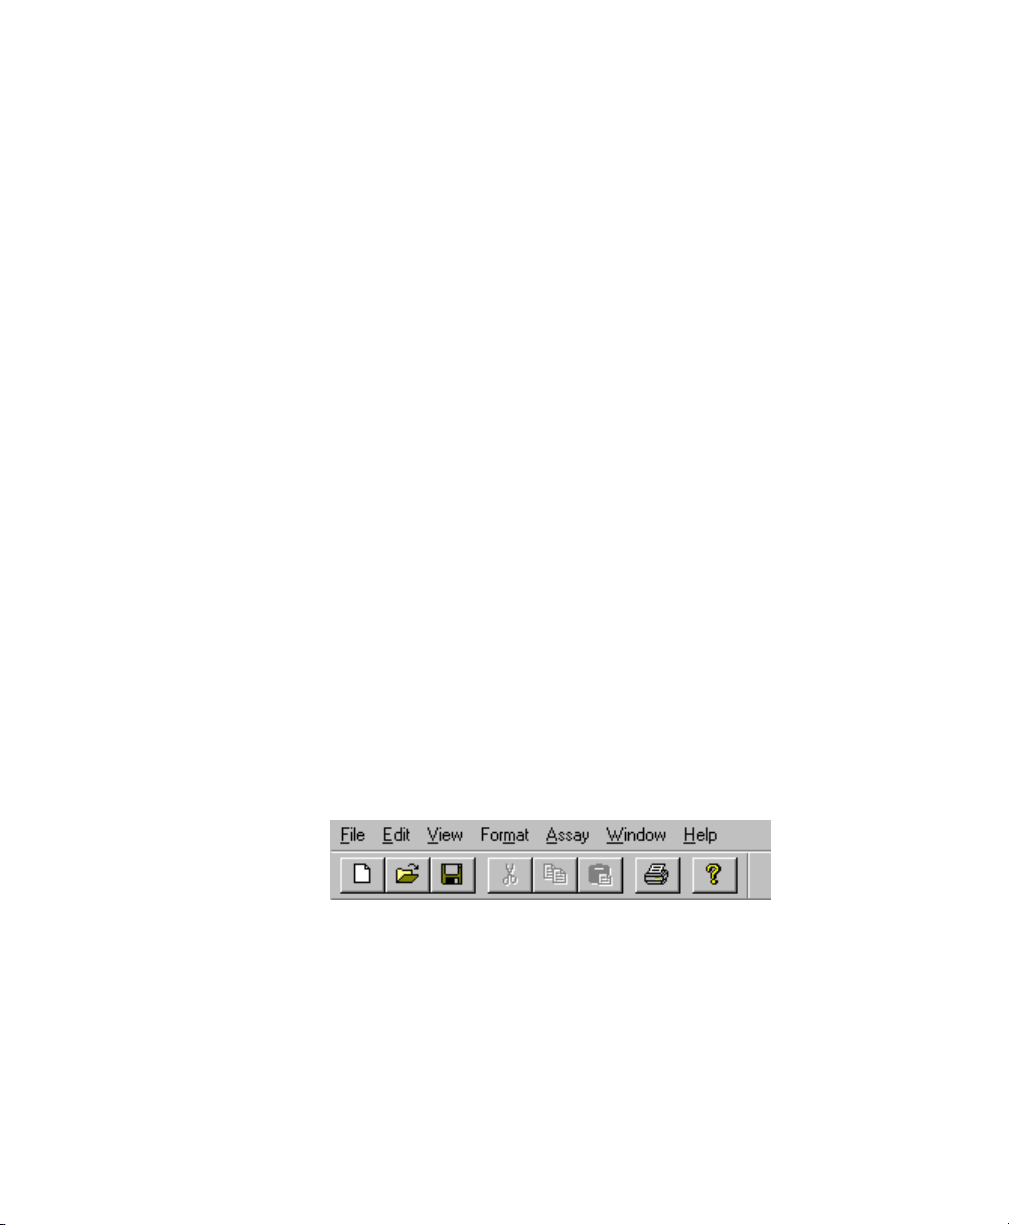
Toolbars
Microplate Manager has a main toolbar that contains standard file and formatting
tools . It is displayed below the menu bar. Display of the main toolbar can be toggled
on and off from the VIEW menu.
Figure 3. Menu bar and main toolbar.
Other tools are associated with particular features of the software, and only appear
when you are using those features. For example, the template toolbar is only
displayed when you are formatting a template. It is located at the top of the template
form.
9
Microplate Manager User Guide
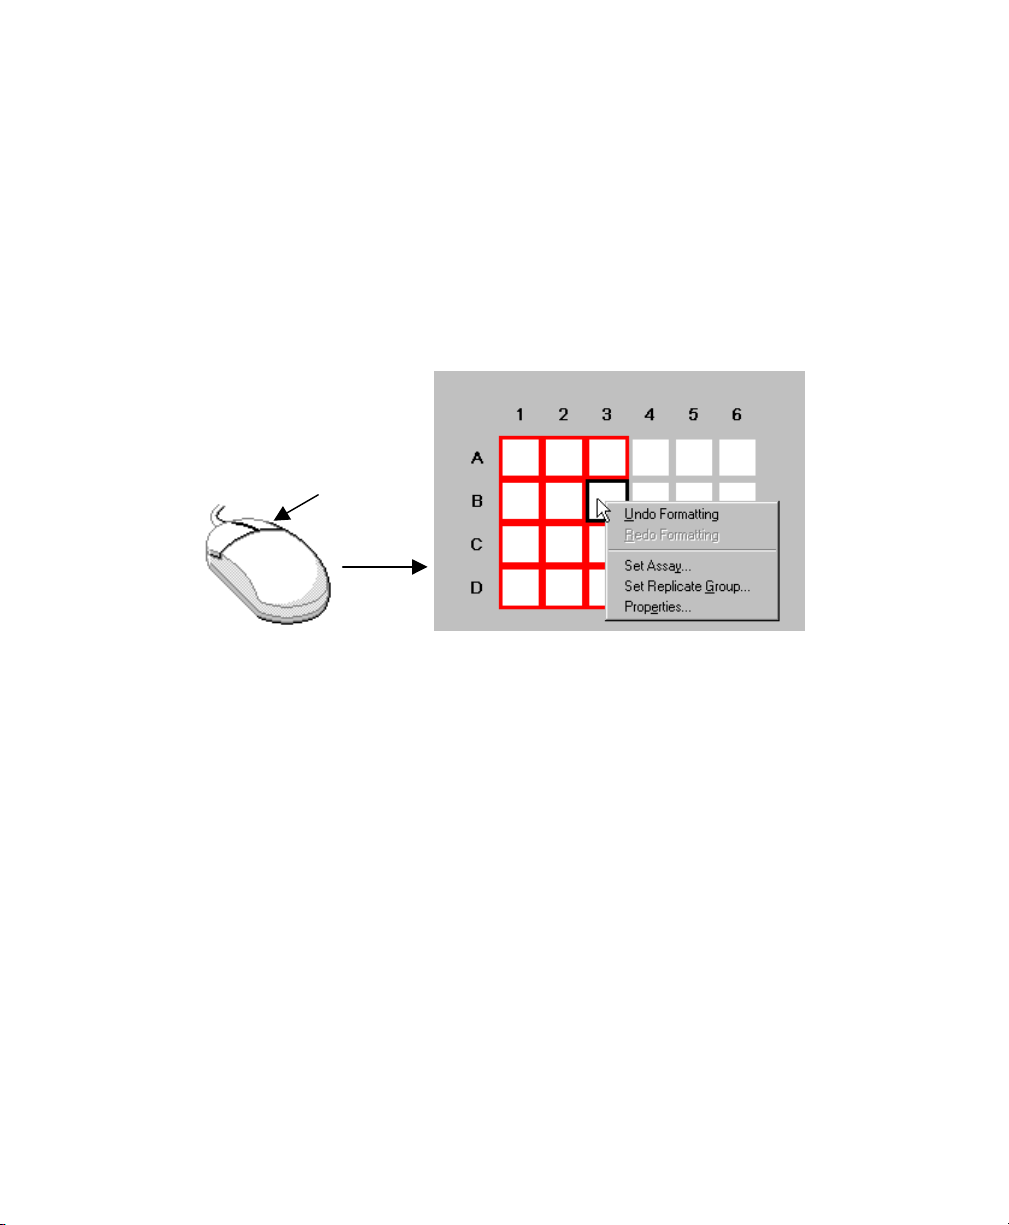
Right-click Commands
You can access many of the commands associated with the action you are currently
performing by using the right mouse button. For example, if you are in the process
of defining an assay on your template, position your cursor over a well in the
template and click the right mouse button to display many of the commands
associated with that action. The commands are displayed in a context menu next to
the cursor.
Click right
mouse button
Figure 4. Example of a right-click context menu.
Status Bar
The status bar appears at the bottom of the Microplate Manager window. If your
cursor is positioned over a button or menu command, a brief description of that
function will appear in the status bar.
In some reports (Raw Image, Standard Curve), the status bar indicates the position
of the cursor. It also indicates the position of the cursor when you are working with
templates.
Display of the status bar can be toggled on and off from the VIEW menu.
10
Chapter 3. Getting Started
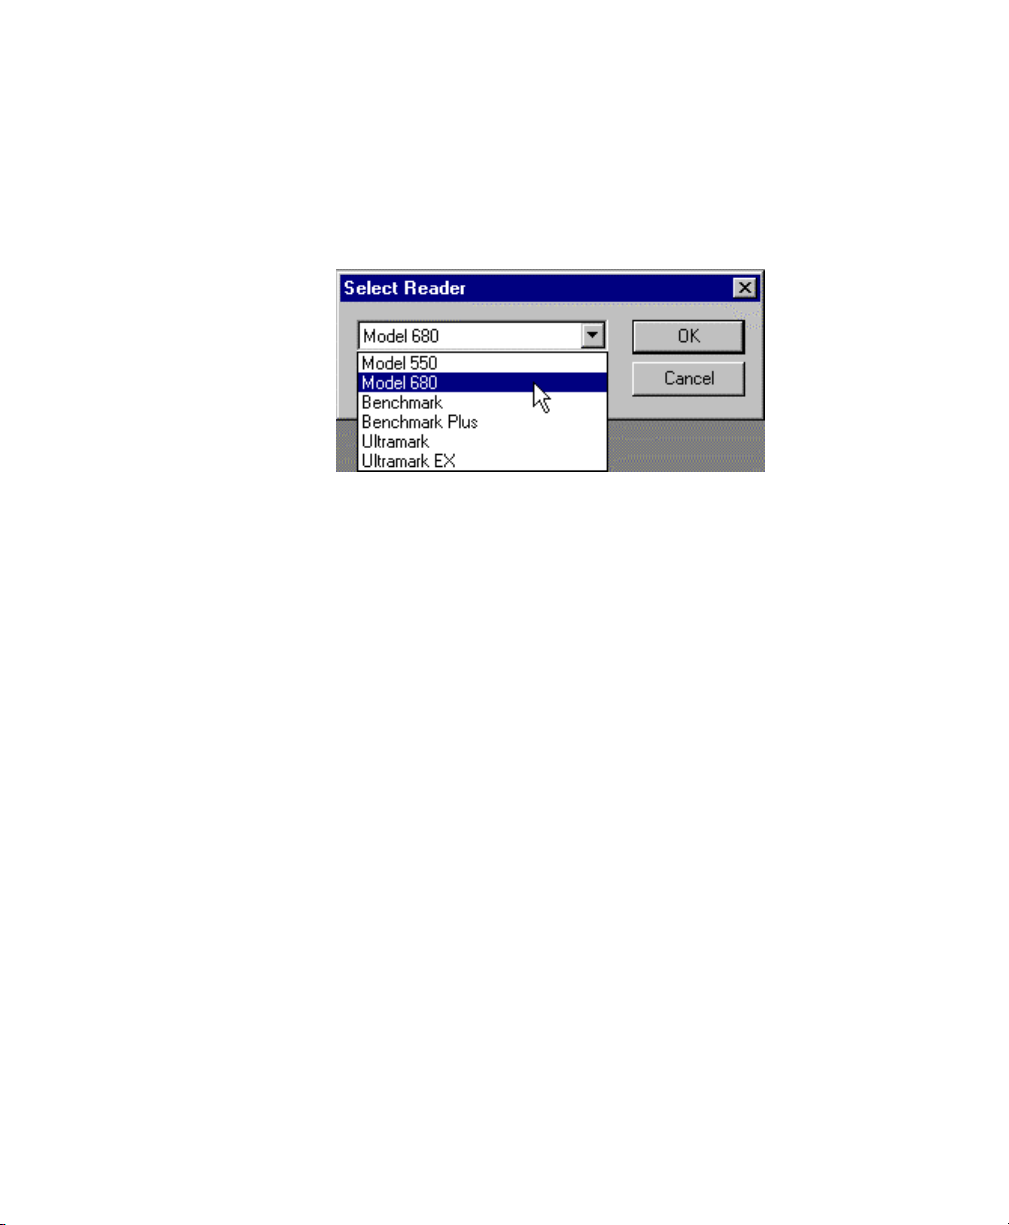
Selecting a Reader
To select an instrument, go to the FILE menu and select Select Reader.
Figure 5. Select Reader dialog box.
From the pull-down menu, select the appropriate reader and click on OK. If you
select a reader that is not connected or is otherwise unavailable, you will receive a
warning message when you attempt to open a Protocol window.
Microplate Manager does not attempt to communicate to the reader until you open a
Protocol window.
(Note that for readers connected via serial port, you no longer have to select the serial
port for the instrument. Microplate Manager will automatically search the available
serial ports.)
Setting Filters
If you change the filters in the Ultramark or Model 550 microplate readers, you must
specify the wavelengths of the new filters in Microplate Manager. (Benchmark and
Model 680 users should refer to the hardware manual for instructions on changing
filter settings.)
You must open a Protocol window before you can change the filter settings.
11
Microplate Manager User Guide
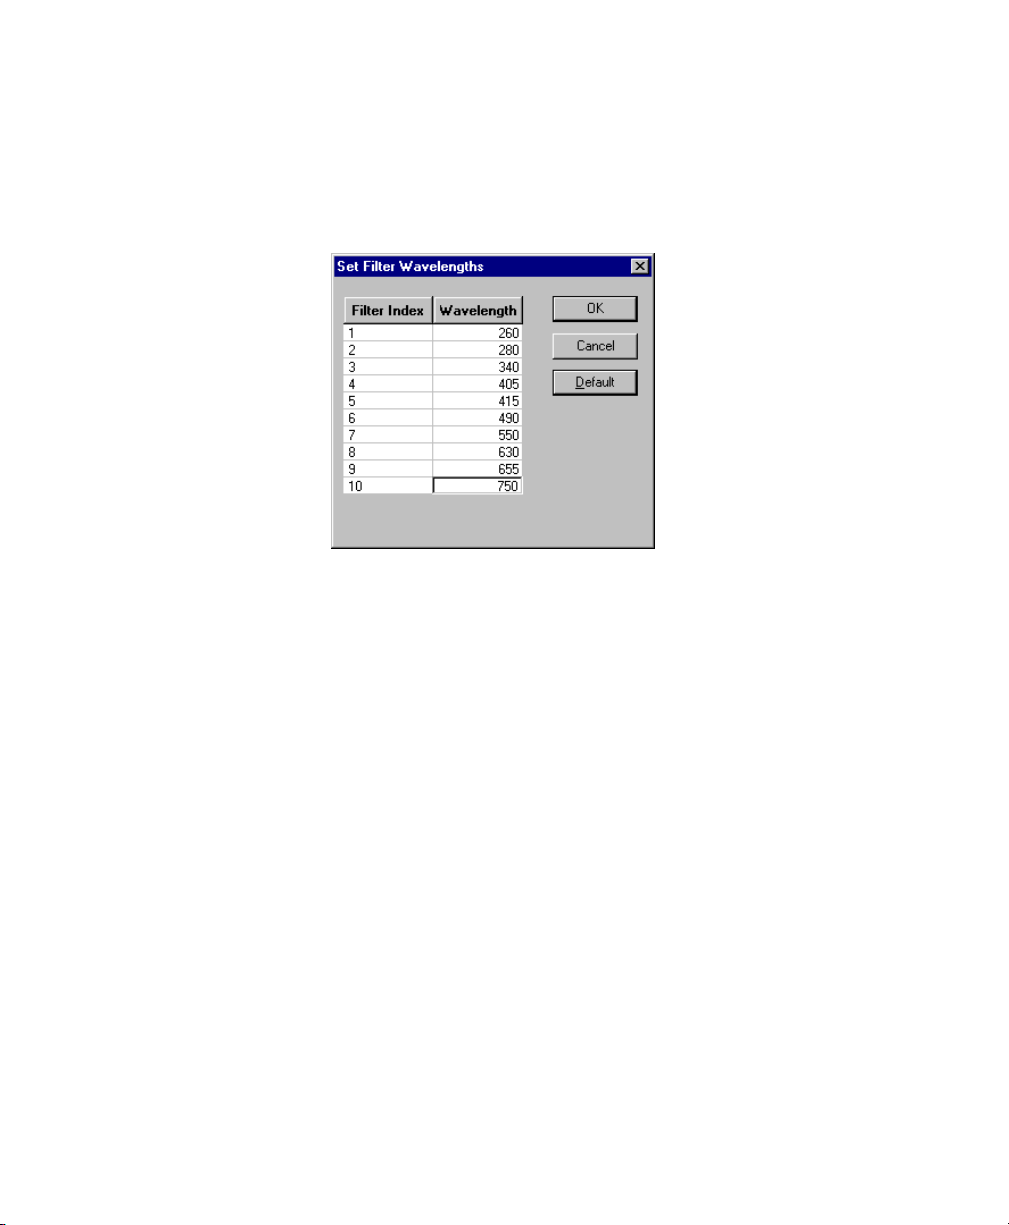
Ultramark and Ultramark EX Setup
With a Protocol window open, select Instrument Setup from the FILE menu.
Figure 6. Ultramark Setup dialog box.
For each filter, enter the appropriate wavelength. The wavelengths of the filters that
are shipped with the Ultramark are included with your Ultramark documentation. If
you change any of the filters, you will need to change these settings.
Click on OK to implement your changes.
Model 550 Setup
With a Protocol window open, select Instrument Setup from the FILE menu.
12
Chapter 3. Getting Started
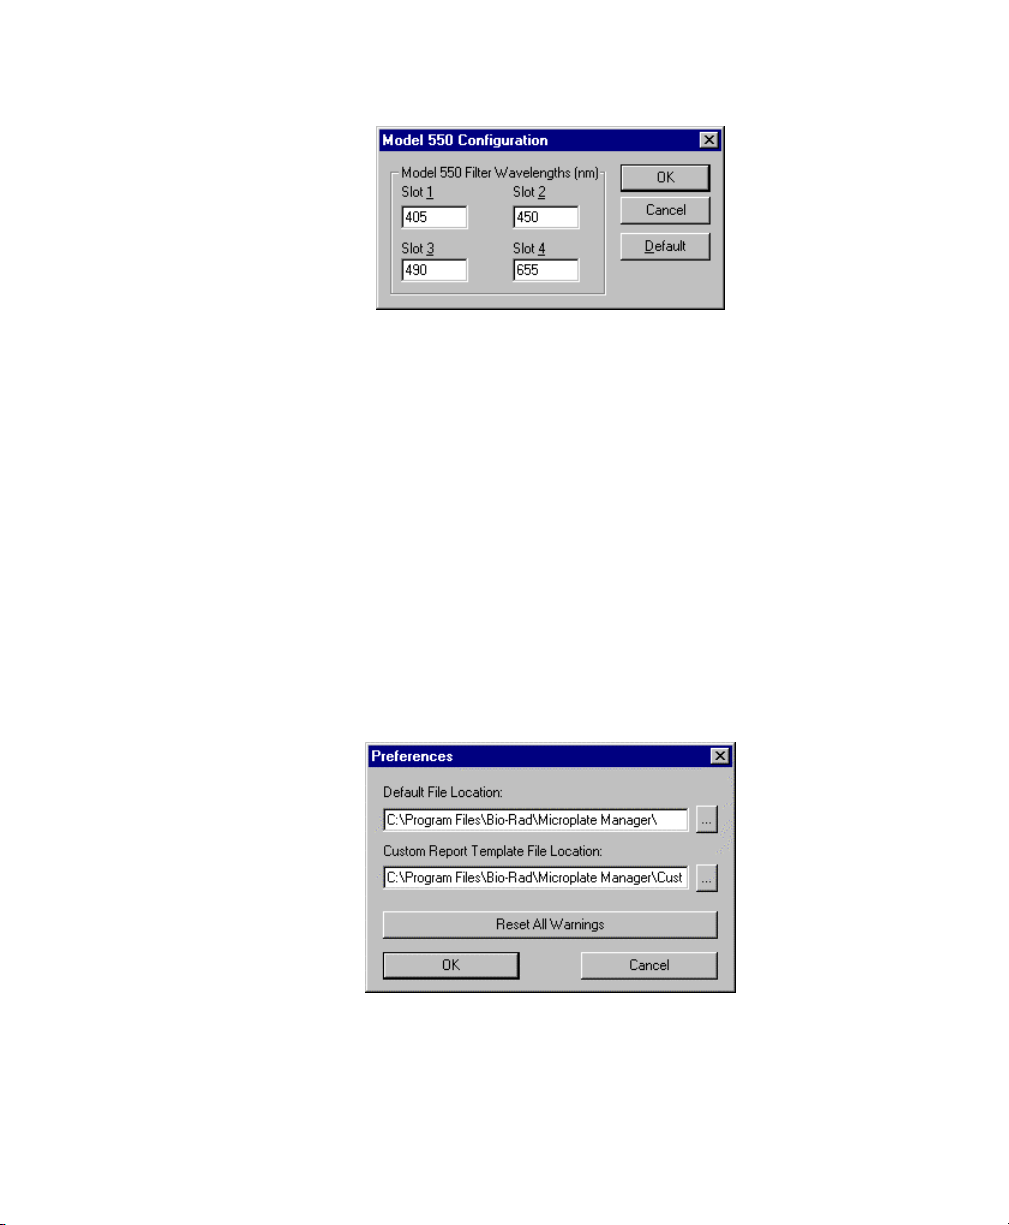
Figure 7. Model 550 Setup dialog box.
For each filter, enter the appropriate wavelength in the dialog. The wavelengths of
the filters that are shipped with the Model 550 are included with the reader
documentation. If you change any of the filters, you will need to change these
settings.
Click on OK to implement your changes.
Preferences
To set the user-defined preferences for Microplate Manager, select Preferences from
the FILE menu.
Figure 8. Preferences dialog box.
13

Microplate Manager User Guide
In the Preferences dialog, enter or select the Default File Location for opening and
saving files, and enter or select the Custom Report Template File Location for
opening and saving custom report templates.
To select the directory, click on the “...” button next to the text field and scroll
through the directory tree. You can also type the full directory path and name directly
in the field. If an invalid path is entered, it will be ignored, and the working directory
will be used as the home directory.
Microplate Manager has a number of “warning” messages that pop up if you try to
perform certain operations. Those messages include a checkbox to disable the
warning (“Don’t show this warning again”). If you select that checkbox, and then
decide that you want to display the warning again, click on the Reset All Warnings
button in the Preferences dialog box.
When you are finished making your selections, click on the OK button.
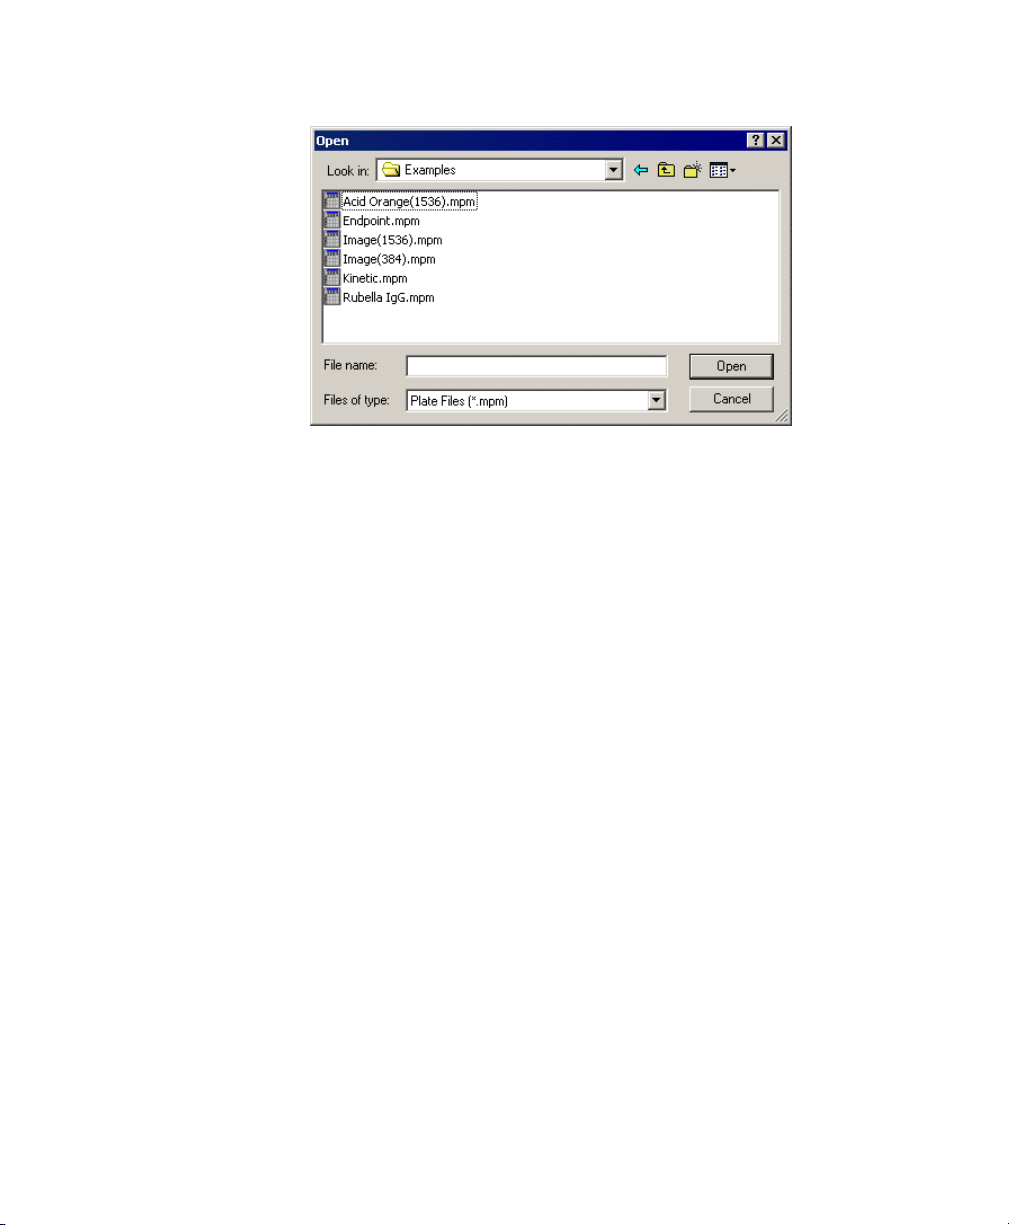
Sample Data Files
Six sample Data Files are installed with Microplate Manager. These are installed in a
directory called Examples in the Microplate Manager directory on your hard drive.
14
Chapter 3. Getting Started
Figure 9. Examples directory.
Clicking on any of these Data Files will open Microplate Manager and display the
template for that file. Then you can view the sample data using the commands
described in Chapter 6.
Opening and Saving Files
Microplate Manager has two basic file types: Protocol Files and Data Files. Protocol
Files have a .kpr, .epr., or .mpr extension. Data Files have an .mpm extension.
To open an existing Protocol File or Data File, select Open... from the FILE menu,
select the name of the file you want to open, and click on the Open button.
To save a Protocol File, select Save Protocol or Save Protocol As... from the FILE
menu. To save a Data File, select Save Data/Template or Save Data/Template As...
from the FILE menu. If you are saving a new file or renaming an old file, enter the
new file name and click on the Save button.
See the individual chapters on Protocols (Chapter 4), templates (Chapter 5), and data
and reports (Chapter 6) for more information.
15

Microplate Manager User Guide
Importing Data
This version of Microplate Manager will read files from the previous version (5.0.x).
Tab-delimited and comma-separated data are also supported (TXT, CSV, LOT,
ASC). From Kinetic Collector PC, Data Files in matrix format, row format, or
column format may be imported (MTX, ROW, or COL). The software will not read
native files from the Macintosh Microplate Manager software, but it will read tab
delimited files generated by the Macintosh Microplate Manager software.
Quick Start
To read a plate immediately, perform the following steps:
1. Turn on the microplate reader and let it warm up. Prepare a microplate and place
it in the reader.
2. Open Microplate Manager. Select your microplate reader using the FILE >
Select Reader command.
3. Under the FILE menu, select New Endpoint Protocol, New Kinetic Protocol, or
New Multiple Plate Protocol, depending on the type of analysis you want to
perform. The Protocol dialog box will open.
4. In the dialog box, select the size of your microplate from the Plate Type:
pulldown list and click on the Run button. The plate will be read and your raw
absorbance or velocity data will be displayed.
At this point, you can format the template, save and analyze the data, and generate,
display, and print any additional reports. (See the following chapters for information
about to perform these functions.)
Typical Scenarios
The following scenarios describe the workflow for typical kinds of analysis. Refer to
the following chapters for details on how to perform the particular functions.
16
Chapter 3. Getting Started
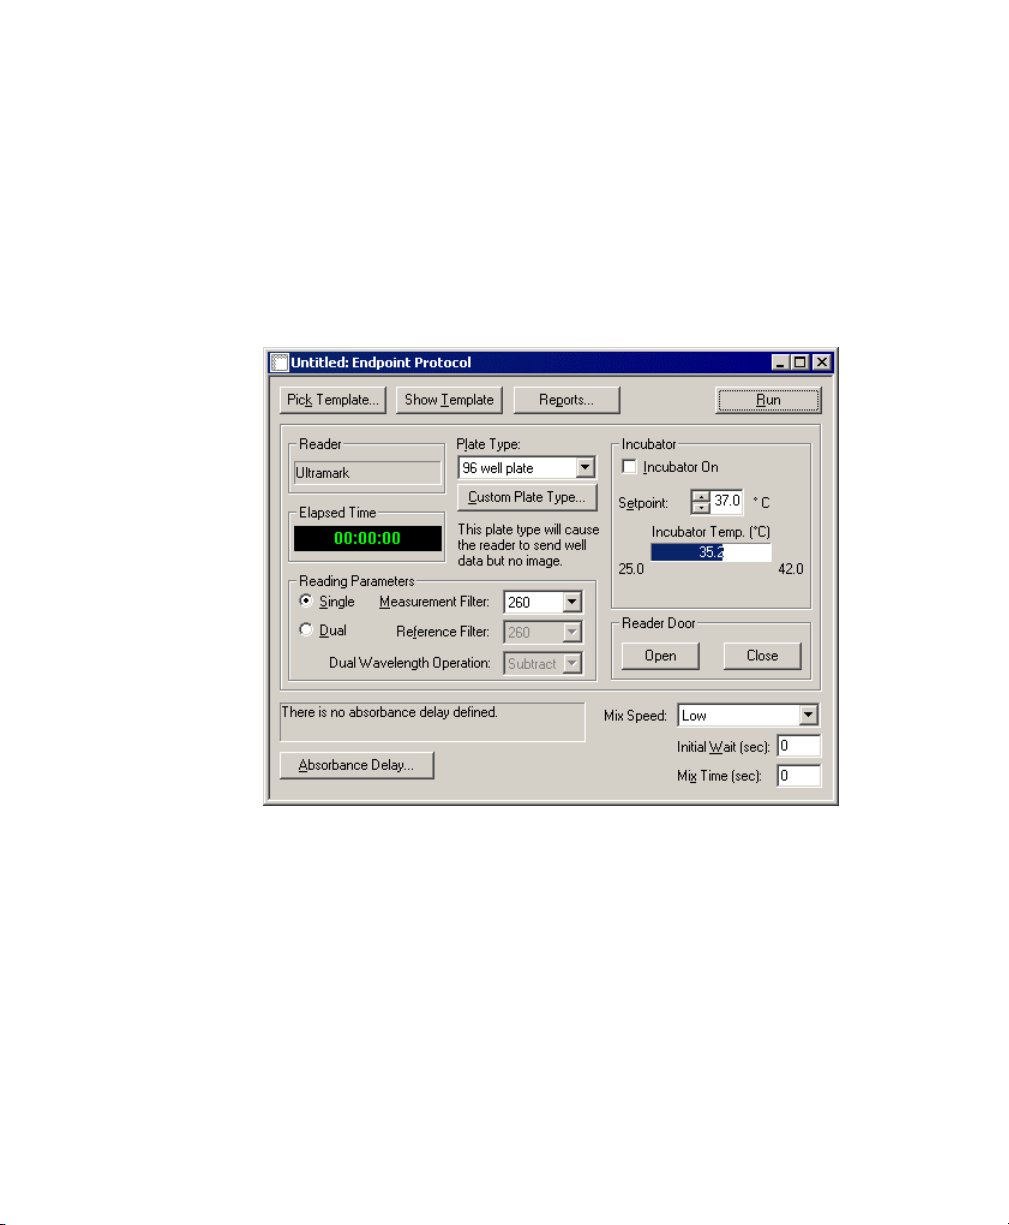
Scenario 1. Endpoint Assay with Previously Formatted
Template
You want to perform an Endpoint assay using a template layout that you have already
defined. From the FILE menu, you select New Endpoint Protocol. This opens the
Endpoint Protocol dialog box. You enter Mix Time, Initial Wait, and Incubator
settings for the reader.
Figure 10. Performing an Endpoint reading.
You have a Data File saved from a previous run with the template you want to use for
this plate, so you click on Pick Template... and choose that Data File. Now that
everything is set, you click on the Run button.
After the reading is complete, the raw data values pop up. The plate template is also
displayed. Since the template already contains the concentrations of the standards,
you go straight to the Unknown Concentration Report (select Unknown
17

Microplate Manager User Guide
Concentration Report from the VIEW menu). You select Print... from the FILE
menu to print this report.
You decide that you will be repeating this operation frequently, so you go back to the
Endpoint Protocol dialog box. The Reports... button opens a dialog box in which
you specify the reports to view and/or print after each reading. Select the Unknown
Concentration Report for printing, and click on OK. You select Save Protocol from
the FILE menu and enter a file name to store this Protocol on disk.
The next day, you want to repeat the Protocol. Select the Protocol File name from the
Open dialog box, place your plate in the reader, click on the Run button, and wait at
the printer for a hard copy of the new Unknown Concentration Report.
Scenario 2. Kinetic Assay
You want to perform a new Kinetic assay. From the FILE menu, you select New
Kinetic Protocol. The Kinetic Protocol dialog box opens.
For this assay, you would like to make five readings at 22-second intervals followed
by 20 readings at one-minute intervals. You want to shake the plate for one second
before each of the first five readings.
To accomplish this, you define two reading sets. The first set has 5 repetitions, a
1-second mix time, and a 22-second interval (note that the interval you specify
includes the mix time). The second set has 20 repetitions, 0 seconds mix time, and a
60-second interval.
Interval includes
mix time
Figure 11. Defining the Reading Sets.
18

Chapter 3. Getting Started
After inserting your plate into the reader, you click on Run and the reader begins
collecting data. At this point, both the template and the Kinetic Plots Report
automatically pop up.
The Kinetic Plots Report shows a graph of absorbance versus time for each well. As
each reading is completed, the graphs are updated. After all of the data has been read,
you can display any relevant report (Limit, Control, etc.) by selecting it from the
VIEW menu. To change the velocity calculation, you go to Analysis Options... under
the OPTIONS menu and select one of the two calculation methods under Kinetic
Mode. When you click on OK, the velocities are automatically recalculated.
Scenario 3. Using External Standards and Curve
Comparisons
You are running the same assay on many samples. To increase throughput, you
would like to place a set of standards on the first plate and then use those to
determine unknown concentrations on all subsequent plates. Near the end of the day,
you want to check the consistency of the readings by comparing the external
standards (from the first plate) to a fresh set of standards.
First, you measure the absorbances of the standards on Plate 1 and save the resulting
data as Data File 1. Next, while creating a Protocol File for all subsequent data
collection, open the Standard Curve Report or Unknown Concentration Report
and select External Standards... from the OPTIONS menu. Choose Data File 1 as
the source file for the external standards. Now the unknown concentrations on all
plates read using this new Protocol File will automatically be calculated using the
standards from Plate 1.
To compare a new standard curve to the external standard curve (from Plate 1),
define standards on the new plate (internal standards) and run the plate. When the
data is displayed, open the Standard Curve Report and select External Standards...
from the OPTIONS menu. Choose Data File 1 as the source file for the external
standards. Both the internal and external standard curves will be displayed. Now
select Analysis of Variance... from the OPTIONS menu and a statistical summary of
the comparison of the two curves will be displayed.
19

Microplate Manager User Guide
Figure 12. Comparing external and internal standards.
20

4. Protocols
Protocols contain the settings for controlling the microplate reader. To read a
microplate, you must first open a Protocol window and specify the settings.
Some of the features and functions in the Protocols are different depending on the
type of microplate reader you are using. These differences are noted in the text. The
figures depict some functions that are only available with certain microplate readers.
Microplate Manager has three general types of Protocols: Endpoint, Kinetic, and
Multiple Plate.
• Endpoint Protocols are used to acquire a single absorbance reading from each
well of a microplate.
• Kinetic Protocols are used to acquire a series of absorbance readings from each
well over a user-defined interval. You can use these Protocols to calculate
reaction velocities.
• Multiple Plate Protocols are used to collect Endpoint data from a series of
plates. The plates can be loaded by a plate loader for full automation, or they can
be loaded by hand. Multiple Plate Protocols save each successive Endpoint data
set in a separate file, and can also export the data in text format.
First you select the type of Protocol you want to use from the FILE menu, then you
specify the settings for your particular reading, and finally you take the reading. If
you want to reuse the particular Protocol you’ve created, you can save it as a
Protocol file.
Reader Identification
When you select a new or existing Protocol from the FILE menu, the software first
scans for the SCSI or serial port connection to the selected microplate reader.
21

Microplate Manager User Guide
If no reader is found, you will receive a warning message. Make sure the reader is
turned on, and check all the connections to the reader. See the microplate reader
hardware manual for more details.
Creating/Opening a Protocol
Creating a New Protocol
To create a new Protocol, select New Kinetic Protocol, New Endpoint Protocol, or
New Multiple Plate Protocol from the FILE menu. This will open the dialog box for
that particular type of Protocol.
Opening an Existing Protocol
To edit an existing Protocol File, choose Open... from the FILE menu, and then
select the Protocol name from the Open File dialog box. File names for Protocols
have the suffixes .epr (Endpoint reading), .mpr (Multiple Plate reading), or .kpr
(Kinetic plate reading).
Only one Protocol may be open at a time.
22
 Loading...