


mini Vidas
Table of contents
 Loading...
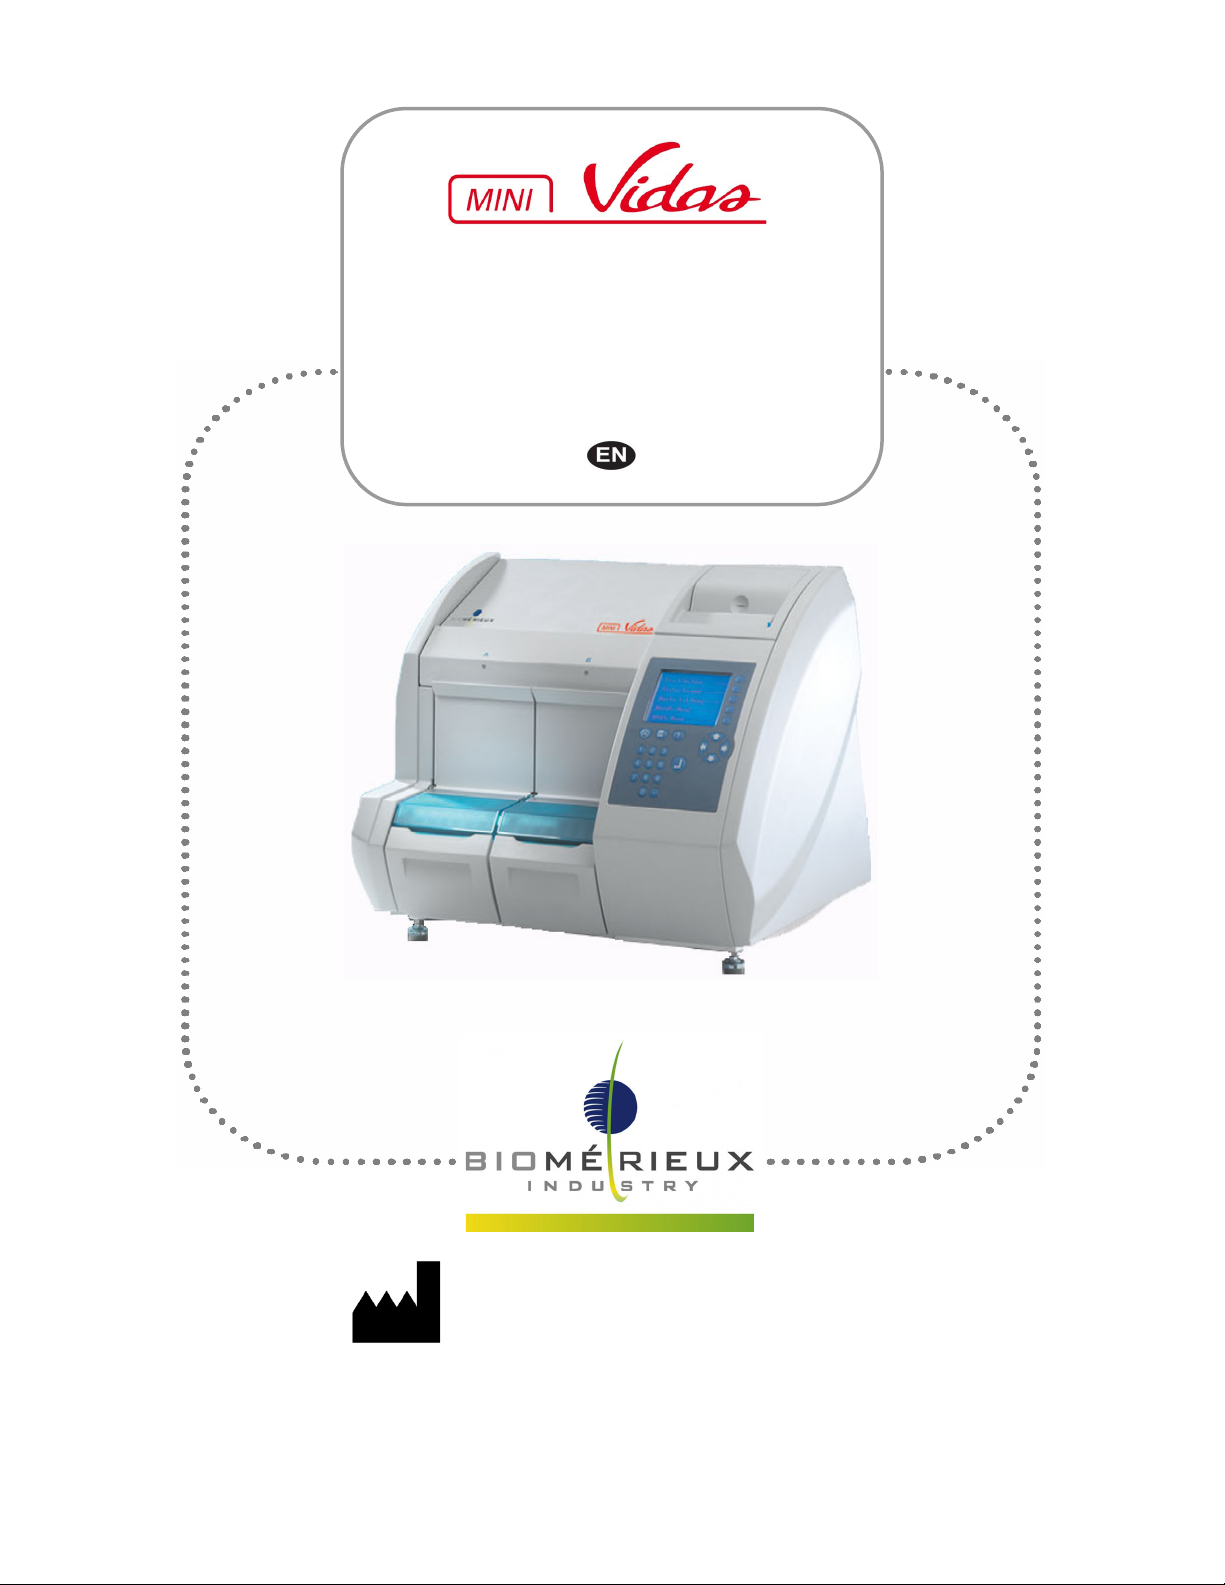
User Manual
Industry Use - US version
161150-849- A - en - 2016/10 – 161150-849
bioMérieux SA
376 Chemin de l’Orme
69280 Marcy-l’Etoile - France
Tél: 33 (0)4 78 87 20 00
Fax: 33 (0)4 78 87 20 90
www.biomerieux.com

General Information
The content of this manual is based on the Software release 5.6.
Please discard any previous copies of this manual if relevant.
This manual may contain information or references relating to certain bioMérieux products,
software or services which are not available in the country of release; this shall not mean that
bioMérieux intends to market such products, software or services in such country.
To request copies of publications or for any technical request / assistance, contact bioMérieux
or your local distributor (contact information available on www.biomerieux.com).
Note: The screens and figures shown are intended as illustrations only and must not be interpreted
as actual representations of data, results or equipment.
Screens and equipment are not shown to scale.
IMPORTANT: Please read this manual carefully before using the mini VIDAS® analyzer.
Limited Warranty
bioMérieux warrants the performance of the product for its stated intended use provided that
all procedures for usage, storage and handling, shelf life (when applicable), and precautions
are strictly followed as detailed in the instructions for use (IFU).
Except as expressly set forth above, bioMerieux hereby disclaims all warranties, including any
implied warranties of merchantability and fitness for a particular purpose or use, and disclaims
all liability, whether direct, indirect or consequential, for any use of the reagent, software,
instrument and disposables (the “System”) other than as set forth in the IFU.
Customer acknowledges and agrees that use of the System for testing of sample types or for
indications other than those described in the IFU is done solely at the Customer’s own risk.
Customer acknowledges and agrees that it is Customer’s sole and exclusive responsibility to
validate the System for any such intended use, and to determine whether the System is
suitable for that intended use. The performance of any validation studies and the subsequent
use of the System based on Customer’s validation studies shall be the Customer’s sole risk
and responsibility.
Product warranty details can be obtained from bioMérieux or your local distributor (contact
information available on www.biomerieux.com).
Intellectual Property
BIOMERIEUX, the blue logo, SPR and VIDAS are used, pending and/or registered
trademarks belonging to bioMérieux, or one of its subsidiaries, or one of its companies.
Any other name or trademark is the property of its respective owner.
© 2016 bioMérieux SA
bioMérieux SA RCS Lyon 673 620 399.

Table of Contents
Introduction to the System ........................................................................................ 1-1
Intended Use and Users. . . . . . . . . . . . . . . . . . . . . . . . . . . . . . . . . . . . . . . . . . . . . . . . . . . . 1-1
Benefits and Limitations of Use . . . . . . . . . . . . . . . . . . . . . . . . . . . . . . . . . . . . . . . . . . . . . . 1-1
Warning and Safety Messages. . . . . . . . . . . . . . . . . . . . . . . . . . . . . . . . . . . . . . . . . . . . . . . 1-2
Statement Types . . . . . . . . . . . . . . . . . . . . . . . . . . . . . . . . . . . . . . . . . . . . . . . . . . . . . . 1-2
General Statements . . . . . . . . . . . . . . . . . . . . . . . . . . . . . . . . . . . . . . . . . . . . . . . . . . . . . . .1-3
Standard Symbols . . . . . . . . . . . . . . . . . . . . . . . . . . . . . . . . . . . . . . . . . . . . . . . . . . . . . . . .1-6
Safety Information ...................................................................................................... 2-1
System Compliance . . . . . . . . . . . . . . . . . . . . . . . . . . . . . . . . . . . . . . . . . . . . . . . . . . . . . . . 2-1
Instrument Labels . . . . . . . . . . . . . . . . . . . . . . . . . . . . . . . . . . . . . . . . . . . . . . . . . . . . . . . . .2-2
SPR® Block . . . . . . . . . . . . . . . . . . . . . . . . . . . . . . . . . . . . . . . . . . . . . . . . . . . . . . . . . . 2-2
Reagent Strip Tray. . . . . . . . . . . . . . . . . . . . . . . . . . . . . . . . . . . . . . . . . . . . . . . . . . . . . 2-3
Strip Section. . . . . . . . . . . . . . . . . . . . . . . . . . . . . . . . . . . . . . . . . . . . . . . . . . . . . . . . . .2-4
Rear Panel . . . . . . . . . . . . . . . . . . . . . . . . . . . . . . . . . . . . . . . . . . . . . . . . . . . . . . . . . . . 2-5
Safety Precautions . . . . . . . . . . . . . . . . . . . . . . . . . . . . . . . . . . . . . . . . . . . . . . . . . . . . . . . .2-6
Precautions For Use Of Reagents . . . . . . . . . . . . . . . . . . . . . . . . . . . . . . . . . . . . . . . . . . . 2-11
General Precautions . . . . . . . . . . . . . . . . . . . . . . . . . . . . . . . . . . . . . . . . . . . . . . . . . . 2-11
Preparing the Analyses . . . . . . . . . . . . . . . . . . . . . . . . . . . . . . . . . . . . . . . . . . . . . . . . 2-11
Precautions for Samples . . . . . . . . . . . . . . . . . . . . . . . . . . . . . . . . . . . . . . . . . . . . . . . 2-12
At the End of the Run. . . . . . . . . . . . . . . . . . . . . . . . . . . . . . . . . . . . . . . . . . . . . . . . . . 2-12
System Description and Basic Operations .............................................................. 3-1
mini VIDAS® analyzer Description . . . . . . . . . . . . . . . . . . . . . . . . . . . . . . . . . . . . . . . . . . . 3-1
Screen and Keypad . . . . . . . . . . . . . . . . . . . . . . . . . . . . . . . . . . . . . . . . . . . . . . . . . . . . 3-2
Internal Printer . . . . . . . . . . . . . . . . . . . . . . . . . . . . . . . . . . . . . . . . . . . . . . . . . . . . . . . . 3-3
Rear Panel Components . . . . . . . . . . . . . . . . . . . . . . . . . . . . . . . . . . . . . . . . . . . . . . . . 3-3
Bar Code Readers . . . . . . . . . . . . . . . . . . . . . . . . . . . . . . . . . . . . . . . . . . . . . . . . . . . . . 3-4
Memory Cards . . . . . . . . . . . . . . . . . . . . . . . . . . . . . . . . . . . . . . . . . . . . . . . . . . . . . . . . 3-4
Technical Data and Specifications . . . . . . . . . . . . . . . . . . . . . . . . . . . . . . . . . . . . . . . . . . . . 3-5
Dimensions . . . . . . . . . . . . . . . . . . . . . . . . . . . . . . . . . . . . . . . . . . . . . . . . . . . . . . . . . . 3-5
Weight . . . . . . . . . . . . . . . . . . . . . . . . . . . . . . . . . . . . . . . . . . . . . . . . . . . . . . . . . . . . . . 3-5
Physical Space Requirements . . . . . . . . . . . . . . . . . . . . . . . . . . . . . . . . . . . . . . . . . . . . 3-5
Electrical Specifications . . . . . . . . . . . . . . . . . . . . . . . . . . . . . . . . . . . . . . . . . . . . . . . . . 3-6
Environmental Conditions . . . . . . . . . . . . . . . . . . . . . . . . . . . . . . . . . . . . . . . . . . . . . . . 3-6
Temperature . . . . . . . . . . . . . . . . . . . . . . . . . . . . . . . . . . . . . . . . . . . . . . . . . . . . . . . . . . . . . .3-7
Humidity . . . . . . . . . . . . . . . . . . . . . . . . . . . . . . . . . . . . . . . . . . . . . . . . . . . . . . . . . . . . . . . . .3-7
Altitude . . . . . . . . . . . . . . . . . . . . . . . . . . . . . . . . . . . . . . . . . . . . . . . . . . . . . . . . . . . . . . . . . . 3-7
Sound Level . . . . . . . . . . . . . . . . . . . . . . . . . . . . . . . . . . . . . . . . . . . . . . . . . . . . . . . . . . . . . .3-7
161150-849 - A i mini VIDAS
®

Table of Contents
Technical features . . . . . . . . . . . . . . . . . . . . . . . . . . . . . . . . . . . . . . . . . . . . . . . . . . . . . 3-7
Capacity . . . . . . . . . . . . . . . . . . . . . . . . . . . . . . . . . . . . . . . . . . . . . . . . . . . . . . . . . . . . . . . . .3-7
Motors. . . . . . . . . . . . . . . . . . . . . . . . . . . . . . . . . . . . . . . . . . . . . . . . . . . . . . . . . . . . . . . . . . . 3-7
Pumping . . . . . . . . . . . . . . . . . . . . . . . . . . . . . . . . . . . . . . . . . . . . . . . . . . . . . . . . . . . . . . . . .3-7
Temperature control. . . . . . . . . . . . . . . . . . . . . . . . . . . . . . . . . . . . . . . . . . . . . . . . . . . . 3-8
Absolute Accuracy . . . . . . . . . . . . . . . . . . . . . . . . . . . . . . . . . . . . . . . . . . . . . . . . . . . . . . . . .3-8
Relative Accuracy. . . . . . . . . . . . . . . . . . . . . . . . . . . . . . . . . . . . . . . . . . . . . . . . . . . . . . . . . .3-8
Thermal resistance . . . . . . . . . . . . . . . . . . . . . . . . . . . . . . . . . . . . . . . . . . . . . . . . . . . . . . . . . 3-8
Optics. . . . . . . . . . . . . . . . . . . . . . . . . . . . . . . . . . . . . . . . . . . . . . . . . . . . . . . . . . . . . . . 3-8
Optional Hardware . . . . . . . . . . . . . . . . . . . . . . . . . . . . . . . . . . . . . . . . . . . . . . . . . . . . . . . .3-9
Accessories for Industry Use . . . . . . . . . . . . . . . . . . . . . . . . . . . . . . . . . . . . . . . . . . . . . . . . 3-9
Assay Kit Specifications . . . . . . . . . . . . . . . . . . . . . . . . . . . . . . . . . . . . . . . . . . . . . . . . . . . 3-10
VIDAS® SPR® . . . . . . . . . . . . . . . . . . . . . . . . . . . . . . . . . . . . . . . . . . . . . . . . . . . . . . . . . . .3-10
VIDAS® Single Reagent Strip. . . . . . . . . . . . . . . . . . . . . . . . . . . . . . . . . . . . . . . . . . . . . . . .3-10
Reagents . . . . . . . . . . . . . . . . . . . . . . . . . . . . . . . . . . . . . . . . . . . . . . . . . . . . . . . . . . . . . . 3-11
VIDAS®Assay Kit . . . . . . . . . . . . . . . . . . . . . . . . . . . . . . . . . . . . . . . . . . . . . . . . . . . . 3-11
Single Reagent Strip. . . . . . . . . . . . . . . . . . . . . . . . . . . . . . . . . . . . . . . . . . . . . . . . . . . . . . .3-11
Single Reagent Strip for Immuno-Concentration (for Industry Use Only). . . . . . . . . . . . . . . 3-12
Dual Reagent Strip (for Clinic Use Only) . . . . . . . . . . . . . . . . . . . . . . . . . . . . . . . . . . . . . . .3-12
Reagent Strip Label . . . . . . . . . . . . . . . . . . . . . . . . . . . . . . . . . . . . . . . . . . . . . . . . . . . . . . .3-13
SPR® . . . . . . . . . . . . . . . . . . . . . . . . . . . . . . . . . . . . . . . . . . . . . . . . . . . . . . . . . . . . . . . . . .3-14
Standards / Calibrators and Controls . . . . . . . . . . . . . . . . . . . . . . . . . . . . . . . . . . . . . . . . . .3-15
System Basics . . . . . . . . . . . . . . . . . . . . . . . . . . . . . . . . . . . . . . . . . . . . . . . . . . . . . . . . . .3-16
Analysis Protocols . . . . . . . . . . . . . . . . . . . . . . . . . . . . . . . . . . . . . . . . . . . . . . . . . . . . 3-16
Principle of a VIDAS® Assay . . . . . . . . . . . . . . . . . . . . . . . . . . . . . . . . . . . . . . . . . . . . 3-16
Analysis Methods . . . . . . . . . . . . . . . . . . . . . . . . . . . . . . . . . . . . . . . . . . . . . . . . . . . . . 3-17
Qualitative Assays (Single Reagent Strips) . . . . . . . . . . . . . . . . . . . . . . . . . . . . . . . . . . . . .3-17
Qualitative Assays (Dual Reagent Strips) . . . . . . . . . . . . . . . . . . . . . . . . . . . . . . . . . . . . . .3-18
Quantitative Assays . . . . . . . . . . . . . . . . . . . . . . . . . . . . . . . . . . . . . . . . . . . . . . . . . . . . . . .3-19
Principles Of Calibration / Recalibration. . . . . . . . . . . . . . . . . . . . . . . . . . . . . . . . . . . . 3-20
Calibration . . . . . . . . . . . . . . . . . . . . . . . . . . . . . . . . . . . . . . . . . . . . . . . . . . . . . . . . . . . . . .3-20
Recalibration. . . . . . . . . . . . . . . . . . . . . . . . . . . . . . . . . . . . . . . . . . . . . . . . . . . . . . . . . . . . .3-22
Overview of Operation Elements . . . . . . . . . . . . . . . . . . . . . . . . . . . . . . . . . . . . . . . . . . . . 3-25
Strip and SPR® Sections . . . . . . . . . . . . . . . . . . . . . . . . . . . . . . . . . . . . . . . . . . . . . . . 3-25
Strip Preparation Tray . . . . . . . . . . . . . . . . . . . . . . . . . . . . . . . . . . . . . . . . . . . . . . . . . . . . .3-27
Microprocessor . . . . . . . . . . . . . . . . . . . . . . . . . . . . . . . . . . . . . . . . . . . . . . . . . . . . . . 3-28
Incubator . . . . . . . . . . . . . . . . . . . . . . . . . . . . . . . . . . . . . . . . . . . . . . . . . . . . . . . . . . . 3-28
Detection System . . . . . . . . . . . . . . . . . . . . . . . . . . . . . . . . . . . . . . . . . . . . . . . . . . . . . 3-28
Central Processing Unit . . . . . . . . . . . . . . . . . . . . . . . . . . . . . . . . . . . . . . . . . . . . . . . . 3-28
Software Basics . . . . . . . . . . . . . . . . . . . . . . . . . . . . . . . . . . . . . . . . . . . . . . . . . . . . . . . . .3-29
Menu Structure . . . . . . . . . . . . . . . . . . . . . . . . . . . . . . . . . . . . . . . . . . . . . . . . . . . . . . 3-29
Selecting a Menu Option . . . . . . . . . . . . . . . . . . . . . . . . . . . . . . . . . . . . . . . . . . . . . . . 3-30
161150-849 - A ii mini VIDAS
®

Table of Contents
The Status Screen . . . . . . . . . . . . . . . . . . . . . . . . . . . . . . . . . . . . . . . . . . . . . . . . . . . . 3-31
The First Status Screen . . . . . . . . . . . . . . . . . . . . . . . . . . . . . . . . . . . . . . . . . . . . . . . . . . . .3-31
The Second Status Screen. . . . . . . . . . . . . . . . . . . . . . . . . . . . . . . . . . . . . . . . . . . . . . . . . .3-32
The Third Status Screen. . . . . . . . . . . . . . . . . . . . . . . . . . . . . . . . . . . . . . . . . . . . . . . . . . . .3-32
Online Help . . . . . . . . . . . . . . . . . . . . . . . . . . . . . . . . . . . . . . . . . . . . . . . . . . . . . . . . . 3-33
Viewing Error Messages . . . . . . . . . . . . . . . . . . . . . . . . . . . . . . . . . . . . . . . . . . . . . . . 3-33
Screen Paging . . . . . . . . . . . . . . . . . . . . . . . . . . . . . . . . . . . . . . . . . . . . . . . . . . . . . . . 3-34
Using the Arrow Keys . . . . . . . . . . . . . . . . . . . . . . . . . . . . . . . . . . . . . . . . . . . . . . . . . . . . . .3-34
Paging Bar . . . . . . . . . . . . . . . . . . . . . . . . . . . . . . . . . . . . . . . . . . . . . . . . . . . . . . . . . . . . . . 3-34
System Installation and Configuration ..................................................................... 4-1
Unpacking. . . . . . . . . . . . . . . . . . . . . . . . . . . . . . . . . . . . . . . . . . . . . . . . . . . . . . . . . . . . . . . 4-1
Storage Conditions . . . . . . . . . . . . . . . . . . . . . . . . . . . . . . . . . . . . . . . . . . . . . . . . . . . . . . . .4-2
Choosing A Location . . . . . . . . . . . . . . . . . . . . . . . . . . . . . . . . . . . . . . . . . . . . . . . . . . . . . . 4-2
Electrical connections. . . . . . . . . . . . . . . . . . . . . . . . . . . . . . . . . . . . . . . . . . . . . . . . . . . . . .4-2
Checking Installation . . . . . . . . . . . . . . . . . . . . . . . . . . . . . . . . . . . . . . . . . . . . . . . . . . . . . .4-2
Connecting an external bar code reader . . . . . . . . . . . . . . . . . . . . . . . . . . . . . . . . . . . . . . . 4-2
Starting the System . . . . . . . . . . . . . . . . . . . . . . . . . . . . . . . . . . . . . . . . . . . . . . . . . . . . . . .4-3
Shutting Down the System . . . . . . . . . . . . . . . . . . . . . . . . . . . . . . . . . . . . . . . . . . . . . . . . . . 4-4
Introduction . . . . . . . . . . . . . . . . . . . . . . . . . . . . . . . . . . . . . . . . . . . . . . . . . . . . . . . . . .4-4
Procedure . . . . . . . . . . . . . . . . . . . . . . . . . . . . . . . . . . . . . . . . . . . . . . . . . . . . . . . . . . . 4-4
Configuring the mini VIDAS® analyzer . . . . . . . . . . . . . . . . . . . . . . . . . . . . . . . . . . . . . . . . 4-5
Selecting a Language . . . . . . . . . . . . . . . . . . . . . . . . . . . . . . . . . . . . . . . . . . . . . . . . . . 4-5
Setting Dose Units . . . . . . . . . . . . . . . . . . . . . . . . . . . . . . . . . . . . . . . . . . . . . . . . . . . . . 4-6
Setting User IDs . . . . . . . . . . . . . . . . . . . . . . . . . . . . . . . . . . . . . . . . . . . . . . . . . . . . . . . 4-8
Setting the Report Header . . . . . . . . . . . . . . . . . . . . . . . . . . . . . . . . . . . . . . . . . . . . . . . 4-9
Setting the Date and Time . . . . . . . . . . . . . . . . . . . . . . . . . . . . . . . . . . . . . . . . . . . . . . 4-10
Setting Display Contrast . . . . . . . . . . . . . . . . . . . . . . . . . . . . . . . . . . . . . . . . . . . . . . . 4-11
Selecting the Printer. . . . . . . . . . . . . . . . . . . . . . . . . . . . . . . . . . . . . . . . . . . . . . . . . . . 4-12
Setting the Date/time Format . . . . . . . . . . . . . . . . . . . . . . . . . . . . . . . . . . . . . . . . . . . . 4-13
Defining the Sample ID Character Sets . . . . . . . . . . . . . . . . . . . . . . . . . . . . . . . . . . . . 4-14
Changing the Keyclick Volume . . . . . . . . . . . . . . . . . . . . . . . . . . . . . . . . . . . . . . . . . . 4-15
Changing the Beep Volume . . . . . . . . . . . . . . . . . . . . . . . . . . . . . . . . . . . . . . . . . . . . . 4-16
Error Beeps . . . . . . . . . . . . . . . . . . . . . . . . . . . . . . . . . . . . . . . . . . . . . . . . . . . . . . . . . 4-17
Setting the Final Error Volume . . . . . . . . . . . . . . . . . . . . . . . . . . . . . . . . . . . . . . . . . . . 4-18
Enabling Display Blinking. . . . . . . . . . . . . . . . . . . . . . . . . . . . . . . . . . . . . . . . . . . . . . . 4-19
161150-849 - A iii mini VIDAS
®

Table of Contents
Miscellaneous Items . . . . . . . . . . . . . . . . . . . . . . . . . . . . . . . . . . . . . . . . . . . . . . . . . . 4-20
Onscreen Warnings for Expired Standards . . . . . . . . . . . . . . . . . . . . . . . . . . . . . . . . . . . . .4-20
Printed warnings for Expired Standards . . . . . . . . . . . . . . . . . . . . . . . . . . . . . . . . . . . . . . . .4-20
Autoprint Errors . . . . . . . . . . . . . . . . . . . . . . . . . . . . . . . . . . . . . . . . . . . . . . . . . . . . . . . . . .4-21
Check for Any Standard at Assay Startup . . . . . . . . . . . . . . . . . . . . . . . . . . . . . . . . . . . . . .4-21
Check for Current Standard at Assay Startup . . . . . . . . . . . . . . . . . . . . . . . . . . . . . . . . . . .4-21
Check for Master Lot at Assay Startup. . . . . . . . . . . . . . . . . . . . . . . . . . . . . . . . . . . . . . . . .4-21
Show All Assays . . . . . . . . . . . . . . . . . . . . . . . . . . . . . . . . . . . . . . . . . . . . . . . . . . . . . . . . . .4-22
Beep After Printing . . . . . . . . . . . . . . . . . . . . . . . . . . . . . . . . . . . . . . . . . . . . . . . . . . . . . . . .4-22
LIS User Options . . . . . . . . . . . . . . . . . . . . . . . . . . . . . . . . . . . . . . . . . . . . . . . . . . . . . 4-23
Enable LIS Upload . . . . . . . . . . . . . . . . . . . . . . . . . . . . . . . . . . . . . . . . . . . . . . . . . . . . . . . .4-23
Warn About Missing IDs . . . . . . . . . . . . . . . . . . . . . . . . . . . . . . . . . . . . . . . . . . . . . . . . . . . . 4-23
LIS Auto Validation . . . . . . . . . . . . . . . . . . . . . . . . . . . . . . . . . . . . . . . . . . . . . . . . . . . . . . . .4-23
Creating Normal Ranges for Assays . . . . . . . . . . . . . . . . . . . . . . . . . . . . . . . . . . . . . . 4-24
Installing Paper in the Internal Printer . . . . . . . . . . . . . . . . . . . . . . . . . . . . . . . . . . . . . 4-25
Print Screen . . . . . . . . . . . . . . . . . . . . . . . . . . . . . . . . . . . . . . . . . . . . . . . . . . . . . . . . . 4-26
Workflow and Instructional Procedures................................................................... 5-1
Routine Workflow . . . . . . . . . . . . . . . . . . . . . . . . . . . . . . . . . . . . . . . . . . . . . . . . . . . . . . . . .5-1
Planning a Run . . . . . . . . . . . . . . . . . . . . . . . . . . . . . . . . . . . . . . . . . . . . . . . . . . . . . . . . . . . 5-2
Managing the Job List . . . . . . . . . . . . . . . . . . . . . . . . . . . . . . . . . . . . . . . . . . . . . . . . . . 5-2
Defining the Type of Run Required . . . . . . . . . . . . . . . . . . . . . . . . . . . . . . . . . . . . . . . . 5-2
Checking Assay Compatibility . . . . . . . . . . . . . . . . . . . . . . . . . . . . . . . . . . . . . . . . . . . . 5-2
Defining the Standards/calibrators and Controls to be used . . . . . . . . . . . . . . . . . . . . . 5-3
Standards/calibrators . . . . . . . . . . . . . . . . . . . . . . . . . . . . . . . . . . . . . . . . . . . . . . . . . . . . . . .5-3
Controls . . . . . . . . . . . . . . . . . . . . . . . . . . . . . . . . . . . . . . . . . . . . . . . . . . . . . . . . . . . . . . . . .5-3
Running Assays . . . . . . . . . . . . . . . . . . . . . . . . . . . . . . . . . . . . . . . . . . . . . . . . . . . . . . . . . . 5-4
Entering Master Lot Data . . . . . . . . . . . . . . . . . . . . . . . . . . . . . . . . . . . . . . . . . . . . . . . . 5-4
Scanning Master Lot Data on the Reagent Kit Label . . . . . . . . . . . . . . . . . . . . . . . . . . . . . . .5-5
Automatically Entering Master Lot Data Using the Master Lot Entry (MLE) card. . . . . . . . . .5-6
Manually Entering Master Lot Data Using the Master Lot Entry (MLE) card. . . . . . . . . . . . . . 5-7
Running Assays in «Load and Go» Mode. . . . . . . . . . . . . . . . . . . . . . . . . . . . . . . . . . 5-12
Loading Reagent Strips and SPR®s . . . . . . . . . . . . . . . . . . . . . . . . . . . . . . . . . . . . . . 5-12
Starting A «Load and Go» Run . . . . . . . . . . . . . . . . . . . . . . . . . . . . . . . . . . . . . . . . . . . . . .5-13
Running Assays in «Defined» mode . . . . . . . . . . . . . . . . . . . . . . . . . . . . . . . . . . . . . . 5-15
Assigning Assays to a Position. . . . . . . . . . . . . . . . . . . . . . . . . . . . . . . . . . . . . . . . . . . . . . .5-15
Assigning Standards/calibrators for Assays with one standard/calibrator . . . . . . . . . . . . . .5-17
Assigning Standards/calibrators for Assays with two standards/calibrators (S1 and S2). . . 5-18
Assigning Controls to a Position. . . . . . . . . . . . . . . . . . . . . . . . . . . . . . . . . . . . . . . . . . . . . . 5-19
Assigning Sample IDs to a Position using a Bar code Reader . . . . . . . . . . . . . . . . . . . . . . . 5-20
Assigning Sample IDs to a Position Manually . . . . . . . . . . . . . . . . . . . . . . . . . . . . . . . . . . .5-21
Defining the Same Assay Type for the next position . . . . . . . . . . . . . . . . . . . . . . . . . . . . . .5-22
Erasing Inputs for a Position or a Section . . . . . . . . . . . . . . . . . . . . . . . . . . . . . . . . . . . . . . 5-22
Loading Reagent Strips and SPR®s. . . . . . . . . . . . . . . . . . . . . . . . . . . . . . . . . . . . . . . . . . .5-23
Starting a «Defined» Run . . . . . . . . . . . . . . . . . . . . . . . . . . . . . . . . . . . . . . . . . . . . . . . . . . .5-24
Unloading Reagent Strips and SPR®s . . . . . . . . . . . . . . . . . . . . . . . . . . . . . . . . . . . . . . . . . 5-25
Assigning a Dilution Factor. . . . . . . . . . . . . . . . . . . . . . . . . . . . . . . . . . . . . . . . . . . . . . . . . . 5-26
161150-849 - A iv mini VIDAS
®

Table of Contents
Running Internal Quality Controls (for Clinic Use Only) . . . . . . . . . . . . . . . . . . . . . . . . 5-28
Viewing Stored Standards/calibrators . . . . . . . . . . . . . . . . . . . . . . . . . . . . . . . . . . . . . 5-30
Viewing Master Lot Data . . . . . . . . . . . . . . . . . . . . . . . . . . . . . . . . . . . . . . . . . . . . . . . 5-31
Stopping a Section. . . . . . . . . . . . . . . . . . . . . . . . . . . . . . . . . . . . . . . . . . . . . . . . . . . . 5-32
Results and Reports................................................................................................... 6-1
The Assay Reports . . . . . . . . . . . . . . . . . . . . . . . . . . . . . . . . . . . . . . . . . . . . . . . . . . . . . . . .6-1
Report Header . . . . . . . . . . . . . . . . . . . . . . . . . . . . . . . . . . . . . . . . . . . . . . . . . . . . . . . . 6-1
Qualitative Assays Results . . . . . . . . . . . . . . . . . . . . . . . . . . . . . . . . . . . . . . . . . . . . . . 6-2
Quantitative Assays Results . . . . . . . . . . . . . . . . . . . . . . . . . . . . . . . . . . . . . . . . . . . . . 6-4
Assay Report Errors. . . . . . . . . . . . . . . . . . . . . . . . . . . . . . . . . . . . . . . . . . . . . . . . . . . . 6-5
Reprinting an Assay Report . . . . . . . . . . . . . . . . . . . . . . . . . . . . . . . . . . . . . . . . . . . . . . . . . 6-6
Reprinting an Assay Report without Editing Data . . . . . . . . . . . . . . . . . . . . . . . . . . . . . 6-6
Editing Data before Reprinting an Assay Report . . . . . . . . . . . . . . . . . . . . . . . . . . . . . . 6-7
Validating LIS Results . . . . . . . . . . . . . . . . . . . . . . . . . . . . . . . . . . . . . . . . . . . . . . . . . . . . .6-9
Canceling Uploads of Results to the LIS . . . . . . . . . . . . . . . . . . . . . . . . . . . . . . . . . . . 6-10
Deleting the Remaining Non-validated LIS Upload Data . . . . . . . . . . . . . . . . . . . . . . . 6-10
Stopping Validation . . . . . . . . . . . . . . . . . . . . . . . . . . . . . . . . . . . . . . . . . . . . . . . . . . . 6-10
Validating Internal Quality Controls Transfers (for Clinic Use Only). . . . . . . . . . . . . . . . . .6-11
Printing the mini VIDAS® Assay List . . . . . . . . . . . . . . . . . . . . . . . . . . . . . . . . . . . . . . . . . 6-12
Miscellaneous Operations ......................................................................................... 7-1
Taking a Section Off line . . . . . . . . . . . . . . . . . . . . . . . . . . . . . . . . . . . . . . . . . . . . . . . . . . . 7-1
Changing Factory Settings . . . . . . . . . . . . . . . . . . . . . . . . . . . . . . . . . . . . . . . . . . . . . . . . . . 7-1
Testing the mini VIDAS® analyzer. . . . . . . . . . . . . . . . . . . . . . . . . . . . . . . . . . . . . . . . . . . . 7-2
Testing the Display . . . . . . . . . . . . . . . . . . . . . . . . . . . . . . . . . . . . . . . . . . . . . . . . . . . . 7-2
Decrease in the Intensity of Display . . . . . . . . . . . . . . . . . . . . . . . . . . . . . . . . . . . . . . . . . . . .7-2
Testing the Keypad . . . . . . . . . . . . . . . . . . . . . . . . . . . . . . . . . . . . . . . . . . . . . . . . . . . . 7-3
Testing the Printer . . . . . . . . . . . . . . . . . . . . . . . . . . . . . . . . . . . . . . . . . . . . . . . . . . . . . 7-4
Testing the audio output . . . . . . . . . . . . . . . . . . . . . . . . . . . . . . . . . . . . . . . . . . . . . . . . 7-4
Updating an Assay . . . . . . . . . . . . . . . . . . . . . . . . . . . . . . . . . . . . . . . . . . . . . . . . . . . . . . . .7-5
Preliminary Instructions . . . . . . . . . . . . . . . . . . . . . . . . . . . . . . . . . . . . . . . . . . . . . . . . . 7-5
Reading Assay Update Card Bar codes . . . . . . . . . . . . . . . . . . . . . . . . . . . . . . . . . . . . 7-6
Displaying the mini VIDAS® Software Version . . . . . . . . . . . . . . . . . . . . . . . . . . . . . . . . . . 7-9
Printing the mini VIDAS® Software Version . . . . . . . . . . . . . . . . . . . . . . . . . . . . . . . . . . . . 7-9
Displaying the Assay Version . . . . . . . . . . . . . . . . . . . . . . . . . . . . . . . . . . . . . . . . . . . . . . . 7-10
Section Counters . . . . . . . . . . . . . . . . . . . . . . . . . . . . . . . . . . . . . . . . . . . . . . . . . . . . . . . .7-11
Printing the Assay Version . . . . . . . . . . . . . . . . . . . . . . . . . . . . . . . . . . . . . . . . . . . . . . . . . 7-11
Updating the mini VIDAS® Software . . . . . . . . . . . . . . . . . . . . . . . . . . . . . . . . . . . . . . . . . 7-12
Verifying the Memory Card Data . . . . . . . . . . . . . . . . . . . . . . . . . . . . . . . . . . . . . . . . . . . . 7-13
Parking themini VIDAS® analyzer . . . . . . . . . . . . . . . . . . . . . . . . . . . . . . . . . . . . . . . . . . . 7-13
161150-849 - A v mini VIDAS
®

Table of Contents
Maintenance ................................................................................................................ 8-1
Preventive Maintenance . . . . . . . . . . . . . . . . . . . . . . . . . . . . . . . . . . . . . . . . . . . . . . . . . . . . 8-1
User Maintenance . . . . . . . . . . . . . . . . . . . . . . . . . . . . . . . . . . . . . . . . . . . . . . . . . . . . . . . .8-1
Required Tools. . . . . . . . . . . . . . . . . . . . . . . . . . . . . . . . . . . . . . . . . . . . . . . . . . . . . . . . 8-1
Cleaning and Disinfection Procedures . . . . . . . . . . . . . . . . . . . . . . . . . . . . . . . . . . . . . . 8-2
Cleaning the SPR® block (Monthly). . . . . . . . . . . . . . . . . . . . . . . . . . . . . . . . . . . . . . . . . . . .8-3
Cleaning the Reagent Strip Trays (Every 6 Months or if Needed) . . . . . . . . . . . . . . . . . . . . .8-7
Cleaning the Plastic Trays (Every 6 Months or if Needed). . . . . . . . . . . . . . . . . . . . . . . . . . .8-8
Cleaning the Strip Preparation Trays (Every 6 Months or if Needed). . . . . . . . . . . . . . . . . . .8-9
Cleaning the Outer Covers of the Instrument (Every 6 Months or if Needed) . . . . . . . . . . . 8-10
Cleaning the Screen and Keypad (Every 6 Months or if Needed) . . . . . . . . . . . . . . . . . . . .8-10
Cleaning the Bar Code Reader (Every 6 Months or if Needed) . . . . . . . . . . . . . . . . . . . . . .8-10
Cleaning Optical Lenses (Monthly) . . . . . . . . . . . . . . . . . . . . . . . . . . . . . . . . . . . . . . . 8-11
Checking the Pipetting System (Monthly) . . . . . . . . . . . . . . . . . . . . . . . . . . . . . . . . . . 8-12
Calibration and Adjustments. . . . . . . . . . . . . . . . . . . . . . . . . . . . . . . . . . . . . . . . . . . . . . . . 8-13
Optical System . . . . . . . . . . . . . . . . . . . . . . . . . . . . . . . . . . . . . . . . . . . . . . . . . . . . . . . 8-13
Manual Optics Calibration . . . . . . . . . . . . . . . . . . . . . . . . . . . . . . . . . . . . . . . . . . . . . . . . . .8-13
Self Diagnostics . . . . . . . . . . . . . . . . . . . . . . . . . . . . . . . . . . . . . . . . . . . . . . . . . . . . . . . . . .8-13
Self-calibration . . . . . . . . . . . . . . . . . . . . . . . . . . . . . . . . . . . . . . . . . . . . . . . . . . . . . . . . . . .8-13
Pipetting System . . . . . . . . . . . . . . . . . . . . . . . . . . . . . . . . . . . . . . . . . . . . . . . . . . . . . 8-15
Calibration and self diagnostics . . . . . . . . . . . . . . . . . . . . . . . . . . . . . . . . . . . . . . . . . . . . . .8-15
Temperature Validation . . . . . . . . . . . . . . . . . . . . . . . . . . . . . . . . . . . . . . . . . . . . . . . . 8-15
Self diagnostics . . . . . . . . . . . . . . . . . . . . . . . . . . . . . . . . . . . . . . . . . . . . . . . . . . . . . . . . . .8-15
Master Curve Establishment and Calibration . . . . . . . . . . . . . . . . . . . . . . . . . . . . . . . . 8-16
Establishing the master curve (performed at the manufacturer). . . . . . . . . . . . . . . . . . . . . .8-16
Establishing the Calibration Curve (performed by the customer) . . . . . . . . . . . . . . . . . . . . .8-16
Appendix - Maintenance Records .............................................................................A-1
Maintenance Schedule . . . . . . . . . . . . . . . . . . . . . . . . . . . . . . . . . . . . . . . . . . . . . . . . . . . . .A-1
Maintenance Check-List . . . . . . . . . . . . . . . . . . . . . . . . . . . . . . . . . . . . . . . . . . . . . . . . . . . .A-2
Appendix - Troubleshooting......................................................................................B-1
Indication Of Errors. . . . . . . . . . . . . . . . . . . . . . . . . . . . . . . . . . . . . . . . . . . . . . . . . . . . . . . .B-1
Displaying Errors . . . . . . . . . . . . . . . . . . . . . . . . . . . . . . . . . . . . . . . . . . . . . . . . . . . . . . . . .B-1
Error Messages and Recovery Procedures . . . . . . . . . . . . . . . . . . . . . . . . . . . . . . . . . . . . .B-2
Start Errors. . . . . . . . . . . . . . . . . . . . . . . . . . . . . . . . . . . . . . . . . . . . . . . . . . . . . . . . . . .B-2
Manually Entering Bar codes . . . . . . . . . . . . . . . . . . . . . . . . . . . . . . . . . . . . . . . . . . . . .B-5
Other Error Messages . . . . . . . . . . . . . . . . . . . . . . . . . . . . . . . . . . . . . . . . . . . . . . . . . . . . .B-7
Instrument Errors . . . . . . . . . . . . . . . . . . . . . . . . . . . . . . . . . . . . . . . . . . . . . . . . . . . . . .B-7
Error Messages . . . . . . . . . . . . . . . . . . . . . . . . . . . . . . . . . . . . . . . . . . . . . . . . . . . . . . . . . . .B-8
161150-849 - A vi mini VIDAS
®

Table of Contents
Problems that May Occur with the Bar code Reader . . . . . . . . . . . . . . . . . . . . . . . . . . . . .B-15
The reader does not emit a beam of light . . . . . . . . . . . . . . . . . . . . . . . . . . . . . . . . . .B-15
Reader fails to read bar codes . . . . . . . . . . . . . . . . . . . . . . . . . . . . . . . . . . . . . . . . . . .B-15
The bar codes are unreadable: . . . . . . . . . . . . . . . . . . . . . . . . . . . . . . . . . . . . . . . . . . . . . .B-15
The reader window is not clean:. . . . . . . . . . . . . . . . . . . . . . . . . . . . . . . . . . . . . . . . . . . . . .B-15
The reading distance is incorrect:. . . . . . . . . . . . . . . . . . . . . . . . . . . . . . . . . . . . . . . . . . . . .B-15
Assay Report Errors . . . . . . . . . . . . . . . . . . . . . . . . . . . . . . . . . . . . . . . . . . . . . . . . . . . . . .B-16
Correcting Assay Report Errors . . . . . . . . . . . . . . . . . . . . . . . . . . . . . . . . . . . . . . . . . .B-16
Assay Report Error Symbols . . . . . . . . . . . . . . . . . . . . . . . . . . . . . . . . . . . . . . . . . . . .B-16
Error Messages on Assay Reports . . . . . . . . . . . . . . . . . . . . . . . . . . . . . . . . . . . . . . .B-17
Printer Errors . . . . . . . . . . . . . . . . . . . . . . . . . . . . . . . . . . . . . . . . . . . . . . . . . . . . . . . . . . .B-17
Viewing Saved Errors . . . . . . . . . . . . . . . . . . . . . . . . . . . . . . . . . . . . . . . . . . . . . . . . . . . . .B-18
Displaying and Printing Instrument Temperatures . . . . . . . . . . . . . . . . . . . . . . . . . . . . . . .B-18
Appendix - Installing external hardware...................................................................C-1
External printer . . . . . . . . . . . . . . . . . . . . . . . . . . . . . . . . . . . . . . . . . . . . . . . . . . . . . . . . . . C-1
Equipment Required . . . . . . . . . . . . . . . . . . . . . . . . . . . . . . . . . . . . . . . . . . . . . . . . . . C-1
Before Installation . . . . . . . . . . . . . . . . . . . . . . . . . . . . . . . . . . . . . . . . . . . . . . . . . . . . C-1
Installation . . . . . . . . . . . . . . . . . . . . . . . . . . . . . . . . . . . . . . . . . . . . . . . . . . . . . . . . . . C-1
Possible Error Message . . . . . . . . . . . . . . . . . . . . . . . . . . . . . . . . . . . . . . . . . . . . . . . . C-2
Installing the Bar code Reader . . . . . . . . . . . . . . . . . . . . . . . . . . . . . . . . . . . . . . . . . . . . . . C-2
Equipment Required . . . . . . . . . . . . . . . . . . . . . . . . . . . . . . . . . . . . . . . . . . . . . . . . . . C-2
Installation . . . . . . . . . . . . . . . . . . . . . . . . . . . . . . . . . . . . . . . . . . . . . . . . . . . . . . . . . . C-2
Appendix - Computer interface information.............................................................D-1
Introduction. . . . . . . . . . . . . . . . . . . . . . . . . . . . . . . . . . . . . . . . . . . . . . . . . . . . . . . . . . . . . D-1
Configuration Information . . . . . . . . . . . . . . . . . . . . . . . . . . . . . . . . . . . . . . . . . . . . . . . . . . D-2
Example of a mini VIDAS® Upload . . . . . . . . . . . . . . . . . . . . . . . . . . . . . . . . . . . . . . . D-3
161150-849 - A vii mini VIDAS
®

Table of Contents
Appendix - Technical Data and Specifications (previous versions of mini VIDAS®
analyzers) ....................................................................................................................E-1
Dimensions. . . . . . . . . . . . . . . . . . . . . . . . . . . . . . . . . . . . . . . . . . . . . . . . . . . . . . . . . . . . . .E-1
Weight . . . . . . . . . . . . . . . . . . . . . . . . . . . . . . . . . . . . . . . . . . . . . . . . . . . . . . . . . . . . . . . . .E-1
Physical Space Requirements . . . . . . . . . . . . . . . . . . . . . . . . . . . . . . . . . . . . . . . . . . . . . . .E-1
Electrical Specifications . . . . . . . . . . . . . . . . . . . . . . . . . . . . . . . . . . . . . . . . . . . . . . . . . . . .E-2
Environmental Conditions. . . . . . . . . . . . . . . . . . . . . . . . . . . . . . . . . . . . . . . . . . . . . . . . . . .E-3
Temperature . . . . . . . . . . . . . . . . . . . . . . . . . . . . . . . . . . . . . . . . . . . . . . . . . . . . . . . . .E-3
Humidity . . . . . . . . . . . . . . . . . . . . . . . . . . . . . . . . . . . . . . . . . . . . . . . . . . . . . . . . . . . . .E-3
Altitude . . . . . . . . . . . . . . . . . . . . . . . . . . . . . . . . . . . . . . . . . . . . . . . . . . . . . . . . . . . . . .E-3
Sound Level . . . . . . . . . . . . . . . . . . . . . . . . . . . . . . . . . . . . . . . . . . . . . . . . . . . . . . . . . .E-3
Technical features . . . . . . . . . . . . . . . . . . . . . . . . . . . . . . . . . . . . . . . . . . . . . . . . . . . . . . . .E-4
Capacity . . . . . . . . . . . . . . . . . . . . . . . . . . . . . . . . . . . . . . . . . . . . . . . . . . . . . . . . . . . . .E-4
Motors . . . . . . . . . . . . . . . . . . . . . . . . . . . . . . . . . . . . . . . . . . . . . . . . . . . . . . . . . . . . . .E-4
Pumping. . . . . . . . . . . . . . . . . . . . . . . . . . . . . . . . . . . . . . . . . . . . . . . . . . . . . . . . . . . . .E-4
Temperature control . . . . . . . . . . . . . . . . . . . . . . . . . . . . . . . . . . . . . . . . . . . . . . . . . . . . . . .E-4
Absolute Accuracy . . . . . . . . . . . . . . . . . . . . . . . . . . . . . . . . . . . . . . . . . . . . . . . . . . . . .E-4
Relative Accuracy . . . . . . . . . . . . . . . . . . . . . . . . . . . . . . . . . . . . . . . . . . . . . . . . . . . . .E-4
Thermal resistance . . . . . . . . . . . . . . . . . . . . . . . . . . . . . . . . . . . . . . . . . . . . . . . . . . . .E-4
Optics . . . . . . . . . . . . . . . . . . . . . . . . . . . . . . . . . . . . . . . . . . . . . . . . . . . . . . . . . . . . . . . . . .E-5
Assay Kit Specifications . . . . . . . . . . . . . . . . . . . . . . . . . . . . . . . . . . . . . . . . . . . . . . . . . . . .E-5
VIDAS® SPR
® . . . . . . . . . . . . . . . . . . . . . . . . . . . . . . . . . . . . . . . . . . . . . . . . . . . . . . . . . . . . . . . . . . . . . . E-5
VIDAS® Single Reagent Strip . . . . . . . . . . . . . . . . . . . . . . . . . . . . . . . . . . . . . . . . . . . .E-5
Appendix - Glossary................................................................................................... F-1
161150-849 - A viii mini VIDAS
®

1 Introduction to the System
Intended Use and Users
The mini VIDAS® Industry system is an immunodiagnostic system intended to be used by
trained and qualified laboratory professionals, for veterinary and industrial applications.
The mini VIDAS® Industry system is intended to execute an immunoassay protocol and to
release results according to the package insert of the VIDAS
®
assay kits.
Note: When referring to the mini VIDAS® analyzer or system in this user manual, it refers to the
mini VIDAS
Note: Some information in this user manual may only apply to mini VIDAS® for a clinical application.
Information specific for clinical use will mention "for clinical use only" and will not be taken into
account for mini VIDAS
®
Industry analyzer or system.
Benefits and Limitations of Use
The mini VIDAS® analyzer has a built-in system for detecting and reporting errors. Its unique
design enables it to operate around the clock and daily start-up is completed in a few seconds.
The mini VIDAS® analyzer is a completely self-contained system that includes:
• an analytical module (12 test positions i.e. two 6-test sections) and,
• data processing equipment (monitor, keypad, printer).
The mini VIDAS® analyzer enables different analytes to be used simultaneously according to
their compatibility.
The number of tests/ hour depends on the kit (eg: up to 36 tests/ hour with VIDAS® PCT).
It is used with VIDAS® assay kits covering numerous immunoassay* fields (non exhaustive
list):
• hepatitis,
•AIDS,
• serology testing,
• bacterial and viral antigen detection,
• fertility/pregnancy monitoring,
• thyroid hormones,
• allergies,
• tumor markers,
• endocrinology,
• anemia,
• cardiovascular diseases,
• therapeutic drug monitoring,
• immuno-hemostasis,
• industrial microbiology.
* The availability of certain VIDAS® tests may be restricted in some countries, depending on registration
release dates. Please contact your local bioMérieux representative for further information.
®
Industry.
161150-849 - A 1-1 mini VIDAS
®
Warning and Safety Messages Introduction to the System
Warning and Safety Messages
The user documentation uses several types of statements to alert you to important
information. Important information is labeled in text and identified using symbols.
Statement Types
The statement types are Warning, Caution, Important, and Note. The following examples
define each statement type. The general caution symbol is used in these examples, but other
symbols (see Standard Symbols on page 1-6) may be used instead.
The warning messages in this manual mainly refer to:
WARNING
A Warning statement alerts the user to the possibility of injury, death, or
other serious adverse reactions associated with the use or misuse of the
device.
CAUTION: A Caution statement alerts the user to the possibility of a problem with
the device associated with its use or misuse. Such problems include device
malfunction, device failure, damage to the device, or damage to other property.
Where applicable, a Caution statement may include a precaution that should be
taken to avoid the hazard.
IMPORTANT: An Important statement relates to content presented in the user documentation. It is
ed to reinforce the user’s understanding of selected information.
us
Note: A No
te statement supplies additional information about a topic.
161150-849 - A 1-2 mini VIDAS
®
General Statements Introduction to the System
General Statements
This section provides important statements that apply to all products. Equipment meets the
requirements and standards stated in the certificate supplied with it.
WARNING
Equipment is intended for professional use only.
Laboratory personnel should be qualified and adhere to the principles of
g
ood laboratory practice.
All the user documents supplied must be read prior to use of the equipment.
Under no circumstance should the user disman
of touching dangerous parts, including parts that are infectious or
connected to a source of electric power.
Do not obstruct the equipment and hardware ventilation apertures, and
lea
ve sufficient clearance around the equipment for the circulation of air.
All biological and industry samples should be considered as potentially
inf
ectious. Suitable individual protective equipment is required when
handling chemical or biological substances.
bioMérieux is in no case liable for the harmful consequences of incorrect
u
se or improper handling of these substances.
tle equipment due to the risk
WARNING
Electromagnetic Compatibility (EMC):
The EMC class of the equipment is indicated
it.
If equipment is a class A product, it may cause radio interference in a
d
omestic environment, in which case the user will be required to correct the
interference at his own expense.
on the certificate supplied with
Do not use this device near strong sourc
example, intentionally unprotected radio-electric sources), which could
interfere with the operation of the equipment.
It is recommended to evaluate the electromagnetic environment before
s
tarting the device.
es of electromagnetic radiation (for
WARNING
Only modify the software configuration parameters you are authorized to
modify and which are described in the user documentation.
161150-849 - A 1-3 mini VIDAS
®
General Statements Introduction to the System
WARNING
Decontamination of equipment at the end of its life cycle:
The following instructions must be followed by all users in countries where
loc
al legislation imposes the treatment and recycling of equipment at the
end of its life cycle.
As a general rule, and as a precautionary measure, any part of the
e
quipment (including sub-assemblies, components and materials)
considered to be potentially infectious, must be decontaminated, whenever
possible, or removed if decontamination is impossible or presents a risk.
Any part considered to be potentially i
nfectious, which is not
decontaminated, must be removed from the instrument before following the
normal channels for elimination of infectious products, in accordance with
local regulations.
The decontamination instructions in the user documentation correspond to
t
he parts of the equipment that are potentially infectious according to their
intended use. These operations must be performed before the equipment is
transferred to a third party.
However, bioMérieux cannot exclude that other parts of the equipment have
n
ot been contaminated in other circumstances, in particular as the result of
spillage of infectious substances. In this case, the user is solely responsible
for decontaminating these parts or removing them before they follow the
normal channels for elimination of infectious products.
WARNING
This statement only applies to European countries with regard to the waste
electrical and electronic equipment European directive:
You can play an important role in contributing to reuse, recycling, and other
f
orms of recovery of waste electrical and electronic equipment. Sorting this
type of waste significantly reduces potential negative effects on the
environment and human health as a result of the presence of hazardous
substances in electrical and electronic equipment.
At the end of the life cycle of this product, do not dispose of the product as
un
sorted municipal waste, even if it is decontaminated. It is imperative that
you contact bioMérieux to assure its appropriate disposal.
IMPORTANT: Electrical or other connections should only be made using the accessories supplied
with the equipment.
IMPORTANT: It is important to follow all the restrictions on use, particularly concerning temperature,
st
orage, installation and voltage, which are indicated on the product label or in the user
documentation.
161150-849 - A 1-4 mini VIDAS
®

General Statements Introduction to the System
IMPORTANT: The accuracy of results obtained with this equipment depends on the maintenance
operations described in the user documentation (user maintenance and/or periodic
preventive maintenance performed by bioMérieux).
IMPORTANT: The user should be aware that if the maintenance operations are not performed, are
only partially performed, or are not performed as described in the user documentation,
bioMérieux is in no case liable for any false test results obtained.
IMPORTANT: It is recommended to keep the original packaging materials in case the equipment
needs to be moved. Any damage directly or indirectly resulting from the transport of
the equipment without adequate containers will not be covered by the warranty.
161150-849 - A 1-5 mini VIDAS
®
Standard Symbols Introduction to the System
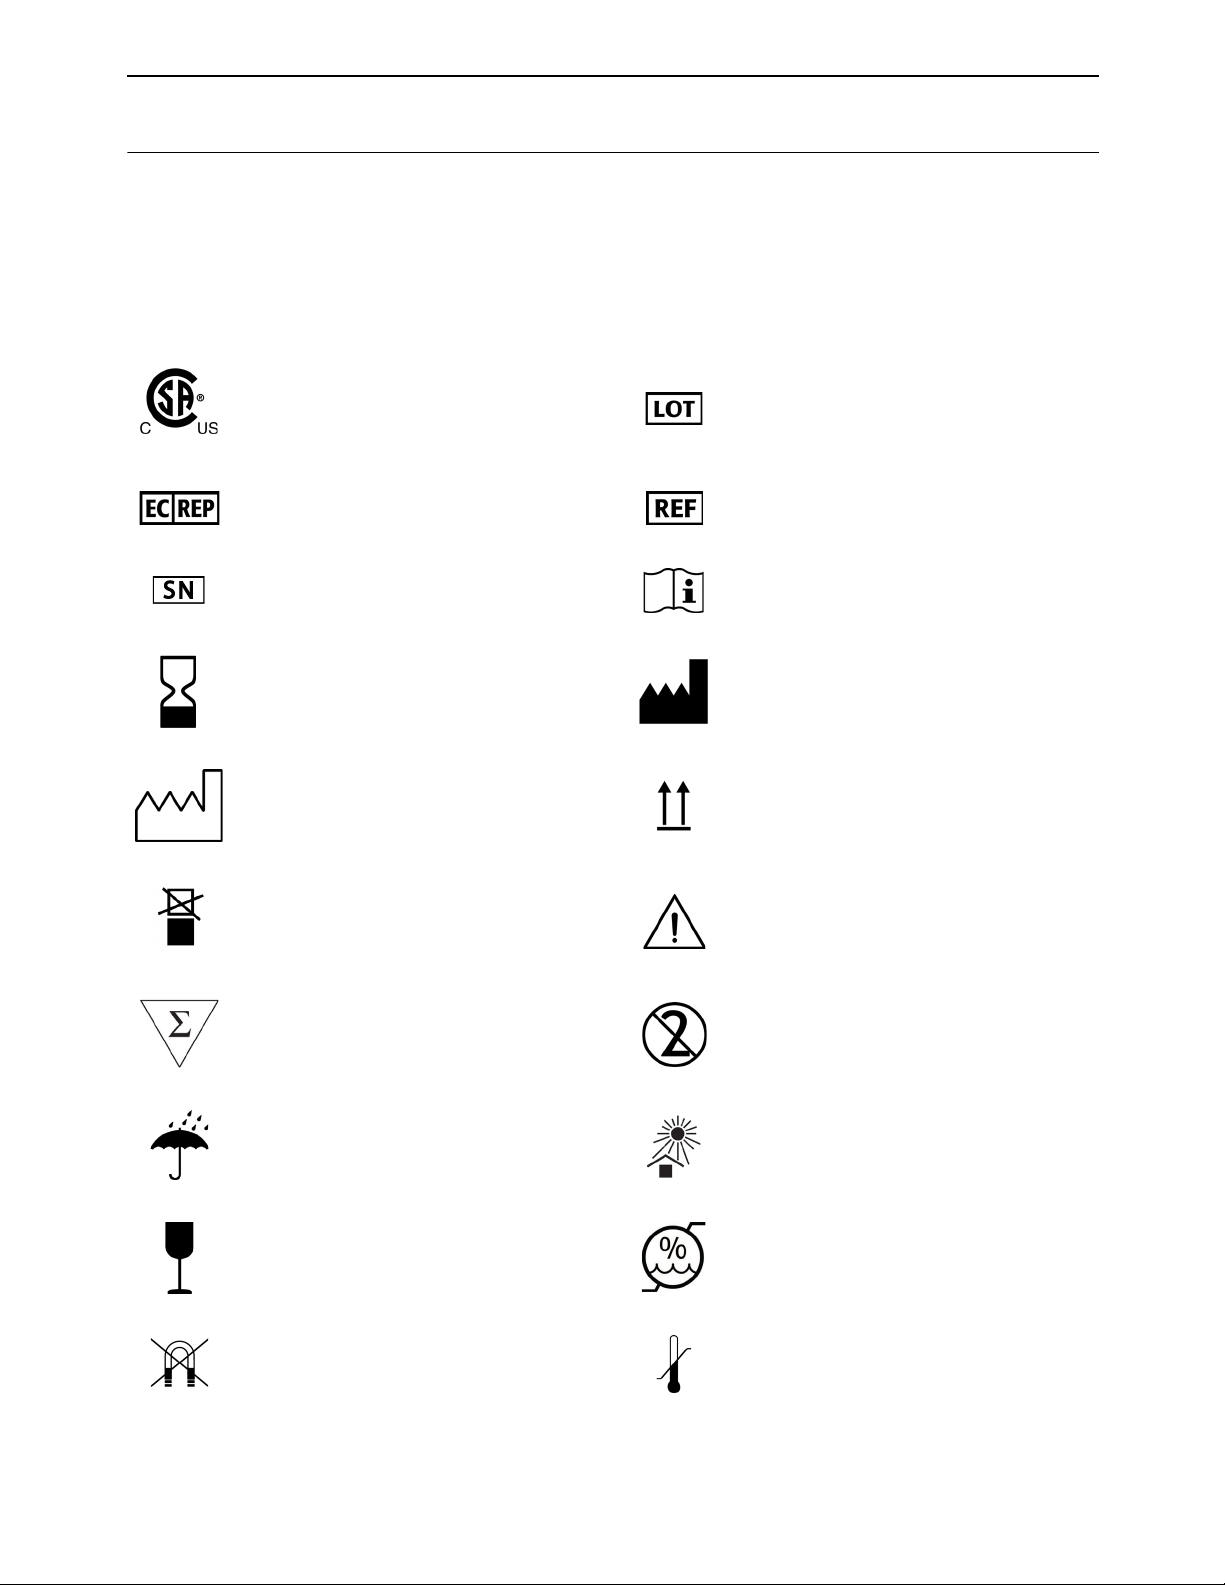
Standard Symbols
The following table defines symbols that may appear in the instructions for use or on the
instrument, package inserts, or packaging. When surrounded by a triangle on a yellow
background, the symbol highlights an immediate warning and is positioned on the instrument
itself.
Compliance with US and Canadian Safety
Standards certified by CSA
Authorized Representative in the European
Community
Serial number Consult Instructions for Use
Use by date Manufacturer
Date of manufacture This way up
Do not stack Caution, consult accompanying documents
Batch code
Catalog number
Contains sufficient for <n> tests Do not reuse
Keep dry Keep away from light
Fragile, handle with care Humidity limitation
Keep away from magnetic field Temperature limitations
161150-849 - A 1-6 mini VIDAS
®
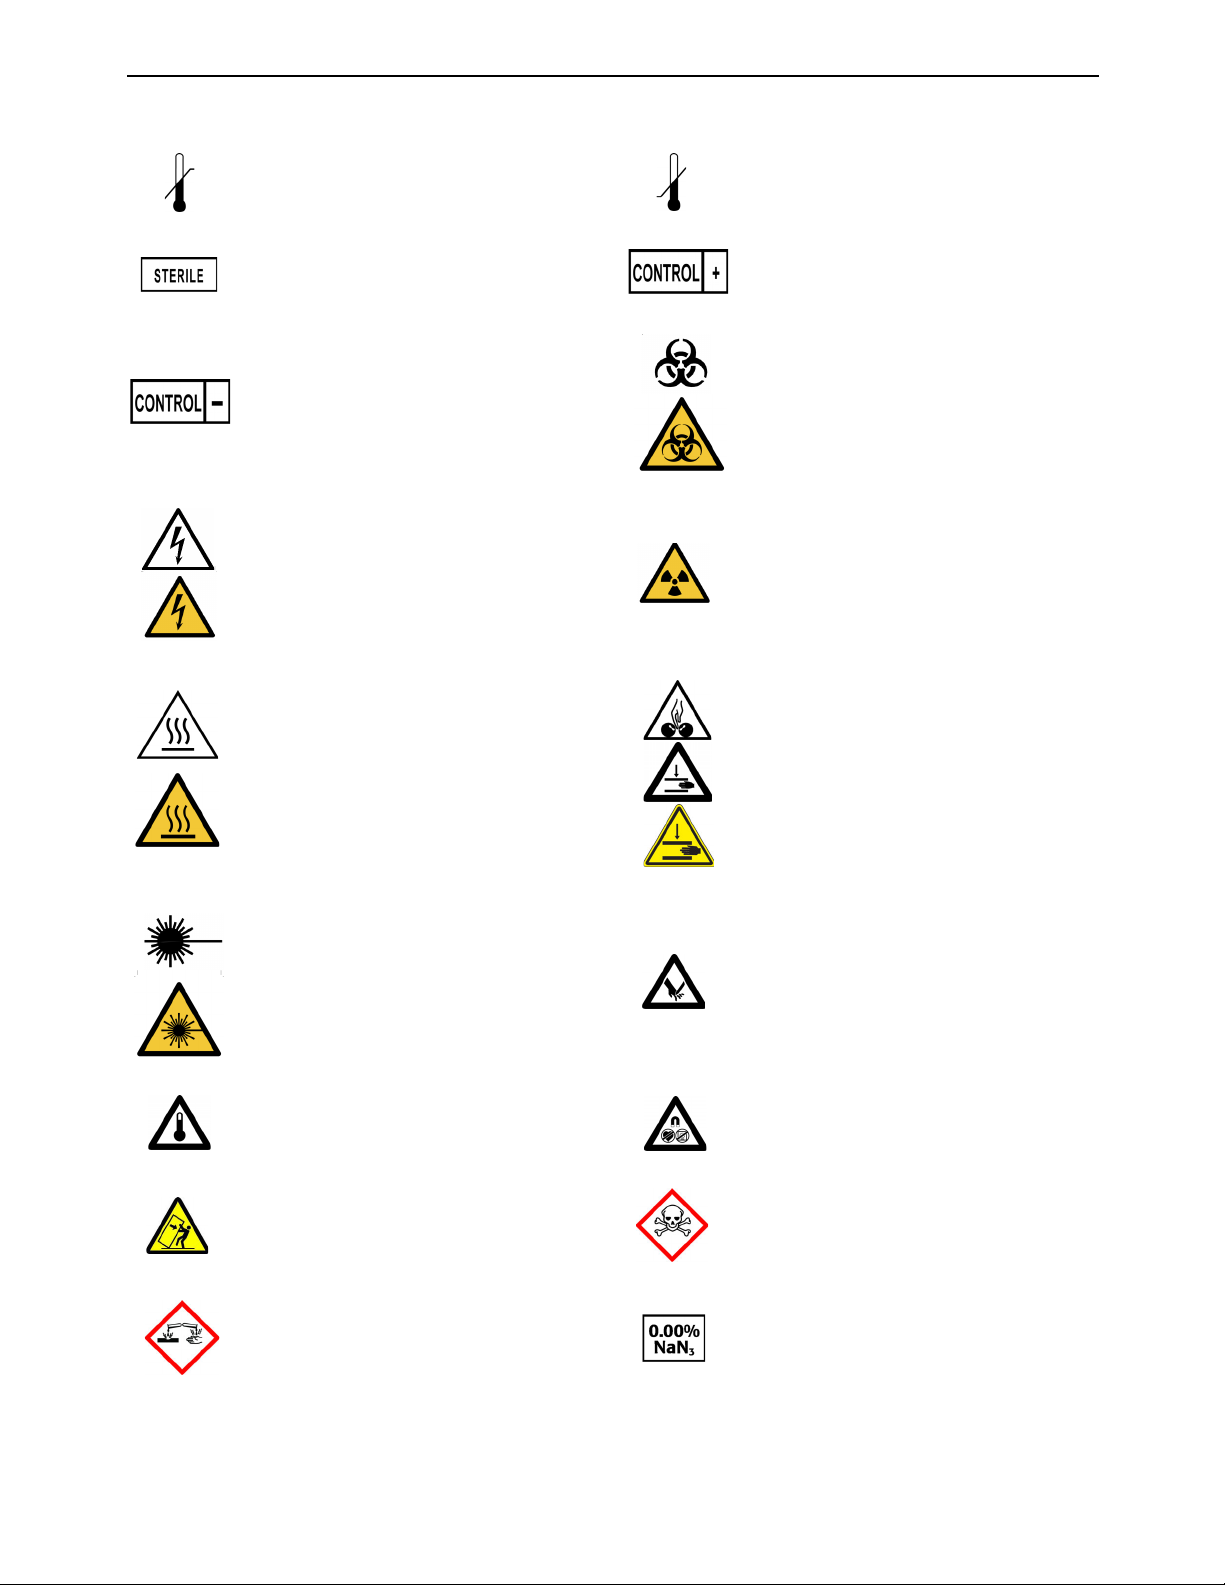
Standard Symbols Introduction to the System
Upper limit of temperature Lower limit of temperature
Sterile Positive control
Negative control Biological risk
Electric shock warning Radiation warning
Hot surface Potential pinch-point warning
Laser beam Shearing hazard
High temperature Hazardous magnetic field
Potential tip-over/crush hazard Acute toxicity
Corrosives Sodium azide
161150-849 - A 1-7 mini VIDAS
®
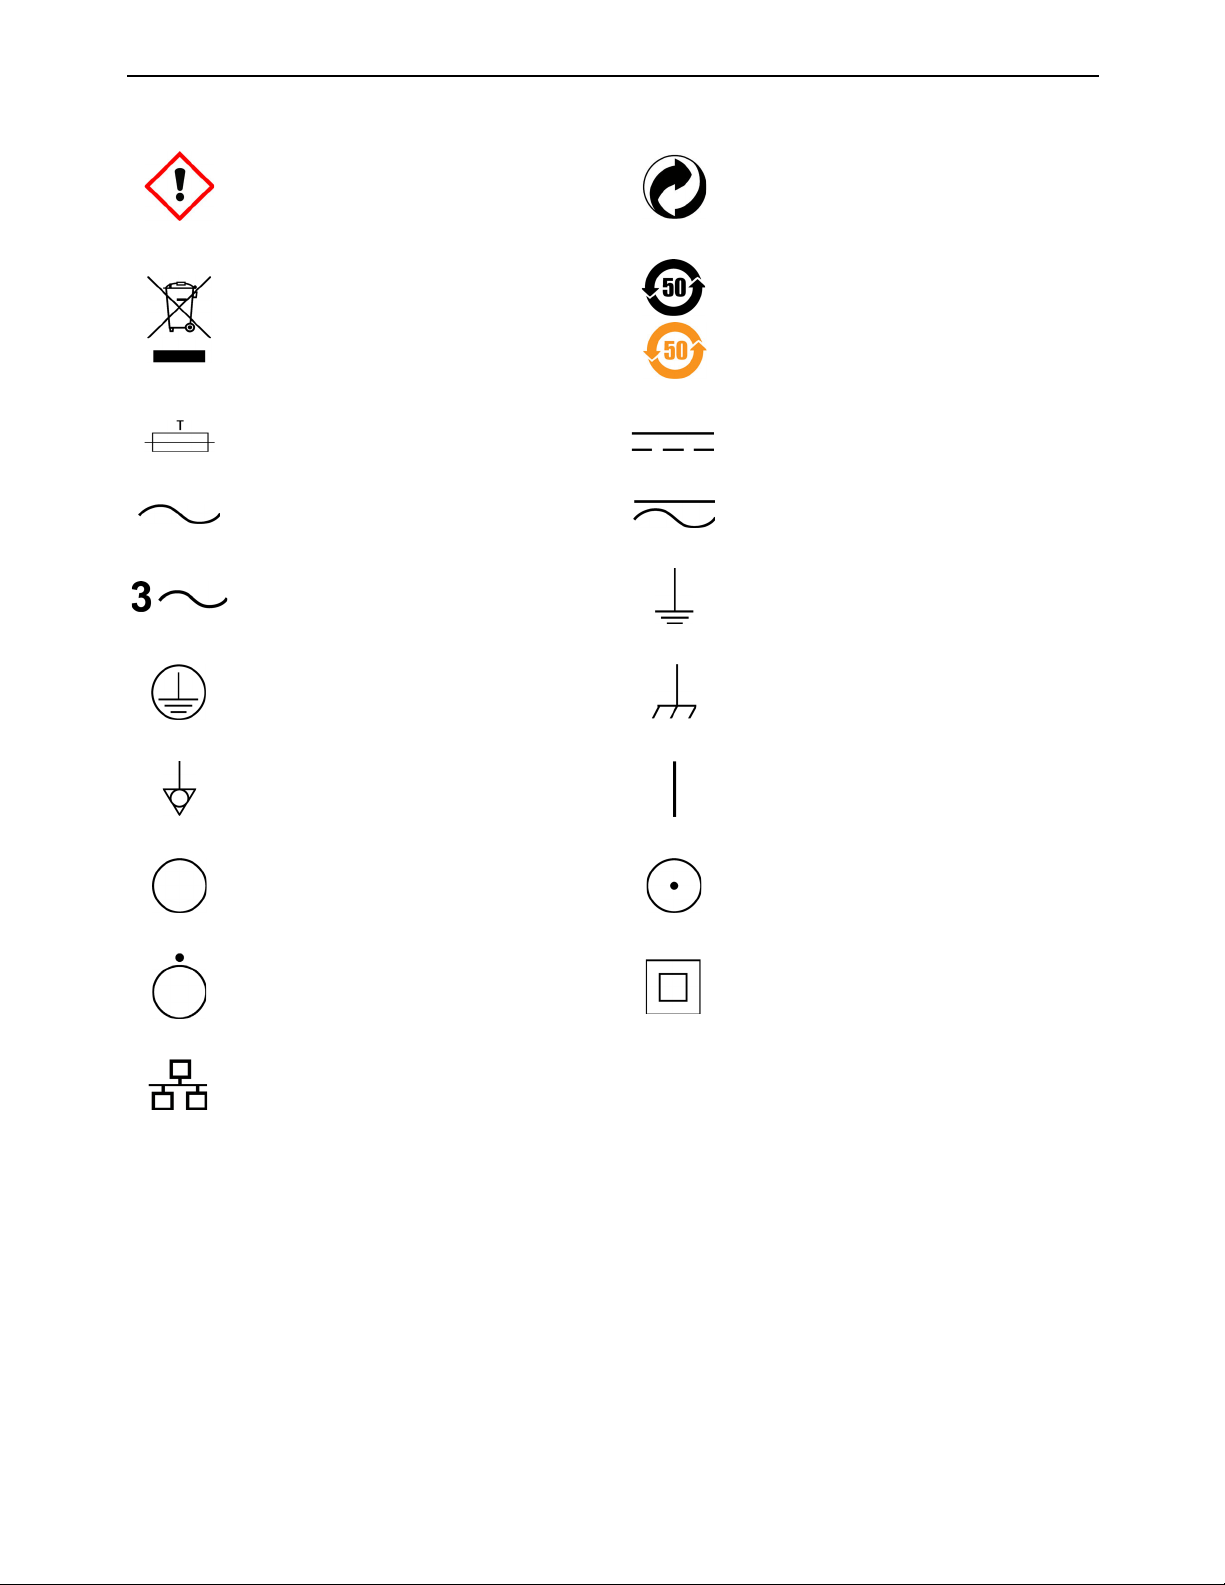
Standard Symbols Introduction to the System
Irritant Recyclable
Environmentally friendly use period. Actual
Separate collection for waste electrical and
electronic equipment
number of years may vary by product. This
symbol is typically orange in color.
Fuse Direct current
Alternating current Both direct and alternating current
Three-phase alternating current Earth (ground) terminal
Protective conductor terminal Frame or chassis terminal
Equipotentiality ON (supply)
OFF (supply)
OFF (only for a component of the system
equipment)
ON (only for a component of the system
equipment)
Equipment protected throughout by
double insulation or reinforced insulation
(Equivalent
to Class II of IEC 536)
Ethernet port
161150-849 - A 1-8 mini VIDAS
®
2 Safety Information
It is essential that the warnings, cautions and safety requirements contained in this manual are
read and understood by the user before operating the system.
Warning symbols have been placed on the system to
hazards.
System Compliance
This instrument complies with the emissions and immunity requirements of IEC 61326.
This is a Class A product. The instrument was de
class A.
In a domestic environment this product may cause
may be required to take adequate measures.
• bioMérieux recommends the evaluation of the ele
operating the instrument.
• Laser Class 1
The Instrument is a Class 1 LED/Laser product in acco
draw your attention to areas of potential
signed and tested against CISPR 11,
radio interference, in which case the user
ctromagnetic environment before
CAUTION: Use of this instrument in a dry environment, especially if synthetic
materials are present (synthetic clothing, carpets, etc.) may cause damaging static
discharges that may cause erroneous results.
rdance with the requirements of:
• 21CFR1040.10 and 1040.11 except for deviation
July 26,2001
• IEC 60825-1: 1993+Amendments
• EN 60825-1:1994+Amendments
• IEC 60825-1: 2007
• EN 60825-1:2007
Class 1 devices are not considered to be hazardous when used for their intended purpose.
CAUTION: Use of controls, adjustments or performance of procedure other than
those specified in the user’s manual may result in hazardous LED/laser light
exposure.
s pursuant to Laser Notice No 50, dated
161150-849 - A 2-1 mini VIDAS
®
Instrument Labels Safety Information
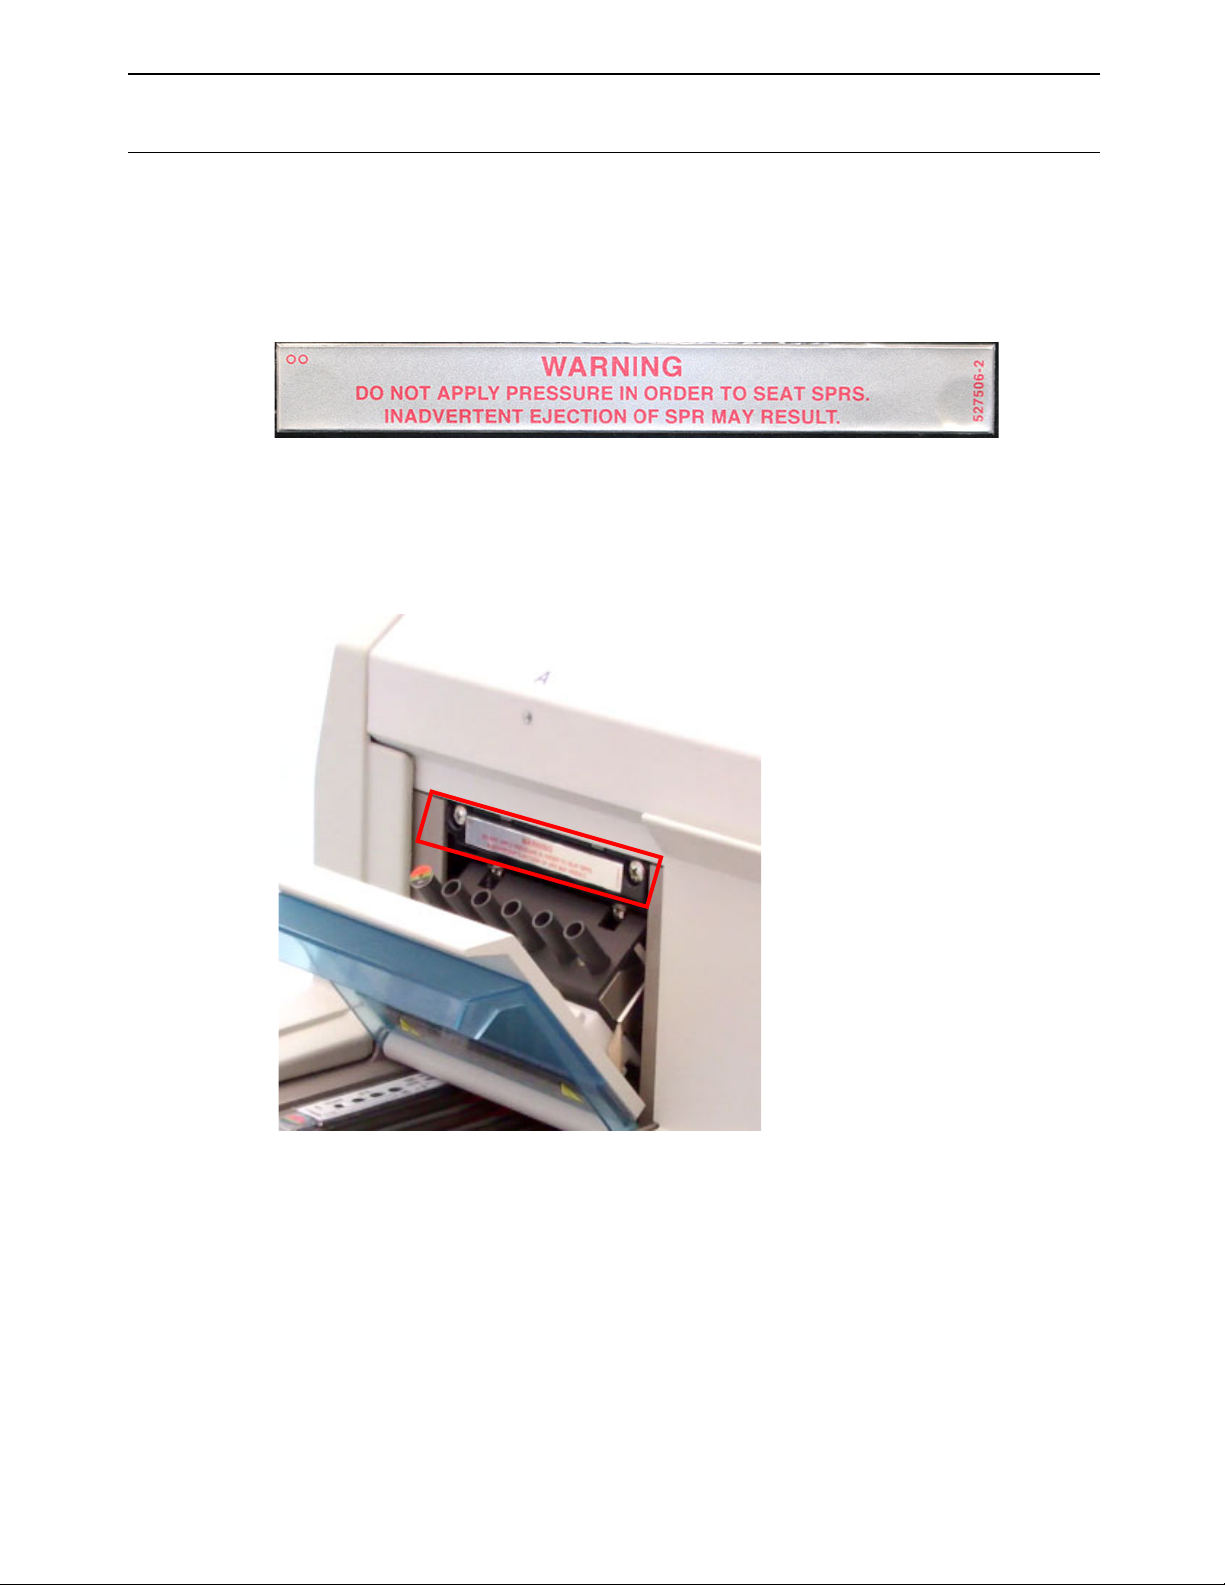
This label reads:
WARNING - DO NOT APPLY PRESSURE IN ORDER TO SEAT SPRS.
INADVERTENT EJECTION OF SPR MAY RESULT.
Instrument Labels
The following photos of the analyzer illustrate the positions of the safety warning labels.
SPR® Block
The label is applied above the SPR® slots inside each SPR® block.
Figure 2-1: SPR® Block Label
Figure 2-2: Position of the label
161150-849 - A 2-2 mini VIDAS
®
Instrument Labels Safety Information
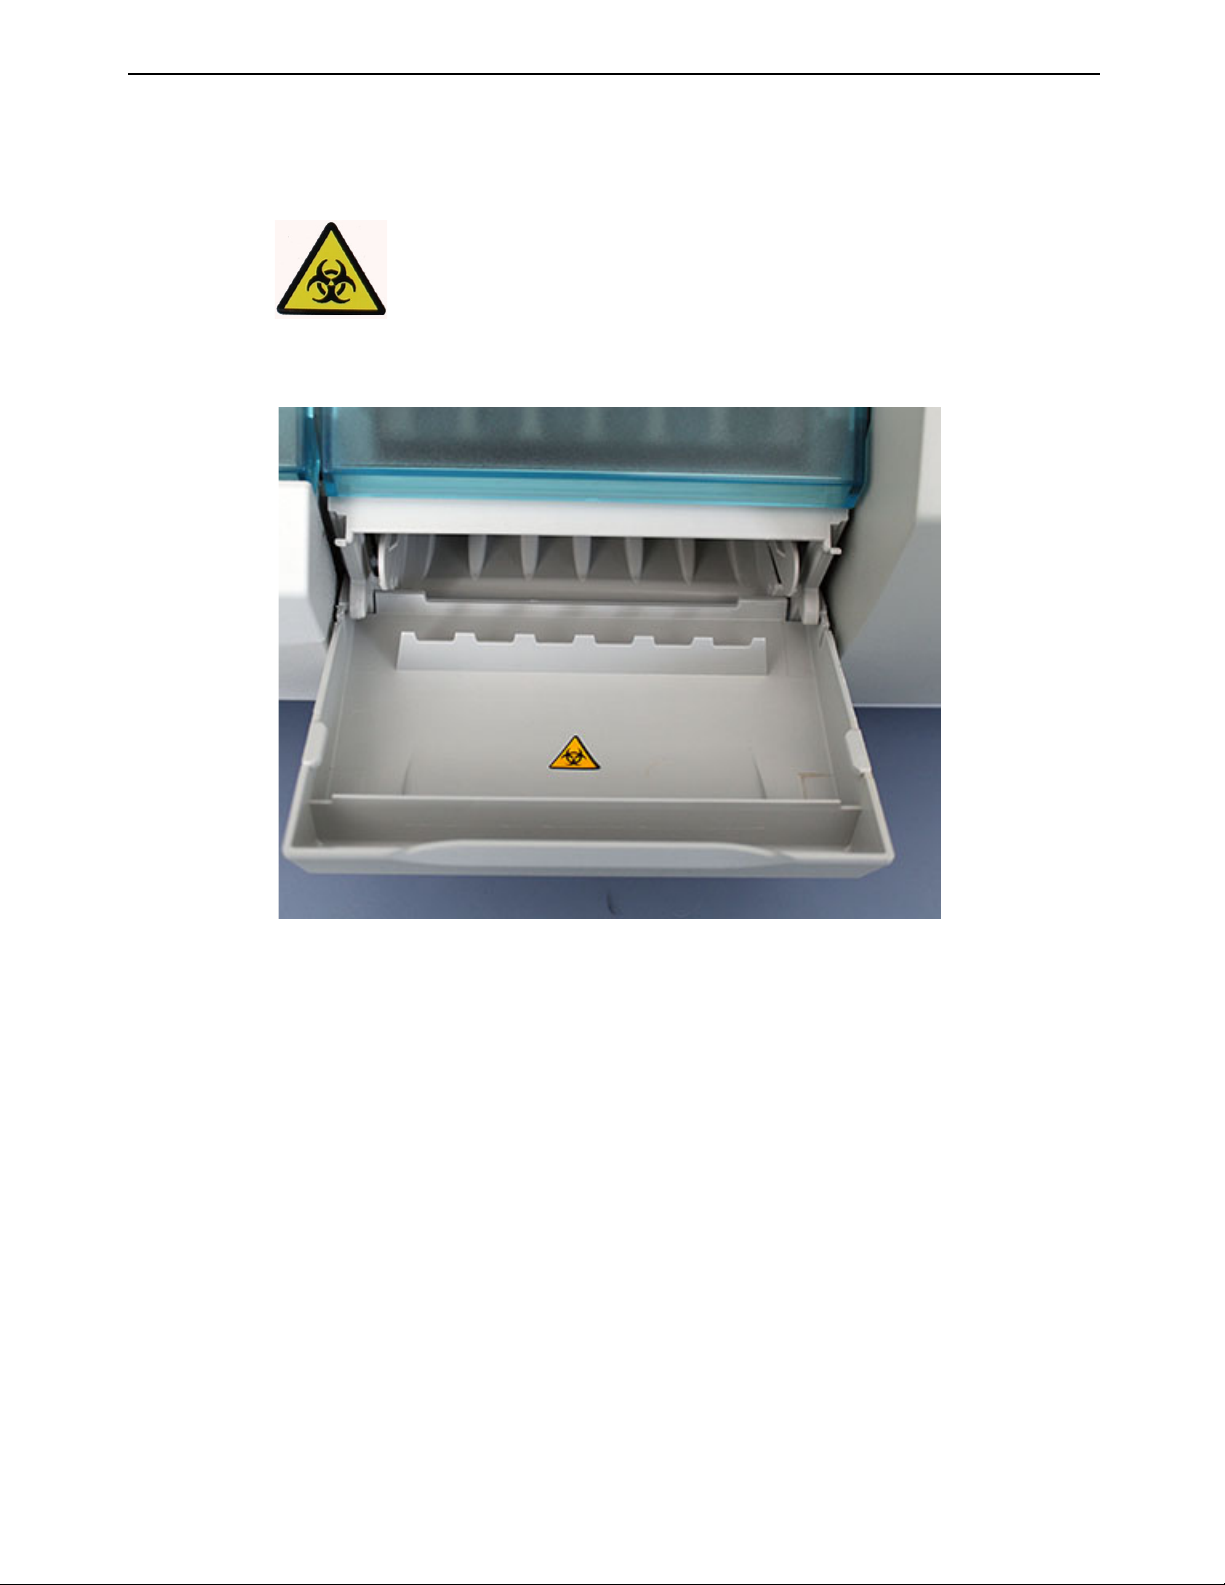
Reagent Strip Tray
When you pull out the reagent strip tray, the biological risk label appears.
Figure 2-3: Reagent strip tray label (Biohazard)
Figure 2-4: Position of label
161150-849 - A 2-3 mini VIDAS
®
Instrument Labels Safety Information
This label reads:
CAUTION: BIOHAZARD MATERIAL. SEE MANUAL
FOR DECONTAMINATING INSTRUMENT
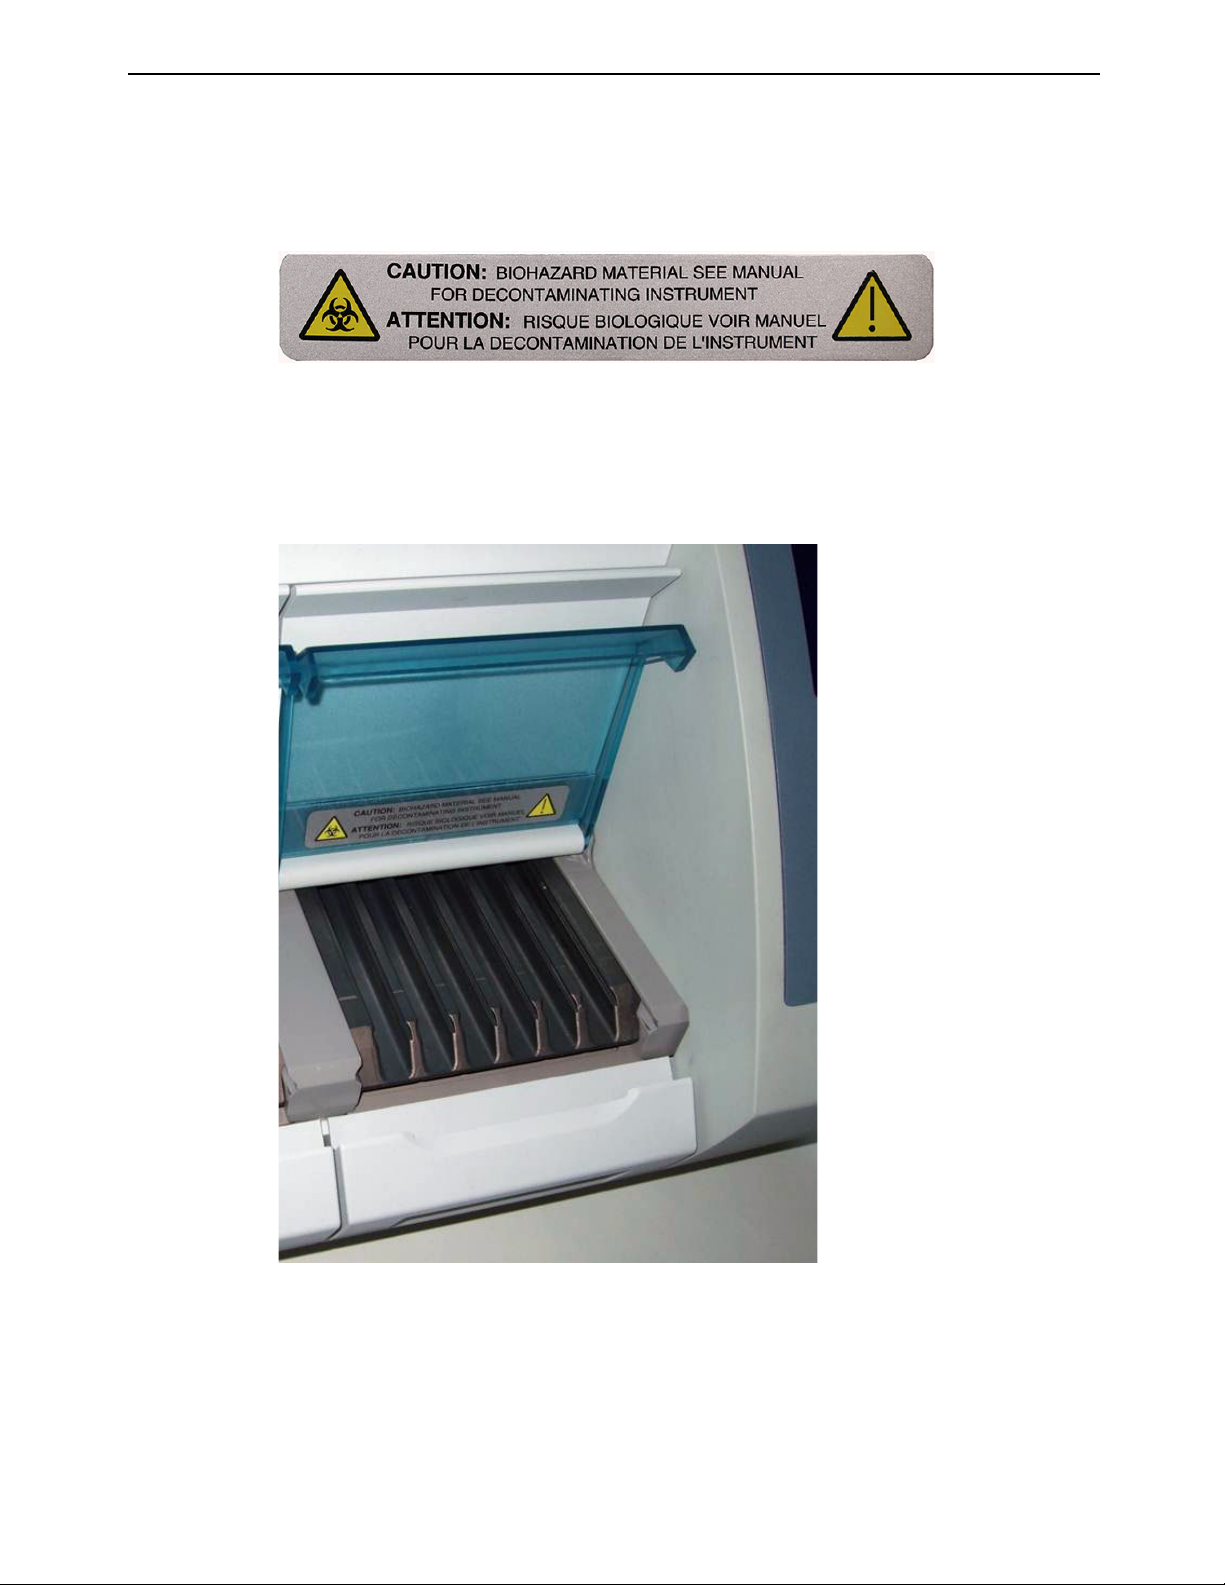
Strip Section
The label is applied inside the transparent part of the each section door. In addition to the
biological risk, the label directs the user to read the user manual in French and English.
Figure 2-5: Strip section label
Figure 2-6: Position of label
161150-849 - A 2-4 mini VIDAS
®
Instrument Labels Safety Information
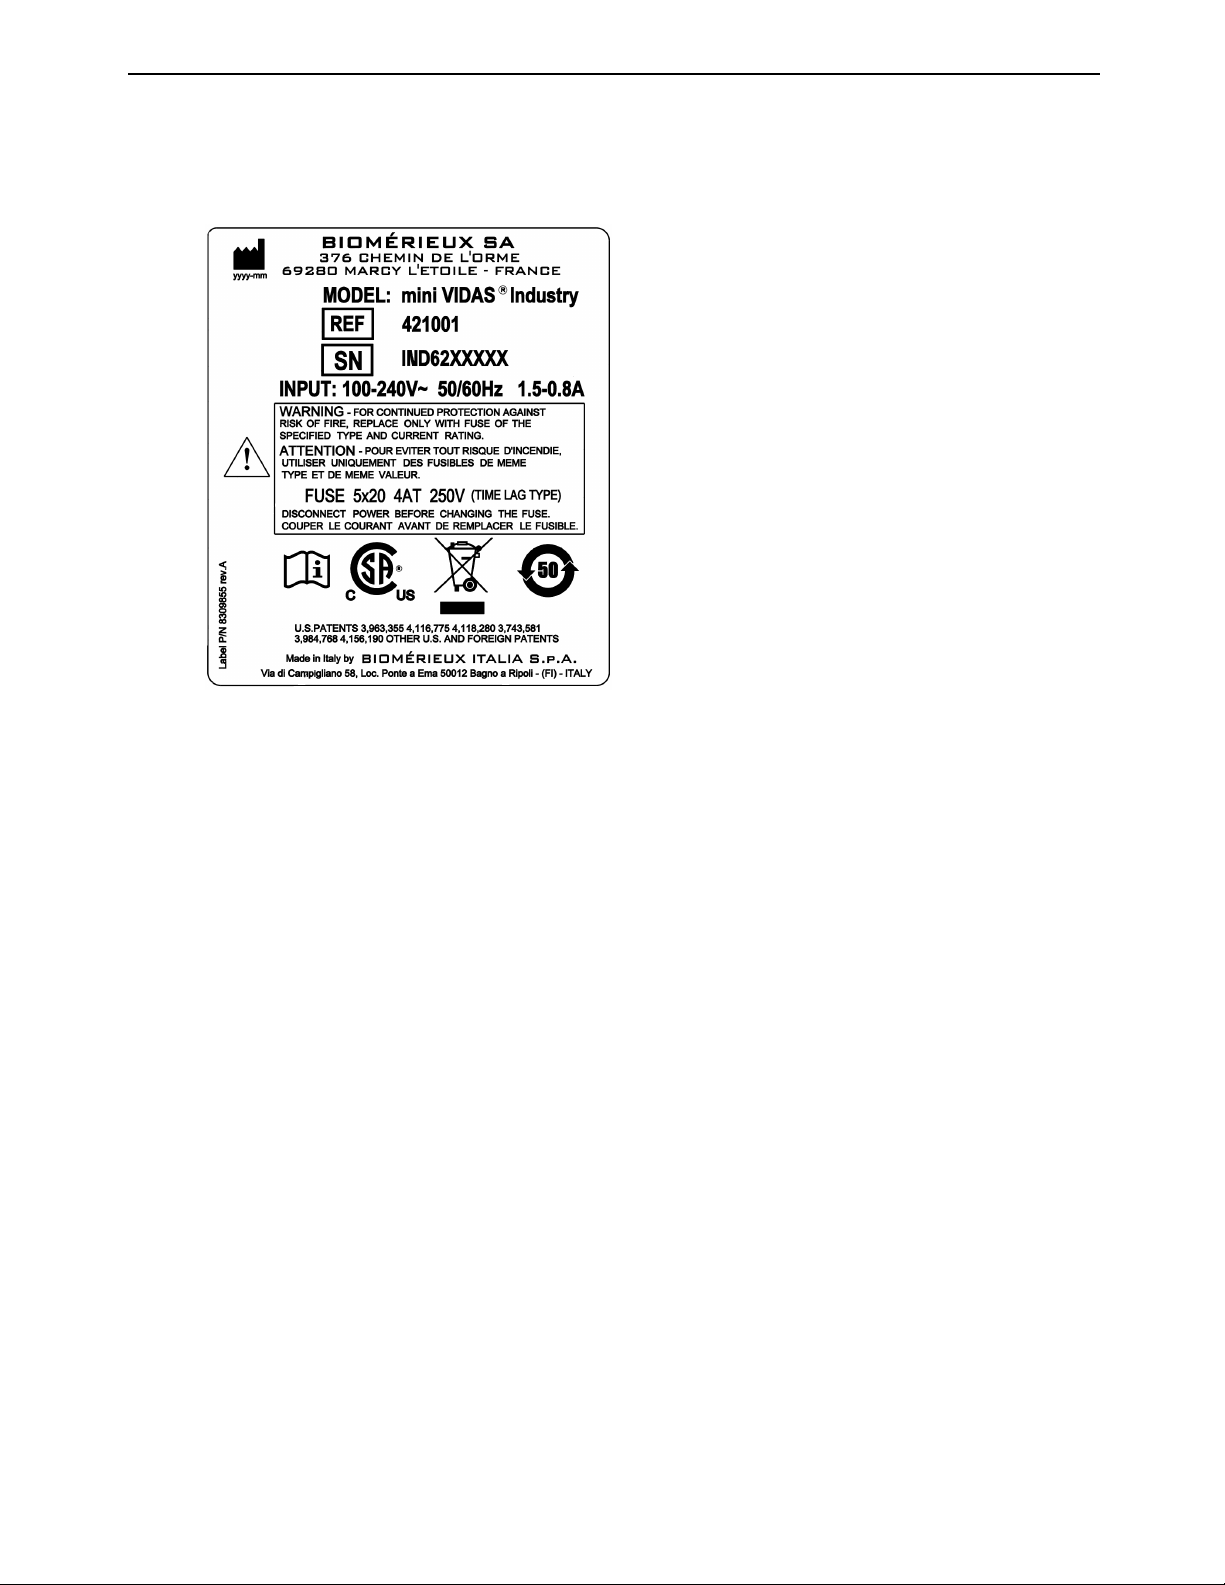
This label reads:
WARNING - FOR CONTINUED PROTECTION
AGAINST RISK OF FIRE, REPLACE ONLY WITH
FUSE OF THE SPECIFIED TYPE AND CURRENT
RATING.
FUSE 5x20 4AT 250V (TIME LAG TYPE)
DISCONNECT POWER BEFORE CHANGING THE
FUSE.
Rear Panel
The label is positioned on the rear panel of the mini VIDAS® analyzer.
Figure 2-7: Label (rating plate)
161150-849 - A 2-5 mini VIDAS
®

Safety Precautions Safety Information
Safety Precautions
Pay particular attention to the following safety precautions. If these safety precautions are
ignored, injury or damage to the instrument may occur. Each individual precaution is
important.
WARNING
If the equipment is used in a manner not specified by the manufacturer, the
protection provided by the equipment may be impaired.
WARNING
All biological and industry samples and quality control (QC) products
incubated in this system, as well as all waste in the waste containers,
should be treated as potentially biohazardous materials. All materials and
mechanical components associated with the waste systems should be
handled according to safe microbiological practices in compliance with the
installation site's biohazard procedures. Use the personal protective
equipment recommended by the facility when handling any of these
components, including gloves, safety glasses, and a lab coat.
The system must be decontaminated before its covers are removed by
serv
ice personnel. Ensure that appropriate decontamination is carried out if
hazardous materials are spilled on or into the equipment or surrounding
areas.
WARNING
Treat waste material, including consumable items, and any components
coming into contact with waste material as having the potential hazards of
the samples used.
All service personnel should be familiar with the Material Safety Data Sheet
(MSDS) f
and the correct procedures for handling these materials.
or all materials used in the procedures relating to this instrument,
WARNING
Even when power is removed from the instrument, the potential exists for
electricity to be generated if components, such as assemblies that are
mounted on belts, are moved too quickly. Components should be moved
slowly to prevent the buildup of electricity. Failure to comply may result in
injury to personnel or damage to the instrument.
161150-849 - A 2-6 mini VIDAS
®
Safety Precautions Safety Information
WARNING
Do not replace detachable main supply cords by inadequately rated cords.
Only use main supply cords provided by the manufacturer.
Do not replace electric cables. If cables do not have the same technical
s
pecificities, there is a risk of electrical shock.
Nothing should be placed on top of the connection cables, whether
temp
orarily, permanently or intermittently. Cables should not be laid across
passage-ways.
Computer cables must not intersect or be placed too close to cables for
conn
ection of the power supply.
Cables should not be allowed to form loops or knots, or be rolled up near or
on oth
er electrical equipment.
WARNING
Electronic equipment can be the source of electrical shocks. Installation,
service, and repair should only be performed by authorized and qualified
bioMérieux personnel.
WARNING
All power switches should be off when connecting or disconnecting cables
to power outlets to reduce the risk of electrical shock.
161150-849 - A 2-7 mini VIDAS
®
Safety Precautions Safety Information
WARNING
bioMérieux recommends connecting this instrument to a main power outlet
that is protected with a ground fault circuit interrupter to reduce the risk of
electrical shock.
The electrical supply to which the system is connected must conform to
curr
ent standards:
• diameter of cables,
• grounding,
• connector calibration and type etc.
The electrical power supply must be
direct, individual, calibrated, and
compatible with the technical specifications of the product or
configuration.
WARNING
No other equipment likely to interfere with the proper functioning of the
system should be connected on the same circuit.
Extension sockets and serially connected adapters should not be used.
If the power supply is not sufficient to guarantee proper functioning of the
produ
ct, an independent protective device, adapted to the product's
technical characteristics should be used.
Do not use power sockets controlled by wall-mounted switches or timers.
Ac
cidental power cuts may destroy information in both the analytical
module and the computer memories.
No electrical equipment likely to cause interference (equipment not bearing
the
CE mark …) should be operated in the immediate vicinity of the system.
The safety connection should not be interrupted by an extension cord
witho
ut a protection conductor.
Before connecting or disconnecting the connecting cables, check that the
powe
r supply cords of the CPU and all the units connected to it are
themselves disconnected.
When adding units to the system or removing them, disconnect the power
cab
les to these units before connecting or disconnecting the connecting
cables.
Never connect the mini VIDAS
®
analyzer to the same power supply as
devices which generate high current surges (centrifuges) or which, due to
frequent start-ups, generate interferences if they are ill-protected (freezers,
water baths etc.).
161150-849 - A 2-8 mini VIDAS
®
Safety Precautions Safety Information
WARNING
As with any mechanical system, certain precautions must be taken when
operating the instrument. The instrument has a protective cover intended to
prevent the operator from coming into contact with any moving parts and
aerosols. When servicing the instrument, take special care, as there are
moving parts that can cause injury.
WARNING
Cleaning and disinfecting solutions have corrosive properties. Always wear
protective (chemical resistant) gloves and safety glasses when handling
cleaning and disinfecting solutions.
WARNING
Hot surfaces can cause injury.
WARNING
After replacement or recalibration of the scanner head of the mini VIDAS®
analyzer, reperform a calibration for each assay used.
CAUTION: Any liquid spilled on the system may result in system malfunctioning.
If liquid is spilled on the system, wipe it
wipes.
CAUTION: The mini VIDAS® analyzer has been carefully configured for optimal
system performance. Altering the configuration may severely hamper the usability
of the instrument.
up immediately using decontamination
IMPORTANT: For optimum operation of the instrument, the SPR® block and tray doors must be kept
closed.
161150-849 - A 2-9 mini VIDAS
®
Safety Precautions Safety Information
Note: Before performing electrical safety or other compliance testing on the instrument, contact your
local bioMérieux representative.
WARNING
The user must only perform the maintenance operations described in this
user manual and rigorously follow each of the steps.
The use of tools not specified by bioMérieux is forbidden.
Powderless gloves, a lab coat and safety glasses or goggles must be worn
whe
n performing maintenance operations.
Always use personal protective equipment, including powderless gloves, a
la
b coat and safety glasses or goggles when handling reagents.
161150-849 - A 2-10 mini VIDAS
®
Precautions For Use Of Reagents Safety Information
Precautions For Use Of Reagents
General Precautions
CAUTION: Carefully read the reagent kit package insert before using the
reagents.
Store the reagent kits according to the kit label instructions.
ONLY use bioMérieux reagents to perform the analyses. The use of any other
reagent
Do not mix reagents from different lots.
Do not use reagents after the expiration date.
Use powderless gloves.
s is the sole responsibility of the user.
Preparing the Analyses
CAUTION: Sample preparation steps, which may vary from assay to assay, are
covered in the package insert for each assay.
ONLY remove the required number of tests from the reagent kit.
Reagents should be at room temperature before use (refer to the package insert in
th
Carefully reseal the SPR
Carefully mix the standard/calibrator, controls and samples before pipetting into
th
Do not use visibly deteriorated strips (da
leaking, as this could affect the accuracy of test results.
Do not re-use a SPR
Avoid touching the SPR
Check that each SPR
e reagent kits).
e strip.
®
pouch after use with the desiccant inside.
maged foil or plastic) or if reagents are
®
.
®
dots.
®
has a color-coded dot that is clean and undamaged.
Check that each SPR
®
Reject SPR
161150-849 - A 2-11 mini VIDAS
s with no hole in the center of the dot.
®
dot on top has a hole.
®
Precautions For Use Of Reagents Safety Information
Precautions for Samples
CAUTION: The sample must not contain any solid matter that could clog the tip of
the SPR®.
At the End of the Run
Always put the correct sample into the
assigned strip.
CAUTION: If a SPR® does not have its color-coded dot:
• Reject the result corresponding to the defective SPR
®
.
• Check that the dot is not adhered to the SPR® block or the SPR
if it has, remove it.
• Repeat the assay for the defective SPR
®
.
• Contact bioMérieux Technical Assistance or your local bioMérieux
representative.
®
seal and
161150-849 - A 2-12 mini VIDAS
®
Loading...