

Beurer BM 28 User Manual [de]

BM 28
D Blutdruckmessgerät
Gebrauchsanweisung ............................................. 2 – 15
G Blood pressure monitor
Instructions for use ................................................16 - 28
F Tensiomètre
Mode d’emploi ........................................................29 - 41
E Tensiómetro
Manual de instrucciones .......................................42 - 55
I Misuratore di pressione
Istruzioni per l’uso .................................................56 - 69
T Bilgisayarli tansiyon ölçer
Kullanım kılavuzu ...................................................70 - 82
r Прибор для измерения кровяного давления
в плечевой артерии
Инструкция по применению ...............................83 - 97
Q Ciśnieniomierz
Instrukcja obsługi.................................................98 - 111
Electromagnetic Compatibility Information ...........117 - 112

DEUTSCH
Inhalt
1. Kennenlernen ................................................................ 2
2. Wichtige Hinweise ......................................................... 3
3. Gerätebeschreibung ...................................................... 6
4. Messung vorbereiten ..................................................... 7
5. Blutdruck messen .......................................................... 9
6. Ergebnisse beurteilen .................................................. 11
7. Messwerte speichern, abrufen und löschen ............... 12
8. Fehlermeldung/Fehlerbehebung .................................. 12
9. Gerät und Manschette reinigen und aufbewahren ...... 13
10. Technische Angaben ................................................... 13
11. Netzteil ......................................................................... 14
12. Garantie / Service ......................................................... 15
Sehr geehrte Kundin, sehr geehrter Kunde,
wir freuen uns, dass Sie sich für ein Produkt unseres Sortimentes entschieden haben. Unser Name steht für hochwertige und eingehend geprüfte Qualitätsprodukte aus den
Bereichen Wärme, Gewicht, Blutdruck, Körpertemperatur,
Puls, Sanfte Therapie, Massage, Beauty und Luft. Bitte lesen
Sie diese Gebrauchsanweisung aufmerksam durch, bewah-
ren Sie sie für späteren Gebrauch auf, machen Sie sie anderen Benutzern zugänglich und beachten Sie die Hinweise.
Mit freundlicher Empfehlung
Ihr Beurer-Team
1. Kennenlernen
Überprüfen Sie das Beurer BM 28 Blutdruckmessgerät auf
äußere Unversehrtheit der Verpackung und auf die Vollständigkeit des Inhalts. Vor dem Gebrauch ist sicherzustellen, dass das Gerät und Zubehör keine sichtbaren Schäden
aufweisen und jegliches Verpackungsmaterial entfernt wird.
Benutzen Sie es im Zweifelsfall nicht und wenden Sie sich
an Ihren Händler oder an die angegebene Service-Adresse.
Das Oberarm-Blutdruckmessgerät dient zur nichtinvasiven
Messung und Überwachung arterieller Blutdruckwerte von
erwachsenen Menschen.
Sie können damit schnell und einfach Ihren Blutdruck messen, die Messwerte abspeichern und sich den Verlauf und
Durchschnitt der Messwerte anzeigen lassen.
Bei eventuell vorhandenen Herzrhythmusstörungen werden
Sie gewarnt.
Die ermittelten Werte werden eingestuft und grafisch beurteilt.
2
2. Wichtige Hinweise
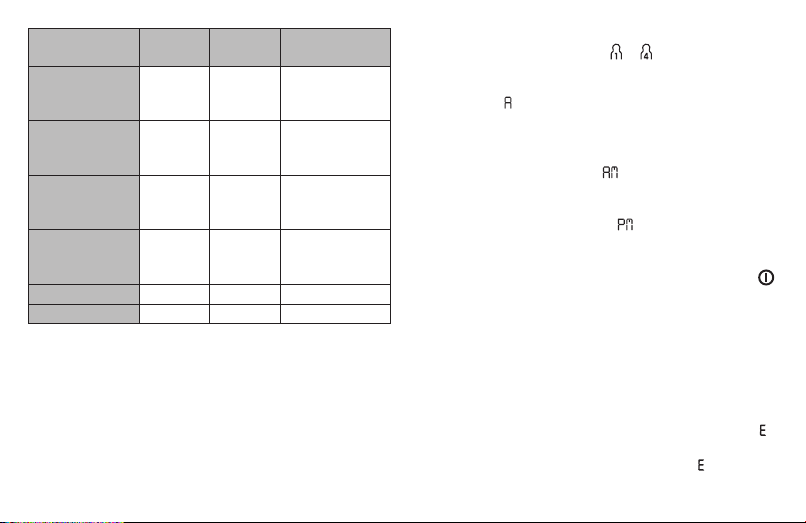
Storage
%
-20°C
Operating
10°C
RH 20% - 85%
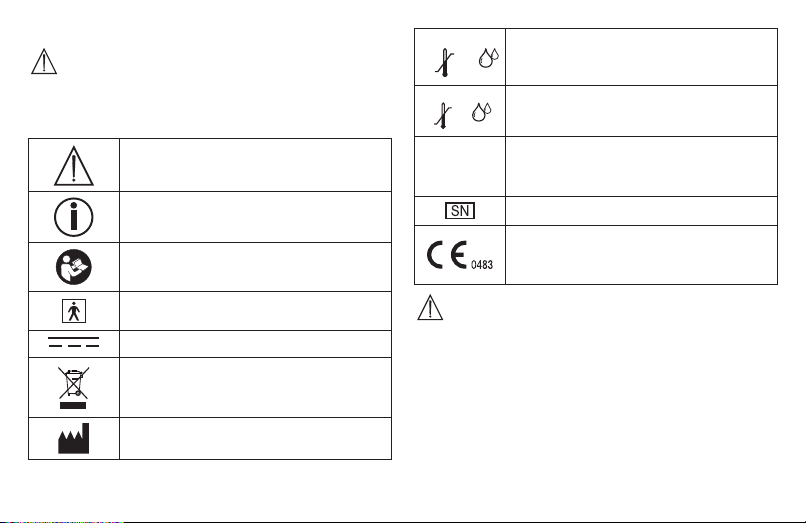
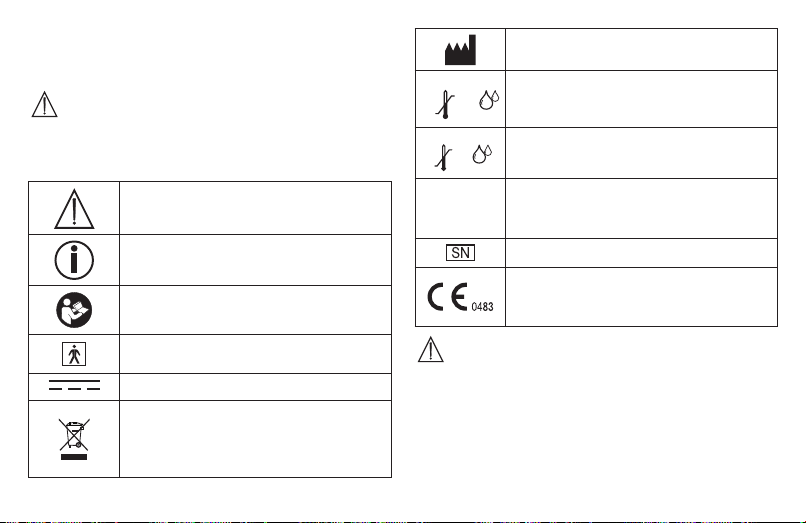
Zeichenerklärung
In der Gebrauchsanweisung, auf der Verpackung und auf
dem Typschild des Geräts und des Zubehörs werden folgende Symbole verwendet:
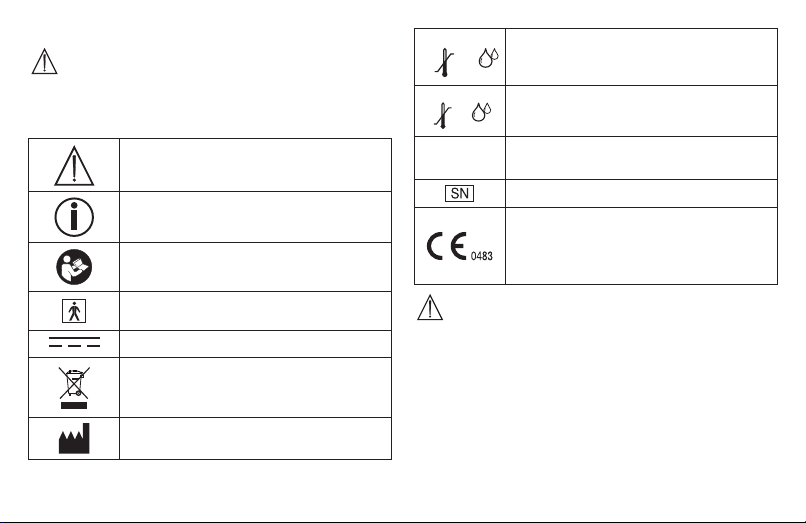
Vorsicht
Hinweis
Hinweis auf wichtige Informationen
Gebrauchsanweisung beachten
Anwendungsteil Typ BF
Gleichstrom
Entsorgung gemäß Elektro- und Elektro-
nik-Altgeräte EG-Richtlinie – WEEE (Waste
Electrical and Electronic Equipment)
Hersteller
Zulässige Aufbewahrungs- und Transport-
55°C
bedingungen
RH 20% - 90
Zulässige Betriebstemperatur und -luft-
40°C
feuchtigkeit
IP21
Geschützt gegen Fremdkörper ≥ 12,5 mm
und gegen senkrechtes Tropfwasser
Seriennummer
Die CE-Kennzeichnung bescheinigt die
Konformität mit den grundlegenden Anforderungen der Richtlinie 93/42/EEC für
Medizinprodukte.
Hinweise zur Anwendung
• Um eine Vergleichbarkeit der Werte zu gewährleisten, messen Sie Ihren Blutdruck immer zu gleichen Tageszeiten
•
Ruhen Sie sich vor jeder Messung ca. 5 Minuten aus!
•
Wenn Sie mehrere Messungen an einer Person durchfüh-
ren möchten, warten Sie zwischen den einzelnen Messungen jeweils 5 Minuten.
•
Mindestens 30 Minuten vor der Messung sollten Sie nicht
essen, trinken, rauchen oder sich körperlich betätigen.
3
.

•
Wiederholen Sie die Messung im Falle zweifelhaft gemes-
sener Werte.
•
Die von Ihnen selbst ermittelten Messwerte können nur
zu Ihrer Information dienen – sie ersetzen keine ärztliche
Untersuchung! Besprechen Sie Ihre Messwerte mit dem
Arzt, begründen Sie daraus auf keinen Fall eigene medizinische Entscheidungen (z.B. Medikamente und deren
Dosierungen)!
•
Verwenden Sie das Blutdruckmessgerät nicht bei Neuge-
borenen und Präeklampsie-Patientinnen. Vor Anwendung
des Blutdruckmessgerätes in der Schwangerschaft empfehlen wir eine Abstimmung mit dem Arzt.
•
Erkrankungen des Herz-Kreislaufsystems können zu Fehl-
messungen bzw. zu Beeinträchtigungen der Messgenauigkeit führen. Ebenso der Fall ist dies bei sehr niedrigem
Blutdruck, Diabetes, Durchblutungs- und Rhythmusstörungen sowie bei Schüttelfrost oder Zittern.
•
Dieses Gerät ist nicht dafür bestimmt, durch Personen
(einschließlich Kinder) mit eingeschränkten physischen,
sensorischen oder geistigen Fähigkeiten oder mangels
Erfahrung und/oder mangels Wissen benutzt zu werden, es sei denn, sie werden durch eine für Ihre Sicherheit zuständige Person beaufsichtigt oder erhielten von ihr
Anweisungen, wie das Gerät zu benutzen ist. Kinder sollten beaufsichtigt werden, damit sie nicht mit dem Gerät
spielen.
• Das Blutdruckmessgerät darf nicht im Zusammenhang mit
einem Hochfrequenz-Chirurgiegerät verwendet werden.
•
Verwenden Sie das Gerät nur bei Personen mit dem für
das Gerät angegebenen Umfangbereich des Oberarmes.
•
Beachten Sie, dass es während des Aufpumpens zu einer
Funktionsbeeinträchtigung des betroffenen Gliedmaßes
kommen kann.
•
Die Blutzirkulation darf durch die Blutdruckmessung nicht
unnötig lange unterbunden werden. Bei einer Fehlfunktion
des Gerätes nehmen Sie die Manschette vom Arm ab.
•
Vermeiden Sie das mechanische Einengen, Zusammen-
drücken oder Abknicken des Manschettenschlauches.
•
Verhindern Sie einen anhaltenden Druck in der Man-
schette sowie häufige Messungen. Eine dadurch resultierende Beeinträchtigung des Blutflusses kann zu Verletzungen führen.
•
Achten Sie darauf, dass die Manschette nicht an einem
Arm angelegt wird, dessen Arterien oder Venen in medizinischer Behandlung sind, z.B. intravaskulärer Zugang
bzw. eine intravaskuläre Therapie oder ein arteriovenöser
(A-V-) Nebenschluss.
•
Legen Sie die Manschette nicht bei Personen an, die eine
Brustamputation hatten.
•
Legen Sie die Manschette nicht über Wunden an, da dies
zu weiteren Verletzungen führen kann.
4
•
Legen Sie die Manschette ausschließlich am Oberarm an.
Legen Sie die Manschette nicht an anderen Stellen des
Körpers an.
• Sie können das Blutdruckmessgerät mit Batterien oder mit
einem Netzteil betreiben. Das Gerät muss bei Netzbetrieb
so aufgestellt werden, dass es vom Anwender jederzeit
vom Strom getrennt werden kann. Sobald die Batterien
verbraucht sind oder das Netzteil vom Stromnetz getrennt
wird, verliert das Blutdruckmessgerät Datum und Uhrzeit.
•
Die Abschaltautomatik schaltet das Blutdruckmessge-
rät zur Schonung der Batterien aus, wenn innerhalb 30
Sekunden keine Taste betätigt wird.
•
Das Gerät ist nur für den in dieser Gebrauchsanweisung
beschriebenen Zweck vorgesehen. Der Hersteller haftet
nicht für Schäden, die durch unsachgemäßen oder falschen Gebrauch verursacht wurden.
Hinweise zur Aufbewahrung und Pflege
•
Das Blutdruckmessgerät besteht aus Präzisions- und
Elek tronik-Bauteilen. Die Genauigkeit der Messwerte und
Lebens dauer des Gerätes hängt ab vom sorgfältigen Umgang:
– Schützen Sie das Gerät vor Stößen, Feuchtigkeit,
Schmutz, starken Temperaturschwankungen und direkter
Sonneneinstrahlung.
– Lassen Sie das Gerät nicht fallen.
– Benutzen Sie das Gerät nicht in der Nähe von starken
elektromagnetischen Feldern, halten Sie es fern von
Funkanlagen oder Mobiltelefonen.
– Verwenden Sie nur die mitgelieferte oder originale Ersatz-
Manschetten. Ansonsten werden falsche Messwerte
ermittelt.
•
Falls das Gerät über einen längeren Zeitraum nicht be-
nutzt wird, wird empfohlen, die Batterien zu entfernen.
Hinweise zum Umgang mit Batterien
•
Wenn Flüssigkeit aus einer Batteriezelle mit Haut oder
Augen in Kontakt kommt, die betroffene Stelle mit Wasser
auswaschen und ärztliche Hilfe aufsuchen.
Verschluckungsgefahr! Kleinkinder könnten Batterien verschlucken und daran ersticken. Daher Batterien für
Kleinkinder unerreichbar aufbewahren!
•
Auf Polaritätskennzeichen Plus (+) und Minus (-) achten.
•
Wenn eine Batterie ausgelaufen ist, Schutzhandschuhe
anziehen und das Batteriefach mit einem trockenen Tuch
reinigen.
•
Schützen Sie Batterien vor übermäßiger Wärme.
Explosionsgefahr! Keine Batterien ins Feuer werfen.
•
Batterien dürfen nicht geladen oder kurzgeschlossen wer-
den.
5
•
Bei längerer Nichtbenutzung des Geräts die Batterien aus
dem Batteriefach nehmen.
•
Verwenden Sie nur denselben oder einen gleichwertigen
Batterietyp.
•
Immer alle Batterien gleichzeitig auswechseln.
•
Keine Akkus verwenden!
•
Keine Batterien zerlegen, öffnen oder zerkleinern.
Hinweise zu Reparatur und Entsorgung
•
Batterien gehören nicht in den Hausmüll. Bitte
entsorgen Sie die verbrauchten Batterien an den dafür
vorgesehenen Sammelstellen.
•
Öffnen Sie nicht das Gerät. Bei Nichtbeachten erlischt die
Garantie.
•
Das Gerät darf nicht selbst repariert oder justiert werden.
Eine einwandfreie Funktion ist in diesem Fall nicht mehr
gewährleistet.
•
Reparaturen dürfen nur vom Kundenservice oder autori-
sierten Händlern durchgeführt werden. Prüfen Sie jedoch
vor jeder Reklamation zuerst die Batterien und tauschen
Sie diese gegebenenfalls aus.
•
Bitte entsorgen Sie das Gerät gemäß der Elektro-
und Elektronik Altgeräte EG-Richtlinie – WEEE
(Waste Electrical and Electronic Equipment).
Bei Rückfragen wenden Sie sich bitte an die für die Ent-
sorgung zuständige kommunale Behörde.
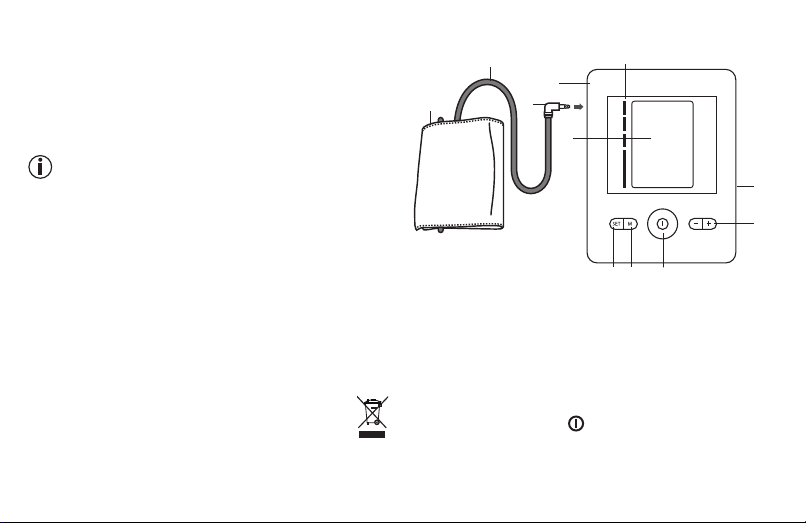
3. Gerätebeschreibung
2
5
1
3
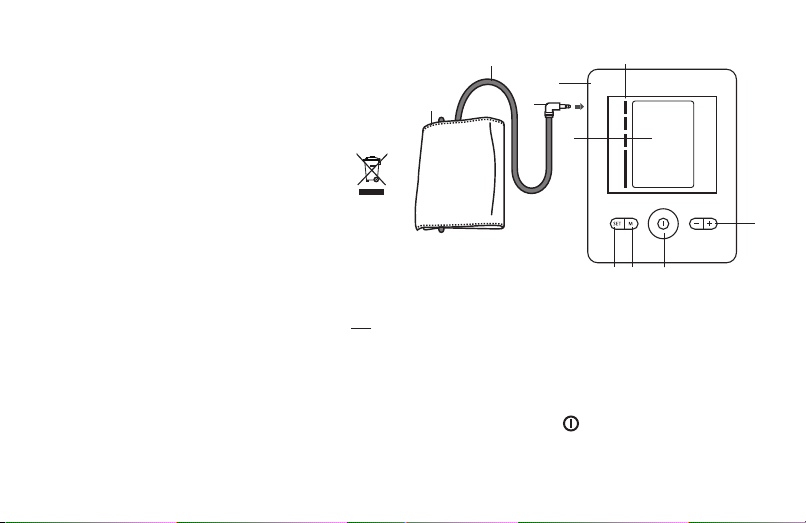
1. Manschette
2. Manschettenschlauch
3. Manschettenstecker
4. Display
5. Anschluss für Manschettenstecker
6. Skala zur Einstufung der Messergebnisse
7. Anschluß für Netzteil
8. Funktionstasten -/+
9. START/STOPP-Taste
10. Speichertaste M
11. Einstellungstaste SET
6
6
4
7
8
91011
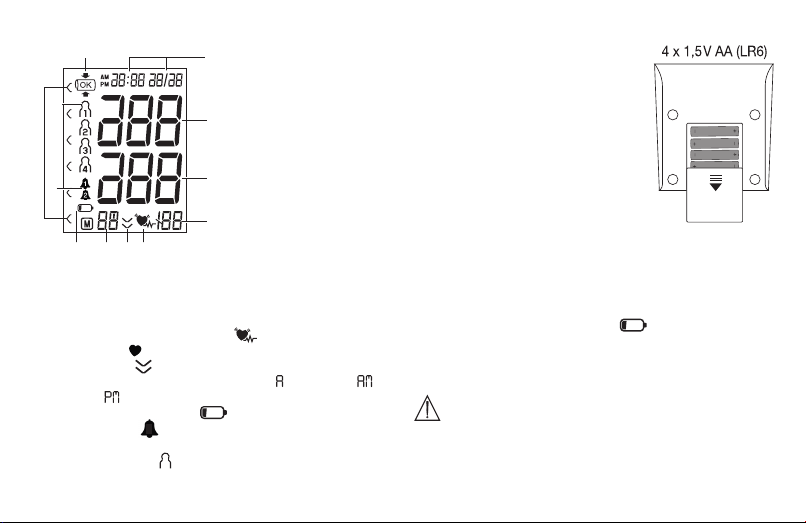
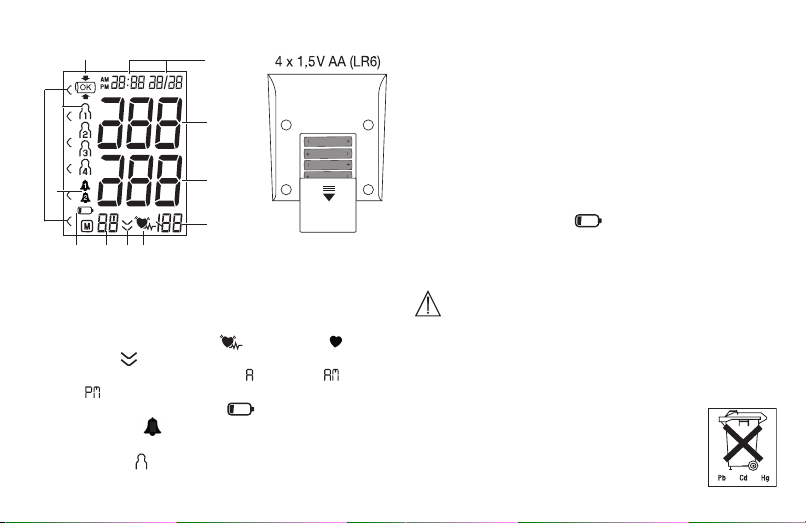
Anzeigen auf dem Display:
12
11
10
9
5678
1
2
3
4
1. Uhrzeit und Datum
2. Systolischer Druck
3. Diastolischer Druck
4. Ermittelter Pulswert
5. Symbol Herzrhythmusstörung
Symbol Puls
6. Luft ablassen
7. Speicheranzeige: Durchschnittswert ( ), morgens ( ),
abends (
8. Symbol Batteriewechsel
9. Alarmfunktion
), Nummer des Speicherplatzes
10. Einstufung der Messergebnisse
11. Benutzerspeicher
12. Manschettensitzkontrolle
4. Messung vorbereiten
Batterie einlegen
•
Öffnen Sie den Deckel des Batterie-
faches.
•
Legen Sie vier Batterien vom Typ
1,5V AA (Alkaline Type LR6) ein.
Achten Sie unbedingt darauf, dass
die Batterien entsprechend der
Kennzeichnung mit korrekter Polung
eingelegt werden.
Verwenden Sie keine wiederaufladbaren Akkus.
•
Schließen Sie den Batteriefachdeckel wieder sorgfältig.
•
Alle Displayelemente werden kurz angezeigt, 24 h blinkt
im Display. Stellen Sie nun wie im Folgenden beschrieben
Datum und Uhrzeit ein.
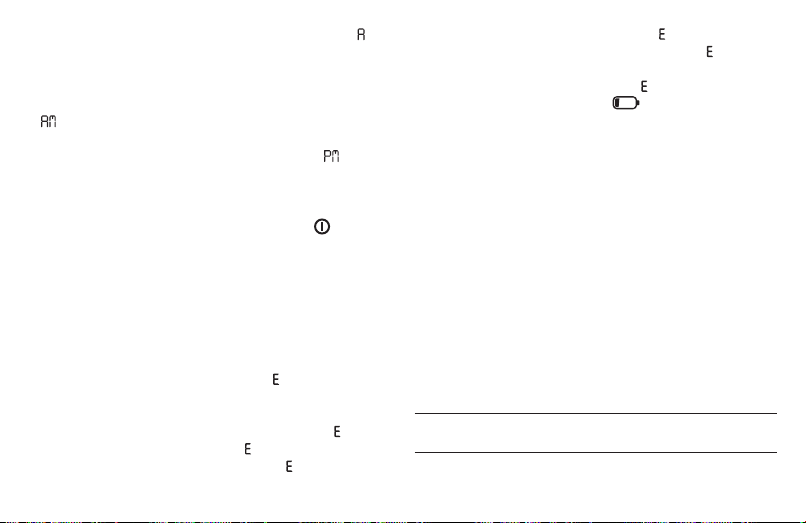
Wenn die Batteriewechselanzeige
ist keine Messung mehr möglich und Sie müssen alle Batterien erneuern. Sobald die Batterien aus dem Gerät entfernt
werden, muss die Uhrzeit neu eingestellt werden.
Batterie Entsorgung
• Die verbrauchten, vollkommen entladenen Batterien müssen Sie über speziell gekennzeichnete Sammelbehälter,
Sondermüllannahmestellen oder über den Elektrohändler
7
dauerhaft erscheint,
entsorgen. Sie sind gesetzlich dazu verpflichtet, die Batterien zu entsorgen.
• Diese Zeichen finden Sie auf schadstoffhaltigen Batterien:
Pb = Batterie enthält Blei,
Cd = Batterie enthält Cadmium,
Hg = Batterie enthält Quecksilber
Stundenformat, Datum und Uhrzeit einstellen
Sie sollten Datum und Uhrzeit unbedingt einstellen. Nur so
können Sie Ihre Messwerte korrekt mit Datum und Uhrzeit
speichern und später abrufen.
Zur Einstellung von Datum und Uhrzeit gehen Sie wie folgt
vor:
•
Legen Sie die Batterien ein, oder
Sekunden die Einstellungstaste
ten Batterien.
• Stellen Sie mit den Funktionstasten -/+ 24h oder 12h
Modus ein. Bestätigen Sie mit
blinken. Stellen Sie mit den Funktionstasten -/+ das Jahr
ein und bestätigen Sie mit
•
Stellen Sie Monat, Tag, Stunde und Minute ein und bestä-
tigen Sie jeweils mit der
• Das Blutdruckmessgerät schaltet sich automatisch ab.
drücken Sie länger als 5
SET
bei bereits eingeleg-
SET
. Das Jahr beginnt zu
SET.
Einstellungstaste
SET.
Alarm einstellen
Sie können 2 verschiedene Alarmzeiten einstellen, um sich
an die Messung erinnern zu lassen. Zur Einstellung des
Alarms gehen Sie wie folgt vor:
• Drücken Sie 5 Sekunden lang, gleichzeitig die Funktionstasten - und +.
• Im Display wird Alarm 1 angezeigt, gleichzeitig blinkt
„on“ bzw „off“. Wählen Sie mit den Funktionstasten -/+ ob
Alarm 1 aktiviert („on“ blinkt) oder deaktiviert („off“ blinkt)
sein soll und bestätigen Sie mit der Einstellungstaste SET.
• Wird Alarm 1 deaktiviert („off“) so gelangen Sie zur Einstellung des Alarm 2 .
• Wird Alarm 1 aktiviert, blinkt die Stunden zahl im Display. Wählen Sie mit den Funktionstasten -/+ die gewünschte Stundenzahl und bestätigen Sie mit SET. Am Display
blinkt die Minutenzahl, wählen Sie mit den Funktionstasten
-/+ die gewünschte Minutenzahl und bestätigen Sie mit SET.
• Im Display wird Alarm 2 angezeigt, gleichzeitig blinkt
„on“ bzw. „off“. Gehen Sie zum Einstellen analog wie bei
Alarm 1 vor. Das Blutdruckmessgerät schaltet sich automatisch aus.
Betrieb mit dem Netzteil
Sie können dieses Gerät auch mit einem Netzteil betreiben.
Dazu dürfen keine Batterien im Batteriefach sein.
8
• Das Blutdruckmessgerät darf ausschließlich nur mit dem hier
beschriebenen Netzteil betrieben werden, um eine mögliche
Beschädigung des Blutdruckmessgerätes zu verhindern.
• Stecken Sie das Netzteil in den dafür vorgesehenen An-
schluss des Blutdruckmessgerätes. Das Netzteil darf nur
an die auf dem Typschild angegebene Netzspannung ange
schlossen werden.
• Schließen Sie danach den Netzstecker des Netzteils an die
Steckdose an.
• Nach dem Gebrauch des Blutdruckmessgerätes trennen Sie
das Netzteil zuerst von der Steckdose und anschließend vom
Blutdruckmessgerät. Sobald Sie das Netzteil ausstecken,
verliert das Blutdruckmessgerät Datum und Uhrzeit. Die gespeicherten Messwerte bleiben jedoch erhalten.
-
5. Blutdruck messen
Bringen Sie das Gerät vor der Messung auf Raumtemperatur.
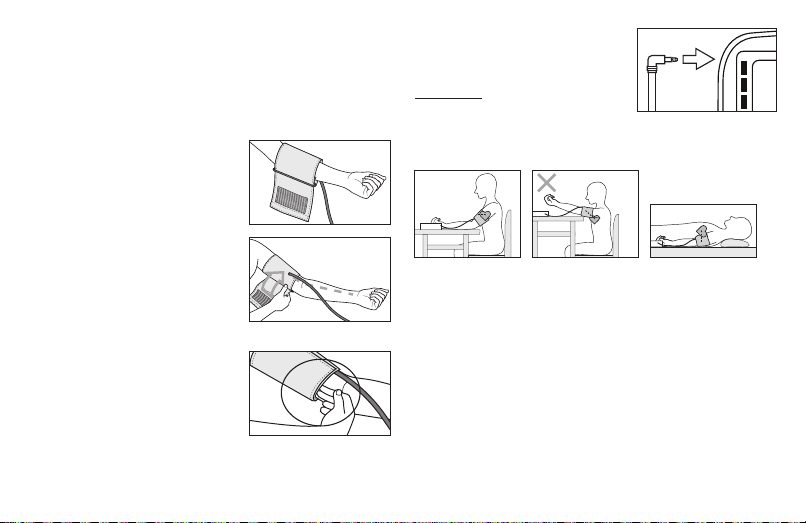
Manschette anlegen
Legen Sie die Manschette am
entblößten linken Oberarm an. Die
Durchblutung des Arms darf nicht
durch zu enge Kleidungsstücke
oder Ähnliches eingeengt sein.
9
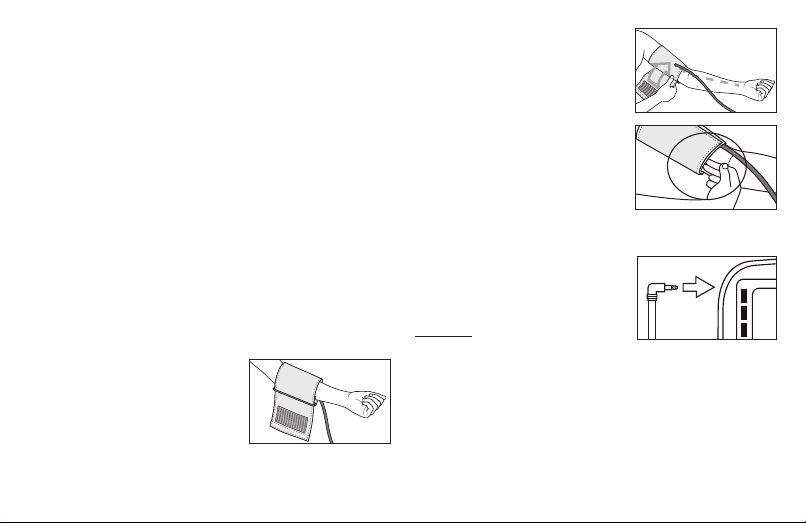
Die Manschette ist am Oberarm so
zu platzieren, dass der untere Rand
2 – 3 cm über der Ellen beuge und
über der Arterie liegt. Der Schlauch
weist zur Hand flächenmitte.
Legen Sie nun das freie Ende der
Manschette eng, aber nicht zu
stramm um den Arm und schließen
Sie den Klettverschluss. Die
Manschette sollte so stramm
angelegt sein, dass noch zwei
Finger unter die Manschette passen.
Stecken Sie nun den Manschettenschlauch in den Anschluss für den
Manschettenstecker.
Achtung: Das Gerät darf nur mit
der Original-Manschette betrieben
werden. Die Manschette ist für einen Armumfang von 22 bis
42 cm geeignet.
Richtige Körperhaltung einnehmen
•
Ruhen Sie sich vor jeder Messung ca. 5 Minuten aus!
Ansonsten kann es zu Abweichungen kommen.
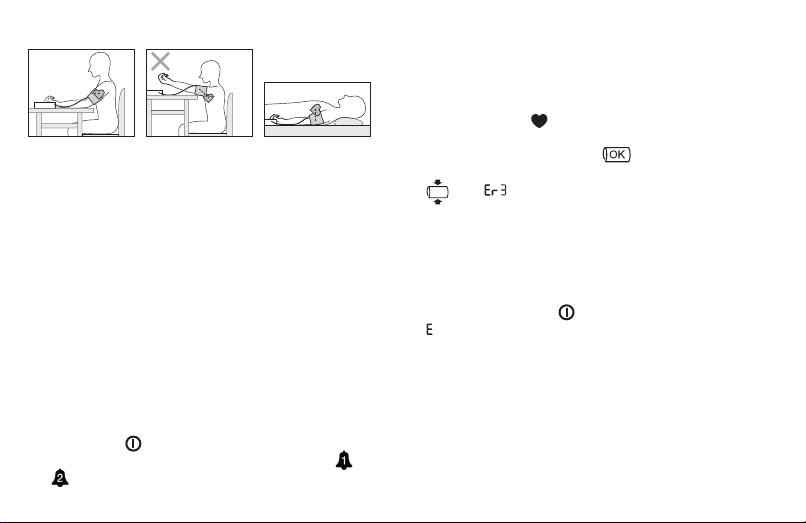
•
Sie können die Messung im Sitzen oder im Liegen durch-
führen. Achten Sie in jedem Falle darauf, dass sich die
Manschette in Herzhöhe befindet.
•
Sitzen Sie zur Blutdruckmessung bequem. Lehnen Sie
Rücken und Arme an. Kreuzen Sie die Beine nicht. Stellen
Sie die Füße flach auf den Boden.
•
Um das Messergebnis nicht zu verfälschen, ist es wichtig,
sich während der Messung ruhig zu verhalten und nicht
zu sprechen.
Blutdruckmessung durchführen
•
Legen Sie, wie zuvor beschrieben, die Manschette an
und nehmen Sie die Haltung ein, in der Sie die Messung
durchführen wollen.
•
Starten Sie das Blutdruckmessgerät mit der START/
STOPP-Taste . Nach der Vollbildanzeige werden die
jeweiligen Alarmsymbole angezeigt, falls Alarm 1 /
2 aktiviert ist.
•
Die Manschette wird automatisch aufgepumpt. Der Man-
schetten-Luftdruck wird langsam abgelassen. Bei einer
bereits zu erkennenden Tendenz zu hohem Blutdruck
wird nochmals nachgepumpt und der Manschetten druck
nochmals erhöht. Sobald ein Puls zu erkennen ist, wird
das Symbol Puls angezeigt.
•
Während der gesamten Messung wird das Symbol für
die Manschettensitzkontrolle angezeigt. Wenn die
Manschette zu straff oder zu locker angebracht ist, wird
und „ “ angezeigt. In diesem Fall wird die Messung
nach ca. 30 Sekunden abgebrochen und das Gerät schaltet sich aus. Bringen Sie die Manschette korrekt an und
führen Sie eine neue Messung durch.
•
Die Messergebnisse Systolischer Druck, Diastolischer
Druck und Puls werden angezeigt.
•
Sie können die Messung jederzeit durch das Drücken der
START/STOPP-Taste abbrechen.
•
_ erscheint wenn die Messung nicht ordnungsgemäß
durchgeführt werden konnte. Beachten Sie das Kapitel
Fehlermeldung/Fehlerbehebung in dieser Gebrauchsanweisung und wiederholen Sie die Messung.
•
Wählen Sie nun durch drücken der Speichertaste M den
gewünschten Benutzerspeicher aus. Wenn Sie keine
Auswahl des Benutzerspeichers vornehmen, wird das
Messergebnis dem zuletzt verwendeten Benutzerspeicher
10
zur Speicherung zugewiesen. Das entsprechende Symbol
, , oder erscheint im Display.
• Zum Abschalten drücken Sie die
Wenn Sie vergessen das Gerät auszuschalten, schaltet
sich das Gerät nach ca. 3 Minute automatisch ab.
Warten Sie vor einer erneuten Messung mindestens 5 Minu ten!
START/STOPP
-Taste
.
6. Ergebnisse beurteilen
Herzrhythmusstörungen:
Dieses Gerät kann während der Messung eventuelle Störungen des Herzrhythmus identifizieren und weist gegebenenfalls nach der Messung mit dem Symbol
Dies kann ein Indikator für eine Arrhythmie sein. Arrhythmie
ist eine Krankheit, bei der der Herzrhythmus aufgrund von
Fehlern im bioelektrischen System, das den Herzschlag
steuert, anormal ist. Die Symptome (ausgelassene oder
vorzeitige Herzschläge, langsamer oder zu schneller Puls)
können u.a. von Herzerkrankungen, Alter, körperlicher Veranlagung, Genuss mittel im Übermaß, Stress oder Mangel an
Schlaf herrühren. Arrhythmie kann nur durch eine Untersuchung bei Ihrem Arzt festgestellt werden. Wiederholen Sie
die Messung, wenn das Symbol nach der Messung auf
dem Display angezeigt wird. Bitte achten Sie darauf, dass
Sie sich 5 Minuten ausruhen und während der Messung
nicht sprechen oder bewegen. Sollte das Symbol oft erscheinen, wenden Sie sich bitte an Ihren Arzt. Selbstdiagno-
darauf hin.
11
se und -behandlung aufgrund der Messergebnisse können
gefährlich sein. Befolgen Sie unbedingt die Anweisungen
Ihres Arztes.
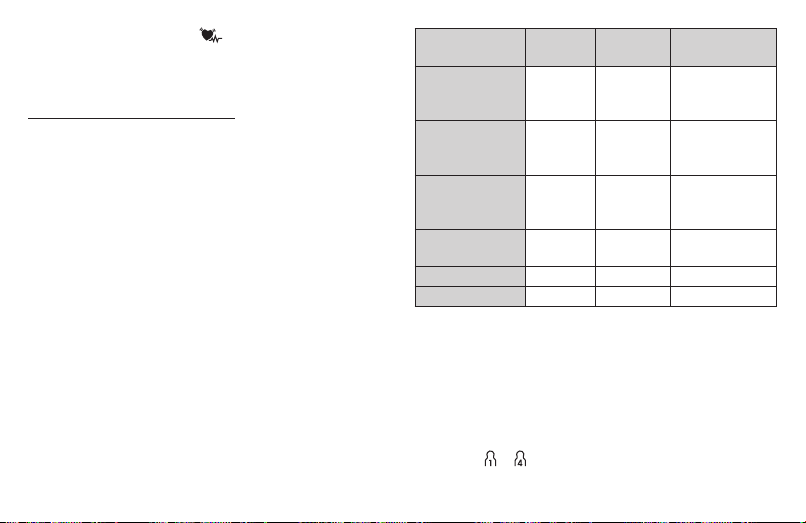
Einstufung der Messergebnisse:
Die Messergebnisse lassen sich gemäß nachfolgender Tabelle einstufen und beurteilen.
Diese Standardwerte dienen jedoch lediglich als allgemeine
Richtlinie, da der individuelle Blutdruck bei verschiedenen Personen und unterschiedlichen Altersgruppen usw.
abweicht.
Es ist wichtig, dass Sie Ihren Arzt in regelmäßigen Abständen zu Rate ziehen. Ihr Arzt teilt Ihnen Ihre individuellen
Werte für einen normalen Blutdruck sowie den Wert mit, ab
dem die Höhe des Blutdrucks als gefährlich einzustufen ist.
Die Balkengrafik im Display und die Skala auf dem Gerät
geben an, in welchem Bereich sich der ermittelte Blutdruck
befindet.
Sollte sich der Wert von Systole und Diastole in zwei unterschiedlichen Bereichen befinden (z.B. Systole im Bereich
Hoch normal und Diastole im Bereich Normal) dann zeigt
Ihnen die graphische Einteilung auf dem Gerät immer den
höheren Bereich an, im beschriebenen Beispiel „Hoch
normal“.
Bereich der
Blutdruckwerte
Stufe 3:
starke
Hypertonie
Stufe 2:
mittlere
Hypertonie
Stufe 1:
leichte
Hypertonie
Hoch normal 130 – 139 85 – 89
Normal 120 – 129 80 – 84 Selbstkontrolle
Optimal < 120 < 80 Selbstkontrolle
Quelle: WHO, 1999 (World Health Organization)
Systole
(in mmHg)
≥ 180 ≥ 110
160 – 179 100 – 109
140 – 159 90 – 99
Diastole
(in mmHg)
Maßnahme
einen Arzt aufsuchen
einen Arzt aufsuchen
regelmäßige
Kontrolle beim
Arzt
regelmäßige
Kontrolle beim
Arzt
7. Messwerte speichern, abrufen und
löschen
Die Ergebnisse jeder erfolgreichen Messung werden zusammen mit Datum und Uhrzeit abgespeichert. Bei mehr als 30
Messdaten gehen die jeweils ältesten Messdaten verloren.
•
Drücken Sie die Speichertaste M. Wählen Sie den ge-
wünschten Benutzerspeicher ( ... ) durch erneutes
Drücken der Speichertaste M.
•
Durch Drücken der Funktionstaste + wird der Durch-
schnittswert aller gespeicherten Messwerte des Benutzerspeichers angezeigt. Durch weiteres Drücken der
Funktionstaste + wird der Durchschnittswert der letzten 7 Tage der Morgen-Messung angezeigt. (Morgen:
5.00 Uhr – 9.00 Uhr, Anzeige ). Durch weiteres Drücken
der Funktionstaste + wird der Durchschnittswert der
letzten 7 Tage der Abend-Messung angezeigt. (Abend:
18.00 Uhr – 20.00 Uhr, Anzeige ). Durch weiteres
Drücken der Funktionstaste + werden die jeweils letzten
Einzelmesswerte mit Datum und Uhrzeit angezeigt.
•
Zum Abschalten drücken Sie die START/STOPP-Taste
•
Sollten Sie vergessen das Gerät abzuschalten, schaltet
sich dieses automatisch nach 30 Sekunden ab.
•
Wenn Sie den den kompletten Speicher des jeweiligen
Nutzers löschen wollen, drücken Sie die Speicher taste M.
Halten Sie nun für 5 Sekunden die Speichertaste M und
die Einstellungstaste SET gleichzeitg gedrückt.
8. Fehlermeldung/Fehlerbehebung
Bei Fehlern erscheint auf dem Display die Fehlermeldung _.
Fehlermeldungen können auftreten, wenn
•
der Puls nicht korrekt erfasst werden konnte: 1;
12
•
wenn keine Messung möglich war: 2;
• die Manschette zu stark bzw. zu schwach angelegt ist: 3 ;
•
Fehler während der Messung auftreten: 4;
•
der Aufpumpdruck höher als 300 mmHg ist: 5;
•
ein Systemfehler vorliegt. Wenden Sie sich bei dieser Feh-
lermeldung bitte an den Kundenservice : 6.
• die Batterien fast verbraucht sind: .
Wiederholen Sie in diesen Fällen die Messung. Achten Sie
darauf, dass Sie sich nicht bewegen oder reden.
Setzen Sie gegebenenfalls die Batterien neu ein oder ersetzen Sie diese.
9. Gerät und Manschette reinigen und
aufbewahren
•
Reinigen Sie das Gerät und die Manschette vorsichtig nur
mit einem leicht angefeuchteten Tuch.
•
Verwenden Sie keine Reinigungs- oder Lösungsmittel.
•
Sie dürfen Gerät und Manschette auf keinen Fall unter
Wasser halten, da sonst Flüssigkeit eindringen kann und
das Gerät und die Manschette beschädigt.
• Wenn Sie Gerät und Manschette aufbewahren, dürfen
keine schweren Gegenstände auf dem Gerät und der Manschette stehen. Entnehmen Sie die Batterien. Der Manschettenschlauch darf nicht scharf abgeknickt werden
.
10. Technische Angaben
Modell-Nr. BM 28
Messmethode Oszillometrisch, nicht invasive Blut-
Messbereich Manschettendruck 0-300 mmHg,
Genauigkeit der
Anzeige
Messunsicherheit max. zulässige Standardabweichung
Speicher 4 x 30 Speicherplätze
Abmessungen L 134 mm x B 103 mm x H 60 mm
Gewicht Ungefähr 245,5 g (ohne Batterien und
Manschettengröße
Zul. Betriebs-
bedingungen
13
druckmessung am Oberarm
systolisch 50-280 mmHg,
diastolisch 30-200 mmHg,
Puls 40-199 Schläge /Minute
systolisch ± 3 mmHg,
diastolisch ± 3 mmHg,
Puls ± 5 % des angezeigten Wertes
gemäß klinischer Prüfung:
systolisch 8 mmHg /
diastolisch 8 mmHg
Manschette)
22 bis 42 cm
+10 °C bis +40 °C, 20 bis 85% relative
Luftfeuchte (nicht kondensierend)

Zul. Aufbewahrungsbedingungen
Stromversorgung 4 x 1,5 V
Batterie-Lebens-
dauer
Zubehör Gebrauchsanweisung, 4 x 1,5 V AA Bat-
Klassifikation Interne Versorgung, IPX0, kein AP oder
Änderungen der technischen Angaben ohne Benachrichtigung sind aus Aktualisierungsgründen vorbehalten.
•
Dieses Gerät entspricht der europäischen Norm
EN60601-1-2 und unterliegt besonderen Vorsichtsmaßnahmen hinsichtlich der elektromagnetischen Verträglichkeit. Bitte beachten Sie dabei, dass tragbare und mobile
HF-Kommunikationseinrichtungen dieses Gerät beeinflussen können. Genauere Angaben können Sie unter der
angegebenen Kundenservice-Adresse anfordern oder am
Ende der Gebrauchsanweisung nachlesen.
•
Das Gerät entspricht der EU-Richtlinie für Medizinpro-
dukte 93/42/EEC, dem Medizinproduktegesetz und den
-20 °C bis +55 °C, 20 bis 90% relative Luftfeuchte, 800-1050 hPa Umgebungsdruck
AA Batterien
Für ca. 300 Messungen, je nach Höhe
des Blutdrucks bzw. Aufpumpdrucks
terien, Aufbewahrungstasche
APG, Dauerbetrieb, Anwendungsteil
Typ BF
Normen EN1060-1 (nicht invasive Blutdruckmessgeräte
Teil 1: Allgemeine Anforderungen), EN1060-3 (nicht invasive Blutdruckmessgeräte Teil 3: Ergänzende Anforderungen für elektromechanische Blutdruckmesssysteme)
und IEC80601-2-30 (Medizinische elektrische Geräte
Teil 2 – 30: Besondere Festlegungen für die Sicherheit
einschließlich der wesentlichen Leistungsmerkmale von
automatisierten nicht invasiven Blutdruckmessgeräten).
•
Die Genauigkeit dieses Blutdruckmessgerätes wurde
sorgfältig geprüft und wurde im Hinblick auf eine lange
nutzbare Lebensdauer entwickelt. Bei Verwendung des
Gerätes in der Heilkunde sind messtechnische Kontrollen
mit geeigneten Mitteln durchzuführen. Genaue Angaben
zur Überprüfung der Genauigkeit können unter der Service-Adresse angefragt werden.
11. Netzteil
Modell Nr. LXCP12-006060BEH
Eingang 100 – 240 V, 50 – 60 Hz, 0.5 A max
Ausgang 6 V DC, 600 mA, nur in Verbindung mit Beu-
Hersteller Shenzhen Iongxc power supply co., ltd
14
rer Blutdruckmessgeräten

Schutz Das Gerät ist doppelt schutzisoliert und ver-
Gehäuse
und Schutzabdeckungen
fügt über eine primärseitige Sicherung, die
das Gerät im Fehlerfall vom Netz trennt.
Stellen Sie sicher, dass Sie die Batterien aus
dem Batteriefach entnommen haben, bevor
Sie das Netzteil benutzen.
Polarität des Gleichspannungs anschlusses
Schutzisoliert / Schutzklasse 2
Das Netzteilgehäuse schützt vor Berührung
von Teilen, die unter Strom stehen bzw. stehen können (Finger, Nadel, Prüfhaken).
Der Anwender darf nicht gleichzeitig den
Patienten und den Ausgangsstecker des AC/
DC-Netzteils berühren.
12. Garantie / Service
Wir leisten 3 Jahre Garantie ab Kaufdatum für Material- und
Fabrikationsfehler des Produktes. Die Garantie gilt nicht:
• Im Falle von Schäden, die auf unsachgemäßer Bedienung
beruhen.
• Für Verschleißteile.
• Bei Eigenverschulden des Kunden.
• Sobald das Gerät durch eine nicht autorisierte Werkstatt
geönet wurde.
15
Die gesetzlichen Gewährleistungen des Kunden bleiben
durch die Garantie unberührt. Für Geltendmachung eines
Garantiefalles innerhalb der Garantiezeit ist durch den
Kunden der Nachweis des Kaufes zu führen. Die Garantie
ist innerhalb eines Zeitraumes von 3 Jahren ab Kaufdatum
gegenüber der Beurer GmbH, Ulm (Germany) geltend zu
machen.
Bitte wenden Sie sich im Falle von Reklamationen an
unseren Service unter folgendem Kontakt:
Service Hotline:
Tel.: +49 (0) 731 / 39 89-144
E-Mail: kd@beurer.de
www.beurer.com
Fordern wir Sie zur Übersendung des defekten
Produktes auf, ist das Produkt an folgende Adresse
zu senden:
Beurer GmbH
Servicecenter
Lessingstraße 10 b
89231 Neu-Ulm
Germany
Irrtum und Änderungen vorbehalten

ENGLISH
Contents
1. Getting to know your device........................................ 16
2. Important notes ........................................................... 17
3. Device description ....................................................... 20
4. Preparing the measurement ........................................ 21
5. Measuring blood pressure ........................................... 23
6. Evaluating results ........................................................ 24
7. Saving, displaying and deleting measured values ...... 25
8. Error messages/troubleshooting ................................. 26
9. Cleaning and storing the device and cuff .................... 26
10. Technical specifications .............................................. 26
11. Mains part.................................................................... 28
Dear customer,
Thank you for choosing one of our products. Our name
stands for high-quality, thoroughly tested products for applications in the areas of heat, weight, blood pressure, body
temperature, pulse, gentle therapy, massage, beauty and
air. Please read these instructions for use carefully and keep
them for later use, be sure to make them accessible to other
users and observe the information they contain.
With kind regards,
Your Beurer team
1. Getting to know your device
Check that the packaging of the Beurer BM28 blood pressure monitor has not been tampered with and make sure that
all the required contents are present. Before use, ensure that
there is no visible damage to the device or accessories and
that all packaging material has been removed. If you have
any doubts, do not use the device and contact your retailer
or the specified Customer Services address.
The upper arm blood pressure monitor is used to carry out
non-invasive measurement and monitoring of the arterial
blood pressure values in adults.
This allows you to quickly and easily measure your blood
pressure, save the measured values and display the development and average values of the measured values taken.
You are also warned of possible existing cardiac arrhythmia.
The recorded values are classified and evaluated graphically.
16
2. Important notes
Storage
%
-20°C
Operating
RH 20% - 85%
Signs and symbols
The following symbols are used in these instructions for
use, on the packaging and on the type plate for the device
and the accessories:
Attention
Note
Note on important information
Observe the instructions for use
Application part, type BF
Direct current
Disposal in accordance with the Waste
Electrical and Electronic Equipment EC
Directive – WEEE
Manufacturer
Permissible storage and transport condi-
55°C
tions
RH 20% - 90
Permissible operating temperature and
40°C
10°C
humidity
Protected against foreign objects equal to
IP21
or greater than 12.5 mm in diameter and
against vertically falling drops of water
Serial number
The CE labelling certifies that the product
complies with the essential requirements of
Directive 93/42/EEC on medical products.
Notes on use
•
In order to ensure comparable values, always measure
your blood pressure at the same time of day.
•
Before every measurement, relax for about five minutes.
•
If you want to perform several measurements on the same
person, wait five minutes between each measurement.
•
Do not take a measurement within 30 minutes of eating,
drinking, smoking or exercising.
•
Repeat the measurement if you are unsure of the meas-
ured value.
17

•
The measured values taken by you are for your informa-
tion only – they are no substitute for a medical examination. Discuss the measured values with your doctor and
never base any medical decisions on them (e.g. medicines and their administration).
•
Do not use the blood pressure monitor on newborns or
patients with pre-eclampsia. We recommend consulting
a doctor before using the blood pressure monitor during
pregnancy.
•
Cardiovascular diseases may lead to incorrect measure-
ments or have a detrimental effect on measurement accuracy. The same also applies to very low blood pressure,
diabetes, circulatory disorders and arrhythmias as well as
chills or shaking.
•
This device is not intended for use by people (including
children) with restricted physical, sensory or mental skills
or a lack of experience and/or a lack of knowledge, unless
they are supervised by a person who is responsible for
their safety or are instructed by such a person in how to
use the device. Supervise children around the device to
ensure they do not play with it.
• The blood pressure monitor must not be used in connection with a high-frequency surgical unit.
•
Only use the device on people who have the specified
upper arm measurement for the device.
•
Please note that when inflating, the functions of the limb
in question may be impaired.
•
During the blood pressure measurement, the blood circu-
lation must not be stopped for an unnecessarily long time.
If the device malfunctions remove the cuff from the arm.
•
Avoid any mechanical restriction, compression or bending
of the cuff line.
•
Do not allow sustained pressure in the cuff or frequent
measurements. The resulting restriction of the blood flow
may cause injury.
•
Make sure that the cuff is not placed on an arm in which
the arteries or veins are undergoing medical treatment,
e.g. intravascular access or intravascular or therapy, or an
arteriovenous (AV) shunt.
•
Do not use the cuff on people who have undergone a
mastectomy.
•
Do not place the cuff over wounds as this may cause fur-
ther injury.
•
Place the cuff on your upper arm only. Do not place the
cuff on other parts of the body.
•
You can either use the blood pressure monitor with bat-
teries or with a mains part. For mains operation, the
device must be set up so that it can be disconnected by
the user at any time. As soon as the batteries are empty
or the mains part is disconnected from the power supply,
the blood pressure monitor loses the date and time.
18
•
To conserve the batteries, the blood pressure monitor
switches off automatically if you do not press any buttons
for 30seconds.
•
The device is only intended for the purpose described in
these instructions for use. The manufacturer is not liable
for damage resulting from improper or careless use.
Instructions for storage and maintenance
•
The blood pressure monitor is made from precision and
electronic components. The accuracy of the measured
values and service life of the device depend on its careful
handling:
– Protect the device from impacts, humidity, dirt, marked
temperature fluctuations and direct sunlight.
– Do not drop the device.
– Do not use the device in the vicinity of strong electro-
magnetic fields and keep it away from radio systems or
mobile telephones.
– Only use the cuff included with the delivery or original
replacement parts. Otherwise incorrect measured values
will be recorded.
•
We recommend that the batteries be removed if the de-
vice will not be used for a prolonged period of time.
Notes on handling batteries
•
If your skin or eyes come into contact with battery fluid,
rinse the affected areas with water and seek medical
assistance.
Choking hazard! Small children may swallow and
choke on batteries. Store the batteries out of the reach of
small children.
•
Observe the plus (+) and minus (-) polarity signs.
•
If a battery has leaked, put on protective gloves and clean
the battery compartment with a dry cloth.
•
Protect batteries from excessive heat.
Risk of explosion! Never throw batteries into a fire.
•
Do not charge or short-circuit batteries.
•
If the device is not to be used for a relatively long period,
take the batteries out of the battery compartment.
•
Use identical or equivalent battery types only.
•
Always replace all batteries at the same time.
•
Do not use rechargeable batteries.
•
Do not disassemble, split or crush the batteries.
Instructions for repairs and disposal
•
Batteries do not belong in household waste. Please dis-
pose of empty batteries at the collection points intended
for this purpose.
19
•
Do not open the device. Failure to comply will result in
voiding of the warranty.
•
Do not repair or adjust the device yourself. Proper opera-
tion can no longer be guaranteed in this case.
•
Repairs must only be carried out by Customer Services
or authorised suppliers. Before making a claim, please
check the batteries first and replace them if necessary.
•
Please dispose of the device in accordance with
EC Directive – WEEE (Waste Electrical and
Electronic Equipment).
If you have any questions, please contact the local au-
thorities responsible for waste disposal.
3. Device description
2
5
1
3
4
6
8
1. Cuff
2. Cuff line
3. Cuff connector
7
4. Display
5. Connection for cuff connector
6. Scale for classifying the measurements
7. Connection for mains part
8. Function buttons -/+
9. START/STOPbutton
10. Memory button M
11. Setting button SET
20
91011
Information on the display:
12
11
10
9
5678
1
2
3
4
1. Time and date
2. Systolic pressure
3. Diastolic pressure
4. Calculated pulse value
5. Cardiac arrhythmia symbol pulse symbol
6. Release air
7. Memory display: average value ( ), morning ( ), evening ( ), memory space number
8. Battery replacement symbol
9. Alarm function
10. Classification of measurements
11. User memory
12. Cuff position control
4. Preparing the measurement
Inserting the batteries
•
Open the battery compartment lid.
•
Insert four 1.5V AA (alkaline type LR6) batteries. Make
sure that the batteries are inserted the correct way round.
Do not use rechargeable batteries.
•
Close the battery compartment lid again carefully.
•
All display elements are briefly displayed, 24 h flashes
in the display. Now set the date and time as described
below.
If the low battery indicator
you can no longer perform any measurements and must replace the batteries. Once the batteries have been removed
from the device, the time must be set again.
Battery disposal
• The empty, completely flat batteries must be disposed of
through specially designated collection boxes, recycling
points or electronics retailers. You are legally required to
dispose of the batteries.
• The codes below are printed on batteries containing
harmful substances:
Pb = Battery contains lead,
Cd = Battery contains cadmium,
Hg = Battery contains mercury
21
is permanently displayed,

Setting the hour format, date and time
It is essential to set the date and time. Otherwise, you will
not be able to save your measured values correctly with a
date and time and access them again later.
To set the date and time, proceed as follows:
•
Insert the batteries, or
SET
for at least 5 seconds if the batteries have already
been inserted.
•
Select 12h or 24h mode using the function buttons -/+.
Press
SET
Set the year with the function buttons -/+ and confirm with
SET.
•
Set the month, day, hour and minute and confirm each
with the
•
The blood pressure monitor switches itself off automatically.
Set alarm
You can set 2 different alarm times to remind yourself to take
the measurement. To set the alarm, proceed as follows:
• Press and hold the function buttons - and + simultaneously
for 5 seconds.
• Alarm 1 is shown in the display, „on“ or „off“ flashes at
the same time. With the function buttons -/+, choose whether alarm 1 should be activated („on“ flashes) or deactivated („off“ flashes) and confirm with the setting button SET.
to confirm. The year display will start to flash.
setting button SET.
press and hold the setting button
• If alarm 1
to setting alarm 2 .
• If alarm 1
Select the desired hour using the function buttons -/+ and
confirm with SET. The minutes flash on the display. Select
the desired minute using the function buttons -/+ and confirm with SET.
• Alarm 2 is shown in the display, „on“ or „off“ flashes
at the same time. To set, proceed as for alarm 1 . The
blood pressure monitor switches itself off automatically.
Operation with the mains part
You can also operate this device with a mains part.
When doing so, there must not be any batteries in the battery
compartment.
•
To prevent possible damage to the device, the blood
pressure monitor must only be used with the mains part
described here.
•
Insert the mains part into the connection provided for this
purpose on the blood pressure monitor. The mains part
must only be connected to the mains voltage that is specified on the type plate.
•
Then insert the mains plug of the mains part into the
mains socket.
•
After using the blood pressure monitor, unplug the mains
part from the mains socket first and then disconnect it from
22
is deactivated („off“), you automatically switch
is activated, the hours flash on the display.
the blood pressure monitor. As soon as you unplug the
mains part, the blood pressure monitor loses the date and
time setting but the saved measurements are retained.
5. Measuring blood pressure
Ensure the device is at room temperature before measuring.
Attaching the cuff
Place the cuff on to the bare left
upper arm. The circulation of the
arm must not be hindered by tight
clothing or similar.
The cuff must be placed on the
upper arm so that the bottom
edge is positioned 2 – 3 cm above
the elbow and over the artery. The
line should point to the centre of
the palm.
Now tighten the free end of the cuff,
but make sure that it is not too
tight around the arm and close the
hook-and-loop fastener. The cuff
should be fastened so that two
fingers can fit under the cuff.
Now insert the cuff line into the
connection for the cuff connector.
Important: The unit may only be
operated with the original cuff. The
cuff is suitable for an arm circumference of 22 to 42 cm.
Adopting the correct posture
•
Before every measurement, relax for about five minutes.
Otherwise deviations can occur.
•
You can take the measurement while sitting or lying. Al-
ways make sure that the cuff is at heart level.
•
To carry out a blood pressure measurement, make sure
you are sitting comfortably with your arms and back leaning on something. Do not cross your legs. Place your feet
flat on the ground.
•
To avoid falsifying the measurement, it is important to
remain still during the measurement and not to speak.
23
Performing the blood pressure measurement
•
As described above, attach the cuff and adopt the pos-
ture in which you want to perform the measurement.
•
Start the blood pressure monitor with the START/STOP
button . After the full-screen display, the respective
alarm symbols are displayed if alarm 1 / 2 is activated.
•
The cuff automatically inflates. The cuff’s air pressure is
slowly released. If you already recognise a tendency for
high blood pressure, you should reinflate the cuff and
increase the cuff’s pressure again. As soon as a pulse is
found, the pulse symbol will be displayed.
•
The cuff position control symbol is displayed
throughout the entire measurement. If the cuff is applied
too tightly or too loosely, then and “ ” are displayed. In such cases, the measurement is cancelled after
approx. 30 seconds and the device switches itself off.
Apply the cuff correctly and take a new measurement.
•
The systolic pressure, diastolic pressure and pulse rate
measurements are displayed.
•
You can cancel the measurement at any time by pressing
the START/STOP button .
•
_ appears if the measurement has not been performed
properly. Observe the chapter on error messages/troubleshooting in these instructions for use and repeat the
measurement.
•
Now select the desired user memory by pressing the
memory button M. If you do not select a user memory,
the measurement is stored in the most recently used user
memory. The relevant , , or symbol appears on
the display.
•
To switch off, press the
forget to turn off the device, it will switch itself off automatically after approx. 3 minutes.
Wait at least 5 minutes before taking another measurement.
START/STOP
button
. If you
6. Evaluating results
Cardiac arrhythmia:
This device can identify potential disruptions of the heart
rhythm when measuring and if necessary, indicates this
after the measurement with the symbol
be an indicator for arrhythmia. Arrhythmia is an illness in
which the heart rhythm is abnormal because of flaws in
the bioelectrical system that regulates the heartbeat. The
symptoms (skipped or premature heart beats, pulse being
slow or too fast) can be caused by factors such as heart
disease, age, physical make-up, excess stimulants, stress
or lack of sleep. Arrhythmia can only be determined through
an examination by your doctor. If the symbol is shown
on the display after the measurement has been taken,
repeat the measurement. Please ensure that you rest for 5
minutes beforehand and do not speak or move during the
24
. This can
measurement. If the symbol appears frequently, please
consult your doctor. Self-diagnosis and treatment based on
the measurements can be dangerous. Always follow your
GP’s instructions.
Classification of measurements:
The measurements can be classified and evaluated in accordance with the following table.
However, these standard values serve only as a general
guideline, as the individual blood pressure varies in different
people and different age groups etc.
It is important to consult your doctor regularly for advice.
Your doctor will tell you your individual values for normal
blood pressure as well as the value above which your blood
pressure is classified as dangerous.
The bar chart on the display and the scale on the unit show
which category the recorded blood pressure values fall into.
If the values of systole and diastole fall into two different
categories (e.g. systole in the High normal category and
diastole in the Normal category), the graphical classification
on the device always shows the higher category; for the
example given this would be High normal.
25
Blood pressure
value category
Setting 3:
severe hypertension
Setting 2:
moderate hypertension
Setting 1:
mild hypertension
High normal 130 – 139 85 – 89
Normal 120 – 129 80 – 84 self-monitoring
Optimal < 120 < 80 self-monitoring
Source: WHO, 1999 (World Health Organization)
Systole
(in mmHg)
≥ 180 ≥ 110
160 – 179 100 – 109
140 – 159 90 – 99
Diastole
(in mmHg)
Action
seek medical
attention
seek medical
attention
regular monitoring by doctor
regular monitoring by doctor
7. Saving, displaying and deleting measured
values
The results of every successful measurement are stored
together with the date and time. If there are more than 30
measurements, the oldest measurements are lost.
•
Press the memory button M. Select the desired user
memory ( ... ) by pressing the memory button M again.
•
If you press the function button +, the average value of
all the stored measured values in the user memory will be
displayed. If you press the function button + again, the
average value of the morning measurements for the last
7days will be displayed (morning: 5 a.m. – 9 a.m., display
). If you press the function button + again, the average
value of the evening measurements for the last 7 days will
be displayed (evening: 6 p.m. – 8 p.m., display ). If you
continue to press the function button +, the most recent
individual measured values are displayed in turn with the
date and time.
•
To switch off, press the START/STOP button
•
If you forget to switch off the device, it will switch itself off
automatically after 30 seconds.
•
If you want to delete the whole memory for a specific
user, press the memory button M. Press and hold down
the memory button M and the setting button SET simultaneously for 5 seconds.
.
8. Error messages/troubleshooting
In the event of errors, the error message _ appears on the
screen.
Error messages may appear if:
•
It was not possible to correctly record the pulse: 1;
•
No measurement could be taken: 2;
• The cuff is fastened too tightly or loosely:
3 ;
•
Errors occur during the measurement: 4;
•
The pump pressure is higher than 300 mmHg: 5;
•
There is a system error. If this error message appears,
please contact Customer Services: 6.
• The batteries are almost empty: .
In such cases, repeat the measurement. Ensure that you do
not move or speak.
If necessary, reinsert or replace the batteries.
9. Cleaning and storing the device and cuff
•
Clean the device and cuff carefully using a slightly damp
cloth only.
•
Do not use any cleaning agents or solvents.
•
Under no circumstances hold the device and cuff under
water, as this can cause liquid to enter and damage the
device and cuff.
•
If you store the device and cuff, do not place heavy ob-
jects on the device and cuff. Remove the batteries. The
cuff line should not be bent sharply.
10. Technical specifications
Model No. BM 28
Measurement
method
26
Oscillometric, non-invasive blood pressure measurement on the upper arm

Measurement
range
Display accuracy Systolic ± 3 mmHg,
Measurement
inaccuracy
Memory 4 x 30 memory spaces
Dimensions L 134 mm x W 103 mm x H 60 mm
Weight Approximately 245,5 g (without batte-
Cuff size
Permissible opera-
ting conditions
Permissible sto-
rage conditions
Power supply 4 x 1.5 V
Cuff pressure 0-300 mmHg,
Systolic 50-280 mmHg,
Diastolic 30-200 mmHg,
Pulse 40-199 beats/minute
Diastolic ± 3 mmHg,
Pulse ± 5% of the value shown
Max. permissible standard deviation
according to clinical testing:
Systolic 8 mmHg /
Diastolic 8 mmHg
ries and cuff)
22 to 42 cm
+10°C to +40°C, 20 to 85% relative
humidity (non-condensing)
-20°C to +55°C, 20 to 90% relative
humidity, 800-1050 hPa ambient pressure
AA batteries
Battery life For approx. 300measurements, depen-
Accessories Instructions for use, 4 x 1.5V AA batte-
Classification Internal supply, IPX0, no AP or APG,
Technical information is subject to change without notification to allow for updates.
•
This device complies with European Standard EN60601-
1-2 and is subject to particular precautions with regard
to electromagnetic compatibility. Please note that portable and mobile HF communication systems may interfere
with this unit. More details can be requested from the stated Customer Services address or found at the end of the
instructions for use.
•
The device complies with the EU Medical Devices
Directive 93/42/EEC, the German Medical Devices Act
(Medizinproduktgesetz) and the standards EN1060-1
(Non-invasive sphygmomanometers – Part1: General
requirements), EN1060-3 (Non-invasive sphygmomanometers – Part 3: Supplementary requirements for electro-mechanical blood pressure measuring systems) and
IEC80601-2-30 (Medical electrical equipment – Part 2
27
ding on levels of blood pressure and
pump pressure
ries, storage bag
continuous operation, application part
type BF

– 30: Particular requirements for the basic safety and
essential performance of automated non-invasive sphygmomanometers).
•
The accuracy of this blood pressure monitor has been
carefully checked and developed with regard to a long
useful life. If using the device for commercial medical purposes, it must be regularly tested for accuracy by appropriate means. Precise instructions for checking accuracy
may be requested from the service address.
11. Mains part
Model no. LXCP12-006060BEH
Input 100 – 240 V, 50 – 60 Hz, 0.5 A max
Output 6 V DC, 600 mA, only in connection with
Supplier Shenzhen Iongxc power supply co., ltd
Protection This device is double insulated and pro-
beurer blood pressure monitor.
tected against short circuit and overload
by a primary thermal fuse.
Make sure to take the batteries out of
the compartment before using the mains
part.
Polarity of the the DC voltage
connection
Enclosures and
Protective Covers
28
Double insulated / equipment class 2
Equipment enclosed to protect against
contact with live parts, and with parts
which can become live (finger, pin, hook
test).
The operator shall not contact the patient
and the output plug of AC mains part
simultaneously.
Subject to errors and changes

FRANÇAIS
Sommaire
1. Présentation ................................................................ 29
2. Conseils importants ..................................................... 30
3. Description de l’appareil .............................................. 33
4. Préparer la mesure ...................................................... 34
5. Mesurer la tension ....................................................... 36
6. Évaluer les résultats ..................................................... 37
7. Enregistrer, récupérer et supprimer les valeurs
de mesure ....................................................................39
8. Message d’erreur/Résolution des erreurs ................... 39
9. Nettoyage et rangement de l‘appareil et de la
manchette .....................................................................39
10. Caractéristiques techniques ........................................ 40
11. Adaptateur ................................................................... 41
Chère cliente, cher client,
Nous vous remercions d’avoir choisi l’un de nos produits. Notre société est réputée pour l’excellence de ses produits et les contrôles de qualité auxquels ils sont soumis. Nos produits couvrent les domaines de la chaleur, du
poids, de la pression sanguine, de la température corporelle, de la thérapie douce, des massages, de la beauté
et de l’amélioration de l’air. Lisez attentivement ce mode
d’emploi, conservez-le pour un usage ultérieur, mettez-le à
disposition des autres utilisateurs et suivez les consignes
qui y figurent.
Sincères salutations,
Votre équipe Beurer
1. Présentation
Vérifiez que l’emballage du tensiomètre BM 28 de Beurer
est intact et que tous les éléments sont inclus. Avant
l’utilisation, assurez-vous que l’appareil et les accessoires
ne présentent aucun dommage visible et que la totalité de
l’emballage a bien été retirée. En cas de doute, ne l’utilisez
pas et adressez-vous à votre revendeur ou au service client indiqué.
Le tensiomètre de bras est conçu pour la mesure non invasive et la surveillance des valeurs de tension artérielle des
personnes adultes.
Il vous permet de mesurer votre tension rapidement et
facilement, d’enregistrer les valeurs et d’afficher l’évolution
et la moyenne de ces valeurs.
Vous êtes averti en cas d’éventuels troubles du rythme cardiaque.
29
Les valeurs calculées sont classées et évaluées sous forme
Storage
%
Operating
10°C
RH 20% - 85%
graphique.
2. Conseils importants
Symboles utilisés
Les symboles suivants sont utilisés sur le mode d’emploi,
sur l’emballage et sur la plaque signalétique de l’appareil et
des accessoires:
Attention:
Remarque
Indication d’informations importantes
Respecter les consignes du mode
d’emploi
Appareil de type BF
Courant continu
Élimination conformément à la directive
européenne WEEE (Waste Electrical and
Electronic Equipment) relative aux déchets
d’équipements électriques et électroniques
Fabricant
Conditions de conservation et de transport
55°C
-20°C
admissibles
RH 20% - 90
Température et taux d’humidité d’utilisa-
40°C
tion admissibles
Protection contre les corps solides
IP21
≥12,5mm et contre les chutes verticales
de gouttes d‘eau
Numéro de série
Le sigle CE atteste de la conformité aux exigences fondamentales de la directive 93/42/
EEC relative aux dispositifs médicaux.
Conseils d’utilisation
•
Mesurez toujours votre tension au même moment de la
journée afin que les valeurs soient comparables.
•
Avant toute mesure, reposez-vous pendant environ
5minutes!
•
Lorsque vous devez effectuer plusieurs mesures sur une
personne, patientez à chaque fois 5minutes entre chaque
mesure.
30
 Loading...