


 Loading...
XR Series
User Manual

Copyright
Copyright © 2015 by BenQ Corporation. All rights reserved. No part of this publication may be reproduced, transmitted, transcribed, stored in a retrieval system or translated into any language or computer language, in any form or by any means, electronic, mechanical, magnetic, optical, chemical, manual or otherwise, without the prior written permission of BenQ Corporation.
Disclaimer
BenQ Corporation makes no representations or warranties, either expressed or implied, with respect to the contents hereof and specifically disclaims any warranties, merchantability or fitness for any particular purpose. Further, BenQ Corporation reserves the right to revise this publication and to make changes from time to time in the contents hereof without obligation of BenQ Corporation to notify any person of such revision or changes.
The performance of flicker-free may be affected by external factors such as poor cable quality, unstable power supply, signal interference, or poor grounding, and not limited to the above mentioned external factors. (Applicable for flicker-free models only.)
Power Safety
 Please follow these safety instructions for best performance, and long life for your monitor.
•The AC plug isolates this equipment from the AC supply.
•The power supply cord serves as a power disconnect device for pluggable equipment. The socket outlet should be installed near the equipment and be easily accessible.
•This product should be operated from the type of power indicated on the marked label. If you are not sure of the type of power available, consult your dealer or local power company.
•An approved power cord greater or equal to H03VV-F or H05VV-F, 2G or 3G, 0.75mm2 must be used.
•For XR3501, the power adapter is manufactured by Delta Electronics, Inc. (ADP-90MD H).
•Use only the power adapter supplied with your LCD Monitor. Use of another type of power adapter will result in malfunction and/or danger.
•Allow adequate ventilation around the adapter when using it to operate the device or charge the battery. Do not cover the power adapter with paper or other objects that will reduce cooling. Do not use the power adapter while it is inside a carrying case.
•Connect the power adapter to a proper power source.
•Do not attempt to service the power adapter. There are no service parts inside. Replace the unit if it is damaged or exposed to excess moisture.
2

Care And Cleaning
•Cleaning. Always unplug your monitor from the wall outlet before cleaning. Clean the LCD Monitor surface with a lint-free, non-abrasive cloth. Avoid using any liquid, aerosol or glass cleaners.
•Slots and openings on the back or top of the cabinet are for ventilation. They must not be blocked or covered. Your monitor should never be placed near or over a radiator or heat source, or in a built-in installation unless proper ventilation is provided.
•Never push objects or spill liquid of any kind into this product.
Servicing
Do not attempt to service this product yourself, as opening or removing covers may expose you to dangerous voltages or other risks. If any of the above mentioned misuse or other accident such as dropping or mishandling occurs, contact qualified service personnel for servicing.
BenQ ecoFACTS
BenQ has been dedicated to the design and development of greener product as part of its aspiration to realize the ideal of the "Bringing Enjoyment 'N Quality to Life" corporate vision with the ultimate goal to achieve a low-carbon society. Besides meeting international regulatory requirement and standards pertaining to environmental management, BenQ has spared no efforts in pushing our initiatives further to incorporate life cycle design in the aspects of material selection, manufacturing, packaging, transportation, using and disposal of the products. BenQ ecoFACTS label lists key eco-friendly design highlights of each product, hoping to ensure that consumers make informed green choices at purchase. Check out BenQ's CSR Website at http://csr.BenQ.com/ for more details on BenQ's environmental commitments and
achievements.
3
Table of Contents |
|
Copyright ...................................................................................................................................... |
2 |
Getting started ............................................................................................................................. |
5 |
Getting to know your monitor ................................................................................................ |
7 |
Front view.................................................................................................................................................... |
7 |
Back view .................................................................................................................................................... |
7 |
Connection ................................................................................................................................................... |
8 |
How to assemble your monitor hardware ........................................................................... |
9 |
How to change cable connection after initial installation ............................................... |
12 |
Getting the most from your BenQ Monitor ...................................................................... |
13 |
How to install the monitor driver on a new computer .................................................................. |
14 |
How to upgrade the monitor driver on an existing computer ..................................................... |
15 |
How to install driver on Windows 8 (8.1) system .......................................................................... |
16 |
How to install driver on Windows 7 system .................................................................................... |
17 |
How to adjust your monitor ................................................................................................. |
18 |
The control panel..................................................................................................................................... |
18 |
Basic menu operation ............................................................................................................................. |
19 |
Initial setup for playing games at 144 Hz ............................................................................................ |
21 |
Customizing the hot keys....................................................................................................................... |
22 |
Adjusting display mode ........................................................................................................................... |
22 |
Choosing an appropriate picture mode.............................................................................................. |
22 |
Video source selection in PIP/PBP mode............................................................................................ |
23 |
Navigating the main menu ...................................................................................................... |
24 |
Display menu ............................................................................................................................................. |
25 |
Picture menu ............................................................................................................................................. |
27 |
Picture Advanced menu ......................................................................................................................... |
29 |
Audio menu ............................................................................................................................................... |
32 |
System menu ............................................................................................................................................. |
33 |
Troubleshooting ....................................................................................................................... |
36 |
Frequently asked questions (FAQ) ...................................................................................................... |
36 |
Need more help?...................................................................................................................................... |
37 |
4
Getting started
When unpacking please check you have the following items. If any are missing or damaged, please contact the place of purchase for a replacement.
BenQ LCD Monitor
Quick Start Guide
CD-ROM
Power Cord
(Picture may differ from product supplied for your region.)
Power Adapter
Video Cable: DP (Optional accessory)
Video Cable: DP to mini DP
Getting started |
5 |

Video Cable: HDMI
Audio Cable
• Available accessories and the pictures shown here may differ from the actual contents and the product supplied for your region. And the package contents may subject to change without prior notice. For cables that are not supplied with your product, you can purchase them separately.
•Consider keeping the box and packaging in storage for use in the future when you may need to transport the monitor. The fitted foam packing is ideal for protecting the monitor during transport.
 Always keep the product and accessories out of reach of small children.
6 Getting started

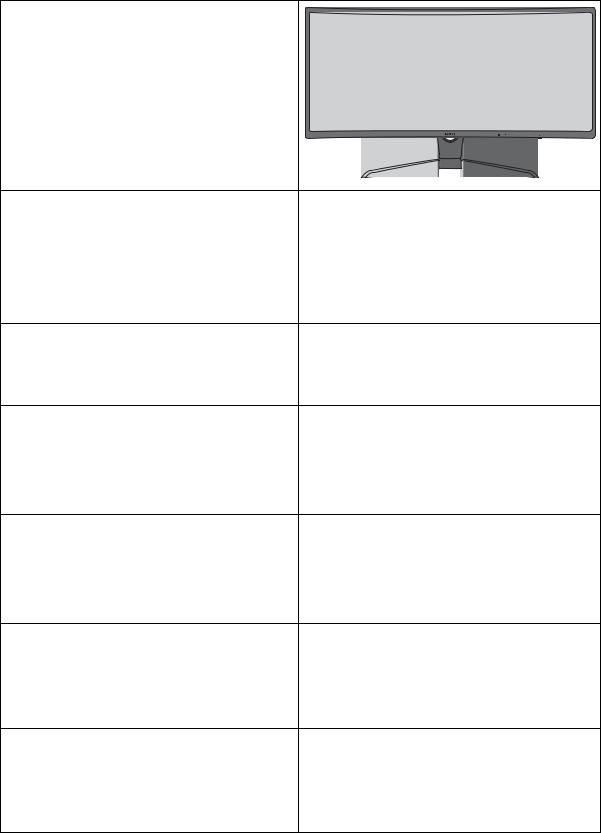
Getting to know your monitor
Front view
1. Power button
2. Control buttons
1 2
Back view
|
3. |
Cable clip |
|
|
4. |
Cable management hole |
|
|
5. |
DC power input jack |
|
|
6. |
HDMI-2 socket |
|
|
7. |
HDMI-1 socket |
|
|
8. |
DisplayPort socket |
|
3 |
13 9. |
Mini DisplayPort socket |
|
4 |
10. |
Audio Line In |
|
11. |
Audio Line Out |
||
|
|||
|
12. |
Headphone jack |
|
|
13. |
Kensington lock slot |
5 |
6 |
7 |
8 |
9 |
10 1112 |
• Above diagram may vary depending on the model.
• Picture may differ from product supplied for your region.
Getting to know your monitor |
7 |
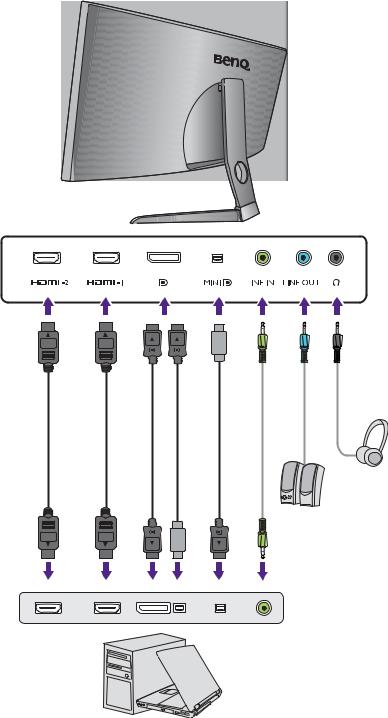
Connection
The following connection illustrations are for your reference only. For cables that are not supplied with your product, you can purchase them separately.
For detailed connection methods, see page 9 - 10.
8 Getting to know your monitor
How to assemble your monitor hardware
• If the computer is turned on, you must turn it off before continuing.
Do not plug-in or turn-on the power to the monitor until instructed to do so.
•The following illustrations are for your reference only. The location and available input and output jacks may vary depending on the purchased model.
•The supported timing may vary by input signal. Refer to the "Preset display modes" section on the link "Adjusting the Screen Resolution" on the CD for more information.
1.Connect the PC video cable.
 Your monitor comes with a curved screen and the screen surface should never be placed on the desk without a cushion underneath.
 Please be careful to prevent damage to the monitor. Placing the screen surface on an object like a stapler or a mouse will crack the glass or damage the LCD substrate voiding your warranty. Sliding or scraping the monitor around on your desk will scratch or damage the monitor surround and controls.
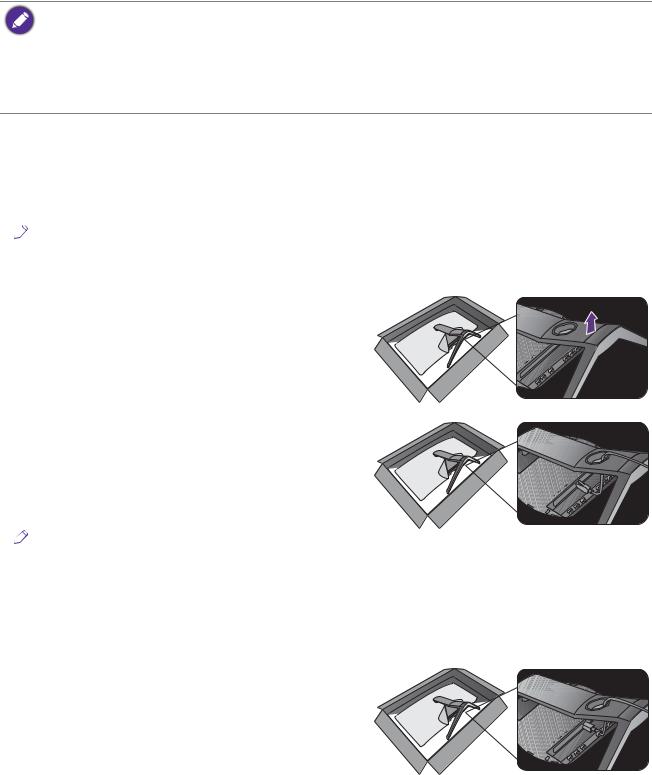
While the monitor is still inside the box, remove the cushion that protects the back of the monitor. Then pull the monitor stand arm upwards clear of the monitor.
Remove the foam wrap from the monitor stand and base. Open the foam wrap that protects the monitor for the following cable connection.
To Connect the DP Cable
Pass the cable through the cable management hole on the stand arm first. Connect the plug of the DP cable to the monitor video socket. Connect the other end of the cable to the computer video socket.
 After the monitor is powered on, if the image is not displayed, disconnect the cable. Go to System and DisplayPort on the OSD menu of the monitor and change the setting from 1.2 to 1.1, and then connect the cable again. To go to the OSD menu, see Basic menu operation on page 19.
To Connect the mini DP Cable |
or |
Pass the cable through the cable management hole on the stand arm first. Connect the plug of the mini DP cable to the monitor video socket. And then route the cable via the cable clip right below the input port. Connect the other end of the cable to the computer video socket.
How to assemble your monitor hardware |
9 |
To Connect the HDMI Cable |
or |
Pass the cable through the cable management hole on the stand arm first. Connect the plug of the HDMI cable to the HDMI port on the monitor. And then route the cable via the cable clip right below the input port. Connect the other end of the cable to the HDMI port of a digital output device.
 The video cables included in your package and the socket illustrations on the right may vary depending on the product supplied for your region.
2. Connect the audio cable.
Pass the cable through the cable management hole on the stand arm first.
To Input Audio Signals
Connect the audio cable between the socket on the rear of the monitor (Line In) and your computer audio outlet. And then route the cable via the cable clip right below the input port.
To Output Audio Signals
You are provided with the following options to output audio from the monitor:
•You may connect headphones to the headphone jack found on the back side of the monitor.
•If you prefer using external speakers, please also use another audio cable (usually supplied with the speakers) to connect the monitor (Line Out) to the input/Line In jack of the speaker.
3. Connect the power adapter to the monitor.
Pass the cable through the cable management hole on the stand arm first. Connect the power adapter to the
socket labelled 

 on the rear of the monitor. Do not connect the other end to a power outlet just yet.
4. Install the back cover.
Align the back cover with the holes on the back of the |
1 |
monitor, and press the sides of the back cover against the holes to lock it into place as illustrated.
 2
2 
 To remove the back cover, see How to change cable connection after initial installation on page 12 for more information.
10 How to assemble your monitor hardware
5. Lift the monitor.
Take the monitor out of the box by 2 people. Carefully lift the monitor, turn it over and place it upright on its stand on a flat even surface.
Remove the foam wrap from the monitor.
 Make sure to perform this procedure by 2 people. Failure to do so may cause injuries and damages to the personnels and the monitor itself.
 Consider keeping the box and packaging in storage for use in the future when you may need to transport the monitor. The fitted foam packing is ideal for protecting the monitor during transport.
6. Tilt the monitor.
You should position the monitor and angle the screen to minimize unwanted reflections from other light sources.
7. Connect-to and turn-on the power.
Connect the power cord to the power adapter. Plug the other end of the power cord into a power outlet and turn it on.
 Picture may differ from product supplied for your region.
Turn on the monitor by pressing the power button on the monitor.
Turn on the computer too, and follow the instructions in Getting the most from your BenQ Monitor on page 13 to install the monitor software.
 To extend the service life of the product, we recommend that you use your computer's power management function.
How to assemble your monitor hardware |
11 |
How to change cable connection after initial installation
To protect the curved screen, do not lay the screen face down on the desk without the protection of the supplied cushion. If you prefer to change the cable connection after the initial installation has been completed in How to assemble your monitor hardware on page 9, follow the procedures below.
1. Turn off the monitor.
Turn off the monitor and the power before unplugging the power cable. Turn off the computer before unplugging the monitor signal cable.
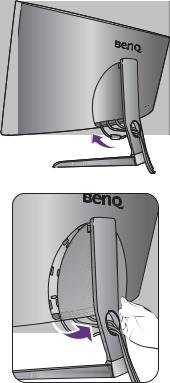
2. Tilt the monitor to its extended position.
Gently tilt the monitor to the maximum extended position. To properly tilt the monitor, see Tilt the monitor. on page 11.
3. Remove the back cover.
Remove the back cover from its bottom as illustrated.
Follow the instructions in Connect the PC video cable. on page 9 and change connected cables. Re-install the back cover as instructed in Install the back cover. on page 10.
12 How to change cable connection after initial installation
Loading...