

Page 1

Lavatrice
Washing Machine
WML 60611 M
Page 2

Leggere prima il manuale utente!
Gentile cliente,
Speriamo che otterrà i migliori risultati dal prodotto realizzato in impianti all'avanguardia e
sottoposto ad una severa procedura di controllo qualità.
Pertanto, la preghiamo di leggere l'intero manuale utente con attenzione prima di usare il
prodotto e di conservarlo come riferimento per usi futuri. In caso di passaggio del prodotto ad
altre persone, fornisca loro anche il manuale.
Il manuale utente la aiuterà ad usare la macchina in modo sicuro e veloce.
• Legga questo manuale prima di installare e avviare il prodotto.
• Segua sempre le istruzioni per la sicurezza.
• Conservi questo manuale utente a portata di mano per riferimento futuro.
• Legga anche gli altri documenti in dotazione con il prodotto.
Ricordi che questo manuale utente è applicabile anche per diversi altri modelli. Le diversità tra
modelli saranno identificate nel manuale.
Spiegazioni dei simboli
In questo manuale utente sono usati i seguenti simboli:
C Importanti informazioni o suggerimenti utili sull’uso.
A Avvertenze su situazioni rischiose con riguardo alla vita e alle cose.
B Avvertenze per shock elettrico.
2820522130_IT/100611.1432
Questo apparecchio è contrassegnato dal simbolo della raccolta differenziata
relativa allo smaltimento di materiale elettrico ed elettronico. Ciò significa che
questo prodotto deve essere portato presso un centro di raccolta differenziata
conformemente alla direttiva europea 2002/96/CE, in modo tale da potere
essere riciclato o smantellato così da ridurne l’eventuale impatto su l’ambiente
Per ulteriori informazioni in proposito si consiglia di rivolgersi alla propria
amministrazione locale o regionale.
I prodotti elettronici che non sono oggetto di una raccolta differenziata sono
potenzialmente nocivi per l’ambiente e la salute umana a causa della presenza
di sostanze pericolose.
2 _ IT
Page 3

INDICE
1 La lavatrice 4
Panoramica . . . . . . . . . . . . . . . . . . . . . . 4
Specifiche tecniche . . . . . . . . . . . . . . . . 5
2 Istruzioni importanti per la
sicurezza 6
Sicurezza generale . . . . . . . . . . . . . . . . 6
Uso previsto . . . . . . . . . . . . . . . . . . . . . 6
Sicurezza dei bambini . . . . . . . . . . . . . . 6
3 Installazione 7
Posizione adeguata di montaggio . . . . . 7
Rimozione dei rinforzi dell'imballaggio . . 7
Rimozione dei blocchi di trasporto. . . . . 7
Collegamento della fornitura idrica. . . . . 8
Collegamento dello scarico . . . . . . . . . . 8
Regolazione dei piedini . . . . . . . . . . . . . 9
Collegamento elettrico. . . . . . . . . . . . . . 9
Primo utilizzo . . . . . . . . . . . . . . . . . . . . 10
Smaltimento dei materiali per
l'imballaggio . . . . . . . . . . . . . . . . . . . . 10
Trasporto del prodotto. . . . . . . . . . . . . 10
Smaltimento della vecchia lavatrice . . . 10
Consigli per un lavaggio efficace . . . . . 11
4 Preparazione 12
Cose da fare ai fini del risparmio
energetico . . . . . . . . . . . . . . . . . . . . . . 12
Selezione del bucato . . . . . . . . . . . . . . 12
Preparazione del bucato da lavare. . . . 12
Corretta capacità di carico. . . . . . . . . . 13
Caricamento del bucato . . . . . . . . . . . 13
Uso di detersivo e ammorbidente . . . . 13
Programmi principali . . . . . . . . . . . . . . 16
Selezione della temperatura. . . . . . . . . 17
Selezione velocità centrifuga . . . . . . . . 17
Tabella Selezione programma e
consumo . . . . . . . . . . . . . . . . . . . . . . . 18
Selezione funzione ausiliaria. . . . . . . . . 19
Avvio del programma. . . . . . . . . . . . . . 19
Blocco bambini . . . . . . . . . . . . . . . . . . 19
Avanzamento del programma . . . . . . . 20
Blocco sportello di carico . . . . . . . . . . 20
Cambiare le selezioni dopo che il
programma è iniziato . . . . . . . . . . . . . . 20
Annullamento del programma . . . . . . . 20
Fine del programma. . . . . . . . . . . . . . . 20
6 Manutenzione e pulizia 21
Pulizia del cassetto del detersivo . . . . . 21
Pulizia dello sportello di carico e del
cestello . . . . . . . . . . . . . . . . . . . . . . . . 21
Pulizia del corpo e del pannello di
controllo . . . . . . . . . . . . . . . . . . . . . . . 21
Pulire i filtri di ingresso dell'acqua. . . . . 21
Eliminare eventuale acqua residua e pulire
il filtro della pompa. . . . . . . . . . . . . . . . 22
7 Ricerca e risoluzione dei
problemi 24
5 Funzionamento del
prodotto 16
Pannello di controllo . . . . . . . . . . . . . . 16
Preparazione dell'elettrodomestico . . . 16
Selezione del programma . . . . . . . . . . 16
3 _ IT
Page 4
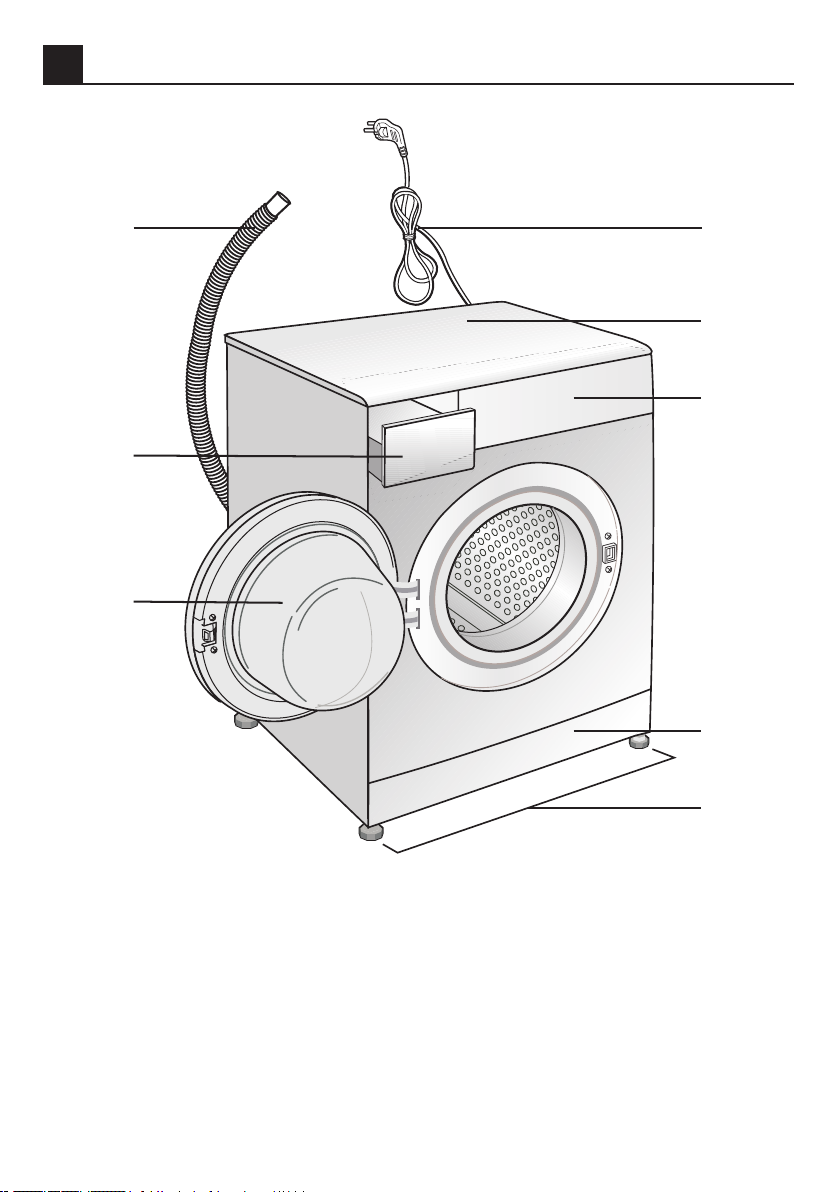
1 La lavatrice
Panoramica
8
1
2
3
7
6
4
5
1- Cavo di alimentazione
2- Pannello superiore
3- Pannello di controllo
4- Copertura filtro
5- Piedini regolabili
6- Sportello di carico
7- Cassetto del detersivo
8- Flessibile di scarico
4 _ IT
Page 5

Specifiche tecniche
Modelli
Capacità massimo di lavaggio a secco (kg)
Altezza (cm)
Larghezza (cm)
Profondità (cm)
Peso netto (±4 kg.)
Elettricità in ingresso (V/Hz)
Corrente totale (A)
Energia totale (W)
Velocità centrifuga(gpm max.)
Alimentazione modalità stand-by (W)
Alimentazione modalità di spegnimento (W)
WML 60611 M
6
84
60
45
60
230 V / 50Hz
10
2200
600
1.00
0.25
Le specifiche tecniche possono essere modificate senza preavviso per migliorare la qualità
C
del prodotto.
Le illustrazioni contenute in questa guida sono schematiche e potrebbero non
C
corrispondere esattamente al prodotto in uso.
I valori indicati sulle etichette della macchina o nella documentazione di
C
accompagnamento sono ottenuti in laboratorio, in conformità con gli standard di
riferimento. I valori possono cambiare in funzione delle condizioni operative e ambientali
dell’elettrodomestico.
5 _ IT
Page 6

2 Istruzioni importanti per la sicurezza
Questa sezione contiene istruzioni sulla
sicurezza che aiutano a proteggere dal rischio
di lesioni personali o danni alla proprietà. La
mancata osservanza di queste istruzioni rende
la garanzia priva di validità.
Sicurezza generale
• Questo prodotto non deve essere usato
da persone con disturbi fisici, sensoriali
o mentali o da persone senza adeguata
formazione o esperienza (compresi
bambini) a meno che non ricevano la
supervisione di una persona responsabile
della loro sicurezza o che le istruisca nel
modo giusto sull'uso del prodotto.
• Non posizionare mai il prodotto su
un pavimento coperto da tappeto;
altrimenti la mancanza del flusso di aria
al di sotto della macchina provoca il
surriscaldamento delle parti elettriche.
Ciò può provocare malfunzionamenti del
prodotto.
• Non utilizzare il prodotto se il cavo di
alimentazione / la spina sono danneggiati.
Contattare l'agente autorizzato per
l'assistenza.
• Far collegare da un elettricista qualificato
il fusibile da 16 ampere sul luogo della
installazione del prodotto.
• Se il prodotto presenta un guasto, non
deve essere utilizzato, a meno che non
sia riparato da un agente autorizzato
per l'assistenza. C'è il rischio di shock
elettrico!
• Il prodotto è progettato per riprendere a
funzionare in caso di ripristino di corrente
dopo un guasto elettrico. Se si desidera
annullare il programma, vedere la sezione
"Annullamento del programma".
• Collegare il prodotto ad una presa messa
a terra protetta da un fusibile conforme ai
valori della tabelle "Specifiche tecniche".
Non trascurare la possibilità di fare
installare la messa a terra da un elettricista
qualificato. La nostra azienda non sarà
responsabile dei danni derivanti dall'uso
del prodotto senza la messa a terra
conforme ai regolamenti locali.
• L'alimentazione dell'acqua e i flessibili di
scarico devono essere montati in modo
sicuro e restare privi di danni. Altrimenti
c'è il rischio di perdite di acqua.
• Non aprire mai lo sportello né togliere il
filtro mentre vi è ancora dell’acqua nel
cestello. Altrimenti si verifica il rischio di
allagamenti e lesioni provocate dall'acqua
calda.
• Non forzare per aprire lo sportello di carico
bloccato. Lo sportello di carico sarà
pronto per l’apertura pochi minuti dopo
la fine del ciclo di lavaggio. Se si forza
per aprire lo sportello di carico bloccato,
sportello e meccanismo di blocco
potrebbero danneggiarsi.
• Scollegare il prodotto quando non è in
uso.
• Non lavare mai il prodotto versando o
cospargendo acqua su di esso! C'è il
rischio di shock elettrico!
• Non toccare mai la spina con le mani
bagnate! Non scollegare mai tirando dal
cavo, estrarre sempre tirando dalla spina.
• Usare solo detersivi, ammorbidenti e
additivi adatti alle lavatrici automatiche.
• Seguire le istruzioni sulle etichette dei
tessuti e sulla confezione del detersivo.
• Il prodotto deve essere scollegato
durante le procedure di installazione,
manutenzione, pulizia e riparazione.
• Far eseguire sempre le procedure di
installazione e riparazione dall'agente
autorizzato per l'assistenza. Il produttore
non sarà ritenuto responsabile per danni
che possono derivare da procedure
eseguite da persone non autorizzate.
Uso previsto
• Questo prodotto è progettato per un
uso domestico. Non è adatto ad un uso
commerciale e non deve essere usato al
di là dell'uso previsto.
• Il prodotto può essere utilizzato
esclusivamente per il lavaggio e il
risciacquo di bucato che in etichetta
preveda tale tipo di lavaggio.
• Il produttore declina ogni responsabilità
che derivi da uso o trasporto non corretti.
Sicurezza dei bambini
• I prodotti elettrici sono pericolosi per i
bambini. Tenere i bambini lontani dal
prodotto mentre questo è in uso. Non
lasciarli giocare con il prodotto. Usare il
blocco bambini per evitare che i bambini
possano interferire con il funzionamento
del prodotto.
• Non dimenticare di chiudere lo sportello di
carico quando si esce dalla stanza in cui
si trova il prodotto.
• Conservare tutti i detersivi e gli additivi
in un posto sicuro fuori dalla portata dei
bambini.
6 _ IT
Page 7
3 Installazione
Rivolgersi al più vicino agente autorizzato per
l'assistenza per l'installazione del prodotto.
Per rendere il prodotto pronto per l'uso,
rivedere le informazioni del manuale utente e
assicurarsi che elettricità, fornitura di acqua e
sistemi di scarico dell'acqua siano appropriati
prima di chiamare l'agente autorizzato per
l'assistenza. Se non lo sono, chiamare un
tecnico e un idraulico qualificati per eseguire
tutte le regolazioni necessarie.
La preparazione del luogo e le
C
installazioni elettriche, idriche e
dell'acqua di scarico sul luogo della
installazione sono una responsabilità del
cliente.
Installazione e collegamenti elettrici
B
del prodotto devono essere eseguiti
dall'agente autorizzato per l'assistenza.
Il produttore non sarà ritenuto
responsabile per danni che possono
derivare da procedure eseguite da
persone non autorizzate.
Prima della installazione, ispezionare
A
visivamente il prodotto per rilevare la
presenza di eventuali difetti. Se è così,
non farlo installare. I prodotti danneggiati
rappresentano un rischio per la
sicurezza.
Assicurarsi che i flessibili di ingresso
C
e scarico dell'acqua nonché il cavo
di alimentazione non siano piegati,
schiacciati o strappati quando si
riposiziona il prodotto dopo le procedure
di installazione o pulizia.
Posizione adeguata
di montaggio
• Posizionare la macchina su un suolo
solido. Non posizionare la macchina su
tappeti a pelo lungo o su superfici simili.
• Il peso totale di lavatrice e asciugatrice
- a pieno carico - quando sono poste
l'una sull'altra raggiunge circa 180 kg.
Mettere il prodotto su una superficie
solida e piana che abbia una sufficiente
capacità di sopportare il carico!
• Non posizionare il prodotto sul cavo di
alimentazione.
• Non installare il prodotto in luoghi in cui la
temperatura può scendere al di sotto di
0ºC.
• Mettere il prodotto ad una distanza di
almeno 1 cm dai bordi degli altri arredi.
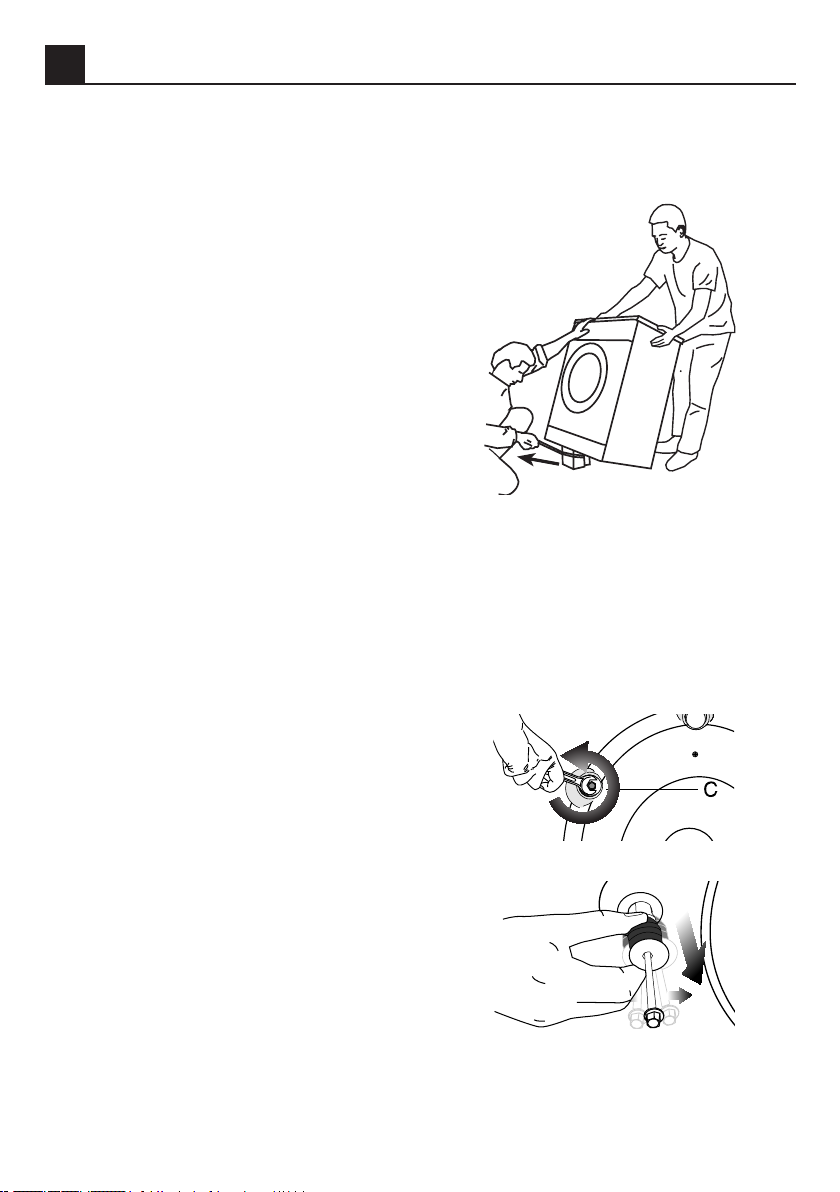
Rimozione dei rinforzi
dell'imballaggio
Ribaltare la lavatrice all'indietro per rimuovere
i rinforzi dell’imballaggio. Tirare il nastro per
rimuovere i rinforzi dell’imballaggio.
Rimozione dei blocchi
di trasporto
Non rimuovere i blocchi di trasporto
A
prima di aver estratto i rinforzi
dell'imballaggio.
Rimuovere i bulloni di sicurezza per il
A
trasporto prima di azionare la lavatrice,
altrimenti il prodotto si danneggia.
1. Allentare tutti i bulloni con un’apposita
chiave, sino a quando ruoteranno
liberamente (C).
2. Rimuovere i bulloni di sicurezza di
trasporto ruotandoli delicatamente.
3. Inserire i coperchietti in plastica nei fori
del pannello posteriore, in dotazione nel
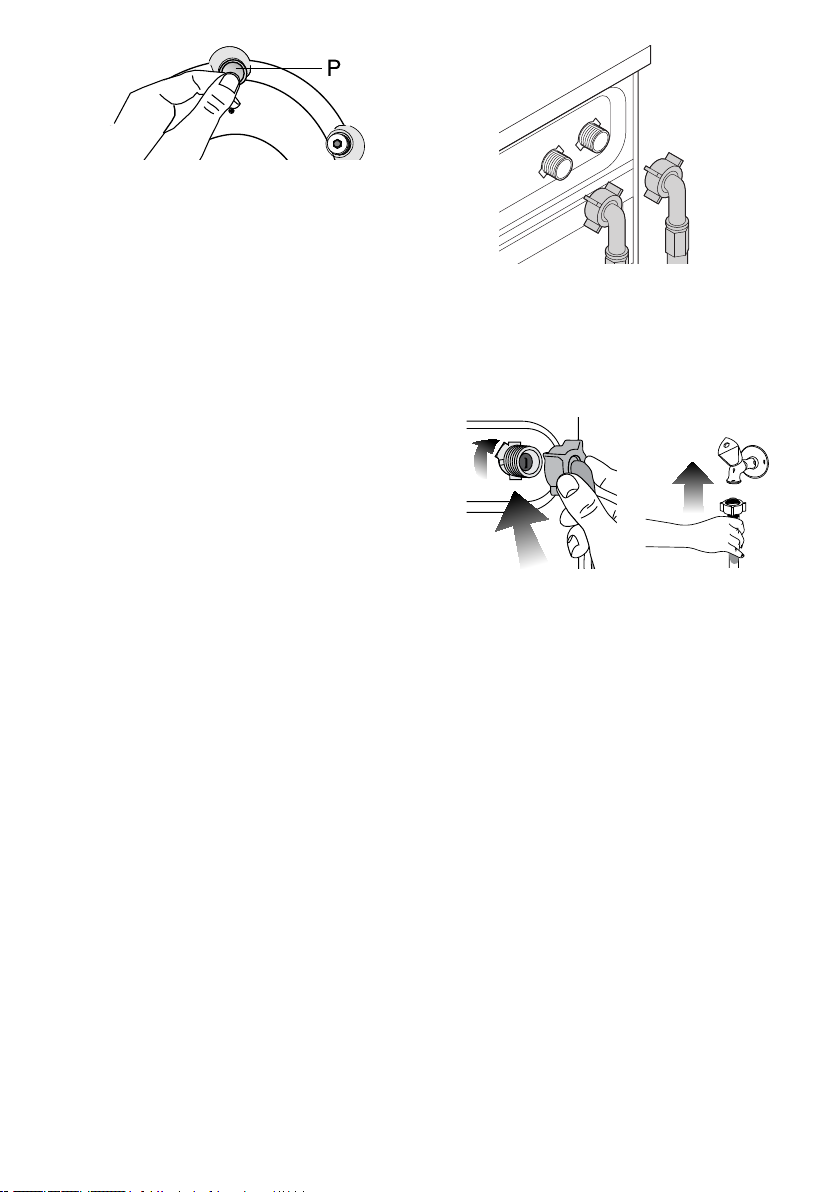
sacchetto allegato al manuale utente. (P)
7 _ IT
Page 8
Conservare i bulloni di sicurezza in un
C
posto sicuro per riutilizzarli in caso di
ulteriori trasporti.
Non spostare mai il prodotto senza
C
avere prima ripristinato correttamente i
bulloni di sicurezza!
Collegamento della
fornitura idrica
La pressione idrica necessaria per
C
utilizzare il prodotto è compresa tra 1 e
10 bars (0,1 – 10 MPa). È necessario
disporre di 10-80 litri di acqua corrente
al minuto con il rubinetto completamente
aperto perché la lavatrice funzioni senza
problemi. Collegare una valvola di
riduzione della pressione se la pressione
dell’acqua è più alta.
Se si usa il doppio ingresso per l’acqua
C
come unità a singolo ingresso dell’acqua
(fredda), è necessario installare il tappo
in dotazione con la lavatrice, sulla valvola
dell’acqua calda, prima di utilizzare il
prodotto. (Si applica ai prodotti forniti di
un gruppo tappo cieco).
Se si desidera usare entrambi gli ingressi
C
dell’acqua del prodotto, collegare il
flessibile dell’acqua calda dopo aver
rimosso il tappo e la guarnizione dalla
valvola dell’acqua calda. (Si applica ai
prodotti forniti di un gruppo tappo cieco).
I modelli con ingresso singolo dell'acqua
A
non devono essere collegati al rubinetto
dell'acqua calda. In questo caso il
bucato si danneggia o il prodotto passa
in modalità protezione e non funziona.
Non usare su prodotti nuovi flessibili
A
per l'acqua vecchi o usati. Altrimenti il
bucato potrebbe macchiarsi.
1. I flessibili specifici in dotazione con
la lavatrice sono collegati alle valvole
di ingresso dell'acqua sul prodotto. Il
flessibile rosso (sinistra) (max. 90 ºC)
è per l'ingresso dell'acqua calda, il
flessibile blu (destra) (max. 25 ºC) è per
l'ingresso dell'acqua fredda.
Quando si installa la lavatrice, assicurarsi
A
che i rubinetti di acqua calda e fredda
siano collegati in modo corretto.
Altrimenti il bucato resta caldo alla fine
del processo di lavaggio usurandosi.
2. Stringere a mano tutti i dadi del flessibile.
Non usare mai una chiave per stringere i
dadi.
3. Aprire completamente i rubinetti dopo
aver collegato il flessibile per controllare
se ci sono perdite di acqua nei punti
di connessione. In caso di perdite,
chiudere il rubinetto e rimuovere il dado.
Stringere nuovamente il dado dopo aver
controllato la guarnizione. Per evitare
perdite di acqua e danni conseguenti,
tenere i rubinetti chiusi quando la
lavatrice non è in uso.
Collegamento dello scarico
• L’estremità del flessibile deve essere
collegata direttamente alla fognatura o al
lavandino.
La casa potrebbe allagarsi se il flessibile
A
esce dal suo alloggiamento durante lo
scarico dell’acqua. Inoltre, c'è il rischio
di ustioni dovuto alle alte temperature di
lavaggio! Per evitare tali situazioni e per
assicurare ingresso e scarico dell'acqua
privi di problemi, montare l'estremità del
flessibile di scarico in modo sicuro, così
che non possa fuoriuscire.
• Il flessibile deve essere installato ad
un'altezza minima di 40 cm e massima
di 100 cm.
• Nel caso in cui il cavo venga sollevato
dopo essere stato a livello o in prossimità
del pavimento (a meno di 40 cm dal
suolo), lo scarico dell’acqua risulta più
8 _ IT
Page 9
difficoltoso e la biancheria potrebbe
uscire ancora eccessivamente bagnata.
Pertanto, seguire le altezze descritte in
figura.
• Per evitare il flusso di acqua sporca che
rientra nella macchina e per consentire
uno scarico facile, non immergere
l'estremità del flessibile nell'acqua sporca
o tenerla ad una distanza di almeno
15 cm. Se il flessibile è troppo lungo,
tagliarlo.
• L'estremità del flessibile non deve essere
piegata, non deve essere calpestata e
non deve essere piegata fra lo scarico e
la macchina.
• Se la lunghezza del flessibile non è
sufficiente, aggiungere una prolunga
originale per flessibili. La lunghezza
del flessibile non deve superare 3,2
m. Per evitare guasti provocati dalla
perdita dell’acqua, la connessione tra
la prolunga del flessibile e il flessibile
di scarico della lavatrice deve essere
eseguita con un morsetto adeguato che
si mantenga fermo e non perda.
Regolazione dei piedini
La lavatrice deve stare su una superficie
A
pianeggiante e in equilibrio, perché
funzioni in modo più silenzioso e senza
vibrazioni. Mettere in equilibrio la
macchina regolando i piedini. Altrimenti
il prodotto può spostarsi provocando
problemi di rumori e vibrazioni.
1. Allentare manualmente i controdadi posti
sui piedini.
2. Regolare i piedini finché il prodotto non è
allo stesso livello e in equilibrio.
3. Stringere di nuovo a mano tutti i
controdadi del flessibile.
Non utilizzare alcun utensile per allentare
A
i controdadi. Potrebbero subire dei
danni.
Collegamento elettrico
Collegare il prodotto ad una presa messa
a terra protetta da un fusibile conforme ai
valori della tabelle "Specifiche tecniche". La
nostra azienda non sarà responsabile dei
danni derivanti dall'uso del prodotto senza la
messa a terra conforme ai regolamenti locali.
• Il collegamento deve essere effettuato in
ottemperanza ai regolamenti vigenti.
• Una volta terminata l'installazione, il cavo
di alimentazione deve essere a portata di
mano.
• La tensione e la protezione o
l'interruttore dei fusibili consentiti sono
precisati nella sezione “Specifiche
tecniche”. Se il valore corrente del fusibile
o dell'interruttore in casa è inferiore a
16 Amps, far installare un fusibile da 16
Amp da un elettricista qualificato.
9 _ IT
Page 10

• La tensione dell’apparecchio deve
corrispondere alla tensione di rete.
• Non eseguire collegamenti usando
prolunghe o spine multiple.
Cavi di alimentazione danneggiati
B
devono essere sostituiti da un agente
autorizzato per l'assistenza.
Primo utilizzo
Prima di cominciare ad usare il prodotto,
assicurarsi di eseguire tutte le preparazioni
secondo le istruzioni delle sezioni "Istruzioni
importanti per la sicurezza" e "Installazione".
Per preparare il prodotto al lavaggio del
bucato, eseguire la prima operazione del
programma per la pulizia del cestello. Se
la lavatrice non ha un programma per la
pulizia del cestello, usare il programma
Cotone 90 e selezionare le funzioni ausiliarie
di acqua aggiuntiva o risciacquo extra.
Prima di avviare il programma, mettere
max. 100 g di anticalcare in polvere nello
scomparto detersivo per lavaggio principale
(scomparto n. II). Se l'anticalcare è in
compresse, mettere un'unica compressa
nello scomparto n. II. Asciugare l'interno
del soffietto con un panno pulito quando il
programma è completo.
2. Rimuovere i collegamenti idrici per
scarico e fornitura d'acqua.
3. Scaricare completamente l'acqua
rimanente nel prodotto; vedere "Scarico
dell'acqua rimanente e pulizia del filtro
della pompa".
4. Installare bulloni di sicurezza per
il trasporto nell'ordine inverso alla
procedura di rimozione; vedere
"Rimozione dei blocchi di trasporto".
Non spostare mai il prodotto senza
C
avere prima ripristinato correttamente i
bulloni di sicurezza!
Smaltimento della
vecchia lavatrice
Liberarsi del vecchio apparecchio rispettando
l’ambiente.
Fare riferimento all'agente locale o a un
centro per lo smaltimento dei rifiuti per avere
informazioni sullo smaltimento della lavatrice.
Per la sicurezza dei bambini, prima di smaltire
il prodotto, tagliare il cavo di alimentazione
e rompere il meccanismo di blocco dello
sportello di carico in modo che non funzioni.
Usare un anticalcare appropriato alle
C
lavatrici.
Potrebbe restare dell'acqua nel prodotto
C
in seguito ai processi di controllo della
qualità durante la produzione. Non è
dannosa per il prodotto.
Smaltimento dei materiali
per l'imballaggio
I materiali di imballaggio sono dannosi per
i bambini. Tenere i materiali di imballaggio
in un luogo sicuro lontano dalla portata dei
bambini.
I materiali di imballaggio della macchina sono
prodotti con materie riciclabili. Smaltirli in
modo corretto e dividerli secondo le istruzioni
per il riciclaggio dei rifiuti. Non smaltirli
insieme ai normali rifiuti domestici.
Trasporto del prodotto
1. Scollegare il prodotto prima di
trasportarlo.
10 _ IT
Page 11

Consigli per un lavaggio efficace
Colori chiari e capi
bianchi
Molto sporco
(macchie difficili
come erba, caffé,
frutta e sangue).
Sporco normale
Livello di sporco
(Per esempio,
macchie naturali su
colletti e polsini)
Poco sporco
(Non sono presenti
macchie visibili).
(Intervallo di
temperatura
consigliata basato
sul livello di sporco:
40-90C)
Potrebbe essere
necessario pretrattare
le macchine ed
eseguire il prelavaggio. Detersivi
in polvere e liquidi
consigliati per i capi
bianchi possono
essere usati ai
dosaggi consigliati
per capi molto
sporchi. Si consiglia
di usare detersivi
liquidi per pulire
macchie di argilla e
creta e macchie che
sono sensibili alla
candeggina.
Detersivi in polvere
e liquidi consigliati
per i capi bianchi
possono essere usati
ai dosaggi consigliati
per capi con sporco
normale.
Detersivi in polvere
e liquidi consigliati
per i capi bianchi
possono essere usati
ai dosaggi consigliati
per capi poco
sporchi.
(Intervallo di
temperatura consigliata
basato sul livello di
sporco: freddo-40C)
Detersivi in polvere
e liquidi consigliati
per i capi colorati
possono essere usati
ai dosaggi consigliati
per capi molto sporchi.
Si consiglia di usare
detersivi liquidi per
pulire macchie di argilla
e creta e macchie
che sono sensibili
alla candeggina.
Usare detersivi senza
candeggina.
Detersivi in polvere e
liquidi consigliati per i
capi colorati possono
essere usati ai dosaggi
consigliati per capi
con sporco normale.
Usare detersivi senza
candeggina.
Detersivi in polvere
e liquidi consigliati
per i capi colorati
possono essere usati
ai dosaggi consigliati
per capi poco sporchi.
Usare detersivi senza
candeggina.
Indimenti
Colori Colori scuri
(Intervallo di
temperatura
consigliata basato
sul livello di
sporco: freddo40C)
Detersivi iliquidi
consigliati
adatti per capi
colorati e scuri
possono essere
usati ai dosaggi
consigliati per
capi molto
sporchi.
Detersivi iliquidi
consigliati
adatti per capi
colorati e scuri
possono essere
usati ai dosaggi
consigliati per
capi con sporco
normale.
Detersivi iliquidi
consigliati
adatti per capi
colorati e scuri
possono essere
usati ai dosaggi
consigliati per
capi poco
sporchi.
Delicati/lana/
seta
(Intervallo di
temperatura
consigliata
basato sul
livello di sporco:
freddo-30C)
Preferire i
detersivi liquidi
prodotti per
capi delicati.
Capi in lana e
seta devono
essere lavati con
detersivi speciali
per la lana.
Preferire i
detersivi liquidi
prodotti per
capi delicati.
Capi in lana e
seta devono
essere lavati con
detersivi speciali
per la lana.
Preferire i
detersivi liquidi
prodotti per
capi delicati.
Capi in lana e
seta devono
essere lavati con
detersivi speciali
per la lana.
11 _ IT
Page 12
4 Preparazione
Cose da fare ai fini del
risparmio energetico
Le informazioni che seguono aiutano ad
usare il prodotto in modo ecologico e con
risparmio energetico.
• Utilizzare il prodotto alla massima
capacità consentita dal programma
selezionato, ma non sovraccaricarlo;
vedere la tabella "Programma e
consumo".
• Seguire sempre le istruzioni sulla
confezione del detersivo.
• Lavare il bucato poco sporco a
temperature basse.
• Usare programmi più veloci per piccole
quantità di bucato poco sporco.
• Non usare prelavaggio e temperature
alte per bucato poco sporco o
macchiato.
• Se si desidera asciugare il bucato
nell'asciugatrice, selezionare la velocità
di centrifuga più alta consigliata durante il
programma di lavaggio.
• Non usare detersivo in quantità superiore
a quella consigliata sulla confezione.
Selezione del bucato
• Selezionare il bucato in base al tipo di
tessuto, al colore, al livello di sporco e
alla temperatura di lavaggio consentita.
• Rispettare sempre le istruzioni presenti
sulle etichette dei capi.
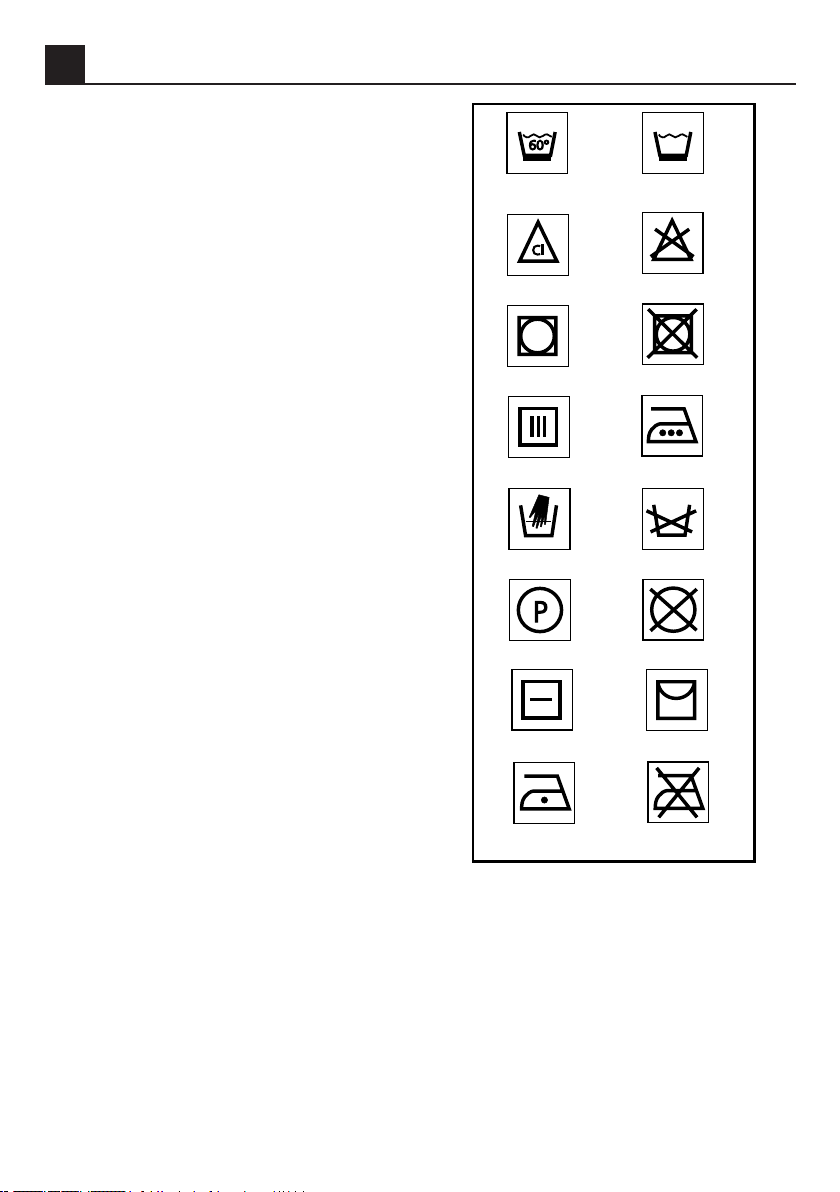
Temperatura
dell’acqua di lavaggio
È possibile
candeggiare
Adatto per
lavaggio a secco
Appendere senza
centrifugare
Non lavare in lavatrice Non lavare
Lavare a secco Non lavare a secco
Lavaggio con programmi
brevi e delicati.
Non candeggiare
Non asciugare con
essicatore
Può essere stirato
con ferro caldo
Asciugare
orizzontalmente
Può essere stirato
con ferro tiepido
Ascgiugare su
appendiabiti
Non stirare
Preparazione del
bucato da lavare
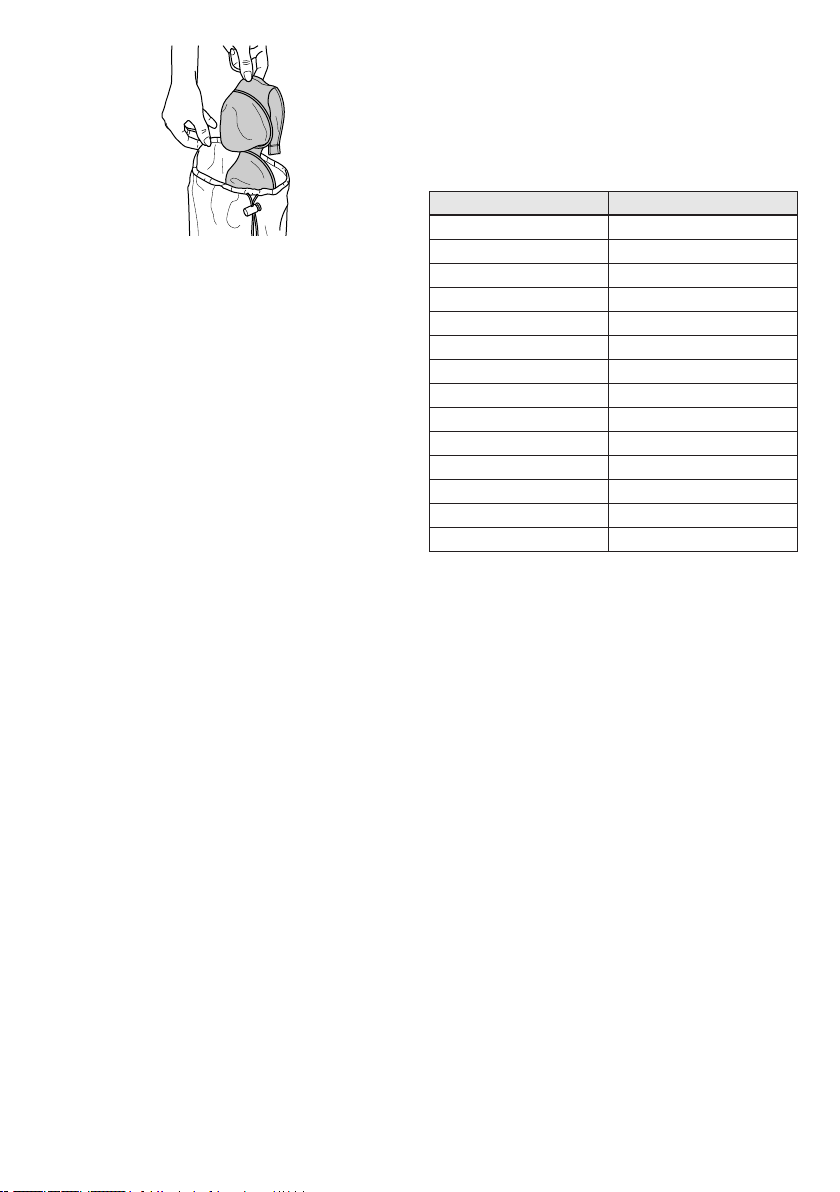
• Gli indumenti con accessori in metallo,
quali reggiseno, fibbie di cinture o
bottoni metallici possono danneggiare la
lavatrice. Rimuovere le parti in metallo o
lavare questi capi ponendoli in una borsa
apposita o nella federa di un cuscino.
12 _ IT
Page 13
• Togliere dalle tasche tutti gli oggetti, quali
monete, penne e graffette, capovolgere
le tasche e spazzolare. Tali oggetti
possono danneggiare il prodotto o
provocare problemi dovuti al rumore.
• Mettere i capi piccoli, come i calzini dei
neonati e le calze di nylon, in una borsa
apposita o nella federa di un cuscino.
• Mettere le tende all'interno senza
comprimerle. Rimuovere gli accessori
dalle tende.
• Chiudere le cerniere, cucire i bottoni
allentati e sistemare strappi e lacerazioni.
• Scegliere il programma corretto per
i capi che recano scritto in etichetta
“lavare in lavatrice” o “lavare a mano”.
• Non lavare insieme capi bianchi e
colorati. I capi in cotone nuovi o di colori
scuri perdono molto colore. Lavarli
separatamente.
• Macchie resistenti devono essere trattate
correttamente prima del lavaggio. Se
non si è sicuri, utilizzare un pulitore a
secco.
• Utilizzare solo tinte/coloranti e
smacchiatori adatti per l’utilizzo con la
lavatrice. Seguire sempre le istruzioni
indicate sulla confezione.
• Lavare pantaloni e capi delicati girandoli
al rovescio.
• Tenere i capi fatti in lana d’angora nel
congelatore per qualche ora prima del
lavaggio. Questo ridurrà la perdita del
pelo.
• Il bucato molto sporco di materiale come
farina, polvere di calcare, polvere di
latte, ecc. deve essere scosso prima di
metterlo in lavatrice. Tali tipi di polvere
sul bucato possono raccogliersi nelle
parti interne della lavatrice nel tempo e
possono provocare danni.
Corretta capacità di carico
La capacità massima di carico dipende dal
tipo di bucato, dal grado di sporco e dal
programma di lavaggio desiderato.
La macchina regola automaticamente la
quantità di acqua secondo il peso del bucato
che viene posto all'interno.
Seguire le informazioni della tabella
A
“Programma e consumo”. In caso
di sovraccarico, la prestazione della
lavatrice peggiora. Inoltre possono
verificarsi problemi di rumore e vibrazioni.
Tipo di bucato e pesi medi nella tabella che
segue sono presentati come esempi.
Tipo di bucato Peso (g.)
Accappatoio 1200
Tovaglioli 100
Copripiumone 700
Lenzuola 500
Federa per cuscino 200
Tovaglia 250
Asciugamano 200
Asciugamani 100
Camicia da notte 200
Biancheria intima 100
Tute maschili 600
Camicie maschili 200
Pigiami maschili 500
Camicette 100
Caricamento del bucato
• Aprire lo sportello di carico.
• Mettere il bucato sciolto dentro alla
macchina.
• Chiudere lo sportello di carico fino
a sentire un suono di blocco. Fare
attenzione a che non vi siano capi
impigliati nello sportello.
Lo sportello di carico è bloccato
C
durante l'esecuzione dei programmi. Lo
sportello può essere aperto solo dopo
un certo periodo di tempo dalla fine del
programma.
In caso di cattivo posizionamento del
A
bucato, possono verificarsi rumori e
vibrazioni nella lavatrice.
Uso di detersivo e
ammorbidente
Cassetto del detersivo
Il cassetto del detersivo è suddiviso in tre
scomparti:
- (I) per il prelavaggio
– (II ) per il lavaggio principale
– (III) per l’ammorbidente
– (*) inoltre c'è un sifone nello scomparto
dell'ammorbidente.
13 _ IT
Page 14
2
3
Il distributore del detersivo può essere
C
di due tipi, in funzione del modello della
lavatrice, come mostrato sopra.
1
23
1
Detersivo, ammorbidente e altri
detergenti
• Aggiungere il detersivo e l’ammorbidente
prima di avviare il programma di
lavaggio.
• Non aprire mai il cassetto del detersivo
mentre il programma è in corso!
• Quando si usa un programma senza
prelavaggio, non mettere detersivo nello
scomparto del prelavaggio (scomparto
n. I).
• Quando si usa un programma con
prelavaggio, non mettere detersivo
liquido nello scomparto del prelavaggio
(scomparto n. I).
• Non selezionare un programma con
prelavaggio se si usa un sacchetto
detergente o una sfera detergente.
Mettere il sacchetto detergente o la sfera
direttamente tra il bucato nella lavatrice.
• Se si usa detersivo liquido, non
dimenticare di mettere il contenitore per
il detersivo liquido nello scomparto per il
lavaggio principale (scomparto n. II).
Scelta del tipo di detersivo
Il tipo di detersivo da usare dipende dal tipo e
dal colore del tessuto.
• Usare detersivi diversi per bucato bianco
e colorato.
• Lavare i capi delicati solo con detersivi
speciali (detersivo liquido, shampoo per
lana, ecc.) che si usano solo per capi
delicati.
• Quando si lavano capi di colore scuro e
trapunte, si consiglia di usare detersivo
liquido.
• Lavare i capi in lana con un detersivo
speciale specifico per i capi in lana.
Usare solo detersivi prodotti
A
specificamente per lavatrici.
Non usare sapone in polvere.
A
Regolazione della quantità di detersivo
La quantità di detersivo da utilizzare dipende
dal volume di biancheria, dal grado di sporco
e dalla durezza dell’acqua. Leggere le
istruzioni del produttore sulla confezione del
detersivo con attenzione e seguire i valori di
dosaggio.
14 _ IT
• Non utilizzare quantità superiori a quelle
indicate sulla confezione del detersivo,
per evitare la formazione eccessiva di
schiuma e un risciacquo inadeguato.
Inoltre si risparmia denaro e non si
inquina l’ambiente.
• Usare una quantità minore di detersivo
per piccole quantità di bucato o bucato
poco sporco.
• Usare detersivi concentrati nelle dosi
consigliate.
Uso di ammorbidenti
Versare l’ammorbidente nello scomparto
apposito del cassetto del detersivo.
• Usare i dosaggi consigliati indicati sulla
confezione.
• Non superare il contrassegno di livello
(>max<) dello scomparto ammorbidente.
• Se l’ammorbidente ha perso fluidità,
diluirlo con acqua prima di metterlo nel
cassetto del detersivo.
Uso di detersivi liquidi
Se il prodotto contiene un contenitore
per detersivo liquido:
• Assicurarsi di aver posizionato il
contenitore per detersivo liquido nello
scomparto n. "II".
• Usare solo il misurino del produttore per
il detersivo e seguire le istruzioni sulla
confezione.
• Usare i dosaggi consigliati indicati sulla
confezione.
• Se il detersivo liquido ha perso fluidità,
diluirlo con acqua prima di metterlo nel
contenitore del detersivo.
Se il prodotto non contiene un
contenitore per detersivo liquido:
• Non usare detersivo liquido per il
prelavaggio in un programma con
prelavaggio.
• Usare solo il misurino del produttore per
il detersivo e seguire le istruzioni sulla
confezione.
Page 15

• Il detersivo liquido macchia il bucato
se usato con la funzione di avvio con
ritardo. Se si usa la funzione di avvio con
ritardo, non usare detersivo liquido.
Uso di detersivo in gel e compresse
Quando si usano detersivi in compresse, gel,
ecc., leggere le istruzioni del produttore sulla
confezione del detersivo con attenzione e
seguire i valori di dosaggio. Se non ci sono
istruzioni sulla confezione, applicare quanto
segue.
• Se la consistenza del detersivo in gel
è fluida e la lavatrice non contiene un
contenitore speciale per detersivo
liquido, mettere il detersivo in gel nello
scomparto del lavaggio principale
durante il primo carico di acqua. Se la
lavatrice contiene un contenitore per
detersivo liquido, riempirlo di detersivo
prima di avviare il programma.
• Se la consistenza del detersivo in gel
non è fluida o esso è contenuto in una
capsula, metterlo direttamente nel
cestello prima del lavaggio.
• Mettere il detersivo in compresse
nello scomparto lavaggio principale
(scomparto n. II) o direttamente nel
cestello prima del lavaggio.
Il detersivo in compresse può lasciare
C
residui nello scomparto detersivo. In
questo caso, mettere il detersivo in
compresse nel bucato, chiudere la
parte inferiore del cestello nei lavaggi
successivi.
Usare il detersivo in compresse o
C
gel senza selezionare la funzione di
prelavaggio.
Uso dell'appretto
• Aggiungere appretto liquido, in
polvere o colorante nello scomparto
ammorbidente se viene indicato sulla
confezione.
• Non usare insieme ammorbidente e
appretto, in un ciclo di lavaggio.
• Pulire l'interno della lavatrice con un
panno umido e pulito dopo aver usato
l'appretto.
Uso di candeggina
• Selezionare un programma con
prelavaggio e aggiungere la candeggina
all'inizio del prelavaggio. Non
versare detersivo nello scomparto
del prelavaggio. Come applicazione
alternativa, selezionare un programma
con risciacquo extra e aggiungere la
candeggina mentre la macchina aspira
l'acqua dallo scomparto detersivo
durante la prima fase di risciacquo.
• Non usare candeggina e detersivo
mescolandoli.
• Usare una piccola quantità (circa 50 ml)
di candeggina e sciacquare i capi molto
bene, perché provoca irritazione della
pelle. Non versare la candeggina sui capi
e non usarla per capi colorati.
• Quando si usa candeggina a base
di ossigeno, seguire le istruzioni sulla
confezione e selezionare un programma
a bassa temperatura.
• La candeggina a base di ossigeno può
essere usata insieme al detersivo; però
se la consistenza non è la stessa del
detersivo, mettere il detersivo prima
nello scomparto n. "II" del cassetto del
detersivo e aspettare finché il detersivo
non fluisce quando la lavatrice aspira
l'acqua. Aggiungere candeggina dallo
stesso scomparto quando la lavatrice
sta ancora aspirando l'acqua.
Uso di un agente anticalcare
• Quando necessario, usare agenti
anticalcare prodotti specificamente solo
per lavatrici.
• Seguire sempre le istruzioni sulla
confezione.
15 _ IT
Page 16
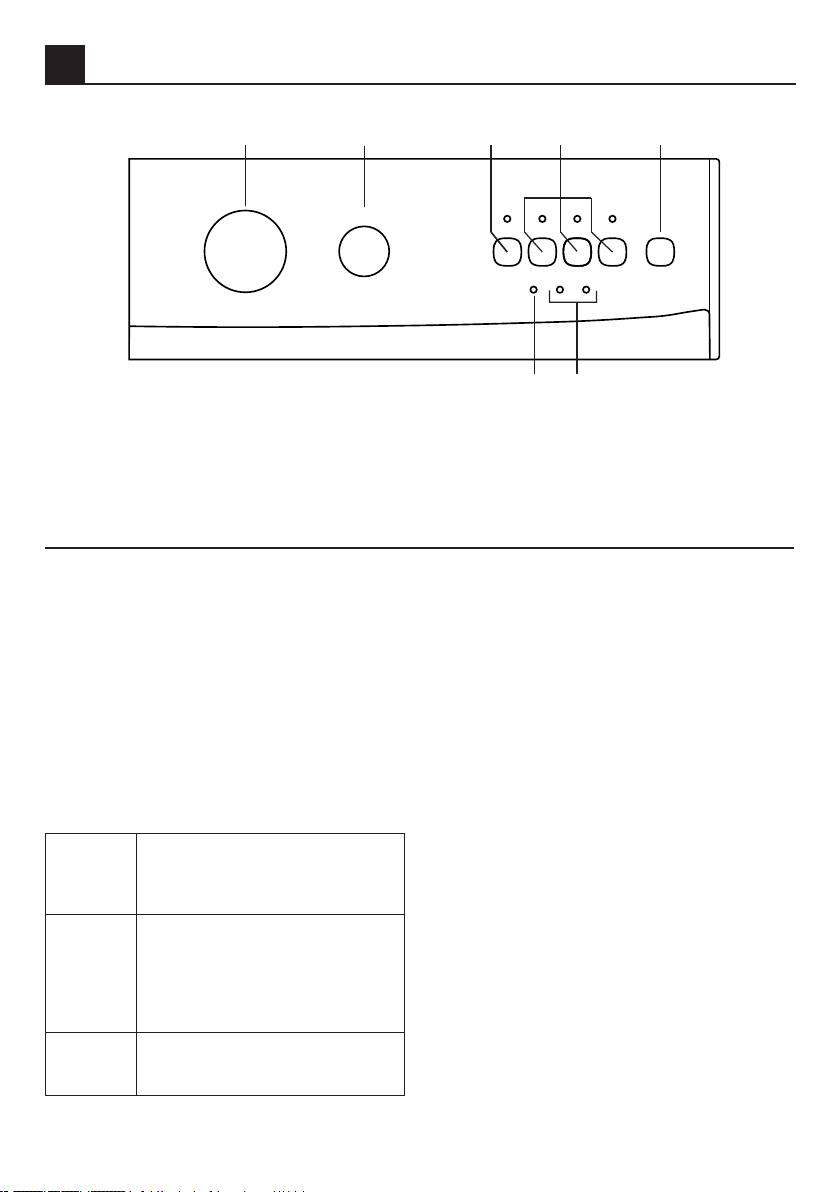
5 Funzionamento del prodotto
Pannello di controllo
1
3
4
5
8
7
6
1 - Manopola di selezione del programma
2 - Tasto di regolazione velocità della
centrifuga*
3 - Tasto di regolazione della temperatura*
4 - Tasto avvio / pausa / annulla
5 - Tasti funzioni ausiliarie
Preparazione
dell'elettrodomestico
Assicurarsi che i flessibili siano collegati in
modo sicuro. Collegare la macchina alla
presa elettrica. Aprire completamente il
rubinetto. Mettere il bucato nella macchina.
Aggiungere detersivo e ammorbidente per
bucato.
Selezione del programma
1. Selezionare il programma adatto a tipo,
quantità e livello di sporco del bucato
secondo la tabella "Programma e
consumo" e la tabella "Temperatura"
sotto.
90˚C
60˚C
40˚C30°C-
Freddo
2. Selezionare il programma desiderato con
il tasto di selezione del programma.
Capi bianchi e tessuti in cotone,
molto sporco. (tovagliette,
tovaglie, asciugamani, lenzuola,
ecc.)
Capi in cotone o sintetici che
non scoloriscono, colorati,
sporco normale (magliette,
camicie da notte, pigiami, ecc.)
e capi bianchi leggermente
sporchi (biancheria intima, ecc.).
Bucato misto compresi tessuti
delicati (tende di velo, ecc.), capi
sintetici e in lana.
16 _ IT
6 - Tasto di accensione / spegnimento
7 - Indicatore di follow-up del programma*
8 - Spia sportello di carico*
* Varia a seconda del modello
dell'elettrodomestico.
I programmi sono dotati di limitatore per
C
la velocità di centrifuga appropriata per
quel particolare tipo di tessuto.
Quando si seleziona il programma,
C
considerare sempre il tipo di tessuto, il
colore, il livello di sporco e la temperatura
dell'acqua consentita.
Selezionare sempre la più bassa
C
temperatura richiesta. Temperatura
più alta significa maggiore consumo
energetico.
Per maggiori dettagli sui programmi,
C
vedere la tabella "Programma e
consumo".
Programmi principali
A seconda del tipo di tessuto, usare i
programmi principali che seguono.
• Cotone
È possibile lavare il bucato normalmente
sporco di cotone e lino con questo
programma con il massimo risparmio di
energia e acqua, rispetto agli altri programmi
di lavaggio adatti ai capi in cotone. La
temperatura reale dell’acqua può differire
dalla temperatura dichiarata del ciclo. La
durata del programma può essere abbreviata
automaticamente durante le ultime fasi del
programma se si lava una minore quantità
di bucato (per es. ½ capacità o meno). In
questo caso il consumo di energia e acqua
diminuisce ulteriormente dando l’opportunità
Page 17

di un lavaggio ancora più economico. Questa
funzione è disponibile per determinati modelli
dotati del display del tempo rimanente.
• Sintetici
Usare questo programma per lavare i capi
sintetici (magliette, camicie, tessuti misti
sintetici/cotone, ecc.). Lava con un'azione
gentile ed ha un ciclo di lavaggio più breve
rispetto al programma Cotone.
Per tende e tulle, usare il programma
Sintetici 40˚C con la funzione di prelavaggio
selezionata. Poiché i tessuti a rete provocano
schiuma in eccesso, lavare veli/tulle
mettendo poco detersivo nello scomparto
del lavaggio principale. Non versare detersivo
nello scomparto del prelavaggio.
• Lana
Usare questo programma per lavare i capi in
lana. Selezionare la temperatura appropriata
conforme alle etichette degli abiti. Usare
detersivi appropriati per i capi in lana.
Programmi aggiuntivi
Per casi speciali, sono disponibili programmi
aggiuntivi.
I programmi aggiuntivi possono differire
C
in funzione del modello della macchina.
• Delicati
Usare questo programma per lavare i capi
delicati. Lava con un'azione gentile senza
centrifuga rispetto al programma per i capi
sintetici.
• Lavaggio a Mano
Usare questo programma per lavare
indumenti in lana/delicati che portano
l’etichetta “non lavare in lavatrice” per i quali
si raccomanda il lavaggio a mano. Lava il
bucato con una azione di lavaggio molto
delicata per non danneggiare il bucato
stesso.
• Mini 30
Usare questo programma per lavare una
piccola quantità di capi in cotone poco
sporchi, in poco tempo (30 minuti).
• Super
Usare questo programma per lavare il bucato
per cui non è possibile usare il programma
Cotone 60 °C. Si ha lo stesso risultato con
il programma Cotone 60 °C lavando per un
periodo più lungo a 40 °C, consentendo così
un risparmio energetico.
Programmi speciali
Per applicazioni specifiche, selezionare uno
dei seguenti programmi.
• Risciacquo
Usare questo programma quando si vuole
risciacquare o inamidare separatamente.
• Centrifuga
Usare questo programma per applicare un
ciclo di centrifuga aggiuntivo per la biancheria
17 _ IT
o per scaricare l’acqua dalla macchina.
Prima di selezionare questo programma,
selezionare la velocità di centrifuga desiderata,
premere il pulsante avvio/pausa/annulla. Per
prima cosa, la macchina scarica l'acqua
interna. Poi, centrifuga il bucato con la velocità
impostata per la centrifuga e scarica l'acqua
che ne deriva.
Se si desidera solo scaricare l'acqua senza
l'azione di centrifuga, selezionare il programma
Pompa+centrifuga e poi selezionare la
funzione "Nessuna centrifuga" con l'aiuto del
tasto di regolazione della velocità di centrifuga
a seconda del modello dell'elettrodomestico e
premere il tasto Avvio / Pausa.
Se l'elettrodomestico non è dotato
C
del tasto di regolazione della velocità
di centrifuga e della funziona ausiliaria
Nessuna centrifuga e si desidera solo
scaricare l'acqua senza centrifugare
il bucato, selezionare il tasto
Pompa+Centrifuga e premere il tasto
Avvio / Pausa. L'elettrodomestico passa
alla fase centrifuga solo dopo aver
completato la fase pompa. Premere il
tasto Avvio / Pausa / Annulla per arrestare
l'elettrodomestico appena si vede il
cestello ruotare.
Per il bucato delicato usare una velocità di
C
centrifuga inferiore.
Selezione della temperatura
Nei modelli dotati di tasto di regolazione
della temperatura, si può lavare il bucato alla
temperatura desiderata usando questo tasto.
Per evitare danni al bucato, non
A
selezionare una temperatura che superi
quella consigliata per il bucato nella tabella
“Programma e consumo".
Selezione velocità centrifuga
Nei modelli dotati di tasto di regolazione della
velocità di centrifuga, si può centrifugare il
bucato alla velocità desiderata usando questo
tasto.
In modelli senza tasto di regolazione della
velocità di centrifuga, la centrifuga sarà
eseguita alla velocità consigliata per il
programma selezionato.
Se si desidera estrarre il bucato senza
C
centrifuga, portare il tasto di regolazione
della velocità di centrifuga sulla posizione
Nessuna centrifuga.
Page 18
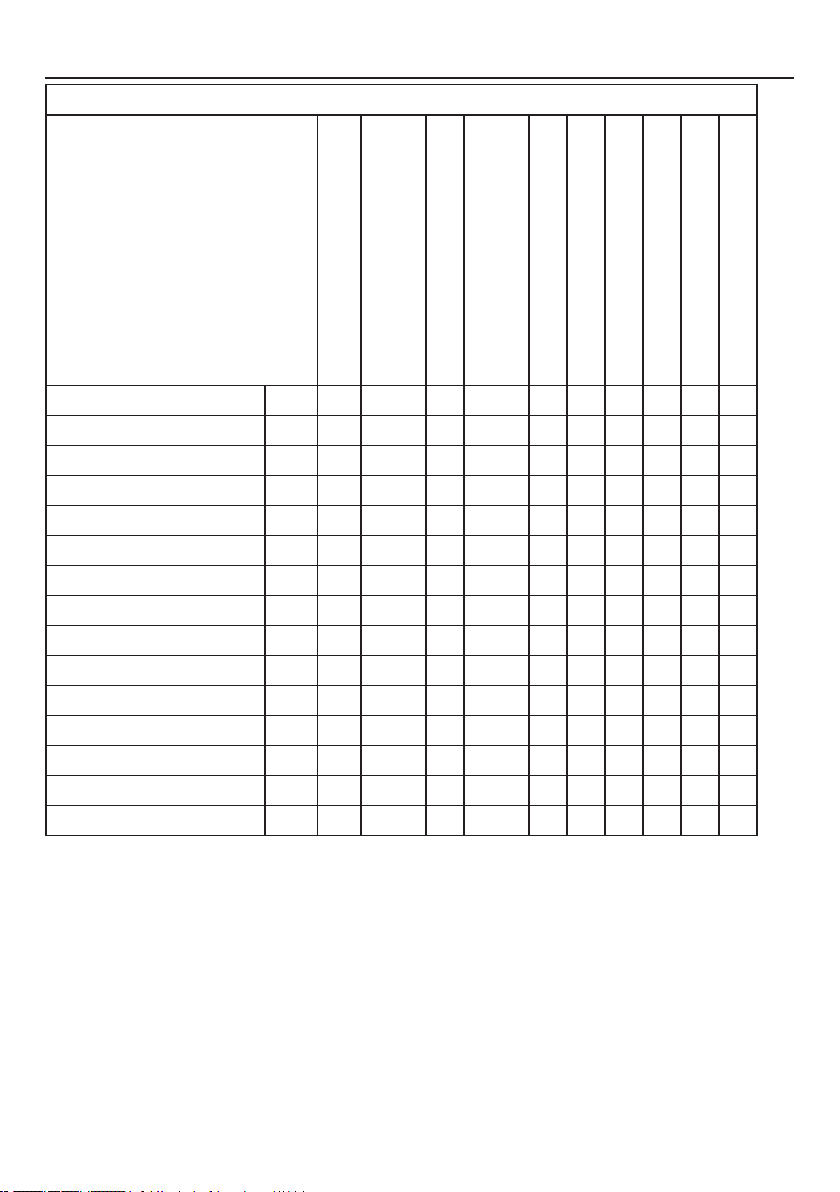
Tabella Selezione programma e consumo
IT
Programma
Cotone 90 6 125 53 1.65 • • • • • •
Cotone 60** 6 148 52 1.01 • • • • • •
Cotone 60** 3 148 48 0.86 • • • • • •
Cotone 40** 3 132 48 0.62 • • • • • •
Cotone 40 6 105 53 1.33 • • • • • •
Cotone Freddo 6 95 53 0.16 • • • • • •
Sintetici 60 2.5 113 52 0.92 • • • • • •
Sintetici 40 2.5 125 52 0.56 • • • • • •
Sintetici 30 2.5 95 52 0.30 • • • • • •
Sintetici Freddo 2.5 90 52 0.15 • • • • • •
Delicati 30 2 65 45 0.36 • • • • •
Lana 40 1.5 60 45 0.36 • • • • •
Lana Freddo 1.5 50 45 0.02 • • • •
Lavaggio a Mano 30 1 45 32 0.21 • • •
Mini 30 30 2.5 30 43 0.17 • • •
26
Carico max.(Kg)
Durata programma (~min)
Consumo d’acqua (l)
Consumo energia (KWh)
Prelavaggio
Extra Risciacquo
Risciacquo Aggiuntivo
Riduzione velocita’ centrifuga
Esclusione Centrifuga
Senza calore
• : Selezionabile
* : Selezionato automaticamente, non annullabile.
**: Etichetta Energia programma (EN 60456 Ed.3)
- : Vedere la descrizione del programma per il carico massimo.
Il consumo di acqua ed energia potrebbe variare in base a differenze nella pressione
C
dell'acqua, alla durezza e alla temperatura dell'acqua, alla temperatura ambiente, al tipo e
alla quantità di bucato, alla scelta di funzioni ausiliarie e a modifiche della tensione elettrica.
Le funzioni ausiliarie nella tabella possono variare in funzione del modello della lavatrice.
C
18 _ IT
Page 19

Selezione funzione ausiliaria
Selezionare le funzioni ausiliarie desiderate
prima di avviare il programma. Inoltre è
possibile selezionare o annullare le funzioni
ausiliarie che sono adatte all'esecuzione del
programma senza premere il tasto avvio/
pausa/annulla durante il funzionamento della
lavatrice. Per questo, la macchina deve essere
in una fase precedente alla funzione ausiliaria
che si sta per selezionare o annullare.
Se la funzione ausiliaria non può essere
selezionata o annullata, la spia della relativa
funzione ausiliaria lampeggia 3 volte per
avvertire l'utente.
Alcune funzioni non possono essere
C
selezionate insieme. Se una seconda
funzione ausiliaria è in conflitto con la
prima selezionata prima dell'avvio della
lavatrice, la funzione selezionata come
prima viene annullata e la seconda
funzione ausiliaria resta attiva.
Una funzione ausiliaria che non è
C
compatibile con il programma non può
essere selezionata. (Vedere la tabella
"Programma e consumo")
I tasti della funzione ausiliaria possono
C
differire a seconda del modello della
lavatrice.
• Prelavaggio
Conviene effettuare il prelavaggio solo con
bucato molto sporco. Non usare il prelavaggio
consente di risparmiare energia, acqua,
detersivo e tempo.
Poiché i tessuti a rete provocano schiuma
C
in eccesso, lavare veli/tulle mettendo poco
detersivo nello scomparto del lavaggio
principale. Non versare detersivo nello
scomparto del prelavaggio.
• Extra Risciacquo
Questa funzione consente alla lavatrice di
eseguire un altro risciacquo oltre a quello già
eseguito dopo il lavaggio principale. Si riduce
così il rischio che la pelle sensibile (neonati,
pelli con allergie ecc) venga attaccata dal
detersivo che rimane sul bucato.
• Risciacquo Aggiuntivo
Se non si tolgono i capi dalla lavatrice
immediatamente dopo il completamento del
programma, è possibile usare la funzione
trattieni risciacquo e lasciare il bucato
nell'acqua del risciacquo finale per evitare che
si riempiano di pieghe quando non c'è acqua
nella macchina.
Nei modelli dotati di tasto di regolazione della
velocità di centrifuga, selezionare la velocità
per la centrifuga e premere il tasto avvio/
pausa/annulla se si desidera centrifugare il
bucato che è in acqua.
Nei modelli senza tasto di regolazione della
velocità di centrifuga, selezionare il programma
Centrifuga+Pompa se si desidera centrifugare
il bucato che è in acqua.
In questi modelli, bisogna arrestare
C
l'elettrodomestico premendo il tasto avvio/
pausa/annulla prima di passare alla fase di
centrifuga e dopo il completamento della
fase di pompa e lo scarico dell'acqua
dall'elettrodomestico. Così l'acqua
all'interno dell'elettrodomestico è scaricata
e il bucato non è centrifugato.
• Senza calore
Usare questa funzione se si desidera lavare il
bucato in acqua fredda.
• Esclusione Centrifuga
Usare questa funzione se non si desidera
centrifugare il bucato alla fine del programma.
• Riduzione velocita’ centrifuga
Questa funzione consente di centrifugare
il bucato ad una velocità inferiore rispetto
alla velocità massima di centrifuga
dell'elettrodomestico.
Quando si preme il tasto di riduzione della
centrifuga, la velocità di centrifuga sarà limitata
alla velocità minima specificata sul pannello di
controllo.
Avvio del programma
1. Premere il tasto avvio/pausa/annulla per
avviare il programma.
2. Il tasto avvio/pausa/annulla si accende
per indicare che il programma si è avviato.
3. Lo sportello di carico è bloccato e la spia
relativa si spegne.
Blocco bambini
Usare la funzione di blocco bambini per
evitare che i bambini possano interferire con il
funzionamento del prodotto. In questo modo
si possono evitare cambiamenti ai programmi
in corso.
Si può accendere e spegnere la
C
macchina con il tasto di accensione/
spegnimento quando il blocco bambini
è attivo. Quando si accende di nuovo
l'elettrodomestico, il programma riprende
dal punto in cui è stato interrotto con il
blocco bambini attivato.
Per attivare il blocco bambini:
Tenere premuti i tasti della 1a e 2a funzione
ausiliaria per 3 secondi contemporaneamente
dopo l'avvio del programma di lavaggio. La
spia della 1a funzione ausiliaria si accende in
modo continuo.
Per disattivare il blocco bambini:
Il blocco bambini deve essere disattivato per
avviare un nuovo programma dopo la fine o
l'interruzione di un programma in corso.
19 _ IT
Page 20

Tenere premuti i tasti della 1a e 2a
funzione ausiliaria per 3 secondi
contemporaneamente per disattivare il
blocco bambini.
Avanzamento del programma
L'avanzamento di un programma in corso
può essere seguito grazie all'indicatore di
follow-up del programma. All’inizio di tutte
le fasi di programma, la spia dell’indicatore
appropriato si accenderà e rimarrà accesa
fino al termine della fase.
Per cambiare la funzione ausiliaria, le
impostazioni di velocità e temperatura
mentre un programma è in corso, bisogna
portare l'elettrodomestico in modalità Pausa.
Premere il tasto avvio/pausa/annulla per
passare in modalità pausa. In questo caso, la
spia avvio/pausa/annulla lampeggia.
Se la lavatrice non supera la fase di
C
centrifuga, potrebbe essere attiva la
funzione di risciacquo trattenuto o
potrebbe essersi attivato il sistema
automatico di rilevamento carico non
bilanciato a causa di una distribuzione
sbilanciata del bucato nella lavatrice.
Blocco sportello di carico
C'è un sistema di blocco sullo sportello di
carico della lavatrice che impedisce l'apertura
dello sportello nel caso in cui il livello
dell'acqua non è adatto.
Quando l'elettrodomestico è portato in
modalità pausa, controlla il livello dell'acqua
all'interno. Se il livello è adatto, la spia dello
sportello di carico si accende fissa entro 1-2
minuti e lo sportello di carico può essere
aperto.
Se la spia dello sportello di carico non è
accesa, lo sportello di carico non può essere
aperto. Se si è costretti ad aprire lo sportello
di carico quando la la spia dello sportello
di carico è spenta, bisogna annullare il
programma corrente; vedere "Annullamento
del programma".
Cambiare le selezioni dopo
che il programma è iniziato
Per cambiare le impostazioni dopo l'avvio del
programma, bisogna portare per prima cosa
l'elettrodomestico in modalità pausa.
Anche se si seleziona un nuovo
C
programma cambiando la posizione
della manopola di selezione del
programma quando l'elettrodomestico
è in funzione o in modalità pausa, il
programma selezionato per primo
continua. Bisogna annullare il
programma corrente per cambiare
il programma di lavaggio. Vedere
"Annullamento del programma".
20 _ IT
Modifica di funzione ausiliaria, velocità
e temperatura
A seconda della fase raggiunta dal
programma, si possono annullare o attivare
le funzioni ausiliarie; vedere "Selezione
funzioni ausiliarie".
Si possono anche modificare le impostazioni
di velocità e temperatura; vedere "Selezione
velocità di centrifuga" e "Selezione
temperatura".
Aggiunta o rimozione bucato
1. Premere il tasto avvio/pausa/annulla
per passare in modalità pausa.
2. Aspettare finché non è possibile
aprire lo sportello di carico.
Se la spia dello sportello di carico non
C
si accende in 1-2 minuti, vuol dire che
il livello dell'acqua nell'elettrodomestico
non è adatto e non è possibile
aggiungere bucato. Si può riprendere
il programma premendo il tasto avvio/
pausa/annulla.
3. Aprire lo sportello di carico e aggiungere
o estrarre il bucato.
4. Chiudere lo sportello di carico.
5. Eseguire i cambiamenti nelle
impostazioni di funzioni ausiliarie,
temperatura e velocità, se necessario.
6. Premere il tasto avvio/pausa/annulla per
avviare la macchina.
Annullamento del programma
Tenere premuto il tasto avvio/pausa/annulla
per 3 secondi per annullare il programma
corrente. Alla fine di questo periodo,
l'elettrodomestico può scaricare l'acqua
interna o può aspirare e scaricare l'acqua
fino a 3 volte per raffreddare il bucato. Le
spie di lavaggio e fine si accendono.
Una volta che lo scarico è completo, le
spie di avvio/pausa/annulla e lavaggio si
spengono e la spia dello sportello di carico
comincia a lampeggiare.
Quando lo sportello di carico può essere
aperto, la relativa spia si accende e resta
accesa. In questo caso, si può selezionare e
avviare un nuovo programma.
Fine del programma
La spia di fine dell'indicatore di follow-up
del programma si accende una volta che il
programma è finito.
1. Premere il tasto di accensione/
spegnimento per spegnere la macchina.
2. Estrarre il bucato e chiudere lo sportello
di carico. La macchina è pronta per il
successivo ciclo di lavaggio.
Page 21

6 Manutenzione e pulizia
La vita di servizio del prodotto è più lunga e i
problemi affrontati di frequente diminuiscono
se si esegue la pulizia ad intervalli regolari.
Pulizia del cassetto
del detersivo
Pulire il cassetto del detersivo ad intervalli
regolari (ogni 4-5 cicli di lavaggio) come
mostrato di seguito per evitare l'accumulo di
polvere di detersivo nel tempo.
1. Premere il punto colorato sul sifone
all’interno del comparto destinato
all’ammorbidente e premere sino a
quando il comparto fuoriesce dalla
macchina.
Se una quantità d’acqua o una miscela
C
di ammorbidente superiore al normale
inizia ad accumularsi nel comparto
dell’ammorbidente, è necessario pulire il
sifone.
2. Lavare il cassetto del detersivo e il sifone
con abbondante acqua tiepida in un
lavandino. Indossare guanti di protezione
o usare una spazzola adatta per evitare
di toccare i residui nel cassetto durante
la pulizia.
3. Reinserire il cassetto dopo la pulizia ed
assicurarsi che sia posizionato bene.
Pulizia dello sportello di
carico e del cestello
Residui di ammorbidente, detersivo e sporco
possono accumularsi nella lavatrice nel
tempo e possono provocare odori poco
gradevoli e problemi di lavaggio. Per evitarlo,
usare il programma per la pulizia del cestello.
Se la lavatrice non ha un programma per
la pulizia del cestello, usare il programma
Cotone 90 e selezionare le funzioni ausiliarie
di acqua aggiuntiva o risciacquo extra.
Prima di avviare il programma, mettere
max. 100 g di anticalcare in polvere nello
scomparto detersivo per lavaggio principale
(scomparto n. II). Se l'anticalcare è in
compresse, mettere un'unica compressa
nello scomparto n. II. Asciugare l'interno
del soffietto con un panno pulito quando il
programma è completo.
Ripetere la procedura di pulizia del
C
cestello ogni 2 mesi.
Usare un anticalcare appropriato alle
C
lavatrici.
Dopo ogni lavaggio, assicurarsi che nessuna
sostanza estranea resti nel cestello.
Se i fori del soffietto mostrato nella
figura sono bloccati, aprirli usando uno
stuzzicadenti.
Sostanze estranee in metallo nella
C
macchina possono provocare macchie
di ruggine. Pulire le macchie sulla
superficie del cestello usando agenti di
pulizia per acciaio inox. Non usare mai
lana di acciaio o metallica.
Pulizia del corpo e del
pannello di controllo
Pulire il corpo della lavatrice con acqua
saponata o detersivo delicato in gel non
corrosivo quando necessario e asciugare
con un panno morbido.
Usare solo un panno morbido e umido per
pulire il pannello di controllo.
Non usare mai una spugna o materiali
A
che graffiano. Questi danneggerebbero
le superfici in plastica e smaltate.
Pulire i filtri di ingresso
dell'acqua
C'è un filtro nella parte terminale di ciascuna
valvola di immissione dell’acqua sul lato
posteriore della lavatrice e anche alla fine di
ciascun flessibile di immissione dell’acqua,
nel punto di collegamento al rubinetto. Questi
filtri evitano che le sostanze estranee e lo
sporco dell'acqua entrino nella lavatrice. I filtri
devono essere puliti quando si sporcano.
21 _ IT
Page 22

1. Chiudere i rubinetti.
2. Rimuovere i dadi dei flessibili di ingresso
dell'acqua per accedere ai filtri delle
valvole di ingresso dell'acqua. Pulirli con
una spazzola appropriata. Se i filtri sono
troppo sporchi, è possibile estrarli con le
pinze e pulirli.
3. I filtri sull'estremità piatta dei flessibili
di ingresso dell'acqua devono essere
estratti a mano con le relative guarnizioni
e puliti sotto l'acqua corrente.
4. Sostituire guarnizioni e filtri correttamente
e quindi serrare manualmente i dadi.
Eliminare eventuale
acqua residua e pulire
il filtro della pompa
Il sistema filtro della lavatrice evita che gli
oggetti solidi come bottoni, monete e fibre
si blocchino nella pompa durante lo scarico
dell'acqua di lavaggio. Così, l'acqua sarà
scaricata senza problemi e la vita di servizio
della pompa si allunga.
Se la lavatrice non scarica l’acqua, il filtro
della pompa è intasato. Il filtro deve essere
pulito ogni volta che si intasa o ogni 3 mesi.
Per pulire il filtro della pompa è necessario
scaricare l’acqua.
Inoltre, prima di trasportare la lavatrice
(per es., quando si trasloca) ed in caso di
congelamento dell'acqua, l'acqua potrebbe
dover essere scaricata completamente.
Sostanze estranee che restano nel filtro
A
della pompa possono danneggiare la
lavatrice o provocare problemi di rumori.
Per pulire il filtro sporco e scaricare l’acqua:
1. Scollegare la lavatrice per interrompere
l’alimentazione.
La temperatura dell'acqua interna alla
A
lavatrice può arrivare fino a 90 ºC. Per
evitare il rischio di bruciature, il filtro deve
essere pulito dopo che la lavatrice si è
raffreddata.
2. Aprire il coperchio del filtro.
Se il coperchio del filtro è composto da
due elementi, premere verso il basso la
linguetta sul coperchio del filtro e tirare
l’elemento verso di sé.
22 _ IT
Se il coperchio del filtro si compone di
un unico elemento, tirare il coperchio da
entrambi i lati sulla parte alta per aprire.
Si può rimuovere la copertura del filtro
C
spingendo leggermente verso il basso
con un piccolo strumento appuntito
in plastica, attraverso l'apertura posta
sopra la copertura stessa del filtro. Non
usare strumenti appuntiti in metallo per
rimuovere la copertura.
3. Alcuni dei nostri prodotti hanno un
flessibile di scarico di emergenze e alcuni
no. Seguire le fasi sotto per scaricare
l'acqua.
Scarico dell'acqua quando il prodotto ha un
flessibile di scarico di emergenza:
a. Estrarre il flessibile di scarico di
emergenza dal suo alloggiamento
b. Disporre un ampio contenitore
all’estremità del flessibile. Scaricare
l’acqua del contenitore, tirando la presa
all'estremità del flessibile. Quando il
contenitore è pieno, bloccare l'ingresso
del flessibile riposizionando il tappo.
Quando il contenitore si è svuotato,
ripetere la procedura suddetta per
scaricare completamente l'acqua dalla
lavatrice.
c. Quando lo scarico dell'acqua è
completato, chiudere l'estremità di
nuovo usando il tappo e fissare il
flessibile in posizione.
d. Ruotare il filtro della pompa per estrarlo.
Page 23

Scarico dell'acqua quando il prodotto non ha
un flessibile di scarico di emergenza:
a. Collocare un ampio contenitore davanti
al filtro per raccogliere l’acqua in uscita
dal filtro.
b. Allentare il filtro della pompa (in senso
antiorario) sino a quando l’acqua inizierà
a fluire. Dirigere il flusso d’acqua nel
contenitore davanti al filtro. Utilizzare
sempre un panno per assorbire l’acqua
fuoriuscita.
c. Quando l'acqua all'interno della lavatrice
è finita, estrarre completamente il filtro
ruotandolo.
4. Eliminare eventuali residui nel filtro, o
eventuali fibre, attorno all'area del rotore
della pompa.
5. Installare il filtro.
Se il prodotto è dotato di un getto
A
d’acqua, assicurarsi che il filtro sia
correttamente alloggiato nella pompa.
Non forzare mai il filtro quando lo si
installa nel suo alloggiamento. Installare
completamente il filtro in posizione.
Altrimenti potrebbero esserci perdite di
acqua dal coperchio del filtro.
6. Se il coperchio del filtro si compone di
due elementi, chiuderlo premendo sulla
linguetta. Se si compone di un unico
elemento, per prima cosa sistemare le
linguette nella parte inferiore in posizione
e poi premere la parte superiore per
chiudere.
23 _ IT
Page 24

7 Ricerca e risoluzione dei problemi
Impossibile avviare o selezionare il programma.
• La lavatrice potrebbe essere in modalità protezione automatica a causa di problemi
alla fornitura (tensione della griglia, pressione dell'acqua, ecc.) >>> Tenere premuto il
tasto avvio / pausa / annulla per 3 secondi per riportare la lavatrice alle impostazioni di
fabbrica. (Vedere "Annullamento del programma")
Acqua nella lavatrice.
• Potrebbe restare dell'acqua nel prodotto in seguito ai processi di controllo della qualità
durante la produzione. >>> Questo non è un guasto; l'acqua non è pericolosa per la
lavatrice.
C'è una perdita di acqua dal fondo della lavatrice.
• Potrebbero esserci problemi ai flessibili o al filtro della pompa. >>> Assicurarsi che le
guarnizioni dei flessibili siano correttamente posizionate. Montare in modo fermo il
flessibile al rubinetto.
• Il filtro della pompa potrebbe non essere completamente chiuso. >>> Assicurarsi che il
filtro della pompa sia completamente chiuso.
La lavatrice non si riempie di acqua.
• Il rubinetto è chiuso. >>> Aprire completamente i rubinetti dell’acqua.
• Il flessibile di ingresso dell'acqua è piegato. >>> Appiattire il flessibile di ingresso
dell'acqua.
• Il filtro di ingresso dell'acqua è intasato. >>> Pulire il filtro di ingresso dell'acqua.
• Lo sportello di carico è accostato. >>> Chiudere lo sportello di carico.
La lavatrice non scarica l'acqua.
• Il flessibile di scarico dell’acqua potrebbe essere intasato o attorcigliato. >>> Pulire o
appiattire il flessibile.
• Il filtro della pompa è intasato. >>> Pulire il filtro della pompa.
La lavatrice vibra o fa rumore.
• La lavatrice potrebbe non essere in equilibrio. >>> Regolare i piedini per livellare la
lavatrice.
• Una sostanza dura potrebbe essere entrata nel filtro della pompa. >>> Pulire il filtro della
pompa.
• I bulloni di sicurezza per il trasporto non sono stati rimossi. >>> Rimuovere i bulloni di
sicurezza per il trasporto.
• La quantità di bucato nella lavatrice potrebbe essere scarsa. >>> Aggiungere altro
bucato nella lavatrice.
• La lavatrice potrebbe essere sovraccarica di bucato. >>> Estrarre parte del bucato dalla
lavatrice o distribuire il carico a mano per renderlo più omogeneo nella lavatrice.
• La lavatrice potrebbe essere inclinata su qualcosa di rigido. >>> Assicurarsi che la
macchina non penda su alcunché.
La lavatrice si è fermata subito dopo l’avvio del programma.
• La macchina può fermarsi occasionalmente a causa di bassa tensione. >>> Riprenderà a
funzionare quando la tensione sarà stata riportata a livelli normali.
La lavatrice scarica direttamente l'acqua che aspira.
• Il flessibile di scarico potrebbe non essere all'altezza giusta. >>> Collegare il flessibile di
scarico dell’acqua come descritto nel manuale operativo.
Non si vede acqua nella lavatrice durante il lavaggio.
Il livello dell’acqua non è visibile dall’esterno della lavatrice. Questo non è un guasto.
C
24 _ IT
Page 25

Lo sportello di carico non può essere aperto.
• Il blocco dello sportello è attivato a causa del livello di acqua nella lavatrice. >>> Scaricare
l'acqua eseguendo il programma pompa o centrifuga.
• La lavatrice sta riscaldando l’acqua o è nel ciclo di centrifuga. >>> Aspettare finché il
programma si completa.
• Il blocco bambini è attivato. Il blocco dello sportello sarà disattivato un paio di minuti dopo
la fine del programma. >>> Aspettare un paio di minuti per disattivare il blocco dello
sportello.
Il lavaggio dura più del tempo specificato nel manuale.
• La pressione dell'acqua è bassa. >>> La lavatrice aspetta di aspirare una quantità
adeguata di acqua per evitare una qualità di lavaggio scadente a causa di una diminuita
quantità di acqua. Pertanto i tempi di lavaggio si allungano.
• La tensione potrebbe essere bassa. >>> Il tempo di lavaggio è prolungato per evitare
risultati scadenti quando la tensione di alimentazione è bassa.
• La temperatura di ingresso dell’acqua potrebbe essere bassa. >>> Il tempo necessario
al riscaldamento dell'acqua si allunga durante le stagioni fredde. Inoltre, il tempo di
lavaggio può essere prolungato per evitare risultati scadenti.
• Il numero dei risciacqui e/o la quantità dell’acqua di risciacquo potrebbero essere
aumentati. >>> La lavatrice aumenta la quantità di acqua di risciacquo quando è
necessario un buon risciacquo e aggiunge una fase extra di risciacquo se necessario.
• Potrebbe essersi formata schiuma in eccesso e potrebbe essersi attivato un sistema
di assorbimento schiuma a causa del troppo detersivo usato. >>> Usare la quantità di
detersivo consigliata.
Se la biancheria non è disposta in maniera uniforme nel cestello, la lavatrice non eseguirà
C
la fase della centrifuga, per evitare danni alla lavatrice e al suo ambiente. Ridisporre la
biancheria ed eseguire una nuova centrifuga.
Il tempo del programma non esegue il conto alla rovescia. (Su modelli con display)
• Il timer potrebbe arrestarsi durante l'aspirazione dell'acqua. >>> L'indicatore del timer
non esegue il conto alla rovescia finché la lavatrice non aspira una quantità adeguata
di acqua. La lavatrice resterà in attesa sino a quando ci sarà una quantità di acqua
sufficiente per evitare risultati di lavaggio inadeguati a causa della mancanza d’acqua.
L'indicatore del timer riprende il conto alla rovescia dopo ciò.
• Il timer potrebbe arrestarsi durante la fase di riscaldamento. >>> L'indicatore del timer
non esegue il conto alla rovescia finché la lavatrice non raggiunge la temperatura
selezionata.
• Il timer potrebbe arrestarsi durante la fase di centrifuga. >>> Il sistema automatico di
rilevamento carico non bilanciato potrebbe essersi attivato a causa della distribuzione
sbilanciata del bucato nel cestello.
Se la biancheria non è disposta in maniera uniforme nel cestello, la lavatrice non eseguirà
C
la fase della centrifuga, per evitare danni alla lavatrice e al suo ambiente. Ridisporre la
biancheria ed eseguire una nuova centrifuga.
Il tempo del programma non esegue il conto alla rovescia.
• Potrebbe esserci uno squilibrio del carico all’interno della lavatrice. >>> Il sistema
automatico di rilevamento carico non bilanciato potrebbe essersi attivato a causa della
distribuzione sbilanciata del bucato nel cestello.
Se la biancheria non è disposta in maniera uniforme nel cestello, la lavatrice non eseguirà
C
la fase della centrifuga, per evitare danni alla lavatrice e al suo ambiente. Ridisporre la
biancheria ed eseguire una nuova centrifuga.
25 _ IT
Page 26

La lavatrice non passa alla fase di centrifuga.
• Potrebbe esserci uno squilibrio del carico all’interno della lavatrice. >>> Il sistema
automatico di rilevamento carico non bilanciato potrebbe essersi attivato a causa della
distribuzione sbilanciata del bucato nel cestello.
Se la biancheria non è disposta in maniera uniforme nel cestello, la lavatrice non eseguirà
C
la fase della centrifuga, per evitare danni alla lavatrice e al suo ambiente. Ridisporre la
biancheria ed eseguire una nuova centrifuga.
• La lavatrice non centrifuga se l’acqua non è stata completamente scaricata. >>>
Riposizionare il filtro e il flessibile di scarico.
• Potrebbe essersi formata schiuma in eccesso e potrebbe essersi attivato un sistema
di assorbimento schiuma a causa del troppo detersivo usato. >>> Usare la quantità di
detersivo consigliata.
La prestazione del lavaggio è scadente: Il bucato diventa grigio.
• Per un lungo periodo di tempo, è stata usata una quantità insufficiente di detersivo. >>>
Usare la quantità consigliata di detersivo adatta alla durezza dell’acqua e al bucato.
• Il lavaggio è stato eseguito a basse temperature a lungo per un lungo periodo di tempo.
>>> Selezionare la temperatura corretta per il bucato da lavare.
• Si usa una quantità insufficiente di detersivo con acqua dura. >>> L'uso di una quantità
insufficiente di detersivo con acqua dura provoca l'aderire dello sporco al bucato e
questo provoca l'ingrigire dei capi nel tempo. È difficile eliminare il grigio una volta che si
è formato. Usare la quantità consigliata di detersivo adatta alla durezza dell’acqua e al
bucato.
• È stato usato troppo detersivo. >>> Usare la quantità consigliata di detersivo adatta alla
durezza dell’acqua e al bucato.
• Non si applica la regolare pulizia del cestello. >>> Pulire il cestello regolarmente. Per
questo, vedere "Pulizia dello sportello di carico e del cestello".
La prestazione del lavaggio è scadente: Le macchie persistono o il bucato non è sbiancato.
• Si usa una quantità di detersivo insufficiente. >>> Usare la quantità consigliata di
detersivo adatta al bucato.
• È stato caricato bucato in eccesso. >>> Non caricare la lavatrice in eccesso. Caricare
secondo le quantità consiglia nella tabella "Programma e consumo".
• Sono stati selezionati programma e temperature sbagliati. >>> Selezionare il programma
e la temperatura corretti per il bucato da lavare.
• Si usa il tipo di detersivo sbagliato. >>> Usare detersivo originale adatto alla lavatrice.
• Il detersivo è messo nello scomparto sbagliato. >>> Mettere il detersivo nello scomparto
giusto. Non mescolare candeggina e detersivo.
• Non si applica la regolare pulizia del cestello. >>> Pulire il cestello regolarmente. Per
questo, vedere "Pulizia dello sportello di carico e del cestello".
La prestazione del lavaggio è scadente: Sul bucato compaiono macchie oleose.
• Non si applica la regolare pulizia del cestello. >>> Pulire il cestello regolarmente. Per
questo, vedere "Pulizia dello sportello di carico e del cestello".
La prestazione del lavaggio è scadente: I capi hanno un odore sgradevole.
• Tali strati di odori e batteri potrebbero essersi formati sul cestello come risultato di
lavaggi continui a basse temperature e/o di programmi brevi. >>> Lasciare il cassetto
del detersivo e lo sportello della lavatrice aperti dopo ogni lavaggio. Così, un ambiente
umido favorevole ai batteri non viene creato nella macchina.
• Non si applica la regolare pulizia del cestello. >>> Pulire il cestello regolarmente. Per
questo, vedere "Pulizia dello sportello di carico e del cestello".
26 _ IT
Page 27

Colore degli abiti sbiadito.
• È stato caricato bucato in eccesso. >>> Non caricare la lavatrice in eccesso.
• Il detersivo in uso è umido >>> Tenere i detersivi chiusi in un ambiente privo di umidità e
non esporli a temperature eccessive.
• È selezionata una temperatura più alta. >>> Selezionare il programma e la temperatura
corretti secondo il tipo e il livello di sporco del bucato.
• Non si applica la regolare pulizia del cestello. >>> Pulire il cestello regolarmente. Per
questo, vedere "Pulizia dello sportello di carico e del cestello".
Non sciacqua bene.
• La quantità, la marca e le condizioni di conservazione del detersivo non sono appropriate.
>>> Usare un detersivo appropriato alla lavatrice e al bucato. Tenere i detersivi chiusi in
un ambiente privo di umidità e non esporli a temperature eccessive.
• Il detersivo è messo nello scomparto sbagliato. >>> Se il detersivo viene messo nello
scomparto prelavaggio sebbene non sia stato selezionato il ciclo di prelavaggio, la
lavatrice può usare questo detersivo durante il risciacquo o la fase con l'ammorbidente.
Mettere il detersivo nello scomparto giusto.
• Il filtro della pompa è intasato. >>> Controllare il filtro.
• Il flessibile di scarico è piegato. >>> Controllare il flessibile di scarico
Il bucato diventa duro dopo il lavaggio.
• Si usa una quantità di detersivo insufficiente. >>> L’uso di una quantità insufficiente
di detersivo per la durezza dell'acqua può far sì che il bucato diventi duro nel tempo.
Usare la quantità corretta di detersivo secondo la durezza dell’acqua.
• Il detersivo è messo nello scomparto sbagliato. >>> Se il detersivo viene messo nello
scomparto prelavaggio sebbene non sia stato selezionato il ciclo di prelavaggio, la
lavatrice può usare questo detersivo durante il risciacquo o la fase con l'ammorbidente.
Mettere il detersivo nello scomparto giusto.
• Il detersivo potrebbe mescolarsi con l'ammorbidente. >>> Non mescolare ammorbidente
e detersivo. Lavare e pulire il dosatore con acqua calda.
• Non si applica la regolare pulizia del cestello. >>> Pulire il cestello regolarmente. Per
questo, vedere "Pulizia dello sportello di carico e del cestello".
Il bucato non odora come l’ammorbidente.
• Il detersivo è messo nello scomparto sbagliato. >>> Se il detersivo viene messo nello
scomparto prelavaggio sebbene non sia stato selezionato il ciclo di prelavaggio, la
lavatrice può usare questo detersivo durante il risciacquo o la fase con l'ammorbidente.
Lavare e pulire il dosatore con acqua calda. Mettere il detersivo nello scomparto giusto.
• Il detersivo potrebbe mescolarsi con l'ammorbidente. >>> Non mescolare ammorbidente
e detersivo. Lavare e pulire il dosatore con acqua calda.
• Non si applica la regolare pulizia del cestello. >>> Pulire il cestello regolarmente. Per
questo, vedere "Pulizia dello sportello di carico e del cestello".
27 _ IT
Page 28

Residui di detersivo nel cassetto del detersivo.
• Il detersivo è posto in un cassetto bagnato. >>> Asciugare il cassetto dosatore prima di
mettervi il detersivo.
• Il detersivo potrebbe essersi inumidito. >>> Tenere i detersivi chiusi in un ambiente privo
di umidità e non esporli a temperature eccessive.
• La pressione dell'acqua è bassa. >>> Controllare la pressione dell'acqua.
• Il detersivo nello scomparto del lavaggio principale potrebbe essersi bagnato con l’acqua
del prelavaggio. I fori dello scomparto del detersivo sono bloccati. >>> Controllare i fori e
pulirli se sono intasati.
• C'è un problema con le valvole del cassetto del detersivo. >>> Contattare l'agente
autorizzato per l'assistenza.
• Il detersivo potrebbe mescolarsi con l'ammorbidente. >>> Non mescolare ammorbidente
e detersivo. Lavare e pulire il dosatore con acqua calda.
• Non si applica la regolare pulizia del cestello. >>> Pulire il cestello regolarmente. Per
questo, vedere "Pulizia dello sportello di carico e del cestello".
È rimasto del detersivo nel bucato.
• È stato caricato bucato in eccesso. >>> Non caricare la lavatrice in eccesso.
• Sono stati selezionati programma e temperature sbagliati. >>> Selezionare il programma
e la temperatura corretti per il bucato da lavare.
• È stato usato il detersivo sbagliato. >>> Selezionare il detersivo giusto per il bucato da
lavare.
• Non si applica la regolare pulizia del cestello. >>> Pulire il cestello regolarmente. Per
questo, vedere "Pulizia dello sportello di carico e del cestello".
Si forma troppa schiuma nella lavatrice.
• Vengono usati detersivi non corretti per la lavatrice. >>> Usare detersivi appropriati per la
lavatrice.
• Si usa una quantità eccessiva di detersivo. >>> Usare solo la quantità sufficiente di
detersivo.
• Il detersivo è stato conservato in condizioni non corrette. >>> Conservare il detersivo in
un luogo chiuso e asciutto. Non conservare in luoghi eccessivamente caldi.
• Alcuni tipi di bucato a rete, come il tulle, possono formare troppa schiuma a causa della
loro composizione. >>> Usare quantità inferiori di detersivo per questo tipo di bucato.
• Il detersivo è messo nello scomparto sbagliato. >>> Mettere il detersivo nello scomparto
giusto.
• L'ammorbidente viene aspirato prima. >>> Potrebbe esserci un problema nelle valvole o
nel dosatore del detersivo. Contattare l'agente autorizzato per l'assistenza.
• Non si applica la regolare pulizia del cestello. >>> Pulire il cestello regolarmente. Per
questo, vedere "Pulizia dello sportello di carico e del cestello".
28 _ IT
Page 29

La schiuma fuoriesce dal cassetto del detersivo.
• È stato usato troppo detersivo. >>> Mescolare un cucchiaio di ammorbidente e mezzo
litro di acqua e versare nello scomparto principale del cassetto per il detersivo.
Mettere il detersivo nella macchina secondo il programma e i carichi massimi indicati
C
nella tabella “Programma e consumo”. Se si usano additivi chimici (agenti di rimozione
macchie, candeggine, ecc.), ridurre la quantità di detersivo.
Il bucato resta bagnato alla fine del programma
• Potrebbe essersi formata schiuma in eccesso e potrebbe essersi attivato un sistema
di assorbimento schiuma a causa del troppo detersivo usato. >>> Usare la quantità di
detersivo consigliata.
Se la biancheria non è disposta in maniera uniforme nel cestello, la lavatrice non eseguirà
C
la fase della centrifuga, per evitare danni alla lavatrice e al suo ambiente. Ridisporre la
biancheria ed eseguire una nuova centrifuga.
Se non si riesce ad eliminare il problema nonostante si siano rispettate le istruzioni in
A
questa sezione, consultare il rivenditore o l'agente autorizzato per l'assistenza. Non
cercare mai di riparare il prodotto da soli.
29 _ IT
Page 30

Page 31

Please read this user manual first!
Dear Customer,
We hope that you get the best results from the product which has been manufactured in
state-of-the-art plants and passed through a strict quality control procedure.
Therefore, please read the entire user manual carefully before using the product and keep it
as a reference for future use. In case of transferring the product to someone else, give the
manual as well.
The user manual will help you use your machine in a fast and safe way.
• Read the user manual before installing and starting your product.
• Always follow the safety instructions.
• Keep this user manual within easy reach for future reference.
• Read also the other documents supplied with the product.
Remember that this user manual is also applicable for several other models. Differences
between models will be identified in the manual.
Explanation of symbols
Throughout this user manual the following symbols are used:
C Important information or useful hints about usage.
A Warning for hazardous situations with regard to life and property.
B Warning for electric shock.
2820522130_EN/100611.1432
This appliance’s packaging material is recyclable. Help recycle it and protect
the environment by dropping it off in the municipal receptacles provided for this
purpose. Your appliance also contains a great amount of recyclable material.
It is marked with this label to indicate the used appliances that should not be
mixed with other waste. This way, the appliance recycling organised by your
manufacturer will be done under the best possible conditions, in compliance with
European Directive 2002/96/EC on Waste Electrical and Electronic Equipment.
Contact your town hall or your retailer for the used appliance collection points
closest to your home. We thank you doing your part to protect the environment.
31
EN
Page 32

TABLE OF CONTENTS
1 Your washing machine 33
Overview . . . . . . . . . . . . . . . . . . . . . .33
Technical specifications . . . . . . . . . . . 34
2 Warnings 35
General Safety. . . . . . . . . . . . . . . . . . 35
First Use . . . . . . . . . . . . . . . . . . . . . . 35
Intended use . . . . . . . . . . . . . . . . . . . 35
Safety instructions . . . . . . . . . . . . . . . 36
If there are children in your house... . . 36
3 Installation 37
Appropriate installation location . . . . . 37
Removing packaging reinforcement. . 37
Removing the transportation locks. . . 37
Connecting water supply. . . . . . . . . . 38
Connecting to the drain . . . . . . . . . . . 38
Adjusting the feet. . . . . . . . . . . . . . . . 39
Electrical connection . . . . . . . . . . . . . 39
First use . . . . . . . . . . . . . . . . . . . . . . 40
Disposing of packaging material . . . . 40
Transportation of the product. . . . . . . 40
Disposing of the old product . . . . . . . 40
4 Preparation 41
Main programmes . . . . . . . . . . . . . . 46
Temperature selection . . . . . . . . . . . . 47
Spin speed selection . . . . . . . . . . . . .47
Programme selection and consumption
table . . . . . . . . . . . . . . . . . . . . . . . . . 48
Auxiliary function selection. . . . . . . . . 49
Starting the programme. . . . . . . . . . . 49
Child Lock . . . . . . . . . . . . . . . . . . . . . 49
Progress of programme. . . . . . . . . . . 50
Loading door lock . . . . . . . . . . . . . . . 50
Changing the selections after programme
has started . . . . . . . . . . . . . . . . . . . . 50
Cancelling the programme. . . . . . . . . 50
End of programme . . . . . . . . . . . . . . 50
6 Maintenance and cleaning 51
Cleaning the detergent drawer. . . . . . 51
Cleaning the loading door and the
drum . . . . . . . . . . . . . . . . . . . . . . . . . 51
Cleaning the body and control panel . 51
Cleaning the water intake filters . . . . .51
Draining remaining water and cleaning the
pump filter . . . . . . . . . . . . . . . . . . . . . 52
7 Troubleshooting 54
Things to be done for energy saving . 41
Sorting the laundry . . . . . . . . . . . . . .41
Preparing laundry for washing . . . . . . 41
Correct load capacity . . . . . . . . . . . . 42
Loading the laundry. . . . . . . . . . . . . . 42
Using detergent and softener . . . . . . 42
Tips for efficient washing . . . . . . . . . . 45
5 Operating the product 46
Control panel. . . . . . . . . . . . . . . . . . . 46
Preparing the machine. . . . . . . . . . . . 46
Programme selection. . . . . . . . . . . . . 46
32
EN
Page 33

1 Your washing machine
Overview
8
1
2
3
7
6
4
5
1- Power cable
2- Top panel
3- Control panel
4- Filter cap
5- Adjustable feet
6- Loading door
7- Detergent drawer
8- Drain hose
33
EN
Page 34

Technical specifications
Models
Maximum dry laundry capacity (kg)
Height (cm)
Width (cm)
Depth (cm)
Net weight (±4 kg.)
Electrical input (V/Hz)
Total current (A)
Total power (W)
Spin speed (rpm max.)
Stand-by mode power (W)
Off-mode power (W)
WML 60611 M
6
84
60
45
60
230 V / 50Hz
10
2200
600
1.00
0.25
Technical specifications may be changed without prior notice to improve the quality of the
C
product.
Figures in this manual are schematic and may not match the product exactly.
C
Values stated on the product labels or in the documentation accompanying it are obtained
C
in laboratory conditions in accordance with the relevant standards. Depending on
operational and environmental conditions of the product, these values may vary.
34
EN
Page 35

2 Warnings
Please read the following information.
Otherwise, there may be the risk of personal
injury or material damage. Moreover, any
warranty and reliability commitment will
become void.
General Safety
• Never place your machine on a carpet
covered floor. Otherwise, lack of airflow
from below of your machine may cause
electrical parts to overheat. This may
cause problems with your washing
machine.
• If the power cable or mains plug is
damaged you must call Authorized
Service for repair.
• Check water hoses for wear. Do not
use old/used water inlet hoses. These
may cause stains on your laundry.
• Fit the drain hose into the discharge
housing securely to prevent any water
leakage and to allow machine to take
in and discharge water as required. It is
very important that the water intake and
drain hoses are not folded, squeezed,
or broken when the appliance is pushed
into place after it is installed or cleaned.
• Your washing machine is designed to
continue operating in the event of a
power interruption. You cannot cancel
any program by pressing the “On/Off
button.” Your machine will not resume
its program when the power restores.
Press the “Start/Pause/Cancel” button
for 3 seconds to cancel the program
(See, Cancelling a Program)
• There may be some water in your
machine when you receive it. This is
from the quality control process and
is normal. It is not harmful to your
machine.
• Some problems you may encounter
may be caused by the software.
Press “Start/Pause/Cancel” button
for 3 seconds to cancel the program
set in your machine before calling the
authorized service.
First Use
• To prepare your machine for washing,
carry out your first washing process
without loading your machine and
with detergent under “Cottons 90°C”
program.
• Ensure that the cold and hot water
connections has been made correctly
when installing your machine.
Otherwise, your laundry may come out
hot at the end of the washing process
and may wear out.
• If the current fuse or circuit breaker is
less than 16 Amperes, please have a
qualified electrician install a 16 Ampere
fuse or circuit breaker.
• While using with or without a
transformer, do not neglect to have the
grounding installation laid by a qualified
electrician. Our company shall not be
liable for any damages that may arise
when the machine is used on a line
without grounding.
• To make your machine ready for use,
please be sure that the tap water
supply and water drainage systems
are appropriate before calling the
authorized service. If they are not, call a
qualified plumber to have any necessary
arrangements carried out.
Intended use
• This product has been designed for
home use.
• The appliance may only be used for
washing and rinsing of textiles that are
marked accordingly.
• Only detergents, softeners and
supplements suitable for washing
machines may be used.
• Observe the care instructions labelled
on textile products and any other
instructions given by companies that
produce detergents for your machine.
• This appliance is not intended for use
by persons (including children) with
reduced physical, sensory or mental
capabilities, or lack of experience
and knowledge, unless they have
been given supervision or instruction
concerning use of the appliance by a
person responsible for their safety.
35
EN
Page 36

Safety instructions
• This appliance must be connected to
an earthed outlet protected by a fuse of
suitable capacity.
• The supply and draining hoses must
always be securely fastened and remain
in an undamaged state.
• Fit the draining hose to a washbasin
or bathtub securely before starting up
your machine. There may be a risk of
being scalded due to high washing
temperatures!
• Never open the door or remove the
filter while there is still water in the drum.
Otherwise, there may be the risk of
flooding and possible injury due to the
hot water.
• Never force open the locked door! The
door will be ready to open just a few
minutes after the washing cycle comes
to an end.
• Unplug the machine when it is not in
use.
• Never wash down the appliance with a
water hose! There is the risk of electric
shock! Always disconnect from the
mains by unplugging before cleaning.
• Never touch the plug with wet hands.
Never unplug by pulling on the cable,
always pull out from the plug only. Do
not operate the machine if the power
cord or plug is damaged.
• Never attempt to repair the machine
yourself. Otherwise, you may be putting
yours and other’s lives in danger.
• For malfunctions that cannot be solved
by information in the operating manual:
Turn off the machine, unplug it, turn off
the water tap and contact an authorized
service agent.
If there are children
in your house...
• Electrical appliances may be dangerous
for the children. Keep children away
from the machine when it is operating.
Do not let them tamper with the
machine.
• Close the door when you leave the area
where the machine is located.
• Store all detergents in a safe place out
of reach of the children.
36
EN
Page 37

3 Installation
Refer to the nearest Authorised Service
Agent for installation of the product. To
make the product ready for use, review the
information in the user manual and make
sure that the electricity, tap water supply
and water drainage systems are appropriate
before calling the Authorized Service Agent.
If they are not, call a qualified technician
and plumber to have any necessary
arrangements carried out.
Preparation of the location and
C
electrical, tap water and waste water
installations at the place of installation is
under customer's responsibility.
Installation and electrical connections of
B
the product must be carried out by the
Authorized Service Agent. Manufacturer
shall not be held liable for damages that
may arise from procedures carried out
by unauthorized persons.
Prior to installation, visually check if the
A
product has any defects on it. If so, do
not have it installed. Damaged products
cause risks for your safety.
Make sure that the water inlet and
C
discharge hoses as well as the power
cable are not folded, pinched or
crushed while pushing the product into
its place after installation or cleaning
procedures.
Appropriate installation location
• Place the machine on a rigid floor. Do
not place it on a long pile rug or similar
surfaces.
• Total weight of the washing machine
and the dryer -with full load- when they
are placed on top of each other reaches
to approx. 180 kilograms. Place the
product on a solid and flat floor that has
sufficient load carrying capacity!
• Do not place the product on the power
cable.
• Do not install the product at places
where temperature may fall below 0ºC.
• Place the product at least 1 cm away
from the edges of other furniture.
Removing packaging
reinforcement
Tilt the machine backwards to remove
the packaging reinforcement. Remove the
packaging reinforcement by pulling the
ribbon.
Removing the
transportation locks
Do not remove the transportation
A
locks before taking out the packaging
reinforcement.
Remove the transportation safety bolts
A
before operating the washing machine,
otherwise, the product will be damaged.
1. Loosen all the bolts with a spanner until
they rotate freely (C).
2. Remove transportation safety bolts by
turning them gently.
3. Attach the plastic covers supplied in the
User Manual bag into the holes on the
rear panel. (P)
37
EN
Page 38

Keep the transportation safety bolts in
C
a safe place to reuse when the washing
machine needs to be moved again in
the future.
Never move the product without the
C
transportation safety bolts properly fixed
in place!
Connecting water supply
The water supply pressure required to
C
run the product is between 1 to 10 bars
(0.1 – 10 MPa). It is necessary to have
10 – 80 liters of water flowing from the
fully open tap in one minute to have
your machine run smoothly. Attach
a pressure reducing valve if water
pressure is higher.
If you are going to use the double
C
water-inlet product as a single (cold)
water-inlet unit, you must install the
supplied stopper to the hot water valve
before operating the product. (Applies
for the products supplied with a blind
stopper group.)
If you want to use both water inlets of
C
the product, connect the hot water
hose after removing the stopper and
gasket group from the hot water valve.
(Applies for the products supplied with a
blind stopper group.)
Models with a single water inlet should
A
not be connected to the hot water
tap. In such a case the laundry will get
damaged or the product will switch to
protection mode and will not operate.
Do not use old or used water inlet
A
hoses on the new product. It may
cause stains on your laundry.
1. Connect the special hoses supplied
with the product to the water inlets on
the product. Red hose (left) (max. 90
ºC) is for hot water inlet, blue hose (right)
(max. 25 ºC) is for cold water inlet.
Ensure that the cold and hot water
A
connections are made correctly when
installing the product. Otherwise, your
laundry will come out hot at the end of
the washing process and wear out.
2. Tighten all hose nuts by hand. Never
use a wrench when tightening the nuts.
3. Open the taps completely after making
the hose connection to check for water
leaks at the connection points. If any
leaks occur, turn off the tap and remove
the nut. Retighten the nut carefully after
checking the seal. To prevent water
leakages and damages caused by
them, keep the taps closed when the
machine is not in use.
Connecting to the drain
• The end of the drain hose must be
directly connected to the wastewater
drain or to the washbasin.
Your house will be flooded if the
A
hose comes out of its housing during
water discharge. Moreover, there is
risk of scalding due to high washing
temperatures! To prevent such
situations and to ensure smooth water
intake and discharge of the machine, fix
the end of the discharge hose tightly so
that it cannot come out.
• The hose should be attached to a
height of at least 40 cm, and 100 cm at
most.
• In case the hose is elevated after
laying it on the floor level or close to
38
EN
Page 39

the ground (less than 40 cm above the
ground), water discharge becomes
more difficult and the laundry may come
out excessively wet. Therefore, follow
the heights described in the figure.
• To prevent flowing of dirty water back
into the machine and to allow for easy
discharge, do not immerse the hose
end into the dirty water or drive it in the
drain more than 15 cm. If it is too long,
cut it short.
• The end of the hose should not be
bent, it should not be stepped on and
the hose must not be pinched between
the drain and the machine.
• If the length of the hose is too short, use
it by adding an original extension hose.
Length of the hose may not be longer
than 3.2 m. To avoid water leak failures,
the connection between the extension
hose and the drain hose of the product
must be fitted well with an appropriate
clamp as not to come off and leak.
Adjusting the feet
In order to ensure that the product
A
operates more silent and vibration-free,
it must stand level and balanced on its
feet. Balance the machine by adjusting
the feet. Otherwise, the product may
move from its place and cause crushing
and vibration problems.
1. Loosen the lock nuts on the feet by
hand.
2. Adjust the feet until the product stands
level and balanced.
3. Tighten all lock nuts again by hand.
Do not use any tools to loosen the lock
A
nuts. Otherwise, they will get damaged.
Electrical connection
Connect the product to a grounded outlet
protected by a fuse complying with the
values in the "Technical specifications" table.
Our company shall not be liable for any
damages that will arise when the product is
used without grounding in accordance with
the local regulations.
• Connection must comply with national
regulations.
• Power cable plug must be within easy
reach after installation.
• The voltage and allowed fuse or breaker
protection are specified in the “Technical
specifications” section. If the current
value of the fuse or breaker in the house
is less than 16 Amps, have a qualified
electrician install a 16 Amp fuse.
39
EN
Page 40

• The specified voltage must be equal to
your mains voltage.
• Do not make connections via extension
cables or multi-plugs.
Damaged power cables must be
B
replaced by the Authorized Service
Agents.
First use
Before starting to use the product, make
sure that all preparations are made in
accordance with the instructions in
sections "Important safety instructions" and
"Installation".
To prepare the product for washing
laundry, perform first operation in Drum
Cleaning programme. If your machine is not
featured with Drum Cleaning programme,
use Cottons-90 programme and select
Additional Water or Extra Rinse auxiliary
functions as well. Before starting the
programme, put max. 100 g of powder
anti-limescale into the main wash detergent
compartment (compartment nr. II). If the
anti-limescale is in tablet form, put only one
tablet into compartment nr. II. Dry the inside
of the bellow with a clean piece of cloth after
the programme has come to an end.
Transportation of the product
1. Unplug the product before transporting
it.
2. Remove water drain and water supply
connections.
3. Drain the remaining water in the product
completely; see, "Draining remaining
water and cleaning the pump filter".
4. Install transportation safety bolts in the
reverse order of removal procedure;
see, "Removing the transportation
locks".
Never move the product without the
C
transportation safety bolts properly fixed
in place!
Disposing of the old product
Dispose of the old product in an
environmentally friendly manner.
Refer to your local dealer or solid waste
collection centre in your area to learn how to
dispose of your product.
For children's safety, cut the power cable
and break the locking mechanism of the
loading door so that it will be nonfunctional
before disposing of the product.
Use an anti-limescale suitable for the
C
washing machines.
Some water might have remained in
C
the product due to the quality control
processes in the production. It is not
harmful for the product.
Disposing of packaging material
Packaging materials are dangerous to
children. Keep packaging materials in a safe
place away from reach of the children.
Packaging materials of the product are
manufactured from recyclable materials.
Dispose of them properly and sort
in accordance with recycled waste
instructions. Do not dispose of them with
normal domestic waste.
40
EN
Page 41

4 Preparation
Things to be done for
energy saving
Following information will help you use the
product in an ecological and energy-efficient
manner.
• Operate the product in the highest
capacity allowed by the programme you
have selected, but do not overload; see,
“Programme and consumption table”.
• Always follow the instructions on the
detergent packaging.
• Wash slightly soiled laundry at low
temperatures.
• Use faster programmes for small
quantities of lightly soiled laundry.
• Do not use prewash and high
temperatures for laundry that is not
heavily soiled or stained.
• If you plan to dry your laundry in a
dryer, select the highest spin speed
recommended during washing process.
• Do not use detergent in excess of
the amount recommended on the
detergent package.
Sorting the laundry
• Sort laundry according to type of
fabric, colour, and degree of soiling and
allowable water temperature.
• Always obey the instructions given on
the garment tags.
Washing water
temperature
Bleach can be
used
Suitable for drier
Hang without
spinning
Non machine-washable Do not wash
Dry-cleanable Do not dry-clean
Wash with sensitive,
.short programmes
Do not use bleach
Do not dry with drier
Can be ironed with
hot iron
Dry horizontally Dry on a hanger
Can be ironed
with warm iron
Do not iron
Preparing laundry for washing
• Laundry items with metal attachments
such as, underwired bras, belt buckles
or metal buttons will damage the
machine. Remove the metal pieces or
wash the clothes by putting them in a
laundry bag or pillow case.
41
EN
Page 42

• Take out all substances in the pockets
such as coins, pens and paper clips,
and turn pockets inside out and brush.
Such objects may damage the product
or cause noise problem.
• Put small size clothes such as infant’s
socks and nylon stockings in a laundry
bag or pillow case.
• Place curtains in without compressing
them. Remove curtain attachment
items.
• Fasten zippers, sew loose buttons and
mend rips and tears.
• Wash “machine washable” or “hand
washable” labeled products only with
an appropriate programme.
• Do not wash colours and whites
together. New, dark coloured cottons
release a lot of dye. Wash them
separately.
• Tough stains must be treated properly
before washing. If unsure, check with a
dry cleaner.
• Use only dyes/colour changers and
limescale removers suitable for machine
wash. Always follow the instructions on
the package.
• Wash trousers and delicate laundry
turned inside out.
• Keep laundry items made of Angora
wool in the freezer for a few hours
before washing. This will reduce pilling.
• Laundry that are subjected to materials
such as flour, lime dust, milk powder,
etc. intensely must be shaken off before
placing into the machine. Such dusts
and powders on the laundry may build
up on the inner parts of the machine in
time and can cause damage.
Correct load capacity
The maximum load capacity depends on
the type of laundry, the degree of soiling and
the washing programme desired.
The machine automatically adjusts the
amount of water according to the weight of
42
the loaded laundry.
Follow the information in the
A
“Programme and consumption table”.
When overloaded, machine’s washing
performance will drop. Moreover, noise
and vibration problems may occur.
Laundry types and their average weights in
the following table are given as examples.
Laundry type Weight (g)
Bathrobe 1200
Napkin 100
Duvet cover 700
Bed Sheet 500
Pillowcase 200
Tablecloth 250
Towel 200
Hand towel 100
Evening gown 200
Underclothing 100
Men’s overalls 600
Men’s shirt 200
Men’s pajamas 500
Blouses 100
Loading the laundry
• Open the loading door.
• Place laundry items loosely into the
machine.
• Push the loading door to close until you
hear a locking sound. Ensure that no
items are caught in the door.
The loading door is locked while a
C
programme is running. The door
can only be opened a while after the
programme comes to an end.
In case of misplacing the laundry, noise
A
and vibration problems may occur in
the machine.
Using detergent and softener
Detergent Drawer
The detergent drawer is composed of three
compartments:
- (I) for prewash
- (II) for main wash
– (III) for softener
– (*) in addition, there is siphon piece in the
softener compartment.
EN
Page 43

2
3
The detergent dispenser may be in two
C
different types according to the model
of your machine as seen above.
Detergent, softener and other cleaning
agents
• Add detergent and softener before
starting the washing programme.
• Never open the detergent drawer while
the washing programme is running!
• When using a programme without
prewash, do not put any detergent
into the prewash compartment
(compartment nr. I).
• In a programme with prewash, do not
put liquid detergent into the prewash
compartment (compartment nr. I).
• Do not select a programme with
prewash if you are using a detergent
bag or dispensing ball. Place the
detergent bag or the dispensing ball
directly among the laundry in the
machine.
• If you are using liquid detergent, do
not forget to place the liquid detergent
cup into the main wash compartment
(compartment nr. II).
Choosing the detergent type
The type of detergent to be used depends
on the type and colour of the fabric.
• Use different detergents for coloured
and white laundry.
• Wash your delicate clothes only with
special detergents (liquid detergent,
wool shampoo, etc.) used solely for
delicate clothes.
• When washing dark coloured clothes
and quilts, it is recommended to use
liquid detergent.
• Wash woolens with special detergent
made specifically for woolens.
Use only detergents manufactured
A
specifically for washing machines.
Do not use soap powder.
A
Adjusting detergent amount
The amount of washing detergent to be
used depends on the amount of laundry,
the degree of soiling and water hardness.
1
23
1
Read the manufacturer’s instructions on the
detergent package carefully and follow the
dosage values.
• Do not use amounts exceeding the
dosage quantities recommended on the
detergent package to avoid problems of
excessive foam, poor rinsing, financial
savings and finally, environmental
protection.
• Use lesser detergent for small amounts
or lightly soiled clothes.
• Use concentrated detergents in the
recommended dosage.
Using softeners
Pour the softener into the softener
compartment of the detergent drawer.
• Use the dosages recommended on the
package.
• Do not exceed the (>max<) level
marking in the softener compartment.
• If the softener has lost its fluidity, dilute
it with water before putting it in the
detergent drawer.
Using liquid detergents
If the product contains a liquid
detergent cup:
• Make sure that you have placed the
liquid detergent cup in compartment nr.
“II”.
• Use the detergent manufacturer’s
measuring cup and follow the
instructions on the package.
• Use the dosages recommended on the
package.
• If the liquid detergent has lost its fluidity,
dilute it with water before putting in the
detergent cup.
43
EN
Page 44

If the product does not contain a liquid
detergent cup:
• Do not use liquid detergent for the
prewash in a programme with prewash.
• Use the detergent manufacturer’s
measuring cup and follow the
instructions on the package.
• Liquid detergent stains your clothes
when used with Delayed Start function.
If you are going to use the Delayed Start
function, do not use liquid detergent.
Using gel and tablet detergent
When using tablet, gel, etc. detergents,
read the manufacturer’s instructions on the
detergent package carefully and follow the
dosage values. If there is not any instruction
on the package, apply the following.
• If the gel detergent thickness is fluidal
and your machine does not contain a
special liquid detergent cup, put the gel
detergent into the main wash detergent
compartment during first water intake.
If your machine contains a liquid
detergent cup, fill the detergent into this
cup before starting the programme.
• If the gel detergent thickness is not
fluidal or in the shape of capsule liquid
tablet, put it directly into the drum
before washing.
• Put tablet detergents into the main
wash compartment (compartment nr. II)
or directly into the drum before washing.
Tablet detergents may leave residues
C
in the detergent compartment. If you
encounter such a case, place the tablet
detergent between the laundry, close
to the lower part of the drum in future
washings.
Use the tablet or gel detergent without
C
selecting the prewash function.
Using starch
• Add liquid starch, powder starch or the
dyestuff into the softener compartment
as instructed on the package.
• Do not use softener and starch together
in a washing cycle.
• Wipe the inside of the machine with a
damp and clean cloth after using starch.
Using bleaches
• Select a programme with prewash
and add the bleaching agent at the
beginning of the prewash. Do not put
detergent in the prewash compartment.
As an alternative application, select a
programme with extra rinse and add
the bleaching agent while the machine
is taking water from the detergent
compartment during first rinsing step.
• Do not use bleaching agent and
detergent by mixing them.
• Use just a little amount (approx. 50 ml)
of bleaching agent and rinse the clothes
very well as it causes skin irritation. Do
not pour the bleaching agent onto the
clothes and do not use it for coloured
clothes.
• When using oxygen based bleaches,
follow the instructions on the package
and select a programme that washes at
a lower temperature.
• Oxygen based bleaches can be used
together with detergents; however, if
its thickness is not the same with the
detergent, put the detergent first into
the compartment nr. “II” in the detergent
drawer and wait until the detergent
flows while the machine is taking in
water. Add the bleaching agent from the
same compartment while the machine
is still taking in water.
Using limescale remover
• When required, use limescale removers
manufactured specifically for washing
machines only.
• Always follow instructions on the
package.
44
EN
Page 45

Tips for efficient washing
Light colours and
whites
(Recommended
temperature range
based on soiling
level: 40-90C)
It may be necessary
to pre-treat the
stains of perform
prewash. Powder
and liquid detergents
Heavily Soiled
(difficult stains
such as grass,
coffee, fruits and
blood.)
Normally Soiled
Soiling Level
(For example,
stains caused by
body on collars
and cuffs)
Lightly Soiled
(No visible stains
exist.)
recommended
for whites can be
used at dosages
recommended for
heavily soiled clothes.
It is recommended
to use powder
detergents to clean
clay and soil stains
and the stains that
are sensitive to
bleaches.
Powder and
liquid detergents
recommended
for whites can be
used at dosages
recommended
for normally soiled
clothes.
Powder and
liquid detergents
recommended
for whites can be
used at dosages
recommended for
lightly soiled clothes.
Clothes
Colors Dark colors
(Recommended
temperature range
based on soiling level:
cold-40C)
Powder and
liquid detergents
recommended for
colours can be
used at dosages
recommended for
heavily soiled clothes.
It is recommended to
use powder detergents
to clean clay and soil
stains and the stains
that are sensitive
to bleaches. Use
detergents without
bleach.
Powder and
liquid detergents
recommended for
colours can be
used at dosages
recommended for
normally soiled clothes.
Use detergents without
bleach.
Powder and
liquid detergents
recommended for
colours can be
used at dosages
recommended for
lightly soiled clothes.
Use detergents without
bleach.
(Recommended
temperature
range based on
soiling level: cold40C)
Liquid detergents
suitable for
colours and dark
colours can be
used at dosages
recommended
for heavily soiled
clothes.
Liquid detergents
suitable for
colours and dark
colours can be
used at dosages
recommended
for normally soiled
clothes.
Liquid detergents
suitable for
colours and dark
colours can be
used at dosages
recommended
for lightly soiled
clothes.
Delicates/
Woolens/Silks
(Recommended
temperature
range based
on soiling level:
cold-30C)
Prefer liquid
detergents
produced for
delicate clothes.
Woollen and silk
clothes must
be washed with
special woollen
detergents.
Prefer liquid
detergents
produced for
delicate clothes.
Woollen and silk
clothes must
be washed with
special woollen
detergents.
Prefer liquid
detergents
produced for
delicate clothes.
Woollen and silk
clothes must
be washed with
special woollen
detergents.
45
EN
Page 46

5 Operating the product
Control panel
1
1 - Programme Selection knob
2 - Spin Speed Adjustment button*
3 - Temperature Adjustment button*
4 - Start / Pause / Cancel button
5 - Auxiliary Function buttons
3
Preparing the machine
1. Make sure that the hoses are
connected tightly.
2. Plug in your machine.
3. Turn the tap on completely.
4. Place the laundry in the machine.
5. Add detergent and fabric softener.
Programme selection
1. Select the programme suitable for
the type, quantity and soiling degree
of the laundry in accordance with the
"Programme and consumption table"
and the temperature table below.
90˚C
60˚C
40˚C30˚CCold
2. Select the desired programme with the
Programme Selection button.
Heavily soiled white cottons
and linens. (coffee table covers,
tableclothes, towels, bed
sheets, etc.)
Normally soiled, coloured,
fade proof cottons or synthetic
clothes (shirt, nightgown,
pajamas, etc.) and lightly soiled
white linens (underwear, etc.)
Blended laundry including
delicate textile (veil curtains,
etc.), synthetics and woolens.
46
4
6 - On / Off button
7 - Programme Follow-up indicator
8 - Loading Door light*
* Varies depending on the model of your
machine.
Programmes are limited with the
C
highest spin speed appropriate for that
particular type of fabric.
When selecting a programme, always
C
consider the type of fabric, colour,
degree of soiling and permissible water
temperature.
Always select the lowest required
C
temperature. Higher temperature
means higher power consumption.
For further programme details, see
C
"Programme and consumption table".
5
8
7
6
Main programmes
Depending on the type of fabric, use the
following main programmes.
• Cotone (Cottons)
You may wash your normally soiled durable
cotton and linen laundry in this programme
with the highest energy and water saving
compared to all other wash programmes
suitable for cottons. Actual water
temperature may differ from the declared
cycle temperature. Programme duration
may automatically be shortened during later
stages of the programme if you wash less
amount (e.g. ½ capacity or less) of laundry.
In this case energy and water consumption
will be further decreased giving you the
opportunity for a more economical wash.
EN
Page 47

This feature is available for certain models
having remaining time display.
• Sintetici (Synthetics)
Use this programme to wash your synthetic
clothes (shirts, blouses, synthetic/cotton
blends, etc.). It washes with a gentle action
and has a shorter washing cycle compared
to the Cottons programme.
For curtains and tulle, use the Synthetic 40˚C
programme with prewash function selected.
As their meshed texture causes excessive
foaming, wash the veils/tulle by putting little
amount of detergent into the main wash
compartment. Do not put detergent in the
prewash compartment.
• Lana (Woollens)
Use this programme to wash your woolen
clothes. Select the appropriate temperature
complying with the tags of your clothes. Use
appropriate detergents for woolens.
Additional programmes
For special cases, additional programmes
are available in the machine.
Additional programmes may differ
C
according to the model of the machine.
• Delicati (Delicate)
Use this programme to wash your delicate
clothes. It washes with a gentle action
without any interim spin compared to the
Synthetics programme.
• Lavaggio a Mano (Hand wash)
Use this programme to wash your woolen/
delicate clothes that bear “not machinewashable” tags and for which hand wash
is recommended. It washes laundry with a
very gentle washing action to not to damage
clothes.
• Mini 30
Use this programme to wash your little
amount of lightly soiled cotton clothes in a
short time (30 minutes).
• Super
Use this programme to wash your laundry
for which you cannot use Cottons 60 °C
programme. It gives the same result with the
Cottons 60 °C programme by washing for
a longer time at 40 °C, thus enabling energy
saving.
Special programmes
For specific applications, select any of the
following programmes.
• Risciacquo (Rinse)
Use this programme when you want to rinse
or starch separately.
• Centrifuga (Spin + Drain)
Use this programme to apply an additional
spin cycle for your laundry or to drain the
water in the machine.
Before selecting this programme, select the
desired spin speed and press Start / Pause
/ Cancel button. First, the machine will drain
the water inside of it. Then, it will spin the
laundry with the set spin speed and drain
the water coming out of them.
If you wish to drain water only without
spinning your laundry, select the
Pump+Spin programme and then select
the "No Spin" function with the help of Spin
Speed Adjustment button depending on
the model of your machine and press Start /
Pause button.
If your machine is not equipped
C
with Spin Speed Adjustment button and
No Spin auxiliary function and if you wish to
drain the water only without spinning your
laundry, select the Pump+Spin programme
and press Start / Pause button. Machine will
switch to spin step once it completes pump
step. Press Start / Pause / Cancel button to
stop the machine as soon as you see the
drum rotating.
Use a lower spin speed for delicate
C
laundries.
Temperature selection
In models equipped with Temperature
Adjustment button, you can wash your
clothes at the desired temperature by using
this button.
To prevent damage on your laundry, do
A
not select a temperature that exceeds
the one recommended for your laundry
in the “Programme and consumption
table".
Spin speed selection
In models equipped with Spin Speed
Adjustment button, you can spin your
laundry at the desired speed by using this
button.
In models not equipped with Spin Speed
Adjustment button, spin will be performed
at the recommended speed for the selected
programme.
If you wish to take out your laundry
C
without spinning, switch the Spin Speed
Adjustment button to No Spin position.
47
EN
Page 48

Programme selection and consumption table
EN
Programme
Cotone 90 6 125 53 1.65 • • • • • •
Cotone 60** 6 148 52 1.01 • • • • • •
Cotone 60** 3 148 48 0.86 • • • • • •
Cotone 40** 3 132 48 0.62 • • • • • •
Cotone 40 6 105 53 1.33 • • • • • •
Cotone Cold 6 95 53 0.16 • • • • • •
Sintetici 60 2.5 113 52 0.92 • • • • • •
Sintetici 40 2.5 125 52 0.56 • • • • • •
Sintetici 30 2.5 95 52 0.30 • • • • • •
Sintetici Cold 2.5 90 52 0.15 • • • • • •
Delicati 30 2 65 45 0.36 • • • • •
Lana 40 1.5 60 45 0.36 • • • • •
Lana Cold 1.5 50 45 0.02 • • • •
Lavaggio a Mano 30 1 45 32 0.21 • • •
Mini 30 30 2.5 30 43 0.17 • • •
2
Max. Load (kg)
Programme Duration (~min)
Water Consumption (l)
Energy Consumption (kWh)
Prelavaggio
Extra Risciacquo
Rinse Hold
Spin speed reduction
Esclusione Centrifuga
No Heat
• : Selectable
* : Automatically selected, no cancelling.
**: Energy Label programme (EN 60456 Ed.3)
- : See the programme description for maximum load.
Water and power consumption may vary subject to the changes in water pressure,
C
water hardness and temperature, ambient temperature, type and amount of laundry,
selection of auxiliary functions and spin speed, and changes in electric voltage.
The auxiliary functions in the table may vary according to the model of your machine.
C
48
EN
Page 49

Auxiliary function selection
Select the desired auxiliary functions before
starting the programme. Furthermore, you
can also select or cancel auxiliary functions
that are suitable to the running programme
without pressing the Start / Pause / Cancel
button when the machine is operating. For
this, the machine must be in a step before
the auxiliary function you are going to select
or cancel.
If the auxiliary function cannot be selected
or canceled, light of the relevant auxiliary
function will blink 3 times to warn the user.
Some functions cannot be selected
C
together. If a second auxiliary function
conflicting with the first one is selected
before starting the machine, the
function selected first will be canceled
and the second auxiliary function
selection will remain active.
An auxiliary function that is not
C
compatible with the programme cannot
be selected. (See "Programme and
consumption table")
Auxiliary Function buttons may vary
C
according to the model of the machine.
• Prelavaggio (Prewash)
A Prewash is only worthwhile for heavily
soiled laundry. Not using the Prewash will
save energy, water, detergent and time.
As their meshed texture causes
C
excessive foaming, wash the veils/tulle
by putting little amount of detergent
into the main wash compartment.
Do not put detergent in the prewash
compartment.
• Extra Risciacquo (Rinse Plus)
This function enables the machine to make
another rinsing in addition to the one already
made after the main wash. Thus, the risk
for sensitive skins (babies, allergic skins,
etc.) to be effected by the minimal detergent
remnants on the laundry can be reduced.
• Rinse Hold
If you are not going to unload your
clothes immediately after the programme
completes, you can use rinse hold function
to keep your laundry in the final rinsing
water in order to prevent them from getting
wrinkled when there is no water in the
machine.
In models equipped with Spin Speed
Adjustment button, select the Spin Speed
and press Start / Pause / Cancel button if
you want to spin the laundry held in water.
In models not equipped with Spin Speed
Adjustment button, select Spin+Pump
programme if you want to spin your laundry
held in water.
In these models, you need to stop the
C
machine by pressing Start / Pause /
Cancel button before switching to spin
step and after pump step is completed
and the water in the machine is drained.
Thus, water inside the machine is
drained and your laundry is not spun.
• No Heat
Use this function if you want to wash your
laundry in cold water.
• Esclusione Centrifuga (No Spin)
Use this function if you do not want
your clothes be spun at the end of the
programme.
• Spin speed reduction
This function allows spinning of laundry at a
speed lower than the maximum spin speed
of the machine.
When Spin Reduction button is pressed,
spin speed will be limited to the minimum
speed specified on the control panel.
Starting the programme
1. Press Start / Pause / Cancel button to
start the programme.
2. Start / Pause / Cancel button lights up
to indicate that the programme has
started.
3. Loading door is locked and Loading
Door light turns off.
Child Lock
Use Child Lock function to prevent children
from tampering with the machine. Thus
you can avoid any changes in a running
programme.
You can switch on and off the machine
C
with On / Off button when the Child
Lock is active. When you switch on the
machine again, programme will resume
from where it has stopped with the child
lock enabled.
To activate the Child Lock:
Press and hold 1st and 2nd Auxiliary Function
buttons for 3 seconds simultaneously after
washing programme has started. 1. The 1st
Auxiliary Function light flashes continuously.
To deactivate the Child Lock:
Child lock must be deactivated to start
a new programme after the programme
has finished or to interrupt a running
programme.
49
EN
Page 50

Press and hold 1st and 2nd Auxiliary Function
buttons for 3 seconds simultaneously to
disable child lock.
Progress of programme
Progress of a running programme can
be followed from the Programme Followup indicator. At the beginning of every
programme step, the relevant indicator light
will turn on and light of the completed step
will turn off.
To change the auxiliary function, speed and
temperature settings while a programme is
running, you need to switch the machine to
Pause mode. Press Start / Pause / Cancel
button to switch the machine into Pause
mode. In this case, Start / Pause / Cancel
light flashes.
If the machine does not pass to the
C
spinning step, Rinse Hold function
might be active or the automatic
unbalanced load detection system
might be activated due to the
unbalanced distribution of the laundry in
the machine.
Loading door lock
There is a locking system on the loading
door of the machine that prevents opening
of the door in cases when the water level is
unsuitable.
When machine is switched to Pause mode,
it checks the level of the water inside. If
the level is suitable, Loading Door light
illuminates steadily within 1-2 minutes and
the loading door can be opened.
If the Loading Door light is not on, Loading
Door cannot be opened. If you are obliged
to open the Loading Door while the Loading
Door light is off, you must cancel the
current programme; see "Cancelling the
programme".
Changing the selections after
programme has started
To change your settings after the program
has started, you have to switch the machine
to Pause mode first.
Even if you select a new programme
C
by changing the position of the
Programme Selection knob while the
machine is running or in Pause mode,
the programme selected first will
continue. You must cancel the current
programme to change the washing
programme. See "Cancelling the
programme".
Changing the auxiliary function, speed
and temperature
Depending on the step the programme has
reached, you may cancel or activate the
auxiliary functions; see, "Auxiliary function
selection".
You can also change the speed and
temperature settings; see, "Spin speed
selection" and "Temperature selection".
Adding or taking out laundry
1. Press Start / Pause / Cancel button to
switch the machine to pause mode.
2. Wait until the Loading Door can be
opened.
If the Loading Door light does not turn
C
on in 1-2 minutes, it means that the
water level in the machine is not suitable
and laundry cannot be added. You can
resume the programme by pressing
Start / Pause / Cancel button.
3. Open the Loading Door and add or
take out the laundry.
4. Close the Loading Door.
5. Make changes in auxiliary functions,
temperature and speed settings if
necessary.
6. Press Start / Pause / Cancel button to
start the machine.
Cancelling the programme
Press and hold Start / Pause / Cancel
button for 3 seconds to cancel the current
programme. At the end of this period,
machine can drain the water inside it or can
take in and drain water up to 3 times to cool
down the laundry. Washing and End lights
turn on.
Once draining is complete, Start / Pause
/ Cancel and Washing lights turn off, and
Loading Door light starts flashing.
When the Loading Door is openable,
Loading Door light turns on and remains
lit. In this case, you can select and start the
new programme.
End of programme
End light in the programme follow-up
indicator will light up once the programme
comes to an end.
1. Press On / Off button to switch off the
machine.
2. Take out your laundry and close the
loading door. Your machine is ready for
the next washing cycle.
50
EN
Page 51

6 Maintenance and cleaning
Service life of the product extends and
frequently faced problems decrease if
cleaned at regular intervals.
Cleaning the detergent drawer
Clean the detergent drawer at regular
intervals (every 4-5 washing cycles)
as shown below in order to prevent
accumulation of powder detergent in time.
1. Press the dotted point on the siphon
in the softener compartment and pull
towards you until the compartment is
removed from the machine.
If more than normal amount of water
C
and softener mixture starts to gather in
the softener compartment, the siphon
must be cleaned.
2. Wash the detergent drawer and the
siphon with plenty of lukewarm water
in a washbasin. Wear protective gloves
or use an appropriate brush to avoid
touching of the residues in the drawer
with your skin when cleaning.
3. Insert the drawer back into its place
after cleaning and make sure that it is
seated well.
Cleaning the loading
door and the drum
Residues of softener, detergent and dirt
may accumulate in your machine in time
and may cause unpleasant odours and
washing complaints. To avoid this, use
the Drum Cleaning programme. If your
machine is not featured with Drum Cleaning
programme, use Cottons-90 programme
and select Additional Water or Extra Rinse
auxiliary functions as well. Before starting
the programme, put max. 100 g of powder
anti-limescale into the main wash detergent
compartment (compartment nr. II). If the
anti-limescale is in tablet form, put only one
tablet into compartment nr. II. Dry the inside
of the bellow with a clean piece of cloth after
the programme has come to an end.
Repeat Drum Cleaning process in
C
every 2 months.
Use an anti-limescale suitable for the
C
washing machines.
After every washing make sure that no
foreign substance is left in the drum.
If the holes on the bellow shown in the
figure is blocked, open the holes using a
toothpick.
Foreign metal substances in your
C
machine will cause rust stains. Clean
the stains on the drum surface by
using cleaning agents for stainless
steel. Never use steel wool or wire
wool.
Cleaning the body
and control panel
Wipe the body of the machine with soapy
water or non-corrosive mild gel detergents
as necessary, and dry with a soft cloth.
Use only a soft and damp cloth to clean
the control panel.
Never use sponge or scrub materials.
A
These will damage the painted and
plastic surfaces.
Cleaning the water
intake filters
There is a filter at the end of each water
intake valve at the rear of the machine
and also at the end of each water intake
hose where they are connected to the tap.
These filters prevent foreign substances
and dirt in the water to enter the washing
machine. Filters should be cleaned as they
do get dirty.
51
EN
Page 52

1. Close the taps.
2. Remove the nuts of the water intake
hoses to access the filters on the water
intake valves. Clean them with an
appropriate brush. If the filters are too
dirty, take them out by means of pliers
and clean them.
3. Take out the filters on the flat ends of
the water intake hoses together with
the gaskets and clean thoroughly under
running water.
4. Replace the gaskets and filters carefully
in their places and tighten the hose nuts
by hand.
Draining remaining water and
cleaning the pump filter
The filter system in your machine prevents
solid items such as buttons, coins and
fabric fibers clogging the pump impeller
during discharge of washing water. Thus,
the water will be discharged without any
problem and the service life of the pump will
extend.
If the machine fails to drain water, the pump
filter is clogged. Filter must be cleaned
whenever it is clogged or in every 3 months.
Water must be drained off first to clean the
pump filter.
In addition, prior to transporting the machine
(eg., when moving to another house) and
in case of freezing of the water, water may
have to be drained completely.
Foreign substances left in the pump
A
filter may damage your machine or may
cause noise problem.
In order to clean the dirty filter and discharge
the water:
1. Unplug the machine to cut off the
supply power.
Temperature of the water inside the
A
machine may rise up to 90 ºC. To avoid
burning risk, filter must be cleaned after
the water in the machine cools down.
2. Open the filter cap.
If the filter cap is composed of two
pieces, press the tab on the filter cap
downwards and pull the piece out
towards yourself.
If the filter cap is one piece, pull the cap
from both sides at the top to open.
You can remove the filter cover by
C
slightly pushing downwards with a thin
plastic tipped tool, through the gap
above the filter cover. Do not use metal
tipped tools to remove the cover.
3. Some of our products have emergency
draining hose and some does not have.
Follow the steps below to discharge the
water.
Discharging the water when the product
has an emergency draining hose:
a. Pull the emergency draining hose out
from its seat
b. Place a large container at the end of the
hose. Drain the water into the container
by pulling out the plug at the end of the
hose. When the container is full, block
the inlet of the hose by replacing the
plug. After the container is emptied,
repeat the above procedure to drain the
water in the machine completely.
52
EN
Page 53

c. When draining of water is finished, close
the end by the plug again and fix the
hose in its place.
d. Turn the pump filter to take it out.
Discharging the water when the product
does not have an emergency draining hose:
a. Place a large container in front of the
filter to catch water from the filter.
b. Loosen pump filter (anticlockwise) until
water starts to flow. Fill the flowing water
into the container you have placed in
front of the filter. Always keep a piece of
cloth handy to absorb any spilled water.
c. When the water inside the machine is
finished, take out the filter completely by
turning it.
4. Clean any residues inside the filter as
well as fibers, if any, around the pump
impeller region.
5. Install the filter.
If your product has a water jet feature,
A
be sure to fit the filter into its housing in
the pump. Never force the filter while
installing it into its housing. Seat the filter
into its place completely. Otherwise,
water may leak from the filter cap.
6. If the filter cap is composed of two
pieces, close the filter cap by pressing
on the tab. If it is one piece, seat the
tabs in the lower part into their places
first, and then press the upper part to
close.
53
EN
Page 54

7 Troubleshooting
Programme cannot be started or selected.
• Washing machine has switched to self protection mode due to a supply problem (line
voltage, water pressure, etc.). >>> Press and hold Start / Pause / Cancel button for 3
seconds to reset the machine to factory settings. (See "Canceling the programme")
Water in the machine.
• Some water might have remained in the product due to the quality control processes
in the production. >>> This is not a failure; water is not harmful to the machine.
There is water leaking from the bottom of the washing machine.
• Likely problems with hoses or the pump filter. >>> Be sure the seals of the water inlet
hoses are securely fitted. Attach the hose to the tap tightly.
• Pump filter might not be closed fully. >>> Make sure that the pump filter is completely
closed.
Machine does not fill with water.
• Tap is turned off. >>> Open the inlet water taps fully.
• Water inlet hose is bent. >>> Flatten the water inlet hose.
• Water inlet filter is clogged. >>> Clean the water inlet filter.
• The loading door is ajar. >>> Close the Loading Door.
Machine does not drain water.
• Water drain hose might be clogged or twisted. >>> Clean or flatten the hose.
• Pump filter is clogged. >>> Clean the pump filter.
Machine vibrates or makes noise.
• Machine might be standing unbalanced. >>> Adjust the feet to level the machine.
• A hard substance might have entered into the pump filter. >>> Clean the pump filter.
• Transportation safety bolts are not removed. >>> Remove the transportation safety
bolts.
• Laundry quantity in the machine might be too little. >>> Add more laundry to the
machine.
• Machine might be overloaded with laundry. >>> Take out some of the laundry from the
machine or distribute the load by hand to balance it homogenously in the machine.
• Machine might be leaning on a rigid item. >>> Make sure that the machine is not
leaning on anything.
Machine stopped shortly after the programme started.
• Machine might have stopped temporarily due to low voltage. >>> It will resume
running when the voltage restores to the normal level.
Machine directly discharges the water it takes in.
• Draining hose might not be at adequate height. >>> Connect the water draining hose
as described in the operation manual.
No water can be seen in the machine during washing.
The water level is not visible from outside of the washing machine. This is not a failure.
C
Loading door cannot be opened.
• Door lock is activated because of the water level in the machine. >>> Drain the water
by running the Pump or Spin programme.
• Machine is heating up the water or it is at the spinning cycle. >>> Wait until the
programme completes.
• Child lock is engaged. Door lock will be deactivated a couple of minutes after the
programme has come to an end. >>> Wait for a couple of minutes for deactivation of
the door lock.
54
EN
Page 55

Washing takes longer time than the one specified in the manual.
• Water pressure is low. >>> Machine waits until taking in adequate amount of water to
prevent poor washing quality due to the decreased amount of water. Therefore, the
washing time extends.
• Voltage might be low. >>> Washing time is prolonged to avoid poor washing results
when the supply voltage is low.
• Input temperature of water might be low. >>> Required time to heat up the water
extends in cold seasons. Also, washing time can be lengthened to avoid poor washing
results.
• Number of rinses and/or amount of rinse water might have increased. >>> Machine
increases the amount of rinse water when good rinsing is needed and adds an extra
rinsing step if necessary.
• Excessive foam might have occurred and automatic foam absorption system might
have been activated due to too much detergent usage. >>> Use recommended
amount of detergent.
Machine does not switch to spinning step when the laundry is not evenly distributed in
C
the drum to prevent any damage to the machine and to its surrounding environment.
Laundry should be rearranged and re-spun.
Programme time does not countdown. (On models with display)
• Timer may stop during water intake. >>> Timer indicator will not countdown until
the machine takes in adequate amount of water. The machine will wait until there is
sufficient amount of water to avoid poor washing results due to lack of water. Timer
indicator will resume countdown after this.
• Timer may stop during heating step. >>> Timer indicator will not countdown until the
machine reaches the selected temperature.
• Timer may stop during spinning step. >>> Automatic unbalanced load detection
system might be activated due to the unbalanced distribution of the laundry in the
drum.
Machine does not switch to spinning step when the laundry is not evenly distributed in
C
the drum to prevent any damage to the machine and to its surrounding environment.
Laundry should be rearranged and re-spun.
Programme time does not countdown.
• There might be an imbalance of laundry in the machine. >>> Automatic unbalanced
load detection system might be activated due to the unbalanced distribution of the
laundry in the drum.
Machine does not switch to spinning step when the laundry is not evenly distributed in
C
the drum to prevent any damage to the machine and to its surrounding environment.
Laundry should be rearranged and re-spun.
Machine does not switch to spinning step.
• There might be an imbalance of laundry in the machine. >>> Automatic unbalanced
load detection system might be activated due to the unbalanced distribution of the
laundry in the drum.
Machine does not switch to spinning step when the laundry is not evenly distributed in
C
the drum to prevent any damage to the machine and to its surrounding environment.
Laundry should be rearranged and re-spun.
• The machine will not spin if water is not drained completely. >>> Check the filter and
the draining hose.
• Excessive foam might have occurred and automatic foam absorption system might
have been activated due to too much detergent usage. >>> Use recommended
amount of detergent.
55
EN
Page 56

Washing performance is poor: Laundry turns gray.
• Insufficient amount of detergent was used over a long period of time. >>> Use the
recommended amount of detergent appropriate for water hardness and the laundry.
• Washing was made at low temperatures for a long time over a long period of time. >>>
Select the proper temperature for the laundry to be washed.
• Insufficient amount of detergent is used with hard waters. >>> Using insufficient
amount of detergent with hard water causes the soil to stick on the cloth and this turns
the cloth into gray in time. It is difficult to eliminate graying once it happens. Use the
recommended amount of detergent appropriate for water hardness and the laundry.
• Too much detergent is used. >>> Use the recommended amount of detergent
appropriate for water hardness and the laundry.
• Regular drum cleaning is not applied. >>> Clean the drum regularly. For this, please
see "Cleaning the loading door and the drum".
Washing performance is poor: Stains persist or the laundry is not whitened.
• Insufficient amount of detergent is used. >>> Use recommended amount of detergent
appropriate for the laundry.
• Excessive laundry was loaded in. >>> Do not load the machine in excess. Load with
amounts recommended in the "Programme and consumption table".
• Wrong programme and temperature were selected. >>> Select the proper programme
and temperature for the laundry to be washed.
• Wrong type of detergent is used. >>> Use original detergent appropriate for the
machine.
• Detergent is put in the wrong compartment. >>> Put the detergent in the correct
compartment. Do not mix the bleaching agent and the detergent with each other.
• Regular drum cleaning is not applied. >>> Clean the drum regularly. For this, please
see "Cleaning the loading door and the drum".
Washing performance is poor: Oily stains appeared on the laundry.
• Regular drum cleaning is not applied. >>> Clean the drum regularly. For this, please
see "Cleaning the loading door and the drum".
Washing performance is poor: Clothes smell unpleasantly.
• Odours and bacteria layers are formed on the drum as a result of continuous washing
at lower temperatures and/or in short programmes. >>> Leave the detergent drawer
as well as the loading door of the machine ajar after each washing. Thus, a humid
environment favorable for bacteria cannot occur in the machine.
• Regular drum cleaning is not applied. >>> Clean the drum regularly. For this, please
see "Cleaning the loading door and the drum".
Colour of the clothes faded.
• Excessive laundry was loaded in. >>> Do not load the machine in excess.
• Detergent in use is damp. >>> Keep detergents closed in an environment free of
humidity and do not expose them to excessive temperatures.
• A higher temperature is selected. >>> Select the proper programme and temperature
according to the type and soiling degree of the laundry.
• Regular drum cleaning is not applied. >>> Clean the drum regularly. For this, please
see "Cleaning the loading door and the drum".
56
EN
Page 57

It does not rinse well.
• The amount, brand and storage conditions of the detergent used are inappropriate.
>>> Use a detergent appropriate for the washing machine and your laundry. Keep
detergents closed in an environment free of humidity and do not expose them to
excessive temperatures.
• Detergent is put in the wrong compartment. >>> If detergent is put in the prewash
compartment although prewash cycle is not selected, machine can take this detergent
during rinsing or softener step. Put the detergent in the correct compartment.
• Pump filter is clogged. >>> Check the filter.
• Drain hose is folded. >>> Check the drain hose.
Laundry became stiff after washing.
• Insufficient amount of detergent is used. >>> Using insufficient amount of detergent
for the water hardness can cause the laundry to become stiff in time. Use appropriate
amount of detergent according to the water hardness.
• Detergent is put in the wrong compartment. >>> If detergent is put in the prewash
compartment although prewash cycle is not selected, machine can take this detergent
during rinsing or softener step. Put the detergent in the correct compartment.
• Detergent might be mixed with the softener. >>> Do not mix the softener with
detergent. Wash and clean the dispenser with hot water.
• Regular drum cleaning is not applied. >>> Clean the drum regularly. For this, please
see "Cleaning the loading door and the drum".
Laundry does not smell like the softener.
• Detergent is put in the wrong compartment. >>> If detergent is put in the prewash
compartment although prewash cycle is not selected, machine can take this detergent
during rinsing or softener step. Wash and clean the dispenser with hot water. Put the
detergent in the correct compartment.
• Detergent might be mixed with the softener. >>> Do not mix the softener with
detergent. Wash and clean the dispenser with hot water.
• Regular drum cleaning is not applied. >>> Clean the drum regularly. For this, please
see "Cleaning the loading door and the drum".
Detergent residue in the detergent drawer.
• Detergent is put in wet drawer. >>> Dry the detergent drawer before putting in
detergent.
• Detergent has gotten damp. >>> Keep detergents closed in an environment free of
humidity and do not expose them to excessive temperatures.
• Water pressure is low. >>> Check the water pressure.
• The detergent in the main wash compartment got wet while taking in the prewash
water. Holes of the detergent compartment are blocked. >>> Check the holes and
clean if they are clogged.
• There is a problem with the detergent drawer valves. >>> Call the Authorized Service
Agent.
• Detergent might be mixed with the softener. >>> Do not mix the softener with
detergent. Wash and clean the dispenser with hot water.
• Regular drum cleaning is not applied. >>> Clean the drum regularly. For this, please
see "Cleaning the loading door and the drum".
There is detergent left on the laundry.
• Excessive laundry was loaded in. >>> Do not load the machine in excess.
• Wrong programme and temperature were selected. >>> Select the proper programme
and temperature for the laundry to be washed.
• Wrong detergent was used. >>> Select the proper detergent for the laundry to be
washed.
• Regular drum cleaning is not applied. >>> Clean the drum regularly. For this, please
see "Cleaning the loading door and the drum".
57
EN
Page 58

Too much foam forms in the machine.
• Improper detergents for the washing machine are being used. >>> Use detergents
appropriate for the washing machine.
• Excessive amount of detergent is used. >>> Use only sufficient amount of detergent.
• Detergent was stored under improper conditions. >>> Store detergent in a closed and
dry location. Do not store in excessively hot places.
• Some meshed laundry such as tulle may foam too much because of their texture. >>>
Use smaller amounts of detergent for this type of item.
• Detergent is put in the wrong compartment. >>> Put the detergent in the correct
compartment.
• Softener is being taken early. >>> There may be problem in the valves or in the
detergent dispenser. Call the Authorized Service Agent.
• Regular drum cleaning is not applied. >>> Clean the drum regularly. For this, please
see "Cleaning the loading door and the drum".
Foam is overflowing from the detergent drawer.
• Too much detergent is used. >>> Mix 1 tablespoonful softener and ½ l water and pour
into the main wash compartment of the detergent drawer.
Put detergent into the machine suitable for the programmes and maximum loads
C
indicated in the “Programme and consumption table”. When you use additional
chemicals (stain removers, bleaches and etc), reduce the amount of detergent.
Laundry remains wet at the end of the programme
• Excessive foam might have occurred and automatic foam absorption system might
have been activated due to too much detergent usage. >>> Use recommended
amount of detergent.
Machine does not switch to spinning step when the laundry is not evenly distributed in
C
the drum to prevent any damage to the machine and to its surrounding environment.
Laundry should be rearranged and re-spun.
If you cannot eliminate the problem although you follow the instructions in this section,
A
consult your dealer or the Authorized Service Agent. Never try to repair a nonfunctional
product yourself.
 Loading...