


Barbecook Nassau Ceram II Black, Nassau Ceram I Black, Nassau Inox II, Nassau Inox I User Manual [it]
Nassau
NASSAU CERAM I+ |
NASSAU CERAM II+ |
223.9043.000 |
223.9042.000 | 223.9042.200 |
NASSAU INOX I+223.9021.000 |
NASSAU INOX II+ |
|
223.9020.000 |
www.barbecook.com
Saey Home & Garden NV, Industrielaan 4, 8501 Heule, Belgium
tel: (32)(0) 56 35 42 00 - fax: (32)(0) 56 37 15 15 - e-mail: info@barbecook.com
50
NASSAU CERAM I+
223.9043.000
2 | www.barbecook.com
50
NASSAU CERAM II+
223.9042.000 | 223.9042.200
www.barbecook.com | 3
50
NASSAU INOX I+
223.9021.000
4 | www.barbecook.com

50
NASSAU INOX II+
223.9020.000
www.barbecook.com | 5

N° |
Nassau Inox I+ |
Nassau Inox II+ |
Nassau Ceram I+ |
Nassau Ceram II B |
Nassau Ceram II DE |
|
223.9021.000 |
223.9020.000 |
223.9043.000 |
223.9042.000 |
223.9042.200 |
||
|
||||||
1 |
227.9020.115 |
227.9020.115 |
227.9040.115 |
227.9040.115 |
227.9040.115 |
|
2 |
227.9020.110 |
227.9020.110 |
227.9020.110 |
227.9020.110 |
227.9020.110 |
|
3 |
227.9020.120 |
227.9020.120 |
227.9020.120 |
227.9020.120 |
227.9020.120 |
|
4 |
|
|
|
223.0232.840 |
223.0232.840 |
|
6 |
227.9020.135 |
227.9020.135 |
227.9020.135 |
227.9020.135 |
227.9020.135 |
|
7 |
227.9020.140 |
227.9020.140 |
227.9020.140 |
227.9020.140 |
227.9020.140 |
|
8 |
|
227.9020.200 |
227.9020.200 |
227.9020.200 |
227.9020.200 |
|
9 |
227.9020.210 |
227.9020.210 |
227.9020.210 |
227.9020.210 |
227.9020.210 |
|
10 |
227.9020.220 |
227.9020.220 |
227.9040.220 |
227.9040.220 |
227.9040.220 |
|
11 |
227.9020.230 |
227.9020.230 |
227.9020.230 |
227.9020.230 |
227.9020.230 |
|
12 |
227.9020.240 |
227.9020.240 |
227.9020.240 |
227.9020.240 |
227.9020.240 |
|
15 |
227.9020.250 |
227.9020.250 |
227.9042.250 |
227.9042.250 |
227.9042.250 |
|
16 |
227.9020.260 |
227.9020.260 |
227.9020.260 |
227.9020.260 |
227.9020.260 |
|
18 |
227.9020.270 |
227.9020.270 |
227.9020.270 |
227.9040.270 |
227.9040.270 |
|
19 |
227.9020.280 |
227.9020.280 |
227.9020.280 |
227.9020.280 |
227.9020.280 |
|
20 |
227.9020.300 |
227.9020.300 |
227.9020.300 |
227.9040.300 |
227.9040.300 |
|
21 |
227.9020.310 |
227.9020.310 |
227.9020.310 |
227.9020.310 |
227.9020.310 |
|
22 |
227.9020.320 |
227.9020.320 |
227.9020.320 |
227.9020.320 |
227.9020.320 |
|
23 |
|
227.9020.330 |
227.9040.330 |
227.9040.330 |
227.9040.330 |
|
24 |
227.9020.340 |
227.9020.340 |
227.9020.340 |
227.9020.340 |
227.9020.340 |
|
25 |
227.9020.350 |
227.9020.350 |
227.9020.350 |
227.9020.350 |
227.9020.350 |
|
26 |
|
|
|
227.9041.400 |
227.9041.400 |
|
27 |
|
|
|
227.9041.410 |
227.9041.410 |
|
28 |
|
|
|
227.9041.420 |
227.9041.420 |
|
29 |
|
|
|
227.9041.430 |
227.9041.430 |
|
30 |
|
|
|
227.9041.440 |
227.9041.440 |
|
31 |
|
|
|
227.9041.450 |
227.9041.450 |
|
36 |
227.9020.500 |
227.9020.500 |
227.9020.500 |
227.9020.500 |
227.9020.500 |
|
37 |
227.9020.510 |
227.9020.510 |
227.9020.510 |
227.9020.510 |
227.9020.510 |
|
38 |
227.9020.520 |
227.9020.520 |
227.9020.520 |
227.9020.520 |
227.9020.520 |
|
39 |
227.9020.530 |
227.9020.530 |
227.9020.530 |
227.9020.530 |
227.9020.530 |
|
40 |
227.9020.540 |
227.9020.540 |
227.9020.540 |
227.9020.540 |
227.9020.540 |
|
41 |
227.9020.550 |
227.9020.550 |
227.9020.550 |
227.9020.550 |
227.9020.550 |
|
42 |
227.9020.560 |
227.9021.560 |
227.9020.560 |
227.9020.560 |
227.9020.560 |
|
43 |
227.9020.570 |
227.9020.570 |
227.9020.570 |
227.9020.570 |
227.9020.570 |
|
44 |
227.9020.580 |
227.9020.580 |
227.9020.580 |
227.9020.580 |
227.9020.580 |
|
45 |
227.9020.590 |
227.9020.590 |
227.9020.590 |
227.9020.590 |
227.9020.590 |
|
46 |
227.9020.610 |
227.9020.610 |
227.9020.610 |
227.9020.600 |
227.9020.650 |
|
47 |
227.9020.700 |
227.9020.700 |
227.9020.700 |
227.9020.700 |
227.9020.700 |
|
50 |
|
|
|
227.9020.290 |
227.9020.290 |
6 | www.barbecook.com

GB |
ASSEMBLY INSTRUCTIONS |
Tools Needed for Assembly:
•Screwdriver, No. 2
•Key, No. 10
Read these instructions carefully before assembling the barbecue.
Assemble the barbecue on a flat, clean surface.
Caution: Take care when assembling the appliance, since the tools can damage the enamel.
You may have extra hardware left over after completing the assembly.
FINSTRUCTION D’ASSEMBLAGE
Outils requis:
•Tournevis cruciforme n° 2
•Clé n° 10
Avant d’assembler le barbecue, lisez attentivement les instructions.
Assemblez le barbecue sur une surface plane et propre.
Attention: Soyez prudent pendant l’assemblage du barbecue. Les outils peuvent abîmer la surface émaillée.
Il se peut qu’il reste des fixations à la fin de l’assemblage.
DMONTAGEANLEITUNG
Benötigte Werkzeuge:
•Kreuzschraubendreher Nr. 2
•Schlüssel Nr. 10
Bevor Sie den Grill zusammenbauen sollten Sie die Anweisungen aufmerksam durchlesen. Bauen Sie den Grill auf einer ebenen, sauberen Fläche zusammen.
Achtung: Vorsicht beim Zusammenbau des Grills: Die Werkzeuge können die emaillierte Oberfläche beschädigen.
Möglicherweise sind nach Ende der Montage noch Befestigungsteile übrig.
NL MONTAGE-INSTRUCTIES
Vereiste gereedschappen:
•Schroevendraaier kruispunt n° 2
•Sleutel n° 10
Lees aandachtig de instructies alvorens de barbecue te monteren.
Monteer de barbecue op een vlakke en propere ondergrond.
Opgelet : Wees voorzichtig tijdens het monteren van de barbecue.
Het gereedschap kan het geëmailleerde oppervlak beschadigen.
Het kan gebeuren dat er vijzen over zijn na de montage.
www.barbecook.com | 7

EINSTRUCCIÓN DE MONTAJE
Herramientas necesarias:
•Destornillador de hoja cruciforme n° 2
•Llave n° 10
Antes de montar la barbacoa, lea atentamente las instrucciones.
Monte la barbacoa sobre una superficie plana y limpia.
Atención : Tenga cuidado durante el montaje de la barbacoa.Las herramientas pueden dañar la superficie esmaltada.
Puede darse el caso de que queden fijaciones por hacer al final del montaje.
IISTRUZIONI DI MONTAGGIO
Attrezzi necessari per il montaggio:
•Cacciavite, No. 2
•Chiave n° 10
Leggere attentamente le istruzioni prima del montaggio del barbecue.
Montare il barbecue in una superficie piana e pulita.
Attenzione : Fare prudenza durante il montaggio del barbecue, poiché gli attrezzi possono danneggiare lo smalto.
È possibile che vi siano delle viti nel sistema dopo il montaggio.
PINSTRUÇÕES DE MONTAGEM
Benötigte Werkzeuge:
•Kreuzschraubendreher Nr. 2
•Schlüssel Nr. 10
Bevor Sie den Grill zusammenbauen sollten Sie die Anweisungen aufmerksam durchlesen. Bauen Sie den Grill auf einer ebenen, sauberen Fläche zusammen.
Achtung: Vorsicht beim Zusammenbau des Grills: Die Werkzeuge können die emaillierte Oberfläche beschädigen.
Möglicherweise sind nach Ende der Montage noch Befestigungsteile übrig.
SMONTAGE-INSTRUCTIES
Ferramentas necessárias:
•Chave de estrela nº 2
•Chave º 10
Antes de montar o grelhador, leia atentamente as instruções.
Monte o grelhador numa superfície plana e limpa.
Atenção: Seja prudente durante a montagem do grelhador. As ferramentas podem estragar a superfície esmaltada.
Podem sobrar fixações no final da montagem.
8 | www.barbecook.com

DK SAMLEVEJLEDNING
Nødvendigt værktøj:
•Stjerneskruetrækker nr. 2
•Skruenøgle nr. 10
Læs denne vejledning omhyggeligt, før du samler havegrillen.
Saml havegrillen på en jævn og ren overflade.
Bemærk: Vær forsigtig under samling af havegrillen.
Værktøjet kan beskadige den emaljerede overflade.
Det er muligt, at der er nogle skruer og møtrikker i overskud.
FIN |
OHJEET KOKOAMISEEN |
Tarvittavat työkalut:
•Ristipäinen ruuvimeisseli nro. 2
•Avain nro. 10
Lue ohjeet tarkkaan ennen kuit alat kokoamaan grilliä.
Kokoa grilli tasaisella ja puhtaalla alustalla.
Varoitus: Ole varovainen kootessasi grilliä. Työkalut voivat vahingoittaa emalista pintaa.
Kokoamisen päätteeksi on hyvinkin mahdollista, että vielä löytyy korjattavaa.
CZ |
MONTÁŽNÍ POSTUP |
Nářadí potřebné k montáži:
•šroubovák č. 2
•klíč č. 10
Před kompletací grilu čtěte pečlivě následující instrukce.
Kompletujte gril na rovném a čistém povrchu.
Upozornění: Dávejte pozor při montáži spotřebiče, poněvadž nářadí může poškodit smalt.
Po dokončení montáže je možné, že vám zůstanou nějaké součástky.
SK |
POKYNY PRE MONTÁŽ |
Nástroje potrebné pre montáž:
•skrutkovač .2
•kľúč .10
Pred použitím grilu si dôkladne prečítajte tieto pokyny.
Gril montujte na rovnom a čistom podstavci.
Poznámka: Pri montáži grilu postupujte opatrne. Nástroje by mohli poškodiť smaltovaný povrch.
Po dokončení montáže vám môžu ostať nepoužité skrutky.
www.barbecook.com | 9
N
|
|
L |
I |
|
|
|
|
|
K
E
G
R 
 A
A
F
J
P
B
Q
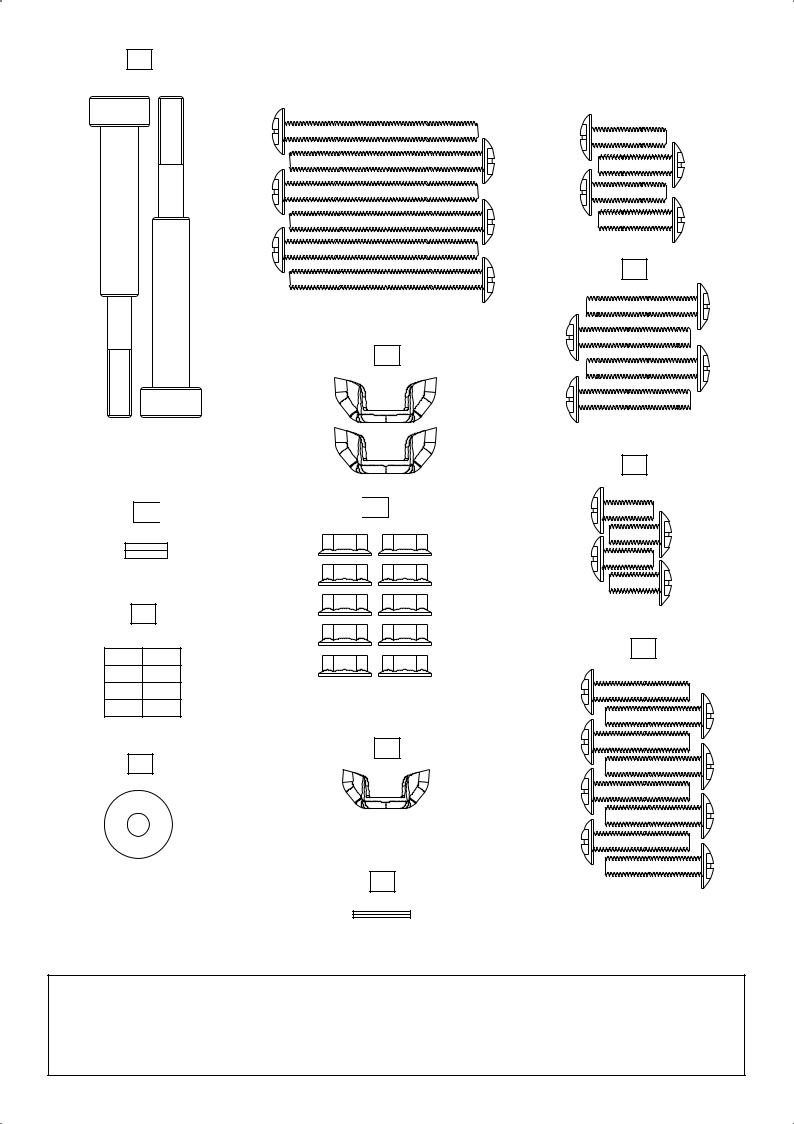
A : M6 : 10x |
I : M6x50 : 6x |
P : M4 : 1x |
B : 2x |
J : M6x25 : 8x |
Q : 2x |
E : 1/4” : 2x |
K : M6x30 : 4x |
R : 7mm – 2x |
F : ¼” : 8x |
L : M6x20 : 4x |
|
G : M6x13 : 4x |
N : 2x |
|
10 | www.barbecook.com
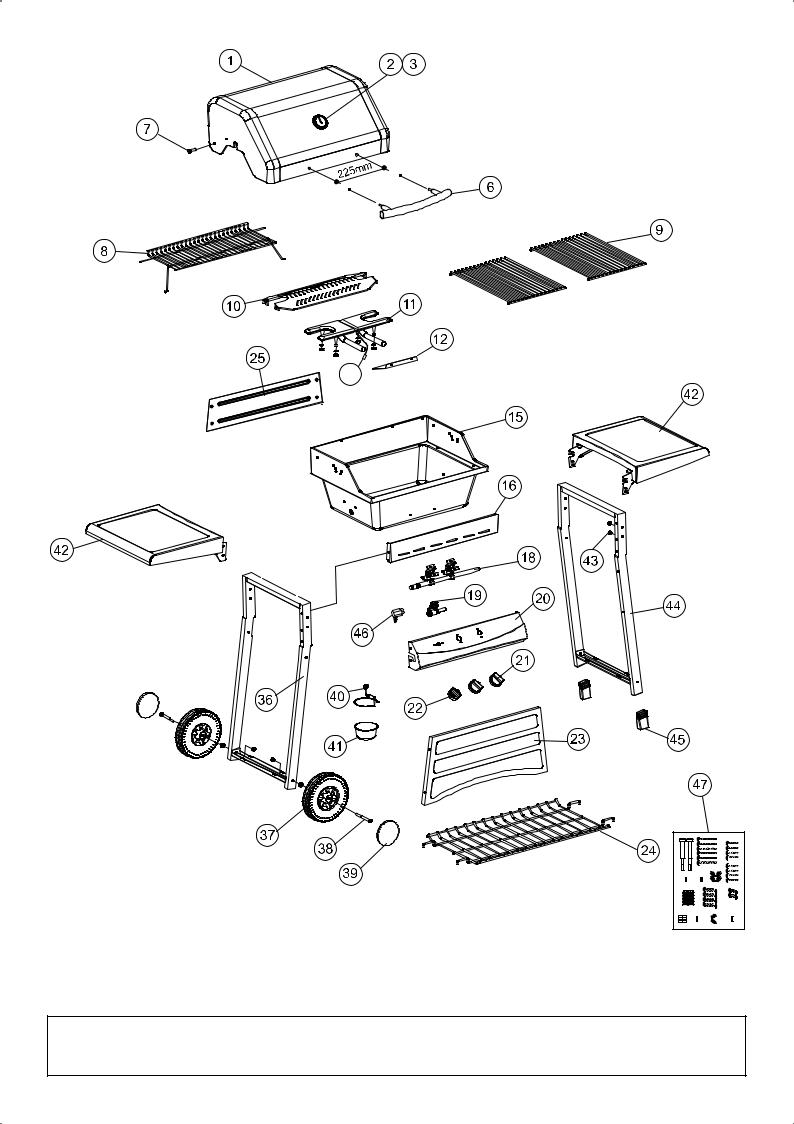
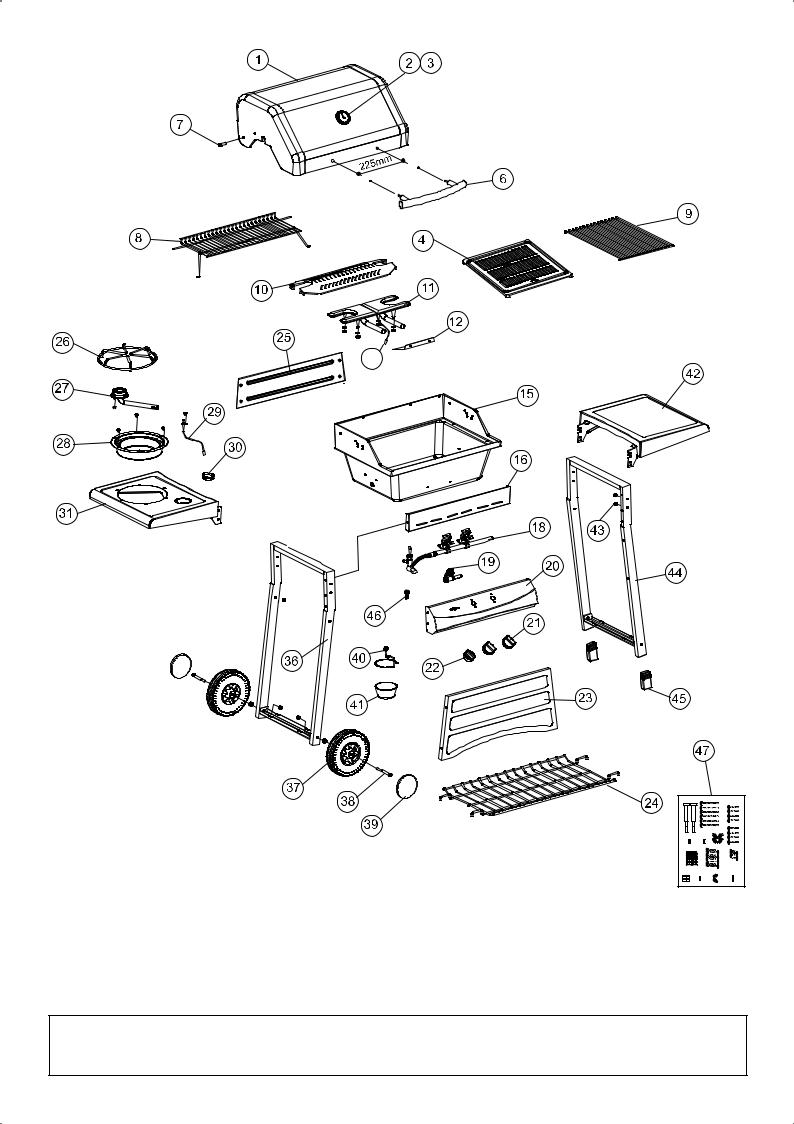
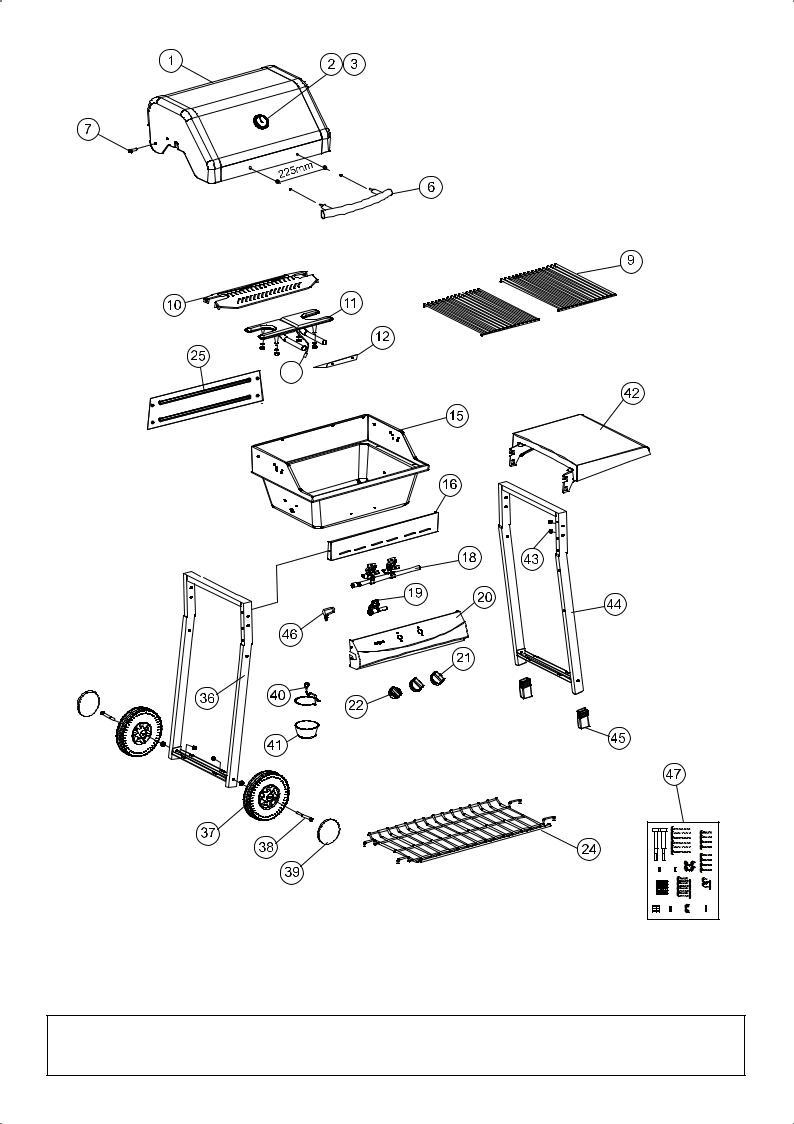
1
2
3
36
16
I
G
23 |
A |
44
25
K
24
A |
|
|
45 |
|
Q |
|
|
|
|
|
|
|
|
N |
39 |
|
37 |
|
|
|
|
|
L 
B
15 |
R |
6 |
|
E
 A
A
A 
www.barbecook.com | 11

4
21
22
I
20
5


 F
F
J
6
18
12 | www.barbecook.com

7
26
27 

P 

ONLY FOR 223.9041.000
8
GB Important! Burner tube must engage valve opening, and the burner tube must be aligned with the valve, as shown.
FTrès important! Les sorties des valves doivent être insérées dans les tubes des brûleurs.
DSehr wichtig! Die Ventilausgänge müssen in die Rohre der Brenner eingeführt werden.
NL |
Heel belangrijk! De venturibuizen moeten goed over de openingen van de |
|
gaskleppen geplaatst worden. |
|
EMuy importante! Las vías de salida de las válvulas deben insertarse en los tubos de los quemadores.
IMolto importante! Il tubo del bruciatore deve agganciarsi perfettamente all’apertura della valvola del gas.
PMuito Importante! As saídas das válvulas devem estar inseridas nos tubos dos queimadores.
S Mycket viktigt! Ventilöppningarna måste vara ordentligt inskjutna i gasrören.
DK Meget vigtigt! Ventilernes udgange skal sættes ind i brændernes rør.
FIN Erittäin tärkeää! Venttiiliaukot tulee asettaa poltinputkien sisään.
CS Důležité upozornění Trubice hořáku musí být připevněna na ventil, jak je znázorněno na obrázku.
SK Dôležité upozornenie Ubezpečte sa, že boli splnené nasledujúce podmienky: Horáky sú správne namontované, Venturiho trubice sú správne umiestnené na otvoroch ventilov plynu
www.barbecook.com | 13

9
9
10
8
10
11
30-37 MBAR
14 | www.barbecook.com

50 MBAR
www.barbecook.com | 15

|
|
|
|
Industrielaan 4 B - 8501 KORTRIJK - Heule Belgium |
|
|
|
|
|
|
|
0461/06 |
|||
|
|
|
|
||||
|
|
|
|
|
|
||
|
|
|
|
|
|
||
|
|
|
|
|
|
||
|
|
|
|
|
|
|
|
|
|
|
|
|
|
|
|
|
|
|
|
|
|
|
|
|
|
|
|
|
|
|
|
F
13,7 kW |
12,8 kW |
13,7 kW |
E
BURNER |
I |
|
|
CERAMWITHOUT |
|
|
INO |
|
|
MODEL |
L |
|
INO |
|
A
X
16 | www.barbecook.com

|
|
|
|
|
|
GB |
SAFE USE, CARE AND ASSEMBLY MANUAL |
18 |
|
|
|
F |
GUIDE D’ASSEMBLAGE, D’UTILISATION ET D’ENTRETIEN |
27 |
|
|
|
D |
MONTAGE-, BEDIENUNGSUND WARTUNGSANLEITUNG |
36 |
|
|
|
NL |
HANDLEIDING EN GEBRUIKSAANWIJZING |
45 |
|
|
|
E |
INSTRUCCIONES DE MONTAJE, UTILIZACIÓN Y MANTENIMIENTO |
54 |
|
|
|
I |
MANUALE PER IL MONTAGGIO, L’USO E LA MANUTENZIONE |
63 |
|
|
|
P |
GUIA DE MONTAGEM, UTILIZAÇÃO E MANUTENÇÃO |
72 |
|
|
|
S |
ANVISNINGAR FÖR MONTERING, ANVÄNDNING OCH SKÖTSEL |
81 |
|
|
|
DK |
VEJLEDNING FOR SAMLING, BRUG & VEDLIGEHOLDELSE |
90 |
|
|
|
FIN |
OPAS KOKOAMISEEN, KÄYTTÖÖN JA KUNNOSSAPITOON |
99 |
|
NÁVOD K MONTÁŽI, OBSLUZE A ÚDRŽBĚ |
|
CZ |
108 |
www.barbecook.com | 17

GB |
|
SAFE USE, CARE AND ASSEMBLY MANUAL |
|
|
|
Read this manual before using the barbecue !
The use of lavarocks is unnecessary with this barbecue.
FOR YOUR SAFETY
If you smell gas:
1.Immediately turn off the gas flow to the unit.
2.Extinguish any open flame.
3.Open the lid of the unit.
4.If the odour persists, immediately call your gas supplier or fire department for assistance.
5.Do not store or use gasoline or other flammable vapours and liquids in the vicinity of this or any other appliance.
6.A gas cylinder not connected for use must not be stored in the vicinity of this or any other appliance.
Failure to follow all of the Manufacturer’s instructions could result in hazardous fires, explosions or property damage. The user is responsible for the proper assembly, installation and use of his barbecue.
Failure to follow all of the manufacturer’s instructions could result in serious personal injury, or even death. Any modification of the appliance may be dangerous. Do not store the gas cylinder underneath the barbecue.
THIS BARBECUE IS FOR OUTDOOR USE ONLY
WARRANTY
The barbecook® comes with a two-year limited warranty on manufacturing defects, from the date of purchase and to the extent to which use of the appliance corresponds with these instructions for use. The receipt stating the date of purchase is valid as a guarantee card.
This barbecook® is not suited for professional use.
This warranty shall be limited to the repair or replacement of parts that prove defective under normal conditions of use and service.
The foregoing warranty does not apply to defects resulting from faulty installation, incorrect operation, disassembly, alterations or remodelling; misuse, misapplication, neglect, abuse, an accident, tornado, hurricane, or earthquake, or lack of proper maintenance, cleaning and care.
18 | www.barbecook.com

INSTALLATION
This appliance must be installed in accordance with all local regulations.
A
ADDITIONAL WARNINGS
Minimum clearance to adjacent combustible materials:
•76 cm (30”) from furthest protruding edge on side of barbecue.
•76 cm (30”) from furthest protruding edge on rear of barbecue.
•Always keep the area around the barbecue clean and clear of any combustible materials such as gasoline or other flammable liquids, paper or oily rags.
•Do not operate this barbecue under any overhanging or unprotected construction.
•Remember that this barbecue is for outdoor use only, in a well-ventilated area and at least 3m (10’) away from any dwelling or other building. The barbecue is not intended for use on any boat or recreational vehicle.
•Do not use in garages or in any other enclosed area.
•Do not leave your barbecue unattended while in operation.
•Do not obstruct the flow of combustion and ventilation air to the barbecue.
•Do not use while under the influence of drugs or alcohol.
•Do not store any spare cylinders, full or empty, underneath or near your barbecue.
•Warning: accessible parts may be very hot. Do not allow children or pets to play anywhere near the barbecue.
•Do not move the barbecue while cooking.
GAS CYLINDER
When purchasing a cylinder for your barbecue, it must be constructed and marked as meeting the specifications of the local standards. Check whether the bottle can supply sufficient gas, as stipulated for your barbecue model.
•Always keep the cylinder that is in use, securely fastened in an upright position.
•Always handle the tank valve with the utmost care.
•Never connect a cylinder without a regulator to the barbecue.
•Never connect an unregulated gas cylinder to the barbecue.
•Always close the cylinder valve completely when the barbecue is not in use.
•If the barbecue is not equipped with a tank clip the gas cylinder must be placed on the ground, next to the barbecue.
•Never store a spare cylinder, empty or full, near or underneath the barbecue when in operation.
•Never expose the cylinders to direct sunlight or excessive heat.
www.barbecook.com | 19
TRANSPORTATION AND STORAGE OF CYLINDER
Although the cylinder is completely safe when handled properly, misuse could result in an explosion or fire, which could cause serious personal injury and / or property damage.
To avoid unnecessary risks:
•Do not store the cylinder in any enclosed area such as a garage, and make sure that the storage area is well ventilated.
•Do not store the cylinder near any appliances or in any areas that could become hot, such as a vehicle or a boat.
•Make sure that the cylinder is out of reach of children.
•When transporting or storing the cylinder, make sure that it is in an upright position and not lying on its side.
•Do not smoke in the vicinity of the cylinder, especially when transporting it in a vehicle.
HOSE AND REGULATOR
The hose and regulator are not provided by the manufacturer. You may only use a combination of hose and regulator that complies with all local standards, and that corresponds with the couplings of the gas cylinder and the gas type/nominal pressure indicated on the barbecue. Keep the hose as short as possible.
•Never connect this barbecue to an unregulated gas supply, or to another type of gas. Do not alter or change the hose or regulator in any way.
•Visually inspect the entire hose assembly before each use for evidence of wear or damage such as cracks, burns or cuts. If any damage is found, replace the assembly before using the barbecue. Only use a hose that complies with the national standards
•Do not allow any grease or other hot materials to fall on the hose, and make sure that the hose does not touch any hot surfaces of the barbecue.
•The connection fitting must be protected when it is disconnected from the cylinder. Do not allow the fitting to bump or drag on the ground, since nicks and scratches could help create a leak when it is reconnected to the cylinder.
•Do not twist the hose when connecting or disconnecting the gas cylinder.
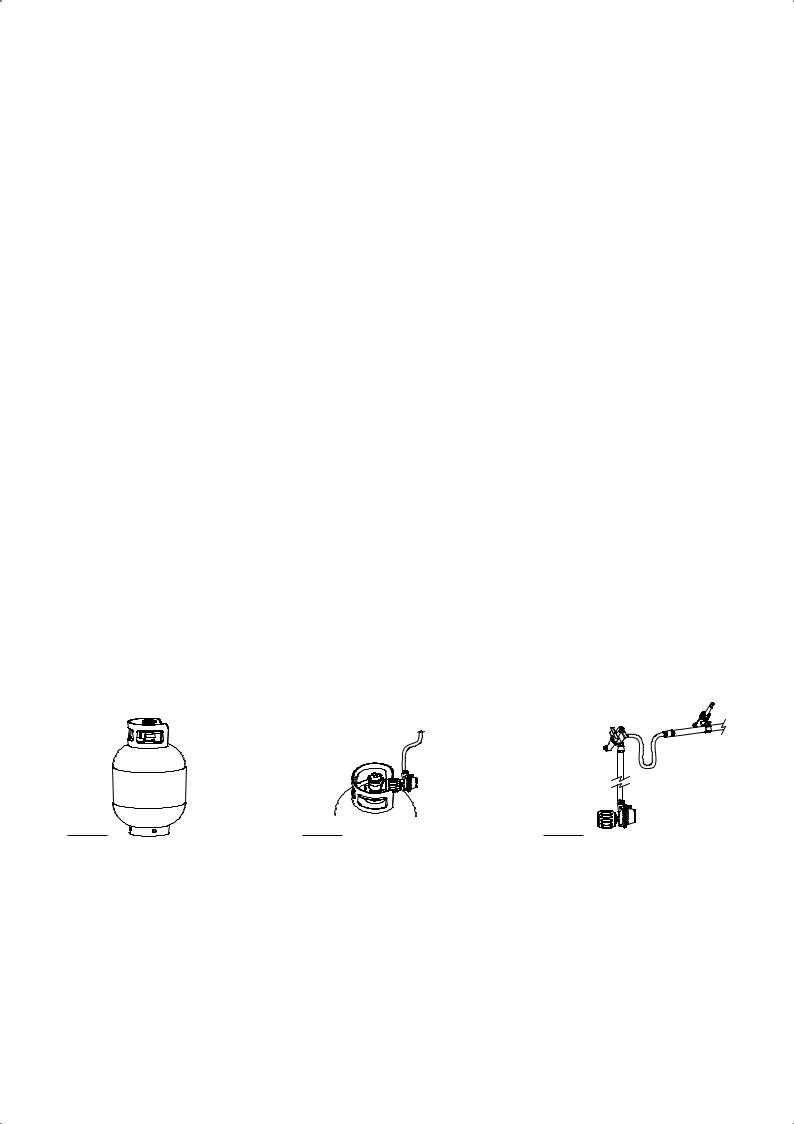
LEAK TESTING
B C D
Please note: model of the regulator can vary.
Perform a “Leak Test”
•Before lighting your barbecue for the first time.
•Every time the cylinder is refilled, or any component is replaced.
•At least once every year, preferably at the start of the season.
The “Leak Test” must be done outdoors, away from heat, open flames and flammable liquids. Do not smoke while performing the test. Use only a mixture of 50 /50 liquid soap and water for leak testing. Never use a match or open flame.
20 | www.barbecook.com
The following must be checked:
•The tank valve, including the threads into the tank (drawing C).
•Regulator fittings and tank connections (drawing C).
•All tank welds (drawing B).
•All hose connections (drawing D).
1.With a newly filled and tested propane tank attached to the barbecue and all the barbecue controls turned OFF, slowly open the cylinder valve one full turn.
2.Using a brush and soap, soak all the connections and components listed above and shown in drawings B, C, D.
3.Look carefully for bubbles forming, which is an indication of leaking gas.
4.Tighten the connections in the areas where the bubbles were visible until re-testing shows no indication of any leaks (shut off the cylinder while correcting any leaks).
5.Close the cylinder valve and ensure that all control valves are closed.
6.Do not use the barbecue if there are any leaks that cannot be stopped. Close the gas cylinder valve, remove the gas cylinder and seek assistance from a qualified gas appliance service mechanic or gas dealer.
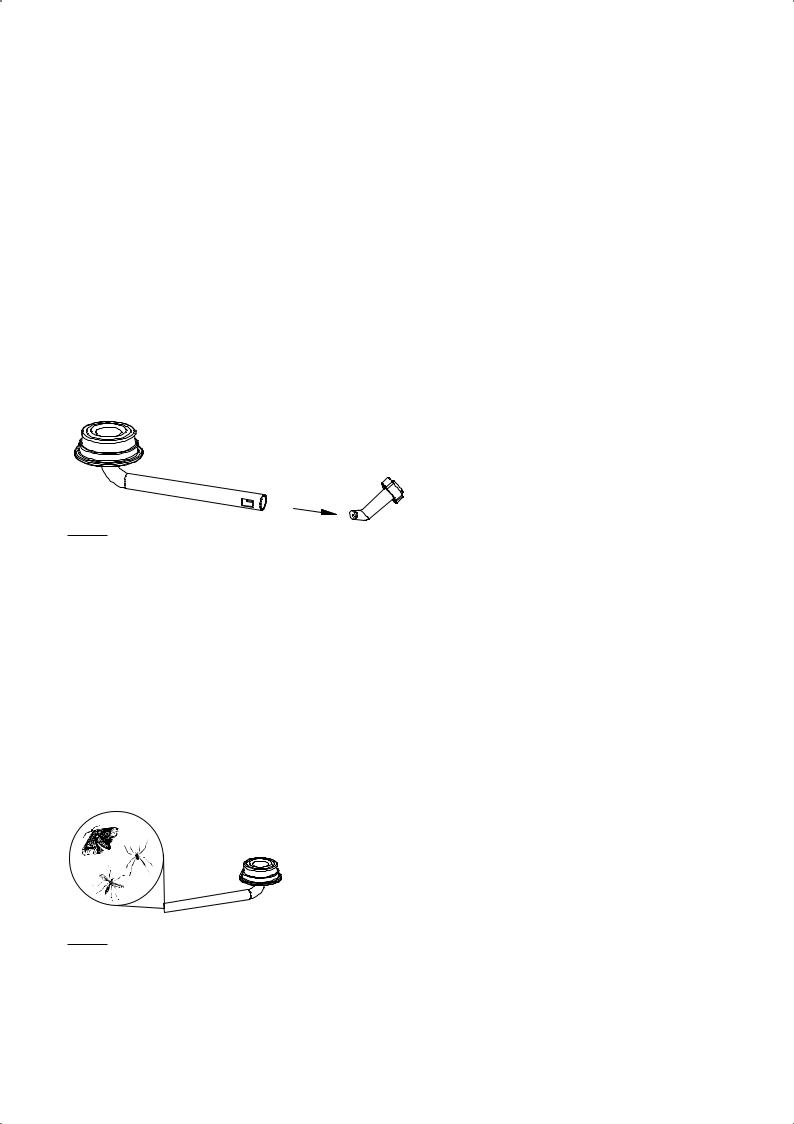
PRIOR TO USE
E
Do not use your barbecue until you have carefully read and fully understand all the information in this manual. Please ensure that:
•Your barbecue is properly assembled.
•There are no leaks in the system (see “Leak Test”).
•The burner is properly assembled, with the Venturi tubes seated over the valve outlets (drawing E), and that there is nothing blocking the Venturi tubes (drawing F).
•All the power cords and / or gas supply hoses will not touch or be near the surfaces that will get hot.
•The barbecue is in a safe location (see installation).
Ensure that the valve outlets (orifices) are inserted approximately 6mm (1/4½’) deep into the Venturi tubes, and that the valve outlets and Venturi tubes are more or less parallel to the bottom of the lower body.
WARNING
|
Natural Hazards – insects and spiders |
|
|
During shipment or storage, small insects such as spiders could |
|
|
find their way into the Venturi tubes and nest or make webs. This |
|
|
could block the flow of gas through the Venturi tube, causing a |
|
|
smoky, yellowish flame, or prevent a burner from lighting. It could |
|
|
even cause the gas to burn outside the Venturi tube, which could |
|
F |
seriously damage your barbecue. If these occur, turn off the gas |
|
flow and wait for the barbecue to cool down. When the barbecue |
||
|
||
|
has cooled down, remove the burner and clean out the Venturi |
tubes with a brush or pipe cleaner. Replace the burner and ensure that the Venturi tubes are seated over the orifices located on the gas valves. The Venturi tubes should be cleaned periodically, especially at the start of the season.
Note: Damage resulting from blocked Venturi tubes is not covered by the warranty, and is regarded as inadequate maintenance.
www.barbecook.com | 21

LIGHTING THE GRILL
Make sure you have followed all the checks, procedures and instructions indicated in the preceding sections before attempting to light the grill.
•Always raise the barbecue lid before lighting the burner.
•Do not bend directly over the barbecue while lighting, in case of backflash.
•Making sure all the control knobs are ‘OFF’. Slowly and carefully open the gas cylinder valve. Wait for about five seconds before opening the burner valve and lighting the barbecue. This procedure allows the pressure to stabilise, and prevents activation of the flow control feature.
LIGHTING THE MAIN BURNER
•Important: Light only one burner!
•Once one burner is lit, the burner next to it can be lit by turning the control knob to “HIGH”.
•Never light both burners at once.
USING THE IGNITOR TO LIGHT THE BURNER
•Raise the lid of the barbecue.
•Turn on the tank.
•Push in the control knob and turn it to the “HIGH” position.
•Turn the ignitor button until a clicking noise is heard (a spark is being generated).
•If the burner does not light after three attempts, turn the control knob to the “OFF” position and wait for the gas to clear (about 5 minutes). Repeat the aforementioned lighting procedure.
•If the burner still does not light, refer to the troubleshooting guide for help, or light with a long match as explained below.
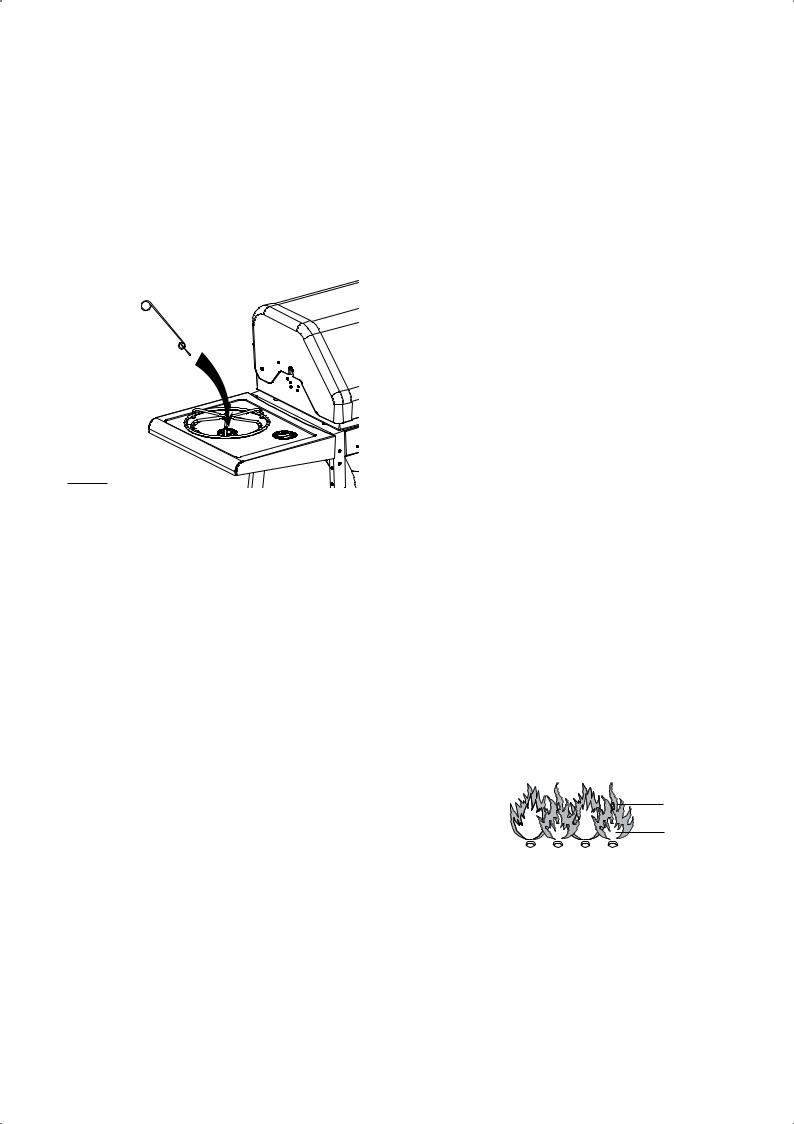
G
MANUAL LIGHTING PROCEDURE
The barbecue has a small hole on the lower left and right side of the housing. These holes are situated towards the front of the barbecue, and are used to manually light the barbecue (Drawing G).
•Raise the lid of the barbecue.
•Place a lighted match through the hole, to within 1,3 cm (0,51”) of the burner.
•Turn on the tank.
•Push in the burner knob and turn it to the “HIGH” position. If the burner does not light within 5 seconds, turn the control knob back to the “OFF” position and wait for the gas to clear.
•Wait for 5 minutes, and then repeat steps 1 to 4. If the burner still does not light after three attempts, consult the troubleshooting guide for help.
LIGHTING THE SECOND BURNER
Turn the second control knob on the main control panel to the “HIGH” position. The unlit burner will automatically ignite.
22 | www.barbecook.com
LIGHTING THE SIDE BURNER WITH THE IGNITOR
Use the push-button igniter on the main control panel and the right control knob on the side burner panel.
•Push in the right control knob and turn it to the “HIGH” position.
•Turn the ignitor button until a loud click is heard, which is the spark being generated. Repeat several times if the burner does not light.
•If the burner does not light after several attempts, turn the right control knob off and wait for 5 minutes for the gas to clear.
•Repeat the above instructions. If the side burner still does not light, refer to the troubleshooting section for help or light the burner manually.
Note: The side burner is designed to accept a maximum weight of 9kg (20 lb). Do not overload the side burner!
H
LIGHTING THE SIDE BURNER WITH A MATCH
•Place match in front ring of provided match holder.
•Insert a lit match through the hole, to within 1,3 cm (0,51”) of the side burner (Drawing H).
•Push in the burner knob and turn it to the “HIGH” position. If the burner does not light within 5 seconds, turn the control knob back to the “OFF” position and wait for 5 minutes for the gas to clear.
•Now repeat steps 1 to 3. If the burner still does not light after three attempts, consult the troubleshooting guide for help.
VISUALLY CHECK BURNER FLAME
•Adjust the flame by turning the knobs from ‘HIGH’ to ‘LOW’. The flames will be smaller when the knobs are in the ‘LOW’ position.
•If the flames come out of the burner box when the barbecue is in use, turn off the knobs immediately. Wait for 5 minutes
for the gas to clear before lighting the burner again. Consult the troubleshooting guide if the problem persists.
•Always check the flame prior to each use. A good flame is almost entirely blue, with a little bit of yellow on top. If the flame is unusually small and mostly yellow, turn off the barbecue and check whether the Venturi tubes are blocked, or consult the troubleshooting guide for help.
HIGH
LOW
SHUTTING DOWN THE BARBECUE AFTER USE
•Turn off the gas cylinder valve.
•Turn the burner control valve to the “OFF” position.
This sequence is important, as it prevents residual gas from being left in the system under pressure and will make the next use easier.
www.barbecook.com | 23

TIPS ON USING YOUR BARBECUE
FIRST USE
Before cooking, turn on the grill and operate on “HIGH” for about 15 minutes with the lid closed. Do not open the lid during this procedure. Open the lid and continue to run the grill on “HIGH” for another 5 minutes. Your grill should now be burnt in and ready to use.
PREPARATION
The barbecue should be preheated before adding any food. This is done by lighting the grill and running it at “HIGH” for up to ten minutes, with the lid closed. If the food you are cooking needs a lower temperature, turn the control knob to the required setting before adding food.
COOKING TIME
This is affected by many things, and experience in grilling will help you. The type of food, the thickness of the food, and even the weather can have an effect on cooking time. You will learn that on a hot day, a lower setting will work better and on a cold day a higher setting may work better.
FLARE-UPS
Flare-ups can increase the temperature in the grill and add to the build-up of grease, resulting in a higher risk of a grease fire. Some flare-ups are normal and are required to create smoke, which enhances the flavour of your food. To keep these flare-ups at the desired level, you should:
•Always trim fat from steaks / red meats before grilling.
•Cook chicken and pork at a lower setting.
•Make sure the grease drain hole is clear, and that the grease catcher is not full.
•Always cook with the lid down, and cook at the lowest efficient heat setting.
Note: with the lid down, you will maintain a more consistent temperature inside the cooking area and use less energy / gas.
HOW TO PREVENT FOOD FROM STICKING TO THE COOKING GRATES
•Marinating or lightly oiling the food before placing it on the cooking grates will help prevent food from sticking to the grate.
•Food may stick if turned too soon after being placed on the cooking grates. Let food cook for a few minutes before turning it, so that it will have time to sear properly.
WARNING :
•Do not leave your barbecue unattended, and watch out for children around the barbecue. Make sure the barbecue is functioning safely at all times.
•Do not move the barbecue while cooking.
•Do not use charcoal, wood or briquettes.
•Do not use lava rocks or ceramic briquettes.
24 | www.barbecook.com

CLEANING AND MAINTENANCE
To get many years of service out of your barbecue, perform the following procedures at least once a year, especially at the start of a new season. Purchase a barbecook® cover to protect your investment.
GRILL
Apply a light coating of cooking oil to the grating to prevent food from sticking. After each use, and after the barbecue has cooled down, scrub the grating with a non-abrasive brush. Alternatively, you can wash the grating with a special barbecook® cleaner, mild detergent or baking soda, but do not use a commercial oven cleaner.
BURNER AND VENTURI TUBES
It is important to remove the burner and Venturi tube and clean them at least twice a year, making sure that all dirt and rust are removed. Use a piece of wire to clean out the hole in the Venturi tube. Make sure the bottom housing is clean, and that all holes are clear. If the burner has been damaged or has rusted, replace it as soon as possible. If the burner is in good shape, reinstall it in the correct position. Also ensure that the Venturi tube is centred over the valve outlet.
STORAGE
When the outdoor cooking season is over and you are going to store the unit for the winter, please do the following:
•After removing and cleaning the burner and grill (lightly oil the grill after cleaning), wrap them in paper and store indoors.
•Cover the barbecue with a barbecook® cover if it is to be stored outdoors.
•Do not store the gas cylinder in an enclosed area.
When the barbecue is not in use, the gas must be turned off at the cylinder valve. The barbecue and cylinder should be stored outdoors, in a well-ventilated area. Do not store the barbecue in a garage or near heat. If there is a need for the barbecue to be stored indoors, remove the cylinder. The barbecue can be stored indoors if the cylinder is disconnected from the appliance and stored outside.
www.barbecook.com | 25

TROUBLESHOOTING GUIDE
Problem |
Possible causes |
Corrective action |
|
Burner will not light (match or |
• Blocked Venturi tubes |
• Clean out blockage |
|
ignitor) |
|||
|
|
||
Burners not hot enough |
• Cylinder or gas supply valve |
• Open cylinder or gas supply |
|
turned off. |
valve. |
||
|
|||
|
• Venturi tubes not properly |
• Ensure proper Venturi tube as- |
|
|
sealed over orifices |
sembly |
|
|
• Burner ports blocked |
• Clean / replace burner |
|
|
• Low on or out of propane |
• Refill cylinder |
|
|
• Regulator not fully tightened |
• Tighten regulator fully onto cyl- |
|
|
inder (by hand). |
||
|
onto cylinder |
||
|
• Straighten fuel hose |
||
|
|
||
Flames smoky, yellow |
• Partially blocked Venturi tubes |
• Clean out blockage |
|
|
• Excess cooking salts on burner |
• Clean burner |
|
Burner lights with match, but not |
• Loose wire connection |
• Check that all connections are |
|
with igniter |
tight |
||
|
|||
|
• Broken electrode |
• Ensure that collector box, burn- |
|
|
er and igniter are assembled |
||
|
• Poor ground |
||
|
properly. |
||
|
|
||
|
• Faulty igniter |
• Replace ignitor |
|
Flame blows out / down through |
• High wind conditions |
• Relocate barbecue with the rear |
|
base |
towards the wind. |
||
|
|||
|
• Propane low |
• Refill cylinder |
|
Too much heat / excessive flare- |
• Excessive fat in meat |
• Trim meat, turn down burner |
|
up |
controls and / or fuel supply |
||
|
|||
|
• Grease drain plugged |
• Clean casting base and burner. |
|
|
• Cooking system not positioned |
• Position cooking system cor- |
|
|
correctly |
rectly |
|
Flames under heat control con- |
|
• Immediately shut off gas at |
|
• Blocked Venturi tubes |
source, allow grill to cool down |
||
sole |
|||
|
and clean out Venturi tubes |
||
|
|
||
|
|
• Temporary condition caused by |
|
Regulator humming |
• This is not a defect or a hazard |
high outside temperatures and |
|
|
|
a full propane cylinder. |
|
Incomplete flame |
• Plugged, rusted or leaking |
• Clean / replace burner |
|
burner |
|||
|
|
||
|
• Legs are angled too narrowly, or |
• The warming rack legs are |
|
Warming rack does not fit |
adjustable. Bend them to fit into |
||
too widely |
|||
|
the warming rack holes. |
||
|
|
26 | www.barbecook.com

FR |
|
GUIDE D’ASSEMBLAGE, D’UTILISATION ET D’ENTRETIEN |
|
|
|
Lisez ce guide jusqu’au bout avant d’utiliser l’appareil et conservez-le pour consultation ultérieure !
Il ne faut pas utiliser des pierres de lave avec ce barbecue.
AVERTISSEMENT
Le simple fait d’ignorer ces instructions peut provoquer un feu ou une explosion.
Il est de votre responsabilité de veiller à ce que votre appareil soit bien monté, bien installé et bien entretenu. Le fait de ne pas suivre les instructions de ce manuel peut provoquer de graves blessures et/ou endommager le matériel.
Toute modification du barbecue est dangereuse et interdite.
POUR VOTRE SECURITE
Si vous détectez une odeur de gaz:
1.Coupez immédiatement l’alimentation en gaz de l’appareil.
2.Éteignez toute flamme nue.
3.Ouvrez le couvercle.
4.Si l’odeur persiste, contactez immédiatement votre fournisseur de gaz ou le service des incendies.
5.Ne rangez pas d’essence ni d’autres liquides ou vapeurs inflammables près du barbecue ou de tout autre appareil ménager.
6.Si vous avez une bonbonne de gaz additionnelle, gardez-la loin du barbecue ou de tout autre appareil ménager.
AVERTISSEMENT
Suivez attentivement la marche à suivre pour détecter les fuites de gaz avant d’utiliser le barbecue, même s’il a été assemblé par le détaillant. Ne tentez jamais d’allumer le barbecue sans avoir d’abord lu la section ‘Allumage’ du présent guide.
CE BARBECUE EST CONÇU POUR ETRE UTILISE A L’EXTERIEUR SEULEMENT.
GARANTIE
Votre barbecook® est garanti deux ans à partir de la date d’achat du barbecue, contre tout vice de fabrication et pour autant qu’il soit utilisé selon les spécifications de ce mode d’emploi. Le reçu ou le ticket de caisse du commerçant tient lieu de garantie.
Cette garantie se limite à la réparation ou au remplacement des pièces qui s’avèrent défectueuses à la suite d’un usage normal.
Cette garantie ne s’applique pas aux défaillances qui résultent d’une mauvaise installation, d’une utilisation inappropriée, du démontage, d’une modification, d’un usage abusif, d’une négligence, d’un accident, d’une tornade, d’un ouragan, d’un tremblement de terre ou encore d’un manque d’entretien ou de nettoyage.
www.barbecook.com | 27

INSTALLATION
Cet appareil doit être installé conformément à tous les règlements en vigueur.
A
AVERTISSEMENTS ADDITIONNELS
Distance minimale des matériaux combustibles :
•76 cm du côté du foyer, 76 cm de l’arrière du foyer (Voir illustration A).
•Gardez toujours la zone environnante propre et n’y laissez aucune matière combustible telle que de l’essence, du liquide inflammable, du papier ou des linges huileux.
•N’utilisez pas le barbecue sous une structure en porte-à-faux ou non protégée.
•Cet appareil est conçu pour un usage extérieur seulement et ne doit pas être utilisé sur un bateau ni dans un véhicule récréatif.
•Utilisez ce barbecue à l’extérieur, dans un endroit bien aéré, à au moins 3 m de toute habitation ou structure.
•Ne l’utilisez ni dans un garage ni dans un endroit clos.
•Ne laissez jamais le barbecue fonctionner sans surveillance.
•N’obstruez pas la combustion ni le passage de l’air autour du barbecue.
•N’utilisez pas le barbecue si vous êtes sous l’influence de la drogue ou de l’alcool.
•Ne rangez pas de bonbonne de gaz (pleine ou vide) à proximité du barbecue.
•Attention : des parties accessibles peuvent être très chaudes ! Eloignez les jeunes enfants !
•Ne déplacez pas l’appareil lors de son fonctionnement.
BONBONNE DE GAZ
N’utilisez qu’une bonbonne de gaz conforme à toutes les normes et exigences nationales. Veillez à ce que la bonbonne soit en mesure de diffuser suffisamment de gaz pour rencontrer les exigences du modèle dont vous disposez.
•Gardez la bonbonne toujours en position verticale.
•Manipulez toujours les robinets de la bonbonne avec soin.
•Ne jamais connecter une bonbonne de gaz sans détendeur au barbecue.
•Fermez les robinets de la bonbonne de gaz après usage.
•Si l’appareil n’est pas muni d’un support bouteille, la bonbonne doit être placée au niveau du sol, près de l’appareil.
•Ne branchez jamais de bonbonne non certifiée au barbecue.
•Ne jamais placer la bonbonne de réserve ou bonbonne vide sous l’appareil ou près de l’appareil lorsqu’il fonctionne.
•N’exposez jamais la bonbonne à une chaleur excessive ou aux rayons intenses du soleil.
•N’insérez jamais de corps étranger dans le raccord de la bouteille, car vous risqueriez d’endommager la soupape. Une soupape endommagée pourrait laisser fuir le gaz, ce qui accroîtrait les risques d’explosion, d’incendie, de dommages matériels, de blessures graves ou mortelles.
28 | www.barbecook.com

TRANSPORT ET ENTREPOSAGE DE LA BOUTEILLE
La bonbonne de gaz ne présente aucun danger pourvu qu’elle soit utilisée adéquatement. Si elle est utilisée incorrectement, elle pourrait exploser ou prendre feu, et causer des blessures graves et des dommages matériels importants.
Pour réduire les risques:
•Ne rangez jamais la bonbonne dans un endroit clos tel un garage et assurez-vous que l’endroit choisi est bien aéré.
•Ne rangez pas la bonbonne près d’appareils ménagers ni dans des endroits qui pourraient devenir chauds, comme un véhicule ou bateau.
•Gardez la bonbonne hors de portée des enfants.
•Transportez et rangez toujours la bonbonne dans une position verticale, ne pas tourner sur le côté
•Ne fumez pas à proximité de la bouteille, surtout durant le transport dans un véhicule.
TUYAU ET DETENDEUR
Le tuyau et le détendeur ne sont pas fournis par le fabricant. Vous devez utiliser un ensemble tuyau/détendeur reconnu et conforme aux normes locales/nationales et adapté au type de gaz et aux pressions apparaissant sur la fiche signalétique de l’appareil. Le tuyau doit être le plus court possible.
•Ne branchez jamais ce barbecue à une alimentation sans détendeur. Ne modifiez d’aucune façon le détendeur et le tuyau.
•Avant chaque utilisation, vérifiez l’état du tuyau pour vous assurer qu’il ne présente aucune craquelure, brûlure ni coupure ou usures éventuelles. S’il est endommagé, remplacez le tuyau avant d’utiliser le barbecue, selon les normes.
•Assurez-vous qu’aucune graisse ni autre substance chaude ne coule sur le tuyau, et que ce dernier n’est en contact avec aucune pièce chaude du barbecue.
•Le raccord du détendeur doit être protégé lorsqu’il n’est pas branché à une bouteille.
•Assurez-vous qu’il n’est jamais frappé ni traîné sur le sol, car une simple égratignure pourrait compromettre l’étanchéité de la connexion.
•Ne pas tordre le tuyau lorsque vous branchez ou débranchez la bouteille.
TEST DE FUITE
B C D
Remarque : le détendeur peut différer quelque peu de celui-ci.
Vous DEVEZ faire un “essai d’étanchéité” :
•Avant d’allumer le barbecue pour la première fois.
•Chaque fois que la bonbonne est remplie, ou qu’une pièce est remplacée.
•Au moins une fois par an, de préférence au début de la saison.
•Après une longue période d’entreposage ou de non-utilisation.
L’essai d’étanchéité doit être effectué à l’extérieur, à l’écart de toute source de chaleur, de toute flamme nue et de tout liquide inflammable. Ne fumez jamais durant l’essai d’étanchéité. Utilisez simplement une solution moitié eau, moitié savon liquide pour détecter les fuites. N’utilisez jamais une allumette ou une flamme nue.
www.barbecook.com | 29
L’étanchéité doit être vérifiée aux endroits suivants :
•La valve et les filets de la bonbonne (illustration C).
•Toutes les soudures de la bonbonne (illustration B).
•Le raccord du détendeur et la connexion à la bonbonne (illustration C).
•Toutes les connexions du tuyau (illustration D).
1.Une fois que la bonbonne pleine est raccordée au barbecue et que les commandes des brûleurs sont sur la position « OFF », tournez lentement la valve de la bonbonne d’environ un tour.
2.Trempez un pinceau dans l’eau savonneuse et badigeonnez tous les endroits susmentionnés et indiqués sur les illustrations B, C et D.
3.Des bulles apparaîtront s’il y a une fuite de gaz.
4.Dans un tel cas, resserrez les connexions où des bulles sont apparues et refaites l’essai (refermez la valve de la bonbonne pendant que vous resserrez les connexions).
5.Refermez la valve de la bonbonne et assurez-vous que les commandes des brûleurs sont sur la position “OFF”.
6.Si vous ne réussissez pas à arrêter une fuite, n’utilisez pas le barbecue. Fermez la valve de la bouteille, débranchez la bonbonne du barbecue et contactez un technicien qualifié pour réparer les appareils à gaz ou votre détaillant de gaz.
AVANT LA PREMIERE UTILISATION
E
Avant d’utiliser votre barbecue, prenez le temps de lire et de bien comprendre tous les renseignements qui figurent dans le présent guide et assurez-vous :
•Que le barbecue a été assemblé correctement.
•Qu’il n’y a aucune fuite de gaz (voir la section «Essai d’étanchéité»).
•Que les brûleurs sont bien installés (la valve doit être engagée dans le venturi – illustration E) et qu’ils ne sont pas obstrués (illustration F).
•Qu’aucun tuyau de gaz ni cordon électrique ne touche aux surfaces qui deviendront chaudes.
•Que le barbecue est situé dans un endroit qui ne présente aucun danger (voir la section «Installation»).
AVERTISSEMENT
|
Risques naturels – araignées et autres insectes : |
|
|
durant le transport ou l’entreposage, il arrive que des araignées |
|
|
et autres insectes pénètrent dans les venturis et y fassent leur |
|
|
nid, ce qui pourrait obstruer le passage du gaz dans le venturi et |
|
|
produire une flamme jaune ou simplement empêcher le brûleur |
|
|
de s’allumer. L’obstruction pourrait même faire brûler le gaz à |
|
F |
l’extérieur du venturi, ce qui pourrait sérieusement endommager |
|
le barbecue. Si cela se produit, fermez la valve de la bonbonne et |
||
|
||
|
laissez refroidir le barbecue. Une fois que le barbecue est refroidi, |
sortez le brûleur en question et nettoyez l’intérieur du venturi avec une brosse ou un cure-pipe. Réinstallez le brûleur en vous assurant que la valve est engagée dans le venturi. Les venturis des brûleurs doivent être nettoyés périodiquement, surtout au début de la saison.
Remarque : les dommages causés par des venturis obstrués ne sont pas couverts par la garantie.
30 | www.barbecook.com
 Loading...