

System Administrator’s
Guide
Monarch® FreshMarx® 9417 Food Freshness System
TC9417SA Rev. AC
1/2015
©2013 Avery Dennison Corp. All rights reserved.

Each product a nd program carr ies a respective wr itten warrant y, the only warrant y on which the
customer c an rely. Aver y Dennison reserves t he right t o make chan ges in the pr oduct, the programs ,
and their availability at any time and without notice. Although Aver y Dennison has made e very effort to
provide com plete and accurat e information in this manual, Aver y Dennison shall not b e liable for any
omissions or i naccuracies. A ny update will be incor porated in a later edition of this m anual.
©2013 Aver y Dennison Corpor ation. A ll rights r eserved. No part of th is publicati on may be r eproduced,
transmitted, stored in a retrieva l system, or translat ed into an y language i n any form by any means ,
without the pr ior written perm ission of Avery Den nison.
WARNING
This equipment has been tested and found to comply with the limits for a Class A digital device, pursuant to Part 15 of the FCC Rules. These limits
are designed to provide reasonable protection against harmful interference when the equipment is operated in a commercial environment. This
equipment generates, uses, and can radiate radio frequency energy and, if not installed and used in accordance with the instruction manual, may
cause harmful interference to radio communications. Operation of this equipment in a residential area is likely to cause harmful interference in which
case the user will be required to correct the interference at his own expense.
CANADIAN D .O.C. W ARNING
This digital apparatus does not exceed the Class A limits for radio noise emissions from digital apparatus set out in the Radio Interference
Regulations of the Canadian Department of Communications. Le présent appareil numérique n’émet pas de bruits radioélectriques dépassant les
limites applicables aux appareils numériques de la classe A prescrites dans le Réglement sur le brouillage radioélectrique édicte par le ministère des
Communications du Canada.
Trademarks
FreshMarx®, Monarch®, and Avery Dennison® are registered trademarks of Avery Dennison Corporation
Avery Dennison
170 Monarch Lane
Miamisburg, OH 45342

TABLE OF CONTENTS
INTRODUCTION ............................................................................................................................. 1-1
Audience .................................................................................................................................. 1-1
About the Printer ....................................................................................................................... 1-1
About the Setup Wizard ............................................................................................................. 1-3
Using the Keypad ...................................................................................................................... 1-3
SETTING THE TIME AND DATE ....................................................................................................... 2-1
Adjusting the Time and Date ...................................................................................................... 2-1
Formatting the Time and Date .................................................................................................... 2-2
SETTING UP THE PRINTER ............................................................................................................ 3-1
Adjusting the Print Settings ........................................................................................................ 3-1
Adjusting the Backlight .............................................................................................................. 3-3
Changing the Administrator’s Password ....................................................................................... 3-3
Setting the Options .................................................................................................................... 3-4
Adjusting the Language Settings ................................................................................................. 3-6
Selecting a System Language ................................................................................................. 3-6
Alternate Button Names .......................................................................................................... 3-7
Adjusting the Network Settings ................................................................................................... 3-8
To automatically obtain an IP Address: .................................................................................... 3-9
To enter an IP Address: .......................................................................................................... 3-9
Selecting your Network Time Server ....................................................................................... 3-10
EDITING PRODU CT DATA .............................................................................................................. 4-1
Entering Edit Mode .................................................................................................................... 4-1
Adding and Removing Products .................................................................................................. 4-2
To add a product button: ......................................................................................................... 4-2
To remove a product button: ................................................................................................... 4-4
Editing Product Descriptions ...................................................................................................... 4-4
E
diting the Use First Button ....................................................................................................... 4-5
Editing Category Buttons ........................................................................................................... 4-6
Assigning a Label Format ........................................................................................................... 4-8
Editing Tab Names .................................................................................................................... 4-9
Adding Timers .......................................................................................................................... 4-10
Setting a Timer ........................................................................................................................ 4-12
Viewing Timers ......................................................................................................................... 4-13
Removing a Timer .................................................................................................................... 4-13
Exiting Edit Mode ..................................................................................................................... 4-14
BATCH PRINTING .......................................................................................................................... 5-1
Creating a Batch ....................................................................................................................... 5-1
Editing a Batch .......................................................................................................................... 5-3
Renaming a Batch ..................................................................................................................... 5-4
Deleting a Batch ........................................................................................................................ 5-4
i

USING THE EDIT UTILITY ............................................................................................................... 6-1
System Requirements ................................................................................................................ 6-1
Installing the Edit Utility ............................................................................................................. 6-1
Creating a New Product Data File ............................................................................................... 6-1
Configuring the Network Settings ................................................................................................ 6-2
Entering the Printer’s IP Address in the Edit Utility: .................................................................. 6-2
Specifying the Printer’s Type ...................................................................................................... 6-2
Enabling Alternate Button Names................................................................................................ 6-2
Specifying the Product Data File Format ..................................................................................... 6-2
Uploading the Product Data File ................................................................................................. 6-3
Editing the Data File .................................................................................................................. 6-4
Editing Category Buttons ........................................................................................................ 6-5
Editing the Use First Button .................................................................................................... 6-6
Editing Tabs .......................................................................................................................... 6-6
Creating and Editing Product Buttons ...................................................................................... 6-6
Adding Timers ........................................................................................................................... 6-8
Updating the Product Data File ................................................................................................... 6-8
Updating the Application’s Software ............................................................................................ 6-9
UPDATING THE P RINTER ............................................................................................................... 7-1
Updating Your Product Data File via USB .................................................................................... 7-1
Updating Your Application Software via USB ............................................................................... 7-2
Updating the Printer via FTP ...................................................................................................... 7-3
PERFORMING M AINTENANCE ........................................................................................................ 8-1
Printing Diagnostic Labels .......................................................................................................... 8-1
Version Information ................................................................................................................ 8-2
Network Information ............................................................................................................... 8-2
Gray Scale ............................................................................................................................ 8-2
C
heckerboard ........................................................................................................................ 8-3
Copying a Data File to a USB Flash Drive ................................................................................... 8-3
Calibrating the Supply................................................................................................................ 8-4
Calibrating the Sensor ............................................................................................................... 8-5
Calibrating the Touch Screen ..................................................................................................... 8-6
Performing a Factory Reset ........................................................................................................ 8-7
LABEL FORMATS .............................................................................................................................. 1
Format 1 ...................................................................................................................................... 1
Format 2 ...................................................................................................................................... 1
Format 3 ...................................................................................................................................... 2
Format 4 ...................................................................................................................................... 3
Format 5 ...................................................................................................................................... 4
Format 6 ...................................................................................................................................... 5
Format 7 ...................................................................................................................................... 6
Format 8 ...................................................................................................................................... 7
ii System Administrator’s Guide

INTRODUCTION
1
Use the Monarch® FreshMarx® 9417 Food Freshness System for product f reshness and
to label inventory. T he printer is available as a single pri nter (left printer onl y) or dual printer
(left and right print er).
You may have a custom applicatio n that differs slightly f rom the examples in this manual. T he
screens and labels sho wn are for reference only of t he dual printer.
This manual describes the f eatures available in Version 2.2.
Audience
This manual is for the System Admi nistrator who config ures and updates the printer. For
information on printin g labels and the printer’s car e and maintenance, ref er to the Operator’s
Handbook.
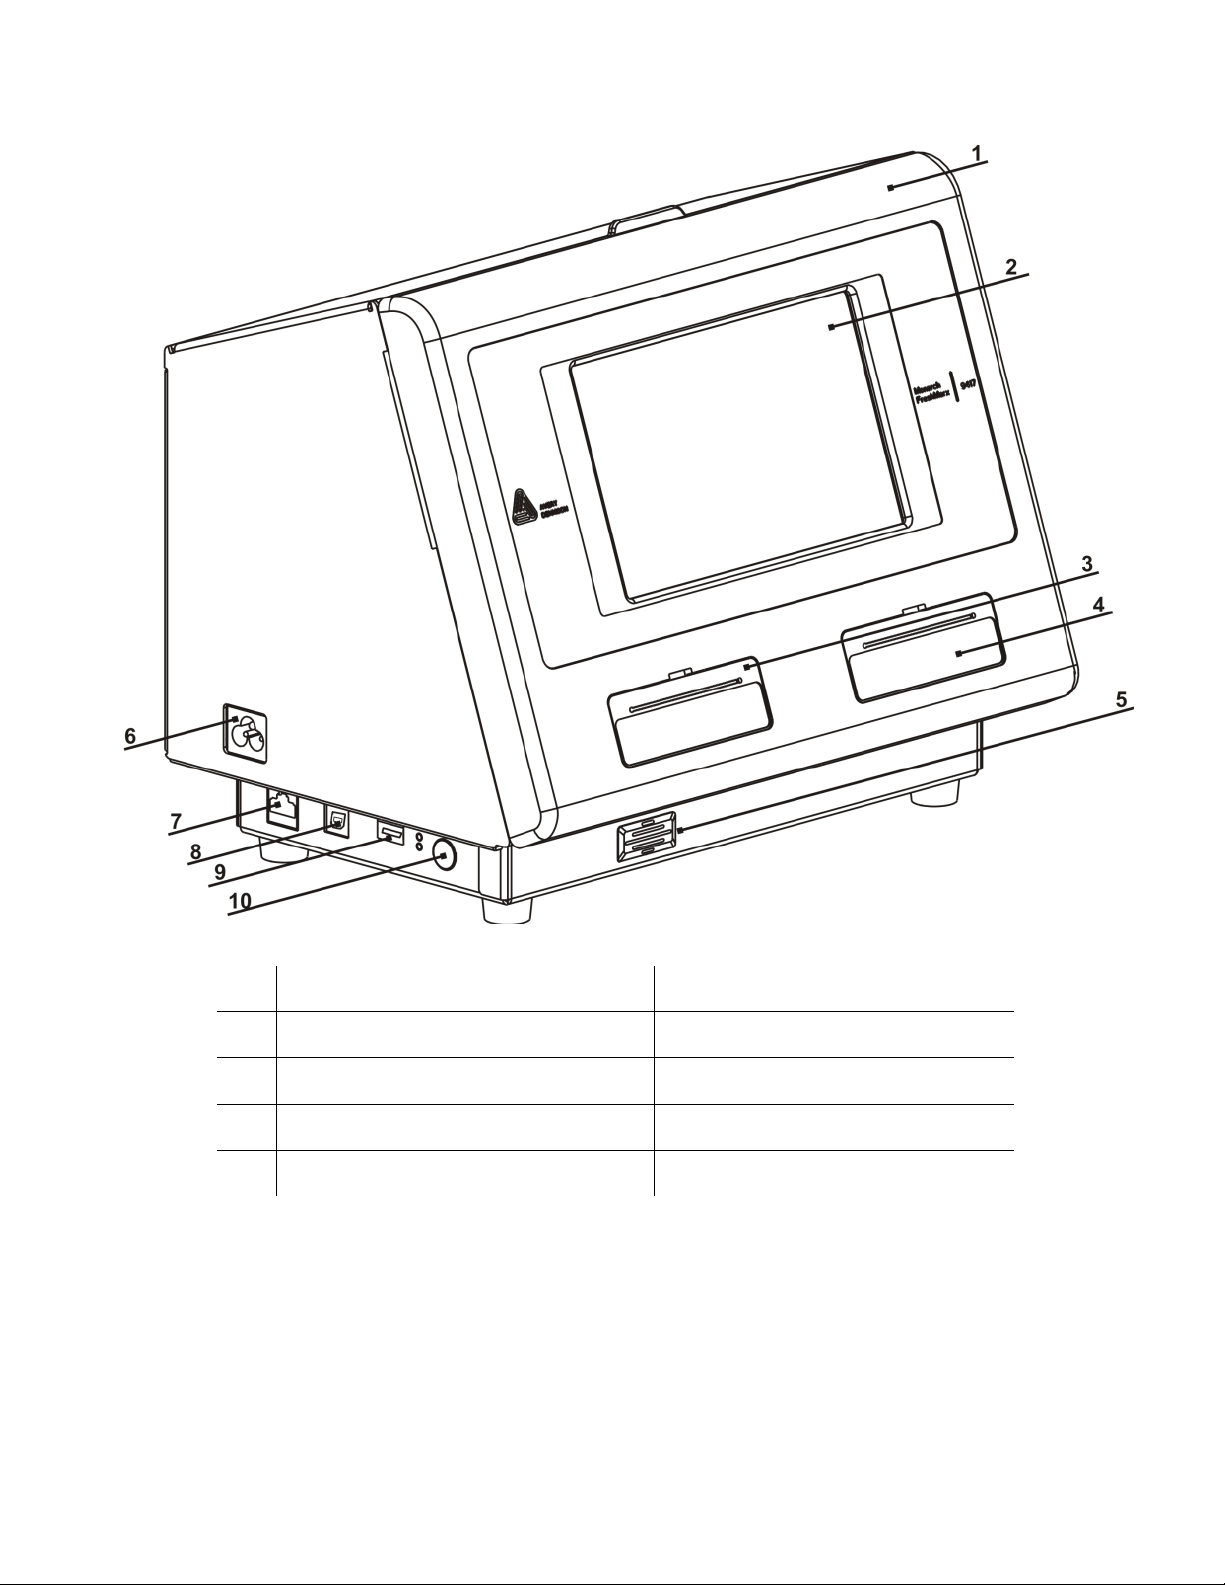
About the Printer
The printer has a touch screen and a bu ilt-in FreshMarx applicat ion. The printer is availab le as
a single printer (lef t printer only) or dual printer ( left and right printer). You may have a custom
application that diff ers slightly from the examples i n this manual. The screens sho wn are for
reference only of the dual pr inter.
The printer includes eig ht formats. You can configur e the dual printer to print one size suppl y
on the Left printer and a dif ferent size supply on the Right printer. For example, load 1.2” wide
by 1.1” long labels in the Lef t printer and 2.2” wide by 3.0” long labels in the Right printer. The
Left printer could prin t Format 1 and Format 8. The Right print er could print Format 5 and
Format 7. See Appendix A, “Labe l Formats” for the size and cont ent of each format.
If your dual printer applic ation only uses one size suppl y and one format, you could conf igure
the printer to print all f ormats on the Left printer and use the R ight printer as a backup.
Note: Load the same size supply in both th e Left and Right printers.
If you want the operator t o select which printer (Left or Right) to use when a product button is
pressed, assign all cat egories to the same format (1-8) and the same printer (left or righ t). See
“Editing Category Butt ons” in Chapter 4 for more inf ormation.
Introduction 1-1
1
Cover
2
Display
3
Left Printer
4
Right Printer
5
Speaker
1-2 System Administrator’s Guide
6
Power Cord Connection
7
Ethernet Port
8
USB (Type B) Port
9
USB (Type A) Port
10
Power Button
About the Setup Wizard
When the 9417 printer is po wered on for the first time or after updating the software, a setup
wizard appears. The wizard g uides you through import ant tasks such as setting the pr inter’s
language and setting the t ime and date. An administrator can run the setup wizard at any time
by selecting Tools, Admin, System Settings, Startup W izard.
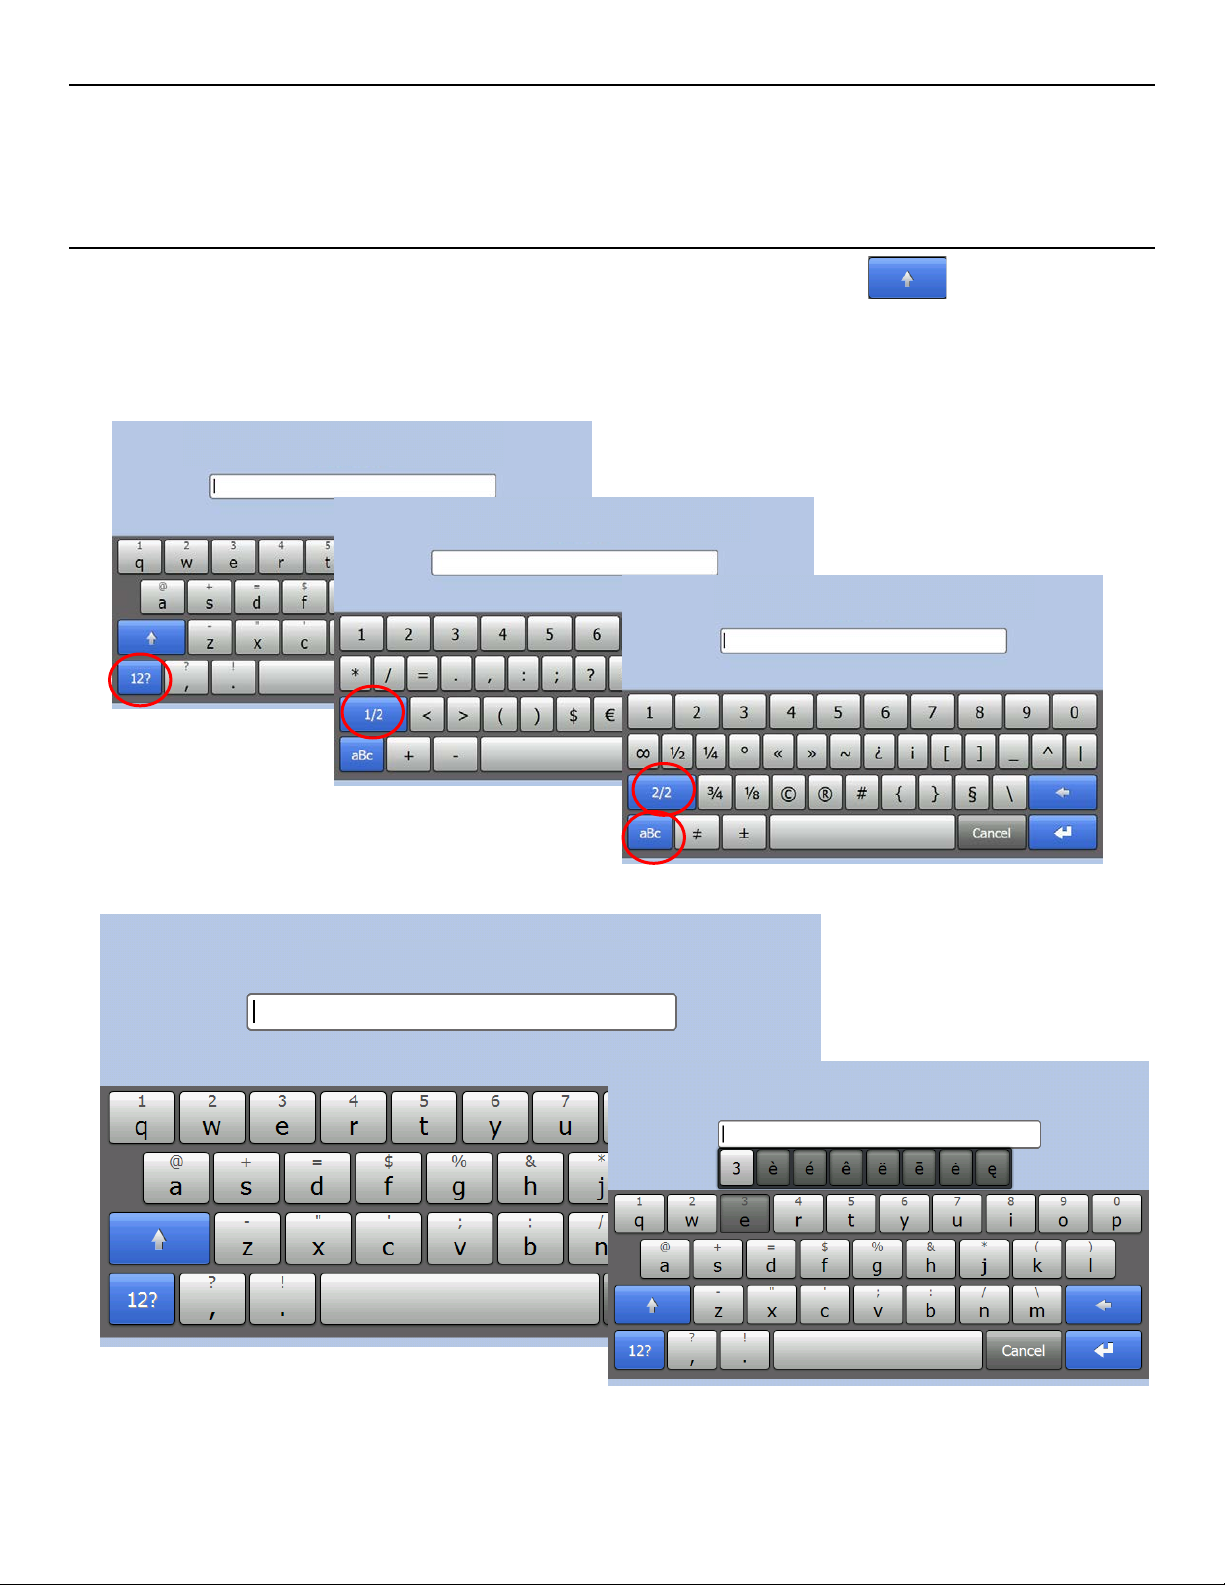
Using the Keypad
♦ The default keypad is lo wercase alphabetic. Press t he Shift button to use uppercase
alphabetic characters .
♦ Press the 12? Button to use num eric characters or symbols. Pre ss the 1/2 Button to see the
second page of symbols; press t he 2/2 Button to return t o the first page of symbols. Press
the aBc Button to return to t he lowercase alphabetic keypad.
♦ Press and hold a key to use symbols and accented characters.
Introduction 1-3

1-4 System Administrator’s Guide
SETTING THE TIME AND DATE
2
This chapter tells you ho w to
♦ set the time and date.
♦ format the time and date.
Note: You may have a custom applicatio n that differs slightly f rom the examples in this
manual. The screens and labe ls shown are for reference o nly of the dual printer.
Adjusting the Time and Date
You can set the system time a nd date, format the time and date, s elect your time zone, and
establish network t ime.
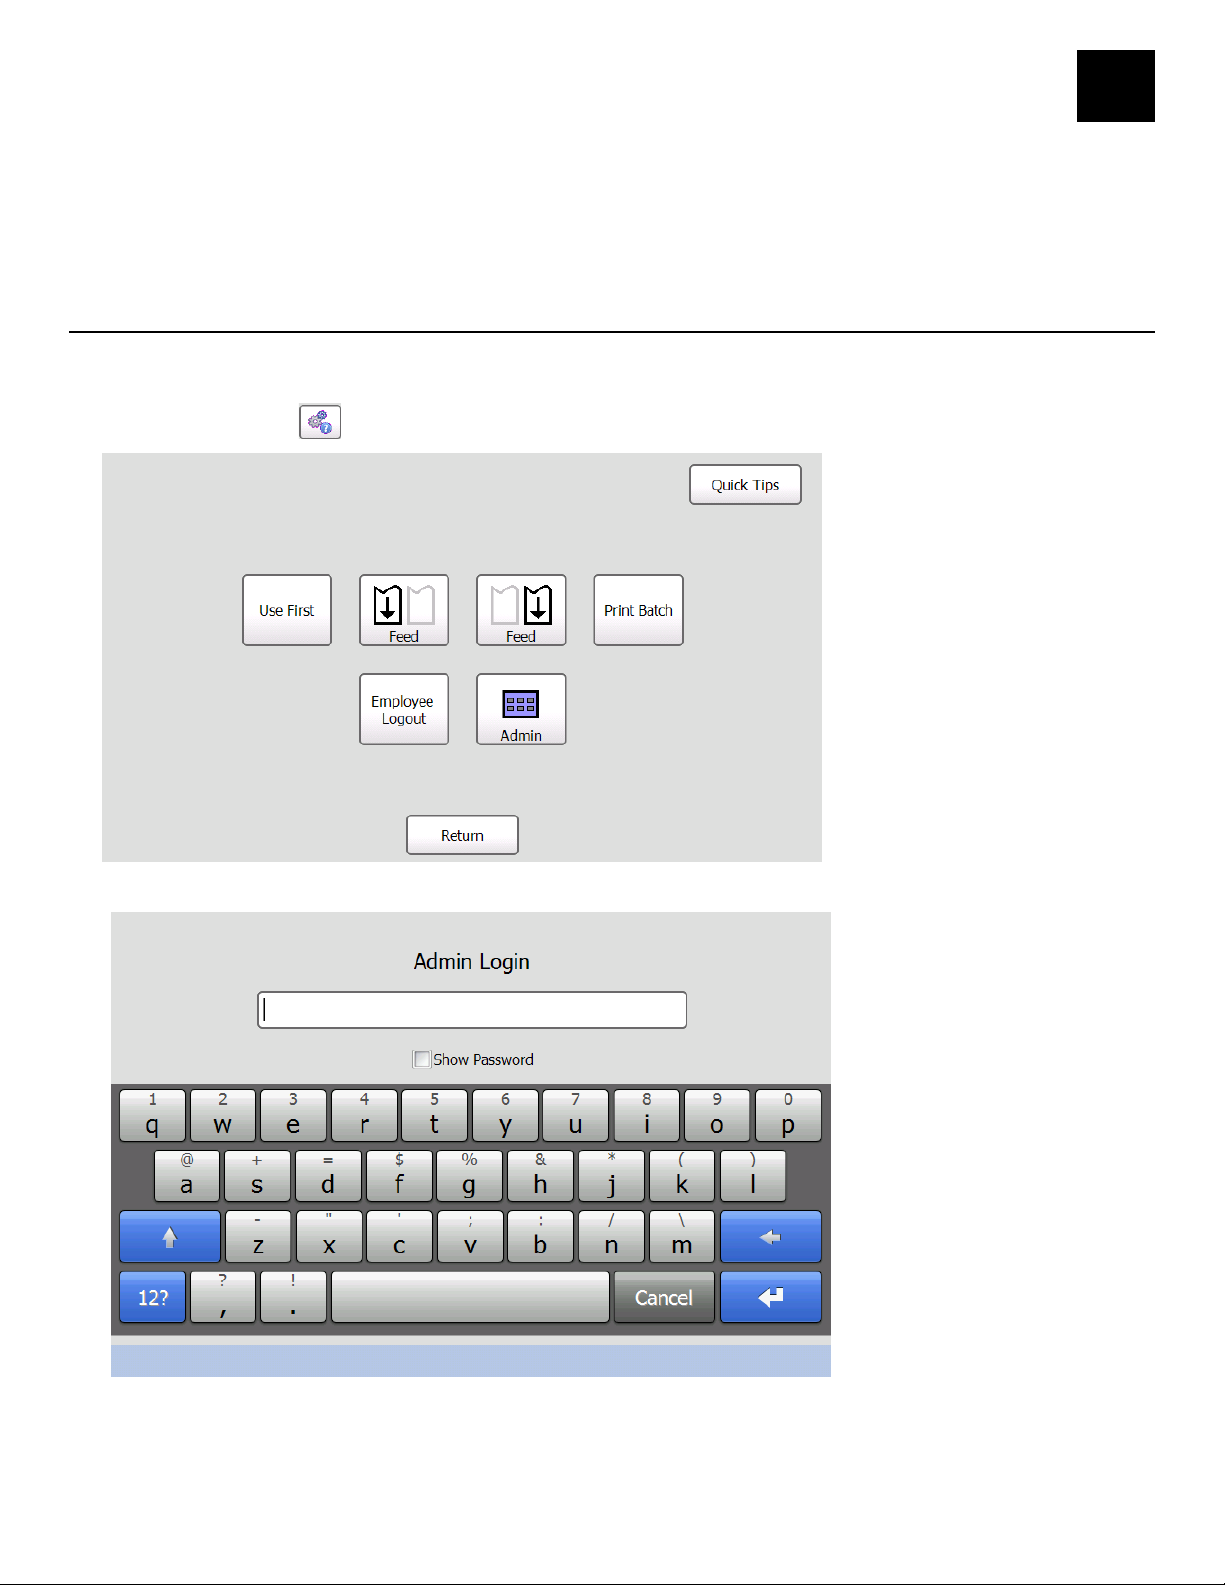
1. Press the Tools button.
2. Press Admin.
3. Enter the Admin password and press Enter. The default pass word is 1234.
Setting the Time and Date 2-1

4. Press Set Time / Date.
Use and to set the time and date.
Touch AM/PM to toggle the setting bet ween AM and PM.
5. Press OK when you are finished.
Formatting the Time and Date
To change the way the time/ date appears on printed labels:
1. From the Admin Tools screen, press System Settings.
2-2 System Administrator’s Guide
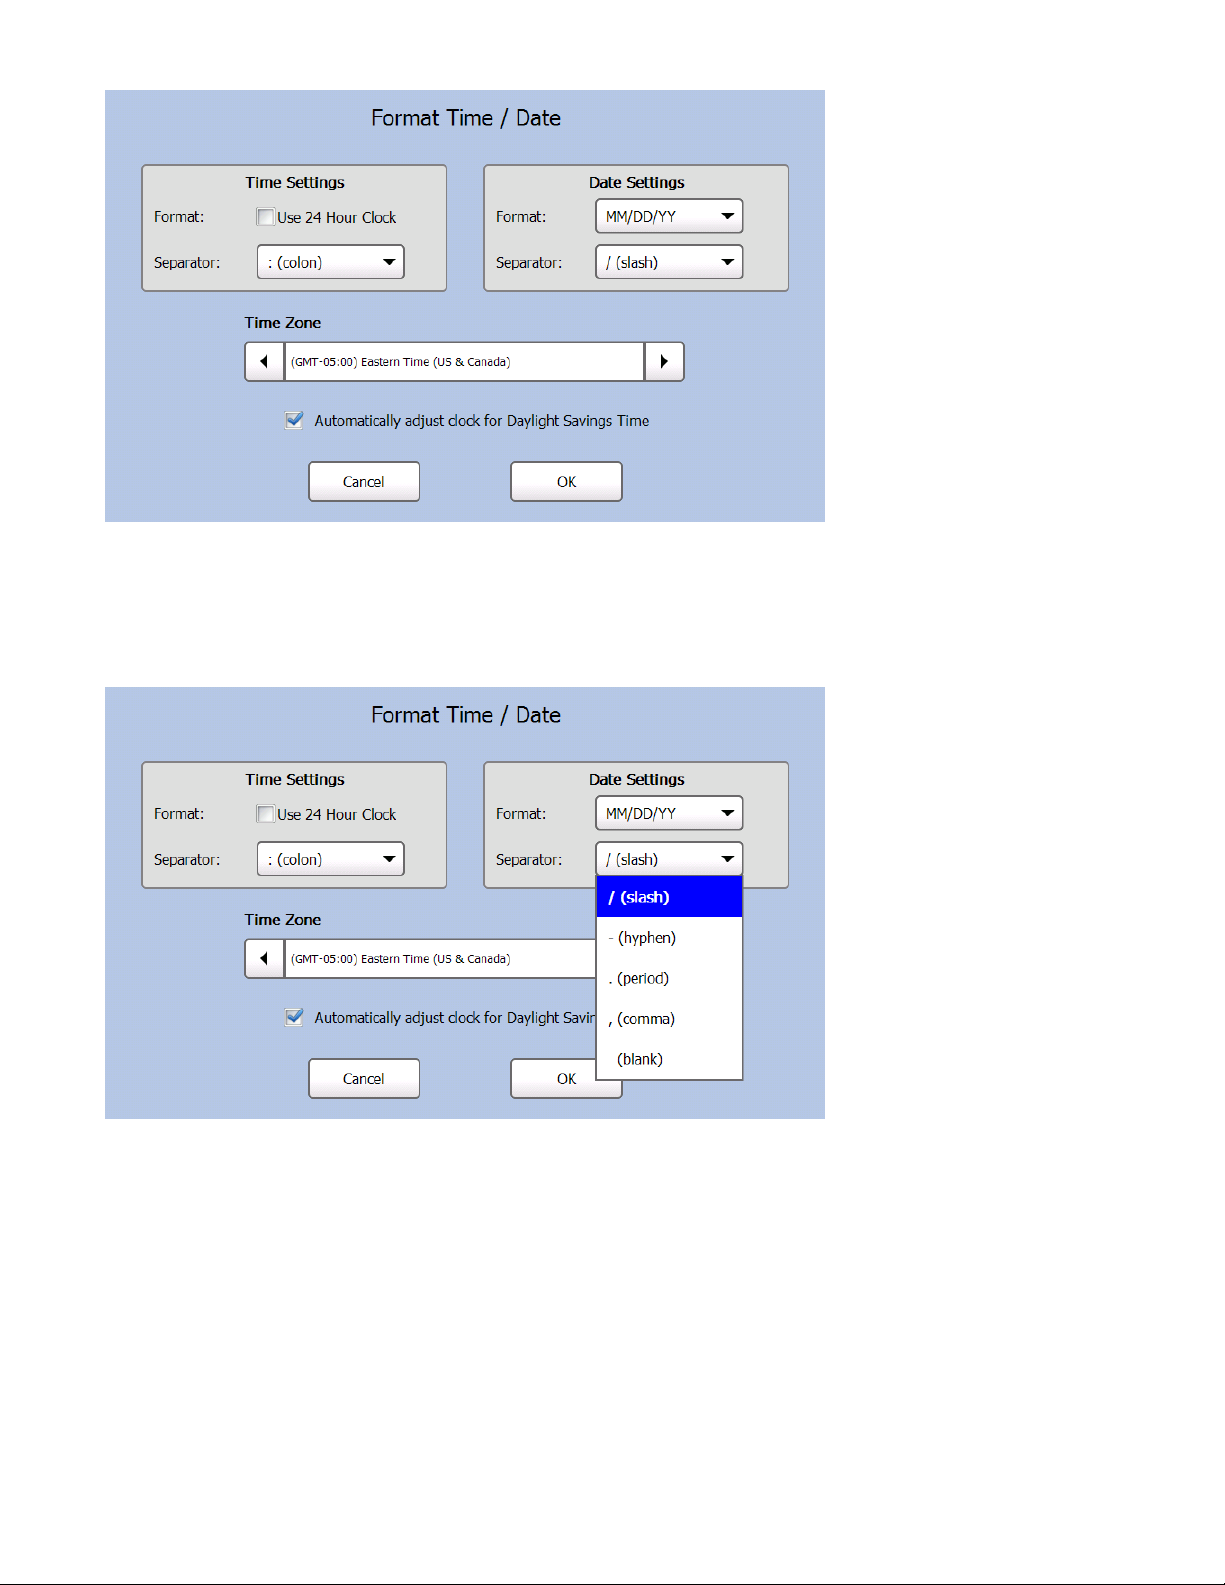
2. Press Format Time / Date.
3. Select the check box if you want to use a 24-hour clock. Fo r example, 4:00 p.m. would
appear as 16:00. Use the drop do wn menu to select the time separator to place between the
hour, minute, and seconds ( colon, period, comma, blank ).
4. Use the drop down menus to select th e date format and the date sepa rator (slash, hyphen,
period, comma, blank). Th e date separator is placed between t he year, month, and day.
5. Use the and buttons to select your T ime Zone.
6. Select the checkbox if you want the printer to autom atically adjust the time f or Daylight
Saving Time.
7. Press OK when you are finishe d.
Setting the Time and Date 2-3

SETTING UP THE PRINTER
3
This chapter tells you ho w to
♦ adjust where data prints on the label.
♦ adjust the backlight.
♦ change the Administrato r’s Password.
♦ set the options.
♦ adjust the network set tings.
♦ use a network time server.
Note: You may have a custom applicatio n that differs slight ly from the examples in this
manual. The screens and labe ls shown are for reference o nly of the dual printer.
11B11B11B
Adjusting the Print Settings
You can adjust the horizonta l (X) and vertical (Y) print pos ition of data on a label and set t he
print contrast. The Contras t controls the darkness of the printing.
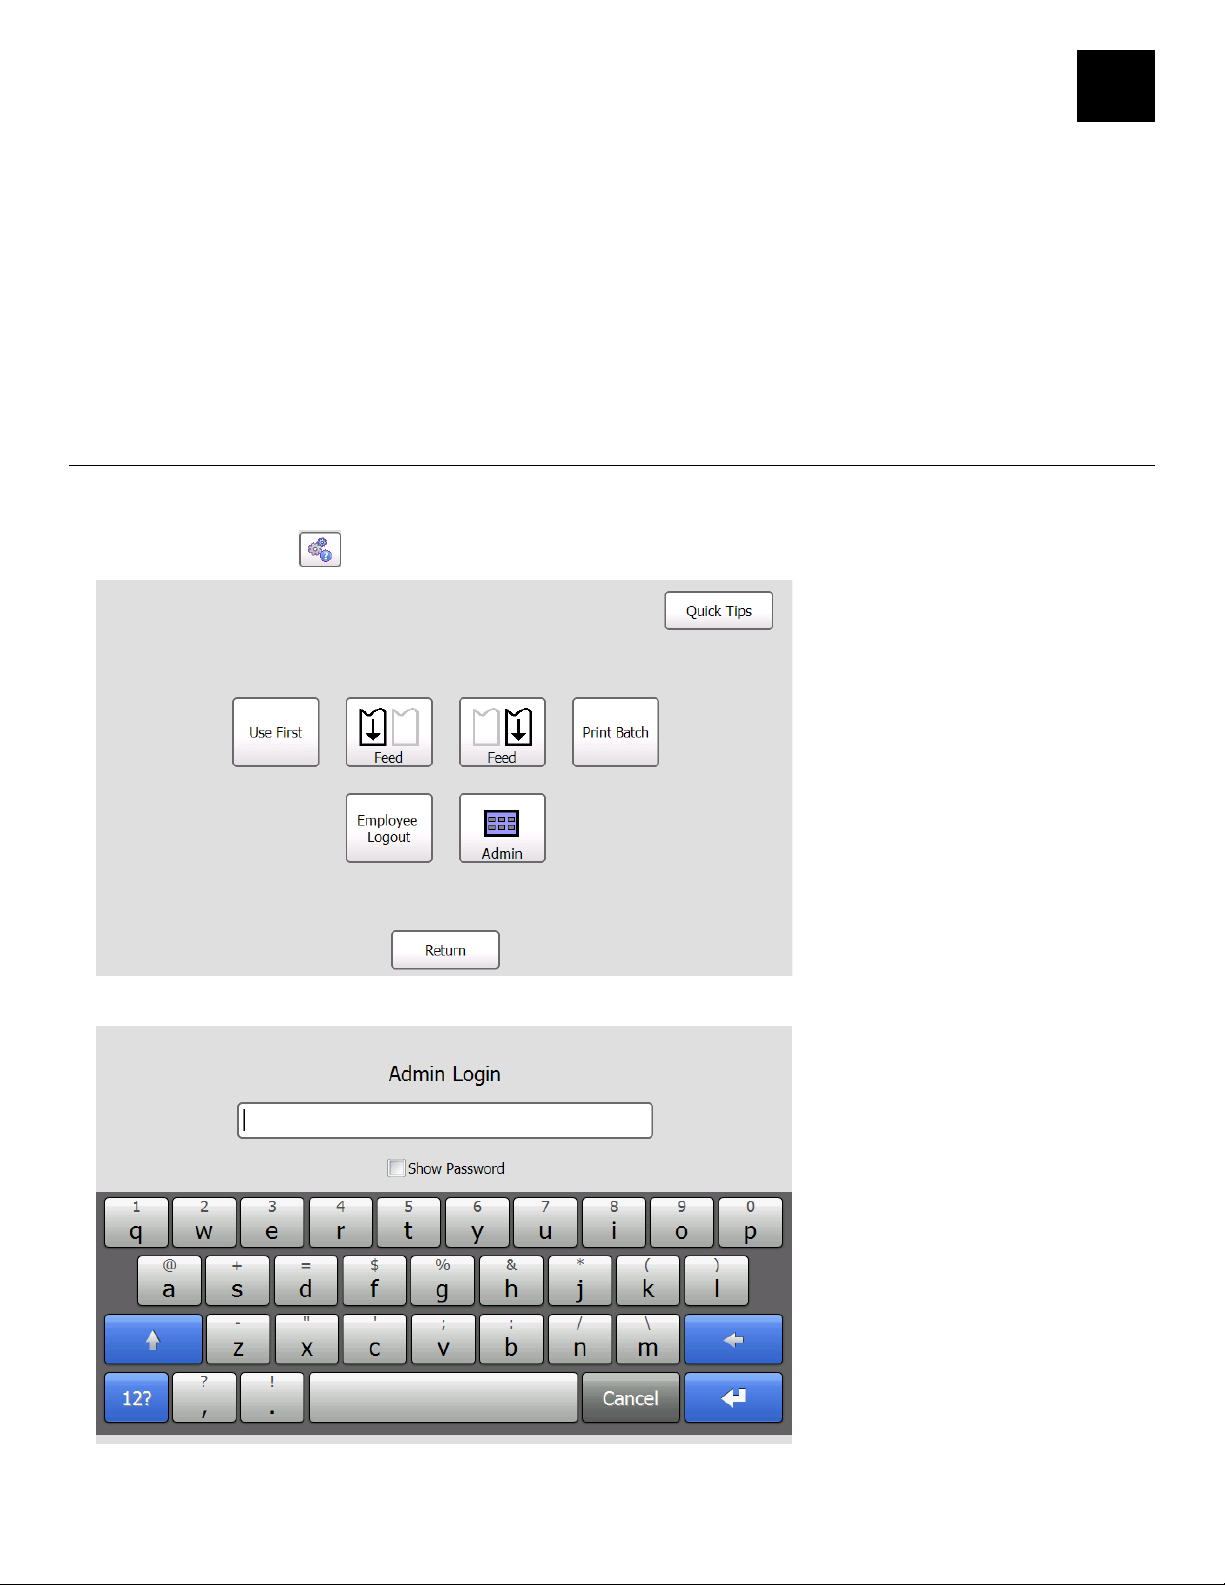
1. Press the Tools
2. Press Admin.
button.
Note: Select Show
Password to see the
characters while
entering the
password.
Setting Up the Printer 3-1
3. Enter the Admin password and press Enter. The default pass word is 1234.
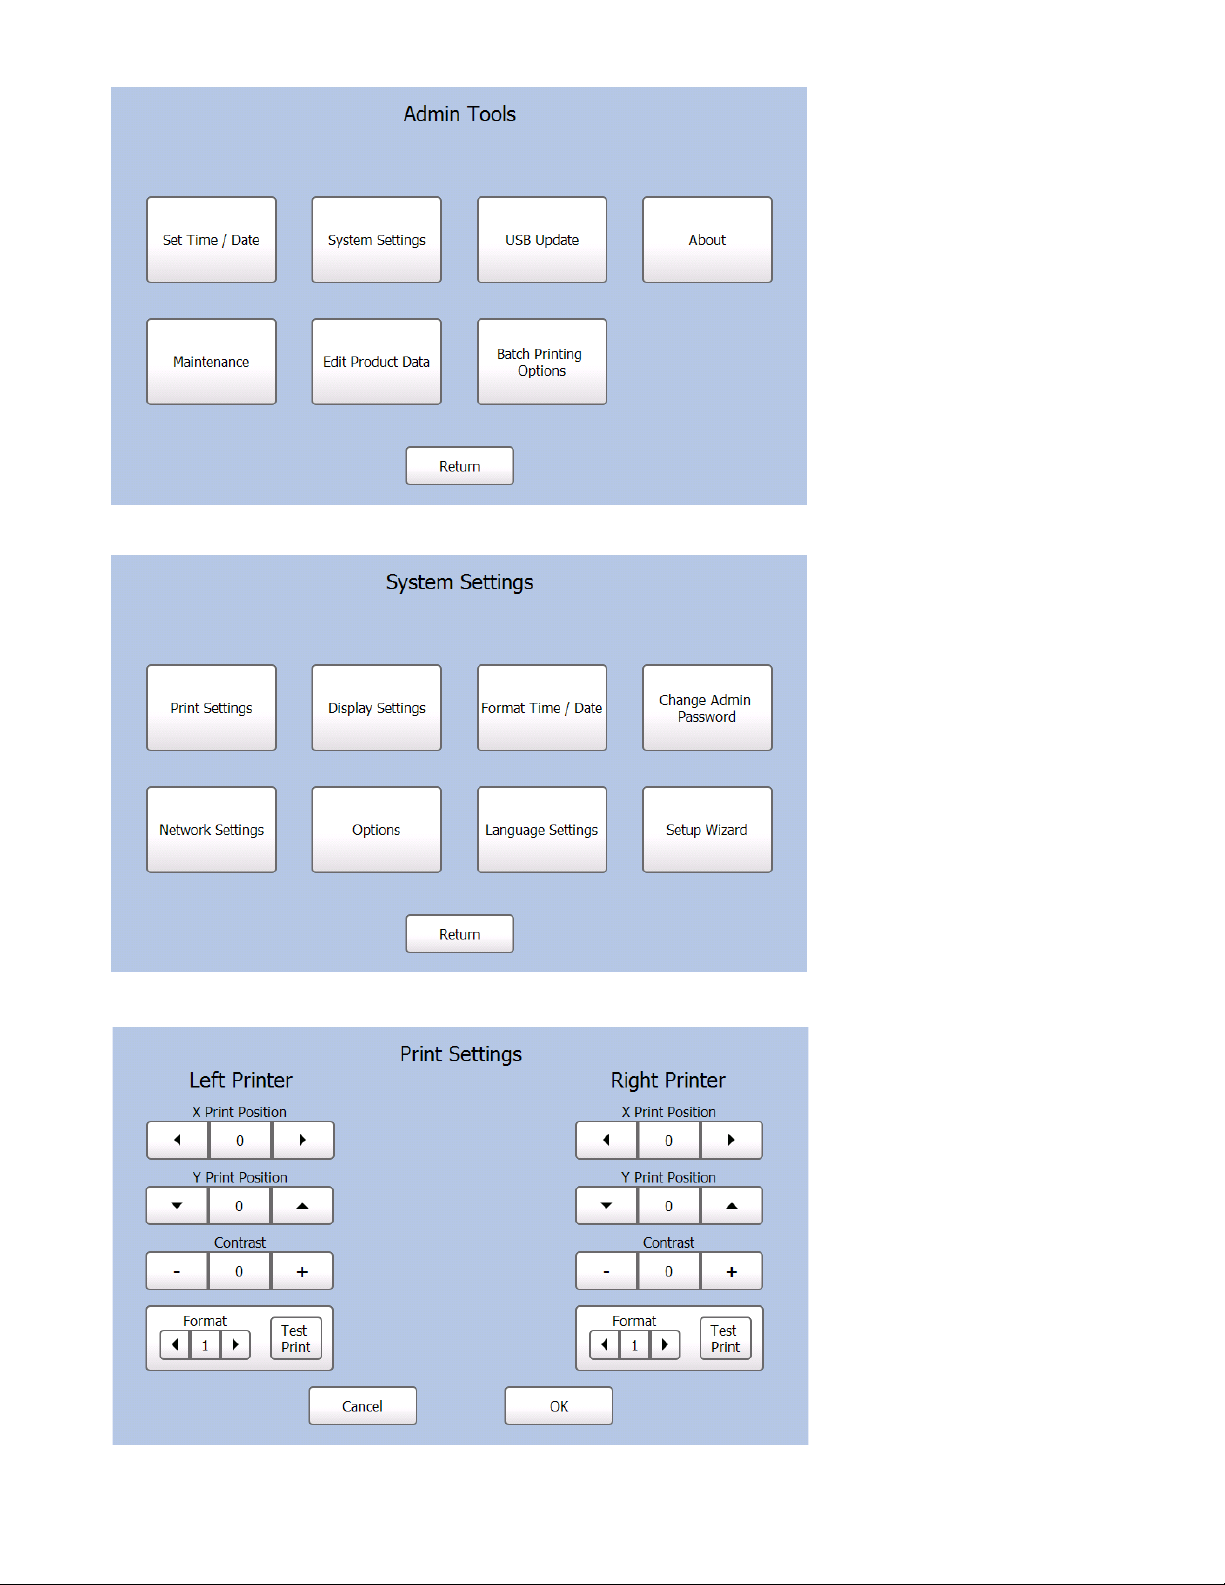
4. Press System Settings.
5. Press Print Settings. Adjust t he print settings for the Lef t and Right Printer:
3-2 System Administrator’s Guide
6. Use the and buttons to adjust the X Print Position. Increasing t he value moves the
printed text to the right. Decreasing the value moves the pr inted text to the left. The rang e
is -100 to 100 and the default is 0.
7. Use the and buttons to adjust the Y Print Position. Increasing the value moves the
printed text up. Decreasing t he value moves the printed text do wn. The range is
-128 to 127 and the default is 0.
8. Use the - and + buttons to adjust the Contrast. Increasing the value mak es the print darker.
Decreasing the value mak es the print lighter. The rang e is -100 to 100 and the default is 0.
9. Use the and buttons to select a f ormat and click Test Print to check your print s ettings.
The label prints. Make adj ustments if necessary. See Appen dix A, “Label Formats” f or the
size and content of each f ormat.
10. Press OK when you a re finished.
Adjusting the Backlight
You can adjust the bright ness of the screen. The range is 0 t o 100 percent.
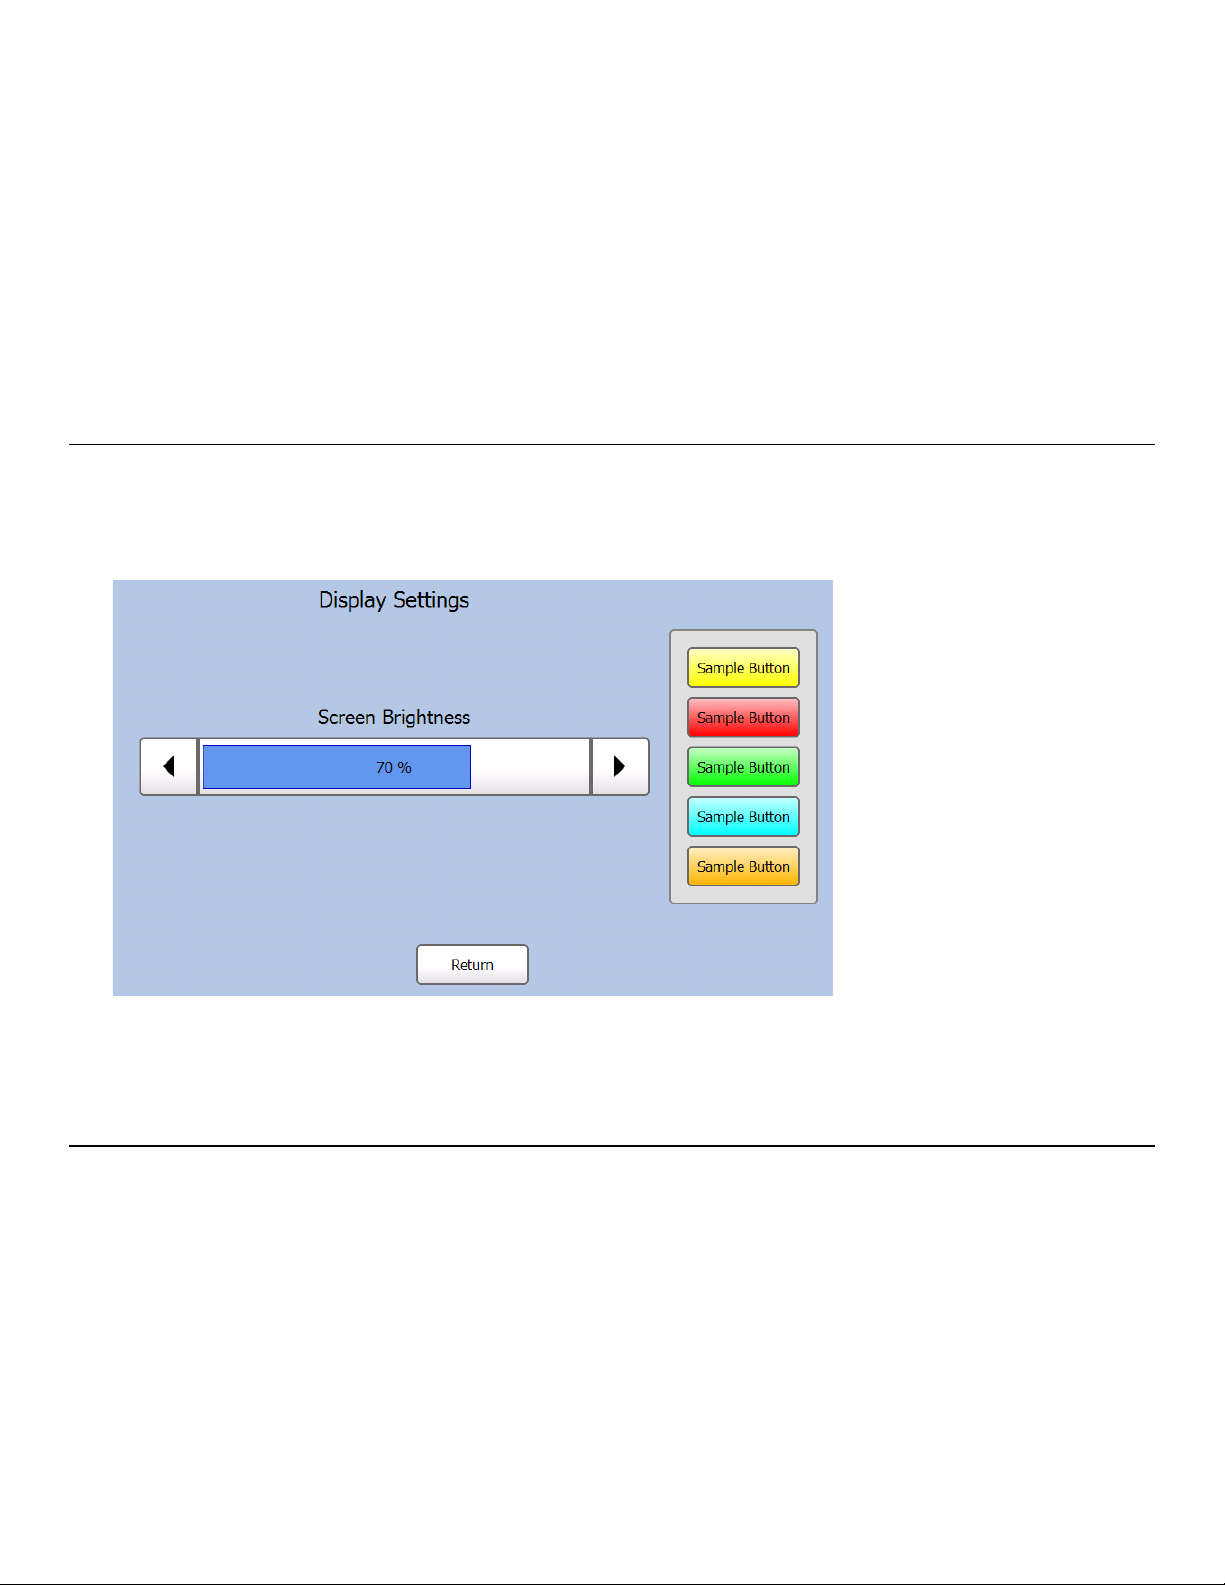
1. From the Admin Tools screen, press System Settings.
2. Press Display Settings.
3. Use and to adjust the screen brig htness. The Sample Buttons at t he right show how the
colors appear at the various br ightness settings.
4. Press Return when you are finished.
Changing the Administrator’s Password
To change the administr ator’s password:
1. From the Admin Tools screen, press System Settings.
2. Press Change Admin Password.
3. Enter the new password. As you enter the password, the charac ters are replaced with “ ” in
the text. Select Show Password if you want the characters to appear in the text box.
4. Press Enter. The password has been cha nged.
Make a note of your new password. If you forget your password, call S ervice.
Setting Up the Printer 3-3
End of Day
Normal Expiration
Setting the Options
Expiration
Expiration
Expiration
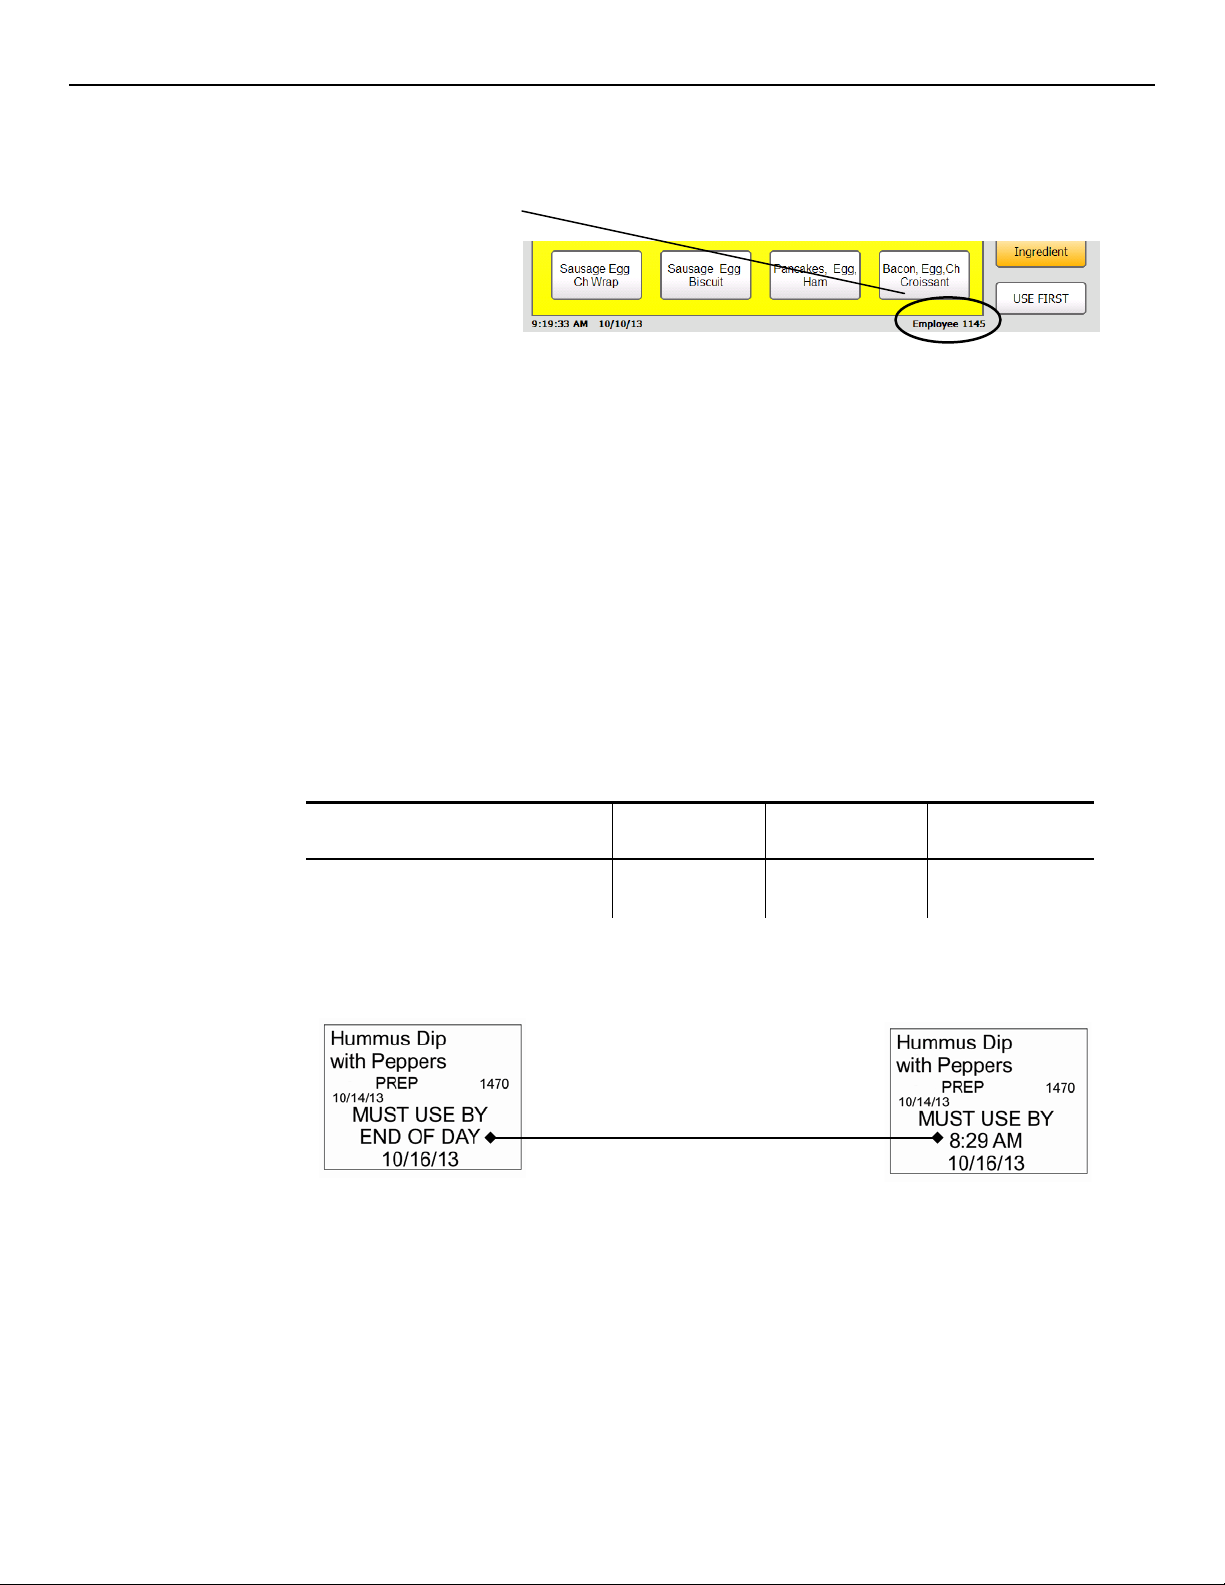
The options allow users to enable/ disable employee login, recreate an old label, use “end of day”
expiration, or print “end of day” on labels.
Enable Employee
Login
Recreate Label
Use “End of Day”
expiration mode
Prompts users for an em ployee login. Login must be 2-10 alphanumeric
characters. The ID displays on the screen and prints on f reshness
labels.
Note: Once Employee Login is enab led, you see “Enter Employee ID”
and must login before cont inuing.
Users may need to reprint a f reshness label if a label is torn or missing
from a product. The user ent ers the original Use B y time and date.
Note: An asterisk (*) prints af ter the date or time, indicating a
reprinted label.
Use for products that expire at the end of each day or in a set nu mber
of days from the first use.
Enter product expirati on values in multiples of 1 day. For example,
0 day expires today; 1 day expires t omorrow, etc.
Note: If the expiration time c ontains any hours and/or minut es, the
printer uses normal date/ time mode for that product .
For more information about expiration dates, s ee the table
below.
End of Day Expiration
0 Day
1 Day
2 Day
Print “End of Day”
on Label.
Current Dat e:
May 1
End of Da y
5/1/13
End of Da y
5/2/13
End of Da y
5/3/13
Enables or disables print ing the words “End of Day” on th e label when
using “End of Day” expiratio n mode. Only the date is printed, not the
time.
Expiration Mode
Mode
3-4 System Administrator’s Guide
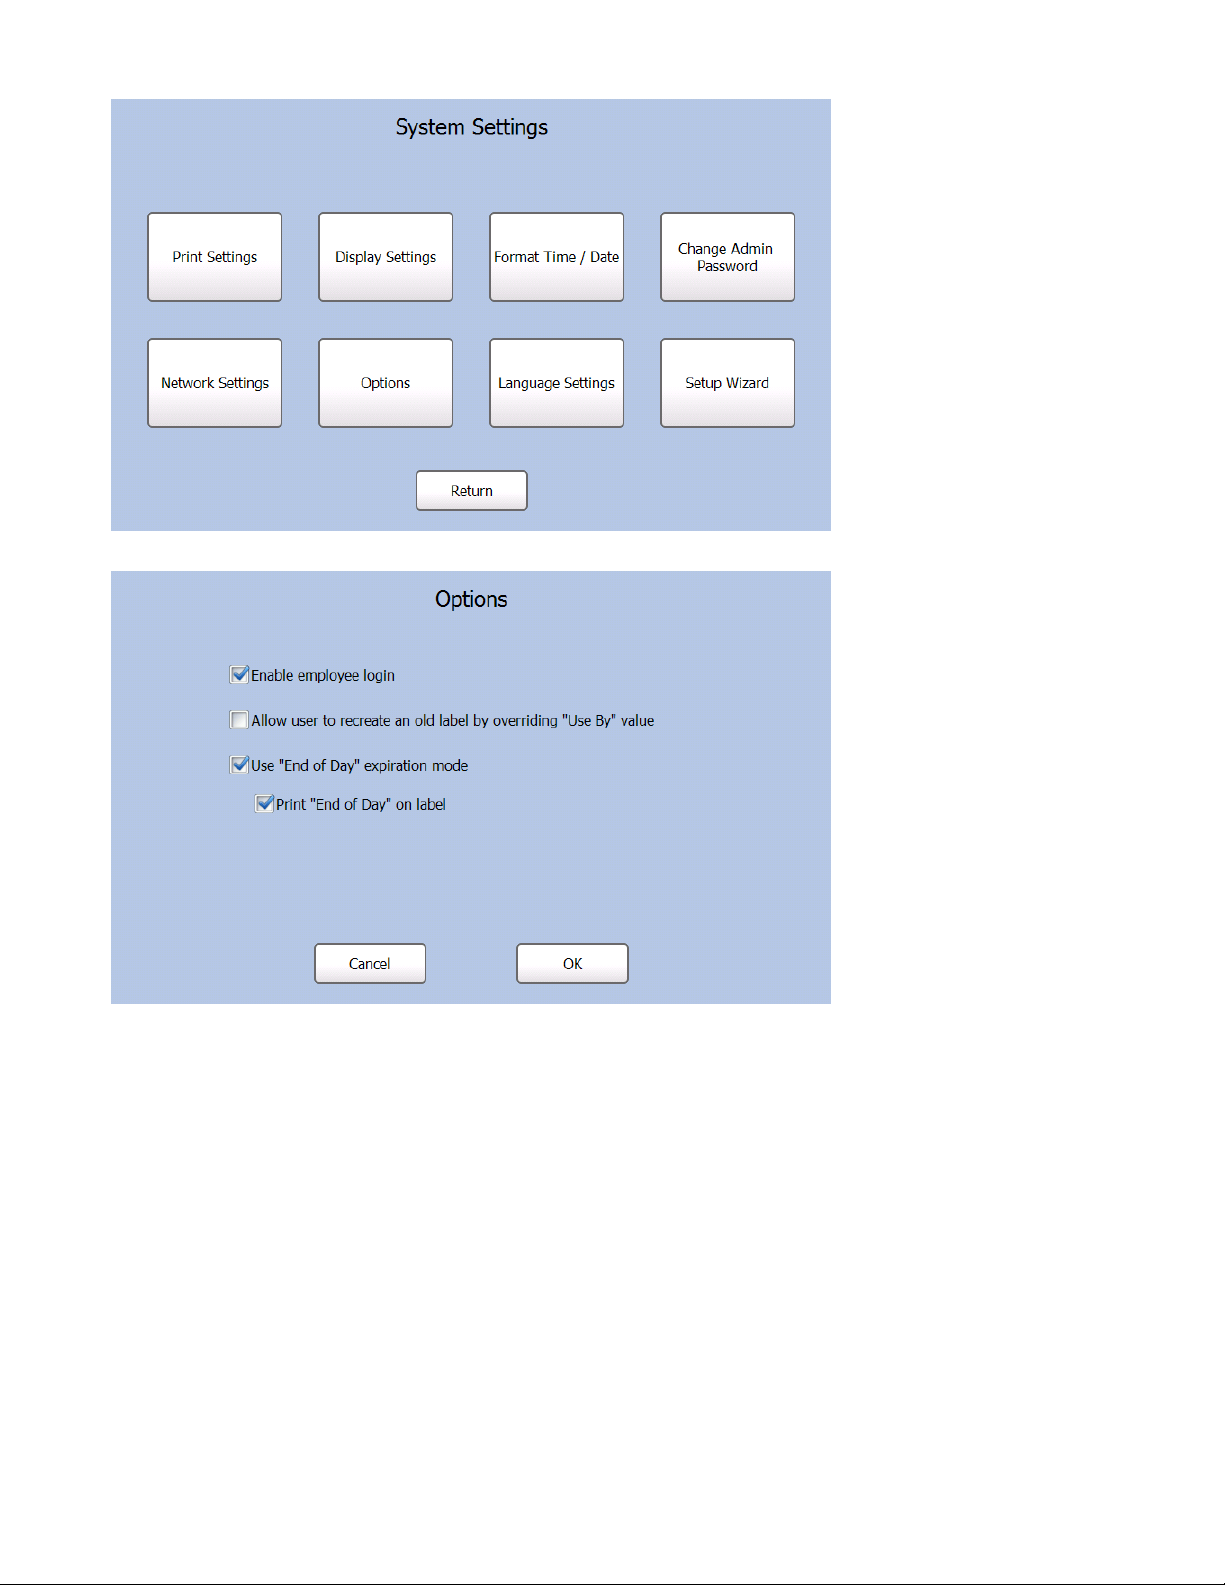
1. From the Admin Tools screen, press System Settings.
2. Press Options.
3. Select the options you need.
4. Press OK when you are finishe d.Note: When Employee Login is enabled, you see “Enter
Employee ID” . You must login to continue.
Setting Up the Printer 3-5
Adjusting the Language Settings
Use the Language Setting s menu to set a primary system langua ge, enable/disable alter nate
button names, and set an alt ernate system language.
1. Press the Tools button.
2. Press Admin.
3. Enter the Admin password and press Enter. The default pass word is 1234.
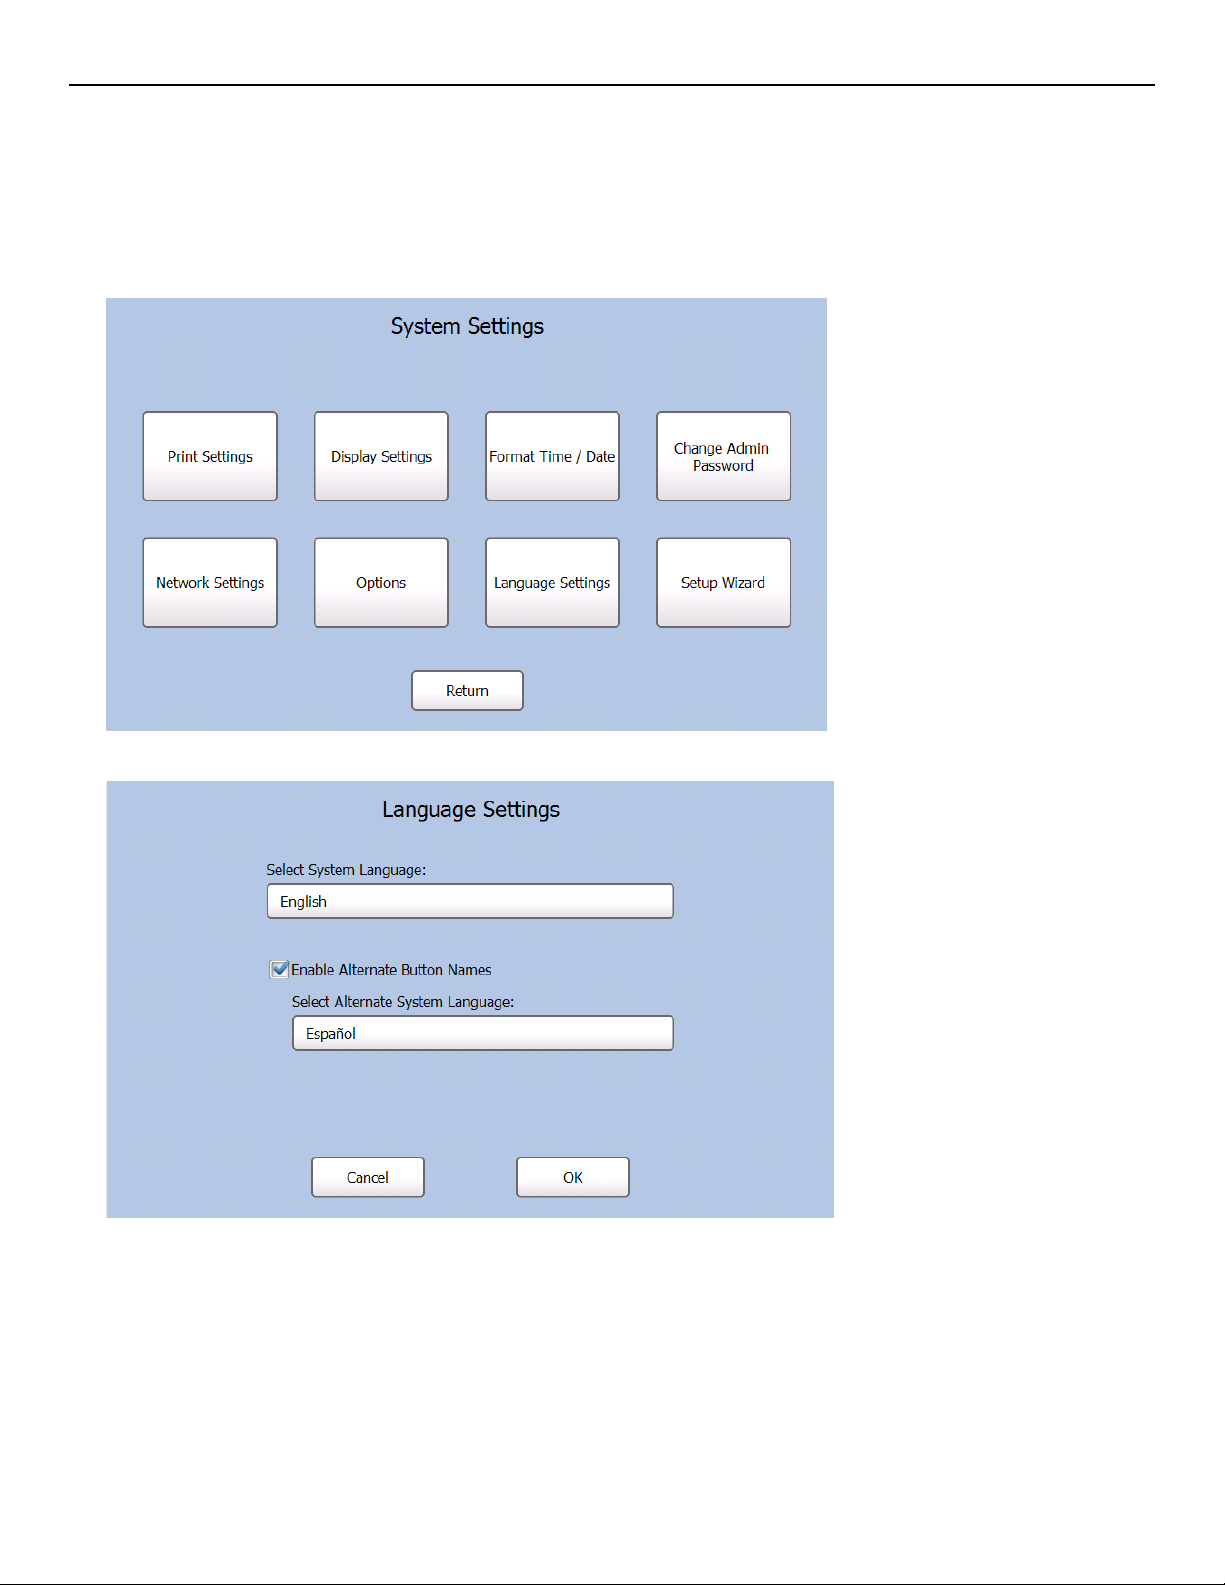
4. Press System Settings.
5. Press Language Settings.
Selecting a System Language
Press the language box under Select System Language to s elect a System Language. The
system language is the langua ge you want to use for all printer prompts and buttons.
3-6 System Administrator’s Guide
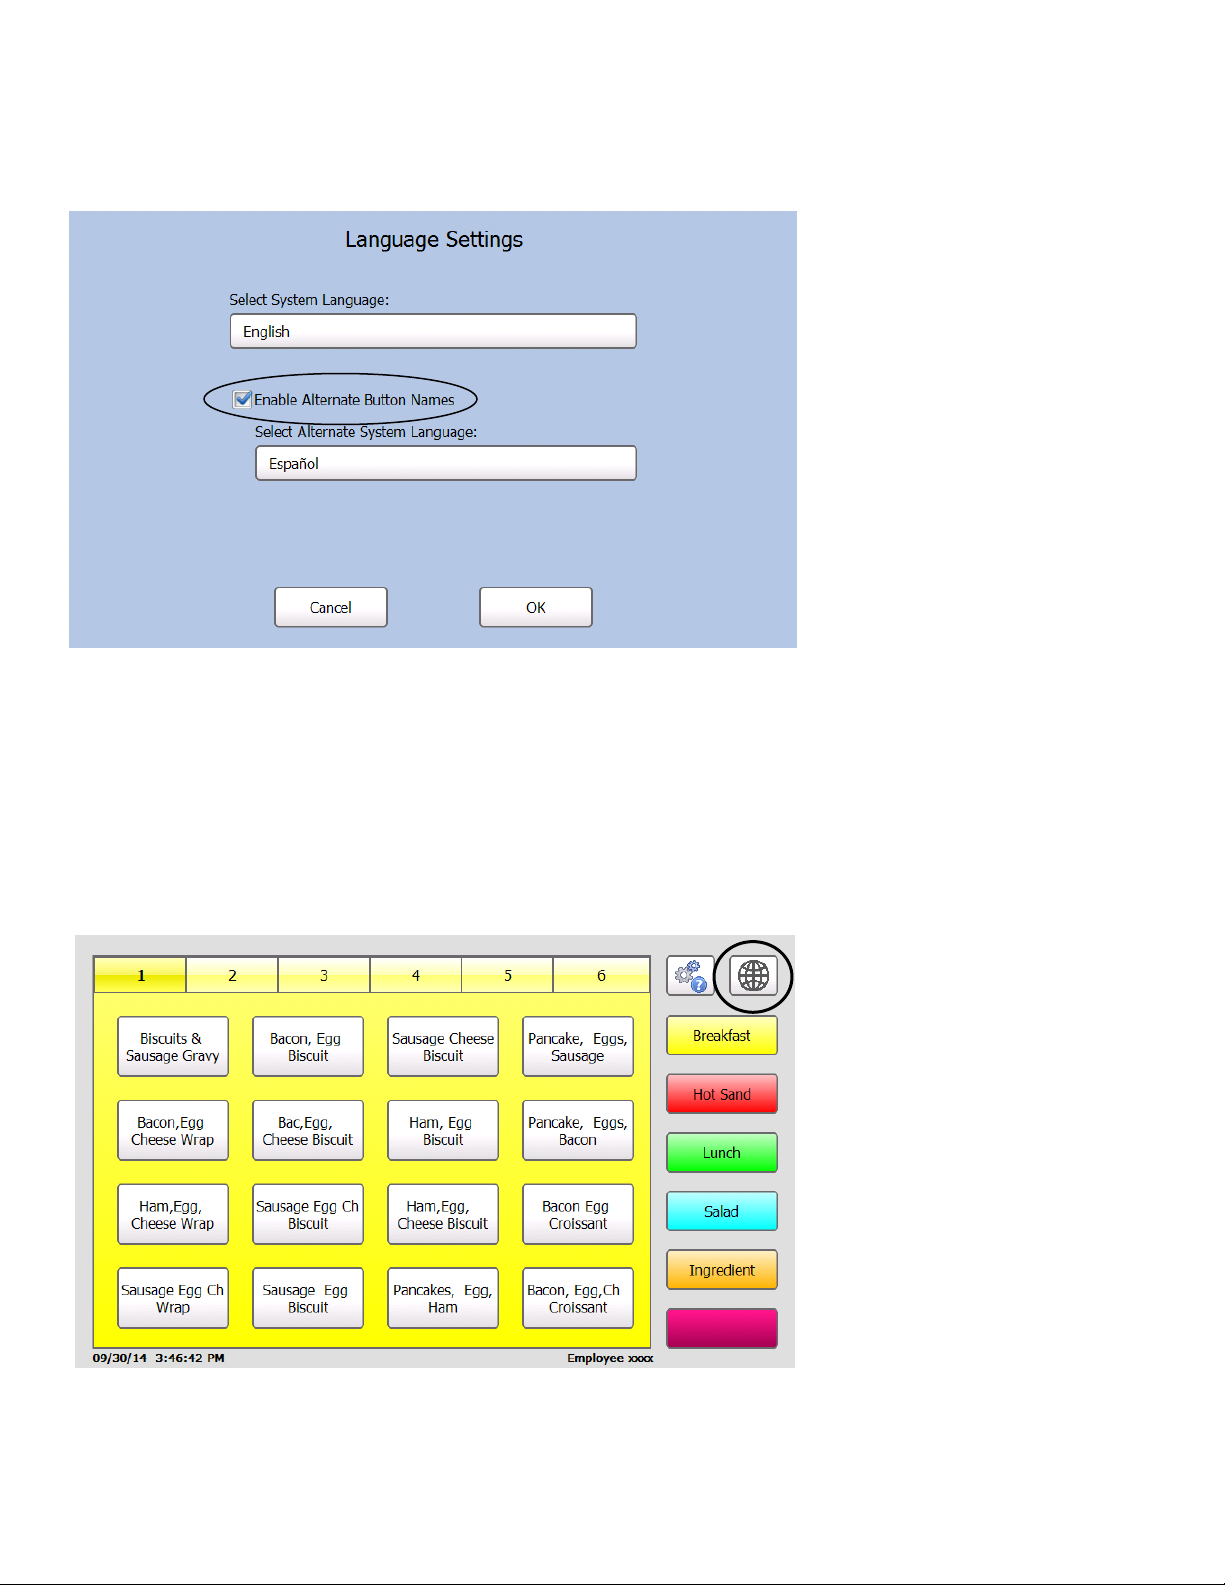
Alternate B utton Names
When you enable alternat e button names, you can enter the pr oduct button names in a second
language (Alternate System Language). Press the Languag e Toggle Button to switch bet ween
the primary and secondary langu ages. For more information, see Chapter 4, “Using the Edit
Mode” or Chapter 5, “Usin g the Edit Ut ility”.
Alternate System Language
With alternate button names enab led, press the language box under Select Alternate System
Language to select an Alternat e System Language. The Alter nate System Language is the
secondary language in which al l printer prompts and buttons appear. Press the Languag e
Toggle Button to switch bet ween the primary and secondar y languages.
Language Toggle Button
When alternate button nam es is enabled, you see a Language Tog gle button next to the Tools
button. Press the Languag e Toggle Button to switch between th e primary and secondary
languages.
Setting Up the Printer 3-7

Adjusting the Network Settings
Use the Network Setting s menu to view the network sett ings or set an IP Address. The printer’s
current network sett ings are displayed.
1. Press the Tools button.
2. Press Admin.
3. Enter the Admin password and press Enter. The default pass word is 1234.
4. Press System Settings.
5. Press Network Settings. The cur rent network settings appear.
3-8 System Administrator’s Guide
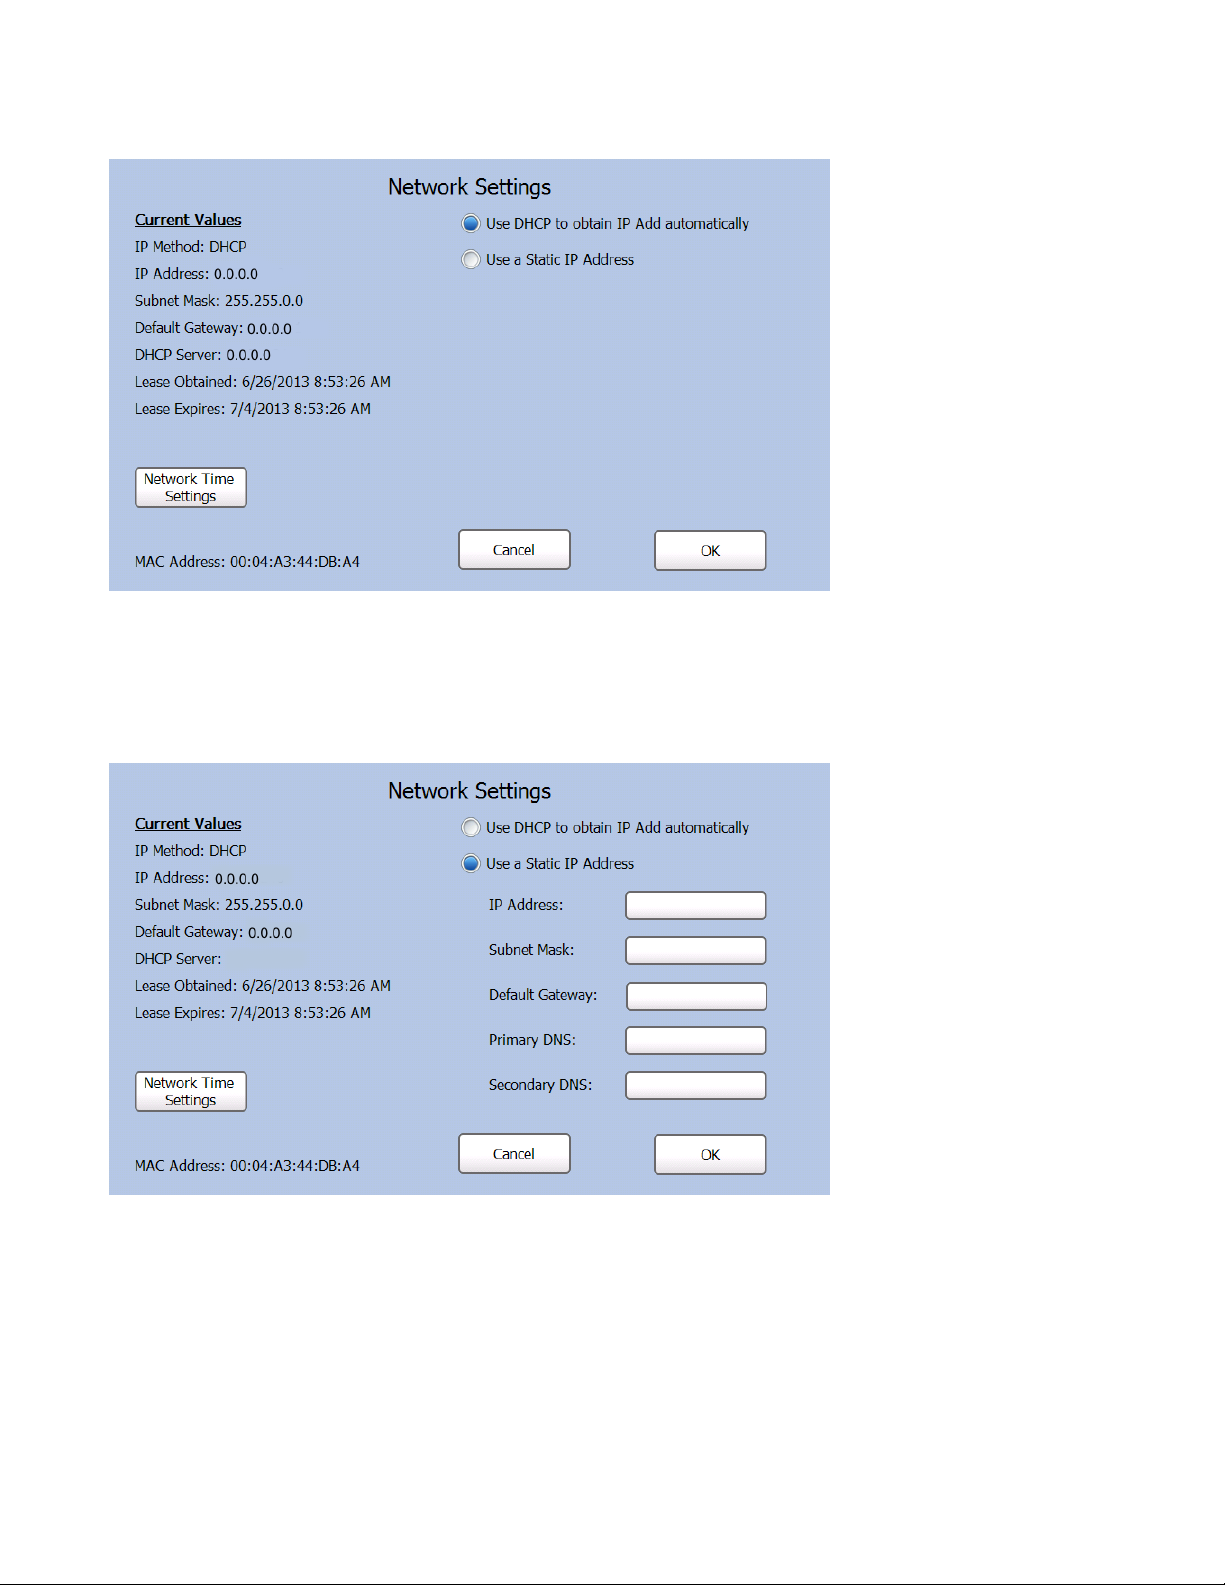
To automatically obtain an IP Address:
You can use DHCP to automatical ly obtain the printer’s IP Ad dress.
1. From the Network Settings scr een, select Use DHCP to obtain I P Add automatically.
2. Press OK.
To enter an IP Address:
You can assign the printer a st atic IP Address.
1. From the Network Settings screen, select Use a Static IP Addres s.
2. Touch the text box next to each f ield to enter the infor mation as needed on the keypad.
3. Press Enter on the keypad each time yo u complete a field.
4. Press OK when you are finished.
Setting Up the Printer 3-9

Selecting your Network Time Server
If your printer is connect ed to a network with Internet access or to a network time server, use
this screen to adjust the set tings.
1. From the Network Settings scr een, press Network Time Sett ings.
2. Select the check box if you want to automatically synchro nize your clock with a Net work
Time Server.
3. To add a new Network Time Server pres s Add. Use the k eypad to enter the server address .
Press Enter on the keypad each time yo u complete a field.
To edit an existing Network Time Server, select the ser ver name from the box then
press Edit. Use the keypad to change the server address as ne eded.
To remove an existing Net work Time server, select the ser ver name from the box then
press Remove.
4. Adjust the frequency at which your clock synchronizes with t he Network Time Server. Use
the + and – buttons to adjust t he setting up or down.
5. Press OK when you are finishe d.
3-10 System Administrator’s Guide

EDITING PRODUCT DATA
4
This chapter tells you ho w to
♦ add or remove product butt ons.
♦ edit product descriptio ns.
♦ edit category buttons.
♦ edit category label form ats.
♦ add or remove timers.
Note: Only for Managers and Superv isors can edit product data.
Entering Edit Mode
You can make changes to the pr oduct buttons; on the printer throug h Admin Tools or on your
PC using the Edit Uti lity (see Chapter 5, “Usi ng the Edit Uti lity”).
1. Press the Tools button.
2. Press Admin.
3. Enter the Admin password then pres s Enter. The default pass word is 1234.
4. Press Edit Product Data.
You return to the product
screen. The background
color of the screen changes
and “Edit Product Data”
appears at the bottom r ight of
the screen. After five
minutes of inactivity, you
must repeat steps 1 – 4. The
countdown is shown at the
bottom right of the scree n.
Editing Product Data 4-1

Adding and Removing Products
*Optional Field
You must be in Edit Mode to add or remo ve product buttons.
To add a product button:
1. Press any empty pr oduct button.
*The Alternate Name f ield is shown if you enable Alternate Button Names (see “Adjusting t he
Language Settings” in Chapt er 3 for more informat ion). Enter the button’s alternate n ame as
you want it to appear when the oper ator presses the Language T oggle Button .
Note: The Butt on Mode field is used to set the butt on’s function. If you choose “Label” , the
button is used to print labels. If you choose “Timer”, the but ton is used to set a timer. See
“Adding Timers” for more inf ormation.
2. Fill in the fields as needed. Touch the text box next to each fiel d to open the keypad. Press
and hold a key to use symbols and acce nted characters.
3. Press Enter on the keypad each time yo u complete a field.
4-2 System Administrator’s Guide

4. Touch the text box next to the Use B y Description field to open t he keypad. The default
New Use By Description:
“MUST USE BY” appea rs.
5. Press the
to clear the field and enter t he new data, for example, BEST BEFORE. Press
Enter.
When this item is printed, the new Use By description print s. For example:
BEST BEFORE
Note: To return to the default value, p ress the
to clear the field then click Save. Default
values are shown in italici zed, gray text. User modif ied values are shown in nonitalicized, black t ext.
6. Touch the text box next to the Use B y Duration field.
7. Use the and buttons to set the produc t’s expiration time in Days, Hour s, and Minutes.
Press OK.
8. Press Save when you are finished. The new product appears on the selected butt on.
Editing Product Data 4-3

To remove a prod uct button:
1. Press the product button you want to remove.
2. Press Clear All. All existing product information is remo ved from the screen.
3. Press Save when you are f inished.
You return to the product scr een; the selected button is blank .
Editing Product Descriptions
You must be in Edit Mode to change but ton information.
1. Press the product but ton to edit.
2. Edit the product informat ion fields as needed. Touch t he text box next to each field to open
the keypad.
3. Press Enter on the keypad each time yo u complete a field.
4. Press Save when you are f inished.
4-4 System Administrator’s Guide

Editing the Use First Button
BEST
*Optional Field
You must be in Edit Mode to change t he Use First button.
1. Press the Tools button.
2. Press Use First.
*The Alternate Name f ield is shown if you enable Alternate Button Names (see “Adjusting the
Language Settings” in Chapt er 3 for more informat ion). Enter the button’s alternat e name as
you want it to appear when the oper ator presses the Language T oggle Button .
3. Enter the Button Name.
4. Enter the Label Data. T his field is printed on labels when th e Use First
button is pressed. If this f ield is left blank, the def ault text “Use First”
prints on labels.
Note: This field has a maximum of four words.
5. Click Save to save the chang es or Cancel to exit.
Note: The “Use First” Button Name, “Use First” Alternate Name, and L abel
BEFORE
07/01/13 2:20 PM
Data fields have default values. You can press the to clear the f ield then click Save
to use the default values.
Editing Product Data 4-5

Editing Category Buttons
Tabs
Category Buttons
*Optional Fields
You can change the names of the category buttons and tabs. You can also s elect which format
and printer (left or r ight) prints for each categor y. You m ust be in Edit Mode to edit tab and
categories.
Note: Settings apply to all produc t buttons within the selected category.
1. Select the category button you want to edit. You may have to pres s the category button up
to three times to open the edit ing screen.
*The Alternate Name and Alter nate Tab fields are sho wn if you enable Alternate Butt on Names
(see “Adjusting the Lang uage Settings” in Chapter 3 f or more information). Enter t he button’s
alternate name as you want it t o appear when the operator pres ses the Language
Toggle Button .
4-6 System Administrator’s Guide

2. Touch the text box next to the But ton Name field to open the ke ypad. Enter the Button Name
and then press Enter on the k eypad.
3. Select the Label Format f or all products in this categor y. Use the and buttons to scroll
through the list of f ormats (1–8). See Appendix A, “Label Formats ” for the size and content
of each form at.
Note: If you select a format larger than the loaded labels, some inf ormation may not print.
4. Select either the Left or Right printer to print the product labels for this category. T his option
does not appear for single pr inter models.
Note: If you want the operator t o select which printer (Left or Right) to use when a product
button is pressed, assign a ll categories to the same f ormat (1-8) and the same printer
(left or right).
5. Touch the text box next to the Use B y Description field to open t he keypad. Enter the Use
By Description and then pr ess Enter.
Note: The Use by Description field has a default value (“ MUST USE BY”). You can press t he
to clear the field then click Save to use the default value. Defa ult values are shown
in italicized, gray text . User modified values are sho wn in non-italicized, black t ext.
6. Touch the Tab Name buttons if you want to name the tabs. Use the rig ht and left arrow
buttons to view all of the t abs. The keypad opens. Enter the T ab Name and press Enter on
the keypad when you complete the f ield.
7. Press Save when you are f inished.
Editing Product Data 4-7

Assigning a Label Format
Label Format Selector
You can select the label for mat for the category buttons. All pr oducts within a category use the
same label format. You must be in Ed it Mode to assign a label form at to a category.
1. While in Edit Mode, select the cat egory button you want to assig n a format to. If that
category is not active, press the category button ag ain.
2. Select the Label Format f or all products in this category. Use t he and buttons to scroll
through the list of f ormats (1–8). See Appendix A, “Label Formats ” for the size and content
of each format.
Note: If you select a format larger than the loaded labels, some inf ormation may not print.
3. Press Save when you are f inished.
4-8 System Administrator’s Guide

Editing Tab Names
Tabs
*Optional Fields
You can change the names of the product button tabs. You must be in Ed it Mode to edit
product button tabs.
1. Touch one of the Tab Name buttons. The keypad opens.
2. Enter the Tab Name you want then pr ess Enter on the keypad.
3. Press Save when you are f inished.
Editing Product Data 4-9

Adding Timers
You must be in Edit Mode to create timer s.
1. Press any empty prod uct button.
2. Select Timer as the Button Mode.
Note: The Button Mode field sets the but ton’s function. Choose “Label” t o use the button to
print labels. Choose “Timer ” to use t he button to set a timer.
3. Fill in the Button Name f ield. Touch the text box next to each field t o open the keypad.
Press and hold a key to use symbols and accented characters. Press Enter on t he keypad
when you complete the f ield.
4-10 System Administrator’s Guide

4. Touch the text box next to the Time Duration field.
5. Use the and buttons to set the timer’s expiration time in Hour s, Minutes, and Seconds.
Press OK.
6. Press Save when you are finished. The new timer appears on the selected b utton.
Editing Product Data 4-11

Setting a Timer
1. Press the product butt on of the timer to set. You see the list of timers.
2. Press Return to go back to the Main scre en. The timer continues t o count down. You can
see the timer icon at the bott om of the Main screen.
3. When the t imer expires, you see the Timers s creen and hear a tone. Press Remove to clear
the expired timer.
4-12 System Administrator’s Guide

Viewing Timers
You can view a list of timer s that are running.
1. Press the Tools button.
2. Press View Timers.
3. Press Return to go back to the Main scre en.
Removing a Timer
1. Press the Tools button.
2. Press View Timers.
3. Press Remove to cancel a timer befor e it expires.
Editing Product Data 4-13

Exiting Edit Mode
To exit Edit Mode:
1. Press the Tools button.
2. Press Exit Edit Mode to save all chang es and return to the Product screen.
Or, press Continue Editi ng t o remain in Edit Mode and make additi onal changes.
4-14 System Administrator’s Guide

BATCH PRINTING
5
This chapter tells you ho w to
♦ create a new batch.
♦ edit a batch.
♦ delete a batch.
Creating a Batch
1. Press the Tools button.
2. Press Admin.
3. Enter the Admin password then pre ss Enter. The default pass word is 1234.
12B12B12B
4. Press Batch Printing Options.
5. Press Create Batch.
Batch Printing 5-1

6. Fill in the New Batch Name field. Press Enter o n the keypad when you complete the fiel d.
Note: You cannot have more than one batch with the same name.
7. Press Add Item to add an item to the batc h.
8. Click on the item’s Pro duct Button to add it to the ba tch.
9. Select the number of labels t o print for that batch item t hen press Enter.
5-2 System Administrator’s Guide

10. Repeat ste ps 8 -9 to continue adding items t o the batch.
11. W hen you are finished adding items t o the batch press Save & Exit.
Note: Cancel deletes the batch.
Editing a Batch
1. Press the Tools button.
2. Press Admin.
3. Enter the Admin password then pre ss Enter. The default pass word is 1234.
4. Press Batch Printing Options.
5. Press Edit Batch.
6. Select the batch you want to edit.
Batch Printing 5-3

7. Press Add Item to add more items to t he batch.
Use the and next to an item quant ity to change the number of labels t hat print for that
item.
Press Delete to remove that item f rom the batch.
8. Press Save & Exit when you f inish making changes to the b atch.
Note: Cancel deletes the changes.
Renaming a Batch
1. Press the Tools button.
2. Press Admin.
3. Enter the Admin password then pre ss Enter. The default pass word is 1234.
4. Press Batch Printing Options.
5. Press Rename Batch.
6. Select the batch you want to renam e.
7. Enter the new batch name then pr ess Enter.
Note: You cannot have more than one batch with the same name.
Deleting a Batch
1. Press the Tools button.
2. Press Admin.
3. Enter the Admin password then pre ss Enter. The default pass word is 1234.
4. Press Batch Printing Options.
5. Press Delete Batch.
6. Select the batch you want to delete.
7. Select Yes to delet e the batch.
5-4 System Administrator’s Guide

USING THE EDIT UTILITY
6
This chapter tells you h ow to
♦ install the Ed it Utility.
♦ configure the network settings.
♦ upload printer data fil es to your computer.
♦ edit the product data f ile.
♦ update the product data f ile and update the application’s s oftware.
Note: The Edit Utility is only f or Managers and Supervisors.
System Requirements
To install and use the Monarch® Fr eshMarx® Edit Utility, your PC must meet these
requirements:
12B12B12B
Supported
Operating Systems:
Processor: 1 GHz minimum recommended
Memory (RAM): 1 GB minimum recommended
Hard Disk Space: 1 GB minimum recommended
♦ Windows XP
♦ Windows Vista
♦ Windows 7
Installing the Edit Utility
To install the Edit Utilit y on your computer:
1. Download the Edit Utility from our
Web site to your computer.
2. Open the downloaded file and f ollow
the on screen instructions t o
complete the installat ion.
3. Start the Edit Utility. T he Main
screen appears.
4. Once the Edit Utility is installed, you
can:
♦ Upload the product data f ile from
the printer to your computer , see
“Uploading the Product Data Fil e”
for more information.
♦ Edit the product data f ile on your
computer, see “Editing the Data
File” for more inf ormation.
♦ Update the product data f ile, see “Updating the Product Dat a File” for more inform ation.
♦ Update the applicatio n, see “Updating the Application ’s Software” for more inform ation.
Creating a New Product Data File
You can use the Edit Utilit y to create a new data file.
1. Start the Edit Utility. The Main screen appea rs.
Using the Edit Utility 6-1

2. Click File, then New. A blank data file appears. T o customize the data file, see “Edit ing the
Data File.”
Configuring the Network Settings
To communicate with the pr inter using Ethernet, ent er your printer’s IP Address withi n the Edit
Utility. See “ Adjusting the Network Settings” in Chapter 3 to view your p rinter’s IP Address.
Entering the Printer’s IP Address in the Edit Utility:
1. Connect the printer to your com puter using an
Ethernet cable.
2. Turn on the printer.
3. Start the Edit Utility.
4. Click Setup, then Network.
5. Enter the printer’s IP addr ess.
6. Click OK.
Specifying the Printer’s Type
The printer is available a s a single printer (left printer only) or dual printer (lef t and right
printer). Specifying the correct printer’s type is impor tant, so features displa y properly in the
Edit Utilit y.
1. Start the Edit Utility.
2. Click Setup, then Printer Type….
3. Select Single Printer or Dual Printer.
4. Click OK.
Enabling Alternate Button Names
The printer can display your pro duct and category buttons in an alternate language. When you
enable alternate butt on names the language togg le button appears.
1. Start the Edit Uti lity.
2. Start a new data file or open your existing one.
3. Click Setup, then Alternate Button Names.
Note: To disable Alternate Butt on Names repeat
steps 1-3.
Specifying the Product Data File Format
The product data file can be f ormatted for 480 product butt ons (5 categories) or 1, 152 product
buttons (6 categories).
6-2 System Administrator’s Guide

Note: The exampl es shown in this document are based on 1, 152 Items.
1. Start the Edit Utility.
2. Click Setup, then Pro duct Data File Format.
3. Select 480 Items (5 categor ies/6 tabs) or 1,152 Items ( 6 categories/12 tabs).
4. Click OK.
Uploading the Product Data File
You can use an Ethernet connect ion to retrieve an existing product data file from t he printer and
save it to your computer . To perform updates using Ethernet, t he Edit Utility’s IP address m ust
match the printer’s IP addr ess.
To make changes to the printer ’s data file with the Edit Uti lity, upload the data f ile to your
computer.
1. Connect the printer to your comput er using an Ethernet cable.
2. Turn on the printer.
3. Start the Edit Utility.
4. Enter the Printer’s IP Address in the Edit Util ity (if you have not already done so) . See
“Entering the Printer’s I P Address in the Edit Utility” f or more information.
5. Click Update, then U pload Product Data.
If you already have a product dat a file open in the Edit Ut ility, you are prompt ed to save
changes. Click either Yes or No.
If you select Yes, enter a file name and click Save. The data file must be saved as a
Unicode text file (.dat) to be loaded into a printer.
If you select No, a message ap pears, “Receiving product data...”
6. Click OK. The product data f ile from the printer is saved as Pr odData.dat.
Using the Edit Utility 6-3

Editing the Data File
Use First
Product
Buttons
Category
Buttons
Tabs
This section tells you ho w to use the Edit Utility to customi ze the tabs, category butt ons, Use
First button, and product buttons.
Button
6-4 System Administrator’s Guide

Editing Categor y Buttons
*Optional Fields
You can change the names of the category buttons, select which format prints for each
category, select which pr inter to use, and name the tabs.
Printer selection is onl y necessary with dual printer versions.
See Appendix A, “Label Format s” for the size and content of each format.
Note: All products in the same cate gory must use the same format .
1. Click the category butt on you want to edit.
*The Alternate Name and
Alternate Tabs fields ar e
shown if you enable Alternat e
Button Names (see “Enabling
Alternate Button Names” on p
5-2 for more information).
Enter the button’s alternat e
name as you want it to appear
when the operator presses
the Language Toggle Button.
2. Enter the Button Name.
3. Select the Label Format f or all products in this categor y.
Note: If you select a format larger than the loaded labels, some inf ormation may not print.
4. Select which printer wi ll print the product labels f or this category. This option does n ot
appear for single print ers or if you have not correct ly specified a dual printer. See
“Specifying the Printer ’s Type” for more information.
Note: If you want the operator t o select which printer (Left or Right) to use when a product
button is pressed, assign a ll categories to the same f ormat (1-8) and the same printer
(left or right).
5. Enter the Use By Description.
6. Enter the Tab Names if neces sary.
7. Click OK when finished.
Using the Edit Utility 6-5

Editing the Use Fi rst Button
USE
*Optional Field
Product
Buttons
The Use First button is cust omizable.
1. Click the Use Fir st button.
*The Alternate Name f ield is shown if you enable Alternate Button Names (see “Enabling
Alternate Button Names” on p 5-2 f or more information). Enter the button’s alternate name as
you want it to appear when the oper ator presses the Language T oggle Button .
2. Enter the Button Name.
3. Enter the Label Data. T his field is printed on labels when t he Use First
button is pressed. If this field is left blank, the def ault text “Use First”
prints on labels. For exam ple:
4. Click OK.
FIRST
07/01/13 2:20 PM
Editing Tabs
Tab names are entered in each c ategory. See “Editing Categ ory Buttons”
for more information.
Creating and Edi ting Product Buttons
1. Click File, then Open… to edit an existi ng data (.dat) file or clic k File, then New to create a
new data file from a blank t emplate.
You see your data file or a blank template.
6-6 System Administrator’s Guide

2. Click a blank button to add a new prod uct or click an existing pr oduct button to edit.
The Button Properties scr een appears. This screen varies de pending on the format
selected for each categ ory. See “Editing Category Buttons” for more information.
3. Enter the Button Name.
4. Enter the Label Data (fo r example: Description 1, Descript ion 2, and Description 3). The
Label Data informatio n prints on the label when the product button is pressed.
If nothing is entered for Description [1], the text entered f or the Button Name is used.
5. Enter the Use By Description. The default is “MUST USE BY.”
6. Set the product’s duration (e xpiration time). See “Sett ing the Options” for mor e information
about expiration times.
7. Enter any other informat ion as necessary.
8. Click OK when finished.
9. Click the Category Butt ons on the right to edit product butt ons within the diff erent categories.
10. Click OK when finished.
11. Click File, then Save to save ch anges. The data file mus t be saved as a Unicode text file
(.dat) to be loaded into a pr inter.
Using the Edit Utility 6-7

Adding Timers
1. Press any empty pr oduct button.
2. Select Timer as the Button Mode.
3. Fill in the Button Name f ield (and Alternate Name if applic able).
4. Fill in the Time Durat ion fields.
5. Press OK.
Updating the Product Data File
You can use an Ethernet connect ion to transfer your data f ile from the computer to your printe r.
To perform updates using Ether net, the Edit Utility’s IP addres s must match the printer ’s IP
address. See “Entering t he Printer’s IP Address in the Edit Ut ility” for more infor mation.
When you are done making changes to the Product Data file, you can download it to the printer .
1. Start the Edit Utility.
2. Open the data file to transf er to the printer.
3. Connect the printer to your comput er using an Ethernet cable.
4. Turn on the printer.
5. Click Update, then Produc t Data. A message appears when the do wnload is complete.
6. Click OK.
Note: If you do not have an Ethernet connect ion, see “Updating your Pr oduct Data File via
USB” for more informat ion.
6-8 System Administrator’s Guide

Updating the Application’s Software
You can use an Ethernet connect ion to update the Applicat ion’s software. To perform updates
using Ethernet, the Edit Uti lity’s IP address must m atch the printer’s IP address.
Download the latest appl ication from our Web site on your comp uter.
Note: Save the file to your computer ’s hard drive, not a network d rive.
1. Start the Edit Utility.
2. Connect the printer to your comp uter using an Ethernet cab le.
3. Turn on the printer.
4. Click Update, then Application Software.
5. Select the 130444 FreshMarxVxx.cab (“xx” indicate s the version number) file you
downloaded from the W eb site.
6. Click Open.
7. The printer enters download m ode. This may take several minut es. A message appears
when the download is comp lete.
8. Click OK.
The printer restarts automatically and loads the latest appl ication.
Note: If you do not have an Ethernet connect ion, see “Updating your A pplication’s Software
via USB” for more info rmation.
Using the Edit Utility 6-9


UPDATING THE PRINTER
7
This chapter tells you ho w to
♦ update the product data f ile.
♦ update the application sof tware.
Updating Your Product Data File via USB
You can use a USB Flash Drive to trans fer your updated product data file from your PC to your
printer. Save your data f ile in the root directory on a USB Flash Drive.
1. Plug the USB Flash Drive into t he USB port on the side of the pr inter.
2. Press the Tools button.
3. Press Admin.
4. Enter the Admin password then pres s Enter. The default pas sword is 1234.
Updating the Printer 7-1

5. Press USB Update.
6. Press Update Product Data to update t he data files.
If you have more than one Product Dat a file stored on your USB Flash Drive, select the
file you want to install t hen press OK.
7. A message appears when the file is loaded. Press OK to continue.
8. Remove the USB Flash Drive.
Updating Your Application Software via USB
You can use a USB Flash Drive to trans fer updated Application Sof tware from your PC to your
printer. Save the latest application in the root direct ory of a USB Flash Drive.
1. Turn on the printer.
2. Plug the USB Flash Drive into t he USB port on the side of the pr inter.
7-2 System Administrator’s Guide

3. Press the Tools button.
4. Press Admin.
5. Enter the Admin password then pre ss Enter. The default pass word is 1234.
6. Press USB Update.
7. Press Update Application Software.
If you have more than one Applic ation Software file stored on your USB Flash Drive,
select the file you want to inst all then press OK.
This may take several minut es. When the update is complete, t he printer restarts.
8. Remove the USB Flash Drive.
Updating the Printer via FTP
You can use FTP to update your print er’s Product Data File an d Application Software. T he 9417
printer uses industry stan dard TCP/IP protocols.
Your host computer must have FTP cl ient software installed.
The default username f or the 9417 printer is “ad9415”. The default password is “monarch”.
Updating the Printer 7-3

7-4 System Administrator’s Guide

PERFORMING MAINTENANCE
8
This chapter tells you ho w to
♦ print diagnostic label s.
♦ copy a product data file to USB.
♦ calibrate the touch scr een.
♦ reset the printer.
Printing Diagnostic Labels
Several diagnostic labels ar e available: Version Inf ormation, Network I nformation, Gray Scale,
and Checkerboard.
To print any of the diagnost ic labels:
1. Press the Tools button.
2. Press Admin.
3. Enter the Admin password and press Enter. The default pass word is 1234.
4. Press Maintenance.
5. Press Diagnostic Labels.
Note: On a Dual Printer,
Press the Left or Right
toggle button to select
which printer to use.
Performing Maintenance 8-1

Sample Sample with voids
Version Informa tion
The Version Informat ion label shows the model number and app lication part number al ong with
version numbers for the applicat ion, core, print engine and main board.
Press The following label pri nts:
Version Informat ion
Network Informa tion
The Network Information labe ls shows the method for obtaini ng an IP address, the IP address,
Subnet mask, Gateway addre ss, and MAC address.
Press The following label pri nts:
Network Information
Gray Scale
The gray scale test checks the uniformity of the printing . The printed sample should be
uniformly gray across the s upply. If you see voids, keep the sam ple and call Service.
Press The following label pri nts:
Gray Sca le
8-2 System Administrator’s Guide

Checkerboard
Prints a label to verify that t he printhead strobes are wor king. If the printed sample h as fewer
lines or no lines, keep the sam ple and call Service.
Press The following label pri nts:
Checkerboard
Copying the Data File to a USB Flash Drive
You can copy the Product Data Fi le from the printer to a USB
Flash Drive.
1. Insert a USB Flash Drive into t he port on the side of the
printer.
2. Press the Tools button.
3. Press Admin.
4. Enter the Admin password and press Enter. The default pass word is 1234.
5. Press Maintenance.
6. Press Copy to USB.
7. Press OK.
Performing Maintenance 8-3

Calibrating the Supply
You can calibrate the suppl y if your printer skips labels or prints off the label.
1. Press the Tools button.
2. Press Admin.
3. Enter the Admin password and press Enter. The default pass word is 1234.
4. Press Maintenance.
5. Press Calibrate Supply.
6. Load supply then press Calibr ate Left Supply or Calibrate Ri ght Supply for the print er you
want to use. The printer f eeds a few labels.
7. Press Return.
8-4 System Administrator’s Guide

Calibrating the Sensor
You need to calibrate the sensor if your printer sk ips label s or prints off the labe l.
1. Press the Tools button.
2. Press Admin.
3. Enter the Admin password and press Enter. The default pass word is 1234.
4. Press Maintenance.
5. Press Calibrate Sensor.
6. Follow the on-screen instru ctions to properly load suppl y for sensor calibration.
Performing Maintenance 8-5

7. Press Calibrate Left Sensor or Calibrat e Right Sensor.
Press and hold for 3 seconds
Note: A popup message appears to tell you if the calibration was succ essful. If calibration
failed, make sure tha t only the liner is in the supply path and t ry the calibration again.
8. Press Ok.
Calibrating the Touch Screen
Calibrate the touch screen so the buttons respond correctl y when pressed. You are promp ted to
do this the first time you tur n the printer on after receiving it and after you update the print er’s
Application Software. Follow the onscreen instructions to calibrate the
touch screen. The applicatio n runs
automatically when you are finished.
Note: Be sure that you only touch the
screen in the center of t he
crosshair and that nothing
touches any other part of the
screen during calibrat ion.
You can also calibrate the t ouch screen if it does not correct ly respond to touch.
Use a paperclip to press and hold t he button shown. Then follow the o n-screen instructions to
calibrate the touch scr een
8-6 System Administrator’s Guide

Performing a Factory Reset
Use Factory Reset to delete all d ata files from the printer . Data files include the pro duct button
information, passwor d, and printer configurat ion settings.
It may be necessary to delete dat a files when there are err ors in the current data f iles.
Note: Before deleting the printer ’s data files, you may want t o upload the Product Data file t o
your computer or to a USB Flash Dr ive to save the product butto n information. See
“Uploading the Product Data Fil e” or “Copying a Data File to a USB Flash Dr ive” for
more information.
1. Press the Tools button.
2. Press Admin.
3. Enter the Admin password and press Enter. The default pass word is 1234.
4. Press Maintenance.
5. Press Factory Reset. A warning messag e appears.
6. Press Yes to delete all data f iles. T he printer deletes all data f iles and loads the default
data files. The printer restarts. Press No to cancel.
Note: All data files are delet ed when you select Yes; they cannot be r ecovered. You cannot
select a specific f ile to delete.
Performing Maintenance 8-7


LABEL FORMATS
Field
Description
A
This appendix shows a sample of each label format.
Note: If an asterisk (*) print s after the time or date, the labe l was reprinted using the
original expiration tim e or date. See “Setting the Manager O ptions” for more
information.
Format 1
Prints 1.2” wide x 1.1” long labels.
Enter the following infor mation for each field:
Descriptio n 1
Descriptio n 2
Descriptio n 3
EMPL
Must Use By
Note: The employee ID number does not print if Employee Login is not enab led.
Prints up t o 17 charac ters.
Prints up t o 17 charac ters.
Prints up t o 17 charac ters.
Employee ID must be 2 -10 characters .
Numbers onl y. Days 0-365, hours 0-23, min utes 0-59.
Format 2
Prints 2.2” wide x 1.1” long labels.
Enter the following infor mation for each field:
Field Description
Descriptio n 1
Descriptio n 2
EMPL
Must Use By
Note: The employee ID number does not print if Employee Login is not enab led.
Prints up t o 35 charac ters.
Prints up t o 35 charac ters.
Employee ID must be 2 -10 characters .
Numbers onl y. Days 0-365, hours 0-23, min utes 0-59.
Label Formats A-1

Format 3
Field
Description
Prints up t o 25 charac ters.
Prints 2.2” wide x 1.5” long labels.
Enter the following infor mation for each field:
Descriptio n 1
Descriptio n 2
EMPL
Must Use By
Prints up t o 25 charac ters.
Employee ID must be 2 -10 characters .
Numbers onl y. Days 0-365, hours 0-23, min utes 0-59.
Note: The employee ID number does not print if Employee Login is not ena bled.
A-2 System Administrator’s Guide

Format 4
Indicates the
Prints 2.2” wide x 2.0” long labels.
Note: Arrows point to the block that corresponds to the day-of-week expiration date while
diagonal lines print thr ough the color-coded boxes that do not apply.
day-of-week expi ration
Enter the following infor mation for each field:
Field Description
Descriptio n 1
Descriptio n 2
EMPL
Must Use By
Blue
Yellow
Red
Brown
Green
Orange
Black
Prints up to 15 characters.
Prints up t o 15 charac ters
Employee ID must be 2 -10 characters .
Numbers onl y. Days 0-365, hours 0-23, min utes 0-59.
Use by Monda y.
Use by T ues da y.
Use by W ednesda y.
Use by T hur sda y.
Use by Fr ida y.
Use by Saturda y.
Use by Sunday.
Note: The employee ID number does not print if Employee Login is not enabled.
Label Formats A-3

Format 5
Field
Description
Prints 2.2” wide by 3.0” long labels.
Enter the following infor mation for each field:
Description
Shelf Life
EMPL
Must Use By
Prints up t o 16 charac ters.
Prints up t o 13 charac ters.
Employee ID must be 2 -10 characters .
Numbers onl y. Days 0-365, hours 0-23, min utes 0-59.
Note: The employee ID number does not print if Employee Login is not enab led.
A-4 System Administrator’s Guide

Format 6
Field
Description
Prints 2.2” wide x 4.0” long labels.
Enter the following infor mation for each field:
Store Name
Description 1
Descriptio n 2
Descriptio n 3
Ingredients
Must Use By
Net Weight
Price
Prints up t o 17 charac ters.
Prints up t o 23 charac ters.
Prints up t o 23 charac ters.
Prints up t o 23 charac ters.
Prints up t o 875 charac ters.
Note: Does n ot print se micolons or returns.
Prints the date in MM/ DD/YY form at.
Prints up t o 8 charact ers.
Prints up t o 7 charact ers: number s 0-9, period and dollar,
cents, Euro, pound, and yen signs only.
Label Formats A-5

Format 7
Prints 2.2” wide x 3.0” long labels.
Enter the following infor mation for each field:
Field Description
Descriptio n 1
Serving Si ze
Servings Per Container
Calories
Fat Calories
Total Fat (g & %)
Saturated F at (g & %)
Trans Fat
Cholesterol (mg & %)
Sodium (mg & %)
Total Carbs (g & %)
Dietary Fiber (g & %)
Sugars (g)
Protein (g)
Vitamin A ( %)
Vitamin C (% )
Iron (%)
Calcium (%)
Prints up t o 23 charac ters.
Prints up t o 25 charac ters.
Prints up t o 10 charac ters.
Prints up t o 6 charact ers: number s 0-9 and per iod only.
Prints up t o 6 charact ers: number s 0-9 and period onl y.
Prints up t o 6 charact ers: number s 0-9 and per iod only.
Prints up t o 6 charact ers: number s 0-9 and per iod only.
Prints up t o 6 charact ers: number s 0-9 and per iod only.
Prints up t o 6 charact ers: number s 0-9 and per iod only.
Prints up t o 6 charact ers: number s 0-9 and per iod only.
Prints up t o 6 charact ers: number s 0-9 and per iod only.
Prints up to 6 charac ters: num bers 0-9 and per iod only.
Prints up t o 6 charact ers: number s 0-9 and per iod only.
Prints up t o 6 charact ers: number s 0-9 and per iod only.
Prints up t o 6 charact ers: number s 0-9 and period only.
Prints up t o 6 charact ers: number s 0-9 and per iod only.
Prints up t o 6 charact ers: number s 0-9 and per iod only.
Prints up t o 6 charact ers: number s 0-9 and per iod only.
A-6 System Administrator’s Guide

Format 8
Field
Description
Indicates the
Prints 1.2” wide x 1.1” long labels.
Note: Arrows point to the block that corresponds to the day-of-week expiration date while
diagonal lines print thr ough the color-coded boxes that do not apply.
day-of-week expi ration
Enter the following infor mation for each field:
Descriptio n 1
Descriptio n 2
Descriptio n 3
EMPL
Must Use By
Blue
Yellow
Red
Brown
Green
Orange
Black
Prints up t o 17 charac ters.
Prints up t o 17 charac ters.
Prints up t o 17 charac ters.
Employee ID must be 2 -10 characters .
Numbers onl y. Days 0-365, hours 0-23, min utes 0-59.
Use by Monda y.
Use by T ues da y.
Use by W ednesda y.
Use by T hur sda y.
Use by Fr ida y.
Use by Saturda y.
Use by Sunday.
Note: The employee ID number does not print if Employee Login is not enab led.
Label Formats A-7

Avery Dennison
170 Monarch Lane
Miamisburg, OH 45342
1-800-543-6650 U.S.A
1-800-367-4740 Canada
www.monarch.averydennison.com
©2013 Avery Dennison Corp. All rights reserved.
 Loading...