

Page 1

RS; Reviewed:
SPOC 12/7/2010
Solution & Interoperability Test Lab Application Notes
©2010 Avaya Inc. All Rights Reserved.
1 of 44
ITEL_BCM60
These Application Notes describe the configuration steps required for the ITEL Reporting for
Contact Center v5.0.450.2 and the Avaya Intelligent Contact Center software to successfully
interoperate with Avaya Business Communication Manager (BCM) Release 6.0.
ITEL Reporting for Contact Center 5.0 uses the XML Contact Center Reporting Interface
(XML stream, logs into Avaya BCM Release 6.0, and retrieves all of the data that is
currently in the BCM). It is a Contact Center application which gathers real time data and
historical statistical data from the BCM Intelligent Contact Center (ICC) and uses these two
data sources to populate real time screens and create historical reports.
Information in these Application Notes has been obtained through DevConnect compliance
testing and additional technical discussions. Testing was conducted via the DevConnect
Program at the Avaya Solution and Interoperability Test Lab.
Avaya Solution & Interoperability Test Lab
Application Notes for ITEL Reporting for Contact Center
v5.0.450.2 with Avaya Business Communication Manager,
Release 6.0 – Issue 1.0
Abstract
Page 2

RS; Reviewed:
SPOC 12/7/2010
Solution & Interoperability Test Lab Application Notes
©2010 Avaya Inc. All Rights Reserved.
2 of 44
ITEL_BCM60
1. Introduction
The objective of this interoperability compliance testing is to verify that the ITEL Reporting for
Contact Center (RCC) v5.0.450.2 software can parse data that is currently in the Business
Communication Manager (BCM), write the data to its own database and then use the data to
populate the reports.
1.1. Interoperability Compliance Testing
The focus of the compliance testing was primarily on verifying whether the ITEL RCC v5.0.450.2
software can establish an HTTP/HTTPs session with Avaya BCM release 6.0, retrieve all data
from the BCM, and populate the data to the real time screens and create historical reports.
1.2. Support
Technical support for ITEL can be obtained by contacting ITEL via email at support@itel-
business-solutions.com or by calling +44 (0) 1244 670200.
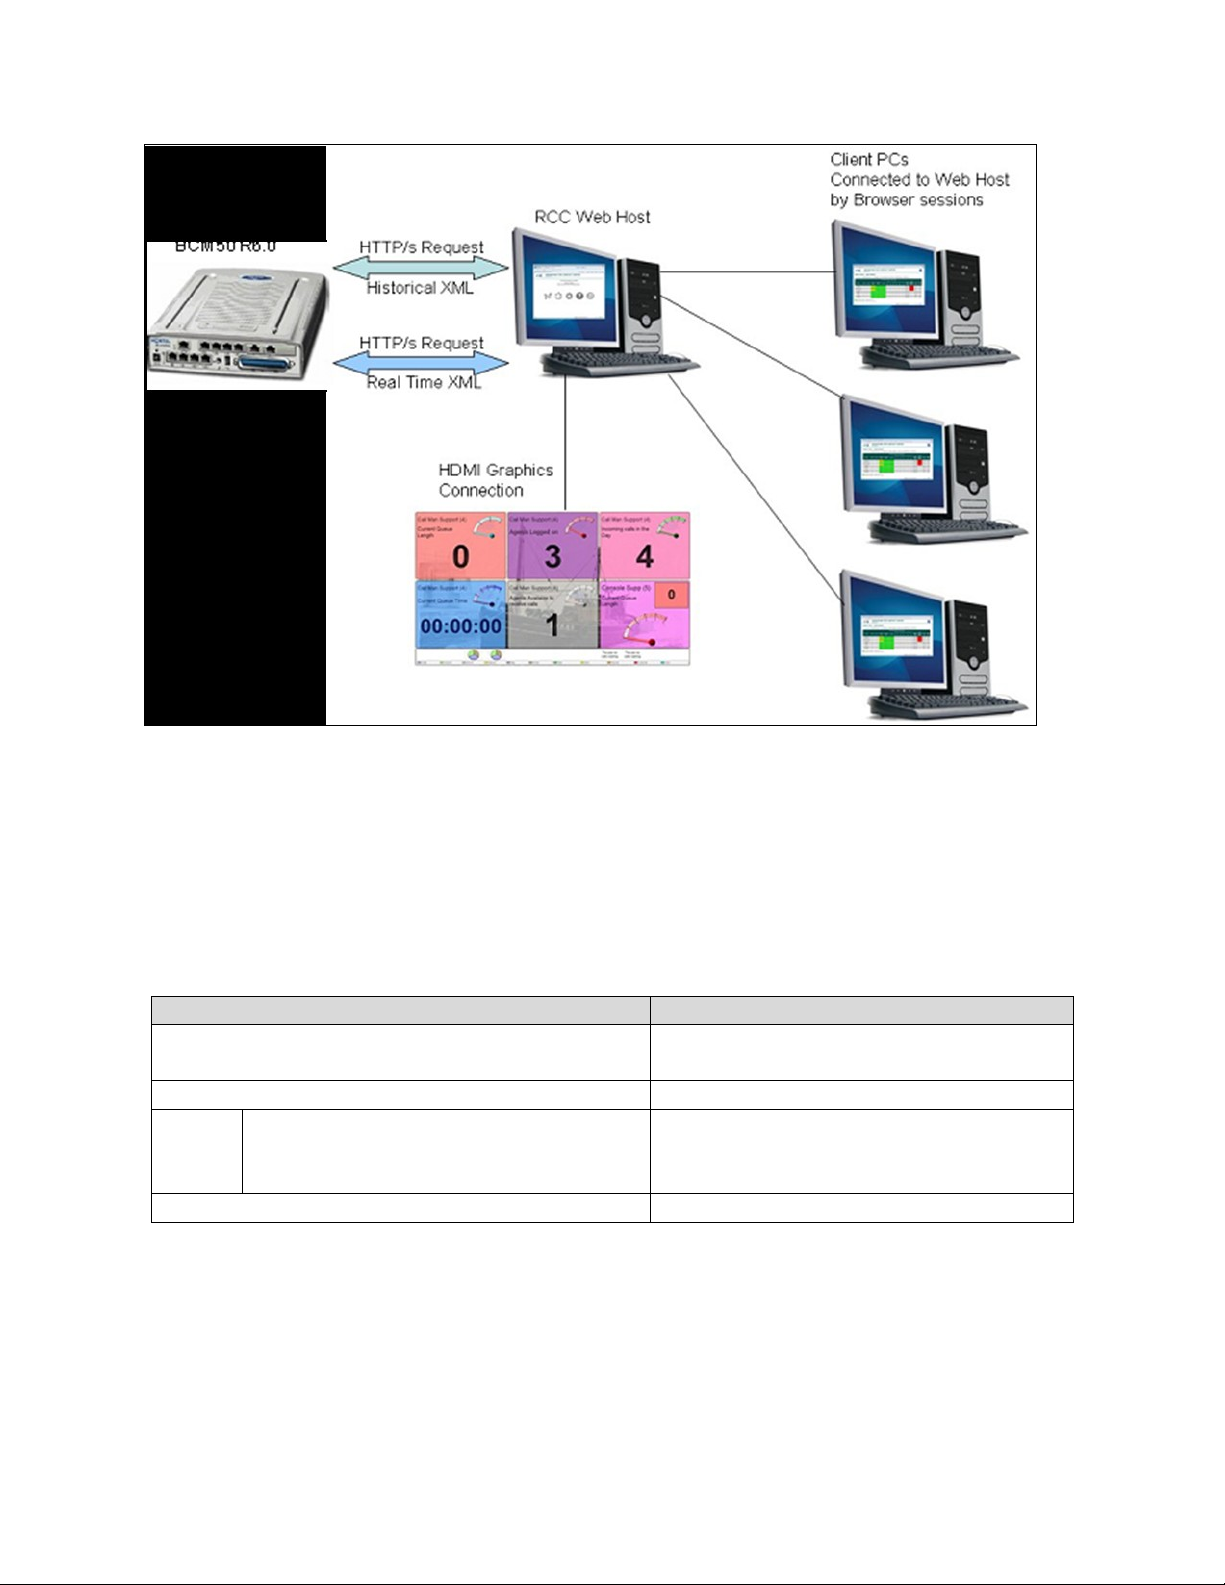
2. Reference Configuration
Figure 1 illustrates the test configuration used during the compliant testing event between the
BCM rel. 6.0 and the ITEL RCC v5.0.450.2.
Page 3
RS; Reviewed:
SPOC 12/7/2010
Solution & Interoperability Test Lab Application Notes
©2010 Avaya Inc. All Rights Reserved.
3 of 44
ITEL_BCM60
Equipment
Software/Firmware
Avaya BCM50r5
System software version : 10.0.1.02.115
SW Version : Avaya BCM50 Release 6
Avaya Telephones
I2007 (IP) – Used as agents on BCM
2004P2 (IP) – Used to call into the
BCM agent sets.
0621C7G
0602B76
ITEL RCC
v5.0.450.2
Figure 1: Test Bed Connection Diagram for RCC
3. Equipment and Software Validated
BCM rel.6.0 with the XML Contact Center Reporting Interface enabled (key coded).
Page 4
RS; Reviewed:
SPOC 12/7/2010
Solution & Interoperability Test Lab Application Notes
©2010 Avaya Inc. All Rights Reserved.
4 of 44
ITEL_BCM60
4. Configure on BCM
This section describes the steps to configure the BCM for the RCC.
4.1. Configure Line and Agent
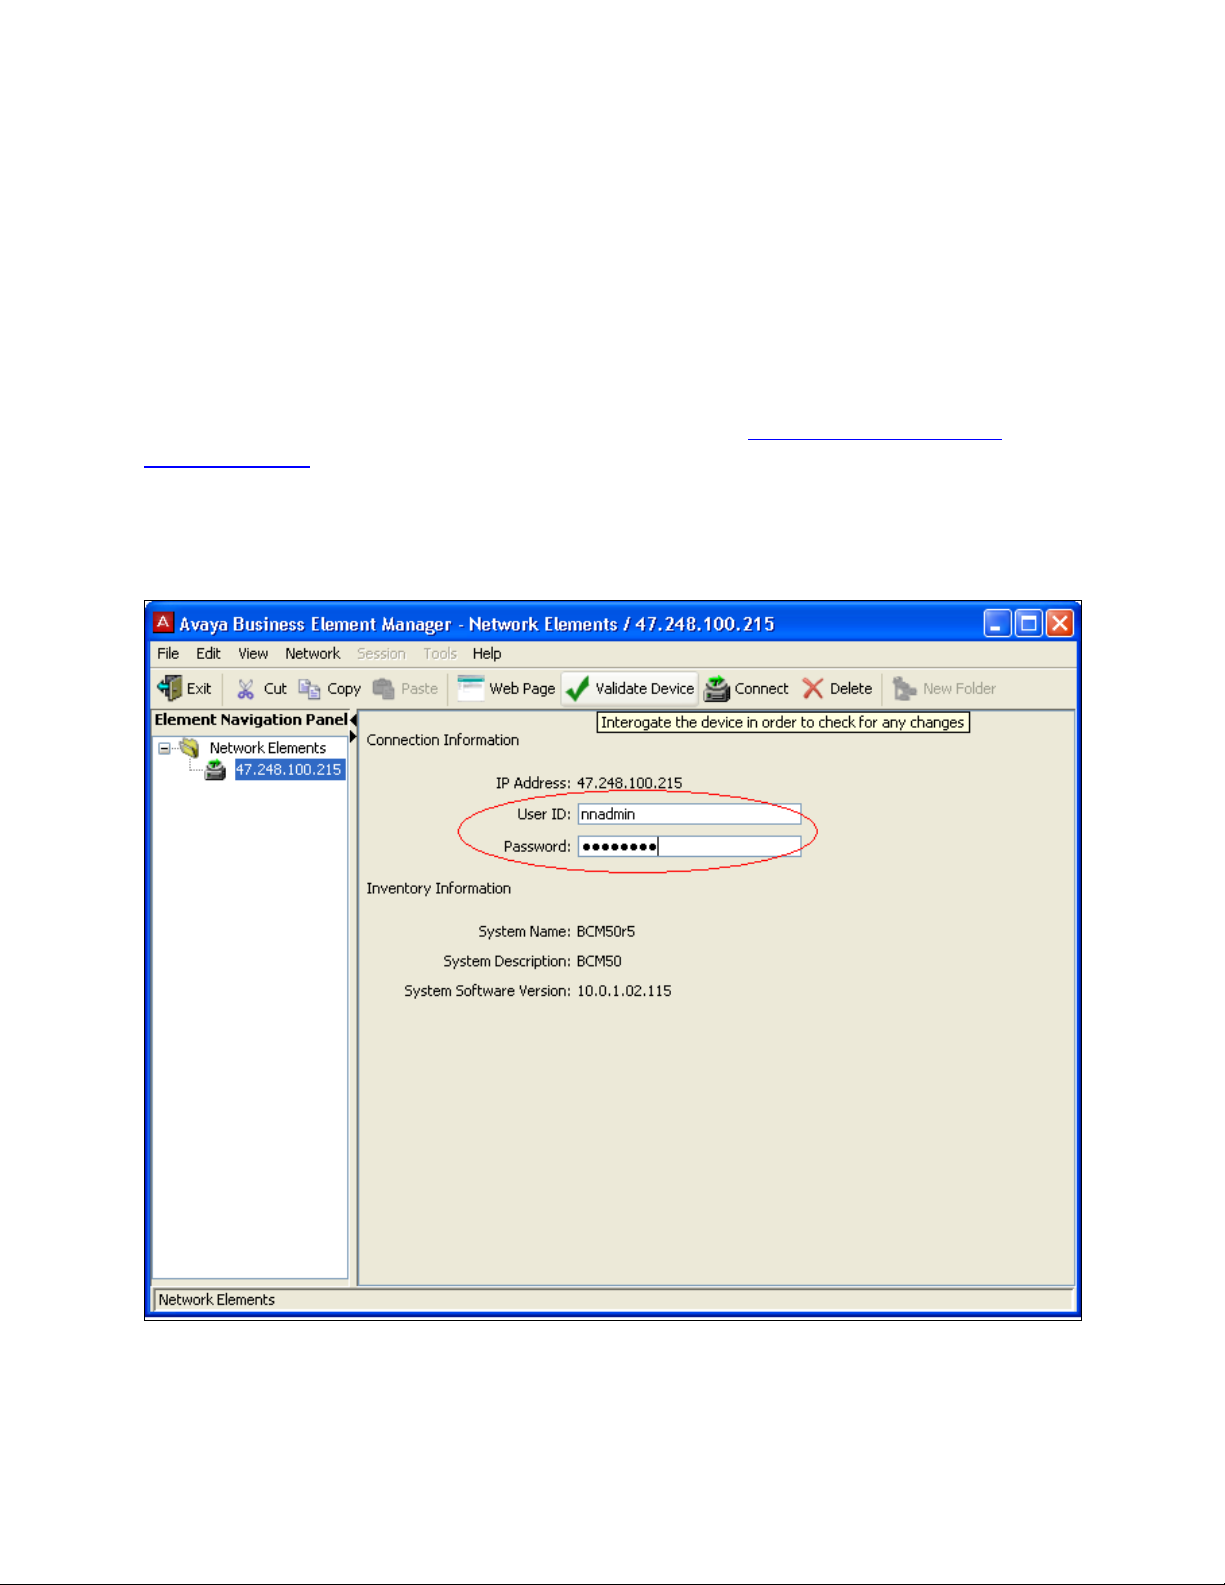
The BCM configurations for RCC can be performed through Business Element Management
only. The configuration procedure is provided below.
- Download Business Element Manager (BEM) software from https://IP Address of BCM
Server/index.htm and install it on a Windows PC.
- Double-click the BEM icon installed to launch Business Element Manager as shown on Figure
2 below.
- Enter a valid User ID and Password.
Figure 2: Login Screen
Page 5
RS; Reviewed:
SPOC 12/7/2010
Solution & Interoperability Test Lab Application Notes
©2010 Avaya Inc. All Rights Reserved.
5 of 44
ITEL_BCM60
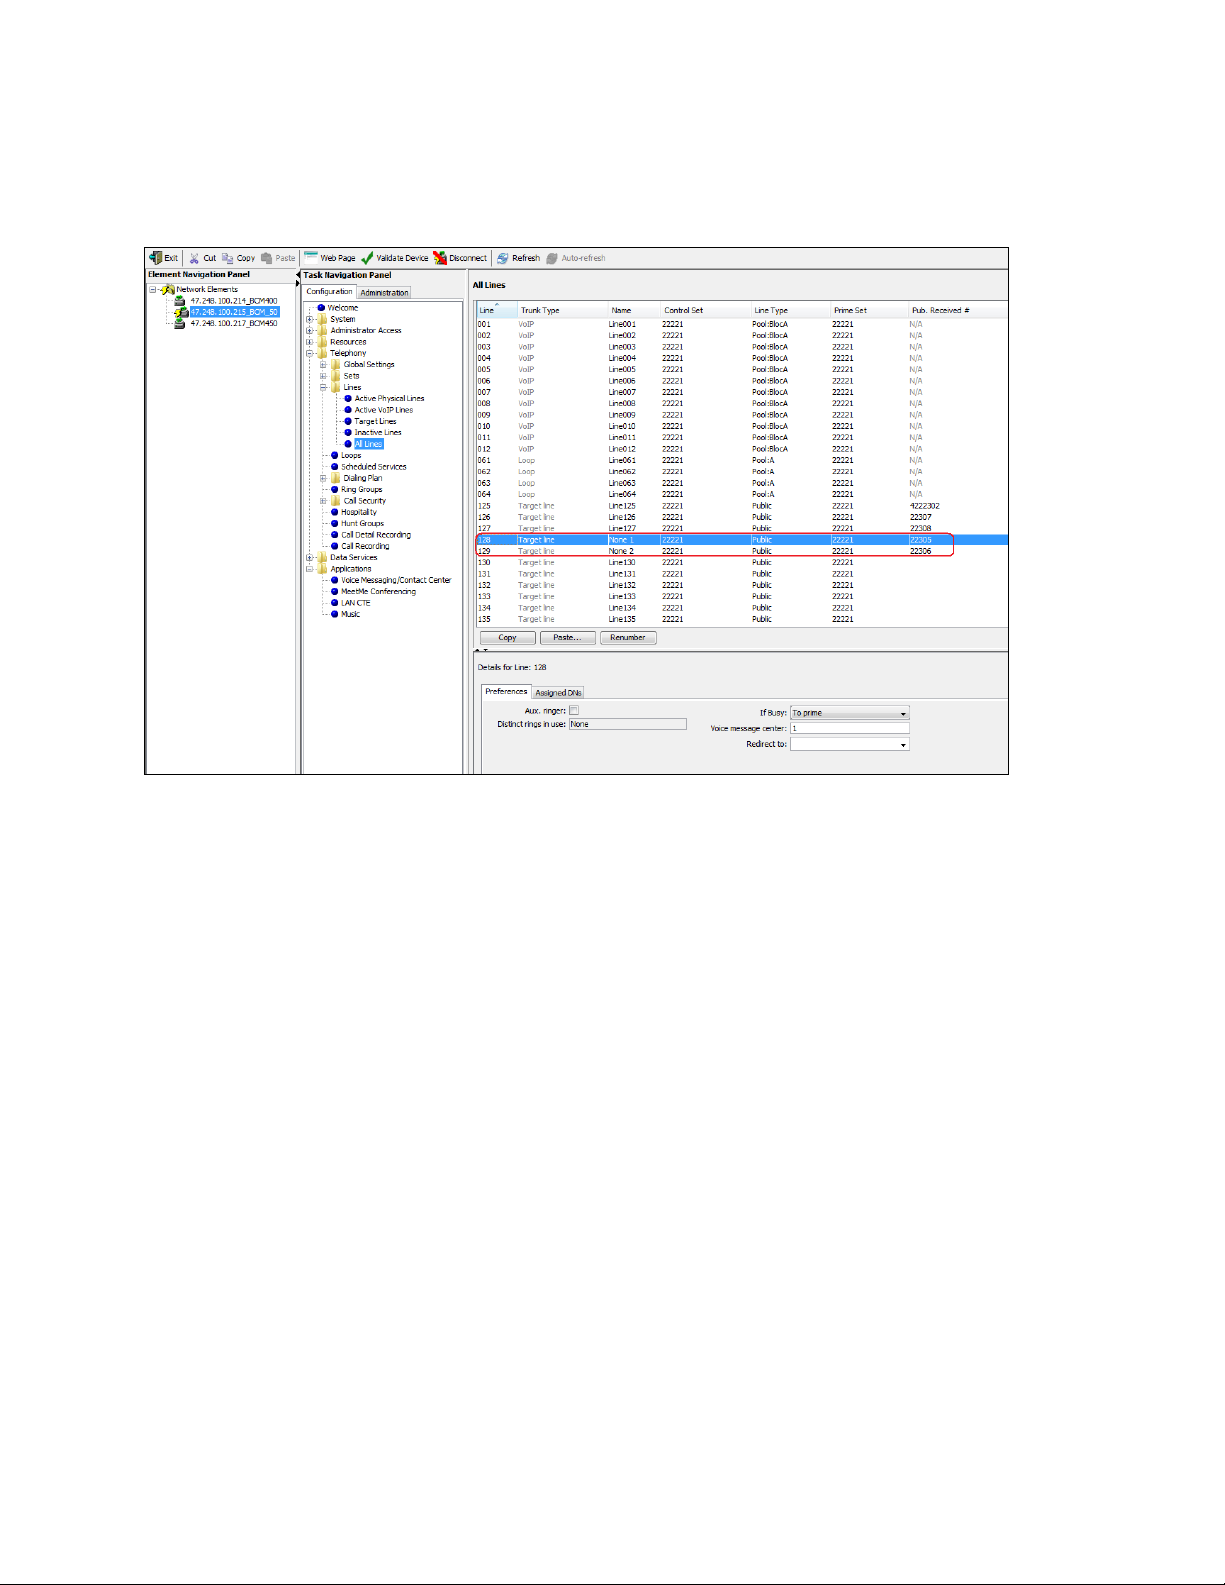
To configure a line, navigate to Telephony > Lines > All Lines from the Configuration tab as
shown in Figure 3 below, select a line that is available, one line corresponds to one Directory
Number (DN).
Figure 3: Line Configuration
As shown in Figure 3, for example, line 128 is known as the target line. The DN 22305 is
known as the public received number. Line 128 corresponds to DN 22305. When a user dials
DN 22305, line 128 will ring.
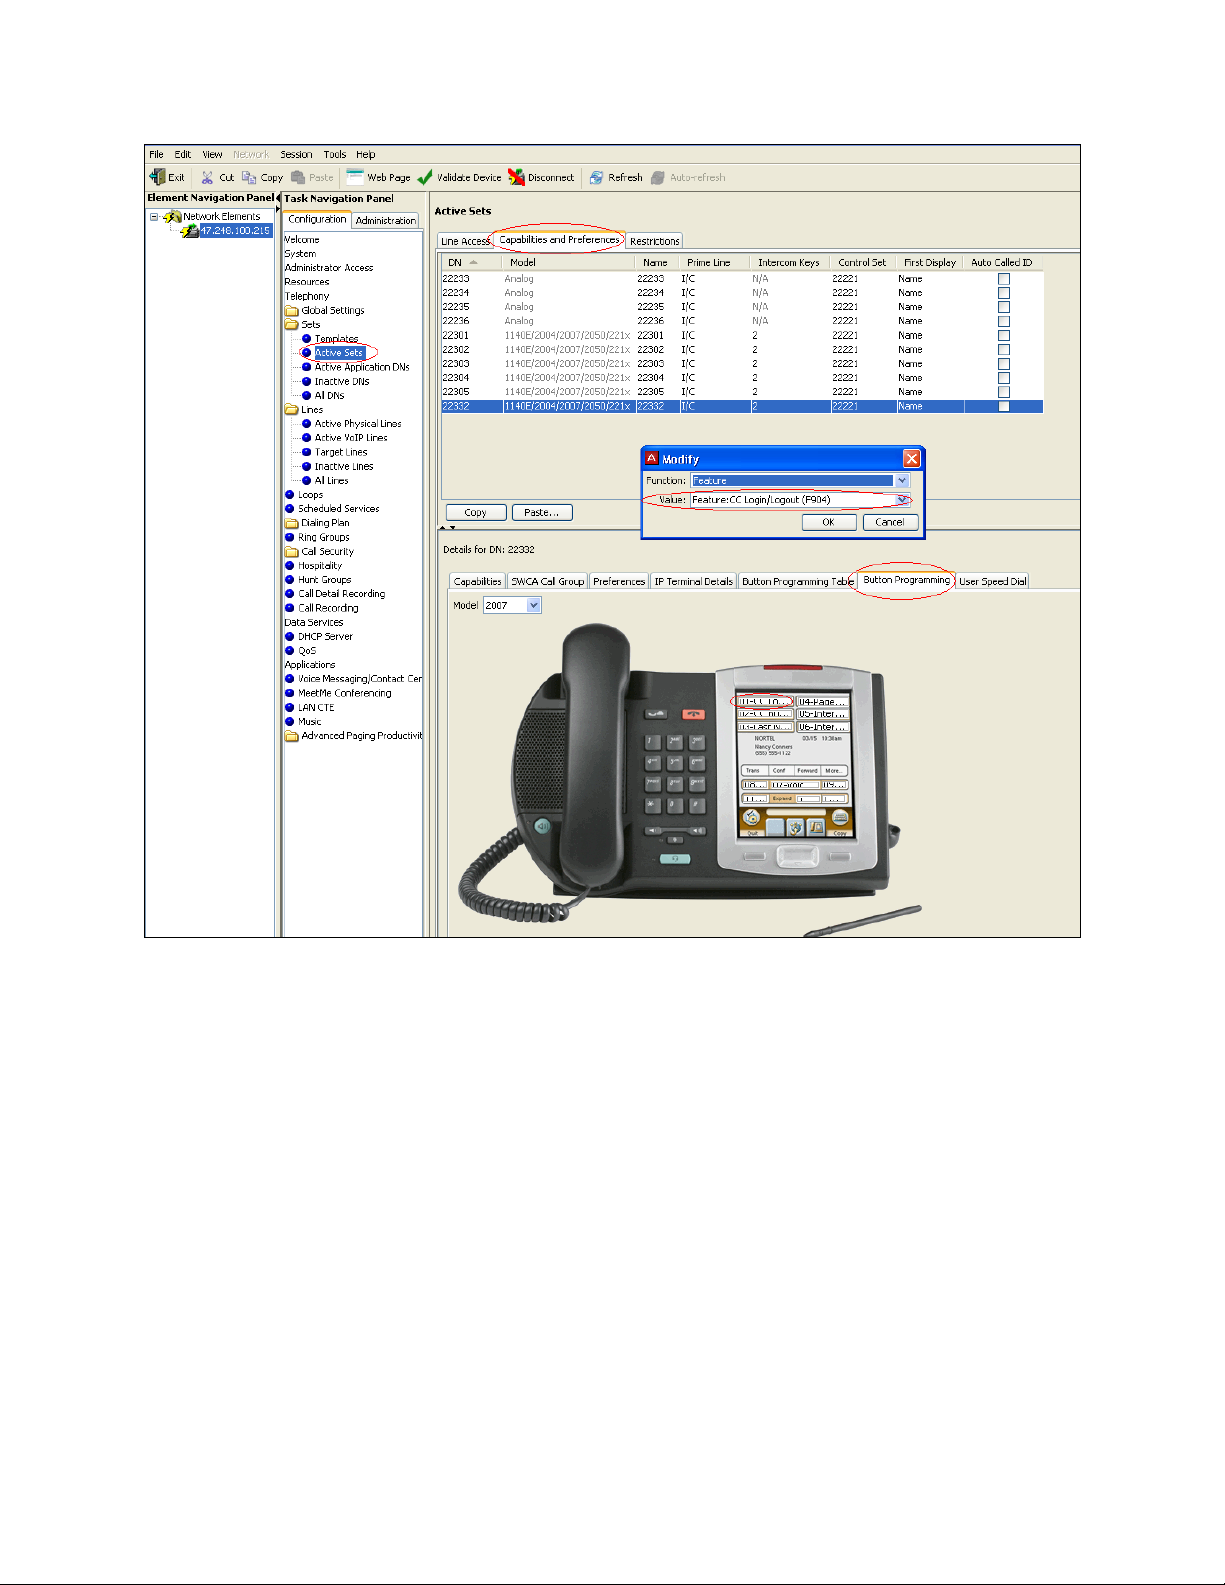
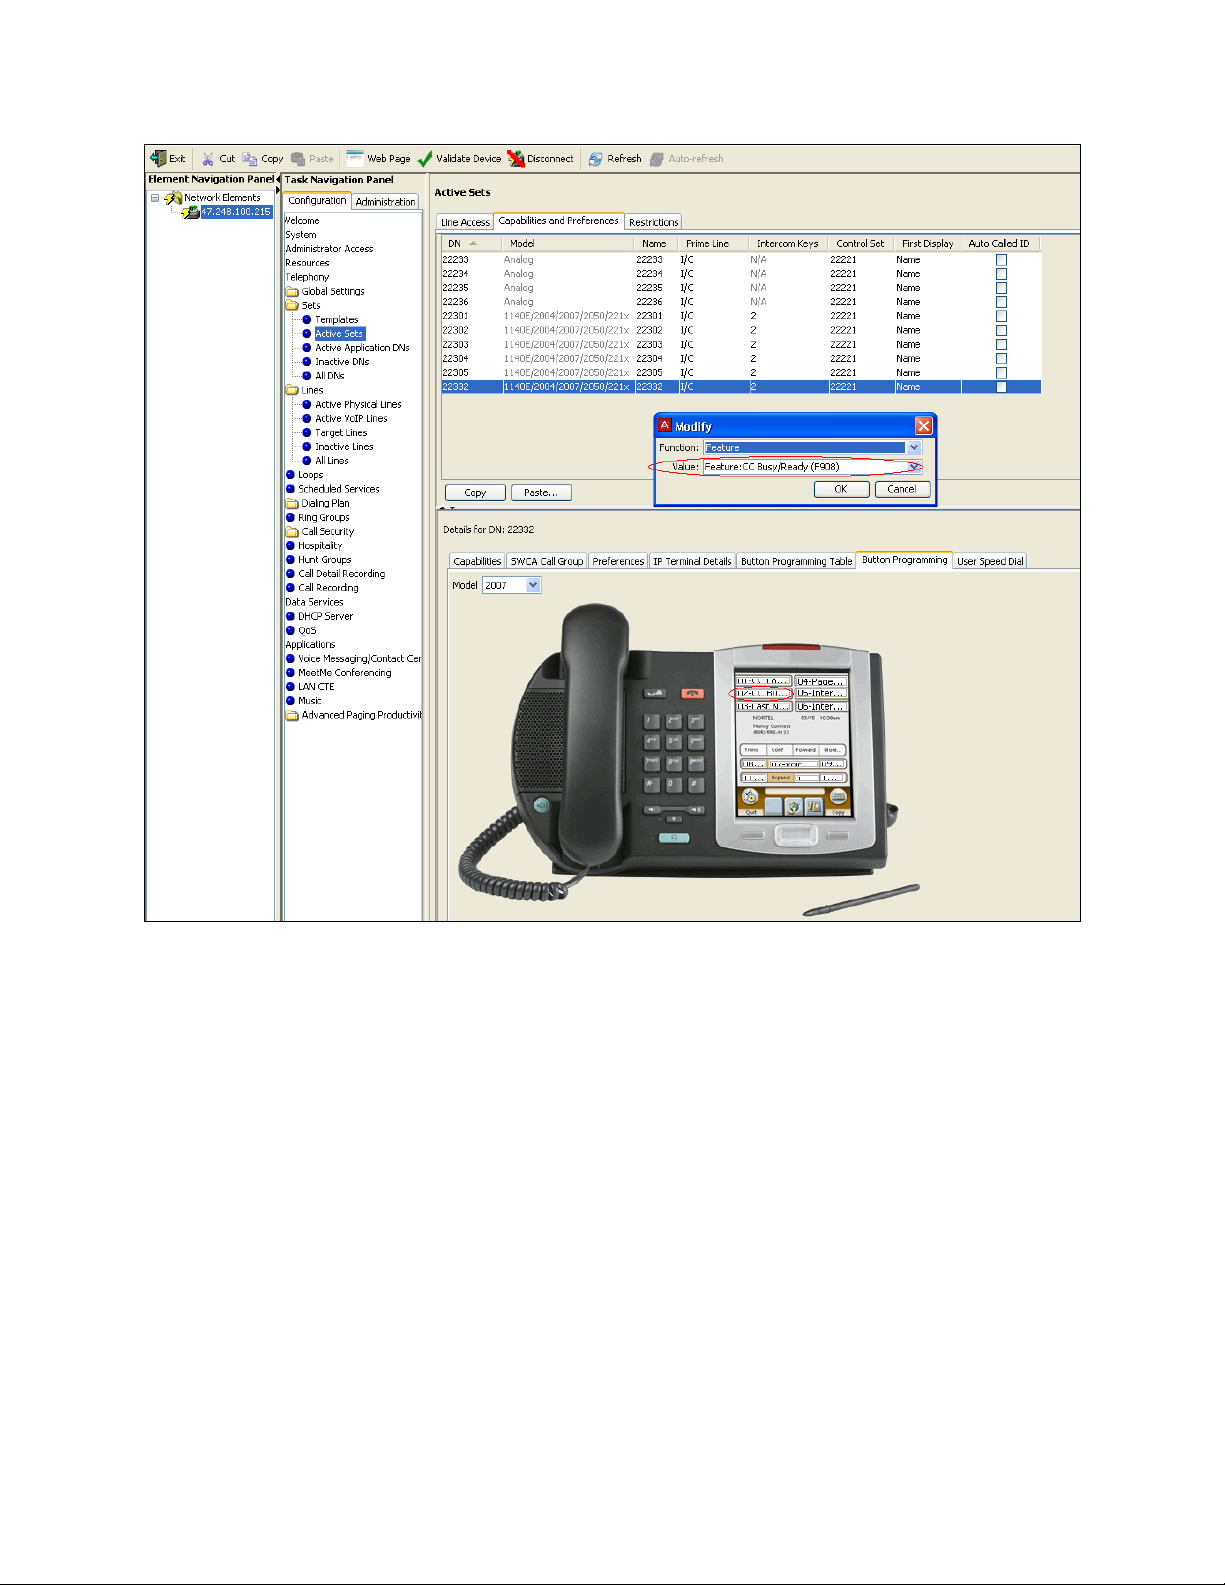
Go to the Configuration tab and then navigate to Telephony >Sets > Active Sets, select one
DN to configure a set as an agent.
- Select the Capabilities and Preference tab (as shown on Figure 4).
- Select a DN and then access the Button Programming tab for that DN.
- Select Key 1 from the phone screenshot demo.
- Select “Feature: CC Login/Logout (F904)” from the Value drop-down menu in
the dialog box and click on the OK button to complete.
- Do the same for Key 2 from the phone screenshot demo with dialog box of
Value as “Feature: CC Busy/Ready (F908)” as show on Figure 5.
Page 6
RS; Reviewed:
SPOC 12/7/2010
Solution & Interoperability Test Lab Application Notes
©2010 Avaya Inc. All Rights Reserved.
6 of 44
ITEL_BCM60
Figure 4: Active Sets – Feature CC Login/Logout
Page 7
RS; Reviewed:
SPOC 12/7/2010
Solution & Interoperability Test Lab Application Notes
©2010 Avaya Inc. All Rights Reserved.
7 of 44
ITEL_BCM60
Figure 5: Active Sets – Feature CC Busy Ready
Page 8
RS; Reviewed:
SPOC 12/7/2010
Solution & Interoperability Test Lab Application Notes
©2010 Avaya Inc. All Rights Reserved.
8 of 44
ITEL_BCM60
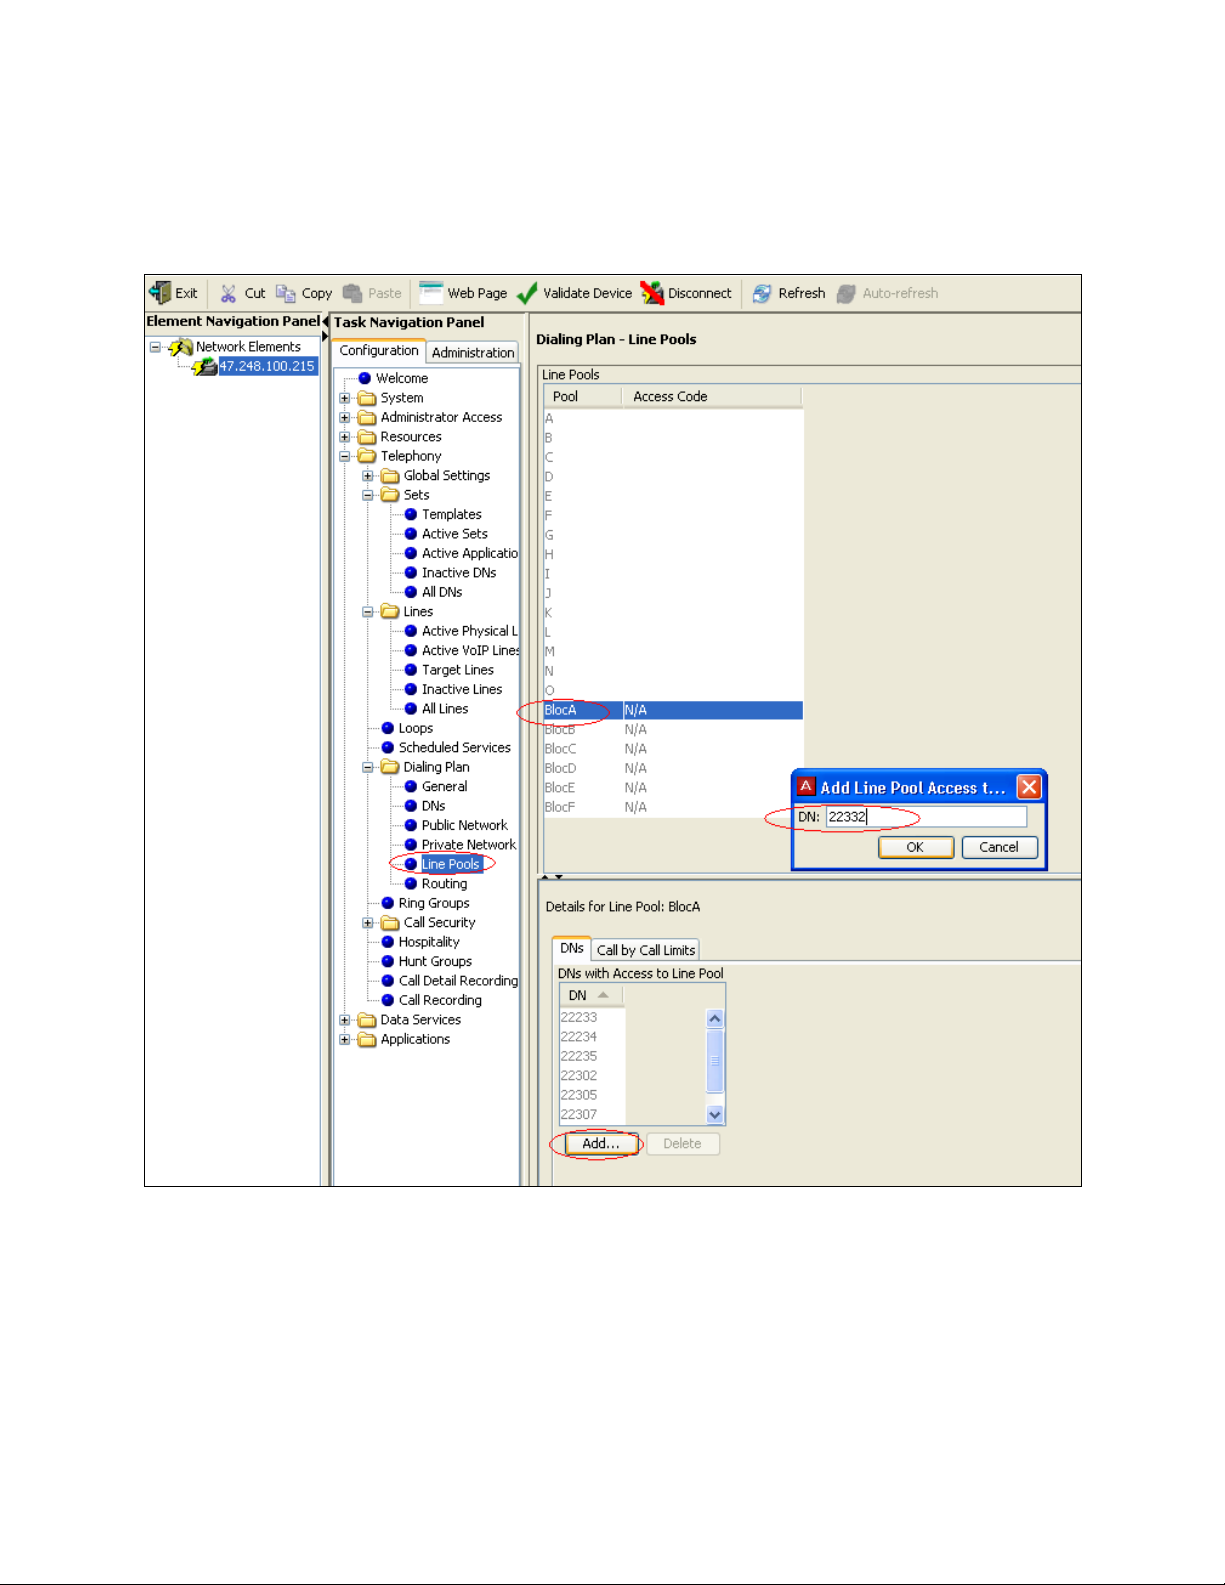
The Line Pool access has to be provided to the agent set to make outgoing calls. To configure
Line Pool access, go to the Configuration tab, navigate to Telephony > Dialing Plan > Line
Pools. Select BlocA and click on the Add button to add a DN to the Line Pool Access as
shown in Figure 6.
Figure 6: Line Pool Access
Page 9
RS; Reviewed:
SPOC 12/7/2010
Solution & Interoperability Test Lab Application Notes
©2010 Avaya Inc. All Rights Reserved.
9 of 44
ITEL_BCM60
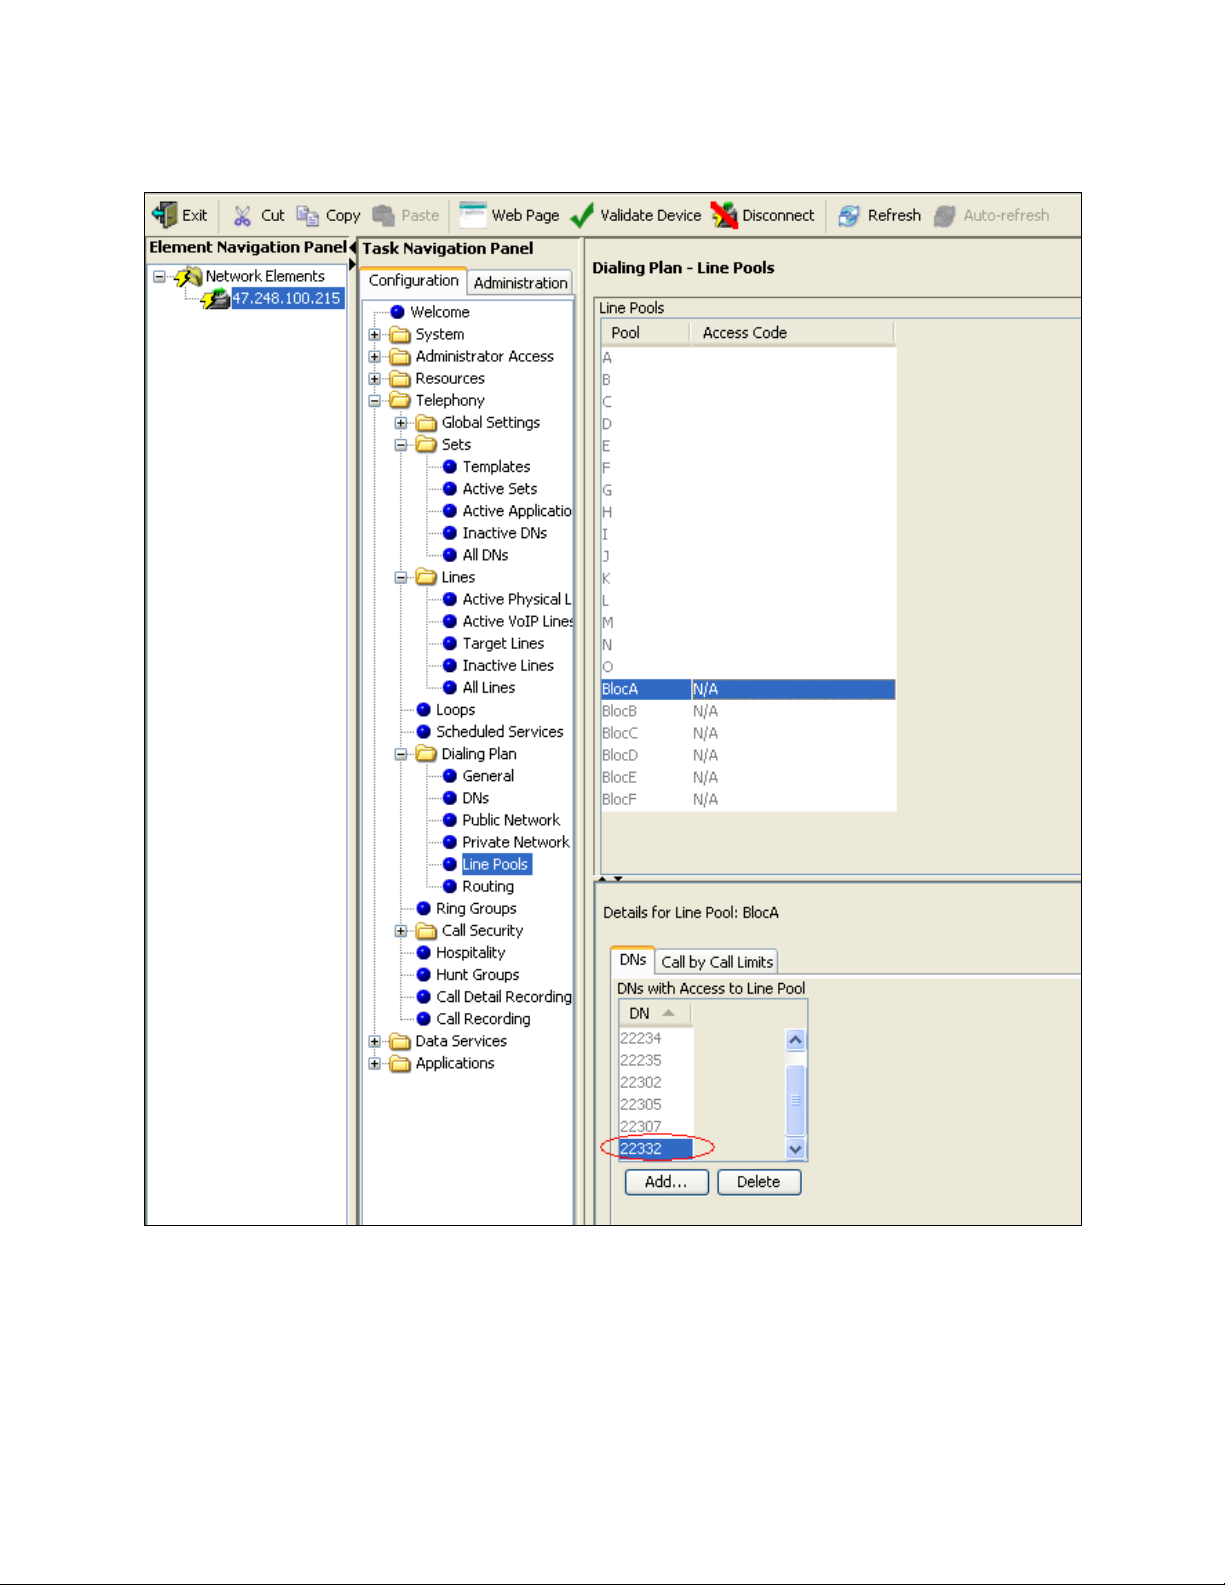
Figure 7 shows the added DN in the BlocA Line Pool.
Figure 7: Line Pool Added
Page 10
RS; Reviewed:
SPOC 12/7/2010
Solution & Interoperability Test Lab Application Notes
©2010 Avaya Inc. All Rights Reserved.
10 of 44
ITEL_BCM60
4.2. Configure Contact Center Reporting Data stream
After launching the Business Element Manager as shown in Figure 2, follow the steps below to
launch the Contact Center on the BEM:
- From the Task Navigation Panel as shown in Figure 3, under the Configuration
tab, Navigate to Applications > Voice Messaging/Contact Center.
- Click on the Launch CallPilot Manager (not shown).
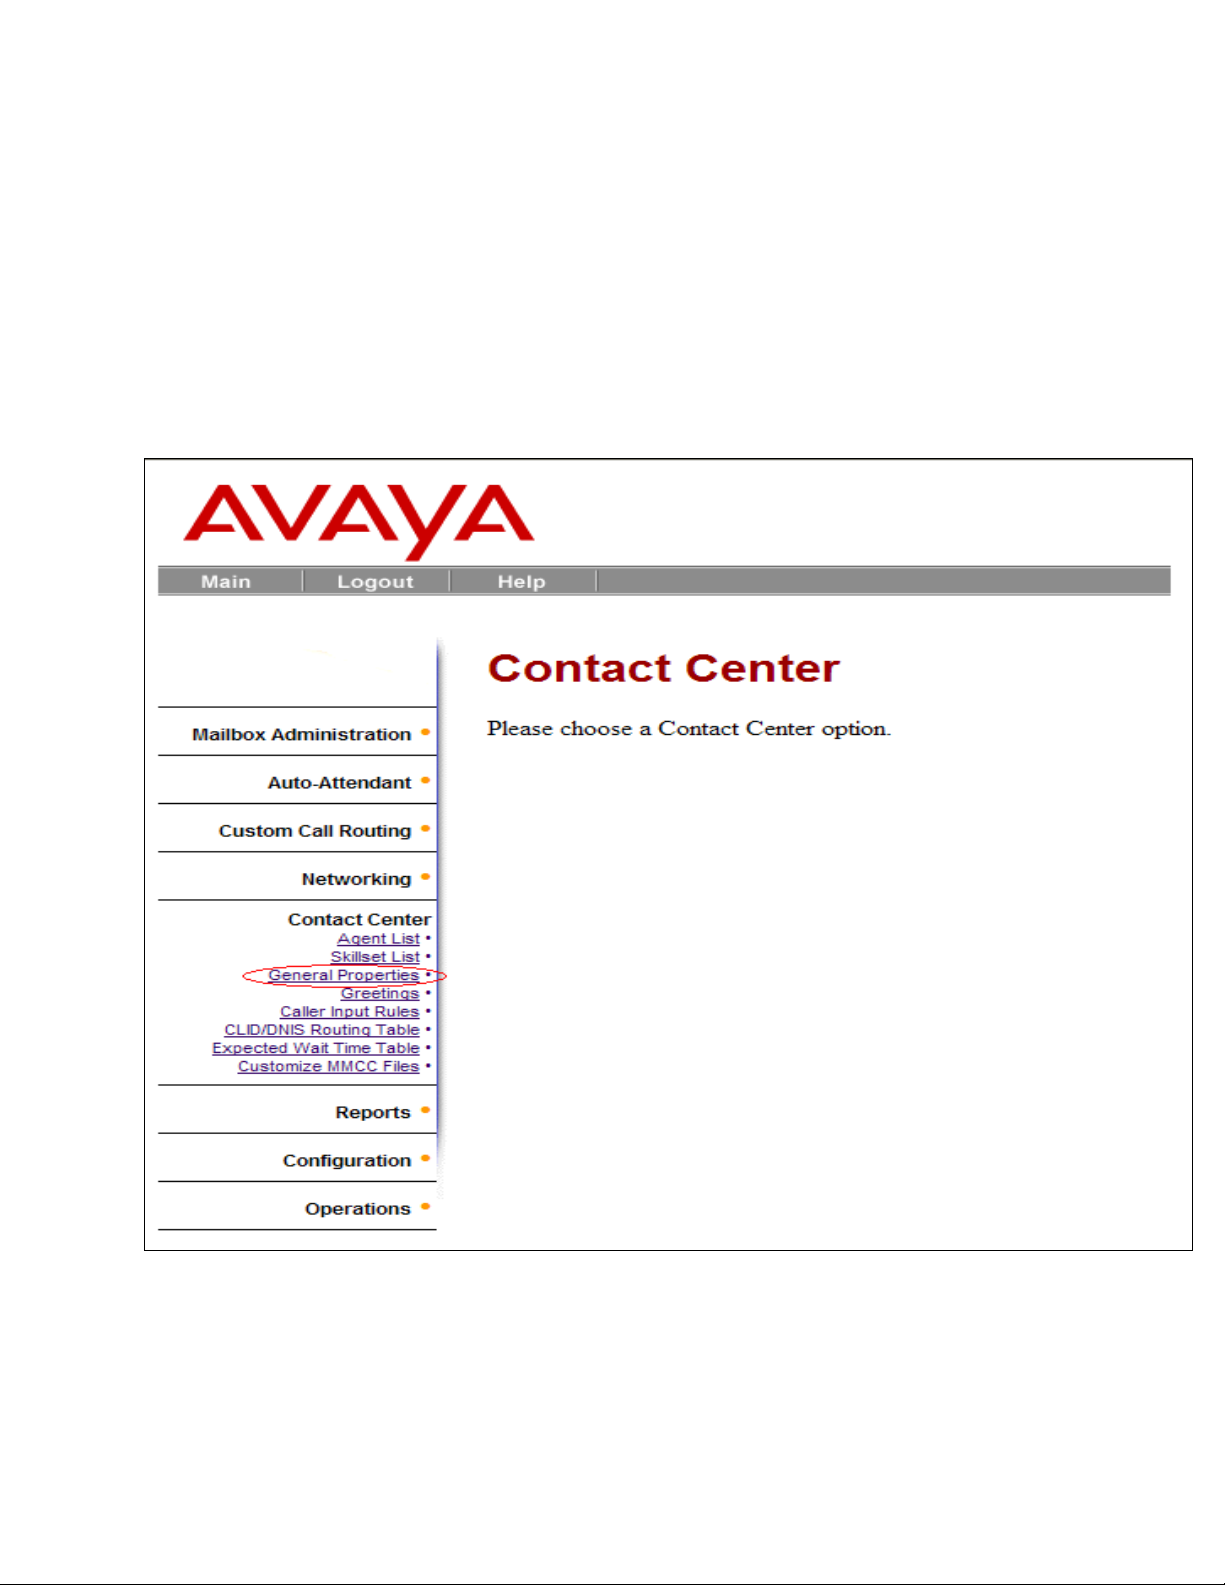
The Contact Center will appear as shown in Figure 8.
On the left menu column, click on the Contact Center to display a menu options list. Then click
on the General Properties as shown in red oval of Figure 8 below.
Figure 8: Contact Center Main Screen
Page 11
RS; Reviewed:
SPOC 12/7/2010
Solution & Interoperability Test Lab Application Notes
©2010 Avaya Inc. All Rights Reserved.
11 of 44
ITEL_BCM60
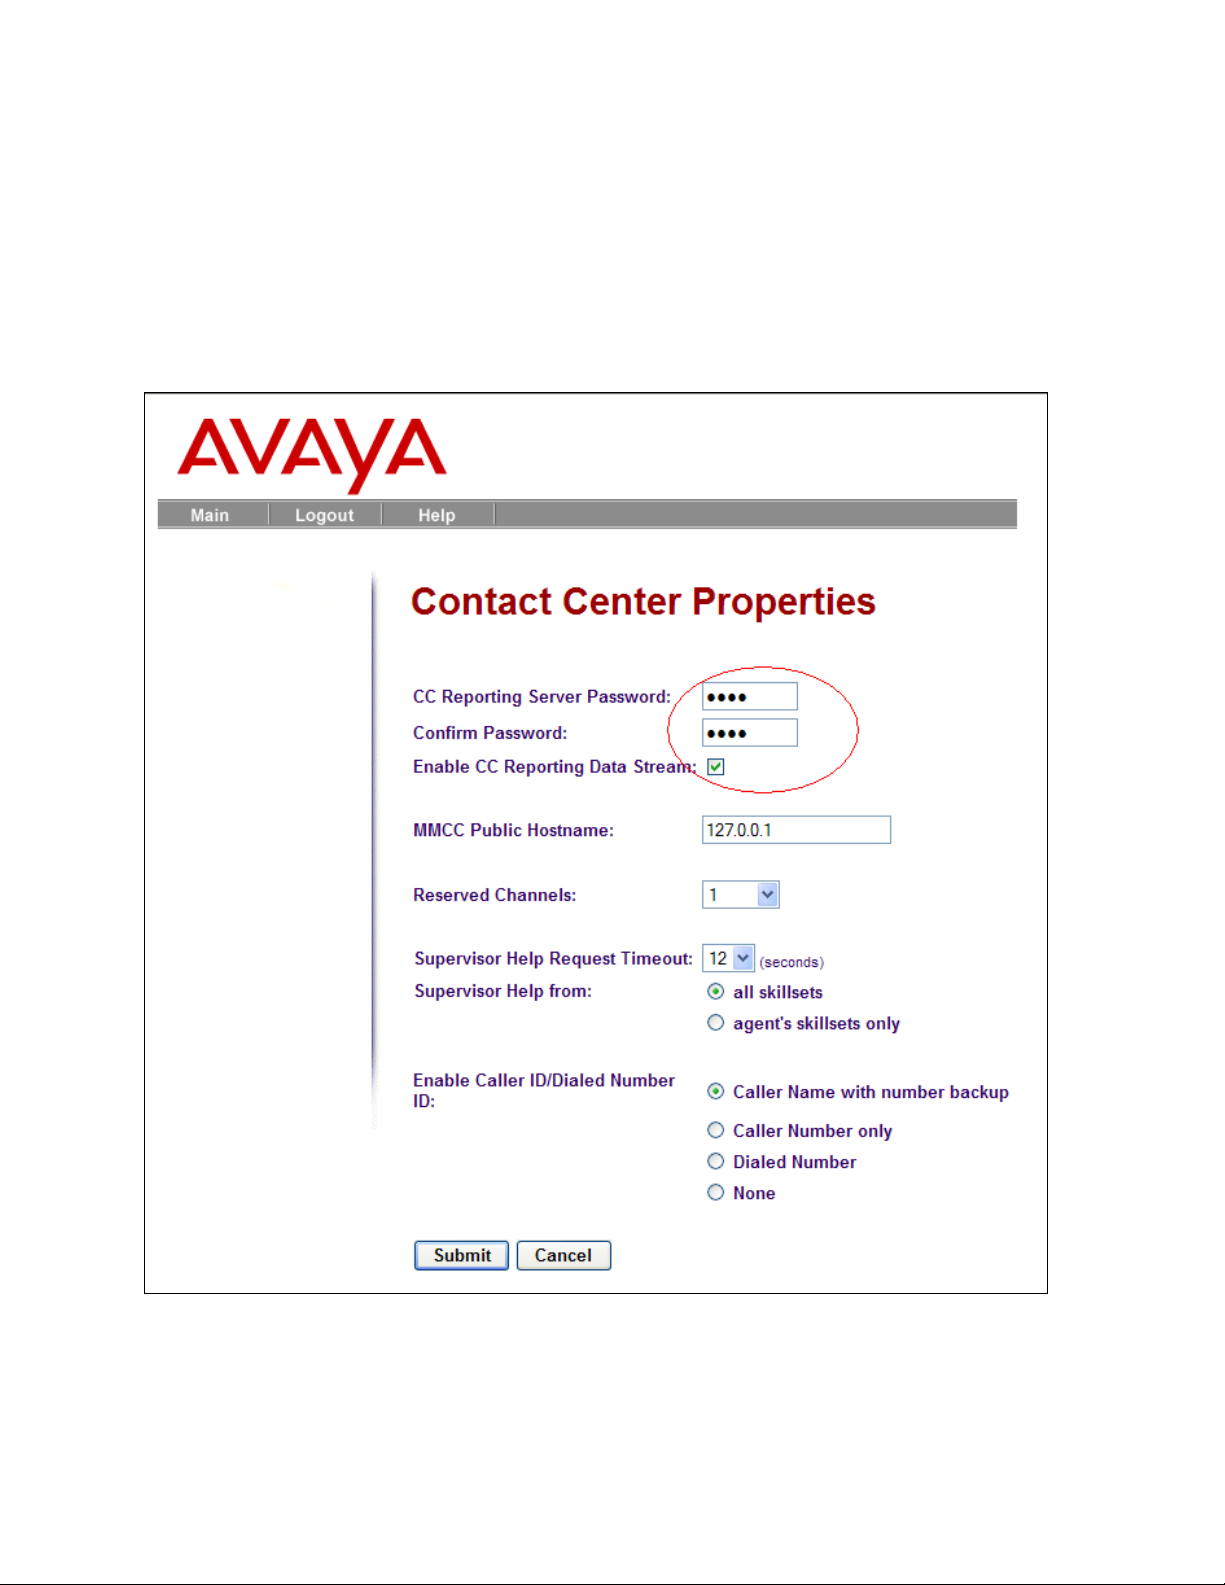
The Contact Center Properties page will be shown in Figure 9 below. Provide information to
enable the CC reporting data stream by following the steps below:
- Enter the password on the CC Reporting Server Password textbox (CCRS is the
default password).
- Re-enter the password to confirm.
- Check on the Enable CC Reporting Data Stream check-box.
- All other attributes are left as default values.
- Click on the Submit button to save the set up information.
Figure 9: General Properties
Page 12
RS; Reviewed:
SPOC 12/7/2010
Solution & Interoperability Test Lab Application Notes
©2010 Avaya Inc. All Rights Reserved.
12 of 44
ITEL_BCM60
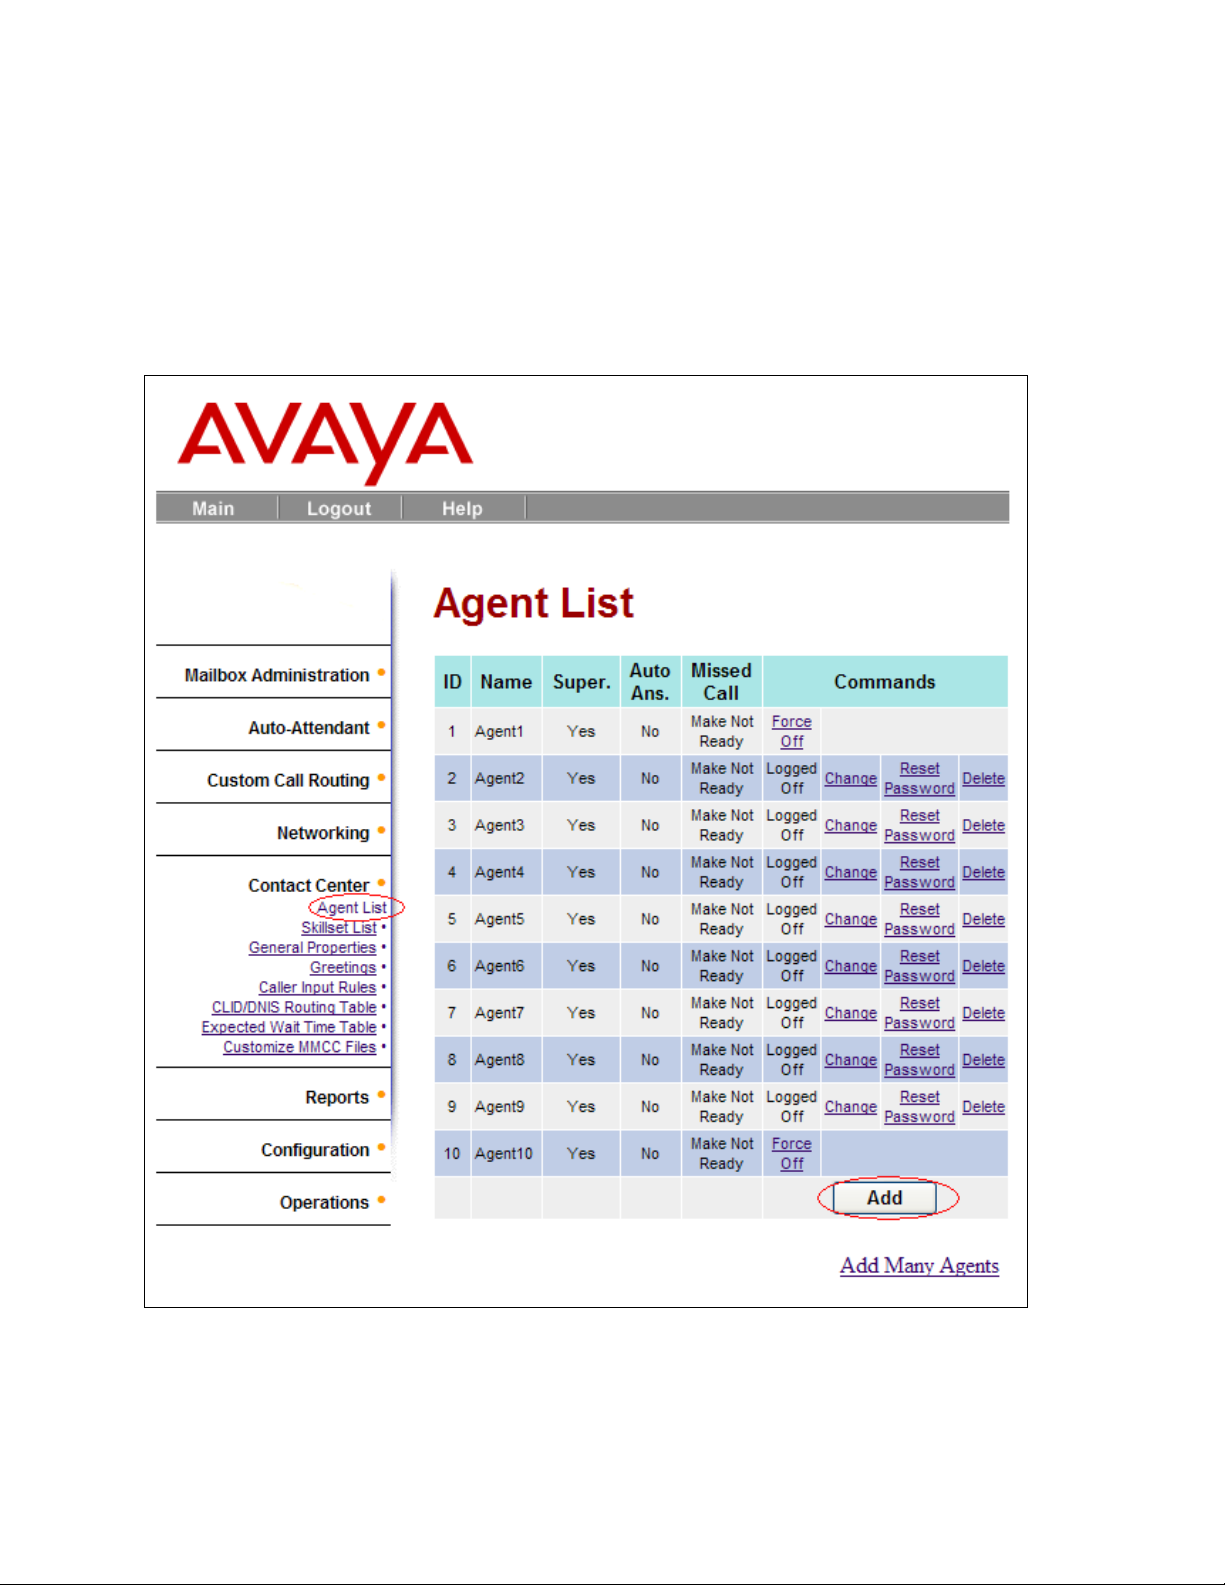
4.3. Create Agent list
The following steps will show how to add an Agent to an Agent List on the Contact Center:
- On the Contact Center page as shown in Figure 8, under the Contact Center menu
options list, click on the Agent List.
- Click on the Add button as shown in Figure 10 below.
Figure 10: Add List
Page 13
RS; Reviewed:
SPOC 12/7/2010
Solution & Interoperability Test Lab Application Notes
©2010 Avaya Inc. All Rights Reserved.
13 of 44
ITEL_BCM60
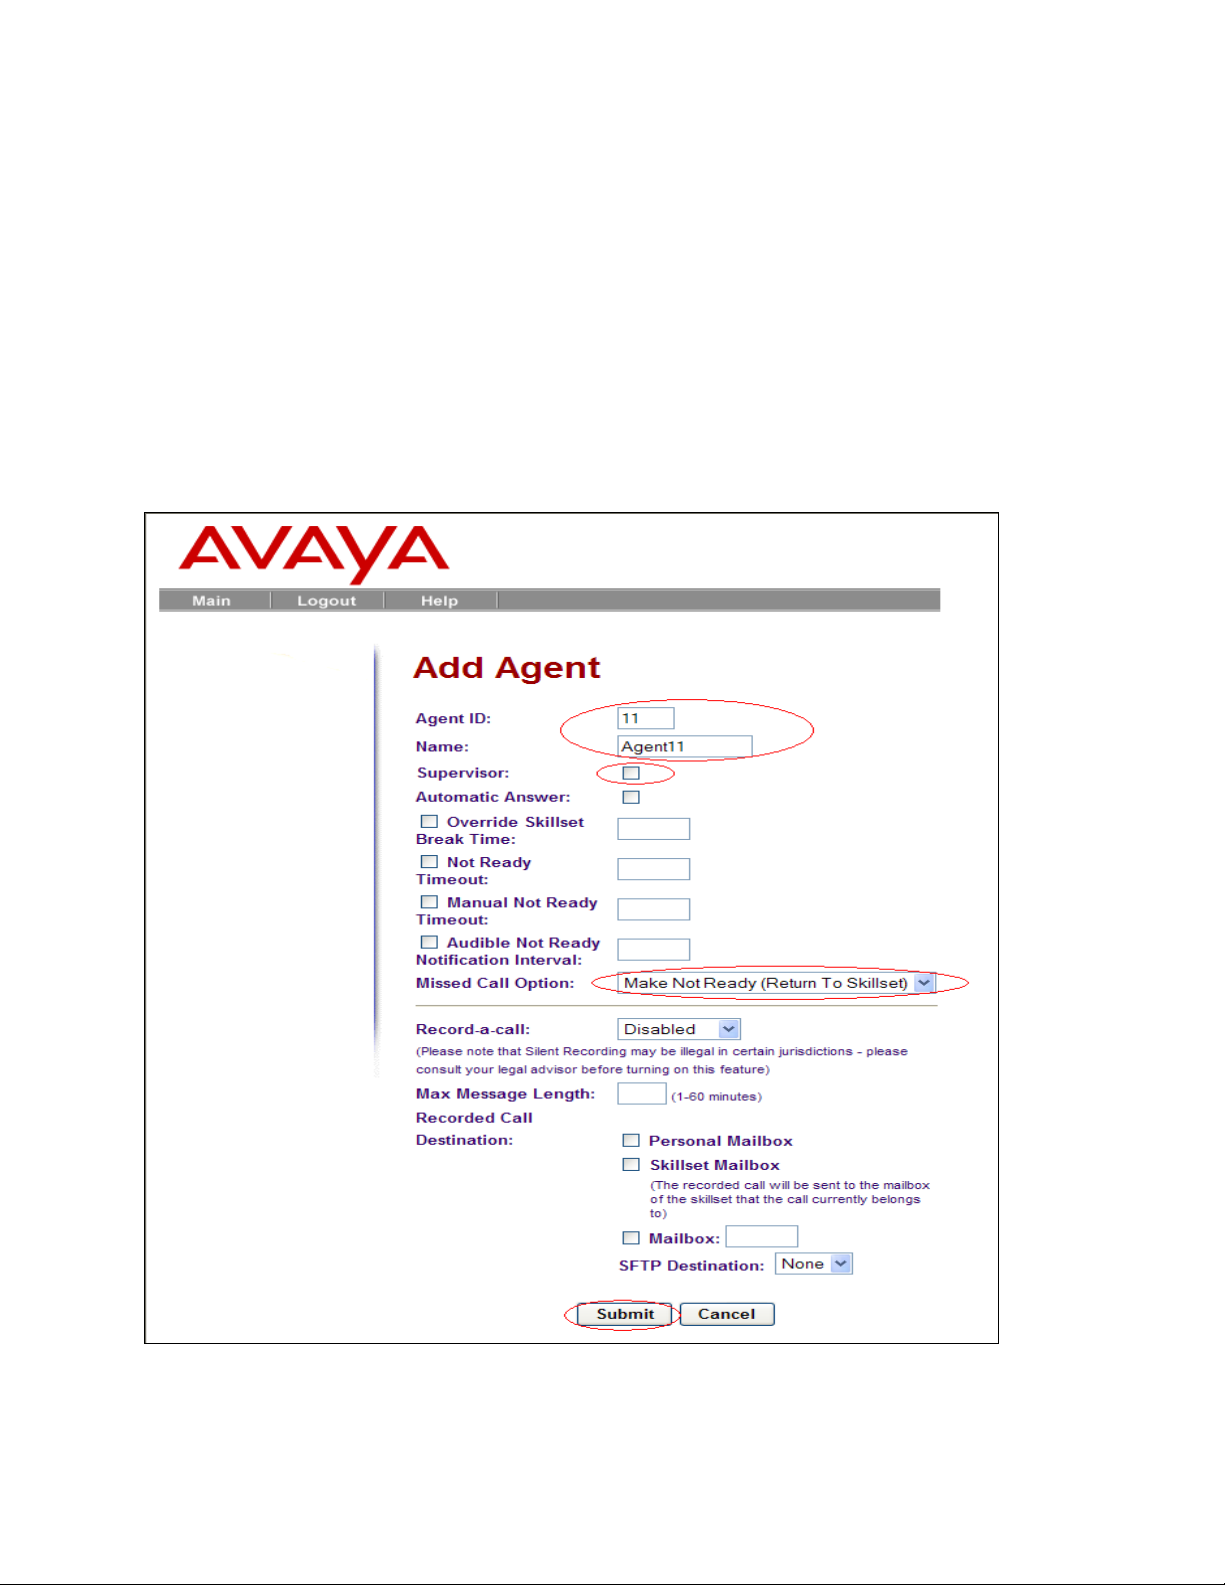
The page Add Agent details page will appear as shown in Figure 11. Follow the instruction
below to enter details information for an agent.
- Agent ID and Name are generated automatically.
- Check on Supervisor check-box if the agent will be a supervisor else this box will
remain unchecked.
- From Missed Call Option drop down menu list, select the “Make Not Ready
(Return To Skillset)”.
- All the other attributes are left as default values or changed as required.
- Click on the Submit button to save the configured information.
Figure 11: Add Agent
Page 14
RS; Reviewed:
SPOC 12/7/2010
Solution & Interoperability Test Lab Application Notes
©2010 Avaya Inc. All Rights Reserved.
14 of 44
ITEL_BCM60
4.4. Create SkillSet list
A configured Intelligent Contact Center requires at least one skill set per agent or group of
agents.
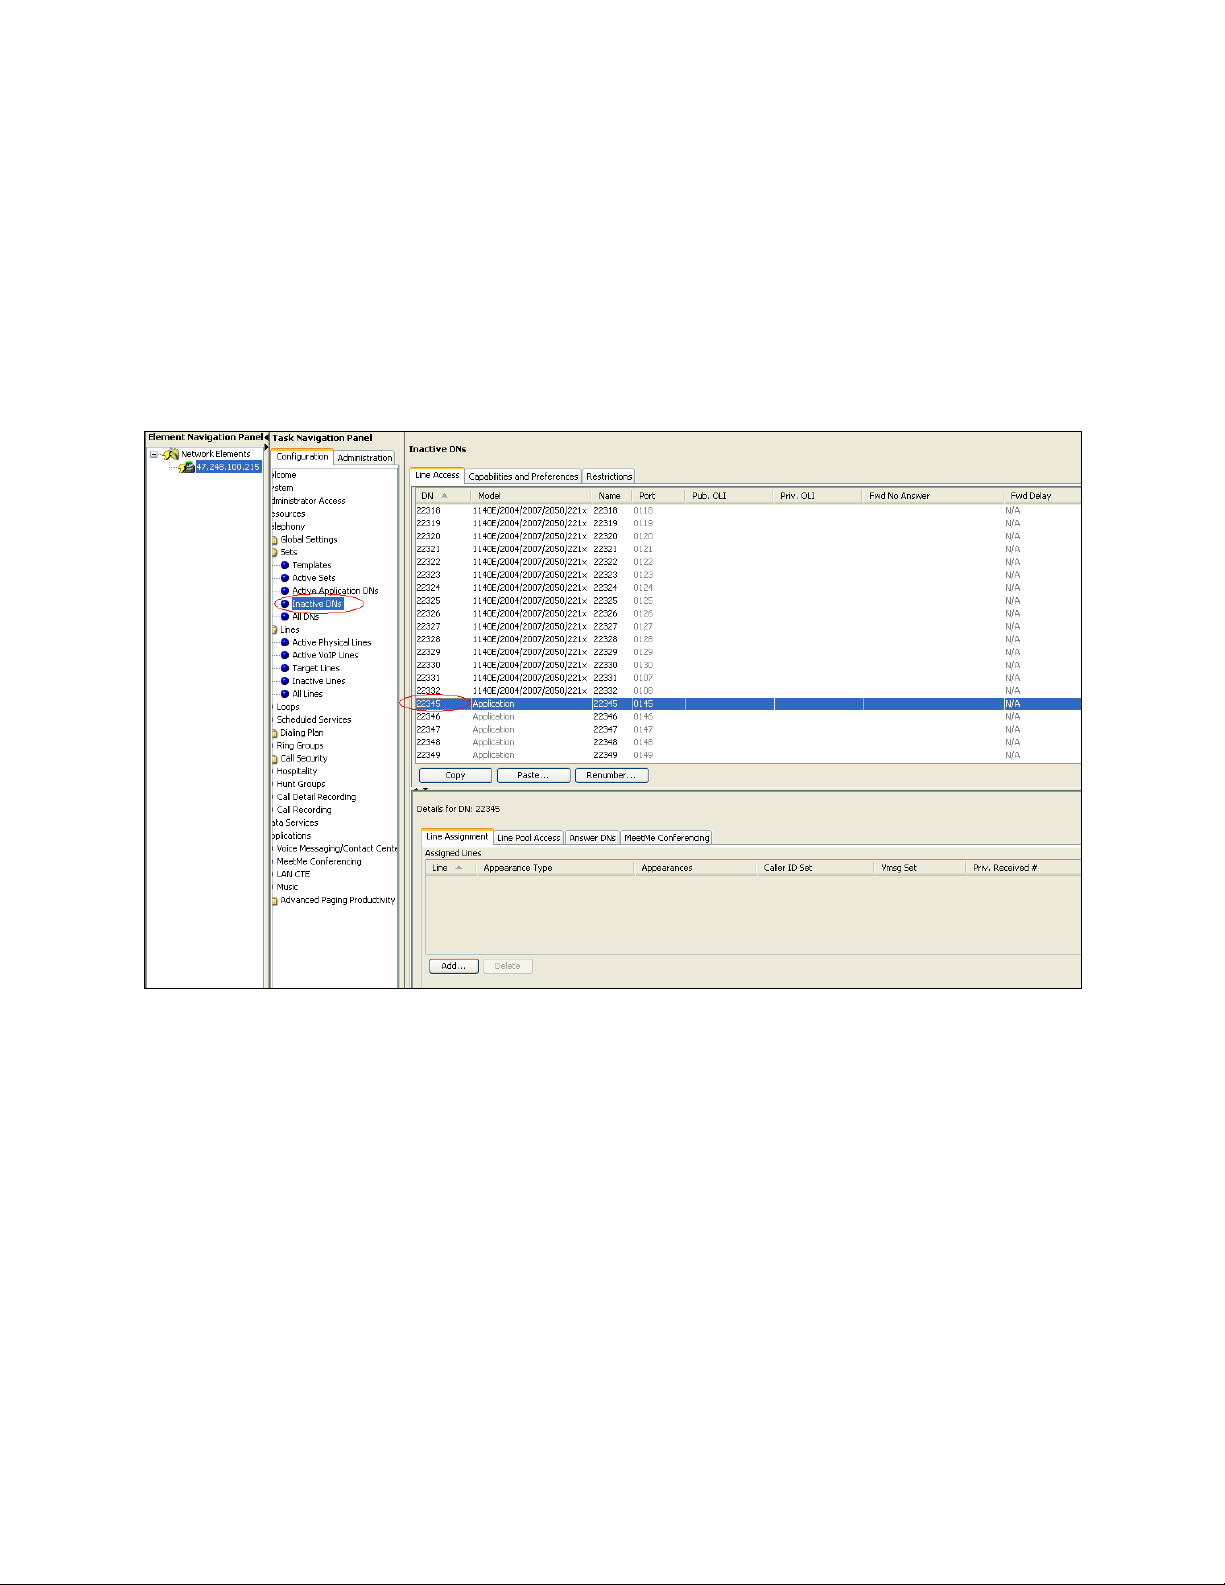
The following steps will show how to add a skill set to a SkillSet List on the Contact Center:
- In order to associate an agent directory number (DN) to a specific skill set, from
Figure 3, select under Task Navigation Panel, Configuration tab > Telephony >
Sets > Inactive DNs.
- Select one DN with Model as „Application‟ as shown on Figure 12 below.
- On the Contact Center page as shown in Figure 8, under the Contact Center menu
options list, click on the Skillset List.
- Click on the Configure link highlighted in red oval as shown in Figure 13 below.
Figure 12: Application DN
Page 15

RS; Reviewed:
SPOC 12/7/2010
Solution & Interoperability Test Lab Application Notes
©2010 Avaya Inc. All Rights Reserved.
15 of 44
ITEL_BCM60
Figure 13: Skillset List
The Skillset Properties page will appear as shown in Figure 14. Follow the instructions below to
enter details information for a Skillset.
- Enter control DN (as selected on Figure 12 above).
- Enter the name of the Skillset as PV SKILL8 as an example.
- Enter the Break Time as 30 seconds an example.
- Check on the Primary Alert check-box and specify duration of 30 seconds on the
text-box.
- Check on the Secondary Alert check-box and enter a value of 1 minute on the
text-box.
- All other attributes are left as default.
- Click on the Submit button to save the configured information.
Page 16

RS; Reviewed:
SPOC 12/7/2010
Solution & Interoperability Test Lab Application Notes
©2010 Avaya Inc. All Rights Reserved.
16 of 44
ITEL_BCM60
After clicking on the Submit button on Figure 14, a pop up message window will say “A new
mail box has been created. Please initialize it before attempting to enable the skillset”, as shown
in Figure 15. A user must initialize the mail box for the CDN of the skillset via his/her
telephone handset.
Figure 14: Skillset Properties
Page 17

RS; Reviewed:
SPOC 12/7/2010
Solution & Interoperability Test Lab Application Notes
©2010 Avaya Inc. All Rights Reserved.
17 of 44
ITEL_BCM60
Figure 15: Initialize Pop Up
4.5. Assign Agent to a SkillSet
On the Contact Center page as shown in Figure 8, under the Contact Center menu options list,
click on the Skillset List and then click on the Agent link of the newly created skillset as shown
in Figure 16.
Page 18

RS; Reviewed:
SPOC 12/7/2010
Solution & Interoperability Test Lab Application Notes
©2010 Avaya Inc. All Rights Reserved.
18 of 44
ITEL_BCM60
Figure 16: Skillset List
The Assigned Agents page will appear as shown in Figure 17. Click on the Assign button as
highlighted in red oval.
Figure 17: Assigned Agents List
Page 19

RS; Reviewed:
SPOC 12/7/2010
Solution & Interoperability Test Lab Application Notes
©2010 Avaya Inc. All Rights Reserved.
19 of 44
ITEL_BCM60
To assign agent(s) to the skill set, check the Assign check-box as shown in Figure 18a. Then
click on the Submit button to save the configured information. Figure 18b shows the Assigned
Agents.
Figure 18a: Assigned Agents
Figure 18b: Assigned Agents after Submit
Page 20

RS; Reviewed:
SPOC 12/7/2010
Solution & Interoperability Test Lab Application Notes
©2010 Avaya Inc. All Rights Reserved.
20 of 44
ITEL_BCM60
4.5.1. Day Routing Table configuration
This section describes how to set up daily day routine for agents who belong to a specific skill
set. These routines involve a sequence of action steps to greet callers calling into a contact
center.
From Skillset List page shown in Figure 16, click on the Day link. The page Day Routing Table
will appear as shown in Figure 19. Then click on the Insert link as highlighted in red oval.
The Routing Step page will appear, as shown in Figure 20, showing detailed configuration for
this specific step, Step 1 in this example. The following steps below describe how to complete
Step 1 as an example:
- Click on the radio button of the attribute Distribute for.
- Enter the time, 1 second, in the text box.
- All the other fields are left at default values.
- Click on the Submit button to complete Step 1.
Figure 19: Day Routing Table
Page 21

RS; Reviewed:
SPOC 12/7/2010
Solution & Interoperability Test Lab Application Notes
©2010 Avaya Inc. All Rights Reserved.
21 of 44
ITEL_BCM60
After finishing with the insertion of the Step 1 by clicking on the Submit button, the Day Routing
Table page will re-appear with the step 1 in the table as shown in Figure 21.
Figures 22-25 are examples of insertion of more sequencing steps, which an administrator can
set up, to assign routines to the agents belonging to a particular skill set.
Figure 20: Routing Step 1
Page 22

RS; Reviewed:
SPOC 12/7/2010
Solution & Interoperability Test Lab Application Notes
©2010 Avaya Inc. All Rights Reserved.
22 of 44
ITEL_BCM60
Figure 21: Day Routing Table
Figure 22: Additional Step
Page 23

RS; Reviewed:
SPOC 12/7/2010
Solution & Interoperability Test Lab Application Notes
©2010 Avaya Inc. All Rights Reserved.
23 of 44
ITEL_BCM60
Figure 23: Second Step
Figure 24: Additional Steps
Page 24

RS; Reviewed:
SPOC 12/7/2010
Solution & Interoperability Test Lab Application Notes
©2010 Avaya Inc. All Rights Reserved.
24 of 44
ITEL_BCM60
Figure 25: Sample Routing Table with 5 Steps
4.5.2. Night Routing Table configuration
This section describes how to set up daily night routine for agents who belong to a specific skill
set. These routines involve a sequence of action steps to greet callers calling into a contact
center.
From Skillset List page shown in Figure 16, click on the Night link. The Night Routing Table
page will appear (not shown). Then click on the Insert link to go to Routing Step details page as
shown Figure 26 below to insert the sequencing steps to treat the incoming call to Contact
Center.
Figures 26-28 are examples of the insertion of the routing steps that can be used to treat the
night time callers calling into contact center services.
Page 25

RS; Reviewed:
SPOC 12/7/2010
Solution & Interoperability Test Lab Application Notes
©2010 Avaya Inc. All Rights Reserved.
25 of 44
ITEL_BCM60
Figure 26: Night Routing Table Step 1
Figure 27: Night Routing Table Step 2
Page 26

RS; Reviewed:
SPOC 12/7/2010
Solution & Interoperability Test Lab Application Notes
©2010 Avaya Inc. All Rights Reserved.
26 of 44
ITEL_BCM60
Figure 28: Sample Night Routing Table with 2 Steps
Click on the Close button as shown in Figure 28 above to return to the Skillset List page as
shown in Figure 16. Then Click on the Enable link to enable the skillset.
Note: If the configuration needs to be modified, the skillset must first be disabled before the user
makes changes.
4.5.3. Assign Lines to a SkillSet
This section describes how to assign a line to a Skillset. The following steps will show how to
configure it.
- Go to the Auto Attendant section.
- Click on the Lines Administration link.
- Select the line that needs to be configured.
- Click on the Change link as shown on Figure 29 below.
Page 27

RS; Reviewed:
SPOC 12/7/2010
Solution & Interoperability Test Lab Application Notes
©2010 Avaya Inc. All Rights Reserved.
27 of 44
ITEL_BCM60
After clicking on the Change link of Figure 29, the Line Properties page of line 128 (not seen in
Figure 29) will appear as shown on Figure 30 below. Follow these steps to configure the Line
Properties:
- Select “Contact Center” from the pull down menu of the Answer Mode attributes.
- Enter the Table/SkillSet number corresponding to the Skillset.
- Specify the Number of Rings from the pull down list.
- Click on the Submit button to finish assigning the Skillset to the CDN.
Figure 29: Lines Administration
Page 28

RS; Reviewed:
SPOC 12/7/2010
Solution & Interoperability Test Lab Application Notes
©2010 Avaya Inc. All Rights Reserved.
28 of 44
ITEL_BCM60
Figure 30: Line Properties
After configuring the Line Properties, Figure 31 shows the assigned skill set associated with
Line 128.
Figure 31: Sample of a Line with an assigned Skillset
Page 29

RS; Reviewed:
SPOC 12/7/2010
Solution & Interoperability Test Lab Application Notes
©2010 Avaya Inc. All Rights Reserved.
29 of 44
ITEL_BCM60
5. Configure and generate report for Contact Center
This section describes the steps on how to configure the ITEL RCC software application on a
designated PC, known as the Web Host PC, to report on Contact Center call activity on a
Business Communications Manager.
5.1. Configure ITEL RCC
This section describes how to configure the ITEL RCC.
Prior to configuring the ITEL RCC it is assumed that the installation has been successful and
also while installation, the BCM Connection Data has been completed as shown in Figure 32,
where IP address of BCM is entered along with the port 8088 and CCRS password (CCRS as
default).
Figure 32: BCM Connection Data
ITEL RCC can be launched at the end of a successful installation by clicking on the link as
shown in Figure 33 or by typing http://localhost/rcc in the URL of an Internet browser window
after the installation has been completed.
Figure 33: Launch RCC window at end of Installation
Page 30

RS; Reviewed:
SPOC 12/7/2010
Solution & Interoperability Test Lab Application Notes
©2010 Avaya Inc. All Rights Reserved.
30 of 44
ITEL_BCM60
ITEL configurations for the Reporting for Contact Centre (RCC) can be performed through web
browser as shown in Figure 33a below. The login credentials are: Username = admin,
Password = 0000. Users must change the password after login for the first time as shown in
Figure 33b.
Figure 33a: RCC Main Page
Figure 33b: RCC Password Change Page
During a new installation, The Contact Center Connection allows user to download all the Data
from the connected BCM to the RCC application server as shown in Figure 34a. Figure 34b
shows the status of the downloaded data.
Page 31

RS; Reviewed:
SPOC 12/7/2010
Solution & Interoperability Test Lab Application Notes
©2010 Avaya Inc. All Rights Reserved.
31 of 44
ITEL_BCM60
Figure 34a: Contact Center Connection
Figure 34b: Status of Data Download
Click on the Check mark button shown in Figure 34a to go to the Home page as shown in
Figure 35 below. Click on the Administration Menu icon and then click on the Contact Center
Connection Menu as shown in Figure 36 below.
Figure 35: Administration Menu Icon
Page 32

RS; Reviewed:
SPOC 12/7/2010
Solution & Interoperability Test Lab Application Notes
©2010 Avaya Inc. All Rights Reserved.
32 of 44
ITEL_BCM60
Figure 36: Administration Menu
The Contact Center Connection details page will appear as shown in the Figure 37 below. A
user is required to enter the CCRS password (CCRS is default password in this case).
Figure 37: Contact Center Connection
At the “Make Historical Data requests every” attribute, from the drop down menu, user can
choose the duration of how long the RCC can make request for data from BCM. It can be from
5, 15, 30 minutes or 1 hour as shown in Figure 38 and Figure 39
Figure 38: Historical Data Request Time
Page 33

RS; Reviewed:
SPOC 12/7/2010
Solution & Interoperability Test Lab Application Notes
©2010 Avaya Inc. All Rights Reserved.
33 of 44
ITEL_BCM60
Figure 39: Historical Data Request Time Options
5.2. Generate the historical reports for Contact Center
The following steps describe how to generate historical report for Contact Center on the
connected BCM system.
- Go to the Administration Menu page as shown in Figure 36.
- Click on the Home tab menu as shown in Figure 40 below.
Figure 40: Home Menu Tab
Click on the Historical Reports icon as shown in Figure 41 below.
Page 34

RS; Reviewed:
SPOC 12/7/2010
Solution & Interoperability Test Lab Application Notes
©2010 Avaya Inc. All Rights Reserved.
34 of 44
ITEL_BCM60
Figure 41: Historical Reports Icon
The Historical Reports page is shown in Figure 42 below:
- Select interval time: From Date – To Date, From Time – To Time.
- Click on “Abandonded CLID/DNIS by CLID/DNIS” and “Answered
CLID/DNIS” checkboxes as examples.
- Click on the right arrow icon to go to the next page.
Figure 42: Historical Reports Page
Page 35

RS; Reviewed:
SPOC 12/7/2010
Solution & Interoperability Test Lab Application Notes
©2010 Avaya Inc. All Rights Reserved.
35 of 44
ITEL_BCM60
Historical Reports Parameters page are shown in Figure 43 below.
- Click on “All Skillsets” checkbox to select all skillsets
- Click on the View icon to see the report.
Figure 43: Historical Reports Parameters
The details report for abandoned calls is shown in the Figure 44 below.
Page 36

RS; Reviewed:
SPOC 12/7/2010
Solution & Interoperability Test Lab Application Notes
©2010 Avaya Inc. All Rights Reserved.
36 of 44
ITEL_BCM60
Figure 44: Abandoned Call Report
The details report for answered calls is shown in Figure 45 below.
Figure 45: Answered Call Report
Similarly, the Call Break Down by Agent and Abandoned Call by Skillset report are shown
respectively in Figure 46 and Figure 47 below.
Page 37

RS; Reviewed:
SPOC 12/7/2010
Solution & Interoperability Test Lab Application Notes
©2010 Avaya Inc. All Rights Reserved.
37 of 44
ITEL_BCM60
Figure 46: Call Breakdown by Agent Report
Figure 47: Abandoned Calls by Skillset Report
For getting a complete latest list of Contact Center Calls in the database, go to the Historical
Reports home page and click on the down arrow button as shown in Figure 48 below.
Page 38

RS; Reviewed:
SPOC 12/7/2010
Solution & Interoperability Test Lab Application Notes
©2010 Avaya Inc. All Rights Reserved.
38 of 44
ITEL_BCM60
Figure 48: Latest Contact Center Data
The CC Download Status window appears as shown in Figure 49 below.
Figure 49: Data Download Status Window
5.3. Generate the real time screens for Contact Center
This section describes the steps on how to generate real time screens for Contact Center.
Go to the Home page and click on the Clock icon to load Real Time Screens as shown in Figure
50 below.
Page 39

RS; Reviewed:
SPOC 12/7/2010
Solution & Interoperability Test Lab Application Notes
©2010 Avaya Inc. All Rights Reserved.
39 of 44
ITEL_BCM60
Figure 50: Real Time Screens Icon
Real Time Screens page is shown in Figure 51 below.
- Click on “All Skillsets” checkbox to select all skillsets.
- Click on the Tick icon to open the Real Time screens.
Figure 51: Real Time Screens Page
Real Time - Agent Summary, Real Time - Agent Detail, Real Time - Call Summary and Real
Time – Call Detail reports are shown in Figure 52, Figure 53, Figure 54 and Figure 55
respectively. The status of the Agent(s) or calls will be updated in real-time.
Page 40

RS; Reviewed:
SPOC 12/7/2010
Solution & Interoperability Test Lab Application Notes
©2010 Avaya Inc. All Rights Reserved.
40 of 44
ITEL_BCM60
Figure 52: Real Time – Agent Summary
Figure 53: Real Time – Agent Detail
Page 41

RS; Reviewed:
SPOC 12/7/2010
Solution & Interoperability Test Lab Application Notes
©2010 Avaya Inc. All Rights Reserved.
41 of 44
ITEL_BCM60
Figure 54: Real Time – Call Summary
Figure 55: Real Time – Call Detail
6. General Test Approach and Test Results
The compliance test included HTTP/HTTPs operation to allow ITEL RCC to collect data from the
Intelligent Contact Center in the Avaya BCM.
6.1. General test approach
The general test approach is to verify whether the ITEL RCC software can establish an
HTTP/HTTPs session with the Avaya BCM, retrieve all data from the BCM, populate the data to
the real time screens and create historical reports.
6.2. Test Results
All executed test cases have been passed. The ITEL RCC successfully gathers real time and
historical statistical data from the BCM Intelligent Contact Center (ICC), populates on the real
time screens and creates the historical reports. The following observation was made during the
compliance testing:
While getting a complete latest Contact Center Calls in the database from the
Historical Reports page, the time in the Historical Reports page is not updated
according to the time seen in the Download status window. Refer to Figure 56 below
for the reported observation. User needs to hit F5 (Refresh) on the Historical Reports
page to refresh the latest time after the update is completed.
Page 42

RS; Reviewed:
SPOC 12/7/2010
Solution & Interoperability Test Lab Application Notes
©2010 Avaya Inc. All Rights Reserved.
42 of 44
ITEL_BCM60
Figure 56: Observation showing Time not being updated
7. Verification Steps
This section includes some steps that can be followed to verify the solution is working.
Make calls into the Contact Center to generate skill-set call activity and verify that:
ITEL RCC is connected to a BCM. It will pull all the stored data from the BCM until
the RCC database is up-to-date.
ITEL RCC provides real time and historical statistics on system and agent performance
in BCM Intelligent Contact Center.
ITEL RCC provides real time and historical data at a set frequency interval. The
intervals can be set by the end user.
8. Conclusion
All of the executed test cases have passed and met the objectives outlined in Section 6.1, with
an observation explained in Section 6.2. The ITEL RCC v5.0.450.2 software is considered
compliant with BCM rel. 6.0.
9. Additional References
Product documentation for Avaya products may be found at:
https://support.avaya.com/css/Products/
Product information for ITEL products can be found at
http://www.itel-business-solutions.com/ and http://www.rcc5.net/
Page 43

RS; Reviewed:
SPOC 12/7/2010
Solution & Interoperability Test Lab Application Notes
©2010 Avaya Inc. All Rights Reserved.
43 of 44
ITEL_BCM60
Page 44

RS; Reviewed:
SPOC 12/7/2010
Solution & Interoperability Test Lab Application Notes
©2010 Avaya Inc. All Rights Reserved.
44 of 44
ITEL_BCM60
©2010 Avaya Inc. All Rights Reserved.
Avaya and the Avaya Logo are trademarks of Avaya Inc. All trademarks identified by ®
and ™ are registered trademarks or trademarks, respectively, of Avaya Inc. All other
trademarks are the property of their respective owners. The information provided in these
Application Notes is subject to change without notice. The configurations, technical data,
and recommendations provided in these Application Notes are believed to be accurate and
dependable, but are presented without express or implied warranty. Users are responsible
for their application of any products specified in these Application Notes.
Please e-mail any questions or comments pertaining to these Application Notes along with
the full title name and filename, located in the lower right corner, directly to the Avaya
DevConnect Program at devconnect@avaya.com.
 Loading...