


C3-RS-730 LCD
THIS PRODUCT IS DESIGNED FOR P
ROFESSIONAL INSTALLATION ONLY
C3-RS-730 LCD
PROFESSIONAL 2-WAY LCD REMOTE CAR STARTER & ALARM
SYSTEM
With
Built in Temperature, Voltage Sensor
And Two-way Serial Port Data Link
Compatible
OPERATION MANUAL
Please register your product at:
www.autopageusa.com
1
Congratulations on your purchase of the RS -730 LCD remote start vehicle security system. We sincerely
hope the purchase of the RS-730 remote start security system gives peace of mind to you.
The RS-730 LCD is a state-of-the-art two-way communication system. Please take the time to read over this
manual to thoroughly familiarize your self with the many features and options of the RS -730 LCD.
Auto Page, Inc. has over 25 years of experience in the vehicle security industry in the United States and is a
wholly owned subsidiary of Iwata Electric Co., of Tokyo, Japan. Iwata has been an industry leader for over 50
years, establishing a reputation for ingenuity in its engineering capability and innovative communication
products. Auto Page and Iwata maintain a long tradition of providing the best value to their customers.
WARNINGS:
As with any product that performs automatic functions, there are certain safety precautions that you must
practice and be aware of.
1. Keep the transmitter out of children’s reach.
2. Do not leave anyone in the vehicle while running on remote control.
3. Alert servicing personnel that the vehicle can be started automatically.
4. Do not start the vehicle by remote while it’s in an enclosed area or garage.
5. Always apply the parking brake and lock the vehicle as you exit the vehicle.
6. The vehicle windows must be rolled up.
7. Should the unit malfunction, disconnect the fuse until the problem is corrected.
8. The use and operations of this system is the sole responsibility of the operator.
9. Some areas may have local ordinances that prohibit leaving a vehicle running on public streets.
10.It is not safe to remote start the vehicle if the vehicle is parked on a steep incline.
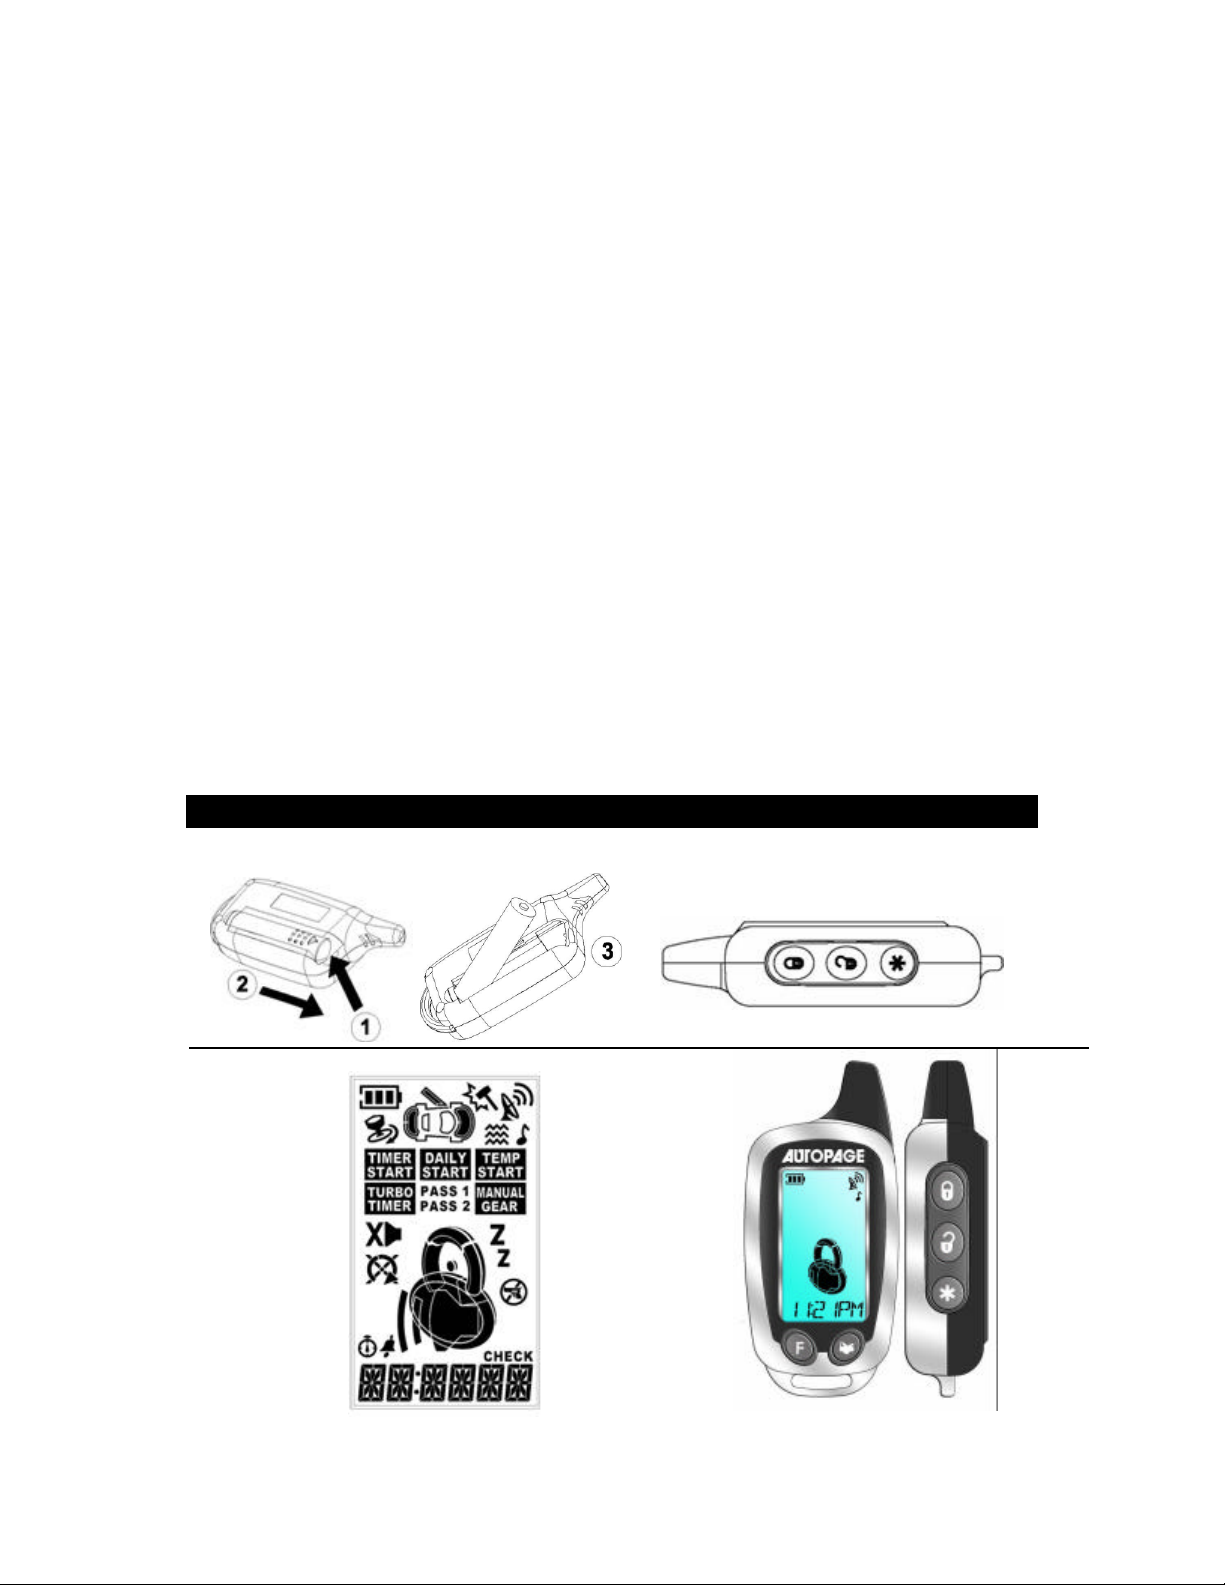
LCD REMOTE CONTROL TRA NSCEIVER: XT-74 LCD
2

A. BATTERY REPLACEMEN T:
This system needs no specific maintenance beyond remote control battery replacement. The 2-way
remote is powered by a 1.5V AAA battery. The 1-way remote is powered by a pair of 3V, CR2016 batteries.
Battery Level Indicator (2-way remote)
The Battery Le vel indicator has three level indicators that serve as a visual indication of battery charge.
When the battery reaches a low charge level that requires replacement, the remote control will generate a
single notification chirp, and the Battery Level indicator will flash continuously.
Gently pull the end of the battery door away from the top of the remote control then slide the door up to
expose the battery and remove the expired battery. Place the new battery into the remote. When power is
returned the remote control will display all icons in the LCD and generate all beeper tones once. Press
any button on the remote to terminate the beeper tone review.
B. STANDARD LCD ICON CONFIGURATIONS:
The lock icon will be displayed when the
door locked.
Sensor Bypass
Sensor 1 bypass under Arm mode
Valet Mode
Remote start and alarm functions shall
be temporarily on hold.
Hood Trigger
Hood is illegally opened (Zone 1)
Door Open Warning
Doors are illegally opened (Zone 3)
Ignition Trigger
Ignition switch is illegally turned on (Zone
5)
Remote Transmission
You are transmitting the signal to control
unit
Anti Car-Jack Mode
Activate the anti car -jacking mode
Engine Cranking
Your vehicle engine Cranking by remote
control
Timer Control Start
Engine start automatically every 2 or 3
hours.
Temperature Start
Engine start automatically when reach
programmed temperature.
The unlock icon will be displayed when
the door unlock
Hidden Alarm Mode
The security system arm with hidden
alarm function (silent alarm)
Trunk Trigger
Trunk is illegally opened (Zone 2)
Sensor Trigger
Trigger on Sensor 1 (Zone 4)
System trigger
In – Range Indicator
You are within the range of the remote
control.
Icon flash under check mode
Engine Running
Your vehicle's engine is running
Daily Start
Engine start automatically at the same
time next day
Turbo Timer
Turbo timer was set up
3
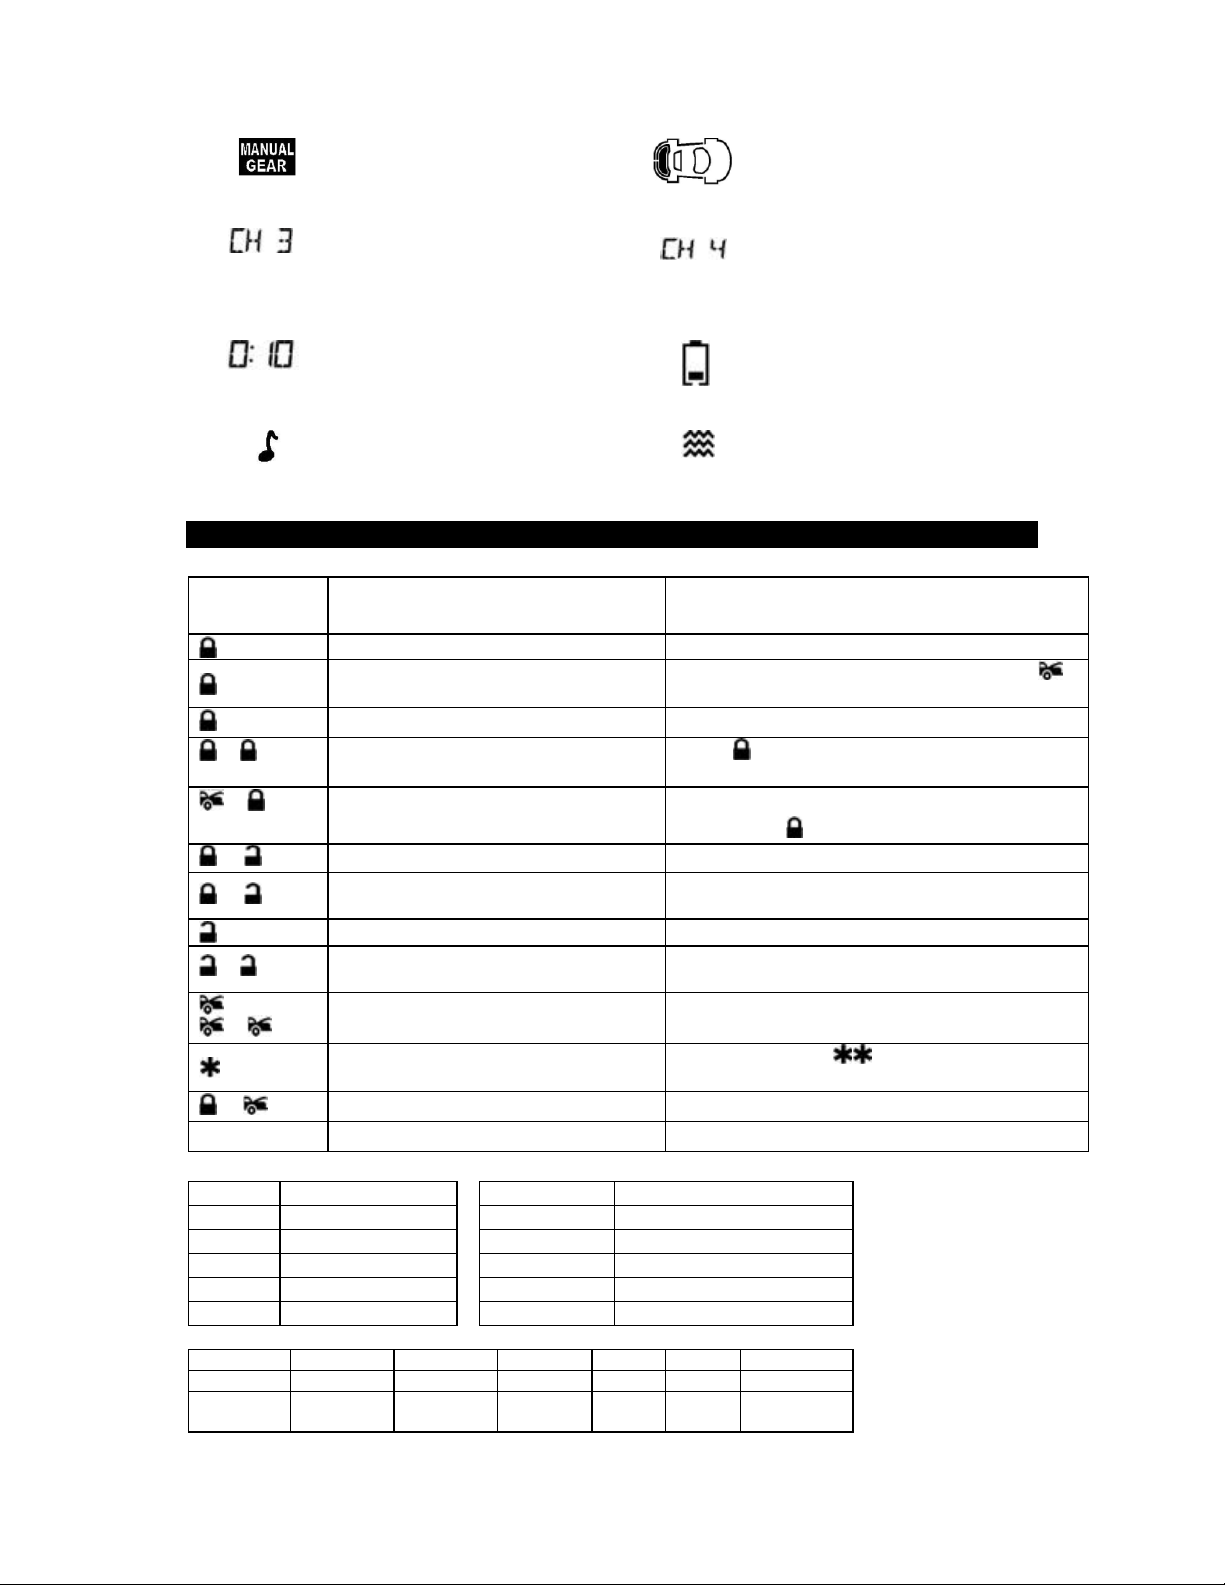
tart Memorizing for the car with
12:00
Manual Gear
Engine S
manual gear was set up
Activate Channel 3
Time Monitor
Parking Meter
Reminder when time is up for parking
12:00
Activate Channel 3 (Trunk Release).
Activate Channel 4
Alarm Clock
You have set morning call alarm
Low Battery
You have to replace the battery of remote
control.
Melody Mode
Remote Control alert user through
melody sound
Vibration Mode
Remote Control vibrates when the
system is triggered
OPERATION:
C: REMOTE TRANSMITTER OPERATION:
Transmitter
Button
-
Arm and Delete The 2 Stage Shock
- Arm System and Hidden Alarm Function Press within 3 seconds and Hold
+
+ Active Anti Car-Jacking Mode
Unlock Doors & Disarm System
-
Two Steps Door Unlock & Disarm
- Passive Arming By-pass While the system Disarmed.
Activate or Tur n Off The Remote Start
+
II
Switching code For 2nd Car Operation . For regular XT-33 remote transmitter Only
System Function Remark
Lock Doors & Arm System
Panic function
Press and Hold for 3 seconds. Press Trunk
button to stop panic function
Car Locator Press when in armed mode
Press twice within 3 seconds. Pass will appear
Sensor
on the remote
button for 2 seconds
Silent Arming / Disarming Ignition in "off" position.
Ignition in "on" position press and hold for 2
seconds
System(optional)
Press twice within 3 seconds.
Trunk Release (Channel 3) Press and Hold for 2 seconds
Press button once. Press Twice if set to start
safety mode
Channel # 4 Timer Output ( 4) Optional
D CHIRP INDICATORS: PARKING LIGHT:
Chirp Function
1 chirp
2 chirps
3 chirps
4 chirps
6 chirps
Arm
Disarm
Defective Reminder
Disarm / Triggered
Car Locator
ALARM OPERATING CONDITION:
Siren / Horn Parking Light
1. Arming 1 or 3 Chirps 1 Flash Slow Flash Locking Disable
2. Disarming 2 or 4 Chirps 2 or 3 Flashes
Parking light Function
1 flash
2 flashes
3 flashes
12 flashes
Constant On
LED Doors Starter Dome Light
Unlocking
Disarm / Triggered
Under Remote Start
Arm
Disarm
Car Locator
Turns on for 30
- second
4

3. Trigger Alarming Flashes Slow Flash Disable Flashes
4. Passive
Starter
Disable
5. Panic Alarming Flashes Flashes
6. Car- Jacking Alarming Flashes Disable Flashes
7. Car Locator 6 Chirps 12 Flashes Locking
Fast Flash Disable
E. ACTIVE ARMING – LOCK & ARM:
1. Press button on the transmitter.
2. The siren will chirp once and parking light will flash once indicating that the system is now armed. The
vehicle’s doors will lock upon arming if interfaced with the security system.
DEFECTIVE SENSOR REMINDER: If the siren so unds 3 chirps, then you have left a door, trunk, or hood lid ajar.
SILENT ARMING / DISARMING: Press the transmitter and buttons at the same time. This will arm or
disarm your security system, No chirp sound will be heard, arm / disarm confirmation will be through the
vehicles parking lights only.
SENSOR BY-PASS:
The sensor bypass feature is programmed to activate for one arming cycle only. The security system will
return to normal operation during the next arming cycle.
Sensor By-Pass : Press the button two times within 5 seconds will arm the security system and
by-pass the shock sensor.
HIDDEN ALARM FUNCTION: Silent Alarm
Press the button first; within 3 seconds press the button to activate the hidden alarm function. The
security system will arm and with “Hidden Alarm Function” The siren / horn will be silenced even if the
sensor is triggered in the armed status. Alarm indication will only appear on the LCD Transmitter.
F. PASSIVE ARMING (Programmable)
Active arming / disarming is controlled by your security system via the remote transmitter. This security
system is equipped with an optional Passive Arming feature which allows the security system to arm 30
seconds after the last door is closed. Operation is as follows.
1. Turn the ignition to the “OFF” position and exit the vehicle.
2. After all entrances are closed, the security system LED will flash fast for 30 seconds. If you reopen any
door / hood / trunk, the security system LED will stop flashing. It will begin flashing again once all vehicle
entrances are closed.
3. After the 30-second time has elapsed, the security system will automatically “ARM”. The siren will chirp [1]
time and the parking lights will flash [1] time.
PASSIVE ARMING WITH PASSIVE DOOR LOCKING
The vehicle doors will automatically lock after the passive arming cycle has been completed.
PASSIVE ARMING BY-PASS: While the system is disarmed, Press the button twice, the system will respond
with [1] chirp and LED will turn “ON”. The security system will remain in this temporary state for as long as you wish.
To exit passive by-pass, press the transmitter or buttons and the system will return to normal status.
G. ACTIVE DISARMING – UNLOCK & DISARM:
1. Press button on the transmitter.
2. The siren will chirp twice and the parking lights will flash twice indicating that the security system is now disarmed.
The vehicle’s doors will unlock and the dome light will turn on for 30 seconds upon disarming. (Note: Power door
locks and dome light must be installed with the security syst em.)
5

TAMPER DISARMING: If the alarm is triggered , upon disarm the system’s siren will chirp 4 times, and the
parking lights will flash 3 times telling you the alarm has been triggered during the last armed state.
PATHWAY ILLUMINATION: When receiving an unlock /disarm signal, this feature will turn the parking lights
“ON” for 30 seconds and for 10 seconds upon the lock signal. (Programmable)
TWO STEPS DOOR UNLOCK (Optional): This feature will independently unlock the driver’s door only when
disarming the security system. Pushing the button a second time within 3 seconds will unlock the other
doors.
AUTOMATIC RE-ARM: If this feature is selected, the security system will automatically re-arm itself in 60
seconds after disarming with remote transmitter. Automatic rearm will cancel if any door is opened before
the 60 seconds timer has elapsed.
H . DISARMING WITHOUT A TRANSMITTER
OVERRIDES THE ALARM WITHOUT PASSWORD PIN CODE: (Factory Default Setting)
The Override function may be used if the remote tran smitter is lost or inoperative.
1. Enter the vehicle and turn the ignition switch to the 'ON’ position.
2. (Alarm will sound.)
3. Within 10 seconds push and release the valet switch. The alarm will stop sounding and enter the disarm
mode. You can now start and op erate the vehicle normally.
OVERRIDE THE ALARM WITH PASSWORD PIN CODE:
Unlike valet switch that can easily be found and defeated, this security system allows the consumer to
program a password pin code offering a higher level of security.
1. Enter the vehicle and turn the ignition switch to 'ON’ position. (Alarm will sound.)
2. Within 5 seconds, enter your chosen first digit code by pressing and releasing the Valet Switch. (When
finished above procedures, system's siren will stop alarming, lights will stop flashing, but the vehicle
can’t be started.)
3. Within 15 seconds of the last digit code enter (the 1st code), then turn the Ignition Switch “OFF” and then
“ON”.
4. Within 15 seconds, enter your chosen second digit code by pressing and releasing the Valet Switch.
5. Turn the ignition switch “OFF” position. 4 Chirps from siren/horn and 3 flashes from the parking light
indicate the system has disarmed.
Note: You must override the alarm within 60 seconds. If not, the system will automatically re-arm.
EXAMPLE: To Overri de the System with the Password Code 83,
1. Enter the vehicle and turn the ignition switch to the 'ON’ position.
(Alarm will sound.)
2. Within 5 seconds, Press and Release the Valet Switch 8 times, (When finished the system's siren will
stop alarming, lights st op flashing, but the vehicle cannot be started or driven away.)
3. Within 15 seconds of entering the last digit code enter (the 1st code), turn the Ignition Switch “Off” and then
“ON”.
4. Within 15 seconds, Press and Release the Valet Switch 3 times.
5. Turn the Ignition Switch to the “Off” position. 4 Chirps form siren/horn and 3 flashes from the parking lights
will indicate the system has disarmed.
I. VALET MODE:
VALET MODE: (System is in Disarm Mode )
The valet switch allows you to temporarily bypass all alarm function, eliminating the need to hand your
transmitter to parking attendants or garage mechanics. When the system is in valet mode, all alarm
functions and remote start functions are bypassed, however, the remote panic feature and remote door
6

locks will rema in operational. To use the valet mode, the system must first be disarmed either by using your
remote transmitter, or by operating the Manual Override sequence.
Get into/out valet mode using the ignition key.
Enter Valet Mode:
a). Under disarm mode, turn the ignition to “ON” position.
b). Press and hold valet switch for 2 seconds until the LED turns ON solid . The LED will remain on as
long as the system is in 'valet mode'.
Exit Valet Mode:
a). T urn ignition 'ON'.
b). Push and hold valet switch for 2 secon ds, The LED will turn off indicate the system are exiting the
valet mode.
J. CAR LOCATOR
Under armed mode, press the button to active car locator function. The siren will chirp 6 times. The
parking light will flash 12 times, for you to easily locate your car.
K. PANIC FUNCTION:
The transmitter can be used as a remote panic switch to manually trigger the alarm in case of emergency.
1. Press and hold the button for 3 second. The alarm will immediately sound.
2. During panic mode, the normal function of this transmitter button will be disabled. The transmitter and
buttons can be used to lock and unlock the door (if the option is installed), however once the button is
pressed, the vehicle’s starter disable device, (where installed) will be disengaged allowing the vehicle to start.
3. To stop the alarm, press the trunk button on the remote control
4. If the button is not pressed, the alarm will automatically stop after 30 seconds.
L. TRIGGER THE SYSTEM
When armed, your vehicle is protected as follows:
Light impact will trigger the warn-away signal.
Heavy impacts / Doors open /(if installed) Hood open / (if installed) Trunk open / Turning on the ignition key
will trigger the programmed sequence.
The starter disable relay (if installed) prevents the vehicle’s starter from cranking. The siren, horn, parking
lights, and dome light will turn on alerting of an intrusion for 30 seconds. Then it will stop and automatic
reset and re-arm. If the any one of the sensors or detectors is still active, the alarm system will sound a
maximum of 3 times of 30 seconds cycles.
NOISE ABATEMENT CIRCUIT: Your system has a “Noise Abatement Circuit”. It prevents annoying repetitive
trigger sequences due to faulty door pin switches or environmental conditions such as thunder,
jackhammers airport noise, etc.
Here’s how “Noise Abatement Circuit” works: The alarm triggers five times. Each time, the same sensor
or switch has triggered the alarm; the “Noise Abatement Circuit” will interpret this pattern of triggers as a
false alarm. After the third trigger, the “Noise Abatement Circuit” ignores, or bypasses, that sensor or switch
until a different sensor or switch is trigger.
“Noise Abatement Circuit” covers doors (Hood/Trunk) differently: If the alarm is triggered by an open door
for Three full cycles, the doors will be bypassed until the trigger ceases.
M. ANTI CAR- JACKING (Programmable)
Warning: If you don't need the carjacking function in this alarm system, be sure to set carjacking feature
“OFF”. This systems default setting is “OFF” for all carjacking modes.
ACTIVE ANTI CAR JACKING:
7
 Loading...