

Page 1

Gartenhäcksler
Originalbetriebsanleitung – Sicherheitshinweise – Ersatzteile
Garden Shredder
Original instructions – Safety instructions – Spare parts
Broyeur de végétaux
Notice originale – Consignes de sécurité – Pièces de rechange
Zahradní drtič
Originální návod k použití – Bezpečnostní pokyny – Náhradní díly
Kompostkværn
Original brugsanvisning – Sikkerhedshenvisninger – Reservdeler
Puutarhasilppurin
Alkuperäiset ohjeet – Turvaohjeet – Varaosat
Kerti szecskavágó
Erediti használati utalítás – Biztonsági tudnivalók – Pótalkatrészek
Vrtna sječkalica
Originalne upute za rad – Sigurnosne upute – Rezervni dijelovi
Trituratore da giardino
Istruzioni originali – Indicazioni per la sicurezza – Pezzi di ricambio
Seite 1
Page 8
Page 15
Str 23
Side 30
Side 37
44. oldal
Strana 51
Pagina 58
Kompostkvern
Original brugsanvisning – Sikkerhetsinformasjoner – Reservedeler
Tuinhakselaar
Oorspronkelijke gebruiksaanwijzing – Veiligheidsinstructies
Reserveonderdelen
Rozdrabniacz ogorodowy
Instrukcja oryginalna – Wskazówki bezpieczeństwa
Części zamienne
Садовый измельчитель
Оригинальное руководство по эксплуатации
Указания по технике безопасности – Запасные части
Kompostkvarn
Bruksanvisning i original – Säkerhetsanvisningar
Reservdelar
Záhradný drtič
Originálný návod na použitie – Bezpečnostné pokyny
Náhradné dielce
Vrtni rezalnik
Navodilo za uporabo – Varnostni napotki
Nadomestni deli
Side 65
Blz. 72
Stronie 79
стр. 87
Sidan 95
Strana
102
Stran 109
Page 2

Sie dürfen das Gerät nicht in Betrieb nehmen, bevor
Sie diese Betriebsanleitung gelesen, alle angegebenen Hinweise beachtet und das Gerät wie beschrieben montiert haben.
Anleitung für künftige Verwendungen aufbewahren.
IInnhhaalltt
EG-Konformitätserklärung 1
Lieferumfang 1
Beschreibung des Gerätes 1
Symbole Gerät 2
Symbole Betriebsanleitung 2
Betriebszeiten 2
Bestimmungsgemäße Verwendung 2
Restrisiken 2
Sicherheitshinweise 3
Inbetriebnahme 4
Arbeiten mit dem Gartenhäcksler 5
Einstellen des Gegenmessers 6
Wartung und Pflege 6
Störungen 6
Technische Daten 7
Garantie 7
Zusammenbau 116
Ersatzteile 117
LLiieeffeerruummffaanng
g
Überprüfen Sie nach dem Auspacken den Inhalt des Kar-
tons auf
! Vollständigkeit
! evtl. Transportschäden
Teilen Sie Beanstandungen umgehend dem Händler, oder Hersteller mit. Spätere Reklamationen werden nicht anerkannt.
• 1 vormontierte Geräteeinheit
• 1 Standbein-links
• 1 Standbein-rechts
• 1 Achse
• 2 Räder
• 2 Radabdeckungen
• 1 Schraubenbeutel
• 1 Auffangsack
• 1 Betriebsanleitung
BBeesscchhrreeiibbuunngg ddeess GGeerräättees
s
EEGG--KKoonnffoorrmmiittäättsseerrkklläärruunng
g
entsprechend der EG-Richtlinie 2006/42/EG
Hiermit erklären wir
ATIKA GmbH & Co. KG
Schinkelstraße 97, 59227 Ahlen - Germany
in alleiniger Verantwortung, dass das Produkt
Gartenhäcksler Typ AH 600
Seriennummer: siehe letzte Seite
konform ist mit den Bestimmungen der o. a. EG-Richtlinie, sowie
mit den Bestimmungen folgender weiterer Richtlinien:
2004/108/EG und 2000/14/EG.
Folgende harmonisierte Normen wurden angewandt:
EN 60335-1:2002+A1+A11+A12+A2+A13;
EN 13683:2003+A1:2009; EN 62233:2008; EN 55014-1:2006;
EN 55014-2/A1:2001; EN 61000-3-2:2006; EN 61000-3-11:2000
Konformitätsbewertungsverfahren: 2000/14/EG – Anhang V
Gemessener Schallleistungspegel L
91 dB (A).
WA
Garantierter Schallleistungspegel LWA 92 dB (A).
Aufbewahrung der technischen Unterlagen:
ATIKA GmbH & Co. KG – Technisches Büro – Schinkelstr. 97
59227 Ahlen – Germany
Ahlen, 30.04.2010 A. Pollmeier, Geschäftsführung
A. Trichteröffnung für Häckselgut
B. Handgriff
C. Rückstellknopf / Motorschutz
D. Netzstecker
E. Ein-/Aus-Schalter
F. Drehrichtungsumschalter
G. Fahrgestell
H. Gehäuseoberteil
I. Einstellknopf für Schneidwalze
J. Auswurfschlitz
1
Page 3

SSyymmbboollee GGeerräät
Vor Inbetriebnahme die Betriebsanleitung
und Sicherheitshinweise lesen
und beachten.
Gefahr durch
fortschleudernde
Teile bei laufendem Motor –
unbeteiligte Personen, sowie
Haus- und Nutz
Tiere aus dem Gefahrenbe-
t
Vor Reparatur-,
Wartungs- und
Reinigungsarbeiten Motor abstellen und Netzstecker ziehen.
Achtung vor rotierenden Messern.
Hände und Füße
nicht in Öffnungen
halten, wenn die
Maschine läuft.
reich fernhalten.
Augen- und Gehörschutz tragen.
Schutzhandschuhe
tragen.
Vor Feuchtigkeit
schützen.
Elektrische Geräte gehören nicht in den Hausmüll.
Geräte, Zubehör und Verpackung einer umwelt-
freundlichen Wiederverwertung zuführen.
Gemäß der Europäischen Richtlinie 2002/96/EG über Elektround Elektronik-Altgeräte müssen nicht mehr gebrauchsfähige
Elektrogeräte getrennt gesammelt und einer umweltgerechten
Wiederverwertung zugeführt werden.
SSyymmbboollee BBeettrriieebbssaannlleeiittuunng
g
Drohende Gefahr oder gefährliche Situation. Das
Nichtbeachten dieser Hinweise kann Verletzungen zur
Folge haben oder zu Sachbeschädigung führen.
Wichtige Hinweise zum sachgerechten Umgang.
L
Das Nichtbeachten dieser Hinweise kann zu Störungen
führen.
Benutzerhinweise. Diese Hinweise helfen Ihnen, alle
Funktionen optimal zu nutzen.
Montage, Bedienung und Wartung. Hier wird Ihnen
genau erklärt, was Sie tun müssen.
BBeettrriieebbsszzeeiitteen
n
Gemäß der Maschinenlärmschutzverordnung vom September
2002 dürfen Gartenhäcksler in reinen, allgemeinen und besonderen Wohngebieten, Kleinsiedlungsgebieten, Sondergebieten, die
der Erholung dienen, Kur- und Klinikgebieten und Gebieten für
die Fremdenbeherbergung sowie auf dem Gelände von Krankenhäusern und Pflegeanstalten an Sonn- und Feiertagen sowie an
Werktagen von 20.00 bis 7.00 Uhr nicht in Betrieb genommen
werden.
Bitte beachten Sie auch die regionalen Vorschriften zum
Lärmschutz.
BBeessttiimmmmuunnggssggeemmääßßee VVeerrwweenndduunngg
Zur bestimmungsgemäßen Verwendung gehört das Häckseln von
- Ästen aller Art bis max. Durchmesser (je nach Holzart und
Frische)
- welken, feuchten, bereits m ehrere Tage gelagerten Garten-
abfällen im Wechsel mit Ästen
Das Häckseln von Glas, Metall, Kunststoffteilen, Plastiktüten,
Steinen, Stoffabfällen, Wurzeln mit Erdreich, Abfällen ohne feste
Konsistenz (z. B. Küchenabfällen) wird ausdrücklich ausgeschlossen.
Der Gartenhäcksler ist nur für die private Nutzung im Haus- und
Hobbygarten geeignet.
Als Häcksler für den privaten Haus- und Hobbygarten werden
solche Geräte angesehen, die nicht in öffentlichen Anlagen,
Parks, Sportstätten, in der Land- und Forstwirtschaft und nicht
gewerblich eingesetzt werden.
Zur bestimmungsgemäßen Verwendung gehört auch die Einhaltung der vom Hersteller vorgeschriebenen Betriebs-, Wartungsund Instandsetzungsbedingungen und die Befolgung der in der
Anleitung enthaltenen Sicherheitshinweise.
Jeder weiter darüber hinausgehende Gebrauch gilt als nicht bestimmungsgemäß. Für hieraus resultierende Schäden jeder Art
haftet der Hersteller nicht: Das Risiko trägt allein der Benutzer.
Eigenmächtige Veränderungen an dem Gartenhäcksler schließen
eine Haftung des Herstellers für daraus entstehende Schäden
jeder Art aus.
Das Gerät darf nur von Personen gerüstet, genutzt und gewartet
werden, die damit vertraut und über die Gefahren unterrichtet
sind. Instandsetzungsarbeiten dürfen nur durch uns bzw. durch
von uns benannte Kundendienststellen durchgeführt werden.
RReessttrriissiikkeen
Auch bei bestimmungsgemäßer Verwendung können trotz
n
Einhaltung aller einschlägigen Sicherheitsbestimmungen aufgrund der durch den Verwendungszweck bestimmten Konstruktion noch Restrisiken bestehen.
Restrisiken können minimiert werden, wenn die „Sicherheitshinweise“ und die „Bestimmungsgemäße Verwendung“, sowie die
Betriebsanleitung insgesamt beachtet werden.
Rücksichtnahme und Vorsicht verringern das Risiko von Personenverletzungen und Beschädigungen.
Verletzungsgefahr der Finger und Hände, wenn Sie mit der
Hand durch eine Öffnung greifen und an das Messerwerk gelangen.
Verletzungsgefahr der Finger und Hände bei Montage- und
Reinigungsarbeiten am Messerwerk.
Verletzung durch weggeschleudertes Häckselgut im Bereich
des Trichters.
Gefährdung durch Strom, bei Verwendung nicht ordnungsge-
mäßer Elektro-Anschlussleitungen.
Berührung spannungsführender Teile bei geöffneten elektri-
schen Bauteilen.
2
Page 4

Beeinträchtigung des Gehörs bei länger andauernden Arbei-
ten ohne Gehörschutz.
Des Weiteren können trotz aller getroffener Vorkehrungen nicht
offensichtliche Restrisiken bestehen.
SSiicchheerrhheeiittsshhiinnwweeiissee
Lesen und beachten Sie vor Inbetriebnahme dieses
Erzeugnisses die folgenden Hinweise und die im jeweiligen
Land gültigen Sicherheitsbestimmungen, um sich selbst und
andere vor möglichen Verletzungen zu schützen.
Geben Sie die Sicherheitshinweise an alle Personen
L
weiter, die mit der Maschine arbeiten.
Bewahren Sie diese Sicherheitshinweise gut auf.
L
Reparaturen am Gerät haben durch den Hersteller
bzw. von ihm benannte Firmen zu erfolgen.
Machen Sie sich vor Gebrauch mit Hilfe der Betriebsanleitung
mit dem Gerät vertraut.
Benützen Sie das Gerät nicht für Zwecke, für das es nicht
bestimmt ist (siehe Bestimmungsgemäße Verwendung und
Arbeiten mit dem Gartenhäcksler).
Sorgen Sie für sicheren Stand und halten Sie jederzeit das
Gleichgewicht. Strecken Sie sich nicht vor. Stehen Sie beim
Einwerfen des Häckselgutes auf gleicher Ebene mit dem Gerät.
Seien Sie aufmerksam. Achten Sie darauf, was Sie tun. Ge-
hen Sie mit Vernunft an die Arbeit. Verwenden Sie das Gerät
nicht, wenn Sie müde sind oder unter dem Einfluss von Drogen, Alkohol oder Medikamenten stehen. Ein Moment der
Unachtsamkeit beim Gebrauch des Gerätes kann zu ernsthaften Verletzungen führen.
Tragen Sie beim Arbeiten Schutzbrille, Arbeitshandschuhe
und Gehörschutz.
Tragen Sie geeignete Arbeitskleidung:
- keine weite Kleidung
- rutschfestes Schuhwerk
Der Bedienende ist im Arbeitsbereich der Maschine gegen-
über Dritten verantwortlich.
Kinder und Jugendliche unter 16 Jahren dürfen das Gerät
nicht bedienen.
Kinder vom Gerät fernhalten.
Setzen Sie das Gerät niemals ein, während unbeteiligte Per-
sonen in der Nähe sind.
Lassen Sie das Gerät nie unbeaufsichtigt.
Halten Sie Ihren Arbeitsbereich in Ordnung! Unordnung
kann Unfälle zur Folge haben.
Nehmen Sie eine Arbeitsstellung ein, die sich seitlich oder
hinter dem Gerät befindet. Niemals im Bereich der Auswurföffnung stehen.
Niemals in die Einfüll- oder Auswurföffnung greifen.
Halten Sie Gesicht und Körper von der Einfüllöffnung fern.
Überlasten Sie das Gerät nicht! Sie arbeiten besser und si-
cherer im angegebenen Leistungsbereich.
Betreiben Sie das Gerät nur mit kompletten und korrekt ange-
brachten Schutzeinrichtungen und ändern Sie an der Maschine nichts, was die Sicherheit beeinträchtigen könnte.
Ändern Sie nicht die Drehzahl des Motors, denn diese regelt
die sichere maximale Arbeitsgeschwindigkeit und schützt den
Motor und alle sich drehenden Teile vor Schaden durch übermäßige Geschwindigkeit.
Das Gerät nicht ohne Einfülltrichter betreiben.
Das Gerät bzw. Teile des Gerätes nicht verändern.
Vor Einschalten des Motors Gerät schließen.
Das Gerät nicht mit Wasser abspritzen. (Gefahrenquelle elekt-
rischer Strom).
Berücksichtigen Sie Umgebungseinflüsse:
− Benutzen Sie das Gerät nicht in feuchter oder nasser Um-
gebung.
− Gerät nicht im Regen stehen lassen oder bei Regen ar-
beiten.
− Arbeiten Sie nur bei ausreichenden Sichtverhältnissen,
Sorgen Sie für gute Beleuchtung.
Um Verletzungsgefahr für die Finger auszuschließen, bei
Montage- und Reinigungsarbeiten Schutzhandschuhe tragen.
Schalten Sie die Maschine ab und ziehen Sie den Netzste-
cker aus der Steckdose bei:
− Wartungs- und Reinigungsarbeiten
− Beseitigung von Störungen
− Überprüfungen der Anschlussleitungen, ob
diese verschlungen oder beschädigt sind
− Transport
− Reparaturarbeiten
− Messerwechsel
− Verlassen (auch bei kurzzeitigen Unterbrechungen)
Bei Verstopfungen im Ein- und Auswurf der Maschine schal-
ten Sie den Motor aus und ziehen Sie den Netzstecker, bevor
Sie Materialreste im Ein- oder Auswurf beseitigen.
Überprüfen Sie die Maschine auf eventuelle Beschädigun-
gen:
− Vor weiterem Gebrauch des Gerätes müssen Schutzvor-
richtungen sorgfältig auf ihre einwandfreie und bestim-
mungsgemäße Funktion untersucht werden.
− Überprüfen Sie, ob die beweglichen Teile einwandfrei
funktionieren und nicht klemmen oder ob Teile beschädigt
sind. Sämtliche Teile müssen richtig montiert sein und alle
Bedingungen erfüllen, um einwandfreien Betrieb des Gerätes sicherzustellen.
− Beschädigte Schutzvorrichtungen und Teile müssen
sachgemäß durch eine anerkannte Fachwerkstatt repariert
oder ausgewechselt werden, soweit nichts anderes in der
Betriebsanleitung angegeben ist.
− Beschädigte oder unleserliche Sicherheitsaufkleber sind
zu ersetzen.
Bewahren Sie unbenutzte Geräte an einem trockenen, ver-
schlossenen Ort außerhalb der Reichweite von Kindern auf.
EElleekkttrriisscchhee SSiicchheerrhheeiitt
Ausführung der Anschlussleitung nach IEC 60245
(H 07 RN-F) mit einem Aderquerschnitt von mindestens
− 1,5 mm² bei Kabellänge bis 25 m
− 2,5 mm² bei Kabellänge über 25 m
Lange und dünne Anschlussleitungen erzeugen einen Span-
nungsabfall. Der Motor erreicht nicht mehr seine maximale
Leistung, die Funktion des Gerätes wird reduziert.
3
Page 5

Stecker und Kupplungsdosen an Anschlussleitungen müssen
aus Gummi, Weich-PVC oder anderem thermoplastischen
Material der gleichen mechanischen Festigkeit sein oder mit
diesem Material überzogen sein.
Die Steckvorrichtung der Anschlussleitung muss spritzwas-
sergeschützt sein.
Beim Verlegen der Anschlussleitung darauf achten, dass sie
nicht gequetscht, geknickt und die Steckverbindung nicht nass
wird.
Wickeln Sie bei Verwendung einer Kabeltrommel das Kabel
vollständig ab.
Verwenden Sie das Kabel nicht für Zwecke, für die es nicht
bestimmt ist. Schützen Sie das Kabel vor Hitze, Öl und
scharfen Kanten. Verwenden Sie das Kabel nicht, um den
Stecker aus der Steckdose zu ziehen.
Kontrollieren Sie Verlängerungskabel regelmäßig und erset-
zen Sie sie, wenn sie beschädigt sind.
Verwenden Sie keine defekten Anschlussleitungen.
Verwenden Sie im Freien nur dafür zugelassene und ent-
sprechend gekennzeichnete Verlängerungskabel.
Keine provisorischen Elektroanschlüsse einsetzen.
Schutzeinrichtungen niemals überbrücken oder außer Be-
trieb setzen.
Schließen Sie das Gerät über Fehlerstromschutzschalter
(30 mA) an.
Der Elektroanschluss bzw. Reparaturen an elektrischen
Teilen der Maschine haben durch eine konzessionierte E-
lektrofachkraft oder eine unserer Kundendienststellen zu erfolgen. Örtliche Vorschriften insbesondere hinsichtlich der
Schutzmaßnahmen sind zu beachten.
Reparaturen an anderen Teilen der Maschine haben durch
den Hersteller bzw. einer seiner Kundendienststellen zu erfolgen.
Nur Originalersatzteile verwenden. Durch den Gebrauch
anderer Ersatzteile können Unfälle für den Benutzer entstehen. Für hieraus resultierende Schäden haftet der Hersteller nicht.
IInnbbeettrriieebbnnaahhmmee
Vergewissern Sie sich, dass das Gerät komplett und vor-
schriftsmäßig montiert ist.
Stellen Sie den Häcksler zum Gebrauch auf waagerechten
und festen Untergrund (Kippgefahr).
Das Gerät nicht auf gepflasterten oder geschotterten Boden
stellen.
Benutzen Sie das Gerät nur im Freien. Halten Sie Abstand
(mindestens 2 m) von einer Wand oder einem anderen starren Gegenstand.
Überprüfen Sie vor jedem Gebrauch:
− die Anschlussleitungen auf defekte Stellen (Risse,
Schnitte o. dgl.)
verwenden Sie keine defekten Leitungen
− das Gerät auf eventuelle Beschädigungen
(siehe Sicherheitshinweise)
− ob alle Schrauben fest angezogen sind
L Netzanschluss
Vergleichen Sie die auf dem Gerätetypenschild angegebene
Spannung mit der Netzspannung und schließen Sie das Gerät
an die entsprechende und vorschriftsmäßige Steckdose an.
Verwenden Sie Verlängerungskabel mit ausreichendem
Querschnitt
Netzabsicherung
Schweiz UK
2300 W
2500 W
2800 W
Ein-/Ausschalter
Benutzen Sie kein Gerät, bei dem sich der Schalter nicht ein
und ausschalten lässt. Beschädigte Schalter müssen unverzüglich vom Kundendienst repariert oder ersetzt werden.
EIN
AUS
Einschalten
Drücken Sie den grünen Knopf I
Ausschalten
Drücken Sie den roten Knopf 0
Wiederanlaufsicherung bei Strom-
ausfall
Bei Stromausfall schaltet das Gerät automatisch ab (Nullspannungsauslöser). Zum Wiedereinschalten erneut den grünen
Knopf drücken.
Motorschutz
Der Motor ist mit einem Schutzschalter ausgerüstet und schaltet
bei Überlastung selbsttätig ab. Der Motor kann nach einer Abkühlpause (ca. 5 min.) wieder eingeschaltet werden. Drücken Sie
1. Rückstellknopf (Motorschutz)
2. grünen Knopf I zum Wiedereinschalten.
16 A träge
16 A träge
16 A träge
Rücklauf
10 A träge 13 A träge
13 A träge
13 A träge
Rückstellknopf
(Motorschutz)
Drehrichtungsumschalter
AUS
Einzug
4
Page 6

Drehrichtungsumschalter
Den Drehrichtungsumschalter nur bei abgeschaltetem
Häcksler betätigen.
Stellung
Gerät läuft nicht an.
Stellung
Das Material wird von der Schneidwalze eingezogen und gehäckselt.
Stellung
Das Messer arbeitet in umgekehrter Richtung, und eingeklemmtes Material wird frei.
Nachdem Sie den Drehrichtungsumschalter in die Stellung
gebracht haben, halten Sie den grünen Knopf des Ein-/AusSchalters gedrückt. Die Schneidwalze wird auf umgekehrte Richtung gestellt. Wenn Sie den Ein-/Aus-Schalter loslassen, bleibt
der Häcksler automatisch stehen.
Tipps
z Große Gegenstände oder Holzstücke werden nach mehr-
maliger Betätigung sowohl in Schneide- als auch in Freigaberichtung entfernt.
z Benutzen Sie einen Stopfer oder Haken zum Entfernen von
blockierten Gegenständen aus dem Trichter oder Auswurfschlitz.
Warten Sie stets, bis der Häcksler stillsteht, bevor Sie
ihn wieder einschalten.
Netzimpedanz
Bei ungünstigen Netzbedingungen kann es während des Einschaltvorganges des Gerätes zu kurzzeitigen Spannungsabsenkungen kommen, die andere Geräte beeinträchtigen können (z.
B. Flackern einer Lampe).
Es sind keine Störungen zu erwarten, wenn die in der Tabelle
angegebene maximale Netzimpedanz eingehalten wird.
Leistungsaufnahme P
2300 0,21
2500 0,21
2800 0,19
AArrbbeeiitteenn mmiitt ddeemm GGaarrtteennhhääcckksslleerr
Nehmen Sie eine Arbeitsstellung ein, die sich seitlich oder
hinter dem Gerät befindet. Niemals im Bereich der Auswurföffnung stehen.
Längeres Material, das aus dem Gerät hervorsteht, könnte zurückschnellen, wenn es von den Messern eingezogen
wird! Sicherheitsabstand einhalten!
Niemals in die Einfüll- oder Auswurföffnung greifen.
Halten Sie Gesicht und Körper von der Einfüllöffnung fern.
(W)
1
Netzimpedanz Z
max
(Ω)
Bringen Sie Hände, andere Körperteile und Kleidung nicht in
das Einfüllrohr, Auswurfkanal oder in die Nähe von anderen
beweglichen Teilen.
Vor Einschalten des Gerätes überprüfen, ob keine Häcksel-
reste im Einfülltrichter sind.
Kippen Sie das Gerät nicht bei laufendem Motor.
Beim Füllen darauf achten, dass keine Metallstücke, Steine,
Flaschen oder andere nicht zu verarbeitende Gegenstände in
den Einfülltrichter gelangen.
Gelangen fremde Gegenstände in den Einfülltrichter oder das
Gerät fängt an außergewöhnliche Geräusche oder Vibrationen zu machen, das Gerät sofort ausschalten und zum Stillstand kommen lassen. Netzstecker ziehen und folgende
Punkte durchführen:
− inspizieren Sie den Schaden
− ersetzen oder reparieren Sie beschädigte Teile
− überprüfen Sie das Gerät und ziehen Sie lockere Teile fest
Sie dürfen das Gerät nicht reparieren, wenn Sie dazu nicht
berechtigt sind (siehe Sicherheitshinweise)
Was kann ich häckseln?
Ja:
• organische Abfälle aus Haushalt und Garten
z. B. Hecken- und Baumschnitt, verblühte Blumen, Küchenabfälle
Nein:
• Glas, Metallteile, Kunststoffe, Plastiktüten, Steine, Stoffabfäl-
le, Wurzeln mit Erdreich, Speise-, Fisch- und Fleischabfälle
Besondere Hinweise zum Häckseln:
¾ Füllen Sie das zu häckselnde Mate-
rial immer von der rechten Seite in
die Einfüllöffnung des Trichters.
¾ Häckseln Sie die Äste, Zweige und
Hölzer kurz nach dem Schneiden
− dieses Häckselgut wird bei Austrocknung sehr hart, der
maximal zu verarbeitende Astdurchmesser wird hierdurch
geringer.
¾ Entfernen Sie Seitentriebe bei stärker verzweigten Ästen.
¾ Verarbeiten von stark wasserhaltigen, zum Verkleben nei-
genden Garten- bzw. Küchenabfällen
− diese abwechselnd mit holzigem Häckselgut zerkleinern,
um eine Verstopfung im Gerät zu vermeiden.
¾ Das gehäckselte Gut im Bereich der Auswurföffnung nicht zu
hoch anwachsen lassen. Dies kann zur Folge haben, dass bereits Gehäckseltes den Auswurfkanal verstopft. Dadurch kann
es zu einem Rückschlag des Materials durch die Einfüllöffnung kommen.
¾ Reinigen Sie die Einfüllöffnung und den Auswurfkanal, wenn
das Gerät verstopft ist. Schalten Sie hierfür
aus und ziehen Sie den Netzstecker.
¾ Beachten Sie, dass der Ihrem Gerät entsprechende maximal
zu verarbeitende Astdurchmesser eingehalten wird (s.
„Technische Daten“). Je nach Art und Frische des Holzes
kann sich der maximal zu verarbeitende Astdurchmesser verringern.
¾ Das Schneidwerk zieht das Häckselgut selbständig und durch
das langsame Laufen der Schneidwalze stoßfrei ein.
zuerst den Motor
5
Page 7

¾ Selbsttätiges Umschalten der Drehrichtung:
Bei plötzlichem Blockieren des Gerätes kann die Drehrichtung der Schneidwalze umschalten und in diesem Fall das
Häckselgut zurückschieben.
− Gerät ausschalten
− Stillstand der Schneidwalze abwarten
− Gerät erneut einschalten und leichter zu verarbeitendes
Häckselgut verwenden.
¾ Beim Überlasten des Gerätes schaltet der mit einem Motor-
schutzschalter ausgestattete Schalter selbständig ab
− schalten Sie den Häcksler nach ca. 5 min. erneut ein
− lässt sich das Gerät nach dieser Wartezeit nicht einschal-
ten, sehen Sie unter Punkt „Mögliche Störungen“ nach.
EEiinnsstteelllleenn ddeess GGeeggeennmmeesssseerrss
Das Gegenmesser (B) kann an der Schneidwalze (A) spielfrei
eingestellt werden. Ein möglichst kleiner Abstand sollte für einen
effektiven Betrieb eingehalten werden.
Weiches Material oder nasse Zweige können reißen statt geschnitten werden. Auch ein nach mehrfacher Betätigung verschlissenes Gegenmesser kann zu diesem Problem führen.
Einstellknopf (D) nach rechts, so dass sich die Schraube (C) zur
Schneidwalze hin bewegt. Drehen Sie so lange, bis feine Aluspäne aus dem Auswurfschlitz fallen.
WWaarrttuunngg uunndd PPfflleeggee
• Vor Beginn jeder Wartungsarbeit
- Motor abschalten und Netzstecker ziehen
- Schutzhandschuhe zur Vermeidung von Verletzungen anziehen.
Das Schneidwerkzeug steht nach dem Ausschalten nicht
sofort still. Warten Sie, bevor Sie mit der Reparatur oder
Wartung beginnen, bis alle Teile zum Stillstand gekommen
sind.
Achten Sie darauf, Werkzeug und Schraubenschlüssel nach
der Wartung oder Reparatur wieder zu entfernen.
• Der Gartenhäcksler ist weitgehend wartungsfrei. Zur
Werterhaltung und einer langen Lebensdauer Nachstehendes beachten:
− Lüftungsschlitze frei und sauber halten.
− überprüfen der Befestigungsschrauben (ggf. nachziehen).
− nach dem Häckseln das Gerät innen und außen reinigen.
Benutzen Sie zum Reinigen Ihres Geräts nur ein warmes
feuchtes Tuch und eine weiche Bürste.
Verwenden Sie niemals Reinigungs- oder Lösungsmittel. Sie
könnten dem Gerät irreparable Schäden zufügen. Die Kunststoffteile können von Chemikalien angegriffen werden.
− den Häcksler nicht mit fließendem Wasser oder Hochdruck-
reinigern reinigen.
blanke Metallteile nach jedem Gebrauch zum Schutz gegen
−
−
Korrosion mit einem umweltschonenden, biologisch abbaubaren Sprühöl behandeln.
Einstellen des Abstandes.
Schalten Sie das Gerät ein.
Auf der rechten Seite des Kunststoffgehäuses befindet sich eine
− Schneidwalze und Nachschneideplatte sind Verschleißteile,
haben jedoch bei normaler Nutzung und vorschriftsmäßigem
Nachstellen eine Lebensdauer von mehreren Jahren.
Einstellvorrichtung. Zum Einstellen des Abstands drehen Sie den
SSttöörruunnggeenn
Vor jeder Störungsbeseitigung
− Gerät ausschalten
− Stillstand des Gerätes abwarten
− Netzstecker ziehen
Störung mögliche Ursache Beseitigung
Motor läuft nicht an - Netzspannung fehlt
- Anschlusskabel defekt
- Gerät überlastet (Motorschutz wurde
ausgelöst)
- Absicherung überprüfen
- überprüfen lassen (Elektrofachmann)
- Gerät abkühlen lassen.
Drücken Sie
1. Rückstellknopf (Motorschutz)
2. grünen Knopf I zum Wiedereinschalten.
6
Page 8

Störung mögliche Ursache Beseitigung
Motor läuft nicht an - Drehrichtungsumschalter auf Stellung „0“
gestellt
Motor brummt, läuft aber
nicht an
- Schneidwalze blockiert
- Kondensator defekt
- Gerät ausschalten und Drehrichtungsumschalter
umstellen.
- Gerät ausschalten.
Schalten Sie den Drehrichtungsumschalter in die Stel-
lung
. Gerät einschalten bis die Blockierung be-
hoben ist. Gerät wieder ausschalten. Stellen Sie den
Drehrichtungsumschalter in die Stellung
- Gerät zur Reparatur an Hersteller bzw. an von ihm
benannte Firma
Häckselgut wird nicht eingezogen
- Die Schneidwalze läuft rückwärts. Schal-
terstellung nicht richtig
- Häckselgut klemmt im Trichter
(Materialstau)
- zu weiches oder nasses Häckselgut
- Verschleiß an der Schneidwalze
- Gerät ausschalten und Drehrichtungsumschalter
umstellen.
- Gerät ausschalten. Schalten Sie den Drehrichtungs-
umschalter in die Stellung
damit das Häckselgut freigegeben wird, evtl. Verunreinigungen entfernen.
Gerät wieder ausschalten. Zum Weiterarbeiten stellen
Sie den Drehrichtungsumschalter in die Stellung
zurück.
- mit einem Ast nachschieben und durchhäckseln
- Gegenmesser wie bei „Einstellen des Gegenmessers“
beschrieben einstellen, bei starker Abnutzung
Schneidwalze ersetzen.
Häckselgut wird nicht sauber
durchtrennt
Gerät läuft an, blockiert jedoch bei geringer Belastung
und schaltet über Motorschutzschalter ab.
- Gegenmesser nicht ausreichend einge-
stellt
Verlängerungskabel zu lang oder zu kleiner
Querschnitt. Steckdose zu weit vom Hauptanschluss entfernt und zu kleiner Querschnitt der Anschlussleitung.
- Gegenmesser wie bei „Einstellen des Gegenmessers“
beschrieben einstellen
Verlängerungskabel mindestens 1,5 mm², maximal 25
m lang. Bei längerem Kabel Querschnitt mindestens 2,5
mm².
zurück.
. Gerät einschalten,
TTeecchhnniisscchhee DDaatteenn
Modell
2300 2500 2800
Typ-Bezeichnung AH 600 AH 600 AH 600
Motor Wechselstrommotor 230 V~, 50 Hz, 2800 min
Motorleistung P
Drehzahl Schneidwalze 40 min
S6 - 40 % 2300 W 2500 W 2800 W
1
-1
-1
Ein-Aus-Schalter mit Überlastschutz, Schneid- und Rücklauffunktion, Nullspannungsauslöser
Gewicht 24 kg 24,5 kg 25 kg
Schalldruckpegel L
(gemessen nach 2000/14/EG)
PA
gemessener Schallleistungspegel L
(gemessen nach 2000/14/EG)
garantierter Schallleistungspegel L
(gemessen nach 2000/14/EG)
max. zu verarbeitender Astdurchmesser
(je nach Holzart und -frische)
WA
WA
83,8 dB (A)
K = 3 dB (A)
84,2 dB (A)
K = 3 dB (A)
82,5 dB (A)
K = 3 dB (A)
91 dB (A) 91 dB (A) 91 dB (A)
92 dB (A) 92 dB (A) 92 dB (A)
∅ max. 35 mm ∅ max. 40 mm ∅ max. 44 mm
Schutzklasse I
Schutzart IP X4
Netzabsicherung
Schweiz
UK
16 A träge
10 A träge
13 A träge
16 A träge
--
13 A träge
16 A träge
--
13 A träge
GGaarraannttiiee
Bitte beachten Sie die beiliegende Garantieerklärung.
7
Page 9

You may not start to operate the machine until you
have read these operating instructions, observed all
the instructions given and installed the machine as described!
Keep the instructions in a safe place for future use.
CCoonntteennttss
EC Declaration of Conformity 8
Extent of delivery 8
Description of the device 8
Symbols on the machine 9
Symbols in the operating manual 9
Operating times 9
Proper use 9
Residual risks 9
Safety instructions 9
Commissioning 11
Working with the garden shredder 12
Adjusting the fixed counter blade 12
Maintenance and cleaning 13
Operational faults 13
Technical data 14
Guarantee 14
Assembly 116
Spare parts 117
EExxtteenntt ooff ddeelliivveerry
y
After unpacking, check the contents of the box
! That it is complete
! Check for possible transport damage
Report any damage or missing items to your dealer, supplier or
the manufacturer immediately. Complaints made at a later date
will not be acknowledged.
• 1 pre-assembled device unit
• 1 standing leg (left)
• 1 standing leg (right)
• 1 axle
• 2 wheels
• 2 wheel covers
• 1 screw bag
• 1 collection sack
• 1 operating instructions
DDeessccrriippttiioonn ooff tthhee ddeevviicce
e
EECC DDeeccllaarraattiioonn ooff CCoonnffoorrmmiitty
y
according to EC directive: 2006/42/EC
We,
ATIKA GmbH & Co. KG
Schinkelstraße 97
59227 Ahlen - Germany
herewith declare under our sole responsibility that the product
Gartenhäcksler (Garden Shredder) type AH 600
Serial number: see last page
is conform with the above mentioned EC directive as well as with
the provisions of the guidelines below:
2004/108/EC and 2000/14/EC
Following harmonized standards have been applied:
EN 60335-1:2002+A1+A11+A12+A2+A13;
EN 13683:2003+A1:2009; EN 62233:2008; EN 55014-1:2006;
EN 55014-2/A1:2001; EN 61000-3-2:2006; EN 61000-3-11:2000
Conformity assessment procedure: 2000/14/EC - Appendix V.
Measured level of the acoustic output LWA 91 dB (A).
Guaranteed level of the acoustic output LWA 92 dB (A).
Keeping of technical documents at:
ATIKA GmbH & Co. KG – Technical department – Schinkelstr. 97
59227 Ahlen – Germany
Ahlen, 30.04.2010 A. Pollmeier, management
A. Hopper opening for material to be shredded
B. Handle
C. Reset button / motor protection
D. Power supply plug
E. On / Off switch
F. Direction of rotation selector switch
G. Carriage
H. Upper enclosure part
I. Adjusting knob for cutting roller
J. Ejection slot
8
Page 10

SSyymmbboollss oonn tthhee mmaacchhiinne
Carefully read the
operating manual
and the safety
instructions before starting the
machine and
observe the in-
e
Switch off the motor and disconnect
the mains plug
before performing
cleaning, maintenance or repair
work.
structions when
operating.
Danger – objects
may be thrown
out at high speed
when motor is
running. Keep
bystanders, pets
and domestic animals out of
Danger – rotating
blades. Keep
hands and feet out
of openings while
machine is running.
the danger area.
Wear eye and ear
protection.
Wear protective
gloves.
Protect against
humidity.
Electrical devices do not go into the domestic rubbish.
Give devices, accessories and packaging to an
ecofriendly recycling.
According to the European Directive 2002/96/EC on electrical and
electronic scrap, electrical devices that are no longer serviceable
must be separately collected and brought to a facility for an environmentally compatible recycling.
SSyymmbboollss OOppeerraattiinngg iinnssttrruuccttiioonns
s
Potential hazard or hazardous situation. Failure to
observe this instruction may lead to injuries or cause
damage to property.
Important information on proper handling. Failure to
L
observe this instruction may lead to faults.
User information. This information helps you to use all
the functions optimally.
Assembly, operation and servicing. Here you are
explained exactly what to do.
OOppeerraattiinngg ttiimmees
s
Please observe as well the regional regulations for noise
protection.
PPrrooppeerr uussee
The proper use includes the shredding of
- all types of branches up to a max. diameter (depending on
wood species and freshness)
- wilted, moist garden refuse that has already been stored for
several days, alternating with branches
Shredding of glass, metal, plastic parts, plastic bags, stones,
fabric cut-offs, roots with soil, waste without solid consistency
(e.g. kitchen scraps) is explicitly excluded.
The garden shredders are suitable for private use in gardens and
allotments.
As garden shredders for private gardens and allotments are considered such devices that are not applied in public facilities,
parks, and sports facilities as well as in agriculture and forestry on
a commercial basis.
The intended usage also includes compliance with the operating,
servicing and repair conditions prescribed by the manufacturer
and following the safety instructions included in the instructions.
Any other use is deemed not to be use as prescribed. The manufacturer is not liable for any type of damage resulting from this:
the user bears the sole risk.
Unauthorised modifications on the garden shredder exclude a
liability of the manufacturer for damages of any kind resulting
from it.
Only persons who are familiarised with the device and informed
about possible risks are allowed to prepare, operate and service
this device. Repair works may only be carried out by us or by a
customer service agent nominated by us.
RReessiidduuaall rriisskks
s
Even if used properly, residual risks can exist even if the relevant
safety regulations are complied with due to the design determined
by the intended purpose.
Residual risks can be minimised if the “Safety information” and
the “Intended usage” as well as the whole of the operating instructions are observed.
Observing these instructions, and taking proper care, will reduce
the risk of personal injury or damage to the equipment.
Risk of injury to the fingers and hands, if your hand grasps
through an opening and reaches the blade unit.
Risk of injury to the fingers and hands, when carrying out
assembly work and cleaning on the blade unit.
Injury by the chopped material spinning away near the hop-
per.
Risk from electricity when using improper electrical connec-
tions.
Touching live parts of opened electrical components.
Impairment of hearing when working on the machine for
longer periods of time without ear protection.
In addition, in spite of all the precautionary measures taken, nonobvious residual risks can still exist.
SSaaffeettyy iinnssttrruuccttiioonnss
Before commissioning this product, read and keep to
the following advice. Also observe the preventive regulations
of your professional association and the safety provisions
applicable in the respective country, in order to protect
yourself and others from possible injury.
9
Page 11

Pass the safety instructions on to all persons who work
L
with the machine.
Keep these safety instructions in a safe place.
L
Repair works on the shredder must be carried out by
the manufacturer or by companies appointed by the
manufacturer respectively.
Make yourself familiar with the equipment before using it, by
reading and understanding the operating instructions.
Do not use the machine for unsuitable purposes (see 'Normal
intended use' and 'Working with the garden shredder').
Provide a safe standing position and keep at any time the
balance. Do not lean forward. When placing material into the
shredder, always stand on the same level as the machine.
When placing material into the shredder, always stand on the
same level as the machine.
Be observant. Attend to what you do. Start working with ra-
tionality. Do not use the device when you are tired or under
the influence of drugs, alcohol or medicaments. One moment
of carelessness when using the device can result in serious
injuries.
Wear protective goggles, gloves and noise protection while
working with the machine.
Wear suitable work clothes:
- do not wear loose-fitting clothes
- slip-proof shoes
Within his area of work the operator is responsible for third
parties.
The machine must not be operated by children or young
people under 16 years of age.
Keep children away form machine.
Never operate the machine if other persons are in the imme-
diate vicinity.
Never leave the device unattended.
Keep your workplace in an orderly condition! Untidiness
can result in accidents.
Choose a working position alongside the equipment or be-
hind it. Never stand near the ejection opening.
Never reach into the filling or ejection opening.
Keep your face and body away from the filling opening.
Do not overload the machine! You work better and safer in the
given performance range.
Only operate the machine with complete and correctly at-
tached safety equipment and do not alter anything on the
machine that could impair the safety.
Do not alter the revolution speed of the motor, since this con-
trols the safe maximum operating speed, and protects the motor and all rotating parts against damage due to excess
speed.
Do not operate without the funnel.
Do not modify the device or parts of the device respectively.
Close machine properly before enabling motor.
Do not hose down the device with water. (Origin of danger
electric current).
Take into consideration environmental influences:
− Do not use the device in moist or wet ambience.
− Do not leave the machine standing in the rain or use
when raining.
− Provide for good illumination.
To prevent danger of injury to fingers during assembly or
cleaning operations wear protecting gloves.
Switch the machine off and remove the mains plug from the
socket when
− Performing maintenance and cleaning work.
− Eliminating faults.
− Checking connecting lines, whether these
are knotted or damaged.
− Transporting.
− Carrying out repair work.
− Leaving unattended (even during short interruptions).
If the machine’s filling funnel or ejection slot is blocked switch
off the motor and disconnect the mains plug before removing
material from the filling funnel or ejection slot.
Check the machine for possible damage:
− Before further use of the machine the safety devices must
be checked carefully for their proper and intended function.
− Check whether movable parts function perfectly and do
not stick or whether parts are damaged. All parts must be
correctly installed and fulfil all conditions to ensure perfect
operation of the machine.
− Damaged safety devices and parts must be properly re-
paired or exchanged by a recognized, specialist workshop;
insofar as nothing else is stated in the instructions for use.
− Damaged or illegible safety labels have to be replaced.
Store unused equipment in a dry, locked place out of the
reach of children.
EElleeccttrriiccaall ssaaffeettyy
Design of the connection cable according to IEC 60 245 (H
07 RN-F) with a core cross-section of at least
− 1.5 mm
− 2.5 mm
2
for cable lengths up to 25 m
2
for cable lengths over 25 m
Long and thin connection lines result in a potential drop. The
motor does not reach any longer its maximal power; the function of the device is reduced.
Plugs and coupler outlets on connection cables must be made
of rubber, plasticised PVC or other thermoplastic material of
same mechanical stability or be covered with this material.
The connector of the connection cable must be splash-proof.
When running the connection line observe that it does not
interfere, is not squeezed, bended and the plug connection
does not get wet.
Wind off completely the cable when using a cable drum.
Do not use the cable for purposes for which it is not meant.
Protect the cable against heat, oil and sharp edges. Do
not use the cable to pull the plug from the socket.
Regularly check the extension cables and replace them if
they are damaged.
Do not use any defective connection cables.
When working outdoors, only use extension cables especially
approved and appropriately labelled for outdoor use.
Do not set up any provisional electrical connections.
Never bypass protective devices or deactivate them.
Only hook up the machine by means of a fault-current cir-
cuit breaker (30 mA).
The electrical connection or repairs to electrical parts of
the machine must be carried out by a certified electrician or
one of our customer service points. Local regulations –
especially regarding protective measures – must be observed.
10
Page 12

Repairs to other parts of the machine must be carried out
by the manufacturer or one of his customer service points.
Use only original spare. Accidents can arise for the user
through the use of other spare parts. The manufacturer is
not liable for any damage or injury resulting from such action.
CCoommmmiissssiioonniinngg
Check that the machine is completely and correctly assem-
bled.
To avoid toppling, place the shredder on a firm horizontal
surface.
Do not place the equipment on ground which is paved or
surfaced with gravel.
The machine should only be operated in the open. Always
maintain a safe distance (at least 2 m) from walls or other
fixed objects.
Before each use, check
− Connection cables for defects (cracks, cuts, etc.).
Do not use any defective cables.
− There are no damage at the machine (see safety instruc-
tions).
− All screws are tight.
L Mains connection
Compare the voltage given on the machine model plate e.g.
230 V with the mains voltage and connect the machine to the
relevant and properly earthed plug.
Only use extension cables with sufficient core cross-section.
Mains fuse
Switzerland UK
2300 W 16 A time-lag
2500 W 16 A time-lag
2800 W 16 A time-lag
On / Off switch
Do not use any device where the switch can not be switched
on and off. Damaged switches must be repaired or replaced
immediately by the customer service.
ON
OFF
Reverse
10 A time-lag 13 A time-lag
13 A time-lag
13 A time-lag
Reset button
(motor protection)
Direction of
rotation selector
switch
OFF
Infeed
Switch on
Press the green button I .
Switch off
Press the red button 0 .
Restart protection in case of power
failure
In case of a power failure, the device switches off automatically
(zero-voltage initiator). To restart, press the green button again.
Motor protection
The motor is equipped with a safety switch and switches off
automatically when overloaded. After a cooling-down break
(approx. 5 min), the motor may be restarted. Press the
1. reset button (motor protection)
2. green button I to restart.
Direction of rotation selector switch
Only actuate the direction of rotation selector switch
while the shredder is switched off.
Position
Motor does not start.
Position
The material is drawn in by the cutting roller and shredded.
Position
The blades operate in the opposite direction and jammed material
is released.
Keep depressing the green button of the on/off switch once you
have placed the direction of rotation selector switch into the
position. The cutting roller is placed into the opposite direction. If
you release the on/off switch, the shredder automatically stops.
Hints
z Large objects or pieces of wood may be removed after the
shredder has been operated several times both in cutting
and in release direction.
z Use a tamper or hook to remove jammed objects from the
hopper or ejection slot.
Always wait until the shredder has come to a complete
standstill before restarting it.
Electrical mains supply impedance
When conditions in the electrical mains supply are un-favourable,
voltage reductions for short periods can occur during the process
of turning on the equipment, which can adversely affect other
equipment (e.g., the flickering of a lamp).
No breakdowns are to be expected if the maximum, electrical
mains supply impedances given in the table are met.
11
Page 13

Power consumption P1 (W) Electrical mains supply
impedance Zmax (W)
2300 0,21
2500 0,21
2800 0,19
WWoorrkkiinngg wwiitthh tthhee ggaarrddeenn sshhrreeddddeerr
Choose a working position alongside the equipment or be-
hind it. Never stand near the ejection opening.
Longer material that is protruding from the device could
spring back when it is drawn in by the blades! Observe safety
distance!
Never reach into the filling or ejection opening.
Keep your face and body away from the filling opening.
Never place hands, other parts of the body or clothing into the
filler funnel, ejection channel or in the vicinity of other moving
parts.
Check that no chopped residues are in the filling hopper be-
fore switching on the equipment.
Do not tip or tilt the machine when the motor is running.
When filling, be careful that no pieces of metal, stones, bottles
or other objects unintended for processing, enter the filling
hopper.
Immediately switch off the equipment and allow it to come to a
stop, if foreign objects enter the filling hopper or if the equipment starts to make unusual noises or vibrates. Remove the
mains plug and carry out the following checks:
− inspect for damage,
− replace or repair damaged parts,
− check the equipment and tighten loose parts.
You must not repair the equipment yourself if you are
unauthorized to do so.
What can I shred?
Yes:
• all types of branches up to a max. diameter, depending on
wood species and freshness.
• withered garden refuse which has lain a number of days.
Only shred in alternation with branches.
No:
• glass, metal, plastic, plastic bags, stones, cloth, roots with soil
• refuse which does not have a solid consistency, e. g. kitchen
waste
Special tips on shredding:
¾ Always fill the material to be shred-
ded into the filling hopper from the
right.
¾ Branches, twigs and wood should
be broken down immediately after
they have been cut.
− Material of this kinds gets very hard when it is dry, and the
maximum allowed branch diameter to be processed has to
be reduced.
¾ Remove any side shoots from branches with a large number
of twigs.
¾ How to shred garden and kitchen waste with hight water con-
tent and a tendency to clog
− to prevent the machine from clogging, alternate waste with
wood containing material.
¾ Do not allow the shredded material to pile up too high in the
area of the ejection opening. This can lead to shredded material blocking the ejection channel, and backing up to the filler
opening.
¾ Clean out the filler opening and ejection channel thoroughly if
the machine becomes blocked. Before doing this, switch the
motor off and disconnect the machine from the mains power
supply.
¾ Please do not exceed the maximum branch diameter speci-
fied (cutting fresh wood) for your appliance (∅ see “Technical
data”). Depending on the wood’s nature and freshness the
maximum branch diameter the machine can process may be
smaller.
¾ The cutter automatically draws the shredding material into the
machine through the slow rotation of the cutting rollers.
¾ Automatic switch-over in the direction of rotation:
If the unit suddenly clogs, the blades may start to turn in the
opposite direction and push the shredded material back out.
− Switch off unit
− Wait until the blades come to a standstill
− Switch unit back on and use material which is easier to
process.
¾ If the machine is overloaded, a protective motor switch en-
sures that the machine turns itself off automatically.
− Turn the shredder on again after about 5 minutes.
− If you cannot turn on the machine after this waiting time re-
fer to „Operational faults“.
AAddjjuussttiinngg tthhee ffiixxeedd ccoouunntteerr bbllaaddee
It is possible to adjust the counter blade (B) at the cutting roller
(A) free of clearance. For an effective operation, an as small as
possible clearance should be maintained.
Soft material or wet branches may tear instead of being cut. A
counter blade that is worn after repeated use may also lead to
this problem.
12
Page 14

Setting the clearance.
Switch on the device.
There is an adjustment device on the right hand side of the plastic housing. To adjust the distance turn the adjusting knob (D)
clockwisely so that the screw (C) moves toward the cutting roller. Turn until fine aluminium chips are falling from the ejection slot.
MMaaiinntteennaannccee aanndd cclleeaanniinngg
• Each time before starting maintenance work:
− Switch off the motor and pull out the mains plug.
− Wear protective gloves to prevent injury.
The cutters will not come to a standstill immediately after cut-off. Before starting any service work wait until all parts are stationary.
Be sure to have removed any tools from the machine after completion of service work.
• Generally garden shredders require little maintenance. To maintain their efficiency and a long life, observe the following:
− Keep vent slits clean and free from obstructions.
− Check the locking screws (tighten where necessary).
− Clean the device after shredding.
To clean your product only use a warm moist cloth and a soft brush.
Never use cleaning agents or solvents. Otherwise the device may be damaged irreversibly. Plastic parts may be corroded by chemi-
cals.
− Do not clean the machine with running water or high-pressure cleaners.
After each operation treat bare metal parts with an environment-compatible biodegradable spray oil to protect them against corro-
−
−
sion.
− the cutting roller and shaving plate are expendable parts, though with normal use and correct adjustment they have a service life of
many years
OOppeerraattiioonnaall ffaauullttss
Before each fault elimination:
− Switch off device.
− Wait for standstill of the device.
− Pull out mains plug.
Fault Possible cause Remedy
Motor does not start - Rotation selector switch on position “0”
- No power supply
- Mains cable defective
- Machine overloaded (motor protection)
- Switch off device and switch over direction of rotation
selector switch.
- Check fuses
- have these checked (electrician)
- Allow the device to cool down.
Press the
1. reset button (motor protection)
2. green button I to restart.
Motor hums but does not
start
- Cutting roller blocked
- Capacitor faulty
- Switch off the device.
Turn the direction of rotation selector switch into
position
. Switch on device until the jam has been
cleared. Switch device off again. Turn back the
direction of rotation selector switch to position
- Bring machine to manufacturer or authorised work-
shop for repair
.
13
Page 15

Fault Possible cause Remedy
Shredding material is not
drawn into the shredder
- The cutting roller is running in reverse.
Wrong switch position.
- Shredding material caught in funnel
- Shredding material too soft or wet
- Cutting roller worn
- Switch off device and switch over direction of rotation
selector switch.
- Switch off device. Switch the direction of rotation
selector switch into position
release the material to be shredded, remove any
foreign matter.
Switch off device again. To continue work, place the
direction of rotation selector switch back into position
.
- Push down with a branch and shred
- Adjust fixed counter blade as described under „adjust-
ing the fixed counter blade“. In case of severe wear,
replace cutting roller.
Shredding material not cut
cleanly
Device starts but blocks
under as slight load and
switches off via protective
motor switch.
- Fixed counter blade not adequately ad-
justed
Extension cable too long or cross-section to
small.
Socket too far from mains supply and crosssection of mains cable too small
- Adjust fixed counter blade
Extension cable at least 1.5 mm², maximum 25 m long. If
a longer cable is used, minimum cross-section 2.5 mm².
. Switch on device to
TTeecchhnniiccaall ddaattaa
Model
2300 2500 2800
Name AH 600 AH 600 AH 600
Motor AC-Motor 230 V~, 50 Hz, 2800 rpm
Motor rating P
Rotational speed cutting roller
S6 - 40 % 2300 W 2500 W 2800 W
1
-1
40 min
ON/OFF-switch with overload protection; cutting and reverse function, zero-voltage initiator
Weight 24 kg 24,5 kg 25 kg
Sound pressure level at work LPA
(measured to 2000/14/EC)
Measured sound power level LWA
(measured to 2000/14/EC)
Guaranteed sound power level LWA
(measured to 2000/14/EC)
Max. branch diameter
(only for freshly cut wood)
83,8 dB (A)
K = 3 dB (A)
84,2 dB (A)
K = 3 dB (A)
82,5 dB (A)
K = 3 dB (A)
91 dB (A) 91 dB (A) 91 dB (A)
92 dB (A) 92 dB (A) 92 dB (A)
∅ max. 35 mm ∅ max. 40 mm ∅ max. 44 mm
Safety class I
Protection class IP X4
Mains fuse
Switzerland
UK
GGuuaarraanntteeee
16 A time-lag
10 A time-lag
13 A time-lag
16 A time-lag
--
13 A time-lag
Please observe the enclosed terms of guarantee.
14
16 A time-lag
--
13 A time-lag
Page 16

Vous ne devez pas mettre la machine en route avant
d’avoir lu attentivement ce mode d’emploi, d’avoir observé
toutes les informations indiquées et d’avoir monté la ma-
chine tel que cela est décrit.
Conserver ces notices d’utilisation pour toute utilisation future.
TTaabbllee ddeess mmaattiièèrreess
Déclaration de conformité CE
Fourniture
Description de la machine
Symboles utilisés: appareil
15
15
15
16
Symboles utilisés: notice d’utilisation 16 Tranches horaires 16
Utilisation conforme
Risques résiduels
Consignes de sécurité
Mise en service
Travaux avec le broyeur de végétaux
Réglage du contre-couteau
16
16
17
18
19
20
Maintenance et entretien 20
Pannes 21
Caractéristiques techniques 22
Garantie 22
Assemblage
116
Pièces de rechange 117
FFoouurrnniittuurree
Après le déballage de la machine, vérifiez le contenu du carton
quant à
! l’intégralité des pièces
! la présence éventuelle de dommages dus au transport.
Informez immédiatement le revendeur, le transporteur et / ou le
fabricant en cas de réclamation. Toute réclamation ultérieure ne
sera pas acceptée.
• 1 unité prémontée de l’appareil
• 1 pied gauche
• 1 pied droit
• 1 essieu
• 2 roues
• 2 cache-roues
• 1 sachet de vis
• 1 sac de récupération
• 1 notice d’utilisation
DDeessccrriippttiioonn ddee llaa mmaacchhiinnee
DDééccllaarraattiioonn ddee ccoonnffoorrmmiittéé CCEE
Conformément à la directive CE: 2006/42/CE
Par la présente, nous
ATIKA GmbH & Co. KG
Schinkelstraße 97, 59227 Ahlen - Germany
déclarons sous notre responsabilité exclusive que le produit
Gartenhäcksler (Broyeur de végétaux) type AH 600
Numéro de série : voir la dernière page
est conforme aux dispositions de la directive CE susnommée ainsi
qu’aux dispositions des directives suivantes :
2004/108/CE, 2006/95/CE et 2000/14/CE.
Les normes harmonisées suivantes ont été appliquées :
EN 60335-1:2002+A1+A11+A12+A2+A13;
EN 13683:2003+A1:2009; EN 62233:2008; EN 55014-1:2006;
EN 55014-2/A1:2001; EN 61000-3-2:2006; EN 61000-3-11:2000
Procédé d’évaluation de la conformité: 2000/14 CE - Annexe V
Niveau de puissance sonore mesur LWA 91 dB (A).
Niveau de puissance sonore garanti L
92 dB (A).
WA
Conservation de la documentation technique:
ATIKA GmbH & Co. KG – Bureau technique – Schinkelstr. 97 –
59227 Ahlen – Germany
Ahlen, 30.04.2010 A. Pollmeier, le gérant
A. Ouverture d’entonnoir pour matière hachée
B. Poignée
C. Bouton de réinitialisation / Protection du moteur
D. Fiche de contact
E. Interrupteur marche/arrêt
F. Commutateur du sens de rotation
G. Châssis
H. Partie supérieure du carter
I. Bouton de réglage du rouleau de coupe
J. Fente d’éjection
15
Page 17

SSyymmbboolleess uuttiilliissééss ssuurr cceett aappppaarreeiill
Lire la notice
d’utilisation et les
consignes de
sécurité avant la
mise en service et
en tenir compte
pendant le fonc-
Arrêter le moteur et
débrancher la fiche
de contact avant
toute opération
d’entretien, de
remise en état ou
de nettoyage.
tionnement.
Les pièces éjec-
tées repré-sentent
un danger lorsque
que le moteur est
en marche – les
personnes étran-
gères ainsi que
les animaux domestiques et de
rente doivent rester à l’écart de
la machine pendant que celle-ci
est en marche.
Nous recommandons une extrême
prudence avec les
lames rotatives. Ne
pas introduire les
mains ou les pieds
dans les orifices de
la zone dangereuse.
Porter des lunettes
de protection et un
Porter des gants de
protection.
Protéger de
l’humidité.
casque antibruit.
Ne jamais jeter un appareil électrique aux ordures ménagères. Les appareils, les accessoires et les emballages
doivent être recyclés de façon non polluante.
Conformément à la directive européenne 2002/96/CE relative aux
déchets d’équipements électriques et électroniques, les appareils
électriques ne pouvant plus être utilisés doivent être collectés
séparément et recyclés d'une manière respectueuse de l'environnement.
SSyymmbboolleess uuttiilliissééss ddaannss cceettttee nnoottiicce
dd’’uuttiilliissaattiioonn
Danger imminent ou situation dangereuse.
L’inobservation de ces indications peut entraîner des blessures ou des dégâts matériels.
Indications importantes pour un emploi conforme à
L
l’usage prévu. L’inobservation de ces indications peut
provoquer des dysfonctionnements.
Indications pour l’usager. Ces indications sont d’une
aide précieuse pour un emploi optimal des différentes
fonctions.
Montage, exploitation et maintenance. Ce symbole attire
votre attention sur ce que vous devez faire.
TTrraanncchheess hhoorraaiirreess
Observez les dispositions spécifiques de la loi nationale.
UUttiilliissaattiioonn ccoonn ffoorrmmee
Le hachage de
- branches de tout type, jusqu’au diamètre max. (suivant la nature
et la fraîcheur du bois)
- déchets de jardin flétris, humides, stockés depuis plusieurs
jours, en alternance avec des branches, fait partie d’une utilisation conforme à l’emploi.
Le hachage de verre, de métal, d’objets ou de sachets en plastique,
de pierres, de déchets textiles, de racines avec de la terre, de déchets sans consistance ferme (par ex. déchets de cuisine) est formellement exclu.
Le broyeur de végétaux est destiné uniquement à une utilisation
privée à la maison et dans le jardins.
Sont considérés comme broyeurs pour l'utilisation privée à la maison et au jardin les machines qui ne sont pas utilisées pour les
espaces verts publics tels que les parcs et les terrains de sport, pour
l'agriculture et la sylviculture et qui ne sont pas utilisées à des fins
professionnelles.
Un emploi conforme à l’usage prévu implique notamment aussi
l’observation des instructions de service, de maintenance et de
réparation du fabricant et le respect des consignes de sécurité
contenues dans ces instructions.
Toute utilisation divergente de la machine est considérée comme
emploi non conforme à l’usage prévu. Le fabricant décline toute
responsabilité pour les dommages en résultant : le risque incombe
exclusivement à l’usager.
L'appareil ne doit être utilisé, entretenu et ajusté que par des personnes connaissant l'appareil et averties des risques qui y sont liés.
Les réparations demeurent strictement réservées à notre SAV ou à
un service après-vente nommé par nos soins.
RRiissqquueess rrééssiidduueellss
e
Même un emploi conforme à l’usage prévu et le respect des
consignes de sécurité applicables en la matière ne sauraient exclure
tous les risques résiduels générés par la construction et l’emploi de
la machine.
Les risques résiduels peuvent être minimisés en respectant les
« consignes de sécurité » et une « utilisation conforme » ainsi que
toutes les indications de cette notice d’utilisation.
La prise de précautions et la prudence réduisent les risques de
blessures corporelles et d’endommagements.
Risque de blessure des doigts et des mains si vous introdui-sez
la main dans une ouverture et entrez en contact avec le couteau.
Risque de blessure des doigts et des mains lors d‘opérations de
montage et de nettoyage du couteau.
Risque de blessures dues à la projection de morceaux branches
dans la zone de l’entonnoir.
Dangers d’électrocution en cas d’utilisation de câbles de raccor-
dement électrique non conformes.
Contact avec les pièces conductrices de composants électriques
ouverts.
Endommagement de l’ouïe en cas de travaux particulièrement
longs sur la machine sans protection acoustique.
Il se peut que des risques résiduels non apparents persistent bien
que toutes les mesures de protection aient été prises.
16
Page 18

CCoonnssiiggnneess ddee ssééccuurriittéé
Avant toute mise en service de ce produit, lire et respecter
les indications suivantes et les consignes bde sécurité en vigueur dans les pays respectifs afin d’éviter tout risque
d’accident sur vous et les autres.
Remettez les consignes de sécurité à toutes les personne
L
sdevant travailler avec la machine.
Conservez ces consignes de sécurité en lieu sûr.
L
Toute réparation de la machine est à effectuer par le
fabricant ou par les entreprises qu’il aura nommées.
Avant utilisation, familiarisez-vous avec l’appareil à l’aide de la
notice d’utilisation.
Ne pas utiliser l’appareil à des fins non appropriées (voir «Utili-
sation conforme» et «Travaux avec le broyeur de végétaux»).
Prenez correctement appui sur vos jambes et veillez à votre
équilibre à tout moment. Ne vous penchez pas en avant. Res-
tez à hauteur de l’appareil lorsque vous y introduisez les ma-
tériaux à hacher.
Soyez attentif. Veillez à ce que vous faites. Travaillez de façon
raisonnable. N'utilisez pas l'équipement si vous êtes fatigué ou
sous l'emprise de drogues, d'alcool ou de médicaments. La
moindre inattention pendant l'utilisation de l'équipement peut
provoquer de graves blessures.
Pendant le travail avec la machine, portez des lunettes de
protection, des gants de travail et une protection auditive.
Portez des vêtements de protection appropriés:
− Pas d’habits larges
− Chaussures avec semelles antidérapantes.
L’utilisateur est responsable de la machine à l’égard de tiers
dans la zone de travail.
Il est interdit aux enfants et aux adolescents de moins de 16
ans d’utiliser l’appareil.
Maintenez les enfants à distance de l’appareil.
Ne mettez jamais l’appareil en marche lorsque des personnes
étrangères se trouvent à proximité.
Ne laissez jamais l’appareil sans surveillance.
Veillez à maintenir la zone de travail en ordre ! Le désordre
peut être la cause d’accidents.
Adoptez une position de travail sur le côté ou derrière
l’appareil. Ne restez jamais dans la zone de l’orifice d’éjection.
Ne jamais mettre les mains dans l’ouverture de remplissage ou
d’éjection.
Maintenez le visage et le corps à distance de l’orifice de rem-
plissage.
Ne surchargez pas la machine ! Elle travaille mieux et avec une
sécurité accrue dans la plage indiquée.
Veillez au montage complet et correct des équipements de
sécurité pendant l’exploitation et ne modifiez rien sur la ma-
chine qui risquerait d’influencer sa sécurité.
Ne modifiez jamais le régime du moteur. C’est lui qui régule la
vitesse de travail maximale sûre et protège le moteur ainsi que
toutes les pièces rotatives codesntre les détériorations dues à
une vitesse excessive.
Ne jamais mettre en service sans l’entonnoir.
Ne pas modifier l'appareil ou des parties ou pièces de l'appa-
reil.
Lors de la mise en marche du moteur, l’appareil doit être fer-
mé.
L’appareil ne doit pas être arrosé d’eau (source de risque car
présence de courant électrique).
Prenez les conditions environnantes en considération :
− Ne pas utiliser la machine dans un environnement humide.
− Ne pas travailler avec l'appareil lorsqu'il pleut et ne pas
laisser l’appareil sous la pluie.
− Travaillez uniquement avec de bonnes conditions visuelles,
veillez au bon éclairage de la zone de travail.
Porter des gants de protection pour toute intervention de
montage et de nettoyage afin d'éviter le risque de blessure
des doigts.
Débranchez la machine et retirez la fiche de la
prise de secteur en cas de
− travaux de maintenance et de nettoyage
− réparation de dysfonctionnements
− vérifications pour savoir si les conduites de rac-
cordement sont enchevêtrées ou endommagées
− transport
− travaux de réparation
− et si vous quittez l’appareil (même s’il ne s’agit que d’une
brève interruption du travail)
En cas d’obstructiondes orifices d’introduction ou d’éjection de la
machine, arrêter le moteur et retirer la fiche de la prise de courant avent d’enlever les résidus de matière.
Vérifiez si la machine est éventuellement endommagée.
− Contrôlez avec soin le fonctionnement impeccable et
conforme à l’usage prévu des équipements de sécurité
avant de poursuivre l’utilisation de la machine.
− Vérifiez le fonctionnement correct des pièces mobiles et
assurez-vous qu’elles ne sont ni coincées ni partiellement
endommagées. Toutes les pièces sont à monter correctement et toutes les conditions requises sont à remplir afin de
garantir une exploitation impeccable de l’appareil.
− Les dispositifs de sécurité et les pièces endommagés
doivent être réparés ou remplacés convenablement dans un
atelier spécialisé agréé, à moins que d’autres informations
ne soient mentionnées dans le mode d’emploi.
− Les autocollants de sécurité endommagés ou illisibles
doivent être remplacés.
Conservez les appreils non utilisés dans un endroit sec et
verrouillé et hors de portée des enfants.
Sécurité électrique
Exécution de la ligne de raccordement cf.
IEC 60245 (H 07 RN-F) avec une section d’au moins
− 1,5 mm² pour les câbles d’une longueur de 25 m maximum
− 2,5 mm² pour les câbles de plus de 25 m
Les conduites de raccordement longues et minces génèrent une
chute de tension. Le moteur n’atteint plus sa puissance maximale et le fonctionnement de la hacheuse est restreint.
Les fiches et les prises femelles sur les conduites de raccorde-
ment doivent être en caoutchouc, en PVC souple ou en une autre matière thermoplastique de même résistance mécanique ou
bien recouvertes d‘une de ces matières.
Le système d’enfichage de la conduite de raccordement doit être
protégé contre les projections d’eau.
Lors de la pose de la ligne de raccordement, veiller à ce qu'elle
ne soit pas coincéeni pliée et à ce que le connecteur ne soit pas
mouillé.
En cas d'utilisation d'un tambour, dérouler le câble complète-
ment.
N’employez pas le câble à des fins pour lesquelles il n’est pas
prévu. Protégez le câble de la chaleur, l’huile et des arêtes
tranchantes. Ne tirez pas sur le câble pour retirer la fiche de la
prise au secteur.
17
Page 19

Vérifiez le câble de rallonge à intervalles réguliers et rempla-
cez-le dès que vous constatez un endommagement.
Ne vous servez jamais de lignes de raccordement défec-
tueuses.
Servez-vous exclusivement de câbles de rallonge spéciaux et
homologués pour l’extérieur le cas échéant.
Ne vous servez jamais de raccordements électriques provi-
soires.
Ne pontez jamais les équipements de sécurité et ne les mettez
jamais hors service.
Brancher la machine à l’aide d’un disjoncteur à protection
différentielle (30 mA).
Tout raccordement électrique, voire toute réparation sur les
parties électriques de la machine doivent être effectués par
des électriciens agréés ou confiés à l’un de nos services
après-vente. Les règlements locaux, particulièrement en ce qui
concerne les mesures de protection, sont à respecter.
Toute réparation des différentes pièces de la machine est à
effectuer par le fabricant ou l’un de ses services après-vente.
N’utiliser que des pièces de rechange d’origine. L’utilisation
d’autres pièces de rechange pourraint entraîner un risque
pour l’utilisateur, le fabricant déclinant toute responsabilité
pour tout dommage encouru.
MMiissee eenn sseerrvviiccee
Assurez-vous que l'appareil est monté intégralement et
conformément aux réglementations.
Pour utiliser le broyeur de végétaux, placez-le sur une surface
stable et horizontale (de façon à ce qu’il ne bascule pas).
Ne posez pas l’appareil sur un sol pavé ou ballasté.
N’utilisez l’appareil qu’à l’extérieur. Restez à distance (2 m
minimum) des murs et des autres objets fixes.
Avant toute utilisation, veuillez vérifier
− que les lignes de raccordement ne présentent pas de défec-
tuosités (fissures, coupures ou autres).
− l‘d’ éventuels endommagements de l’appareil (voir consignes
de sécurité)
− que toutes les vis sont serrées à fond
L Branchement au secteur
Comparez la tension de votre secteuravec la tension indiquée
sur la plaque signalétique de la machine et raccordez la machine à une prise appropriée et conforme aux prescriptions.
Utilisez un câble de rallonge de section suffisante.
Protection de secteur
Suisse UK
2300 W 16 A retardée
2500 W 16 A retardée
2800 W 16 A retardée
10 A retardée 13 A retardée
13 A retardée
13 A retardée
Interrupteur marche/arrêt
Ne jamais utiliser un appareil dont l'interrupteur ne fonctionne
pas. Les interrupteurs défectueux doivent immédiatement être
réparés ou remplacés par le service après vente.
Bouton de
réinitialisation
(protection du
moteur)
MARCHE
ARRET
Commutateur du
sens de rotation
Mouvement
de retour
ARRET
Entraînement
Mise en marche
Appuyez sur le bouton vert I .
Arrêt
Appuyez sur le bouton rouge 0 .
Sécurité de remise en marche en
cas de panne de courant
En cas de panne de courant, la hacheuse s‘arrête automatiquement
(déclencheur à tension nulle). Pour une remise en marche, appuyez
à nouveau sur le bouton vert.
Protection du moteur
Le moteur est équipé d’un disjoncteur de protection et s’arrête automatiquement en cas de surcharge. Il peut être remis en marche
après une pause de refroidissement (env. 5 mn). Appuyez sur
1. le bouton de réinitialisation (protection du moteur)
2. le bouton vert I pour une remise en marche.
Commutateur du sens de rotation
Actionnez le commutateur du sens de rotation uniquement
lorsque la hacheuse est à l‘arrêt.
Position
Le moteur ne démarre pas.
Position
La matière est entraînée et hachée par le cylindre de coupe.
Position
La lame fonctionne en sens inverse et la matière serrée est libre.
Une fois que vous avez mis le commutateur du sens de rotation en
position
che/arrêt appuyé. Le cylindre de coupe est positionné en sens inverse. Lorsque vous relâchez l‘interrupteur marche/arrêt, la hacheuse reste automatiquement à l‘arrêt.
, maintenez le bouton vert de l‘interrupteur mar-
18
Page 20

Conseils
z Les gros objets ou les morceaux de bois sont enlevés en sens
de coupe ou en sens de déblocage après un actionnement à
plusieurs reprises.
z Utilisez un bouchon ou un crochet pour enlever les objets
bloqués dans l‘entonnoir ou dans la fente d‘éjection.
Attendez toujours que la hacheuse soit à l‘arrêt avant de la
remettre en marche.
Impédance de secteur
En cas de mauvaises conditions de secteur, des baisses de tension
momentanées peuvent survenir pendant le processus d’allumage de
l’appareil et peuvent gêner d’autres appareils (parex. une lampe
vacille).
Tout risque de dysfonctionnement est exclu si l’on respecte les
impédances de secteur maximales indiquées dans le tableau.
Puissance absorbée P
(W)
1
Impédance de secteur Z
max
(Ω)
2300 0,21
2500 0,21
2800 0,19
TTrraavvaauuxx aavveecc llee bbrrooyyeeuurr ddee vvééggééttaauuxx
Adoptez une position de travail à côté ou derrière l’appareil. Ne
restez jamais dans la zone de l’orifice d’éjection.
Les branches longues dépassant de l’appareil risquent
d’être renvoyées en arrière lorsqu’elles seront entraînées par les
lames ! Respectez la distance de sécurité !
Ne jamais mettre les mains dans l'ouverture de remplissage ou
d'éjection.
Maintenez le visage et le corps à distance de l’orifice de rem-
plissage.
N’introduisez jamais les mains, d’autres parties du corps ou vos
vêtements dans le tube de remplissage, le canal d’évacuation ou
à proximité d’autres pièces mobiles.
Avant la mise en marche de l‘appareil, vérifiez si des restes de
broyage se trouvent dans l’entonnoir.
Ne renversez pas l’appareil pendant que le moteur est en mar-
che.
Lors du remplissage, veillez à ce que des pièces en métal, des
pierres, des bouteilles ou d‘autres objets n’entrent pas en
contact avec des objets à broyer dans l’entonnoir.
Si des objets extérieurs entrent dans l’entonnoir ou si l’appareil
commence à émettre des bruits ou des vibrations inhabituelles,
arrêtez immédiatement l’appareil et immobilisez-le. Débranchez
la fiche et effectuez les points suivants :
− examiner les dommages
− remplacer ou réparer les pièces endommagées
− vérifier l’appareil et resserrer les pièces dévissées
Vous ne devez pas réparer l’appareil si vous n’êtes pas au-
torisé à le faire (voir consignes de sécurité).
Qu’est-ce que je peux broyer?
Oui:
• branches de tout type, ayant un diamètre de max., suivant la
nature et la fraîcheur du bois
• déchets de jardin humides et flétris, déjà entreposés depuis
plusieurs jours
uniquement en alternance avec le broyage de branches
Non:
• verre, morceaux de métaux, matières plastiques, sacs en
plastique, pierres, déchets de tissus, racines souillées par de
la terre
• déchets sans consistance solide, par exemple déchets de
cuisine
Instructions spéciales concernant
le broyage:
¾ Introduisez toujours la matière à
hacher du côté droit dans l‘orifice
de remplis-sage de l‘entonnoir.
¾ Broyez les branches, les rameaux
et les bois juste après les avoir
coupés
− Ces matériaux à broyer deviennent très durs lorsqu’ils sè-
chent, le diamètre maximal des branches à traiter diminue
donc.
¾ Lorsque les branches sont très ramifiées, enlever les rameaux
latéraux.
¾ Broyage de déchets de cuisine ou de jardin contenant beau-
coup d’eau et tendant à coller
− Ces déchets doivent être broyés en alternance avec des dé-
chets contenant du bois afin d’éviter que l’appareil ne soit
obstrué.
¾ Ne pas laisser s’entasser trop de matériaux hachés sous la
sortie de l’orifice d’évacuation. Il risquerait sinon d’obstruer le
canal d’évacuation. Cela pourrait entraîner un retour des matériaux par l’orifice de remplissage.
¾ Nettoyez l’orifice de remplissage ainsi que le canal d’évacuation
lorsque l’appareil est obstrué. Pour ce faire, éteignez d’abord le
moteur et retirez la fiche secteur.
¾ Veillez à ce que le diamètre maximal des branches pouvant
être haché par votre appareil soit respecté (∅ voir « Caractéris-
tiques techniques »). Selon la taille et la fraîcheur du bois, le diamètre maximal de la branche que vous souhaitez broyer peut
être réduit.
¾ L'unité coupante introduit automatiquement et sans à-coups les
matériaux à hacher grâce à la rotation lente du rouleau de
coupe.
¾ Commutation automatique du sens de rotation:
En cas de brusque blocage de l’appareil, le sens de rotation du
cylindre de découpe peut commuter, ce qui repoussera dans ce
cas le matériau haché.
− Arrêter l‘appareil
− Patienter jusqu’a immobilisation du cylindre de découpe
− Remettre l’appareil en marche et l’alimenter en matériau
plus facile à hacher.
¾ En cas de surcharge de l’appareil, le sélecteur équipé d’un
disjoncteur-protecteur met la machine automatiquement hors
circuit
− Dans ce cas, remettez le broyeur en marche au bout de 5
minutes environ
− Au cas ou la machine ne se remettrait pas en marche au
bout de ce temps d’attente, veuillez vous reporter au point
„Pannes“.
19
Page 21

RRééggllaaggee dduu ccoonnttrree--ccoouutteeaauu
Le contre-couteau (B) peut être réglé sans jeu sur le cylindre de
coupe (A). Pour un fonctionnement efficace, la distance doit être
la plus courte possible.
Des déchets souples ou des branches mouillées peuvent être
déchirées au lieu d‘être coupées. Un contre-couteau usé après
un actionnement à plusieurs reprises peut également occasionner ce problème.
Réglage de la distance.
Mettez l‘appareil en marche.
A droit du carter en plastique se trouve un dispositif de réglage. Pour ajuster l’écart, tourner le bouton de réglage (D) vers la droite de façon à
approcher la vis (C) au rouleau de coupe. Tournez jusqu‘à ce que de fins copeaux d‘aluminium tombent de la fente d‘éjection.
MMaaiinntteennaannccee eett eennttrreettiieenn
• Avant de commercer tout travail d’entretien:
− mettre le moteur hors service et débrancher la fiche de contact
− mettre des gants de protection pour éviter les blessures.
Le jeu de couteaux ne stoppe pas immédiatement après l’arrêt. Avant de commencer votre travail de réparation ou de maintenance, patientez jusqu’à ce que tous les éléments soient complètement arrêtés.
Veillez à retirer l’outil et la clé à vis après l’entretien ou la réparation.
• Le broyeur de végétaux nécessite peu d’entretien. Pour que l’appareil ne se dégrade pas et pour lui assurer une longue durée
de vie, il convient d’observer les points suivants:
− les fentes d'aération doivent toujours être libres et propres.
− vérifier les vis de fixation (le cas échéant, les resserrer).
− après avoir procédé à des travaux de hachage, le hacheur doit être nettoyé à l’intérieur comme à l’extérieur.
Pour nettoyer votre appareil, utilisez uniquement un chiffon chaud et humide et une brosse souple.
N’utilisez jamais de produits nettoyants ou de solvants. Ils pourraient entraîner des dommages irréparables sur l’appareil. Les produits chimiques pourraient attaquer les éléments en matière plastique.
− le broyeur ne doit pas être nettoyé avec un nettoyeur haute pression ou même au jet d’eau.
− les pièces métalliques nues devraient être protégées de la corrosion après chaque utilisation à l’aide d’une huile à pulvériser biodé-
gradable et écologique.
− le rouleau de coupe et la plaque de recoupe sont des pièces d'usure, toutefois, elles ont une longévité de plusieurs années en cas
d'utilisation normale et à condition que le réajustage ait été réalisé conformément aux prescriptions.
20
Page 22

PPaannnneess
Avant de procéder à l'élimination des défauts
− arrêter l'équipement
− Attendre l’arrêt de l’appareil
− retirer la fiche du secteur
Panne Cause possible Remède
Le moteur ne démarre pas - le commutateur du sens de rotation sur la
position « 0 »
- absence de tension secteur
- câble de raccordement défectueux
- Appareil trop sollicité
- Arrêtez l‘appareil et déplacez le commutateur du sens
de rotation.
- vérifier le fusible
- laisser vérifier (par un électrotechnicien)
- Laissez refroidir l‘appareil.
Appuyez sur
1. le bouton de réinitialisation (protection du moteur)
2. le bouton vert I pour une remise en marche.
Le moteur ronfle mais ne
démarre pas
- le rouleau de coupe est bloqué
- Arrêtez l‘appareil.
Réglez le commutateur du sens de rotation sur la position
. Mettez l‘appareil en marche jusqu‘à ce que
le blocage soit éliminé. Arrêtez à nouveau l‘appareil.
Remettez le commutateur du sens de rotation sur la po-
- le condensateur est défectueux
sition
.
- confier l'appareil au constructeur en vue de sa répara-
tion ou l'envoyer à une adresse mention-née par ses
soins
La matière à hacher n'est pas
introduite automatiquement
- Le cylindre de coupe recule. La position du
commutateur est incorrecte.
- la matière à hacher est bloquée dans la
- Arrêtez l‘appareil et déplacez le commutateur du sens
de rotation.
- Arrêtez l‘appareil. Réglez le commutateur du sens de
trémie
rotation sur la position
che pour que la matière à hacher soit libérée; le cas
échéant, enlevez les saletés.
Arrêtez à nouveau l‘appareil. Pour continuer à travailler,
réglez à nouveau le commutateur du sens de rotation
. Mettez l‘appareil en mar-
- la matière à hacher est trop tendre ou trop
mouillée
- usure sur le rouleau de coupe
sur la position
- Pousser la masse de remplissage en utilisant une bran-
che et laisser hacher le tout
- Réglez la contre-plaque, tel que cela est décrit dans le
.
chapitre “Réglage de la contre-plaque“; en cas de forte
usure, remplacez le cylindre de coupe.
La matière à hacher n'est pas
- Ajustage insuffisant du contre-couteau - Réglez le contre-couteau
proprement coupée /hachée
L'appareil démarre, se bloque
cependant, déjà en présence
d'une sollicitation minimale et
est inac-tivé par le disjoncteurprotecteur.
le câble de rallonge est trop long ou de trop
petite section.
La prise est trop éloignée du raccordement
principal et la ligne de raccor-dement présente une trop petite section.
Câble de rallonge d'au moins 1,5 mm² et de 25 m de long
au maximum. En présence d'un câble plus long, section de
2,5 mm² au minimum.
21
Page 23

CCaarraaccttéérriissttiiqquueess tteecchhnniiqquueess
Modèle 2300 2500 2800
Désignation du type AH 600 AH 600 AH 600
Moteur moteur à courant alternatif 230 V~, 50 Hz, 2800 min
-1
Puissance du moteur P
Vitesse de rotation du cylindre de coupe 40 min
Interrupteur de mise en marche/arrêt avec: protection contre les surcharges; fonction de coupe et d'inversion de la direction de rotation;
Poids 24 kg 24,5 kg 25 kg
Niveau de pression acoustique LPA
(mesuré conformément au réglement
2000/14/CE)
Niveau de puissance sonore mesuré LWA
(mesuré conformément au réglement
2000/14/CE)
Niveau de puissance sonore garanti LWA
(mesuré conformément au réglement
2000/14/CE)
Diamètre maximal des branches à hacher
(s’applique uniquement à la coupe de bois
frais)
Classe de protection I
Type de protection IP X4
S6 - 40 % 2300 W 2500 W 2800 W
1
-1
déclencheur à tension nulle
83,8 dB (A)
K = 3 dB (A)
91 dB (A) 91 dB (A) 91 dB (A)
92 dB (A) 92 dB (A) 92 dB (A)
∅ max. 35 mm ∅ max. 40 mm ∅ max. 44 mm
84,2 dB (A)
K = 3 dB (A)
82,5 dB (A)
K = 3 dB (A)
Protection de secteur
Suisse
UK
GGaarraannttiiee
Veuillez tenir compte de la déclaration de garantie ci-jointe.
16 A retardée
10 A retardée
13 A retardée
16 A retardée
--
13 A retardée
16 A retardée
--
13 A retardée
22
Page 24

Přístroj nesmíte uvést do provozu dříve, dokud si
nepřečtete tento návod k obsluze, nedodržíte
všechny pokyny a přístroj nesmontujete předepsaným
způsobem.
Tento návod uchovejte pro další použití.
OObbssaahh
Prohlášení o shodě 23
Rozsah dodávky 23
Popis stroje 23
Symboly na přístroji 23
Symboly v návodu k obsluze 24
Provozní doby 24
Vymezení použití 24
Zbytková rizika 24
Bezpečná práce 24
Uvedení do provozu 25
Práce se zahradním drtičem 26
Nastavení protinože 27
Údržba a péče 27
Možné poruchy 28
Technické údaje 29
Záruka 29
Montáž 116
Náhradní díly 117
RRoozzssaahh ddooddáávvkkyy
Zkontrolujte podle níže uvedeného seznamu obsah
kartonu z hlediska
! kompletnosti
! případných škod při přepravě.
Zjištěné nedostatky sdělte ihned obchodníkovi, dodavateli resp.
výrobci. Pozdější reklamace se neuznávají.
• 1 částečně smontovaný přístroj
• 1 stojanová noha levá
• 1 stojanová noha pravá
• 1 osa
• 2 kolečka
• 2 kryty kol
• 1 sáček se šrouby
• 1 záchytný vak
• 1 návod k použití
PPooppiiss ssttrroojjee
PPrroohhllááššeenníí oo sshhoodděě ppooddllee ssmměěrrnniiccee EESS
podle směrnice ES
2006/42/ES
de a tímto prohlašujeme
ATIKA GmbH & Co. KG
Schinkelstraße 97, 59227 Ahlen - Germany
na vlastní zodpovědnost, že výrobek
Gartenhäcksler (zahradní drtič) typ AH 600
Seriové číslo: viz poslední strana
odpovídá ustanovením ES-směrnicím, rovněž ustanovením
následných směrnic:
2004/108/ES a 2000/14/ES.
Následující normy byly použity:
EN 60335-1:2002+A1+A11+A12+A2+A13;
EN 13683:2003+A1:2009; EN 62233:2008; EN 55014-1:2006;
EN 55014-2/A1:2001; EN 61000-3-2:2006; EN 61000-3-11:2000
Shodové hodnocení se řídí dle: 2000/14/ES - příloha V
Měřená hladina hlučnosti L
Zaručená hladina hlučnosti L
WA
91 dB (A).
92 dB (A).
WA
Uchování technických podkladů:
ATIKA GmbH & Co. KG – Technické oddělení – Schinkelstr. 97
59227 Ahlen – Germany
Ahlen, 30.04.2010 A. Pollmeier, jednatel spolčnosti
A. Násypka pro drcený materiál
B. Rukojeť
C. Vratné tlačítko/ochrana motoru
D. Síťová zástrčka
E. Tlačítko vyp/zap
F. Přepínač směru otáčení
G. Podvozek
H. Horní část pláště
I. Regulační kolečko
J. Vyhazovací otvor
SSyymmbboollyy nnaa ppřřííssttrroojjii
Před uvedením do
provozu si přečtěte
tento návod k
obsluze a
bezpečnostní
pokyny a dodržujte
je.
Před opravou,
údržbou nebo
čištěním vždy
vypněte motor a
odpojte stroj od
sítě.
23
Page 25

Nebezpečí zranění
odletujícími
částicemi drceného
odpadu při běžícím
motoru. Obsluha
přístroje musí
zamezit přístup do
pracovního okruhu dalším osobám
event. domácím zvířatům.
Pozor na rotující
nože. Nestrkejte
končetiny do
otvorů jestliže
motor běží.
Každé jiné použití stroje nespadá do okruhu působnosti stroje a
jestliže při takovém užití vzniknou škody, veškerá rizika z nich
plynoucí jdou na vrub uživatele.
Používat drtič a provádět jeho seřizování a údržbu smí pouze
osoby, které jsou s těmito činnostmi obeznámeny a které byly
poučeny o možných rizicích. Event.opravy drtiče smí, vedle
výrobce, provádět pouze autorizovaný servis.
ZZbbyyttkkoovváá rriizziikkaa
Používejte ochranné
prostředky očí a sluchu.
Používejte
ochranné rukavice.
Chraňte před
vlhkem.
Elektrospotřebiče nepatří do domácího odpadu.
Zařízení, příslušenství a obal odevzdávejte k recyklaci
šetřící životní prostředí.
Podle evropské směrnice 2002/96/ES o elektro- a elektronických
starších přístrojích není nutné použité elektropřístroje odděleně
shromažďovat a dodávat k ekologické recyklaci.
SSyymmbboollyy vv nnáávvoodduu kk oobbsslluuzzee
Hrozící nebezpečí nebo nebezpečná situace.
Zanedbání těchto upozornění může mít za následek
zranění nebo věcné škody.
Důležité pokyny pro správný postup. Zanedbání
L
těchto pokynů může vést k poruchám.
Pokyny pro uživatele. Tyto pokyny vám pomohou
optimálně využít všechny funkce.
Montáž, obsluha a údržba. Zde se přesně vysvětluje,
co musíte udělat.
PPrroovvoozznníí ddoobbyy
Řiďte se místními předpisy.
VVyymmeezzeenníí ppoouužžiittíí
K odbornému použití patří drcení
− větví všeho druhu do průměru max. (v závislosti na druhu
dřeva a čerstvosti)
− zvadlého, vlhkého, již několik dní skladovaného zahradního
odpadu střídavě s větvemi
Drcení skla, kovu, plastů, igelitových sáčků, kamenů, látkových
odpadů, kořenů se zeminou, odpadů bez pevné konzistence
(např. kuchyňské odpady) se výslovně vylučuje.
Zahradní drtič je vhodný pouze pro použití v domácnostech a na
zahradě.
Jako drtiče pro domácí či hobby-zahradní použití se rozumí
přístroje, které nejsou používány na veřejných prostranstvích,
parcích, sportovištích nebo oblasti zemědělství či lesního
hospodářsrví.
Do této kapitoly patří též dodržení výrobcem přdepsaných Pokynů
z hlediska údržby, péče a event.oprav či čištění stroje. Rovněž
dodržení všech bezpečnostních pokynů.
I při předpisovém použití mohou navzdory dodržení všech
příslušných bezpečnostních ustanovení existovat ještě zbytková
rizika, daná konstrukcí přístroje, která je určená účelem jeho
použití.
Tato zbytková rizika lze minimalizovat dodržením
"bezpečnostních pokynů" a "vymezeného použití", jakož i tohoto
návodu k obsluze.
Při vlastní práci ohleduplnost a opatrnost zmenšují rizika zranění
nebo jiných škod.
Nebezpečí zranění prstů a rukou, jestliže saháte rukou do
otvoru a dostanete se do prostoru nože.
Nebezpečí zranění prstů a rukou při montáži a čištění nože.
Nebezpečí zranění odletujícími kusy drceného
materiálu v
prostoru násypky.
Ohrožení elektrickým proudem při použití nesprávného
elektrického přívodu.
Dotyk součástí pod napětím při otevření elektrických částí
přístroje.
Ohrožení sluchu při déle trvající práci bez chrániče sluchu.
Přes všechna podniknutá opatření mohou kromě toho existovat
ještě další skrytá zbytková rizika.
BBeezzppeeččnnáá pprrááccee
Před uvedením tohoto výrobku do provozu si přečtěte a
dodržujte následující pokyny a předpisy bezpečnosti práce
vašeho profesního sdružení resp. v dané zemi platné
bezpečnostní předpisy, abyste ochránili sebe a jiné před
možným úrazem.
Bezpečnostní pokyny sdělte všem ostatním osobám,
L
které se strojem pracují.
Uložte dobře tyto bezpečnostní předpisy.
L
Opravy bezpečnostního vypínání smí provádět jen
výrobce resp. jím pověřené osoby.
Před použitím se seznamte s přístrojem pomocí tohoto
návodu k obsluze.
Nepoužívejte přístroj pro účely, pro které není určen (viz
vymezení použití a práce se zahradním drtičem).
Při práci zaujměte bezpečný postoj a udržujte vždy
rovnováhu. Při práci se nad drtič nenaklánějte. Při vkládání
odpadu stůjte stejně rovně jako drtič.
Buďte pozorní. Dávejte pozor na to, co děláte. Přistupujte k
práci odpovědně. Nepoužívejte přístroj, když jste unavení
nebo když jste pod vlivem drog, alkoholu nebo léků. Okamžik
nepozornosti při použití přístroje může mít za následky vážná
zranění.
24
Page 26

Při práci používejte ochranné brýle, pracovní rukavice a
ochranu sluchu.
Noste vhodný pracovní oděv:
− žádné široké oblečení,
− neklouzavou obuv.
Obsluha je v pracovním okruhu stroje odpovědná za ostatní
osoby.
Děti a mladiství (do 16 let) nesmějí drtič obsluhovat.
Děti se nesmějí zdržovat v blízkosti stroje.
Nikdy nezapínejte přístroj je-li v pracovním okruhu ještě jiná
osoba.
Nenechávejte přístroj nikdy bez dozoru.
Udržujte pracovní prostor uklizený! Nepořádek může mít za
následek úraz.
Zaujměte pracovní postoj ze strany nebo za přístrojem. Nikdy
nestůjte v prostoru výstupního otvoru.
Nikdy nesahejte do plnicího a výstupního otvoru.
Obličej a tělo držte daleko od plnicího otvoru.
Nepřetěžujte přístroj! Nejlépe a bezpečně se pracuje v
uvedeném výkonovém rozsahu.
Přístroj provozujte jen s kompletním a správně
namontovaným bezpečnostním zařízením, na stroji
neupravujte nic, co by mohlo ohrozit bezpečnost.
Neprovozujte přístroj bez plnicí násypky.
Přístroj a jeho části se nesmí upravovat.
Před zapnutím motoru se přístroj musí zavřít.
Přístroj se nesmí ostřikovat vodou (nebezpečí úrazu
elektrickým proudem).
Dbejte na pracovní prostředí a jeho vliv na práci:
− Nikdy neprovozujte přístroj ve vlhkém prostředí.
− Přístroj nenechávejte stát na dešti ani nepracujte v dešti.
− Postarejte se o dokonalé osvětlení pracoviště.
Přístroj se připojí na odpovídající předpisovou zásuvku.
Abyste zamezili zbytečnému poranění prstů, noste při montáži
či očistě stroje rukavice.
Stroj vypněte a vytáhněte zásuvku ze sítě při:
− údržbě a čištění
− přepravě
− kontrole přípojného vedení, zda není
zamotané nebo poškozené
− dopravě
− opravách
− opuštění stroj (i krátkodobém přerušení práce).
Při ucpání vstupního či výstupního otvoru nejprve vypněte
přístroj a odpojte od el. proudu. Teprve potom odstraňte
ucpávku.
Zkontrolujte stroj na případné poškození:
− Pečlivě zkontrolujte bezvadný stav stroje z hlediska
bezpečnosti a funkce.
− Zkontrolujte zda všechny pohyblivé části jsou funkční,
nelepí, nedrhnou a nejsou poškozené. Zkontrolujte jeich
správné namontování. Tyto části musí splňovat
bezvadného provozu a tím bezpečný chod stroje.
− Poškozené bezpe čnostní zařízení nebo součásti se musí
odborně opravit nebo vyměnit v uznané dílně, pokud není
v návodu k obsluze uvedeno jinak.
− Nikdy nezapínejte přístroj je-li v pracovním okruhu ještě
jiná osoba.
Jestliže přístroje nepoužíváte, skladujte je (i nářadí) v
suchém, uzavřeném prostoru kam zejména děti nemají
přístup.
Elektrická bezpečnost
Provedení připojovacího vedení podle ČSN IEC 60245 s
průřezem vodičů minimálně
− 1,5 mm² při délce kabelu do 25 m
− 2,5 mm² při délce kabelu nad 25 m
(do cca 40 m)
Dlouhé a tenké připojovací vodiče způsobují napěťový úbytek.
Motor již nedosahuje svůj maximální výkon, funkce přístroje
se snižuje.
Při používání kabelového bubnu kabel zcela odmotejte.
Zástrčky a zásuvky na připojovacích vodičích musejí být
z pryže, měkčeného PVC nebo jiného termoplastického
materiálu o stejné mechanické pevnosti nebo musejí být tímto
materiálem potažené.
Zástrčka připojovacího vodiče musí být chráněna před
stříkající vodou.
Při vedení kabelu je třeba dbát na to, aby se kabel nelámal,
nesvíral a zásuvka nebyla v mokru.
Nepoužívejte kabel pro účely, ke kterým není určen. Chraňte
kabel před horkem, olejem a ostrými hranami. Nepoužívejte
kabel k vytahování zástrčky ze zásuvky.
Prodlužovací kabel pravidelně kontrolujte a vyměňte v případě
jeho poškození.
Nepoužívejte vadné přívodní kabely.
Venku používejte jen prodlužovací kabely k tomu schválené a
příslušně označené.
Nepoužívejte žádné provizorní elektrické připojení.
Jističe se nesmí nikdy přemostit ani vyřadit z provozu.
Přístroj se připojí na síť přes proudový chránič (30mA).
Elektrické připojení a opravy na elektrických součástech
smí provádět jen odborný elektrikář s koncesí nebo některé
z našich servisních míst. Přitom se musí dodržet místní
předpisy, zvláště pokud se týká ochranných opatření.
Opravy ostatních částí stroje provádí výrobce nebo jím
pověřený servis.
Používejte pouze originální náhradní díly. Při použití jiných
náhradních dílů a jiného příslušenství může dojít k úrazu
uživatele. Za takto vzniklé škody výrobce neodpovídá.
UUvveeddeenníí ddoo pprroovvoozzuu
Přesvědčte se, že přístroj je kompletní a správně smontován.
Drtič před použitím postaví na vodorovný a pevný podklad
(nebezpečí překocení).
Přístroj nestavte na dlažbu nebo štěrk.
Přístroj používejte jen ve venkovním prostředí.Minimální
bezpečná vzdálenost, od dalších stěn(venku) či jiných
pevných předmětů, je 2 m.
Před každým použitím zkontrolujte:
− vadná místa přívodního kabelu (trhliny, řezy apod.)
nepoužívejte vadné kabely
− poškození přístroje (viz bezpečná práce)
− zda jsou všechny šrouby pevně utažené
L Připojení k síti
Porovnejte napětí na typovém štítku s napětím sítě a přístroj
připojte na odpovídající a předpisovou zásuvku.
25
Page 27

Připojte stroj pomocí správných pojistek.
Použijte prodlužovací kabel dostatečného průřezu.
Síťové pojistky
Švýcarsko UK
2300 W 16 A pomalá
2500 W 16 A pomalá
2800 W 16 A pomalá
10 A pomalá
13 A pomalá
13 A pomalá
13 A pomalá
Zapínač/vypínač
Nepoužívejte žádné přístroje, u kterých se nedá spínač
zapínat a vypínat. Poškozené spínače se musejí dát k opravě
nebo výměně do servisu.
vratné tlačítko
(ochrana
motoru)
ZAP
VYP
přepínač
směru
otáčení
Poloha
Materiál vtahuje a řeže řezný válec.
Poloha
Nůž pracuje opačným směrem a uvízlý materiál se uvolní.
Poté co jste přepínač směru otáčení otočili do polohy držte
stisknuté zelené tlačítko zapínače/vypínače. Řezný válec se
přepne na opačný směr. Jestliže zapínač/vypínač pustíte,
zůstane řezačka automaticky stát.
Tipy
z Velké předměty a kusy dřeva se po opakovaném spuštění
jak ve směru řezání, tak i uvolnění odstraní.
z K odstranění zablokovaných předmětů z násypky nebo
vyhazovacího otvoru používejte pěchovadlo nebo hák.
Dříve než řezačku opět zapnete, počkejte, až se stroj
zastaví.
Impedance sítě
Při nepříznivých podmínkách sítě může při zapínání přístroje dojít
ke krátkému poklesu napětí, které může ovlivnit jiné přístroje
(např. pohasnutí světla). Neočekávají se žádné poruchy, pokud je
dodržena maximální impedance sítě, uvedená v tabulce.
zpětný chod
VYP
Vstup
Zapnutí
Stiskněte zelené tlačítko I
Vypnutí
Stiskněte červené tlačítko 0
Pojistka proti znovuspuštění při
výpadku proudu
Při výpadku proudu se přístroj automaticky vypne (spouštěč při
nulovém napětí). K opětovnému zapnutí je nutné znovu stisknout
zelené tlačítko.
Ochrana motoru
Motor je vybaven jističem a při přetížení se samočinně vypíná.
Motor je možné po fázi ochlazení (cca 5 minut) opět zapnout.
Stiskněte
1. vratné tlačítko (ochrana motoru)
2. zelené tlačítko I pro opětovné zapnutí.
Přepínač směru otáčení
Přepínač směru otáčení ovládejte pouze tehdy, je-li
řezačka vypnutá.
Poloha
Motor se nerozbíhá.
příkon P1 (W)
impedance sítě Zmax (Ω)
2300 0,21
2500 0,21
2800 0,19
PPrrááccee ssee zzaahhrraaddnníímm ddrrttiiččeemm
Zaujměte pracovní postoj z boku nebo za přístrojem. Nikdy
nestůjte v prostoru výstupního otvoru.
Delší materiál, který z přístroje vyčnívá, by se mohl
z přístroje odmrštit, když je vtahován noži! Dodržujte
bezpečnou vzdálenost!
Nikdy nesahejte do plnicího a výstupního otvoru.
Obličej a tělo držte dále od plnicího otvoru.
Před zapnutím přístroje zkontrolujte, zda se v plnicí násypce
drtiče nenacházejí žádné zbytky.
Nestrkejte ruce či další části těla či oblečení do plnicího
otvoru, výstupního ovtoru nebo do blízkosti pohyblivých částí.
Nikdy nesahejte do plnicího a výstupního otvoru.
Při plnění je třeba dbát, aby se do násypky nedostaly žádné
kovové předměty, kameny, lahve či jiné nezpracovatelné
předměty.
Před zapnutím přístroje zkontrolujte, zda se v plnicí násypce
drtiče nenacházejí žádné zbytky.
S drtičem je třeba pracovat s ohledem na kvalitu a vlhkost
drceného materiálu, občas je třeba drcený materiál
povytáhnout zpět a odlehčit tak zatížení stroje.
Když se do násypky dostanou cizí předměty nebo přístroj
začne vydávat neobvyklý hluk nebo vibrovat, okamžitě jej
vypněte a nechejte zastavit. Vytáhněte síťovou vidlici a
proveďte následující body:
− zkontrolujte škody
26
Page 28

− vyměňte nebo opravte poškozené součásti
− prohlédněte přístroj a utáhněte uvolněné součásti.
Přístroj nesmíte opravovat, pokud k tomu nemáte
oprávnění.
Co je možné drtit?
Ano:
• Větve všeho druhu až do průměru , v závislosti na druhu a
čerstvosti dřeva
• uvadlý, vlhký, již několik dní uložené zahradní odpady
pouze střídavě s větvemi
Ne:
• sklo, kovové součásti, umělé hmoty, plastové sáčky, kameny,
látky, kořeny se zemí atd.
• odpady bez tuhé konzistence, např. kuchyňské odpady
Pokyny pro drcení:
Řezaný materiál do plnicího
otvoru násypky vždy plňte
z pravé strany.
L Technika drcení
Při postavení za drtičem vidíte
v násypce 2 otvory (spojené). Drcenou větev vsouvejte pouze
do levého otvoru. Tímto způsobem větev přijde do kontaktu s
rotujícími noži kolmo.
Větev z počátku zavádějte rukou (POZOR-nenaklánějte se
nad vstupní otvor).
Vlastní drcení provádějte přerušovaně t.zn. po chvilce drcení
větev povytáhnout zpět a opět spustit dolů.
Větve, výhonky a dřevo se drtí nejlépe ihned po uříznutí.
− tento materiál při vyschnutí tvrdne a maximální
zpracovatelný průměr větví se tím zmenšuje.
U silně rozvětvených větví odstraňte boční výhony.
Zpracování zahradních a kuchyňských odpadů s vysokým
obsahem vody, které mají tendenci k nalepování
− nejlépe střídavě s dřevěným odpadem, aby se zabránilo
ucpání přístroje.
Drcený odpad pod vývodem nenechte příliš narůst. To může
mít za následek ucpání vývodu drtiče. V horším případě
mohou zbytky odpadu vylétnout zpět plnicím otvorem.
V případě, že je přístroj ucpán je třeba ho vyčistit. Nejprve
přístroj vypněte a odpojte od sítě.
Maximální dovolený průměr větví pro daný přístroj musí být
dodržen (viz „Technické údaje“). Podle druhu a čerstvosti
drceného dřeva je možné, že udaný maximální průměr
drceného materiálu se zmenší.
Řezný nůž vtahuje dovnitř drcený materiál samočinně
pomalým otáčením řezného válce bez rázů.
Samočinné přepnutí směru otáčení:
Při náhlém zablokování přístroje se může směr otáčení
řezného válce otočit a drcený materiál se vysunuje zpět.
− Přístroj vypne.
− Vyčkejte se zastavení řezného válce.
− Přístroj znovu zapne a použije se snadněji zpracovatelný
materiál.
− Drt’te jen st řídavě s větvemi
Při přetížení přístroje samočinně vypne ochranný spínač
motoru
− po cca 5 minutách znovu drtič zapněte
− když přístroj nelze po této době zapnout, vyhledejte
kapitolu "Provozní poruchy".
NNaassttaavveenníí pprroottiinnoožžee
Protinůž (B) lze na řezném válci (A) bez vůle nastavit. Pro
efektivní provoz by měla být dodržena co nejmenší mezera.
Měkký materiál nebo mokré větve se mohou místo řezání trhat.
Tento problém může způsobovat i protinůž, který je po častém
používání opotřebovaný.
Nastavení mezery.
Zapněte přístroj.
Na pravé straně plastového pláště se nachází nastavovací
zařízení. K nastavení odstupu otočte regulační kolečko (D)
doprava, aby šroub (C) se přiblížil k řezacímu válci. Šroubujte tak
dlouho, až z vyhazovacího otvoru začnou padat jemné hliníkové
třísky.
ÚÚddrržžbbaa aa ppééččee
• Před zahájením jakékoliv údržby
− Motor vypněte a síťovou vidlici vytáhněte.
− Navlékněte si ochranné rukavice, aby nedošlo ke zranění.
Dejte pozor při údržbě řezacího ústrojí.Toto může běžet
(startovací mechanismus) i když motor (díky blokaci na krytu)
neběží.
Dbejte na to,aby nářadí použité při opravě či údržbě bylo
opět odstraněno.
• Zahradní drtič do značné míry nevyžaduje údržbu. K
zachování hodnoty a dlouhé životnosti:
− Větrací otvory musí být volné a čisté.
− Zkontrolujte upevňovací šrouby (případně dotáhněte)
− Po drcení přístroj vyčistěte.
K čištění Vašeho přístroje použijte buď vlhký hadřík nebo
měkký kartáček.
Nikdy nepoužívejte čistící chemické prostředky nebo
ředidla. Tím byste mohli způsobit neopravitelné škody na
Vašem přístroji. Umělá hmota může být těmito prostředky
poškozena.
27
Page 29

− Drtič se nesmí čistit proudem vody nebo vysokotlakým čisticím přístrojem.
− holé kovové části po každém použití chraňte před korozí ekologicky šetrným biologicky odbouratelným olejem.
− Řezný válec a řezná deska jsou součásti, podléhající opotřebení. Při normálním používání a správném nastavení však přesto
mají životnost několik let.
MMoožžnnéé ppoorruucchhyy
Před každým odstraňováním poruchy
− vypněte pilu
− vyčkejte úplného zastavení stroje
− vytáhněte zástrčku ze zásuvky
porucha možná příčina odstranění
motor se nerozbíhá - přepínač směru otáčení do polohy „0“
- výpadek síťového napětí
- vadný přívodní kabel
- přístroj přetížen
- Přístroj vypněte a přepněte přepínač směru otáčení.
- zkontrolujte jistič
- zkontrolujte kabel (elektrikářem)
- Nechejte přístroj vychladit.
Stiskněte
1. vratné tlačítko (ochrana motoru)
2. zelené tla čítko I pro opětovné zapnutí.
motor bručí, ale neběží - řezný válec zablokován
- vypněte přístroj.
Zapněte přepínač směru otáčení do polohy
Zapněte přístroj, až je zablokování odstraněno.
Přístroj opět vypněte. Přepínač směru otáčení
- defektní kondensátor
přepněte zpět do polohy
- přístroj nechte opravit, kontaktujte prodejce
.
.
materiál se nevtahuje - Řezný válec běží pozpátku. Nesprávná
poloha spínače.
- materiál se příčí v násypce
- Přístroj vypněte a přepněte přepínač směru otáčení.
- Přístroj vypněte. Přepněte přepínač otáčení směru
- měkký nebo vlhký materiál
- opotřebený řezný válec
do polohy
materiál uvolnil, odstraňte případné nečistoty.
Přístroj opět vypněte. Pro pokračování v práci
přepněte přepínač směru otáčení zpět do polohy
.
- pomocí větve materiál posuňte a rozsekejte
- Protilehlou desku nastavte, jak je popsáno
v odstavci „Nastavení protilehlé desky“, při silném
opotřebení vyměňte řezný válec.
materiál není čistě rozsekaný - protinůž není dostatečně nastaven - nastavte protinůž
přístroj se rozběhne, při
malém zatížení však se
zablokuje a ochranný spínač
dlouhý prodlužovací kabel nebo malý průřez
zásuvka daleko od hlavního připojení a malý
průřez přívodního vedení
použijte prodlužovací kabel minimálně 1,5 mm²,
max.délka 25 m, při delším kabelu průřez nejméně
2,5 mm².
motoru vypne
. Přístroj zapněte, aby se řezaný
28
Page 30

TTeecchhnniicckkáá ddaattaa
Model
2300 2500 2800
Typ
Motor
Výkon motoru P
S6 - 40 %
1
AH 600 AH 600 AH 600
Motor na střídavý proud 230 V~, 50 Hz, 2800 min
2300 W 2500 W 2800 W
Otáčky řezného válce 40 min
Spínač/vypínač:
s ochranou proti přetížení, přepínáním chodu vpřed a vzad,
vypínač pří nulovém napětí
Hmotnost
Hladina hluku LPA
(měřeno podle 2000/14/ES)
měřená hladina hlučnosti LWA
(měřeno podle 2000/14/ES)
24 kg 24,5 kg 25 kg
83,8 dB (A)
K = 3 dB (A)
84,2 dB (A)
K = 3 dB (A)
91 dB (A) 91 dB (A) 91 dB (A)
zaručená hladina hlučnosti LWA
92 dB (A) 92 dB (A) 92 dB (A)
(měřeno podle 2000/14/ES)
Maximální průměr zpracovávané větve
(pouze čerstvé dřevo)
Lizolační třída
Způsob ochrany
∅ max. 35 mm ∅ max. 40 mm ∅ max. 44 mm
I
IP X4
-1
-1
82,5 dB (A)
K = 3 dB (A)
Síťové pojistky
Švýcarsko
16 A pomalá
10 A pomalá
UK
ZZáárruukkaa
13 A pomalá
Prosíme, přečtěte si a respektujte přiložené záruční prohlášení a jeho podmínky.
16 A pomalá
--
13 A pomalá
16 A pomalá
--
13 A pomalá
29
Page 31

Anvend ikke apparatet, før du har læst
betjeningsvejledningen, iagttaget de angivne
henvisninger og monteret apparatet som beskrevet.
Vejledningen skal opbevares til senere brug.
IInnddhhoolldd
EF-overensstemmelseserklæring 30
Leveringsomfang 30
Beskrivelse 30
Symboler på apparatet 30
Symboler betjeningsvejledning 31
Driftstider 31
Tiltænkt anvendelse 31
Uberegnelige risici 31
Sikkerhedshenvisninger 31
Igangsætning 33
Arbejde med kompostkværnen 33
Indstilling af skæreplade 34
Vedligeholdelse og pleje 34
Mulige fejl 35
Tekniske data 36
Garantie 36
Montering 116
Reservedeler 117
LLeevveerriinnggssoommffaanng
g
Kontroller efter udpakningen kartonens indhold for
! fuldstændighed
! evt. transportskader
Meld omgående reklamationen til forhandleren, leverandøren
eller producenten. Senere reklamationer anerkendes ikke.
• 1 formonteret apparatenhed
• 1 støtteben - venstre
• 1 støtteben - højre
• 1 aksel
• 2 hjul
• 2 hjulkapsler
• 1 pose skruer
• 1 opsamlingssæk
• 1 betjeningsvejledningen
BBeesskkrriivveellsse
e
EEFF--oovveerreennsssstteemmmmeellsseesseerrkkllæærriinng
g
i henhold til EU-direktiv: 2006/42/EF
Hermed erklærer vi
ATIKA GmbH & Co KG.
Schinkelstraße 97 - D-59227 Ahlen - Germany
på eget ansvar, at produkt
Gartenhäcksler (kompostkværn) type AH 600
Serienummer: se sidste side
stemmer overens med forskrifterne i de ovennævnte EF-direktiver
samt med forskrifterne i følgende yderligere direktiver:
2004/108/EF og 2000/14/EF
Følgende harmoniserede standarder er anvendt:
EN 60335-1:2002+A1+A11+A12+A2+A13;
EN 13683:2003+A1:2009; EN 62233:2008; EN 55014-1:2006;
EN 55014-2/A1:2001; EN 61000-3-2:2006; EN 61000-3-11:2000
Procedure for overensstemmelsesvurdering:
2000/14/EF – Tillæg V
Målt lydeffektniveau L
Garanteret lydeffektniveau L
91 dB (A).
WA
WA
92 dB (A).
Opbevaringssted for den tekniske dokumentation:
ATIKA GmbH & Co. KG – Technisches Büro – Schinkelstr. 97
59227 Ahlen - Germany
Ahlen, 30.04.2010 A. Pollmeier, direktion
A. tragtåbning for skæremateriale
B. Håndgreb
C. Reset-knap / motorbeskyttelse
D. netstikket
E. tænd-/slukknap
F. Omdrejningsretningsomskifter
G. kørestativ
H. husets overdel
I. indstillingsknap til skærevalsen
J. tømningsslids
SSyymmbboolleerr ppåå aappppaarraatteet
Før igangsætning skal brugsanvisning og
sikkerhedshenvisningerne
læses og
iagttages.
t
Før reparations-,
vedligeholdelsesog rengøringsarbejde skal
motoren slås fra og
netstikket trækkes
ud.
30
Page 32

Fare pga.
vækslyngede
dele ved løbende
motor – hold
uimplicerede
personer, samt
hus- og
Giv agt på de roterende knive. Hold
ikke hænder og
fødder ind i åbninger, når maskinen
kører.
nyttedyr væk fra fareområdet.
Anvend øjen- og
høreværn.
Anvend
beskyttelseshandsker.
Skal beskyttes mod
fugt.
Elektriske apparater må ikke bortskaffes med
dagrenovationen. Apparater, tilbehør og emballagen
skal tilføres en miljøvenlig genanvendelse.
I henhold til EU-direktivet 2002/96/EF om brugt elektronisk
materiel skal brugte elektroniske apparater, der ikke længere
kan bruges, indsamles separat til miljørigtig genbrug.
SSyymmbboolleerr bbeettjjeenniinnggssvveejjlleeddnniinng
g
Truende fare eller farlig situation. Tilsidesættelse af
disse anvisninger kan medføre tilskadekomst eller
materielle skader.
Vigtige henvisninger til saglig korrekt håndtering.
L
Tilsidesættelse af disse henvisninger kan medføre
forstyrrelser.
Brugerhenvisninger. Disse henvisninger hjælper Dem
med at anvende alle funktioner optimalt.
Montering, betjening og vedligeholdelse. Her
forklares nøjagtigt, hvad De skal gøre.
DDrriiffttssttiiddeer
r
Vær inden idrifttagning af apparatet opmærksom på de
regionale forskrifter vedrørende støjemissionen.
TTiillttæænnkktt aannvveennddeellssee
Anvendelse i henhold til formålet omfatter knusning af
- alle slags grene op til maks. diameter (alt efter træsort og
tilstand)
- dødt, fugtigt, i flere dage aflejret haveaffald skiftevis med
grene.
Knusning af glas, metal, plastdele, plastposer, sten, stof, rødder
med jord, affald uden fast konsistens (f. eks køkkenaffald)
udelukkes udtrykkeligt.
Kompostkværnen er beregnet til privat brug i hus- og hobbyhave.
Som kompostkværn til private haver anses apparater, der ikke
anvendes i offentlige anlæg, parker, sportssteder samt i land- og
skovbrug.
Til den tiltænkte anvendelse hører også opfyldelse af de af
producenten foreskrevne drifts-, vedligeholdelses- og
reparationsbetingelser samt efterkommelse af sikkerhedsanvisningerne i vejledningen.
Enhver derudover gående brug gælder som ikke at være
beregnet til formålet. For enhver form for skader, der resulterer
heraf, overtager producenten intet ansvar: Risikoen overtages
ene og alene af brugeren.
Egenmægtige forandringer på apparatet udelukker producentens
ansvar for deraf resulterende skader.
Apparatet må kun passes, benyttes og repareres af personer, der
er fortrolige med sådant arbejde og kender de forskellige risici.
Reparationsarbejde må kun udføres af os eller af
kundeservicecentre, som vi har udpeget.
UUbbeerreeggnneelliiggee rriissiicci
i
Også ved formålsbestemt anvendelse kan der endnu bestå
uberegnelige risici på trods af overholdelse af alle gældende
sikkerhedsbestemmelser på grund af konstruktionen til
anvendelsesformålet.
Uberegnelige risici kan minimeres, når både
"Sikkerhedshenvisninger" og "Formålsbestemt anvendelse samt
betjeningsvejledningen iagttages.
Hensyntagen og forsigtighed reducerer risikoen for person- og
materielle skader.
Fare for skader på fingre og hænder, når der gribes gennem
en åbning med hånden og når ind til skæreværktøjet.
Fare for skader på fingre og hænder ved monterings- og
rengøringsarbejde på skæreværktøjet.
Kvæstelser på grund af emner i kværnen, der slynges ud, i
tragtens område.
Fare på grund af strøm ved brug af ukorrekte eltilslutnings-
kabler.
Berøring af spændingsførende dele ved åbnede elektriske
komponenter.
Høreskader ved længere varende arbejde uden høreværn.
Desuden kan der være ikke åbenlyse uberegnelige risici på trods
af alle trufne forholdsregler.
SSiikkkkeerrhheeddsshheennvviissnniinnggeerr
Læs og iagttag før ibrugtagning af dette produkt
følgende henvisninger og din brancheforenings forskrifter
om ulykkesforebyggelse hhv. de gyldige sikkerhedsbestemmelser i det pågældende land for at beskytte dig selv
og andre mod eventuelle skader.
Giv sikkerhedsanvisningerne videre til alle personer, som
L
arbejder med skæremaskinen.
Disse sikkerhedsanvisninger skal opbevares omhyggeligt.
L
Reparationer på maskinen må kun udføres af
producenten hhv. firmaer, som han har autoriseret til
det.
Gør dig fortrolig kendt med apparatet før brug ved hjælp af
betjeningsvejledningen.
Anvend apparatet ikke til formål, som det ikke er beregnet til
(se "Formålsbestemt anvendelse" og "Arbejde med
kompostkværnen").
31
Page 33

Sørg for en stabil kropsstilling og hold hele tiden balancen.
Bøj dig ikke forover. Stå ved indkastning af hakkelsegodset på
samme niveau som apparatet.
Vær opmærksom. Vær opmærksom på hvad du har med at
gøre. Vær omhyggeligt under arbejdet. Anvend ikke
apparatet, når du er træt eller under indflydelse af rusmidler,
alkohol eller medikamenter. Et øjebliks uagtsomhed ved
anvendelse af apparatet kan medføre alvorlige kvæstelser.
Anvend under arbejdet beskyttelsesbriller, arbejdshandsker
og høreværn.
Anvend egnet arbejdstøj:
- Intet løsthængende tøj
- Skridsikkert fodtøj
Brugeren er ansvarlig over for tredjemænd i apparatets
arbejdsområde.
Børn og unge under 16 år må ikke betjene apparatet.
Børn må ikke komme i nærheden af apparatet.
Anvend aldrig apparatet, mens uimplicerede personer er i
nærheden.
Apparat må aldrig være uden opsyn.
Hold arbejdsområdet i orden! Uorden kan resultere i ulykker.
Indtag en arbejdsstilling, der er ved siden af eller bagved
apparatet. Ophold Dem aldrig i udkastningsåbningens
område.
Grib aldrig ind i påfyldnings- og udkastningsåbningen.
Hold ansigtet og kroppen borte fra påfyldningsåbningen.
Overbelast ikke apparatet! De arbejder bedre og mere sikkert
i det angivne effektområde.
Apparatet må kun anvendes med komplette og korrekt
anbragte sikkerhedsindretninger, og der må ikke ændres
noget på apparatet, som kan påvirke sikkerheden.
Ændre ikke motorens omdrejningstal, da denne regulere den
sikre maksimale arbejdshastighed og beskytter motor og alle
drejede dele for skader pga. for høj hastighed.
Anvend apparatet ikke uden påfyldningstragt.
Apparatet eller dele af apparatet må ikke ændres.
Luk apparatet før indkobling af motoren.
Spul ikke apparatet med vand (farekilde elektrisk strøm).
(farekilde elektrisk stød).
Vær opmærksom på påvirkninger udefra:
− Benyt ikke maskinen i fugtige og våde omgivelser.
− Apparatet må ikke stå ude i regn og der må ikke arbejdes i
regnvejr.
− Sørg for god belysning.
Bær handsker under monterings-og rengøringsarbejder.
Sluk for skæremaskinen og tag netstikket ud af stikkontakten
ved:
− vedligeholdelses- og rengøringsarbejde
− afhjælpning af fejl
− kontrol af tilslutningsledningen, om disse er
filtret sammen eller beskadiget.
− transport
− reparationsarbejde
− når apparatet efterlades (også ved kortvarige afbrydelser)
Ved blokeringer i fødnings- og tømningsområdet på maskinen
slukkes for motoren og netstikket trækkes inden
materialerester i fødnings- og tømningsområdet fjernes.
Kontroller saven for eventuelle beskadigelser:
− Inden yderligere brug af maskinen skal
beskyttelsesudstyret undersøges nøje med henblik på
korrekt og formålstjenlig funktion.
− Kontroller, om de bevægelige dele fungerer upåklageligt
og ikke sidder fast eller om dele er beskadigede. Samtlige
dele skal være rigtigt monterede og alle betingelser være
opfyldt for at sikre upåklagelig drift.
− Beskadigede beskyttelsesanordninger og dele skal
repareres ordentligt af et autoriseret værksted eller
udskiftes, såfremt intet andet er angivet i brugervejledningen.
− Beskadigede eller ulæselige sikkerhedsmærkater skal
udskiftes.
Opbevar ikke anvendte apparater på et tørt, aflåst sted uden
for børns rækkevidde.
EElleekkttrriisskk ssiikkkkeerrhheedd
Udførelse af tilslutningskablet i henhold til IEC 60245 (H 07
RN-F) med et åretværsnit på mindst
− 1,5 mm² ved en kabellængde op til 25 m
− 2,5 mm² ved en kabellængde over 25 m
Længere tilslutningsledninger forårsager spændingsfald.
Motoren opnår ikke mere sin maksimale effekt,
maskinfunktionen reduceres.
Stik og samledåser på tilslutningsledninger skal være af
gummi, blødt PVC eller andet termoplastisk materiale af den
samme mekaniske styrke eller være overtrukket med dette
materiale.
Stikforbindelsen på tilslutningsledningen skal være
stænkbeskyttet.
Ved montering af en tilslutningsledning sørg for at denne ikke
er i vejen, kommer i klem, bøjes og at stikforbindelsen ikke
bliver våd.
Rul kablet fuldstændigt ud, når der anvendes en kabeltromle.
Anvend ikke kablet til andre formål end det tiltænkte. Beskyt
kablet mod varme, olie og skarpe kanter. Anvend ikke kablet
til at trække stikket ud af stikkontakten.
Kontroller forlængerledningen regelmæssigt og udskift den i
tilfælde af beskadigelser.
Anvend ingen defekte tilslutningskabler.
Anvend udendørs kun de hertil tilladte og tilsvarende
markerede forlængerledninger.
Anvend ingen provisoriske eltilslutninger.
Beskyttelsesanordninger må aldrig kortsluttes eller sættes ud
af drift.
Tilslut apparatet via et fejlstrømsrelæ (30 mA).
Eltilslutningen eller reparationer på kværnens elektriske dele
skal udføres af en autoriseret elektriker eller af en af vore
kundeserviceafdelinger. Lokale forskrifter især i henseende
til beskyttelsesforanstaltninger skal iagttages.
Reparationer på apparatets andre dele skal lades udføre af
producenten hhv. en af hans serviceafdelinger.
Anvend kun originale reservedele. Ved anvendelse af andre
reservedele og andet tilbehør kan brugeren komme i fare.
For heraf resulterende skader overtager producenten intet
ansvar.
32
Page 34

IIbbrruuggttaaggnniinngg
Kontroller, at apparatet er monteret komplet og efter
reglementerne.
Stil kompostkværnen ved anvendelse på en vandret og fast
undergrund (fare for væltning).
Apparatet må ikke opstilles på undergrunde belagt med
brosten eller skærver.
Benyt kun apparatet udendørs. Hold afstand (mindst 2 m) fra
en væg eller en anden fast genstand.
Kontroller før hver brug:
− tilslutningsledningerne for defekte steder (revner, snit e.l.)
Anvend ingen defekte ledninger
− Eventuelle beskadigelser (se "Sikkert arbejde")
− Om alle skruer er strammede.
L Nettilslutning
Sammenlign på apparatets mærkeplade den angivne
spænding med netspændingen og tilslut apparatet til en
tilsvarende og korrekte stikkontakt.
Anvend forlængerledninger med tilstrækkeligt tværsnit.
Netsikring:
Schweiz UK
2300 W 16 A forsinket
2500 W 16 A forsinket
2800 W 16 A forsinket
Tænd-/slukknap
Benyt intet apparat, hvor kontakten ikke tænde eller slukke.
Beskadigede kontakter skal omgående repareres eller
udskiftes af kundeservice.
IND
FRA
Indkobling
Tryk på den grønne knap I .
Frakobling
Tryk på den røde knap 0 .
Tilbageløb
10 A forsinket 13 A forsinket
13 A forsinket
13 A forsinket
Tilbageknap
(Motorværn)
Omdrejningsretningsomskifter
Fremføring
FRA
Strømsvigt
I tilfælde af strømsvigt kobler apparatet automatisk fra
(nulspændingsrelæ). For at genindkoble, tryk igen på den grønne
knap.
Motorværn
Motoren er forsynet med en sikkerhedsafbryder og kobler
automatisk fra ved overbelastning. Motoren kan genindkobles
efter en afkølingspause (ca. 5 min.). Tryk
1. Tilbageknap (Motorværn)
2. på den grønne I knap.
Omdrejningsretningsomskifter
Omdrejningsretningsomskifteren må kun aktiveres når
grenknuseren er slukket.
Position
Motoren starter ikke.
Position
Materialet trækkes in af skærevalsen og skæres/knuses.
Position
Kniven arbejder i omvendt retning og blokeret materiale kommer
fri igen.
Efter at omskifteren er bragt i position , holdes den
grønne knap på tænd-/sluk-kontakten nede. Skærevalsen
skifter til modsat retning. Når tænd/sluk-knappen slippes, standser grenknuseren automatisk.
Tips
z Store genstande eller træstykker fjernes ved flere gange at
skifte fra skære til frigivelsesretning og tilbage.
z Brug et stykke træ eller en krog til at fjerne blokerede
genstande fra tragt og udgangsslidsen.
Vent indtil grenknuseren står stille inden den tændes
igen.
Netimpedans
I tilfælde af ugunstige netbetingelser kan der under
indkoblingsprocessen opstå kortvarige spændingsfald, som kan
påvirke andre apparater (f.eks. blafrer en lampe).
Der vil sandsynligvis ikke opstå fejl, når maks. netimpendanser
overholdes.
Optaget effekt P1 (W) Netimpedans Zmax (W)
2300 0,21
2500 0,21
AArrbbeejjddee mmeedd kkoommppoossttkkvvæærrnneenn
Indtag en arbejdsstilling, der er ved siden af eller bagved
apparatet. Ophold Dem aldrig i udkastningsåbningens
område.
tilbage når det trækkes ind af knivene. Hold
sikkerhedsafstand!
2800 0,19
Langt materiale, som står ud af apparatet, kan støde
33
Page 35

Grib aldrig ind i påfyldnings- og udkastningsåbningen.
Hold ansigtet og kroppen borte fra påfyldningsåbningen.
Bring ikke hænder, andre legemsdele og beklædning i
indfyldningsrør, tømningskanal eller i nærheden af andre
bevægelige dele.
Kontroller før indkobling af apparatet, at der ikke er rester i
påfyldningstragten.
Vip ikke apparatet ved løbende motor.
Vær under påfyldningen opmærksom på, at ingen metaldele,
sten, flasker eller andre genstande, som ikke kan knuses, når
ind i påfyldningstragten.
Hvis fremmedlegemer når ind i påfyldningstragten eller
apparatet begynder at lave usædvanlige lyde eller vibrationer,
skal apparatet omgående kobles fra og lades komme i
stilstand. Træk netstikket ud og udfør følgende punkter:
− Kontroller skaden
− Udskift eller reparer beskadigede dele
− Kontroller apparatet og stram løse dele
De må ikke reparere apparatet, hvis De ikke er kvalificeret
til det.
Hvad kan jeg knuse?
Ja:
• alle slags grene op til maks. diameter (alt efter træsort og
tilstand)
• dødt, fugtigt, i flere dage aflejret haveaffald skiftevis med
grene.
Nej:
• Glas, metaldele, kunststoffer, plastikposer, sten, stofrester,
rødder med jord, mad-, fiske- og kødaffald.
• Affald uden fast konsistens, f. eks. køkkenaffald.
Særlige henvisninger til knusning:
¾ Påfyld det materiale, der skal knuses,
altid fra højre side ind i fødetragtens
åbning.
¾ Knus grene, kviste og træ kort efter
afskæringen
− Disse emner bliver meget hårde efter tørring, den
grendiameter, der maks. kan bearbejdes, bliver mindre.
¾ Fjern sideaflæggere ved stærkt forgrenede grene.
¾ Forarbejdning af stærkt vandholdigt have- hhv. køkkenaffald,
der har tendens til at klæbe sammen.
− Disse skal knuses skiftevis med træemner for at undgå
tilstopning af apparatet.
¾ Lad ikke hakkelsebunken i området omkring
udkastningsåbningen vokse for højt. Dette kan have til følge,
at allerede hakket gods forstopper tømningskanalen.
Derigennem kan det komme til et tilbageslag af materialet
gennem fødeåbningen.
¾ Rengør indfyldningsåbning og udkastningskanal, hvis
apparatet er forstoppet. Afbryd hertil først motoren og træk
stikket.
¾ Vær opmærksom på, at den højest tilladelige grendiameter for
Deres apparat overholdes (se ”Tekniske data”). Alt efter
træsort og tilstand kan den maks. tilladte grendiameter være
mindre.
¾ Skæremekanismen trækker kompostmaterialet automatisk og
stødfrit ind p. g. a. den langsomt roterende skærecylinder.
¾ Automatisk omskiftning af omdrejningsretningen:
Hvis apparatet pludselig blokeres, skifter skærevalsen
omdrejningsretning og presser som her materialet tilbage:
− sluk for apparatet.
− vent til skærevalsen står stille.
− start apparatet igen og benyt materiale, der er nemmere at
forarbejde.
¾ Ved overbelastning af apparatet kobler det automatisk fra
med en motorværnskontakt.
− Tænd kompostkværnen igen efter ca. 5 min.
− Hvis apparatet ikke kan indkobles efter denne ventetid,
læs efter under punkt "Mulige fejl".
IInnddssttiilllliinngg aaff sskkæærreeppllaaddee
Skærepladen (B) kan indstilles uden spil på skærevalsen (A). Der
skal overholdes en så lille afstand som mulig for effektiv drift.
Blødt materiale eller våde grene kan rive i stedet for at blive
skåret. Også en slidt modkniv kan forårsage dette problem efter
flere ganges anvendelse.
Indstilling af afstanden.
Tænd for apparatet. Til indstilling af afstanden drej
instillingsknappen (D) mod højre, således at skruen (C) flytter sig
mod skærevalsen.
Drej så længe, indtil fine aluminiumspån falder ud af
udstødningsåbningen.
VVeeddlliiggeehhoollddeellssee oogg pplleejjee
• Før ethvert vedligeholdelsesarbejde
- Sluk for motoren og træk netstikket
- Bær arbejdshandsker for at undgå kvæstelser.
Skæreværktøjet standser ikke straks når det slukkes. Vent
inden du starter med reparations eller vedligeholdelse, indtil
alle dele holder stille.
Husk at fjerne værktøj og skruenøgler efter vedligeholdelse
og reparation.
• Kompostkværnen er stort set vedligeholdelsesfri. Til
opretholdelse af værdi og en lang levetid skal følgende
iagttages:
34
Page 36

− hold luftslidserne frie og rene
− kontroller monteringsskruer.
− efter brug skal apparatet rengøres ind- og udvendigt.
Brug kun en fugtig, varm klud og en blød børste til rengøringen.
Brug aldrig rengørings- eller opløsningsmidler. disse kan beskadige apparatet irreparabelt. plastdelene kan ødelægges af
kemikalier.
− Maskinen må ikke rengøres med rindende vand eller med en højtryksspuler
Blanke metaldele skal efter hver brug behandles med en miljøvenlig, biologisk nedbrydelig sprøjteolie for at beskytte dem mod
−
−
korrosion.
− Skærecylinder og efterskæreplade er sliddele, men har dog ved normal brug og forskriftsmæssig justering en levetid på flere år.
MMuulliiggee ffeejjll
Inden hver afhjælpning af fejl
− frakobl apparatet
− vent indtil apparatet står stille
− træk netstikket
Fejl Muligt årsag Fjernelse
Motoren starter ikke
− omdrejningsretningsomskifter til position
„0“
− manglende netforsyning
− tilslutningskabel defekt.
− aparat overbelastet
− Sluk for skærevalsen og skift omdrejninsretnings-
kontakten.
− kontrollér sikringen
− lad det kontrollere (elektriker)
− Motoren kan genindkobles efter en afkølingspause.
Tryk
1. Tilbageknap (Motorværn)
2. på den grønne I knap.
Motoren brummer,
− Skærecylinder blokerer
men starter ikke
− Kondensator er i stykker
Kompostmaterialet bliver
− Skærevalsen kører baglæns kontaktposi-
ikke trukket ind
− Materialet blokerer i tragten (ophobning)
tion forkert
− sluk for apparatet
Drej omdrejningsretningsomskifter til position .
Tænd for apparatet indtil blokeringen er fjernet. Sluk
igen for apparatet Drej omdrejningsretningsomskifter
tilbage til position
− send apparatet for reparation til producenten hhv. et
autoriseret firma
− Sluk for skærevalsen og skift omdrejninsretnings-
kontakten.
− Sluk for apparatet. Drej omdrejningsretningsomskifter
til position
frigives, fjern evt., forureninger
Sluk igen for apparatet Til den videre forarbejdning
drej omdrejningsretningsomskifter tilbage til position
.
. Tænd for apparetet så materialet
− For blødt eller for vådt kompostmateriale
− Slid på skærecylinderen
.
− Der skubbes efter med en gren og hakkes igennem.
− Skærepladen indstilles som beskrevet under
"Indstilling af skæreplade", ved stærkt slid erstattes
skærecylinderen.
Kompostmaterialet bliver
− Skærepladen ikke tilstrækkeligt indstille. − Skærepladen indstilles
ikke skåret rent igennem.
Apparatet starter, blokerer
dog ved lav belastning og
kobler fra via motorværnskontakten.
Forlængerledningen er for lang eller tvær-
snittet er for lille. Stikkontakten er for langt
væk fra hovedtilslutningen og tilslutningskablets tværsnit er for lille.
Forlængerledning med mindst 1,5 mm², og højst 25 m
lang. Ved længere kabel tværsnit mindst 2,5 mm².
35
Page 37

TTeekknniisskkee ddaattaa
Model
2300 2500 2800
Type AH 600 AH 600 AH 600
motor Vekselstrømsmotor 230 V~, 50 Hz, 2800 / 40 min
Motoreffekt P
Tænd-/sluk-knap med
S6 - 40 % 2300 W 2500 W 2800 W
1
överbelastningsskydd, skör- och backfunktion, nulspændingsudløser
-1
Vægt 24 kg 24,5 kg 25 kg
Lydtryksniveau LPA
(målt i henhold til direktiv 2000/14/EF)
83,8 dB (A)
K = 3 dB (A)
84,2 dB (A)
K = 3 dB (A)
82,5 dB (A)
K = 3 dB (A)
målt lydeffektniveau LWA
91 dB (A) 91 dB (A) 91 dB (A)
(målt i henhold til direktiv 2000/14/EF)
garanteret lydeffektniveau LWA
92 dB (A) 92 dB (A) 92 dB (A)
(målt i henhold til direktiv 2000/14/EF)
Højest grendiameter
(gælder kun for friskt træsnit)
∅ max. 35 mm ∅ max. 40 mm ∅ max. 44 mm
Beskyttelsesklasse I
Afsikringens art IP X4
Netsikring
16 A forsinket
16 A forsinket
16 A forsinket
Schweiz
UK
GGaarraannttii
Vi henviser til vedlagte garantierklæring.
10 A forsinket
13 A forsinket
--
13 A träge
13 A forsinket
--
36
Page 38

Älä ota laitetta käyttöön, ennenkuin olet lukenut sen
käyttöohjeen, huomioinut kaikki huomautukset ja
asentanut laitteen kuvatulla tavalla.
Säilytettävä tulevaa käyttlö varten.
SSiissäällllyyss
EU-yhdenmukaisuusselvitys 37
Toimituksen osat 37
Laitteen kuvaus 37
Laitteen symbolit 37
Käyttöohjeen symbolit 38
Käyttöajat 38
Käyttötarkoitus 38
Jäljelle jäävät riskit 38
Turvallisuusohjeita 38
Käyttöönotto 39
Työskentely oksasilppurilla 40
Vastaterän säätäminen 41
Huolto ja hoito 41
Mahdolliset häiriöt 42
Tekniset tiedot 43
Takuu 43
Kokoonpano 116
Varaosat 117
TTooiimmiittuukksseenn oossaat
t
Tarkasta pakkauksen purkamisen jälkeen,
! onko sen sisältö täydellinen
! tai mahdolliset kuljetusvauriot
Esitä valitukset kauppiaalle, laitteen toimittajalle tai valmistajalle
välittömästi. Jälkeenpäin esitettyjä valituksia ei hyväksytä.
• 1 esiasennettu laiteyksikkö
• 1 tukijalka-oikealla
• 1 akseli
• 1 pyörää
• 2 pyörännavan kapselia
• 2 pyörän kansinuppia
• 1 ruuvipussi
• 1 keräyssäkki
• 1 käyttöohje
LLaaiitttteeeenn kkuuvvaauus
s
EEUU--yyhhddeennmmuukkaaiissuuuusssseellvviittyys
s
vastaa EY-direktiiviä: 2006/42 EY
Yrityksemme
ATIKA GmbH & Co. KG
Schinkelstraße 97 , 9227 Ahlen - Germany
ilmoittaa täten yksinomaisella vastuulla, että tuote
Gartenhäcksler (Puutarhasilppurin) tyyppi AH 600
Sarjanumero: katso viimeinen sivu
on yhdenmukainen ylämainittujen EY-direktiivien määräysten
kanssa sekä seuraavien direktiivien määräysten kanssa:
2004/108/EY, 2006/95/EY ja 2000/14/EY.
Seuraavia harmonisoituja normeja on käytetty:
EN 60335-1:2002+A1+A11+A12+A2+A13;
EN 13683:2003+A1:2009; EN 62233:2008; EN 55014-1:2006;
EN 55014-2/A1:2001; EN 61000-3-2:2006; EN 61000-3-11:2000
Vaatimustenmukaisuuden arviointimenetelmä:
2000/14/EY – liite V
Mitattu äänen tehotaso L
91 dB (A).
WA
Taattu äänen tehotaso LWA 92 B (A).
Teknisten asiakirjojen säilytys:
ATIKA GmbH & Co. KG – Technisches Büro – Schinkelstr. 97
59227 Ahlen – Germany
Ahlen, 30.04.2010 A. Pollmeier, Toimitusjohtaja
A. Suppiloaukko silputtaville oksille
B. Kahva
C. Palautusnappi / moottorinsuoja
D. Verkkopistoke
E. Käynnistys-/pysäytyskytkin
F. Kiertosuunnan vaihtokytkin
G. Ajoteline
H. Kotelon yläosa
I. Leikkuuterän säätönuppi
J. Poistoaukko
LLaaiitttteeeenn ssyymmbboolliit
t
Lue ja huomioi
käyttöohje ja
turvallisuusohjeet ennen laitteen käyttöönottoa.
Pysäytä moottori ja
vedä virtapistoke
irti ennen korjaus-,
huolto- ja
puhdistustöitä.
37
Page 39

Vaarana sinkoutuvat osat moottorin käydessä –
asiattomat sekä
Varo pyöriviä teriä.
Älä pidä käsiä tai
jalkoja aukoissa
koneen käydessä.
koti- ja muut
eläimet on pidettävä loitolla
vaaraalueelta.
Käytä silmien- ja
kuulonsuojaa.
Käytä
suojakäsineitä.
Suojaa kosteudelta.
Sähkölaitteet eivät kuulu talousjätteisiin. Laitteet,
lisälaitteet ja pakkausmateriaali on poistettava
ympäristöystävälliseen kierrätykseen.
EU-direktiivin 2002/96/EY mukaisesti käyttökelvottomat
sähkölaitteet on kerättävä erikseen ja kierätettävä
ympäristöystävällisesti.
KKääyyttttööoohhjjeeeenn ssyymmbboolliit
t
Uhkaava vaara tai vaarallinen tilanne. Näiden
ohjeiden laiminlyönti voi aiheuttaa vammoja tai
aineellisia vahinkoja.
Tärkeitä ohjeita asianmukaista käyttöä varten.
L
Näiden ohjeiden laiminlyönti voi aiheuttaa häiriöitä.
Käyttäjän ohjeet. Nämä ohjeet auttavat sinua
käyttämään kaikkia toimintoja parhaalla mahdollisella
tavalla.
Asennus, käyttö ja huolto. Tässä selitetään tarkalleen,
mitä sinun tulee tehdä.
KKääyyttttööaajjaat
t
Huomioi ennen laitteen käyttöönottoa maan (alueellisten)
melumääräykset.
MMäääärrääyykksseennmmuukkaaiinneenn kkääyyttttöö
Määräysten mukaiseen käyttöön kuuluu
- kaikenlaisten oksien silppuaminen maks. halkaisimen asti
(riippuen puulajista ja sen tuoreudesta)
- kuihtuneiden, kosteiden, jo useampia päiviä seisseiden
puutarhajätteiden silppuaminen vuorottain oksien kanssa
Lasin, metallin, muoviosien, muovipussien, kivien, vaatejätteiden,
multaisten juurien tai jätteiden, joilla ei ole kiinteää koostumusta
(esim. keittiöjätteet), silppuaminen on ehdottomasti kiellettyä.
Oksasilppuri soveltuu vain yksityiskäyttöön pihan ja puutarhan
hoidossa.
Yksityiskäyttöön pihan ja puutarhan hoitoon tarkoitetuiksi oksasilppuriksi luetaan silppurit, joita ei saa käyttää yleisissä puistoissa, urheilukentillä, maa- ja metsätauloudessa eikä kaupallisessa
toiminnassa.
Määräyksenmukaiseen käyttöön kuuluu myös valmistajan
määrämien käyttö-, huolto- ja kunnossapitovaatimuksien ja
käyttöohjeessa olevien turvallisuusohjeiden noudattaminen.
Jokainen tästä yli menevä käyttö katsotaan ei-määräyksen
mukaiseksi. Valmistaja ei vastaa minkäänlaisista määräyksen
vastaisesta käytöstä johtuvista vahingoista. Riski on pelkästään
käyttäjällä.
Kaikki muu käyttö, joka poikkeaa näistä ei ole määräysten
mukaista käyttöä. Valmistaja ei vastaa mistään näistä syistä
aiheutuneista vahingoista - käyttäjä vastaa niistä kokonaan itse.
JJäälljjeellllee jjäääävväätt rriisskkiit
t
Myös määräystenmukaisessa käytössä voi, asianomaisten
turvallisuusmääräysten noudattamisesta huolimatta, jäädä
jäännösriskejä, johtuen käyttötarkoituksen määräämästä
rakenteesta.
Jäännösriskejä voidaan vähentää huomioimalla
"turvallisuusohjeet" ja "käyttötarkoitus" sekä käyttöohje.
Huomaavaisuus ja varovaisuus pienentää henkilöiden
vahingoittumisen ja vaurioiden riskiä.
Sormet ja kädet voivat loukkaantua, jos panet kätesi aukkoon
ja osut terään.
Sormet ja kädet voivat loukkaantua terämekanismin
asennuksessa ja puhdistuksessa.
Loukkaantumisen vaara suppilosta sinkoutuvien oksien
vuoksi.
Virran aiheuttamat vaarat, jos käytät epäasianmukaisia
sähköisiä liitäntäjohtoja.
Jännitettä johtavien osien koskettaminen, kun sähköiset
rakenneosat ovat avattuina.
Kuulohäiriöt pitkäaikaisessa työskentelyssä ilman
kuulonsuojaa.
Varotoimista huolimatta on olemassa lisäksi epäilmeisten
jäännösriskien vaara.
TTuurrvvaalllliissuuuussoohhjjeeiittaa
Lue ja huomioi ennen tämän tuotteen käyttöönottoa
seuraavat ohjeet ja ammattiyhdistyksen antamat
tapaturmantorjuntamääräykset tai kulloisenkin maan
voimassaolevat turvallisuusmääräykset, voidaksesi suojella
itseäsi ja muita mahdollisilta vammoilta.
Anna turvallisuusohjeet kaikkien laitetta käyttävien
L
luettavaksi.
Säilytä nämä turvallisuusohjeet hyvin.
L
Laitetta saa korjata vain valmistaja tai valmistajaa
valtuuttama yritys.
Tutustu laitteeseen käyttöohjeen avulla ennen käyttöä.
Älä käytä laitetta muihin kuin vain sille määrättyihin
tarkoituksiin (katso kohtia käyttötarkoitus ja oksasilppurilla
työskenteleminen).
Älä kurkota eteenpäin. Ota oikea työasento. Seiso samalla
tasolla kuin laite, kun heität silputtavaa materiaalia laitteen
sisään.
38
Page 40

Ole tarkkaavainen. Kiinnitä huomiota siihen mitä teet. Aloita
työ järkevästi. Älä käytä laitetta kun olet väsynyt tai olet
huumeen, alkoholin tai lääkkeen vaikutuksen alainen.
Varomattomuuden hetki laitteen käytössä voi johtaa vakaviin
loukkaantumisiin.
Käytä työssä suojalaseja, työkäsineitä ja kuulonsuojaa.
Käytä sopivaa työvaatetusta:
ei väljiä vaatteita
ei luistavia kenkiä
Laitteen käyttäjä on vastuussa muiden käyttöpaikan
läheisyydessä oleskelevien turvallisuudesta.
Alle 16-vuotiaat eivät saa käyttää laitetta.
Pidä lapset loitolla laitteesta.
Älä koskaan ota laitetta käyttöön, kun sen lähellä on
asiattomia henkilöitä.
Älä jätä laitetta seisomaan ilman valvontaa.
Pidä työalue järjestyksessä! Epäjärjestyksestä voi olla
seurauksena tapaturmat.
Seiso aina laitteen sivulla tai sen takana. Älä seiso
ulosheittoaukon edessä.
Älä missään tapauksessa työnnä kättäsi täyttö- tai
ulosheittoaukkoon.
Pidä kasvot ja keho loitolla täyttöaukosta.
Älä ylikuormita laitetta! On olemassa vaara, että sahanterä
tarttuu hallitsemattomasti yksittäiskappaleihin.
Käytä laitetta vain kaikkien suojavarusteiden ollessa oikein
kiinnitettyinä, äläkä tee laitteeseen muutoksia, jotka haittaavat
turvallisuutta.
Älä muuta moottorin kierroslukua, sillä kierrosluku säätää
turvallisen maksimityönopeuden ja suojaa moottoria ja kaikkia
pyöriviä osia liikanopeuden aiheuttamilta vahingoilta.
Älä käytä laitetta ilman täyttösuppiloa.
Älä muuta laitetta tai laitteen osia.
Sulje laite ennen moottorin käynnistystä.
Älä jätä laitetta sateeseen seisomaan, äläkä työskentele
sateessa.
Huomioi ympäristövaikutukset:
− Älä käytä konetta kosteassa tai märässä ympäristössä.
− Säilytä laitetta kuivassa paikassa. Pidä lapset loitolla.
− Työskentele vain riittävissä näköolosuhteissa.
Sormien suojaamiseksi asennuksessa ja puhdistuksessa on
käytettävä suojakäsineitä.
Sammuta kone ja vedä verkkopistoke pistorasiasta:
− huolto- ja puhdistustöissä
− häiriöiden poistossa
− kun tarkistat johtoja kiertymisen tai
vaurioiden varalta.
− kuljetus
− korjaustöissä
− laitteelta poistuttaessa (myös lyhytaikaisesti)
Laitteen täyttö- ja poistoaukon tukkeutuessa kytke moottori
pois päältä ja vedä verkkopistoke irti ennen kuin poistat ainetta täyttö- tai poistoaukosta.
Tarkasta laitteen mahdolliset vauriot:
− Tarkasta huolellisesti ennen seuraavaa käyttöä
suojavarusteiden moitteeton ja tarkoituksenmukainen
kunto.
− Tarkista, toimivatko kaikki liikkuvat osat moitteettomasti, ja
etteivät osat ole jumittuneet tai vaurioituneet. Kaikkien
osien on oltava oikein asennettuina ja täytettävä kaikki
edellytykset, jotta toiminta olisi moitteetonta.
− Vaurioituneet suojalaitteet ja osat täytyy korjauttaa tai
vaihdattaa asianmukaisesti hyväksytyn korjaamon (tai
valmistajan) kautta, jos ei toisin ilmoitettu käyttöohjeessa.
− Vaurioituneet tai lukukelvottomat turvallisuusetiketit on
korvattava uusilla.
Säilytä laitteet kuivassa, lukitussa paikassa, lasten
ulottumattomissa.
SSäähhkkööttuurrvvaalllliissuuuuss
IEC 60245 (H 07 RN-F) mukainen liitäntäjohto, jonka johtimen
poikkileikkaus on vähintään
− 1,5 mm² 25 m kaapelipituudelle asti
− 2,5 mm² yli 25 m kaapelipituudella
Pitkät ja ohuet liitosjohdot aiheuttavat jännitehäviötä. Moottori
ei saavuta enää maksimaalista tehoa, laitteen toiminta
heikkenee.
Liitäntäjohdon pistokkeiden ja kytkentälaatikoiden tulee olla
kumista, pehmeästä PVC:stä tai muusta termoplastisesta
materiaalista, jonka mekaaninen lujuus on sama tai niiden
täytyy olla päällystetty vastaavalla materiaalillla.
Liitäntäjohdon pistokkeen täytyy olla roiskevesisuojattu.
Liitäntäjohtojen asennuksessa on huomioitava, että johtoja ei
litistetä, taivuteta eikä pistokeliitin ole märkä.
Jos käytät johtokelaa, kelaa johto kokonaan kelasta.
Käytä johtoa vain tarkoituksenmukaisiin töihin. Suojaa johto
kuumuudelta, öljyltä ja teräviltä reunoilta. Älä vedä johdosta
pistokkeen irrottamiseksi pistorasiasta.
Tarkista liitosjohdot säännöllisesti ja vaihda vioittuneet.
Älä käytä viallisia liitäntäjohtoja.
Käytä ulkona vain tarkoituksenmukaisia sallittuja ja
vastaavasti merkittyjä jatkojohtoja.
Väliaikaisratkaisuiksi tarkoitettuja sähköliitäntöjä ei saa
käyttää.
Suojalaitteita ei saa koskaan ohittaa tai ottaa pois käytöstä.
Kytke laite varokkeelliseen maadoitettuun pistorasiaan (30
mA).
Sähköisten osien sähköliitäntä tai korjaukset on annettava
toimiluvan saaneen sähkömiehen tai meidän
asiakaspalvelumme suoritettavaksi. Paikallisia määräyksiä,
erityisesti suojatoimenpiteitä on noudatettava.
Laitteen muiden osien korjaukset on annettava valmistajan
tai sen asiakaspalvelun suoritettavaksi.
Käytä vain alkuperäisiä varaosia, lisävarusteita ja
erityislisävarusteita. Muiden varaosien ja lisävarusteiden
käyttö voi aiheuttaa käyttäjälle vammoja. Valmistaja ei
vastaa tällaisten varusteiden aiheuttamista vahingoista.
KKääyyttttöööönnoottttoo
Varmistu, että laite on asennettu täydellisesti ja määräysten
mukaisesti.
Pystytä silppuri käyttöä varten vaakasuoralle ja tukevalle
alustalle (kaatumisen vaara).
Älä pystytä laitetta kivetylle tai soratulle maaperälle.
Käytä laitetta vain ulkona. Pidä etäisyys (vähintään 2 m)
seinästä ja muista jäykistä kohteista.
39
Page 41
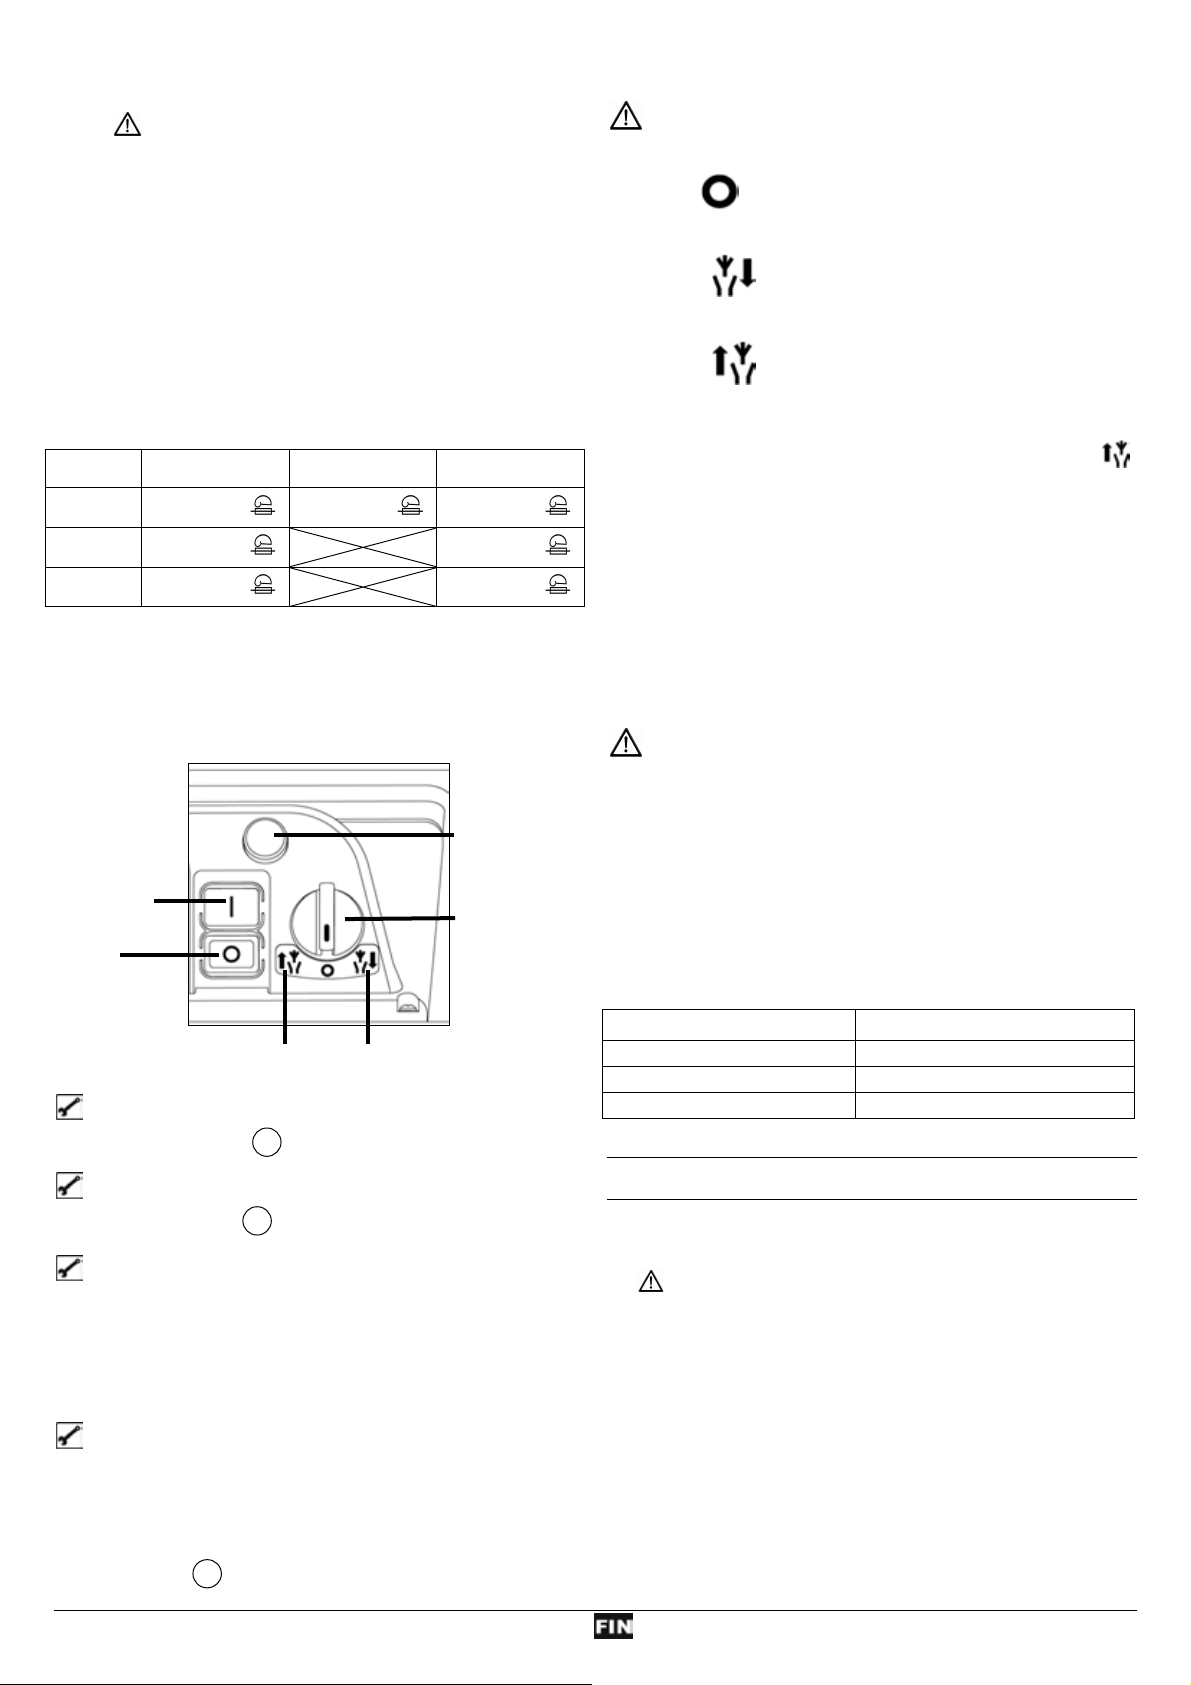
Tarkista ennen jokaista käyttöä:
− johdot rikkinäisten kohtien varalta (repeämät, viillot ym.)
älä käytä rikkinäisiä johtoja
− laitteen mahdolliset vauriot (katso kohtaa "Turvallinen
työskentely")
− ovatko ruuvit hyvin kiinnitettyinä
L Verkkoliitäntä
Vertaa laitteen tyyppikilpeen merkittyä jännitettä
verkkojännitteeseen ja liitä laite vastaavaan ja
määräystenmukaiseen pistorasiaan.
Käytä pidennysjohtoa, jonka poikkileikkaus on riittävä.
Verkkoimpedanssi
2300 W
2500 W
2800 W
16 A hidas
16 A hidas
16 A hidas
Päälle-/poiskytkin
Älä käytä laitetta jonka kytkintä ei voida kytkeä päälle tai pois
päältä. Vaurioitunut katkaisia on heti korjattava tai
vaihdettava asiakaspalvelun toimesta.
PÄÄLLE
POIS
Käynnistys
Paina vihreää painiketta I .
Sammutus
Paina punaista nappia 0 .
Jälleenkäynnistymisvaroke
virtakatkossa
Kone kytkeytyy virtakatkossa automaattisesti pois päältä
(nollajännitelaukaisin). Uudelleen käynnistämistä varten paina
jälleen vihreää painiketta.
Moottorin suojaus
Moottori on varustettu suojakytkimellä, ja se kytkeytyy
ylikuormituksessa itsestään pois päältä. Moottori voidaan
jäähtymistauon (n. 5 min.) jälkeen käynnistää uudestaan. Paina
1. palautusnappia (moottorinsuoja)
2. vihreää I käynnistysnappia.
palautus
Sveitsi
UK
10 A hidas 13 A hidas
13 A hidas
13 A hidas
palautusnappi
(moottorinsuoja)
kierrossuunnankytkin
veto
Kierrossuunnan vaihtokytkin
Kierrossuunnan vaihtokytkintä saa käyttää vain
silppurin ollessa pysäytettynä.
Asento
Moottori ei käynnisty.
Asento
Leikkuutela vetää materiaalin sisään ja silppuaa sen.
Asento
Terä työskentelee vastakkaiseen suuntaan ja kiinni juuttunut
materiaali irtoaa.
Kun olet asettanut kierrossuunnan vaihtokytkimen asentoon
,
pidä käynnistyksen/pysäytyksen vihreää kytkintä alas painettuna.
Leikkuutela asettuu vastakkaiseen suuntaan. Kun päästät
käynnistys-/pysäytyskytkimestä, silppuri pysähtyy automaattisesti.
Vinkkejä
z Suuret oksankappaleet irtoavat sekä leikkuu- että
vapautussuuntaan, kun käynnistys toistetaan useampaan
kertaan.
z Käytä kiinni juuttuneen kappaleen poistamiseen suppilosta
tai poistoaukosta kättä pidempää apuvälinettä.
Odota aina, että silppuri on täysin pysähtynyt, ennen
kuin käynnistät sen uudelleen.
Verkkoimpedanssi
Epäsuotuisten verkko-olosuhteiden vallitessa voi laitteen
käynnistyksessä ilmaantua lyhytaikaista jännitteen vähennystä,
joka saattaa haitata muiden laitteiden toimintaa (esim. lampun
lepatusta).
Häiriöitä ei pitäisi esiintyä, jos noudatetaan maksimaalista
verkkoimpedanssia.
Tehonotto P
TTyyöösskkeenntteellyy ookkssaassiillppppuurriillllaa
Seiso aina laitteen sivulla tai sen takana. Älä seiso
ulosheittoaukon edessä.
Pidempi oksa, joka pistää ulos laitteesta, voi kimmota
takaisin, kun terät tarttuvat siihen! Pidä turvaväli!
Älä missään tapauksessa työnnä kättäsi täyttö- tai
ulosheittoaukkoon.
Pidä kasvot ja keho loitolla täyttöaukosta.
Älä vie käsiä, muita kehonosia tai vaatteita täyttöputken tai
ulosheittokanavan sisään tai muiden liikkuvien osien lähelle.
Tarkasta ennen laitteen käynnistystä, että täyttösuppiloon ei
ole jäänyt pilkottuja oksanjätteitä.
Älä kallista laitetta moottorin käydessä.
Täytössä on huomioitava, että täyttösuppiloon ei laiteta
metalliosia, kiviä, pulloja tai muita käsittelykelvottomia
esineitä.
(W) Verkkoimpedanssi Zmax (Ω)
1
2300 0,21
2500 0,21
2800 0,19
40
Page 42

Jos täyttösuppiloon joutuu vieraita esineitä tai laitteesta alkaa
kuulua epätavallisia ääniä tai se alkaa täristä, laite on
sammutettava heti ja seisautettava. Vedä verkkopistoke irti ja
huomioi seuraavat kohdat:
− tutki vauriot
− vaihda tai korjaa vialliset osat
− tarkasta laite ja kiristä löystyneet osat
Et saa korjata laitetta itse, ellet ole siihen oikeutettu.
Mitä voidaan silputa?
Kyllä:
• Kaikenlaisia, läpimitaltaan korkeintaan suuruisia oksia aina
puulajista ja sen tuoreudesta riippuen.
• Kotitaloudesta ja pihapuutarhasta tulleita orgaanisia jätteitä
esim. pensaiden ja puiden oksia, kuihtuneita kasveja, keittiön
jätteitä.
silputaan vain vuorottain oksien kanssa
Ei:
• Lasia, metallia, muovia, muovipusseja, kiviä, kangaspalasia,
multaisia juuria
• Jätteet, joilla ei ole kiinteää koostumusta, esim. keittiöjätteet
Erityisiä huomautuksia silppuamista
varten:
¾ Työnnä silputtava materiaali aina
oikealta puolelta suppilon
täyttöaukkoon
¾ Silppua puiden oksat ja haarat
pian leikkauksen jälkeen
− nämä aineet kovettuvat kuivuessaan, joten suurimman
käsittelykelpoisen oksan halkaisija pienenee.
¾ Poista hyvin oksaisista oksista liialliset haarat.
¾ Hyvin vesipitoisten, liimautuvien piha-tai keittiöjäännösten
silppuamisessa
− täytä suppiloon vuoronperään em. aineita ja puunoksia,
jotta laite ei tukkeutuisi.
¾ Älä anna silputun materiaalin kasautua liian korkealle
ulosheittoaukon alle. Tästä voisi olla seurauksena, että jo
silputtu materiaali tukkeaa ulosheittokanavan ja materiaali
saattaa iskeytyä tällöin takaisin täyttöaukosta.
¾ Jos laite tukkeutuu, puhdista täyttöaukko ja ulosheittokanava.
Kytke tätä ennen ensiksi moottori pois päältä ja irrota
verkkopistoke.
¾ Huomioi, että noudatat laitettasi vastaavaa maksimaalista
käsittelykelpoista oksan halkaisijaa (katso ”Tekniset tiedot”).
Käsittelykelpoisen oksan suurin halkaisija voi pienentyä riippuen puun laadusta ja tuoreudesta.
¾ Leikkuusylinterin hitaan pyörimisen ansiosta silppuri vetää
silputtavan materiaalin sisään automaattisesti, niin ettei sitä
tarvilse työntää.
¾ Leikkuuterä on tehtaalla valmiiksi säädetty eikä vaadi säätlä
ennen käytön aloittamista.
Vastaterän säätäminen on tarpeen, jos katkaistu materiaali ei
silppuunnu kunnolla:
− Käännä vipukatkaisin oikealle.
− Odota leikkuutelan liikkeen loppumista.
− Kytke laite uudestaan päälle ja syötä laitteeseen
helpommin työstettävää ainetta.
¾ Laitteen ylikuormittuessa moottorin suojakytkimellä varustettu
kytkin sammuttaa laitteen automaattisesti.
− käynnistä silppuri jälleen n. 5 min. kuluttua.
− jos laite ei käynnisty tämän ajan jälkeen, katso kohta
"Mahdolliset häiriöt".
VVaassttaatteerräänn ssäääättäämmiinneenn
Vastaterä (B) voidaan säätää välyksettömäksi leikkuutelaan (A)
nähden. Jotta silppuri työskentelisi tehokkaasti, välimatkan tulisi
olla mahdollisemman pieni.
Pehmeä materiaali tai märät oksat voivat revetä leikkautumisen
sijasta. Myös pitkästä käytöstä kulunut vastaterä voi aiheuttaa
tämän ongelman.
Välimatkan säätäminen.
Käynnistä laite.
Muovikotelon oikealla puolella on säätölaite. Kun haluat säätää
välimatkan, työnnä laitteen mukana tullut kuusiokoloavain (D)
sisään ja käännä sitä oikeaan niin, että ruuvi (C) liikkuu
leikkuutelan suuntaan. Käännä niin pitkään, kunnes
poistoaukosta tulee ohuita alumiinilastuja.
HHuuoollttoo jjaa hhooiittoo
• Ennen kuin aloitat huoltoa:
− katkaise virta moottorista ja irrota pistoke.
− ota suojakäsineet käteesi vahinkojen välttämiseksi.
Kun huollat leikkuuteriä, ota huomioon, että
käynnistysmekanismi saattaa vielä käydä, vaikka moottori ei
kävisikään päällyskannen lukituksen estämänä.
Varmista huollon tai korjauksen jälkeen, ettei työkaluja ja
ruuvivääntimiä jäänyt laitteeseen.
• Okasilppuria ei yleensä tarvitse huoltaa. Laitteen
kunnossa pitämiseksi ja sen pitkän käytön takaamiseksi
on muistettava seuraava:
− pidä tuuletusaukot puhtaina ja esteettöminä.
− tarkista kiinnityspultit (kiristä tarvittaessa).
− puhdista laite käytön jälkeen sisä- ja ulkopuolelta.
41
Page 43

Käytä silppurin puhdistamiseen vain lämmintä, kosteaa liinaa ja pehmeää harjaa.
Älä koskaan käytä puhdistus- tai liuotinainetta. Ne voivat vahingoittaa peruuttamattomasti silppuria. Kemikaalit voivat syövyttää
muoviosia.
− Älä puhdista konetta juoksevalla vedellä tai painepesurilla.
Käsittele metalliosat jokaisen käytön jälkeen korroosiota estävällä, ympäristöä suojelevalla, biologisesti hajoavalla öljysuihkeella.
−
−
− Leikkuuterä ja vastalevy ovat kuluvia osia, mutta normaalisti käytettyinä ja ohjeiden mukaan asennettuina ne kestävät useita vuosia.
MMaahhddoolllliisseett hhääiirriiöött
Ennen jokaista häiriönpoistoa:
− kytke laite pois päältä
− Odota että oksasilppurin terät pysähtyvät
− vedä virtapistoke irti
Häiriö Mahdollinen syy Korjaus
Moottori ei käynnisty − verkkojännite puuttuu
− liitäntäjohto viallinen
− laite ylikuormittunut (moottorinsuoja on
lauennut)
− tarkasta varoke
− tai anna tarkastettavaksi (sähkömies)
− anna laitteen jäähtyä.
Paina
1. palautusnappia (moottorinsuoja)
2. vihreää I käynnistysnappia.
Moottori hurisee, mutta ei
käynnisty
− leikkuuterä tukkeutunut
− pysäytä laite.
Kytke kierrossuunnan vaihtokytkin asentoon
. Käynnistä laitetta, kunnes
lukkiutumistila on saatu poistettua. Pysäytä
laite jälleen. Aseta kierrossuunnan vaihtokyt-
Kone ei vedä silputtavaa
materiaalia kunnolla sisäänpäin
− kondensaattori viallinen
− leikkuuterä pyörii takaisinpäin. Kytkimen
asenti ei ole oikein
− materiaali on juuttunut suppiloon (tukos)
− materiaali on liian pehmeää tai liian märkää
− leikkuuterä on kulunut
kin takaisin asentoon
− vie kone valtuutetulle korjaajalle
− käännä katkaisinvipu oikeaan asentoon
− Pysäytä laite. Kytke kierrossuunnan
vaihtokytkin asentoon
jotta silputtava aine vapautuu tai roskat
poistuvat.
Pysäytä laite jälleen. Kun jatkat työskentelyä,
aseta kierrossuunnan vaihtokytkin jälleen
asentoon
− työnnä materiaalia alaspäin oksan avulla
.
pyörittäen
− säädä vastalevy kuten kohdassa „Vastalevyn
.
. Käynnistä laite,
säätäminen“ on kuvattu. Jos leikkuutela on
pahasti kulunut, vaihda se uuteen
Silppuamistulos on huono. Vastaterä ei ole säädetty oikein. Säädä vastaterä.
Moottori käynnistyy, lukkiutuu
kuitenkin jo pienestä
kuormituksesta ja sammuu
moottorin-suojakytkimestä
− Pidennysjohto liian pitkä tai sen
poikkileikkaus liian pieni.
− Pistorasia liian kaukana pääliitännästä ja
liitäntäjohdon poikkileikkaus liian pieni.
Pidennyjohto saa olla vähintään 1,5 mm
enintään 25 m pitkä. Pidemmän johdon
poikkileikkauksen tulee olla vähintään 2,5 mm
2
,
2.
42
Page 44

TTeekknniisseett ttiieeddoott
Malli
2300 2500 2800
Tyyppi
Moottori
Moottorin teho P
S6 - 40 %
1
Leikkuutelan kierrosluku
Käynnistys-/katkaisu kytkin varustettu
Paino
Äänen painetaso LPA
(mitattu direktiivin 2000/14/EY mukaisesti)
mitattu melutehotaso LWA
(mitattu direktiivin 2000/14/EY mukaisesti)
taattu melutehotaso LWA
(mitattu direktiivin 2000/14/EY mukaisesti)
Suurimman käsittelykelpoisen oksan
halkaisija
(pätee vain juuri leikatuille oksille)
Turvallisuusluokitus
Suojaus
AH 600 AH 600 AH 600
vaihtovirtamoottori 230 V~, 50 Hz, 2800 min
-1
2300 W 2500 W 2800 W
-1
40 min
Varustettu ylikuormitussuojalla, leikkuuja taaksepäin pyöritys, nollajännitelaukaisin
24 kg 24,5 kg 25 kg
83,9 dB (A)
K = 3 dB (A)
84,2 dB (A)
K = 3 dB (A)
82,5 dB (A)
K = 3 dB (A)
91 dB (A) 91 dB (A) 91 dB (A)
92 dB (A) 92 dB (A) 92 dB (A)
∅ max. 35 mm ∅ max. 40 mm ∅ max. 44 mm
I
IP X4
Verkkoimpedanssi
Sveitsi
UK
TTaakkuuuu
Huomioi mukana oleva takuuselvitys.
16 A hidas
10 A hidas
13 A hidas
16 A hidas
--
13 A hidas
16 A hidas
--
13 A hidas
43
Page 45

A készüléket jelen kezelési utasítás elolvasása,
valamennyi megadott utasítás figyelembevétele és
a készülék leírásnak megfelelő összeszerelése előtt
üzembe helyezni nem szabad.
Kérjük, a leírást későbbi használat céljára szíveskedjen
megőrizni.
TTaarrttaalloomm
EK-megfelelőségi-nyilatkozat 44
Szállított csomag 44
A készülék leírása 44
A készüléken alkalmazott szimbólumok 44
Jelzések kezelési utasítás 45
Üzemidők 45
Rendeltetésszerű alkalmazás 45
Fennmaradó kockázat 45
Biztonságos munkavégzés 45
Üzembe helyezés 47
Munkavégzés a kerti aprítógéppel 48
A ellenkés beállítása 48
Karbantartás és ápolás 49
Lehetséges zavarok 49
Műszaki adatok 50
Garancia 50
Összeszerelés 116
Pótalkatrészek 117
SSzzáállllííttootttt ccssoommaagg
Kicsomagolás után ellenőrizze a karton tartalmának
! teljességét
! esetleges szállítási károkra
Kifogásolásokat haladéktalanul közölje szakkereskedőjével,
szállítójával, illetve a gyártóval. Későbbi reklamációkat nem áll
módunkban elfogadni.
• 1 előszerelt készülékegység
• 1 láb - bal oldali
• 1 láb - jobb oldali
• 1 tengely
• 2 kerék
• 2 keréksapka
• 2 kerék fedőcsavarok
• 1 csavartasak
• 1 gyűjtőzsák
• 1 kezelési utasítás
AA kkéésszzüülléékk lleeíírráássa
a
EEKK--mmeeggffeelleellőőssééggii--nnyyiillaattkkoozzaatt
A irányelvnek megfelelően: 2006/42 EK
Az
ATIKA GmbH & Co. KG
Schinkelstraße 97, 59227 Ahlen, Németország
a fenti Irányelv előírásainak megfelelően kizárólagos felelősséggel
kijelenti, hogy a
Gartenhäcksler (kerti aprítógép) típus AH 600
Sorozatszám: lásd az utolsó oldalon
megfelel a fenti Irányelv, továbbá az alábbi Irányelvek
követelményeinek: 2004/108/EK, 2006/95/EK, 2000/14/EK.
A következő harmonizált szabványok kerültek alkalmazásra:
EN 60335-1:2002+A1+A11+A12+A2+A13;
EN 13683:2003+A1:2009; EN 62233:2008; EN 55014-1:2006;
EN 55014-2/A1:2001; EN 61000-3-2:2006; EN 61000-3-11:2000
Megfelelőségi értékelési eljárás: 2000/14/EK – V függelék.
Mért hangteljesítmény-szint LWA 91 dB (A).
Garantált hangteljesítményszint L
92 dB (A).
WA
A műszaki iratok őrzésének helye:
ATIKA GmbH & Co. KG – Műszaki Iroda – Schinkelstraße 97
59227 Ahlen – Németország
Ahlen, 2010.04.30. A. Pollmeier, Vállalatvezetés
A. Az aprítandó gallyak bemeneti tölcsérje
B. Fogantyú
C.
Visszaállító gomb / Motorvédelem
D. Hálózati csatlakozó dugó
E. KI-/BE-kapcsoló
F.
Forgásirány-átkapcsoló
G. Alváz
H. A motorház felső
I. Beállító gomb a vágóhengerhez
J. Kidobó nyílás
44
Page 46

AA kkéésszzüülléékkeenn aallkkaallmmaazzootttt sszziimmbbóólluummookk
Üzembe
helyezés előtt
olvassa el, és
vegye figyelembe
a kezelési
utasítást és a
biztonsági
utasításokat.
Járó motor
mellett ügyeljen a
gépből kirepülő
forgácsdarabokra
– ne engedjen
idegen
személyeket,
házi- és haszonállatokat a
veszélyes gép közelébe.
Szem- és
hallásvédelmet viseljen.
A tönkrement elektromos készülék nem való a háztartási
hulladékba. A készüléket, tartozékait és csomagolását
környezetkímélő módon juttassa hulladékba.
Az elhasznált elektromos és elektronikai készülékekről szóló
2002/96/EK Európai Irányelv rendelkezései szerint a már nem
használható elektromos készülékeket külön kell begyűjteni és a
környezetnek megfelelő újrahasznosításra előkészíteni.
Védőkesztyűt
viseljen.
JJeellzzéésseekk kkeezzeellééssii uuttaassííttááss
Fenyegető veszély vagy veszélyes helyzet. Jelen
utasítások figyelmen kívül hagyása sérüléseket vonhat
maga után, illetve dologi károkhoz vezethet.
L
Szakszerű alkalmazásra vonatkozó fontos
utasítások. Jelen utasítások figyelmen kívül hagyása
zavarokhoz vezethet.
Alkalmazói utasítások. Eme utasítások segítséget
nyújtanak a funkciók optimális kihasználásához.
Szerelés, kezelés és karbantartás. Itt pontosan
ÜÜzzeemmiiddőőkk
elmagyarázzuk Önnek, hogy mit kell tennie.
Kérjük, vegye figyelembe a regionális előírásokat.
RReennddeelltteettéésssszzeerrűű aallkkaallmmaazzááss
A rendeltetésszerű használat esetében a gallyaprító
- mindennemű gally (a fa fajtájától és frissességétől függően) a
max. átmérőig
- fonnyadt, nyirkos, már napok óta tárolt kerti hulladéknak
gallyakkal váltakozó aprítására alkalmas.
Javítási,
karbantartási és
tisztítási
munkálatok előtt a
motort állítsa le, és
a hálózati
csatlakozó dugót
húzza ki.
Óvakodjék a
forgókésektől. járó
motor mellett ne
nyúljon be se
kézzel, se lábbal a
berendezés
nyílásaiba.
Nedvességtől
védjük.
Üveg, fém, műanyagok, műanyag szatyrok, kövek,
szövetanyagok, földes gyökerek, nem kellő szilárdságú
hulladékok (pl. konyhai hulladék) aprítása kifejezetten kizárt
A kerti aprítógép csak magáncélú, ház körüli kertben vagy
szabadidőkertben való használatra alkalmas.
Házi- és hobbikertben használandó készüléknek az tekintendő,
amelyiket nem közcélú létesítményekben, parkokban,
sportlétesítményekben, mező- és eredőgazdaságokban és nem
ipari célokra használnak.
A rendeltetésnek megfelelő használathoz tartozik még a gyár által
előírt módon való használat-, az ennek megfelelő karbantartásés javítás valamint az útmutatóban olvasható biztonsági
tudnivalók követése.
Minden ezektől eltérő használat rendeltetéssel ellentétesnek
minősül. Az ilyen jellegű károkért a gyár nem vállal
szavatosságot. A kockázat ekkor egyedül a felhasználót terheli.
A gépet csak olyan személy szerelheti, használhatja és tarthatja
karban, akit azzal megbíztak, és akit a lehetséges veszélyekről
tájékoztattak. Karbantartást csak gyárunk, vagy az általunk
megnevezett vevőszolgálati műhely végezhet.
FFeennnnmmaarraaddóó kkoocckkáázzaatt
A gép rendeltetésének megfelelő használata mellett, és
valamennyi vonatkozó biztonsági rendelkezés betartása ellenére
is fennállhatnak még fennmaradó kockázatok.
A fennmaradó kockázat csökkenthető, ha a „Biztonsági
utasítások” és a „Rendeltetésszerű alkalmazás”, valamint a
kezelési utasítás leírásainak figyelembe vételével.
Mindezek figyelembe vétele és a kellő óvatosság segít a
balesetek és sérülések megelőzésében.
Az újjak és a kezek megsérülhetnek, ha kézzel átnyúlunk egy
nyíláson, és a késekhez jutunk.
Az újjak és a kezek sérülésének veszélye a késeken végzett
szerelési és tisztítási munkák során.
Sérülés kiperdült aprított anyag által a tölcsér közelében.
Veszélyeztetés áram által, nem szabályszerű villamos
csatlakozóvezetékek alkalmazása esetén.
Feszültséget hordozó részek megérintése nyitott villamos
szerkezeti elemek esetén.
A halláskárosodás hosszabb ideig tartó munkavégzés esetén
hallásvédelem nélkül.
Továbbiakban minden megtett óvintézkedés ellenére
fennállhatnak még nem nyilvánvaló fennmaradó kockázatok.
BBiizzttoonnssáággooss mmuunnkkaavvééggzzééss
A gyártmány üzembe helyezése előtt olvassa el és
vegye figyelembe a következő utasításokat ésszakmai a
mindenkori országban érvényes biztonsági rendelkezéseket,
hogy saját magát és másokat a lehetséges sérülésektől
megóvja.
45
Page 47

A biztonsági utasításokat adja tovább mindenkinek, aki a
L
géppel dolgozik.
Őrizze meg gondosan ezeket a biztonsági utasításokat.
L
A biztonsági lekapcsoláson szükséges javításokat a
gyártó, illetve általa megnevezett cégek végezhetik.
Használat előtt a kezelési utasítás segítségével ismerkedjen
meg készülékével.
A készüléket ne használja olyan célokra, amelyekre az nem
való (lásd „Rendeltetésszerű használat” és „Munkavégzés a
kerti aprítógéppel” pontokat).
Álljon biztosan a lábán, és mindenkor őrizze meg
egyensúlyát. Ne hajoljon ágaskodva előre. A szecskázni való
bedobásakor álljon egy szinten a berendezéssel.
Legyen figyelmes. Figyeljen arra, amin dolgozik. Munkáját
ésszerűen hajtsa végre. A gépet ne használja olyankor amikor
fáradt, kábító hatású szer, alkohol vagy gyógyszer hatása
alatt áll. A gép használatánál elég egy figyelmetlen pillanat
ahhoz, hogy súlyos balesetet szenvedjen.
Viseljen a munkavégzés során védőszemüveget,
munkakesztyűt és hallásvédelmet.
Viseljen alkalmas munkaruházatot:
− ne dolgozzék bő ruhában
− viseljen csúszásmentes lábbelit
A kezelő felelős a gép környezetében tartózkodó más
személyek biztonságáért.
Gyermekeknek és 16 év alatti fiatalkorúaknak nem szabad
a berendezést kezelniük.
A gyermekeket a készüléktőltartsa távol.
Ne működtesse a berendezést, ha idegen személyek
tartózkodnak a gép veszélyes közelségében.
Soha ne hagyja a készüléket felügyelet nélkül.
Tartsa a munkaterületét rendben! A rendetlenség
baleseteket vonhat maga után.
Álljon a gép mögé vagy az oldalához. Soha ne tartózkodjon a
kidobó nyílás közelében.
Soha ne nyúljon bele a töltő- vagy a kidobó nyílásba.
Tartsa távol arcát és testét a töltőnyílástól.
A készüléket ne terhelje túl! Jobban és biztonságosabban
dolgozhat a megadott teljesítménytartományban.
A készüléket csak komplett és szabályosan felhelyezett
védőberendezésekkel üzemeltesse, és ne módosítson a gépen
semmit, ami a biztonságot csorbítaná.
Ne módosítsa a motor fordulatszámát, mert az szabályozza
a legnagyobb biztonságos munkasebességet, valamint óvja a
motort és az összes forgó alkatrészt a túlzott sebesség
következtében fellépő károsodástól.
A készüléket soha ne üzemeltesse adagolótölcsér nélkül.
A készüléken, illetve annak részein módosításokat ne
végezzen.
A motor bekapcsolása előtt a készüléket zárja le.
A készüléket vízzel nem fröcskölje le. (Áramütés veszélye!).
A készüléket nem hagyja esőben állni, illetve esőben ne
dolgozzék vele.
A gépet csak száraz helyen, gyermekek által nem elérhető
helyen tárolja.
Hogy ujjsérülését megelőzze, a gép szerelésénél és
tisztításakor viseljen védőkesztyűt.
Kapcsolja ki a gépet és húzza ki a hálózati
csatlakozó dugót következő esetekben:
− javítási munkálatok
− karbantartási és tisztítási munkák
− a csatlakozó vezetékek ellenőrzése, hogy
nincsenek-e összegabalyodva vagy megsérülve
− zavarok elhárítása
− szállítás
− a gép elhagyása (rövid megszakítások esetén is)
A gép bemeneti és kidobórészének dugulása esetén
kapcsolja ki a motort és húzza ki a hálózati csatlakozódugót,
mielőtt a dugulást okozó anyagmaradványokat eltávolítja.
Ellenőrizze a gépet esetleges sérülésekre:
− A készülék további használata előtt a
védőberendezéseket alaposan meg kell vizsgálni
kifogástalan és rendeltetésszerű működés szempontjából.
− Ellenőrizze, hogy a mozgó alkatrészek működése
kifogástalan-e, vagy nincs-e valamelyik alkatrész
megsérülve. Az összes alkatrésznek helyesen kell
felszerelve lennie és minden feltételt teljesítenie kell a
fűrész kifogástalan működése érdekében.
− Sérült védőberendezéseket és alkatrészeket elismert
szakszerviz által szakszerűen meg kell javíttatni, vagy ki
kell cseréltetni, amennyiben a használati utasításban
egyéb adat nem szerepel.
− A sérült vagy olvashatatlan biztonsági feliratok
haladéktalanul kicserélendők.
A használaton kívüli gépeket száraz, lezárt helyiségben
tárolja, ahol ahhoz gyermekek hozzá nem férhetnek.
Villamos biztonság
A csatlakozóvezeték kivitelezése IEC 60245 (H 07 RN-F)
szerint legalább következő vezeték keresztmetszettel
− 1,5 mm² 25 m-ig terjedő vezetékhossz esetén
− 2,5 mm² 25 m feletti vezetékhossz esetén
A hosszú és vékony csatlakozóvezetékek
feszültségcsökkenéshez vezetnek. Ilyenkor a motor nem éri el
a maximális teljesítményt, a berendezés pedig ugyancsak
nem működik kielégítően.
A dugaszoló aljazatnak és a csatlakozóvezetékek gumiból,
puha PVC-ből vagy más, hasonló mechanikai szilárdsággal
rendelkező termoplasztikus anyagból készüljenek, vagy ilyen
anyaggal kell ezeket bevonni.
A csatlakozóvezetékek csatlakozóját védje a fröcskölő víztől.
A csatlakozóvezetékek fektetése során ügyelni kell arra,
hogy azok ne legyenek kitéve zúzódásnak, törésnek, valamint
arra, hogy a dugaszolható összeköttetést víz ne érje.
Kábeldob használatánál a kábelt mindig teljesen tekerje le a
dobról.
A vezetéket ne használja olyan célokra, melyekre nem
rendeltetett. Óvja a vezetéket hőtől, olajtól és éles
peremektől. A csatlakozó dugót ne a vezetéknél fogva húzza
ki az aljzatból.
Rendszeresen ellenőrizze a hosszabbító kábeleket, és
azokat cserélje ki, ha sérültek.
Ne használjon hibás csatlakozóvezetékeket.
A szabadban csak erre a célra engedélyezett és megfelelő
jelöléssel ellátott hosszabbító kábeleket alkalmazzon.
Ne alkalmazzon átmeneti villamos csatlakozásokat.
46
Page 48

Védőberendezéseket soha ne hidalja át, illetve azokat soha
nem helyezze üzemen kívürel.
A villamos csatlakoztatást illetve javításokat a gép
villamos részein csak engedélyezett villamossági
szakember vagy ügyfélszolgálati irodáink egyike készítse el.
A helyi előírásokat, különösképpen az óvóintézkedéseket
figyelembe kell venni.
A gép egyéb részein szükséges javításokat a gyár illetve
ügyfélszolgálati irodáinak egyike végezheti.
Csak eredeti pótalkatrészeket alkalmazzon. Egyéb
pótalkatrészek és egyéb tartozékok használata a kezelő
balesetéhez vezethet. Ebből eredő károk tekintetében a
gyártó felelősséget nem vállal.
ÜÜzzeemmbbee hheellyyeezzééss
Győződjék meg arról, hogy a készülék összeszerelése
komplett és előírásszerű módon történt.
Használat esetén az aprítógépet állítsa vízszintes és szilárd
alapzatra (borulás veszélye).
A készüléket ne állítsa köves, vagy kavicsos talajra.
A berendezés kizárólag a szabadban használható. Tartson
megfelelő távolságot (legalább 2 m) minden faltól vagy más
merev tárgytól.
Minden használat előtt ellenőrizze:
− a csatlakozó vezetékek sérülésmentességét (repedések,
vágások, vagy hasonló)
ne használjon hibás vezetékeket
− esetleges sérülésekre
(lásd „Biztonságos munkavégzés”)
− hogy minden csavar szorosan meg van-e húzva
L Hálózati csatlakozás
Hasonlítsa össze a készülék típustábláján megadott
feszültséget a hálózati feszültséggel, majd csatlakoztassa a
készüléket a megfelelő és előírásszerű csatlakozó aljzatra.
Megfelelő keresztmetszetű hosszabbító vezetéket
alkalmazzon.
Hálózati biztosíték
2300 W
2500 W
2800 W
16 A lomha
16 A lomha
16 A lomha
Svájcban
10 A lomha 13 A lomha
KI-/BE-kapcsoló
Ne használjon olyan készüléket, amelynek a kapcsolóját nem
lehet be- kikapcsolni. A sérült kapcsolót haladéktalanul
javíttassa meg vagy cseréltesse ki arra alkalmas
szakemberrel vagy a kijelölt vevőszolgálattal.
UK
13 A lomha
13 A lomha
Visszaállító
gomb (Motorvédelem)
BE
Forgásirány-
KI
átkapcsoló
Visszmenet
Bekapcsolás
KI
Behúz
Nyomja meg a zöld gombot ! I
Kikapcsolás
Nyomja meg a piros gombot ! 0
Újraindítás- áramkimaradás esetén
Áramkimaradás esetén a készülék automatikusan kikapcsol
(nulla-feszültség-kioldó). A készülék ismételt bekapcsolásához
nyomja meg újra a piros gombot.
Motorvédelem
A motor védőkapcsolóval rendelkezik és túlterhelés esetén
magától kikapcsol. A motor a lehülési időt (kb. 5 percet) követően
ismételten bekapcsolható. Az ismételt bekapcsoláshoz nyomja
meg
1. a visszaállító gombot (motorvédelem)
2. a zöld gombot I .
Forgásirány-átkapcsoló
A forgásirány-átkapcsolót kizárólag a gallyaprító gép
kikapcsolt állapotában működtessük.
állás
Motor nem indul be.
állás
Az aprítandó anyagot a vágószerszám behúzza a gépbe és
felaprítja.
állás
A vágókés fordított irányban dolgozik, ilyenkor a beszorult
aprítandó anyag kiszabadul.
Miután a forgásirány-átkapcsolót az
benyomva a KI-/BE-kapcsoló zöld gombját. A vágószerszám
fordított irányba állítódik. Ha elengedjüka KI/BE-kapcsolót, a
gallyaprító automatikusan megáll.
Jótanács
z Nagyobb tárgyakat vagy fadarabokat többszöri
működtetéssel mind a vágásirányban, mind pedig fordított
irányban eltávolíthatunk.
z Használjunk egy botot vagy egy kampót a leblokkolt
tárgyaknak a bevezető tölcsérből vagy a kidobó nyílásból
való eltávolítására.
Az újra történő bekapcsolás előtt mindig várjuk
meg, amíg a gallyaprító teljesen megállt.
állásba állítottuk, tartsuk
47
Page 49

Hálózati impedancia
Kedvezőtlen hálózati feltételek mellett a készülék bekapcsolási
folyamata során rövid idejű feszültségcsökkenések léphetnek fel,
melyek más készülékekre befolyást gyakorolhatnak (pl. egy
lámpa villogása).
Nem várhatók zavarok, ha a táblázatban megadott maximális
hálózati impedanciákat betartják.
Teljesítményfelvétel P1 (W)
Hálózati impedancia Z
max
(Ω)
2300 0,21
2500 0,21
2800 0,19
MMuunnkkaavvééggzzééss aa kkeerrttii aapprrííttóóggééppppeell
Viseljen a munkavégzés során védőszemüveget,
védőkesztyűt és hallásvédelmet.
A gépből kiálló nagyobb hosszúságú anyagok
visszacsapódhatnak, mialatt a vágószerszám a berendezésbe
behúzza őket! Tartson megfelelő biztonsági távolságot!
Viseljen alkalmas munkaruházatot:
− ne viseljen bő ruházatot
− viseljen csúszásmentes lábbelit
Munka közben álljon a gép oldalához, vagy a gép mögé. Soha
ne álljon a kidobó nyílás közelébe.
Ne dugja be a kezét vagy más testrését a bevezető nyílásba,
a kidobó csatornába vagy a többi mozgó tárgy közelébe.
Soha ne nyúljon az adagoló, illetve a kidobó nyílásba.
Ne borítsa föl a készüléket járó motorral.
Arcát és testét tartsa távol az adagolónyílástól.
A készülék bekapcsolása előtt ellenőrizze, hogy a adagoló
tölcsérben vannak-e aprított maradványok.
Adagolás során ügyeljen arra, hogy fémdarabok, kövek, üveg
vagy egyéb, nem feldolgozható tárgy ne kerülhessen az
adagoló tölcsérbe.
Amennyiben idegen tárgyak kerülnek az adagoló tölcsérbe,
vagy ha a készüléknél rendkívüli zajok vagy rezgések
tapasztalhatók, a készüléket azonnal ki kell kapcsolni, és
nyugalmi állapotba kell helyezni. Húzza ki a hálózati
csatlakozó dugót, és végezze el a következőket:
− elenőrizze a kárt
− a sérült alkatrészeket cserélje ki vagy javíttassa meg
− ellenőrizze a készüléket és húzza meg a meglazult
alkatrészek rögzítését.
Ne vállalkozzék a gép javítására, ha ahhoz nincs
képesítése (l. biztonsági útmutatások).
Mit szabad aprítanom?
Igen:
• mindennemű max. vastagságú gallyat a fa fajtájától és
frissességétől függően
• hervadt, nedves, többnapos kerti hulladékot
csak ággal felváltva szecskázni
Nem:
• üveg, fémdarabok, műanyag, műanyag, kő, szövet, földes
gyökeret
• nem szilárd hulladékot, pl. konyhahulladékot
Aprításra vonatkozó különleges
tudnivalók:
¾ Az aprítandó anyagot mindig a
tölcsér bevezető nyílásának jobb
oldala felől töltsük a
berendezésbe!
¾ Aprítsa az ágakat, gallyakat és
fadarabokat röviddel a lemetszés, illetve vágás után
− az efféle aprítandó anyag kiszáradás után igen kemény
lesz, a maximálisan feldolgozható ágak átmérője ennek
következtében csökken.
¾ Erősebben elágazó ágak esetében távolítsa el az
oldalhajtásokat.
¾ Magas víztartalmú, ragadásra hajlamos kerti, illetve konyhai
hulladékok feldolgozása
− ezeket a készülék eldugulásának megakadályozása
érdekében fás aprítandó anyaggal váltakozva aprítsa.
¾ Ne hagyja, hogy a felaprított anyag a kidobó nyílás mellett
túlságosan magasra halmozódjék. Ekkor ugyanis az apríték a
bevezető nyíláson keresztül visszacsapódhat.
¾ Tisztítsa meg a bevezető nyílást és a kidobó csatornát ezek
eldugulása esetén. Ilyenkor előbb kapcsolja ki a motort és
húzza ki a dugaszoló aljazatból a hálózati csatlakozót.
¾ Kérjük, vegye figyelembe, hogy az Ön készülékének
megfelelő maximálisan feldolgozható ágátmérőt (lásd
„Műszaki adatok”). A fa frisseségétől és fajtájától függően a
feldolgozható ág átmérője különböző lehet.
¾ A vágó hengermű automatikusan lassan m zog, így ütközés
nélkül húzza be a szecskáznivalót.
¾ A gép túlterhelése esetén a motorvédő kapcsoló
automatikusan leállítja a gépet.
− kb. 5 perc után kapcsolja be újra a gépet
− ha a gép ennyi id ő után nem hagyja magát bekapcsolni,
nézzen utána a “üzemzavarok” pont után.
¾ A készülék túlterhelése esetén a motorvédő kapcsolóval
ellátott kapcsoló önműködően lekapcsol
− az aprítót ilyenkor kb. 5 perc elteltével kapcsolja be újból
− amennyiben a készülék a várakozási id ő eltelte után nem
kapcsolható be, nézzen ennek oka után az „Üzemzavarok”
pont alatt.
AA eelllleennkkééss bbeeáállllííttáássaa
A (B) jelű ellenkés szabad játék nélkül állítható be az (A) jelű kés
vágóéléhez. A hatékony üzemelés érdekében célszerű lehetőleg
kis távolság betartása.
Puha anyagok vagy nyirkos gallyak gyakran csak szakadnak,
ahelyett hogy elvágódnának. A többszöri működtetés során
kicsorbult vagy eltompult kés ugyancsak ehhez a problémához
vezethet.
48
Page 50

A távolság beállítása.
Kapcsoljuk be a berendezést.
A műanyag motorház jobb oldalán található a beállító
berendezés. Etäisyys säädetään kääntämällä säätönuppia (D)
oikealle, jolloin ruuvi (C) liikkuu terätelaan päin. Folytassuk a
csavarást mindaddig, amíg a kidobó nyílásból finom
alumíniumreszelék hullik ki.
KKaarrbbaannttaarrttááss ééss ááppoollááss
• Minden karbantartás és ápolás előtt
− a motort leállítani és hálózati csatlakozót kihúzni
− sérülések ellen védőkesztyűt használni
Ügyeljünk arra a vágószerszám karbantartása során, hogy ez
az indító mechanizmus segítségével még akkor is járhat, ha a
motor a fedél elzárása folytán már eljárt.
Legyen gondja rá, hogy karbantartás és javítás után a gépből a
szerszámot, csavarhúzót távolítsa el.
• A kerti szecskavágó gép messzemenően
karbantartásmentes. Értékének megőrzése és hosszú
működőképessége érdekében ügyeljen a következőkre:
− szellőztető réseket tartsa szabadon és tisztán
− rögzítő csavarokat ellenőrizze és szükség esetén húzza
utána
− használat után a gépet tisztítsa meg
A tisztításhoz csak nedves meleg törlőrongyot és puha
kefét használjon.
Soha ne használjon tisztító- vagy oldószert. Azok a gépen helyrehozhatatlan kért tehetnek. A vegyszer a
műanyagot megtámadhatja.
− a gépet nem szabad folyó vízzel vagy magasnyomású
tisztítóval tisztítani.
− Fényes fémrészeket a korrózió elleni védelem
érdekében minden használat után környezetbarát,
biológiailag lebontható olajspray segítségével kezelje.
− a vágóhenger és az utánvágólemez kopó részek,
viszont normális használattal és szabály szerinti
utánállítással több évig működőképesek.
LLeehheettssééggeess zzaavvaarrookk
Minden zavarelhárítás előtt
− kapcsolja ki a gépet
− Odota, että laite pysähtyy
− húzza ki a konnektordugót.
üzemzavar lehetséges ok megszüntetés
motor nem indul be - a forgásirány-átkapcsolót újra „0”
állásba
- nincsen hálózati feszültség
- vezeték hibás
- gép túlterhelt (motorvédelem)
motor zúg, de nem indul be
- vágóhenger blokkolódik
- kondenzátor hibás
a szecskáznivalót nem húzza
be
- A vágóél visszafelé forog. A
kapcsolóállás helytelen.
- a szecskáznivaló a tölcsérben
beszorult (Materialstau)
- Kapcsoljuk ki a készüléket és kapcsoljuk át a forgásirány-
átkapcsolót.
- biztosítékot ellenőrizni
- ellenőriztetni (elektroszakember)
- Hagyjuk lehűlni a készüléket.
1. Az ismételt bekapcsoláshoz nyomjuk meg
2. visszaállítógombot (motorvédelem) zöld gombot I .
- Kapcsoljuk ki a készüléket.
Kapcsoljuk a forgásirány-átkapcsolót
Kapcsoljuk be a készüléket, amíg a blokkolás el nem
múlik. Kapcsoljuk ki újra a készüléket. Kapcsoljuk a
forgásirány-átkapcsolót újra
- gépet a gyártó cég vagy a gyártó cég által kijelölt céghez
javításra küldeni.
- Kapcsoljuk ki a készüléket és kapcsoljuk át a forgásirány-
átkapcsolót.
- Kapcsoljuk ki a készüléket. Kapcsoljuk a forgásirány-
átkapcsolót
irányba. Kapcsoljuk be a készüléket,
hogy az aprítandó anyag kiszabaduljon, távolítsuk el az
esetleges szennyeződéseket.
Kapcsoljuk ki újra a készüléket. Kapcsoljuk a forgásirány-
átkapcsolót újra
állásba.
irányba.
állásba.
49
Page 51

üzemzavar lehetséges ok megszüntetés
a szecskáznivalót nem húzza
be
a szecskáznivalót nem
szabályosan aprítja
A készülék beindul, de
csekély terhelésnél blokkol
és a motorvédő kapcsolón
keresztül, lekapcsol
- túl puha vagy túl nedves szecs káznivaló
- kopás a vágóhengeren
- egy ágat utánatolni és eldarabol tatni
- Állítsuk be az ellenlapot az „Az ellenlap beállítása“
című részben foglaltak szerint, erős elhazsnálódás
esetén cseréljük ki a vágóélet.
- Az ellenkés nincs megfelelően beállítva - Állítsuk be az ellenkést
A hosszabbító vezeték túl hosszú vagy túl
kicsi a keresztmetszet.
A dugaszoló aljzat túl messze van a
A hosszabbító vezeték legalább 1,5mm², legfeljebb 25 m
hosszú. Hosszabb vezeték esetén a keresztmetszet
legalább 2,5 mm².
főcsatlakozástól és túl kicsi a csatlakozó
vezeték keresztmetszete.
MMűűsszzaakkii aaddaattookk
Modell 2300 2500 2800
Típus AH 600 AH 600 AH 600
Motor váltakozó áramú motor 230 V~, 50 Hz, 2800 min
Motorteljesítmény P
S6 - 40 % 2300 W 2500 W 2800 W
1
-1
Fordulatszám vágóél 40 min-1
Be/kikapcsoló túlterhelés-védővel, vágó- és visszamenettel, feszültséghiány-kioldó
Súly 24 kg 24, kg 25 kg
Hangnyomásszint LPA
(mérve 2000/14/EG)
Mért hangteljesítményszint L
WA
(mérve 2000/14/EG)
Garantált hangteljesítményszint L
WA
(mérve 2000/14/EG)
83,8 dB (A)
K = 3 dB (A)
91 dB (A) 91 dB (A) 91 dB (A)
92 dB (A) 92 dB (A) 92 dB (A)
84,2 dB (A)
K = 3 dB (A)
82,5 dB (A)
K = 3 dB (A)
Max. feldolgozható ágátmérő
(csak frissen vágott, illetve metszett fára
∅ max. 35 mm ∅ max. 40 mm ∅ max. 44 mm
érvényes)
Védelmi osztály I
Védettség IP X4
Hálózati biztosíték
Svájcban
UK
16 A lomha
10 A lomha
13 A lomha
16 A lomha
--
13 A lomha
16 A lomha
--
13 A lomha
GGaarraanncciiaa
Kérjük a mellékelt garancianyilatkozat figyelembe vételét
50
Page 52

Uređaj ne smijete pustiti u pogon prije nego što
pročitate upute za uporabu, obratite pažnju na sve
naznačene upute i uređaj montirate kao što je opisano.
Upute sačuvajte za buduću upotrebu.
SSaaddrržžaajj
Izjava o usklađenosti 51
Opseg isporuke 51
Opis uređaja 51
Simboli na uređaju 51
Simboli uputa za uporabu
Vrijeme rada 52
Svrsishodna primjena 52
Preostali rizici 52
Sigurnosne upute 52
Puštanje u pogon 53
Rad s vrtnom sječkalicom 54
Namještanje protumjerača 55
Održavanje i njega 55
Moguće smetnje 56
Tehnički podaci 57
Jamstvo 57
Montaža 116
Rezervni dijelovi 117
OOppsseegg iissppoorruukkee
Nakon što izvadite uređaj iz kartona provjerite
! potpunost sadržaja
! eventualna oštećenja proizvoda nastala prilikom transporta
Molimo Vas da reklamacije odmah prijavite dostavljaču tj.
proizvođaču. Kasnije reklamacije neće biti uvažene.
• 1 montirana jedinica uređaja
• 1 nogar lijevo
• 1 nogar desno
• 1 osovina
• 2 kotača
• 2 poklopca kotača
• 1 vrećica s vijcima
• 1 vreća za prihvat materijala
• 1 upute za uporabu
OOppiiss uurreeđđaajja
a
EEGG--IIzzjjaavvaa oo uusskkllaađđeennoossttii
odgovarajući smjernici: 2006/42 EU
Ovime mi,
ATIKA GmbH & Co. KG
Schinkelstraße 97, 59227 Ahlen - Germany
s punom odgovornošću izjavljujemo da je ovaj proizvod
Gartenhäcksler (vrtna sječkalica) tip AH 600
Serijski broj: vidi posljednju stranicu
usklađen s odredbama gore navedenih EU smjernica kao i s
odredbama sljedećih smjernica:
2004/108/EU i 2000/14/EU.
Primijenjene su sljedeće harmonizirane norme:
EN 60335-1:2002+A1+A11+A12+A2+A13;
EN 13683:2003+A1:2009; EN 62233:2008; EN 55014-1:2006;
EN 55014-2/A1:2001; EN 61000-3-2:2006; EN 61000-3-11:2000
Megfelelőségi értékelési eljárás: 2000/14/EU - V függelék
Izmjeren intenzitet buke L
Zajamčen intenzitet buke L
91 dB (A).
WA
92 dB (A).
WA
Pohrana tehničke dokumentacije:
ATIKA GmbH & Co. KG – Technisches Büro – Schinkelstr. 97
59227 Ahlen – Germany
Ahlen, 30.04.2010 A. Pollmeier, voditelj poslova
A. Otvor lijevka za materijal za sječenje
B. Ručka
C. Gumb za vraćanje / zaštita motora
D. Mrežni utikač
E. Sklopka za uključivanje / isključivanje
F. Preklopnik pravca okretanja
G. Postolje
H. Gornji dio kućišta
I. Gumb za podešavanje valjka za rezanje
J. Otvor za izbacivanje
51
Page 53

SSiimmbboollii nnaa uurreeđđaajjuu
Prije puštanja u
pogon pročitati i
obratiti pažnju na
upute za uporabu i
sigurnosne upute.
Opasnost zbog
dijelova koji se
izbacuju kad
motor radi –
osobe koje ne
sudjeluju u radu,
kao i kućne i
korisne životinje držati podalje
od područja opasnosti.
Prije radova
popravljanja,
održavanja i
čišćenja treba
isključiti motor i
izvaditi utikač iz
struje.
Pozor od rotirajućih
noževa. Ruke i
noge ne držati u
otvorima, kada je
stroj uključen.
Sjeckanje stakla, metala, plastičnih predmeta, plastičnih vrećica,
kamenja, otpada tkanina, korijenja iz zemlje, otpada bez čvrste
konzistencije (npr. kuhinjskog smeća) izričito se isključuje.
Vrtna sječkalica prikladna je samo za privatnu upotrebu u kućnim
i hobi vrtovima.
Kao sječkalice za privatne i hobi vrtove, takvi uređaji nisu
predviđeni za korištenje na javnim površinama, u parkovima, na
sportskim igralištima kao ni u poljoprivredi i šumarstvu.
Odgovarajuća namjenska primjena uključuje pridržavanje od
proizvođača propisanih uvjeta za rad, održavanje i popravak i
pridržavanje sigurnosnih naputaka koji se nalaze u uputi.
Svaka drugačija uporaba nije namjenska. Za oštećenja bilo koje
vrste koja proizlaze iz toga proizvođač ne jamči: rizik snosi sam
korisnik.
Uređaj mogu za uporabu pripremati, upotrebljavati i održavati
samo osobe koje su za to osposobljene i koje su upoznate s
opasnostima te vrste. Popravke smijemo vršiti samo mi odnosno
od nas ovlaštena servisna mjesta.
Nositi zaštitu za uši i
oči.
Nositi zaštitne
rukavice.
Zaštititi od vlage.
Električni uređaji ne spadaju u kućni otpad. Uređaj,
pribor i ambalažu odložite u skladu sa zaštitom
okoliša.
U skladu s Europskom smjernicom 2002/96/EG o starim
električnim i elektroničkim uređajima, električni uređaji koji više
nisu sposobni za uporabu moraju se skupljati odvojeno i
podvrgnuti ekološki primjerenome recikliranju.
SSiimmbboollii uuppuuttaa zzaa uuppoorraabbuu
Prijeteća opasnost ili opasne situacije. Nepoštivanje
ovih uputa može dovesti do ozljede ili oštećivanja
predmeta.
L
Važne upute za ispravno rukovanje. Nepoštivanje ovih
uputa može dovesti do smetnji.
Upute za korisnika. Ove upute Vam pomažu da
optimalno koristite sve funkcije.
Montaža, posluživanje i održavanje. Ovdje će Vam se
točno objasniti što morate raditi.
PPrreeoossttaallii rriizziiccii
Čak i kod svrsishodne primjene mogu usprkos pridržavanju
svih dotičnih sigurnosnih propisa nastati zbog određene
konstrukcije u svrhu primjene, preostali rizici.
Oni mogu biti svedeni na minimum, ako se „Sigurnosne upute“ i
„Svrsishodna primjena“ kao i upute za uporabu poštuju u cijelosti.
Pažljivost i oprez smanjuju rizik ozljeda osoba i oštećenja.
Opasnost od ozljede prstiju i ruku, ako ruku stavite u otvor i
tako dospijete do noževa.
Ozljeda prstiju i ruku kod montažnih radova i prilikom čišćenja
noževa.
Ozljeda komadima koji se izbacuju u području lijevka.
Opasnost od struje kod primjene neodgovarajućeg električnog
priključka.
Dodirivanje električki vodljivih dijelova kod otvorenih
električnih sklopova.
Oštećivanje sluha kod dužeg rada bez zaštite ušiju.
Nadalje mogu usprkos svih mjera zaštite postojati neočigledni
preostali rizici.
SSiigguurrnnoossnnee nnaappoommeennee
VVrriijjeemmee ppooggoonnaa
Molimo Vas da obratite pažnju na regionalne propise.
SSvvrrssiisshhooddnnaa pprriimmjjeennaa
U svrsishodnu uporabu spada sjeckanje
- grana svih vrsta do maks. presjeka (ovisno o vrsti drveta i
svježini)
- uvenulog, vlažnog vrtnog otpada koji stoji već nekoliko dana,
zajedno s granama
52
Prije puštanja u pogon ovog proizvoda obratite pažnju
na sljedeću uputu i Propise o sprječavanju nezgoda Vašeg
strukovnog udruženja tj. sigurnosne odredbe koje vrijede u
svakoj dotičnoj zemlji, kako bi zaštitili sebe i druge od
mogućih ozljeda.
Proslijedite sigurnosne upute svim osobama koje rade sa
L
strojem.
Dobro spremite sigurnosne upute.
L
Popravci na sigurnosnom isključivaju moraju
uslijediti kroz proizvođača tj. kroz firmu koju on
imenuje.
Page 54

Prije korištenja upoznajte se sa uređajem uz pomoć uputa za
uporabu.
Uređaj nemojte koristiti u svrhe za koje nije namijenjen (vidi
svrsishodna primjena i rad s vrtnom sječkalicom).
Pobrinite se za stabilnost uređaja i držite stalno ravnotežu.
Nemojte se naginjati naprijed. Prilikom ubacivanja materijala
za sjeckanje stojte na istoj razini sa uređajem.
Budite pažljivi. Pazite što činite. Krenite s razumom na posao.
Ne koristite stroj ako ste umorni ili pod utjecajem droga,
alkohola ili lijekova. Trenutak nepažnje kod uporabe stroja
može dovesti do ozbiljnih ozljeda.
Pri radu nosite zaštitne naočale, radne rukavice i zaštitu za
uši.
Nosite odgovarajuću radnu odjeću:
- nikakvu široku odjeću
- obuću koja se ne kliže
Korisnik je u radnom području stroja odgovoran za druge
osobe.
Djeca i mladi ispod 16 godina ne smiju koristiti uređaj.
Djecu držite podalje od uređaja.
Nikada nemojte koristiti uređaj dok se u blizini nalaze osobe
koje ne sudjeluju u poslu.
Uređaj nemojte ostavljati bez nadzora.
Svoje radno područje držite urednim! Neurednost može
dovesti do nezgoda.
Zauzmite radni položaj sa strane ili iza uređaja. Nikada u
predjelu otvora kroz koji se izbacuje isječen materijal.
Nikada nemojte rukom zahvaćati u otvor kroz za punjenje ili
pražnjenje isječenog materijala.
Lice i tijelo držite udaljeno od otvora za punjenje.
Nemojte preopteretiti uređaj! Bolje i sigurnije će te raditi u
navedenom polju radnog učinka.
Služite se sa uređajem samo sa kompletnim i ispravno
montiranim sigurnosnim uređajima i nemojte ništa mijenjati
na stroju što bi moglo utjecati na sigurnost rada.
Nemojte mijenjati broj okretaja stroja jer on regulira sigurnu
maksimalnu radnu brzinu, a motor i sve rotirajuće dijelove štiti
od oštećenja zbog prekomjerne brzine.
Uređaj ne upotrebljavajte bez lijevka za punjenje.
Uređaj tj. njegove dijelove nemojte mijenjati.
Prije uključivanja motora uređaj zatvorite.
Uređaj ne prskajte vodom. (Izvor opasnosti je električna
struja).
Uzmite u obzir vanjske utjecaje.
Nemojte koristiti uređaj u mokroj ili vlažnoj okolini.
Uređaj ne ostavljajte na kiši ili ne radite njime na kiši.
Radite pri dostatnoj vidljivosti i osigurajte dobru rasvjetu.
Da bi se isključile opasnosti od ozljeđivanja prstiju nosite
zaštiten rukavice prilikom poslova montaže i čišćenja.
Isključite stroj i izvadite mrežni utikač kod:
− radova održavanja i čišćenja uređaja
− uklanjanja smetnji
− provjeravanja priključnih vodova jesu li
zapetljani ili oštećeni
− transporta
− popravaka
− napuštanja (i kod kratkih prekida rada)
U slučaju začepljenja prilikom ubacivanja i izbacivanja iz
stroja, isključite motor i izvucite mrežni utikač prije nego ćete
ukloniti ostatke materijala iz otvora za ubacivanje i
izbacivanje.
Pregledajte ima li na stroju mogućih oštećenja:
− Prije dalje upotrebe ure đaja sigurnosni uređaji moraju se
brižljivo prekontrolirati na njihovu ispravnu i svrsishodnu
funkciju.
− Provjerite funkcioniraju li pokretni dijelovi besprijekorno i
nisu li zaglavljeni ili oštećeni. Svi dijelovi moraju biti
pravilno montirani i ispunjavati sve uvjete da bi osigurali
besprijekorni rad pile.
− Oštećene sigurnosne naprave i dijelove mora primjereno
popraviti ili zamijeniti ovlaštena stručna radionica, ukoliko
ništa drugo nije navedeno u uputama za uporabu.
− Oštećene ili nečitljive sigurnosne naljepnice potrebno je
zamijeniti.
Čuvajte nekorištene strojeve na suhom, zaključanom mjestu
izvan dohvata djece.
Električna sigurnost
Izvođenje priključka po IEC 60245 (H 07 RN-F) sa
presjekom kabela od najmanje
− 1,5 mm² kod dužine kabela do 25 m
− 2,5 mm² kod dužine kabela preko 25 m
Dugi i tanki priključni vodovi uzrokuju pad napona. Motor više
ne dostiže maksimalnu snagu, a funkcija uređaja je smanjena.
Utičnice i priključne kutije na priključnim vodovima moraju biti
od gume, mekane plastike ili drugog termoplastičnog
materijala jednake mehaničke čvrstoće ili biti prevučene tim
materijalom.
Utična naprava priključnog voda mora biti zaštićena od
prskajuće vode.
Kod postavljanja priključka obratite pažnju na to da nije
prikliješten, savijen i da utični spoj ne bude mokar.
Nemojte koristiti kabel u svrhe za koje nije namijenjen. Kabel
zaštitite od vrućine, ulja i oštrih rubova. Nemojte vući za
kabel da bi izvadili utikač iz utičnice.
Kod uporabe kabelskog bubnja odmotajte kabel u potpunosti.
Redovno pregledajte produžni kabel i zamijenite ga ako
utvrdite da je oštećen.
Nemojte upotrebljavati neispravne priključne vodove.
Na otvorenom upotrijebite samo za to odobrene odgovarajući
označene produžne kabele.
Nemojte primjenjivati provizorne električne priključke.
Zaštitne naprave nikada ne premošćujte niti ih ne
isključujte.
Uređaj priključite preko zaštitne strujne sklopke (30 mA).
Električni priključak tj. popravke električnih dijelova stroja
mora provesti samo ovlašteni električar. Moraju se
poštovati mjesni propisi, posebice u vezi sigurnosnih mjera.
Popravke drugih dijelova stroja mora provesti proizvođač
tj. njegove servisne službe.
Koristite samo originalne dijelove. Upotrebom drugih
rezervnih dijelova može doći do nezgoda za korisnika. Za
štete koje proizađu iz toga proizvođač ne jamči.
PPuuššttaannjjee uu ppooggoonn
Provjerite je li uređaj u cijelosti i propisno montiran.
Da biste mogli raditi s vrtnom sječkalicom, postavite ju na
ravnu i čvrsti podlogu (opasnost od prevrtanja).
53
Page 55
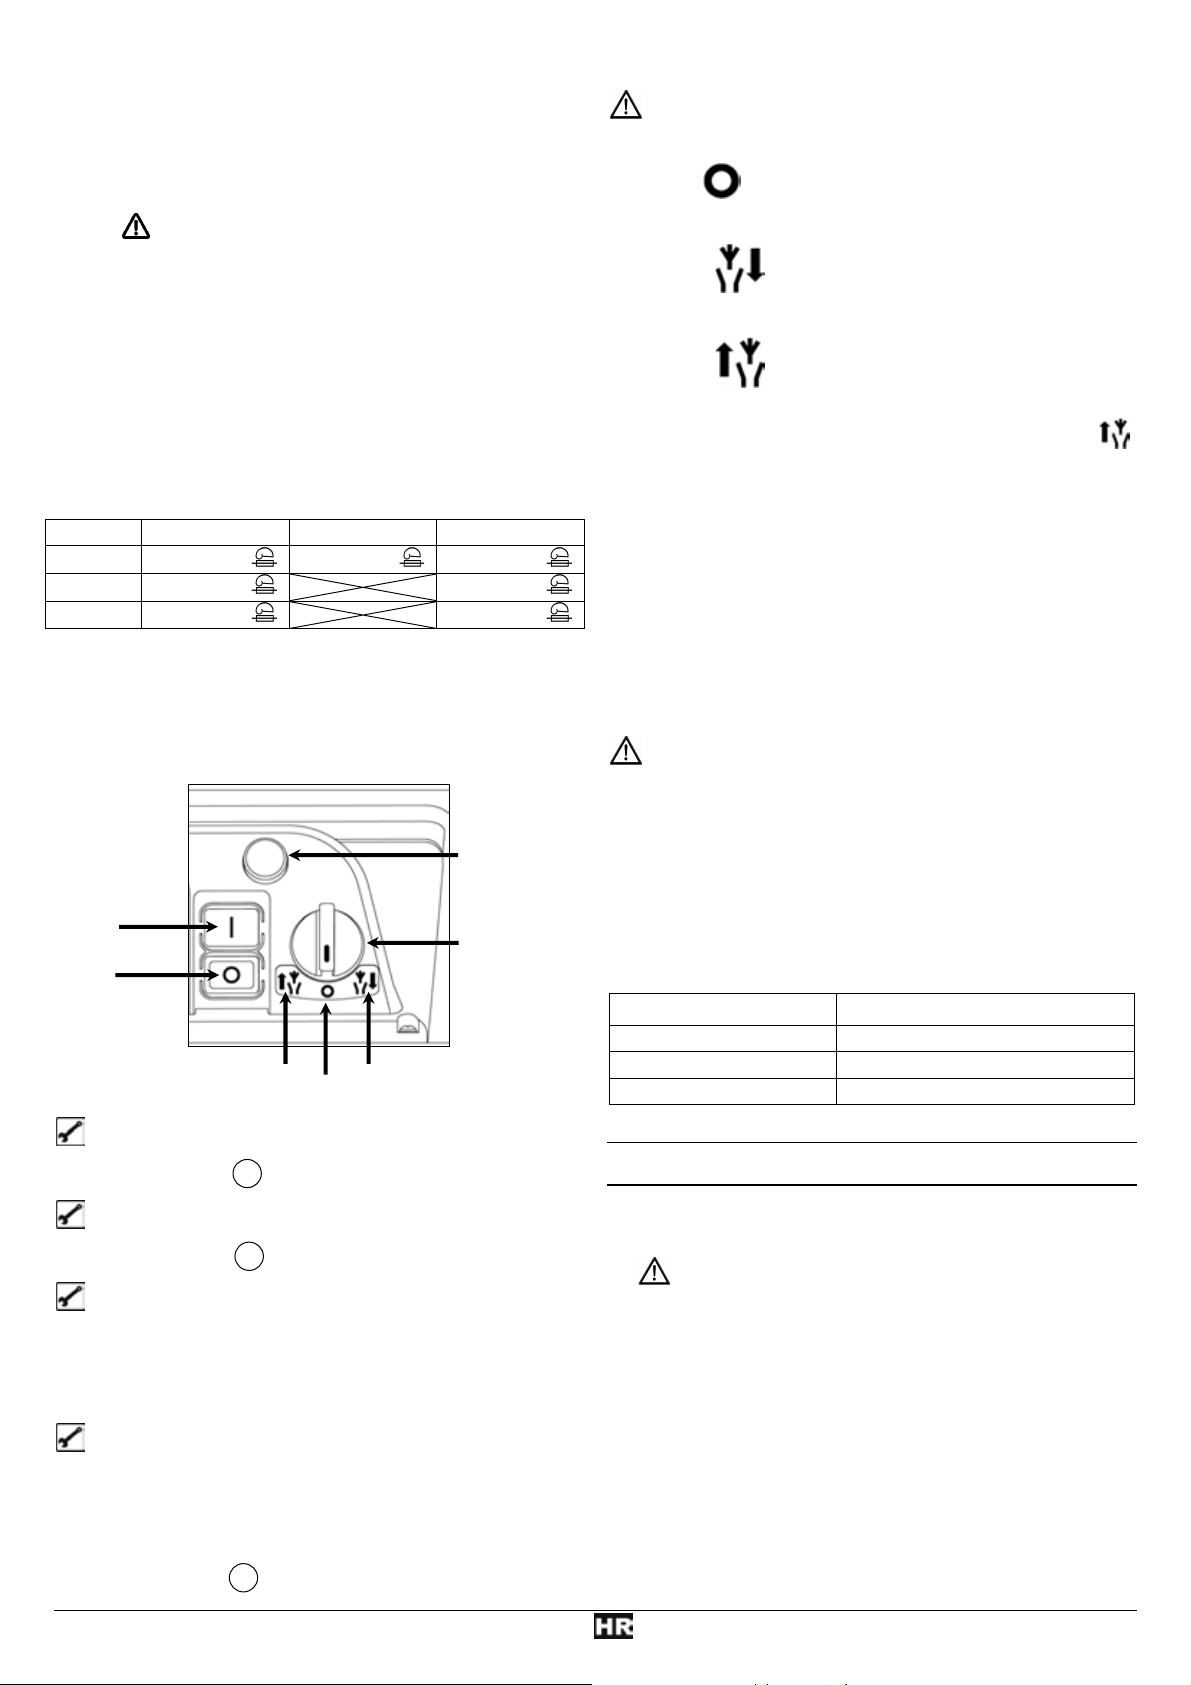
Uređaj ne postavljajte na popločenu podlogu ili na šljunak.
Uređaj koristite samo na otvorenom. Držite razmak (najmanje
2 m) od zida ili nekog drugog čvrstog predmeta.
Prije svake upotrebe provjerite:
− ima li na priključnim vodovima kvarova (pukotine, rezovi
ili sl.)
nemojte upotrijebiti neispravne vodove
− eventualna oštećenja uređaja
(vidi sigurnosne upute)
− jesu li svi vijci čvrsto pritegnuti
L Priključak na mrežu
Usporedite napon koji je naznačen na pločici s tipom uređaja i
priključite uređaj na odgovarajuću propisanu utičnicu.
Upotrijebite produžni kabel odgovarajućeg presjeka.
Mrežno osiguranje
Švicarsku UK
2300 W
2500 W
2800 W
Sklopka za uključivanje / isključivanje
16 A tromo
16 A tromo
16 A tromo
Ne upotrebljavajte stroj na kojem se sklopka ne može
uključiti ni isključiti. Oštećene sklopke morate odmah dati na
popravak ili zamjenu u servisnu službu.
UKLJ
ISKLJ
Povratni tok
Uključivanje
Pritisnite zeleni gumb I
Isključivanje
Pritisnite crveni gumb 0
Osigurač od ponovnog pokretanja
kod nestanka struje
Kod nestanka struje uređaj se automatski isključuje (okidač nultog
napona). Za ponovno uključivanje opet pritisnite zeleni gumb.
Zaštita motora
Motor je opremljen zaštitnom sklopkom i kod preopterećenja se
samostalno isključuje. Motor se nakon faze hlađenja (oko 5 min.)
može opet uključiti. Pritisnite
1. povratni gumb (zaštita motora)
2. zeleni gumb I za ponovno uključivanje.
10 A tromo 13 A tromo
13 A tromo
13 A tromo
Gumb za
vraćanje
(zaštita
motora)
Preklopnik
pravca
okretanja
ISKLJ
Ulaz
Preklopnik pravca okretanja
Preklopnik pravca okretanja pritisnuti samo kod
isključene sjeckjalice.
Položaj
Motor se ne pokreće.
Položaj
Rezni valjak uvlači i sjecka materijal.
Položaj
Nož radi u obrnutom pravcu i zaglavljeni materijal se oslobađa.
Nakon što ste preklopnik pravca okretanja postavili u položaj
zeleni gumb sklopke za uključivanje / isključivanje držite
pritisnutim. Rezni valjak se postavlja u obrnuti pravac. Ako pustite
sklopku za uključivanje / isključivanje, sjeckalica automatski
ostaje stajati.
Upute
z Veliki predmeti ili komadi drveta se uklanjaju nakon više
puta pokretanja kako u pravcu rezanja tako i u pravcu
izbacivanja.
z Koristite napravu za guraje ili kuki za uklanjanje blokiranih
predmeta iz lijevka ili otvora za izbacivanje.
Uvijek čekajte, dok se sjeckalica zaustavi, prije nego što
ju opet uključite.
Impedancija mreže
Kod nepovoljnih uvjeta mreže tijekom uključivanja uređaja može
doći do kratkotrajnog pada napona koji može utjecati na rad
drugih uređaja (npr. treperenje svjetiljke).
Održava li se maksimalna impedancija mreže navedene u tablici,
smetnje ne treba očekivati.
Potrošnja snage P1 (W)
2300 0,21
2500 0,21
2800 0,19
RRaadd ss vvrrttnnoomm ssjjeeččkkaalliiccoomm
Zauzmite radni položaj sa strane ili iza uređaja. Nikada u
predjelu otvora kroz koji se izbacuje isječen materijal.
Duži materijal koji strši iz uređaja mogli bi uvući noževi i i
kliznuo bi natrag! Držite sigurnosni razmak!
Nikad nemojte rukom zahvaćati u otvor za punjenje ili
pražnjenje.
Ruke, druge dijelove tijela i odjeću nemojte stavljati blizu
ulazne cijevi, kanala za izbacivanje ili drugih pokretljivih
dijelova.
Prije uključivanja uređaja provjerite ima li u lijevku za punjenje
ostataka sječenog materijala.
Uređaj nemojte naginjati kad motor radi.
Prilikom punjenja obratite pažnju na to da se u lijevku za
punjenje ne nalaze nikakvi metalni predmeti, kamenje, boce ili
neki drugi predmeti koji se neće usitnjavati.
Impedancija mreže Z
maks
,
(Ω)
54
Page 56

Ako strani predmeti dospiju u lijevak za punjenje ili se začuje
neobična buka i uređaj počne vibrirati, treba ga odmah
isključiti i pustiti da se zaustavi. Izvucite mrežni utikač i
provjerite sljedeće:
− ispitajte štetu
− zamijenite ili popravite oštećene dijelove
− pregledajte uređaj i pritegnite labave dijelove
Uređaj ne smijete popravljati ako za to niste ovlašteni
(vidi Sigurnosne napomene).
− nakon oko 5 minuta vrtna sječkalica se ponovno uključuje
− ako se uređaj nakon tog vremena čekanja ne može
ponovno uključiti, pogledajte upute pod točkom „Moguće
smetnje“.
NNaammjjeeššttaannjjee pprroottuummjjeerraaččaa
Što mogu usitnjavati?
Da:
• Grane svih vrsta do maks. promjera, ovisno o vrsti drveta i
svježini.
• Uvenule, vlažne vrtne otpade koji već više dana leže
rezati samo izmjenično sa granama
Ne:
• Staklo, metalne dijelove, plastiku, kamenje, ostatke tkanine,
žile sa zemljom
• Otpadi bez čvrste konzistencije npr. kuhinjske otpade
Posebna upozorenja za
usitnjavanje:
¾ Materijal koji se treba
sjeckati uvijek punite sa
desne strane u otvor za
punjenje lijevka.
¾ Granje usitnjujte odmah nakon što ga odrežete
− ta vrsta materijala nakon isušivanja postaje vrlo tvrda, a
maksimalni promjer grane koja se usitnjava na taj način
postaje manji.
¾ Kod jako razgranatih grana odstranite bočne izbojke.
¾ Obrada otpadaka iz kuhinje tj. vrta koji sadrže puno vode ili
su ljepljivi
− treba ih usitnjavati naizmjenice s drvenim materijalom
kako bi se spriječilo začepljenje uređaja.
¾ Nemojte pustiti da usitnjeni materijal previše napuni otvor za
izbacivanje. On može začepiti kanal za izbacivanje zbog čega
može doći do povratnog udarca materijala kroz otvor za
punjenje.
¾ Kad se uređaj začepi, očistite otvor za punjenje i kanal za
izbacivanje. Za to najprije isključite motor i izvadite mrežni
utikač.
¾ Pazite na to da se pridržavate maksimalnog presjeka granja
koji se može obrađivati (vidi «Tehnički podaci»). Ovisno o
vrsti i svježini drva, može se smanjiti maksimalan presjek
granja koje ćete usitnjavati.
¾ Mehanizam s noževima uglavnom samostalno uvlači
materijal za usitnjavanje.
¾ Samostalno preklapanje smjera okretanja:
Kod iznenadnog blokiranja uređaja se smjer okretanja reznog
valjka može preklopiti i u tom slučaju se komadi sječke mogu
gurnuti nazad.
− uređaj isključiti
− pričekati zaustavljanje reznog valjka
− uređaj nanovo uključiti i primjeniti komade sječke koji se
lakše režu.
¾ U slučaju preopterećenja uređaja samostalno se isključuje
sklopka koja ima ugrađenu sklopku za zaštitu motora.
Protunož (B) se na reznom valjku (A) može namjestiti bez
slobodnog prostora. Za učinkovit rad bi se trebao održati što je
moguće manji razmak.
Mekani materijal ili mokre grane mogu puknuti, umjesto da se
režu. Taj problem može uzorkovati i protunož, ishaban
dugotrajnom uporabom.
Namještanje razmaka.
Uključite uređaj.
Na desnoj strani plastičnog kućišta se nalazi naprava za
namještanje. Da biste podesili razmak okrećite gumb za
podešavanje (D) udesno tako da se vijak (C) kreće prema valjku
za rezanje. Okrećite tako dugo, skroz dok na otvor za izbacivanje
ne padnu fine aluminijske strugotine.
OOddrržžaavvaannjjee ii nnjjeeggaa
• Prije početka svakog održavanja
− isključite motor i izvadite mrežni utikač.
− stavite zaštitne rukavice kako biste spriječili ozljeđivanje.
Nakon isključivanja uređaja rezni alat se ne zaustavlja
odmah. Prije nego počnete s radovima popravaka ili
održavanja, provjerite jesu li se zaustavili svih dijelovi.
Pripazite da nakon tih radova uklonite alat i odvijače koje ste
koristili.
− Vrtnu sječkalicu uglavnom ne treba održavati. Za
održavanje njezinih vrijednosti i dugog vijeka trajanja
treba obratiti pažnju na slijedeće:
− otvori za prozračivanje moraju biti očišćeni i slobodni
− pregledajte vijke za pričvršćivanje (po potrebi pritegnite)
− nakon usitnjavanja o čistite uređaj
Za čišćenje uređaja koristite samo toplu, vlažnu krpu i
meku četku.
55
Page 57

Nikad nemojte koristiti sredstva za čišćenje ni otapala. Ona bi na uređaju mogla uzrokovati nepopravljive štete. Kemikalije bi mogle
nagristi plastične dijelove.
− vrtnu sječkalicu ne čistite tekućom vodom niti uređajima za čišćenje pod visokim tlakom.
− Sjajne metalne dijelove treba nakon svake upotrebe poprskati biološki razgradivim uljem za zaštitu od korozije.
− Rezni valjak i ploča za naknadno rezanje su dijelovi koji se troše, ali kod normalne upotrebe i propisanim namještanjem traju
više godina
MMoogguuććee ssmmeettnnjjee
Prije svakog uklanjaja smetnji
− isključite uređaj
− Pričekajte da se uređaj zaustavi
− izvucite mrežni utikač
Smetnje mogući uzroci otklanjanje
Motor se ne pokreće - smjera okretanja preklopite u položaj «0»
- nedostaje mrežni napon
- priključni vod je neispravan
- uređaj je preopterećen (zaštita motora)
- Islkjučiti uređaj i premjestiti preklopnik smjera
okretanja.
- pregledati osiguranje
- dati pregledati (električar)
- Uređaj pustiti da se ohladi.
Pritisnite
1. gumb za vraćanje (zaštita motora)
2. zeleni gumb I za ponovno uključivanje
Motor zuji ali se ne pokreće
- Rezni valjak blokira
- Isključiti uređaj.
- Kondenzator je neispravan
Preklopnik smjera okretanja preklopite u položaj
Uređaj uključititi dok se ne ukloni blokiranje. Uređaj
opet isključiti. Preklopnik smjera okretanja ponovno
namjestite natrag u položaj
- Uređaj poslati na popravak proizvođaču ili firmi koju
on imenuje
Komadi sječke se ne uvlače
- Rezni valjak hoda unatrag. Položaj
sklopke nije ispravan
Komadi sječke su se zaglavili u valjku
- Islkjučiti uređaj i premjestiti preklopnik smjera
okretanja.
Uređaj isključiti. Preklopnik smjera okretanja
- previše mekana i mokra sječka
- istrošenost reznog valjka
namjestite u položaj
mogao osloboditi materijal za sjeckanje, po potrebi
ukloniti prljavštinu. Za dalji rad preklopnik smjera
okretanja opet vratite natrag u položaj
- Potisnuti sa granom i izrezati
- Protuploču namjestiti kao što je opisano pod
„Namještanje protuploče“, kod jake istrošenosti
zamijeniti rezni valjak.
Komadi sječke se ne
- Protunož nije dovoljno namješten - Namjestiti protunož
razdvajaju čisto
Uređaj se pokreće, ali uslijed
minimalnog opterećenja
blokira i isljučuje se preko
okidača za zaštitu motora
Produžni kabel je predugačak ili je presjek
premali.
Utikač u struju je previše udaljen od glavnog
priključka, presjek priključnog voda je
Produžni kabel mora biti najmanje 1,5 mm², i
maksimalno 25 m dugačak. Kod dužih kabela presjek
mora iznositi najmanje 2,5 mm².
premal.
.
.
. Uređaj uključiti, kako bi se
.
56
Page 58

TTeehhnniiččkkii ppooddaaccii
Model 2300 2500 2800
Tip AH 600 AH 600 AH 600
Motor Izmjenični motor 230 V~, 50 Hz, 2800 min
-1
Snaga motora 2300 W 2500 W 2800 W
Broj okretaja reznog valjka 40 min
-1
Sklopka za uključivanje/isključivanje sa zaštitom od prevelikog opterećenja, funkcijom rezanja i povratnim hodom nulnaponski
okidač
Težina 24 kg 24,5 kg 25 kg
Razina zvučnog tlaka L
(izmjereno prema 2000/14/EG)
izmjeren intenzitet buke L
PA
WA
(izmjereno prema 2000/14/EG)
zajamčen intenzitet buke L
WA
(izmjereno prema 2000/14/EG)
maks. promjer grane koji se može
preraditi
(vrijedi samo za svježe odrezano drvo)
83,8 dB (A)
K = 3 dB (A)
84,2 dB (A)
K = 3 dB (A)
82,5 dB (A)
K = 3 dB (A)
91 dB (A) 91 dB (A) 91 dB (A)
92 dB (A) 92 dB (A) 92 dB (A)
∅ maks. 35 mm ∅ maks. 40 mm ∅ maks. 44 mm
Klasa zaštite I
Vrsta zaštite IP X4
Mrežno osiguranje
Švicarsku
UK
JJaammssttvvoo
16 A tromo
10 A tromo
13 A tromo
Molimo Vas da obratite pozornost na priloženu izjavu o garanciji.
16 A tromo
--
13 A tromo
16 A tromo
--
13 A tromo
57
Page 59
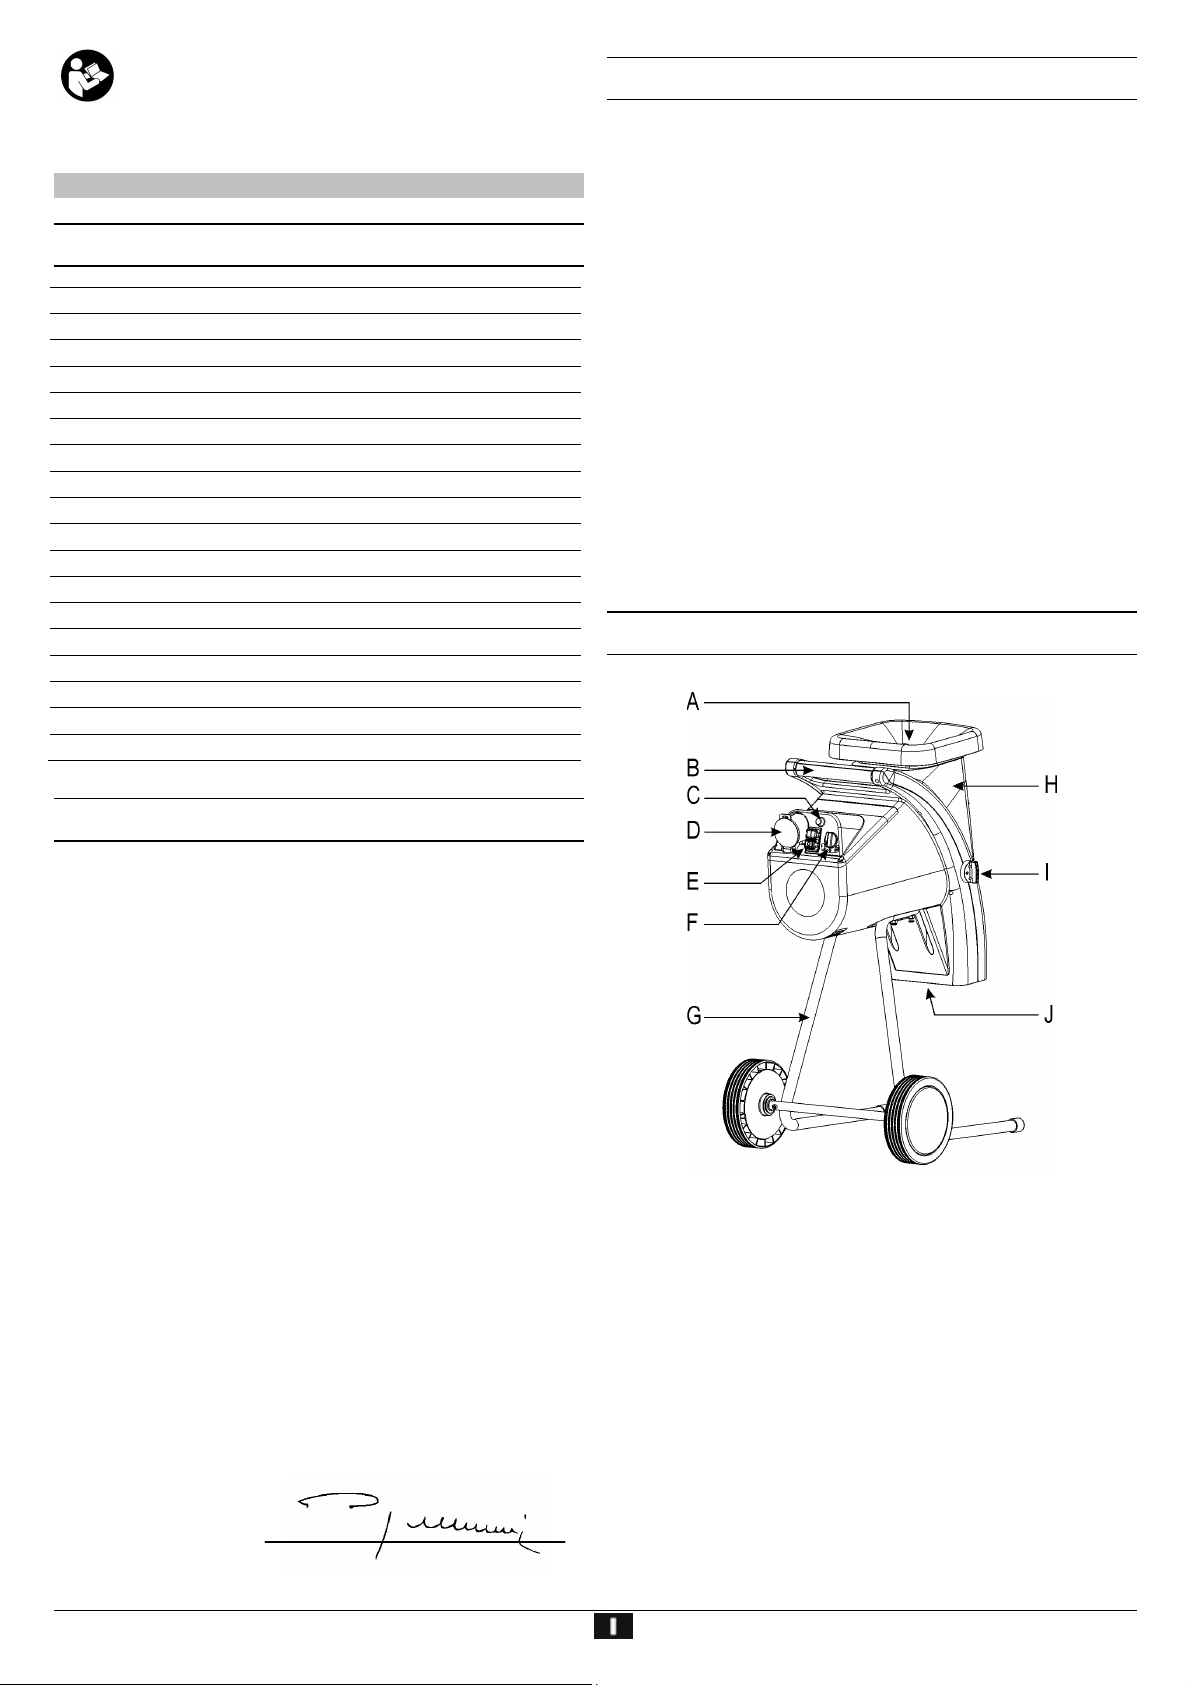
Non mettere in funzione l’apparecchio senza avere
prima letto le presenti istruzioni per l’uso, avere
osservato tutte le norme specificate e avere montato
l’apparecchio nel modo descritto!
Conservare le istruzioni per un utilizzo futuro.
IInnddiiccee
Dichiarazione di conformità CE 58
Standard di fornitura 58
Descrizione dell'apparecchio 58
Simboli presenti sull’apparecchio 59
Simboli delle istruzioni per l’uso 59
Tempi di esercizio 59
Utilizzo conforme alla finalità d’uso 59
Rischi residui 59
Indicazioni di sicurezza 60
Messa in funzione 61
Utilizzo del trituratore da giardino 62
Regolazione della controlama 63
Cura e manutenzione 63
Anomalie 63
Dati tecnici 64
Garanzia 64
Montaggio 116
Pezzi di ricambio 117
SSttaannddaarrdd ddii ffoorrnniittuurraa
Una volta disimballato l'apparecchio, verificare se il
contenuto della scatola
! è completo;
! presenta eventuali danni imputabili al trasporto.
Comunicare immediatamente al rivenditore o al costruttore
eventuali contestazioni. Non verranno presi in considerazione i
reclami presentati in un momento successivo.
• 1 unità premontata
• 1 asta di sostegno sinistra
• 1 asta di sostegno destra
• 1 asse
• 2 ruote
• 2 copriruota
• 1 confezione di viti
• 1 sacco di raccolta
• 1 manuale di istruzioni per l’uso
DDeessccrriizziioonnee ddeellll''aappppaarreecccchhiio
o
DDiicchhiiaarraazziioonnee ddii ccoonnffoorrmmiittàà CCEE
corrispondentemente alle direttive: 2006/42/CE
Con la presente dichiariamo
ATIKA GmbH & Co. KG
Schinkelstraße 97, 59227 Ahlen – Germany
sotto la nostra responsabilità che il prodotto
Gartenhäcksler (Trituratore da giardino) mod. AH 600
Numero di serie: vedere ultima pagina
è conforme alle disposizioni delle summenzionate Direttive CE,
nonché alle disposizioni delle seguenti ulteriori Direttive:
2004/108/CE e 2000/14/CE.
Sono state applicate le seguenti norme armonizzate:
EN 60335-1:2002+A1+A11+A12+A2+A13;
EN 13683:2003+A1:2009; EN 62233:2008; EN 55014-1:2006;
EN 55014-2/A1:2001; EN 61000-3-2:2006; EN 61000-3-11:2000
Procedura di accertamento di conformità:
2000/14/CE - Appendice V.
Livello di potenza acustica misurato L
livello di potenza acustico garantito L
91 dB (A)
WA
92 dB (A)
WA
Conservazione dei documenti tecnici:
ATIKA GmbH & Co. KG – ufficio tecnico – Schinkelstr. 97
59227 Ahlen – Germany
Ahlen, 30.04.2010 A. Pollmeier, amministratore
A. Apertura dell'imbuto per il materiale da triturare
B. Impugnatura
C. Pulsante di richiamo / Salvamotore
D. Spina di alimentazione
E. Interruttore On/Off
F. Commutatore del senso di rotazione
G. Telaio
H. Parte superiore contenitore
I. Manopola di regolazione per rullo di taglio
J. Fessura di espulsione
58
Page 60
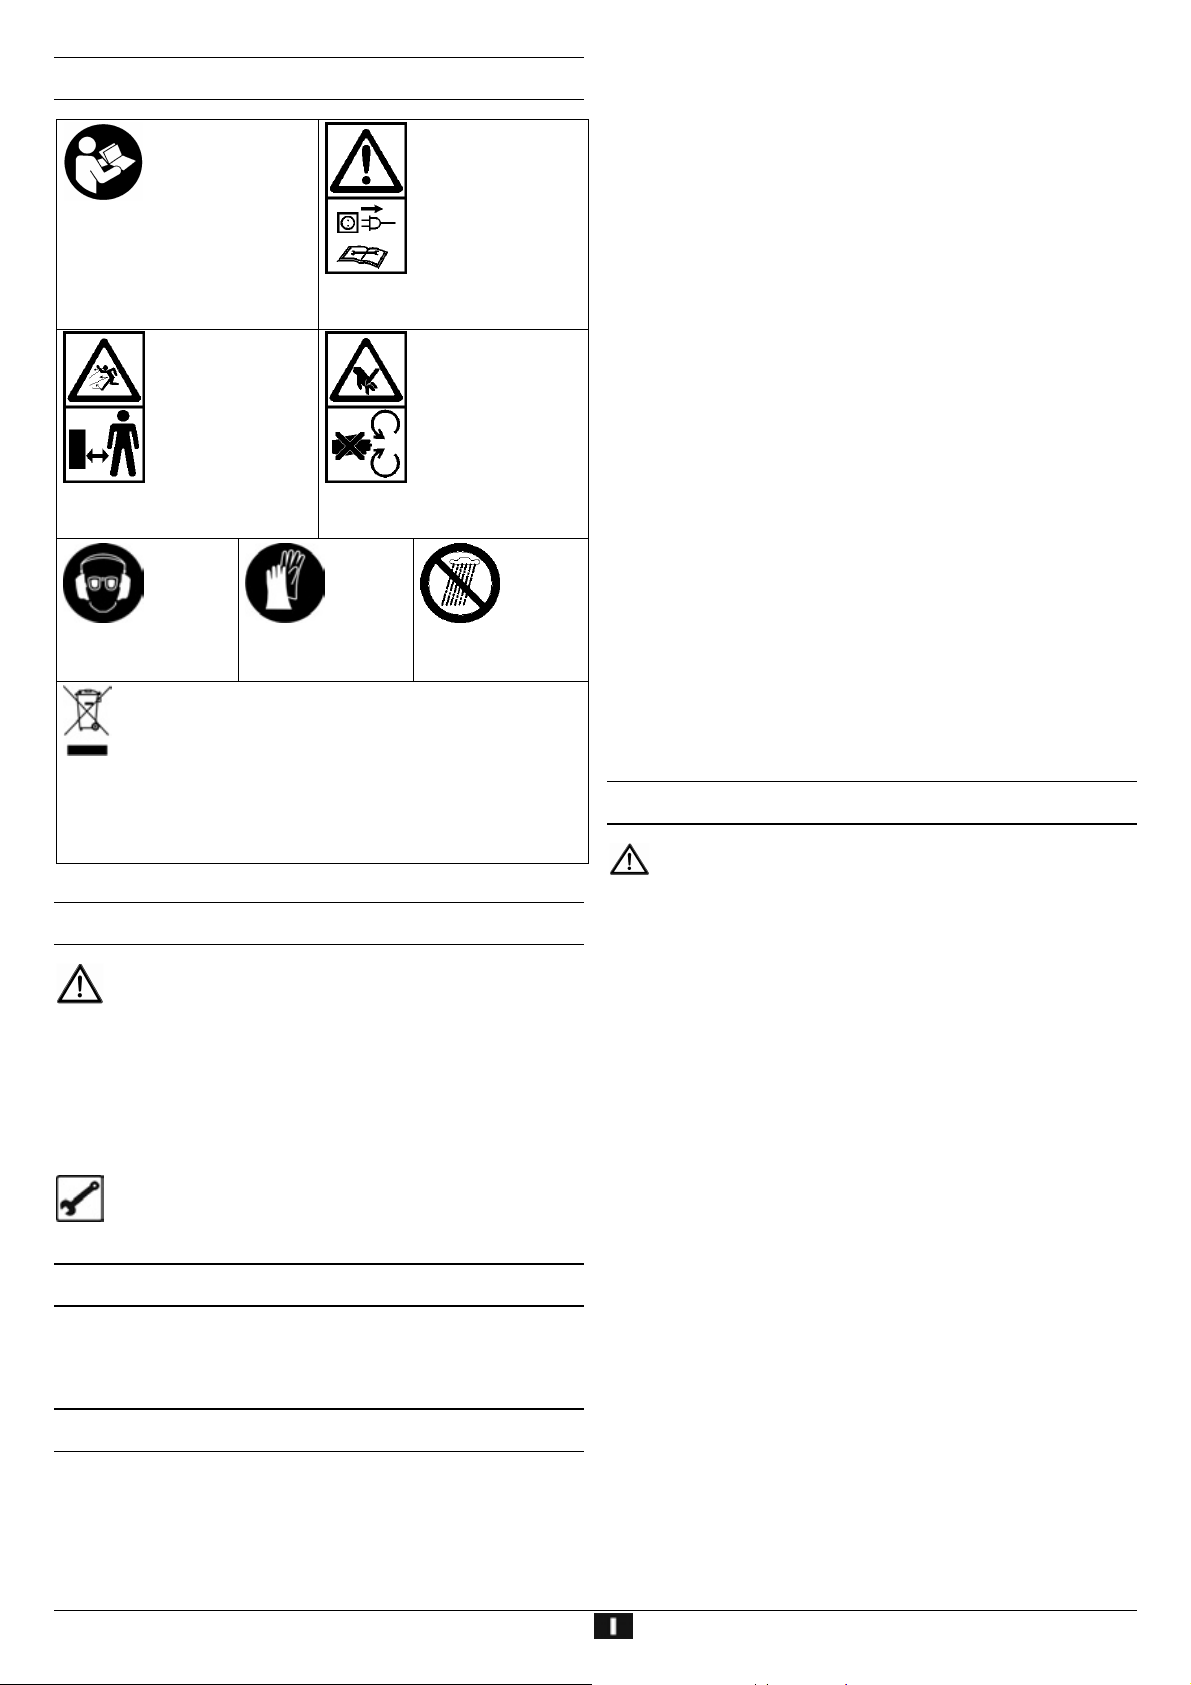
SSiimmbboollii pprreesseennttii ssuullll’’aappppaarreecccchhiioo
Prima della messa
in funzione,
leggere e
applicare quanto
contenuto nelle
istruzioni per l’uso
Prima degli
interventi di
riparazione,
manutenzione e
pulizia, spegnere il
motore e
e nelle norme de i sicurezza. disinserire la spina di
alimentazione.
Pericolo di lancio
di parti con il
motore in funzione
– tenere lontano
dalla zona di
pericolo persone
estranee, nonché animali
funzione.
Attenzione: lame
rotanti!
Non tenere le mani
e i piedi nelle
aperture quando
l'apparecchio è in
domestici e da produzione.
Indossare occhiali e
cuffie di protezione
Indossare guanti di
protezione.
Proteggere
dall’umidità.
Non gettare le apparecchiature elettriche tra i rifiuti
domestici. Smaltire nel modo corretto apparecchiature,
accessori e imballaggio.
Ai sensi della Direttiva europea 2002/96/CE sui rifiuti di
apparecchiature elettriche ed elettroniche le apparecchiature
elettriche inutilizzabili devono essere raccolte separatamente e
riciclate nel rispetto dell'ambiente.
SSiimmbboollii ddeellllee iissttrruuzziioonnii ppeerr ll’’uussoo
Potenziale pericolo o situazione pericolosa. La
mancata osservanza di questo avviso potrebbe causare
lesioni o danni materiali.
Avvisi importanti per un utilizzo conforme. La
L
mancata osservanza di questo avviso potrebbe causare
guasti.
Avvisi per l’utente. Questi avvisi aiutano l’utente a
sfruttare al meglio tutte le funzionalità.
Montaggio, utilizzo e manutenzione. Qui vengono
spiegate in modo chiaro le operazioni da compiere.
TTeemmppii ddii eesseerrcciizziioo
Osservare anche le disposizioni regionali sulla protezione dai
rumori.
UUttiilliizzzzoo ccoonnffoorrmmee aallllaa ffiinnaalliittàà dd’’uussoo
Per utilizzo conforme alla finalità d'uso si intende la triturazione di
- rami di ogni tipo fino al diametro massimo (in base al tipo di
legno e alla freschezza)
- rifiuti di giardinaggio secchi, umidi, vecchi di diversi giorni
alternativamente con rami.
Si esclude espressamente la triturazione di vetro, metallo, pezzi e
sacchetti di plastica, pietre, scarti di tessuti, radici con la terra,
rifiuti senza consistenza solida (ad es., rifiuti di cucina).
Il trituratore da giardino è adatto esclusivamente per l’uso privato
domestico e per il giardinaggio.
Sono considerati trituratori destinati al settore domestico e di
giardinaggio quelli non impiegati in giardini pubblici, parchi, centri
sportivi, in campo agricolo, forestale e commerciale.
Per utilizzo conforme alla finalità d’uso si intende anche
l’osservanza delle condizioni di funzionamento, manutenzione e
riparazione prescritte dal costruttore e il rispetto delle norme di
sicurezza contenute nelle istruzioni per l’uso.
Ogni utilizzo diverso è da considerarsi come non conforme alla
finalità d’uso. Il costruttore declina ogni responsabilità per i danni
di qualsiasi genere da ciò risultanti. Il rischio ricade
esclusivamente sull’utente.
Il costruttore declina ogni responsabilità per i danni di qualsiasi
genere che dovessero risultare da modifiche al trituratore da
giardino apportate in proprio dall’utente.
L'apparecchio deve essere preparato, utilizzato e sottoposto a
manutenzione solo da persone che abbiano acquisito familiarità
con esso e siano a conoscenza dei rischi connessi. Gli interventi
di riparazione devono essere eseguiti solo dai nostri tecnici
oppure dai centri di assistenza da noi consigliati.
RRiisscchhii rreessiidduuii
Anche in caso di utilizzo conforme e nonostante
l’osservanza di tutte le norme di sicurezza pertinenti, potrebbero
comunque sussistere rischi residui dovuti alla costruzione
specifica per la finalità d’uso prevista.
I rischi residui possono essere ridotti al minimo attenendosi
scrupolosamente a tutte le norme di sicurezza e usando
l'apparecchio in modo conforme alla finalità d’uso.
Attenzione e cautela riducono il rischio di lesioni alle persone e
danni alle cose.
Pericolo di lesioni alle dita o alle mani, se si afferra
un'apertura con la mano o si arriva al gruppo lame.
Pericolo di lesioni alle dita e alle mani durante gli interventi di
montaggio e pulizia effettuati sul gruppo lame.
Pericolo di lesioni nella zona dell'imbuto a causa della
proiezione di pezzi da triturare.
Pericolo dovuto alla corrente, in caso di utilizzo di conduttori di
collegamento elettrici non a norma.
Contatto con parti sotto tensione in caso di componenti
elettrici aperti.
Danni all’udito in caso di lavori di lunga durata senza apposite
protezioni.
Nonostante tutte le contromisure adottate, potrebbero comunque
crearsi chiari rischi residui.
59
Page 61

IInnddiiccaazziioonnii ddii ssiiccuurreezzzzaa
Prima della messa in funzione di questi utensili, leggere
e osservare le seguenti norme e le norme di sicurezza in
vigore nei singoli paesi. In questo modo è possibile
proteggere se stessi e gli altri dal rischio di contusioni.
Consegnare le norme di sicurezza a tutte le persone
L
chiamate ad operare con la macchina.
Conservare le presenti norme di sicurezza in buono stato.
L
Le riparazioni e il dispositivo per il disinseri-mento di
sicurezza, devono essere eseguite dal produttore oppure
da una ditta autorizzata dallo stesso.
Prima dell’uso, acquisire familiarità con l’apparecchio facendo
riferimento alle istruzioni per l’uso.
Non utilizzare l’apparecchio per scopi diversi da quelli previsti
(si veda Utilizzo conforme alla finalità d’uso e Utilizzo del
trituratore da giardino).
Garantire un supporto sicuro e mantenere in ogni momento
l’equilibrio. Non sporgersi in avanti. Durante l'introduzione del
materiale da triturare posizionarsi alla stessa altezza
dell’apparecchio.
Agire con la massima attenzione. Prestare attenzione a
quanto si sta per fare. Lavorare con coscienza. Non utilizzare
l’apparecchio se si è stanchi o sotto l’influsso di droghe, alcool
o medicinali. Un momento di disattenzione durante l’uso
dell’apparecchio potrebbe infatti causare lesioni serie.
Durante il lavoro, indossare occhiali, guanti da lavoro e cuffie
di protezione.
Indossare indumenti di lavoro appropriati:
− non indossare indumenti ampi
− scarpe antiscivolo
L’operatore è responsabile nei confronti di terzi nella zona di
lavoro dell’apparecchio.
L'apparecchio non deve essere utilizzato da bambini e
ragazzi di età inferiore a 16 anni.
Tenere i bambini lontani dall’apparecchio.
Non lasciare mai l'apparecchio senza sorveglianza.
Non utilizzare mai l’apparecchio in presenza di estranei.
Non lasciare mai l’apparecchio incustodito.
Tenere la zona di lavoro in ordine! Il disordine potrebbe
causare incidenti. Tenere la zona di lavoro in ordine! Il
disordine potrebbe causare incidenti.
Assumere una posizione di lavoro corretta, ovvero
posizionarsi lateralmente o dietro all'apparecchio. Non sostare
mai nell'area dell'apertura di espulsione.
Non afferrare mai l'apertura di riempimento o di espulsione.
Tenere il viso e il corpo lontani dall'apertura di riempimento.
Non sovraccaricare l’apparecchio! Si lavora al meglio e nella
massima sicurezza rispettando il campo di potenza
specificato.
Mettere in funzione l’apparecchio solo con i dispositivi di
protezione completi e correttamente montati;
sull’apparecchio non modificare nulla che possa
comprometterne la sicurezza.
Non modificare il numero di giri del motore, in quanto questo
regola la velocità di lavoro massima sicura e protegge il
motore e tutte le sue parti rotanti da danni causati da
un'eccessiva velocità.
Non mettere in funzione l'apparecchio senza l'imbuto di
riempimento.
Non modificare l’apparecchio o parti di esso.
Collegare l'apparecchio prima di accendere il motore.
Non spruzzare acqua sull’apparecchio. (Fonte di pericolo
corrente elettrica).
Tenere in considerazione gli influssi ambientali:
− non usare l'apparecchio in ambienti umidi o bagnati;
− Non lasciare l’apparecchio sotto la pioggia e non
lavorare quando piove.
− lavorare esclusivamente in condizioni di visibilità
sufficiente, garantire un'illuminazione adeguata.
Per evitare il pericolo di lesioni alle dita durante gli interventi di
montaggio e pulizia e indossare guanti di protezione.
Spegnere la macchina e disinserire la spina di
alimentazione dalla presa nei seguenti casi:
− Lavori di riparazione
− Eliminazione di anomalie
− Controlli dei conduttori di collegamento per
accertarsi che non siano aggrovigliati o
danneggiati;
− Trasporto
− Interventi di riparazione
− Abbandono (anche per interruzioni di breve durata)
In caso di intasamenti nell'apertura di riempimento e di
espulsione della macchina, spegnere il motore e disinserire la
spina di alimentazione prima di rimuovere i residui di
materiale.
Controllare se l'apparecchio presenta danni:
− Prima di riutilizzare l’apparecchio, è necessario verificare
attentamente se le protezioni funzionano in modo corretto
e secondo le disposizioni.
− Controllare se le parti mobili funzionano in modo ottimale
senza bloccarsi o se vi sono parti danneggiate. Per
assicurare un funzionamento ottimale dell'apparecchio,
tutte le parti devono essere montate in modo corretto e
devono soddisfare tutte le condizioni previste.
− Le protezioni e le parti danneggiate devono essere
riparate o sostituite a regola d’arte da parte di un’officina
specializzata autorizzata, salvo diversamente indicato
nelle istruzioni per l’uso.
− Sostituire le etichette di sicurezza danneggiate o illeggibili.
Conservare i dispositivi inutilizzati in un luogo asciutto e
chiuso lontano dalla portata dei bambini.
Sicurezza elettrica
Esecuzione dei conduttori di collegamento conformemente
a IEC 60245 (H 07 RN-F) con una sezione dei fili di almeno
− 1,5 mm² nei cavi aventi una lunghezza fino a 25 m
− 2,5 mm² nei cavi aventi una lunghezza superiore a 25 m
conduttori di collegamento lunghi e sottili producono una
caduta di tensione. Il motore non raggiunge più la sua
potenza massima e il funzionamento dell’apparecchio viene
ridotto.
Le spine e le prese volanti sui conduttori di collegamento
devono essere in gomma, PVC morbido o altro materiale
termoplastico della stessa consistenza meccanica o rivestite
con questo materiale.
La presa a innesto del conduttore di collegamento deve
essere protetta da spruzzi d’acqua.
60
Page 62

Durante la posa dei conduttori di collegamento assicurarsi
che non siano danneggiati o schiacciati e che il connettore
non sia umido.
In caso di utilizzo di una bobina per cavi, svolgere
completamente il cavo.
Non utilizzare il cavo per scopi per i quali non è adatto.
Proteggere il cavo da calore, olio e bordi affilati. Non
utilizzare il cavo per disinserire la spina dalla presa.
Controllare regolarmente i cavi di prolunga e sostituirli
quando sono danneggiati.
Non utilizzare conduttori di collegamento difettosi.
All’aperto utilizzare solo cavi di prolunga appositamente
omologati e contrassegnati in modo adeguato.
Non utilizzare collegamenti elettrici provvisori.
Non cavallottare mai i dispositivi di protezione né metterli
fuori servizio.
Collegare l’apparecchio con l’interruttore di sicurezza per
correnti di guasto (30 mA).
Il collegamento elettrico o le riparazioni sulle parti
elettriche della macchina devono essere eseguiti da un
elettricista autorizzato o da uno dei nostri centri di
assistenza. Attenersi alle disposizioni locali, in particolare
relative alle misure di sicurezza.
Le riparazioni su altri componenti della macchina devono
essere eseguite dal costruttore o da uno dei suoi centri di
assistenza.
Utilizzare solo pezzi originali. L’utilizzo di pezzi di
ricambio diversi potrebbe causare incidenti per
l’utilizzatore. Il costruttore declina ogni responsabilità per i
danni da ciò risultanti.
MMeessssaa iinn ffuunnzziioonnee
Accertarsi che l’apparecchio sia montato completamente e
correttamente.
Ai fini dell'utilizzo del trituratore, posizionarlo su una base
orizzontale e solida (pericolo di ribaltamento).
Non posizionare l'apparecchio su una base lastricata o
brecciata.
Utilizzare l’apparecchio solo all'aperto. Mantenere una
distanza (almeno 2 m) da una parete o da un altro oggetto
fisso.
Prima di ogni utilizzo, controllare:
− se i conduttori di collegamento presentano difetti
(incrinature, tagli o simili)
non utilizzare conduttori difettosi
− se l’apparecchio presenta danni (si veda Norme di
sicurezza)
− se tutte le viti sono serrate
L Allacciamento alla rete
Confrontare la tensione specificata nella targhetta con la
tensione di rete e collegare correttamente l’apparecchio alla
presa corrispondente.
Utilizzare cavi di prolunga con sezione sufficiente
Protezione
Svizerra UK
2300 W
2500 W
2800 W
Interruttore On/Off
16 A inerte
16 A inerte
16 A inerte
10 A inerte 13 A inerte
13 A inerte
13 A inerte
Non utilizzare apparecchi il cui interruttore sia difficile da
attivare e disattivare. Gli interruttori danneggiati devono
essere immediatamente riparati o sostituiti dal servizio
clienti.
Pulsante di
richiamo
(salvamotore)
ON Commutatore
senso di
OFF
rotazione
Mov. di ritorno
OFF
Inserimento
Accensione
Premere il pulsante verde I
Spegnimento
Premere il pulsante rosso 0
Protezione contro il riavvio in
mancanza di corrente
In mancanza di corrente, l’apparecchio si spegne
automaticamente (dispositivo di attivazione della tensione di
sbilanciamento). Per riaccendere l'apparecchio, premere
nuovamente il pulsante verde.
Salvamotore
Il motore è dotato di un interruttore di protezione e si spegne
automaticamente in caso di sovraccarico. Dopo una pausa di
raffreddamento (circa 5 min.), il motore può essere nuovamente
acceso. Premere
1. tasto di ripristino (salvamotore)
2. pulsante verde I per la riaccensione I
Commutatore del senso di rotazione
Azionare il commutatore del senso di rotazione solo se
la trinciatrice è spenta (disinserita).
Posizione
Il motore ronza, ma non si avvia.
Posizione
Il materiale viene trascinato dal cilindro portalame e trinciato.
61
Page 63
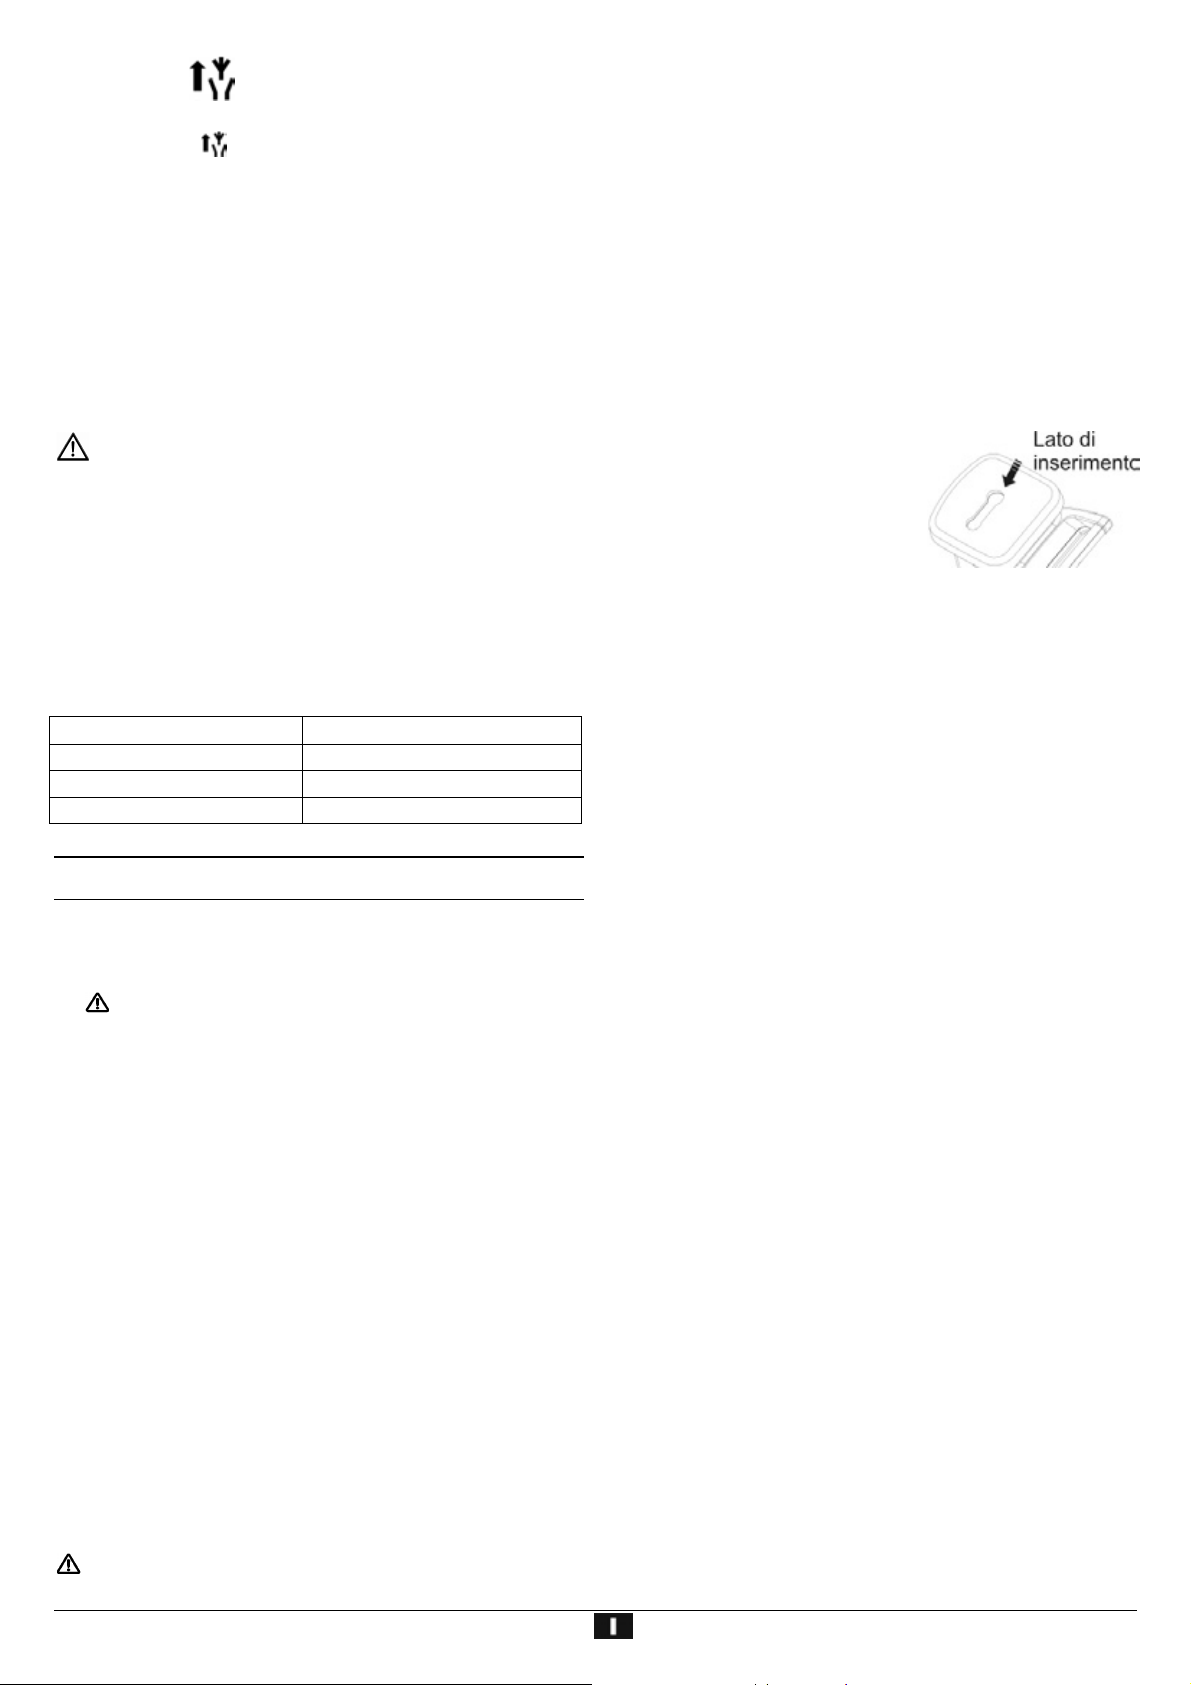
Posizione
Quando il commutatore del senso di rotazione è stato messo
nella posizione
dell'interruttore on / off. Il cilindro portalame viene posizionato
nella direzione opposta. Quando si rilascia l'interruttore on / off, la
trituratrice rimane ferma automaticamente.
Suggerimenti
z Oggetti o pezzi di legno grandi, dopo diversi azionamenti
vengono rimossi sia dal dispositivo di taglio che da quello di
scatto.
z Per rimuovere gli oggetti rimasti bloccati, dall'imbuto di
entrata o dalla fessura di espulsione, utilizzare un pressino o
un gancio.
Prima di reinserire la trinciatrice, attendere SEMPRE che
questa si sia fermata completamente.
Impedenza di rete
In caso di condizioni della rete sfavorevole, durante l’accensione
dell’apparecchio possono verificarsi brevi cadute di tensione che
possono danneggiare altri dispositivi (ad es., sfarfallio di una
spia).
Per escludere guasti, osservare le impedenze di rete massime
indicate nella tabella.
Potenza assorbita P1 (W)
2300 0,21
2500 0,21
2800 0,19
UUttiilliizzzzoo ddeell ttrriittuurraattoorree ddaa ggiiaarrddiinnoo
Assumere una posizione di lavoro corretta, ovvero
posizionarsi lateralmente o dietro all'apparecchio. Non sostare
mai nell'area dell'apertura di espulsione.
I materiali più lunghi che sporgono dall'apparecchio
potrebbero essere proiettati verso l'operatore quando
vengono tirati dalle lame! Mantenere una distanza di
sicurezza!
Non afferrare mai l'apertura di riempimento o di espulsione.
Tenere il viso e il corpo lontani dall'apertura di riempimento.
Non portare le mani, altre parti del corpo e indumenti nel tubo
di riempimento, nel canale di espulsione o in prossimità di
altre parti rotanti.
Prima di accendere l'apparecchio, verificare se sono presenti
resti di materiali triturati nell'imbuto di riempimento.
Non ribaltare l'apparecchio con il motore in funzione.
Durante il riempimento, verificare che pezzi metallici, pietre,
bottiglie o altri oggetti che non vanno triturati non finiscano
nell'imbuto di riempimento.
Se oggetti estranei entrano nell'imbuto di riempimento o
l'apparecchio inizia a emettere rumori strani o vibrazioni,
spegnere immediatamente l'apparecchio e farlo fermare.
Disinserire la spina ed procedere nel modo seguente:
− verificare il danno
− sostituire o riparare le parti danneggiate
− controllare l'apparecchio e serrare le parti allentate
Non riparare l'apparecchio se non si è autorizzati (si veda
Norme di sicurezza).
, mantenere premuto il pulsante verde
Impedenza di rete Z
max
(Ω)
Che cosa si può triturare?
Sì:
• rami di tutti i tipi fino ad un diametro al massimo, in base al
tipo di legno e alla freschezza,
• cascame da giardino appassito, umido già raccolto da più
giorni
Att. sminuzzare solo in alternanza con i rami.
No:
• vetro, pezzi mettalici, materiali plastici, sacchetti di plastica,
pietre, resti di stoffa, radici con terra
• rifiuti senza consistenza solida p.es. rifiuti di cucina
Istruzioni particolari per la
triturazione:
¾ Inserire il materiale da triturare
nell'ap-ertura per il riempimento
dell'imbuto sempre dal lato
destro.
¾ Triturare i rami, i ramoscelli e i
legni subito dopo averli tagliati
− questo materiale, seccandosi, diventa molto dura; di
conseguenza, il diametro massimo dei rami da sminuzzare
si riduce.
¾ Rimuovere i getti laterali in caso di rami molto ramificati.
¾ Trattamento di rifiuti da giardino o da cucina molto acquosi e
che tendono ad attaccarsi
− per evitare l’intasamento dell’apparecchio, sminuzzare
questo materiale alternandolo con rifiuti legnosi.
¾ Non fare accumulare eccessivamente il materiale triturato
nell'area dell'apertura di espulsione. In caso contrario, il
materiale già triturato potrebbe intasare il canale di
espulsione. Ciò può provocare un contraccolpo del materiale
attraverso l'apertura di riempimento.
¾ Se l'apparecchio è intasato, pulire l'apertura di riempimento e
il canale di espulsione. A tal fine, spegnere prima il motore e
disinserire la spina di alimentazione.
¾ Accertarsi di rispettare il diametro massimo dei rami da
sminuzzare corrispondente all'apparecchio in uso (si “Dati
tecnici”). A seconda del tipo e della freschezza del legno può
ridursi il diametro dei rami massimo da sminuzzare.
¾ Il meccanismo per il taglio prende il materiale da sminuzzare
autonomamente e senza urti a causa della corsa lenta del
cilindro da taglio.
¾ Inversione automatica del senso di rotazione:
se l’apparecchio si blocca improvvisamente si può invertire il
senso di rotazione del rullo di taglio che in questo caso spinge
indietro il materiale da sminuzzare.
− disinserire l‘apparecchio
− attendere che il rullo di taglio si fermi completamente
− inserire nuovamente l’apparecchio e inserire del materiale
facilmente sminuzzabile.
¾ In caso di sovraccarico dell'apparecchio, l'interruttore dotato
di salvamotore si spegne automaticamente
− accendere nuovamente il trituratore dopo circa 5 min.
− se l'apparecchio non si riaccende dopo questo intervallo di
tempo, consultare il paragrafo "Possibili guasti".
62
Page 64

RReeggoollaazziioonnee ddeellllaa ccoonnttrroollaammaa
La controlama (B) può essere regolata nel cilindro portalame (A)
senza gioco. Per un esercizio effettivo si consiglia di mantenere
possibilmente una piccola distanza.
Il materiale morbido oppure i rami umidi potrebbero spaccarsi
invece di venire tagliati. Anche una controlama consumata, dopo
diversi azionamenti, può causare questo problema.
CCuurraa ee mmaannuutteennzziioonnee
• Prima di qualsiasi intervento di manutenzione
− Spegnere il motore e disinserire la spina
− Indossare guanti protettivi per evitare lesioni.
L'utensile di taglio non si ferma subito dopo lo spegnimento.
Prima di iniziare la riparazione o la manutenzione, attendere
l'arresto di tutte le parti.
Accertarsi di rimuovere l'utensile e la chiave dopo la
manutenzione o la riparazione.
• Il trituratore da giardino non necessita di alcuna
manutenzione. Per mantenere il valore e garantire una
lunga durata dell'apparecchio, osservare quanto segue:
− lasciare libere e pulite le fessure di ventilazione.
− controllare le viti di fissaggio (se necessario, serrare).
− dopo la triturazione, pulire l'apparecchio internamente ed
esternamente
Per la pulizia dell'apparecchio utilizzare solo un panno
umido caldo e una spazzola morbida.
Non utilizzare mai detergenti o solventi. L'utilizzo di tali
prodotti potrebbe danneggiare irreparabilmente
l'apparecchio. Le parti in plastica possono essere
aggredite dalle sostanze chimiche.
Regolazione della distanza.
Inserire l'apparecchio.
Sul lato destro del contenitore di plastica è situato un dispositivo
di regolazione. Per impostare la distanza ruotare la manopola di
regolazione (D) verso destra, in modo che la vite (C) si muova
verso il rullo di taglio. Girare finché dalla fessura di espulsione
non fuoriescono dei piccoli trucioli di alluminio.
AAnnoommaalliiee
− Non pulire il trituratore con acqua corrente o idropulitrici.
− Dopo l’uso, trattare tutti i componenti metallici lucidi con
olio ecologico e biologico per proteggerli dalla corrosione.
− il cilindro da taglio e la lastra da taglio sono parti soggette
ad usura. Tuttavia, se usate normalmente e sottoposte a
regolare riaffilatura, hanno una durata di parecchi anni.
Prima di rimuovere qualsiasi guasto
− Spegnere l’apparecchio
− Attendere l’arresto dell'apparecchio
− Disinserire la spina di alimentazione
Disturbo Possibile causa Eliminazione
Il motore non s’avvia - il commutatore del senso di rotazione
nella posizione “0”
- Manca la tensione di rete
- Cavo di connessione difettoso
- Apparecchio sovraccarico
- Disinserire l'apparecchio e invertire il commutatore
per il senso di rotazione.
- Controllare il dispositivo di sicurezza
- fare controllare (da un elettricista)
- Lasciare raffreddare l'apparecchio.
Per il reinserimento premere il
1. pulsante di richiamo (salvamotore)
2. pulsante verde I
Il motore ronza, ma non
si avvia
- Cilindro da taglio bloccato
- Condensatore difettoso
- Disinserire l'apparecchio.
Mettere il commutatore del senso di rotazione nella
posizione
. Inserire l'apparecchio finché non è
stato rimosso il bloccaggio. Inserire nuovamente
l'apparecchio. Mettere il commutatore del senso di
rotazione, indietro, nella posizione
- Portare l’apparecchio dal produttore o alla ditta da lui
indicataper la riparazione.
.
63
Page 65

Disturbo Possibile causa Eliminazione
Il materiale da sminuzzare
non viene afferrato
Il materiale da sminuzzare
non viene tagliato in modo
- Il cilindro portalame si muove all'indietro.
- Disinserire l'apparecchio e invertire il commutatore
La posizione dell'interruttore è sbagliata.
- il materiale da sminuzzare
- Disinserire l'apparecchio. Mettere il commutatore del
- Materiale da sminuzzare troppo
molle/bagnato
- Introdurre un ramo e sminuzzare.
- Regolare la contropiastra come descritto nel punto
- Logoramento del cilindro da taglio
- La controlama non è sufficientemente
- Regolare la controlama
regolata
per il senso di rotazione.
senso di rotazione nella posizione
l'apparecchio, in maniera tale che il materiale triturato
venga sbloccato, eventualmente rimuovere le
impurità.
Disinserire nuovamente l'apparecchio. Per continuare
a lavorare con l'apparecchio, mettere il commutatore
del senso di rotazione, indietro, nella posizione
"Regolazione della contropiastra", in caso di evidente
usura del cilindro portalame sostituirlo.
corretto
L’apparecchio si avvia, però
si blocca al minimo cari-co
esi spegne tramite il
salvamotore.
La prolunga è troppo lunga o la sua sezione è troppo piccola. La presa è troppo
lontana dall’allacciamento principale e la
linea elettrica ha la sezione troppo piccola..
La prolunga deve essere lunga max. 25 m, con una
sezione di almeno 1,5 mm
2
. In caso di cavi più lunghi, la
sezione deve essere di almeno 2,5 mm
. Inserire
.
2
DDaattii tteeccnniiccii
Modello 2300 2500 2800
Denominazione modello AH 600 AH 600 AH 600
Motore Motore a corrente alternata 230 V~, 50 Hz, 2800 min
Potenza motore P
Numero di giri cilindro portalame 40 min
S6 - 40 % 2300 W 2500 W 2800 W
1
-1
-1
Interruttore On/Off protezione sovraccarico; funzione di taglio e di corsa inversa; interruttore di minima
tensione
Peso 24 kg 24,5 kg 25 kg
Livello di pressione acustica LPA
(misurazione secondo la direttiva 2000/14/CE)
Livello di potenza acustica misurato L
(misurazione secondo la direttiva 2000/14/CE)
Livello di potenza acustica garantito L
(misurazione secondo la direttiva 2000/14/CE)
WA
WA
83,8 dB (A)
K = 3 dB (A)
91 dB (A) 91 dB (A) 91 dB (A)
92 dB (A) 92 dB (A) 92 dB (A)
84,2 dB (A)
K = 3 dB (A)
82,5 dB (A)
K = 3 dB (A)
Diametro max. dei rami da sminuzzare
(a seconda del tipo e della freschezza del
∅ max. 35 mm ∅ max. 40 mm ∅ max. 44 mm
legno)
Classe di protezione I
Categoria di protezione IP X4
Protezione della rete
Svizerra
UK
16 A inerte
10 A inerte
13 A inerte
16 A inerte
--
13 A inerte
16 A inerte
--
13 A inerte
GGaarraannzziiaa
Si prega di fare riferimento alla dichiarazione di garanzia allegata.
64
Page 66

Du må ikke ta dette apparatet i drift før du har lest
denne bruksanvisningen, studert de angitte henvis-
ningene og montert apparatet slik det beskrives.
Skal oppvevares for senere bruk.
IInnnnhhoolldd
EF- konformitetserklæring 65
Samlet leveranse 65
Beskrivelse av apparatet 65
Apparatets symboler 66
Bruksanvisning symboler 66
Driftstider 66
Hensiktsmessig anvendelse 66
Restrisikoer 66
Arbeide under trygge forhold 66
Ibruktaking 68
Arbeide med hakkelsmaskinen 68
Innstilling av mellomtappskiven 69
Vedlikehold og pleie 69
Mulige driftsforstyrrelser 70
Tekniske data 71
Garantibetingelser 71
Montasje 116
Reservdeler 118
SSaammlleett lleevveerraannsse
e
Kontroller følgende når du har pakket ut esken:
! er esken komplett
! har det oppstått ev. transportskader
Reklamer omgående til forhandleren, leverandøren hhv.
produsenten. Senere reklamasjoner godkjennes ikke.
• 1 formontert apparatdel
• 1 støtteben – venstre
• 1 støtteben – høyre
• 1 aksel
• 2 hjul
• 2 hjulkapsler
• 1 skruepose
• 1 samlesekk
• 1 bruksanvisning
BBeesskkrriivveellssee aavv aappppaarraatteet
t
EEFF-- kkoonnffoorrmmiitteettsseerrkkllæærriinng
g
tilsvarer EU-direktivene
2006/42 EC
Herved erklærer vi
ATIKA GmbH & Co. KG
Schinkelstraße 97, 59227 Ahlen - Germany
seg eneansvarlig for at produktet
Gartenhäcksler (Kompostkvern) type AH 600
Serienummer: se siste side
er konform med bestemmelsene i EU-direktivene som er nevnt
over og bestemmelsene i direktivene som er nevnt nedenfor:
2004/108/EC og 2000/14/EC.
Følgende harmoniserte normer ble benyttet:
EN 60335-1:2002+A1+A11+A12+A2+A13;
EN 13683:2003+A1:2009; EN 62233:2008; EN 55014-1:2006;
EN 55014-2/A1:2001; EN 61000-3-2:2006; EN 61000-3-11:2000
Samsvarsvurderingsprosess: 2000/14/EC – vedlegg V
Målt lydeffektnivå LWA 91 dB (A).
Garantert lydeffektnivå L
92 dB (A).
WA
Oppbevaring av de tekniske dokumentene:
ATIKA GmbH & Co. KG – Technisches Büro – Schinkelstr. 97
59227 Ahlen – Tyskland
Ahlen, 30.04.2010 A. Pollmeier, forretningsfører
A. Traktåpning for hakkelsmaterial
B. Håndtak
C. Tilbakestilingsknapp / Motorens
beskyttelsesanordning
D. Nettpluggen
E. På-/Avknapp
F. Dreieretningsomkopler
G. Understell
H. Husoverdel
I. Innstillingsknappen til skjærevalsen
J. Utkasterspalte
65
Page 67

AAppppaarraatteettss ssyymmbboolleer
Les nøye
gjennom bruksanvisningen og
vær oppmerksom
på sikkerhetsanvisningene før
apparatet tas i
drift.
Fare pga. deler
som akselererer
videre når
motoren er i gang
– personer uten
deltagelse, hus-
og nyttedyr
må holdes borte fra
fareområdet.
r
Denne hakkelsmaskinen er kun egnet til privat bruk i hagen din.
Hakkelsmaskiner som er ment brukt i private husholdninger og
Slå av motoren og
trekk ut støpselet
før du foretar
reparasjons-,
vedlikeholds- og
rengjøringsarbeider.
Vær oppmerksom
på de roterende
knivene. Ikke hold
hender eller føtter i
åpninger når
maskinen er i
gang.
hageområder, er slike som ikke benyttes på offentlige anlegg,
parker, idrettsanlegg og innen landbruks og skogsdrift og ikke
benyttes i kommersielt øyemed.
Til riktig bruk hører også at man må overholde produsentens
drifts-, vedlikeholds- og reparasjonsbetingelser og overholdelse
av sikkerhetsinformasjonene i anvisningen.
All bruk utover dette gjelder som uriktig bruk. Produsenten er ikke
ansvarlig for skader som oppstår på grunn av dette. Brukeren
bærer selv risikoen.
Hvis du selv foretar endringer på hakkelsmaskinen, er vi ikke
ansvarlige for de skadene som oppstår på grunn av dette.
Apparatet må kun klargjøres, benyttes og vedlikeholdes av
personer som kjenner disse oppgavene og som er kjenner farene
de utsettes for. Reparasjonsarbeid må kun gjennomføres av oss
eller av kundeservicesteder som er anbefalt av oss.
Bruk øye- og
hørselsvern.
Bruk vernehansker. Må beskyttes mot
fuktighet.
Elektriske apparater må ikke kastes sammen med
husholdningsavfallet. Apparat, tilbehør og emballasje
må innleveres for miljøvennlig gjenbruk.
I henhold til det europeiske direktivet 2002/96/EC angående
utrangerte elektriske og elektroniske apparater må elektriske
apparater som ikke lenger kan benyttes samles separat og
tilføres den miljøvennlige gjenbrukskretsen.
BBrruukkssaannvviissnniinnggeennss ssyymmbboolleer
r
Overhengende fare eller farlig situasjon. Dersom du
ignorerer disse anvisningene, kan det føre til
personskader og materielle skader.
Viktige anvisninger for korrekt håndtering.
L
Forstyrrelser kan oppstå som følge av at du ignorerer
disse anvisningene.
Brukeranvisninger. Disse anvisningene hjelper deg å
utnytte alle funksjonene optimalt.
Montasje, betjening og vedlikehold. Her forklares
nøyaktig hva du må gjøre.
DDrriiffttssttiiddeer
r
Vær oppmerksom på forskriftene som gjelder i ditt område.
HHeennssiikkttssmmeessssiigg aannvveennddeellssee
Riktig bruk omfatter hakling av
- alle typer kvister med et maks. tverrsnitt (alt etter tretype og
hvor friskt det er )
- vissent, fuktig, flere dager gammelt hageavfall blandet med
kvister
RReessttrriissiikkooeer
r
Til tross for at alle sikkerhetsbestemmelser overholdes ved
den hensiktsmessige anvendelsen, kan det allikevel gjenstå
restrisikoer som følge av apparatets konstruksjon.
Restrisikoer kan reduseres, dersom du er oppmerksom på
”Sikkerhetsanvisningene” og ”Hensiktsmessig anvendelse” og
leser nøye gjennom bruksanvisningen.
Hvis man tar hensyn og er forsiktig minsker risikoen for personog materialskader.
Fare for skader på fingre og hender, dersom du putter hånden
inn i en åpning og kommer borti knivverket.
Fare for skader på fingre og hender ved monterings- og
rengjøringsarbeider på knivverket.
Skader på grunn av hakkelsmaterialer som slynges ut rundt
trakten.
Fare ved strøm ved bruk av elektriske stikkledninger som ikke
er intakt.
Berøring av spenningsførende deler ved åpne elektriske
bestanddeler.
Hørselen svekkes ved vedvarende arbeider uten hørselsvern.
Til tross for alle forholdsregler som tas, kan det fremdeles gjenstå
en restrisiko.
AArrbbeeiiddee uunnddeerr ttrryyggggee ffoorrhhoolldd
Les nøye gjennom følgende anvisninger og forskrifter
til forebygging av ulykker hhv. de gjeldende sikkerhetsbestemmelsene i de forskjellige landene. Slik kan du beskytte deg selv og andre mot skader.
Formidle sikkerhetsanvisningene til alle som arbeider med
L
maskinen.
Ta godt vare på disse sikkerhetsanvisningene.
L
Reparasjoner på maskinen må kun utføres av
produsenten hhv. av firmaer som produsenten
henviser til.
66
Page 68

Gjør deg kjent med apparatet ved hjelp av bruksanvisningen
før du tar det i bruk.
Ikke bruk apparatet til formål som det ikke konstruert for (se
”Hensiktsmessig anvendelse” og ”Arbeide med
hakkelsmaskinen”).
Sørg for at du står stabilt og hold likevekten hele tiden. Du
arbeider bedre og tryggere i det angitte kapasitetsområdet.
Ved kasting av hakkelsgodset må du stå på samme nivå mit
som maskinen.
Vær oppmerksom. Pass på hva du gjør. Gå fram med fornuft.
Ikke benytt apparatet når du er sliten eller er påvirket av
narkotiske stoffer, alkohol eller medikamenter. Et øyeblikks
uoppmerksomhet kan medføre alvorlige skader.
Bruk vernebriller, arbeidshansker og hørselsvern når du
arbeider.
Bruk egnet arbeidstøy:
− ikke vide klær
− sklisikkert skotøy
Den som betjener maskinen er ansvarlig for andre perosner i
maskinenes arbeidsområde.
Barn og unge under 16 år får ikke betjene maskinen.
Hold barn borte fra apparatet.
Du må aldri bruke apparatet hvis personer uvedkoemmende
personer er i nærheten.
La aldri trimmeren være uten oppsikt.
Hold arbeidsområdet i orden! Uorden kan medføre ulykker.
Innta arbeidsstilling ved siden av eller bak apparatet. Stå aldri
i nærheten av utkasteråpningen.
Grip aldri inn i påfyllings- eller utkasteråpningen.
Snu ansiktet og kroppen bort fra påfyllingsåpningen.
Ikke hold hender eller føtter i åpninger når maskinen er i gang.
Du arbeider bedre og tryggere i det angitte kapasitetsområdet.
Driv apparatet kun med komplett og korrekt montert
beskyttelsesanordning.
Du må ikke endre turtallet til motoren, for dette regulerer den
sikre, maksimale arbeidshastigheten og beskytter motoren og
alle deler som dreies mot skader pga. for stor hastighet.
Ikke driv apparatet uten fylletrakt.
Ikke forta endringer på apparatet eller apparatets deler.
Lukk apparatet før motoren slås på.
Du må ikke sprute vann på apparatet. (Risikokilde - elektrisk
strøm).
Ta hensyn til påvirkning fra omgivelsene:
− Ikke bruk trimmeren i fuktige og våte omgivelser.
− Ikke la apparatet stå ute i regnvær.
− Arbeid kun under tilstrekkelige sikkerhetsforhold, sørg for
god belysning.
Bruk vernehansker for å unngå fare for skader på fingre ved
monterings- og rengjøringsarbeider.
Slå av maskinen og trekk støpselet ut av stikkontakten ved:
− vedlikeholds- og rengjøringsarbeider
− oppretting av feil
− kontroll av tilkoplingsledningene om disse er
omslynget eller skadet.
− transport
− reparasjonsarbeider
− når du forlater apparatet (også ved kortere
avbrudd).
Ved tilstopping i maskinens inntak eller utløp må du slå av
motoren og trekke ut støpselet fra stikkontakten, før du fjerner
materialrester i inntaket eller utløpet.
Kontroller om maskinen ev. er skadet:
− kontroller omhyggelig om beskyttelsesanordningene
fungerer feilfritt og hensiktsmessig før du fortsetter driften
av apparatet.
− kontrollér om de bevegelige delene fungerer som de skal
og ikke er klemt fast eller om deler er skadet. Samtlige
deler må være korrekt montert og oppfylle alle betingelser
for å sikre en feilfri drift.
− Skadete verneinnretninger og deler må repareres eller
byttes ut på godkjent verksted (eller hos produsenten),
hvis ikke annet er nevnt i bruksanvisningen.
− Skadede eller uleselige sikkerhetsklistremerker skal
erstattes.
Oppbevar apparatet kun på et tørt sted utenfor barns
rekkevidde.
EElleekkttrriisskk ssiikkkkeerrhheett
Stikkledningens utførelse iht. IEC 60245 (H 07 RN-F) med et
åretverrsnitt på minimum:
− 1,5 mm² ved en kabellengde på inntil 25 m
− 2,5 mm² ved en kabellengde på over 25 m
Lange og tynne tilkoplingsledninger gir et spenningsfall.
Motoren oppnår ikke lenger sin maksimale effekt, apparatets
funksjon reduseres.
Støpslene og koplingsboksene på tilkoplingsledningene må
være produsert i gummi, myk PVC eller annet termoplastisk
material med lik mekanisk fasthet eller være trukket over med
et slikt material.
Pluggen til tilkoplingsledningen må være beskyttet mot
sprutevann.
Påse at stikkledningen ikke kommer i klemme eller bøyes og
at pluggforbindelsen ikke blir våt når du installerer ledningen.
Ved bruk av kabeltrommel, må kabelen vikles helt inn.
Ikke bruk ledningen til noe den ikke er konstruert til. Beskytt
ledningen mot varme, olje og skarpe kanter. Ikke bruk
ledningen til å trekke støpselet ut av stikkontakten.
Kontroller skjøteledningen jevnlig og skift den ut når den er
ødelagt.
Ikke bruk defekte stikkledninger.
Bruk kun skjøteledninger som er godkjent og kjennetegnet for
utendørs bruk.
Ikke monter provisoriske elektriske tilkoplinger.
Du må aldri brokople eller slå av beskyttelses-anordningen.
Kople til trimmeren via en feilstrømsvernebryter (30 mA).
Den elektriske tilkoplingen hhv. reparasjoner på maskinenes
elektriske deler må kun utføres av en faglært elektriker eller
av vår kundeservice. Vær oppmerksom på lokale forskrifter,
særlig med hensyn til sikkerhetstiltak.
Reparasjoner på maskinenes andre deler må kun utføres av
produsenten hhv. av hans kundeservice.
Benytt kun originale reservedeler. Hvis man benytter andre
reservedeler kan det oppstå ulykker for brukeren.
Produsenten er ikke ansvarlig for skader som oppstår som
følge av dette.
67
Page 69

IIbbrruukkttaakkiinngg
Forsikre deg om at hele apparatet er montert på en
forskriftsmessig måte.
Plasser hakkelsmaskinen på et vannrett og hardt underlag før
du tar den i bruk (fare for at den velter).
Ikke plasser apparatet på et gulv som er brostein- eller
singlebelagt.
Bruk apparatet kun ute. Hold avstand (minst 2 m) fra vegger
eller andre stive gjenstander.
Kontroller før hver bruk:
− om tilkoplingsledningene har defekte steder (riper, snitt
eller lignende)
Ikke bruk defekte ledninger.
− er apparatet ev. skadet (se ”Arbeide under trygge forhold”)
− er alle skruene skrudd hardt fast
L Nettilkopling
Sammenlign den angitte spenningen på apparatets typeskilt
med nettspenningen. Kople apparatet til den tilsvarende og
forskriftsmessige stikkontakten.
Bruk skjøteledning med tilsvarende tverrsnitt.
Nettsikring
Sveits UK
2300 W
2500 W
2800 W
16 A treg
16 A treg
16 A treg
Av/på-bryter
Ikke benytt trimmere hvor man ikke kan slå bryteren på eller
av. Skadete brytere må straks repareres eller byttes ut av
kundeservice.
PÅ
AV
Tilbakeløp
Slå på apparatet
Trykk inn den grønne knappen I .
Slå av apparatet
Trykk på den røde knappen 0 .
Ved strømbrudd
Apparatet slås automatisk av ved strømbrudd (nullspenningsrelé).
Trykk inn den grønne knappen for å slå på apparatet igjen.
10 A treg 13 A treg
13 A treg
13 A treg
Tilbakestillingsknapp
(motorens
beskyttelsesanordning)
Dreieretningsomkopler
Inntrekk
Motorens beskyttelsesanordning
Motoren er utstyrt med en sikkerhetsbryter som slås automatisk
av ved overbelastning. Motoren kan slås på igjen etter en kjøletid
på ca. fem minutter.
1. Tilbakestillingsknapp (motorvern)
2. den grønne knappen I for å slå den på.
Dreieretningsomkopler
Dreieretningsomkopleren må kun aktiveres når
hakkelsmaskinen er slått av.
Stilling
Motoren starter ikke.
Stilling
Materialet trekkes inn og kuttes av skjærevalsen.
Stilling
Kniven arbeider i omvendt rekkefølge og inneklemt material frigjøres.
Etter at du har bragt dreieretningsomkopleren i stillingen
,
hold den grønne knappen til på-/avbryteren inne. Skjærevalsen
stilles i omvendt retning. Når du slipper på/av-bryteren, stanser
hakkelsmaskinen automatisk.
Tips
z Store gjenstander eller trestykker fjernes etter flere gangers
aktivering både i skjære- og i frigjøringsretningen.
z Bruk en stamper eller en krok for å fjerne blokkerte
gjenstander fra trakten eller utkasterspalten.
Vent alltid til hakkelsmaskinen har stanset helt, før du
slår den på igjen.
Nettimpedans
Dersom betingelsene for nettspenningen ikke er optimale, kan det
oppstå korte spenningsfall når apparatet slås på. Dette kan ha
negativ innvirkning på andere arrarater (f. eks. lampe som
blafrer).
Det oppstår ingen forstyrrelser, dersom den maksimale
nettspenningen som angis i tabellen nedenfor ikke overskrides.
Inngangseffekt P1 (W) Nettimpedans Zmaks (Ω)
2300 0,21
2500 0,21
2800 0,19
AArrbbeeiiddee mmeedd hhaakkkkeellssmmaasskkiinneenn
Innta arbeidsstilling ved siden av eller bak apparatet. Stå aldri
i nærheten av utkasteråpningen.
Lengere material, som stikker ut av apparatet, kan slynes
tilbake når det trekkes inn av knivene! Hold sikkerhetsavstanden!
Grip aldri inn i påfyllings- eller utkasteråpningen.
68
Page 70

Snu ansiktet og kroppen bort fra påfyllingsåpningen.
Ikke få hender, andre kroppsdeler og klær inn i påfyllingsrøret,
utkastingskanalen eller i nærheten av andre bevegelige deler.
Kontroller at det ikke er hakkelsrester i fylletrakten før du slår
på apparatet.
Ikke vipp apparatet når motoren er i gang.
Når du fyller på fylletrakten, må du påse at det ikke kommer
metallgjenstander, steiner, flasker eller andre gjenstander i
apparatet som det ikke kan bearbeide.
Det oppstår ingen forstyrrelser, dersom den maksimale
nettspenningen som angis i tabellen nedenfor ikke
overskrides. Slå av apparatet straks og la det komme til
stillstand, dersom fremmede gjenstander kommer i
fylletrakten. Det samme gjelder, dersom apparatet begynner å
vibrere eller lage unaturlige lyder.
− inspiser skaden
− skift ut eller reparer ødelagte deler
− kontroller apparatet og stram fast løse deler
Du må ikke reparere apparatet, dersom du ikke er berettiget
til det.
Hva kan jeg kutte opp?
Ja:
• alle typer kvister med et maks. tverrsnitt (alt etter tretype og hvor
friskt det er)
• vissent, fuktig, flere dager gammelt hageavfall blandet med
kvister
vekselvist med grener
Nei:
• glass, metalldeler, kunststoffer, plastposer, steiner, stoffrester,
røtter med jord
• avfall uten fast konsistens f. eks. kjøkkenavfall
Spesielle anvisninger vedrørende
oppkutting:
¾ Fyll alltid det materialet som skal
inn i hakkelsmaskinen fra høyre
side i traktens innfyllingsåpning.
¾ Kutt opp grener, kvister og ved
straks de er kappet av:
− dette hakkelsmaterialet blir meget hardt når det tørker, den
maksimale kvisttykkelsen som kan bearbeides blir derfor
mindre.
¾ Fjern sideskuddene på grener med mange kvister.
¾ Bearbeid hage- og kjøkkenavfall som både er meget
vannholdig og som lett klistrer seg sammen.
− Bearbeid hage- og kjøkkenavfall som både er meget
vannholdig og som lett klistrer seg sammen.
¾ Ikke la det hakkslete materialet bli for høyt i området til
utkastningskanalen. Dette kan føre til at hakkslet material
forstopper utkastningskanalen. Dermed kan det komme til
tilbakeslag av materialet gjennom påfyllingsåpningen.
¾ Rengjør påfyllingsåpningen og utkastningskanalen når
apparatet er forstoppet. Slå først av motoren, og trekk ut
nettpluggen.
¾ Påse at grenens maksimale diameter som skal bearbeides,
tilsvarende diameteren på apparatet ditt, ikke overskrides (se
”Tekniske data”). Alt etter tretype og friskhet, kan den
maksimale kvistykkelsen som kan bearbeides blir forringes.
¾ Kvernen trekker automatisk inn det som skal kvernes uten
rykk pga. den sakte bevegelsen.
¾ Automatisk omkopling av dreieretningen:
derson maskinen plutselig blokkeres, kan skjærevalsen skifte
omdreiningsretning og i dette tilfelle skyve materialet tilbake
− slå av maskinen.
− vent til skjærevalsen er kommet til stilstand.
− start maskinen igjen og bruk materiale som er lettere å
behandle.
¾ Bryteren som er utstyrt med motorens sikkerhetsbryter, slås
automatisk av når apparatet overbelastes:
− slå på hakkelsmaskinen igjen etter ca. fem minutter
− les avsnitt ”Mulige driftsforstyrrelser”, dersom apparatet
ikke kan slås på igjen etter denne ventetiden
− Skjærevalsen og etterskjæringsplaten er bruksdeler, men
har likevel en levetid på flere år ved normal bruk
IInnnnssttiilllliinngg aavv mmeelllloommttaappppsskkiivveenn
Mellomtappskiven (B) kan settes inn i skjærevalsen (A) uten
klaring. Minst mulig avstand bør holdes for å sikre effektiv drift.
Myke materialer eller våte grener kan rives i stykker i stedet for å
kuttes. Et motstål som har vært i bruk lenge og er slitt kan ha
samme virkning.
Avstandsjustering.
Koble inn apparatet. For innstilling av avstanden, vrir du
innstillingsknappen (D) mot høyre, slik at skruen (C) beveger seg
til skjærevalsen. Drei helt til det kommes fint metallspon ut av
utkasteråpningen.
VVeeddlliikkeehhoolldd oogg pplleeiiee
• Før vedlikeholdsarbeidet kan begynne:
− stans motoren og trekk ut nettstikket.
− bruk vernehansker for å unngå skader.
Skjæreverktøyet stanser ikke med en gang når man slår av
apparatet. Vent med å foreta reparasjoner eller vedlikehold til
alle delene har stanset helt.
Pass på å fjerne verktøy og skrutrekkere etter at du har gjennomført vedlikehold eller raparasjoner.
69
Page 71

• Hakkelsmaskinen er i stor grad vedlikeholdsfri. Følg punktene under for verdibevaring og lang levetid:
− Luftespor skal holdes frie og rene.
− Kontroller festeskruene (evt. trekk til).
− Rengjør apparatet inn- og utvendig når du har brukt hakkelsmaskinen.
Til rengjøring av apparatet benyttes det kun en varm, fuktig klut og en myk børste.
Benytt aldri rengjørings- eller løsningsmidler. Det kan påføre apparatet skader som ikke kan repareres. Kunststoffdeler kan angripes
av kjemikaliene.
− Kvernen skal ikke rengjøres med rennende vann eller høytrykkspyler.
Behandle blanke metalldeler med en miljøvennlig, biologisk nedbrytbar sprøyteolje etter hvert bruk for å beskytte apparatet mot
−
−
korrosjon.
Skjærevalsen og etterskjæringsplaten er bruksdeler, men har likevel en levetid på flere år ved normal bruk.
−
−
MMuulliiggee ddrriiffttssffoorrssttyyrrrreellsseerr
Før hver retting av feil
− Slå av apparatet
− Vent til apparatet står helt stille
− Trekk ut nettpluggen
Forstyrrelser Mulig årsak Tiltak
Motoren starter ikke − dreieretningsomkopleren i stillingen „0“
− lkke koblet til nettet
− Tilkoblingsledning er defekt
− Maskinen er overbelastet
− Slå av apparatet og omstill dreieretnings-
omkopleren.
− Kontroller sikringen.
− Kontrolleres av fagmann (elektriker).
− Motoren kan slås på igjen etter en kjøletid.
1.Tilbakestillingsknapp (motorvern)
2. den grønne knappen I for å slå den på
Motoren durer, men starter
ikke
− Skjærevalsen er blokkert
− Kondensator defekt
− Slå av apparatet.
Kople dreieretningsomkopleren i stillingen
Slå på apparatet inntil blokkeringen er opphevet. Slå av apparatet igjen. Kople dreieretning-
somkopleren tilbake i stillingen
− Ta maskinen til et autorisert serviceverksted
for reparasjon.
Det som skal kvernes blir
ikke trukket inn
− Skjærevalsen går bakover. Bryterstillingen er
ikke riktig
− Hakkelsmaterialet er fastklemt i trakten
(materialkø)
− Det som skal kvernes er for mykt eller for vått
− Slitasje på skjærevalsen
− Slå av apparatet og omstill dreieretnings-
omkopleren.
− Slå av apparatet. Kople dreieretnings-
omkopleren i stillingen
slik at hakkelsmaterialet kan frigjøres, evt.
fjerne urenheter.
Slå av apparatet igjen. Kople dreieretningsomkopleren tilbake i stillingen
− Skyv inn med en gren og la det kvernes.
− Still mellomtappskiven som beskrevet under
"Innstilling av mellomtappskiven". Skift ut
skjærevalsen hvis den er nedslitt.
Det som skal kvernes blir
ikke riktig oppdelt
Mellomtappskiven er ikke tilstrekkelig justert. Juster mellomtappskiven. Dersom mellomtapp-
skiven ikke kan etterjusteres, må den skiftes ut av
en kundeservice (forhandler).
Maskinen starter, men den
låses ved liten belastnin o
slås av via motorbeskyttelsesbryteren.
Skjøteledningen er for lang eller har for lite
tverssnitt. Stikkontakten for langt unna
hovedtilkoblingen, for lite tverrsnitt på
Sjøteledning minst 1,5 mm², maks. 25 m lang.
Ved lengre ledning tverrsnitt m inst 2,5 mm².
tilkoblingsledningen.
.
.
. Slå på apparatet,
.
70
Page 72

TTeekknniisskkee ddaattaa
Modell
2300 2500 2800
Type
Motor
Motorytelse P
S6 - 40 %
1
På-/Avknapp med
Vekt
Lydtrykknivå LPA
(målt i henhold til direktivet 2000/14/EF)
Målt lydeffektnivå LWA
(målt i henhold til dirktivet 2000/14/EF)
Garantert lydeffektnivå LWA
(målt i henhold til direktivet 2000/14/EF)
Maks. grendiameter som kan bearbeides
(gjelder kun for nyskåret tre)
Beskyttelsesklasse
Beskyttelsesart
Nettsikring
Sveits
UK
AH 600 AH 600 AH 600
vekselstrømsmotor 230 V, 50 Hz, 2800 / 40 min
-1
2300 W 2500 W 2800 W
overbelastningsbeskyttelse, skjære- og reservefunksjon, nullspenningsutløser
24 kg 24,5 kg 25 kg
83,8 dB (A)
K = 3 dB (A)
84,2 dB (A)
K = 3 dB (A)
82,5 dB (A)
K = 3 dB (A)
91 dB (A) 91 dB (A) 91 dB (A)
92 dB (A) 92 dB (A) 92 dB (A)
∅ max. 35 mm ∅ max. 40 mm ∅ max. 44 mm
I
IP X4
16 A treg
10 A treg
13 A treg
16 A treg
13 A treg
--
16 A treg
--
13 A treg
GGaarraannttiibbeettiinnggeellsseerr
Vennligst ta hensyn til den vedlagte garantierklæringen.
71
Page 73

U mag de machine niet gebruiken voordat u deze
gebruiksaanwijzing heeft gelezen, alle voorschriften
heeft opgevolgd en de machine als voorgeschreven heeft
gemonteerd.
Bewaar deze bedieningsaanwijzing voor alle toekomstige
toepassingen.
IInnhhoouudd
EG-verklaring van overeenstemming 72
Leveringsomvang 72
Beschrijving van het apparaat 72
Symbolen apparaat 72
Symbolen in de gebruiksaanwijzing 73
Bedrijfstijden 73
Reglementaire toepassing 73
Restrisico’s 73
Veiligheidsinstructies 73
Ingebruikname 75
Werken met de tuinhakselaar 76
Instellen van het tegenmes 76
Onderhoud en verzorging 77
Storingen 77
Technische gegevens 78
Garantie 78
Montage 116
Reserveonderdelen 118
LLeevveerriinnggssoommvvaanng
g
Controleer na het uitpakken de inhoud van de verpakking
op:
! Aanwezigheid van alle onderdelen
! Eventuele transportschade
Meld mogelijke onvolkomenheden direct aan uw leverancier.
Latere reclamaties worden niet in behandeling genomen.
• 1 voorgemonteerd apparaat
• 1 standbeen links
• 1 standbeen rechts
• 1 as
• 2 wielen
• 2 wielafdekkingen
• 1 verpakking moeren
• 1 opvangzak
• 1 gebruiksaanwijzing
BBeesscchhrriijjvviinngg vvaann hheett aappppaarraaaat
t
EEGG--vveerrkkllaarriinngg vvaann oovveerreeeennsstteemmmmiinng
overeenkomstig de richtlijn van de raad: 2006/42/EG
g
Hiermede verklaren wij
ATIKA GmbH & Co. KG
Schinkelstraße 97, 59227 Ahlen – Germany
in uitsluitende verantwoordelijkheid, dat het product
Gartenhäcksler (tuinhakselaar) type AH 600
Serienummer: zie laatste pagina
aan de bepalingen van de boven vermelde EG-richtlijn alsook aan
de bepalingen van de volgende verdere richtlijnen beantwoordt:
2004/108/EG en 2000/14/EG.
De volgende geharmoniseerde normen werden toegepast:
EN 60335-1:2002+A1+A11+A12+A2+A13;
EN 13683:2003+A1:2009; EN 62233:2008; EN 55014-1:2006;
EN 55014-2/A1:2001; EN 61000-3-2:2006; EN 61000-3-11:2000
Conformiteit-beoordeling-procedures:
2000/14/EG - Aanhangsel V
Gemeten geluidsniveau L
gegarandeerd geluidsniveau L
91 dB (A).
WA
92 dB (A).
WA
Bewaring van de technische documenten:
ATIKA GmbH & Co. KG – Technisch kantoor – Schinkelstr. 97
59227 Ahlen – Germany
Ahlen, 30.04.2010 A. Pollmeier, bedrijfsleiding
A. Trechteropening voor hakselmateriaal
B. Handgreep
C. Terugzetknop / Motorveiligheid
D. Netstekker
E. In-/uitschakelaar
F. Draairichtingsomschakelaar
G. Onderstel
H. Bovenkant van de behuizing
I. Instelknop voor snijwals
J. Uitworpopening
SSyymmbboolleenn aappppaarraaaat
t
Lees voor de
inbedrijfstelling
de bedieningshandleiding en
veiligheidsvoorschriften en
neem deze in
acht.
Schakel de motor
uit voor reparatie-,
onderhouds- en
reinigingswerkzaamheden en
haal de netstekker
uit hetcontactdoos.
72
Page 74

Gevaar door
wegslingerende
delen bij lopende
motor – niet
betrokken
personen, alsook
huis- en nuttige-
dieren uit de gevaarszone
Let op voor
roterende messen.
Handen en voeten
niet in de openingen houden terwijl
de machine draait.
verwijderd houden.
Oog- en
geluidsbescherm-
Veiligheidshandschoenen dragen.
Tegen vochtigheid
beschermen.
ing dragen.
Elektrische toestellen behoren niet in de huisafval.
Toestellen, toebehoren en verpakking naar een
milieuvriendelijk recycling brengen.
Volgens de Europese Richtlijn 2002/96/EG over oude elektronische apparaten en electronica moeten niet meer bruikbare
elektrische toestellen apart worden verzamend en een
milieuvriendelijk recycling worden toegevoerd.
SSyymmbboolleenn iinn ddee ggeebbrruuiikkssaaaannwwiijjzziinng
g
Dreigend gevaar of gevaarlijke situatie. Het niet
opvolgen van deze aanwijzingen kan schade of
verwondingen tot gevolg hebben.
Belangrijke aanwijzing voor het vakkundig gebruik.
L
Het niet opvolgen van deze aanwijzingen kan storingen
aan de machine veroorzaken.
Gebruikersaanwijzingen. Deze aanwijzingen helpen u
de machine optimaal te benutten.
Montage, gebruik en onderhoud. Hier wordt precies
uitgelegd wat u moet doen.
BBeeddrriijjffssttiijjddeen
n
Houdt alstublieft vóór ingebruikname van het toestel
rekening met de landelijke (regionale) voorschriften omtrent
de lawaaibescherming.
RReegglleemmeennttaaiirree ttooeeppaassssiinngg
Bij het gebruik conform de voorschriften hoort het hakselen van
- allerhande takken tot max. diameter (naargelang het
houtsoort en de versheid)
- verwelkte, vochtige, reeds meerdere dagen opgeslagen
tuinafval afwisselend met de takken.
Het hakselen van glas, metaal, kunststofdelen, plastic zakken,
stenen, textielafval, wortelen met aarde, afval zonder vaste
consistentie (bijv. keukenafval) wordt uitdrukkelijk uitgesloten.
De tuinhakselaar is geschikt voor privé gebruik in huis- en
hobbytuin.
Als hakselmachine voor de privé huis- of hobbytuin worden zulke
toestellen aangezien die niet in openbare plantsoenen, parks,
recreatieplaatsen alsook in het landbouwbedrijf en de bosbouw
worden ingezet.
Tot de reglementaire toepassing behoort ook het opvolgen van de
gebruiks-, onderhouds- en reparatievoorschriften en het opvolgen
van de veiligheidsvoorschriften van de fabrikant.
Alle verdere toepassingen gelden als onreglementair. Voor de
hieruit voortvloeiende schade is de fabrikant niet aansprakelijk –
de aansprakelijkheid is alleen voor de gebruiker.
Eigenmachtige verbouwingen aan de machine sluiten een
aansprakelijkheid van de fabrikant voor hieruit voortvloeiende
schade van eenieder soort uit.
Deze machine mag alleen voorbereidt, gebruikt en onderhouden
worden door personen die met de machine vertrouwd zijn en
goed ingelicht zijn over de risico’s. Reparaties mogen alleen door
de fabrikant of geautoriseerde werkplaatsen uitgevoerd worden.
RReessttrriissiiccoo’’s
s
Ook bij het gebruik volgens de voorschriften zijn er op grond van
de constructie voor de toepassing van deze machine nog een
aantal restricties.
De restricties kunnen geminimaliseerd worden wanneer de
veiligheids-, gebruiks-, gezondheid- en onderhoudsvoorschriften
nauwkeurig in acht genomen worden.
Consideratie en voorzichtigheid verminderen het risico van
personenletsels en beschadigingen.
Gevaar voor letsels aan vingers en handen, wanneer u met
de hand door een opening grijpt en in aanraking komt met de
roterende messen.
Gevaar voor letsels aan vingers en handen, bij montage- en
reinigingswerkzaamheden aan de messen.
Verwonding door wegslingerend hakselgoed in het bereik van
de trechter.
Gevaar door stroom door het niet juist aansluiten van de
aansluitdraden.
Het aanraken van onder spanning staande delen bij geopende
elektrische delen.
Vermindering van het gehoor bij langdurig werken zonder
gehoorbescherming.
Verder kunnen er ondanks alle genomen maatregelen niet
zichtbare restricties bestaan.
VVeeiilliigghheeiiddssiinnssttrruuccttiieess
Lees en volg de onderstaande aanwijzingen, de
voorschriften ter voorkoming van ongevallen en de
algemene veiligheidsvoorschriften op, om u zelf en anderen
tegen verwondingen te beschermen.
Geef de veiligheidsvoorschriften aan alle personen, die
L
met deze machine werken, door.
Bewaar deze veiligheidsvoorschriften goed.
L
Reparaties aan elektrische onderdelen van de
machine moeten door de fabrikant of een door hem
aangewezen persoon worden uitgevoerd.
73
Page 75

Maak u voor gebruik met het apparaat vertrouwd, met behulp
van de bedieningshandleiding.
Gebruik de machine alleen waar hij voor gemaakt is (zie
“Reglementaire toepassing” en "Werken met de
tuinhakselaar").
Zorg voor een stabiele en uitgebalanceerde houding. Strek
u niet vooruit. Ga bij het inwerpen van het hakselmateriaal op
dezelfde hoogte met het toestel staan.
Wees oplettend. Let op dat, wat u doet. Ga met verstand te
werk. Gebruik het toestel niet, wanneer u moe bent of onder
de invloed van drugs, alcohol of medicamenten staat. Een
moment van onoplettendheid bij het gebruik van het toestel
kan tot ernstige verwondingen leiden.
Tijdens het werken met deze machine dienen veiligheidsbril,
werkhandschoenen en gehoorbeveiliging te worden gedragen.
Draag de juiste werkkleding.
Nauw sluitende kleding dragen.
Geen schoenen met gladde zolen dragen.
De bedienende persoon is binnen het arbeidsbereik van de
machine verantwoordelijk ten opzichte van derden.
Kinderen en jongeren van minder dan 16 jaar mogen het
toestel niet bedienen.
Kinderen dienen uit de buurt van het apparaat te worden
gehouden.
Zet het toestel nooit aan, terwijl niet betrokken personen in de
buurt zijn.
Laat de machine nooit zonder toezicht .
Zorg dat uw werkomgeving in orde is. Rommel kan
ongevallen veroorzaken.
Neem een werkpositie in, zijdelings of achter het apparaat.
Ga nooit in het bereik van de uitwerpopening staan.
Nooit uw hand in de vul- of uitworpopening steken.
Blijf met uw gezicht en uw lichaam uit de buurt van de
vulopening.
Overbelast de machine niet. U werkt beter en zeker met de
juiste belasting van de machine.
Werk alleen met alle veiligheidsvoorzieningen op de juiste
wijze aangebracht.
Verander het toerental van de motor niet, want de regelaar
regelt de veilige maximum werksnelheid en beschermt de
motor en alle draaiende delen tegen schade door te hoge
snelheid.
Het apparaat mag niet zonder de vultrechter gebruikt
worden.
Het toestel resp. delen van het toestel niet veranderen.
Bij het inschakelen van de motor moet het apparaat conform
de voorschriften zijn gesloten.
Het toestel niet met water afspatten. (Gevarenbron elektrische
stroom).
Let op de omgevingsinvloeden.
− Gebruik de machine niet in een vochtige of natte
omgeving.
− Machine niet in de regen laten staan of in de regen
werken.
− Werk alleen bij toereikend zicht, zorg voor een goede
verlichting.
Om letsel aan vingers te vermijden, bij montage en/of reini-
ging werkhandschoenen dragen.
Schakel de machine uit en neem de steker uit het stopcontact
bij:
− onderhouds- en reinigingswerkzaamheden
− bij storingen
− controle van de aansluitleidingen, of deze
verstrengeld of beschadigd zijn
− transport
− reparatiewerkzaamheden
− het verlaten van de machine (ook voor een korte tijd)
Bij verstoppingen in de ingooi en uitwerp van de machine
schakel de motor uit en neem de netsteker uit het stopcontact,
alvorens u materiaalresten in de ingooi of uitwerp verwijdert.
Onderzoek de machine op eventuele beschadigingen.
− Voordat de machine verder wordt gebruikt, moet zorg-
vuldig worden onderzocht of de beschermingsvoorzieningen en licht beschadigde onderdelen foutloos
en volgens de voorschriften functioneren.
− Controleer of alle bewegende delen van de machine goed
functioneren en niet klemmen of beschadigd zijn. Alle
delen moeten juist gemonteerd zijn en goed functioneren
om de machine correct te laten werken.
− Beschadigde bescherminrichtingen en -delen moeten,
indien noodzakelijk, door een erkende reparatiewerkplaats
gerepareerd of verwisseld worden.
− Beschadigde of onleesbare veiligheidsstickers dienen te
worden vervangen.
Bewaar de machine in een droge en afgesloten ruimte, buiten
het bereik van kinderen.
EElleekkttrriisscchhee vveeiilliigghheeiidd
De aansluitkabel moet volgens IEC 60245 (H 07 RN-F) zijn,
met een draad doorsnede van minstens:
− 1,5 mm² bij een lengte tot 25 m.
− 2,5 mm² bij een lengte vanaf 25 m.
Lange en dunne aansluitkabels zorgen voor een
spanningsverlies. De motor bereikt zijn maximaal vermogen
niet meer, de werking van het toestel wordt gereduceerd.
Stekker en aansluitdozen aan aansluitleidingen moeten uit
rubber, zacht pvc of een ander thermoplastisch materiaal van
dezelfde mechanische vastheid zijn of met dit materiaal zijn
gecoat.
De stekkervoorziening van de aansluitleiding moet tegen
spatwater beveiligd zijn.
Let er bij het leggen van de aansluitkabel op dat deze niet
stoort, bekneld raakt, geknikt wordt en de steekverbinding niet
nat wordt.
Wikkel bij gebruik van een kabeltrommel de kabel geheel af.
Gebruik de kabel niet voor doeleinden waarvoor hij niet
geschikt is. Bescherm de kabel tegen hitte, olie of scherpe
randen. De steker niet met de kabel uit het stopcontact
trekken.
Controleer de verlengkabel regelmatig op beschadigingen en
vervang hem als hij beschadigd is.
Gebruik geen defecte kabels.
Gebruik alleen toegestane en gemerkte verlengkabels.
Maak geen geknutselde elektrische aansluitingen.
Veiligheidsvoorzieningen nooit overbruggen of buitenwerking
stellen.
Het apparaat via een veiligheidsschakelaar (30 mA)
aansluiten.
74
Page 76

Elektrische aansluitingen of reparaties mogen alleen door
een erkend bedrijf of een erkende reparatiewerkplaats
uitgevoerd worden. De plaatselijke voorschriften moeten
opgevolgd worden.
Reparaties aan andere delen van de machine mogen alleen
door de fabrikant of een door hem erkende werkplaats
uitgevoerd worden.
Alleen de originele toebehoren en onderdelen gebruiken. Bij
het gebruik van niet originele onderdelen kunnen risico’s
voor de gebruiker ontstaan. De fabrikant kan niet
aansprakelijk gesteld worden voor ongevallen hierdoor
ontstaan.
In-/uitschakelaar
Gebruik geen toestel, waarbij zich de schakelaar niet laat inen uitschakelen. Beschadigde schakelaars moeten
onmiddellijk door de klantenservice worden gerepareerd of
worden vervangen.
Terugzetknop
(motorveiligheid)
AAN
UIT
Draairichtingsomschakelaar
IInnggeebbrruuiikknnaammee
Overtuigt u zich er van, dat het apparaat compleet en
volgens voorschrift is gemonteerd.
Plaats de hakselmachine vóór het gebruik op een
horizontale en stevige ondergrond (kiepgevaar).
Plaats het apparaat niet op een geplaveide of
steengruisondergrond.
Gebruik het toestel alleen in open lucht. Houd afstand
(minimum 2 m) van een muur of een ander onbuigzaam
voorwerp.
Controleer voor elk gebruik:
− de aansluitkabels op beschadiging
gebruik geen beschadigde aansluitkabels.
− de machine op eventuele beschadigingen
(zie veiligheidsinstructies)
− of alle schroeven goed zijn vastgedraaid
L Aansluiting op het net
Vergelijk de op het typeplaatje van de machine vermelde
spanning, bv 230 V met de netspanning en sluit de machine
aan het desbetreffend en reglementair stopcontact aan.
Gebruik een verlengkabel met voldoende diameter
Beveiliging
Zwitserland UK
2300 W
2500 W
16 A traag
16 A traag
10 A traag 13 A traag
13 A traag
Terugloop
UIT
Intrek
Inschakelen
Druk op de groene knop I .
Uitschakelen
Druk op de rode knop 0 .
Beveiliging tegen opnieuw aanlo-
pen bij stroomuitval
Bij stroomuitval schakelt het toestel automatisch uit
(overbelastingsschakelaar).
Motorveiligheid
De motor is uitgerust met een veiligheidsschakelaar en schakelt
bij overbelasting zelfstandig uit. Druk
1. terugzetknop (motorveiligheid)
2. groene knop I om opnieuw in te schakelen.
Draairichtingsomschakelaar
Activeer de draairichtingsomschakelaar alleen bij
uitgeschakelde hakselaar
.
Positie
Motor doet het niet.
2800 W
16 A traag
13 A traag
Positie
Het materiaal wordt door de snijwals ingetrokken en gehakseld.
Positie
Het mes werkt in omgekeerde richting en ingeklemd materiaal
komt vrij.
Nadat u de draairichtingsomschakelaar in de positie
gebracht, houdt u de groene knop van de in-/uitschakelaar
ingedrukt. De snijwals wordt op de omgekeerde richting
geschakeld. Wanneer u de in-/uitschakelaar loslaat, blijft de
hakselaar automatisch staan.
heeft
75
Page 77

Tips
z Grote voorwerpen of stukken hout worden na meermalige
activering zowel in de snij- alsook in de vrijgaverichting
verwijderd.
z Gebruik een stopper of een haak voor het verwijderen van
geblokkeerde voorwerpen uit de trechter of de
uitworpopening.
Wacht steeds tot de hakselaar stilstaat, voor u deze
opnieuw inschakelt.
Netimpedantie
Bij ongunstige netcondities kan het gedurende het
inschakelproces van het toestel tot korte spanningsdalingen
komen die andere toestellen kunnen belemmeren (bv knipperen
van een lamp).
Er zijn geen storingen te verwachten, wanneer de maximale
netimpedanties worden opgevolgd.
Vermogensopname P1 (W) Netimpedantie Zmax (W)
2300 0,21
2500 0,21
2800 0,19
WWeerrkkeenn mmeett ddee ttuuiinnhhaakksseellaaaarr
Neem een werkpositie in, zijdelings of achter het apparaat.
Ga nooit in het bereik van de uitwerpopening staan.
Langer materiaal, dat uit het toestel uitsteekt, zou terug
kunnen springen, wanneer het door de messen wordt
ingetrokken! Veiligheidsafstand aanhouden!
Nooit uw hand in de vul- of uitworpopening steken.
Blijf met uw gezicht en uw lichaam uit de buurt van de
vulopening.
Breng uw handen, andere lichaamsdelen en kleding niet in de
vulbuis, het uitwerpkanaal of in de buurt van andere
beweegbare delen.
Controleer voor het inschakelen van het apparaat of er geen
hakselresten in de vulopening aanwezig zijn.
Kantel het toestel niet met lopende motor.
Let op bij het vullen, dat er geen metaal, stenen, flessen of
andere niet verwerkbare voorwerpen in de vultrechter komen.
Wanneer er vreemde voorwerpen in de vultrechter komen of
het apparaat buitengewone geluiden of trillingen vertoont,
schakel het apparaat dan onmiddellijk uit en laat het tot
stilstand komen. Haal de stekker uit de contactdoos en voer
de volgende punten uit:
− controleer de schade
− vervang of repareer beschadigde delen
− controleer het apparaat, schroef losse delen vast.
U mag het apparaat niet repareren wanneer u daartoe niet
bevoegd bent.
Wat kan ik hakselen?
Ja:
• allerhande takken tot max. diameter, naargelang de houtsoort
en de versheid
• verlepte, vochtige, reeds meerdere dagen oude tuinafval.
Alleen afwisselend met takken verwerken.
Nee:
• glas, metaaldelen, kunststoffen, plastic zaken, stenen,
stofaval, wortelen met aarde
• afval zonder vaste consistentie, b.v. keukenafval
Speciale aanwijzingen voor het
hakselen:
¾ Vul het te hakselen materiaal
steeds vanop de rechterzijde in de
vulopening van de trechter.
¾ Maak takken, twijgen en hout vlak
na het snijden klein
− dit hakselgoed wordt tijdens het uitdrogen zeer hard, de
maximum te verwerken takdiameter wordt hierdoor kleiner.
¾ Verwijder zijtakken bij takken met veel twijgen.
¾ Verwerken van zeer waterhoudende, aan elkaar plakkend
tuin- en keukenafval
− dit afwisselend met houten hakselgoed klein maken om
een verstopping van het apparaat te vermijden.
¾ Laat het gehakselde materiaal in de zone van de
uitwerpopening niet te zeer ophopen. Dit kan tot gevolg
hebben, dat reeds gehakseld materiaal het uitwerpkanaal
verstopt. Dit kan leiden tot een terugslag van het materiaal
door de vulopening.
¾ Reinig de vulopening en het uitwerpkanaal wanneer het
toestel verstopt is. Schakel hiervoor eerst de motor uit en haal
de stekker uit de contactdoos.
¾ Let u er op dat bij uw apparaat alleen de max te verwerkende
takmiddellijn bijgehouden wordt (zie “Technische gegevens”).
Al naar soort en frisheid van het hout kan zich de maximaal te
verwerken takdoorsnede reduceren.
¾ Het snijsysteem trekt het materiaal zelfstandig en dankzij de
langzame beweging van de wals gelijkmatig naar binnen.
¾ Automatische omschakeling van de draairich-ting:
Bij plotseling blokkeren van het apparaat kann de
draairichting van de snijwals worden veranderd en kann
het te hakselen materiaal terugschuiven.
− apparaat uitschakelen
− wachten tot de snijwals stilstaat
− apparaat opnieuw inschakelen en eenvoudiger te
verwerken materiaal gebruiken.
¾ Bij overbelasting van het apparaat schakelt de schakelaar die
met een motorbeveiliging is uitgerust vanzelf uit
− schakel de hakselmachine na ca. 5 minuten opnieuw aan
− wanneer het apparaat na deze wachttijd niet kan worden
ingeschakeld, dient u onder het punt „Mogelijke storingen“
na te kijken.
IInnsstteelllleenn vvaann hheett tteeggeennmmeess
Het tegenmes (B) kan aan de snijwals (A) zonder speling worden
ingesteld. Een zo klein mogelijke afstand dient voor een
effectieve werking te worden aangehouden.
76
Page 78

Zacht materiaal of natte takken kunnen splijten in plaats van te
worden gesneden. Ook een meervoudige activering van een
versleten tegenmes kan tot dit probleem leiden.
Instellen van de afstand.
Schakel het toestel in.
Op de rechterzijde van de behuizing bevindt zich een
instelinrichting. Draai de instelknop (D) naar rechts om de afstand
in te stellen. Door deze handeling beweegt de schroef (C) in de
richting van de snijwals. Schroef zolang, tot er fijne
aluminiumspaanders uit de uitworpopening vallen.
OOnnddeerrhhoouudd eenn vveerrzzoorrggiinngg
• Voor iedere onderhoud:
− moet de motor uitgezet worden en de stekker uit het
stopcontact verwijderd worden
− om een terugloop en verwondingen te voorkomen is het
dragen van veiligheidshandschoenen aan te bevelen.
Het snijwerktuig staat na het uitschakelen niet meteen stil.
Wacht alvorens u met de reparatie of het onderhoud begint
tot alle delen tot stilstand zijn gekomen.
Let erop, werktuig en schroefsleutels na onderhouds- of
reparatiewerkzaamheden weer te verwijderen.
• De tuinhakselaar is over het algemeen onderhoudsvrij. In
het belang van het behoud van de waarde en een lange
levensduur dient met het volgende rekening te worden
gehouden:
− ventilatiegleuven open en schoon houden.
− bevestigingsschroeven controleren (indien nodig vastdraaien)
− na ieder gebruik, het apparaat van binnen en van buiten goed
te reinigen.
Gebruik voor de reiniging van uw toestel slechts een warme,
vochtige doek en een zachte borstel.
Gebruik nooit reinigings- of oplosmiddelen. Zij zouden
onherstelbare schade aan het toestel kunnen veroorzaken. De
kunststofdelen kunnen door chemische producten worden
aangetast.
− de hakselmachine niet met stromend water of met
hogedrukreinigers reinigen.
blanke metalen delen na ieder gebruik ter bescherming
−
−
tegen corrosie met een milieuvriendelijke, biologisch af te
breken sproeiolie behandelen.
− snijwals en nasnijplaat zijn aan slijtage onderhevige
onderdelen. Bij normaal gebruik en bijstelling volgens
voorschrift gaan zij echter meerdere jaren mee.
SSttoorriinnggeenn
Voor het verhelpen van iedere storing
− toestel uitschakelen
− Wachten tot het apparaat stilstaat
− stroomtoevoer onderbreken
Storing Mogelijke oorzaak Oplossing
Motor doet het niet
− de draairichtingsschakelaar op de positie
“0”
− Geen netspanning
− Aansluitkabel defect
− Toestel overbelast (motorveiligheid werd
geactiveerd)
− Toestel uitschakelen en draairichtings-omschakelaar
omschakelen.
− Zekering controleren
− Laten controleren (elektromonteur)
− Toestel laten afkoelen.
Druk op de
1. terugzetknop (motorveiligheid)
2. groene knop I om opnieuw in te schakelen.
Motor bromt, maar doet het
niet
− Snijwals geblokkeerd
− Condensator defect
− Toestel uitschakelen.
Schakel de draairichtingsschakelaar in de positie
Toestel inschakelen tot de blokkering is verwijderd.
Toestel weer uitschakelen. Zet de
draairichtingsschakelaar terug in de positie
− Apparaat ter reparatie naar de fabrikant of de door
hem genoemde firma sturen.
.
.
77
Page 79

Storing Mogelijke oorzaak Oplossing
Hakselmateriaal wordt niet
naar binnen getrokken
− De snijwals loopt achteruit.
Schakelaarpositie niet correct.
− Materiaal zit klem in de trechter
(materiaalopstuwing)
− Te zacht of te nat materiaal
− Snijwals versleten
− Toestel uitschakelen en draairichtings-omschakelaar
omschakelen.
− Toestel uitschakelen. Schakel de draairich-
tingsomschakelaar in de positie
inschakelen, zodat het hakselmateriaal wordt
vrijgegeven, evt. verontreinigingen verwijderen.
Toestel weer uitschakelen. Om verder te werken
schakelt u de draairichtingsomschake-laar weer in de
positie
− Met een tak doorschuiven en hakselen
− Tegenplaat zoals bij „Instellen van de tegenplaat“ is
beschreven instellen, bij sterke slijtage snijwals
vervangen.
Materiaal wordt niet goed
− Tegenmes niet voldoende ingesteld. − Tegenmes instellen.
doorgesneden.
Apparaat begint wel te lopen,
maar blokkeert bij geringe
belasting en schakelt via de
Verlengingskabel te lang of te dun.
Stopcontact te ver van de hoofdaansluiting
verwijderd en te dunne aansluitleiding.
Verlengingskabel minstens 1,5 mm², max. 25 meter
lang. Bij langere kabels doorsnede minstens 2,5 mm².
motorveiligheidsschakelaar
uit.
. Toestel
terug.
TTeecchhnniisscchhee ggeeggeevveennss
Model
2300 2500 2800
Type AH 600 AH 600 AH 600
Motor Wisselstroommotor 230 V, 50 Hz, 2800 min
Vermogen P
Toerental snijwals 40 min
S6 - 40 % 2300 W 2500 W 2800 W
1
-1
-1
Aan-/uitschakelaar met beveiliging tegen overbelasting; snij- en achteruit-functie; nulspanninginitiator
Gewicht 24 kg 24,5 kg 25 kg
Geluidsdrukpegel L
(volgens richtlijn 2000/14/EG)
gemeten geluidsniveau L
PA
WA
(volgens richtlijn 2000/14/EG)
gegarandeerd geluidsniveau LWA
(volgens richtlijn 2000/14/EG)
83,8 dB (A)
K = 3 dB (A)
84,2 dB (A)
K = 3 dB (A)
82,5 dB (A)
K = 3 dB (A)
91 dB (A) 91 dB (A) 91 dB (A)
92 dB (A) 92 dB (A) 92 dB (A)
max. te verwerkende takmiddellijn
(geldt alleen voor het snijden van vers
∅ max. 35 mm ∅ max. 40 mm ∅ max. 44 mm
hout)
Veiligheidsklasse I
Veiligheidssoort IP X4
Netzekering
Zwitserland
UK
16 A traag
10 A traag
13 A traag
16 A traag
--
13 A traag
16 A traag
--
13 A traag
GGaarraannttiiee
Houdt u alstublieft rekening met de ingesloten garantieverklaring.
78
Page 80

Zanim nie przeczytają Państwo niniejszej Instrukcji
obsługi, nie przyjmą do wiadomości i przestrzegania
zawartych w niej wskazówek oraz nie zmontują urządzenia w
opisany poniżej sposób, nie wolno uruchomić urządzenia.
Niniejszą instrukcję należy przechować dla późniejszego
wykorzystania.
SSppiiss ttrreeśścci
i
Deklaracja zgodności UE 79
Zakres dostawy 79
Opis urządzenia 79
Symbole na urządzeniu 80
Symbole w Instrukcji obsługi
80
Czas użytkowania 80
Stosowanie zgodne z przeznaczeniem 80
Pozostałe elementy ryzyka 80
Bezpieczna praca 81
Uruchomienie 82
Praca rozdrabniaczem ogrodowym 83
Ustawienie przeciwnoża 84
Konserwacja i dogląd 84
Możliwe zakłócenia w pracy urządzenia 85
Dane techniczne 86
Gwarancja 86
Montaż 116
Części zamienne 118
ZZaakkrreess ddoossttaawwyy
Po rozpakowaniu kartonu należy sprawdzić
! kompletność dostawy
! ew. szkody transportowe
Należy odwrotnie poinformować dystrybutora, dostawcę bądź
producenta o zastrzeżeniach. Późniejsze reklamacje nie zostaną
uwzględnione.
• 1 wstępnie zmontowane urz ądzenie
• 1 noga stojaka-lewa
• 1 noga stojaka-prawa
• 1 oś
• 2 koła
• 2 zaślepki osi
• 1 woreczek zawierający śruby
• 1 worek wychwytujący
• 1 Instrukcja obsługi
OOppiiss uurrzząąddzzeenniia
a
DDeekkllaarraaccjjaa zzggooddnnoośśccii UUEE
z dyrektywą: 2006/42/WE
Niniejszym my, firma
ATIKA GmbH & Co. KG
Schinkelstraße 97, 59227 Ahlen – Germany
oświadczamy, przyjmując na siebie wyłączną odpowiedzialność, że
następujący produkt,
Gartenhäcksler (rozdrabniacz) typ AH 600
Numer seryjny: patrz ostatnia strona
jest zgodny z postanowieniami dyrektyw Wspólnoty Europejskiej oraz
następujących, innych dyrektyw:
2004/108/WE, 2006/95/WE i 2000/14/WE.
Zastosowane zostały następujące normy zharmonizowane:
EN 60335-1:2002+A1+A11+A12+A2+A13;
EN 13683:2003+A1:2009; EN 62233:2008; EN 55014-1:2006;
EN 55014-2/A1:2001; EN 61000-3-2:2006; EN 61000-3-11:2000
Postępowanie szacunku zgodności:
2000/14/WE - Wyrostek robaczkowy V.
Mierzony poziom ciśnienia akustycznego L
Gwarantowany poziom ciśnienia akustyczneg L
91 dB (A).
WA
92 dB (A).
WA
Przechowywanie dokumentacji technicznej:
ATIKA GmbH & Co. KG – Biuro Techniczne – Schinkelstr. 97
59227 Ahlen – Germany
Ahlen, 30.04.2010 A. Pollmeier, generalny direktor
A. otwór leja zasypowego dla rozdrabnianych przedmiotów
B. uchwyt
C. przycisk powrotny / bezpiecznik silnika
D. gniazdo wtykowe
E. włącznik / wyłącznik
F. przełącznik kierunku obrotów
G. podwozie
H. górna część obudowy
I. pokrętło ustawcze walca tnącego
J. szczelina wylotowa
79
Page 81

SSyymmbboollee nnaa uurrzząąddzzeenniiuu
Przed uruchomieniem
urządzenia
należy dokładnie
przeczytać
instrukcję obsługi
i stosować się
do zamieszczonych w niej
wskazówek.
Przed
rozpoczęciem
wykonywania
napraw, czynności
obsługowokoserwacyjnych
oraz czyszczenia
urządzenia należy wyłączyć
silnik i wyjąć wtyczkę z gniazda
zasilania sieciowego.
Niebezpieczeńst
wo wywołane
przez części
obracające się
podczas pracy
silnika – nie pozwolić na zbliżanie
się osób nieuczestniczących
Uwaga na
obracające się
noże. Nie wkładać
dłoni i rąk do
otworów, gdy
maszyna pracuje.
w pracy oraz zwierząt
domowych i użytkowych do
strefy zagrożenia.
Stosować ochronę
narządów wzroku i słuchu.
Nosić rękawice
ochronne.
Chronić przed
wilgocią.
Urządzenie elektryczne nie nadają się do wyrzucania
z odpadami domowymi. Urządzenia, osprzęt i
opakowania należy poddawać ekologicznemu
recyklingowi.
Zgodnie z dyrektywą europejską 2002/96/WE w sprawie urządzeń
elektrycznych i niesprawne urządzenia należy gromadzić
oddzielnie i poddawać utylizacji zgodnie z zasadami ochrony
środowiska.
SSyymmbboollee ww IInnssttrruukkccjjii oobbssłłuuggi
i
Zagrażające niebezpieczeństwo lub niebezpieczna
sytuacja. Nieprzestrzeganie niniejszych wskazówek
może prowadzić w następstwie do odniesienia obrażeń
lub wystąpienia szkód rzeczowych.
Ważne wskazówki dotyczące prawidłowej obsługi.
L
Nieprzestrzeganie niniejszych wskazówek może
prowadzić do zakłóceń w pracy urządzenia.
Wskazówki dla użytkownika. Wskazówki te pomagają
w optymalnym wykorzystaniu wszystkich funkcji
urządzenia.
Montaż, obsługa i konserwacja. Tutaj następuje
dokładne objaśnienie czynności, które należy wykonać.
CCzzaass uużżyyttkkoowwaanniiaa
Należy stosować się do przepisów lokalnych.
SSttoossoowwaanniiee zzggooddnnee zz pprrzzeezznnaacczzeenniieem
m
Pojęcie zgodnej z przeznaczeniem eksploatacji obejmuje
rozdrabnianie:
- wszelkiego rodzaju gałęzi do maksymalnej średnicy (w
zależności od rodzaju drewna i jego świeżości).
- zwiędłych, wilgotnych, kilka dni składowanych odpadów
ogrodowych na zmianę z gałęziami.
Z naciskiem wyklucza się rozdrabnianie przedmiotów ze szkła,
metali, tworzyw sztucznych, plastikowych torebek, kamieni,
odpadów materiałówych, korzeni z ziemią, odpadów niestałych
(np. odpadów kuchennych).
Rozdrabniacz ogrodowy jest przewidziany wyłącznie do
hobbystycznego stosowania w ogródkach domowych.
Za rozdrabniacze do ogródków domowych i hobbystycznych
uznaje się takie urządzenia, których nie używa się na publicznych
skwerach, w parkach, obiektach sportowych, w rolnictwie i
leśnictwie i nie w ramach działalności gospodarczej.
Do eksploatacji zgodnej z przeznaczeniem zalicza się także
dotrzymywanie podanych przez producenta warunków
eksploatacji, konserwacji i napraw, jak również stosowanie się do
umieszczonych w instrukcji obsługi wskazówek bezpieczeństwa.
Każdy inny przypadek użytkowania maszyny, niż podany w
instrukcji obsługi, uważa się za niezgodny z przeznaczeniem.
Producent nie odpowiada za wynikające stąd szkody: ryzyko
ponosi wyłącznie użytkownik.
Samowolne przeróbki sieczkarni ogrodowej wykluczają gwarancję
producenta za wynikające z nich szkody wszelkiego rodzaju.
Urządzenie mogą uzbrajać, stosować i konserwować tylko osoby,
które je znają i są pouczone o zagrożeniach. Wykonywanie prac
naprawczych wolno powierzać tylko nam lub wyznaczonym przez
nas punktom serwisowym.
PPoozzoossttaałłee eelleemmeennttyy rryyzzyykkaa
Także przy posługiwaniu się urządzeniem w sposób zgodny
ze wszystkimi obowiązującymi przepisami dotyczącymi
bezpieczeństwa mogą, w związku z jego przeznaczeniem i
konstrukcją, pozostać jeszcze pewne elementy ryzyka.
Te pozostałe elementy ryzyka można zminimalizować,
przestrzegając łącznie „wskazówek bezpieczeństwa“,
„stosowania zgodnego z przeznaczeniem“ oraz instrukcji obsługi.
Praca wykonywana w przemyślany sposób i z zachowaniem
należytej ostrożności zmniejsza ryzyko odniesienia obrażeń przez
inne osoby oraz ryzyko spowodowania szkód.
Niebezpieczeństwo odniesienia obrażeń palców i rąk, jeżeli
ręka zostanie włożona przez otwór wpustowy do wnętrza
maszyny i nastąpi kontakt z wirującymi nożami.
Niebezpieczeństwo odniesienia obrażeń palców i rąk podczas
montażu i czyszczenia zespołu noży tnących.
Obrażenia odniesione przez uderzenie odrzuconym
rozdrobnionym materiałem w strefie leja wpustowego.
Zagrożenie porażeniem prądem przy stosowaniu
nieprawidłowych przewodów zasilania energią elektryczną.
Dotknięcie elementów przewodzących prąd przy otwartych
podzespołach elektrycznych.
80
Page 82

Uszkodzenie słuchu wskutek długotrwałego użytkowania
maszyny bez stosowania odpowiedniego zabezpieczenia
narządu słuchu przed hałasem.
Ponadto, pomimo wszystkich zastosowanych środków
zapobiegawczych mogą wystąpić elementy utajonego ryzyka.
BBeezzppiieecczznnaa pprraaccaa
W celu ochrony siebie samego i innych przed ewen-
tualnymi obrażeniami, przed włączeniem niniejszego produktu należy przeczytać i stosować się do następujących
wskazówek i przepisów o zapobieganiu wypadkom, opracowanych przez Wasze zrzeszenia branżowe lub do obowiązujących lokalnie w danym kraju regulacji dotyczących
bezpieczeństwa.
Należy przekazać niniejsze wskazówki dotyczące bez-
L
pieczeństwa wszystkim osobom, które użytkują maszynę.
Niniejsze wskazówki dotyczące bezpieczeństwa należy
L
starannie przechowywać.
Naprawy wyłącznika bezpieczeństwa mogą być
wykonywane wyłącznie przez producenta lub firmy
posiadające jego autoryzację.
Przy pomocy niniejszej instrukcji należy zapoznać się z
urządzeniem przed rozpoczęciem użytkowania.
Nie należy stosować urządzenia do celów, do których nie jest
ono przeznaczone (patrz Użytkowanie zgodne z
przeznaczeniem i praca rozdrabniaczem ogrodowym).
Przyjąć bezpieczną postawę i stale utrzymywać
równowagę. Nie wyciągać się nad urządzeniem. Podczas
wrzucania materiału, który ma zostać rozdrobniony, stać na
równej wysokości z urządzeniem.
Pracować uważnie i zwracać uwagę na wykonywane
czynności. Zachować rozsądek podczas pracy. Nie używać
urządzenia w stanie zmęczenia, pod wpływem narkotyków,
alkoholu lub leków. Moment nieuwagi podczas używania
urządzenia może doprowadzić do poważnych obrażeń.
Podczas pracy stosować okulary ochronne, rękawice
robocze i ochronę narządu słuchu.
Należy także stosować odpowiednią odzież roboczą:
− nie nosi ć zbyt obszernej odzieży
− stosować obuwie o antypoślizgowych podeszwach
Obsługujący maszynę odpowiada w miejscu użytkowania
maszyny w stosunku do osób trzecich.
Dzieci i młodzież poniżej 16 roku życia nie mogą obsługiwać
urządzenia.
Dzieci muszą pozostawać z dala od urządzenia.
Nigdy nie używać urządzenia, gdy w pobliżu są osoby
niebiorące udziału w pracy.
Nie pozostawiać urządzenia bez dozoru.
Na stanowisku pracy należy utrzymywać porządek!
Następstwem nieporządku mogą być wypadki.
Prawidłowa pozycja pracy to pozycja z boku lub z tyłu
urządzenia. Nie należy nigdy pozostawać w pobliżu otworu
wyrzucania rozdrobnionego materiału.
Nie należy nigdy wkładać rąk do otworów wpustu lub
wyrzucania.
Twarz i ciało powinny pozostawać z dala od otworu wpustu
materiału.
Nie należy przeciążać urządzenia! Praca w podanym
zakresie wykorzystania mocy jest łatwiejsza i
bezpieczniejsza.
Użytkować urządzenie tylko z kompletnymi i prawidłowo
zamontowanymi urządzeniami ochronnymi i nie dokonywać
przy maszynie żadnych zmian, które mogą mieć wpływ na
zmniejszenie bezpieczeństwa.
Nie zmieniać prędkości obrotowej silnika, gdyż reguluje ona
maksymalną bezpieczną prędkość roboczą maszyny i chroni
silnik oraz wszystkie obracające się części przed
uszkodzeniem na skutek nadmiernej prędkości.
Nie eksploatować urządzenia bez leja wpustowego.
Nie dokonywać zmian konstrukcyjnych urządzenia ani jego
podzespołów.
Przed włączeniem silnika należy zamknąć urządzenie.
Nie spryskiwać urządzenia wodą (zagrożenie porażeniem
prądem elektrycznym).
Uwzględnić wpływ środowiska:
− Nie używać urządzenia w wilgotnym i mokrym otoczeniu.
− Nie pozostawiać urz ądzenia oraz nie pracować w czasie
opadów deszczu.
− Zapewnić dobre oświetlenie.
Przechowywać urządzenie w suchym miejscu i uniemożliwić
dostęp dzieciom.
Aby uniknąć zagrożenia odniesienia obrażeń palców, podczas
prac związanych z montażem i czyszczeniem należy zakładać
rękawice ochronne.
Do wykonywania następujących robót należy wyłączyć
maszynę i wyjąć wtyczkę z gniazda zasilania sieciowego:
− Naprawy
− Czynności obsługowo-konserwacyjne
− Sprawdzanie , czy przewody przyłączeniowe
nie są splątane lub uszkodzone
− Usuwanie zakłóceń
− Transport
− Pozostawienie urządzenia (także na krótki okres czasu)
W przypadku zapchania otworu wrzutowego i wyrzutowego
maszyny wyłączyć silnik i wyjąć wtyczkę sieciową, zanim
usunie się pozostałości materiału w otworze wrzutowym lub
wyrzutowym.
Sprawdzić maszynę, czy nie wykazuje ona ewentualnych
uszkodzeń:
− Przed dalszym użytkowaniem urządzenia należy starannie
sprawdzić, czy urządzenia ochronne zostały w
prawidłowy sposób zamontowane i czy spełniają swoją
funkcję.
− Sprawdzić, czy części ruchome należycie funkcjonują,
czy nie są blokowane oraz, czy jakieś części nie uległy
uszkodzeniu. Dla zapewnienia prawidłowej eksploatacji
urządzenia wszystkie jego części muszą zostać należycie
zamontowane i muszą spełniać wszystkie stawiane
wymogi.
− Jeżeli niniejsza instrukcja nie stanowi inaczej, wszystkie
uszkodzone urządzenia ochronne muszą zostać
fachowo naprawione lub wymienione przez autoryzowany
warsztat.
− Uszkodzone lub nieczytelne etykiety bezpieczeństwa
należy wymienić na nowe.
Nieużywane urządzenia przechowywać w suchym,
zamkniętym pomieszczeniu poza zasięgiem dzieci.
81
Page 83
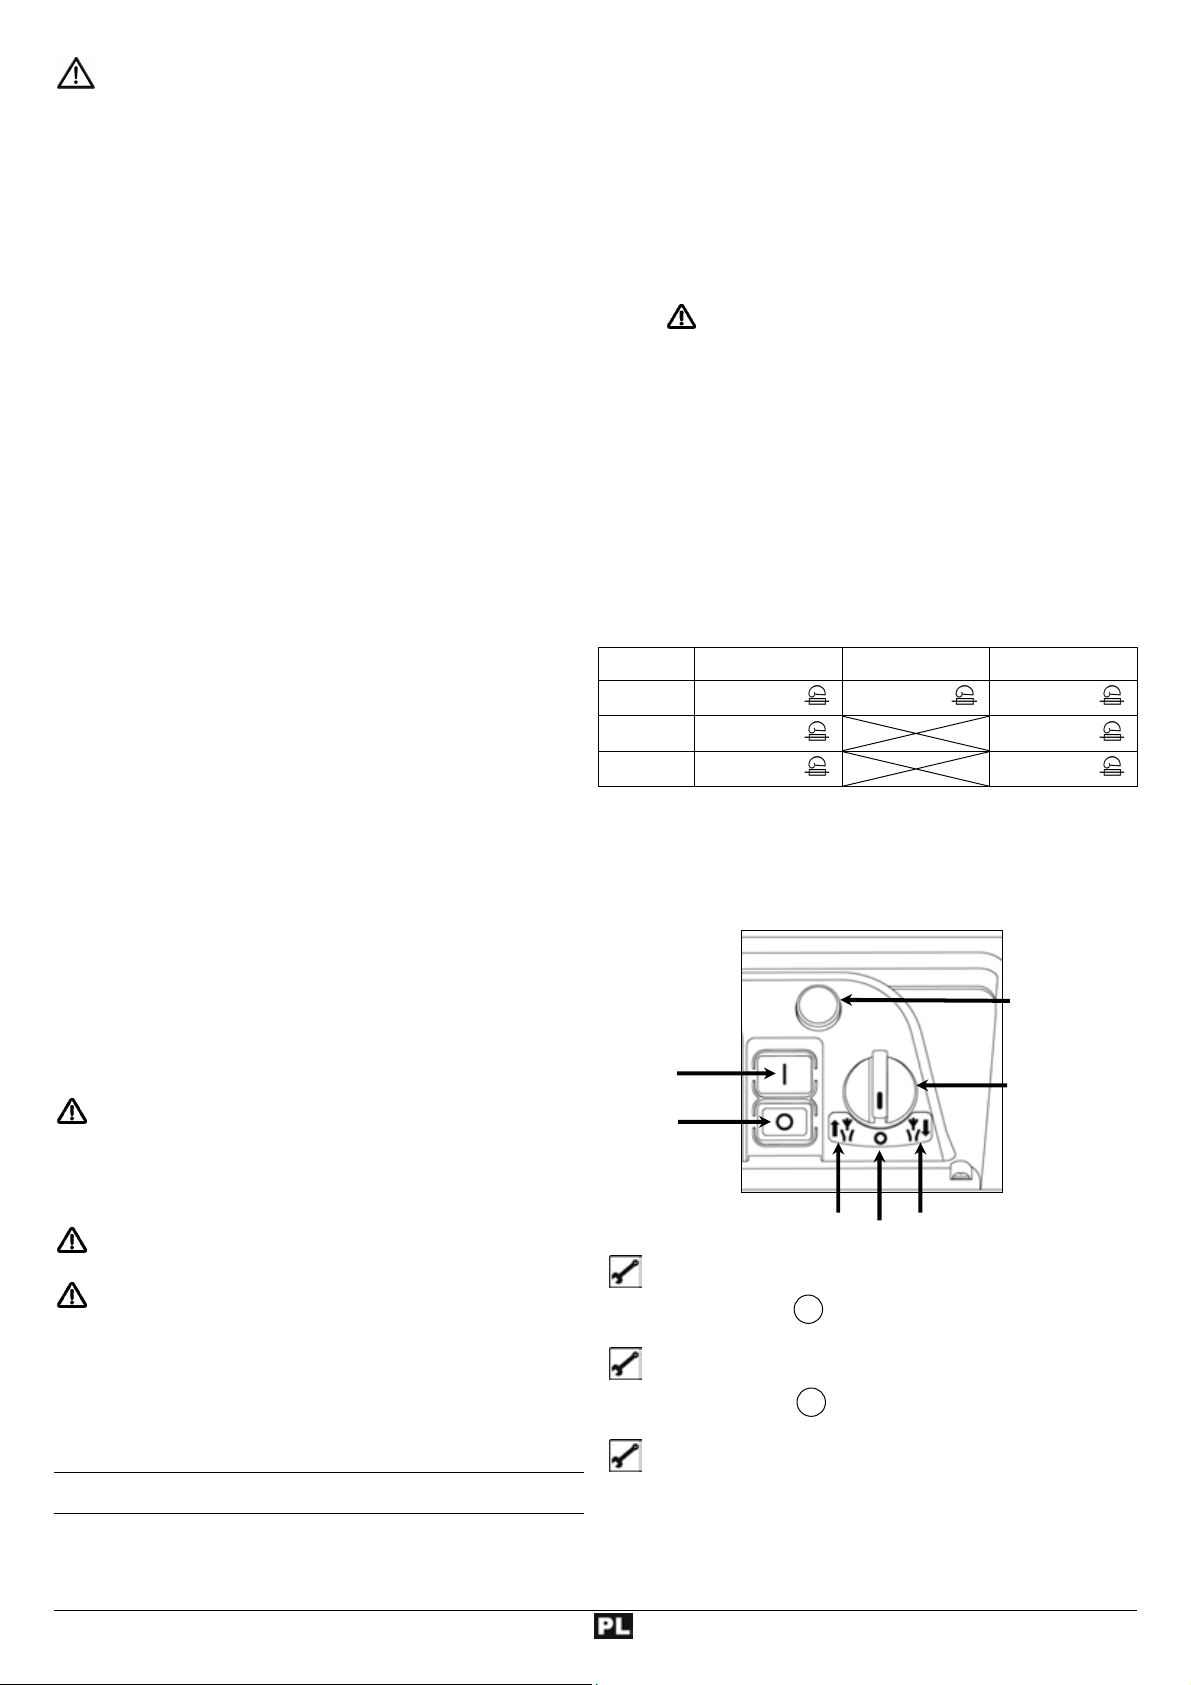
Bezpieczeństwo urządzeń
elektrycznych
Wykonanie przewodu zasilania sieciowego zgodnie z IEC
60245 (H 07 RN-F) o minimalnych przekrojach:
− 1,5 mm² przy przewodzie do 25 m
− 2,5 mm² przy przewodzie powyżej 25 m
Długie i cienkie przewody zasilające powodują spadek
napięcia. Silnik nie uzyskuje wówczas swojej maksymalnj
mocy, spadają także wydajność i moc urządzenia.
Wtyczki i gniazda wtykowe przewodów zasilających i
przedłużaczy muszą być wykonane z gumy, miękkiego PCW
lub innych materiałów termoplastycznych o jednakowej
wytrzymałości mechanicznej, lub muszą być odpowiednio
takim materiałen zaizolowane.
Wtyczki przewodów zasilających i przedłużaczy muszą być
chronione przez rozbryzgami wody.
Przy układaniu przewodu zasilania sieciowego należy
zwrócić uwagę na to, żeby nie został zgnieciony ani złamany
oraz żeby połączenie wtykowe nie uległo zawilgoceniu.
Nie należy stosować przewodu zasilającego do celów, do
których nie jest przewidziany. Należy chronić przewód
zasilania przed wysokimi temperaturami, olejem i ostrymi
krawędziami. Nie wyciągać wtyku z gniazda zasilania
sieciowego ciągnąc za przewód.
Podczas używania bębna do nawijania kabla kabel należy w
pełni rozwinąć.
Regularnie sprawdzać stan techniczny przewodu
przedłużacza i wymienić go, jeżeli jest uszkodzony . Nie
należy posługiwać się uszkodzonymi przewodami
zasilającymi.
Podczas pracy na otwartej przestrzeni należy stosować tylko
dozwolone do tego i odpowiednio oznakowane przedłużenia
przewodów zasilających.
Nie należy posługiwać się prowizorycznymi przyłączami
elektrycznymi.
Nie należy nigdy stosować obejść urządzeń
zabezpieczających, ani ich wyłączać.
Przyłączyć urządzenie poprzez wyłącznik ochronny
prądowy (30 mA).
Przyłącze elektryczne lub naprawy podzespołów
elektrycznych maszyny mogą być wykonywane wyłącznie
przez koncesjonowanego elektrotechnika lub jedną z
naszych stacji obsługi klienta. Należy przy tym stosować się do
lokalnych przepisów dotyczących bezpieczeństwa.
Naprawy innych podzespołów maszyny wykonuje producent
lub jedna z jego stacji obsługi klienta.
Należy stosować wyłącznie oryginalne części zamienne oraz
elementy wyposażenia standardowego i specjalnego. Wskutek
stosowania innych części zamiennych oraz elementów
wyposażenia użytkownik może ulec wypadkowi. Za szkody
wynikłe wskutek powyższego producent nie przyjmuje na
siebie odpowiedzialności.
UUrruucchhoommiieenniiee
Upewnić się, czy urządzenie jest kompletne oraz czy jest
prawidłowo zmontowane.
W celu użytkowania należy ustawić rozdrabniacz na poziomym
i mocnym podłożu (niebezpieczeństwo przew-rócenia).
Nie ustawiać urządzenia na brukowanym lub szutrowym
podłożu.
Używać urządzenia wyłącznie na wolnym powietrzu.
Zachować odległość (co najmniej 2 m) od ściany lub innych
sztywnych przedmiotów.
Przed każdym użyciem należy sprawdzić:
− czy przewody zasilania energią nie wykazują uszkodzeń
(pęknięć, przecięć itp.),
Nie należy posługiwać się uszkodzonymi prze-wodami.
− czy nie występują inne uszkodzenia (patrz – Bezpieczne
wykonywanie pracy),
− czy wszystkie śruby zostały prawidłowo dokręcone.
L Przyłącze sieciowe
Należy porównać wartość napięcia znamionowego podaną na
tabliczce urządzenia z wartością napięcia sieciowego i
podłączyć urządzenie do przepisowego gniazda wtykowego.
Stosować przedłużenia przewodów zasilania sieciowego o
wystarczającym przekroju.
Bezpiecznik zasilania sieci
Szwajcarii UK
2300 W
2500 W
2800 W
Włącznik / wyłącznik
Nie używać urządzeń, których wyłączniki nie dają się włączyć lub
wyłączyć. Uszkodzone wyłączniki muszą być niezwłocznie
naprawione lub wymienione przez serwis.
16 A bierny
16 A bierny
16 A bierny
ZAŁ
WYŁ
ruch wstecz
Włączenie
Wciśnij zielony przycisk I .
Wyłączenie
Wciśnij zielony przycisk 0 .
Zabezpieczenie przed
samorozruchem
W przypadku zaniku prądu urządzenie automatycznie wyłącza się
(wyzwalacz zanikowy). Aby je włączyć, ponownie wcisnąć zielony
przycisk.
10 A bierny 13 A bierny
13 A bierny
13 A bierny
przycisk powrotny (ochrona silnika)
przełącznik
kierunku ruchu
WYŁ
wciąganie
82
Page 84

Ochrona silnika
Silnik posiada wyłącznik ochronny i w przpadku przeciążenia
samoczynnie się wyłącza. Po około 5-minutowej przerwie na
ochłodzenie silnik można ponownie włączyć. W tym celu wciśnij:
1. przycisk powrotny (ochrony silnika)
2. zielony przycisk I dla ponownego włączenia.
Przełącznik zmiany kierunku obrotów
Przełącznik zmiany kierunku obrotów wolnom uruchamiać
tylko przy wyłączonej rozdrabniarce.
Nastawa
Silnik nie podejmuje pracy.
Nastawa
Walec tnący wciąga i rozdrabnia cięty materiał..
Nie należy nigdy wkładać rąk do otworu wsadu lub do otworu
wylotu rozdrobnionego materiału.
Twarz i ciało obsługującego powinny pozostawać z dala od
otworu wsadu.
Nie wkładaj dłoni, innych części ciała i odzieży do rury wlotowej,
kanału wylotowego lub w pobliże innych ruchomych części.
Przed włączeniem urządzenia należy sprawdzić, czy w leju
wpustowym nie ma pozostałości rozdrabnianego materiału.
Nie przechylać urządzenia podczas pracy silnika.
Podczas napełniania należy zwrócić uwagę na to, żeby w leju
wpustowym maszyny nie znalazły się przedmioty metalowe,
kamienie, butelki oraz inne przedmioty nienadające się do
rozdrobnienia.
Jeżeli takie przedmioty znalazły się w leju wpustowym, lub jeżeli
urządzenie zaczyna wydawać odgłosy nietypowe dla normalnej
pracy lub wpadać w wibracje, to należy je natychmiast wyłączyć
i odczekać aż się zatrzyma. Wyjąć wtyk z gniazda zasilania
sieciowego i wykonać następujące czynności:
− ustalić rodzaj i zakres szkód,
− wymienić lub naprawić uszkodzone podzespoły,
− sprawdzić urządzenie i dokręcić luźne podzespoły
Nastawa
Nóż pracuje w odwrotnym kierunku, zakleszczony materiał zostaje
uwolniony.
Po ustawieniu przycisku zmiany kierunku obrotu walców w
położeniu
Walec tnący jest ustawiany w odwrotnym kierunku. Po zwolnieniu
przyciski włącznika / wyłącznika rozdrabniarka automatycznie się
zatrzyma.
Wskazówki
z Większe przedmioty i kawałki drewna można usunąć przez
wielokrotne uruchamianie zarówno w kierunku rozdrabniania,
jak i w kierunku wstecznym.
z Aby usunąć zablokowane przedmioty z leja zasypowego lub
szczeliny wyrzutnika, korzystaj z upychacza lub z haka.
Przed ponownym uruchomieniem rozdrabniarki poczekaj,
aż się całkowicie zatrzyma.
Impedancja sieci zasilania
W niekorzystnych warunkach sieciowych może w czasie włączania
urządzenia dojść do krótkotrwałego spadku napięcia, który może
wywrzeć ujemny wpływ na inne urządzenia (np. migotanie lampy).
Jeżeli zostaną zachowane maksymalne impedancje sieci podane w
tabeli, nie powinny wystąpić żadne zakłócenia.
Pobór mocy P
L
Podczas pracy należy pozostawać z boku urządzenia lub z
tyłu. Nie należy nigdy znajdować się w strefie otworu wylotu
rozdrobnionego materiału.
leja, mogą gwałtownie cofnąć się podczas wciągania przez noże
! Zachować bezpieczną odległość!
przytrzymaj zielony przycisk włącznika / wyłącznika.
(W)
1
Impedancja sieci Z
max
(Ω)
2300 0,21
2500 0,21
2800 0,19
PPrraaccaa rroozzddrraabbnniiaacczzeemm ooggrrooddoowwyym
m
Wkładane do urządzenia matariały dłuższe, które wystają z
Jeżeli nie dysponują Państwo odpowiednimi uprawnieniami, to
nie wolno samodzielnie naprawiać urządzenia.
Co mogę rozdrabniać?
Tak:
• Wszelkiego rodzaju gałęzie o maksymalnej średnicy
(w zależności od rodzaju i świeżości drewna)
• zwiędłe, wilgotne, składowane już od szeregu dni odpady
ogrodowe
rozdrabniać tylko na przemian z gałęziami
Nie:
• szkło, przedmioty metalowe, tworzywa sztuczne, torby
plastikowe, kamienie, odpady tkanin, korzenie z ziemią.
• odpady o niestałej konsystencji np. odpadki kuchenne.
Szczególne wskazówki dotyczące
rozdrabniania:
¾ Materiał do rozdrab-niania
wkładać zawsze z prawej strony
otworu napałniania leja.
¾ Gałęzie, gałązki i drzewka należy
rozdrobnić wkrótce po ich
obcięciu
− powyższy materiał po wyschnięciu stanie się bardzo twardy i
maksymalny przekrój gałęzi nadających się do rozdrobnienia
będzie wskutek tego dużo mniejszy.
¾ Przy rozłożystych gałęziach należy poobcinać boczne pędy.
¾ Rozdrabnianie odpadków ogrodowych lub kuchennych o dużej
zawartości wody i wskutek tego skłonnych do sklejania się
− w celu uniknięcia zapchania maszyny wskutek posklejania
należy je rozdrabniać na przemian z materiałem
drewnianym.
¾ Nie pozwolić, aby nagromadzenie rozdrobnionego materiału
urosło zbyt wysoko w okolicy otworu wylotowego. Może to
spowodować zapchanie kanału wylotowego przez rozdrobniony
już materiał. W wyniku tego może dojść do wyrzucenia
materiału z powrotem przez otwór wlotowy.
83
Page 85

Wyczyść otwór wlotowy i kanał wylotowy, gdy urządzenie
¾
zapcha się. W tym celu najpierw wyłączyć silnik i wyciągnąć
wtyczkę z gniazdka.
¾ Zwracać uwagę na to, żeby nie przekraczać maksymalnej
grubości gałęzi dozwolonej dla urządzenia (patrz – „Dane
techniczne”
zmniejszyć maksymalna średnica gałęzi, które można obrabiać.
). Zależnie od rodzaju i świeżości drewna może się
¾ Urządzenie tnące w maszynie wciąga materiał do
rozdrabniania w znacznym stopniu samodzielnie.
¾ Samoczynna zmiana kierunku obrotów:
Przy nagłym zablokowaniu urządzenia może nastąpić zmiana
kierunku obrotów walca tnącego i w takim przypadku materiał
zostanie wysunięty w przeciwnym kierunku.
− wyłączyć urządzenie
− odczekać aż się zatrzyma walec tnący
− Ponownie włączyć urządzenie i zastosować materiał łatwiej
ulegający rozdrobnieniu.
¾ Przy przeciążeniu urządzenia nastąpi samoczynne wyłączenie
silnika wyposażonego w wyłącznik przeciążeniowy.
− ponownie włączyć urządzenie po upływie około 5 min.
− je żeli po tym czasie oczekiwania nie będzie można włączyć
ponownie urządzenia – patrz punkt „Zakłócenia w pracy
urządzenia“.
KKoonnsseerrwwaaccjjaa ii ddoogglląądd
• Przed rozpoczęciem każdej obsługi urządzenia
− wyłączyć silnik i wyjąć wtyk z gniazda zasilania sieciowego
− w celu uniknięcia skaleczeń założyć rękawice ochronne
Urządzenie tnące nie zatrzymuje się natychmiast po wyłączeniu.
Przed naprawą lub konserwacją należy odczekać, aż zatrzymają się
wszystkie części.
Po konserwacji lub naprawie pamiętać o usunięciu narzędzi i
kluczy do śrub.
• Rozdrabniacz ogrodowy nie wymaga większej konserwacji. W
celu zachowania wartości urządzenia i jego długiej trwałości
należy zwrócić uwagę na następujące zagadnienia:
− szczeliny wentylacyjne należy utrzymywać w wolnym i
czystym stanie.
− sprawdzać (i w razie potrzeby dokręcać) śruby mocujące.
− po zakończeniu rozdrabniania wyczyścić urządzenie.
Do czyszczenia urządzenia używać tylko ciepłej wilgotnej
ścierki i miękkiej szczotki.
Nigdy nie stosować środków czyszczących lub
rozpuszczalników. W ten sposób można by spowodować
szkody nie do naprawienia. Części z tworzywa sztucznego
mogą zostać uszkodzone przez chemikalia.
UUssttaawwiieenniiee pprrzzeecciiwwnnoożżaa
Przeciwnóż (B) można ustawić przy wałku tnącym (A) bez luzu. Dla
zapewnienia efektywnej eksploatacji należy zachować możliwie
mały odstęp.
Miękkie materiały lub wilgotne gałęzie mogą być rozrywane zamiast
cięte. Także, stępiony podczas wielokrotnego użytku przeciwnóż,
może być przyczyną takich problemów.
Ustawienie odstępu.
Włącz urządzenie.
Z prawej strony korpusu z tworzywa sztucznego znajduje się
mechanizm regulacji. W celu ustawienia odstępu obracać pokrętło
ustawcze (D) w prawo, tak aby śruba (C) przesuwała się do walca
tnącego. Dokręcaj tak długo, aż ze szczeliny wylotowej zaczną
wypadać drobne wióry aluminium.
− nie należy czyścić rozdrabniacza pod bieżącą wodą lub przy
pomocy myjni wysokociśnieniowej.
− niemalowane podzespoły metalowe należy po każdym
użyciu zabezpieczyć przed korozją poprzez spryskanie
olejem nieszkodliwym dla środowiska naturalnego i
ulegającym rozkładowi biologicznemu.
− Walec tnący i płyta tnąca są podzespołami ulegającymi
zużyciu eksploatacyjnemu. Jednakże przy normalnym
użytkowaniu i przepisowej regulacji okres ich trwałości
wynosi wiele lat.
84
Page 86

MMoożżlliiwwee zzaakkłłóócceenniiaa ww pprraaccyy uurrzząąddzzeenniiaa
Przed każdą naprawą
− wyłączyć urządzenie
− Odczekać, aż zatrzyma się urządzenie
− wyciągnąć wtyczkę z gniazda
Zakłócenie Możliwa przyczyna Sposób usunięcia
silnik nie podejmuje pracy - kierunku obrotów ustawić w położeniu „0”
- brak napięcia sieciowego
- uszkodzony przewód zasilania sieciowego
- przeciążenie urządzenia
- Urządzenie wyłączyć i przestawić przełącznik kierunku
obrotów.
- sprawdzić zabezpieczenie
- zlecić sprawdzenie (elektrotechnikowi)
- urządzenie ochłodzić.
Wciśnij przycisk
1. przycisk powrotny / bezpiecznik silnika
2. zielony przycisk I dla ponownego włączenia.
silnik wydaje pomruki ale nie
podejmuje pracy
- zablokowany walec tnący
- niesprawny kondensator
- urządzenie wyłączyć.
Przełącznik kierunku obrotów ustawić w położeniu
Urządzenie włączyć do momentu usunięcia blokady.
Urządzenie ponownie wyłączyć. Przełącznik kierunku
obrotów ustawić ponownie w położeniu
- zlecić wykonanie naprawy producentowi lub wskazanej
przez niego firmie
materiał do rozdrabniania nie
zostaje wciągnięty
- Walec tnący obraca się w kierunku
wstecznym. Błędne położenie przełącznika
- materiał do rozdrabniania zaciął się w leju
wpustowym
- zbyt miękki lub mokry materiał do
rozdrabniania
- zużycie eksploatacyjne walca tnącego
- Urządzenie wyłączyć i przestawić przełącznik kierunku
obrotów.
- Urządzenie wyłączyć. Przełącznik kierunku obrotów
ustawić w położeniu
zakleszczony materiał, ewentualnie usunąć
zanieczyszczenia.
Urządzenie ponownie wyłączyć. Aby kontynuować
pracę, przestawić przełącznik kierunku obrotów na
powrót w położenie
- popchnąć materiał przy pomocy gałęzi i rozdrobnić
- Płytę dociskową ustawić zgodnie z opisem zawartym w
rozdziale „Ustawienie płyty dociskowej“. W przypadku
silniejszego zużycia wymienić walec tnący
materiał do rozdrabniania nie
- Złe ustawienie przeciwnoża - Ustawić przeciwnóż
zostaje wciągnięty
urządzenie podejmuje pracę,
jednakże ulega zablokowaniu
już przy niewielkim obciążeniu
i zostaje wyłączone przez
wyłącznik ochronny silnika
przedłużenie przewodu zasilania silnika jest
za długie lub o zbyt małym przekroju,
gniazdo zasilania sieciowego w zbyt dużej
odległości od przyłącza głównego oraz zbyt
mały przekrój przewodu przyłącza
przekrój przedłużenie przewodu zasilania sieciowego
minimum 1,5 mm², maksymalna długość 25 m – przy
dłuższym przewodzie przekrój minimum 2,5 mm².
elektrycznego.
.
.
. Urządzenie włączyć i uwolnić
.
85
Page 87

DDaannee tteecchhnniicczznne
e
Model 2300 2500 2800
Typ AH 600 AH 600 AH 600
Silnik silnik prądu zmiennego 230 V~, 50 Hz, 2800 min
-1
Moc silnika P
Prędkość obrotowa walca tnącego 40 min
S6 - 40 % 2300 W 2500 W 2800 W
1
-1
Włącznik/wyłącznik z wyłącznikiem przeciążeniowym, funkcjami cięcia i wycofywania materiału,
wyzwalacz prądy zerowego
Ciężar 24 kg 24,5 kg 25 kg
Akustyczny poziom szumów L
PA
(pomiar wg 2000/14/EG)
Mierzony poziom ciśnienia akustycznego L
WA
(pomiar wg 2000/14/EG)
Gwarantowany poziom ciśnienia akustycznego L
WA
(pomiar wg 2000/14/EG)
Maksymalna grubość gałęzi do rozdrabniania
(obowiązuje w stosunku do świeżo obciętych gałęzi)
83,8 dB (A)
K = 3 dB (A)
91 dB (A) 91 dB (A) 91 dB (A)
92 dB (A) 92 dB (A) 92 dB (A)
∅ max. 35 mm ∅ max. 40 mm ∅ max. 44 mm
84,2 dB (A)
K = 3 dB (A)
82,5 dB (A)
K = 3 dB (A)
Klasa zabezpieczenia I
Stopień ochrony IP X4
Bezpiecznik zasilania sieciowego
Szwajcaria
UK
16 A bierny
10 A bierny
13 A bierny
16 A bierny
--
13 A bierny
16 A bierny
--
13 A bierny
GGwwaarraannccjjaa
Proszę przestrzegać załączonego oświadczenia gwarancyjnego.
86
Page 88

Запрещается вводить устройство в эксплуата-
цию до того, как Вы прочтете настоящую инструкцию по эксплуатации, учтете все приведенные указания и смонтируете устройство описанным образом
Сохранить инструкцию для использования в будущем.
ССооддеерржжааннииее
Заявление о соответствии требованиям 87
Объем поставки 87
Описание устройства 87
Символы, используемые в устройстве 88
Символы, используемые в инструкции по эксплуата-
88
ции
Время работы 88
Использование в соответствии с назначением 88
Остаточные источники риска 88
Безопасная работа 89
Ввод в эксплуатацию 90
Работа с садовым измельчителем 91
Настройка противорежущего ножа 92
Техническое обслуживание и уход 92
Возможные неполадки 93
Технические данные 94
Гарантия 94
Сборка 116
Запасные части 118
ООббъъеемм ппооссттааввккии
После распаковки проверьте содержимое картонной
упаковки на
! комплектность поставки,
! наличие возможных повреждений в результате транспор-
тировки.
Незамедлительно сообщите о рекламациях торговой организации или на завод-изготовитель. Рекламации, заявленные
позже, не признаются.
• 1 предварительно смонтированный узел устройства
• 1 стойка левая
• 1 стойка правая
• 1 ось
• 2 колеса
• 2 колпака колес
• 2 крышки колес
• 1 пакет с винтами
• 1 приемник
• 1 инструкция по эксплуатации
ООппииссааннииее ууссттррооййссттвва
а
ЗЗааяяввллееннииее оо ссооооттввееттссттввииии ттррееббоовваанниияямм ЕЕввррооппееййссккооггоо ССооююззаа
Согласно директиве ЕС: 2006/42/ЕС
-
Настоящим мы,
ATIKA GmbH & Co. KG
Schinkelstraße 97, 59227 Ahlen – Germany
заявляем под единоличную ответственность, что продукт
Gartenhäcksler (садовые измельчители) тип AH 600
Серийный номер: см. на последней странице
соответствует положениям вышеназванных директив ЕС, а
также положениям следующих дополнительных директив:
2004/108/ЕС и 2000/14/ЕС.
Были применены следующие согласованные стандарты:
EN 60335-1:2002+A1+A11+A12+A2+A13;
EN 13683:2003+A1:2009; EN 62233:2008; EN 55014-1:2006;
EN 55014-2/A1:2001; EN 61000-3-2:2006; EN 61000-3-11:2000
Метод оценки соответствия: 2000/14/ЕС – Приложение V
Замеренный уровень звуковой мощности LWA 91 дБ (A).
Гарантированный уровень звуковой мощности L
92 дБ (A).
WA
Сохранение технической документации:
ATIKA GmbH & Co. KG – техническое бюро – Schinkelstr. 97
59227 Ahlen – Germany
Ален, 30.04.2010 г. A. Польмайер, управляющий
A. Раструб для измельчаемого материала
B. Ручка
C. Клавиша возврата/защита двигателя
D. Сетевой штекер
E. Двухпозиционный переключатель
F. Переключатель направления вращения
G. Шасси
H. Верхняя часть корпуса
I. Ручка установки режущего валика
J. Шлиц для выброса
87
Page 89

ССииммввооллыы,, ииссппооллььззууееммыыее вв ууссттррооййссттввее
Перед вводом в
эксплуатацию
прочитать и соблюдать инструкцию по эксплуатации и указания по
технике безопасности. соединительного шнура.
Опасность
вылетания
частей при
работающем
двигателе – не
допускать в
опасную зону
посторонних, а также
домашних животных и скот.
Носить средства для
защиты глаз и слуха.
Электрические приборы не удалять в бытовой
мусор. Устройства, принадлежности и упаковку
направлять на утилизацию в соответствии с
требованиями окружающей среды.
В соответствии с Европейской директивой 2002/96/EG по
старым электрическим и электронным приборам больше
непригодные к использованию электроприборы должны
отдельно собираться и направляться на утилизацию в
соответствии с требованиями защиты окружающей среды.
во время работы машины.
Носить защитные перчатки.
ССииммввооллыы,, ииссппооллььззууееммыыее вв
ииннссттррууккццииии ппоо ээккссппллууааттааццииии
Грозящая опасность или опасная ситуация. Несоблюдение этих указаний может привести к травмам
или к материальному ущербу.
L
ВВррееммяя ррааббооттыы
Просьба соблюдать региональные предписания по защите от
шума.
Важные указания по надлежащему обращению.
Несоблюдение этих указаний может привести к неполадкам.
Указания для пользователя. Эти указания помогут
Вам оптимально использовать все функции.
Монтаж, обслуживание и техническое обслуживание. Здесь Вам даются точные разъяснения о том,
что Вам нужно делать.
Перед проведением работ по ремонту, техобслуживанию и очистке отключить двигатель и вытащить вилку
Соблюдать
осторожность при
обращении с
вращающимися
ножами. Не
вставлять руки и
ноги в отверстия
Предохранять от
влаги.
-
ИИссппооллььззооввааннииее вв ссооооттввееттссттввииии
сс ннааззннааччееннииеемм
Объем применения измельчителя по назначению включает в
себя
- обработку веток любых видов с макс. диаметром (в
зависимости от сорта и возраста дерева)
- обработку вялых садовых отходов, лежащих уже
несколько дней, поочередно с обработкой веток.
Категорически запрещается производить измельчение
стекла, металла, пластмассовых изделий, пластмассовых
мешков, камней, текстильных отходов, корней с содержанием
земли, отходов, которые не имеют твердую консистенцию
(например, кухонные отходы).
Садовый измельчитель предназначен только для частного
использования на приусадебных садово-огородных участках
и на участках садоводов-любителей.
Измельчителями для частных домовых и садовых участков
считаются такие, которые не используются в общественных
сооружениях, парках, спортивных сооружениях, в сельском и
лесном хозяйстве и в промышленных целях.
Также необходимо соблюдение действительных для
эксплуатации предписаний по предотвращению несчастных
случаев, а также прочих общепризнанных предписаний по
производственной медицине и технике безопасности.
К использованию по назначению относится также
соблюдение предписанных изготовителем условий
эксплуатации, техобслуживания и ремонта и соблюдение
приведенных в инструкции указаний по технике
безопасности.
Несанкционированные изменения садового измельчителя
исключают ответственность изготовителя за причиненный в
результате этого ущерб любого вида.
Снаряжать и использовать аппарат, а также выполнять
работы по его техническому обслуживанию разрешается
только лицам, умеющим обращаться с ним и которым
известны возможные опасности при его использовании.
Ремонтные работы разрешается проводить только нам или
сервисным службам, уполномоченным нами.
ООссттааттооччнныыее ииссттооччннииккии ррииссккаа
Даже при использовании в соответствии с назначением
и несмотря на соблюдение всех соответствующих положений
техники безопасности все еще могут иметься остаточные источники риска, обусловленные конструкцией, которая определяется назначением.
Можно свести до минимума остаточные источники риска, если соблюдаются разделы „Указания по технике безопасности“ и „Использование в соответствии с назначением“, а так-
же инструкция по эксплуатации в целом.
Внимательность и осторожность снижают степень риска
получения травм и повреждения устройства.
Опасность повредить пальцы и руки, если Вы введете ру-
ку в отверстие и попадете в ножевой механизм.
88
Page 90

Опасность повредить пальцы и руки в процессе работ по
монтажу и очистке ножевого механизма.
Повреждения, когда измельченная масса разбрасывается
по сторонам в зоне воронки.
Опасность поражения электрическим током, если исполь-
зуются ненадлежащие соединительные электропровода.
Прикосновение к токопроводящим деталям, если открыты
электрические узлы.
Ухудшение слуха, если работа проводится без средств за-
щиты слуха в течение продолжительного времени.
Далее, несмотря на все принятые меры предосторожности
могут иметься остаточные источники риска, не очевидные однозначно.
ББееззооппаассннааяя ррааббооттаа
Перед вводом в эксплуатацию этого изделия прочи-
тайте и соблюдайте следующие указания и предписания по
профилактике несчастных случаев Вашего профессионального объединения или, соотв., действующие в конкретной
стране положения по технике безопасности с тем, чтобы защитить от возможных травм самого себя и других.
Проинформируйте об указаниях по технике безопас-
L
ности всех людей, которые работают с машиной.
Хорошо сохраните эти указания по технике безопасно-
L
сти.
Ремонт защитного выключателя необходимо поручать заводу-изготовителю или, соотв., поименованным им фирмам.
Перед тем как использовать устройство, ознакомьтесь с
ним при помощи инструкции по эксплуатации.
Не используйте устройство для целей, для которых оно не
предназначено (см. разделы "Использование в соответствии с назначением" и "Работа с садовым измельчителем").
Позаботьтесь о надежной устойчивости и о том, чтобы Вы
всегда сохраняли равновесие. Не наклоняйтесь вперед
при работе. При закладывании измельчаемого материала
стойте на одном уровне с машиной.
Будьте внимательны. Обращайте внимание на то, что Вы
делаете. Выполняйте работы рационально. Запрещается
работать на устройстве под воздействием наркотиков,
алкоголя или медикаментов. Один момент
невнимательности во время работы может привести к
серьезным травмам.
Во время работы носите защитные очки, рабочие перчат-
ки и средство для защиты слуха.
Носите подходящую рабочую одежду:
− одежда не должна быть широкой;
− обувь не должна скользить.
Обслуживающее лицо несет ответственность по отноше-
нию к третьим лицам в рабочей зоне машины.
Запрещается работать с машиной детям и подросткам
младше 16 лет.
Держите детей вдали от устройства.
Не включайте машину, если поблизости находятся
посторонние.
Никогда не оставляйте устройство без надзора.
Поддерживайте порядок на Вашем рабочем участке! Бес-
порядок может привести к несчастным случаям.
Займите такое рабочее положение, чтобы Вы находились
сбоку или позади устройства. Строго запрещается стоять
в зоне выбросного отверстия.
Строго запрещается засовывать руки в загрузочное или
выбросное отверстие.
Держите лицо и туловище вдали от загрузочного отвер-
стия.
Не перегружайте устройство! Вы будете работать лучше и
безопаснее в указанном диапазоне мощности.
Осуществляйте эксплуатацию устройства только с полно-
стью укомплектованными и правильно смонтированными
защитными приспособлениями и не вносите в машину никаких изменений, которые могли бы отрицательно сказаться на безопасности.
Не изменяйте скорость вращения двигателя, так как она
определяет максимальную надежную рабочую скорость и
защищает двигатель и все вращающиеся части от
повреждений вследствие чрезмерной скорости.
Не осуществляйте эксплуатацию устройства без загрузоч-
ной воронки.
Не вносите изменения в устройство или, соотв., в детали
устройства.
Закрывайте устройство перед тем, как включить двигате-
ль.
Не обливайте устройство водой (источник опасности:
электрический ток).
Соблюдать также влияния окружающей среды:
− Запрещается использовать устройство в условиях
повышенной влажности.
− Избегать попадания аппарата под дождь.
− Выполнять работы только в условиях достаточного
освещения. Работать необходимо также при хорошем
освещении.
Храните устройство только в сухом месте вне пределов
досягаемости детей.
Во избежание опасности повреждения пальцев работы по
монтажу и очистке выполнять в защитных перчатках.
Отключите машину и вытащите из розетки вилку соедини-
тельного шнура в следующих случаях:
− ремонтные работы
− работы по техобслуживанию и очистке
− устранение неполадок
− транспортировка
− когда Вы отходите от устройства (даже при
кратковременных перерывах в работе).
При забивании входного и выходного отверстий машины
выключите двигатель и извлеките сетевую штепсельную
вилку и только потом приступайте к удалению остатков
материала из входного или выходного отверстия.
Проверьте машину на наличие возможных повреждений:
− Перед дальнейшей эксплуатацией устройства необхо-
димо тщательно обследовать защитные приспособления на их безупречную и соответствующую назначению работу.
− Проверьте, повреждены или дефектны ли детали. Все
детали должны быть правильно смонтированы и выполнять все условия, чтобы обеспечить безупречную
эксплуатацию.
89
Page 91

− Необходимо осуществлять квалифицированный ре-
монт или замену поврежденных защитных приспособлений в авторизованной специализированной мастерской, если в руководстве по эксплуатации не указано
иного.
− Поврежденные или нечитаемые предохранительные
наклейки следует заменять.
Хранить неиспользуемые устройства в сухом месте,
замыкаемом на ключ и недоступном для детей.
Электрическая безопасность
Исполнять соединительную проводку согласно стан-
дарту IEC 60245 (H 07 RN-F) с поперечным сечением жил
не менее
− 1,5 мм² при длине кабеля до 25 м,
− 2,5 мм² при длине кабеля свыше 25 м.
Соединительные линии с большой длиной и с небольшим
диаметром обуславливают понижение напряжения. В
данном случае двигатель не в состоянии достигать
максимальную мощность, в результате чего происходит
понижение работоспособности прибора.
Штекеры и соединительные розетки на линиях
подключения должны быть изготовлены из резины,
эластичного ПВХ или из другого термопластичного
материала с подобной механической прочностью, или же
они должны содержать покрытие из такого материала.
Штекерное приспособление соединительной линии
должно иметь брызгозащищенное исполнение.
При прокладке соединительной линии следите за тем,
чтобы она не зажималась, не надламывалась и чтобы не
становился влажным штепсельный разъем.
При использовании кабельного барабана кабель
необходимо полностью разматывать с него.
Не используйте кабель для целей, для которых он не
предназначен. Защищайте кабель от жары, масла и острых кромок. Не используйте кабель для того, чтобы вы-
таскивать из розетки штепсельную вилку.
Регулярно контролируйте удлинительные кабели и за-
меняйте их, если они повреждены.
Не используйте дефектные соединительные провода.
Под открытым небом используйте только удлинительные
кабели, допущенные для этого и снабженные соответствующей маркировкой.
Не пользуйтесь временными подсоединениями к источ-
нику электрического питания.
Подключайте устройство через выключатель защиты от
токов повреждения (30 мA).
Поручайте реализацию электрического подсоедине-
ния или, соотв., проведение ремонта на электрических
деталях машины авторизованному специалисту-электрику или одному из наших пунктов сервисного обслуживания. Соблюдайте местные предписания, в частности,
касающиеся мер обеспечения защиты.
Поручайте проведение ремонта на других деталях ма-
шины заводу-изготовителю или одному из его пунктов
сервисного обслуживания.
Разрешается использовать только оригинальные
запчасти и принадлежности. Использование других
запчастей и других принадлежностей может привести к
травмированию пользователя. За причиненный в таких
случаях ущерб изготовитель ответственности не несет.
ВВввоодд вв ээккссппллууааттааццииюю
Убедитесь в том, что устройство смонтировано полно-
стью и в соответствии с предписаниями.
Для использования измельчителя поставьте его на ров-
ное и прочное основание (опасность опрокидывания).
Не ставьте устройство на мощеный или покрытый щеб-
нем грунт.
Эксплуатируйте машину только на открытом воздухе.
Соблюдайте дистанцию (не менее 2 м) до стен и других
неподвижных предметов.
Перед каждым использованием проверьте:
− соединительные провода на наличие дефектных
участков (трещины, порезы или т. п.).
Не использовать дефектные провода.
− устройство на наличие возможных повреждений (см.
раздел "Безопасная работа");
− прочно ли затянуты все винты.
L Подсоединение к сети
Сопоставьте напряжение, указанное на фирменной таб-
личке устройства, с сетевым напряжением и подсоедините устройство к надлежащей и соответствующей предписаниям розетке.
Используйте удлинительные кабели с достаточным по-
перечным сечением.
Сетевое предохранение
Швейцарии UK
2300 Вт
2500 Вт
2800 Вт
16 A *
16 A *
16 A *
* = Инерционно-плавкие предохранители
Двухпозиционный переключатель
Запрещается использовать устройство, выключатель
которого не включается и не выключается.
Поврежденные выключатели подлежат немедленному
ремонту или замене сервисной службой.
ВКЛ.
ВЫКЛ.
Обратный ход
10 A * 13 A *
13 A *
13 A *
Клавиша
возврата
(защита
двигателя)
Переключатель
направления
вращения
Ввод
90
Page 92

Включение
Нажмите зеленую клавишу I
Выключение
Нажмите красную клавишу 0
Предохранитель повторного пуска
в случае перебоя электроснабжения
В случае перебоя электроснабжения прибор автоматически
выключается (нулевой автомат). Для повторного включения
необходимо нажать зеленую клавишу.
Защита электродвигателя
Электродвигатель оснащен защитным автоматом, за счет
которого в случае перегрузки происходит автоматическое
выключение. После определенного времени охлаждения
(около 5 минут) электродвигатель можно снова включить. Для
этого нажмите
1. клавишу возврата (защита двигателя)
2. зеленую клавишу I для повторного включения.
Переключатель направления вращения
Переключатель направления вращения можно
включать только при выключенном приборе.
Положение
Двигатель не запускается.
Положение
Материал затягивается и измельчается режущим валиком.
Положение
Нож работает в обратном направлении, при этом происходит
освобождение зажатого материала.
После включения переключателя направления вращения в
положение
переключатель вкл./выкл. За счет этого происходит
перестановка режущего валика в обратное направление. В
случае отпускания переключателя вкл./выкл. измельчитель
автоматически останавливается.
Рекомендации
z Удаление крупногабаритных или деревянных предметов
осуществляется путем повторного включения, как по
направлению резки, так и по направлению
деблокировки.
z Для удаления блокирующих предметов из раструба или
шлица выброса используйте спе- циальное
приспособление или крючок.
Перед повторным включением подождите, пока не
произойдет останов измельчителя.
необходимо держать в нажатом состоянии
Полное сопротивление сети
При неблагоприятных параметрах сети в процессе включения устройства может иметь место кратковременное падение
напряжения, которое может отрицательно повлиять на другие устройства (например, вызвать мигание лампы).
Помех не придется ожидать, если будут соблюдены параметры максимального полного сопротивления сети, приведенные в таблице.
Потребляемая мощность P
(Вт)
Полное сопротивление сети
1
Z
(Ом)
макс.
2300 0,21
2500 0,21
2800 0,19
РРааббооттаа сс ссааддооввыымм ииззммееллььччииттееллеемм
Займите такое рабочее положение, чтобы Вы находи-
лись сбоку или позади устройства. Строго запрещается
стоять в зоне выбросного отверстия.
Материал большой длины, выступающий из
устройства, во время его затягивания ножами, может
отскочить назад! Обратите Ваше внимание на надежное
расстояние!
Строго запрещается засовывать руки в загрузочное или
выбросное отверстие.
Держите лицо и туловище вдали от загрузочного отвер-
стия.
Не допускайте попадания рук, других частей тела и
одежды в загрузочную трубу, выбросной канал или другие
подвижные части.
Перед включением устройства проверьте, не находятся
ли в загрузочной воронке остатки измельченного материала.
Не наклоняйте машину при работающем двигателе.
Проводя загрузку, следите за тем, чтобы в загрузочную
воронку не попадали куски металла, камни, бутылки или
другие предметы, не подлежащие переработке.
Если в загрузочную воронку попали посторонние предме-
ты или если устройство начинает издавать непривычные
звуки или вибрировать, немедленно отключите устройство и дайте ему остановиться. Вытащите вилку соединительного провода и выполните следующие операции:
− осмотреть повреждения;
− заменить или отремонтировать поврежденные
детали;
− проверить устройство и подтянуть ослабевшие соеди-
нения деталей.
Вам запрещается ремонтировать устройство, если Вы не
располагаете соответствующей авторизацией.
Что я могу измельчать?
Да:
• Ветки любых видов с максимальным диаметром в
зависимости от сортов и возраста дерева.
• Увядшие, мокрые, хранившиеся уже несколько дней садо-
вые отходы
измельчать только попеременно с сучьями.
91
Page 93

Нет:
• стекло, металлические детали, пластмасса, пластиковые
мешочки, камни, отходы из ткани, корни с приставшей к
ним землей.
• Отходы без твердой консистенции, например, кухонные
отходы.
Особые указания по процессу из-
мельчения:
¾ Загрузку материала,
подлежащего измельчению, в
загрузочное отверстие
раструба производите всегда с правой стороны.
¾ Измельчайте сучья, ветви и древесину вскоре после
резки.
− Этот измельчаемый материал становится очень твер-
дым по мере высыхания, в результате чего уменьшается максимально возможный для переработки диаметр сучьев.
¾ Удалите побеги с сильно разветвленных сучьев.
¾ Переработка садовых или, соотв., кухонных отходов, со-
держащих большое количество влаги и имеющих
склонность к склеиванию:
− измельчать эти отходы попеременно с древесным из-
мельчаемым материалом, чтобы предупредить закупорку устройства.
¾ Не допускайте большого скопления измельченного
материала в зоне выходного отверстия, так как это может
привести к закупорке выбросного канала. Это в свою
очередь может вызвать обратный выброс материала
через загрузочное отверстие. При закупорке прочистите
загрузочное отверстие и выбросной канал.
Предварительно отключите двигатель и вынуть вилку
питания.
¾ Следите, чтобы выдерживался диаметр сучьев, макси-
мально допустимый для переработки (см. „Техниче-
ские данные“). В зависимости от вида и свежести
древесины диаметр сучьев, максимально допустимый для
переработки, может уменьшиться.
¾ Ножевой механизм в принципе сам втягивает в себя из-
мельчаемый материал.
¾ Автоматическое переключение направления враще-
ния:
при внезапной блокировке устройства направление вращения режущего валика может переключиться и в таком
случае вытеснить обратно измельчаемый материал.
− Отключить устройство.
− Подождать, пока не остановится режущий валик.
− Опять включить устройство и загружать измельчаемый
материал, который легче перерабатывается.
¾ При перегрузке устройства двигатель, оснащенный за-
щитным выключателем, отключается автоматически.
− Опять включите измельчитель прибл. через 5 минут.
− Если устройство не удается включить спустя этот пе-
риод времени, посмотрите раздел „Возможные неполадки“.
ННаассттррооййккаа ппррооттииввоорреежжуущщееггоо нноожжаа
Противорежущий нож (В) можно настроить на режущем
валике (А) без зазора. При этом необходимо предусмотреть
небольшое расстояние для обеспечения эффективного
рабочего режима.
У определенных видов материала или у мокрых ветвей
может вместо резки происходить разрыв. Такая проблема
может возникнуть в случае многократного применения
изношенного противорежущего ножа.
Настройка расстояния.
Включите прибор. На правой стороне пластмассового
корпуса находится регулировочное устройство. Для
регулирования расстояния поверните ручку установки (D)
вправо, так чтобы винт (C) переместился к режущему валику.
Произведите поворот до тех пор, пока из шлица выброса не
будут падать мелкие алюминиевые стружки.
ТТееххннииччеессккооее ооббссллуужжииввааннииее ии ууххоодд
• Перед тем, как проводить любые работы по техобслу-
живанию:
− отключить двигатель и вытащить вилку соединитель-
ного шнура.
− Надеть защитные перчатки во избежание поврежде-
ний.
При техобслуживании режущего инструмента следует иметь
в виду, что за счет пускового механизма он еще может
работать, даже если двигатель уже не работает после
блокировки крышки.
После проведения работ по техническому обслуживанию или
ремонту проследить за тем, чтобы были удалены
инструменты и гаечные ключи.
• Садовый измельчитель в принципе не нуждается в
техническом обслуживании. Для сохранения его ценности и в интересах продолжительного срока службы
учитывать нижеследующее:
− Не загораживать вентиляционные отверстия и поддер-
живать их в чистом виде.
92
Page 94

− Проверять крепежные винты (при необходимости подтянуть).
− Очистить устройство после измельчения.
Для очистки устройства пользоваться только теплой влажной салфеткой и мягкой кисточкой.
Категорически запрещается пользоваться чистящими средствами или растворителями. В противном случае устройству
может быть нанесен непоправимый ущерб. Химикаты могут разрушить пластиковые детали.
− Не очищать измельчитель проточной водой или высоконапорными средствами для очистки.
− После каждого употребления предохранять непокрытые краской металлические детали от коррозии, опрыскав их эколо-
гически совместимым маслом, способным к биологическому расщеплению.
− Режущий валик и зачистная плита являются быстроизнашивающимися деталями, которые однако имеют срок служ-
бы в несколько лет при нормальном использовании и дополнительной регулировке в соответствии с предписаниями.
ВВооззммоожжнныыее ннееппооллааддккии
Перед каждым устранением неисправностей
− выключить станок
− Подождать останова механизма
− вытащить сетевой штекер
Неполадка Возможная причина Способ устранения
Двигатель не запускается. - переключатель направления вращения
в положение „0“
- Выключить прибор и изменить положение
переключателя направления вращения.
- Отсутствует сетевое напряжение. - Проверить защиту предохранителями.
- Неисправен присоединительный ка-
бель.
- Поручить проверить (специалисту-электрику).
- Устройство перегружено. - Подождите, пока прибор не охладится.
Нажмите
1. клавишу возврата (защита двигателя
2. зеленую клавишу I для повторного включения.
Двигатель гудит, - Блокирован режущий валик. - Выключите прибор.
но не запускается. Включите переключатель направления вращения
- Неисправен конденсатор.
в положение
. Включите прибор до тех пор,
пока не будет устранена блокировка. Затем снова
выключите прибор. Включите переключатель
направления вращения назад в положение
.
- Отправить устройство на ремонт на завод-изгото-
витель или, соотв., на поименованную им фирму.
Измельчаемый материал
не затягивается.
- Режущий валик производит обратный
ход. Переключатель включен в
неправильное положение
- Измельчаемый материал заклинило в
воронке.
.
- Слишком мягкий или влажный измель-
чаемый материал
- Износ режущего валика
- Выключить прибор и изменить положение
переключателя направления вращения.
- Выключить прибор. Включите переключатель
направления вращения в положение
Включите прибор для деблокировки материала,
подлежащего измельчению. В случае
необходимости удалите загрязнение. Снова
выключите прибор. Для выполнения дальнейшей
работы включите переключатель направления
вращения назад в положение
- Подтолкнуть суком и измельчить.
- Выполните регулировку контрплиты, как это
описано в разделе «регулировка контрплиты». При
высоком износе замените режущий валик.
.
93
Page 95

Неполадка Возможная причина Способ устранения
Измельчаемый материал
не разрезается аккуратно.
- Неправильно настроен
противорежущий нож
- Выполните настройку противорежущего ножа
Неполадка Возможная причина Способ устранения
Устройство запускается,
однако стопорится при незначительной нагрузке и
отключается посредством
защитного выключателя
двигателя.
Удлинительный кабель слишком длинный или имеет слишком малое поперечное сечение.
Розетка слишком далеко удалена от магистрального подсоединения и слишком
малое поперечное сечение соединитель-
Удлинительный кабель не менее 1,5 мм², не более
25 м длины. При более длинном кабеле поперечное
сечение не менее 2,5 мм².
ного кабеля.
ТТееххннииччеессккииее ддаанннныыее
Модель 2300 2500 2800
Тип AH 600 AH 600 AH 600
Двигатель Двигатель переменного тока 230 В~, 50 Гц, 2800 об./мин
Мощность двигателя P S6 - 40 % 2300 Вт 2500 Вт 2800 Вт
Число оборотов режущего валика 40 min
1
-1
Двухпозиционный переключатель с защитой от перегрузки, функциями резания и обратного хода, минимальным
расцепителем напряжения
Вес 24 кг 24,5 кг 25 кг
Уровень звукового давления L
(замерено по Директиве 2000/14/EG)
PA
замеренный уровень звуковой мощности L
(замерено по Директиве 2000/14/EG)
гарантированный уровень звуковой мощности L
(замерено по Директиве 2000/14/EG)
WA
WA
83,8 дБ (A) 84,2 дБ (A) 82,5 дБ (A)
K = 3 dB (A) K = 3 dB (A) K = 3 dB (A)
91 дБ (A) 91 дБ (A) 91 дБ (A)
92 дБ (A) 92 дБ (A) 92 дБ (A)
Макс. возможный для переработки диаметр
сучьев
занную древесину)
(распространяется только на свежесре-
∅ макс. 35 мм ∅ макс. 40 мм ∅ макс. 44 мм
Класс защиты I
Степень защиты IP X4
Сетевое предохранение
Швейцария
UK
16 A *
10 A *
13 A *
16 A *
--
13 A *
16 A *
--
13 A *
* = Инерционно-плавкие предохранители
ГГааррааннттиияя
Просим обратить внимание на прилагаемое гарантийное обязательство.
94
Page 96

Det är inte tillåtet att ta maskinen i drift om man inte
noga har läst igenom bruksanvisningen, följt alla
anvisningar och har monterat maskinen enligt monteringsanvisningarna.
Förvara bruksanvisningen väl.
IInnnneehhåållll
EG-konformitetsförklaring 95
Leveransomfattning 95
Beskrivning 95
Symboler på maskinen 95
Symboler driftinstruktion 96
Drifttider 96
Användning till rätt ändamål 96
Resterande risker 96
Säkerhetshänvisningar 96
Idrifttagning 98
Hur man använder kompostkvarnen 99
Ställa in motkniven 99
Underhåll och skötsel 100
Möjliga störningar 100
Tekniska data 101
Garanti 101
Montering 116
Reservdelar 118
LLeevveerraannssoommffaattttnniinng
g
Kontrollera kartongens innehåll efter uppackning
! att leveransen är komplett
! ev. transportskador
Vid reklamationer ska omgående återförsäljaren,
underleverantörerna och tillverkaren meddelas. Senare
reklamationer kan inte godkännas.
• 1 förmonterad maskinenhet
• 1 stödben – vänster
• 1 stödben – höger
• 1 axel
• 2 hjul
• 2 hjulkåpor
• 1 skruvpåse
• 1 samlingssäck
• 1 bruksanvisning
BBeesskkrriivvnniinngg
EEGG--kkoonnffoorrmmiitteettssfföörrkkllaarriinng
g
Motsvarande EG-direktiv: 2006/42/EG
Härmed förklarar vi
ATIKA GmbH & Co. KG
Schinkelstraße 97, 59227 Ahlen - Germany
med ensamt ansvar att produkten
Gartenhäcksler (Kompostkvarn) Typ AH 600
Serienummer: se sista sidan
Är konform med bestämmelserna i ovannämnda EG-direktiv,
samt med bestämmelserna i dessa följande direktiv:
2004/108/EG, 2006/95/EG och 2000/14/EG.
Följande passande normer har använts:
EN 60335-1:2002+A1+A11+A12+A2+A13;
EN 13683:2003+A1:2009; EN 62233:2008; EN 55014-1:2006;
EN 55014-2/A1:2001; EN 61000-3-2:2006; EN 61000-3-11:2000
Förfarande vid konformitetsvärdering: 2000/14/EG – bilaga V
Uppmätt bullernivå L
Garanterad bullernivå L
91 dB (A)
WA
92 dB (A)
WA
Tekniska underlag förvaras hos:
ATIKA GmbH & Co. KG – Technisches Büro – Schinkelstr. 97
59227 Ahlen – Germany
Ahlen, 30.04.2010
A. Pollmeier, företagsledning
A. Trattöppning för grenmaterialet
B. Handtag
C. Nollställlningsknapp / motorskydd
D. Nätkontakt
E. På-/Av-brytare
F. Rotationsriktningsomkopplare
G. Underrede
H. Apparatöverdel
I. Inställningsratt för skärvalsen
J. Utkastningsöppning
95
Page 97

SSyymmbboolleerr ppåå mmaasskkiinneen
Läs noga igenom
bruksanvisningen innan ni
börjar använda
maskinen och
beakta alla säkerhetsanvisningar.
n
Stäng av motorn
och dra ur nätkontakten innan ni
börjar med några
som helst reparationer, underhållsoch rengöringsarbeten.
Risk för utkastade delar när
motorn är igång –
håll obehöriga
personer, liksom
husdjur och
andra djur på avstånd från
Se upp för
roterande knivar.
Stick inte in händer
eller fötter när
maskinen är igång.
riskområdet.
Använd ögon- och
hörselskydd.
Elektriska apparater bör inte slängas i soptunnan.
Apparater, tillbehör och förpackning skall återvinnas på
miljövänligt sätt.
Enligt det europeiska direktivet 2002/96/EG om gamla el- och
elektronikapparater, måste elapparater som inte längre är
driftsdugliga, samlas ihop åtskilt och tillföras en miljöriktig
återanvändning.
SSyymmbboolleerr ddrriiffttiinnssttrruukkttiioon
Bär
skyddshandskar.
Skydda mot
fuktighet.
n
Hotande fara eller farlig situation. Underlåtenhet att
följa dessa anvisningar kan leda till person- eller
sakskador.
Viktiga anvisningar för den rätta användningen.
L
Underlåtenhet att följa dessa anvisningar kan leda till
fel.
Användningstips. Här får ni information och tips om
hur ni använder maskinen på optimalt sätt.
Montering, hantering och underhåll. Här förklaras allt
i detalj som ni måste göra.
DDrriiffttttiiddeer
r
Var vänlig beakta ert lands (regionala) föreskrifter gällande
bullerskydd
AAnnvväännddnniinngg eennlliiggtt bbeessttäämmmmeellsseerrnnaa
Användning enligt bestämmelserna innebär nerskärning av
- grenar och kvistar med en diameter på max. (beroende på hur
hårt och färskt träet är)
- visset och fuktigt trädgårdsavfall som redan legat några dagar
omväxlande med grenar och kvistar
Det är absolut inte tillåtet att skära glas, metall, plast, plastpåsar,
stenar, tygavfall, rötter med jord på eller avfall som inte har någon
fast konsistens (t ex köksavfall).
Denna trädgårds-kompostkvarn får endast användas privat, dvs
hemma i trädgården.
Som kompostkvarn för den privata hemmaträdgården, avses
sådana apparater som inta används yrkesmässigt inom offentliga
anläggningar, parker, sportanläggningar, lantbruk eller skogsbruk.
I användning till rätt ändamål ingår också att de av tillverkaren
föreskrivna drift-, underhålls- och reparationsbestämmelserna
samt de i bruksanvisningen angivna säkerhetsbestämmelserna
följs.
Varje form av användning utöver detta gäller som användning
utanför bestämmelserna. Tillverkaren tar inget ansvar för skador
orsakade av användning till ej godkända ändamål. Endast
användaren står för hela risken.
Tillverkaren tar inget ansvar för skador som uppstått på grund av
egenmäktiga förändringar av kompostkvarnen.
Maskinen får endast ställas in, användas och underhållas av
personer förtrogna med detta och som är informerade om
riskerna. Reparationsarbeten får endast utföras av oss eller av
oss rekommenderade kundserviceverkstäder.
ÖÖvvrriiggaa rriisskkeer
r
Även om man använder maskinen på föreskrivet sätt och
beaktar alla säkerhetsanvisningar finns alltid en viss risk att skada
sig på grund av maskinens speciella konstruktion.
Risken att skada sig kan man i första hand reducera genom att i
detalj följa alla anvisningar i avsnittent "Användning enligt
bestämmelserna" och "Säkerhetsanvisningar", Därutöver bör man
vara extra försiktig vad det gäller följande risker:
Hänsyn och försiktighet minskar riskerna för person- och
sakskador.
Risk att skada händer och fingrar om man går ner med
handen i någon öppning och kommer i kontakt med knivarna.
Risk att skada händern och fingrar i samband med att man
monterar eller rengör knivarna.
Risk att skadas genom att skärmaterial slungas i väg i
området kring tratten.
Risk orsakade av elspänning vid användning av ej korrekta
elanslutningsledningar.
Beröring av spänningsförande delar i öppnade elektriska
komponenter.
Risk för hörselskador vid längre arbetspass utan hörselskydd.
Dessutom kan det trots alla vidtagna skyddsåtgärder kvarstå
uppenbara resterande risker.
SSääkkeerrhheettssaannvviissnniinnggaarr
Läs noga igenom och beakta anvisningarna nedan samt alla
tillämpliga nationella säkerhetsbestämmelser innan ni börjar använda maskinen för att skydda både er själv och andra, för möjliga faror.
96
Page 98

Ge säkerhetsanvisningarna till alla personer, som arbetar
L
med maskinen.
Spara dessa säkerhetsanvisningar väl.
L
Reparationer på säkerhetsfrånkopplingen får endast
utföras av tillverkaren själv eller på auktoriserade
service-verkstäder.
Informera er med hjälp av bruksanvisningen om maskinen och
dess funktioner.
Använd aldrig maskinen för andra ändamål än den är avsedd
för (se avsnitten "Användning enligt bestämmelserna" och
"Hur man använder kompostkvarnen“).
Se till att ni står stadigt så att ni har god balans. Sträck er
inte framåt. Stå alltid på samma höjd som maskinen när ni
kastar in trädgårdsavfallet.
Var uppmärksam. Koncentrera er på arbetet. Arbeta förnuftigt.
Använd inte apparaten om ni är trött eller påverkad av
narkotika, alkohol eller läkemedel. Ett ögonblicks oaktsamhet
kan leda till allvarliga personskador.
Använd skyddsglasögon, skyddshandskar och hörselskydd
när maskinen är igång.
Bär lämpliga arbetskläder:
− inga vida och löst sittande klädesplagg
− halksäkra skor
Den som använder maskinen ansvarar för att inga andra
personer kan ta skada av den.
Barn och ungdomar under 16 år får inte använda maskinen.
Håll barn på avstånd från kompostkvarnen.
Använd alldrig maskinen när obehöriga personer uppehåller
sig i närheten.
Låt maskinen aldrig vara utan uppsikt.
Se till att ert arbetsområde alltid är i gott skick. Oordning kan
leda till olycksfall.
Ställ er alltid så, att ni befinner er antingen vid sidan om
maskinen eller bakom den. Ställ er aldrig i området kring
öppningen där skärmaterialet kastas ut.
Stick aldrig in händerna i påfyllnings- eller
utkastningsöppningen.
Håll alltid ansiktet och kroppen på avstånd från
påfyllningsöppningen.
Överbelasta inte maskinen! Arbetet går bättre och säkrare i
det angivna effektområdet.
Använd endast maskinen med kompletta och korrekt
monterade skyddsanordningar och ändra inget som kan
påverka säkerheten.
Förändra inte motorns rotationshastighet, denna reglerar
nämligen en säker maximal arbetshastighet och skyddar
motorn och alla roterande delar från skador genom överdrivet
hög hastighet.
Använd maskinen aldrig utan påfyllningstratt.
Förändra inte maskinen eller dess delar.
Stäng maskinen alltid innan ni sätter igång den.
Spruta inte maskinen med vatten. (riskkälla: elektrisk ström).
Ta hänsyn till omgivningens påverkan:
− Använd inte maskinen i fuktig eller våt omgivning.
− Låt maskinen aldrig stå ute i regn och använd den inte
när det regnar.
− Arbeta bara där det är god sikt. Se till att det är god
belysning.
Använd skyddshandskar i samband med monterings- eller
rengöringsarbeten för att förhindra att skada fingarna.
Stäng av maskinen och dra ut nätkontakten ur eluttaget vid:
− underhålls- och rengöringsarbeten
− åtgärd av fel
− vid kontroll av om anslutningsledningarna
har flätats ihop eller skadats.
− transport
− reparationsarbeten
− att ni lämnar maskinen (även vid korta
arbetsavbrott)
Om in- och utloppen stoppas igen på maskinen, kopplar ni
ifrån maskinen och drar ut stickkontakten, innan ni åtgärdar
materialresterna i in- och utloppen.
Kontrollera att maskinen inte har fått några eventuella skador:
− Före vidare användning ska man kontrollera
skyddsanordningarna noga, så att de fungerar korrekt.
− Kontrollera om de rörliga delarna fungerar felfritt och inte
sitter i kläm eller om det finns skadade delar. Samtliga
delar måste vara rätt monterade och uppfylla alla villkor för
att maskinen ska fungera korrekt.
− Skadade skyddsanordningar och delar måste
fackmannamässigt repareras eller bytas av erkänd
fackverkstad eller tillverkare, om inte annat framgår av
bruksanvisningen.
− Skadade eller oläsliga etiketter med säkerhets-anvisningar
måste ersättas.
Förvara oanvända apparater på ett torrt, låst ställe, utanför
barns räckvidd.
EElleekkttrriisskk ssääkkeerrhheett
Anslutningsledningen måste motsvara IEC 60245 (H 07
RN-F) och ha ett trådtvärsnitt på minst
− 1,5 mm² vid kabellängder upp till 25 m
− 2,5 mm² vid kablar över 25 m längd
Långa och tunna anslutningsledningar skapar ett
spänningsfall. Motorn uppnår inte längre sin maximala effekt,
apparatens funktion reduceras.
Stickkontakter och kopplingsdosor vid anslutningsledningarna
måste vara tillverkade av gummi, mjuk PVC eller av ett annat
termoplastmaterial med samma mekaniska hållfasthet eller
vara överdragna med dessa material.
Anslutningsledningens stickkontakt måste vara
stänkvattenskyddad.
Vid montage se till att anslutningsledningen inte kläms eller
knäcks och att stickkontakten inte blir blöt.
Linda helt av kabeln om ni använder en kabeltrumma.
Använd inte kabeln för ändamål, den inte är avsedd för.
Skydda kabeln från värme, olja och vassa kanter. Använd inte
kabeln för att dra ut kontakten ur eluttaget.
Kontrollera förlängningskabeln regelbundet och byt ut den om
den är skadad.
Använd inga defekta anslutningsledningar.
Använd endast godkända kablar och förlängningskablar vid
arbete utomhus.
Använd inte provisoriska kablar.
Skyddsanordningar får aldrig överbryggas eller tas ur drift.
Anslut kompostkvarnen med en jordfelsbrytare (30 mA).
Elanslutningar resp. reparationer på maskinens elektriska
komponenter får endast iordningställas resp. genomföras av
auktoriserad elfackman eller på en av våra service-
97
Page 99

verkstäder. De lokala föreskrifterna, i synnerhet vad det gäller skyddsåtgärder, ska alltid beaktas.
Reparationer på övriga delar på maskinen får endast
genomföras av tillverkaren eller på en av våra serviceverkstäder.
Använd endast original-reservdelar och original tillbehör.
Genom att använda andra reservdelar och andra tillbehör
kan olyckor vållas. För skador som följd av att andra delar
än originaldelar har använts ansvarar tillverkaren inte.
IIddrriiffttttaaggnniinngg
Kontrollera att maskinen är komplett monterad och att alla
anvisningar har beaktats i samband med monteringen.
Ställ kompostkvarnen på en jämn och plan yta innan ni
börjar använda den (så att den inte kan välta).
Ställ inte upp den på kullerstenar eller grus.
Använd enbart maskinen utomhus. Håll den på avstånd (minst
2 m) från en vägg eller ett annat fast föremål.
Kontrollera före varje start:
− anslutningsledningar avseende defekta ställen (sprickor,
snitt etc.)
Använd inga defekta ledningar
− Om själva maskinen eventuellt kan vara skadad (se
avsnittet "Säker användning“)
− Om alla skruvar är ordentligt åtdragna.
L Nätanslutning
Kontrollera att spänningen som står på maskinens typskylt
stämmer överens med nätspänningen och anslut maskinen till
ett föreskrivet el-uttag.
Använd endast skarvledningar med tillräckligt stort tvärsnitt.
Nätsäkringar
Schweiz UK
2300 W
2500 W
2800 W
16 A trög
16 A trög
16 A trög
Till/Frånknapp
Använd ingen apparat vars brytare inte slår till och ifrån.
Skadade brytare måste omedelbart repareras eller bytas av
kundtjänsten.
PÅ
AV
Bakåtgång
10 A trög 13 A trög
13 A trög
13 A trög
Nollställningsknapp
(motorskydd)
Rotationsriktningsomkopplare
AV
Indrag
Tillkoppling
Tryck på den gröna knappen I
Frånkoppling
Tryck på den röda knappen 0
Återstartsäkring vid strömavbrott
Vid elavbrott stängs maskinen av automatiskt
(nollspänningsutlösningsdon). För att starta maskinen igen trycker
ni på den gröna knappen.
Motorskydd
Motorn är utrustad med en skyddsbrytare som stänger av motorn
automatiskt om den överbelastas. När motorn har svalnat (efter
ca 5 minuter) kan den startas igen. Tryck på
1. återställningsknappen (motorskydd)
2. gröna knappen I för att starta den igen.
Rotationsriktningsomkopplare
Ställ om rotationsriktnigsomkopplaren endast när
hackelsemaskinen är avstängd.
Läge
Motorn startar inte.
Läge
Materialet dras in av skärvalsen och krossas.
Läge
Kniven roterar i omvänd riktning, material som har fastnat frigörs.
När du har ställt rotationsriktningsomkopplaren på läget
håller
du den gröna knappen på På-/Av-brytaren nertryckt. Skärvalsen
ställs nu in på den omvända riktningen. När du släpper På-/Avbrytaren stannar hackelsemaskinen automatiskt.
Tips
z Stora föremål eller träbitar lossnar efter det att man tryckt på
knappen flera gånger både i skärriktning och i
frigörningsriktning.
z Använd en laddstake eller en krok för att ta bort blockerade
föremål ur tratten eller utkastningsöppningen.
Vänta tills hackelsemaskinen står stilla innan du startar
den igen.
Nätimpedans
Vid ogynnsamma nätvillkor kan det under tillkopplingen av
maskinen under en kort tid förekomma spänningsfall som kan ha
inflytande på andra apparater (t.ex. lampflimmer).
Om man iakttar maximala nätimpedanser är inga störningar att
vänta.
Effektförbrukning P1 (W) Nätimpedans Zmax (()
2300 0,21
2500 0,21
2800 0,19
98
Page 100

HHuurr mmaann aannvväännddeerr kkoommppoossttkkvvaarrnneenn
Ställ er alltid så, att ni befinner er antingen vid sidan om
maskinen eller bakom den.
Långa kvistar som står ut över maskinens kant kan utföra
en piskande rörelse när det dras in av knivarna! Se till att ni
befinner er på säkert avstånd!
Gå aldrig med händerna in i påfyllnings- eller
utkastningsöppningen.
Håll alltid ansiktet och kroppen på avstånd från
påfyllningsöppningen.
Håll inte händer, andra kroppsdelar och kläder i inmatningsrör,
utkaströr eller i närheten av andra rörliga delar.
Kontrollera att det inte finns några materialrester kvar i
påfyllningstratten innan ni tillkopplar maskinen.
Tippa inte maskinen när motorn är igång.
När ni fyller påfyllningstratten är det viktigt att kontrollera att
det inte hamnar några andra föremål än trädgårdsavfall, som
t.ex metallbitar, stenar, flaskor eller annat material som
maskinen inte kan bearbeta, i påfyllningstratten.
Om föremål som maskinen inte kan bearbeta har hamnat i
påfyllningstratten eller om ovanliga ljud hörs eller maskinen
börjar vibrera på onormalt sätt måste man omgående
frånkoppla maskinen och vänta tills den har stannat helt. Drag
sedan ur nätkontakten och gör följande:
− kontrollera om maskinen har tagit skada
− byt ut eller låt reparera defekta delar
− kontrollera apparaten och spänn fast lösa delar
Ni får inte reparera apparaten, om ni inte är behörig till det
(se säkerhetsanvisningarna).
Vilka material får jag skära med
maskinen?
Áno:
• grenar och kvistar med en diameter på max. (beroende på hur
hårt och färskt träet är)
visset och fuktigt trädgårdsavfall som redan legat några dagar
omväxlande med grenar och kvistar
Nie:
• glas, metalldelar, plast, plastpåsar, stenar, tygrester och
rötter med jord
¾ Låt inte det bearbetade fliset växa för högt i området omkring
utkastöppningen. Detta kan ha till följd att det redan
bearbetade fliset stoppar upp i utkaströret. Därigenom kan det
uppstå ett bakslag av materialet genom inmatningsöppningen.
¾ Rensa inmatningsöppningen och utkaströret när apparaten är
tillstoppad. Koppla därför alltid först från motorn och dra ut
stickproppen ur eluttaget.
¾ Beakta den maximala grendiametern som får skäras (se
”Tekniska data”). Beroende på typ och färskhet på träet, kan
den maximala diametern på grenar som ska skäras,
reduceras.
¾ Knivarna drar automatiskt ner komposteringsmaterialet i jämn
takt, pga att knivarna går så långsamt.
¾ Automatisk omkoppling av rotationsriktningen:
om maskinen plötsligt blockerar kann man ioppla skärvalsens
rotationsriktning och på så skjuta tillbka hackelseprodukten.
− Frånkoppla maskinen.
− Vänta tills skärvalsen har stannat.
− Tillkoppla maskinen på nytt och använd material som är
lättare at bearbeta.
¾ Om motorn överbelastas frånkopplas den automatiskt genom
motorskyddsbrytaren.
− Tillkoppla sedan maskinen igen efter ca. 5 min.
− Om det inte går att tillkoppla den igen efter denna tid, se
avsnittet "Möjliga störningar“.
SSttäällllaa iinn mmoottkknniivveenn
Motkniven (B) kan man ställa in på skärvalsen (A) så att den inte
har något spelrum. För en optimal drift bör avståndet vara så litet
som möjligt.
Mjukt material eller våta kvistar kan slitas sönder i stället för att
krossas. Även om man aktiverar en sliten motkniv flera gånger
kan man ha detta problem.
• avfall utan fast konsistens t. ex. köksavfall
Speciella anvisningar:
¾ Fyll alltid på materialet som ska
krossas från höger sida i trattens
påfyll-ningsöppning.
¾ Skär ner grenar, kvistar och trä
kort tid efter att de har klippts
resp. sågats av
− dessa material blir mycket hårda när de väl har torkat, så
att den maximala diametern som kan bearbetas blir
mindre.
¾ Tag bort kvistarna på större grenar.
¾ Om ni vill skära trädgårds- eller köksavfall som innehåller
mycket vatten resp. som har en tendens att klibba
− ska dessa skäras omväxlande med trämaterial för att
förhindra att maskinen täpps igen.
Ställa in avståndet.
Starta maskinen.
På plasthusets högra sida befinner sig en inställningsanordning.
För att ställa in avståndet sätter du i nyckeln med den infällda
bussningen (D) som bifogas och vrider den åt höger så att skruven
(C) rör sig i riktning mot skärvalsen. Vrid nyckeln så mycket, tills
du ser små aluminiumspån komma ut ut utkastningsöppningen.
99
 Loading...