

Page 1
Copyright Notice:
No part of this installation guide may be reproduced, transcribed, transmitted, or translated in any language, in any form or by any means, except duplication of documentation
by the purchaser for backup purpose, without written consent of ASRock Inc.
Products and corporate names appearing in this guide may or may not be registered
trademarks or copyrights of their respective companies, and are used only for identifi ca-
tion or explanation and to the owners’ benefi t, without intent to infringe.
Disclaimer:
Specifi cations and information contained in this guide are furnished for informational use
only and subject to change without notice, and should not be constructed as a commitment by ASRock. ASRock assumes no responsibility for any errors or omissions that may
appear in this guide.
With respect to the contents of this guide, ASRock does not provide warranty of any kind,
either expressed or implied, including but not limited to the implied warranties or conditions of merchantability or fi tness for a particular purpose. In no event shall ASRock, its
directors, offi cers, employees, or agents be liable for any indirect, special, incidental, or
consequential damages (including damages for loss of profi ts, loss of business, loss of
data, interruption of business and the like), even if ASRock has been advised of the possibility of such damages arising from any defect or error in the guide or product.
This device complies with Part 15 of the FCC Rules. Operation is subject to the following
two conditions:
(1) this device may not cause harmful interference, and
(2) this device must accept any interference received, including interference that
may cause undesired operation.
CALIFORNIA, USA ONLY
The Lithium battery adopted on this motherboard contains Perchlorate, a toxic substance
controlled in Perchlorate Best Management Practices (BMP) regulations passed by the
California Legislature. When you discard the Lithium battery in California, USA, please
follow the related regulations in advance.
“Perchlorate Material-special handling may apply, see
www.dtsc.ca.gov/hazardouswaste/perchlorate”
ASRock Website: http://www.asrock.com
Published April 2012
Copyright©2012 ASRock INC. All rights reserved.
ASRock H71M-DG3 Motherboard
English
1
Page 2
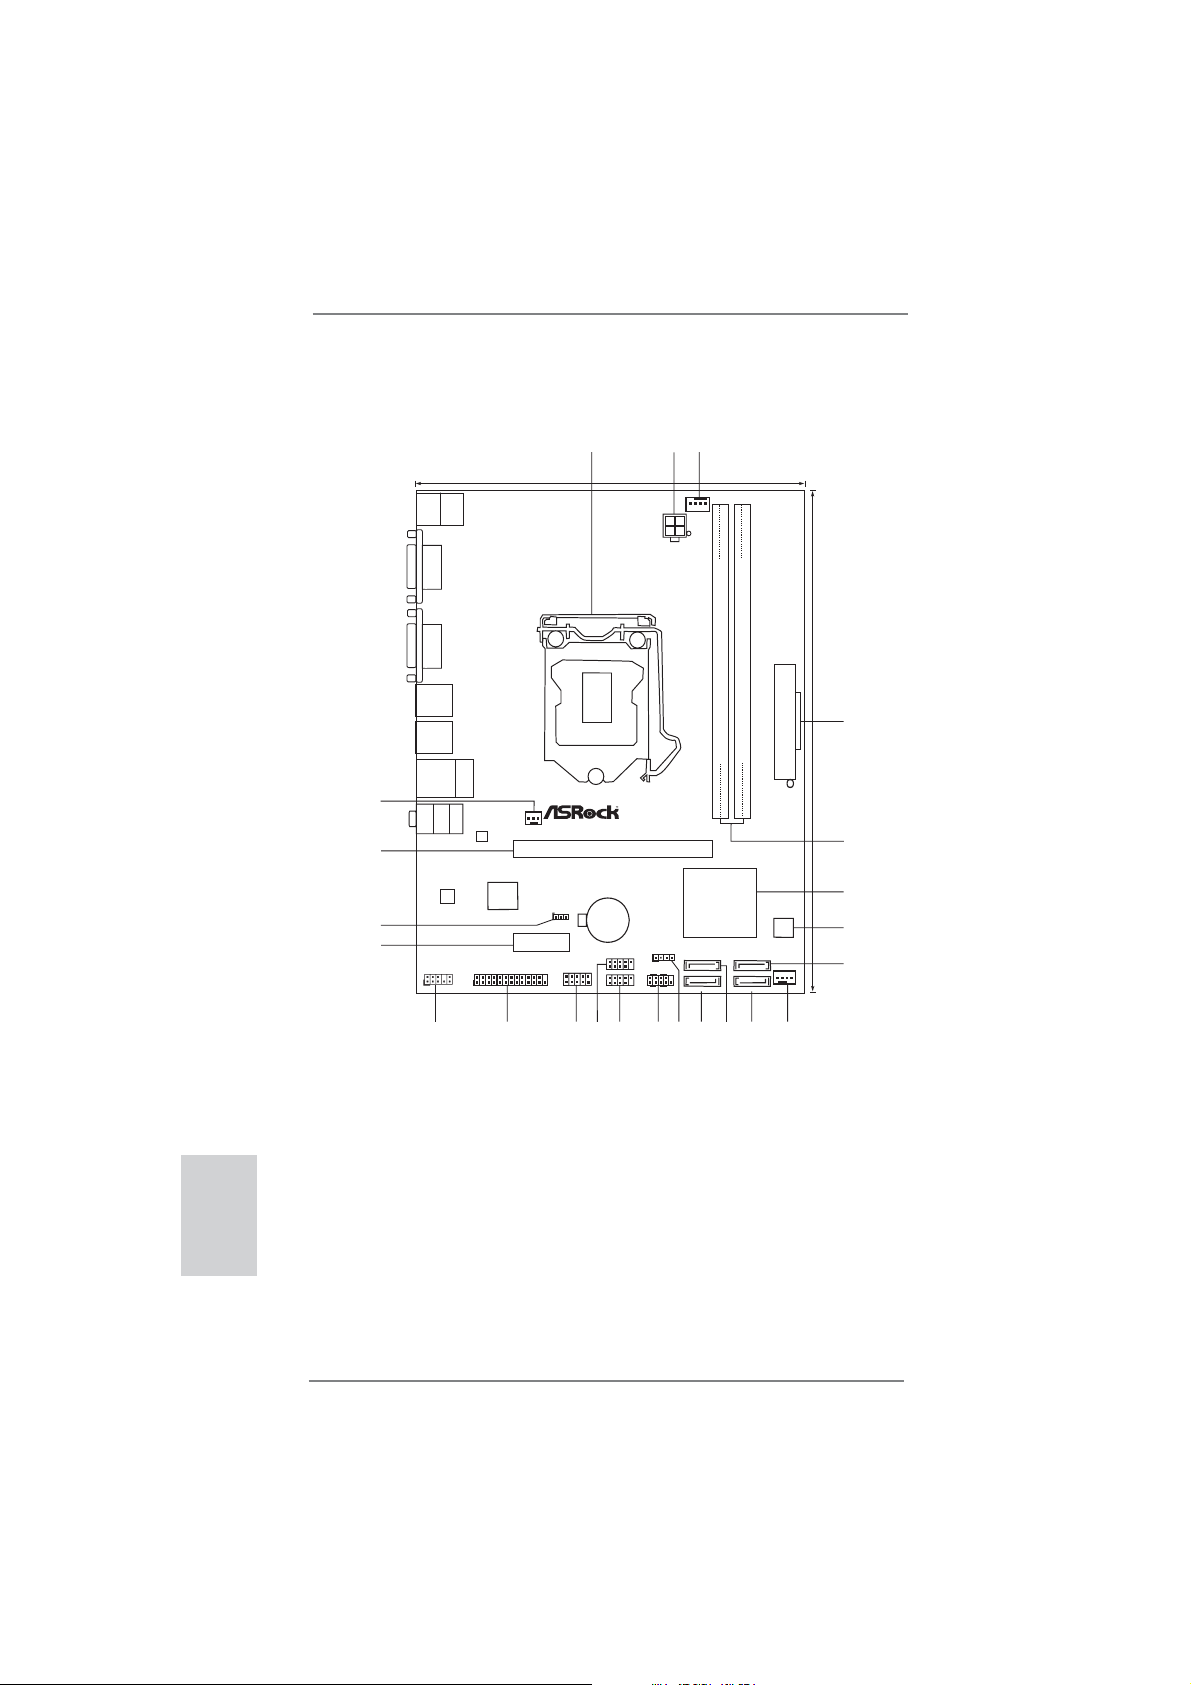
Motherboard Layout
17.3cm (6.8in)
Keyboard
Mouse
PS2
PS2
3
1
2
CPU_FAN1
English
VGA1
Fast LAN
X
ATX12 V1
RoHS
Fast USB
X
DVI1
22.6cm (8.9in)
USB2.0
T:USB0
B:USB1
USB2.0
T:USB2
B:USB3
USB2.0
Top:
T:USB4
RJ-45
23
22
20
B:USB5
Bottom:
MIC IN
Top:
LINE IN
Center:
FRONT
AUDIO
CODEC
21
PWR_FAN1
Super
I/O
H71M-DG3
CLRCMOS1
1
LAN
PHY
PCIE2
HD_AUDIO1
1
1
LPT1
19
1
18
17
X
Fast RAM
PCIE1
CMOS
Battery
USB8_9
1
SPEAKER1
1
COM1
PLEDPWRBTN
USB6_7
1
1
HDLED RESET
PANEL1
15
16
14
13
ErP/EuP Ready DDR3
Intel
H61
SATA2_3
SATA2_2
12
DDR3_A1 (64bit, 240-pin module)
11
DDR3_B1 (64bit, 240-pin module)
SATA2_1
SATA2_0
10
ATXPWR1
32Mb
BIOS
CHA_FAN1
9
Designed inTaipei
4
5
6
7
8
1 1155-Pin CPU Socket 13 Chassis Speaker Header (SPEAKER 1, White)
2 ATX 12V Power Connector (ATX12V1) 14 System Panel Header (PANEL1, White)
3 CPU Fan Connector (CPU_FAN1) 15 USB 2.0 Header (USB6_7, Blue)
4 ATX Power Connector (ATXPWR1) 16 USB 2.0 Header (USB8_9, Blue)
5 2 x 240-pin DDR3 DIMM Slots 17 COM Port Header (COM1)
(Dual Channel: DDR3_A1, DDR3_B1, Blue) 18 Print Port Header (LPT1, White)
6 Intel H61 Chipset 19 Front Panel Audio Header
7 32Mb SPI Flash (HD_AUDIO1, White)
8 SATA2 Connector (SATA2_1, Blue) 20 PCI Express 2.0 x1 Slot (PCIE2, White)
9 Chassis Fan Connector (CHA_FAN1) 21 Clear CMOS Jumper (CLRCMOS1)
10 SATA2 Connector (SATA2_0, Blue) 22 PCI Express 3.0 x16 Slot (PCIE1, Blue)
11 SATA2 Connector (SATA2_3, Blue) 23 Power Fan Connector (PWR_FAN1)
12 SATA2 Connector (SATA2_2, Blue)
2
ASRock H71M-DG3 Motherboard
Page 3

I/O Panel
1 PS/2 Mouse Port (Green) 7 USB 2.0 Ports (USB23)
* 2 LAN RJ-45 Port 8 USB 2.0 Ports (USB01)
3 Line In (Light Blue) 9 DVI-D Port
** 4 Front Speaker (Lime) 10 D-Sub Port
5 Microphone (Pink) 11 PS/2 Keyboard Port (Purple)
6 USB 2.0 Ports (USB45)
* There are two LED next to the LAN port. Please refer to the table below for the LAN port LED
indications.
Activity/Link LED SPEED LED
Status Description Status Description
Off No Link Off 10Mbps connection
Blinking Data Activity Orange 100Mbps connection
On Link Green 1Gbps connection
LAN Port LED Indications
ACT/LINK
LED
LAN Port
SPEED
LED
** To enable Multi-Streaming function, you need to connect a front panel audio cable to the front
panel audio header. Please refer to below steps for the software setting of Multi-Streaming.
For Windows® XP:
After restarting your computer, you will fi nd “Mixer” tool on your system. Please select “Mixer
ToolBox” , click “Enable playback multi-streaming”, and click “ok”. Choose “2CH” or
“4CH” and then you are allowed to select “Realtek HDA Primary output” to use Rear Speaker
and Front Speaker, or select “Realtek HDA Audio 2nd output” to use front panel audio. Then
reboot your system.
For Windows
After restarting your computer, please double-click “Realtek HD Audio Manager” on the
system tray. Set “Speaker Confi guration” to “Quadraphonic” or “Stereo”. Click “Device
advanced settings”, choose “Make front and rear output devices playbacks two different audio
streams simultaneously”, and click “ok”. Then reboot your system.
®
7 / VistaTM:
ASRock H71M-DG3 Motherboard
English
3
Page 4
1. Introduction
Thank you for purchasing ASRock H71M-DG3 motherboard, a reliable motherboard
produced under ASRock’s consistently stringent quality control. It delivers excellent
performance with robust design conforming to ASRock’s commitment to quality and
endurance.
This Quick Installation Guide contains introduction of the motherboard and step-bystep installation guide. More detailed information of the motherboard can be found
in the user manual presented in the Support CD.
Because the motherboard specifi cations and the BIOS software might be
updated, the content of this manual will be subject to change without notice. In case any modifi cations of this manual occur, the updated version
will be available on ASRock website without further notice. You may fi nd
the latest VGA cards and CPU support lists on ASRock website as well.
ASRock website http://www.asrock.com
If you require technical support related to this motherboard, please visit
our website for specifi c information about the model you are using.
www.asrock.com/support/index.asp
1.1 Package Contents
ASRock H71M-DG3 Motherboard
(Micro ATX Form Factor: 8.9-in x 6.8-in, 22.6 cm x 17.3 cm)
ASRock H71M-DG3 Quick Installation Guide
ASRock H71M-DG3 Support CD
2 x Serial ATA (SATA) Data Cables (Optional)
1 x I/O Panel Shield
English
ASRock Reminds You...
To get better performance in Windows® 7 / 7 64-bit / Vista
bit, it is recommended to set the BIOS option in Storage Confi guration to
AHCI mode. For the BIOS setup, please refer to the “User Manual” in our
support CD for details.
TM
/ VistaTM 64-
4
ASRock H71M-DG3 Motherboard
Page 5
1.2 Specifications
Platform - Micro ATX Form Factor: 8.9-in x 6.8-in, 22.6 cm x 17.3 cm
- All Solid Capacitor design
CPU - Supports 3
LGA1155 Package
- Supports Intel
- Supports K-Series unlocked CPU
- Supports Hyper-Threading Technology (see CAUTION 1)
Chipset - Intel® H61
- Supports Intel
Technology
Memory - Dual Channel DDR3 Memory Technology (see CAUTION 2)
- 2 x DDR3 DIMM slots
- Supports DDR3 1600/1333/1066 non-ECC, un-buffered
memory (DDR3 1600 with Intel
DDR3 1333 with Intel® Sandy Bridge CPU)
- Max. capacity of system memory: 16GB (see CAUTION 3)
- Supports Intel
Intel® Ivy Bridge CPU
Expansion Slot - 1 x PCI Express 3.0 x16 slot (blue @ x16 mode)
* PCIE 3.0 is only supported with Intel® Ivy Bridge CPU. With
Intel
- 1 x PCI Express 2.0 x1 slot
Graphics * Intel® HD Graphics Built-in Visuals and the VGA outputs can
be supported only with processors which are GPU
integrated.
- Supports Intel
Sync Video 2.0, Intel® InTruTM 3D, Intel® Clear Video HD
Technology, Intel® InsiderTM, Intel® HD Graphics 2500/4000
with Intel
- Supports Intel® HD Graphics Built-in Visuals: Intel® Quick
Sync Video, Intel® InTruTM 3D, Intel® Clear Video HD
Technology, Intel® HD Graphics 2000/3000, Intel® Advanced
Vector Extensions (AVX) with Intel® Sandy Bridge CPU
- Pixel Shader 5.0, DirectX 11 with Intel
Pixel Shader 4.1, DirectX 10.1 with Intel® Sandy Bridge
CPU.
- Max. shared memory 1760MB with Intel
Max. shared memory 1759MB with Intel® Sandy Bridge
CPU. (see CAUTION 4)
rd
and 2nd Generation Intel® CoreTM i7 / i5 / i3 in
®
Turbo Boost 2.0 Technology
®
Rapid Start Technology and Smart Connect
®
Ivy Bridge CPU,
®
Extreme Memory Profi le (XMP) 1.3 / 1.2 with
®
Sandy Bridge CPU, it only supports PCIE 2.0.
®
HD Graphics Built-in Visuals: Intel® Quick
®
Ivy Bridge CPU
®
Ivy Bridge CPU.
®
Ivy Bridge CPU.
English
ASRock H71M-DG3 Motherboard
5
Page 6
English
- Dual VGA Output: support DVI-D and D-Sub ports by
independent display controllers
- Supports DVI with max. resolution up to 1920x1200 @ 60Hz
- Supports D-Sub with max. resolution up to 2048x1536
@ 75Hz
- Supports HDCP function with DVI port
- Supports Full HD 1080p Blu-ray (BD) / HD-DVD playback
with DVI port
Audio - 5.1 CH HD Audio (Realtek ALC662 Audio Codec)
LAN - PCIE x1 Gigabit LAN 10/100/1000 Mb/s
- Realtek RTL8111C
- Supports Wake-On-LAN
- Supports PXE
Rear Panel I/O I/O Panel
- 1 x PS/2 Mouse Port
- 1 x PS/2 Keyboard Port
- 1 x D-Sub Port
- 1 x DVI-D Port
- 6 x Ready-to-Use USB 2.0 Ports
- 1 x RJ-45 LAN Port with LED (ACT/LINK LED and SPEED
LED)
- HD Audio Jack: Line in/Front Speaker/Microphone
Connector - 4 x SATA2 3.0 Gb/s connectors, support NCQ, AHCI and
Hot Plug functions
- 1 x Print Port header
- 1 x COM port header
- CPU/Chassis/Power FAN connector
- 24 pin ATX power connector
- 4 pin 12V power connector
- Front panel audio connector
- 2 x USB 2.0 headers (support 4 USB 2.0 ports)
BIOS Feature - 32Mb AMI BIOS
- AMI UEFI Legal BIOS with GUI support
- Supports “Plug and Play”
- ACPI 1.1 Compliance Wake Up Events
- Supports jumperfree
- SMBIOS 2.3.1 Support
- IGPU, DRAM, PCH, CPU PLL, VTT, VCCSA Voltage
Multi-adjustment
6
ASRock H71M-DG3 Motherboard
Page 7

Support CD - Drivers, Utilities, AntiVirus Software (Trial Version),
CyberLink MediaEspresso 6.5 Trial, Creative Sound Blaster
X-Fi MB - Trial, ASRock MAGIX Multimedia Suite - OEM
Unique Feature - ASRock Extreme Tuning Utility (AXTU) (see CAUTION 5)
- ASRock Instant Boot
- ASRock Instant Flash (see CAUTION 6)
- ASRock APP Charger (see CAUTION 7)
- ASRock SmartView (see CAUTION 8)
- ASRock XFast USB (see CAUTION 9)
- ASRock XFast LAN (see CAUTION 10)
- ASRock XFast RAM (see CAUTION 11)
- Hybrid Booster:
- ASRock U-COP (see CAUTION 12)
- Boot Failure Guard (B.F.G.)
- Combo Cooler Option (C.C.O.) (see CAUTION 13)
Hardware - CPU Temperature Sensing
Monitor - Chassis Temperature Sensing
- CPU/Chassis/Power Fan Tachometer
- CPU/Chassis Quiet Fan (Allow Chassis Fan Speed
Auto-Adjust by CPU Temperature)
- CPU/Chassis Fan Multi-Speed Control
- Voltage Monitoring: +12V, +5V, +3.3V, CPU Vcore
OS - Microsoft
®
Windows® 7 / 7 64-bit / Vista
TM
/ VistaTM 64-bit
/ XP / XP 64-bit compliant (see CAUTION 14)
Certifi cations - FCC, CE, WHQL
- ErP/EuP Ready (ErP/EuP ready power supply is required)
(see CAUTION 15)
* For detailed product information, please visit our website: http://www.asrock.com
WARNING
Please realize that there is a certain risk involved with overclocking, including
adjusting the setting in the BIOS, applying Untied Overclocking Technology, or
using the third-party overclocking tools. Overclocking may affect your system
stability, or even cause damage to the components and devices of your system.
It should be done at your own risk and expense. We are not responsible for possible
damage caused by overclocking.
ASRock H71M-DG3 Motherboard
English
7
Page 8

English
CAUTION!
1. About the setting of “Hyper Threading Technology”, please check page
40 of “User Manual” in the support CD.
2. This motherboard supports Dual Channel Memory Technology. Before
you implement Dual Channel Memory Technology, make sure to read the
installation guide of memory modules on page 14 for proper installation.
3. Due to the operating system limitation, the actual memory size may be
less than 4GB for the reservation for system usage under Windows
VistaTM / XP. For Windows® OS with 64-bit CPU, there is no such limitation. You can use ASRock XFast RAM to utilize the memory that Win-
®
dows
cannot use.
4. The maximum shared memory size is defi ned by the chipset vendor and
is subject to change. Please check Intel® website for the latest information.
5. ASRock Extreme Tuning Utility (AXTU) is an all-in-one tool to fi ne-tune
different system functions in a user-friendly interface, which is including
Hardware Monitor, Fan Control, Overclocking, OC DNA and IES. In
Hardware Monitor, it shows the major readings of your system. In Fan
Control, it shows the fan speed and temperature for you to adjust. In
Overclocking, you are allowed to overclock CPU frequency for optimal
system performance. In OC DNA, you can save your OC settings as a
profi le and share with your friends. Your friends then can load the OC
profi le to their own system to get the same OC settings. In IES (Intelligent
Energy Saver), the voltage regulator can reduce the number of output
phases to improve effi ciency when the CPU cores are idle without
sacrificing computing performance. Please visit our website for the
operation procedures of ASRock Extreme Tuning Utility (AXTU).
ASRock website: http://www.asrock.com
6. ASRock Instant Flash is a BIOS fl ash utility embedded in Flash ROM.
This convenient BIOS update tool allows you to update system BIOS
without entering operating systems fi rst like MS-DOS or Windows®. With
this utility, you can press <F6> key during the POST or press <F2> key to
BIOS setup menu to access ASRock Instant Flash. Just launch this tool
and save the new BIOS fi le to your USB fl ash drive, fl oppy disk or hard
drive, then you can update your BIOS only in a few clicks without prepar-
ing an additional fl oppy diskette or other complicated fl ash utility. Please
be noted that the USB fl ash drive or hard drive must use FAT32/16/12 fi le
system.
®
7 /
8
ASRock H71M-DG3 Motherboard
Page 9

7. If you desire a faster, less restricted way of charging your Apple devices,
such as iPhone/iPod/iPad Touch, ASRock has prepared a wonderful
solution for you - ASRock APP Charger. Simply installing the APP Char-
ger driver, it makes your iPhone charged much quickly from your computer and up to 40% faster than before. ASRock APP Charger allows you
to quickly charge many Apple devices simultaneously and even supports
continuous charging when your PC enters into Standby mode (S1), Suspend to RAM (S3), hibernation mode (S4) or power off (S5). With APP
Charger driver installed, you can easily enjoy the marvelous charging
experience than ever.
ASRock website: http://www.asrock.com/Feature/AppCharger/index.asp
8.
SmartView, a new function of internet browser, is the smart start page for
IE that combines your most visited web sites, your history, your Facebook
friends and your real-time newsfeed into an enhanced view for a more
personal Internet experience. ASRock motherboards are exclusively
equipped with the SmartView utility that helps you keep in touch with
friends on-the-go. To use SmartView feature, please make sure your
OS version is Windows
browser version is IE8. ASRock website: http://www.asrock.com/Feature/
SmartView/index.asp
9. ASRock XFast USB can boost USB storage device performance. The
performance may depend on the property of the device.
10. ASRock XFast LAN provides a faster internet access, which includes
below benefits. LAN Application Prioritization: You can configure your
application priority ideally and/or add new programs. Lower Latency in
Game: After setting online game priority higher, it can lower the latency in
game. Traffi c Shaping: You can watch Youtube HD video and download
fi les simultaneously. Real-Time Analysis of Your Data: With the status
window, you can easily recognize which data streams you are currently
transferring.
11. ASRock XFast RAM fully utilizes the memory space that cannot be used
under Windows
viously visited websites, making web surfi ng faster than ever. And it also
boosts the speed of Adobe Photoshop 5 times faster. Another advantage
of ASRock XFast RAM is that it reduces the frequency of accessing your
SSDs or HDDs in order to extend their lifespan.
12. While CPU overheat is detected, the system will automatically shutdown.
Before you resume the system, please check if the CPU fan on the
motherboard functions properly and unplug the power cord, then plug it
back again. To improve heat dissipation, remember to spray thermal
grease between the CPU and the heatsink when you install the PC sys-
tem.
13. Combo Cooler Option (C.C.O.) provides the fl exible option to adopt three
different CPU cooler types, Socket LGA 775, LGA 1155 and LGA 1156.
Please be noticed that not all the 775 and 1156 CPU Fan can be used.
®
7 / 7 64 bit / VistaTM / VistaTM 64 bit, and your
®
OS 32-bit CPU. It also shortens the loading time of pre-
English
ASRock H71M-DG3 Motherboard
9
Page 10

14. ASRock XFast RAM is not supported by Microsoft® Windows® XP / XP
64-bit.
15. EuP, stands for Energy Using Product, was a provision regulated by Eu-
ropean Union to defi ne the power consumption for the completed system.
According to EuP, the total AC power of the completed system shall be
under 1.00W in off mode condition. To meet EuP standard, an EuP ready
motherboard and an EuP ready power supply are required. According to
Intel’s suggestion, the EuP ready power supply must meet the standard
of 5v standby power effi ciency is higher than 50% under 100 mA current
consumption. For EuP ready power supply selection, we recommend you
checking with the power supply manufacturer for more details.
English
10
ASRock H71M-DG3 Motherboard
Page 11
2. Installation
Pre-installation Precautions
Take note of the following precautions before you install motherboard components or change any motherboard settings.
1. Unplug the power cord from the wall socket before touching any
component. Failure to do so may cause severe damage to the
motherboard, peripherals, and/or components.
2. To avoid damaging the motherboard components due to static
electricity, NEVER place your motherboard directly on the carpet or the like. Also remember to use a grounded wrist strap or
touch a safety grounded object before you handle components.
3. Hold components by the edges and do not touch the ICs.
4. Whenever you uninstall any component, place it on a grounded
antstatic pad or in the bag that comes with the component.
5. When placing screws into the screw holes to secure the motherboard to the chassis, please do not over-tighten the screws!
Doing so may damage the motherboard.
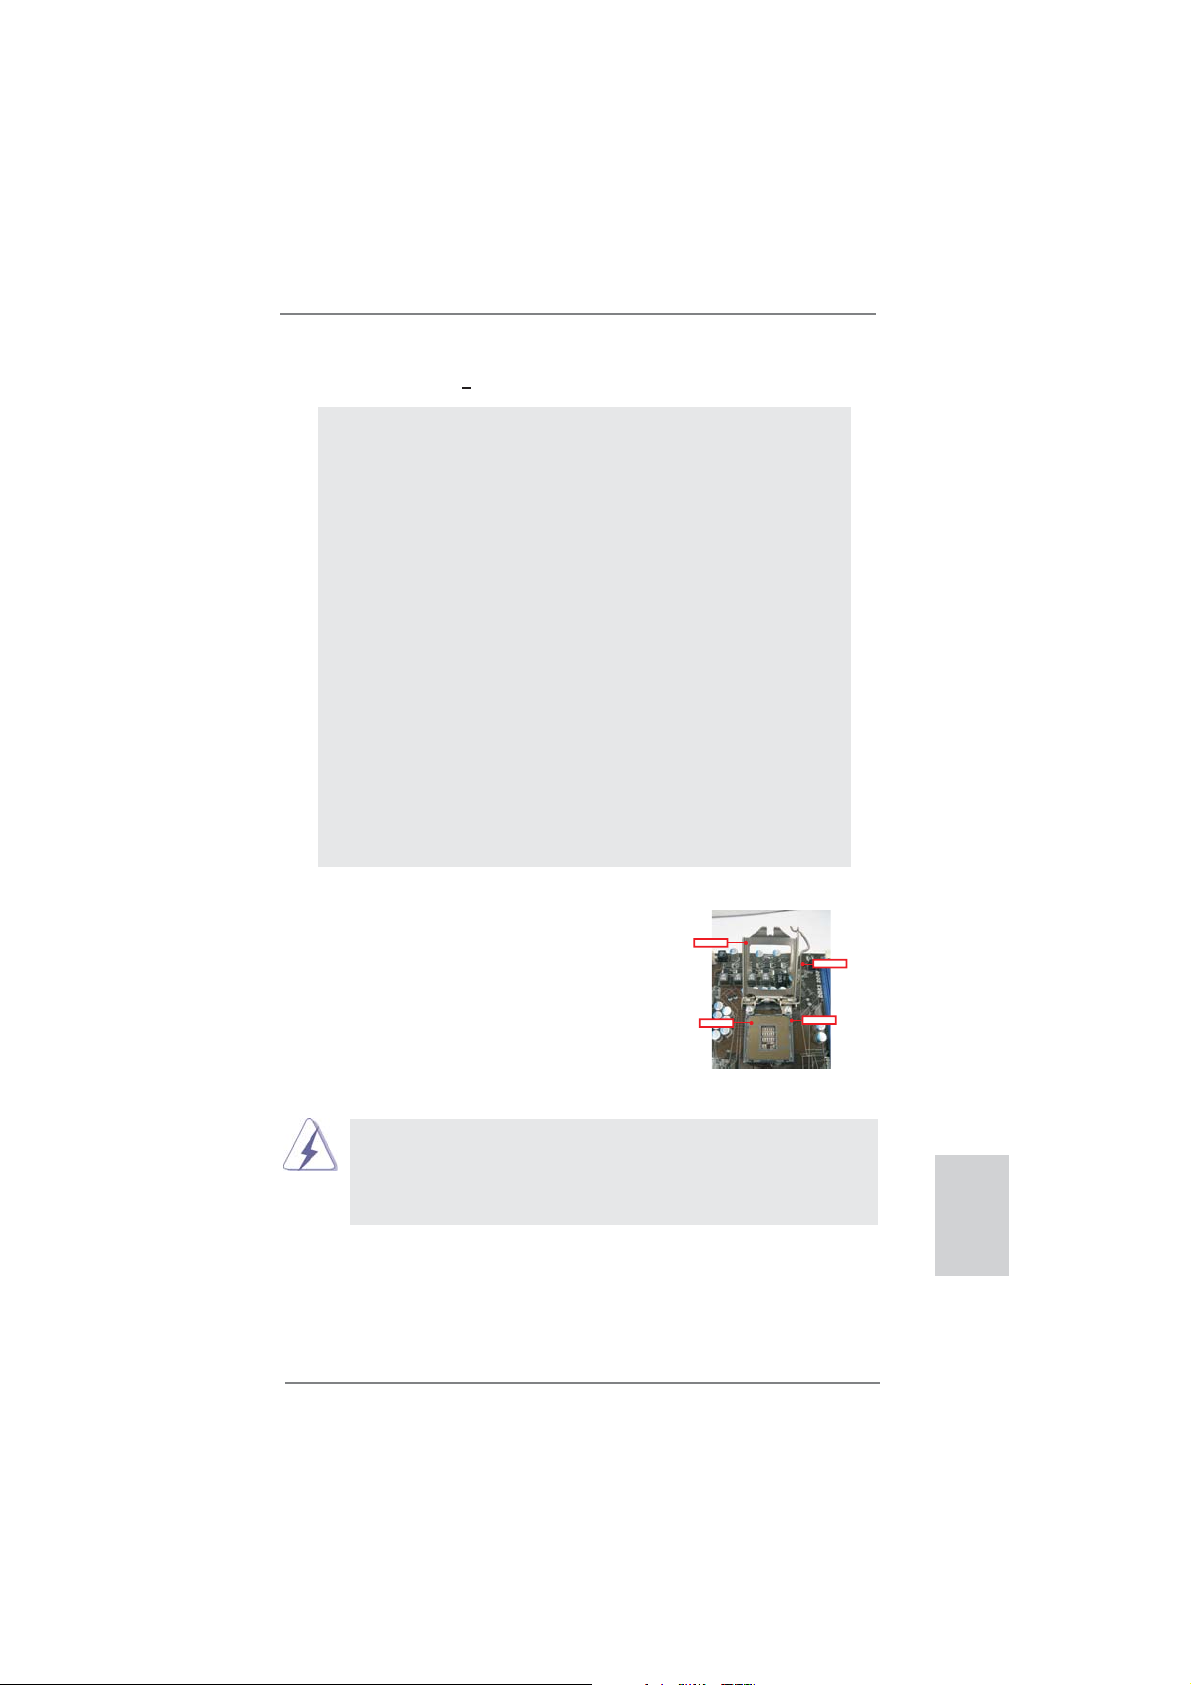
2.1 CPU Installation
For the installation of Intel 1155-Pin CPU,
please follow the steps below.
LoadPlate
LoadLever
ContactArray
1155-Pin Socket Overview
Before you insert the 1155-Pin CPU into the socket, please check if the
CPU surface is unclean or if there is any bent pin on the socket. Do not
force to insert the CPU into the socket if above situation is found. Otherwise, the CPU will be seriously damaged.
SocketBody
ASRock H71M-DG3 Motherboard
English
11
Page 12
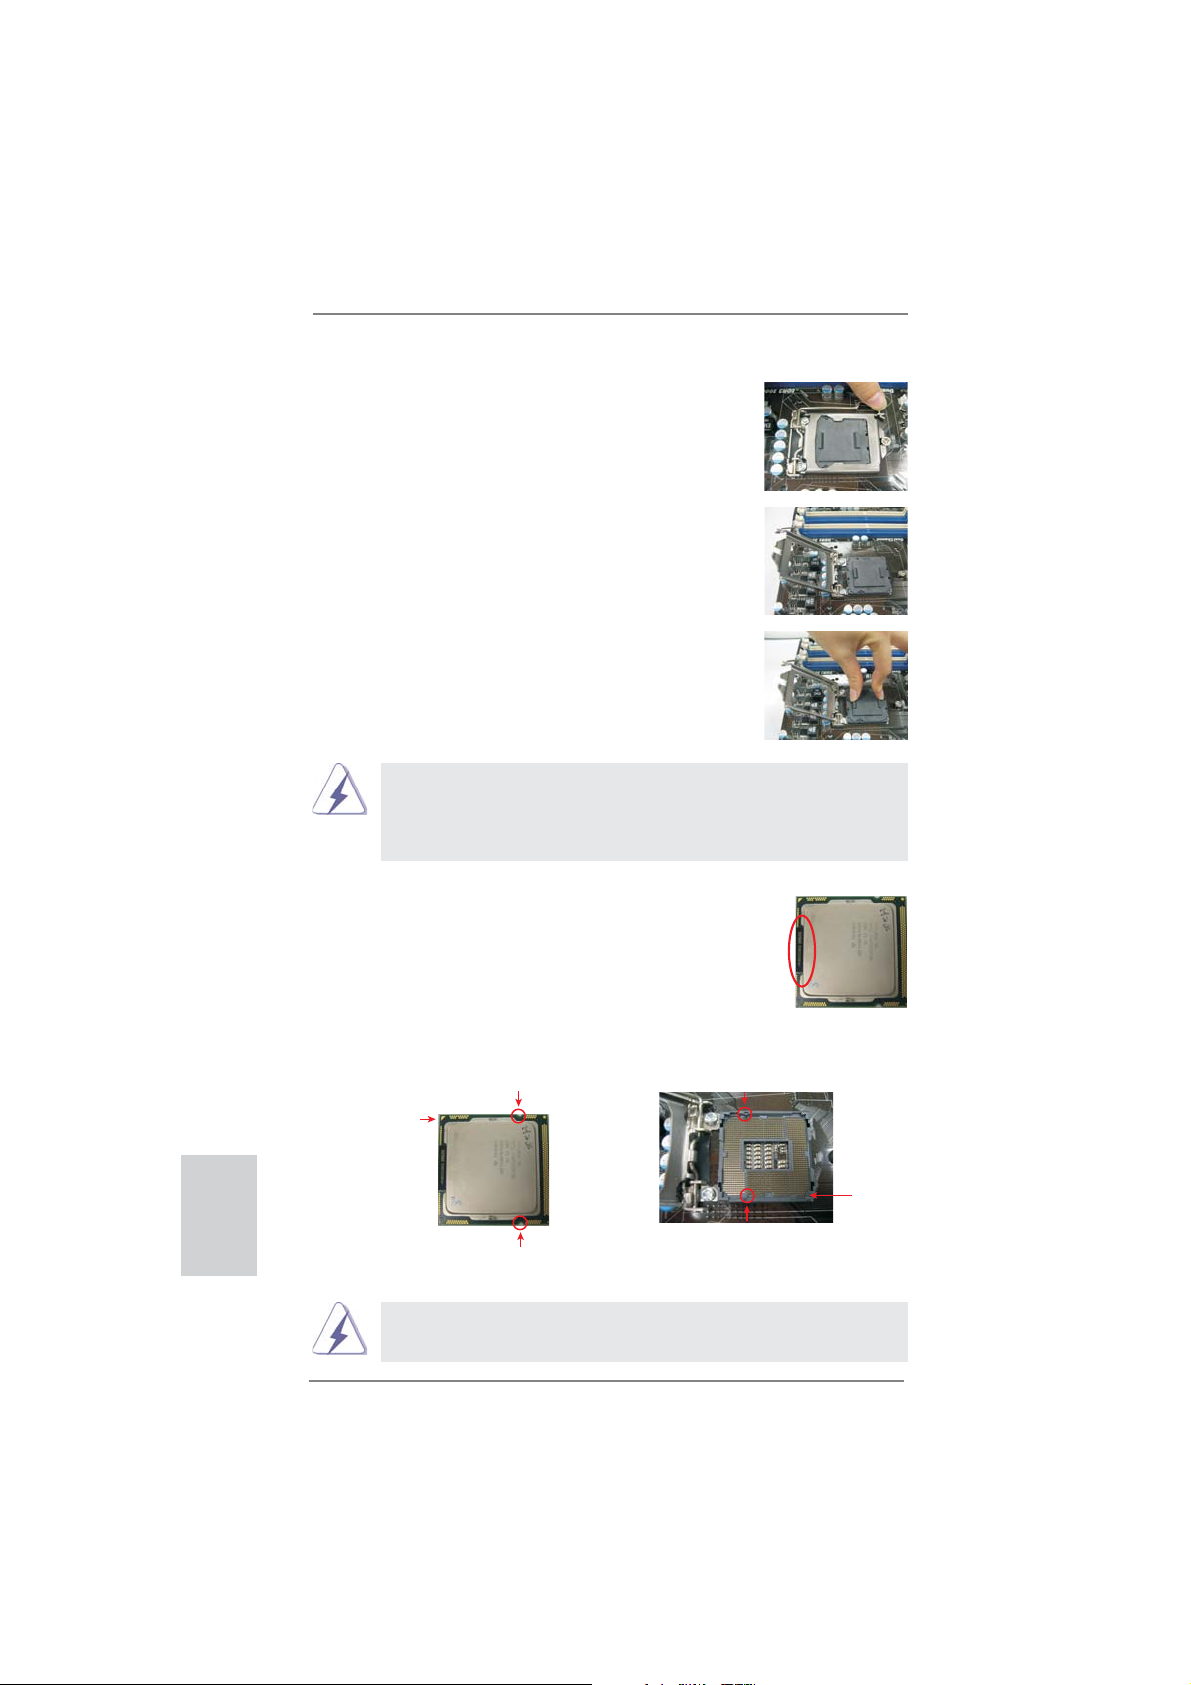
Step 1. Open the socket:
Step 1-1. Disengaging the lever by depressing
down and out on the hook to clear
retention tab.
Step 1-2. Rotate the load lever to fully open po-
sition at approximately 135 degrees.
Step 1-3. Rotate the load plate to fully open po-
sition at approximately 100 degrees.
Step 2. Remove PnP Cap (Pick and Place Cap).
1. It is recommended to use the cap tab to handle and avoid kicking
off the PnP cap.
2. This cap must be placed if returning the motherboard for after
service.
Step 3. Insert the 1155-Pin CPU:
Step 3-1. Hold the CPU by the edges where
are marked with black lines.
black line
English
12
Step 3-2. Orient the CPU with IHS (Integrated
Heat Sink) up. Locate Pin1 and the
two orientation key notches.
orientation key notch
Pin1
orientation key notch
1155-Pin CPU
For proper inserting, please ensure to match the two orientation key
notches of the CPU with the two alignment keys of the socket.
alignment key
1155-Pin Socket
ASRock H71M-DG3 Motherboard
Pin1
alignment key
Page 13
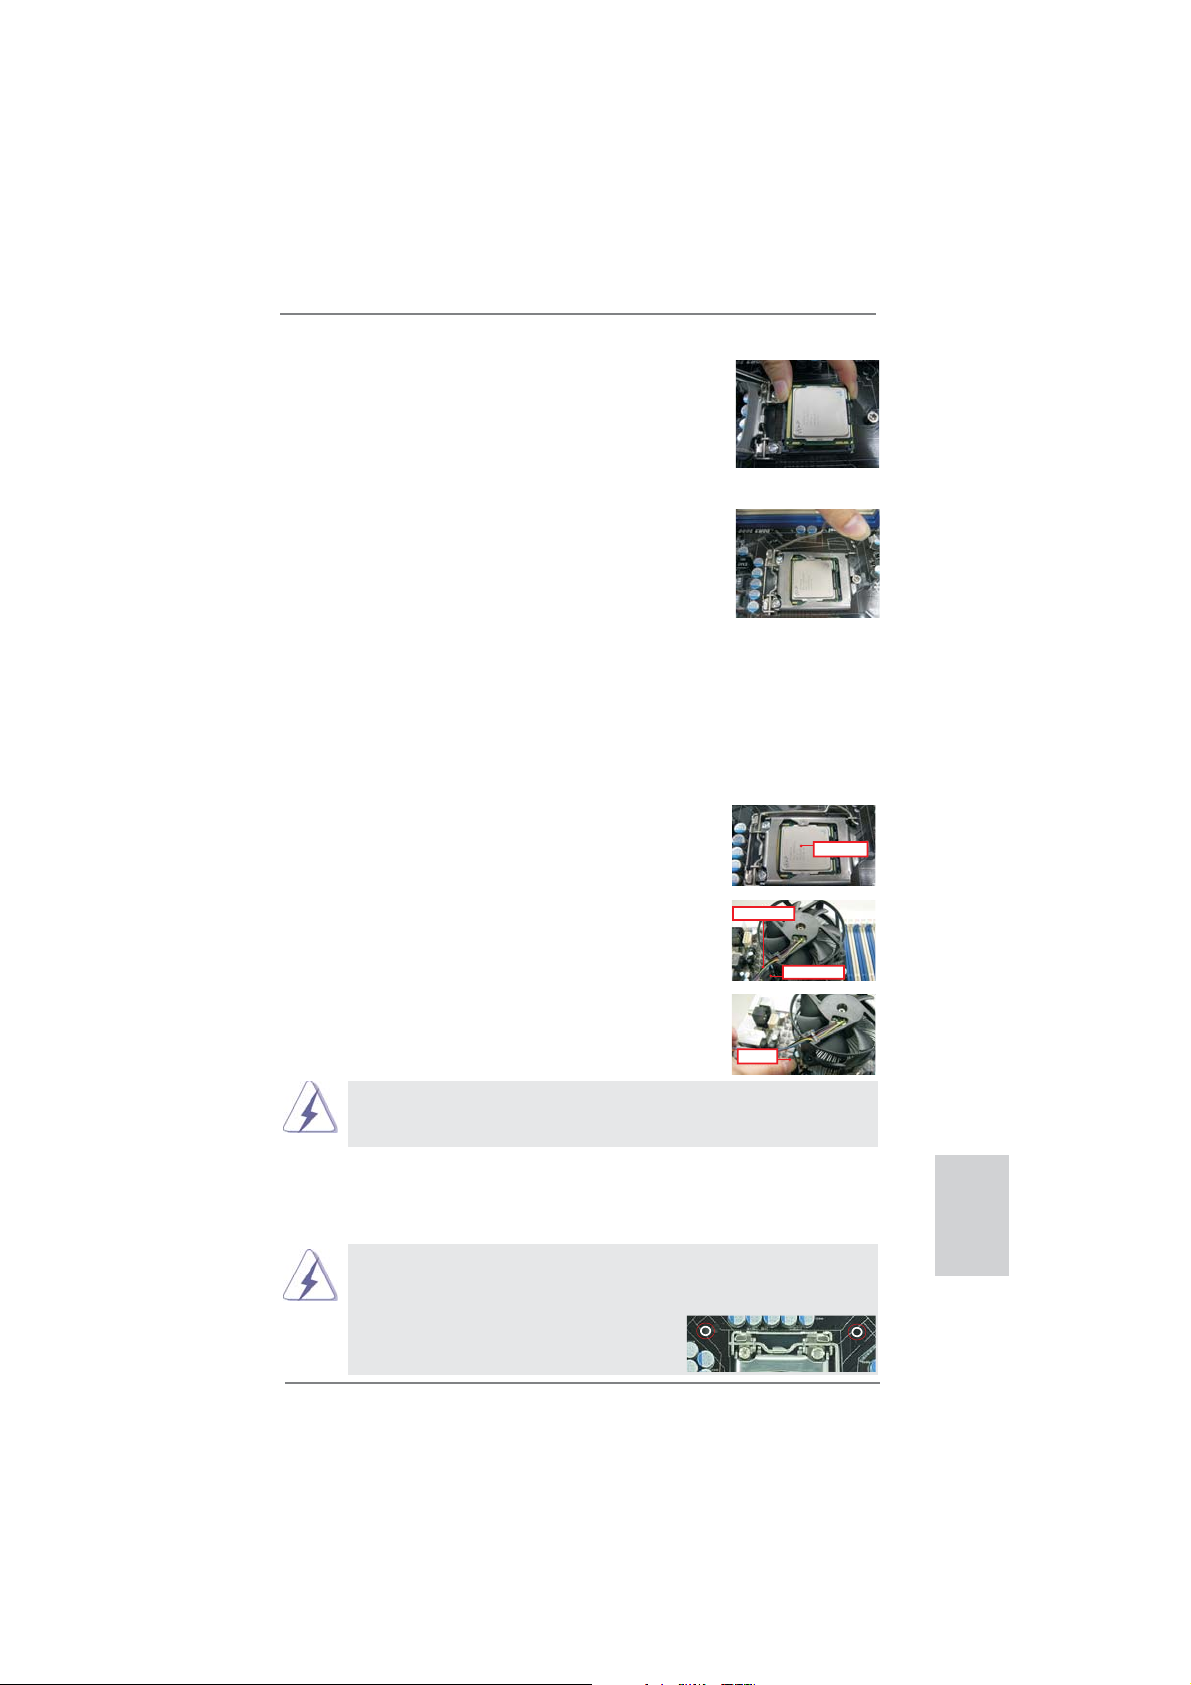
Step 3-3. Carefully place the CPU into the
socket by using a purely vertical motion.
Step 3-4. Verify that the CPU is within the sock-
et and properly mated to the orient
keys.
Step 4. Close the socket:
Step 4-1. Rotate the load plate onto the IHS.
Step 4-2. While pressing down lightly on load
plate, engage the load lever.
Step 4-3. Secure load lever with load plate tab
under retention tab of load lever.
2.2 Installation of CPU Fan and Heatsink
For proper installation, please kindly refer to the instruction manuals of your CPU
fan and heatsink.
Below is an example to illustrate the installation of the heatsink for 1155-Pin CPU.
Step 1. Apply thermal interface material onto center of
IHS on the socket surface.
Step 2. Place the heatsink onto the socket. Ensure
fan cables are oriented on side closest to the
CPU fan connector on the motherboard (CPU_
FAN1, see page 2, No. 3).
Step 3. Align fasteners with the motherboard through-
holes.
Step 4. Rotate the fastener clockwise, then press
down on fastener caps with thumb to install
and lock. Repeat with remaining fasteners.
Fancables on side
closestto MB header
PressDown
(4Places)
ApplyThermal
InterfaceMaterial
Fastenerslots
pointingstraight out
If you press down the fasteners without rotating them clockwise, the
heatsink cannot be secured on the motherboard.
Step 5. Connect fan header with the CPU fan connector on the motherboard.
Step 6. Secure excess cable with tie-wrap to ensure cable does not interfere with
fan operation or contact other components.
Please be noticed that this motherboard supports Combo Cooler
Option (C.C.O.), which provides the fl exible option to adopt three dif-
ferent CPU cooler types, Socket LGA 775, LGA 1155 and LGA 1156.
The white throughholes are for Socket LGA
1155/1156 CPU fan.
ASRock H71M-DG3 Motherboard
English
13
Page 14
2.3 Installation of Memory Modules (DIMM)
This motherboard provides two 240-pin DDR3 (Double Data Rate 3) DIMM slots,
and supports Dual Channel Memory Technology. For dual channel configuration,
you always need to install two identical (the same brand, speed, size and chiptype) memory modules in the DDR3 DIMM slots to activate Dual Channel Memory
Technology. Otherwise, it will operate at single channel mode.
1. It is not allowed to install a DDR or DDR2 memory module into
DDR3 slot;otherwise, this motherboard and DIMM may be
damaged.
2. If you install only one memory module or two non-identical
memory modules, it is unable to activate the Dual Channel
Memory Technology.
3. Some DDR3 1GB double-sided DIMMs with 16 chips may not
work on this motherboard. It is not recommended to install them
on this motherboard.
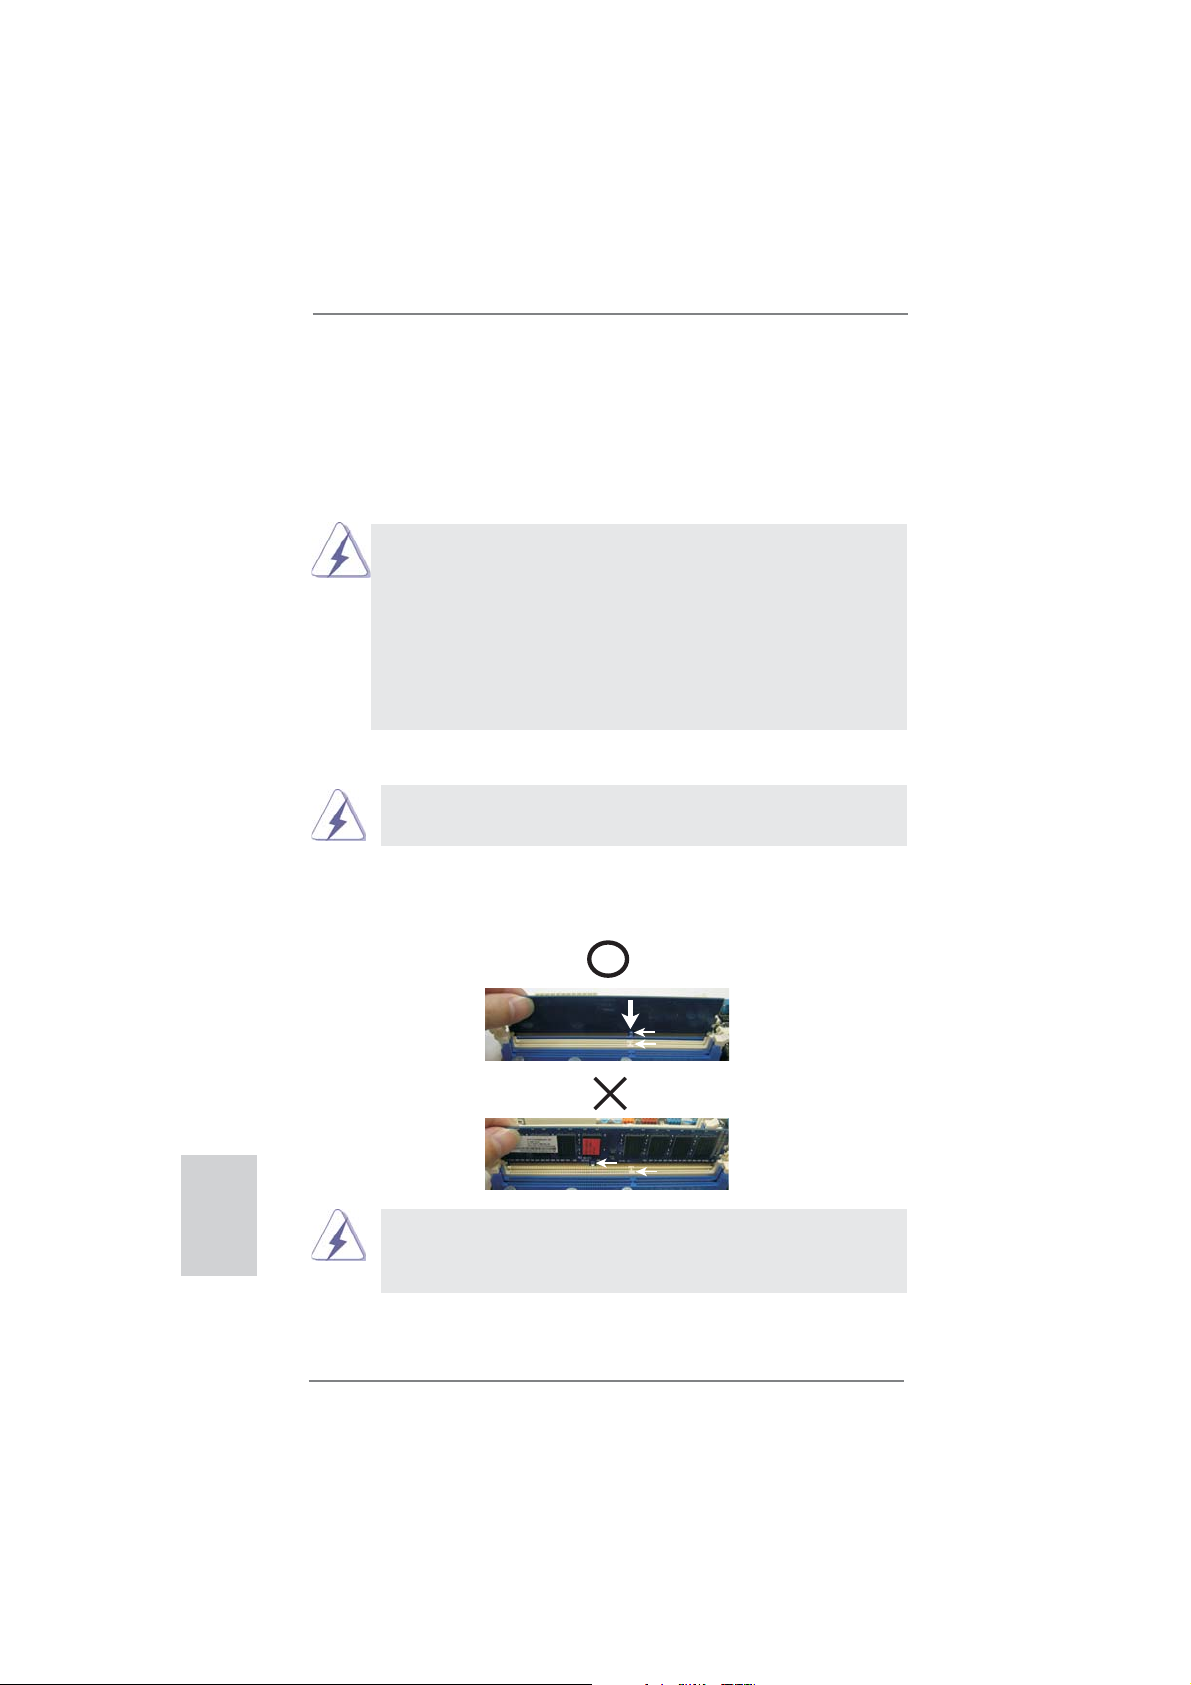
Installing a DIMM
Please make sure to disconnect power supply before adding or
removing DIMMs or the system components.
Step 1. Unlock a DIMM slot by pressing the retaining clips outward.
Step 2. Align a DIMM on the slot such that the notch on the DIMM matches the
break on the slot.
English
notch
break
notch
break
damage to the motherboard and the DIMM if you force the DIMM into the slot
at incorrect orientation.
The DIMM only fi ts in one correct orientation. It will cause permanent
Step 3. Firmly insert the DIMM into the slot until the retaining clips at both ends
fully snap back in place and the DIMM is properly seated.
14
ASRock H71M-DG3 Motherboard
Page 15
2.4 Expansion Slots (PCI Express Slots)
There are 2 PCI Express slots on this motherboard.
PCIE slots:
PCIE1 (PCIE 3.0 x16 slot; Blue) is used for PCI Express x16 lane width
graphics cards.
PCIE2 (PCIE 2.0 x1 slot; White) is used for PCI Express cards with x1
lane width cards, such as Gigabit LAN card, SATA2 card, etc.
Only PCIE1 slot supports Gen 3 speed. To run the PCI Express in Gen
3 speed, please install an Ivy Bridge CPU. If you install a Sandy Bridge
CPU, the PCI Express will run only at PCI Express Gen 2 speed.
Installing an expansion card
Step 1. Before installing the expansion card, please make sure that the power
supply is switched off or the power cord is unplugged. Please read the
documentation of the expansion card and make necessary hardware
settings for the card before you start the installation.
Step 2. Remove the system unit cover (if your motherboard is already installed
in a chassis).
Step 3. Remove the bracket facing the slot that you intend to use. Keep the
screws for later use.
Step 4. Align the card connector with the slot and press fi rmly until the card is
completely seated on the slot.
Step 5. Fasten the card to the chassis with screws.
Step 6. Replace the system cover.
English
ASRock H71M-DG3 Motherboard
15
Page 16
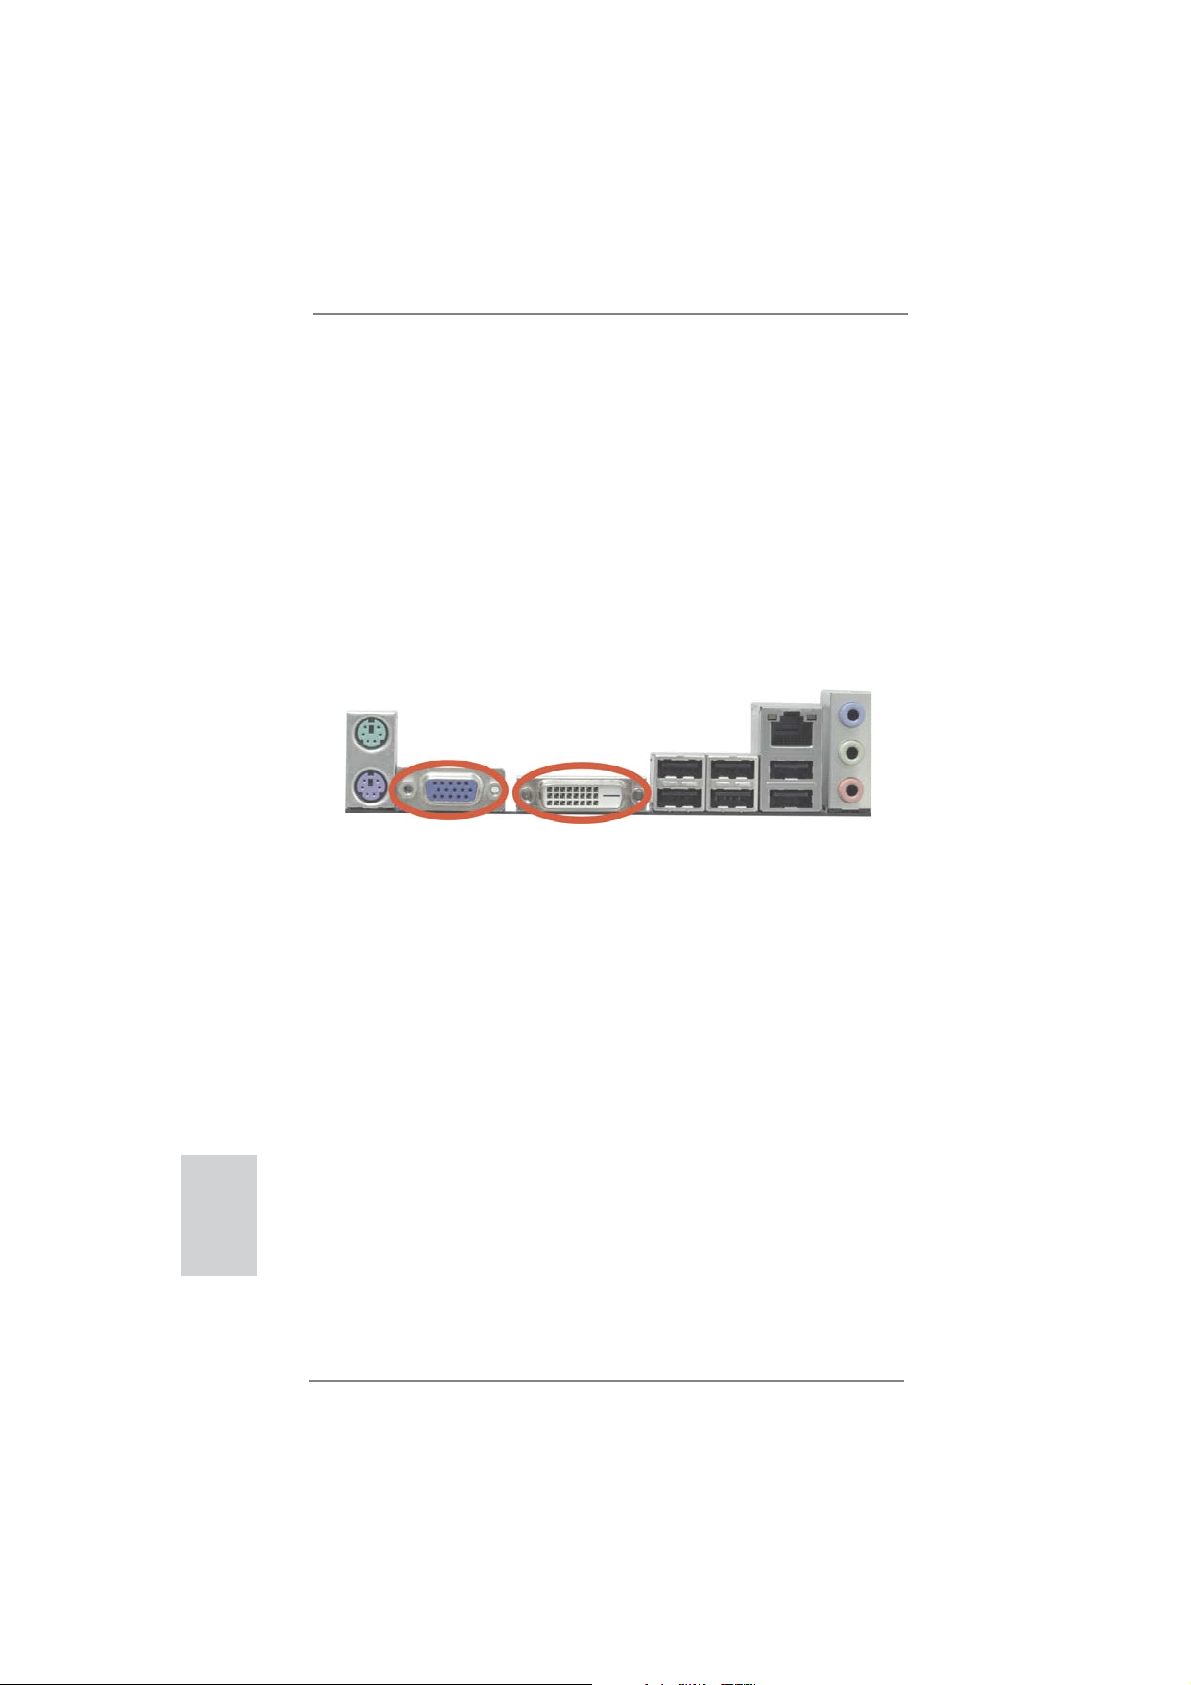
2.5 Dual Monitor and Surround Display Features
Dual Monitor Feature
This motherboard supports dual monitor feature. With the internal VGA output support (DVI-D and D-Sub), you can easily enjoy the benefi ts of dual monitor feature
without installing any add-on VGA card to this motherboard. This motherboard also
provides independent display controllers for DVI-D and D-Sub to support dual VGA
output so that DVI-D and D-sub can drive same or different display contents.
To enable dual monitor feature, please follow the below steps:
1. Connect DVI-D monitor cable to DVI-D port on the I/O panel, and connect D-Sub
monitor cable to D-Sub port on the I/O panel.
D-Sub port DVI-D port
2. If you have installed onboard VGA driver from our support CD to your system
already, you can freely enjoy the benefi ts of dual monitor function after your
system boots. If you haven’t installed onboard VGA driver yet, please install
onboard VGA driver from our support CD to your system and restart your
computer.
English
16
ASRock H71M-DG3 Motherboard
Page 17

Surround Display Feature
This motherboard supports surround display upgrade. With the internal VGA output
support (DVI-D and D-Sub) and external add-on PCI Express VGA cards, you can
easily enjoy the benefi ts of surround display feature.
Please refer to the following steps to set up a surround display environment:
1. Install the PCI Express VGA card on PCIE1 slot. Please refer to page 15 for
proper expansion card installation procedures for details.
2. Connect DVI-D monitor cable to DVI-D port on the I/O panel, and connect
D-Sub monitor cable to D-Sub port on the I/O panel. Then connect other
monitor cables to the corresponding connectors of the add-on PCI Express VGA
card on PCIE1 slot.
3. Boot your system. Press <F2> or <Del> to enter UEFI setup. Enter “Onboard
VGA Share Memory” option to adjust the memory capability to [32MB], [64MB],
[128MB], [256MB] or [512MB] to enable the function of D-sub. Please make sure
that the value you select is less than the total capability of the system memory.
If you do not adjust the UEFI setup, the default value of “Onboard VGA Share
Memory”, [Auto], will disable D-Sub function when the add-on VGA card is
inserted to this motherboard.
4. Install the onboard VGA driver and the add-on PCI Express VGA card driver to
your system. If you have installed the drivers already, there is no need to install
them again.
5. Set up a multi-monitor display.
For Windows
®
XP / XP 64-bit OS:
Right click the desktop, choose “Properties”, and select the “Settings” tab
so that you can adjust the parameters of the multi-monitor according to
the steps below.
A. Click the “Identify” button to display a large number on each monitor.
B. Right-click the display icon in the Display Properties dialog that you
wish to be your primary monitor, and then select “Primary”. When
you use multiple monitors with your card, one monitor will always be
Primary, and all additional monitors will be designated as Secondary.
C. Select the display icon identifi ed by the number 2.
D. Click “Extend my Windows desktop onto this monitor”.
E. Right-click the display icon and select “Attached”, if necessary.
F. Set the “Screen Resolution” and “Color Quality” as appropriate for the
second monitor. Click “Apply” or “OK” to apply these new values.
G. Repeat steps C through E for the diaplay icon identifi ed by the number
one, two, three and four.
ASRock H71M-DG3 Motherboard
English
17
Page 18

For Windows® 7 / 7 64-bit / VistaTM / VistaTM 64-bit OS:
Right click the desktop, choose “Personalize”, and select the “Display
Settings” tab so that you can adjust the parameters of the multi-monitor
according to the steps below.
A. Click the number ”2” icon.
B. Click the items “This is my main monitor” and “Extend the desktop onto
this monitor”.
C. Click “OK” to save your change.
D. Repeat steps A through C for the display icon identifi ed by the number
three and four.
6. Use Surround Display. Click and drag the display icons to positions representing
the physical setup of your monitors that you would like to use. The placement
of display icons determines how you move items from one monitor to another.
HDCP Function
HDCP function is supported on this motherboard. To use HDCP
function with this motherboard, you need to adopt the monitor
that supports HDCP function as well. Therefore, you can enjoy
the superior display quality with high-defi nition HDCP
encryption contents. Please refer to below instruction for more
details about HDCP function.
What is HDCP?
HDCP stands for High-Bandwidth Digital Content Protection,
a specifi cation developed by Intel
®
for protecting digital
entertainment content that uses the DVI interface. HDCP is a
copy protection scheme to eliminate the possibility of
intercepting digital data midstream between the video source,
or transmitter - such as a computer, DVD player or set-top box and the digital display, or receiver - such as a monitor, television
or projector. In other words, HDCP specifi cation is designed to
protect the integrity of content as it is being transmitted.
English
Products compatible with the HDCP scheme such as DVD
players, satellite and cable HDTV set-top-boxes, as well as few
entertainment PCs requires a secure connection to a compliant
display. Due to the increase in manufacturers employing HDCP
in their equipment, it is highly recommended that the HDTV or
LCD monitor you purchase is compatible.
18
ASRock H71M-DG3 Motherboard
Page 19
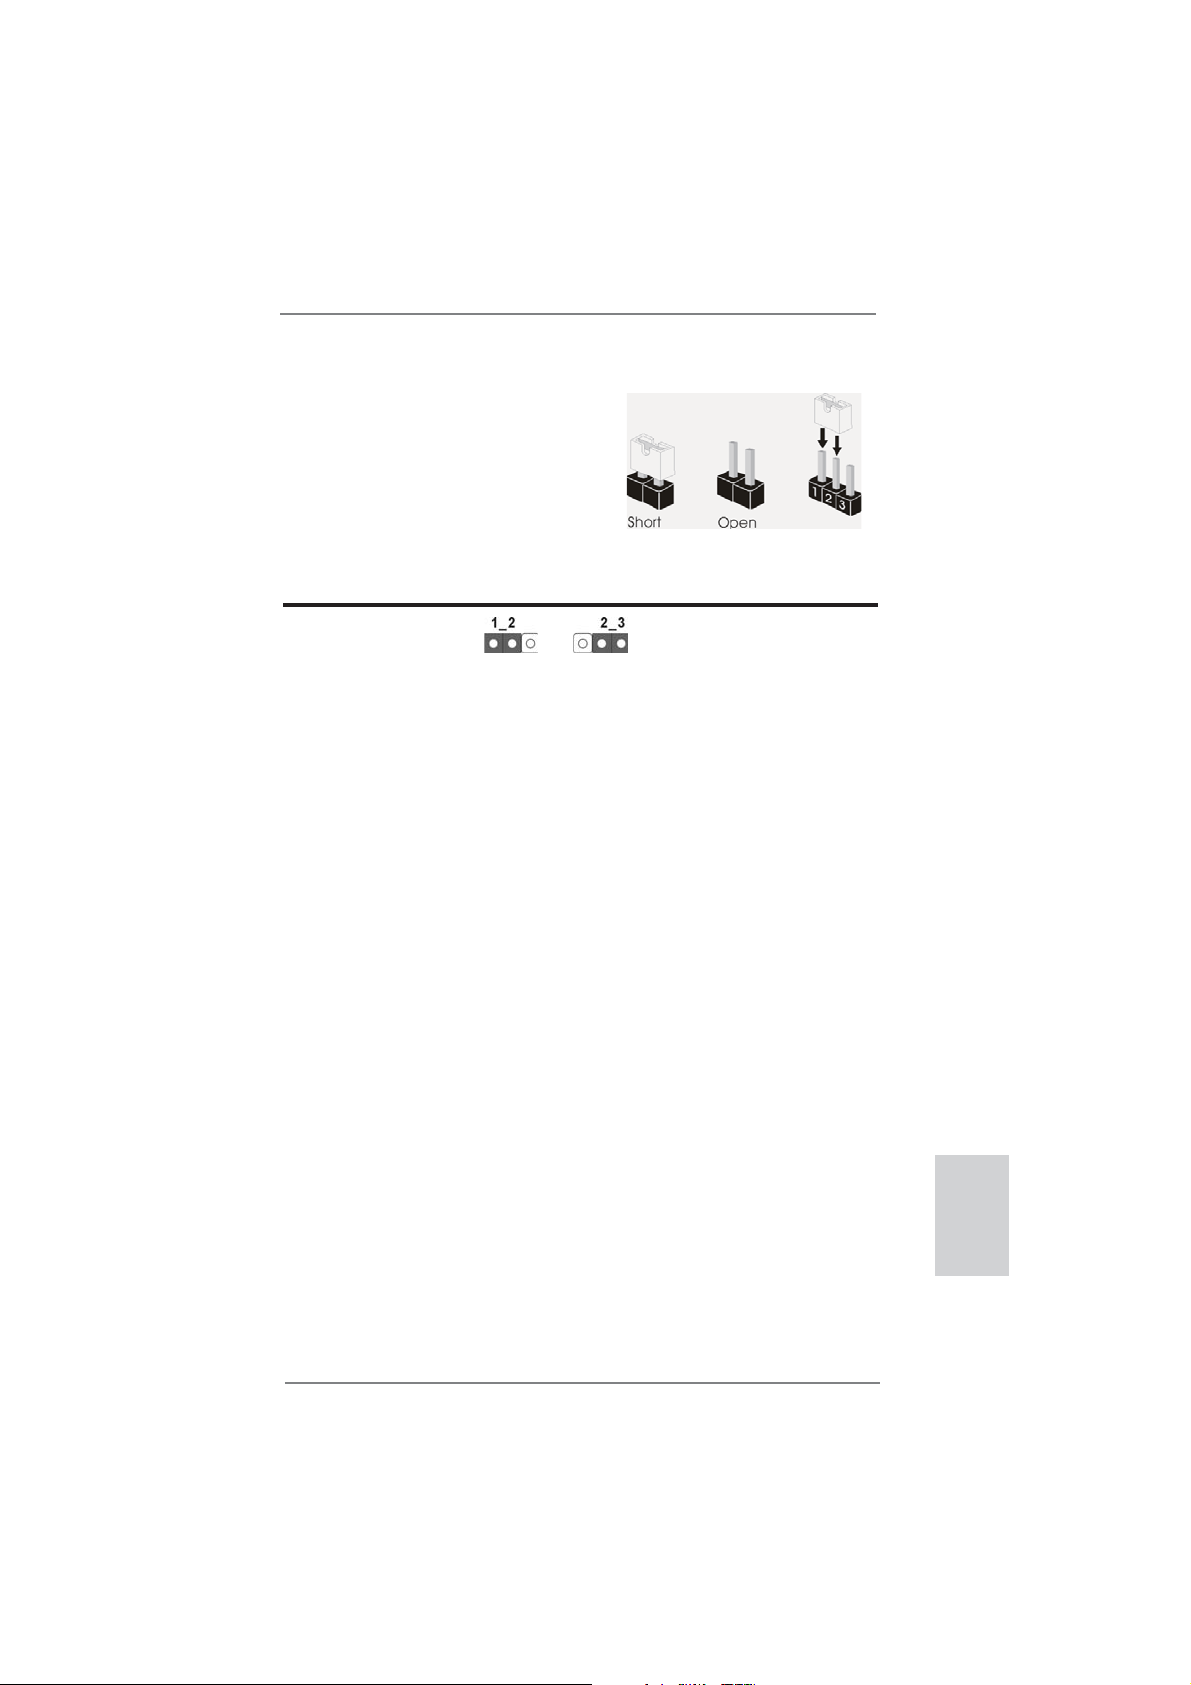
2.6 Jumpers Setup
The illustration shows how jumpers are
setup. When the jumper cap is placed on
pins, the jumper is “Short”. If no jumper cap
is placed on pins, the jumper is “Open”. The
illustration shows a 3-pin jumper whose
pin1 and pin2 are “Short” when jumper cap
is placed on these 2 pins.
Jumper Setting Description
Clear CMOS Jumper
(CLRCMOS1)
(see p.2, No. 21)
Note: CLRCMOS1 allows you to clear the data in CMOS. To clear and reset the
system parameters to default setup, please turn off the computer and unplug
the power cord from the power supply. After waiting for 15 seconds, use a
jumper cap to short pin2 and pin3 on CLRCMOS1 for 5 seconds. However,
please do not clear the CMOS right after you update the BIOS. If you need
to clear the CMOS when you just fi nish updating the BIOS, you must boot
up the system fi rst, and then shut it down before you do the clear-CMOS ac-
tion. Please be noted that the password, date, time, user default profi le, 1394
GUID and MAC address will be cleared only if the CMOS battery is removed.
Clear CMOSDefault
ASRock H71M-DG3 Motherboard
English
19
Page 20
2.7 Onboard Headers and Connectors
Onboard headers and connectors are NOT jumpers. Do NOT place
jumper caps over these headers and connectors. Placing jumper caps
over the headers and connectors will cause permanent damage of the
motherboard!
Serial ATAII Connectors These four Serial ATAII
(SATA2_0: see p.2, No. 10)
(SATA2_1: see p.2, No. 8)
(SATA2_2: see p.2, No. 12)
(SATA2_3: see p.2, No. 11)
SATA2_3
(SATAII) connectors support
SATA data cables for internal
storage devices. The current
SATA2_2
SATAII interface allows up to
SATA2_1
SATA2_0
3.0 Gb/s data transfer rate.
Serial ATA (SATA) Either end of the SATA data
Data Cable cable can be connected to the
(Optional)
SATA / SATAII hard disk or the
SATAII connector on this
motherboard.
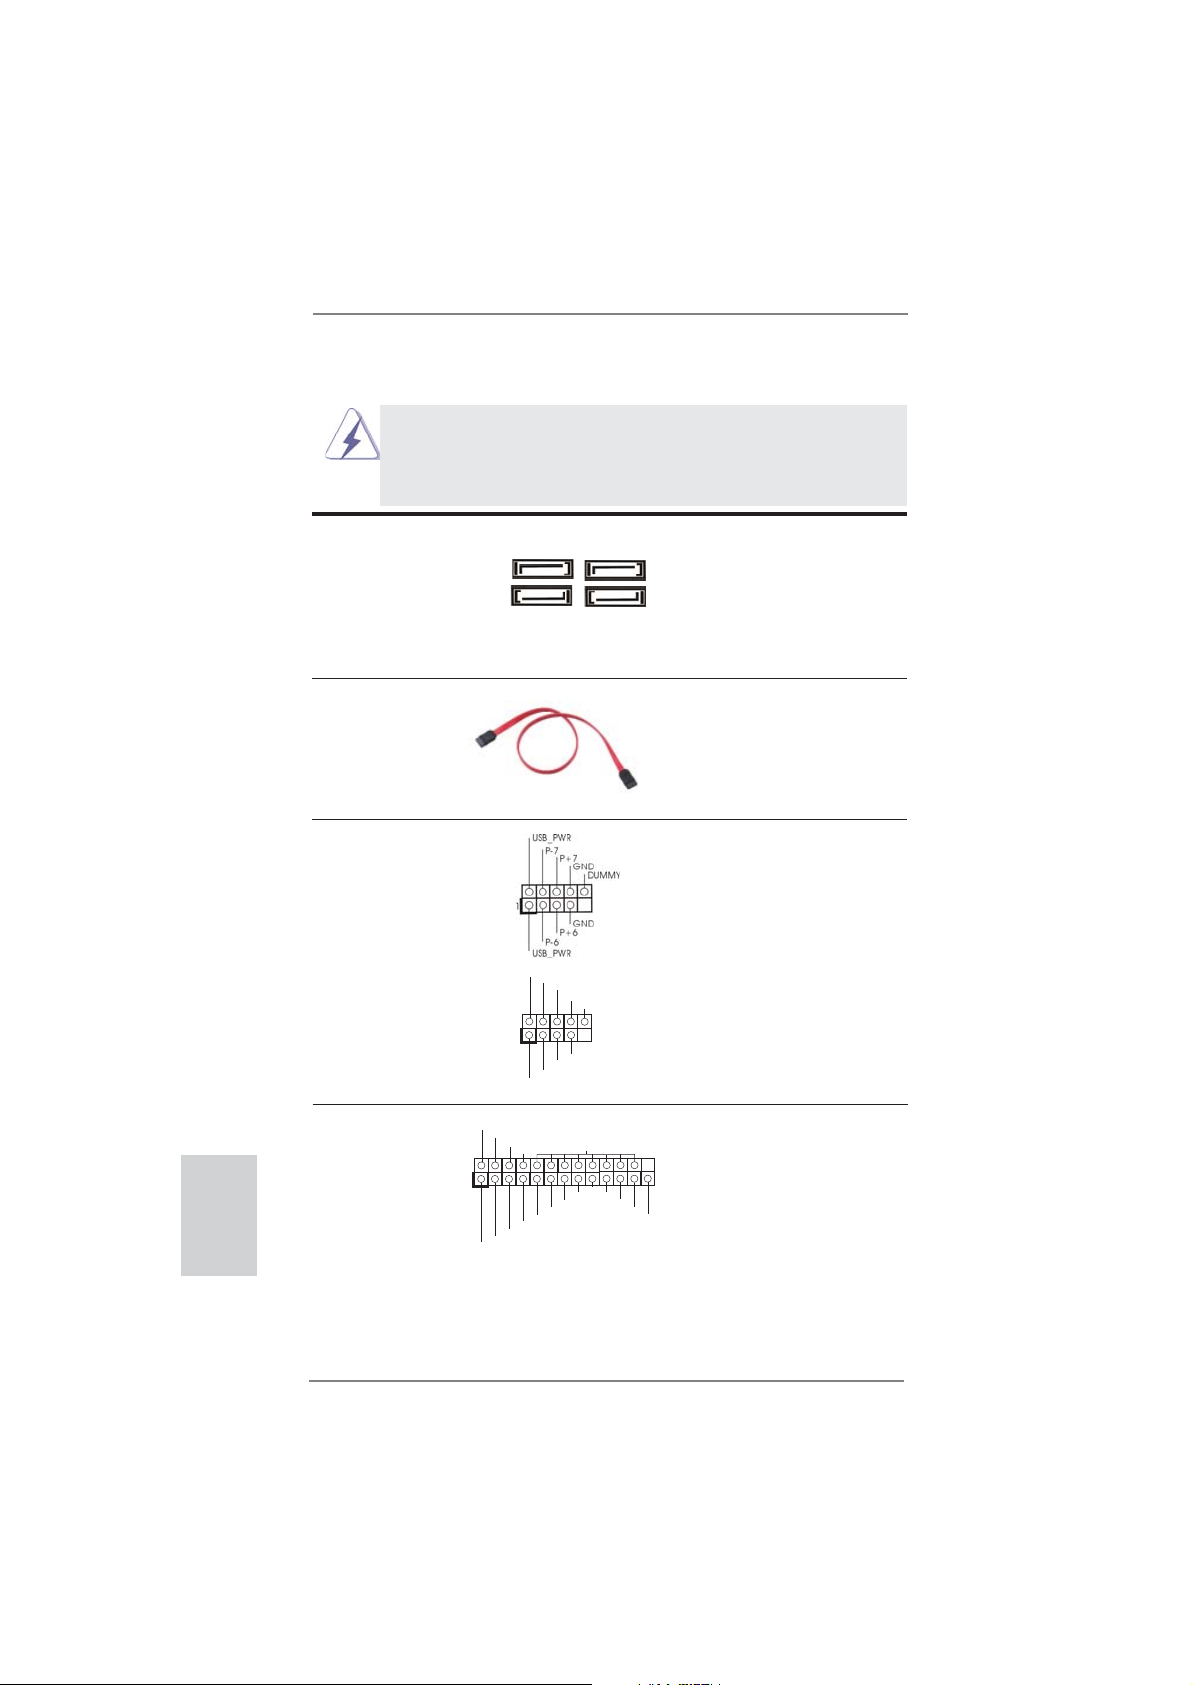
USB 2.0 Headers Besides six default USB 2.0
(9-pin USB6_7)
(see p.2 No. 15)
ports on the I/O panel, there
are two USB 2.0 headers on
this motherboard. Each
USB 2.0 header can support
two USB 2.0 ports.
(9-pin USB8_9)
(see p.2 No. 16)
1
USB_PWR
P-9
P-8
USB_PWR
P+9
P+8
GND
GND
DUMMY
English
Print Port Header This is an interface for print
(25-pin LPT1)
(see p.2 No. 18)
port cable that allows
convenient connection of printer
devices.
1
AFD#
STB#
ERROR#
PINIT#
SPD1
SPD0
SLIN#
SPD2
SPD3
SPD4
SPD5
GND
SPD6
SPD7
ACK#
BUSY
PE
SLCT
20
ASRock H71M-DG3 Motherboard
Page 21

1
GND
PRESENCE#
MIC2_R
MIC2_L
MIC_RET
J_SENSE
OUT2_R
OUT_RET
OUT2_L
Front Panel Audio Header This is an interface for front
(9-pin HD_AUDIO1)
(see p.2 No. 19)
panel audio cable that allows
convenient connection and
control of audio devices.
1. High Defi nition Audio supports Jack Sensing, but the panel wire on
the chassis must support HDA to function correctly. Please follow the
instruction in our manual and chassis manual to install your system.
2. If you use AC’97 audio panel, please install it to the front panel audio
header as below:
A. Connect Mic_IN (MIC) to MIC2_L.
B. Connect Audio_R (RIN) to OUT2_R and Audio_L (LIN) to OUT2_L.
C. Connect Ground (GND) to Ground (GND).
D. MIC_RET and OUT_RET are for HD audio panel only. You don’t
need to connect them for AC’97 audio panel.
E. To activate the front mic.
For Windows
Select “Mixer”. Select “Recorder”. Then click “FrontMic”.
For Windows
®
XP / XP 64-bit OS:
®
7 / 7 64-bit / VistaTM / VistaTM 64-bit OS:
Go to the "FrontMic" Tab in the Realtek Control panel. Adjust
“Recording Volume”.
System Panel Header This header accommodates
(9-pin PANEL1)
(see p.2 No. 14)
several system front panel
functions.
Connect the power switch, reset switch and system status indicator on the
chassis to this header according to the pin assignments below. Note the
positive and negative pins before connecting the cables.
PWRBTN (Power Switch):
Connect to the power switch on the chassis front panel. You may confi gure
the way to turn off your system using the power switch.
RESET (Reset Switch):
Connect to the reset switch on the chassis front panel. Press the reset
switch to restart the computer if the computer freezes and fails to perform a
normal restart.
PLED (System Power LED):
Connect to the power status indicator on the chassis front panel. The LED
is on when the system is operating. The LED keeps blinking when the system is in S1 sleep state. The LED is off when the system is in S3/S4 sleep
state or powered off (S5).
ASRock H71M-DG3 Motherboard
English
21
Page 22

HDLED (Hard Drive Activity LED):
Connect to the hard drive activity LED on the chassis front panel. The LED
is on when the hard drive is reading or writing data.
The front panel design may differ by chassis. A front panel module mainly
consists of power switch, reset switch, power LED, hard drive activity LED,
speaker and etc. When connecting your chassis front panel module to this
header, make sure the wire assignments and the pin assign-ments are
matched correctly.
Chassis Speaker Header Please connect the chassis
(4-pin SPEAKER 1)
(see p.2 No. 13)
speaker to this header.
English
Chassis and Power Fan Connectors Please connect the fan cables
(4-pin CHA_FAN1)
(see p.2 No. 9)
match the black wire to the
to the fan connectors and
CHA_FAN_SPEED
+12V
FAN_SPEED_CONTROL
GND
ground pin.
(3-pin PWR_FAN1)
(see p.2 No. 23)
CPU Fan Connectors Please connect the CPU fan
(4-pin CPU_FAN1)
(see p.2 No. 3)
cable to the connector and
match the black wire to the
ground pin.
Though this motherboard provides 4-Pin CPU fan (Quiet Fan) support, the 3-Pin
CPU fan still can work successfully even without the fan speed control function.
If you plan to connect the 3-Pin CPU fan to the CPU fan connector on this
motherboard, please connect it to Pin 1-3.
ATX Power Connector Please connect an ATX power
(24-pin ATXPWR1)
(see p.2 No. 4)
supply to this connector.
4 3 2 1
+12V
FAN_SPEED_CONTROL
CPU_FAN_SPEED
12 124
GND
Pin 1-3 Connected
3-Pin Fan Installation
13
22
ASRock H71M-DG3 Motherboard
Page 23

Though this motherboard provides 24-pin ATX power connector,
it can still work if you adopt a traditional 20-pin ATX power supply.
To use the 20-pin ATX power supply, please plug your
power supply along with Pin 1 and Pin 13.
12
24
20-Pin ATX Power Supply Installation
1
ATX 12V Power Connector Please connect an ATX 12V
(4-pin ATX12V1)
(see p.2 No. 2)
power supply to this connector.
Serial port Header This COM1 header supports a
(9-pin COM1)
(see p.2 No. 17)
serial port module.
13
ASRock H71M-DG3 Motherboard
English
23
Page 24

2.8 Driver Installation Guide
To install the drivers to your system, please insert the support CD to your optical
drive fi rst. Then, the drivers compatible to your system can be auto-detected and
listed on the support CD driver page. Please follow the order from up to bottom side
to install those required drivers. Therefore, the drivers you install can work properly.
2.9 Installing Windows® 7 / 7 64-bit / Vista
TM
/ Vista
TM
64-bit / XP
/ XP 64-bit Without RAID Functions
If you want to install Windows® 7 / 7 64-bit / VistaTM / VistaTM 64-bit / XP / XP 64bit OS on your SATA / SATAII HDDs without RAID functions, please follow below
procedures according to the OS you install.
2.9.1 Installing Windows® XP / XP 64-bit Without RAID Functions
If you want to install Windows® XP / XP 64-bit OS on your SATA / SATAII HDDs
without RAID functions, please follow below steps.
Using SATA / SATAII HDDs without NCQ function
STEP 1: Set up UEFI.
A. Enter UEFI SETUP UTILITY Advanced screen Storage Confi guration.
B. Set the option “SATA Mode Selection” to [IDE].
STEP 2: Install Windows
2.9.2 Installing Windows® 7 / 7 64-bit / Vista
®
XP / XP 64-bit OS on your system.
TM
/ Vista
TM
64-bit
Without RAID Functions
If you want to install Windows® 7 / 7 64-bit / VistaTM / VistaTM 64-bit OS on your SATA
/ SATAII HDDs without RAID functions, please follow below steps.
English
Using SATA / SATAII HDDs without NCQ function
STEP 1: Set up UEFI.
A. Enter UEFI SETUP UTILITY Advanced screen Storage Confi guration.
B. Set the option “SATA Mode Selection” to [IDE].
STEP 2: Install Windows
system.
®
7 / 7 64-bit / VistaTM / VistaTM 64-bit OS on your
24
ASRock H71M-DG3 Motherboard
Page 25

Using SATA / SATAII HDDs with NCQ function
STEP 1: Set Up UEFI.
A. Enter UEFI SETUP UTILITY Advanced screen Storage Confi guration.
B. Set the option “SATA Mode Selection” to [AHCI].
STEP 2: Install Windows
system.
®
7 / 7 64-bit / VistaTM / VistaTM 64-bit OS on your
3. BIOS Information
The Flash Memory on the motherboard stores BIOS Setup Utility. When you start up
the computer, please press <F2> or <Del> during the Power-On-Self-Test (POST)
to enter BIOS Setup utility; otherwise, POST continues with its test routines. If you
wish to enter BIOS Setup after POST, please restart the system by pressing <Ctl>
+ <Alt> + <Delete>, or pressing the reset button on the system chassis. The BIOS
Setup program is designed to be user-friendly. It is a menu-driven program, which
allows you to scroll through its various sub-menus and to select among the predetermined choices. For the detailed information about BIOS Setup, please refer to the
User Manual (PDF fi le) contained in the Support CD.
4. Software Support CD information
®
This motherboard supports various Microsoft
64-bit / Vista
motherboard contains necessary drivers and useful utilities that will enhance motherboard features. To begin using the Support CD, insert the CD into your CD-ROM
drive. It will display the Main Menu automatically if “AUTORUN” is enabled in your
computer. If the Main Menu does not appear automatically, locate and double-click
on the fi le “ASSETUP.EXE” from the BIN folder in the Support CD to display the
menus.
TM
/ Vista
TM
64-bit / XP / XP 64-bit. The Support CD that came with the
Windows® operating systems: 7 / 7
ASRock H71M-DG3 Motherboard
English
25
Page 26

1. 主板簡介
ASRock提醒您
謝謝你采用了華擎
能夠獲得卓越的性能。本安裝指南介紹了安裝主板的步驟。更加詳細的主板信息可參
看驅動光盤的用戶手冊。
由于主板規格和 BIOS 軟件將不斷升級 , 本手冊之相關內容變更恕不另
行通知。請留意華擎网站上公布的升級版本。你也可以在華擎網站找
到最新的顯卡和 CPU 支持表。
1.1 包裝盒內物品
H71M-DG3
華擎
(Micro ATX 規格 : 8.9 英吋 X 6.8 英吋 , 22.6 厘米 X 17.3 厘米 )
H71M-DG3
華擎
H71M-DG3
華擎
兩條 Serial ATA(SATA) 數據線 ( 選配 )
一塊 I/O 擋板
H71M-DG3
華擎网址:http://www.asrock.com
如果您需要與此主板有關的技術支持 , 請參觀我們的網站以了解您使用機
種的規格信息。
www.asrock.com/support/index.asp
主板 , 本主板由華擎嚴格制造 , 質量可靠 , 穩定性好 ,
主板
快速安裝指南
支持光盤
簡體中文
26
ASRock提醒您
為了在 Windows
更好的性能,建議您在BIOS中將Storage Configuration(存儲配置)選項
設成AHCI模式。關于BIOS設置程序,請參見支持光盤中的“User Manual”
以了解相詳細信息。
...
®
7 / 7 64-bit / Vista
TM
/ VistaTM 64-bit 系統中取得
ASRock H71M-DG3 Motherboard
Page 27

1.2 主板規格
架构 - Micro ATX 規格 :
8.9 英吋 X 6.8 英吋 , 22.6 厘米 X 17.3 厘米
- 全固態電容設計
處理器 - 支持第三代和二代 Intel
(LGA1155 針腳 )
- 支持 Intel® Turbo Boost 2.0 技術
- 支持 K- 系列解鎖的 CPU
- 支持 Hyper-Threading 超線程技術(詳見警告 1)
芯片組 - Intel
®
H61
- 支持 Intel®快速啟動技術和 Intel®智能連接技術
系統內存 - 支持雙通道 DDR3 內存技術(見警告 2)
- 配備 2 個 DDR3 DIMM 插槽
- 支持 DDR3 1600/1333/1066 non-ECC、un-buffered 內存
(Intel
®
Ivy Bridge CPU 支持 DDR3 1600,Intel® Sandy
Bridge CPU 支持 DDR3 1333 )
- 最高支持 16GB 系統容量(見警告 3)
- 通過 Intel
®
Ivy Bridge CPU 支持 Intel® Extreme Memory
Profile(XMP)1.3/1.2
擴展插槽 - 1 x PCI Express 3.0 x16 插槽 ( 藍色 @ x16 模式 )
* 使用 Intel® Ivy Bridge CPU 方可支持 PCIE 3.0。若使用
Intel
®
Sandy Bridge CPU,僅支持 PCIE 2.0。
- 1 x PCI Express x1 插槽
板載顯卡 * 僅內置 GPU 的處理器可支持 Intel® HD Graphics 內置視覺特
性与 VGA 輸出。
- 通過 Intel® Ivy Bridge CPU 支持 Intel® HD Graphics 內置
視覺特性 :Intel
3D、Intel® Clear Video HD 技術、Intel® InsiderTM、Intel®
HD Graphics 2500/4000
- 通過 Intel® Sandy Bridge CPU 支持 Intel® HD Graphics 內
置視覺特性 :Intel® Quick Sync Video、Intel® InTruTM
3D、Intel® Clear Video HD 技術、Intel® HD Graphics
2000/3000、Intel® Advanced Vector Extensions(AVX)
- Intel® Ivy Bridge CPU 支持 Pixel Shader 5.0、DirectX 11
技術
。
Intel® Sandy Bridge CPU 支持 Pixel Shader 4.1、
DirectX 10.1 技術。
- 通過 Intel® Ivy Bridge CPU 支持最大共享內存 1760MB。通
過 Intel
®
Sandy Bridge CPU 支持最大共享內存 1759MB。
(見警告 4)
- 雙 VGA 輸出 : 通過獨立顯示控制器提供 DVI-D 和 D-Sub 接口
®
CoreTM i7 / i5 / i3 處理器
®
Quick Sync Video 2.0、Intel® InTruTM
簡體中文
ASRock H71M-DG3 Motherboard
27
Page 28

簡體中文
- 支持 DVI, 最高分辨率達 1920x1200 @ 60Hz
- 支持 D-Sub, 最高分辨率達 2048x1536 @ 75Hz
- 通過 DVI 接口支持 HDCP 功能
- 通過 DVI 接口可播放 10800 線藍光光盤 (BD) / HD-DVD 光盤
音效 - 5.1 聲道高保真音頻 (Realtek ALC662 音頻編解碼器 )
板載 LAN 功能 - PCIE x1 Gigabit LAN 10/100/1000 Mb/s
- Realtek RTL8111C
- 支持网路喚醒(Wake-On-LAN)
- 支持 PXE
Rear Panel I/O 界面
I/O - 1 個 PS/2 鼠標接口
( 后面板輸入 / - 1 個 PS/2 鍵盤接口
輸出接口 ) - 1 個 D-Sub 接口
- 1 個 DVI-D 接口
- 6 個可直接使用的 USB 2.0 接口
- 1 個 RJ-45 局域网接口與 LED 指示燈 (ACT/LINK LED 和
SPEED LED)
- 高保真音頻插孔:音頻輸入 / 前置喇叭 / 麥克風
連接頭 - 4 x SATA2 3.0Gb/s 連接頭 , 支持 NCQ, AHCI 和熱插拔功
能
- 1 x 打印機端口接針
- 1 x 串行接口
- CPU/ 機箱 / 電源風扇接頭
- 24 針 ATX 電源接頭
- 4 針 12V 電源接頭
- 前置音頻面板接頭
- 2 x USB 2.0 接口 ( 可支持 4 個額外的 USB 2.0 接口 )
BIOS - 32Mb AMI BIOS
- AMI UEFI Legal BIOS,支持 GUI
- 支持即插即用(Plug and Play,PnP)
- ACPI 1.1 電源管理
- 支持喚醒功能
- 支持 jumperfree 免跳線模式
- IGPU、DRAM、PCH、CPU PLL、VTT、VCCSA 電壓多功能調節器
支持光盤 - 驅動程序 , 工具軟件 , 殺毒軟件(測試版本 ),CyberLink
MediaEspresso 6.5 試用版 , Creative Sound Blaster X-Fi
MB - 試用版 , 華擎 MAGIX 多媒体套件 - OEM
獨家功能 - ASRock Extreme Tuning Utility (AXTU)(詳見警告 5)
- 華擎即時開機功能
- 華擎 Instant Flash(見警告 6)
- 華擎 APP Charger(見警告 7)
28
ASRock H71M-DG3 Motherboard
Page 29

- 華擎 SmartView(見警告 8)
- 華擎 XFast USB(見警告 9)
- 華擎 XFast LAN(見警告 10)
- 華擎 XFast RAM(見警告 11)
- Hybrid Booster( 安心超頻技術 ):
- ASRock U-COP(見警告 12)
- Boot Failure Guard (B.F.G., 啟動失敗恢復技術 )
- 組合散熱器選項 (C.C.O.)(見警告 13)
硬件監控器 - CPU 溫度偵測
- 主板溫度偵測
- CPU/ 機箱 / 電源風扇轉速計
- CPU/ 机箱靜音風扇(允許根据 CPU 溫度自動調整机箱風扇速
度)
- CPU/ 机箱風扇多速控制
- 電壓範圍:+12V, +5V, +3.3V, 核心電壓
操作系統 - Microsoft
®
Windows
®
7/7 64 位元 /Vista
TM
/Vista
TM
64 位元 /
XP/XP 64 位元适用于此主板(見警告 14)
認證 - FCC, CE, WHQL
- 支持 ErP/EuP( 需要同時使用支持 ErP/EuP 的電源供應
器 )(見警告 15)
* 請參閱華擎網站了解詳細的產品信息 : http://www.asrock.com
警告
請了解超頻具有不可避免的風險 , 這些超頻包括調節 BIOS 設置、運用異步超
頻技術或使用第三方超頻工具。超頻可能會影響您的系統穩定性 , 甚至會導
致系統組件和設備的損壞。這種風險和代價須由您自己承擔 , 我們對超頻可
能導致的損壞不承擔責任。
ASRock H71M-DG3 Motherboard
簡體中文
29
Page 30

簡體中文
警告!
1、 關于“Hyper-Threading Technology”(超線程技術)的設置,請參考 CD
2、 這款主板支援雙通道內存技術。在您實現雙通道內存技術之前,為能正確
3、 由于操作系統的限制,在 Windows
4、 最大共享內存大小由芯片組廠商定義並且可以更改。請查閱 Intel
站了解最新資訊。
5、
6、 華擎 Instant Flash 是一個內建于 Flash ROM 的 BIOS 更新工具程序。這個
7、 若您想要更快速、更自由地為您的蘋果設備,如 iPhone/iPad/iPod
8、
光盤中的“User Manual”( 用戶手冊 , 中文版)第32頁。
安裝,請確認您已經閱讀了第 14 頁的內存模組安裝指南。
際內存容量可能小于 4GB。對於 Windows® 操作系統搭配 64 位元 CPU 來說 ,
不會存在這樣的限制。您可以通過華擎 XFast RAM 來利用 Windows®無法使
用的內存。
ASRock Extreme Tuning Utility (AXTU) 是一個多合一的工具,可在用戶
友好的界面中微調不同的系統功能,包括硬件監控、風扇控制、超頻、OC
DNA 和 IES。在 Hardware Monitor(硬件監控)中,顯示系統的主要參數。
在 Fan Control(風扇控制)中,顯示風扇速度和溫度,以便您進行調整。
在 Overclocking(超頻)中,您可以對 CPU 進行超頻,以优化系統性能。
在 OC DNA 中,您可以將自己的 OC 設置保存為配置文件,并与您的朋友共
享。您的朋友可以將您的 OC 配置文件加載他們的系統中,從而得到相同
的 OC 設置。在 IES(智能節能)中,電壓調節器可以在 CPU 核心空閒時減
少輸出相位數,以提高效率且不影響運計算性能。關于 ASRock Extreme
Tuning Utility (AXTU) 的操作步驟,請訪問我們的网站。
華擎網站:http://www.asrock.com
方便的BIOS 更新工具可讓您無需進入操作系統 ( 如 MS-DOS 或 Windows
即可進行BIOS 的更新。在系統開机自檢過程中按下 < F6> 鍵或在 BIOS 設
置菜單中按下 < F2> 鍵即可進入華擎 Instant Flash 工具程序。啟動這一
程序後 ,只需把新的BIOS文件保存在 U 盤、軟盤或硬盤中 , 輕鬆點擊鼠
標就能完成 BIOS的更新,而不再需要準備額外的軟盤或其他複雜的更新
程序。請注意 :U 盤或硬盤必須使用 FAT32/64 文件系統。
touch 充電 , 華擎為您提供了一個絕妙的解決方案 - 華擎 APP Charger。
只需安裝 APP Charger 驅動程序 , 用電腦為 iPhone 充電最多可比以往快
40%。華擎 A PP Charger 允許您同時為多部蘋果設備快速充電 , 甚至可以
在電腦進入待機 ( S1)、掛起至內存 ( S3)、休眠 ( S4) 或關機 ( S5) 模式下
持續為設備充電。只需安裝了 APP Charger 驅動程序 , 您立刻就能擁有非
凡的充電體驗。
SmartView 是Internet瀏覽器的一項新功能,它作為 IE 的智能起始頁
面,在一個增強的視圖中提供您經常訪問的网站、您的遊覽歷史記錄、
您的Facebook朋友、以及您的實時新聞來源,可為您提供更具個性化的
Internet 体驗。
時与朋友保持聯系。為使用 SmartView 功能,請确保您操作系統的版本是
Windows® 7 / 7 64位元 / VistaTM / VistaTM 64位元,瀏覽器的版本是
IE8。華擎网站:http://www.asrock.com/Feature/SmartView/index.asp
華擎主板專門配備 SmartView 應實用程序,可幫助您隨
®
7 / Vista
TM
/ XP 下,供系統使用的實
®
網
®
)
30
ASRock H71M-DG3 Motherboard
Page 31

9、 華擎 XFast USB 可以提升 USB 存儲設備性能。性能可能因設備特性不同而
存在差异。
10、 華擎 XFast LAN 可提供更快的网絡訪問,包括以下諸多好處。网絡應用程
序优先級:您可以設置理想的應用程序优先級,并可以添加新程序。游戲
更少延遲:將在線游戰設置為較高的优先級,可降低游戰中的延遲。流量
定形:您可以在觀看 Youtube 高清視頻的同時進行文件下載。實時分析您
的數据:通過狀態窗口,您可以清楚地看到目前正在傳輸的是哪個數据流。
11、華擎 XFast RAM 能充分利用 Windows®操作系統 32-bit CPU 無法使用的內
存空間。華擎 XFast RAM 可縮短之前訪問過的网站的加載時間,從而加快
网絡衝浪速度。此外,它還能提升 Adobe Photoshop 運行的速度高達五倍
之多。華擎 XFast RAM 的另一項优勢是它能減少訪問 SSD 或 HDD 的頻次,
從而延長它門的使用壽命。
12、 當檢測到 CPU 過熱問題時,系統會自動關機。在您重新啟動系統之前,請
檢查主板上的 C PU 風扇是否正常運轉並拔出電源線,然后再將它插回。為
了提高散熱性,在安裝 PC 系統時請在 CPU 和散熱器之間涂一層導熱膠。
13、 組合散熱器選項 (C.C.O.) 提供靈活的選項 , 讓您可使用三種不同的 C PU
散熱器類型 , 分別是 L GA775, L GA1155 與 L G A1156。請注意 : 並非所有的
775 和 1156 CPU 風扇都支持此功能。
14、 Microsoft® Windows® XP / XP 64-bit 系統不支持華擎 XFast RAM。
15、 EuP, 全稱 Energy Using Product( 能耗產品 ), 是歐盟用來定義完整系統
耗電量的規定。根據 E uP 的規定 , 一個完整系統在關機模式下的交流電總
消耗必須在 1.00W 以下。為滿足 E uP 標準 , 您需要同時具備支持 Eu P 的主
板和支持 EuP 的電源供應器。根據 Intel
必須滿足在 100m A 電流消耗時 ,5V sb 電源效率高于 50%。有關支持 E uP 的
電源供應器選擇方面的更多細節 , 我們建議您諮詢電源供應器的製作商。
®
的建議 , 支持 EuP 的電源供應器
ASRock H71M-DG3 Motherboard
簡體中文
31
Page 32

1.3 跳線設置
插圖所示的就是設置跳線的方法。當跳線
帽放置在針腳上時 , 這個跳線就是“短
接”。如果針腳上沒有放置跳線帽 , 這個
跳線就是“開路”。插圖顯示了一個 3 針
腳的跳線 , 當跳線帽放置在針腳 1 和針腳 2
之間時就是“短接”。
接腳 設定
清除 CMOS
(CLRCMOS1, 3 針腳跳線 )
(見第2頁第21項)
默認設置
注意: CLRCMOS1允許您清除CMOS中的數据。如要清除并將系統參數恢复至默認
設置,請關閉計算机,然后從電源插座上拔掉電源線。等待 15 秒后,使用跳
線帽將CLRCMOS1上的插針 2 和插針 3 短接 5 秒。但是,請勿在更新 BIOS 后
立即清除 CMOS。如果需要在更新 BIOS 后立即清除 CMOS,必須在執行 CMOS
清除操作之前,先啟動然后關閉系統。請注意,只有取出 CMOS 電池,密碼、
日期、時間、用戶默認配置文件、1394 GUID 和 MAC 地址才會被清除。
清除 CMOS
簡體中文
32
ASRock H71M-DG3 Motherboard
Page 33

1.4 板載接頭和接口
板載接頭和接口不是跳線。切勿將跳線帽放置在這些接頭和接口上。將
跳線帽放置在接頭和接口上將會導致主板的永久性損壞!
Serial ATAII 接口 這裡有四組 Serial ATAII
USB_PWR
P-9
P-8
USB_PWR
P+9
P+8
GND
GND
SATA2_1
SATA2_0
DUMMY
(SATA2_0: 見第 2 頁第 10 項 )
(SATA2_1: 見第 2 頁第8項)
(SATA2_2: 見第 2 頁第 12 項 )
(SATA2_3: 見第 2 頁第 11 項 )
SATA2_3
(SATAII) 接口支持 Serial
(SATA) 數據線作為內部儲存
設置。目前 SATAII 界面理論
SATA2_2
上可提供高達 3.0Gb/s 的數
據傳輸速率。
Serial ATA (SATA) SATA 數據線的任意一端均可
數據線 連接 SATA/SATAII 硬
(選配)
盤或者主板上的 SATAII 接口。
USB 2.0 擴展接頭 除了位於 I/O 面板的六個默
(9 針 USB6_7)
(見第2頁第15項)
認 USB 2.0 接口之外,這款
主板有兩組 USB 2.0 接針。
這組 USB 2.0 接針可以支持
兩個 USB 2.0 接口。
(9 針 USB8_9)
(見第2頁第16項)
1
打印機端口接針 這是一個連接打印機端口的
(25 針 LPT1)
(見第2頁第18項)
接口,方便您連接打印機設
前置音頻面板接頭 可以方便連接音頻設備。
(9 針 HD_AUDIO1)
(見第2頁第19項)
AFD#
ERROR#
PINIT#
SLIN#
備。
1
SPD2
SPD1
SPD0
STB#
SPD3
SPD4
1
SPD5
GND
MIC2_L
GND
SPD7
SPD6
PRESENCE#
MIC_RET
OUT2_R
MIC2_R
ACK#
J_SENSE
BUSY
OUT_RET
OUT2_L
PE
SLCT
ASRock H71M-DG3 Motherboard
簡體中文
33
Page 34

簡體中文
1. 高保真音頻 (High Definition Audio, HDA) 支持智能音頻接口檢測功能
(Jack Sensing), 但是機箱面板的連線必須支持 HDA 才能正常使用。請按我
們提供的手冊和機箱手冊上的使用說明安裝您的系統。
2. 如果您使用 AC’97 音頻面板 , 請按照下面的步驟將它安裝到前面板音頻接針 :
A. 將 Mic_IN(MIC) 連接到 MIC2_L。
B. 將 Audio_R(RIN) 連接到 OUT2_R, 將 Audio_L(LIN) 連接到
OUT2_L。
C. 將 Ground(GND) 連接到 Ground(GND)。
D. MIC_RET 和 OUT_RET 僅用于 HD 音頻面板。您不必將它們連接到
AC’97 音頻面板。
在 Windows
選擇”Mixer”。選擇”Recorder” 。接著點擊”FrontMic”。
在 Windows® 7 / 7 64 位元 / VistaTM / VistaTM 64 位元操作系
統中 :
在 Realtek 控制面板中點擊”FrontMic”。調節”Recording
Volume”。
E. 開啟前置麥克風。
®
XP / XP 64 位元操作系統中 :
系統面板接頭 這個接頭提供數個系統前面
(9 針 PANEL1)
(見第2頁第14項)
根據下面的針腳說明連接機箱上的電源開關、重啟按鈕與系統狀態
指示燈到這個排針。根據之前請注意針腳的正負極。
PWRBTN( 電源開關 ):
連接機箱前面板的電源開關。您可以設置用電源鍵關閉系統的方式。
RESET( 重啟開關 ):
連接機箱前面板的重啟開關。當電腦死機且無法正常重新啟動時 , 可
按下重啟開關重新啟動電腦。
PLED( 系統電源指示燈 ):
連接機箱前面板的電源狀態指示燈。當系統運行時 , 此指示燈亮起。
當系統處于 S1 待機模式時 , 此指示燈保持閃爍。當系統處于 S3/S4 待
機模式或關機 (S5) 模式時 , 此指示燈熄滅。
HD LED( 硬盤活動指示燈 ):
連接機箱前面板的硬盤動作指示燈。當硬盤正在讀取或寫入數據時 ,
此指示燈亮起。
板功能。
前面板設計因機箱不同而有差異。前面板模塊一般由電源開關、
重啟開關、電源指示燈、硬盤動作指示燈、喇叭等構成。將您的機
箱前面板連接到此排針時 , 請確認連接線與針腳上的說明相對應。
機箱喇叭接頭 請將機箱喇叭連接到這個接
(4 針 SPEAKER1)
(見第2頁第13項)
頭。
34
ASRock H71M-DG3 Motherboard
Page 35

機箱 , 電源風扇接頭 請將風扇連接線接到這個
(4 針 CHA_FAN1)
(見第2頁第9項)
(3 針 PWR_FAN1)
(見第2頁第23項)
接頭,並讓黑線與接地的針腳
相接。
CHA_FAN_SPEED
+12V
FAN_SPEED_CONTROL
GND
CPU 風扇接頭 請將 CPU 風扇連接線接到這個
(4 針 CPU_FAN1)
(見第2頁第3項)
接頭,並讓黑線與接地的針腳
相接。
4 3 2 1
+12V
FAN_SPEED_CONTROL
CPU_FAN_SPEED
GND
雖然此主板支持 4-Pin CPU 風扇 (Quiet Fan, 靜音風扇 ), 但是沒有調速功能的
3-Pin CPU 風扇仍然可以在此主板上正常運行。如果您打算將 3-Pin CPU 風扇
連接到此主板的 CPU 風扇接口 , 請將它連接到 Pin 1-3。
Pin 1-3 連接
3-Pin 風扇的安裝
ATX 電源接頭 請將 ATX 電源供應器連接到這
(24 針 ATXPWR1)
(見第2頁第4項)
個接頭。
雖然此主板提供 24-pin ATX 電源接口 , 但是您仍然可以使用
12 124
13
12
傳統的 20-pin ATX 電源。為了使用 20-pin ATX 電源 , 請順著
Pin 1 和 Pin 13 插上電源接頭。
20-Pin ATX 電源安裝說明
1
ATX 12V 接頭 請將一個 ATX 12V 電源供應
(4 針 ATX12V1)
(見第2頁第2項)
器接到這個接頭。
24
13
串行接口連接器 這個 COM1 端口支持一個串行
(9 針 COM1)
(見第2頁第17項)
接口的外設。
ASRock H71M-DG3 Motherboard
簡體中文
35
Page 36

2. BIOS 信息
主板上的 Flash Memory 存儲了 BIOS 設置程序。請再啟動電腦進行開機自檢 (POST)
時按下<F2> 或<Del>鍵進入 BIOS 設置程序;此外,你也可以讓開機自檢 (POST)
進行常規檢驗。如果你需要在開機自檢 (POST) 之后進入BIOS 設置程序,請按下
<Ctrl>+<Alt>+<Delete> 鍵重新啟動電腦,或者按下系統面板上的重啟按鈕。有關
BIOS 設置的詳細信息,請查閱隨機支持光盤裡的用戶手冊 (PDF 文件 )。
3. 支持光盤信息
本主板支持各種微軟視窗操作系統:Microsoft® Windows® 7/7 64 位元 /VistaTM/
TM
Vista
64 位元 /XP/XP 64 位元。主板隨機支持光盤包含各種有助于提高主板效能的
必要驅動和實用程序。請將隨機支持光盤放入光驅裡,如果電腦的“自動運行”功能
已啟用,屏幕將會自動顯示主菜單。如果主菜單不能自動顯示,請查找支持光盤內
BIN 文件夾下的“ASSETUP.EXE”,并雙擊它,即可調出主菜單。
簡體中文
36
ASRock H71M-DG3 Motherboard
Page 37

電子信息產品污染控制標示
依據中國發布的「電子信息產品污染控制管理辦法」及 SJ/T 11364-2006「電子信息
產品污染控制標示要求」,電子信息產品應進行標示,藉以向消費者揭露產品中含有
的有毒有害物質或元素不致發生外洩或突變從而對環境造成污染或對人身、財產造成
嚴重損害的期限。依上述規定,您可于本產品之印刷電路板上看見圖一之標示。圖一
中之數字為產品之環保使用期限。由此可知此主板之環保使用期限為 10 年。
圖一
有毒有害物質或元素的名稱及含量說明
若您慾了解此產品的有毒有害物質或元素的名稱及含量說明,請參照以下表格及說
明。
有害物質或元素
部件名稱
鉛 (Pb) 鎘(Cd) 汞(Hg) 六价鉻 (Cr(VI)) 多溴聯苯 (PBB)多溴二苯醚(PBDE)
印刷電路板
及電子組件
外部信號連
接頭及線材
O:
表示該有毒有害物質在該部件所有均質材料中的含量均在 SJ/T 11363-2006 標準規定
的限量要求以下。
X:
表示該有毒有害物質至少在該部件的某一均質材料中的含量超出 SJ/T 11363-2006 標準
規定的限量要求,然該部件仍符合歐盟指令 2002/95/EC 的規範。
備註 : 此產品所標示之環保使用年限,系指在一般正常使用狀況下。
X O O O O O
X O O O O O
ASRock H71M-DG3 Motherboard
簡體中文
37
Page 38

1. 主機板簡介
ASRock提醒您
謝謝你採用了華擎
H71M-DG3
性好 , 能夠獲得卓越的性能。此快速安裝指南包括了主機板介紹和分步驟安裝指導。
您可以查看支持光碟裡的使用手冊了解更詳細的資料。
由於主機板規格和 BIOS 軟體將不斷更新 , 本手冊之相關內容變更恕不另
行通知。請留意華擎網站上公布的更新版本。你也可以在華擎網站找到最
新的顯示卡和 CPU 支援列表。
華擎網址:http://www.asrock.com
如果您需要與此主機板有關的技術支援 , 請參觀我們的網站以了解您使用
機種的規格訊息。
www.asrock.com/support/index.asp
1.1 包裝盒內物品
華擎
H71M-DG3
(Micro ATX 規格 : 8.9 英吋 x 6.8 英吋 , 22.6 公分 x 17.3 公分 )
華擎
H71M-DG3
華擎
H71M-DG3
兩條 Serial ATA(SATA) 數據線 ( 選配 )
一塊 I/O 擋板
主機板
快速安裝指南
支援光碟
主機板 , 本主機板由華擎嚴格製造 , 品質可靠 , 穩定
繁體中文
38
ASRock提醒您...
若要在Windows® 7 / 7 64位元 / Vista
能,建議您將儲存裝置組態中的BIOS選項設為AHCI模式。有關BIOS設定的
詳細資訊,請參閱支援光碟中的「使用者手冊」。
TM
/ Vista
TM
64位元中發揮更好的效
ASRock H71M-DG3 Motherboard
Page 39

1.2 主機板規格
架構 - Micro ATX 規格 :
8.9 英吋 x 6.8 英吋 , 22.6 公分 x 17.3 公分
- 全固態電容設計
處理器 - 支援第三代和二代 Intel
(LGA1155 腳位 )
- 支援 Intel
®
Turbo Boost 2.0 技術
- 支援 K 系列解除鎖定 CPU
- 支援 Hyper-Threading 技術(詳見警告 1)
晶片組 - Intel
®
H61
- 支援 Intel®快速啟動技術和智能連接技術
系統記憶體 - 支援雙通道DDR3 記憶體技術(見警告 2)
- 2 個 DDR3 DIMM 插槽
- 支援 DDR3 1600/1333/1066 non-ECC、un-buffered 記憶體
(Intel
®
Ivy Bridge CPU 支援 DDR3 1600,Intel® Sandy
Bridge CPU 支援 DDR3 1333)
- 最高支援 16GB 系統容量(見警告 3)
- 透過 Intel
®
Ivy Bridge CPU 支援 Intel® Extreme Memory
Profile(XMP)1.3/1.2
擴充插槽 - 1 x PCI Express 3.0 x16插槽 ( 藍色 @ x16 模式 )
* PCIE 3.0 僅適用 Intel® Ivy Bridge CPU。Intel® Sandy
Bridge CPU 僅支援 PCIE 2.0。
- 1 x PCI Express 2.0 x1 插槽
內建顯示 * 只有整合 GPU 的處理器才支援 Intel
技術 (Built-in Visuals) 與 VGA 輸出。
- 透過 Intel
®
Ivy Bridge CPU 支援 Intel® HD Graphics 內建
視覺技術 (Built-in Visuals):Intel® Quick Sync Video
2.0、Intel® InTruTM 3D、Intel® Clear Video HD
Technology、Intel® InsiderTM、Intel® HD Graphics
2500/4000
- 透過 Intel
®
Sandy Bridge CPU 支援 Intel® HD Graphics 內
建視覺技術 (Built-in Visuals):Intel® Quick Sync
Video、Intel® InTruTM 3D、Intel® Clear Video HD
Technology、Intel® HD Graphics 2000/3000、Intel®
Advanced Vector Extensions (AVX)
- Intel
®
Ivy Bridge CPU 支援 Pixel Shader 5.0、DirectX 11
技術。Intel® Sandy Bridge CPU 支援 Pixel Shader 4.1、
DirectX 10.1 技術。
- 透過 Intel® Ivy Bridge CPU 支援最大共享記憶體 1760MB。
透過 Intel
®
Sandy Bridge CPU 支援最大共享記憶體
1759MB。(見警告 4)
ASRock H71M-DG3 Motherboard
®
CoreTM i7 / i5 / i3 處理器
®
HD Graphics 內建視覺
繁體中文
39
Page 40

繁體中文
40
- 雙 VGA 輸出 : 透過獨立顯示控制器提供 DVI-D 和 D-Sub 接口
- 支援 DVI, 最高解析度達 1920x1200 @ 60Hz
- 支援 D-Sub, 最高解析度達 2048x1536 @ 75Hz
- DVI 接口支援 HDCP 功能
- DVI 接口可播放 1080p 藍光光碟 (BD) / HD-DVD 光碟
音效 - 5.1 聲道高清晰音效 (Realtek ALC662 音效編解碼器 )
網路功能 - PCIE x1 Gigabit LAN 10/100/1000 Mb/s
- Realtek RTL8111C
- 支援網路喚醒(Wake-On-LAN)
- 支援 PXE
Rear Panel I/O 界面
I/O - 1 個 PS/2 滑鼠接口
( 後背板輸入 / - 1 個 PS/2 鍵盤接口
輸出接口 ) - 1 個 D-Sub 接口
- 1 個 DVI-D 接口
- 6 個可直接使用的 USB 2.0 接口
- 1 個 RJ-45 區域網接口與 LED 指示燈 (ACT/LINK LED 和
SPEED LED)
- 高清晰音效插孔:音效輸入 / 前置喇叭 / 麥克風
接頭 - 4 x SATA2 3.0Gb/s 接頭 , 支援 NCQ, AHCI 和熱插拔功能
- 1 x 印表機接針
- 1 x 序列埠
- CPU/ 機箱 / 電源風扇接頭
- 24 針 ATX 電源接頭
- 4 針 12V 電源接頭
- 前置音效接頭
- 2 x USB 2.0 接頭 ( 可支援 4 個額外的 USB 2.0 接口 )
BIOS - 32Mb AMI BIOS
- AMI UEFI Legal BIOS ( 支援 GUI)
- 支援即插即用(Plug and Play,PnP)
- ACPI 1.1 電源管理
- 支援喚醒功能
- 支援 jumperfree 免跳線模式
- IGPU、DRAM、PCH、CPU PLL、VTT、VCCSA 電壓多功能調節
支援光碟 - 驅動程式, 工具軟體 , 防毒軟體(試用版本 ),CyberLink
MediaEspresso 6.5 試用版 ,Creative Sound Blaster X-Fi
MB - 試用版 , 華擎 MAGIX 多媒體套餐 - OEM
獨家功能 - ASRock Extreme Tuning Utility (AXTU)(詳見警告5)
- 華擎即時開機功能
- 華擎 Instant Flash(見警告 6)
- 華擎 APP Charger(見警告 7)
- 華擎 SmartView(見警告 8)
ASRock H71M-DG3 Motherboard
Page 41

- 華擎 XFast USB(見警告 9)
- 華擎 XFast LAN(見警告 10)
- 華擎 XFast RAM(見警告 11)
- Hybrid Booster( 安心超頻技術 ):
- ASRock U-COP(見警告 12)
- Boot Failure Guard (B.F.G., 啟動失敗恢復技術 )
- 組合散熱片選項 (C.C.O.)(見警告 13)
硬體監控 - CPU溫度偵測
- 主機板溫度偵測
- CPU/ 機箱 / 電源風扇轉速計
- CPU/ 機箱靜音風扇 ( 可透過 CPU 溫度自動調節機箱的風扇速
度 )
- CPU/ 機箱風扇多速控制
- 電壓範圍:+12V, +5V, +3.3V, 核心電壓
操作系統 - Microsoft
®
Windows® 7/7 64 位元 /VistaTM/Vista
TM
64 位元 /
XP/XP 64 位元(見警告 14)
認證 - FCC, CE, WHQL
- 支援 ErP/EuP( 需要同時使用支援 ErP/EuP 的電源供應器 )
(見警告 15)
* 請參閱華擎網站了解詳細的產品訊息 : http://www.asrock.com
警告
請了解超頻具有不可避免的風險 , 這些超頻包括調節 BIOS 設置、運用非同步
超頻技術或使用第三方超頻工具。超頻可能會影響您的系統穩定性 , 甚至會
導致系統組件和設備的損壞。這種風險和代價須由您自己承擔 , 我們對超頻
可能導致的損壞不承擔責任。
ASRock H71M-DG3 Motherboard
繁體中文
41
Page 42

繁體中文
警告!
1、 關於“Hyper-Threading Technology"的設置,請參考 CD 光碟中的“User
2、 這款主機板支援雙通道記憶體技術。在您使用雙通道記憶體技術之前,為
3、 由於作業系統的限制,在 Windows
4、 最大共享記憶體大小由晶片組廠商定義並且可能更改。請查閱 Intel®網站
5、 ASRock Extreme Tuning Utility (AXTU) 是一款多合一的工具,易於操
6、 華擎Instant Flash 是一個內建於 Flash ROM 的 BIOS更新工具程式。這
Windows®) 即可進行 BIOS的更新。在系統開機自檢過程中按下 <F6>鍵或
7、 若您想要更快速、更自由地為您的蘋果設備,如iPhone/iPad/iPod
8、
Manual"( 使用手冊 , 英文版)第40頁。
能正確安裝,請確認您已經閱讀了第 14 頁的記憶體安裝指南。
際記憶體容量可能小於 4GB。對於 Windows
來說 , 不會存在這樣的限制。對於 Windows®作業系統搭配 64 位元 CPU 來
說 , 不會存在這樣的限制。您可以透過華擎 XFast RAM 來利用 Windows
法使用的記憶體。
了解最新訊息。
作的使用者介面便於微調不同的系統功能(例如:Hardware Monitor、
Fan Control、Overclocking、OC DNA 及 IES)。Hardware Monitor 可顯
示系統的主要讀數;Fan Control可顯示並可供您調整風扇速度及溫度;
Overclocking可供您進行 CPU 超頻以獲得最佳系統效能。透過 OC DNA,
您可將自己的 OC 設定另存為設定檔並與朋友分享,您的朋友可將此 OC設
定檔上傳至自己的系統中,以取得相同的OC 設定。透過IES (Intelligent
Energy Saver),當CPU 處於閒置狀態時,電壓調整器能降低輸出相位數量
以改善效率,並可兼顧運算效能。有關 ASRock Extreme Tuning Utility
(AXTU) 的操作程序說明,請造訪 ASRock 網站。
華擎網站:http://www.asrock.com
個方便的 BIOS 更新工具可讓您無需進入操作系統 ( 如 MS-DOS 或
在 BIOS 設置菜單中按下 <F2> 鍵即可進入華擎 Instant Flash 工具程式。
啟動這一程式後,只需把新的BIOS文件保存在隨身碟、磁盤或硬碟中,
輕鬆點選滑鼠就能完成 BIOS的更新,而不再需要準備額外的磁碟片或其
他複雜的更新程式。請注意: 隨身碟或硬碟必須使用 FAT32/64 文件系統。
touch充電,華擎為您提供了一個絕妙的解決方案 - 華擎 APP Charger。
只需安裝 APP Charger 驅動程式 , 用電腦為 iPhone充電最多可比以往快
40%。華擎 APP Charger 讓您可以同時為多部蘋果設備快速充電 , 甚至可
以在電腦進入待命 (S1)、待命 (S3)、休眠 (S4)或關機 (S5)模式下持續
為設備充電。只需安裝了 APP Charger驅動程式 , 您立刻就能擁有非凡的
充電體驗。
SmartView是網際網路瀏覽器的新功能,也是IE的起始頁面,其中結合
了您最常瀏覽的網站、您的記錄、Facebook朋友和即時新聞摘要,並全
數整合在一個更好的檢視中,以提供更貼近您個人使用習慣的網際網路功
能。ASRock 主機板獨家配備 SmartView 公用程式,協助您隨時隨地與朋友
保持聯繫。若要使用 SmartView 功能,請確定您所使用的作業系統版本為
Windows® 7 / 7 64 位元 / VistaTM / VistaTM 64 位元,而且您的瀏覽器
版本是 IE8。
index.asp
ASRock 網站:http://www.asrock.com/Feature/SmartView/
®
7 / Vista
TM
/ XP 下,供系統使用的實
®
作業系統搭配 64 位元 C P U
®
無
42
ASRock H71M-DG3 Motherboard
Page 43

9、 華擎 XFast USB 可提升 USB 儲存裝置的效能(效能可能須視裝置特性而
定)。
10、 華擎 XFast LAN 可提供更快的互聯網連接,包含以下諸多優勢。局域網優先
應用:您可以設置理想的優先應用程式,並可以添加新程式。減少遊戲延遲:
在設置優先級更高的網路遊戲時,可降低遊戲中的延遲。流量定形:您可以
在觀看 Youtube 高解析影片的同時還進行文件下載。及時分析您的數據:透
過狀態窗口,您可以清楚地看到目前正在傳輸的是哪個數據流。
11、 華擎 XFast RAM 能充分利用 Windows®操作系統 32-bit CPU 無法使用的記憶
體空間。它縮短之前訪問過的網站的讀取時間,從而加快網路瀏覽速度。
此外,它還能提升 Adobe Photoshop 執行的速度高達五倍之多。華擎 XFast
RAM 的另一項優勢是它能減少使用 SSD 或 HDD 的頻率,從而延長它們的使用
壽命。
12、 當檢測到 CPU 過熱問題時,系統會自動關機。在您重新啟動系統之前,請
檢查主機板上的 CPU風扇是否正常運轉並拔出電源線,然後再將它插回。
為了提高散熱性,在安裝PC 系統時請在 CPU 和散熱器之間塗一層散熱膏。
13、 組合散熱片選項 (C.C.O.) 提供具有彈性的選項 , 讓您可使用三種不同的
CPU 散熱片類型 , 分別是 LGA775,LGA1155 與 LGA1156。請注意 : 並非所有的
775 和 1156 CPU 風扇都支援此功能。
14、 Microsoft
15、 EuP, 全稱 Energy Using Product( 能耗產品 ), 是歐盟用來定義完整系統耗
電量的規定。根據 EuP 的規定 , 一個完整系統在關機模式下的交流電總消耗
必須在 1.00W 以下。為符合 EuP 標準 , 您需要同時具備支援 EuP 的主機板和
支援 EuP 的電源供應器。根據 Intel
符合在 100mA 電流消耗時 ,5Vsb 電源效率高於 50%。有關支援 EuP 的電源供
應器選擇方面的詳情 , 我們建議您諮詢電源供應器的製造商。
®
Windows® XP / XP 64-bit 系統不支援華擎 XFast RAM。
®
的建議 , 支援 EuP 的電源供應器必須
ASRock H71M-DG3 Motherboard
繁體中文
43
Page 44

1.3 跳線設置
插圖所示的就是設置跳線的方法。當跳線
帽放置在針腳上時,這個跳線就是“短
接"。如果針腳上沒有放置跳線帽 , 這個
跳線就是“開路"。插圖顯示了一個3 針
腳的跳線 , 當跳線帽放置在針腳 1 和針腳 2
之間時就是“短接"。
接腳 設定
清除 CMOS
(CLRCMOS1, 3 針腳跳線 )
(見第2頁第21項)
默認設置
註: CLRCMOS1可供您清除CMOS中的資料。若要清除及重設系統參數並恢復為預設設
定,請先關閉電腦電源,並從電源插座中拔下電源線,等待15秒鐘之後,使用跳
線帽使CLRCMOS1 的 pin2 及 pin3短路 5 秒的時間。但請勿於更新 BIOS 後立即清除
CMOS。如需於更新 BIOS 後立即清除 CMOS,您必須先開機再關機,然後再執行 CMOS
清除操作。請注意,只有在移除 CMOS電池的情況下,密碼、日期、時間、使用者
預設設定檔、1394 GUID 及 MAC 位址才會清除。
清除 CMOS
繁體中文
44
ASRock H71M-DG3 Motherboard
Page 45

1.4 接頭
此類接頭是不用跳線帽連接的,請不要用跳線帽短接這些接頭。
跳線帽不正確的放置將會導致主機板的永久性損壞 !
接頭 圖示 說明
Serial ATAII 接口 這裡有四組 Serial ATAII
(SATA2_0: 見第 2 頁第 10 項 )
(SATA2_1: 見第 2 頁第8項)
(SATA2_2: 見第 2 頁第 12 項 )
(SATA2_3: 見第 2 頁第 11 項 )
SATA2_3
(SATAII) 接口支援 SATA 數據
線作為內部儲存設置。
目前 SATAII 界面理論上
SATA2_2
可提供高達 3.0Gb/s 的數據
傳輸速率。
Serial ATA (SATA) SATA 數據線的任意一端均可
數據線 連接 SATA/SATAII 硬
(選配)
碟或者主機板上的SATAII 接口。
USB 2.0 擴充接頭 除了位於 I/O 面板的六個
(9 針 USB6_7)
(見第2頁第15項)
USB 2.0 接口之外,這款
主機板有兩組 USB 2.0 接
針。每組 USB 2.0 接針可以
支援兩個 USB 2.0 接口。
(9 針 USB8_9)
(見第2頁第16項)
1
USB_PWR
P-9
P-8
USB_PWR
P+9
P+8
GND
GND
SATA2_1
SATA2_0
DUMMY
印表機接針 這是一個連接印表機的接
(25 針 LPT1)
(見第2頁第18項)
口,方便您連接印表機設
前置音效接頭 可以方便連接音效設備。
(9 針 HD_AUDIO1)
(見第2頁第19項)
AFD#
ERROR#
PINIT#
SLIN#
備。
1
SPD2
SPD1
SPD0
STB#
1
SPD3
MIC2_L
SPD5
SPD4
GND
PRESENCE#
MIC2_R
GND
SPD6
MIC_RET
J_SENSE
OUT2_R
SPD7
OUT_RET
OUT2_L
ACK#
BUSY
PE
SLCT
ASRock H71M-DG3 Motherboard
繁體中文
45
Page 46

1. 高清晰音效 (High Definition Audio, HDA) 支援智能音效接口檢測功能
(Jack Sensing), 但是機箱面板的連線必須支持 HDA 才能正常使用。請按我
們提供的手冊和機箱手冊上的使用說明安裝您的系統。
2. 如果您使用 AC'97 音效面板 , 請按照下面的步驟將它安裝到前面板音效接針 :
A. 將 Mic_IN(MIC) 連接到 MIC2_L。
B. 將 Audio_R(RIN) 連接到 OUT2_R, 將 Audio_L(LIN) 連接到
OUT2_L。
C. 將 Ground(GND) 連接到 Ground(GND)。
D. MIC_RET 和 OUT_RET 僅用於 HD 音效面板。您不必將它們連接到
AC'97 音效面板。
E. 開啟前置麥克風。
在 Windows® XP / XP 64 位元作業系統中 :
選擇"Mixer"。選擇"Recorder" 。接著點選"FrontMic"。
在 Windows® 7 / 7 64 位元 / VistaTM / VistaTM 64 位元作業系
統中 :
在 Realtek 控制面板中點選"FrontMic"。調整"Recording
Volume"。
系統面板接頭 可接各種不同燈,電源開關及
(9 針 PANEL1)
(見第2頁第14項)
請根據下面的腳位說明連接機箱上的電源開關、重開按鈕與系統狀
態指示燈到這個接頭。請先注意針腳的正負極。
重啟鍵等各種連線。
繁體中文
46
PWRBTN( 電源開關 ):
連接機箱前面板的電源開關。您可以設定用電源鍵關閉系統的方式。
RESET( 重開開關 ):
連接機箱前面板的重開開關。當電腦當機且無法正常重新啟動時 , 可
按下重開開關重新啟動電腦。
PLED( 系統電源指示燈 ):
連接機箱前面板的電源狀態指示燈。當系統運行時 , 此指示燈亮起。
當系統處於 S1 待命模式時 , 此指示燈保持閃爍。當系統處於 S3/S4 待
命模式或關機 (S5) 模式時 , 此指示燈熄滅。
HD LED( 硬碟活動指示燈 ):
連接機箱前面板的硬碟動作指示燈。當硬碟正在讀取或寫入數據時 ,
此指示燈亮起。
前面板設計因機箱不同而有差異。前面板模組一般由電源開關、
重開開關、電源指示燈、硬碟活動指示燈、喇叭等構成。將您的機
箱前面板連接到此接頭時 , 請確認連接線與針腳上的說明相對應。
ASRock H71M-DG3 Motherboard
Page 47

機箱喇叭接頭 請將機箱喇叭連接到這個接
(4 針 SPEAKER1)
(見第2頁第13項)
頭。
機箱 , 電源風扇接頭 請將風扇連接線接到這個接
(4 針 CHA_FAN1)
(見第2頁第9項)
(3 針 PWR_FAN1)
(見第2頁第23項)
頭,並讓黑線與接地的針腳
相接。
CPU 風扇接頭 請將 CPU 風扇連接線接到這個
(4 針 CPU_FAN1)
(見第2頁第3項)
接頭,並讓黑線與接地的針腳
相接。
雖然此主板支持 4-Pin CPU 風扇 (Quiet Fan, 靜音風扇 ), 但是沒有調速功能的
CHA_FAN_SPEED
+12V
FAN_SPEED_CONTROL
GND
4 3 2 1
+12V
FAN_SPEED_CONTROL
CPU_FAN_SPEED
GND
3-Pin CPU 風扇仍然可以在此主板上正常運行。如果您打算將 3-Pin CPU 風扇
連接到此主板的 CPU 風扇接口 , 請將它連接到 Pin 1-3。
Pin 1-3 連接
3-Pin 風扇的安裝
ATX 電源接頭 請將 ATX 電源供應器連接到這
(24 針 ATXPWR1)
(見第2頁第4項)
個接頭。
雖然此主機板提供 24-pin ATX 電源接口 , 但是您仍然可以使
12 124
13
12
用傳統的 20-pin ATX 電源。為了使用 20-pin ATX 電源 , 請順
著 Pin 1 和 Pin 13 插上電源接頭。
24
20-Pin ATX 電源安裝說明
1
ATX 12V 電源接口 請注意,必需將帶有ATX 12V
(4 針 ATX12V1)
(見第2頁第2項)
插頭的電源供應器連接到這個
插座,這樣就可以提供充足的
電力。如果不這樣做,就會導
致供電故障。
ASRock H71M-DG3 Motherboard
13
繁體中文
47
Page 48

序列埠 這個序列埠 COM1 支援一個序
(9 針 COM1)
列埠的裝置。
(見第2頁第17項)
繁體中文
48
ASRock H71M-DG3 Motherboard
Page 49

2. BIOS 訊息
主板上的Flash Memory晶片存儲了BIOS設置程序。啟動系統,在系統開機自檢(POST)
的過程中按下 <F2> 或 <Del> 鍵,就可進入 BIOS 設置程序,否則將繼續進行開機自檢
之常規檢驗。如果需要在開機自檢後進入 BIOS 設置程序,請按下 <Ctl> + <Alt> +
<Delete> 鍵重新啟動電腦,或者按下系統面板上的重開按鈕。功能設置程序儲存有主
板自身的和連接在其上的設備的缺省和設定的參數。這些訊息用於在啟動系統和系統
運行需要時,測試和初始化元件。有關 BIOS設置的詳細訊息,請查閱隨機支援光碟
裡的使用手冊 (PDF 文件 )。
3. 支援光碟訊息
本主板支援各種微軟 Windows®操作系統:Microsoft® Windows® 7/7 64 位元 /
VistaTM/Vista
板效能的必要驅動和實用程式。請將隨機支援光碟放入光碟機裡,如果系統的“自動
運行"功能已啟用,銀幕將會自動顯示主菜單。如果主菜單不能自動顯示,請查閱支
援光碟內 BIN 文件夾下的 ASSETUP.EXE 文件並雙點它,即可調出主菜單。
TM
64 位元 /XP/XP 64 位元。主板附帶的支援光碟包含各種有助於提高主
ASRock H71M-DG3 Motherboard
繁體中文
49
Page 50

1. Giriş
ASRock’ın kesintisiz titiz kalite denetimi altında üretilen güvenilir bir anakart olan
ASRock H71M-DG3 anakartını satın aldığınız için teşekkür ederiz. ASRock’ın kalite
ve dayanıklılık konusundaki kararlılığına uygun güçlü tasarımıyla mükemmel bir
performans sunar.
Bu Hızlı Takma Kılavuzu anakarta giriş ve adım adım takma kılavuzu içerir. Anakart
hakkında daha ayrıntılı bilgiyi Destek CD’sinde sunulan kullanıcı kılavuzunda bulabilirsiniz.
Anakart özellikleri ve BIOS yazılımı güncelleştirilebileceğinden bu kılavuzun içeriği
önceden haber verilmeksizin değişebilir. Bu belgede değişiklik yapılması durumun
-da, güncelleştirilmiş sürüm ayrıca haber verilmeksizin ASRock web sitesinde
sunulur. En son VGA kartlarını ve CPU destek listelerini de ASRock web sitesinde
bulabilirsiniz. ASRock web sitesi http://www.asrock.com
Bu anakartla ilgili teknik desteğe ihtiyacınız olursa, kullandığınız modele özel bilgiler
için lütfen web sitemizi ziyaret edin.
www.asrock.com/support/index.asp
Türkçe
1.1 Paket İçindekiler
ASRock H71M-DG3 Anakart
(Micro ATX Form Faktörü: 8,9-inç x 6,8-inç, 22,6 cm x 17,3 cm)
ASRock H71M-DG3 Hızlı Takma Kılavuzu
ASRock H71M-DG3 Destek CD’si
2 x Seri ATA (SATA) Veri Kablosu (İsteğe Bağlı)
1 x G/Ç Panel Kalkanı
ASRock Size Şunu Hatırlatır...
Windows® 7 / 7 64-bit / Vista
elde etmek için, Depolama Konfi gürasyonundaki BIOS seçeneğini AHCI
moduna ayarlamanız tavsiye edilir. BIOS ayarı için, ayrıntıları öğrenmek
üzere lütfen destek CD'mizdeki "Kullanıcı Kılavuzu"na bakın.
TM
/ VistaTM 64-bit ile daha iyi performans
50
ASRock H71M-DG3 Motherboard
Page 51

1.2 Özellikler
Platform - Micro ATX Form Faktörü: 8,9-inç x 6,8-inç, 22,6 cm x 17,3 cm
- Tüm Katı Kapasitör tasarımı
CPU - LGA1155 Paketi’deki 3. ve 2. Nesil Intel
destekler
- Intel
®
Turbo Boost 2.0 Teknolojisini destekler
- K-Serisi kilidi kaldırılmış işlemciyi destekler
- Hyper-Threading Teknolojisini destekler (bkz. DİKKAT 1)
Yonga seti - Intel® H61
- Intel
®
Rapid Start Teknolojisini ve Smart Connect Teknolojisi’ni
destekler
Bellek - Çift Kanallı DDR3 Belleği Teknolojisi (bkz. DİKKAT 2)
- 2 x DDR3 DIMM yuva
- DDR3 1600/1333/1066 ECC olmayan, ara belleksiz bellek
(Intel
®
Ivy Bridge işlemciye sahip DDR3 1600, Intel® Sandy
Bridge işlemciye sahip DDR3 1333)
- Sistem belleğinin maks. kapasitesi: 16 GB (bkz. DİKKAT 3)
- Intel
®
Ivy Bridge İşlemci ile Intel® Extreme Bellek Profi lini
(XMP)1.3/1.2 destekler
Genişletme - 1 x PCI Express 3.0 x16 yuva (mavi @ x16 modu)
Yuvası * PCIE 3.0, sadece Intel
®
Ivy Köprü İşlemcisiyle desteklenir.
Intel® Sandy Köprü İşlemciyle, sadece PCIE 2.0'ı destekler.
- 1 x PCI Express 2.0 x1 yuva
Grafi kler * Intel® HD Grafi k Yerleşik Görselleri ve VGA çıkışları, yalnızca
GPU entegre işlemciler tarafından desteklenmektedir.
- Intel
®
Ivy Bridge İşlemci ile Intel® HD Graphics Dahili
Görselleri: Intel® Hızlı Eşitleme Videosu 2.0, Intel® InTruTM 3D,
Intel® Clear Video HD Teknolojisi, Intel® InsiderTM, Intel® HD
Graphics 2500/4000
- Intel
®
Sandy Bridge İşlemci ile Intel® HD Graphics Dahili
Görselleri: Intel® Hızlı Eşitleme Videosu, Intel® InTruTM 3D,
Intel® Clear Video HD Teknolojisi, Intel® HD Graphics
2000/3000, Intel® Gelişmiş Vektör Uzantıları (AVX)
- Pixel Shader 5.0, Intel® Ivy Bridge işlemciye sahip DirectX 11.
Pixel Shader 4.1,Intel
®
Sandy Bridge işlemciye sahip DirectX
10.1
- Intel® Ivy Bridge İşlemci ile Maks. paylaюэlan bellek 1760 MB.
Intel® Sandy Bridge İşlemci ile Maks. paylaюэlan bellek 1759
MB. (bkz. DЭKKAT 4)
- Çift VGA Çıkış: desteği DVI-D ve bağımsız görüntü
denetleyiciler tarafından D-Sub bağlantı noktaları
ASRock H71M-DG3 Motherboard
®
CoreTM i7 / i5 / i3’yi
Türkçe
51
Page 52

Türkçe
- 60Hz’de 1920x1200’e kadar maks. зцzьnьrlьkle DVI’yэ
destekler
- 75Hz’de 2048x1536’ya kadar maks. зцzьnьrlьkle D-Sub’э
destekler
- DVI portlarэyla HDCP iюlevini destekler
- DVI portlarэyla Tam HD 1080p Blu-ray (BD) / HD-DVD
oynatэmэnэ destekler
Ses - (Realtek ALC662 Ses Codec’i) 5,1 Kanal HD Ses
LAN - PCIE x1 Gigabit LAN 10/100/1000 Mb/sn
- Realtek RTL8111C
- LAN’da Uyan özelliğini destekler
- PXE’yi destekler
Arka Panel G/З Paneli
G/З - 1 x PS/2 Fare Portu
- 1 x PS/2 Klavye Portu
- 1 x D-Sub Portu
- 1 x DVI-D Portu
- 6 x Kullanэma Hazэr USB 2.0 Portu
- 1 x RJ-45 LAN Portu, LED’li (AKT/LЭNK LED’i ve HIZ LED’i)
- HD Ses Jakı: Hat Girişi/Ön Hoparlör/Mikrofon
Konektör - 4 x SATA2 3,0Gb/sn, donanım NCQ, AHCI ve “Sistem Açıkken
Bileşen Takma” işlevlerini
- 1 x Yazdэrma Portu fi юi
- 1 x COM portu fi şi
- CPU/Kasa/Güç FAN konektörü
- 24 pin ATX güç konektörü
- 4 pin 12V güç konektörü
- Ön panel ses konektörü
- 2 x USB 2.0 fi ş (4 USB 2.0 portu destekler)
BIOS Özelliği - 32 Mb AMI BIOS
-
- “Tak Çalıştır”ı destekler
- ACPI 1.1 Uyumlu Uyandırma Olayları
- Jumpersız ayarlamayı destekler
- AMBIOS 2.3.1 Desteği
- IGPU, DRAM, PCH, CPU PLL, VTT, VCCSA Voltaj Çoklu ayarı
Destek CD’si - Sürücüler, Yardımcı Programlar, AntiVirüs Yazılımı (Deneme
Sürümü), CyberLink MediaEspresso 6.5 Deneme Sürümü,
Creative Sound Blaster X-Fi MB - Deneme, ASRock MAGIX
Multimedya Seti - OEM
Benzersiz - ASRock Extreme Tuning Utility (AXTU) (bkz. DİKKAT 5)
Özellik - ASRock Anında Önyükleme
GUI destekli AMI UEFI Geçerli BIOS
52
ASRock H71M-DG3 Motherboard
Page 53

- ASRock Anında Flash (bkz. DİKKAT 6)
- ASRock APP Charger (bkz. DİKKAT 7)
- ASRock SmartView (bkz. DİKKAT 8)
- ASRock XFast USB (bkz. DİKKAT 9)
- ASRock XFast LAN (bkz. DİKKAT 10)
- ASRock XFast RAM (bkz. DİKKAT 11)
- Hibrit Yükseltici:
- ASRock U-COP (bkz. DİKKAT 12)
- Önyükleme Hatası Koruması (B.F.G.)
- Kombo Soğutucu Seçeneği (C.C.O.) (bkz. DİKKAT 13)
Donanım - CPU Sıcaklık Duyarlılığı
Monitör - Kasa Sıcaklık Duyarlılığı
- CPU/Kasa/Güç Fan Takometresi
- İşlemci/Kasa Sessiz Fanı (Kasa Fan Hızı’nın İşlemci sıcaklığı
ile Otomatik Ayar’ına izin verir)
- CPU/Kasa Fan Çoklu-Hız Kontrolü
- Voltaj İzleme: +12V, +5V, +3,3V, CPU Vcore
İS - Microsoft® Windows® 7 / 7 64-bit / VistaTM / VistaTM 64-bit / XP /
XP 64-bit uyumlu (bkz. DİKKAT 14)
Sertifi kalar - FCC, CE, WHQL
- ErP/EuP Hazır (ErP/EuP hazır güç kaynağı gerekli)
(bkz. DİKKAT 15)
* Ayrıntılı ürün bilgileri için lütfen web sitemizi ziyaret edin: http://www.asrock.com
UYARI
Lütfen, ayarı BIOS'da ayarlama, Untied Overclocking Teknolojisi'ni uygulama veya
üçüncü taraf aşırı hızlandırma araçlarını kullanma gibi durumlarda aşırı hızlandırmayla
ilgili risk olduğunu unutmayın. Aşırı hızlandırma sisteminizin kararlılığını etkiler veya
hatta sisteminizin bileşenlerini ve cihazlarına zarar verebilir. Bu risk size aittir ve zararı
siz ödersiniz. Aşırı hızlandırmadan kaynaklanan olası zarardan sorumlu değiliz.
DİKKAT!
1. "Hyper Threading Teknolojisi" ayarı hakkında lütfen destek CD'sindeki
"Kullanıcı Kılavuzu"nda sayfa 40'ye bakın.
2. Bu anakart Çift Kanallı Bellek Teknolojisi'ni destekler. Çift Kanallı Bellek
Teknolojisi'ni uygulamadan önce, uygun yükleme hakkında sayfa 14'teki
bellek modüllerinin yükleme kılavuzunu okuduğunuzdan emin olun.
3. İşletim sistemi kısıtlaması nedeniyle, Windows
sistem kullanımı için ayırmak için gerçek bellek boyutu 4 GB'den az olabilir.
64-bit CPU'lu Windows
kullanamadığı bellekten yararlanmak için ASRock XFast RAM’i kullanabilirsiniz.
®
OS için bu tür bir sınırlama yoktur. Windows®’un
ASRock H71M-DG3 Motherboard
®
7 / VistaTM / XP altında
Türkçe
53
Page 54

Türkçe
4. Maksimum paylaюэlan bellek boyutu yonga seti satэcэsэ tarafэndan
tanэmlanэr ve deрiюebilir. Lьtfen en son bilgileri iзin Intel® web sitesini
kontrol edin.
5. ASRock Extreme Tuning Utility (AXTU) hepsi bir arada bir araç olup
kullanıcı ile dost bir arayüzde farklı sistem işlevlerinin ince ayarını yapmak
için kullanılmakta olup buna Donanım Monitörü, Fan Kontrolü, Hız Aşırtma,
OC DNA ve IES dahildir. Donanım Monitöründe sisteminizde okunan
önemli değerleri gösterir. Fan Kontrolünde ayarlamanız için fan hızını ve
sıcaklığını gösterir. Hız aşırtmada optimum sistem performansı
almak için CPU frekansını hız aşırtma yapmanıza izin verilmiştir. OC
DNA’da OC ayarlarınızı bir profi l olarak kaydedebilir ve arkadaşlarınız
ile paylaşabilirsiniz. Ardından arkadaşlarınız OC profi lini kendi sistemine
ekleyerek aynı OC ayarlarını
çekirdekleri boşta olduğunda bilgisayarın performansından ödün vermeden
gerilim düzenleyicisi çıkış fazlarının sayısını düşürerek verimliliği iyileştirir.
ASRock Extreme Tuning Utility (AXTU)’nun çalışma prosedürleri için lütfen
web sitemizi ziyaret ediniz. ASRock web sitesi: http://www.asrock.com
6. ASRock Anında Flash, Flash ROM’a katıştırılmış bir BIOS fl ash yardımcı
programıdır. Bu kullanışlı BIOS güncelleme aracı, sistem BIOS’unu MSDOS veya Windows® gibi ilk önce işletim sistemine girmeden güncellemenizi sağlar. Bu yardımcı programla, POST sırasında <F6> tuşuna basabilirsiniz veya BIOS ayarları menüsünün ASRock Anında Flash’a erişmesi
için <F2> tuşuna basabilirsiniz. Bu aracı başlatın ve yeni BIOS dosyasını
USB fl ash sürücünüze, diskete veya sabit sürücüye kaydedin, sonra
BIOS’unuzu yalnızca birkaç tıklatma ile ek bir disket veya diğer karmaşık
fl ash yardımcı programlarını hazırlamadan güncelleyebilirsiniz. Lütfen USB
fl ash sürücünün veya sabit diskin FAT32/16/12 dosya sistemi kullanması
gerektiğini unutmayın.
7. iPhone/iPod/iPad Touch gibi Apple cihazlarınızı şarj etmek için daha
hızlı ve daha özgür bir biçimde şarj etmek istiyorsanız, ASRock sizin için
mükemmel bir çözüm hazırladı - ASRock APP Charger. Sadece APP
Charger sürücünü kurarak, iPhone’unuzu bilgisayarınızdan daha çabuk ve
eskisinden 40% daha hızlı şekilde şarj edebilirsiniz. ASRock APP Charger
birçok Apple cihazını aynı anda ve hızlı bir biçimde şarj etmenize olanak
tanır ve hatta bilgisayarınız Bekleme modunda (S1), RAM’de Askıya
Al modunda (S3), uyku modunda (S4) veya kapalı(S5) iken sürekli şarj
etmeyi destekler. APP Charger sürücüsü kurulu iken kolaylıkla şimdiye hiç
olmadığı kadar harika bir şarj deneyimi yaşayabilirsiniz.
ASRock internet sitesi: http://www.asrock.com/Feature/AppCharger/index.
asp
8.
İnternet tarayıcısının yeni bir işlevi olan SmartView, en sık ziyaret ettiğiniz
web sitelerini, geçmişinizi, Facebook arkadaşlarınızı ve sizin gerçek
zamanlı haber beslemelerinizi, daha kişisel bir İnternet deneyimi için
geliştirilmiş bir görünümde birleştiren IE için akıllı başlangıç sayfasıdır.
ASRock anakartları, hareket halindeki arkadaşlarınızla irtibat halinde
kalmanıza yardım eden SmartView yardımcı programı ile donatılmıştır.
alabilir. IES’de (Akıllı Enerji Tasarrufu), CPU
54
ASRock H71M-DG3 Motherboard
Page 55

SmartView özelliğini kullanmak için işletim sistemi sürümünüzün Windows®
7 / 7 64 bit / Vista
dikkat edin. ASRock web sitesi: http://www.asrock.com/Feature/SmartView/
index.asp
9. ASRock XFast USB, USB bellek aygıtı performansını arttırabilir. Performans aygtının özelliğine göre değişiklik gösterebilir.
10. ASRock XFast LAN hızlı internet erişimi sağlarken aşağıdaki avantajlara
da sahiptir. LAN uygulaması Önceliklendirmesi: Uygulama önceliğinizi ideal
şekilde yapılandırabilir ve/veya yeni programlar ekleyebilirsiniz. Oyunda
Daha Az Gecikme Zamanı: Çevrimiçi oyun önceliğini daha yükseğe
ayarladığınızda, oyundaki gecikmeler azalabilir. Trafi k Şekillendirme: You-
tube HD video izleyebilir ve aynı anda dosyaları indirebilirsiniz. Verilerinizin
Gerçek Zamanlı Analizi: Durum penceresi ile, şu anda aktardığınız hangi
verilerin akışının yapıldığını kolaylıkla yapı
11. Windows® 32-bit işletim sistemi CPU’su altında kullanılamayan bellek
alanından tamamen yararlanır. ASRock XFast RAM webde sörfü şimdiye
kadar olmadığı kadar hızlandırırken önceden ziyaret edilen web sitelerinin
yüklenme süresini kısaltır. Ay rıca Adobe Photoshop’ın hızını 5 kat arttırır.
ASRock XFast RAM’in başka bir avantajı da, SSD veya HDD’lerinize erişim
sıklığını azaltarak kullanım ömürlerini uzatması.
12. CPU aşırı ısınması algılandığında, sistem otomatik olarak kapatılır. Sistemi
devam ettirmeden önce, lütfen anakarttaki CPU fanının düzgün çalıştığını
kontrol edin ve güç kablosunu çıkarın, sonra geri takın. Isı geçişini artırmak
için, PC sistemini yüklediğinizde CPU ile ısı emici arasına ısı macunu
sürmeyi unutmayın.
13. Kombo Soğutucu Seçeneği (C.C.O.) üç farklı CPU soğutucu tipi olan Soket
LGA 775, LGA 1155 ve LGA 1156’yı çalıştıracak esnek seçeneğe sahiptir.
Lütfen tüm 775 ve 1156 CPU Fanlarının kullanılamayacağını unutmayın.
14. ASRock XFast RAM, Microsoft® Windows® XP / XP 64-bit ile uyumlu
değildir.
15. Enerji Kullanan Ürün anlamına gelen EuP, tamamlanmış sistemler için güç
tüketimini tanımlamak için Avrupa Birliği tarafından düzenlenen bir gerekliliktir. EuP’a göre, kapalı mod durumunda tamamlanmış sistemin toplam AC
gücü 1,00W altında olmalıdır. EuP standardını karşılamak için, EuP hazır
anakart ve EuP hazır güç kaynağı gerekir. Intel’in önerisine göre, EuP
hazır güç kaynağının 100 mA akım tüketiminde 5v beklemede güç etkinliği
%50’den yüksektir standardını karşılaması gerekir. EuP hazır güç kaynağı
seçimi için, daha fazla ayrıntı için güç kaynağı üreticisine başvurmanızı
öneririz.
TM
/ VistaTM 64 bit, ve tarayıcı sürümünüzün IE8 olmasına
landırabilirsiniz.
ASRock H71M-DG3 Motherboard
Türkçe
55
Page 56

1.3 Jumper'ların Ayarı
Şekilde jumper'ların nasıl ayarlandıkları
gösterilmektedir. Jumper kapağı pinler üzerine
yerleştirildiğinde jumper "Kapalı" dır. Jumper
kapağı pinler üzerindeyken jumper "Açık" tır.
Şekilde pin1 ve pin2'si "Kapalı" olan jumper
kapağı bu 2 pine yerleştirilmiş 3-pinli jumper
gösterilmektedir.
Jumper Ayar
CMOS’u temizleme
(CLRCMOS1, 3-pinli jumper)
(bkz. s.2 No. 21)
Not:
CLRCMOS1, CMOS’daki verilerinizi temizlemenize olanak sağlar. Sistem
parametrelerini temizlemek ve varsayılan ayara sıfırlamak için lütfen bilgisayarı
kapatın ve güç kablosunun fi şini güç kaynağından çekin. 15 saniye bekledikten
sonra, pin2 ve pin3‘ü CLRCMOS1’de 5 saniye kısaltmak için bir atlatıcı şapkası
kullanın. Ancak, BIOS’u güncelledikten hemen sonra lütfen CMOS’u temizlemeyin.
BIOS’u güncellemeyi tamamladığını zda CMOS’u temizlemeniz gerekirse,
ilk olarak sistemi başlatmanı z ve ardından CMOS temizleme işlemini
gerçekleştirmeden önce kapatmanız gereklidir. Parola, tarih, saat, kullanıcı
varsayılan profi li, 1394 GUID ve MAC adresinin yalnızca CMOS pili çıkarıldığında
temizleneceğini lütfen aklınızda bulundurunuz.
Clear CMOSDefault
Türkçe
56
ASRock H71M-DG3 Motherboard
Page 57

1.4 Yerleşik Fişler ve Konektörler
Yerleşik fi şler ve konektörler jumper DEĞİLDİR. Bu fi şlerin ve konektörlerin üzerine
jumper kapakları YERLEŞTİRMEYİN. Fişlerin ve konektörlerin üzerine jumper
kapakları yerleştirmek anakartın kalıcı olarak zarar görmesine neden olabilir!
Seri ATAII Konektörler Bu dört Seri ATAII (SATAII)
(SATA2_0: bkz. s.2, No. 10)
(SATA2_1: bkz. s.2, No. 8)
(SATA2_2: bkz. s.2, No. 12)
(SATA2_3: bkz. s.2, No. 11)
SATA2_3
konektör, dahili depolama
cihazları için SATA veri
kablolarını destekler. Geçerli
SATA2_2
SATAII arayüzü 3,0 Gb/sn veri
SATA2_1
SATA2_0
aktarım hızına izin verir.
Seri ATA (SATA) SATA veri kablosunu her iki ucu
Veri Kablosu da SATA / SATAII sabit
(İsteğe bağlı)
diskine veya anakarttaki
SATAII konektörüne
bağlanabilir.
USB 2.0 Fişleri G/Ç panelindeki varsayılan
(9-pinli USB6_7)
(bkz. s.2 No. 15)
altı USB 2.0 portundan başka,
bu anakartta iki USB 2.0 fi şi
bulunur. Her USB 2.0 fi şi iki
USB 2.0 portunu destekler.
1
USB_PWR
P-9
P-8
USB_PWR
P+9
P+8
GND
GND
DUMMY
(9-pinli USB8_9)
(bkz. s.2 No. 16)
Yazdırma Portu Fişi Bu, yazdırma portu kablosu için
(25-pinli LPT1)
(bkz. s.2 No. 18)
yazıcı cihazlarının uygun
bağlanmasını sağlayan bir
arayüzdür.
1
AFD#
STB#
ERROR#
PINIT#
SPD1
SPD0
SLIN#
SPD2
SPD3
SPD4
SPD5
SPD6
GND
SPD7
ACK#
BUSY
PE
SLCT
ASRock H71M-DG3 Motherboard
Türkçe
57
Page 58

1
GND
PRESENCE#
MIC2_R
MIC2_L
MIC_RET
J_SENSE
OUT2_R
OUT_RET
OUT2_L
Ön Panel Ses Fişi Bu, panel ses kablosu için
(9-pinli HD_SES1)
(bkz. s.2 No. 19)
uygun bağlantı sağlayan ve
ses cihazlarını kontrol
etmeyi sağlayan bir arayüzdür.
1. Yükse Tanımlı Ses Jak Duyarlılığını destekler, ancak kasadaki panel
kablosunun HDA'nın düzgün çalışmasını desteklemesi gerekir. Lütfen
sisteminizi yüklemek için kılavuzumuzdaki ve kasa kılavuzundaki
talimatları izleyin.
2. AC'97 ses paneli kullanıyorsanız, lütfen ön panel ses fi şine aşağıdaki gibi
takın:
A. Mic_IN'i (MIC) MIC2_L'ye bağlayın.
B. Audio_R'yi (RIN) OUT2_R'ye ve Audio_L'yi (LIN) OUT2_L'ye bağlayın.
C. Ground'u (GND) Ground'a (GND) bağlayın.
D. MIC_RET ve OUT_RET yalnızca HD ses paneli içindir. Bunları AC’97 ses
paneli için bağlamanız gerekmez.
E. Ön mikrofonu etkinleştirmek için
Windows
®
XP / XP 64-bit İS için:
"Karıştırıcı"yı seçin. "Kaydedici"yi seçin. Sonra "Ön Mikrofon"u tıklatın.
®
Windows
7 / 7 64-bit / VistaTM / VistaTM 64-bit İS için:
Realtek Kontrol panelinde "Ön Mikrofon" Sekmesine gidin. "Kayıt Ses
Seviyesi"ni ayarlayın.
Sistem Paneli Fişi Bu fi ş, birçok sistem ön paneli
(9-pinli PANEL1)
(bkz. s.2 No. 14)
işlevini barındırır.
Türkçe
Kasa üzerindeki güç anahtarını, sıfırlama anahtarını ve sistem durumu
göstergesini aşağıdaki pin atamalarına göre bu bağlantıya bağlayın.
Kabloları bağlamadan önce pozitif ve negatif pinlere dikkat edin.
PWRBTN (Güç Anahtarı):
Kasa üzerindeki güç anahtarını ön panele bağlayın. Güç anahtarını
kullanarak sisteminizi kapatma şeklinizi yapılandırabilirsiniz.
RESET (Sıfırlama Anahtarı):
Kasa üzerindeki sıfırlama anahtarını ön panele bağlayın. Bilgisayar
donarsa veya normal bir yeniden başlatma gerçekleştirilemezse,
bilgisayarı yeniden başlatmak için sıfırlama anahtarına basın.
PLED (Sistem Gücü LED’i):
Kasa üzerindeki güç durumu göstergesini ön panele bağ
layın. Sistem
çalışırken LED yanar. Sistem S1 uyku modunda iken LED yanıp sön
meye devam eder. Sistem S3/S4 uyku modunda veya kapalı (S5) iken
LED söner.
58
ASRock H71M-DG3 Motherboard
Page 59

HDLED (Sabit Disk Çalışma LED’i):
Kasa üzerindeki sabit disk çalışma LED’ini ön panele bağlayın. Sabit
disk veri okurken veya yazarken LED yanar.
Ön panel tasarımı kasaya göre değişiklik gösterebilir. Ön panel
modülünde temel olarak güç anahtarı, sıfırlama anahtarı, güç LED’i,
sabit disk çalışma LED’i, hoparlör vb. bulunur. Kasa ön panel
modülünüzü bu bağlantıya bağlarken, kablo atamalarının ve pin
atamalarının doğru biçimde eşleştirildiğinden emin olun.
Kasa Hoparlörü Fişi Lütfen kasa hoparlörünü bu fi şe
(4-pinli SPEAKER1)
(bkz. s.2 No. 13)
bağlayın.
Kasa/güç Fan Konektörü Lütfen kasa fan kablolarını
(4-pinli CHA_FAN1)
(bkz. s.2 No. 9)
fanına bu konektöre bağlayın
ve siyah kabloyu toprak pinine
CHA_FAN_SPEED
+12V
FAN_SPEED_CONTROL
GND
bağlayın.
(3-pinli PWR_FAN1)
(bkz. s.2 No. 23)
CPU Fan Konektörü Lütfen fan kablolarını CPU
(4-pinli CPU_FAN1)
(bkz. s.2 No. 3)
fanına bu konektöre bağlayın
ve siyah kabloyu toprak pinine
bağlayın.
Bu anakart 4-Pinli CPU fan (Sessiz Fan) desteği sağlasa da, 3-Pinli CPU
fan hızı kontrol işlevi olmadan bile hala başarılı bir şekilde çalışabilir.
3-Pinli CPU fanı bu konektördeki CPU fan konektörüne bağlamayı
planlıyorsanız, lütfen Pin 1-3'e bağlayın.
ATX Güç Konektörü Lütfen bir ATX güç kaynağını
(24-pinli ATXPWR1)
(bkz. s.2 No. 4)
bu konektöre bağlayın.
4 3 2 1
+12V
FAN_SPEED_CONTROL
CPU_FAN_SPEED
12 124
GND
Pin 1-3 Bağlı
3-Pinli Fanı Takma
13
Türkçe
ASRock H71M-DG3 Motherboard
59
Page 60

Bu anakart 24-pinli ATX güç konektörü sağlasa da
geleneksel bir 20-pinli ATX güç kaynağı bağlarsanız da
çalışabilir. 20-pinli ATX güç kaynağını kullanmak için,
lütfen güç kaynağınızı Pin 1 ve Pin 13'le birlikte takın.
12
24
20-Pinli ATX Güç Kaynağını Takma
1
ATX 12V Güç Konektörü Lütfen bir ATX 12V güç
(4-pinli ATX12V1)
(bkz. s.2 No. 2)
kaynağını bu konektöre
bağlayın.
Seri port Fişi Bu COM1 fi şi bir seri port
(9-pinli COM1)
(bkz. s.2 No. 17)
modülünü destekler.
13
Türkçe
60
ASRock H71M-DG3 Motherboard
Page 61

2. BIOS Bilgileri
Anakarttaki Flash Bellek BIOS Ayarları Yardımcı Programını içerir. Bilgisayarı
başlattığınızda, lütfen Otomatik Güç Sınaması (POST) sırasında BIOS Ayarları
yardımcı programına girmek için <F2> veya <Del> tuşuna basın; aksi halde, POST
test rutinlerine devam eder. BIOS Ayarlarına POST'tan sonra girmek istiyorsanız,
lütfen <Ctl> + <Alt> + <Delete> tuşlarına basarak veya sistem kasasındaki sıfırlama
düğmesine basarak sistemi yeniden başlatın. BIOS Ayarları programı kullanıcı
dostu olacak şekilde tasarlanmıştır. Çeşitli alt menüler arasında dolaşmanıza ve
önceden belirlenen seçenekler arasından seçim yapmanıza izin veren menü tabanlı
bir programdır. BIOS Ayarlar
bulunan Kullanıcı Kılavuzu'na (PDF dosyası) başvurun.
ı hakkında ayrıntılı bilgi için, lütfen Destek CD'sinde
3. Yazılım Destek CD’si bilgileri
Bu anakart çeşitli Microsoft® Windows® işletim sistemleri destekler: 7 / 7 64-bit
TM
/ Vista
/ VistaTM 64-bit / XP / XP 64-bit. Anakartla birlikte gelen Destek CD'si
anakart özelliklerini genişleten gerekli sürücüleri ve kullanışlı yardımcı programları
içerir. Destek CD'sini kullanmaya başlamak için, CD'yi CDROM sürücünüze takın.
Bilgisayarınızda "OTOMATİK KULLAN" özelliği etkinleştirilmişse, Ana Menüyü
otomatik olarak görüntüler. Ana Menü otomatik olarak görüntülenmezse, menüleri
görüntülemek için Destek CD'sinin “BIN” klasöründeki "ASSETUP.EXE" dosyasını
bulun ve çift tıklatın.
ASRock H71M-DG3 Motherboard
Türkçe
61
Page 62

1. Penjelasan
Terimakasih untuk membeli papan induk penghasilan kontrol kualitas keras terusmenerus ASRock’s yang dapat dipercaya. Dia dapat menyajikan pertunjukan baik
dengan bentuknya sesuai dengan janji kualitas dan ketahanan ASRock’s.
Buku Pedoman Instalasi Cepat ini mengandung perkenalan papan induk dan instalasi langkah-demi-langkah. Informasi lebih terperinci tentang papan induk ini dapat
dilihat dalam buku tangan pemakai dalam Support CD.
Karena spesifi kasi papan induk dan software BIOS barangkali dapat diperbarui,
isi dalam buku pedoman ini akan mengikuti perubahan tanpa peringatan. Dalam
kondisi terjadinya modifi kasi buku pedoman ini, versi baru akan diperlihatkan
dalam website ASRock tanpa peringatan lebih. Anda dapat mendapatkan kartu-
kartu yang paling baru dan daftar bantuan CPU pada website ASRock.
Website ASRock http://www.asrock.com
1.1 Isi Paket
Papan Induk H71M-DG3 ASRock
(Faktor Form Mikro ATX: 8.9-in x 6.8-in, 22.6 cm x 17.3 cm)
Pemimpin Instalasi Cepat H71M-DG3 ASRock
Support CD H71M-DG3 ASRock
2 x Kabel satu serial Data ATA (SATA) (bebas-pilih)
1 x Satu Pelindung I/O
Bahasa Indonesia
62
ASRock H71M-DG3 Motherboard
Page 63

1.2 Spesifikasi
Podium - Faktor Form Mikro ATX: 8.9-in x 6.8-in, 22.6 cm x 17.3 cm
- Desain All Solid Capacitor
CPU - Mendukung Intel
dalam Paket LGA1155
- Menggunakan Teknologi Intel
- Mendukung CPU K-Series jenis “unlocked”
- Menggunakan Teknologi Hyper-Threading
Grup Chip - Intel® H61
- Mendukung Intel
Connect Technology
Ingatan - Teknologi ingatan DDR3 dwisaluran
- 2 x Alur DDR3 DIMM
- Mendukung memori DDR3 1600/1333/1066 non-ECC yang
tidak di-buffer (DDR3 1600 dengan Intel
DDR3 1333 dengan Intel® Sandy Bridge CPU)
- Kapasitas paling banyak: 16GB
- Mendukung Intel
Intel® Ivy Bridge CPU
Alur Ekspansi - 1 x slot PCI Express 3.0 x16 (biru @ x16 mode)
* PCIE 3.0 hanya didukung dengan Intel® Ivy Bridge CPU.
Dengan Intel
didukung.
- 1 x PCI Express 2.0 x1 slot
Diagram * Intel® HD Graphics Built-in Visual dan output VGA hanya
dapat didukung dengan prosesor yang mengintegrasikan
GPU.
- Mendukung Intel
Sync Video 2.0, Intel® InTruTM 3D, Intel® Clear Video HD
Technology, Intel
dengan Intel® Ivy Bridge CPU
- Mendukung Intel® HD Graphics Built-in Visuals: Intel® Quick
Sync Video, Intel® InTruTM 3D, Intel® Clear Video HD
Technology, Intel® HD Graphics 2000/3000, Intel® Advanced
Vector Extensions (AVX) dengan Intel
- Pixel Shader 5.0, DirectX 11 dengan Intel® Ivy Bridge CPU,
Pixel Shader 4.1, DirectX 10.1 dengan Intel
CPU
- Ingatan sama Max. 1760MB dengan Intel® Ivy Bridge CPU.
Ingatan sama Max. 1759MB dengan Intel® Sandy Bridge
®
CoreTM i7 / i5 / i3 Generasi Ke-3 dan Ke-2
®
Turbo Boost 2.0
®
Rapid Start Technology dan Smart
®
Ivy Bridge CPU,
®
Extreme Memory Profi le (XMP) dengan
®
Sandy Bridge CPU, hanya PCIE 2.0 yang
®
HD Graphics Built-in Visuals: Intel® Quick
®
InsiderTM, Intel® HD Graphics 2500/4000
®
Sandy Bridge CPU
®
Sandy Bridge
Bahasa Indonesia
ASRock H71M-DG3 Motherboard
63
Page 64

CPU.
- Output VGA Ganda: mendukung port DVI-D dan D-Sub
melalui pengontrol tampilan independen
- Mendukung DVI dengan resolusi maksimal hingga
1920x1200 @ 60Hz
- Mendukung D-Sub dengan resolusi maksimal hingga
2048x1536 @ 75Hz
- Mendukung fungsi HDCP dengan port DVI
- Mendukung pemutaran 1080p Blu-ray (BD) / HD-DVD
dengan port DVI
Audio - 5.1 CH HD Audio (Realtek ALC662 Audio Codec)
LAN - PCIE x1 Gigabit LAN 10/100/1000 Mb/s
- Realtek RTL8111C
- Menggunakan Wake-On-LAN
- Mendukung PXE
Papan Belakang I/O Panel
I/O - 1 x Port Mouse PS/2
- 1 x Port Keyboard PS/2
- 1 x Port D-Sub
- 1 x Port DVI-D
- 6 x Port USB 2.0 siap-dipakai
- 1 x RJ-45 LAN Port LED (ACT/LINK LED dan SPEED LED)
- HD Audio Jack: Line in/Penyuara Depan/mikropon
Penghubung - 4 x penghubung SATA2 3.0Gb/s, dapat menggunakan NCQ,
AHCI dan fungsi “Hot Plug”
- 1 x port header Print
- 1 x port header COM
- Penghubung KIPAS CPU/casis/power
- Penghubung power 24 pin ATX
- Penghubung power 4 pin 12V
- Penghubung audio panel dapan
- 2 x USB 2.0 header (menggunakan 4 port USB 2.0)
Ciri-ciri BIOS - 32Mb AMI Legal BIOS
Bahasa Indonesia
- AMI UEFI Legal BIOS dengan dukungan GUI
- Menggunakan “Plug and Play”
- ACPI 1.1 Compliance Wake Up Events
- Menggunakan jumperfree
- Penyokong AMBIOS 2.3.1
- Penyesuaian berbagai tegangan IGPU, DRAM, PCH,
CPU PLL, VTT, VCCSA
64
ASRock H71M-DG3 Motherboard
Page 65

Sokongan CD - Driver, Utilitas, Perangkat Lunak Antivirus (Versi
Percobaan), CyberLink MediaEspresso 6.5 Versi
Percobaan, Creative Sound Blaster X-Fi MB - Trial, ASRock
MAGIX Multimedia Suite - OEM
Fitur Unik - ASRock Extreme Tuning Utility (AXTU)
- ASRock Instant Boot
- ASRock Instant Flash
- ASRock APP Charger
- ASRock SmartView
- ASRock XFast USB
- ASRock XFast LAN
- ASRock XFast RAM
- Hybrid Booster:
- ASRock U-COP
- Penjaga kegagalan input (B.F.G.)
- Combo Cooler Option (C.C.O.)
Penjaga - Perasa Suhu CPU
Hardware - Perasa Suhu Casis
- Pengukur Kipas CPU/casis/power
- Kipas CPU/Sasis Senyap (Kecepatan Kipas Sasis Otomatis
Disesuaikan Berdasarkan Temperatur CPU)
- Kontrol Multi-Kecepatan Kipas CPU/casis
- Penjagaan voltasi: +12V, +5V, +3.3V, Vcore
OS - dapat digunakan Microsoft
®
Windows® 7 / 7 64-bit /
VistaTM / VistaTM 64-bit / XP / XP 64-bit
Sertifi kasi - FCC, CE, WHQL
- ErP/EuP Ready (memerlukan catu daya ErP/EuP ready)
* Untuk informasi rinci, silakan kunjungi website kami: http://www.asrock.com
ASRock H71M-DG3 Motherboard
Bahasa Indonesia
65
Page 66

Installing OS on a HDD Larger Than 2TB
This motherboard is adopting UEFI BIOS that allows Windows® OS to be installed
on a large size HDD (>2TB). Please follow below procedure to install the operating
system.
®
1. Please make sure to use Windows
Windows® 7 64-bit.
2. Press <F2> or <Delete> at system POST. Set AHCI Mode in UEFI Setup Utility >
Advanced > Storage Confi guration > SATA Mode.
3. Choose the item “UEFI:xxx“ to boot in UEFI Setup Utility > Boot > Boot Option #1.
(“xxx” is the device which contains your Windows
an optical drive.) You can also press <F11> to launch boot menu at system POST
and choose the item “UEFI:xxx“ to boot.
4. Start Windows
®
installation.
5. If you install Windows® 7 64-bit OS, OS will be formatted by GPT (GUID Partition
Table). Please install the hotfi x fi le from Microsoft®:
http://support.microsoft.com/kb/979903
VistaTM 64-bit (with SP1 or above) or
®
installation fi les. Normally it is
English
66
ASRock H71M-DG3 Motherboard
 Loading...