


KeyStep 37
USER MANUAL
Special Thanks
DIRECTION
Frederic BRUN
Philippe CAVENEL
ENGINEERING
Sebastien COLIN Olivier DELHOMME Philippe CAVENEL Thomas AUBERT
INDUSTRIALIZATION
Jérôme BLANC
DESIGN
Sébastien ROCHARD DesignBox
TESTING
Sylvain LOURY
Maxime AUDFRAY
BETA TESTING
Marco CORREIA
(Koshdukai)
Tom HALL
Paul BEAUDOIN
Boele GERKES
Nicolas DUBOIS
Kévin MOLCARD
Florian MARIN
Victor MORELLO
Jeff HALER
Gustavo LIMA
Guillaume BONNEAU
Mark DUNN
Tony FLYING SQUIRREL
Jean-Gabriel
SCHOENHENZ
Gaspard COTIN
Alex THEAKSTON
Richard COURTEL
Jeremy BERNSTEIN
TJ TRIFFELETTI
George WARE
Grégory ROUDGÉ
Chuck CAPSIS
MANUAL
Gert BRAAKMAN (author)
Minoru KOIKE
© ARTURIA SA – 2020 – All rights reserved.
26 avenue Jean Kuntzmann
38330 Montbonnot-Saint-Martin
FRANCE
http://www.arturia.com
Information contained in this manual is subject to change without notice and does not
represent a commitment on the part of Arturia. The software described in this manual is
provided under the terms of a license agreement or non-disclosure agreement. The software
license agreement specifies the terms and conditions for its lawful use. No part of this
manual may be reproduced or transmitted in any form or by any purpose other than
purchaser’s personal use, without the express written permission of ARTURIA S.A.
All other products, logos or company names quoted in this manual are trademarks or
registered trademarks of their respective owners.
Product version: 1.0
Revision date: 8 September 2020
Camille DALEMANS
Charlotte METAIS
Jose RENDON
Holger STEINBRINK

Thank you for purchasing the Arturia KeyStep!
This manual covers the features and operation of Arturia’s KeyStep, a full-featured USB
MIDI keyboard controller complete with a polyphonic sequencer, arpeggiator, a robust set
of MIDI and C/V connections, and outfitted with our new Slimkey keyboard for maximum
playability in the minimum space.
In this package you will find:
• One KeyStep controller, with a serial number and unlock code on the bottom. You
will need this information in order to register your KeyStep.
• One USB Micro B / Type A cable
• The Quick Start Guide for KeyStep.
Also included in the purchase of your KeyStep is a free installation of Ableton Live Lite,
a remarkably full-featured recording / sequencing application. The license number will be
provided to you when you register your KeyStep on the Arturia website. Then you can
download the installation file from ableton.com/live-lite.
Be sure to register your KeyStep as soon as possible! There is a sticker on the bottom panel
that contains the serial number of your unit and an unlock code. These are required during
the online registration process. You may want to record these elsewhere or take a photo of
the sticker in case it becomes damaged.
Registering your KeyStep provides the following benefits:
• A product license key for your installation of Ableton Live Lite [see note below]
• Access to the KeyStep user manual and the latest version of the MIDI Control
Center software
• You can download the installation file from ableton.com/live-lite.
Special offers restricted to KeyStep owners.

Special Message
Specifications Subject to Change:
The information contained in this manual is believed to be correct at the time of printing.
However, Arturia reserves the right to change or modify any of the specifications without
notice or obligation to update the hardware that has been purchased.
IMPORTANT:
The product and its software, when used in combination with an amplifier, headphones or
speakers, may be able to produce sound levels that could cause permanent hearing loss.
DO NOT operate for long periods of time at a high level or at a level that is uncomfortable.
If you encounter any hearing loss or ringing in the ears, you should consult an audiologist.
NOTICE:
Service charges incurred due to a lack of knowledge relating to how a function or feature
works (when the product is operating as designed) are not covered by the manufacturer’s
warranty, and are therefore the owner's responsibility. Please study this manual carefully
and consult your dealer before requesting service.
Precautions include, but are not limited to, the following:
1. Read and understand all the instructions.
2. Always follow the instructions on the instrument.
3. Before cleaning the instrument, always remove the USB cable. When cleaning,
use a soft and dry cloth. Do not use gasoline, alcohol, acetone, turpentine or any
other organic solutions; do not use a liquid cleaner, spray or cloth that's too wet.
4. Do not use the instrument near water or moisture, such as a bathtub, sink,
swimming pool or similar place.
5. Do not place the instrument in an unstable position where it might accidentally
fall over.
6. Do not place heavy objects on the instrument. Do not block openings or vents
of the instrument; these locations are used for air circulation to prevent the
instrument from overheating. Do not place the instrument near a heat vent at any
location with poor air circulation.
7. Do not open or insert anything into the instrument that may cause a fire or
electrical shock.
8. Do not spill any kind of liquid onto the instrument.
9. Always take the instrument to a qualified service center. You will invalidate your
warranty if you open and remove the cover, and improper assembly may cause
electrical shock or other malfunctions.
10. Do not use the instrument with thunder and lightning present; otherwise it may
cause long distance electrical shock.
11. Do not expose the instrument to hot sunlight.
12. Do not use the instrument when there is a gas leak nearby.
13. Arturia is not responsible for any damage or data loss caused by improper
operation of the instrument.

Introduction
Congratulations on your purchase of the Arturia KeyStep!
This unique keyboard controller gives you everything you need to make music wherever
you and your portable tech will be. Its compact size is due in part to its Slimkey keyboard;
these great-feeling keys are smaller than standard piano keys but still large enough to allow
for maximum playability. But this is no toy; as with all Arturia products, it’s built like a tank.
All the essential features of a keyboard controller are here, including aftertouch, touch-strips
for pitch bend and modulation, a footswitch input and a Hold button.
The polyphonic sequencer will capture your ideas and the arpeggiator will unleash them.
You can specify the exact feel of your music through the Swing and Gate parameters, which
are instantly accessible from the front panel. And the chord memory feature will make you
seem like even more of a musical monster than you already are.
KeyStep has an unlimited number of potential uses and setup options, thanks to its
simultaneous USB, MIDI, CV/Gate and synchronization capabilities. There’s an additional
Mod connection to complement the CV and Gate outputs, allowing for even more creative
options with external devices such as modular synthesizers. And the included MIDI Control
Center software allows you to configure KeyStep the way that works best for your style and
system.
KeyStep is very easy to use, so you’ll probably start experimenting with it right out of the
box. But be sure to read this manual completely, because in addition to covering the basics
we’ll also describe several ways to integrate this little powerhouse of a controller with your
system. You will find KeyStep to be a great source of musical inspiration and creativity.
Be sure to visit www.arturia.com. That’s the place to go for the latest firmware and to
download the MIDI Control Center. You’ll also find links to our tutorials and FAQs.
We will leave the two of you alone now. You have a lot of great music to make!
The Arturia team

Table Of Contents
1. Introduction and Overview.................................................................................................................................... 4
1.1. A fascinating adventure..................................................................................................................................................... 4
1.2. About Reading Manuals .................................................................................................................................................... 4
1.3. Installation ................................................................................................................................................................................. 5
1.3.1. Warning............................................................................................................................................................................................................................... 5
1.3.2. Register your Instrument........................................................................................................................................................................................ 5
1.4. KeyStep and KeyStep 37 .................................................................................................................................................. 6
1.4.1. Sequencer and Arpeggiator ................................................................................................................................................................................... 6
1.4.2. Scale and Root ............................................................................................................................................................................................................... 6
1.4.3. The Chord / CC unit .................................................................................................................................................................................................... 7
1.4.4. The Back Panel .............................................................................................................................................................................................................. 7
1.5. Overview ..................................................................................................................................................................................... 8
1.5.1. Making the connections ............................................................................................................................................................................................ 8
1.6. Front panel overview........................................................................................................................................................ 10
1.6.1. Sequencer/Arpeggiator.......................................................................................................................................................................................... 10
1.6.2. Tap Tempo/Rest/Tie.................................................................................................................................................................................................... 11
1.6.3. The transport section............................................................................................................................................................................................... 12
1.6.4. LED display, Chord button and knobs .......................................................................................................................................................... 12
1.6.5. Hold/Chord button ..................................................................................................................................................................................................... 12
1.6.6. Shift button ..................................................................................................................................................................................................................... 13
1.6.7. Oct -/+, Transpose, Kbd Play............................................................................................................................................................................... 13
1.6.8. Pitch & Mod touch strips ........................................................................................................................................................................................ 14
1.7. Rear panel overview.......................................................................................................................................................... 15
1.7.1. USB/DC IN ........................................................................................................................................................................................................................ 15
1.7.2. 12V DC IN (with optional adapter)................................................................................................................................................................... 15
1.7.3. Pitch/Gate/Mod outputs ......................................................................................................................................................................................... 15
1.7.4. Sustain pedal input.................................................................................................................................................................................................... 15
1.7.5. Sync input/output ....................................................................................................................................................................................................... 16
1.7.6. MIDI input/output....................................................................................................................................................................................................... 16
1.7.7. Sync source selector switches........................................................................................................................................................................... 16
1.7.8. Kensington lock port ................................................................................................................................................................................................. 16
2. Basic Operations ........................................................................................................................................................ 17
2.1. Plug and play .......................................................................................................................................................................... 17
2.1.1. Slimkey keyboard........................................................................................................................................................................................................ 17
2.1.2. Keyboard MIDI channel selection ................................................................................................................................................................... 17
2.1.3. Pitch and Mod touch strips .................................................................................................................................................................................. 18
2.1.4. The Hold button ........................................................................................................................................................................................................... 18
2.1.5. Sustain pedal................................................................................................................................................................................................................. 19
2.1.6. Oct - / Oct + .................................................................................................................................................................................................................... 19
2.1.7. Factory reset.................................................................................................................................................................................................................. 19
2.2. Select and play a sequence ...................................................................................................................................... 20
2.2.1. Sequencer / Arpeggiator toggle switch..................................................................................................................................................... 20
2.2.2. Sequencer / Arpeggiator Mode encoder ................................................................................................................................................. 20
2.2.3. Transport control ..................................................................................................................................................................................................... 20
2.2.4. Rate knob (set tempo)............................................................................................................................................................................................ 21
2.2.5. Time Division encoder............................................................................................................................................................................................ 21
2.3. Using the arpeggiator .................................................................................................................................................... 22
2.3.1. Seq / Arp toggle switch......................................................................................................................................................................................... 22
2.3.2. Seq / Arp Mode encoder...................................................................................................................................................................................... 22
2.3.3. Transport section...................................................................................................................................................................................................... 23
2.3.4. Set the tempo.............................................................................................................................................................................................................. 23
2.3.5. Time Division............................................................................................................................................................................................................... 23
2.3.6. Hold button ................................................................................................................................................................................................................... 24
2.4. Scales & Chords ................................................................................................................................................................. 36
3. Shift Functions ............................................................................................................................................................ 25
3.1. Chord mode ........................................................................................................................................................................... 25
3.1.1. Activating chord mode............................................................................................................................................................................................ 25
3.1.2. Playing single notes ................................................................................................................................................................................................ 26
3.1.3. Setting Chord span with Notes.......................................................................................................................................................................... 27
3.1.4. Setting the Velocity to Notes ratio .................................................................................................................................................................. 28

3.1.5. Selecting Strum type............................................................................................................................................................................................... 29
3.1.6. Sequences & arpeggios ....................................................................................................................................................................................... 30
3.2. Transpose / Kbd Play in Seq mode ....................................................................................................................... 31
3.3. Skip selections: Seq / Arp............................................................................................................................................. 32
3.4. Skip selections: Time Division.................................................................................................................................... 32
3.5. Restart Seq / Arp from beginning .......................................................................................................................... 33
3.6. Keyboard Shift Functions............................................................................................................................................. 33
3.6.1. Keyboard MIDI channel ....................................................................................................................................................................................... 33
3.6.2. Gate................................................................................................................................................................................................................................... 34
3.6.3. Swing ............................................................................................................................................................................................................................... 34
3.6.4. Sequence....................................................................................................................................................................................................................... 35
3.6.5. Scales............................................................................................................................................................................................................................... 36
3.6.6. Shift function chart................................................................................................................................................................................................. 40
4. Creating Sequences ................................................................................................................................................. 41
4.1. What is a step sequencer? ........................................................................................................................................... 41
4.2. Creating a sequence ....................................................................................................................................................... 42
4.2.1. Step recording ............................................................................................................................................................................................................. 42
4.2.2. Real-time record/replace..................................................................................................................................................................................... 47
4.2.3. Adjusting the sequence length........................................................................................................................................................................ 49
4.2.4. What does it record?............................................................................................................................................................................................. 49
4.2.5. What is not recorded?......................................................................................................................................................................................... 50
4.3. Modifying a sequence................................................................................................................................................... 50
4.3.1. Append ............................................................................................................................................................................................................................ 50
4.3.2. Clear Last ....................................................................................................................................................................................................................... 51
4.4. Saving sequences .............................................................................................................................................................. 51
5. The Arpeggiator.......................................................................................................................................................... 52
5.1. What's an arpeggiator? ................................................................................................................................................. 52
5.2. Arpeggiator features....................................................................................................................................................... 53
5.3. Arpeggiator modes .......................................................................................................................................................... 54
5.3.1. Start the arpeggiator............................................................................................................................................................................................... 54
5.3.2. Arp mode: Up.............................................................................................................................................................................................................. 54
5.3.3. Arp mode: Down....................................................................................................................................................................................................... 54
5.3.4. Arp mode: Inclusive................................................................................................................................................................................................ 55
5.3.5. Arp Mode: Exclusive................................................................................................................................................................................................ 55
5.3.6. Arp Mode: Random ................................................................................................................................................................................................. 55
5.3.7. Arp Mode: Walk.......................................................................................................................................................................................................... 55
5.3.8. Arp Mode: Pattern .................................................................................................................................................................................................... 56
5.3.9. Arp Mode: Order........................................................................................................................................................................................................ 56
5.4. Adding Notes in other octave ranges................................................................................................................... 57
5.5. Building a multi-octave arpeggio............................................................................................................................ 58
5.6. Pausing an arpeggio....................................................................................................................................................... 59
5.7. Arpeggio Tricks................................................................................................................................................................... 60
5.7.1. Ratcheting...................................................................................................................................................................................................................... 60
5.7.2. Spicing up your Arpeggios................................................................................................................................................................................ 60
6. Synchronization .......................................................................................................................................................... 61
6.1. As Master .................................................................................................................................................................................. 61
6.2. As Slave.................................................................................................................................................................................... 62
6.2.1. Sync In/Out types..................................................................................................................................................................................................... 62
6.2.2. Clock connectors ...................................................................................................................................................................................................... 63
7. MOD/GATE/PITCH functions .............................................................................................................................. 64
7.1. Pitch and Gate signals..................................................................................................................................................... 64
7.1.1. How do Pitch and Gate work?........................................................................................................................................................................... 64
7.1.2. Can my DAW send CV/Gate signals?.......................................................................................................................................................... 64
7.1.3. Modulation (Mod) output....................................................................................................................................................................................... 65
7.2. Routing the signals ........................................................................................................................................................... 65
7.3. MOD/GATE/PITCH specifications............................................................................................................................ 65
8. Controlling external synths................................................................................................................................. 66
8.1. Control Mode.......................................................................................................................................................................... 66
8.1.1. What are CC# messages?................................................................................................................................................................................... 66
8.1.2. CC messages and MIDI......................................................................................................................................................................................... 67
8.1.3. Monitoring CC#'s and their values .................................................................................................................................................................. 67
8.2. The four CC Banks............................................................................................................................................................ 68

8.2.1. Editing CC numbers................................................................................................................................................................................................. 68
8.3. Examples................................................................................................................................................................................. 70
8.3.1. Connecting knobs ..................................................................................................................................................................................................... 70
8.3.2. Controlling parameters on the MicroFreak.............................................................................................................................................. 72
9. The MIDI Control Center ...................................................................................................................................... 74
9.1. The Basics ................................................................................................................................................................................ 74
9.1.1. System requirements ............................................................................................................................................................................................... 74
9.1.2. Installation and location........................................................................................................................................................................................ 74
9.1.3. Connection...................................................................................................................................................................................................................... 75
9.1.4. Back up your sequences ....................................................................................................................................................................................... 76
9.1.5. Where to find the manual.................................................................................................................................................................................... 77
9.2. The Sync option................................................................................................................................................................... 78
9.2.1. Sync operations .......................................................................................................................................................................................................... 78
9.2.2. Non-sync operations............................................................................................................................................................................................... 79
9.3. Device Projects................................................................................................................................................................... 80
9.3.1. The Working Project............................................................................................................................................................................................... 80
9.4. Project Browser ................................................................................................................................................................... 81
9.4.1. Building a library ....................................................................................................................................................................................................... 83
9.4.2. Revise a Template.................................................................................................................................................................................................... 83
9.4.3. Send one sequence to KeyStep 37 ............................................................................................................................................................... 85
9.5. Store To/Recall From....................................................................................................................................................... 86
9.5.1. The 'Store To' button ................................................................................................................................................................................................ 86
9.5.2. Recall edited sequences from KeyStep 37.............................................................................................................................................. 86
9.5.3. Save, Delete, Import/Export, etc...................................................................................................................................................................... 87
9.6. Import/Export Device Settings................................................................................................................................... 87
9.6.1. Export Device Settings............................................................................................................................................................................................. 87
9.6.2. Import Device Settings......................................................................................................................................................................................... 88
9.7. Editing basics ....................................................................................................................................................................... 89
9.7.1. Data entry....................................................................................................................................................................................................................... 89
9.7.2. Selecting the tabs .................................................................................................................................................................................................... 90
9.7.3. Seq tab............................................................................................................................................................................................................................ 90
9.7.4. Device Settings tab................................................................................................................................................................................................. 90
9.8. Sequence window ............................................................................................................................................................. 91
9.8.1. Navigation ....................................................................................................................................................................................................................... 91
9.8.2. Per-sequence parameters.................................................................................................................................................................................. 92
9.8.3. Sequence events....................................................................................................................................................................................................... 93
9.9. Sequence management ............................................................................................................................................... 98
9.9.1. Copy a Seq tab to another Seq tab............................................................................................................................................................... 98
9.9.2. Drag/drop onto a tab............................................................................................................................................................................................. 99
9.10. Working with Device Settings............................................................................................................................. 100
9.10.1. Common features ............................................................................................................................................................................................... 100
9.10.2. MIDI Controller settings .................................................................................................................................................................................. 102
9.10.3. Sequence settings............................................................................................................................................................................................... 104
9.10.4. CV/Gate settings .................................................................................................................................................................................................. 108
9.10.5. Transport settings................................................................................................................................................................................................. 110
9.10.6. CC Bank settings..................................................................................................................................................................................................... 111
10. Software License Agreement........................................................................................................................ 112
11. Declaration of Conformity................................................................................................................................. 114

1. INTRODUCTION AND OVERVIEW
The KeyStep 37 is an advanced third-generation controller and sequencing station. It is both
compact and versatile, with unique features that will spark your imagination and creativity
in a new way. It enables you to connect to all your studio and performance gear and control
it in ways you never thought possible.
Controllers have come a long way. The first generation of controllers could transmit MIDI
pitch and velocity over the 16 MIDI channels, not much more. The second generation
added complex step- and real-time sequencing features and was capable of connecting to
your DAW in special ways, allowing you to control multiple parameters of VSTi's (virtual
instruments, including synths).
This third-generation controller adds control options for modular systems. The KeyStep 37
lets you play, record, edit and add to your sequences on the fly, with a clear and easy-tounderstand workflow that encourages your creativity. Each pattern can be up to 64 steps
long. Couple this with the advanced chord strumming options and scale quantisation and
you'll begin to understand why it will soon become your favourite controller.
1.1. A fascinating adventure
As soon as you start experimenting with the KeyStep 37, you'll be faced with many
questions: How do I make connections? What are the differences between Real-time and
Step recording?
The answers to these questions come slowly: you'll find many of the answers in this manual
and many others by reading online forums, sharing and comparing user experiences and,
most importantly, by diving in and experimenting. Whatever you do, take the time to get to
know the KeyStep 37 inside out.
To sustain the fascination you feel, learn the functions of the KeyStep 37 one by one and test
your knowledge continuously. The KeyStep 37 is an advanced controller with many levels of
understanding. It offers a unique way to experience the reward that comes with being able
to create the sounds as you imagine them.
1.2. About Reading Manuals
Reading manuals can mean much more than familiarizing yourself with an instrument.
Yes, it is excellent for learning, but it serves another purpose that is much less understood:
creating the basis for inspiration.
Inspiration can flourish when you have many little pieces of knowledge 'online' in your
mind, so that you can interconnect and crosslink them; it widens the scope of your creativity.
It also helps to look at the current state of your knowledge as something that needs to be
maintained and expanded. Reading a manual, again and again, causes a quantum shift in
what you absorb from it. You are building a living model of the controller in your brain.
Reading a manual the first time helps you to get acquainted with the parameters of an
instrument; what does a knob do and how does it affect the sound of external modules or
synths? Second and third readings will give you a better understanding of the structure of
the KeyStep 37. Beyond that, reading becomes a source of creative input that inspires you
to think of new ways to use this unique controller and sequencing station.
Arturia - User Manual KeyStep 37 - Introduction and Overview 4

1.3. Installation
1.3.1. Warning
Do not place this product in a place or position where anyone might walk on, trip over,
or roll anything over power cords or connecting cables. The use of an extension cord is
not recommended. However, if you must use one, make sure that the cord can handle
the maximum current needed by this product. Please consult a local electrician for more
information on your power requirements. This product should be used only with accessories
supplied or recommended by Arturia. When used with any such products, please observe
all safety markings and instructions that accompany them.
Always power-off all audio gear before making any connections. Failing to do so may
damage your speakers, the KeyStep 37, or the other audio equipment. After completing all
connections, set all volume levels to zero. Power-on the various devices, with your audio
amplifier or monitoring system last, then raise the volumes to a comfortable listening level.
1.3.2. Register your Instrument
Registering your instrument establishes your legal ownership of it, which entitles you to
access the Arturia Technical Support service and to be informed of updates. Additionally,
you can subscribe to the Arturia newsletter to be informed of Arturia-related news as well as
promotional offers. Connect to your Arturia account](https://www.arturia.com/login)), go to
the section My Registered Products, then add the KeyStep 37 by entering its serial number,
as printed on the sticker located under the controller.
5 Arturia - User Manual KeyStep 37 - Introduction and Overview

1.4. KeyStep and KeyStep 37
The KeyStep 37 has many new fascinating features. When upgrading from a KeyStep the
first thing you'll notice is a new function strip with four knobs (more about these later) and
a row of 37 LED above the keys of the keyboard.
The Keyboard LEDs will help you to check the status of notes you are playing on the
keyboard and notes the Sequencer and the Arpeggiator are currently playing. They will also
be helpful when you are editing the notes of a chord in chord mode or when you create an
Arpeggio pattern. Two LEDs at the keyboard edges inform you that there is activity (notes
playing) outside the keyboard boundaries.
What else has changed? The Tempo option is more refined; Tempo speed can now be set
in 0.01 BPM increments. There are fewer swing settings but they have changed to be more
musically relevant.
1.4.1. Sequencer and Arpeggiator
The Shift+ Key combination switches the Sequencer to Mono mode: if your sequence was
polyphonic only the lowest note in a chord will be played.
On the KeyStep 37 there's an easy way to set the length of a sequence; just hold Record and
tap one of the first 16 keys to define a length. Repeatedly pressing a key while still holding
the Record button will add its number to the length of the sequence.
In addition, the sequencer has an overdub mode that can be activated with a Shift function.
when ON new notes will be added to the existing sequence.
Two new Arpeggio modes replace the old Up x2 and Down x2 modes, they are Walk and
Pattern. In Walk mode, the sequencer digitally 'throws a dice' to decide whether to go
forward or backwards at the end of each step: there's a 50% chance it will play the next
step, a 25% chance it will play the current step and a 25% chance it will play the previous
step.
In Pattern arpeggio mode, a repeated pattern of up to 64 notes is randomized each time a
key is pressed. You can change the length of the pattern the same way you can change the
length of a sequence, by holding the Record button and pressing the first 16 keys.
1.4.2. Scale and Root
A new Scale option allows you to play notes in an existing sequence in one of five different
scales: Chromatic, Major, Minor, Blues, and User
The scale root feature enables you to define a new root for each of these scales. As a user,
you can create and recall a fifth scale.
Arturia - User Manual KeyStep 37 - Introduction and Overview 6

1.4.3. The Chord / CC unit
At the right of the transport button, you'll find a Chord / CC unit with a status screen, a full
colour backlit LED button and four 270° knobs.
The Chord button on the Chord / CC unit enables you to create a chord that will play when
pressing a single key. Chord mode on the KeyStep 37 is more flexible than on the KeyStep;
you can use the four knobs to create various chord types and strum patterns.
First of the mighty four is the Type knob. Turn it to cycle through a list of 11 predefined chords.
The twelfth entry is yours to define, you can store your own magic chord there.
The Notes knob allows you to control how many notes of the chord will sound. You can stack
a huge eight note chord and then use the note knob to control how many of them will sound!
The Vel>Notes knob lets you control how many notes of the chord will sound dynamically!
It works in tandem with the Notes knob: the number of notes that will sound is dependent
on the velocity you have programmed or recorded in a step or played on the keyboard.
When playing with low velocity only the root and the lowest notes in the chord will play.
With increased velocity more notes will sound.
With the Strum knob, you spread the notes of the generated chord in time. In the central
position, all notes of a chord will sound simultaneously. When turning the knob clockwise,
the lowest notes of the chord will sound first and the higher notes in the chord will be
delayed. Turning the knob counter-clockwise will have the reverse effect: the highest notes in
the Chord will sound first. The knob has four zones: in the upper two zones the strum speed
is defined in absolute time in miliseconds . In the lower two zones the strum is quantized to
the current tempo. For more details please refer to Chapter 3: selecting strum type [p.29].
The Chord button takes on a completely different role when you press it while holding
down the Shift button. It will turn the four knobs into CC controllers you can use to control
parameters on external devices. Four banks can hold a total of 16 CC codes.
1.4.4. The Back Panel
The back panel KeyStep 37 is nearly identical to that of the Keystep with one exception: the
Micro-USB input has been replaced by a standard USB type B connector.
7 Arturia - User Manual KeyStep 37 - Introduction and Overview
1.5. Overview
1.5.1. Making the connections
There are quite a few ways to connect KeyStep 37 with other types of equipment, from
vintage to modern. Below are some examples of potential setups:
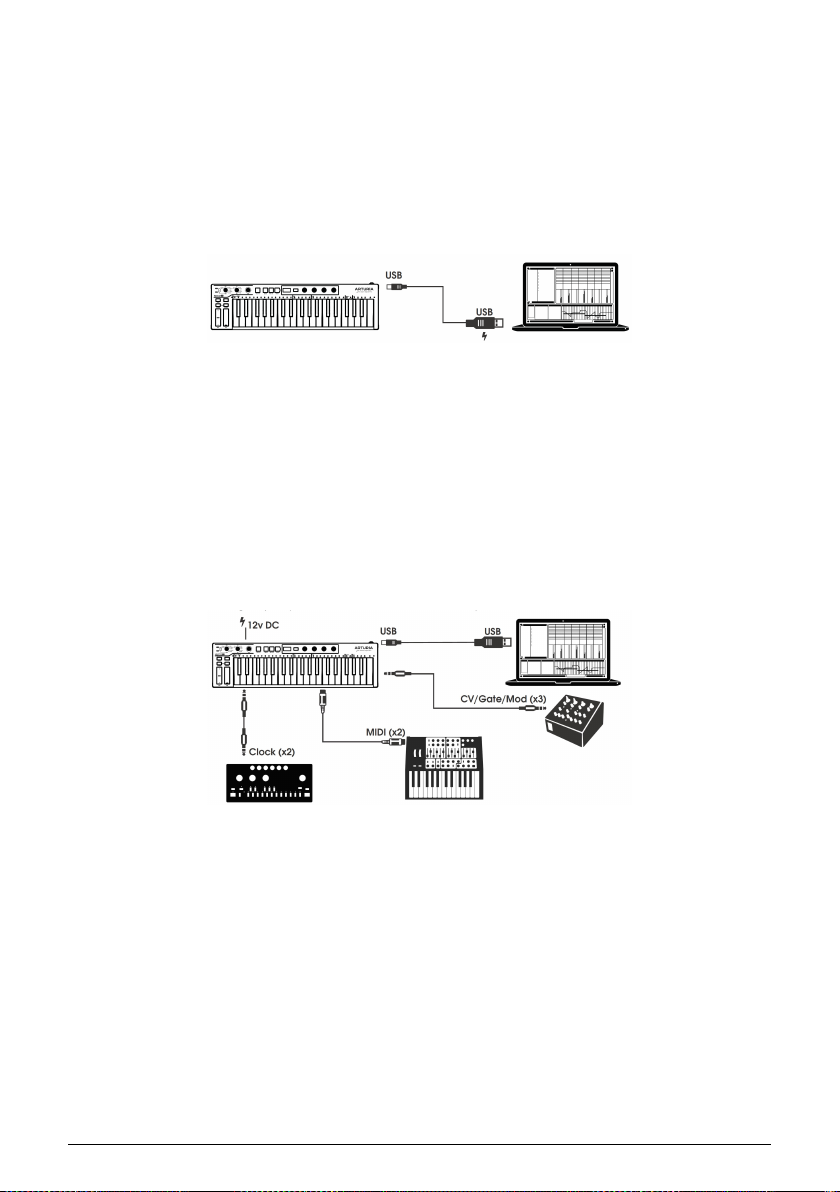
1.5.1.1. .....with a Computer
KeyStep 37 is a USB class-compliant controller, so at its most basic level it can be connected
to any computer with a USB port and used as an input device for various applications.
The included MIDI Control Center software lets you choose which MIDI messages will be
sent by the mod strip and pedal, and also enables you to specify the global KeyStep 37
parameters.
However, KeyStep 37 can also be used without a computer attached! In this case, simply use
a 12V DC 1.5A center positive power supply (not included) or a standard USB mobile phone
charger to power the unit. Then connect everything else as shown in the following diagrams.
1.5.1.2. .....with external devices
As you can see, KeyStep 37 can be at the center of some amazing systems.
CV/Mod/Gate
KeyStep 37 will send control voltages to non-MIDI devices through its Pitch, Mod and Gate
connectors. It also can send data to those devices from the USB port of your computer or
from an external MIDI device.
Arturia - User Manual KeyStep 37 - Introduction and Overview 8

MIDI devices
Many mid-vintage devices have MIDI jacks but don't have CV/Gate connectors or USB ports.
KeyStep 37 can plug directly into them and also serve as a USB MIDI converter.
Sync sources/destinations
The Sync input and output connectors allow KeyStep 37 to synchronize with lots of different
clock types: a single pulse per step, two pulses per step, 24 pulses per quarter note (ppqn),
and 48 ppqn. Between these four options you are ready to connect with almost any
imaginable music technology.
See section 6.2.2 [p.63] for specific information about what cables to use for the various sync
connections and formats.
9 Arturia - User Manual KeyStep 37 - Introduction and Overview
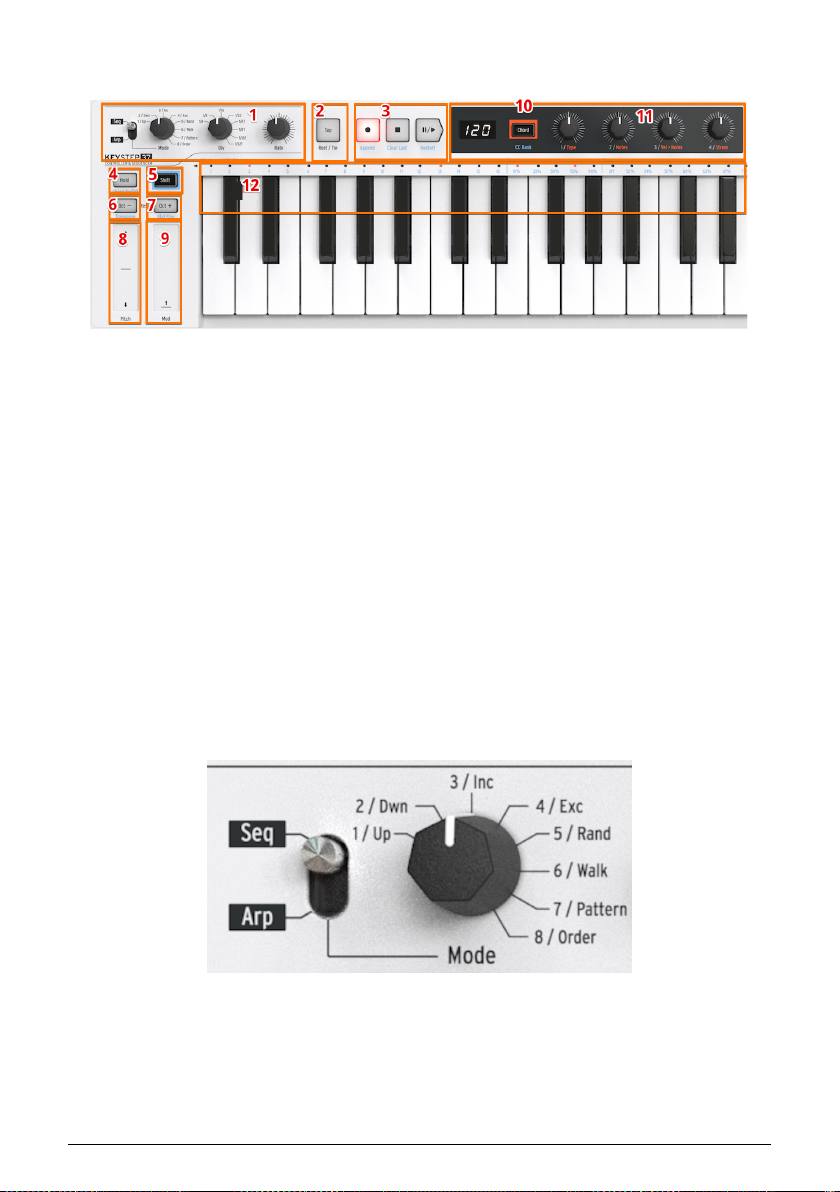
1.6. Front panel overview
1. Sequencer / Arpeggiator section
2. Tap Tempo / Rest / Tie
3. Transport section
4. Hold / Chord (with Shift)
5. Shift button
6. Oct - / Transpose (with Shift)
7. Oct + / Kbd Play (with Shift)
8. Pitch Touch Strip
9. Mod Touch Strip
10. Chord/CC Bank (with Shift)
11. Chord/CC knobs
12. Keyboard functions (with Shift)
1.6.1. Sequencer/Arpeggiator
KeyStep 37 provides a sequencer and an arpeggiator. You can record eight different
sequences, each with up to 64 steps. The arpeggiator generates notes based on the keys
you have pressed and plays them back according to the Arp Mode setting.
The sequencer and arpeggiator have unique features, so be sure to read chapter 4 and
chapter 5 to learn more.
Arturia - User Manual KeyStep 37 - Introduction and Overview 10

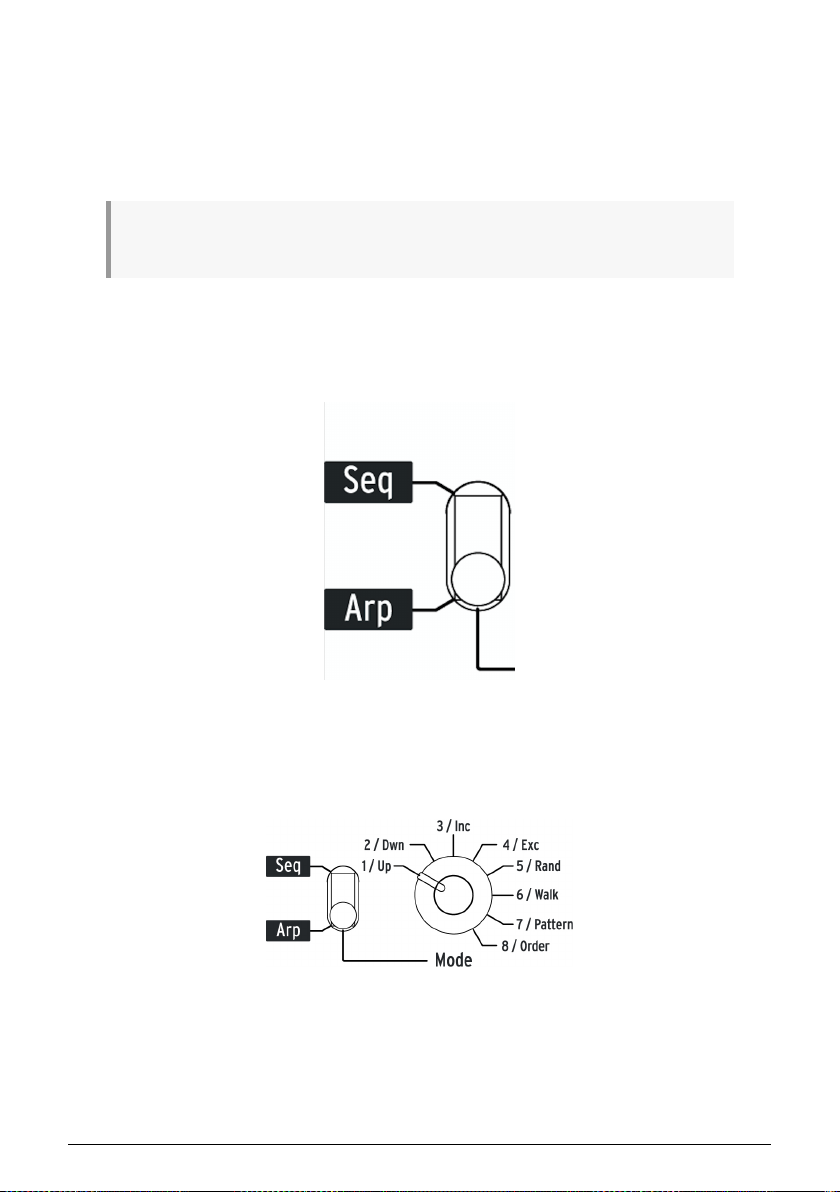
1.6.1.1. The Seq/Arp toggle switch
When this switch is set to Seq a sequence can be played or recorded. The controls in this
section select which sequence is active and the time division at which it will be played back.
When the switch is set to Arp the controls select the pattern and the time division for the
arpeggiator.
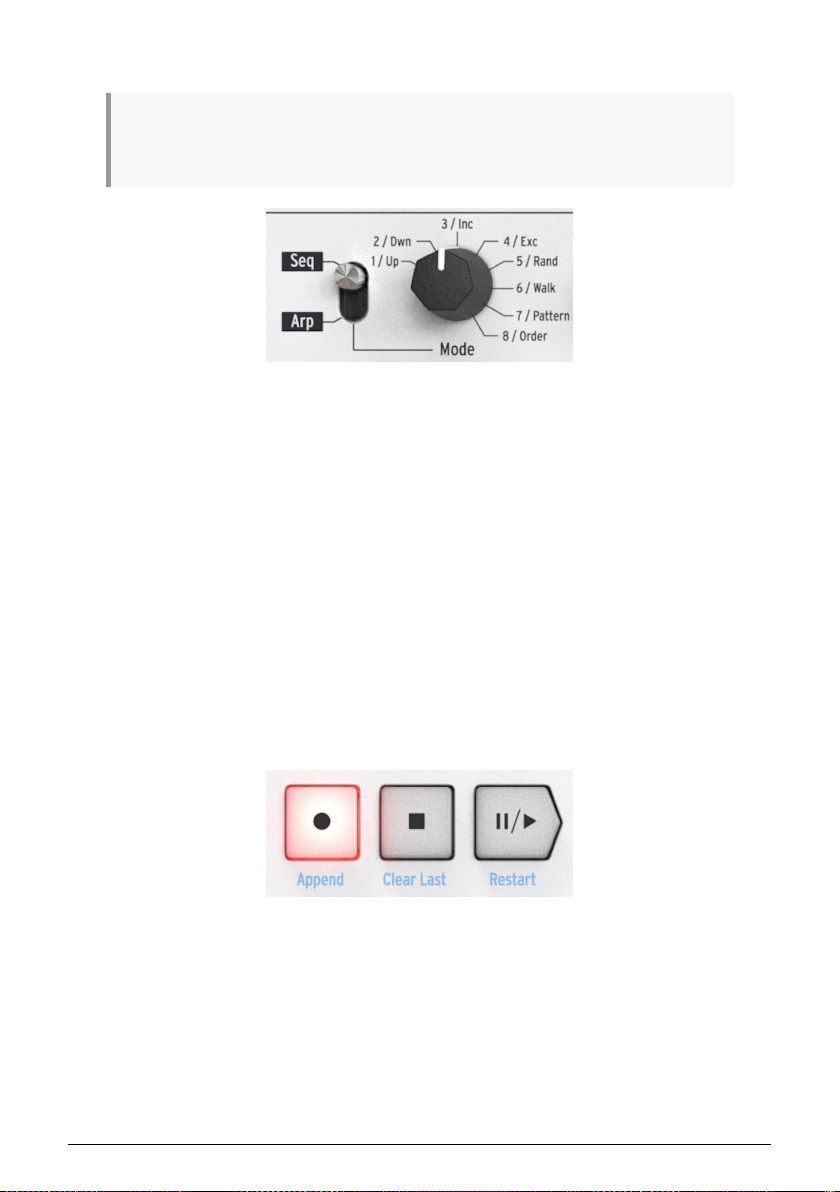
1.6.1.2. Seq /Arp modes
The function of the Seq / Arp Mode switch changes depending on which mode is selected.
In sequencer mode it selects which of the eight sequences are active. In arpeggiator mode
it selects which pattern will be used to play back the notes you hold on the keyboard.
For a full explanation of these features, see Chapter 5 [p.52] and Chapter 9 [p.74].
1.6.1.3. The time Division
The Time Div encoder determines the rhythmic value of the active sequence or arpeggio.
Eight different settings are available.
We'll go into this in greater detail in Chapter 3 [p.17].
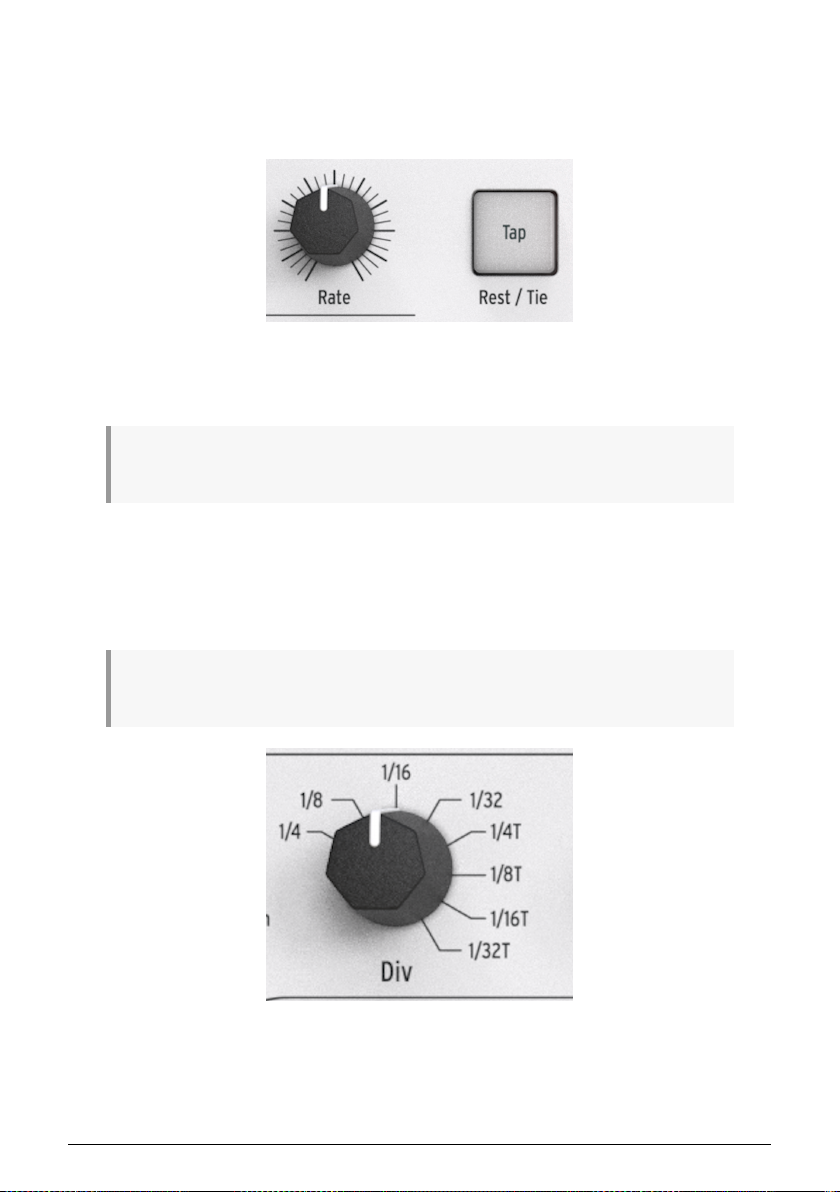
1.6.1.4. Rate
Use the Rate knob to control the tempo of the sequence or arpeggio. The Tap button can also
be used. The tempo can be set between 30-240 bpm (beats per minute). If you need finer
control, hold Shift: the decimal part of the current BPM appears in the LED. After a second
period of non-activitity the LED will again show the BPM.
The MIDI Control Center allows you to choose how the Rate knob responds, either
immediately (Jump mode), after you pass through the current value (Pick-up mode) or
progressively, reaching the current value as you turn the knob (Scale mode). Please refer to
Chapter 9 [p.74] to learn about the MIDI Control Center.
1.6.2. Tap Tempo/Rest/Tie
The Tap button allows you to set the tempo of the active sequence or arpeggio 'on the fly'?.
All you have to do is tap it in time with the music. The number of taps it takes to adjust the
tempo can be defined in the MIDI Control Center.
This button is also used to enter rests or to tie two notes together when creating a sequence.
See Chapter 4 [p.41] for information about this.
11 Arturia - User Manual KeyStep 37 - Introduction and Overview
1.6.3. The transport section
The Transport buttons control the sequencer, the arpeggiator, and external MIDI devices
using MIDI Machine Control. But they also can send other MIDI messages if your DAW does
not respond to MMC commands. Use the MIDI Control Center to make changes.
All three buttons are active in sequencer mode, while only Play/Pause and Stop are used
with the arpeggiator.
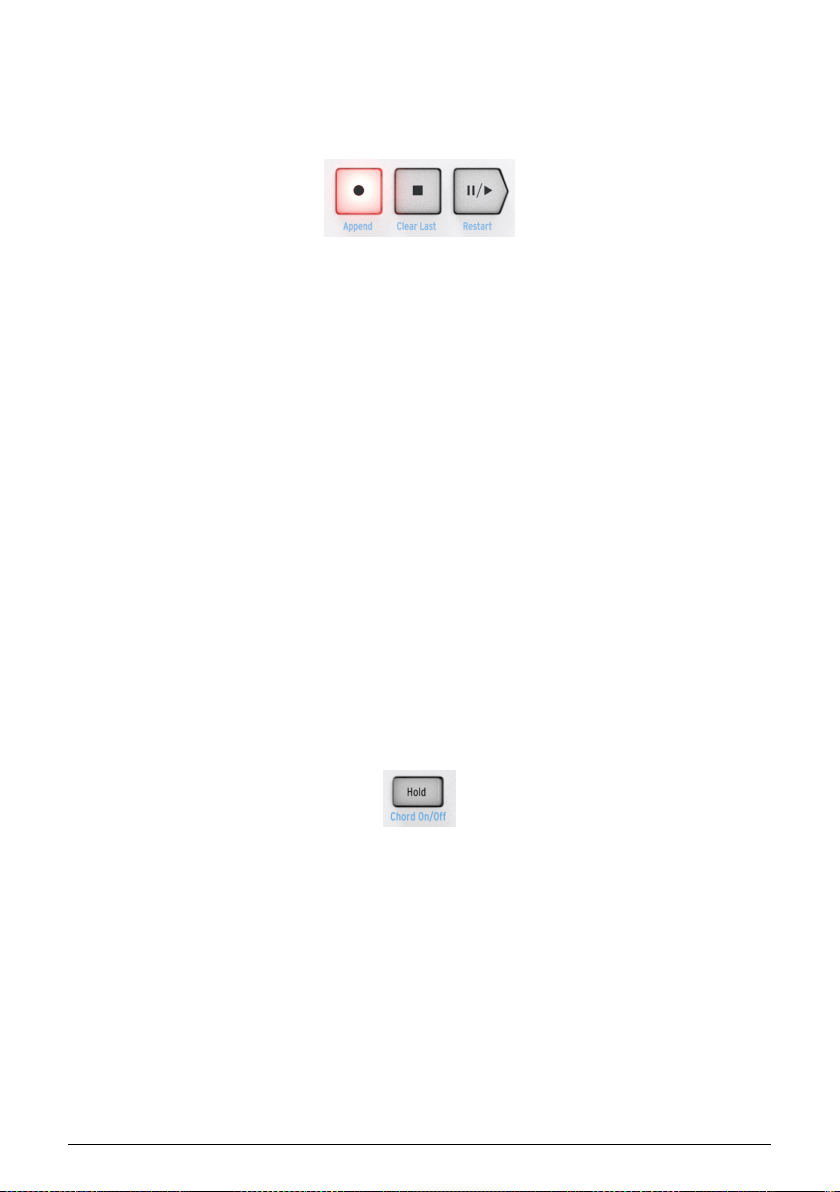
Each button has an secondary function when creating a sequence (Append, Clear Last, and
Restart). These features will be described in detail in section 4.2 [p.42].
1.6.3.1. All Notes Off
The Stop button has an additional function. If for some reason you end up with a stuck note,
just press the Stop button quickly three times in a row. KeyStep 37 will then send an All Notes
Off command over MIDI.
1.6.4. LED display, Chord button and knobs
The four knobs have two functions; they enable you to create chords and strum patterns in
various forms and double up as bank and CC controllers.
The LED displays the data you dial in with the knobs and the Chord button gives access to
both the Chord and the CC functions.
1.6.5. Hold/Chord button
The Hold button enables you to add more notes to the arpeggiator while it is running (up to
32!). It is also used with the Shift button to toggle Chord mode on and off.
There's more information about the Hold and Chord modes in Chapter 2 [p.17] and Chapter
3 [p.25]
Arturia - User Manual KeyStep 37 - Introduction and Overview 12
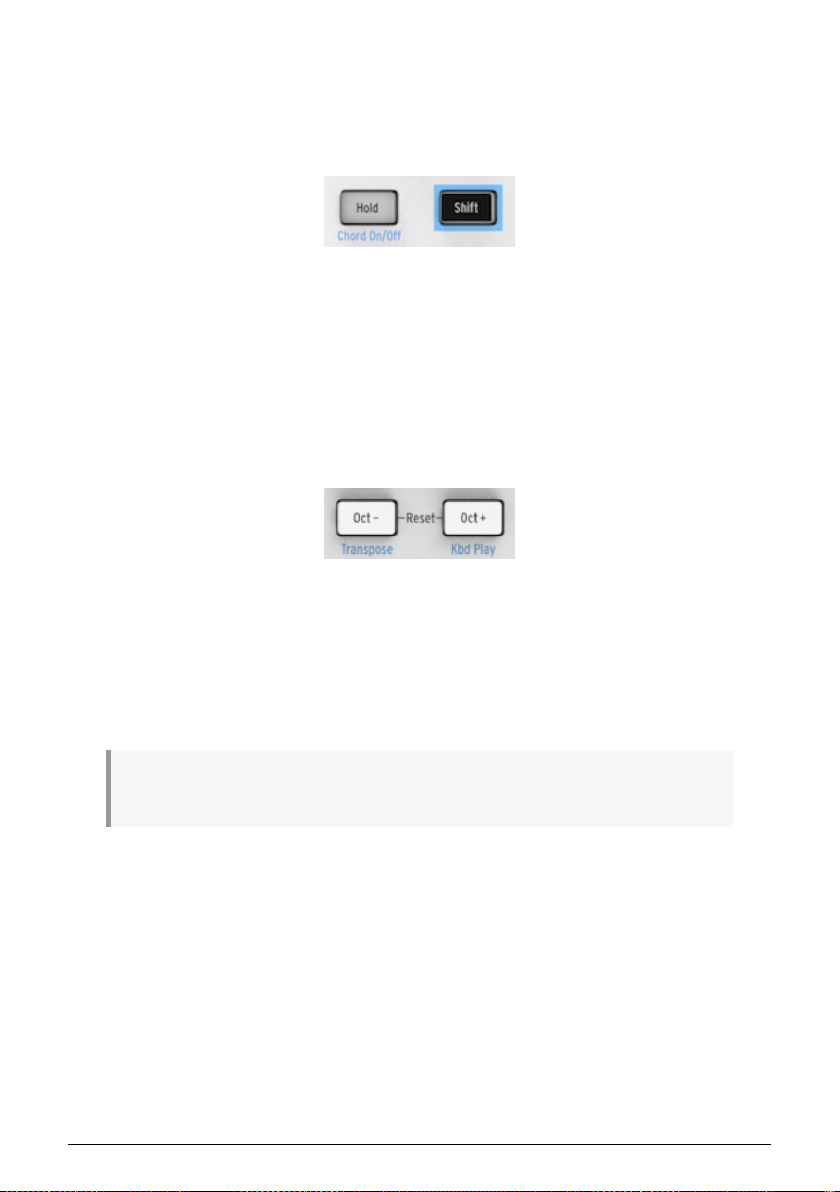
1.6.6. Shift button
The Shift button allows access to secondary functions such as Chord mode, access to the
CC banks and the MIDI channel settings for the keyboard. It also can be used to modify the
feel of the sequence 'on the fly'? by changing the Swing and Gate time settings. All of these
features involve holding the Shift button and pressing another button or a key.
For a complete chart of Shift functions, see section 3.4 [p.40].
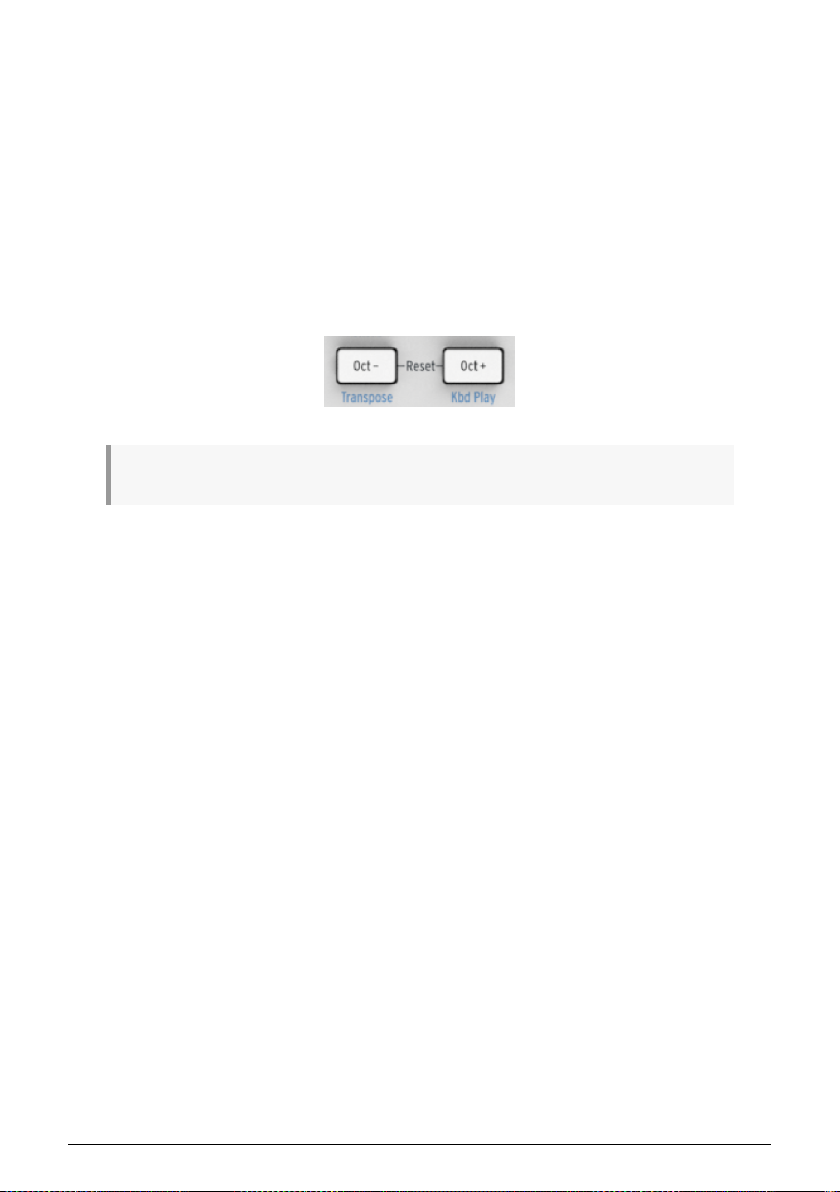
1.6.7. Oct -/+, Transpose, Kbd Play
These buttons are a quick way to shift the keyboard in octave increments. The further you
shift from the center, the faster they flash. Maximum transposition is +/- 4 octaves. Press
both buttons at the same time to reset the keyboard to its center octave.
When pressing Oct+ or Oct- while an arpeggio is running, notes you add will be added in
higher or lower octaves depending on the Oct button you pressed.
The blue letters under the buttons tell you that the Shift and Oct-/Oct+ buttons are used
together to change the way the keyboard behaves while a sequence is running:
Shift + Oct Minus -> Transpose mode: the keys will transpose the sequence while it is running.
Shift + Oct Plus -> Kbd Play mode: The keys are able to play independently in addition to the
part the sequencer is playing. It is possible to specify a separate MIDI channel for Kbd Play
mode.
Transpose and Kbd Play modes are mutually exclusive. Pressing the Shift button will light u p either
the Oct Minus or Oct Plus button to indicate which of the two modes is active.
More about these features in section 3.2.0.2 [p.31].
13 Arturia - User Manual KeyStep 37 - Introduction and Overview
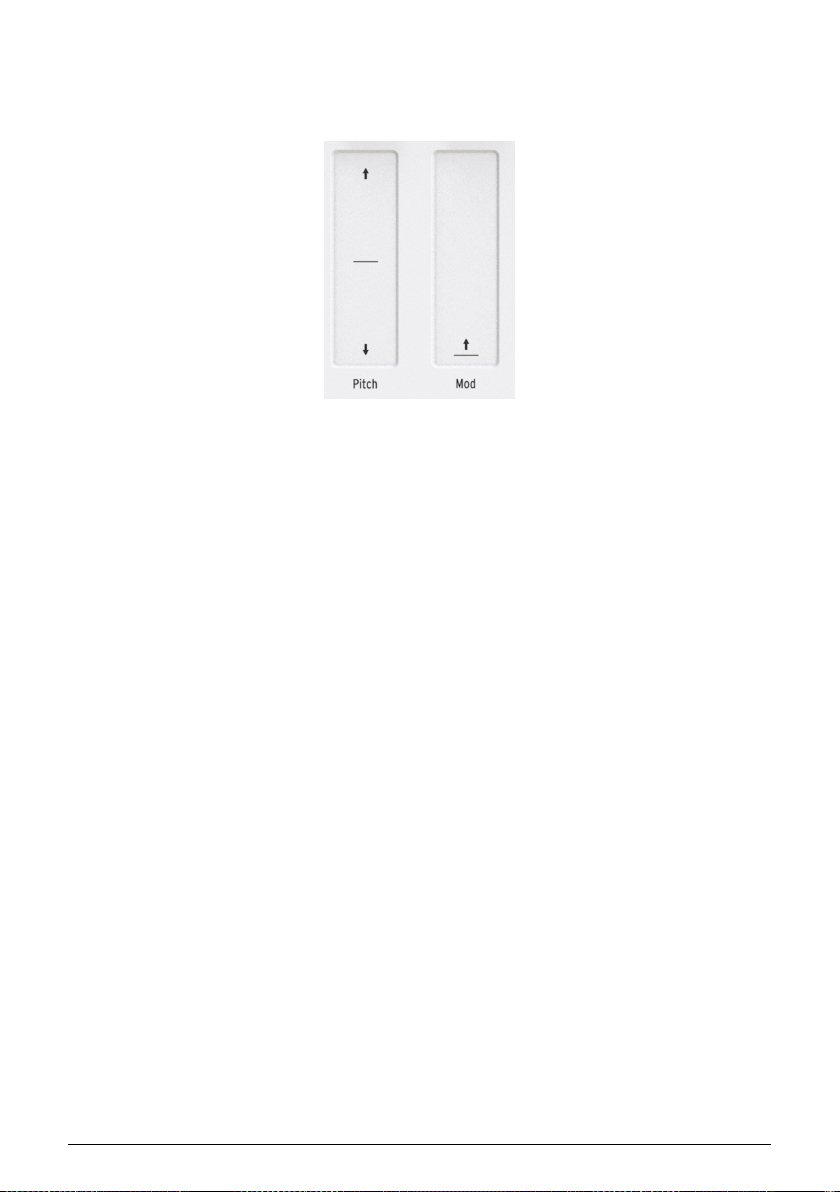
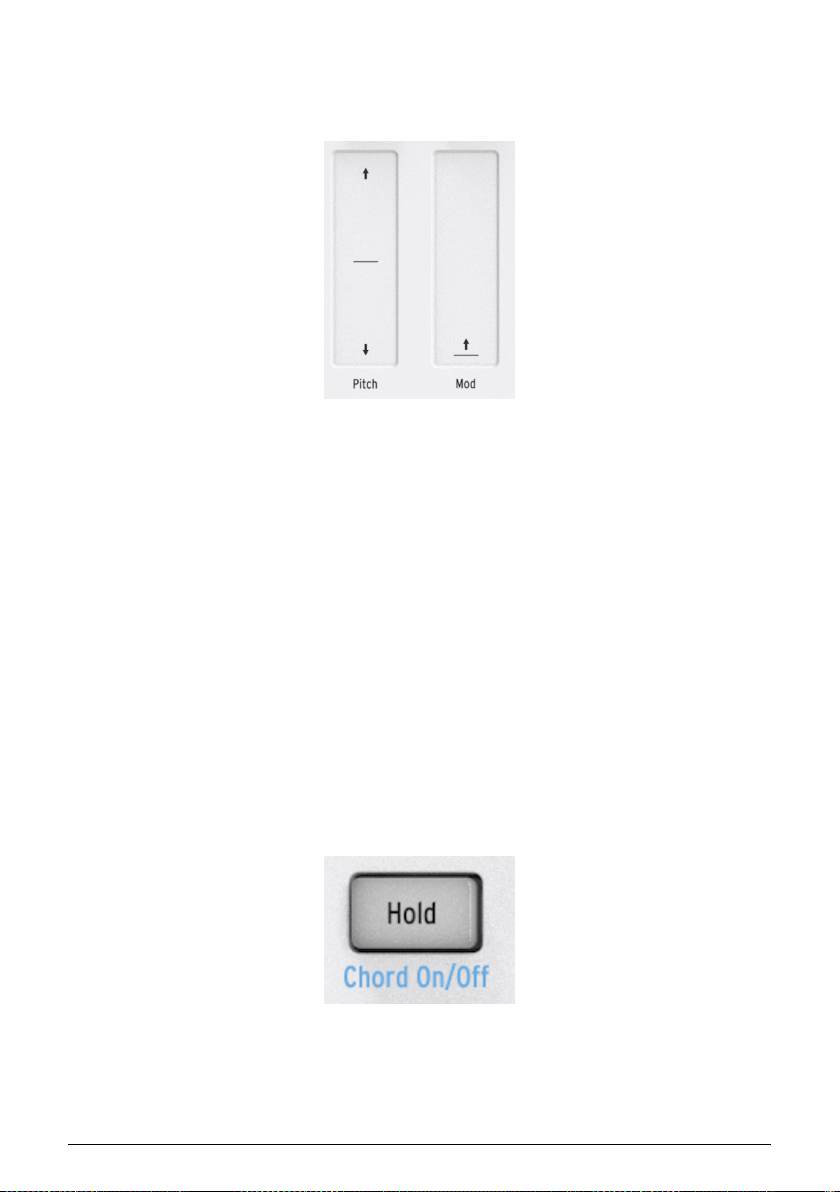
1.6.8. Pitch & Mod touch strips
These innovative controls take the place of the standard 'wheels'? found on traditional
controllers.
Arturia - User Manual KeyStep 37 - Introduction and Overview 14
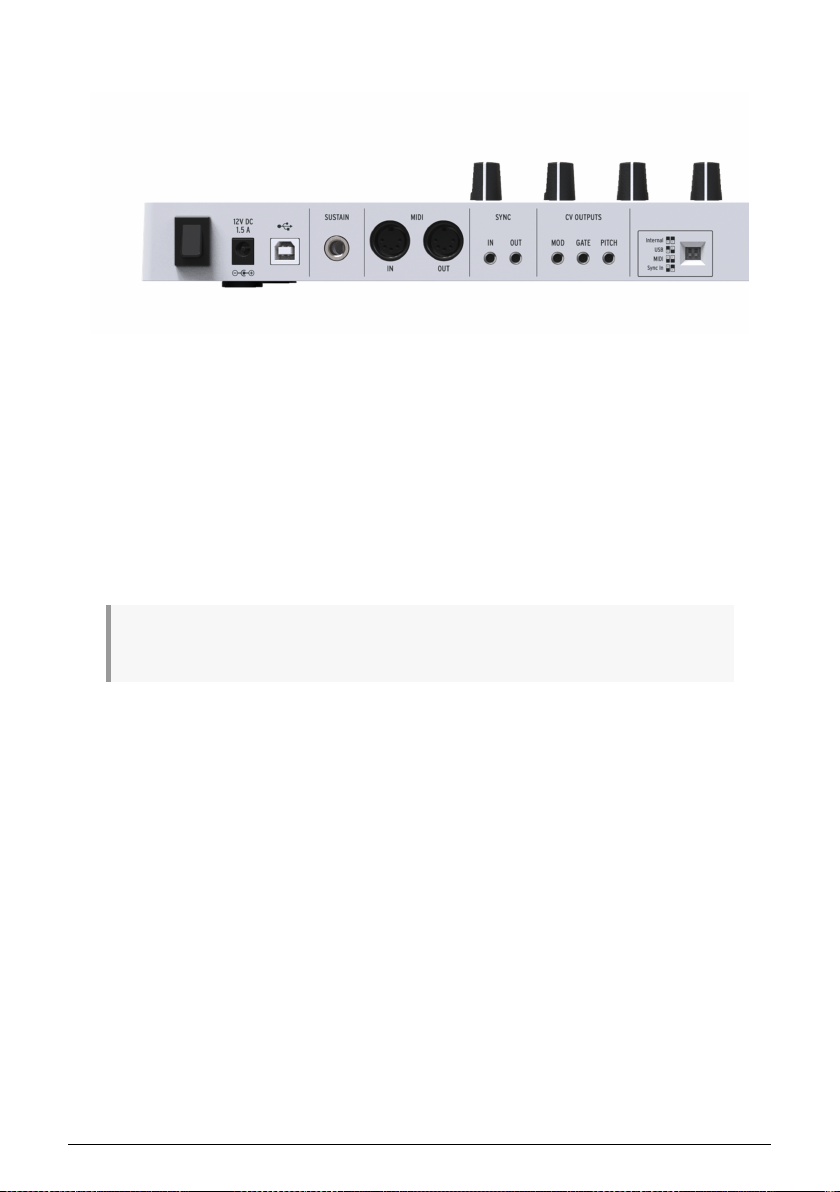
1.7. Rear panel overview
1.7.1. USB/DC IN
This jack provides the power and data connections to a computer. It can also be used with
a standard USB mobile phone charger, allowing you to use KeyStep 37 even without a
computer present.
1.7.2. 12V DC IN (with optional adapter)
KeyStep 37 can be used as a stand-alone device without a computer. Simply connect an
optional power adapter to your KeyStep 37 (12V DC, 1.5A, center positive).
If your mobile device does not supply enough power, you will need to connect a power adapter as
described above (not included).
1.7.3. Pitch/Gate/Mod outputs
These are normally used to send electrical signals to an external device such as Arturia's
popular analog synthesizers (MiniBrute/SE, MicroBrute/SE, MatrixBrute) or to a modular
analog synthesizer.
The Pitch output is often referred to as Control Voltage or CV. The Gate output is sometimes
known as a Trigger. The Mod output is a second type of Control Voltage output that can be
routed to any number of destinations on the target device.
The MIDI Control Center allows you to configure the type of electrical signals sent by each
output. See section 7.3 [p.65] for information about the signal types that are supported.
1.7.4. Sustain pedal input
Connect a momentary footswitch (optional) to this input. It is best to connect the pedal
before supplying power to the KeyStep 37 so it can sense the pedal's polarity. Be sure to
keep your foot off the pedal when first making the connection or it could work backward. If
this happens, power off the KeyStep 37, plug the sustain pedal, and turn on the KeyStep 37
again.
15 Arturia - User Manual KeyStep 37 - Introduction and Overview
1.7.5. Sync input/output
These jacks allow KeyStep 37 to interface with pre-MIDI technology that was capable of
synchronization, such as early drum machines. See section 6.2.1 [p.62] for information about
the types of sync signals KeyStep 37 can send and receive.
1.7.6. MIDI input/output
Connect standard MIDI cables and KeyStep 37 can send MIDI data to external MIDIcompatible devices. It will also send MIDI data to those devices from your computer.
In addition to MIDI note data from the keys, KeyStep 37 can send and receive MIDI sync.
It's also possible to configure some of KeyStep 37's controls to send specific MIDI data using
the MIDI Control Center.
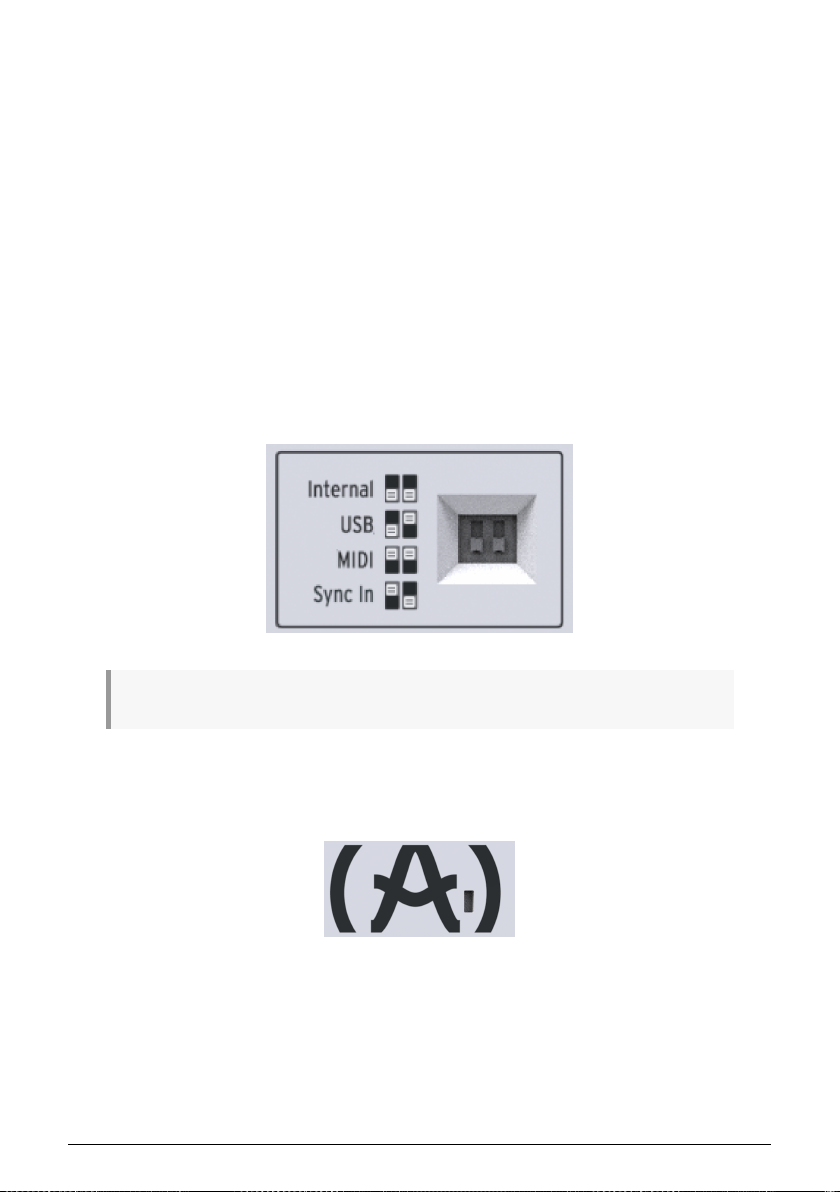
1.7.7. Sync source selector switches
There are four synchronization options which are accessed on the rear panel. Use the small
slider switches as shown in the diagram to select the option you want.
The picture at right has both switches down. It corresponds to the Internal sync option.
For descriptions of the various sync settings see Chapter 6 [p.61].
1.7.8. Kensington lock port
KeyStep 37 is highly portable, and it should be carried only where you want it to go. So we've
included a Kensington lock slot on the far right edge of the rear panel so you can secure it
to the surface of your choice.
Arturia - User Manual KeyStep 37 - Introduction and Overview 16
2. BASIC OPERATIONS
2.1. Plug and play
Connect KeyStep 37 to your computer or an external device as shown in section 1.1 [p.8] and
you're ready to go! Here are a few pointers to make the most of your first session.
2.1.1. Slimkey keyboard
The Slimkey keyboard is both velocity and pressure sensitive. You can specify the velocity
curve and aftertouch response using the MIDI Control Center. See Chapter 9 [p.74] for details.
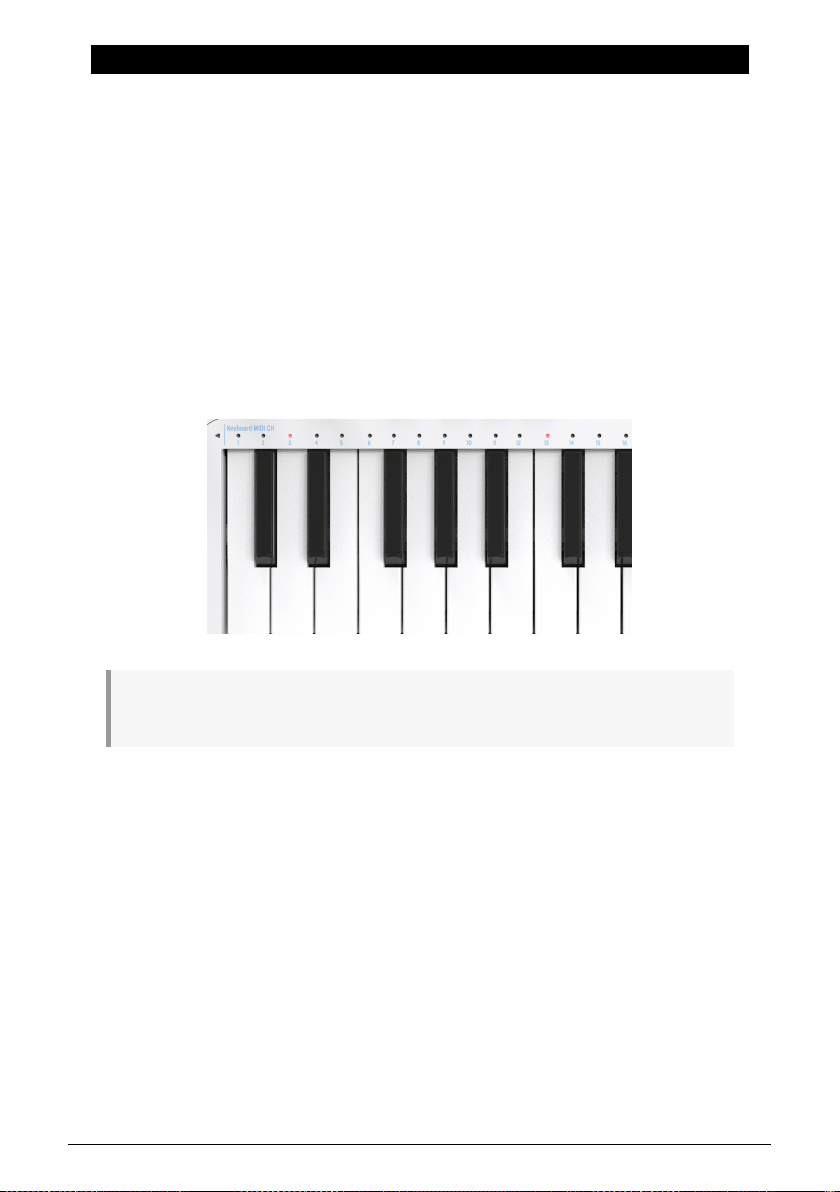
2.1.2. Keyboard MIDI channel selection
If you need to match the KeyStep 37 MIDI channel to an external device, simply hold the
Shift button and press the key that corresponds to the desired MIDI channel."
When the MIDI channel is changed the Kbd Play MIDI channel will change to match it. To select an
independent MIDI channel for Kbd Play mode, see section 3.2.0.2 [p.31].
17 Arturia - User Manual KeyStep 37 - Basic Operations
2.1.3. Pitch and Mod touch strips
The Pitch and Mod touch strips work the same as standard wheels, except that you slide
your finger along the track instead of moving a wheel.
2.1.3.1. The Pitch strip
The Pitch strip has a center zone which equals no change. Moving your finger forward bends
the pitch upward, and moving backward bends the pitch downward.
When you release your finger the Pitch strip will snap back to zero.
2.1.3.2. The Mod strip
The Mod strip works like a mod wheel: from minimum to maximum. Placing your finger at
the bottom of the Mod strip (the side closest to you) equals no modulation, and moving your
finger all the way up causes maximum modulation. But when you lift your finger the Mod
strip does not snap to zero.
2.1.4. The Hold button
The Hold button enables the arpeggiator to keep playing after you take your fingers off the
keys. But there's another way to use it, too: when Hold mode is active, you can keep adding
notes to an arpeggio as long as you continue holding down at least one key.
We'll provide step-by-step instructions in chapter 5: The arpeggiator [p.52].
Arturia - User Manual KeyStep 37 - Basic Operations 18
2.1.5. Sustain pedal
If you have a momentary footswitch, plug it into the Sustain jack on the rear panel. If
it works backward, turn the KeyStep37 off then on again. KeyStep 37 will now sense the
polarity of the pedal and it should work fine after that.
There are several configuration options for the Sustain pedal in the MIDI Control Center. See
Chapter 9 [p.74] for information.
2.1.6. Oct - / Oct +
Pushing one of these buttons can transpose the keyboard by as much as four octaves u p
or down. The farther from center the keyboard has been transposed, the faster the buttons
will flash.
After pressing one of the Octave buttons the transposition will not occur until the next note is played.
To reset the keyboard octave range back to center, press both buttons at the same time.
2.1.7. Factory reset
The Octave buttons are also used to reset your KeyStep 37 back to the factory specifications.
To do this:
• Turn off KeyStep 37
• Press the Oct- and Oct+ buttons and keep them down
• Turn the KeyStep 37 back on and watch it display 'rST'
19 Arturia - User Manual KeyStep 37 - Basic Operations
2.2. Select and play a sequence
Important: The sequencer will not run if the sync selection switches are set to something other than
Internal and no external clock is present. Note: Chord mode has limited functionality in Seq mode. We'll
describe how the two work together in section 3.1 [p.25].
2.2.1. Sequencer / Arpeggiator toggle switch
To use the sequencer you must first set the Seq/Arp toggle switch to Seq. The position
marked Arp selects the arpeggiator, which is covered in section 2.3 [p.22]
2.2.2. Sequencer / Arpeggiator Mode encoder
Use the Seq/Arp Mode encoder to select one of the eight available sequences. If the
sequencer is already running, the MIDI Control Center allows you to specify when the next
sequence should start. See chapter 10 for a description. You can record your own music into
any one of the eight sequences; we'll learn how to do this in Chapter 4 [p.41].
2.2.3. Transport control
Press the Play/Pause button and the sequence will start. Press it again to pause the
sequence, and a second time to resume playback from where you stopped. You can also
restart the sequence while it's still running by holding Shift and pressing Play/Pause.
To start a sequence from the beginning, press the Stop button and then press Play again.
Arturia - User Manual KeyStep 37 - Basic Operations 20
2.2.4. Rate knob (set tempo)
Use the Rate knob or the Tap button to adjust the playback tempo. You can also set the
exact tempo of the sequence before starting the sequencer by pressing the Tap button a few
times.
With the MIDI Control Center you can specify how many taps of the Tap button it takes to
adjust the tempo, and also how the Rate knob will respond when it is turned. See Chapter 9
[p.74] for more information.
♪: You can make fine adjustments to tempo in decimal increments by holding the Shift button while
turning the Rate knob.
2.2.5. Time Division encoder
The Time Division encoder allows you to change the rhythmic relationship of the sequence
relative to the tempo: quarter notes (one step per beat), eighth notes (two steps per beat),
and so on. Triplet values are offered as well (1/4T, 1/8T, etc.).
♪: If you hold Shift then turn the Div knob, the time division does not change immediately, but only
after you release the Shift button. This allows smooth transitions between different time divisions.
21 Arturia - User Manual KeyStep 37 - Basic Operations
2.3. Using the arpeggiator
An arpeggio is a chord of which you repeatedly play the individual notes. It's what you hear
when you hold a chord on a guitar and pluck the strings from top to bottom or the other
way around. A major part of learning to play the guitar is figuring out how to play different
fingerpicking/arpeggio styles. The arpeggiator on the KeyStep 37 does all these things for
you.
The arpeggiator will not run if the sync selection switches are set to something other than internal
and no external clock is present.
2.3.1. Seq / Arp toggle switch
To use the arpeggiator you must first set the Seq/Arp toggle switch to Arp. The Seq position
selects the sequencer, which is covered in section 2.2 [p.20].
2.3.2. Seq / Arp Mode encoder
Use the Seq/Arp Mode encoder to select one of the eight arpeggiator Modes: Up, Down,
Inclusive, Exclusive, Random, Walk, Pattern, Order.
The Modes are described in more detail in Chapter 5 [p.52]
Arturia - User Manual KeyStep 37 - Basic Operations 22

2.3.3. Transport section
Press the Play/Pause button, hold down some keys and the arpeggiator will start. You can
add up to 32 notes to an arpeggio. Please read Chapter 5 [p.52] to learn how to do this.
Press the Play/Pause button again to pause the arpeggio pattern, and a second time to
resume playback from where you stopped. You can also restart the arpeggio while it's still
running by holding Shift and pressing Play/Pause.
To start a new arpeggio pattern press the Stop button, press Play and hold down some keys.
It will be more obvious what the different Arp Modes do when you are holding down three or more
keys.
2.3.4. Set the tempo
Use the Rate knob or the Tap button to adjust the playback tempo. You can also set the exact
tempo of the arpeggio pattern before starting the arpeggiator by pressing the Tap button a
few times.
With the MIDI Control Center you can specify how many taps of the Tap button it takes to
adjust the tempo, and also how the Rate knob will respond when it is turned. See Chapter 9
[p.74] for more information.
Remember: Tap tempo and the Rate knob will not function when KeyStep 37 is set to one of
the external sync sources.
♪: Hold Shift+Rate to make decimal tempo adjustments
2.3.5. Time Division
The Time Division encoder allows you to change the rhythmic relationship of the arpeggio
relative to the tempo: quarter notes (one step per beat), eighth notes (two steps per beat),
and so on. Triplet values are offered as well (1/4T, 1/8T, etc.).
When you turn the Div knob while holding Shift, the time division does not take effect
immediately, but only after you release the Shift button. This allows for smooth transitions
between different time divisions.
23 Arturia - User Manual KeyStep 37 - Basic Operations

2.3.6. Hold button
When the Hold button is lit you can lift your fingers off the keys and the arpeggio will keep
playing. It will keep running until you play another note or chord, at which point the new
note(s) will become a new arpeggio.
You may add as many as 32 notes to your arpeggio as long as you continue to hold down at
least one key. The notes you play will be added to the arpeggio at the nearest time division
increment.
The same rule applies with large arpeggios: once you release all of the keys the arpeggio
you have constructed will continue to run until you play another note or chord.
For even more in-depth coverage of the arpeggiator see Chapter 5 [p.52].
2.4. Scales & Chords
Some of the most interesting features of the KeyStep 37 are its scale and chord options,
which we'll cover in more detail in Chapter 3 [p.25], but to get an idea of the impact
that changing scale has on your sequences and arpeggios, try this neat trick while your
sequence or arpeggio is running.
• Hold Shift + (Scale)-minor. The Scale selectors are located just above the
keyboard. For example, you activate the minor scale with Shift + C4 (the third 'C'
from the left.) Try some of the other Scale selectors to hear the different types of
scale.
Creating strums in Chord mode is equality fascinating:
• Stop everything that's playing by pressing the 'Stop' button
• Hold Shift + HOLD/Chord. The Chord button will come alive and change from
dimmed orange to bright orange.
• Set the Type knob to 5, the Notes knob to its maximum position-
• Set the Vel>Notes knob to its minimum position, and the Strum knob to 40
• Play any key on the keyboard and hear how a strum is formed. Experiment with
the Type and Notes knobs to form strums of different lengths and chord types.
There are many other options to discover here such as browsing through a list
of chords, chord editing and strum editing. We'll cover these options in detail in
Chapter 3 [p.25].
Arturia - User Manual KeyStep 37 - Basic Operations 24

3. SHIFT FUNCTIONS
For a complete chart of all the Shift functions, refer to the end of this chapter [p.40].
3.1. Chord mode
In Chord mode the KeyStep 37 takes a single note and builds a chord from it. It will do so
with every note, whether that note is part of a sequence or part of an arpeggio or played
in keyboard mode or even when you play notes on anternal keyboard of feed the KeyStep
37 notes from a DAW! In the following paragraph, we'll have a look the different ways to
activate chord mode and the options you have for creating chord forms and strum patterns.
3.1.1. Activating chord mode
On startup the Chord button is lit in a dimmed orange color; Chord Mode is Off.
To activate Chord Mode hold Shift and press Hold. The Chord button will light up in bright
orange and the Hold button will start to blink. To disable Chord Mode press Shift+Hold once
more.
A second way to activate Chord mode is to turn the Type knob. This is a fast way to
access Chord Mode when the Chord button is dimmed orange. To disable Chord Mode press
Shift+Hold once more.
The third way to activate Chord Mode is to hold the Chord button and play a chord on the
keyboard. This instantly switches the KeyStep 37 to User Chord Mode. In this mode a chord
is generated based on the notes you provide. You can alter the tonality of the chords being
generated with the scale option.
The chord button acts as a toggle between Chord Mode and CC mode; pressing the chord
button while in Chord Mode wil make the KeyStep 37 switch to CC mode: the knobs will now
enable you to send CC data. Pressing it a second time turns its colour back to orange and
change the function of the knobs back to chord editing.
Note: pressing the Chord button will only change the function of the knobs. To turn Chord
Mode ON or Off you must use the Shift + Hold button.
25 Arturia - User Manual KeyStep 37 - Shift Functions
 Loading...