


KeyLab Essential 61
USER MANUAL

Special Thanks
DIRECTION
Nicolas Dubois Philippe Cavenel Frédéric Brun
PROGRAMMING
Sebastien Colin Leonard Sauget Olivier Delhomme
INDUSTRIALIZATION
Nicolas Dubois
MANUAL
Morgan Perrier
Matthieu Courouble
Guy Perchard
Sebastien Colin
Camille Dalemans
DESIGN
Glen Darcey Sébastien Rochard Axel Hartmann
© ARTURIA SA – 2019 – All rights reserved.
26 avenue Jean Kuntzmann
38330 Montbonnot-Saint-Martin
FRANCE
www.arturia.com
Information contained in this manual is subject to change without notice and does not
represent a commitment on the part of Arturia. The software described in this manual is
provided under the terms of a license agreement or non-disclosure agreement. The software
license agreement specifies the terms and conditions for its lawful use. No part of this
manual may be reproduced or transmitted in any form or by any purpose other than
purchaser’s personal use, without the express written permission of ARTURIA S.A.
All other products, logos or company names quoted in this manual are trademarks or
registered trademarks of their respective owners.
Product version: 1.0.3
Revision date: 14 January 2020

Congratulations on purchasing the
Arturia KeyLab Essential!
Get ready to start your musical journey.
KeyLab Essential is a class-compliant, universal MIDI controller, capable of harnessing the
power of practically any software instrument and DAW. It has been designed to enhance
your workflow, let you spend less time using a keyboard and mouse to create music, and
seamlessly integrate with Arturia Analog Lab 2.
This instruction manual covers the general use and features of KeyLab Essential, and goes
into more detail on the technical aspects of the controller so you can make the most of its
advanced functionality.
In this package, you will find:
• KeyLab Essential controller keyboard
• USB cable
• Quick Start Guide This small document gives you a few simple steps to get your
KeyLab Essential up and running, along with the codes you need to register the
controller keyboard and activate the included software titles:
◦ Analog Lab 2
◦ Ableton Live Lite
◦ UVI Grand Piano Model D
Don’t lose your registration information! The serial numbers and activation codes detailed
in the Quick Start Guide are required to unlock your software.
Remember to register! It sounds boring, but it’s worth it. Registering is important because it
lets you download and activate Analog Lab 2, as well as the Arturia MIDI Control Center.

Special Message Section
Specifications Subject to Change: The information contained in this manual is believed to
be correct at the time of printing. However, Arturia reserves the right to change or modify
any of the specifications without notice or obligation to update the hardware that has been
purchased.
IMPORTANT: The product and its software, when used in combination with an amplifier,
headphones or speakers, may be able to produce sound levels that could cause permanent
hearing loss. DO NOT operate for long periods of time at a high level or at a level that is
uncomfortable.
If you encounter any hearing loss or ringing in the ears, you should consult an audiologist.
NOTICE: Service charges incurred due to a lack of knowledge relating to how a function
or feature works (when the product is operating as designed) are not covered by the
manufacturer’s warranty, and are therefore the owner's responsibility. Please study this
manual carefully and consult your dealer before requesting service.
Precautions include, but are not limited to, the following:
1. Read and understand all the instructions.
2. Always follow the instructions on the instrument.
3. Before cleaning the instrument, always remove the USB cable. When cleaning,
use a soft and dry cloth. Do not use gasoline, alcohol, acetone, turpentine or any
other organic solutions; do not use a liquid cleaner, spray or cloth that's too wet.
4. Do not use the instrument near water or moisture, such as a bathtub, sink,
swimming pool or similar place.
5. Do not place the instrument in an unstable position where it might accidentally
fall over.
6. Do not place heavy objects on the instrument. Do not block openings or vents
of the instrument; these locations are used for air circulation to prevent the
instrument from overheating. Do not place the instrument near a heat vent at any
location with poor air circulation.
7. Do not open or insert anything into the instrument that may cause a fire or
electrical shock.
8. Do not spill any kind of liquid onto the instrument.
9. Always take the instrument to a qualified service center. You will invalidate your
warranty if you open and remove the cover, and improper assembly may cause
electrical shock or other malfunctions.
10. Do not use the instrument with thunder and lightning present; otherwise it may
cause long distance electrical shock.
11. Do not expose the instrument to hot sunlight.
12. Do not use the instrument when there is a gas leak nearby.
13. Arturia is not responsible for any damage or data loss caused by improper
operation of the instrument.

Table Of Contents
1. Getting Started ............................................................................................................................................................... 2
1.1. Connecting KeyLab Essential ......................................................................................................................................... 2
1.2. The Front Panel....................................................................................................................................................................... 2
1.3. The Rear Panel........................................................................................................................................................................ 3
2. Guided Tour..................................................................................................................................................................... 4
2.1. Keyboard..................................................................................................................................................................................... 4
2.2. Pitch & modulation wheel............................................................................................................................................... 4
2.3. Octave Control & Transpose.......................................................................................................................................... 5
2.3.1. Setting the Octave........................................................................................................................................................................................................ 5
2.3.2. Activating Transpose................................................................................................................................................................................................. 6
2.3.3. Resetting Transpose.................................................................................................................................................................................................. 6
2.4. Chord mode ............................................................................................................................................................................. 6
2.4.1. Activating Chord mode............................................................................................................................................................................................. 6
2.5. Pads .............................................................................................................................................................................................. 7
2.5.1. Selecting Maps using the pads ........................................................................................................................................................................... 7
2.6. MIDI Channel selection.................................................................................................................................................... 8
2.6.1. Changing MIDI Channel.......................................................................................................................................................................................... 8
2.7. Encoders ..................................................................................................................................................................................... 8
2.8. Faders .......................................................................................................................................................................................... 8
2.9. Part Controls............................................................................................................................................................................ 9
2.10. DAW Command Center .............................................................................................................................................. 10
2.11. Preset Browser & Display.............................................................................................................................................. 11
2.12. Sending a Panic Message............................................................................................................................................ 11
2.13. Factory Reset....................................................................................................................................................................... 12
3. MIDI Control Center ................................................................................................................................................. 13
3.1. Customize your perfect controller ........................................................................................................................... 13
3.1.1. Connecting to MIDI Control Center................................................................................................................................................................. 13
3.1.2. Device Memories ........................................................................................................................................................................................................ 14
3.1.3. Local Templates.......................................................................................................................................................................................................... 15
3.2. MCC Controller Map.......................................................................................................................................................... 16
3.3. Customizing the Pads ...................................................................................................................................................... 17
3.3.1. Pad Off............................................................................................................................................................................................................................... 17
3.3.2. Pad MIDI Note.............................................................................................................................................................................................................. 17
3.3.3. Pad Switched Control.............................................................................................................................................................................................. 17
3.3.4. Pad Patch Change.................................................................................................................................................................................................... 18
3.3.5. Pad MMC......................................................................................................................................................................................................................... 18
3.4. Customizing the Encoders............................................................................................................................................ 19
3.4.1. Encoder Off .................................................................................................................................................................................................................... 19
3.4.2. Encoder Control.......................................................................................................................................................................................................... 19
3.5. Customizing the Faders............................................................................................................................................... 20
3.5.1. Fader Off........................................................................................................................................................................................................................ 20
3.5.2. Fader Control ............................................................................................................................................................................................................. 20
3.6. Customizing the Keyboard ........................................................................................................................................ 20
3.7. Customizing the Sustain Pedal.................................................................................................................................. 21
3.7.1. Sustain Pedal Off........................................................................................................................................................................................................ 21
3.7.2. Sustain Pedal MIDI Note ...................................................................................................................................................................................... 21
3.7.3. Sustain Pedal Switched Control....................................................................................................................................................................... 21
3.7.4. Sustain Pedal MMC................................................................................................................................................................................................... 21
3.8. Changing the Global Settings.................................................................................................................................... 22
4. Software License Agreement............................................................................................................................ 23
5. Declaration of Conformity .................................................................................................................................. 25
1. GETTING STARTED
1.1. Connecting KeyLab Essential
First of all, we recommend that you install the Analog Lab 2 and the other included software,
and be sure to register and authorize them.
Connect KeyLab Essential to your computer using the included USB cable. Power is also
supplied through this connection.
As KeyLab Essential is a class-compliant USB device, its drivers are automatically installed
when connecting to a computer. Your controller keyboard is now ready to use.
If you wish to use KeyLab Essential as a universal MIDI controller for outboard equipment,
simply use the optional 9v DC 500mA PSU, and connect KeyLab Essential’s MIDI Out socket
to your preferred equipment’s MIDI In socket using a standard MIDI cable.
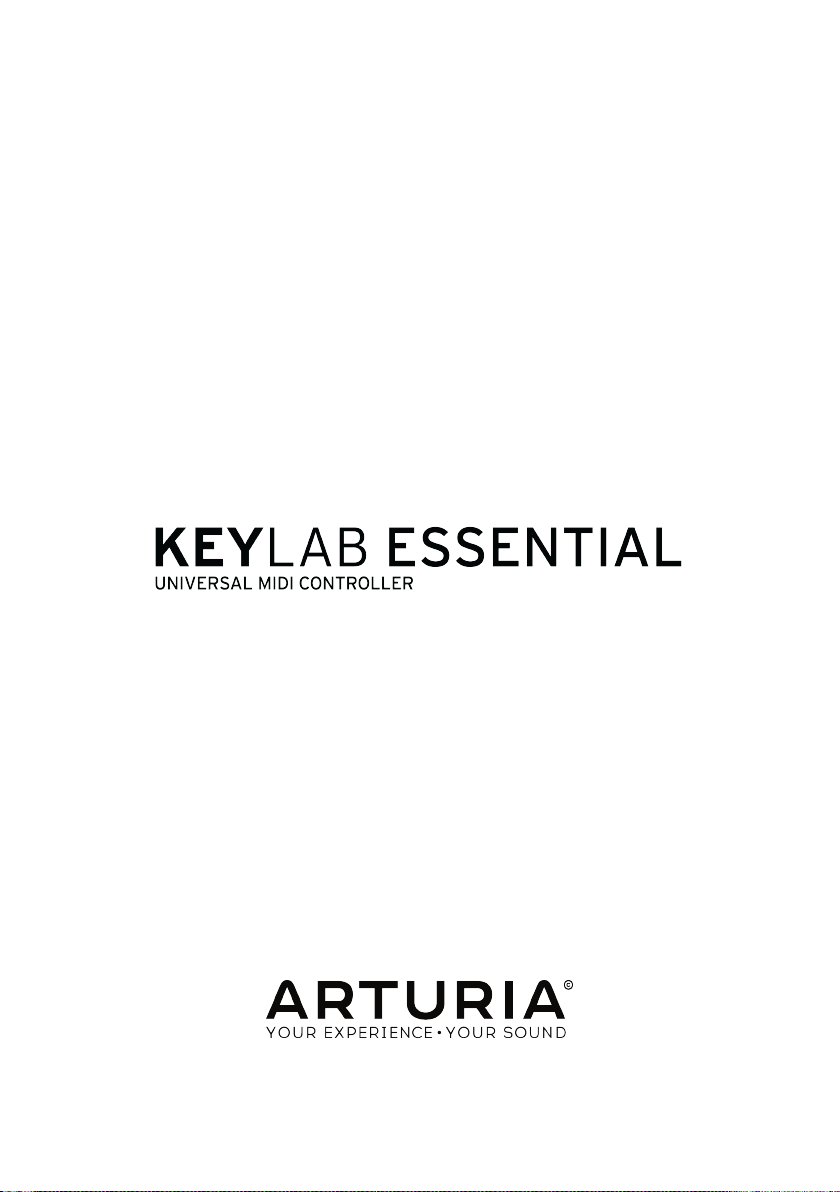
1.2. The Front Panel
1. Pitch & Mod wheels These are used to control pitch bend and modulation
parameters of your sound.
2. Octave, Chord & Transpose buttons These buttons activate KeyLab Essential’s
various pitch control and chord functions.
3. Performance Pads The pads can be used to perform percussive elements, trigger
samples within your DAW, or toggle the Map mode of KeyLab Essential between
Analog Lab 2, DAW functions, or user-made templates.
4. DAW Command Center This section of KeyLab Essential controls various
functions within your preferred audio recording software, including transport
control and common commands.
5. Preset Browser & Display This section of the controller is used to select presets
in Analog Lab 2, navigate menus, and display parameter and preset info.
6. Part Controls This small section of assignable buttons is used to flick between
the 2 parts within Analog Lab 2’s Multi Mode, the dedicated Live map and track
shifting in DAW mode.
7. Encoders The rotary knobs are used to control software instrument parameters,
as well as channel pan within your DAW.
8. Faders The compact faders are used to alter software instrument parameters, as
well as changing your channel volume within your DAW.
2 Arturia - User Manual KeyLab Essential - Getting Started

1.3. The Rear Panel
1. MIDI Out KeyLab Essential's MIDI Out socket can be used to send MIDI
information to outboard synths & modules when powered with the optional PSU,
rather than via USB.
2. Sustain Pedal Input The sustain pedal input automatically detects the polarity of
your sustain pedal when KeyLab Essential is turned on, so it can be used with
practically any standard pedal.
3. USB Connection Use this socket to connect KeyLab Essential to your device. This
port provides both power, MIDI data, and control information.
4. Power Socket If you wish to use KeyLab Essential in standalone mode using the
MIDI Out socket, you can connect the optional 9v DC 500mA PSU here.
Arturia - User Manual KeyLab Essential - Getting Started 3
2. GUIDED TOUR
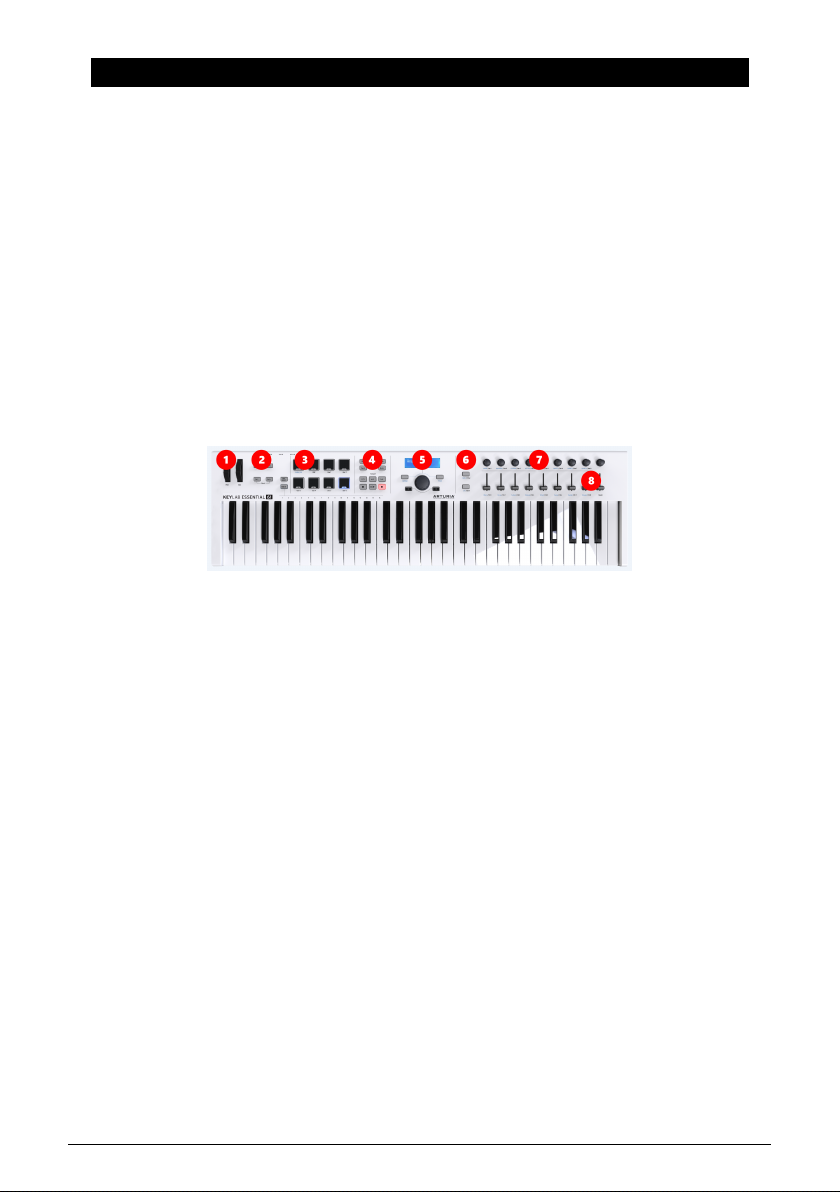
2.1. Keyboard
KeyLab Essential features either 49 or 61 velocity sensitive, synth-action keys, or 88 velocity
sensitive, semi-weighted keys.
This is obviously used to capture melodic performance, but can also be used in conjunction
with the MIDI Channel Select function to change KeyLab Essential's MIDI output channel.
2.2. Pitch & modulation wheel
These controllers allow for real-time pitch shifting and modulation control.
Moving the Pitch Wheel up or down will raise or lower the pitch of the sound. This range of
this effect is set within the hardware or software instrument it is controlling.
Moving the Modulation Wheel up increases the modulation setting of your selected sound.
The effect this has on the sound will depend on the settings of the instrument it is controlling.
Occasionally, certain instruments or presets will not use the modulation parameter.
These controls transmit standard MIDI commands, and cannot be customized using the
MIDI Control Center.
4 Arturia - User Manual KeyLab Essential - Guided Tour
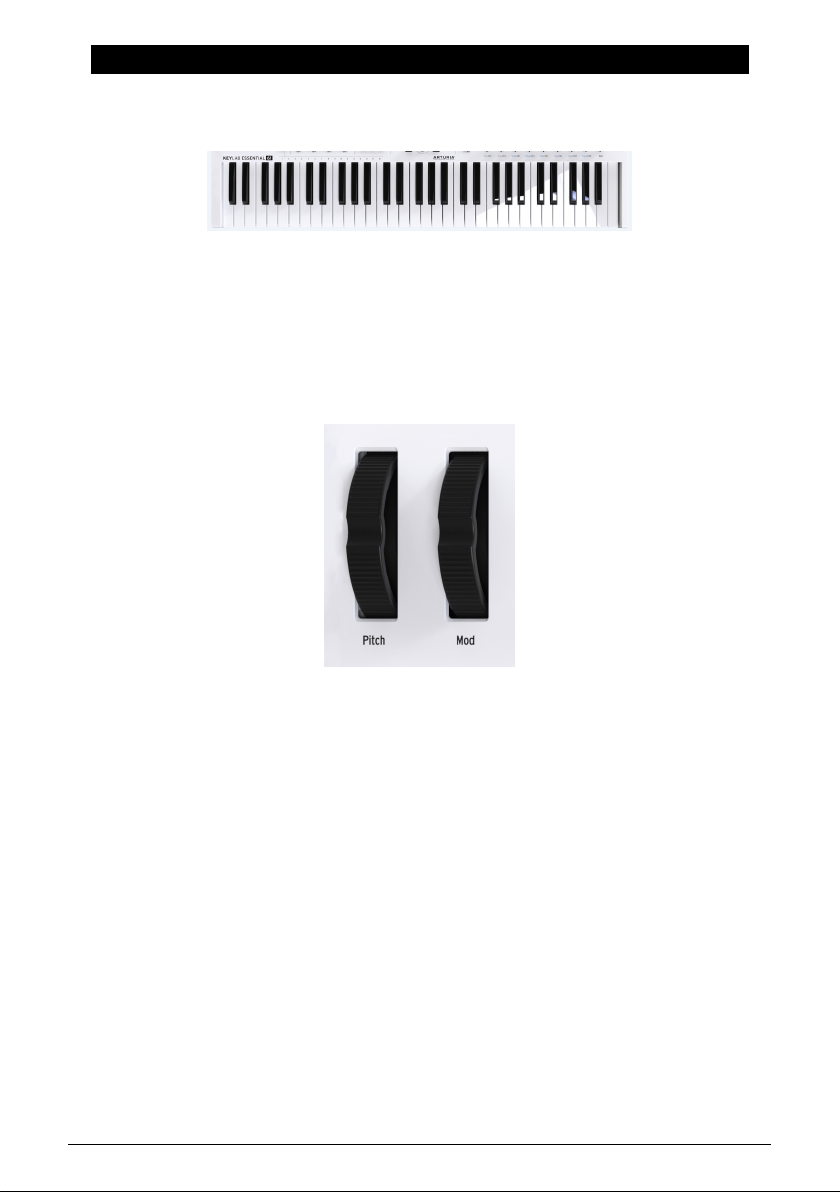
2.3. Octave Control & Transpose
2.3.1. Setting the Octave
Pressing the Oct - and Oct + buttons will shift the range of KeyLab Essential’s keyboard,
giving you access to higher and lower pitches.
When activated, the selected octave button will blink at a certain speed, indicating how low
or high you have transposed the keyboard. This is indicated as follows:
• Octave +3: Oct + blinks quickly
• Octave +2: Oct + blinks normally
• Octave +1: Oct + blinks slowly
• Standard: Neither Octave button blinks
• Octave -1: Oct - blinks slowly
• Octave -2: Oct - blinks normally
• Octave -3: Oct - blinks quickly
To quickly reset the octave shift and set the KeyLab Essential to the neutral position, hit both
Oct - and Oct + buttons simultaneously.
NOTE: Both Octave and Transpose settings can be saved within User map presets.
Arturia - User Manual KeyLab Essential - Guided Tour 5
 Loading...