


USER’S MANUAL

PROGRAMMING:
Thomas Diligent
Robert Bocquier
Adrien Courdavault
Mathieu Nocenti
SOUND DESIGN:
Luca Torre (Multis)
Michael Hosker (All)
Ted James (Jupiter8V)
Matthew Sevant (ProphetV)
Knowlton Walsh (MiniV)
Matt Sterling (Arp 2600V)
Ted James (CS80V)
MANUAL:
Randy Lee
Pierce Warnecke
Tomoya Fukushi
Noritaka Ubukata
Antoine Back
Thomas Diligent
DESIGN:
Shaun Ellwood
Morgan Perrier
© ARTURIA SA – 1999-2014 – All rights reserved. 4, Chemin de Malacher
38240 Meylan FRANCE
http://www.arturia.com
Information contained in this manual is subject to change without notice and does not represent a commitment on the part of Arturia. The software described in this manual is provided under the terms of a license agreement or non-disclosure agreement. The software license agreement specifies the terms and conditions for its lawful use. No part of this manual may be produced or transmitted in any form or by any purpose other than purchaser’s personal use, without the express written permission of ARTURIA S.A.
All other products, logos or company names quoted in this manual are trademarks or registered trademarks of their respective owners.
January 2014 edition
2 |
ARTURIA – Analog Lab – USER’S MANUAL |

Thank you for purchasing Arturia’s
Analog Lab!
This manual covers the features and operation of Arturia’s Analog Lab, a software synthesizer that allows you to play and modify over 5,000 sounds.
After the purchase of this software you will receive its serial number and an unlock code by e-mail. This information enables you to register the software online.
Once you have registered your software you will receive an activation code by e-mail that will allow you to authorize the software for use on your computer.
For details regarding the registration and authorization processes, see Chapter 3.
Special Message Section
SPECIFICATIONS SUBJECT TO CHANGE:
The information contained in this manual is believed to be correct at the time of printing. However, Arturia reserves the right to change or modify any of the specifications without notice or obligation to update existing software installations.
IMPORTANT:
The product used in combination with an amplifier, headphones or speakers, may be able to produce sound levels that could cause permanent hearing loss. DO NOT operate for long periods of time at a high level or at a level that is uncomfortable.
If you encounter any hearing loss or ringing in the ears, you should consult an audiologist.
NOTICE:
Service charges incurred due to a lack of knowledge relating to how a function or feature works (when the software is operating as designed) are not covered by the manufacturer’s warranty, and are therefore the owner's responsibility. Please study this manual carefully and consult your dealer before requesting service.
PRECAUTIONS INCLUDE, BUT ARE NOT LIMITED TO, THE FOLLOWING:
1.Read and understand all the instructions.
2.Arturia is not responsible for any damage or data loss caused by improper operation of the software.
ARTURIA – Analog Lab – USER’S MANUAL |
3 |

Table of Contents
1 INTRODUCTION ........................................................................................................................................ |
6 |
|
1.1 |
HISTORY.................................................................................................................................................. |
6 |
1.2 |
HERE AND NOW....................................................................................................................................... |
7 |
1.3 |
TAE® ...................................................................................................................................................... |
7 |
1.3.1 Aliasing-free oscillators.................................................................................................................. |
7 |
|
1.3.2 A better reproduction of analog oscillator waveforms ................................................................... |
8 |
|
1.3.3 Direct Filter Circuit Modeling........................................................................................................ |
9 |
|
2 INSTALLATION........................................................................................................................................ |
11 |
||
2.1 |
SYSTEM REQUIREMENTS ........................................................................................................................ |
11 |
|
2.1.1 |
REQUIRED MINIMUM CONFIGURATION:.............................................................................. |
11 |
|
2.1.2 |
PLATFORM SPECIFICATIONS: ................................................................................................. |
11 |
|
2.2 |
WINDOWS INSTALLATION (7/8) ............................................................................................................. |
11 |
|
2.3 |
MAC OS X INSTALLATION..................................................................................................................... |
13 |
|
3 AUTHORIZATION ................................................................................................................................... |
14 |
||
3.1 |
REGISTRATION ...................................................................................................................................... |
14 |
|
3.1.1 |
Log in or create a new user account............................................................................................. |
15 |
|
3.1.2 |
If all else fails… ............................................................................................................................ |
18 |
|
3.2 |
ENTERING ACTIVATION CODE INTO ELICENSER ..................................................................................... |
19 |
|
4 ANALOG LAB QUICK START............................................................................................................... |
22 |
||
4.1 |
AUDIO & MIDI SETUP........................................................................................................................... |
22 |
|
4.1.1 |
Audio setup ................................................................................................................................... |
22 |
|
4.1.2 |
MIDI setup .................................................................................................................................... |
23 |
|
4.2 |
SOUND MODE QUICK START ................................................................................................................. |
23 |
|
4.2.1 |
Select a preset ............................................................................................................................... |
23 |
|
4.2.2 |
Filtering and sorting the Preset list .............................................................................................. |
24 |
|
4.2.3 |
Modify a preset ............................................................................................................................. |
27 |
|
4.2.4 |
Saving a User preset ..................................................................................................................... |
28 |
|
4.3 |
WINDOW MANAGEMENT........................................................................................................................ |
29 |
|
4.3.1 |
Click and resize............................................................................................................................. |
29 |
|
4.3.2 |
Scroll bars..................................................................................................................................... |
29 |
|
4.4 |
TAKING A SNAPSHOT............................................................................................................................. |
30 |
|
4.5 |
MULTI MODE QUICK START.................................................................................................................. |
32 |
|
4.5.1 |
Select a Multi preset ..................................................................................................................... |
32 |
|
4.5.2 |
Changing a Sound within a Multi ................................................................................................. |
33 |
|
4.5.3 |
Saving an edited Multi as a User program ................................................................................... |
34 |
|
4.5.4 |
Start a Multi from Scratch ............................................................................................................ |
34 |
|
4.6 |
LIVE MODE QUICK START ..................................................................................................................... |
35 |
|
5 USING ANALOG LAB .............................................................................................................................. |
36 |
||
5.1 |
CONFIGURATION ................................................................................................................................... |
36 |
|
5.1.1 |
General options ............................................................................................................................ |
36 |
|
5.1.2 |
Arturia Plug-ins ............................................................................................................................ |
37 |
|
5.1.3 |
Audio & MIDI Settings ................................................................................................................. |
37 |
|
5.2 |
TOOL BAR ............................................................................................................................................. |
39 |
|
5.3 |
VIRTUAL KEYBOARD ............................................................................................................................. |
40 |
|
5.3.1 |
Virtual keyboard options .............................................................................................................. |
40 |
|
5.3.2 |
Virtual keyboards: Common controls and features ...................................................................... |
41 |
|
|
5.3.2.1 |
Master Volume.......................................................................................................................................... |
41 |
|
5.3.2.2 Pitchbend and Modulation wheels / touch strips ....................................................................................... |
41 |
|
|
5.3.2.3 |
Snapshots tab ............................................................................................................................................ |
41 |
|
5.3.2.4 |
Pads tab ..................................................................................................................................................... |
42 |
|
5.3.2.5 |
5-octave keyboard ..................................................................................................................................... |
42 |
5.3.3 |
Virtual keyboards: To each its own control section...................................................................... |
43 |
|
5.3.4 |
Assignable MIDI control of parameters ....................................................................................... |
44 |
|
4 |
ARTURIA – Analog Lab – USER’S MANUAL |

5.3.5 |
Exporting/Importing the MIDI Configuration (*.lab2midi) ......................................................... |
45 |
|
5.4 |
SOUND MODE ........................................................................................................................................ |
46 |
|
5.4.1 |
Instruments ................................................................................................................................... |
47 |
|
5.4.2 |
Sound Types .................................................................................................................................. |
48 |
|
5.4.3 |
Sound Characteristics................................................................................................................... |
49 |
|
5.4.4 |
Additional Filters.......................................................................................................................... |
49 |
|
5.4.5 |
Preset details ................................................................................................................................ |
50 |
|
5.4.6 |
Editing a preset............................................................................................................................. |
50 |
|
5.4.7 |
Organization ................................................................................................................................. |
52 |
|
5.5 |
MULTI MODE ........................................................................................................................................ |
52 |
|
5.5.1 |
Multi Mode: an introduction......................................................................................................... |
53 |
|
5.5.2 |
Sorting the Multis ......................................................................................................................... |
54 |
|
5.5.3 |
Selecting a Multi ........................................................................................................................... |
54 |
|
5.5.4 |
Multi mode: Preset details ............................................................................................................ |
55 |
|
5.5.5 |
Parameter control assignments per Part ...................................................................................... |
55 |
|
5.5.6 |
Editing a Sound Preset within Multi mode ................................................................................... |
56 |
|
5.5.7 |
Editing a Multi .............................................................................................................................. |
56 |
|
|
5.5.7.1 Changing the Sound assigned to the Part .................................................................................................. |
56 |
|
|
5.5.7.2 Part parameters: Level, Pan and FX .......................................................................................................... |
56 |
|
|
5.5.7.3 Part parameters: MIDI and Split ............................................................................................................... |
57 |
|
|
5.5.7.4 Multi parameters: FX Sends A and –B...................................................................................................... |
58 |
|
|
5.5.7.5 Multi parameters: Control Assign ............................................................................................................. |
58 |
|
|
5.5.7.6 Multi Parameters: FX Returns A and –B .................................................................................................. |
59 |
|
|
5.5.7.7 Global parameter: Master Volume ............................................................................................................ |
59 |
|
5.5.8 |
Saving your edited Multi............................................................................................................... |
59 |
|
|
5.5.8.1 |
Name ......................................................................................................................................................... |
60 |
|
5.5.8.2 |
Genre......................................................................................................................................................... |
60 |
|
5.5.8.3 |
Creator ...................................................................................................................................................... |
60 |
|
5.5.8.4 |
Save sounds............................................................................................................................................... |
61 |
5.6.1 |
Start a Multi from Scratch ............................................................................................................ |
61 |
|
5.6.2 |
MIDI control of Multi mode parameters....................................................................................... |
61 |
|
5.7 |
LIVE MODE ............................................................................................................................................ |
62 |
|
5.7.1 |
Selecting a Preset for the Program Map ...................................................................................... |
62 |
|
5.7.2 |
The Preset / Song Details window ................................................................................................ |
64 |
|
|
5.7.2.1 |
Sound details............................................................................................................................................. |
64 |
|
5.7.2.2 |
Multi details .............................................................................................................................................. |
64 |
5.7.3 |
Managing the Live Map [new in Analog Lab 1.1] ........................................................................ |
64 |
|
|
5.7.3.1 Clearing the Live Map .............................................................................................................................. |
64 |
|
|
5.7.3.2 Importing and exporting the LiveMap ...................................................................................................... |
65 |
|
5.7.4 |
Standard list of presets and MIDI Program Change [new in Analog Lab 1.1] ............................ |
65 |
|
6 ARTURIA ANALOG LAB – LEGAL INFORMATION ....................................................................... |
66 |
||
6.1 |
SOFTWARE LICENSE AGREEMENT ......................................................................................................... |
66 |
|
6.2 |
NO LIABILITY FOR CONSEQUENTIAL DAMAGES ...................................................................................... |
70 |
|
6.3 |
FCC INFORMATION (USA) .................................................................................................................... |
70 |
|
6.4 |
CANADA ................................................................................................................................................ |
70 |
|
6.5 |
EUROPE ................................................................................................................................................. |
71 |
|
ARTURIA – Analog Lab – USER’S MANUAL |
5 |

1 INTRODUCTION
1.1 History
Early in 2001 Arturia began working on advanced algorithms for the digital emulation of analog circuit audio characteristics. They are known as TAE®, standing for True Analog Emulation. In non-technical language, this is an unprecedented way of analyzing and recreating the analog circuits of the original product. Nearly a year after they began work on the algorithms, Arturia was ready for feedback. At the 2002 NAMM show in California, Arturia shared an early version of what would later be the Modular V synthesizer. A recreation of the classic 60’s modular synthesizer that set the foundation for all synths to come.
In seeking insight from sound production experts as well as avid synthesizer users, Arturia was able to ensure the quality of the instruments they made.. The launch of this sound powerhouse was an instant success, winning awards from several top magazines, and leading to the development of other synth recreations.
Shortly thereafter, Arturia started receiving many requests from musicians, producers and bands. Many of them explained how they were planning to replace their original hardware synthesizers with virtual instruments. Artists around the globe were beginning to see the advantages of a software alternative to hardware-based synthesizers.
The CS-80V emulated the legendary Yamaha CS-80, considered by many as "the ultimate polyphonic" synthesizer, and was launched at the AES 2003 in New York.
ARP 2600V was launched at the Winter NAMM Show 2005 in Anaheim. This is a faithful reproduction of the ARP 2600 and is great for just about any sound one might wish to create: everything from drum n’ bass stabs to Star Wars’ R2-D2 sounds have been made with the ARP.
At the Winter NAMM Show 2006, ARTURIA announced the release of its seventh product: the Prophet V. This powerful hybrid gives you two instruments in one: it combines the warmth of the legendary Prophet 5 programmable analog synth with the unique Vector Synthesis textures of the digital Prophet VS.
At the summer 2007 NAMM Show Arturia launched the Jupiter-8V. The Jupiter-8V was capable of creating very versatile sounds: You could easily make ‘fat’ or ‘crystal’ sounds with it. In fact, Jupiter-8V sounded the way it looked: ‘sleek and polished’.
After Jupiter 8V came Oberheim SEM. Oberheim SEM brought the unique sound of the constantly variable filter and oscillators that the original SEM had. By adding the 8 Voice Programmer, it allowed the user to create one of most rare and expensive poly synths of the 70’s, the Oberheim 8 voice. As usual we went beyond the original boundaries of the product and added new sound and modulation capabilities that take the SEM far beyond the original while maintaining the sound characteristics.
In 2012 Arturia launched its first venture into the classic electric piano products with the release of Wurltizer V. Based on a physical modeling engine, it recreates the sound used on many of the best albums ever. Once again we went a step beyond and allowed the user access to the physical modeling parameters itself so that you could sculpt the sound in ways never before possible.
6 |
ARTURIA – Analog Lab – USER’S MANUAL |
1.2 Here and Now
Analog Lab brings all of these classic instruments together into one software app. It allows the user access to the sounds of all these great instruments that now are out of reach for most to be able to purchase. With its simple but powerful browser and data filtering, it makes finding the right sound quick and easy. The new MULTI page allows you to create your own splits and layers of these powerhouse synths and keyboards with simple drag and drop functionality. The LIVE page then allows you to organize your SOUNDS and MULTIS so that you can recall them quickly via program change messages. Analog Lab is more than just a sound library of the best analog keyboards; it is a powerful sound design tool and live performance instrument that will become an integral part of your everyday workflow.
1.3 TAE®
TAE® (True Analog Emulation) is Arturia's outstanding technology dedicated to the digital reproduction of the analog circuits used in vintage synthesizers.
TAE®’s software algorithms result in spot-on emulation of analog hardware. This is why Analog Lab, and all of Arturia’s virtual synthesizers, offer an unparalleled quality of sound.
TAE® combines three major advances in the domain of synthesis:
1.3.1 Aliasing-free oscillators
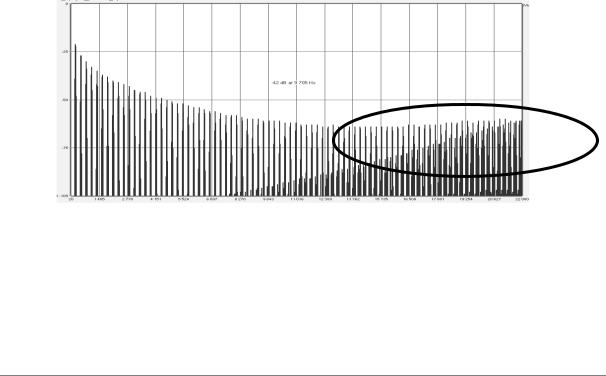
Standard digital synthesizers produce aliasing in high frequencies, and also when using Pulse Width Modulation (PWM) or Frequency Modulation (FM).
TAE® enables the generation of oscillators which are completely free of aliasing in all contexts (PWM, FM…), and at no extra CPU cost.
Aliasing
67
Linear frequency spectrum of a current well-known software synthesizer
ARTURIA – Analog Lab – USER’S MANUAL |
7 |
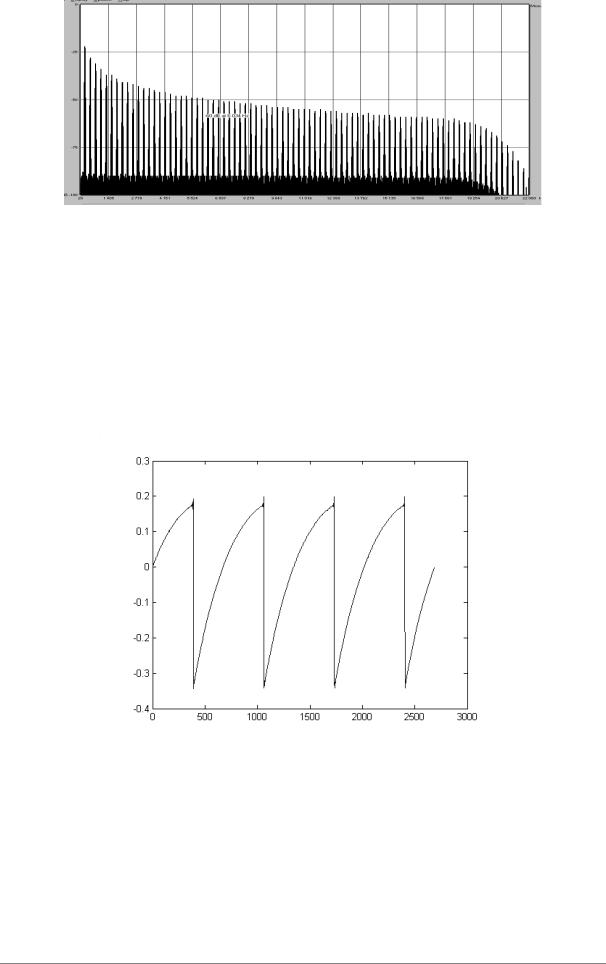
Linear frequency spectrum of the Analog Lab oscillator made with TAE®
1.3.2 A better reproduction of analog oscillator waveforms
The waveforms produced by the oscillators in analog synthesizers are affected by the presence of a capacitor in the circuits. The discharge of a capacitor results in a slight ‘bend’ in the original waveform (most notably for sawtooth, triangular and square waveforms). TAE® reproduces the result of this capacitor discharge in software.
Below is the analysis of a waveform from one of the 5 original instruments that Arturia’s software emulates, followed by one made by Analog Lab. They are both equally deformed by the low-pass and high-pass filtering.
Temporal representation of the “sawtooth” waveform of a hardware synthesizer
8 |
ARTURIA – Analog Lab – USER’S MANUAL |
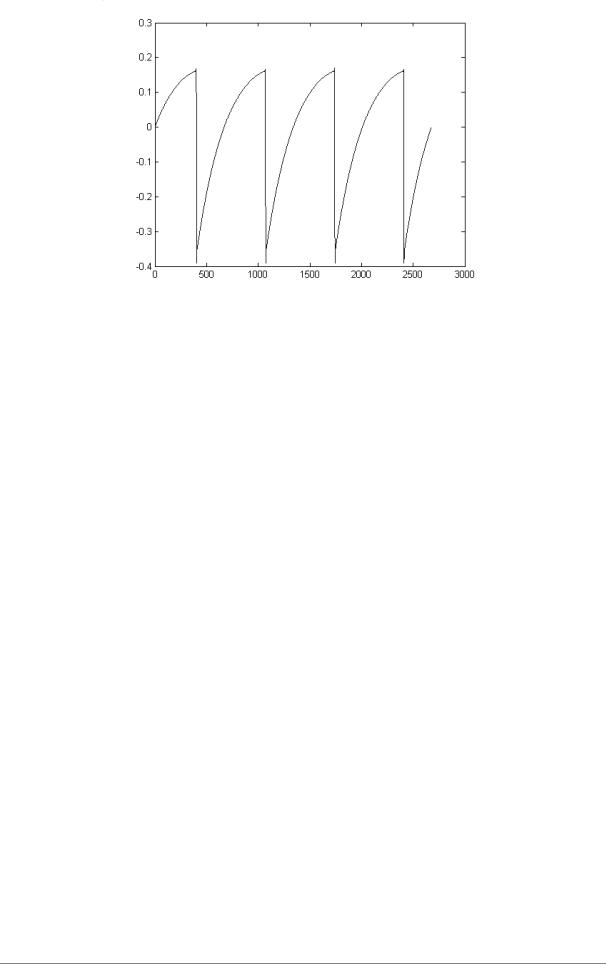
Temporal representation of a “sawtooth” waveform reproduced by TAE®
What’s more, the hardware analog oscillators were unstable. In fact, their waveform varies slightly from one period to another. If we add to this the fact that the starting point for each period (in Trigger mode) can vary with the temperature and other environmental conditions, we see why vintage synthesizers have such a typical sound.
TAE® reproduces the instability of oscillators, resulting in a fatter and “bigger” sound.
1.3.3 Direct Filter Circuit Modeling
Due to advances in computer processing power, Analog Lab can now employ direct filter modeling techniques to achieve unprecedented accuracy in the emulation of a hardware synthesizer’s filter. By modeling the operation of the individual hardware components of the filter circuit, the warm nuances synonymous with analog sounds are recreated.
The following graph shows a single example of direct circuit modeling in action. The peaks represent the generation of harmonics at multiples of the resonant frequency when a particular filter is in self oscillation mode. These harmonics are characteristic of hardware synthesizer filters and are due to the non-linear behavior inherent to their analog circuitry. Anomalies such as these add to the richness and warmth of the sound produced by the filter.
But you’ll notice there are two lines on the graph: Those are the superimposed frequency domain plots for both one of Arturia's virtual instruments and the hardware filter being emulated. They are practically indistinguishable, both on the graph and to the human ear. The direct recreation of this analog circuitry causes the same characteristics of the sound to be present, thus giving the user a truly analog sound.
ARTURIA – Analog Lab – USER’S MANUAL |
9 |
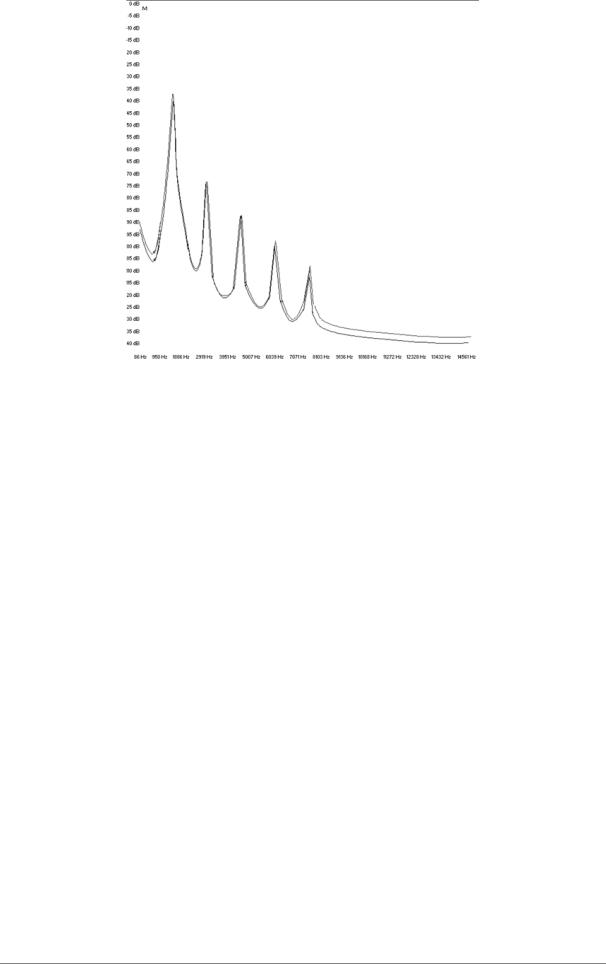
Comparison of harmonics generated by the filter circuits in self oscillation of Analog Lab and a hardware synthesizer
10 |
ARTURIA – Analog Lab – USER’S MANUAL |
2INSTALLATION
2.1System requirements
2.1.1REQUIRED MINIMUM CONFIGURATION:
PC: 2 GB RAM; CPU 2 GHz (Multiple cores required)
Mac: 2 GB RAM; CPU 2 GHz (Multiple cores required)
2.1.2 PLATFORM SPECIFICATIONS:
Windows: SEVEN/EIGHT
Mac OS X: 10.6 or higher
2.2Windows installation (7/8)
Download the installer file and double-click on the icon named Analog_Lab.exe.
The first step of the process requires you to read and accept the terms of the License Agreement, after which you will choose the destination folder for the Analog Lab installation. By default, it will be installed in this location:
C:\Program Files (x86)\Arturia\Analog Lab
You can select a different destination with the Browse button.
Choose the installation folder
ARTURIA – Analog Lab – USER’S MANUAL |
11 |

On the next screen you will be asked to choose a set of installation folders for the 32-bit and 64-bit versions of the Analog Lab VST plug-in. The default folders are the ones most likely to be used by other plug-ins, but you may define other locations if you like.
Choose the locations of the VST plug-in installation folders
Analog Lab is installed as a standalone application by default; the following step lets you choose whether to install it as a plug-in as well. To do so, click the boxes next to the protocol(s) you wish to use (VST2.4, VST3, RTAS and/or AAX). However, to ensure the greatest degree of compatibility we recommend selecting all three installation options.
Choose the installation components
12 |
ARTURIA – Analog Lab – USER’S MANUAL |
The installation program now has enough information to complete the installation. When the installation process is complete, proceed to the authorization step (Chapter 3).
2.3Mac OS X installation
Download the installer file and then double-click on the icon named Analog_Lab.dmg. Follow these steps:
Read and accept the End User License Agreement
Select a destination.
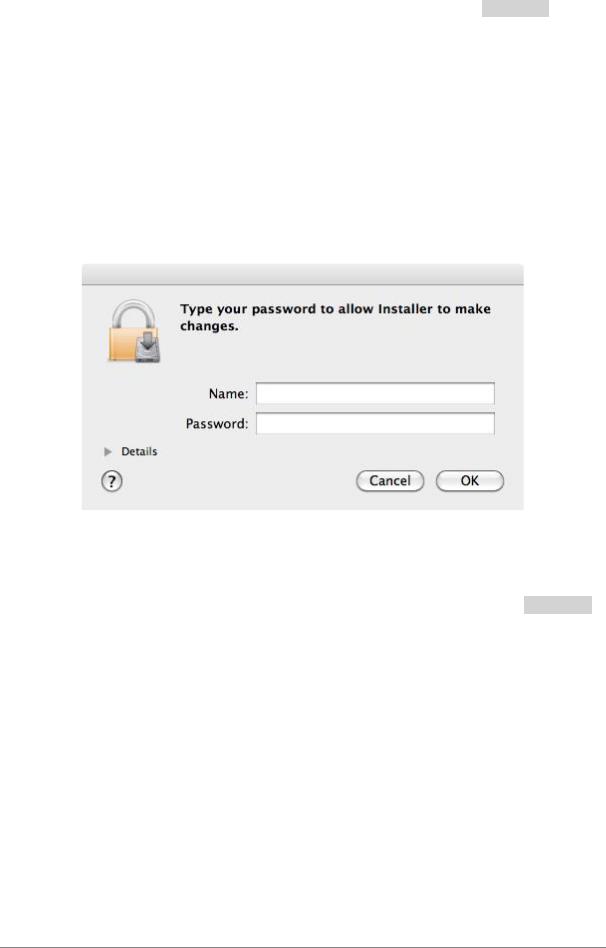
When prompted, enter the administrator name and password of your computer in the Installer window.
Installer window
Analog Lab will be installed automatically as a standalone application and also as VST2, VST3, AU, RTAS and AAX plug-ins.
When the installation process is complete, proceed to the authorization step (Chapter 3).
ARTURIA – Analog Lab – USER’S MANUAL |
13 |
3 AUTHORIZATION
Now that Analog Lab has been installed you will need to authorize the software.
Analog Lab uses the Soft-eLicenser virtual dongle solution so as to avoid tying up a USB port. This system enables the use of the synthesizer on one computer, which will need to be connected to the Internet during the authorization process.
 To transfer your license to another computer, or simply use Analog Lab on several computers (one instance at a time), you will need:
*to use one USB-eLicenser hardware dongle (sold separately, also used by many other software editors);
*in the eLicenser Control Center, to drag-and-drop your license from Soft-eLicenser to USB-eLicenser. This transfer, requiring a valid internet connection, can be done both ways:
*from Soft-eLicenser to USB-eLicenser;
*from USB-eLicenser to Soft-eLicenser.
Please check the eLicenser documentation installed on your computer for any further technical details.
3.1 Registration
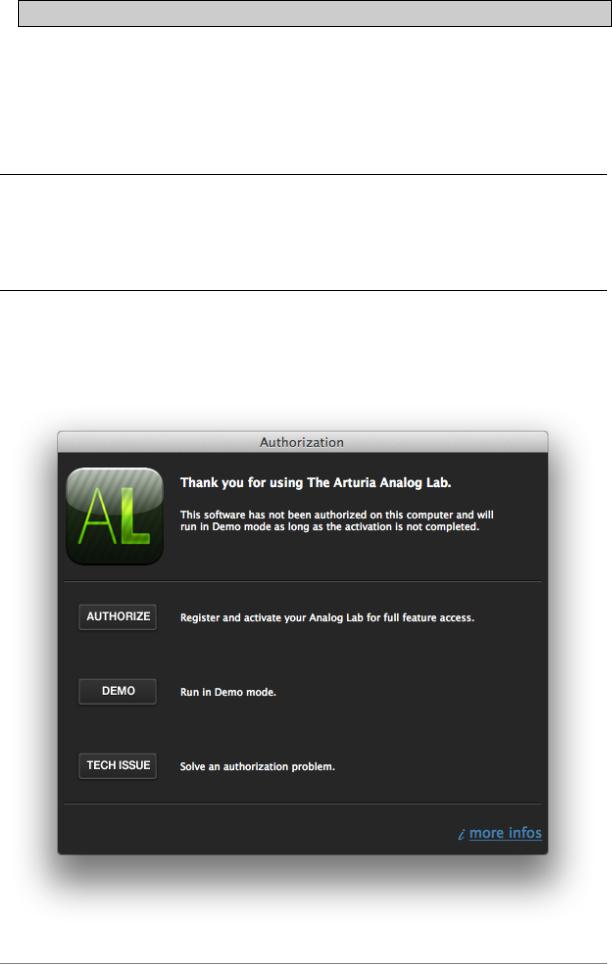
The first time you launch Analog Lab our ‘Activation Wizard’ will open:
14 |
ARTURIA – Analog Lab – USER’S MANUAL |

Click the ‘Authorize’ button to proceed. The screen that follows contains a link to the Arturia web site, where you have the option to sign into your existing Arturia account or create a new one.
This next window will stay open while you go through the registration steps online; once you’ve done that you’ll use it to proceed through the activation steps that follow.
3.1.1 Log in or create a new user account
If you already have an Arturia account setup, simply log in:
ARTURIA – Analog Lab – USER’S MANUAL |
15 |
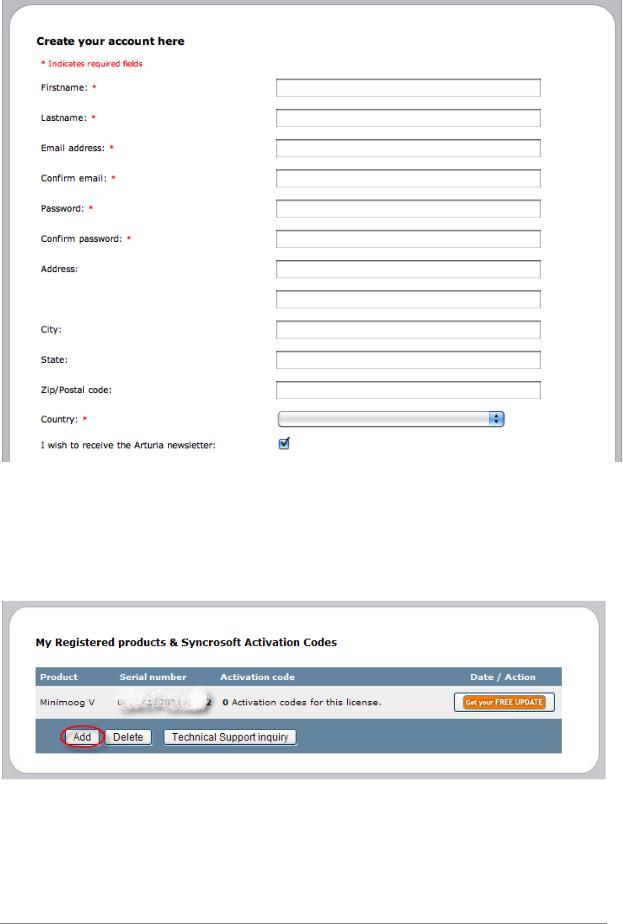
If you don’t have an Arturia account yet, please create one. When you do you will see this form:
Once you are logged into your account, you can register Analog Lab and request your activation code.
Go to the “My Registered Products” section of your account and click on the “Add” button:
The registration page that appears will ask you for a serial number and an unlock code for your software.
16 |
ARTURIA – Analog Lab – USER’S MANUAL |
If you purchased Analog Lab online, you will receive the serial number and an unlock code in an email confirmation
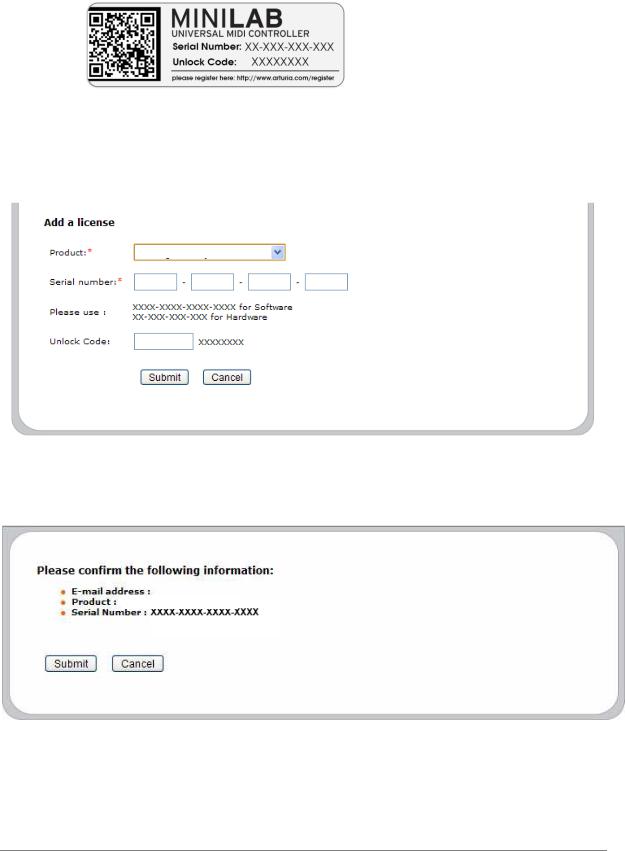
If you purchased a controller keyboard such as MiniLab or some other Arturia controller that came bundled with Analog Lab, you will find the serial number and an unlock code on a sticker inside the Quick Start Guide that ships with the controller. It looks like this:
When you see the page pictured below, select “Analog Lab” or the appropriate Arturia controller from the pull-down menu, enter the serial number and unlock code in the appropriate spots, and click ‘Submit’:
Analog Lab
You should see the following confirmation screen. If the information is correct, click
‘Submit’ again:
Analog Lab
After this you will be shown a screen from which you can copy the eLicenser activation code. It will be sent to you by email as a backup, too.
Now let’s return to that Activation wizard window and click ‘Next’.
ARTURIA – Analog Laboratory – USER’S MANUAL |
17 |

The third and final window of the Activation wizard will appear, and this is where you will enter the activation code.
Copy and paste the activation code into the space provided and click Finish. The software has now been authorized on your computer.
3.1.2 If all else fails…
If the process described in the previous section fails for some reason, an error message will be displayed and the eLicenser Control Center should open automatically. You’ll be able to enter the activation code by following the method described in the next section.
18 |
ARTURIA – Analog Lab – USER’S MANUAL |
3.2 Entering activation code into eLicenser
Now that you have retrieved the activation code, launch the eLicenser Control Center (if it isn’t already open). This application was automatically installed on your computer along with Analog Lab. You’ll find it here:
Windows: Start > Programs > eLicenser > eLicenser Control Center
Mac OS X: Finder > Applications > eLicenser Control Center
 The following screenshots were taken from a computer running Mac OS X; however, the process is basically identical on a machine running Windows XP/Vista/7/8. The graphical user interface and the wording may differ somewhat, but this should not hinder the process.
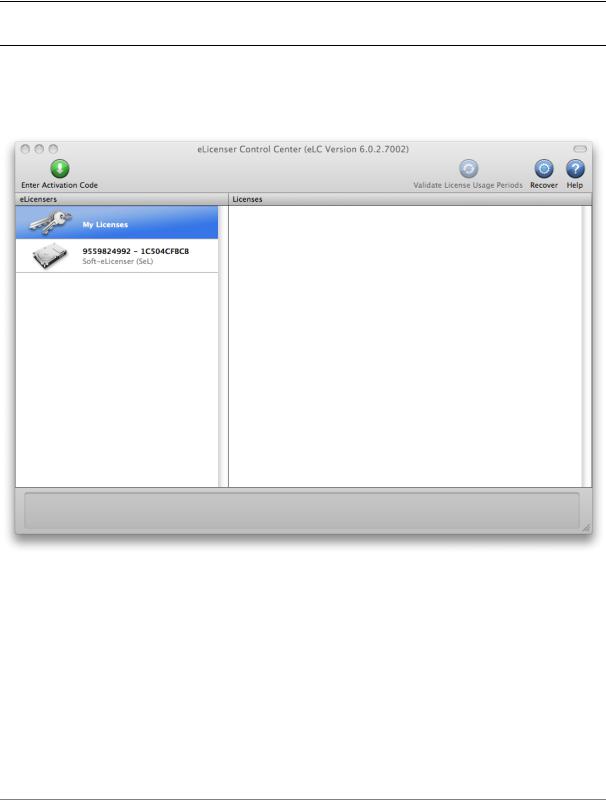
In the eLicenser Control Center main window you should see a “SeL” virtual dongle installed onto your computer.
The eLicenser Control Center main window, showing an empty Soft-eLicenser
In the eLicenser Control Center menu, click on the “Enter Activation Code” button, and enter the code when prompted. Simply paste in the 32-digit code you’ve just copied from your account on the Arturia website:
ARTURIA – Analog Laboratory – USER’S MANUAL |
19 |
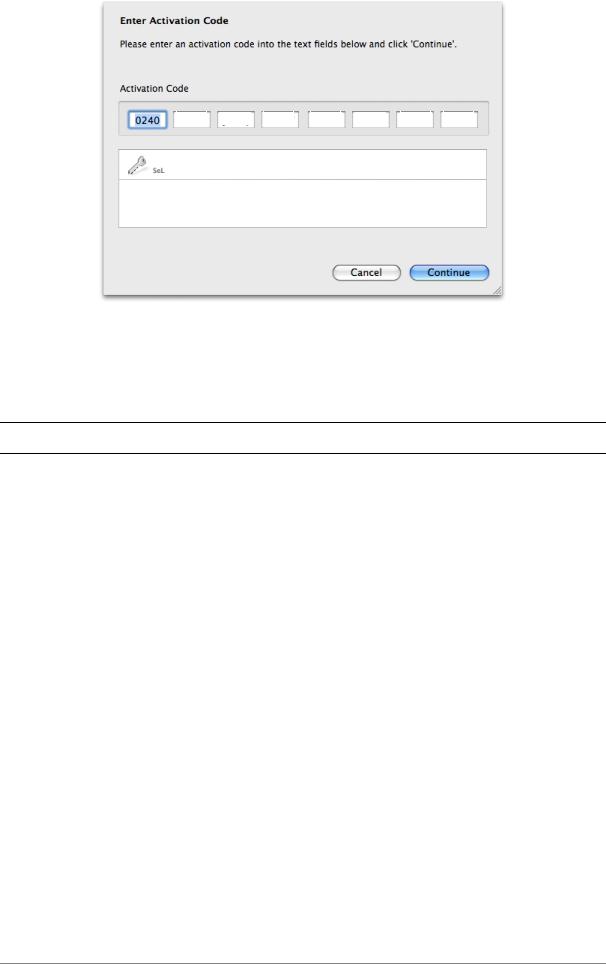
Analog Lab
Enter the activation code
The eLicenser Control Center is now ready to download the software license that will allow you to use Analog Lab. Click “Continue” and the progress bar should advance until the download is complete. Once the popup window has confirmed completion of the download, click “Close”.
 If a USB-eLicenser hardware dongle is found connected to your computer, the Center will favor it as the default destination for the license download.
Now the main eLicenser Control Center window should show your Analog Lab license installed and activated:
20 |
ARTURIA – Analog Lab – USER’S MANUAL |
License is installed and activated
It’s now time to launch the Analog Lab application.
ARTURIA – Analog Laboratory – USER’S MANUAL |
21 |
4 ANALOG LAB QUICK START
The following chapter is a quick overview of how to start using Analog Lab immediately. It does not go into exhaustive detail; the goal here is to help you start enjoying the sounds as soon as possible. For more a more in-depth description of how Analog Lab works, please see Chapter 5.
4.1 Audio & MIDI Setup
The first thing to do after launching Analog Lab is to make sure your software is set to output Audio correctly and that it will receive MIDI from an external keyboard.
4.1.1 Audio setup
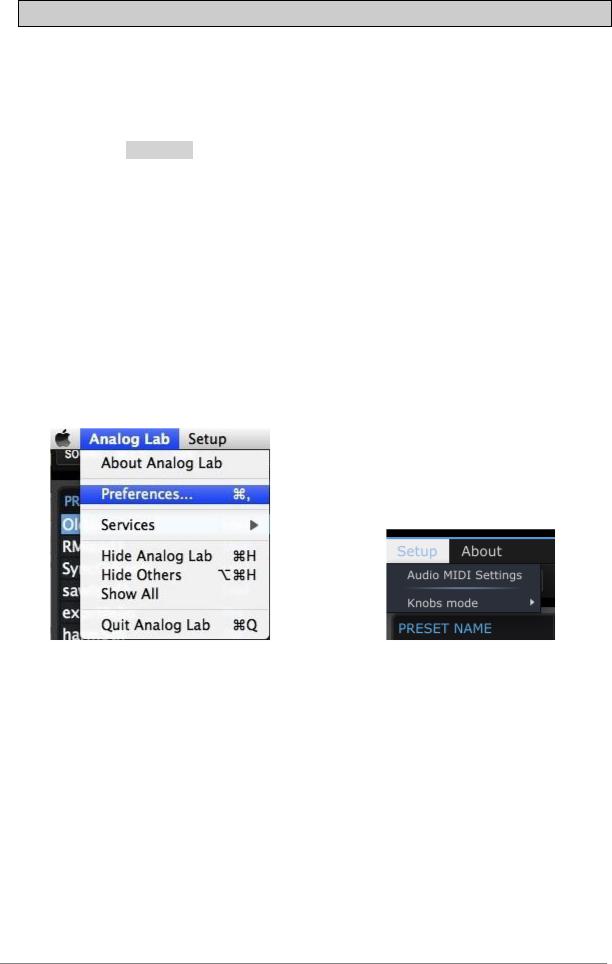
In order to check the audio driver settings for Analog Lab, open the Preferences window by pressing [Command] + [,] on the Mac keyboard or by selecting it from the Analog Lab drop-down menu (OS X and Windows).
The Preferences menu item on Mac OS X… |
…and on Windows |
This will open the Audio & MIDI Settings window, which is where the preferred audio output device will be selected. Now click the Test button: If you hear a short sine wave, then your audio is set up correctly. If not, make sure the correct audio driver is selected and that your headphones or speakers are properly connected and turned on.
22 |
ARTURIA – Analog Lab – USER’S MANUAL |
 Loading...