

Page 1
ARB WINCH/NONWINCH BULLBAR
TO SUIT HJ100 IFS
(To suit October 2002 on)
PRODUCT No. 32/3413190
FITTING KITS 6172338, 6172342
WARNING
FOR VEHICLES EQUIPPED WITH SRS AIRBAG
WHEN INSTALLED IN ACCORDANCE WITH THESE INSTRUCTIONS, THE
FRONT PROTECTION BAR DOES NOT AFFECT OPERATION OF THE SRS
AIRBAG.
TAKE NOTE OF THE FOLLOWING:
• THIS PRODUCT MUST BE INSTALLED EXACTLY AS PER THESE
INSTRUCTIONS USING ONLY THE HARDWARE SUPPLIED.
• IN THE EVENT OF DAMAGE TO ANY BULL BAR COMPONENT, CONTACT
YOUR NEAREST AUTHORISED ARB STOCKIST. REPAIRS OR
MODIFICATIONS TO THE IMPACT ABSORPTION SYSTEM MUST NOT BE
ATTEMPED.
• DO NOT USE THIS PRODUCT FOR ANY VEHICLE MAKE OR MODEL, OTHER
THAN THOSE SPECIFIED BY ARB.
• DO NOT REMOVE LABELS FROM THIS BULL BAR.
• THIS PRODUCT OR ITS FIXING MUST NOT BE MODIFIED IN ANY WAY.
OPTIONAL LIGHT SETS TO SUIT THIS PRODUCT:
-ARB 6821201 Fog Light Kit Suit 3163015
-Up to IPF 900 SERIES FOG OR DRIVING LIGHT SETS
30/04/08 Page 1 of 13 3786407
If you have any queries regarding the installation of this product please contact the distributor from whom it was purchased, or alternatively the ARB office in your state.
WA: (08) 9244 3553 NSW: (02) 9821 3633 ACT: (02) 6280 7475 SA: (08) 8244 5001 QLD: (07) 3872 3872 NT: (08) 8947 2262 TAS: ( 03) 6331 4190
Head Office – ARB Corporation Ltd VIC: 42-44 Garden Street, Kilsyth, Victoria, 3137 Tel: (03) 9761 6622 Fax: (03) 9761 6807
Page 2

USE
MOUNT BRACKETS TO 6151099 2 BOLT M14 X 40mm
VEHICLE 4581052 2 WASHER SPRING M14
6151299 2 BOLT M10 X 1.5 X 100mm
6151040 2 BOLT M10 X 1.25 X 30
4581048 4 WASHER SPRING M10
4581040 6 WASHER FLAT M10
6151026 2 NUT 10 X 1.5
3756493L 1 BRACKET IMPACT ABSORBER LHS
3756493R 1 BRACKET IMPACT ABSORBER RHS
4721520 2 TUBE CRUSH
BULLBAR TO MOUNT ASSY 6151232 8 BOLT M10 X 30X 1.5
4581288 4 WASHER FLAT M10 LARGE
4581040 4 WASHER M10 FLAT
4581048 8 WASHER M10 SPRING
6151026 4 NUT M10
6151304 4 NUT M10 CAGED
WINCH 8/9000/10,000 LB 4581040 4 WASHER FLAT 3/8”
6151074 2 BOLT 3/8” X 1 ¾”
4581041 2 WASHER FLAT 7/16”
NUMBER PLATE 3751451 1 NUMBER PLATE BRACKET
6151180 4 BOLT M6 X 16
6151046 4 WASHER FLAT M6
6151128 4 NUT FLANGE M6
CONTROL BOX 3751564 1 CONTROL BOX BRACKET
6151021 2 BOLT M8 X 20MM
6151132 2 NUT FLANGE M8
4581044 2 WASHER M8
BUFFERS TO BAR 6151128 12 NUT FLANGE M6
6162470R 1 BUFFER UPRIGHT RH
6162470L 1 BUFFER UPRIGHT LH
WINCH CABLES BLB560 2 BLACK CABLE
BLR 560 1 RED CABLE
CABLE TIES 180302 8 CABLE TIES
AIR DEFLECTOR 3314477 1 AIR DEFLECTOR
6151300 4 NUT M6 CAGED
6151180 4 BOLT M6 X 20
6151046 4 WASHER FLAT
4581036 4 WASHER SPRING
INDICATORS TO BAR 3163015 1 COMBINATION LIGHT SURROUND KIT
3314478 1 PAN COVER INTERCOOLER
TURBO DIESEL MODEL 6151128 5 NUT FLANGE M6
FIT KIT 6171775 6151180 5 BOLT M6 X 20
6151046 5 WASHER FLAT M6
PART No
180701 6 SCOTCH LOCK
6821151L 1 TURN SIGNAL / CLEARANCE LIGHT
6821151R 1 TURN SIGNAL / CLEARANCE LIGHT
6821152 2 WIRING LOOM
QTY DESCRIPTION
Tools Required
10mm, 14mm, 13mm 18mm, 19mm, 22mm Spanners and Sockets. Phillips
head screwdriver, drill & 10mm drill bit, hacksaw or angle grinder and 50mm,
100m socket extension.
29/04/08 Page 2 of 13 3786407
Page 3
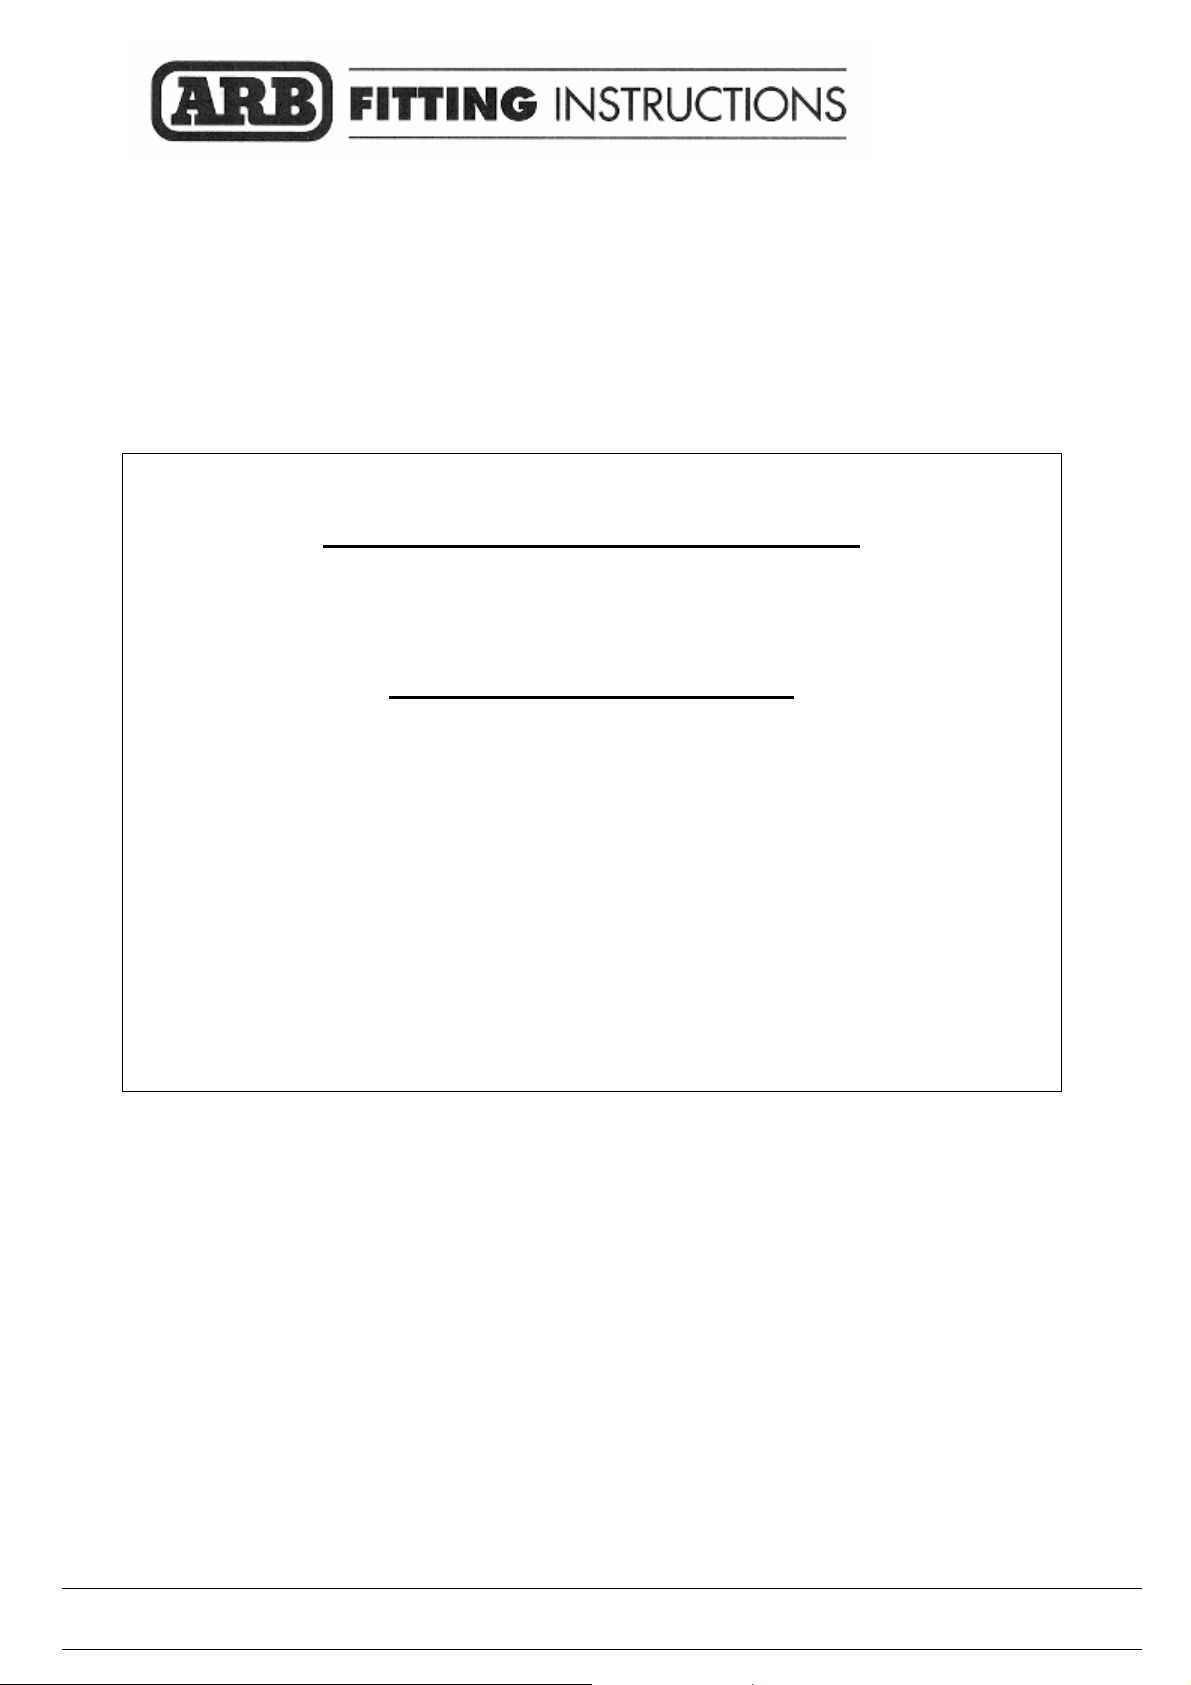
1. Remove the bumper bar and grille
from vehicle.
2. Remove the cross member bracket
and tow brackets and tie downs.
Remove the 4 front 8mm bolts that
secure the vehicle stone tray.
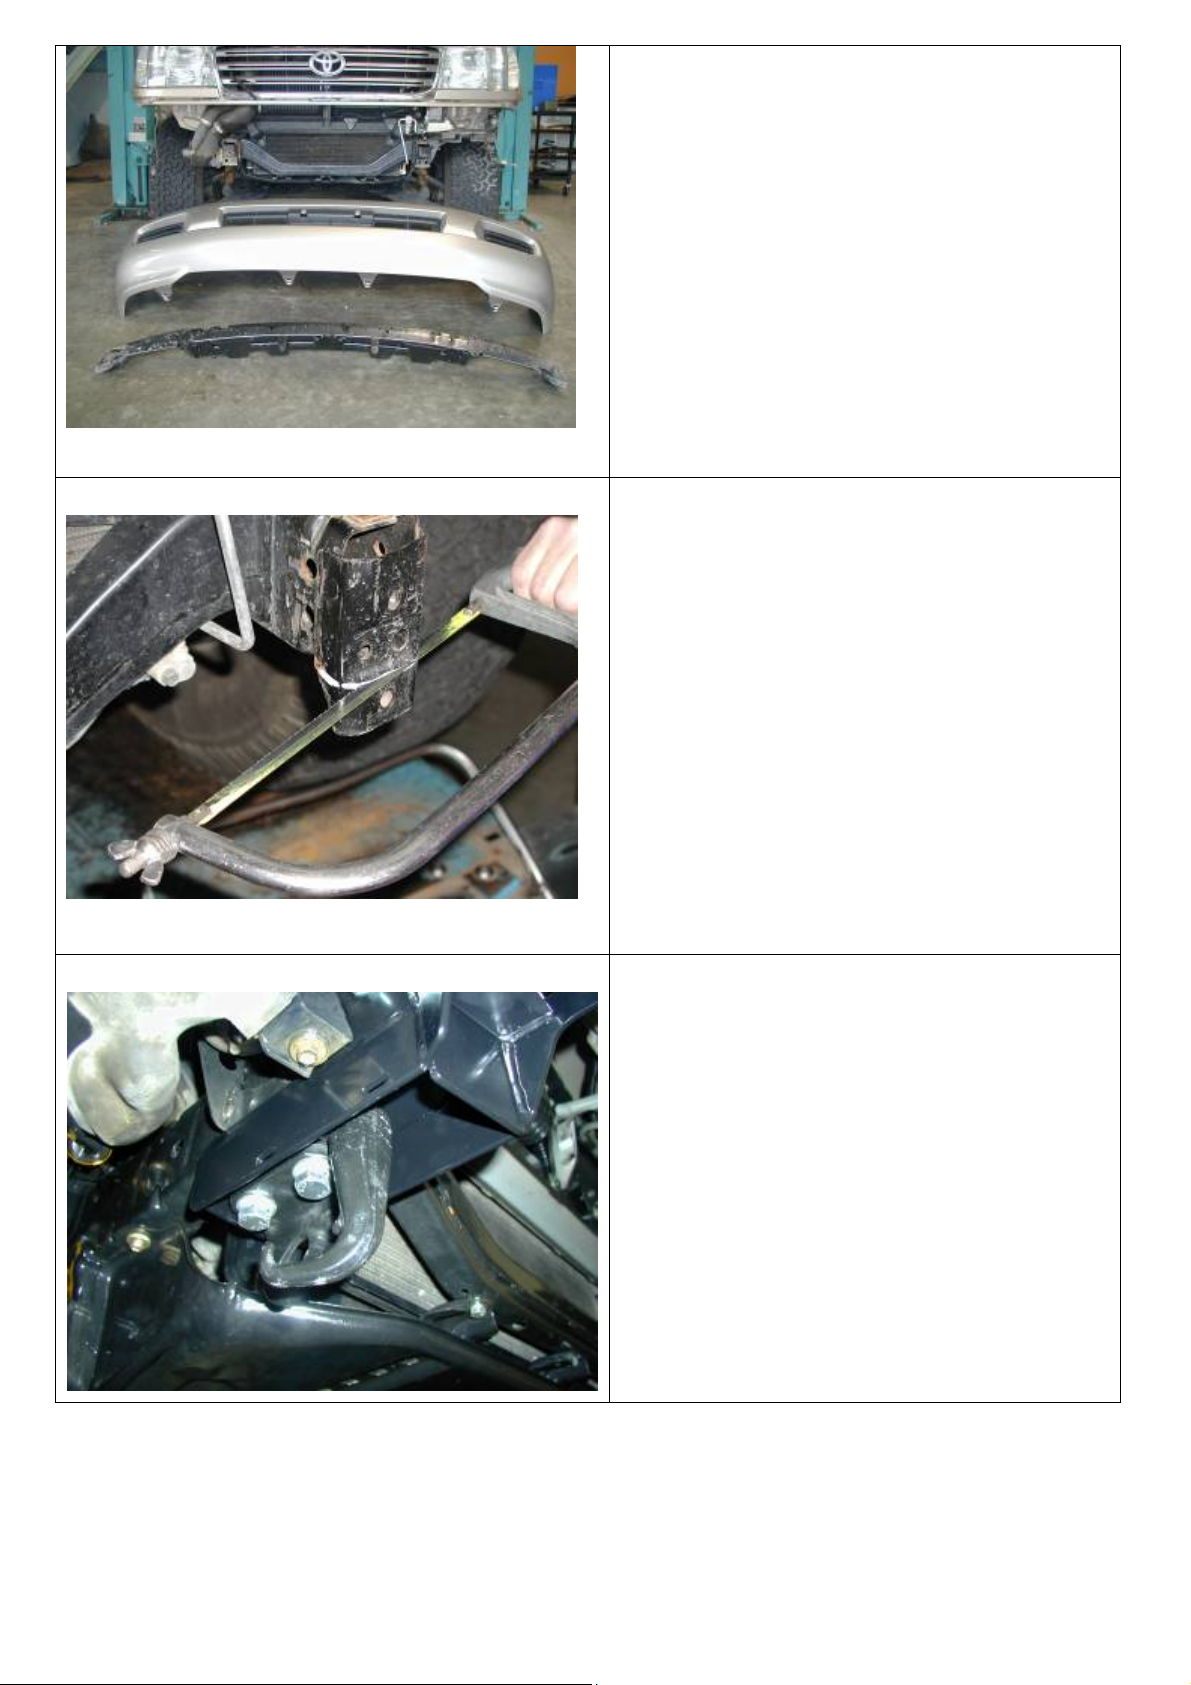
3. To fit chassis brackets to chassis rails,
cut off the lower section of chassis
mount.
4. Mark out a line level with the bottom
of chassis rail, and cut off using a
hacksaw or a angle grinder and touch
up bare metal with paint.
5. Fit chassis brackets to vehicle and
secure as follows.
6. On RHS of vehicle, refit tie down
bracket, tow hook, original 14mm
long bolts and washers to underside
of chassis bracket, finger tighten
only.
Note: Swap tie down brackets left to
right so they mount as shown.
29/04/08 Page 3 of 13 3786407
Page 4
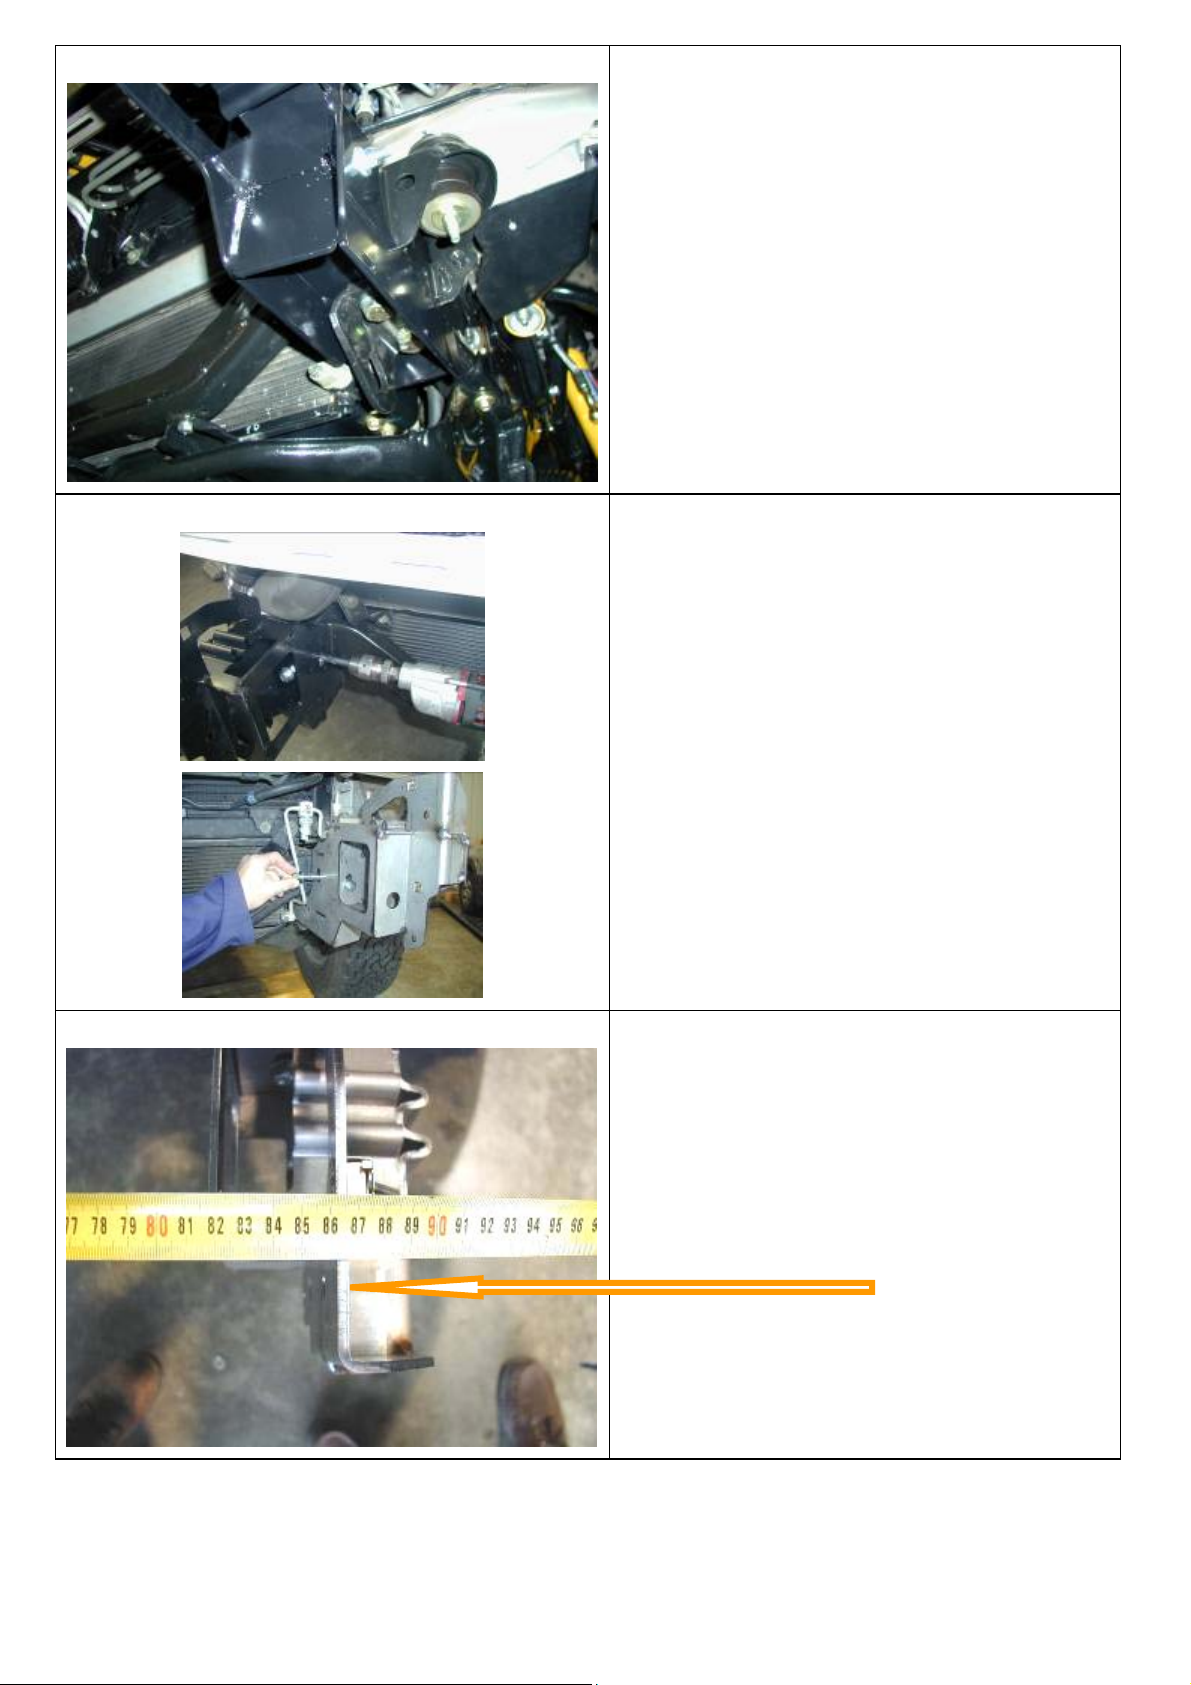
7. On LHS of vehicle secure chassis
bracket and tie down bracket to
vehicle using 14mm x 40 bolts and
spring washers supplied in bolt kit.
(finger tighten only)
8. Using a 13mm drill bit, drill through
chassis rails using hole in impact
absorber as a template. Fit crush
tube, 100mm x10mm bolt, 10mm
washers and nuts through both sides
of chassis brackets. (Finger tighten
only)
9.Fit a 10mm fine thread x 30mm bolt
and washers in the front of chassis
brackets.
10. When all bolts are fitted, the width
of the chassis brackets at bolting
surface should be 860mm. When
measurement is correct, tighten all
bolts securely. Fit 10mm caged nuts
into each chassis bracket. (2 per side)
29/04/08 Page 4 of 13 3786407
Page 5

TO FIT A WINCH BAR.
ORIGINAL
VIEWED FROM
LHS OF VEHICLE
ROTATED
ORIGINAL
11.To fit a 8/9/9.5/000lb winch, rotate
gearbox 144° counterclockwise.
12.Stand winch upright and undo the
capped head screws and by lifting the
gearbox only a couple of millimeters,
rotate the gearbox. Once in position,
refit all screws and tighten firmly.
WARNING
Do not lift gear box more than a couple
of millimeters.
13. To fit a 10/12000 winch, rotate
gearbox 72° clockwise. Both winches
are viewed from gearbox end and
cable spools from the bottom of both
winches.
VIEWED FROM
RHS OF VEHICLE
ROTATED
14. Drill out roller fairlead 25mm
lower than original hole using a
12mm drill bit.
15. 8/9000lb winches use top holes
when fitted to bar
8.
New holes
16. 10/12000lb winches use lower holes
when fitted to bar
29/04/08 Page 5 of 13 3786407
Page 6

17. Remove the cover from the control
box.
18. The three main power cables that go
from winch to control box, must be
changed over using longer cables from
bolt kit. Make sure that you identify the
colour codes on the new cables before
replacing the cover.
(This must be done for all winches to be
fitted to the bull bar)
If fitting XP 9.5 winch, leave
cover open and continue to step
19. For any other winch,
advance to step 25.
19. For XP 9.5 winch, remove the two
cap screws, nuts and spacer washers that
hold the four solenoids in place.
29/04/08 Page 6 of 13 3786407
Page 7

20. Remove the four solenoids from the
base of the control box using the copper
bus bar as an aid and hold to one side.
21. Remove the two bolts in the base of
the control box and reposition them into
the more centralised holes
Before
After
22. Place the 4 solenoids over the 2 metal
stands that are facing upwards. Make
sure they line up with the holes in the
base.
29/04/08 Page 7 of 13 3786407
Page 8

23. Replace the 2 cap screws, washers
and nuts removed in step 19 above into
original holes.
24. Replace the black cover and refit the
three cover screws (DO NOT OVER
TIGHTEN)
25. Fit control box bracket to bar using
8mm hardware.
26. Fit buffers to bull bar using 6mm
hardware.
27. Fit control box to control box
bracket and pull wires through top
cutouts.
28. Fit 8/9000lb winch to top hole
pattern in rear of bar. Secure top
holes of winch using 1 ½” x 3/8”
bolts, spring and flat washers, and
lower holes with 1 ¾” x 3/8’ bolts
through roller fairlead original top
holes. When all bolts are fitted,
tighten firmly.
29. Connect power wires to winch motor
as per Warn instruction manual
(Clutch handle on LHS of
vehicle)
29/04/08 Page 8 of 13 3786407
Page 9

30. Fit 10/12000lb winch to lower hole
pattern in rear of bar. Secure top
and lower holes of winch using 1 ½”
x 7/6” bolts, spring and flat washers,
through roller fairlead drilled lower
holes. When all bolts are fitted,
tighten firmly.
31. Connect power wires to winch motor
as per Warn instruction manual.
(clutch handle on RHS of vehicle)
32. When fitting roller fairlead to bar,
remove circlips and push vertical
pins upward so you can push
vertical rollers sideways to enable
you to place a socket to the bolt
33. When all bolts are tighten, replace
pins and circlips.
29/04/08 Page 9 of 13 3786407
Page 10

34. Before fitting bar to chassis brackets
on vehicle, cable tie all winch power
cables well clear of all moving parts.
When bar is fitted to vehicle, fit leads to
battery and cable tie clear of all moving
parts.
35. Fit 6mm caged nuts into square holes
in lower section of bar.
36. With the help of a friend, lift bar in
between the chassis brackets and
secure to caged nuts using 10mm x
30mm bolts, large HD washers and
spring washers.
29/04/08 Page 10 of 13 3786407
Page 11

37. Adjust bar so there is a 15mm plus
gap around the periphery of the
front of the vehicle.
38. Tighten all 4 bolts until the washers
start to deform.
39. Using a 10mm drill bit. Drill out
pinning holes using holes in bar as a
template. Secure using 10mm x
30mm bolts, washers and 10mm
nuts. Tighten all bolts firmly.
40. Top hole through light aperture in
bar
41. Lower hole through bottom of bar
upright.
29/04/08 Page 11 of 13 3786407
Page 12

42. When bar is secured to vehicle, fit
splash pan using 6mm caged nuts on
lower lip of bar, and to where the
stone tray 8mm bolts were removed
earlier, when all bolts are in place
tighten securely.
43. Assemble and install combination
light surrounds (p/n 3163015) as per
instructions no. 3786421 supplied with
surround kit. Note: Optional fog lamps
can be installed at this point as per
fitting instruction no. 3783315 supplied
with fog lamp kit no. 6821201.
Wire the combination lamp to the
vehicles indicator and clearance lamps.
Caution: Cable tie all cables together
and keep all cables clear of sharp edges
and moving parts.
44. For turbo diesel models, a cover
shield for intercooler pipes must be
fitted.
45. Cover shield fits to chassis bracket,
lower lip of bar and to the tag on the
tube inside the bar.
29/04/08 Page 12 of 13 3786407
Page 13

y
46. Fit number plate to bar.
Winch Bar
If
ou have a slimline number plate
attach it directly to the top pan with
the fasteners provided.
If you have a standard number plate,
fasten it to the top pan using the
bracket and fasteners provided.
Non Winch Bar
Fasten the number plate to the lower
pan using the fasteners provided.
29/04/08 Page 13 of 13 3786407
 Loading...