


Aprilaire 8840 User Manual
Model 8840 Wi-Fi Automation
Indoor Air Quality Thermostat
Owner’s Manual
Includes Operating Instructions and
Warranty Information
READ AND SAVE THESE INSTRUCTIONS
1

 WARNING
Do not use sharp instruments to press touch screen. Only use your fingertips.
TABLE OF CONTENTS |
|
|
FEATURES |
|
|
|
|
FEATURES . . . . . . . . . . . . . . . . . . . . . . . . . . . . . . . . . . . . . . . . . . . . . . . . |
. 2 |
|
• Temperature control.. |
DISPLAY OVERVIEW. . . . . . . . . . . . . . . . . . . . . . . . . . . . . . . . . . . . . . . |
. 3 |
|
• Remote access and control over Wi-Fi.. |
Home Screen . . . . . . . . . . . . . . . . . . . . . . . . . . . . . . . . . . . . . . . . . . . . |
. 3 |
|
• Indoor air quality control.. |
Main Menu |
3 |
|
|
|
–– Humidification automatic or manual control.. |
||
WI-FI SETUP |
4 |
|
|
|
–– Dehumidification.. |
||
THERMOSTAT OPERATION . . . . . . . . . . . . . . . . . . . . . . . . . . . . . . . . . |
. 7 |
|
–– Event-Based™ air cleaning.. |
Select System Mode |
7 |
|
–– Ventilation with temperature and humidity limits.. |
. . . . |
. . . . . |
||
Change Temperature Setpoint . . . . . . . . . . . . . . . . . . . . . |
. .7 |
. . . . |
•. Heat. Blast® raises the room temperature 3°F to 5°F.. |
. . . . . . . . . . . . . . . . . . . . . . . . . . . . . . .Select Fan Setting |
. .8 |
. . . . |
•. One. . touch Away.. |
Set Time and Date |
9 |
|
|
|
|
||
SCHEDULE AND HOLDS |
11 |
|
• Large touch screen with adjustable backlight.. |
|
|
||
Understanding Schedules . . . . . . . . . . . . . . . . . . . . . . . |
11. |
. . . |
•. .7. day. . .programmability.. |
Changing Schedules . . . . . . . . . . . . . . . . . . . . . . . . . . . . . . |
.12. |
. . . . |
•. Displays room temperature, room humidity, temperature |
Schedule Holds |
15 |
|
|
|
setting, and optional outdoor temperature.. |
||
Temporary Hold |
15 |
|
|
. . . |
•. .Air. . filter,. humidifier, dehumidifier, fresh air and HVAC service |
||
Permanent Hold |
15. |
|
|
|
reminders |
||
Vacation Hold |
16 |
|
|
. . . . |
. . . |
||
Heat Blast® (if installed) . . . . . . . . . . . . . . . . . . . . . . . . . . . . |
17. . |
. . |
• Support for optional wireless outdoor temperature sensor.. |
Away (if installed) . . . . . . . . . . . . . . . . . . . . . . . . . . . |
17. . |
. . . |
•. Programmable. . . . fan control with fan circulation mode.. |
STATUS |
18 |
|
|
|
• Easy to use temperature control can override program schedule |
||
ALERTS |
20 |
|
|
|
at any time.. |
||
Maintenance Reminders . . . . . . . . . . . . . . . . . . . . . . . . . . . . . . . . . . |
22 |
|
• Progressive recovery ensures proper temperature at the start of |
WEATHER |
23 |
|
|
. . . . |
. a. .program event.. |
||
|
|
|
|
INDOOR AIR QUALITY FUNCTIONS . . . . . . . . . . . . . . . . . . . . . . . . . |
24 |
|
|
Humidity Control . . . . . . . . . . . . . . . . . . . . . . . . . . . . . . . . . . |
24. . |
. . . |
. |
Automatic Mode . . . . . . . . . . . . . . . . . . . . . . . . . . . . . . . . . . . . . . . |
24 |
|
|
Manual Mode . . . . . . . . . . . . . . . . . . . . . . . . . . . . . . . . . . . . . . . . . . |
25 |
|
|
Dehumidifier . . . . . . . . . . . . . . . . . . . . . . . . . . . . . . . . . . . |
25. . |
. . . . |
. |
Event Based™ Air Cleaning . . . . . . . . . . . . . . . . . . . . . . . |
26. . |
. . . |
. . . |
Fresh Air . . . . . . . . . . . . . . . . . . . . . . . . . . . . . . . . . . . . . . . . . . . . . . . . |
27 |
|
|
USER PREFERENCES . . . . . . . . . . . . . . . . . . . . . . . . . . . . . . |
28. |
. . . |
. . . . |
Away Button . . . . . . . . . . . . . . . . . . . . . . . . . . . . . . . . . . . . . . . . . . . . |
29 |
|
|
Lockouts . . . . . . . . . . . . . . . . . . . . . . . . . . . . . . . . . . . . . . . . . . . . . . . . |
31 |
|
|
Temperature Scale . . . . . . . . . . . . . . . . . . . . . . . . . . . . . . . . . . . . . . . |
32 |
|
|
Schedule Settings . . . . . . . . . . . . . . . . . . . . . . . . . . . . |
33. |
. . . |
. . . . . . . |
CLEAN SCREEN . . . . . . . . . . . . . . . . . . . . . . . . . . . . . . . . . . . . |
34. |
. . . . |
. . |
WI-FI MAINTENANCE AND TROUBLESHOOTING . . . . . . . . . |
35. |
. . |
|
Wi-Fi Status Indicator . . . . . . . . . . . . . . . . . . . . . . . . . . . . . . . . . . . . |
35 |
|
|
Clearing Router Settings. . . . . . . . . . . . . . . . . . . . . . . . . . . . . . . . . . |
36 |
|
|
Disabling the Wi-Fi Radio . . . . . . . . . . . . . . . . . . . . . . . . . |
37. |
. . . |
. . . |
LIMITED WARRANTY . . . . . . . . . . . . . . . . . . . . . . . . . . . . . . . . . . . . . . |
38 |
|
|
2
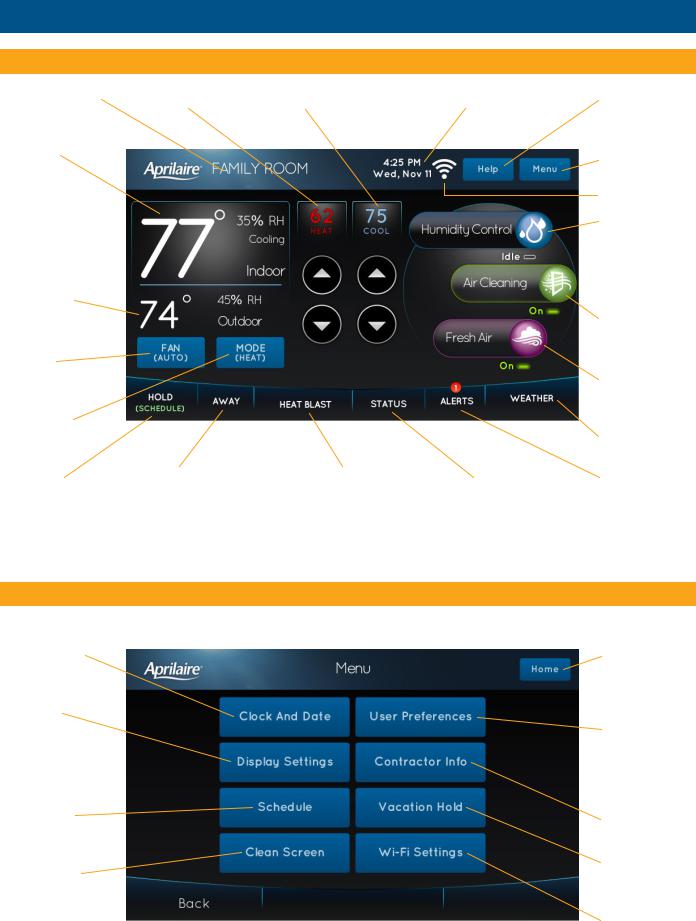
DISPLAY OVERVIEW
HOME SCREEN
THERMOSTAT NAME |
HEAT SETTING |
COOL SETTING |
CURRENT DATE AND TIME |
CURRENT SCREEN |
|
|
|
|
|
|
RELATED HELP |
ROOM TEMPERATURE |
|
|
|
|
|
& HUMIDITY |
|
|
|
MAIN MENU |
|
|
|
|
|
|
|
HEATING AND |
|
|
|
WI-FI INDICATOR |
|
|
|
|
HUMIDIFIER AND/ |
||
COOLING |
|
|
|
||
EQUIPMENT |
|
|
|
|
OR DEHUMIDIFIER |
|
|
|
|
||
STATUS |
|
|
|
INDOOR AIR |
|
|
|
|
|
|
QUALITY SCREEN |
OUTDOOR |
|
|
|
& SIMPLE STATUS |
|
TEMPERATURE |
|
|
|
AIR CLEANING |
|
& HUMIDITY |
|
|
|
||
|
|
|
INDOOR AIR |
||
|
|
|
|
|
|
|
|
|
|
|
QUALITY SCREEN |
FAN MODE |
|
|
|
& SIMPLE STATUS |
|
|
|
|
|
||
SELECTION |
|
|
|
FRESH AIR INDOOR |
|
|
|
|
|
|
|
|
|
|
|
|
AIR QUALITY SCREEN |
SYSTEM MODE |
|
|
|
& SIMPLE STATUS |
|
|
|
|
|
||
SELECTION |
|
|
|
WEATHER FORECAST |
|
|
|
|
|
|
& ALLERGY REPORT |
HOLD MENU |
AWAY MODE |
HEAT BLAST MODE |
DETAILED |
ACTIVE ALERTS & |
|
& STATUS |
& STATUS |
& STATUS |
EQUIPMENT STATUS |
ALERT SETTINGS |
|
NOTE: SCREEN BRIGHTENS AFTER FIRST TOUCH..
Display may differ depending on equipment/options installed.
MAIN MENU
Touch Menu from the home screen to access the Menu screen.. The Menu screen allows access to all the thermostat settings..
SET DATE & TIME |
RETURN TO THE |
|
|
HOME SCREEN |
|
|
FROM THE |
|
SET SCREEN |
CURRENT SCREEN |
|
|
||
BRIGHTNESS |
TEMPERATURE |
|
AND SCREEN |
SCALE, LOCKOUTS, |
|
SAVER |
AWAY MODE |
|
|
SETTING, SCHEDULE |
|
|
SETTINGS |
|
SET SCHEDULE |
VIEW CONTRACTOR |
|
|
||
|
INFORMATION |
|
CLEAN DISPLAY |
SET UP AND |
|
ENABLE VACATION |
||
|
||
|
SETTINGS |
|
|
CONNECT TO WI-FI |
|
|
NETWORKS |
3
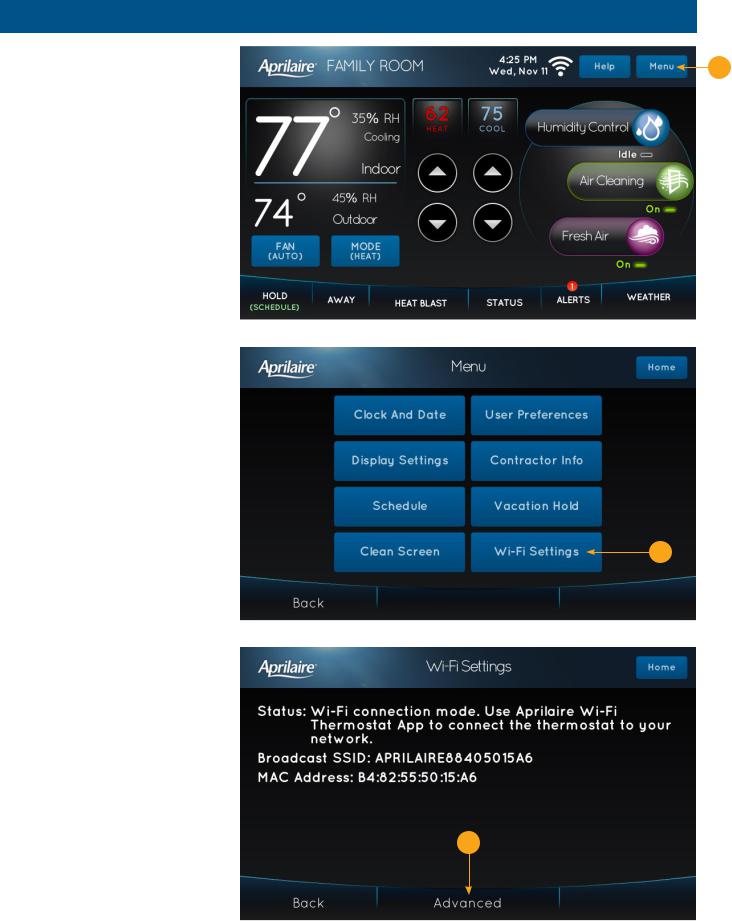
WI-FI SETUP
Complete the following steps to connect |
1 |
your thermostat to your home network.. |
1.Touch Menu to open the Menu screen..
2.Touch Wi-Fi Settings to open the Wi-Fi Settings screen..
3.Touch Advanced to open the
Advanced Wi-Fi Settings screen..
2
3
4
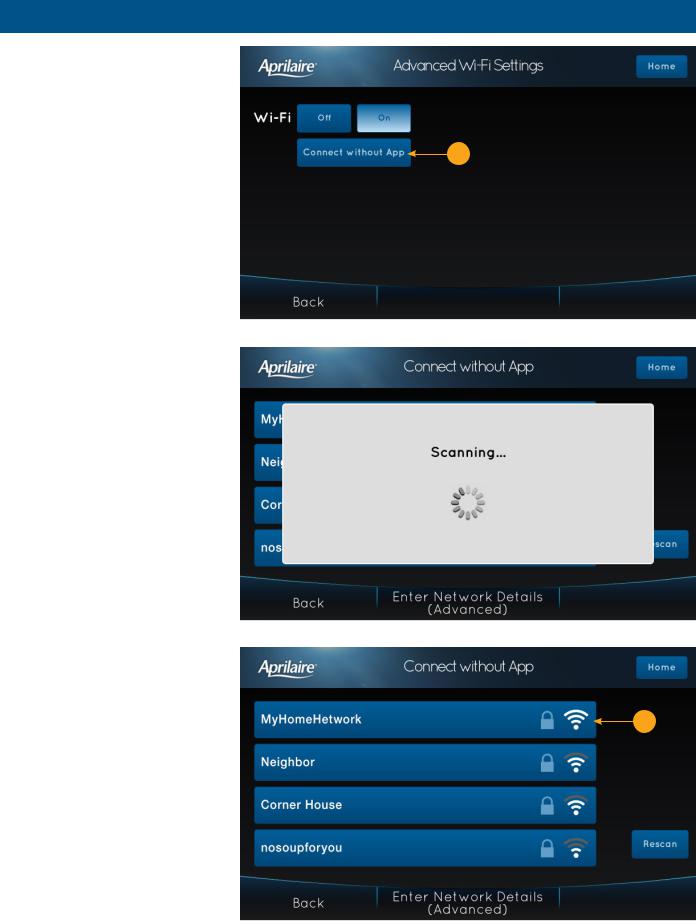
WI-FI SETUP
4.Touch Connect without App to open the Connect without App screen.. The thermostat will automatically scan for available networks to join..
5.Touch the listing for your home
network.. |
4 |
|
5
5
WI-FI SETUP
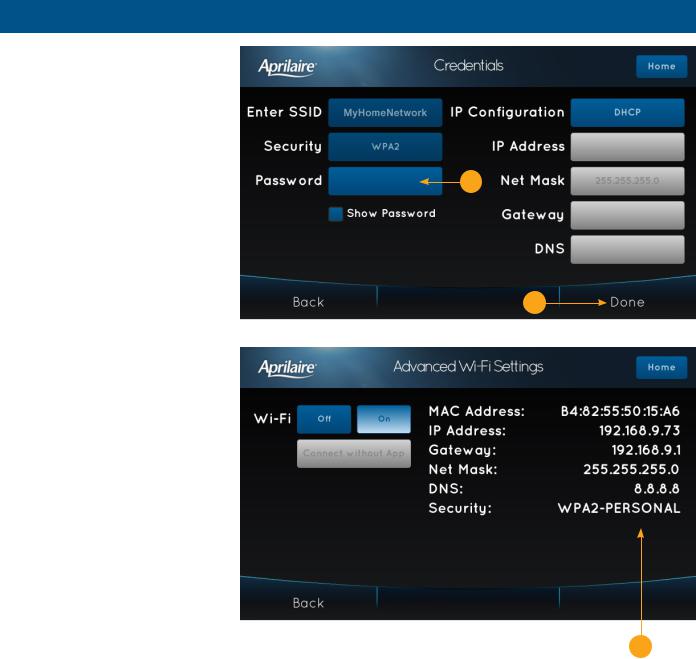
6.Touch the Password box to type in your home network’s password.. Touch Done when finished.. Touch Cancel to exit the password keyboard without saving any changes..
7.Touch Done when finished..
The thermostat will attempt to connect to your home network.. If it is not successful check your password and try again.. You can select Show Password to confirm you are using the correct password..
8.If the connection is successful, you will see the Advanced Wi-Fi Settings screen with the network values filled-in..
6
7
8
6
THERMOSTAT OPERATION
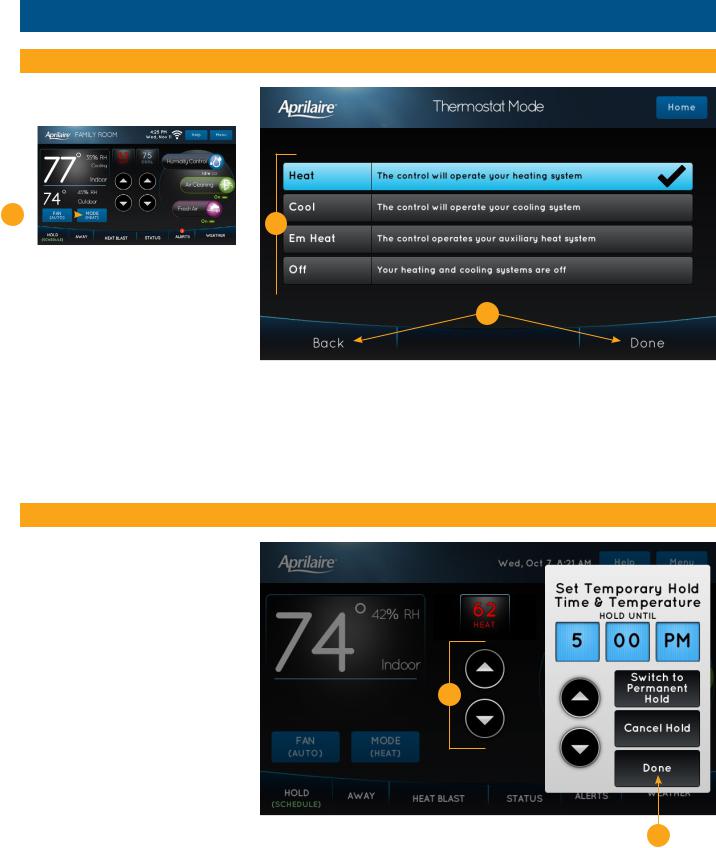
SELECT SYSTEM MODE
1.Touch MODE to open the Thermostat Mode screen..
1 |
|
|
2 |
|
|
|
|
|
|||
|
|
|
|
||
|
2. Select the desired mode.. |
|
|
|
|
|
3. Touch Done to save any changes.. |
|
|
|
|
|
|
|
|||
|
Touch Back to discard your changes.. |
3 |
|||
|
The thermostat will automatically |
|
|
|
|
|
discard your changes if one minute |
|
|
|
|
|
elapses without touching Done.. |
|
|
|
|
|
Note: Em Heat (Emergency Heat) is only |
|
|
|
|
|
applicable to heat pump installations.. |
|
|
|
|
CHANGE TEMPERATURE SETPOINT
1.Touch the  or
or  arrows to adjust the temperature setpoint.. The Set
Temporary Hold pop-up will appear..
2.Touch Done to save your changes..
See page 15 for information on temporary and permanent holds..
1
2
7
THERMOSTAT OPERATION
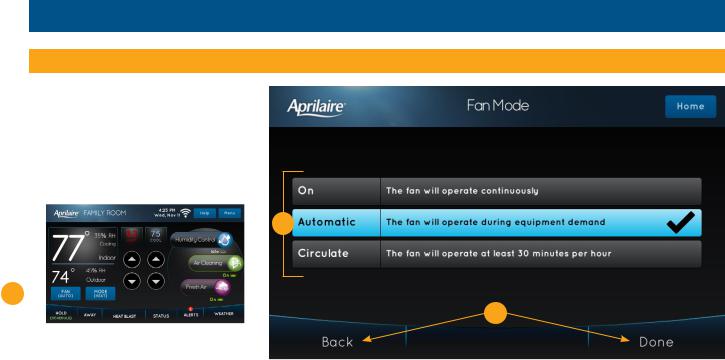
SELECT FAN SETTING
When the fan mode is changed during a scheduled event, it remains in that mode until the next event starts.. To learn about scheduled events, see pages 11-14..
1.Touch FAN to open the Fan Mode screen..
2
1 
3
2. Select the desired mode..
3.Touch Done to save any changes.. Touch Back to discard your changes..
The thermostat will automatically discard your changes if one minute elapses without touching Done..
8
THERMOSTAT OPERATION
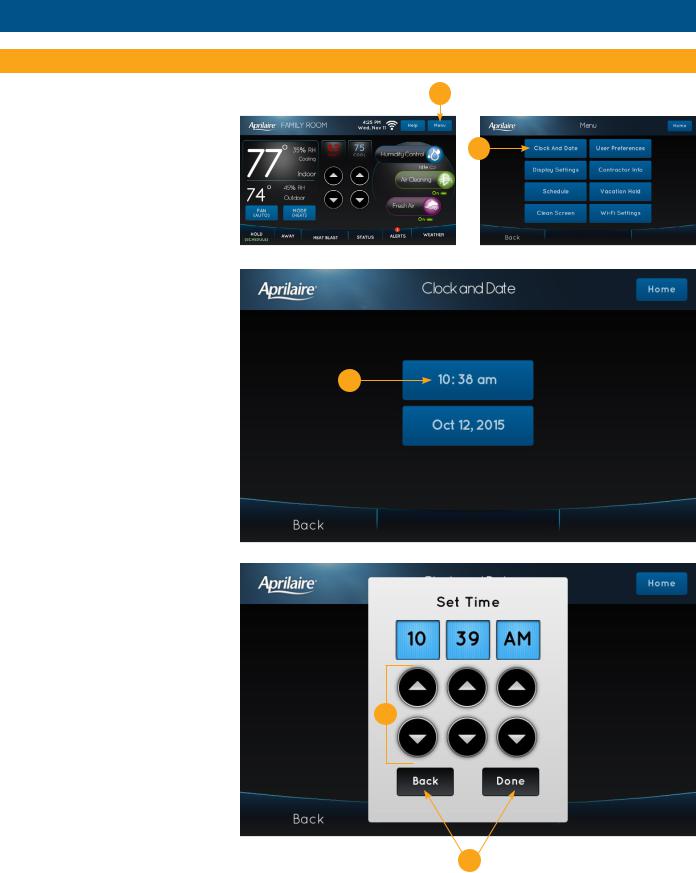
SET TIME AND DATE
The thermostat will automatically retrieve Time and Date from the internet (if connected).. If the thermostat is used without an internet connection the time can be manually adjusted..
1
2
To set the time:
1.Touch Menu to open the Menu screen..
2.Touch Clock And Date to open the
Clock and Date screen..
3.Touch the current time.. The Set Time pop-up will appear..
4.Touch the  or
or  arrows to set the correct hour, minutes and AM/PM..
5.Touch Done to save any changes..
Touch Back to discard your changes.. |
3 |
The thermostat will automatically discard your changes if one minute elapses without touching Done..
4
5
9
THERMOSTAT OPERATION
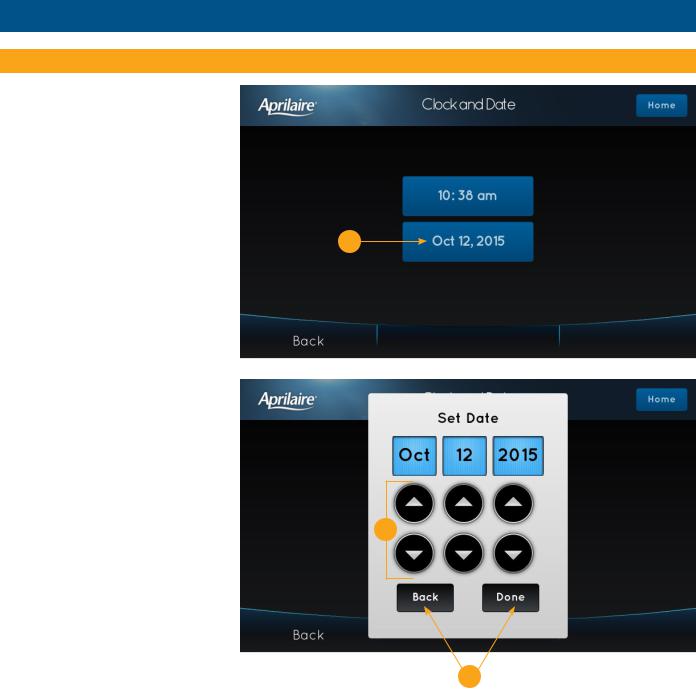
SET TIME AND DATE (continued)
To set the date:
6.Touch the current date.. The Set Date pop-up will appear..
7.Touch the  or
or  arrows to set correct month, date and year..
8.Touch Done to save any changes..
Touch Back to discard your changes.. The thermostat will automatically discard your changes if one minute elapses without touching Done..
6
7
8
10
SCHEDULE AND HOLDS
UNDERSTANDING SCHEDULES
The daily schedule is split into four events:
WAKE: Temperature when you wake up in the morning..
LEAVE: Temperature when you are away from the house.. RETURN: Temperature when you return home..
SLEEP: Temperature you would prefer while sleeping..
The times shown in the table below are the defaults.. These are the recommended settings, since they can reduce your heating/cooling expenses.. The fan mode is pre-set to AUTO for all events..
The start time, temperature and fan mode of each event can be changed to fit your specific schedule.. (See Changing Schedules section on pages 12-14..)
|
|
|
SET TEMPERATURE |
|
|
EVENT DESIGNATOR |
START TIME |
HEAT |
|
COOL |
FAN |
|
|
|
|
|
|
WAKE |
6:00 AM |
70°F (21°C) |
|
78°F (25..5°C) |
AUTO |
|
|
|
|
|
|
LEAVE |
8:00 AM |
62°F (16..5°C) |
|
85°F (29..5°C) |
AUTO |
|
|
|
|
|
|
RETURN |
5:00 PM |
70°F (21°C) |
|
78°F (25..5°C) |
AUTO |
|
|
|
|
|
|
SLEEP |
10:00 PM |
62°F (16..5°C) |
|
82°F (27..5°C) |
AUTO |
|
|
|
|
|
|
11

SCHEDULE AND HOLDS
CHANGING SCHEDULES
1.Touch Menu to open the Menu screen..
2.Touch Schedule to open the Set Schedule screen..
The current day of the week will be displayed on the Set Schedule screen.. From this screen you can change the start time, heat and cool setpoints, and fan mode for each event for this day of the week.. See page 14 for instructions on how you can copy this day's schedule to other days..
To set the start time:
3.Touch the event start time.. The Set
Time pop-up will appear..
4.Touch the  or
or  arrows to set the desired event start time..
5.Touch Done to save any changes..
Touch Back to discard your changes..
1
2
3
4
5
12
 Loading...