

Page 1

Quick Start
Xserve
For Cluster Node Servers
Important hardware and safety
information and guide to
server documentation
Page 2

Page 3

Overview of Xserve Hardware,
1
Setup, and Safety
This booklet provides an illustrated reference for your Xserve hardware and an orientation to
unpacking, setting up, and using your server. Use it as your “road map” to the procedures and
documents necessary to:
m
Install the server hardware in a rack
m
Work with server components
m
Set up Mac OS X Server software
m
Monitor server operations and make adjustments as needed
A list of documents that provide information and instructions for Xserve, with a description of
each document, appears in “Where to Find Instructions for Xserve Hardware and Software” on
page 13.
This booklet also includes instructions for installing or restoring server software from a remote
computer.
3
Page 4

Removing the Server From Its Packaging
To protect its precision components, the server is shipped in special packaging, with a
temporary plastic faceplate covering its front panel. You need to remove this faceplate before
opening the server or installing it in a rack.
Xserve is specifically designed for rack mounting. It is not designed for use as a desktop
computer.
Warning
Do not place a monitor or any other equipment on top of the server. Any
weight on the server’s case could damage the components inside the unit.
Note:
If at all possible, work with another person when handling the server.
Follow these steps to remove the server from its carton and remove the faceplate.
Open the carton, remove any foam or other packaging, and fold back the plastic covering the
1
server.
2
With one person holding the server on each side, carefully lift the unit and place it on a table.
4
Page 5
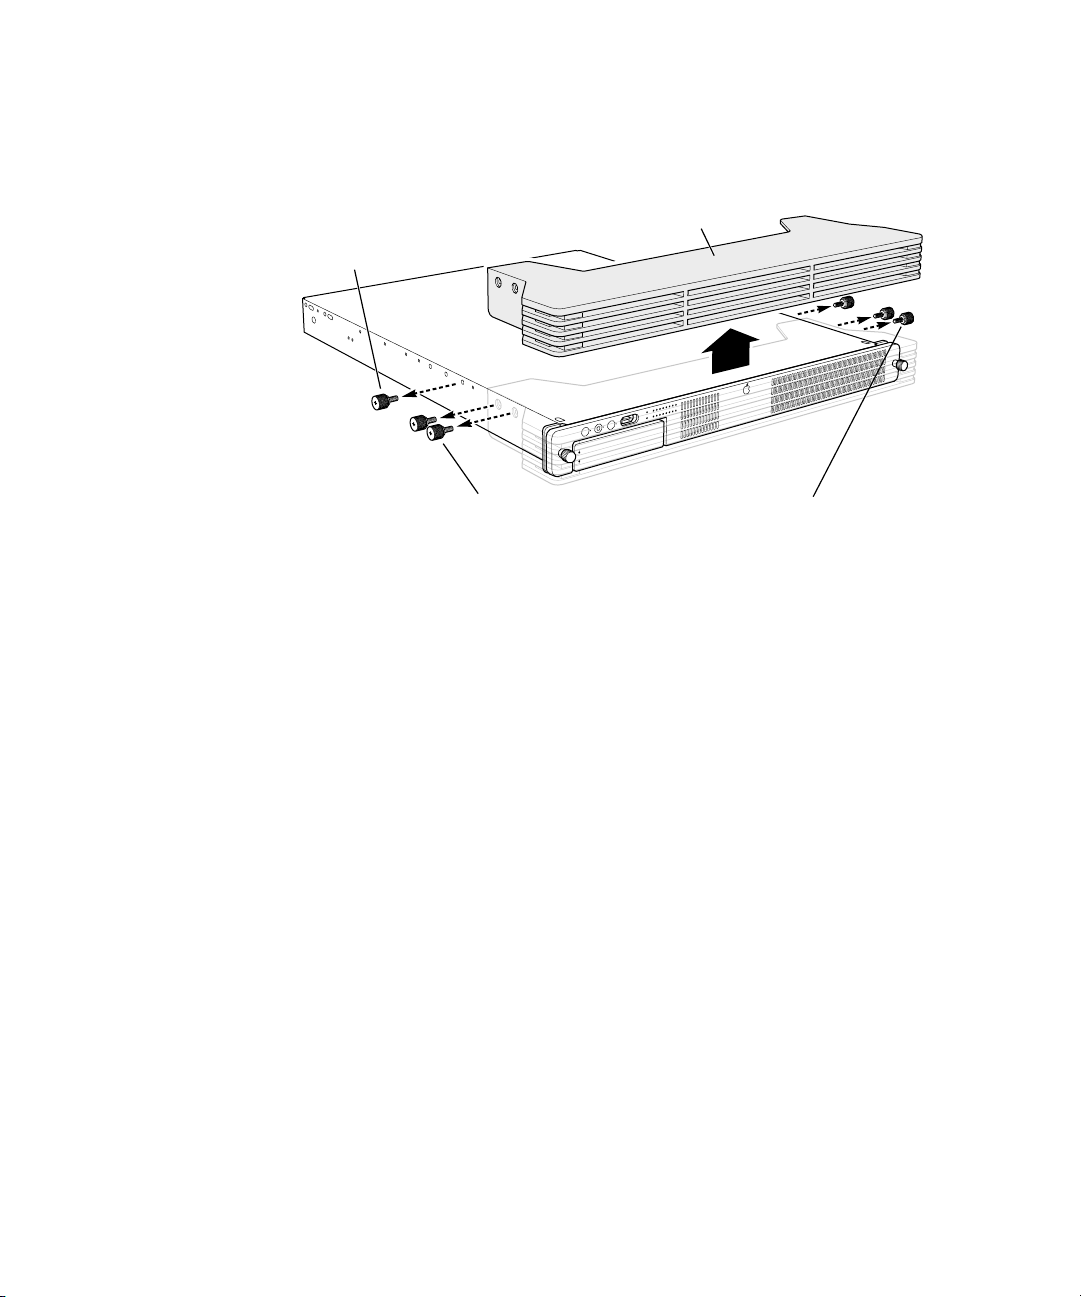
3
Remove the protective faceplate from the server’s front panel by unscrewing the
thumbscrews at each side of the faceplate and lifting it off. Remove the additional shipping
screws on either side of the server. (The shipping screws do not need to be reinstalled unless
you intend to transport your server.)
There is one screw on either
side of the server.
Remove the four thumbscrews that hold the protective faceplate
in place, and remove the faceplate by lifting it straight up.
4
Remove any plastic film from the front and rear of the server’s cover.
Protective faceplateRemove the two shipping screws.
See “Summary of Hardware Installation” on page 12 for more information about installing
the server in a rack.
Your Server Hardware
Your model of the Xserve system differs somewhat from the model illustrated in the
User’s Guide.
The illustrations on the pages that follow provide a reference for the specific
features of your server’s hardware.
Xserve
5
Page 6
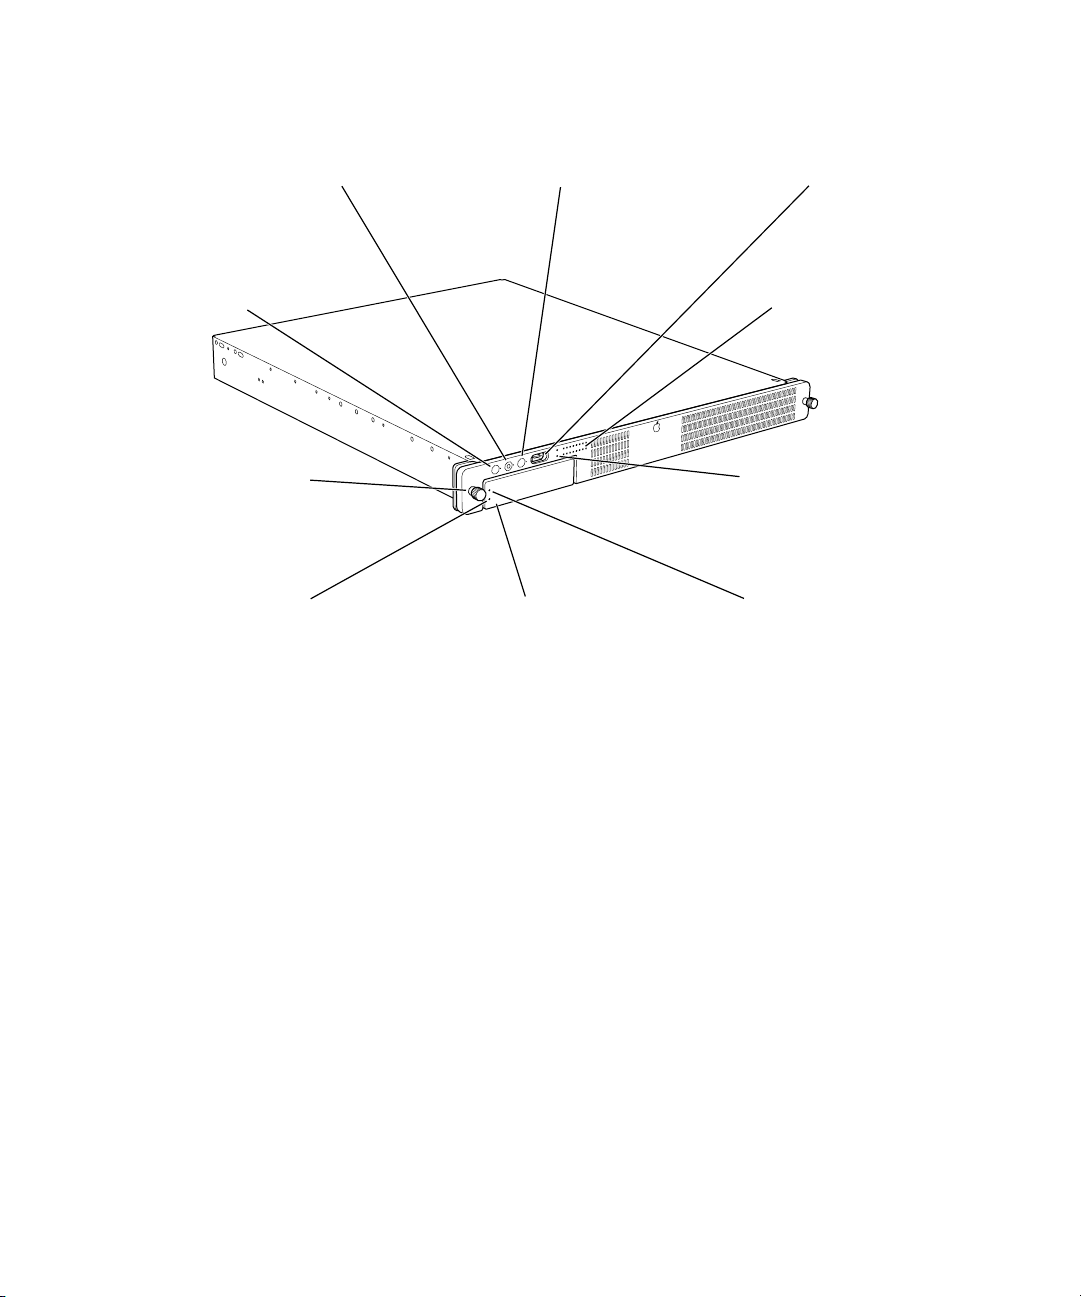
Your Server at a Glance—Front Panel
FireWire 400 portSystem identifier button/lightEnclosure lock and status light
Power button /light
Securing thumbscrews (2) Built-in Ethernet link light
Drive module activity light
System activity lights
Drive module status lightApple Drive Module bay
6
Page 7

Power button and light
®
Press to turn on the server.
Enclosure lock and lock status light
The lock secures the enclosure and drive modules in the server. It can be locked and
unlocked with the enclosure key supplied with the server.
When the enclosure lock is locked (the light is on), the server may not recognize
peripheral devices such as a keyboard, mouse, or storage device. Unlock the lock to use
those devices.
System identifier button and light
The system identifier light turns on if a problem is detected. It also can be turned on
manually by pressing the button. This indicator is useful for locating a particular unit in a
rack with multiple servers. A duplicate system identifier button and light are on the back
panel.
FireWire 400 port
Provides a FireWire 400 connection on the front of the server. There are also two FireWire
800 ports on the back panel. The enclosure lock must be unlocked for the server to
recognize some devices connected to this port. (See “FireWire Specifications” in
Appendix A of the
Xserve User’s Guide
for information about FireWire ports and
connectors.)
Built-in Ethernet link light
This light indicates an Ethernet link.
System activity lights
Two rows of eight lights indicate system activity. The rows of lights operate independently
to show each processor’s activity.
Drive module and lights
The drive module contains the server software and has lights showing operating status and
disk activity. You cannot install additional drive modules in this Xserve model.
7
Page 8

Your Server at a Glance—Back Panel
Gigabit Ethernet port System identifier button/lightPower socket
FireWire 800 ports (2) Serial console port
USB ports (2)
PCI card expansion slots (2)
8
Page 9

Power socket
≤
The power cord connects here; it is held in place by a special clip so that it stays connected
when the server is opened in the rack.
Gigabit Ethernet port
G
Connect your server to a high-speed Ethernet network. Ethernet ports adjust automatically
to the transmission speed supported by network components. The Ethernet port is built
in.
System identifier button and light
The system identifier light turns on if a problem is detected. It also can be turned on
manually by pressing the button. This indicator is useful for locating a particular unit in a
rack with multiple servers. A duplicate system identifier button and light are on the front
panel.
PCI card slots
You can install two 12-inch PCI cards in the server to connect peripheral devices. See
“About PCI Cards for the Server” in Chapter 5 of the
Xserve User’s Guide
for details. One or
two slots may come with cards installed at the factory.
FireWire 800 ports
Connect FireWire devices to the server. A FireWire 400 port is also located on the front
panel. The enclosure lock must be unlocked for the server to recognize some devices
connected to this port. (See “FireWire Specifications” in Appendix A of the
Guide
for information about FireWire ports and connectors.)
USB ports
Xserve User’s
Connect USB devices, such as a keyboard or mouse. The enclosure lock must be unlocked
for the server to recognize some devices connected to this port.
Serial console port
Connect a serial device or computer with a serial port. This console supports
RS-232–compatible connections.
9
Page 10

Your Server at a Glance—Interior
Power supplyBattery
PCI card slots (2)
RAM slots (4)
Chassis release latch
Blowers
Main logic board
Chassis
release latch
Serial number and
Ethernet MAC address label
10
Page 11

PCI card slots
You can install two 12-inch PCI expansion cards in the two slots. (See “About PCI Cards for
the Server” in Chapter 5 of the
Xserve User’s Guide
for more information about card
requirements.)
RAM expansion slots
You can expand DDR RAM up to 2 GB, using the four slots. (See “Adding Memory” in
Chapter 5 of the
Power supply
Xserve User’s Guide
for more information.)
The auto-switching power supply detects the input voltage and adjusts for it. A thermal
control adjusts the speed of the power supply’s fan as needed.
Blowers
The blowers cool the server during operation. Sensors detect and report if a blower needs
service. Software adjusts the blower’s speed as necessary.
Chassis release latches
Press these latches to slide the server to its full length when in the rack, or to remove it
from the cover.
Serial number and Ethernet MAC address label
You must use the system’s serial number and the Ethernet MAC address when you install
and set up the server software. Write down these numbers and keep them in a safe place. A
duplicate of this label is on the back of the system, below the PCI card expansion slots.
11
Page 12

Summary of Hardware Installation
Installing the server in a rack involves a series of steps. These include:
m
Unpacking the server and removing the protective faceplate from the front panel
m
Placing the server on a table or other flat surface and removing the top of the case
m
Locating and writing down the server’s hardware serial number and Ethernet MAC
address (necessary to log in for software setup)
m
Installing any optional internal components, such as RAM or an expansion card
m
Installing the top of the server’s case in a rack or cabinet (you can install Xserve in a fourpost rack or cabinet or a two-post telecommunications-style, or telco, rack)
m
Placing the server’s case in the rack or cabinet
m
Securing the server and locking the disk drives in place
m
Connecting the cable-management arm (four-post rack or cabinet only)
m
Connecting cables to the back panel and fitting them into the cable-management arm
m
Connecting peripheral devices to back-panel cables
m
Connecting a FireWire device to the front panel, if applicable
Important
Two people are required to install the server or to open the server before it is
installed in a rack.
Hardware for rack installation is provided; you need a medium-sized Phillips screwdriver.
Once the hardware is installed in a rack, you can turn on the server and set up the software.
See Chapter 3, “Installing Your Server in a Rack,” in the
Xserve User’s Guide
for detailed
instructions on installing the server in a rack.
See “Where to Find Instructions for Xserve Hardware and Software” on page 13 of this
booklet for additional details about the server documentation.
See “Installing or Restoring Software on Your Xserve System” on page 15 for several
suggested methods of installing or restoring software on your server.
12
Page 13

Considerations for Multiple Xserve Systems in a Rack
Because your Xserve system is designed for use with other Xserve units and additional
components in a rack, you must plan and provide adequate resources for all of these units.
Consider the combined requirements of your Xserve systems and other components for:
m
Electrical power and backup power
m
Operating environment
m
Access to the front and back of each system, as well as room to open the Xserve systems
m
Orderly management of cables for multiple components
m
Stability of the rack
m
Security for the rack’s location
See Chapter 2, “Preparing to Install Your Server,” in the
Xserve User’s Guide
for more
information about planning the installation of your Xserve systems.
Also consult the documentation for each additional component and for the rack to be certain
that your installation and resources meet their combined requirements.
Where to Find Instructions for Xserve Hardware and Software
Your server comes with several documents that provide instructions for installing and
maintaining the hardware, setting up the software, and monitoring and adjusting the server’s
operation. This section includes a description of each of the server documents.
In addition to this “quick start” booklet, the server’s learning materials include the following
documents and reference sources.
Note:
The system CD that came with the server contains electronic documentation in
PDF format.
Xserve User’s Guide
This printed book covers:
m
An overview of hardware components (showing a different model from your system)
m
Installing the server in a rack and turning it on (for all Xserve models)
m
Replacing or installing server components such as disk drives, RAM, and PCI cards
m
Connecting devices to the server
m
Managing cables connected to the server
13
Page 14

Getting Started With Mac OS X Server
This printed software guide provides information about the remote setup and monitoring
tools added to Mac OS X Server software. It covers:
m
Setup overview
m
Server system requirements
m
Overview of installation and setup options
m
Remote installation and setup instructions
m
Setting up basic services
m
Managing your server
The electronic version of this book is installed with the server software and is located in
/Library/Documentation/MacOSXServer/English. It is named “Getting Started.pdf.”
Mac OS X Server Administrator’s Guide
This electronic guide (PDF) is installed along with Mac OS X Server software. This guide
highlights the server’s services and tours its administration applications. It describes:
m
Directory services used to find information about users, groups, and devices on your
network
m
How to administer settings for server users and groups
m
How to share folders, hard disks, and CDs among users
m
File and print services
m
Client management for Mac OS 8, 9, and X computer users
m
How to set up and administer web and mail servers
m
Network services, such as DHCP and firewall
m
NetBoot and Network Install
m
Necessary details for using another vendor’s directory service information
14
This electronic book is installed into /Library/Documentation/MacOSXServer/English; it is
named “Admin Guide.pdf.”
On the Web
Be sure to check these websites for additional information:
m
www.apple.com/xserve
This site provides information about your server hardware and optional features.
m
www.apple.com/server
Check this site for documents that provide useful background on setting up and using the
server, including:
Page 15

m
Understanding and Using NetInfo, which describes the built-in Mac OS X directory
service and provides instructions for configuring NetInfo and Mac OS X Server
m Integrating Mac OS X With Active Directory, which describes how you can use the
information stored in Microsoft’s Active Directory to authenticate Macintosh users and
provide file services and home directories for them on Mac OS X Server
m Upgrading to Mac OS X Server, which contains guidelines for migrating data and
settings being used on existing servers
Software Update for Xserve
Depending on the software version installed on your Xserve system, you may need to
download and install a software update. You can get automatic software updates by using the
software update command-line tool (when logged in remotely as “root”). This procedure lists
any available updates for your system; you can choose the appropriate update. See the
Mac OS X Server documentation for additional information.
For best performance, keep your system current with the latest software updates.
Installing or Restoring Software on Your Xserve System
Mac OS X Server is preinstalled on the drive module of your Xserve system. If the software
has a problem or you need to reinstall or restore the server software, you can use one of
several methods to complete installation.
All of these installation methods involve using a remote computer or another Xserve system.
Note: For any method that uses command-line tools, you must be logged in as root.
The installation methods include:
m Removing the drive module from your Xserve system and using another Xserve system
that has an optical drive to install the software on that drive module
m Starting up from an external FireWire optical drive that has the Mac OS X Server install
disc in it
m Putting the Xserve system in target disk mode and connecting a PowerBook, iBook, or
other Mac by means of a FireWire port on the Xserve system
m Installing the software over the network, using a NetBoot image or using the command-
line tool Apple Software Restore (asr)
Important Remote installation of Mac OS X Server erases the target volume. Be sure to
back up other information on that volume.
15
Page 16

Using a Second Xserve System to Install Server Software
This is a simple method for installing or restoring software, but you must have a second
Xserve system with an optical drive to do it. You can install software with a second system
using either of these methods:
m The Terminal application and command-line tools
m Server Assistant
To use a second Xserve system and command-line tools:
1 Shut down your Xserve system and remove its drive module.
2 On a second Xserve system, unmount and remove one of the drive modules (or a blank
module) and insert the drive module from your system.
Note: You should not remove the startup drive module from the second system.
3 Insert the server install CD that came with your Xserve system in the second system’s optical
drive.
4 Use an administrator computer to log in to the second system as root.
See Chapter 17, “Tools for Advanced Administrators,” in the Mac OS X Server
Administrator’s Guide for more information about using command-line tools with the
Terminal application.
5 As the root user type the following command:
% installer
-pkg /Volumes/Mac\OS\X\Server\Install\CD/System/Installation/
Packages/OSInstall.mpkg
-target /Volumes/<the name of the disk to be restored>
-lang <English, Japanese, German or French>
6 While still logged in as root, open System Preferences on the second Xserve system and
select the original startup volume for that system.
You must change the startup disk because the remote installation set the drive you inserted
into the second system as its startup disk.
7 Unmount the volume on which you just restored the software.
8 Remove the drive module with the restored software from the second system, put it in your
Xserve system, and restart the system.
9 Replace the drive module or the blank module you removed from the second Xserve system
and restart that system.
16
Page 17

To use a second Xserve system and Server Assistant:
1 Shut down your Xserve system and remove its drive module.
2 On a second Xserve system, unmount and remove one of the drive modules (or a blank
module) and insert the drive module from your system.
Note: You should not remove the startup drive module from the second system.
3 Insert the server install CD that came with your Xserve system in the second system’s optical
drive.
4 Restart the second Xserve system from the server install CD using one of these procedures:
m If the system has a tray-loading optical drive, hold in the system identifier button as you
press the power button. Continue holding in the system identifier button until the drive
tray opens. Insert the server install disc and close the tray.
m If the system has a slot-loading optical drive, use the front panel mode to start up from
the optical drive. See “Using Front Panel Mode on an Xserve System” on page 19 for
instructions; use light 1.
5 Do one of the following:
m Use Server Assistant on a remote computer to install the software on the drive module
from your Xserve system. (See “Remote Installation” in Chapter 1 of Getting Started With
Mac OS X Server for details.)
m If you have a monitor and keyboard available for the second Xserve, double-click “Install
Mac OS X Server.”
When software installation is complete, the second system will restart.
6 Quickly remove your drive module from the second system before that system finishes
starting up.
7 Insert the drive module in your Xserve system and start it up.
8 Use the administration tools on a remote computer to finish setting up your server.
Starting Up From an External FireWire Optical Drive
If you have an external optical drive with a FireWire port, you can use it to start up your
Xserve system from the Mac OS X Server install disc. Once you’ve started up from the
external drive, you can use Server Assistant on a remote computer to install the software.
To start up from an external optical drive:
1 Shut down your Xserve system.
2 Press the handle of the drive module to open it, which assures that the drive won’t be
recognized during startup.
3 Connect the external optical drive to the FireWire port on the system’s front panel.
17
Page 18

4 Turn on the optical drive and insert the server install disc.
5 Start up your Xserve system.
After a few moments, the system begins starting up from the disc in the optical drive.
6 When you hear the disc in the optical drive beginning to start up the system, press the
handle on the drive module to close it.
The drive module must be recognized as the system starts up so that you can install the
server software on it.
7 Use Server Assistant on a remote computer to install the software on the drive module in
your Xserve system. (See “Remote Installation” in Chapter 1 of Getting Started With
Mac OS X Server for details.)
8 Unmount the volume on which you just installed the software.
9 Turn off the system by holding in the power button for 5 seconds.
Connecting Another Mac With the Xserve System in Target Disk Mode
You can also connect a PowerBook, iBook, Xserve, or other Mac directly to your Xserve
system. The computer you connect must have a FireWire port and an optical drive, and the
Xserve system must be in target disk mode.
Note: The default name of the server’s startup volume is Server HD. If you connect another
server to your Xserve system, you may want to change the name of its startup volume
temporarily to avoid having two disks with that name when you want to install.
To put your system into target disk mode and connect a Mac to it:
1 Remove any FireWire devices that are connected to the Xserve system.
2 Use the front panel mode to put the system into target disk mode. See “Using Front Panel
Mode on an Xserve System” on page 19 for instructions; use light 5.
3 Connect a PowerBook, iBook, or other Mac to the FireWire port on the system’s front panel.
4 Turn on the connected computer and insert the server install disc.
The Xserve system’s drive or volumes mount on the connected computer.
5 Begin the installation process from the server install disc and install on the mounted volume
of your installation drive.
Note: You can use either Server Assistant or the Terminal application and command-line
tools to control the installation.
See Chapter 17, “Tools for Advanced Administrators,” in the Mac OS X Server
Administrator’s Guide for more information about using command-line tools with the
Terminal application.
18
Page 19

Using Front Panel Mode on an Xserve System
Xserve systems with a slot-loading optical drive have a method of entering limited commands
using the system identifier button on the front panel.
To use any of the available boot commands (listed after step 3):
1 With the power off, hold in the system identifier button while you press the power button.
2 Continue holding in the system identifier button until the top row of blue lights blinks
sequentially and the rightmost light in the bottom row turns on.
3 Release the system identifier button, then press it again to light the next button in the
bottom row, moving from right to left. Press the button again to change lights.
The lights in the bottom row indicate (from right to left):
m Light 1 (far right): Start up from the system disc (on models with an optical drive)
m Light 2: Start up from a network server (NetBoot)
m Light 3: Start up from the internal drive
m Light 4: Bypass the current startup disk and start up from any other available startup disk
m Light 5: Begin target disk mode (all volumes will show up)
m Light 6: Restore the system’s default settings (reset NVRAM)
m Light 7: Enter Open Firmware (via the serial port if no monitor and keyboard are
connected)
4 When the light for the action you want is on, hold in the system identifier button for at least
2 seconds, until all lights in the top row are on.
5 Release the button.
Installing and Restoring from a Network Server
You can use a remote computer to install server software on one system or on many systems.
Two methods that are especially useful for installations on multiple Xserve systems are
Network Install and the Apple Software Restore (asr) command.
For more information about using command-line tools, see Chapter 17, “Tools for Advanced
Administrators,” in the Mac OS X Server Administrator’s Guide. For details on starting up or
installing over the network, see Chapter 12, “NetBoot,” and Chapter 13, “Network Install,” in
the Mac OS X Server Administrator’s Guide.
19
Page 20

© 2003 Apple Computer, Inc. All rights reserved. Apple, the Apple logo, FireWire, the FireWire logo, iBook, Mac,
Mac OS, Macintosh, PowerBook, and QuickTime are trademarks of Apple Computer, Inc., registered in the U.S. and
other countries. Xserve is a trademark of Apple Computer, Inc.
034-2262-A
Printed in U.S.A.
 Loading...