

Page 1

Xsan 2
Setup Guide
Page 2

Apple Inc.
K PowerPC
© 2008 Apple Inc. All rights reserved.
Under the copyright laws, this manual may not be copied,
in whole or in part, without the written consent of Apple.
The Apple logo is a trademark of Apple Inc., registered in
the U.S. and other countries. Use of the “keyboard” Apple
logo (Option-Shift-K) for commercial purposes without the
prior written consent of Apple may constitute trademark
infringement and unfair competition in violation of federal
and state laws.
Every eort has been made to ensure that the information
in this manual is accurate. Apple is not responsible for
printing or clerical errors.
Apple
1 Innite Loop
Cupertino, CA 95014-2084
408-996-1010
www.apple.com
Apple, the Apple logo, Mac, the Mac logo, Macintosh,
Mac OS, Xsan, and Xserve are trademarks of Apple Inc.,
registered in the U.S. and other countries.
Finder is a trademark of Apple Inc.
Intel, Intel Core, and Xeon are trademarks of Intel Corp. in
the U.S. and other countries.
International Business Machines Corporation, used under
license therefrom.
Other company and product names mentioned herein
are trademarks of their respective companies. Mention
of third-party products is for informational purposes
only and constitutes neither an endorsement nor a
recommendation. Apple assumes no responsibility with
regard to the performance or use of these products.
The product described in this manual incorporates
copyright protection technology that is protected
by method claims of certain U.S. patents and other
intellectual property rights owned by Macrovision
Corporation and other rights owners. Use of this copyright
protection technology must be authorized by Macrovision
Corporation and is intended for home and other
limited viewing uses only unless otherwise authorized
by Macrovision Corporation. Reverse engineering or
disassembly is prohibited.
Apparatus Claims of U.S. Patent Nos. 4,631,603, 4,577,216,
4,819,098 and 4,907,093 licensed for limited viewing uses
only.
Simultaneously published in the United States and
Canada.
034-4261-A/2008-01-16
™
and the PowerPC logo™ are trademarks of
Page 3

Contents
5 Setting Up a SAN
5 Is This the Right Guide for You?
6 Equipment You’ll Need
7 What You Need to Know
9 SAN Setup Instructions
9 Step 1: Unpack and Install the SAN Hardware
10 Step 2: Connect the SAN Networks
11 Step 3: Set Up the Client Computers
14 Step 4: Set Up the Standby Metadata Controller
17 Step 5: Set Up the RAID Systems
17 Step 6: Create a Metadata Array
18 Step 7: Set Up the Primary Metadata Controller
22 Step 8: Congure the SAN
31 Step 9: Set Up a SAN Volume
36 What’s Next?
3
Page 4

Page 5

Setting Up a SAN
Follow the instructions in this guide to set up a volume on a storage area network
(SAN) using Xsan 2.
Is This the Right Guide for You?
To keep setup instructions simple, this guide assumes:
You are setting up a SAN for the rst time using new computers and RAID systems
Â
right out of the box
You’ll let Xsan set up a SAN directory service on your metadata controllers
Â
You’ll use the Mac OS X Server setup assistant to create SAN user accounts
Â
You’ll choose a standard SAN volume type and let Xsan organize your storage pools
Â
You’ll let the Xsan setup assistant congure your private metadata network settings
Â
If you want to reuse existing computers while following this guide, you need to
perform a clean installation of Mac OS X v10.5 or Mac OS X Server v10.5 or later on each
of the computers before you begin.
If you want more control over the underlying organization of your SAN volumes or
directory services, you can nd more general instructions in the Xsan 2 Administrator’s
Guide on the Xsan Install Disc and at www.apple.com/server/documentation.
5
Page 6

If you already have a SAN that you want to upgrade to Xsan 2, you’ll nd instructions in
the Xsan 2 Migration Guide at www.apple.com/server/documentation.
Equipment You’ll Need
To set up a SAN using the instructions in this guide, you need:
RAID storage devices for SAN storage
Â
Two computers running Mac OS X Server v10.5 to act as SAN metadata controllers
Â
One or more SAN client computers running Mac OS X v10.5 or Mac OS X Server v10.5
Â
An Intel or PowerPC G5 processor and at least 2 GB of RAM in each SAN computer
Â
An additional 2 GB per SAN volume in each metadata controller that hosts more
Â
than one SAN volume
An Apple Fibre Channel PCI, PCI-X, or PCI-E card installed in each SAN computer
Â
A Fibre Channel switch and cables for all storage devices and computers
Â
An Ethernet switch and cables for the private SAN metadata network
Â
A second Ethernet switch and cables for public intranet and Internet access
Â
An equipment rack for your RAID storage systems and Xserve computers
Â
A list of qualied RAID systems and Fibre Channel switches is available on the Xsan
website at www.apple.com/xsan
6 Setting Up a SAN
Page 7

What You Need to Know
You’ll need to provide the following information when you set up your SAN:
A static (xed) public IP address, subnet mask, router address, and DNS server
Â
address for each computer on the SAN. You can enter this information manually or
congure a DHCP server to provide some or all of it. If you want the DHCP server
to provide IP addresses, it must always assign the same IP address to each SAN
computer.
A single user name and password that will be used for the administrator account on
Â
all SAN computers.
A unique user name and password for each user who will log in to a client computer.
Â
An Xsan serial number for each computer on the SAN.
Â
Setting Up a SAN 7
Page 8
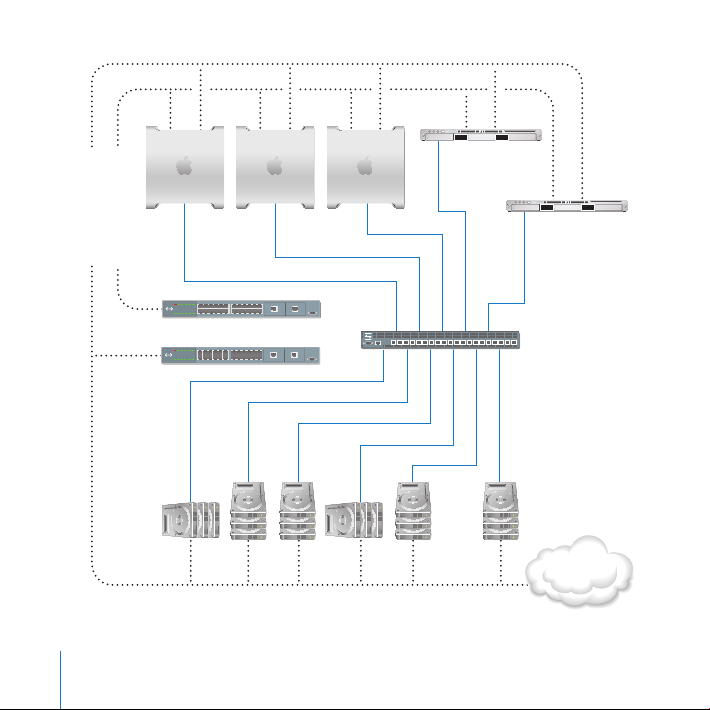
Metadata
controller
Clients
Standby
controller
Fibre
Channel switch
Ethernet (public)
Ethernet (private)
Intranet/
Internet
Ethernet switches
Metadata RAID
array (LUN)
RAID
arrays
(LUNs)
8 Setting Up a SAN
Page 9

SAN Setup Instructions
Follow the instructions on the following pages to set up your SAN for the rst time.
Summary
1 Unpack and Install the SAN Hardware
2 Connect the SAN Networks
3 Set Up the Client Computers
4 Set Up the Standby Metadata Controller
5 Set Up the RAID Systems
6 Create a Metadata Array
7 Set Up the Primary Metadata Controller
8 Congure the SAN
9 Set Up a SAN Volume
Step 1: Unpack and Install the SAN Hardware
To install the components of your SAN, follow the instructions that come with each
computer, RAID storage system, and switch. Don’t turn on any of the equipment until
you are instructed to do so.
1 Unpack each computer that will be part of the SAN.
2 If you need to install Fibre Channel or Ethernet cards in any of the computers, follow
the instructions that come with the computer to install the card.
3 If you are using Xserve computers, follow the instructions that come with them to
install them in a rack.
Setting Up a SAN 9
Page 10

4 Unpack the RAID systems that will provide your SAN storage and follow the
instructions that come with the systems to install them in a rack.
5 Unpack and install the Fibre Channel switch, following the instructions that come with
the switch.
6 Unpack and install the Ethernet switches for the SAN’s private metadata network and
public intranet or Internet connections.
Step 2: Connect the SAN Networks
Use Fibre Channel and Ethernet cables to connect the SAN computers and storage
devices to the Fibre Channel and Ethernet switches. Apple-qualied switches are ready
to use right out of the box with no special conguration.
1 Turn on the Fibre Channel switch and connect each SAN computer to the switch using
one or two Fibre Channel cables.
2 Connect the Fibre Channel ports on each RAID storage unit to the Fibre Channel
switch. For details, see the instructions that come with the RAID system.
3 Turn on the Ethernet switches and connect the rst Ethernet port on each SAN
computer to the public Ethernet switch using an Ethernet cable.
4 Connect the second Ethernet port on each SAN computer to the private metadata
Ethernet switch using a second Ethernet cable.
5 Connect the Ethernet ports on each RAID storage system to the public Ethernet switch.
For details, see the instructions that come with the RAID storage system.
10 Setting Up a SAN
Page 11

Step 3: Set Up the Client Computers
Now you’ll go to each client computer to set up an administrator account, congure
network settings, and install the Xsan software. The procedure diers based on
whether the client has Mac OS X or Mac OS X Server installed. Use one of the next two
procedures—“If a Client Has Mac OS X Installed” or “If a Client Has Mac OS X Server
Installed”—as appropriate on each client computer on the SAN. When you nish
setting up the client computers, they are ready to join the SAN and will be detected
automatically during SAN setup.
After you nish setting up client computers, go on to Step 4, “Set Up the Standby
Controller Metadata.“
If a Client Has Mac OS X Installed
1 Turn on the client computer.
2 Follow the Mac setup assistant’s onscreen instructions to set up the computer. Pay
special attention to the information in the following panes:
Select Your Admin Account: If this pane appears, select “Create a local user account to
administer this computer.”
Connect to Mac OS X Server: If this pane appears, deselect the “Use the following
Mac OS X Server” option and click Continue.
Create Your Account: Enter the administrator account name and password that you
plan to use on all SAN computers. To simplify SAN setup, use the same administrator
name and password on all computers in the SAN.
3 When the Mac setup assistant nishes and the Finder appears, choose System
Preferences from the Apple () menu.
Setting Up a SAN 11
Page 12

4 Click Network and select the rst Ethernet port, which should be connected to your
public intranet and the Internet. Choose a conguration method from the pop-up
menu and then enter the appropriate settings for the client computer. See “What You
Need to Know” on page 7. You can choose:
Manually, and then enter the static public IP address, subnet mask, router address,
Â
and DNS server address for the client computer
Using DHCP with manual address, and then enter the client computer’s IP address,
Â
if your DHCP server will provide the other TCP/IP connection settings
Using DHCP, if your DHCP server will provide the client computer a static IP address
Â
and the other connection settings
Don’t congure the port connected to the private metadata network—the Xsan setup
assistant will congure it for you.
5 In Date & Time preferences, congure the computer to set the date and time
automatically using a time server.
6 Insert the Xsan Install Disc, double-click the Install Xsan.mpkg icon, and then follow the
onscreen instructions to install the Xsan software on the client computer.
7 Eject the Xsan Install Disc.
If a Client Has Mac OS X Server Installed
1 Turn on the client computer.
2 Follow the Mac OS X Server setup assistant’s onscreen instructions to set up the
computer. Pay special attention to the information in the following panes:
Server Conguration: Select Advanced.
12 Setting Up a SAN
Page 13

Administrator Account: Enter the same account name and password on all of your
client computers.
Network Address: If this pane appears, select “No, congure network settings
manually.”
Network Interfaces: Enable only the public Ethernet port. Disable the Ethernet port
connected to the private metadata network—the Xsan setup assistant will congure it
for you. If you are setting up an Intel-based Xserve, you can also enable the lights-out
management port.
TCP/IP Connection (public Ethernet port): Choose a conguration method from the
pop-up menu and then enter the appropriate settings for the client computer. See
“What You Need to Know” on page 7. You can choose:
Manually, and then enter the static public IP address, subnet mask, router address,
Â
and DNS server address for the client computer
Using DHCP with manual address, and then enter the client computer’s IP address,
Â
if your DHCP server will provide the other TCP/IP connection settings
Using DHCP, if your DHCP server will provide the client computer a static IP address
Â
and the other connection settings
Time Zone: To ensure consistent time metadata across all computers in the SAN,
choose a network time server for your client computers.
3 Insert the Xsan Install Disc, double-click the Install Xsan.mpkg icon, and then follow the
onscreen instructions to install the Xsan software on the client computer.
4 Eject the Xsan Install Disc.
Setting Up a SAN 13
Page 14

Step 4: Set Up the Standby Metadata Controller
Now set up the standby metadata controller. This computer must have Mac OS X Server
installed but not yet set up.
1 Turn on the computer you are using as the standby metadata controller.
2 Follow the Mac OS X Server setup assistant’s onscreen instructions to congure the
computer. Pay special attention to the settings in the following panes:
Server Conguration: Select Xsan Metadata Controller.
14 Setting Up a SAN
Page 15

Administrator Account: Enter the same account name and password that you used on
all of your client computers.
Network Address: If this pane appears, select “No, congure network settings
manually.”
Network Interfaces: Enable only the public Ethernet port. Disable the Ethernet port
connected to the private metadata network—it will be detected and congured by the
Xsan setup assistant. If you are setting up an Intel-based Xserve, you can also enable
the lights-out management port.
TCP/IP Connection (public Ethernet port): Choose a conguration method from
the pop-up menu and then enter the appropriate settings for the standby metadata
controller. See “What You Need to Know” on page 7. You can choose:
Manually, and then enter the static public IP address, subnet mask, router address,
Â
and DNS server address for the computer
Using DHCP with manual address, and then enter the computer’s IP address, if your
Â
DHCP server will provide the other TCP/IP connection settings
Time Zone: To ensure consistent time metadata across all computers in the SAN,
choose the same network time server you chose for your client computers.
Setting Up a SAN 15
Page 16

Xsan Controller Type: Select Standby Xsan Metadata Controller.
3 When prompted, insert the Xsan Install Disc and follow the onscreen instructions to
install Xsan.
The standby metadata controller is now ready to join the SAN and will be automatically
detected by the primary metadata controller during SAN setup.
16 Setting Up a SAN
Page 17

Step 5: Set Up the RAID Systems
Now congure your RAID systems. Xsan sees the RAID arrays provided by the RAID
systems as Fibre Channel logical unit numbers (LUNs) that can be combined to create
SAN volumes.
1 Follow the instructions that come with your RAID systems to turn them on and
congure their network, management, and security settings.
2 If your RAID systems come with RAID sets already congured, they’ll be automatically
detected during SAN setup, and you can skip to Step 6, “Create a Metadata Array.”
Otherwise, use the management software that comes with the RAID system to create
arrays that are the same size, leaving three drives on one system unassigned so you can
create a small, separate metadata LUN as described in the next step.
Step 6: Create a Metadata Array
Ten gigabytes (GB) of disk space is enough to store the metadata for a volume
containing 10 million les, so a two-drive RAID 1 (mirrored) array is generally large
enough to store the metadata for your SAN volume. If you dedicate a spare drive to this
array to guarantee availability, then three drives are adequate for your SAN metadata.
If all of your RAID arrays consist of four or more drives, you can follow these steps to
convert one of these existing arrays into a small metadata array so you can reuse the
extra drives.
1 If you don’t have three spare drives or if all of the drives in your RAID systems already
belong to RAID arrays, use the management application for your RAID system to delete
an existing array. You can run the application on the standby metadata controller or on
a client that you’ve already set up.
2 Use two of the drives to create a new two-drive RAID 1 (mirrored) array.
Setting Up a SAN 17
Page 18

3 Assign a third drive as a dedicated spare for the array.
4 You can use any leftover drives from the original array to create a separate array, or save
them for use as spares.
You now have a new two-drive RAID 1 array for storing SAN metadata. You’ll add this
LUN to your metadata storage pool when you create your SAN volume.
Step 7: Set Up the Primary Metadata Controller
Now that you’ve prepared your SAN clients, standby metadata controller, and RAID
storage systems, you’re ready to set up the primary metadata controller. This computer
must have Mac OS X Server installed but not yet set up.
1 Turn on the computer that will be the primary metadata controller.
2 Follow the Mac OS X Server setup assistant’s onscreen instructions to congure the
computer. Pay special attention to the following panes:
18 Setting Up a SAN
Page 19

Server Conguration: Select Xsan Metadata Controller.
Administrator Account: Enter the same administrator account name and password
that you used for your SAN clients and standby metadata controller.
Network Address: If this pane appears, select “No, congure network settings
manually.”
Setting Up a SAN 19
Page 20

Network Interfaces: Enable only the public Ethernet port. Disable the Ethernet port
connected to the private metadata network—the Xsan setup assistant will congure it
for you. If you are setting up an Intel-based Xserve, you can also enable the lights-out
management port.
TCP/IP Connection (public Ethernet port): Choose a conguration method from
the pop-up menu and then enter the appropriate settings for the primary metadata
controller. See “What You Need to Know” on page 7. You can choose:
Manually, and then enter the static public IP address, subnet mask, and router
Â
address for the computer
Using DHCP with manual address, and then enter the computer’s IP address, if your
Â
DHCP server will provide the other TCP/IP connection settings
Time Zone: To ensure consistent le metadata, choose the same network time server
you chose for the other computers in the SAN.
20 Setting Up a SAN
Page 21

Xsan Controller Type: Select Primary Xsan Metadata Controller.
Users and Groups: Select “Manage users and groups with Xsan Admin.”
Add User Accounts: Select “Add new user accounts now.”
Add New User Accounts: Enter a user name, short name, and password for each user
who will log in to a client computer.
Setting Up a SAN 21
Page 22

3 When prompted, insert the Xsan Install Disc and follow the onscreen instructions to
install Xsan.
When Xsan nishes installing, the Xsan setup assistant opens automatically. Continue
with the next step.
Step 8: Congure the SAN
The Xsan setup assistant opens automatically when basic server conguration and
Xsan installation are complete. Follow these steps to enter basic SAN settings.
1 In the Introduction pane, click Continue.
22 Setting Up a SAN
Page 23

2 In the Initial SAN Setup pane, select “Congure new SAN.”
Setting Up a SAN 23
Page 24

3 In the SAN Settings pane, type a name for the SAN, and then enter the SAN
administrator’s name and email address.
24 Setting Up a SAN
Page 25

4 In the Add Computers pane, make sure all the computers that you want to be in the
SAN are selected.
If a computer you want to include isn’t listed, make sure you have installed Xsan on
that computer, check that it is connected to both Ethernet networks, and check the
network settings in the computer’s Network preferences.
You can also click Add Remote Computer to add computers manually.
Setting Up a SAN 25
Page 26

5 In the Authenticate SAN Computers pane, select “Use same authentication information
for all SAN Computers” and enter the user account name and password you entered on
the clients and the standby metadata controller.
26 Setting Up a SAN
Page 27

6 In the Serial Numbers pane, enter your Xsan serial numbers.
You can click Add Serial Number and type a number, or drag a text le containing serial
numbers to the list.
Setting Up a SAN 27
Page 28

7 In the Choose Metadata Controllers pane, select only your primary and standby
metadata controllers. Deselect any client-only computers that appear in the list.
28 Setting Up a SAN
Page 29

8 In the Private Metadata Network pane, select “Yes, manage private Ethernet network
settings.”
Setting Up a SAN 29
Page 30

9 Review the Summary pane, and if all settings are correct, click Continue.
To change a setting, click Go Back until you reach the pane where you can correct the
setting. Then click Continue until you return to the Summary pane.
30 Setting Up a SAN
Page 31

Step 9: Set Up a SAN Volume
When the Xsan setup assistant nishes basic SAN conguration, it asks if you want to
set up a volume.
1 In the “Create Volume” pane, select “Create a volume now” and click Continue.
Setting Up a SAN 31
Page 32

2 In the “Volume Name and Type” pane, type a name for the volume and choose a
volume type that matches the type of work the volume will support.
3 If the Label LUNs pane appears, select “Automatically label all unlabeled LUNs with
prex” and click Continue. When the list of labeled LUNs appears, verify the LUN labels
and click Continue.
32 Setting Up a SAN
Page 33

4 In the Congure Volume Anities pane, drag LUNs from the left column to the
corresponding anity tag in the right column.
a Drag the special metadata LUN you created (in Step 6, “Create a Metadata Array“) to
the MetadataAndJournal anity tag.
b Drag your other LUNs to the other anity tags. To avoid wasting storage, all LUNs
assigned to an anity tag should be the same size.
c When you nish, click Continue.
Setting Up a SAN 33
Page 34

5 In the Volume Failover Priority pane, ensure that the primary metadata controller is at
the top of the list, and then click Continue.
34 Setting Up a SAN
Page 35

6 In the Setup Complete pane, click Continue.
Xsan Admin displays a summary of your SAN conguration and the new volume is
mounted and ready to use in the Finder on all clients and metadata controllers.
Setting Up a SAN 35
Page 36

What’s Next?
Your SAN volume is now ready to use. When any SAN user logs in to a client
computer, they’ll see the volume in the Finder. For information about using and
managing the SAN, see the Xsan 2 Administrator’s Guide on the Xsan Install Disc and
at www.apple.com/server/documentation. This guide includes topics such as:
Controlling access to les and folders on SAN volumes
Â
Setting folder anities
Â
Managing available space with user quotas
Â
Monitoring the status of the SAN and its volumes
Â
You can also nd information about these and other tasks in the onscreen help.
Open Xsan Admin and choose Help > Xsan Admin Help.
36 Setting Up a SAN
 Loading...