

Page 1
NewFeaturesin
LogicPro7. 2
Page 2

K
Apple Computer, Inc.
© 2006 Apple Computer, Inc. All rights reserved.
Under the copyright laws, this manual may not be
copied, in whole or in part, without the written consent
of Apple.
The Apple logo is a trademark of Apple Computer, Inc.,
registered in the U.S. and other countries. Use of the
“keyboard” Apple logo (Option-Shift-K) for commercial
purposes without the prior written consent of Apple
may constitute trademark infringement and unfair
competition in violation of federal and state laws.
Every effort has been made to ensure that the
information in this manual is accurate. Apple is not
responsible for printing or clerical errors.
Apple
1 Infinite Loop
Cupertino, CA 95014-2084
408-996-1010
www.apple.com
Apple, the Apple logo, Final Cut, Final Cut Pro, FireWire,
iBook, iMac, iTunes, Logic, Mac, Macintosh, Mac OS,
PowerBook, and QuickTime are trademarks of Apple
Computer, Inc., registered in the U.S. and other
countries.
Finder and GarageBand are trademarks of Apple
Computer, Inc.
Other company and product names mentioned herein
are trademarks of their respective companies. Mention
of third-party products is for informational purposes
only and constitutes neither an endorsement nor a
recommendation. Apple assumes no responsibility with
regard to the performance or use of these products.
LP00001
Page 3

Contents
1
Preface 7New Features in Logic Pro 7.2
8
Logic Pro 7.2 Features Overview
Chapter 1 11 G eneral Improvements
11
Plug and Play of Audio Interfaces
11
Pro Tools HD 7 Support
12
Interface Changes
14
Hidden Menu and Scroll Bars in Screensets
15
Preferences
17
Song Settings
18
Transport Window Enhancements
Chapter 2 19 E diting Enhancements
19
Key Command Enhancements
25
Loop Length Editing
25
Creating Multiple Tracks
26
Global Track Enhancements
27
Arrange Region Handling
Chapter 3 29 Working With Audio
29
Direct Playback of Compressed Audio Files
30
Additional Time Stretch Algorithms
31
Serato AU Support
31
Working With the Follow Tempo Function
33
Export as Audio File Functions
33
Faster Overview Creation
33
Renaming Split Stereo Files
Chapter 4 35 Working in the Mixer Windows
35
Using Channel Strip Performances
37
Multiple Selection of Channel Strips
38
Automating the Bypass Status
39
Support of Stereo ReWire Objects
40
Surround Pan Window
3
Page 4

41
Hand Tool in Track Mixer and Arrange Channel Strip
42
Bouncing Enhancements
Chapter 5 45 Working With Video
45
Working With Movie Audio Tracks
46
Finding and Removing Scene Markers
46
Removing Movies
47
Terminology Changes
Chapter 6 49 Importing Files
49
Importing XML Files
50
Importing MIDI Files
Chapter 7 51 Co nt rol Surface Support
51
Additional Control Surface Support
52
Working With the Track Control Bar
53
New Key Repeat Function
54
Intermediate Stop at Default Value
55
Modal Dialogs Display
55
Mackie Control Mode Support
56
Controller Assignments Editor Enhancements
Chapter 8 57 Using Apple Loops
57
Green and Blue Apple Loops
59
Adding Apple Loops
60
Working With the Loop Browser
64
Creating Apple Loops
77
Global Tracks and Apple Loops
80
Converting Apple Loops to Audio Files
80
Apple Loops and Sample Rates
81
Fading Apple Loops
81
Apple Loop File Paths
Chapter 9 83 Updated File Paths
83
Preferences
83
Song Templates
84
Plug-in Settings
84
GarageBand Instruments
85
Channel Strip Settings
85
EXS Instruments
85
EXS Sample Conversion
86
Space Designer Impulse Responses
86
Ultrabeat Samples
86
User Icons
4
Contents
Page 5

86
I/O Labels
86
Control Surface Plug-ins
86
Tuning Tables
87
DNA Grooves
87
Default Directories
Chapter 10 89 Plug-in Enhancements
89
Working With the AU Manager
91
Working With Plug-in Delay Compensation
94
Processing Audio Units When Running the Node Application
94
Adjusting Plug-in Parameters With the Mouse Wheel
95
Support of Generator Audio Units Plug-ins
95
Replacing Setting-Compatible Plug-ins
95
Ultrabeat
10 0
Sculpture
101
EVB3
10 3
EXS24 mkII
10 6
EVP88
10 6
GarageBand Instruments
10 7
Bass Amp
10 9
New Ducker Plug-in
11 0
New Speech Enhancer Plug-in
111
Enhance Timing Effect
112
Grooveshifter
113
Pitch Correction
113
Vocal Transformer
11 4
BPM Counter
11 4
Match EQ
11 4
Mix Slider of Platinum Verb and Tape Delay
11 5
Test Oscillator
11 5
Space Designer
11 5
Audio Units Multi-Channel Instrument Support
11 5
MIDI Learn Mode
11 5
Conversion of EVP73, EXSP24, and ET1 Audio Units Plug-ins
Chapter 11 117WaveBurner Enhancements
Appendix 11 9Corrections to Logic Pro 7 Documentation
Contents
5
Page 6

Page 7

New Features in Logic Pro 7.2
This document describes features not covered in the Logic
Pro 7 manuals.
It contains detailed information about the improvements and changes found in the
Logic Pro Updates that have been released since Logic Pro 7.
Preface
Important:
Logic Pro 7 manuals!
For late-breaking information about Logic Pro 7.2, please refer to the Late-Breaking
News document. This document is published online and may be updated as additional
information becomes available. You can access the Late-Breaking News document by
choosing Help > Late-Breaking News in Logic.
For the latest information about product updates, tips and techniques, visit the Logic
Pro website at http://www.apple.com/logicpro.
This document combines the Logic Pro 7.1 and Logic Pro 7.2 new features descriptions
and the Logic Pro 7.0 and Logic Pro 7.1 Late Breaking News document. This is to provide
a single, unified reference that contains all new feature descriptions and changes that
would otherwise have been spread across four separate manuals. If you are only
interested in changes made since Logic Pro 7.1, please refer to the following section. It
provides a high-level feature list for Logic Pro 7.2. For detailed information about these
features and changes, follow the links to the respective sections.
The updated documentation also includes a comprehensive Apple Loops chapter. This
provides a one-stop-shop for all topics relating to audio in this format.
The descriptions in this document supersede the relevant sections of the
7
Page 8

Logic Pro 7.2 Features Overview
This section provides a summary of the Logic Pro 7.2 features. For more information on
these features and their use, see the corresponding chapters in this document.
Playback of compressed file formats
Logic Pro 7.2 allows the direct playback of compressed file formats, such as AAC. These
files no longer need to be automatically converted when imported. For detailed
information, see “Direct Playback of Compressed Audio Files” on page 29.
Channel Strip Performances
Logic Pro 7.2 allows you to switch Channel Strip settings via MIDI program change
messages. For more information, see “Using Channel Strip Performances” on page 35.
Toggling the Insert slot bypass status
Logic Pro 7.2 allows you to toggle the bypass status of Audio Object Insert slots using
MIDI controller value 64. For more information, see “Automating the Bypass Status” on
page 38.
Support of stereo ReWire Objects
Logic Pro 7.2 now offers support for stereo ReWire Objects, providing additional
flexibility and simplifying use of ReWired applications such as Reason. For more
information, see “Support of Stereo ReWire Objects” on page 39.
Auto Hide Dock preference
Logic Pro 7.2 offers a new Auto Hide Dock preference, allowing you to hide the Dock
while running Logic, making more screen space available. For more information, see
the “New Auto Hide Dock Preference” on page 15.
Enhanced Control Surfaces support
Logic Pro 7.2 now supports the iControl GarageBand control surface distributed by MAudio. For information about individual control surface assignments, or how to change
the default assignments, please refer to the
in the Documentation folder of the Logic Pro 7 Installation DVD.
Furthermore, Logic Pro 7.2 offers the Track Control Bar: This is a colored bar that
indicates Arrange window tracks that are actively being accessed by a control surface.
For detailed information, refer to “Working With the Track Control Bar” on page 52.
Key Command functions triggered via controller assignments now support key
repeats: the key command function is continuously executed for as long as the button
or switch is held down. For details on working with the Key Repeat function, see the
“New Key Repeat Function” on page 53.
Control Surfaces Support
document—found
8 Preface
New Features in Logic Pro 7.2
Page 9

Key command changes
The Logic Pro 7.2 Update features the following key command changes:
Â
Go to Song Start—New
Â
Remove Movie—New
Â
Save as Performance—New
Â
Go to Selection End—New. This Sample Editor key command sets the SPL to the end
of the selected audio file section.
The Goto Selection key command has been renamed as Go to Selection Start.
The Pickup Clock (Move Event to SPL) and the Pickup Clock and Select Next Event key
commands can now also be used to move the currently selected marker (in the Marker
track) to the current song position.
For a complete list of all key command changes since the Logic Pro 7.0 release, please
read about the “Key Command Enhancements” on page 19.
New Ducker plug-in
This plug-in automatically reduces the level of a music mix while an announcement (a
voice-over) is being made. Once the announcement has finished, the music mix
volume will return to its previous level. Details on working with the Ducker plug-in can
be found in the section entitled “New Ducker Plug-in” on page 109.
New Speech Enhancer plug-in
This plug-in enhances the intelligibility and sound of speech recordings made with
built-in Macintosh microphones, such as those found in iBooks and PowerBooks. For
details on working with the Speech Enhancer plug-in, read about the “New Speech
Enhancer Plug-in” on page 110.
Loop Browser offers new sound effects categories
Logic Pro 7.2 ships with a number of additional Apple Loops designed for use as sound
effects. These loops can be found in the Loop Browser’s new Sound Effects view—
which displays new Loop Browser buttons, with special tags for effects and jingles. You
can activate this Loop Browser view by clicking the View button that features the Bell
icon. Clicking the Note icon switches to the Button view of previous Logic versions. For
further information, see “The Loop Browser Interface” on page 60.
Follow Tempo option for Apple Loops
The Region Parameter box of looped (not-one-shot) Apple Loops now offers the Follow
Tempo option. If this option is disabled, the Apple Loop will not follow the song tempo
and key. For information on Follow Tempo, please read “Working With the Follow
Tempo Function” on page 31. For information about Apple Loops, please refer to “Using
Apple Loops” on page 57.
Preface
New Features in Logic Pro 7.2
9
Page 10

Serato Audio Units plug-in support
Logic Pro 7.2 allows you to use the pitch shift and time stretch algorithms provided
with Serato’s Pitch ’n Time Audio Units plug-in as Time Machine algorithms. For further
information, see “Serato AU Support” on page 31.
Digidesign Pro Tools HD 7 DAE support
Logic Pro 7.2 only supports Pro Tools HD 7. Older versions of Pro Tools (including
Pro Tools 6) are no longer supported. Users of older Pro Tools versions must use
previously compatible versions of Logic Pro as well. For further information, see “Pro
Tools HD 7 Support” on page 11.
State of “Faster overview calculation” option is saved
Logic now remembers the state of the Faster overview calculation option in the
Overview creation dialog. For further information, see “Faster Overview Creation” on
page 33.
Enhanced AAC Sound Settings Window
Logic Pro 7.2 features an improved, unified AAC Sound Settings window that simplifies
the creation of this compressed file type. For more information, see “Streamlined AAC
Sound Settings Window” on page 42.
Horizontal Transport window now shows Song End display
The horizontal view of the Logic Transport window now includes the Song End display
(instead of the Free Memory display), allowing you to set the song end directly in the
Transport window. This is useful in situations where you’d like to bounce the complete
song, as the start and end position in the Bounce dialog encompass the entire Logic
song if no other selection is made. You can read about “Transport Window
Enhancements” on page 18.
Support for up to 32 mono outputs for Audio Units instruments
Logic now supports up to 32 mono outputs for multi-channel Audio Units instruments.
For further information, read about “Audio Units Multi-Channel Instrument Support” on
page 115.
WaveBurner enhancements
Logic Pro 7.2 includes WaveBurner 1.2. WaveBurner 1.2 offers the following
enhancements:
 The new Maximum Zoom In command allows you to set the display to the highest
possible zoom level—in just one step.
 The new Set Time Format Globally preference allows you to synchronize time format
changes in the Region list, Track list and Wave View area.
A complete list of all WaveBurner enhancements since WaveBurner 1.1 can be found in
the section entitled “WaveBurner Enhancements” on page 117.
10 Preface New Features in Logic Pro 7.2
Page 11

1 General Improvements
1
This chapter describes all general enhancements that have
been made since Logic Pro 7.
These changes streamline and simplify the use and setup of Logic. They include:
 Plug and play of audio interfaces
 Pro Tools HD 7 support
 Interface enhancements
 Preference and song setting enhancements
Plug and Play of Audio Interfaces
Logic Pro supports plug and play for audio interfaces, making it possible to connect
and switch on a new/additional audio interface while Logic is running. An alert appears
when you connect a new device, and will prompt you to select and confirm the audio
interface/driver that you would like to use.
Pro Tools HD 7 Support
Logic Pro 7.2 only supports Pro Tools HD 7. Older versions of Pro Tools (including Pro
Tools 6) are no longer supported. Users of older Pro Tools versions must use previous,
compatible versions of Logic Pro.
Note: The Pro Tools HD 7 software does not support Digidesign’s MIX systems, nor does
Logic Pro 7.2.
11
Page 12
Interface Changes
The Logic interface has been enhanced in the following areas since the release of
Logic Pro 7:
 Many dialogs provide additional audio file handling options.
 Menus have been cleaned up, some menu items have clearer names.
 Parameter boxes: Parameters that only have two states are displayed as checkboxes.
Read the following sections for details.
Dialog Enhancements
A number of changes have been made to the following Logic dialogs:
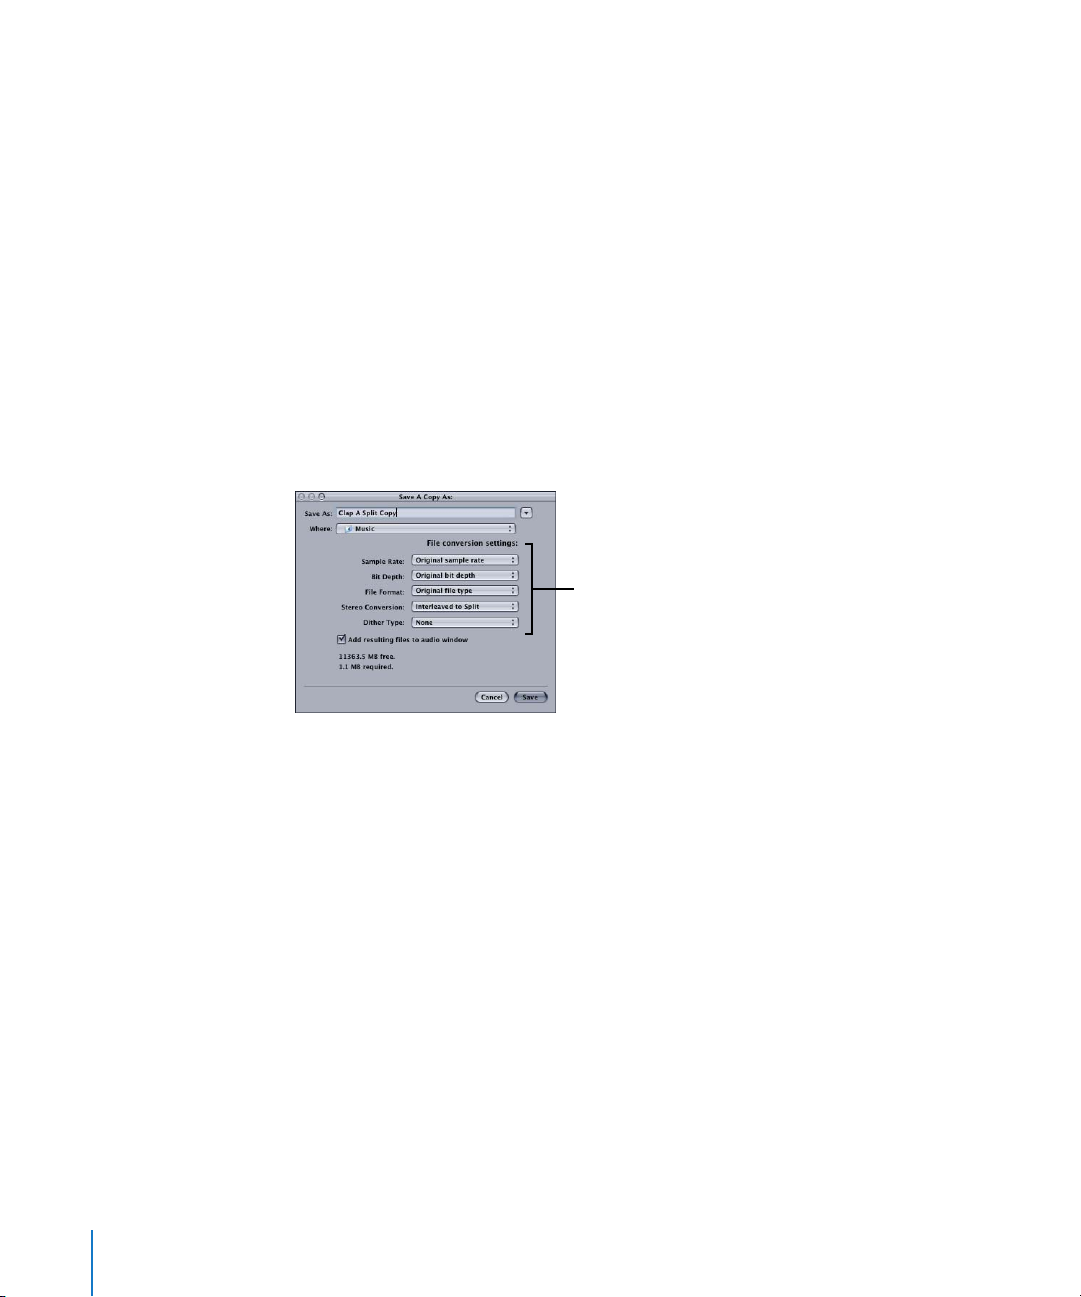
 Sample Editor: Audio File > Save Selection As, Audio File > Save a Copy As. Both
dialogs allow you to set the desired sample rate, stereo conversion and dither type
for the destination file. The dialogs also feature an “Add resulting files to Audio
window” option.
Some file dialogs feature
additional file conversion
settings.
 Audio window: Audio File > Save Region As, Audio File > Copy/Convert File As: Both
dialogs offer the file conversion menus outlined above for the Sample Editor,
enabling one or multiple selected Regions/files to be converted or copied. The Copy/
Convert File As dialog also provides an “Add resulting files to Audio window” option.
 Arrange window: The Audio > Convert Regions to New Audio Files dialog offers the
file conversion menus outlined above for the Sample Editor.
 The global File > Export > Region as Audio File dialog offers the “Add resulting files to
Audio window” option.
 Project: The File > Save as Project dialog and File > Project > Consolidate dialogs
contain new Ultrabeat sample handling options. The pull-down menu choices
include: Leave, Move and Copy. These work in the same fashion as the Audio Files,
Sampler Instruments and Samples pull-down menu options. Please see the
Logic Pro 7 Reference Manual for details.
12 Chapter 1 General Improvements
Page 13

Menu Changes
File > Export > MIDI Region as Audio File was renamed to File > Export > Region as
Audio File, as this describes the function more precisely (both Audio and MIDI Regions
can be exported).
The Audio > Audio Settings menu item was removed, as it duplicated the Logic >
Preferences > Audio functionality.
The Logic > Preferences > Control Surfaces > Scan and Logic > Preferences > Control
Surfaces > Install menu items have been moved into the local New menu of the Setup
window (Logic > Preferences > Control Surfaces > Setup).
The local Matrix Editor View > White Background menu item was renamed to View >
Bright Background.
The Logic > Preferences > Audio > General > “Force record & convert interleaved into
split stereo file(s)” preference was renamed to “Record and convert interleaved as split
stereo file(s)”.
The Project Manager View > Sort > Up and View > Sort > Down local menu items were
renamed to View > Sort > Ascending and View > Sort > Descending.
The following items in the Options > Movie menu have been renamed:
 Extract Audio from Movie is now Import Audio from Movie.
 Extract Audio to Arrange is now Import Audio to Arrange.
 Remove Scene Cuts is now Remove Scene Markers.
 Find Scene Cuts is now Create Scene Markers.
The DV Mode menu of the Video song settings is now the Video Format menu.
Historically, the DV Mode menu was designed for use with FireWire devices. It now
works with other kinds of devices such as SDI, so a more generic name that does not
just imply DV via FireWire was chosen.
The (Video) Sound Output menu options have also be renamed. The Internal option is
now named System Sound, indicating that audio will be output in accordance with the
System Preferences.
The (Video) External option is now named External Device, indicating that it does not
just refer to external speakers connected to your Mac.
Chapter 1 General Improvements 13
Page 14

Parameter Boxes
All parameters that only have two states (on/off, for example) are enabled/disabled
with checkboxes.
Simply click on the box to activate (checked) or deactivate (unchecked) the parameter.
Parameters that have been updated to operate in this fashion include:
 Region: Loop, Clip Length
 Chord Memorizer Object: Cable Split
 Arpeggio Object: Repea t
 Display parameter in Score Editor: Interpretation, Syncopation, No Overlap, Lyric
Hidden Menu and Scroll Bars in Screensets
Logic Pro allows you to save the state of hidden menu bars and scroll bars in
Screensets. Hidden menu bars and scroll bars are also saved when you close a window.
As an example: Hide the menu bar and scroll bars of the Arrange window and close it.
When you reopen the Arrange window, the menu and scroll bars remain hidden.
To hide a window’s local menu and scroll bars:
m Option-Command click the window’s title bar.
This function is handy in situations where you would like to configure small floating
Environment windows containing Fader Objects—used as switches, for example.
14 Chapter 1 General Improvements
Page 15
Preferences
This section outlines changes to the Logic preferences.
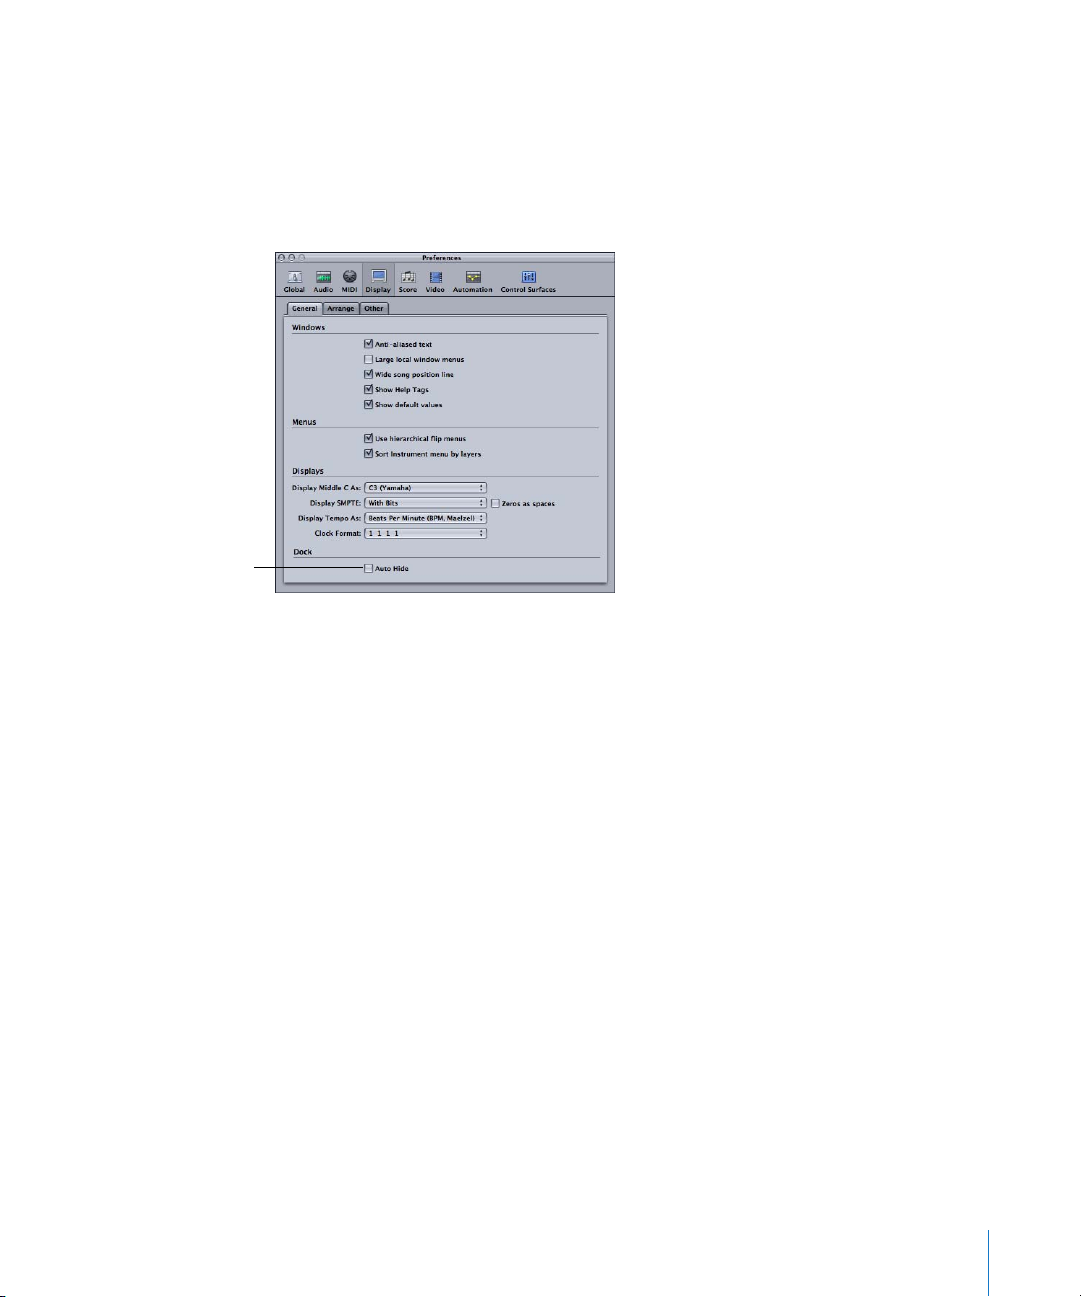
New Auto Hide Dock Preference
The General pane of the Display preferences in Logic Pro 7.2 offers the Auto Hide Dock
option.
Auto Hide Dock
preference
Activation of this preference automatically hides the Dock while Logic is running,
maximizing onscreen space for Logic windows.
To activate the Dock Auto Hide preference:
1 Choose Logic > Preferences.
2 Click the Display button.
3 Activate the Auto Hide checkbox in the Dock section of the General pane.
Note: This option is also available in the Logic Setup Assistant.
File Format Option
The Audio preferences of Logic 6 allowed you to change the bit depth of freeze files
from the default 32 bit (float) to 24, or even 16, bit. The primary intent of this option
was to allow the use of freeze files in place of bounced tracks, given the absence of the
Export Track As Audio File function. As Logic Pro 7 offers this functionality, the Freeze
File Format option is no longer required, and has been removed from the Audio
preferences.
Chapter 1 General Improvements 15
Page 16
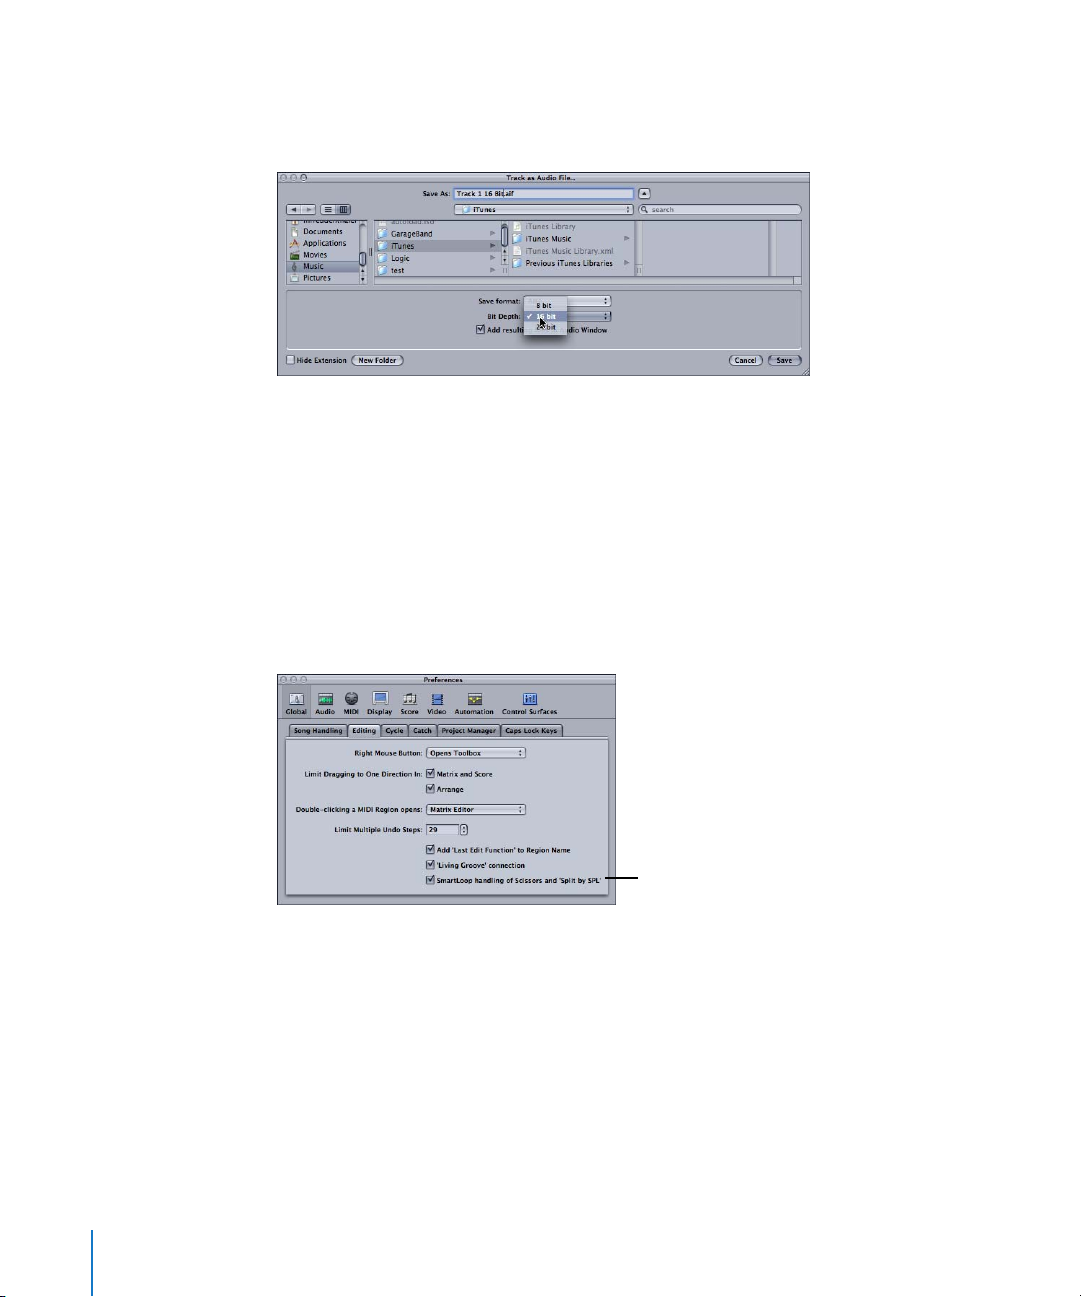
To export a track as an audio file:
1 Choose File > Export > Track as Audio File (or use the Export Track as Audio File key
command).
Set the desired bit depth and file name in the Export Track as Audio File dialog.
The Export Track As Audio File function offers the same export functionality as the
Freeze function in Logic 6, but track naming is more convenient and you can freely
choose the file destination and format for each export.
Smart Loop Handling Option
In the Global > Editing preferences you will find the “SmartLoop handling of Scissor
and Split by SPL” option, which determines how Logic Pro handles the cutting of
looped Regions.
This option, when activated, allows you to cut the looped area of Regions (using the
Scissors or Marquee tools or Split by SPL commands). Logic Pro automatically creates
Regions after—and, if necessary—before the cut, ensuring that these areas remain
identical. This allows you to split looped Regions without altering playback in the
looped area.
If the “SmartLoop handling of Scissor and Split by SPL” option is switched off, it is not
possible to cut looped areas. Direct cutting of a looped Region deactivates the Loop
parameter in the Region Parameter box.
16 Chapter 1 General Improvements
Smart Loop Handling option
Page 17

Song Settings
The song settings contain an additional Audio pane, which offers the following two
options:
Playback Pre-roll
When this option is enabled, all start commands will start playback a little earlier
(shifted to the left). The exact pre-roll value is dependent on the current delay
compensation value for plug-ins. This option ensures that transients which fall exactly
on the start position are played back correctly. If this option is disabled, transients that
fall precisely on the start position can be missed, or appear to be faded in.
Pan Law
The Pan Law value determines the amount of volume reduction to mono signals that
are panned to the center position. If set to 0 dB, mono signals will seem louder when
panned to the center position, in comparison with extreme left or right pan positions. If
set to either –3 dB or “–3 dB compensated”, mono signals will seem equal in loudness,
regardless of their pan position:
 –3 dB: A full scale mono signal (0 dBfs) will have a level of –3 dB when panned to the
center position.
 –3 dB compensated: A full scale mono signal (0 dBfs) will have a level of 0 dB when
panned to the center position (or +3 dB when panned to extreme left or right
positions).
Note: Songs created in older Logic versions use the 0 dB option. Be aware that
switching the Pan Law value to –3 dB will change the mix of such songs!
Chapter 1 General Improvements 17
Page 18
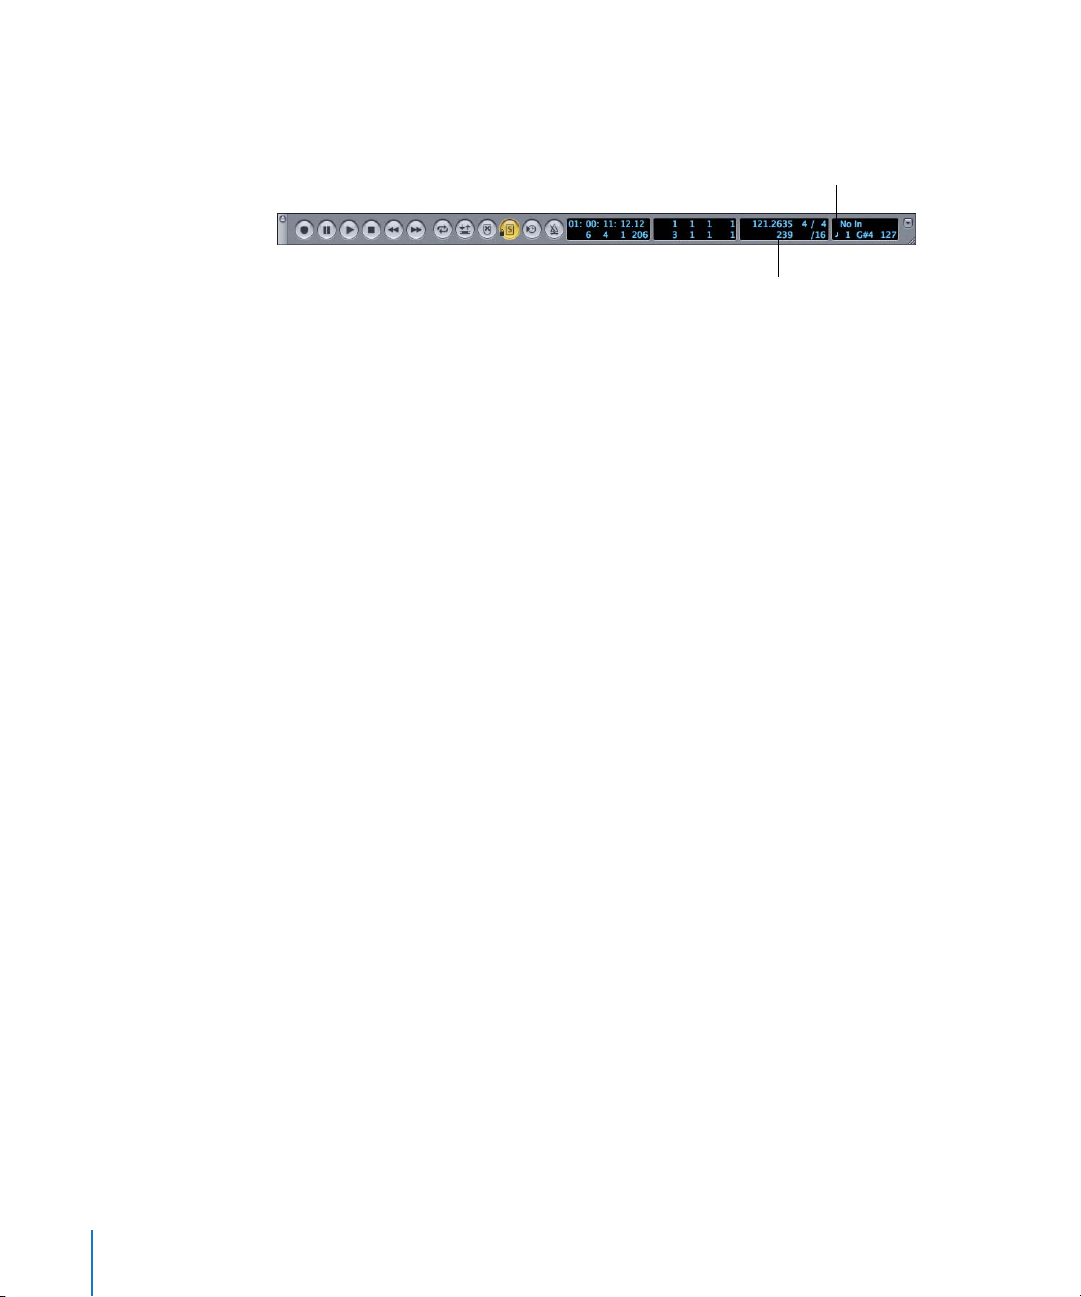
Transport Window Enhancements
The horizontal view of the Logic Transport window now includes the Song End display
(instead of the Free Memory display).
MIDI Activity Display
Song End display
This allows you to set the song end directly in the Transport window—a function that
comes in handy when you’d like to bounce the complete song, as the start and end
positions in the Bounce dialog encompass the entire Logic song (provided that the
Cycle function is switched off and no Regions are selected).
Note: The Song End field—shown in the standard Transport window view—has been
moved to the position formerly occupied by the Free Memory display.
The Reorganize Memory function (which you could access by double-clicking the Free
Memory display) has been moved to the Song Information window: Choose Options >
Song Information and click the Reorganize Memory button to use this function.
In former versions, a click in the Free Memory display showed the frame rate of
incoming MIDI time code. This function can now be accessed by clicking the Upper
(MIDI In) section of the MIDI Activity display.
Clicking the lower (MIDI Out) section still initiates a MIDI Reset.
Double-clicking centrally on (the entire) MIDI Activity display still initiates a Full Panic
reset.
18 Chapter 1 General Improvements
Page 19

2 Editing Enhancements
2
This chapter outlines the editing enhancements made since
Logic Pro 7.
These changes encompass a number of new or altered key commands, new track
creation facilities and improved marker handling, among others.
Key Command Enhancements
The following section outlines all key command enhancements made since the release
of Logic Pro 7. This includes several new key commands which may accelerate your
workflow and a new key command warning, which can help you to keep track of key
command assignments.
Additional Key Commands
The following tables list all key commands that have been added since the release of
Logic Pro 7.
19
Page 20

Global Menu Functions
The following global key commands have been added.
Key command Function/Explanation
Open Global Preferences
Open Audio Preferences
Open MIDI Preferences
Open Display Preferences
Open Score Preferences
Open Video Preferences
Open Automation Preferences
Open Control Surfaces Preferences
Open Surround Preferences
Open Synchronization Song Settings
Open Metronome Song Settings
Open Tuning Song Settings
Open Audio Song Settings
Open Score Song Settings
Open Video Song Settings
Start Logic Setup Assistant Opens the Logic Setup Assistant.
Start Logic AU Manager Opens the Logic AU Manager.
Initialize All Except Key Commands Resets all preferences to their default values. Key
Project Settings Opens the Project Settings window.
Clean Up Project Displays all unused audio files or EXS instruments in your
Consolidate Project Moves all files associated with a project into one folder.
Rename Project Opens a dialog that allows you to rename your project.
Save as Project Saves a song or project. If the open song isn’t already a
Save a Copy as Allows you to save a copy of a song or project under a
Save as Template Saves the song (inclusive of all mixer, track and
Export Region as Audio File Creates a new audio file from a Region.
Export Track as Audio File Creates a new audio file from all Regions on the selected
Export All Tracks as Audio File Creates new audio files from all Regions on all tracks.
Export Song as OMF File Exports your song as an OMF file, allowing you to
Opens the respective preferences.
Opens the respective song settings.
commands remain unchanged.
project folder, allowing you to delete them.
project, the song is assigned project status.
different name.
environment settings) as a template, which can be used
for future projects.
track.
exchange audio data with other applications that support
OMF files (such as Pro Tools).
20 Chapter 2 Editing Enhancements
Page 21

Key command Function/Explanation
Export Song as OpenTL File Exports your song as an OpenTL file, allowing you to
exchange audio data with hardware or applications that
support OpenTL files (such as Tascam HD recorders).
Export Song as AAF File Exports your song as an AAF file, allowing you to
exchange audio data with other applications that support
AAF files (Avid and Adobe products, for example).
Song to Final Cut Pro/XML Exports your song as an XML file, allowing you to
exchange audio data between Final Cut and Logic.
Import Audio File Adds an audio file to your project.
Loop Browser Launches the Loop Browser window.
EXS24 Instrument Editor Launches the EXS24 Instrument Editor window.
Audio Hardware Setup Opens the Audio preferences, as per the Open Audio
Preferences key command.
TDM DSP Usage Opens the TDM DSP Usage window.
Toggle Punch On The Fly Enables seamless drop-in/out recording. If disabled, there
may be a slight delay.
Toggle Pre-Fader Metering Switches metering between pre/post fader.
Create Marker by Regions Creates a marker based on the selected Region(s).
Quick Edit Marker Opens the selected marker’s text edit field.
Toggle Automation Quick Access Enables/disables Automation Quick Access, if you have set
it up.
Delete Orphan Automation Data of
Current Track
Open Movie as Float Opens the movie in a float window, ensuring that the
Remove Movie Completely removes a movie from a song.
Import Audio from Movie Once a movie has been opened in a song, you can use this
Import Audio from Movie to Arrange Once a movie has been opened in a song, you can use this
Export Audio to Movie Once a movie has been opened in a song, you can use this
Create Scene Markers (Auto Range) Analyzes a movie (that has been opened in a song) for
Remove Scene Markers (Auto Range) Removes recognized movie markers inside a defined song
Any automation data that is “disconnected” from the
selected track will be removed.
selected movie stays “on top” of other windows.
key command to import the movie’s audio tracks into the
Audio window.
key command to import the movie’s audio tracks into the
Arrange (and Audio) window.
key command to export Arrange window audio tracks into
the movie.
significant content changes and generates (SMPTE locked)
markers for them.
part.
Chapter 2 Editing Enhancements 21
Page 22

Key command Function/Explanation
Open Step Input Keyboard Displays the Step Input Keyboard window.
Toggle Plug-In Delay Compensation: All/
Tracks and Instruments
Switches the Plug-in Delay Compensation preference
between “All” and “Audio tracks and instruments”
Arrange menu
The following local Arrange menu functions (Arrange window) are also available as key
commands:
Key command Function/Explanation
Create Multiple Tracks Opens a dialog that enables you to sequentially create the
defined number of tracks.
Delete Redundant Audio Tracks Removes unused audio tracks.
Unpack Folder (Use Existing Tracks) Moves the contents of a folder to individual tracks.
Demix by Note Pitch Separates the contents of a MIDI Region into individual
Regions for each note. Ideal for MIDI drum parts.
Select All Orphan Aliases Aliases of Regions that no longer exist are selected.
Delete All Orphan Aliases Aliases of Regions that no longer exist are deleted.
Open in Apple Loops Utility Opens the selected Audio Region in the Apple Loops
Utility.
Copy ReCycle Loop Self-explanatory.
Paste ReCycle Loop Self-explanatory.
Search Zero Crossings Enables/disables automatic searches for zero crossing
points in audio files and Regions. Enabling this facility
makes the creation of smooth audio loops easier.
Hyper Editor
The following local Hyper Editor functions are also available as key commands:
Key command Function/Explanation
Create Hyper Set Allows you to define a limited number of MIDI controllers
Create GM Drum Set Self-explanatory.
Create Hyper Set For Current Events A Hyper Set is created, based on controller information
Clear Hyper Set Removes all controller definitions from a Hyper Set.
Track Mixer
All Filter buttons can be switched on and off via key commands.
Key command Function/Explanation
Toggle MIDI Instruments Shows/Hides MIDI instrument channel strips.
Toggle Audio Inputs Shows/Hides audio input channel strips.
22 Chapter 2 Editing Enhancements
as a Hyper Set.
that exists in the selected Region(s).
Page 23

Key command Function/Explanation
Toggle Audio Tracks Shows/Hides audio track channel strips.
Toggle Audio Instruments Shows/Hides audio instrument channel strips.
Toggle Audio Aux Shows/Hides auxiliary channel strips.
Toggle Audio Busses Shows/Hides bus channel strips.
Toggle Audio Outputs Shows/Hides audio output channel strips.
Channel Strip settings
The following key commands have been added:
Key command Function/Explanation
Next Channel Strip Setting Loads the next Channel Strip setting in the list of settings.
Previous Channel Strip Setting As above for the preceding setting.
Next Channel Strip Setting or Plug-in
setting or EXS Instrument
Previous Channel Strip Setting or Plug-in
setting or EXS Instrument
Save Channel Strip Setting as Allows you to save a Channel Strip setting under a new
Copy Channel Strip Setting Copies the selected Channel Strip setting into the
Paste Channel Strip Setting Pastes the Channel Strip setting from the Clipboard into
Save as Performance Saves the Channel Strip setting as a numbered (and
Loads the next Channel Strip or Plug-In setting (or EXS
Instrument) in the list of settings.
As above for the preceding setting.
name.
Clipboard.
the selected channel strip.
named) Performance setting, allowing you to access it via
a program change message.
Snap and Drag menu
All Snap and Drag menu entries can be chosen via key commands. Simply search for
Drag or Snap in the Key Commands window to find them.
Audio window
Groups can be created or deleted via corresponding key commands.
Key command Function/Explanation
Create Group Creates a group for all selected audio files.
Delete selected Groups Removes group associations between audio files.
Sample Editor
The Sample Editor offers the new Go to Selection End key command, which moves the
SPL to the end of the selection (within an audio file). The Goto Selection key command
has been renamed as Go to Selection Start.
Chapter 2 Editing Enhancements 23
Page 24
Pickup Clock key commands
The Pickup Clock (Move Event to SPL) and the Pickup Clock and Select Next Event key
commands now also move the currently selected marker (in the Marker track) to the
current song position.
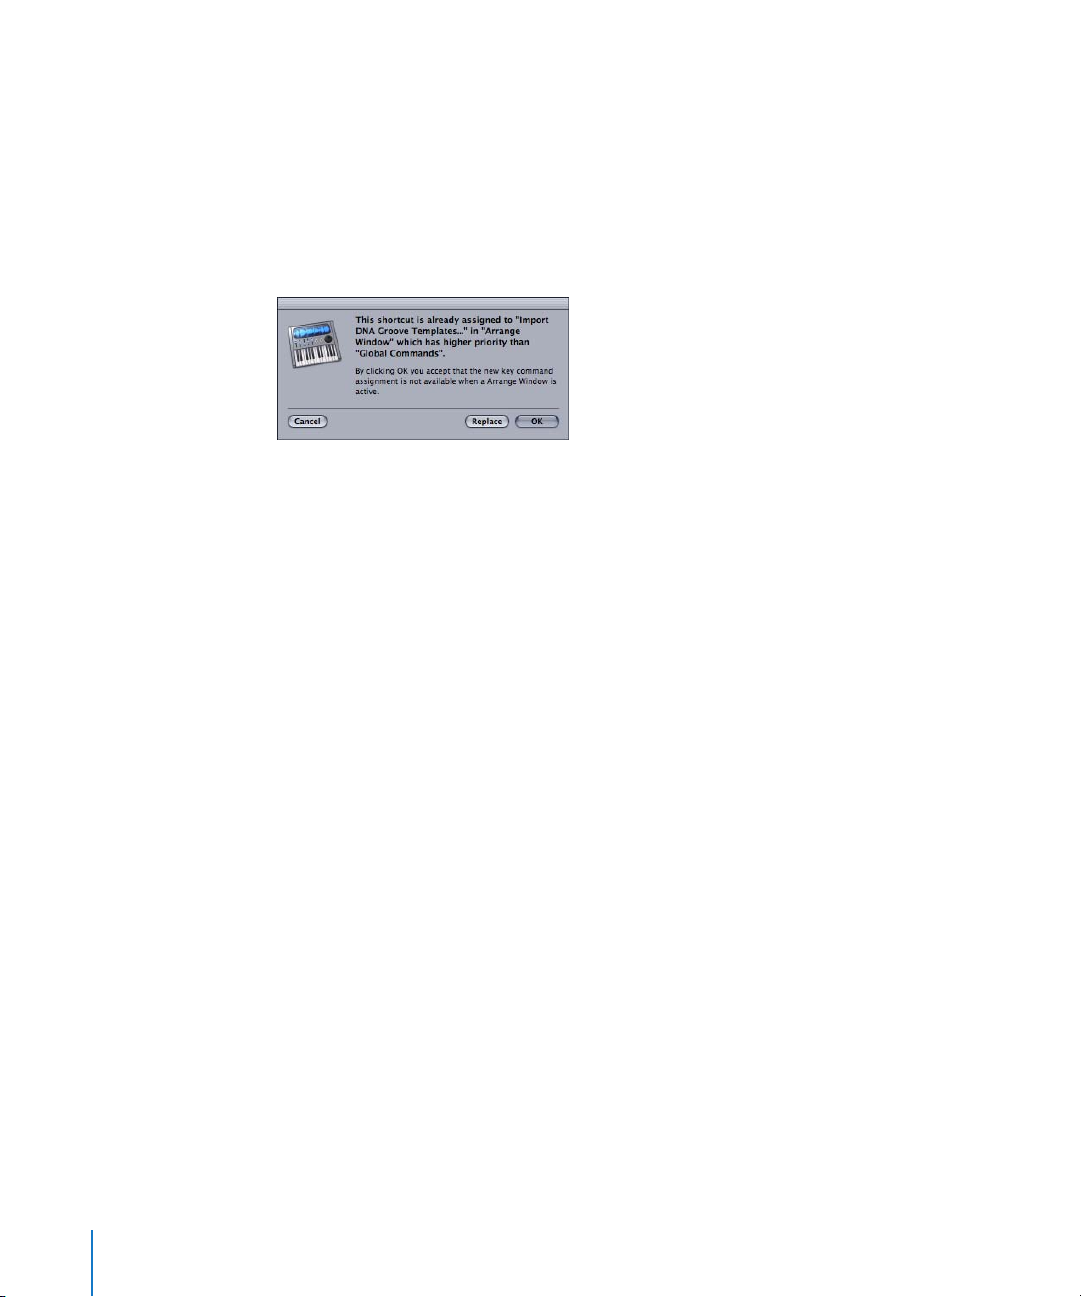
New Key Command Warning
In circumstances where an existing local key command combination is used while
assigning a new global key command, the following warning message will appear:
You have three options: Cancel, Replace, or OK.
 Cancel does not alter existing assignments.
 Replace will substitute the existing shortcut (assigned to the chosen key command
combination) with the selected function.
 OK will assign the key command combination to the selected function, while
retaining the existing key command/function (in a different class).
Important: There is a hierarchy of key command classes, which are not merely
separated into global and local key commands. As an example, there is a key command
class that applies to all windows that display Regions. This class has higher priority than
global key commands, but a lower priority than local (Arrange, Score, Matrix, and so on)
window key commands.
24 Chapter 2 Editing Enhancements
Page 25
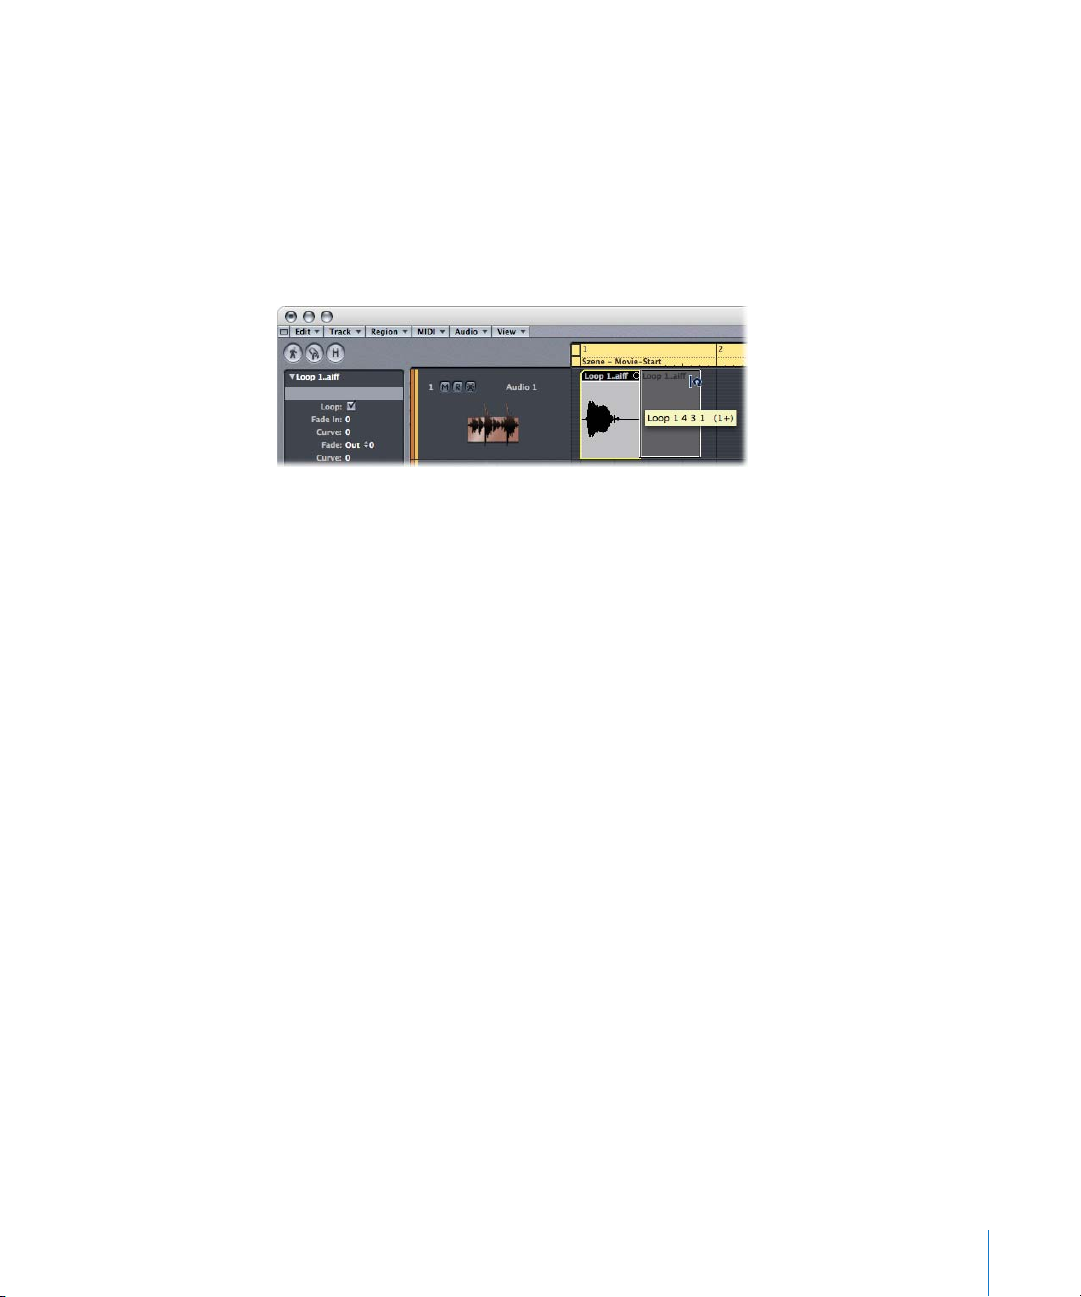
Loop Length Editing
The Loop feature of Logic has been enhanced with an easy to use Loop Length Editing
function.
To set the length of a looped Region:
1 Move the cursor to the end of the Region that you want to loop.
The cursor will change into a circular arrow (a loop) when positioned in the upper half
of the Region.
2 Click-hold and drag the end of the Region to the desired length.
Note: Whenever you move the cursor into the upper half of the looped area, it changes
to a circular arrow, allowing loop length changes. If you want to select the looped
Region (to move it, for example), click in the lower half of the looped area. You can also
Shift-click in the upper loop area to select the Region.
The cursor will only turn into the circular arrow (and offer the Loop Length Editing
functions) when the track is of sufficient height. If the track height is minimal, Optionclick on the end of the Region to access the Loop Length Editing function. This also
applies if automation data is visible on a track.
Important: Deactivation of the Region Loop parameter resets the loop length. The next
time the Loop parameter is used, the Region is repeated until it encounters another
Region on the same track or the Song End point is reached.
Creating Multiple Tracks
This facility, accessible via the Tracks > Create Multiple menu option in the Arrange
window (and corresponding key command), does exactly what it says. When selected, a
dialog box opens, allowing you to choose the:
 Driver: This pull-down menu allows you to select the audio hardware driver that you
wish to use for your newly-created tracks.
 Track Type: This pull-down menu allows you to choose between Audio, Audio
Instrument, and Auxiliary tracks.
 Number of Tracks: Type in the desired number of tracks. Eight (8) is the default.
Chapter 2 Editing Enhancements 25
Page 26
 Mode: Simply click on the desired Mono or Stereo radio button, to create multiple
mono or stereo tracks of the chosen type.
The Create Multiple Tracks function is intelligent in the way it handles tracks, and
underlying Audio Objects. To explain; imagine a song that contains four Audio tracks in
the Arrange, but there are actually eight Audio Objects set up on the Environment’s
Audio Layer. Use of the Create Multiple Tracks function to add another four tracks to
the Arrange will work as expected. The four existing tracks use Audio Objects 1 to 4,
and the newly-created tracks use Audio Objects 5 to 8.
Global Track Enhancements
The following section supersedes some of the information found in the Global Tracks
chapter of the Logic Pro 7 Reference manual.
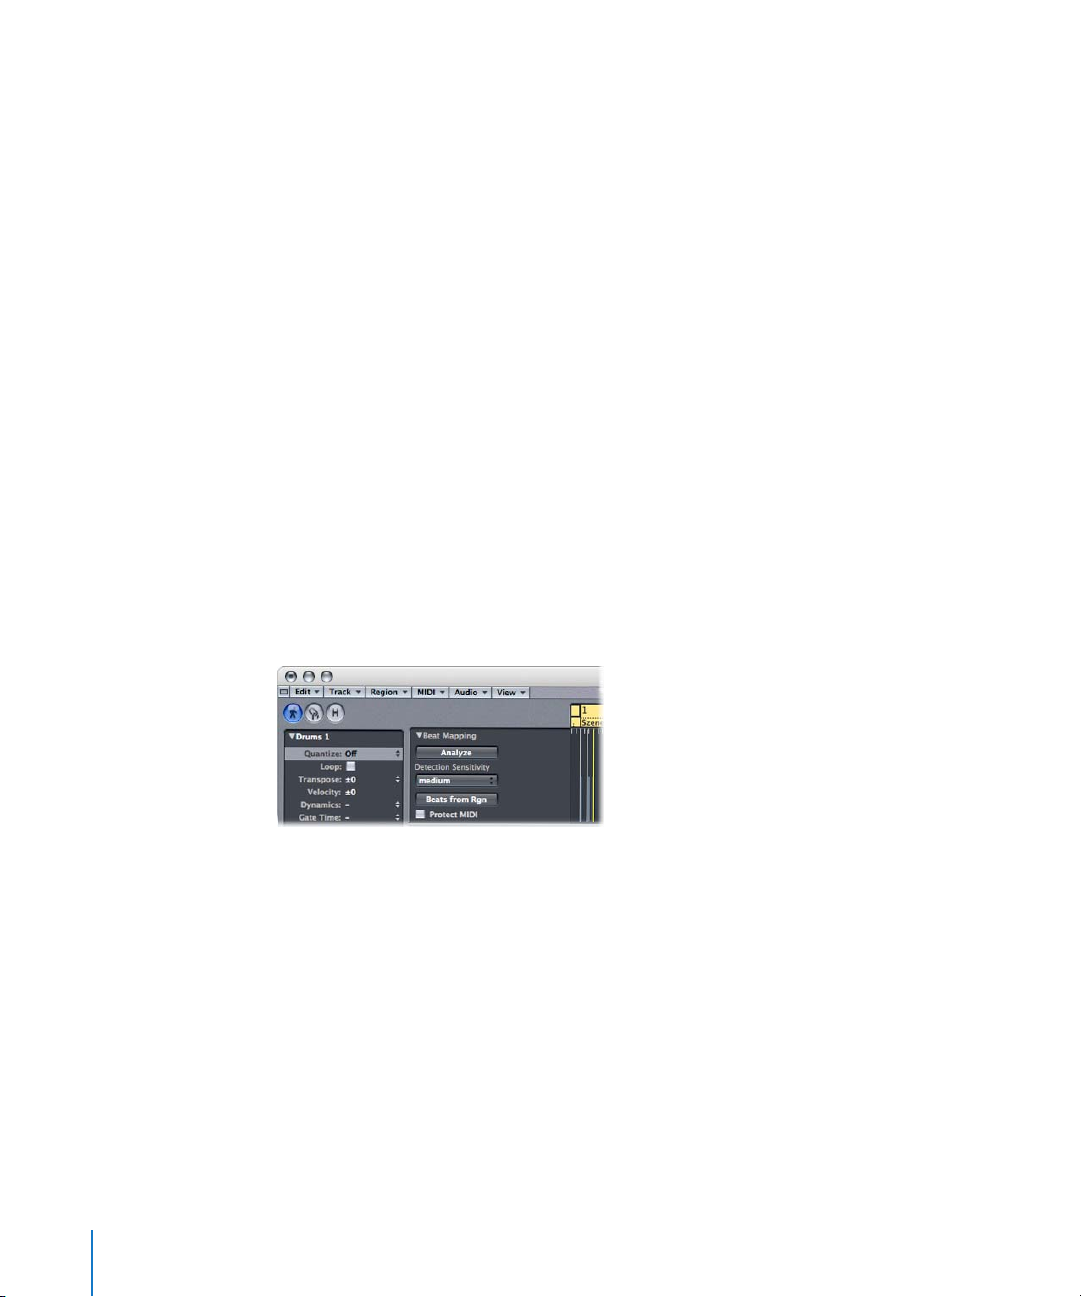
Beat Mapping Track
The global Beat Mapping track helps make the display of audio or MIDI recordings
rhythmically meaningful. It does this by defining the bar positions of existing musical
events without changing their absolute time position, thus preserving their timing.
On occasion, this behavior may not be desirable. As an example, for existing MIDI
events that already fall on musically useful positions, which should remain unmoved
when beat mapping is used for audio recordings.
Such situations are catered for by the inclusion of the Protect MIDI checkbox, found in
the Parameters area of the Beat Mapping track. Simply activate this checkbox to retain
the current positions of existing MIDI events when using beat mapping.
26 Chapter 2 Editing Enhancements
Page 27
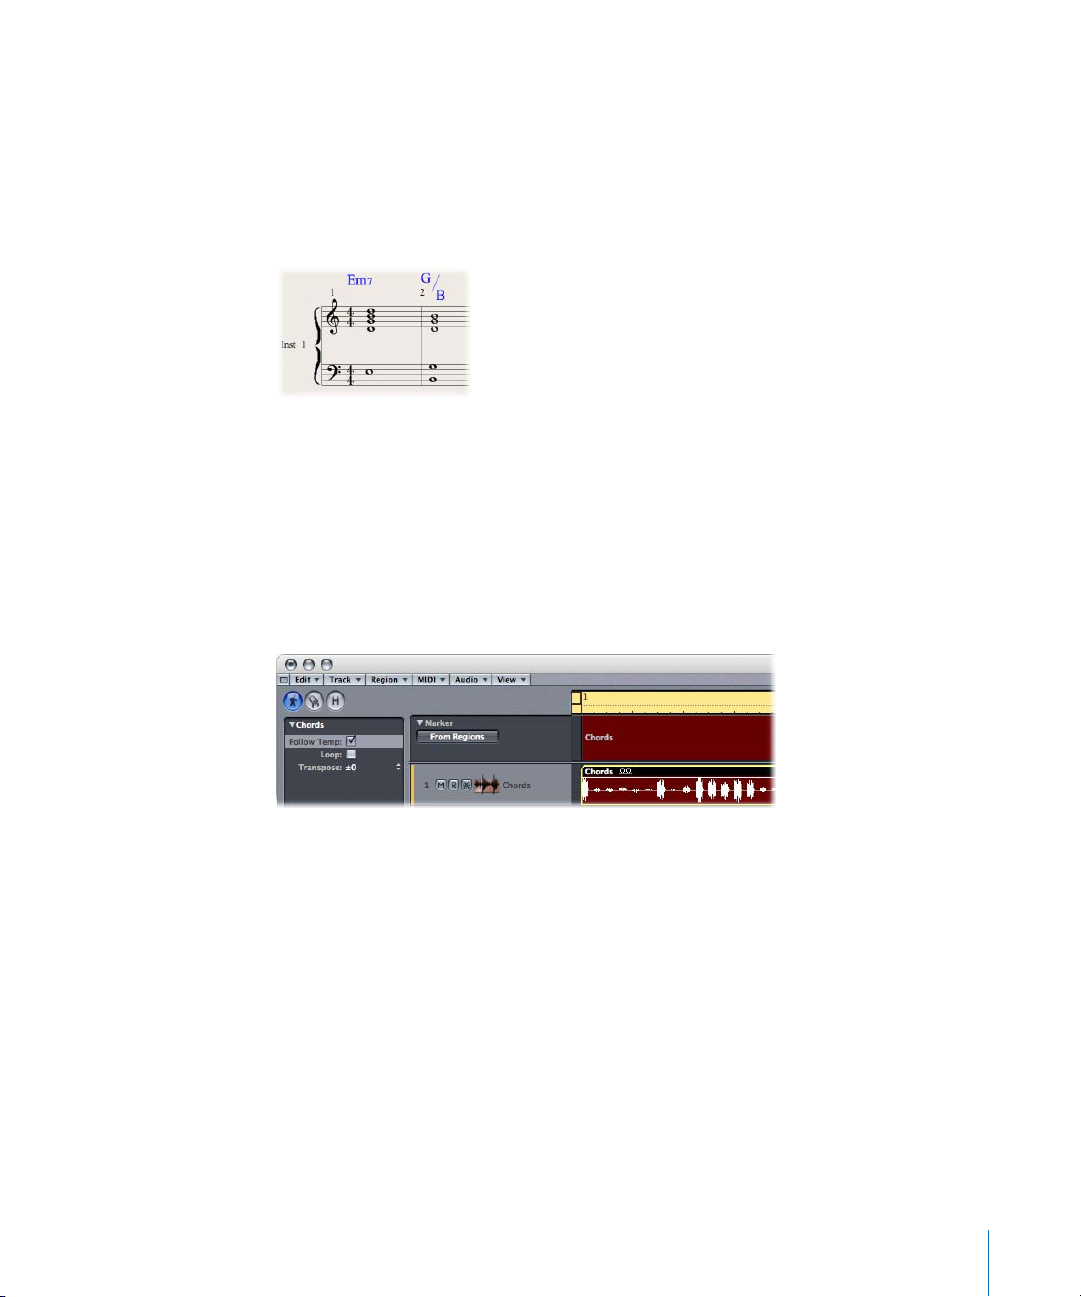
Chord Track
The chord symbols displayed in the Chord track can be inserted into the Score Editor
(and printed):
To insert chords from the Chord track into the Score Editor:
m Select the staff that you would like to use for the chord symbols in the Score Editor and
choose Functions > Insert Chords from global Chord track.
Inserted chord symbols are displayed in blue (printout will be black), and can only be
moved within the boundaries of the chord on the Chord track. Double-clicking such a
chord will launch the Define Chord dialog of the Chord track.
Marker Track
If you create markers from Regions (by dragging a Region from an Arrange track onto
the Marker track, or by clicking the From Region button in the Marker track, for
example), the corresponding marker will use the Region color.
Limited Cycle Dragging
Dragging the cycle area in the Bar Ruler is limited to either horizontal or vertical
movements. This ensures that you do not accidentally:
 move the cycle area when creating markers (by dragging the cycle area into the
lower third of the Bar Ruler or into the Marker track).
 create markers when you want to move the cycle area.
Note: Press Shift if you want to drag the cycle area in both directions simultaneously.
Arrange Region Handling
The handling of Regions in the Arrange window has been improved: selected Regions
that overlap with unselected Regions are shown “on top”.
Chapter 2 Editing Enhancements 27
Page 28

Page 29
3 Working With Audio
Many audio editing facilities have been enhanced since the
release of Logic Pro 7.
Logic Pro 7.2 introduces direct playback of compressed audio files, new time stretch
algorithm facilities and split stereo file renaming enhancements, among others.
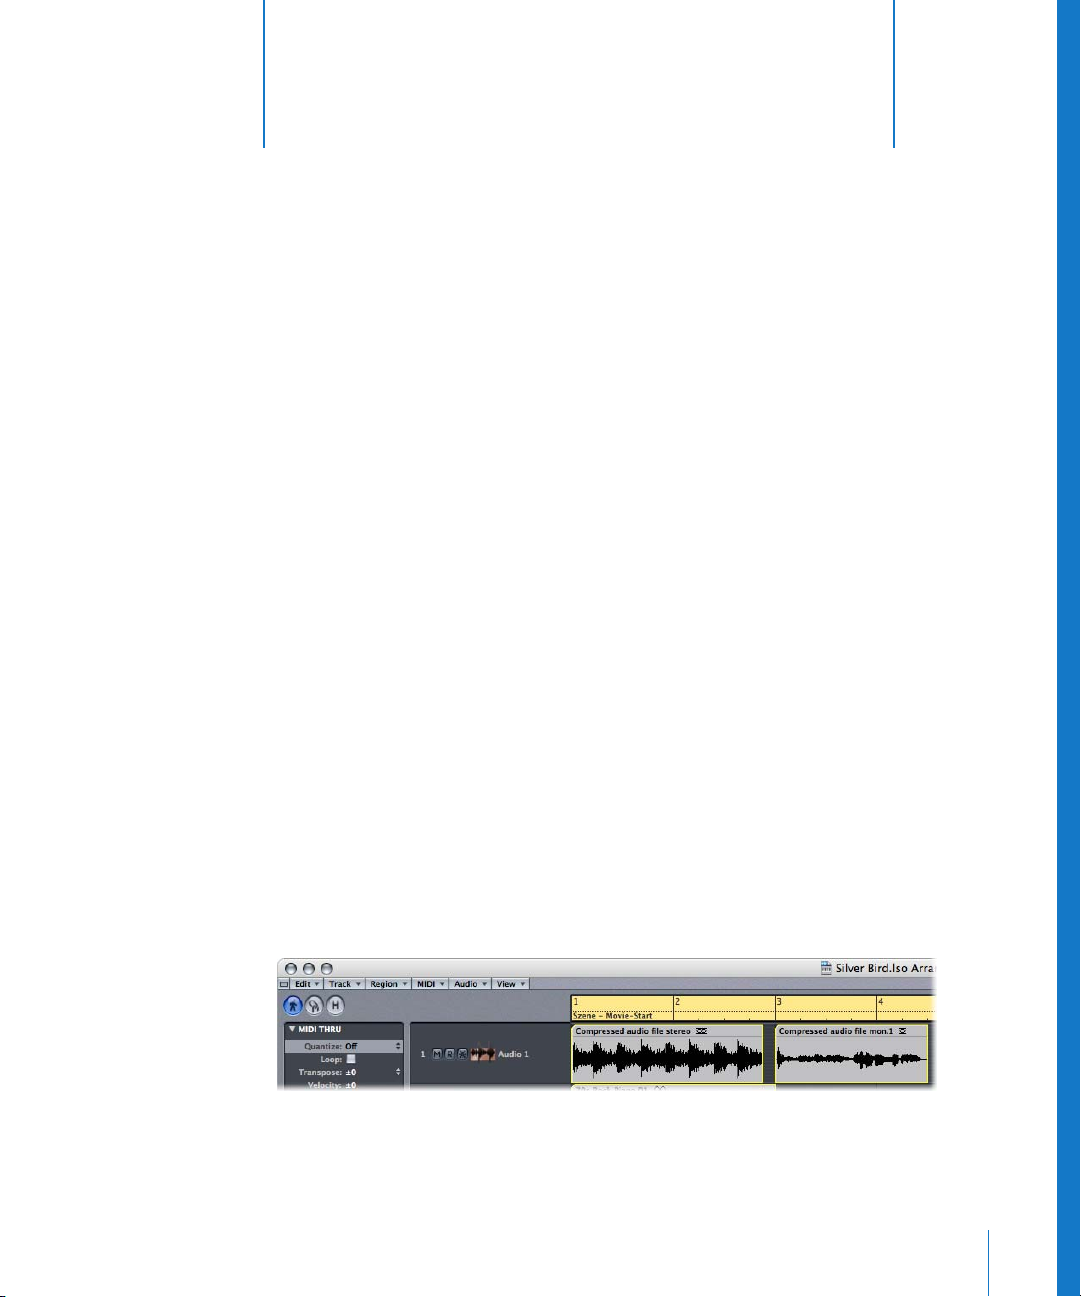
Direct Playback of Compressed Audio Files
Logic Pro 7.2 allows you to directly play back the following compressed audio file
formats:
 AAC
 Apple Lossless files
3
These files are no longer automatically converted when imported into Logic. The
compressed audio file is added to the Arrange window and a Region that encompasses
the complete audio file is created. You can edit this Region in the same fashion as a
“normal” Audio Region in the Arrange window: You can cut it, loop it, rename it, and
so on.
Note: It is not possible to assign fades to compressed audio files, nor can you
destructively edit them.
Audio Regions that point to compressed audio files are denoted by the following
symbols:
29
Page 30
The Project Manager can organize these compressed audio file types. The Audio File
category in the Browse view now offers the Compressed subcategory. The Find mode
Audio File filter also includes a new Compressed checkbox: Activate it to search for all
compressed AAC and Apple Lossless audio files.
You can convert compressed AAC and Apple Lossless audio files by doing one of the
following:
m Select the Audio Regions pointing to the desired audio file in the Arrange window,
then choose Audio > Convert Regions to New Audio Files in the local Arrange window
menu (or use the Convert Regions to New Audio Files key command; the default
assignment is Control-F).
The part of the audio file spanned by the Audio Region is converted to a new audio file.
m Select the audio files in the Audio window, then choose Audio File > Copy/Convert
File(s) in the local Audio window menu (or use the Copy/Convert File(s) key command).
Important: Compressed audio files protected by the DRM (Digital Rights Management)
scheme can not be opend in Logic. Music bought in the iTunes Music Store is usually
protected by DRM.
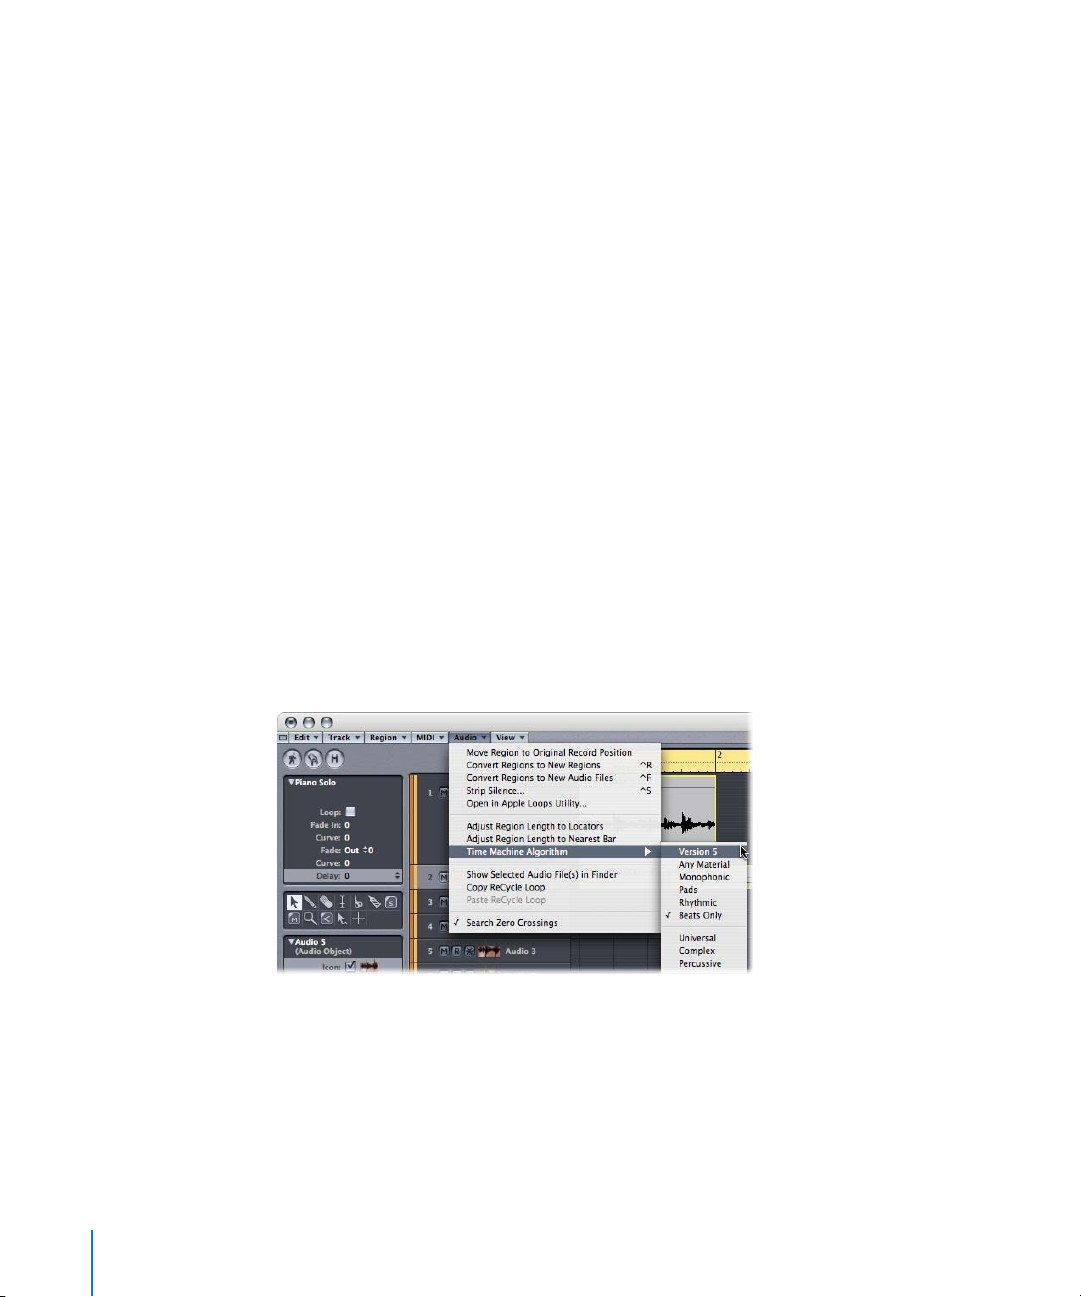
Additional Time Stretch Algorithms
The Time and Pitch Machine includes three additional time stretch algorithms. You can
choose them via the Arrange window Audio > Time Machine Algorithm menu or the
Time and Pitch Machine in the Sample Editor.
 Universal—This high-quality algorithm is able to handle any kind of audio material
and is generally recommended for most time stretching tasks. The following two
algorithms can, however, deliver better results in cases where the audio material
exactly matches the outlined specifications.
 Complex—Choose this algorithm to obtain natural sounding results when time
stretching complex musical material such as orchestral music or final mixes.
30 Chapter 3 Working With Audio
Page 31

 Percussive—The Percussive algorithm perfectly maintains the timing of percussive
material, making it a good choice for drum loops and percussive, non-harmonic
material. In comparison to the Beats Only algorithm, the Percussive algorithm is
better suited for percussive material that has been processed through a reverb (or
contains a long “tail”). This may also apply to percussive playing styles, such as a
staccato electric piano or clavinet parts. Beats Only may be the better alternative for
“dry” drum recordings.
Note: These three new algorithms will only appear in Logic Pro if Mac OS X version 10.4
(Tiger) or QuickTime 7 is installed on your system.
Serato AU Support
Logic Pro 7.2 allows you to use the pitch shift and time stretch algorithms provided
with Serato’s Pitch’n Time plug-in as Time Machine algorithms.
You can access these algorithms via the Arrange window’s Audio > Time Machine
Algorithm menu or the Time and Pitch Machine in the Sample Editor.
Note: The Pitch’n Time plug-in must be installed as an Audio Units plug-in for this
algorithm “sharing” to be available in Logic.
Working With the Follow Tempo Function
Audio files created in Logic Pro 7.1 or Logic Pro 7.2 can follow the song tempo
(including tempo changes) and the first key signature set in the Global tracks.
As an example: If you record a bass solo at 100 bpm, you can change the song tempo
to 120 bpm and the bass solo will automatically be played back at the new tempo.
The function works for all audio files that were recorded in, or bounced/exported from,
Logic Pro 7.1 and Logic Pro 7.2. The function only works in the parent song (the song
the audio files were created in). If you drag a file recorded in a given song to another
song with the Finder, the file can not follow the song tempo. Bounced/exported files
can only follow the song tempo, if the “Add resulting files to Audio window” option was
enabled in the Export/Bounce window prior to the bounce/export. Files copied
between two songs retain the ability to follow the song tempo.
The song’s tempo information is used to tag the beats in the recording. The function
works best if your audio files match the song tempo as precisely as possible. The longer
your audio files are, the more RAM is required for this functionality to work properly.
To make an audio file follow the song tempo and first key signature:
1 Select one of the audio file’s Audio Regions in the Arrange window.
If your audio file was created with one of the methods outlined above, the Follow
Tempo option appears in the Region parameter box.
Chapter 3 Working With Audio 31
Page 32
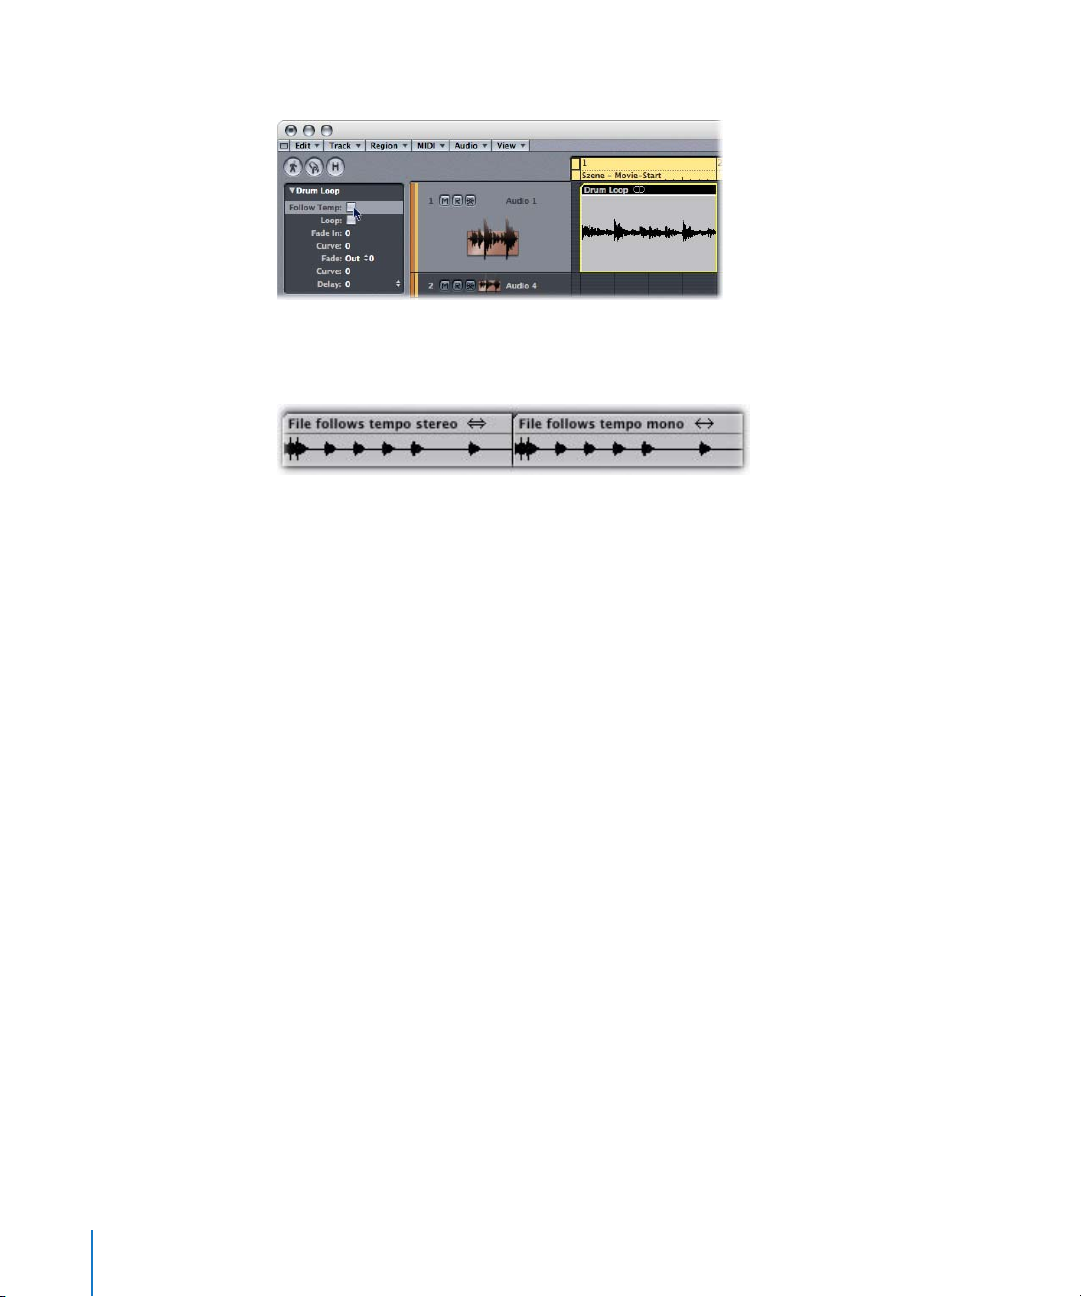
2 Enable the Follow Tempo option in the Region Parameter box.
All audio files that follow the song tempo and first key signature are indicated by the
following symbols in Logic:
Note: Follow tempo is actually an audio file tempo operation, not a Region function,
but was included in the Region parameter box for convenience. It is synchronized for
all Regions that make use of the same audio file.
Follow Tempo and Apple Loops
The Follow Tempo option does not create an Apple Loop!
Remember: Apple Loops follow chord changes—should you record a solo over an
arrangement consisting of Apple Loops with transposition changes over time, you
might want to enable Follow Tempo for your solo, but you won’t be happy with the
double transpositions that will occur…
To create an Apple Loop, please use either of the following options:
 Choose Region > Add to Apple Loops Library in the Arrange window. This method
sets transients that are based on the song’s tempo information.
 Choose Audio > Open in Apple Loops Utility in the Arrange window. This
functionality allows you to set the transients manually—independent of the song
tempo.
Please see “Creating Apple Loops” on page 64 for more information on creating Apple
Loops.
The Region Parameter box of looped (not-one-shot) Apple Loops also offers the Follow
Tempo option. If this option is disabled, the Apple Loop will not follow the song tempo
and key. Disabling the Follow Tempo option for a looped (not-one-shot) Apple Loop
does not convert the Apple Loop to a “standard” audio file.
32 Chapter 3 Working With Audio
Page 33
Export as Audio File Functions
The Export Audio File functions have been enhanced in the following ways:
 All Export As Audio File dialogs (Export > Track as Audio File, Export > Region as
Audio File, Export > All Tracks as Audio files) feature the “Add to Audio window”
option. Activation automatically adds the exported audio file(s) to the song’s Audio
window.
 The naming mechanism of the Export > Tracks as Audio Files function has
changed: All files are named after the corresponding Audio Object and track name
(“Audio Object Name-Track Name.filetype extension” or simply
“Audio Object Name.filetype extension” if no track name has been specified). If the
resulting file name is longer than 31 characters, the naming components are
abbreviated. When choosing File > Export > Track as Audio File, a name based on the
selected track’s name and Audio Object is created as the default name in the save
dialog.
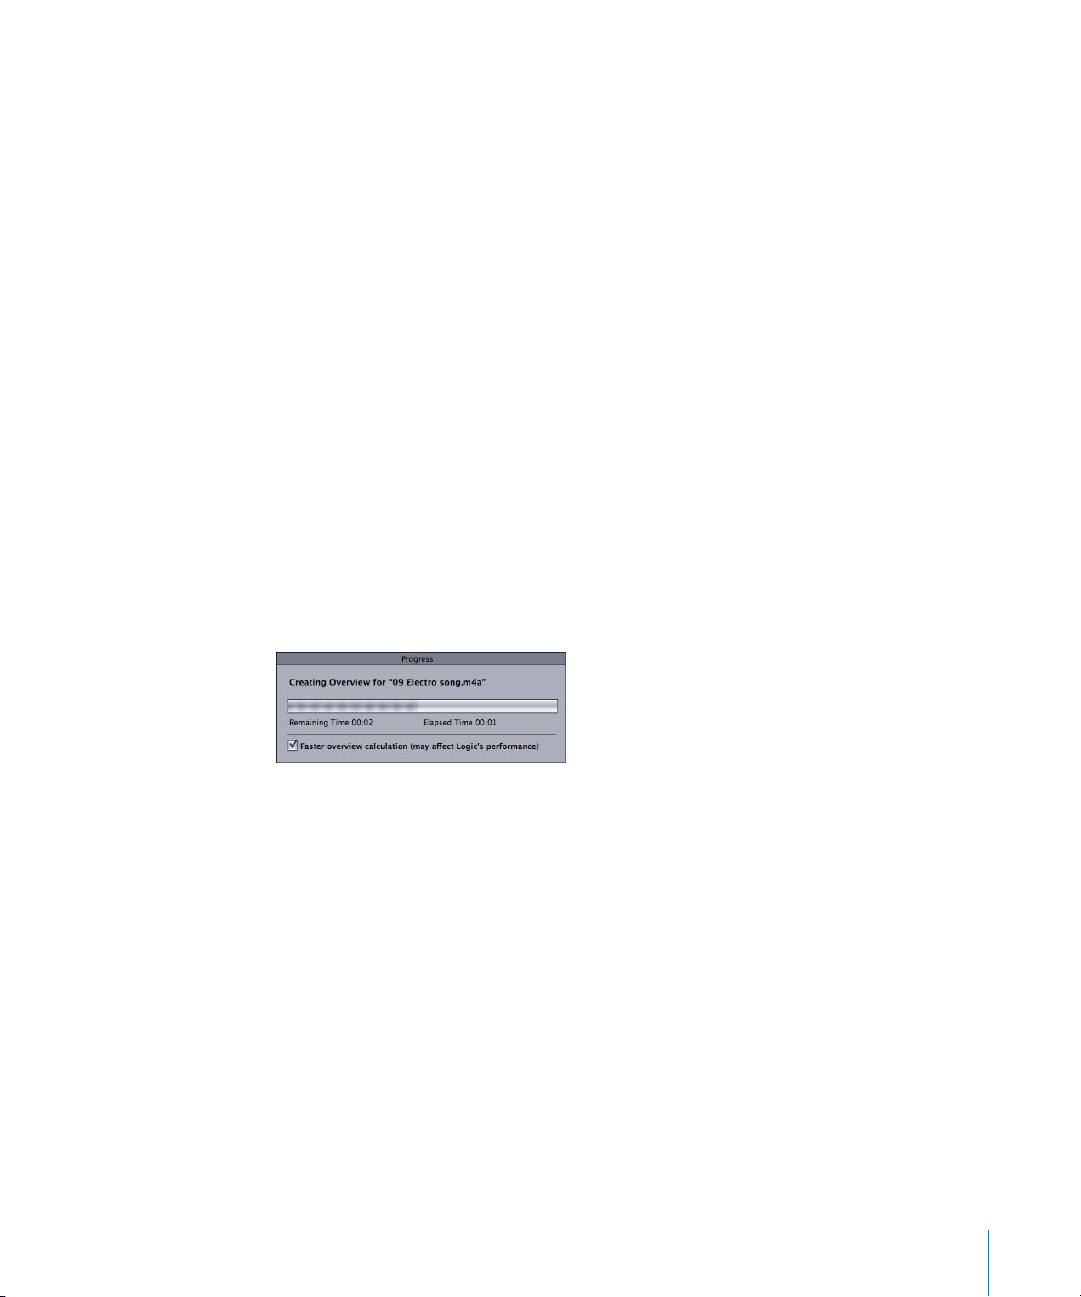
Faster Overview Creation
The Overview Creation dialog features an additional option which accelerates overview
creation. This makes overview creation as fast as the “foreground” overview creation of
Logic 6 (at the cost of slowing down other operations, but not blocking user
interaction completely).
Logic remembers the state of the “Faster overview calculation” option.
Renaming Split Stereo Files
You can now independently rename disconnected stereo files.
Warning: If you rename only one file of a disconnected split stereo file pair, it will not
be possible to reconnect the disconnected split stereo file.
Chapter 3 Working With Audio 33
Page 34

Page 35

4 Working in the Mixer Windows
4
Logic Pro 7.2 allows you to switch between Channel Strip
settings by sending MIDI program change messages.
It also allows you to toggle the bypass status of Insert slots with one controller value.
The following chapter outlines all mixing and bouncing enhancements made since the
release of Logic Pro 7. This includes support of stereo ReWire Objects, the Hand tool in
the Track Mixer and Arrange window channel strips, Surround Pan window and Bounce
window improvements.
Using Channel Strip Performances
You can now switch between Channel Strip settings by sending MIDI program change
messages. This allows you to select your favorite “sounds” (consisting of a complete
Channel Strip setting that can contain a software instrument and effect plug-ins) by
pushing a button on your MIDI keyboard. This facility is named Channel Strip
Performances.
Important: Only program change messages sent on MIDI channel 1 will switch
between Channel Strip Performances. All program change messages sent on other
MIDI channels are forwarded to Audio Units instruments, if applicable.
Channel Strip Performances can be used for all Audio Object types. They are saved in
the Performances subfolder (in ~/Library/Application Support/Logic/Channel Strip
Settings/Audio Object name). The Performance names start with the corresponding
Program Change number (as examples: 001Piano, 045FlangeGuitar, 111ArcoCelloHall).
There are 128 Performances (corresponding to 128 available program change events).
To create a Performance setting:
1 Configure a channel strip that you would like to have available as a performance (by
opening a Channel Strip setting from the factory library and making changes according
to your needs, for example).
35
Page 36
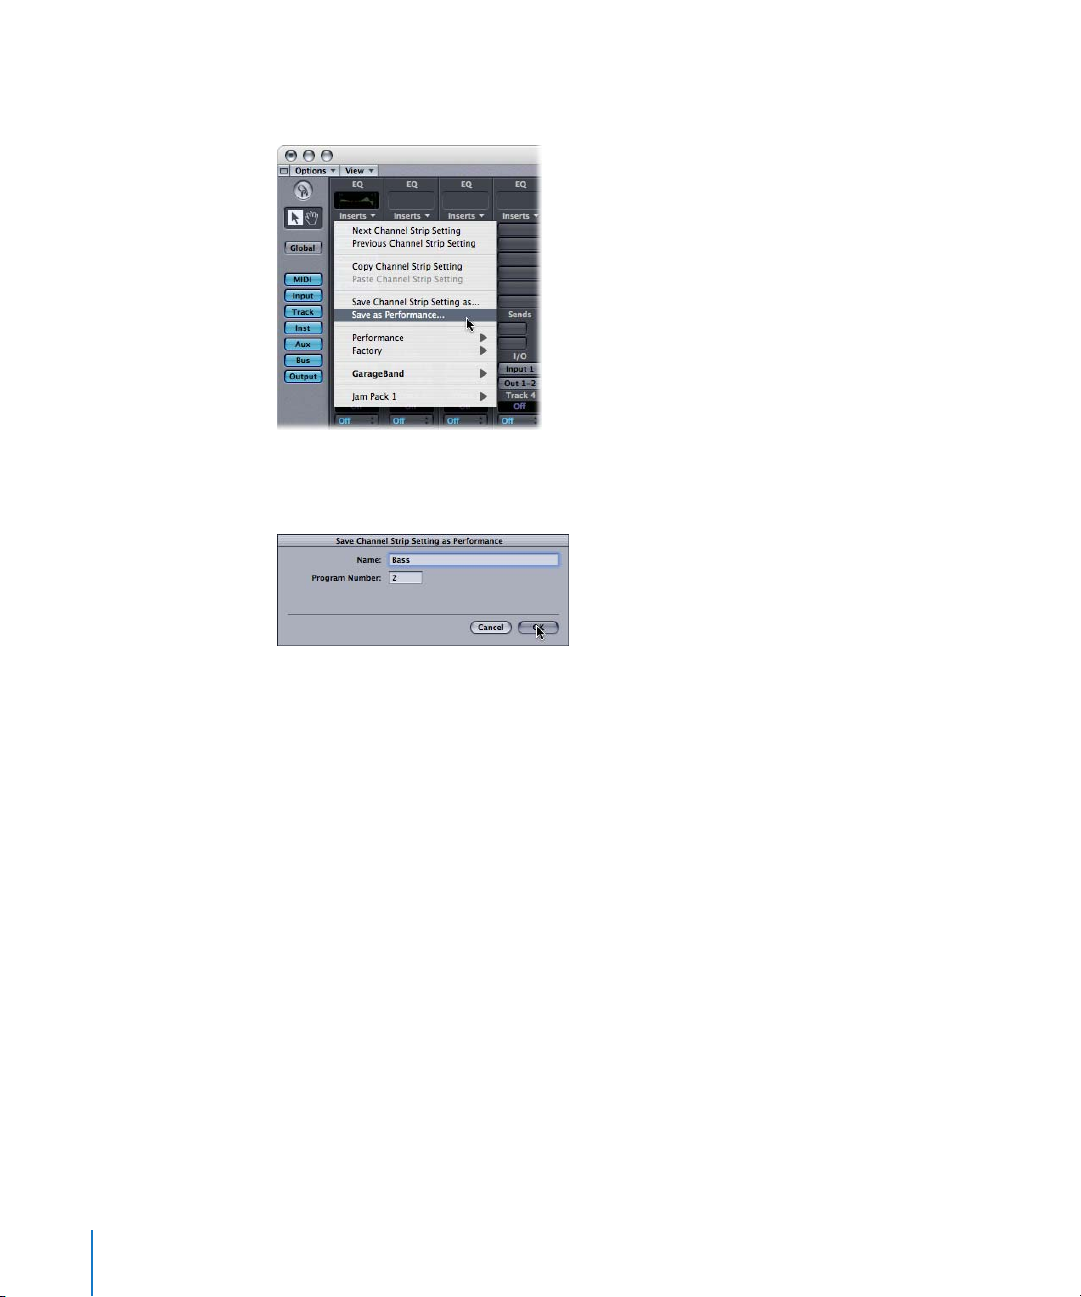
2 Open the Channel Strip Settings menu by clicking the word Insert on any channel strip,
then choose “Save as Performance”.
3 In the ensuing dialog, enter a Performance name, choose a program change number
and click OK.
You can also set the program change number by sending it from your MIDI controller.
Note: By default, the dialog will suggest the lowest, unused program change number.
An alert will advise you of any attempt to insert a program change number that is
already assigned. Click Overwrite if you want to replace the existing Performance
assigned to this program change number.
As soon as an Audio Object receives a program change message on MIDI channel 1
that corresponds to an assigned Performance number, it will load this Performance.
Note: If an unassigned program change value is sent, the channel strip ignores the
message, and the currently loaded Channel Strip Performance setting remains in place.
36 Chapter 4 Working in the Mixer Windows
Page 37
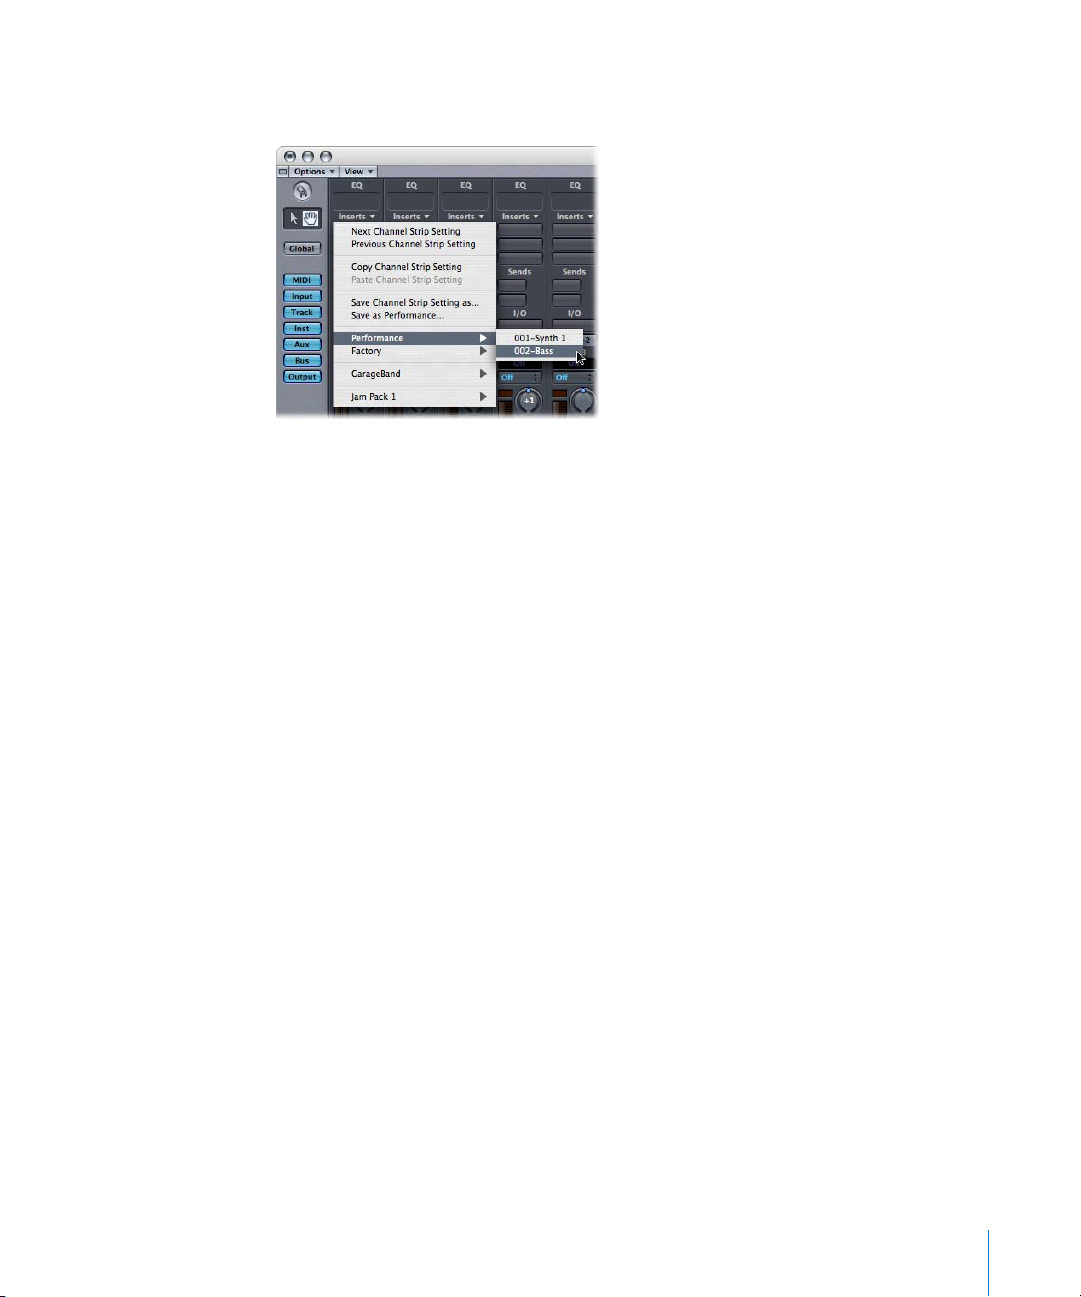
All saved Performance settings appear in the Performances folder of the Channel Strip
Settings menu.
Multiple Selection of Channel Strips
The Multiple Selection of channel strips function (in the Mixer windows) has been
enhanced: Clicking a channel background (without Shift held) also allows you to select
further channels by dragging over them (in the background).
Chapter 4 Working in the Mixer Windows 37
Page 38

Automating the Bypass Status
Logic Pro 7.2 allows you to toggle the bypass status of Audio Object Insert slots with a
single controller value: namely controller value 64.
The addition of this feature results in the following behaviors for controllers 56 to 70:
 A value of 0 switches bypass off.
 Values 1 to 63 and 65 to 127 switch bypass on.
 Repeated use of value 64 switches between the two bypass states.
This facility allows you to switch the bypass state of Insert slots 1 to 15 with a single
button, assigned to controllers 56 to 70, sending a value of 64. (Earlier versions required
that two different values be sent; one to activate, and one to deactivate, the bypass
status.) The following table lists the controller number used to switch the Bypass status
of the corresponding Insert slot.
Insert Slot Controller Number
156
257
358
459
560
661
762
863
964
10 6 5
11 6 6
12 6 7
13 6 8
14 6 9
15 7 0
This feature may prove particularly useful if you use a control surface that doesn’t
provide feedback. Imagine the following situation: you press the button on your
control surface, sending a value that switches the bypass status of an Insert slot to off.
The bypass status for this Insert is reactivated (turned to on, with the mouse) in Logic.
Your control surface will not reflect this change, if it doesn’t support feedback, leading
to nothing happening when pressing the appropriate button on your control surface.
This new facility allows you to use one button to toggle the bypass status—regardless
of state (bypass on/off).
38 Chapter 4 Working in the Mixer Windows
Page 39

Note: This facility also applies to the Mute and Solo buttons: If controller 9 sends a
value of 64, the Mute button status is switched, if controller 3 sends a value of 64, the
status of the Solo button is set to on/off—dependent on the current Solo status.
Support of Stereo ReWire Objects
Logic Pro 7.2 supports stereo ReWire Objects. This allows you to assign ReWire stereo
streams to a single Audio Object and configure the Audio Object as stereo.
Note: ReWire is a system from Propellerhead Software that allows you to stream audio
data between two audio applications in real time. You can use ReWire to stream audio
data from Propellerhead‘s Reason software into Logic, for example. Further information
about ReWire is found in the Logic Pro 7 Reference Manual.
To use stereo ReWire Objects in Logic Pro 7.2:
1 Start Logic, then start your ReWire application.
Logic displays the audio returns of ReWire-connected applications as Audio Object
channels.
2 Select the desired Audio Object in the Environment, then choose the ReWire channel in
the Channel menu of the Object Parameter box.
If you choose a stereo ReWire channel, the Audio Object displays the Mono/Stereo
button.
Chapter 4 Working in the Mixer Windows 39
Page 40

3 Click this button to configure the Audio Object as stereo.
The button will show two interlinked circles, indicating that it is a stereo Object. You are
able to insert stereo plug-ins, as in normal stereo audio tracks. The level meter will
divide into two discrete meters, the pan control will work as balance control.
Note: Logic can only work as a ReWire host application, which means that you can
stream audio into Logic, but you can not stream audio from Logic into another ReWired
application.
Surround Pan Window
The following Surround Pan window enhancements have been made since the release
of Logic Pro 7:
 It is possible to open multiple Surround Pan windows simultaneously.
40 Chapter 4 Working in the Mixer Windows
Page 41

 You can save Surround Pan windows in Screensets.
 The Surround Pan window provides a Link button. If enabled, the window will always
show the surround setup status of the selected Audio Object. This feature works in
the Track Mixer and in the Arrange window, but not in the Environment.
Hand Tool in Track Mixer and Arrange Channel Strip
The Track Mixer Hand tool is used to move and copy plug-ins between channel strips.
Note: The Track Mixer Hand tool is identical to that found in the Audio Configuration
window. All enhancements described below also apply to the Audio Configuration
window Hand tool, and supersede the corresponding information in the Logic
manuals.
To move a plug-in between two Insert slots:
1 Click the Hand tool in the Track Mixer Toolbox.
2 Select the (source) plug-in label and drag it to the desired target slot.
During the drag and drop operation, the potential destination is displayed as an orange
rectangle (empty slot) or line (when placing an effect between two Insert slots—see
below). Pressing Option during dragging copies the plug-in, rather than moves it.
You can also use the Hand tool in the Arrange window’s channel strip by pressing
Command (or right-clicking) when the cursor hovers over the Instrument or Insert slot.
Note: The Hand tool is the second default tool in the Track Mixer. Pressing Command
while clicking enables you to switch from the Pointer tool to the Hand tool. This allows
you to move plug-ins by Command-dragging them, and to copy them by OptionCommand-dragging them.
If you drag a plug-in label onto a used plug-in slot in the same channel strip, the plugins are swapped. When dragged between different channel strips, the existing plug-in
is replaced.
Placing Effects Between Used Insert Slots
If you drop an effect between two used Insert slots, the effect is inserted into a new
slot between the two used slots. The effects below the insert point are shifted down by
one slot.
Chapter 4 Working in the Mixer Windows 41
Page 42

If the effect’s source location is above the destination location, all plug-ins between the
source and destination locations are shifted up one position. If the plug-in’s source
location is below the destination location, all plug-ins between the source and
destination locations will be shifted down one position.
Note: If all 15 Insert slots are used, you can not place effects between Insert slots.
Bouncing Enhancements
The Bounce facilites in Logic have been enhanced in the following areas since the
release of Logic Pro 7:
 AAC bounce options are now available in a single Sound Settings window.
 The Bounce dialog‘s Device menu allows you to choose between any recognized CD
burners connected to your system.
 The default values for bounce start and end positions take a wider selection range
into account.
Streamlined AAC Sound Settings Window
The AAC (Advanced Audio Coding) bounce options are now available in a single Sound
Settings window.
Note: AAC provides high-quality audio encoding, well suited for Internet, wireless and
digital broadcast applications.
To access the AAC Sound Settings window:
1 Choose File > Bounce from the main menu bar (or use the Bounce key command).
42 Chapter 4 Working in the Mixer Windows
Page 43

2 In the Bounce dialog, activate the AAC option, choose a file name and destination, then
click Bounce.
The AAC Sound Settings window offers the following settings:
 Format: Displays the selected compression codec.
 Channels: Allows you to choose between a mono or stereo output file.
 Rate: A number of predefined sample rates are available in this pop-up menu,
ranging from 8000 Hz to 48,000 Hz. The Recommended option will select a rate
based on choices made in the Advanced Settings.
 Show Advanced Settings: Activate this checkbox to show further AAC settings in the
area below.
 Quality (Sample Rate Converter): Sets the quality of the sample rate conversion.
Reducing the quality accelerates the conversion process, but at the expense of audio
quality. Keep this set to Best whenever possible.
 Bit Rate Format: You have a choice of Constant or Variable Bit Rate: Variable Bit Rate
(VBR) encoding compresses simpler passages more heavily than passages that are
(more) harmonically rich. Not all AAC players can decode VBR-encoded AAC data,
which is why this option is set to Constant Bit Rate by default.
 Tar get Bit Rate: S ets the bit rate for the AAC export. The more kilobits per second, the
better the audio quality.
 Precedence: Allows you to connect the bit rate and sample rate options. If you set
Precedence to Sample Rate, the available Target Bit Rates are dependent on the
selected Sample Rate. If you set Precedence to Bit Rate, the options available in the
Sample Rate menu are dependent on the chosen Bit Rate setting.
Chapter 4 Working in the Mixer Windows 43
Page 44

 Quality (AAC Encoder): Sets the quality of the AAC encoded bitstream. Reducing the
quality accelerates the conversion process, but at the expense of audio quality. Set to
Best whenever possible.
Choosing the CD Burner
The Bounce dialog in Logic Pro offers a Device menu in the Burn options, which allows
you to choose between any recognized CD burners connected to your system.
Start and End Position Default Values
The default values for the Start and End Position fields of the Bounce dialog also take
Arrange window selections into account.
This means that the default Start and End Position values are set in the following ways:
 If the Cycle function is engaged, they will be set to the locator positions.
 If a selection (of one or more Regions) is made in the Arrange window, they will be
set to the selected area.
 If neither of the above is valid, the Start and End Position values will encompass the
entire Logic song.
44 Chapter 4 Working in the Mixer Windows
Page 45

5 Working With Video
5
A number of video functions and names have changed since
the release of Logic Pro 7.
This includes the following:
 Exporting a specific song section to a movie is now possible.
 Movie audio tracks can be imported directly into the Arrange window.
 Finding and removing scene markers can be restricted to portions of a movie.
 The new Remove Movie function allows you to completely remove a movie from a
song.
 Many video related menu items and preferences have clearer names.
Working With Movie Audio Tracks
Once a movie has been opened in a song, you can use the Movie sub menu to import
audio from a movie (into Logic) or export audio (from Logic) into a movie. Logic Pro 7.2
enhances these functions in the following ways.
Exporting Audio to a Movie
The Export Audio to Movie command now takes the cycle area into account. To
explain: If a cycle is active when choosing Options > Movie > Export Audio to Movie,
only Audio Regions that fall within the cycle area are bounced. A new QuickTime file,
spanning the cycle area, is created.
This allows you to export a portion of audio to a movie. Imagine a 35 minute project
where you have finished work on the first three minutes. You can now use the locators
to specify a section of audio that you want to export, creating a video file of the same
length, and using the same locator positions. This makes the creation of a (much
smaller) file for your client’s approval a simple, fast task.
45
Page 46

Importing Movie Audio Into the Arrange Window
You can import movie audio tracks directly into the Arrange window by using the
Options > Movie > Import Audio to Arrange function.
To import movie audio tracks into the Arrange window:
1 Choose Options > Movie > Import Audio to Arrange from the main menu bar (or use
the Import Audio from Movie to Arrange key command).
2 Select the audio tracks you want to import in the ensuing dialog, then click OK.
Note: When extracting audio from a movie file that only contains one audio file,
selection is superfluous.
The extracted movie audio appears as an Audio Region on the selected Arrange
window track.
Finding and Removing Scene Markers
Finding and removing scene markers can now be restricted to portions of a movie.
Choosing Options > Find Scene Markers or Options > Remove Scene Markers opens a
new submenu that offers the following:
 Auto Range: Logic removes or searches for scene markers—using one of the
following selection criteria—in the following order: Marquee Selection, Cycle Area,
Selected Regions. If none of these selection criteria is met, Logic will automatically
search the entire movie.
 Marquee Selection: Finding or removing scene markers is restricted to the marquee
selection.
 Cycle Area: Finding or removing scene markers is restricted to the cycle area.
 Selected Regions: Finding or removing scene markers is restricted to the selection of
one or more Regions.
 Entire Movie: Logic searches the complete movie.
The submenu entries are dimmed if no movie (or selection, respectively) is available in
the Arrange window.
Note: The Create Scene Markers (Auto Range) and Remove Scene Markers (Auto
Range) key commands always use the Auto Range option (as the name of these
functions suggests).
Removing Movies
The Options > Movies menu features a Remove Movie function, which allows you to
completely remove a movie from a song or project. All references to the movie in the
project or song are deleted. This function can also be initiated with the Remove Movie
key command.
46 Chapter 5 Working With Video
Page 47

Terminology Changes
The following items in the Options > Movie menu have been renamed:
 Extract Audio from Movie is now Import Audio From Movie.
 Extract Audio to Arrange is now Import Audio to Arrange.
 Remove Scene Cuts is now Remove Scene Markers.
 Find Scene Cuts is now Create Scene Markers.
The DV Mode menu of the Video song settings is now the Video Format menu.
Historically, the DV Mode menu was designed for use with FireWire devices. It now
works with other kinds of devices such as SDI, so a more generic name that does not
just imply DV via FireWire was chosen.
The Sound Output menu options have also be renamed. The Internal option is now
named System Sound, indicating that audio will be output in accordance with the
System Preferences.
The External option is now named External Device, indicating that it does not just refer
to external speakers connected to your Mac.
Chapter 5 Working With Video 47
Page 48

Page 49
6 Importing Files
6
The importation of XML and MIDI file data has been
improved since Logic Pro 7.
These enhancements make it easier to import Final Cut sequences and event-based
MIDI data into Logic Pro.
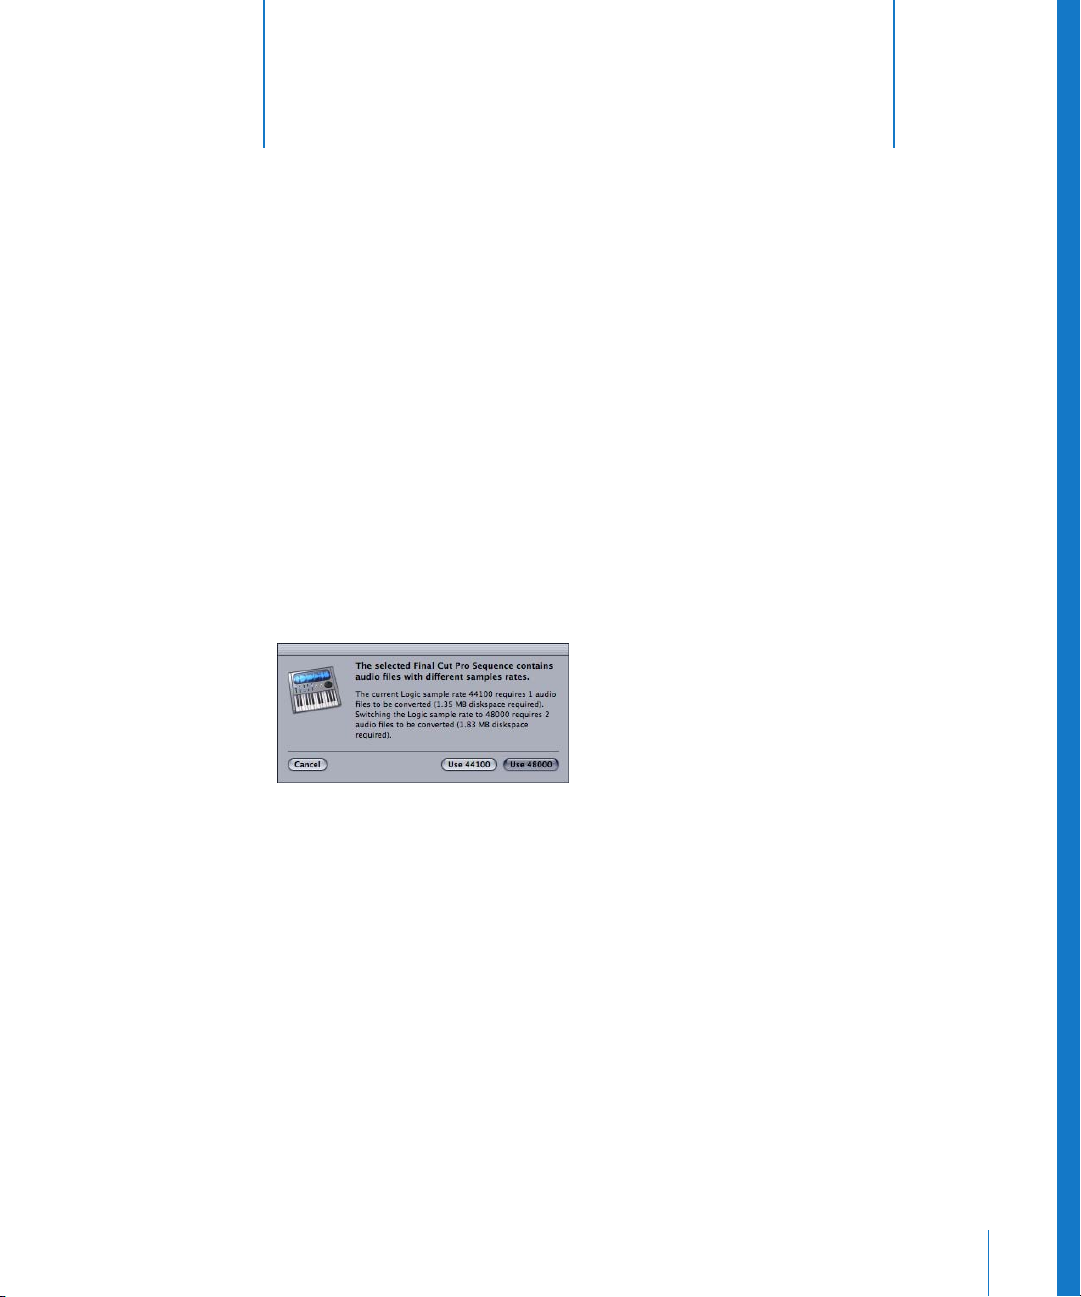
Importing XML Files
The XML import procedure allows you to retain the sample rate of audio files used in
your Final Cut sequences. If you import sequences that contain audio files with
different sample rates, the following dialog appears:
You can choose to change or keep the sample rate of your Logic project. All Final Cut
sequence audio files (with a sample rate that differs from the song sample rate) are
converted.
Note: A Final Cut sequence is an arranged series of video, audio, graphic clips, edit
information and effects, which combined create a movie. This is unrelated to the
former use of the term “sequence” in Logic, which referred to MIDI Regions. Use of XML
to import Final Cut sequences into Logic allows you to rapidly exchange multiple audio
tracks, with all positional region information, region names, volume and pan
automation data retained.
49
Page 50

Importing MIDI Files
Opening and importing MIDI files behaved in a similar fashion in earlier Logic versions.
Both the Import and Open commands loaded all data (including global information,
such as tempo events) into a new song. This may not be the behavior one would
normally expect from an “import”: usually an import only loads MIDI Region data
(notes, controller, SysEx, pitchbend, specific meta events) into an opened song. This
import behavior was available in previous Logic versions: when you dragged a MIDI
file from the Finder into the Arrange window, only MIDI Region data was loaded. The
MIDI Import menu command of Logic Pro 7 initiates a “true” import.
To import a MIDI file, either:
m Choose File > Import from the main menu bar (or use the Import key command), then
select the desired MIDI file in the ensuing file selector box.
Note: You can only import MIDI files if a “target” song is already open. If no song is
open, the File > Import item is dimmed.
The MIDI file is placed at the SPL position, rounded to bars.
m Drag the desired MIDI file from the Finder into the Arrange window.
The mouse position—when the mouse button is released—determines the position
(rounded to the nearest bar) and destination of the first track in the imported file.
Both methods only load MIDI Region data (notes, controller, pitchbend, SysEx, certain
meta events), with global data (such as tempo events, signatures, chords, track names,
SMPTE start and so on) being ignored.
If you want to load all information contained in a MIDI file, you must open it.
To open a MIDI file:
1 Choose File > Open from the main menu bar (or use the Open key command), then
select the desired MIDI file in the ensuing file selector box.
If a song is loaded, a dialog will ask if you want to create a new environment or copy
the current environment for the MIDI file.
2 Do one of the following:
 Click Copy to replicate the existing environment. The tracks of the MIDI file are
automatically assigned to suitable instruments.
 Click New to load the environment of the default song template (this template is
based on choices made when you ran the Logic Setup Assistant).
The MIDI file is loaded as a new song that contains all MIDI events—inclusive of time
positions and channel assignments, names of individual tracks, names and positions of
markers, tempo changes and copyright marks.
50 Chapter 6 Importing Files
Page 51

7 Control Surface Support
7
The extensive support for control surfaces has been further
enhanced since the release of Logic Pro 7.
Direct support for a number of control surfaces has been added, and several key
usability and assignment facilities have been improved. These include the track control
bar and key repeat functions.
Additional Control Surface Support
In order to keep Control Surface support current, the following control surfaces are
now directly recognized by Logic:
 M-Audio iControl
 Tascam US-2400
 Tascam FW-1082
 Frontier TranzPort
 JL Cooper CS-32
 JL Cooper FaderMaster 4/100
 Korg microKONTROL
 Korg KONTROL49
Note: For further information about the individual control surfaces, please refer to the
Control Surfaces Support document—found in the Documentation folder of the
Logic Pro 7.2 Installation DVD.
51
Page 52

Working With the Track Control Bar
When a control surface is connected to Logic Pro 7.2, the Track Control Bar is displayed
in the Arrange window. This bar indicates the tracks that are currently being accessed
by your control surface.
This bar is available for all control surface devices connected to your system. The Track
Control Bar of each control surface can be assigned a different color. The bar color is set
in the Device parameter box.
To change the Track Control Bar color:
1 Choose Logic > Preferences > Control Surfaces > Setup (or use the Open Setup key
command) to open the Control Surfaces Setup window.
2 Select the appropriate control surface icon.
The Device Parameter box appears, featuring the Color option.
3 Click the Color option.
This launches a color palette, allowing you to choose or create the desired color.
52 Chapter 7 Control Surface Support
Page 53
New Key Repeat Function
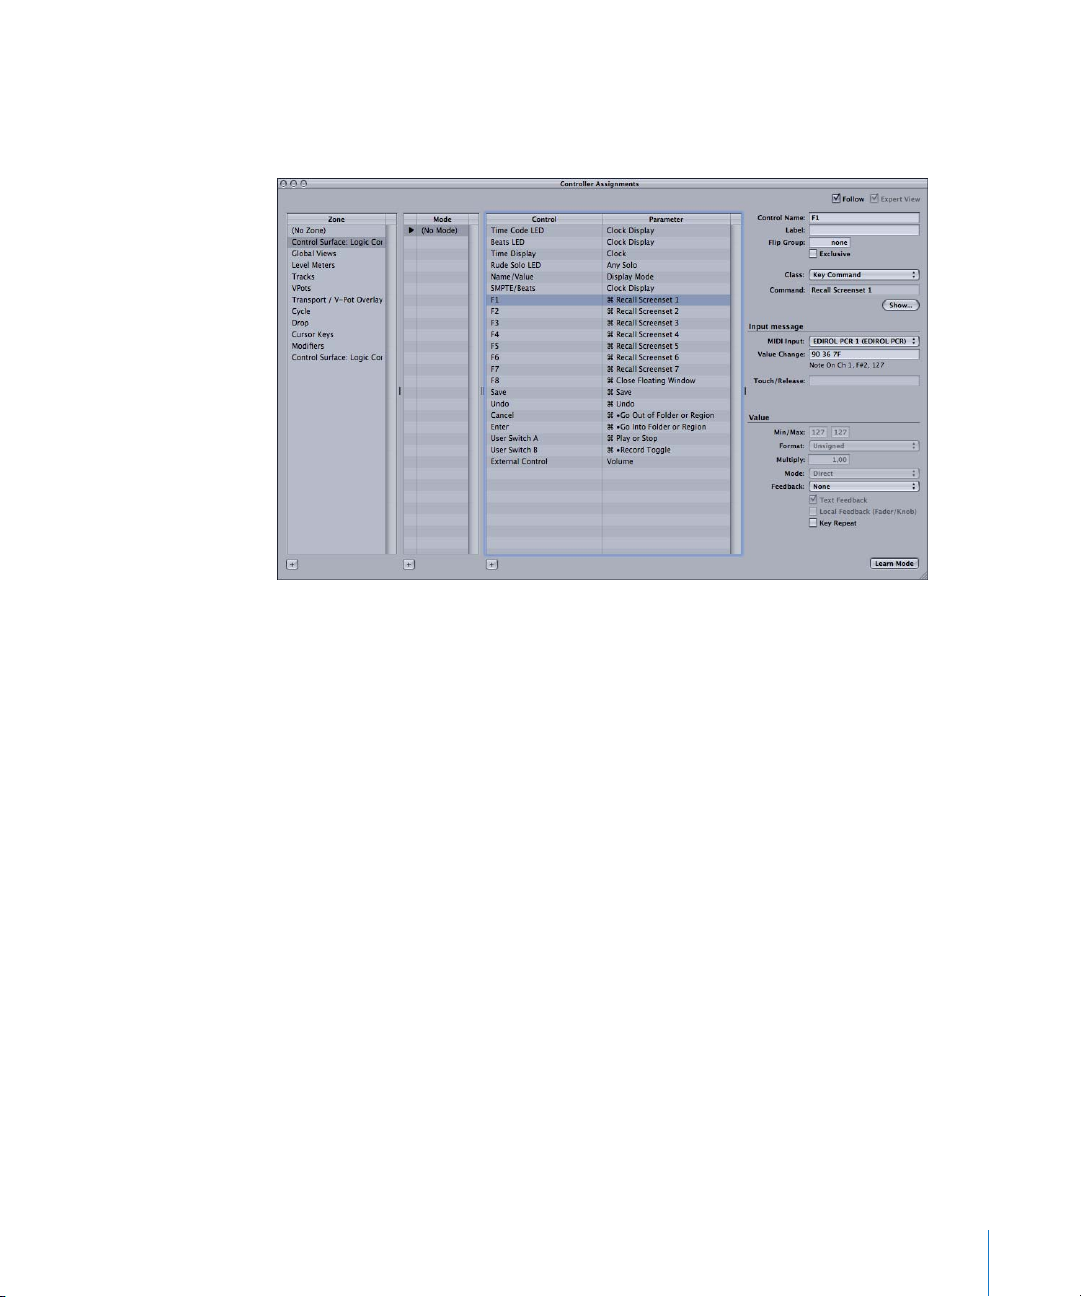
The Expert view of the Controller Assignments Editor now features the Key Repeat
checkbox in the Value section.
Note: The Key Repeat checkbox is positioned at the bottom of the Controller
Assignments Editor. If the vertical size of the Controller Assignments Editor is
insufficient, the checkbox will not be visible. In this situation, simply drag the lower
right corner of the window downwards to resize it.
When you enable the Key Repeat checkbox, the assignment is repeatedly executed.
The Key Repeat Rate slider—set in the Mac OS X Keyboard & Mouse preferences—
determines how quickly Logic repeats the assignment. The duration that the button/
controller must be held for, before the assignment is repeated, is set with the Delay
Until Repeat slider in the Keyboard & Mouse preferences.
Example: This facility is particularly useful for the zoom function: If you assign a key
repeat command to the Zoom buttons on the Logic Control, for example, you can
simply hold down the Zoom In button. Logic will zoom in until the Zoom In button is
released. This mirrors the behavior of the Zoom key commands. In earlier versions, you
had to repeatedly press the (Logic Control) Zoom buttons to zoom in/out more than
one level.
Note: The Key Repeat checkbox is only available for key commands, key presses and
relative value changes. If any other assignment class is selected, the checkbox is
dimmed.
Chapter 7 Control Surface Support 53
Page 54

Logic Pro 7.2 provides updated control surface plug-ins for several devices: the factory
key command assignments already support the Key Repeat function (if useful and/or
applicable to the device)—making changes unnecessary for use of this new
functionality.
If you want to enable the Key Repeat function for your own assignments, you may
need to use the re-learn option for the assigned message. Key Repeat messages must
include the Lo7 byte, which provides information on the up (released) or down
(pressed) state of the assigned button.
Logic guides you through the re-learning process: The current MIDI message is
automatically cleared, Learn mode is activated, and a help tag prompts you to send the
desired MIDI message.
Releasing the assigned button—after learning the MIDI message—automatically
creates the Lo7 byte, and assigns the Lo7 value for the button release message to the
Min parameter. The Lo7 value for the “button pressed” message is automatically
assigned to the Max parameter.
Typically, the value range of 1–127 is used for the button pressed message. The zero (0)
value is generally used for button released.
Note: Some control surfaces may use different value ranges (CM Labs MotorMix, for
example). Assigning the used value range to the desired Min and Max values ensures
that key repeat also works with such devices. This, however, also means that you need
to take care when manually changing the Min or Max value for a key command (in
cases where the Min and Max values do not match the button on and button release
(off) states, the complete assignment will not work). Please consult your control surface
manual for further information about the values used.
Intermediate Stop at Default Value
Pressing the Option button on your control surface, while editing a parameter assigned
to a rotary encoder, enters “Relative Controller mode”. In this mode, a turn to the right
sets the encoder to its maximum value. A turn to the left sets the encoder to its
minimum value. Logic Pro 7.2 enhances this mode: it now also stops at the encoder’s
default value.
As an example: When the Pan knob is somewhere left of center, turning the encoder to
the right—with Option pressed—will initially set the pan parameter to its center
(default value) position, with a further right-turn setting the full right (maximum value)
position.
54 Chapter 7 Control Surface Support
Page 55

Modal Dialogs Display
All modal dialogs (except file selector boxes) are now shown on control surfaces that
feature LCD text displays.
All text fields are shown in the display’s upper row (if applicable to the device). If the
dialog text does not fit into the LCD’s upper row, it will start scrolling after three
seconds. You can scroll the dialog text manually with the appropriate control (see
assignment tables in the relevant Control Surface Support documentation). Manual
text scrolling disables automatic scrolling.
 If there is an Enter or OK button on the control surface, it triggers the dialog’s default
button, where applicable.
 If there is a Cancel or Exit button on the control surface, it triggers the button labeled
Cancel or Abort, where applicable.
 All buttons (push buttons, including Enter/default and Cancel, as well as checkboxes
and radio buttons, but not pop-up buttons) are shown in the display’s lower row (if
applicable to the device). Pressing a control surface button below the display triggers
the appropriate button/function in the dialog, where relevant.
Following use of the Enter/Cancel button on the control surface (or with the mouse),
the dialog will disappear, and all controls and displays will return to their previous
state/mode.
Mackie Control Mode Support
Logic Control, Logic Control XT, Mackie Control Universal and Mackie Control Extender
(all with firmware version 1.02 or higher) units no longer need to be switched to Logic
Control mode, to be recognized by Logic.
If you use software that requires Mackie Control mode:
1 Switch to Mackie Control mode. (Details can be found in your control surface
documentation).
2 Delete the Logic Control control surface in the Control Surfaces Setup window.
3 Turn on the power for your control surface. It will automatically be installed as a Mackie
Control. The functionality of both modes (Mackie/Logic Control) is identical.
Note: If you don’t use software that requires Mackie Control mode, there’s no need to
change anything.
Chapter 7 Control Surface Support 55
Page 56

Controller Assignments Editor Enhancements
The Easy View of the Controller Assignment window has been simplified. The Control
Name field has been removed, because Easy View is generally used for unsupported
control surfaces—such as the controllers on your master keyboard or other fader
boxes.
The Track parameter allows you to choose between selected (which is the default, if
creating assignments on the selected track) or a fixed track number (if you want to set
up your controls as a mixer surface).
The Learn Message button has been renamed to Learn Mode (because you can create
multiple assignments while it’s enabled).
Assignments created for a specific plug-in are only active if the plug-in is present on
the specified track. This enables you to use the same controller messages for different
plug-ins—to control the cutoff frequency of ES1, ES2, or EXS24 via the same knob, for
example—depending on which software instrument is inserted in the selected track.
As a further productivity enhancement, you can now delete the selected assignment,
zone, or mode with the backspace key—or you may use the Edit > Clear menu option
that was available in earlier versions.
When the Controller Assignment window is opened in Expert view, any newly-created
assignments will become part of the currently displayed Mode. When not in Expert
view, the assignment is created in the No Zone section, which contains assignments
that are always active.
Your assignments are stored as preferences, making them available in all songs.
56 Chapter 7 Control Surface Support
Page 57
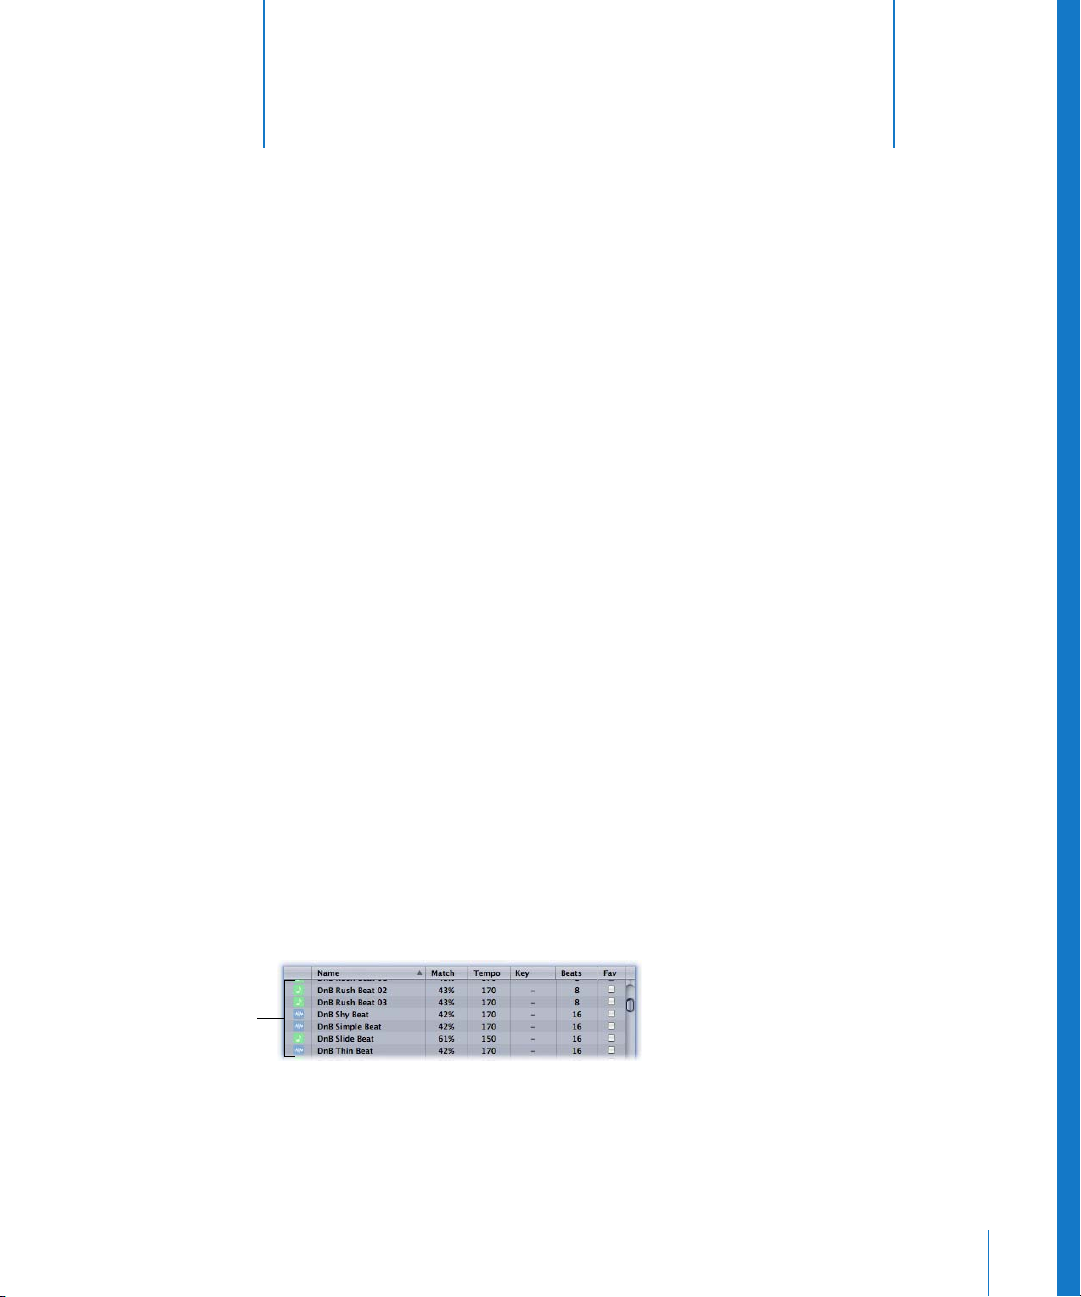
8 Using Apple Loops
The support of Apple Loops in Logic Pro brings a range of
flexible options to your music-making palette.
This chapter covers their use in Logic Pro, information on Apple Loop creation and
further material that will aid you in making the most of the facilities available.
Logic Pro ships with a number of Apple Loops, as does GarageBand. Apple Loops are
AIFF format audio files that contain PCM audio data. Apple Loops can be used in any
audio application that supports AIFF files. In comparison with “standard” audio loops,
Apple Loops have a significant advantage: they can contain additional information
that Logic Pro uses for a variety of purposes, including automatic time and pitch
shifting, indexing and searching.
Two important data types that Apple Loops may include are; metadata tags and
transient markers. Logic Pro uses metadata tags to help locate files when using the
Search features of the Loop Browser. Transient markers indicate where beats occur in
the file. Logic Pro uses this information, in conjunction with the metadata tags, to
match the file’s tempo and key to the song tempo and key, thus ensuring the best
possible playback quality.
8
Green and blue Apple
Loops in the Loop
Browser
Green and Blue Apple Loops
There are two types of Apple Loops: those featuring a blue sound wave icon and
others with a green note icon (these icons are shown in the Loop Browser).
Both contain uncompressed PCM audio data, and both may contain additional
information for time stretching, transposition, indexing and searching.
57
Page 58

Green and blue Apple Loops can be added to audio tracks. They look like normal Audio
Regions, but can be easily identified by the Apple Loop symbol in the upper right
corner. They follow the song key and tempo.
Stereo Apple Loop
symbol
Mono Apple Loop
symbol
Apple Loops that feature the green icon can also be placed on Audio Instrument and
MIDI tracks. On such tracks, these files can be edited just like other MIDI Regions,
including individual note editing.
Green Apple Loop placed on
an Audio Instrument track
Another interesting thing about the green Apple Loops is that if dragged onto a
“blank” Audio Instrument track (one with an empty channel strip), the corresponding
instrument, effect(s) and input setting are automatically inserted. These instruments
can be played in the same fashion as Logic Pro audio instruments. Green Apple Loops
carry all information contained by the blue Apple Loops, but also contain a MIDI
Region plus software instrument and plug-in settings. Green Apple Loops are known as
SIALs (Software Instrument Apple Loops).
Tip: When you place SIALs on audio tracks, they are imported as Audio Regions. This
reduces the audio processing required for playback.
58 Chapter 8 Using Apple Loops
Page 59

Adding Apple Loops
There are several ways to add Apple Loop files to your Logic song. Logic Pro offers a
special Loop Browser that enables you to search for Apple Loops, using key words for
instrument, genre, mood, and other descriptors. You can also import Apple Loops in
the same way as audio files.
To add an Apple Loop to your arrangement, do one of the following,
m Open the Loop Browser by choosing Audio > Loop Browser (or use the Loop Browser
key command). Select the desired Apple Loop file, and drag it into the Arrange
window, where you can drop it at the desired position.
More information on the Loop Browser is found in the section on “Working With the
Loop Browser” on page 60.
m Drag the desired Apple Loop file directly from the Finder into the Arrange window.
m Select the Pencil tool, and Shift-click on the desired track in the Arrange window (or
choose Audio > Import Audio File from the main menu bar; you can also use the
Import Audio File key command). This will launch a standard file browser. Browse to the
folder in which your Apple Loops reside (See “Apple Loop File Paths” on page 81 and
the information on the Jam Pack Management pull-down menu in the Loop Browser
section.)
When you add an Apple Loop to an audio track, it is automatically matched to the
tempo and key of the song. This functionality allows you to play back several Apple
Loops simultaneously, and have them sound good, even if they have different tempos
and keys.
When you add a SIAL to an Audio Instrument track, it is displayed as a MIDI Region. If
the track’s channel strip is empty, the corresponding software instrument, effects and
settings are also loaded.
Chapter 8 Using Apple Loops 59
Page 60

Working With the Loop Browser
The Loop Browser is designed to make finding Apple Loops an intuitive and fast
process. You can search for loops by using keywords, perform text searches, preview
loops, view information about loops, and limit the display to loops from a specific Jam
Pack or loop library.
To open the Loop Browser, do one of the following:
m Choose Audio > Loop Browser.
m Use the Loop Browser key command.
The Loop Browser Interface
The default view of the Loop Browser shows a matrix of 54 buttons, each featuring a
category name. Simply click on the desired button(s) in the matrix to narrow your
search for appropriate Apple Loops. Activated buttons are highlighted. Multiple
categories can be selected, either in conjunction with the Jam Pack Management, Scale
and Signature pull-down menu options, or not.
Scale menu
“Play in” menu
View buttons Jam Pack Management menu
Signature menu
Search field
Category buttons
Volume slider
Apple Loops file list
Displays all Apple Loops
that match the set search
criteria
60 Chapter 8 Using Apple Loops
Page 61

The View buttons at the top left switch between three view types. The first button from
the left, featuring the three rectangles, switches to a standard Mac OS X column file
menu that is hierarchically separated into All, By Genres, By Instruments, By Moods, and
Favorites search criteria. The second button from the left (featuring the note icon)
switches to the “normal” Matrix view mode, showing musically-related categories. The
third button from the left (featuring the bell icon) switches to Sound Effects view,
offering effect-related category buttons such as Explosions, Foley, or People.
You can replace a displayed category via the shortcut menu that opens when you
Control-click (or right click) on any category button.You can choose from:
 Genre: This sub-menu offers musical categories, and for example includes Rock/Blues
and Electronic.
 Instruments: Bass, FX, Vocals, and the Textures and Jingles options are available,
amongst others.
 Descriptors: The options in this sub-menu cover the “mood” of Apple Loops, and
include Dark, Relaxed, Grooving, and others.
Basically, the Loop Browser displays all indexed loops in the system. When a high
number of Apple Loops is installed on your system, this might become rather complex
to administer. To keep things tidy, the Loop Browser offers advanced loop management
tools. The Jam Pack Management pull-down menu allows you to limit the display to
loops from a specific Jam Pack or other folder. Jam Packs are professionally-created
genre or instrument-specific Apple Loop collections, available from Apple.
Simply select the desired option from the Jam Pack Management menu. You can
choose between:
 Show All: Choose this default option to display all Apple Loops on your system. It is
extremely handy if you are unable to locate a loop that you know is installed and
indexed on your system, but do not know what Jam Pack it belongs to.
 My Loops: Choose to display all Apple Loops in the ~/Library/Audio/Apple Loops and
~/Library/Application Support/GarageBand folders (~ denotes the User name).
 GarageBand: Choose to display all Apple Loops installed with GarageBand.
 Jam Pack x: Choose to display all Apple Loops from a specific Jam Pack.
 Vendor x: Choose to display all Apple Loops from a specific third-party vendor.
Chapter 8 Using Apple Loops 61
Page 62

The Scale pull-down menu offers Any, Minor, Major, Neither and Good For Both options.
Use of these options limits the search for Apple Loops to the selected Scale type, within
the chosen category. As an example, if Country, Acoustic and Relaxed categories were
selected, you would be presented with twenty or so files that matched your choices.
Selection of the Minor Scale option would reduce this list to ten possible Apple Loops,
making the task of auditioning and selecting the most appropriate material faster.
The Signature pull-down menu performs a similar task to the Scale menu, but limits
searches to Apple Loops that match the selected time signature.
The Search field is used to find Apple Loops by name or partial name:
Cancel button
 Type in the desired search term, and press the Return key. Any files that match your
search term will be displayed in the file browser at the bottom of the window.
 The Cancel button to the right (which appears as soon as any text is entered) clears
any entered text. It also clears the search history.
The “Play in” pop-up menu determines the playback key of the selected Apple Loop.
Choices include: Song Key, Original Key, and C through to B.
Note: Any chord in the Chord track can affect the playback key of Apple Loops. If
defined chords exist in the Chord track, the Song Key option will automatically be
selected in the “Play in” pop-up menu. The insertion of any chords into the Chord track,
after Apple Loops have been added to your arrangement, will result in an alert that
advises you of the impact this will have. For further information, see “Chord Track” on
page 78.
The Volume fader adjusts the playback level of the selected file in the Loop Browser
window.
The list at the bottom of the window displays all Apple Loops that match the criteria
set with the parameters discussed above.
 Clicking on any of the column titles will sort the list of results by Name, Match,
Tempo, Key and so on.
 Clicking on the arrow in any selected column title will sort the list in ascending or
descending alphabetical, match percentage, tempo, key, beat or favorite order.
 Columns can be resized by dragging the vertical lines between column titles.
 Selection of any entry in the list of files will automatically begin playback. You can
stop playback by clicking on the speaker icon in the left-hand column.
62 Chapter 8 Using Apple Loops
Page 63

 The Fav (Favorites) column offers a checkbox for every displayed loop. Simply check
this box to add the loop to the Favorites category (for more information, see
“Working With Favorites” on page 64).
Adding Apple Loops to the Loop Browser
Logic Pro must index Apple Loops before they are shown in the Loop Browser. Loops
can reside in any directory, but you need to tell Logic Pro where to find them.
To add Apple Loops to the Loop Browser:
1 Open a Finder window alongside Logic Pro.
2 Navigate to the folder that contains the Apple Loops.
3 Select the Apple Loops in the folder and drag them into the Loop Browser.
The loops are added to the Apple Loops library and indexed. When this process is
finished, the loops will be available directly in the Loop Browser.
If you drag a single loop to the Loop Browser, the loop will be copied to ~/Library/
Audio/Apple Loops/User Loops/SingleFiles.
If you drag a folder of loops that are located on the same drive and partition as the
Loop Browser, the loops will be left at their current location, and an alias of the folder
will be created in ~/Library/Audio/Apple Loops/User Loops.
If the loops are located on a different drive or partition, you’ll be asked whether you
want to copy them to the loop library, or index them at their current location (loops
added from optical media will always be copied).
 If you choose to copy them, the folder containing the loops will be copied to ~/
Library/Audio/Apple Loops/User Loops/.
 If you choose to index them at their current location, an alias to the folder will be
created in ~/Library/Audio/Apple Loops/User Loops/.
Acid Loops in the Loop Browser
The Loop Browser also displays Acid Loops. Acid Loops don’t contain “tags” like Apple
Loops. In Acid Loops, this information is derived from the surrounding folder structure
(especially the names of folders), which must comply with certain standards. This
means that it’s not possible to drag an individual Acid Loop file into the Loop Browser.
As such, you need to drag the entire CD (or folder) that contains the Acid Loops into
the Loop Browser.
Chapter 8 Using Apple Loops 63
Page 64
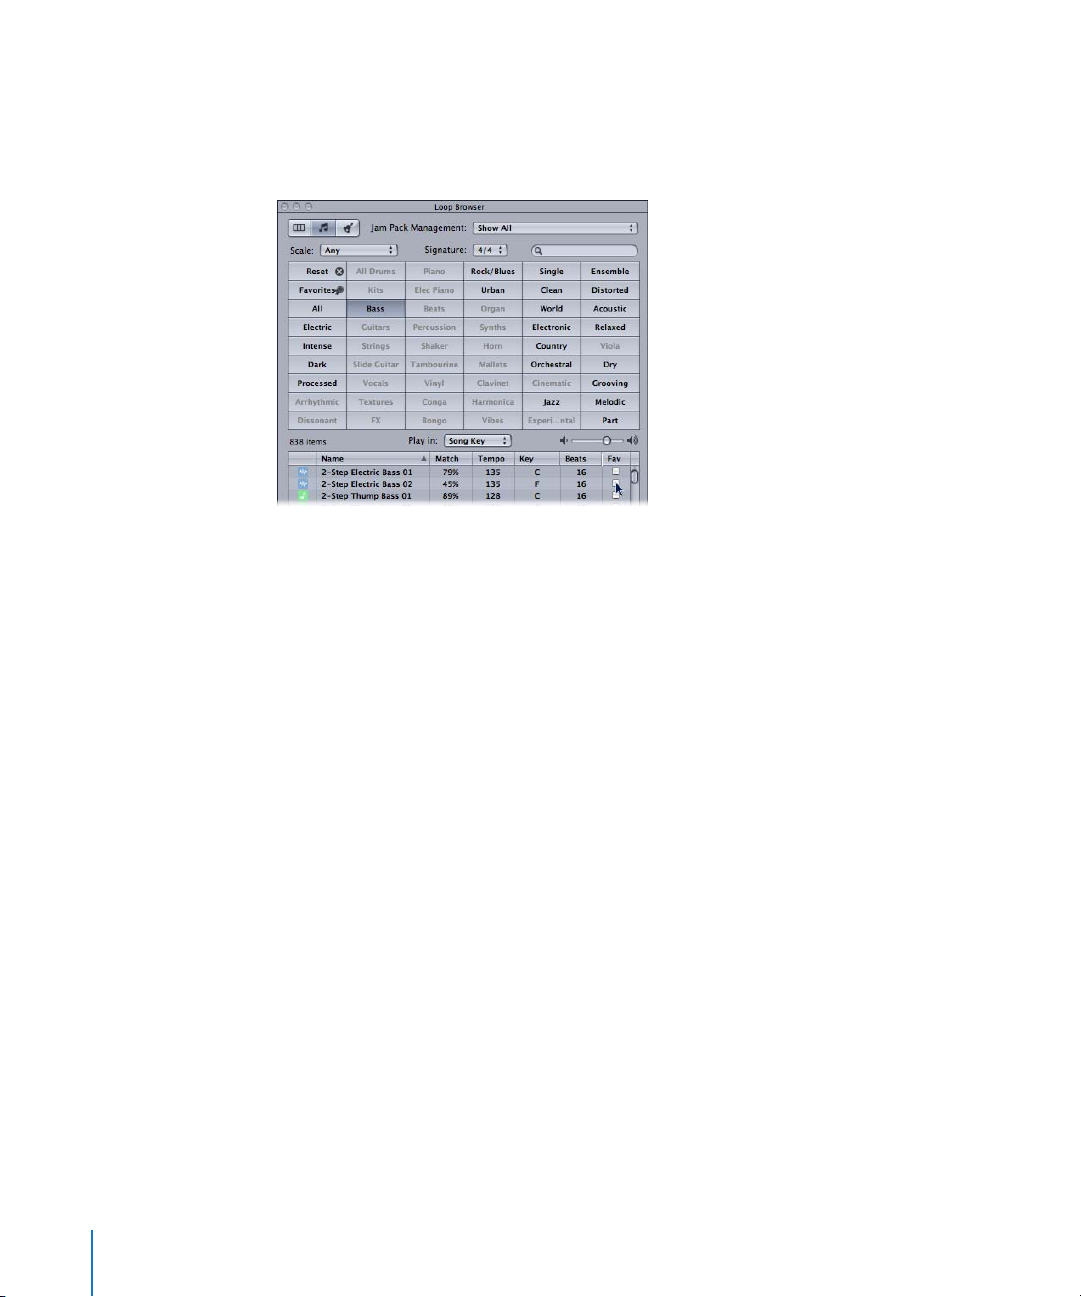
Working With Favorites
The Fav (Favorites) column in the list at the bottom of the Loop Browser offers a
checkbox for every displayed loop. Simply check this box to add the loop to the
Favorites category.
This facility is ideal for compiling a collection of Apple Loops that you use regularly. As
a producer of dance-floor music, you may often construct songs by starting with drum
loops. You could conceivably have a basic “four on the floor” kick pattern, eighth and
sixteenth note hi-hats, two or four beat snare or clap patterns and so on, and use these
favorite loops as a groove construction kit—at least while creating your shell
arrangement.
These loops can be easily replaced or added to as your project advances, but the use of
favorites may form a great starting point for many of your songs.
Creating Apple Loops
You may wish to create an Apple Loop from an existing audio recording as Apple Loops
offer the advantages of automatic time stretching and transposition over other audio
file formats.
You can save both Audio and Audio Instrument Regions as Apple Loops in Logic. The
set transients are based on the song’s tempo information. For more information on this
method, see the following section.
You can also use the Apple Loops Utility to create Apple Loops from Audio Regions.
The Apple Loops Utility is a companion application to Logic Pro that allows you to
manage metadata tags and transients in audio files. The Apple Loops Utility offers
sophisticated tag editing functions for audio files. You can, for example, set the
transients manually—independent of the song tempo. (for more information read
“Creating Apple Loops in the Apple Loops Utility” on page 68).
64 Chapter 8 Using Apple Loops
Page 65

Note: The Apple Loops Utility does not allow you to create SIALs.
Which tool to use, and when to use it?
As mentioned above, Logic Pro offers Apple Loops creation facilities, and the separate
Apple Loops Utility also allows you to construct your own Apple Loops.
You have a fairly simple decision path to follow:
 If you want to create an Apple Loop from an audio file that matches the song tempo,
use the Apple Loop creation utilities available in Logic Pro.
 If you want to create a Software Instrument Apple Loop (SIAL), use the Apple Loop
creation utilities available in Logic Pro.
 If you want to create a non-looped Apple Loop from an audio file that does not
match the song tempo, use the Apple Loop creation utilities available in Logic Pro.
Non-looping Apple Loops (or one-shots) do not follow the song tempo and key. This
is useful if you want to add discrete, non-musical sounds (such as sound effects) to
the loop library, which should not be altered by the tempo and key properties.
 If you want to create a looped Apple Loop from an audio file that does not match the
song tempo, use the Apple Loops Utility.
Read the following section if you want to create Apple Loops in Logic. Information on
“Creating Apple Loops in the Apple Loops Utility” can be found on page 68.
Creating Apple Loops in Logic
When you save a Region as Apple Loop in Logic Pro, the Region is added to the loop
library and appears in the Loop Browser, allowing its use in other songs.
The tempo information of the song is used to tag the transients of user-created Apple
Loops. This function works best if your audio files match the song tempo as precisely as
possible.
Note: User-created Apple Loops behave exactly like the Apple Loops that ship with
Logic, GarageBand and Jam Packs: They follow the tempo of your song and match the
song key (as defined by the initial key signature). Apple Loops will also follow any
chord transpositions in the Chord track. For further information, see the section on the
“Chord Track” on page 78.
To create an Apple Loop in Logic:
1 Select the Audio or Audio Instrument Region in the Arrange window.
2 Choose Region > Add to Apple Loops Library in the local Arrange menu.
3 In the Add Region to Apple Loops Library dialog:
 Type in a name for the loop, choose the scale, genre, instrument category,
instrument name and appropriate mood descriptions—to simplify searches.
Chapter 8 Using Apple Loops 65
Page 66
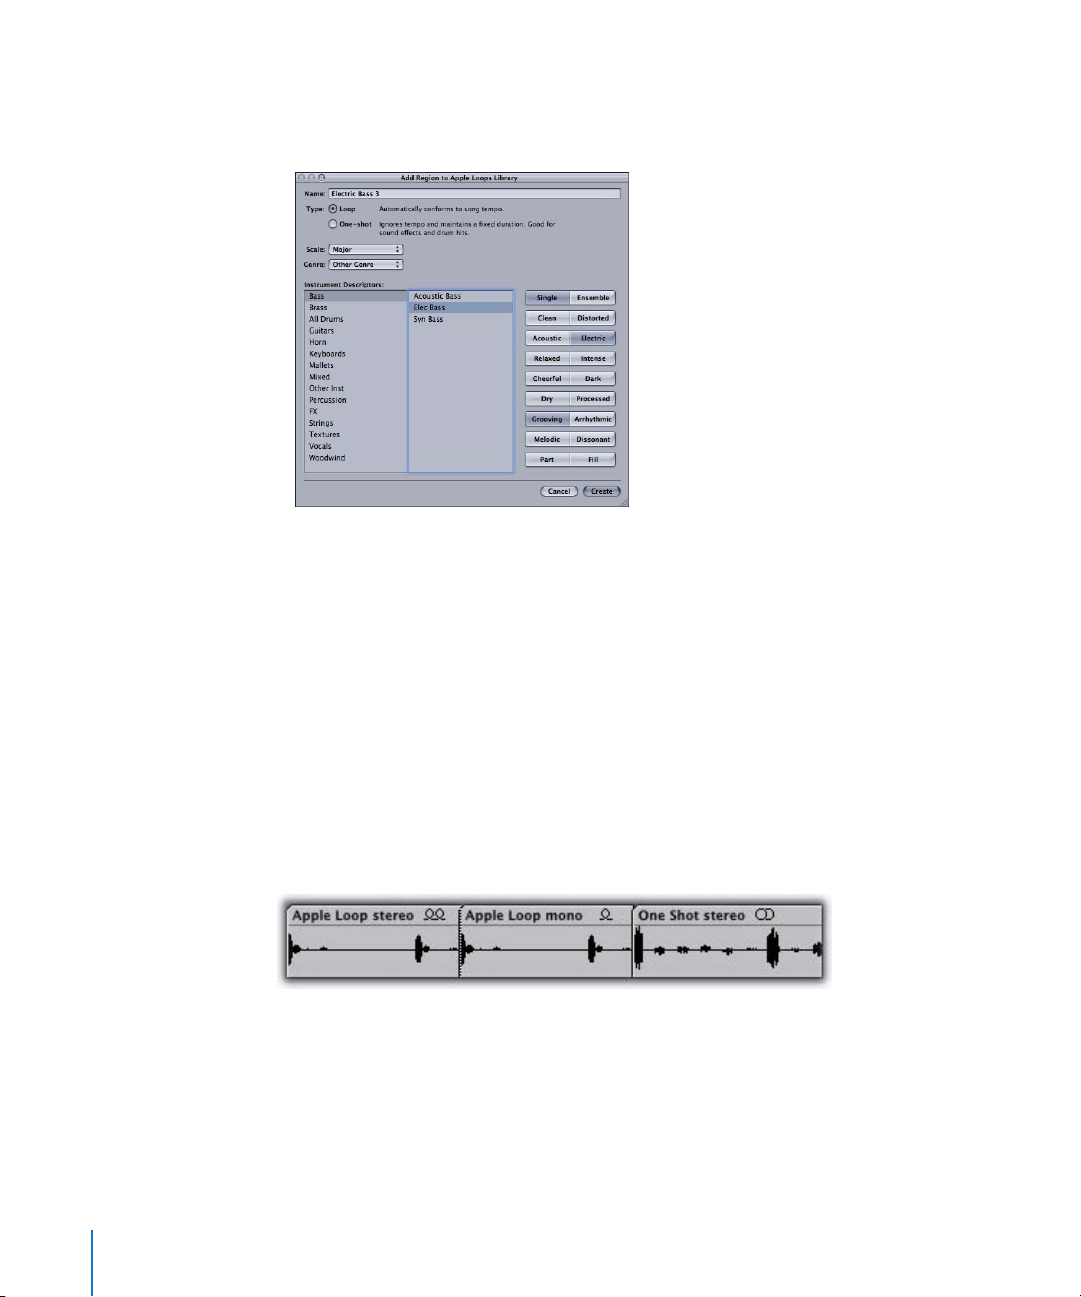
 Set the file type, which can be One-shot or Looped. If the length of the audio file is
not precisely trimmed to contain a number of whole bars, One-shot is selected
automatically, and the file type buttons are dimmed.
Note: One-shots do not follow the song tempo and key. This is useful if you want to
add discrete, non-musical sounds (such as sound effects) to the loop library, which
should not be altered by the tempo and key properties. These types of loops still
contain metadata tags, allowing easy searching and categorization in the Loop
Browser.
4 Click Create.
The loop is added to the Loop Browser. It will be stored in ~/Library/Audio/Apple
Loops/User Loops/SingleFiles. You can find it by using the keyword buttons, menus, or
by typing the name in the Search field. If you drag the loop into the Arrange window,
the Apple Loops symbol is shown beside the file name. As one-shots are handled like
normal audio files, the usual stereo or mono Region symbol is shown alongside the file
name (rather than the Apple Loops symbol).
66 Chapter 8 Using Apple Loops
Page 67

If you want to create a looped Apple Loop from an audio file that does not match the
song tempo, you should use the Apple Loops Utility. The Apple Loops Utility allows you
to define the intended length of the loop, regardless of the song tempo, by setting the
Number of Beats and Time Signature tag manually. Please note that the utility only
works with Audio Regions—not with MIDI regions on Audio Instrument tracks. For
further information about the Apple Loops Utility, see “Creating Apple Loops in the
Apple Loops Utility” on page 68.
You can also adjust the song tempo to the file length. Logic Pro offers an automatic
function that matches the length of an Audio Region with the intended musical length.
The length of the Region remains constant, but the sequencer tempo is varied
automatically, with the Region playing back at the intended length.
To adjust the song tempo to an audio file:
1 Create an Audio Region that spans the complete audio file.
2 Construct a cycle in the Arrange window Bar Ruler. Set the length to match the
intended musical length of the Region. As an example: If the Audio Region is one bar
long, set a cycle length of one bar.
3 Do one of the following:
 Choose Options > Tempo > “Adjust Tempo using Region Length and Locators” from
the main menu bar.
 Use the “Adjust Tempo using Region Length and Locators” key command (default key
command assignment: Command-T).
The tempo is recalculated, the Region (and the referenced audio file) matches the song
tempo.
Send Effects in Software Instrument Apple Loops
If you create a SIAL from a Region on an Audio Instrument track that uses sends to bus
effects, and then drag the saved loop to another (empty) Audio Instrument track, the
new loop will sound different to the original source Region. This happens because the
effects sends in the original track are not saved with the loop.
Logic Pro does not automatically assign effects to busses, because doing so would
potentially interfere with bus configurations that you’ve already set up in your song.
Effects that are inserted directly on the Audio Instrument channel will, however, be
automatically recalled when the loop is dragged to the Arrange window from the Loop
Browser.
Chapter 8 Using Apple Loops 67
Page 68
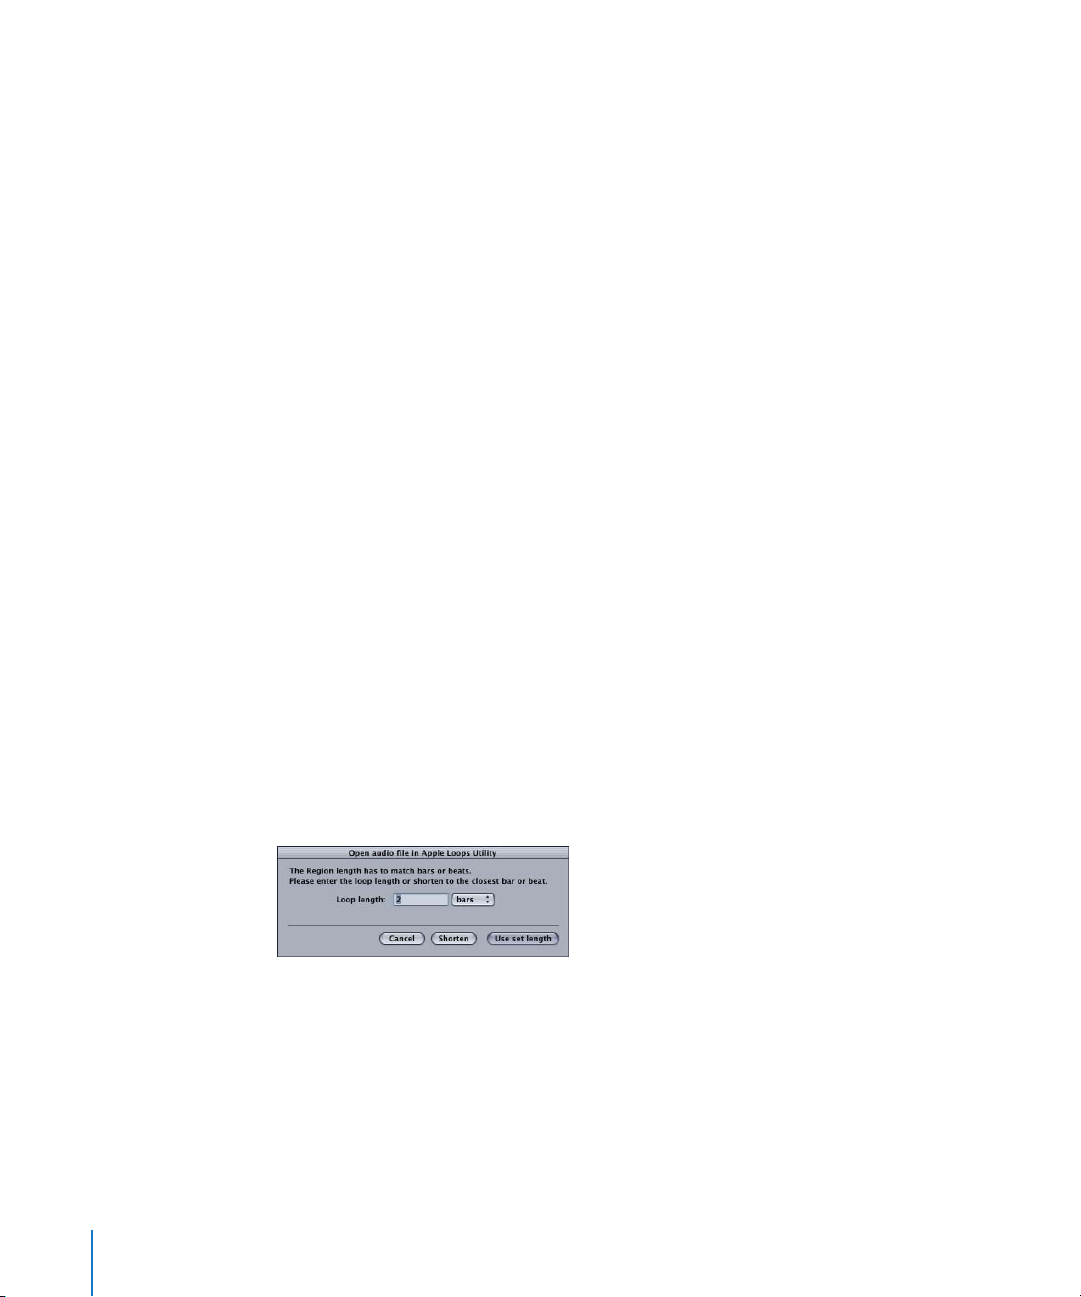
You can use one of the following options to ensure that loops created from Audio
Instrument Regions will sound the same as the original Regions:
 Drag your SIAL (the original of which was assigned to bus sends) to an audio track
instead of an Audio Instrument track. When you create an Audio Instrument loop, the
audio file that is rendered will include any bus processing. This will sound identical to
the original.
 When creating a loop from an Audio Instrument Region, insert all effects needed to
reproduce the desired sound directly into the instrument’s channel strip. This will
allow a faithful recreation of all sound elements when you subsequently add the
loop to an Audio Instrument track.
 When using SIALs, manually set up the sends and bus effects needed to reproduce
the sound of the original Region.
Creating Apple Loops in the Apple Loops Utility
The Apple Loops Utility provides sophisticated functions for creating Apple Loops from
Audio Regions. It can detect transients present in an audio file, and you can add
markers for additional transients. You can also move these markers to new locations.
You can add and edit metadata tags; you can also tag multiple files, a process known as
batch tagging. The Apple Loops Utility can read both AIFF and WAV files. If you save
changes, the file is automatically saved as an AIFF file.
To create an Apple Loop in the Apple Loops Utility:
1 Select an Audio Region in the Arrange window.
2 Do one of the following:
 Choose Audio > Open in Apple Loops Utility from the local window Audio menu.
 Use the Open in Apple Loops Utility key command.
If the length of your audio file does not match the beats, the following dialog appears:
There are two possible reasons for the wrong length:
 The audio recording was recorded at the song tempo, but not cut correctly. In this
situation, you can reduce the length of the recording, via the dialog.
 The loop uses a different tempo. In this case, you can set the length of the audio loop
in the “Loop length” box and choose “Use set length”.
68 Chapter 8 Using Apple Loops
Page 69
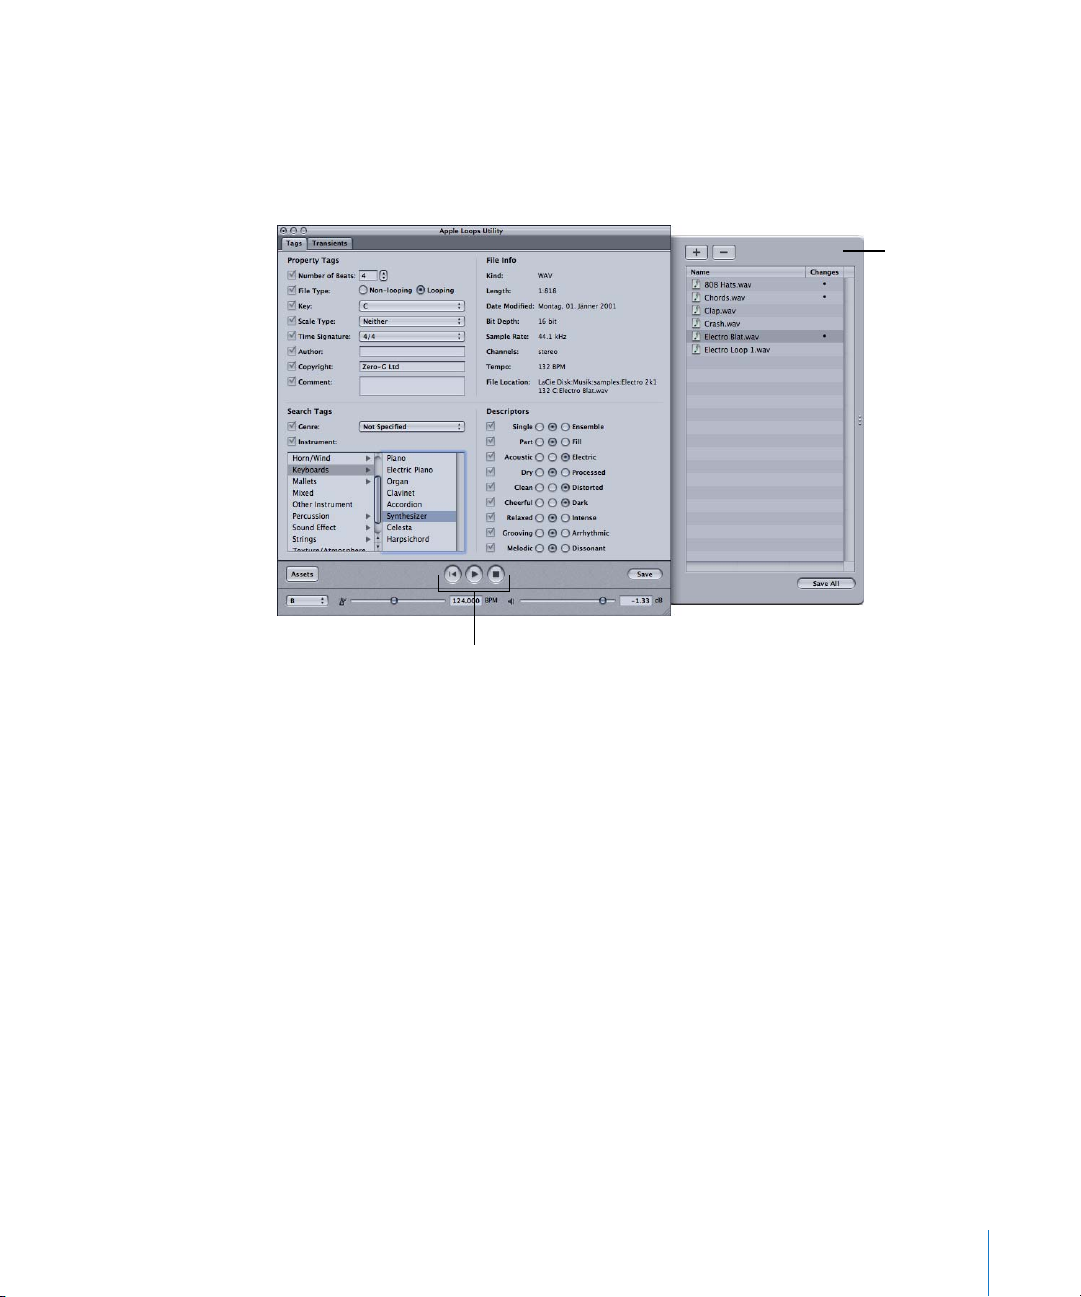
The Apple Loops Utility Interface
The Apple Loops Utility window consists of the Tags and Transients panes. The bottom
of the window includes a set of playback controls and file management buttons. The
Apple Loops Utility also includes an Assets drawer, located to the right of the main
window, where you can manage open files.
Assets drawer
Playback controls
Chapter 8 Using Apple Loops 69
Page 70
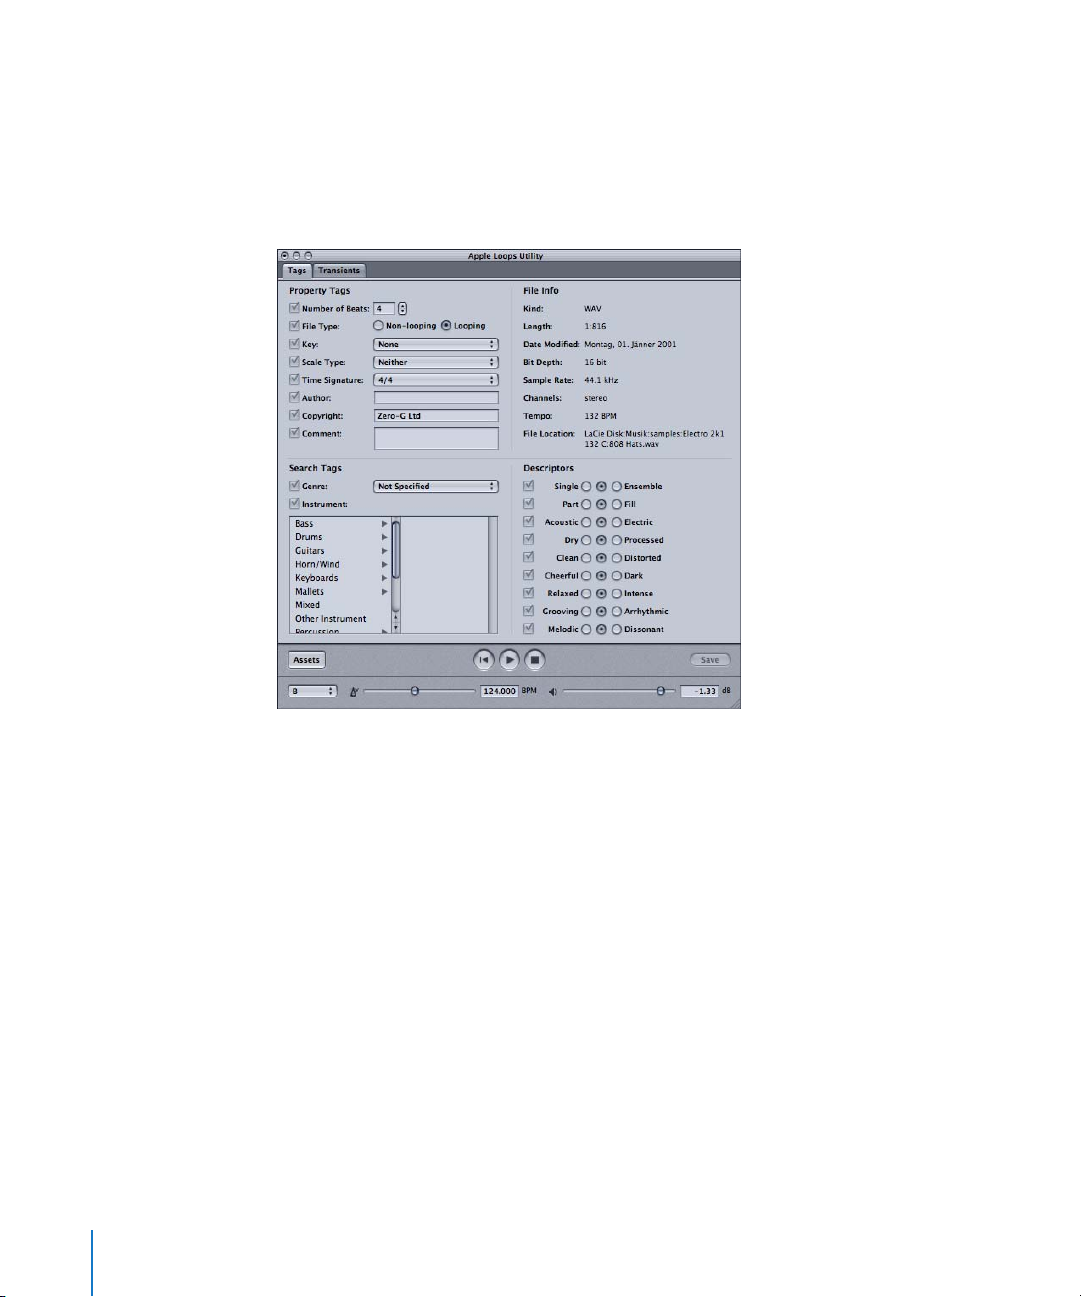
Tags Pane
The Tags pane is divided into four areas. In three of the sections, you edit different
types of tags. In the fourth area, you view information (that cannot be edited in the
Apple Loops Utility), such as the length and location of the file. The more metadata
(tag) information you include with your files, the more accurate your searches will be in
the Loop Browser.
Property tags
Logic Pro uses the settings for the Number of Beats, Key and Time Signature property
tags, in conjunction with the transient markers, to optimize playback of the Apple
Loop. Changing these affects how the loop sounds when it is played back. The
remaining property tags can be used to include additional information, but do not
affect playback.
The Number of Beats field allows you to enter the correct number of beats in a file. This
number controls how Logic Pro matches the tempo of a loop to the song tempo. When
you open an Audio Region in the Apple Loops Utility for the first time, Logic Pro sends
the following information to the Apple Loops Utility:
 The song tempo.
 The length of the audio file in beats.
70 Chapter 8 Using Apple Loops
Page 71

Provided that the audio file matches the song tempo, and that its length fits a whole
number of beats (or you entered the correct length in the “Open Audio File in Apple
Loops Utility” dialog), the Apple Loops Utility sets the correct default value for the
Number of Beats field.
Note: If you open an audio file directly in the Apple Loops Utility this information is not
available. In this situation, the Apple Loops Utility uses different assumptions to set the
Number of Beats value. Please consult the Apple Loops Utility manual for more
information on this.
The File Type tag allows you to set the file type, which can be Non-Looping or Looped.
Looping files are matched to the song tempo and, if the Key tag is set to a value other
than None, are matched to the song key. Non-looping files (or one-shots) are not
matched to the song key or tempo. If you import them into Logic, they behave like
“normal” audio files. This is useful if you want to add discrete, non-musical sounds (such
as sound effects) to the loop library, which should not be altered by the tempo or key
properties. Non-looping audio files still contain metadata tags, allowing easy searching
and categorization in the Loop Browser.
In general, you will tag files featuring rhythmic patterns or musical passages intended
for music composition and arranging as “looping”, allowing Logic Pro to match them to
the song tempo and (for musical, pitched loops) the song key. Files with non-rhythmic
elements, such as sound effects and voice-overs, intended for occasional use on
soundtracks, should usually be tagged as non-looped.
The Key tag controls how Logic Pro matches the key of a loop to the song. When you
import the loop into Logic Pro, it matches the key of the loop to the song by
transposing the loop the required number of semitones. The loop is either transposed
up or down, in whichever direction requires the smaller number of semitone steps.
As an example: If the song key is C, and the given loop’s Key tag is D, Logic Pro
transposes the loop up by two semitones (instead of transposing it down by ten
semitones). Both would match the loop to the song key.
The playback transposition for Apple Loops is controlled by the root note of chords in
the Chord track. These root notes determine the global playback transposition—
relative to the current key signature—shown in the Signature track. If no chords are
available in the Chord track, the global playback key for Apple Loops is determined by
the very first key signature in the Signature track (default: C major).
No distinction is made between major and minor keys for these global transposition
functions; in fact, only the root of the initial key signature is relevant for playback of
Apple Loops and MIDI Regions.
By default, Apple Loops Utility sets the Key tag to the information Logic Pro provides in
the Signature track.
Chapter 8 Using Apple Loops 71
Page 72

The Scale Type tag identifies the file’s scale type. It only serves as a search tag and has
no effect on the sound of the loop. Changing a loop’s Scale Type does not affect the
scale of the loop. Again, this defaults to the information Logic Pro provides, courtesy of
the Signature track.
Music uses various scale types. The main types are the major and minor scales. Musical
loops in the same key (with the same root note) may not sound appropriate when
played together, if their scale type differs. As an example: A loop with a piano chord
progression in the key of D and a loop with a synth line also in the key of D, may not
sound “right” if the piano loop uses the D major scale and the synth line uses the D
minor scale.
The Scale Type menu offers the Major, Minor, Good for Both and Neither choices. The
latter option is suitable for percussive, non-pitched material. Loops that can work in
either scale are best tagged as Good for Both.
The Time Signature tag provides the following information about a loop: the number
of beats in each measure and the note lengths of the beat value. Logic Pro uses the
number of beats in a measure to display the measure and beat positions in the Bar
Ruler. This value does not affect playback. If the beat value is not set correctly, playback
is affected. The Apple Loops Utility sets the Time Signature tag to the value provided by
the Signature track in Logic. If you use loops with a different beat value, these loops are
played back at the wrong tempo. Correct the Time Signature tag, so that it indicates
the beat value correctly.
The Author and Copyright tags offer a place to name the author of a loop and
copyright information. The Comment field displays any comments about the file. This
field is often used to indicate an internal file name or code number that was used
during the creation of a loop library. These three tags are not displayed in the Loop
Browser in Logic. They can not be used to search for files, and serve only as a place to
include text information. They do not affect the sound of a loop.
Search tags
These tags are used by the Search feature in the Loop Browser, allowing you to search
for files that match specific criteria.
 Genre pop-up menu: Defines the type or style of music for which the loop is
appropriate. The list of musical genres is not editable.
 Instrument list: Displays choices for the musical instrument or instrument category of
the file. Selecting a category in the left column displays a list of instruments/subcategories in the right column.
File Info
This area of the Tags pane includes rows that offer Kind, Length, Date Modified, Sample
Rate, Channels, Tempo and File Location information. This file information can only be
viewed, and cannot be edited in the Apple Loops Utility.
72 Chapter 8 Using Apple Loops
Page 73
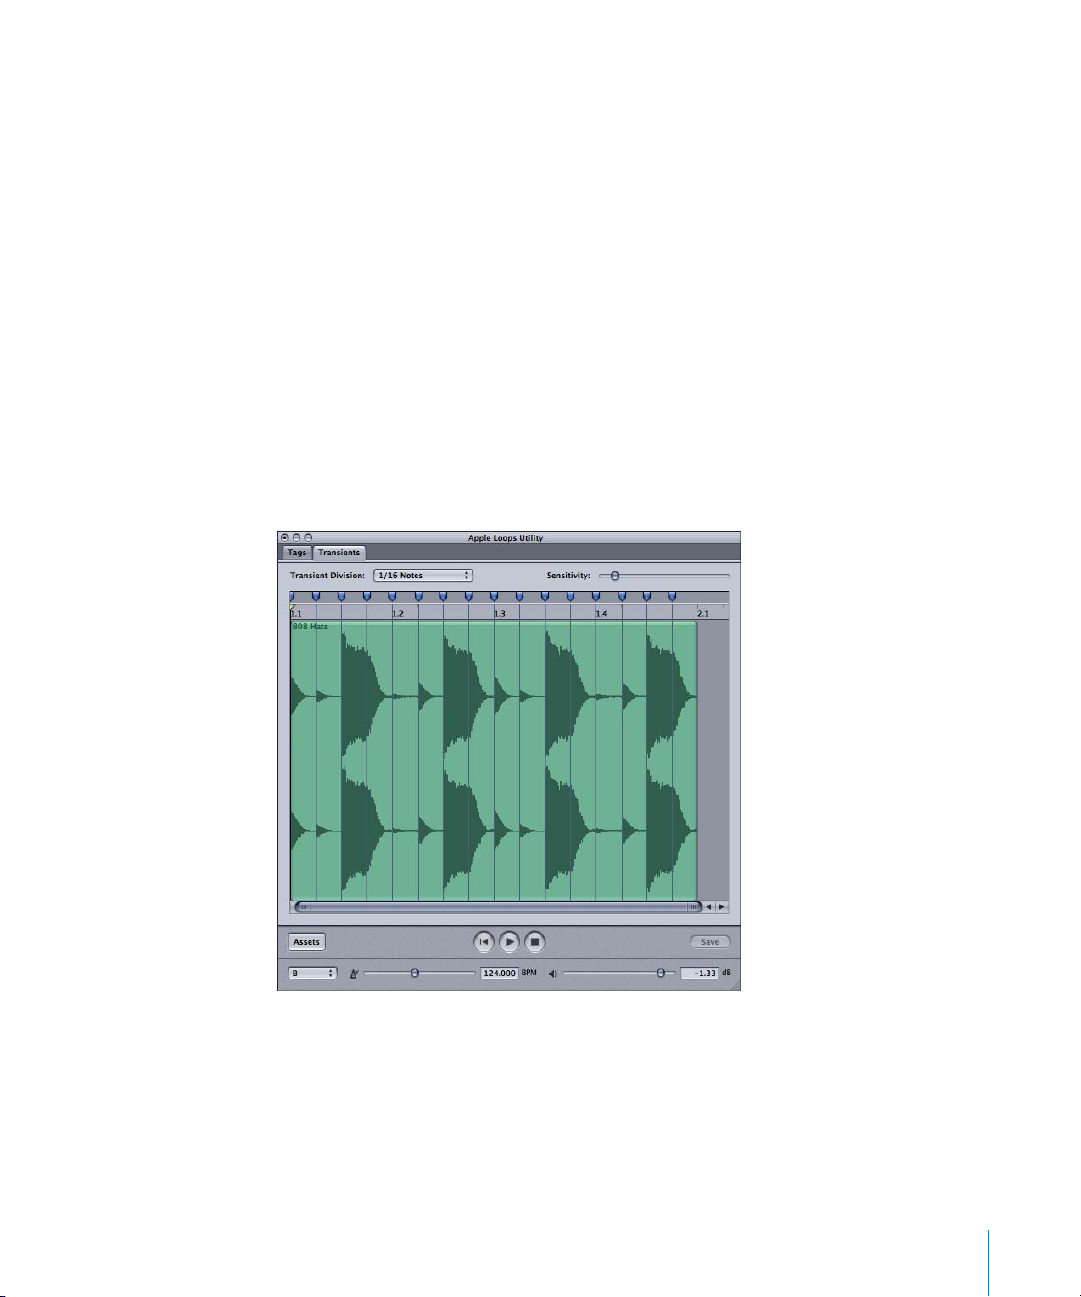
Descriptors
The Loop Browser in Logic Pro allows you to search for files using descriptors.
Descriptors are complementary pairs of keywords that describe the musical mood or
character of the file. Each pair of keywords offers a row of radio buttons, allowing you
to choose either one keyword from the pair, or neither keyword.
Tagging Files
To tag a file, select it in the Assets drawer, then edit the file’s tags in the Tags tab. You
can change the tags of multiple files at the same time. To do so, simply select the
desired files in the Assets drawer, activate the appropriate tag checkboxes, make your
edits, and save.
Note: If you do not assign tags to a loop, it will be difficult to find in the Loop Browser.
The Loop Browser only displays loops in its file list if a category is chosen, or if a name
is typed into the Search field. As such, if a loop does not belong to a category, you can
only search for it by typing its name into the Search field.
Transients Pane
Logic Pro uses transient markers, along with the Number of Beats, Key and Time
Signature tags, to process a loop during playback. You can add and edit transient
markers in the Transients pane of the Apple Loops Utility.
Chapter 8 Using Apple Loops 73
Page 74

The Transients pane contains a large waveform display, a beat ruler and a horizontal
scroll bar. Markers indicate the position of transients in the file. Typically, transients
correspond to the (vertically) widest parts of a sound’s waveform (the peaks in the
waveform, in other words). The Transient Division pop-up menu and the Sensitivity
slider determine the placement of transient markers in a loop.
The Transient Division menu sets the beat value used by the Apple Loops Utility for
transient detection. The Sensitivity slider sets the degree of sensitivity for transient
detection. When you increase the sensitivity of transient detection, the Apple Loops
Utility considers points of higher amplitude in the waveform as transients, regardless of
whether or not they occur on a beat value.
When you open a file in the Apple Loops Utility, it defaults to looking for transients at
every 16th note position, based on the file’s tempo and Number of Beats tags. You can
change the beat value used for transient detection via the Transient Division pop-up
menu. The range covers Whole through to 1/64th notes.
The waveform display in the Transients pane shows both the transients detected by the
Apple Loops Utility and user-inserted transients. You can add transients and move
existing transients in the Transients pane.
To display a file in the Transients pane:
m Select the file in the Assets drawer, then click the Transients tab.
Note: The Transients window can only display one file at a time. If multiple files are
selected, no waveform is displayed in the window.
To add a new transient:
m Click in the darker area above the beat ruler in the waveform display.
To move a transient marker:
m Drag the marker by its handle in the area above the beat ruler.
To remove a transient, do one of the following:
m Click the transient’s handle in the area above the beat ruler, then press the Delete key.
m Drag the transient out of the area above the beat ruler.
In most cases, you can find the optimal placement of transient markers by adjusting
the Transient Division menu and Sensitivity slider options. You should only need to edit
a few markers individually. The default placement may not be accurate in certain loops,
such as loops with highly distorted musical content or unclear rhythms. Such loops will
generally require manual edits of transient markers.
To determine where to place markers, listen to the loop at its original tempo and pitch.
Then listen at a different tempo and key, to see how the tempo change affects
playback. Repeat this procedure to see how your marker edits affect playback.
74 Chapter 8 Using Apple Loops
Page 75

You should also keep the following guidelines in mind:
 Each transient marker in the audio file should be labelled by a transient marker in the
Apple Loops Utility. You should also add a transient marker at all points of musical
significance, including the beginning and end of notes, pitch bends or glissandos.
 During playback, Logic Pro speeds up or slows down the tempo of loop areas
without transient markers. If a loop contains sustained notes or chords, you should
also label these periods with transient markers, ensuring that there is no time period
greater than a quarter note without a marker.
 You should always try to achieve the above guidelines using as few markers as
possible: artifacts may occur at the transition points between markers (where the
tempo is unchanged) and the area between markers (where the tempo is altered).
Assets Drawer
The Assets drawer lists the files open in the Apple Loops Utility. The drawer contains a
Name column that lists each open file, and a Changes column, which indicates any files
that you have altered. Clicking a file in the Assets drawer, displays it in the Tags or
Transients pane.
The Save All button saves all files that have been changed.
Chapter 8 Using Apple Loops 75
Page 76

Playback and File Management Controls
The bottom of the Apple Loops Utility window contains a set of playback controls,
allowing you to audition the selected file. These controls do not affect the file’s tags.
Go to Beginning button Play button
Stop button
Volume slider
Tempo sliderKey menu
 Go to Beginning button: Starts playback from the beginning of the selected file.
 Play button: Plays back the selected file.
 Stop button: Stops playback of the selected file.
 Key pop-up menu: Transposes the selected file to a new key for playback.
 Tempo slider: Sets the playback tempo of the selected file.
 Volume slider: Sets the playback volume of the selected file.
Note: When multiple files are selected in the Assets drawer, the playback controls are
not available. You cannot play more than one file at a time in this window.
There are two additional buttons at the bottom of the window, the Assets button and
the Save button.
 Assets button: Shows and hides the Assets drawer.
 Save button: Saves your changes to the currently selected file(s) in the Assets drawer.
Creating Apple Loops From Split Stereo Files
Logic Pro allows you to create Apple Loops from split stereo files, placed on (Universal
Track Mode) stereo tracks. The split stereo file must first be converted to an interleaved
stereo file. When you add the Region to the loops library or open it in the Apple Loops
Utility, a dialog will ask if you want to convert the file. Confirm this by pressing Convert.
Converting ReCycle Files Into Apple Loops
Logic Pro allows you to convert ReCycle files into Apple Loops. You can either import
ReCycle files as Apple Loops or convert multiple ReCycle files with the Project
Manager’s Batch Convert function.
To import single ReCycle files as Apple Loops:
1 You initiate a ReCycle import by using the same options as for audio files:
 Choose Audio > Import Audio File (or use the Import Audio File key command). You
can also Shift-click an audio track with the Pencil (or Command-Shift-click with the
Pointer tool).
Select the desired ReCycle loop in the ensuing file selector box.
76 Chapter 8 Using Apple Loops
Page 77

 Drag the ReCycle loop from the Finder onto an audio track.
2 Choose the Render to Apple Loop option in the Fix menu of the ensuing ReCycle File
Import dialog.
The ReCycle loop is converted to an Apple Loop (the slice points are converted to
transient positions) and copied to the ~/Library/Audio/Apple Loops/User Loops/Single
Files folder. The Apple Loop is added to your Logic song.
As an alternative, you can use the Project Manager’s Batch Convert function to
simultaneously convert multiple ReCycle files into Apple Loops.
To convert multiple ReCycle files into Apple Loops:
1 Select the desired ReCycle files in the Project Manager.
2 Choose Functions > Convert selected REX files to Apple Loops.
3 In the ensuing file selector box, select a location for the converted files.
The ReCycle files are converted to Apple Loops (the slice points are converted to
transient positions) and copied to the chosen location.
Global Tracks and Apple Loops
You can use the Global tracks to change global events such as tempo, time signature
and key during a song. The following section summarizes how these changes in the
Global tracks affect the playback of Apple Loops. For detailed information about Global
tracks, read the “Global Tracks” chapter in the Logic Pro 7 Reference Manual.
Tempo and Beat Mapping Track
Apple Loops adjust automatically to the tempo of these tracks.
Signature Track
Apple Loops can contain information about their original key, and can be transposed
automatically. They will be played back at the song key by default, which is defined by
the first key signature event. No distinction is made between major and minor keys for
these global transposition functions; in fact, only the root of the initial key signature is
relevant for playback of Apple Loops and MIDI Regions.
Chapter 8 Using Apple Loops 77
Page 78

The playback transposition for Apple Loops is controlled by the root note of chords in
the Chord track. These root notes determine the global playback transposition—
relative to the current key signature—shown in the Signature track. If no chords are
available in the Chord track, the global playback key for Apple Loops is determined by
the very first key signature in the Signature track (default: C major).
Chord Track
The root notes of chords in the Chord track determine the transposition (pitch shifting)
of all Apple Loops.
The Change Display Only mode does not work with Apple Loops used on Audio tracks.
This shouldn’t pose a problem, as you won’t normally need this function when working
with Apple Loops. There is one exception, however: some Apple Loops contain chord
progressions. These chord progressions are not displayed in the Chord track.
Unfortunately, you can’t use the Chord track’s Change Display Only mode to match the
displayed chords to what is actually being heard. All changes in the Chord track will
affect the transposition of the Apple Audio Loops. Activating the Change Display Only
option doesn’t help.
There is, however, a solution:
1 Cut the Apple Audio Loop at the precise position(s) of any chord changes.
2 Match the chords displayed in the Chord Track with the chord progression in the cut
Apple Loop files by manually entering the chords of each section in the Chord track.
The individual Apple Loop parts will then be transposed accordingly.
3 Enter the inverted Transposition values of the chord root note changes in the Region
Parameter box of each section, so that playback of the Apple Loop parts will match the
original Apple Loop file.
As an example:
 The Apple Audio Loop contains a chord progression with root notes of: C, F, G and C.
Cut it at these chord change positions.
 Enter C, F, G and C at the corresponding positions in the Chord track. Assuming the
original key is C, this is equivalent to a transposition of the second Region by +5 and
the third Region by +7 semitones. If you played the entire part at this point, the
original audio material would be transposed by the amounts just entered in the
Chord track, which isn’t what you want!
 Set the Transpose value of the second Region to –5, and of the third Region to –7 in
their respective Region Parameter boxes.
Playback of the whole part will now sound as it did before the cuts, and the correct
chords are displayed in the Chord track.
78 Chapter 8 Using Apple Loops
Page 79

Transposition Track
Transposition events are closely linked to the progression of the chord root notes in the
Chord track: Changing a chord root will be reflected in the Transposition track and
vice-versa. Any alteration or creation of a transposition event will generate or alter the
corresponding chord in the Chord track. All Apple Loops and MIDI Regions will be
pitch-shifted accordingly.
Note: “Standard” Audio Regions (Audio Regions that are not Apple Loops) will not be
affected. Nor will Apple Loops that do not have a Key definition (drum loops, for
example).
The global Transpose track transposes Apple Loops used on audio tracks by a
maximum of ±36 semitones. This is a designed limitation, as Apple Loops don’t sound
that great when transposed over a greater range. This is also true for the Transpose
parameter of the Region Parameter box.
Apple Loops transpose to the wrong octave
Transposing an Apple Loop to a higher pitch may result in the loop being played back
at a lower pitch, and vice-versa.
Example: If an Apple Loop is transposed to sound seven semitones higher, it will
actually play back five semitones lower. This is harmonically-correct transposition, but
it’s probably not to the intended octave.
Transposing audio material is a technically complicated process which always implies a
certain loss in quality. The greater the transposition range, the more significant the loss
in quality. This is why Apple Loops are always transposed by the smallest possible
value.
You should note that sound quality is dependent on the transposition amount of the
Apple Loop’s original key—not the song key, which defines the zero line of the
Transposition track. As an example; if the song key is already five semitones above the
original key of an Apple Loop, setting the transposition value to +2 will transpose the
Apple Loop downwards by ten semitones. This is because the transposition value is
only five semitones below its original key (rather than seven semitones above it).
In the classical European music system, an octave is divided into 12 semitones. As +7
semitones is harmonically equal to –5 semitones, a value of minus 5 is used as the
transposition amount. The same happens with other settings: A transposition value of
–9 will result in +3, and +12 will result in ± 0.
Chapter 8 Using Apple Loops 79
Page 80

Converting Apple Loops to Audio Files
When you convert an Apple Loop into an audio file, the resulting file may not play at
the song’s current tempo and key settings. Rather, the new audio file will play at the
original tempo and key of the Apple Loop.
This happens when you select an Apple Loop and choose Audio > Convert Regions to
New Audio Files from the Arrange menu, and change the File Format parameter in the
ensuing window from “Original file type” to either “Wave” or “SDII”. This creates a copy of
the original Apple Loop file, but without the transient and category tags. The lack of
these tags restricts file playback to the originally recorded tempo and key of the Apple
Loop—not the tempo and key of the song.
If you want to turn an Apple Loop Region into an audio file that uses the song’s tempo
and key settings, select the loop (or loops) and choose File > Export > Region as Audio
File. Be sure to select the “Add resulting files to Audio window” checkbox to use the
new file in your current song.
This will export the Apple Loop as a new audio file with all plug-in effect processing of
the track/channel on which the Apple Loop resides. To export the Apple Loop without
these effects, bypass them before exporting the Region. To bypass a plug-in, click the
Insert slot while pressing the Option.
You should note that although this new file will play at your song’s current tempo and
key, it can’t follow subsequent tempo or key changes like other Apple Loops; such files
are fixed at the tempo and key of your song when you exported the file.
Tip: If you enable the Follow Tempo option for the audio file, it will follow the song
tempo and the first key signature set in the Global tracks. For further information, see
“Working With the Follow Tempo Function” on page 31.
Apple Loops and Sample Rates
The method used to convert the sample rate of audio files also applies to Apple Loops.
This sample conversion method also includes correction of transient positions.
To convert the sample rate of an Apple Loop:
1 Select the desired Apple Loop in the Audio window.
2 Choose Audio File > Copy/Convert File(s) from the local Audio window menu (or use
the Copy/Convert Files(s) key command. The default key command assignment is
Option-C).
3 Choose the desired sample rate (and all other file conversion settings) in the ensuing
dialog, select the folder location, then click Save.
80 Chapter 8 Using Apple Loops
Page 81

If the “Add resulting files to Audio window” option is activated, the sample rate
converted Apple Loop is automatically added to the song. It will follow the song tempo
and key changes (provided that the Key tag was set in the original loop).
Note: If a new Apple Loop is created, it will need to be indexed to make it visible in the
Loop Browser. Loops can reside in any directory, but you need to tell Logic Pro where
to find them.
You will probably not need to convert Apple Loops as often as standard audio files
when working with Logic, as Apple Loops offer a major advantage: If the sample rate
of your song is changed by choosing Audio > Sample Rate > … from the main menu
bar, the playback speed of all Apple Loops currently used in the song will automatically
be adapted to the newly selected sample rate.
Fading Apple Loops
Apple Loops do not support fades, so you can’t directly assign a fade to them. As you
can’t apply fades to an Apple Loop, no fade parameters are displayed in the Region
parameter box when an Apple Loop is selected.
If you’d like to achieve a fade effect, you need to export the Apple Loop (choose File >
Export > Region as Audio file in the Arrange window). Import this file into the Arrange
window and apply the fade to it.
Apple Loop File Paths
The file paths used for Apple Loop installations in Logic Pro 7.2 are as follows:
/Library/Audio/Apple Loops
Used for any Apple Loops libraries that ship with Logic Pro 7.2. This folder is also used
for GarageBand versions higher than 2.0 and any additional Jam Pack libraries (higher
than volume 4).
~/Library/Audio/Apple Loops/User Loops
Used for user-created Apple Loops.
/Library/Application Support/GarageBand
Used for all Apple Loops libraries that were released before Logic Pro 7.1 (including the
libraries that ship with Logic Pro 7 and GarageBand 1, as well as Jam Pack library
volumes 1 to 3).
~/Library/Application Support/GarageBand
Used for all Apple Loops created with Logic Pro 7, Logic Pro 7.0.1 (or any GarageBand 1
versions)
Chapter 8 Using Apple Loops 81
Page 82

Note: Apple Loops dragged from the Finder into the Loop Browser window, in
conjunction with the “Copy to Library” option, copies the Apple Loop(s) to this location.
You may, of course, keep additional copies of Apple Loops in their original Finder
location(s).
82 Chapter 8 Using Apple Loops
Page 83

9 Updated File Paths
9
The location of all files (preferences, plug-in settings and so
on) associated with Logic Pro have changed.
Unlike earlier versions, Logic Pro 7 does not use the program folder as the location for
any associated files. Logic Pro 7 complies fully with Mac OS X standards:
Pre-installed files
All pre-installed files are located in the local domain: YourHardDiskName
It is usually prefaced with a: / (at the beginning of a path).
User created/editable files
All files that can be directly written by the user are located in the user domain:
YourHardDiskName/Users/YourUserName.
It is usually prefaced with a: ~/
Preferences
All preference files are installed in: ~/Library/Preferences/Logic
The main preference file is named: com.apple.logic.pro
Other Logic Pro preference files and the Project Manager database folder are also
found in this folder.
com.apple.LogicNodes.plist
This preference file contains information about Logic Nodes that were previously
connected to your system.
Song Templates
Logic Pro scans for a folder named “Song Templates” in the following folder:
~/Library/Application Support/Logic.
Logic Pro then searches for the “Autoload” or “Autoload.lso” song in:
/Library/Application Support/Logic.
83
Page 84

Plug-in Settings
Logic Pro scans for a folder named after the plug-in (“PlugInName/”) in the following
folders, and order:
 ~/Library/Application Support/Logic/Plug-In Settings
User-defined or edited settings are always stored here. These settings appear in the
top level of the Settings pop-up menu in Plug-in windows. The “Save Setting as”
command defaults to this level. “Save Setting” only works on settings located at this
top level (otherwise a “Save Setting as” is performed).
 /Library/Application Support/Logic/Plug-In Settings
Factory settings are installed here. If Logic Pro 7.2 also finds settings in one of the
other locations, the settings found here appear in the “Factory” subfolder of the
Settings menu.
 /Applications/Logic 6 Series/Plug-In Settings
The setting files of the Logic 6 Series were always stored here. If Logic Pro also finds
settings in one of the other locations, the settings found here appear in the “Logic 6
Series” subfolder of the Settings menu.
It is recommended that all old settings from this folder are moved to the new location
for user settings (~/Library/Application Support/Logic/Plug-In Settings). You can do this
with a drag and drop in the Finder, or in Logic; by loading the settings, and saving
them to the new location (which is the default location of the “Save” or “Save as”
dialogs).
Default settings
Like earlier versions, Logic Pro allows you to use a default setting file that automatically
loads when opening a plug-in. This file must be named “#default.pst”, and is searched
for in: ~/Library/Application Support/Logic/Plug-In Settings/PlugInName.
This is where you can save your own default setting. Simply save a setting called
“#default.pst”.
If not found, Logic Pro looks in /Library/Application Support/Logic/Plug-In Settings/
PlugInName/ and then /Applications/Logic 6 Series/Plug-In Settings/PlugInName.
GarageBand Instruments
Logic Pro searches for GarageBand Instruments in the: “Plug-In Settings/PlugInName”
folder in the following directories, and order:
 ~/Library/Application Support/Logic/Plug-In Settings/PlugInName
User-defined or edited settings are stored here.
 /Library/Application Support/GarageBand/Plug-In Settings/PlugInName
“Factory” settings are stored here.
84 Chapter 9 Updated File Paths
Page 85

Channel Strip Settings
Logic Pro scans for a folder named “Channel Strip Settings” in the following folders, and
order:
 ~/Library/Application Support/Logic
User-defined or edited Channel Strip settings are stored here.
 /Library/Application Support/Logic
Factory settings are always stored here.
Logic Pro also scans the following folder path for Track and Instrument Audio
Objects: /Library/Application Support/GarageBand/Instrument Library/Track Settings.
EXS Instruments
Logic Pro scans for a folder named “Sampler Instruments” in the following folders, and
order:
 ~/Library/Application Support/Logic
User-defined or edited instruments are stored here.
 /Library/Application Support/Logic
Factory EXS Instrument files are installed here.
 /Applications/Logic 6 Series
EXS Instrument files of the Logic 6 Series are always stored here.
 …/SongOrProjectName
As in earlier versions, Logic Pro also searches for EXS Instruments in the project or
song folder.
Logic Pro also looks in: /Library/Application Support/GarageBand/Instrument Library/
Sampler.
EXS Sample Conversion
These are the default locations for converted samples of different formats:
 ~/Library/Application Support/Logic/AKAI Samples
For samples converted from AKAI format.
 ~/Library/Application Support/Logic/DLS-Giga Samples
For samples converted from GigaSampler/GigaStudio format.
 ~/Library/Application Support/Logic/SoundFont Samples
For samples converted from SoundFont format.
Chapter 9 Updated File Paths 85
Page 86

Space Designer Impulse Responses
Logic Pro scans for a folder named “Impulse Responses” in the following folders, and
order:
 ~/Library/Application Support/Logic
 /Library/Application Support/Logic
 …/SongOrProjectName
Ultrabeat Samples
Logic Pro scans for a folder named “Ultrabeat Samples” in the following folders, and
order:
 ~/Library/Application Support/Logic
 /Library/Application Support/Logic
 …/SongOrProjectName
User Icons
Logic Pro scans for user-definable track icons in the following folder:
~/Library/Application Support/Logic/Images/Icons.
The format for user icons remains .png. The filename needs to start with xxx (where xxx
is a 1 to 3 digit number). Correspondingly numbered default icons will be replaced by
your personal icons.
I/O Labels
The user-definable I/O Labels (the “IOLabels Core Audio” file) are located in:
~/Library/Application Support/Logic.
This is the automatic file save location. If not found, Logic Pro also searches:
/Applications/Logic 6 Series.
Control Surface Plug-ins
Control Surface plug-ins are installed (and searched for) in the application bundle.
You can install additional Control Surface plug-ins in:
~/Library/Application Support/MIDI Device Plug-ins.
Tuning Tables
Logic Pro scans for a folder named “Tuning Tables” in the following folder:
/Library/Application Support/Logic.
86 Chapter 9 Updated File Paths
Page 87

DNA Grooves
Logic Pro scans for a folder named “GROOVES” in the following folders, and order:
 ~/Library/Application Support/Logic
 /Library/Application Support/Logic
 Applications/Logic 6 Series
Default Directories
Logic Pro uses the following default directories:
 ~/Music/Logic: for Logic Pro songs (Open/Save/Save as).
 ~/Movies: for Movie files (Open).
 ~/Pictures: For the Camera tool in the Score Editor (Save Bitmap File as).
Chapter 9 Updated File Paths 87
Page 88

Page 89

10 Plug-in Enhancements
10
The following chapter outlines the plug-in enhancements
that have been made since Logic Pro 7, superseding the
information in the Logic Pro 7 Plug-in Reference.
This includes the following:
 Working with the AU Manager
 Working with full plug-in delay compensation
 Instrument enhancements
 Effect enhancements
Working With the AU Manager
Logic Pro uses the Apple AU Validation Tool to ensure that only Audio Units plug-ins
that fully comply with the Audio Units specification are used in Logic. This minimizes
problems that may be caused by third-party Audio Units plug-ins when running Logic.
The validation process takes place automatically when you launch Logic Pro. You can
see the results of the scan for all Audio Units plug-ins in the Logic AU Manager.
To open the AU Manager, do one of the following:
m Choose Preferences > Start Logic AU Manager in the main menu bar.
m Use the Start Logic AU Manager key command.
89
Page 90

Note: Logic Pro automatically quits before the Logic AU Manager is launched. Logic will
automatically restart after you quit the Logic AU Manager.
The results of the test are shown in the Compatibility column. Audio Units plug-ins that
“failed” the validation test, can be enabled—but be aware that these plug-ins can
cause problems. Use of plug-ins that have failed the validation can negatively affect the
test results of subsequently scanned plug-ins, can cause Logic to quit unexpectedly, or
even lead to data loss (destroyed song files).
It is strongly recommended that you check the manufacturer’s website for updated
versions of Audio Units plug-ins that fail the validation.
The Logic AU Manager also allows you to disable Audio Units plug-ins that you don’t
want to use in Logic, even if they pass the test. Simply uncheck the corresponding
checkbox in the Use column to disable any plug-in. You can store your choice of Audio
Units plug-ins by clicking OK.
Click the Reset & Rescan All button to run another validation test, after installing plugins/updaters or moving components in the Finder, while Logic or the AU Manager are
open. You can also rescan individual plug-ins—in cases where you’ve installed an
updated version. Updated plug-in versions will automatically be tested the next time
Logic is launched. They will be enabled automatically, if they pass the validation scan.
Note: If you press Control-Shift while launching Logic, the AU Safe Mode will be
used: Only plug-ins that pass the validation test will be available; manually activated
plug-ins that failed the validation test will not be available.
90 Chapter 10 Plug-in Enhancements
Page 91
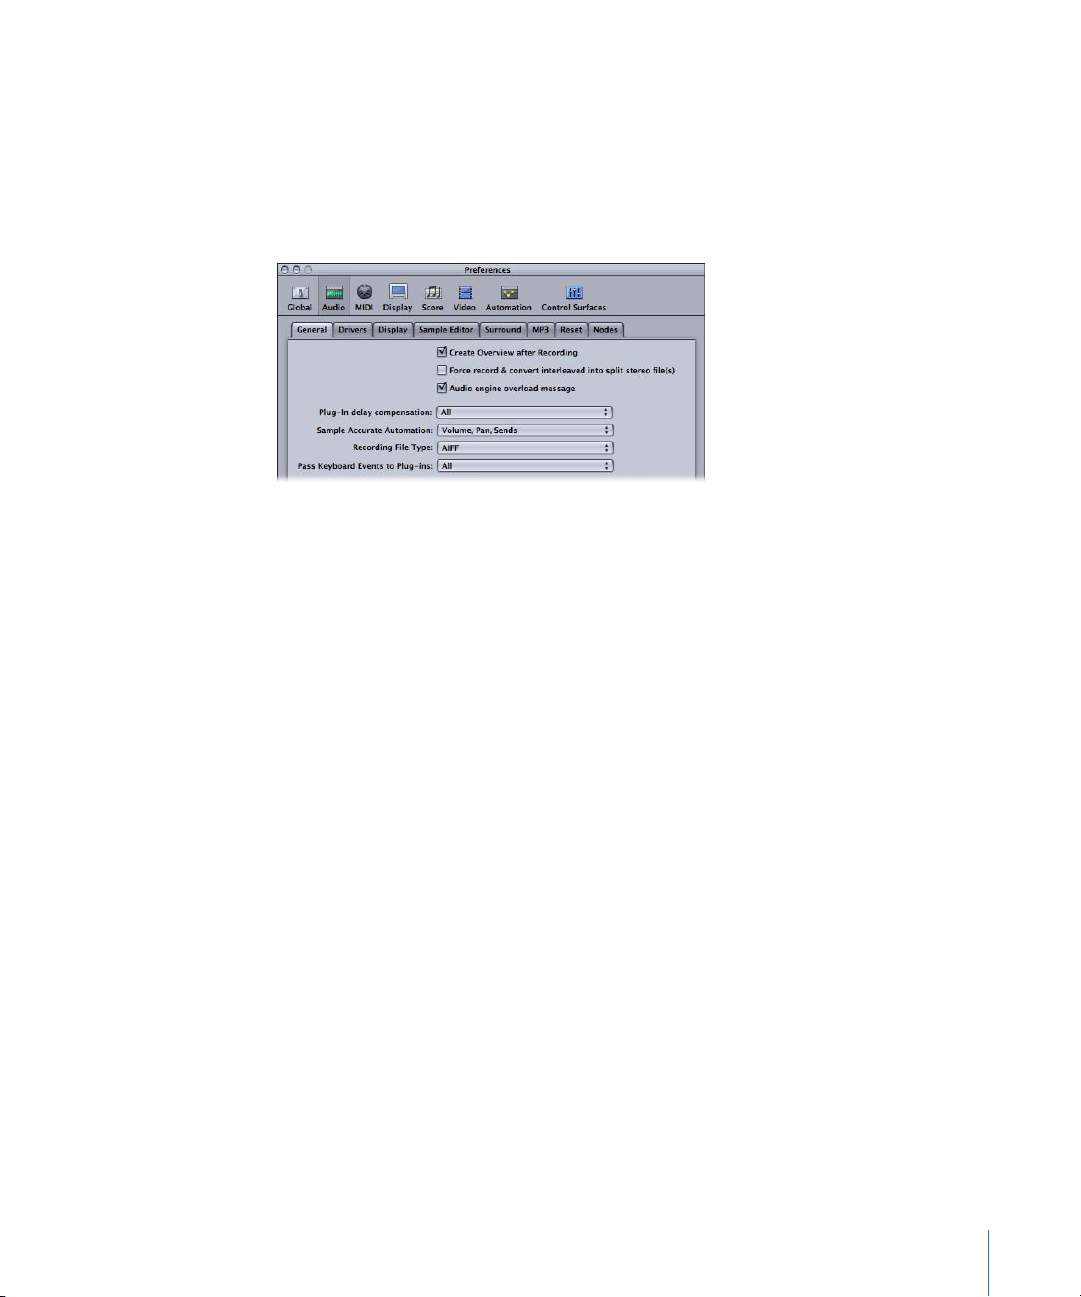
Working With Plug-in Delay Compensation
Logic Pro includes plug-in delay compensation for instruments, tracks, busses, auxes,
outputs and ReWire Objects. A pop-up menu in the Logic > Preferences > Audio >
General pane allows you to activate plug-in delay compensation for either:
 Audio tracks and instruments
 All (Audio Track, Instrument, Bus, Aux, ReWire and Output Objects)
About Plug-in Delay Compensation
Some effect plug-ins introduce latency: this means that it takes the effect a short time
to process the audio fed into it—as a result, the plug-in output will be slightly delayed.
This happens with all dynamic effects that feature lookahead parameters, for example.
Logic provides plug-in delay compensation for all channels: If activated, Logic
compensates for latency introduced by plug-ins, ensuring that audio routed through
such plug-ins is synchronized with all other audio.
Logic achieves this by calculating the amount of latency caused by plug-ins and
delaying audio streams by an appropriate amount—or by shifting instrument and
audio tracks forward in time. The compensation method depends on the type of
channel in which the latency-inducing plug-in is inserted.
 If latency-inducing plug-ins are inserted in bus, aux, ReWire and output channels,
Logic delays all other audio streams by an appropriate amount.
 If latency-inducing plug-ins are inserted in audio and audio instrument channels,
Logic automatically shifts these tracks forward in time. The advantage of this method
is that other channels (that do not contain latency-inducing plug-ins) do not need to
be delayed.
Chapter 10 Plug-in Enhancements 91
Page 92

As an example: Imagine a simple song with a few bass, guitar, vocal, and drum tracks.
The bass track is played through an Audio Object that contains a plug-in that
introduces a latency of 100 ms. All guitar tracks are routed to a Bus Object that contains
several inserted plug-ins. The combined latency introduced by these plug-ins is 300
milliseconds (ms). The vocals are routed through another Bus Object that has a set of
plug-ins that introduce 150 ms of latency. The drum tracks are routed straight to the
main outputs, without being routed through any plug-ins. If latencies were not
compensated for, the drum tracks would play 300 ms ahead of the guitar tracks. The
bass track would play 200 ms ahead of the guitar track, but 100 ms behind the drums.
The vocals would play 150 ms before the guitar track, but 150 ms behind the drums
and 50 ms behind the bass. Needless to say, this isn’t ideal.
With Plug-in Delay Compensation set to All, Logic shifts the bass track forward by 100
ms, thus synchronizing the bass and drum tracks. Logic will then delay both streams in
the Output Object by 300 ms, aligning them with the guitar tracks. The Bus Object that
the vocals are streamed to is also delayed by 150 ms, aligning it with the drum and
guitar streams. The precise calculations required for each stream are handled
automatically.
Plug-in Delay Compensation Limitations
Plug-in delay compensation works seamlessly during playback and mixing. The delay
created to compensate for latency-inducing plug-ins in bus, output and auxiliary
channels can be applied to non-delayed streams before they are played back.
Instrument and audio tracks (that contain latency-inducing plug-ins) can also be
shifted forward in time before playback starts.
There are, however, some limitations if you use plug-in delay compensation with live
tracks. Shifting pre-recorded instrument and audio tracks forward in time is possible
when the audio is streaming live. So, recording while plug-in delay compensation is set
to instruments and tracks will work fine—as long as you do not try to record through
latency-inducing plug-ins: A live track can not be shifted forward in time.
Delaying a live stream in order to synchronize it with other delayed audio channels is
not possible. This may lead to problems should you decide to make further recordings
after setting plug-in delay compensation to All, and inserting latency-inducing plug-ins
in auxes, busses, and outputs. If Logic needs to delay streams to compensate for plugin latencies, you will be listening to delayed audio streams during recording. As such,
your recording will be late by the number of samples that the audio streams were
delayed by.
For these same reasons, you may encounter increased latency if playing Audio
Instrument tracks live when plug-in delay compensation is set to All.
92 Chapter 10 Plug-in Enhancements
Page 93

Dealing With Latency Issues
To avoid these potential pitfalls, try to complete any audio and audio instrument
recording before inserting latency-inducing plug-ins. If you find it necessary to record
an audio instrument or audio track after setting up a latency-inducing signal routing,
the following procedure will help you to get around any possible problems.
To record after setting up a latency-inducing signal routing:
1 Switch the plug-in delay compensation setting from “All” to “Audio tracks and
instruments” in the Logic > Preferences > General > Audio pane.
Note: You can use the Toggle Plug-In Delay Compensation: All/Tracks and Instruments
key command to quickly switch the delay compensation setting between “All” and
“Audio tracks and instruments”.
The “Audio tracks and Instruments” plug-in delay compensation method shifts tracks
that contain latency-inducing plug-ins forward in time—so any audio and audio
instrument tracks that contain latency-inducing plug-ins will be in sync with nondelayed tracks. There is only one exception: Live tracks can not be shifted forward in
time.
The next step is to eliminate any latency induced by plug-ins in your recording track.
2 Bypass any latency-inducing plug-ins on the recording track by Option-clicking on the
respective Insert slot(s).
In the “Audio tracks and Instruments” plug-in delay compensation mode, bypassing
plug-ins eliminates the latency that they create. Latency induced by plug-ins in audio
and Audio Instrument tracks is compensated for.
The last thing to do is to get around the latency introduced by plug-ins on busses,
auxes and outputs.
3 Bypass any latency-inducing plug-ins on busses, auxes and outputs to eliminate any
latency.
At this point, all audio streams will be synchronized, allowing you to proceed with your
recording.
When you’ve finished recording, re-enable all latency-inducing plug-ins, and switch the
delay compensation setting to “All”.
Note: In the All mode, bypassing plug-ins on busses, auxes and outputs will not
eliminate the latency that they create. You must remove these plug-ins entirely from
the Insert slots to eliminate latency.
Chapter 10 Plug-in Enhancements 93
Page 94

If you are recording audio, another strategy would be to disable the Software
Monitoring checkbox in the Logic > Preferences > Audio > Drivers pane. This would
necessitate monitoring your recording via an external mixer. When Logic is not
providing software monitoring of incoming audio, it can correctly position audio
recordings—even when full delay compensation is active. Obviously, you can’t use
external monitoring when recording audio instruments.
Note: As Logic has no direct control over the audio outputs of external devices, plug-in
delay compensation can not work for MIDI tracks that trigger external sound modules.
If you activate full plug-in delay compensation and insert latency-inducing plug-ins,
external MIDI signals will be out of sync with the delayed audio streams. Logic allows
you to circumvent this issue with the External Instrument plug-in: Use it to route the
audio outputs of your external MIDI devices to the inputs of your audio hardware—and
monitor them through Logic. This enables you to compensate for the delays of any
audio streams coming from MIDI devices during playback.
Processing Audio Units When Running the Node Application
The Logic Node Application can’t process Audio Units plug-ins. It is, however, possible
to split tracks that use Audio Units into two halves. The first plug-in (and up to the last
Audio Units plug-in on the track) is processed locally (on the host computer), and
remaining plug-ins (Logic native) may be processed on a Node.
As an example: Use an Audio Units instrument plug-in on the host computer, and
process it with Logic plug-ins on a Node machine.
Adjusting Plug-in Parameters With the Mouse Wheel
You can use the mouse wheel to adjust Logic plug-in parameters in Logic Pro.
To adjust plug-in parameters with the mouse wheel:
1 Position the mouse cursor over the desired Logic plug-in parameter.
2 Click and move the mouse wheel.
94 Chapter 10 Plug-in Enhancements
Page 95

Support of Generator Audio Units Plug-ins
Logic Pro supports the Generators Audio Units plug-in type. As the name suggests,
these Audio Units plug-ins generate audio signals. In contrast to Audio Units
Instruments, however, they do not require a MIDI signal. All Audio Units Generator
plug-ins installed on your system can be found in the respective AU Instrument menu’s
Mono/Stereo/Multichannel > Generators sub menu.
This means that you can choose between three different types of Audio Units plug-ins
(provided you have suitable plug-ins installed on your system) in the Instrument menu:
 AU Generators
 AU MIDI Controlled Effects: As these effects can be controlled via MIDI, they are
inserted into the Instrument slot of Audio Instrument Objects. The audio signal that
you would like to process is then selected via the plug-in’s Side Chain menu.
 AU Instruments
Replacing Setting-Compatible Plug-ins
When you replace a plug-in with another plug-in that is setting-compatible, the new
plug-in automatically uses the setting of the replaced plug-in.
As an example: When you replace the Channel EQ with the Linear Phase EQ, the
inserted Linear Phase EQ uses the same setting as the replaced Channel EQ. The same
is true if you replace an ES2-based GarageBand instrument with the ES2. It also works
for most EXS-based GarageBand instruments (exceptions: Hybrid Morph and Hybrid
Basic).
Ultrabeat
The following updates the information in the Ultrabeat chapter of the Logic Pro 7
Plug-In Reference.
Importing Drum Voices and Sequences
Ultrabeat allows you to import drum voices and sequences from other Ultrabeat
settings into your currently active drum kit. This can be done by clicking on the Import
button in the upper area of the Ultrabeat interface.
Use the ensuing file selector box to open the desired Ultrabeat setting that you wish to
import drum voices and sequences from.
Chapter 10 Plug-in Enhancements 95
Page 96

A list of all drum voices found in the setting is displayed in the Import List beside the
mixer/assignment section. You can preview a sound by clicking on its name in the
Import List.
Import List
A Control-click on a drum voice opens a shortcut menu that contains the Copy (Voice &
Seq) entry. This command copies the drum voice and all 24 of its sequences—empty or
not—into the Clipboard.
As the next step, Control-click on the target drum voice in the mixer/assignment
section. A contextual menu with the following entries will open:
 Copy (Voice & Seq)
 Paste Voice
 Paste Sequence > (submenu)
 Swap with Clipboard
 Init > (submenu)
The two Paste commands replace the corresponding data of the target drum voice.
Choose Paste Voice to replace the target drum voice, without changing its sequences.
The Paste Sequence submenu replaces all, or individual sequences, of the target drum
voice. Paste Sequence has no impact on the target drum voice. Pasting a single
sequence replaces the currently active sequence (as shown in the sequencer pattern #
field) of the target drum voice. This allows you to import drum voice sequences into
any of the 24 possible pattern locations.
Note: You can also use drag and drop to transfer drum voices and sequences from the
Import List to the Mixer section. Holding Command while doing so includes all
sequences.
96 Chapter 10 Plug-in Enhancements
Page 97
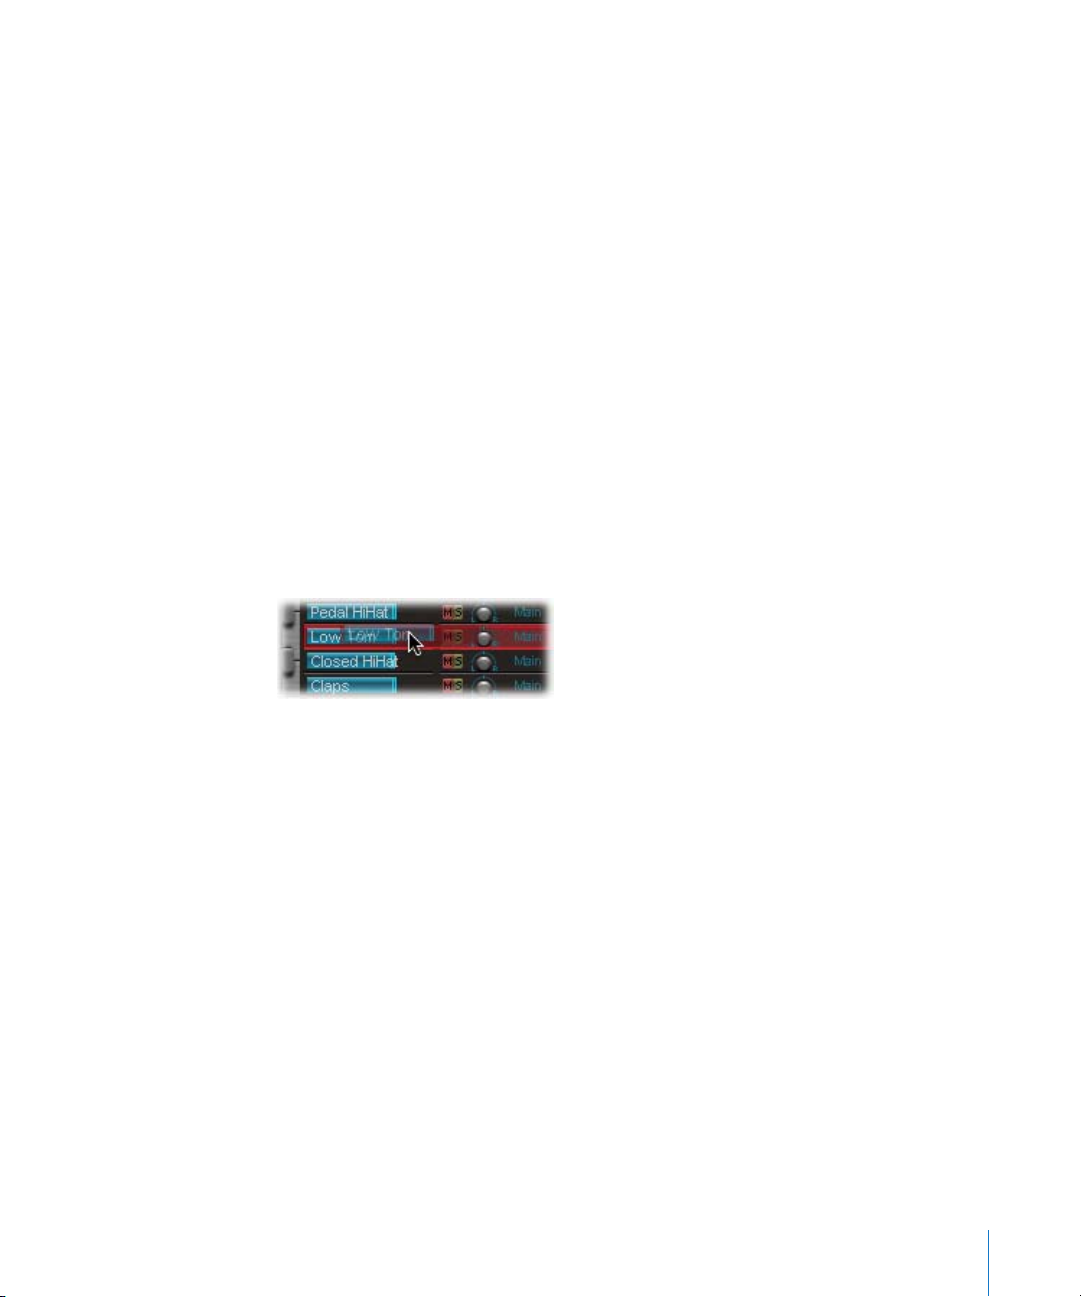
Note that these are single voice based operations, all sequence and voice data of the
other 24 drum voices remain untouched. This is why the term sequences (as opposed
to patterns) is used here. Patterns contain data for all 25 Drum Voices. You should also
note that importing is a “downstream” process—you can copy and paste data from the
imported Ultrabeat Setting into your current Setting, but not vice versa.
The other shortcut menu entries in the mixer/assignment section work as follows:
 Swap with Clipboard swaps the content of the Clipboard with the target drum voice.
As this command swaps both drum voice and sequence data, it’s very useful for
reorganization of your drum kit.
 The Init submenu contains a few starting-point (Init) sounds. Selecting one of them
will replace the target Drum Voice.
Drag and Drop Functionality
Swapping or copying drum voices within a kit, or integrating drum voices from an
imported kit can also be performed with a drag and drop operation, enhancing
workflow and ease-of-use.
To swap/copy drum voices using drag and drop:
1 Click-hold the drum voice in the assignment section (not on a button or menu).
2 Drag and drop it to the desired position.
 A simple drag and drop swaps the two drum voices, without sequences.
 Holding Command during the drag and drop operation swaps the two drum voices,
including sequences.
 Holding Option during the drag and drop operation copies the voice, without its
sequences.
 Holding Option-Command during the drag and drop operation copies the voice,
including all of its sequences.
Chapter 10 Plug-in Enhancements 97
Page 98
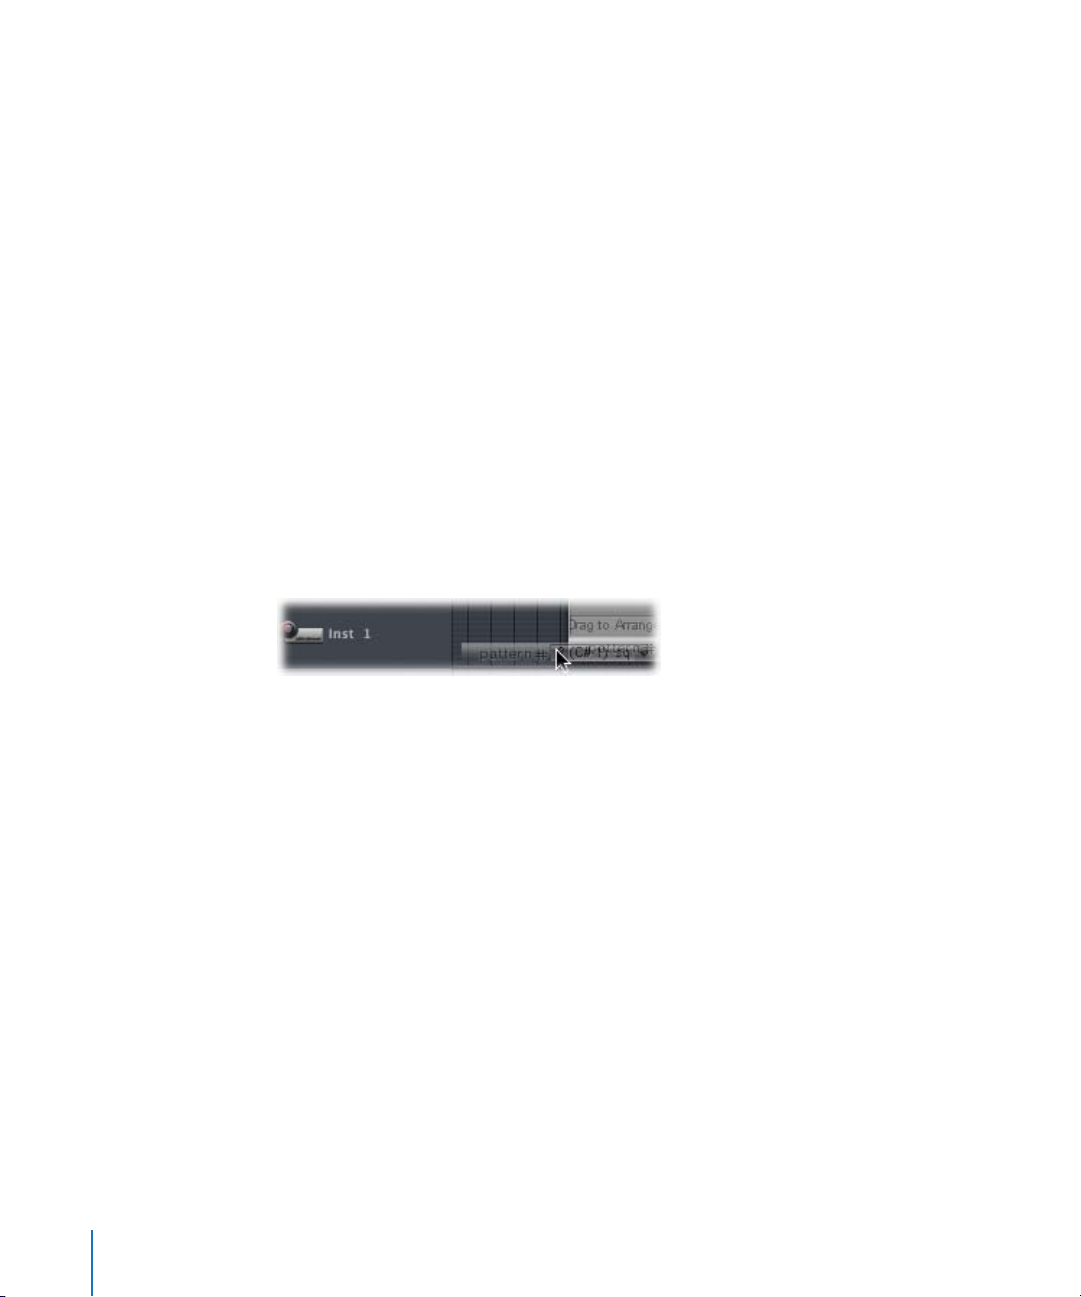
Copying Patterns in the Pattern menu
Copying patterns is achieved with a copy and paste operation via a shortcut menu. The
same tasks can also be performed with a short cut, enhancing workflow and ease-ofuse.
To copy a pattern using the short cut:
1 Select the desired pattern in the Pattern menu.
2 Press Option and select another Ultrabeat pattern. The selected pattern is copied to the
target position.
All sequencer data that exists in the new pattern number is replaced. If you change
your mind during the process, simply release Option.
Exporting Step Sequences as MIDI Regions
Step sequences programmed in Ultrabeat’s internal step sequencer can also be
exported as MIDI Regions into the Arrange window.
To export an Ultrabeat sequence to the Arrange window:
1 Select the desired pattern in Ultrabeat’s Pattern menu.
2 Click-hold the area to the left of the pattern menu.
3 Drag and drop the sequence at the desired song position on the respective Ultrabeat
track. A Region is created, containing all MIDI events, including Swing and Accent
parameter settings. MIDI notes are positioned according to their Swing value set in
Ultrabeat. Accents are interpreted as polyphonic pressure events.
Note: To avoid double triggering while playing back the exported MIDI Region, you
may want to turn off Ultrabeat’s internal sequencer.
Previewing Samples in Sample Load Window
Ultrabeat offers a Play button in its Load Sample dialog, which allows audio files (AIFF,
WAV, SD2, UBS) to be previewed before loading.
 Press the Play button to loop playback of the currently selected sample file. The
sample is played directly from the hard disk, with no voice manipulation: filters, EQ,
envelopes, and other synthesizer parameters are ignored.
 Pressing the button again stops playback.
You can audition multiple files by pressing Play once, and then stepping through the
files.
98 Chapter 10 Plug-in Enhancements
Page 99
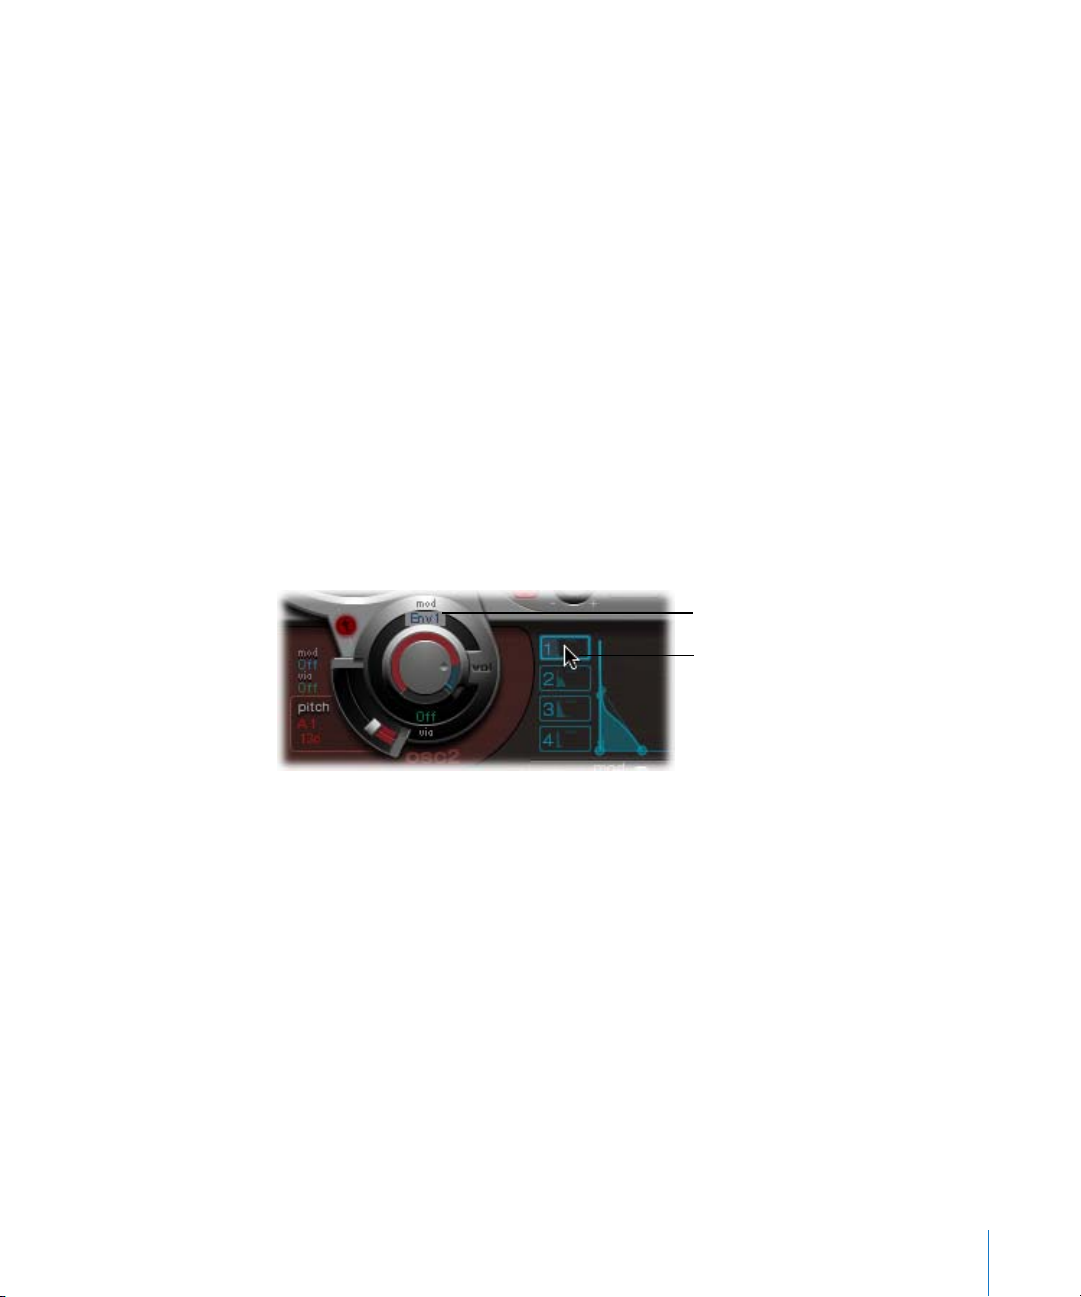
Note: In the case of multi-layer UBS files, the sample is played with a fixed velocity of
75%. Independent auditioning of all layers is not possible. Only the layer addressed by
this Velocity value will be played.
Preview Sample in Ultrabeat Voice function
The “Preview Sample in Ultrabeat Voice” option temporarily replaces the sample files
(AIFF, WAV, SDII, UBS) in the currently selected voice. The voice is not directly triggered
by activating this option, but it can be triggered via MIDI notes (played notes, MIDI
Region events or Ultrabeat sequencer events) while the File window is open. You can
step through various audio files in this way. The selected sample can be heard as part
of the current drum voice, inclusive of all synthesizer processing. Once you find a
sample you’d like to use, click Open to load it. Click Cancel to return to the previously
loaded sample.
Note: Any effects inserted into the Ultrabeat instrument channel affect previews.
Modulation Target Display of LFOs and Envelopes
Ultrabeat’s user interface features a function that makes finding the modulation targets
of the LFOs and envelopes faster: Simply press the numerical field of the desired
modulation source to highlight all of its modulation targets.
Highlighted modulation
target of Envelope 1
Click here to highlight all
modulation targets of
Envelope 1.
HMT Tuning
Ultrabeat is designed as a drum synthesizer and does not respond to the global
Hermode Tuning settings.
Chapter 10 Plug-in Enhancements 99
Page 100

Sculpture
The following information supplements the Sculpture documentation in the Logic Pro 7
Plug-In Reference.
Additional Body EQ models
Sculpture incorporates the following additional Body EQ models:
Long Name Short Name
Western Guitar 1
Western Guitar 2
Semi-Acoustic Guitar
Dobro Guitar
Banjo
Mandolin
Ukulele 1
Ukulele 2
Kalimba
Double Bass 1
Double Bass 2
Cello 1
Cello 2
Violin 3
Bass Flute
Alto Flute
Wst Guit 1
Wst Guit 2
SemiAcGuit
Dobro Guit
Banjo
Mandolin
Ukulele 1
Ukulele 2
Kalimba Bd
Dbl Bass 1
Dbl Bass 2
Cello 1
Cello 2
Violin 3
Bass Flute
Alto Flute
The Guitar 1 and Guitar 2 Body EQ models have been renamed to Acoustic Guitar 1 (Ac
Guit 1) and Acoustic Guitar 2 (Ac Guit 2).
Enhanced string animation
Sculpture’s string animation has been enhanced: it shows the range of the string’s
motion, rather than its momentary position.
100 Chapter 10 Plug-in Enhancements
 Loading...