

Page 1

Late-Breaking News
About Aperture
This document provides updated information about Aperture and covers these topics:
Â
Late-Breaking News About Aperture 1.5.2 (p. 2)
Â
Previous Release Information About Aperture 1.5 (p. 4)
Â
Previous Release Information About Aperture 1.1 (p. 24)
Â
Previous Release Information About Aperture 1.0 (p. 27)
This document may be updated as new versions of Aperture are released or new
information becomes available. You can check for updated information by choosing
Help > Late-Breaking News when Aperture is open.
For the latest information about product updates, tips and techniques, and qualified
third-party devices, visit the Aperture website at http://www.apple.com/aperture.
For the latest support information from AppleCare, choose Aperture Support from the
Aperture Help menu. To receive automatic notification about new support issues, use
Safari to bookmark the AppleCare Aperture RSS page at feed://docs.info.apple.com/rss/
aperture.rss. See Safari Help for more information about configuring RSS feeds.
There is no late-breaking information about Aperture 1.5.1.
1
Page 2

Late-Breaking News About Aperture 1.5.2
Aperture 1.5.2 provides performance, reliability, and compatibility enhancements.
Note:
Aperture 1.5.2 is designed to run natively on both PowerPC-based and Intel-
based Macintosh computers.
Suppressing Preview Generation When Opening Aperture
When Aperture is opened, it begins updating previews for those projects whose Maintain
Previews setting is enabled. (For more information about maintaining previews, see
“Controlling Previews with the Project Action Pop-Up Menu” on page 13.) This can cause
problems if a project contains damaged files or images in unsupported file formats. In
Aperture 1.5.2, you can suppress preview generation when opening Aperture, allowing
you to more easily identify the damaged image files. To do this, press the Shift key while
opening Aperture. You can also cancel the current preview maintenance operation using
the Background Task List window. For more information, see “Viewing Preview
Generation Progress in the Background Task List Window” on page 17.
Note:
If you have canceled a preview maintenance operation, the previews are not
updated until another change is made to the image. To force Aperture to update the
preview for an image, see “Controlling Previews with Shortcut Menus” on page 14. The
next time you open Aperture, automatic preview maintenance resumes.
Scaling Watermarks
Aperture 1.5.2 provides the ability to turn watermark scaling on and off. Aperture
allows you to scale a watermark by the same amount as the exported image. For
example, if the image is exported at 50 percent of its original size, the watermark is
also scaled to 50 percent of its original size to maintain the watermark’s visual
appearance in relation to the image as a whole. However, you can keep watermark
scaling turned off when it’s important to maintain the size of your watermark
regardless of the size of the exported image.
To export images with scaled watermarks:
1
Select the images you want to export.
2
Choose File > Export > Export Versions (or press Command-Shift-E).
3
In the dialog that appears, choose Edit from the Export Preset pop-up menu.
4
In the Export Presets dialog, select the export preset you want to use to export your images.
2
Page 3

5
If necessary, choose an output dimension option from the Size To pop-up menu.
Note:
Watermarks are never scaled above 100 percent of the size at which they were
created. If an image is exported at 100 percent of its original size, the watermark is not
scaled. If the watermark is too small in relation to the image as a whole, you will need
to create a new watermark at a larger size.
6
Select the Show Watermark checkbox.
7
Click the Choose Image button.
8
Select the image you want to use as a watermark, then click Choose.
9
Choose where you want the watermark to appear on the images from the Position
pop-up menu.
10
To adjust the opacity of the watermark, drag the Opacity slider to a new position.
11
To scale the watermark by the same amount as the images, select the “Scale
watermark” checkbox.
Note:
If you have already created the watermark to match the output dimensions of
the exported images, you do not need to select the “Scale watermark” checkbox.
12
When you’re satisfied with how your watermark appears in the watermark preview
area, click OK.
13
Navigate to the location where you want the exported images placed.
14
Choose a name format for your exported files from the Export Name Format
pop-up menu.
15
Click Export.
Your images are exported and the watermark is scaled by the same amount as the
exported images. For more information about exporting images and applying
watermarks, see the
Aperture User Manual
in the Aperture Help menu.
Corrections to Aperture 1.5 Documentation
Page 390 of the
an image in a book you should Command-click the metadata box. To relink a metadata
box to the image, Control-click (or right-click) the metadata box and choose Link
Metadata Box from the shortcut menu.
3
Aperture User Manual
incorrectly states that to relink a metadata box to
Page 4

Previous Release Information About Aperture 1.5
Aperture 1.5 provides performance, reliability, and compatibility enhancements.
Note:
Aperture 1.5 is designed to run natively on both PowerPC-based and Intel-based
Macintosh computers.
Viewing Images with the Centered Loupe
Aperture 1.5 has an additional, enhanced Loupe called the
position the Centered Loupe over the portion of the image you want to magnify, or
you can position the Centered Loupe off to the side of the image and have the Loupe
magnify the image at the position of the pointer. Then, as you move the pointer, you
see specific parts of the image magnified. The Centered Loupe is useful for examining
the effects of adjustments as you make them, and making quick checks for sensor dust,
flaws, fingerprints on film scans, or other issues. You can use the Centered Loupe on
any image or thumbnail in the Aperture Library.
Showing the Centered Loupe
To use the Centered Loupe, you first have to show the Loupe you are accustomed to
from previous versions of Aperture.
To show the Loupe, do one of the following:
m
Choose View > Show Loupe, or press the grave accent (`) key.
m
Click the Loupe button in the toolbar.
Centered Loupe.
You can
Note:
To hide the Loupe, do any of the above again.
Once the Loupe appears, you can show and use the Centered Loupe.
To show the Centered Loupe:
m
Choose View > Use Centered Loupe, or press Command–Shift–grave accent (`).
The Centered Loupe appears.
Centered Loupe
Note:
To switch back to the regular Loupe, repeat the step above.
4
Centered Loupe pop-up menu
Page 5
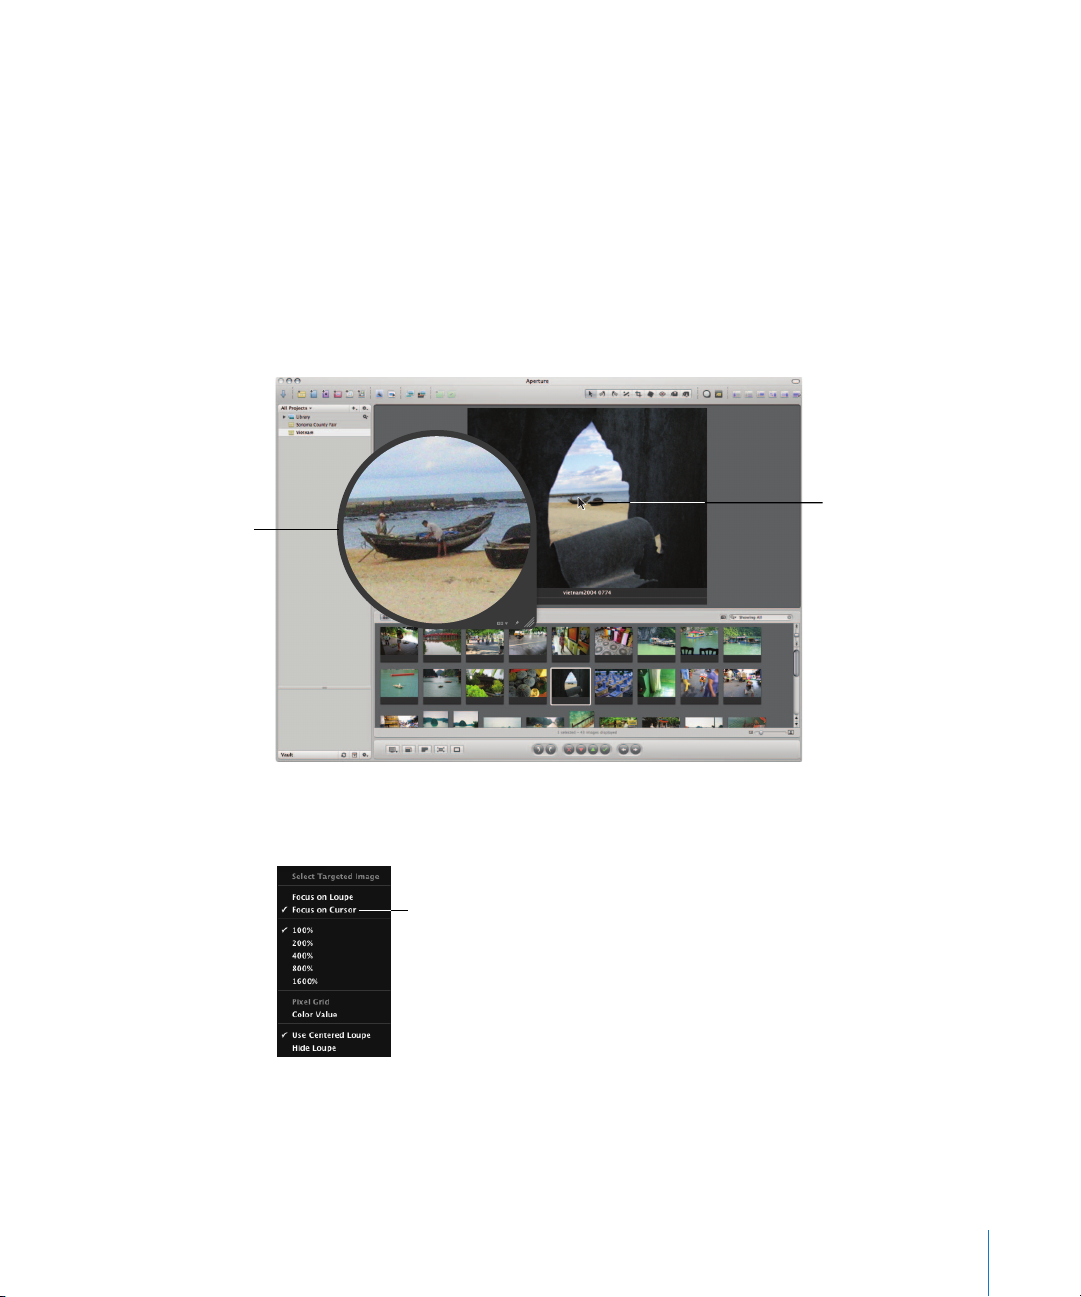
The Centered Loupe
shows a magnified view
of the portion of the
image at the position of
the pointer.
Moving the Centered Loupe
You can move the Centered Loupe by dragging it to different locations over an image.
To move the Centered Loupe, do one of the following:
m
Drag the Centered Loupe to a new location. If you drag within the Centered Loupe, a
circle appears that targets the area that will be magnified.
m
Press the grave accent (`) key, and the Loupe moves to the current location of the pointer.
Using the Pointer to Magnify Parts of an Image
You can leave the Centered Loupe stationary and have it magnify the portion of the
image at the position of the pointer.
Pointer position
To use the pointer to magnify parts of an image:
m
Choose Focus on Cursor from the Centered Loupe pop-up menu.
Choose Focus on Cursor from
the pop-up menu.
To turn off this feature, choose Focus on Loupe from the Centered Loupe pop-up menu.
5
Page 6
Changing the Size and Magnification of the Centered Loupe
You can also change the size of the Centered Loupe and increase or decrease its
magnification level. The Loupe scaling settings are respected by both the regular Loupe
and the Centered Loupe.
To change the size of the Centered Loupe, do one of the following:
m
Choose View > Loupe Scaling > Decrease Diameter, or press Shift-Option-hyphen (-),
to decrease the size.
m
Choose View > Loupe Scaling > Increase Diameter, or press Shift–Option–equal sign (=),
to increase the size.
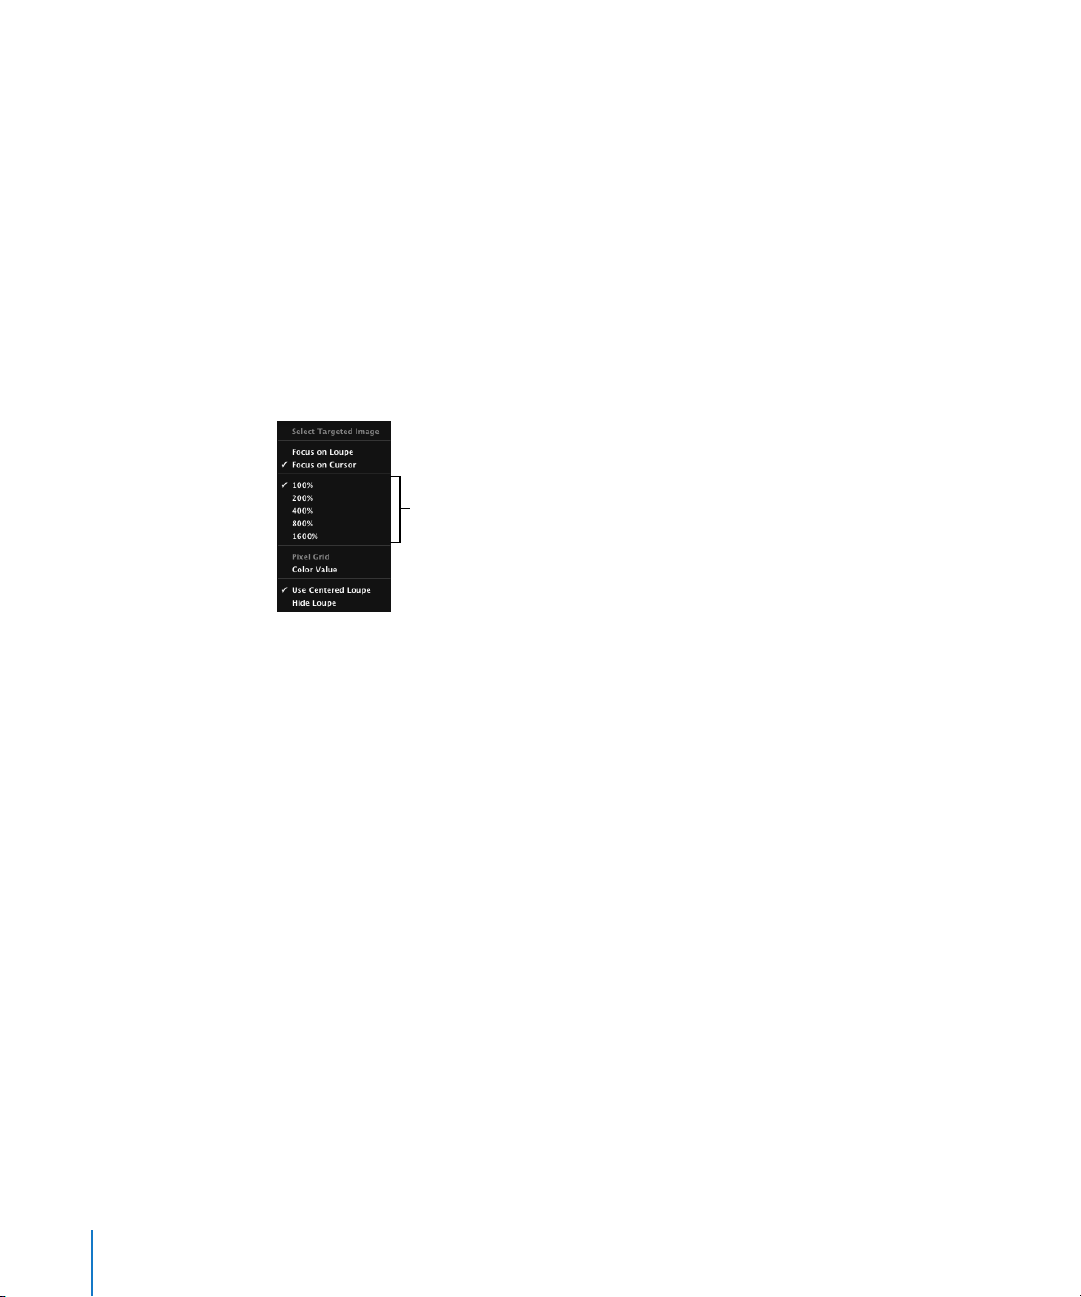
To change the Centered Loupe’s magnification, do one of the following:
m
Choose the magnification level you want from the Centered Loupe pop-up menu.
Choose a magnification
level here.
m
Choose View > Loupe Scaling > Increase Zoom, or press Command–Shift–equal sign (=),
to increase the Centered Loupe’s magnification.
Press these keys repeatedly to increase magnification more.
m
Choose View > Loupe Scaling > Decrease Zoom, or press Command-Shift-hyphen (-),
to decrease the Centered Loupe’s magnification.
Press these keys repeatedly to decrease magnification more.
m
Place the pointer within the Loupe, and roll the mouse wheel to create smooth
changes in magnification.
6
Page 7
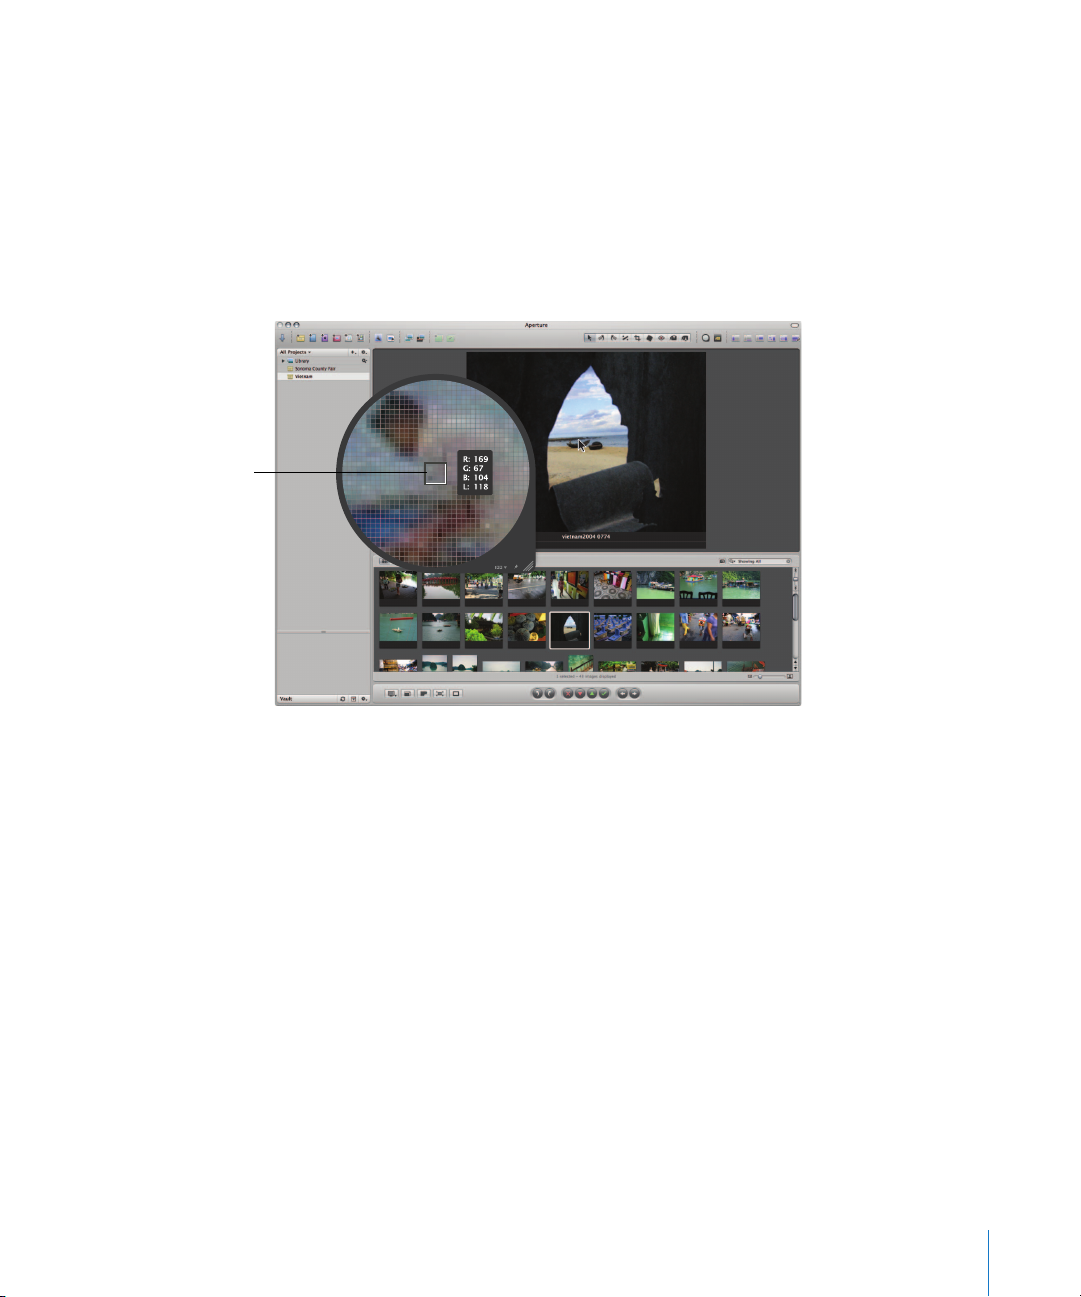
Centered Loupe set
to display a pixel grid
and color values
Displaying a Pixel Grid and Color Values
You can have the Centered Loupe display the image as a grid of pixels that shows the
actual pixel composition of the image, allowing you to see the individual pixel values at
high magnification (400% or higher). You can also set the Centered Loupe to display
readings of the color values of the image, showing the RGB, CMYK, HSL, or HSB values
chosen for the Color meter.
Note:
The Show Color Value in Loupe command has moved from the Add Adjustments
pop-up menu (in the Adjustments Inspector and Adjustments HUD) to the View menu.
To set the Centered Loupe to show a pixel grid:
1
Set the Centered Loupe’s magnification to 400% or higher.
For more information about setting the Centered Loupe’s Magnification, see “Changing
the Size and Magnification of the Centered Loupe” on page 6.
2
Choose View > Show Pixel Grid in Loupe, or choose Pixel Grid from the Centered Loupe
pop-up menu.
To turn off this feature, choose the menu item again.
Note:
You can also show the pixel grid using the regular Loupe by choosing
View > Show Pixel Grid in Loupe.
7
Page 8

You can turn on the display of Color meter values within the Centered Loupe.
To turn on the display of color values in the Centered Loupe,
do one of the following:
m
Choose View > Show Color Value in Loupe, or press Shift–Option–grave accent (`).
m
Choose Color Value from the Centered Loupe pop-up menu.
To turn off this feature, choose the menu item again.
Note:
You can also display color values in the regular Loupe by choosing
View > Show Color Value in Loupe.
Understanding the Edge Sharpen Workflow
The Edge Sharpen adjustment in Aperture is a professional tool that’s used to sharpen
photos. Using the Edge Sharpen adjustment controls in conjunction with the following
workflow makes it easy to achieve professional results.
To sharpen an image:
1
In the Edge Sharpen area of the Adjustments Inspector or Adjustments HUD, set the
Intensity slider to the maximum value to see the effect of the operation.
2
Adjust the Edges slider so you can see which parts of the image are being sharpened.
If possible, adjust the Edges slider so that edges are sharpened, but noise and texture
in the image are not affected.
3
Adjust the Falloff slider so that the edge sizes you want sharpened the most are
accentuated.
4
Decrease the Intensity parameter value until the sharpening effect is appropriately
subtle. Values below 0.5 usually work best.
Working with Preview Images
Aperture 1.5 adds the ability to create JPEG previews of versions in the Library. These
preview images are used within Aperture and can be shared with other applications.
Previews are JPEG images generated by Aperture that represent the original master file
with any applied adjustments. You can control the size of previews, from a preview
image that has the full-size dimensions of the master file down to a preview image that
is 1280 pixels in the longest dimension. You can also control the JPEG compression
quality of the previews.
You can have Aperture create and maintain previews automatically as you add or
modify versions, or you can create previews manually whenever you need them.
Furthermore, if your workflows do not benefit from previews, you can configure
Aperture to not create them at all.
8
Page 9

Uses of Preview Images
Aperture preview images improve the display of images in Aperture and allow you to
easily use your images in other applications.
Displaying Images in Aperture Slideshows
In previous versions, Aperture decoded the master file and applied the adjustments as
the image was displayed during the slideshow. Now it uses the JPEG previews to display
images in slideshows. The result is smoother, more responsive slideshows. However, if
the previews are absent or not up to date, Aperture must render the preview images
before the slideshow begins.
Note:
You can control the display quality of images in the slideshow using presets.
“Best” quality uses the JPEG previews, rendering them if necessary before the slideshow
begins. “Good” quality uses the 1024-pixel (longest dimension) thumbnail images, which
are always available and do not need to be rendered. The 1024-pixel thumbnail images
are large enough for many projectors used for slideshows. For more information about
slideshow presets, see the
Displaying Images in the Viewer
When a version needs to be displayed in the Viewer, Aperture does the following:
1
Aperture draws the thumbnail image (a JPEG image that is 1024 pixels in the longest
dimension).
2
Aperture draws the JPEG preview, if present.
3
Aperture decodes the master file and applies any adjustments to it.
Aperture User Manual
in the Aperture Help menu.
Once the third step is completed, the adjustment controls become enabled. Because
the JPEG preview is created with all the adjustments for that version, it appears
onscreen faster than the adjusted master file would. The result is a sharp preview
image that appears quickly in the Viewer.
Dragging and Dropping
When a version has a preview built for it, you can drag the image directly from the
Browser to any application that accepts JPEG files, including the Finder, Mail, and most
other applications. If the version doesn’t have a preview, drag and drop is disabled for
that version (except within Aperture). If you are dragging multiple images, but only
some of them have previews, only the versions with previews are dragged out.
9
Page 10

Integration with iLife and iWork
You can use previews to distribute your Aperture pictures in movies, on the web, on
DVDs, in slideshows, and in podcasts. You can also download your Aperture pictures to
your iPod, import them into iPhoto, or use them to create Pages documents. The media
browsers in the iLife and iWork applications now support browsing Aperture Libraries.
For each version in the Library, Aperture provides two JPEG files to iLife and iWork: a
240-pixel (longest dimension) JPEG thumbnail that is shown in the media browser, and
the JPEG preview image (at whatever size you specified for it). If a version has no
preview, the image is not made available to the media browser.
Note:
When images are within stacks, only stack picks and album picks are shared. If
you want iLife to have access to an image in a stack and it’s not the pick, you need to
extract it from the stack or make it the pick.
Integration with Mac OX X Desktop & Screen Saver System Preferences
Like iPhoto Libraries, Aperture Libraries can be used for your screen saver and desktop
picture, through the same mechanism the media browser uses.
Displaying Offline Referenced Images
When a master file is offline or cannot be found, Aperture draws the thumbnail image
first, and then the preview if it is present. Because the preview is high quality, you can
zoom and even use the Loupe.
Controlling Preview Images
You can control the creation and maintenance of preview images for an entire Library,
as well as on a project-by-project or image-by-image basis.
10
Page 11

Select “Create previews
for existing images” to
have Aperture create a
preview for each image
in the Library.
Upgrading the Aperture Library
To use an existing Library with Aperture 1.5, you must upgrade it. Aperture prompts
you with the following dialog:
By default, previews are created for images in the Library. Previews are built in the
background after the Library is upgraded to version 1.5. Regardless of what you choose
here, it is easy to switch the setting in Aperture later. You can control this preview
setting individually for each Aperture Library on your system. For more information
about turning off previews after an upgrade and selectively building them, see
“Example Workflows for Using Previews Effectively” on page 18.
If you have a Library with thousands of images, it will take many hours to build these
previews. In that case, you may wish to build the previews overnight or when the
computer is not in use. Or, you can deselect the “Create previews for existing images“
checkbox and build previews on a project-by-project basis, as discussed in “Example
Workflows for Using Previews Effectively” on page 18.
Setting Preview Preferences
Aperture provides four preference settings for controlling previews. These settings
apply to all Libraries.
To open Aperture preferences:
m
Choose Aperture > Preferences.
11
Page 12

The Preferences window appears, and the Previews preferences are at the bottom of
the window.
Â
New projects automatically generate previews:
Selecting this checkbox tells Aperture
to automatically build and maintain previews for new projects you create in the
current Library (and, by extension, in new Libraries). This checkbox sets the Maintain
Previews for Project setting (discussed below) for each new project as it is created.
Â
Share previews with iLife and iWork:
Selecting this checkbox tells Aperture to create a
file, in XML format, that the iLife and iWork media browser (and Mac OS X screen
saver) use to access the Aperture Library. If this checkbox is deselected, Aperture will
not create this file for any of your Libraries, and the media browser and the screen
saver will not be able to see your Aperture Libraries. The XML file is updated
whenever Aperture quits or is no longer the active application. For very large
Libraries, the XML file can take some time to update. In this case, if you are not
sharing your previews with other applications (other than through drag and drop),
you may decide to deselect this checkbox.
Â
Preview Quality:
Use this slider to determine the compression setting used for the
JPEG previews. The scale ranges from 0 (very high compression and relatively low
quality) to 12 (very low compression and relatively high quality). The lower the
quality setting, the less disk space a preview uses.
Â
Limit preview size: Choose the size (width and height in pixels) of preview images
from this pop-up menu. The default setting is “Fit within 2560 x 2560”. The “Don’t
limit” setting tells Aperture to make each preview the same size as the version. The
other choices limit the preview to a size no larger than the specified size. A preview is
never wider or taller than the version from which it is made. Aperture places asterisks
(*) next to choices that match the resolution of your currently connected displays.
Not all display resolutions are offered in the pop-up menu, so you may not see any
asterisks here. For more information about how much disk space is used by previews
at a variety of compression quality settings and picture sizes, see “Comparing the File
Sizes of JPEG Previews and Their Master Files” on page 22.
Note: Changing the preview quality and size settings does not affect previews that
have already been generated. If you want to regenerate previews using the new
settings, you must use the methods described in the following sections.
12
Page 13

A checkmark indicates
that automatic preview
maintenance is enabled.
Controlling Previews with the Project Action Pop-Up Menu
You enable or disable automatic preview maintenance on a project-by-project basis, or
for all projects in a Library.
To have Aperture automatically update previews in the Library:
1 In the Projects panel, select Library.
2 Choose Maintain Previews For All Projects from the Project Action pop-up menu (with a
gear icon).
Aperture enables automatic preview maintenance for each project in the Library.
Aperture will now automatically update previews when images are imported into
projects in the Library, as well as when versions are created or adjusted. For new
projects, Aperture examines the application preference described earlier (“New projects
automatically generate previews”). At the Library level, a checkmark by the menu item
(as shown above) indicates that the setting is enabled for all projects (or for the
selected project). A dash (–) indicates that some projects have their previews
maintained and others don’t (a mixed state). Finally, if neither a checkmark nor a dash
appears, automatic preview maintenance is disabled for the entire Library.
Note: Enabling this setting does not generate the previews. It only tells Aperture what
to do the next time an image is imported or a version is created or adjusted. To
generate previews, you can use the shortcut menus described below.
You can also have Aperture update previews on a project-by-project basis.
To have Aperture automatically update previews in a single project only:
1 In the Projects panel, select the project with the images you want to maintain
previews for.
2 Choose Maintain Previews For Project from the Project Action pop-up menu (with a
gear icon).
A checkmark appears next to the Maintain Previews For Project menu command.
Aperture will now automatically update previews when images are imported into the
project, as well as when versions are created or adjusted.
3 Repeat steps 1 and 2 until all the projects you want maintained are set to update
previews automatically.
Note: Enabling this setting does not generate the previews. It only tells Aperture what
to do the next time an image is imported or a version is created or adjusted. To
generate previews, you can use the shortcut menus described below.
13
Page 14

Choose Delete Previews
for Project from the
shortcut menu.
Controlling Previews with Shortcut Menus
You can control previews in projects by Control-clicking a project in the Projects panel
and choosing an item from the shortcut menu that appears. In addition, you can
control previews for single images or for a selection of images by Control-clicking
images in the Browser.
In the Projects panel, you can delete all the previews for a project or update all the
previews for a project.
To delete all the JPEG previews for a project:
m In the Projects panel, Control-click the project whose JPEG previews you want to
delete, then choose Delete Previews for Project from the shortcut menu.
m In the Projects panel, Control-click the project whose JPEG previews you want to
14
To update all the JPEG previews in a project:
update, then choose Update Previews for Project from the shortcut menu.
If previews are already up to date and you choose Update Previews for Project, Aperture
alerts you that no work is required. However, you can force the rebuilding of previews.
Page 15

Hold down the
Option key while
Control-clicking a project
to make Generate
Previews for Project
appear in the
shortcut menu.
To force the rebuilding of JPEG previews in a project:
1 In the Projects panel, hold down the Option key while Control-clicking the project
whose JPEG previews you want to force Aperture to update.
2 Choose Generate Previews for Project from the shortcut menu.
In the Browser, you can select one or more images and either delete or update the
JPEG previews.
To delete JPEG previews for an image selection:
1 In the Browser, select an image or group of images whose JPEG previews you want
to delete.
2 Control-click the image selection, then choose Delete Previews from the shortcut menu.
Choose Delete Previews.
15
Page 16

Hold down the
Option key while
Control-clicking an image
selection to make
Generate Previews
appear in the
shortcut menu.
To update JPEG previews for an image selection:
1 In the Browser, select an image or group of images whose JPEG previews you want
to update.
2 Control-click the image selection, then choose Update Previews from the shortcut menu.
You can also force the rebuilding of previews for an image selection.
To force the rebuilding of JPEG previews for an image selection:
1 In the Browser, select an image or group of images whose JPEG previews you want to
force Aperture to update.
2 Hold down the Option key while Control-clicking the image selection, then choose
Generate Previews from the shortcut menu.
16
Note: The commands for deleting, updating, and generating previews are also
available in the Images menu.
Page 17

Viewing Preview Generation Progress in the Background Task List Window
Aperture renders preview images in the background; however, there may be times
when you want to stop this operation. You can view the progress of the preview render
operation, as well as cancel this operation, in the Background Task List window.
To stop building previews:
1 Choose Window > Show Task List.
Select this task, then click
the Cancel Task button.
2 In the Background Task List window, select the “Processing previews” task, then click
the Cancel Task button.
3 Close the Background Task List window.
Note: Because slideshows that use the “Best” quality setting cannot begin until all preview
images are up to date, preview generation is done in the foreground with a Cancel button
to stop the operation. In all other cases, previews are created in the background.
Rescheduling JPEG Preview Maintenance
For projects in which automatic preview maintenance is disabled, canceled previews
can be rescheduled.
To reschedule JPEG preview maintenance, do one of the following:
m In the Projects panel, select the project whose JPEG previews you want to start
updating again, then choose Image > Update Previews (or Control-click the project and
choose Update Previews from the shortcut menu).
Note: Each time you open Aperture, it checks for out-of-date previews in those
projects whose automatic preview maintenance option is enabled, and schedules the
previews for regeneration. If you don’t want previews updated automatically, disable
automatic preview maintenance for your projects. For more information, see
“Controlling Previews with the Project Action Pop-Up Menu” on page 13.
17
Page 18

Rendering Preview Images
Aperture renders preview images in four situations:
Â
When a Library is upgraded to version 1.5—provided that the “Create previews for
existing images” checkbox is selected in the Welcome to Aperture 1.5 dialog
Â
When an image is imported, or a version is created, rotated, or adjusted—provided
that the Maintain Previews item is enabled in the Project Action pop-up menu (with
a gear icon)
Â
When you Control-click the Library, a project, or an image selection and choose
Update Previews from the shortcut menu
Â
Immediately before a slideshow, if the previews are not up to date, and the preset
uses the “Best” quality setting
When rendering a group of preview images, Aperture uses the current application
preference settings for compression quality and picture size, not the settings that were
specified when preview rendering began. For example, if you have the quality set to 6,
and then halfway through rendering you change the setting to 8, the previews that
have not yet been rendered will be compressed at setting 8. Already rendered previews
are unaffected.
To update previews to use new size and compression settings:
1
In the Browser, select the images you want to update.
2
Hold down the Option key, Control-click the image selection, and choose Generate
Previews from the shortcut menu.
If you encounter performance issues, you can check the Background Task List window
to see if Aperture is doing work in the background (choose Window > Show Task List).
If you think that preview processing may be degrading performance, you can disable
automatic preview maintenance for that project and cancel the preview processing
task underway. You can then generate the previews at a more convenient time.
18
Example Workflows for Using Previews Effectively
There are several methods for using preview images efficiently and effectively.
Generating Previews on a Project-by-Project Basis for Large Libraries
Because previews can take a long time to render (especially for high-resolution images
or heavily adjusted ones), it may be best to disable automatic preview maintenance for
a large Library, and instead select the projects for which you want previews created.
Page 19

To stop building previews Library-wide and build previews on a project-by-project basis:
1 Choose Window > Show Task List.
2 Select the “Processing previews” task, then click the Cancel Task button.
3 Close the Background Task List window.
4 In the Projects panel, select Library and choose Maintain Previews For All Projects from
the Project Action pop-up menu (with a gear icon).
No checkmark or dash (–) next to the menu item indicates that preview maintenance is
disabled for the entire Library.
5 In the Projects panel, individually select the projects for which you want previews
created, then do one of the following:
 Control-click each project and choose Update Previews for Project from the
shortcut menu.
 Select each project and choose Maintain Previews for Project from the Project Action
pop-up menu (with a gear icon).
A checkmark next to the Maintain Previews for Project menu item indicates that
preview maintenance is enabled for the selected project.
Generating Previews for Projects You Intend to Keep Offline
A JPEG preview is displayed when a referenced image’s master file is offline or cannot
be found. This makes previews a great way of maintaining high picture quality while
conserving the disk space that master files (especially RAW files) require.
To use previews for offline referenced images:
1 Make sure the external hard drive containing the referenced master files you want to
keep offline is connected to your computer.
If the master files you want to keep offline are currently stored on your computer, you
must convert the images to referenced images and move the master files to an external
hard disk. You can do this by selecting the project containing the images whose master
files you want to keep offline, choosing File > Relocate Masters for Project, selecting an
external hard disk location for the master files, and then clicking Relocate Masters.
2 Control-click the project containing the images whose master files you want to keep
offline, then choose Update Previews from the shortcut menu.
3 When the previews are built (you can tell by choosing Window > Show Task List), you
can disconnect the hard disk containing the master files.
Even though the master files are offline, you can browse, search, and assign metadata
to preview images. You can even use the Loupe to zoom in on preview images,
because they are high-quality JPEG files.
19
Page 20

Generating Previews for Images Based on Rating
Another way to use previews is to create a search that displays only low-rated images.
You can then build previews just for those images, and take their master files offline
(for example, burn them to a DVD). That way you still have good-quality images for all
of your photos, without using a lot of disk space.
You can also create a search that displays only highly rated images, and then build
previews for those images only. This is a useful alternative for workflows where the
default thumbnail resolution is sufficient for low-rated images.
Generating Previews for New or Active Projects
Because previews are used by the iLife and iWork media browsers, as well as by the
Mac OS X screen saver, you can use previews as a way to distribute your Aperture
pictures in movies, on the web, on DVDs, in slideshows, and in podcasts. You can also
download your Aperture pictures to your iPod, import them into iPhoto, or use them to
create Pages documents.
To share previews with other applications:
1 Select the project whose images you want to share with other applications, then
choose Maintain Previews for Project from the Project Action pop-up menu (with a
gear icon).
2 Make sure the “Share previews with iLife and iWork” checkbox is selected in Aperture
preferences (Choose Aperture > Preferences).
3 In the Projects panel, Control-click the project and choose Update Previews for Project
from the shortcut menu.
When the previews are built, you can open any of the iLife and iWork applications and
use your Aperture images.
1 Create a Smart Album and specify criteria for it using the Smart Album’s Query HUD.
2 Click in the Browser, then press Command-A to select all the images.
3 Control-click one of the selected images and choose Update Previews from the
20
Generating Previews for Smart Albums
You can also create previews for images collected in Smart Albums. For example, you
can create previews for highly rated images only.
To generate previews for Smart Albums:
shortcut menu.
When the previews are built, you can share them with iLife and iWork, or drag them to
other applications.
Page 21

Note: Previews for Smart Albums are not automatically maintained—automatic
preview maintenance is a project-level and Library-level setting only. In this workflow,
you need to update the previews yourself periodically, by Control-clicking the images
in the album and choosing Update Previews from the shortcut menu. Aperture will
build previews only for the versions that have changed, so you don’t need to determine
which ones to update.
Determining Which Versions Have Previews
There isn’t a badge indicating if a version has a preview. You can Control-click the
version and choose Update Preview from the shortcut menu to learn if a version’s
preview is up to date (if the version’s preview is not present or needs updating,
Aperture will build it or update it). You can also drag a single version out of the
Aperture Browser, and a plus sign (+) appears over the pointer indicating there is a
preview to drag out. If a plus sign (+) does not appear over the pointer, no preview
exists for the selected version.
Turning Previews Off
If your workflow does not benefit from previews, you can turn them off completely.
To turn off previews:
1 Choose Aperture > Preferences, then deselect the “New projects automatically generate
previews” checkbox.
This step disables automatic preview maintenance for any new projects that you create.
2 In the Projects panel, select Library, then choose Maintain Previews For All Projects
from the Project Action pop-up menu (so there is no checkmark next to it).
This step disables automatic preview maintenance for your existing projects.
Note: You will need to perform steps 1 and 2 for each of your Libraries.
3 If you have already generated previews for some projects and do not want them, select
Library in the Projects panel, then choose Images > Delete Previews For Library.
This step deletes all previews that have previously been generated. Again, you will
need to do this for each Library in which you have already generated previews.
21
Page 22

Comparing the File Sizes of JPEG Previews and Their Master Files
Previews use less disk space than their associated master files, especially for high-resolution
RAW files. The charts below show the disk space that previews take for fifty 16-megapixel
1Ds Mark II images. The previews were created at three compression quality settings
(10, 8, and 6) and at three size settings (No limit, 2560, and 1680). In the first chart, you can
see how the compression setting affects the disk space used for each preview size. In the
second chart, you can see how the preview’s size affects disk space used for each
compression setting.
Preview file size by compression setting
1Ds Mark II images (50 images, 678.1 MB)
200
180
160
140
120
100
80
60
Preview disk space (MB)
40
20
0
No limit
2560
Preview image size
(long dimension in pixels)
168 0
Compression setting
10
8
6
22
Preview file size by image dimension
1Ds Mark II images (50 images, 678.1 MB)
200
180
160
140
120
100
80
60
Preview disk space (MB)
40
20
0
10
8
Compression setting
Long dimension
in pixels
No limit
2560
168 0
6
Page 23

Controlling Slideshows with the Apple Remote
In Aperture 1.5, you can control slideshows with the Apple Remote that comes with
MacBook, MacBook Pro, and iMac computers.
Apple Remote function Effect
Pressing left button Moves back one slide and pauses the slideshow.
Pressing right button Moves forward one slide and pauses the slideshow.
Pressing Play Plays or pauses the slideshow.
Pressing and holding
right button
Exits the slideshow.
Copying Your Presets to Another Aperture System
In Aperture 1.5, you can now share your presets, such as export, filenaming, and print
presets, with other Aperture 1.5 or later systems. This is particularly useful when you
want to copy your preset settings from one workstation in your studio to another, or
from a workstation to a portable computer.
To copy your preset settings from one Aperture system to another:
1 Make sure Aperture 1.5 is installed on both systems.
2 Copy the contents of /Users/username/Library/Application Support/Aperture/ to the
same location on the other computer.
When you open Aperture on the other system, your preset settings match the Aperture
system you copied them from.
Opening Aperture Libraries in the Finder
You can now easily open Aperture Libraries from any location in the Finder by
double-clicking the Aperture Library icon. When you open an Aperture Library using
this method, Aperture resets the Library’s location in Preferences to the current location
of the Aperture Library file.
Note: Opening an Aperture Library in the Finder does not overwrite the contents of
the previously selected Aperture Library.
To open an Aperture Library in the Finder:
1 Quit Aperture if it is open.
2 In the Finder, double-click the icon for the Aperture Library you want to open.
Aperture opens, displaying the contents of the selected Library. If you want to display
the contents of the previous Library, repeat steps 1 and 2.
23
Page 24

Consolidating Master Files
When consolidating master files, you are given the choice of either moving or copying
the master files from their current location in the Finder to the Aperture Library. When
you have master files stored on a server or RAID, and then decide to store them in the
Library (so that you can work on them efficiently), selecting the ”Copy files” option in
the Consolidate Master Images dialog won’t affect the source volume. For more
information about consolidating master files, see the Aperture User Manual, located in
the Aperture Help menu.
About Toolbar Icons
Your toolbar may appear different because the default set of toolbar icons has
changed in Aperture 1.5. For more information about the default set of toolbar icons
in Aperture 1.5 and how to customize the toolbar, see the Aperture User Manual,
located in the Aperture Help menu.
Note: If you customized the toolbar using Aperture 1.1.2 , y our toolbar icons have not changed.
Previous Release Information About Aperture 1.1
The following information was included with Aperture 1.1. Aperture 1.1 is designed to
run natively on both PowerPC-based and Intel-based Macintosh computers.
24
Library Compatibility with Aperture 1.1
When you open Aperture 1.1, the Aperture Library will need to be updated for use with
Aperture 1.1. Once converted, you won’t be able to use this Library with earlier versions
of Aperture.
Undo No Longer Deletes Externally Edited Versions
In previous versions of Aperture, when you exported an image to an external editor
and brought it back into Aperture, choosing Undo deleted the new version created by
the external editor. In Aperture 1.1, Undo no longer deletes a version imported from an
external editor. After an image is brought into Aperture from an external editor, the
Undo command is dimmed.
Page 25

Removing Spaces from Filenames When Exporting
When exporting images for specific uses, such as for use on websites, you may need
to use filenames without spaces so that they are compatible with the intended
application or website. Aperture adds spaces to filenames depending on the name
format you use. You can easily modify name formats to remove spaces from filenames.
To modify a name format to remove spaces:
1 Choose Aperture > Presets > File Naming.
2 In the Naming Presets dialog, select the preset name format you want to modify.
Select the name format
you want to modify.
Select the space
between name elements
and delete it.
3 In the Format field, select and delete the spaces or characters between the name elements.
If you wish, you can also add spaces or characters between name elements.
4 Click OK.
Time Format Change in Version Names
In Aperture 1.1, the time format applied to filenames during import has changed to
eliminate periods and colons that could potentially lead to file incompatibilities with
other applications. For example, a filename that had a date and time format applied,
such as DCS1-2006-09-14 06:13:56 PM, now appears as DCS1-2006-09-14 061356PM.
You Can’t Rename Projects Before an Import Session Is Complete
When importing images into a project, you cannot rename the project or modify the
hierarchy of folders that contain the project until the import session is complete. In
previous versions of Aperture, it was possible to rename projects or change the folder
and project hierarchy before an import session was complete, which could potentially
cause import errors.
25
Page 26

Improved Web Gallery and Web Journal Updating
In previous versions of Aperture, when you updated the images in a web gallery or
web journal posted to .Mac, Aperture would first export all the web gallery or web
journal images to temporary storage on your hard disk and then transfer only the new
or changed images to your .Mac site. Aperture 1.1 now first checks to determine which
images in a web gallery or web journal are new or changed, and then exports only
those images to temporary storage for transfer to .Mac, saving time when updating
large web galleries or web journals.
Note: The first time you use Aperture 1.1 to update web galleries or web journals created
with previous versions of Aperture, Aperture 1.1 exports all your web gallery or web
journal images to temporary storage, and then transfers only new or changed images to
.Mac (as was done in previous versions of Aperture). Exporting all images to temporary
storage is required for an efficient one-time conversion to the Aperture 1.1 format.
About Aperture Sample Projects
The Aperture installation disc includes several sample projects containing high-resolution
images. When you first open Aperture, a dialog appears asking if you’d like to install a
sample project. Other sample projects are available in the Sample Projects folder on the
Aperture installation disc. You can import these projects into Aperture from the Aperture
installation disc at any time after installing the application.
26
Corrections to Aperture 1.1 Documentation
Page 12 of the Digital Photography Fundamentals PDF document incorrectly states that the
focal length of a lens changes when it is put on a DSLR with a digital image sensor smaller
than 35 mm. The focal length of a lens does not change, but the picture angle is different
because of the difference in size between 35 mm film and the digital image sensor.
Page 102 of Aperture Getting Started incorrectly states that when Aperture detects a
series of bracketed images, it designates the neutral image as the pick within a stack.
The first image shot is designated as the pick within a stack of bracketed images.
Page 191 of Aperture Getting Started incorrectly refers users to .Mac Help for information
about posting their Aperture webpages to a .Mac account. For information about
posting Aperture webpages to a .Mac account, see the chapter about creating
webpages in the Aperture User Manual, available in the Aperture Help menu.
Page 27

Previous Release Information About Aperture 1.0
The following information was included with Aperture 1.0.
Maximizing the Performance of the Library
To maximize performance, place the Library on an internal hard disk. You can set the
Library’s location in the Preferences window (choose Aperture > Preferences).
Working with Master Files
This section contains information about working with digital master files.
Deleting Master Files Cannot Be Undone
When you delete a master file, the master file and all version information is permanently
removed from the Aperture Library. This includes all applied adjustments and metadata.
You cannot use the Undo command to restore the master file or associated versions.
Deleting a master file also clears the Undo queue, so you cannot undo the series of
actions before the master file deletion.
Deleted Master Files Are Placed in the Trash
Aperture gives you one last chance to review your deleted master files before
permanently deleting them from your hard disk. When you delete master files from
the Aperture Library, they are moved to the Trash. A folder named Aperture appears
in the Trash with the master files sorted into folders named after the projects into
which they were originally imported.
If you update a vault that contained copies of the master files, a folder called
[Name] Deleted Images (where “Name” is the title of the vault) is created at the same
location on the hard disk as the vault. To remove the deleted images from your hard
disk, move the files to the Trash. To make the space these files occupied on both
your internal and external hard disks available, you have to empty the Trash
(choose Finder > Empty Trash).
About Master File Limits in Projects
While Aperture can work with hundreds of thousands of master files, projects can have
a maximum of 10,000 master files each. However, the limit for master files does not
apply to versions. You can create as many versions as you need.
27
Page 28

Working with Vaults
This section contains information about working with vaults.
Hard Drives You Can Use to Store Vaults
You can store vaults only on internal hard disks and external FireWire hard disk drives.
To protect your image assets against hardware failure, make sure you store the vault on
a disk other than the one where the Library is stored.
Supported Drive Formats for Vaults
Vaults can be saved only to disks formatted in Mac OS Extended format (also called
HFS Plus). If your external drive is not formatted in Mac OS Extended format, you will
need to reformat it using Disk Utility. For more information, see Disk Utility Help.
Warning: Reformatting a hard disk deletes all of the files residing on it. Make sure to
move any important files to another disk prior to reformatting your hard disk.
Working with Albums
This section contains information about working with albums.
Duplicating Albums
You can make copies of your albums. This applies to regular albums, Smart Albums,
book albums, web gallery albums, and web journal albums.
1 In the Projects panel, select the album you want duplicate.
2 Choose File > Duplicate [Item].
1 In the Projects panel, select an album.
2 In the Browser, click the Query HUD button (with a magnifying glass icon).
3 In the Query HUD, deselect the Rating checkbox.
28
To duplicate an album:
The selected album is duplicated and the number 1 is added to the end of the
duplicated album’s name.
Working with Reject-Rated Images in Albums
When viewing the contents of albums (including Smart Albums) in the Browser, you
may not be able to see images with a rating of Reject. This is because the Browser
Query HUD is set to show unrated images or better. To view rejected images, you must
set the Browser Query HUD to show all images.
To set the Browser Query HUD to show all images:
All images, including rejects, appear in the Browser, and Showing All appears in the
Browser’s search field.
Page 29

To set the Browser Query HUD to show rejected images only:
1 In the Query HUD, make sure the Rating checkbox is selected.
2 Choose “is” from the Rating pop-up menu, and set the Rating slider to X (Reject).
Only images with the Reject rating appear in the Browser, and X appears in the
Browser’s search field.
Selectively Removing Keywords
You can easily remove an individual keyword from a selection of multiple images
without removing the remaining keywords applied to the images.
To selectively remove an individual keyword from a group of images:
1 Select the group of images.
2 In the control bar, type the keyword you want to remove in the Add Keyword field,
then press Shift-Return.
The keyword is removed from the selected images.
Publishing to .Mac
In Aperture, you can publish your web galleries and web journals directly to .Mac.
However, after publishing your web gallery or journal to .Mac, you have to manually
link it to your homepage.
To publish your web gallery or journal to .Mac:
1 In the Webpage Editor, click the Publish to .Mac button.
2 In the dialog that appears, do the following:
 Enter the name of your webpage in the Publish Album As field.
 Select the appropriate Thumbnail and Detail Image presets.
3 Click the Publish button.
Aperture exports the web gallery or journal to your .Mac account.
4 In the dialog that appears, copy the Internet address for the web gallery or journal by
selecting the text and pressing Command-C.
Note: You need this address to link the web gallery or journal to your .Mac homepage.
5 If you want to view the published web gallery or journal in a web browser, such as
Safari, click the View in Browser button.
The published web gallery or journal appears in your web browser.
29
Page 30

To link your web gallery or journal to your .Mac homepage:
1 Go to http://www.mac.com, then click HomePage at the top of the screen.
2 If you haven’t already done so, log in.
3 In the Pages list, select a Menu page, such as Home, then click Edit.
Note: The page category is listed to the right of the selection.
4 In the “Edit your page” section, click the plus sign (+) button next to an existing link to
add a new link.
A new empty link is created to the right of the previous link.
5 Enter a page title and brief description, then click the Edit Link button.
6 In the “Edit your links” page, click the Other Pages tab, paste the address for your web
gallery or journal in the Address field by pressing Command-V, then click Apply.
7 When you are ready to publish your updated homepage, click the Publish button at the
top-right area of the screen.
A new screen appears with a link to your updated homepage address.
Lifting and Stamping Adjustments
In many cases, you can lift Aperture adjustments and stamp them across multiple images.
However, Crop and Straighten adjustments have to be applied manually to each image.
30
Note: In Aperture 1.5, you can now lift and stamp Crop and Straighten adjustments.
For more information about lifting and stamping adjustments, see Performing Image
Adjustments in the Aperture Help menu.
Turning Off Color Management in Your Printer
For best results, you should turn off color management in your printer when printing
an image using Aperture. By default, most printers are set to convert the image to the
printer’s color space. However, Aperture is designed to perform this conversion
internally. Each printer manufacturer creates its own print dialog. This means the
setting for turning off color management in your printer varies depending upon the
manufacturer of your printer and the printer model.
Note: If you have multiple printers connected to your computer, you must create a
print preset and turn off color management for each printer.
The following is a set of example tasks for turning off color management in Epson R2400,
Canon i9100, and HP Photosmart 8700 series printers.
Page 31

To turn off color management in an Epson R2400 printer:
1 In Aperture, choose File > Print (or press Command-P).
The Print dialog appears.
2 Click the Printer Settings button.
3 In the dialog that appears, choose Color Management from the third pop-up menu
from the top of the dialog, and select Off (No Color Adjustment).
4 Make sure the other printer settings are correct, then click Done.
To turn off color management in a Canon i9100 printer:
1 In Aperture, choose File > Print (or press Command-P).
The Print dialog appears.
2 Click the Printer Settings button.
3 In the dialog that appears, choose Color Options from the third pop-up menu from the
top of the dialog, and choose None from the Color Correction pop-up menu.
4 Make sure the other printer settings are correct, then click Done.
31
Page 32

To turn off color management in an HP Photosmart 8700 series printer:
1
In Aperture, choose File > Print (or press Command-P).
The Print dialog appears.
2
Click the Printer Settings button.
3
In the dialog that appears, choose Paper Type/Quality from the third pop-up menu
from the top of the dialog, click the Paper button, then choose Application Managed
Color from the Color pop-up menu.
4
Make sure the other printer settings are correct, then click Done.
© 2006 Apple Computer, Inc. All rights reserved.
Apple, the Apple logo, Final Cut, Final Cut Pro, FireWire, iLife, iMac, iPhoto, iPod, iTunes, Mac, Macintosh,
Mac OS, and Pages are trademarks of Apple Computer, Inc., registered in the U.S. and other countries. Aperture,
Finder, iWork, MacBook, and Safari are trademarks of Apple Computer, Inc. AppleCare is a service mark of
Apple Computer, Inc., registered in the U.S. and other countries. .Mac is a service mark of Apple Computer, Inc.
Intel and Intel Core are trademarks of Intel Corp. in the U.S. and other countries. PowerPC and the PowerPC logo
are trademarks of International Business Machines Corporation, used under license therefrom. Other company
and product names mentioned herein are trademarks of their respective companies.
November 28, 2006 019-0885
 Loading...