

Page 1
Aperture
Getting Started
Page 2

K
Apple Computer, Inc.
© 2006 Apple Computer, Inc. All rights reserved.
The owner or authorized user of a valid copy of Aperture
software may reproduce this publication for the purpose
of learning to use such software. No part of this
publication may be reproduced or transmitted for
commercial purposes, such as selling copies of this
publication or for providing paid for support services.
Every effort has been made to ensure that the
information in this manual is accurate. Apple is not
responsible for printing or clerical errors. Because Apple
frequently releases new versions and updates to its
system software, applications, and Internet sites, images
shown in this book may be slightly different from what
you see on your screen.
The Apple logo is a trademark of Apple Computer, Inc.,
registered in the U.S. and other countries. Use of the
“keyboard” Apple logo (Option-Shift-K) for commercial
purposes without the prior written consent of Apple
may constitute trademark infringement and unfair
competition in violation of federal and state laws.
Apple, the Apple logo, Apple Cinema Display, ColorSync,
FireWire, iPhoto, Mac, Macintosh, Mac OS, and
QuickTime are trademarks of Apple Computer, Inc.,
registered in the U.S. and other countries.
Aperture and Finder are trademarks of Apple Computer,
Inc.
.Mac is a service mark of Apple Computer, Inc.
Adobe and Photoshop are trademarks or registered
trademarks of Adobe Systems Incorporated in the U.S.
and/or other countries.
Other company and product names mentioned herein
are trademarks of their respective companies. Mention
of third-party products is for informational purposes
only and constitutes neither an endorsement nor a
recommendation. Apple assumes no responsibility with
regard to the performance or use of these products.
Page 3

1
Contents
Chapter 1 9 An Overview of Aperture
9
Using Aperture in Your Workflow
13
Elements Used in Aperture
Chapter 2 21 Setting Up an Aperture System
21
Setting Up a Basic System
23
Setting Up Your System with Two Displays
28
Using Additional Hard Disk Storage and FireWire Drives
Chapter 3 29 Learning About the Aperture Interface
29
Basics of Working in Aperture
30
The Aperture Main Window
41
Additional Parts of the Aperture Interface
44
Configuring Your Workspace
47
Working Efficiently
Chapter 4 49 Working with Projects
49
Controls in the Projects Panel
50
Creating and Naming Projects
50
Opening and Closing Projects
52
Creating and Showing Favorite Projects
53
Deleting Images from Projects and Albums
54
Deleting Items from the Projects Panel
Chapter 5 55 Importing Images
55
An Overview of Importing
56
File Formats You Can Import into Your Library
57
Importing from Your Digital Camera or Card Reader
61
Importing Image Files Stored on Your Computer
63
Dragging Image Files from the Finder into a Project
64
Importing Folders of Images from the Finder
Importing Your iPhoto Library
65
67
Transferring Projects from Another Aperture System
68
Making an Immediate Backup
3
Page 4

Chapter 6 69 Working with Images in the Browser
69
An Overview of the Browser
70
Viewing Images in the Browser
73
Navigating Through and Selecting Images
75
Rearranging Images in the Browser
76
Rotating Images
76
Displaying Specific Metadata with Your Images
78
Creating Versions of an Image
80
Copying Images and Moving Images to Different Locations
80
Working with Referenced Images
Chapter 7 83 Displaying Images in the Viewer
83
An Overview of the Viewer
84
Adjusting the Background of the Viewer
85
Choosing the Number of Images Displayed in the Viewer
86
Comparing Images
87
Viewing Images with the Loupe
88
Viewing Images at Full Resolution
89
Viewing Images on Multiple Displays
91
Displaying Metadata Associated with Images
Chapter 8 93 Viewing Images in Full Screen Mode
93
An Overview of Full Screen Mode
95
Entering and Exiting Full Screen Mode
95
Using the Filmstrip in Full Screen Mode
99
Working with the Toolbar in Full Screen Mode
10 2
Using HUDs in Full Screen Mode
10 4
Using Keyboard Shortcuts in Full Screen Mode
Chapter 9 105 Stacking Images and Making Picks
10 5
An Overview of Stacks
10 6
Creating Stacks Automatically
10 7
Creating Stacks Manually
10 8
Working with Stacks
111
Keyboard Shortcuts for Working with Stacks
4
Contents
Page 5

Chapter 10 113 Rating Images
113
An Overview of the Rating System
11 4
Rating Images
11 5
Sorting Images by Rating
117
Comparing and Rating Images
11 9
Keyboard Shortcuts for Rating Images
12 0
Keyboard Shortcuts for Displaying Images with Specific Ratings
Chapter 11 121 Applying Keywords to Images
121
An Overview of Keywords
12 2
Applying Keywords Using the Keywords HUD
12 9
Applying Keywords Using Keyword Controls and Keyword Presets
13 4
Applying Keywords Using the Lift & Stamp HUD
13 6
Viewing Keywords Applied to Images
13 8
Removing Keywords from an Image
Chapter 12 139 Searching for and Displaying Images
13 9
An Overview of the Query HUD
141
Searching by Image Name, Caption, or Other Text
14 2
Searching by Rating
14 3
Searching by Keyword
14 4
Searching by Date
14 6
Searching by IPTC Information
14 7
Searching by EXIF Information
14 8
Searching by File Status
14 9
Searching by a Combination of Criteria
15 0
Saving Your Search Results
Chapter 13 151 Grouping Images with Smart Albums
151
An Overview of Smart Albums
15 2
Collecting Images in a New Smart Album
15 4
Revising the Contents of a Smart Album
15 4
Deleting a Smart Album
Chapter 14 155 An Overview of Image Adjustments
15 5
An Overview of Adjustments in Aperture
15 6
Displaying the Adjustment Controls
Contents
5
Page 6

Chapter 15 159 Creating Slideshow Presentations
15 9
An Overview of Slideshows
160
Creating a Slideshow Using Presets
161
Controlling a Slideshow
161
Changing a Slideshow’s Images
Chapter 16 163 Using the Light Table
163
An Overview of the Light Table
164
Creating a Light Table Album and Adding Images to It
165
Adding Images to the Light Table
166
Moving and Resizing Images in the Light Table
167
Aligning and Arranging Images in the Light Table
169
Adjusting the Light Table View
17 0
Printing a Light Table Arrangement
Chapter 17 171 Printing Your Images
171
Settings in the Print Dialog
17 3
Printing Single Images
17 3
Printing a Series of Images
174
Printing a Contact Sheet or Series of Contact Sheets
17 5
Printing a Book
17 5
Creating a PDF File of a Book
Chapter 18 177 Exporting Images
17 7
An Overview of Exporting Your Images
17 8
Exporting Copies of Digital Master Files
17 9
Exporting Image Versions
18 0
About Export Presets
18 2
Adding a Watermark to Exported Images
Chapter 19 183 Creating Web Journals and Web Galleries
An Overview of Web Galleries and Web Journals
183
18 4
Creating and Working with Web Galleries
18 6
Creating and Working with Web Journals
18 8
Viewing and Navigating Your Webpages
18 9
Changing the Appearance of Your Webpages
191 Posting Your Webpages to the Web
6
Contents
Page 7

Chapter 20 193 Creating Books
19 3 An Overview of the Book Creation Process
19 4 Creating a Book Album
19 5 Controls in the Book Layout Editor
19 8 Placing Images in a Book
19 8 Adding Pages to a Book
19 8 Removing Pages from a Book
19 9 Resizing and Aligning Images on a Page
19 9 Adding Text to Pages
200 Changing the Theme
200 Ordering a Printed Book
Chapter 21 201 Backing Up Your Images
201 An Overview of Backing Up Your Files
203 Controls in the Vaults Panel
204 Creating a Vault
205 Updating Vaults
206 Removing a Hard Drive from Your System
206 Deleting a Vault Permanently
207 Restoring Your Aperture System
Appendix 209 Credits
Index 211
Contents 7
Page 8

Page 9

1 An Overview of Aperture
1
Aperture is a powerful and easy-to-use digital image
management system that can track thousands of digital
images and provides professional-quality tools for working
with your photos.
Aperture is a nondestructive image processing and database application that lets
you efficiently acquire digital images, perform photo edits, adjust and retouch
images, publish images on the web or in print, export images, and back up your
images for safekeeping.
Before starting work, you need to understand how Aperture is used in your workflow.
You’ll also need to find out about the basic elements used as you work with your
images in Aperture.
Using Aperture in Your Workflow
The following illustration shows the basic workflow steps you generally follow when
using Aperture. Keep in mind that workflows can vary, either from person to person or
from project to project. As you work in Aperture, you may not always proceed in strict
linear order, and you may choose to overlap some steps.
9
Page 10
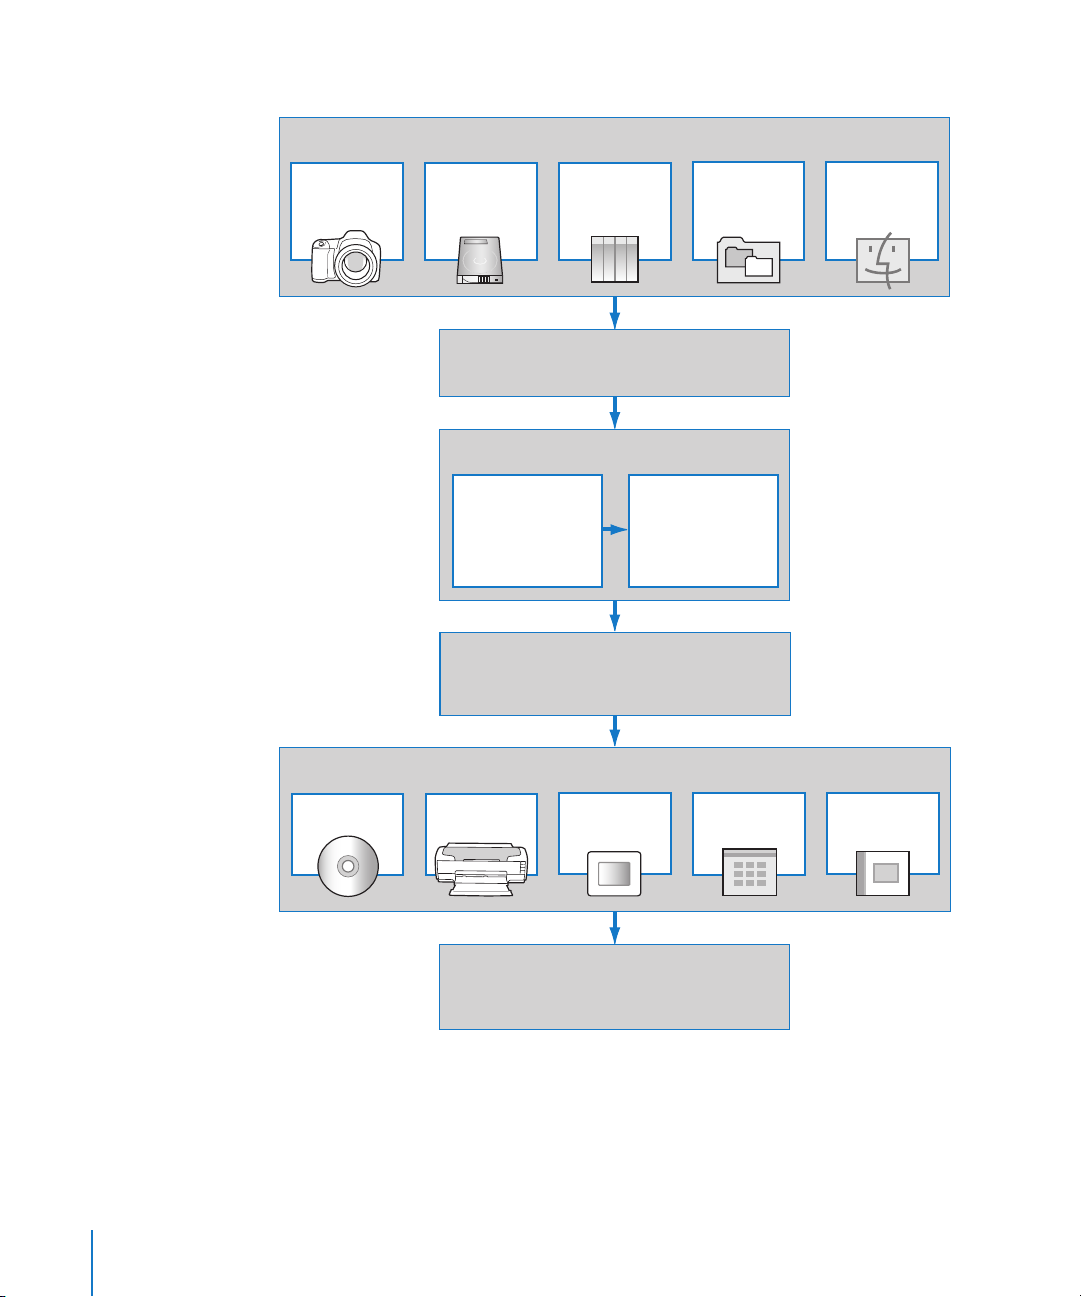
Aperture Workflow
Acquire Images
Import from
card/camera
Import from
hard disk or
media
Sort
• Rate
• Apply keywords
• Compare
• Stack
Import from
iPhoto
Create Projects
Before or during import
Photo Edit
• Using Query HUD
• Using Smart Albums
Apply Adjustments
• Exposure
• Levels
• White balance
Import folders
(maintaining
structure)
Group
Drag from
Finder
Export
Print
10 Chapter 1 An Overview of Aperture
Distribute
Create
slideshow
Back Up
• Set up vault
• Back up to vault
Publish
webpages
Print
books
Page 11
Elements in Aperture That Correspond to Workflow
Import images using the
Import panel.
Create projects in the
Projects panel.
Photo edit using the
Viewer...
...and the Browser.
Apply adjustments
using the Adjustments
Inspector.
As you photo edit, you
can view information
about an image using
the Metadata Inspector.
Use the Vaults panel for
backing up your images.
Step 1: Set up your Aperture system
For this beginning stage, you set up your Aperture system by connecting the hardware
you need. For most users, it’s fairly straightforward: simply connect your camera or card
reader to a FireWire or USB port on your computer, then turn on your computer and
open Aperture.
Step 2: Acquire images and create projects
Once you’ve set up your Aperture system, you need to import your images into
Aperture. Acquiring, or importing, images is the process of getting the images from
your camera, a card reader, external storage media (such as a CD, DVD, or external hard
disk drive), or folders on your computer into Aperture. You can choose to acquire many
images, such as all the ones on a card, or selected images only. Before or during the
import process, you have the option to create a new project to store your images. You
can also create projects after importing, or at any stage in the process.
You can also import all or just a portion of your iPhoto Library. When you import your
iPhoto Library, Aperture maintains the structure as well as all adjustments and
information, also known as metadata, applied to the images.
Chapter 1 An Overview of Aperture 11
Page 12

Step 3: Photo edit
For this stage, you’ll sort through your images and choose which images you want to
work with and further adjust. You can add keywords, captions, or other text to your
images to help you sort and organize them, as well as apply ratings and stack related
images together.
You can also group images to further organize them. You can find images using the
Query HUD (heads-up display), a floating panel with search options. You can also create
containers, such as folders and albums, within projects to further manage your images.
Aperture also uses Smart Albums, which are albums that can be dynamically generated
and updated based on specific search criteria you specify in the Query HUD. This can
save you time and effort finding just the right images.
Step 4: Apply adjustments
With Aperture, you can make adjustments to images, including adjusting exposure,
levels, and white balance and eliminating red-eye. You can also crop, rotate, and resize
images. If you want to make adjustments that involve compositing, you can easily work
with your images in another application, known as an external editor, such as Adobe
Photoshop; adjusted images automatically appear in Aperture when the image is saved.
You can apply different adjustments to multiple versions of the same image.
Step 5: Distribute your images
Aperture provides several options for distributing your images. You can print images
directly to a printer, export images for delivery to a professional photo lab, or create a
book of images for printing using the printing service supplied by your .Mac account.
Aperture also includes tools that allow you to publish photos on the web and create
online journals without having to know any HTML. You can also use slideshows to
present work to clients or provide a background of images and music during an event.
Step 6: Back up your images
You can make a backup copy of your Aperture Library and store it in one or more vaults
located on external hard disk drives—usually FireWire drives. The Library includes your
projects, digital master files, and any versions you’ve created.
12 Chapter 1 An Overview of Aperture
Page 13

Elements Used in Aperture
In Aperture, you use projects, albums, and folders to organize your images as you work.
Other important elements are the Library, used to manage your files, and the vault for
storing backup copies of your Library.
 Digital master files: The original image files imported from your camera, memory
card, computer, or external storage media. The digital master files are never changed,
so that the original image is preserved and can be used again.
 Versions: These are files used to display the master files, as well as store any changes
you’ve made to images (such as image adjustments or changes to metadata).
 Projects: Container files used to hold digital master files, versions, and albums. When
project files are moved, the contents are moved with them.
 Albums: Used to organize versions. You can create albums within projects or outside
of them. Types of albums include Smart Albums, Light Table albums, web gallery
albums, web journal albums, and book albums.
 Folders: Used to organize projects and albums within projects.
 Library: A database that manages your files from import to image adjustments and
final distribution. Once you import images, the Library records and tracks your digital
master files and corresponding versions. The Library also tracks projects and albums
you create to organize your images.
 Managed and referenced images: Master files stored in the Aperture Library are
called managed images because Aperture manages the location of the images in its
database. Managed images are physically located in the Aperture Library file in the
Pictures folder. You can also import images into Aperture without storing the digital
master files in the Library. Images that are not stored in the Library file are called
referenced images. Aperture links to referenced images in their current locations on
your hard disk, without placing them in the Aperture Library file.
 Vaults: A vault holds your backed-up images and is a copy of your Library.
For details about each of these elements and how you work with them in Aperture, see
the next few sections.
What Are Digital Master Files?
A digital master file is the original RAW, JPEG, TIFF, or PNG file that was imported into
Aperture from your camera, a memory card, a computer, or external storage media
such as an external hard disk drive or CD. Aperture never changes the master file, so
you always have originals to work from.
Important: Digital master files—especially RAW files—tend to be quite large. Projects
consisting of several thousand digital master files require high-capacity hard disks.
For information about importing your digital master files, see Chapter 5, “Importing
Images,” on page 55.
Chapter 1 An Overview of Aperture 13
Page 14

What Are Versions?
Once you have digital master files on your hard disk, you can review and make
adjustments to your images. For example, you can change the exposure, contrast, or
saturation, or add information to an image, such as the photographer’s name, event,
and location. To work with images, Aperture creates a “version” of each master file that
includes your adjustments and embedded information, and leaves the master file
unchanged. A version refers to the master file on your hard disk, but it is not the master
file itself. Versions store only the thumbnail image, adjustments, and embedded
information. A full image file is not created until you are ready to print or export, saving
valuable storage space on your hard disk.
1A
Versions
1B
1C
1D
2A
2B
3A
3B
3C
from
Master 1
Versions
from
Master 2
Versions
from
Master 3
Computer
Pictures
folder
Aperture
Library file
1
Master
2
Master
3
Master
When you create a version, several things occur:
 Aperture reads the original master file on disk and displays it on the screen.
 As you make adjustments or add information to the image, Aperture uses floating-
point calculations to display the image with those changes, but the original master
file is never changed.
You can create as many versions of an image as you need. For example, a client may
request color, sepia, and black-and-white versions of the same wedding shot. Instead of
saving multiple copies of that image, as you would with other applications, you simply
create different versions of the master file.
14 Chapter 1 An Overview of Aperture
Page 15
What Are Projects?
You organize your digital master files and versions using projects. A project is a
container file consisting of up to 10,000 master files and as many versions as you like.
You can create as many projects as you wish up to the limitations of your disk space.
For example, you can create a new project for each of your shoots. Or if you do several
shoots of the same subject, you may want to create a project that encompasses all of
the shoots. Projects are essential elements because they maintain your digital master
files and track all changes to versions.
You can easily transfer projects from one Aperture system to another. All links between
versions and their master files are maintained when projects are transferred. This is
particularly useful if you use a portable computer when on location or away from your
studio, and a workstation at your studio. For more information, see “Transferring
Projects from Another Aperture System” on page 67.
Examples of items in
the Projects panel
Projects
What Are Albums?
An album is a type of container in the Aperture Library that holds only versions (not
the digital master files to which they refer). Albums help you organize images in the
Library, making your versions easier to manage. You can create albums at the Library
level or within a project.
Albums created at the Library level are used to organize versions from multiple
projects. For example, you can create an album at the Library level to consolidate your
favorite images, known as selects, from multiple clients (each represented by a project).
You can then publish this collection of selects on your website or export the album’s
contents and burn them to a DVD for review by a prospective client.
Chapter 1 An Overview of Aperture 15
Page 16
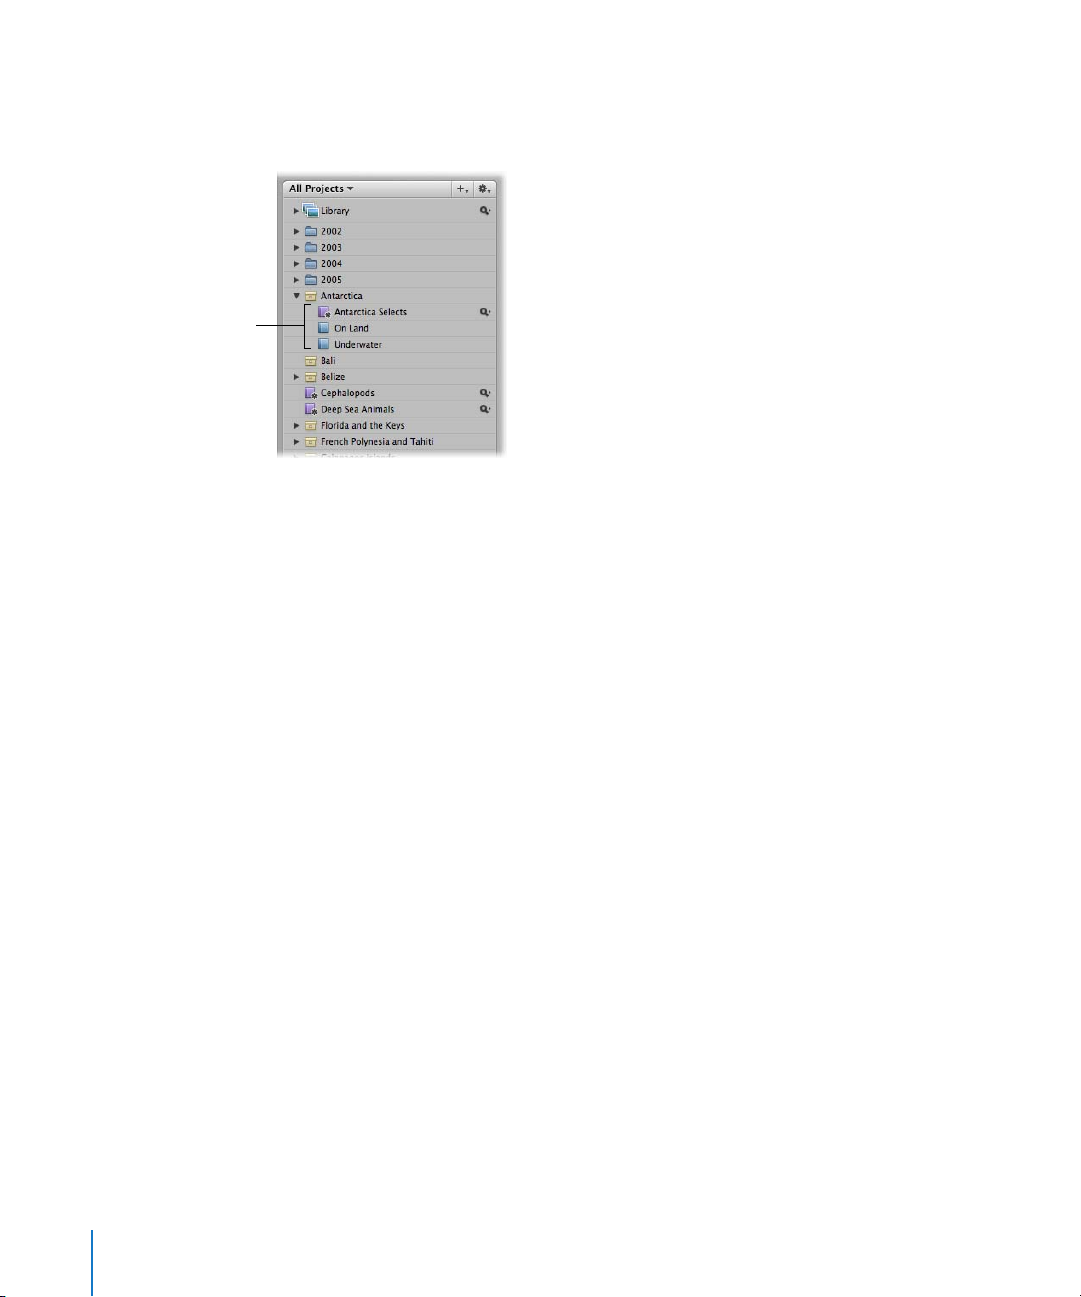
Three albums created
within one project
You can also create albums within projects to help you organize your images into
relevant groups. For example, images in your Antarctica project can be divided into
three albums: Antarctica Selects, On Land, and Underwater.
Note: You can also place versions from other projects in an album that resides within
a project.
There are two main types of albums, each suited to a particular function:
 Album: A type of folder containing image versions. You can view only the versions
that you’ve placed in the album.
 Smart Albums: This type of album contains image versions as well, but the contents
are controlled by search criteria that you specify. When you change the criteria
associated with a particular Smart Album, the contents of the Smart Album
automatically change. For more information about Smart Albums, see Chapter 13,
“Grouping Images with Smart Albums,” on page 151.
Changes made to versions in albums have no effect on the original digital master files
on your computer’s hard disk. If you delete a version from one album, the digital
master file is not deleted from the hard disk.
16 Chapter 1 An Overview of Aperture
Page 17
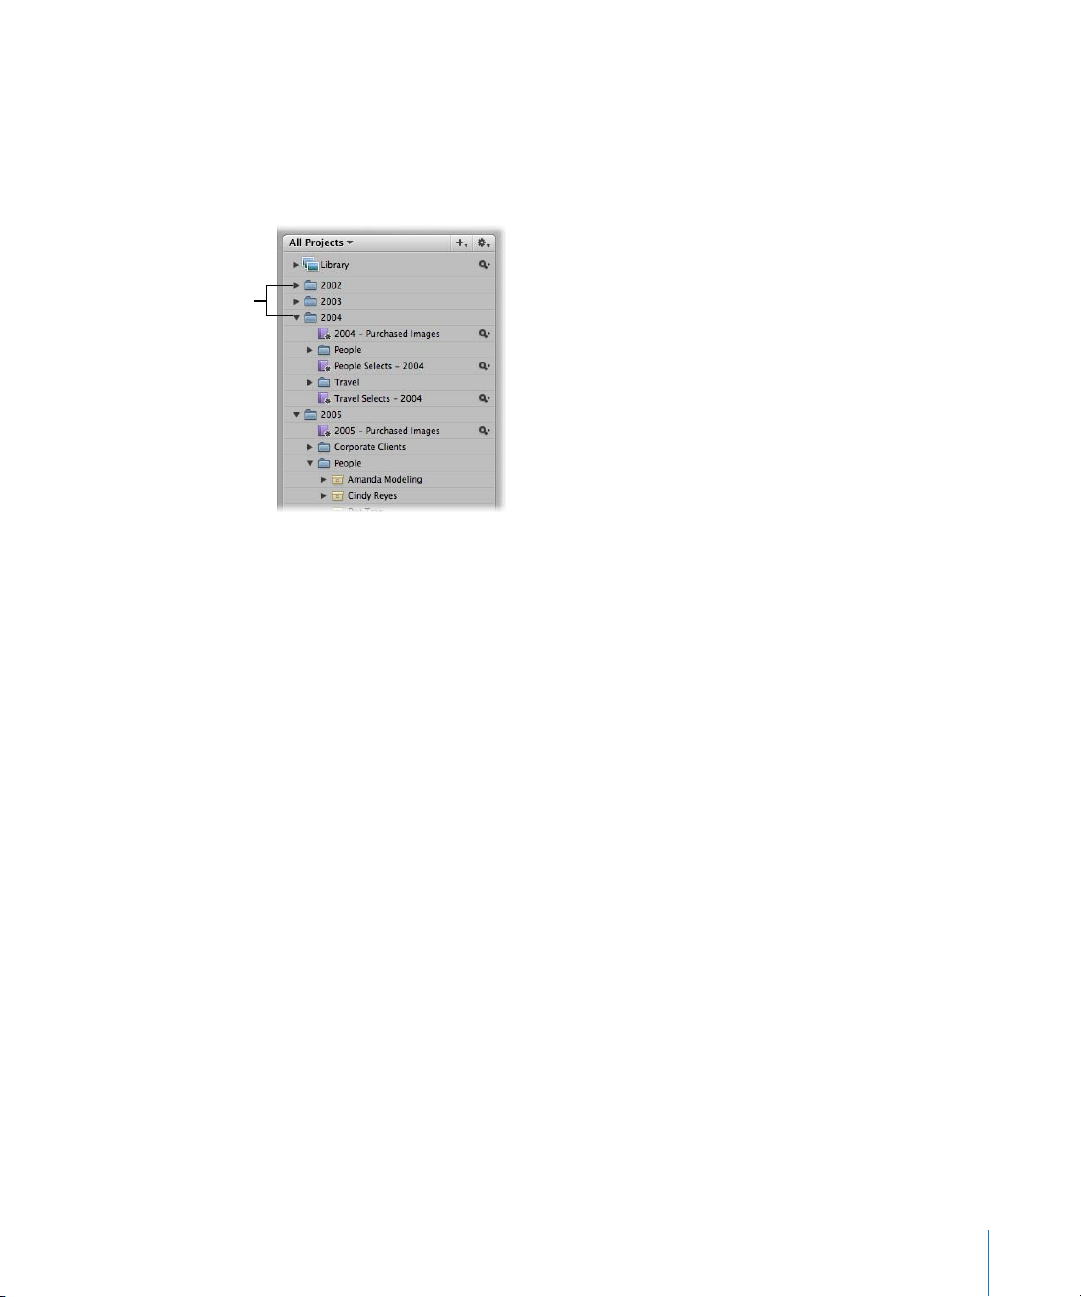
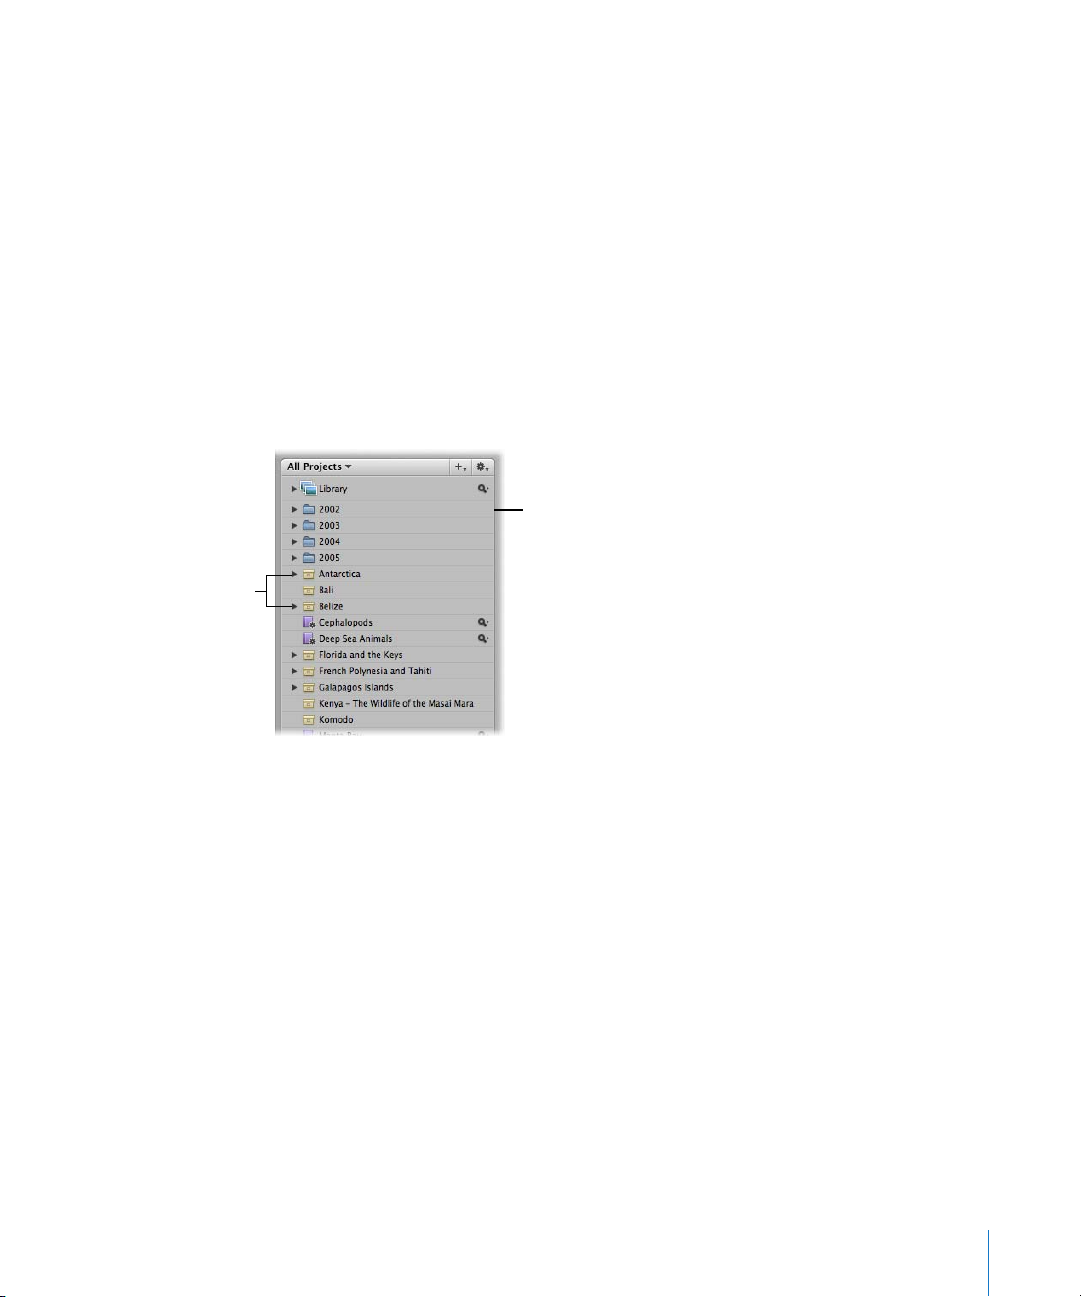
These folders organize
images based on what
year they were shot.
What Are Folders?
In Aperture, folders are used to help organize projects and albums. For example, you
can import images into projects and then organize the projects into folders based on
the year, such as 2002, 2003, 2004, and 2005. And if you shoot multiple projects for the
same client, you can create a folder that contains separate projects for that client.
Note: Folders only contain albums, projects, and other folders.
What Is the Library?
The Aperture Library tracks every project, album, master file, and version no matter
whether the images are stored in the Aperture Library file or in other hard disk
locations. Aperture automatically creates a Library file in your Pictures folder the first
time you open Aperture. You can choose to import images into your Library or have
Aperture access them from other locations on different hard disks. The Library tracks all
your images and the information recorded about them, as well as information about
where backup files are stored. You can access images in the Library by clicking Library
at the top of the Projects panel.
Projects that you transfer from other Aperture systems to your Aperture system are also
added to the Library. And when you back up your digital master files to your vaults on
external FireWire drives, those actions are tracked by the Aperture Library as well.
You can change the location of the Library file to a different folder or a different disk.
You can create multiple Library files. For more information about working with multiple
Library files, see the Aperture User Manual in the Aperture Help menu.
Chapter 1 An Overview of Aperture 17
Page 18

What Are Managed Images and Referenced Images?
Aperture lets you choose how you organize your photos on disk. You can store your
photos in the Aperture Library, or you can import images by simply linking to the
image files in their current locations, without placing them in the Library.
Images whose digital master files are stored in the Aperture Library are called managed
images. These master files are stored in the Library exactly as they were in previous
versions of Aperture. Aperture manages master image files in the Library, keeping them
always accessible, and provides benefits such as one-click backup of digital master files
to vaults.
Imported images whose digital master files haven’t been placed in the Library are
called referenced images. Using referenced images in your Aperture system can provide
a number of substantial benefits to your photography workflow. You can incorporate
your existing portfolio of images into Aperture without changing the current location
of the files. Importing images by reference does not result in a duplication of your
image files in the Aperture Library, thus saving hard disk space. You can also connect
and disconnect hard disks holding your referenced images’ master files as you need
them. This allows you to keep master files for less-used images offline or to make
specific types of images available for editing or adjustments as needed. Using
referenced images in your Aperture system provides a means of building a flexible
image management system customized to your work style.
You specify that an image will be a managed image or a referenced image when you
import it. When importing images, you can:
 Specify that master files be stored in the Aperture Library.
 Import images as referenced images, so that their master files remain in their
current locations.
 Move or copy image files to a new location. For example, you might decide that a
certain group of referenced image files, such as wedding photos, will always be
placed in one hard disk location, while other groups, such as sports photos, will
reside in a different hard disk location.
You can work with referenced images—creating versions, making adjustments,
cropping, and adding metadata—just as you can with images whose master files are
stored in the Library. Versions that you create from a referenced image are stored in the
Library. In order for you to make adjustments to a version from a referenced image, the
referenced image’s master file must be available on your hard disk or other storage
device. For example, if you delete a referenced image’s master file in the Finder,
Aperture no longer has access to the master file and so no longer allows you to change
your versions or create new ones.
18 Chapter 1 An Overview of Aperture
Page 19

To help you identify referenced images, Aperture marks referenced images with a
badge overlay that you can display or hide. When a referenced image’s master file is
missing or offline, its badge changes to show that the image is not accessible. For
example, if you disconnect a hard disk that holds master files for many referenced
images, Aperture automatically marks the referenced images in the Browser and Viewer
as offline. If you reconnect the hard disk or other storage device later, Aperture
accesses the master files automatically and you can work with and change their
versions again.
You can also relocate master files, moving them out of the Library or moving referenced
master files to different hard disk locations. If needed, you can also move referenced
master files into the Aperture Library by choosing the Consolidate command.
You can search for images based on whether they are managed images, referenced
images, or online or offline images. Aperture also provides robust file-management
tools that let you quickly determine which images are offline and easily reconnect
images that have been moved to different volumes.
What Is a Vault?
A vault is a container consisting of an exact copy of your Library. This includes your
projects, managed digital master files, and any versions you’ve created. You can easily
create and update a vault to back up your Library. It’s best to store your vaults on
multiple external hard drives connected to your computer, usually via FireWire. A Vault
Status button changes color when your vaults need updating.
You can have as many vaults as you deem necessary. Creating more than one vault is
useful if you work at different locations; you can always keep one vault on a FireWire
drive onsite and another one offsite. All vaults and backup files are tracked by the Library
so that even if you disconnect the external hard drive that contains your vault, Aperture
will synchronize it the next time you reconnect the drive and update your vault.
All the managed master file images, versions, and all metadata, previews, and adjustment
information associated with your images are backed up. The versions, previews, and
metadata associated with referenced images’ master files are also backed up in the vault.
Referenced images’ master files are not backed up in the vault with the Library.
Chapter 1 An Overview of Aperture 19
Page 20

Page 21
2 Setting Up an Aperture System
2
You can use Aperture with just your computer and display,
or you can set up a system with two displays for extra screen
space to view and adjust images.
This chapter provides instructions for connecting a digital camera or card reader to
your computer and setting up a dual-display system.
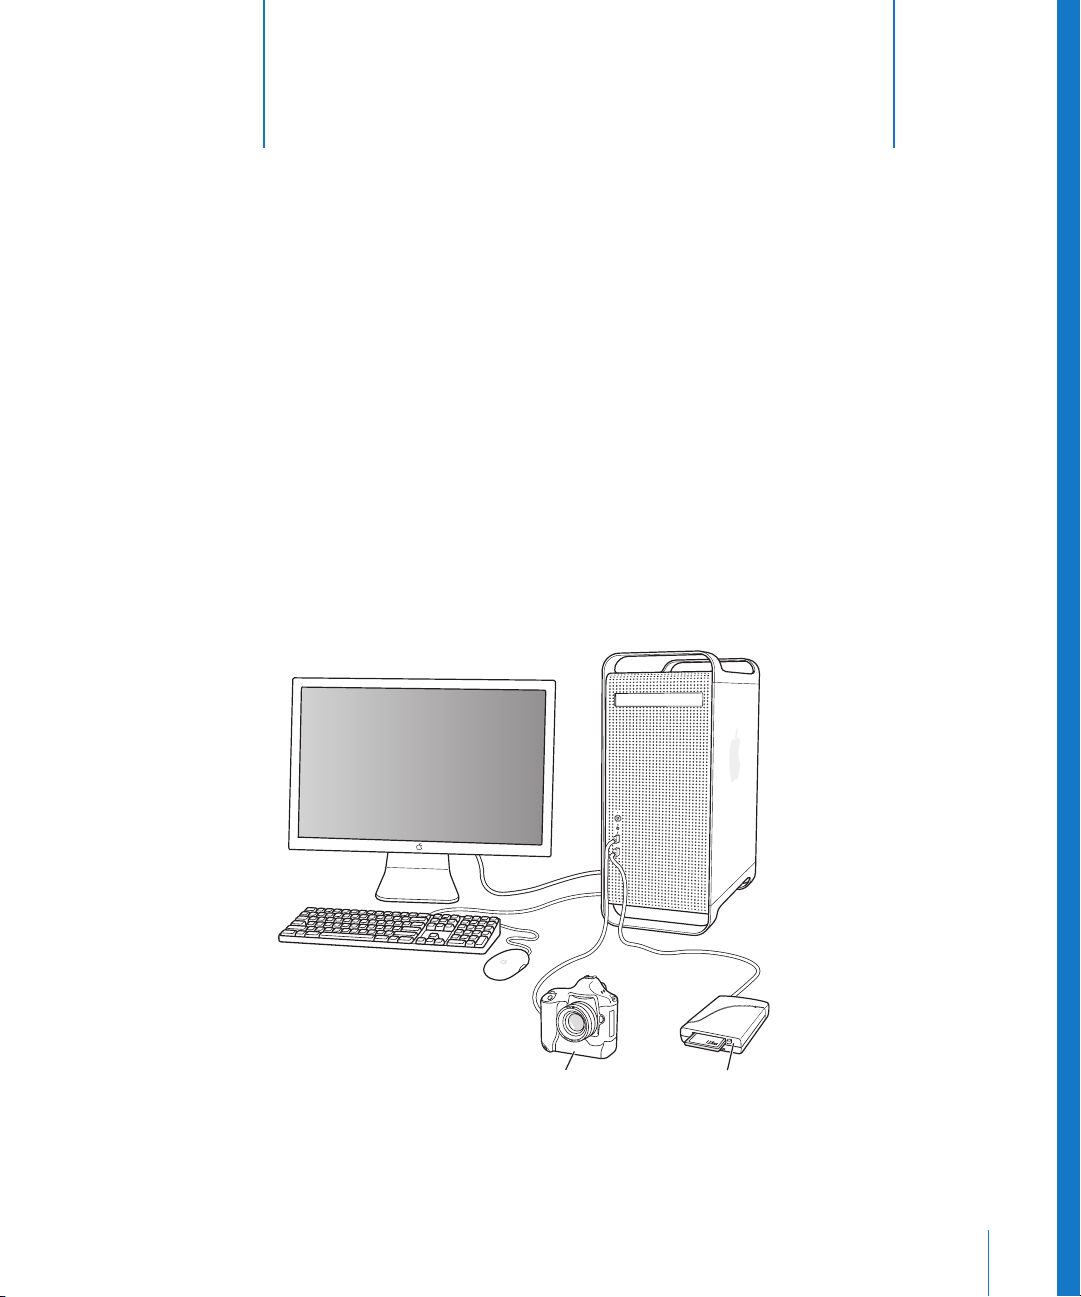
Setting Up a Basic System
The following are basic instructions for connecting a digital camera or card reader to
your computer.
Computer
Camera
21
Card reader
Page 22
A basic Aperture system consists of the following equipment:
 A computer and display
 A digital camera or card reader (a FireWire card reader is strongly recommended
because it’s faster)
 A cable to connect your camera or card reader to your computer (typically a USB 2.0
cable or a 4-pin-to-6-pin FireWire cable that came with your camera or card reader)
For information about setting up a computer and display, see the documentation that
came with the computer and display.
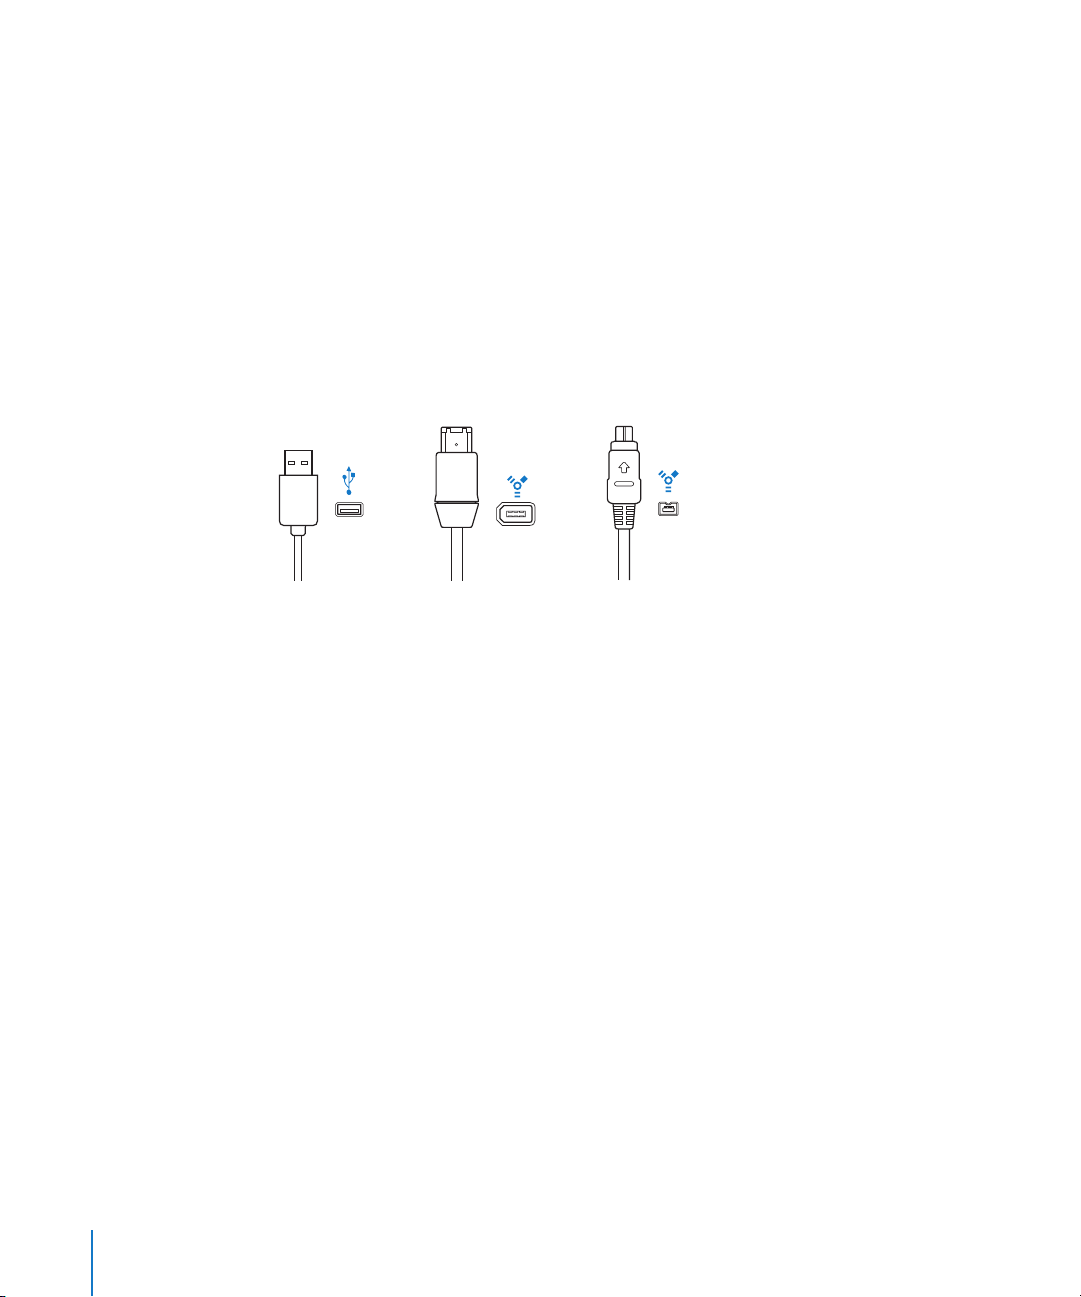
To connect a camera or card reader to your computer:
m Connect your camera or card reader to your computer using the USB or FireWire cable
that came with your camera or card reader.
USB 2.0
FireWire 400 (6-pin) FireWire 400 (4-pin)
To ensure proper setup, see the documentation that came with your camera or
card reader.
22 Chapter 2 Setting Up an Aperture System
Page 23
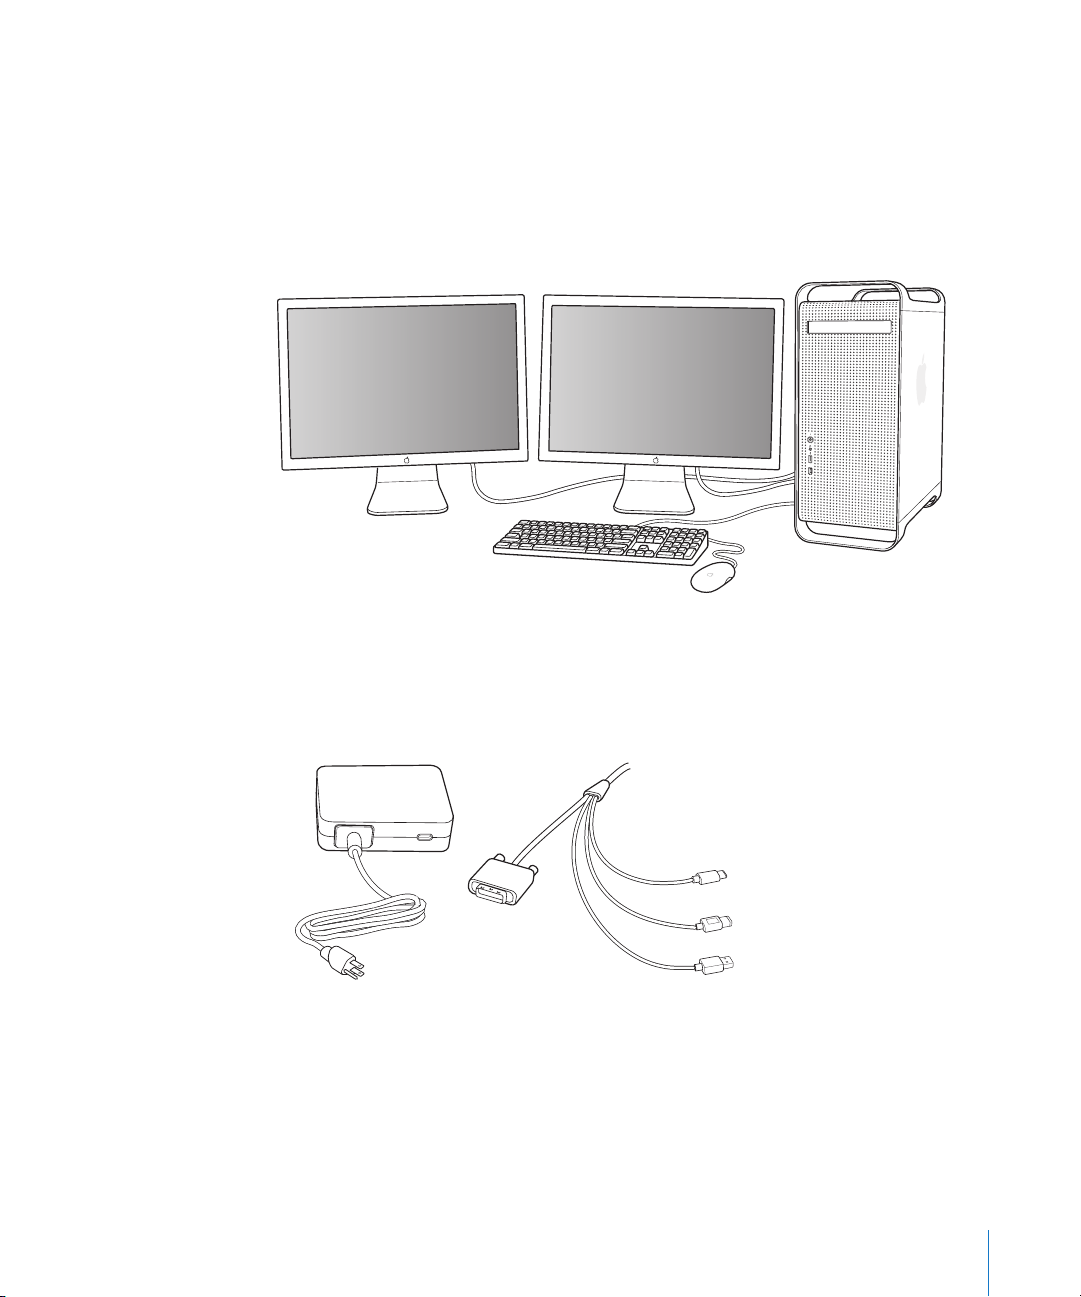
Setting Up Your System with Two Displays
Using two displays gives you additional screen space to view and adjust images, play
slideshows, and present your full-color, full-size images.
Connecting a Second Display to Your Computer
You can connect two displays to the graphics card on your computer and use both
displays at the same time.
For connecting a second display, you’ll need the following:
 Power adapter for the display
 Display cable to connect the display to the graphics card on your computer
Power adapter Apple Cinema Display cable connectors
DC power
£
DVI
H
d
FireWire
USB
Chapter 2 Setting Up an Aperture System 23
Page 24
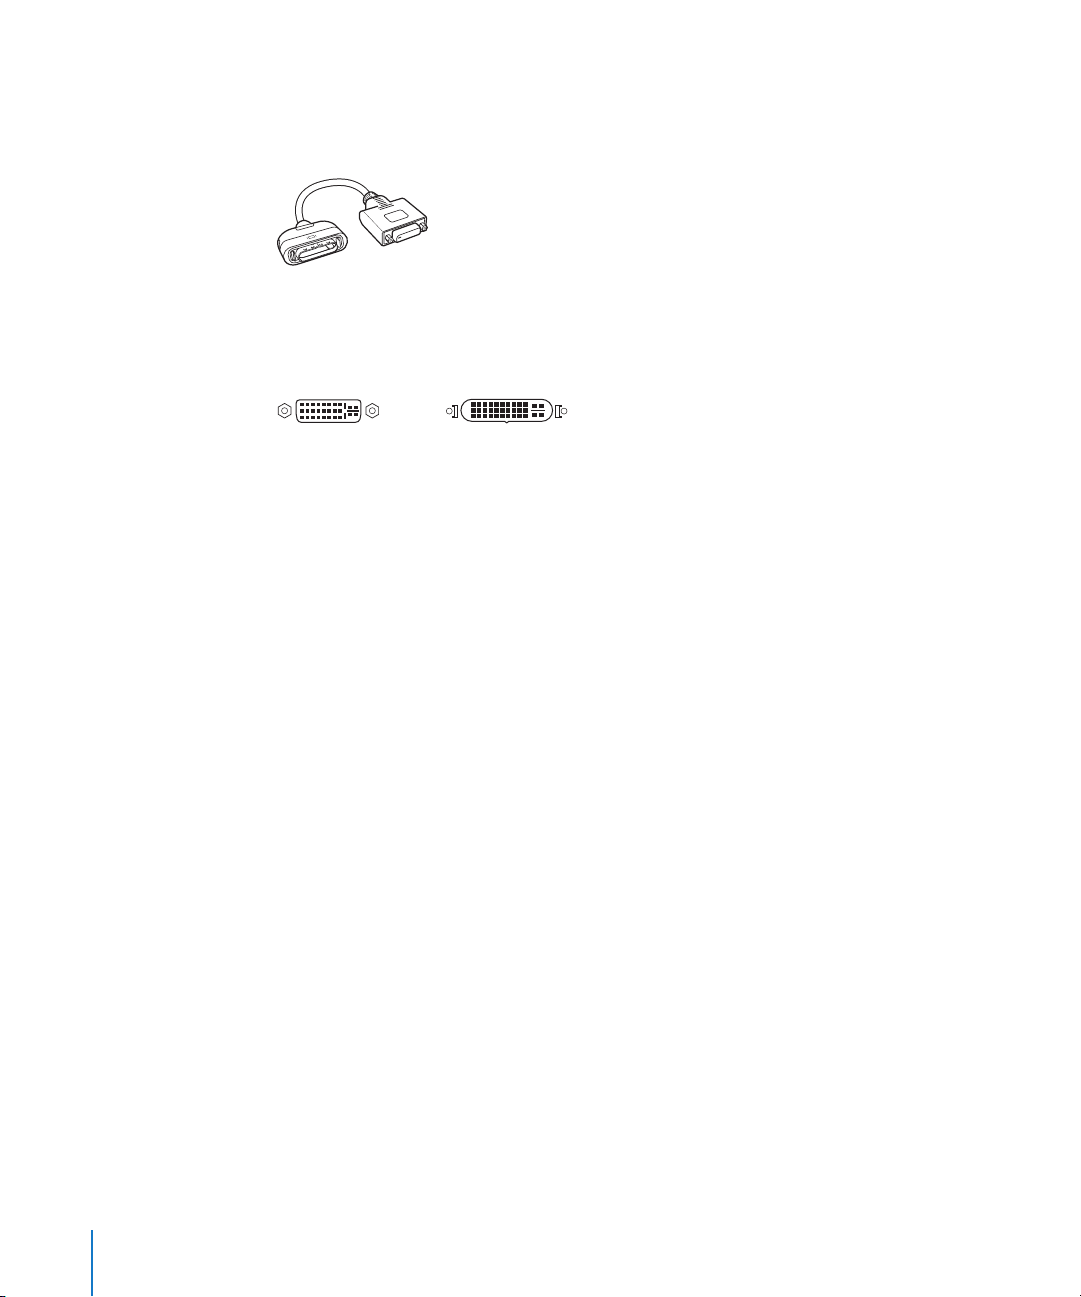
Note: You may also need to purchase an adapter to connect the display cable to the
graphics card on your computer.
ADC to DVI adapter
Macintosh computers come with two possible display ports: Apple Display Connector
(ADC) ports to connect ADC displays, and Digital Visual Interface (DVI) ports to connect
digital displays that have DVI connectors (such as a flat-panel Apple Cinema Display).
ADC display port DVI display port
 If your second display is an ADC display, connect it to an available ADC display port
on your computer, or use a DVI to ADC adapter to connect the display to a DVI
display port.
 If your second display is a DVI display, connect the display to an available DVI display
port on your computer, or use an ADC to DVI adapter to connect the display to an
ADC display port.
See the documentation that came with your computer or graphics card for more
information on the type of display cable or adapter you need.
To connect a second display to your computer:
1 Turn off the computer.
2 Connect a display cable (and adapter, if necessary) from an available display port on
your computer or graphics card to the display.
Depending on your displays, you may have one or more cables to connect. Refer to the
documentation that came with the display and your computer for detailed information.
Important: Make sure the cables are connected firmly, or you may not be able to see
an image on the display.
24 Chapter 2 Setting Up an Aperture System
Page 25
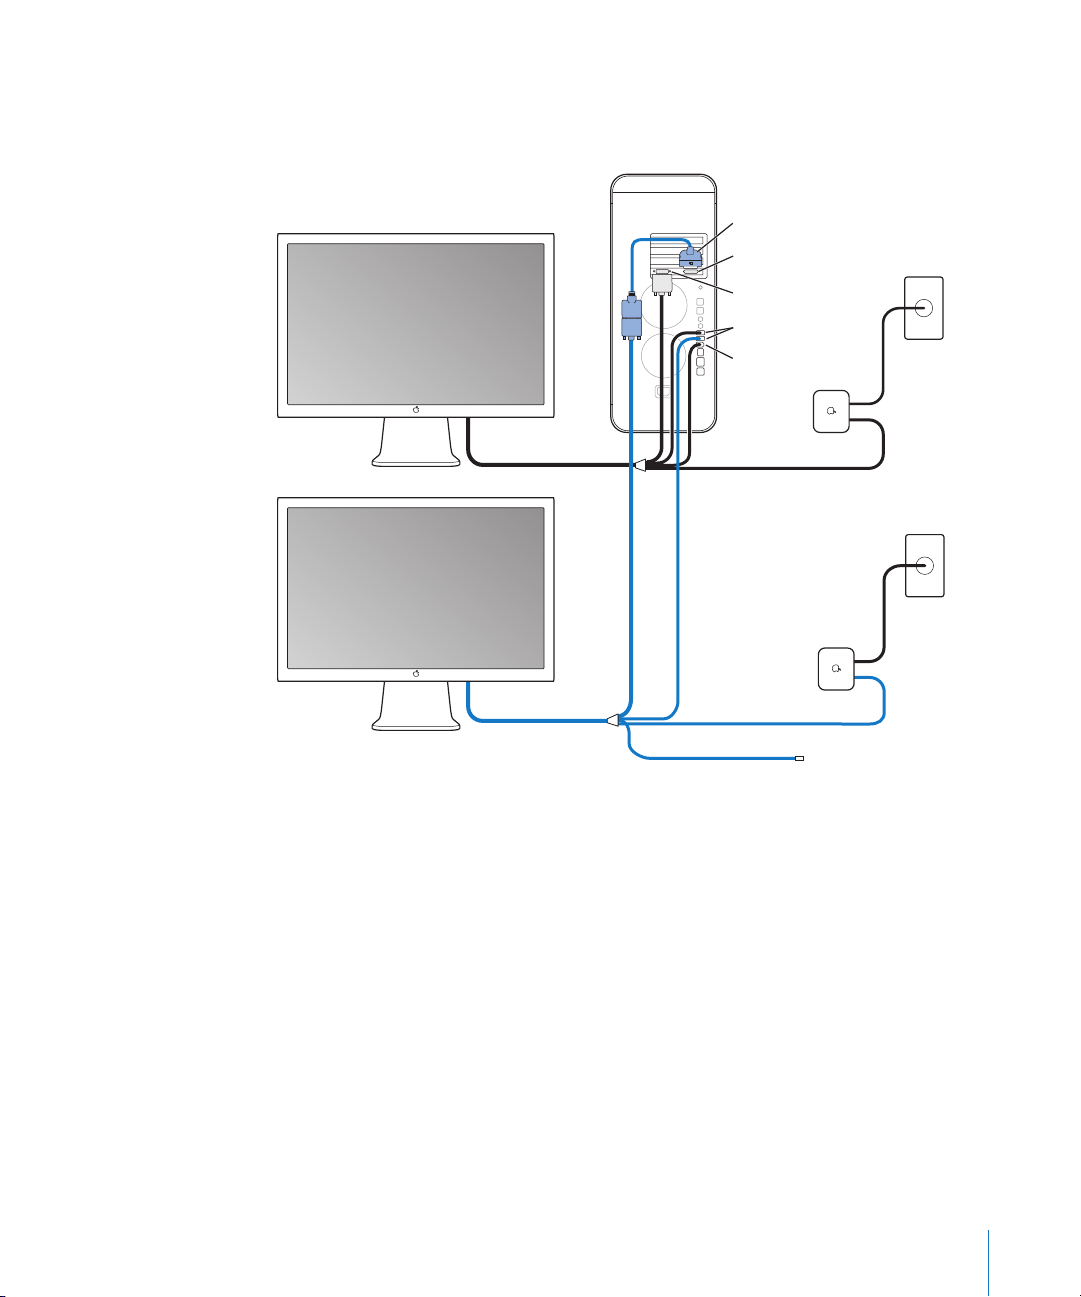
The following illustration shows one possible scenario for connecting two displays
to a computer.
Power Mac G5
Apple Cinema Display
Second Apple Cinema Display
ADC to DVI adapter
£
ADC display port
DVI display port
£
USB ports
d
FireWire 400 port
H
Power
adapter
Power
adapter
H
Power
outlet
AC plug
DC plug
Power
outlet
AC plug
DC plug
FireWire connector
(not used)
3 Turn on the displays (if necessary) and start up your computer.
You’ll now want to adjust your displays for proper viewing.
Chapter 2 Setting Up an Aperture System 25
Page 26

Configuring Mac OS X for Multiple Displays
If your computer is connected to two displays, you can set them up to show a
continuous desktop that extends across both screens. This is known as extended
desktop mode.
Because Aperture controls the second display, you must keep your computer in this
mode for the application to operate properly. If you work in mirroring mode, where the
same contents appear on both displays, Aperture may not work properly.
To exit mirroring mode:
1 Choose Apple (K) menu > System Preferences.
2 Click Displays, then click Arrangement.
Note: If the Arrangement button does not appear, click the Detect Displays button. If
the Arrangement button still does not appear, make sure the second display is properly
connected to your computer. For more information, see “Setting Up Your System with
Two Displays” on page 23.
3 Deselect the Mirror Displays checkbox.
After you connect a second display, your displays may show the arrangement of the
desktop out of order. For example, the display that shows the hard disk icon and menu
bar is typically on the left, so that your desktop extends out to the right on the
rightmost display.
To rearrange the position of the displays:
1 Choose Apple menu > System Preferences.
2 Click Displays, then click Arrangement.
Note: If the Arrangement button does not appear, click the Detect Displays button. If
the Arrangement button still does not appear, make sure the second display is properly
connected to your computer. For more information, see “Setting Up Your System with
Two Displays” on page 23.
26 Chapter 2 Setting Up an Aperture System
Page 27
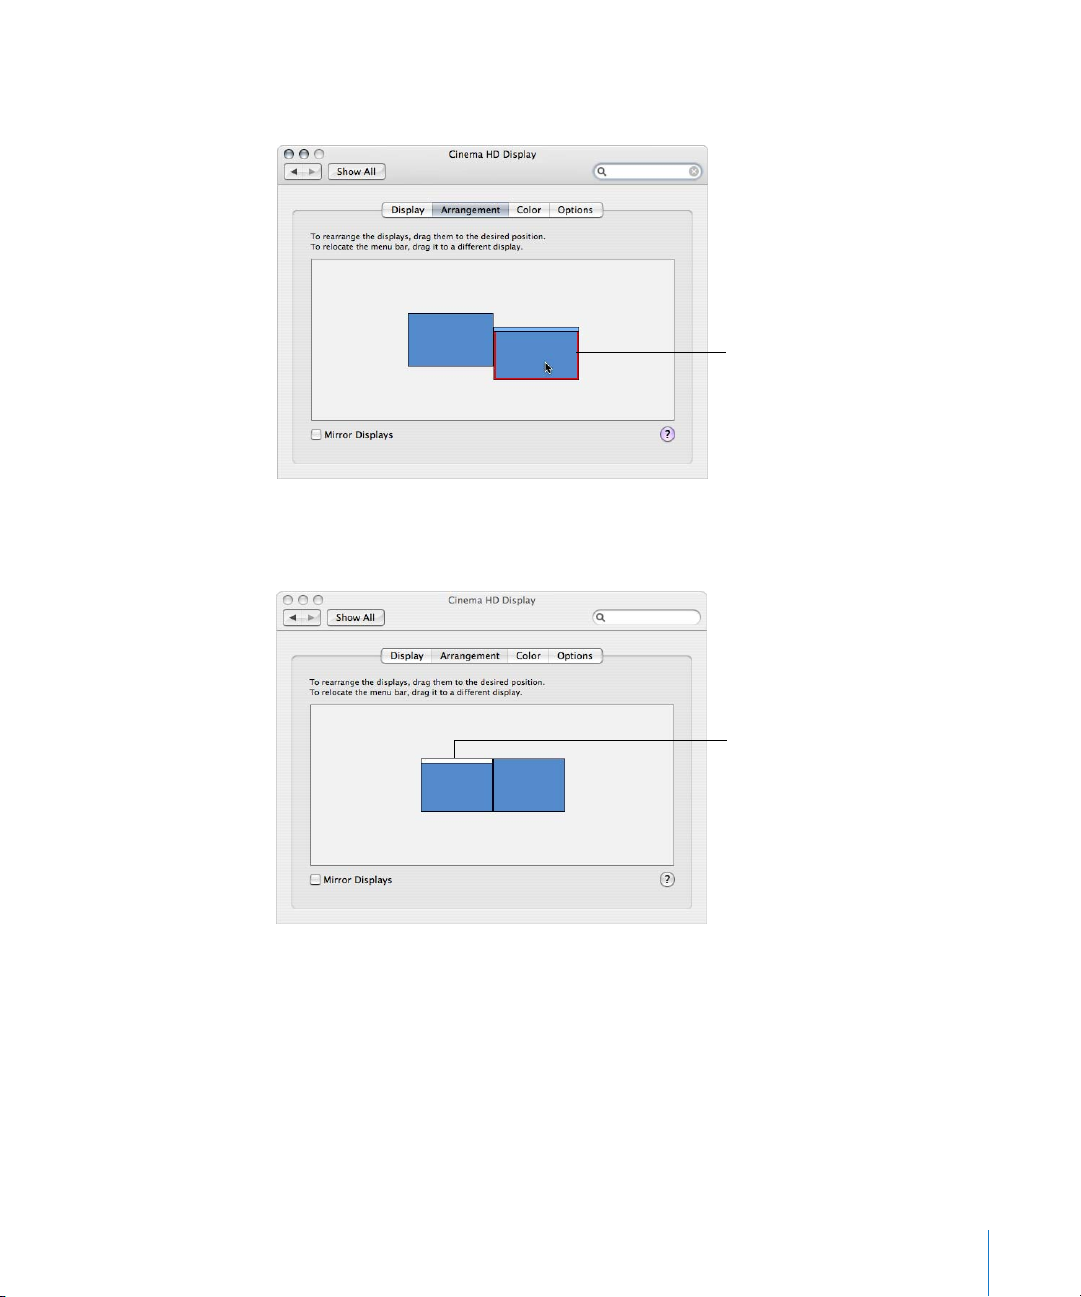
3 Drag one of the blue rectangles, representing one of the displays, to match the
position of the display on your desk.
The red outline indicates
the screen of the display
you are moving.
The display screens temporarily refresh to accommodate the new arrangement.
4 Drag the white rectangle to move the menu bar to the display on the left.
Drag the menu bar to the
display on the left.
The display screens temporarily refresh to accommodate the new arrangement. The
contents of the screen may be rearranged to accommodate the new position of the
menu bar.
Chapter 2 Setting Up an Aperture System 27
Page 28

Using Additional Hard Disk Storage and FireWire Drives
The disk that contains your computer’s operating system is called the startup disk. In
addition to the operating system, the startup disk also stores your applications (such as
Aperture), application preferences, system settings, documents, and image files. The
more hard disk space you have, the more images Aperture can store. Because you’ll be
shooting and storing many images, you should have at least one high-capacity hard disk.
Aperture can also uses external FireWire drives to store and back up image files. These
external drives can be “daisy-chained,” meaning that you can connect one drive to
another and another. The first drive in the chain is connected to your computer.
FireWire drives are “hot-swappable,” meaning that you can connect and disconnect
them from your computer without having to shut it down first. FireWire drives are also
a great way to add storage space if you are using Aperture on a portable computer.
28 Chapter 2 Setting Up an Aperture System
Page 29
3 Learning About
the Aperture Interface
Aperture provides an outstanding interface designed to allow
professional photographers to efficiently import, manage,
edit, and distribute images.
This chapter provides basic information about the Aperture main window and tells you
how to customize your workspace layout to work more efficiently.
Basics of Working in Aperture
You may want to open Aperture so you can view the main window and familiarize
yourself with its elements as you read.
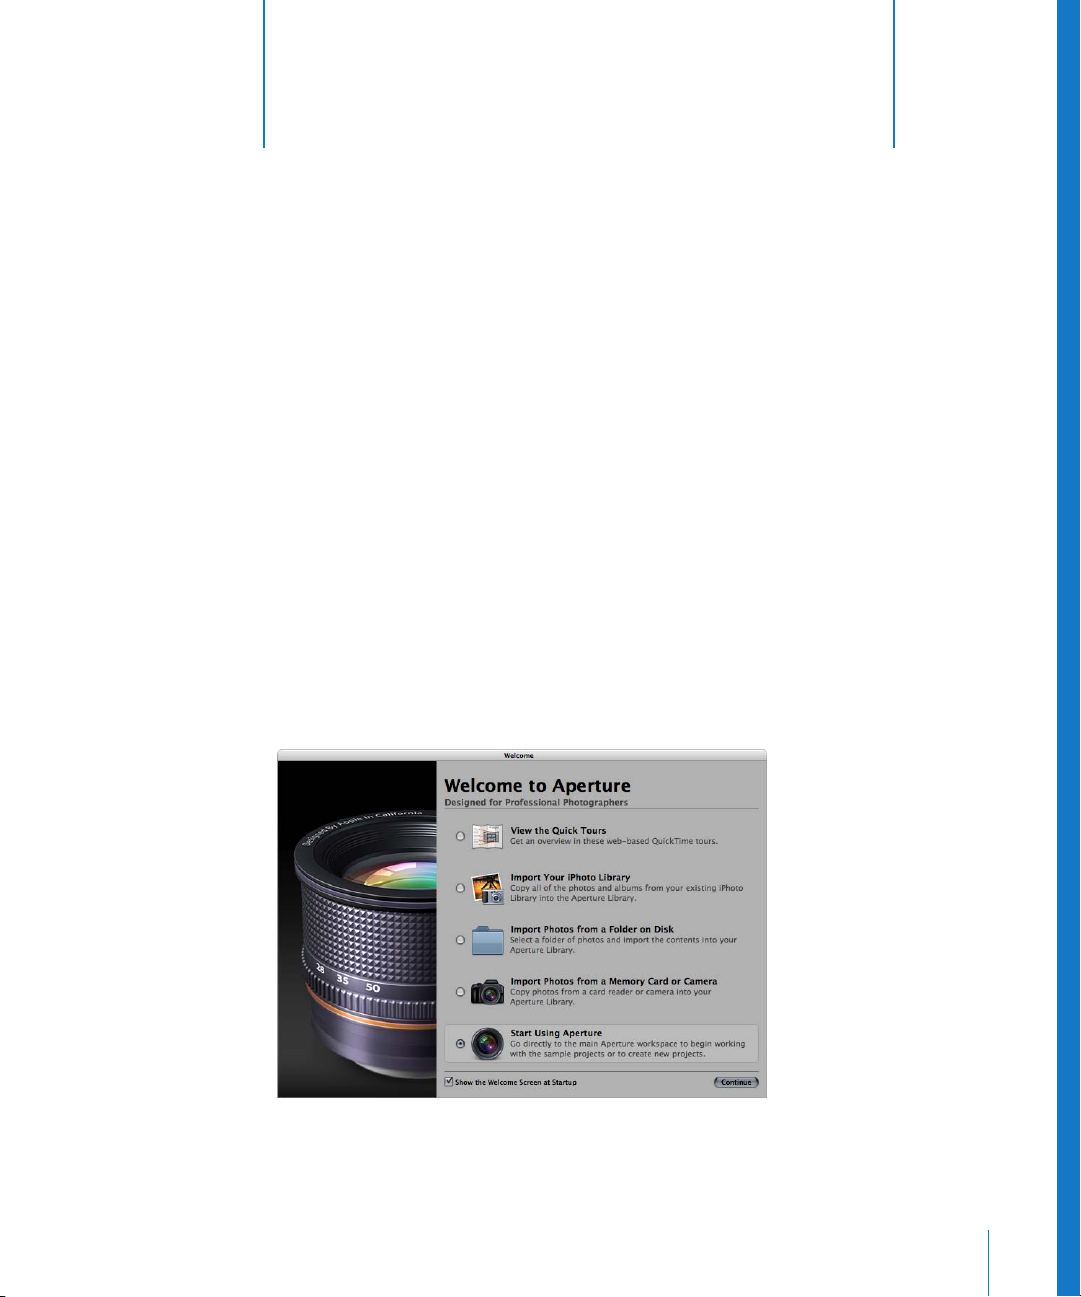
Opening Aperture for the First Time
The first time you open Aperture, you have several choices as to what to do, depending
on your workflow.
3
29
Page 30

To choose an option when you first open Aperture:
1 Click the button next to the option you want.
2 Click Continue.
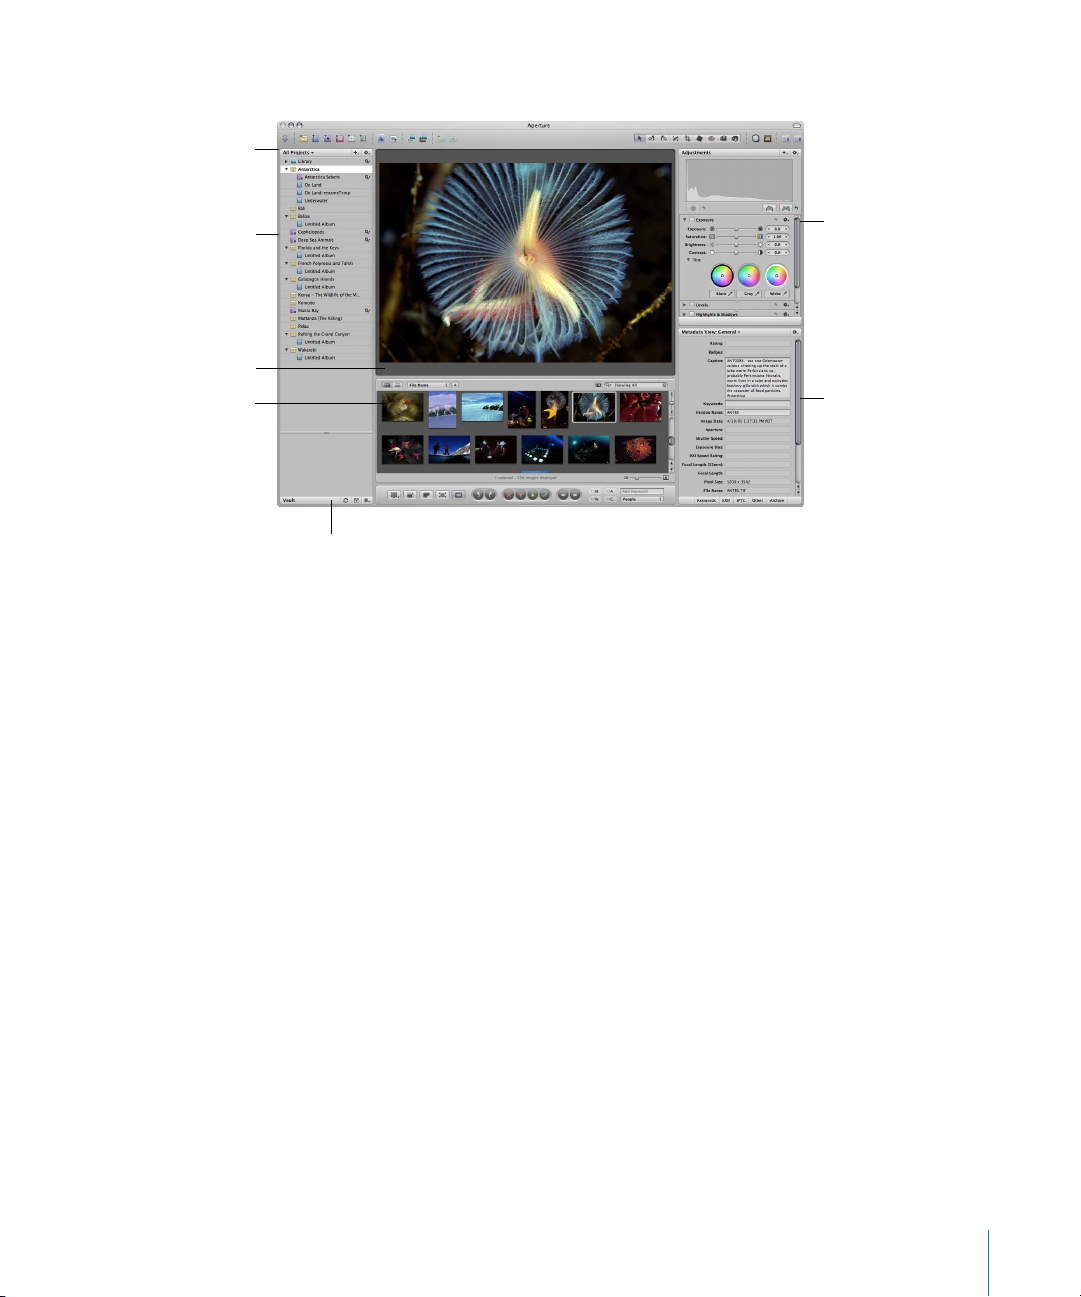
The Aperture Main Window
This is the main window that you’ll routinely use in Aperture.
Viewer
Toolbar
Projects panel
Browser
Example of a tooltip.
You can press Control-G
to switch the Browser
to grid view.
Adjustments Inspector
Metadata Inspector
Control bar
Note: The inspectors are not shown when you first open Aperture. To show or hide the
Inspectors panel, press I. You can also double-click an image to open the Inspectors panel.
To help you learn Aperture, you can hold the pointer over a control in Aperture and a
small box called a tooltip appears with a description of the control. Next to the
description is the keyboard shortcut for using the control. You can turn the display of
tooltips on or off in the Preferences window.
30 Chapter 3 Learning About the Aperture Interface
Page 31

Projects Panel
You use the Projects panel to organize your imported images using projects, folders,
and albums. You can create webpages (photo galleries and online journals) and
specially formatted books for printing. You can also create Smart Albums that
automatically find and store images based on search criteria you specify (for more
information, see Chapter 13, “Grouping Images with Smart Albums,” on page 151).
Projects pop-up menu
Project Action
pop-up menu
A project
Add to Library
pop-up menu
 Projects pop-up menu: Provides options for showing all projects, your favorites, or
recently selected projects. You can create as many projects as you like.
 Add to Library pop-up menu: Provides a quick way to create new elements, such as
projects, folders, and albums.
 Project Action pop-up menu: Provides options for adding or removing selected items
from a list of favorites and exporting them.
The Projects panel is shown by default.
To hide the Projects panel:
m Choose Window > Hide Projects (or press W).
To show the Projects panel if it’s hidden:
m Choose Window > Show Projects (or press W).
For more information, see Chapter 4, “Working with Projects,” on page 49.
Chapter 3 Learning About the Aperture Interface 31
Page 32

The Viewer displays
a detailed view of
selected images.
The Browser displays
images in a selected
project or album.
Browser and Viewer
You use the Browser to display images in projects and albums. When you select an
image in the Browser, a detailed view of the image appears in the Viewer. You can
quickly select other images by pressing the arrow keys.
The white outline indicates
the selected image.
You can move, copy, and sort your images in the Browser. You can drag images from
the Browser into other projects and albums in the Projects panel. You can also classify
your images by applying ratings and keywords to them.
You can display images in the Browser in grid view or list view. In grid view (shown
above), thumbnails are displayed for every image contained in a project or album. In
grid view you can identify your images by sight, working with the thumbnails. In list
view, your images are listed by file information, such as filename, pixel size, file size, and
rating. List view provides an easy way to sort your images by category. For more
information about the Browser, see Chapter 6, “Working with Images in the Browser,”
on page 69.
The Viewer displays a detailed view of images selected in the Browser so you can make
adjustments, compare similar images, and inspect images at full resolution. In the
Viewer, you can see a magnified view of specific image details. You can also apply
adjustments to your images in the Viewer. You can set the Viewer to display one, three,
or multiple images at a time. For more information, see Chapter 7, “Displaying Images in
the Viewer,” on page 83.
32 Chapter 3 Learning About the Aperture Interface
Page 33

Control Bar
The control bar at the bottom of the Aperture main window has buttons that allow you
to quickly rotate, rate, and navigate through images. There are also buttons to control
how images are displayed and to apply keywords to your images. The control bar is
shown by default, but you can hide it at any time.
To hide the control bar:
m Choose Window > Hide Control Bar (or press D).
To show the control bar:
m Choose Window > Show Control Bar (or press D).
The following sections provide descriptions of each button and control in the control bar.
Display Controls
Show Master Image button
Viewer Mode
pop-up menu
Primary Only
button
Zoom Viewer
button
Full Screen
button
 Viewer Mode pop-up menu: Choose how to view your images and arrange your
displays from this pop-up menu. For more information, see Chapter 7, “Displaying
Images in the Viewer,” on page 83.
 Zoom Viewer: Click this button to move between viewing an image at actual size and
fitting the image to the Viewer’s screen size.
 Show Master Image: Click this button to see an image of the original digital master file.
 Full Screen: Click this button to switch to Full Screen mode. For more information, see
Chapter 8, “Viewing Images in Full Screen Mode,” on page 93.
 Primary Only: Click this button to temporarily change between making metadata
changes to all selected images or the primary selection only.
Chapter 3 Learning About the Aperture Interface 33
Page 34

Rotate Buttons
Rotate Left button Rotate Right button
 Rotate Left: Click this button to rotate the selected image to the left.
 Rotate Right: Click this button to rotate the selected image to the right.
Rating Buttons
Increase Rating button
Reject button
Previous Image button
Select button
Decrease Rating button
 Reject: Gives the selected image a Reject rating.
 Decrease Rating: Decreases the rating of the selected image.
 Increase Rating: Increases the rating of the selected image.
 Select: Gives the selected image a Select rating (five stars).
For more information, see Chapter 10, “Rating Images,” on page 113.
Navigation Buttons
Next Image button
 Previous Image: Click this to go to the previous image.
 Next Image: Click this to go to the next image.
34 Chapter 3 Learning About the Aperture Interface
Page 35

Keyword Controls
Add Keyword field
Keyword Preset Group
pop-up menu
Individual keyword buttons
 Individual keyword buttons: Click a keyword button to apply a preset keyword to a
selected image or group of images. Shift-click the button to remove a keyword.
 Keyword Preset Group pop-up menu: Choose a preset group of keywords to display or
edit an existing group.
 Add Keyword field: Enter a new keyword, then press Return. Aperture creates a new
keyword and applies it to the selected image.
Note: If the Adjustments and Metadata Inspectors are open, there may not be enough
room to show the entire control bar. In that case, the keyword controls are not shown.
For more information, see Chapter 11, “Applying Keywords to Images,” on page 121.
Toolbar
The toolbar is a collection of buttons and tools located at the top of the Aperture main
window. Buttons and tools are grouped by function. There are buttons for creating
projects, organizing images, and configuring the Aperture workspace, as well as tools for
applying adjustments. The toolbar is shown by default, but you can hide it at any time.
Toolbar
To hide the toolbar:
m Choose View > Hide Toolbar (or press Shift-T).
To show the toolbar:
m Choose View > Show Toolbar (or press Shift-T).
If you want to customize the toolbar based on your preferences, see “Customizing the
Toolbar” on page 45.
Chapter 3 Learning About the Aperture Interface 35
Page 36

Import and Project Buttons
Import Panel button
New Project
button
Â
Import Panel:
New Smart
Album button
New Album
button
Click this button to reveal the Import panel. When you select either the
New Book
Album button
New Light Table Album
button
New Web Gallery
Album button
camera, a memory card, or a mounted drive, the Import dialog appears. For more
information, see “Import Panel” on page 41.
Â
New Project:
Â
New Album:
Â
New Smart Album:
Click this to create a new project.
Click this to create a new album with your current image selection in it.
Click this to create a new Smart Album. For more information, see
Chapter 13, “Grouping Images with Smart Albums,” on page 151.
Â
New Book Album:
Click this to create a new book album with your current image
selection in it. For more information, see Chapter 20, “Creating Books,” on page 193.
Â
New Web Gallery Album:
Click this to create a new web gallery album with your
current image selection in it. For more information, see Chapter 19, “Creating Web
Journals and Web Galleries,” on page 183.
Â
New Light Table Album:
Click this to create a Light Table album with your current
image selection in it. For more information, see Chapter 16, “Using the Light Table,”
on page 163.
Email and Slideshow Buttons
Email button Slideshow button
Â
Email:
Â
Slideshow:
36 Chapter 3
Click this to open your email program and attach selected images.
Click this to initiate a slideshow of the selected images.
Learning About the Aperture Interface
Page 37

Version Buttons
Duplicate Version
button
Stack button
Selection tool
New Version From
Master button
 Duplicate Version: Click this to create a version, or duplicate, of a selected image.
 New Version From Master: Click this to create a new version from a selected image’s
digital master file.
Stacking Buttons
Stack Pick button
For details about working with stacks, see Chapter 9, “Stacking Images
and Making Picks,” on page 105.
 Stack: Click this to group the selected items in a stack.
 Stack Pick: Click this to mark a selected image as the stack’s pick, or best image.
Adjustment Tools
Rotate Left
tool
Straighten
tool
Red Eye tool
Lift tool
Stamp tool
Rotate Right tool
Crop tool
Spot & Patch tool
 Selection: Use this to select projects, albums, and images.
 Rotate Left: Use this to rotate an image to the left. You can use this tool to rotate an
image displayed in the Viewer or Browser.
 Rotate Right: Use this to rotate an image to the right. You can use this tool to rotate
an image displayed in the Viewer or Browser.
 Straighten: Use the guides to help manually straighten (or level) the selected image.
 Crop: Use this to crop the selected image.
 Spot & Patch: Removes imperfections in the image, such as sensor dust, by either
copying the pixels around the blemish (Spot tool) or copying pixels from another
area of the image (Patch tool).
Chapter 3 Learning About the Aperture Interface 37
Page 38

 Red Eye: Use this to correct red-eye, occurring when the subject’s retinas reflect light
from your camera’s flash.
 Lift: Use this to copy a set of adjustments, including cropping and straightening, and
metadata from a selected image.
 Stamp: Use this to stamp, or apply, a copied set of adjustments or metadata to one
or several images.
Loupe and Keywords HUD Buttons
Loupe button
Adjustments Inspector
button
Keywords HUD button
 Loupe: Opens the Loupe tool, which zooms in on your image.
 Keywords HUD: Click this to show or hide the Keywords HUD.
Adjustments Inspector and Metadata Inspector Buttons
Use these buttons to reconfigure your workspace layout. For more information, see
“Choosing Your Workspace Layout” on page 46.
Keywords Inspector
button
 Adjustments Inspector: Click this button to show or hide the Adjustments Inspector in
the Inspectors panel.
 Metadata Inspector: Click this button to show or hide the Metadata Inspector in the
Inspectors panel.
Adjustments Inspector
You can use controls in the Adjustments Inspector to apply, edit, and remove
adjustments to a selected image, such as exposure, levels, and white balance. Controls
in the Adjustments Inspector are grouped according to the type of image adjustment
they perform. You can see the controls for an adjustment category by clicking its
disclosure triangle.
Note: By default, the Adjustments Inspector and Metadata Inspector are shown at the
same time. You can also show them individually in the Inspectors panel by choosing
Window > Show Metadata or Window > Show Adjustments.
38 Chapter 3 Learning About the Aperture Interface
Page 39

Adjustments Inspector
Click the disclosure
triangle for an
adjustment to
see its controls.
To show the Adjustments Inspector, do one of the following:
m Double-click an image (or press I) to open the Inspectors panel.
m Choose Window > Show Adjustments (or press Control-A).
Press I to hide the Inspectors panel again.
If the Adjustments Inspector is open when you view your images, you can easily see a
summary of the adjustments that have been applied by clicking the disclosure triangle
for each adjustment. To edit an adjustment applied to an image, click the disclosure
triangle for the adjustment and use its controls to make your changes. To remove an
adjustment, deselect the checkbox for the adjustment. For more information, see
Chapter 14, “An Overview of Image Adjustments,” on page 155. For in-depth explanations
of adjustments, see Performing Image Adjustments in the Aperture Help menu.
Note: Although you can apply initial adjustments with the Adjustments Inspector, it’s
often more convenient to use the Adjustments HUD in Full Screen mode. For more
information, see Chapter 8, “Viewing Images in Full Screen Mode,” on page 93.
Chapter 3 Learning About the Aperture Interface 39
Page 40

Metadata Inspector
The Metadata Inspector can display an image’s caption text, keywords, version number,
filename, and file size. You can also view EXIF (Exchangeable Image File) and IPTC
(International Press Telecommunications Council) data associated with your image, as
well as image keywords and other information. EXIF metadata is embedded with an
image file by the digital camera and includes camera settings such as shutter speed,
date and time, focal length, exposure, metering pattern, and flash information. IPTC
information can be embedded in a digital image with most software programs used to
edit photos, and can include a caption, the place and date a photo was taken, and
copyright information.
You can create your own views of the types of metadata displayed with an image and
create metadata presets that you can use to apply combinations of metadata
repeatedly to multiple images.
Note: By default, the Adjustments Inspector and Metadata Inspector are shown at the
same time.
To show the Metadata Inspector, do one of the following:
m Double-click an image (or press I) to open the Inspectors panel.
m Choose Window > Show Metadata (or press Control-D).
Press I to hide the Inspectors panel again.
Metadata Inspector
Click one of these
buttons to display the
associated text.
40 Chapter 3 Learning About the Aperture Interface
Page 41

Import panel button
Additional Parts of the Aperture Interface
As you work in Aperture, you will use other panels, such as the Import and Vaults
panels, as well as specialized panels called inspectors and HUDs. There is also a Full
Screen mode that provides a full-screen view of your images and a Light Table feature
that allows you to arrange images.
Import Panel
The Import panel displays a list of connected card readers and external hard disk
drives, as well as local hard disks and mounted servers. If you want to import images
into Aperture, you select one of these devices, and the Import dialog appears. You
specify settings in that dialog to import images from that device to your Library or a
selected project.
To show the Import panel, do one of the following:
m Choose Window > Show Import Panel (or press Shift-I).
m Click the Import Panel button in the toolbar.
Import panel
This list displays all locations
from which you can currently
import images, including internal
disks and connected drives.
To hide the Import panel, do one of the following:
m Choose Window > Hide Import Panel (or press Shift-I).
m Click the Import Panel button in the toolbar.
For more information, see Chapter 5, “Importing Images,” on page 55.
Chapter 3 Learning About the Aperture Interface 41
Page 42

Vaults Panel
The Vaults panel is where you set the location of your vaults, which are designated
storage areas for backup copies of your Library. Typically, an external hard disk drive,
such as an external FireWire drive, serves as a vault.
To show the Vaults panel:
m Click the Vaults Panel button.
To hide the Vaults panel, click the Vaults Panel button again.
Vaults panel
Vault Status button
Click the Vaults Panel
button to show or hide
the Vaults panel.
As you store managed images in the Library, Aperture automatically tracks which files
have been backed up to your vault. When your vault is up to date, the Vault Status
button appears black. When a change to at least one version occurs, such as an
adjustment, the Vault Status button appears yellow. When Aperture determines that
even a single master file has not been backed up, the Vault Status button appears red.
You can have Aperture update your vaults whenever you want.
For more information, see Chapter 21, “Backing Up Your Images,” on page 201.
HUDs
HUDs, or heads-up displays, are collections of related controls contained in a floating
panel. You can open and then move a HUD wherever you wish, based on your display
setup. You can use HUDs in regular and Full Screen mode. Many of the adjustment tools
have HUDs, which are shown when you select the tool in the toolbar. Other HUDs, such
as the Keywords HUD and Adjustments HUD, are also available from the Window menu.
You’ll frequently use the Query HUD to search for images based on specific criteria,
such as ratings and keywords. For more information, see Chapter 12, “Searching for
and Displaying Images,” on page 139.
42 Chapter 3 Learning About the Aperture Interface
Page 43

To show the Query HUD:
m Choose Edit > Find (or press Command-F).
Query HUD
Full Screen Mode
The Full Screen mode available in Aperture allows you to view your images on a simple
black background, with no other interface elements shown, such as the Browser or
Projects panel. For more information, see Chapter 8, “Viewing Images
in Full Screen Mode,” on page 93.
Full Screen mode
provides a full-screen
view of images on
a simple black
background.
Chapter 3 Learning About the Aperture Interface 43
Page 44

allows you to freely
view, compare, and
position images.
Light Table
The Light Table provides an open, freeform workspace where you can arrange images.
When you create or select a Light Table album, the Light Table appears in place of the
Viewer. Use the Light Table to review and compare images, create mockups of
webpages, compare color values in a selection of images before making adjustments,
or do anything else that involves viewing and comparing your images. For detailed
information, see Chapter 16, “Using the Light Table,” on page 163.
The Light Table
Configuring Your Workspace
The Aperture interface is highly configurable, and it’s easy to show and hide areas of
the interface. Aperture also offers several workspace layouts created to accommodate
different workflows.
Showing and Hiding Areas of the Interface
To see which areas of the interface are currently shown, look at the items in the Window
menu (in the menu bar at the top of the screen). Many Window menu items start with
Hide or Show so you can easily detect which ones are shown and which are hidden.
 Show: If you see this in front of a menu item, you can view the interface element by
choosing the menu item.
 Hide: If you see this in front of a menu item, you can hide the interface element by
choosing the menu item.
44 Chapter 3 Learning About the Aperture Interface
Page 45

Customizing the Toolbar
You can customize the toolbar based on your workflow and preferences, selecting
which buttons to include, their arrangement, and whether or not to display a button’s
name along with its icon.
Note: The adjustment tools appear as a set in a particular order and cannot be
individually rearranged.
To customize the toolbar:
1 Do one of the following:
 Choose View > Customize Toolbar.
 Control-click the toolbar, then choose Customize Toolbar from the shortcut menu.
2 In the dialog that appears, make any necessary changes:
 To add buttons to the toolbar: Drag a button’s icon from the dialog to the toolbar.
 To remove buttons from the toolbar: Drag them out of the toolbar, or Control-click the
button you want to remove and choose Remove Item from the shortcut menu.
 To change the order of the buttons in the toolbar: Drag a button to a new position.
 To set the toolbar to a default configuration: Drag the default set of buttons and tools
to the toolbar.
 To control whether each button’s icon and text appear in the toolbar: Choose Text Only,
Icon Only, or Icon & Text from the Show pop-up menu in the lower-left corner, or
Control-click the toolbar and choose an option from the shortcut menu.
3 When you’ve finished configuring the toolbar, click Done.
Chapter 3 Learning About the Aperture Interface 45
Page 46

Choosing Your Workspace Layout
Aperture provides three workspace layouts for working with your images.
Â
Basic layout:
work with stacks of images. This workspace shows the Projects panel on the left for
selecting projects that you want to work with. The images in a selected project
appear in the Browser in grid view, where you can quickly select and review them.
Images selected in the Browser appear in the Viewer above.
Â
Maximize Browser layout:
provides a large view of the Browser, simplifying the screen to make selecting and
working with images easy. You can quickly open different projects in the Projects
panel and review and make changes to projects as needed.
Â
Maximize Viewer layout:
Light Table. When you choose this workspace layout, the Viewer (or specialized
interface elements that replace the Viewer, such as the Light Table) is enlarged to its
maximum size.
To choose a layout, do one of the following:
m
Choose Window > Layouts, then choose the preset layout you want.
m
Press Command-Option and the letter corresponding to the layout you want: S for
Basic, B for Maximize Browser, or V for Maximize Viewer.
Used to review images, perform initial rating passes, and create and
Use this to work with multiple projects. This workspace
Use this workspace layout when working with images in the
Viewing and Specifying Preferences
Aperture has various preferences that allow you to modify how a particular feature
behaves. The settings you specify affect all projects you create, although most of them
can be overridden for individual projects. Taking time to specify your preferences can
make creating and working with your projects faster and easier.
To open the Preferences window:
m
Choose Aperture > Preferences, or press Command-comma (,).
The Preferences window appears.
46 Chapter 3
Learning About the Aperture Interface
Page 47

Working Efficiently
To perform many tasks in Aperture, you can use keyboard shortcuts. The keyboard
shortcuts let you perform actions on your computer using the keyboard instead of by
pointing and clicking.
For example, to create a new folder, you press Command-Shift-N; this means you hold
down the Command key and the Shift key, and then press N. For a list of keyboard
shortcuts, see Quick Reference in the Aperture Help menu or refer to the printed
Aperture Quick Reference card.
Quickly Accessing Commands
You can also quickly access commands via a shortcut menu, as an alternative to using
the menu bar at the top of the screen or pop-up menus within a window.
To view a shortcut menu:
m Position the pointer over a project or image, or in an area of the main window, then
hold down the Control key and click. (This is called Control-clicking.)
Note: Although accessing these shortcut menus can help you work more quickly, keep
in mind that not all commands are available in shortcut menus.
Using the Undo Command
When you’re working in Aperture and you make a change you don’t like or didn’t mean
to make, it can usually be undone.
To undo the previous action:
m Choose Edit > Undo (or press Command-Z).
You can choose Undo multiple times to undo a series of changes that you’ve made.
To redo an action that you have undone:
m Choose Edit > Redo (or press Command-Shift-Z).
Chapter 3 Learning About the Aperture Interface 47
Page 48

Page 49

4 Working with Projects
4
Projects are one of the main building blocks used to manage
your images in Aperture.
This chapter covers how to create projects, as well as open them, save them as
favorites, and delete them.
Controls in the Projects Panel
There are several controls in the Projects panel that you’ll use when working with projects.
Projects pop-up menu
Disclosure triangle
Project Action
pop-up menu
Add to Library
pop-up menu
 Disclosure triangle: Click this to see all items within the Library, project, or folder.
 Projects pop-up menu: Choose to display all projects, favorites, or recent projects.
 Add to Library pop-up menu: Click this to add a new item, such as a project or Smart
Album, to the Library or selected project.
 Project Action pop-up menu: Click this to add the selected item to your favorites or
remove it.
49
Page 50

A new, untitled
project appears in the
Projects panel.
The project now has the
name you entered.
Creating and Naming Projects
You can create projects at any time, although typically you create them when you
import images. When you import images and no project is selected, a new project is
created to contain those images. For more information, see Chapter 5, “Importing
Images,” on page 55. However, you can create a new empty project at any time.
To create a new project:
1 Choose File > New Project (or press Command-N).
2 Enter the name you want for the project, then press Return.
Opening and Closing Projects
To start working in Aperture, you must have a project open. You can also open and
work on more than one project at a time, each represented by its own tab in the
Browser. When you finish working and quit Aperture, Aperture remembers which
projects were open. The next time you open Aperture, all projects that were open at
the end of your last session open automatically.
50 Chapter 4 Working with Projects
Page 51

Select a project to view
its images in the Browser.
All images in the project
appear in the Browser.
To open a project:
m Select the project in the Projects panel.
To open additional projects in the Browser:
m Command-click a project in the Projects panel.
The newly opened project appears in the Browser with its own tab, in front of any
other open projects.
To open another project in its own pane:
m Option-click a project in the Projects panel.
The newly opened project appears in the Browser in its own pane.
To switch between several open projects:
m In the Browser, click a project’s tab.
Projects are identified
by their tabs.
Chapter 4 Working with Projects 51
Page 52

To close a project:
1 Click the project’s tab to bring it to the front.
2 Do one of the following:
 Choose File > Close Tab (or press Command-W).
 Click the tab’s close button.
Close button in a tab
Creating and Showing Favorite Projects
If you have certain projects that you work on most often or at the same time, you can
make them favorites to quickly view them all at the same time.
To make a project or folder a favorite:
m In the Projects panel, select a project, then choose Add to Favorites from the Project
Action pop-up menu.
To view favorite projects or folders:
m In the Projects panel, choose Show Favorites from the Projects pop-up menu at the
top-left corner.
To remove a project or folder as a favorite:
m In the Projects panel, select a project, then choose Remove From Favorites from the
Project Action pop-up menu.
52 Chapter 4 Working with Projects
Page 53

Deleting Images from Projects and Albums
Aperture allows you to delete versions separately from their digital master files. You can
also delete a master file and all its versions in a project. If you delete a version in an
album (not a project), its master file and related versions are not deleted.
To delete a master file and all its versions from a project:
1 Select the image, then choose File > Delete Master Image and All Versions.
A dialog appears asking if you want to continue.
2 Click the Move to Trash button.
The digital master file and all versions are deleted. If you delete a managed image file,
the master file is removed from the Library. If you delete a referenced image file, the
digital master file is removed from Aperture but left on your hard disk.
Warning: This action cannot be undone. Once you click the Move to Trash button, the
master file is moved to the Trash. All versions and their adjustments and metadata are
permanently deleted. To permanently remove the master files from your hard disk,
empty the Trash.
To delete only a version from an album:
m Select the image, then choose File > Delete Version.
The version is deleted. The digital master file and its other versions are not deleted.
Chapter 4 Working with Projects 53
Page 54

Deleting Items from the Projects Panel
You can also delete items from the Projects panel. When you delete an item from the
Projects panel, the contents of the item are deleted with it.
Note: If you delete a project or a project within a folder, the digital master files
contained in the project are also deleted.
To delete projects and folders:
1 Select the item, then do one of the following:
 To delete a project: Choose File > Delete Project (or press Command-Delete).
 To delete a folder: Choose File > Delete Folder (or press Command-Delete).
A dialog appears asking if you want to continue.
2 Click the Delete button.
The selected item is deleted along with its contents.
Warning: This action cannot be undone. Once you click the Delete button, the master
files are moved to the Trash. All versions and their adjustments and metadata are
permanently deleted. To permanently remove the master files from your hard disk,
empty the Trash.
To delete an album, a Light Table album, a web gallery album,
a web journal album, or a book album:
m Select the album, then choose File > Delete [Item], where “Item” is a type of album.
The selected item is deleted along with its contents.
54 Chapter 4 Working with Projects
Page 55

5
Importing Images
5
Aperture provides tools and workflow options that make it
easy to import your images.
This chapter discusses how you can import images into Aperture from a variety of sources.
An Overview of Importing
When you import from a camera or card reader, Aperture places the images in a
project. If you don’t select an existing project, a new one is created automatically.
As Aperture imports images, it generates a version file and an image thumbnail
corresponding to each digital master file.
Import
RAW
& JPEG
Aperture Library
(system disk)
Project
Versions
Digital
master files
Importing
to Aperture
Camera
You can import digital master images directly from a camera or card reader and from
your hard disk drives.
Vault
(FireWire drive)
Back up
55
Page 56

When you import images, you can choose whether to have the digital master files
stored in the Aperture Library or store them on your hard disk outside of the Library
where they can be accessed as referenced images.
As you import images, you can have Aperture automatically name and record
information about them. Aperture can assign filenames using custom naming
conventions, as well as record metadata such as captions, keywords, dates, copyright
and credit information, and IPTC information. You can even set Aperture to stack
related images together, keeping bracketed shots or a series of shots taken in quick
succession in groups that you can easily select and work with. For more information on
stacks, see Chapter 9, “Stacking Images and Making Picks,” on page 105.
Before you import images into Aperture, it’s a good idea to plan the organization of
your images. Eventually your image library may contain many thousands of images that
you’ll want organized in a flexible and easy-to-manage system.
Plan how you want to import your existing portfolio of digital images. Because you
may have many thousands of images previously stored on disk, you need to decide
whether you’ll import them into the Aperture Library, or import them as referenced
images, leaving them in their current hard disk locations. You can also copy or move
them into different hard disk locations when importing them.
As an import strategy, it’s best to try out importing images in a series of steps. Make
trial imports of a small group of images directly from your digital camera or card
reader. Try out the different methods for importing individual files into your system.
Once you’re familiar with how Aperture works, you can begin setting up your image
management system for long-term use.
File Formats You Can Import into Your Library
Aperture is a QuickTime-compatible application, so it supports standard QuickTimecompatible still-image file formats, as well as some other file formats and file types. The
following file types and formats can be imported:
 GIF
 JPEG
 JPEG2000
 PNG
 PSD (8 and 16 bit)
 RAW files from a variety of supported digital cameras
 TIFF (8 and 16 bit)
Note: For a list of supported digital cameras, go to http://www.apple.com/aperture.
56 Chapter 5 Importing Images
Page 57

Importing from Your Digital Camera or Card Reader
You can import all images from a camera or card reader into Aperture, or you can
import selected images only. You can import your images into a new project or an
existing project.
To import all the images from a camera or card reader into Aperture:
1 Connect your camera or card reader to your computer.
The Import panel and Import dialog appear, showing the images on the camera or card.
Note: If iPhoto opens when you connect your camera or card reader, quit iPhoto and
then, in Aperture, choose Aperture > Preferences. Choose Aperture from the “When a
camera is connected” pop-up menu. Disconnect and reconnect your camera to have
Aperture open the Import dialog.
Import panel
Import arrow
Import button
Import dialog
Chapter 5 Importing Images 57
Page 58

Select the project
into which you want to
import images.
2 Do one of the following:
 If you want to import into a new, empty project: Choose File > New Project (or press
Command-N) to create a new project.
Note: You can also click the Library icon in the Projects panel, if necessary, to select
it. When you select the Library (not a project), a new, untitled project is automatically
created when images are imported.
Make sure the Import arrow
is pointing to the Library to
import the images into a
new project.
 If you want to import the images into an existing project: Select the project. The Import
arrow points at the currently selected project, indicating the destination for the import.
The top-left portion of the Import dialog updates, displaying where the images are
being placed.
3 Choose a location for the imported images by doing one of the following:
 To store imported master image files in the Aperture Library: Choose In the Aperture
Library from the Store Files pop-up menu.
 To store imported master image files as referenced images in the Pictures folder on your
hard disk: Choose Pictures from the Store Files pop-up menu.
 To store imported master image files as referenced images in a location other than the
Pictures folder: Choose “Choose” from the Store Files pop-up menu and select the
folder you want. Choose “No folder” from the Subfolders pop-up menu to specify
that the files be stored as separate individual files in the selected folder. You can also
specify that Aperture create and store your files in a hierarchy of subfolders with
specific folder names. For more information about specifying folders to hold your
imported images, see the Aperture User Manual in the Aperture Help menu. Choose
whether you want the image files moved or copied to a new location by clicking the
“Move files” or “Copy files” button.
58 Chapter 5 Importing Images
Page 59

4 Choose a naming convention from the Version Name pop-up menu to specify how you
want the images named.
For example, choose Master Filename from the Version Name pop-up menu to have your
files stored using the current master filenames from your camera or card. Choose a name
format from the Version Name pop-up menu to have your images stored using a
specified name. If you choose a custom name format, enter the name you want in the
Name Text field. You can also apply the name format to the master file as well. Choose
Edit from the Version Name pop-up menu to define a new naming scheme. For more
information about naming files, see the Aperture User Manual in the Aperture Help menu.
5 To add metadata to your images as they’re imported, choose a metadata preset from
the Add Metadata From pop-up menu.
6 With no images selected in the dialog, click the Import arrow or the Import button in
the lower-right corner of the dialog.
If you select images, only the selected images are imported. To reset the image
selection so that no images are selected, click in the background beside a thumbnail.
The import process begins and an indicator appears next to the project’s name,
showing the progress of the import. When images are imported, a dialog appears.
7 Click Eject Card, Erase and Eject Card, or Done.
As the images appear in the Browser, you can begin working with them. Images may
temporarily appear as gray boxes until the loading is complete.
Importing a Selection of Images
You can also import a selection of images from your camera or card reader.
To import a selection of images:
1 Connect your camera or card reader to your computer.
The Import panel and Import dialog appear, showing the images on the camera or card.
2 In the Projects panel, do one of the following:
 Choose File > New Project (or press Command-N) to create a new project.
 Select an existing project to hold your images. (The Import arrow points at the
selected project.)
The top-left portion of the Import dialog updates, displaying where the images are
being placed.
Chapter 5 Importing Images 59
Page 60

3 Select the images you want to import by Shift-clicking to select a range of adjacent
images, Command-clicking to select nonadjacent images, or dragging a selection
rectangle around the images you want.
The current number of images selected for import is displayed on the Import button in
the lower-right corner of the dialog.
Import button showing
the number of images
selected for import
To reset the image selection so that no images are selected, click in the background
beside a thumbnail.
If necessary, adjust the size of the thumbnails by dragging the Thumbnail Resize slider
at the bottom of the dialog.
4 Choose a location for the imported images by doing one of the following:
 To store imported master image files in the Aperture Library: Choose In the Aperture
Library from the Store Files pop-up menu.
 To store imported master image files as referenced images in the Pictures folder on your
hard disk: Choose Pictures from the Store Files pop-up menu.
 To store imported master image files as referenced images in a location other than the
Pictures folder: Choose “Choose” from the Store Files pop-up menu and select the
folder you want. Choose “No folder” from the Subfolders pop-up menu to specify
that the files be stored as separate individual files in the selected folder. You can also
specify that Aperture create and store your files in a hierarchy of subfolders with
specific folder names. Choose whether you want the image files moved or copied to
a new location by clicking the “Move files” or “Copy files” button.
5 Choose a naming convention from the Version Name pop-up menu to specify how you
want the images named.
For example, choose Master Filename from the Version Name pop-up menu to have
your files stored using the current master file names from your camera or card. Choose
a name format from the Version Name pop-up menu to have your images stored using
a specified name. If you choose a custom name format, enter the name you want in the
Name Text field. You can also apply the name format to the master image as well.
Choose Edit from the Version Name pop-up menu to define a new naming scheme.
6 To add metadata to your images as they’re imported, choose a metadata preset from
the Add Metadata From pop-up menu.
60 Chapter 5 Importing Images
Page 61

7 When you are satisfied with your image selection, click the Import arrow or the Import
button in the lower-right corner of the dialog.
The import process begins and an indicator appears next to the project’s name,
showing the progress of the import. When images are imported, a dialog appears.
8 Click Eject Card, Erase and Eject Card, or Done.
As the images appear in the Browser, you can begin working with them. Images may
temporarily appear as gray boxes until the loading is complete.
Importing Image Files Stored on Your Computer
You can import image files stored on your computer and other storage devices. You
have a choice of storing imported images in the Aperture Library, importing images as
referenced images and leaving them in their current locations, or importing images as
referenced images and moving or copying them to a different location.
Note: If you have folders of images to import, you can import them using the Import
Folders as Projects command.
You can import image files in many common image formats, including images scanned
from nondigital sources such as film and photographic prints. Adding these image files
to your Aperture database is as simple as navigating to the folder where they reside on
your hard disk using the Import dialog.
Import Panel button
Select the disk where the
images you want to
import are located.
When you import images from a folder on your computer system, you have the choice
of importing the images into a new project or an existing one.
To import image files stored on your computer’s hard disk or other storage device:
1 If the Import panel is hidden, click the Import Panel button in the toolbar to show it (or
press Shift-I).
2 Select the disk that holds the image files you want to import.
The Import dialog appears with the file browser at the top.
Chapter 5 Importing Images 61
Page 62

3 In the file browser, navigate to the folder containing the image files you want to import.
Select the folder of
images you want to
import.
When you have selected the folder containing the image files you want to import,
image thumbnails appear in the Import dialog.
4 In the Projects panel, do one of the following:
 Select Library to create a new, untitled project or choose File > New Project (or press
Command-N). (The Import arrow points at the Library.)
 Select an existing project to hold your images. (The Import arrow points at the
selected project.)
The top-left portion of the Import dialog updates, displaying where the images are
being placed.
5 Select the images you want to import by Shift-clicking to select a range of adjacent
images, Command-clicking to select nonadjacent images, or dragging a selection
rectangle around the images you want.
6 Choose a location for the imported images by doing one of the following:
 To store imported master image files in the Aperture Library: Choose In the Aperture
Library from the Store Files pop-up menu.
 To import the files as referenced images stored in their current locations on your hard
disk: Choose “In their current location” from the Store Files pop-up menu.
 To store imported master image files as referenced images in the Pictures folder on your
hard disk: Choose Pictures from the Store Files pop-up menu.
 To store imported master image files as referenced images in a location other than the
Pictures folder: Choose “Choose” from the Store Files pop-up menu and select the
folder you want. Choose “No folder” from the Subfolders pop-up menu to specify
that the files be stored as separate individual files in the selected folder. You can also
specify that Aperture create and store your files in a hierarchy of subfolders with
specific folder names. Choose whether you want the image files moved or copied to
a new location by clicking the “Move files” or “Copy files” button.
62 Chapter 5 Importing Images
Page 63

7 Choose a naming convention from the Version Name pop-up menu to specify how you
want the images named.
For example, choose Master Filename from the Version Name pop-up menu to have
your files stored using the current master filenames from your camera or card. Choose a
name format from the Version Name pop-up menu to have your images stored using a
specified name. If you choose a custom name format, enter the name you want in the
Name Text field. You can also apply the name format to the master image as well.
Choose Edit from the Version Name pop-up menu to define a new naming scheme.
8 To add metadata to your images as they’re imported, choose a metadata preset from
the Add Metadata From pop-up menu.
9 When you are satisfied with your image selection, click the Import arrow or the Import
button in the lower-right corner of the dialog.
As the images appear in the Browser, you can begin working with them.
Note: If the folder contains subfolders of images and you want those imported too,
choose File > Import > Folders as Projects.
Dragging Image Files from the Finder into a Project
You can drag image files from the Finder or desktop directly into a project. This is useful
if you composited or created images in another application, and you want to use them
in Aperture. You can also do this if you have image files scattered on your desktop or
throughout folders on your system and you want to consolidate them in one place.
To quickly import image files from the Finder into a project:
1 In the Projects panel, create a new project or select an existing project.
2 Locate the image file or files in the Finder.
3 Select the image files and drag them to the project in the Projects panel.
Drag the selected image
files to a project.
The import process begins and an indicator appears next to the project’s name,
showing the progress of the import.
Chapter 5 Importing Images 63
Page 64

Importing Folders of Images from the Finder
If you’ve spent time organizing your images into a meaningful hierarchy on your
computer and you want to keep that organization, you can import a folder of images
as a project or drag it directly into the Projects panel. When you import a folder of
images or drag it into the Projects panel, the folder becomes a project and any
subfolders become albums within the project.
Warning: When importing folders of images into Aperture, carefully plan how you
want your images organized before you begin. The top-level folder containing images
becomes a project containing all the images in the subfolders as well. This means that
if you import a folder with thousands of images contained within its subfolders,
Aperture will create a project with thousands of images. You can import a maximum
of 10,000 master images into a project. If you have over 10,000 images to import into
Aperture, consider importing the subfolders individually instead. Each subfolder will
then become its own project.
To import a folder of images from the Finder using the Import command:
1 In the Projects panel, select Library.
2 Choose File > Import > Folders into a Project.
3 Select the folder of images that you want to import.
4 Choose a location for the imported images by doing one of the following:
 To store imported master image files in the Aperture Library: Choose In the Aperture
Library from the Store Files pop-up menu.
 To import the files as referenced images stored in their current locations on your hard
disk: Choose “In their current location” from the Store Files pop-up menu.
 To store imported master image files as referenced images in the Pictures folder on your
hard disk: Choose Pictures from the Store Files pop-up menu.
 To store imported master image files as referenced images in a location other than the
Pictures folder: Choose “Choose” from the Store Files pop-up menu and select the
folder you want. Choose “No folder” from the Subfolders pop-up menu to specify
that the files be stored as separate individual files in the selected folder. You can also
specify that Aperture create and store your files in a hierarchy of subfolders with
specific folder names. Choose whether you want the image files moved or copied to
a new location by clicking the “Move files” or “Copy files” button.
64 Chapter 5 Importing Images
Page 65

5 Choose a naming convention from the Version Name pop-up menu to specify how you
want the images named.
For example, choose Master Filename from the Version Name pop-up menu to have
your files stored using the current master filenames from your camera or card. Choose a
name format from the Version Name pop-up menu to have your images stored using a
specified name. If you choose a custom name format, enter the name you want in the
Name Text field. You can also apply the name format to the master image as well.
Choose Edit from the Version Name pop-up menu to define a new naming scheme.
6 Click Open.
The top-level folder is converted to a project. If the folder you imported contains a
hierarchy of subfolders and images, the subfolders appear as albums.
You can select multiple folders to import by Shift-clicking them.
When you drag folders into the Projects panel, Aperture uses the last import settings
you specified to determine how the folders are imported and where they are stored.
To drag folders into Aperture:
1 In the Finder, locate the folder containing the images you want to import.
2 Drag the folder to the Projects panel.
The top-level folder is converted to a project. If the folder you imported contains a
hierarchy of subfolders and images, the subfolders appear as albums.
Importing Your iPhoto Library
When you first open Aperture, a dialog appears that enables you to import your iPhoto
Library. You can import your iPhoto Library, copying it into the Aperture Library, or you
can simply allow Aperture to access the iPhoto Library as referenced images without
storing it in the Aperture Library.
The organization of your iPhoto images and albums is maintained as projects in the
Projects panel, as well as each image’s name, EXIF information, keywords, rating, and
any applied adjustments. You cannot import slideshows, books, and Smart Albums
from your iPhoto Library.
Note: You must upgrade to iPhoto version 5.0.4 or later before you can import photos
from your iPhoto Library into Aperture.
If you choose not to import your iPhoto Library right away, you can do it later.
Chapter 5 Importing Images 65
Page 66

To import your iPhoto Library:
1 Choose File > Import > iPhoto Library.
2 Select the iPhoto Library folder using the file browser in the Import dialog.
3 Choose a location for the imported images by doing one of the following:
 To store imported master image files in the Aperture Library: Choose In the Aperture
Library from the Store Files pop-up menu.
 To import the files as referenced images stored in their current locations on your hard
disk: Choose “In their current location” from the Store Files pop-up menu.
 To store imported master image files as referenced images in the Pictures folder on your
hard disk: Choose Pictures from the Store Files pop-up menu.
 To store imported master image files as referenced images in a location other than the
Pictures folder: Choose “Choose” from the Store Files pop-up menu and select the
folder you want. Choose “No folder” from the Subfolders pop-up menu to specify
that the files be stored as separate individual files in the selected folder. You can also
specify that Aperture create and store your files in a hierarchy of subfolders with
specific folder names. Choose whether you want the image files moved or copied to
a new location by clicking the “Move files” or “Copy files” button.
4 Choose a naming convention from the Version Name pop-up menu to specify how you
want the images named.
For example, choose Master Filename from the Version Name pop-up menu to have
your files stored using the current master filenames from your camera or card. Choose a
name format from the Version Name pop-up menu to have your images stored using a
specified name. If you choose a custom name format, enter the name you want in the
Name Text field. You can also apply the name format to the master image as well.
Choose Edit from the Version Name pop-up menu to define a new naming scheme.
5 Click Choose.
Your iPhoto Library is imported into Aperture.
If you choose to store the photos imported from your iPhoto Library in the Aperture
Library, Aperture makes a copy of each image file and places it in the Aperture Library.
This doubles the amount of disk space the image files occupy on your computer. To
save space, import the photos in your iPhoto Library as referenced images. You can also
delete images from your iPhoto Library after importing them, but you will no longer
have access to those images within iPhoto. If you choose not to delete the images in
your iPhoto Library, any changes you make to those images in iPhoto will not be
reflected in the duplicate images in Aperture.
Note: You can also import individual images or albums from your iPhoto Library.
66 Chapter 5 Importing Images
Page 67

Transferring Projects from Another Aperture System
If you work with several computers, or work on a project with other people, you may
find it necessary to transfer projects from one Aperture system to another. Transferring
projects is a simple import process.
To transfer a project from one computer to another:
1 Select the project you want to transfer, then choose File > Export Project (or press
Command-Shift-E).
2 Enter a name and choose a location for the exported project.
3 If your project contains referenced images, select the “Consolidate images into
exported project” checkbox to transfer the original referenced images’ master files as
well as the previews and metadata as a self-contained project that another Aperture
system can use.
If you want to transfer projects with referenced images to another computer, and don’t
want to transfer the referenced images’ master files, but would rather transfer just the
referenced images’ previews, don’t choose the “Consolidate images into exported
project” checkbox.
4 Click Save.
The project file is exported to the location you chose.
5 Connect or network the two computers together.
For more information, see the documentation that came with the computers.
6 Open Aperture on the computer to which you want to transfer the project.
7 In the Projects panel, select Library.
8 Choose File > Import > Projects.
9 In the Import dialog, navigate to the location on the other computer where the project
you want to transfer is stored, select the project, then click Open.
The selected project appears in the Projects panel.
Chapter 5 Importing Images 67
Page 68

Making an Immediate Backup
After you import images into Aperture, you can make an immediate backup to ensure
that your digital master files exist in more than one place. You do this by having
Aperture create a new vault or update an existing vault. For more information, see
“Updating Vaults” on page 205.
It’s a good idea to back up your images as often as possible. To protect yourself from
the loss of image assets due to catastrophic failure, you should back up your digital
master files as soon as you’ve finished importing them into Aperture. For detailed
information, see Chapter 21, “Backing Up Your Images,” on page 201.
68 Chapter 5 Importing Images
Page 69

6 Working with Images
Sorting pop-up menu
in the Browser
6
After a shoot, you may need to sort through hundreds or
thousands of images in a project. The Browser provides
efficient ways to deal with a large number of images.
This chapter provides details about the Browser and how to use it to view, select,
rearrange, rotate, and display images.
An Overview of the Browser
When you select a project or album in the Projects panel, thumbnails of its images
appear in the Browser. You select images in the Browser to work with them. You can
move and rearrange the images, rotate images, make new versions, and delete images
from the project.
Sort Direction button
Query HUD button
Grid View button
List View button
Images displayed in grid
view in the Browser
Search field
Shuttle control
Scroll bar
Thumbnail Resize slider
 Grid View button: Click to display images as thumbnails.
 List View button: Click to display images as a text list.
 Sorting pop-up menu: You can choose to sort images by image date, rating, or
keywords from this pop-up menu.
 Sort Direction button: Click this to sort images in ascending or descending order.
 Query HUD button: Click this to show the Query HUD for searching. For more
information, see Chapter 12, “Searching for and Displaying Images,” on page 139.
69
Page 70

 Search field: Enter text to search for images associated with that text, such as a
version name or keywords.
 Shuttle control: Drag this to shuttle continuously through images in the Browser. You
can also use the J, K, and L keys.
 Scroll bar: Use this to navigate through all images in a project.
 Thumbnail Resize slider: Use this to increase or decrease the size of thumbnails
displayed in grid view.
Viewing Images in the Browser
You can view images in the Browser in grid view (the default) or list view.
 Grid view: Organizes thumbnails of your images in a grid pattern. Use grid view
when it’s easiest to identify your images by sight and work with thumbnails as you
organize, stack, and assign keywords to images.
 List view: Lists your images by file information. Use list view when you need to see or
sort your images by file data such as pixel size, file size, or rating. You can also use list
view to sort your images by any of the column categories. Click the category column
heading to sort your images by that category.
Images displayed in list
view in the Browser
You can also customize the information that appears with your images. For example,
you can set your images to appear with filename, ratings, and metadata.
70 Chapter 6 Working with Images in the Browser
Page 71

Working with Images in Grid View
Grid view is the Browser’s default view. Grid view provides a grid of thumbnails as a
top-level view of your project. If your project has many images, you may want to adjust
the size of the thumbnails to a size convenient for selecting and working with them.
You can also use the Shuttle control or scroll bar to scroll through the images.
To switch to grid view, do one of the following:
m Choose View > Grid (or press Control-G).
m Click the Grid View button in the Browser.
Grid View button
To adjust thumbnail size:
m Drag the Thumbnail Resize slider to increase or decrease the size of the thumbnails.
To shuttle continuously through the images in a project, do one of the following:
m Drag the Shuttle control.
m Press J to shuttle up, press K to stop shuttling, or press L to shuttle down.
Note: Pressing J or L multiple times increases the shuttle speed.
Working with Images in List View
Instead of displaying thumbnails, list view displays images by icon, with accompanying
information such as image dimensions, file sizes, and dates. You can choose what type
of information is displayed.
To switch to list view, do one of the following:
m Choose View > List (or press Control-L).
m Click the List View button in the Browser.
List View button
Chapter 6 Working with Images in the Browser 71
Page 72

To choose what type of information is displayed in list view:
1 Choose View > View Options (or press Command-J).
The View Options window appears.
2 In the List View Columns section, choose a display option from the Set 1 pop-up menu.
Columns in the Browser immediately change to display the information you selected.
One of the main advantages of list view is that you can quickly sort images based on a
category of information. When you click a column heading in list view, Aperture
reorders the images, sorting them by that category. For example, you might sort your
images by date.
To sort images in list view by a category:
m Click the category column heading in the Browser.
Images in list view
sorted by rating
When you work in list view, it may sometimes be difficult to determine the content of
an image based on the file information. You can enlarge the thumbnail icons that
appear in list view to give you a better look at the images.
To enlarge the thumbnail icons in list view:
m Drag the Thumbnail Resize slider to increase or decrease the size of the icons.
You can also easily rename files after importing. When you rename a file, you are
renaming the image version, not the digital master file. The filename of the original
master file does not change.
To rename an image version in list view:
m Select an image, double-click the image name, then enter a new name.
72 Chapter 6 Working with Images in the Browser
Page 73

Adjusting the Background of the Browser
You may want to lighten or darken the background of the Browser to better view your
thumbnails. You can darken the background from shades of gray all the way to black,
or lighten it from gray to white.
Note: A darker background interferes less with the colors in your image, and is good
for performing color adjustments on your images.
To change the background of the Browser:
1 Choose Aperture > Preferences.
2 In the Preferences window, drag the Grid View Background Brightness slider to lighten
or darken the background, then close the window.
Navigating Through and Selecting Images
To work on images, you’ll need to review them in the Browser. You can use the arrow
keys or menu commands to navigate to images in the Browser.
To navigate to images, do one of the following:
m Press an arrow key to move left, right, up, or down.
m In the control bar, click the Previous Image or Next Image button.
Previous Image button
All selected images
display a thin white
border.
Next Image button
Aperture provides fast and efficient ways of selecting images, depending on your work
style and preferences. Images you’ve selected have a white border. When you select a
group of images, the actively selected image, called the primary selection, appears with a
thick white border and the rest of the selected images appear with thin white borders.
A thick white border surrounds
the primary selection.
Chapter 6 Working with Images in the Browser 73
Page 74

To select a single image:
m Click the image.
To select a range of images, do one of the following:
m Click the first image in a range, then Shift-click the last image.
m Press the arrow keys to select the first image, then press Shift and the Left or Right
Arrow key to select the last image in the range.
m Select an image in a stack, then choose Edit > Grow Selection (or press Command-E) to
select all images in the stack.
m Select an image, then choose Edit > Select to End (or press Shift-End) to extend the
selection to the last image in the Browser.
m Select an image, then choose Edit > Select to Beginning (or press Shift-Home) to
extend the selection to the first image in the Browser.
m Drag a selection rectangle to select all the images that fall within the rectangle.
To select nonadjacent images:
m Command-click the images you want to select.
Command-click the images again to deselect them.
To select all images in the Browser:
m Choose Edit > Select All (or press Command-A).
To select only the primary selection, deselecting all other images:
m Choose Edit > Reduce Selection (or press Shift-E).
To deselect the current selection and select all unselected images:
m Choose Edit > Invert Selection (or press Command-R).
To deselect all images in the Browser:
m Choose Edit > Deselect All (or press Command-Shift-A).
74 Chapter 6 Working with Images in the Browser
Page 75

Rearranging Images in the Browser
As you work with images in the Browser, you can move and rearrange images into any
order or grouping you want. For example, you might want to keep all related images of
a wedding event, such as the cake cutting, in close proximity to allow you to easily
adjust them.
You can drag images to new locations in the Browser. You can drag single images or
selections of multiple images. When you drag images to new locations, you create a
custom arrangement of your images; the Sorting pop-up menu changes to show the
Custom option. Aperture records the order of your images, and any time you choose
Custom from the Sorting pop-up menu, your images reappear in that order.
To rearrange images in the Browser:
m Drag the images you want to a new location; when the green bar appears, release the
mouse button.
As you drag an image to
a new location, a green
bar marks where the
image will be placed.
To restore a custom arrangement of your images in the Browser:
m Choose Custom from the Sorting pop-up menu.
Aperture remembers the last time you moved images and restores that arrangement.
Chapter 6 Working with Images in the Browser 75
Page 76

Rotating Images
When images are imported into a project, some may appear in an incorrect orientation,
requiring you to rotate them right side up. The control bar provides rotate buttons for
rotating selected images, and the toolbar contains rotate tools. You can rotate images
individually or select a group and rotate them all at once. You can also conveniently
select images and quickly rotate them using keyboard shortcuts.
To rotate images counterclockwise, do one of the following:
m Select an image or group of images, then choose Images > Rotate Counterclockwise, or
press the left bracket ([) key.
m Select an image or group of images, then click the Rotate Left button in the control bar.
Rotate Left button Rotate Right button
m Select the Rotate Left tool in the toolbar, then click an image.
To rotate images clockwise, do one of the following:
m Select an image or group of images, then choose Images > Rotate Clockwise, or press
the right bracket (]) key.
m Select an image or group of images, then click the Rotate Right button in the control bar.
m Select the Rotate Right tool in the toolbar, then click an image.
Displaying Specific Metadata with Your Images
You can quickly display specific types of information, or embedded metadata, with
your images. For example, you can have Aperture show the EXIF (Exchangeable Image
File) or IPTC (International Press Telecommunications Council) data associated with
your images.
 EXIF metadata: Includes camera settings such as shutter speed, ISO setting, date and
time, focal length, exposure, metering pattern, and flash information.
 IPTC metadata: Information that can be embedded in a digital image with most
software programs used to edit photos. Includes a caption, the place and date a
photo was taken, and copyright information.
76 Chapter 6 Working with Images in the Browser
Page 77

You use the View Options window to customize the display of information shown with
images in the Browser.
The Browser’s metadata
display settings appear here.
In the Grid View section, you select the Set buttons and choose the information you
want displayed. You can also choose where the information should appear from the
Placement pop-up menus.
To set the display of metadata shown with images in the Browser:
1 Choose View > View Options (or press Command-J).
2 Select the Grid View checkbox.
3 Choose the metadata views you want to use from the Set 1 and Set 2 pop-up menus.
4 Choose the location where you want the metadata displayed from the Placement pop-
up menus.
5 Click the Set 1 or Set 2 button to select the metadata view you want displayed.
6 Click Done.
To show EXIF metadata in the Metadata Inspector:
m Select an image, then press Control-E.
To show IPTC metadata in the Metadata Inspector:
m Select an image, then press Control-I.
Chapter 6 Working with Images in the Browser 77
Page 78

Creating Versions of an Image
Occasionally, you may want to make copies of an image. For example, you might copy
an image and apply different exposure settings or other adjustments, or change it for a
specific use, such as for placement in a webpage or print book. When you copy an
image, Aperture makes a new version of the image.
When you create a new image version, you have a choice of copying the original
master file or the currently selected version with any changes you’ve made. For
example, if you’ve made a series of adjustments to an image and now you’d like to start
from the original master file and make different adjustments, you can copy the master
file and start with a fresh, unchanged image.
To copy the master file:
1 Select the image whose master file you want to copy.
2 Do one of the following:
 Choose Images > New Version From Master (or press Option-G).
 Click the New Version From Master button in the toolbar.
If you’re creating a number of image versions showing incremental changes to an
image, you can copy the last version you made and make more changes. For example,
if you plan to use the same cropping and exposure adjustments in multiple versions, it
makes sense to perform those adjustments first and then make copies of the image
version before proceeding.
To copy the selected image version:
1 Select the image you want to copy.
2 Do one of the following:
 Choose Images > Duplicate Version (or press Option-V).
 Click the Duplicate Version button in the toolbar.
If you create multiple versions of an image, Aperture tracks the versions within a stack.
The stack represents all the versions of a particular image that you have created. You can
open a stack and see the different versions you’ve created for an image.
78 Chapter 6 Working with Images in the Browser
Page 79

To open a stack to see all the versions:
m Click the Stack button on the stack.
Click the Stack button
on an image to show all
versions in the stack.
A dark gray border
surrounds the images
in a version stack.
When a stack is open, you can select any of its image versions to display that version in
the Viewer.
Understanding Image Versions
Whenever you work on an image, you are working with an image version, never the
master file. Each time you copy an image, you create a new version. When an image
has multiple versions, all versions are stacked together.
Aperture keeps all your image versions together so that you can view or work with
them whenever you wish. For example, you might open a stack and select a specific
image version to copy. The entire stack appears in all the different projects or albums
in which the image appears.
The instant you change a version in an album, a new version is added to the stack.
The first image in the stack is the pick and represents the stack, and is the image
you work with when you select the version stack in your album. You can also
specify that one of the versions in a stack is the pick for a specific album. You can
select the pick you want and make it the album pick, and that image appears with
an album pick icon. The pick is specific to the album it’s in. The original pick
remains selected in the other locations.
When you open a stack, you can reorder the image versions however you like.
Dragging an image version to the first position makes it the pick. You can reorder,
or promote or demote, the versions according to your needs. For more information
about stacks, see Chapter 9, “Stacking Images and Making Picks,” on page 105.
Chapter 6 Working with Images in the Browser 79
Page 80

Copying Images and Moving Images to Different Locations
You can drag images into different projects and albums. The following kinds of files can
be dragged directly into a project or album:
 GIF
 JPEG
 JPEG2000
 PNG
 PSD
 RAW files from a variety of supported digital cameras
 TIFF
Note: For a list of supported digital cameras, go to http://www.apple.com/aperture.
To copy a master file into another project:
m Option-drag the image in the Browser into a different project in the Projects panel.
To move a master file into another project, removing it from the current project:
m Drag the image into a different project.
To copy an image version into another album:
m Drag the image version into a different album.
Working with Referenced Images
Master files for images that you import as referenced images may reside in many
different locations on your hard disk storage devices instead of in the single location
of your main Aperture Library file. At times you may need to determine which images
are referenced images in order to readily locate them in the Finder. With Aperture,
you can easily:
 Display badge overlays that identify referenced images
 Display a list of referenced images
 Locate a referenced image on your hard disk
80 Chapter 6 Working with Images in the Browser
Page 81

Identifying Referenced Images
After you import referenced images, you can identify them in the Browser by turning
on referenced image badge overlays. Referenced images appear with badges that
show whether their master files are currently available (online) or not found (offline).
These badge overlays
indicate the images are
referenced images.
This badge overlay
indicates the image is an
offline referenced image.
To turn on referenced image badge overlays:
1 Choose Aperture > Preferences.
2 Select the “Badge referenced images” checkbox.
You can select and work with online referenced images using the same procedures you
use with images whose master files reside in the Aperture Library.
Aperture keeps track of referenced images’ master files when you simply move or
rename the files in the Finder, keeping them on the same hard disk or volume.
A referenced image appears as an offline image if the hard disk holding the referenced
image’s master file has been disconnected from your computer system. A referenced
image is listed as “not found” when its master file has been deleted, moved to the
Trash, or moved from its original hard disk location to another hard disk drive and
Aperture can’t find it.
Displaying a List of Referenced Images
When working with numerous images in the Browser, you may need to determine
which images have master files that reside in the Aperture Library and which are
referenced images whose master files are located elsewhere on your hard disks.
You can select a group of images in the Browser and then have Aperture show a list of
the referenced images within the selection and where the master files are located.
Chapter 6 Working with Images in the Browser 81
Page 82

To see a list of referenced images in a selection:
1 In the Browser, select the group of images you want.
2 Choose File > Manage Referenced Files.
3 Choose File > Show Referenced Files.
Shows the names of
hard disks where
referenced master
files are located.
Identifies the hard
disk location of the
referenced master files.
Identifies how many master files for
referenced images are on the hard disk,
and how many are not found.
Displays the specific image
and metadata to help you
identify the image.
The Referenced Files dialog appears.
Locating a Referenced Image on a Hard Disk
At times you may need to quickly find a referenced image’s master file on your hard
disk to copy or move it, attach it to an email, or otherwise work with it outside of
Aperture. You can select an image in the Browser and have Aperture display the
image’s master file location in the Finder.
To locate a referenced image’s master file in the Finder:
1 Select the referenced image you want in the Browser.
2 Choose File > Show in Finder.
A Finder window appears, displaying the selected referenced image’s master file.
Note: If you open a referenced image’s master file from the Finder in another
application, you will not see the changes or adjustments you’ve made to the image in
Aperture. Your changes appear in versions stored in the Aperture Library, and the
referenced image’s master file is always left unchanged. To see the adjusted photo, you
need to export a version of it.
82 Chapter 6 Working with Images in the Browser
Page 83

7 Displaying Images in the Viewer
7
You can view an image in incredible detail or view several
images at a time in the Viewer.
This chapter provides details about the Viewer and how you can use it to view images
in great detail when you are comparing images, making adjustments, and viewing
images on multiple displays.
An Overview of the Viewer
When you select images in the Browser, the Viewer immediately displays a detailed
view of your selection. You can display one image at a time, three images at a time, or
display a selection of multiple images.
A detailed view of the
selected image appears
in the Viewer.
The selected image
in the Browser
83
Page 84

When rating or adjusting images, you can set the Viewer to compare two images at once.
You can select an image to compare against and then display other similar or related
images next to it for inspection. You might use the Aperture comparison feature to select
images from a series or compare versions of adjusted images to see which is the best.
You can use the Viewer
to compare two images.
You can also set Viewer options that determine the amount of information that
appears with each image. For example, you can display images in the Viewer with their
keywords, ratings, and other information, such as IPTC or EXIF metadata.
Adjusting the Background of the Viewer
You may want to lighten or darken the background of the Viewer to better view your
images. You can darken the background from shades of gray all the way to black, or
lighten it from shades of gray to white.
To change the background of the Viewer:
1 Choose Aperture > Preferences.
2 In the Preferences window, drag the Viewer Background Brightness slider to lighten or
darken the background, then close the window.
84 Chapter 7 Displaying Images in the Viewer
Page 85

Choose Primary from
the Viewer Mode pop-up
menu to view a single
image on the screen.
Choosing the Number of Images Displayed in the Viewer
You can specify whether the Viewer displays one image, three images, or multiple
images at a time. If your system uses multiple displays, you can configure your primary
and secondary displays to show single images, three images, or multiple images
simultaneously.
To display a single image, do one of the following:
m Choose View > Main Viewer > Primary (or press Option-R).
m Choose Primary from the Viewer Mode pop-up menu in the control bar.
When the Viewer is set to show three images at a time, Aperture displays the selected
image in the center of the three images that appear in the Viewer.
To display three images, do one of the following:
m Choose View > Main Viewer > Three Up (or press Option-H).
m Choose Three Up from the Viewer Mode pop-up menu in the control bar.
When the Viewer is set to show multiple images, Aperture displays all selected images.
To display multiple images, do one of the following:
m Choose View > Main Viewer > Multi (or press Option-U).
m Choose Multi from the Viewer Mode pop-up menu in the control bar.
Chapter 7 Displaying Images in the Viewer 85
Page 86

Comparing Images
You can select an image against which to compare other images in your project or
Library. The selected image remains on the screen as you select and display other
images to compare against it. The comparison feature is useful for making final
selections of the best images in a series, or comparing two versions of an image for
correct exposure or highlights. When comparing images, you can apply ratings and
keywords, and make adjustments to selected images.
Comparing images involves setting a “compare” image and then viewing other images
against the compare image. You can also compare images in Full Screen mode. For
more information, see Chapter 8, “Viewing Images in Full Screen Mode,” on page 93.
To set the compare image:
1 Select an image.
2 Choose Edit > Set Compare Item (or press Return).
The compare image is
displayed with a yellow
border, visible in the
Viewer and Browser.
The image you want to
examine against the
compare image is shown
to the right.
To view an image against a compare image, do one of the following:
m Select a second image.
m Navigate through the images in the Browser with the Up, Down, Left, and Right
Arrow keys.
If you wish, you can view multiple images against the compare image.
To view multiple images against a compare image, do one of the following:
m Command-click multiple images in the Browser.
m Hold down the Shift key while pressing the Up, Down, Left, or Right Arrow key.
When you’ve finished comparing images, you can turn this feature off.
To turn off the comparison feature and select the compare item:
m Choose Edit > Select Compare Item (or press Option-Return).
To turn off the feature and select the image you’re viewing against
the compare item:
m Choose Edit > Clear Compare Item (or press Command-Return).
86 Chapter 7 Displaying Images in the Viewer
Page 87

The Loupe shows a
magnified view of
whatever is beneath it.
Viewing Images with the Loupe
You can use the Loupe to examine parts of an image. You position the small ring of the
Loupe over the portion of the image you want to see, and the large ring shows a
magnified view. It’s useful for making quick checks for dust specks, flaws, fingerprints, or
other issues. You can use the Loupe on any image or thumbnail in the Aperture Library.
For information about the latest enhancements to the Loupe, see New Features in the
Aperture Help menu.
To show the Loupe, do one of the following:
m Choose View > Loupe, or press the grave accent (`) key.
m Click the Loupe button in the toolbar.
To hide the Loupe, do any of the above again.
You can also change the size of the Loupe and increase or decrease its magnification level.
To reduce the size of the Loupe:
m Choose View > Decrease Diameter, or press Option-Shift–hyphen (-), to decrease the
Loupe size.
To enlarge the size of the Loupe:
m Choose View > Increase Diameter, or press Option-Shift–equal sign (=), to increase the
Loupe’s size.
Chapter 7 Displaying Images in the Viewer 87
Page 88

To increase the Loupe magnification:
m Press Command–Shift–equal sign (=).
Press these keys repeatedly to increase magnification more.
To decrease the Loupe magnification:
m Press Command-Shift-hyphen (-).
Press these keys repeatedly to decrease magnification more.
Viewing Images at Full Resolution
Most digital cameras let you save images in different formats and image sizes. Aperture
displays your images to fit the Viewer size, providing a reduced view. If you have a large
display or two displays, you can increase the size of the Viewer to display your images
at sizes closer to their full-resolution size.
A full-resolution image shows every pixel of an image. You can set Aperture to display
your image at full resolution, even though the image may not fit within the Viewer.
Viewing images at full resolution allows you to inspect your images using the finest
level of detail possible.
To display a selected image at full resolution, do one of the following:
m Choose View > Zoom to Actual Size (or press Z).
m Click the Zoom Viewer button in the control bar.
Click the button again to turn off the full-resolution display.
Zoom Viewer button
When an image doesn’t fit within the area of the Viewer, a small, gray box appears on
your image with a red rectangle inside, showing the portion of the image that is
currently visible in the Viewer. You can drag the red rectangle within the gray box to
see other parts of the image, also known as panning.
88 Chapter 7 Displaying Images in the Viewer
Page 89

To pan the full-resolution image in the Viewer, do one of the following:
m Drag the red rectangle that appears on the image.
Drag the red rectangle
to change your view of
the image.
m Hold down the Space bar and drag the image.
Viewing Images on Multiple Displays
Using the additional screen space of a second display affords an excellent platform for
viewing and adjusting images, playing slideshows, and presenting your full-color, fullsize images to clients. For more information on setting up two displays, see
“Connecting a Second Display to Your Computer” on page 23.
When your system uses two displays, Aperture provides two Viewers in which you can
view multiple images. These Viewers are called the primary Viewer and secondary
Viewer. The primary Viewer is used for displaying the Aperture application and the
secondary Viewer for viewing images.
You can set the secondary Viewer to display images in different ways by choosing an
option from the Viewer Mode pop-up menu in the control bar.
 Desktop: Turns off the dual-display function.
 Blank: Sets the secondary Viewer to be a blank screen.
 Mirror: Displays the same images in the primary and secondary Viewers. For example,
if you have the primary Viewer set to display three images, the secondary Viewer
displays three images as well.
 Alternate: Displays the currently selected image in the secondary Viewer. The
secondary Viewer shows only one image even when you have the primary Viewer set
to display multiple images.
 Span: Splits the display of the currently selected images between the primary and
secondary Viewers. For example, if you select seven images to view, the primary
Viewer shows as many as fit its screen size, and the remaining images appear in the
secondary Viewer. Thus, one Viewer might show three images and the other Viewer
might show the remaining four of the seven. Span is also used if you want to
compare images and show one image per display.
Chapter 7 Displaying Images in the Viewer 89
Page 90

Choose Alternate from
the Viewer Mode pop-up
menu to display the
selected image in the
secondary Viewer.
To display the currently selected image in the secondary Viewer,
do one of the following:
m Choose View > Secondary Viewer > Alternate (or press Option-A).
m Choose Alternate from the Viewer Mode pop-up menu in the control bar.
To display the same images in both the primary and secondary Viewers,
do one of the following:
m Choose View > Secondary Viewer > Mirror (or press Option-M).
m Choose Mirror from the Viewer Mode pop-up menu in the control bar.
To display a selection of images across both the primary and secondary Viewers,
do one of the following:
m Choose View > Secondary Viewer > Span (or press Option-S).
m Choose Span from the Viewer Mode pop-up menu in the control bar.
To turn off the display of images in the secondary Viewer,
do one of the following:
m Choose View > Secondary Viewer > Blank (or press Option-B).
m Choose Blank from the Viewer Mode pop-up menu in the control bar.
To turn off the secondary Viewer function, do one of the following:
m Choose View > Secondary Viewer > Desktop (or press Option-X).
m Choose Desktop from the Viewer Mode pop-up menu in the control bar.
90 Chapter 7 Displaying Images in the Viewer
Page 91

Displaying Metadata Associated with Images
To help identify your images as you work with them, you can set Aperture to display
the metadata associated with images. You can display keywords, ratings, EXIF
information, IPTC information, and more. You can specify whether the information
appears below the image or across the bottom of the image.
You can also specify up to two sets of predefined information displays. For example,
one set of Viewer options can be set to show ratings only, and another set to show all
the IPTC information associated with an image. You can then switch between sets to
change the information that appears with your images.
The caption
and keywords are
displayed here.
Chapter 7 Displaying Images in the Viewer 91
Page 92

The View Options
window lets you choose
how you want to
view images.
To set the display of metadata shown with images in the Viewer:
1 Choose View > View Options (or press Command-J).
2 In the View Options window, do the following:
a Select the Viewer checkbox to activate Viewer overlays.
b Choose the information you want displayed with your images from the Set 1 or Set 2
pop-up menu.
c Choose where you want the information to appear from the Placement pop-up
menu for the set.
3 Click Done.
92 Chapter 7 Displaying Images in the Viewer
Page 93

8 Viewing Images
in Full Screen Mode
8
High resolution, no distractions, and access to the tools and
HUDs make Full Screen mode an ideal environment for
working with your images.
This chapter details how to use Full Screen mode as an alternate work environment when
you want to view images only, with as little of the Aperture interface shown as possible.
An Overview of Full Screen Mode
Full Screen mode projects your images onto a simple black background and can be
used with one or two displays. Using Full Screen mode with a dual-display system gives
you additional space to compare and adjust images. For more information about setting
up a dual-display system, see “Setting Up Your System with Two Displays” on page 23.
Once you’re in Full Screen mode, you can view, sort, and stack your images. You can
also apply adjustments and keywords. When you’ve finished working with your images,
you can use this mode to preview and proof your images.
93
Page 94

Full Screen mode includes a toolbar and filmstrip to help you view, organize, and adjust
your images.
Toolbar available in
Full Screen mode
The displayed image fills
the screen.
Filmstrip available
in Full Screen mode
 Toolbar: Contains version and stacking buttons, as well as the full set of image
adjustment tools.
Note: By default, the toolbar is hidden; to display it at the top of the screen, move
your pointer to the top of your primary screen.
 Filmstrip: Use this to move through, organize, and rate your images. You can dock
the filmstrip on the left, right, or bottom of the screen—wherever it best suits your
work habits.
Note: You can also use any of the Aperture HUDs in Full Screen mode. You can open
the Adjustments HUD or Keywords HUD by pressing its keyboard shortcut (see “Using
Keyboard Shortcuts in Full Screen Mode” on page 104).
94 Chapter 8 Viewing Images in Full Screen Mode
Page 95

Entering and Exiting Full Screen Mode
You can quickly switch between Full Screen mode and your workspace view.
To enter Full Screen mode:
m Click the Full Screen button in the control bar (or press F).
Full Screen button
in the control bar
The Aperture main window disappears and your images appear in Full Screen mode.
To exit Full Screen mode, do one of the following:
m Click the Exit Full Screen button in the filmstrip (or press F).
Exit Full Screen button
in the filmstrip
Search field
m Press Escape.
The workspace layout you were working in before entering Full Screen mode reappears.
Using the Filmstrip in Full Screen Mode
The filmstrip in Full Screen mode is similar to the control bar in the Aperture main
window. You can use the filmstrip’s controls to move through, rotate, view, and rate
your images.
Query HUD button
Shuttle control
Chapter 8 Viewing Images in Full Screen Mode 95
Scroll bar
Images shown in the filmstrip
Thumbnail Resize slider
Page 96

Filmstrip Controls
The following controls in the filmstrip are used to view images when in Full Screen mode.
 Shuttle control: Click either side of this slider to rapidly scroll through your filmstrip
images. The closer to the double arrows you click, the more rapidly the filmstrip
moves through its images. You can also use the J, K, and L keys to shuttle through
your images.
 Scroll bar: Use this to navigate through your images.
 Thumbnail Resize slider: Drag the slider to change the size of the image thumbnails
shown in the filmstrip.
The following controls are displayed on the left side of the filmstrip and control the
images shown in the filmstrip.
Search field
Query HUD button
Rotate buttons
Rating buttons
Navigation buttons
Display controls
 Search field: Enter text; images that match appear in the full-screen view.
 Query HUD button: Opens the Query HUD. From the Query HUD, you can perform a
quick search or create a new album to hold the contents of your search.
96 Chapter 8 Viewing Images in Full Screen Mode
Page 97

Rotate and Navigation Buttons
Rotate Left
Reject
Next Image
Rotate Right
Previous Image
 Rotate Left: Click this button to rotate the selected image counterclockwise.
 Rotate Right: Click this button to rotate the selected image clockwise.
 Previous Image: Click this button to display the previous image.
 Next Image: Click this button to display the next image.
Rating Buttons
Select
Decrease
Rating
Increase
Rating
 Reject: Click this button to give the selected image a Reject rating.
 Decrease Rating: Click this button to decrease the selected image’s rating.
 Increase Rating: Click this button to increase the selected image’s rating.
 Select: Click this button to give the selected image a Select rating.
Chapter 8 Viewing Images in Full Screen Mode 97
Page 98

Display Controls
Viewer Mode
pop-up menu
Primary Only
button
Zoom Viewer
button
Â
Viewer Mode pop-up menu
Exit Full Screen
button
: Use this to choose how to view images on your display or
displays and how to position images on each display. You can also control the filmstrip
with this pop-up menu (see “Showing and Hiding the Filmstrip” on page 99).
Note:
The display settings in Full Screen mode and the display settings in the control
bar in the Aperture main window are not shared. This allows you to have different
display settings in each mode. For example, you can set your main display setting to
Desktop while in the main window, and set your second display setting to Span
while in Full Screen mode.
Â
Zoom Viewer:
Â
Exit Full Screen:
Â
Primary Only:
Click this button to enlarge the image to a 100% pixel-for-pixel view.
Click this button to exit Full Screen mode.
Click this button to temporarily change between making metadata
changes to all selected images or the primary selection only.
Viewing Images in Full Screen Mode
You can easily view images in Full Screen mode.
To view an image that’s in the filmstrip:
m
Select an image displayed in the filmstrip.
The image fills the screen.
To view more than one image at the same time, do one of the following:
m
Command-click images to select them.
m
Change your view settings in the Viewer Mode pop-up menu.
98 Chapter 8
Viewing Images in Full Screen Mode
Page 99

Showing and Hiding the Filmstrip
You can move the filmstrip to any location on your primary display. But there are times,
especially when viewing an image at full resolution, that you cannot get the filmstrip
off your image. The filmstrip includes controls that let you define when the filmstrip
appears. You can also specify how the filmstrip fits on the screen in relation to the
image or images you are viewing.
There are several ways you can configure the filmstrip. You can choose to always show
the filmstrip, show it based on image dimensions, or have Aperture automatically fit
the images and filmstrip on your screens without overlapping.
To always show the filmstrip, do one of the following:
m Choose On from the Viewer Mode pop-up menu.
m Press Control-slash (/).
To only show the filmstrip when you move the pointer over its docked position,
do one of the following:
m Choose Auto from the Viewer Mode pop-up menu.
m Press Control-period (.).
To have Aperture automatically fit the image and the filmstrip on the screen,
do one of the following:
m Choose Avoid from the Viewer Mode pop-up menu.
m Press Control-V.
Aperture fits your images and the filmstrip on your screen, keeping the filmstrip and
your images from overlapping.
Working with the Toolbar in Full Screen Mode
The toolbar displayed in Full Screen mode is very similar to the toolbar in the Aperture
main window.
To view the Full Screen mode toolbar:
m In Full Screen mode, move the pointer to the top of your primary screen.
Chapter 8 Viewing Images in Full Screen Mode 99
Page 100

Controls in the Full Screen Mode Toolbar
You can use the toolbar’s buttons and tools to create image versions, work with stacks,
and make a variety of adjustments to your images.
Version Buttons
Duplicate Version
button
Stack Pick button
New Version From
Master button
 Duplicate Version: Click this to create a new version of the selected image.
 New Version From Master: Click this to create a version from the original master file. A
duplicate of the master file is created.
Stacking Buttons
Album Pick button Open All Stacks button
Close All Stacks button
Promote
button
Demote
button
 Stack Pick: Select a stack item, then click this button to mark the image as its
stack’s pick.
 Promote: Select a stack item, then click this button to move the selected stack item
closer to the stack’s pick.
 Demote: Select a stack item, then click this button to move the selected stack item
farther from the stack’s pick.
 Album Pick: Select an image version to represent a stack, then click this button to
select the image as the stack pick within the album (the stack can have a different
pick image in another album).
 Open All Stacks: Click this button to open all the image stacks in the album or project
you’re viewing.
 Close All Stacks: Click this button to close all the image stacks in the album or project
you’re viewing.
100 Chapter 8 Viewing Images in Full Screen Mode
 Loading...