

Page 1

Aperture 3.5
User Guide
Page 2

K Apple Inc.
© 2013 Apple Inc. All rights reserved.
Your rights to the software are governed by the accompanying
software license agreement. The owner or authorized user of a
valid copy of Aperture software may reproduce this publication
for the purpose of learning to use such software. No part
of this publication may be reproduced or transmitted for
commercial purposes, such as selling copies of this publication
or for providing paid for support services.
The Apple logo is a trademark of Apple Inc., registered in
the U.S. and other countries. Use of the “keyboard” Apple
logo (Option-Shift-K) for commercial purposes without the
prior written consent of Apple may constitute trademark
infringement and unfair competition in violation of federal and
state laws.
Every eort has been made to ensure that the information in
this manual is accurate. Apple is not responsible for printing
and clerical errors.
Apple
1 Innite Loop
Cupertino, CA 95014
408-996-1010
www.apple.com
Apple, the Apple logo, Aperture, AppleScript, Apple TV,
ColorSync, Finder, FireWire, GarageBand, iLife, iPad, iPhone,
iPhoto, iPod, iTunes, iWork, Keychain, Mac, Mac OS, OS X,
QuickTime, and Safari are trademarks of Apple Inc., registered
in the U.S. and other countries.
Multi-Touch is a trademark of Apple Inc.
iCloud is a service mark of Apple Inc., registered in the U.S. and
other countries.
Adobe and Photoshop are trademarks or registered
trademarks of Adobe Systems Incorporated in the U.S. and/or
other countries.
IOS is a trademark or registered trademark of Cisco in the U.S.
and other countries and is used under license.
UNIX is a registered trademark of The Open Group.
The YouTube logo is a trademark of Google Inc.
Other company and product names mentioned herein
are trademarks of their respective companies. Mention of
third-party products is for informational purposes only and
constitutes neither an endorsement nor a recommendation.
Apple assumes no responsibility with regard to the
performance or use of these products.
019-2561
Page 3

Contents
12 Chapter 1: Aperture basics
12 What is Aperture?
13 Aperture workow overview
15 Aperture interface overview
19 Basic components of Aperture
19 Basic components overview
20 What are originals?
20 What are versions?
21 What are projects?
21 What are albums?
23 What are folders?
23 What is the library?
24 What are managed images and referenced images?
25 What is the Aperture Trash?
25 What is a vault?
26 Open Aperture for the rst time
27 Chapter 2: Import photos
27 Importing photos overview
29 File formats you can import into the library
29 Plan your import strategy
30 Import from a camera, card reader, or device
36 Add import options
36 Import options overview
36 View le information
37 Automatically name imported photos
40 Adjust time zone data at import
40 Add metadata at import
41 Apply eects at import
41 Filter les by type at import
42 Import RAW + JPEG image pairs
43 Use AppleScript actions at import
44 Automatically back up les at import
44 Reset import options
45 Import folders of les from the Finder
46 Import originals for referenced images into folders
47 Capture photos as you work
48 Add audio attachments to image les
49 Where Aperture stores your managed les in the library
49 Reprocess photos from earlier versions of Aperture
3
Page 4

51 Chapter 3: Work with projects and the library
51 Organize items in the Library inspector
51 Library inspector overview
53 Create and name items
54 Open and close items in the Library inspector
55 Arrange items in the Library inspector
56 Create and show favorite items
56 Work with the Aperture Trash
58 Work with library les
58 Create new libraries
58 View other libraries
59 Merge libraries
61 Open your library in iPhoto
61 Work with projects
61 View projects
64 Create and delete projects
64 Organize and sort projects in Projects view
66 Import photos into projects
66 Merge projects
67 Duplicate a project structure
67 Work with referenced images
72 Back up the library
72 Plan your backup system
73 Create and update vaults
75 Disconnect and reconnect vaults
76 Restore your Aperture library
76 Repair and rebuild your Aperture library
78 Chapter 4: Organize and sort photos
78 Browser overview
80 Navigate through and select photos
80 Navigate through photos in the Browser
81 Select photos
82 Navigate through photos in Quick Preview mode
83 Change the Browser view
83 Work with photos in lmstrip view
84 Work with photos in grid view
85 Work with photos in list view
87 Work with two Browsers open
88 Set up and arrange photos
88 Rearrange and sort photos in the Browser
89 Rotate photos
89 Create versions of a photo
90 Delete photos from the Browser
91 Rename original image les
91 Drag photos into dierent projects and albums
92 Stack photos and make picks
92 Stacking photos overview
93 Create stacks
95 Open and close stacks
95 Set a pick photo for a stack
Contents 4
Page 5

96 Work with stacked photos
97 Compare photos in stacks
98 Work with stacks in list view
98 Rate photos
98 Rating photos overview
100 Rating workow
101 Rate and compare photos
104 Sort photos by rating
105 Add keywords to photos
105 Keywords overview
108 View a photo’s keywords
110 Apply keywords using the Keywords HUD
114 Apply keywords using keyword controls and keyword presets
118 Apply keywords using the Lift & Stamp HUD
121 Apply keywords using the Info inspector
122 Apply keywords to photos in the Light Table
122 Remove keywords from a photo
123 Export and import keyword lists
123 Organize photos by people using Faces
123 Faces overview
125 Add names to faces in your photos
127 View photos in Faces view
130 Search for photos by face
131 Organize photos by location using Places
131 Places overview
133 View photo locations
138 Change the map view
139 Add locations to photos
142 Change photo locations
143 Remove locations
143 Import and work with GPS Track le data
144 Assign location information to projects
146 Work with location information using the Info inspector
150 Search for and display photos
150 Searching overview
151 Perform quick searches using the Search Field pop-up menu
152 Search using a combination of criteria
154 Save your search results
155 Group photos with Smart Albums
155 Smart Albums overview
156 Collect photos in a new Smart Album
159 Search within a Smart Album
159 Revise the contents of a Smart Album
160 Transfer Smart Album photos to an album
160 Delete a Smart Album
160 Work with library albums
Contents 5
Page 6

162 Chapter 5: View and compare photos
162 View photos in the Viewer
162 Viewer overview
164 Change the number of photos in the Viewer
164 Compare photos
166 View photos at full resolution
167 View original photos
168 Work with audio and video in the Viewer
170 View photos on multiple displays
171 Show hot and cold areas in your photos
172 Set up the Viewer for onscreen proong
172 View photos in full-screen view
172 Full-screen view overview
174 Enter and exit full-screen view
175 Work in Viewer mode in full-screen view
177 Work in Browser mode in full-screen view
178 Work in Projects mode in full-screen view
179 Use HUDs in full-screen view
180 Change the display of metadata in full-screen view
181 View photos with the Loupe
181 Loupe overview
182 Magnify photos using the Loupe
184 Use the alternate Loupe
185 Arrange photos in the Light Table
185 Light Table overview
186 Create and delete Light Table albums
188 Place and view photos in the Light Table
190 Move, resize, and align photos in the Light Table
193 Chapter 6: Work with metadata
193 Working with metadata overview
196 View and change metadata in the Info inspector or Info HUD
196 Show the Info inspector and modify views
198 Modify metadata in the Info inspector and Inspector HUD
201 Display metadata with your photos
201 Metadata overlays overview
202 Turn the display of metadata on or o
203 Specify the type of metadata to display in the Viewer and Browser
206 Work with the AutoFill Editor
206 Work with metadata views
206 Metadata views overview
208 Create, modify, and manage metadata views
210 Work with metadata presets
210 Create metadata presets
211 Share metadata presets
212 Batch change metadata
213 About IPTC metadata
214 Understanding badge overlays
214 Badge overlays overview
215 Display photos with badge overlays
216 Adjust the photo date and time
Contents 6
Page 7

217 Chapter 7: Make image adjustments
217 Adjustments in Aperture
219 About making adjustments onscreen
220 Use the adjustment controls
220 Use the Adjustments inspector and Inspector HUD
223 Use sliders
223 Work with adjustment tools in the tool strip
224 Use the brush controls
225 Ways to perform adjustments
225 Apply standard adjustments
228 Apply brushed adjustments
231 Apply Quick Brush adjustments
232 Work with brush strokes
235 Work with brushed adjustment overlays
237 Limit the tonal range of brushed adjustments
238 Remove adjustments
238 Perform adjustments in full-screen view
239 Adjust images from within Aperture editors
239 Use an external editor
240 Apply iPhoto eects to images
241 Apply specic standard adjustments
241 Enhance an image automatically
242 Retouch an image
245 Remove red-eye
250 Spot and patch an image
258 Straighten an image’s horizon
259 Crop an image
262 Flip the composition of an image
263 Remove chromatic aberration
264 Remove a vignette
265 Reduce digital noise
266 White balance an image
270 Correct exposure, highlight detail, shadow detail, and brightness
273 Adjust contrast, clarity, and saturation
276 Remove unwanted tints from an image
282 Adjust the tonal curve of an image
292 Preserve highlight and shadow details in an image
295 Adjust the levels of an image
303 Selectively adjust the color values in an image
308 Manually convert an image to black and white
309 Convert a color image to black and white with a color tint
310 Apply a sepia tint
311 Sharpen an image
313 Apply a vignette to an image
315 Apply specic Quick Brush adjustments
315 Brush the Skin Smoothing adjustment on an image
316 Brush the Dodge adjustment on an image
317 Brush the Burn adjustment on an image
318 Brush the Polarize adjustment on an image
319 Brush the Intensify Contrast adjustment on an image
Contents 7
Page 8

320 Brush the Tint adjustment on an image
321 Brush the Contrast adjustment on an image
322 Brush the Saturation adjustment on an image
323 Brush the Denition adjustment on an image
324 Brush the Vibrancy adjustment on an image
325 Brush the Blur adjustment on an image
326 Brush the Sharpen adjustment on an image
327 Brush the Halo Reduction adjustment on an image
327 Brush the Noise Reduction adjustment on an image
328 Create and apply eects
334 Adjust how Aperture decodes RAW images
334 RAW Fine Tuning controls overview
335 Use the Boost controls
335 Use the Sharpening controls
336 Use the Moire controls
337 Use the De-noise control
338 Work with DNG les
338 Set the camera default
339 Sample color values and display camera information
342 Use modier keys to identify color clipping
344 Understanding how to read histograms
344 Histograms overview
345 About evaluating exposure
346 About evaluating tonality and contrast
348 Chapter 8: Print photos
348 Printing overview
350 Print individual photos
353 Print contact sheets
354 Print books
355 Print Light Table arrangements
356 Create and modify print presets
357 Proof images and manage color
358 Chapter 9: Export photos
358 Exporting photos overview
358 Export tips
359 Export by dragging
359 Export using the Export command
364 Choose export settings
364 Work with export presets
367 Set image resolution when exporting
369 Adjust images at export
370 Add a watermark at export
370 Apply IPTC metadata and keywords to your photos
371 Rename photos at export
374 Export photos into named or numbered folders
Contents 8
Page 9

376 Chapter 10: Create slideshows
376 Slideshows overview
376 Create slideshows quickly using presets
376 Slideshow presets overview
377 Play a slideshow using a preset
379 Create and modify slideshow presets
381 Create full-featured slideshows
381 Full-featured slideshow overview
383 Create a slideshow and choose a theme
385 Change slideshow settings
386 Set the slideshow aspect ratio and crop
387 Add a title or text to the slideshow
390 Set the length of time slides play
391 Apply transitions and eects to slides
393 Apply a Ken Burns eect to a slide
395 Adjust the volume of video slides
395 Add music and audio to slideshows
401 Loop the slideshow and the main audio track
402 View your slideshows in Aperture
402 Share your slideshow movies
404 Chapter 11: Create books
404 Creating books overview
405 Plan your book
406 Create a book album
407 View pages
409 Place photos in a book
411 Add and remove pages
411 Add individual pages to a book
413 Automatically create new pages
414 Add a photo index to a book
415 Remove pages from a book
415 Work with pages
417 Work with photos
417 Add photo boxes to a book page
418 Modify photo boxes
419 Copy, paste, cut, and remove photos in photo boxes
420 Stack photo boxes in a specic order
420 Change the look of photos with lters
421 Add map boxes to a book page
425 Work with text
425 Place text on the page
426 Add metadata boxes to a page
427 Hide or show photo plate numbers in books
427 Modify the appearance of text in books
428 Work with the Layout Options inspector
429 Work with master pages
429 Master pages overview
429 Create and modify master pages
430 Unify and split master pages
431 Update book pages with master page changes
Contents 9
Page 10

431 Create and share custom themes
432 Copy a book album
432 Order books from third-party print vendors using plug-ins
434 Chapter 12: Share photos online
434 Sharing photos overview
434 Use iCloud to keep photos up to date across your devices
434 My Photo Stream overview
436 Set up your iCloud account
437 Turn on My Photo Stream for an Aperture library
438 Automatically transfer photos between Aperture and My Photo Stream
439 Manually transfer photos between Aperture and My Photo Stream
439 About turning on My Photo Stream on more than one Mac
440 About uploading RAW les to My Photo Stream
441 Use iCloud to share photos with others
441 iCloud Photo Sharing overview
441 Turn on iCloud Photo Sharing in Aperture
442 Create shared photo streams
443 Add, remove, and edit items in a shared photo stream
444 Manage subscribers to your shared photo streams in Aperture
445 Subscribe to shared photo streams in Aperture
448 Email photos
449 Publish photos to Flickr, Facebook, and SmugMug
449 Sharing photos with Flickr, Facebook, and SmugMug overview
450 Set up a Flickr, Facebook, or SmugMug account in Aperture
456 Create and delete Flickr, Facebook, and SmugMug albums
458 View Flickr, Facebook, and SmugMug albums
460 Update your Flickr, Facebook, and SmugMug albums
461 Manage your Flickr, Facebook, and SmugMug accounts
463 Create webpages
463 Creating webpages overview
463 Create web galleries and web journals
466 View and navigate through webpages
467 Choose and modify themes
468 Work with web gallery pages
468 Work with web journal pages
470 Export webpages as HTML les
471 Work with web export presets
473 Add watermarks to webpage photos
474 Chapter 13: Customize the Aperture workspace
474 Change the main window layout
476 Set Aperture preferences
476 Aperture preferences overview
477 Open Aperture preferences
478 General preferences
479 Appearance preferences
480 Import preferences
481 Export preferences
482 Labels preferences
482 Previews preferences
Contents 10
Page 11

483 iCloud preferences
483 Accounts preferences
484 Advanced preferences
485 Customize the toolbar
487 Use gestures with Aperture
488 Customize keyboard shortcuts
488 Customizing keyboard shortcuts overview
490 Search for commands and keyboard shortcuts
492 Modify keyboard shortcuts and command sets
494 Work with preview images
494 Preview images overview
495 How Aperture displays photos in the Viewer
495 Set preview preferences
495 Automatically manage previews
496 Manually manage previews
496 Reschedule JPEG preview maintenance
497 Render preview images
497 Suppress preview generation
498 Sample workows for using previews eectively
501 Glossary
Contents 11
Page 12
Aperture basics
1
What is Aperture?
Aperture is a powerful, easy-to-use digital photo management system for organizing, adjusting,
archiving, and presenting high-quality photographic images.
In Aperture, you can:
•
Work directly with your iPhoto library without having to import your iPhoto photos.
Important: To ensure library compatibility, make sure you upgrade both iPhoto and Aperture
to the latest versions.
•
Import digital photos, audio les, and HD video les from cameras, card readers, and hard disk
drives in high-quality formats such as JPEG, TIFF, and RAW.
•
Edit and adjust digital photos using intuitive image-processing tools for retouching, skin
smoothing, red-eye removal, color balance, exposure correction, and more.
•
Work with your photos in RAW format, from capture through adjustment to nal output,
preserving the highest-quality images throughout your workow.
•
Store photos, audio les, and video les wherever you want—in the Aperture library, on
multiple hard disks, or on other storage media.
•
Work with multiple Aperture libraries, with the ability to switch from library to library without
closing Aperture.
•
Catalog and manage thousands of photos and video les using exible organizational tools,
comprehensive metadata support, and powerful search tools that let you nd les instantly in
multiple locations, including hard disks, oine volumes, CDs, and DVDs.
•
Export any part of your library, make changes to it on a second system running Aperture, and
then merge it back into the library of your primary Aperture system.
12
Page 13

•
Process your photos nondestructively. Aperture protects your original image les and uses
built-in safeguards to help ensure that you don’t accidentally overwrite or modify originals.
•
Automatically back up copies of your image les to designated storage areas, called vaults,
located on external hard disks.
•
Print or publish your photos and albums in any of numerous formats and to multiple locations.
Working directly with RAW photos, you can create color-accurate prints, custom contact
sheets, and unique bound books.
•
Share your photos electronically, publishing them to Facebook, Flickr, and SmugMug. If you
have an iCloud account, you can make your new photos available on all your Mac and iOS
devices using My Photo Stream, and you can share photos with friends using iCloud Photo
Sharing. You can also create slideshow presentations for clients and friends, attach photos to
email, and create webpages to display your photos.
Aperture workow overview
The basic process of managing photos in Aperture is described below. You don’t have to do
every step, and you might do other tasks that aren’t listed here.
Use your iPhoto library with Aperture
The rst time you open Aperture, the Welcome to Aperture screen invites you to open your
iPhoto library. You can also switch to your iPhoto library by choosing File > Switch to Library.
Important: To ensure library compatibility, make sure you upgrade both iPhoto and Aperture to
the latest versions.
For more information about switching libraries in Aperture, see View other libraries on page 58.
Import photos into Aperture
To use Aperture, you rst import your photos. You can import digital photos directly from your
camera or a card reader and from hard disks or other storage devices where you’ve archived
digital les.
Aperture automatically imports any audio attachments associated with your image les,
provided that the image les and their audio attachments have the same lename. In addition
to importing photos into Aperture, you can also import QuickTime-compatible audio and
video les.
Create projects
As you work with Aperture, you create projects to hold your photos. Projects are simliar to events
in iPhoto. A project can hold dozens, hundreds, or even thousands of photos. When you need
to further subdivide and organize photos in a project, you can create albums. As your portfolio
increases and you create more and more projects, you can organize your work into hierarchies of
folders, projects, and albums.
View and organize your photos
To work with your photos, you select a project in the Library inspector, and the project’s photos
appear in the Browser. You use the Browser to review, organize, and select photos. When you
select a thumbnail image in the Browser, the photo appears in the Viewer. If you want to work
with your photos in detail, you can view them in full-screen view.
Chapter 1 Aperture basics 13
Page 14

Aperture also provides several tools to help you organize a large portfolio of photos. You can
compare high-resolution photos side by side, group similar photos in stacks, rate photos, identify
people in your photos using Faces, and apply location information to your photos using Places.
You can also apply keywords and other metadata to your photos to make them easier to nd.
Adjust your images
You can enhance your photos using a set of powerful, nondestructive adjustments such as Crop,
Straighten, Exposure, White Balance, Levels, Curves, Highlights & Shadows, Vignette, and more. In
addition, you can use brushes to apply or remove adjustments selectively, aecting only certain
parts of an image.
To streamline your workow, you can save adjustment settings as presets (collections of saved
settings) and apply a combination of image adjustments to one or more photos in a single step.
Share your photos
When it’s time to show your work to others, Aperture provides many options for distributing and
sharing your photos:
•
Send your photos to Flickr and Facebook.
•
Present your photos in multimedia slideshows.
•
Create premium-quality photo books.
•
Print high-resolution photos.
•
Export your photos in a variety of le formats.
•
Email your photos directly from Aperture.
•
Publish your photos in web galleries and web journals as HTML that you can upload to a
web server.
•
Use My Photo Stream to make your photos available on all your devices—including iOS
devices, Mac computers, PCs, and Apple TV—and use iCloud Photo Sharing to share photos
with friends and family members who have iCloud accounts.
Back up your work
After you import photos from your camera and erase memory cards in preparation for the next
shoot, Aperture stores a single copy of each photo on your hard disk. It’s important to make
backup copies of these photos to safeguard your portfolio. You can set Aperture to back up your
managed images (images that are stored in the Aperture library) and all information associated
with them, such as keywords and image adjustment settings, on vaults located on hard disk
drives. You can also set Aperture to automatically back up your photos during import.
Chapter 1 Aperture basics 14
Page 15
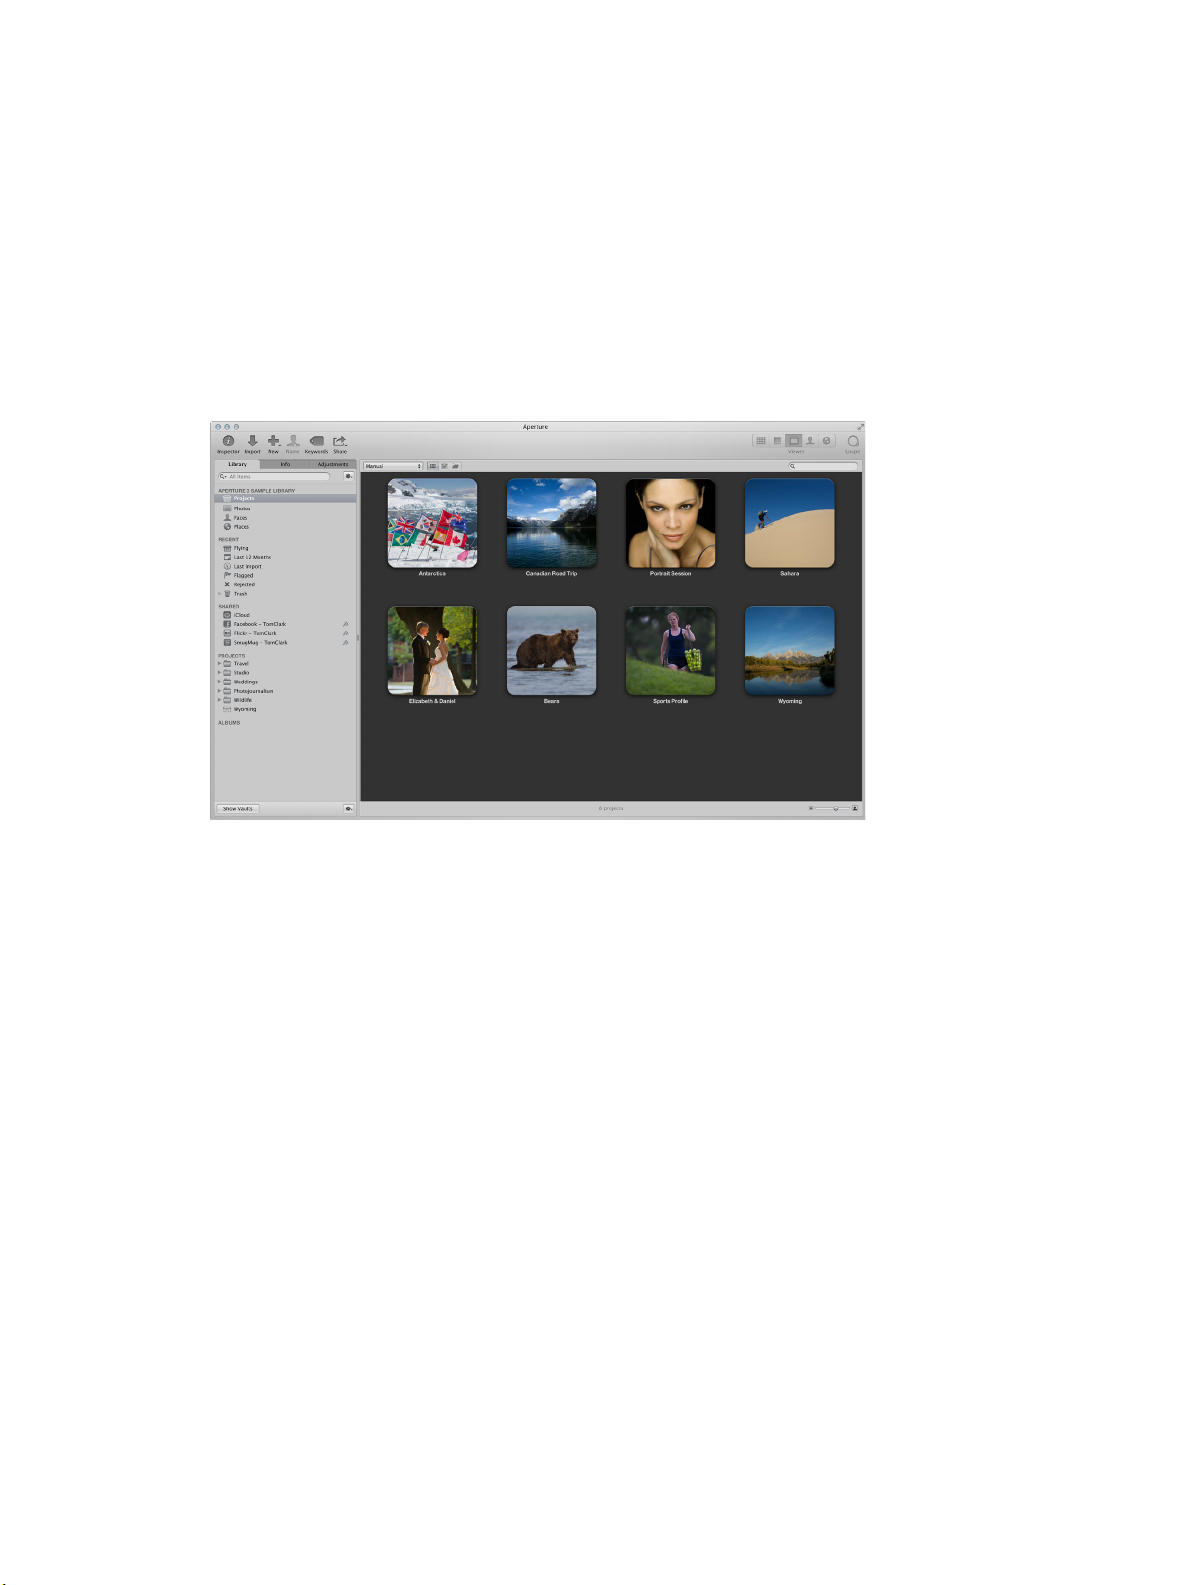
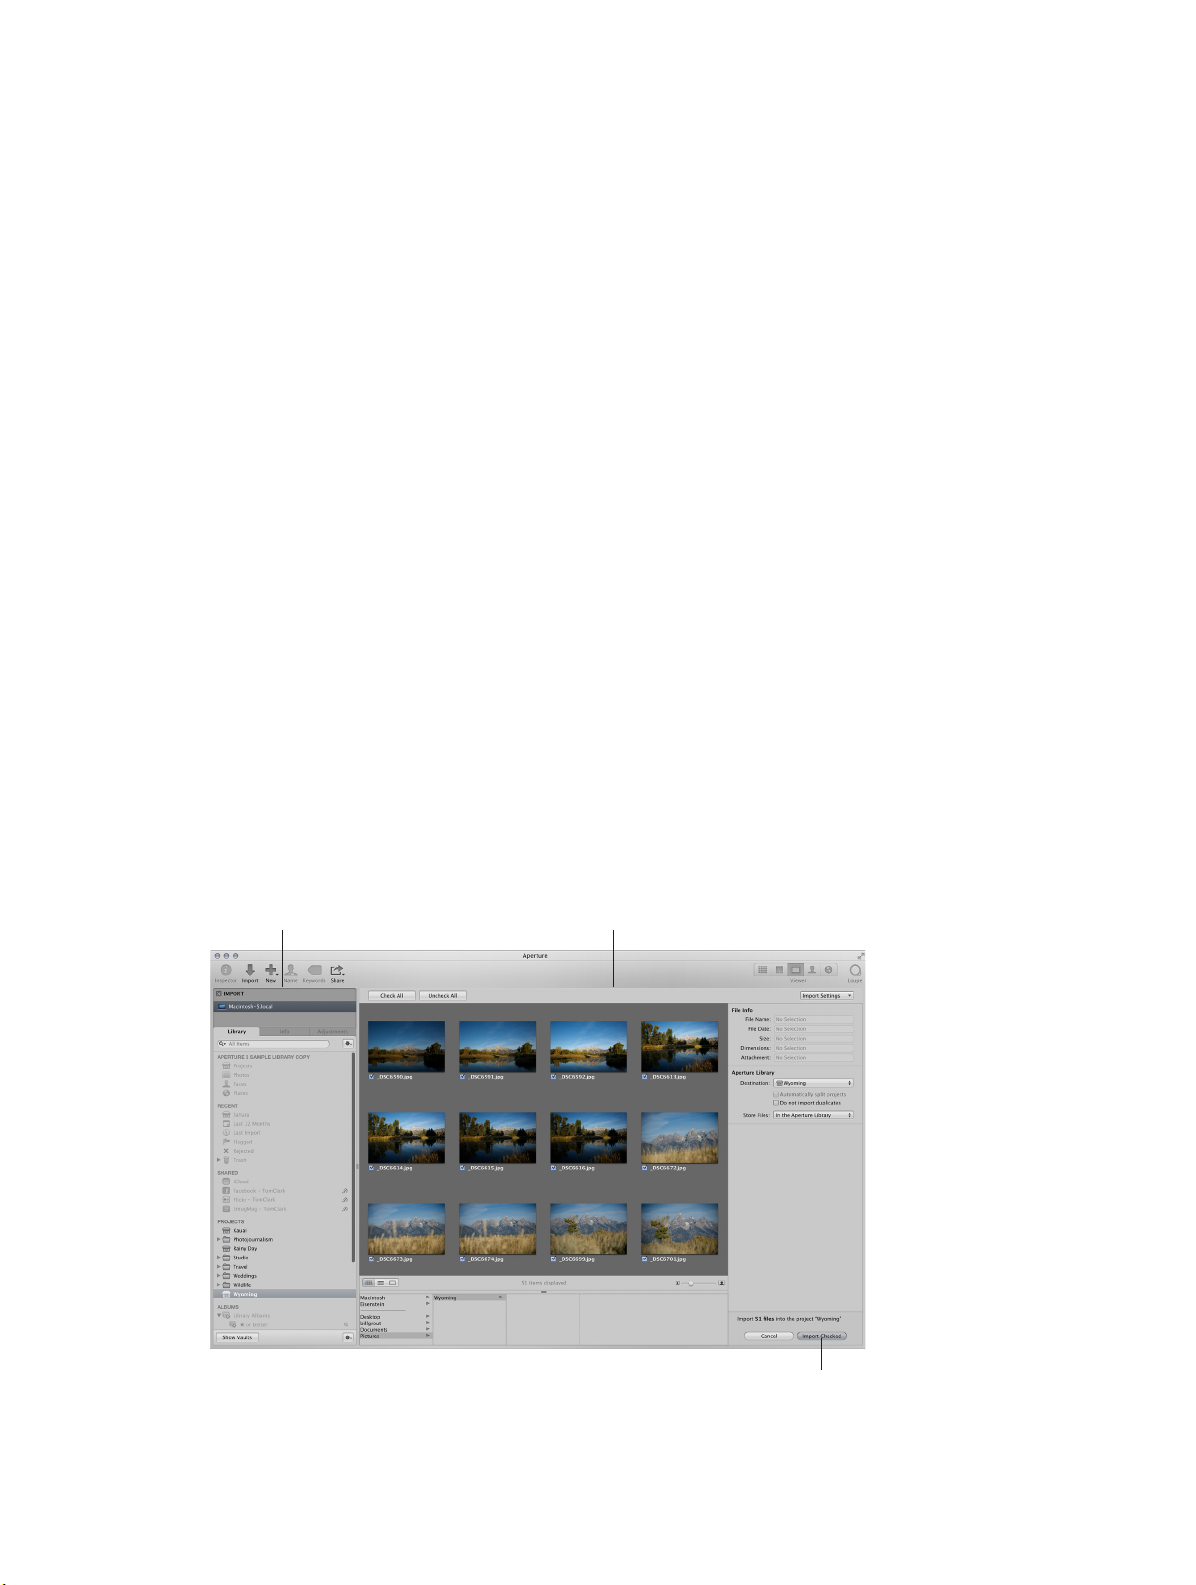
Aperture interface overview
Toolbar: Perform common tasks
Here are the main areas of the Aperture window:
and select a workspace view.
Inspectors: Access the library,
view photo information, and
adjust photos.
Browser: View thumbnails
of photos in the item selected
in the Library inspector.
Viewer: View the photo
or photos selected in
the Browser.
Chapter 1 Aperture basics 15
Page 16
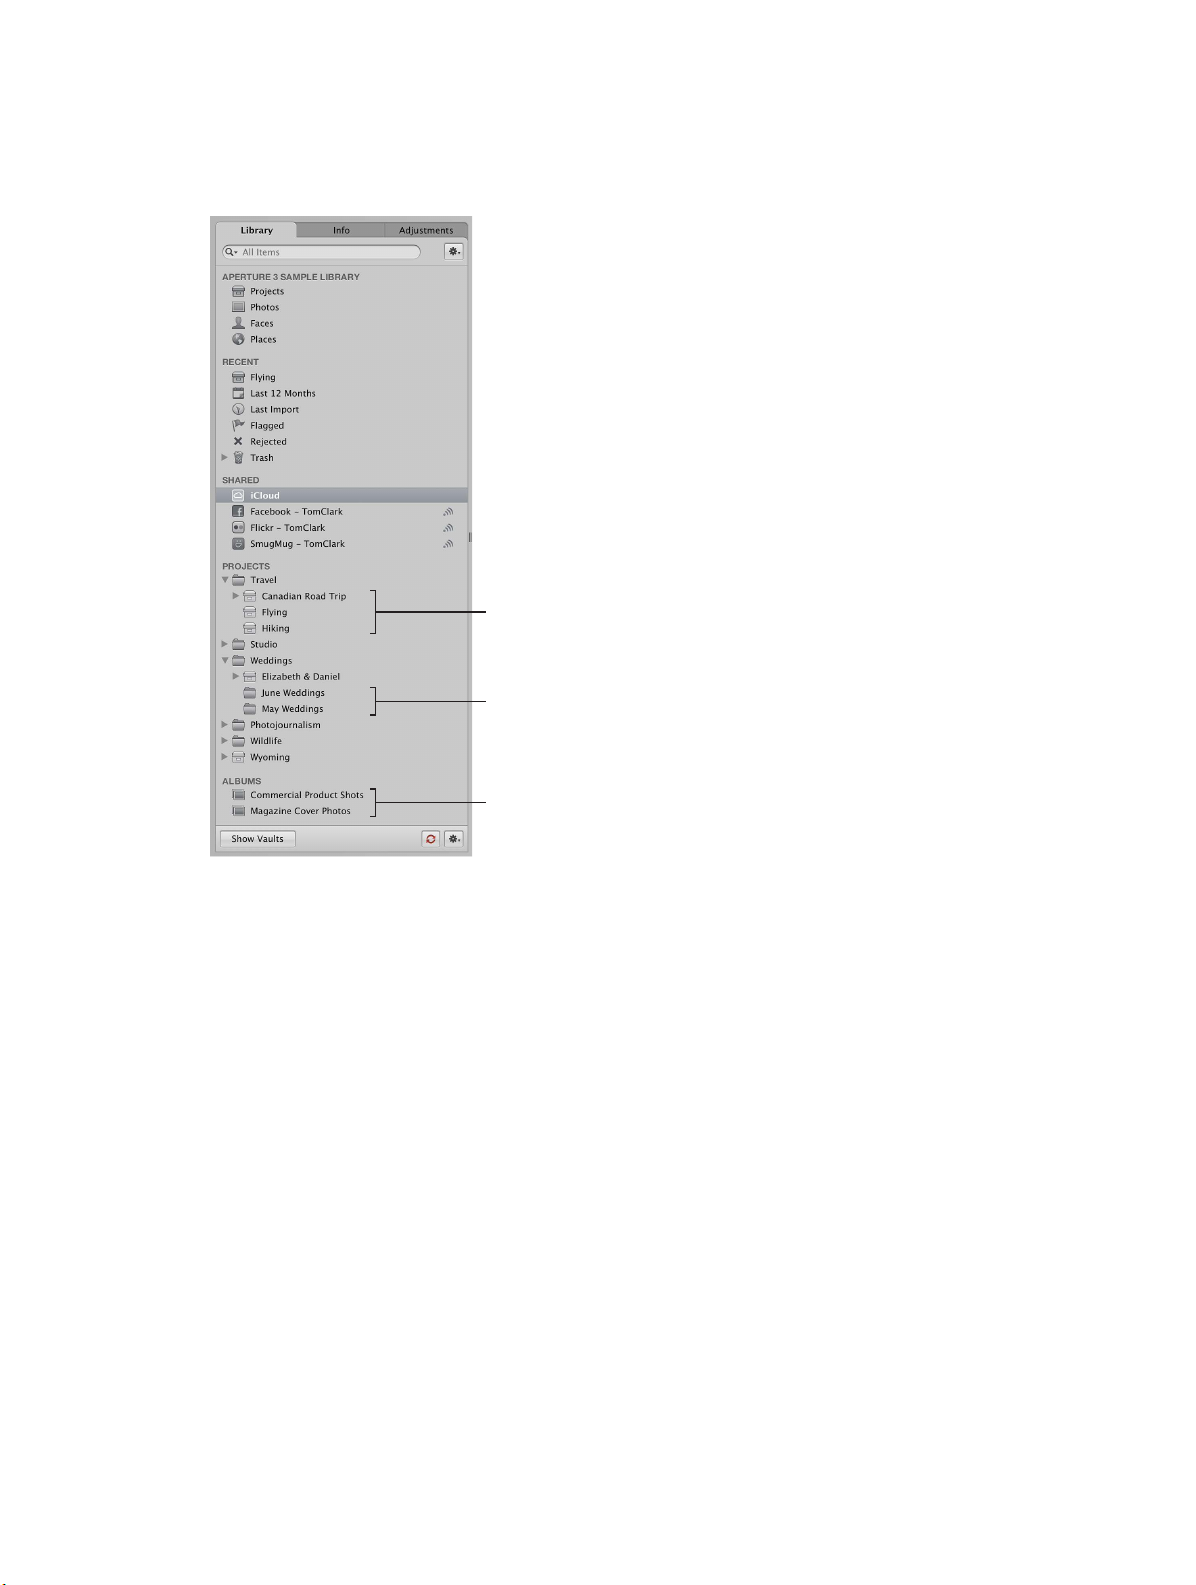
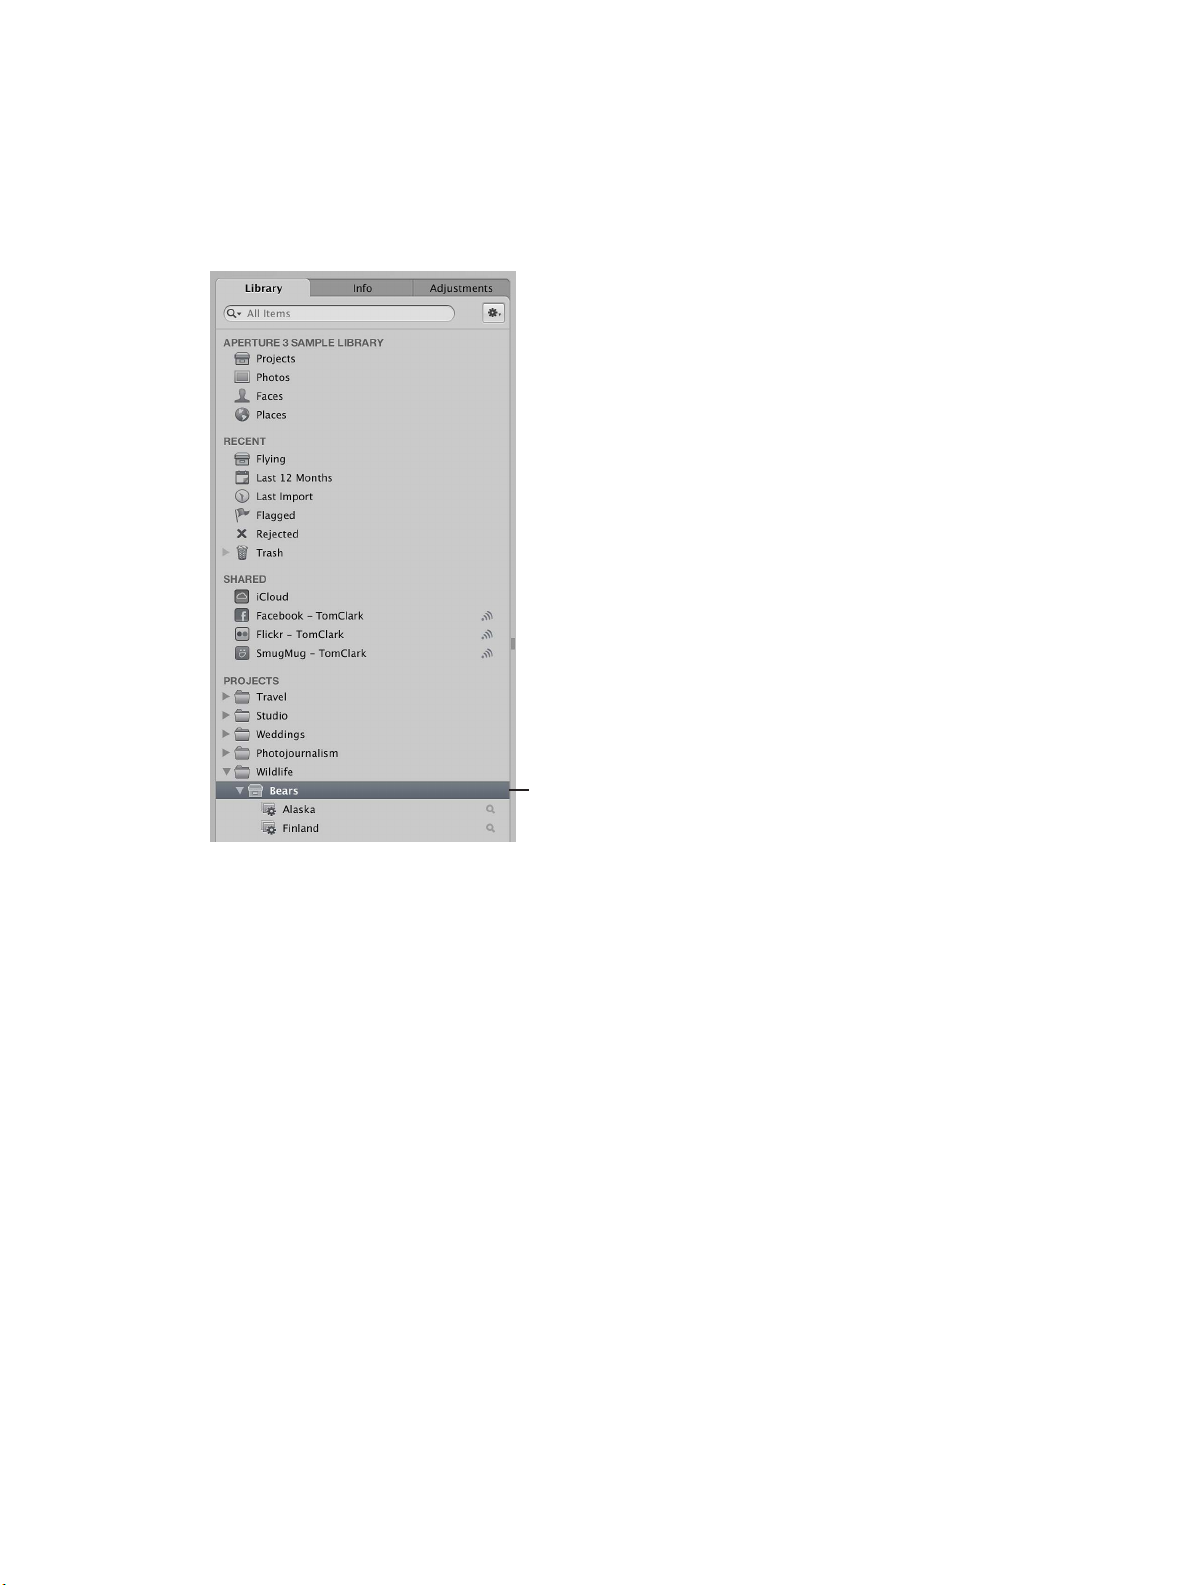
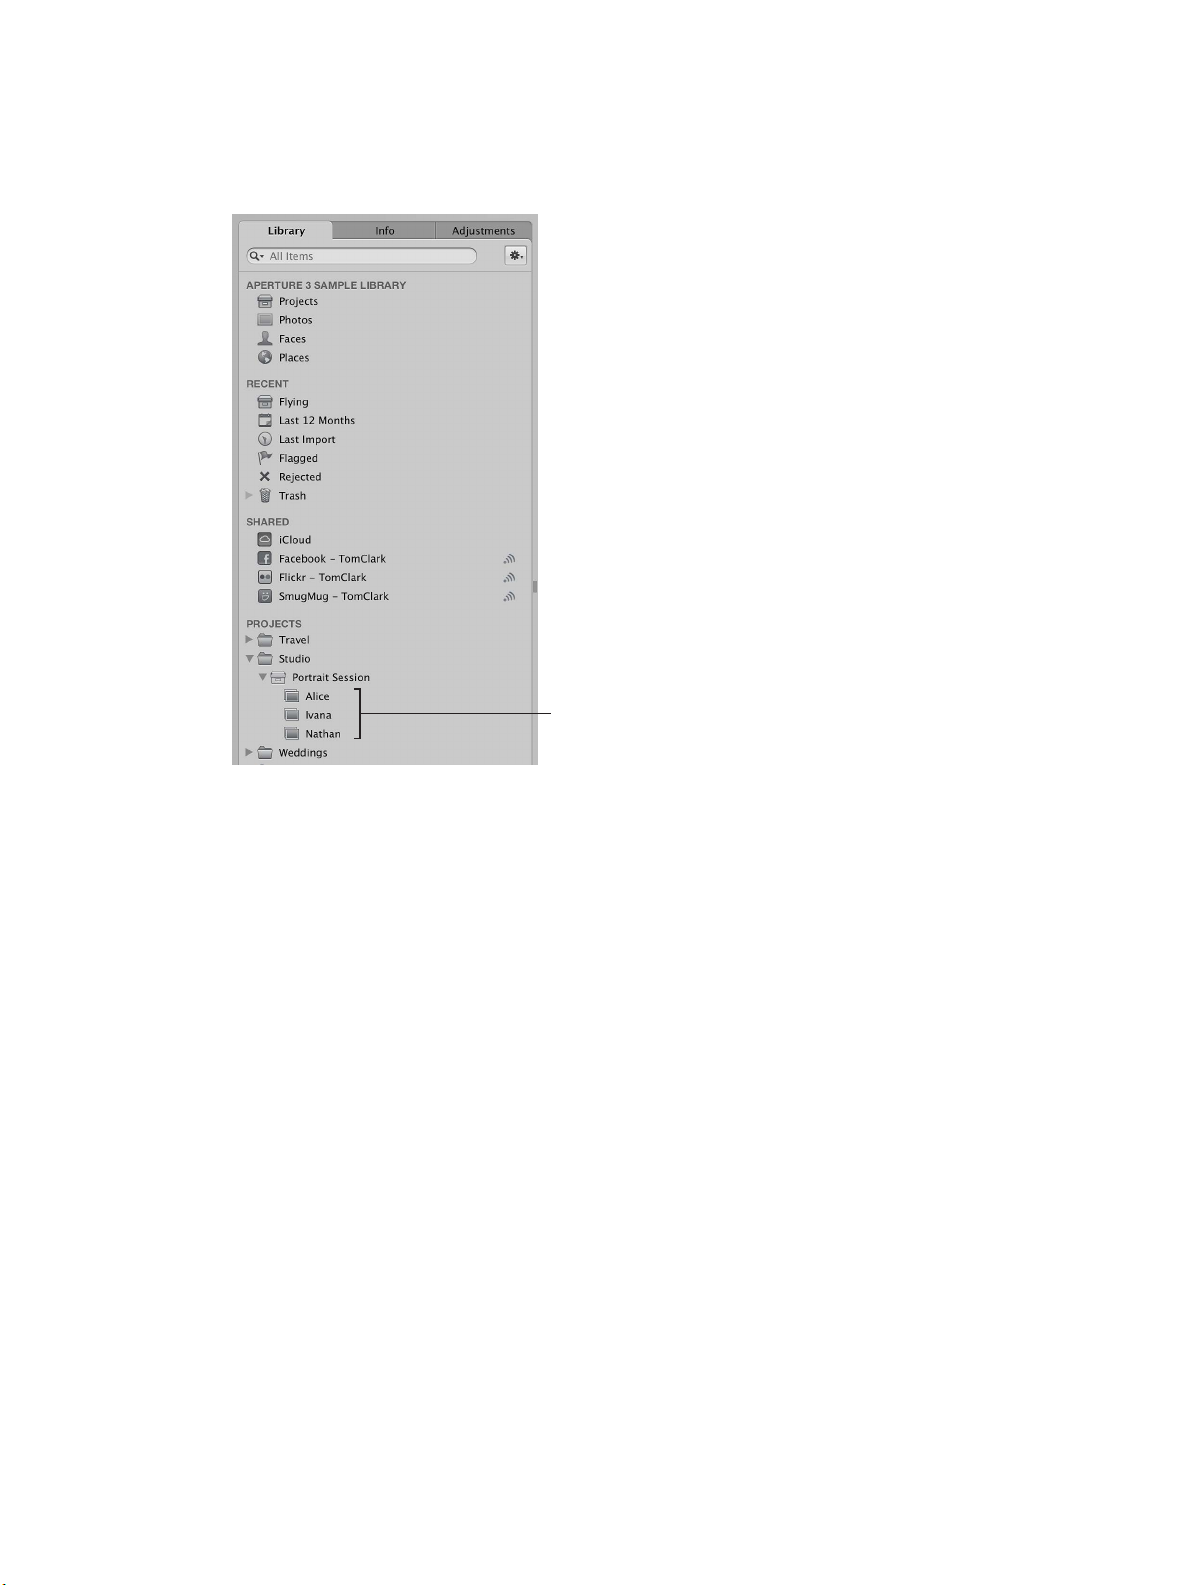
Organize photos using the Library inspector
All your imported photos are available in the Library inspector, one of three inspectors in the
Inspector pane on the left side of the Aperture main window. The Library inspector holds
containers—projects, folders, and albums—you can use to organize your photos.
Projects
Folders
Albums
The Library inspector also provides a number of ways to view items in the library. For example,
you can select Projects at the top of the Library inspector to view your photos organized by
project, or Places to view the locations of all the photos in the library. For more information, see
Library inspector overview on page 51.
When you select a folder, a project, or an album in the Library inspector, the images appear in
the Browser and Viewer to the right.
Display photos in the Browser and Viewer
You can arrange the Browser and Viewer to suit your work style, showing either one by itself
or both at once. To change the main window layout, click a layout button at the right side of
the toolbar.
Chapter 1 Aperture basics 16
Page 17
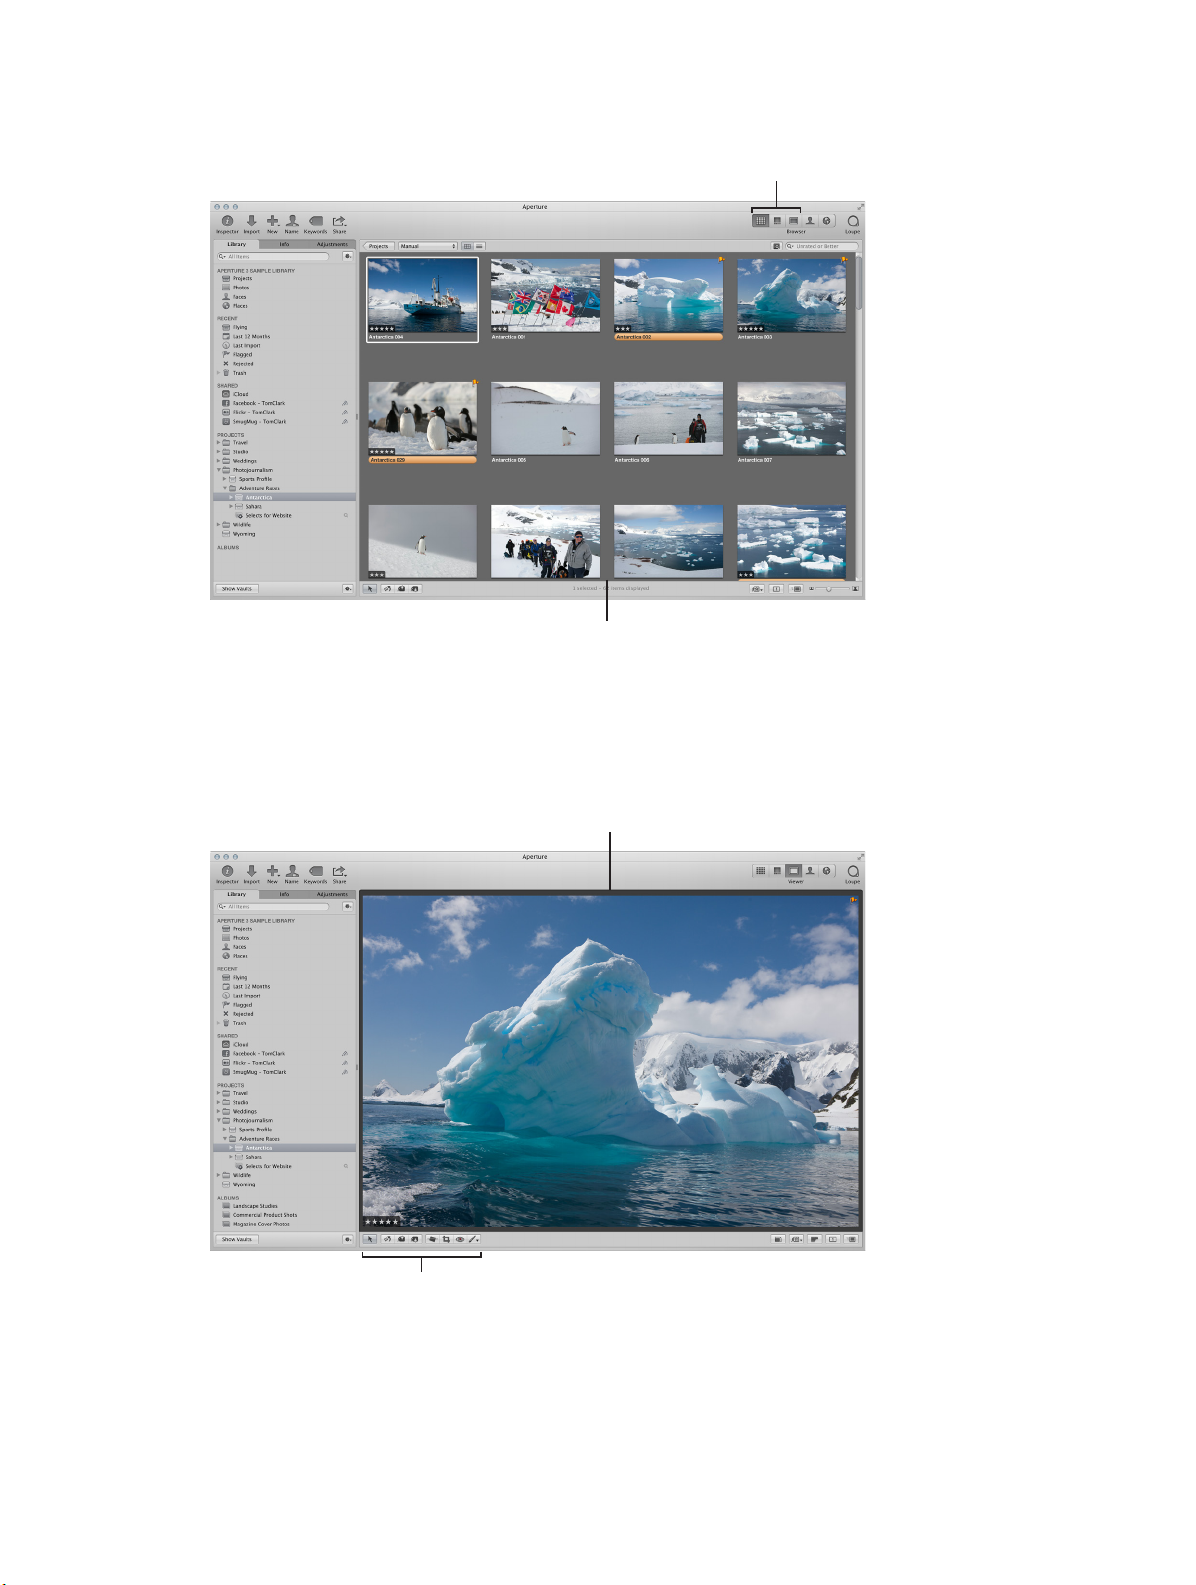
The Browser layout displays a grid of thumbnail images.
Layout buttons: Click
Viewer layout: The Viewer
main window layout.
Browser layout: The Browser
fills the workspace and displays
a grid of thumbnail images.
a button to select a
When you double-click a thumbnail image in the Browser (or click the Viewer button in the
toolbar), Aperture switches to the Viewer layout, displaying the selected photo in a larger format.
You can use the Viewer to examine a photo at full size or compare multiple photos side by side.
fills the workspace and
displays your photo selection.
Tool strip: Use these
tools to adjust and work
with your photos.
You can use the tools in the tool strip below the Viewer to adjust and manipulate your photos.
For more information, see Work with adjustment tools in the tool strip on page 223.
Chapter 1 Aperture basics 17
Page 18
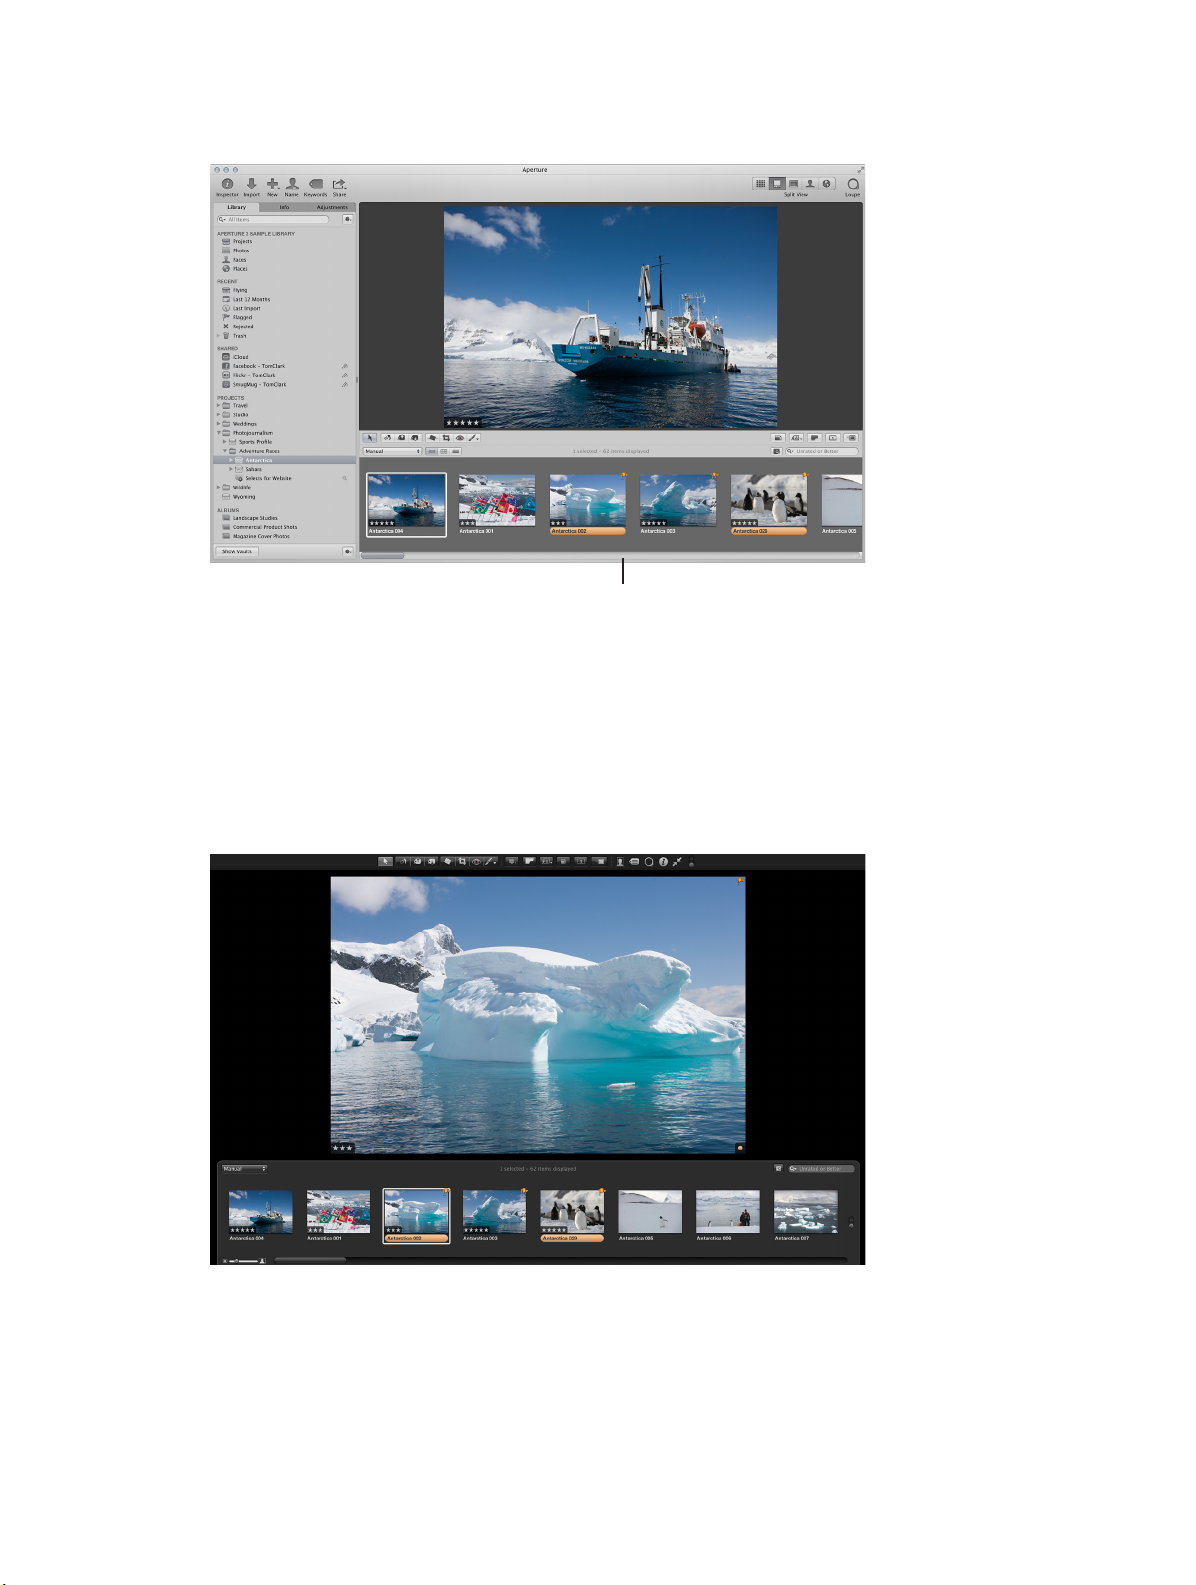
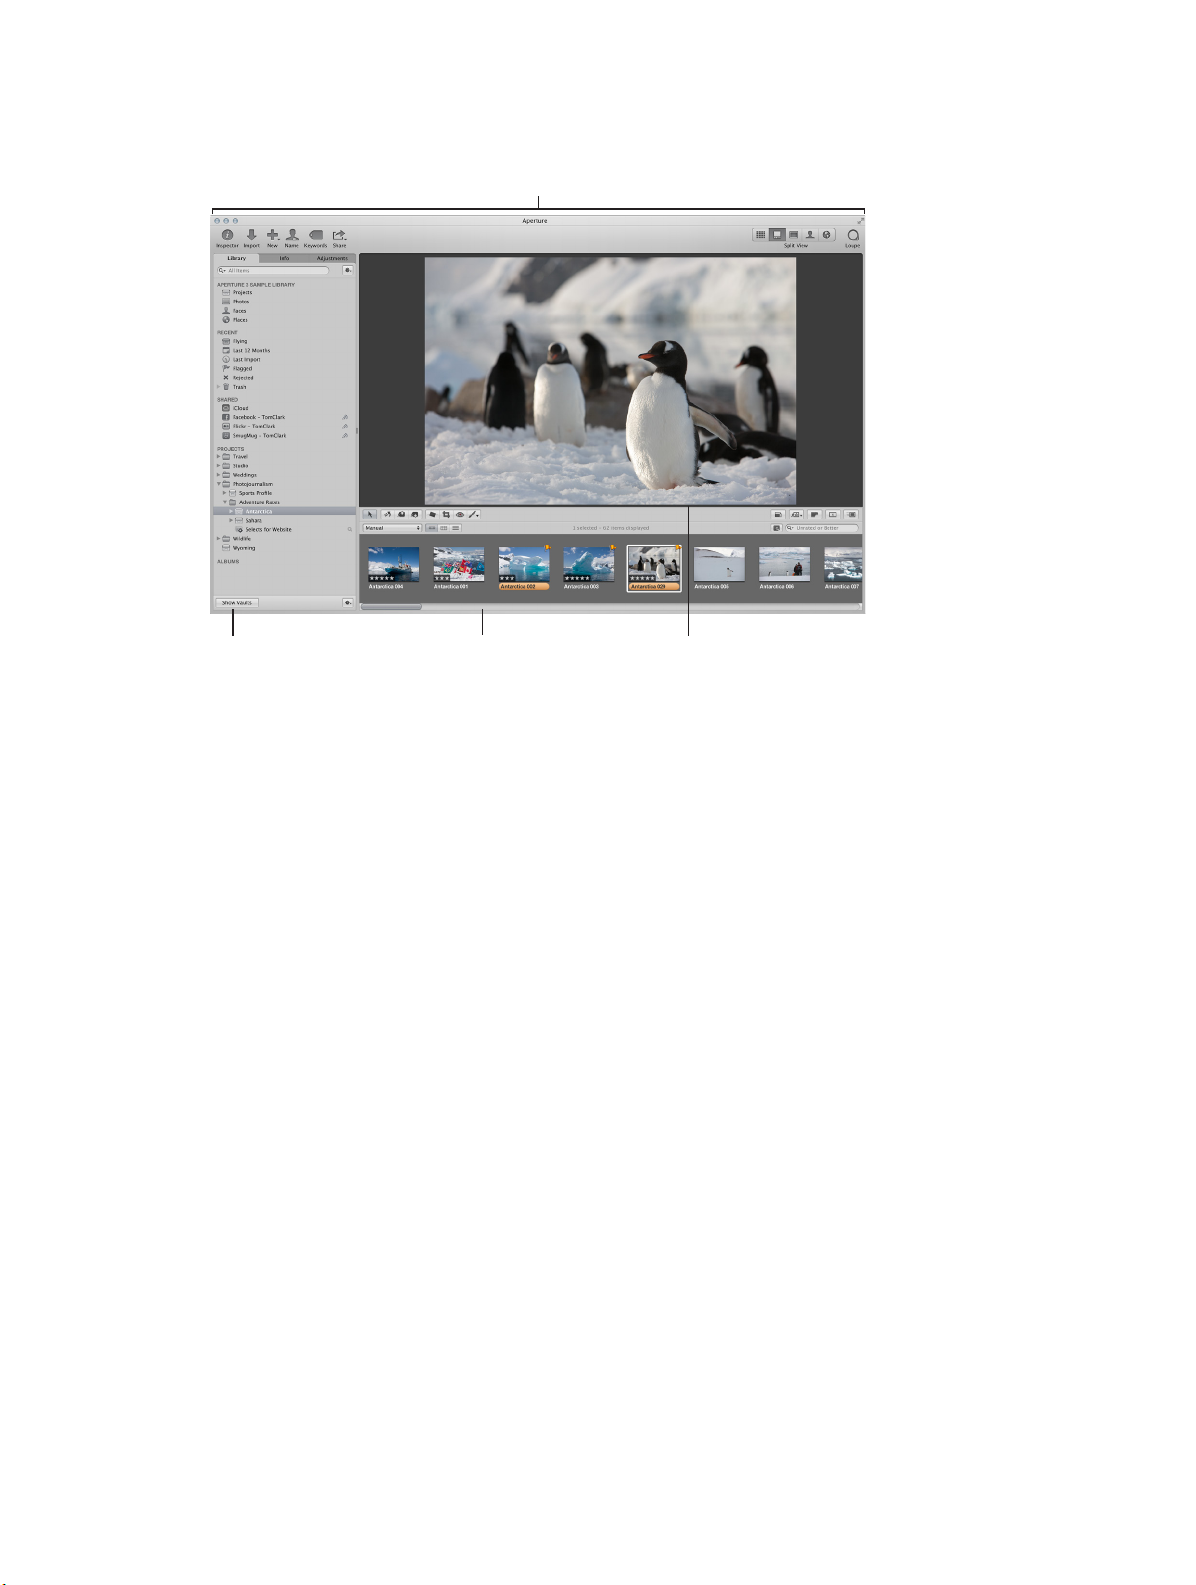
To display the Viewer and Browser at the same time, click the Split View button at the right side
of the toolbar.
Split View layout: The Viewer
and Browser appear together.
For more information about changing the conguration of Aperture windows, see Change the
main window layout on page 474.
Display photos in full-screen view
You can also view your photos in full-screen view, dramatically projecting them onto a solid
background for detailed adjustments and comparisons. Full-screen view oers dierent display
layouts that let you view large-format versions of selected photos, view thumbnails, or view
photos by project. For more information, see Full-screen view overview on page 172.
Display metadata associated with photos
To help identify your photos as you work with them, you can set Aperture to display the
metadata associated with photos in the Viewer. You can display keywords, ratings, EXIF
information, IPTC information, and more. You can specify whether the information appears
below the photos or over the lower portion of the photo.
Chapter 1 Aperture basics 18
Page 19
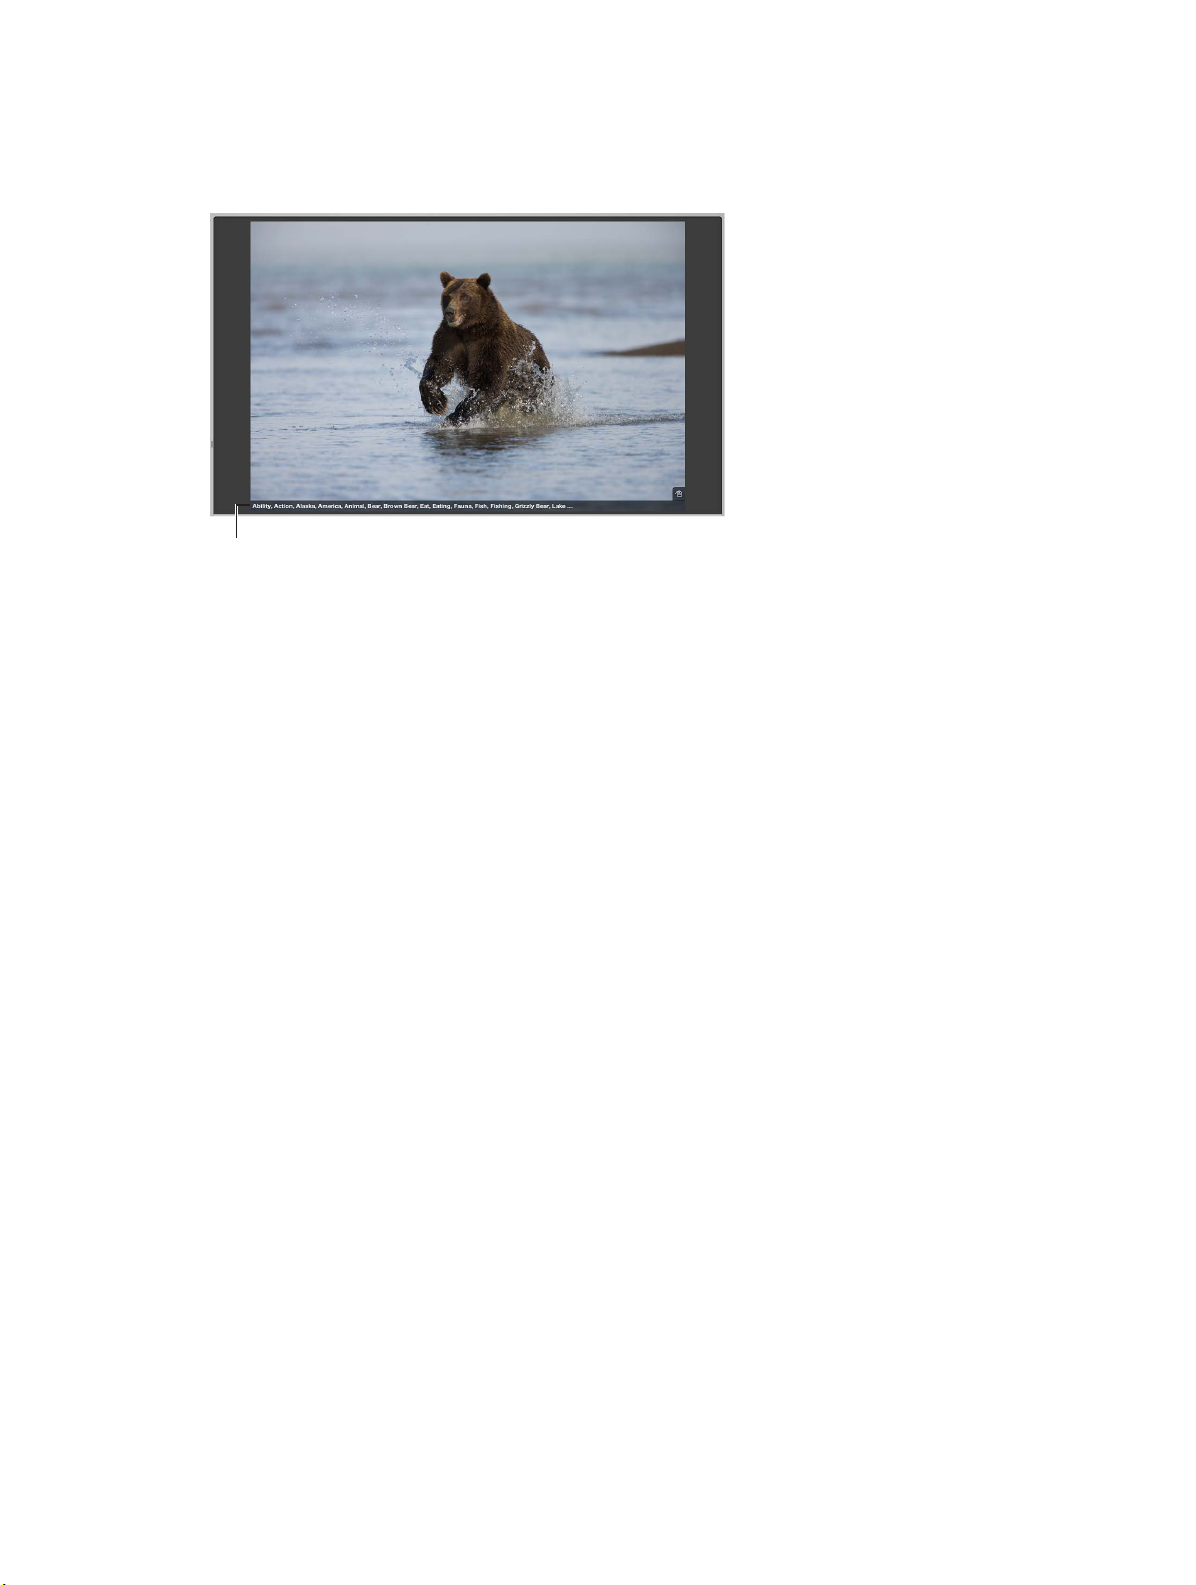
You can also specify up to two views of information to be displayed with photos in the Viewer—
basic or expanded. For example, one view might be congured to show ratings only, and another
view to show all the IPTC information associated with a photo. You can then switch between
views to change the information that appears with your photos.
The caption and keywords
are displayed here.
For more information about working with metadata views in the Viewer, see Metadata overlays
overview on page 201.
Basic components of Aperture
Basic components overview
Aperture uses the following basic components in your photo management system:
•
Originals: The original image, video, and audio les imported from your digital camera,
memory card, computer, or external storage media.
•
Versions: Files derived from the originals and used to display your photos with any changes
you’ve made, including image adjustments or changes to metadata.
•
Projects: The basic containers used in Aperture to organize photos. Projects can hold versions,
folders, and albums.
•
Albums: Containers that hold versions. You can create albums to organize photos within
projects or outside of them.
•
Folders: Containers used to organize projects and albums.
•
Library: The Aperture database that records and tracks your original image, video, and audio
les and all of their corresponding versions. You can also create multiple Aperture library les
in dierent locations. The library tracks all the information about the projects, folders, and
albums you create to organize your media.
•
Managed and referenced images: Originals stored in the Aperture library are called managed
images because Aperture manages the location of the image les in its database. Managed
image les are physically located in the Aperture Library le. You can also import photos into
Aperture without storing the original image les in the library. Image les that are not stored
in the library are called referenced images. Aperture links to referenced image les in their
current locations on your hard disk, without placing them in the Aperture Library le.
•
Aperture Trash: Container that holds items you delete in Aperture. You can retrieve items from
the Aperture Trash until it is emptied.
•
Vaults: Containers that each hold a backup of the library and all its photos and information.
The next sections describe each of these elements and how you work with them in Aperture.
Chapter 1 Aperture basics 19
Page 20
What are originals?
Originals are the original digital RAW, GIF, JPEG, TIFF, DNG, PNG, audio, or video les that are
imported into Aperture from digital cameras, memory cards, computers, CDs, DVDs, or storage
devices such as external hard disk drives. Aperture never changes the original, so you always
have originals to work from.
Important: Originals—especially RAW les—tend to be quite large. Projects consisting of several
thousand originals require high-capacity hard disks.
For information about importing originals, see Importing photos overview on page 27.
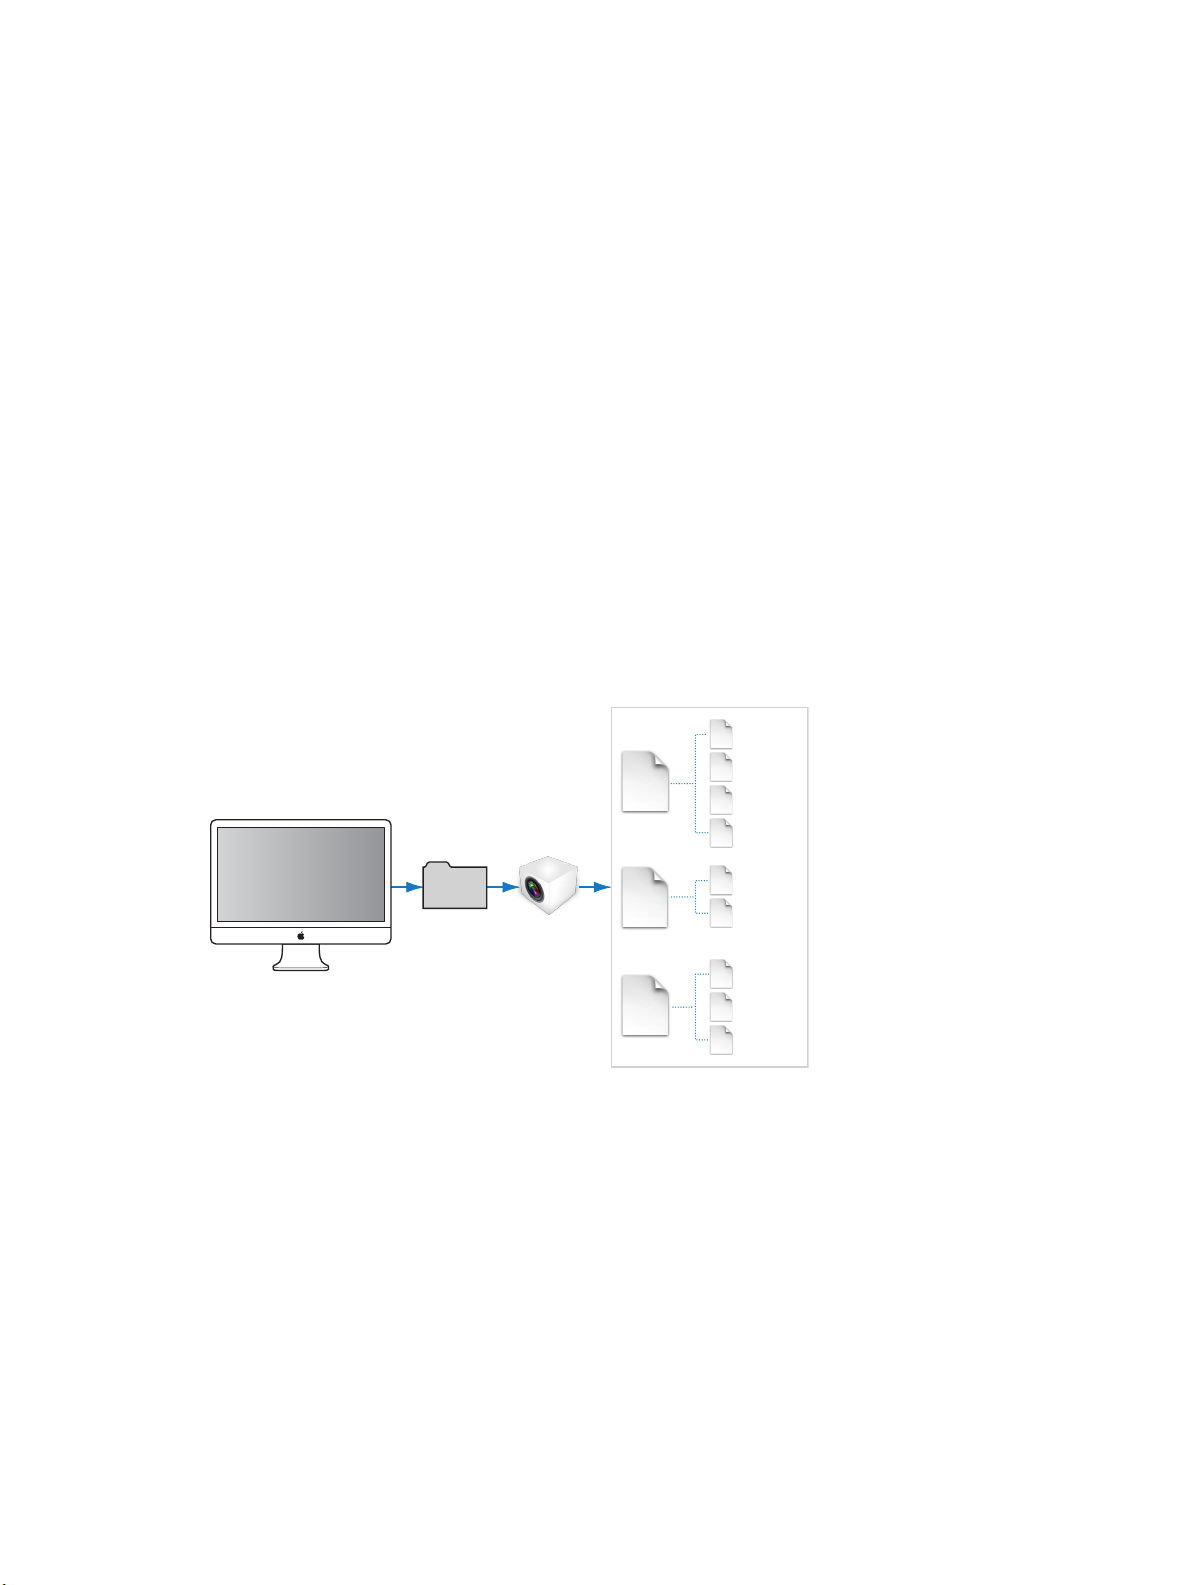
What are versions?
After you import originals to your hard disk, you can review and make adjustments to your
images. For example, you can change the exposure, contrast, or saturation, or add information to
an image, such as the photographer’s name, the project, and the location. To work with photos,
Aperture creates a version of each original that includes your adjustments and embedded
information, leaving the original unchanged. A version is linked to the original on your hard
disk, but it is not the original itself. Versions store only the thumbnail image, adjustments, and
embedded information. A full image le is not created until you are ready to print or export,
saving valuable hard disk storage.
In many cases, your workow may call for dierent renderings of the same photo. For example,
a client may request a color as well as a black-and-white version of the same head shot. You can
create multiple versions of the same photo in Aperture.
1A
Versions
1B
1C
1D
2A
2B
3A
3B
3C
from
Original 1
Versions
from
Original 2
Versions
from
Original 3
Computer
Pictures
folder
Aperture
Library file
1
Original
2
Original
3
Original
When you create a version, Aperture reads the original image le on disk and displays it on the
screen. As you make adjustments or add information to the image, Aperture displays the version
with your changes, but the original image le is never changed.
Chapter 1 Aperture basics 20
Page 21
What are projects?
You organize your originals and versions using projects, which are similar to events in iPhoto.
When you import photos into Aperture, you assign them to a project. You can create as many
projects as you like, up to the limitations of your disk space. For example, you can create a new
project for each of your shoots. Or, if you do several shoots of the same subject, you can create
a project that encompasses all of the shoots.
Project opened
to show its contents
You can have multiple projects open at the same time, each represented by its own icon in the
Library inspector.
What are albums?
An album is a container in the Aperture library used to group photo versions. You can create
albums at the library level or within a project.
You use albums created at the library level to organize versions from multiple projects. For
example, you can create an album to consolidate your favorite photos, or selects, from multiple
projects. You can then publish this collection of selects on your website or export the album’s
contents for review by a prospective client.
You can also create albums within projects to help you organize your photos into relevant
groups. For example, you can organize photos in a project by:
•
Occasion: Break a project into a series of albums according to specic occasions. For example,
a wedding project can be divided into albums for the preparation, ceremony, and reception, or
a soccer project can be divided up in albums for each game.
•
Day: Break a project that spans multiple days into albums for individual days. For example,
a project consisting of a two-week trip to Japan can be divided into 14 individual albums
corresponding to each day.
Chapter 1 Aperture basics 21
Page 22
•
Subject: Break a project consisting of multiple photographed subjects into individual albums
dedicated to each subject. For example, a studio photographer may shoot three models for
a single project. The photographer can create an album for each model. Or you might create
albums to hold specic photo types, such as candid shots or close-ups.
Three albums created
within one project
You can also place versions from other projects into an album that resides within a project.
In addition to a standard album that you drag photos into, you can create Smart Albums whose
contents are controlled by criteria you specify. When you change a Smart Album’s search criteria,
the contents of the Smart Album change automatically. For more information, see Group photos
with Smart Albums on page 155.
Chapter 1 Aperture basics 22
Page 23
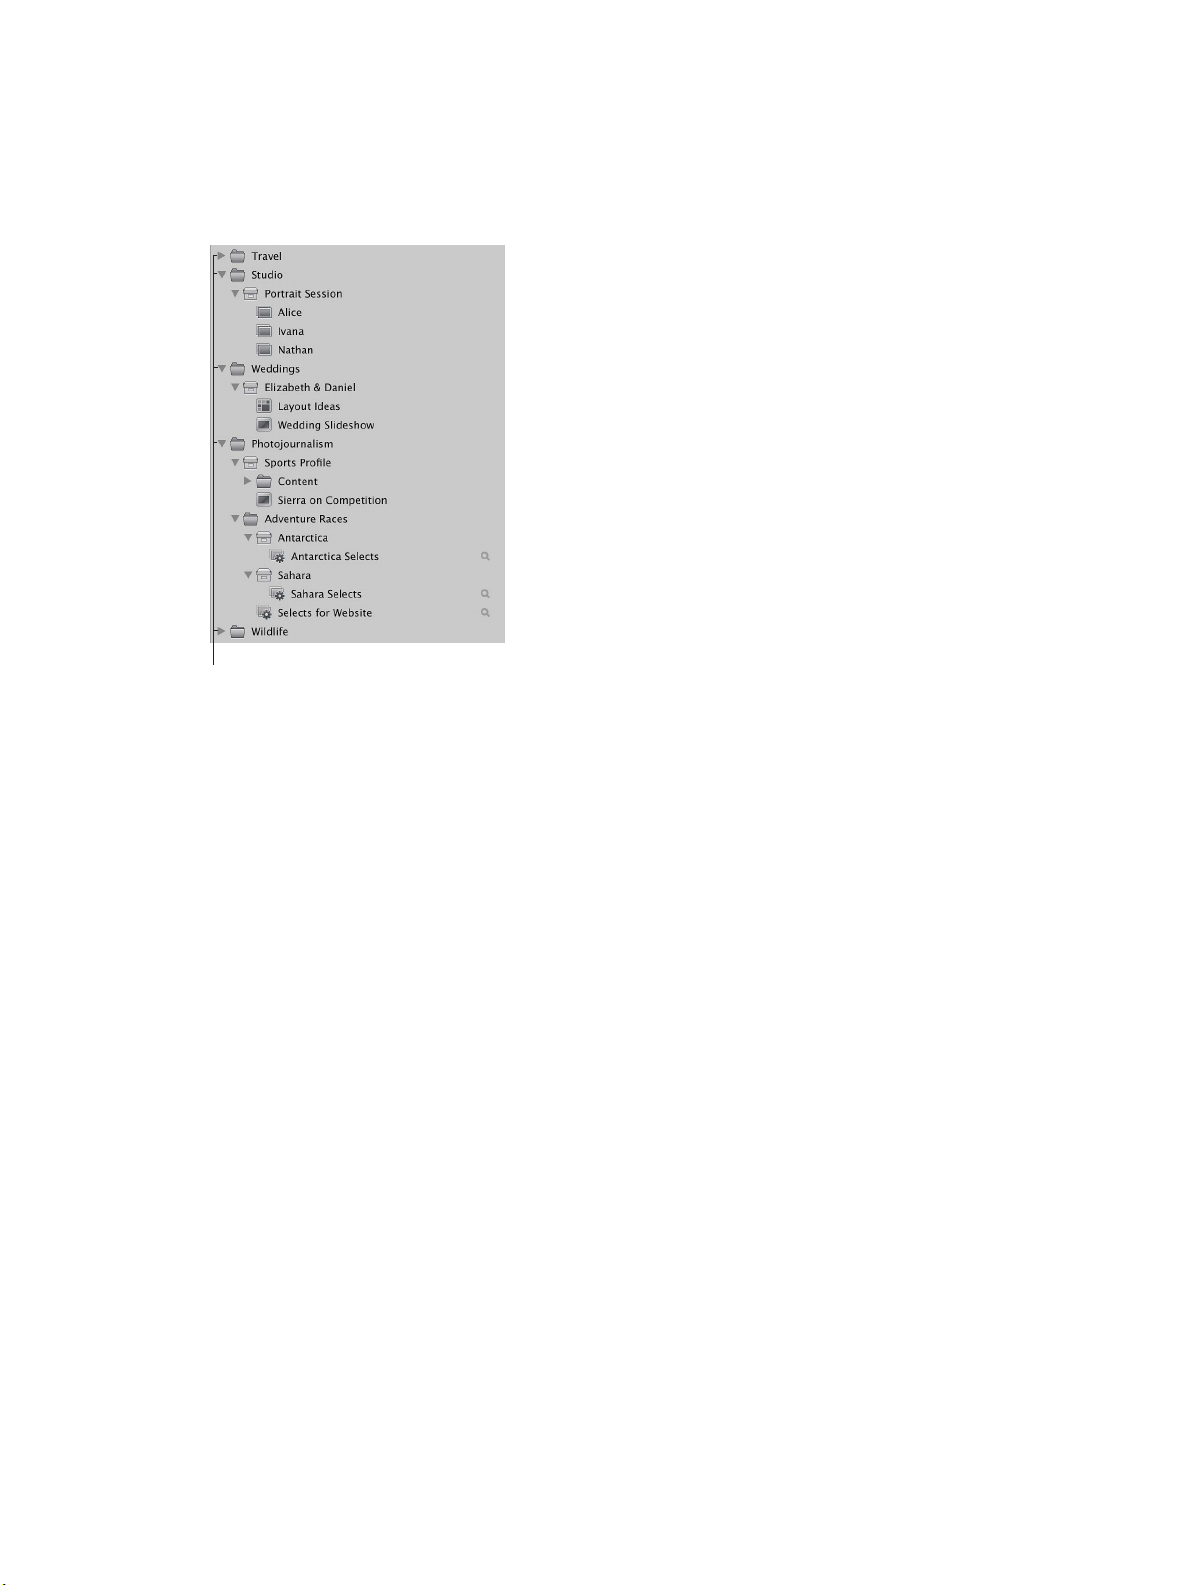
What are folders?
In Aperture, you use folders to organize projects and albums. For example, you can import
photos into projects and then place the projects in folders based on photo type or location.
If you shoot multiple projects for the same client, you can create a folder that holds the
client’s projects.
These folders organize
projects based on type.
Folders contain only albums, projects, and other folders. They don’t contain originals or versions.
What is the library?
The Aperture library tracks every project, album, folder, original, and version, no matter whether
the photos, video les, and audio les are stored in the Aperture Library le or in other hard disk
locations. Aperture automatically creates a library le in the Pictures folder the rst time you
open Aperture. You can import media into the library or have Aperture access the les in other
locations. When you back up your originals to vaults on external hard disks, those actions are
tracked by the Aperture library as well. For more information about backing up your library, see
Plan your backup system on page 72.
In Aperture you can:
•
Work with multiple libraries: You can work with as many libraries as necessary—including
iPhoto libraries—and switch between them without having to quit and reopen Aperture. If
your workow calls for several unique libraries, you can switch between them on the y. You
can also check the contents of a library prior to importing it into the library that’s currently
open. For more information, see Create new libraries on page 58 and View other libraries on
page 58.
•
Merge libraries: You can also transfer libraries from other systems running Aperture and merge
them with the library on your local Aperture system. All links between versions and their
original photos are maintained when projects are transferred. This is particularly useful if you
use a portable computer when on location or away from your studio, and a workstation at
your studio. For more information, see Merge libraries on page 59.
Chapter 1 Aperture basics 23
Page 24

•
Move a library to another location: When the library le becomes large and requires more disk
space than is available in its current location, you can move it to a hard disk with greater
storage capacity. To change the location of the library, you move the library le to a new
location and then double-click it to open it in Aperture. You specify where the library is located
using the Preferences window. For information about working with multiple library les in
Aperture, see General preferences on page 478 and View other libraries on page 58.
Tip: To maximize performance, place the library le on an internal hard disk.
What are managed images and referenced images?
Aperture lets you choose how you organize your photos on disk. You can store your photos
in the Aperture library, or you can import photos by simply linking to the image les in their
current locations, without placing them in the library.
Images whose originals are stored in the Aperture library are called managed images. Managed
images are always accessible and are easily backed up to vaults, to name just two benets.
Imported photos whose originals haven’t been placed in the library are called referenced images.
Using referenced images provides a number of substantial benets to your photography
workow. For example, you can incorporate your existing portfolio of photos into Aperture
without changing the current location of the les. Importing images by reference does not result
in a duplication of your image les in the Aperture library, thus saving hard disk space. You can
also connect and disconnect hard disks holding your referenced images’ originals as you need
them. This allows you to keep originals for less-used photos oine or to make specic types of
photos available for editing or adjustments as needed. Using referenced images lets you build a
exible image management system customized to your work style.
You specify whether a photo will be a managed image or a referenced image when you import
it. When importing photos, you can:
•
Specify that originals be stored in the Aperture library.
•
Import photos as referenced images, so that their originals remain in their current locations.
•
Move or copy image les to a new location. For example, you might decide to have a certain
group of referenced image les, such as photos from 2011, placed in one hard disk location,
and another group, such as photos from 2012, placed in a dierent hard disk location.
You can work with referenced images—creating versions, making adjustments, cropping, and
adding metadata—just as you can with managed images. Versions that you create from a
referenced image are stored in the library. To make adjustments to a version from a referenced
image, the referenced image’s original must be available on your hard disk or other storage
device. For example, if you delete a referenced image’s original in the Finder, Aperture no
longer has access to the original and so no longer allows you to change your versions or create
new ones.
To help you identify referenced images, Aperture marks them with a badge overlay that you
can display or hide. When a referenced image’s original is missing or oine, its badge changes
to show that the image is not accessible. For example, if you disconnect a hard disk that holds
originals for many referenced images, Aperture automatically marks the referenced images
in the Browser and Viewer as oine. If you reconnect the hard disk or other storage device
later, Aperture accesses the originals automatically and you can work with and change their
versions again.
Chapter 1 Aperture basics 24
Page 25

You can also relocate originals, moving them out of the library or moving referenced originals to
dierent hard disk locations. If needed, you can also move referenced originals into the Aperture
library by choosing the Consolidate Originals command in the File menu.
You can search for photos based on whether they are managed images, referenced images, or
online or oine images. Aperture also provides robust le management tools that let you quickly
determine which images are oine and easily reconnect images that have been moved to
dierent volumes.
What is the Aperture Trash?
All items deleted in Aperture, including projects, albums, folders, versions, and originals, are
placed in the Aperture Trash in the Library inspector. You can retrieve any item from the Aperture
Trash until you empty it. For more information, see Work with the Aperture Trash on page 56.
What is a vault?
To ensure that you have backup copies of your photos, you create a vault to hold the backup
les. A vault is a container that holds an exact copy of the library. This includes projects, originals,
and any versions you’ve created. You can easily create and update a vault to back up the library.
It’s a good idea to create multiple vaults on multiple external hard disk drives to safeguard
copies of the library.
You can have as many vaults as you deem necessary. Creating more than one vault is useful if
you work at dierent locations; you can always keep one vault on an external drive onsite and
another one osite. All vaults and backup les are tracked by the library so that even if you
disconnect the external hard drive that contains a vault, Aperture can access it the next time
you reconnect the drive and update the vault.
All the originals and versions for managed images are backed up, as well as all metadata,
previews, and adjustment information associated with managed images. The versions, previews,
metadata, and adjustment information associated with referenced originals are also backed up
in the vault. Referenced originals are not backed up in the vault with the library.
Important: Because the originals for referenced images are stored outside of the library, you
must manage the backup and archiving of them yourself.
Chapter 1 Aperture basics 25
Page 26

Open Aperture for the rst time
The rst time you open Aperture, a Welcome to Aperture screen presents you with two options,
provided you have an iPhoto library:
•
Update and begin using your existing iPhoto library.
•
Start with a new, empty Aperture library and begin importing photos.
Important: Aperture can only open iPhoto libraries upgraded to iPhoto 9.3 or later. To upgrade
your iPhoto library, open it in iPhoto 9.3 or later.
Open Aperture for the rst time
1 In the Applications folder in the Finder, double-click the Aperture icon.
The Welcome to Aperture screen appears.
2 Do one of the following:
•
To update your iPhoto library and begin working with it in Aperture: Click the Update
iPhoto button.
After iPhoto is updated to the latest version, open your iPhoto library so that it is upgraded
to the latest version as well. When the upgrade is complete, close iPhoto and open Aperture.
The contents of your iPhoto library appear in the Library inspector in Aperture. For more
information, see Library inspector overview on page 51.
•
To open a new, empty Aperture library: Click the Create New button.
Aperture opens a new, empty Aperture library, and you can begin importing photos
immediately. For more information, see Importing photos overview on page 27.
Tip: To set Aperture to use the keyboard shortcuts you’re familiar with using in iPhoto, choose
Aperture > Commands > iPhoto, and choose your language. For more information, see
Customizing keyboard shortcuts overview on page 488.
Chapter 1 Aperture basics 26
Page 27
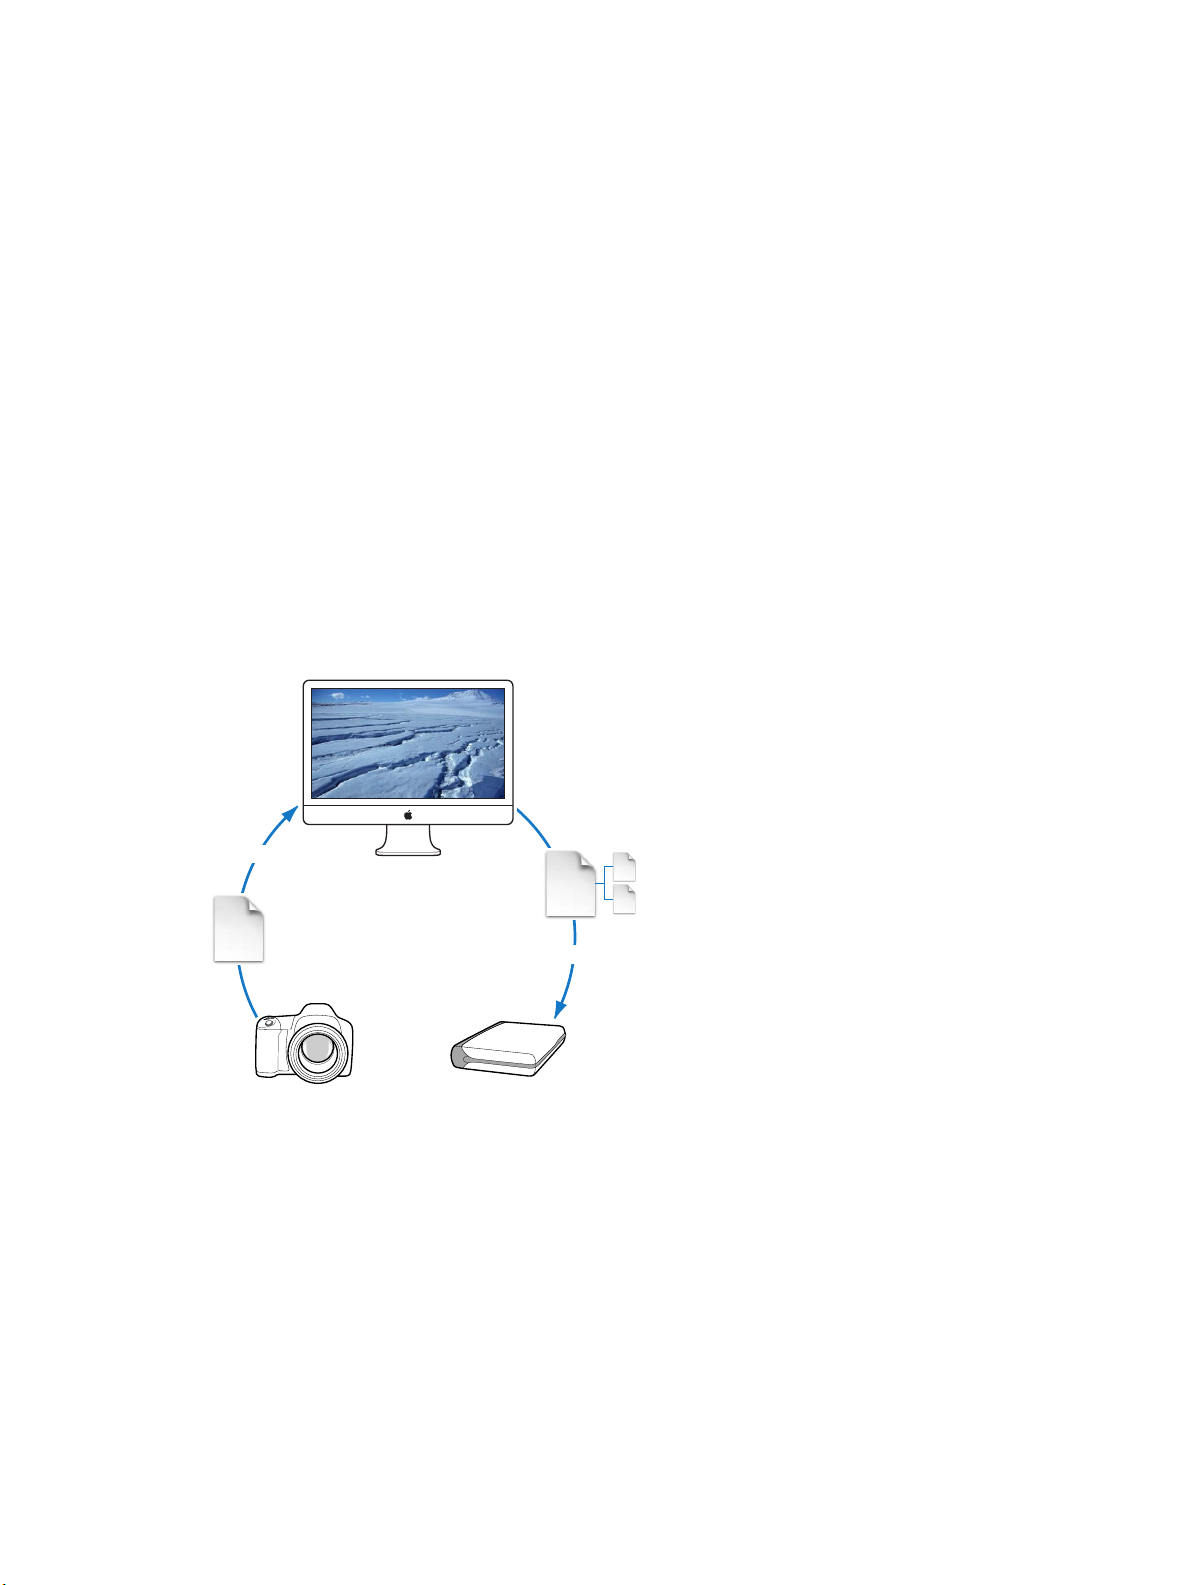
Camera
(external drive)
Import photos
2
Importing photos overview
Aperture provides tools and workow options that make it easy to import your photos. You can
import photos directly from your digital camera or card reader, and import photos stored on
your computer hard disk or other storage devices. You can also import audio and video les.
In Aperture you can open, view, and work with iPhoto libraries the same way you work with
multiple Aperture library les. For more information about opening your iPhoto library in
Aperture, see View other libraries on page 58.
When you import from a digital camera or card reader, Aperture places the photos in a project. If
you don’t select an existing project, a new one is created automatically.
As Aperture imports photos, video les, and audio les, it generates a version le, preview, and
thumbnail corresponding to each original.
Import
RAW
& JPEG
Aperture library
(system disk)
Importing
to Aperture
Vault
Project
Back up
Versions
Originals
27
Page 28
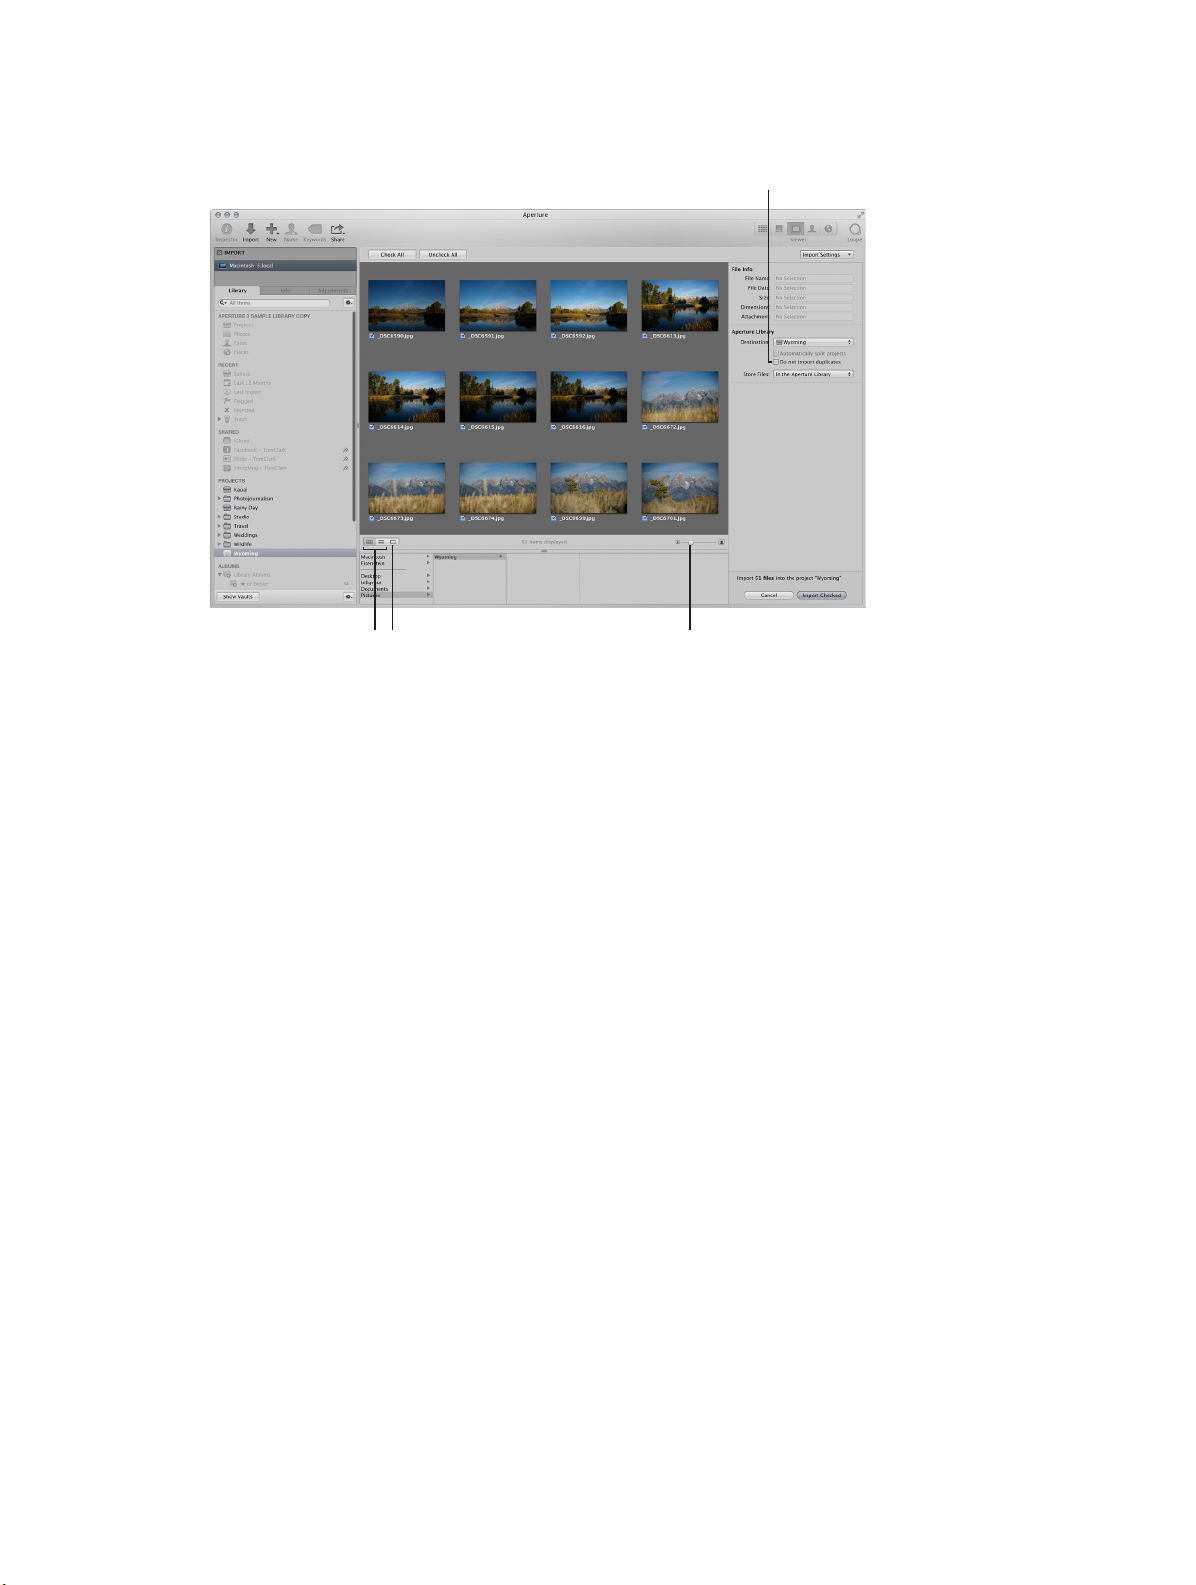
You can import originals directly from a digital camera or card reader and from your hard
“Do not import
disk drives.
duplicates” checkbox
Grid View and
List View buttons
Viewer button Thumbnail Resize slider
When you connect a digital camera or select an item in the Import pane, the Import
browser appears.
You use the options in the Import browser to specify how and where photos are imported. The
Import browser shows thumbnails of your photos that you can enlarge or reduce in size using
the Thumbnail Resize slider. You can select individual photos to import or import all the photos
at once. You can also set the Import browser to display photos in a list by clicking the List View
button. In list view, you can click a column heading to sort photos by category. If you are unsure
whether a specic photo should be imported, you can click the Viewer button to inspect a high-
resolution version of the photo.
When you import photos, Aperture automatically checks to see if any of the photos are
duplicates of previously imported photos. Aperture checks the lename of the original to
determine if a photo is a duplicate of one in the library. Select the “Do not import duplicates”
checkbox to prevent Aperture from importing duplicates. If this checkbox is unselected, Aperture
imports all photos, even if they are duplicates, and creates a new original with a dierent
name for each duplicate. Aperture never overwrites or replaces an original that has already
been imported.
As you import photos, you can set Aperture to automatically name and record information about
them. Aperture can assign lenames using custom naming conventions; record metadata such
as captions, keywords, dates, copyright and credit information, and IPTC information; and adjust
the time when the photo was shot to the correct time zone. If the photo has an XMP sidecar
le, Aperture imports it as well and adds the metadata to the image version. You can even set
Aperture to automatically back up your photos as they are imported. For more information, see
Plan your backup system on page 72.
Chapter 2 Import photos 28
Page 29

When you import photos, you can choose whether to have the originals stored in the Aperture
library or on a hard disk outside of the library, where they can be accessed as referenced images.
For more information about referenced images, see What are managed images and referenced
images? on page 24.
Important: Audio les, audio attachments, and PDFs imported into your Aperture library are not
visible when you open your Aperture library in iPhoto. To view and work with these items, open
your Aperture library in Aperture.
File formats you can import into the library
Aperture supports most image, audio, and video le formats captured by digital cameras. File
types and formats that can be imported into your Aperture library include:
•
GIF
•
JPEG
•
JPEG2000
•
PDF
•
PNG
•
PSD (8- and 16-bit)
•
TIFF (8- and 16-bit)
•
BMP
•
DNG
•
RAW les from a variety of supported digital cameras
•
AIF
•
WAV
•
MOV
•
AVCHD
Important: Aperture does not support 1080p AVCHD footage recorded at 60 frames per
second (fps) or 50 fps.
Note: For a list of supported digital cameras, go to http://www.apple.com/aperture/specs.
Plan your import strategy
Before you import photos into Aperture, plan the organization of your photos. Eventually your
photo library may contain thousands of photos that you’ll want organized in a exible and easy-
to-manage system.
You may already have a large digital portfolio that you eventually want to import into the
Aperture library. As an import strategy, it’s best to try out importing photos in a series of steps:
•
If you have an iPhoto library, you can open your iPhoto library and work with its contents
directly in Aperture. For more information about opening iPhoto libraries in Aperture, see View
other libraries on page 58.
•
Make trial imports of a small group of photos directly from your digital camera or card reader.
Learn about import features, such as automatic lenaming and the application of metadata
presets. For information about importing from your digital camera or card reader, see Import
from a camera, card reader, or device on page 30.
Chapter 2 Import photos 29
Page 30
•
Import pane Import browser
Plan how you want to import your legacy digital photos. Because you may have thousands
of image les already stored on disk, you need to decide whether you’ll store newly imported
photos in the Aperture library or store them as referenced images, leaving them in their
current hard disk locations. You can also copy or move image les to a dierent hard disk
location when importing them. Also, plan the project organization you’ll need to hold the
photos. For general information about importing les, see Importing photos overview on
page 27.
•
Try out the dierent methods for importing individual les into your system. You can
import individual les, import les stored in folders, and drag les or folders from the
Finder into Aperture.
Import from a camera, card reader, or device
Using the Import browser, you can import photos from a digital camera, card reader, or other
device. You can import all photos on the camera or storage device or you can import a selection
of photos.
Note: When connecting your camera directly to the computer, make sure that you turn the
camera on and set it to the mode for transferring photos (PC, PTP, Normal, or another mode,
depending on the type of camera). Some cameras automatically select the correct transfer mode
when connected to a computer. See your camera’s manual for specic instructions. If you have a
card reader, it’s preferable to transfer photos using the card reader rather than the camera. Using
a card reader saves you time and doesn’t require the use of your camera’s battery.
Import photos from a camera or card reader
1 Connect your camera or card reader to your computer.
The Import browser appears, showing the photos on the camera or card.
Note: If iPhoto opens when you connect your camera or card reader, quit iPhoto. Then, in
Aperture, choose Aperture > Preferences and click Import. Choose Aperture from the “When
a camera is connected, open” pop-up menu. Disconnect and reconnect your camera to have
Aperture open the Import browser.
Import Checked button
Chapter 2 Import photos 30
Page 31

2 Do one of the following:
The project selected in
•
If you want to import the photos into a new, empty project: Choose New Project from the
Destination pop-up menu to create a new project, and enter a name for the project in the
Project Name eld.
•
If you want to import the photos into an existing project: Select the project in the
Library inspector.
Project Name field
the Library inspector
appears here.
Selected project in
the Library inspector
The selected project appears in the Destination pop-up menu.
3 Choose a location to store the original image les by doing one of the following:
•
To store imported originals in the Aperture library: Choose “In the Aperture Library” from the
Store Files pop-up menu.
•
To store imported originals as referenced images in the Pictures folder on your hard disk: Choose
Pictures from the Store Files pop-up menu, then choose whether you want the image les
moved or copied to the Pictures folder by clicking the “Move les” or “Copy les” button.
•
To store imported originals as referenced images in a location other than the Pictures folder:
Choose “Choose” from the Store Files pop-up menu and select a folder. In the dialog that
appears, choose a location to store the imported originals, then click Open. Choose Project
Name from the Subfolders pop-up menu to specify that the les be stored in a folder with the
same name as the project. Choose whether you want the image les moved or copied to the
new location by clicking the “Move les” or “Copy les” button.
4 To add controls for additional import settings, choose an option from the Import Settings
pop-up menu.
For more information about Import Settings, see Import options overview on page 36.
Chapter 2 Import photos 31
Page 32

5 Do one of the following:
Check All button
•
To import all photos from the camera or card reader: Click the Check All button.
The checkboxes for all the photos in the Import browser are selected.
•
To import a subset of photos from the camera or card reader: Click the Uncheck All button to
clear the checkboxes for all photos, then select the checkboxes for the photos you want
to import.
You can also Shift-click adjacent photos and Command-click nonadjacent photos, and then
select the checkbox for one of the photos. Selecting a single checkbox selects the checkboxes
for all of the selected photos.
Note: Depending on your camera type, you may be able to double-click a thumbnail image
to see a larger version of the photo, if you want to verify its contents before importing it.
Double-click the photo again to return to the thumbnail image view.
Uncheck All button
6 Click the Import Checked button.
The import process begins and an indicator appears next to the project’s name, showing the
progress of the import. When the photos are imported, a dialog appears.
7 Click Eject Card, Erase Imported Items and Eject Card, or Done.
Note: The options oered in this dialog depend on the way your camera is made available when
it is connected. Some cameras connect as mass storage devices. When you import from these
cameras, the Erase and Eject options appear. Other cameras simply connect as cameras, and you
will not see either Erase or Eject after the import is completed. In that case, you can erase the
photos directly in the camera.
As the photos appear in the Browser, you can begin working with them. Photos may temporarily
appear as gray boxes until the loading process is complete.
Chapter 2 Import photos 32
Page 33

Import les from a storage device
You can import image, audio, and video les stored on your computer and other storage devices.
You have a choice of storing the imported les in the Aperture library, or importing the les as
referenced image, audio, and video les and then moving or copying them to a dierent location.
Note: If you have folders of photos to import, you can import them using the Import Folders as
Projects command in the File menu. For more information, see Import folders of les from the
Finder on page 45.
You can import image les in many common image formats, including images scanned from
nondigital sources such as lm and photographic prints. You can also import any QuickTimecompatible audio or video le. Adding these les to your Aperture database is as simple as
navigating to the folder where they reside on your hard disk using the Import browser.
1 Click the Import button in the toolbar (or press Command-I).
The Import browser appears.
2 Select your computer.
Select the source where
the photos you want
to import are located.
3 At the bottom of the browser, navigate to the folder containing the les you want to import.
Your computer, connected servers, and connected storage devices are listed in the column on
the left.
Tip: To quickly select the desktop, press Command-D.
Select the folder
of photos you
want to import.
When you select the folder containing the les you want to import, thumbnail images appear in
the Import browser representing the image, audio, and video les within the folder.
Chapter 2 Import photos 33
Page 34

4 Do one of the following:
The project selected in
Check All button
•
If you want to import the les into a new, empty project: Choose New Project from the
Destination pop-up menu to create a new project, then enter a name for the project
in the Project Name eld.
•
If you want to import les into an existing project: Select the project in the Library inspector.
Project Name field
the Library inspector
appears here.
Selected project in
the Library inspector
The selected project appears in the Destination pop-up menu.
5 Do one of the following:
Uncheck All button
•
To import all the les in the selected folder: Click the Check All button.
The checkboxes for all the les in the Import browser are selected.
Chapter 2 Import photos 34
Page 35

•
To import a subset of les from the selected folder: Click the Uncheck All button to clear the
checkboxes for all photos, then select the checkboxes for the photos you want to import.
Note: Depending on your camera type, you may be able to double-click a thumbnail image
to see a larger version of the photo if you want to verify its contents before importing it.
Double-click the photo again to return to the thumbnail image view.
6 Choose a location for the imported les by doing one of the following:
•
To store imported originals in the Aperture library: Choose “In the Aperture Library” from the
Store Files pop-up menu.
•
To store imported originals as referenced image les, audio les, or video les in their current
location: Choose “In their current location” from the Store Files pop-up menu.
•
To store imported originals as referenced image les, audio les, or video les in the Pictures folder on
your hard disk: Choose Pictures from the Store Files pop-up menu, then choose whether you want
the les moved or copied to the Pictures folder by clicking the “Move les” or “Copy les” button.
•
To store imported originals as referenced image les, audio les, or video les in a location other
than the Pictures folder: Choose “Choose” from the Store Files pop-up menu and select a folder.
In the dialog that appears, choose a location to store the imported originals, then click Open.
Choose Project Name from the Subfolders pop-up menu to specify that the les be stored in a
folder with the same name as the project. Choose whether you want the image les moved or
copied to the new location by clicking the “Move les” or “Copy les” button.
7 To add controls for additional import settings, choose an option from the Import Settings
pop-up menu.
For more information about Import Settings, see Import options overview on page 36.
8 Click the Import Checked button in the lower-right corner of the Import browser.
The import process begins and an indicator appears next to the project’s name, showing the
progress of the import. When the import process is complete, a dialog appears.
Tip: If you want to immediately import additional image, audio, or video les, Option-click the
Import Checked button. The Import browser remains open, and you can immediately start
importing additional items.
As the les appear in the Browser, you can begin working with them.
Important: You can import and export XMP sidecar les in Aperture. However, Aperture displays
only metadata that adheres to the XMP 1.0 specication. Ratings, label values, and custom
metadata created by third-party applications are not supported.
Import les from the Finder quickly
You can drag image, video, and audio les from the Finder or desktop directly into the Library
inspector, Viewer, and Browser. This is useful if you receive image les from a source other than
your camera and you want to use them in Aperture. You can also use this technique if you have
image, audio, and video les scattered on your desktop or throughout folders on your computer
and you want to consolidate them in one place in the library.
1 Select an item in the Library inspector, such as a project or an album, in which to import
the photos.
2 Locate the image, audio, or video les in the Finder.
3 Drag the les to either the selected item in the Library inspector or anywhere in the Browser
or Viewer.
The import process begins and an indicator appears next to the project’s name, showing the
progress of the import.
Chapter 2 Import photos 35
Page 36

Add import options
Import options overview
You can use import options to:
•
Store imported photos in the Aperture library or select a dierent location on your hard disk
and import the photos as referenced images
•
Have Aperture automatically delete the image les on your memory card after the photos
are imported
•
Have Aperture automatically split the photos into multiple projects based on the length of
time between shots
•
Have Aperture automatically back up photos as they are imported
•
Display photos in the Import browser as a grid of thumbnails or as a list that you can sort
•
Apply a naming convention to standardize the names of the image les in the library
•
Apply metadata to the image les, such as keywords, captions, copyright information, and the
photographer’s name. You can also keep or replace existing metadata associated with a photo
when you import the image.
•
Adjust the shoot time of photos that were shot in a dierent time zone
In the Import browser, you add import options to rene how les are brought into Aperture.
You add controls for additional import settings by choosing an option from the Import Settings
pop-up menu. After you modify the import settings, you can remove them from view by
deselecting the option in the Import Settings pop-up menu.
File Info option
View le information
By default, basic le information about the photos you are about to import into Aperture is not
shown in the Import browser. However, you can set Aperture to show this information.
Show basic le information about the les displayed in the Import browser
m In the Import browser, choose File Info from the Import Settings pop-up menu.
Basic metadata about the le selection appears above the Aperture Library controls in the
Import browser.
Note: If the selection is a movie or audio le, the duration is shown as well. When a photo with an
attachment (such as an audio annotation) is selected, the duration of that attachment is displayed.
Chapter 2 Import photos 36
Page 37

Automatically name imported photos
The lenames given to photos by the camera are often dicult to distinguish. When you import
photos, you can have Aperture use the original name assigned by the camera or use a lenaming
convention that you choose or create. For example, you can use a name format that includes
a name that you specify, plus the date, the time, and an index number. Aperture provides a
number of preset name formats, and you can also create your own naming conventions to suit
the dierent types of shoots you do.
You can apply names to your image les when you import them and when you export them. You
can specify names to apply to the versions and to the originals. For example, when you import
photos from your camera, you can specify that a name format be applied to each image version
that Aperture creates. You can also specify that Aperture apply names to the originals as they are
stored in the library or on a hard disk.
When you import originals as referenced images, you can’t rename the originals if you leave
them in their original locations. However, when you import originals as referenced images and
move them to a new hard disk location, you can rename them at that time.
Note: If you back up your les on import, the copied les are also renamed. For more
information, see Automatically back up les at import on page 44.
Proper lenaming is one of the most critical aspects of media and project management. When
you capture your originals, consider how and where your les may be used in the future. Naming
your les simply and consistently makes it easier to share media among multiple photographers,
transfer projects to other Aperture systems, move les across a network, and properly restore
archived projects.
The most conservative lenaming conventions provide the most cross-platform compatibility.
This means that your lenames will work in dierent operating systems, such as OS X and other
UNIX-based operating systems, and Windows. You also need to consider lenaming when you
transfer les over the Internet, where you can never be certain what computer platform your les
may be stored on, even if temporarily.
Avoid Example characters Reasons
File separators / (slash)
\ (backslash)
Special characters not included in
your native alphabet
Punctuation marks, parentheses,
quotation marks, brackets,
and operators
White space characters such
as spaces, tabs, new lines, and
carriage returns (the last two
are uncommon)
¢™ These characters may not be
. , [ ] { } ( ) ! ; “ ` * ? < > | These characters are often used
Some applications may not allow
lenames with slashes, which are
directory separators for OS X and
DOS (Windows), respectively.
supported or may be dicult
to work with when exported to
other applications.
in scripting and programming
languages.
White space is handled dierently
in dierent programming
languages and operating systems.
The most conservative lenames
avoid all use of white space
characters and use the underscore
(_) character instead.
Chapter 2 Import photos 37
Page 38

Name les during import automatically
1 In the Import browser, choose Rename Files from the Import Settings pop-up menu.
The Rename Files controls appear in the Import browser.
2 Do one of the following:
•
To apply a preset name format to your les as they are imported: Choose a preset name format
from the Version Name pop-up menu.
•
To use the existing lenames: Choose None from the Version Name pop-up menu.
•
To create a new name format: Choose Edit from the Version Name pop-up menu, and create a
custom name format in the File Naming dialog.
3 If you choose a name format with a custom name, the Name Text eld appears below the Version
Name pop-up menu. Enter a name for the photos in the Name Text eld.
4 Select the Rename Original File checkbox if you want to change the lenames of the originals on
disk to match the version names.
Aperture provides the following preset name formats in the Version Name pop-up menu
by default.
Preset name format Example
Custom Name with Index Thailand 1, Thailand 2, and so on
Custom Name with Index (no spaces) Thailand1, Thailand2, and so on
Version Name IMG001
Version Name and Date/Time IMG001 - 2008-10-14 09.03.25 PM
Version Name with Sequence IMG001 (1 of 2), IMG002 (2 of 2), and so on
Version Name with Index IMG001 1, IMG002 2, and so on
Image Date/Time 2008-10-14 09.03.25 PM
Custom Name with Counter Thailand 001, Thailand 002, and so on
Chapter 2 Import photos 38
Page 39

Create a custom name format
In addition to the preset name formats, you can create custom name formats. To create a name
format, you select the name elements you want in the File Naming dialog.
1 In the Import browser, choose Rename Files from the Import Settings pop-up menu, then choose
Edit from the Version Name pop-up menu.
The File Naming dialog appears.
2 Click the Add button (+) to create a new name format, or select the preset name format you
want to change.
3 Drag the name elements you want into the Format eld in the order you want them. You can
also add valid characters or spaces between the name elements.
4 Enter a custom name in the Custom Name eld, if you like.
5 Click OK.
Your new name format now appears in the Version Name pop-up menu.
Reset the starting number of a counter in a name format
When using a counter in your name format, you can specify the starting number and the
number of digits, from one to six, that appear in the counter. When you use a preset name format
with a counter, make sure to reset the initial starting number, if necessary. Otherwise, on the next
import, Aperture will continue numbering the imported les starting from the last number of the
previous import.
Do one of the following:
m In the File Naming dialog, type “0” (zero) in the “Incrementing counter starting at” eld.
m In the File Naming dialog, select the preset whose counter you want to reset to zero, then click
the Reset Preset button.
Chapter 2 Import photos 39
Page 40

Adjust time zone data at import
On a trip, it’s easy to forget to update your camera’s clock to match the local time zone. If you
didn’t synchronize your camera time to the new location, Aperture lets you correct the time
assigned to the image le by whole hours when importing.
Adjust time zone data during import
1 In the Import browser, choose Time Zone from the Import Settings pop-up menu.
The Time Zone controls appear in the Import browser.
2 Choose the time zone that matches the camera’s time setting from the Camera Time
pop-up menu.
3 Choose the time zone of the shoot location from the Actual Time pop-up menu.
Aperture updates the capture time of your image les according to the Time Zone settings.
After you’ve imported photos, you can adjust the date and time of any versions you’ve created
by choosing Metadata > Adjust Date and Time. For more information, see Adjust the photo date
and time on page 216.
Add metadata at import
You can add metadata to your photos as they are imported into Aperture. Adding metadata
during the import process helps you keep track of your photos and quickly locate them using
the Smart Settings HUD and Filter HUD. For example, you can add IPTC keywords and other
metadata to the photos.
Add metadata to photos during import
1 In the Import browser, choose Metadata Presets from the Import Settings pop-up menu.
The Metadata Presets controls appear in the Import browser.
2 Do one of the following:
•
To show the metadata elds for a metadata preset: Choose a metadata preset from the Metadata
pop-up menu.
•
If you don’t want to modify the metadata of the les during import: Choose None from the
Metadata pop-up menu.
•
To create a new metadata preset: Choose Edit from the Metadata pop-up menu, then create a
new metadata preset using the Metadata dialog.
Chapter 2 Import photos 40
Page 41

3 Do one of the following:
•
To add metadata to the photo while maintaining any associated metadata: Click Append.
•
To add metadata and overwrite any associated metadata: Click Replace.
When you choose a metadata preset, Aperture displays the list of metadata elds and metadata
for that preset. You can edit the metadata preset to store any metadata that you want to apply
frequently to your photos using the Info inspector. For more information, see Create metadata
presets on page 210.
Apply eects at import
You can apply image eects and basic image adjustments, such as an exposure adjustment,
to your photos as they are imported. You apply eects and image adjustments by choosing
an eect preset from the Eects pop-up menu. The eect preset is applied uniformly to every
imported photo until it is turned o.
You can edit eect presets that you want to apply frequently to your photos. For more
information, see Create and apply eects on page 328.
Apply eects to photos during import
1 In the Import browser, choose Eect Presets from the Import Settings pop-up menu.
The Eect Presets control appears in the Import browser.
2 Choose an eect preset option to apply to the imported photos from the Eect Presets
pop-up menu.
Turn o eects during import
m In the Eect Presets control area, choose None from the Eect pop-up menu.
Filter les by type at import
Some digital cameras allow you to add audio attachments to your photos. For example, some
cameras allow you to record audio annotations for a photo after you shoot it. The camera
attaches the audio le to the image le so that you can review the audio when you download
the photo. When you connect a digital camera or card reader or point to a folder with photos
on your computer, Aperture recognizes any photo that has an audio attachment. You can also
import standalone QuickTime-compatible audio and video les.
Filter les by type during import
1 In the Import browser, choose File Types from the Import Settings pop-up menu.
The File Types controls appear in the Import browser.
Chapter 2 Import photos 41
Page 42

2 Do any of the following:
•
To exclude image les, leaving only audio and video les available for import: Select the “Exclude
photos” checkbox.
•
To exclude video les during import: Select the “Exclude videos” checkbox.
•
To exclude audio les during import: Select the “Exclude audio les” checkbox.
•
To exclude all audio les attached to the photos: Select the “Exclude audio attachments” checkbox.
•
To include only les that were agged or locked using the camera: Select the “Only include les
agged/locked in camera” checkbox.
All photos matching the selected criteria appear in the Import browser. To make all the photos
reappear, deselect the checkboxes above.
Important: An audio le is imported into Aperture as an attachment when the audio le’s name
matches the image le’s name. For example, when you import “le.nef” and “le.wav,” Aperture
imports the .wav le attached to the .nef raw image le. Audio les are automatically attached
during all types of import: from a connected camera or card reader, from internal and external
hard disk drives, as well as by dragging. If the audio lename is not the same as the image
lename, it will not be attached to the photo even if imported directly from a camera or a card
reader. However, there is one exception: some Canon cameras, including the G9 and G10, prex
the audio lename with “SND” and the image lename with “IMG”; these audio les are imported
as attachments.
Import RAW + JPEG image pairs
Many digital cameras have a setting for creating a RAW le plus a JPEG le for each photo as you
shoot. Many photographers use the RAW + JPEG workow for the convenience of publishing
the JPEG images quickly while saving the RAW les for high-resolution prints. Aperture provides
several options for importing the RAW + JPEG image pairs.
Note: The RAW + JPEG Pairs import setting remains in eect from one import session to the next.
Filter RAW + JPEG pairs during import
1 In the Import browser, choose RAW + JPEG Pairs from the Import Settings pop-up menu.
The RAW + JPEG Pairs control appears in the Import browser.
2 Choose an option from the Import pop-up menu:
•
To import both the RAW and the JPEG image les and set the JPEG le in each pair as the original:
Choose “Both (JPEG as Original).”
•
To import both the RAW and the JPEG image les and set the RAW le in each pair as the original:
Choose “Both (RAW as Original).”
•
To import the RAW and JPEG image les as separate originals: Choose “Both (Separate Originals).”
•
To import the JPEG les only: Choose “JPEG les only.”
•
To import the RAW les only: Choose “RAW les only.”
Chapter 2 Import photos 42
Page 43

Import the RAW les that match the JPEG les already in your Aperture library
If you imported the JPEG image les only, you can go back and import the corresponding
RAW les later.
1 Choose “Matching RAW les” from the Import pop-up menu.
The Include pop-up menu appears below the Import pop-up menu.
2 Choose an option from the Include pop-up menu:
•
To import all matching RAW les regardless of rating: Choose “All matching les.”
•
To import all RAW les matching JPEG les that are unrated or better: Choose “Unrated or better.”
•
To import all RAW les that match the current rating: Choose “Current lter.”
For information about rating photos, see Rating photos overview on page 98.
Use AppleScript actions at import
The Aperture community provides many AppleScript actions online to automate repetitive tasks
in Aperture. Additionally, you can create your own AppleScript actions to help automate your
workow. You can use AppleScript actions from within Aperture immediately after an import
operation is complete.
For more information about AppleScript actions for use with Aperture, go to
http://www.apple.com/aperture/resources.
Important: All scripts must use the import event handler: on importActionForVersions
(input)
.
Use AppleScript actions after import
1 Choose Actions from the Import Settings pop-up menu.
The Actions controls appear in the Import browser.
2 If no AppleScript action is selected, click the Choose button and locate a script from the dialog
that appears.
The selected AppleScript action appears in the AppleScript eld and is set to begin as soon as
the import operation is complete.
Note: The AppleScript action is applied only to the current import operation.
Stop AppleScript actions from automatically starting after import
m Click the Clear button.
Chapter 2 Import photos 43
Page 44

Automatically back up les at import
Creating copies of your photos from the moment you take them is essential to the preservation
of your work. In Aperture, you can back up your original les as they are imported, using the Back
Up Files import option. Backing up your image, video, and audio les at import ensures that if
something catastrophic happens to your computer system, copies of your original les are stored
somewhere safe. If you back up your les during import, Aperture makes a copy of each le and
places the copied les in the location you specify.
Back up your original les during import
1 In the Import browser, choose Backup Location from the Import Settings pop-up menu.
The Backup Location controls appear in the Import browser.
2 Do one of the following:
•
To back up your les to the Documents folder: Choose Documents from the Backup To
pop-up menu.
•
To back up your les to a new location: Choose “Choose” from the Backup To pop-up menu, then
select a location from the dialog that appears.
Note: It’s a good idea to back up your original les to a location other than your computer. This
is the only way to ensure that your original les are safe if something catastrophic happens to
your computer.
Turn o automatic backup during import
m Choose None from the Backup To pop-up menu.
Reset import options
The import settings you set in the Import browser remain in eect from import session to
import session, regardless of whether they are shown. However, you can quickly reset the import
settings to their defaults.
Reset all import settings to their defaults
m In the Import browser, choose Reset to Defaults from the Import Settings pop-up menu.
Remove an import option from view
1 In the Import browser, click the background of the import option you want to remove from view.
The import option becomes highlighted, indicating it is selected.
2 Press Delete.
Chapter 2 Import photos 44
Page 45

Import folders of les from the Finder
If you’ve spent time organizing your image, video, and audio les into a meaningful hierarchy
on your computer and you want to keep that organization, you can import a folder of les as
a project or drag it directly into the Library inspector. When you import a folder of les or drag
it into the Library inspector, the top folder becomes a folder in the Library inspector and any
subfolders become projects within the folder.
Import a folder of les from the Finder using the Import command
1 Choose File > Import > Folders as Projects.
2 Select the folder of photos that you want to import.
You can select multiple folders to import by Shift-clicking them.
3 Do one of the following:
•
To import the top-level folder as a folder in the Aperture library and all of its subfolders as individual
projects: Choose Folders and Projects from the Import Folders As pop-up menu.
•
To import the top-level folder as a project and all its subfolders as albums: Choose Projects and
Albums from the Import Folders As pop-up menu.
4 Choose a location for the imported photos by doing one of the following:
•
To store imported originals in the Aperture library: Choose “In the Aperture Library” from the
Store Files pop-up menu.
•
To import the les as referenced images stored in their current location on your hard disk: Choose
“In their current location” from the Store Files pop-up menu.
•
To store imported originals as referenced images in the Pictures folder on your hard disk: Choose
Pictures from the Store Files pop-up menu, then choose whether you want the les moved or
copied to the Pictures folder by clicking the “Move les” or “Copy les” button.
•
To store imported originals as referenced images in a location other than the Pictures folder: Choose
“Choose” from the Store Files pop-up menu and select a folder. Choose “None” from the Subfolders
pop-up menu to specify that the les be stored as separate, individual les in the selected folder.
You can also specify that Aperture create a hierarchy of subfolders with specic folder names to
hold your les. For more information about creating folders to hold your imported photos, see
Import originals for referenced images into folders on page 46. Choose whether you want the
image les moved or copied to the new location by clicking the “Move les” or “Copy les” button.
5 Choose a naming convention from the Version Name pop-up menu to specify how you want the
photos named.
For example, choose Original File Name from the Version Name pop-up menu to have your les
stored using the original lenames from your camera or card. Choose a name format from the
Version Name pop-up menu to have your photos stored using a specied name. If you choose a
custom name format, enter a name in the Name Text eld. Choose Edit from the Version Name
pop-up menu to dene a new naming scheme. For more information about naming les, see
Automatically name imported photos on page 37.
Click the “Apply to Original lenames” checkbox to rename the original les as well.
6 Choose how you want Aperture to import RAW + JPEG pairs from the RAW + JPEG pop-up menu.
For more information about importing RAW + JPEG pairs, see Import RAW + JPEG image pairs on
page 42.
7 Click Import.
The top-level folder in the selection either appears as a folder or is converted to a project based
on the option you chose from the Import Folders As pop-up menu. If the folder you imported
contains a hierarchy of subfolders and photos, the subfolders appear as albums.
Chapter 2 Import photos 45
Page 46

Drag folders into Aperture
When you drag folders into the Library inspector, Aperture uses the last import settings you
specied to determine how the folders are imported and where they are stored.
1 In the Finder, locate the folder containing the folders, video les, and audio les you want
to import.
2 Drag the folder to the Library inspector.
Import originals for referenced images into folders
When you import photos as referenced images, you can have Aperture place their originals
individually into a selected folder or create subfolders to hold the les. For example, you might
have the imported image les placed in subfolders identied by date. You can create folder name
format presets that you can quickly choose to select the folder name format you prefer.
To create a folder name format, you select the name elements in the Folder Naming Presets
dialog. You can specify a combination of name elements to create custom folder names.
Create a custom folder name format
1 In the Import browser, choose Pictures or another folder from the Store Files pop-up menu, then
choose Edit from the Subfolder pop-up menu that appears.
The Folder Naming dialog appears.
2 Click the Add button (+) to create a new name format, or select the preset name format you
want to change.
3 Drag name elements into the Format eld in the order you want them to appear.
You can also create a hierarchy of folders within folders. For example, you can specify that
Aperture place your referenced images in a subfolder named Date, and within that folder you
can create subfolders identied by the time the photo was taken.
4 Drag a slash between the elements where you want subfolders created.
5 Enter a custom name in the Custom Name eld, if you like.
6 Click OK.
Your new folder name format now appears in the Subfolders pop-up menu.
Chapter 2 Import photos 46
Page 47

Reset the starting number of a counter in a folder name format
When using a counter in your folder name format, you can specify the starting number and the
number of digits, from one to six, that appear in the counter. When you use a folder name format
with a counter, reset the initial starting number. Otherwise, on the next import, Aperture will
continue numbering the image folders starting from the last number of the previous import.
m In the Folder Naming Presets dialog, type “0” (zero) in the “Incrementing counter starting at” eld.
Capture photos as you work
For certain kinds of shoots, such as product shoots done within your oce studio, you may want
to immediately see test shots on your computer to check on lighting and other production
factors. You can connect your camera directly to your computer and have each shot immediately
appear in an Aperture project as you shoot. You can review a photo in detail, make production
changes, and then shoot and immediately see the results again. This process is called tethered
shooting, and it’s ideal for checking the details of a shot while setting up the nal shot.
Note: For a list of cameras that Aperture supports for tethered shooting, go to
http://support.apple.com/kb/HT4176. See your camera’s manual for information about
setting up your camera for tethered shooting.
After starting a session, you can use Aperture to view and capture photos. You use the Aperture
Tether HUD to control your camera and take photos as you work.
Set up Aperture for tethered shooting
1 Connect your camera to your computer using a USB or FireWire cable.
2 In the Library Inspector, select the project you want the photos captured to.
3 Choose File > Tether > Start Session.
4 Specify import settings in the Tether Settings dialog.
For information, see Import from a camera, card reader, or device on page 30.
5 Click Start Session.
The Tether HUD appears.
6 Do one of the following:
•
To begin the capture session: Click Capture.
•
To stop the capture session: Click Stop Session.
Chapter 2 Import photos 47
Page 48

Add audio attachments to image les
Although the audio les of photos with audio attachments are automatically imported into
Aperture when the lenames match, you can also manually attach an audio le to a photo after
it has been imported into Aperture. There are two ways to attach an audio le to a photo. If the
project selected in the Library inspector contains an original audio le, you can attach the audio
le to a photo in the project using the Info inspector. If the audio le is outside of the Aperture
library, you can drag the audio le from the Finder to the photo in the Viewer.
Note: For a list of le formats that can be used for audio attachments in Aperture, go to
http://www.apple.com/aperture/specs.
Add an audio attachment using the Info inspector
1 In the Library inspector, select a project containing the audio le you want to attach.
2 In the Browser, select the photo you want to attach the audio le to.
3 In the Info inspector, choose Attach Audio File from the Metadata Action pop-up menu .
4 In the dialog that appears, select the audio le you want to attach, then click Attach.
You can preview the selected audio le by clicking the Play button.
Audio file
Attach button
Play button
The audio attachment is added to the photo, and the audio le’s thumbnail disappears from the
Browser. A badge appears on the lower-right portion of the photo, indicating that an audio le
is attached. For more information about playing audio attachments, see Modify metadata in the
Info inspector and Inspector HUD on page 198.
Add an audio attachment to a photo by dragging
1 If necessary, click the Split View button in the toolbar, and then select the photo you want to
attach the audio le to in the Browser.
2 In the Finder, select the audio le you want to attach.
3 Drag the audio le to the photo you want to attach it to in the Viewer.
The photo is surrounded with a green outline, indicating that the le is about to be attached.
The audio attachment is added to the photo in Aperture. A badge appears on the lower-right
portion of the photo, indicating that an audio le is attached. For more information about
playing audio attachments, see Modify metadata in the Info inspector and Inspector HUD on
page 198.
Chapter 2 Import photos 48
Page 49

Remove an attachment from a photo
1 In the Browser, select the photo whose attachment you want to remove.
2 In the Info inspector, choose Detach Audio File from the Metadata Action pop-up menu.
The audio le is detached and placed in the same project as the photo it was attached to.
Where Aperture stores your managed les in the library
You can always view and work with your photos within the Aperture application. However, you
may wonder where your managed image les physically reside in the Aperture library on the
computer’s hard disk. By default, your photos are stored in the Aperture Library le within the
Pictures folder. For more information about managed image les, see What are managed images
and referenced images? on page 24.
You can open and see the contents of the Aperture Library le in the Finder by Controlclicking the le and choosing Show Package Contents from the shortcut menu. However, it’s
not recommended that you access or work with your originals in this way because you risk
interfering with the Aperture library.
WARNING: You should always back up and work with your managed images and projects
from within the Aperture application. If you move or accidentally change the les stored in
the Aperture Library le, Aperture may not be able to locate your projects and the media they
contain. Making a change to a managed le in the Finder, such as renaming it, creates changes
that Aperture cannot track.
Reprocess photos from earlier versions of Aperture
Aperture provides image processing algorithms that deliver improved image quality. With
improved default rendering of RAW images from supported cameras, Aperture 3.5 provides
signicantly enhanced image quality with improvements in noise reduction, sharpening, and
highlights recovery.
To maintain the image integrity of the existing photos in your Aperture library, Aperture
allows you to retain the original processing of your photos from previous versions, selectively
process images using the most current RAW image processing, or create duplicate versions of
each original image le with the most current RAW image processing applied. However, some
adjustments and brushed adjustments are not available unless the selected photo uses the most
current RAW image processing.
When you start using Aperture 3.5, all of your existing photos continue to use the previous
version’s image processing, in order to preserve their appearance. Any of these photos can
be individually reprocessed to use the most current image processing. You can also use the
Reprocess Originals command in the Photos menu to reprocess selected photos, projects,
books, slideshows, webpages, web journals, Light Table albums, albums, and Smart Albums.
If you want to reprocess photos while retaining versions with the original processing, you
can create duplicate versions of each original image le with the most current RAW image
processing applied.
Chapter 2 Import photos 49
Page 50

Because reprocessing a large number of photos can be a time-consuming process, you may nd
it easier to reprocess photos on an as-needed basis. For example, if you have ve-star selects, you
may decide to initially reprocess only those photos. Photos are not aected by being reprocessed
more than once; if a photo already uses the most current image processing, reprocessing it has
no eect.
Note: Some adjustments and brushed adjustments are not available unless the selected photo
uses the most current RAW image processing.
Reprocess a photo selection
1 Do one of the following:
•
To reprocess selected photos: Select a photo or group of photos.
•
To reprocess a project or an album: Select a project, a book, a slideshow, an album, a webpage
album, a web journal album, a Light Table album, or a Smart Album.
•
To reprocess all photos in the library: Select the Photos item in the Library inspector.
Photos item
Important: Reprocessing thousands of image les can be a lengthy operation. Make sure to set
aside a signicant amount of time for Aperture to process the image les—preferably when you
don’t need to use your Aperture system.
2 Choose Photos > Reprocess Originals.
3 In the dialog that appears, select reprocessing options, and click Reprocess Photos.
You can choose whether to reprocess all photos in the selection or just those with or without
adjustments. You can also choose whether to reprocess the existing image versions or a
duplicate set.
Reprocess an individual photo
1 Select a photo.
2 In the Adjustments inspector or the Adjustments pane of the Inspector HUD, choose RAW Fine
Tuning from the Add Adjustment pop-up menu.
3 In the RAW Fine Tuning controls, click the Reprocess button.
Note: If the Reprocess button does not appear in the Adjustments inspector or the Adjustments
pane of the Inspector HUD, the photo has already been reprocessed using Aperture 3.5
image processing.
Chapter 2 Import photos 50
Page 51

Library search field
Work with projects and the library
3
Organize items in the Library inspector
Library inspector overview
The Library inspector provides access to items tracked by the Aperture library, such as projects
and albums, and dierent views of the contents of the library. For example, you can select Faces
in the Library inspector to view your photos grouped by the people in them, or Places to view
your photos grouped by where they were taken.
There are several controls you use to work with items in the Library inspector.
Library Action
pop-up menu
51
Disclosure triangle
•
Library search eld: Enter text to search for items located in the Library inspector.
•
Disclosure triangle: Click to see all items within a project, a folder, or the Trash.
•
Library Action pop-up menu: Add the selected item to a list of favorites or remove it from the
favorites list. You can also choose to export items selected in the Library inspector or maintain
previews. For more information about previews, see Preview images overview on page 494.
The main space of the Library inspector displays several categories that let you view your photos
organized in dierent ways.
Page 52

Library category
The Library category contains icons that, when selected, display your photos organized in any of
four dierent ways:
•
Projects: Select the Projects icon to have all the projects in the library appear in Projects view
in place of the Browser and Viewer. Each project is represented by a single thumbnail. You
can position the pointer over a project thumbnail and drag to quickly skim the photos in
the project. When you hold down the Control key and click a project’s thumbnail, a shortcut
menu appears that allows you to create a new project, display information about the project,
delete the project, import les into the project, export the project as a library, set the currently
displayed image as the key photo that represents the project, empty the Aperture Trash, or
play each photo in the project in a slideshow. Double-click the project’s thumbnail to see the
photos in the Browser.
For more information, see View projects on page 61.
•
Photos: Select this item to see all photos, video clips, and audio clips in the library. All media in
the library is displayed in the Browser as thumbnails. Select a thumbnail in the Browser to view
it or listen to it in the Viewer.
•
Faces: Select this item to view people identied in photos and tracked by Aperture in the
library. Click the Info button on a snapshot to show the Info HUD. The Info HUD provides
the name of the person, how many photos in the library contain the person, when the photos
were shot, and the person’s full name and email address (if you entered them). Click the View
Photos button in the HUD to view all the photos the person appears in and any photos the
person might appear in.
For more information, see Faces overview on page 123 and Add names to faces in your
photos on page 125.
•
Places: Select this item to view a map that shows the locations where photos in the library
were shot.
For more information, see Places overview on page 131 and View photo locations on page 133 .
Recent category
You can select icons in the Recent area of the Library inspector to view photos you’ve imported
recently, agged photos, rejected photos, or photos you’ve placed in the Aperture Trash.
•
Last 12 Months: Select this item to see all photos, video clips, and audio clips imported into
Aperture during the last 12 months. Select a thumbnail in the Browser to view it or listen to it
in the Viewer.
Chapter 3 Work with projects and the library 52
Page 53

•
Last Import: Select this item to see all photos, video clips, and audio clips imported into
Aperture during the last import session. Select a thumbnail in the Browser to view it or listen
to it in the Viewer.
•
Flagged: Select this item to see all the photos, video clips, and audio clips in the library that
have been agged. The thumbnails for all agged media appear in the Browser. Select a
thumbnail in the Browser to view it or listen to it in the Viewer.
•
Trash: Select this item to see all the photos, video clips, and audio clips in the library that have
been deleted. The thumbnails for all deleted media appear in the Browser. Select a thumbnail
in the Browser to view it or listen to it in the Viewer. Click the disclosure triangle next to the
Trash to view any items that have been deleted in the Library inspector. Select an item in the
Trash to view its contents.
Note: If there is no disclosure triangle next to the Aperture Trash, no items in the Library
inspector have been deleted since the last time the Trash was emptied.
For more information, see Work with the Aperture Trash on page 56.
Projects and album categories
Below the Library and Recent categories, other categories appear when specic types of content
are present in your library. The Projects category (not to be confused with the Projects icon in the
Library category) lists each project in your library. When you add albums to your library (book
albums, Light Table albums, slideshow albums, and so on), those categories appear in the Library
inspector (unless you add an album to a specic project, in which case the album appears below
that project in the Projects category).
Create and name items
You can create new items in the Library inspector to organize your photos. When you create a
new item, such as an album, the item is empty. You add photos to the new item by dragging
photos to it. Newly created Smart Albums and Smart Web Page Albums do not contain photos.
You add photos to them by setting the Smart Album’s search criteria.
Note: You cannot put photos in folders. Folders are designed to help you organize projects,
albums, and other folders in the Library inspector.
Create a new item in the Library inspector
Do one of the following:
m Choose File > New, and choose an item from the submenu.
m Choose an item from the New pop-up menu in the toolbar.
Choose an item from
the New pop-up menu.
Chapter 3 Work with projects and the library 53
Page 54

Aperture prompts you to name new projects, albums, and Light Table albums before adding
them to the Library inspector. Aperture immediately adds new folders, Smart Albums, and Smart
Web Page Albums to the Library inspector with the item’s “Untitled” name highlighted so that
you can rename them as you create them. When you create a new book, slideshow, web journal,
or webpage, Aperture prompts you to choose a theme in addition to a name before adding the
item to the Library inspector.
For more information about creating projects and certain types of albums, see the
following topics:
•
Create and delete projects on page 64
•
What are albums? on page 21
•
Light Table overview on page 185
•
Collect photos in a new Smart Album on page 15 6
•
Creating books overview on page 404
•
Slideshows overview on page 376
•
Creating webpages overview on page 463
Open and close items in the Library inspector
To work with photos in Aperture, you rst select an item in the Library inspector to open it in
the Browser. You can open and work on more than one item at a time. When you open multiple
items from the Library inspector, you can have each item appear in the Browser with its own tab
or have the contents of all items appear in a single Browser. You can click an item’s Browser tab
to bring it to the front. You can also open an item in its own pane to view the contents of two
items in the Browser side by side. When you quit and reopen Aperture, all items that were open
at the end of your last session open automatically.
Open an item in the Library inspector
m Select the item in the Library inspector.
Select a project to view
its photos in the Browser.
All photos in the project
appear in the Browser.
Chapter 3 Work with projects and the library 54
Page 55

Open additional items in the Browser, each with its own tab
Library items are
Close button in a tab
m Option-Command-click an item in the Library inspector.
The newly opened item appears in the Browser with its own tab, in front of any other
open items.
Open another item in its own pane
m Option-click an item in the Library inspector.
identified by their tabs.
The newly opened item appears in the Browser with its own tab and in its own pane.
Switch among several open items
m In the Browser, click a project’s tab.
Open multiple items in the same Browser
m Command-click multiple items in the Library inspector.
The contents of each item selected in the Library inspector appear in the same Browser.
Close an item in the Browser
1 Click the item’s tab to bring it to the front.
2 Click the tab’s close button.
Arrange items in the Library inspector
Typically, you create a new Aperture project for each photography project or job that you work
on, regardless of its duration. For example, if you’re working on a documentary in Thailand, you
would create a project for it. If you’re also shooting the temples in the interior of the country, that
could be a second, separate project. Both projects could conceivably refer to some of the same
photos, but they are completely independent structures, each with its own versions and albums.
Very large photography projects, such as documentaries and sporting events, often consist of
large numbers of photos. You can always break one project into several should the need arise.
As your library grows, you may need to reorganize your library’s structure to t your workow.
You can rearrange projects, folders, albums, and other items in the Library inspector.
Chapter 3 Work with projects and the library 55
Page 56

Move an item in the Library inspector
m Select an item in the Library inspector, and drag it to a new location.
The black box indicates
where the item will
be placed.
A black bar indicates where the item will be placed.
Move multiple items in the Library inspector
Do one of the following:
m Shift-click adjacent items, and drag them to a new location.
m Command-click nonadjacent items, and drag them to a new location.
Automatically arrange items in the Library inspector
m To group similar items together: Control-click in the Library inspector, and choose Keep Arranged
By > Kind from the shortcut menu.
m To sort items alphabetically: Control-click in the Library inspector, and choose Keep Arranged By >
Name from the shortcut menu.
Create and show favorite items
If you have certain projects, folders, or albums that you work on most often or that you work on
at the same time, you can make them favorites to quickly view them all simultaneously.
Make a project, a folder, or an album a favorite
m In the Library inspector, select a project, a folder, or an album, and choose Add to Favorites from
the Library Action pop-up menu .
View a favorite project, folder, or album
m In the Library inspector, choose Favorite Items from the search eld pop-up menu at the
top-left corner.
Only the items in the library that have been chosen as favorites are shown. All other items in the
Library inspector are removed from view.
Remove a project, a folder, or an album as a favorite
m In the Library inspector, select a project, a folder, or an album, and choose Remove From
Favorites from the Library Action pop-up menu .
View recently selected items in the Library inspector
m In the Library inspector, choose Recent Items from the search eld pop-up menu at the
top-left corner.
View all items in the Library inspector again
m In the Library inspector, choose All Items from the search eld pop-up menu.
Work with the Aperture Trash
All items deleted in Aperture, including projects, albums, folders, versions, and originals, are
placed in the Aperture Trash in the Library inspector. You can retrieve any item from the Trash
until you empty it.
Chapter 3 Work with projects and the library 56
Page 57

Delete a version from a project
m Select a photo, a video clip, or an audio clip, and choose File > Delete Version.
The version is moved to the Trash, along with the original if you deleted its last version.
Delete an original and all its versions from a project
m Select a photo, a video clip, or an audio clip, and choose File > Delete Original Image and
All Versions.
The original and all versions are moved to the Trash.
Delete only a version from an album
m Select a photo, a video clip, or an audio clip, and choose Photos > Remove From Album (or
press Delete).
The version is deleted. The original and its other versions are not deleted.
Delete projects and folders
When you delete an item from the Library inspector, the contents of the item are deleted with it.
Note: If you delete a project, the originals contained in the project are also deleted.
1 Select a project or folder.
2 Do one of the following:
•
Choose File > Delete [item] (or press Command-Delete).
•
Drag the item to the Aperture Trash.
The selected item is moved to the Trash in the Library inspector.
Move an item out of the Aperture Trash
If you delete an item in the Library inspector by mistake, it’s easy to x.
Do one of the following:
m Drag the item out of the Aperture Trash.
m Control-click the item in the Aperture Trash, and choose Put Back from the shortcut menu.
The selected item is moved back to its original position in the Library inspector.
Empty the Aperture Trash
After you’ve reviewed the contents of the Aperture Trash and are condent that you no longer
need the items within it, you can empty the Trash. When you empty the Aperture Trash, all of its
photos and videos are placed in the Finder Trash.
1 Do one of the following:
•
Choose Aperture > Empty Aperture Trash (or press Shift-Command-Delete).
•
Control-click the Aperture Trash, and choose Empty Aperture Trash from the shortcut menu.
A dialog appears, warning you that the items will be removed from the Aperture
Trash permanently.
2 Click Delete.
WARNING: This action cannot be undone, but you can retrieve the originals from the Finder
Trash until you empty it.
Chapter 3 Work with projects and the library 57
Page 58

Work with library les
Create new libraries
If the Aperture library becomes large, you can create additional, separate library les to hold
more photos. You can create additional library les in dierent locations on your internal hard
disk or on dierent hard disks. You can also rename library les as needed. Thus, you might have
multiple library les with dierent names in the same location, with Aperture set to access the
library le you want.
Create a new, empty library le in a new location
1 Choose File > Switch to Library > Other/New.
2 In the dialog that appears, click Create New.
3 In the next dialog, enter a name for the library in the Save As eld, choose a location, and
click Create.
View other libraries
When you have multiple Aperture and iPhoto library les accessible to your Aperture system, you
can switch between them and view their contents. You can also choose which library le to use
when you open Aperture.
Important: Aperture can only open and view iPhoto libraries upgraded to iPhoto 9.3 or later.
To upgrade your iPhoto library, open it in iPhoto 9.3 or later. iPhoto upgrades the library
automatically. All cards, books, calendars, and Smart Albums in your iPhoto library can be viewed
but not edited in Aperture. To work with your iPhoto cards, books, calendars, and Smart Albums,
close Aperture and open your iPhoto library in iPhoto.
Access a dierent Aperture or iPhoto library
1 Choose File > Switch to Library > [library lename].
2 If the library you’re looking for doesn’t appear in the Switch to Library submenu, choose
Other/New.
Chapter 3 Work with projects and the library 58
Page 59

3 In the dialog that appears, select the library you want to open from the list, and click Choose.
Note: You must close iPhoto before opening your iPhoto library in Aperture.
Aperture opens the library you selected.
Choose which library to use while opening Aperture
1 Hold down the Option key while opening Aperture.
A dialog appears, with options for selecting an existing library or creating a new one.
2 Do one of the following:
•
To open an Aperture library le shown in the dialog: Select the library le, and click Choose.
•
To open an Aperture library le not shown in the dialog: Click the Other Library button, locate the
library le in the dialog that appears, and click Select.
•
To open a new, empty library: Click the Create New button, give the library a name in the Save
As eld, select a location for the library, and click Create.
Aperture creates a new, empty library le and opens it.
Merge libraries
If you work with several computers, or work on projects with other people, you may nd it
necessary to transfer projects and albums from one Aperture system to another. Transferring
folders, projects, and albums is a simple export and import process. The items you export are
consolidated into a library le. When you import the library into the second Aperture system,
you can add les, delete les, modify metadata, and make adjustments. When you’re ready to
return the contents of the modied library to the original computer, Aperture merges the two
libraries together.
Chapter 3 Work with projects and the library 59
Page 60

Transfer folders, projects, and albums from one computer to another
1 In the Library inspector, select the items you want to transfer, and choose File > Export > Items as
New Library.
Note: Items in the Export menu change depending on what is selected. If you have a single item,
such as an album, selected in the Library inspector, choose File > Export > Album as New Library.
2 Enter a name and choose a location for the exported library.
3 Do any of the following:
•
If your project contains referenced images and you want the original les to be available to the new
Aperture system: Select the “Consolidate originals into exported library” checkbox to copy the
original image les into the new library le.
•
If you want to copy the previews into the new library so that you don’t have to rebuild them on the
new Aperture system: Select the “Include Previews in exported library” checkbox.
•
If you want Aperture to alert you when it nishes building the new library: Select the “Show alert
when nished” checkbox.
4 Click Export Library.
Aperture consolidates the selected items into a library, and the library le is exported to the
location you chose.
5 Connect or network the two computers together, and copy the exported library le to the
second computer.
For more information, see the documentation that came with the computers.
6 Open Aperture on the second computer, and choose File > Switch to Library > [library lename].
You can now work with the exported library from the rst computer on the second computer.
Merge the modied library from the second computer into the library of the rst computer
When you’re ready to merge the modied library on the second computer into the library on the
rst computer, import it into the open library on the rst computer.
1 Follow the steps in the previous task to transfer the modied library on the second computer to
the rst computer.
2 On the rst computer, choose File > Import > Library/Project, locate the modied library le from
the second computer, and click Import.
A dialog appears, giving you the option to merge the imported library with the current library or
add the contents of the imported library to the current library.
3 Click Merge.
A dialog appears, asking you to choose which library to use to resolve potential conicts caused
by the dierences between the libraries.
4 To import the changes in the modied library, choose the library from the second computer.
Aperture imports the modied library from the second computer, merging the changes made
to the projects and albums on the second computer into the same projects and albums on the
rst computer. Any les that were deleted on the second computer, or for some other reason no
longer exist in the library le of the second computer, are moved to the Aperture Trash in the
library of the rst computer.
Chapter 3 Work with projects and the library 60
Page 61

Add the contents of the library from the second computer without overwriting the contents
of the library on the rst computer
If you don’t want to overwrite the original projects and albums you exported from the rst
computer with the projects and albums you modied on the second computer, you can add the
modied projects and albums to the library on the rst computer as unique items.
1 Transfer the modied library from the second computer to the rst computer.
2 On the rst computer, choose File > Import > Library/Project, locate the modied library le from
the second computer, and click Import.
A dialog appears, asking you to choose which library to use to resolve potential conicts caused
by the dierences between the libraries.
3 Click Add.
Aperture imports the contents of the modied library from the second computer into the library
of the rst computer. Instead of overwriting the les that changed, Aperture adds the changed
les as additional items. If imported items have the same names as existing items in the Library
inspector, the names of the imported items are appended with “(1).”
Open your library in iPhoto
You can open your library in iPhoto from within Aperture.
Open your library in iPhoto
m Choose File > Open Library in iPhoto.
Aperture closes and iPhoto opens the library you were working with in Aperture.
Work with projects
View projects
You organize your photos in containers called projects. You can view all of your projects in the
Library inspector (as a list under the Projects heading) or in Projects view. Projects view displays
a thumbnail of each project in your library or libraries. Double-clicking a thumbnail opens a
project, displaying all of its photos in the Browser. In Projects view, you can conveniently view,
organize, and sort your projects.
Switch to Projects view
m In the Library inspector, select the Projects icon.
Chapter 3 Work with projects and the library 61
Page 62

Preview the photos in a project quickly
In Projects view, do one of the following:
m Slowly drag the pointer horizontally across the project’s thumbnail.
m Select the project’s thumbnail, and use the Left Arrow and Right Arrow keys to navigate through
the photos in the project.
Set the key photo for a project
You can set any photo within a project as the key photo displayed in Projects view.
1 Do one of the following:
•
Move the pointer slowly over the project’s thumbnail to skim to the photo you want to set as
the key photo.
•
Select the project’s thumbnail, and use the Left Arrow and Right Arrow keys to navigate to the
photo you want to set as the key photo.
2 When you locate the photo you’re looking for, press the Space bar.
The selected photo is set as the key photo to represent the project.
Play a slideshow of a project’s photos
You can select a project and play a slideshow to review the photos within it.
1 Do one of the following:
•
Select a project’s thumbnail, and choose File > Play Slideshow (or press Shift-S).
•
Control-click a project, and choose Play Slideshow from the shortcut menu.
2 In the Play Slideshow dialog, choose a preset from the Slideshow Preset pop-up menu, and
click Start.
A slideshow of the photos in the selected project plays. Press the Space bar to pause and play
the slideshow, and the Escape key to stop the slideshow. For more information about slideshows,
see Slideshows overview on page 376.
View a project’s photos in the Browser
When you locate the project you want to work with in Projects view, you can display the project’s
photos in the Browser.
m In Projects view, double-click the project.
The Browser replaces Projects view and displays the selected project’s thumbnail images.
Chapter 3 Work with projects and the library 62
Page 63

View and change project information in the Info HUD
In Projects view, you can use the Info HUD to add descriptive information about a project and
change the project’s key photo (the thumbnail image that represents the project).
1 If the Aperture main window is not in Projects view, select Projects at the top of the
Library inspector.
2 To open the Info HUD for a project, click the Info button on a project’s thumbnail.
Info button
3 In the Info HUD, do either or both of the following:
•
To add descriptive information about the project: Type a description in the text eld to the right
of the project thumbnail.
•
To change the key photo for the project: Skim the project thumbnail to locate the photo you
want to set as the key photo, and click the “Click to make key photo” button.
Click to set this photo
as the key photo.
The photo you selected appears as the thumbnail image for the project.
To view or change information for another project, navigate to the project by clicking the
arrow buttons in the bottom-left corner of the Info HUD. To open a project, click the Go to
Project button. To assign location information to a photo, see Places overview.
Chapter 3 Work with projects and the library 63
Page 64

Create and delete projects
You can create new projects and delete projects in Projects view.
Create a new project
1 In Projects view, do one of the following:
•
Choose File > New > Project (or press Command-N).
•
Control-click a project, and choose New > Project from the shortcut menu.
•
Choose Project from the New pop-up menu in the toolbar.
2 In the dialog that appears, enter a name for the project in the Project Name eld.
3 Click OK.
The new, empty project opens in the Browser.
Delete a project
In Projects view, do one of the following:
m Select a project’s thumbnail, and choose File > Delete Project (or press Command-Delete).
m Control-click a project, and choose Delete Project from the shortcut menu.
The selected project is moved to the Aperture Trash. For more information, see Work with the
Aperture Trash on page 56.
Organize and sort projects in Projects view
You can organize your projects by the year the photos were created. If you organize your
projects in folders in the Library inspector, you can group your projects by the folders they reside
in. You can sort projects by name, in ascending and descending order, and in the order in which
the projects appear from top to bottom in the Library inspector. If you have a large number of
projects in your library, you can search for a specic project, removing the others from view.
If you have more than one project documenting the same subject and you want to consolidate
the projects into a single project, you can merge the projects.
Chapter 3 Work with projects and the library 64
Page 65

Group projects by year or by folder
Arrow button
Projects button
m To group projects by year: Click the Group by Year button at the top of Projects view.
m To group projects by folder: Click the Group by Folder button at the top of Projects view.
When you group projects by year or by folder, the number of projects and photos for each year
or folder is displayed in the top-right corner of each group’s row. Click the adjacent arrow button
to display projects for a single year or folder only.
To return to full display of projects for all years or folders, click the Projects button at the top of
the main window in Projects view.
Sort projects automatically in Projects view
m To sort projects by name: Choose Name from the Sorting pop-up menu in the top-left corner of
Projects view.
m To sort projects in ascending order by the date the photos were captured: Choose Date – Newest First
from the Sorting pop-up menu.
m To sort projects in descending order by the date the photos were captured: Choose Date – Oldest First
from the Sorting pop-up menu.
m To sort projects by the order in which they appear in the Library inspector: Choose Library from the
Sorting pop-up menu.
Sort projects manually in Projects view
1 Choose Manual from the Sorting pop-up menu in the top-left corner of Projects view.
2 In the Browser, select a project and drag it to a new position.
A green line indicates the project’s new position.
Search for projects
m In Projects view, enter the name of the project you want to locate in the search eld.
All projects are removed from view except for the project or projects matching the name in the
search eld. To display all projects again, click the Reset button (with an X) in the search eld.
Chapter 3 Work with projects and the library 65
Page 66

Import photos into projects
You can import les, as well as Aperture projects and libraries, into a project selected in
Projects view.
Import les into a project
In Projects view, do one of the following:
m Select a project’s thumbnail, and choose File > Import > Files (or press Command-I).
m Control-click a project, and choose Import > Files from the shortcut menu.
The Import browser appears with the project selected in the Destination pop-up menu. For more
information about importing les, see Importing photos overview on page 27.
Import another project or an Aperture library into a project
1 In Projects view, Control-click a project, and choose Import > Library or Import > Folders as
Projects from the shortcut menu.
2 In the dialog that appears, select the project or library that you want to merge into the project
selected in Projects view, and click Import.
The project or library is merged into the project selected in Projects view. For more information,
see Merge libraries on page 59.
Merge projects
If you create multiple projects and then later decide that the content spread among the projects
belongs in a single project, you can select the projects in the Library inspector or in Projects view
and merge them into one project.
Merge projects in the Library inspector
1 In the Library inspector, select the projects you want to merge by Shift-clicking adjacent projects
or Command-clicking nonadjacent projects.
2 Choose File > Merge Projects.
A dialog appears, indicating which project the selected projects will be merged into.
3 Click Merge.
The content in the selected projects is merged into the topmost selected project in the
Library inspector.
Merge projects in Projects view
In Projects view, do one of the following:
m Select a project or projects, drag them into the project that you want to contain the other
project or projects, and click Merge in the dialog that appears.
m Select the projects you want to merge, choose File > Merge Projects, and click Merge in the
dialog that appears.
Chapter 3 Work with projects and the library 66
Page 67

Duplicate a project structure
If you routinely use the same project structure populated with the same types of albums and
folders, you can duplicate the structure of an existing project and create a new, empty project
with the same arrangement of albums and folders. If the project you’re duplicating has Smart
Albums, the settings for those Smart Albums are duplicated as well. For more information about
Smart Albums, see Collect photos in a new Smart Album on page 156.
Duplicate a project structure
1 In the Library inspector, select the project whose structure you want to copy.
2 Choose File > Duplicate Project Structure.
The project and all of its subordinate items, such as albums, folders, and Smart Albums, are
duplicated along with their names. However, the duplicated project contains no photos, audio
clips, or video clips.
3 Double-click the name of each duplicated item in the new project to give it a new name.
Double-click the item’s
name to rename it.
Work with referenced images
A referenced image is a photo whose original isn’t stored in the Aperture library. You create a
referenced image by specifying a location outside of the library when you import the image.
Aperture tracks the locations of referenced images and works with them in the same way as
with images in the library, except that referenced originals are not backed up when you back
up your library. You can identify referenced images in Aperture by turning on referenced image
badge overlays.
A referenced image is online if Aperture can access its original. Referenced images remain
online even if you rename them or move their originals to another location on the same hard
disk or volume. If you disconnect the disk that holds a referenced original, move the original to
the Finder Trash, or move the original to a dierent hard disk or volume, the referenced image
becomes oine (unavailable). When an original is oine, Aperture draws the thumbnail image
rst, and then the preview if it exists. Because the preview is high quality, you can zoom and
even use the Loupe. However, you can’t make adjustments until you either reconnect the disk
that holds the original or use Aperture to reconnect to the original in its new location.
You can copy, move, delete, and search for referenced images in your Aperture projects using the
same procedures you use for other Aperture versions and originals. When you copy a version of
a referenced image in Aperture, a new version is created and tracked in the Aperture library. No
new les are recorded on the hard disk in the location of the referenced image’s original. When
you move a referenced image between projects on your Aperture system, the referenced original
remains in its original location on your hard disk.
If you decide that it would be more convenient to store referenced originals in the Aperture
library (for example, so that you can back them up to vaults), you can have Aperture move or
copy the les to the library.
Chapter 3 Work with projects and the library 67
Page 68

When you delete a referenced original from Aperture, you can specify whether the photo’s
version is placed in the Aperture Trash. When you empty the Aperture Trash, the link to the
original is deleted, but the original remains in its current location in the Finder.
Identify referenced images
After you import referenced images, you can identify them in the Browser by turning on
referenced image badge overlays. Referenced images appear with badges that show whether
their originals are currently online (available) or oine (unavailable).
These badge overlays
indicate the photos are
referenced images.
This badge overlay
indicates the photo is an
offline referenced image.
1 Choose Aperture > Preferences, or press Command-Comma (,).
2 In the Preferences window, click Appearance and select the “Badge referenced items” checkbox.
See a list of referenced images in a selection
When working with a selection of photos in the Browser, you may need to determine which
photos have originals that reside in the Aperture library and which are referenced images whose
originals are located elsewhere on your hard disks. You can select a group of photos in the
Browser and show a list of the referenced images within the selection, along with their locations.
1 In the Browser, select a group of photos.
2 Choose File > Locate Referenced Files.
Chapter 3 Work with projects and the library 68
Page 69

The Referenced Files In Selection dialog appears.
This column shows
This column
The specific photo
the names of hard
disks where referenced
originals are located.
These columns identify how
many originals for referenced
images are on the hard disk,
and how many are not found.
identifies the hard
disk location of the
referenced originals.
and metadata to help
you identify the file
are displayed here.
Locate a referenced image’s original in the Finder
At times, you may need to quickly nd a referenced image’s original on your hard disk to copy
or move it, attach it to an email, or otherwise work with it outside of Aperture. You can select a
photo in the Browser and display the location of the photo’s original in the Finder.
1 Select a referenced image in the Browser.
2 Choose File > Show in Finder.
A Finder window appears, displaying the le path for the referenced original.
Note: If you open a referenced image’s original from the Finder in another application, you won’t
see the changes or adjustments you’ve made to the image in Aperture. Your changes appear
in versions stored in the Aperture library, and the referenced image’s original is always left
unchanged. To see the adjusted photo, you need to export a version of it.
Chapter 3 Work with projects and the library 69
Page 70

Reconnect oine referenced images
If you disconnected a hard disk drive that holds referenced image’s originals, you can reconnect
the drive to your computer, and Aperture automatically reconnects the originals.
If a photo is oine or modied in some way that makes it unrecognizable as the original
referenced image, you can still select it and have Aperture reconnect the original.
1 Reconnect the hard disk drive holding the referenced originals, or otherwise locate or make the
les available to Aperture for reconnecting.
2 Select the project that contains the oine photos you want to reconnect, or select the oine
photos in the Browser.
3 Choose File > Locate Referenced Files.
4 If necessary, click the Show Reconnect Options button.
Select the volume you want here,
and navigate to the location of the
file on the hard disk.
5 At the top of the dialog, select the le path for the original that you want to reconnect.
A thumbnail of the photo and some identifying metadata appear.
6 In the bottom half of the dialog, navigate to the location of the referenced image’s original on
the hard disk and select the original.
You can follow the le path listed for a selected photo in the top of the dialog.
When you select the le, a thumbnail of the photo and metadata appear, allowing you to
compare them to the thumbnail and metadata in the upper part of the dialog to make sure
you’ve selected the correct le.
7 Click Reconnect to reconnect a specic photo, or click Reconnect All to reconnect all
selected photos.
Chapter 3 Work with projects and the library 70
Page 71

Move originals for referenced images to a new location
You can easily move referenced originals to new locations on the same hard disk or a dierent
hard disk.
1 In the Browser, select the referenced images whose originals you want to move.
2 Choose File > Relocate Originals.
3 Select a folder location in the dialog that appears.
4 To specify that the les be stored as separate, individual les in the selected folder, choose None
from the Subfolders pop-up menu.
You can also specify that Aperture create a hierarchy of subfolders with specic folder names to
store your les. For more information about creating folders to hold your imported image les,
see Import originals for referenced images into folders on page 46.
5 To specify how you want the originals named, choose a naming convention from the Name
Format pop-up menu.
For example, choose Original File Name from the Name Format pop-up menu to have your les
stored using the original lenames from your camera or card. Choose a custom name format to
have your originals stored using a specied name. If you choose a custom name format, enter
the name you want in the Custom Name eld. For more information about naming les, see
Automatically name imported photos on page 37.
6 Click Relocate Originals.
Move referenced originals to the Aperture library
If you have originals stored in dierent hard disk locations but want to work with them all stored
in the Aperture library, you can select the referenced images in the Browser and move their
originals to the library. Aperture manages all aspects of originals stored in the library, keeping
them always available and allowing you to back them up in your vaults.
1 In the Browser, select the referenced images whose originals you want to move to the library.
2 Choose File > Consolidate Originals.
3 Choose whether you want the image les moved or copied into the Aperture library by clicking
the “Move les” or “Copy les” button.
4 Click Continue.
Search for photos by le status
You can search for photos using their le status. For example, you can search for photos that are
referenced images, managed images, and online or oine images.
1 In the Library inspector, select an item you want to search.
2 Show the Filter HUD by doing one of the following:
•
Choose Edit > Find (or press Command-F).
•
Click the Filter HUD button beside the search eld in the Browser.
3 In the Filter HUD, choose File Status from the Add Rule pop-up menu in the top-right corner, and
select the “File status” checkbox.
Chapter 3 Work with projects and the library 71
Page 72

4 Deselect any checkboxes that aren’t part of your query, and choose a le status from the “File
status” pop-up menu.
Select the “File status” checkbox
and choose the file status you
want to search for.
5 Choose Any from the pop-up menu in the top-left corner.
The photos that match the search criteria appear in the Browser.
Back up the library
Plan your backup system
As you begin working with Aperture, it’s important to perform regular backups of your photos.
Using the Aperture backup system, you can create backups and update them whenever you
wish. Aperture tracks your backups and indicates how up to date your most recent backup is.
In the rare event of equipment failure or an unforeseen catastrophe such as a re or weather-
related damage, you can easily restore the entire Aperture library onto your computer or a
new computer.
You set Aperture to back up a copy of the library to a designated storage area called a vault. For
safety and redundancy, use external hard disks to hold your vaults. You can create as many vaults
as you deem necessary.
When you back up your photos, Aperture makes a complete copy of the library in its current
state. If you remove items from the library, those items are removed from the backup when it is
next updated.
All originals for managed images, all versions, and all metadata, previews, and adjustment
information associated with your photos are backed up. The versions, previews, and metadata
associated with referenced images are also backed up in the vault.
Important: Referenced images’ originals are not backed up in the vault with the library. Because
the originals for referenced images are stored outside of the library, you must manage the
backup and archiving of them yourself.
Chapter 3 Work with projects and the library 72
Page 73

A typical backup system used with Aperture might look like the following:
Aperture library
(internal disk)
Office
Vault
(external disk)
Vault
(kept offsite and
updated regularly)
Remote location
This system backs up the Aperture library to two vaults stored on external hard disks. You
routinely back up the library on one external hard disk. You use the second hard disk as a backup
that you keep osite. You can then rotate your onsite external hard disk with the osite hard disk
to keep all your vaults updated.
To set up your Aperture backup system, you need to do the following:
•
Determine the number of vaults you need. For example, do you need one for routine backups,
one for weekly backups, and one for osite storage?
•
Determine the number of hard disks you need for routine backups.
•
Determine the number of hard disks you’ll use for storing backups osite.
•
Connect your hard disk drives to your computer.
•
Open Aperture and create the vaults you need, assigning a hard disk to each vault.
•
Update the new, empty vaults with copies of the Aperture library.
•
Disconnect one of the vault hard disks and take it to an osite location for safekeeping.
When planning the amount of storage space you’ll need, estimate the amount of disk space
needed to hold your existing digital images (photos you plan to import into Aperture) and the
amount of space you might need for new projects. For example, RAW images typically require 8
to 25 or more megabytes (MB) of disk space per le. Estimating the number of photos in a typical
project and the number of projects you usually create in a year, you can make a rough estimate
of what might represent a year’s storage space.
Create and update vaults
Before you can back up your les, you must create a vault and assign a hard disk to it. After
you assign a disk to the vault, Aperture uses the vault to back up the entire library. You can
create additional vaults and assign hard disks to them, and each additional vault also records a
complete backup of the library.
Show the Vault pane
Do one of the following:
m Choose Window > Show Vaults (or press Shift-R).
m Click the Show Vaults button below the Library inspector.
Chapter 3 Work with projects and the library 73
Page 74

Create a new vault
Disclosure triangle
1 Do one of the following:
•
Choose File > Vault > Add Vault.
•
Choose Add Vault from the Vault Action pop-up menu below the Library inspector.
Vault Action pop-up menu
A dialog appears, listing the number of managed les that will be backed up to the vault and
the number of referenced les that will not be included.
2 Click Continue.
3 In the Add Vault dialog, enter a name for the vault, choose a location to save it, and click Add.
The new, empty vault appears in the Vault pane.
Important: To ensure preservation of your photos, make sure to assign a separate external hard
disk drive to each vault.
Update a new, empty vault
When you create a new vault, it’s empty. As soon as you create a new vault, you should update it.
m In the Vault pane, click the Vault Status button to the right of the vault’s name.
See the hard disk assigned to a vault
m In the Vault pane, click the disclosure triangle beside the vault name.
You can easily see the amount of free space your vault has available next to the vault name.
Make sure to assign enough disk space to the vault to ensure a complete backup of the library
and to allow the library to grow as you import new photos over time.
Update all connected vaults
1 Do one of the following:
•
Choose File > Vault > Update All Vaults.
•
In the Vault pane, click the Update All Vaults button.
2 In the dialog that appears, click Update.
Update an existing vault
1 In the Vault pane, select the vault you want to update.
2 Do one of the following:
•
Choose Update Vault from the Vault Action pop-up menu .
•
Click the Vault Status button beside the vault name.
3 In the dialog that appears, click Update.
Chapter 3 Work with projects and the library 74
Page 75

Permanently remove a vault and delete its information
You can delete an entire vault and all the photos on it when you need to recongure your
backup system. This is useful when you have moved your backup vault to a larger-capacity hard
disk and you want to delete the vault information from the current hard disk drive to use it for
other purposes.
1 In the Vault pane, select the vault you want to remove.
2 Do one of the following:
•
Choose File > Vault > Remove Vault.
•
Choose Remove Vault from the Vault Action pop-up menu .
A dialog appears, asking if you want to remove the vault.
3 Click one of the following buttons:
•
Remove and Delete: When you click this button, Aperture no longer tracks the vault, and the
vault’s les are deleted from your hard disk.
•
Remove: When you click this button, Aperture no longer tracks the vault, but the vault’s les
remain on the hard disk.
Disconnect and reconnect vaults
You may routinely disconnect a backup hard disk drive from your Aperture system and take it to
a safe osite location. When you disconnect a backup hard disk from your computer, Aperture
takes the associated vault oine. When you reconnect the hard disk, Aperture automatically
detects the hard disk and connects it to the corresponding vault.
Disconnect a vault’s hard disk drive from your Aperture system
1 In the Finder, drag the icon for the hard disk drive to the Trash, or select the disk in the sidebar
of a Finder window and click the Eject button.
2 Disconnect the hard disk drive from your computer.
Specify a vault’s new location or path
1 Connect the hard disk drive to your computer.
2 To show the Vault pane, do one of the following:
•
Choose Window > Show Vaults (or press Shift-R).
•
Click the Show Vaults button below the Library inspector.
3 Select the vault to be updated to a new path.
4 Choose Update Vault Path from the Vault Action pop-up menu .
5 Navigate to the location of the vault on the hard disk drive, select it, and click Update Path.
Chapter 3 Work with projects and the library 75
Page 76

Restore your Aperture library
If you experience equipment failure or other unexpected events, such as re or weather-related
damage to your computer, you can easily restore your Aperture library from a vault stored on a
backup disk. You can also use the backup disk to transfer your library to another computer that
has Aperture installed.
Restore the entire library from an external backup disk
1 Connect the hard disk drive that contains the most up-to-date vault to your computer, and
open Aperture.
2 Choose File > Vault > Restore Library.
The Restore Library dialog appears.
3 Choose the vault you want to use to restore your library from the Source Vault pop-up menu.
If the vault doesn’t appear in the Source Vault pop-up menu, choose Select Source Vault from the
Source Vault pop-up menu, navigate to the vault’s location in the Select Source Vault dialog, and
click Select.
4 Click Restore, and then click Restore again.
Repair and rebuild your Aperture library
In the rare event that your Aperture database becomes corrupted or the les within it have
permissions issues, Aperture provides a few methods for reconstituting your Aperture library and
the le relationships within it.
Repair or rebuild your Aperture library
1 Close Aperture, if it’s open.
2 Locate the Aperture library you want to x, and then hold down the Command and Option keys
while double-clicking the Aperture library.
The Photo Library First Aid dialog appears.
Chapter 3 Work with projects and the library 76
Page 77

3 Do one of the following:
•
To repair the permissions of the les within your Aperture library: Select Repair Permissions.
This option should be used when Aperture can’t access some of the image les within the
database or is unable to open the library. The Repair Permissions option reviews each le
in your Aperture library and sets the read-and-write access of each le where appropriate,
allowing Aperture to access the les again.
Note: This option does not relocate referenced images whose original image les are oine.
For more information about reconnecting oine images, see Work with referenced images on
page 67.
•
To repair your Aperture library le: Select Repair Database.
This is the rst option you should use if you believe there is something wrong with the
Aperture library other than image le access issues.
•
To rebuild your database from scratch: Select Rebuild Database.
Rebuilding large libraries can be time-consuming; use this option if you’ve tried repairing
your database and the issues with your library persist. Aperture examines the library’s entire
database and rebuilds each component until it reconstitutes your original Aperture library.
4 Depending on your selection, click Repair or Rebuild.
Aperture either xes le permissions within the library or repairs or rebuilds the library, and then
opens the application workspace.
Chapter 3 Work with projects and the library 77
Page 78

Sorting
Grid View and
Organize and sort photos
4
Browser overview
After a shoot, you may need to sort through hundreds or even thousands of photos in a project.
Aperture provides ecient methods for increasing your productivity when working with large
numbers of photos.
When you select a project, a folder, or an album in the Library inspector, thumbnails of its photos
appear in the Browser. You select photos in the Browser to work with them. You can move and
rearrange photos, rotate photos, make new versions, and delete photos from a project.
Aperture provides fast and ecient ways of selecting photos in the Browser. You can use the
arrow keys to quickly select a photo or multiple photos to work on. You can also select photos
by clicking, dragging a selection rectangle, and using keyboard shortcuts. If using Aperture with
a trackpad, you can use the swipe gesture to select photos. For more information about using
gestures with Aperture, see Use gestures with Aperture on page 487.
pop-up menu
Tool strip
List View buttons
Search field
Thumbnail Resize slider
78
Page 79

In the Browser, you can display thumbnails in any of three views:
Photos displayed in list
•
Filmstrip view: Displays a single row of photos that you can select and navigate through.
Viewer
Browser in
filmstrip view
•
Grid view: Displays thumbnails of your photos in a grid pattern. Use grid view when it’s easiest
to identify your photos by sight and work with thumbnails as you organize, stack, or assign
keywords to photos.
•
List view: Displays a list of your photos with associated le information. Use list view when you
need to see or sort your photos by corresponding le properties such as image date, le size,
or rating.
view in the Browser
List view is a great way to quickly see information about your les. You can also use list view to
sort your photos by any of the column categories. Click a column heading to sort your photos
by that category.
You can also customize the information that appears with your photos in the Browser. For
example, you can set your photos to appear with the lename as well as the IPTC data and
EXIF data. You can change what information appears in the Browser in grid view, list view, and
lmstrip view by customizing the Metadata options in the Browser & Viewer Metadata window.
For more information, see Metadata overlays overview on page 201.
For information about changing the conguration of Aperture window layouts, see Change the
main window layout on page 474.
Chapter 4 Organize and sort photos 79
Page 80

Navigate through and select photos
All selected photos
Move Selection Left
Navigate through photos in the Browser
You can select one or more thumbnail-size photos in the Browser, and then modify them
in the Browser or see them in a larger format in the Viewer. Photos selected in the Browser
are highlighted with a white border. When you select a group of photos, the most recently
selected photo, called the primary selection, appears with a thicker white border than the
other selected photos.
display a white border.
A thick white border
surrounds the
primary selection.
Navigate through photos
Do one of the following:
m Press an arrow key to move left, right, up, or down in the Browser.
m Use the scroll bar to scroll through the photos in the Browser, then click the photo you want
to view.
m Choose Window > Show Control Bar to display the control bar. In the control bar, click the Move
Selection Left or Move Selection Right button.
Move Selection Right
Chapter 4 Organize and sort photos 80
Page 81

Select photos
Selecting photos in the Browser is a fundamental task in Aperture. Knowing the many ways
you can select photos can help increase your productivity and satisfaction while working with
your photos.
You can select photos in the following ways.
Task Action
•
Select a single photo
Select a range of photos
Select a photo among selected photos
Select a photo in a stack
Select nonadjacent photos
Slide a selection
Select the next stack
Select or set a compare photo
Deselect the compare photo
Select a dierent compare photo
Select all photos in the Browser
Select only the primary photo, deselecting all others
Deselect all photos in the Browser
Click the photo.
•
Press the arrow keys to navigate to the photo.
•
Select the rst photo, then choose Edit > Select to
End (or press Shift-End) to extend the selection to
the last photo in the Browser.
•
Select the last photo in a range, then choose Edit >
Select to Beginning (or press Shift-Home) to extend
the selection to the rst photo in the Browser.
•
Click the rst photo in a range, then Shift-click the
last photo.
•
Press the arrow keys to select the rst photo, then
press Shift and an arrow key to select the last
photo in the range.
•
Drag a selection rectangle to select all the photos
that fall within the rectangle.
•
Press Semicolon (;) or press Option–Command–
Left Arrow to select the previous photo in the
selection. Press Apostrophe (’) or press Option–
Command–Right Arrow to select the next photo
in the selection.
•
Press the Right Arrow or Left Arrow key.
•
Command-click the photos you want to select.
Command-click the photos again to deselect them.
•
Press Command–Left Arrow or Command–Right
Arrow to slide the current selection over by one
photo. For example, you can move a three-photo
selection left or right by one photo at a time.
•
With a stack selected, press Option–Page Up or
Option–Page Down.
•
Select the photo, then press Option-O.
•
Press Command-Return.
•
Select the photo you want as a compare photo,
then press Return.
•
Choose Edit > Select All (or press Command-A).
•
Choose Edit > Reduce Selection (or press Shift-E).
•
Choose Edit > Deselect All (or press
Shift-Command-A).
•
Click the gray background of the Browser.
Chapter 4 Organize and sort photos 81
Page 82

Navigate through photos in Quick Preview mode
As you work with photos in the Browser and Viewer, you can set Aperture to display JPEG
representations of the photos called previews. Because the preview’s le size is smaller than that
of the original photo, Aperture can display the photo more quickly. For example, the thumbnails
in the Browser are preview representations of the originals, reduced to thumbnail size.
Likewise, when you select a photo in the Viewer, Aperture rst displays a preview photo as it
reads the larger original on disk. It then displays the full original after the image is decoded.
This process of displaying the previews and then the originals can be nearly instantaneous, or,
depending on the size of your originals, there can be a short delay in the nal display.
For more information about creating and working with previews, see Preview images
overview on page 494.
To speed up the access and display of photos, you can turn on Quick Preview mode. In Quick
Preview mode, Aperture displays preview photos only, without reading the larger originals. You
can use Quick Preview mode to rapidly move to and select dierent photos. For example, you
might use Quick Preview mode to quickly select and stack photos, add keywords, or change
other metadata. When using Quick Preview mode, however, there are some things you can’t do,
such as make adjustments to photos. In Quick Preview mode, tools and functions that aren’t
available appear dimmed. Depending on your task, you may nd switching to Quick Preview
mode a great way to gain speedy access to photos.
Turn on Quick Preview mode
Do one of the following:
m Choose View > Quick Preview (or press P).
m Click the Quick Preview button in the tool strip.
The Quick Preview button in the tool strip turns yellow, and the border around the photo
selection in the Browser changes from white to yellow.
Chapter 4 Organize and sort photos 82
Page 83

Change the Browser view
Work with photos in lmstrip view
Filmstrip view, the default view for the Browser, displays the photos in your selection in the
Library inspector as a strip of thumbnails under the Viewer. You can use lmstrip view in
combination with the Viewer to quickly scroll from photo to photo, making changes and
comparing photos. For example, you can select several photos in a row, group them in a stack,
apply ratings, and compare them side by side in the Viewer. You can use the Right Arrow and Left
Arrow keys to quickly move from photo to photo, and you can use the scroll bar and the Shuttle
control to scroll through photos. You can resize the thumbnails in the lmstrip by dragging the
top of the lmstrip to enlarge its area.
Viewer
Browser in
filmstrip view
Switch to lmstrip view
Do one of the following:
m Choose View > Browser > Filmstrip (or press Control-F).
m Click the Filmstrip View button in the Browser.
Note: The main window must be set to the Split View layout in order to access the lmstrip in
the Browser. When the main window is set to Browser, the Filmstrip View button disappears.
Shuttle continuously through the photos in lmstrip view
m Press J to shuttle left, press K to stop shuttling, or press L to shuttle right.
Note: Pressing J or L multiple times increases the shuttle speed.
Chapter 4 Organize and sort photos 83
Page 84

Work with photos in grid view
Grid view displays the photos in your selection in the Library inspector as a grid of thumbnails
in the Browser. You can use grid view when you want to review large thumbnail photos quickly.
Setting the Aperture main window to show the Browser by itself provides the maximum amount
of space to dedicate to viewing thumbnails. You may want to adjust the size of the thumbnails to
a size convenient for selecting and working with them. If your selection in the Library inspector
has many photos, you can also use the Shuttle control or the scroll bar to scroll through
the photos.
For more information about setting the Aperture main window to show the Browser by itself, see
Change the main window layout on page 474.
Thumbnail Resize slider
Scroll bar
Switch to grid view
Do one of the following:
m Choose View > Browser > Grid (or press Control-G).
m Click the Grid View button in the Browser.
Adjust the thumbnail size
m Drag the Thumbnail Resize slider to increase or decrease the size of the thumbnails.
Shuttle continuously through the photos in grid view
m Press J to shuttle left, press K to stop shuttling, or press L to shuttle right.
Note: Pressing J or L multiple times increases the shuttle speed.
Chapter 4 Organize and sort photos 84
Page 85

Lighten or darken the background of the Browser
Disclosure triangle
Depending on your work preferences, you may want to lighten or darken the background that
your thumbnails appear against in the Browser. The darker the background, the less it interferes
with the colors in your photo. It’s a good idea to set the background to a dark color when
performing color adjustments to your photo. You can darken the background from shades of
gray all the way to black, or lighten it from gray to white.
1 Choose Aperture > Preferences, or press Command-Comma (,).
2 In the Preferences window, click Appearance and drag the Browser Background Brightness slider
to lighten or darken the background, then close the window.
Work with photos in list view
Instead of displaying thumbnails, list view displays photos by name and icon with accompanying
information such as rating, image dimensions, le size, and date.
Switch to list view
Do one of the following:
m Choose View > Browser > List (or press Control-L).
m Click the List View button in the Browser.
Choose what type of information is displayed in list view
1 Choose View > Metadata Display > Customize (or press Command-J).
2 In the Browser & Viewer Metadata dialog, choose a list view option from the View pop-up menu.
3 In the Metadata Fields column, click the disclosure triangles next to the main groups of metadata
to reveal the options within them.
Chapter 4 Organize and sort photos 85
Page 86

4 Specify the type of metadata that appears in list view by selecting the checkboxes
The Date column
corresponding to each type (and deselecting the checkboxes for metadata items you
want to remove).
Each metadata item selected in the Metadata Fields column in the Browser & Viewer Metadata
dialog appears as a column in list view.
5 If necessary, rearrange the order in which the metadata columns are displayed by dragging the
metadata items up or down in the Display Order column.
The order of metadata selections in the Display Order column from top to bottom corresponds
to the order of columns in the Browser in list view from left to right. Moving an item up in the
Display Order column moves the metadata column to the left in list view.
“Badges” is moved
and will appear
after “Keywords.”
6 When you’re satised with your metadata selections and the order in which they will be
displayed in list view, click OK.
Rearrange the metadata columns in list view
You can rearrange the metadata columns to keep the most important information in view.
m Select the column’s header and drag the column to a new position.
is being dragged.
Chapter 4 Organize and sort photos 86
Page 87

Sort photos in list view by a category
Photos in list view
Project tab
One of the main advantages of list view is that you can quickly sort photos based on a category
of information. When you click a column heading in list view, Aperture reorders the photos,
sorting them by that category. For example, you might sort your photos by date.
m Click the category column heading in the Browser.
sorted by date
Enlarge the thumbnail icons in list view
When you work in list view, it may sometimes be dicult to determine the content of a photo
based on the le information. You can enlarge the thumbnail icons that appear in list view to
give you a better look at the photos.
m Drag the Thumbnail Resize slider to increase or decrease the size of the icons.
Rename a photo version in list view
You can easily rename les after importing them. When you rename a le, you are renaming the
photo version, not the original. The lename of the original does not change.
m Select a photo, then double-click the photo’s version name and enter a new name.
Work with two Browsers open
You can work with two items in the Library inspector open at once, splitting the Browser into a
separate pane for each item.
Split the Browser into two panes
m Select one item in the Library inspector, and Option-click a second item in the Library inspector.
The Browser splits into two panes and shows thumbnail images for both items.
You can also set dierent display options for each pane. For example, one pane may show photos
in grid view and the other in list view. You may nd that working with multiple Browser panes
open allows you to easily copy or transfer the contents of one item in the Library inspector to
another. You can also open multiple items in the Library inspector and display their contents in a
single Browser. For more information about opening and closing multiple projects, see Open and
close items in the Library inspector on page 54.
Chapter 4 Organize and sort photos 87
Page 88

Set up and arrange photos
Choose the sort property
Rearrange and sort photos in the Browser
As you work with photos in the Browser, you can move and rearrange them into any order or
grouping you like. For example, you might want to keep all related photos of a wedding project,
such as the cake cutting, in close proximity to allow you to easily sort through the best ones and
then adjust them.
You can drag photos to new locations in the Browser. When you drag photos to new locations,
you create a custom arrangement of your photos, and the Sorting pop-up menu changes to
show the Manual option. Aperture records the order of your photos, and whenever you choose
Manual from the Sorting pop-up menu, your photos reappear in that order.
You can also change the order of photos in the Browser based on photo properties such as
lename, le size, date, color label, rating, and more. For example, when displaying photos by
lename, Aperture places the photos in alphabetical order. You might also order the photos by
date or time. You choose the sort property from the Sorting pop-up menu in grid view, list view,
and lmstrip view.
and direction from the
Sorting pop-up menu.
Rearrange photos in the Browser
m In grid view: Drag the photos you want to rearrange to a new location; when the green bar
appears, release the mouse button.
m In list view: Drag the photos you want to rearrange to a new location; when the blue bar appears,
release the mouse button.
Restore a manual arrangement of your photos in the Browser
m Choose Manual from the Sorting pop-up menu.
Aperture remembers the last time you moved photos and restores that arrangement.
Change the displayed order of photos in the Browser
m Choose a sort property from the Sorting pop-up menu. Choose Ascending or Descending to
specify an ascending or descending sort order.
Chapter 4 Organize and sort photos 88
Page 89

Rotate photos
When photos are imported into a project, some may be displayed in an incorrect orientation,
requiring you to rotate them. The tool strip provides a Rotate tool for rotating selected photos
counterclockwise. You can rotate photos individually or select a group and rotate them all at
once. You can also select photos and quickly rotate them using keyboard shortcuts.
Rotate photos individually
Do one of the following:
m Select the photo you want to rotate, then choose Photos > Rotate Counterclockwise (or press [),
or choose Photos > Rotate Clockwise (or press ]).
m Select a photo and click the Rotate tool in the tool strip to rotate the photo counterclockwise, or
Option-click the Rotate tool to rotate the photo clockwise.
m Make sure no photos are selected, then select the Rotate tool in the tool strip, and click a photo
to rotate it counterclockwise, or Option-click a photo to rotate it clockwise.
Rotate a group of selected photos
Do one of the following:
m Select a group of photos, then choose Photos > Rotate Counterclockwise (or press [), or choose
Photos > Rotate Clockwise (or press ]).
m Select a group of photos, then click the Rotate tool in the tool strip to rotate the photos
counterclockwise, or Option-click the Rotate tool to rotate the photos clockwise.
Create versions of a photo
Occasionally, you may want to make a second version of a photo. For example, you might want
to create another version of a photo and apply dierent exposure settings or other adjustments,
or change it for a specic use, such as for placement in a webpage or book.
You create a new photo version by duplicating either the original image or the currently selected
version. When you duplicate a version, all of the changes you’ve made to the rst version are
carried over to the new version. If you’ve made a series of adjustments to a photo and now
you want to start from the original photo and make dierent adjustments, you can duplicate
the original and start with a fresh, unchanged photo. In contrast, if you plan to use the same
adjustments in multiple versions, you can make those adjustments rst and then duplicate the
version with the adjustments applied.
Create a new version from an original
1 Select the photo you want to duplicate.
2 Choose Photos > New Version From Original (or press Option-G).
Duplicate the selected photo version
1 Select the photo you want to duplicate.
2 Choose Photos > Duplicate Version (or press Option-V).
Chapter 4 Organize and sort photos 89
Page 90

Delete photos from the Browser
If necessary, you can delete versions and even originals.
When deleting photos, you can:
•
Remove a version of the photo from an album, leaving any other versions in their original
locations in the library
•
Delete versions from within a stack
•
Delete a version from a project
•
Delete originals
Remove a version from an album
m Select the version and choose Photos > Remove From Album (or press Delete).
Delete an original
When a photo is represented in the Browser by a single version, you can select the version and
delete it, and the corresponding original is deleted as well.
1 Select a version.
2 Choose File > Delete Version (or press Command-Delete).
The original and its version are moved to the Aperture Trash. For more information, see Work
with the Aperture Trash on page 56.
Delete a version from a stack
When you create new versions of a photo, you can set Aperture to group the versions in a
stack—a set of related photos that can be shown side by side in the Browser for comparison
purposes. You can delete a version from such a version stack. For more information, see Create
stacks on page 93.
1 Click the Stack button to open the stack, and select the version you want to delete.
2 Choose File > Delete Version (or press Command-Delete).
The deleted version is moved to the Aperture Trash. For more information, see Work with the
Aperture Trash on page 56.
Delete a version from a project
m Select a photo, a video clip, or an audio clip, and choose File > Delete Version.
The version is moved to the Trash, along with the original if you deleted its last version.
Delete a version stack and its original
You can select a stack containing versions of the same image and delete all the image versions in
the stack as well as the original.
1 Select the stack you want to delete.
2 Choose File > Delete Original Image and All Versions.
The original and all its versions are moved to the Aperture Trash. For more information, see Work
with the Aperture Trash on page 56.
Chapter 4 Organize and sort photos 90
Page 91

Recover a deleted photo
If you accidentally delete a photo you meant to keep, and you can’t recover it by choosing Undo,
you may be able to recover it from the Aperture Trash.
1 In the Library inspector, select Trash.
All photos currently in the Aperture Trash are displayed in the Browser.
2 Do one of the following:
•
Drag the photo you accidentally deleted back to its original project.
•
Control-click the accidentally deleted photo and choose Put Back from the submenu.
If you’ve already emptied the Aperture Trash, you may be able to recover the photo from the
Finder Trash. If you’ve already emptied the Finder Trash, but you backed up your library before
deleting the photo, you may be able to restore the project containing the deleted photo from
the vault. If you updated your vault after emptying the Aperture Trash, the vault won’t contain
the deleted photo.
Rename original image les
At times, you may want to rename original image les to match the names you’ve assigned to
the photo versions in Aperture. Although Aperture keeps track of your originals regardless of
what they are named, it’s often useful for your image lenames to match inside and outside of
Aperture—especially when the originals are referenced images. For more information about
working with referenced images, see Work with referenced images on page 67.
Rename originals
1 In the Browser, select a photo or group of photos.
2 Choose Metadata > Batch Change (or press Shift-Command-B).
3 In the Batch Change dialog, choose a naming convention from the Version Name Format pop-up
menu to specify how you want the originals named.
For example, choose Version Name from the Version Name Format pop-up menu to have your
original lenames changed to match the names of the corresponding versions in Aperture. If
you choose a custom name format, enter the name you want in the Custom Name text eld. For
more information about naming les, see Automatically name imported photos on page 37.
4 Select the Apply to Original Files checkbox, then click OK.
The original les corresponding to the selected photos are renamed. For more information about
working with the Batch Change dialog, see Batch change metadata on page 212 .
Drag photos into dierent projects and albums
You can drag photos into dierent projects and albums. Depending on where you drag a photo,
Aperture either moves or copies the photo to the new location.
As a general rule, when you drag a photo into a dierent project, Aperture moves the photo into
the new project.
When you drag a photo into a dierent album, Aperture creates a duplicate version of the photo
and places it in the album. A photo can be copied into any album in the same project or into
albums in dierent projects. The destination album can be an album, book album, Light Table
album, slideshow, or web journal or webpage album.
Chapter 4 Organize and sort photos 91
Page 92

Copy a photo into a dierent album
The Stack button
m Drag the photo into another album in the Library inspector.
Move a photo into a dierent project
m Drag the photo into another project in the Library inspector.
Copy a photo into a dierent project
m Option-drag the photo into another project in the Library inspector.
You can also drag photos out of Smart Albums. If you drag a photo from a Smart Album into
another album, the version is copied to the new location. If you drag a photo into a project
dierent from the project that contains the Smart Album, Aperture moves the photo to the
destination project. All links to versions in other albums are maintained. For more information
about working with Smart Albums, see Collect photos in a new Smart Album on page 156 .
Stack photos and make picks
Stacking photos overview
To capture a specic moment in time, such as a bride and groom kissing or a student soccer
player kicking the winning goal, a photographer may shoot multiple photos, using both
bracketing and continuous shooting, to increase the odds of capturing a usable photo. After
shooting the series, the photographer reviews the images and picks the best photo of the group.
Reviewing and making picks from many related photos can be time-consuming and
dicult. Aperture makes it simple to choose the best photo out of a series by allowing you to
group related photos into sets, called stacks, that are easy to review, work with, and select nal
picks from.
Aperture can automatically create stacks by grouping photos that were shot in quick succession,
or by grouping multiple versions of the same photo. You can also select photos and create
stacks manually.
A stack appears in the Browser as a group of thumbnail images. The photo that represents the
stack, called the pick, is selected and displayed on the left. You can select any photo in the stack
as the pick, and it moves to the leftmost position in the stack. You can rearrange the order of
photos in a stack. For example, you might choose an alternate photo and position it next to the
pick. A Stack button appears in the upper-left corner of the pick photo in the stack, indicating
the number of photos in the stack.
indicates the number
of photos in the stack.
A stack with three photos
is shown expanded.
Chapter 4 Organize and sort photos 92
Page 93

After creating a stack and selecting the pick, you can close the stack by clicking the Stack button
Only the pick photo is
on the pick photo. When a stack is closed, only the stack’s pick photo appears in the Browser.
Clicking the Stack button again expands the stack.
shown when the stack
is closed.
By closing stacks, you quickly reduce the number of photos you have to visually sort through
when selecting photos in the nal photo edit.
After creating stacks, you can organize and change them as needed. You can add photos to
a stack and remove those that don’t belong. You can also split a stack into multiple stacks
if necessary.
Important: When you open an Aperture library in iPhoto, only stack picks are shown. The photos
within stacks are not shown or accessible, but they are not discarded. To work with your photos
within stacks, open the Aperture library in Aperture.
Create stacks
You can create stacks in two ways: specify that Aperture create stacks automatically, or you can
create stacks manually. For example, if you shoot a series of photos in quick succession (such
as at a sports event) or if you bracket photos to allow for dierences in lighting or exposure,
you most likely will want to view those photos together. Aperture can stack those photos
automatically based on metadata recorded by the camera as the series of pictures is taken.
A series of photos taken
in quick succession.
You can also have Aperture automatically group new versions of the same photo as you
create them.
Stack photos automatically
1 In the Library inspector, select a project or an album that contains the photos you want to stack.
2 Choose Stacks > Auto-Stack (or press Option-Command-A).
Chapter 4 Organize and sort photos 93
Page 94

3 In the Auto-Stack Images HUD, drag the slider to specify the maximum interval for successive
The selected photos are
The Stack button
shots in a stack.
Move the slider to indicate
the maximum interval for
successive shots.
As you drag the slider, the photos in the Browser are stacked according to the interval of time
specied. For example, if you typically shoot a series of related photos in 15-second intervals, set
the slider to 15 seconds.
4 Inspect the stacks to determine if the time interval should be shortened or lengthened.
Note: You can also manually select photos in the Import browser and stack and unstack them
using the same commands and procedures you use to stack photos in the Browser.
Create new version stacks automatically
1 Choose Aperture > Preferences, or press Command-Comma (,).
The Aperture Preferences window appears.
2 Click the General button, then select the “Automatically stack new versions” checkbox.
Create a stack manually
After importing photos, you may want to quickly review them and delete those that you
immediately see have technical or content aws. You may then want to group the remaining
photos into stacks before rating them. Stacking photos manually can help provide an initial
organization and an overview of your shots, which you can then put through a more rened or
discriminating rating pass later.
1 In the Browser, select the photos you want to stack.
You can Shift-click adjacent photos and Command-click nonadjacent photos to select them.
Tip: To quickly select a series of photos, select a photo at one end of the series, hold down the
Shift key and press the Right Arrow or Left Arrow key to select additional photos.
2 Choose Stacks > Stack (or press Command-K).
appears on the
current pick photo.
now stacked and have a
dark gray box around them.
The selected photos are now stacked and appear linked in gray. The Stack button appears as an
overlay on the top-left portion of the current pick photo in the Browser. You can change the pick
photo and rearrange the order of the photos in the stack as you wish.
Unstack a selection of photos
m After creating a stack, choose Edit > Undo, or select a photo in the stack and choose Stacks >
Unstack (or press Shift-Command-K).
Chapter 4 Organize and sort photos 94
Page 95

Open and close stacks
Only the pick photo is
You can close a stack and open it again whenever you wish. You may want to do this to free up
space in the Browser. You can also close stacks to quickly reduce the number of photos you must
sort through visually when selecting photos for a nal photo edit. When a stack is closed, only
the stack’s pick photo appears in the Browser.
Close or open a stack
m To close a stack: Select an open stack, then choose Stacks > Close Stack (or press Shift-K).
m To open a stack: Select a closed stack, then choose Stacks > Open Stack (or press Shift-K).
You can also close or open a stack by clicking the Stack button on the pick photo.
shown when the stack
is closed.
Close or open all stacks
m To close all stacks: Choose Stacks > Close All Stacks, or press Option-Semicolon (;).
m To open all stacks: Choose Stacks > Open All Stacks, or press Option-Apostrophe (’).
m Select a photo in the stack, then choose Stacks > Pick, or press Command-Backslash (\).
m Drag the photo you want into the pick (or leftmost) position in the stack. When you see a green
m Select a photo in the stack, then choose Stacks > Set Album Pick, or press Shift-Command-
Set a pick photo for a stack
The pick photo represents the stack. You can set the photo you like best as the pick, or Aperture
can set the pick automatically. When you select and stack photos manually in the Browser, the
leftmost photo becomes the pick. You can change the pick whenever you wish.
If the same stack appears in several albums, you can assign a dierent pick photo for the stack in
each album. For example, a stack in a webpage album may have one pick photo, and the same
stack in a book album may have a dierent pick photo adjusted for printing. An album pick
appears with the Album Pick badge at the top of the image’s thumbnail in the Browser.
Set a photo as the stack pick
Do one of the following:
bar appear, release the mouse button.
Select an album pick for a stack that appears in multiple albums
Backslash (\).
To clear an album pick from a stack, choose Stacks > Clear Album Pick, or press Shift-Command-
Backslash (\) again.
Chapter 4 Organize and sort photos 95
Page 96

Work with stacked photos
You can change the order of photos in a stack, add or remove photos in a stack, split a stack into
multiple stacks, and drag a stack (or photos within a stack) to a new location.
Promote a photo in a stack
You can change the order of photos within a stack to help you choose the pick and alternates.
Moving a photo to the left promotes it; moving it to the right demotes it.
m To promote a photo: Select a photo, then choose Stacks > Promote, or press Command–Left
Bracket ([).
m To demote a photo: Select a photo, then choose Stacks > Demote, or press Command–Right
Bracket (]).
You can also drag a photo to a new location in a stack. When you see a green bar appear, then
release the mouse button.
Add or remove photos in stacks
You can add photos to and remove photos from stacks at any time. You can drag photos into or
out of a stack, and you can also drag photos from one stack to another.
m To add a photo: Select the photos in a stack and the photo you want to add to the stack, then
choose Stacks > Stack (or press Command-K).
m To remove a photo: Select the photo, then choose Stacks > Extract Item (or press Option-Shift-K).
You can also drag photos into or out of expanded stacks.
Split a stack
You can split a stack into multiple stacks to rene the organization of your photos. All photos
remain stacked, but they are now part of new stacks. The photo selected as the splitting point
becomes the pick for the new stack.
1 In an expanded stack, select the photo that you want as the rst photo in a new stack.
Select the photo you
want as the first image
in the new stack.
2 Choose Stacks > Split Stack (or press Option-K).
The selected image becomes
the pick in the new stack, which
is marked with a white outline.
Chapter 4 Organize and sort photos 96
Page 97

Drag a stack to a new location
m With the stack closed, drag the stack to a new location in the browser.
The entire stack is relocated.
You can also drag photos into or out of a stack. However, if you drag a photo within a stack into
a new project, the entire stack moves to the new location.
When you drag a stack into a webpage album, web journal album, book album, or slideshow
album, the entire stack appears in the Browser, but only the stack picks can be used for
publication in webpages, web journals, books, and slideshows.
Compare photos in stacks
You can see a side-by-side comparison of the pick and any any other photo in a stack using the
stack-viewing feature. When you enable this feature, clicking a stack in the Browser opens the
stack and displays its pick in the Viewer alongside the next leftmost photo in the stack. You can
change the comparison photo by clicking any other photo in the stack.
This stack-viewing feature also works in full-screen view.
Set the Viewer to open and compare two photos in a stack
m Choose View > Main Viewer > Stack (or press Option-T).
The pick photo and the photo to its immediate right in the stack open in the Viewer. The pick
photo is surrounded by a green border, and the alternate photo is surrounded by a white border.
Tip: When the Viewer is in Stack mode, you can press the Up Arrow and Down Arrow keys to
move from stack to stack.
Select another alternate photo
Do one of the following:
m Press the Left Arrow and Right Arrow keys.
m Select any photo in the stack.
Promote or demote the alternate photo in the stack
m To promote the alternate photo: Press Command–Left Bracket ([).
m To demote the alternate photo: Press Command–Right Bracket (]).
The alternate photo moves one position left or right in the Browser.
Chapter 4 Organize and sort photos 97
Page 98

Set the alternate photo as the stack pick photo
m Press Command–Backslash (\).
The photo moves to the far left of the stack, becoming the pick photo.
Stop comparing photos in a stack
Do one of the following:
m Press Command-Return.
m Choose another option from the View > Main Viewer menu.
m Select a photo in the Browser that is not in a stack.
Work with stacks in list view
If you prefer, you can create and work with stacks in list view. You can select photos to stack,
select a pick, add and remove photos, and split stacks, just as you can in lmstrip view and
grid view.
Click the disclosure triangle to
the left of the pick photo to view
the photos within the stack.
In list view, a stack is identied by a disclosure triangle beside the name of the pick photo.
Open and close stacks in list view
m Click the disclosure triangle beside the name of the pick photo.
You can work with the photos in a stack in list view by dragging, pressing keyboard shortcuts, or
choosing commands from the Stacks menu.
Rate photos
Rating photos overview
Rating photos is a quick and easy way to narrow down the number of photos you intend to work
with. It can also help you locate your best photos later.
After nishing a shoot, photographers typically review their photos and determine which
ones are worth working with. Although a “yes or no” appraisal of a photo can work with a
small selection of photos, with a larger collection of similar photos that show small variations,
photographers need an organized method of noting which photos are superior shots, which
deserve further review, and which are poor quality or rejects. A simple and eective rating
system can help you narrow the number of photos to focus on during the selection process.
Rating is a simple process with powerful results. If you can easily identify 100 out of 500 photos
that aren’t going to work, removing these photos reduces your workload by 20 percent.
Chapter 4 Organize and sort photos 98
Page 99

Aperture provides a system for rating photos from Select to Reject. The easily decipherable
Make sure this checkbox
option from the pop-up menu.
photo ratings appear on the photos themselves as overlays. Positive ratings appear as stars; you
can rate photos from one to ve stars, with ve being the highest, or Select, rating. A negative, or
Reject, rating appears as an X.
Five stars indicate
the highest rating
(Select).
Stars indicate
a positive rating.
An X indicates a
negative rating (Reject).
The process of rating a photo can be as easy as selecting a photo and clicking a rating button in
the Info inspector.
Click a rating button
to assign and change
photo ratings.
You can also use keyboard shortcuts to quickly assign or change ratings.
You can select and rate multiple photos at once. You can review and rate photos in the Viewer,
Browser, and Light Table, as well as in full-screen view. When you’ve nished rating photos,
Aperture allows you to sort photos according to their ratings.
You can use the Filter HUD to hide or show photos of a certain rating. For example, after an initial
rating pass, you can set the Filter HUD to show only those photos that are rated one star. You can
then closely inspect and further rene your selection or begin an adjustment pass. Aperture is
preset to hide photos that are rated Reject, so you may need to change the Filter HUD settings to
see rejected photos.
is selected, then choose an
Set the slider to a rating.
Rejected photos appear with a white X overlay. Positive ratings appear with white star overlays. If
no overlays are displayed on the photo, the photo is considered neutral or is not rated.
Chapter 4 Organize and sort photos 99
Page 100

Rating workow
You can use photo rating as part of your workow to help reduce a large group of photos to a
smaller group of preferred photos. Sometimes you can accomplish the selection process in one
pass, especially if the group of photos is small. If the group is large, additional rating and culling
passes may be necessary.
Rating photos with multiple passes can allow you to take a measured approach to the photo
editing process. You can systematically rate photos and then remove levels of rated photos from
view to work with your best photos.
Here is a suggested workow for rating photos in multiple passes.
Rate photos in multiple passes
1 Begin by assigning a Reject rating to all photos that are clearly unacceptable.
If the Filter HUD is set to show unrated photos or better (the default setting), the rejected photos
immediately disappear.
2 In the next rating pass, assign positive ratings to any photos that deserve a rating of one star or
better. Leave photos you’re uncertain about unrated.
3 To hide all unrated photos, show the Filter HUD and specify a rating that is greater than or equal
to one star as search criteria.
Only photos with a rating of one star or better remain visible in the Browser.
4 In the next rating pass, assign a rating of two stars to any photos that are better than one star.
5 Change the search criteria in the Filter HUD to show only those photos that are rated two stars
or better.
6 In the next rating pass, assign a rating of three stars to your photos that are better than two stars.
7 Change the search criteria in the Filter HUD to show only those photos that are rated three stars
or better.
8 In the next rating pass, assign a rating of four stars to your photos that are better than
three stars.
9 Change the search criteria in the Filter HUD to show only those photos that are rated four stars
or better.
10 In the next pass, assign a rating of ve stars, or Select, to your best photos.
Chapter 4 Organize and sort photos 100
 Loading...