

Page 1

rt
Chapter 1 Get ting Started
Chapter 2 Get ting H elp
Chapter 3 Using Exp an sion Bay Modules and PC Car ds
Chapter 4 Conn ecting Additional Equipment
Chapter 5 Installing and Using Ap plic ation Programs
Chapter 6 Power Manag ement
pa
I
Page 2

Page 3

Follow the instructions in this
chapter to set up your computer
and learn the basics.
1
Getting Started
The information and illustrations in this chapter provide an overview of your
Macintosh PowerBook system and get you started using the computer. To
begin, take a few moments to review some important details about the
computer’s hardware, software, and learning materials.
Becoming familiar with your Macintosh PowerBook
Your PowerBook is designed to keep you working productively in any
locatio n. With a PowerBook, you have
m easily expandable hardware
m specialized programs for mobile computing and versatile productivity
applications, in addition to Macintosh system software
m interactive online instructions for using the computer, a manual for setting
up and troubleshooting, and electronic manuals for application programs
provided with the computer
Hardware at a glance
The illustration on the next page shows the built-in features of your computer,
including the slots for PC Cards, the expansion bay for adding a CD-ROM
drive or other internal device, and the ports for connecting to a network, a
printer, and other external equipment.
3
Page 4
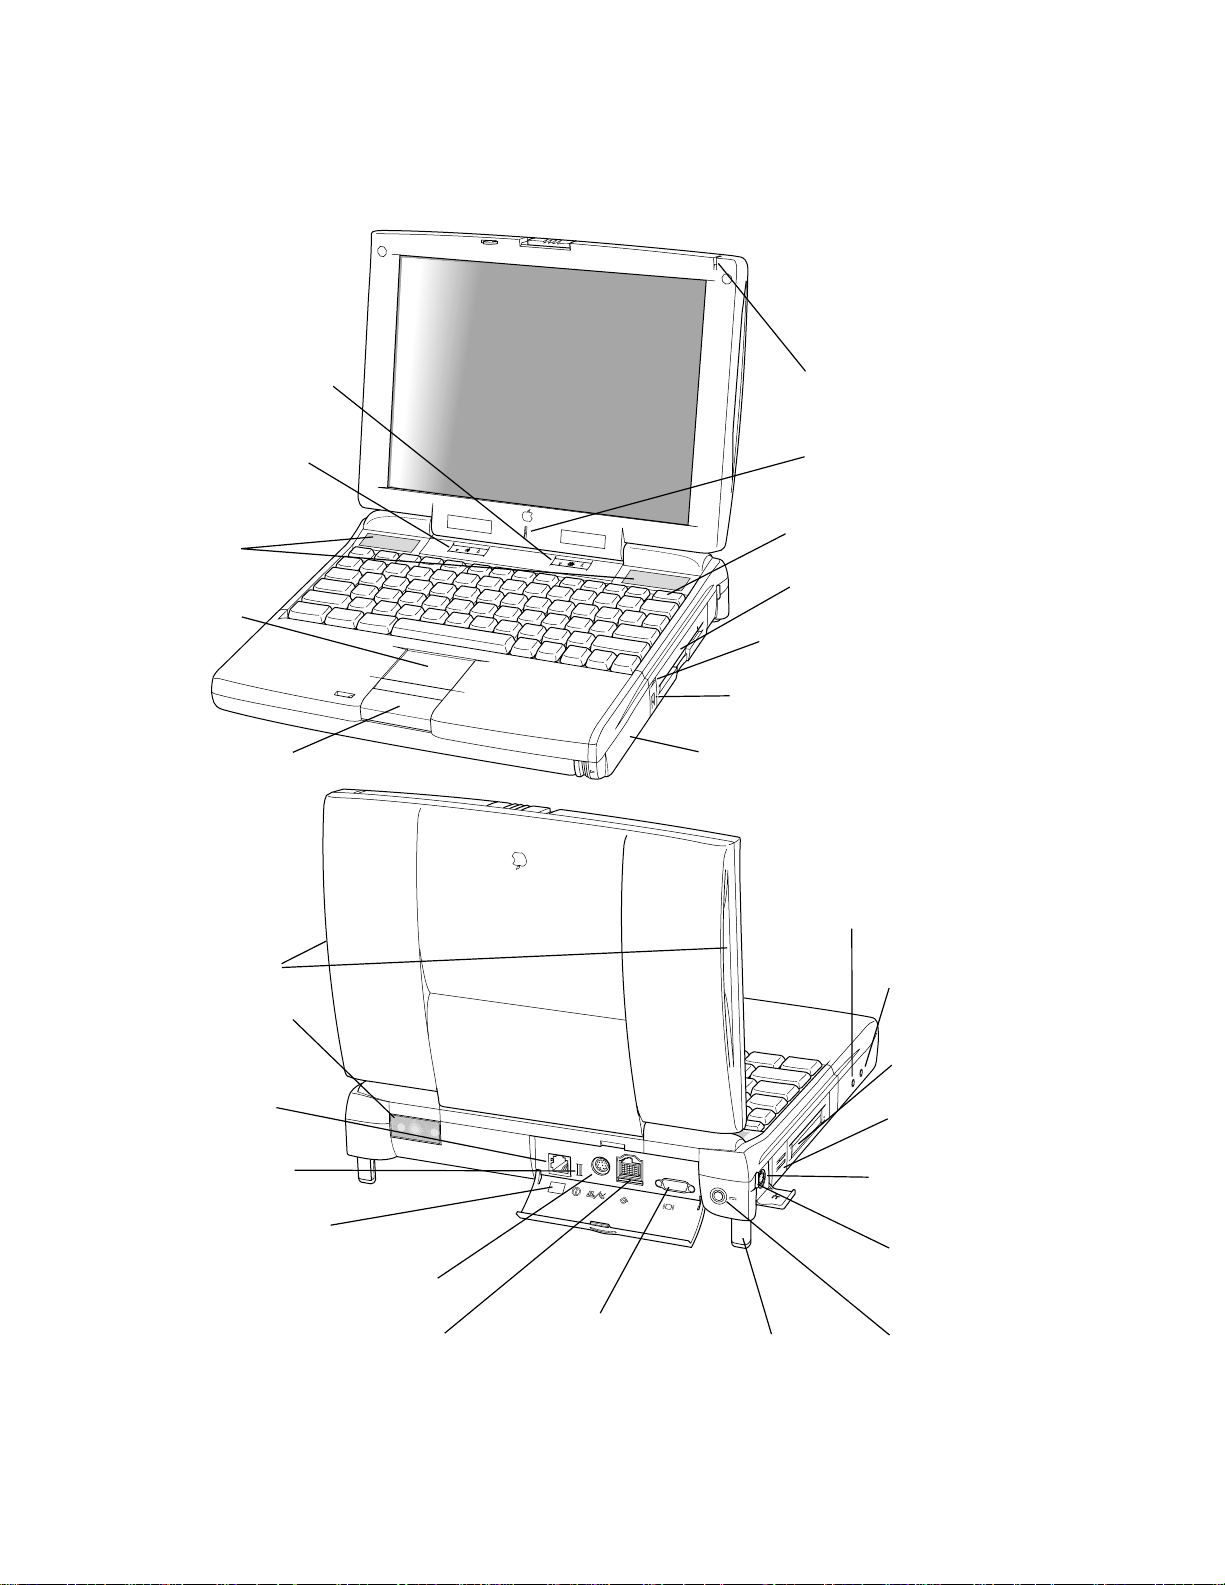
Battery
Infrared window
Expansion card label
Trackpad
Stereo
speakers
Trackpad button
Elevation feet
Elevation foot
release button
g
SCSI port (HDI-30)
-
Sound output port
¯
Power adapter port
V
Apple Desktop Bus
(ADB) port
I
Reset button
√
Sound input port
™
External monitor port
(VGA-style connector)
´
Printer/External modem port
PC Card eject buttons
Two PC Card
(PCMCIA card) slots
Microphone
-
Volume control
¤
Brightness control
Power key
Floppy disk drive module
Expansion bay drive in-use light
Security slot
Sleep indicator
P
Connector for
Ethernet/modem or
Ethernet card
(optional)
Dual speakers
®
Page 5

Software for mobility and efficiency
Your PowerBook comes with a variety of applications, utility programs, and
control panels that provide broad functionality and flexibility. These include
the following i tems:
In the Applications folder
m Apple Intern et Connection Kit, complete software for using the Internet
m Claris O rganizer, for managing contacts and calendar information
m America Online, for electronic mail, information services, and Intern et
browsing
m Remote Access Client, for connecting to a computer located elsewhere
m Software for sending faxes and making modem connections (Apple
Tel ecom or FaxSTF, depending on the model and geographical region)
In the Apple E x tr a s folder
m Apple IR File Exchange, for sending and receiving files using the
computer’s infrared window
m PowerBook File Assistant, for synchronizing file contents when you have
several versions of a file
m MoviePlayer, for viewing QuickTime movies
In the Control Panels folder
m Apple Location Manager, for saving groups of system settings, called
“locations,” that you can use in different operating environments
In the Utilitie s folder
m Drive Setup, for testing, formatting, and partitioning hard disk drives and
drives for removable media, such as optical disks
m Disk First Aid, for testing and repairing floppy disks and hard disks or
removable media (except SRAM storage PC Cards)
Each folder contai ns other items as well.
Getting Started
5
Page 6

Control Strip for quick changes
The Control Strip appears on the desktop when you start up your PowerBook.
It lets you change settings quickly—by pressing an icon and then choosing
the option you wa nt from a pop-up menu.
Monitor
battery’s charge
Turn
AppleTalk
on or off
Play
audio CD
Turn file
sharing
on or off
Set screen’s
colors or grays
Spin
down the
hard disk
or performance
Set screen’s
resolution
Adjust for
conservation
Put computer
to sleep
Change
default
printer
Adjust
sound
volume
Save
system
settings
(The Control Strip on your computer may look different from the illustration.)
You can adjust the Control Strip and add or remove items from it. For
instructions, see “How do I use the Control Strip?” in the “Customizing Your
Computer” topic area of Mac OS Guide, available from the Guide (h) menu.
Learning materials and ot her information about the computer
Your PowerBook comes with this user’s manual, which provides the
information you need for setting up the computer, caring for it, and finding
solutions to problems with the hardware. Depending on the PowerBook
model you have, other manuals may be included as well.
The majority of instructions for using your PowerBook are online—in the
Mac OS Tutorial, which introduces new users to the computer, a nd Mac OS
Guide, which offers step-by-step instructions for the primary tasks you
perform with the computer.
6
The Guide menu
You use the Guide menu to open Mac OS Tutorial or Mac OS Guide.
Chapter 1
Page 7
The Guide menu contains online instructions for using Macintosh system
software when the Finder is the active program. In addition to Mac OS Guide
and the tutorial, the Guide menu contains an explanation for using the Guide
online instructions (About Apple Guide) and a summary of shortcuts.
The Guide menu usually provides online h elp for other applications when
they are active.
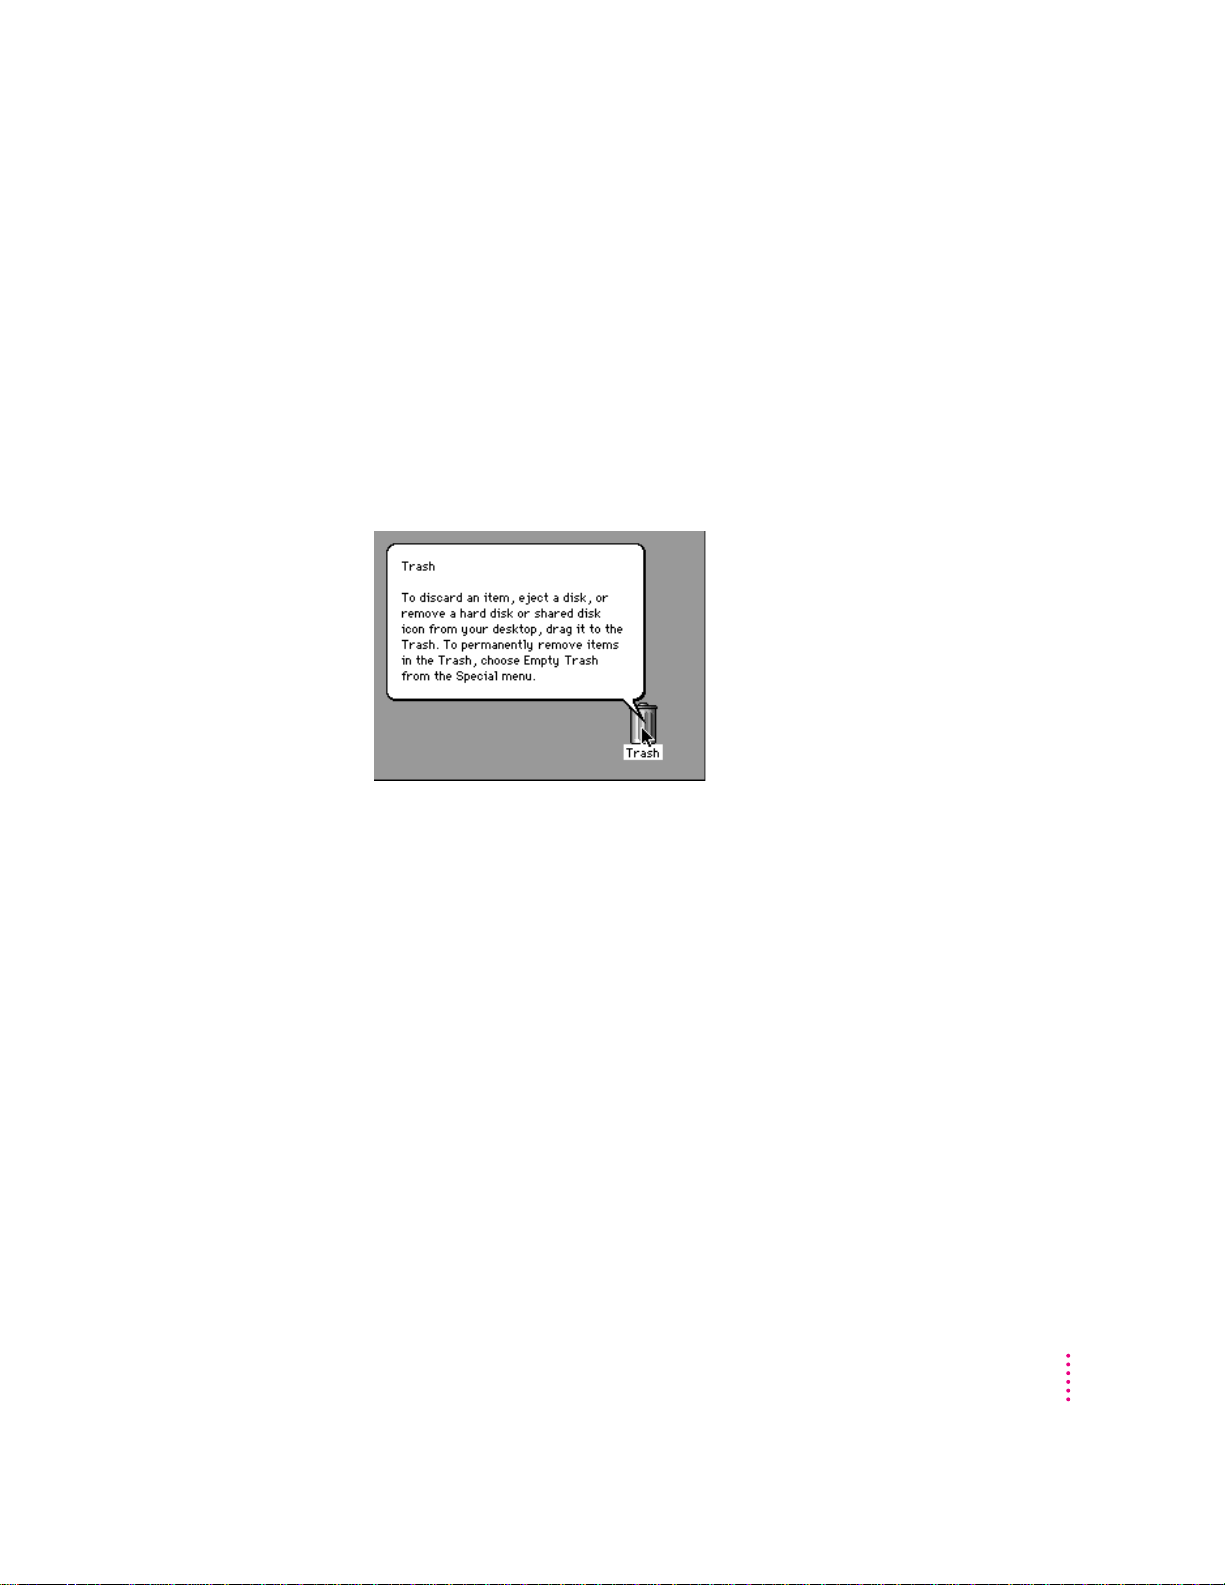
You also use the Guide menu to turn balloons on or off. When turned on,
balloons display a description of the item on the screen at the pointer’s
location. The illustration shows the balloon for the Trash.
Whe n you have questions about the computer
When you have questions about using your Macintosh, you can look for
answers in several places. These include
m Mac OS Guide and other online instructions available in the Guide menu
m electronic manuals and Read Me documents on your computer’s hard disk
m files that provide demonstrations and tours of the hardware and software
(on the hard disk)
m the printed ma nuals that came with your computer and with any additional
application programs or equipment you’re using
m Apple’s World Wide Web sites and other information sources on the
Internet (by modem or network connection)
m the Apple support center (by telephone)
Getting Started
7
Page 8
Wher e to find answers
The summary that follows indicates the type of information you can expect to
get from each information source.
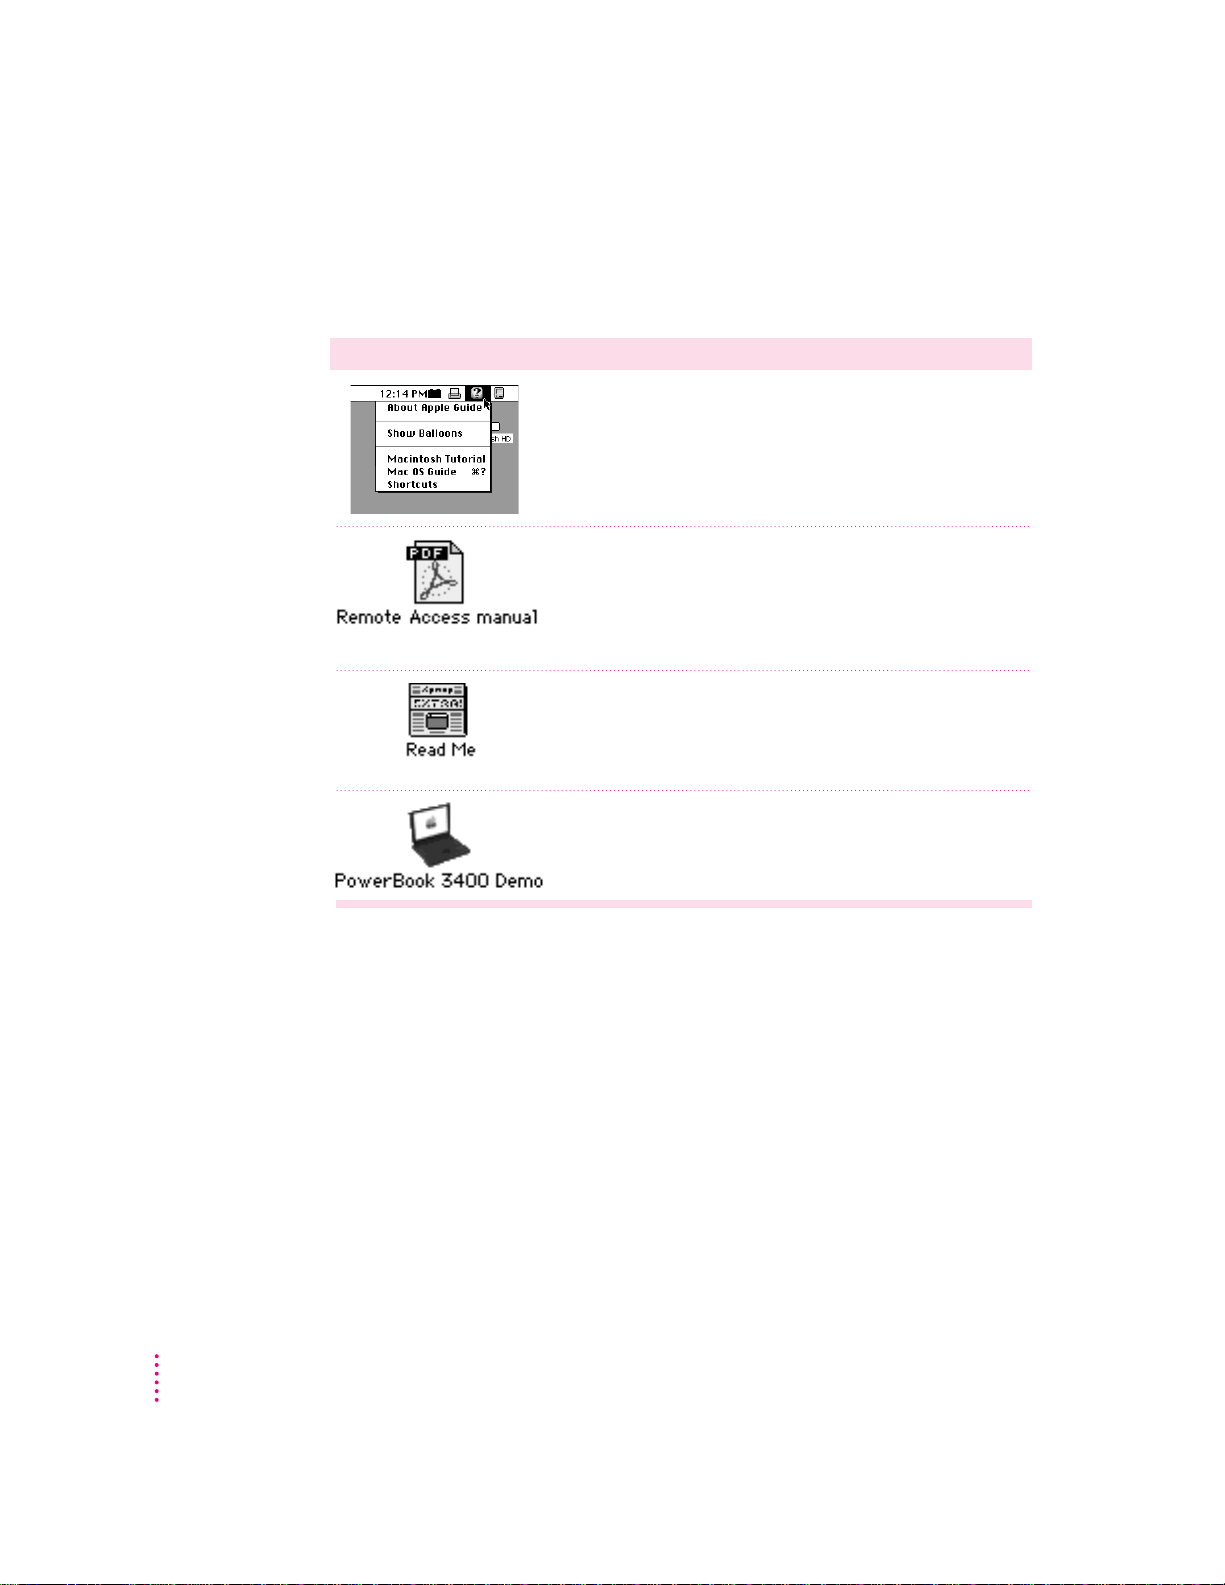
On the computer’s hard disk
In the Guide menu
The Guide menu (marked with the hicon) is your main source
of information about the Macintosh. You can learn basic skills in
the tutorial and get interactive, step-by-step help for tasks in
Mac OS Guide.
In electronic manuals
For some programs, condensed instructions and reference
information are supplied in an online manual. This type of document
usually contains illustrations and bookmarks you use for quick
access to the items you need. You can print this manual also.
In Read Me documents
The Read Me files that come on your computer’s hard disk
contain late-breaking information about your PowerBook and
some of the software that comes with your PowerBook.
In software samplers and tours
8
Some files on your hard disk offer a tour of the computer’s features
or an introduction to one or more applications.
Chapter 1
Page 9
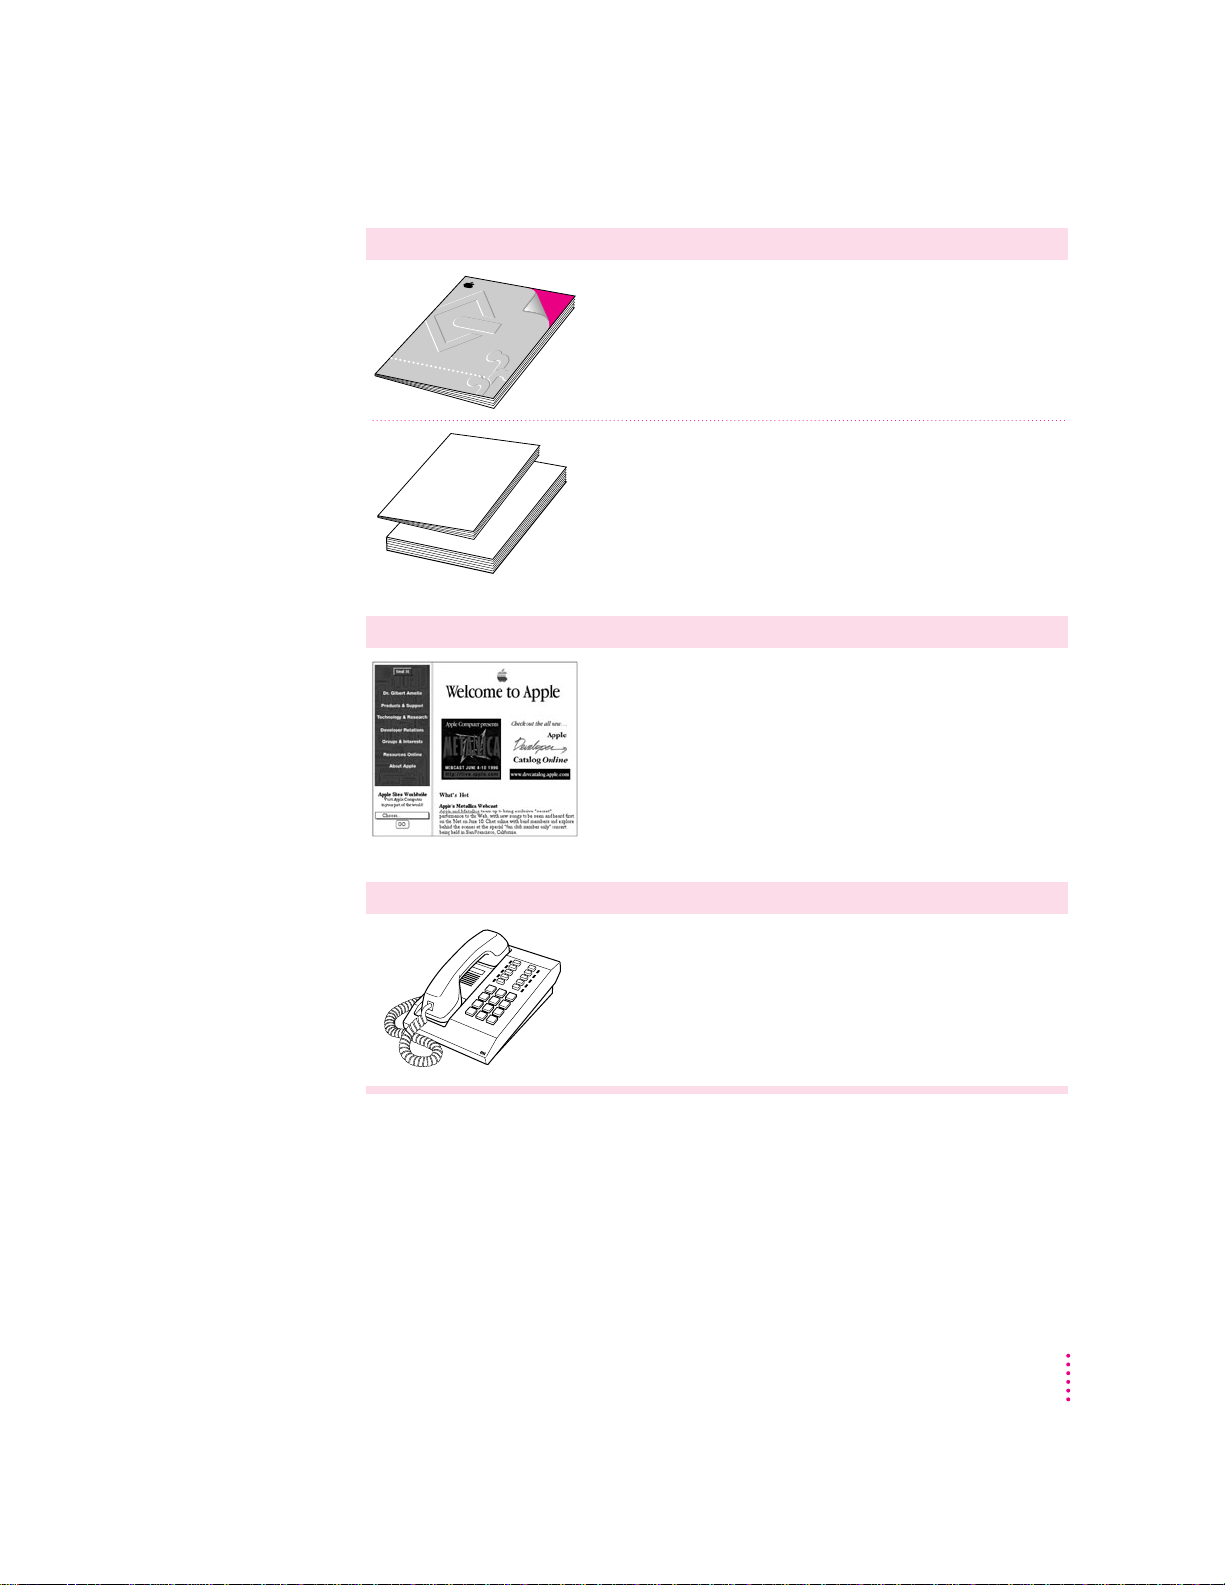
In the printed materials
User’s ManualUser’s Manual
Macintosh PowerBookMacintosh Pow
erBoo
k
On the Internet
In this book
Use this book to set up and learn about your computer and for
useful tips and suggestions if you have problems while using your
computer.
In other manuals
For answers to questions about other equipment or about
application programs you have purchased, see the manuals
that came with them.
At Apple’s Web sites
Apple maintains a number of sites on the World Wide Web
that provide software updates, product information, and technical
information. The central site is http://www.apple.com.
Several other Apple sites (linked to the central one) provide
PowerBook updates, product details, and mobile computing
solutions, including http://powerbook.apple.com.
Over the telephone
From Apple’s customer support line
If you can’t find an answer in any of the materials provided, call the
Apple Assistance Center. (See the service and support information
that came with your computer for the phone number.)
Getting Started
9
Page 10

Preparing to set up th e computer
Now that you know some essential details about your PowerBook, you’re
ready to set it up and begin using it.
To set up your computer for the first time, you need the power adapter and
the power co rd that cam e with it.
When setting up your computer, place your computer on a sturdy, flat surface
near a grounded electrical outlet. Before following the setup instructions in
this chapter, you may want to read “Arra nging Your Work Area and
Equipment” in Appendix A for tips on adjusting your work furniture and
computer so that you’re comfortable when using the computer.
Pluggin g in the computer
Plugging in the power adapter recharges the computer’s battery. You should
plug in the power adapter in case the battery has drained duri ng shipping or
storage. (If the battery was completely drained, the power will come on
automatically when the power adapter is attached.)
10
Chapter 1
WARNING
Use only the power adapter that came with your Macintosh
PowerBook computer, part number M4895. Adapters for other
electronic devices (including other Macintosh PowerBook models and
other portable computers) may look similar, but they may damage your
computer.
Page 11
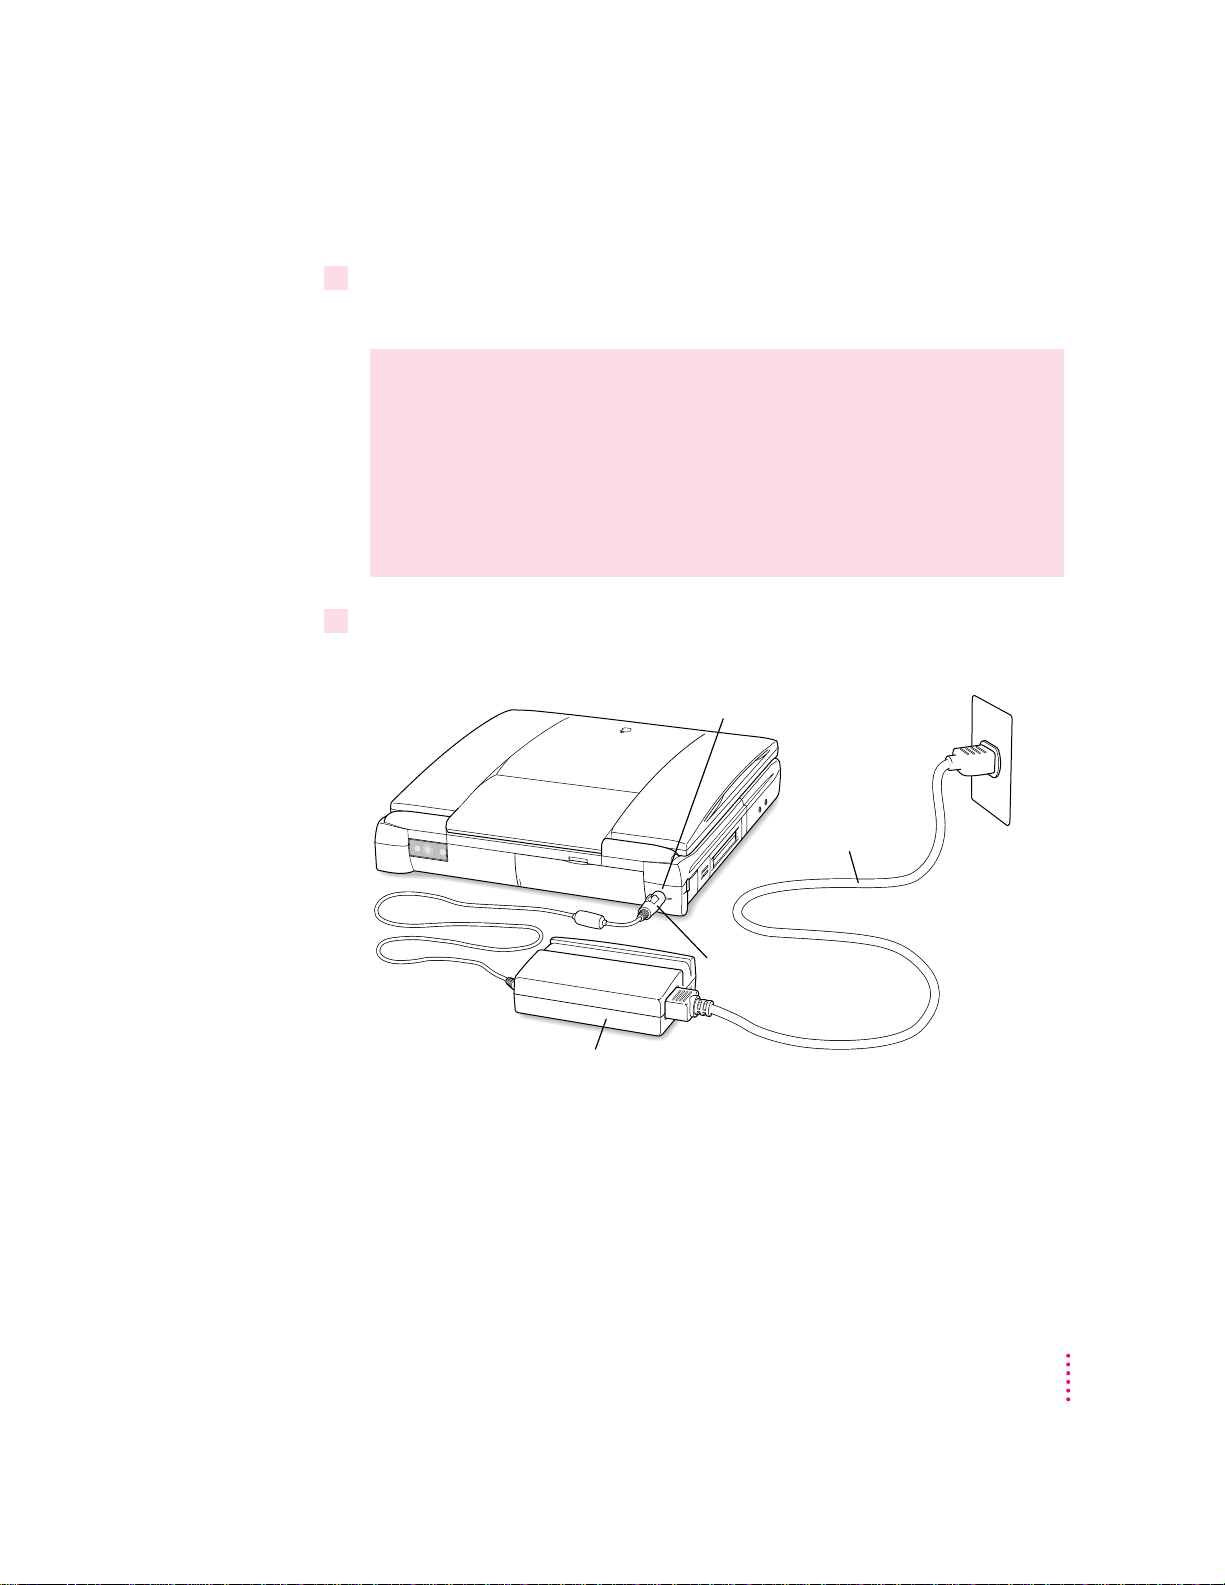
When you are ready to begin, follow these steps:
Power cord
Power adapter
Power adapter plug
¯
Power adapter port
1Plug one end of the power cord into the power adapter and the other end into a three-
hole grounded outlet or power strip.
WARNING
This equipment is intended to be electrically grounded. The
power adapter that came with your Macintosh PowerBook is equipped
with a three-wire grounding plug—a plug that has a third (grounding)
pin. This plug will fit only a grounded AC outlet. This is a safety
feature. If you are unable to insert the plug into the outlet, contact a
licensed electrician to replace the outlet with a properly grounded
outlet. Do not defeat the purpose of the grounding plug!
2Plug the power adapter plug into the power adapter port (marked with the icon
back panel of the computer.
¯
) on the
Getting Started
11
Page 12
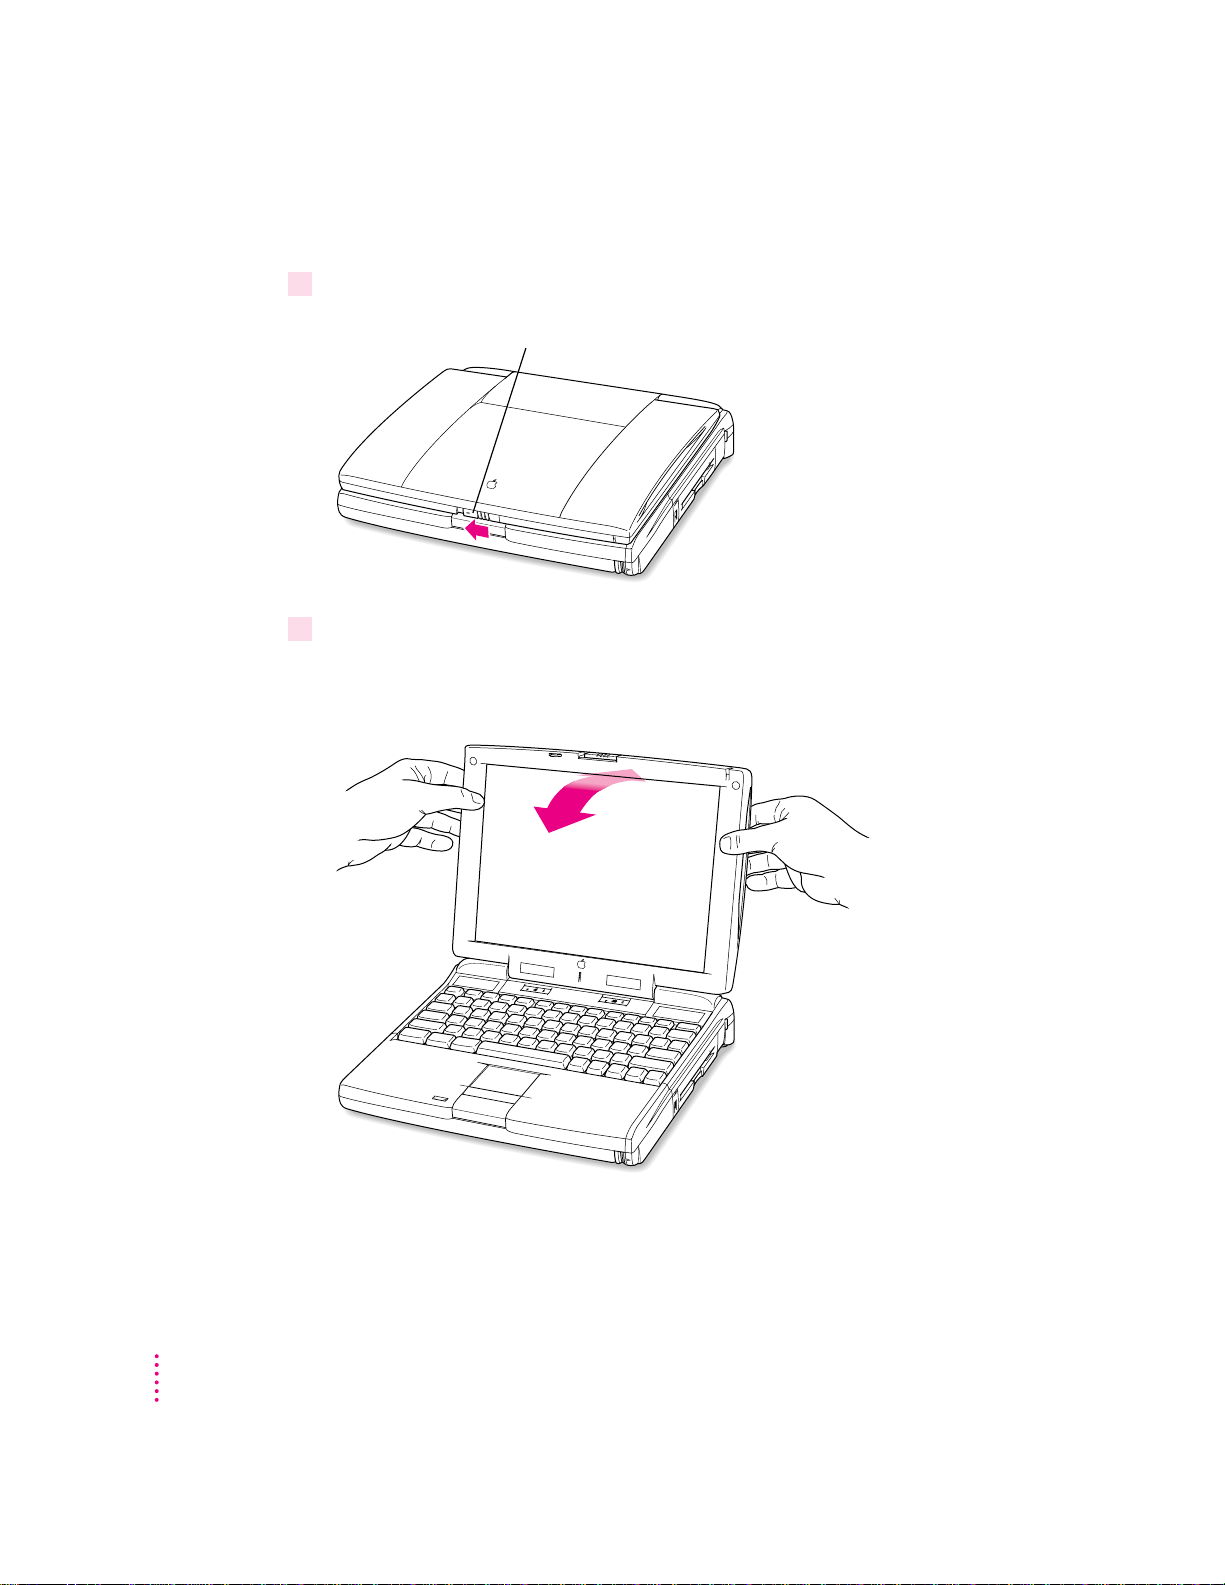
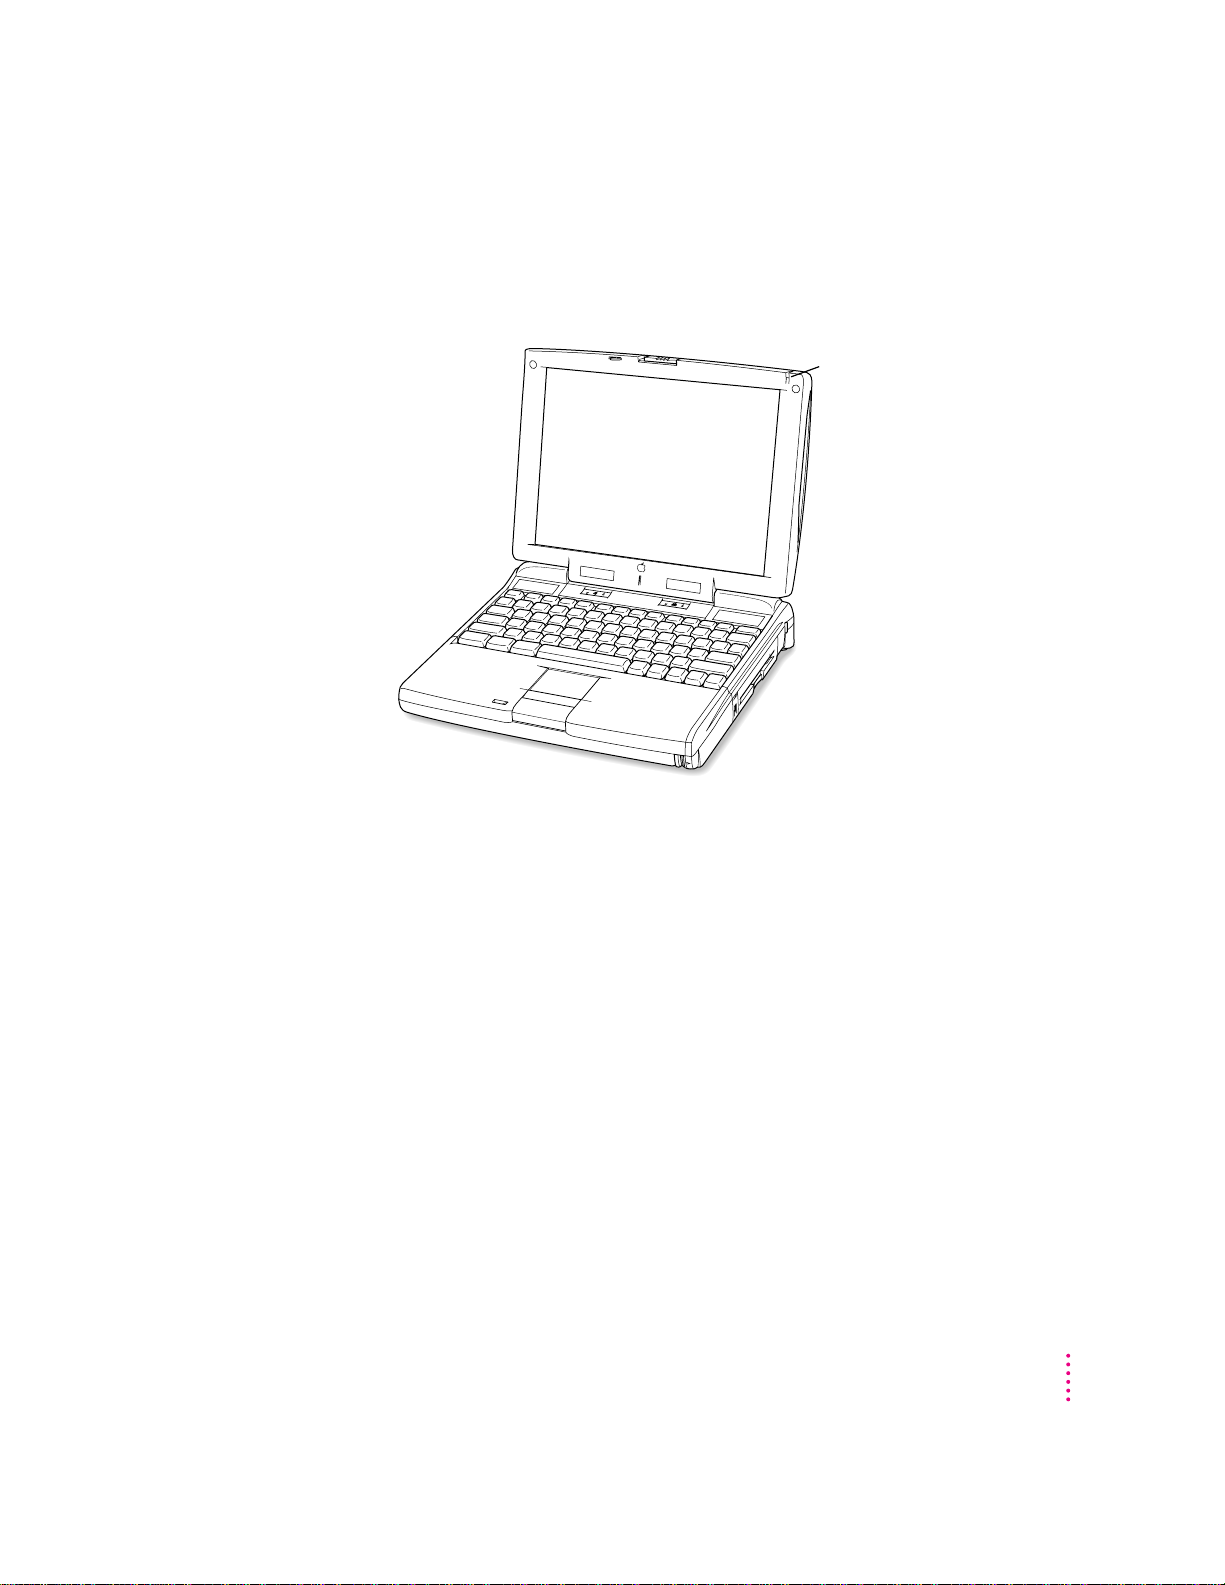
Opening the display
Slide the latch to the left to open the display.
1Slide the latch to the left and lift up the display.
2Position the display at a comfortable viewing angle.
You can adjust the angle of the display at any time by tilting it toward or away
from you.
12
Chapter 1
Page 13
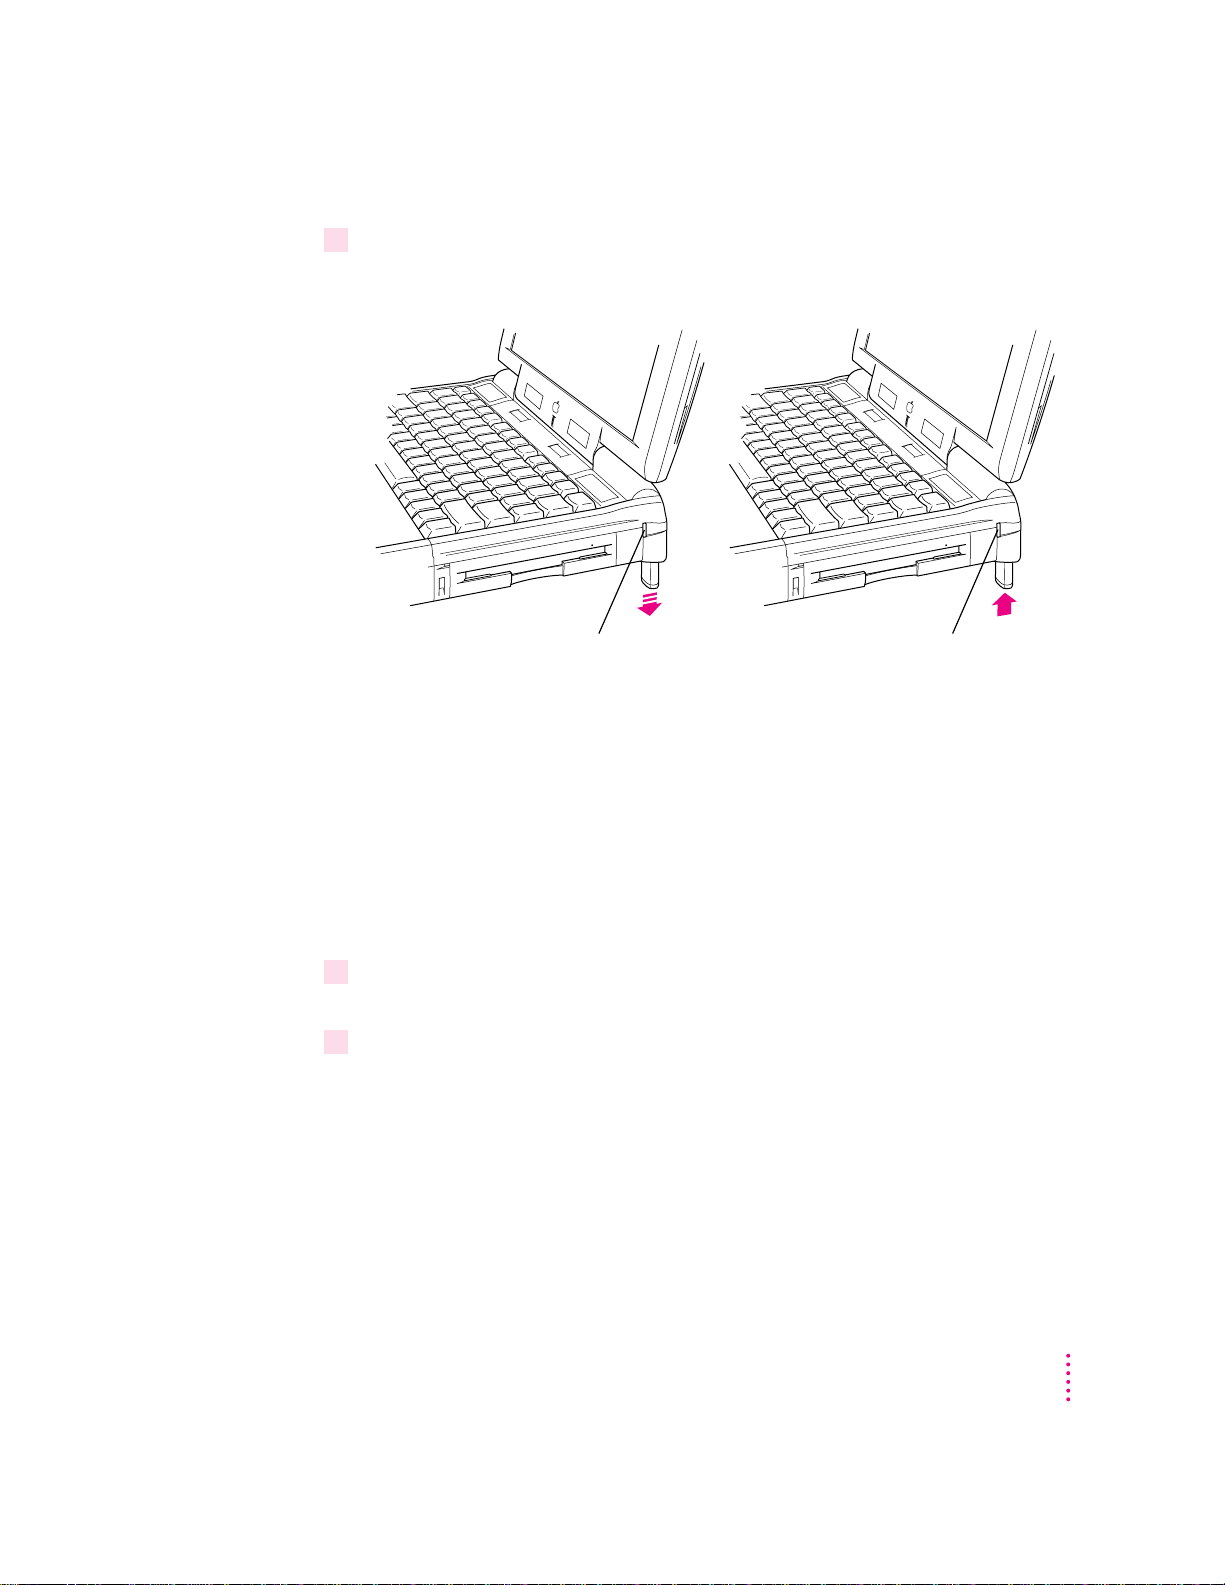
3Adjust the elevation feet to raise the computer.
To lower the foot, press the release
button. The foot extends automatically.
To raise the foot, press the release button while
pushing up on the foot until it clicks into place.
The back of the keyboard is slightly elevated when the feet are in use.
It is a good idea to lower the elevation feet whenever you are using your
computer on a flat surface.
Removing the battery label
Most new PowerBooks are shipped with a label covering the battery to
protect it from losing its charge completely. If there is a label, you need to
remove it before the battery will provide power for the computer.
1With the display open, peel off the part of the label on the computer’s case, taking care
not to tear the label.
2Close the display (with the detached part of the label outside of the computer).
Getting Started
13
Page 14
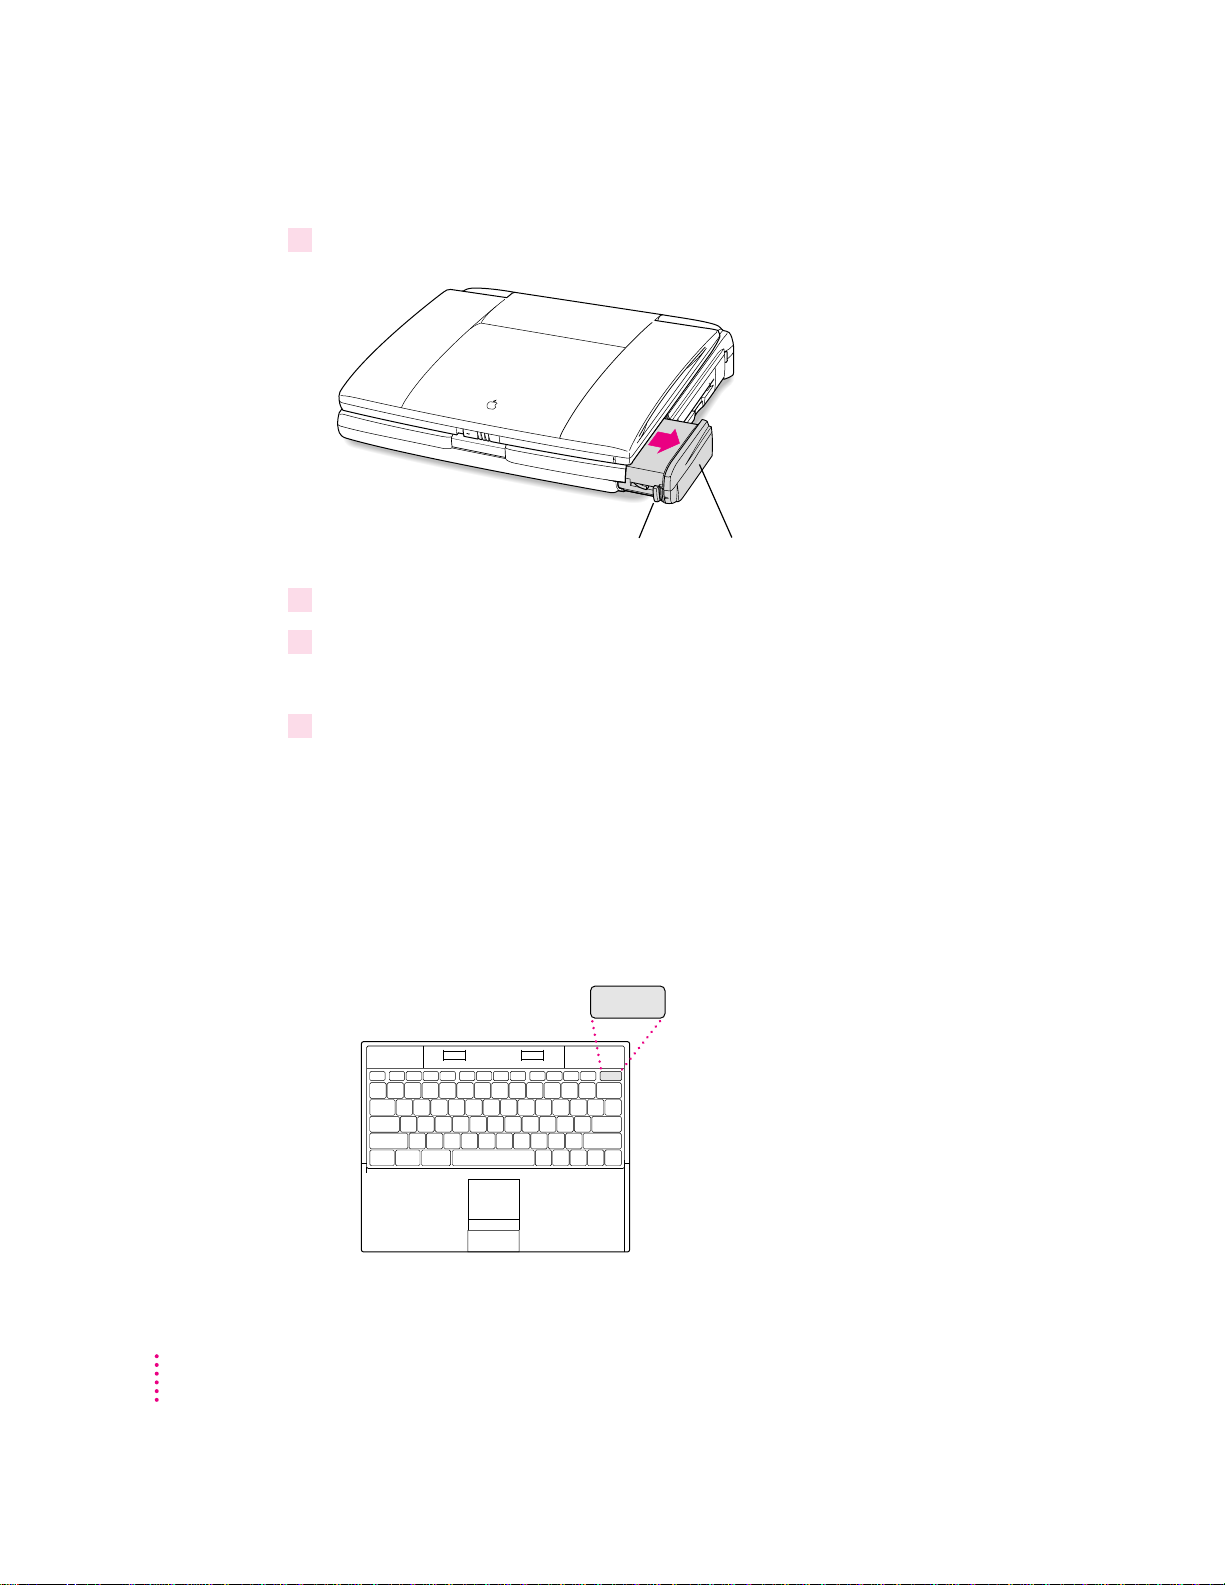
3Press the battery release button on the battery.
P
Power key
1 Press the button on the battery. 2 Slide the battery out.
4Slide the battery out of its compartment.
5 Carefully remove the label from the battery.
Avoi d touching the battery’s metal contacts as you peel off the label.
6 Replace the battery and open the display.
Turning the computer on
14
Chapter 1
To tu r n on the computer for the first time, do this:
m
Press the Power key at the upper-right corner of the keyboard to turn the
computer on.
Page 15

You should hear a tone when you turn on the computer. It takes the computer
a few moments to start up. You’ll see the Mac OS startup screen as the system
software is loaded on the computer. After your computer starts up for the first
time, a picture similar to this appears on the screen:
Note: Your screen should look very similar to this, but it may not look exactly
the same.
Prob lems turning th e compu ter on?
m
Nothing happened when you pressed the Power key.
The battery may be drain ed. Make sure you plugged in the power adapter,
and that the power adapter is firmly connected to both the computer and a
power source. If the power adapter is plugged into a power strip, make sure
the power strip is plugged in and turned on. If the computer doesn’t make a
sound when you press the Power key, press the reset button (marked with
an I) on the back of the computer. Once the battery has charged you
should be able to use the Power key normally.
If the computer still doesn’t turn on, see “Problems Starting Up the
Computer” in Chapter 7.
Getting Started
15
Page 16
m
¤
Brightness control
The computer made a sound, but you can’t see anything on the screen.
Adjust t he brightness control (marked with the icon ¤) until an image
appears and the screen is easy to read.
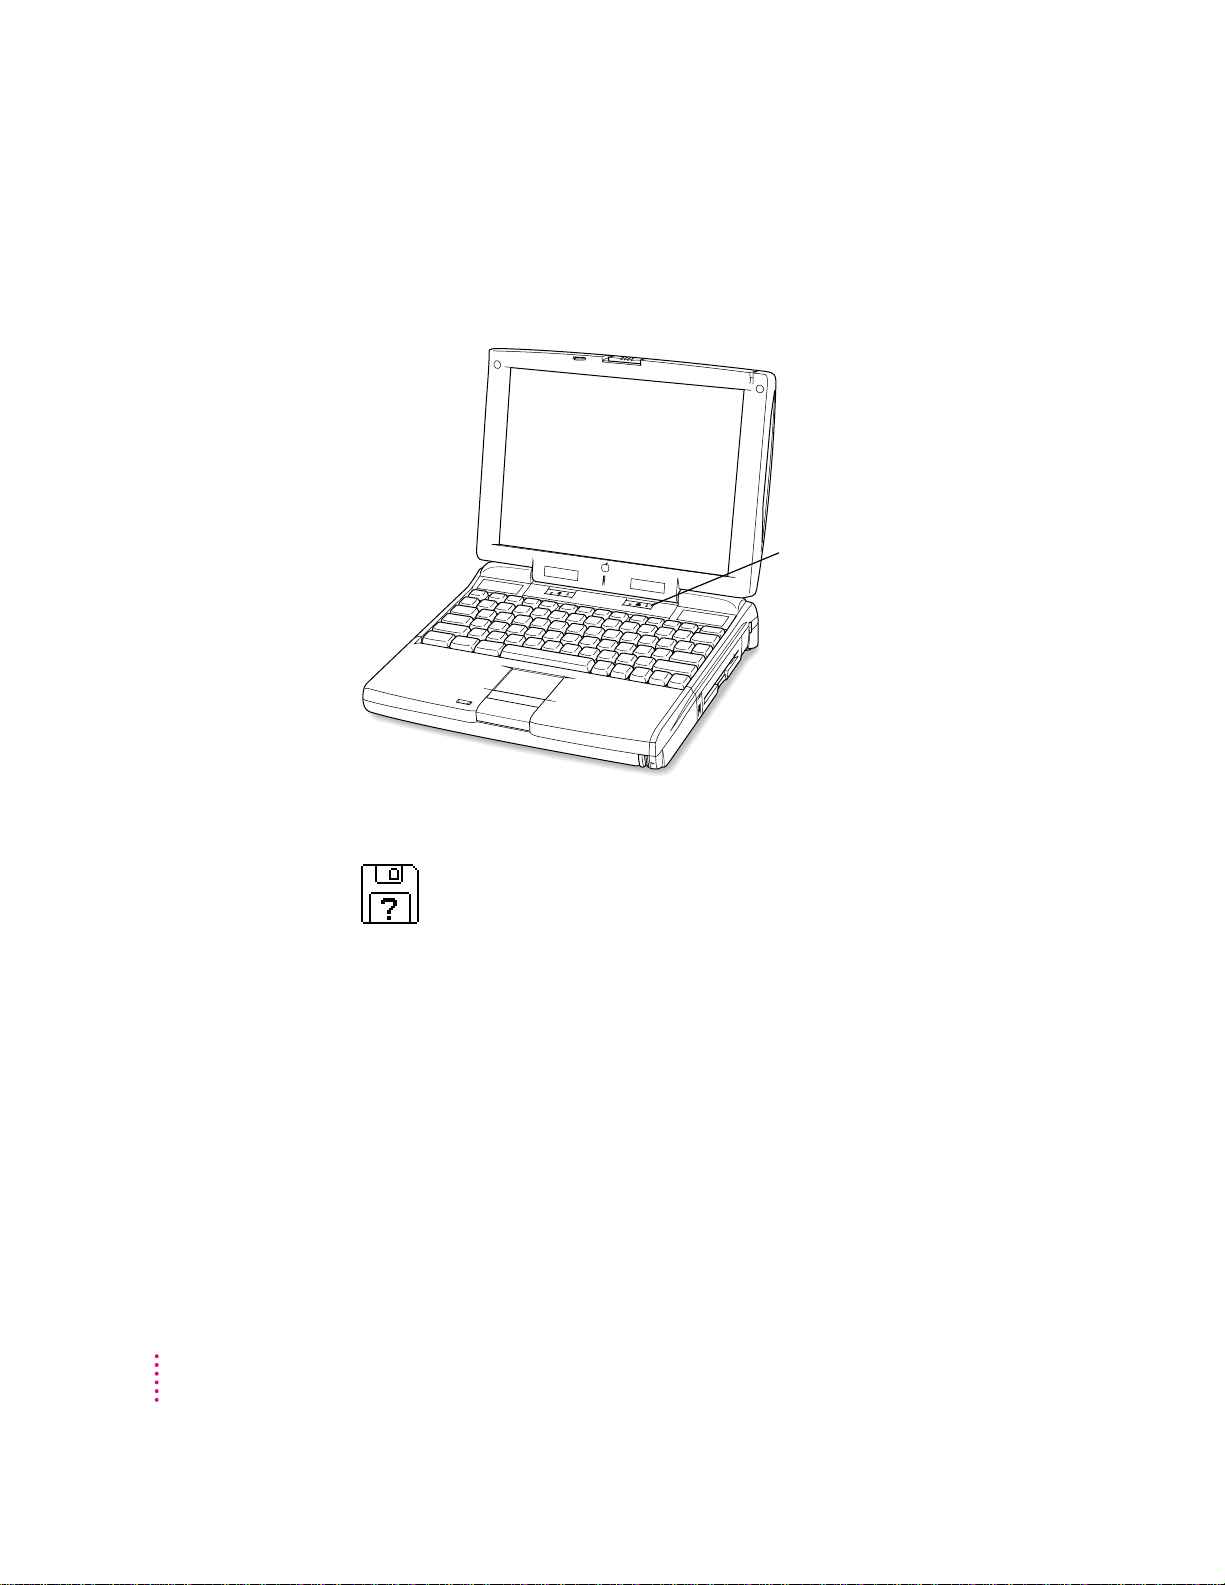
m
You see a picture of a disk with a blinking question mark on the screen.
16
Chapter 1
This icon usually means that the computer can’t find system software on
the hard disk or any disks attached to the computer. You may need to
reinstall system software. See “Reinstalling System Software” in Chapter 8.
Page 17

What’s next?
Yo u’ve now finished setting up your Macintosh PowerBook. Continue with
one of the following steps:
m If you are new to the Macintosh, turn to the next section, “Learning the
Basics.”
m If you are an experienced Macintosh user, tur n to Chapter 2, “Getting
Help,” to learn about Mac OS Guide, your main source of information
when you’re working with the Macintosh computer.
m If you have additional equipment to connect to your computer, see
Chapter 4, “Connecting Additional Equipment,” for instructions. (If you
are a new Macintosh user, you should complete “Learning the Basics”
before connecting additional equipment.)
m If you have application programs that you want to install on your computer,
see Chapter 5, “Installing and Using Application Programs,” for
instructions. (If you are a new Macintosh user, you should complete
“Learning the Basics” before installing application programs.)
IMPORTANT
If you need to turn off your computer at any point, read the
instructions in “Turning the Computer Off” later in this chapter to learn the
correct procedure for turning off your Macintosh PowerBook computer.
Getting Started
17
Page 18

Learning the basics
Trackpad Trackpad button
If you are new to the Macintosh, you should begin by looking at the
easy-to-use program called the Macintosh Tutorial. The tutorial teaches you
the basic skills you’ll need to use your computer. To start the tutorial, follow
these steps:
1Move your finger on the trackpad to move the arrow pointer (
8
) on the screen.
Place your index finger on the trackpad and your thumb on the trackpad
button. Don’t press the trackpad button yet.
Move your finger across the trackpad, watching the arrow on the screen.
Notice that the arrow on the screen moves in the same direction that you
move your finger on the trackpad.
18
Chapter 1
The trackpad is sensitive not only to the direction you move your finger, but
also to how fast you move your finger. If you want the pointer to move a short
distance across the screen, you move your finger slowly across the trackpad.
The faster you move your finger, the farther the pointer moves on the screen.
Page 19

Tips for using the trackpad
For best results when using the trackpad, keep in mind these tips:
m Use your index finger (left or right hand). Use only one finger.
m Use only your finger on the trackpad. Do not use a pen or any
other object.
m Extend your PowerBook’s elevation feet when it is placed on a flat
surface. This gives your fingers better access to the keyboard and
makes it easier to use the tip of your finger on the surface of
the trackpad.
m Sometimes humidity or condensation may cause moisture to gather
on the trackpad. If this happens, gently wipe the trackpad with a
clea n cloth before you use it.
2Move your finger on the trackpad so that the tip of the arrow (
mark in the upper-right portion of the screen.
3With the tip of the arrow (8) on the question mark, press and hold down the
trackpad button.
8
) points to the question
A list of choices (called a menu) appears. This is the Guide (h) menu, which
is the place to go when you have a question about how to use your computer.
4While holding down the trackpad button, move the arrow (
Tutorial” are highlighted, then release the trackpad button.
8
)until the words “Macintosh
A window appears welcoming you to the tutorial. You can set aside this book
for now and follow the instructions you see on the screen. When you have
completed the tutorial, return to this book.
Getting Started
19
Page 20

Reviewing the basic s
You can use the following illustrations to review the elements you use on your
screen to do work with your computer.
Menu
Control Strip
Menus
The strip across the top of the screen is called the menu bar. The symbols
and words in it represent menus of commands. To op en a menu, place the
pointer on the symbol or word for the menu and press and hold down the
trackpad button.
Icons
Window
20
Chapter 1
Printer menu
You can see a list of printers and choose
any of them as the default printer.
Application menu
You can have several application programs open at once. To
see which program i s a c t i v e o r t o s w i t c h from one program to
another, use this menu (called the Application menu).
Guide menu
To find an answer to a question,
look in the Guide (
) menu.
h
Page 21
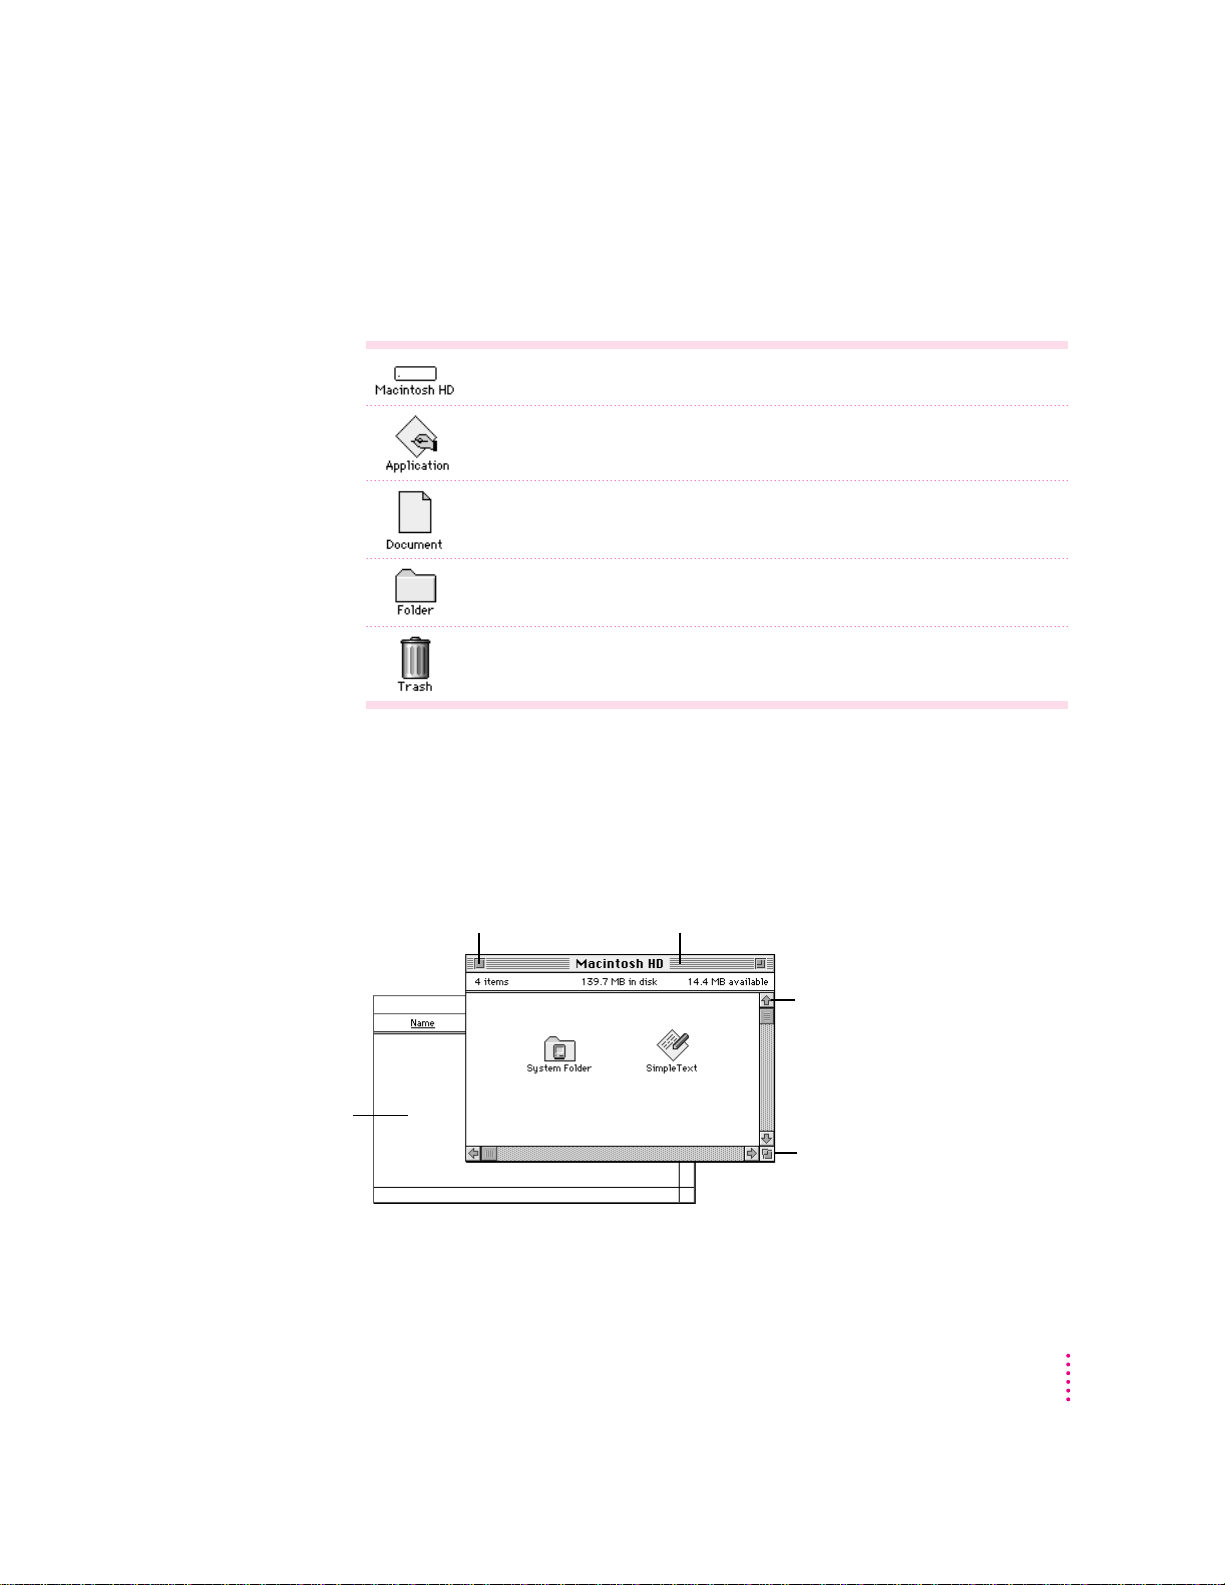
Icons
Icons are small pictures that represent disks, programs, documents, and
folders. You can double-click any icon to open it and see what it contains.
This icon represents your computer’s internal hard disk.
Icons like this one represent application programs, which you use to create
documents and do other work.
Icons like this one represent documents, which you can create and edit.
Icons like this represent folders. A folder contains other icons.
To throw away an item you no longer want, drag it to the Trash icon and choose
Empty Trash from the Special menu.
Windows
Windows are boxes that display text, graphics, or icons. To change the shape
or position of a window, or to close the window, use the elements shown here.
To make a partially
covered window
active, click anywhere
in it.
Close box
To close a window,
click the close box.
Title bar
To move a window, drag it by the middle of the title
bar (anywhere in the bar except the small boxes).
Scroll arrow
To bring hidden portions
of a window’s contents into
view, click one of the four
scroll arrows.
Size box
To change the shape or size of
a window, drag the size box.
Getting Started
21
Page 22

Control Strip
The Control Strip gives you a quick and easy way to monitor and update your
PowerBook’s power management options and other useful features. For
instructions on using the Control Strip, see “How do I use the Control Strip?”
in the “Customizing Your Computer” topic area of Mac OS Guide, available
in the Guide (h) menu.
Turning the computer off
Always use one of the following methods to shut down the computer. If you
don’t, you risk losing any work you haven’t previously saved on a disk. You
also risk losing any open documents.
Turning the computer off with the Power key
To tu r n th e computer off, press the Power key. Detailed instructions follow.
1If the computer is in sleep, press the Power key (or any key on the keyboard except
Caps Lock) to wake it.
22
For information on the sleep feature of your Macintosh PowerBook, see
“Putting the Computer to Sleep,” next.
2Press and hold the Power key for about two seconds.
The following dialog box appears on the screen:
3Press the Return key on the keyboard (or click the Shut Down button in the dialog box).
Chapter 1
Page 23

Turning the computer off with the Shut Down comm and
You can also turn your computer off by using the Shut Down command in the
Special menu. Follow these steps:
1If the computer is in sleep, press the Power key (or any key on the keyboard except Caps
Lock) to wake it.
2Move the tip of the arrow to the word “Special” at the top center of the screen.
If the word “Special” does not appear at the top of the screen, you’re not
working in the Finder. Choose Finder from the Application menu at the
far-right end of the menu bar.
3With the tip of the arrow on the word “Special,” press and hold down the trackpad button.
4While holding down the trackpad button, move the arrow until the words “Shut Down”
are highlighted, then release the button.
Trouble? If a problem with the computer prevents you from using the Power
key or choosing Shut Down—for example, if the computer “freezes” so that
the pointer does not respond to the trackpad—you can restart the computer
by pressing the Command (x), Control, and Power keys simultaneously. If the
computer doesn’t restar t, press the reset button (marked with an I) on the
back of the computer. Use this method only if you cannot choose Shut Down
or Restart when you press the Power key, or if you cannot choose either
command from the Special menu.
Getting Started
23
Page 24

Putting the computer to sleep
Sleep is a power conservation feature of Macintosh PowerBook computers
that lets you instantly restart the computer and bypass the startup process.
You can extend the period of time your battery will power the computer by
putting the PowerBook to sleep when you won’t be using it for several
minutes or hours. The length of time the computer can be left in sleep
depends on the charge state of the battery.
When the computer is in sleep, it has a darkened screen and appears to be off.
A small green light flashes on the top of the display case when the computer
is in sleep. (Note: The computer must be on in order for you to put it to sleep.)
To put the computer to sleep, do this:
1Press and hold the Power key for about two seconds.
2Click the Sleep button.
WARNING
Once you put your computer to sleep, listen for the hard disk
to stop spinning before you move your Macintosh PowerBook. Moving
your Macintosh PowerBook with the hard disk spinning can damage
your computer.
Other ways of putting your computer to sleep
m You can choose the Sleep command from the Special menu to put your
computer to sleep.
24
Chapter 1
Page 25
m You can also put your computer to sleep by closing and latching the display.
Sleep indicator
When the computer is in sleep, a small green light flashes in the upperright corner of the display.
For information on other ways of putting the computer to sleep, see the
“Batteries & Power” topic area of Mac OS Guide, available in the Guide (h)
menu. (You can learn more about using Mac OS Guide in Chapter 2 of this
manual.)
Automatic sleep
If you don’t use the computer for several minutes, it goes to sleep
automatically. This conserves battery power.
To wa ke the computer, press any key on the keyboard (except Caps Lock).
The screen will reappear as it was before the computer went to sleep.
You can control the automatic sleep feature. For more information on sleep
and automatic sleep, see the “Batteries & Power” topic area of Mac OS
Guide, available in t he Guide (h) menu. (You can learn more about using
Mac OS Guide in Chapter 2 of this manual.)
Getting Started
25
Page 26

Restarting a computer that’s already on
You need to restart your computer—turn it off and back on again—when you
want to make certain changes to settings, use a newly installed system
software file, or start up the computer using a different disk.
You may also need to restart if you see a “system error” message on the
screen (indicating a temporary software problem). In this case, use the
trackpad to click the Restart button that appears.
Follow these instructions to restart your computer:
1Press and hold the Power key for about two seconds.
2Click the Restart button.
You can also do this to restart:
m
Choose Restart from the Special menu.
26
If the Special menu does not appear in the menu bar, you’re not working in
the Fi nder. Click anywhere on the desktop to return to the Finder.
When you choose Restart, the computer prompts you to save your work,
closes all open programs, and restarts itself.
Restarting using either of the methods outlined above does not affect your
RAM disk (if you created one) or its contents.
Chapter 1
Page 27

Trouble? If a problem with the computer prevents you from using the Power
key or choosing Restart—for example, if the computer “freezes” so that the
pointer does not respond to the trackpad—you can restart the computer by
pressing the Command (x), Control, and Power keys simultaneously.
If the computer doesn’t restart, press the reset button (marked with an I) on
the back of the computer. (If the computer is on but “frozen,” pressing the
reset button will turn off the computer. You will then need to press the Power
key to turn it on.) Use this method only if you cannot choose Shut Down or
Restart f rom the dialog box that app ears when you press the Power key, or if
you cannot choose either command from the Special menu.
Getting Started
27
Page 28

Page 29

Use the instructions in this
chapter to learn about the help
available to you in the Guide menu.
2
Getting Help
TheGuide menu contains online help and information and is your main
source of information when working with your computer. The menu is
identified by a question mark (
h) in the upper-right corner of the screen.
29
Page 30
Getting answers to your questions
When you have a question while working with your computer, you can get the
answer by choosing Mac OS Guide from the Guide menu. (You may
occasionally see a reference to Macintosh Guide. It is the same as
Mac OS Guide.)
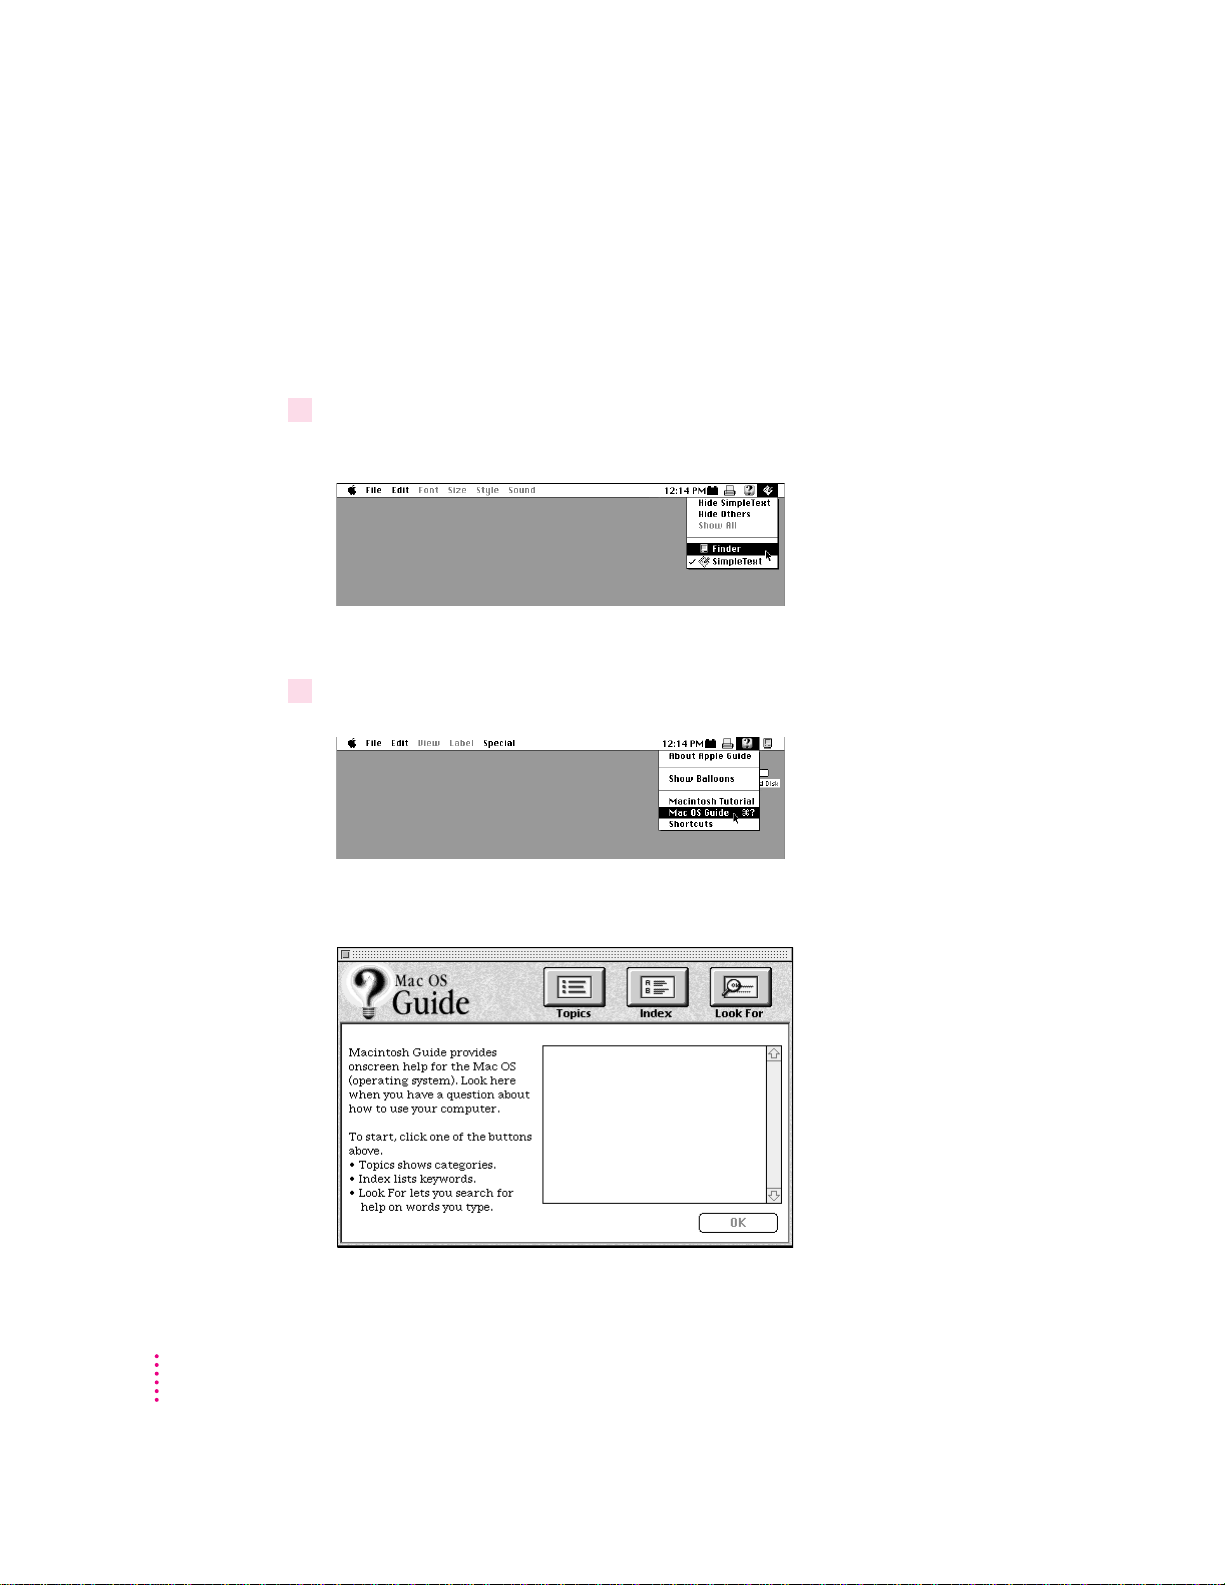
1 Open the Application menu (in the upper-right corner of the screen) and choose Finder
to make it the active application program.
A checkmark in the menu indicates that the Finder is the active program.
2 Open the Guide menu (marked with the
h
icon) and choose Mac OS Guide.
The Mac OS Guide window appears.
30
Chapter 2
Page 31
Whenever you use Mac OS Guide, its window remains in front of other
windows. If the window gets in your way, you can move it by dragging its
title ba r (the gray bar across the top of the window).
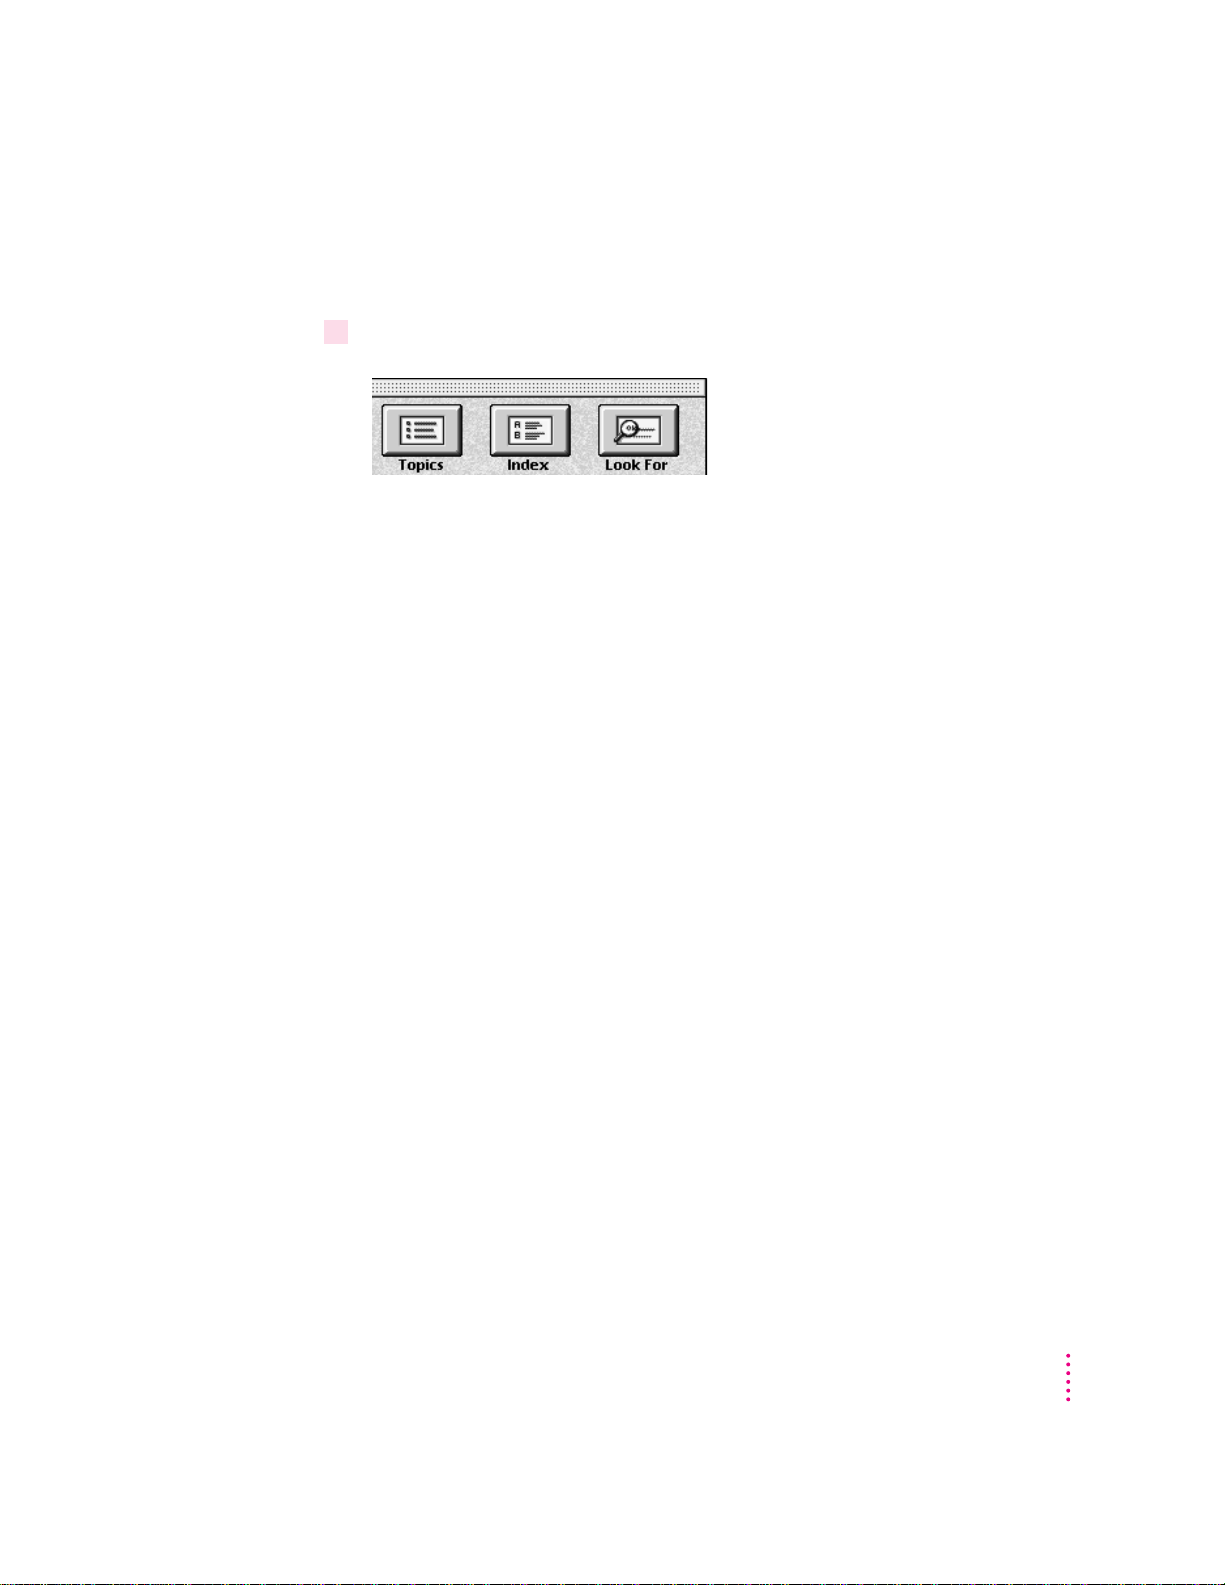
3Notice the three buttons at the top of the window: Topics, Index, and Look For.
Mac OS Guide gives you three ways of finding information:
m
Topics
lets you choose from a list of general subjects; it is like the table of
contents in a book.
m
Index
lets you choose from an alphabetical list of more specific subjects; it
is like the index in a book.
m
Look For
lets you search for information related to a specific word or
phrase that you type.
In the following sections you will practice using each method.
If you have problems while using Mac OS Guide, see “Tips for Using Mac OS
Guide” later in this chapter.
Getting Help
31
Page 32

Getting answers with the Topics button
1In the Mac OS Guide window, click the Topics button.
A list of general topics appears on the left side of the Mac OS Guide window.
(Depending on the hardware and software you have, the list of topics may
look different.)
2In the list of topics, click “Customizing Your Computer.”
When you click any topic area, a list of related questions appears on the right
side of the Mac OS Guide window.
32
To get instructions,
click a question…
…and then click OK.
Chapter 2
Page 33

3Click the question “How do I set the time and date?” and then click OK. Or double-click
If you want to
return to the main
Mac OS Guide
window, click
this button.
4 Read and follow the instructions in this window.
5When you have completed all the steps, click the Topics button in the lower-left corner to
the question.
A small window appears with instructions for you to follow.
Click here to see the next
step (if there is one).
Mac OS Guide provides step-by-step instructions to answer the question you
selected. When you have completed each step, click the right arrow in the
lower-right corner to see the next step.
return to the main Mac OS Guide window.
Now continue with the next section.
Getting answers with the Index button
1 In the Mac OS Guide window, click the Index button.
An alphabetical list of subjects appears on the left side of the window.
Slider
Scroll bar
Getting Help
33
Page 34

2Scroll through the alphabetical list until the phrase “background pattern” is visible.
You can scroll through the list either by dragging the slider to the letter B or
by using the scroll bar at the right of the list.
3Click the phrase “background pattern” in the alphabetical list.
When you click any index entry, a list of related questions appears on the
right side of the Mac OS Guide window.
To get instructions,
click a question…
…and then click OK.
4Click the question “How do I change the background pattern?” and then click OK.
Or double-click the question.
34
If you want to
return to the main
Mac OS Guide
window, click
this button.
Chapter 2
A small window appears with instructions for you to follow.
Click here to see the next
step (if there is one).
Page 35

5 Read and follow the instructions in the window.
6When you have completed all the steps, click the Topics button in the lower-left corner to
1 In the Mac OS Guide window, click the Look For button.
To activate the text
box, click here.
Mac OS Guide provides step-by-step instructions to answer the question you
selected. When you have completed each step, click the right arrow in the
lower-right corner to see the next step.
return to the main Mac OS Guide window.
Now continue with the next section.
Getting answers with the Look For button
A small box in which you can type text appears on the left side of the
window.
Type a word or phrase
in the text box…
…and then click here.
2Click the arrow button to activate the text box.
Getting Help
35
Page 36
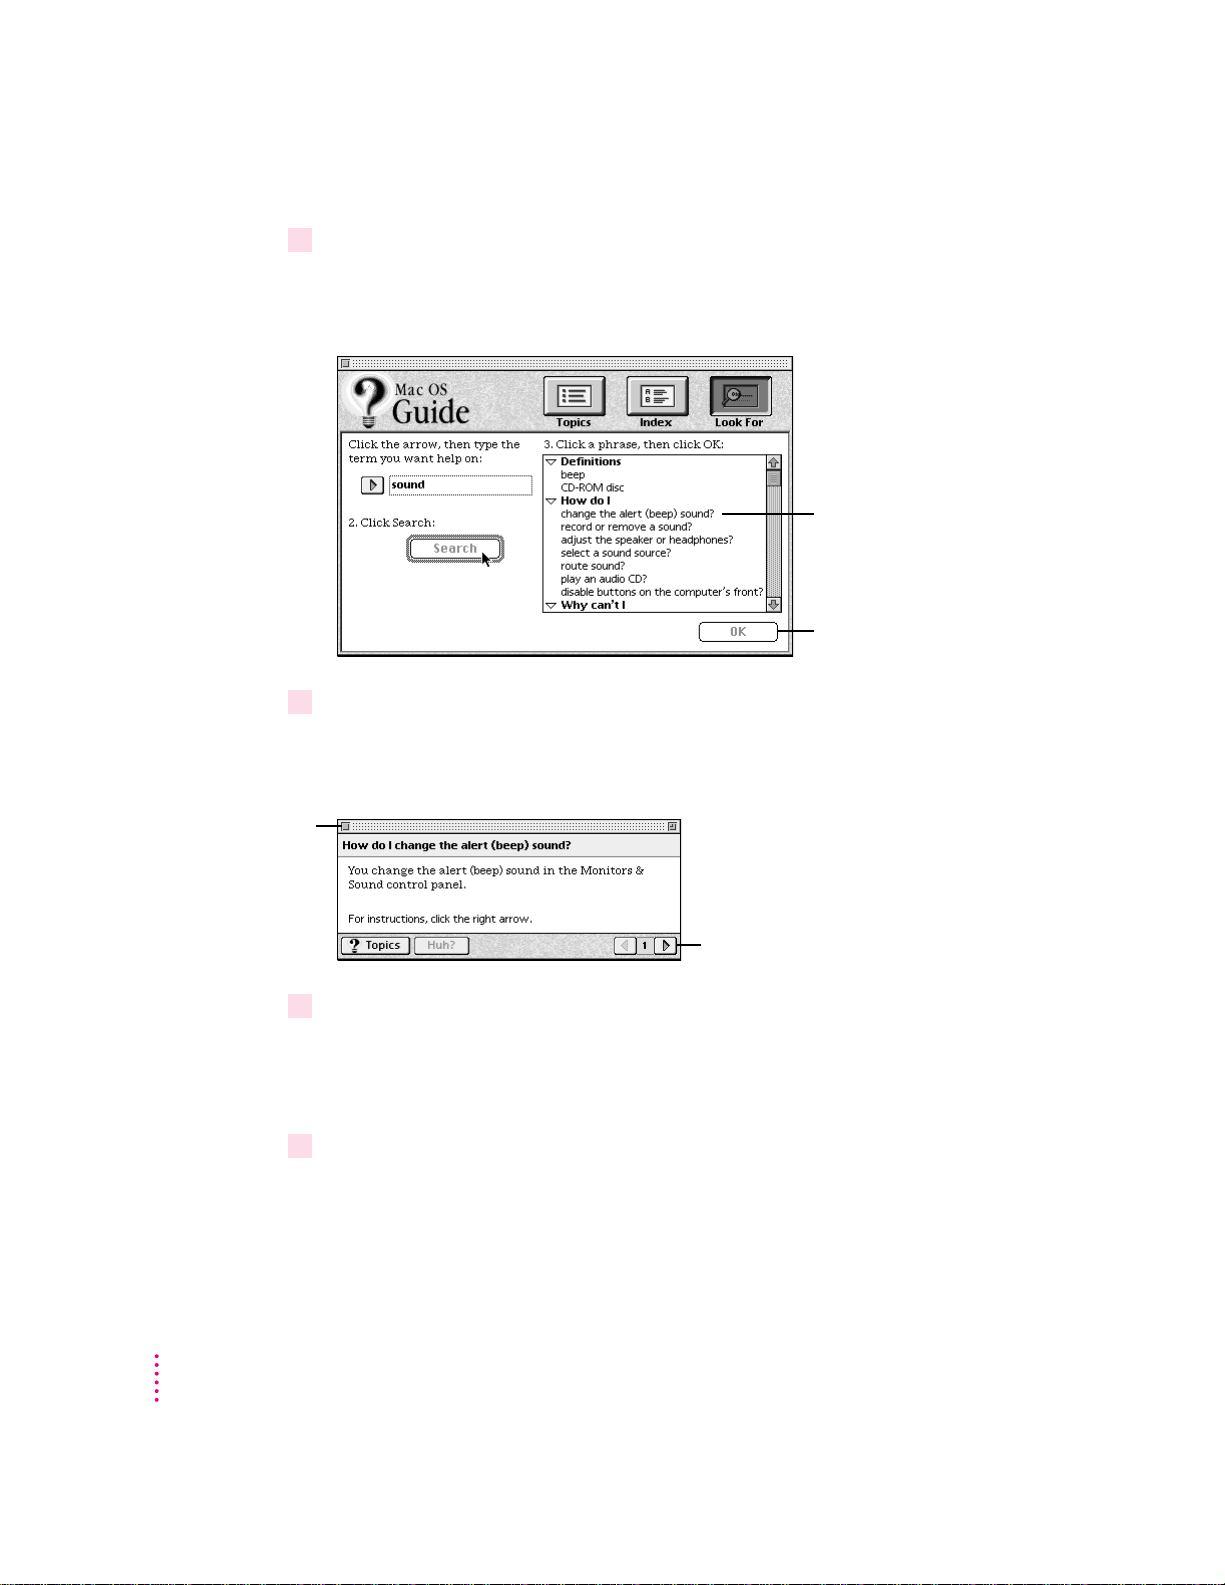
3Type “sound” in the text box, then click Search.
4Click the question “How do I change the alert (beep) sound?” and then click OK. Or
If you want to close
Mac OS Guide,
click here.
When you click Search, a list of questions related to the word or phrase you
typed appears on the right side of the Mac OS Guide window.
To get instructions,
click a question…
…and then click OK.
double-click the question.
A small window appears with instructions for you to follow.
36
Click here to see the next
step (if there is one).
5 Read and follow the instructions in the window.
Mac OS Guide provides step-by-step instructions to answer the question you
selected. When you have completed each step, click the right arrow in the
lower-right corner to display the next step.
6When you have completed all the steps, click the close box in the upper-left corner to
close Mac OS Guide.
Chapter 2
Page 37

Tips for using Mac OS Guide
Here are a few tips for using Mac OS Guide effectively:
m Mac OS Guide is available only when you are in the Finder—the
desktop area where you can see the icons of disks, folders, and files.
(Other programs may also have help available in the Guide menu,
however.) If you don’t see Mac OS Guide in the Guide menu, open
theApplication menu (to the right of the Guide menu) and choose
Finder.
m Foll ow the steps when you’re instructed to; don’t skip ahead or read
ahead. That way the computer can check to make sure you’ve done a
step correctly.
m Unlike most windows, the Mac OS Guide window stays in front of
other windows on the screen so that your instructions are never
covered. If you need to move the Guide window out of the way, drag
it by the title bar at the top of the window.
You can also move the window out of the way by clicking the zoom
box. Click the box once to shrink the window; click it a second time
to expand the window to its original size.
m If you need more information about an instruction or a term, click the
button labeled “Huh?” to get a further explanation. (The “Huh?”
button is dimmed when no additional information is available.)
m If you want to return to the main Mac OS Guide window, click the
Topics button in the lower-left corner of the Guide window.
m When you’re finished using Mac OS Guide, click the close box in the
upper-left corner of the window.
Close box
Topics button
Title bar
Zoom box
Right arrow
“Huh?” button
Getting Help
37
Page 38
Identifying what’s on your c omputer s cr een
Sometimes you’ll see an unfamiliar item on the screen and ask yourself,
“What’s that?” You can get an answer by using a Macintosh feature known as
Balloon Help.
Using balloons like those you see in comic strips, Balloon Help explains
the function of icons, menus, commands, and other items on the Macintosh
screen.
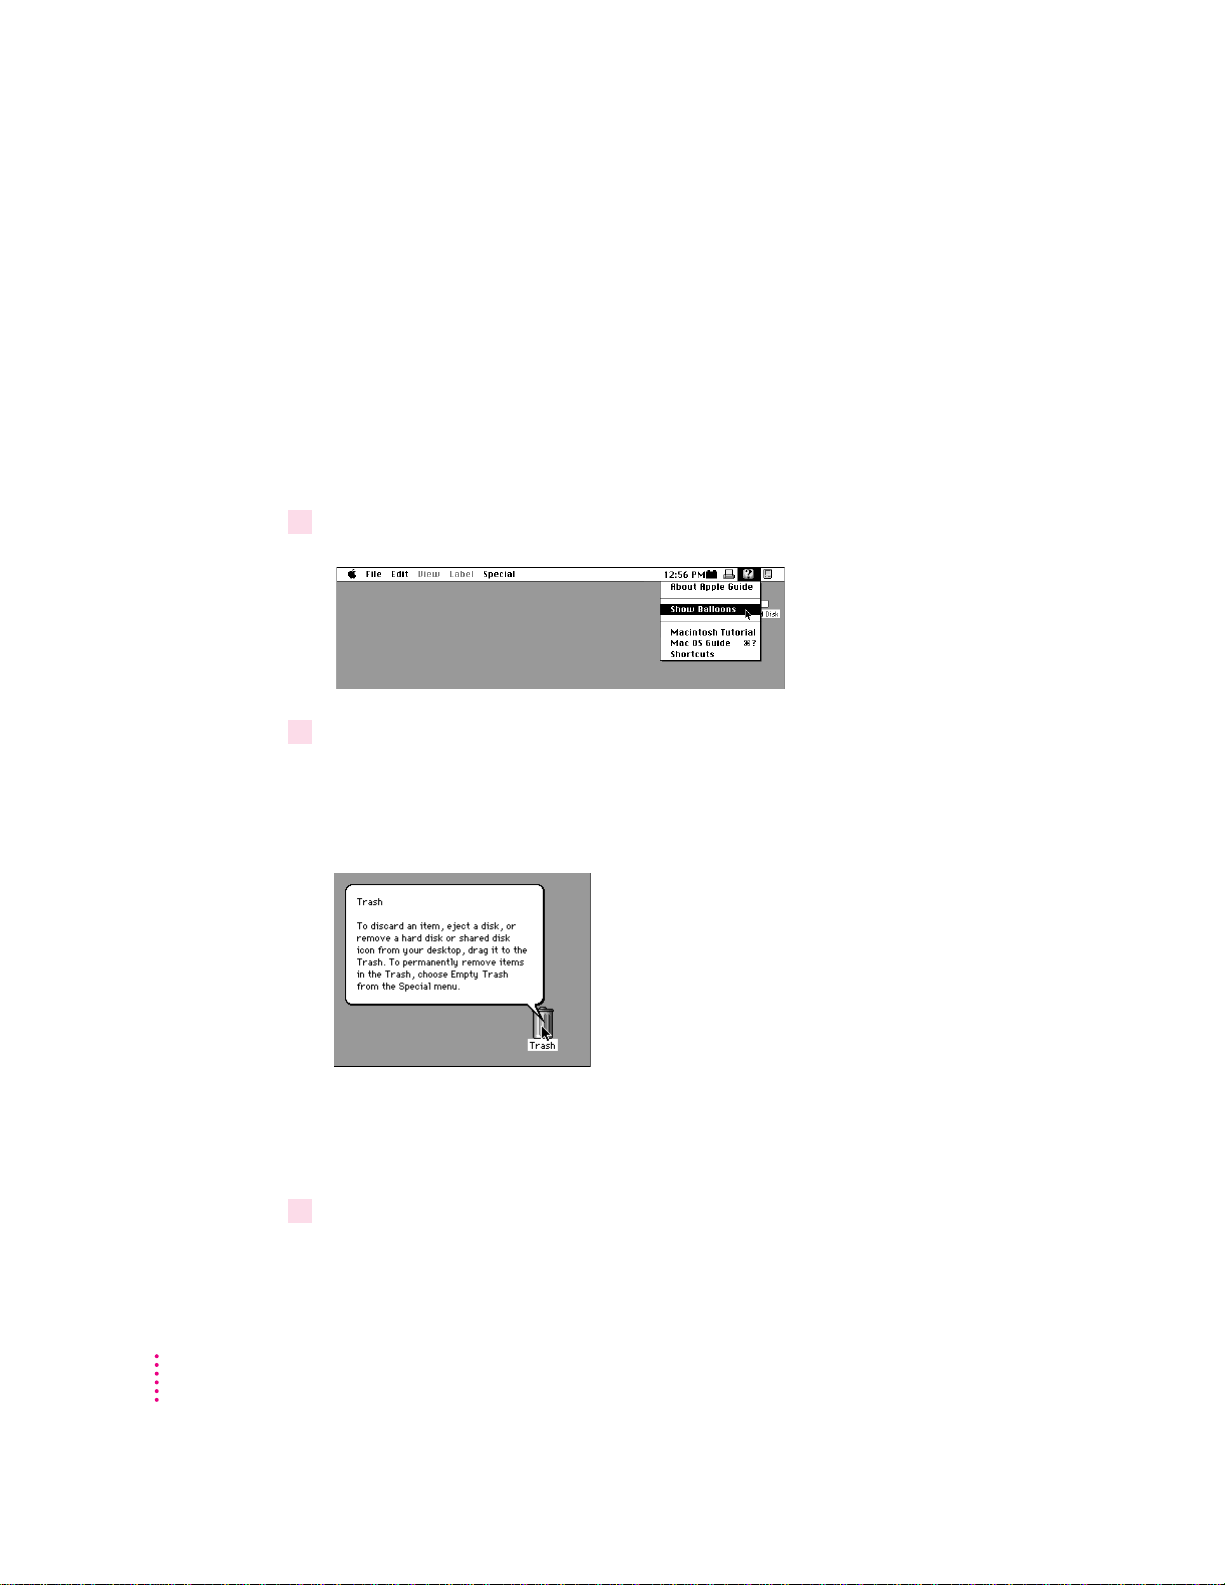
Follow these steps to use Balloon Help:
1 Open the Guide menu (marked with the
2Point to any object on the screen that you want to identify.
h
icon) and choose Show Balloons.
A balloon appears next to the object. In the following illustration, for
example, pointing to the Trash displays a balloon that explains how to use the
Trash to throw items away.
38
Although balloons appear next to items when you point to them, the way
you work does not change; you can still select icons, choose commands, and
so on.
3When you’re finished using Balloon Help, open the Guide menu again and choose
Hide Balloons.
Chapter 2
Page 39

Learning useful shor tcuts
You can perform many tasks in the Finder more quickly if you use keyboard
or trackpad shortcuts. For example, instead of clicking an icon and choosing
Open from the File menu, you can simply double-click the icon to open it.
Foll ow these steps to learn keyboard and trackpad shortcuts:
1 Open the Guide menu (marked with the
2Click one of the category buttons.
If you want to
close the window,
click here.
h
icon) and choose Shortcuts.
The main Macintosh Shortcuts window appears.
Another window appears, describing shortcuts for that category.
Click the Topics
button to return to the
main Macintosh
Shortcuts window for
more categories.
Click here to see the next
window (if there is one).
Getting Help
39
Page 40

3 Read about the shortcuts available for the category you selected.
Click the right arrow in the lower-right corner of the window to display the
next window (if there is one).
4When you finish reading about the shortcuts for your category, click the Topics button
in the lower-left corner to return to the main Macintosh Shortcuts window. Or click the
close box in the upper-left corner to close the window.
40
Chapter 2
Page 41

Read this chapter for
information on using expansion
bay modules and PC Cards.
3
Using Expansion Bay Modules and PC Cards
Using expansion bay modules
The floppy disk drive and the optional CD-ROM drive in your Macintosh
PowerBook are removable modules, which you can easily switch or replace
with another module. The place in your computer where modules go is called
expansion bay. (The floppy disk drive is installed in the expansion bay at
the
the factory.)
You can switch the modules, such as the floppy disk drive and CD-ROM
drive, or remove a module while the PowerBook is turned on, in sleep, or shut
down. All expansion bay mod ules are inser ted a nd removed in the same way.
To protect your work and to be sure that the computer recognizes which
module is in use, first quit any programs that may be using files on the disk in
that module. Then select the disk’s icon and choose Put Away from the File
menu or drag the icon to the Trash.
IMPORTANT
care not to remove a module if a floppy disk or CD-ROM is inserted a nd
in use.
Don’t switch modules while the computer is starting up. Also take
If you purchase an expansion bay module from an independent supplier, be
sure to follow the instructions that came with the device. Some modules may
have special requirements, such as shutting down the computer before
inserting or removing the module. At least one manufacturer makes an
internal power adapter for use in the expansion bay.
41
Page 42

Removing an expansion bay module
To unlock the module, slide the latch
on the underside of the computer.
To remove an expansion bay module from your Macintosh PowerBook, follow
these steps:
1 Quit any application programs or files that are using the floppy disk or compact disc
(CD) or other medium inserted in the expansion bay module.
Remember to save your work.
2If a floppy disk or CD is inserted in the module, click its icon to select it and drag its icon
to the Trash (or choose Put Away from the File menu).
You should not remove the module if a disk is in use. If you have any other
kind of optional expansion bay module, make sure you drag the icon for its
media to the Trash or select the icon and choose Put Away from the
File menu.
3Unlock the expansion bay module by sliding the module release latch on the bottom of
your Macintosh PowerBook in the direction of the arrow.
42
Chapter 3
Page 43

4Hold the module by the gripping surface and pull it out of the computer.
Hold the module by the gripping surface
and pull it completely out of the computer.
The module release latch automatically slides back
into its proper position as you remove the module.
Gripping surface
IMPORTANT
You should not remove an expansion bay module if it is in use or
you may lose data. If you try to remove the module when it is in use, you’ll
see a message telling you to reinsert it. Reinsert the module, quit any files
or programs that may be using the floppy disk (or other medium inserted in
the module), then select the disk’s icon and choose Put Away from the File
menu or drag the disk’s icon to the Trash. (If the module contains the startup
disk, you can’t remove the module or drag the disk to the Trash.)
To be sure that you don’t get another in-use message, wait 5 seconds after
quitting programs and ejecting a disk before you remove the module.
If you put your computer to sleep while a floppy disk or other medium is
inserted, the green in-use light to the left of the module will flash (similar to
the sleep indicator light on your computer’s display). You should not remove
the module while the in-use light is on or flashing. (The exception is that it’s
all right to remove a module while the computer is in sleep.)
Using Expansion Bay Modules and PC Cards
43
Page 44

Inserting an expansion bay module
Flap for narrow module
To reinser t the expansion bay module, slide the module in. Make sure the
gripping surface is facing down. The release button automatically returns to
the locked position.
Be sure the module is completely inserted. If it does not insert properly, reset
the module release latch to the unlocked position (as in step 3 earlier) before
reinserting the module.
Note that the expansion bay can use a wide component, such as the 5.25-inch
CD-ROM drive, or a narrower component, such as the 3.5-inch floppy disk
drive. When a narrower device is in the expansion bay, a small flap covers the
empty part of the bay. When a wider drive is inserted, the flap folds into
the bay.
44
Chapter 3
Page 45
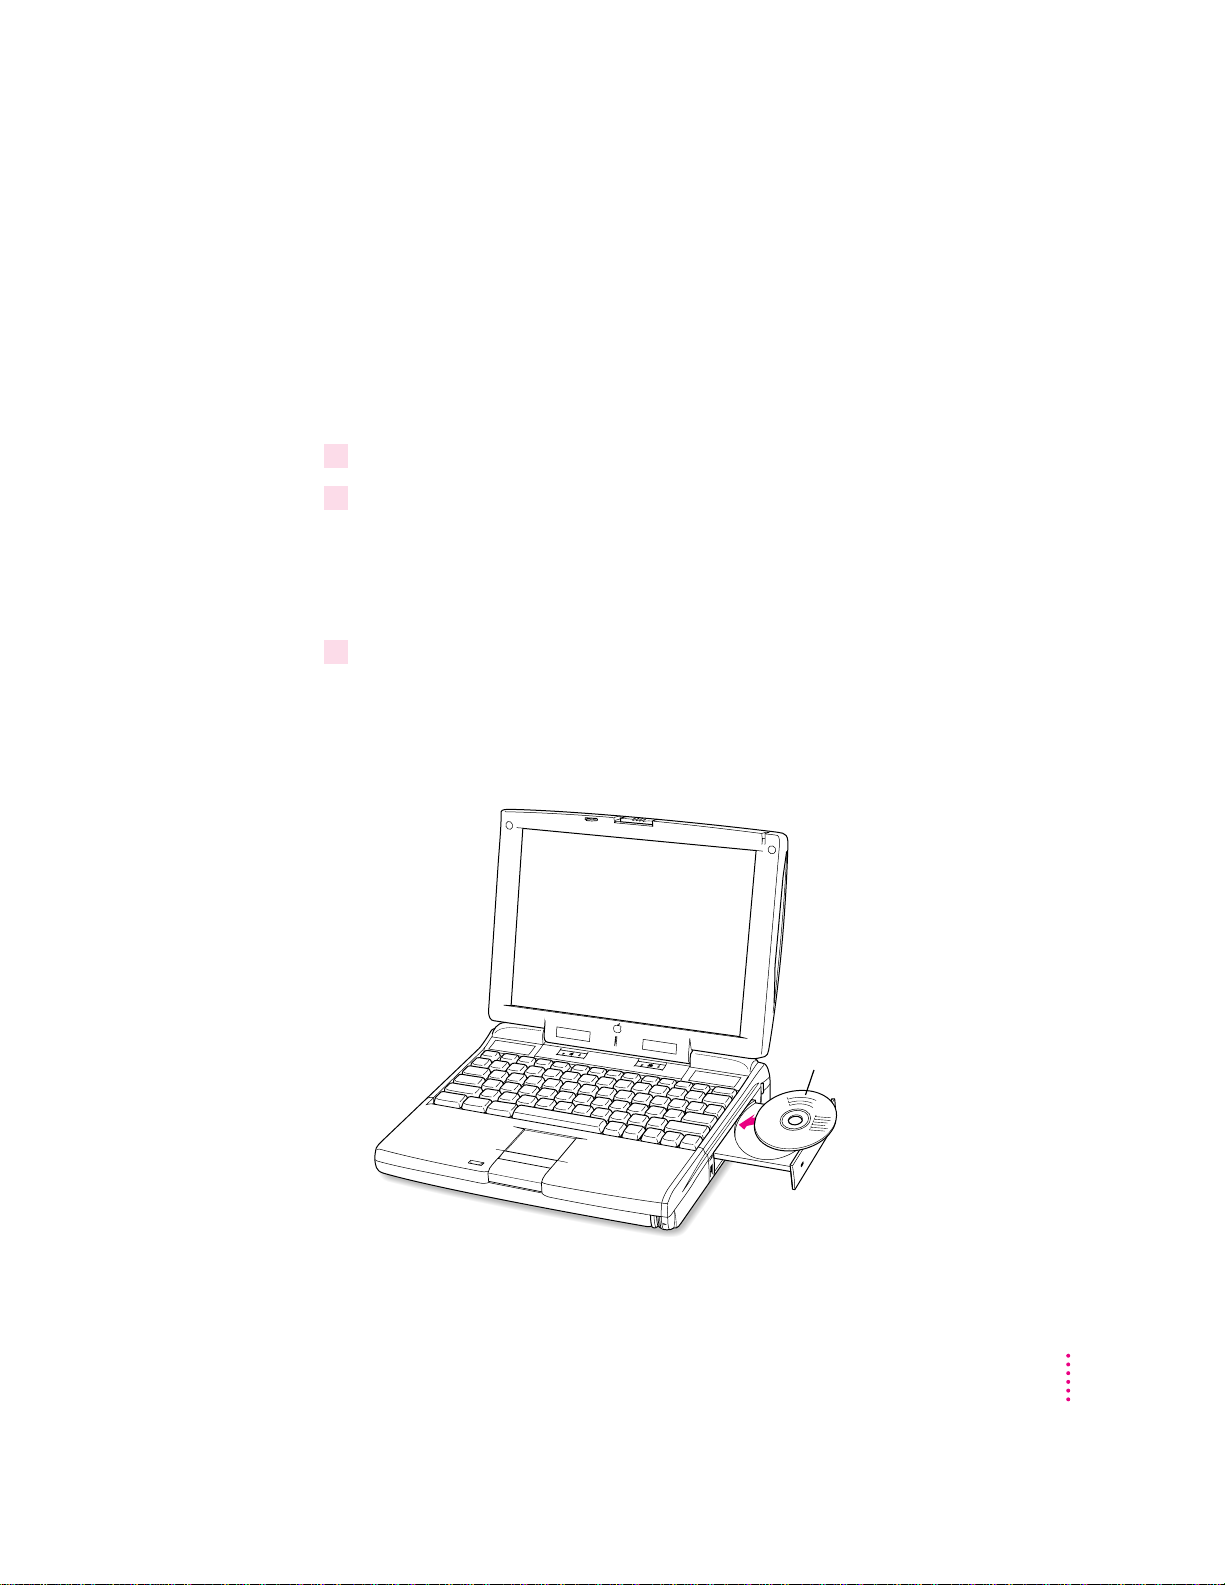
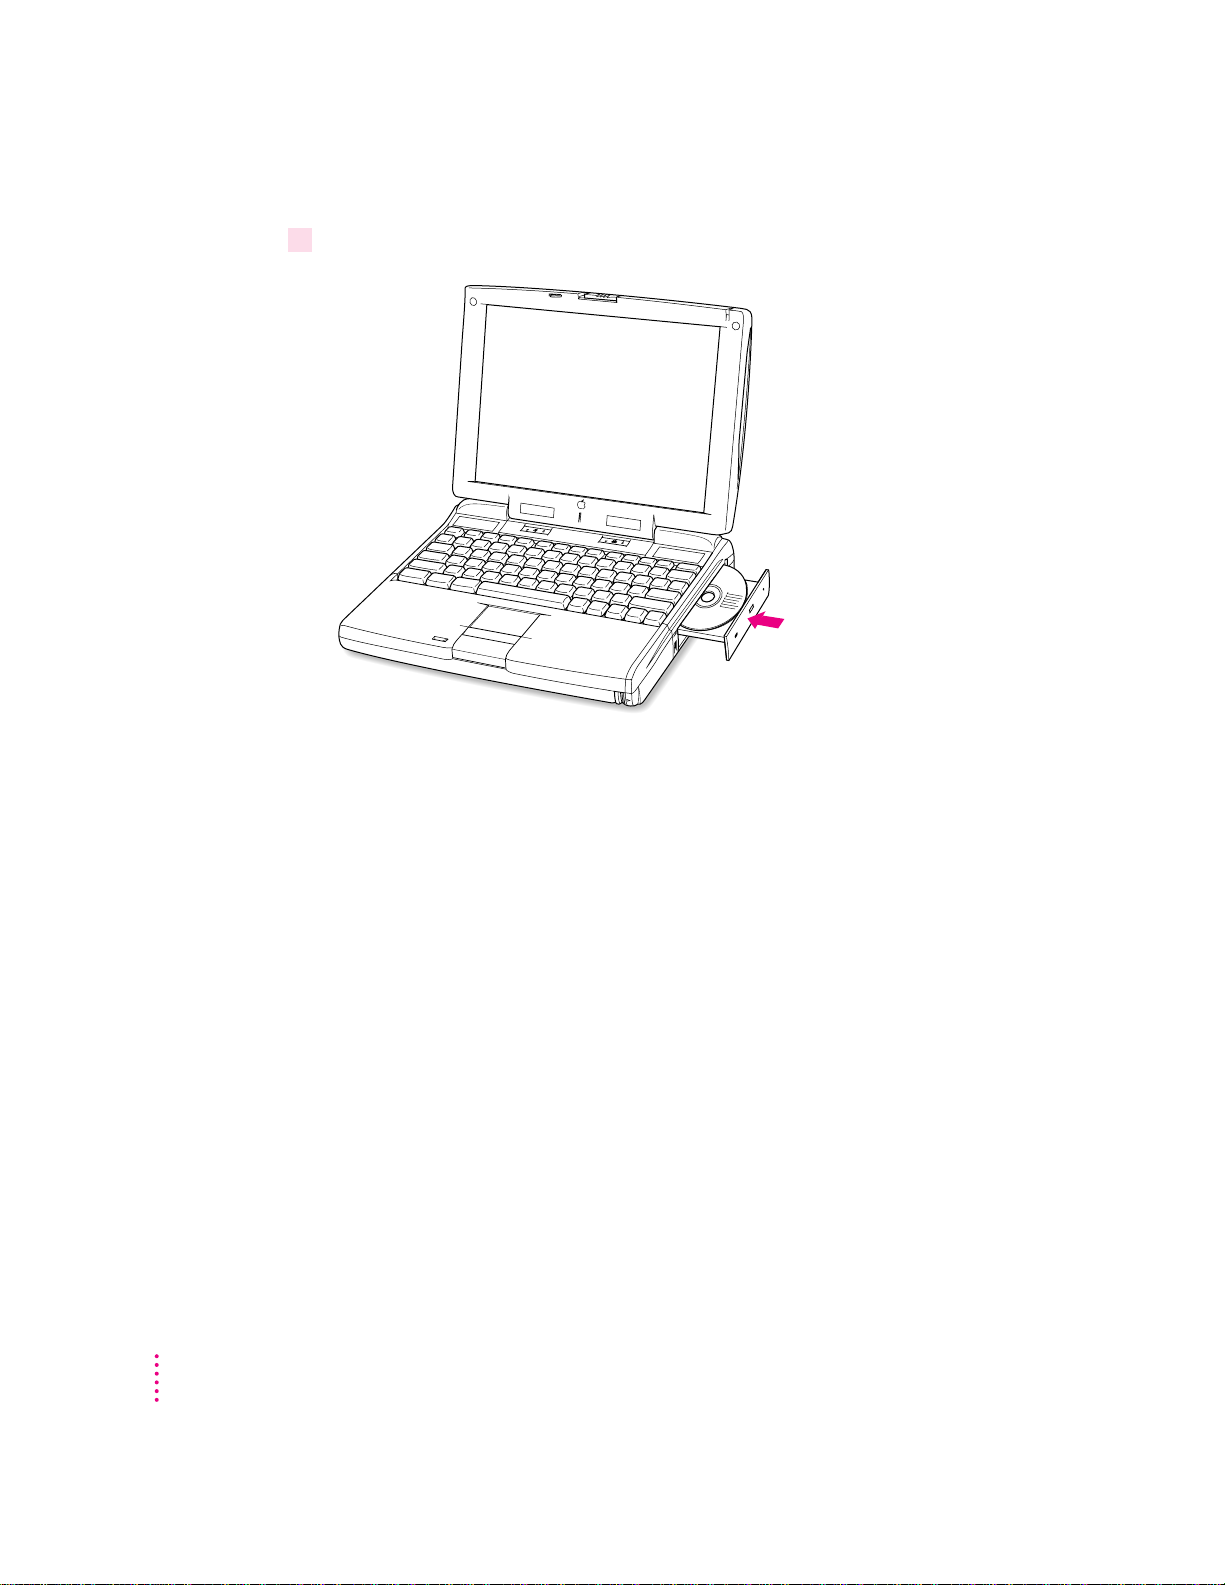
Using a CD in the CD-ROM drive
Insert the disc,
label side up.
If you have the optional CD-ROM drive, you insert or remove the drive in the
same way as any other module.
Inserting a disc
To load a compact disc in the drive, follow these steps:
1 Start up the PowerBook, if it’s not already on.
2Press the Open button on the outside of the CD-ROM module to open its tray.
The tray opens (partially).
(If the tray doesn’t open, a disc may already be in the drive. Drag its icon to
the Trash to open the tray. You’ll see a message if the disc is in use.)
3Pull the tray all the way open and place a CD-ROM disc in the tray, with the label
facing up.
Make sure the disc is lying flat in the tray and is seated firmly on the spindle.
Avoi d touching the drive’s lens.
Using Expansion Bay Modules and PC Cards
45
Page 46
4Push the tray in to close it.
Note: When the CD-ROM drive is in use, you may notice some vibration as
the co mpact disc spins rapidly. Cert ai n discs can cause the drive to vibrate
because they have heavily inked artwork or a label that creates an imbalance
as the drive spins.
46
Some vibration is not unusual for a high-speed CD-ROM drive. To minimize
vibration from unbalanced compact discs, do not put labels on your CDs.
In addition, place the computer on a flat, solid surface when using the
CD-ROM drive.
Keep the CD-ROM drive’s tray closed except when loading discs. This
prevents dust from getting inside the mechanism. Also be sure to keep CDs
free of dust and grease.
Chapter 3
Page 47

Ejecting a disc
Foll ow these instr uctions to open the tray and eject a CD-ROM disc from
the drive:
1 Open the tray.
There are several ways to open the tray of your CD-ROM drive.
If a CD-ROM disc icon appears on your screen, do one of the following:
m Select the disc icon on your screen and drag the icon to the Trash.
m Click the disc icon and choose the Put Away command in the File menu.
m While the CD player’s window is active, choose Eject CD from the File
menu, or simultaneously press the x and E keys. (Do not remove the
module if you use this method of ejecting the disc.)
m Use the pop-up menu in the CD section of the Control Strip to eject a CD.
If no CD-ROM disc icon appears on your screen, do this:
m Press the Open button on your CD-ROM drive.
2Take the disc out of the tray.
Store your disc in a safe place, away from heat, dust, and moisture.
3Push the tray in to close it.
To avoid possible damage to the tray or the drive, keep the tray closed when
you are not using it.
Using Expansion Bay Modules and PC Cards
47
Page 48

If you still can’t eject a disk, try this method:
Insert the end of a
large, straightened
paper clip into
this hole.
If the standard methods of ejecting a CD do not work (or the computer is
shut down), you can eject the disc manually. Carefully insert the end of a
straightened paper clip into the small hole near the CD-ROM drive’s opening,
and push firmly until the tray disengages. Pull the tray open, remove the disc,
and close the tray.
48
Chapter 3
Page 49

Locking an expan s io n bay module
Sample locking device
with security cable
Battery
Expansion bay module
Security slot
You can purchase a security cable and lock to protect your Macintosh
PowerBook. With a lock, you can do the following:
m secure your computer to a desk or table
m lock the expansion bay module and battery in your computer
See your Apple-authorized dealer or computer retailer for details on what
security devices are available.
Note: You can protect the contents on your hard disk by turning on password
protection in the Password Security control panel. For information on this
control panel, see “How do I turn password security on and off?” in the
“Sett ing Options” section of Mac OS Guide, available in the Guide (h) menu.
Using Expansion Bay Modules and PC Cards
49
Page 50

Using PC Cards (PCMCIA cards)
PC Cards (also known as PCMCIA cards) are about the size of a thick credit
card a nd have a 68-pin connector at one end. They come in many varieties,
such as fax/modem cards, mass-storage cards, Ethern et connection cards, and
wireless communication cards. You can use PC Cards to expand your
Macintosh PowerBook’s capabilities.
This section describes how to insert a nd eject PC Cards, and how to set up
your communications software to use PC Card modems. For information on
using P C Cards, see the “Using PC Cards” topic area of Mac OS Guide,
available in the Guide (h) menu.
Your Macintosh PowerBook has two PC Card slots: an upper slot and a lower
slot. You can insert a card into either slot, or you can use both slots
simultaneously.
There are three types of PC Cards. T he different types refer to the thickness
of the card. A Type I card is 3.3 millimeters (mm) thick, a Typ e II card is
5 mm thick, and a Type III card is 10.5 mm thick. Make sure you check the
documentation that came with your PC Card to verify that it is compatible
with your Macintosh PowerBook.
50
Chapter 3
WARNING
Make sure you only use cards that are designated by the PC
Card manufacturer as compatible with your Macintosh PowerBook. If
you use an incompatible card, you may damage the card or your
PowerBook. If you are not sure whether a PC Card is compatible with
your PowerBook, contact the PC Card manufacturer.
You can place a Type I or Type II card in either the upper or lower slot. You
can place a Type III card only in the lower slot. When a Type III card is in the
lower slot, you cannot use the upper slot. You may find it useful to get in the
habit of always using the lower slot to make sure the card you are using is
properly inserted.
A special type of PC Card supports “zoom video,” a method of showing fullmotion video images in a window on the computer’s screen. Your PowerBook
is designed to use a zoom video card, but this type of card must be placed in
the lower PC Card slot.
Page 51

Inserting a PC Card
A Type III PC Card
must be inserted in the lower slot.
A Type I or Type II PC Card can be
inserted in either the upper or lower slot.
To in ser t a card, do this:
m
Insert the card, connector first and label up, into the slot. Make sure the card is level.
Using Expansion Bay Modules and PC Cards
51
Page 52

Yo u’ ll feel some resistance as you slide the card in. When the card is firmly
seated, you will feel it click into place. Consult the card’s documentation for
details of its use.
An icon for the PC Card appears on the desktop.
You are now ready to use the card.
Eje c ting a PC Card
Your computer must be on or off to eject a PC Card. You cannot eject a PC
Card when the computer is in sleep.
IMPORTANT
Before you eject a card, make sure that nothing is blocking the
card’s slot. If you want to use the card again immediately, pull it out about an
inch more and then push it back in. (If you don’t follow this procedure and
you try to push the card back in to use it again, the card will not engage
properly.)
To eject a PC Card when the computer is on, follow these steps:
1If the computer is in sleep, press the Power key (or any key on the keyboard except Caps
Lock) to wake it.
2Click the PC Card’s icon to select it.
3 Drag the card’s icon to the Trash.
4Pull the card out of the slot.
IMPORTANT
Do not pull or force a PC Card out of the slot. Doing so may
damage your computer or PC Card.
Other ways to eject a PC Card when the computer is on include the following:
m Click the card’s icon to select it. Open the File menu and choose Put Away.
After the card is ejected, pull it out of the slot.
m Click the card’s icon to select it. Open the Special menu and choose Eject
PC Card. After the card is ejected, pull it out of the slot. (If a dimmed icon
of the card remains on the desktop, you can drag it to the Trash.)
52
Chapter 3
Page 53

To ej ect a PC Card when the computer is on or off, do this:
Press the eject button next to
the slot with the PC Card in it.
m Press the eject button next to the slot containing the PC Card you want to
eject. (The eject buttons do not work if your computer is in sleep.) If the
card is not in use, it will usually be ejected.
Try to use the eject buttons only when the computer is turned off. Many
PC Cards won’t eject when the button is pressed if the computer is on.
Using Expansion Bay Modules and PC Cards
53
Page 54

If you can’t eject a card
If you can’t eject a card, insert
the end of a straightened paper
clip into the hole next to the slot.
This hole is for the upper slot.
This hole is for the lower slot.
If you are unable to eject a card, follow these steps:
1 Straighten one end of a paper clip.
2Insert the end of the straightened paper clip into the hole next to the slot that contains
the card, and press gently but firmly until the card is ejected.
54
Chapter 3
3Pull the card out of the slot.
Setting the computer not to eject storage PC Cards at startup
If a you have a storage PC Card, such as an SRAM card or an ATA hard disk,
in either slot, the card will be ejected when the computer starts up. To prevent
excessive wear on PC Card connectors and slots, you can use the Startup Disk
control panel to keep storage PC Cards from ejecting when you turn on the
computer. (Other types of PC Cards, such as a modem or Ethernet card, are
not ejected at startup.)
Page 55

Foll ow these steps to avoid having a storage PC Card eject at startup:
1 Open the Startup Disk control panel.
If you need instructions for opening the control panel, see “How do I make a
disk the startup disk?” in the Disks topic area of Mac OS Guide, available in
the Guide (h) menu.
2Click the icon for the computer’s hard disk to select it.
3Close the control panel.
The PC Card storage device will no longer eject at startup.
Using a zoom vide o PC Card
The lower PC Card slot in the PowerBook 3400 series computer has circuitry
for handling video signals, called “zoom video.” Some independent
manufacturers offer PC Cards to which you can provide a video signal or
which allow you to connect a video camera. The zoom video PC Card is a
Type II card; it can only be used in the lower slot (because the special
circuitry needed for video signals is located in that slot).
With a zoom video card in the lower PC Card slot, the PowerBook can display
video on the computer’s screen or on a n external monitor. Video signals are
sent directly to the video controller, so that the computer can display fullmotion video while performing other tasks at the same time.
If you purchase a zoom video PC Card, be sure that it has software that works
with your PowerBook.
Using a PC Card modem
When you are using a PC Card modem, make sure you do the following:
1 Install the communications software you want to use, as well as any software that came
with your modem.
PC Card modems work with your communications software by providing
compatibility with a feature of your Macintosh PowerBook’s software called
the Comm unications Toolbox.
Using Expansion Bay Modules and PC Cards
55
Page 56

See the documentation that came with your modem and your communications
software for instructions on setting up a PC Card modem for each application.
Check to see if PC Card modem files for your software were included.
Modem files for some communications programs, including Apple Remote
Access (ARA), come on your Macintosh PowerBook’s hard disk. The
instructions for setting up your modem with one of these application
programs are given in the section below. You can get other modem files from
the manufacturer of your modem or your communications software. You can
use th e steps given below for setting up ARA as guidelines for setting up
your PC Card modem with other types of communications software if you are
having trouble connecting.
2Insert the PC Card modem.
When a PC Card modem is inserted, an icon like the one pictured below
appears on the desktop:
Some card manufacturers may use a custom icon.
56
3Plug your modem into a working phone line.
4 Follow instructions for setting up your modem with the communications software you
are using.
Using Apple Remote Access with a PC Card modem
Appl e Remote Acc e ss uses modem files (sometimes called connection scripts
or CCLs) to get the best performance from some modems. Follow these steps
to select your modem file:
1Insert your PC Card modem.
2 Open the ARA application program.
Chapter 3
Page 57
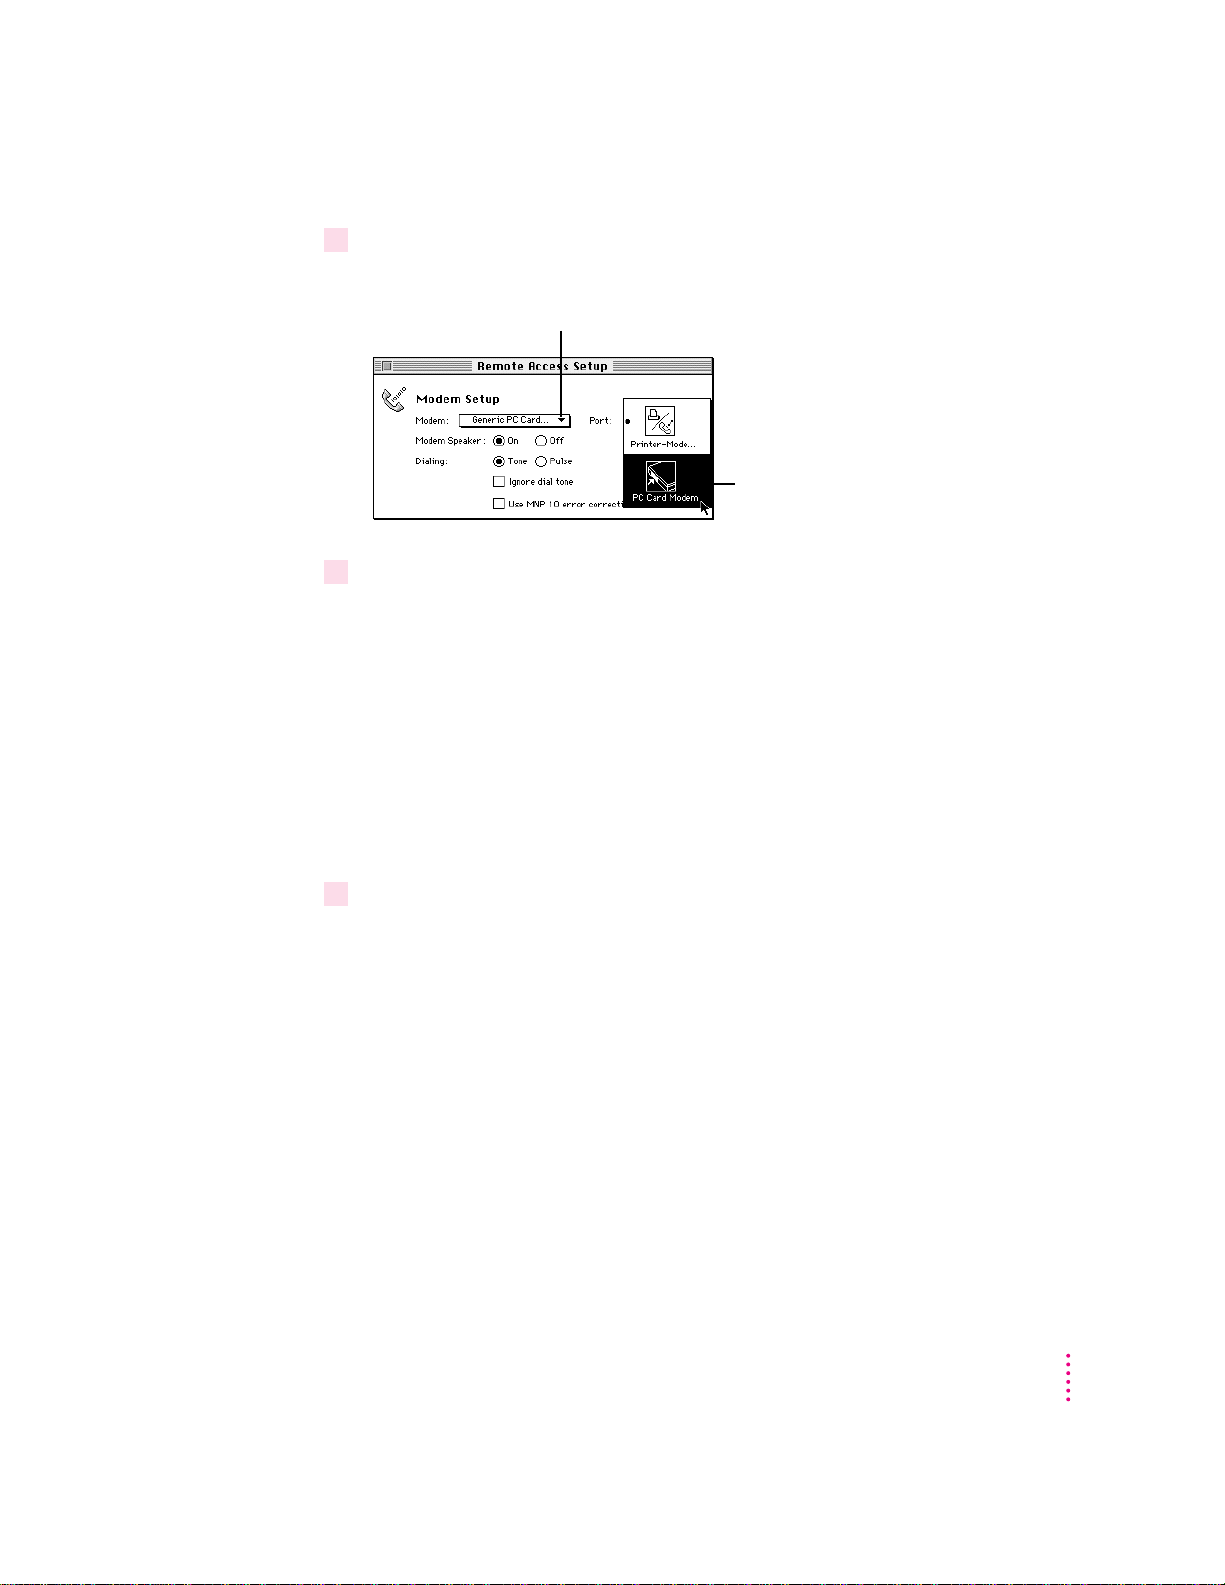
3 Open Remote Access Setup.
The following screen appears:
Select the modem you are using here.
Also select your PC Card modem
here; or select the Data Port, if your
program’s instructions specify it.
4Choose your modem from the Modem pop-up menu.
If your PC Card modem is not listed, check the software or materials that
came with your modem. If you find the file for your modem and ARA, drag it
to the M odem Scripts folder inside the Extensions folder (which is in the
System Folder).
If you can’t find the file for your modem and ARA, try using an existing
modem file from the pop-up menu (such as a different model from the same
manufacturer). One choice provided is Generic PC Card Modem, which is
designed to provide basic modem operations. If this doesn’t help, you may
need to get a modem file from your PC Card modem’s manufacturer.
5Choose the port for your PC Card modem.
The port shows the modem name or type, rather than the name of the
PC Card slot. Some programs use a virtual port, the Data Port, to allow fax
and data applications to share the modem. See the instructions that came
with your modem and communications software to determi ne the specific
setup procedure.
You must reselect the port if you remove the modem and later put it in the
other slot.
Using Expansion Bay Modules and PC Cards
57
Page 58

Page 59

Read this chapter for information on
´
Printer/External modem port
√
Sound input port
-
Sound output port
¯
Power adapter port
V
Apple Desktop Bus
Connector
for Ethernet/
modem or
Ethernet card
(optional)
I
Reset button
™
External monitor port
g
SCSI port (HDI-30)
Infrared
window
Expansion card label
(ADB) port
expanding your computer system
with additional hardware.
4
Connecting Additional Equipment
The illustration below shows where equipment should be connected to your
Macintosh PowerBook. In most cases, you should refer to the manuals that
came with your equipment for instructions on connecting them. The safest
course is always to shut down your Macintosh PowerBook before you connect
any cable other than the power adapter, although you can connect external
devices to the sound port, printer/external modem port, or expansion port
while the computer is on.
59
Page 60

Additional information is provided in this chapter for adding the following
devices to your computer system:
m printers
m external modems
m SCSI devices
m external monitors
m sound input and output devices
m a mouse, keyboard, or other ADB device
m additional memory
Connectin g a printer
The modem/printer port on your computer can accept either a direct
connection (to a printer such as a StyleWriter) or a LocalTalk n etwork
connection (to a printer such as a LaserWriter). See the manual that came
with your printer for specific information about the type of connection
it requires.
To connect a printer directly to your Macintosh PowerBook using the
modem/printer port, follow these steps:
60
Chapter 4
1Connect your printer as instructed in the manual that came with your printer.
2 Open the Chooser from the Apple (
3 Turn off AppleTalk by clicking the Inactive button in the AppleTalk section.
K
) menu.
Note: If you are using an Ether n et connection or a network printer, you don’t
have to turn AppleTalk off.
4In the Chooser, select the icon for the type of printer you connected.
If you need detailed instructions for using the Chooser, see “How do I select
a printer?” in the Printing topic area of Mac OS Guide, available in the Guide
(h) menu.
The printer is ready to use.
Page 61

Connecting an external modem
You can use a PC Card modem in your computer’s PC Card slot. For
information on connecting and using a PC Card modem, see the
documentation that came with your modem, as well as “Using a PC Card
Modem” in the section “Using PC Cards (PCMCIA Cards)” in Chapter 3 of
this manual, and the “Using PC Cards” topic area of Mac OS Guide, available
in the Guide (h) menu.
You can also connect an external modem to the modem/printer port on the
back pa n el of the computer. The modem/printer por t is GeoPort compatible.
To connect an external modem, follow these steps:
1Make sure the computer is in sleep or shut down.
2Connect the modem to a power source and to the phone line.
3Make sure the modem is turned off.
4Connect the modem cable to the port marked with this icon:
5 Turn on the modem.
6Wake or restart the computer.
7 Open the Chooser and select the icon for a network printer (such as LaserWriter).
You must select a printer to be sure that the modem/printer port is available
for the modem.
8 Turn off AppleTalk in the Chooser.
If you see a message, click OK.
Note: If you are using an Ethernet or infrared connection, you don’t need to
turn AppleTalk off.
The external modem is ready to use.
Connecting Additional Equipment
61
Page 62

Connectin g SCSI devices
A SCSI device is any product—including hard disk drives, CD-ROM drives,
and scanners—that communicates with your computer by means of a
standard electronic interface. (SCSI stands for Small Computer System
Interface.) You can attach up to seven SCSI devices to your computer by
linking them together in a chain that starts at your computer’s SCSI port.
To connect a SCSI device to your Macintosh PowerBook, you need an Apple
HDI-30 SCSI System Cable or equivalent. This cable is light gray, is about 19
inches long, and has 29 pins (one “missing” pin).
Refer to the manuals that came with your SCSI devices for instructions on
installing any necessary software, setting SCSI ID numbers, and connecting
SCSI cables and SCSI terminators. Refer to the illustrations on the next page
for the proper positioning of SCSI terminators. A SCSI chain of devices must
include a termi nator attached to the first and last devices in the chain (but
nowhere else in the chain). Some devices include internal ter minators. Your
Macintosh PowerBook is internally terminated.
The names and the part numbers of the cables mentioned in this chapter are
the following :
Type of connection Name of part Part number
62
Chapter 4
From your computer to Apple HDI-30 SCSI System Cable M2538**/A
a SCSI device
From SCSI device to Apple SCSI Peripheral Interface Cable M0207
a SCSI device
For SCSI disk mode Apple HDI-30 SCSI Disk Adapter Cable M2539**/A
WARNING
When connecting SCSI equipment, always turn off power to
all devices in the chain, including your computer. If you don’t, you
could lose information and damage your equipment.
Page 63

Wher e to ad d cable terminators when connecting a single SCSI device
SCSI peripheral interface cables
HDI-30 SCSI
system cable
Terminator
(If this SCSI device has an
internal terminator, omit
this external terminator.)
Terminator
(If this SCSI device has an internal
terminator, omit this external terminator.)
HDI-30 SCSI system cable
Wher e to ad d cable terminators when connecting two or more SCSI devices
Using your Macintosh PowerBook as a hard disk
You can purchase a cable called the Apple HDI-30 SCSI Disk Adapter that
lets you connect your Macintosh PowerBook to another computer as a hard
disk. The PowerBook internal drive appears on the desktop of the other
computer as a hard disk icon, and you can transfer information between the
computers by dragging files. This feature is called SCSI disk mode.
The Apple HDI-30 SCSI Disk Adapter cable is dark gray, is about 10 inches
long, and has 30 pins.
IMPORTANT
Whenever you use your PowerBook in SCSI disk mode, be sure
that the power adapter is plugged in. If you connect the PowerBook as a SCSI
disk under battery power, the battery’s low-power warning will not be
displayed and the computer may shut down because the battery is drained.
Connecting Additional Equipment
63
Page 64

Connecting your compute r as a hard disk
Before making any connections, you need to assign a unique SCSI ID number
to the Powe rBook. (The unique ID number allows the computer to
communicate with several connected devices.)
1Choose Control Panels from the Apple (
2 Open the PowerBook Setup control panel.
3In the SCSI disk mode section of the control panel, click the ID number you want
to assign.
K
) menu of your PowerBook.
If you are connecting the Macintosh PowerBook to an existing SCSI chain,
make sure to give it an ID number different from those of the other devices.
(Many devices include an ID number indicator on the back panel.)
4Close the PowerBook Setup control panel.
5Press the Power (P) key on the PowerBook once to get the Shut Down dialog box and
click Shut Down to turn the PowerBook off.
64
Chapter 4
6Shut down the computer you are connecting to and turn off any other devices in the
SCSI chain.
WARNING
Always shut down the PowerBook before connecting or
disconnecting the SCSI disk adapter cable. Connecting the adapter cable
while the computer is turned on can damage the computer.
7Connect the small connector on the Apple HDI-30 SCSI Disk Adapter to the SCSI port on
your PowerBook.
Page 65

8If you are connecting the Macintosh PowerBook directly to the other computer
(rather than to an external device in the SCSI chain), attach a SCSI system cable to
the other computer.
9Connect the large connector on the Apple HDI-30 SCSI Disk Adapter cable to a SCSI
cable attached to the SCSI port on the last device in the SCSI chain, or to the SCSI
system cable on the other computer.
10 Turn on the PowerBook by pressing the Power key.
After a few seconds a SCSI icon appears on the screen, showing the ID
number you assigned in step 3.
WARNING
If you do not see the SCSI icon, and the computer starts up
normally or displays an error message, press the Power key to shut down
(if you can) and then immediately disconnect your computer from the
SCSI chain. (If you can’t choose Shut Down, try pressing the reset
button. If you cannot shut down your Macintosh PowerBook, you
should disconnect the cable anyway, or you may lose information.)
Then go back and repeat steps 5 through 10, making sure to u se the
proper cables.
You may not be able to have password protection turned on i n the
Password Security control panel while using your PowerBook in SCSI
disk mode. Turn password protection off if you experience problems.
See “How do I turn password security on and off” in the “Setting
Options” topic area of Mac OS Guide, available in the Guide (h) menu.
11 Turn on the other SCSI devices in the chain, if any.
12 Turn on the other computer.
The PowerBook’s internal drive appears as a hard disk icon on the screen of
the co mputer you connected it to. You can now transfer and use files as if the
Macintosh PowerBook were an external disk drive.
Connecting Additional Equipment
65
Page 66

Drawing b atter y power in SCSI disk mode
Your Macintosh PowerBook continues to draw battery power when you use it
as a hard disk. Therefore, it is preferable to connect the power adapter
whenever you use the computer in SCSI disk mode.
IMPORTANT
If you use the PowerBook in SCSI disk mode under battery
power, the battery may be drained and the computer shut down without a
warnin g appearing on the screen.
In some instances a low power indicator may be displayed. This symbol is a
blinking low-power warning on the PowerBook’s screen, like the icon below.
If you see this warning while using your computer as a hard disk, either plug
in the power adapter or quit SCSI disk mode, as described in the next section,
so you can recharge the battery.
Quitting SCSI disk mode
1Shut down the computer your PowerBook is connected to.
2Press the Power (π) key once on the PowerBook to get the Shut Down dialog box.
3 Turn off any other SCSI devices in the chain.
4Disconnect the PowerBook from the adapter cable.
66
Chapter 4
IMPORTANT
Do not leave the adapter cable attached to the PowerBook. If you
do, the computer will behave as though it is still in SCSI disk mode when you
try to restart.
5If necessary, disconnect the adapter cable from the other computer or its SCSI chain.
Your equipment is now ready for normal use. If you disconnected the adapter
cable from the other computer or SCSI chain, make sure that the SCSI chain
is properly terminated.
Page 67

Using an external monito r
You can connect an external monitor to your Macintosh PowerBook. If you
are familiar with other PowerBook models, you will note that the types of
monitors you can use with this model and the way images are displayed on an
external monitor differ somewhat from other PowerBook computers.
To ma ke the b es t choice of an external monitor, keep in mind the following
characteristics of your PowerBook’s hardware.
m Your PowerBook can support a variety of external monitors, including
17-inch and 20-inch multiple-scan displays. Resolutions supported range
from 512 x 384 pixels to 1024 x 768 pixels.
m The connector on the computer’s back panel is a VGA-style connector.
You can connect the cable for a VGA-style monitor directly to your
PowerBook.
m To connect an Apple (or Apple-compatible) monitor to your PowerBook,
you must use the adapter that came with the computer (part number
M0289).
m Images can appear on the inter nal display, the external monitor, or both
screens, depending on your choice of resolution on the external monitor.
m When an image appears on both screens, it is exactly the same (known as
“simulscan” or mirroring). You cannot move the pointer or menu bar from
one screen to the other (as you can when an external monitor is connected
to other PowerBook models or to most Macintosh desktop models).
m When an external monitor offers the same resolution as the PowerBook’s
internal display (800 x 600 pixels at 60 her tz [Hz] refresh rate), the image
appears on both screens the first time you turn on the computer (unless the
PowerBook’s display is closed).
m The PowerBook is designed to be “plug-and-play” when an external
monitor is attached. If the monitor is Apple-compatible, the PowerBook
tries to use the highest resolution possible. If the external monitor is not
Apple-compatible but provides a list of its capabilities, the system uses that
list of resolutions. If no list of resolutions is provided by the monitor, the
system use s a resolution of either 800 x 600 pixels or 640 x 480 pixels as
the default for that monitor.
Connecting Additional Equipment
67
Page 68

m If the PowerBook starts up with the display closed (called “do cking mode”)
and an external monitor is attached, the PowerBook’s display does not turn
on and the display’s resolution (800 x 60 0) is not listed in the resolution
section of the Control Strip.
For complete instructions on adjusting the resolution for an external
monitor, see the “Monitors” topic area of Mac OS Guide, available in the
Guide (h) menu.
Your PowerBook has an external monitor port to which you can connect most
Apple monitors and VGA or SVGA monitors. To connect an Apple or Applecompatible monitor, you must use the adapter that came with the computer.
The list below shows a sampling of the external monitors and resolutions
supported by your PowerBook. Many other monitors are also supported.
Monitor type Resolution Bits per pixel
Apple 20-inch multiple scan 832 x 624 1, 4, 8
Apple 20-inch multiple scan 1024 x 768 1, 4, 8
NTSC TV monitor 512 x 384* 1, 4, 8, 16, 24
NTSC TV monitor 640 x 480 1, 4, 8, 16
PAL TV monitor 640 x 480* 16
PAL TV monitor 1024 x 768 1, 4, 8, 16
*An asterisk indicates the startup resolution. Other resolutions can be selected using the Control Strip.
†
Bits per pixel indicate the number of colors a monitor can display at a given resolution. For example, 1 bit = 4 colors;
4 bits = 16 colors; 8 bits = 256 colors; 16 bits = thousands of colors; and 24 bits = millions of colors.
†
Connecting an external monitor
To connect an external monitor to your PowerBook, follow these steps. Also
consult the documentation that came with the monitor.
1Press the Power (π) key once to get the Shut Down dialog box.
2Click Shut Down or Sleep.
68
If you connect a monitor with your computer turned on, the computer will
not recognize the monitor.
Chapter 4
Page 69

3Place the monitor near to the PowerBook.
8 inches minimum
Floppy drive
Keep the computer and the monitor at least 8 inches apart. Interference
between the monitor and your computer’s floppy disk drive can cause errors
on your floppy disks.
Arrange th e monitor so the top of the screen is slightly below eye level while
you work. Position the monitor to minimize glare and reflections on the
screen from lights and windows.
4Make sure the monitor’s power cord is attached to the monitor. Plug the other end into a
grounded outlet or power strip.
If your monitor’s power cord is designed to plug into the power receptacle on
the ba ck of a computer, rather than into an electrical outlet, you can obtain a
cord with the correct plug from your Apple-authorized dealer.
If you are using a power strip, make sure it is turned on.
5If you are connecting an Apple or Apple-compatible monitor, locate the adapter that
came with your computer and attach it to one end of the external monitor’s cable.
The monitor adapter is a small plastic and metal device that is the same
granite color as the computer. The part number M0289 is on the adapter.
If you are connecting a VGA or SVGA monitor (that is, one that is not Applecompatible), skip this step.
Connecting Additional Equipment
69
Page 70

6Make sure the other end of the monitor’s cable is attached to the monitor. Then attach
External monitor port
Monitor adapter
Monitor cable
(to Macintosh-compatible monitor)
the end of the cable (with the monitor adapter, if it’s an Apple-compatible monitor) to the
external monitor port on the back of the PowerBook.
If you are connecting a VGA or SVGA monitor, do not use the adapter.
Connect the monitor cable directly to the external monitor port on the
PowerBook.
7 Turn on the external monitor.
8Press the Power (π) key to turn on your computer. (You can press any key if your
PowerBook is in sleep.)
70
Chapter 4
The external monitor is automatically activated. You can use the Control Strip
to change the resolution on the monitor. See the “Monitors” topic area of
Mac OS Guide, available in the Guide (h) menu, for instructions.
Trouble with the external monitor?
m
Nothing happened when you tried to turn on the PowerBook.
Make sure that all your equipment is connected properly. Then try pressing
the Power (π) key agai n.
Make sure that the battery is charged, or that the power adapter is plugged
into both the computer and an electrical outlet. If you are using a power
strip, make sure it is turned on.
The computer is on, but the external monitor is dark.
m
Make sure that the monitor’s power cord is connected and that its power
switch is on. Try adjusting the monitor’s brightness and contrast settings. If
this doesn’t work, try restarting your computer.
Page 71

Note: The screen-dimming feature in the PowerBook control panel turns the
External monitor port
Monitor adapter
(for Macintosh-compatible monitor only)
Monitor cable
(no adapter used for VGA-style monitor)
screen brightness down to a low level when you haven’t used the computer for
a few minutes. (You can thin k of dimming as “screen sleep.”) Dimming also
affects the external monitor. Wh en you move your finger on the trackpad or
press a key on the keyboard, the brightness is restored on both screens. For
more information on screen dimming, see the “Batteries & Power” topic area
of Mac OS Guide, available in the Guide (h) menu.
Disconnecting an external monitor
1Make sure your computer is shut down or in sleep.
2Make sure your monitor is switched off.
3Disconnect the monitor cable (for a VGA-style monitor) or monitor adapter (for an Apple
monitor) from the external monitor port on the computer’s back panel. The port is
marked with this icon: ™.
Connecting Additional Equipment
71
Page 72

Connecting sound input and output devices
Microphone
Your computer has a built-in microphone. In addition, you can connect a
PlainTalk microphone to the external sound input port. (You can also connect
a standard line-level input microphone, although it is not suitable for speech
recognition.)
For information on using the microphone to record sounds, see the “Sound”
topic area of Mac OS Guide, available in the Guide (h) menu.
72
Your Macintosh PowerBook also has a stereo sound input port (marked with
the √ icon) for connecting external sound input devices that provide linelevel output. You cannot use the internal microphone and an external sound
input device, such as a PlainTalk microphone, at the same time. For
instructions on selecting a sound device, see the “Sound” topic area of Mac
OS Guide, availab le in the Guide (h) menu.
Chapter 4
Page 73

IMPORTANT
Although the internal microphone is deactivated when an
external sound input device is in use, it’s possible to record sound from more
than one sound device at the same time. This can occur because the computer
merges sound from devices in the expansion bay, such as an audio CD, with
sound from the PC Card slots, such as a television tuner card, and from the
internal expansion card slot (called PCI). If two or more devices in these
locations produce sound, the sound from all of the devices may be recorded
when you use the SimpleSound program or the Monitors & Sound control
panel to record. To eliminate the sounds you don’t want to record, remove or
turn off the device producing those sounds.
The Macintosh PowerBook also has a stereo sound output port (on the left
side of the computer’s case, marked with the - icon) to which you can
connect externally powered speakers, an amplifier, headphon es, or other
audio output devices. The sound output port accepts a standard stereo
miniplug, like that used to attach headphones to a portable tape player.
Your computer also has four stereo speakers, which play sound from an audio
CD in the CD-ROM drive, from an external stereo device connected to the
computer through the Sound input por t, from a zoom video card in the lower
PC Card slot, or from a file on your hard disk.
You can adjust sound output quality in the Monitors & Sound control panel.
(For instructions, see the “Sound” topic area of Mac OS Guide, available in
the Guide [h] menu.) The computer automatically selects the sound output
source. If an external device, such as headphones, is connected, sound is
routed there; if no external output device is connected, sound plays through
the computer’s four speakers.
You can also use the Control Strip to adjust sound volume.
Connecting Additional Equipment
73
Page 74
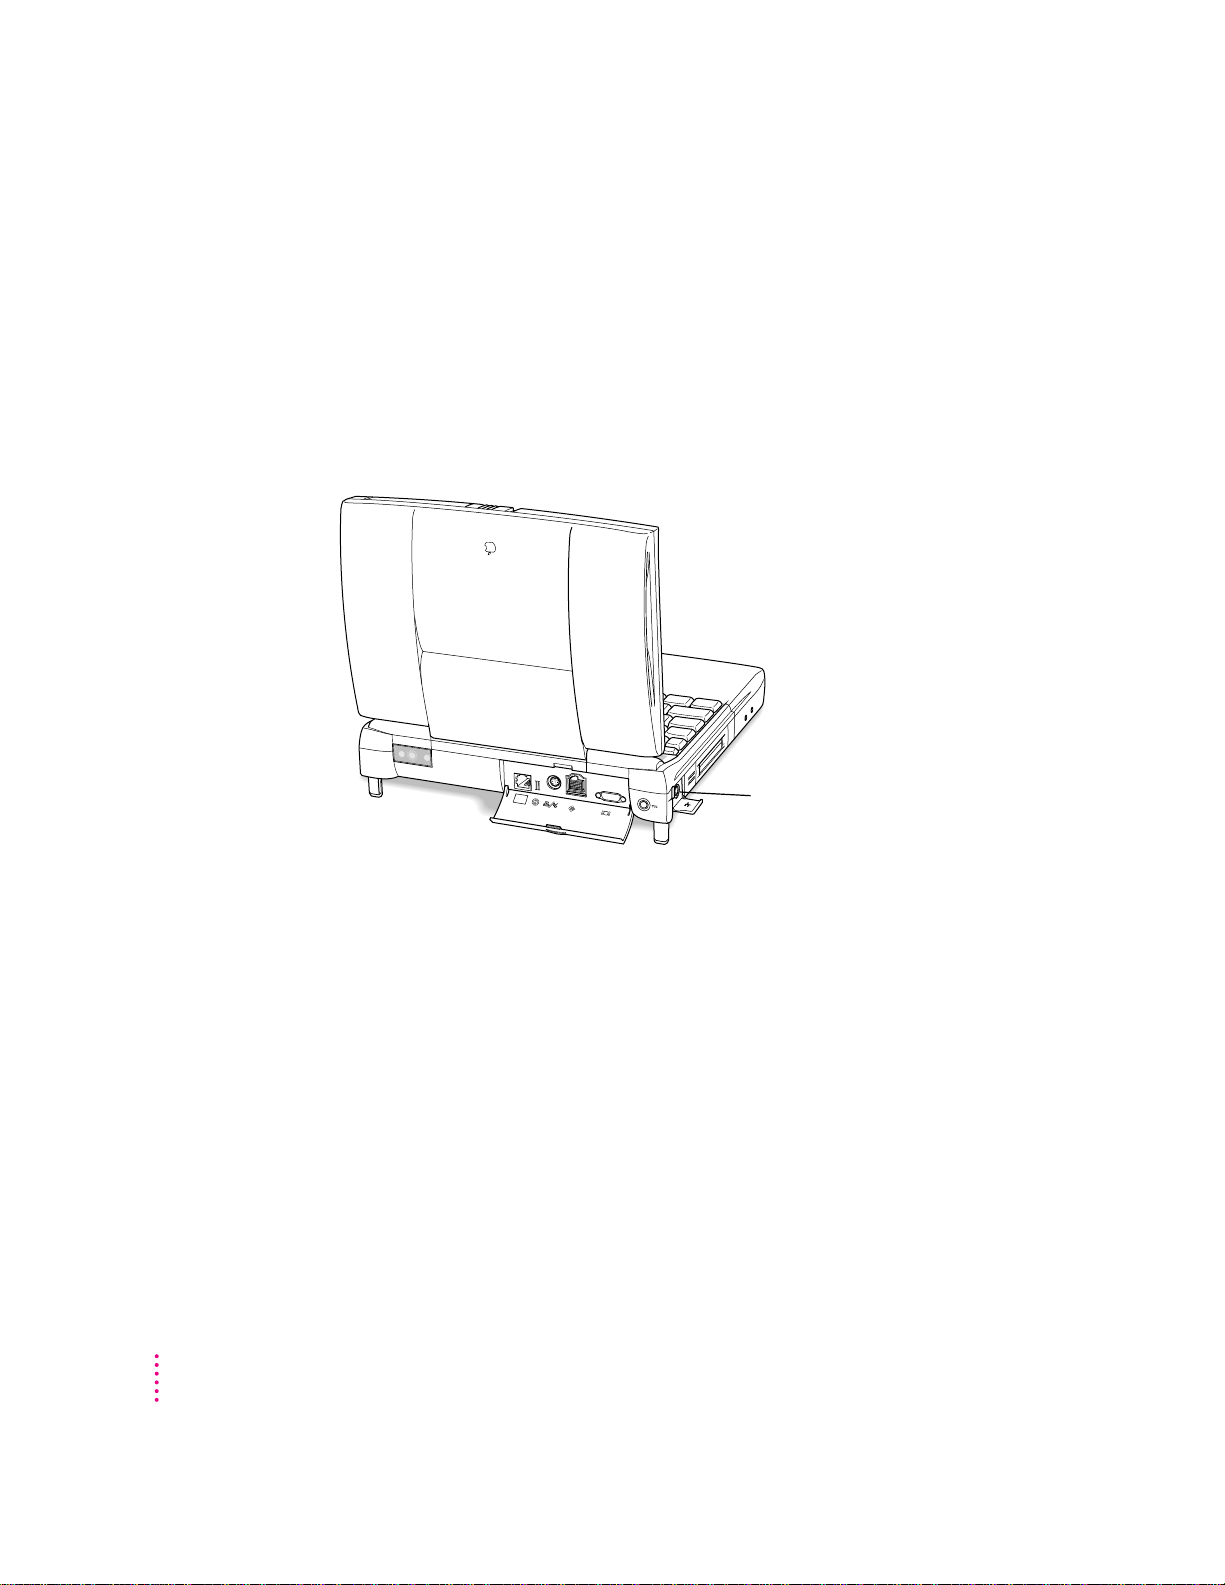
Connectin g a mouse, keyboard, or other ADB device
V
Apple Desktop Bus
(ADB) port
You can connect a mouse, keyboard, graphics tablet, or other Apple Desktop
Bus (ADB) device to the ADB port on the left side of the computer’s case,
behind the PC Card slots. The ADB port has a small cover, which you open
to connect the device.
IMPORTANT
ADB device.
Connecting other devices
For instructions on connecting a device not discussed in this chapter—for
example, networking hardware—refer to the manuals that came with
the device.
You must shut down the computer before connecting an
74
Chapter 4
Page 75

Adding memo ry to your computer
Your Macintosh PowerBook comes with at least 16 MB of random-access
memory (RAM). You can increase your computer’s memory by adding a RAM
expansion card. You can find out how much memory your computer has by
choosing About This Computer from the Apple (K) menu in the Finder.
You can purchase memory upgrades from Apple-authorized dealers. For
complete instructions on installing a RAM expansion card, see Appendix C.
Your Macintosh PowerBook also supports virtual memory, a feature that
makes use of hard disk space to provide additional RAM. Your computer
comes with virtual memory turned on. For information on using virtual
memory, see the “Memory” topic area of Mac OS Guide, available in the
Guide (h) menu.
Using infrared file transfer
Your Macintosh PowerBook has built-in infrared (IR) communication
features that allow you to send and receive data without wires. You can
exchange files with another PowerBook or with a desktop Macintosh that is
using an external IR module such as Farallon’s Ai rDock. In addition, you can
use IR to make a wireless connection to a network by means of a specialized
local area network (LAN) access device, such as Hewlett-Packard’s
NetBeamIR or Extended Systems’ JetEye, that is compatible with the Infrared
Data Association (IrDA) Standard specifications.
To transfer files, your computer and the other IR device must be within range
of each other with the IR windows facing. The range depends on the devices
and the method of communication.
Two PowerBook 3400 series computers must be within 5 feet of each other to
exchange files using the IRTalk transfer protocol (at 230 kilobits per second).
Your computer must be within 3 feet of a LAN access device that complies
with the IrDA Standards to make a network connection (at a transfer rate of
1 megabit per second).
You use the Infrared control panel to select the method of IR communication
you want to use or to view the status of an IrDA connection. For instructions
on IR file transfer, see “How do I use infrared communication?” in the
“Organizing Your Files” topic area of Mac OS Guide, available in the
Guide (h) menu.
Connecting Additional Equipment
75
Page 76

Page 77

Read this chapter for information on
installing and using application
programs on your computer.
5
Installing and Using Application Programs
Your PowerBook comes with some great software already installed that
includes such features as
m Internet access
m productivity programs, including Claris Organizer
m hard disk password protection
m file exchange using infrared communications
m file synchronization
m DOS and Windows file compatibility
m remote access to another Macintosh
Some of this software is already on your computer’s hard disk; additional
programs and additional sample files are on the CD-ROM disc that came with
your PowerBook.
77
Page 78
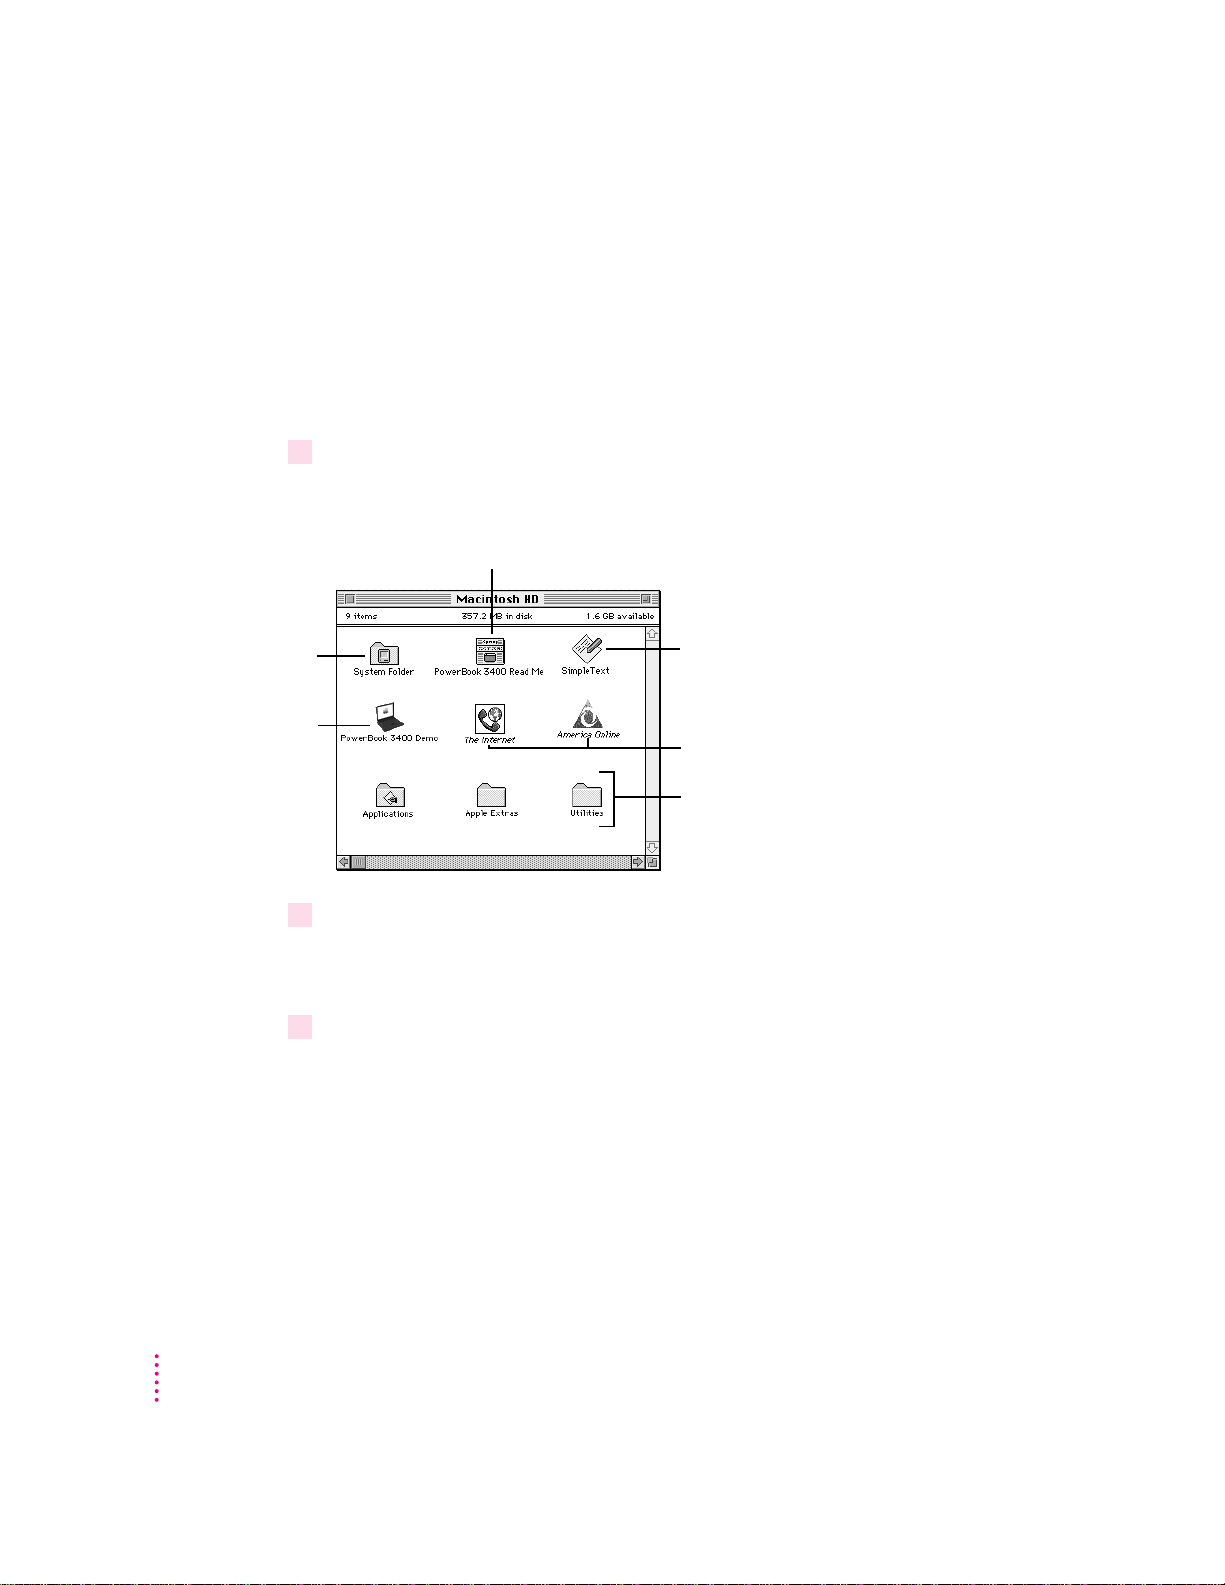
Learning what your PowerBook can do
You can learn more about the software provided with your computer from an
icon on the hard disk called PowerBook 3400 Demo. This demo includes a
short explanation of principal features of your PowerBook, as well as tips for
getting the most out of your computer.
To get started with your software, follow these steps:
1 Open the Macintosh HD icon (if necessary).
A window similar to this appears.
Important information about
your PowerBook
The files used to
start up and control
your computer
A lively tour of the
computer’s hardware
2Double-click the PowerBook 3400 Demo icon.
3Explore the demo’s content to learn about your PowerBook. When you’re finished,
A simple word-processing
program
Access to the Internet,
electronic mail, and more
Folders with the preinstalled
software and related information
If you don’t see the demo’s icon, you can find a duplicate copy on the CD that
came with your computer.
click Quit (or choose Quit from the File menu) to leave the demo.
IMPORTANT
If you delete the PowerBook 3400 Demo icon, you have not
deleted your preinstalled software. (Most of the software is in the Apple
Extras and Applications folders on your computer’s hard disk.)
78
Chapter 5
Page 79
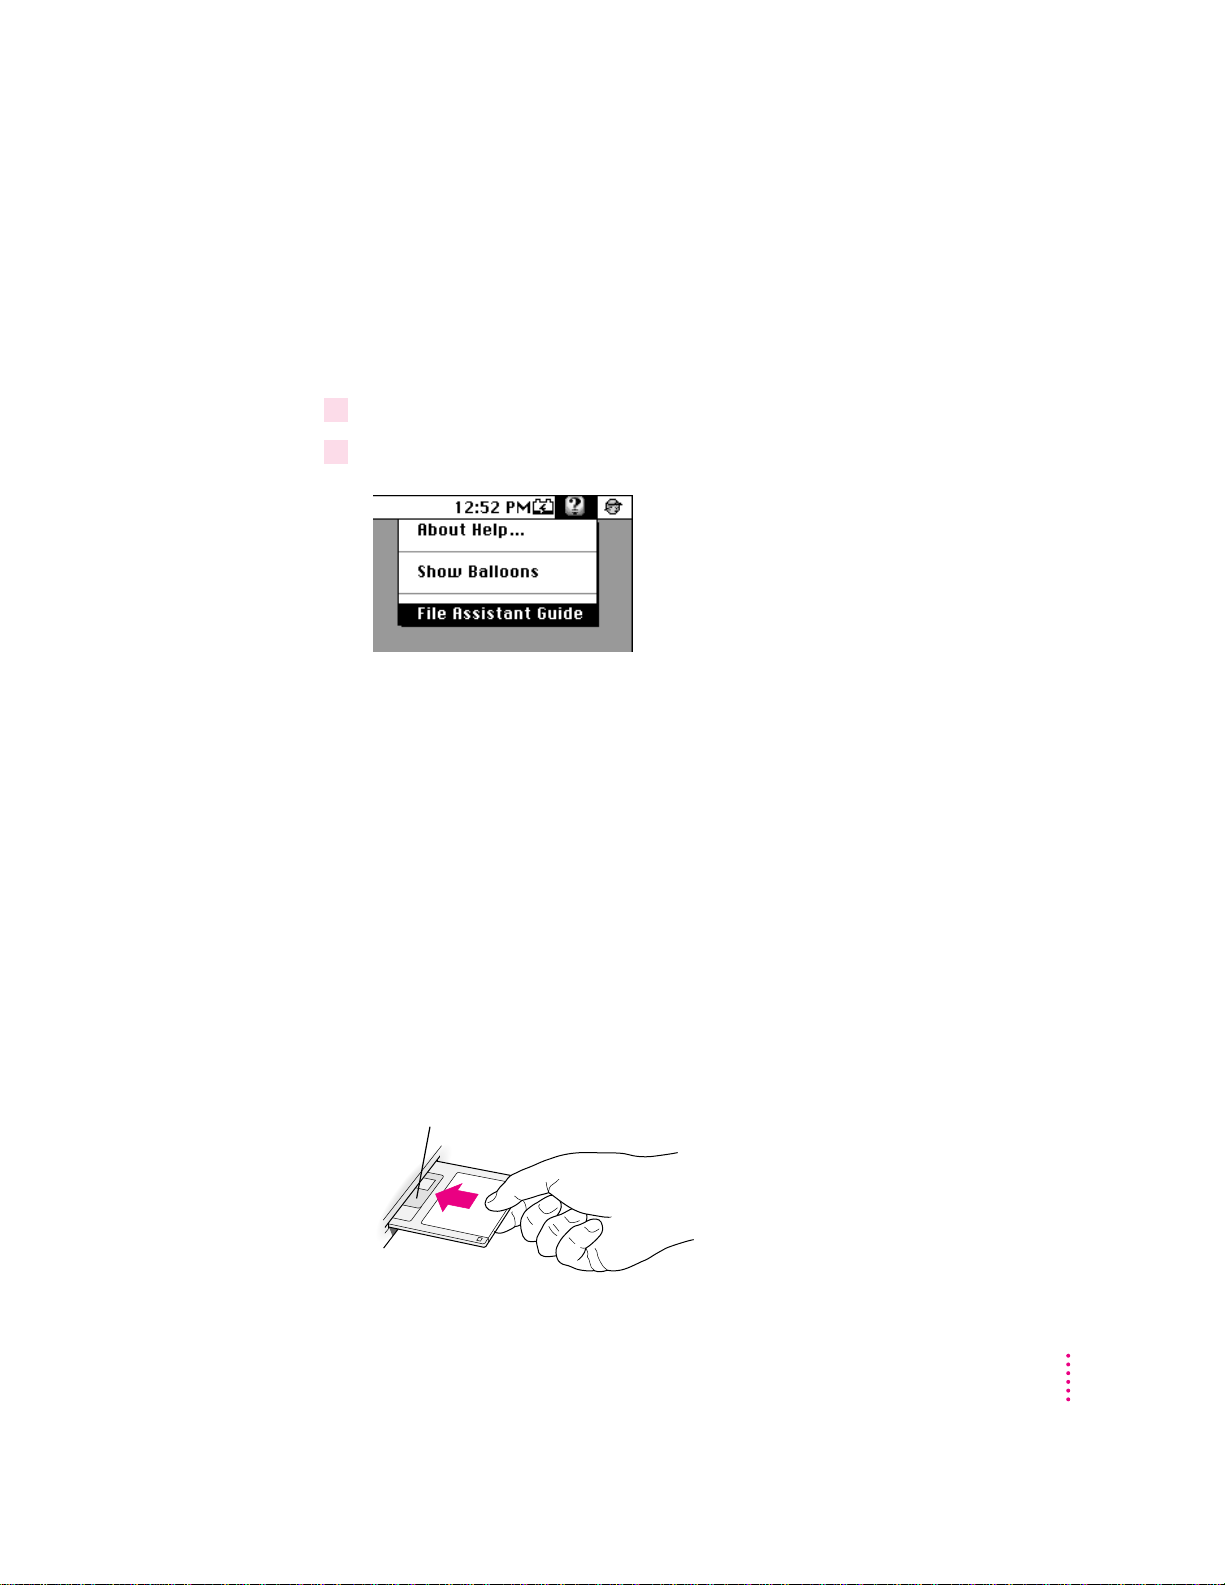
Getting help for application programs
Insert the disk metal end first, label side up.
Some application programs that come on your PowerBook (such as the
File Assistant program) are documented in their own Apple Guide online
help systems. Follow th ese steps to see if a program has an Apple Guide
help system:
1 Open the application program.
2 Open the Guide
(h)
If an item appears in the Guide menu for your application program, choose it.
If an item does not appear, then there is no Apple Guide online help for
that program.
Installing application pro grams
Yo u’ ll probably want to buy and install additional application programs. Refer
to the manuals you receive with your programs for instructions on installing
and using them.
In most cases, you install application programs onto your internal hard disk
from floppy disks or a CD that you receive as part of an application program
package. T he following illustration shows how to insert a floppy disk i n th e
floppy disk drive.
menu.
Installing and Using Application Programs
79
Page 80

Work ing with several programs at a time
You can open as many application programs and desk accessories as your
computer’s memory allows.
All open programs are listed in the Application menu at the right end of the
menu bar. The name of the active program (the one you’re using right now)
has a checkmark next to it, and its icon appears in the menu bar.
The Finder icon
A checkmark
indicates the
active program.
Commands to hide or
display open windows
Open programs
Finding out which progr ams are op en
If you have several programs and windows open, you can find out which
program is active and which other programs are open by pulling down the
Application menu.
Switching programs
You can switch to another open program by choosing its name from the
Application menu.
If a program’s icon is dimmed in the menu, that means its windows are
hidden. Choosing the program from the Application menu displays its
windows.
You can also switch to another program by clicking in a window that belongs
to an op en program, or by double-clicking a program icon (or the icon of a
document that was created with the program).
80
Chapter 5
Page 81

Hiding and showin g windows on the desktop
You can hide all windows except those of the active program by choosing
Hide Others from the Application menu.
The other programs remain open even though their windows are hidden.
When you switch to another program, its windows become visible again.
If you want to see all the open windows, choose Show All from the
Application menu.
Backing up your files and restoring preinstalled software
Making backup copies of important files is good protection against possible
damage to the originals. Files on your hard disk and on the CD that came
with your PowerBook allow you to restore the software that came with
the co mputer.
Backing up and restoring system software and preinstalled programs
m You can make a set of backup floppy disks for the core system software on
your hard disk by using the Floppy Disk Maker application program. This
program and the disk image files it uses are in the System Backup folder on
the CD that came with your computer. I nstructions for using Floppy Disk
Maker ar e in Appendix E.
m If the System Folder on your hard disk is damaged, you can reinstall that
essential software from the CD that came with your computer. See
“Reinstalling System Software” i n Chapter 8 for instr uctions.
m The CD that came with your computer also contains a program for
restoring the complete system software and all preinstalled application
programs from the disk images on the CD. See the document
“CD—Important Information” on the CD for instructions.
Installing and Using Application Programs
81
Page 82

Using “native” application programs
Your computer is compatible with nearly all application programs intended
for use with Macintosh computers. But certain programs are designed
esp ecially for computers with PowerPC microprocessors. (These are
some t imes called “native” applications.) You’ll find that these programs take
best advantage of your computer’s speed.
Special memory requirements
Some native programs may be slightly larger than other programs and may
take up more memory. If you find that you are running out of memory when
you use programs designed for PowerPC microprocessors, you can use space
on your computer’s hard disk as additional memory. This feature is called
virtual memory. Your computer was developed to take advantage of the virtual
memory feature, and comes with virtual memory turned on. For instructions
on how to use or increase hard disk space as memory, see the “Memory” topic
area of Mac OS Guide, available in the Guide (h) menu.
You can also add more memory to your computer, as described in Appendix C.
Shared libraries
82
Native programs use special files called shared libraries. These files help the
programs to run more efficiently, and can be used by more than one native
program simultaneously. Any necessary shared libraries are installed
automatically in the System Folder when you install native programs.
If a native program requires a shared library and there is not enough memory
available for the shared library, you’ll see a message that the program could
not be opened because of insufficient system memory. If this happens, see the
“Memory” topic area of Mac OS Guide, available in the Guide (h) menu, for
instructions on turning on virtual memory.
If a required shared library is missing, you’ll see a message that the program
could not be opened because the shared library could not be found. If this
happens, follow the directions that came with your program to reinstall the
program. If the shared library is still missing, contact the program’s
manufacturer for assistance.
Chapter 5
Page 83

Read this chapter for
information about your
Macintosh PowerBook’s battery.
6
Power sources
Power Management
Your computer can draw its operating power from three different sources.
Main battery
m
battery should provide power for 2–4 hours of work time (you may get
longer work time, depending on the Macintosh PowerBook model you have
and the battery conservation features you use).
Optional battery
m
battery. This battery provides somewhat less work time than the LiIon
battery supplied with your computer. T h e precise amount of work time
with a NiMH battery depends on the Macintosh PowerBook model you
have and the battery conservation features you use.
AC power
m
plugging in the external power adapter that came with your computer. T h e
installed battery will automatically be charged whenever the external AC
adapter is connected. The external adapter will charge the battery more
quickly if the computer is shut down or in sleep, rather than turned on or
operating.
Your computer came with a lithium ion (LiIon) battery. This
Your computer can also use a nickel-metal-hydride (NiMH)
You can run your computer from a grounded electrical outlet by
IMPORTANT
your computer (model number M4895) or one made specifically for this
PowerBook model.
Be sure to use only the external power adapter that came with
83
Page 84

In addition, the PowerBook contains a rechargeable backup cell to keep
system information such as date and time. The backup cell is automatically
recharged whenever the external AC adapter is connected. The backup cell
also provides 4 minutes of power during system sleep while you change the
main battery. (See “Removing or Replacing the Battery” later in this chapter
for more information about changing batteries.)
Monitoring the battery charge
There are four ways you can determine the charge level of your battery:
m Look in the battery monitor portion of the Control Strip.
For information on the battery monitor, see the “Batteries & Power” topic
area of Mac OS Guide, available in the Guide (h) menu.
m See low-power messages on your display.
m Look at the battery level icon next to the clock in the menu bar.
m Look at the battery indicator level lights on the battery, visible when the
battery is out of the computer. (These lights are only on the lithium
ion battery.)
84
Chapter 6
Resp on ding to low-power messages
When the battery runs low, the computer displays a series of low-power
messages. The work time remaining after you see the first message
varies depending on how you are using the computer. It’s a good idea to
act promptly.
What you should do
When you see a low-power message, you should do the following:
1Plug in the power adapter, or
2Save your work and shut down the computer, then
3 Quickly replace the empty battery with a charged one (within 30 seconds, if possible).
IMPORTANT
Always save your work when you see a low-power message.
Page 85

What you should know
When the first low-power message appears, the screen dims automatically to
save power.
If you continue to work without plugging in the power adapter or changing
the battery, the computer displays a second low-power message.
The second message is followed by a third and final message indicating that
the computer is about to put itself to sleep. Within a few seconds, the
computer goes to sleep automatically to protect the contents of RAM. All
activities are interrupted. It’s a good idea to save your work when you see the
fir st two low-power messages to make sure you don’t lose information.
If you continue working until the computer goes to sleep automatically, you
can wake it again as soon as you plug in the power adapter or replace the
battery with a charged battery.
If you can’t plug in the power adapter, the contents of RAM are retained in
sleep for about a day (as long as you don’t remove the battery).
IMPORTANT
Recharge a depleted battery as soon as possible. Leaving a
depleted battery in the computer for a length of time (especially in a hot
location, such as the trunk of a car) may damage the battery so that it can’t
be recharged. If this happens, you need to replace the battery.
Using the battery icon
There is a battery icon in the menu bar that tells you the charge left in
your battery.
The amount of black in the icon
indicates the charge level.
When a lightning bolt appears
in the icon, the battery is charging.
Power Management
85
Page 86

Using the bat t ery level ind ic ator lights (on a lithium ion battery only)
Battery level indicator button
Battery level indicator lights
Fully charged
3/4 charged
1/2 charged
1/4 charged
You can tell the charge left in your LiIon battery by looking at the battery
level indicator lights on the battery itself. Follow these steps to determine the
charge level:
1Save your work and then shut down the computer or plug in the power adapter.
2Pull the battery out of its compartment.
For instructions on removing the battery, see “Removing or Replacing the
Battery” later in this chapter.
3Push the battery level indicator button to activate the battery level indicator lights.
The lights show whether the battery is fully charged, three-fourths charged,
one-half charged, one-fourth charged, or empty (not shown in the
illustration). A lighted square indicates that the battery has power; an
unlighted square (black in the illustration) indicates lack of charge. T he
indicator lights remain lit for a few seconds.
86
Chapter 6
IMPORTANT
If the battery lights are blinking, there’s a problem with the
battery. See an Apple-authorized service provider for assistance.
Note: You can purchase a second battery from an Apple-authorized dealer, so
that you have a backup source of power when you can’t use the AC adapter.
Page 87
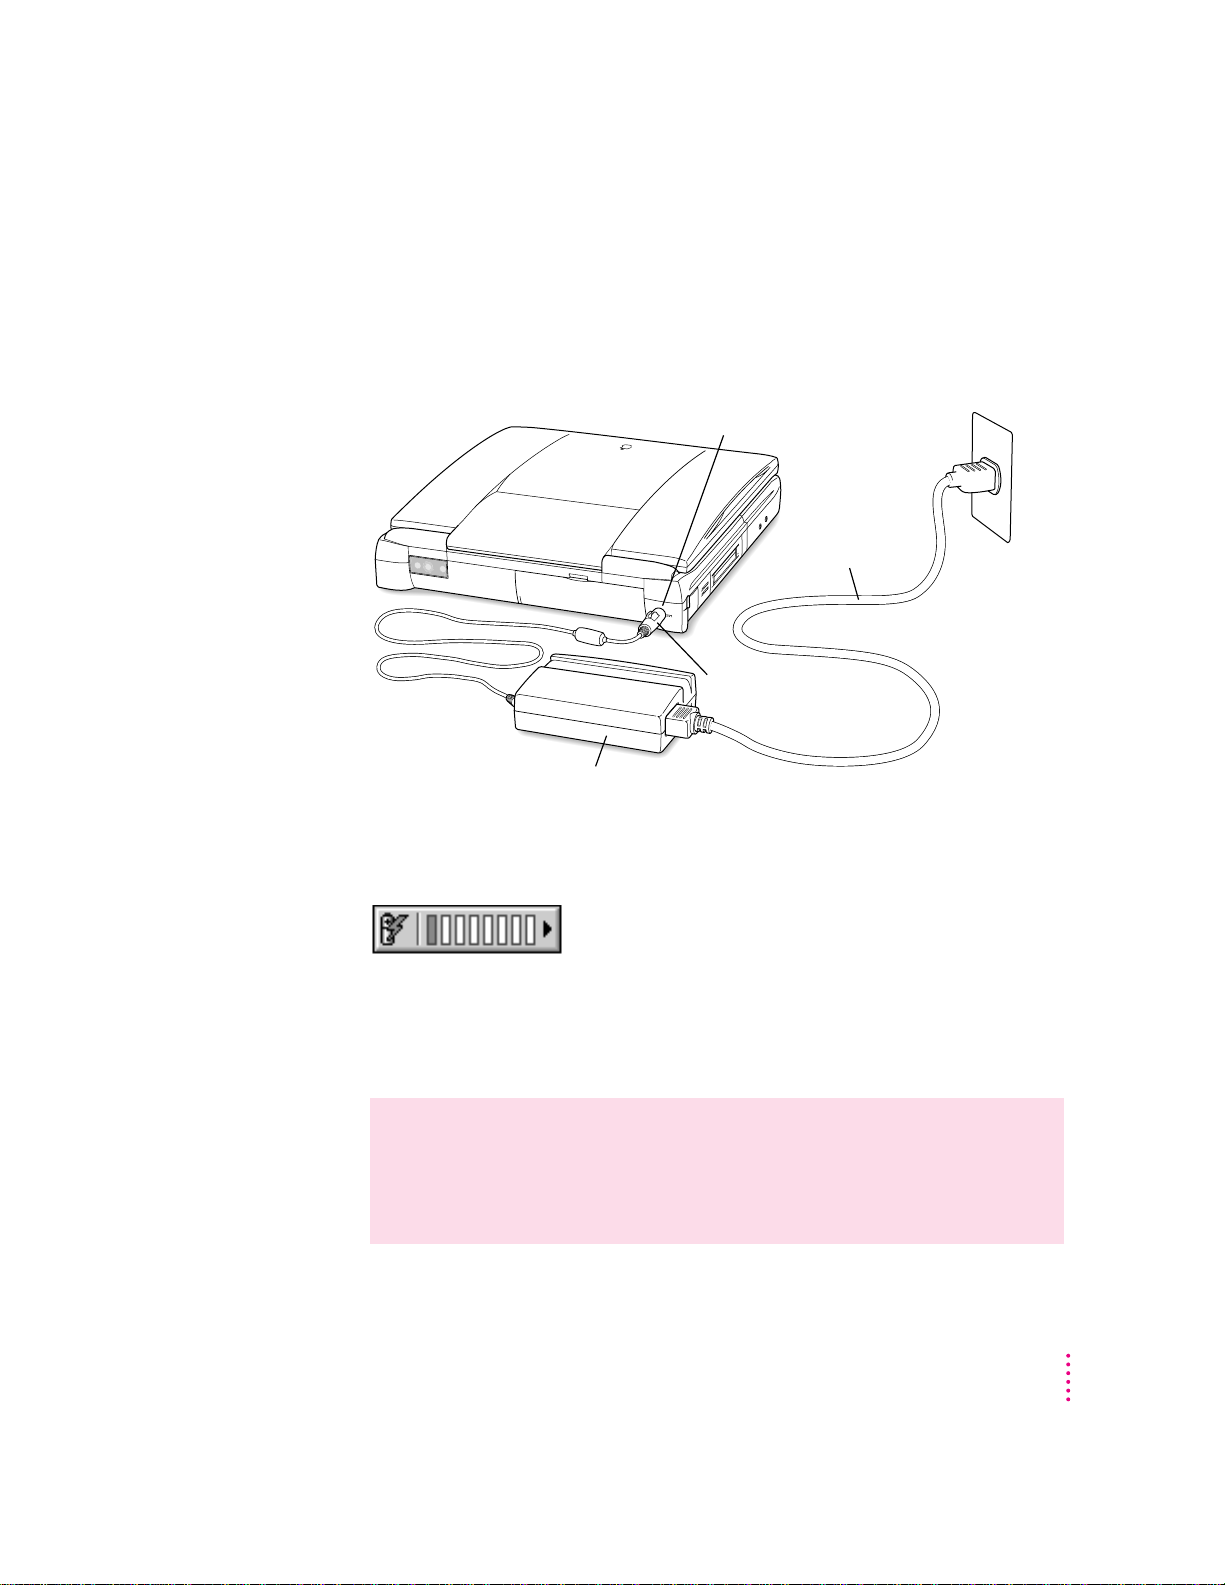
Recharging the battery
Power cord
Power adapter
Power adapter plug
¯
Power adapter port
To recharge the battery, plug in the power adapter. Macintosh PowerBook
3400 series batteries may be charged inside the computer. You may also use
an external battery charger designed specifically for Macintosh PowerBook
3400 series computers.
A lightning bolt icon appears in the battery monitor portion of the Control
Strip when the power adapter is plugged in and a battery is recharging.
The battery is recharged regardless of whether you are using the computer, or
the computer is off or in sleep; however, it will recharge more quickly if the
computer is off or in sleep.
WARNING
computer. Adapters for other electronic devices (including other
portable computers) may look similar, but they may damage
your computer.
Use only the external power adapter that came with your
Power Management
87
Page 88
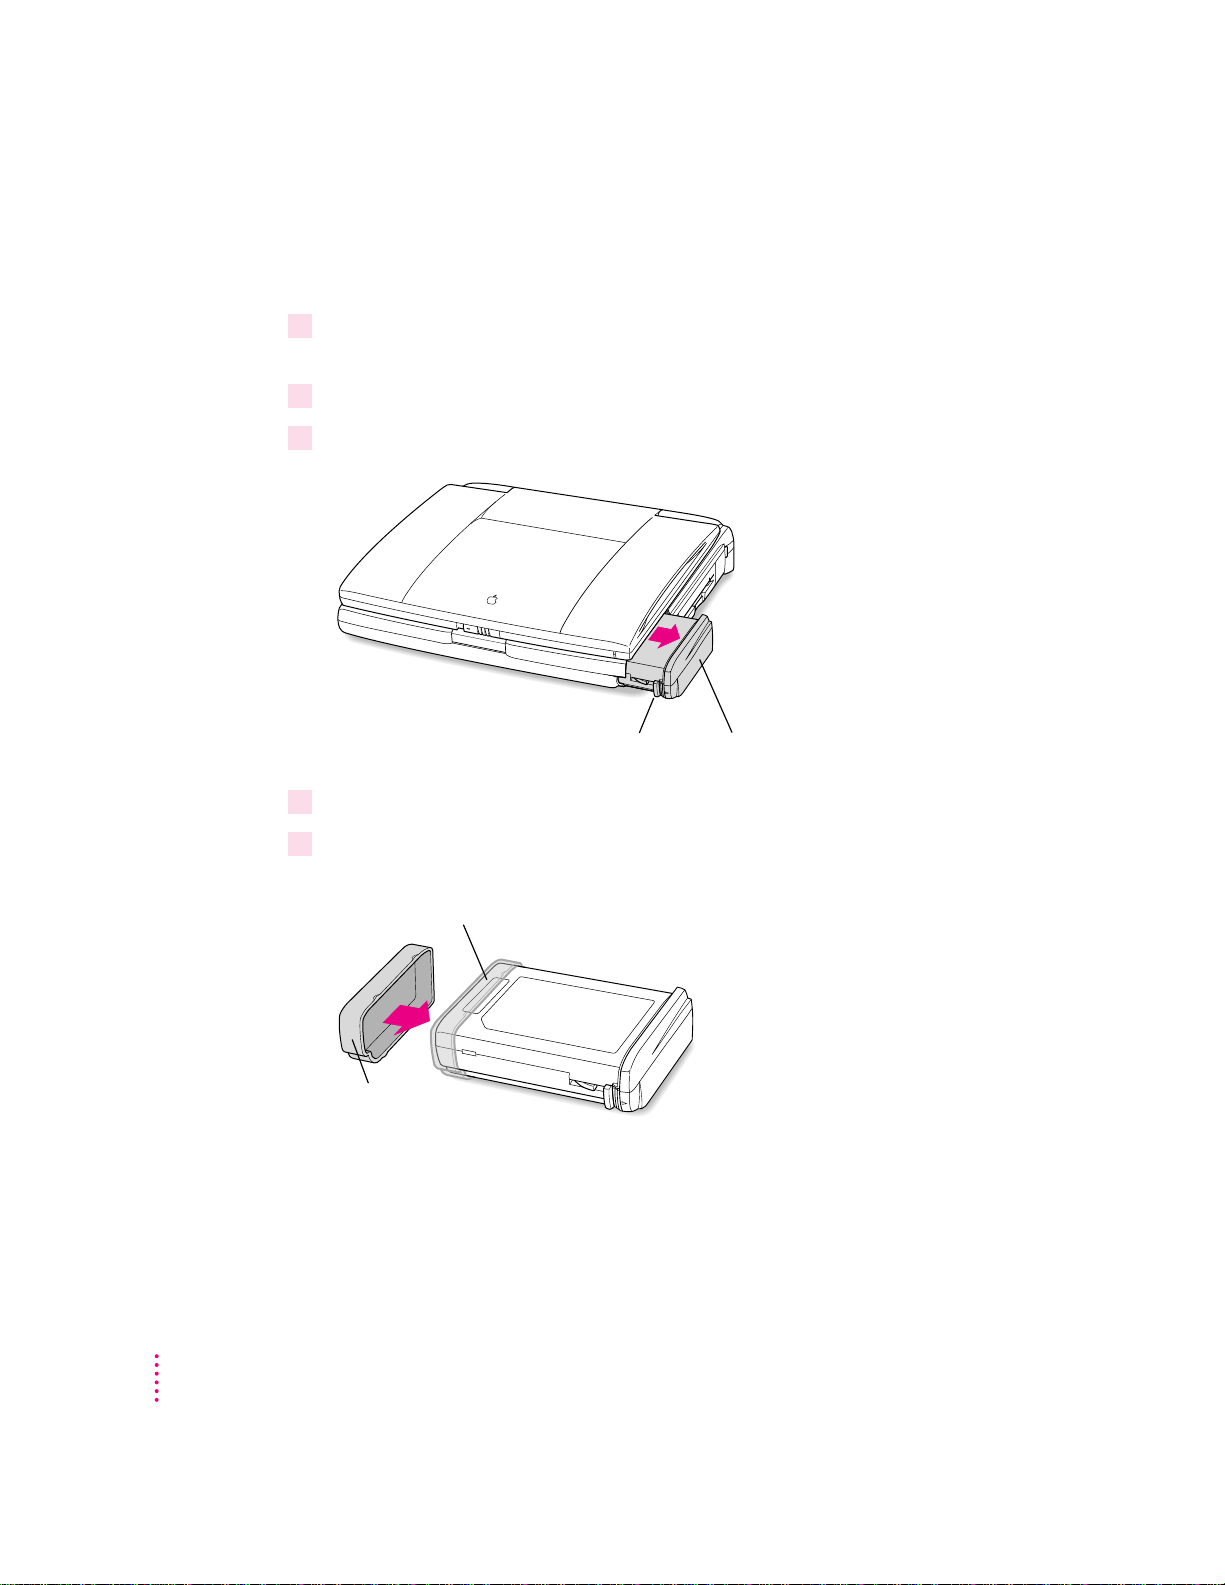
Removing or re pl acing the battery
Battery cap
Always snap the battery cap on the battery
when the battery is out of the computer.
1 Press the button on the battery. 2 Slide the battery out.
To remove or replace the battery, follow these steps:
1Save your work and then shut down the computer or put it to sleep, or plug in the
power adapter.
2Close the display.
3Press the battery release button on the battery.
4Pull the battery out of its compartment.
5Put the battery cap on the battery to protect the battery contacts.
The battery contacts should not be exposed when the battery is out of
the co mputer.
88
Chapter 6
Page 89

6If you are inserting another battery, remove the battery cap from the new battery to
expose the contacts, then slide it into the battery compartment.
You cannot inser t a battery if the battery cap is still on the battery. You can
replace the battery with another LiIon battery or a nickel-metal-hydride
(NiMH) battery. Make sure you only use a battery that is designed for your
Macintosh PowerBook. You should store the battery cap in case you want to
remove and transport the battery later.
IMPORTANT
If you take out the main battery while the computer is in sleep
and it is not connected to an external power adapter, you must insert another
battery within 4 minutes or you may lose any unsaved work.
7If you just inserted a new battery, it’s a good idea to plug in the power adapter in case
the battery is not fully charged. You can look at the indicator lights on the battery to see
the level of charge.
IMPORTANT
Lithium ion (LiIon) and nickel-metal-hydride (NiMH) batteries
contain metals which are hazardous when released in the environment. It is
inappropriate, and in some cases unlawful, to throw batteries away with your
household or business trash. Instead of throwing away your spent batteries,
dispose of them as described here.
In the United States
m
Return spent batteries to your Apple-authorized service
provider, who will make sure they are included in Apple’s battery recycling
program.
Elsewhere
m
Many locations have government or Apple-sponsored collection
or recycling programs for spent batteries. Dispose of spent batteries in
accordance with the mandatory or voluntary battery collection programs
in your location. Contact your Apple-authorized service provider for
information about the recommended disposal procedures in your area.
Power Management
89
Page 90

Maximizing work time
Your Macintosh PowerBook’s battery can provide 2–4 hours of work time
before you need to recharge. The actual work time available depends on
which model of Macintosh PowerBook you have, what equipment you’re
using with your computer, and what steps you take to conserve power while
you work.
Some battery-saving measures you can take include the following:
m Minimize backlighting of the display.
m Turn off AppleTalk if your PowerBook is not connected to a network.
m Set the hard disk to spin down after a very short interval.
m Remove PC Ca rd s a nd CDs when they are not in use.
m Take advantage of the sleep and wake features of your PowerBook
whenever your work is interrupted (such as when the cell phone rings).
You just need to close the display to put the computer in sleep.
For more battery conservation tips, see the “Batteries & Power” topic area of
Mac OS Guide, available in the Guide (h) menu.
90
Chapter 6
Page 91

rt
Chapter 7 Tips and Troubles h o oting
Chapter 8 Diagnostic Techniques
pa
II
Page 92

Page 93

Consult this chapter if you have
questions or experience
problems using your computer.
7
Tips and Troubleshooting
Whe n you have questions
If you want to know how to do a particular task with your computer, refer to
Mac OS Guide in the Guide (
Guide, see Chapter 2 of this manual. If the suggestions in this chapter and
Mac OS Guide don’t solve the problem, go to Chapter 8 for instructions on
some general diagnostic techniques.
Whe n you run into trouble
While you’re using your computer, you may see a bomb icon or an error
message, or you may have a problem such as the pointer (8) “freezing” on the
screen. If you have trouble with your computer, take a few minutes to read the
information in this chapter and Chapter 8. If your problem is related to a
particular procedure, you should also look for information on that procedure
in Mac OS Guide, available in the Guide (h) menu. If you are unable to
access Mac OS Guide (for example, if your screen is “frozen”), refer to this
chapter to see if you can resolve the problem.
h) menu. For instructions on using Mac OS
This chapter and Chapter 8 describe solutions to problems you may
experience with your computer. If the suggestions in these two chapters don’t
solve your problem, contact a local Apple-authorized service provider or call
the Apple Assistance Center. (See the service and support information that
came with your computer for the telephone number.) If your problem is with
third-party software or equipment, please call the software or equipment
manufacturer for help.
93
Page 94

Problem s starting up the computer
I
Reset button
The computer doesn’t start up.
m The battery may need recharging. Plug the power cord into a working
outlet and then plug the power adapter into the computer. Let the battery
recharge for a few minutes.
m Check that the power cord is plugged into a working outlet. If it’s plugged
into a power strip, make sure the power strip is turned on. The power
adapter should get war m after being plugged in for 10 minutes. If it is
cold, make sure the adapter is securely plugged in and attached to
the power cord.
m The screen brightness may be turn ed down. Adjust the brightness control
(marked with the icon ¤) located above the top row of keys on the
keyboard, to the right of center.
m Make sure the battery is properly seated in its compartment.
m If none of these measures helps, you may need to reset the computer. T he
method of resetting you should always try first is to press the Command
(x), Control, and Power keys simultaneously. If the computer does not start
up, connect the power adapter (if it is not already connected) and press the
reset button (marked with the icon I) on the back panel.
94
Chapter 7
Page 95

The sleep indicator light at the top of the display glows a steady green.
You must reset the computer using the reset button. Connect the external
power adapter (if it is not already connected) and press the reset button
(marked with the icon I) on the back panel.
When the reset procedure is used the computer will thoroughly test the RAM,
so it may take a few moments (about 1 second per megabyte of RAM) before
the screen lights. Be patient if you have added expansion RAM.
The computer makes an unusual sound at startup, or you see a “sad Macintosh” icon.
m If you hear the sound of breaking glass when you turn on the computer or
you see a “sad Macintosh” icon, start up the computer with the
Disk Tools
floppy disk that came with your computer. If the computer does not start
up, or if the hard disk icon does not appear, the hard disk may need repair.
Contact an Apple-authorized service provider or call the Apple Assistance
Center. If the hard disk icon does appear, see Chapter 8 for information
about reinstalling the system software.
m There may be a problem with the information stored in the area called
parameter RAM (PRAM). Reset the PRAM (also called “zapping
the PRAM”).
Resetting the PRAM erases the contents of your RAM disk, if you have
one. Resetting the PRAM also restores the default settings in most control
panels. After you reset the PRAM, be sure to check any custom settings
you made for the desktop pattern, memory, n etwork, AppleTalk, trackpad,
power conservation, and so forth. Resetting the PRAM also resets the
power manager.
Foll ow these steps to reset the PRAM:
1. Locate the keys Command (x), Option, P, and R.
2. Ma ke sure the Caps Lock key is not down.
3. Restart your Macintosh (using the Command [x], Control, and Power
keys or the reset button, if necessary). Immediately after hearing the
startup sound, press the Command (x), Option, P, and R keys
simultaneously.
If you don’t hold down the key combination within 5–10 seconds after
you restart, you may need to repeat steps 1–3.
Tips and Troubleshooting
95
Page 96

4. Hold down the keys until you hear the startup sound again.
5. If the computer shuts itself off, press the Power key to turn it back on.
6. When the computer has finished starting up, restore any custom control
panel and network settings.
m If nothing happens after you reset the PRAM, there may be a problem with
a RAM expansion card. If you installed a RAM expansion card in your
computer, check Appendix C to make sure the card is properly installed. If
you purchased an expansion card from a third-party manufacturer, contact
the manufacturer for help.
See also “The Computer Makes Unusual Sounds” in the section “Other
Problems While Worki ng” later in this chapter.
The computer starts up, but the desktop doesn’t appear.
m The screen brightness may be turn ed down. Adjust the brightness
control (¤), located above the top row of keys on the keyboard, to the
right of center.
m The computer may be trying to start up using an external hard disk that
does not contain the correct system software. Disconnect the external hard
disk and restart your computer. (T his can also happen with PC Card drives
and expansion bay drives.)
96
m Sta rt the computer, holding down the Shift key until you see the message
“Extensions off ” in the Welcome to Macintosh box. If the computer starts
up, turn to Chapter 8 and try the steps given in the section “Checking Your
System S oftware Extensions.” You can go directly to the Extensions
Manager control panel by holding down the Space bar during startup.
When you start up the computer, you see a message about the system software.
m The system software on the startup disk you’re using may be incomplete or
damaged, or may be the wrong version. Make sure you’re using the correct
disk as a startup disk.
m If you’re sure you’re using the correct startup disk, you may need to reinstall
system s oft ware. See “Reinstalling System Software” i n Chapter 8.
Chapter 7
Page 97

The computer displays a flashing question mark icon.
m This icon usually means that the computer can’t find system software on
any disks attached to the computer. If the computer is connected to any
external hard disks, make sure they are turned on. Then restart the
computer. If the problem recurs, the hard disk or its system software may
be damaged. See Chapter 8.
m Tur n off the computer, disconnect all external devices except the power
adapter, and restart the computer. If the computer starts up, turn to
“Problems with Equipment Connected to Your Computer ” later in
this chapter.
The computer freezes or displays an error message during startup.
m Tur n off the computer, disconnect all external devices except the power
adapter, and restart the computer. If the computer starts up, turn to
“Problems with Equipment Connected to Your Computer” later in
this chapter.
m Sta rt the computer, holding down the Shift key until you see the message
“Extensions off ” in the Welcome to Macintosh box. If the computer starts
up, turn to Chapter 8.
About the codes in error messages: The number codes in error messages are
used in software development. Sometimes they can help a technician narrow
down the source of a problem. However, the codes are usually too general or
technical in nature to help you diagnose a problem yourself.
When the computer starts up, a message says there is not enough memory.
There may not be enough memory to load all the system software extensions
you’ve i nstalled. Restart the computer, holding down the Shift key until you
see the message “Extensions off ” in the Welcome to Macintosh box. Then try
the following to increase available memory:
m Turn on virtual memory (VM) in the Memory control panel, or increase
the VM size if it’s already on. Your PowerBook can deliver good
performance with VM set to two to three times the amount of actual RAM
in the computer.
Tips and Troubleshooting
97
Page 98

m Reduce the size of the disk cache in the Memory control panel.
m If you use a RAM disk, reduce its size or turn it off in the Memory control
panel.
m Use the Extensions Manager control panel (in the Control Panels folder
inside the System Folder on your hard disk) to turn off extensions you don’t
need. Then restar t the computer. (You can use Extensions Manager to
create different sets of extensions for special situations.)
You need to restart the computer for these changes to take effect.
If these suggestions don’t work, you can increase memory by installing a
RAM expansion card in your computer. See Appendix C for information.
The computer won’t restart.
m If the computer freezes, you can try to “force” the program you’re using
to quit by simultaneously pressing the keys Command (x), Option, and
Esc on your keyboard. Then click Force Quit in the dialog box that
appears. (Note: Unsaved changes in your current do cuments will be
lost.) Imme diately save all open documents, quit all other open programs,
and restart the computer.
m You may need to reset the computer. The method of resetting you should
always try first is to press the Command (x), Control, and Power keys
simultaneously. If the computer does not start up, connect the power
adapter (if it is not already connected) and press the reset button (marked
with the icon I) on the back panel.
Note: You will lose any work you have not saved.
98
m If the problem recurs, reset the parameter RAM (see “The Computer
Makes an Unusual Sound at Startup, or You See a ‘Sad Macintosh’ Icon,” in
the s e ction “Problems Starting Up the Computer” earlier in this chapter). If
the problem still occurs, see Chapter 8.
Every time the computer starts up, it rebuilds the desktop.
There may be a folder on your hard disk that has the same name as a file the
computer uses to keep track of information on your disks. Manually search
for a folder named “Desktop” or “Desktop file.” If you find one, rename it
“Storage.” Then restart the computer. (Do not use the Find File feature to
search for the desktop file. It may find it but you may not be able to access it.)
Chapter 7
Page 99

When you start up the computer, the display lights up for a moment, then shuts down.
m Make sure you are using the correct power adapter for your
computer model.
m If the computer is running on the battery, make sure the battery is charged.
Or connect the external power adapter.
Problem s working with programs
The computer freezes or displays a system error message.
m There may be a temporary software problem. To reset the computer, try the
fol lowing suggestions in order until the computer starts up normally:
1. If the computer freezes, you can try to quit the program you’re using by
pressing the keys Command (x), O ption, and Esc on your keyboard.
Click Force Quit in the dialog box that appears. (You’ll lose unsaved
cha nges in t hat program’s documents.)
Immediately save all open documents and quit all op en programs, then
restart the computer.
2. If you see a message about a system error, you may need to reset the
computer. The method of resetting you should always try first is to press
the Command (x), Control, and Power keys simultaneously. If the
computer does not star t up, connect the power adapter (if it is not
already connected) and press the reset button (marked with the icon I)
on the back panel.
Note: You will lose any work you have not saved.
3. Reset the PRAM (see “The Computer Makes an Unusual Sound at
Startup, or You See a ‘Sad Macintosh’ Icon,” in the section “Problems
Sta rting Up th e Com puter” earlier in this chapter for instructions.)
m If the problem recurs, it may involve one or more of your application
programs. See “Th e Computer Exhibits Odd Behavior, Such as Many
Unexplained System Failures,” next.
About the codes in error messages: The number codes in error messages are
used in software development. Sometimes they can help a technician narrow
down the source of a problem. However, the codes are usually too general or
technical in nature to help you diagnose a problem yourself.
Tips and Troubleshooting
99
Page 100

The computer exhibits odd behavior, such as many unexplained system failures.
m Check for multiple System Folders on your startup disk, using the Find File
command. Throw away extra System Folders (but do not throw away any
System Folders from your RAM Disk Backup folder). T he System Folder
that your computer is using has a small computer icon on it.
m Check for viruses on all your disks, using a virus-detection program.
Eliminate any viruses the program finds.
m If a problem recurs when you are using a particular program, try
the following :
m Consult the documentation that came with the program to make sure you
are using it correctly.
m Check for multiple copies of the program on your hard disk. Use the Get
Info command to check the programs’ version numbers. Keep one copy
of the latest version and throw away all other copies.
m Reinstall the program from a known good source (such as the original
program disks or the CD that came with your computer).
100
m Increase the program’s memory. Quit the program, select its icon, choose
Get Info from the File menu, and type a larger number in the Preferred
Size box.
m Contact the manufacturer or vendor of the program to find out whether
the program contains software errors or “bugs” and whether an upgrade
is availa ble.
m Check that the program is compatible with the version of system
software your computer is using. (See the program’s documentation, or
contact the manufacturer or vendor.) You can find out which version
of software you have by choosing About This Computer in the
Apple (K) menu.
m Make sure your control panels and system software extensions
(especially any that you recently added) are compatible with your
programs. See Chapter 8.
Chapter 7
 Loading...