

Page 1

Environmental
Monitoring Unit
Management Peripheral
AP9312TH
AP9312THi
Installation and
Quick Start Manual
®
Page 2

This manual is available in English on the enclosed CD.
❖❖❖
Dieses Handbuch ist in Deutsch auf der beiliegenden CD-ROM verfügbar.
❖❖❖
Este manual está disponible en español en el CD-ROM adjunto.
❖❖❖
Ce manuel est disponible en français sur le CD-ROM ci-inclus.
Page 3

Contents
Introduction . . . . . . . . . . . . . . . . . . . . . . . . . . . . . 1
Features 1
Product inventory 2
Additional probes 3
Please recycle 3
Your inspection and warranty responsibilities 3
Additional documentation 3
Installation . . . . . . . . . . . . . . . . . . . . . . . . . . . . . . 4
Installing outside an enclosure 4
Installing in an enclosure 4
Connecting the probe(s) 5
Connection process: overview 6
Connecting dry contact devices 6
Contact Sensors . . . . . . . . . . . . . . . . . . . . . . . . . . . 7
Selecting sensors 7
Sensor zone description 8
Connection information 9
Multiple sensors in a zone 9
Example of a typical hookup 10
Quick Configuration . . . . . . . . . . . . . . . . . . . . . . 11
Required and optional settings 11
TCP/IP
Configuring
Accessing the unit 14
Verifying configuration 14
Warranty Information . . . . . . . . . . . . . . . . . . . . .15
Limited warranty 15
Obtaining service 15
Warranty limitations 15
settings 11
i
Page 4

Contents
continued
Troubleshooting . . . . . . . . . . . . . . . . . . . . . . . . .16
Maintenance 16
Correcting problems 16
If problems persist 17
Specifications . . . . . . . . . . . . . . . . . . . . . . . . . . . .18
Electrical specifications 18
Physical specifications 18
Environmental specifications 19
Approvals 19
Radio Frequency Interference 19
Life-Support Policy . . . . . . . . . . . . . . . . . . . . . . . .20
General policy 20
Examples of life-support devices 20
ii
Page 5

Introduction
Features
American Power Conversion’s stand-alone Environmental
Monitoring Unit (
AP9312TH
and
AP9312THi
) continuously
senses temperature and humidity and monitors contacts. You
can control the unit through Web, Control Console, or
SNMP
interfaces. Additional features include:
• Four zones of contact monitoring, each of which
supports both normally open and normally closed
contacts.
• Compatible sensors for fire, water, smoke, unauthorized
entry, physical secur ity, or other external con ditions that
can be measured by contact closure.
• Probes that can report temperature from
140° F
to
90
) and relative humidity levels from 10% to
%.
0
to 60° C (32
• Two levels of user access:
– Administrator
– Device Manager
• Brackets for mounting the unit in an
enclosure or other standard (
EIA-310-D) 19
APC
NetShelter
-inch rack.
• E-mail notification for abnormal contact conditions or
out-of-range temperature and humidity.
• Basic and
MD5
authentication password security.
Continued on next page
1
Page 6
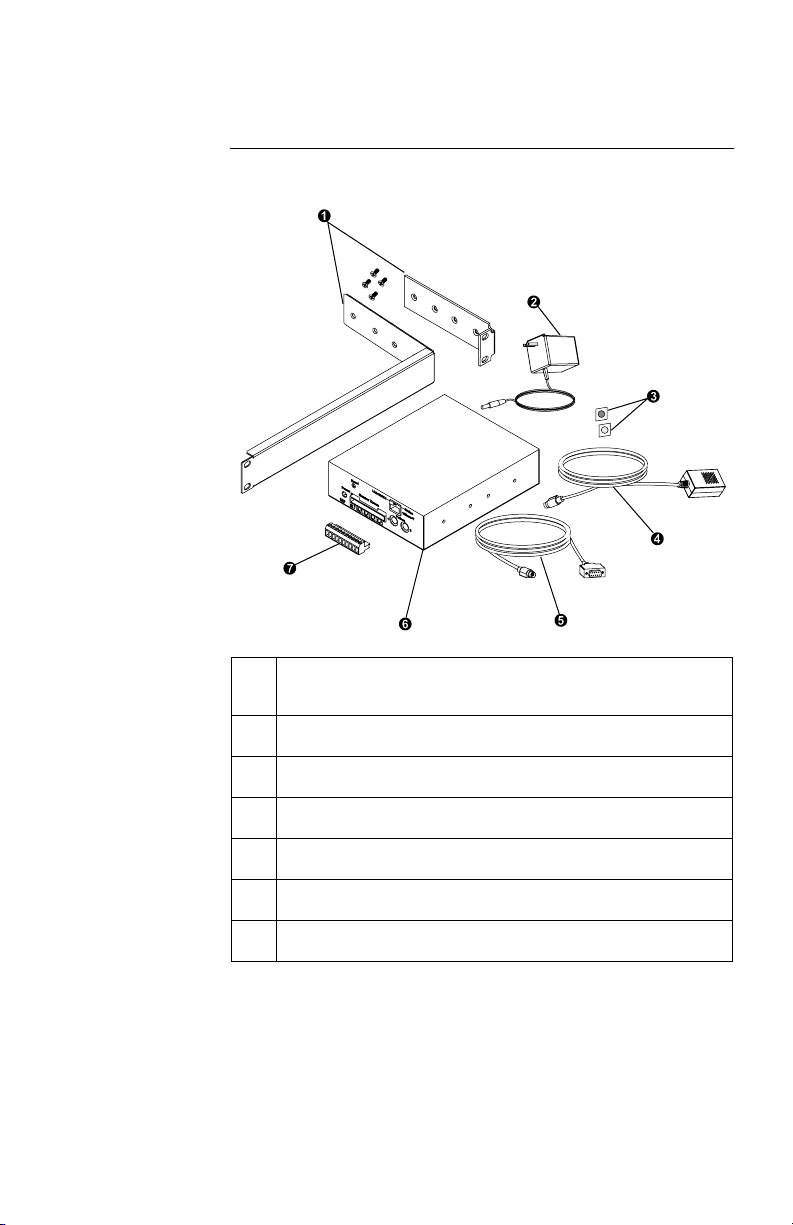
Introduction,
Product
inventory
continued
Rack-mount brackets with 4 flat-head screws (
!
"
#
$
%
&
'
870-8183
and
AC
power adapt er
Hook and loop probe fasteners
Combined temperature and humidity probe (
Configuration cable (
Environmental Monitoring Unit
Detachable screw terminal connect or for contact monitoring
)
940-0120
)
870-8213A
AP9512TH
)
Continued on next page
2
Page 7

Introduction,
continued
Additional
probes
Please recycle
Your i n sp e c ti o n
and warranty
responsibilities
Additional
documentation
To order a second temperature and humidity probe
AP9512TH
(
), call
APC
Customer Support at a number listed on
the back cover of this manual.
The shipping materials for the Environmental Monitoring Unit
are recyclable. Please save them for later reuse or dispose of
them appropriately.
Inspect the Environmental Monitoring Unit immediately, and
notify the carrier and the seller if there is any shipping damage.
Fill out and return the enclosed warranty card befor e you begin
using the unit.
This Installation and Quick Start Manual and the User’ s Guide
are available in
site http://www.apcc.com/support
PDF
format on the supplied CD and at the Web
. The User’s Guide contains
additional information about the following:
• management interfaces
• user accounts
• menu options
•e-mail
• security
SNMP
•
Note: The latest firmware versions are also available at
http://www.apcc.com
3
Page 8

Installation
Installing
outside an
enclosure
Installing in an
enclosure
To install the Environmental Monitoring Unit outside an
enclosure, place it on a flat surface in a protected area with
adequate air flow and minimal dust. Do not operate the unit
where temperature and humidity are outside the limits
specified on page 19.
To install the Environmental Monitoring Unit in a NetShelter
enclosure or other standard (
1. Attach the rack-mount brackets (
870-8183
) to the unit using the four flat-head screws.
EIA-310-D) 19
870-8213A
-inch rack:
and
2. Insert caged nuts (provided with the enclosure) on the
vertical mounting rails at the location you choose for the
unit-bracket assembly in the enclosure.
3. Align the assembly’s brackets with the caged nuts in
Step 2.
Continued on next page
4
Page 9

Installation,
continued
Installing in an
enclosure,
continued
Connecting the
probe(s)
4. Attach the assembly tightly to the enclosure using four
mounting screws and f our plas tic cup was hers (pro vided
with the enclosure).
1. Connect the supplied probe (
probe connectors on the unit. Seat the probe connector
firmly, and connect the second probe (if you have one).
2. Using the supplied hook and loop fasteners, if needed,
place each probe in an area that is within the
environmental limits specified on page 19. The location
must be free from direct sunlight, excessive moisture
(such as dew), dust, chlorine gas, and insecticides. Do
not cover any of the probe’s ventilation holes.
3. Connect the supplied power adapter to the power port
labeled
24VDC
on the front panel of the unit.
AP9512TH
) to one of the
Continued on next page
5
Page 10

Installation,
continued
Connection
process:
overview
Connecting dry
contact devices
You must perform two proced ures to set up con tact monitoring.
• See “Contact Sensors” on page 7 to select and connect
contact sensors.
• See “Connecting dry contact devices” on this page.
To connect dry contact devices to the Environmental
Monitoring Unit:
1. Connect contact closure sensors to the removable screw
terminal block as described in “Contact Sensors”
starting on page 7.
2. The connector accepts wire sizes from
2
mm
26 AWG (0.4
) to
mm2). Remove
14 AWG (1.6
0.25
" (6 mm) of
the wire’s insulation.
3. Connect the screw terminal block to the unit’s Sensor
Zones connector.
Following is an example of a completed installation:
To complete the setup, see “Quick Configuration” on page11.
6
Page 11

Contact Sensors
Selecting
sensors
T o monitor circuits that have no voltage potential of their own,
12 VDC
NO
) or normally closed (NC)
at up to 60 mA at pins 1 and
you can use any normally open (
dry contact sensors. These sensors include:
• Magnetic contact switches
• Window foils
• Tamper switches
• Heat detectors
• Water sensors
• Pressure sen sors
Note: Connecting sensor inputs to circuits other than dry
closure circuits voids the warranty and may damage to
the unit.
To monitor sensors that require power, the Environmental
Monitoring Unit provides
2
of the Sensor Zones connector. These sensors include:
• Passive infrared (body heat) detectors
• Smoke sensors
• Photo relay detectors
For more information on types of sensors you can use with the
unit, call
cover of this manual.
APC
Customer Support at a number listed on the b ack
Continued on next page
7
Page 12

Contact Sensors,
continued
Sensor zone
description
The following figure shows the screw terminal connector and
the connector pins with their associated zones.
The following table describes the zone associated with each
connector pin.
Sensor Zones Connector Pinout
Pin Function
1
Power supply, +12
Power supply ground and normally op en connection
2
for all zones
3
Zone 1 common
VDC
nominal, 60 mA maximum
4
Zone 1 normally closed
5
Zone 2 common
6
Zone 2 normally closed
7
8
9
10
3
common
Zone
Zone 3 normally closed
Zone 4 common
Zone 4 normally closed
Continued on next page
8
Page 13

Contact Sensors,
continued
Connection
information
Multiple
sensors in a
zone
The Environmental Monitoring Unit supports normally open
and normally closed loop systems and allows mixing of
normally open and normally closed sensors on any zone:
Note: Do not connect the unit’s sensors with sensors from any
other system.
T o use more than one senso r on a zone, connect normall y open
sensors in parallel and normally closed sensors in series:
To avoid receiving alarms for unused zones, install a jumper
wire between the
unused zone.
COM
connector and NC connector of each
Continued on next page
9
Page 14

Contact Sensors,
continued
Example of a
typical hookup
In this example:
•Zone
•Zone
•Zone
•Zone
1
is a normally-closed zone with power for the
passive infrared detector supplied by the Environmental
Monitoring Unit.
2
is a normally open zone.
3
combines normally open and normally closed.
4
is not used.
10
Page 15

Quick Configuration
Required and
optional
settings
Configuring
TCP/IP
settings
You must configure the following network settings of the
Environmental Monitoring Unit before it can function on a
network.
IP
•
address of the unit
• Subnet Mask
IP
•
address of the Default Gateway
No further configuration is required. The remaining properties
of the unit have default settings. However, you may want to
customize settings for your application. See “Managing the
Unit” in the
User’s Guide (usrguide.pdf
).
Choose the configuration method that matches your
environment:
• If you are using Windows
NT
, see “Through the Management Card Wizard” on
95
, Window 98, or Windows
this page.
• If you are not using a Windows-based platform, or if
you require direct serial configuration, see “Serially
through the Control Console” on page 12.
• If you are a network administrator using a computer
connected to the local subnet, see “Over the Network by
ARP” on page 13.
• If you are a network administrator using
BOOTP
, see
“Over the Network by BOOTP” on page 13.
Through the Management Card Wizard. The
Environmental Monitoring Unit contains a management card
that provides the network interface. On a Windows
Windows
98
, or Windows NT
4.0
workstation, the
95
,
Management Card Wizard provides a quick way to configure
all management card settings, including
TCP/IP
settings. To
access the Management Card Wizard, run the program
setup.exe on the
CD-ROM
supplied with the unit, and follow
the on-screen instructions.
Continued on next page
11
Page 16

Quick Configuration,
continued
Configuring
TCP/IP settings,
continued
Serially through the Control Console. If you are not using a
Windows-based platform, or if you require direct serial
configuration, use a Probe port to configure the
TCP/IP
settings
of the Environmental Monitoring Unit’s management card:
1. Connect the supplied configuration cable (
940-0120
) to
an available serial port on your computer and to one of
the Probe ports on the front panel of the unit.
2. Disable PowerChute
plus
UNIX
,
Respond, or any other
service that uses the serial port on the computer.
3. Run a terminal emulator such as Windows
HyperTerminal.
4. Configure the appropriate serial port with the following
settings:
2400
bps, no parity, 8 data bits, 1 stop bit, and
no flow control.
Note: Some terminal emulators such as HyperTerminal
require that you disconnect and reconnect in
order for the new serial settings to take effect.
5. From y our computer, press E
NTER
until the user name
prompt appears.
6. Enter the defau lt user name and password (apc for
both).
7. On the Main menu, choose Network.
8. On the Network menu, choose
9. Within the
a. Disable
TCP/IP
BOOTP.
menu:
TCP/IP
.
b. Accept changes.
c. Set a valid
IP
address, Subnet Mask and Default
Gateway for your network.
d. Accept changes
e. Press E
SC
until the Main menu appears.
f. From the Main menu, select Logout.
Note: The new settings take effect when you log out.
12
Continued on next page
Page 17

Quick Configuration,
continued
Configuring
TCP/IP settings,
continued
Over the Network by ARP. To configure the Environmental
Monitoring Unit’s
TCP/IP
settings using
ARP
(Address
Resolution Protocol):
1. Deploy the unit, and connect it to the network.
2. From a command prompt on a computer connected to the
local subnet, type
arp -s, the
Management Card, and the
arp -s 159.215.240.22 00-c0-b7-78-
Note: For the
slip, the
ad-90
MAC
address, see the Quality Assurance
TCP/IP
IP
address of the
MAC
address. For example:
menu of the Control Console, or
the label on the bottom of the unit.
3. Type telnet and the
IP
address of the Management Card.
For example:
telnet 159.215.2 40.22
4. Log in. The default user name and password are both apc.
5. Configure the Subnet Mask and Default Gateway in the
TCP/IP
section of the Network menu.
Over the Network by BOOTP.
BOOTP
Use a
Monitoring Unit’s
1. Enter the unit’s
server to configure the Environmental
TCP/IP
MAC
BOOTP
is enabled by defaul t.
settings:
address, IP address, Subnet Mask,
default Gateway, and optional bootup filename.
Note: For the
slip, the
MAC
address, see the Quality Assurance
TCP/IP
menu of the Control Console, or
the label on the bottom of the unit.
BOOTP
2. The
server provides network settings to the unit.
If you specified a bootup file name, the unit attempts to
transfer that file, first from a
FTP
an
server on the same computer as the
TFTP
server and then from
BOOTP
server. The unit assume all settings in the bootup file.
You can then configure other settings for the unit
remotely using the Telnet, Web, or
SNMP
interfaces.
Note: To create the bootup file use the Management
Card Wizard.
Continued on next page
13
Page 18

Quick Configuration,
continued
Accessing the
unit
Verifying
configuration
You can access the Environmental Monitoring Unit by using a
Web browser, Telnet, or
Through a Web browser.
1. From the browser, enter the unit’s System
DNS
its
2. Log on to the unit. The default User Name and
Password are apc (lowercase).
Through Telnet.
1. Type telnet and the System
2. Log on to the unit. The default User Name and
Password are apc (lowercase).
Through SNMP.
public, and the default read/write community name is private.
To confirm the basic operation of the Environmental
Monitoring Unit:
1. Log on to the unit, and select Environmental
Monitoring Status from the main menu.
2. Confirm the operation of the probe. With the probe
properly connected, the unit reports accurate
temperature and humidity. If the probe is not properly
connected, the unit reports very low temperature and
humidity values.
3. Confirm contact sensing. Activate each sensor in turn,
according to the recommendation of the sensor
manufacturer, and verify that it operates as expected.
name (if a
SNMP
.
IP
address or
DNS
name is configured).
IP
address of the unit.
The default read-only community name is
14
Page 19

Warranty Information
Limited
warranty
Obtaining
service
Warranty
limitations
American Power Conversion (
APC
) warrants the
Environmental Monitoring Unit to be free from defects in
materials a nd workman s hip for a period of two years from the
date of purchase. Its obligation under this warranty is limited to
repairing or replacing, at its own sole option, any such
defective products. This warranty does not apply to equipment
which has been damaged by accident, negligence, or
misapplication or has been altered or modified in any way . This
warranty applies only to the original purchaser.
To obtain service under warranty you must obtain a returned
material authorization (
or an
APC
service center. Products must be returned to
APC
service center with transportation charges
designated
APC
RMA
) number from
APC
or a
prepaid and must be accompanied by a brief description of the
problem encountered and proof of date and place of purchase.
For further information on obtaining service, see “If problems
persist” on page 17.
Except as provided herein, American Power Conversion make s
no warranties, express or implied, including warranties of
merchantability and fitness for a particular purpose. Some
jurisdictions do not permit limitation or exclusion of implied
warranties; therefore, the aforesaid limitation(s) or exclusion(s)
may not apply to the purchaser.
Except as provided above, in no event will
APC
be liable for
direct, indirect, special, incidental, or consequential damages
arising out of the use of this product, even if advised of the
possibility of such damage.
Specifically,
APC
is not liable for any costs, such as lost profits
or revenue, loss of equipment, loss of use of equipment, loss of
software, loss of data, costs of substitutes, claims by third
parties, or otherwise. This warranty gives you specific legal
rights and you may also have other rights which vary from
state to state.
15
Page 20

Troubleshooting
Maintenance
Correcting
problems
The Environmental Monitoring Unit requires periodic
maintenance.
• To remove any visible buildup of dust from the
temperature and humidity probe, gently brush or
vacuum the probe. Do not bl o w any type o f compressed
gas into the probe.
• For maintenance of contact sensors, see the sensor
manufacturer’s product literature.
Problem Possible Cause Solution
Constant alarm on
one or more
unused zones.
Constant low
temperature and
humidity readings.
Incorrect sensor
readings.
No jumper wires
for unused zones.
12 VDC
supply
(pin 1) shorted to
ground or
overloaded.
Improper sensor
wiring.
For each unused zone,
connect a wire
between the
NC
terminal s.
Correct the short
circuit: examine all
sensors that use the
VDC
Correct the sensor
wiring. (See “Contact
Sensors” on page 7.)
COM
power supply.
and
12
16
Continua l reports
of low temperature
or humidity.
Probe not
connected
properly.
Connect the probe
properly. (See
“Connecting the
probe(s)” on page 5.)
Continued on next page
Page 21

Troubleshooting,
continued
If problems
persist
If a problem is not mentioned in “Correcting problems” on
page 16, or if the problem persists:
1. Note the serial number and date of purchase of the
Environmental Monitoring Unit, and contact Customer
Support at a phone number on the back cover of this
manual. A technician will try to help you solve the
problem by phone.
2. If you must return the unity, the technician will give you
a return material authorization (
warranty expired, you will be charged for repair or
replacement of the unit.
a. Pack the unit carefully. The warranty does not cover
damage sustained in transit. Enclose a letter with
your name, address,
phone number; a copy of the sales receipt; and a
check as payment, if applicable.
b. Mark the
shipping carton.
c. Return the unit by insured, prepaid carrier to the
address provided by the Customer Support
technician.
RMA
RMA
number clearly on the outside of the
RMA
) number. If the
number, and daytime
17
Page 22

Specifications
Electrical
specifications
Item Specification
Physical
specifications
Input voltage, nom ina l
Maximum total cur re nt draw
Temperature accuracy
Humidity accuracy
Sensor zone input response
time
Power output
Item Specification
Size (height × width × depth)
Weight
24 VDC
0.1 A @ 24 VDC
(exclusive of
any attached sensors)
2° C
3.6° F
(±
±
32
104° F
to
(
), from 0 to 40° C
)
±8% RH, 10 to 90% RH, at 25° C
77° F
)
(
8% RH, 30
±
to 80% RH, from 15
to 30° C (59 to 95° F)
100
ms
12 VDC
nominal, 60 mA
maximum, ground-referenced
1.73
5.53
4.0
×
×
6.75
17.3
in
cm
4.39
1.8
0.8
×
× 1
lb
kg
18
Shipping weight
4.6
lb
2.1
kg
Continued on next page
Page 23

Specifications,
Environmental
specifications
continued
Item Specification
Approvals
Radio
Frequency
Interference
Elevation:
Operating:
Storage:
Temperature:
Operating:
Storage:
Probe operating temperatu r e
Operating humidity
0
to
0
to
0
to
0
to
0
to
0
to
10,000
ft (0 to
50,000
ft (0 to
40 ° C (32
45 ° C (32
60° C (32
95%
to
to
to
, non-condensing
3000
15 000
104° F
113° F
140° F
m)
m)
)
)
)
Item Approval
EMC verification
Electromagnetic immuni ty
FCC, VCCI, DOC
Class A
EN50082
-1 verified
, and
EN55022
:
This equipment has been tested and found to comply with the
limits for a Class
FCC
Rules. These limits provide reasonable protection against
A
digital device, pursuant to part 15 of the
harmful interference when the equipment is operated in a
commercial environment.
This equipment generates, uses, and can radiate radio
frequency energy and, if not installed and used in accordance
with this manual, may cause harmful interference to radio
communications. Operation of this equipment in a residential
area is likely to cause harmful interference. The user will bear
sole responsibility for correcting such interference.
This Class
003
.
A
digital apparatus complies with Canadian
ICES-
Cet appar eil n umériq ue de l a class e A est con for me à la norme
003 du Canada.
NMB
-
19
Page 24

Life-Support Policy
General policy
Examples of
life-support
devices
As a general policy, American Power Conversion (
APC
) does
not recommend the use of any of its products in the following
situations:
• life-support applications where failure or malfunction of
APC
the
failure of the
product can be reasonably expected to cause
life-support device
or to significantly
affect its safety or effectiveness.
• direct patient care.
APC
will not knowingly sell its products for use in such
applications unless it receives in writing assurances
satisfactory to
APC
that (a) the risks of injury or damage have
been minimized, (b) the customer assumes all such risks, and
(c) the liability of American Power Conversion is adequately
protected under the circumstances.
The term life-support device includes but is not limited to
neonatal oxygen analyzers, n erve stimulators (wh ether used for
anesthesia, pain relief, or other purposes), autotransfusion
devices, blood pumps, defibrillators, arrhythmia detectors and
alarms, pacemakers, hemodialysis systems, peritoneal dialysis
systems, neonatal ventilator incubators, ventilators (for adults
or infants), anesthesia ventilators, infusion pumps, and any
other devices designated as “critical” by the
U.S. FDA
.
20
Hospital-grade wiring devices and leakage current protection
may be ordered as options on many
APC UPS
systems.
APC
does not claim that units with this modifications are certified or
listed as hospital-grade by
APC
or any other organization.
Therefore these units do not meet the requirements for use in
direct patient care.
Page 25

Declaration of Conformity
Application of Council Directives
Standards to Which Conformity is
Declared
Manufacturer’s Name and Address American Power Conversion
Importer’s Name and Address American Power Conversion (
Type of Equipment
Model Numbers
Serial Numbers WA0001000000 and above
Year of Manufacture
89/336/EEC
EN55022, EN55024
Fairgrounds Road
132
West Kingston, Rhode Island
USA
–or–
American Power Conversion (
Ballybrit Business Park
Galway, Ireland
Ballybrit Business Park
Galway, Ireland
Management Peripheral
AP9312THi
2000 onward
02892
A.P.C.)b.v.
A.P.C.)b.v.
We, the undersigned, hereby declare that the equipment specified above
conforms to the above directives
.
St. Louis, MO February 16,2000 Ted Eckert
Galway, Ireland February 16, 2000 Ray Ballard
Regulatory Compliance Engineer
General Manager, Galway
Page 26

APC Worldwide Customer Support
Customer sup port f or th is or an y oth er APC prod uct is av ailab le a t no c har g e in any o f
the following ways:
• Visit the APC Web site to find answers to frequently asked questions
(F AQs), to access documents in the APC Knowledge Base, and to submit
customer support requests.
– http://www.apc.com
Connect to localized APC Web sites for specific countries, each of which
provides customer support information.
– http://www.apc.com/support/
Global support with FAQs, knowledge base, and e-support.
• Contact an APC Customer Support cent er by telephone or e-mail.
– Regional centers:
.
APC Headquarters
(U.S. and Canada)
Latin America (1) (401) 789-5735 (United States)
(Corporate Headquar ters)
(1) (800) 800-4272 (toll free)
Europe, Middle East,
Africa
(353) (91) 702020 (Ireland)
Japan (03) 5434-202 1 Gu id an c e 3
– Local, country-specific centers: go to http://www.apc.com/support/
contact for contact information.
• Contact the APC r e presentative or other distributor from whom you purchased your APC product for information on how to obtain local customer
support.
Entire contents copyright © 2001 American Power Conversion. All rights reserved.
Reproduction in whole or in part without permission is prohibited. APC is a registered
trademark of American Power Conversion Corporation. All other trademarks,
product names, and corporate names are the prope r ty of the ir res pective
owners and are used for informat iona l pur poses only.
990-0814B 08/2001
 Loading...