


Microwave Oven
Service Manual
RS511P
RS511MBCS10 PA
RCS10MPSA511A
RFS511G12MPSA
URS511MBRF 12G
URS511P
URCS511A
RFS511SW2A
CAUTION
BEFORE SERVICING THE UNIT, READ THE SAFETY PRECAUTIONS IN THIS MANUAL.

SAFETY PRECAUTIONS
This device is to be serviced only by properly qualified service personnel.
Consult the service manual for proper service procedures to assure continued safety operation and for precautions to be taken to avoid possible exposure to excessive microwave energy.
PRECAUTIONS TO BE OBSERVED BEFORE AND DURING SERVICING TO AVOID POSSIBLE EXPOSURE TO EXCESSIVE MICROWAVE ENERGY
A)Do not operate or allow the oven to be operated with the door open.
B)Make the following safety checks on all ovens to be serviced before activating the magnetron or other microwave source, and make repairs as necessary; (1) interlock operation, (2) proper door closing, (3) seal and sealing surfaces (arcing, wear, and other damage), (4) damage to or loosening of hinges and latches, (5) evidence of dropping or abuse.
C)Before turning on microwave power for any service test or inspection within the microwave generating compartments, check the magnetron, wave guide or transmission line, and cavity for proper alignment, integrity, and connections.
D)Any defective or misadjusted components in the interlock, monitor, door seal, and microwave generation and transmission systems shall be repaired, replaced, or adjusted by procedures described in this manual before the oven is released to the owner.
E)A microwave leakage check to verify compliance with the Federal Performance Standard should be performed on each oven prior to release to the owner.
|
|
|
CONTENTS |
|
|
|
|
(Page) |
|
SAFETY PRECAUTIONS |
|
- - - - - - - - - - - - - - - |
- - - - - - - - - - - - - - - - - - - - - - - - - - - - - - - - - - - - - - - - - - - - - - - - - - - - - - Inside front cover |
|
SPECIFICATIONS |
|
- - - - - - - - - - - - - - - - - - - - - - - - - - - |
- - - - - - - - - - - - - - - - - - - - - - - - - - - - - - - - - - - - - - - - - - - - - - - - - - - - - - - - - - - - - - - - - - - - - - - - - - |
1-1 |
CAUTIONS - |
- - - - - - |
- - - - - - - - - - - - - - - - - - - - - - - - - - - - - - |
- - - - - - - - - - - - - - - - - - - - - - - - - - - - - - - - - - - - - - - - - - - - - - - - - - - - - - - - - - - - - - - - - - - - - - - - - |
2-1 |
INSTALLATIONS |
|
- - - - - - - - - - - - - - - - - - - - - - - - - - - - |
- - - - - - - - - - - - - - - - - - - - - - - - - - - - - - - - - - - - - - - - - - - - - - - - - - - - - - - - - - - - - - - - - - - - - - - - - - |
3-1 |
OPERATING INSTRUCTIONS |
|
- - - - - - - - - |
- - - - - - - - - - - - - - - - - - - - - - - - - - - - - - - - - - - - - - - - - - - - - - - - - - - - - - - - - - - - - - - - - - - - - - - - - - - |
4-1 |
COOKING DISPLAY |
|
S - - - - - - - - - - - - - - - - - - - - - - - |
- - - - - - - - - - - - - - - - - - - - - - - - - - - - - - - - - - - - - - - - - - - - - - - - - - - - - - - - - - - - - - - - - - - - - - - - - - - - - - - - - - |
4-6 |
PROGRAMMING DISPLAY |
S - - - - - - - - - - - - - |
- - - - - - - - - - - - - - - - - - - - - - - - - - - - - - - - - - - - - - - - - - - - - - - - - - - - - - - - - - - - - - - - - - - - - - - - - - - - - - - - - - - |
4-6 |
|
OPERATIO |
N - - - - |
- - - - - - - - - - - - - - - - - - - - - - - - - - - - - - - - - - |
- - - - - - - - - - - - - - - - - - - - - - - - - - - - - - - - - - - - - - - - - - - - - - - - - - - - - - - - - - - - - - - - - - - - - - - - - - - - - - - - |
- 4-7 |
PROGRAMMIN |
|
G - - - - - - - - - - - - - - - - - - - - - - - - - - - - - - - |
- - - - - - - - - - - - - - - - - - - - - - - - - - - - - - - - - - - - - - - - - - - - - - - - - - - - - - - - - - - - - - - - - - - - - - - - - - - - - - - - - |
4-8 |
SCHEMATIC DIAGRA |
|
M - - - - - - - - - - - - - - - - - - - - |
- - - - - - - - - - - - - - - - - - - - - - - - - - - - - - - - - - - - - - - - - - - - - - - - - - - - - - - - - - - - - - - - - - - - - - - - - - - - - - - - 4-10 |
|
CIRCUIT DESCRIPTION |
- - - - - - - - - - - - - - - - - - - |
- - - - - - - - - - - - - - - - - - - - - - - - - - - - - - - - - - - - - - - - - - - - - - - - - - - - - - - - - - - - - - - - - - - - - - - - - - - - - - - - 4-11 |
||
SERVICE INFORMATION |
|
- - - - - - - - - - - - - - - - |
- - - - - - - - - - - - - - - - - - - - - - - - - - - - - - - - - - - - - - - - - - - - - - - - - - - - - - - - - - - - - - - - - - - - - - - - - - |
5-1 |
TOOLS AND MEASURING INSTRUMENTS |
- - - - - - - - - - - - - - - - - - - - - - - - - - - - - - - - - - - - - - - - - - - - - - - - - - - - - - - - - - - - - - - - - - - - - - - - - - - |
5-1 |
||
MICROWAVE LEAKAGE TEST |
- - - - - - - - - |
- - - - - - - - - - - - - - - - - - - - - - - - - - - - - - - - - - - - - - - - - - - - - - - - - - - - - - - - - - - - - - - - - - - - - - - - - - - - - - - - - - - |
5-1 |
|
MEASUREMENT OF MICROWAVE POWER OUTPUT |
- - - - - - - - - - - - - - - - - - - - - - - - - - - - - - - - - - - - - - - - - - - - - - - - - - - - - - - - - - - |
5-3 |
||
DISASSEMBLY AND ADJUSTMENT - |
- - - - - - - - - - - - - - - - - - - - - - - - - - - - - - - - - - - - - - - - - - - - - - - - - - - - - - - - - - - - - - - - - - - - - - - - - - - - - - - - - - - - |
5-3 |
||
INTERLOCK CONTINUITY TEST - - - - - - - |
- - - - - - - - - - - - - - - - - - - - - - - - - - - - - - - - - - - - - - - - - - - - - - - - - - - - - - - - - - - - - - - - - - - - - - - - - - - - - - - - - - - |
5-7 |
||
COMPONENT TEST PROCEDURE |
- - |
- - - - - - - - - - - - - - - - - - - - - - - - - - - - - - - - - - - - - - - - - - - - - - - - - - - - - - - - - - - - - - - - - - - - - - - - - - - - - - - - - - - - |
5-8 |
|
TROUBLE SHOOTING |
|
- - - - - - - - - - - - - - - - - - - - - - |
- - - - - - - - - - - - - - - - - - - - - - - - - - - - - - - - - - - - - - - - - - - - - - - - - - - - - - - - - - - - - - - - - - - - - - - - - - - - - - - - 5-11 |
|
EXPLODED VIEW |
|
- - - - - - - - - - - - - - - - - - - - - - - - - - - - |
- - - - - - - - - - - - - - - - - - - - - - - - - - - - - - - - - - - - - - - - - - - - - - - - - - - - - - - - - - - - - - - - - - - - - - - - - |
6-1 |
SCHEMATIC DIAGRAM OF P.C.B. |
- - - |
- - - - - - - - - - - - - - - - - - - - - - - - - - - - - - - - - - - - - - - - - - - - - - - - - - - - - - - - - - - - - - - - - - - - - - - - - - - |
7-1 |
|
PRINTED CIRCUIT BOARD |
- - - - - - - - - - - - - - - |
- - - - - - - - - - - - - - - - - - - - - - - - - - - - - - - - - - - - - - - - - - - - - - - - - - - - - - - - - - - - - - - - - - - - - - - - - - - - - - - - - - |
7-2 |
|

SPECIFICATIONS
|
|
ITEM |
|
|
|
DESCRIPTION |
||
|
|
|
|
|
|
|
|
|
|
|
MODEL |
RS511P / RS511MB |
URS511MB / URS511P |
||||
|
|
RCS511A / RFS511G |
URCS511A / RFS511SW2A |
|||||
|
|
|
||||||
|
|
|
|
|
|
|
|
|
|
|
Power Requirement |
230 Volts AC 50 Hz |
240 Volts AC 50 Hz |
||||
|
|
|
|
|
|
|
|
|
|
|
|
1,600 Watts |
1,700 Watts |
||||
|
|
|
|
|
|
|
|
|
|
|
|
Single phase, 3 wire grounded |
|
||||
|
|
|
|
|
|
|
|
|
|
|
Power Output |
1,100 Watts full microwave power (IEC60705) |
|
||||
|
|
|
|
|
|
|
|
|
|
|
|
|
|
|
|
|
|
|
|
Microwave Frequency |
2,450 MHz |
|
||||
|
|
|
|
|
|
|
|
|
|
|
|
|
|
|
|
|
|
|
|
Magnetron |
2M282 |
|
||||
|
|
|
|
|
|
|
|
|
|
|
Timer |
0 ~ 60 min. |
|
||||
|
|
|
|
|
|
|
|
|
|
|
|
|
|
|
|
|
|
|
|
Outside Dimensions |
213/4” (W) x 141/4” (H) x 17 7/8”(D) |
|
||||
|
|
Cavity Dimensions |
141/4” (W) x 8 7/8” (H) x 16 3/8”(D) |
|
||||
|
|
Net Weight |
51 lbs (approx.) |
|
||||
|
|
|
|
|
|
|
|
|
|
|
Shipping weight |
58 lbs (approx.) |
|
||||
|
|
|
|
|
|
|
|
|
|
|
Control Complement |
Touch Control System |
|
||||
|
|
|
Clock : 00 ~ 60 |
|
||||
|
|
|
Microwave Power for Variable Cooking |
|
||||
|
|
|
Power level |
|
||||
|
|
|
HIGH -------------------------------Full power throughout the cooking time |
|||||
|
|
|
70% |
(Med.-High)----------------approx. 70% of Full power |
||||
|
|
|
50% |
(Med.-Low) ---------------approx. 50% of Full power |
||||
|
|
|
20% |
(Low) -----------------------approx. 20% of Full power |
||||
|
|
|
|
|
|
|
|
|
|
|
Nameplate Location |
|
|
|
|
|
|
|
|
|
|
|
|
|
|
Back side |
|
|
|
|
|
|
|
|
|
|
|
|
|
|
|
|
|
|
|
|
|
|
|
|
|
|
|
|
|
|
|
|
|
|
|
|
This microwave oven is designed for commercial use only.
It is not recommended for built-in Installation.
1-1

CAUTIONS
Unlike other appliances, the microwave oven is high-voltage and high-current equipment. Though it is free from danger in ordinary use, extreme care should be taken during repair.
•DO NOT operate on a 2-wire extension cord during repair and use.
•NEVER TOUCH any oven components or wiring during operation.
•BEFORE TOUCHING any parts of the oven, always remove the power plug from the outlet.
•For about 30 seconds after the oven stops, an electric charge remains in the high voltage capacitor. When replacing or checking, you must discharge the high voltage capacitor by shorting across the two terminals with an insulated screwdriver.
•Remove your watches whenever working close to or replacing the Magnetron.
•DO NOT touch any parts of the control panel circuit. A resulting static electric discharge may damage this P.C.B.
•NEVER operate the oven with no load.
•NEVER injure the door seal and front plate of the oven cavity.
•NEVER put iron tools on the magnetron.
•NEVER put anything into the latch hole and the interlock switches area.
MICROWAVE RADIATION
Personnel should not be exposed to the microwave energy which may radiate from the magnetron or other microwave generating device if it is improperly used or connection. All input and output microwave connections, waveguide, flange, and gasket must be secure never operate the device without a microwave energy absorbing load attached.
Never look into an open waveguide or antenna while the device is energized.
•Proper operation of the microwave oven requires that the magnetron be assembled to the waveguide and cavity. Never operate the magnetron unless it is properly installed.
•Be sure that the magnetron gasket is properly installed around the dome of the tube whenever installing the magnetron.
ANTENNA
Gasket
COOLING FIN
FILAMENT
TERMINALS
MAGNETRON
CHASSIS GROUND
MAGNETRON
THE OVEN IS TO BE SERVICED ONLY BY PROPERLY QUALIFIED SERVICE PERSONNEL.
2-1

INSTALLATIONS
BEFORE YOU BEGIN, READ THE FOLLOWING INSTRUCTIONS COMPLETELY AND CAREFULLY.
INSTALLING
1.Empty the microwave oven and clean inside it with a soft, damp cloth. Check for damage such as misaligned door, damage around the door or dents inside the cavity or on the exterior.
2.Put the oven on a counter, table, or shelf that is strong enough to hold the oven and the food and utensils you put in it. (The control panel side of the oven is the heavy side. Use care when handling.)
3.Do not block the vent and the air intake openings. Blocking vent or air intake openings can cause damage to the oven and poor cooking results.
Make sure the microwave oven legs are in place to ensure proper air flow.
4.The oven should not be installed in any area where
heat and steam are generated, because they may damage the electronic or mechanical parts of the unit.
Do not install the oven next to a conventional surface unit or above a conventional wall oven.
5.Use microwave oven in an ambient temperature less than 104°F(40°C).
6.Place the microwave oven on a sturdy and flat surface at least 10 cm(4 inches) from the wall.
7.Place the microwave oven as far away as possible
from TV, RADIO, COMPUTER, etc., to prevent interference.
8.Do not touch the front glass during or after cooking of the Grill and Combination mode.
This glass is very hot during heater operating.
9.Do not operate the oven at microwave and combination mode with Grill rack placed in the cavity when the oven is empty.
10cm
EARTHING INSTRUCTIONS
This microwave oven is designed to be used in a fully earthed condition.
It is imperative, therefore, to make sure it is properly earthed before servicing
WARNING-
THIS APPLIANCE
MUST BE EARTHED
IMPORTANT
The wires in this mains lead |
are colored in |
|
accordance with the following code: |
|
|
Green-and-yellow: |
Earth |
|
Blue: |
|
Neutral |
Brown: |
|
Live |
As the colors of the wires in the mains lead of this appliance may not correspond with the colored markings identifying the terminals in your plug, proceed as follows.
The wire which is colored |
|
green-and-yellow |
|
|
|
|
|
must be |
|||
connected to the terminal in the plug which is marked |
|
|
|
|
|
|
|||||
with the letter |
E or by the |
earth symbol |
( |
|
|
|
|
) or |
|||
|
|
|
|
||||||||
colored |
green |
or |
green-and-yellow |
|
. |
|
|
|
|
|
|
The wire which is colored |
|
blue |
must be connected to |
||||||||
the terminal in the plug which is marked with the letter |
|
|
|
|
|
|
|||||
N or colored |
black |
. |
|
|
|
|
|
|
|
|
|
The wire which is colored |
|
brown |
must be connected |
||||||||
to the terminal in the plug which is marked with the |
|
|
|
|
|
|
|||||
letter |
L or colored |
red . |
|
|
|
|
|
|
|
|
|
3-1

FEATURES
Window Door Screen
Electronic Control
Safety Door Lock System
CONTROL PANEL |
Display |
|
Some items in display can be seen but will not glow. |
Pads
|
|
|
|
|
TIME ENTRY |
Use to enter heating time without changing |
|
|
|
|
|
|
preprogrammed number pads. |
|
|
|
|
|
|
|
|
|
|
|
|
Pads 1-0 |
Use to begin heating with preprogrammed |
|
|
|
|
|
||
|
|
|
|
|
|
times and power levels or to enter times for |
|
|
|
|
|
|
|
|
|
|
|
|
|
“Manual Time Entry” cooking. |
|
|
|
|
|
|
|
|
|
|
|
|
HOLD 0%, |
Use to select power level. Oven can heat at |
|
|
|
|
|
||
|
|
|
|
|
DEFROST 20%, |
full or reduced power. If oven power level is |
|
|
|
|
|
MEDUIM 50%, |
set to 0% oven does not heat for |
|
|
|
|
|
MED-HI 70% |
programmed time. If no power level is |
|
|
|
|
|
||
|
|
|
|
|
||
|
|
|
|
|
|
selected, oven operates at 100% power. |
|
|
|
|
|
|
|
|
|
|
|
|
STOP/RESET |
Use to exit programming mode and stop |
|
|
|
|
|
||
|
|
|
|
|
|
cooking during cooking cycle. |
|
|
|
|
|
|
|
|
|
|
|
|
|
|
|
|
|
|
|
START |
Use to start “Manual Time Entry” program |
|
|
|
|
|
|
or restart interrupted cooking cycle. Use to |
|
|
|
|
|
|
advance to next user option. Use to save |
|
|
|
|
|
|
times and power levels when programming |
|
|
|
|
|
|
pads. |
|
|
|
|
|
|
|
RS511P / URS511P
4-1

FEATURES
Window Door Screen
Electronic Control
Safety Door Lock System
CONTROL PANEL |
Display |
|
Some items in display can be seen but will not glow. |
Pads
TIME ENTRY |
Use to enter heating time without changing |
|
preprogrammed number pads. |
Pads 1-0 |
Use to begin heating with preprogrammed |
|
times and power levels or to enter times for |
|
“Manual Time Entry” cooking. |
POWER |
Use to select power level. Oven can heat at |
LEVEL |
full or reduced power. If oven power level is |
|
set to 0% oven does not heat for |
|
programmed time. If no power level is |
|
selected, oven operates at 100% power. |
STOP/RESET |
Use to exit programming mode and stop |
|
cooking during cooking cycle. |
START |
Use to start “Manual Time Entry” program |
|
or restart interrupted cooking cycle. Use to |
|
advance to next user option. Use to save |
|
times and power levels when programming |
|
pads. |
QTY2x |
Use to automatically increase the |
|
programmed time for double quantities. |
RCS511A / URCS511A
4-2

FEATURES
Window Door Screen
Electronic Control
Safety Door Lock System
CONTROL PANEL
Display
Some items in display can be seen but will not glow.
Pads
DIAL |
Use to enter cooking time. |
|
|
QUICK SET |
Use to begin heating with preprogrammed |
|
times and power levels. |
|
|
70%, |
Use to select power level. Oven can heat at |
50%, |
full or reduced power. |
DEFROST |
|
START |
Use to start “Manual Time Entry” program |
|
or restart interrupted cooking cycle. Use to |
|
advance to next user option. Use to save |
|
times and power levels when programming |
|
pads. |
|
|
RCS511MB / URS511MB
4-3

FEATURES
Window Door Screen
Electronic Control
Safety Door Lock System
CONTROL PANEL
Display
Some items in display can be seen but will not glow.
Pads
TIME ENTRY |
Use to enter heating time without changing |
|
preprogrammed number pads. |
Pads 1-0 |
Use to begin heating with preprogrammed |
|
times and power levels or to enter times for |
|
“Manual Time Entry” cooking. |
HOLD 0%, |
Use to select power level. Oven can heat at |
DEFROST 20%, |
full or reduced power. If oven power level is |
MEDUIM 50%, |
set to 0% oven does not heat for |
MED-HI 70% |
programmed time. If no power level is |
|
selected, oven operates at 100% power. |
STOP/RESET |
Use to exit programming mode and stop |
|
cooking during cooking cycle. |
START |
Use to start “Manual Time Entry” program |
|
or restart interrupted cooking cycle. Use to |
|
advance to next user option. Use to save |
|
times and power levels when programming |
|
pads. |
RFS511SW2A
4-4
OPERATING INSTRUCTIONS
FEATURES
Window Door Screen
 Electronic Control
Safety Door Lock System
CONTROL PANEL
TIME POWER QTY
ENTRY LEVEL 2X
-+
8
9
0
RFS511G
Display
Some items in display can be seen but will not glow.
Pads
TIME ENTRY |
Use to enter heating time without changing |
|
preprogrammed number pads. |
|
|
Pads 1-0 |
Use to begin heating with preprogrammed |
|
times and power levels or to enter times for |
|
“Manual Time Entry” cooking. |
|
|
DIAL |
Use to enter times for “Manual Time Entry” |
|
cooking. |
|
|
POWER |
Use to select power level. Oven can heat at |
LEVEL |
full or reduced power. If oven power level is |
|
set to 0% oven does not heat for |
|
programmed time. If no power level is |
|
selected, oven operates at 100% power. |
|
|
STOP/RESET |
Use to exit programming mode and stop |
|
cooking during cooking cycle. |
|
|
START |
Use to start “Manual Time Entry” program |
|
or restart interrupted cooking cycle. Use to |
|
advance to next user option. Use to save |
|
times and power levels when programming |
|
pads. |
QTY2x |
Use to automatically increase the |
|
programmed time for double quantities. |
|
|
4-5
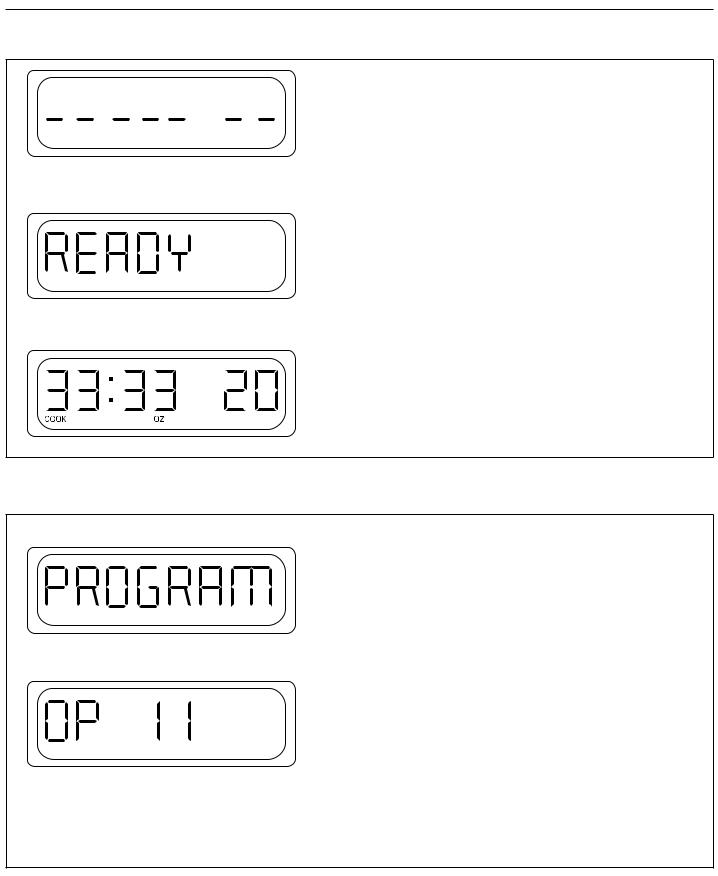
Cooking Displays
Shows when power is connected to oven. Open and close door to clear.
READY shows when oven control will accept entries.
Appears after oven door is opened and closed.
33:33 shows heating time. When more than 1 heating stage is programmed, total time for all stages displays.
COOK shows when oven is operating.
20 indicates the microwave power level used. If power level does not show, oven is heating at 100% power.
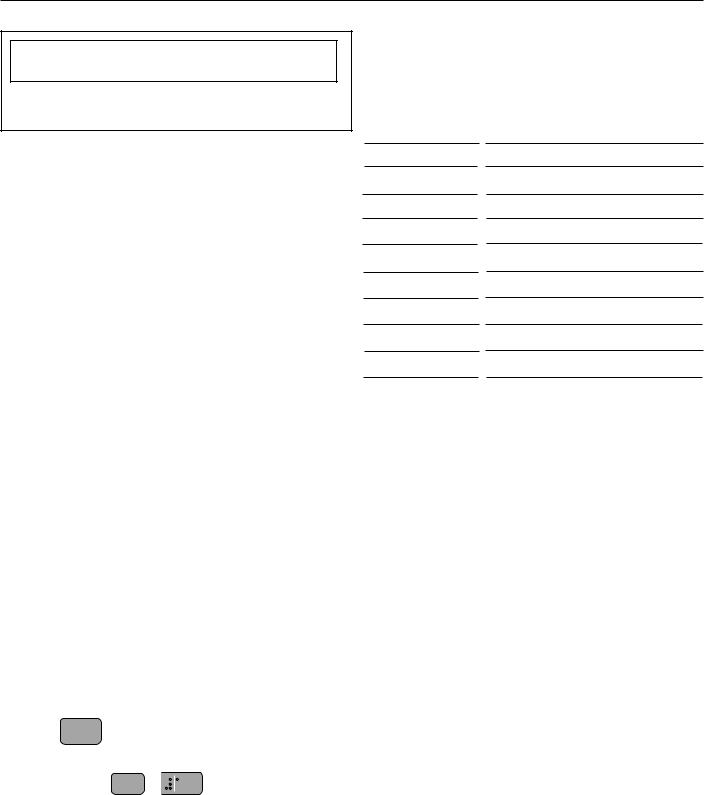
Programming Displays
Indicates programming mode. See “Programming” section of manual for programming procedure.
Indicates programming user options mode. See “User
Options” section of manual for programming procedure.
4-6
Operation
 CAUTION
To avoid fire, do not dry newspapers or clothes in microwave oven.
Interrupting Operation
• Open oven door to interrupt operation. Oven fan |
|
||
continues |
to operate. Close door and press |
START |
|
pad to resume oven operation. |
|
|
|
• Press |
STOP/RESET |
pad to interrupt |
operation. |
Display continues to show countdown time. Press |
|||
START |
pad to resume oven operation and |
|
|
countdown timing. |
|
|
|
Canceling |
Mistakes |
|
|
• If oven is operating, press |
STOP/RESET |
pad once to |
|
stop oven, then again to clear display. |
|
||
• If oven door is open and time shows in display, close |
|
||
oven door |
and press |
STOP/RESET |
pad to clear |
display. |
|
|
|
Operating |
Preprogrammed Pads |
|
|
Oven has 10 ~ 20 preprogrammed number pads. Instructions are written for factory programmed ovens. Ovens that are reprogrammed can respond differently than described below.
1.Open oven door , place food in oven, and close oven door
•If pad is not pressed in 30 seconds, open and close oven door again.
2.Press desired number pad.
•Oven operates and time counts down.
3.Oven stops heating and oven signal sounds when heating timing elapses.
Operating QTY 2X Pads
1. |
Press |
QTY |
Pad. |
|
|
|
|
2X |
|
|
|
2. |
Press desired number pad |
|
|
|
|
• Example : press |
|
QTY |
+ |
1 = 18 sec. |
|
|
2X |
||||
Preprogrammed Times and Cook Level
All preprogrammed pads arrive set at full power.
Option: Single Digit Option: Double Digit
Pads |
Heating |
|
Pads |
Heating |
Pads |
Heating |
|||
|
Times |
|
|
Times |
|
Times |
|||
1 |
10 |
sec. |
|
01 |
10 |
sec. |
11 |
20 |
sec. |
2 |
20 sec. |
|
02 |
20 sec. |
12 |
40 sec. |
|||
3 |
30 sec. |
|
03 |
30 sec. |
13 |
1 |
min. |
||
4 |
45 sec. |
|
04 |
45 sec. |
14 |
1:30 min. |
|||
5 |
1 |
min. |
|
05 |
1 |
min. |
15 |
2 |
min. |
6 |
1:30 min. |
|
06 |
1:30 min. |
16 |
3 |
min. |
||
7 |
2 |
min. |
|
07 |
2 |
min. |
17 |
4 |
min. |
8 |
3 |
min. |
|
08 |
3 |
min. |
18 |
6 |
min. |
9 |
4 |
min. |
|
09 |
4 |
min. |
19 |
8 |
min. |
0 |
5 |
min. |
|
10 |
5 |
min. |
20 |
10 |
min. |
|
|
|
|
|
|
|
|
|
|
Manual Time Entry
Manual Time Entry feature allows the operator to enter time and power levels, and heat without changing the preprogrammed pads.
1.Open oven door, place food in oven, and close door.
•Display shows "READY".
•If pad is not pressed in 30 seconds, open and close oven door again.
2. Press |
TIME ENTRY |
pad. |
•Display shows "00:00".
3.Press number pads to enter desired cooking time.
•For example, to heat for 2 minutes 30 seconds, press 2, 3, and 0 pads.
4.Press desired power level pad to change power level.
•If a power level pad is not pressed, oven defaults to 100% power.
•For example, pressing MEDIUM 50% pad sets oven to 50% power.
•Display shows current power level if other than 100 percent power.
5. Press |
START |
pad. |
• Oven operates and time counts down.
6.Oven stops heating and oven signal sounds when heating timing elapses.
4-7

PROGRAMMING
Preprogrammed Number Pads
Oven has 10 preprogrammed number pads. Follow instructions below to program heating times and power levels for customized cooking.
1.Open oven door.
•If door is closed or STOP/RESET pad is pressed before finishing programming sequence, oven exits programming mode.
2.Press and hold pad 1 for approximately 5 seconds.
•After 5 seconds, signal sounds. Display shows “PROGRAM” indicating program mode..
3.Press desired number pad.
•Display shows heating time, “COOK LEVEL” and power level if other than 100 percent power.
4.Press number pads to enter desired cooking time.
•For example, to heat for 2 minutes 30 seconds, press 2, 3, and 0 pads.
5.Press desired power level pad to change power level.
•If a power level pad is not pressed, oven defaults to 100% power.
•For example, pressing MEDIUM 50% pad sets oven to 50% power.
•Display shows current power level if other than 100% power.
6.Press START pad to save new heating time and power level in oven memory.
•Repeat step 3-6 to program additional pads.
7.Press STOP/RESET pad or close oven door to exit programming mode.
Multiple Heating Stages
Follow instructions below to program oven to perform 3 consecutive heating cycles without interruption.
1.Open oven door.
•If door is closed or STOP/RESET pad is pressed before finishing programming sequence, oven exits programming mode.
2.Press pad 1 for approximately 5 seconds.
•After 5 seconds, signal sounds.
3.Press desired number pad.
•Display shows heating time and preprogrammed number.
4.Press number pads to enter desired cooking time.
•For example, to heat for 2 minutes 30 seconds,
5.Press desired power level pad to change power level.
•If a power level pad is not pressed, oven defaults to 100% power.
•For example, pressing MEDIUM 50% pad sets oven to 50% power.
•Display shows current power level if other than 100 percent power.
6.Press TIME ENTRY pad
•Display briefly shows “STAGE 2” . Then cook time and power level for stage show in display.
•Repeat steps 5-6 to create additional stages.
7.Press START pad to save new heating time and power level in oven memory.
8.Press STOP/RESET pad or close oven door to exit programming mode.
4-8
 Loading...